

Page 1
ADVOCATE
®
User Guide
Guía del usuario
IMPORTANT: Thoroughly read and follow the instructions
in the vehicle owner's manual and this user guide before
installing this child seat. Store this user guide in the pocket
behind the cover (See features pages for reference).
IMPORTANTE: Debe leer y seguir atentamente todas las
instrucciones en el manual del vehículo y en esta guía
usuario antes de instalar el asiento de seguridad para
niños.Guarde esta guía del usuario en el bolsillo detrás de
la cubierta (utilice las páginas sobre las características de
referencia).
Page 2

Page 3

User Guide - English
Table of Contents
User Guide - English ������������������������������������ 1
Child Seat Features �������������������������������������� 2
Safety Information ���������������������������������������� 4
Warnings ....................................................................4
Important Notes .........................................................5
Certification ................................................................6
Registration ...............................................................6
Child Fit Information ..................................................7
Rear-Facing Installation ������������������������������� 8
LATCH Installation .....................................................8
Lap-Shoulder Belt Installation .................................10
Lap Belt Installation .................................................12
Forward-Facing Installation ����������������������� 14
LATCH Installation ...................................................14
Lap-Shoulder Belt Installation .................................16
Lap Belt Installation .................................................18
Securing Your Child ����������������������������������� 20
Child Seat Functions ���������������������������������� 22
Click & Safe Snug Harness Indicator ......................22
Adjusting the Harness Height .................................23
Adjusting the Harness Buckle Position ...................24
Using the Harness Buckle .......................................24
Using the Chest Clip ..............................................25
Using the Lock-Offs .................................................25
Infant Positioning Pillow ..........................................25
Seat Positions ..........................................................26
Using the Lower Anchors and Tethers for Children
(LATCH) ...................................................................27
Using the Lower Connectors...................................27
Using the Energy-Absorbing Versa-Tether ..............28
Vehicle Compatibility �������������������������������� 31
Vehicle Seating Positions ........................................31
Compatible Vehicle Seat Belts ................................31
Incompatible Vehicle Seat Belts ..............................34
Care and Maintenance ������������������������������� 35
Seat Cover ...............................................................35
Harness Buckle .......................................................38
Harness ...................................................................41
Shell .........................................................................41
HUGS with SafeCell Technology .............................41
Troubleshooting ����������������������������������������� 44
Warranty ������������������������������������������������������ 45
ADVOCATE®, BRITAX®, Click & Safe®, EZ-Buckle™, HUGS™, SafeCell Technology®,
Side Impact Cushion Technology™ and Versa-Tether® are trademarks owned by Britax
Child Safety, Inc., and registered in the U.S.A. and other countries. All rights reserved.
©2013 Britax Child Safety, Inc. This product and its components are subject to change
without notice. Printed in U.S.A. P580800_A:09.13
1
Page 4
BRITAX Child Safety, Inc. ADVOCATE User Guide
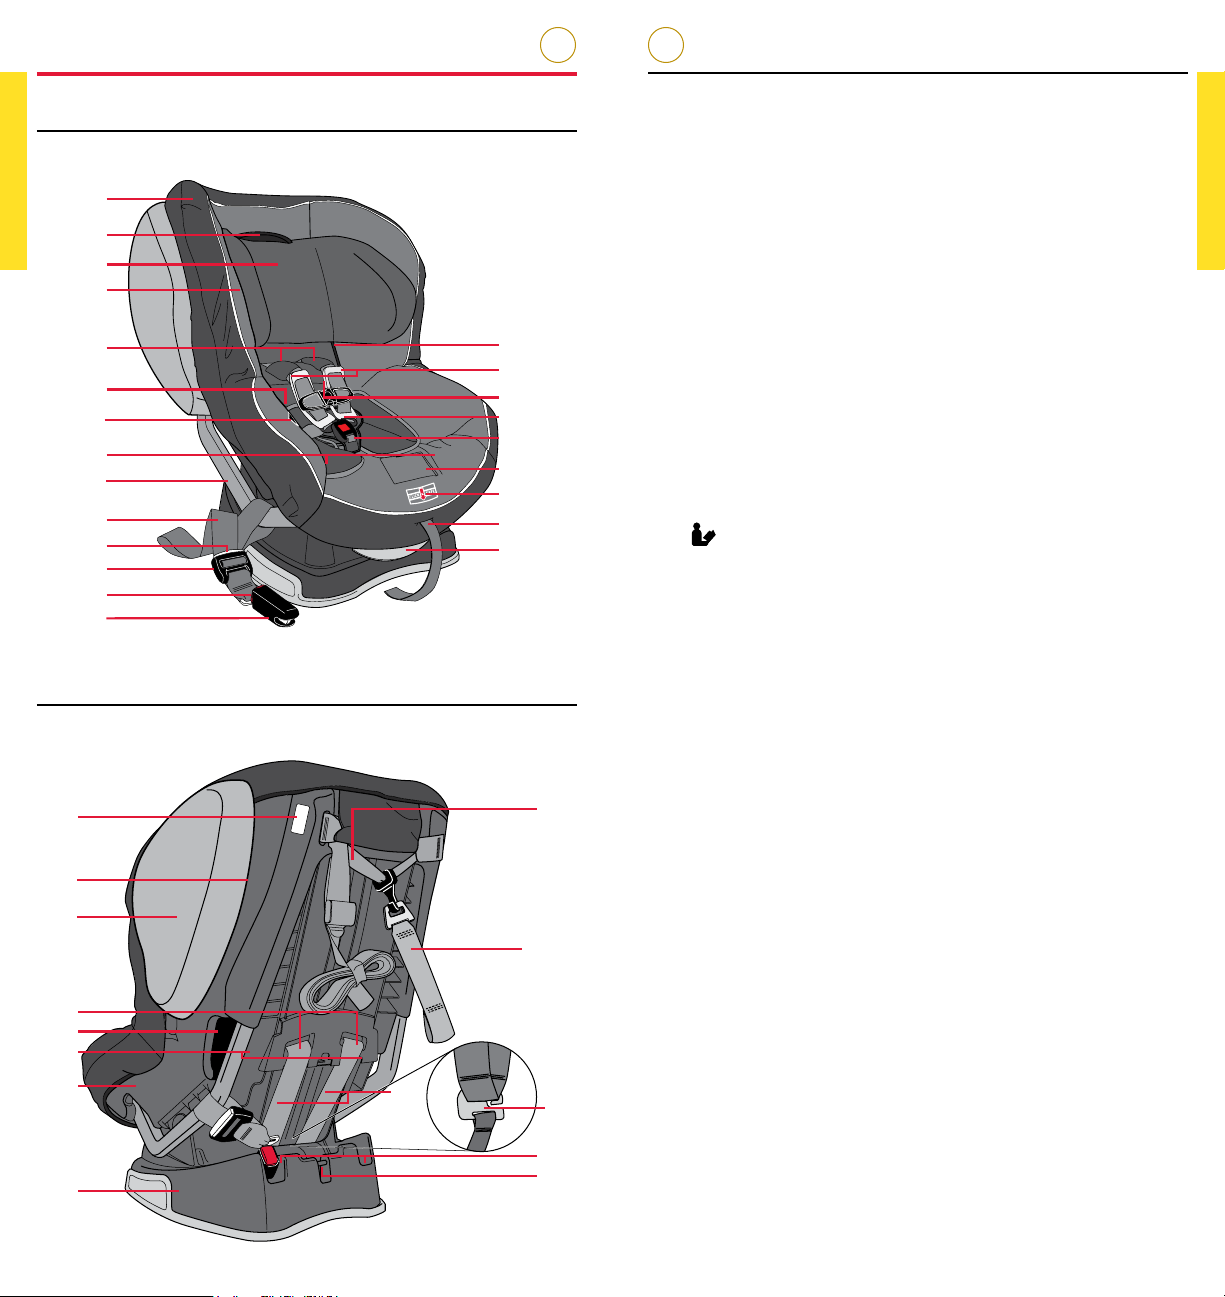
Child Seat Features
Front
1
2
3
4
5
6
7
8
9
10
11
12
13
14
Rear
24
25
26
27
28
29
30
31
35
15
16
17
18
19
20
21
22
23
33
32
34
36
37
Description
1. Cover
2. Harness Height Adjuster
3. Head Restraint
4. Seated Shoulder Height Label
5. Comfort Pads
6. Infant Positioning Pillow
7. Harness Holder
8. Rear-Facing Lock-Offs (Blue – under cover)
9. Lower Connector Bar
10. Lower Connector Strap (LATCH component)
11. Lower Connector Adjuster Release Button (LATCH
component)
12. Lower Connector Adjuster (LATCH component)
13. Lower Connector Release Button (LATCH component)
14. Lower Connector (LATCH component)
15. User Guide Storage (in pocket behind cover)
16. HUGS Chest Pads with SafeCell Technology
17. Chest Clip
18. Harness Buckle
19. EZ-Buckle System Belly Pad
20. Harness Adjuster Lever (under cover)
21. Click & Safe Snug Harness Indicator (under cover)
22. Harness Adjuster Strap
23. Recline Adjustment Handle
24. Serial Number & Manufactured Date Label
25. Shell
26. Side Impact Cushions
27. Harness Slots
28. Forward-Facing Belt Slot
29. Forward-Facing Lock-Offs (Green – under cover)
30. Rear-Facing Belt Slot
31. Base with SafeCell Technology
32. Energy-Absorbing Versa-Tether
(Top Anchorage Strap - LATCH component)
33. Tether Connector Strap
34. Harness Yoke
35. Harness Straps
36. Lower Connector Storage
37. Versa-Tether Carry Clip
2 3
Page 5
BRITAX Child Safety, Inc. ADVOCATE User Guide
Safety Information
Failure to follow all warnings and instructions could result
in SERIOUS INJURY or DEATH.
FIT REQUIREMENTS
• Use only in a rear-facing position when using it with an
infant weighing less than 20 lbs (9.1 kg).
• Use only with children who weigh between 5 and 65 lbs
(2.3 – 29.4 kg) and whose height is 49 in. (124.5 cm) or
less. Use rear-facing for children who weigh between 5
and 40 lbs (2.3 – 18 kg). Use forward-facing for children
who weigh between 20 and 65 lbs (9.1 – 29.4 kg).
• Snugly adjust the belts provided with this child
restraint around your child.
INSTALLATION
• The provided infant positioning pillow must be used
for children weighing 22 lbs (10 kg) or less in a rearfacing position. Do not use over 22 lbs (10 kg) or in a
forward-facing position. See page 25.
• Secure the top anchorage strap provided with this
child restraint.
• Secure this child restraint with the vehicle’s child
restraint anchorage system if available, or with a
vehicle belt.
• This child seat must be reclined to position 3 when
installed rear facing.
• When installing in forward facing mode this child seat
must be in position 1 or position 2 (see page 26).
• Use the inner buckle slot when installed rear facing
with vehicle seat belt.
• Use the outer buckle slot when installing the child seat
forward facing with a child weighing 30 lbs (13.6 kg)
and above or if the buckle is under the child in the
inner position.
GENERAL USAGE
• Follow all instructions on this child restraint and in the
written instructions.
• Register your child restraint with the manufacturer.
• Based on crash statistics, the National Highway Traffic
Safety Administration (NHTSA) recommends that
parents select the back seat as the safest location for
a properly installed child seat. Please study Vehicle
Seating Positions on page 31 to ensure your child’s
safety and consult your vehicle owner’s manual.
• Secure this child seat even when it is not occupied.
In a crash, an unsecured child seat may injure vehicle
occupants.
• To prevent injury due to deterioration or hidden
damage, discontinue use of this child seat if it is
older than seven years or has been in a moderate
or severe crash (see below). See Serial Number and
Manufactured Date Label on child seat (page 2).
• Do not use the lower anchors of the child restraint
anchorage system (LATCH system) to attach this child
restraint when restraining a child weighing more than
40 lbs (18 kg) with the internal harnesses of the child
restraint.
• Prevent the Side Impact Cushions from being
punctured. Puncture damage will cause the cushions
not to perform as intended in a crash.
• The use of non-BRITAX covers, inserts, toys,
accessories, or tightening devices is not approved by
BRITAX. Their use could cause this child seat not to
perform as intended in a crash.
Important Notes
• Use this child seat in position 1 when installed with a
lap belt forward facing with a child over 40 lbs (18 kg).
• Discontinue use of this child seat if it has been in a
moderate or severe crash. It is not necessary to replace a
car seat after a minor crash, defined by the US National
Highway Traffic Safety Administration (NHTSA) as:
a. The vehicle is drivable from the crash site; and
b. The vehicle door nearest the child seat was not
damaged; and
c. No vehicle occupants were injured; and
d. There is no visible damage to the child seat; and
e. The airbags (if present) did not deploy.
• Cover the child seat when the vehicle is parked in direct
sunlight. Metal parts of child seat could become hot
enough to burn a child.
• Store the child seat in a safe place when it is not being
used. Avoid placing heavy objects on top of it.
• Do not, except as described in this booklet, attempt to
disassemble any part of the child seat or change the way
the harness or vehicle’s seat belts are used.
• Never use the harness adjuster strap to lift or carry this
child seat. Doing so could cause damage to harness
adjuster and webbing. Always carry this child seat by its
shell or tether straps.
4 5
Page 6
BRITAX Child Safety, Inc. ADVOCATE User Guide
Shoulder
Level
1 inch
2.5 cm
Shoulder
Level
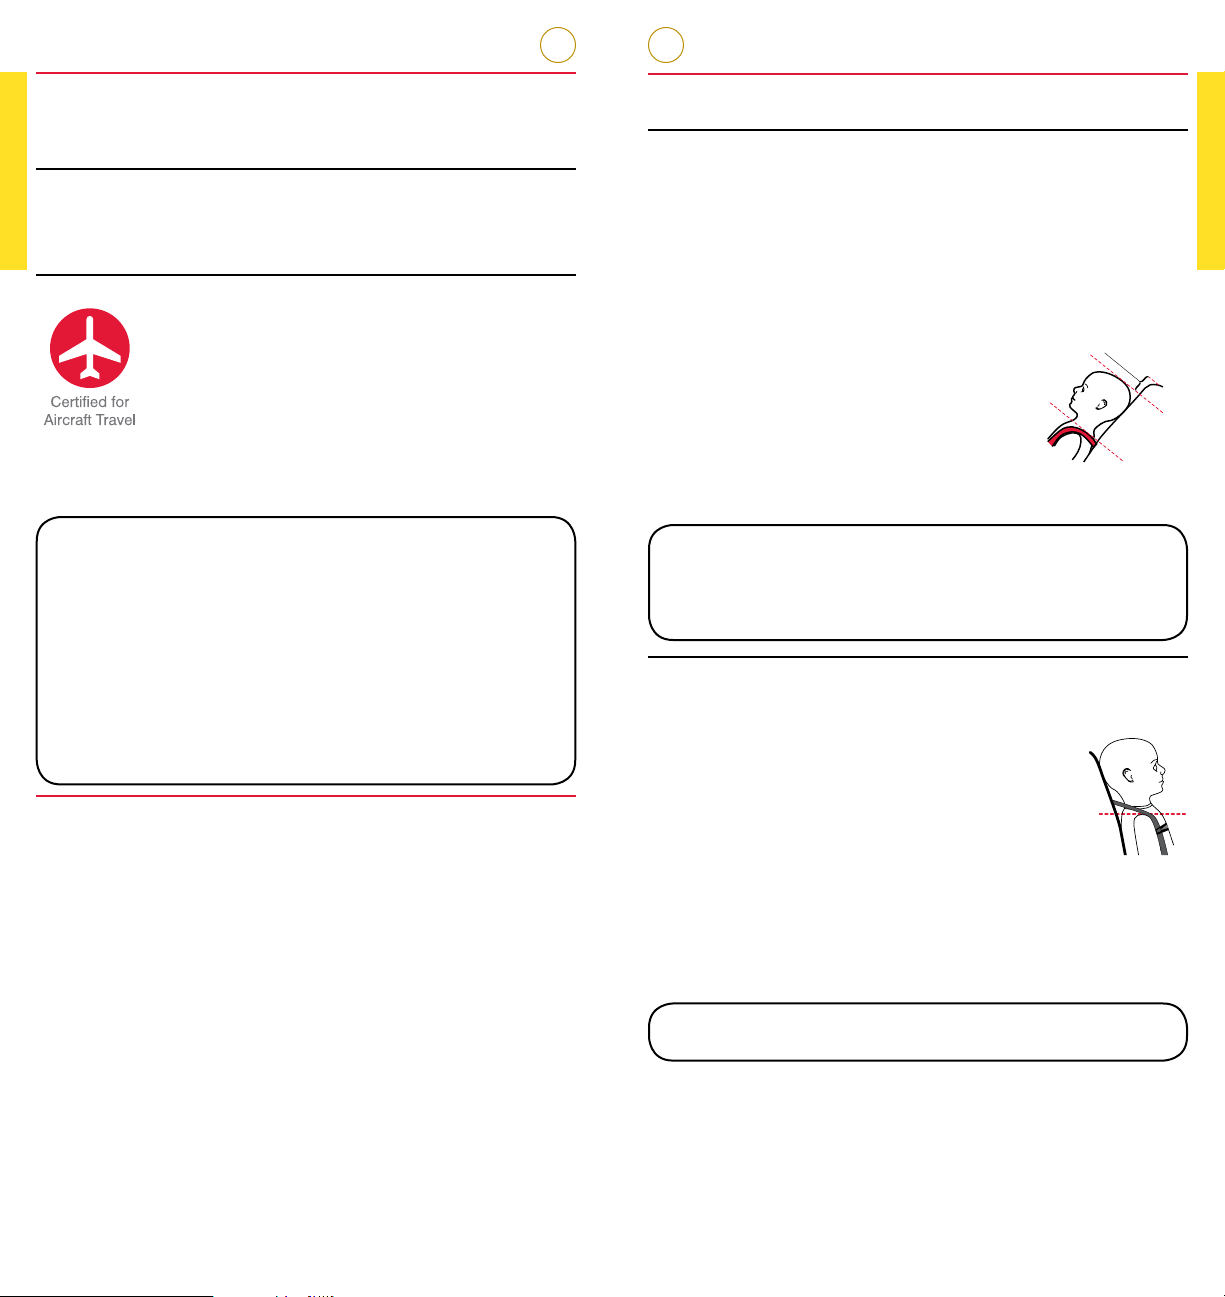
Certification
This Restraint is Certified For Use in Motor Vehicles and
Aircraft�
Motor Vehicles
This child seat system conforms to all applicable Federal
Motor Vehicle Safety Standards (FMVSS 213).
Aircraft
This child seat is certified for aircraft use. Most
airlines in the U.S. and Canada will allow the
use of a child seat as long as it is labeled as an
approved child seat for use in aircraft and fits
properly on the aircraft seat. Contact the airline
about their policy prior to traveling.
The FAA recommends that a child weighing up to 40 lbs
(18 kg) use a certified, harnessed child seat while traveling
on an aircraft.
Install your child seat in a window seat to avoid
blocking the aisle� For rear-facing aircraft installation,
see “Rear-Facing Lap Belt Installation” on pages 12. For
forward-facing installation, follow “Forward-Facing Lap
Belt Installation” on pages 18.
– If the aircraft lap belt is too short, ask a flight attendant
for a belt extender.
– Your child may experience discomfort if the buckle
is located in the seating area of the child seat after
installation.
– Inflatable aircraft lap belts are NOT compatible with
this child seat.
Registration
Child restraints could be recalled for safety reasons. You
must register this restraint to be reached in a recall. Send
your name, address, e-mail address if available and the
restraint’s model number and manufacturing date to Britax
Child Safety, Inc. P.O.Box 91167 Allentown, PA 18109-9925,
or call 1-888-427-4829, or register online at www.BritaxUSA.
com/registration. For recall information, call the U.S.
Government’s Vehicle Safety Hotline at 1-888-327-4236 (TTY
1-800-424-9153), or go to http://www.NHTSA.gov.
For your convenience, record all the information about
your child seat below. Refer to the Serial Number &
Manufactured Date Label for all information (see page 2).
Child Fit Information
Rear Facing: 5 – 40 lbs (2�3 – 18 kg)
The American Academy of Pediatrics recommends that all
infants and toddlers should ride in a Rear-Facing Car Seat
until they are 2 years of age or until they reach the highest
weight or height allowed by their car seat manufacturer.
BRITAX strongly recommends that children ride rear facing
to the highest weight or height specified.
Use rear facing:
• with harness straps in the closest
position at or below the child’s
shoulders and
• with children who weigh 5 – 40 lbs
(2.3 – 18 kg) and
• when the top of the child’s head is at
least 1 in. (2.5 cm) below the top of the
child seat shell.
The infant positioning pillow must be used to
achieve better fit and support for infants weighing up
to 22 lbs (10 kg) in a rear facing position� Do not use
over 22 lbs (10 kg) or in a forward-facing position�
See page 25�
Forward Facing: 20 – 65 lbs (9�1 – 29�4 kg)
BRITAX strongly recommends that children should be
secured with a harness system until they exceed the weight
or height limits specified.
Use forward facing:
• with harness straps in the closest
position at or above the child’s
shoulders, parallel to level ground and
• with children who weigh 20 – 65 lbs
(9.1 – 29.4 kg) and
• who are 49 in. (124.5 cm) or less in
height and
• when the top of the ears are below the
top of the child seat shell.
NOTE: Use the
Seated Shoulder
Height Label on
the child seat as a
guide to determine
when your child
has reached the
top harness slot.
IMPORTANT: Do not use the infant positioning pillow
with a forward-facing installation.
Model Name and Number: ______________________________
Serial Number: ________________________________________
Batch Number: ________________________________________
Date of Manufacture: ___________________________________
6 7
Page 7
BRITAX Child Safety, Inc. ADVOCATE User Guide
1
Rear-Facing Installation
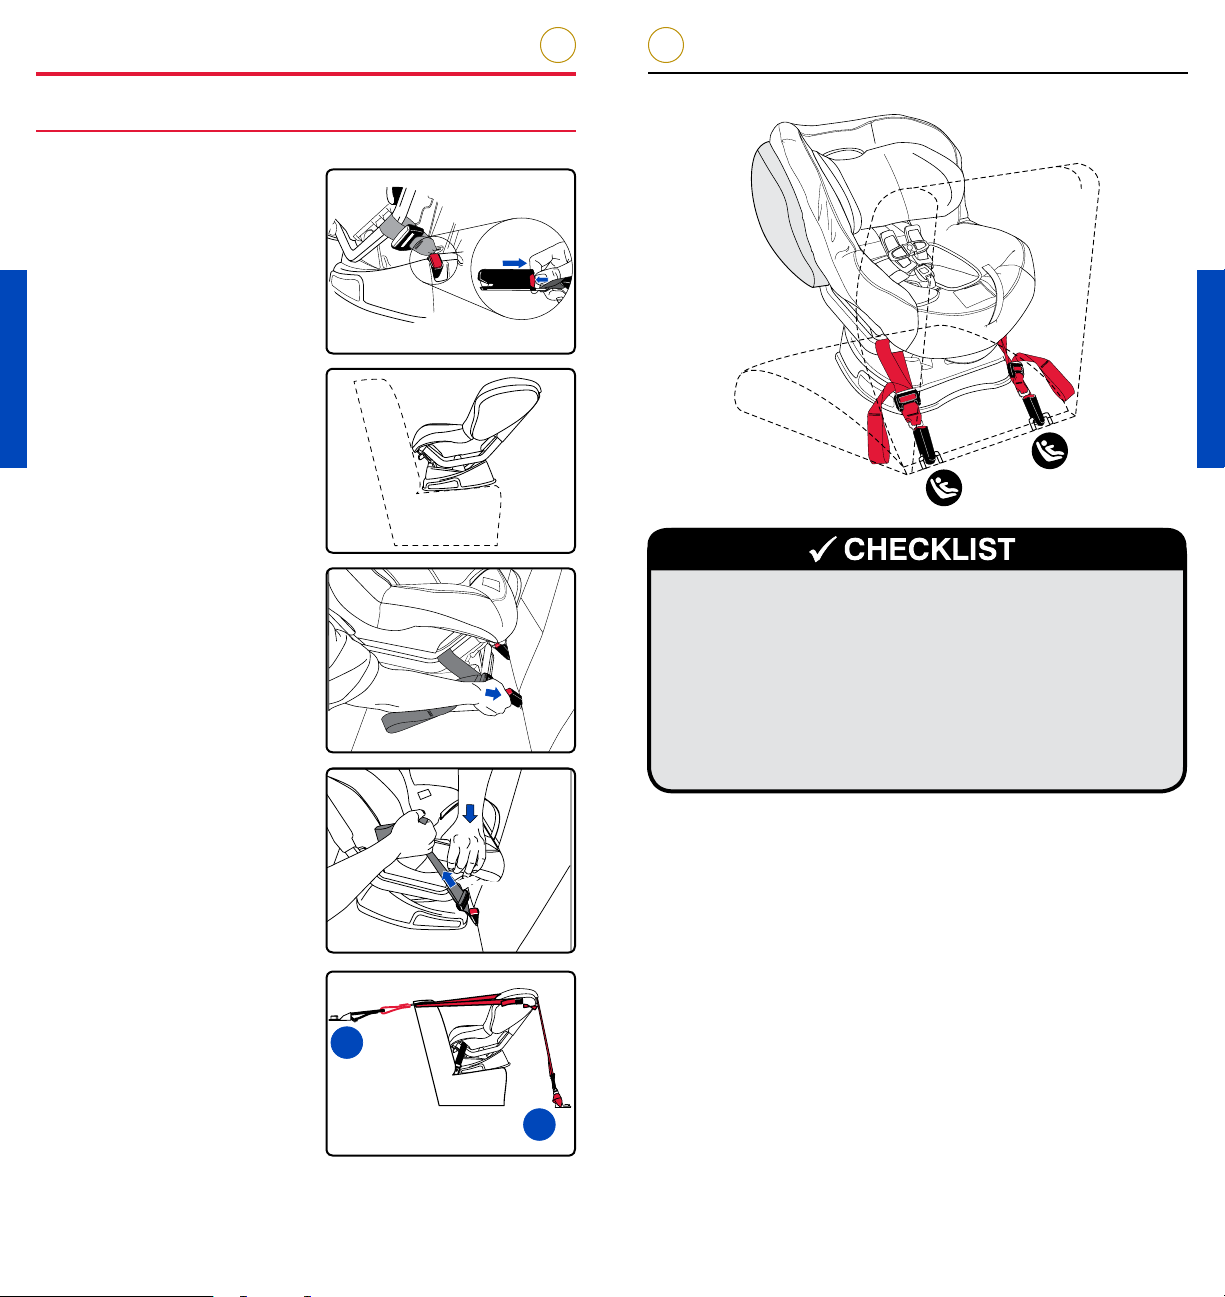
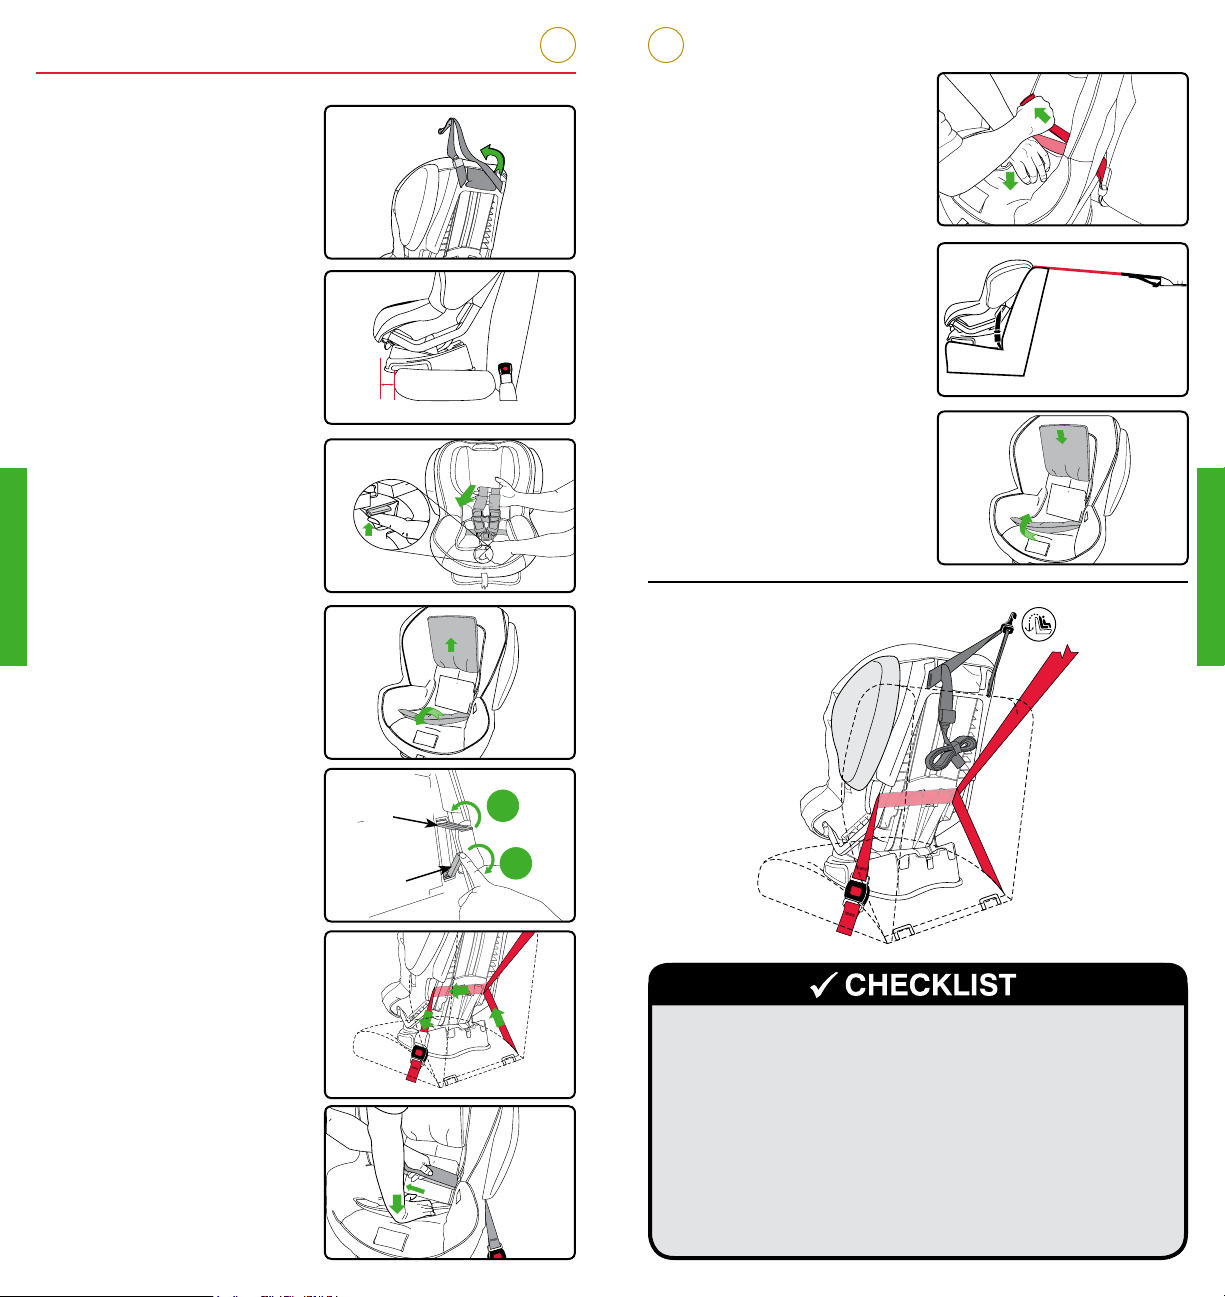
LATCH Installation
1. Remove the lower
connectors from the
storage slots in the base.
Press the adjuster release
button and pull the strap
to full length. Repeat for
the second strap.
2. Recline this child seat to
position 3 and place rearfacing on the vehicle seat
(see page 26).
3. Firmly press the lower
connectors onto the
adjacent lower anchors
until a click confirms
attachment.
4. Push the child seat
down while pulling each
lower connector strap to
tighten.
Rear-Facing Installation with LATCH
9 Check that all connections are secure and straps are not
twisted.
9 Check that the child seat cannot be moved front to back
or side to side more than 1 in. (2.5 cm) at the belt path.
If the child seat is not secure, repeat installation or use a
different seating location.
9 Check that the back angle of the child seat is 30° – 45°
from vertical (not to exceed 45°) when the car is parked
on a level surface. See “Seat Positions” on page 26.
5. Rear-facing installations
can be improved by the
use of the Versa-Tether
(see page 29).
8 9
a
or
b
Page 8
BRITAX Child Safety, Inc. ADVOCATE User Guide
IMPORTANT • ALWAYS position the buckle in the inner slot for
rear-facing use. • The vehicle belt
must pass in front of the buckle
strap for rear-facing use.
• NEVER leave the buckle in the
adjustment slot. • Use the outer
buckle slot when installing the child
seat forward-facing with a child
weighing 30 lbs (13.6 kg) and above or if the buckle is under the
child in the inner position.
INNER SLOT
OUTER SLOT
P405600_R1.05.10
A
DJUSTMENT
SLOT
IMPORTANTE • Coloque la hebilla en la ranura interna SIEMPRE que se
vaya a utilizar el asiento orientado hacia
detrás. • Cuando el asiento se coloca
orientado hacia detrás, el cinturón del
vehículo debe pasar por delante de la
correa de la hebilla. • La hebilla NUNCA
debe dejarse en la ranura de ajuste.
• Utilice la ranura externa de la hebilla si
se va a instalar el asiento orientado hacia delante y este va a ser ocupado
por un niño con un peso mínimo de 13,6 kg (30 lb) o si la hebilla queda
RANURA INTERNA
RANURA EXTERNA
P452800_R1.01.11
RANURA
DE AJUSTE
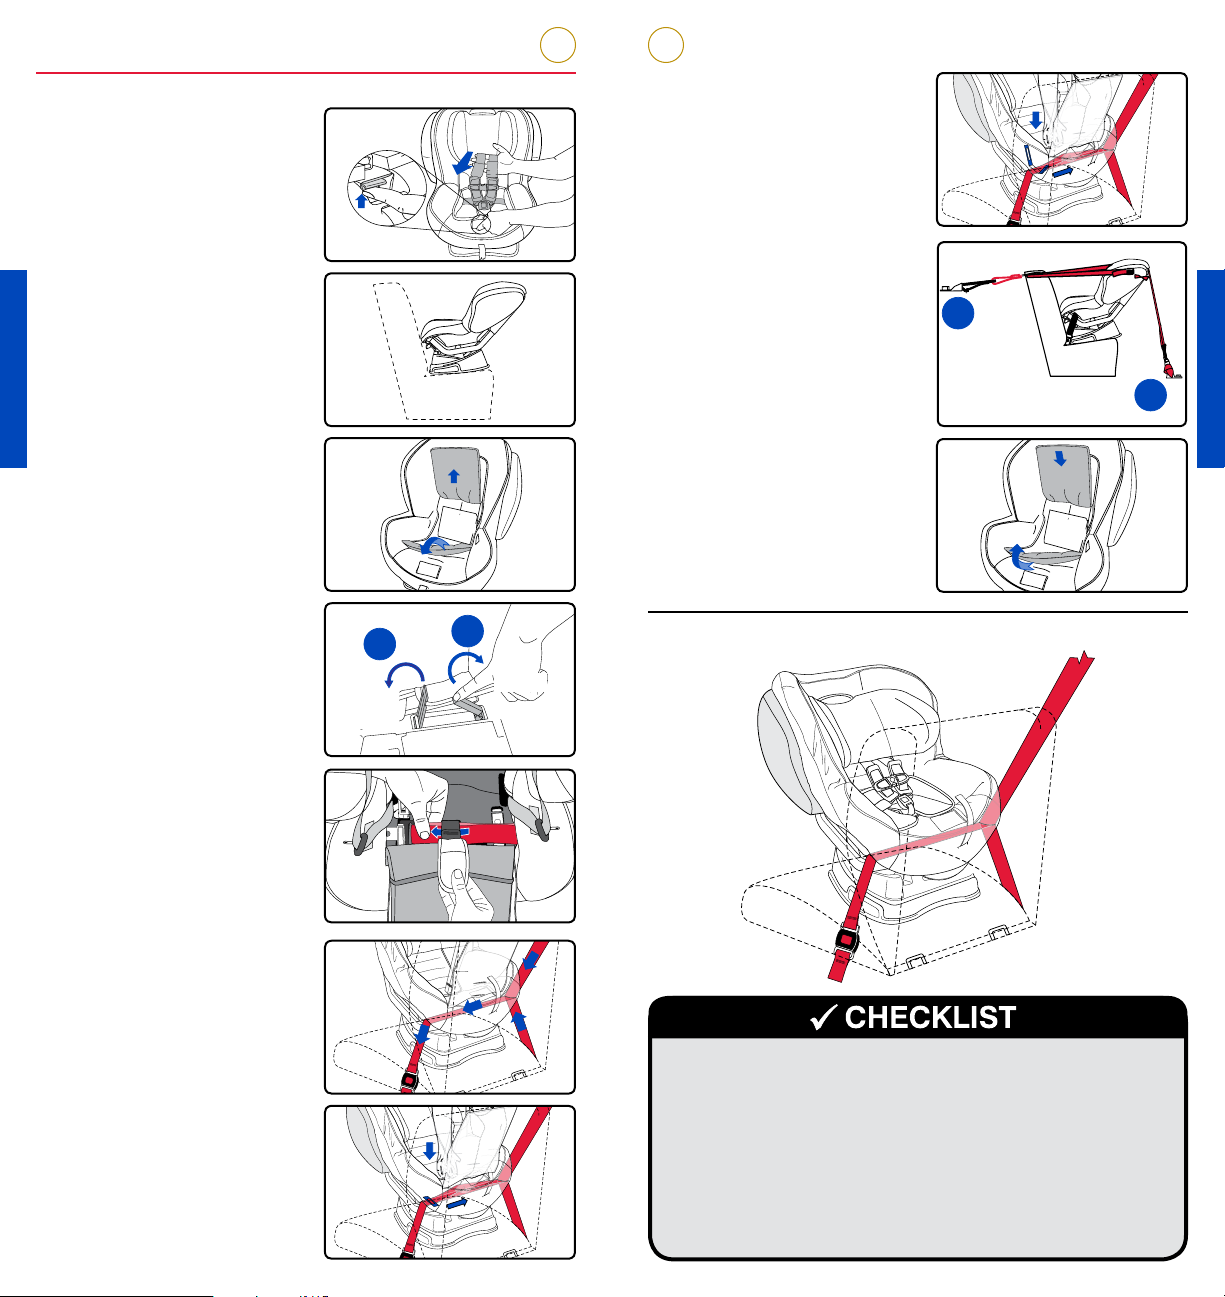
Lap-Shoulder Belt Installation
1. Loosen the harness.
a. Lift harness adjuster
lever and pull both
harness straps
forward.
b. Remove the infant
positioning pillow
and unbuckle the
harness.
2. Recline this child seat to
position 3 and place rearfacing on the vehicle seat
(see page 26).
3. Pull the head restraint
cover up, then pull the
seat cover forward to
access the rear-facing
belt path.
4. Open the blue lockoff closest to where
the vehicle belt will be
buckled.
a. Open the locking tab.
b. Open the clamp.
5. Route the vehicle belt
through the rear-facing
belt slots, ensuring that
the vehicle belt is routed
under the harness buckle
strap.
NOTE: The buckle should
be in the inner slot.
6. Ensure the vehicle belt
is not twisted and buckle
the seat belt.
7. Push down into the
middle of the child
seating area with
moderate force while
removing all slack from
the bottom (lap) part of
the vehicle belt and close
the lock-off, if used (see
page 25).
IMPORTANT: Both the
vehicle lap and shoulder
belts must be routed
through the lock-off.
4a
Locking
Tab
4b
Clamp
8. Push down into the middle
of the child seating area
with moderate force while
pulling the top (shoulder)
part of the belt between
the belt slots to remove
any remaining slack
through the lock-off.
9. Rear-facing installations
can be improved by the
use of the Versa-Tether
(see pages 29).
a
or
10. Replace the seat cover.
Rear-Facing Installation with Lap-Shoulder Belt
9 Check that all connections are secure and straps are not
twisted.
9 Check that the child seat cannot be moved front to back
or side to side more than 1 in. (2.5 cm) at the belt path.
If the child seat is not secure, repeat installation or use a
different seating location.
9 Check that the back angle of the child seat is 30° – 45°
from vertical (not to exceed 45°) when the car is parked
on a level surface. See “Seat Positions” on page 26.
b
10 11
Page 9
BRITAX Child Safety, Inc. ADVOCATE User Guide
IMPORTANT • ALWAYS position the buckle in the inner slot for
rear-facing use. • The vehicle belt
must pass in front of the buckle
strap for rear-facing use.
• NEVER leave the buckle in the
adjustment slot. • Use the outer
buckle slot when installing the child
seat forward-facing with a child
weighing 30 lbs (13.6 kg) and above or if the buckle is under the
child in the inner position.
INNER SLOT
OUTER SLOT
P405600_R1.05.10
A
DJUSTMENT
SLO
T
IMPORTANTE • Coloque la hebilla en la ranura interna SIEMPRE que se
vaya a utilizar el asiento orientado hacia
detrás. • Cuando el asiento se coloca
orientado hacia detrás, el cinturón del
vehículo debe pasar por delante de la
correa de la hebilla. • La hebilla NUNCA
debe dejarse en la ranura de ajuste.
• Utilice la ranura externa de la hebilla si
se va a instalar el asiento orientado hacia delante y este va a ser ocupado
por un niño con un peso mínimo de 13,6 kg (30 lb) o si la hebilla queda
RANURA INTERNA
RANURA EXTERNA
P452800_R1.01.11
RANURA
DE AJUSTE
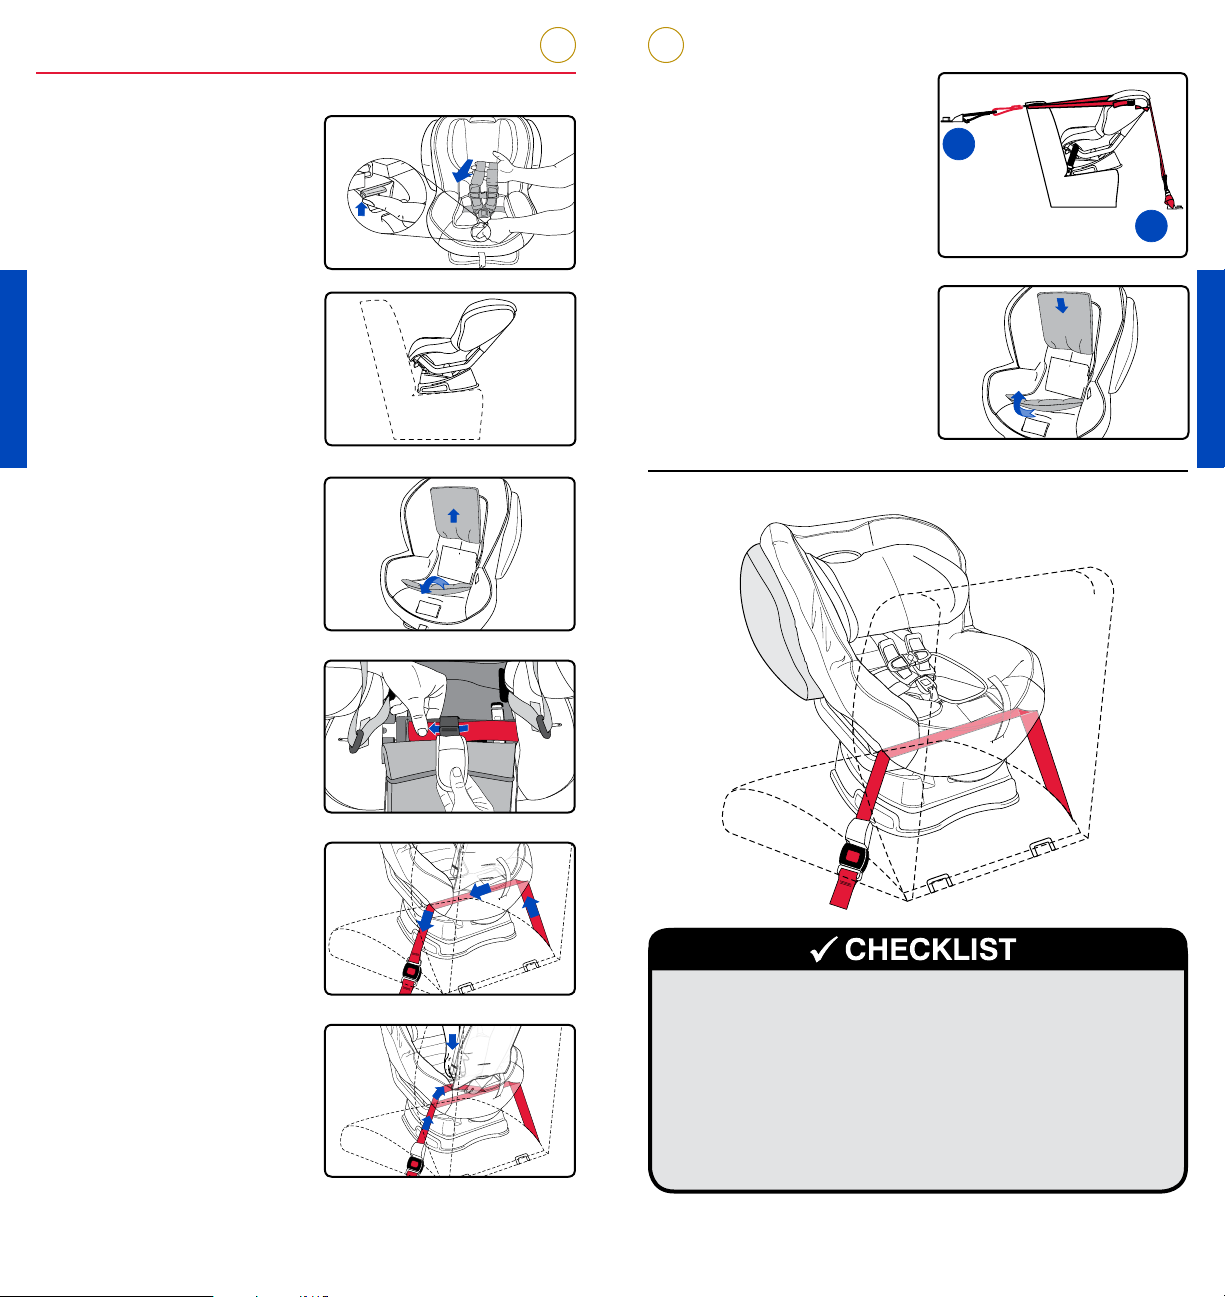
Lap Belt Installation
1. Loosen the harness.
a. Lift harness adjuster
lever and pull both
harness straps
forward.
b. Remove the infant
positioning pillow
and unbuckle the
harness.
2. Recline this child seat to
position 3 and place rearfacing on the vehicle seat
(see page 26).
3. Pull the head restraint
cover up, then pull the
seat cover forward to
access the rear-facing
belt path.
7. Rear-facing installations
can be improved by the
use of the Versa-Tether
(see page 29).
a
8. Replace the seat cover.
Rear-Facing Installation with Lap Belt
or
2
b
4. Route the vehicle belt
through the rear-facing
belt slots, ensuring that
the vehicle belt is routed
under the harness buckle
strap.
NOTE: The buckle should
be in the inner slot.
IMPORTANT: Do not
use lock-offs for lap belt
installations.
5. Ensure the vehicle belt
is not twisted and buckle
the seat belt.
6. Push down on the middle
of the child seat while
pulling the vehicle belt to
remove all slack.
NOTE: Ensure that the
vehicle belt is locked as
directed by your vehicle
owner’s manual.
9 Check that all connections are secure and straps are not
twisted.
9 Check that the child seat cannot be moved front to back
or side to side more than 1 in. (2.5 cm) at the belt path.
If the child seat is not secure, repeat installation or use a
different seating location.
9 Check that the back angle of the child seat is 30° – 45°
from vertical (not to exceed 45°) when the car is parked
on a level surface. See “Seat Positions” on page 26.
12 13
Page 10
BRITAX Child Safety, Inc. ADVOCATE User Guide
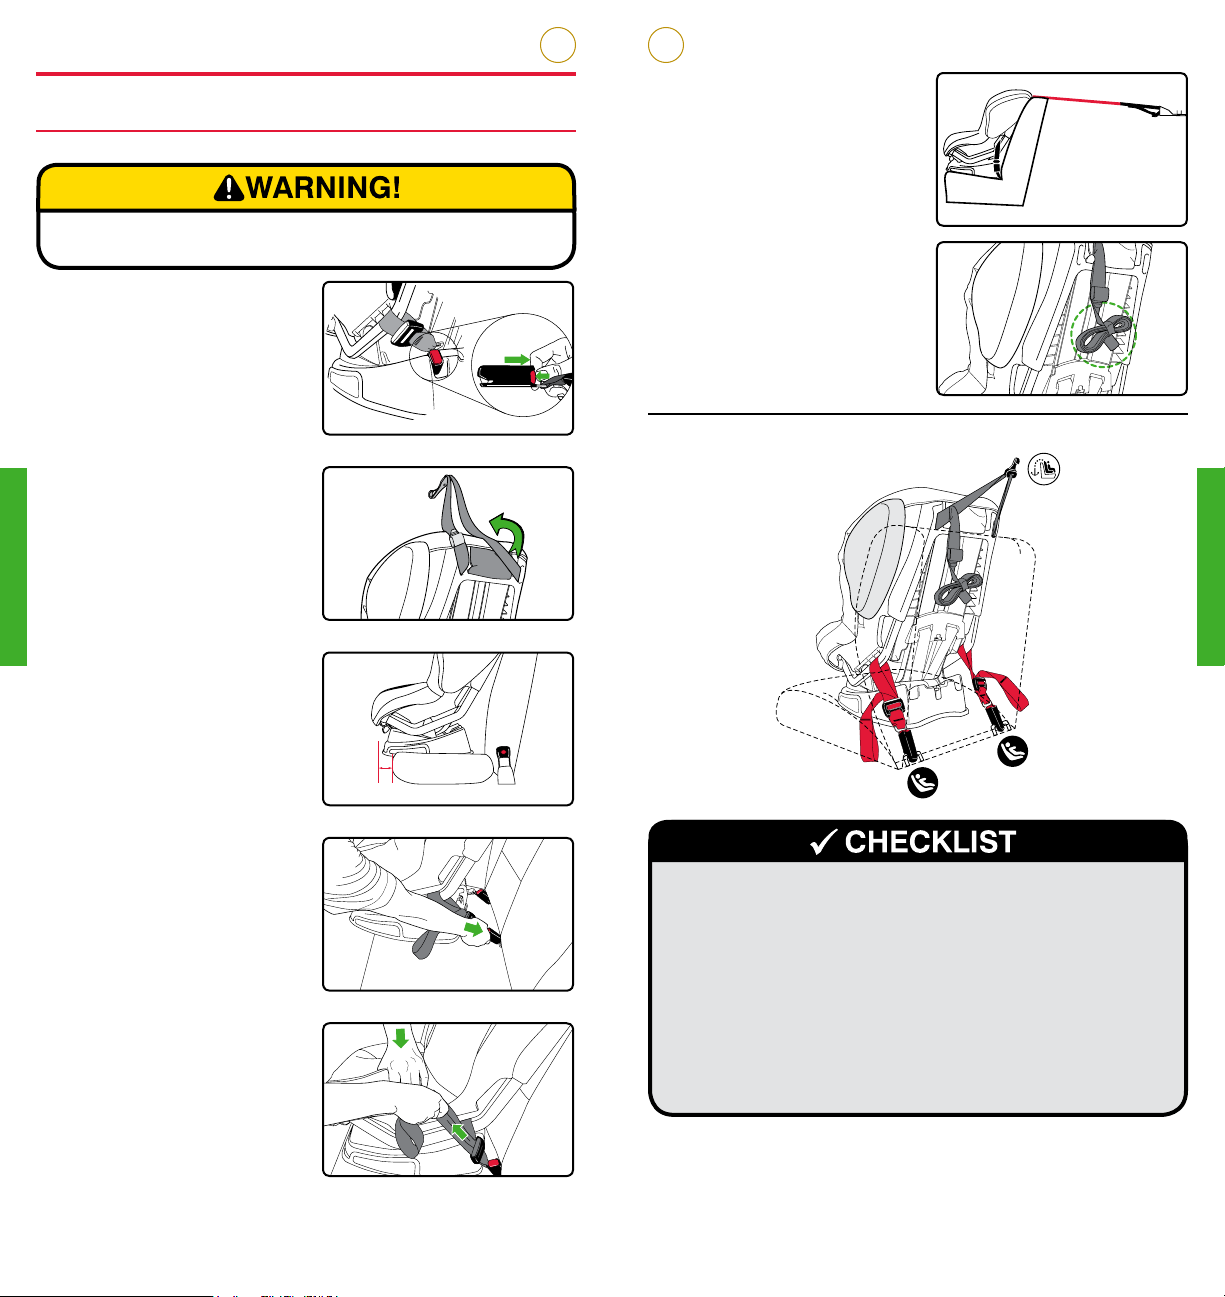
Forward-Facing Installation
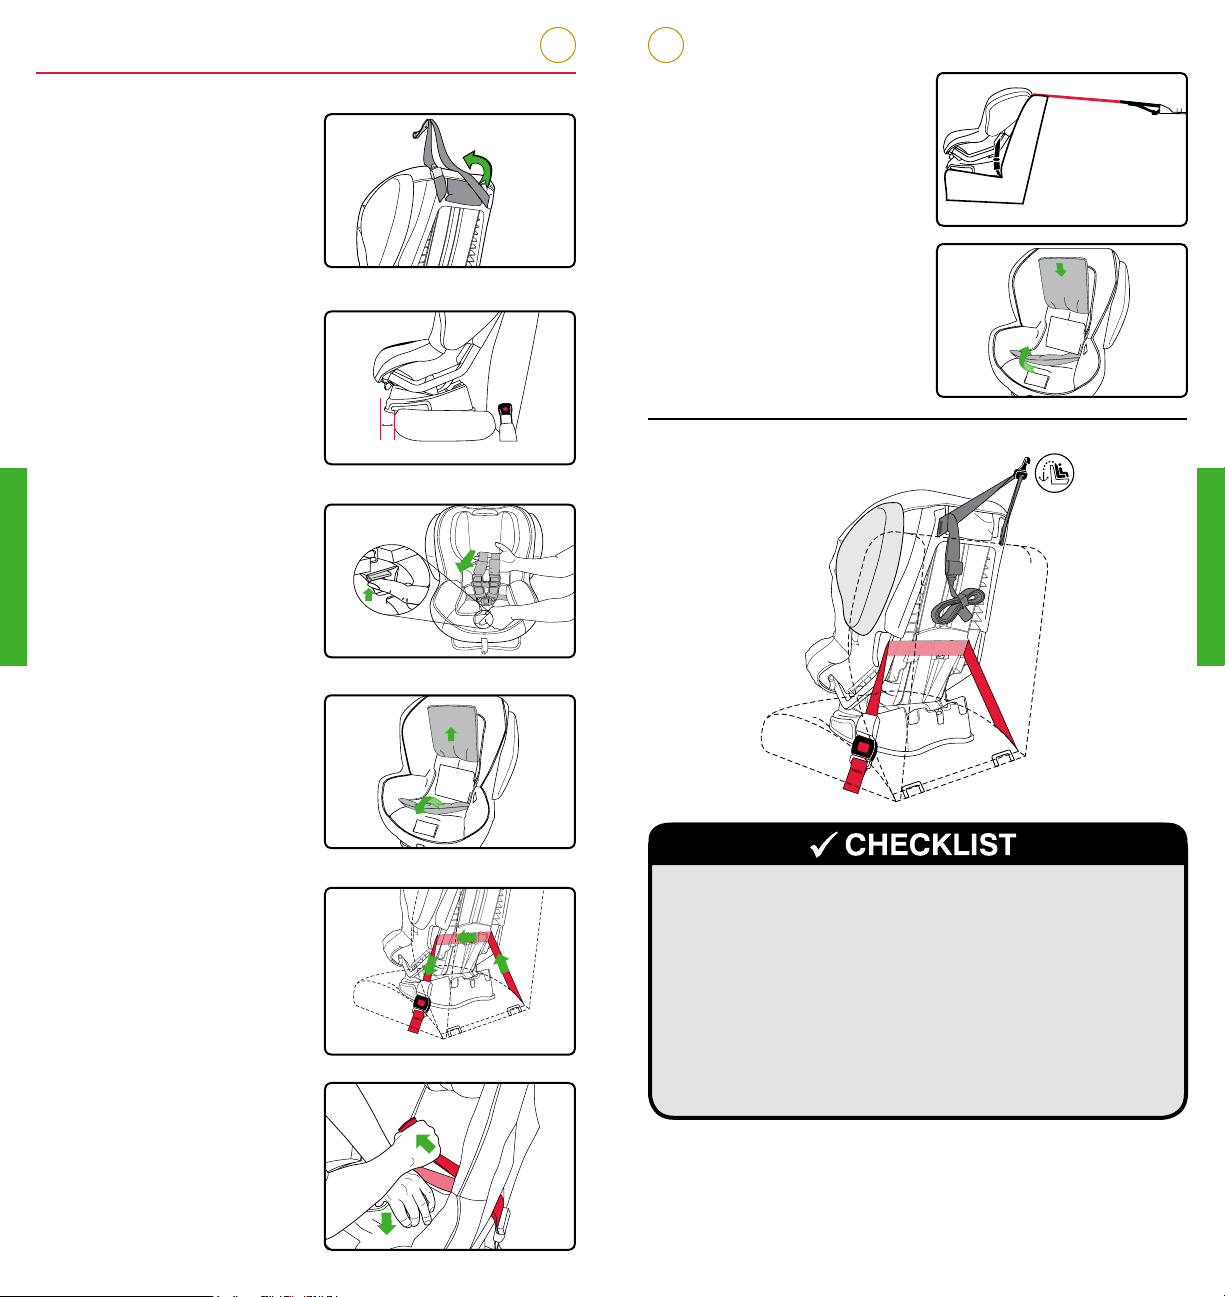
LATCH Installation
Do not use LATCH to attach this child restraint with a
child weighing more than 40 lbs (18 kg).
1. Remove the lower
connectors from the
storage slots in the
base. Press the adjuster
release button and pull
the lower connector
strap to full length.
Repeat for the second
strap.
2. Remove the VersaTether from the pouch
and place it up and over
the child seat back.
3. Adjust this child seat to
position 1 or 2 and place
forward-facing on the
vehicle seat (see page
26). Ensure that no more
than 20% or 3 in. (7.6 cm)
of the base hangs over
the edge of the vehicle
seat.
IMPORTANT: Your child
seat may not perform as
intended if the base of the
child seat is not flat on the
vehicle seat.
4. Firmly press the lower
connectors onto the
adjacent lower anchors.
a. A click confirms
attachment.
b. Verify that the lower
connector strap is
not twisted.
5. Push the child seat down
while pulling each lower
connector strap to tighten.
3"
6. Attach the Versa-Tether
to a designated anchor
(see vehicle owner’s
manual) and remove
slack (see page 29).
7. Store excess webbing in
the elastic strap.
Forward-Facing Installation with LATCH
9 Check that all connections are secure and straps are not
twisted.
9 Check that no more than 20% or 3 in. (7.6 cm) of the
base hangs over the edge of the vehicle seat.
9 Check that the child seat cannot be moved front to back
or side to side more than 1 in. (2.5 cm) at the belt path.
If the child seat is not secure, repeat installation or use a
different seating location.
9 Check that any excess Versa-Tether webbing is contained
within your vehicle and secured in the elastic strap.
14 15
Page 11
BRITAX Child Safety, Inc. ADVOCATE User Guide
Lap-Shoulder Belt Installation
1. Remove the Versa-Tether
from the pouch and place
it up and over the child
seat back.
2. Adjust this child seat to
position 1 or 2 and place
forward-facing on the
vehicle seat (see page 26).
Ensure that no more than
20% or 3 in. (7.6 cm) of the
base hangs over the edge
of the vehicle seat.
IMPORTANT: Your child
seat may not perform as
intended if the base of the
child seat is not flat on the
vehicle seat.
3. Loosen the harness.
a. Lift harness adjuster
lever and pull both
harness straps
forward.
b. Remove the infant
positioning pillow and
unbuckle the harness
4. Pull the head restraint
cover up, then pull the
seat cover forward to
access the forward-facing
belt path
5. Open the green lock-off
closest to where the vehicle
belt will be buckled.
a. Open the locking tab.
b. Open the clamp.
6. Route the vehicle belt
through the forward-facing
belt slots, ensuring the
vehicle belt is not twisted,
then buckle.
7. Push down into the rear
of the child seating area
with moderate force while
removing all slack from
the bottom (lap) part of the
vehicle belt and close the
lock-off (see page 25).
IMPORTANT: Both the
vehicle lap and shoulder
belts must be routed
through the lock-off.
.
.
3"
Locking
Tab
Clamp
8. Push down into the middle
of the child seating area
with moderate force while
pulling the top (shoulder)
part of the belt between
the belt slots to remove
any remaining slack
through the lock-off.
9. Attach the Versa-Tether to
a designated anchor (see
vehicle owner’s manual)
and remove all slack (see
page 29). Store the excess
webbing in the elastic
strap.
10. Replace the seat cover.
Forward-Facing Installation with Lap-Shoulder Belt
5a
5b
9 Check that all connections are secure and straps are not
twisted.
9 Check that no more than 20% or 3 in. (7.6 cm) of the
base hangs over the edge of the vehicle seat.
9 Check that the child seat cannot be moved front to back
or side to side more than 1 in. (2.5 cm) at the belt path.
If the child seat is not secure, repeat installation or use a
different seating location.
9 Check that any excess Versa-Tether webbing is contained
within your vehicle and secured in the elastic strap.
16 17
Page 12
BRITAX Child Safety, Inc. ADVOCATE User Guide
Lap Belt Installation
1. Remove the Versa-Tether
from the pouch and place it
up and over the child seat
back.
2. Adjust this child seat to
position 1 or 2 and place
forward-facing on the
vehicle seat (see page 26).
Ensure that no more than
20% or 3 in. (7.6 cm) of the
base hangs over the edge
of the vehicle seat.
IMPORTANT: Use this
child seat in position 1
with a child over 40 lbs
(18 kg).
IMPORTANT: Your child
seat may not perform as
intended if the base of the
child seat is not flat on the
vehicle seat.
3. Loosen the harness.
a. Lift harness adjuster
lever and pull both
harness straps
forward.
b. Remove the infant
positioning pillow and
unbuckle the harness
4. Pull the head restraint
cover up, then pull the
seat cover forward to
access the forward-facing
belt path.
7. Attach the Versa-Tether to
a designated anchor (see
vehicle owner’s manual)
and remove slack (see
page 29). Store the
excess webbing in the
elastic strap.
8. Replace the seat cover.
Forward-Facing Installation with Lap Belt
3"
.
5. Route the vehicle seat
belt through the forwardfacing belt slots, ensuring
the vehicle belt is not
twisted, then buckle.
IMPORTANT: Do not
use lock-offs for lap belt
installations.
9 Check that all connections are secure and straps are not
twisted.
9 Check that no more than 20% or 3 in. (7.6 cm) of the
base hangs over the edge of the vehicle seat.
9 Check that the child seat cannot be moved front to back
or side to side more than 1 in. (2.5 cm) at the belt path.
If the child seat is not secure, repeat installation or use a
different seating location.
6. Push down on the middle
of the child seat while
9 Check that any excess Versa-Tether webbing is contained
within your vehicle and secured in the elastic strap.
pulling the vehicle belt to
remove all slack.
NOTE: Ensure that the
vehicle belt is locked as
directed by your vehicle
owner’s manual.
18 19
Page 13
BRITAX Child Safety, Inc. ADVOCATE User Guide
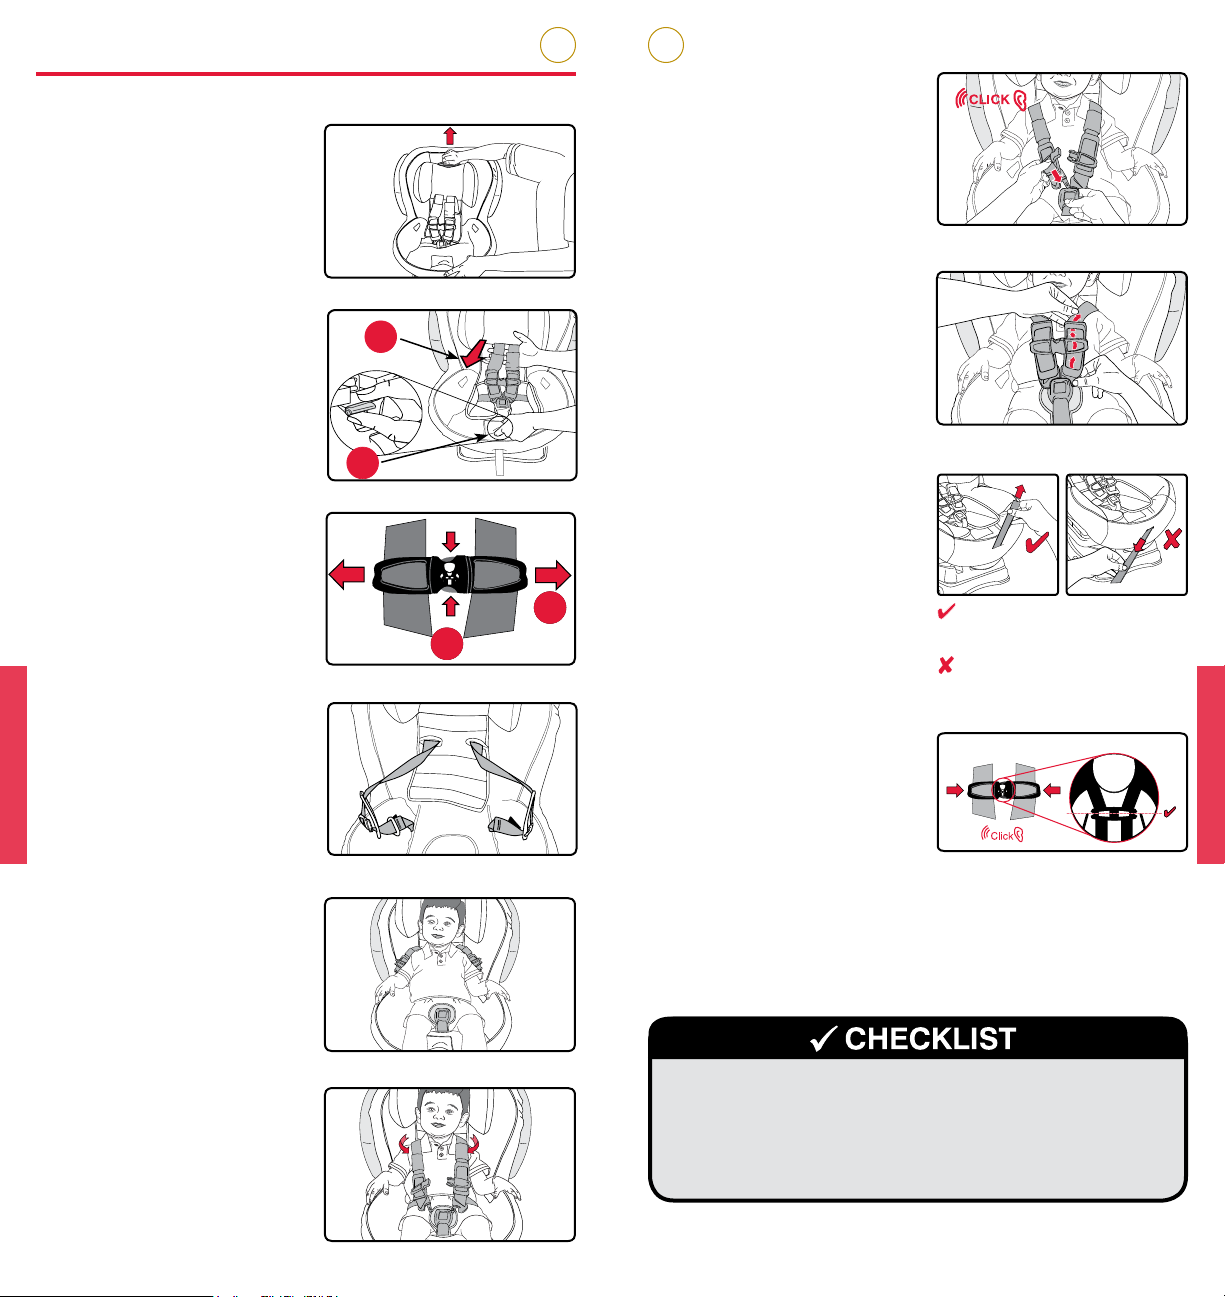
Securing Your Child
1. Follow the instructions
on page 23 to make the
proper adjustments to the
harness and buckle.
IMPORTANT: Adjust the
harness to fit the clothes
the child is wearing.
Remove bulky coats and/
or jackets before putting
the child in the child seat.
2. Loosen the harness.
a. Lift harness adjuster
lever.
b. Pull both harness
straps forward.
3. Open the chest clip.
a. Press tabs.
b. Pull apart.
4. Release the buckle and
attach the harness straps
to the harness holders.
5. Place the child in the child
seat. Ensure the child
is positioned upright in
the child seat and not
slouching. Their bottom
must touch the child seat,
and their back must rest
flat against the back of the
child seat.
IMPORTANT: The HUGS
chest pads are highly
recommended at all
times. Removal of HUGS
is optional for rearfacing mode to ensure a
snug fit for small infants
(approximately 3 months
old).
6. Position the harness
straps around the child.
2a
2b
3a
3b
7. Fasten the harness
buckle. Proper
connection is confirmed
with a click after inserting
each buckle tongue.
8. Check for proper harness
height and pull any
excess slack up to the
child’s shoulder area
before tightening.
9. Pull the harness adjuster
strap to tighten the
harness. The Click
& Safe indicator will
click when the harness
is within range of
appropriate snugness�
NOTE: The harness
should have a snug fit
around the child. A snug
strap should not allow any
slack. It lies in a relatively
straight line without
sagging. It does not press
on the child’s flesh or
push the child’s body
into an unnatural position.
You should not be able to
pinch excess.
10. Fasten the chest clip and
place the HUGS chest
pads in a comfortable
position for the child
within the range of a
correctly placed chest
clip.
NOTE: The correct height
for the chest clip is at the
middle of the chest at
armpit level.
Before traveling, verify that the:
9 Harness straps are not twisted.
9 Harness is snug.
9 Buckle is fastened.
9 Chest clip is at the child’s armpit level.
Pull the harness adjuster strap
Do not pull sideways�
up and away from the child seat
to tighten�
20 21
Page 14

BRITAX Child Safety, Inc. ADVOCATE User Guide
Child Seat Functions
Click & Safe Snug Harness Indicator
IMPORTANT: See page 20 for detailed instructions on
securing your child.
The Click & Safe is designed to sense tension when the
adjuster strap is pulled and will provide an audible indication
when the child seat harness is within range of appropriate
snugness. The harness should have a comfortable but snug
fit around the child. A snug strap should not allow any slack.
It lies in a relatively straight line without sagging. It does not
press on the child’s flesh or push the child’s body into an
unnatural position. You should not be able to pinch excess
webbing at the shoulder. Follow the steps below to tighten
the harness.
To tighten the harness:
1. Remove any bulky clothing
from your child before
tightening the harness.
2. Check for proper harness
height.
3. Pull any excess slack in the
harness up to the child’s
shoulder area.
Adjusting the Harness Height
• In rear-facing mode, the harness straps should be
in the closest position at or below your child’s
shoulders. See page 7.
• In forward-facing mode, the harness straps should
be in the closest position at or above your child’s
shoulders. See page 7.
1. Loosen the harness.
a. Lift harness adjuster
lever.
b. Pull both harness
straps forward.
1b
1a
2. Squeeze the harness
height adjuster, slide the
harness into the desired
position and release.
3. Ensure the harness has
locked into position.
4. Pull the harness adjuster strap up and away from
the child seat until a click is heard. The Click & Safe
indicator will click when the harness is within range
of appropriate snugness�
NOTE: If there is still slack in the harness, repeat the
steps above until another click indicates a snug harness.
It may be necessary to double check that the harness is
within range of appropriate snugness. Always confirm
a snug fit by attempting to pinch excess webbing in the
shoulders.
9 Check that the harness is buckled and secure.
9 Check that the harness is snug and you can not pinch
excess webbing at the shoulder.
22 23
In some cases, the vehicle head
restraint can prevent the child seat
head pad from being raised high
enough to properly adjust the harness
for the fit of your child when using a
forward facing reclined position. DO
NOT force the child seat head pad
past the vehicle head restraint. Doing
so could cause the child seat not to perform as intended.
If the location of the vehicle head restraint interferes with
the child seat head pad, raise or remove the vehicle head
restraint. If the vehicle head restraint cannot be removed,
move the child seat to the upright position or try a
different seating location.
Page 15
BRITAX Child Safety, Inc. ADVOCATE User Guide
ADJUSTMENT
SLOT
Adjusting the Harness Buckle Position
• For rear-facing installation:
– ALWAYS position the buckle
in the inner slot for when
using a vehicle seat belt
installation.
– The vehicle belt must pass in
front of the buckle strap.
– Position the buckle in the slot closest to but not under
the child when using the LATCH installation.
• For forward-facing installation, use the outer buckle
slot when installing the child seat with a child weighing
30 lbs (13.6 kg) and above or if the buckle is under the
child in the inner position.
• NEVER leave the buckle in the adjustment slot.
1. Unbuckle the harness
and remove the buckle.
See pages 38-39.
2. Route the belly pad
and buckle through the
desired slot in the cover.
NOTE: Slide the end of
the belly pad over the
comfort foam.
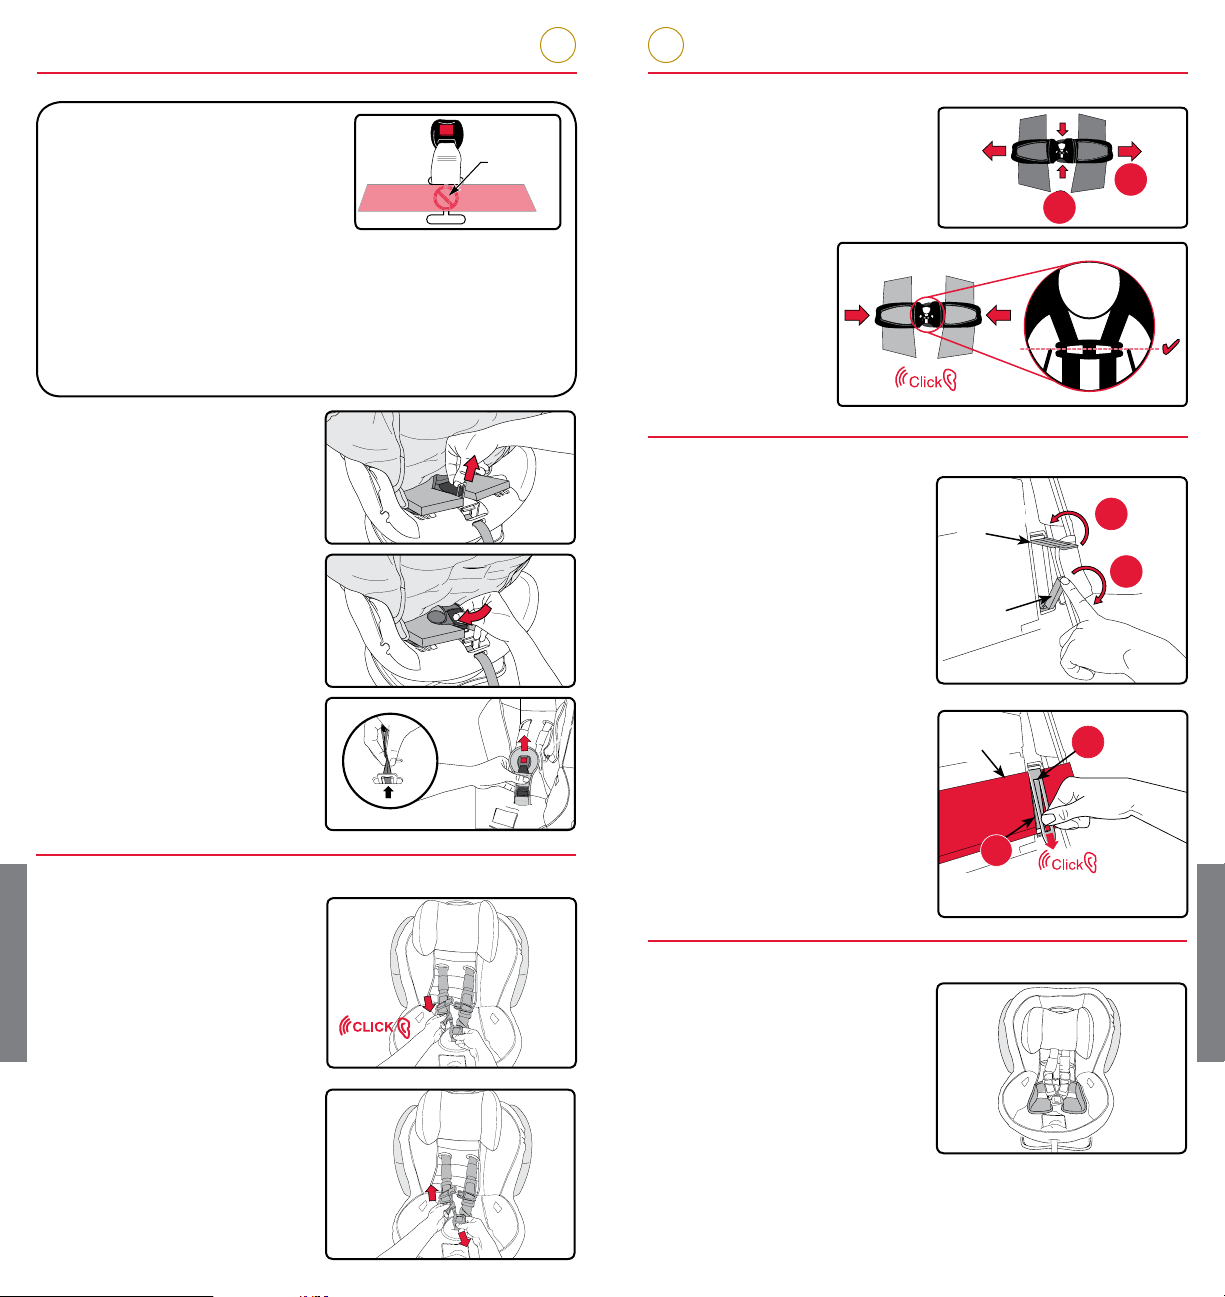
Using the Chest Clip
1. Open the chest clip.
a. Press tabs.
b. Pull apart.
2. Push together
to fasten.
NOTE: Always
position the
chest clip at
armpit level.
Using the Lock-Offs
To Open:
1. Open the locking tab.
2. Open the clamp.
IMPORTANT: Both parts
of the lock-off must be
opened to secure a vehicle
belt.
Locking
Tab
Clamp
b
a
1
2
3. Slide the buckle retainer
into the front buckle
slot and slide into the
corresponding buckle
position. Ensure the red
release button faces out.
Replace cover.
Using the Harness Buckle
To Close:
1. Close the clamp over the
vehicle belt.
2. Push down on the locking
tab where indicated until
a click is heard.
Vehicle
Belt
1
Clamp
2
Locking
Tab
To Fasten:
1. Insert one tongue at a
time into the buckle.
Proper connection is
confirmed with a click
after inserting each
buckle tongue.
To Release:
1. Press the release button
and pull the tongues from
the buckle.
Infant Positioning Pillow
The infant positioning pillow
is designed to provide better
harness fit and comfort for
infants using this child seat.
IMPORTANT: The infant
positioning pillow must be
used with infants weighing
up to 22 lbs (10 kg) when
using a child seat in a rear-
NOTE: Periodically clean
the buckle to ensure
proper operation. See
facing position. Do not use
over 22 lbs (10 kg) or in a
forward-facing position.
page 39.
24 25
Page 16
BRITAX Child Safety, Inc. ADVOCATE User Guide
LATCH SYSTEM ANCHOR LOCATIONS
Anchor
Anchors
90°
0°
90°
0°
90°
0°
Seat Positions
This child seat has 3 positions. To adjust, pull the recline
handle then rotate the child seat shell into the desired
position. Release the recline handle, then verify the child
seat has locked into position.
Position 1 Position 2 Position 3
NOTE: Set the seat position BEFORE installing.
Rear-Facing
When properly installed in the rearfacing position, the back angle of the
30˚
0˚
45˚
child seat should be at least 30˚ for
children and up to 45˚ from vertical for
90˚
infants unable to maintain head and
neck control (not to exceed 45˚) when
the car is parked on a level surface.
Use the line as a guide to achieve the proper recline angle
for rear-facing installations. The line will be parallel to the
ground when the child seat angle is at the center of the
acceptable angle range (37.5˚). If necessary, the proper
recline angle can be achieved by placing a rolled towel or
pool noodle in the vehicle seat bight.
Forward-Facing
In forward-facing
installations, it
is important that
the base of the
child seat rests
completely flat
on the vehicle
seat. As seen in
the illustration, it
is permissible to
allow up to 20% or
Acceptable
Overhang
3"
Unacceptable
Overhang
3"
3 in. (7.6 cm) of the base to hang over the edge of the vehicle
seat. Some vehicle seats do not allow enough of the child
seat base to contact the vehicle seat. If this is the case, adjust
the recline angle to a more upright position. Not doing so
could cause the child seat to not perform as intended.
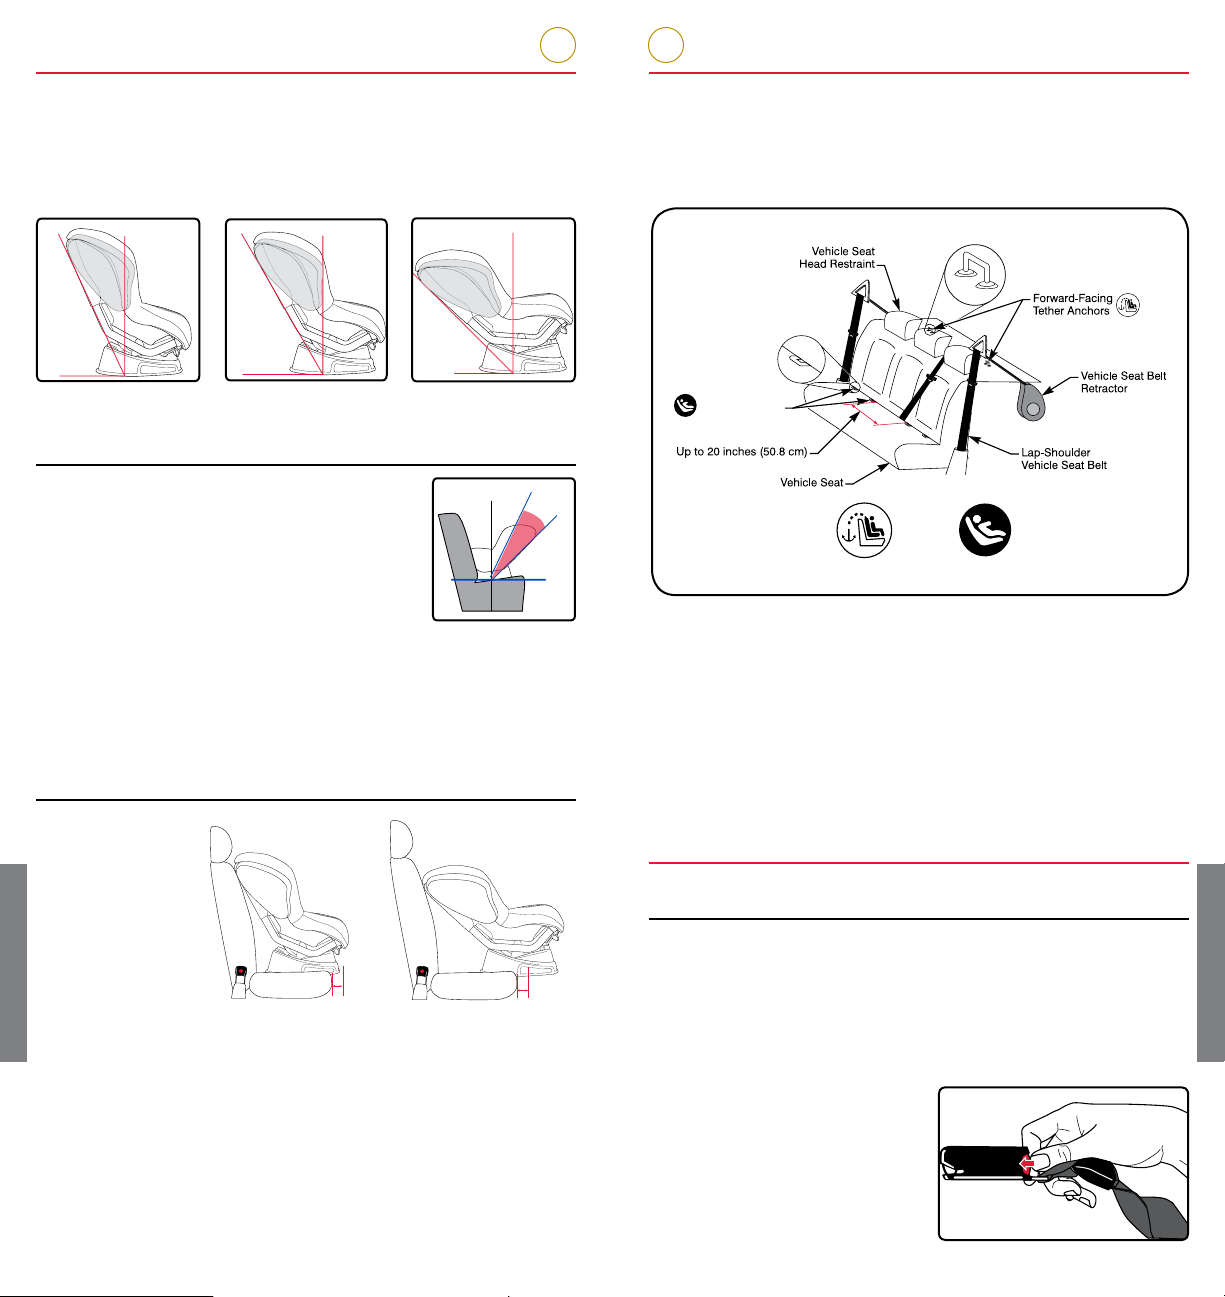
Using the Lower Anchors and Tethers for Children (LATCH)
The Lower Anchors and Tethers for Children or LATCH, is a
system available on this child seat that offers an alternative
to vehicle seat belt installation methods. See pages 2-3 for
LATCH components on this child seat.
Lower Anchors
Tether
Lower
The figure above shows typical locations for lower anchors
and tether anchors in a vehicle. Check your vehicle owner’s
manual to learn if it is equipped with LATCH, the maximum
weight rating for the lower anchors, and for information on
the lower anchor locations and seating positions available for
use with this child seat.
Standard vehicle seat spacing between LATCH anchors is
11 in. (27.9 cm). This child seat can be used in a seating
position with up to 20 in. (50.8 cm) of space between the
LATCH anchors if the vehicle manufacturer allows.
Using the Lower Connectors
Locating the Lower Connectors
The lower connectors are located in the back of the base of
the child seat. Store the connectors in the slots when not in
use.
To remove the lower connector from the storage slot or
lower anchor:
1. Press and hold the red
release button.
26 27
Page 17

BRITAX Child Safety, Inc. ADVOCATE User Guide
2. Pull the lower connector
from the storage slot or
lower anchor.
To attach the lower connector to the storage slot or
lower anchor:
1. Firmly push the lower
connector into the slot or
Top
lower anchor until a click
is heard.
NOTE: The lower
connectors store top
down in the slots.
Using the Energy-Absorbing Versa-Tether
Failure to follow the guidelines below may cause the child
seat not to perform as intended.
• BRITAX recommends that the Versa-Tether be used at
all times when installing the child seat. Using the tether
will improve the stability of your child seat and reduce
the risk of injury.
• Attach the Versa-Tether only to tether anchors identified
by your vehicle manufacturer as tether anchorage
points. Only use the designated tether anchor for each
seating position.
• If your vehicle does not currently have a tether anchor
attachment, refer to your vehicle owner’s manual or
contact your vehicle man u fac tur er for assistance. DO
NOT modify your vehicle without advice from your
vehicle manufacturer.
• Store the Versa-Tether in the pouch on the back of the
child seat when not in use. DO NOT install the child
seat with the Versa-Tether attached to the carry clip.
Tether Configurations
(A) Rear Facing
(B) Rear Facing
(C) Forward Facing
Rear-Facing Tether Connector Strap
Because every vehicle model is different, locations to
anchor the tether for rear-facing installations may vary. Use
the rear-facing tether connector strap to assist in creating an
anchor point for rear-facing configuration “A” (above) .
1. Find a fixed location in the vehicle that is bolted to the
floor. If you cannot find a location to create an anchor
point, contact the vehicle manufacturer to identify a
tether connection point.
2. Route the strap through the anchor point.
3. Thread the metal D-ring
through the loop on the
end of the strap.
4. Pull the metal D-ring
through until the strap is
tight.
3
5. Use the D-ring as an
attachment point for the
tether.
NOTE: Store the tether
connector strap in the
tether pouch when not in
use.
5
Versa-Tether
To attach the Versa-Tether to a Tether Anchor:
Tether anchor locations vary from
vehicle to vehicle. Check your vehicle
owner’s manual and look for the tether
1. Firmly press the hook
over the tether anchor
point.
anchor symbol shown in the diagram
to help identify where the top tether
anchor points are located in your
vehicle. See the diagrams on page 29
for possible rear and forward-facing
Versa-Tether installation configurations.
2. Pull the loose end of the
webbing to remove slack
from the Versa-Tether.
NOTE: When using as a
carry strap, tighten until
the strap is comfortable to
carry.
28 29
Page 18

BRITAX Child Safety, Inc. ADVOCATE User Guide
To remove the Versa-Tether from a Tether Anchor:
1. Loosen the Versa-Tether.
a. Tilt the adjuster tab
up.
b. Pull the tether
webbing.
2. Remove the Versa-Tether hook from the tether anchor.
NOTE: The Versa-Tether
carry clip is only for use
when you wish to carry
the child seat between
locations. Do not install
the child seat with the
Versa-Tether attached
to the carry clip. Secure
the excess Versa-Tether webbing in the elastic strap
during use. Store the Versa-Tether in the storage pouch
when not in use. Always ensure any excess webbing is
contained within your vehicle.
The Versa-Tether can indicate when the child seat has been
in a moderate or severe crash (see “Important Notes” on
page 5) and replacement of the child seat is necessary.
a
b
Vehicle Compatibility
Vehicle Seating Positions
DO NOT place child seat rear-facing
in the front seat of a vehicle with
a passenger air bag. DEATH or
SERIOUS INJURY can occur. See your
vehicle owner’s manual for child seat
installation instructions. The back seat
is the safest place for children 12 and
under.
Some vehicles have no seating positions which are
compatible with this child seat. If in doubt, contact the
vehicle manufacturer for assistance.
Forward-facing vehicle seats MUST be used with this
child seat. Side-facing or rear-facing seats CANNOT be
used. See the diagram below.
Figure 1 shows a tether
acceptable for continued use
(provided the child seat has
not been involved in a crash).
The colored stitching will be
intact and not visible from the
back of the seat.
Figures 2 and 3 show
examples of when the tether
has been damaged and is
unacceptable for continued
use. If one or both of the
loops have pulled through the
back of the shell and/or any
of the colored stitching has
ripped, the child seat is no
longer acceptable for use.
IMPORTANT: Discontinue
use of child seat if it has been
involved in a moderate or
severe crash, regardless of
whether the loops have pulled
through the back side of the
shell and the colored stitching
has been ripped.
1
Compatible Vehicle Seat Belts
NOTE: The information in this section only applies to
installation with vehicle seat belts.
Vehicle seats and seat belts differ from vehicle to vehicle.
Refer to your vehicle owner’s manual for specific information
about your vehicle seat belts and their use with child seats.
2
Lap-Shoulder (3-Point) Belt
1. ALR (Automatic Locking Retractor) with Sliding Latch
Plate
a. Has a latch plate that
freely slides along
the vehicle seat belt
webbing.
Latch
plate
3
30 31
Page 19

BRITAX Child Safety, Inc. ADVOCATE User Guide
24 in.
24 in.
b. Has a retractor that
stops the belt from
being pulled out
again once the belt
webbing has been
pulled out at least 24
in. (61 cm).
c. Tightens by feeding
the belt webbing
back into the
retractor.
2. ELR (Emergency Locking Retractor) with Locking Latch
Plate
a. Has a latch plate
that locks the vehicle
belt.
NOTE: Ensure the latch
plate and vehicle belt
lie flat against the child
Latch
plate
seat or the vehicle belt
may remain unlocked.
b. Has a retractor that
locks only in an
emergency situation
such as sudden stop
or crash.
3. Switchable Retractor with Sliding Latch Plate
a. Has a latch plate that
freely slides along
the vehicle seat belt
webbing.
Latch
plate
b. Has a retractor that
can be switched
to function as an
ALR. Pull the belt all
the way out of the
retractor to set the
automatic locking
function.
NOTE: To use a child
seat with this type of
vehicle seat belt, you
will need to switch to
the ALR mode or use
child seat lock-offs.
4. ELR (Emergency Locking Retractor) with Sliding Latch
Plate
a. Has a latch plate that
freely slides along
the vehicle seat belt
webbing.
b. Has a retractor that
locks only in an
emergency situation
such as sudden stop or
crash.
IMPORTANT: This belt type requires the use of the
lock-offs built into the seat for rear- and forward-facing
installations. See page 25 for information on lock-offs.
5. Switchable Retractor with Sewn Latch Plate and
Inflatable Seat Belt
NOTE: This BRITAX car seat may not be compatible
with every inflatable lap-shoulder belt. See FAQS in
the support section of the BRITAX website (www.
britaxusa.com/support) for additonal instructions.
a. Has a latch plate
that is sewn into the
webbing.
b. Has a retractor that
can be switched to
function as an ALR
by pulling the vehicle
Latch Plate
lap belt fully out until
a clicking sound
can be heard when
retracting.
NOTE: To use a child
seat with this type of
Inflatable Lap
Shoulder Belt
vehicle belt, you will
need to switch the
retractor for the lap
section of the seat belt
to the ALR mode.
Lap Belt
1. ALR (Automatic Locking
Retractor)
a. Has a latch plate
that is sewn into the
webbing.
Latch
plate
b. Has a retractor that
stops the belt from
being pulled out
again once the belt
webbing has been
pulled out at least
24 in. (61 cm).
32 33
Page 20

BRITAX Child Safety, Inc.
ADVOCATE User Guide
c. Tightens by feeding
the belt webbing
back into the
retractor.
2. Locking Latch Plate
a. Has a latch plate
that prevents the
webbing from
becoming loose.
NOTE: Ensure the latch
Latch plate
plate and vehicle belt
lie flat against the child
seat or the vehicle belt
may remain unlocked.
b. Tightens by pulling
on the belt webbing.
Adjuster
Incompatible Vehicle Seat Belts
The following types of vehicle seat belts are NOT
compatible with this child seat. If any of the belt types
listed below are in the chosen seating position, choose
another vehicle seating position or check your vehicle
owner’s manual for information on installing a car seat in
your vehicle.
Care and Maintenance
Seat Cover
Removing the Cover
Never remove the buckle tongues from the harness.
They cannot be reattached after removal. If reassembled
incorrectly, the child seat may not perform as intended.
1. Loosen and unbuckle the
harness.
a. Lift harness adjuster
lever.
b. Pull both harness
straps forward.
c. Unbuckle the
harness.
2. Open the chest clip.
a. Press tabs
b. Pull apart
3. Remove the infant
positioning pillow if
necessary.
4. Remove the belly pad and
buckle.
a. Lift the cover from
the seat to find
the buckle strap
connection.
1b
1a
a
4a
b
Lap-shoulder belts
with top or bottom
anchor points on
the vehicle door�
Lap belts forward
of the vehicle seat
bight�
34
Lap belts with a
sewn-in latch plate
that have a retractor
that locks only in
case of a sudden
stop�
Motorized,
automatic vehicle
seat belts�
Lap-shoulder
belts that have a
separate retractor
each for the
lap section and
shoulder section�
b. Remove the buckle
strap by turning
the buckle retainer
sideways and
routing it out of the
front buckle slot in
the child seat (see
page 38).
c. Slide the end of the
belly pad over the
foam pad on the
seat.
4b
4c
35
Page 21

BRITAX Child Safety, Inc. ADVOCATE User Guide
d. Pull the end of
the belly pad and
buckle retainer
out of the buckle
slot in the cover to
remove.
e. Turn the buckle
retainer sideways
and slide the buckle
out of the belly pad.
5. Detach the hook and
loop fasteners on the
head restraint cover from
around the harness.
6. Remove the head
restraint cover.
a. Raise the harness
to the highest
position.
b. Detach the elastic
straps from the tabs
and the hook and
loop fastener from
behind the harness
height adjuster.
7. Adjust the harness to
the lowest position and
detach the plastic hooks
from the bottom edge of
the child seat.
8. Detach the plastic hooks
from the back of the child
seat shell.
4d
4e
Cleaning the Cover
• HAND WASH the cover using cold water and mild soap.
• LINE DRY to prevent the cover from shrinking.
• DO NOT:
– Bleach
– Machine wash
– Machine dry
– Iron
Replacing the Cover
1. Fit the child seat cover
around the child seat
shell.
2. Attach the plastic hooks
behind the head restraint
onto back of the child
seat.
3. Replace the belly pad and
buckle:
a. Turn the buckle
retainer sideways
and route it through
the belly pad.
b. Route the belly pad
and buckle retainer
through the buckle
slot in the cover.
– Ensure that the
buckle is through
the desired cover
slot for the buckle
position.
c. Slide the end of the
belly pad over the
comfort foam on the
child seat.
3a
3b
3c
9. Remove the cover from
the shell.
36 37
d. Turn the buckle
retainer sideways
and route it through
the front buckle
slot and then into
the desired buckle
position in the child
seat.
3d
Page 22

BRITAX Child Safety, Inc. ADVOCATE User Guide
4. Attach the plastic hooks
to the bottom edge of the
child seat.
5. Slide the head restraint
cover over the front of
the head restraint and
attach the hook and loop
fasteners at the back.
Attach the elastic straps
to the rear tabs.
6. Attach the hook and loop
fasteners on the head
restraint cover around the
harness straps.
Harness Buckle
If your child eats and drinks while in the child seat, you will
need to check the buckle periodically and rinse out any
accumulated debris.
Removing the Harness Buckle
1. Lift the cover from the seat
to find the buckle strap
connection.
3. Slide the end of the belly
pad over the foam pad on
the seat.
4. Pull the end of the belly
pad and buckle retainer
out of the slot in the cover
to remove.
5. Turn the buckle retainer
sideways and route the
buckle assembly out of
the belly pad.
Cleaning the Harness Buckle
• THOROUGHLY RINSE the buckle using warm water.
• TEST THE BUCKLE by fastening and unfastening until a
click is heard after inserting each buckle tongue. If clicks
are not heard, repeat the cleaning procedure.
• TOWEL DRY.
• DO NOT:
– Soak
– Lubricate
– Use solvents
– Use soap or household detergents
2. Remove the buckle strap
by turning the buckle
retainer sideways and
routing it out of the front
buckle slot in the child
seat.
38 39
Page 23

BRITAX Child Safety, Inc. ADVOCATE User Guide
ADJUSTMENT
SLOT
Replacing the Harness Buckle
• For rear-facing installation:
– ALWAYS position the buckle in
the inner slot for when using a
vehicle seat belt installation.
– The vehicle belt must pass in
front of the buckle strap.
– Position the buckle in the
slot closest to but not under the child when using the
LATCH installation.
• For forward-facing installation, use the outer buckle
slot when installing the child seat with a child weighing
30 lbs (13.6 kg) and above or if the buckle is under the
child in the inner position.
• NEVER leave the buckle in the adjustment slot.
1. Turn the buckle retainer
sideways and route it
through the fabric strip on
the belly pad.
2. Route the belly pad and
buckle retainer through
buckle slot in the cover.
– Ensure that the buckle
is through the correct
cover slot for the buckle
position.
3. Slide the end of the belly
pad over the comfort
foam on the child seat.
4. Turn the buckle retainer
sideways and route it
through the front buckle
slot and then into the
desired buckle position.
– Ensure that the buckle
is in the correct buckle
position.
5. Replace the cover.
1
3
4
Harness
Cleaning the Harness
• SPONGE CLEAN the harness using warm water and mild
soap.
• TOWEL DRY.
• DO NOT:
– Disassemble the harness
– Bleach
– Machine wash
– Machine dry
– Iron
Shell
Cleaning the Shell and Side Impact Cushions
• SPONGE CLEAN the shell using warm water and mild
soap.
• TOWEL DRY.
• DO NOT use abrasive cleaners.
Prevent the Side Impact Cushions from being punctured.
Puncture damage will cause the cushions not to perform
as intended.
HUGS with SafeCell Technology
• HUGS chest pads are highly recommended when the
child seat is installed in forward-facing mode.
• HUGS chest pads are optional when the child seat is
installed in rear-facing mode and should be removed
when a snug harness cannot be achieved for small
infants (approximately 3 months old).
Removing HUGS with SafeCell Technology
1. Loosen the harness.
a. Lift harness adjuster
lever.
b. Pull both harness
straps forward.
1b
1a
2. From the back of the
seat, unhook the harness
straps from the yoke.
40 41
Page 24

BRITAX Child Safety, Inc. ADVOCATE User Guide
3. Pull one harness strap
through the harness slot
to the front of the seat.
4. Route the harness strap
out of the comfort pad,
HUGS chest pad, and the
chest clip.
5. Reroute the harness
strap back through the
chest clip, ensuring that
the harness strap is not
twisted.
6. Repeat for other strap.
7. Route the harness straps
through the seat to the
back. Ensure that the
harness straps pass
through the harness
adjuster.
8. Nest the end of the right
harness strap into the left.
Replacing HUGS with SafeCell Technology
1. Loosen the harness.
a. Lift harness adjuster
lever.
b. Pull both harness
straps forward.
1b
1a
2. From the back of the
seat, unhook the harness
straps from the yoke.
3. Pull one harness strap
through the harness slot
to the front of the seat.
4. Route the harness strap
out of the comfort pad
and chest clip.
5. Reroute the harness
strap through the HUGS
chest pad, chest clip, and
comfort pad.
6. Repeat for other strap.
9. Hook the harness straps
onto the yoke. Ensure
that the harness straps
are not twisted and that
the ends of the harness
straps are securely
attached to the yoke.
IMPORTANT: Store the
HUGS chest pads in a
safe location when not in
use.
42 43
7. Route the harness straps
through the seat to the
back. Ensure that the
harness straps pass
through the harness
adjuster.
8. Nest the end of the right
harness strap into the left.
9. Hook the harness straps
onto the yoke. Ensure
that the harness straps
are not twisted and that
the ends of the harness
straps are securely
attached to the yoke.
Page 25

BRITAX Child Safety, Inc. ADVOCATE User Guide
Troubleshooting
Problem Possible Solution
The harness
cannot be
adjusted to its
full height�
The harness is
hard to adjust�
The adjuster
strap is fraying
at the sides�
The buckle will
not fasten with
a click after
each tongue is
inserted�
Please contact BRITAX Consumer Services at 1-888-4274829 or 1-704-409-1699 if you have an issue not listed
here.
Check the seating position where
the child seat is installed. The vehicle
head restraint may obstruct the path
of the child seat harness height
adjuster. Remove or raise the vehicle
head restraint and try adjusting the
harness height again.
The yoke may be caught on the
Versa-Tether webbing or other
component of the child seat.
Remove the obstruction and try
adjusting the harness again. Always
store the Versa-Tether in the pouch
provided when not in use. When the
Versa-Tether is in use, always secure
excess webbing in the elastic strap.
See page 29.
The vehicle seat back may hinder
harness adjustment. Ensure the child
seat base is flat on the vehicle seat.
The harness may be at maximum or
minimum height, the harness may
be too tight to adjust, or the child’s
weight may be pressing against the
head restraint. Check for and correct
all of the above where necessary
and try adjusting the harness again.
Pull the harness adjuster strap up and
away from the child seat to tighten.
Do not pull sideways. Doing so may
cause the harness adjuster strap to
fray at the sides. See page 20.
There may be debris in the buckle
mechanism. Clean the buckle (see
page 39), then try fastening the
buckle again.
Warranty
This child seat was manufactured by Britax Child Safety,
Inc. (“BRITAX”). BRITAX warrants this product to the original
retail purchaser as follows:
LIMITED ONE-YEAR WARRANTY
This product is warranted against defective materials or
work man ship for one year from the date of original purchase.
Proof of purchase is required. Your exclusive remedy for this
warranty is that BRITAX will, at its option, provide repair or
replacement components for this product. BRITAX reserves
the right to discontinue or change fabrics, parts, models or
products, or to make substitutions.
To make a claim under this warranty, you must contact BRITAX
Consumer Services at 1-888-427-4829 or 1-704-409-1699, or
write to us using the address on the back cover of this booklet.
PLEASE COMPLETE AND MAIL THE OWNER
REGISTRATION CARD WITHIN (30) DAYS OF PURCHASE
You may also register online at www.BritaxUSA.com/
registration.
WARRANTY LIMITATIONS
This warranty does not include damages which arise from
negligence, misuse or use not in accordance with the
product instruction.
The use of non-BRITAX covers, inserts, toys, accessories,
or tightening devices is not approved by BRITAX. Their use
could cause this child seat to fail Federal Motor Vehicle
Safety Standards or not perform as intended in a crash.
Their use may void the BRITAX warranty.
LIMITATION OF DAMAGES
The warranty and remedies as set forth above are exclusive
and in lieu of all others, oral or written, express or implied.
In no event will BRITAX, or the retailer selling this product,
be liable to you for any damages, including incidental or
consequential damages, arising out of the use or inability to
use this product.
LIMITATIONS OF WARRANTIES AND OTHER WARRANTY
TERMS AND STATE LAWS
Any implied warranties, including implied warranties of
merchantability and fitness for a particular purpose, shall
be limited to the duration and terms of the express written
warranty. Some states do not allow limitations on how long
an implied warranty lasts or the exclusion or limitation of
incidental or consequential damages, so the above lim i tations
may not apply to you. This warranty gives you specific legal
rights, and you may have other rights, which vary from state
to state. Neither BRITAX, nor the retailer selling this product,
authorizes any person to create for it any other warranty,
obligation, or liability in connection with this product.
44 45
Page 26

Page 27

Guía de Usuario - Español
Índice
Guía de Usuario - Español ������������������������������������������ 1
Características del asiento de seguridad para niños 2
Información de seguridad ������������������������������������������� 4
Advertencias .......................................................................4
Notas Importantes ..............................................................5
Certificación ........................................................................6
Registro ...............................................................................6
Información sobre el ajuste del niño ..................................7
Instalación de asientos con
orientación trasera ������������������������������������������������������ 8
Instalación con LATCH .......................................................8
Instalación orientación trasera con LATCH ........................9
Instalación con cinturones de banda horizontal y
transversal ........................................................................10
Instalación con cinturon de banda horizontal ....................12
Instalación de asientos con
orientación delantera ������������������������������������������������ 14
Instalación con LATCH .....................................................14
Instalación con cinturones de banda horizontal y
transversal .........................................................................16
Instalación con banda horizontal .....................................18
Sujeción del niño ������������������������������������������������������� 20
Funciones del asiento de seguridad para niños ����� 22
Indicador de ajuste del arnés Click & Safe ......................22
Regulación de altura del arnés ........................................23
Ajuste de la posición de la hebilla para el arnés .............24
Utilización de la hebilla para el arnés ...............................24
Utilización del broche pectoral .........................................25
Utilización de los seguros ................................................25
Almohada de posición para bebé ....................................25
Posiciones del asiento de seguridad para niños .............26
Anclajes inferiores y banda de anclaje superior
(LATCH) ............................................................................27
Uso de los conectores inferiores ......................................27
Uso de la sistema de absorción de energía Versa-Tether 28
Compatibilidad de vehículo ������������������������������������� 31
Posiciones de asientos del vehículo ...............................31
Cinturones de seguridad de vehículo compatibles .........31
Cinturones de seguridad de vehículo incompatibles ......35
Cuidado y mantenimiento ����������������������������������������� 36
La cubierta ........................................................................36
La hebilla para el arnés ....................................................39
El arnés .............................................................................42
Exterior del asiento ...........................................................42
HUGS con SafeCell Technology ......................................42
Solución de problemas ��������������������������������������������� 45
Garantía ��������������������������������������������������������������������� 46
ADVOCATE®, BRITAX®, Click & Safe®, EZ-Buckle™, HUGS™, SafeCell Technology®,
Side Impact Cushion Technology
propriedad de Britax y registradas en los Estados Unidos y otros paises. Reservados
todos los derechos. ©2013 Britax Child Safety, Inc. Este producto y sus componentes
están sujetos a cambios sin previo aviso. Impreso en EE.UU. P580800_A:09.13
™
y Versa-Tether® son marcas commercials
1
Page 28

BRITAX Child Safety, Inc. ADVOCATE Guía de Usuario
Características del asiento de
seguridad para niños
Delante
1
2
3
4
5
6
7
8
9
10
11
12
13
14
Atrás
24
25
26
27
28
29
30
31
35
15
16
17
18
19
20
21
22
23
32
33
34
36
37
Descripción
1. Cubierta
2. Regulador de altura del arnés
3. Reposacabezas
4. Etiqueta de altura sentada de los hombros
5. Almohadillas de confort
6. Almohada para el posición del bebé
7. Soporte para el arnés
8. Seguros de orientación trasera (azul: bajo la cubierta
de la parte delantera)
9. Barra de conector inferior
10. Correa de conector inferior (pieza LATCH)
11. Botón de desbloqueo del ajuste del conector inferior (pieza
LATCH)
12. Ajuste del conector inferior (pieza LATCH)
13. Botón de desbloqueo del conector inferior (pieza LATCH)
14. Conector inferior (pieza LATCH)
15.
16. Las almohadillas para el pecho HUGS con SafeCell
17. Broche pectoral
18. Hebilla para el arnés
19. Protector abdominal EZ-Buckle
20. Palanca de ajuste del arnés (debajo de cubierta)
21. Indicador de ajuste del arnés Click & Safe (bajo la cubierta)
22. Correa de ajuste del arnés
23. Palanca de ajuste de la reclinación
24. Etiqueta con la fecha de fabricación y el número de serie
25. Exterior del asiento
26. Las almohadillas de protección lateral
27. Ranuras del arnés
28. Ranura para el cinturón de orientación delantera
29. Seguros de orientación delantera (verde: bajo la cubierta de la
30. Ranura para el cinturón de orientación trasera
31. Base con SafeCell Technology
32. Sistema de absorción de energía Versa-Tether
33. Correa de retención
34. Gancho del arnés
35. Correas del arnés
36. Compartimentos para conectores inferiores
37. Enganche de transporte Versa-Tether
Compartimento para la guía del usuario (en el bolsillo
detrás de la cubierta)
Technology
parte delantera)
(banda de anclaje superior - pieza LATCH)
2 3
Page 29

BRITAX Child Safety, Inc. ADVOCATE Guía de Usuario
Información de seguridad
No seguir las advertencias e instrucciones podría resultar
en LESIONES GRAVES o MUERTE.
AJUSTE PARA NIÑO
• Con niños que pesan menos de 9,1 kg (20 lbs), solo se
debe colocar el asiento orientado hacia atrás.
• Únicamente se debe utilizar con niños que pesan entre
2,3 y 29,4 kg (5 y 65 lbs) y miden un máximo de 124,5 cm
(49 pulg). Con niños que pesan entre 2,3 y 18 kg
(5 y 40 lbs), el asiento debe colocarse orientado hacia atrás.
En el caso de niños que pesan entre 9,1 y 29,4 kg
(20 y 65 lbs), el asiento debe colocarse orientado hacia
delante.
• Ajuste bien los cinturones que se incluyen con este
dispositivo de retención infantil alrededor del niño.
INSTALACIÓN
• La almohada de posición para bebé debe utilizarse para
niños que pesen 10 kg (22 lb) o menos en una posición
orientado hacia atrás. No utilice más de 10 kg (22 lb) o en
una posición hacia delante. Consulte la página 25.
• Asegure la correa de anclaje superior que se incluye con el
dispositivo de retención infantil.
• Asegure este dispositivo de retención infantil con el sistema
de anclaje de retención para niños del vehículo (si hay uno
disponible) o con el cinturón de seguridad del automóvil.
• Este asiento de seguridad para niños debe estar reclinado
en la posición 3 cuando se instala orientado hacia atrás.
• Cuando se coloque el asiento orientado hacia delante, este
debe estar en la posición 1 ó 2 (consulte la página 26).
• Si se instala el asiento orientado hacia atrás, se debe utilizar
la ranura interna de la hebilla con el cinturón de seguridad
del automóvil.
• Utilice la ranura externa de la hebilla si se va a instalar el
asiento orientado hacia delante y este va a ser ocupado por
un niño con un peso mínimo de 13,6 kg (30 lb) o si la hebilla
queda por debajo del niño en la posición interna.
USO GENERAL
• Siga todas las instrucciones que se encuentran en este
dispositivo de retención infantil, así como las instrucciones
escritas.
• Registre este dispositivo de retención infantil con el
fabricante.
• Según las estadísticas de accidentes, la Administración
Nacional de Seguridad de Tráfico en Carreteras (NHTSA,
National Highway Traffic Safety Administration) recomienda
que los padres elijan el asiento trasero como el lugar
más seguro para instalar adecuadamente un asiento de
seguridad para niños. A fin de garantizar la seguridad del
niño debe leer detenidamente el apartado Asientos del
vehículo de la página 31 y consultar el manual del vehículo.
• Asegure el asiento de seguridad para niños aun cuando
no esté ocupado, ya que de no estar asegurado podría,
en caso de accidente, lastimar a los demás ocupantes del
vehículo.
• Para evitar lesiones debido a deterioro o a daños ocultos,
los asientos de seguridad deben dejar de utilizarse tras
siete años de antigüedad o si han estado implicados en un
accidente moderado o grave(consulte más adelante). Ver la
Etiqueta con la fecha de fabricación y el número de serie en
el asiento de seguridad para niños (página 2).
• Cuando esta usando las correas del arnés, no utilice los
anclajes de retencion inferiores (LATCH) para instalaciones
de este asiento de seguridad para niño con un niño cuyo
pesa más de 18 kg (40 lbs).
• Evite que las almohadillas de protección lateral frente a
impactos sufran daños, ya que podría impedir que rindieran
como cabe esperar en caso de accidente.
• BRITAX no aprueba el uso de cubiertas, piezas, juguetes,
accesorios o dispositivos de ajuste que no sean de BRITAX.
El uso de estos podría hacer que el asiento no rinda como
debería durante un accidente.
Notas Importantes
• Utilice este asiento de seguridad en la posición 1 cuando se usa
un instalación con cinturon de banda horizontal con orientación
delantera con un niño que pesa más de 18 kg (40 lb).
• Debe dejar de utilizar este asiento de seguridad para niños
si ha estado implicado en un choque moderado o grave. No
obstante, no es necesario reemplazarlo en caso de un choque
menor y de poca severidad, que la Administración Nacional
de Seguridad de Tráfico en Carreteras de EE. UU. (National
Highway Traffic Safety Administration) (NHTSA) define como
aquellos en los que:
a. Aún es posible conducir el vehículo después del
accidente; y
b. La puerta del vehículo que queda más cerca del asiento
de seguridad para niños no sufrió daño alguno; y
c. Ninguno de los ocupantes del vehículo resultó
lesionado; y
d. No hay indicios visibles de daño en el asiento de
seguridad para niños; y
e. Las bolsas de aire (si presentes) no se inflaron.
• Cubra el asiento de seguridad para niños si deja el vehículo
expuesto al sol, ya que las piezas metálicas pueden calentarse
y quemar al niño.
• Guarde el asiento en un lugar seguro cuando no lo esté
utilizando. No coloque objetos pesados encima.
• No intente desmontar piezas del asiento, a menos que lo
haga según se indica en este manual. Utilice el arnés y los
cinturones de seguridad del vehículo únicamente como se
indica.
• Nunca debe emplearse la correa de ajuste del arnés para
levantar o transportar el asiento de seguridad para niños,
ya que podría dañar el ajuste del arnés e incluso el propio
cinturón. Sostenga siempre el asiento de protección para niños
por el exterior o por las correas de retención
.
4 5
Page 30

BRITAX Child Safety, Inc. ADVOCATE Guía de Usuario
Certificado para
su uso en aviones
Nivel de
los hombros
2,5 cm
1 pulg
Nivel de
los hombros
Certificación
Este sistema de retención está certificado para su uso en
vehículos y aviones�
Vehículos
Este sistema de retención infantil cumple con todas las normas
federales de seguridad automotriz (FMVSS 213)
.
Aviones
Este asiento de seguridad para niños está
certificado para su uso en aviones. La mayoría
de las aerolíneas de Estados Unidos y Canadá
permiten el uso de asientos para niños siempre
que estén aprobados para su uso en aviones y se
puedan instalar adecuadamente en el asiento de la
contacto con la aerolínea para obtener más información acerca de
las normas que tienen en vigor al respecto.
La agencia federal de aviación de EE. UU. (FAA) recomienda que
los niños cuyo peso sea igual o inferior a 18 kg (40 lb) utilicen un
asiento certificado con arnés para viajar en avión.
Instale el asiento de seguridad para niños en un asiento de
ventanilla, a fin de evitar bloquear el paso� Si desea instalar
el asiento de seguridad para niños orientado hacia atrás en
un avión siga las instrucciones “Instalación de asientos con
orientación trasera” en la pagina 12. Si desea instalar el asiento
de seguridad para niños orientado hacia delante en un avión,
siga las instrucciones “Instalación de asientos con orientación
delantera” en la pagina 18.
– Si el cinturon de banda horizontal es demasiado corto,
solicite un auxiliar de vuelo para un extensor de cinturon.
– Puede que el niño no esté cómodo si se deja la hebilla en
la zona del asiento de seguridad para niños donde debe
cabina. Antes de emprender el viaje, póngase en
Nombre y número de modelo: _____________________________
Número de serie: ________________________________________
Número de lote:_________________________________________
Fecha de fabricación: ____________________________________
Información sobre el ajuste del niño
Orientación trasera: 2,3 – 18 kg (5 – 40 lb)
La Academia Americana de Pediatría recomienda colocar a todos
los niños pequeños y bebés en un asiento del vehículo orientado
hacia atrás hasta cumplir los 2 años de edad o hasta que alcancen
la altura o el peso máximo permitido por el fabricante del asiento
de seguridad del vehículo.
BRITAX recomienda encarecidamente colocar a los niños
orientados hacia atrás hasta que alcancen la altura o el peso
máximo especificados.
Usar la orientación trasera:
• cuando las correas del arnés se encuentren a la altura del
hombro del niño o ligeramente por debajo
de esta y
• con niños que pesen entre 2,3 y 18 kg
(5 y 40 lb) y
• cuando la parte superior de la cabeza del
niño quede como máximo a 2,5 cm
(1 pulg) por debajo del borde del exterior
del asiento infantil.
La almohada de posición para bebé debe utilizarse para un
mejor ajuste para niños que pesen 10 kg (22 lb) o menos
en una posición orientado hacia atrás� No utilice más de
10 kg (22 lb) o en una posición hacia adelante� Consulte la
página 25.
sentarse este.
– Cinturones de seguridad inflables del avión NO son
compatibles con este asiento para niños.
Orientación delantera: 9,1 – 29,4 kg (20 – 65 lb)
BRITAX recomienda encarecidamente sujetar bien al niño
mediante el arnés hasta que exceda los límites de peso y altura
Registro
Es posible que algunos dispositivos de retención para niños
pudieran tener que retirarse del mercado por cuestiones de
seguridad. Es importante registrar este asiento para que podamos
ponernos en contacto con usted en caso de que fuera necesario.
Envíenos su nombre, dirección postal y de correo electrónico
(si dispone de una), el número de modelo del dispositivo de
retención y la fecha de fabricación a la dirección siguiente: Britax
Child Safety, Inc. P.O. Box 91167 Allentown, Pennsylvania 181099925 (EE. UU.). También puede optar por llamarnos al teléfono
1 888 427 4829 o 1 704 409 1699, o registrarse en línea en www.
BritaxUSA.com/registration. Para obtener información sobre la
retirada de asientos del mercado, llame a la línea gratuita de
seguridad automotriz de EE. UU. al 1 888 327 4236 (teléfono para
sordomudos: 1 800 424 9153), o visite http://www.NHTSA.gov.
Para su propia comodidad, le recomendamos anotar toda la
información relativa a su asiento de seguridad para niños a
espicificados.
Usar la orientación delantera:
• cuando las correas del arnés quedan a
la altura de los hombros del niño o por
encima, paralelas al nivel del suelo y
• con niños que pesen entre 9,1
y 29,4 kg (20 y 65 lb) y
• con niños que midan 124,5 cm
(49 pulg) o menos de altura y
• cuando el borde superior de las orejas
del niño no quedan queda por encima
de la parte superior del exterior del
asiento.
NOTA: Usa La etiqueta
de la altura sentada
de los hombros en
el asiento de niño
determinar si el niño ha
alcanzado la ranura del
arnés superior.
IMPORTANTE: No debe utilizar la almohada de posición
para bebé con un instalación orientación delantera.
continuación. En la Etiqueta con la fecha de fabricación y el
número de serie podrá encontrar toda la información necesaria
(consulte la página 2).
6 7
Page 31

BRITAX Child Safety, Inc. ADVOCATE Guía de Usuario
1
Instalación de asientos con
orientación trasera
Instalación con LATCH
1. Extraiga los conectores
inferiores de los
compartimentos situados
en la base. Pulse el botón
de desbloqueo del ajuste
y jale de la correa hasta
que esta alcance su
longitud máxima. Repita
la misma operación para
la segunda correa.
2. Este asiento de seguridad
para niños debe estar
reclinado en la posición
3 y orientado hacia atrás
en el asiento del vehículo
(consulte la página 26).
3. Presione con fuerza los
conectores inferiores
sobre los anclajes
inferiores adyacentes
hasta un clic confirme
que este correctamente
acoplado.
Instalación orientación trasera con LATCH
9 Revise que los enlaces inferiores no estén doblados.
9 Revise que el asiento de seguridad no se pueda mover
de adelante hacia atrás o de un lado a otro por más de
2,5 cm (1 pulg). Si el asiento de seguridad para niños
no está bien seguro, vuelva a instalarlo de nuevo o
colóquelo en otro asiento del vehículo.
9 Revise que el ángulo vertical posterior del asiento de
seguridad para niños sea de 30° – 45° grados y que no
exceda de los 45° cuando el automóvil esté estacionado
a nivel plano de la superficie. Consulta “Posiciones del
asiento” en la pagina 26.
4. Empuje el asiento de
seguridad para niños
hacia abajo mientras
tensa las correas tirando
de cada conector inferior.
5. La instalación de asientos
con orientación trasera
puede mejorarse si
se usa el Versa-Tether
(consulte la página 29).
8 9
a
o bien
b
Page 32

BRITAX Child Safety, Inc. ADVOCATE Guía de Usuario
IMPORTANT • ALWAYS position the buckle in the inner slot for
rear-facing use. • The vehicle belt
must pass in front of the buckle
strap for rear-facing use.
• NEVER leave the buckle in the
adjustment slot. • Use the outer
buckle slot when installing the child
seat forward-facing with a child
weighing 30 lbs (13.6 kg) and above or if the buckle is under the
child in the inner position.
INNER SLOT
OUTER SLOT
P405600_R1.05.10
A
DJUSTMENT
SLOT
IMPORTANTE • Coloque la hebilla en la ranura interna SIEMPRE que se
vaya a utilizar el asiento orientado hacia
detrás. • Cuando el asiento se coloca
orientado hacia detrás, el cinturón del
vehículo debe pasar por delante de la
correa de la hebilla. • La hebilla NUNCA
debe dejarse en la ranura de ajuste.
• Utilice la ranura externa de la hebilla si
se va a instalar el asiento orientado hacia delante y este va a ser ocupado
por un niño con un peso mínimo de 13,6 kg (30 lb) o si la hebilla queda
RANURA INTERNA
RANURA EXTERNA
P452800_R1.01.11
RANURA
DE AJUSTE
Instalación con cinturones de banda horizontal y
transversal
1. Afloje el arnés.
a. Levante el ajustador de
altura del arnés.
b. Quite la almohada para
el posición del bebé, y
desabroche el arnés.
2. Este asiento de seguridad
para niños debe estar
reclinado en la posición
3 y orientado hacia atrás
en el asiento del vehículo
(consulte la página 26).
3. Jale la cubierta del
reposacabezas hacia arriba
y la cubierta del asiento
hacia delante, para acceder
al arco del cinturón de los
asientos con orientación
trasera.
4. Abra el seguro azul que
queda más cerca de donde
se abrochará el cinturón de
seguridad del vehículo.
a. Abra la lengüeta de
bloqueo.
b. Abra el dispositivo de
fijación.
Lengüeta
de bloqueo
4a
4b
8. Empuje el asiento de
seguridad para niños hacia
abajo mientras tensa la parte
superior (banda transversal)
del cinturón que pasa por las
ranuras, de manera que no
quede cinturón sobrante en
el seguro.
9. La instalación de asientos
con orientación trasera
puede mejorarse si se usa
el Versa-Tether (consulte la
página 29).
a
o bien
b
10. Vuelva a colocar la cubierta.
Instalación orientación trasera con cinturones de banda
horizontal y transversal
5. Pase el cinturón del vehículo
por la parte trasera hacia
las ranuras de cinta,
Dispositivo
de fijación
asegurándose de que el
cinturón del vehículo es
pasar por debajo de la
correa de la hebilla del
arnés.
NOTA: La hebilla debe estar
en la ranura interna.
6. Compruebe que el cinturón
del vehículo no está torcido y
abróchelo
7. Empuje en el centro de la
zona donde se sentará el
niño mientras tensa la parte
inferior (banda horizontal)
del cinturón de seguridad,
y cierre el seguro si está
utilizado (consulta la pagina
25).
.
9 Revise que los conexiónes y correas no estén doblados.
9 Revise que el asiento de seguridad no se pueda mover
de adelante hacia atrás o de un lado a otro por más de
2,5 cm (1 pulg). Si el asiento de seguridad del niño no
es seguro, repite el instalación o use otro posición en el
vehículo.
9 Revise que el ángulo vertical posterior del asiento de
IMPORTANTE: El cinturon
de banda horizontal y de
transversal debe pasar por
el seguro.
seguridad para niños sea de 30° – 45° grados y que no
exceda de los 45° cuando el automóvil esté estacionado
a nivel plano de la superficie. Consulta “Posiciones de
asiento” en la pagina 26.
10 11
Page 33

BRITAX Child Safety, Inc. ADVOCATE Guía de Usuario
IMPORTANT • ALWAYS position the buckle in the inner slot for
rear-facing use. • The vehicle belt
must pass in front of the buckle
strap for rear-facing use.
• NEVER leave the buckle in the
adjustment slot. • Use the outer
buckle slot when installing the child
seat forward-facing with a child
weighing 30 lbs (13.6 kg) and above or if the buckle is under the
child in the inner position.
INNER SLOT
OUTER SLOT
P405600_R1.05.10
A
DJUSTMENT
SLO
T
IMPORTANTE • Coloque la hebilla en la ranura interna SIEMPRE que se
vaya a utilizar el asiento orientado hacia
detrás. • Cuando el asiento se coloca
orientado hacia detrás, el cinturón del
vehículo debe pasar por delante de la
correa de la hebilla. • La hebilla NUNCA
debe dejarse en la ranura de ajuste.
• Utilice la ranura externa de la hebilla si
se va a instalar el asiento orientado hacia delante y este va a ser ocupado
por un niño con un peso mínimo de 13,6 kg (30 lb) o si la hebilla queda
RANURA INTERNA
RANURA EXTERNA
P452800_R1.01.11
RANURA
DE AJUSTE
Instalación con cinturon de banda horizontal
1. Afloje el arnés.
a. Levante el ajustador
de altura del arnés y
jale hacia delanta las
correas del arnés.
b. Quite la almohada
para el posición
del bebé, y
desabroche el arnés.
2. Este asiento de seguridad
para niños debe estar
reclinado en la posición
3 y orientado hacia atrás
en el asiento del vehículo
(consulte la página 26).
3. Jale la cubierta del
reposacabezas hacia
arriba y la cubierta del
asiento hacia delante,
para acceder al arco del
cinturón de los asientos
con orientación trasera.
4. Pase el cinturón del
vehículo por la parte
trasera hacia las ranuras
de cinta, asegurándose
de que el cinturón del
vehículo es pasar por
debajo de la correa de la
hebilla del arnés.
NOTA: La hebilla debe
estar en la ranura interna
si se desea colocar el
asiento orientado hacia
atrás.
IMPORTANTE: NO
utilice seguros para
instalaciones que
solo utilicen bandas
horizontales.
5. Compruebe que el
cinturón del vehículo no
está torcido.
6. Empuje el asiento de
seguridad para niños
hacia abajo mientras
tensa el cinturón de
seguridad del vehículo.
NOTA: Asegúrese que
el cinturón del vehículo
quede bloqueado.
Consulte el manual de
vehículo.
7. La instalación de asientos
con orientación trasera
puede mejorarse si
se usa el Versa-Tether
(consulte la página 29).
a
o bien
b
8. Vuelva a colocar la
cubierta.
Instalación orientación trasera con cinturon de banda
horizontal
9 Revise que los conexiónes y correas no estén doblados.
9 Revise que el asiento de seguridad no se pueda mover
de adelante hacia atrás o de un lado a otro por más de
2,5 cm (1 pulg). Si el asiento de seguridad del niño no
es seguro, repite el instalación o use otro posición en el
vehículo.
9 Revise que el ángulo vertical posterior del asiento de
seguridad para niños sea de 30° – 45° grados y que no
exceda de los 45° cuando el automóvil esté estacionado
a nivel plano de la superficie. Consulta “Posiciones de
asiento” en la pagina 26.
12 13
Page 34

BRITAX Child Safety, Inc. ADVOCATE Guía de Usuario
Instalación de asientos con
orientación delantera
Instalación con LATCH
No debe usar los anclajes de retencion inferiores (LATCH) para
instalaciones de este asiento de seguridad para niño con un
niño cuyo pesa más de 18 kg (40 lbs).
1. Extraiga los conectores
inferiores de los
compartimentos situados
en la base. Pulse el botón
de desbloqueo del ajuste
y jale de la correa del
conector inferior hasta que
esta alcance su longitud
máxima. Repita la misma
operación para la segunda
correa.
2. Extraiga el Versa-Tether del
bolsillo y colóquelo arriba,
por encima del respaldo
del asiento de seguridad
para niños.
3. El asiento de seguridad
para niños debe estar en la
posición 1 ó 2, y orientado
hacia delante en el asiento
del vehículo (consulta la
pagina 26). Compruebe que
no sobresalga más del 20%
o 7,6 cm (3 pulg) de la base
por el borde del asiento del
vehículo.
IMPORTANTE: Cabe la
posibilidad de que el asiento
de seguridad para niños no
funcione de modo adecuado
si la base del mismo
no descansa de forma
completamente horizontal
sobre el asiento del vehículo.
4. Presione con fuerza los
conectores inferiores sobre
los anclajes inferiores
adyacentes.
a. Oirá un clic cuando
estén correctamente
acoplados.
b. Compruebe que la tira
del conector inferior no
está torcida.
5. Empuje el asiento de
seguridad para niños hacia
abajo mientras tensa las
correas tirando de cada
conector inferior.
7,6 cm
6. Acople el Versa-Tether a un
anclaje designado (consulte
el manual de su vehículo) y
tense la correa (consulte la
página 29).
7. Guarde la correa sobrante en
la cinta elástica.
Instalación orientación delantera con LATCH
9 Compruebe que todos los componentes estén debidamente
acoplados y que las tiras de los conectores no están torcidas.
9 Compruebe que no sobresalga más del 20% o 7,6 cm
(3 pulg) de la base por el borde del asiento del vehículo.
9 Compruebe que el asiento de seguridad para niños no puede
moverse de lado a lado o de adelante hacia atrás más de
2,5 cm (1 pulg) con respecto al arco del cinturón del vehículo.
Si el asiento de seguridad para niños no está bien seguro,
vuelva a instalarlo de nuevo o colóquelo en otro asiento del
vehículo.
9 Verifique que toda la correa Versa-Tether sobrante quede dentro
del vehículo y fijada con la cinta elástica.
14 15
Page 35

BRITAX Child Safety, Inc. ADVOCATE Guía de Usuario
Instalación con cinturones de banda horizontal y
transversal
1. Extraiga el Versa-Tether del
bolsillo y colóquelo arriba,
por encima del respaldo del
asiento de seguridad para
niños.
2. El asiento de seguridad
para niños debe estar en la
posición 1 o 2, y orientado
hacia delante en el asiento
del vehículo (consulta la
pagina 26). Compruebe que
no sobresalga más del 20%
o 7,6 cm (3 pulg) de la base
por el borde del asiento del
vehículo.
IMPORTANTE:
posibilidad de que el asiento
de seguridad para niños no
funcione de modo adecuado
si la base del mismo
no descansa de forma
completamente horizontal
sobre el asiento del vehículo.
3. Afloje el arnés.
a. Levante el ajustador
de altura del arnés y
jale hacia adelante las
correas del arnés.
b. Extraiga la almohada
para el posición del bebé
y desabroche el arnés.
4. Jale de la cubierta del
reposacabezas hacia arriba
y la cubierta del asiento
hacia delante para poder
acceder al arco del cinturón
de orientación delantera.
5. Abra el seguro verde que
queda más cerca de donde
se abrochará el cinturón de
seguridad del vehículo.
a. Abra la lengüeta de
bloqueo.
b. Abra el dispositivo de
fijación.
6. Pase el cinturón de seguridad
del vehículo por las ranuras
del cinturón de orientación
delantera. Compruebe que el
cinturón del vehículo no está
torcido y abróchelo.
7. Empuje en la parte trasera de
la zona donde se sentará el
niño mientras tensa la parte
inferior (banda horizontal)
del cinturón de seguridad del
vehículo, y cierre el seguro.
Consulte la pagina 25.
Cabe la
7,6 cm
Lengüeta
de bloqueo
Dispositivo
de fijación
5a
IMPORTANTE:
de banda horizontal y de
transversal deben pasar por
el seguro verde
8. Empuje el asiento de
seguridad para niños hacia
abajo mientras tensa la parte
superior (banda transversal)
del cinturón que pasa por las
ranuras, de manera que no
quede cinturón sobrante en
el seguro.
9. Acople y tense la correa
del Versa-Tether a
de anclaje
manual de vehículo) y jalar
para apretar (consulte la
pagina 29). Guarde la correa
sobrante en la cinta elástica.
10. Vuelva a colocar la cubierta.
Instalación orientación delantera con cinturones de
banda horizontal y transversal
5b
9 Compruebe que todos los componentes estén debidamente
acoplados y que las tiras de los conectores no están torcidas.
9 Compruebe que no sobresalga más del 20% o 7,6 cm
(3 pulg) de la base por el borde del asiento del vehículo.
9 Compruebe que el asiento de seguridad para niños no puede
moverse de lado a lado o de adelante hacia atrás más de
2,5 cm (1 pulg) con respecto al arco del cinturón del vehículo.
Si el asiento de seguridad para niños no está bien seguro,
vuelva a instalarlo de nuevo o colóquelo en otro asiento del
vehículo.
9 Verifique que toda la correa Versa-Tether sobrante quede dentro
del vehículo y fijada con la cinta elástica.
El cinturon
.
un punto
(consulta al
16 17
Page 36

BRITAX Child Safety, Inc. ADVOCATE Guía de Usuario
Instalación con banda horizontal
1. Extraiga el Versa-Tether del
bolsillo y colóquelo arriba,
por encima del respaldo del
asiento de seguridad para
niños.
2. El asiento de seguridad
para niños debe estar en la
posición 1 o 2, y orientado
hacia delante en el asiento
del vehículo (consulta la
pagina 26). Compruebe que
no sobresalga más del 20%
o 7,6 cm (3 pulg) de la base
por el borde del asiento del
vehículo.
IMPORTANTE:
asiento de seguridad para
niños en posición 1 con un
niño que pesa más de 18 kg
(40 lb).
IMPORTANTE:
posibilidad de que el asiento
de seguridad para niños no
funcione de modo adecuado
si la base del mismo
no descansa de forma
completamente horizontal
sobre el asiento del vehículo.
3. Afloje el arnés.
a. Levante el ajustador
de altura del arnés y
jale hacia adelante las
correas del arnés.
b. Extraiga la almohada
para el posición del bebé
y desabroche el arnés.
4. Jale la cubierta del
reposacabezas hacia arriba
y la cubierta del asiento
hacia delante para poder
acceder al arco del cinturón
de orientación delantera.
5. Pase el cinturón de seguridad
del vehículo por las ranuras
del cinturón de orientación
delantera. Compruebe que el
cinturón del vehículo no está
torcido y abróchelo.
IMPORTANTE:
seguros para instalaciones
que solo utilicen bandas
horizontales.
6. Empuje en la parte trasera
de la zona donde se sentará
el niño mientras tensa el
cinturón de vehículo para
apretarlo.
Utilice este
Cabe la
NO utilice
7,6 cm
NOTA: Asegúrese que el
cinturón del vehículo quede
bloqueado. Consulte el
manual de vehículo.
7. Acople y tense la correa
del Versa-Tether a
de anclaje
manual de vehículo) y jalar
para apretar (consulte la
pagina 29). Guarde la correa
sobrante en la cinta elástica.
8. Vuelva a colocar la cubierta.
(consulta al
un punto
Instalación orientación delantera con cinturones de
banda horizontal
9 Compruebe que todos los componentes estén debidamente
acoplados y que las tiras de los conectores no están torcidas.
9 Compruebe que no sobresalga más del 20% o 7,6 cm
(3 pulg) de la base por el borde del asiento del vehículo.
9 Compruebe que el asiento de seguridad para niños no puede
moverse de lado a lado o de adelante hacia atrás más de
2,5 cm (1 pulg) con respecto al arco del cinturón del vehículo.
Si el asiento de seguridad para niños no está bien seguro,
vuelva a instalarlo de nuevo o colóquelo en otro asiento del
vehículo.
9 Verifique que toda la correa Versa-Tether sobrante quede dentro
del vehículo y fijada con la cinta elástica.
18 19
Page 37

BRITAX Child Safety, Inc. ADVOCATE Guía de Usuario
Sujeción del niño
1. Siga las instrucciones de la
página 23 para realizar los
ajustes oportunos al arnés y
a la hebilla.
IMPORTANTE: Ajuste el
arnés teniendo en cuenta la
ropa que lleve puesta el niño.
Antes de colocar al niño en
el asiento, quítele cualquier
chaqueta o abrigo abultado
que lleve.
2. Afloje el arnés.
a. Levante el ajustador de
altura del arnés.
b. Jale hacia adelante las
correas del arnés.
3. Abra el broche pectoral.
a. Presione las lengüetas.
b. Separe las dos piezas.
4. Suelte la hebilla y acople
las correas del arnés en las
zonas de sujeción del arnés.
5. Siente a su hijo en el asiento
de seguridad para niños.
Asegúrese de que el niño
esté en posición vertical y no
inclinado. La parte inferior del
niño debe estar en contacto
con el asiento de seguridad
infantil y la espalda quedar
erguida contra la parte
posterior.
IMPORTANTE: Las
almohadillas para el pecho
HUGS deben utilizarse en
todo momento, cuando se
esté instalando el asiento
de seguridad para niños
orientado hacia delante.
En el orientación trasera,
es opcional quitar las
almohadillas de pecho
HUGS para obtener un ajuste
perfecto por niños pequeños
(approximadamente tres
meses de edad).
6. Ajuste las correas del arnés
alrededor del niño.
2a
2b
3a
3b
7. Abroche la hebilla del arnés.
Las lengüetas de la hebilla
están bien enganchadas si
escucha un clic cuando las
inserta.
8. Compruebe la altura
correcta del arnés y jala
el exceso de las correas
hasta los hombros antes de
apretar.
9. Para apretar el arnés, jale de
la correa de ajuste del arnés.
El indicador Click & Safe
emitirá un clic cuando el
arnés esté bien ajustado�
NOTA: El arnés debe
quedar perfectamente
ajustado alrededor del niño
de manera que este esté
cómodo. Para que una
correa esté perfectamente
ajustada, no debe quedar
holgada. Debe formar una
línea relativamente recta, sin
torsiones. No debe oprimir
la piel del niño ni provocar
que el cuerpo adopte una
postura que no sea natural.
No debe quedar arnés
sobrante.
10. Fije el broche pectoral y
coloque las almhodillas
de pecho HUGS en una
posicion comoda por el
niño dentro de la gama
de un broche pectoral
correctamente colocado.
NOTA: La altura adecuada
para el broche pectoral es a
la mitad del pecho, justo a la
altura de las axilas.
Jale de la correa de ajuste del arnés
para tensarla.
No jale hacia los lados.
Antes de viajar, compruebe los siguientes puntos:
9 Las correas del arnés no están torcidas.
9 El arnés está bien ajustado.
9 La hebilla está abrochada.
9 El broche pectoral está a la altura de las axilas del
niño.
20 21
Page 38

BRITAX Child Safety, Inc. ADVOCATE Guía de Usuario
Funciones del asiento de
seguridad para niños
Indicador de ajuste del arnés Click & Safe
IMPORTANTE: Consulte la página 20 para obtener
información detallada sobre cómo colocar al niño de manera
segura.
El indicador Click & Safe está diseñado para detectar si la correa
de ajuste está tensa, mediante la presencia de tirantez. Cuando
el ajuste está en la posición correcta, oirá un clic. El arnés debe
quedar perfectamente ajustado alrededor del niño de manera
que este esté cómodo. Para que una correa esté perfectamente
ajustada, no debe quedar holgada. Debe formar una línea
relativamente recta, sin torsiones. No debe oprimir la piel del niño
ni provocar que el cuerpo adopte una postura que no sea natural.
No debe quedar arnés sobrante en los hombros del niño. Siga los
pasos que aparecen a continuación para ajustar el arnés.
Ajuste del arnés:
1. Antes de tensar el arnés,
quítele al niño cualquier prenda
abultada que pueda llevar
puesta.
2. Compruebe que la altura del
arnés sea la adecuada.
3. Asegúrese de que el arnés
no queda holgado en la parte
superior de los muslos del niño.
4. Jale de la correa de ajuste hacia arriba y hacia fuera del asiento
de seguridad para niños hasta oir un clic. El indicador Click &
Safe emitirá un clic cuando el arnés esté bien ajustado�
NOTA: Si el arnés sigue quedando holgado, vuelva a repetir el
primer paso y tire de nuevo de la correa de ajuste hacia arriba
y hacia fuera del asiento de seguridad para niños hasta oir
otro clic, que indicará que el arnés está bien ceñido. Puede
que sea necesario volver a confirmar que el arnés está bien
ajustado. Siempre debe comprobar que el arnés está tirante
verificando que no queda cinturón sobrante en los hombros.
9 Compruebe que el arnés está abrochado y bien acoplado.
9 Asegúrese de que el arnés está bien ajustado y que no queda
correa sobrante en los hombros.
Regulación de altura del arnés
• En posición orientado hacia atras, debe colocar las correas
del arnés siempre en la posición mas cercana a la altura de
los hombros del niño o por debajo de estos. Consulte la
página 7.
• En posición orientado hacia delante, debe colocar las
correas del arnés siempre en la posición mas cercana a la
altura de los hombros del niño o por encima de estos.
Consulte la página 7.
1. Afloje el arnés.
a. Levante el ajustador de
altura del arnés.
b. Jale las correas del
arnés hacia delante.
1b
1a
2. Presione el regulador de
altura del arnés, deslice
el arnés hasta la posición
deseada y suelte.
3. Asegúrese de que el arnés
ha quedado bloqueado en
esa posición.
En algunos casos, cuando se esté utilizando
la posición de reclinación hacia delante, el
reposacabezas del vehículo puede impedir
que el del asiento de seguridad para niños
pueda colocarse lo suficientemente alto
como para ajustar el arnés correctamente
a su hijo. NO fuerce el reposacabezas del
asiento de seguridad para niños para que
pase por el del vehículo, ya que podría provocar que el asiento
de seguridad para niños no rinda como debiera. Si la ubicación
del reposacabezas del vehículo interfiere con la del asiento de
seguridad para niños, deberá subir o quitar el reposacabezas del
vehículo. Si no resulta posible quitar el reposacabezas del vehículo,
ponga el asiento de seguridad para niños en posición vertical o
colóquelo en otro asiento del vehículo.
22 23
Page 39

BRITAX Child Safety, Inc. ADVOCATE Guía de Usuario
RANURA
DE AJUSTE
Ajuste de la posición de la hebilla para el arnés
• Instalación orientado hacia detrás:
– Coloque la hebilla en la ranura
interna SIEMPRE que se vaya a
utilizar el cinturón del vehículo.
– El cinturón del vehículo debe
pasar por delante de la correa de
la hebilla.
– Coloque la hebilla en la ranura que esté más cerca del niño,
pero no debajo de este por un instalación con LATCH.
• Utilice la ranura externa de la hebilla si se va a instalar el
asiento orientado hacia delante y este va a ser ocupado por
un niño con un peso mínimo de 13,6 kg (30 lb) o si la hebilla
queda por debajo del niño en la posición interna.
• La hebilla NUNCA debe dejarse en la ranura de ajuste.
1. Desabroche el arnés y retire
la hebilla. Consulta las
paginas
2. Acomode la almohadilla
abdominal y abroche a
través de la ranura deseada
en la cubierta.
NOTA: Deslice el extremo
de la almohadilla abdominal
por encima de espuma de
confort.
3. Deslice el dispositivo de
retención de la hebilla en la
ranura frontal de esta y en
la posición para abrochar
correspondiente; es
importante que el botón rojo
de desbloqueo quede hacia
fuera. Remplace la cubierta.
39 y 40.
Utilización de la hebilla para el arnés
Para abrochar:
Utilización del broche pectoral
1. Abra el broche pectoral.
a. Presione las
lengüetas.
b. Separe las dos
piezas.
2. Para abrocharlo
solo tendrá que
unirlas.
NOTA: El
broche pectoral
debe quedar
siempre a la
altura de las
axilas.
Utilización de los seguros
Para abrir:
1. Abra la lengüeta de
bloqueo.
2. Abra el dispositivo de
fijación.
IMPORTANTE: Ambas
piezas del seguro deben
estar abiertas para poder
proceder a fijar el cinturón
de seguridad del vehículo.
Para cerrar:
1. Asegure el cinturón de
seguridad del vehículo
con el dispositivo de
fijación.
2. Empuje la lengüeta
de bloqueo donde se
indique.
Lengüeta
de bloqueo
Dispositivo
de fijación
Cinturón
del vehículo
1
Dispositivo
de fijación
a
2
b
1
2
Lengüeta
de bloqueo
1. Inserte las lengüetas en
la hebilla de una en una.
Las lengüetas están bien
enganchadas si escucha
un clic cuando las inserta.
Almohada de posición para bebé
La almohada de posición
para bebé está diseñada
para proporcionar un mejor
Para desabrochar:
ajuste del arnés y una mayor
comodidad al niño.
1. Presione el botón de
desbloqueo y quite las dos
lengüetas de la hebilla.
NOTA: Limpie la hebilla
periódicamente para
garantizar su buen
funcionamiento. Consulta la
pagina
40.
IMPORTANTE:
de posición para bebé debe
utilizarse para niños que pesen
10 kg (22 lb) o menos en una
posición orientado hacia atrás.
No utilice más de 10 kg (22 lb) o
en una posición hacia delante.
La almohada
24 25
Page 40

BRITAX Child Safety, Inc. ADVOCATE Guía de Usuario
UBICACIONES DE LOS ANCLAJES DEL SISTEMA LATCH
del vehículo
90°
0°
90°
0°
90°
0°
Posiciones del asiento de seguridad para niños
El asiento de seguridad para niños puede colocarse en 3
posiciones. Para ajustarlo, presione la palanca de ajuste de la
reclinación y gire el exterior del asiento de seguridad para niños
hasta la posición deseada. Suelte la palanca de ajuste de la
reclinación y compruebe que el asiento del niño ha quedado
bloqueado en esa posición.
Posición 1
Posición 2
Posición 3
NOTA: Ajuste la posición del asiento ANTES de instalar el asiento.
Orientación trasera
Si el asiento de seguridad para niños se coloca orientado hacia
detrás, el ángulo de reclinación debe ser,
como mínimo, de 30˚ respecto de la posición
vertical para niños, y de 45˚ en el caso de
30˚
0˚
45˚
bebés que no pueden mantener la cabeza y
el cuello erguidos aún (sin exceder nunca los
90˚
45˚) cuando el vehículo está aparcado en una
superficie plana.
Utilice la línea azul como guía a fin de obtener
el ángulo de reclinación adecuado para instalar asientos con
orientación trasera. La línea azul deberá quedar paralela al suelo
cuando el ángulo del asiento de seguridad para niños esté en
el centro del intervalo comprendido (37,5˚). De ser necesario, el
ángulo correcto de reclinación se puede lograr colocando una
toalla enrollada o un flotador circular en la unión del respaldar y la
parte inferior del asiento.
Orientación delantera
Cuando se coloque
el asiento orientado
hacia delante, es
importante que la base
descanse de manera
completamente
horizontal sobre el
asiento del vehículo.
Como se muestra
en las imágenes
que aparecen a
continuación, es
aceptable que un 20%
de la base, o unos 7,6 cm (3 pulg), sobresalga por el borde del
asiento del vehículo. Los asientos de algunos vehículos no permiten
Superficie
saliente
aceptable
que la superficie de contacto con el asiento de seguridad para niños
sea lo suficientemente amplia. Si este es el caso, ajuste el ángulo
de reclinación de manera que quede más vertical. De lo contrario, el
asiento de seguridad para niños podría no rendir como debiera.
7,6 cm
Superficie
saliente no
aceptable
7,6 cm
Anclajes inferiores y banda de anclaje superior (LATCH)
Este asiento de seguridad para niños viene equipado con unos
anclajes inferiores y una banda de anclaje superior (también
denominados sistema LATCH), que supone una alternativa a
los métodos convencionales de instalación con cinturones de
seguridad. Consulte las páginas 2 y 3 para obtener información
sobre las piezas LATCH de las que dispone este asiento de
seguridad para niños.
Reposacabezas del
asiento del vehículo
Anclajes inferiores
Hasta 50,8 cm
(20 pulgadas)
Asiento del vehículo
Anclaje
de retención
Anclajes
inferiores
Anclajes
de retención
con orientación
delantera
Sistema
retráctil del
cinturón de
seguridad
Cinturón de
seguridad del
vehículo con
banda horizontal
y transversal
La imagen que aparece arriba muestra los lugares donde suelen
encontrarse los anclajes de retención y los anclajes inferiores en
un vehículo. Consulte el manual del vehículo para ver si este viene
equipado con un sistema LATCH, saber cuál es el peso máximo
que pueden soportar los anclajes inferiores y obtener información
sobre dónde se encuentran los anclajes inferiores y cuáles son los
asientos del vehículo que admiten el uso de asientos de seguridad
para niños.
El espacio estándar que suele quedar libre en los asientos del
vehículo entre los anclajes LATCH es de 27,9 cm (11 pulg). Este
asiento de seguridad para niños puede colocarse en asientos con
hasta 50,8 cm (20 pulg) de separación entre los anclajes LATCH,
si el fabricante del vehículo así lo permite.
Uso de los conectores inferiores
Ubicación de los conectores inferiores
Los conectores inferiores se encuentran situados en la parte
trasera de la base del asiento de seguridad para niños. Guarde
los conectores en las ranuras cuando no estén utilizándose.
Para extraer el conector
inferior del compartimento o
anclaje inferior:
1. Mantenga pulsado el botón
rojo de desbloqueo.
26 27
Page 41

BRITAX Child Safety, Inc. ADVOCATE Guía de Usuario
2. Jale del conector inferior
para extraerlo del
Posiciones de Versa-Tether
compartimento o anclaje
inferior.
Para acoplar el conector inferior al compartimento o
anclaje inferior:
1. Empuje el conector inferior
con firmeza en la ranura o el
anclaje inferior hasta oír un
clic.
NOTA: Los conectores
inferiores quedan guardados
en las ranuras con la parte
superior mirando hacia
abajo.
Parte
Superior
Uso de la sistema de absorción de energía Versa-Tether
No seguir las pautas indicadas a continuación puede hacer que
el asiento de seguridad para niños no rinda como debiera.
• BRITAX recomienda que se use la correa de retención
superior en todo momento, cuando se esté instalando el
asiento de seguridad para niños.
retención mejorará la estabilidad del asiento de seguridad
para niños y disminuirá el riesgo de lesiones.
• Conecte la correa del Versa-Tether sólo en anclajes
identificados por el fabricante del vehículo como puntos de
anclaje de fijación. Sólo use la correa de anclaje designada
para cada posición de los asientos.
• Si su vehículo no cuenta con una sujeción para el anclaje de
retención, consulte el manual o póngase en contacto con el
fabricante del vehículo para obtener ayuda. NO modifique su
vehículo sin seguir las recomendaciones del fabricante.
• Guarde el Versa-Tether en el bolsillo que se encuentra en la
parte trasera del asiento de seguridad para niños cuando
no se esté utilizando. NO instale el asiento de seguridad
para niños con el Versa-Tether acoplado al enganche de
transporte.
El uso de esta correa de
(A) Orientación
trasera
(B) Orientación
trasera
(C) Orientación
delantera
Correa de retención con orientación trasera
Dado que cada modelo de vehículo es diferente, es posible que
el lugar del anclaje de retención en los asientos con orientación
trasera varíe. Use la correa de retención con orientación trasera
para ayudar a crear un punto de anclaje por el configuración A,
orientación trasera (arriba).
1. Busque un punto fijo que esté atornillado al suelo del vehículo.
Si no puede encontrar una ubicación apropiada para crear
un punto de anclaje, póngase en contacto con el fabricante
del vehículo para que le recomiende un punto de conexión
apropiado.
2. Pase la banda por el punto de anclaje.
3. Pase el anillo metálico en forma de D por
la lazada que se encuentra al final de la
banda.
4. Jale del anillo metálico hasta que la
banda quede tensa.
5. Utilice el anillo en forma
de D como punto para
enganchar la correa
de retención.
NOTA: Guarde la correa de
retención en el bolsillo de
retención cuando no esté
utilizándose esta.
3
5
Versa-Tether
Para acoplar el Versa-Tether al anclaje de retención:
1. Presione con fuerza el
gancho situado encima
La ubicación de los anclajes de
retención varía en función de cada
vehículo. En el manual del vehículo
podrá buscar los símbolos de los
anclajes de retención que aparecen
en el gráfico para averiguar dónde se
encuentran los puntos de anclaje de
las correas de retención superiores
en su vehículo. Consulte los gráficos
en pagina 29 para ver las distintas
opciones de instalación del VersaTether con orientación delantera.
del punto del anclaje de
retención.
2. Jale del extremo libre de
la correa para tensar el
Versa-Tether.
NOTA: Cuando se esté
utilizando la correa para
transportar el asiento,
ajústela para una sujeción
cómoda.
28 29
Page 42

BRITAX Child Safety, Inc. ADVOCATE Guía de Usuario
Para extraer el Versa-Tether al anclaje de retención:
1. Afloje el Versa-Tether.
a. Incline la palanca de
ajuste para arriba.
b. Jale de la correa de
retención.
2. Extraiga el gancho del Versa-Tether del anclaje de retención.
NOTA: El enganche de
transporte Versa-Tether solo
debe utilizarse cuando se
desee transportar el asiento
de seguridad para niños a otro
lugar.
No instale el asiento
de seguridad para niños con
el Versa-Tether acoplado
al enganche de transporte.
sobrante con la cinta elástica cuando se esté utilizando.
Guarde el Versa-Tether en el bolsillo correspondiente cuando
no se esté utilizando. Asegúrese siempre de que cualquier
correa sobrante quede dentro del vehículo.
El Versa-Tether puede indicar cuando el asiento de seguridad
para niños ha estado implicado en un choque moderado o grave
(consulte “Notas Importantes“ en la página 5) y es necesario
reemplazarlo.
La figura 1 muestra una
correa de retención que está
en condiciones de seguir
utilizándose (salvo que el asiento
de seguridad para niños haya
estado implicado en un choque).
Las puntadas de color estarán
intactas pero no serán visibles
desde la parte posterior del
asiento.
En las figuras 2 y 3 se pueden
observar ejemplos de correas
de retención que sí han sufrido
daños y que deben dejar de
utilizarse. Debe dejar de usarse
el asiento de seguridad para
niños si alguna de las lazadas
ha salido por la parte posterior
del asiento o si las puntadas de
color están rotas.
IMPORTANTE: Debe dejar
de utilizarse el asiento de
seguridad para niños si este
ha estado implicado en un
choque moderado o grave,
independientemente de si las
lazadas han salido por la parte
posterior del asiento y si las
puntadas de color están rotas.
Fije bien la correa Versa-Tether
a
b
1
2
3
Compatibilidad de vehículo
Posiciones de asientos del vehículo
NO coloque el asiento de seguridad para
niños orientado hacia atrás en el asiento
delantero de un vehículo que tenga bolsas
de aire (AIR BAGS). Podría causar DAÑOS
GRAVES o FALLECIMIENTO. Consulte
el manual del vehículo para ver las
instrucciones de instalación del asiento de
seguridad para niños. El asiento trasero es
el lugar más seguro para niños de 12 años
y menores.
Algunos vehículos no tienen asientos compatibles con este
asiento de seguridad para niños. En caso de duda, póngase
en contacto con el fabricante del vehículo para obtener ayuda.
Este asiento de seguridad para niños DEBE colocarse en
asientos orientados hacia delante. NO se pueden usar asientos
orientados hacia atrás o hacia los laterales. Consulte el
siguiente diagrama.
Cinturones de seguridad de vehículo compatibles
NOTA: La información de esta sección solo es válida cuando se
instalan los asientos haciendo uso de los cinturones de seguridad
del vehículo.
Los asientos del vehículo y los cinturones de seguridad difieren
según el automóvil. Consulte el manual del vehículo para obtener
información específica sobre los cinturones de seguridad y cómo
usarlos con asientos para niños.
Cinturón con banda horizontal y transversal
(de 3 puntos)
1. Sistema retráctil de bloqueo automático con hebilla deslizante
a. Dispone de una hebilla
que se puede deslizar
a lo largo del cinturón
de seguridad del
vehículo.
Hebilla
30 31
Page 43

BRITAX Child Safety, Inc. ADVOCATE Guía de Usuario
61cm
b. Cuenta con un
dispositivo retráctil que
impide que el cinturón
vuelva a alargarse por
segunda vez consecutiva
una vez que se haya
extraído un mínimo de
61 cm (24 pulg).
4. Sistema retráctil de bloqueo en caso de emergencia con
hebilla deslizante
a. Dispone de una hebilla
que se puede deslizar a
lo largo del cinturón de
seguridad del vehículo
b. Tiene un sistema retráctil
que se bloquea solo en
c. Para tensarse, el
cinturón vuelve
a introducirse en el
sistema retráctil.
caso de emergencia, es
decir, en caso de parada
repentina o de choque.
IMPORTANTE: Este tipo de
cinturón requiere el uso de seguros integrados en el asiento,
tanto en asientos orientados hacia delante como hacia
detrás. Consulte la página 25 para obtener más información
2. Sistema retráctil de bloqueo en caso de emergencia con
sobre cómo utilizar los seguros.
hebilla de cierre
a. Dispone de una
hebilla que bloquea el
cinturón de seguridad
del vehículo.
NOTA: Debe asegurarse
de que la hebilla y el
Hebilla
cinturón de seguridad
del vehículo están en
posición horizontal; de lo
contrario, el cinturón de
seguridad del vehículo
podría no abrocharse
correctamente.
b. Tiene un sistema
retráctil que se bloquea
solo en caso de
emergencia, es decir,
en caso de parada
repentina o de choque.
3. Sistema retráctil intercambiable con hebilla deslizante
a. Dispone de una hebilla
que se puede deslizar
a lo largo del cinturón
de seguridad del
vehículo.
b. Viene equipado con un
sistema retráctil que
puede configurarse
para funcionar
como un sistema
retráctil de bloqueo
automático. Para
Hebilla
5. Sistema retráctil intercambiable con hebilla cosida al tejido
con cinturones inflables
NOTA: Este asiento de seguridad de niño BRITAX puede
o no puede ser compatible con cada cinturon inflable.
Consulta las FAQs (preguntas más frequentes) en la
seccion de suporte del sitio de web de BRITAX
(www.britaxusa.com/support) por más informacion.
a. Tiene hebilla cosida al
tejido.
b. Viene equipado con un
sistema retráctil que
puede configurarse
para funcionar
como un sistema
Hebilla
retráctil de bloqueo
automático. Para
activar la función de
bloqueo automático,
es necesario
extraer el cinturón
completamente del
sistema retráctil
Cinturones
con banda
horizontal y
transversal
inflables
NOTA: Para utilizar un
asiento de seguridad
para niños con este tipo
de cinturón de seguridad,
debe cambiar el sistema
retractil por el cinturón de
banda horizontal al modo
de sistema bloqueo
automático.
activar la función de
bloqueo automático,
es necesario
extraer el cinturón
completamente del
sistema retráctil.
NOTA: Para utilizar un asiento de seguridad para niños con
este tipo de cinturón de seguridad, deberá elegir el modo
de sistema retráctil de bloqueo automático o usar seguros
para asientos para niños.
32 33
Page 44

BRITAX Child Safety, Inc. ADVOCATE Guía de Usuario
61 cm
Cinturón de banda horizontal
1. Sistema retráctil de bloqueo automático
a. Tiene una hebilla
cosida al tejido.
b. Cuenta con un
dispositivo retráctil que
impide que el cinturón
vuelva a alargarse
por segunda vez
consecutiva una vez
que se haya extraído
un mínimo de 61 cm
(24 pulg).
c. Para tensarse, el
cinturón vuelve
a introducirse en el
sistema retráctil.
Hebilla
Cinturones de seguridad de vehículo incompatibles
Los siguientes tipos de cinturones de seguridad de vehículos
NO son compatibles con este asiento de seguridad para niños.
Si el asiento donde desea colocar el asiento de seguridad para
niños está equipado con uno de los cinturones especificados a
continuación, debe elegir otro asiento del vehículo o consultar
el manual de este para obtener información sobre cómo
instalar un asiento de seguridad para niños en su automóvil.
Cinturones con
banda horizontal
y transversal,
con puntos de
anclaje superiores
o inferiores en
la puerta del
vehículo�
Bandas
horizontales con
una hebilla cosida
que tienen un
sistema retráctil
que se bloquea
solo en caso de
parada brusca�
Cinturones con
banda horizontal
y transversal,
y retractores
independientes
para cada banda�
2. Hebilla de cierre
a. Dispone de una hebilla
que impide que el
cinturón se afloje.
NOTA: Debe asegurarse
de que la hebilla y el
cinturón de seguridad
del vehículo están en
posición horizontal; de lo
contrario, el cinturón de
seguridad del vehículo
podría no abrocharse
correctamente.
b. Para ajustarlo,
simplemente hay que
jalar del cinturón.
Hebilla
Bandas
horizontales que
nacen en la unión
entre el asiento y
el respaldo�
Cinturones
de seguridad
automáticos
motorizados�
Dispositivo
de ajuste
34 35
Page 45

BRITAX Child Safety, Inc. ADVOCATE Guía de Usuario
Cuidado y mantenimiento
La cubierta
Cómo retirar la cubierta
Nunca quite las lengüetas de la hebilla para desabrochar el
arnés, ya que una vez quitadas no pueden volver a colocarse.
Si las vuelve a colocar de manera incorrecta, es posible que el
asiento de seguridad para niños no rinda como debiera.
1. Afloje el arnés.
a. Levante el ajustador
de altura del arnés.
b. Jale hacia adelante
las correas del
arnés.
c. Desabroche el
arnés.
2. Abra el broche pectoral.
a. Presione las
lengüetas.
b. Separe las dos
piezas.
3. Quite la almohada
posición para bebé si
fuera necesario.
4. Retire la almohadilla
abdominal y la hebilla.
a. Levante la cubierta
del asiento para
encontrar la
conexión de la
correa con hebilla.
b. Retire la hebilla de
la correa girando los
lados de retención
con hebilla y dirigirla
de la ranura de
enganche delantero
en el asiento para
niños (consulta la
pagina 39).
c. Deslice el extremo
de la almohadilla
abdominal por
encima de espuma
de confort en el
asiento.
1b
1a
a
4a
4b
4c
b
d. Jale el extremo
de la almohadilla
abdominal y la
hebilla de retención
de la ranura de la
hebilla en la cubierta
para remover.
e. Gire los lados
de retención
con la hebilla y
deslize la hebilla
de la almohadilla
abdominal.
5. Separe los sujetadores
gancho y lazo en la
cubierta de reposacabeza
de alrededor del arnés.
6. Retire la cubierta de
reposacabeza.
a. Levante el arnés a la
posición más alta.
b. Retire las correas
elásticas de las
pestañas y los
sujetadores de
gancho y lazo por
detrás el regulador
de altura del arnés.
7. Ajustar el arnés a la
posición más baja y quite
los ganchos de plástico
del borde inferior del
asiento del niño.
8. Quite los ganchos de
plástico de la parte
posterior de la concha de
asiento infantil.
9. Quite la cubierta del
exterior del asiento de
seguridad para niños.
4d
4e
36 37
Page 46

BRITAX Child Safety, Inc. ADVOCATE Guía de Usuario
Limpieza de la cubierta
• LAVAR A MANO con agua fría y jabón suave.
• COLGAR PARA SECAR a fin de evitar que encoja.
• NO DEBE:
– Utilizar lejía
– Lavar a máquina
– Secar a máquina
– Planchar
Remplazo de la cubierta
1. Coloque la cubierta sobre
el exterior del asiento de
seguridad para niños.
2. Fije los ganchos de
plástico detrás de la
almohadilla de cabeza en
el asiento para niños.
3. Vuelva a colocar la
almohadilla abdominal y
la hebilla:
a. Gire los lados de
retención con hebilla
y dirijala a través
de la almohadilla
abdominal.
b. Dirija la almohadilla
abdominal y la
hebilla de retención
a través de la ranura
de la hebilla en la
cubierta.
– Asegúrese de que
la hebilla este a
través de la ranura
de la cubierta
correcta para la
posición de la
hebilla.
c. Deslice el extremo
de la almohadilla
abdominal por
encima de espuma
de confort en el
asiento para niños.
d. Girar los lados de
retención de hebilla
y la vía a través de la
ranura de enganche
delantero y luego en
la posición deseada
en la hebilla del
asiento infantil.
38 39
3a
3b
3c
3d
4. Coloque los ganchos
de plástico en el borde
inferior del asiento del
niño.
5. Deslice la cubierta de
reposacabeza sobre el
reposacabeza delante et
conectar los sujetadores
gancho y lazo en la parte
trasera. Coloque las
correas elásticas hacia
las pestañas traseras.
6. Fije los sujetadores
gancho y lazo sobre la
cubierta de reposacabeza
alrededor de las correas
del arnés.
La hebilla para el arnés
Si el niño come y bebe en el asiento, usted deberá revisar la
hebilla periódicamente y limpiar los restos que pueda haber.
Retire la hebilla para el arnés
1. Levante la cubierta del
asiento para encontrar la
conexión de la correa con
hebilla.
2. Retire la hebilla de la
correa girando los lados
de retención con hebilla
y dirigirla de la ranura de
enganche delantero en el
asiento para niños.
Page 47

BRITAX Child Safety, Inc. ADVOCATE Guía de Usuario
RANURA
DE AJUSTE
3. Deslice el extremo de la
almohadilla abdominal
por encima de espuma
de confort en el asiento.
4. Jale el extremo de la
almohadilla abdominal y
la hebilla de retención de
la ranura de la hebilla en
la cubierta para remover.
5. Gire los lados de
retención con la hebilla
y deslize la hebilla de la
almohadilla abdominal.
Limpieza de la hebilla para el arnés
• ENJUAGAR BIEN con agua templada.
• PROBAR LA HEBILLA abrochándola y desabrochándola
hasta que escuche “clic” después de insertar cada
lengüeta. Si no oye ningún clic, debe proceder a limpiar
la hebilla de nuevo.
• SECAR CON TOALLA.
• NO DEBE:
– Dejar en remojo
– Utilizar lubricantes
– Utilizar disolventes
– Utilizar jabón ni detergentes domésticos
Cómo volver a pasar la hebilla para el arnés
• Para la instalación orientación
trasera:
– Coloque la hebilla en la ranura
interna SIEMPRE que se vaya a
utilizar el cinturon del vehículo.
– El cinturón del vehículo debe
pasar por delante de la correa
de la hebilla.
– Coloque la hebilla en la ranura más cercana, pero no
debajo del niño cuando utilize la instalación de LATCH.
• Utilice la ranura externa de la hebilla si se va a instalar el
asiento orientado hacia delante y este va a ser ocupado
por un niño con un peso mínimo de 13,6 kg (30 lb) o
si la hebilla queda por debajo del niño en la posición
interna.
• La hebilla NUNCA debe dejarse en la ranura de ajuste.
1. Gire los lados de
retención con hebilla
y dirijala a través de la
almohadilla abdominal.
2. Dirija la almohadilla
1
abdominal y la hebilla de
retención a través de la
ranura de la hebilla en la
cubierta.
– Asegúrese de que la
hebilla este a través de
la ranura de la cubierta
correcta para la posición
3
de la hebilla.
3. Deslice el extremo de la
almohadilla abdominal
por encima de espuma
de confort en el asiento
para niños.
4. Girar los lados de
4
retención de hebilla y
la vía a través de la
ranura de enganche
delantero y luego en
la posición deseada
en la hebilla del
asiento infantil.
– Asegurarse de que
la hebilla está en la
posición correcta
hebilla.
5. Remplazar la cubierta.
40 41
Page 48

BRITAX Child Safety, Inc. ADVOCATE Guía de Usuario
El arnés
Limpieza del arnés
• LIMPIAR CON ESPONJA utilizando agua templada y
jabón suave.
• SECAR CON TOALLA.
• NO DEBE:
– Desmontar el arnés
– Utilizar lejía
– Lavar a máquina
– Secar a máquina
– Planchar
Exterior del asiento
Limpieza del exterior del asiento y las almohadillas de
protección
• LIMPIAR CON ESPONJA utilizando agua templada y
jabón suave.
• SECAR CON TOALLA.
• NO utilizar productos abrasivos.
Evite que las almohadillas de protección lateral frente
a impactos sufran daños, ya que podría impedir que
rindieran como cabe esperar en caso de accidente.
HUGS con SafeCell Technology
2. Desde la parte posterior
del asiento desabroche
las correas del arnés del
gancho.
3. Jale una correa del arnés
por la ranura de arnés
hacia el frente del asiento.
4. Deslice la correa de
arnés hacia afuera de la
almohadilla de confort,
la almohadilla HUGS y
el broche pectoral para
remover.
5. Desvié las correas del
arnés solo a través
del broche pectoral,
asegúrese de que las
correas del arnés no
estén dobladas.
6. Repite por la otra correa.
7. Pase las correas del
arnés a través del asiento
hacia atrás. Asegúrese de
que las correas del arnés
pasan por el regulador de
altura del arnés.
• Las almohadillas de pecho del sistema de HUGS
deben ser usadas cuando el asiento de niño está en
la posición orientado hacia delante.
• Las almohadillas de pecho HUGS se deben remover
si no se logra un ajuste cómodo para el infante
(de aproximadamente 3 meses de edad) cuando el
asiento de seguridad para niños este orientado hacia
atrás.
Extracción del sistema de HUGS con SafeCell
Technology
1. Afloje el arnés.
a. Levante el ajustador
de altura del arnés.
b. Jale
hacia adelante
las correas del
arnés.
1b
1a
42 43
8. Ponga el extremo de la
correa del arnés derecha
en la izquierda.
9. Enganche las correas
del arnés en el gancho.
Asegúrese de que
las correas no estén
dobladas y que los
extremos de las mismas
estén bien sujetadas al
gancho.
IMPORTANTE: Guarde
las almohadillas para el
pecho del sistema de
HUGS en un lugar seguro
cuando no estén en uso.
Page 49

BRITAX Child Safety, Inc. ADVOCATE Guía de Usuario
Remplazo del sistema de HUGS con SafeCell
Technology
1. Afloje el arnés.
1b
a. Levante el ajustador
de altura del arnés.
b. Jale
hacia adelante
las correas del
arnés.
1a
2. Desde la parte posterior
del asiento desabroche
las correas del arnés del
gancho.
3. Jale una correa del arnés
por la ranura de arnés
hacia el frente del asiento.
4. Deslice la correa de
arnés hacia afuera de la
almohadilla de confort y
el broche pectoral.
5. Desvié las correas del
arnés a través de la
almohadilla de confort,
la almohadilla HUGS y el
broche pectoral.
6. Repite por la otra correa.
7. Pase las correas del
arnés a través del asiento
hacia atrás. Asegúrese de
que las correas del arnés
pasan por el regulador de
altura del arnés.
8. Ponga el extremo de la
correa del arnés derecha
en la izquierda.
9. Enganche las correas
del arnés en el gancho.
Asegúrese de que
las correas no estén
Solución de problemas
Problema Posible solución
El arnés no puede
ajustarse a la
altura máxima�
Resulta difícil
ajustar el arnés�
La correa de
ajuste se está
desgastando por
los laterales
La hebilla no se
abrocha con un
clic después de
insertar cada
lengüeta�
Póngase en contacto con el servicio de atención al cliente
BRITAX llamando al 1 888 427 4829 o 1 704 409 1699 si le
surgiera un problema distinto a los aquí expuestos
�
Compruebe el lugar donde está
instalado el asiento de seguridad para
niños. Es posible que el reposacabezas
del vehículo esté bloqueando el
recorrido del regulador de altura del
arnés del asiento de seguridad para
niños. Extraiga o eleve el reposacabezas
del vehículo e intente ajustar la altura del
arnés de nuevo.
Puede que el enganche haya quedado
apresado en la correa Versa-Tether u
otra pieza del asiento de seguridad
para niños. Retire el posible obstáculo e
intente ajustar el arnés de nuevo. Guarde
siempre el Versa-Tether en el bolsillo
correspondiente cuando no se esté
utilizando. Cuando sí se esté usando,
debe fijar siempre la correa sobrante con
la cinta elástica. Ver la página 29.
Puede que el respaldo del asiento para
vehículos esté impidiendo que el arnés
se ajuste. Compruebe que la base
del asiento de seguridad para niños
descanse de manera completamente
horizontal sobre el asiento del vehículo.
Puede que el arnés esté ya a la
altura máxima o mínima, que esté
demasiado tirante para ajustarlo o que
el peso del niño este aprisionando el
reposacabezas. Compruebe cuál de
las opciones anteriores podría ser el
problema y realice las correcciones
oportunas; intente ajustar el arnés de
nuevo.
Tense la correa de ajuste tirando de ella
hacia arriba y hacia fuera del asiento de
seguridad para niños. No jale hacia los
lados, ya que esto podría provocar que
la correa de ajuste del arnés se desgaste
por esa zona. Consulte la página 20
Es posible que haya suciedad
acumulada en la hebilla. Limpie la hebilla
como se muestra en la página 40 e
intente abrocharla de nuevo
.
.
.
dobladas y que los
extremos de las mismas
estén bien sujetadas al
gancho.
44 45
Page 50

BRITAX Child Safety, Inc.
Garantía
Este asiento de seguridad para niños ha sido fabricado por Britax
Child Safety, Inc. “BRITAX”. BRITAX ofrece la siguiente garantía al
comprador original:
GARANTÍA LIMITADA POR UN AÑO
Este producto ofrece una garantía por materiales defectuosos o
defectos de fabricación de un año a partir de la fecha de compra
original. Es necesario presentar la prueba de compra. Al amparo
de esta garantía, BRITAX le ofrecerá, a su discreción, las piezas de
repuesto o los servicios de reparación que considere oportunos.
BRITAX se reserva el derecho a interrumpir, modificar o sustituir
tejidos, piezas, modelos o productos.
Para realizar una reclamación de acuerdo con esta garantía, debe
ponerse en contacto con el departamento de atención al cliente de
BRITAX llamando al 1 888 427 4829 o 1 704 409 1699, o enviando
una carta a la dirección especificada en la contraportada de este
manual.
COMPLETE LA TARJETA DE REGISTRO DE COMPRA Y
ENVÍELA POR CORREO EN UN PLAZO MÁXIMO DE TREINTA
(30) DÍAS A PARTIR DE LA FECHA DE COMPRA
También puede optar por registrarse en línea en el sitio web
siguiente: www.BritaxUSA.com/registration.
LIMITACIONES DE LA GARANTÍA
Esta garantía no cubre los daños y perjuicios causados por
negligencia, uso indebido o utilización del producto de forma
distinta a la indicada en las instrucciones del producto.
BRITAX no aprueba el uso de cubiertas, piezas, juguetes,
accesorios o dispositivos de ajuste que no sean de BRITAX. Su uso
podría hacer que el asiento no cumpla con las normas federales
de seguridad automotriz o que no rinda como debería durante un
accidente. El uso de estos elementos anula automáticamente la
garantía de BRITAX.
LIMITACIÓN DE DAÑOS Y PERJUICIOS
La garantía y las soluciones expuestas anteriormente son exclusivas
y sustituyen a cualquier otra, tanto escrita como oral, de forma
expresa o implícita. En ningún caso, BRITAX o el establecimiento
que comercializa este producto serán responsables por los daños
y perjuicios, ya sean directos o indirectos, que pudiera ocasionar el
uso inadecuado de este producto.
LIMITACIONES DE LA GARANTÍA Y OTROS TÉRMINOS
RELACIONADOS CON LA GARANTÍA Y LEYES ESTATALES
Cualquier garantía implícita, incluidas las garantías implícitas de
comercialización o adecuación para un propósito determinado,
estará limitada a la duración y a los términos expresados por
escrito en esta garantía. Algunos estados no admiten limitaciones
en cuanto a la duración de una garantía implícita o a la exclusión
o limitación de los daños y perjuicios directos o indirectos; por lo
tanto, es posible que las limitaciones estipuladas anteriormente no
se apliquen en su caso. Esta garantía le otorga derechos legales
específicos; y es posible que tenga otros derechos, que pueden
variar de un estado a otro. Ni BRITAX ni el establecimiento que
comercializa este producto autorizan a ninguna persona a crear
cualquier otra garantía, obligación o responsabilidad en relación con
este producto.
46
Page 51

Page 52

Britax Child Safety, Inc.
4140 Pleasant Road
Fo
rt Mill, SC 29708
USA
A
Limited
Tel. : 1-888-427-4829
Britax Childcare Group
company
1-704-409-1699
www.Britax.com
 Loading...