

Page 1
Rearward Facing
For use with children
up to approximately 12 months.
Forward-facing
For use with children from approximately
12 months to approximately 4 years of age.
Convertible Child Restraint
Series No. 7300/B/2010 and 7300/C/2010
IMPORTANT: KEEP THIS BOOKLET IN THE PLACE PROVIDED ON THE CHILD RESTRAINT
Page 2

INDEX
2 3
INTRODUCTION
WARNINGS
SHOULDER HEIGHT MARKERS A GROWING CHILD
SHOULDER HEIGHT MARKERS
SHOULDER HEIGHT MARKERS AND THE NEXT SEAT
SPECIAL FEATURES - REARWARD-FACING WITH BASE
SPECIAL FEATURES - REARWARD-FACING WITH FOOT
SUITABLE FOR USE - REARWARD-FACING
HOW TO SETUP - REARWARD-FACING
HOW TO INSTALL - REARWARD-FACING
HOW TO USE - REARWARD-FACING
SPECIAL FEATURES - FORWARD-FACING WITH BASE
SPECIAL FEATURES - FORWARD-FACING WITH FOOT
SUITABLE FOR USE - FORWARD-FACING
HOW TO SETUP - FORWARD-FACING
HOW TO INSTALL - FORWARD-FACING
HOW TO USE - FORWARD-FACING
CARE & MAINTENANCE
ACCESSORIES
TRAVELLING TIPS
INSTALLATION OF CAR ANCHOR FITTING
IN CASE OF ACCIDENT
3
4
6
7
8
9
11
13
15
21
29
33
35
37
38
43
50
51
55
59
61
65
Page
INTRODUCTION
This instruction book covers various models under the series number 7300/B & C/2010 design. These
child restraints are installed in the rear of the car and can be used either rearward-facing for infants
or forward-facing for older children. They are installed in the car using the car seatbelt and the tether
strap attached to the car's child restraint anchor tting.
To be used only in a rearward-facing position for an infant until their shoulders reach the lower
shoulder height marker (approximately 12 months of age). Then to be used in forward-facing position
until their shoulders reach the upper shoulder height marker (approximately 4 years of age).
Continue to use this child restraint until the child reaches this limit.
Do not use forward-facing until child's shoulders are above the lower shoulder height marker.
Infants are at risk of serious injury if they face forward too early.
Children are at risk of serious injury if they move to booster seats too early.
Children that have outgrown this restraint are safest in a booster seat until their shoulders reach the
upper shoulder height marker of the booster seat.
CAREFULLY READ ALL THE INSTRUCTIONS FOR INSTALLATION. IN THE EVENT OF DOUBT ABOUT
THE METHOD OF INSTALLATION, CONSULT BRITAX CHILDCARE OR AGENT OR A CHILD RESTRAINT
FITTING STATION AUTHORISED BY A RELEVANT TRANSPORT AUTHORITY OR, IN NEW ZEALAND,
THE AGENT FOR THE VEHICLE.
No child restraint can guarantee absolute protection from injury in every crash. However, to ensure
that your child gets all the protection designed into the restraint PLEASE READ AND FOLLOW THESE
INSTRUCTIONS EXACTLY and use only Safe-n-Sound (Britax) recommended parts and accessories.
THIS RESTRAINT MUST BE ATTACHED TO A CHILD RESTRAINT ANCHORAGE POINT IN THE CAR.
REFER TO CAR OWNER’S HANDBOOK FOR LOCATION OF ANCHORAGE POINTS. REFER TO A CHILD
RESTRAINT FITTING STATION IF NO ANCHORAGE POINTS ARE IN THE MOTOR CAR.
Always store the instruction book in the pocket provided on the side or back of the cover.
THIS RESTRAINT IS NOT SUITABLE FOR USE WHERE THE ANCHORAGE STRAP MAY FALL INTO A
SPLIT IN THE SEAT BACK (E.G. HATCHBACK OR WAGON).
Page 3

• Use the restraint exactly as shown in the instructions.
• Fit the restraint rmly to the car seat.
• Fit the harness rmly to the child.
• A loose restraint or harness is dangerous.
• Supervision of children is needed because they may be able to undo buckles and adjusters.
• DO NOT LEAVE CHILDREN UNATTENDED IN THE CAR.
• Do not alter or modify this restraint.
• Repairs must only be done by the manufacturer or agent.
• Do not allow the restraint to come into contact with polishes, oils, bleach and other chemicals.
• Destroy the restraint if it has been in a severe crash, even if no damage is visible.
• DO NOT USE THIS RESTRAINT WITHOUT A COVER.
• Regularly check the restraint components, straps & other tments for correct function and
condition. Seek prompt repair.
• To ensure baby’s back is evenly supported do not put more than one nappy on the baby and
make sure the nappy is not thickly folded at the back.
• DO NOT USE A REAR-FACING CHILD RESTRAINT WHERE AN AIRBAG IS FITTED IN THE FRONT
OF THE SEATING POSITION.
• If an airbag is tted in the desired seating position where the child restraint is to be tted, follow
the vehicle manufacturer's warnings and instructions.
• The restraint should not be purchased or sold as a second hand item. It is recommended not to
use child restraints older that 10 years as the protection in an accident may be reduced.
4 5
DO NOT LEAVE CHILDREN UNATTENDED IN THE CAR.
• The restraint is not intended to be a substitute baby cot or bed. It is only designed to enable safe
transportation of children in motor vehicles. Do not leave a baby in the restraint for long periods
of time.
• Straps may be damaged by unsecured cargo in a collision. Secure or remove hazardous cargo
before using this strap. Hatchback or wagon: Do not use the child restraint where the upper
anchorage strap may fall into a split in the seat back.
• Protect all webbing from abrasion and cutting by sharp corners and edges.
• Do not lift the seat by the backrest.
• Do not store in areas that may get hot, like in car boots, roof space, beside shed walls which get
hot in summer. Do not place heavy items on top of the seat as this may distort the plastic.
:
Page 4
SHOULDER HEIGHT MARKERS
A GROWING CHILD
Forward-facing
Rearward Facing
Newborn (Rearward-facing)
Shoulder height label (hidden)
Shoulder
height label
Label A
Label A
Older baby (Rearward-facing)
Child Use (Forward-Facing)
Move to the next form of child restraint when
the child's shoulders reach the upper shoulder
height marker.
Shoulder Height Labels
Turn to forward-facing when
the child's shoulders reach the
lower shoulder height marker.
Label A
Label B
6
7
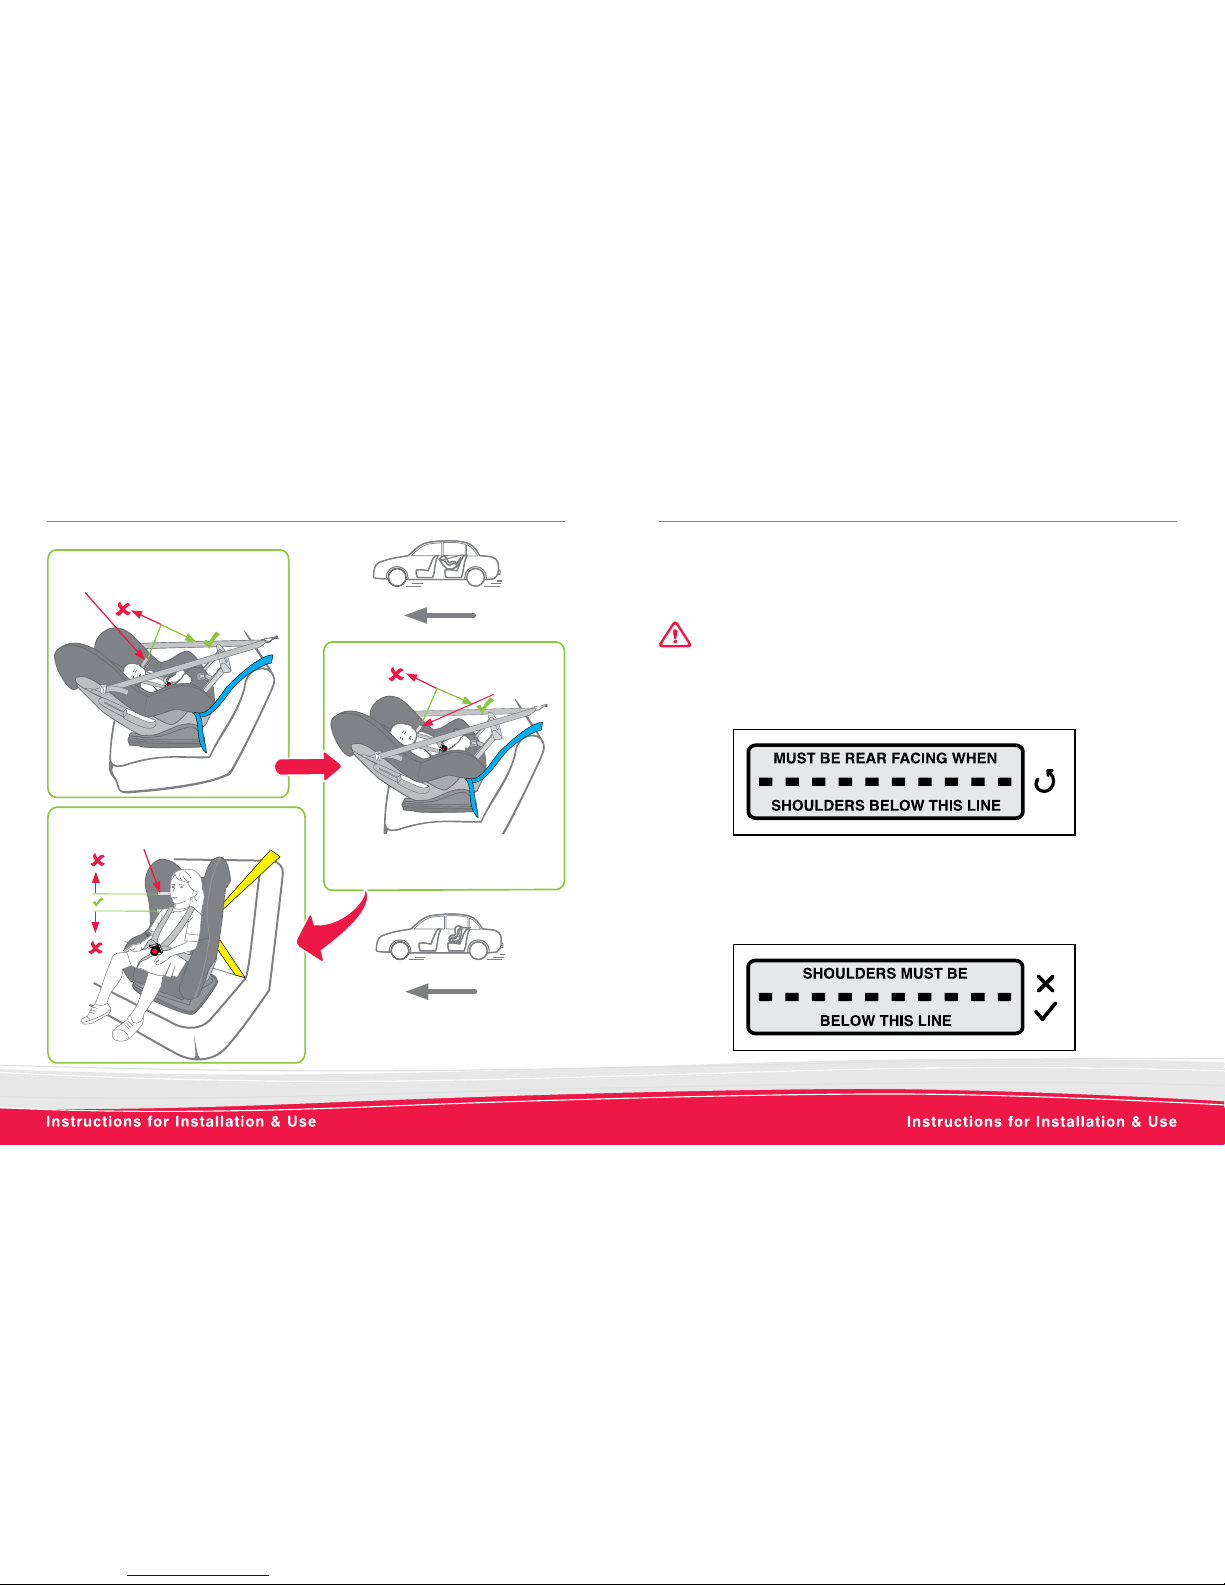
SHOULDER HEIGHT MARKERS
Shoulder height markers are provided on this restraint for a visual indication that the child is safe to
ride in this restraint. Do not turn to forward-facing until the child's shoulder's reach the lower marker.
Do not continue to use the restraint if the child's shoulders are above the top marker.
LOWER SHOULDER HEIGHT MARKER : Label A
When the child's shoulders reach the lower marker, the child restraint may be turned to face towards
the front of the vehicle or move the child to another Forward-Facing seat with in-built harness.
Approximately 12 months of age.
UPPER SHOULDER HEIGHT MARKER : Label B
When the child's shoulders reach this upper marker, the child is now too big for the child restraint. It is
now time to move to the next child restraint. Approximately 4 years of age.
IMPORTANT: FOLLOW THIS ADVICE.
Page 5
SHOULDER HEIGHT MARKERS
AND THE NEXT SEAT
Booster seat
with lap-sash
seatbelt.
Convertible Booster
seat used with
internal harness
until approximately
4 years and then as
a booster seat.
Booster seat and
accessory Child
Harness.
For the next child restraint choose
from:
• Convertible Booster Seat ( Note: you can
move to a convertible booster seat once the
child's shoulders reach the lower shoulder
height marker), this will be a little lower than
the Lower Shoulder Height Marker on the
child restraint covered on the previous page.
OR
• Booster Seat and an accessory Child Harness
(A Child Harness must be used if the car is
tted with a lap only seatbelt in the desired
seating position),
OR
• Booster seat and lap-sash seatbelt.
NOTE: These options are from approximately
6-8 years and 8-10 years.
98
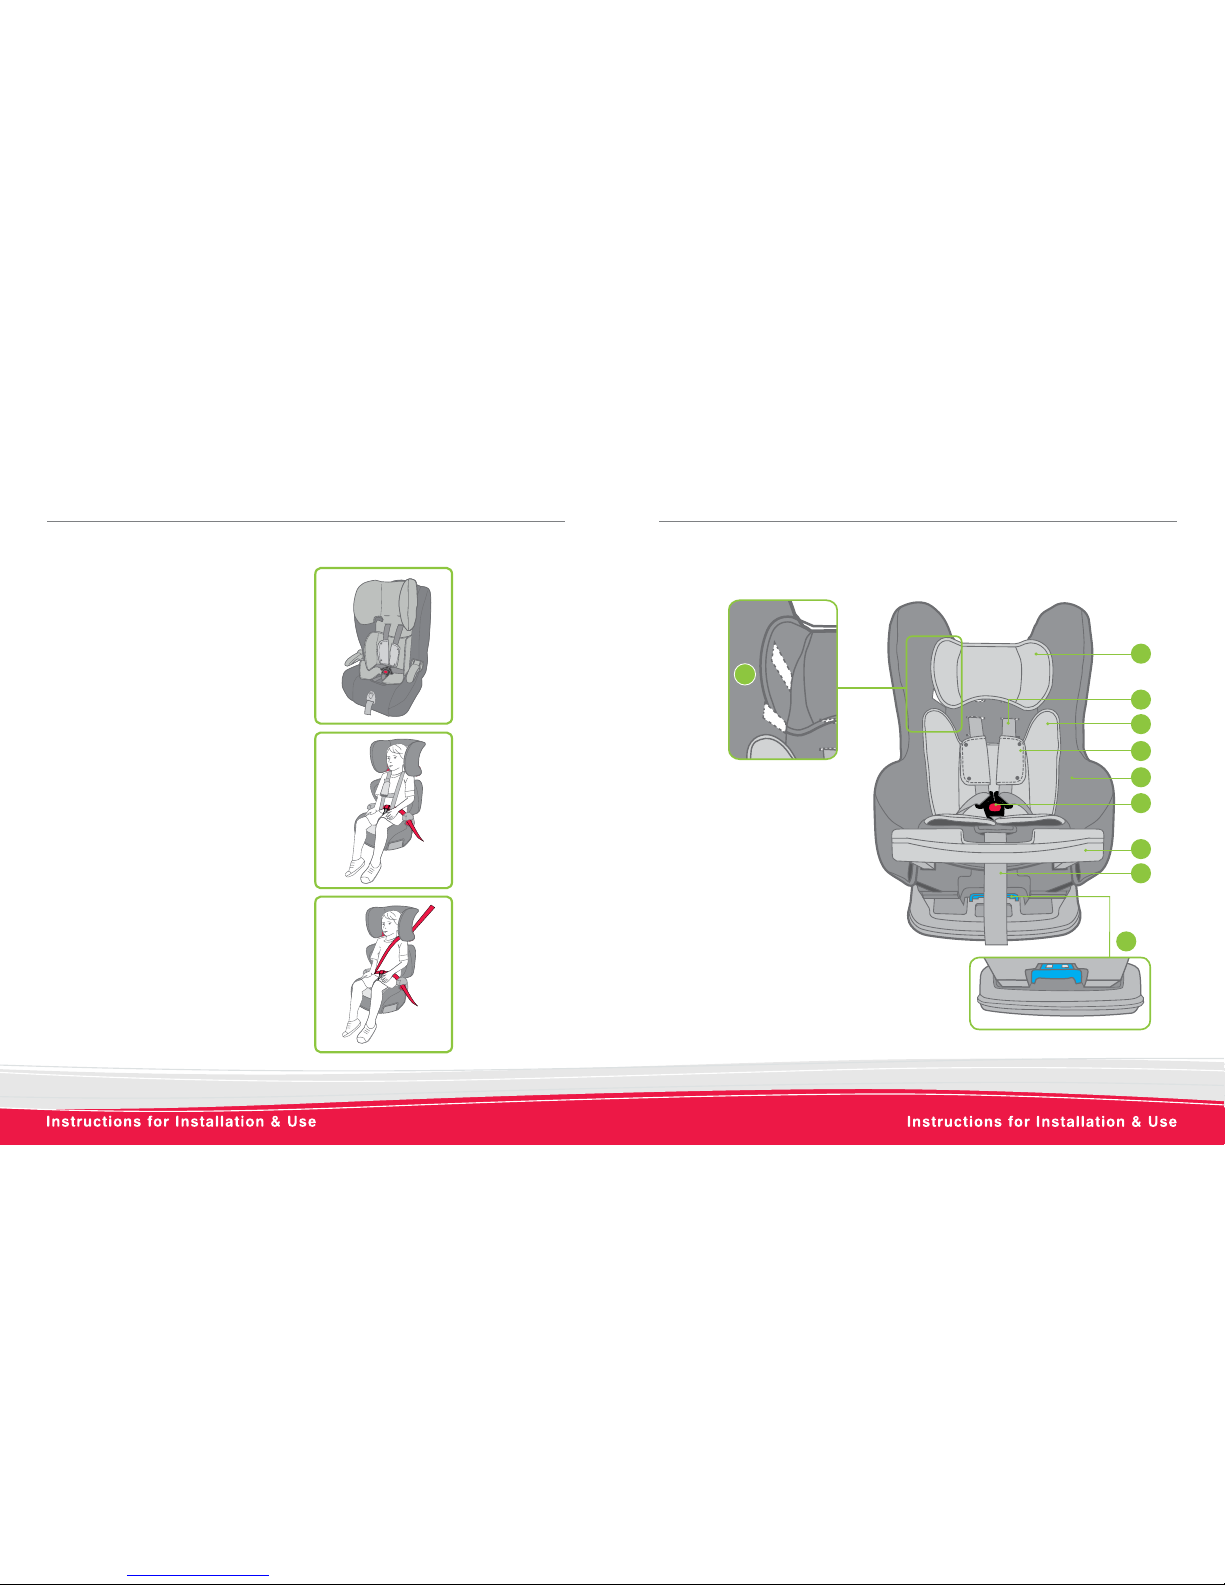
SPECIAL FEATURES - REARWARD-FACING WITH BASE
To be used only in a rearward-facing position until the infant's shoulders reach the lower shoulder
height marker (approximately 12 months of age).
Recline Mechanism
1
3
6
7
5
4
9
8
2
1. Head Pillow (if tted)
2. Fully adjustable 6 point harness
3. Padded Insert (if tted)
4. Shoulder Pads (if tted)
5. Padded cover for baby’s comfort
(may vary in style)
6. Quick Release Buckle (Red button)
7. Stabilising Bar for Baby use (deployed)
8. Harness Adjustment Strap
9. Recline Latch (Front of seat)
10. Shoulder Height Markers (May be hidden behind headrest)
10
Shoulder Height Markers
may be hidden under
headrest in lowest position.
Page 6

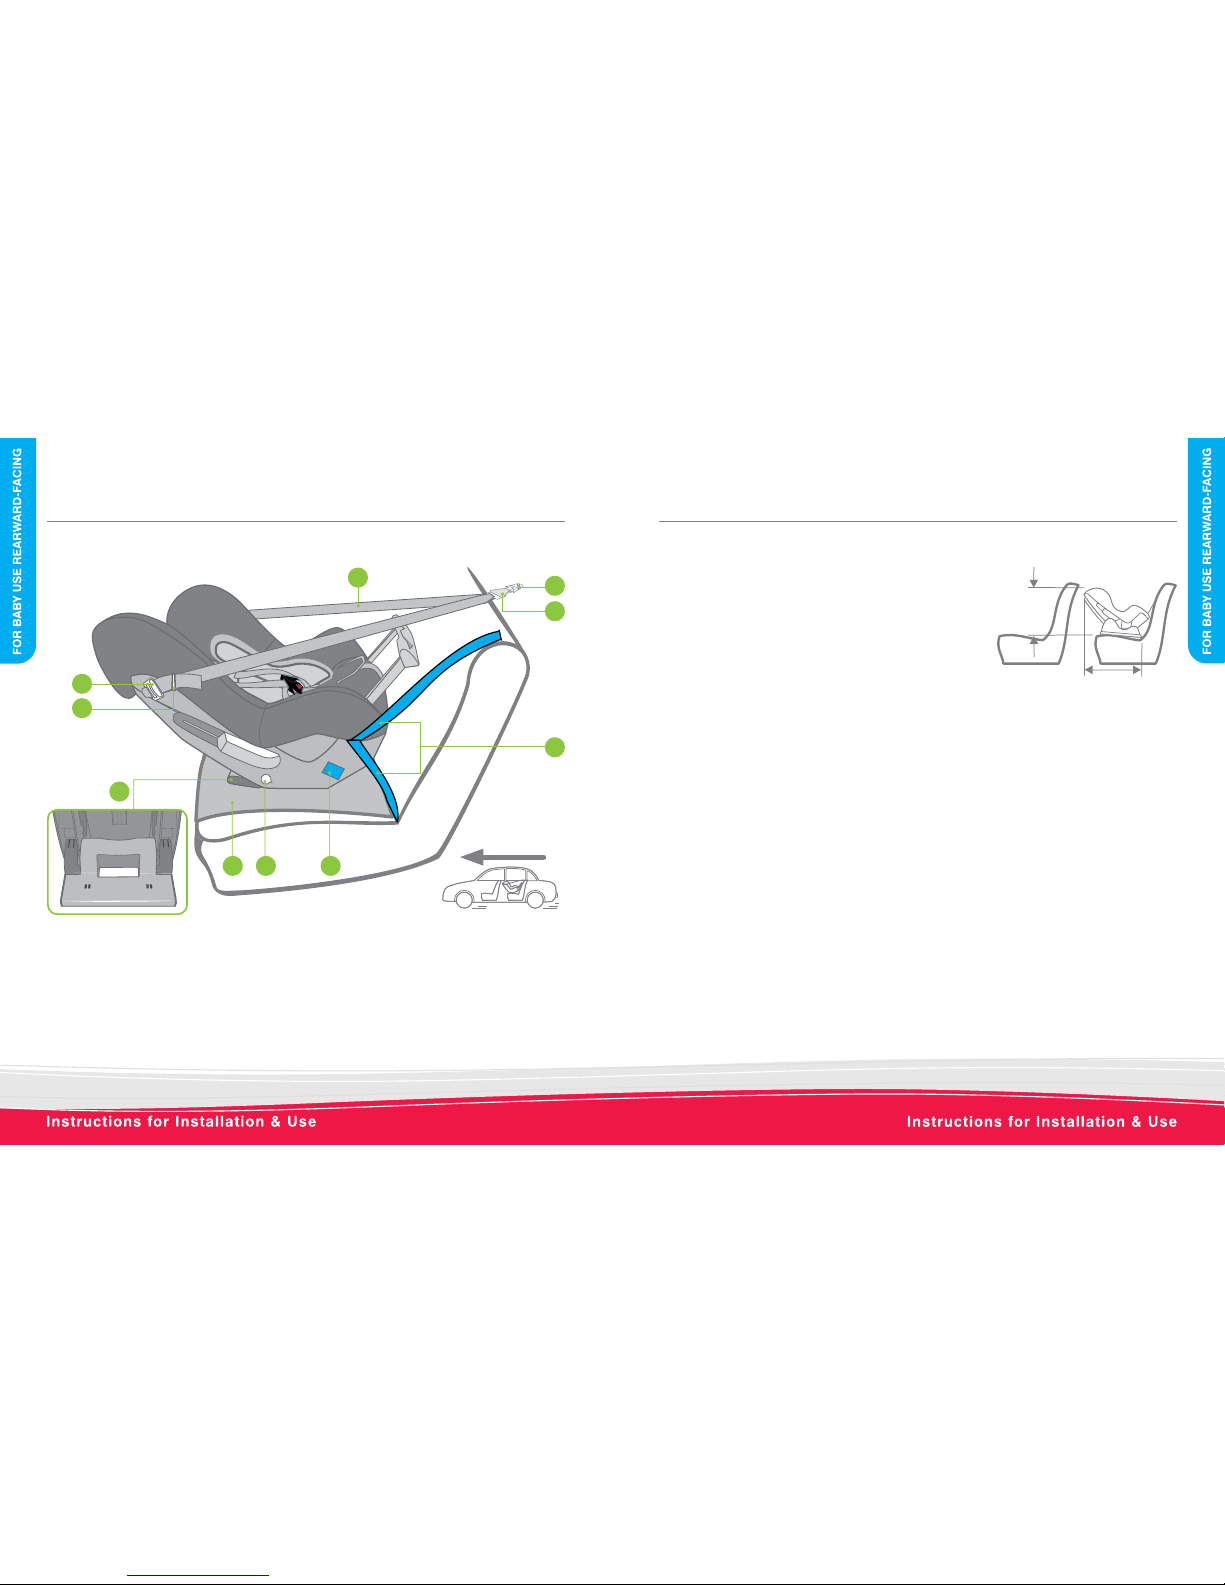
SPECIAL FEATURES - REARWARD-FACING WITH BASE
Recline Mechanism
For rearward-facing mode only
Front of Vehicle
10 11
16. Base (shown in baby use mode)
17. Messy Mat™(if supplied)
18. Recline Latch (back of seat - for rear-facing mode only)
19. Blue REARWARD FACING BELT PATH label
20. Upper Anchorage Storage Band
21. Upper Anchorage Strap Adjuster
11. Adjustable Upper Anchorage Strap
12. Car's Anchor Fitting
13. Attachment Clip
14a. Harness Adjustment Lever
or (under trim ap)
14b. Harness Adjustment Button
15. Vehicle seatbelt
12
13
15
17
16
18
19
21
11
14b
14a
20
SPECIAL FEATURES - REARWARD-FACING WITH FOOT
To be used only in a rearward-facing position until the infant's shoulders reach the lower shoulder
height marker (approximately 12 months of age).
8
1
3
6
7
5
4
2
1. Head Pillow (if tted)
2. Fully adjustable 6 point harness
3. Padded Insert (if tted)
4. Shoulder Pads (if tted)
5. Padded cover for baby’s comfort
(may vary in style)
6. Quick Release Buckle (Red button)
7. Stabilising Bar for Baby use (deployed)
8. Harness Adjustment Strap
9a. Harness Adjustment Lever (under trim ap)
or
9b. Harness Adjustment Button
10. Shoulder Height Markers (May be hidden behind headrest)
10
9b
9a
Page 7
SPECIAL FEATURES - REARWARD-FACING WITH FOOT
Front of Vehicle
12 13
12
13
14
11
1617
18
17. Messy Mat™ (if supplied)
18. Recline foot in baby mode
19. Upper Anchorage Storage Band
20. Upper Anchorage Strap Adjuster
11. Adjustable Upper Anchorage Strap
12. Car's Anchor Fitting
13. Attachment Clip
14. Vehicle seatbelt
15. Blue REARWARD FACING BELT PATH label
16. Recline position Indicator
15
20
19
TO BE USED WITH A LAP SASH OR LAP ONLY SEATBELT IN
THE BACK OF MOST CARS WITH FORWARD-FACING SEATS.
To be used only in a rearward-facing position for an infant
until their shoulders reach the lower shoulder height marker
(approximately 12 months of age). Then to be used in
forward-facing position until their shoulders reach the upper
shoulder height marker (approximately 4 years of age).
Continue to use this restraint until the child reaches this limit.
Do not use forward-facing until child's shoulders are above
the lower shoulder height marker. Infants are at risk of serious
injury if they face forward too early.
Children are at risk of serious injury if they move to booster seats too early.
Children that have outgrown this restraint are safest in a booster seat until their shoulders reach the
upper shoulder height marker of the booster seat.
If the baby's neck muscles are unable to support their head, then the child should remain rear-facing
for as long as possible.
The purchaser should check the measurements between the front of the seat back of the rear seat and
all front seats in the car in which the child restraint is intended to be used, to ensure that the space is
sufcient. If you have the restraint check it ts in your car.
Regional Road Rules may prohibit the use of this restraint in the front seat until the child is 4 years of
age. Check your Regional Road Rules for exemptions.
SUITABLE FOR USE - REARWARD-FACING
560mm(Foot)
600mm(Base)
560mm(Foot)
520mm(Base)
Page 8
DO NOT USE RESTRAINT IN REARWARD-FACING MODE WITHOUT
STABILISING BAR FULLY EXTENDED.
Do not use the restraint without the Upper Anchorage Strap
correctly attached.
DO NOT USE A REAR-FACING CHILD RESTRAINT WHERE AN
AIRBAG IS FITTED IN FRONT OF THE SEATING POSITION.
Do not use on any vehicle seat which faces sideways or rearwards.
Never leave babies or toddlers in a stationary car in the sun because
of the risk of heat exhaustion.
Ensure babies and toddlers have adequate ventilation and are
shaded from direct sunlight through side or rear windows.
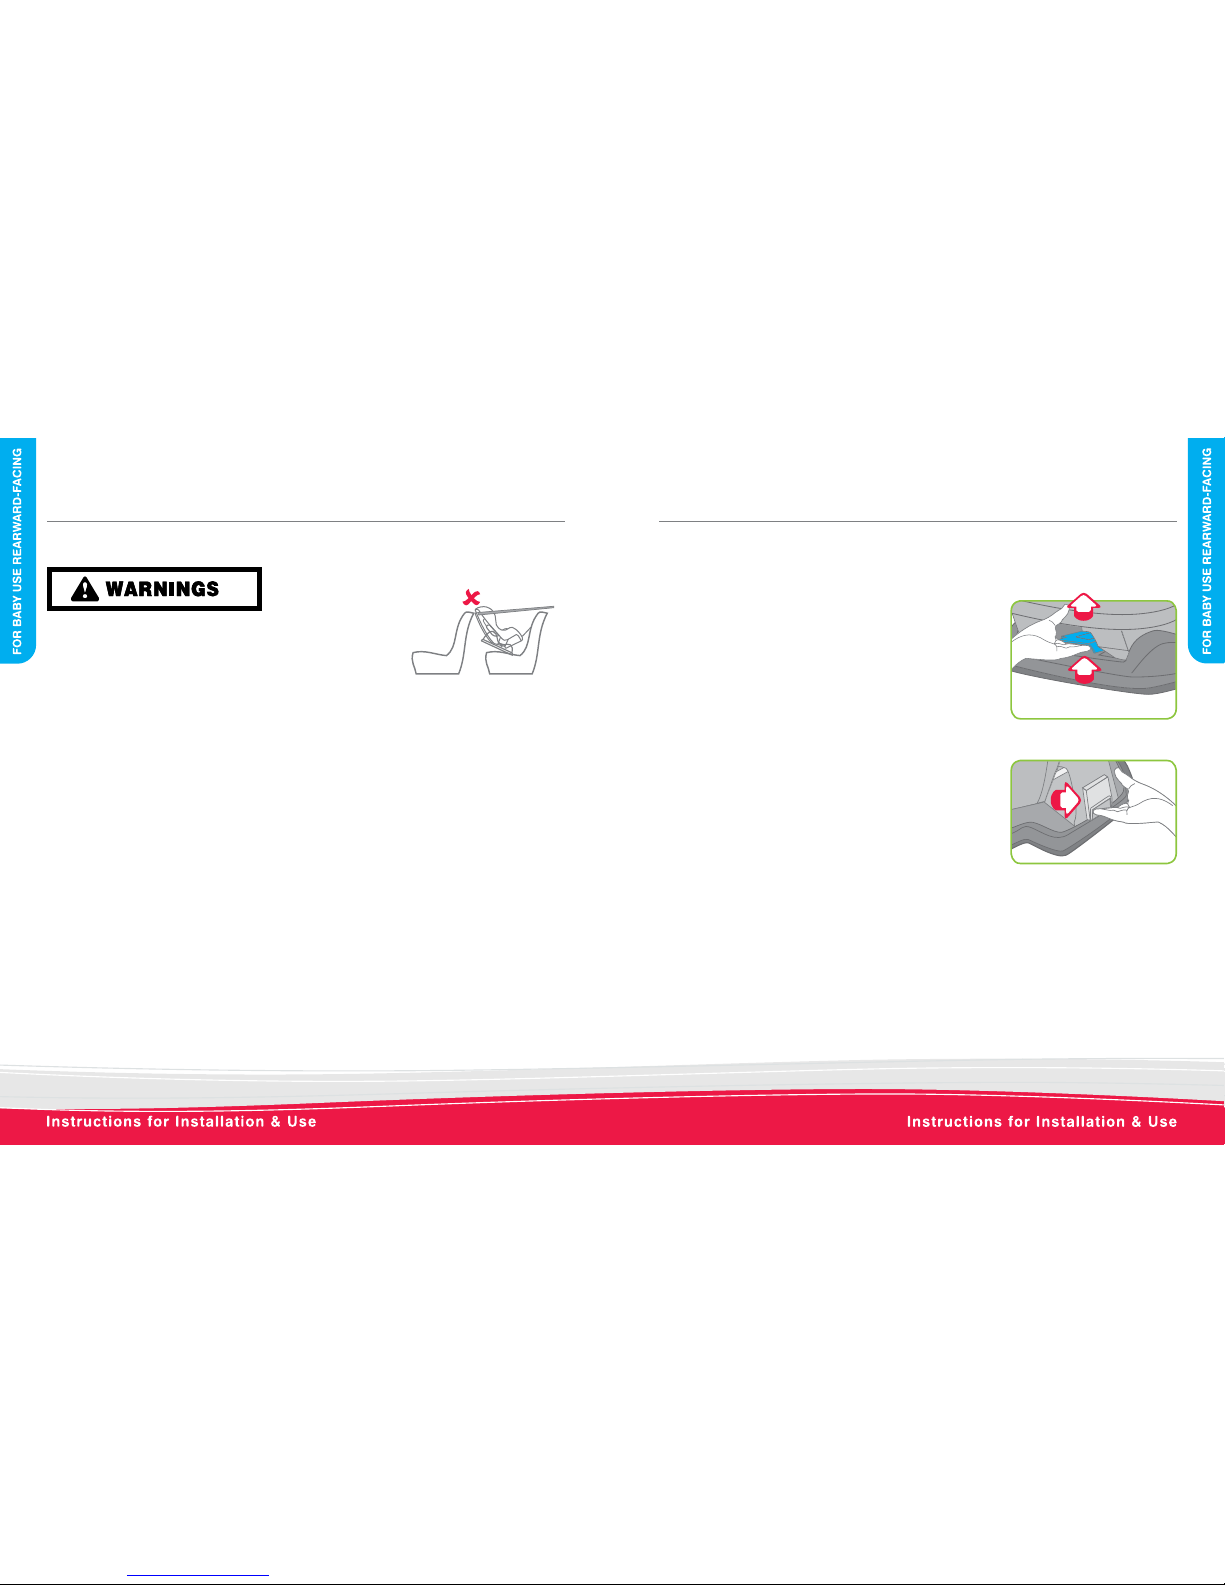
Do not allow the front seat to
alter the installed position of
the restraint. It is permissible to
allow the restraint to touch the
seat on front of it.
SUITABLE FOR USE - REARWARD-FACING
14 15
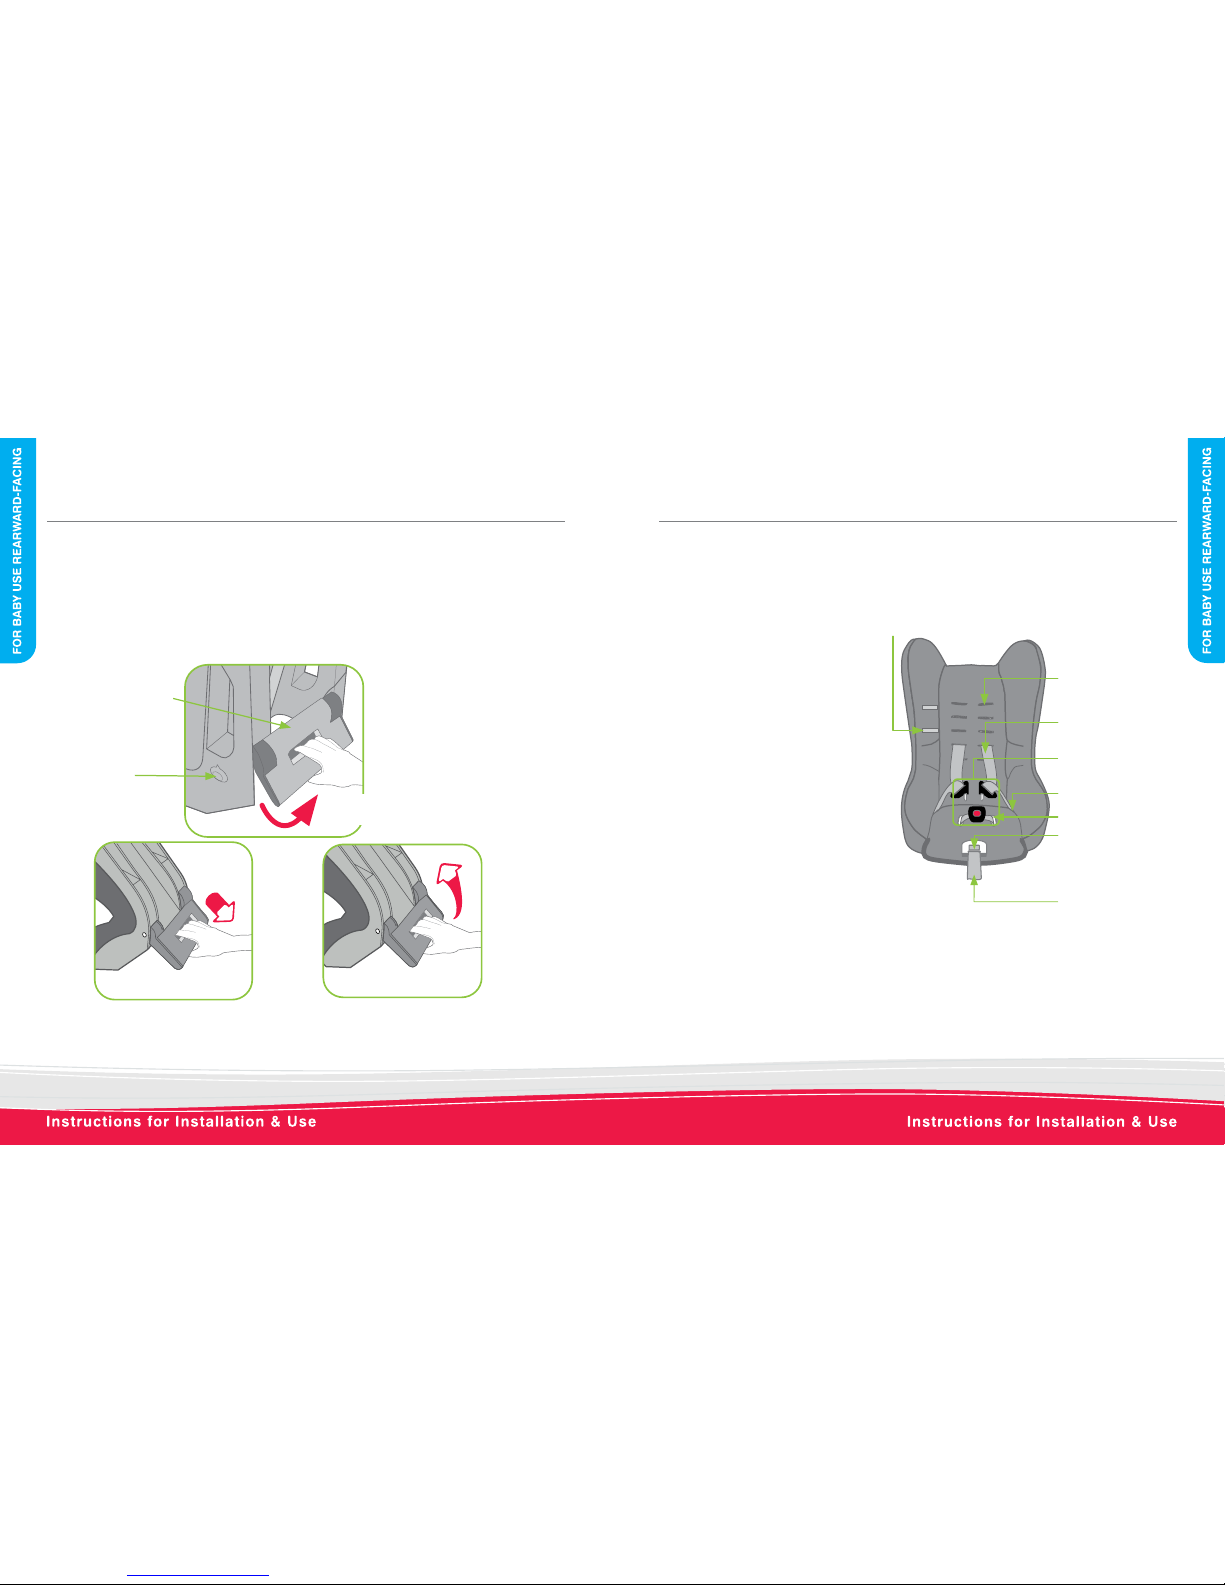
HOW TO SETUP
Lift Recline Latch
CONVERT TO BABY USE MODE (Model with base)
A. To fully recline the restraint into Child use mode, place one hand
on the front corner of the base rmly, lift recline latch up to
unlock, continue pulling restraint forward until fully reclined or
unable to recline further.
B. Once fully reclined in Child use mode, pull the latch located
behind the restraint body, continue pulling the restraint forward
until fully reclined into baby use mode.
Page 9
HOW TO SETUPHOW TO SETUP
CONVERT TO BABY USE MODE (Model with foot)
Move Recline Foot by squeezing the Foot, squeezing the Recline Foot Handle while rotating to the baby
position (refer to label on the side of the restraint) until the handle locks into position. Ensure Recline
Foot locks into position.
Recline position
indicator
Rotate Recline
Foot to baby
position
Squeeze Recline Foot
Handle to adjust
Pull out
Rotate
16 17
ADJUSTING HARNESS STRAP HEIGHT: FOR BABY USE
REARWARD-FACING
Correct tment of the harness is very
important as it restrains the child in the
restraint. The harness must t rmly
around the upper torso of the child and be
positioned so as to leave the child’s arms
and legs free.
The shoulder straps must be in the slots
which are nearest to the child’s shoulders,
but not lower than the child's shoulders.
If your baby's shoulders have reached
the lower shoulder height marker then the
restraint should be converted for “child
use”(Refer to Forward-facing section page
33).
The harness adjuster is tted in different
styles on different models. There is a push
button adjuster that must be pressed to
loosen the harness and there is a lever
operated adjuster that is tted under a ap.
Check your child restraint to see which
version you have.
Harness strap
Shoulder slots
Shoulder harness
straps
Harness tongues
and buckle
Lap strap slots
Crotch strap slots
Harness adjuster strap
Lower shoulder height marker
Harness Adjustment
Button or Harness
Adjustment Lever
under ap
Page 10
HOW TO SETUPHOW TO SETUP
REARWARD FACING
BELT PATH
shown as blue.
The shoulder straps must be in the slots
which are nearest to the child’s shoulders,
but not lower than the child’s shoulders.
ALWAYS OVER THE BAR
Strap Connector
Shoulder straps must be threaded through the
appropriate shoulder strap slots then over the top
of the bar at rear of restraint.
18 19
STEPS IN CHANGING SHOULDER
STRAP SLOTS
A. Remove the restraint from vehicle.
B. At the rear of the restraint, remove one of the harness
shoulder straps from metal Strap Connector by slipping
strap through open slot.
C. Pull the shoulder strap through slot.
Bar
D. Insert shoulder strap through restraint slot which will
position shoulder strap level with or above the child’s
shoulder, then over the metal bar. Ensure that the
shoulder strap passes through the matching slots in
the cover and the restraint body.
Pull
straps
Page 11
HOW TO SETUP
20 21
E. Connect the shoulder strap to metal strap connector at rear of restraint, ensuring that there are no
twists in the shoulder strap. Ensure the strap passes over the bar.
F. Repeat for other shoulder strap. It is better to change one strap at a time so that the other strap will
be a guide for re-assembly.
If using the head pillow adjust the height using the adjusters so the side wings of the head pillow are
just above the shoulders. See page 55 and 56 for adjustment method.
IMPORTANT:
Ensure the shoulder strap is threaded through the slot, then over the top of the bar at the rear of
restraint & connected to the metal strap connector.
IMPORTANT:
Do not use the restraint with harness shoulder straps set at different heights or fed through
mismatching slots. Ensure harness straps are not twisted and that all straps are secure by pulling
each harness strap.
IMPORTANT:
The Padded Insert (if tted) is designed to snugly t baby, providing extra support and comfort it
must be used for smaller babies. Discontinue use when baby's shoulder's reach the Lower Shoulder
Height Marker, the Insert is a tight t or creates discomfort for larger babies.
Then push bar
forward
Pull out
Stabilising
bar
Click
Fig 1.
Lift trim enough
to access the
stabilising bar
INSTALLING INTO VEHICLE
(REARWARD-FACING)
HOW TO INSTALL
The restraint is normally packaged in the fully
upright child use mode so if you need to install for
baby use you must rst fully recline the restraint as
described on page 15 or 16 to convert the restraint
to baby use mode.
For illustration of the install method, the drawings
show the restraint with a base but the method also
applies with the recline foot version of this child
restraint.
If the Upper Anchorage Strap is folded up for
storage, undo Storage Strap then lengthen. Fully
press the Adjuster Button (1) while pulling the
Upper Anchorage Strap (2) to lengthen.
A. Position the restraint rearward-facing in the
chosen seating position.
B. Lift the ap at the end of the seat sufciently to
access the stabilising bar, pull out stabilising
bar and then gently push bar forward until a
click is heard. The Stabilising bar is now locked
in place. Ret the cover. See Fig 1.
C. Undo the buckle and place the straps to each
side.
Fully press Adjuster Button (1) while pulling
Upper Anchorage Strap (2) to lengthen.
Storage
Band
1
2
B
B
Page 12

Pass buckle tongue through here
Fig 2.
E
Backing trim
HOW TO INSTALL
Clic
HOW TO INSTALL
22 23
D. Remove Padded Insert (if tted), and
gently lift back trim end, then pull the
centre panel ap backwards, with the
comfort pad from the inner seat of trim.
See Fig 2.
E. Fully lengthen the car's seatbelt and feed
the seatbelt between the restraint cover
and the restraint body through seatbelt
slots in restraint. See Fig 2.
Padded Insert
D
Centre panel ap and
comfort foam (if tted)
F. Engage the seatbelt buckle and tongue.
Tighten the seatbelt allowing the sash to
fully retract.
NOTE: Seatbelt buckle and tongue must
not rest between restraint cover and
restraint. If seatbelt buckle is adjustable,
adjust the buckle as low as possible
away from the restraint.
G. Replace the back and centre panel of
the cover properly. Ensure the harness
buckle is through the panel, and connect
the hook and loop to retain the cover.
For smaller babies replace the Padded
Insert (if tted). Do not use if the child's
shoulders reach the lower Shoulder
Height Marker. See page 17 and 19
for advice on positioning the shoulder
straps.
NOTE: Seatbelt extenders should not be
used if the seatbelt is not long enough
to secure the child restraint. If they are
used then the buckle must not enter the
seating zone.
F
Pass buckle tongue through slot here
G
Page 13

HOW TO INSTALLHOW TO INSTALL
H. Align the restraint centrally within the
chosen seating position as shown
right. Pull the sash portion of seatbelt
until all slack is removed from Lap
portion of seatbelt. Adjust the seatbelt
to hold the restraint rmly against
the vehicle seat back. For retractor
seatbelts, allow excess belt to feed
back into retractor.
24 25
Pull Adjustment
Strap to remove
slack
Fully press Adjuster Button (1)
while pulling Upper Anchorage
Strap (2) to lengthen.
Storage
Band
1
2
3
Attachment Clip
Car's Anchor Fitting
I. Fit the attachment clip to the anchor tting as shown
right. Make sure to remove as many twists as
possible from the upper anchorage strap.
J. Tighten the adjustable upper anchorage strap by
pulling adjustment strap to remove slack. Do not
over-tighten causing the restraint base to lift off
the vehicle seat. This will usually be done once the
baby has been harnessed into the seat.
K. Roll up the excess strap tightly so the webbing is
thick enough to be held in the storage band.
Roll up excess
strap tightly so the
webbing is thick
enough to be held
in the storage band.
Page 14

HOW TO INSTALLHOW TO INSTALL
26 27
DO NOT USE RESTRAINT IN REARWARD-FACING MODE WITHOUT STABILISING
BAR FULLY EXTENDED.
THE UPPER ANCHORAGE STRAP MUST ALWAYS BE FITTED WHEN THE CHILD
RESTRAINT IS USED IN A VEHICLE.
ALWAYS ATTACH THE HOOK AND REMOVE THE SLACK.
Ensure the Upper Anchorage
Strap is tightened, attached to
the Anchor Fitting and that straps
are the same length on both
sides of the Attachment Clip.
Pull sash portion of seatbelt to
remove slack.
Feed seatbelt between restraint
cover and restraint body.
A single
twist is
required in
baby use.
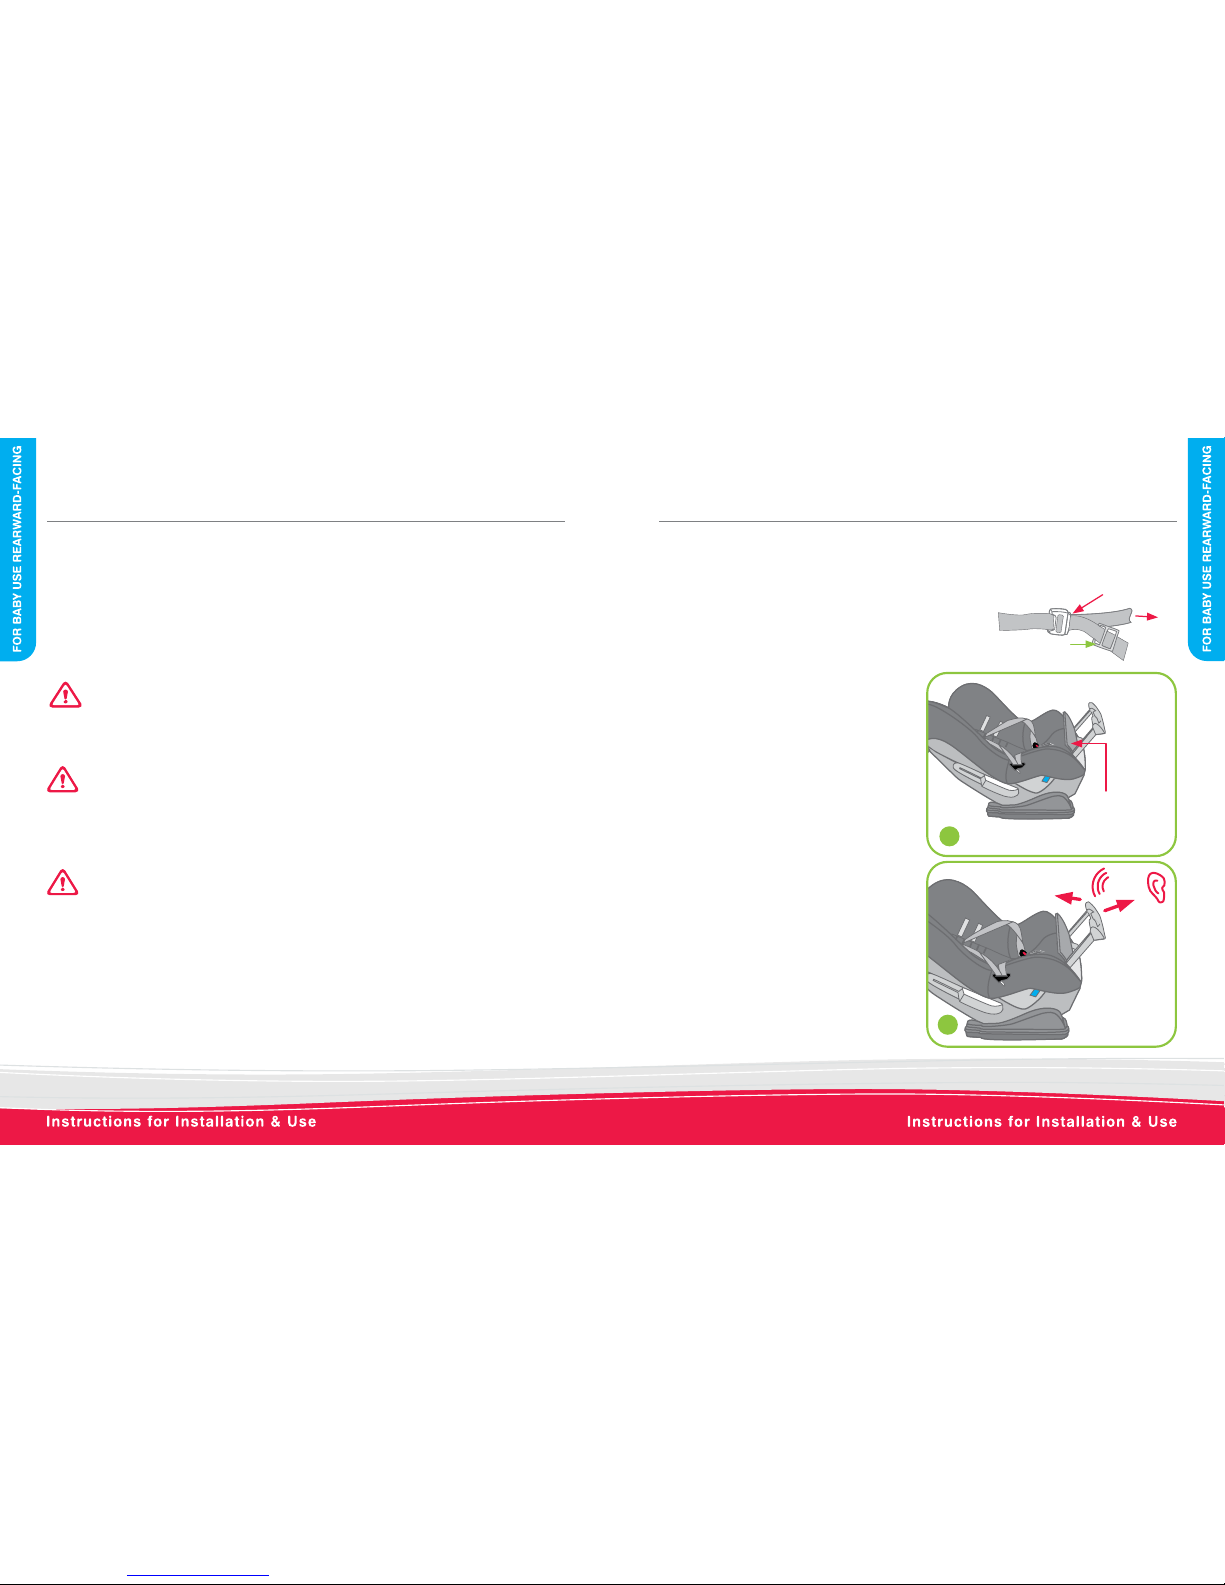
FITTING SUMMARY
Pull to remove
slack - do not
over tighten.
Hook Attachment Clip to
the car's anchor tting.
Extension
Strap
Attachment Clip should
not be in front of the
vehicle seat front.
Attachment Clip
should be behind
the front of the
vehicle seat front.
Attachment Clip
IMPORTANT:
If using an Extension Strap, positioning the Attachment Clip above the baby may lead to injury in an
accident therefore make sure that the Attachment Clip is not positioned in front of the vehicle seat.
Page 15

HOW TO USEHOW TO INSTALL
28 29
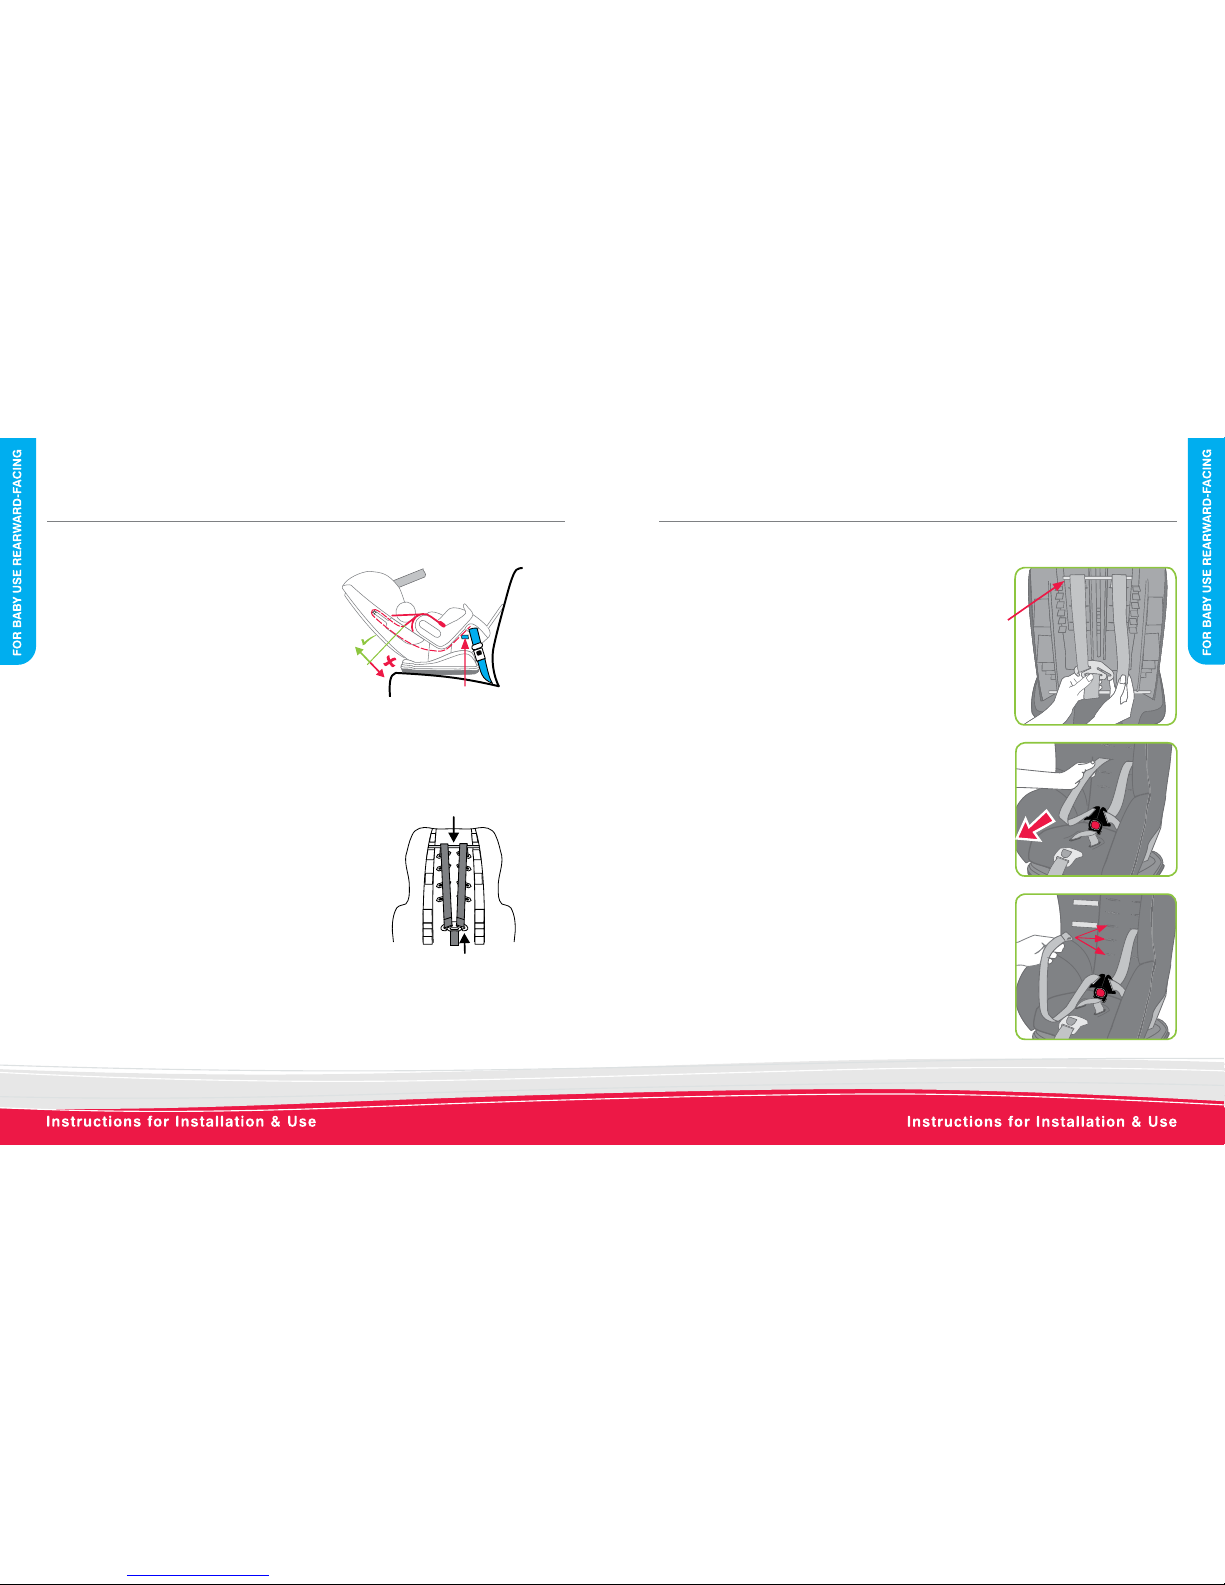
ANGULAR ADJUSTMENT OF RESTRAINT
Some vehicle seats have more rearward slope than others. If the angle of the seat causes the baby to
be too upright for comfort, the angle may be altered by placing a rm packing between the seat and
the underside of the base. Packing can be a rmly rolled up towel or nappy.
Do not remove all of the rearward slope by over packing. Always leave a rearward slope angle of
approximately 10 to 15 degrees as shown
10° to 15°
Model with Base
10° to 15°
Model with Foot
PLACING BABY INTO RESTRAINT
A. Ensure the shoulder straps are positioned to the correct height for your child (see pages 17 to 19).
B. Slacken the Harness Straps by pushing and holding the Harness Adjustment Button, grasping
BOTH shoulder harness straps and fully lengthen.
Alternatively if using a lever adjuster, lift lever and slacken the harness.
Place the buckle tongues over the side of the seat so that the baby does not lay on them.
C. Lay baby on their back into restraint and t the harness as shown above. Make sure the baby is
dressed to allow harness buckle to be pulled up between the baby’s legs e.g. a jump suit. Make
sure the baby’s arms and legs are free. Never wrap baby in a blanket before placing in restraint.
Lower shoulder
height marker
Harness shoulder
straps
Slackened Upper
Anchorage Strap
Adjuster Strap
Car's
Anchor
tting
Harness Adjustment Button
Upper shoulder
height marker
Adjuster for the Upper
Anchorage Strap
Alternative Harness
Adjustment Lever
Page 16

HOW TO USE
30 31
HOW TO USE
D. Fit either harness tongue into the
harness buckle followed by the
other tongue until a click is heard.
Should the second tongue not
insert, press the red button and reinsert the tongues. Ensure secure
engagement by pulling harness
straps.
E. Remove slack from harness lap
straps by pulling shoulder straps.
F. Adjust the harness to a rm but
comfortable t by pulling the
harness adjustment strap.
G. Re-tighten the Adjustable Upper
Anchorage Strap by pulling the
Adjustment Strap to remove slack
as shown. Roll up the excess strap
tightly so the webbing is thick
enough to be held in the storage
band.
Click
Tongue
Buckle
Harness Lap Straps
Shoulder Straps
Crotch Straps
Pull to remove
slack from
harness lap
straps
D
F
Pull Adjustment
Strap to remove
slack
Storage
Band
Press
Roll up excess
strap tightly so the
webbing is thick
enough to be held
in the storage band.
Make sure that nothing is obstructing harness straps and that
baby’s arms and legs are free with the straps in the correct
location as shown right.
Do not use restraint if straps do not tighten and contact Britax
Childcare Customer Service. Refer to back cover for details.
IMPORTANT:
The Padded Insert (if tted) is designed to snugly t baby,
providing extra support and comfor t it must be used for smaller
babies. Discontinue use when Padded Insert is a tight t, creates
discomfort for larger babies, or the baby's shoulder reach the
Lower Shoulder Height Marker.
CAUTION: A LOOSE HARNESS IS DANGEROUS.
Pull to remove slack
from harness straps
Page 17

HOW TO USE
32 33
TO REMOVE RESTRAINT FROM VEHICLE
A. Disengage seatbelt tongue from buckle and remove from
the restraint.
B. Fully press the Upper Anchorage Strap Adjuster Button (1)
while pulling the Upper Anchorage Strap (2) to slacken
as shown right. In some vehicles loosening of the Upper
Anchorage Strap may be difcult. If so, try pushing the
restraint against the vehicle seat back or slightly lifting the
restraint to release the tension.
C. Disengage Attachment Clip from the Anchor Fitting. The
child restraint is now disconnected.
See page 43 for storage of the stabilising bar and the return
to the upright position if required.
Pull Adjustment
Strap to remove
slack
Fully press Adjuster Button (1)
while pulling Upper Anchorage
Strap (2) to lengthen.
Storage
Band
REMOVING BABY FROM RESTRAINT
A. Press the Upper Anchorage Strap Adjuster Button while pulling Upper Anchorage Straps to slacken.
Allow the Upper Anchorage Straps to fall to the sides for easy access into restraint.
B. Lift and hold the harness adjustment lever or push and hold the Harness Adjustment Button
(whichever is tted) while pulling both Shoulder Harness Straps to slacken harness to the desired
amount.
C. Press the red button on Harness Buckle. Then both Harness tongues will be released. Move each
shoulder strap to baby’s side then pick up the baby.
1
2
3
To be used only in a forward- facing position by children whose shoulder's have reached the lower
shoulder height marker (approximately 12 months of age) until the shoulders reach the upper shoulder
height marker (approximately 4 years of age.)
SPECIAL FEATURES - FORWARD-FACING WITH BASE
1
5
4
3
10
8
2
1. Head Pillow (if tted)
2. Shoulder Harness Slots
3. Fully adjustable 6 point harness
4. Shoulder Pads (if tted)
5. Quick Release Buckle (Red button)
6a. Harness Adjustment Lever (under ap)
or
6b. Harness Adjustment Button
7. Harness Adjustment Strap
8. Base (shown in child use mode)
9. Recline Latch (front of seat)
10. Shoulder Height Markers (may be hidden behind headrest)
11. Padded Cover for baby's comfort (may vary in style)
Recline Mechanism
9
6a
6b
7
7
11
Page 18

Front of Vehicle
SPECIAL FEATURES - FORWARD-FACING WITH BASE
34 35
17
13
12
16
18
19 20
13
15
12. Car's Anchor Fitting
13. Vehicle seatbelt
14a. Upper Lock-off (if tted)
or
14b. Without Upper Lock-off
15. Messy Mat™ (if supplied)
16. Yellow FORWARD-FACING BELT PATH labels
17. Upper Anchorage Strap Adjuster
18. Upper Anchorage Storage Band
19. Upper Anchorage Adjustment Strap
20. Attachment Clip
SPECIAL FEATURES - FORWARD-FACING WITH FOOT
To be used only in a forward- facing position by children whose shoulder's have reached the lower
shoulder height marker (approximately 12 months of age) until the shoulders reach the upper shoulder
height marker (approximately 4 years of age.)
7
9
1
5
6
4
3
2
1. Head Pillow (if tted)
2. Shoulder Harness Slots
3. Fully adjustable 6 point harness
4. Shoulder Pads (if tted)
5. Quick Release Buckle
(Red button)
6. Padded Cover for baby's comfort (may vary in style)
7. Harness Adjustment Strap
8a. Harness Adjustment Lever (under trim ap)
or
8b. Harness Adjustment Button
9. Shoulder Height Markers (May be hidden behind headrest)
14b
14a
8b
8a
Page 19

11
SPECIAL FEATURES - FORWARD-FACING WITH FOOT
Front of Vehicle
36 37
17
11
10
16
18
19 20
15
14
10. Car's Anchor Fitting
11. Vehicle seatbelt
12a. Upper Lock-off (if tted)
or
12b. Without Upper Lock-off
13. Recline position Indicator
14. Recline Foot (Shown in Child Mode)
15. Messy Mat™ (if supplied)
16. Yellow FORWARD-FACING BELT PATH labels
17. Upper Anchorage Strap Adjuster
18. Upper Anchorage Storage Band
19. Upper Anchorage Adjustment Strap
20. Attachment Clip
13
12
12a
12b
TO BE USED WITH A LAP SASH OR LAP ONLY SEATBELT IN THE BACK OF MOST CARS WITH
FORWARD-FACING SEATS.
Once the child's shoulders reach the lower shoulder height marker then the seat can be changed to the
forward-facing position and used until the child's shoulders reach the upper shoulder height marker.
Continue to use this restraint in this forward-facing mode until the child's shoulders reach the limit of
the lower shoulder height marker. The child should not sit forward-facing until the baby's neck muscles
are able to support their head. Do not move to a Booster Seat until the child has outgrown this child
restraint.
The purchaser should check the measurements between the front of the seat back of the rear seat and
all front seats in the car in which the child restraint is intended to be used, to ensure that the space is
sufcient. If you have the restraint check it ts in your car.
Regional Road Rules may prohibit the use of this restraint in the front seat of the vehicle until the child
is 4 years of age. Check your Regional Road Rules for exemptions.
SUITABLE FOR USE - FORWARD-FACING
DO NOT USE RESTRAINT IN FORWARD- FACING MODE WITH THE REAR-FACING MODE
STABILISING BAR PULLED OUT.
Do not use the restraint without the Upper Anchorage Strap correctly attached.
If your vehicle is not tted with an anchor point, please contact a Safety Restraint Fitting Station
authorised by the relevant State Government Body for correct tment of the restraint. In New Zealand
contact the agent for the vehicle. The upper anchorage strap must be attached to an anchorage point
using an extension strap if necessary.
Do not use on any vehicle seat which faces sideways or rearwards.
Do not use the Padded Insert (if tted) in Forward-Facing ‘Child Use’.
If an airbag is tted in the desired seating position where the child restraint is tted, follow the vehicle
manufacturer's warnings and instructions.
Children are of risk of serious injury if they move to a booster seat too early.
Page 20

38 39
HOW TO SETUPHOW TO SETUP
FULLY UPRIGHT CHILD
USE MODE
Pull out
Lift forward
FULLY RECLINED
CHILD USE MODE
A. Convert the restraint to child use mode by placing one
hand on the top of the restraint and the other hand pulling
the recline latch at the back of the restraint outwards. Then
lift the restraint forward until audible click is heard.
B. Determine whether an upright or reclined position is preferred and adjust if necessary (see below).
C. Place one hand on the front corner of base rmly, while with the other hand lift the recline latch
up to unlock and push back until the restraint is at the desired position. Ensure the recline latch is
engaged into position by pushing on the restraint.
Lift Recline Latch
CONVERT THE RESTRAINT TO CHILD USE MODE (Model with base)
CONVERT THE RESTRAINT TO CHILD USE MODE (Model with foot)
Recline
position
indicator
Rotate
Recline Foot
downwards
Press Recline Foot Handle to adjust
B. Determine whether an upright or reclined
position is preferred and adjust if
necessary. To adjust the restraint to the
fully upright position, grasp the handle on
the foot, then squeeze the handle outwards
and hold to release the lock. Rotate the
foot fully downwards, then release the
handle to lock the foot in the fully upright
position. The label on the side of the
restraint identies the Forward-facing and
reclined positions.
C. Always check the foot is securely locked
into position.
A. To convert the restraint to Child use mode (from baby use mode), simply squeeze the foot
downwards to rotate the foot to the Child use - reclined position. The foot will automatically lock
into position.
Rotate to
desired position
Pull
out
Page 21

HOW TO SETUPHOW TO SETUP
40 41
The shoulder straps must be in the slots which are nearest
to the child’s shoulders, but not more than 25mm below the
child's shoulders.
Shoulder straps must be threaded through the appropriate
shoulder strap slots and then over the top of the bar at the rear
of the restraint.
ALWAYS OVER THE BAR
Strap Connector
ADJUSTING HARNESS STRAP HEIGHT:
FOR CHILD USE FORWARD-FACING
Correct tment of the harness is very impor tant as it restrains the child in the restraint. The harness
must t rmly around the upper torso of the child and be positioned so as to leave the child’s arms
and legs free.
The shoulder straps must be in the slots which are nearest to the child’s shoulders, but not more than
25mm lower than the child's shoulders. When the child's shoulders reach the upper shoulder height
marker, the child is too large for the child restraint.
Harness Adjustment Button
(if tted) or Harness Adjustment
Lever (if tted)
Harness strap Shoulder slots
Shoulder harness straps
Harness tongues and buckle
Lap strap slots
Crotch strap slots
Harness adjuster strap
Upper shoulder height marker
25mm
Page 22

42 43
HOW TO SETUP
STEPS IN CHANGING SHOULDER
STRAP SLOTS
A. Remove the restraint from vehicle.
B. At the rear of the restraint, remove one of the harness
shoulder straps from metal Strap Connector by slipping
strap through open slot.
C. Pull the shoulder strap through slot.
D. Insert shoulder strap through the restraint slot which will
position shoulder strap level with or above the child’s
shoulder, then over the metal bar. Ensure that the shoulder
strap passes through matching slots in cover and restraint
body.
E. Connect the shoulder strap to the metal strap connector at
the rear of restraint, ensuring that there are no twists in the
shoulder strap.
F. Repeat for other shoulder strap. It is better to change one
strap at a time so that the other strap will be a guide for
re-assembly.
Pull
straps
HOW TO INSTALL
INSTALLING INTO VEHICLE FORWARD-FACING
(UPRIGHT OR RECLINED)
For illustration of the installation method, the
drawings show the restraint with a base but the
method also applies with the recline foot version of
this child restraint.
A. Remove the seat from the vehicle by
disengaging the seatbelt and upper anchorage
strap.
B. Remove the padded insert (if tted) as this is
no longer required.
C. To store the Stabilising Bar, lift the cover at the
end of the seat which uncovers the stabilising
bar storage recess.
D. Press the button on the left side (facing seat)
and gently push stabilising bar back and then
down into the recessed area.
E. Re-attach the cover at the end of the seat.
Rotate
backwards
Then push
inwards
Stabilising
bar
Hook and Loop
attachment
IMPORTANT:
DO NOT USE RESTRAINT IN FORWARD-FACING POSITION WITH THE STABILISING
BAR PULLED OUT.
Do not recline into baby position when using restraint in forward-facing child use
mode.
Ensure the harness is in the correct position (Refer to pages 40 to 42).
Button under trim
If using the head pillow adjust the height using the adjusters
so the side wings of the head pillow are just above the
shoulders. See page 55 and 56 for adjustment method.
Bar
Page 23

44 45
Always attach the hook and remove slack
HOW TO INSTALLHOW TO INSTALL
L. Tighten the Adjustable Upper Anchorage Strap by
pulling the adjustment strap to remove slack as
shown below, but do not over-tighten causing the
restraint base to lift off the vehicle seat.
M. Roll up the excess strap tightly so the webbing is
thick enough to be held in the storage band.
Attachment Clip
Car's Anchor Fitting
Pull Adjustment
Strap to remove
slack
Storage
Band
Press
Roll up excess
strap tightly so the
webbing is thick
enough to be held
in the storage band.
K. Fit the attachment clip on the upper anchorage strap to
the car's anchor tting as shown. Make sure to remove as
many twists as possible from the upper anchorage strap.
NOTE: Seatbelt extenders should not be used if the
seatbelt is not long enough to secure the child restraint.
If they are used then the buckle tongue must not enter
the seatbelt path.
Ensure lap part of
seatbelt is below
the hooks
Pull the sash belt
through the lock-off
to fully tighten the
seatbelt
Slacken the sash
belt and feed into the
lock-off
Lap Seatbelt
Pull sash portion
of seatbelt to
remove slack
1
F. Position the restraint in forward-facing
mode and align restraint centrally within the
chosen seating position.
Some vehicle seat fabrics (particularly
velours) may be damaged by a child
restraint used continuously. We recommend
the use of a full Messy Mat™or thick towel
to keep the vehicle seat in good condition.
G. Fully lengthen seatbelt. Insert seatbelt
tongue through the "forward-facing" seatbelt
path (yellow path), ensuring that the seatbelt
is behind the harness straps and that the
lap part of the seatbelt is below the hooks
as shown.
If not tted with lock-off, allow the sash belt
to sit at the top of the seatbelt path, see
gure H
1. Allow excess sash belt to feed
back into the retractor.
H. Engage the seatbelt buckle and tongue,
ensure to remove all slack from the lap part
of the seatbelt 1 by pulling sash belt 2.
I. If tted with Upper lock-off, grasp the sash
belt 2 between thumb and ngers in each
hand and allow some slack in the belt. Now
slide the slack belt up into the lock-off slot,
up to the top of the slot. If the belt is not
slack it will not enter the lock-off slot.
H
H1
I
J
2
J. Pull the sash belt 2 through the lock-off to fully
tighten the seatbelt. The sash belt 2 must not be
tight when feeding it into the lock-off slot. The
child restraint should now be rmly tted to the
vehicle seat.
Allow the excess sash belt to feed back into
retractor.
Without Upper
Lock-off
2
Page 24

46 47
HOW TO INSTALL
Adjuster Strap
Pull to
lengthen
Push Harness
Adjustment Button
PLACING CHILD IN THE RESTRAINT
A. Lengthen the harness by pushing and holding
the Harness Adjustment Button (if tted)
while pulling on both shoulder straps until the
harness is fully lengthened. Release the harness
adjustment button when there is enough slack.
Alternatively, if you have a Harness Adjustment
Lever, lift the lever while pulling on both shoulder
straps until the harness is fully lengthened.
Anchor
Fitting
Pull to
remove
slack
Attachment Clip & Cover
Storage band
Upper Anchorage
Adjustment Strap
Upper Anchorage
Strap
HOW TO INSTALL
FITTING SUMMARY
Adjuster Strap
Pull to
lengthen
Lift Harness
Adjustment Lever
Child use
seatbelt
path
FORWARD-FACING
BELT PATH;
marked in yellow.
With Upper
Lock-off
(if tted)
Without Upper
Lock-off
IMPORTANT:
Always roll up the excess Upper Anchorage Strap.
Page 25

48 49
HOW TO INSTALL
B. Place the child in the restraint and feed each arm through shoulder
straps. Pull the harness buckle up between the child’s legs.
C. Fit either harness tongue into
the harness buckle followed by
the other tongue until a click is
heard. Should the second tongue
not insert, press the red button
and reinsert the tongues. Ensure
secure engagement by pulling the
harness straps.
Click
Tongue
Buckle
C
D. Remove all of the slack from
the harness lap straps by pulling
shoulder straps, then pull the
harness adjustment strap to adjust
harness to a comfortable but rm
t.
Check that the slack in straps is
removed. The Shoulder Harness
Straps must t rmly to the child. A
loose harness could result in serious
injury in an accident.
Do not use restraint if straps do
not tighten and contact your local
authorised service agent for repair.
CAUTION: A LOOSE HARNESS IS DANGEROUS.
Harness Lap Straps
Shoulder Straps
Crotch Straps
Pull to remove
slack from
harness lap
straps
D
HOW TO INSTALL
Pull to
tighten
Page 26

50 51
TO RECLINE RESTRAINT
The child restraint may be reclined or positioned upright without
removing the child from the restraint. Lift the recline latch
and push or pull to get the desired recline. There are 4 recline
positions. You will be able to gain partial recline from upright
position by just pushing the recline latch up and pulling the seat
forward. The extent of the recline will be limited by the location
of the anchorage point. Loosening of the upper anchorage
strap may be required when positioning the restraint to either
an upright or reclined position. Once the required position
has been determined ensure to tighten the upper anchorage
strap and re-check the car seatbelt tension i.e., all slack to be
removed.
Push recline latch up while
moving restraint into desired
recline position.
HOW TO USE
TO REMOVE RESTRAINT FROM VEHICLE
A. Disengage the seatbelt tongue from the buckle and remove
from the restraint. Pull the sash belt downwards to pull it out
of the Upper lock-off (if tted).
B. Release the stored strap and fully press Upper Anchorage
Strap Adjuster Button (1) while pulling the Upper Anchorage
Strap (2) to slacken as shown right. In some vehicles
loosening of the Upper Anchorage Strap may be difcult. If
so, try pushing the restraint against the vehicle seat back or
slightly lifting the restraint to release the tension.
C. Disengage Attachment Clip from Anchor Fitting. The child
restraint is now disconnected.
Fully press Adjuster Button (1)
while pulling Upper Anchorage
Strap (2) to lengthen.
Storage
Band
1
2
TO REMOVE CHILD
Press the red button on Harness Buckle and then both Harness tongues will be released. Lift the
shoulder straps from the child’s shoulders, the child can then get out.
CARE & MAINTENANCE
TO CLEAN HARNESS BUCKLE:
If sticky liquids such as baby formula, fruit juice, etc. get inside
your Harness Buckle, it may become sluggish. An indication of
a sluggish Harness Buckle is that you cannot hear a click when
engaging the Harness Tongues. To restore the Harness Buckle to
good working order it needs to be cleaned as follows:
A. From the underside of the restraint pull each crotch 3-bar slide
then turn 3-bar slide and push through each slot to remove
the Harness Buckle from the restraint.
B. Place the Harness Buckle under warm (max. 40 degrees
Celsius) running water as shown below. Let the water run
through the mouth of the buckle for ve minutes. Do not
immerse the harness in water.
Cover
Body
3- bar slide
REGULAR CARE OF THIS RESTRAINT:
Please check the following items regularly to ensure the safety of your child:
A. Check the webbing for fraying,
B. Check that the buckle clicks and is not sluggish or sticky in operation,
C. Ensure there are no cracks in moulding or the plastic moulding,
D. Check the harness adjuster is operating and is clamping the webbing,
E. If any part of the restraint is cracked or broken, seek repair immediately or replace the child restraint,
F. Ensure the buckle is free of uff, liquid or other matter that may enter the buckle slots. Clean the
buckle if it is sluggish to engage.
SEAT
Use only mild soap and water to clean all webbing, metal and plastic parts of the restraint using a
damp cloth. Do not use chemicals or cleaning agents.
Page 27

CARE & MAINTENANCE
52 53
CARE & MAINTENANCE
TO REMOVE COVER:
A. Remove the restraint from vehicle.
B. Disengage the harness tongues from the harness buckle.
C. Remove any accessories, pillow, padded insert, shoulder
pads (if tted).
D. Disconnect shoulder harness straps from Metal Strap
Connector at the rear. Pull the shoulder straps out of the
shoulder strap slots. Note the shoulder slot position.
E. Unhook elastic loops at the back of the restraint and under
the front of the restraint, there are 4 places.
F. Remove the cover while feeding the Crotch Buckle, Harness
Tongues and strap through the lap and crotch strap slots
in the cover. If tted with a Harness Adjuster Button,
disconnect the cover from the button housing.
C. Engage and disengage the Harness Tongues and Buckles several
times until a strong audible click is heard when inserting the last
tongue.
D. If you still cannot hear a strong audible click after engaging the
Harness Tongues and Buckle, then repeat cleaning several times.
If the Harness Buckle cannot be returned to its original working
condition then contact Britax Childcare Customer Service.
E. Ret the harness buckle to the restraint with the red button facing
out and feeding each 3-bar slide through appropriate slot.
Click
Crotch slots
E
F
Metal Strap Connector
D
Lap slot
COVER (STYLE MAY VARY)
The restraint has a ame retardant cover which is removable for cleaning. Cleaning instructions are on
the care label attached to the cover. If uffy cover is tted then washing cover prior to use will remove
excess uff.
Drying the Infant Safety Cushion Insert will take additional time as the impact foam will absorb
moisture. Before washing re-engage the hook and loop on the cover and Seat Pad to prevent the 'hook'
damaging the fabric.
The cover has been designed to protect your child when seated in the restraint. Care should be taken if
children either eat or drink while in the restraint as some food or drink products may cause damage or
marking to the cover. Wash or clean immediately.
Do not pull sticky items from covers as the cover may be damaged - soak in water and gently remove.
Unhook elastic loop at
the back of the top of the
restraint
Page 28

B
CARE & MAINTENANCE
TO REPLACE COVER:
A. Stretch the cover over the top of the
restraint rst, then the sides. Feed Harness
Tongues and shoulder straps through the
Lap strap slots on the cover.
B. Stretch the cover around the rim of the
restraint, Hook elastic loops at the back
of the restraint and under the front of the
restraint, there are 4 places.
C. Feed the Crotch Buckle through slots in
cover.
D. Ensure the cover is stretched over Push
Button housing if tted with a Harness
Adjustment Button. (If tted with a Harness
Adjustment Lever, pull the adjuster strap
through the cover). Ensure none of the
harness straps are twisted.
E. Ret the harness strap by feeding through
the previous shoulder strap slots. If you
don't recall the slots used refer to pages
17, 18, 19 or pages 40, 41, 42. You MUST
thread the shoulder strap OVER cross bar
and then re-attach the straps to metal strap
connector at the back of the seat (see page
42). Check that the straps are connected.
F. Ret the Padded Insert (if required) and any
other accessories if required.
G. Ret to the vehicle.
Hooks
Button/
studs
IMPORTANT:
ONLY USE SAFE-N-SOUND SEAT COVERS AND ACCESSORIES THAT ARE DESIGNED AND TESTED
FOR USE WITH THIS PRODUCT.
The following instructions apply to accessories that may be supplied with this restraint at point of
purchase. If not, a variety of accessories are available from various retailers of Safe-n-Sound products.
CANOPY (IF FITTED)
The Canopy has been designed to shade your child from direct
sunlight.
A. Attach the elastic straps at the back of the canopy to the
hooks at the rear of the restraint.
B. Attach together the button/studs sewn on the ends of the
hood and on the sides of the trim.
HEAD PILLOW (IF FITTED)
The head pillow (if tted) is designed to provide extra comfort
and may be one of two styles.
Style 1. Head Pillow loose.
Position the bottom of the head pillow level with the top of the
child's shoulders. Ensure the upper strap is always over the top
of the restraint and the lower strap can be threaded through the
slot above the harness straps (see illustrations).
Head
pillow
Strap for
adjusting
the pillow
Harness strap
Adjuster
Feed through middle sot
Loop over to bottom
slot and pull to tighten
54 55
ACCESSORIES
Hook elastic loop at the back
of the top of the restraint
Cross Bar
Cross Bar
A
Feed Harness Tongues and
shoulder straps through the
Lap strap slots on the cover
E
Metal Strap Connector
E
Page 29

56 57
ACCESSORIES
CROTCH PAD (IF FITTED)
The Crotch Pad is designed to provide extra comfort
for baby or child and is tted to the restraint as follows:
Feed the Crotch Buckle through the slot in crotch pad as shown
and position the pad at the back of the buckle.
SHOULDER PADS (IF FITTED)
Shoulder Pads are designed to provide extra comfort for baby or
child and are easily tted to the shoulder harness straps by:
A. Pull apart fasteners and remove shoulder pads from harness.
B. Re-t shoulder pads to harness and attach fasteners for use.
Messy Mat
ACCESSORIES
Crotch Pad
(If tted)
Shoulder
Pads
Head
Pillow
MESSY MAT™ (IF SUPPLIED)
The Messy Mats have been specically designed to protect your
vehicle seat from damage by the child restraint and children’s
shoes rubbing against it. If the Messy Mat has been supplied it
must be used to protect the car upholstery.
Place pocket on edge of seat, smooth back toward seat join ('A')
and t in any excess Messy Mat into the join of the car seat ('A').
CAUTION:
The Messy Mat pocket is only for small, light items. DO NOT
overload the pocket with heavy, bulky items as this may damage
the pocket or cause passengers to trip over them.
Pocket
Long Messy Mat
(if supplied)
A
Pocket
Note: Some Messy Mats
may not have pockets.
Short Messy Mat
(if supplied)
A
POCKETS (IF FITTED)
The pockets sewn on the trim are designed for your convenience. They can hold those necessary
items that you need at a moments notice. e.g. Bottle, face washer, toy etc. They can also hold a CD or
MP3 player.
CAUTION:
If using the pocket to store lled bottles, please ensure contents are not contaminated due to
prolonged storage. Ensure contents are not crushed by car door when closing.
HEAD PILLOW/HEAD LINER (IF FITTED)
Style 2. Head pillow attached to cover.
Position the bottom of the head pillow level with the top of the child's shoulders. Ensure the straps are
always over the restraint. For installing the pillow see illustrations 1 and 2.
For adjusting the head pillow, pull looped strap out and feed through till the head pillow is in position,
then pull to strap to tighten (see illustrations below).
Feed through middle sot
Loop through the top
slot and pull to tighten
Pull to tighten
Lift to
lower
1
2
Page 30

58 59
ACCESSORIES
CUP HOLDER (IF FITTED)
To t the cup holder to the restraint,
insert the locating tabs through the pair
of holes on either side of the restraint.
Slide the cup holder down until it locks
into position. To remove, press the
release trigger on the bottom of the cup
holder, then slide up and out of the holes
in the restraint. Ensure the cup holder
and its contents can not be crushed by
the car door. Store the cup holder when
not in use.
WARNING: Only use for holding cups, bottles and drink cartons.
Do not use for hot drinks.
Pull crotch strap through
ap in padded insert.
TRAVELLING TIPS
SAFETY
Never hold a baby in arms when riding in a motor vehicle. In this position the baby could be thrown
against the dashboard, windscreen or other occupant and suffer serious injury or death.
When riding in a motor vehicle, never nurse a baby and use the same seatbelt for both of you. In this
position the baby or child could be crushed.
Children must be secured in appropriate restraints at all times when the car is in motion. Children
travelling unrestrained and standing up in the car are in danger of serious injury or death. Trafc
regulations in all states require children to be secured in child restraints or adult seatbelts where
available.
Plan your trip with frequent comfort stops to reduce stress on babies, young children and driver. Keep
the car well ventilated to reduce heat stress. Two car windows should be kept open to maintain a good
ow of fresh air if air conditioning is not used.
Never leave babies or toddlers in a stationary car in the sun because of the risk of heat exhaustion.
Ensure babies and toddlers are adequately shaded from direct sunlight through side or rear windows.
Be on guard against carbon monoxide poisoning which can occur through only a slight leak in the
exhaust system while travelling in a closed car.
Securely stow all heavy objects, feeding bottles, etc. that could become missiles during an accident
and cause injury to any occupant.
Release trigger
Slide cup holder into the
slots and then down, until
it locks into position
INSERT PAD - STYLE MAY VARY
The Insert Pad is designed to snugly support baby for extra support
and comfort and should be used for small babies when rearward-
facing. Discontinue use when the baby insert pad is tight t or creates
discomfort for larger babies or when the baby's shoulder's reach the
lower shoulder height marker. Do not use baby insert pad for babies
over 6 months of age. Do not use when in Forward Facing mode. Fit
as follows:-
A. Disconnect buckle and place the shoulder straps through padded
insert slots (if available).
B. Feed the crotch strap through the ap in the Insert Pad and
re-connect buckle.
Page 31

60 61
TRAVELLING TIPS
CLOTHING/BATHING
Take several changes of clothing and bibs for possible car sickness. Disposable nappies and liners are
very handy while travelling. Since it is often warmer in the car, dress the baby in light clothing. When
cooler, it is easier to place a blanket over the baby than it is to remove the baby from the restraint and
change clothes.
FEEDING
Never breast feed a baby while car is in motion. Babies will require extra feeding if travelling in the
heat. For bottle fed babies, make up the bottles and refrigerate before leaving home for a day trip. Place
in a cool bag and reheat as needed with hot water from a thermos.
Alternatively, bring boiled water in a thermos and pre-measured amounts of baby formula in small
containers. Use the water from the thermos to mix with the formula when required. Regardless which
method is used, it is always a good plan to carry some boiled water in a sterile container or bottle.
Do not attempt to carry warm milk because germs multiply rapidly in warm milk.
INSTALLATION OF CAR ANCHOR FITTING
Consult the vehicle owner’s handbook for location of anchorage ttings or anchorage points and the
possible use of spacers. Some vehicles may have an anchor tting tted by the vehicle manufacturer.
If anchorage points cannot be found refer to car manufacturer or local child restraint tting station or
trafc authority for optimum position of anchorage point and the use of spacers.
UPPER ANCHORAGE STRAP
IMPORTANT:
THE ATTACHMENT CLIP COVER MUST ALWAYS BE USED AS IT PREVENTS THE RISK OF
INCORRECT FITMENT OF THE ATTACHMENT CLIP TO THE ANCHOR FITTING. ALWAYS ENSURE
THAT THE ATTACHMENT CLIP IS CORRECTLY ENGAGED TO THE ANCHOR FITTING AND NOT
HOOKED OR FITTED TO ANY OTHER OBJECT BEFORE EACH USE OF THE RESTRAINT. THIS IS
ESPECIALLY IMPORTANT IN VEHICLES SUCH AS STATION WAGONS, VANS, HATCH BACKS OR
VEHICLES WITHOUT A FIXED PARCEL SHELF, SINCE THE ANCHOR POINT IS USUALLY NOT VISIBLE.
IMPORTANT INSTALLATION NOTE:
In some vehicles the anchor tting in the rear vertical panel can only be installed in one way. Please
refer to vehicle owner’s handbook or a child restraint tting station for correct method.
Page 32

62 63
Extension Strap distance to be measured.
Length 300mm (Use Safe-n-Sound part 0035).
Length 600mm (Use Safe-n-Sound part 0036).
Available from all major child restraint retailers.
DISTANCE TO MEASURE TO THE
ANCHOR POINT
Anchorage Clip Cover
The shaded areas of this diagram illustrate the possible locations of the anchor tting. Within each
shaded area is an anchor tting showing the correct way to install the tting. Ensure the anchor tting
is aligned as illustrated unless stated otherwise in the vehicle owner’s handbook.
Adjustable upper
Anchorage strap.
Front of Vehicle
45°
IF THE CAR IS FITTED WITH CHILD RESTRAINT
ANCHORAGE POINT
Locate the anchorage point behind the rear seating position.
(consult the car owners handbook for the location of the
anchorage point). The anchorage point should be directly
behind and central to the restraint. Remove thread plug from
the parcel shelf/oor/roof, etc. and install anchor bolt and
tting as shown in Fig 1.
CAUTION: DO NOT OVERTIGHTEN ANCHOR BOLT.
OVERTIGHTENING MAY FRACTURE OR BREAK BOLT.
MAXIMUM TORQUE IS 20 Nm (14.75 ft.lb.)
Note: Minimum of ve full turns of anchor bolt is required
before tightening force is applied.
IF THE CAR IS NOT FITTED WITH CHILD RESTRAINT
ANCHORAGE POINTS
For Sedans only - Drill 9mm diameter hole in the parcel shelf
on the centre line of the seating position as shown in Fig 3.
Before drilling the hole, check the underside for accessibility.
Install the anchor bolt as shown in Fig 2.
For vehicles other than Sedans - In Australia, consult your
nearest child restraint tting station or trafc authority for
vehicle inspection to nd the best, correct position for
the placement of the anchorage point, and for the correct
attachment bolt length and use of spacers. In New Zealand,
consult the agent for the vehicle.
Note to Queensland purchasers: The installation of anchorage
points must be approved by authorised ofcers appointed by
Queensland Transport. Authorised ofcers can be sourced
from all Queensland Transport Customer Service and
Queensland Ambulance Service Centres.
Front of Vehicle
UPPER ANCHORAGE
FITTING
Attachment Bolt
Lock washer
Anchor
tting
Spacer(s) if
required
Vehicle metal
structure
Vehicle
trim
Fig.1.
Attachment Bolt
Anchor tting
Spacer(s) if
required
Vehicle metal
structure
Reinforcing
washer (cone
downwards)
Lock washer
Secure nut
UPPER ANCHORAGE
FITTINGS FOR SEDANS
ONLY
Vehicle
trim
Fig.2.
INSTALLATION OF CAR ANCHOR FITTING INSTALLATION OF CAR ANCHOR FITTING
Page 33

ONLY USE A 5/16 UNC GRADE 5 BOLT. IF THE BOLT IS NOT THE
CORRECT LENGTH THE CAR MANUFACTURER’S HAND BOOK
CAN PROVIDE ADVICE ON THE CORRECT LENGTH BOLT.
CHILD RESTRAINTS MUST NOT BE ATTACHED TO UNSOUND
METAL OR TO WOOD, OR SYNTHETIC STRUCTURES. WHEN
DRILLING 9 MM HOLE DO NOT DRILL THROUGH FUEL LINES,
FUEL TANKS, ELECTRICAL WIRING, OR RADIO SPEAKERS.
WEBBING STRAPS MUST BE PROTECTED FROM SHARP
CORNERS AND EDGES. THE ANCHOR FITTING MUST BE USED
ONLY AS DESCRIBED ABOVE. IT MUST NOT BE HOOKED ONTO
ANY OTHER OBJECT.
CAR INSTALLATION ACCESSORIES
(From retailers of Safe-n-Sound products)
EXTRA ANCHOR KITS: Available for using the restraint in additional cars.
Re-order no: 0038
EXTENSION STRAPS: May be required for cars without a xed parcel shelf.
Re-order no: 0035 (length 300mm) or
0036 (length 600mm)
GATED 3-BAR SLIDE (Locking clip): For converting lap-sash seatbelt to lap belt, and to obtain a better
t to the car where the tted lock-off may not be suitable. Most cars will not need this.
Re-order no: 0215.
64 65
Note: Marking on
the top of a Grade 5
Bolt.
Front of Vehicle
Centre line of
seating position
Fig.3.
200mm
min.
If your restraint has been involved in a severe crash, you should destroy the restraint even if no
damage is obvious. Some insurance companies offer vehicle insurance which covers or partially
covers the replacement of your child restraint. Contact your insurance company for further details.
Your insurance company may require you to keep the child restraint for assessment, but do not use
the child restraint after a severe crash. To assist you in making an accident insurance claim cut the
following statement and include it with your claim.
All Safe-n-Sound child restraints are manufactured to Australian/New Zealand Standards
AS/NZS1754-2010 which requires us to advise users of child restraints to "Destroy the
entire restraint if it has been in use in a severe crash, even if no damage is obvious". The
joint Australian/New Zealand Standards committee CS/85, advise that this statement
applies whether a child was in the child restraint or not. We consider a "server crash" as
being one where the main body structure of the vehicle is distorted.
There is no method of determining if the restraint has been damaged and we concur with
the Australian/New Zealand Standards in recommending destruction of the child restraint.
This notice is to advise you of the requirements of the Australian/New Zealand Standards
and our obligation in complying with the standards.
Please assist the owner of this restraint in their claim.
NOTICE TO INSURANCE COMPANY CHILD RE-
STRAINT INVOLVED IN AN ACCIDENT
New Zealand Ofce
Britax Childcare NZ Limited.
Telephone: 0508 688 822
Britax Childcare Pty. Ltd.
(Incorporated in Victoria)
A.B.N 55 006 773 600
Head ofce and registered address:
99 Derby Road Sunshine Victoria 3020
PO Box 147 Sunshine Victoria 3020
Telephone: 1300 303 330
www.britax.com.au www.britax.co.nz
IN CASE OF ACCIDENTINSTALLATION OF CAR ANCHOR FITTING
Page 34

66 67
NOTESIN CASE OF ACCIDENT
CRASH EXCHANGE
We would never want you to experience an accident, but unfortunately accidents do happen.
If you experience an accident you may be eligible for a free replacement.
The Safe-n-Sound Crash Exchange Program is a voluntary program designed to ensure that our
children are safe and that any seat that may have experienced a severe crash is taken out of the
market.
There is no method of determining if the restraint has been damaged in a severe crash, so the restraint
should be destroyed as the crash may reduce the child restraints ability to perform.
Since its inception in 2006, the Crash Exchange program has helped 100’s of families ensure that their
children have new restraints and that the restraints are not sold second hand placing others at risk.
Our Crash Exchange Terms and Application form are accessible on our website. Please visit
www.britax.com.au for further information.
Page 35

The Safe-n-Sound trademark is the property of Britax Childcare Pty. Ltd. (Australia).
The Britax trademark is the property of Britax Excelsior Limited (UK).
We reserve the right to alter this product without notice.
© 1995-2011 Britax Childcare Pty. Ltd. This product is covered by Australian and overseas
Patent applications. Patents pending.
P/No. 2201019/A
09
 Loading...