


Octagon 20 ECO

AE21 GB Issue 02
1
Octagon 20 Eco and Octagon 40 Eco
egg incubators
User instructions
Contents
Section Subject Page
1 Introduction 2
2 Unpacking 2
3 Location, Installation and Temperature 3
4 Storage of eggs 5
5 Humidity and Ventilation 5
6 Egg setting 8
7 Egg turning 8
8 Hatching 8
9 Cleaning up 9
10 Servicing 9
11 Troubleshooting 10
12 Specifications 11
AE21 GB Issue 02
2
1 Introduction
Read the instructions before use.
These instructions detail the operation of your new Octagon 20 Eco or Octagon 40 Eco incubator and optional
Autoturn Cradle. Please read these instructions carefully before setting up your machine to achieve best results
and keep these instructions safe for future reference. This document includes recommended procedures for
successful hatching but incubation involves the control and manipulation of a large number of factors and in
certain circumstances different procedures may be necessary. Your incubator is designed to allow the user to
vary the incubation conditions to suit a wide range of species in different ambient conditions and the specific set-
up for every situation is beyond the scope of these instructions.
There is a range of books available covering incubation techniques, for more information or to request a book list
please don’t hesitate to contact us.
DO NOT COVER THE INCUBATOR. FOR INDOOR USE ONLY. THE INCUBATOR MUST BE PLACED
IN AN AREA NOT SUBJECT TO SPLASHES OF WATER OR WET CONDITIONS AND OUT OF REACH
OF ANIMALS AND CHILDREN.
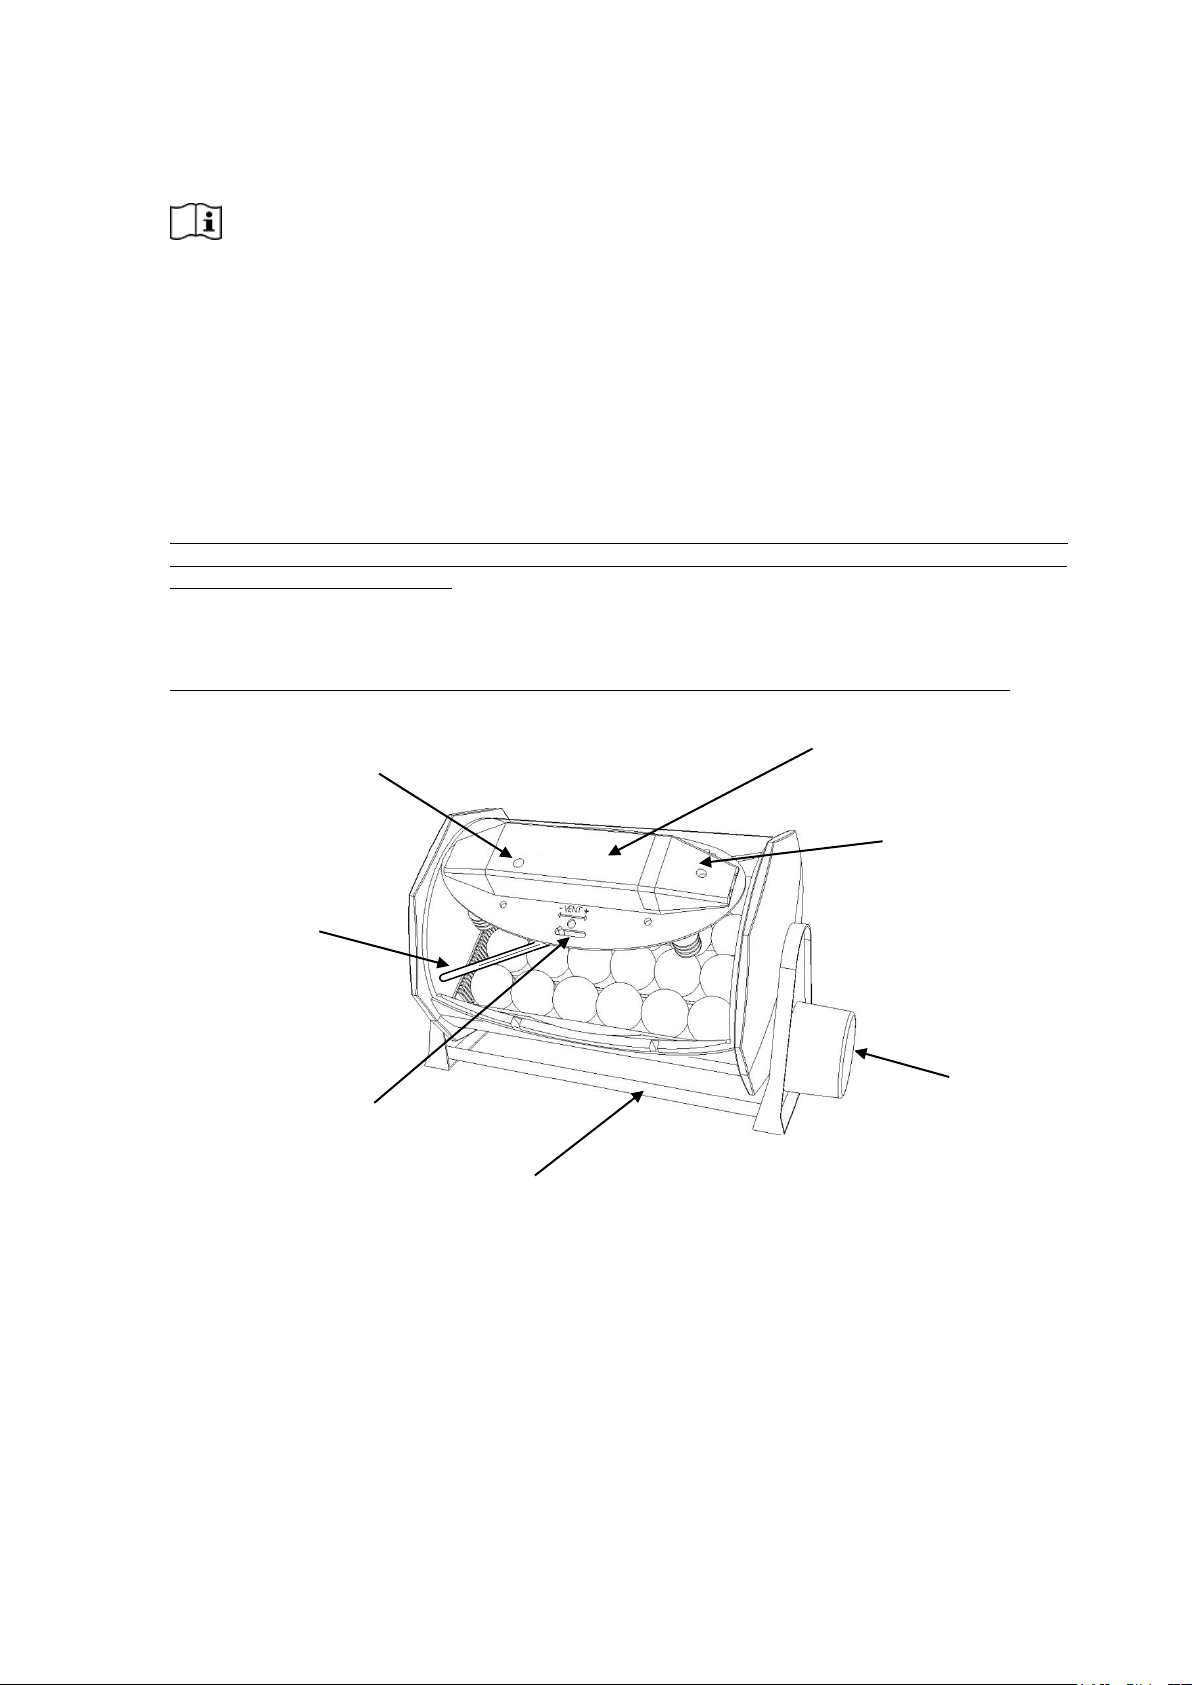
Fig. 1 Functional features of the Octagon 20 Eco (Octagon 40 Eco functionally similar)
2 Unpacking
Your incubator has been supplied in protective packaging. Please remove all tape, strapping and packing from
the incubator and parts. Retain the carton and packing materials to enable the unit to be repacked.
Your incubator will include as standard:
Quantity (Octagon 20 Eco) Quantity (Octagon 40 Eco) Item
1 1 Incubator (including removable lid)
1 2 Egg tray
1 1 Cable cover and screw
1 1 Mains cable
6 12 Wire egg dividers
Autoturn Cradle
Temperature Control
Housing
Heater Indicator LED
Adjustable Air Vent
Turning Motor
Housing
Cable / Adjustment
Spindle Cover
(remove to access
tamper-proof
temperature adjuster)
Liquid-in-glass
Thermometer
AE21 GB Issue 02
3
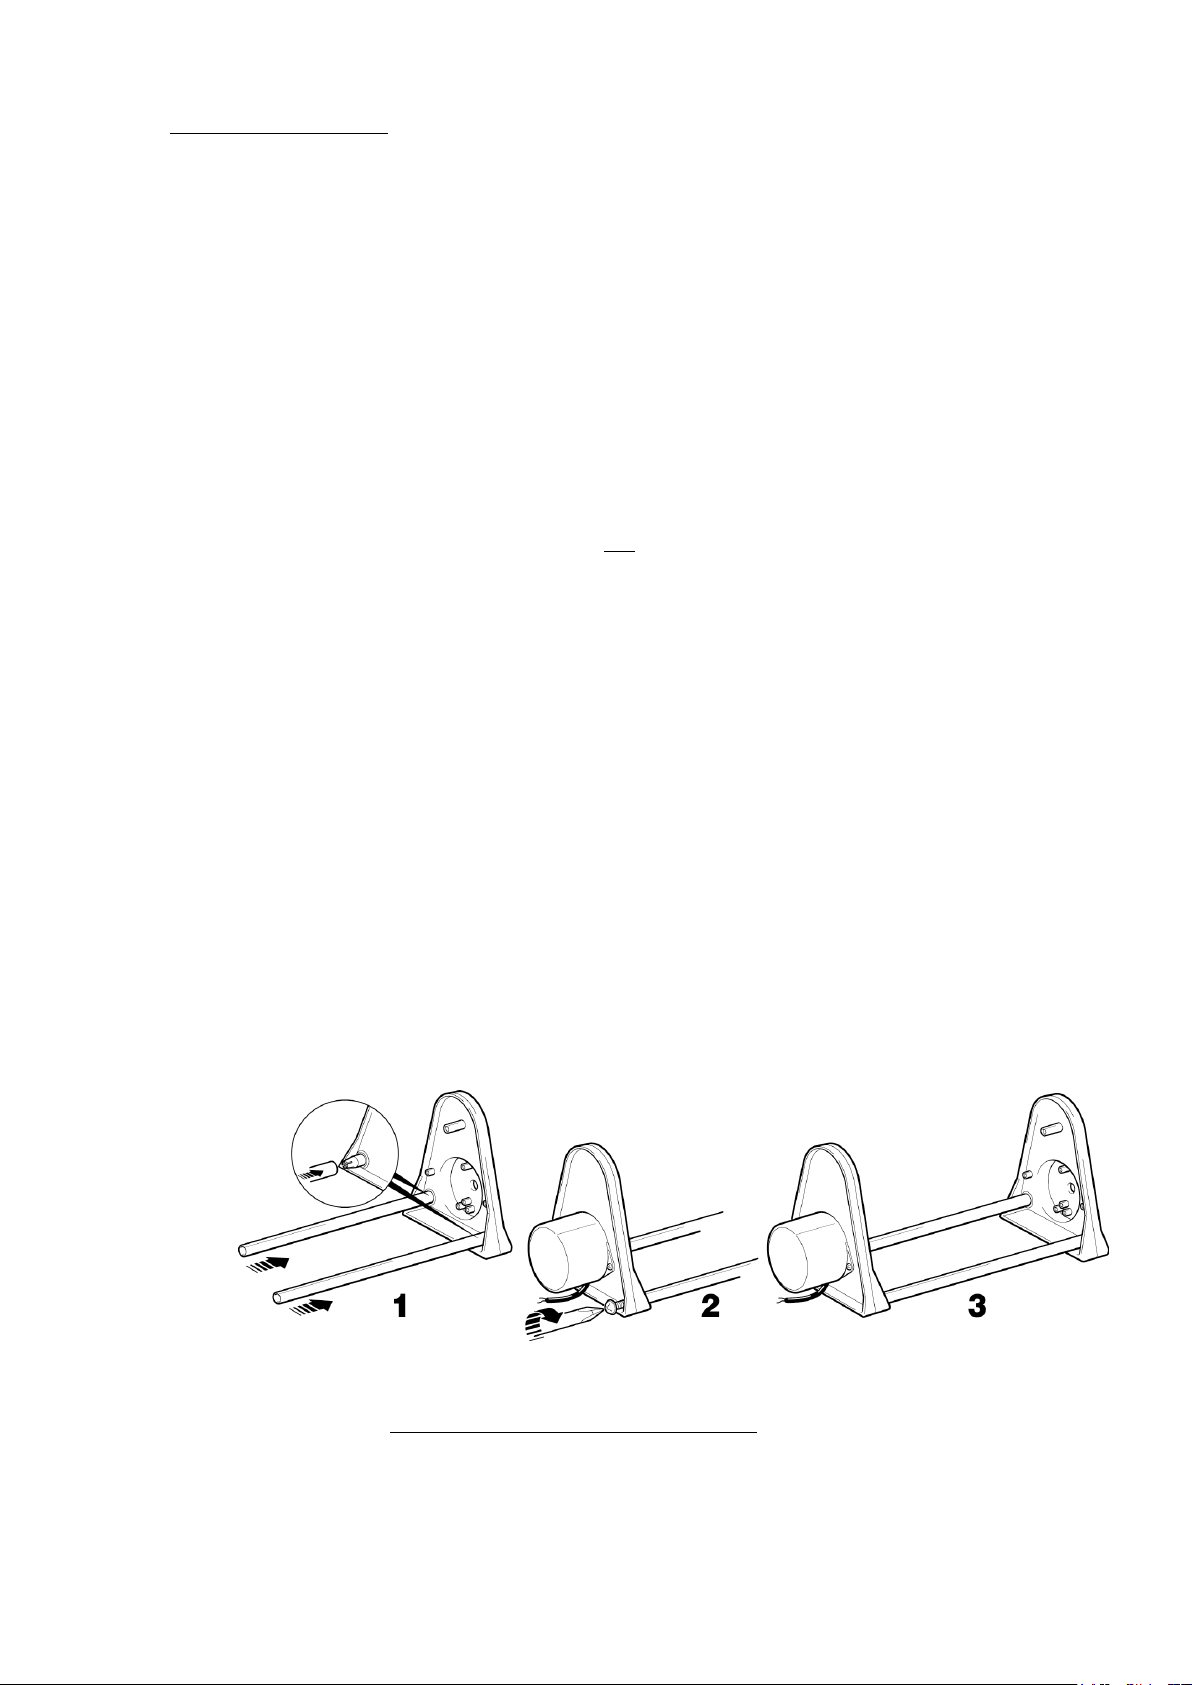
Optional Autoturn Cradle:-
2 Base bars
1 Motorised cradle end
1 Plain cradle end
1 Set of four bolts
2.1 Please identify each part and check that they are all present and undamaged. If there are any parts
damaged or missing please contact your retailer or Brinsea Products (at the address at the end of the
document). Damaged appliances shall not be used.
2.2 Check also that the electrical supply matches the machine’s requirements (marked on the technical label
on the inside of the lid of the incubator and on the inside of the blank Autoturn cradle end). The power
cord set must be an appropriately rated and approved cord-set in accordance with the regulations of the
country it is used in.
2.3 To register your new Brinsea product please visit www.brinsea.co.uk and follow the link on the right
hand side of the home page to qualify for your free 2 year guarantee.
2.4 Go to www.Brinsea.co.uk and register as a free member of the Brinsea Email Group to receive the latest
news and information such as advance notice about new products, special offers, exclusive competitions
and much more.
3 Location, Installation and Temperature
3.1 Your incubator will give best results in a room free from wide temperature variations and with generous
ventilation – particularly if several incubators are running at the same time. Ensure that the room
temperature cannot drop on a cold night. Ideally thermostatically control the room at between 20 and
25°C (68 and 77°F). Never allow the room temperature to drop below 15°C (59°F) and ensure that the
incubator cannot be exposed to direct sunlight. Do not use your incubator on the floor.
3.2 If using the Autoturn cradle: Assemble the Autoturn cradle in accordance with the diagram below (Fig. 2)
and place on a flat, level surface (workbench height is ideal). Place the incubator into the Autoturn cradle
as illustrated (Fig. 1). The cabinet is designed to locate onto the lugs at either end of the Autoturn cradle.
Take care to offer the incubator at the angle which matches that of the drive lug to avoid damage to the
mechanism. Ensure full engagement in the slots in the ends of the incubator so that the incubator is level
end to end.
FIG. 2
3.3 If using without the Autoturn cradle place the incubator upright on a flat level surface.
3.4 Remove the lid and place it where it can not be splashed by water. Lift out the egg tray and fill one of the
two water channels (Octagon 20) or two of the four water channels (Octagon 40) with water or 100:1
Brinsea Incubation Disinfectant Solution leaving the top of the liquid 3/4” (20mm) from the top of the
channel. Replace the tray and replace the lid. Slide the ventilation control to the centre of its range.
AE21 GB Issue 02
4
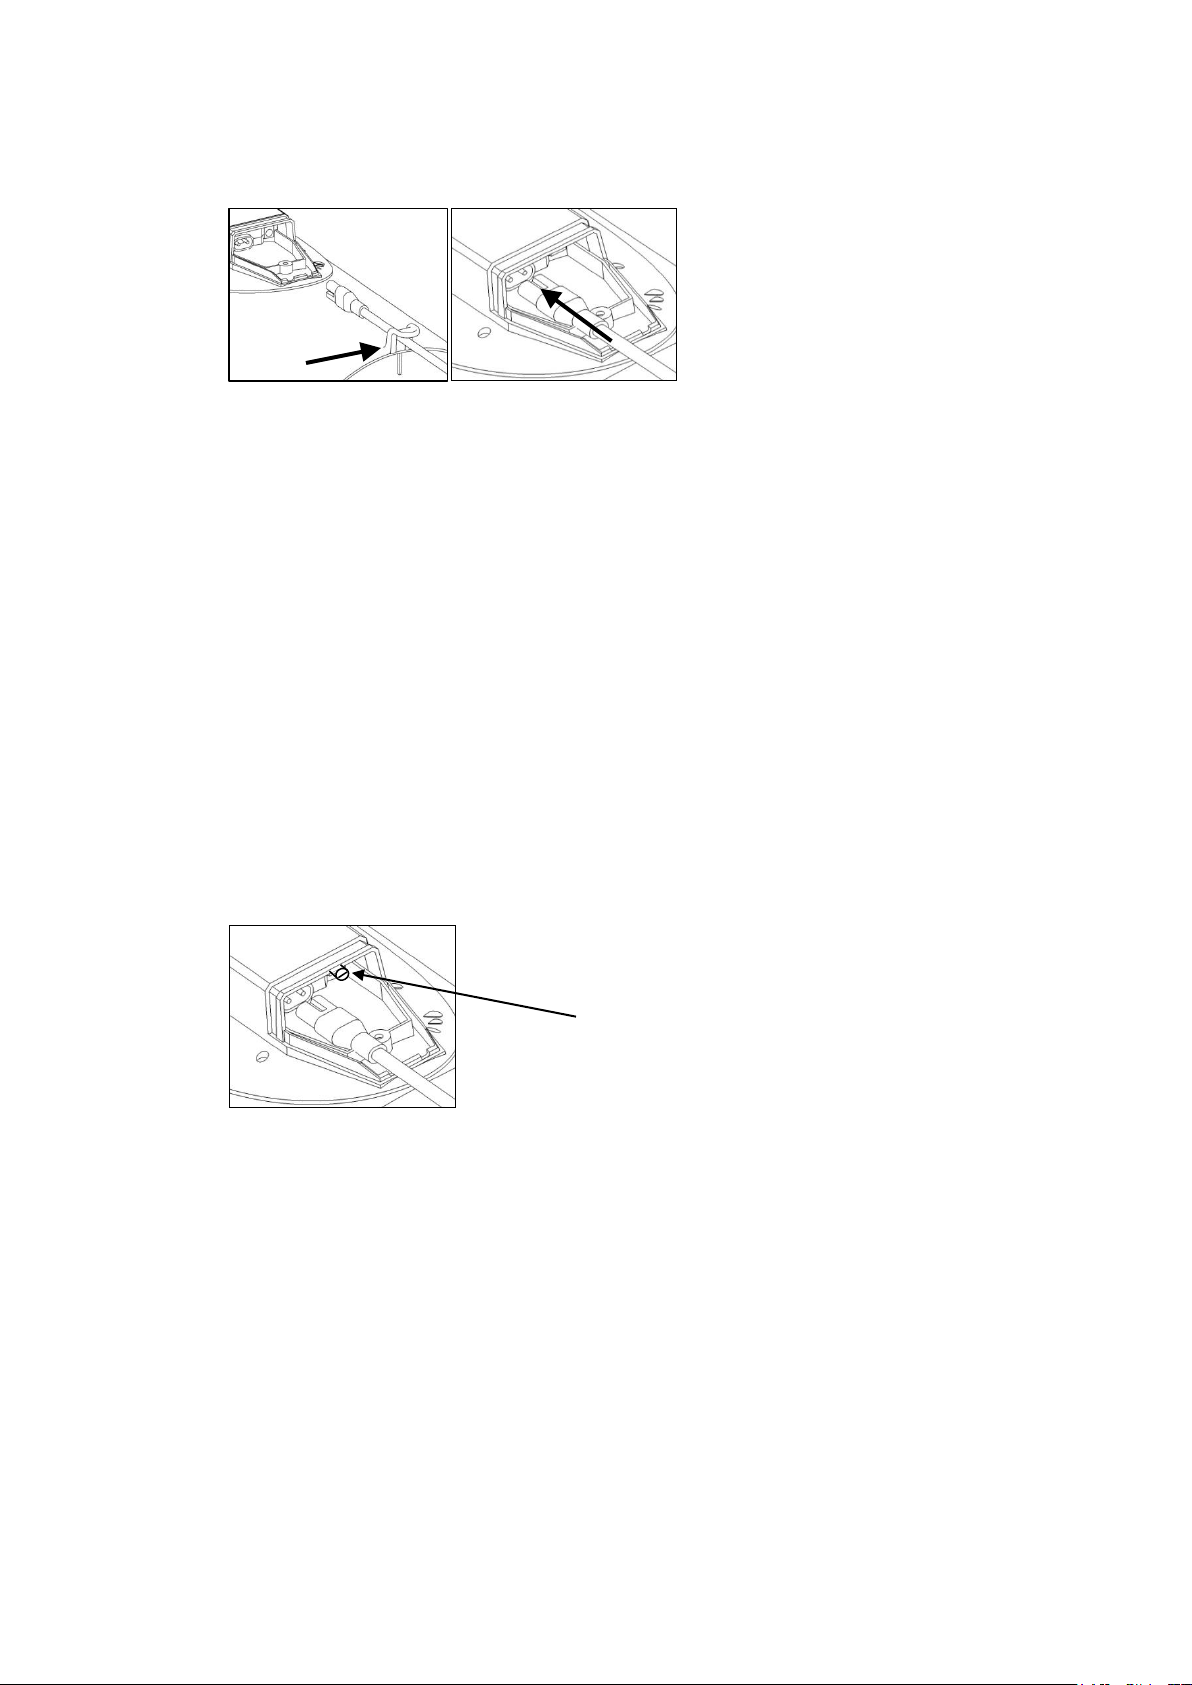
3.5 Connect the mains cable to the incubator lid. Ensure the connector is pushed fully home in its socket; it
may be quite a tight fit.
3.6 Plug the incubator mains supply cable into a suitable outlet ensuring that the cable is not pulled tight. The
incubator fan will start and the red LED in the temperature control housing will light continuously. Allow
the incubator to run for at least an hour to stabilise the temperature before making adjustments or setting
eggs.
Stable and correct temperature is essential for good results. Adjust with care.
Please note: your incubator may not be set to the correct temperature from the factory and the
following procedure must be followed before setting eggs.
3.7 As the incubator warms up and approaches its control setting the red heater indicator LED will change
from continuously on to flashing. Allow the incubator to stabilise for at least an hour before adjusting the
temperature.
3.8 Rotate the red adjustment spindle located in the cable connector housing with a small screwdriver –
clockwise to increase temperature, anticlockwise to reduce it. 1°C (2°F) is about ¼ turn of the spindle.
Refer to the thermometer to check temperature. Adjust temperature with care – small differences have
large effects on hatching performance.
When reducing temperature the red LED may go out while the incubator cools – this is normal.
3.9 Recommended temperatures: Typical incubation period:
Hens 37.4 – 37.6°C 99.3 – 99.6°F 21 days
Pheasant 37.6 – 37.8°C 99.6 - 100°F 23-27 days
Quail 37.6 – 37.8°C 99.6 - 100°F 16-23 days
Ducks 37.4 – 37.6°C 99.3 – 99.6°F 28 days
Geese 37.4 – 37.6°C 99.3 – 99.6°F 28-32 days
Parrots:
Amazons 36.8 – 37.0°C 98.3 – 98.6ºF 24-29 days
Macaws 36.8 – 37.0°C 98.3 – 98.6ºF 26-28 days
Love birds 36.8 – 37.0°C 98.3 – 98.6ºF 22-24 days
African Grey 36.8 – 37.0°C 98.3 – 98.6ºF 28 days
Eclectus 36.8 – 37.0°C 98.3 – 98.6ºF 28 days
Red Adjustment Spindle
Octagon 40
only
 Loading...