

Page 1
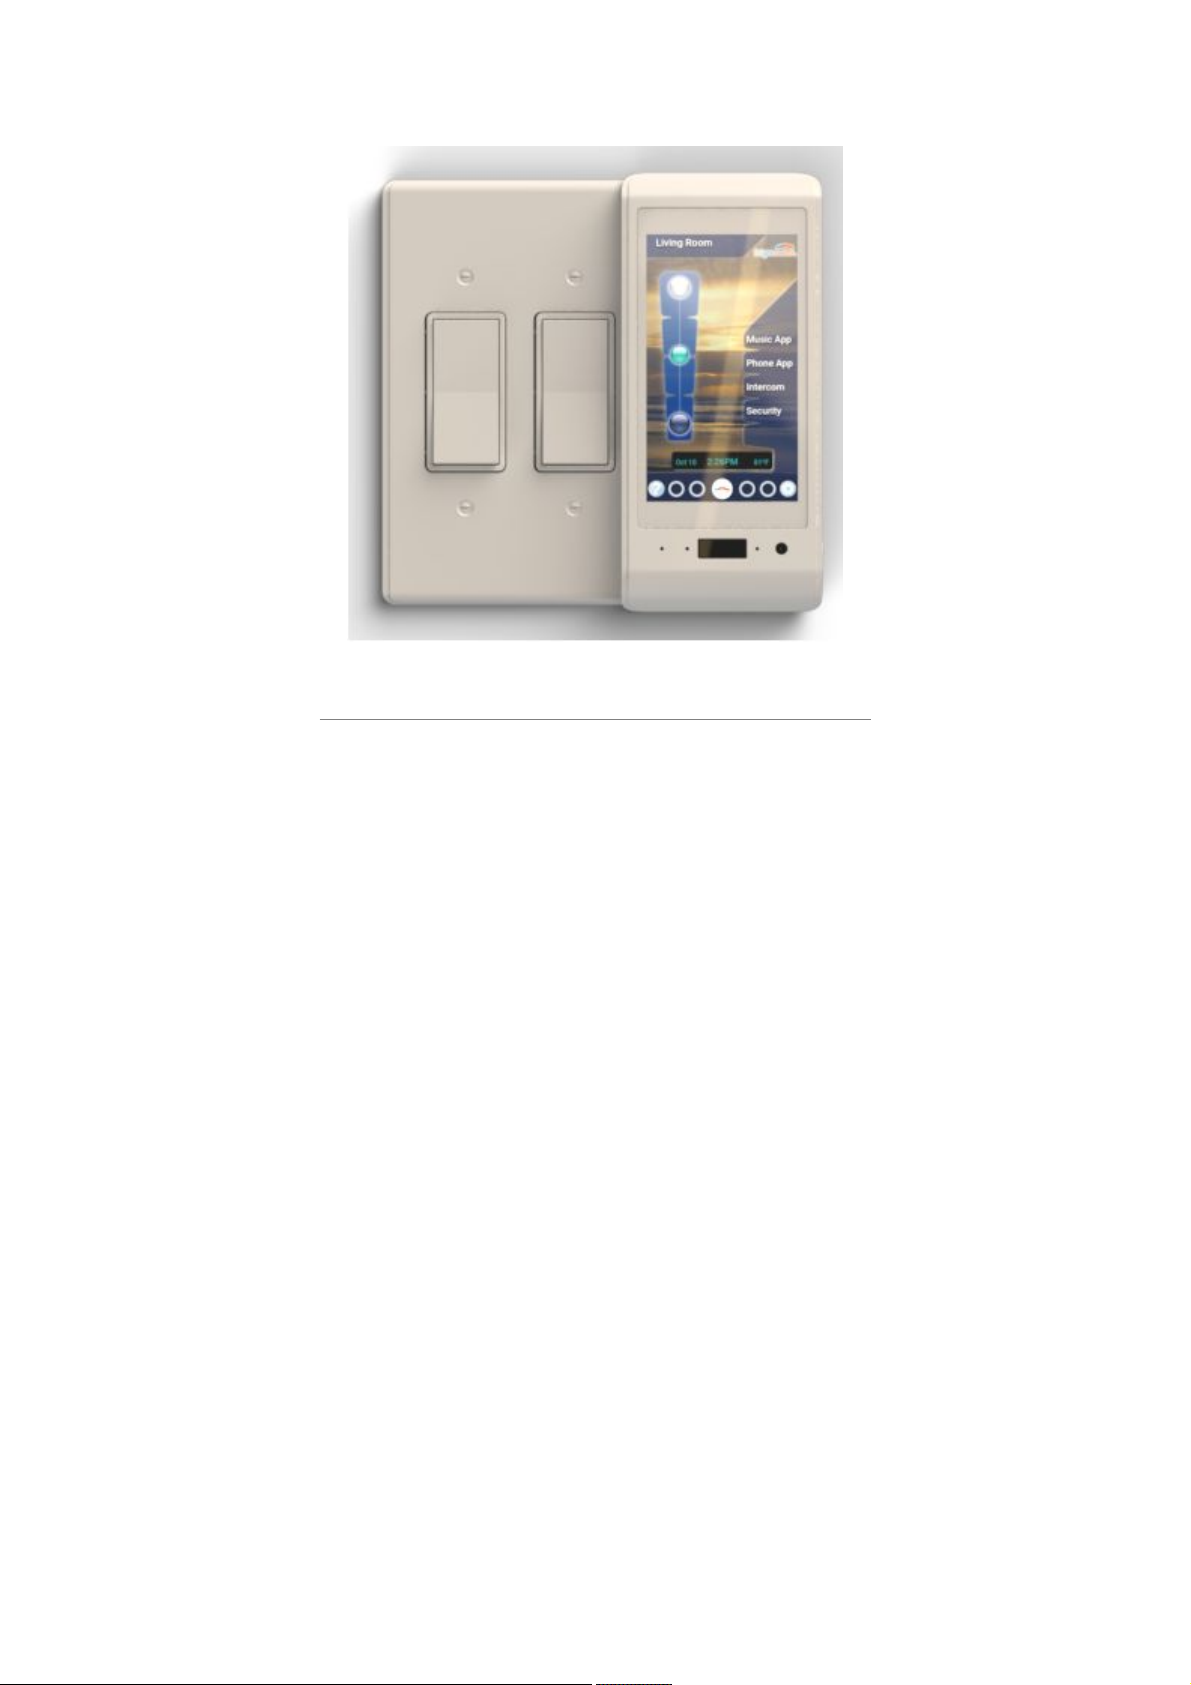
Brightswitch User's Guide
Copyright July 2017
Version 1.07
Page 2

Table of contents
INTRODUCTION ........................................................................................................................................3
--IMPORTANT ELECTRICAL NOTES-- ....................................................................................................5
--SINGLE SWITCH DISPLAY-- .................................................................................................................7
--MULTI-SWITCH DISPLAY-- ..................................................................................................................11
--USING INTERCOM-- ............................................................................................................................14
--USING SECURITY-- .............................................................................................................................15
--USING Z-WAVE-- ..................................................................................................................................16
--REMOVING ITEMS-- ............................................................................................................................19
--RESETTING-- ......................................................................................................................................20
2
Page 3
INTRODUCTION
Congratulations on receiving your new Brightswitch products!
Brightswitch is an Android tablet with sensors married to a high voltage base. It runs the Brightswitch operating
system on startup or when restarted.
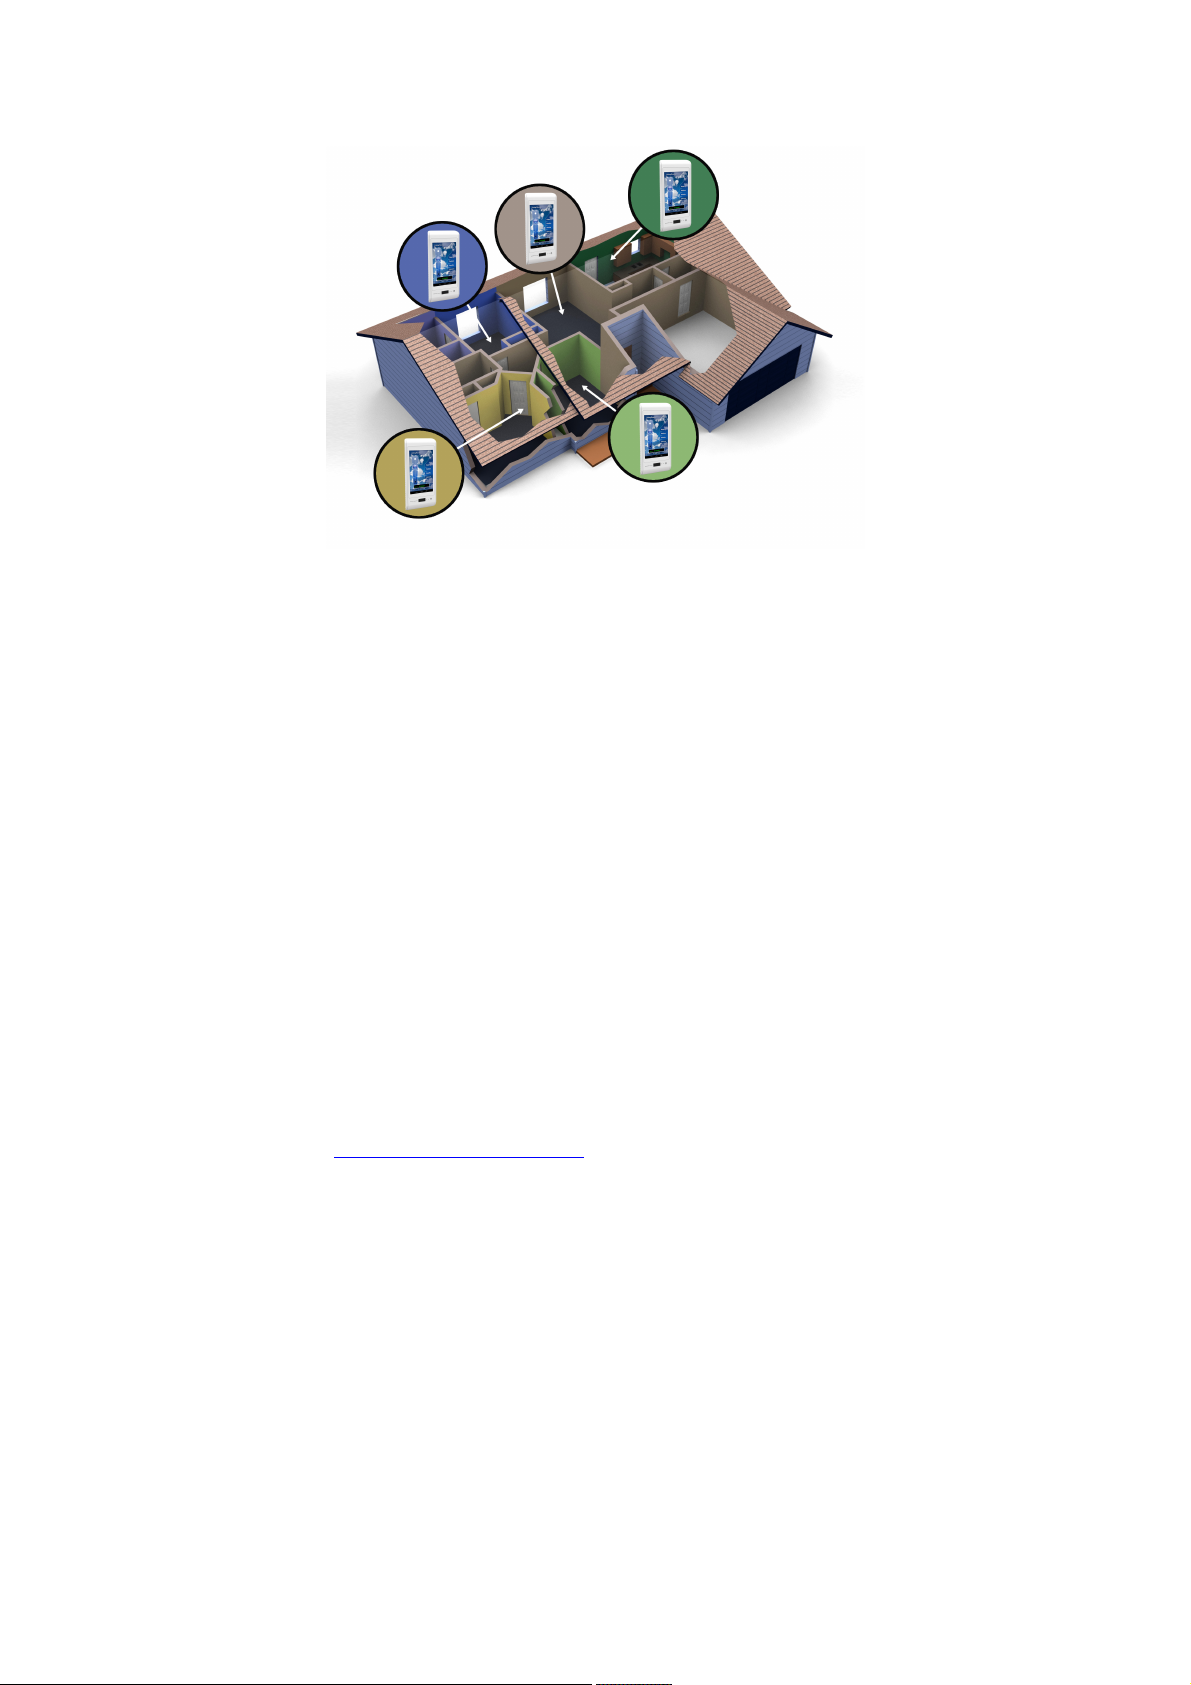
Each Brightswitch has five light locations that it can control. The first light is always connected to the Brightswitch
base. This means that Brightswitch can turn on or off and dim one high voltage AC connection. The other 4 lights
are either Brightswitches or ZWave switches.
Brightswitch has a speaker, microphone, temperature sensor, people sensor (PIR) and camera.
Each Brightswitch has included Security and Intercom functions. Brightswitch can also run two other standard
Android Apps.
Traditional Switches and Brightswitch ("Bright")
The Brightswitch base can be used as either a conventional 2 way (One switch-one light) or a conventional 3Way/4-Way (Two or more switches-one light) switch. Brightswitch will sense the status of the other switches in
a multiple switch system and always display the correct on/off state. Only use one dimmer switch, whether it
is Brightswitch or another dimmer. During startup dimming can be set to enabled or disabled. (It can also be
changed later by going to the General Configure Switch Screen.)
Brightswitches ("Brights") in a WiFi Network
When linked to a Wi-Fi network Brights automatically find each other in a matter of seconds. Once they do, they
can communicate many things between them including Intercom audio, streaming audio and video in Security,
and lighting control.
For example, every Bright knows about all the other Brights if they are all connected to the same WiFi network.
This means you can assign any other Bright to any of the extra four switch positions on each Bright. After that
you can control the other Bright high voltage connection at your local Bright, even though they are not wired
together.
Since each Bright is smart they will each save and share information about the others. This means that for
example if you replace a Brightswitch face on an existing base, the new Brightswitch can resume the identity of
the old one. It also means the network can do some neat tricks, like configure Z-Wave in one Bright from another
Bright, without physically traveling to it.
3
Page 4

Brightswitch and Z-Wave
Each Bright has a Z-Wave controller built in and can also be controlled by other Z-Wave controllers. This means
that up to four Z-Wave light switches can be added to each Bright. It also means each Bright can both be
controlled by and control other Brights over Z-Wave.
A neat trick is that Brights automatically share information. If for example you have added a Z-Wave light to the
living room Bright, you can add that switch to the Bedroom Bright just from selecting it from a list, even if the two
Brights are not on the same Z-Wave network!
The normal configuration is that each Bright has its own Z-Wave network. However, if Brights can reach each
other over Z-Wave they can be linked together in one network.
If in one network, Brights can control each other over both Wi-Fi AND Z-Wave. This creates a redundant system
where even if Wi-Fi is down, the Brights still control each other.
Also, Brights can be included in a Z-Wave hub network you may already have. In this case, the hub network is
used, and local Brightswitch Z-Wave networks are not created or used. The great part about this is that Brights
can still link to and control each other over Wi-Fi. Specific information for how to do this with various hubs is listed
later in the User Guide under the Z-Wave topic headings.
*Press and hold the Home icon on any screen to bring up the volume control.*
**Please note all Trademarked names used anywhere in
this manual are the property of their respective owners.**
Brightswitch email at: [email protected]
Brightswitch phone at : 1-844-412-2532
Introduction End
4
Page 5
--IMPORTANT ELECTRICAL NOTES--
This page introduces important information about Brightswitch and its electrical features.
Note that Brightswitch connects to high voltage. Do not open the case, or attempt to repair a
Brightswitch and excercise care when installing it. Always turn off the power when installing or
removing Brightswitch. Always turn OFF the mechanical switch on the base when changing bulbs.
If screen is black, unplug Face by pulling off base. WAIT ONE MINUTE. Plug Face into Base.
In a 3 or 4-Way installation if Brightswitch shows the wrong light
state, switch the other switch in the circuit to sync them together.
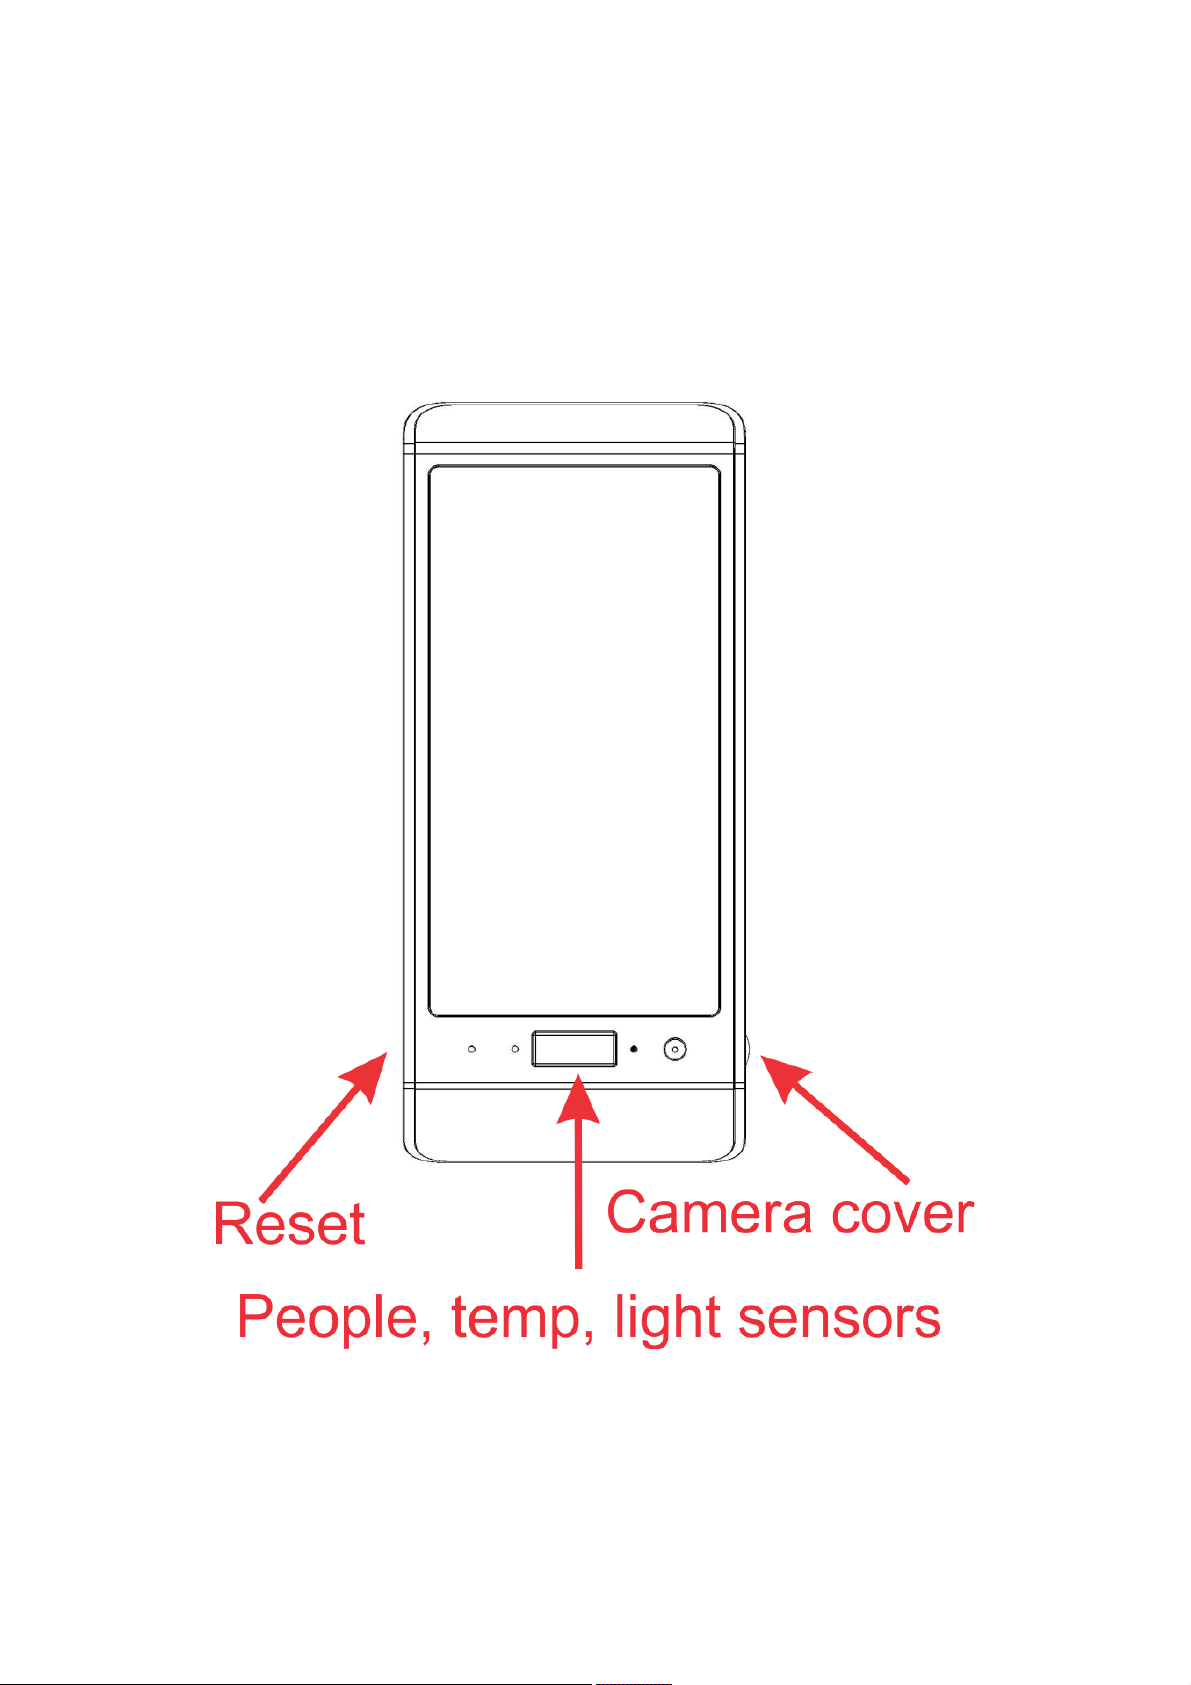
Reset
These steps each take progressively more aggressive action in resetting the Brightswitch. If the display is black,
please skip to step 3.
1) Select Gear, then General, then Exit. Select "Reset the Switch"
2) Insert a pin into the Reset hole on the left side (A tool is included). Press and release.
3) Pull Brightswitch off of the Base, removing power. WAIT ONE MINUTE. Plug Brightswitch into the Base.
5
Page 6

4) Turn off the circuit breaker WAIT ONE MINUTE. Turn on the circuit breaker. This procedure also resets the
Base.
**Note, Brightswitch contains a backup power system to keep it running when another switch is changed. This
power system needs time to clear once power is lost. This is why a one minute delay is required when power is
disconnected for more than a brief period.
Camera Cover
The camera cover provides a solid material that stops the camera from recording images. It is rotated counterclockwise (slide up) to open the camera and clockwise (slide down) to cover the camera.
Sensors
The people (PIR), temperature and light sensors work together to provide advanced functions to Brightswitch.
This area of Brightswitch should not be covered with stickers, notes or be blocked from detecting the room. If
Brightswitch is mounted near an HVAC duct it may return higher or lower temperatures than the average from the
room.
Power
Brightswitch is powered by the electricity in the home. It requires a white wire and a black wire to operate.
1) If power blinks (is very briefly interrupted) Brightswitch backup power will maintain its operation.
2) If power shuts off for a minute or more and then is restored, Brightswitch will reset and operate normally.
3) However, if power is shut of for only a number of seconds and then is restored, Brightswitch will stay off.
Please see Step 3 under Reset above to restore operation.
**Note, if a Brightswitch is in a 3-Way configuration and another switch is held halfway switched, power to
Brightswitch may be interrupted.
Load Detection
Brightswitch contains sophisticated circuitry to detect the operation of other switches in 3 or 4-Way installations. It
will display the state of power to the light when other switches in the circuit are changed.
**Note, in a 3 or 4-Way installation if Brightswitch shows the wrong light state, switch the other switch in the
circuit to sync them together
**Note, if the light being switched by the circuit is less than 10 watts or the dim level is set extremely low, the
detection circuitry in Brightswitch may be unreliable.
**Note, if a light is set to a very low dim level and another switch is operated, Brightswitch may take a moment to
indicate the correct power state after the dim level is raised.
Dimmers
Do not use more than one dimmer on a circuit. For example, if there is already a dimmer in a 3-Way circuit with
Brightswitch, configure Brightswitch for on/off operation only.
Frequent Switching
If a light in a circuit is turned on more than five times with less than 10 seconds between each action,
Brightswitch will reduce power to the light by 50% for 15 seconds. This is done to prevent overheating.
6
Page 7
--SINGLE SWITCH DISPLAY--
This display is activated by default, or by touching Gear, then
Options, then touching "All Switch" to toggle it to "Single Switch" .
Then exit by touching Back and Back again to reboot the Brightswitch system.
Brightswitch has four extra "slots" that can control other Z-Wave or Wi-Fi devices or Brights.
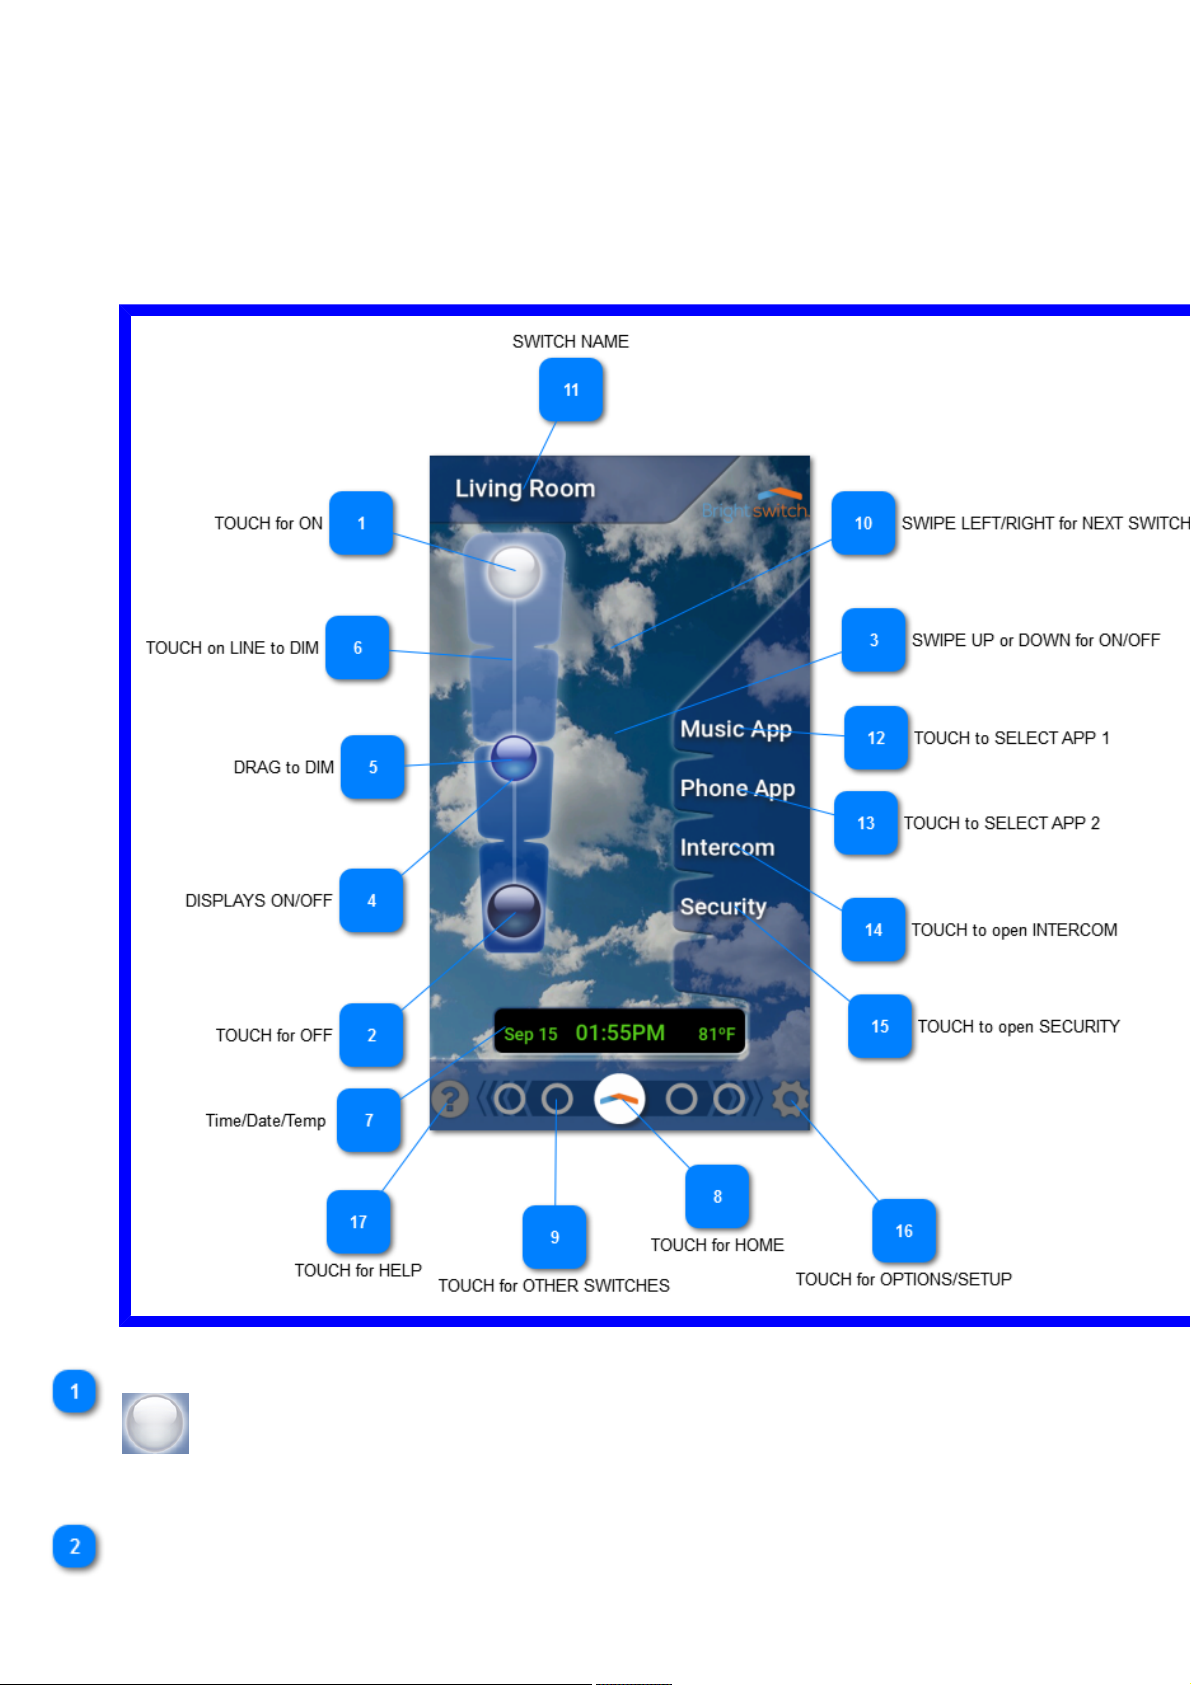
TOUCH for ON
Tap once to turn light ON. Tap twice to turn light ON and set maximum brightness.
TOUCH for OFF
7
Page 8
Tap once to turn light OFF.
SWIPE UP or DOWN for ON/OFF
Swipe up or down anywhere on the display (even over controls) to toggle the light ON or OFF.
DISPLAYS ON/OFF
Globe turns bright when on and dark when off.
DRAG to DIM
Touch and drag globe to set new dim level. Light turns on when released.
TOUCH on LINE to DIM
Touch anywhere on the vertical Dim Line to set new dim level. Light turns on when released.
Time/Date/Temp
Displays the time and date, and the temperature at the switch being displayed.
TOUCH for HOME
Touch to select the Home switch. The Home switch controls the light electrically wired to this
Brightswitch. This Home icon is used throughout Brightswitch and when running other apps. The
Home icon will always return to the main screen (either single switch or multi-switch depending on your
selected display).
8
Page 9
Press and hold the Home icon to bring up the volume control.
TOUCH for OTHER SWITCHES
Touch any of the gray circles to directly select or setup that switch or "slot". Circles that are filled are
already set up.
SWIPE LEFT/RIGHT for NEXT SWITCH
Swipe anywhere on the screen either left or right to move between the main switch and other switches.
SWITCH NAME
This is the name of the switch currently displayed. If it is the Home switch, it controls the light physically
wired to this Brightswitch.
TOUCH to SELECT APP 1
Touch this to first select an app from the Brightswitch Android system. Once selected, touch this to
activate the app. Apps can be downloaded by selecting the Options/Setup Gear and then selecting
"Apps". While Music is suggested, most Android Smart Home and other types of apps can be used here.
Please note: Once you hear the touch tone please wait for Brightswitch to respond. Some actions take
some time to process.
Please note! Modern cell phones are high in cost and offer faster processors and more memory than
Brightswitch. When you use Apps on Brightswitch, please be patient. Apps will load and respond slower
than on your phone.
TOUCH to SELECT APP 2
Touch this to first select an app from the Brightswitch Android system. Once selected, touch this to
activate the app. Apps can be downloaded by selecting the Options/Setup Gear and then selecting
"Apps" While Music is suggested, most Android Smart Home and other types of apps can be used here.
Please note: Once you hear the touch tone please wait for Brightswitch to respond. Some actions take
some time to process.
Please note! Modern cell phones run very high in cost and offer faster processors and more memory
than Brightswitch. When you use Apps on Brightswitch, please be patient. Apps will load and respond
slower than on your phone.
TOUCH to open INTERCOM
Touching here will leave the main screen and enter the Intercom control screen. Use the Home key there
to return here.
TOUCH to open SECURITY
9
Page 10

Touching here will leave the main screen and enter the Security control screen. Use the Home key there
to return here.
TOUCH for OPTIONS/SETUP
Touching the Gear will open a new screen. Many configuration and setup options are available there.
Use the Home key there to return here.
TOUCH for HELP
Touch to open help menu with three options. Touch the book to read user manual. Touch the film arrow
to watch a video demonstration for this screen. Touch the circular arrow to close help menu.
Please note: The manual is accessed over the internet so that we can update it with new information.
This means it will take a few moments to load after Brightswitch opens a browser. Please be patient.
10
Page 11
--MULTI-SWITCH DISPLAY--
This display is activated by touching Gear, then Options, then
touching "Single Switch" to toggle it to "All Switch" or "Web/AllSwitch".
Then exit by touching Back and Back again to reboot the Brightswitch system.
Brightswitch has four extra "slots" that can control other Z-Wave or Wi-Fi devices or Brights.
(Web/AllSwitch switches all lights on the switch ON/OFF when the single Internet control is turned ON or OFF.)
TOUCH to CONTROL DISPLAYED LIGHTS
Turns on and off all lights displayed on this Brightswitch.
SWITCH NAME
11
Page 12
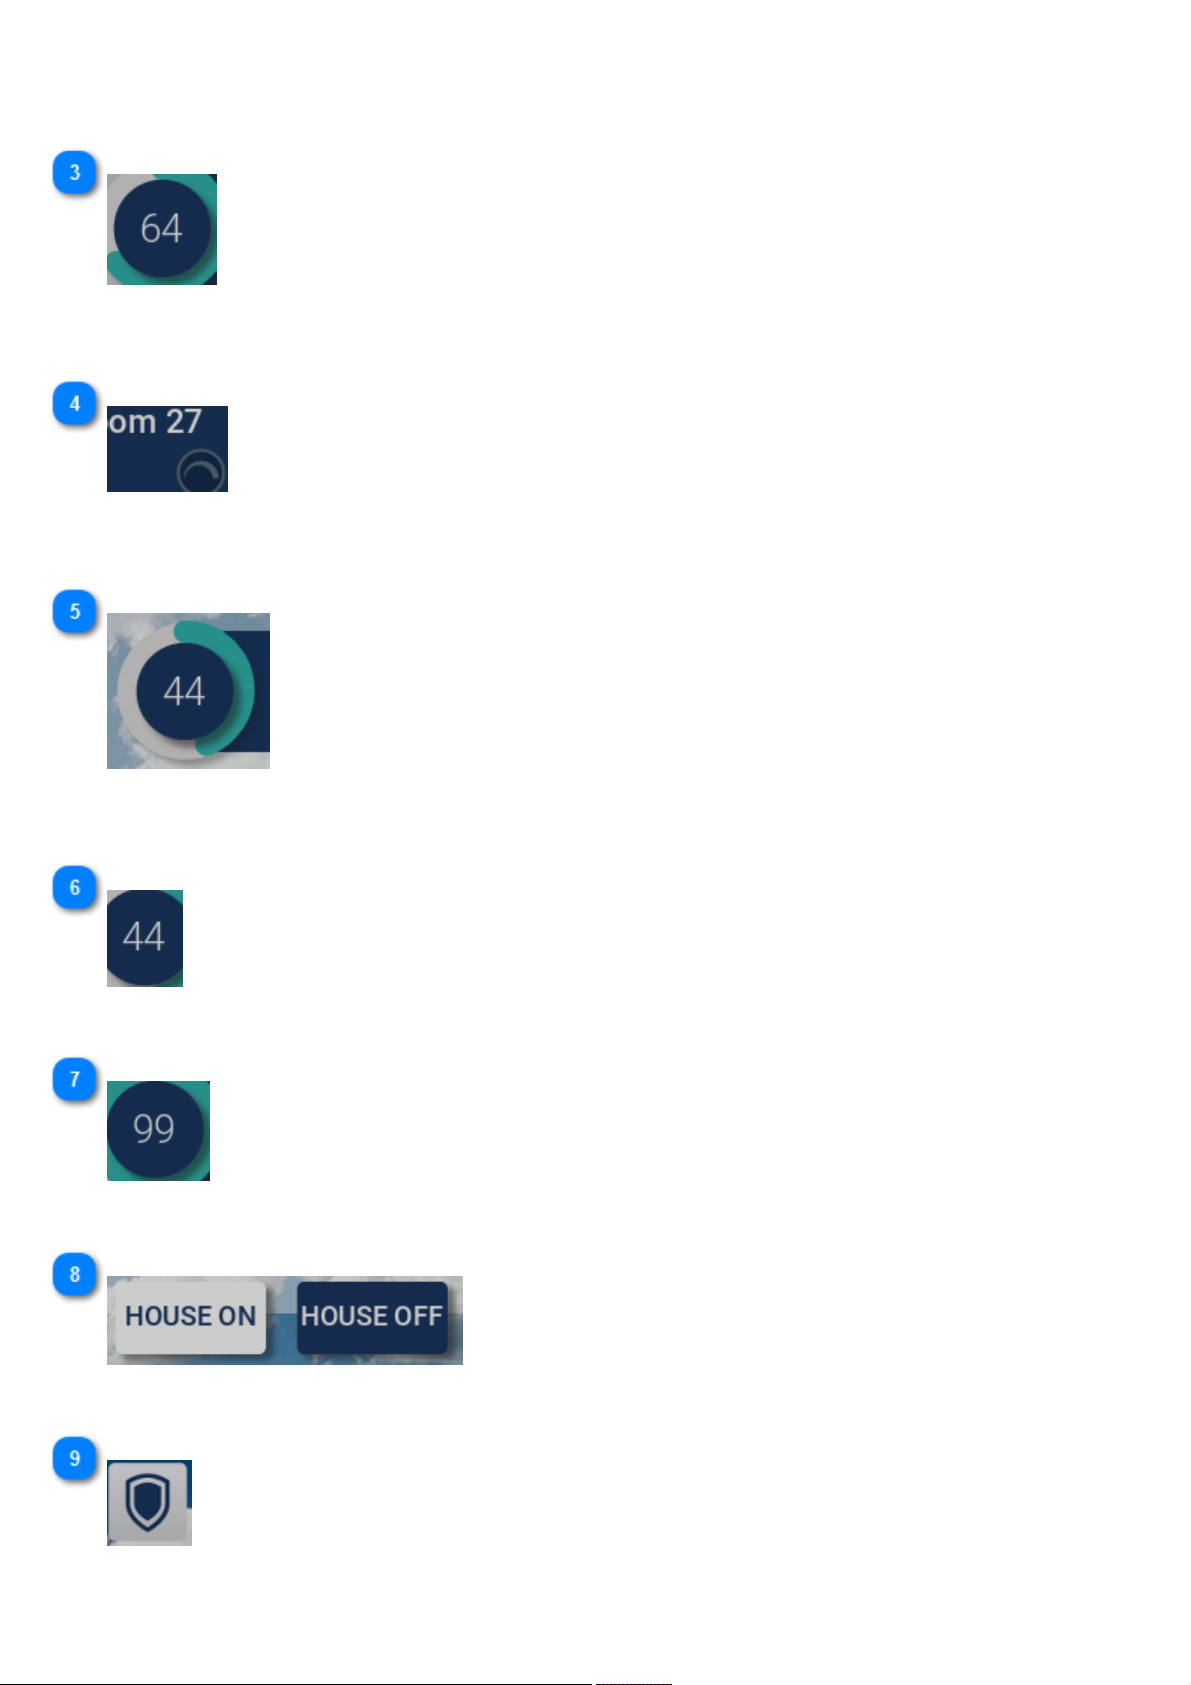
Name of this Brightswitch.
TOUCH to TOGGLE ON/OFF
Toggles the switch displayed on (white circle) and off (dark blue circle). When toggled on, the dimmer slider is
displayed
TOUCH to ADJUST BRIGHTNESS
Slide right for bright and left for dim or touch to set instantly. Slider stays active for 4 seconds for readjustment,
then hides.
GRAPHIC DIM LEVEL
Displays the switch dim level with a circular blue-green graphic. The circle extends clockwise with a brighter
setting.
TEXT DIM LEVEL
Displays the dim level setting as a number from 0 (dim) to 100 (bright). On and off do not change the dim level.
TOUCH to ADD SWITCH
Touch the dimmed plus symbol to add a new Bright or Z-Wave light to the empty "slot".
TOUCH to CONTROL ALL BRIGHTS
Turn on or off all lights connected to all Brights everywhere in the home.
TOUCH for SECURITY
Open the Security page.
12
Page 13
TOUCH for INTERCOM
Open the Intercom page.
TOUCH to SELECT APP
Touch either button to first select an app from the Brightswitch Android system. Once selected, touch
again to activate the app. Apps can be downloaded by selecting the Options/Setup Gear and then
selecting "Apps". While Music and phone are suggested, most Android Smart Home and other types
of apps can be used here. Please note: Once you hear the touch tone please wait for Brightswitch to
respond. Some actions take some time to process.
Please note! Modern cell phones are high in cost and offer faster processors and more memory than
Brightswitch. When you use Apps on Brightswitch, please be patient. Apps will load and respond slower
than on your phone.
TOUCH for HELP
Touch to open help menu with three options. Touch the book to read user manual. Touch the film arrow
to watch a video demonstration for this screen. Touch the circular arrow to close help menu.
Please note: The manual is accessed over the internet so that we can update it with new information.
This means it will take a few moments to load after Brightswitch opens a browser. Please be patient.
TOUCH for OPTIONS/SETUP
Touching the Gear will open a new screen. Many configuration and setup options are available there.
Use the Home key there to return here.
13
Page 14

--USING INTERCOM--
Please see pages INTERCOM DISPLAY and Intercom Setup Menu for details.
Press and hold the Home icon to bring up the volume control.
1) Start by selecting the Bright to talk to by touching its name. The selected name will be underlined.
Note, the first room in the list is always selected by default. Change the room list order by selecting the Gear and
"Brights List" to put the desired room at the top of the list. Use this method to select the most commonly called
room.
All Call does not require a room selection.
A grayed out Bright name means no connection can be made. If a Bright is grayed out, touch the circle arrows
above the Bright list to reset the Intercom.
2) Select the function for the connection. Yellow function and Bright name means connected.
"Call" creates a two way communication. The originator can speak freely once connected. The called Bright
presses "Hold to Talk" to reply and releases it when done.
"All Call" sends audio to all Brights.
"Monitor" sends audio to the selected room. Audio will continue to be sent even if the sending Bright returns to
the Switch Display so that monitoring can continue when the switch is in use.
3) End the connection on either end by selecting "End Call"
14
Page 15

--USING SECURITY--
Please see pages SECURITY DISPLAY and Security Setup Menu for details.
Setup Security in the following manner:
1) Setup a security zone. One or more Brights make up a zone.
2) Optionally enter your phone information along with a Gmail account to allow Brightswitch to send you a
message and picture if an alarm is triggered. This information will automatically be shared with all Brights in the
zone.
3) Optionally assign a security code for entry and exit. This code will automatically be shared with all Brights in
the zone.
4) Select your Entry and Exit delays. The Exit delay is to give you time to exit the home after activating the
alarm. The Entrance delay is to give you time to enter and type in your security code before the alarm is
triggered.
5) Select whether you will toggle on the audio and/or light alarms. These are individual to each Brightswitch
in the zone. When on, the light will come on and the Brightswitch will sound an alarm when the the alarm is
triggered.
Security Use
1) Touch "Alarm On" to enable the alarm. Enter your code if one was selected. Exit the house during the Exit
delay.
2) All Brights in the zone will be set to enabled.
3) Touch "Alarm Off" to disable the alarm. Enter your code if one was selected. Enter the house during the
Entrance delay
4) All Brights in the zone will be set to disabled.
5) If movement is detected after the exit and entrance delays have expired, the alarm will be activated.
6) The Bright first sensing movement will take a picture and optionally send it to your phone, then it will begin
recording video for up to 5 minutes.
7) All Brights in the zone will alarm. If movement is detected at any one of them, it will all also optionally send a
picture to your phone and begin recording video for up to 5 minutes.
8) Pictures sent to your phone will contain a text header telling you the name of the Bright, the event and the time
and date.
End Security Page
15
Page 16

--USING Z-WAVE--
Please note that most functions described below are also described under pages Z-Wave and Z-Wave: Settings
Introduction
Brightswitches can communicate over both Wi-Fi and Z-Wave. Brightswitch has four extra "slots" that can control
other Z-Wave or Wi-Fi devices or Brights.
Initially when first setup on the same Wi-Fi network, Brights are available to each other using Wi-Fi. In this setup,
each Bright also has its own local Z-Wave network. This means that each Bright can control Z-Wave switches
and lights around it. Each of these Z-Wave devices is then automatically shared between the Brights over Wi-Fi.
For example, a Bright in the living room can control a Z-Wave light added by the Bright in the bedroom.
Optionally and if they are in range of each other, Brights may join together in one Z-Wave network. In the Z-Wave
set up screen there will be a "+" shortcut available next to the name of the other Bright. Pressing it will add it to
the local Bright's network without requiring physically traveling to the other Bright. Adding Brights together over
Z-Wave does not break the Wi-Fi connection. Therefore if either Z-Wave or Wi-Fi is interrupted, the connection
between the Brights is maintained.
Another option for Z-Wave is to connect Brights to a hub. In this arrangement, central control of the Brights is
handled by the smart home hub. However, if Brights are still connected to the same Wi-Fi network, they can still
control each other as well. Some hubs will share their other Z-Wave devices with the Brightswitch. In this case, if
they are lights or light switches, they can be added and controlled by one of the Brightswitch slots. Use of the "?"
shortcut on the Z-Wave setup screen will update the Bright information about the network. Finally, these devices
can be shared and controlled over Wi-Fi to other Brights even if they are not on the Z-Wave network.
Brightswitch can control other Z-Wave devices, and also be controlled.
Brightswitch can control Switches and dimmable switch types of Z-Wave devices. It can add any Z-Wave device.
Brightswitch can also be controlled if it receives basic Z-Wave commands. It can turn on or off or dim a light wired
to its base.
Brightswitch can report the condition of its light to other Z-Wave devices, get the value of controlled Z-Wave
devices and set the value of other Z-Wave devices.
Brightswitch as a Z-Wave Device
Brightswitch is a multi-channel Sub-Static Controller. Bright supports 1 channel of
Generic Z-Wave type: GENERIC_TYPE_SWITCH_MULTILEVEL and Specific type:
SPECIFIC_TYPE_POWER_SWITCH_MULTILEVEL.
Supported Command Classes: CC Switch Multilevel
This means Brightswitch has two channels - Root Device and Channel 1. One that allows it to be controlled as a
dimming light switch, and one that presents it as a controller.
In a Brightswitch Z-Wave network, products from different manufacturers and product categories can be a part
of the same Z-Wave network, and different non-battery powered nodes can act as repeaters regardless of
manufacturers.
The Brightswitch Network - The Association CC
There are five "slots" or devices in a Brightswitch Z-Wave network or Association Group.
These devices share a common code and comprise the Brightswitch Z-Wave network.
16
Page 17

Each device in the network will carry a different ID code. Brightswitch will be the primary device with the ID code
1.
Brightswitch sends a Device Reset as a local notification when a reset occurs.
Bright sends Switch Multilevel Report command, when a local light is changed
Brightswitch Z-Wave Functions - Please note that these functions are also described under pages Z-Wave and
Z-Wave: Settings
Command Controls - Please also see the pages SINGLE SWITCH DISPLAY and MULTI-SWITCH DISPLAY
On the single switch display touch the white orb to turn the light on, the black orb to turn the light off and slide the
blue orb up and down to dim the light.
On the multi-switch display touch the circle to the left of the light name to toggle the light on and off. Touch the
room name to expose a slider to drag left and right to change the dim setting.
On the security display, after armed, a change in an attached switch sensor such as a window sensor will activate
the entrance delay and after the countdown, will activate the alarm.
Add a device to Brightswitch (Inclusion): 2 and 3 below will add the device to a slot.
(Also please see Z-Wave Settings chapter)
1) From the main screen select Gear, then Connections, then Z-Wave. Then select the "Edit Network" button,
then "Add a Device".(See Z-Wave chapter) (This will add it to the list but not a slot)
2) From the main screen select Gear, then Switches, then select an empty slot, then Tap here for list, then "Add
New Z-Wave Device"
3) From the main screen select an empty slot, (using gray "+" or "Tap Here to Setup"), then "Tap here for list",
then "Add New Z-Wave Device"
- Alternatively, to add a Brightswitch on the same Z-wave network, from the Z-Wave page press the "+" shortcut
next to the Brightswitch.
After starting this process on Brightswitch, go to the device to be added and follow its instructions for adding it
to a new network. This may be pressing a button, installing a battery or following the instructions in the device
manual. Once Brightswitch finds the device it will return to the Z-Wave screen and display the device.
Remove a device from Brightswitch (Exclusion): All of the following will also remove the device from its slot.
(Also please see Z-Wave Settings chapter)
1) From the main screen select Gear, then Connections, then Z-Wave. (See Z-Wave chapter). Then select the
"Edit Network" button, then "Remove a Device".
2) From the main screen select Gear, then Switches, then select an empty slot, then Tap here for list, select the
device, then "Clear this Bright" or "Delete Switch"
3) From the main screen select an empty slot (using gray "+" or "Tap Here to Setup"), then "Tap here for list",
select a device, then "Clear this Bright" or "Delete Switch"
- Alternatively, to remove a Brightswitch or device on the same Z-Wave network, from the Z-Wave page press,
the "-" shortcut next to the Brightswitch or device.
After starting this process on Brightswitch, go to the device to be removed and follow its instructions for removing
it from a network. This may be pressing a button, installing a battery or following the instructions in the device
manual. Once Brightswitch removes the device it will return to the Z-Wave screen.
17
Page 18

Please note, this process will also work on devices not associated with the Brightswitch network to clear their
associations with other networks.
To clear or delete a Brightswitch network (Factory Reset).
From the main screen select Gear, then Connections, then Z-Wave, then "Edit *name*'s Network" (name is the
name of the network). Next, select either "Z-Wave Reset *name*" or "Delete Entire *name*'s Network".
Please note this process will break connections to all Z-Wave devices and they will need to be removed or reset
individually before they can be added to another network. Also note that selecting "Delete Entire *name*'s
Network" will instruct other Brightswitches on the network to reset their own Z-Wave processors, clearing all
associations.
Including or Removing Brightswitch from a network (Such as adding or removing Brightswitch from a
Smart Home hub)
From the main screen select Gear, then Connections, then Z-Wave. Next, start the add or remove device
process on the hub, then press the "Edit *name*'s Network" and "Start Learn Mode" buttons on Brightswitch.
Wait until the process completes. Use the "?" mark displayed on the Z-Wave page on Brightswitch to update its
knowledge about the Z-Wave network.
Brightswitch and the hub will share information about the devices they already have. Some hubs (such as a SIS
hub) will allow Brightswitch to continue to add additional Z-Wave devices, some will not. Z-Wave devices on the
hub that are shared with Brightswitch will be available on the Brightswitch Wi-Fi network.
Transfering primary controller Function from Brightswitch to another Controller or Hub
If Brightswitch is the primary controller in a network, this process will transfer that role to the other controller or
hub in the network. After this shift some controllers will still allow Brightswitch to add and remove devices (such
as SIS controllers), while other controllers will not.
From the main screen select Gear, then Connections, then Z-Wave, then "Edit *name*'s Network", then select
"Controller Shift". Next follow the instructions on the other controller to accept the new role (Normally by selecting
"Learn Mode".)
18
Page 19

--REMOVING ITEMS--
Please see Configure Switch page for details.
To remove a Bright or Z-Wave device follow the following procedure:
1) Select Gear for Options on the main switch display.
2) Select Switches.
3) To select an item not yet assigned, select an empty slot labeled "Tap here to Setup", then select "Tap Here for
List".
4) Select the item to be removed.
5) After the item details appear, select "Delete Switch".
If the device is a Bright and it is offline, select whether to remove the Bright only from the slot in the current Bright
- "Just Locally" or from the entire Brightswitch network - "Yes".
If the device is Z-Wave select yes when asked and follow the instructions on your device to remove it.
If you remove the local Bright, it will cause a system reset and the Brightswitch will need to be setup
again.
19
Page 20
--RESETTING--
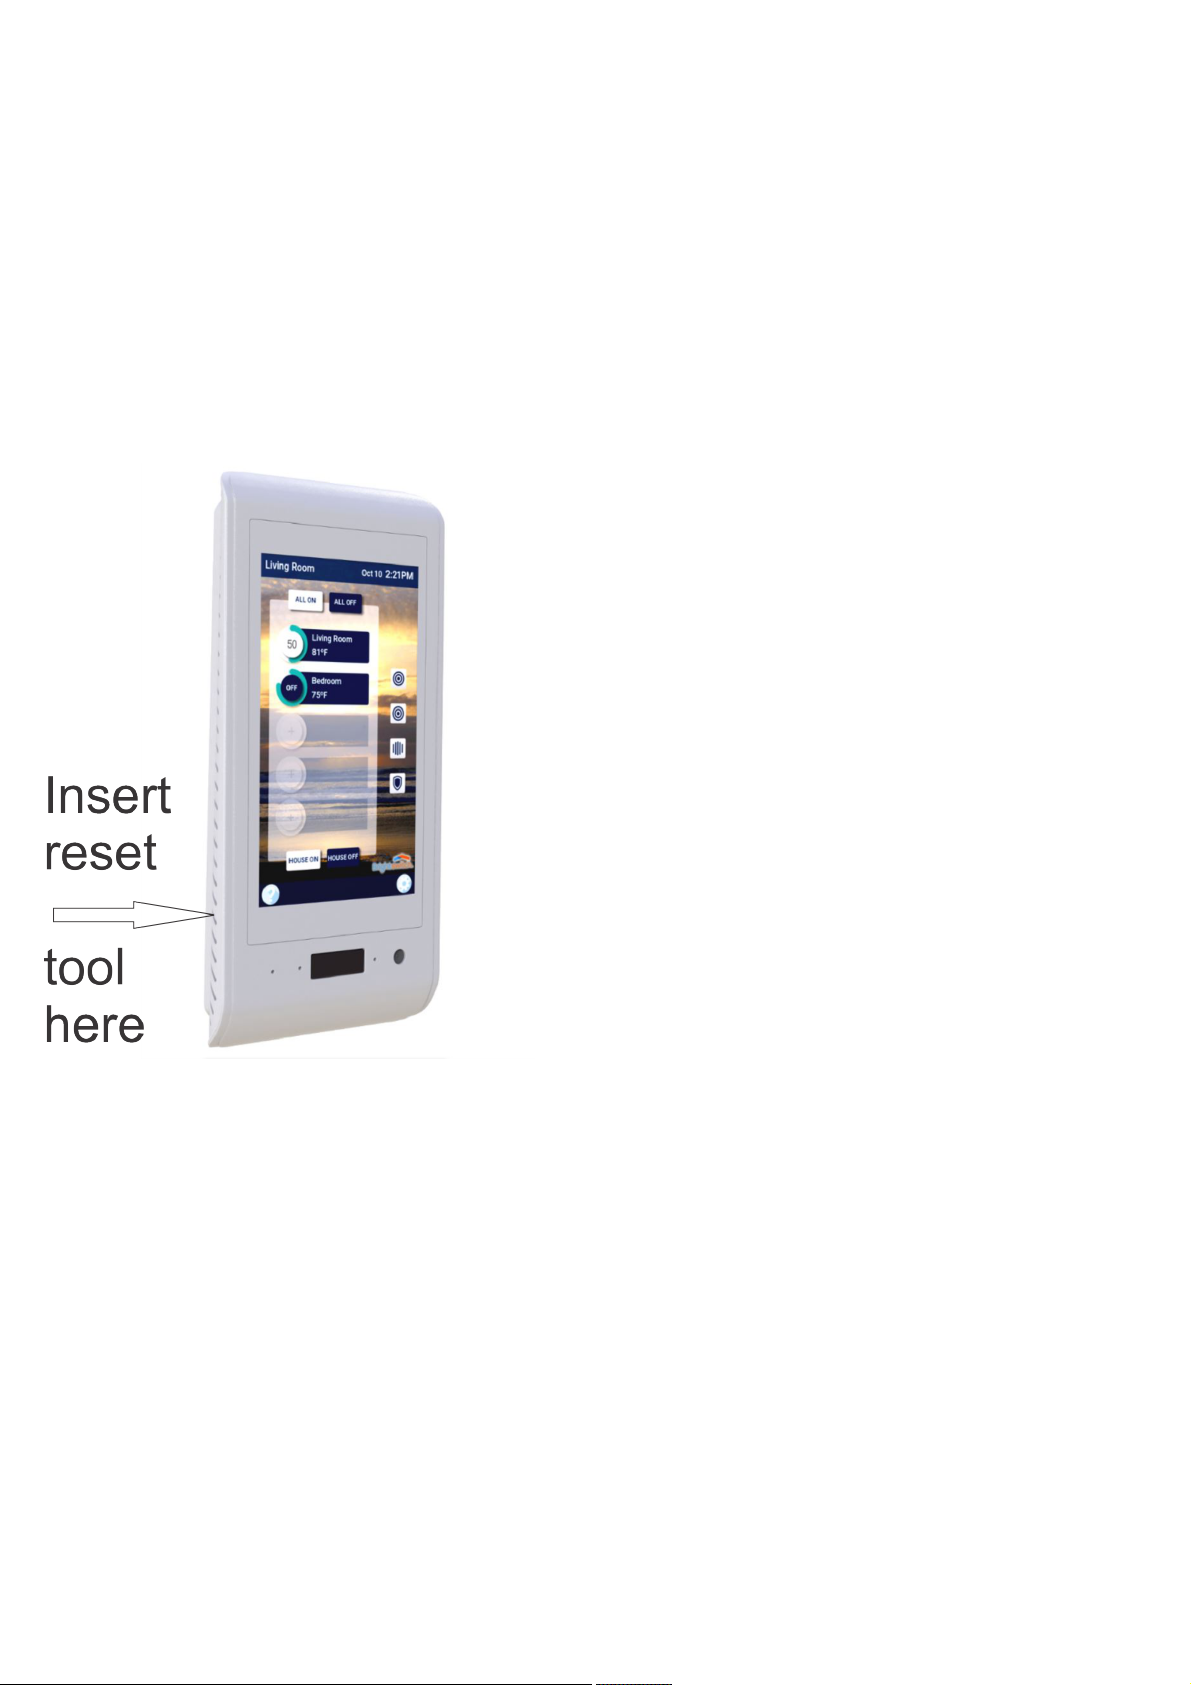
If Brightswitch is frozen or acting erratically it can be reset in one of three ways:
1) Remove the faceplate from the wall and WAIT AT LEAST 60 seconds. Then reinstall.
2) Put the small reset pin through the hole at the lower left side of the faceplate and press in against the reset
button. If using a paper clip instead be sure it is a thick one that fits the hole.
3) Select Gear, then General, then Exit, then Exit to Android. Select Android's recent button on the lower left.
Swipe Brightswitch off the list to the left. Touch the Home key to restart or wait and Brightswitch will restart
automatically.
20
Page 21

FCC Statement
This equipment has been tested and found to comply with the limits for a Class
B digital device, pursuant to part 15 of the FCC rules. These limits are
designed to provide reasonable protection against harmful interference in a
residential installation. This equipment generates, uses and can radiate radio
frequency energy and, if not installed and used in accordance with the
instructions, may cause harmful interference to radio communications.
However, there is no guarantee that interference will not occur in a particular
installation. If this equipment does cause harmful interference to radio or
television reception, which can be determined by turning the equipment off and
on, the user is encouraged to try to correct the interference by one or more of
the following measures:
-Reorient or relocate the receiving antenna.
-Increase the separation between the equipment and receiver.
-Connect the equipment into an outlet on a circuit different from that to which
the receiver is connected.
-Consult the dealer or an experienced radio/TV technician for help.
To assure continued compliance, any changes or modifications not expressly
approved by the party.
Responsible for compliance could void the user’s authority to operate this
equipment. (Example- use only shielded interface cables when connecting to
computer or peripheral devices).
This equipment complies with Part 15 of the FCC Rules. Operation is subject
to the following two conditions:
(1) This device may not cause harmful interference, and
(2) This device must accept any interference received, including interference
that may cause undesired operation.
FCC Radiation Exposure Statement:
The equipment complies with FCC Radiation exposure limits set forth for
uncontrolled enviroment. This equipment should be installed and operated with
minimum distance 20cm between the radiator and your body.
.
 Loading...