

Page 1
TM
User Guide
HD600 and HD2000
MATCHES:
•
BrightSign Software Version: 1.1.28 (HD600); 2.0.94 (HD2000)
•
AutoPlay Script Version: 1.1.7b (HD600); 2.0.0.43 (HD2000)
www.brightsign.biz
Page 2

Copyright
Copyright © 2008–2009 by BrightSign, a division of Roku, Inc. All rights reserved. Roku, the Roku logo,
and the BrightSign logo are trademarks of Roku, Inc. Other brand and product names are trademarks
or registered trademarks of their respective holders.
•
•
•
ii
•
•
•
Page 3

Contents
• • • • • •
Chapter 1
Chapter 2
Chapter 3
Introduction . . . . . . . . . . . . . . . . . . . . . . . . . . . . . . . . . . . . . . . . . . . . . . . . . . . . . . . . .1
What is BrightSign? . . . . . . . . . . . . . . . . . . . . . . . . . . . . . . . . . . . . . . . . . . . . . . . . . . . . . . . 1
Sample BrightSign setups . . . . . . . . . . . . . . . . . . . . . . . . . . . . . . . . . . . . . . . . . . . . . . . . . 2
Video or slide show loop . . . . . . . . . . . . . . . . . . . . . . . . . . . . . . . . . . . . . . . . . . . . . . 2
Interactive presentation . . . . . . . . . . . . . . . . . . . . . . . . . . . . . . . . . . . . . . . . . . . . . . 3
Examples . . . . . . . . . . . . . . . . . . . . . . . . . . . . . . . . . . . . . . . . . . . . . . . . . . . . . . . . . . . . . 4
Getting Started . . . . . . . . . . . . . . . . . . . . . . . . . . . . . . . . . . . . . . . . . . . . . . . . . . . . . .5
Step 1: Get the hardware you need . . . . . . . . . . . . . . . . . . . . . . . . . . . . . . . . . . . . . . . . 5
Step 2: Get the latest BrightSign software . . . . . . . . . . . . . . . . . . . . . . . . . . . . . . . . . . 6
Step 3: Try the demo . . . . . . . . . . . . . . . . . . . . . . . . . . . . . . . . . . . . . . . . . . . . . . . . . . . . . . 7
Step 4: Get the results you want . . . . . . . . . . . . . . . . . . . . . . . . . . . . . . . . . . . . . . . . . . . 8
Playing Media with BrightSign . . . . . . . . . . . . . . . . . . . . . . . . . . . . . . . . . . . . . . . .9
Ways to play media . . . . . . . . . . . . . . . . . . . . . . . . . . . . . . . . . . . . . . . . . . . . . . . . . . . . . . . 9
Auto-playing a video upon power-up . . . . . . . . . . . . . . . . . . . . . . . . . . . . . . . . . . . . 11
Auto-playing a playlist upon power-up . . . . . . . . . . . . . . . . . . . . . . . . . . . . . . . . . . . 12
Auto-playing an interactive playlist upon power-up . . . . . . . . . . . . . . . . . . . . . . . 13
Auto-playing a script upon power-up . . . . . . . . . . . . . . . . . . . . . . . . . . . . . . . . . . . . . 14
Auto-playing content at a scheduled time (HD2000 only) . . . . . . . . . . . . . . . . . 15
•
•
•
iii
•
•
•
Page 4

Chapter 4
Working with Playlists . . . . . . . . . . . . . . . . . . . . . . . . . . . . . . . . . . . . . . . . . . . . . . 17
What is a playlist? . . . . . . . . . . . . . . . . . . . . . . . . . . . . . . . . . . . . . . . . . . . . . . . . . . . . . . . . 17
Creating a playlist . . . . . . . . . . . . . . . . . . . . . . . . . . . . . . . . . . . . . . . . . . . . . . . . . . . . . . . . 19
Playlist commands . . . . . . . . . . . . . . . . . . . . . . . . . . . . . . . . . . . . . . . . . . . . . . . . . . . . . . . 20
Creating interactive presentations . . . . . . . . . . . . . . . . . . . . . . . . . . . . . . . . . . . . . . . . 24
Using Excel to create interactive presentations . . . . . . . . . . . . . . . . . . . . . . . 25
Keywords . . . . . . . . . . . . . . . . . . . . . . . . . . . . . . . . . . . . . . . . . . . . . . . . . . . . . . . . . . . 27
EVENTS . . . . . . . . . . . . . . . . . . . . . . . . . . . . . . . . . . . . . . . . . . . . . . . . . . . . . . . . . . . . . . 31
STATE . . . . . . . . . . . . . . . . . . . . . . . . . . . . . . . . . . . . . . . . . . . . . . . . . . . . . . . . . . . . . . . 33
Controlling GPIO outputs from an interactive playlist (HD2000 only) . . 33
Preloading images . . . . . . . . . . . . . . . . . . . . . . . . . . . . . . . . . . . . . . . . . . . . . . . . . . . 34
Simultaneous states within a single interactive playlist (HD2000 only) . 35
Interactive playlist examples . . . . . . . . . . . . . . . . . . . . . . . . . . . . . . . . . . . . . . . . . . . . . 36
Using rollover regions . . . . . . . . . . . . . . . . . . . . . . . . . . . . . . . . . . . . . . . . . . . . . . . 41
Using rollover events . . . . . . . . . . . . . . . . . . . . . . . . . . . . . . . . . . . . . . . . . . . . . . . . 42
Scheduling playback (HD2000 only) . . . . . . . . . . . . . . . . . . . . . . . . . . . . . . . . . . . . . . 45
Chapter 5
Working with Zones . . . . . . . . . . . . . . . . . . . . . . . . . . . . . . . . . . . . . . . . . . . . . . . . 49
What are zones? . . . . . . . . . . . . . . . . . . . . . . . . . . . . . . . . . . . . . . . . . . . . . . . . . . . . . . . . . 49
Can I customize the zones? . . . . . . . . . . . . . . . . . . . . . . . . . . . . . . . . . . . . . . . . . . . . . . . 50
Using zones with playlists . . . . . . . . . . . . . . . . . . . . . . . . . . . . . . . . . . . . . . . . . . . . . . . . 51
Other keywords for zones . . . . . . . . . . . . . . . . . . . . . . . . . . . . . . . . . . . . . . . . . . . . 54
Comix Tour example . . . . . . . . . . . . . . . . . . . . . . . . . . . . . . . . . . . . . . . . . . . . . . . . . . . . . 56
Chapter 6
Working with Scripts . . . . . . . . . . . . . . . . . . . . . . . . . . . . . . . . . . . . . . . . . . . . . . . 61
What are scripts? . . . . . . . . . . . . . . . . . . . . . . . . . . . . . . . . . . . . . . . . . . . . . . . . . . . . . . . . 61
Sample script . . . . . . . . . . . . . . . . . . . . . . . . . . . . . . . . . . . . . . . . . . . . . . . . . . . . . . . . . . . . 62
•
•
•
iv
•
•
•
Page 5

Roku Objects . . . . . . . . . . . . . . . . . . . . . . . . . . . . . . . . . . . . . . . . . . . . . . . . . . . . . . . . . . . . 62
Using the GPIO control port . . . . . . . . . . . . . . . . . . . . . . . . . . . . . . . . . . . . . . . . . . . . . . 64
Chapter 7
Chapter 8
Getting Help . . . . . . . . . . . . . . . . . . . . . . . . . . . . . . . . . . . . . . . . . . . . . . . . . . . . . . . 65
Learning more and support . . . . . . . . . . . . . . . . . . . . . . . . . . . . . . . . . . . . . . . . . . . . . . 65
Troubleshooting . . . . . . . . . . . . . . . . . . . . . . . . . . . . . . . . . . . . . . . . . . . . . . . . . . . . . . . . . 66
Autoplay and general troubleshooting . . . . . . . . . . . . . . . . . . . . . . . . . . . . . . . 66
General playback problems . . . . . . . . . . . . . . . . . . . . . . . . . . . . . . . . . . . . . . . . . . 67
Interactive playlists . . . . . . . . . . . . . . . . . . . . . . . . . . . . . . . . . . . . . . . . . . . . . . . . . . 70
BrightSign and accessories . . . . . . . . . . . . . . . . . . . . . . . . . . . . . . . . . . . . . . . . . . . 71
Advanced Topics . . . . . . . . . . . . . . . . . . . . . . . . . . . . . . . . . . . . . . . . . . . . . . . . . . . 75
Selecting Compact Flash cards . . . . . . . . . . . . . . . . . . . . . . . . . . . . . . . . . . . . . . . . . . . 75
Avoiding CF/SD card corruption due to read fatigue . . . . . . . . . . . . . . . . . . 75
Speed . . . . . . . . . . . . . . . . . . . . . . . . . . . . . . . . . . . . . . . . . . . . . . . . . . . . . . . . . . . . . . . 76
BrightSign compatibility . . . . . . . . . . . . . . . . . . . . . . . . . . . . . . . . . . . . . . . . . . . . . 76
Other ways to update your BrightSign software . . . . . . . . . . . . . . . . . . . . . . . . . . . 77
Generating HD content for BrightSign HD2000 using Final Cut Pro . . . . . . . . 78
BrightSign shell . . . . . . . . . . . . . . . . . . . . . . . . . . . . . . . . . . . . . . . . . . . . . . . . . . . . . . . . . . 80
Accessing the BrightSign shell . . . . . . . . . . . . . . . . . . . . . . . . . . . . . . . . . . . . . . . 80
Shell commands . . . . . . . . . . . . . . . . . . . . . . . . . . . . . . . . . . . . . . . . . . . . . . . . . . . . . 81
Referencing CF/SD cards (HD2000 only) . . . . . . . . . . . . . . . . . . . . . . . . . . . . . . 82
Testing CF cards . . . . . . . . . . . . . . . . . . . . . . . . . . . . . . . . . . . . . . . . . . . . . . . . . . . . . 83
Testing scripts, playlists, and interactive playlists . . . . . . . . . . . . . . . . . . . . . 84
Linux shell (HD2000 only) . . . . . . . . . . . . . . . . . . . . . . . . . . . . . . . . . . . . . . . . . . . . 86
Updating BrightSign software from the BrightSign Shell . . . . . . . . . . . . . . 87
•
•
•
v
•
•
•
Page 6

Using the registry (HD2000 only) . . . . . . . . . . . . . . . . . . . . . . . . . . . . . . . . . . . . . . . . . 88
Writing to the registry from an interactive playlist (HD2000 only) . . . . . . 88
Displaying registry contents from an interactive playlist (HD2000 only) 89
Copying registry contents from an interactive playlist (HD2000 only) . . 89
Setting the date/time on BrightSign (HD2000 only) . . . . . . . . . . . . . . . . . . . . . . . 90
Using a custom boot script and logo . . . . . . . . . . . . . . . . . . . . . . . . . . . . . . . . . . . . . 91
Using your own boot logo . . . . . . . . . . . . . . . . . . . . . . . . . . . . . . . . . . . . . . . . . . . 91
Using your own boot script (HD600 only) . . . . . . . . . . . . . . . . . . . . . . . . . . . . . 91
Widescreen vs. 4x3 discussion . . . . . . . . . . . . . . . . . . . . . . . . . . . . . . . . . . . . . . . . . . . . 92
Displaying videos . . . . . . . . . . . . . . . . . . . . . . . . . . . . . . . . . . . . . . . . . . . . . . . . . . . . 92
Displaying images . . . . . . . . . . . . . . . . . . . . . . . . . . . . . . . . . . . . . . . . . . . . . . . . . . . 93
Connecting Brightsign to your network . . . . . . . . . . . . . . . . . . . . . . . . . . . . . . . . . . . 93
Configuring BrightSign using DHCP . . . . . . . . . . . . . . . . . . . . . . . . . . . . . . . . . . 93
Using a manual IP configuration . . . . . . . . . . . . . . . . . . . . . . . . . . . . . . . . . . . . . 94
Proxy servers . . . . . . . . . . . . . . . . . . . . . . . . . . . . . . . . . . . . . . . . . . . . . . . . . . . . . . . . 96
Networking software options . . . . . . . . . . . . . . . . . . . . . . . . . . . . . . . . . . . . . . . . 96
Using the NetworkTimer keyword . . . . . . . . . . . . . . . . . . . . . . . . . . . . . . . . . . . . 97
Chapter 9
Product Specifications . . . . . . . . . . . . . . . . . . . . . . . . . . . . . . . . . . . . . . . . . . . . . . 99
BrightSign features . . . . . . . . . . . . . . . . . . . . . . . . . . . . . . . . . . . . . . . . . . . . . . . . . . . . . . 99
Supported media types . . . . . . . . . . . . . . . . . . . . . . . . . . . . . . . . . . . . . . . . . . . . . . . . . 103
Supported input devices . . . . . . . . . . . . . . . . . . . . . . . . . . . . . . . . . . . . . . . . . . . . . . . . 105
USB mice . . . . . . . . . . . . . . . . . . . . . . . . . . . . . . . . . . . . . . . . . . . . . . . . . . . . . . . . . . . 106
•
•
•
vi
•
•
•
Page 7

Chapter 1
Introduction
• • • • • •
What is BrightSign?
BrightSign HD600 and BrightSign HD2000 are standalone digital signs or kiosk controllers that
play content from standard Flash memory cards. You can use BrightSign with almost any
standard or high-definition monitor or TV to play continuous video or image loops. With the
addition of a touch screen or input device, such as a button board or keyboard, you can also use
BrightSign for interactive presentations, and since BrightSign is compatible with standard media
authoring software, you can choose the tools you use to create your content.
Because BrightSign has no moving parts, it is durable, reliable, and an ideal replacement for a
PC in information kiosks, tradeshows, retail displays, and other applications. And best of all,
BrightSign enables you to maintain or improve the quality of your presentations. Using
professional-quality decoding and scaling, BrightSign delivers crisp, clean, high-definition still
images as well as 1920 x 1080 interlaced video from your high-definition MPEG sources.
•
•
•
1
•
•
•
Page 8
Sample BrightSign setups
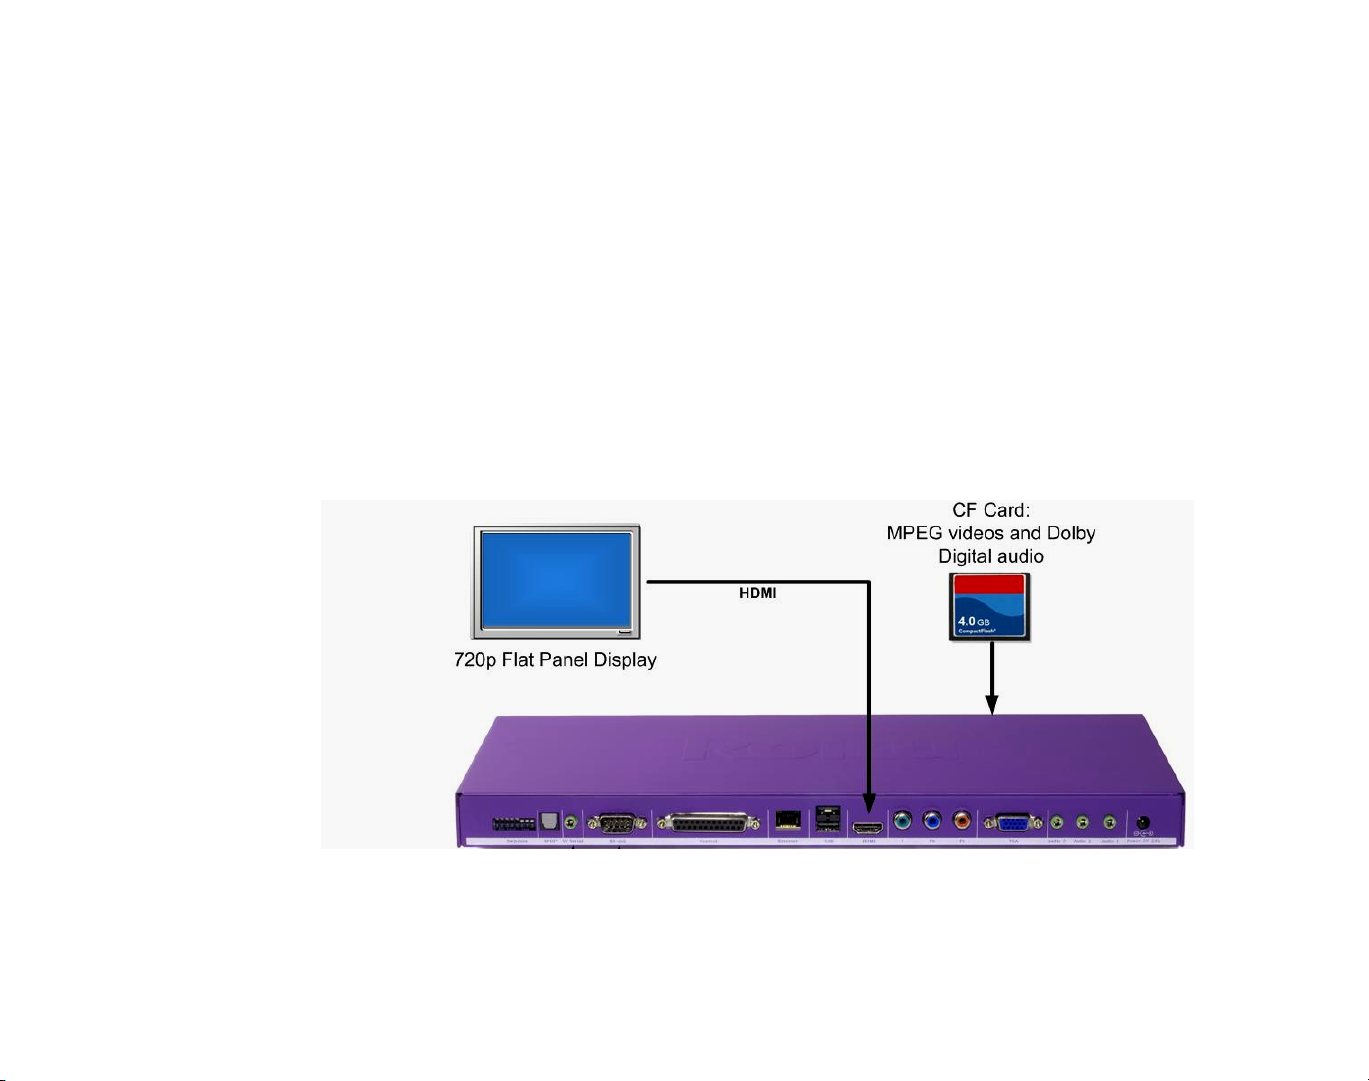
You can connect BrightSign to a wide-range of devices based on your audio, video, and
interactivity needs.
Video or slide show loop
Place a video or set of still images on a CompactFlash card, and connect BrightSign to a display.
You can use any of the following methods to connect to a display:
•
Use a composite cable to connect to a standard definition display (HD600 only)
•
Use a VGA cable to connect to a flat panel monitor
•
Use an RGB component cable to connect to a high-definition display (such as a plasma TV)
•
Use an HDMI cable to connect to a high-definition display
•
•
•
2
•
•
•
Page 9
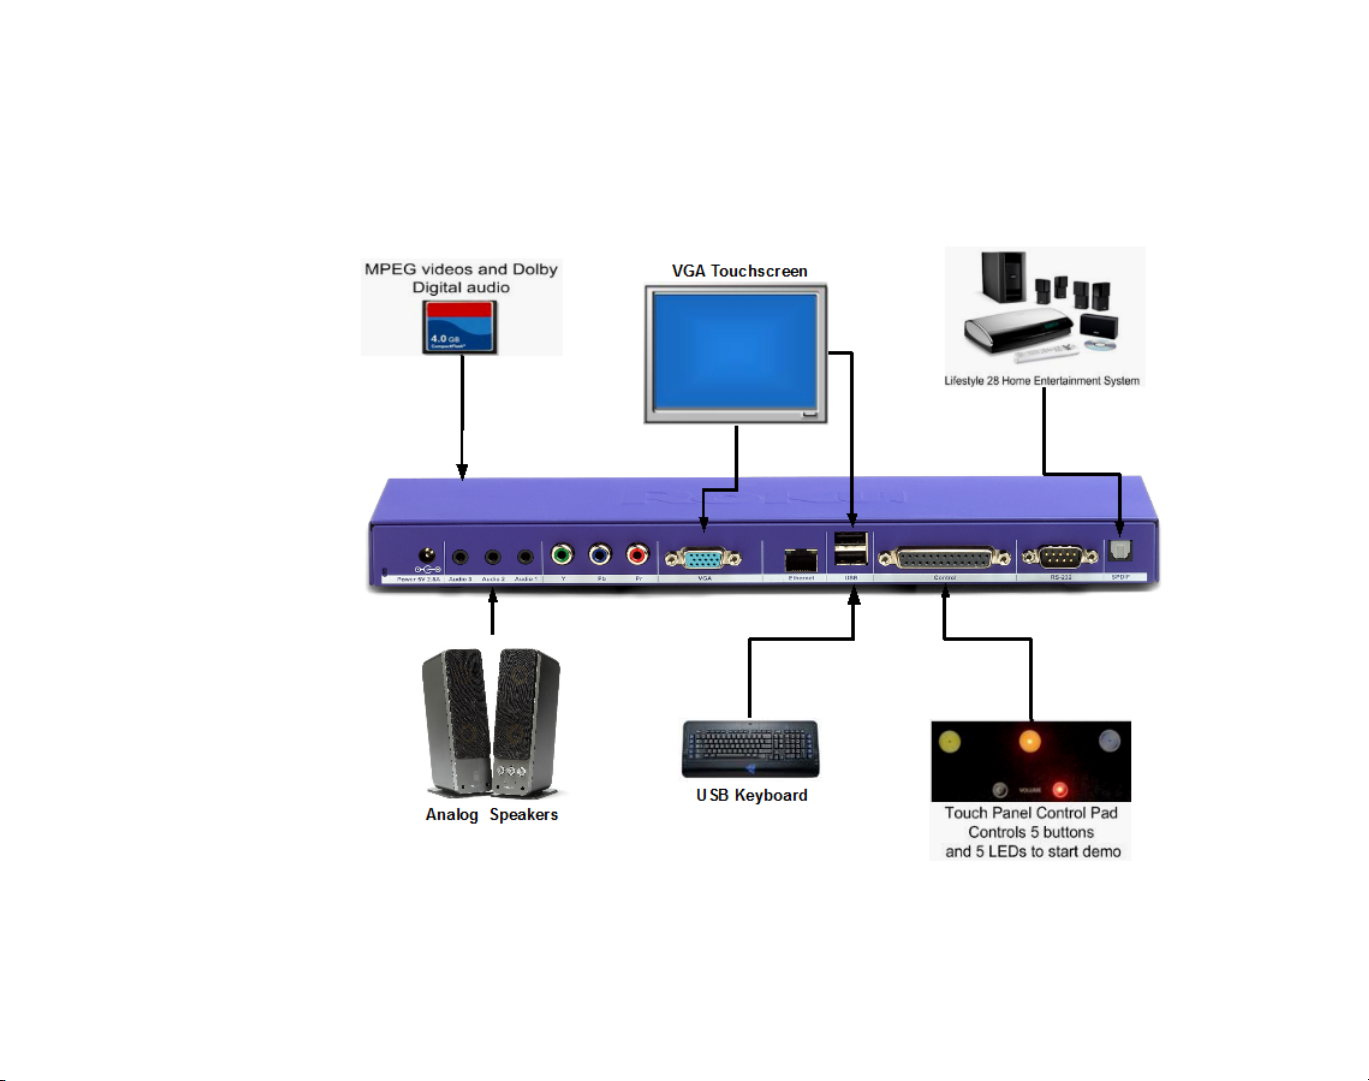
Interactive presentation
By connecting powered speakers to BrightSign, you can add audio to your display, and you can
add interactivity by connecting an input device such as a keyboard, touch screen, button board,
or LED. The example below uses an off-the-shelf USB keyboard.
•
•
•
3
•
•
•
Page 10

Examples
Here are some examples of what you can do with BrightSign:
•
Display a looping video with
•
Display a looping video with HD quality on a variety of display types
•
Display a looping slide show in high definition
•
Play looping music
•
Display videos and images simultaneously in different parts of the screen (also referred to as
zones
)—videos in one zone, slideshow in a second zone, and an RSS feed in a third zone
•
Schedule any of the above to play at a specific time (hour, day, month, year)
•
Combine any of the above
•
Create interactive presentations that play video, photos, or audio in response to input from a
touch screen, mouse, keyboard, remote, or a custom button board that you create
•
Create a playlist with audio, video, and images
DVD+
quality on a variety of monitor types
•
•
•
4
•
•
•
Page 11

Chapter 2
Getting Started
• • • • • •
Step 1: Get the hardware you need
To start using your BrightSign, you need the following hardware:
Display
•
VGA
•
Component
•
Composite (HD600 only)
•
HDMI (HD2000 only)
Storage card
•
CF card (see
•
USB Flash card (HD2000 only)
•
SD card (HD2000 only)
Card Reader/Writer
Any monitor, TV, or Elo touch screen with one of the following types of inputs:
Either of the following:
Selecting Compact Flash cards
The card reader/writer must be connected to your Mac or PC and must be
compatible with your storage card.
Optional Accessories
•
USB keyboard
•
USB mouse
Add any of the following items:
for more info)
•
•
•
5
•
•
•
Page 12

•
GPIO (General Purpose Input/Output) button board
TIP:
To use the BrightSign demo you need one of the following: GPIO button board, ELO touch
screen, or USB mouse.
•
SoundBridge Remote
•
Null modem cable
Step 2: Get the latest BrightSign software
Depending on when you purchased your BrightSign, you may need to download and install the
latest software from the BrightSign web site.
TIP:
Watch the BrightSign web site for information on BrightSign software updates so that you
can take advantage of all the latest features.
1 Check your current software version.
a
Connect a video monitor to your BrightSign.
b
Start BrightSign without a
c
Look for the version number below the Roku logo on your screen. If you don’t see a software
version below the logo, your software is older than version 1.1.
Tip:
You can also check the BrightSign software version using the shell (see
for details).
Compact Flash or SD (
CF/SD) card inserted.
BrightSign shell
2 Download the latest software.
a
Go to the BrightSign web site
b
Click the
c
Compare the software version number with the number on your BrightSign screen.
d
If your BrightSign software is older than the software on the web site, click the
Software Downloads
www.brightsign.biz/support
link.
.
Software
link
for the appropriate model (HD600 or HD2000) to download the latest software.
•
•
•
6
•
•
•
Page 13

3 Extract the software update file onto your CF/SD card. (The file name is UPDATE.ROK.)
4 Insert the CF/SD card into your BrightSign and apply power.
•
HD600:
of the LEDs on the front panel starts to flash. When the LED stops flashing, the upgrade is
complete and BrightSign reboots automatically.
•
HD2000:
panel light as the unit boots.) Wait for the red upgrade LED to light up. During the upgrade,
the connector activity LEDs turn on and off to indicate that the upgrade is in progress.
NOTE:
When the update finishes, BrightSign deletes the UPDATE.ROK file and reboots the unit.
However, if the card was formatted with NTFS or HFS+, then BrightSign does not delete the
UPDATE.ROK file and the unit doesn’t reboot after the update. Instead, the Video Mode LEDs flash.
Step 3: Try the demo
The BrightSign demo shows an example of an interactive digital sign that displays still slides and
video clips, and responds to input from a button board, touch screen, or mouse. It’s easy to try if
you have a BrightSign. Follow these steps:
1 Go to www.brightsign.biz/support/download.php.
2 Click the Demo link under HD600 or HD200 and download the demo file.
Wait for your BrightSign to boot. (The display will be blank.) After several seconds one
Wait for your BrightSign to boot. (The display will be blank, but the LEDs on the front
3 Unzip the BrightSignDemo.zip file and copy the contents into the root directory of a
Compact Flash or SD (CF/SD) card.
4 Connect your BrightSign to either of the following:
•
Elo touch screen
•
Standard monitor and USB Mouse
•
Standard monitor and Roku Button Board
5 Insert the CF/SD card.
6 Turn on the power.
•
•
•
7
•
•
•
Page 14
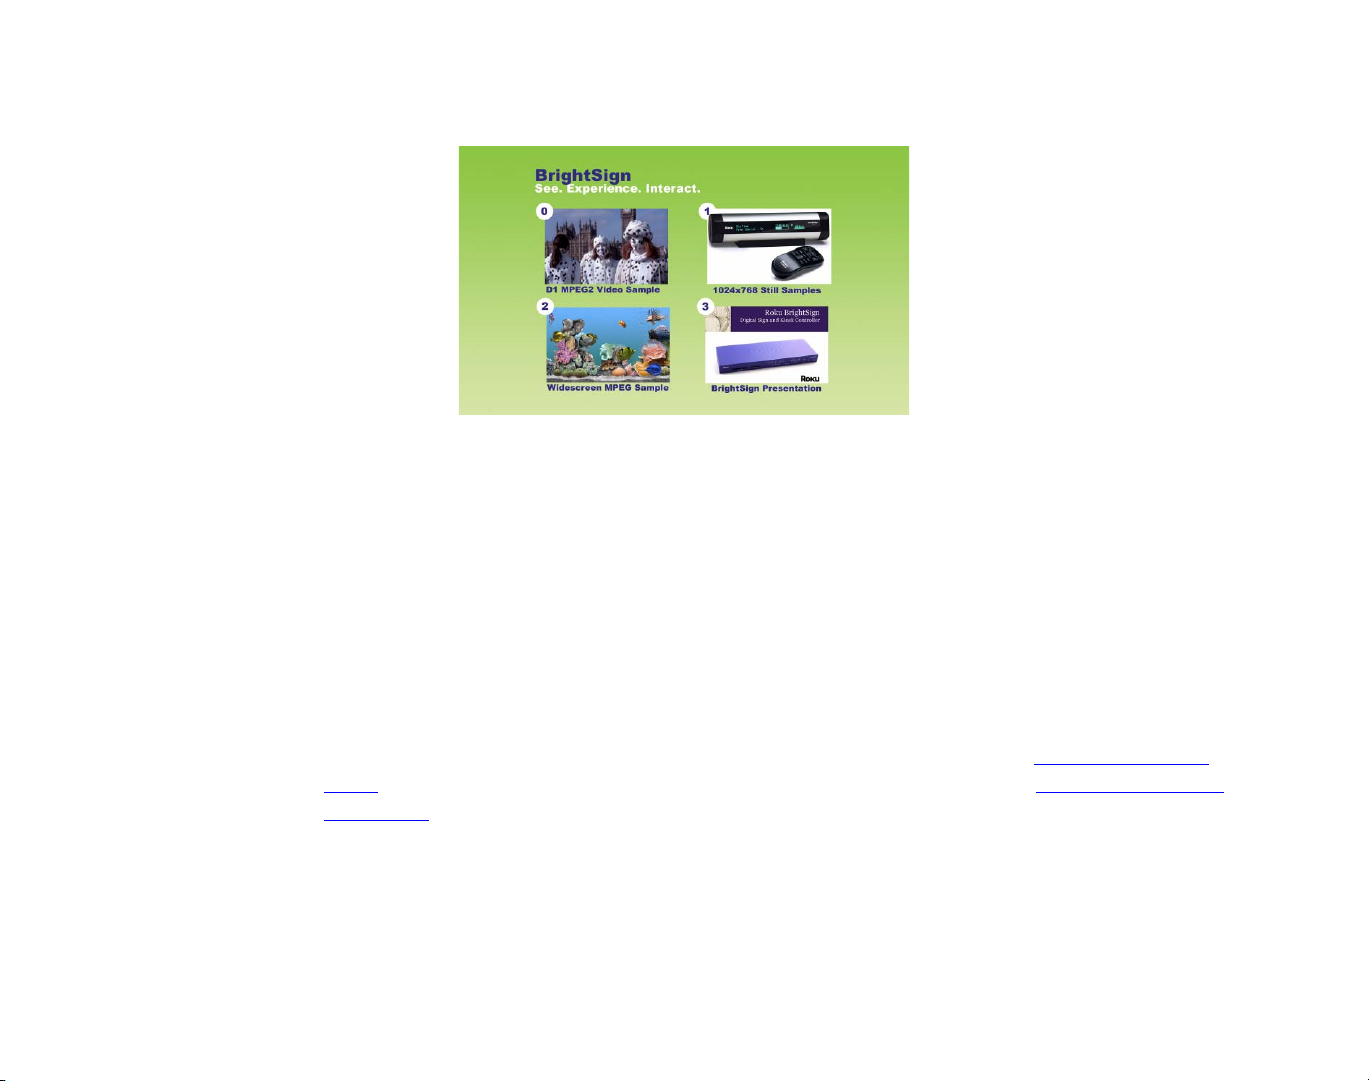
7 Use the touch screen, mouse, or button board to select one of the four hot spots.
You can also use the demo to try BrightSign with different types of monitors:
1 Connect your BrightSign to a monitor or TV using a VGA, component, or HDMI connection.
2 Make sure your monitor is configured to receive input from the cable you’re using.
3 Start the demo by inserting the CF/SD card you created in the previous set of steps.
You should now see the demo in various video modes. Note how BrightSign automatically scales
the images and that it supports both widescreen and 4x3 formats.
Step 4: Get the results you want
Now you’re ready to start using your BrightSign. Just add your content (see
types
for details on the types of files you can use) and follow the directions in
BrightSign
•
•
•
8
•
•
•
to play your presentation.
Supported media
Playing Media with
Page 15

Chapter 3
Playing Media with BrightSign
• • • • • •
Ways to play media
There are several ways to play media files on a BrightSign device:
•
Play media automatically from a CompactFlash or SD (CF/SD) card when you turn on a
BrightSign
•
Play media via a script on a CF/SD card
•
Use the serial shell commands to test media playback
NOTE:
The HD600 outputs video through the VGA connector in 1024x768 resolution, unless you
change this in your playlist, interactive playlist, or script, or by using the front panel video mode
button.
The HD2000 outputs video through the Component and HDMI connectors and the default video
resolution is 720p. If the resolution of a still image file does not exactly match the display
resolution (videomode), then BrightSign scales the image to fit or it centers/crops the image,
depending on the imagemode you selected (see
Playlist commands
and
Keywords
for details).
Video files are always scaled to fit. (The video mode button is not currently supported on the
HD2000.)
•
•
•
9
•
•
•
Page 16

BrightSign can autoplay the following types of media:
•
MPEG-2 video.
You can use a single file as a loop, or multiple files. For the HD600, files must
contain an audio track; if you don’t need audio, include a silent audio track.
•
MP3 Audio.
Any audio (in a video or mp3 file) must have a sample rate of 48KHZ (or 44.1KHZ
on the HD2000).
•
WAV Audio
•
Bitmap files.
(HD2000 only). WAV files must contain16 bit linear PCM data.
For still images, use an 8-bit, 24-bit, or 32-bit BMP file format. You can also use
PNG and JPEG files on the HD2000.
NOTE:
To use 8-bit bitmap files, you must have an HD600 with software version 1.1 or later or an
HD2000 with software version 1.0.4 or later.
•
A playlist
or audio files to play. See
•
An interactive playlist file.
. A playlist is a simple text file that contains the file names of still slides, video clips,
Working with Playlists
for more information.
BrightSign uses interactive playlists as a description of an
interactive sign that responds to buttons, touch screen, mouse, track balls, etc. The BrightSign
demo uses this method. Interactive playlists are very powerful and easy to create without any
scripting. You can create an interactive playlist using Microsoft Excel (or any editor that
supports CSV files, such as OpenOffice or the editor hosted at
http://csved.sjfrancke.nl/index.html)
. See
Creating interactive presentations
for more
information.
•
A custom BrightScript file.
events, and is appropriate for arbitrarily complex interactive media sequences. See
with Scripts
NOTE:
If you’re using AUTORUN.BAS v1.1 or later and you want to autoplay a list of images on
for more information.
A script is a simple program that controls behaviors based on
Working
startup, you must use a playlist or interactive playlist.
10
•
•
•
•
•
•
Page 17

Auto-playing a video upon power-up
To autoplay a video file on power-up or reset, do the following:
1 Copy the video file into the root directory of a
CF/SD card and name it AUTOPLAY.VOB or
AUTOPLAY.MPG.
2 Go to www.brightsign.biz/support and click the
Software Downloads link.
3 Click the AutoPlay Script link under the
appropriate model (HD600 or HD200) to
download the AUTOPLAY.ZIP file.
4 Expand the AUTOPLAY.ZIP file, which contains
a script named AUTORUN.BAS.
5 Copy AUTORUN.BAS into the root directory of
your CF/SD card.
6 Insert the CF/SD card into your BrightSign.
7 Turn on your BrightSign. After a few moments,
BrightSign plays the video and repeats it
automatically to create a loop.
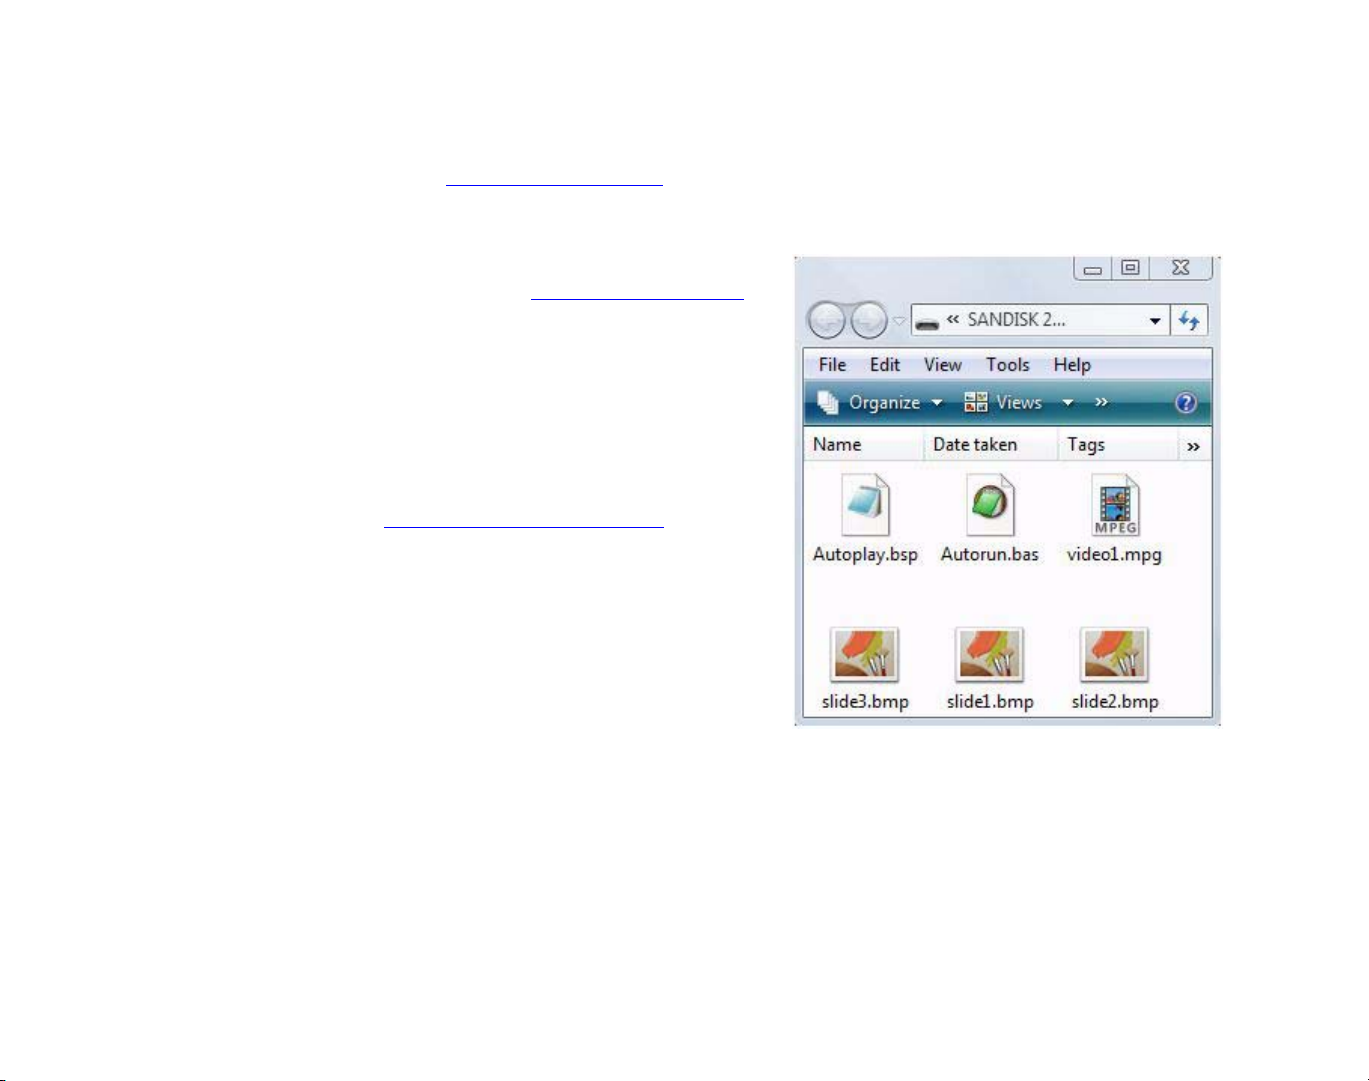
EXAMPLE 1:
CF/SD card with auto-play files
•
•
•
11
•
•
•
Page 18
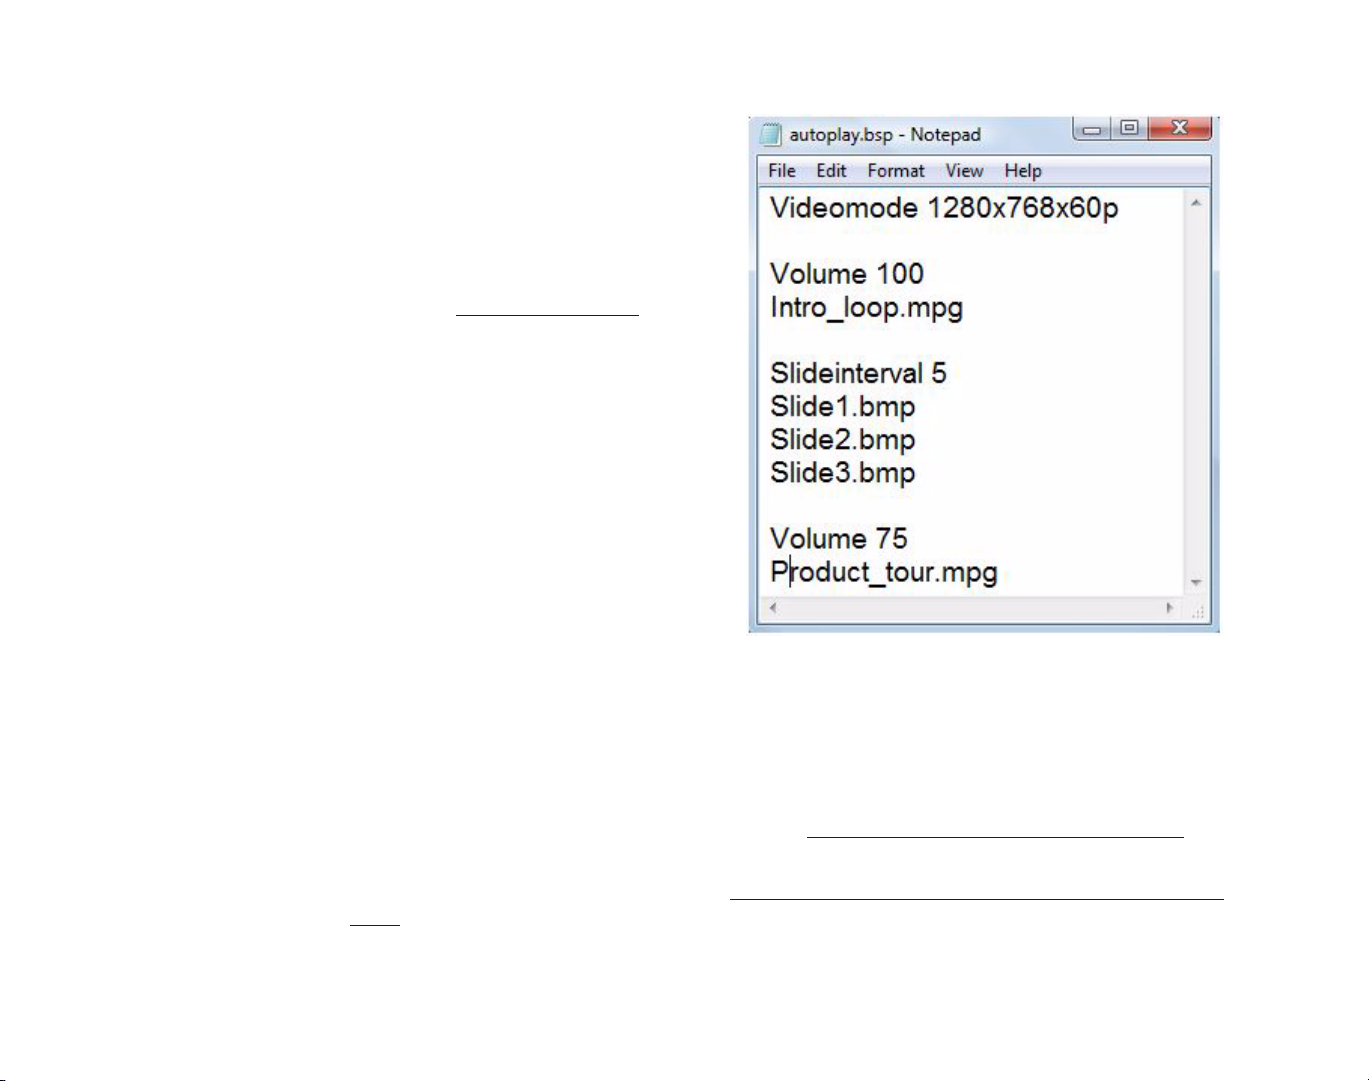
Auto-playing a playlist upon power-up
A playlist is a text file that describes the items you want to play and the order in which you want
to play them. A playlist can include still images, video clips, or audio clips. For details on creating
playlists, see
To autoplay a playlist file on power-up or reset, do the following:
1 Create a playlist file and name it
AUTOPLAY.BSP (see Working with Playlists
for details).
2 Copy the playlist file into the root directory
of a CF/SD card.
3 Copy any still graphics, audio files, or video
files you included in the playlist into the
root of your CF/SD card.
4 Go to www.brightsign.biz/support and
click the Software Downloads link.
5 Click the AutoPlay Script link under the
appropriate model (HD600 or HD200) to
download the AUTOPLAY.ZIP file.
Working with Playlists
.
12
6 Expand the AUTOPLAY.ZIP file, which
contains a script named AUTORUN.BAS.
7 Copy AUTORUN.BAS into the root
EXAMPLE 2:
CF/SD card with playlist files
directory of your CF/SD card.
8 Insert the CF/SD card into your BrightSign.
9 Turn on your BrightSign. After a few
moments, BrightSign plays the playlist and
loops it automatically.
•
•
•
•
•
•
Page 19
Auto-playing an interactive playlist upon power-up
BrightSign can also play a sophisticated presentation that is described in an interactive playlist.
An interactive playlist is a simple text file that contains a table of information. Using Microsoft
Excel, you can easily create a file that describes a sophisticated interactive presentation. The
interactive playlist describes which media to play upon power-up, and which media to play when
a user presses a button or triggers other events.
To autoplay an interactive playlist on power-up or reset, do the following:
1 Create an interactive playlist using
Microsoft Excel and name the file
AUTOPLAY.CSV (see Creating interactive
presentations for details).
2 Copy your media files and your interactive
playlist into the root directory of a CF/SD
card.
3 Go to www.brightsign.biz/support and
click the Software Downloads link.
4 Click the AutoPlay Script link under the
appropriate model (HD600 or HD200) to
download the AUTOPLAY.ZIP file.
5 Expand the AUTOPLAY.ZIP file, which
contains a script named AUTORUN.BAS.
6 Copy AUTORUN.BAS into the root
directory of your CF/SD card.
7 Insert the CF/SD card into your BrightSign.
8 Turn on your BrightSign. After a few
moments, BrightSign runs the interactive
playlist and plays the media referenced in the file.
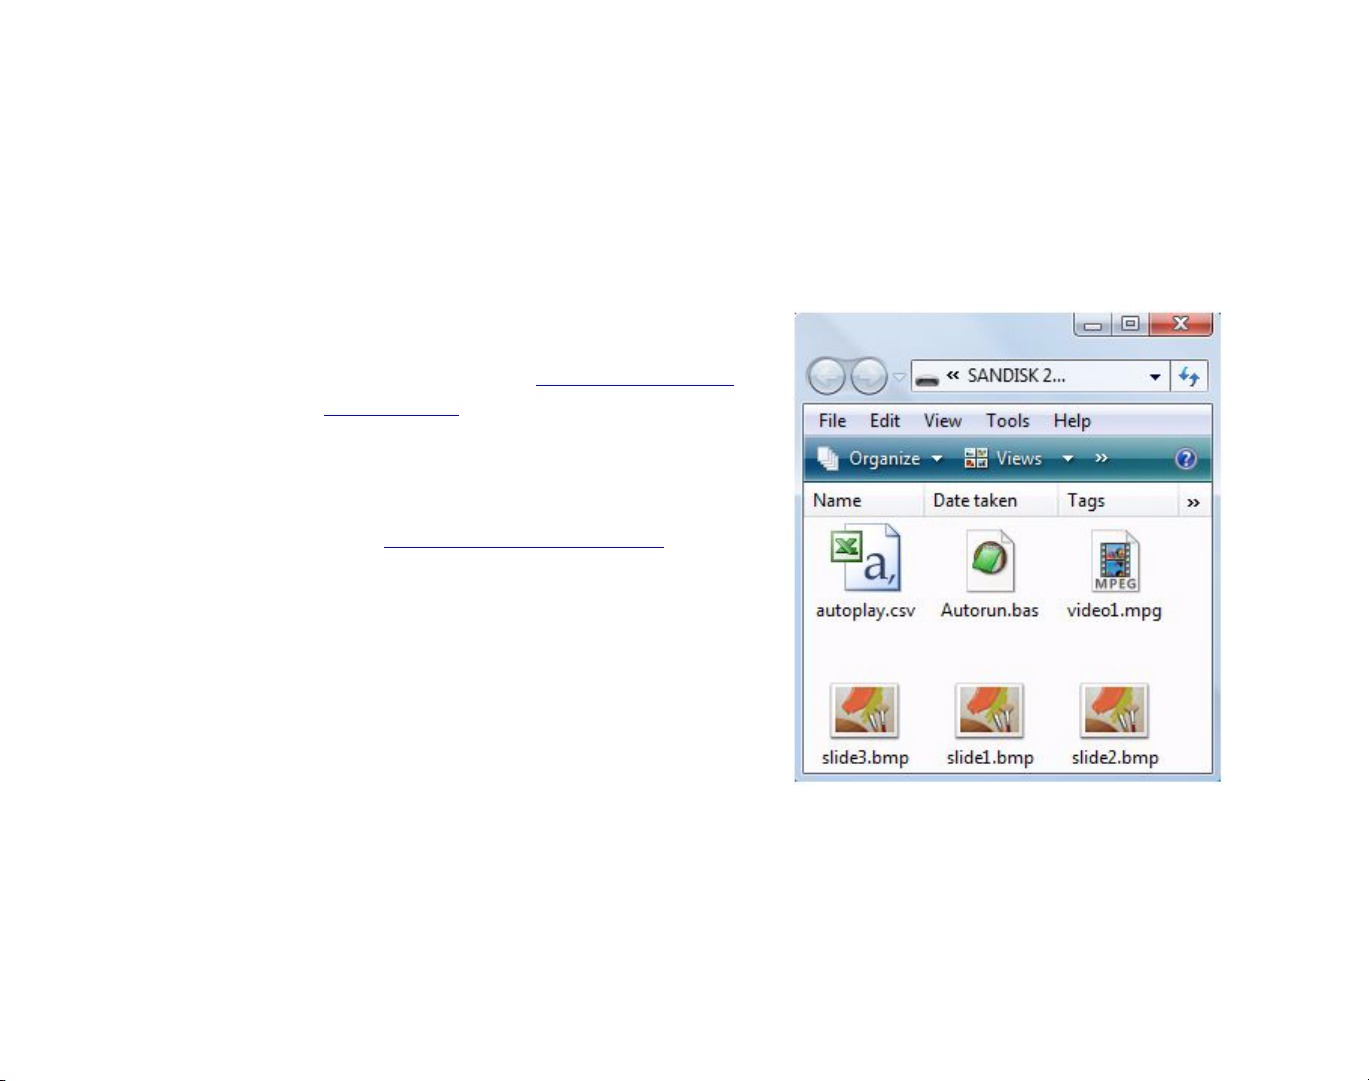
EXAMPLE 3:
CF/SD card with interactive playlist files
•
•
•
13
•
•
•
Page 20
Auto-playing a script upon power-up
Creating a BrightScript script gives you the most control over your interactive presentation. To
autorun a script, do the following:
1 Create a script using a text editor and name the file AUTORUN.BAS (see Working with
Scripts for details).
2 Copy the script into the root directory of your CF/SD card.
3 Insert the CF/SD card into your BrightSign.
4 Turn on your BrightSign. After a few moments, BrightSign runs the script and plays the
media referenced in the script.
14
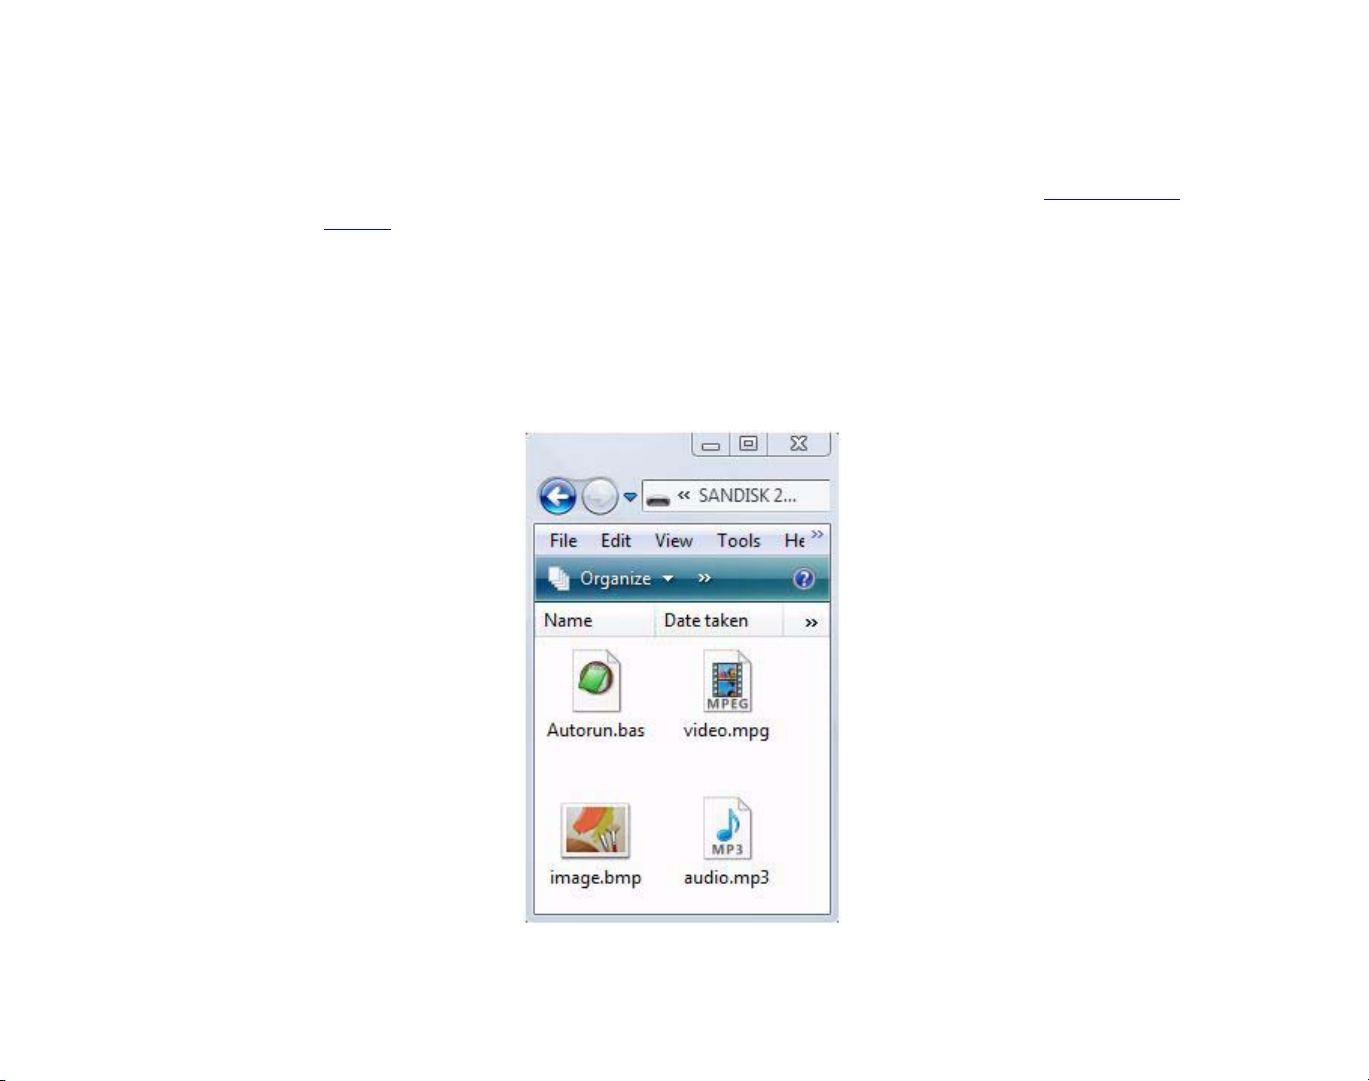
EXAMPLE 4:
•
•
•
•
•
•
CF/SD card with script files
Page 21
Auto-playing content at a scheduled time (HD2000 only)
To play videos, still images, playlists, or interactive playlists at scheduled times, do the following:
1 Create a scheduling file using a text editor
and name the file AUTOSCHEDULE.TXT
(see Scheduling playback (HD2000 only)
for details).
2 Copy AUTOSCHEDULE.TXT into the
root directory of your CF/SD card.
3 Copy all video, still image, playlist,
and interactive playlist files listed in
AUTOSCHEDULE.TXT into the root
directory of the CF/SD card.
4 Go to www.brightsign.biz/support and
click the Software Downloads link.
5 Under HD2000, click the AutoPlay Script
link to download the AUTOPLAY.ZIP file.
6 Expand the AUTOPLAY.ZIP file, which
contains a script named AUTORUN.BAS.
7 Copy AUTORUN.BAS into the root
directory of your CF/SD card.
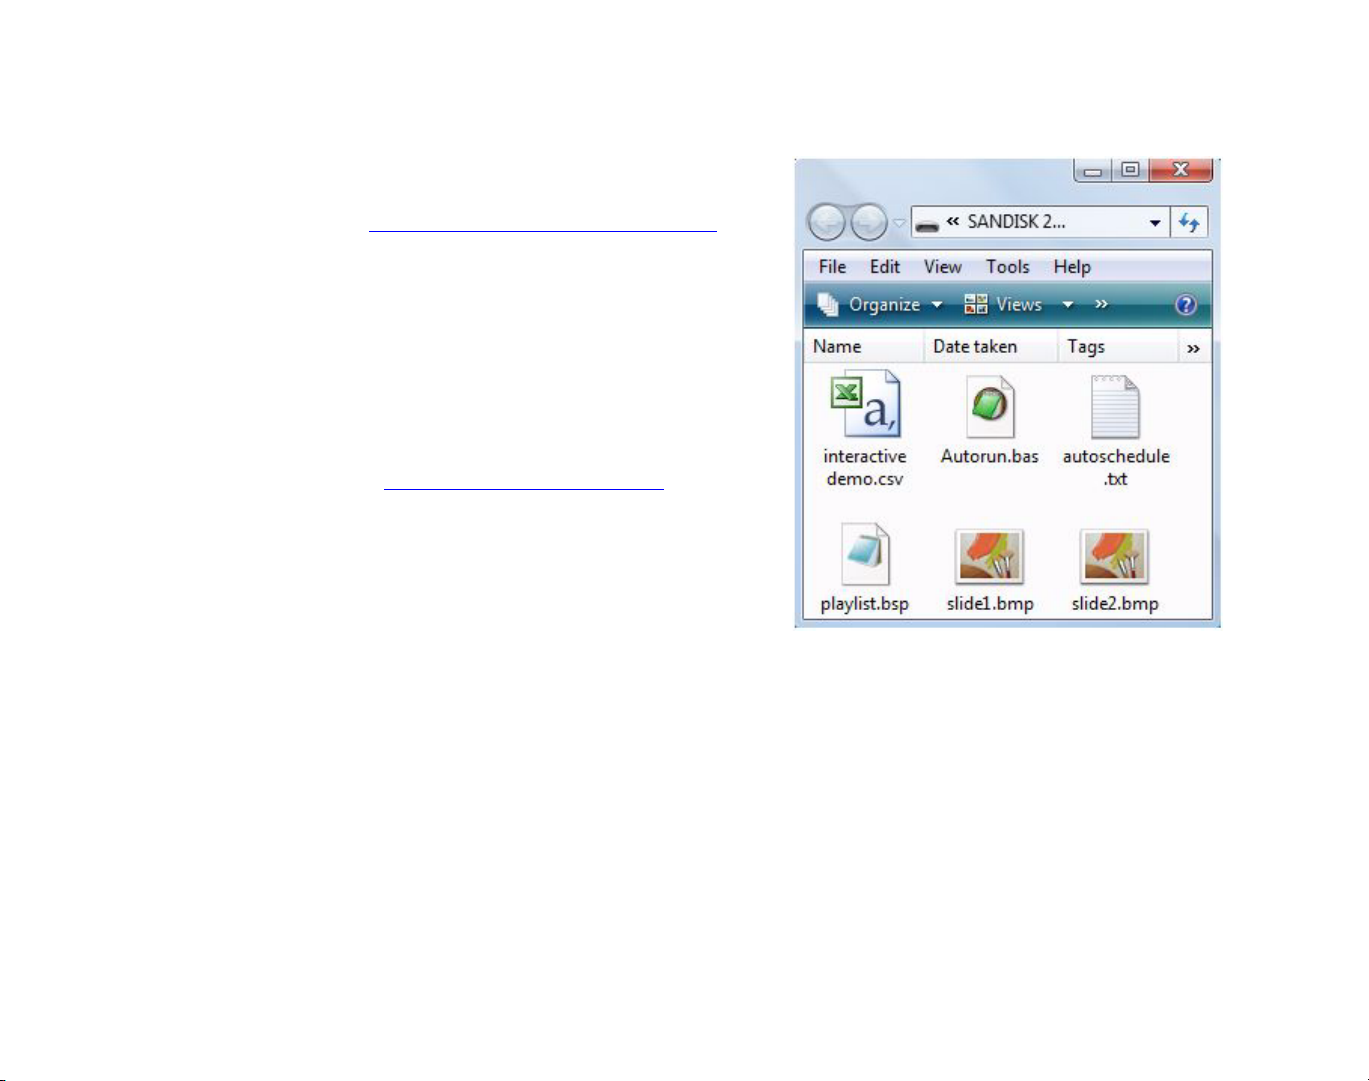
EXAMPLE 5:
CF/SD card with interactive playlist files
8 Insert the CF/SD card into your BrightSign.
9 Turn on your BrightSign. After a few
moments, BrightSign plays the appropriate content.
•
•
•
15
•
•
•
Page 22

16
•
•
•
•
•
•
Page 23

Chapter 4
Working with Playlists
• • • • • •
What is a playlist?
A BrightSign playlist is a text file that ends in BSP (BrightSign Playlist). It contains the names of
the files you want to play and the order in which you want to play them. Files in a playlist are
played in sequence, one after the next. This means that you cannot use a playlist to play files
simultaneously. For example, you cannot play an audio file and a video file at the same time
unless you add your audio to your video file.
A simple playlist might contain just these lines:
slide1.bmp
slide2.bmp
slide3.bmp
This playlist would play SLIDE1.BMP, then SLIDE2.BMP, then SLIDE3.BMP, and then it would repeat
to create a loop.
•
•
•
17
•
•
•
Page 24

The files in a playlist don’t have to be bitmaps; you can use video or audio files too. You can also
mix media types in a single playlist and trigger GPIO (General Purpose Input/Output) pins. In
addition to filenames, there is a set of about 16 commands that you can use in a BrightSign
playlist. For example, if you want the playlist to pause for 5 seconds between images, the
slideshow playlist above could be modified like this:
slideinterval 5
slide1.bmp
slide2.bmp
slide3.bmp
To pause five seconds between slides 1 and 2, and two seconds between slides 3 and 4, modify
the playlist like this:
slideinterval 5
slide1.bmp
slide2.bmp
slideinterval 2
slide3.bmp
slide4.bmp
18
•
•
•
•
•
•
Page 25
Creating a playlist
1 Using a text editor, such as Notepad,
enter the names of the files you want to
play in the order in which you want
them to play.
2 (Optional) Enter any commands you
want to add to your playlist. See the
next section, Playlist commands, for a
description of available commands.
3 Use the Save As command to the file
with a BSP extension.
NOTE:
automatically save files with a TXT
extension, so you need to override the
default file extension when saving the
playlist file.
4 Copy the following files to your CF/SD
card:
•
Your playlist (the file you created in
steps 1-3)
By default, most text editors
EXAMPLE 1:
Playlist file
•
Media files referenced in your playlist
•
AUTORUN.BAS
5 Do either of the following:
•
Play the playlist automatically upon startup (see
for details).
•
Play the playlist at a scheduled time (see
only)
for details).
Auto-playing a playlist upon power-up
Auto-playing content at a scheduled time (HD2000
•
•
•
19
•
•
•
Page 26

Playlist commands
Here is the list of commands that you can use in a playlist:
BMP, MP3, MPG, VOB, PNG (HD2000 only), JPG (HD2000 only)
Any line that is a file name and that ends in one of these extensions is valid. Names may contain
spaces.
debug
Use this command to view debug information on the display (serial port).
rem <comment>
Any line starting with rem is ignored, so you can include comments in your playlist. Rem is short
for
remark
print <line to print to console>
Use this command to send a line of text to the display. This command is useful for debugging.
.
20
audiomode #
(default is 1)
BrightSign provides 5.1 audio decoding that is controlled via the audiomode command. If your
audio source is a video file, you can use any of the following audiomode commands:
•
audiomode 0:
•
audiomode 1:
•
audiomode 2:
•
•
•
•
•
•
Provides decoded 5.1 surround sound (via USB or all six analog outs).
Mixes down 5:1 surround sound to stereo.
Mutes the audio.
Page 27

audiooutput #
(default is 0)
BrightSign has 5 different audio outputs. If an output is not specified, BrightSign uses analog
audio 0 in stereo as the default. Of the 5 outputs, there are five audiooutput modes that are set
with the audiooutput command. The audiooutput command can have one of the following
values:
•0: Outputs analog audio.
•
1:
Outputs USB audio.
•2: Outputs SPDIF audio in stereo PCM.
•3: Outputs SPDIF audio in raw AC3.
•4: Outputs analog audio with SPDIF mirroring raw AC3.
audiochan #
(default is 2)
Since there are three analog outputs, you must also use the audiochan command if you selected
analog audio output:
•
audiochan 2:
•
audiochan 1:
•
audiochan 0:
volume #
(default is 100)
You can set the volume level by specifying a value between 0 and 100. For example:
Sets output 1 (this is not a typo).
Sets output 2.
Sets output 3.
volume 100
is full volume.
•
•
•
21
•
•
•
Page 28

videomode <mode>
(HD600 default is 1024x768x60p; HD2000 default is 1280x720x60p)
Set the output framebuffer format. The options are:
VGA:
•
1024x768x60p
•
640x480x60p (HD600 only)
•
800x600x60p (HD600 only)
•
1280x768x60p (HD2000 only)
Component:
•
720x480x60p
•
720x576x50p (HD2000 only)
•
1280x720x60p
•
1280x720x50p (HD2000 only)
•
1920x1080x60i (HD2000 only)
Composite (HD 600 only):
•
NTSC
•
PA L
22
Viewmode <setting>
(default is 0)
You can use a view mode that is different from the default by setting the mode prior to starting
video playback. The view_mode values are:
•
0:
Scales the video to fill the screen without maintaining the aspect ratio. Images may appear
stretched.
•1: Centers the image and adds black borders. This is also referred to as
letter boxed
video. The
aspect ratio is maintained.
•2: Centers the image and fills the screen. The aspect ratio is maintained.
•
•
•
•
•
•
Page 29

imagemode #
(default is 0)
The imagemode command specifies whether the image is scaled to the display.
•
imagemode 0:
Centers the image without scaling (may result in cropping if the image is
larger than the current videomode resolution).
•
imagemode 1:
Scales the image to fit the display. The whole image is displayed as large as
possible with correct aspect ratio.
•
imagemode 2:
•
imagemode 3:
Scales the image to fill the display while maintaining aspect ratio.
Scales the image to fill the screen without maintaining aspect ratio.
slideinterval #
(default is 3)
Set the number of seconds between slides. The number must be an integer. For example:
slideinterval 3 inserts a 3-second pause between slides.
transition #
(default is 0)
Set the transition between images. Transition commands include:
•
0:
Changes images immediately with no transition.
•
1 to 4:
•
5 to 8:
•
10 to 11:
•
12 to 13:
•
14:
•
15:
•
16 to 19:
lighton #
Wipes the image from top, bottom, left, and right.
Explodes the image from the center, top left, top right, bottom left, and bottom right.
Divides the image into vertical and horizontal venetian blinds.
Comb the image both vertically and horizontally.
Fades the image to the background color.
Fades between the current image and the new image.
Slides the image from top, bottom, left, and right.
or
lightoff #
Use the lighton and lightoff commands to set or clear one of the GPIO outputs. The number can
be any integer between 17 and 22. For example:
lighton 17
sets LED 0 on the button board.
•
•
•
23
•
•
•
Page 30

waitbuttonany
Use this command when you want the playlist to pause until any GPIO buttons is pressed.
pause #
Use this command when you want the playlist to pause for a specified number of seconds.
The number must be an integer. For example, to pause for 5 seconds, the command would be:
pause 5
stop
Use this command to stop playback of the playlist.
Creating interactive presentations
With BrightSign you can create presentations that respond to input from the user. For example,
you can let customers choose which video to watch by pressing the button associated with the
video of their choice. Interactive presentations also respond to user input from touch screens,
mice, serial or USB keyboards, and barcode scanners (see
complete list of supported input devices). To accomplish this with BrightSign, you need to
specify the input device, and you need to do either of the following:
•
Use Microsoft Excel to create a control table and use the BrightSign interactive playlist mode
(see the next section,
Supported input devices
Using Excel to create interactive presentations
for a
for details).
24
•
Create a custom control script (see the next chapter,
•
•
•
•
•
•
Working with Scripts
for details).
Page 31

Using Excel to create interactive presentations
BrightSign can play a sophisticated sign that is described in an interactive playlist. An interactive
playlist is a simple text file that contains a list of information separated by commas. Using
Microsoft Excel, you can create an interactive playlist to describe a sophisticated interactive sign
using a text table. The table describes which media to play, and which media to play when a user
presses a button or triggers other events.
A good example of an interactive playlist is the one used in the BrightSign demo. You can run the
demo to see what it does, and then modify it to meet your needs.
1 Run the demo as described in the introduction.
2 Find the file AUTOPLAY.CSV in the zip file and copy it onto your desktop.
3 Double-click AUTOPLAY.CSV to open it into Microsoft Excel (you must have Excel installed
on your computer. If not, you can load it into any text editor, but the file won’t display in
table format).
4 Edit the file to meet your needs (see Keywords for a description commands you can include
in your interactive playlist file).
5 Use the Save As… command to keep your changes and select CSV as the file format.
NOTE:
Brightsign requires a comma-separated CSV file. If you’re outside the United States, check
the regional settings in Excel and make sure the list separator is a comma and the decimal
separator is a period. Brightsign requires a comma-separated CSV file with periods as the decimal
separator (international defaults may vary).
Below is a section of the AUTOPLAY.CSV file from the BrightSign demo. Due to space limitations,
it does not include all the columns. The columns not shown here are similar to the 5 right-hand
columns, and they describe what happens when the user presses buttons or when a video
finishes or a slide times out.
•
•
•
25
•
•
•
Page 32

VIDEOMODE 1024x768x60p
IMAGEMODE 1
EVENTS elo:110:180:350:200 elo:510:180:350:200 elo:110:400:350:200 elo:510:400:350:200 elo:0:0:1024:768
STATE demo_menu.bmp Dalmations.mpg art1.bmp cars.mpg bs1.bmp
STATE Dalmations.mpg demo_menu.bmp
STATE Cars.mpg demo_menu.bmp
STATE art1.bmp demo_menu.bmp
STATE art2.bmp demo_menu.bmp
STATE art3.bmp demo_menu.bmp
STATE art4.bmp demo_menu.bmp
STATE bs1.bmp bs2.bmp
STATE bs2.bmp bs3.bmp
STATE bs3.bmp bs4.bmp
STATE bs4.bmp bs5.bmp
STATE bs5.bmp bs6.bmp
STATE bs6.bmp bs7.bmp
STATE bs7.bmp bs8.bmp
STATE bs8.bmp bs9.bmp
STATE bs9.bmp bs10.bmp
STATE bs10.bmp demo_menu.bmp
26
•
•
•
•
•
•
Page 33

Keywords
You can include any of the following keywords at the beginning of your playlist file:
VIDEOMODE – HD600
•
ntsc
•
pal
•
640x480x60p
•
800x600x60p
•
1024x768x60p
•
720x480x60p
•
1280x720x60p
NOTE:
If you set the VIDEOMODE, this locks the front panel button on your BrightSign. If you leave
this option off, BrightSign defaults to 1024x768 VGA, and you can use the front panel button to
change the video mode.
VIDEOMODE – HD2000
•
720x480x60p
•
720x576x50p
•
1024x768x60p
•
1280x768x60p
•
1280x720x60p
•
1280x720x50p
•
1920x1080x60i
NOTE:
The front panel button is not supported on the HD2000. If you use a script to change the
video mode, BrightSign reboots and sets the video mode based on the script.
•
•
•
27
•
•
•
Page 34

IMAGEMODE
•0: Centers the image and no scaling takes place. If the image is bigger than the screen,
BrightSign crops the image.
•1: Scales the image to fit so that it is fully viewable with its aspect ratio maintained.
•2: Scales and crops the image so that it totally fills the screen with its aspect ratio maintained.
•3: Scales the image so that it fills the screen and the whole image is viewable. This means that
the is stretched and the aspect ratio may not be maintained.
VIDEOPLAYERAUDIOMODE <audio mode> (HD2000 only)
Sets the audio mode used when playing a video
•0: Sets the audio to AC3 surround.
•1: Mixes AC3 surround audio down to stereo.
•2: Mutes the audio.
VIDEOPLAYERAUDIOOUTPUT <audio output> (HD2000 only)
Sets the audio output when playing a video
•0: Outputs analog audio.
•
2:
Outputs SPDIF audio in stereo PCM.
•
3:
Outputs SPDIF audio in raw AC3.
28
•
4:
Outputs analog audio with SPDIF mirroring raw AC3.
VIDEOPLAYERAUDIOSTEREOMAPPING <stereo mapping> (HD2000 only)
Sets the analog output when playing a video. Use this parameter when the
VIDEOPLAYERAUDIOOUTPUT parameter is set to 0 – Analog audio.
•0: Maps stereo audio to Audio 3.
•1: Maps stereo audio to Audio 2.
•2: Maps stereo audio to Audio 1.
•
•
•
•
•
•
Page 35

VIDEOPLAYERAUDIOVOLUME <volume> (HD2000 only)
Sets the volume when playing a video. The volume parameter can be any number between 0 and
100.
AUDIOPLAYERAUDIOOUTPUT <audio output> (HD2000 only)
Sets the audio output when playing an audio file.
•0: Outputs analog audio.
•
1:
Outputs USB audio.
•
2:
Outputs SPDIF audio in stereo PCM.
•
3:
Outputs SPDIF audio in raw AC3.
•
4:
Outputs analog audio with SPDIF mirroring raw AC3.
AUDIOPLAYERAUDIOSTEREOMAPPING <stereo mapping> (HD2000 only)
Sets the analog output when playing an audio file. Use this parameter if the
AUDIOPLAYERAUDIOOUTPUT parameter is set to 0 – Analog audio.
•0: Maps stereo audio to Audio 3.
•1: Maps stereo audio to Audio 2.
•2: Maps stereo audio to Audio 1.
AUDIOPLAYERAUDIOVOLUME <volume> (HD2000 only)
Sets the volume level when playing an audio file. The volume parameter can be any number
between 0 and 100.
•
•
•
29
•
•
•
Page 36

FLIPELO
Reverses the coordinates of the touch screen. This keyword isn’t used in the example above, and
it should be used only if the touch screen coordinates appear to be reversed.
FLIPELO
IMAGEMODE 2
EVENTS elo:110:180:355:210
REGISTRYSECTION <registry section name> (HD2000 only)
Specifies the registry section where registry input is stored. If the registry section name is not
specified in the interactive playlist, registry input appears in the
Using the registry (HD2000 only)
for additional information.
User
section of the registry. See
DELETEREGISTRYSECTION <registry section name> (HD2000 only)
Deletes the specified registry section and all registry keys and values within this section.
DELETEREGISTRYKEY <registry key> (HD2000 only)
Deletes the specified registry key from the current registry section. The corresponding registry
value is also deleted.
30
•
•
•
•
•
•
Page 37

EVENTS
After the keywords, the first line of the interactive playlist is the EVENTS row. For every event type
you want to respond to, you must make an entry in this row. You do not need to enter events you
don’t use. BrightSign supports the following event types:
elo
Triggers with a USB Mouse or Elo Touch Screen press within a rectangular touch area. Use this
format to define the touch area:
elo:x:y:width:height
•
x:y
represents the starting position, where 0,0 is in the upper left
•
width:height
resolution
You can have as many elo events as you wish. Events can overlap touch areas, but in this case, you
should only use one at a time (see the demo example and how it uses a touch area that covers
the entire screen when not in the main menu).
NOTE:
You can also use
eloc
Triggers with a USB Mouse or Elo Touch Screen press within a circular touch. Use this format to
define the touch area:
represents the width and height of the area in pixels based on a 1024 x 768
elor
instead of elo. They are interchangeable.
eloc:x:y:radius
•
x:y
represents the center of the circular region
•
radius
represents the radius of the circular region, in pixels
•
•
•
31
•
•
•
Page 38

button
Triggers on a GPIO Control Port button press. Use this format to define the button number:
button:number
•
number
represents a number between 0 and 12.
timeout
You can use a timeout event when a video or slide is displaying, or an audio file is playing. For
example, use timeout when you want to advance a slide show to the next slide or to exit a
looping video after a certain number of seconds of playback. You can have only one timeout
event per interactive playlist. The format is:
timeout:seconds
•
seconds
represents the number of seconds after the video/image/audio starts that the event
will trigger.
mstimeout (HD2000 only)
This event is similar to timeout, but you can have multiple mstimeout events per interactive
playlist. The format is:
mstimeout:milliseconds
•
milliseconds
the event will trigger.
represents the number of milliseconds after the video/audio/image starts that
32
videoend
This event triggers when a video finishes playing. You can use this event to move on to another
state after the video ends. The format is:
videoend
. There are no parameters.
audioend
This event triggers when an mp3 file finishes playing. You can use this event to move on to
another state after the audio ends. The format is:
TIP:
See
Using rollover regions
•
•
•
•
•
•
for two additional events you can use with interactive playlists.
audioend
.
There are no parameters.
Page 39

STATE
After the EVENTS row, the interactive playlist may include one or more STATE rows. These rows
begin with the keyword STATE. The first cell after the STATE keyword is the name of the video or
image file to display, or audio file to play. When the state is entered, this file starts playing. The
remaining cells describe what state to jump to when the corresponding event happens. For
example, in the demo example, the first state is DEMO_MENU.BMP. While in this state, the main
menu for the demo appears on the display. If the user presses the elo touch screen or clicks the
mouse in the right spot to trigger the elo:110:180:350:400 event, then BrightSign jumps to the
new state CARS.MPG. Look at the STATE rows in the demo example; notice one of these rows
starts with CARS.MPG. It is also important to note that there can be only one state with a
particular file.
To understand this better, open the demo’s AUTOPLAY.CSV file in Excel while playing the demo
on your BrightSign. As you select options on your BrightSign, look at the interactive playlist to
see how it tells your BrightSign what to do. You can then edit the autoplay interactive playlist in
Excel and Save As… a CSV file to create your own applications.
Controlling GPIO outputs from an interactive playlist (HD2000 only)
To control GPIO output for a particular state, add a GPIO command to the second column of the
state specification in the interactive playlist.
The general syntax is:
<state name>:<gpio command>(<gpio_num>;<gpio_num>;gpio_num)
Enter the state name followed by a colon, then the gpio command, then a list of GPIO’s separated
by semicolons inside parentheses. GPIO 0 corresponds to the first LED on the button board.
The GPIO commands are:
•
gpiosOn:
•
gpiosOff:
•
gpios
Turns on the specified GPIO’s; unspecified GPIO’s are unchanged.
Turns off the specified GPIO’s; unspecified GPIO’s are unchanged.
: Turns on the specified GPIO’s; unspecified GPIO’s are turned off.
•
•
•
33
•
•
•
Page 40

Examples
Demo_menu.bmp:gpios(1;3;5)
When BrightSign enters the demo_menu.bmp state, LED’s 1, 3, and 5 are turned on; the other
LED’s are turned off.
aq.mpg:gpiosOn(2)
When BrightSign enters the aq.mpg state, LED 2 is turned on and the other LED’s are unaffected.
ppt10.bmp:gpiosOff(0;2;4)
When BrightSign enters the ppt10.bmp state, LED’s 0, 2, and 4 are turned off; and the other LED’s
are unaffected.
product1.bmp:gpios()
When BrightSign enters the product1.bmp state, All LED’s are turned off.
Preloading images
The autoplay script preloads still images so that appear automatically when a user triggers their
display. Here are the rules that apply to preloading an image:
34
•
If a state row only has one possible next image state, then the next image is preloaded.
•
If a state row has more than one possible next image state, and one of them is the next row in
the state table, then the image associated with the next state is preloaded. Therefore, if you
have a sequence of images that display one after the other and you want them to preload, put
them in sequential rows in the state table. To see an example of this, look at the BS1.BMP,
BS2.BMP, etc. state rows in the interactive playlist demo.
•
•
•
•
•
•
Page 41

Simultaneous states within a single interactive playlist (HD2000 only)
Within a single interactive playlist, you can create an interactive presentation with simultaneous
states. For example, you can:
•
Play an HDMI slide show at the same time as an analog audio file.
•
Plays a video with English audio in the main speakers, French audio in headphone #1, and
Spanish audio in headphone #2.
The various states can run simultaneously and independently. To use simultaneous states, insert
the keyword
You can then add other keywords, followed by the states for the simultaneous activities. You can
use this process to add up to four states.
When using simultaneous states, only the first state can include video and images. Additionally,
the states must use independent resources. For example, if state 1 is using analog output Audio
1, then this output channel is unavailable to other states– therefore, another state would use
analog output Audio 2.
See
EXAMPLE 5:
interactive playlist with simultaneous states.
NEXT
in the first column of the first row that follows all of the primary STATE rows.
Simultaneous states in a single interactive playlist
for an example of an
•
•
•
35
•
•
•
Page 42

Interactive playlist examples
The BrightSign demo shows that you can design powerful interactive signs using interactive
playlists. The following examples illustrate how easy it is to use and understand interactive
playlists.
36
EXAMPLE 2:
•
•
•
•
•
•
Slideshow that advances automatically after the first slide plays
Page 43

Example 2 contains two events: an elo event (used for ELO touch screens or any mouse input) and
a timeout event. The clickable/touch area is defined as the whole screen. One touch or click starts
the slideshow.
When this demo starts, BrightSign displays MENU.BMP since it’s in the first STATE position.
•
There is no timeout entry for MENU.BMP, so if there is no mouse or touch screen input,
MENU.BMP remains onscreen forever.
•
MENU.BMP has one touch/click event. When MENU.BMP is currently being displayed and
there is a mouse click or touch screen input anywhere onscreen, BrightSign displays PIC1.BMP.
•
Pictures 1 – 6 all have timeout entries. Each image displays for 5 seconds before the next
image plays. The timeout entry for the last image is MENU.BMP.
•
There is no elo entry for pictures 1 – 6, so nothing happens until the timeout is reached even
if there is mouse or touch screen input while the images are playing.
•
•
•
37
•
•
•
Page 44

38
EXAMPLE 3:
Slideshow that advances only when a click / touch occurs
Example 3 has only 1 event, the same elo event as Example 2.
•
There is an elo event entry for each image, so the next image plays when there is a mouse click
or touch activity anywhere onscreen.
•
There are no timeout events in this demo. Because Example 3 only has an elo event, and no
timeout events, the user must click or touch the screen to advance the slideshow.
•
•
•
•
•
•
Page 45

EXAMPLE 4:
Video and slide playback using button input
Example 4 plays two videos and three images and it contains five events: three button events, a
timeout event, and a videoend event. When Example 4 starts, BrightSign displays MENU.BMP,
since it’s in the first STATE position.
•
If the menu is being displayed, pressing button 1 starts the attract video; pressing button 2
starts the showcase video; and pressing button 3 starts the slideshow. If no button is pressed,
the attract video starts automatically after 10 seconds.
•
If the attract or showcase video is playing, pressing button 1 restarts it.
•
If the attract or showcase video is playing, pressing button 3 returns to the menu. Since there
is no entry under button 2 for either video, button 2 is ignored. When either the attract or
showcase video ends, the menu is displayed, as indicated under the videoend event.
•
For the slideshow, button 2 advances to the next slide, and button 1 goes back to the previous
slide. Button 3 returns to the menu.
•
•
•
39
•
•
•
Page 46

40
EXAMPLE 5:
•
•
•
•
•
•
Simultaneous states in a single interactive playlist
Page 47

Example 5 contains three simultaneous states.
•
The first state specifies the video mode, image mode, and audio output for video. In this case,
the keyword VideoPlayerAudioOutput directs BrightSign to output stereo PCM via the SPDIF
audio connector. This machine uses button 0 and the videoend event to control the videos
and the image.
•
Note the NEXT keyword on line 10; it signals the beginning of another state.
•
The second state uses analog audio output through the Audio 2 connector. It uses button 1
and the audioend event to control the audio playback.
•
The NEXT keyword on line 18 indicates the start of the third state.
•
The third state uses analog audio output through the Audio 3 connector, and it uses button 2
and audioend events to control its audio playback.
Using rollover regions
In the previous section,
Using Excel to create interactive presentations
, you learned that you
can create touchable (clickable) areas on the screen using elo (elor) and eloc keywords in the
EVENTS row of an interactive playlist. You can then use these regions like buttons to playback
content. You can also set up any touch region as a rollover region. Rollover regions enable you to
create more dynamic and interactive presentations that accept mouse and touch input and that
are also sensitive to cursor movement. A rollover region has an ON image and an OFF image.
Whenever the cursor is within a rollover region, BrightSign displays the ON image, and when the
mouse cursor is outside the rollover region, BrightSign displays the OFF image. Therefore,
rollover regions enable you to include features such as highlighting buttons as the user moves
the cursor moves over them.
•
•
•
41
•
•
•
Page 48

Using rollover events
You can define either a rectangular or circular rollover region. To setup a rollover region, use
either of the following keywords in the events row:
NOTE:
When the x_origin : y_origin are set to -1:-1, the starting position for the ON and OFF
images are also the starting coordinates for the rollover region. This is true for both rectangular
and circular rollover regions.
Relor
Define a rectangular rollover region using this format:
relor:x:y:width:height:enable_rollover:on_bitmap:off_bitmap:x_origin:y_origin
•
x:y
represents the starting position of the rollover region, where 0,0 is in the upper left corner
of the display.
•
width, height
•
enable_rollover
•
on_bitmap
represents the width and height of the touch area in pixels.
: 1 enables rollovers; 0 disables rollovers
represents the name of the bitmap image that displays when the mouse is within
the defined region.
•
off_bitmap
represents the name of the bitmap image that displays when the mouse is not
within the defined region.
•
x_origin,y_origin
represents the starting position for the rollover image.
Reloc
Define a circular rollover region using this format:
reloc:x:y:radius:enable_rollover:on_bitmap:off_bitmap:x_origin:y_origin
•
x, y
represents the center of the touch area.
42
•
radius
•
enable_rollover:
•
on_bitmap
represents the radius of the touch area in pixels.
1 enables rollovers, 0 disables rollovers
represents the name of the bitmap image that displays when the mouse is within
the defined region.
•
•
•
•
•
•
Page 49

•
off_bitmap
represents the name of the bitmap image that displays when the mouse is not
within the defined region.
•
x_origin,y_origin
represents the coordinates for the center of the rollover image.
EXAMPLE 6:
Rectangular rollover region
Example 6 shows what you would enter in the interactive playlist to define a rollover region. In
this example:
•
Starting position is 765, 674
•
Rollover region is 96 pixels wide and 43 pixels high
•
Rollover region is enabled
•
On and off images are NEXT_ON.BMP and NEXT_OFF.BMP
•
Rollover images are displayed in the same location as the rollover region
Normally, the on and off image have the same dimensions as the rollover region (width, height),
and the same starting position (x,y). However, if your on and off images are larger than the touch
region you use to activate the on and off images, you can use the rollover origin (x_origin,
y_origin) parameters to specify a different starting position. You may also want to adjust the
rollover origin if you have a menu with thumbnail images on the left side, and you want a larger
image to appear on the right side of the screen when the user places the cursor over a thumbnail
image on the menu.
EXAMPLE 7:
Slideshow, with next and back buttons that light up when the mouse is over them
•
•
•
43
•
•
•
Page 50

Example 7 plays a simple slideshow with three images. It has two rectangular rollover region
events and one timeout event. Examples 7.1 and 7.2 are the same as Example 7, but they are
expanded to make them easier to read.
•
If nothing is clicked or touched, the slide show starts automatically after the 10 second
timeout, and then returns to the menu after it finishes.
•
Similar to a standard elo entry, entering the rollover area, advances to the next slide until you
reach MENU.BMP.
•
Entering the second rollover area takes you back to the previous slide.
44
EXAMPLE 7.1:
3 images with rollover regions
Example 7.1 emphasizes that each of the three images have a rollover region that is 96 pixels long
by 43 pixels tall.
•
When the cursor is outside this area, BrightSign displays NEXT_NOTLIT.BMP.
•
When the cursor is inside this area, BrightSign displays NEXT_LIT.BMP.
•
•
•
•
•
•
Page 51

EXAMPLE 7.2:
3 images with rollover regions
Example 7.2 shows that each of the 3 images has a rollover region that is 95 pixels long by
43 pixels tall.
•
When the cursor is outside this area, BrightSign displays BACK_NOTLIT.BMP.
•
When the cursor is inside this area, BrightSign displays BACK_LIT.BMP.
Scheduling playback (HD2000 only)
You can play videos, still images, and playlists at scheduled times using the autoschedule.txt file.
This file specifies the date/time for the event as well as the file you want to play.
The syntax of the date/time specification is as follows:
Year “/” Month “/” Day “-“ Day of Week “-“ Hour “:” Minutes
For example, a date/time specification for December 23, 2009 at 3:20 PM is defined as:
2009/12/23-*-15:20
In this example, the Day of Week parameter is a wildcard defined with an asterisk. All date/time
parameters not used must be defined as wildcards using an asterisk (*).
•
•
•
45
•
•
•
Page 52

Valid syntax for Date/Time parameters:
•
Year:
4 digit integer from 2000 to 2038
•
Month:
•
Day:
•
Day of Week:
•
Hour:
•
Minute:
2 digit integer from 01 to 12
2 digit integer from 01 to 31
the following 3 letter abbreviations: Sun, Mon, Tue, Wed, Thu, Fri, Sat
2 digit integer from 00 to 23
2 digit integer from 00 to 59
In the AUTOSCHEDULE.TXT file, the line following a date/time specification must be an
interactive playlist file, playlist file, video file, or image file. When the date/time event occurs,
BrightSign stops playing the current file and begins playing the new file.
The following is an example AUTOSCHEDULE.TXT file:
*/*/*-MON-01:00
weekday.mpg
*/*/*-SAT-01:00
weekend.mpg
In this example, the WEEKDAY.MPG file launches on Monday at 1:00 AM and plays continually
during the week; on Saturday at 1:00 AM, the file WEEKEND.MPG launches and plays until
Monday at 1:00 AM.
46
•
•
•
•
•
•
Page 53

Another example AUTOSCHEDULE.TXT file:
2009/12/15-*-15:20
image.png
2009/12/25-*-16:16
music.bsp
2010/1/*-WED-16:00
video.mpg
2010/1/*-*-07:00
breakfast.bsp
2010/1/*-*-14:00
demo.csv
In this example, BrightSign displays the image IMAGE.PNG starting on December 15, 2009 at
3:20 PM. On December 25, at 4:16 PM, the playlist MUSIC.BSP starts. The next specification
indicates that VIDEO.MPG starts playing at 4:00 PM every Wednesday in January, 2010. The
playlist BREAKFAST.BSP starts playing at 7:00 AM during January, 2010. Finally, DEMO.CSV
launches every day in January, 2010, at 2:00 PM.
NOTE:
You can insert blank lines in an AUTOSCHEDULE.TXT file to make it easier to read. You can
also add REM lines to annotate these files.
•
•
•
47
•
•
•
Page 54

48
•
•
•
•
•
•
Page 55

Chapter 5
Working with Zones
• • • • • •
What are zones?
With BrightSign zones you can divide the screen into rectangles and play different content in
each rectangle. You can create the following types of zones:
•
•
•
•
•
Below are a few examples of zone layouts, but there are many other ways to arrange your zones
on the screen. The only rule you need to keep in mind is that Image zones cannot overlap. If there
are additional zone types you would like to see or additional widgets (Text, RSS, Clock, etc),
please email your suggestions to BrightSign.
VideoORImages
: This zone supports videos and images. This is the only zone that
supports videos.
Images
RSS
Te xt
Clock
: This zone supports playback images. You create multiple image zones.
: This zone supports playback of a single RSS feed.
: This zone plays static text.
: This zone displays the time and it requires the RESOURCES.TXT file.
•
•
•
49
•
•
•
Page 56

EXAMPLE 1:
Can I customize the zones?
Here are some of the things you can customize in your zones:
•
Background screen color
•
Font:
Choose a true type font for Text and RSS playback.
•
Parameters
•
Line count
•
Length of time to display text
•
Text Appearance—ani mated or stat ic
•
Commands
•
Foreground text color:
•
Background text color:
•
Background bitmap:
Multi-zone examples
: Specify the background color for the display.
: Control settings for RSS and Text zones. You can set the following:
: Use commands to control the following:
Set the foreground text color for Text, Clock, and RSS.
Set the background color for the Text, Clock, or RSS widget.
Set a bitmap image that sits behind the zones.
50
•
•
•
•
•
•
Page 57

Using zones with playlists
The easiest way to use zones is with playlists. However, to use zones, you must update to the
latest software and AUTORUN.BAS file from
Here are a few examples of how to add zones to your playlists:
www.brightsign.biz/support
.
EXAMPLE 2:
5 zones with clock and RSS
•
•
•
51
•
•
•
Page 58

Example 2 shows a presentation with five zones:
•
Zone 1 is the a main video zone.
•
Zone 2 is clock zone in the top right.
•
Zones 3 and 4 are the two image zones to the right.
•
Zone 5 is the RSS zone at the bottom.
The following explains each line in the Example 2 playlist:
•
EnableZones:
•
VideoMode:
•
DefineZone:
This
must be
This keyword sets the video resolution (see
the first keyword in your playlist when using zones.
Playlist commands
for details).
This keyword sets the location of the zones on the screen. For each zone, you
specify the following:
•
Zone type (VideoORImages, Images, Clock, Text, or RSS; see
•
Starting position (in pixels)
•
Width and height (in pixels)
What are zones?
The syntax for the DefineZone keyword is:
DefineZone <zone_type> <rectangle_spec> <zone_param1> <zone_param2>
<zone_param3> <zone_param4>
for details.)
52
When you’re defining an RSS zone, you must also specify the RSS feed you want to display in
addition to the size and location of the zone. All of this information must appear in the same
entry in the playlist. The syntax to define an RSS feed is:
DefineZone RSS 20,610,1250,90 3 0 4
http://news.bbc.co.uk/rss/newsonline_uk_edition/sci/tech/rss.xml
The three numbers after the RSS dimensions represent the following:
•3 (1st number): Represents the number of lines to display
•0 (2nd number): Indicates whether the text is animated or static (0 for animated, 1 for static)
•4 (3rd number): Represents the number of seconds to display each segment
•
•
•
•
•
•
Page 59

EXAMPLE 3:
5 zones with clock and text
•
•
•
53
•
•
•
Page 60

Example 3 is similar to Example 2, but the RSS zone is replaced with a Text zone. The following
explains the Text zone entry:
•
DefineZone TEXT:
This keyword creates a text zone. In addition to providing the size and
location of the zone, you must also specify the strings you want to display by using the
STRING
DefineZone RSS 20,610,1250,90 4 0 10
String This is the first string
String This is the second string
keyword. You can use as many STRING entries as you want.
The three numbers after the Text zone dimensions represent the following:
•4 (1st number): Represents the number of lines to display
•0 (2nd number): Indicates whether the text is animated or static (0 for animated, 1 for static)
•
10
(3rd number): Represents the number of seconds to display each string
Other keywords for zones
In addition to the keywords described in the previous section, you can also use the following
keywords when adding zones to a playlist:
•
Backgroundbitmap:
background bitmap to Text, RSS, or Clock zones. The stretch parameter indicates whether the
image stretches to the size of the window (0 for no stretch; 1 is stretched). The syntax is:
<.bmp file> <stretch>
This keyword adds a background bitmap image. You can add a
54
Backgroundbitmap logo.bmp 1
•
Color:
The color keywords use RGB color values to indicate the density of color for the
background screen color, the foreground text and background text. The color values syntax is:
r:g:b:a
•
•
•
•
•
•
Page 61

When specifying the color values, the a (alpha) value is optional. If you don’t specify an alpha
value, it defaults to 255. The alpha value has no effect on the foreground text color or
background screen color. However, the alpha value does effect the background color for
individual zones (RSS, Text, and Clock) as well as the background text color. The alpha value
is between 0 and 255 (0 [zero] is transparent and a value of 255 is opaque).
You can use the following color keywords:
•
Backgroundscreencolor <color values>:
•
ForegroundTextColor <color values>
•
BackgroundTextColor <color values>:
Sets the background color for all zones.
: Sets the text color RSS, Text, or Clock zones.
Sets the color of the background behind the text
in RSS, Text, or Clock zones.
•
Font <font location & name>:
Sets the font. You can use any TrueType font.
•
•
•
55
•
•
•
Page 62

Comix Tour example
The Comix Tour demo illustrates zones in action. This section provides the playlist that created
the demo, so you can see how the playlist controls the demo. You can download the Comix Tour
demo (1080i) at this location:
NOTE:
www.brightsign.biz/support/demos
.
To view the Comix Tour demo, you need BrightSign software version 2.0.58 or higher.
Main Video Zone
Background color
Image Zone (playlist #1)
56
Text Zone with custom TrueType font Image Zone (playlist #2)
EXAMPLE 4
•
•
•
•
•
•
: Screen capture of the Comix Tours demo
Page 63

The sections that follow show the playlist for Comix Tours demo:
Global settings
EnableZones
VideoMode 1920x1080x60i
BackgroundScreenColor 181:181:181 'color gray71
Zone 1 – video or images
REM
************************************************************************
DefineZone VideoOrImages 40,60,1344,756
audiochan 0 'analog audio
NewEnglandFishingWithFlyByLogo-ZonesDemo.mpg
Zone 2 - images
REM
************************************************************************
DefineZone Images 1384,100,420,420
Slideinterval 2 '2 seconds between images
Transition 15 ' Fades between current and new image
ZoneAfrica_00.png
ZoneAfrica_01.png
ZoneAfrica_02.png
ZoneAfrica_03.png
ZoneAfrica_04.png
ZoneAfrica_05.png
ZoneAfrica_06.png
ZoneAfrica_07.png
ZoneAfrica_08.png
ZoneAfrica_09.png
ZoneAfrica_10.png
ZoneAfrica_11.png
•
•
•
57
•
•
•
Page 64

Zone 3 - images
REM ***********************************************************************
DefineZone Images 1384,520,536,356
Slideinterval 4 '4 seconds between images
Transition 19 ' slides from right
ZoneWorld_00.png
ZoneWorld_01.png
ZoneWorld_02.png
ZoneWorld_03.png
ZoneWorld_04.png
ZoneWorld_05.png
ZoneWorld_06.png
ZoneWorld_07.png
ZoneWorld_08.png
ZoneWorld_09.png
ZoneWorld_10.png
ZoneWorld_11.png
ZoneWorld_12.png
ZoneWorld_13.png
ZoneWorld_14.png
ZoneWorld_15.png
ZoneWorld_16.png
ZoneWorld_17.png
ZoneWorld_18.png
ZoneWorld_19.png
ZoneWorld_20.png
ZoneWorld_21.png
ZoneWorld_22.png
ZoneWorld_23.png
ZoneWorld_24.png
ZoneWorld_25.png
58
•
•
•
•
•
•
Page 65

ZoneWorld_26.png
ZoneWorld_27.png
ZoneWorld_28.png
ZoneWorld_29.png
ZoneWorld_30.png
ZoneWorld_31.png
ZoneWorld_32.png
ZoneWorld_33.png
ZoneWorld_34.png
ZoneWorld_35.png
Zone 4 - text
REM ***********************************************************************
DefineZone Text 160,890,1600,120 3 0 1
ForegroundTextColor 75:75:75'silver 16
BackgroundTextColor 200:200:200:0
Font CF:/ComicSansMSBold.ttf
STRING COMIX TOURS. Prices so good, they're comical!
http://wwww.comixtours.com/
STRING SUMMER OF LOVE SIZZLERS!!! Spanish Riviera Romantic Getaway packages
starting from only $1,999. Airfare and 10-day hotel accommodations included.
Call us now and book your romantic summer fun! Promo code SPAIN-25.
STRING NEED A VACATION? ALASKA!!! Discover the wilderness while it's still
warm. Fish, camp, and relax for two weeks with our WILDERNESS DAYS. Book
yourself wild now! Packages from $2,499. Promo code ALASKA-10.
STRING Work wearing you down? Spouse tired of eating at home? What's the
meaning of life? Fly away! See the world! Book vacation packages from our
many HOT, SUMMER DEALS! We'll send you away so fast your head'll spin!
•
•
•
59
•
•
•
Page 66

60
•
•
•
•
•
•
Page 67

Chapter 6
Working with Scripts
• • • • • •
What are scripts?
A script is a simple program that controls behaviors based on events, such as changing video
playback when the user presses a button. Scripts are commonly used on PCs and Web Sites. For
example, Microsoft Office macros are often Basic Scripts. Adobe Flash apps often rely on
ActionScripts for their logic, and web pages are often driven by scripts written in PHP, Perl, or
JavaScript.
You can use BrightSign without any knowledge of scripts to accomplish common goals such as
playing video loops or slideshows (see
playlists, you can create more sophisticated presentations that include input from a touch screen
or mouse. However, to create the most interactive presentations, you need to use scripts.
BrightSign has a built in scripting language (called BrightScript), similar in many ways to Basic
found in Microsoft Office and Windows Script Hosting VBScript in Windows XP. Scripts can be as
simple as one or two lines, and as complicated as thousands of lines.
Playing Media with BrightSign
). By using interactive
If you don’t have scripting skills in-house, you can hire an IT or Web developer to write scripts for
you, or for a fee, BrightSign can also develop custom scripts and applications for you. For
additional information, contact:
sales@brightsign.biz
.
•
•
•
61
•
•
•
Page 68

Sample script
1 Using a text editor, create a file called HELLO.BAS by entering this line:
2 Save HELLO.BAS into the root directory of a CF/SD card.
3 Insert the CF/SD card into BrightSign.
4 Connect the serial port of BrightSign to your PC using a null modem cable.
5 On your PC, run HyperTerminal (see BrightSign shell for details).
6 Turn on BrightSign and wait for the Roku> shell prompt to appear.
7 Type:
8 If you want the script to autorun upon boot, rename it AUTORUN.BAS.
Roku Objects
Here is how to create a very simple script:
print “hello world”
script /hello.bas
You should see “hello world” on your PC screen.
62
As well as the BrightScript language itself, BrightSign relies upon a library of Roku Objects to
expose the hardware to the scripting language. Each Roku Object provides access to certain
capabilities. For example, there is a roVideoPlayer object and a roTouchScreen object. To create
an object in a script, you need to use the CreateObject() function.
When writing scripts, refer to the following two manuals:
•
Roku BrightScript Reference:
•
Roku Object Reference:
•
•
•
•
•
•
Describes the scripting language
Describes Roku Objects, such as
roVideoPlayer
Page 69

Examples
A good way to learn BrightScript is to look at or modify existing scripts. You can find links to
example scripts at
brightsign
as the username and
HD600 Demo is an example of a more sophisticated script.
You can also test BrightScript commands using the shell. Here is an example:
Welcome to the Roku Shell version 1.1.28 Release
Type '?' for help or 'help <command>' for help on <command>.
Roku> script
BrightScript Micro Debugger.
Enter any BrightScript statement, debug commands, or HELP.
BrightScript> print "hello"
hello
BrightScript> ? "hello"
hello
BrightScript> ?5+6
11
BrightScript> ?type(5)
rotINT32
BrightScript> if 1=1 then print"1 does equal 1!" else print "strange!"
1 does equal 1!
BrightScript> ?right("abcdef",3)
def
BrightScript> exit
Roku>
www.brightsign.biz/support/demos
demos246
as the password. The AUTORUN.BAS in the
. On the demos web page, enter
•
•
•
63
•
•
•
Page 70

Using the GPIO control port
Br ightSign has a DB25 General Pur pos e In put Output (GP IO) Port. This por t has 12 inputs that you
can directly connect to buttons or switches, and 6 outputs that you can use to directly drive LEDs.
To use this port you must create a simple but custom cable that connects a DB25 connector to
your buttons or LEDs. See the
circuits. You can also purchase a test button/LED board from BrightSign to evaluate the GPIO
port and test scripts that read these buttons or set these LEDs.
Here is an example of a script that flashes an LED for half a second each time the user presses a
button on the BrightSign button/led board.
print "BrightSign Button-LED Test Running"
p = CreateObject("roMessagePort")
tmr = CreateObject("roMessagePort")
gpio = CreateObject("roGpioControlPort")
gpio.SetPort(p)
event_loop:
msg=wait(0, p)
if type(msg)<>"roGpioButton" then event_loop
butn = msg.GetInt()
if butn > 5 then event_loop
gpio.SetOutputState(butn+17,1)
print "Button Pressed: ";butn
msg = wait (500, tmr)
gpio.SetOutputState(butn+17,0)
BrightSign Hardware Manual
for more information and example
64
clear_events:
msg=p.GetMessage():if type(msg)<>"rotINT32" then clear_events
goto event_loop
•
•
•
•
•
•
Page 71

Chapter 7
Getting Help
• • • • • •
Learning more and support
The following resources can help you get the most from your BrightSign:
•
Visit
www.brightsign.biz
•
Refer to each of the following BrightSign documents at
•
Brightsign Installation and Regulatory Guide
•
BrightSign User Guide (this guide)
•
BrightSign HD600 Hardware Guide
•
BrightSign HD2000 Hardware Guide
•
BrightSign BrightScript Reference
•
BrightSign Object Reference
•
BrightSign Specifications
www.brightsign.biz/support
:
•
Example Scripts
•
Visit the BrightSign community forums to discuss projects with other customers and
BrightSign engineers:
•
Contact
sales@brightsign.biz
www.brightsign.biz/support/forum.php
for help with custom projects.
•
•
•
65
•
•
•
Page 72

Troubleshooting
If you are still having problems after following the troubleshooting tips in this section, contact
customer support at
Autoplay and general troubleshooting
AUTOPLAY.MPG does not play automatically
1 Make sure that AUTOPLAY.MPG is spelled correctly.
2 Make sure that AUTORUN.BAS and AUTOPLAY.MPG are both in the root of the CF/SD card.
www.brightsign.biz/support
for assistance.
66
NOTE:
HD2000 1.3 software requires AUTORUN.BAS v1.3x or later, and HD2000 2.x software
requires AUTORUN.BAS v2.x or later.
3 There should only be one autoplay file in the root of the CF/SD card. Make sure that you do
not have an AUTOPLAY.CSV or AUTOPLAY.BSP file in the root of the CF/SD card.
4 Set your PC to show file extensions and make sure that you did not accidentally name the
AUTOPLAY.MPG file AUTOPLAY.MPG.MPG.
5 Use the BrightSign Shell to test video playback (see BrightSign shell for details).
6 See General playback problems for more troubleshooting help.
Autoplay.bmp does not play automatically
Naming your bitmaps AUTOPLAY1.BMP, AUTOPLAY2.BMP, etc is not supported under
AUTORUN.BAS version 1.1 or later. Use a playlist to play images in a loop (see
Playlists
•
•
•
•
•
•
for details).
Working with
Page 73

General playback problems
If you’re having general problems playing content with BrightSign, try the following:
1 Make sure you have the latest AUTORUN.BAS file that is compatible with your BrightSign
software. You can
download the latest Autoplay script from
www.brightsign.biz/support
NOTE:
HD2000 1.3 software requires AUTORUN.BAS v1.3x or later, and HD2000 2.x software
requires AUTORUN.BAS v2.x or later.
2 Download the BrightSign demo and make sure it plays (see Step 3: Try the demo for details).
If you’re also having playlist problems, test the Playlist Demo.
3 Make sure your content meets the following specifications:
•
Audio:
MP3, 48Khz sample rate (or 44.1KHZ sample rate on the HD2000), or WAV with 16 bit
linear PCM data on the HD2000.
•
Video:
Standard MPEG-2 program stream, with 48Khz audio layer (audio layer not required on
the HD2000). Maximum resolution is 1920 x 1080 (HD2000) or 1280 x 720 (HD600).
•
Image:
4 Reformat your CF/SD card as FAT32.
5 Copy your content, and any scripts, playlists, or interactive playlists to the CF/SD card again.
6 Download and install the latest BrightSign software. If you’re already using the latest
Bitmap, 8-bit, 24-bit, or 32-bit only or PNG/JPEG files on the HD2000
software, reinstall the software (see Step 2: Get the latest BrightSign software for details).
7 Try using a different brand and/or size CF/SD card.
8 Re-create content with different software, if possible.
Video output includes artifacts, or video quality is poor
Make sure that the format of your video content matches the properties of the display resolution
and that you’ve chosen the highest quality output possible. Since most video output modes are
progressive, you need to encode video files as progressive MPEG-2 files for the highest quality
video reproduction. Otherwise you may see video artifacts when the video is digitally interlaced
on a progressive display.
•
•
•
67
•
•
•
Page 74

Video output is red
On an HD2000, if the video is configured for component / HDMI out and the HD2000 is
connected to a VGA monitor, the video output displays in red. Since the video output defaults to
component/HDMI out, you must set the video mode to 1024x768 when using a VGA monitor.
For playlists (AUTOPLAY.BSP) and interactive playlists (AUTOPLAY.CSV), add the following line:
VIDEOMODE 1024x768x60p
No audio during playback
The Autoplay script defaults to the Audio 1 output. This is the default output for your playlist,
interactive playlist, and AUTOPLAY.MPG files.
1 Make sure your audio cable is firmly connected to the Audio 1 output on your BrightSign.
2 Check the volume on your powered speakers / AV receiver.
3 Make sure the AV receiver is set to the correct input.
4 If you set the volume or audio output in your playlist, double-check the settings you used.
For audio output, 0=Analog, 1=USB, and 2=Optical/HDMI.
5 If you’re using a custom script (including a modified AUTORUN.BAS), make sure the audio
output mode matches the outputs you’re using on the back of your BrightSign. See the
“roAudioPlayer” and “roVideoPlayer” sections in the BrightSign Object Reference for details.
68
Playlists do not play properly
Download the latest Autoplay script from
www.brightsign.biz/support
. Playlist support
requires AUTORUN.BAS v1.1 or later.
1 Make sure AUTOPLAY.BSP is spelled correctly.
2 Make sure that AUTORUN.BAS and AUTOPLAY.BSP are both in the root of the CF/SD card.
NOTE:
HD2000 1.3 software requires AUTORUN.BAS v1.3x or later, and HD2000 2.x software
requires AUTORUN.BAS v2.x or later.
•
•
•
•
•
•
Page 75

3 Make sure you do not have an AUTOPLAY.CSV or AUTOPLAY.MPG in the root of the CF/SD
card. There should be only one autoplay file in the root of the CF/SD card. If you have more
than one autoplay file in the root of the CF/SD card, you need to either rename or delete the
extra autoplay files, or move these files to another folder on the card.
4 Do either of the following:
•
Windows:
Set your PC to show file extensions and make sure that you did not accidentally
name the AUTOPLAY.MPG file AUTOPLAY.MPG.MPG or AUTOPLAY.MPG.TXT.
•
Mac:
Set the preferences for TextEdit to save as
Save
tab, select
5 Use the BrightSign Shell to test video playback (see BrightSign shell for details).
6 See General playback problems for more troubleshooting help.
Western (Windows Latin 1)
plain text
.
by default. Also, on the
Open &
•
•
•
69
•
•
•
Page 76

Interactive playlists
Download the latest Autoplay script from
www.brightsign.biz/support
. Playlist support
requires AUTORUN.BAS v1.1 or later.
1 If you’re outside the United States, check the regional settings in Excel and make sure the list
separator is a comma and the decimal separator is a period. Brightsign requires a commaseparated CSV file with periods as the decimal separator (international defaults may vary).
2 Make sure AUTOPLAY.CSV is spelled correctly.
3 Make sure that AUTORUN.BAS and AUTOPLAY.CSV are both in the root of the CF/SD card.
NOTE:
HD2000 1.3 software requires AUTORUN.BAS v1.3x or later, and HD2000 2.x software
requires AUTORUN.BAS v2.x or later.
4 Make sure you do not have an AUTOPLAY.BSP or AUTOPLAY.MPG in the root of the CF/SD
card. There should be only one autoplay file in the root of the CF card.
5 Make sure your content is in the root of the CF/SD card, not in any subfolders.
6 Confirm the spelling of file names in the AUTOPLAY.CSV file. If you pasted the file names into
the interactive playlist, check for any leading or trailing spaces in the name.
7 Confirm the spelling of any keywords in AUTOPLAY.CSV.
8 Use the BrightSign Shell to test video playback and see any errors reported by the autoplay
script (see BrightSign shell for details).
9 See General playback problems for more troubleshooting help.
70
•
•
•
•
•
•
Page 77

BrightSign and accessories
BrightSign isn’t booting up properly / random lights lit
When BrightSign turns on, it cycles through the Connector Activity and Video Mode lights. The
only two lights that should remain lit at the end of the startup process are the Video Mode light,
normally 1024x768, and the Power light.
1 Download and reinstall the BrightSign software (see Step 2: Get the latest BrightSign
software for details).
2 If reinstalling the BrightSign software doesn’t fix the problem, contact BrightSign Customer
Support at www.brightsign.biz/support.
BrightSign software update fails
1 Confirm that the update file is named UPDATE.ROK.
2 Make sure the update file is in the root of the CF/SD card, not in a sub-directory.
3 Reformat the CF/SD card in FAT32 format.
4 Use a different CF/SD card, if available.
5 Try updating from the BrightSign shell (see Step 2: Get the latest BrightSign software
for details).
CF/SD card works for playback, but can’t update BrightSign
Your CF/SD card might not be compatible with the
safe mode
software on BrightSign. If that’s the
case, you can try manually updating the software from the BrightSign shell or using a different
CF card to do updates. See
Updating BrightSign software from the BrightSign Shell
for details.
•
•
•
71
•
•
•
Page 78

CF/SD card is not recognized by BrightSign
If BrightSign doesn’t see any content on your CF/SD card, that card may not be compatible with
BrightSign.
1 Reformat your CF/SD card in FAT32 format.
2 Try a different brand and/or size card.
3 Once you find a working card, download and install the latest BrightSign software
(see Step 2: Get the latest BrightSign software for details).
4 After you update the BrightSign software, try the problem card again.
Video selector switch does not work
The video selector switch is not currently implemented on the HD2000.
On an HD600, the selector switch does not work if you manually set the video mode using a
script, playlist, or interactive playlist. To verify if this is the case, turn on BrightSign without
inserting a CF/SD card. If the video selector switch doesn’t work without a CF card, try these
steps:
1 Download and reinstall the BrightSign software (see Step 2: Get the latest BrightSign
software for details).
72
2 If the selector switch still isn’t working, contact BrightSign Customer Support,
www.brightsign.biz/support.
•
•
•
•
•
•
Page 79

USB mouse is not responding
BrightSign works with many different brands of USB mice. Before troubleshooting the mouse,
download the BrightSign Demo, and try using your mouse with the demo (see
demo
for details). If the mouse works with the demo, then the problem is with your script or the
Step 3: Try the
coordinates used in the interactive playlist.
1 (HD600 only) Download and install the latest version 1.3 BrightSign software (see Step 2: Get
the latest BrightSign software for details).
2 Unplug the mouse from BrightSign, and reconnect it.
3 If you’re using a wireless mouse, reconnect the wireless transmitter, and replace the
batteries in the mouse.
4 Connect your mouse to BrightSign using a USB hub.
5 Your mouse may not be compatible with BrightSign. Try a mouse from the list of tested mice
(see Supported input devices for details).
USB keyboard is not responding
BrightSign works with many brands of USB keyboards. To use a keyboard, you must write a
custom script. The buttons supported by the AUTOPLAY.CSV are for input from the GPIO port.
1 Disconnect the keyboard from BrightSign and reconnect it.
2 Connect your keyboard to BrightSign using a USB hub.
3 Try a different USB keyboard.
•
•
•
73
•
•
•
Page 80

Elo touch screen coordinates aren’t working properly
If the Elo coordinates appear to be reversed or flipped when using AUTOPLAY.CSV, try
the following:
1 Download version 1.1 or later of the Autoplay Script.
2 Open AUTOPLAY.CSV and add the FLIPELO keyword to the top of the interactive playlist.
FLIPELO
IMAGEMODE
2
EVENTS elo:110:180:355:210
3 Copy the updated AUTOPLAY.CSV and AUTORUN.BAS to your CF/SD card.
4 Insert the CF/SD card into your BrightSign and add power.
74
•
•
•
•
•
•
Page 81

Chapter 8
Advanced Topics
• • • • • •
Selecting Compact Flash cards
When you use BrightSign, your content and scripts resides on a Compact Flash (CF) or Secure
Digital (SD) card. Although the CF/SD interface is standardized, there are a wide range of
performance, compatibility, and reliability issues among CF/SD card brands and models.
BrightSign strongly recommends that you use
have tested industrial rated CF/SD cards from the following brands:
•
Transcend
•
PQI
•
Simpletech
Avoiding CF/SD card corruption due to read fatigue
If you fail to use an industrial CF/SD card, the files on the CF/SD card may become corrupt after a
period of time. This is due to the fact that CF/SD cards use NAND flash memory chips that are
rated for a certain number of
types of NAND flash are more susceptible to read errors than others. For example, multi-level
flash chips are much more susceptible to read errors than single level flash chips. CF/SD card
controllers (the chip inside the CF/SD card that controls the flash memory and interfaces with the
CF/SD connector) are responsible for eliminating these read errors as well as write errors through
block reads
industrial rated
CF/SD cards with BrightSign. We
before a particular block may develop a read error. Some
•
•
•
75
•
•
•
Page 82

various strategies. These strategies include
wear leveling
when writing, automatic error
correction when reading, re-writing a block that is becoming susceptible to read errors, and
moving blocks around in the NAND chip that are repeatedly read over and over.
A typical BrightSign application includes an
attract
video loop. If this video is fairly short, then a
small number of flash blocks are read repeatedly. Over a month or so, the number of times the
attract loop plays can be enough to trigger fatigue read errors if the CF card’s controller chip is
not designed to handle and eliminate these type of errors. Industrial rated CF/SD cards are
designed with high levels of repeated use in mind. Whereas consumer CF/SD cards may be
designed with lower cost or quality standards that assume a digital camera is the typical usage
scenario.
Speed
All modern CF cards we have tried have sufficient read speed for digital sign and kiosk
applications with standard definition video. In general you need a card that can sustain read rates
of over 3 megabytes per second for standard video. However for standard video, we recommend
CF/SD cards with read rates of 4 megabytes per second, which are easy to find. For Hi-Def video,
we recommend a card that can sustain read rates of over 6 megabytes per second. You can test
a card’s speed with BrightSign by placing a file on it, and using the BrightSign Shell
readperf
command.
BrightSign compatibility
BrightSign is compatible with most CF/SD cards, but may not be 100% compatible with every
model. Although there are standards for CF/SD card interfaces, most chips are slightly different.
We have tested with a large number of chips, and at this point have high compatibility.
76
When deploying a group of BrightSigns into the field, BrightSign strongly recommends that you
test the CF/SD card with the BrightSign software version you are using before deployment, and
insist that your CF/SD card duplicator uses the same CF/SD brand and model number as the
model number you tested.
•
•
•
•
•
•
Page 83

Other ways to update your BrightSign software
1 Download the latest software.
a
Go to the BrightSign web site
b
Click the
c
Compare the software version number with the number on your BrightSign screen.
d
If your BrightSign software is older than the software on the web site, click the
Software Downloads
for the appropriate model (HD600 or HD2000) to download the latest software.
2 Extract the software update file onto your CF/SD card and give it one of the following
names:
• UPDATE.ROK: Use this file name if you want to auto-delete the update file after the
update is complete. This is useful when you want to distribute the update to the field on
the same CF/SD card that contains the presentation content. After the first boot, your
BrightSign automatically runs any auto-run content on the CF/SD card.
• UPDATE_SAVE.ROK: Use this file name if you want to keep the update file on the CF/SD
card after the update is complete. This is useful when you want to use the same CF/SD
card to update multiple BrightSigns.
• UPDATE_NEWER.ROK (HD2000 only): Use this file name if you want to apply the update
only if the version is newer than the version currently on your BrightSign. The update file
is not deleted.
www.brightsign.biz/support
link.
.
Software
link
• UPDATE_DIFFERENT.ROK (HD2000 only): Use this file name if you want to apply the
update only if the version does not match the version currently on your BrightSign. The
file is not deleted.
3 Insert the CF/SD card into your BrightSign and apply power.
•
HD600:
Wait for your BrightSign to boot. (The display will be blank.) After several seconds one
of the LEDs on the front panel starts to flash. When the LED stops flashing, the upgrade is
complete. If you’re using the UPDATE.ROK method, BrightSign reboots automatically.
•
HD2000:
Wait for your BrightSign to boot. (The display will be blank, but the LEDs on the front
panel light as the unit boots.) Wait for the red upgrade LED to light up. During the upgrade,
the connector activity LEDs turn on and off to indicate that the upgrade is in progress.
•
•
•
77
•
•
•
Page 84

•
If you named the file UPDATE.ROK, the file deletes when the update finishes and the unit
reboots.
NOTE:
If the card was formatted with NTFS or HFS+, then the UPDATE.ROK file does not delete and
the unit does not reboot after the update. Instead, the Video Mode LEDs flash.
•
If you named the file UPDATE_SAVE.ROK, the Video Mode LEDs flash when the update
finishes. The upgrade file does not delete and the unit does not reboot.
Generating HD content for BrightSign HD2000 using Final Cut Pro
From within Final Cut Pro:
1 Open an existing sequence or create a new one.
2 Add HD content to the sequence as needed.
3 Make sure audio tracks are enabled. If your project has no audio, add a Slug to one of the
audio tracks.
4 Select the portion of the sequence you want to export.
5 Select File > Export > Using Compressor.
In Compressor:
78
1 In the Settings window, go to the Settings tab.
2 Find Apple:Formats:MPEG-2:Program Stream and drag it onto your file in Compressor
(where it says Drag Settings and Destinations Here).
3 Select the program stream you just dragged onto your file.
4 Select your file.
•
•
•
•
•
•
Page 85

5 In the Inspector window, click Encoder (second button from the left) and make sure that the
resolution, frame rate, and aspect ratio are correct.
NOTE:
Most HD sources (HDCAM, HDV etc) set the resolution to 1440x1080. Therefore, if you’re
creating 1080i or 720p content, you need to click
Change
next to the
appropriate field
and
adjust the settings for your content.
6 After you confirm that the settings are correct, click Submit.
From the Finder:
1 Select the movie you want to compress (typically the exported master program).
2 Ensure that the movie contains an audio track. To confirm this:
a
Open the movie in the QuickTime Player.
b
Select
Window>Show Movie Properties
and make sure that a SoundTrack is displayed in
the Properties window.
c
If there is no audio track, go to Final Cut Pro and add audio as described in the previous
section.
d
To ensure that there is an audio track when exporting a movie from Final Cut Pro, click
Export > QuickTime Movie > Save
Video
in the Save dialog box.
and be sure the
Include
option is set to
Audio and
File >
3 Launch Compressor.
4 Drag and drop the movie file into Compressor (where it says Drag Settings and
Destinations).
5 Find Apple:Formats:MPEG-2:Program Stream and drag it onto your file in Compressor
(where it says Drag Settings and Destinations Here).
6 Select the Program stream you just dragged onto your file.
7 Select your file.
•
•
•
79
•
•
•
Page 86

8 In the Inspector window, click Encoder (second button from the left) to confirm that the
resolution, frame rate, and aspect ration are correct.
NOTE:
creating 1080i or 720p content, you need to click
adjust the settings for your content.
9 After you confirm that the settings are correct, click Submit.
BrightSign shell
BrightSign has a command line shell that can be accessed via the serial port. The shell enables
you to type commands to trigger tasks such as running scripts, playing video, trying different
video modes, etc. You do not need to use the shell. You can simply put your content on a CF/SD
card and configure it to auto-play on power-up (see
Accessing the BrightSign shell
You may find it useful to use the shell to test various options or for debugging. Follow these steps
to access the shell:
1 Connect the DB9 connector on BrightSign to your PC’s serial port using a null modem cable
(available at Frys, RadioShack, etc.).
2 Run a terminal emulator application, such as HyperTerminal on Windows XP
(click Start>All Programs>Accessories>Communications>HyperTerminal.)
Most HD sources (HDCAM, HDV etc) set the resolution to 1440x1080. Therefore, if you’re
Change
next to the
Playing Media with BrightSign
appropriate field
and
).
80
3 Configure the terminal with the following settings:
•
9600 baud (HD600) or 38400 baud (HD2000)
•
8 data bits
•
No parity
•
1 stop bit
•
NO flow control
•
TTY mode enabled
•
•
•
•
•
•
Page 87

4 Create a CF/SD card with some test files on it (BMP graphics, 48KHZ MP3 files, MPEG-2 video,
etc), and then insert the card into the BrightSign unit you connected to your PC.
5 Connect speakers and/or a monitor to BrightSign.
6 Turn on your BrightSign.
7 After a few moments you should see the BrightSign shell appear. It should also show you the
software version number. Verify that the version is 1.0.72 or greater.
NOTE:
The current version of BrightSign software does not support hot-swapping of CF/SD cards.
You must insert the CF/SD card before applying power.
Shell commands
With the shell running, you can view a list of shell commands by typing: help <enter>. Type the
command on a line by itself for more information on a particular command.
Example shell commands: playing files and changing settings
All files on the CF/SD card should be referenced with a slash ( / ) in front of the filename.
For a Directory of the cards contents use:
dir /
To show the contents of a sub-directory named images, use:
dir /images
To play a video named MYVIDEO.VOB on the CF card, use:
videoplay /myvideo.vob
To play a video with a space in its name, such as MY VIDEO.VOB, use:
videoplay “/my video.vob”
•
•
•
81
•
•
•
Page 88

To change the volume level (0 - 100) to 75% when playing a video or audio, use:
videoplay volume 75
audioplay volume 75
To change the video mode, use this format with the videomode command:
videomode 1024x768x60p
To display an image, use this format with the imageplay command:
imageplay slide1.bmp
To specify an image mode, use this format with the imageplay command:
imageplay slide1.bmp 0
imageplay slide1.bmp 1
Referencing CF/SD cards (HD2000 only)
To list the contents of an CF card, enter any of the following:
dir
dir cf:/
dir ata:/
82
To list the contents of an SD card, enter:
dir sd:/
To explicitly refer to a card from within a script, use the following:
•
For compact flash cards
CF:/
•
•
•
•
•
•
Page 89

•
For SD cards
SD:/
When BrightSign runs an AUTORUN.BAS script, it sets the current drive to the drive containing
AUTORUN.BAS, so references to files on the same card do not need the CF:/ or SD:/ prefixes.
Testi ng CF cards
BrightSign works with most CF/SD cards, but is not compatible with all CF/SD cards. You can test
your card by using the
Examples:
dir /
readperf bigfile.mpg
If the dir command fails, you get the following result:
Roku> dir /
opendir[/]
Error: can't open dir
If the readperf command fails, you get the following result:
dir /
shell cmd, and/or using the shell cmd
readperf
.
Roku> readperf bigfile.mpg
SET FEATURES transfer mode SUCCEEDED
Unable to open file ATA:\autorun.bas
•
•
•
83
•
•
•
Page 90

Testing scripts, playlists, and interactive playlists
The BrightSign shell enables you to test playback and see debug output. From the BrightSign
shell you can start your script manually and view output from the script.
Manually starting a script
You can start a script from the shell by using the
1 Follow the directions earlier in this section to connect BrightSign to your computer, and
script
command.
access it using HyperTerminal.
2 As your script runs, you see output in your terminal program including a variety of output
such as mouse clicks or button presses, file names, audio and video settings, as well as any
errors associated with incorrect use of functions or commands including the line numbers.
Testing playlists
When your playlist contains the keyword
debug
the autorun.bas script provides detailed output
to the BrightSign shell during playback. To begin testing playlists, do the following:
1 Copy your content, including your AUTOPLAY.BSP and AUTORUN.BAS files to your
CF/SD card.
2 Open your AUTOPLAY.BSP (main playlist file) and add the keyword: debug
3 Insert your CF/SD card into BrightSign, and add power.
84
•
•
•
•
•
•
Page 91

Testing autorun and interactive playlist files
Running AUTORUN.BAS in debug mode provides detailed output to the BrightSign shell while
the script is running. To begin testing the AUTORUN.BAS script in debug mode, do the following:
1 Copy your content, interactive playlist, and AUTORUN.BAS to your CF/SD card.
2 Open AUTORUN.BAS and find the following line near the top of the script:
debug=false 'set to true to turn on debug prints; false to turn them off
3 Change this line to: debug = true
4 Rename AUTORUN.BAS so it doesn’t start automatically. For example, rename it RUN.BAS.
•
If you are testing a playlist, the main playlist must be named
•
If you are testing an interactive playlist, it must be named
5 Insert your CF/SD card into BrightSign, and add power.
6 When the Roku prompt appears, type the following:
script run.bas
AUTOPLAY.BSP
AUTOPLAY.CSV
Testing custom scripts
To make troubleshooting your custom scripts much easier, we recommend adding check and
print statements, like those found in the AUTORUN.BAS script. Here are a few examples:
•
Add print statements telling you which portion of the script you are currently in
•
Add print statements showing the type of event that just occurred
•
Add print statements showing names of files read from the flash card
•
Add print statements showing the coordinates of a mouse click
•
•
•
85
•
•
•
Page 92

To begin testing your custom script:
1 Copy your content and script file to the CF/SD card.
2 Name your script RUN.BAS. You can call it anything, as long as it’s not AUTORUN.BAS, so it
doesn’t start automatically.
3 Add debug = true as the first line of your script. This command enables you to see output
from the print statements you added to your script.
4 Insert your CF/SD card into your BrightSign and add power.
5 When the Roku prompt appears, type the following:
script run.bas
Multi-run script limitations
Currently when a script terminates, BrightSign does not free resources allocated by Roku Objects.
This means that if you use the
script
shell command to run a script, and the script exits, you may
not be able to run it again successfully unless you reboot your BrightSign between script tests.
Linux shell (HD2000 only)
The HD2000 has a Linux shell that you can access via the serial port. To access the Linux shell,
enter the following at the Roku prompt:
86
exit
When you are done using the Linux shell, enter the following at the Linux prompt:
reboot
•
•
•
•
•
•
Page 93

Updating BrightSign software from the BrightSign Shell
BrightSign is pre-programmed with two primary software images: a
safe mode
and a
run mode
The safe mode software image is write-protected, and you cannot change it once programmed
by the factory. The main purpose of safe mode is to validate that the run mode ROM image is not
corrupt and to boot your BrightSign. In addition, safe mode can upgrade or re-program the run
mode ROM image.
The run mode software image is stored on a flash ROM and you can upgrade this software in the
field. The update process is very safe (see
Step 2: Get the latest BrightSign software
for details
updating the run mode software). If for some reason the update fails, for example if there is a
power failure in the middle of the update, BrightSign boots in safe-mode and completes the
update. BrightSign is always working on improving the BrightSign software, so check the
BrightSign web site periodically for upgrades.
BrightSign works with most CF/SD cards, but is not compatible with all cards. Because the
BrightSign safe mode software is normally older than the run mode software, more CF/SD cards
are compatible with run mode than with safe mode. Therefore, BrightSign may not detect the
UPDATE.ROK file on some CF/SD cards. It is impossible to tell by a CF/SD card’s name, brand, or
description if it is compatible. You must try it. (For details on testing your CF/SD cards and
accessing the shell, see
Testing C F cards
and
Accessing the BrightSign shell
.)
To manually update using the BrightSign shell:
1 Copy the UPDATE.ROK file onto your CF/SD card.
.
2 Insert the CF/SD card in your BrightSign and apply power.
3 When the Roku > prompt appears in the BrightSign shell, type the following:
update update.rok
NOTE:
We are continuing to add support for more CF/SD cards.
•
•
•
87
•
•
•
Page 94

Using the registry (HD2000 only)
BrightSign HD2000 has an I2C EEPROM with 2K bytes of memory that supports the storage of
persistent settings. The BrightSign software uses the registry object to read and write
BrightScript data to this eeprom. The purpose of the registry is to enable customers to store
usage statistics and other small amounts of information that may change regularly.
Individual items are stored in the registry through the use of registry keys and values. For
example, you use a registry key named “NumberOfButtonPresses” to count the number of times
a button is pressed. Registry data can be organized into different registry sections if desired.
Interactive playlists support writing to the registry, deleting from the registry, and displaying the
contents of the registry (see
display the contents of the registry from a playlist (see
access the registry by using a custom script that includes the
BrightSign Object Reference Manual
The number of registry keys and values that you can use depends on a number of factors
including the number of sections, the number of keys/values per section, and the size of the keys
and values. In typical usage, there is room in the registry for about 50 keys.
Writing to the registry from an interactive playlist (HD2000 only)
When using interactive playlists on the HD2000, you can use the registry to track the number of
times that the system transitions from one state to another. To do this, add the following to the
state name in an event column:
Using Excel to create interactive presentations
Playlist commands
roRegistry
). In addition, you can
object (see the
for additional information).
). You can also
88
:counter(<registry key name>)
In the demo example, the elo:110:180:350:400 event column shows the state CARS.MPG is in.
To track the number of times that the user activates this transition, enter
cars.mpg:counter(TouchToDemoMenu)
in place of CARS.MPG. Then, each time the user
requests CARS.MPG, BrightSign increments the TouchToDemoMenu key value in the registry.
•
•
•
•
•
•
Page 95

Displaying registry contents from an interactive playlist (HD2000 only)
To display the contents of the registry from an interactive playlist, add a row to the table with the
word
DisplayRegistry
in the column to the right of the keyword STATE. The remainder of the row
is like any other row in the table – it contains other states to transition to when events occur.
Elsewhere in the table, add the state
DisplayRegistry
in the column for the event that you want
to trigger the registry to display. When the system transitions to this state, playback from the
prior state stops and the contents of the registry display on the monitor attached to the
BrightSign.
To display only a subset of the registry, use the following syntax:
DisplayRegistry-<registry section name>
Copying registry contents from an interactive playlist (HD2000 only)
To copy th e conte nts of the regi stry to a file onto a CF/SD card or a USB mass storage device, enter
the following in the state table:
Execute(CopyRegistry <file-name>)
Examples of <file-name> include:
registry-output.csv
sd:/registry-output.csv
usb1:/registry-output.csv
Place the
Execute(CopyRegistry <file-name>)
entry in the appropriate row and column
for the appropriate state or event in the interactive playlist. Unlike other entries in this part of the
state table, this entry executes only the CopyRegistry command and does not transition to a new
state. BrightSign simply copies the contents of the registry into a comma separated value format,
so that you can easily import the information into a spreadsheet application.
•
•
•
89
•
•
•
Page 96

Setting the date/time on BrightSign (HD2000 only)
BrightSign HD2000 has a real-time clock that you can use to schedule content playback. In order
to use the scheduling features, you must first set the date and time on BrightSign.
BrightSign has written a script that provides an interactive means for setting the date/time on
BrightSign. The script is named SETDATETIME.BAS and is available at
www.brightsign.biz/support
Instructions for using the date/time script:
1 Go to www.brightsign.biz/support and click the Software Downloads link.
2 Under HD2000, click the SetDateTime Script link to download the SETDATETIME.ZIP file.
3 Expand the SETDATETIME.ZIP file, which contains a script named SETDATETIME.BAS.
4 Copy SETDATETIME.BAS into the root directory of a CF/SD card and rename it
AUTORUN.BAS.
5 Connect a USB keyboard or a GPIO button board to your BrightSign.
6 Insert the CF/SD card into your BrightSign and apply power.
7 Wait a few moments for the date/time screen to appear and enter the current date and time.
Once you set the date/time on BrightSign, the real-time clock maintains accurate time even if you
turn your BrightSign off and on.
in the software download section.
90
•
•
•
•
•
•
Page 97

Using a custom boot script and logo
With BrightSign software version 1.1, you can change the startup logo or add a boot script. Both
the logo and boot script are stored in the internal FLASH and have a size limit of 200KB.
Using your own boot logo
1 Save your logo in one of the following file formats: BMP, 8 bit indexed, or RLE encoded.
2 Copy your logo to a CF card.
3 Connect your BrightSign to a PC using a null modem cable (see Accessing the BrightSign
shell for details).
4 Run a terminal emulation program such as HyperTerminal (see Accessing the BrightSign
shell for details).
5 Insert the CF card into your BrightSign and apply power.
6 When the terminal prompt appears, type the following (where LOGO.BMP is the name of
your logo file):
writebootfile logo.bmp boot.bmp
7 Reboot BrightSign, and your logo should appear.
Using your own boot script (HD600 only)
You can create your own boot script using a self-contained script file. For example, the boot script
can't be used to play a playlist or interactive playlist. You can, however, use the boot script to play
any content on your CF card (images, audio, and videos).
1 Save your boot script as MYSCRIPT.BAS.
2 Copy MYSCRIPT.BAS to a CF card.
3 Connect your BrightSign to a PC using a null modem cable (see Accessing the BrightSign
shell for details).
•
•
•
91
•
•
•
Page 98

4 Run a terminal emulation program such as HyperTerminal (see Accessing the BrightSign
shell for details).
5 Insert the CF card into your BrightSign and apply power.
6 When the terminal prompt appears, type the following (where myscript.bas is the name of
your boot script):
writebootfile myscript.bas autorun.bas
7 Reboot your BrightSign.
NOTE:
Step 2: Get the latest BrightSign software
To restore the original boot files, reinstall the BrightSign software using UPDATE.ROK (see
Widescreen vs. 4x3 discussion
You can use BrightSign with widescreen or 4x3 displays. However, you may find that using
different display aspect ratios with the various BrightScreen options is confusing. In this section
we try to clarify what you can expect.
Displaying videos
BrightSign treats video and images a little differently. When a video is playing back, it is displayed
by default in what is known in BrightSignese as
video to fill the current output resolution (as set by the videomode command), whatever its
aspect ratio. What this means from a practical point of view is that you should author the content
for 16x9 if you intend to use a 16x9 display mode (any component mode). If you intend to use a
4x3 display mode (any VGA mode, for example 1024x768), then you should author the content
for 4x3. If you author your video for widescreen, but play it back at 1024x768 or 640x480, it will
look squashed. It isn’t automatically letter-boxed like when played on a DVD player. For example,
the aquarium video that is included in the BrightSign demo (that you can download from the
BrightSign web site) is widescreen video. When you view the demo on a VGA display, it appears
squashed, but it appears correct when you view it on a 720p display.
for details).
ViewMode 0
. I n other words, BrightSign scales the
92
•
•
•
•
•
•
Page 99

Using a custom script or modified autorun.bas, you can force a 16x9 video to be letter-boxed.
Using ViewMode 1 sets the video to be letter-boxed and centered while maintaining aspect ratio.
You can read more about ViewMode in the
assumes you have a roVideoPlayer object called
video.SetViewMode(1)
video.PlayFile(“\Aq.mpg”)
Displaying images
When displaying images, BrightSign is smarter about the way the images display. It knows the
image resolution, and it assumes that all VGA resolutions are in 4x3 mode, and that all
component resolutions (except 480p) are widescreen. BrightSign then scales the image
according to the imagemode setting. However, if you connect a widescreen VGA monitor to the
VGA port, you can expect to see distorted images. This is because 1024x768 is a 4x3 mode, and
your widescreen monitor stretches it. To avoid this confusion, for widescreen modes, it is best to
use a component input monitor.
Connecting Brightsign to your network
Brightsign HD2000 includes a built-in 10/100Mbps Ethernet port, and it supports DHCP for
automatic network configuration. BrightSign uses http protocol to communicate over your
network using port 80—the same way you browse the web. You don’t need to open any special
ports in your firewall.
Object Reference Manual
video
:
. The following example
Configuring BrightSign using DHCP
To connect the Brightsign to your network:
1 Use an ethernet cable to connect your Brightsign to your network.
2 Insert your CF/SD card with your content and playlist into your BrightSign and add power.
Brightsign automatically requests an IP address from your network when it boots.
•
•
•
93
•
•
•
Page 100

Using a manual IP configuration
If you do not want to use DHCP or you can't because of your network setup, you can manually
set the IP address on Brightsign in one of two ways:
•
Configure BrightSign from the system shell, by connecting the Brightsign to your computer
using a serial cable.
•
Use a manual IP configuration script.
We recommend the manual IP configuration script method because it is easier than using the
system shell. You can download a manual IP configurations script from the BrightSign website.
Follow these steps to manually configure your IP settings:
1 Go to www.brightsign.biz/support and click the Software Downloads link.
2 Download and unzip the MANUAL_IP_CONFIGURATION.ZIP file, which contains an
AUTORUN.BAS file.
3 Open AUTORUN.BAS with notepad or any text editor.
4 Edit AUTORUN.BAS to match the network settings on your network.
5 Copy AUTORUN.BAS to your CF/SD card.
6 Insert your CF/SD card into your BrightSign and add power.
7 When the option to press the video select button to choose DHCP appears, do not press the
video select button. Wait 8 seconds, and BrightSign accepts the manual settings in your
AUTORUN.BAS file.
94
8 When prompted, restart BrightSign to finish.
•
•
•
•
•
•
 Loading...