


USER GUIDE
BrightAuthor 4.1.1
BrightSign, LLC. 16780 Lark Ave., Suite B Los Gatos, CA 95032 | 408-852-9263 | www.brightsign.biz

TABLE OF CONTENTS |
|
Chapter 1 – Getting Started................................................................................................. |
1 |
What is BrightAuthor? ............................................................................................................................ |
1 |
What Kind of Presentations Can I Create?............................................................................................. |
1 |
What Type of Screen Layouts Can I Use? ............................................................................................. |
2 |
Step 1: Get the Hardware You Need...................................................................................................... |
2 |
Step 2: Install BrightAuthor..................................................................................................................... |
4 |
Step 3: Launch BrightAuthor .................................................................................................................. |
5 |
Step 4: Set up your BrightSign player .................................................................................................... |
5 |
Step 5: Add your Content ....................................................................................................................... |
5 |
Step 6: Create your Presentations ......................................................................................................... |
7 |
Step 7: Publish your Presentations ........................................................................................................ |
7 |
Chapter 2 – Setting up BrightSign Players........................................................................ |
8 |
Adding a Player to the BrightSign Network ............................................................................................ |
9 |
Adding a Player to your Local Network ................................................................................................ |
15 |
Adding a Player to your Simple File Network ....................................................................................... |
20 |
Setting up a Player for Standalone Use ............................................................................................... |
26 |
Chapter 3 – Creating Presentations ................................................................................. |
31 |
Creating a Full-Screen Presentation .................................................................................................... |
31 |

Creating a Multi-Zone Presentation...................................................................................................... |
33 |
Customizing Zone Layouts................................................................................................................... |
38 |
Creating Dynamic Playlists and Live Data Feeds................................................................................. |
40 |
RSS Feeds and Text Feeds ................................................................................................................. |
43 |
Twitter................................................................................................................................................... |
43 |
Media RSS Feeds ................................................................................................................................ |
44 |
HTML5.................................................................................................................................................. |
44 |
Live Video............................................................................................................................................. |
46 |
SignChannel......................................................................................................................................... |
46 |
Local Playlists....................................................................................................................................... |
46 |
Video and Mjpeg Streams .................................................................................................................... |
47 |
Audio Stream........................................................................................................................................ |
47 |
RF In (ATSC)........................................................................................................................................ |
48 |
Tuner Scan........................................................................................................................................... |
49 |
Chapter 4 – Making a Presentation Interactive ............................................................... |
51 |
Customizing the Interactive Playlist...................................................................................................... |
54 |
Editing Interactive Events..................................................................................................................... |
55 |
Editing Media Properties ...................................................................................................................... |
56 |
Copying, Exporting, and Importing States............................................................................................ |
57 |
Video Lists, Image Lists, and Audio Lists............................................................................................. |
57 |
Video Play Files, Image Play Files, and Audio Play Files .................................................................... |
61 |

Live Text............................................................................................................................................... |
64 |
Interactive Menus ................................................................................................................................. |
70 |
Event Handlers..................................................................................................................................... |
75 |
Super States......................................................................................................................................... |
76 |
Commands ........................................................................................................................................... |
78 |
Conditional Targets .............................................................................................................................. |
83 |
Dynamic User Variables....................................................................................................................... |
84 |
Chapter 5 – Interactive Events.......................................................................................... |
87 |
Timeout ................................................................................................................................................ |
87 |
Media End ............................................................................................................................................ |
87 |
GPIO Event .......................................................................................................................................... |
87 |
BP900/200............................................................................................................................................ |
88 |
Synchronize.......................................................................................................................................... |
88 |
UDP Input............................................................................................................................................. |
88 |
Serial Input ........................................................................................................................................... |
89 |
Rectangular Touch ............................................................................................................................... |
89 |
Keyboard Input ..................................................................................................................................... |
90 |
USB Input ............................................................................................................................................. |
90 |
Remote Input........................................................................................................................................ |
90 |
Zone Message...................................................................................................................................... |
91 |
Link Zones............................................................................................................................................ |
91 |

GPS...................................................................................................................................................... |
91 |
Video Time Code.................................................................................................................................. |
92 |
Audio Time Code.................................................................................................................................. |
92 |
Time/Clock ........................................................................................................................................... |
92 |
Plugin Message.................................................................................................................................... |
93 |
User Defined Events ............................................................................................................................ |
94 |
Chapter 6 – Creating A BrightWall™................................................................................ |
96 |
BrightWall Video Requirements ........................................................................................................... |
96 |
Creating a BrightWall Presentation ...................................................................................................... |
96 |
Adding Video to a BrightWall Presentation........................................................................................... |
99 |
Configuring a BrightWall Presentation ............................................................................................... |
101 |
Completing a BrightWall Presentation................................................................................................ |
102 |
Creating a BrightWall on the BrightSign Network............................................................................... |
103 |
Chapter 7 – BP900 and BP200 Button Panels ............................................................... |
106 |
Using BP900 and BP200 Events........................................................................................................ |
106 |
Chapter 8 – Publishing Presentations ........................................................................... |
109 |
Publishing with Local Storage ............................................................................................................ |
109 |
Publishing with BrightSign Network.................................................................................................... |
115 |
Publishing with Simple File Networking.............................................................................................. |
119 |
Publishing with Local Networking....................................................................................................... |
124 |

Publishing a BrightWall™ Presentation.............................................................................................. |
128 |
Chapter 9 – Customizing Presentations ........................................................................ |
130 |
Setting Zone Properties...................................................................................................................... |
130 |
Editing Video Only and Video or Images Zones................................................................................. |
130 |
Editing Ticker Zones........................................................................................................................... |
132 |
Editing Audio Only and Enhanced Audio Zones................................................................................. |
133 |
Editing Images Zones......................................................................................................................... |
134 |
Editing Clock Zones ........................................................................................................................... |
134 |
Editing Background Image Zones ...................................................................................................... |
135 |
Importing and Exporting ..................................................................................................................... |
135 |
RF Channel Scanning ........................................................................................................................ |
136 |
Presentation Tree View ...................................................................................................................... |
137 |
Chapter 10 – Presentation Properties ............................................................................ |
138 |
Main.................................................................................................................................................... |
138 |
I/O....................................................................................................................................................... |
139 |
Interactive........................................................................................................................................... |
139 |
Buttons ............................................................................................................................................... |
140 |
Audio .................................................................................................................................................. |
141 |
Media List ........................................................................................................................................... |
141 |
Autorun............................................................................................................................................... |
141 |
Image Cache ...................................................................................................................................... |
142 |

Variables ............................................................................................................................................ |
142 |
Data Feeds......................................................................................................................................... |
146 |
HTML Sites......................................................................................................................................... |
148 |
Switch Presentations.......................................................................................................................... |
150 |
Files.................................................................................................................................................... |
151 |
UDP.................................................................................................................................................... |
151 |
Chapter 11 – Editing Preferences................................................................................... |
152 |
Video .................................................................................................................................................. |
152 |
Images................................................................................................................................................ |
152 |
Interactive........................................................................................................................................... |
152 |
Clock .................................................................................................................................................. |
152 |
Live Text............................................................................................................................................. |
153 |
Networking ......................................................................................................................................... |
154 |
UI........................................................................................................................................................ |
154 |
Backups.............................................................................................................................................. |
155 |
Storage............................................................................................................................................... |
155 |
Chapter 12 – Managing Your Network ........................................................................... |
157 |
Status ................................................................................................................................................. |
157 |
Presentations ..................................................................................................................................... |
161 |
Library ................................................................................................................................................ |
163 |
Dynamic Playlist ................................................................................................................................. |
163 |

Live Data Feed ................................................................................................................................... |
163 |
HTML Site .......................................................................................................................................... |
164 |
Local Network..................................................................................................................................... |
164 |
User Permissions ............................................................................................................................... |
166 |
Using Advanced Tools ....................................................................................................................... |
166 |
Using the Diagnostic and Local Web Server...................................................................................... |
168 |
Chapter 13 – Frequently Asked Questions.................................................................... |
169 |
Appendix A – Remote Control Protocols....................................................................... |
171 |
Appendix B – Change Log .............................................................................................. |
173 |
Version 3.5 ......................................................................................................................................... |
173 |
Version 3.7 ......................................................................................................................................... |
173 |
Version 3.8 ......................................................................................................................................... |
176 |
Version 4.0 ......................................................................................................................................... |
179 |
Version 4.1 ......................................................................................................................................... |
180 |
CHAPTER 1 – GETTING STARTED
What is BrightAuthor?
BrightAuthor is a software application that helps you create and publish digital-signage presentations for BrightSign players. You can play BrightAuthor presentations on all BrightSign models. Your presentations can include various types of content:
•Images
•Videos
•Live video: Supported on the XD1230, XD1132, and 4K1142
•Audio
•HTML5 pages
•Streaming audio/video over IP
•Text
•Date and time
•RSS, MRSS, and Twitter feeds
•BrightSign Network features: Dynamic Playlists, Live Text feeds (RSS), Live Media feeds (MRSS)
•SignChannel: Supported on all XD and 4K models, as well as the HD222, HD1022, HD220, HD1020, and LS422
Note: A subscription is required to use SignChannel. Go to http://www.signchannel.com/ for details.
What Kind of Presentations Can I Create?
You can create three types of presentation in BrightAuthor:
•Non-Interactive: A playlist of media (images, video, audio) that plays in a continuous loop. You can play noninteractive presentations on all BrightSign models.
•Interactive: A presentation that transitions between media based on input from a user via a button board, touchscreen, remote control, or similar input device. All models support at least one type of interactive event. The types of interactive event supported by a player depend on the connectors and inputs that player has (for example,
Chapter 1 – Getting Started |
1 |
players with a USB 2.0 port support touch screen and button board events, and players with an Ethernet port support UDP events).
•BrightWall™: A non-interactive playlist of media (images, video, live video) that is closely synchronized across multiple players. BrightWall presentations are supported on all 4K and XD models, as well as the HD222, HD1022, HD220, HD1020, and LS422.
What Type of Screen Layouts Can I Use?
You can choose from a variety of ready-to-use layout templates. You can also create your own template. Layout templates fall into two basic categories:
•Full Screen: A simple, looping playlist of media that occupies the full screen (or plays over audio).
•Multi-Zone: A presentation with different types of content in separate regions of the screen. The screen can include multiple Clock, Text, Ticker, and Image zones, as well as (depending on the player model) multiple video zones.
Step 1: Get the Hardware You Need
To create presentations with BrightAuthor and publish them to your player, you will need the following:
•Windows PC
•BrightSign player
•Display
•Storage device
•Card reader/writer (optional if using USB storage)
•Input device (optional)
Windows PC – Any Windows PC that meets or exceeds the following minimum requirements:
•2.3 GHz CPU
•2 GB RAM required (4 GB recommended)
•100 MB available hard disk space for program files (additional disk space required if storing content and/or presentations on your hard disk)
Chapter 1 – Getting Started |
2 |
• One of the following operating systems: o Windows Vista 32 or 64 bit
o Windows 7 32 or 64 bit o Windows 8 32 or 64 bit
BrightSign Player – Any of the following models:
•4K242, 4K1042, 4K1142
•XD232, XD1032, XD1132
•XD230, XD1030, XD1230
•HD222, HD1022
•HD120, HD220, HD1020, HD970, AU320
•LS322, LS422
Display – Any monitor, TV, or touchscreen with one of the following types of inputs:
•HDMI
•VGA (on all model lines except 4Kx42)
•Component (supported with a VGA converter on all model lines except 4Kx42)
Storage Device – Any of the following:
•USB Flash Drive (supported on the 4K242, 4K1042, 4K1142, XD1132, XD1032, XD1030, XD1230, HD1022,
HD1020, LS322, LS422)
•SD card
•SDHC card
•SDXC card
•µSD card (4K and XD models only)
•mSATA drive (4K models only)
Note: We recommend formatting your SD, SDHC, or SDXC card using FAT32. Formatting your card using NTFS
Chapter 1 – Getting Started |
3 |
allows you to play media files that are 4GB or larger in size, but the player will not be able to receive network updates or generate logs.
Card Reader/Writer – Only required if using an SD card. The card reader/writer must be connected to your PC and must be compatible with your storage card.
Input Device – Required for interactive presentations only. BrightSign players support one or more of the following types of input devices:
•Touchscreen equipped with a supported touch controller. See this link for a list of all supported touch controllers. (4K1042, 4K1142, XD1032, XD1132, XD1030, XD1230, HD1022, HD1020, LS422)
•BrightSign’s BP200 and BP900 USB button panels (4K1042, 4K1142, XD1032, XD1132, XD1030, XD1230, HD1022, HD1020, LS322, LS422)
•Many brands of USB Keyboards (4K1042, 4K1142, XD1032, XD1132, XD1030, XD1230, HD1022, HD1020, LS322, LS422)
•Many brands of USB Mouse or Trackball (4K1042, 4K1142, XD1032, XD1132, XD1030, XD1230, HD1022, HD1020, LS422)
•Many brands of USB Bar Code Scanners (4K1042, 4K1142, XD1032, XD1132, XD1030, XD1230, HD1022, HD1020, LS322, LS422)
•Quadravox Serial Button Board
•AMX, Crestron, and similar control devices
•Any GPIO (open/close contact switch) button, signal, or LED (your custom board or LED display)
•PC (via UDP or serial)
•IR input/output devices using the NEC or Pronto Hex remote control protocols (all 4K and XD models, as well as the HD1022, HD1020, HD810, HD1010, HD1010w).
Step 2: Install BrightAuthor
Download the latest software and install it on your PC.
Chapter 1 – Getting Started |
4 |
1.Go to the BrightSign Support page.
2.Click the Software Downloads link and select the appropriate BrightAuthor version for download.
3.Follow the onscreen instructions to install the software on your PC.
Note: BrightAuthor requires the latest version of Microsoft .Net Framework. If this component is not already on your PC, BrightAuthor installs it during the installation. However, if BrightAuthor needs to install Microsoft .Net Framework, the installation may take up to 45 minutes to complete and you may need to restart your PC to complete the installation process.
Step 3: Launch BrightAuthor
1.Double-click the BrightAuthor icon on your desktop.
2.(Optional) If prompted, sign in to BrightSign Network (account required). See the Publishing with BrightSign Network section for more details.
Step 4: Set up your BrightSign player
1.Depending on how you want to publish your presentations, create the appropriate setup files for your BrightSign player.
2.Insert the SD card or USB flash drive that contains the setup files into the player.
3.Connect your player to a display and power it on.
Step 5: Add your Content
BrightAuthor presentations can include the following types of media files:
Video files
BrightSign players support the following video file encodings/compressions:
•MPEG-2: Can be saved as an .mpg, .ts, .m2ts or .vob container.
•MPEG-1: Can be saved as an .mpg container.
•(4K models only) H.265 (HEVC): Can be saved as an .ts, .mov, or .mkv container
Chapter 1 – Getting Started |
5 |
•H.264 (MPEG-4, Part 10): Can be saved as a .mp4, .mov, or .ts container.
Note: .mov files with compressed “atoms” (i.e. metadata) are not currently supported.
•WMV: .wmv video only files (.wma audio files are not supported). Support includes videos exported from
Powerpoint.
For further details on video file encoding and support, see the support page on the BrightSign website.
Audio files
BrightSign players support the following audio formats:
•AAC (LC - Low complexity profile) at a Constant Bit Rate, as part of a video file (.mp4, .mov, or .ts) at 44.1
KHz, 48 KHz
•MP2 (MPEG-1 Layer 2) at a Constant Bit Rate, as part of a video file (.mpg or .ts) at 44.1 KHz, 48 KHz
•MP3 at a Constant Bit Rate (44.1 KHz, 48 KHz, or 32 KHz at up to a bitrate of 224 Kbps) as a standalone file (i.e. not encoded as an audio track in a video file)
•AC3 5.1 passed through (un-decoded, RAW data) HDMI. Audio streams in this format are supported by
BrightSign players, but will require an AC3 decoder (HDMI AV receiver).
•WAV
Image files
For still images, use BMP, PNG, or JPEG files. The maximum supported resolution is 1920x1080: If you attempt to add an image file larger than this resolution, BrightAuthor will give you the option to create a downscaled copy of the image.
Note: BrightSign players do not support JPEG image files with CMYK color profiles. You can convert your CMYK
JPEGs to RGB JPEGs using this free web-based converter.
HTML5 files
See the HTML5 Best Practices guide for more information on the HTML features that can be used with the BrightSign player
Chapter 1 – Getting Started |
6 |
Step 6: Create your Presentations
Now you’re ready to start using BrightAuthor to create presentations. Just add your content and follow the directions in the next chapters of this guide to create your presentations.
Step 7: Publish your Presentations
After creating presentations, use the publishing feature to deliver them to your BrightSign players. See Publishing Presentations for details.
Chapter 1 – Getting Started |
7 |
CHAPTER 2 – SETTING UP BRIGHTSIGN PLAYERS
Before you can publish presentations, you must first set up your BrightSign players. How you set up your units will depend on how you want to publish presentations to your players:
•BrightSign Network: The BrightSign Network is a cloud based content-management system (CMS) that allows you to remotely schedule presentations, distribute content, assign players to groups, and monitor player health the health status of each player.
•Local Network: With local file networking, you can use BrightAuthor to schedule presentations and distribute content to players over your local network.
•Simple File Network: Simple file networking allows you to schedule presentations and distribute content remotely using your own web server.
•Standalone: The standalone method allows you to publish presentations directly to your player using an SD card or USB drive. Use this method if your player doesn’t have a network connection or if you do not plan to update the presentation frequently.
If you’re using the BrightSign Network, Local Networking, or Simple File Networking to publish your presentations, you must set up your BrightSign units by adding them to your local network. Alternatively, you can set up BrightSign players for use as standalone units that are not connected to a network. With this option, you will need to manually update the player storage (SD card or USB flash drive) each time you want to update presentations. For more details on the publishing process, see Publishing Presentations.
To set up a player, you need to create setup files in BrightAuthor and add those files to a storage device (SD card or USB flash drive). Next, insert the storage into the BrightSign player. Keep in mind that this storage must remain inside the player. BrightSign players have no internal storage and, therefore, cannot download or play content without a storage device connected. Once the storage device (typically an SD card) is inserted, your BrightSign player is ready to receive and play presentations.
Chapter 2 – Setting up BrightSign Players |
8 |
Adding a Player to the BrightSign Network
To publish and manage presentations using BrightSign Network, you must first contact BrightSign to obtain an account name, user name, and password.
After you obtain your account credentials, you can create the setup files for each unit. The setup files provide details about what your network and BrightSign Network connections are, where the presentations associated with the selected group are stored, and when the presentations are scheduled.
1.Sign in to your BrightSign Network account.
a.In the BrightAuthor menu bar, click Tools > Sign in to BrightSign Network.
b.If prompted, enter your Account, User name, and Password, and then click Sign In.
2.On the menu bar, click Tools > Setup BrightSign Unit.
3.Under Name Specification, do the following:
a.Enter a Name and Description for this unit.
b.Select whether you want to append the unit ID to the name or use only the name.
4.Under Network Properties, set the following:
a.Enable Wireless: Check this box if you plan to connect to the local network using a wireless connection. In order to use a wireless connection, you must purchase a Wireless Module for your BrightSign player. Enter an SSID and Security key if the player is connecting to a secured network.
b.Network Connection Priority: Use the up and down arrows to prioritize either the Wired or Wireless connection. The BrightSign player will always attempt to download and upload using the first option. It will only use the second option if the first is unavailable.
c.Time zone: Select the time zone where the unit is located.
d.Time server: Select the clock for this unit.
5.Click the Advanced Network Setup button to customize advanced settings for your networked player. Specify the following in the Unit Configuration tab:
a.Specify hostname: Check this box if you want to specify a custom hostname for the player on the network. By default, the player serial number is used to generate a unique hostname.
Chapter 2 – Setting up BrightSign Players |
9 |
b.Use Proxy: Check this box if you want the player to connect using a proxy server. Type the address and port number of the proxy in the fields below. If you need to provide a user name and password, use this format:
<user name>:<password>@<proxy server address> (e.g. “admin:root@myproxy.com”).
c.Limit content downloads: Check this box if you want to restrict player content downloads to a certain time of day. This is helpful if you want to limit network traffic during peak hours. Use the Start Of Range and End Of Range parameters to specify a time frame during which content downloads can occur.
Chapter 2 – Setting up BrightSign Players |
10 |
d.Limit health updates: Check this box if you want to limit when the player sends health updates to the BrightSign
Network. This is helpful if you know a player will be powered off or otherwise disabled during a certain time of day. Use the Start Of Range and End Of Range parameters to specify a time frame during which content downloads can occur.
e.Copy content from the current published schedule: Check this box if you want BrightAuthor to copy the current published schedule to the storage device with the setup files. This is helpful if you don’t want the player downloading large content files from the BrightSign Network right after it is set up.
6.Specify the following in the Wired and Wireless tab of the Advanced Network Setup window:
a.Data Types Enabled: Use these checkboxes to determine the types of data that will be transferred using the connection. You can enable/disable both downloads (Content, Text Feeds, Media Feeds) and uploads (Health,
Log Updates).
b.Connection Settings: Indicate whether the IP address is auto-generated (via DHCP) or static. If you’re using a static IP address, enter the parameters in the fields below.
c.Rate Limit Network Download Traffic: Set rate limitations for downloading content. The options are divided into three categories: Outside content download window and During content download window (both of which correspond to the Limit content downloads setting in the Unit Configuration tab), as well as During initial downloads.
i.Click Unlimited download rate to set no limit.
ii.Click Default limit to use the default limit (2000 Kibit/s) on downloads.
iii.Click Specify limit to enter a customized limit on downloads in the text field (in Kbits/second).
7.Select the Diagnostics tab in the Advanced Network Setup window if you would like the player to perform network diagnostics when first booting up.
a.Enable network diagnostics: The player will display the network diagnostics screen during setup.
i.Test Ethernet: The player will indicate whether or not it was able to attain an IP address over Ethernet.
ii.Test Wireless: The player will indicate whether or not it was able to attain an IP address over wireless.
iii.Test Internet Connection: The player will indicate whether or not it was able to attain a connection to remote services.
Chapter 2 – Setting up BrightSign Players |
11 |
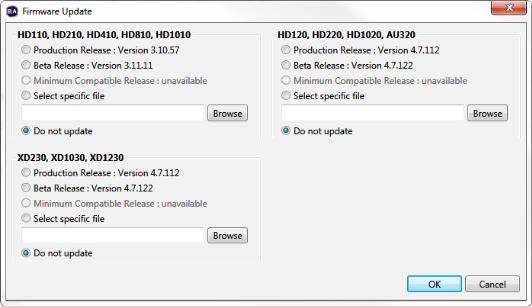
8.Click Specify Firmware Update to indicate whether you want to update the firmware and to which version. The
Firmware Update window is divided by BrightSign model. In the section that corresponds to your BrightSign unit, select a firmware version or select Do not update, and then click OK.
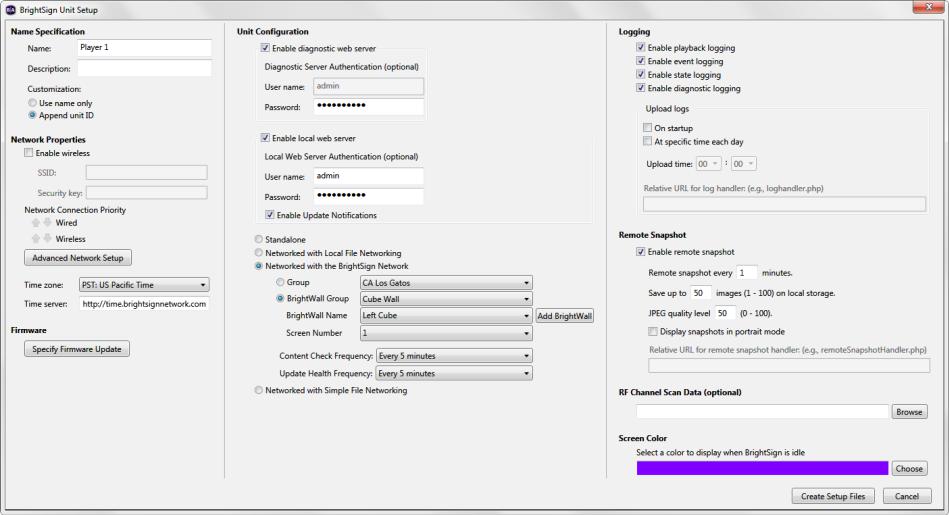
9.Under Unit Configuration, click Networked with BrightSign Network, and then specify the following:
a.(Optional) Enable diagnostic web server: Check this box to enable the Diagnostic Web Server. You can include a username and password in the text fields below for added security.
b.(Optional) Enable local web server: Check this box to enable the Local Web Server. You can include a username and password in the text fields below for added security.
c.(Optional) Enable Update Notifications: Check this box to have the player automatically refresh the User Variables webpage whenever variable values change on the player.
10.Select the Networked with the BrightSign Network option.
a.Group: Select this option to include the player in a standard BSN group. Use the dropdown list to select a BSN group for the unit. Groups allow you to publish presentation schedules to multiple units simultaneously.
See Manage > Status and Publishing with BrightSign Network sections for details.
b.BrightWall Group: Select this option to include the player in a BSN BrightWall group. Use the dropdown list to
Chapter 2 – Setting up BrightSign Players |
12 |
select a BrightWall group for the unit. Each BrightWall group includes one or more BrightWall(s) that share a common configuration file, and each BrightWall in a BrightWall group plays the same presentation.
i.BrightWall Name: Use the dropdown list to assign the player to a BrightWall within the BrightWall group. If you haven’t created the BrightWall yet, click Add BrightWall and enter the BrightWall name. Note that a new BrightWall will utilize the configuration file that is assigned to the BrightWall group.
ii.Screen Number: Specify the section of the BrightWall to which the player belongs. Screens are numbered by row, starting from the top-left section of the BrightWall (the example diagram to the right shows the numbering of a 4x3 BrightWall).
c.Content Check Frequency: Specify how often the player should communicate with the BSN servers to determine if there is new scheduled content to download.
d.Update Health Frequency: Specify how often the player should send health status updates to the BSN servers. This determines how up-to-date the Player Status colors are.
11.Under Logging, check any of the following boxes to enable/disable logs and specify upload settings:
a.Enable playback logging: Creates a log that records start and end times, zone names, media types, and file names.
b.Enable event logging: Creates a log that records timestamps, state names, zone names, event types, and event data.
c.Enable state logging: Creates a log that records current and last state names, timestamps, and media types.
d.Enable diagnostic logging: Creates a log that records timestamps, firmware and script versions, and the current presentation.
e.Upload logs:
i.On startup: Uploads log files each time the player is powered on.
ii.At specific time each day: Uploads log files daily at the specified time. Use the dropdown lists to pick a time.
12.Check the Enable remote snapshot box to enable the Remote Snapshot feature, which allows you to remotely monitor the contents of the presentation display.
Note: The Remote Snapshot feature is not available for the LS422, HD220, or HD1020.
a.Remote snapshot every [ ] minutes: Specify how often the player should take a snapshot of the presentation display.
Chapter 2 – Setting up BrightSign Players |
13 |
b.Save up to [ ] images (1 - 100) on local storage: Specify how many JPEG images can be stored on the local storage of the player.
c.JPEG quality level [ ] (0 - 100): Specify the quality level (and thus the file size) of each image file.
d.Display snapshots in portrait mode: Check this box to have the player rotate the snapshots to portrait mode before saving and uploading them.
13.Use the RF Channel Scan Data (optional) field if you need to publish the same RF channel scan settings to multiple XD1230 players. See Publishing Channel Scan Results for more details.
14.Use the Screen Color option to specify what screen color the player should display after it has successfully completed the setup process. When the player displays this color, it is ready to receive content.
15.Create and install the setup files:
a.Click Create Setup Files.
b.Browse to and select an SD card (recommended) or USB flash drive to store the setup files.
Note: We recommend formatting your SD, SDHC, or SDXC card using FAT32. Formatting your card using NTFS allows you to play media files that are 4GB or larger in size, but the player will not be able to receive network updates or generate logs.
c.Click OK.
d.Turn off the BrightSign unit by unplugging the power adapter (or Ethernet cable if the player is being powered by PoE).
e.Insert the card or flash drive into the unit.
f.Turn on the BrightSign unit by reconnecting the power.
Important: Do not remove the SD card or flash drive from the player.
Chapter 2 – Setting up BrightSign Players |
14 |
Adding a Player to your Local Network
With Local File Networking, you can use BrightAuthor to schedule presentations and distribute content to players over the local network.
1.In the BrightAuthor menu bar, click Tools > Setup BrightSign Unit.
a.Under Name Specification, do the following:
b.Enter a Name and Description for this unit.
2.Select whether you want to append the unit ID to the name or use only the name.
3.Under Network Properties, set the following:
a.Enable Wireless: Check this box if you plan to connect to the local network using a wireless connection. In order to use a wireless connection, you must purchase a Wireless Module for your BrightSign player. Enter an SSID and Security key if the player is connecting to a secured network.
b.Network Connection Priority: Use the up and down arrows to prioritize either the Wired or Wireless connection. The BrightSign player will always attempt to download and upload using the first option. It will only use the second option if the first is unavailable.
c.Time zone: Select the time zone where the unit is located.
d.Time server: Select the clock for this unit.
4.Click the Advanced Network Setup button to customize advanced settings for your networked player. Specify the following in the Unit Configuration tab:
a.Specify hostname: Check this box if you want to specify a custom hostname for the player on the network. By default, the player serial number is used to generate a unique hostname.
b.Use Proxy: Check this box if you want the player to connect using a proxy server. Type the address and port number of the proxy in the fields below. If you need to provide a user name and password, use this format:
<user name>:<password>@<proxy server address> (e.g. “admin:root@myproxy.com”).
5.Specify the following in the Wired and Wireless tab of the Advanced Network Setup window:
a.Data Types Enabled: Use these checkboxes to determine the types of data that will be transferred using the connection. You can enable/disable both downloads (Content, Text Feeds, Media Feeds) and uploads (Log Updates).
Chapter 2 – Setting up BrightSign Players |
15 |
b.Connection Settings: Indicate whether the IP address is auto-generated (via DHCP) or static. If you’re using a static IP address, enter the parameters in the fields below.
6.Select the Diagnostics tab in the Advanced Network Setup window if you would like the player to perform network diagnostics when first booting up.
a.Enable network diagnostics: The player will display the network diagnostics screen during setup.
i.Test Ethernet: The player will indicate whether or not it was able to attain an IP address over Ethernet.
ii.Test Wireless: The player will indicate whether or not it was able to attain an IP address over wireless.
Chapter 2 – Setting up BrightSign Players |
16 |

iii.Test Internet Connection: The player will indicate whether or not it was able to attain a connection to remote services.
7.Click Specify Firmware Update to indicate whether you want to update the firmware and to which version. The Firmware Update window is divided by BrightSign model. In the section that corresponds to your BrightSign unit, select a firmware version or Do not update, and then click OK.
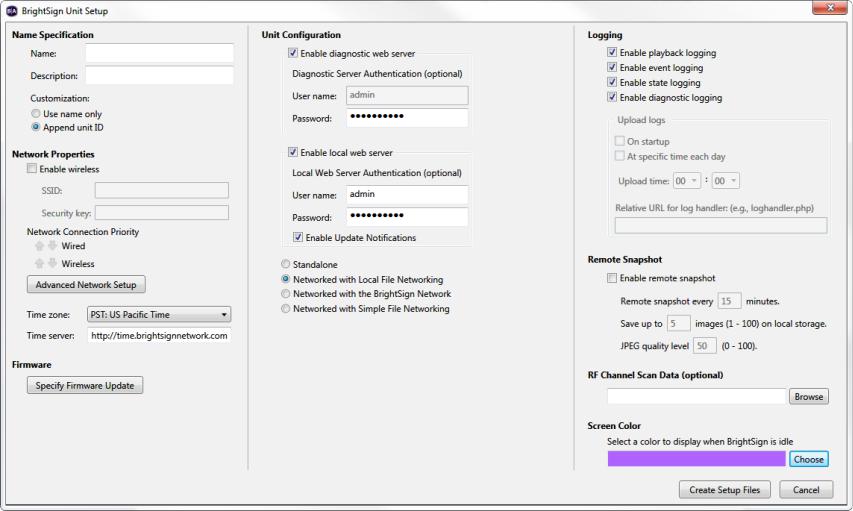
8.Under Unit Configuration, click Networked with Local File Networking, and then specify the following:
a.(Optional) Enable diagnostic web server: Check this box to enable the Diagnostic Web Server. You can include a username and password in the text fields below for added security.
b.(Optional) Enable local web server: Check this box to enable the Local Web Server. You can include a username and password in the text fields below for added security.
c.(Optional) Enable Update Notifications: Check this box to have the player automatically refresh the User
Variables webpage whenever variable values change on the player.
9.Under Logging, check any of the following boxes to enable/disable logs and specify upload settings:
Chapter 2 – Setting up BrightSign Players |
17 |
a.Enable playback logging: Creates a log that records start and end times, zone names, media types, and file names.
b.Enable event logging: Creates a log that records timestamps, state names, zone names, event types, and event data.
c.Enable state logging: Creates a log that records current and last state names, timestamps, and media types.
d.Enable diagnostic logging: Creates a log that records timestamps, firmware and script versions, and the current presentation.
10.Check the Enable remote snapshot box to enable the Remote Snapshot feature, which allows you to remotely monitor the contents of the presentation display.
Note: The Remote Snapshot feature is not available for the LS422, HD220, or HD1020.
a.Remote snapshot every [ ] minutes: Specify how often the player should take a snapshot of the presentation display.
b.Save up to [ ] images (1 - 100) on local storage: Specify how many JPEG images can be stored on the local storage of the player.
c.JPEG quality level [ ] (0 - 100): Specify the quality level (and thus the file size) of each image file.
d.Display snapshots in portrait mode: Check this box to have the player rotate the snapshots to portrait mode before making them available.
11.Use the RF Channel Scan Data (optional) field if you need to publish the same RF channel scan settings to multiple XD1230 players. See Publishing Channel Scan Results for more details.
12.Use the Screen Color option to specify what screen color the player should display after it has successfully completed the setup process. When the player displays this color, it is ready to receive content.
13.Create and install the setup files:
a.Click Create Setup Files.
b.Browse to and select an SD card (recommended) or USB flash drive to store the setup files.
Note: We recommend formatting your SD, SDHC, or SDXC card using FAT32. Formatting your card using NTFS allows you to play media files that are 4GB or larger in size, but the player will not be able to receive network updates or generate logs.
c. Click OK.
Chapter 2 – Setting up BrightSign Players |
18 |
d.Turn off the BrightSign unit by unplugging the power adapter (or Ethernet cable if the player is being powered by PoE).
e.Insert the card or flash drive into the unit.
f.Turn on the BrightSign unit by reconnecting the power.
Important: Do not remove the SD card or flash drive from the player.
Chapter 2 – Setting up BrightSign Players |
19 |
Adding a Player to your Simple File Network
With simple file networking, the setup file provides details about your network, the web folder associated with a unit, where presentations are stored, and when to check for updates.
1.In the BrightAuthor menu bar, click Tools > Setup BrightSign Unit.
2.Under Name Specification, do the following:
a.Enter a Name and Description for this unit.
b.Select whether you want to append the unit ID to the name or use only the name.
3.Under Network Properties, set the following:
g.Enable Wireless: Check this box if you plan to connect to the local network using a wireless connection. In order to use a wireless connection, you must purchase a Wireless Module for your BrightSign player. Enter an SSID and Security key if the player is connecting to a secured network.
a.Network Connection Priority: Use the up and down arrows to prioritize either the Wired or Wireless connection. The BrightSign player will always attempt to download and upload using the first option. It will only use the second option if the first is unavailable.
b.Time zone: Select the time zone where the unit is located.
c.Time server: Select the clock for this unit.
4.Click the Advanced Network Setup button to customize advanced settings for your networked player. Specify the following in the Unit Configuration tab:
a.Specify hostname: Check this box if you want to specify a custom hostname for the player on the network. By default, the player serial number is used to generate a unique hostname.
b.Use Proxy: Check this box if you want the player to connect using a proxy server. Type the address and port number of the proxy in the fields below. If you need to provide a user name and password, use this format:
<user name>:<password>@<proxy server address> (e.g. “admin:root@myproxy.com”).
c.Limit content downloads: Check this box if you want to restrict player content downloads to a certain time of day. This is helpful if you want to limit network traffic during peak hours. Use the Start Of Range and End Of Range parameters to specify a time frame during which content downloads can occur.
5.Specify the following in the Wired and Wireless tab of the Advanced Network Setup window:
Chapter 2 – Setting up BrightSign Players |
20 |

a.Data Types Enabled: Use these checkboxes to determine the types of data that will be transferred using the connection. You can enable/disable both downloads (Content, Text Feeds, Media Feeds) and uploads (Log Updates).
b.Connection Settings: Indicate whether the IP address is auto-generated (via DHCP) or static. If you’re using a static IP address, enter the parameters in the fields below.
c.Rate Limit Network Download Traffic: Set rate limitations for downloading content. The options are divided into
Chapter 2 – Setting up BrightSign Players |
21 |
three categories: Outside content download window and During content download window (both of which correspond to the Limit content downloads setting in the Unit Configuration tab) , as well as During initial downloads.
i.Click Unlimited download rate to set no limit.
ii.Click Default limit to use the default limit (2000 Kibit/s) on downloads
iii.Click Specify limit to enter a customized limit on downloads in the text field (in Kbits/second).
6.Select the Diagnostics tab in the Advanced Network Setup window if you would like the player to perform network diagnostics when first booting up.
a.Enable network diagnostics: The player will display the network diagnostics screen during setup.
i.Test Ethernet: The player will indicate whether or not it was able to attain an IP address over Ethernet.
ii.Test Wireless: The player will indicate whether or not it was able to attain an IP address on the wireless network.
iii.Test Internet Connection: The player will indicate whether or not it was able to attain a connection to remote services.
7.Click Specify Firmware Update to indicate whether you want to update the firmware and to which version. The Firmware Update window is divided by BrightSign model. In the section that corresponds to your BrightSign unit, select a firmware version or Do not update, and then click OK.
8.Under Unit Configuration, click Networked with Simple File Networking, and then specify the following:
a.(Optional) Enable diagnostic web server: Check this box to enable the Diagnostic Web Server. You can include a username and password in the text fields below for added security.
b.(Optional) Enable local web server: Check this box to enable the Local Web Server. You can include a username and password in the text fields below for added security.
c.(Optional) Enable Update Notifications: Check this box to have the player automatically refresh the User
Variables webpage whenever variable values change on the player.
d.URL for the web folder: Set the location from which the player will download presentations. Do not use trailing slashes in your URL; some web servers do not support trailing slashes.
Chapter 2 – Setting up BrightSign Players |
22 |
 Loading...