

Page 1
Not for
Reproduction
GS2500/GS4000/GS6500/GS6500E
Portable Generator/ Gerador Portátil/Generador portátil/
可擕式發電機
Operator’s Manual/ Manual do Operador/Manual de instrucciones/
操作員手冊
/휴대용 발전기
/작동 설명서
BRIGGS & STRATTON CORPORATION
MILWAUKEE, WISCONSIN, U.S.A.
Manual No. 381491 Revision C
Page 2

Not for
Reproduction
1
L
G
S
T
H
F
K
J
U
B
D
C
P
E
N A
R
M
2
B
4
A
A
3
5
A
B
C
A
2 BRIGGSandSTRATTON.COM
Page 3
Not for
Reproduction
6
87
9
10
A
A
B
A
C
A
11
3 3
Page 4

Not for
Reproduction
Thank you for purchasing this quality-built Briggs & Stratton® generator. We are pleased that you’ve placed your confidence in the Briggs & Stratton brand. When operated and
maintained according to the instructions in this manual, your Briggs & Stratton generator will provide many years of dependable service.
This manual contains safety information to make you aware of the hazards and risks associated with generators and how to avoid them. This generator is designed and intended only
for supplying electrical power for operating compatible electrical lighting, appliances, tools and motor loads, and is not intended for any other purpose. It is important that you read
and understand these instructions thoroughly before attempting to start or operate this equipment. Save these original instructions for future reference.
This generator requires final assembly before use. Refer to the Assembly section of this manual for instructions on final assembly procedures. Follow the instructions completely.
Where to Find Us
You never have to look far to find Briggs & Stratton support and service for your generator. There are thousands of Briggs & Stratton authorized service dealers worldwide who
provide quality service. You can also find the nearest Authorized Service Dealer in our dealer locator map on the Internet at BRIGGSandSTRATTON.COM.
Generator
Model Number
Revision
Serial Number
Date Purchased
Table of Contents
Operator Safety . .. . .. . .. . .. . .. . .. . .. . .. . .. . .. . .. . .. . .5
Assembly ...........................................7
Features and Controls. . .. . .. . .. . .. . .. . .. . .. . .. . .. . .. . .7
Operation ...........................................8
Maintenance .. . .. . .. . .. . .. . .. . .. . .. . .. . .. . .. . .. . .. .11
Troubleshooting .. . .. . .. . .. . .. . .. . .. . .. . .. . .. . .. . .. . 14
Specifications ......................................15
Warranties. . .. . .. . .. . .. . .. . .. . .. . .. . .. . .. . .. . .. . .. .16
Engine
Model Number
Type Number
Code Number
Copyright © 2017 Briggs & Stratton Corporation
Milwaukee, WI, USA. All rights reserved.
BRIGGS & STRATTON is a registered trademark of Briggs & Stratton Corporation
4 BRIGGSandSTRATTON.COM4 BRIGGSandSTRATTON.COM
ORIGINAL INSTRUCTIONS
Page 5

Not for
Reproduction
Operator Safety
Equipment Description
Read this manual carefully and become familiar with your generator.
Know its applications, its limitations and any hazards involved.
Every effort has been made to ensure that the information in this manual is both
accurate and current. However, the manufacturer reserves the right to change, alter
or otherwise improve the generator and this documentation at any time without prior
notice.
Important Safety Information
The manufacturer cannot possibly anticipate every possible circumstance that might
involve a hazard. The warnings in this manual, and the tags and decals affixed to the
unit are, therefore, not all-inclusive. If you use a procedure, work method or operating
technique that the manufacturer does not specifically recommend, you must satisfy
yourself that it is safe for you and others. You must also make sure that the procedure,
work method or operating technique that you choose does not render the generator
unsafe.
Safety Symbols and Meanings
Toxic Fumes
Fire
Kickback
Operator’s
Manual
Electrical
Shock
Explosion
Suffocation
Suffocation
The safety alert symbol indicates a potential personal injury hazard. A signal word
(DANGER, WARNING, or CAUTION) is used with the alert symbol to designate a
degree or level of hazard seriousness. A safety symbol may be used to represent the
type of hazard. The signal word NOTICE is used to address practices not related to
personal injury.
DANGER indicates a hazard which, if not avoided, will result in death or serious
injury.
WARNING indicates a hazard which, if not avoided, could result in death or
serious injury.
CAUTION indicates a hazard which, if not avoided, could result in minor or
moderate injury.
NOTICE address practices not related to personal injury.
WARNING POISONOUS GAS HAZARD. Engine exhaust contains carbon
monoxide, a poisonous gas that could kill you in minutes. You CANNOT
see it, smell it, or taste it. Even if you do not smell exhaust fumes, you
could still be exposed to carbon monoxide gas. If you start to feel sick,
dizzy or weak while using this product, shut it off and get to fresh air
RIGHT AWAY. See a doctor. You may have carbon monoxide poisoning.
• Operate this product ONLY outside far away from windows, doors and vents to
reduce the risk of carbon monoxide gas from accumulating and potentially being
drawn towards occupied spaces.
• Install battery-operated carbon monoxide alarms or plug-in carbon monoxide
alarms with battery back-up according to the manufacturer’s instructions. Smoke
alarms cannot detect carbon monoxide gas.
• DO NOT run this product inside homes, garages, basements, crawlspaces,
sheds, or other partially-enclosed spaces even if using fans or opening doors and
windows for ventilation. Carbon monoxide can quickly build up in these spaces
and can linger for hours, even after the product has shut off.
• ALWAYS place this product downwind and point the engine exhaust away from
occupied spaces.
Moving Parts Flying Objects
Carbon
Monoxide Alarm
Choke Run
Volt Meter Oil Level Fuel Start
Circuit Breaker Engine Control Do Not Start
Alarm Bonded to
Hot Surface
Ground
Engine
Heavy Objects
Ground
Terminal
Off On
!
WARNING Starter cord kickback (rapid retraction) will pull hand and arm
toward engine faster than you can let go which could cause broken
bones, fractures, bruises, or sprains resulting in serious injury.
• When starting engine, pull cord slowly until resistance is felt and then pull rapidly
to avoid kickback.
• NEVER start or stop engine with electrical devices plugged in and turned on.
WARNING
• Use approved transfer equipment to prevent backfeed by isolating generator from
electric utility workers.
• When using generator for backup power, notify utility company.
• Use a residual-current device (RCD) in any damp or highly conductive area, such
as metal decking or steel work.
• DO NOT touch bare wires or receptacles.
• DO NOT use generator with electrical cords which are worn, frayed, bare or
otherwise damaged.
• DO NOT operate generator in the rain or wet weather.
• DO NOT handle generator or electrical cords while standing in water, while
barefoot, or while hands or feet are wet.
• DO NOT allow unqualified persons or children to operate or service generator.
Generator voltage could cause electrical shock or burn resulting
in death or serious injury.
5 5
Page 6

Not for
Reproduction
WARNING Exhaust heat/gases could ignite combustibles, structures or
damage fuel tank causing a fire, resulting in death, serious
injury and/or property damage.
Contact with muffler area could cause burns resulting in
serious injury.
• DO NOT touch hot parts and AVOID hot exhaust gases.
• Allow equipment to cool before touching.
• Keep at least 1.5m (5ft.) of clearance on all sides of generator including overhead.
• Contact the original equipment manufacturer, retailer, or dealer to obtain a spark
arrester designed for the exhaust system installed on this engine.
• Replacement parts must be the same and installed in the same position as
the original parts.
WARNING Unintentional sparking could cause fire or electric shock resulting
in death or serious injury.
WHEN ADJUSTING OR MAKING REPAIRS TO YOUR GENERATOR
• Disconnect the spark plug wire from the spark plug and place the wire where it
cannot contact spark plug.
WHEN TESTING FOR ENGINE SPARK
• Use approved spark plug tester.
• DO NOT check for spark with spark plug removed.
WARNING Starter and other rotating parts could entangle hands, hair,
clothing, or accessories resulting in serious injury.
• NEVER operate generator without protective housing or covers.
• DO NOT wear loose clothing, jewelry or anything that could be caught in the
starter or other rotating parts.
• Tie up long hair and remove jewelry.
CAUTION Excessively high operating speeds could result in minor injury
and/or generator damage.
Excessively low speeds impose a heavy load.
• DO NOT tamper with governor spring, links or other parts to increase engine
speed.
• DO NOT modify generator in any way.
NOTICE
Exceeding generators wattage/amperage capacity could damage generator
and/or electrical devices connected to it.
• DO NOT exceed the generator’s wattage/amperage capacity. See Don’t Overload
Generator in the Operation section.
• Start generator and let engine stabilize before connecting electrical loads.
• Connect electrical loads in OFF position, then turn ON for operation.
• Turn electrical loads OFF and disconnect from generator before stopping
generator.
NOTICE
Improper treatment of generator could damage it and shorten its life.
• Use generator only for intended uses.
• If you have questions about intended use, ask dealer or contact local service
center.
• Operate generator only on level surfaces.
• DO NOT expose generator to excessive moisture, dust, dirt, or corrosive vapors.
• DO NOT insert any objects through cooling slots.
• If connected devices overheat, turn them off and disconnect them from
generator.
• Shut off generator if:
-electrical output is lost;
-equipment sparks, smokes, or emits flames;
-unit vibrates excessively.
WARNING Fuel and its vapors are extremely flammable and explosive which
WHEN ADDING OR DRAINING FUEL
• Turn generator engine OFF and let it cool at least 2 minutes before removing fuel
cap. Loosen cap slowly to relieve pressure in tank.
• Fill or drain fuel tank outdoors.
• DO NOT overfill tank. Allow space for fuel expansion.
• If fuel spills, wait until it evaporates before starting engine.
• Keep fuel away from sparks, open flames, pilot lights, heat, and other ignition
sources.
• Check fuel lines, tank, cap and fittings frequently for cracks or leaks. Replace if
necessary.
• DO NOT light a cigarette or smoke.
WHEN STARTING EQUIPMENT
• Ensure spark plug, muffler, fuel cap, and air cleaner are in place.
• DO NOT crank engine with spark plug removed.
WHEN OPERATING EQUIPMENT
• DO NOT operate this product inside any building, carport, porch, mobile
equipment, marine applications, or enclosure.
• DO NOT tip engine or equipment at angle which causes fuel to spill.
• DO NOT stop engine by moving choke control to “Choke” position (
WHEN TRANSPORTING, MOVING OR REPAIRING EQUIPMENT
• Transport/move/repair with fuel tank EMPTY or with fuel shutoff valve OFF.
• DO NOT tip engine or equipment at angle which causes fuel to spill.
• Disconnect spark plug wire.
WHEN STORING FUEL OR EQUIPMENT WITH FUEL IN TANK
• Store away from furnaces, stoves, water heaters, clothes dryers, or other
appliances that have pilot light or other ignition source because they could ignite
fuel vapors.
could cause burns, fire or explosion resulting in death,
serious injury and/or property damage.
).
6 BRIGGSandSTRATTON.COM6 BRIGGSandSTRATTON.COM
Page 7
Not for
Reproduction
Assembly
Your generator is ready for use after it has been properly serviced with the
recommended fuel and oil.
If you have any problems with the servicing of your generator, contact your local Briggs
& Stratton service center. If you need assistance, please have the model, revision, and
serial number from the identification label available. See Features and Controls for
identification label location.
Unpack Generator
1. Set the carton on a rigid, flat surface.
2. Remove everything from carton.
3. Open carton completely by cutting each corner from top to bottom.
Add Oil Figure 2
1. Place generator on a level surface.
2. Clean the oil fill area of any debris.
3. To add oil, pour the oil slowly into the engine oil fill (4,A).
4. Remove the dipstick (2,A) and wipe with a clean cloth.
5. Insert the dipstick but do not screw in. Oil level should be at FULL mark (2,B).
Add oil if needed to reach FULL mark.
6. Replace and tighten the dipstick.
NOTICE
Improper treatment of generator could damage it and shorten its life.
• DO NOT attempt to crank or start the engine before it has been properly
serviced with the recommended oil. This could result in an engine failure.
Add Fuel Figure 1
Fuel must meet these requirements:
• Clean, fresh, unleaded petrol.
• A minimum of 87 octane/87 AKI (91 RON). For high altitude use, see High Altitude.
• Petrol with up to 10% ethanol (gasohol) is acceptable.
NOTICE Do not use unapproved gasolines, such as E15 and E85. Do not mix oil in
gasoline or modify the engine to run on alternate fuels. Use of unapproved fuels will
damage the engine components and void the engine warranty.
To protect the fuel system from gum formation, mix a fuel stabilizer into the fuel. See
Storage. All fuel is not the same. If starting or performance problems occur, change
fuel providers or change brands. This engine is certified to operate on gasoline. The
emissions control system for this engine is EM (Engine Modifications).
WARNING Fuel and its vapors are extremely flammable and explosive which
WHEN ADDING FUEL
• Turn generator engine OFF and let it cool at least 2 minutes before removing fuel
cap. Loosen cap slowly to relieve pressure in tank.
• Fill fuel tank outdoors.
• DO NOT overfill tank. Allow space for fuel expansion.
• If fuel spills, wait until it evaporates before starting engine.
• Keep fuel away from sparks, open flames, pilot lights, heat, and other ignition sources.
• Check fuel lines, tank, cap and fittings frequently for cracks or leaks. Replace if
necessary.
• DO NOT light a cigarette or smoke.
4
3
could cause burns, fire or explosion resulting in death, serious
injury and/or property damage.
Attach Negative Battery Cable Figure
On models with electric start engines, attach the negative battery cable to the battery
as follows:
1. Cut off tie wrap securing loose end of negative (black) cable.
2. Using an 8 mm socket wrench, remove screw (C), lock washer (C) and flat
washer (C) on negative battery terminal (A).
3. Slide lock washer, flat washer and negative battery cable (B) over screw as shown.
4. Reattach screw to negative battery terminal and tighten.
5. Verify that connections to battery and generator are tight and secure.
Features and Controls Figure
Read this Operator’s Manual and safety rules before operating your
generator. Compare the illustrations with your generator, to familiarize
yourself with the locations of various controls and adjustments. Save this
manual for future reference.
A - Engine Identification Number — Provides model, type and code of engine. Please
have these readily available if calling for assistance.
B - Generator Identification Number — Provides model and serial number of
generator. Please have these readily available if calling for assistance.
C - Fuel Tank — Check and add unleaded fuel here.
D - Grounding Fastener — Consult your local agency having jurisdiction for grounding
requirements in your area.
E - Fuel Gauge — Displays amount of fuel available in fuel tank.
F - AC Outlet — May be used to supply electrical power for the operation of AC, single
phase, electrical, lighting, appliance, tool, and motor loads.
G - Circuit Breaker — The receptacles are provided with circuit breakers to protect the
generator against electrical overload.
H - Voltmeter — Used for measuring electrical potential.
J - Oil Fill Cap/Dipstick — Check and add engine oil here.
K - Oil Drain Plug — Drain engine oil here.
L - Fuel Valve — Used to turn fuel supply on and off to engine.
M - Recoil Starter — Used to start the engine manually.
N - Air Cleaner — Protects engine by filtering dust and debris out of intake air.
P - Spark Arrester Muffler — Exhaust muffler lowers engine noise and is equipped
with spark arrester screen.
R - Spark Plug — A device in the cylinder head of engine that ignites the fuel mixture
by means of an electric spark.
S - Choke Control — Used when starting a cold engine.
T - Electric Start Switch (Electric Start) — Turn key to start (
engine. Turn key to off (O) position to switch off engine.
U - Low Oil Warning Light — The low oil warning light is designed to prevent engine
damage caused by not enough engine oil.
5
1
) position to start the
1. Clean area around fuel fill cap, remove cap.
2. Slowly add unleaded fuel to fuel tank (1,C). Be careful not to fill above the red
indicator line (3,A). This allows adequate space for fuel expansion as shown.
3. Install fuel cap and let any spilled fuel evaporate before starting engine.
High Altitude
At altitudes over 5,000 feet (1524 meters), a minimum 85 octane / 85 AKI (89 RON)
gasoline is acceptable. To remain emissions compliant, high altitude adjustment
is required. Operation without this adjustment will cause decreased performance,
increased fuel consumption, and increased emissions. Contact a Briggs & Stratton
Authorized Service Dealer for high altitude adjustment information.
Operation of the engine at altitudes below 2,500 feet (762 meters) with the high
altitude kit is not recommended.
7 7
Page 8
Not for
Reproduction
Operation
System Ground
The generator is provided with a grounding fastener. The generator has a system
ground that connects the generator frame components to the ground terminals on the
AC output receptacles. The system ground is connected to the AC neutral wire (the
neutral is bonded to the generator frame).
Special Requirements
There may be Federal, local codes, or ordinances that apply to the intended use of the
generator. Please consult a qualified electrician, electrical inspector, or the local agency
having jurisdiction:
• In some areas, generators are required to be registered with local utility
companies.
• If the generator is used at a construction site, there may be additional
regulations which must be observed.
Connecting to a Building’s Electrical System
Connections for standby power to a building’s electrical system must use a listed
transfer switch installed by a current licensed electrician. The connection must isolate
the generator power from the utility power and must comply with all applicable laws
and electrical codes.
WARNING
• Use approved transfer equipment to prevent backfeed by isolating generator from
electric utility workers.
• When using generator for backup power, notify utility company.
• Use a residual-current device (RCD) in any damp or highly conductive area, such
as metal decking or steel work.
• DO NOT touch bare wires or receptacles.
• DO NOT use generator with electrical cords which are worn, frayed, bare or
otherwise damaged.
• DO NOT operate generator in the rain or wet weather.
• DO NOT handle generator or electrical cords while standing in water, while
barefoot, or while hands or feet are wet.
• DO NOT allow unqualified persons or children to operate or service generator.
Generator Location Figure 6
WARNING POISONOUS GAS HAZARD. Engine exhaust contains carbon
RIGHT AWAY. See a doctor. You may have carbon monoxide poisoning.
• Operate this product ONLY outside far away from windows, doors and vents to
reduce the risk of carbon monoxide gas from accumulating and potentially being
drawn towards occupied spaces.
• Install battery-operated carbon monoxide alarms or plug-in carbon monoxide
alarms with battery back-up according to the manufacturer’s instructions. Smoke
alarms cannot detect carbon monoxide gas.
• DO NOT run this product inside homes, garages, basements, crawlspaces,
sheds, or other partially-enclosed spaces even if using fans or opening doors and
windows for ventilation. Carbon monoxide can quickly build up in these spaces
and can linger for hours, even after the product has shut off.
• ALWAYS place this product downwind and point the engine exhaust away from
occupied spaces.
Generator voltage could cause electrical shock or burn resulting
in death or serious injury.
7
monoxide, a poisonous gas that could kill you in minutes. You CANNOT
see it, smell it, or taste it. Even if you do not smell exhaust fumes, you
could still be exposed to carbon monoxide gas. If you start to feel sick,
dizzy or weak while using this product, shut it off and get to fresh air
Starting the Engine Figure
NOTICE This engine was shipped without oil. Before you start the engine, make sure
you add oil according to the instructions in this manual. If you start the engine without
oil, it will be damaged beyond repair and will not be covered under warranty.
NOTICE Before you start the engine, make sure that all electrical devices are
disconnected from the generator outlets.
1. Make sure unit is on a flat, level surface.
NOTICE Failure to start and operate the unit on a flat, level surface will cause the unit
not to start or shut down during operation.
2. Turn fuel valve (L) to on position (I).
3. Pull choke control (S) out to close choke (
4A. For electric starting, turn and hold key in start switch (T) to start (
until generator starts. To prolong the life of starter components, DO NOT hold key
in start (
between starting attempts.
• If engine starts, proceed to step 6.
• If engine fails to start, proceed to step 5.
NOTICE If battery is discharged, use manual starting instructions.
WARNING Starter cord kickback (rapid retraction) will pull hand and arm
• When starting engine, pull cord slowly until resistance is felt and then pull rapidly
to avoid kickback.
• NEVER start or stop engine with electrical devices plugged in and turned on.
4B. For manual starting, turn key in start switch to run (I) position, grasp recoil
handle (M) and pull slowly until slight resistance is felt. Then pull rapidly one
time only to start engine.
• If engine starts, proceed to step 6.
• If engine fails to start, proceed to step 5.
5. Push in the choke handle half way, turn key in start switch to run (I) position
and pull recoil handle twice or turn and hold key in start switch to start (
position as described in step 4A.
• If engine fails to start, repeat steps 3 thru 4.
6. Open the choke gradually as the engine warms up by pushing in on the choke
handle.
NOTICE If engine floods, push choke handle all the way in and crank until engine starts.
NOTICE If engine starts after 3 pulls but fails to run, or if unit shuts down during
operation, make sure unit is on a level surface and check for proper oil level in
crankcase. This unit is equipped with a low oil protection device. If so, oil must be at
proper level for engine to start.
WARNING Exhaust heat/gases could ignite combustibles, structures or
serious injury.
• DO NOT touch hot parts and AVOID hot exhaust gases.
• Allow equipment to cool before touching.
• Keep at least 1.5m (5ft.) of clearance on all sides of generator including overhead.
• Contact the original equipment manufacturer, retailer, or dealer to obtain a
spark arrester designed for the exhaust system installed on this engine.
• Replacement parts must be the same and installed in the same position as
the original parts.
) position for more than 15 seconds, and pause for at least 1 minute
toward engine faster than you can let go which could cause broken
bones, fractures, bruises, or sprains resulting in serious injury.
damage fuel tank causing a fire, resulting in death, serious
injury and/or property damage.
Contact with muffler area could cause burns resulting in
1
).
) position
)
8 BRIGGSandSTRATTON.COM
8 BRIGGSandSTRATTON.COM
Page 9
Not for
Reproduction
Connecting Electrical Loads Figure
WARNING
• Use approved transfer equipment to prevent backfeed by isolating generator from
electric utility workers.
• When using generator for backup power, notify utility company.
• Use a residual-current device (RCD) in any damp or highly conductive area, such
as metal decking or steel work.
• DO NOT touch bare wires or receptacles.
• DO NOT use generator with electrical cords which are worn, frayed, bare or
otherwise damaged.
• DO NOT operate generator in the rain or wet weather.
• DO NOT handle generator or electrical cords while standing in water, while
barefoot, or while hands or feet are wet.
• DO NOT allow unqualified persons or children to operate or service generator.
Use only high quality, well-insulated extension cables with the generator’s AC outlets.
Inspect extension cables before each use. Check that all extension cables are suitably
rated and are not damaged.
WARNING Damaged or overloaded electrical cables could overheat, arc, and
• ONLY use suitably rated extension cables.
• Follow all safety instructions on extension cables.
• Inspect cables before each use.
Generator voltage could cause electrical shock or burn resulting
in death or serious injury.
burn resulting in death, serious injury, and/or property damage.
1
Oil Level Switch and Warning Light Figure 1
If the oil level is too low, a switch will stop the engine and activate a warning light (U)
on the generator. If the oil level is too low when starting the engine, the switch will
activate the warning light. If the warning light is activated, make sure the unit is on a
level surface and check for proper oil level. See the How to Check/Add Oil section.
If the oil level is below the ADD mark, add oil until it reaches the FULL mark. Start the
engine and check for oil leaks before continuing to operate.
If the oil level is between the ADD and FULL marks, do not start the engine. See a
Briggs & Stratton Authorized Dealer to have the engine inspected.
1. Let engine stabilize and warm up for a few minutes after starting.
2. Check the voltmeter (H) for proper voltage.
3. Make sure the load of the electrical device is within the generator’s rated output.
NOTICE Receptacles may be marked with rating value greater than generator output
capacity.
• NEVER attempt to power a device requiring more amperage than the generator or
receptacle can supply.
• DO NOT overload the generator. See Generator Capacity.
4. Make sure the electrical device is turned off. Then connect the electrical device
to the generator’s AC outlet (F). After the electrical device is connected, turn on
the electrical device.
5. When connecting additional electrical devices, make sure the total load does
not exceed the generator’s wattage capacity. See Specifications section.
NOTICE Do not exceed the generator’s wattage capacity. Exceeding the wattage
capacity could damage generator and/or connected electrical devices.
6. Before stopping the engine, turn off and then disconnect all electrical devices.
Stopping the Engine Figure 8
1. Before stopping the engine, turn off and then disconnect all electrical devices.
2. Let engine run at no-load for several minutes to stabilize internal temperatures
of engine and generator.
3. Turn fuel valve to the off (
4. Electric Start: Turn the electric start switch (T) to the off ( ) position.
WARNING Fuel and its vapors are extremely flammable and explosive which
could cause burns, fire or explosion resulting in death,
serious injury and/or property damage.
• DO NOT stop engine by moving choke control to “Choke” position (
9
) position.
).
9 9
Page 10

Not for
Reproduction
Circuit Breaker Figure
The circuit breaker(s) (G) will automatically open if the load exceeds the generator’s
rated output. If the circuit breaker opens, then reduce the output load and reset the
circuit breaker before resuming operation. To determine maximum output load, see the
Generator Capacity section.
1
Don’t Overload Generator
Capacity
Make sure the generator’s Starting Wattage* meets or exceeds the Rated (Operating) and
Additional Surge (Starting) Watts of the electrical devices.
1. Select the items you will power at the same time.
2. Total the rated (running) watts of these items. This is the amount of power your
generator must produce to keep your items running. See Wattage Reference
Guide.
3. Estimate how many surge (starting) watts you will need. Surge wattage is the
short burst of power needed to start electric motor-driven tools or appliances
such as a circular saw or refrigerator. Because not all motors start at the same
time, total surge watts can be estimated by adding only the item(s) with the
highest additional surge watts to the total rated watts from step 2.
Tool or Appliance Rated (Running) Watts
Window Fan 300 600
Deep Freezer 500 500
Television 500 —
Security System 180 —
Light (75 Watts) 75 —
1555 Total Running Watts 600 Highest Surge Watts
Example:
Total Rated (Running) Watts 1555
Highest Additional Surge Watts + 600
Total Generator Output Required =2155
NOTICE If total generator output required does not contain additional surge watts, DO
NOT exceed generator’s rated wattage.**
*See Starting Wattage in the Specifications section.
**See Rated Wattage in the Specifications section.
Power Management
Failure to properly connect electrical devices can result in damage to the generator or
to connected electrical devices. The correct and safe way to manage generator power is
to sequentially add electrical devices (loads) as follows:
1. Before you start the engine, make sure that all electrical devices are
disconnected from the generator outlets.
2. Start the engine (see the How to Start the Engine section).
3. Connect the electrical device that requires the most watts (load).
4. Let the generator output stabilize (engine runs smoothly).
5. Connect the next electrical device.
6. Again, let the generator output stabilize.
7. Continue following the above steps to add electrical devices. Make sure the
total watts (load) of all electrical devices does not exceed the generator’s
wattage capacity (see the Specifications section).
NOTICE
Exceeding generators wattage/amperage capacity could damage generator
and/or electrical devices connected to it.
• DO NOT exceed the generator’s wattage/amperage capacity.
• Start generator and let engine stabilize before connecting electrical loads.
• Connect electrical loads in OFF position, then turn ON for operation.
• Turn electrical loads OFF and disconnect from generator before stopping generator.
Additional Surge
(Starting) Watts
Wattage Reference Guide
Tool or Appliance
Essentials
Light Bulb - 75 watt 75 —
Deep Freezer 500 500
Sump Pump 800 1200
Refrigerator/Freezer - 18 cf 800 1600
Water Well Pump - 1/3 hp 1000 2000
Heating/Cooling
Window AC - 10,000 BTU 1200 1800
Window Fan 300 600
Furnace Fan Blower - 1/2 hp 800 1300
Kitchen
Microwave Oven - 1000 Watt 1000 —
Coffee Maker 1500 —
Electric Stove - Single Element 1500 —
Family Room
DVD/CD Player 100 —
VCR 100 —
Stereo Receiver 450 —
Color Television - 27 in 500 —
Personal Computer w/17 in monitor 800 —
Other
Security System 180 —
AM/FM Clock Radio 300 —
Garage Door Opener - 1/2 hp 480 520
DIY/Job Site
Quartz Halogen Work Light 1000 —
Airless Sprayer - 1/3 hp 600 1200
Reciprocating Saw 960 960
Electric Drill - 1/2 hp 1000 1000
Circular Saw - 7-1/4 in 1500 1500
Rated* (Running)
Watts
Additional Surge
(Starting) Watts
10 BRIGGSandSTRATTON.COM
Page 11
Not for
Reproduction
Maintenance
Maintenance Schedule
Follow the hourly or calendar intervals, whichever occurs first. More frequent service is
required when operating in adverse conditions noted below.
First 5 Hours
• Change engine oil
Every 8 Hours or Daily
• Clean debris
• Check engine oil level
Every 25 Hours or Yearly
• Service engine air cleaner†
Every 50 Hours or Yearly
• Change engine oil
Every 100 Hours or Yearly
• Service fuel valve
• Service spark plug
• Inspect muffler and spark arrester
• Clean cooling system
† Service more often under dirty or dusty conditions.
General Recommendations
Regular maintenance will improve the performance and extend the life of the generator.
See any authorized dealer for service.
The generator’s warranty does not cover items that have been subjected to operator
abuse or negligence. To receive full value from the warranty, the operator must
maintain the generator as instructed in this manual.
NOTICE
Improper treatment of generator could damage it and shorten its life.
• NEVER operate generator without protective housing or covers to assure proper
cooling.
Some adjustments will need to be made periodically to properly maintain your generator.
All service and adjustments should be made at least once each season. Follow the
requirements in the Maintenance Schedule chart above.
NOTICE Once a year you should clean or replace the spark plug and replace the air
filter. A new spark plug and clean air filter assure proper fuel-air mixture and help your
engine run better and last longer.
Generator Maintenance
Generator maintenance consists of keeping the unit clean and dry. Operate and store
the unit in a clean dry environment where it will not be exposed to excessive dust, dirt,
moisture, or any corrosive vapors. Cooling air slots in the generator must not become
clogged with snow, leaves, or any other foreign material.
NOTICE DO NOT use water or other liquids to clean generator. Liquids can enter
engine fuel system, causing poor performance and/or failure to occur. In addition, if
liquid enters generator through cooling air slots, some of the liquid will be retained in
voids and cracks of the rotor and stator winding insulation. Liquid and dirt buildup on
the generator internal windings will eventually decrease the insulation resistance of
these windings.
†
†
Cleaning
Daily or before use, look around and underneath the generator for signs of oil or fuel
leaks. Clean accumulated debris from inside and outside the generator. Keep the linkage,
spring and other engine controls clean. Keep the area around and behind the muffler free
from any combustible debris. Inspect cooling air slots and openings on generator. These
openings must be kept clean and unobstructed.
Engine parts should be kept clean to reduce the risk of overheating and ignition of
accumulated debris:
• Use a damp cloth to wipe exterior surfaces clean.
NOTICE
Improper treatment of generator could damage it and shorten its life.
• DO NOT expose generator to excessive moisture, dust, dirt, or corrosive vapors.
• DO NOT insert any objects through cooling slots.
• Use a soft bristle brush to loosen caked on dirt or oil.
• Use a vacuum cleaner to pick up loose dirt and debris.
Fuel System Maintenance Figure 8
WARNING Fuel and its vapors are extremely flammable and explosive which
could cause burns, fire or explosion resulting in death,
serious injury and/or property damage.
• Keep fuel away from sparks, open flames, pilot lights, heat, and other ignition
sources.
• Check fuel lines, tank cap, and fittings frequently for cracks or leaks. Replace if
necessary.
• If fuel spills, wait until it evaporates before starting engine.
How to Clean/Replace the Debris Strainer
1. Remove the fuel cap (11,A).
2. Remove the debris strainer (11,B).
3. If the debris strainer is dirty, clean it. If the debris strainer is torn or otherwise
damaged, replace it. If you replace the debris strainer, make sure to use an
original equipment replacement debris strainer.
How to Clean the Fuel Sediment Cup
The fuel valve is equipped with a fuel sediment cup that can be cleaned as follows:
1. Move the fuel valve to the off position.
2. Remove the sediment cup (8,A) from the fuel valve.
3. Wash the sediment cup in a nonflammable solvent. Dry thoroughly.
4. Install the sediment cup and tighten securely.
5. Move the fuel valve to the on position and check for leaks. If the fuel valve
leaks, replace with an original equipment replacement fuel valve.
11
Battery Maintenance
There is no required maintenance for the starting battery, if equipped. Keep battery and
terminals clean and dry.
NOTICE The starting battery charges only while the generator is operating.
11
Page 12
Not for
Reproduction
Engine Maintenance
WARNING Unintentional sparking could cause fire or electric shock resulting
WHEN ADJUSTING OR MAKING REPAIRS TO YOUR GENERATOR
• Disconnect the spark plug wire from the spark plug and place the wire where it
cannot contact spark plug.
WHEN TESTING FOR ENGINE SPARK
• Use approved spark plug tester.
• DO NOT check for spark with spark plug removed.
Carburetor and Engine Speed Adjustment
Never make adjustments to the carburetor or engine speed. The carburetor was set at
the factory to operate efficiently under most conditions. Do not tamper with governor
spring, linkages, or other parts to change the engine speed. If adjustment is required,
see a Briggs & Stratton authorized dealer.
CAUTION Excessively high operating speeds could result in minor injury
and/or generator damage.
Excessively low speeds impose a heavy load.
• DO NOT tamper with governor spring, links or other parts to increase engine speed.
• DO NOT modify generator in any way.
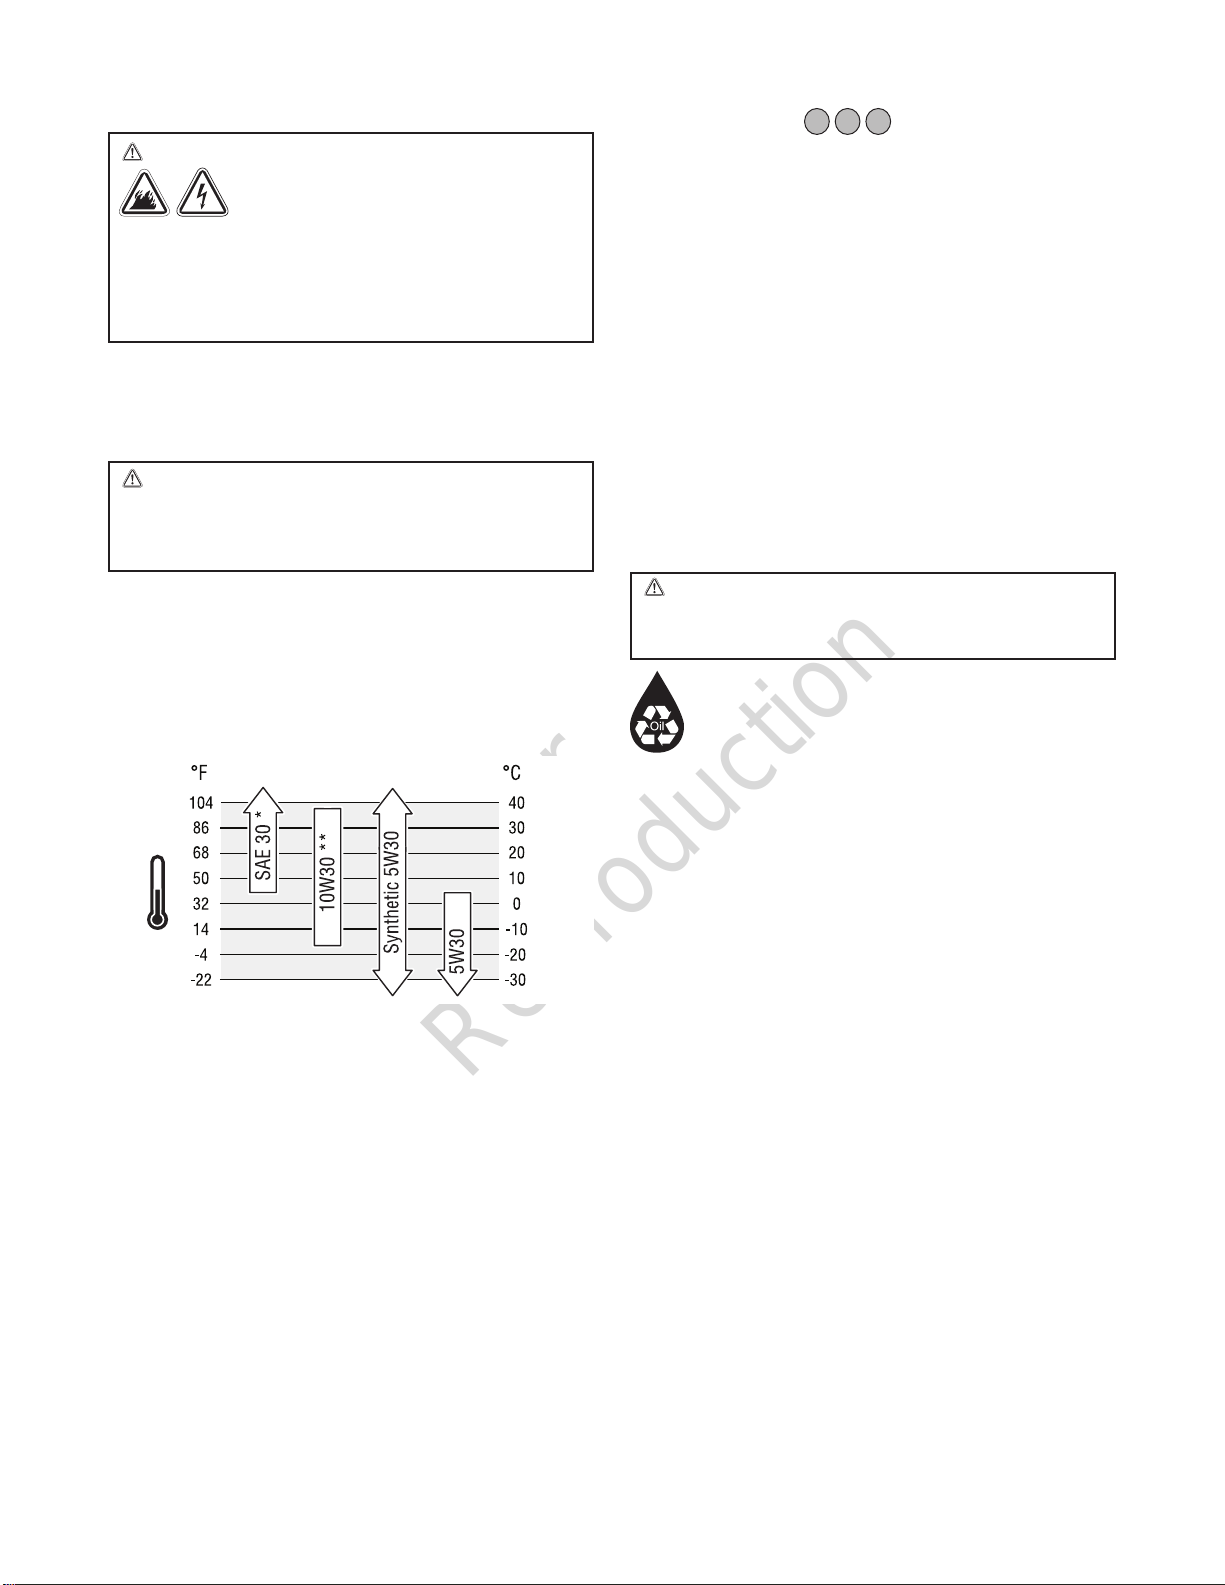
Oil
Oil Recommendations
We recommend the use of Briggs & Stratton Warranty Certified oils for best
performance. Other high-quality detergent oils are acceptable if classified for service
SF, SG, SH, SJ or higher. DO NOT use special additives.
Outdoor temperatures determine the proper oil viscosity for the engine. Use the chart
to select the best viscosity for the outdoor temperature range expected.
in death or serious injury.
Checking Oil Level
Oil level should be checked prior to each use or at least every 8 hours of operation.
Keep oil level maintained.
1. Make sure generator is on a level surface.
2. Clean area around oil fill (4,A), remove oil cap/dipstick and wipe dipstick with
clean cloth. Replace dipstick. Remove and check oil level.
NOTICE DO NOT screw in dipstick when checking oil level.
3. Verify oil is at full mark (2,B) on dipstick. Replace and tighten oil cap/dipstick.
Adding Engine Oil
1. Make sure generator is on a level surface.
2. Check oil level as described in Checking Oil Level.
3. If needed, slowly pour oil into oil fill opening to the full mark on dipstick. DO
NOT overfill.
NOTICE Overfilling with oil could cause the engine to not start, or hard starting.
• DO NOT overfill.
• If over the full mark on dipstick, drain oil to reduce oil level to full mark on dipstick.
4. Replace and tighten oil cap/dipstick.
Changing Engine Oil
If you are using your generator under extremely dirty or dusty conditions, or in
extremely hot weather, change the oil more often.
CAUTION Avoid prolonged or repeated skin contact with used motor oil.
• Used motor oil has been shown to cause skin cancer in certain laboratory
animals.
• Thoroughly wash exposed areas with soap and water.
Change the oil while the engine is still warm from running, as follows:
1. Make sure unit is on a level surface.
2. Disconnect the spark plug wire from the spark plug and place the wire where it
cannot contact spark plug.
3. Clean area around oil drain plug (1,K). The oil drain plug is located at base of
engine, opposite carburetor.
4. Remove oil drain plug and drain oil completely into a suitable container.
5. Reinstall oil drain plug and tighten securely. Remove oil fill cap/dipstick.
6. Repeat steps 3 and 4 to add engine oil as described in Adding Engine Oil.
7. Wipe up any spilled oil.
Figure 1 2 4
KEEP OUT OF REACH OF CHILDREN. DON’T POLLUTE. CONSERVE
RESOURCES. RETURN USED OIL TO COLLECTION CENTERS.
* Below 4°C (40°F) the use of SAE 30 will result in hard starting.
** Above 27°C (80°F) the use of 10W30 may cause increased oil consumption. Check
oil level more frequently.
12 BRIGGSandSTRATTON.COM
12 BRIGGSandSTRATTON.COM
Page 13
Not for
Reproduction
Service Spark Plug Figure
Changing the spark plug will help your engine to start easier and run better.
1. Clean area around spark plug.
2. Remove and inspect spark plug.
3. Check electrode gap with wire feeler gauge and reset spark plug gap to
recommended gap if necessary (see Specifications).
4. Replace spark plug if electrodes are pitted, burned or porcelain is cracked. Use
the recommended replacement spark plug. See Specifications.
5. Install spark plug and tighten firmly.
NOTICE In some areas, local law requires using a resistor spark plug to suppress
ignition signals. If the engine was originally equipped with a resistor spark plug, use
the same type for replacement.
Inspect Muffler and Spark Arrester
Inspect the muffler for cracks, corrosion, or other damage. Remove the spark arrester,
if equipped, and inspect for damage or carbon blockage. If replacement parts are
required, make sure to use only original equipment replacement parts.
WARNING Contact with muffler area can result in serious burns.
• DO NOT touch hot parts and AVOID hot exhaust gases.
• Allow equipment to cool before touching.
• Keep at least 1.5 m (5feet) of clearance on all sides of generator including
overhead.
• Contact the original equipment manufacturer, retailer, or dealer to obtain a spark
arrester designed for the exhaust system installed on this engine.
• Replacement parts must be the same and installed in the same position as the
original parts.
Service Air Cleaner
Your engine will not run properly and may be damaged if you run it with a dirty air
cleaner. Service more often if operating under dirty or dusty conditions.
To service the air cleaner, follow these steps:
1. Unlatch air cleaner cover on top and bottom and remove cover (A).
2. Carefully remove air cleaner (B) to prevent debris from falling into carburetor.
3. Wash foam air cleaner in liquid detergent and water. Squeeze dry in a clean
cloth.
4. SATURATE foam air cleaner in engine oil and squeeze in a clean cloth to
remove excess oil.
5. Reinstall clean or new foam air cleaner in base (C).
6. Assemble air cleaner cover onto base and latch.
Exhaust heat/gases can ignite combustibles, structures or
damage fuel tank causing a fire.
Figure
9
10
Clean Cooling System
Over time debris may accumulate in cylinder cooling fins and cannot be observed
without partial engine disassembly. For this reason, we recommend you have a Briggs
& Stratton authorized dealer clean the cooling system per recommended intervals (see
Maintenance Schedule in the Maintenance section). Equally important is to keep top of
engine free from debris. Also see Cleaning.
Storage
If you will not be using the generator for more than 30days, use the following
guidelines to prepare it for storage.
Generator Storage
• Clean the generator as outlined in Cleaning.
• Check that cooling air slots and openings on generator are open and unobstructed.
Long Term Storage Instructions
Fuel can become stale when stored over 30 days. Stale fuel causes acid and gum
deposits to form in the fuel system or on essential carburetor parts. To keep fuel
fresh, use Briggs & Stratton® Advanced Formula Fuel Treatment & Stabilizer, available
wherever Briggs & Stratton genuine service parts are sold.
There is no need to drain gasoline from the engine if a fuel stabilizer is added
according to instructions. Run the engine for 2 minutes to circulate the stabilizer
throughout the fuel system before storage. If gasoline in the engine has not been
treated with a fuel stabilizer, it must be drained into an approved container. Run
the engine until it stops from lack of fuel. The use of a fuel stabilizer in the storage
container is recommended to maintain freshness.
WARNING Fuel and its vapors are extremely flammable and explosive which
could cause burns, fire or explosion resulting in death, serious
injury and/or property damage.
WHEN STORING FUEL OR EQUIPMENT WITH FUEL IN TANK
• Store away from furnaces, stoves, water heaters, clothes dryers or other
appliances that have pilot light or other ignition source because they could ignite
fuel vapors.
WHEN DRAINING FUEL
• Turn generator engine OFF and let it cool at least 2 minutes before removing fuel
cap. Loosen cap slowly to relieve pressure in tank.
• Drain fuel tank outdoors.
• Keep fuel away from sparks, open flames, pilot lights, heat, and other ignition
sources.
• Check fuel lines, tank, cap and fittings frequently for cracks or leaks. Replace if
necessary.
• DO NOT light a cigarette or smoke.
Change Engine Oil
While engine is still warm, drain oil from crankcase. Refill with recommended grade.
See Changing Engine Oil.
Other Storage Tips
1. DO NOT store fuel from one season to another unless it has been treated as
described in Long Term Storage Instructions.
2. Replace fuel container if it starts to rust. Rust and/or dirt in fuel can cause
problems if it’s used with this unit.
3. Cover unit with a suitable protective cover that does not retain moisture.
WARNING Storage covers could cause a fire resulting in death, serious
injury and/or property damage.
• DO NOT place a storage cover over a hot generator.
• Let equipment cool for a sufficient time before placing the cover on the equipment.
4. Store generator in clean, dry area.
13 13
Page 14
Not for
Reproduction
Troubleshooting
Problem Cause Correction
1. Reset circuit breaker.
2. Contact authorized service facility.
3. Check and repair.
4. Connect another device that is in good condition.
1. Disconnect shorted electrical load.
2. Contact authorized service facility.
3. See Don’t Overload Generator in Operation section.
4. Contact authorized service facility.
5. Clean or replace fuel filter.
1. Turn fuel valve to on (I) position.
2. Fill crankcase to proper level or place generator on
level surface.
3. Clean or replace air cleaner.
4. Clean or replace fuel filter.
5. Fill fuel tank.
6. Drain fuel tank and carburetor; fill with fresh fuel.
7. Connect wire to spark plug.
8. Replace spark plug.
9. Drain gas tank and carburetor; fill with fresh fuel.
10. Wait 5 minutes and re-crank engine.
11. Contact authorized service facility.
12. Contact authorized service facility.
13. Contact authorized service facility.
14. Turn electric stop switch to run position.
15. Charge or replace battery.
1. See Don’t Overload Generator.
2. Replace air filter.
3. Clean or replace fuel filter.
1. Contact authorized service facility.
2. Clean or replace fuel filter.
Engine is running, but no AC output is
available.
Engine runs good at no-load but “bogs
down” when loads are connected.
Engine will not start; shuts down when
running or starts and runs rough.
Engine lacks power.
Engine “hunts” or falters.
1. Circuit breaker open.
2. Fault in generator.
3. Poor connection or damaged extension cable.
4. Inoperative electrical device.
1. Short circuit in connected electrical device.
2. Engine speed too slow.
3. Generator overloaded.
4. Shorted generator circuit.
5. Clogged or dirty fuel filter.
1. Fuel shut off valve in off (O) position.
2. Low oil level.
3. Dirty air filter.
4. Clogged or dirty fuel filter.
5. Out of fuel.
6. Stale fuel.
7. Spark plug wire not connected to spark plug.
8. Damaged spark plug.
9. Water in fuel.
10. Carburetor flooded.
11. Excessively rich fuel mixture.
12. Intake valve stuck open or closed.
13. Engine has lost compression.
14. Electric start switch in off position.
15. Battery discharged.
1. Generator overloaded.
2. Dirty air filter.
3. Clogged or dirty fuel filter.
1. Carburetor is running too rich or too lean.
2. Clogged or dirty fuel filter.
Energy Consumption
Energy consumption (gasoline) in normal operation at 50% of load 1.12 l/h 1.63 l/h 2.04 l/h
Energy consumption (gasoline) in idle mode Does not apply Does not apply Does not apply
Product or service delivered per energy consumed units Does not apply Does not apply Does not apply
2,300 Watt 3,500 Watt 6,000 Watt
14 BRIGGSandSTRATTON.COM
Page 15

Not for
Reproduction
Product Specifications
Model(s) 030566, 030596
Starting Wattage ..............................................2,500 Watts
Rated Wattage* ...............................................2,300 Watts
AC Output Voltage ...............................................230 Volts
Load Current at 230 Volts AC .....................................10.0 Amps
Frequency ........................................................60 Hz
Phase .....................................................Single Phase
Fuel Capacity ................................................4.0 gal (15 L)
Engine Displacement ........................................9.95 ci (163 cc)
Oil Capacity ....................................... 18 - 20 oz (0.54 - 0.59 L)
Spark Plug Gap .........................................0.030 in (0.76 mm)
Spark Plug Torque ........................................180 lb-in (20 Nm)
Intake Valve Clearance ........................ 0.004 - 0.006 in (0.10 - 0.15 mm)
Exhaust Valve Clearance ...................... 0.006 - 0.008 in (0.15 - 0.20 mm)
Model(s) 030570, 030597
Starting Wattage ..............................................4,000 Watts
Rated Wattage* ...............................................3,500 Watts
AC Output Voltage ...............................................230 Volts
Load Current at 230 Volts AC .....................................15.2 Amps
Frequency ........................................................60 Hz
Phase .....................................................Single Phase
Fuel Capacity ................................................6.6 gal (25 L)
Engine Displacement .......................................16.48 ci (270 cc)
Oil Capacity ....................................... 35 - 37 oz (1.05 - 1.09 L)
Spark Plug Gap .........................................0.030 in (0.76 mm)
Spark Plug Torque ........................................275 lb-in (31 Nm)
Intake Valve Clearance ........................ 0.005 - 0.007 in (0.13 - 0.18 mm)
Exhaust Valve Clearance ...................... 0.005 - 0.007 in (0.13 - 0.18 mm)
Model(s) 030576, 030583, 030598, 030599
Starting Wattage ..............................................6,500 Watts
Rated Wattage* ...............................................6,000 Watts
AC Output Voltage ...............................................230 Volts
Load Current at 230 Volts AC .....................................26.0 Amps
Frequency ........................................................60 Hz
Phase .....................................................Single Phase
Fuel Capacity ................................................6.6 gal (25 L)
Engine Displacement .......................................25.63 ci (420 cc)
Oil Capacity ....................................... 35 - 37 oz (1.05 - 1.09 L)
Spark Plug Gap .........................................0.030 in (0.76 mm)
Spark Plug Torque ........................................275 lb-in (31 Nm)
Intake Valve Clearance ........................ 0.005 - 0.007 in (0.13 - 0.18 mm)
Exhaust Valve Clearance ...................... 0.005 - 0.007 in (0.13 - 0.18 mm)
Model(s) 030588
Starting Wattage ..............................................2,500 Watts
Rated Wattage* ...............................................2,300 Watts
AC Output Voltage ...............................................115 Volts
Load Current at 115 Volts AC .....................................20.0 Amps
Frequency ........................................................60 Hz
Phase .....................................................Single Phase
Fuel Capacity ................................................4.0 gal (15 L)
Engine Displacement ........................................9.95 ci (163 cc)
Oil Capacity ....................................... 18 - 20 oz (0.54 - 0.59 L)
Spark Plug Gap .........................................0.030 in (0.76 mm)
Spark Plug Torque ........................................180 lb-in (20 Nm)
Intake Valve Clearance ........................ 0.004 - 0.006 in (0.10 - 0.15 mm)
Exhaust Valve Clearance ...................... 0.006 - 0.008 in (0.15 - 0.20 mm)
Model(s) 030589
Starting Wattage ..............................................4,000 Watts
Rated Wattage* ...............................................3,500 Watts
AC Output Voltage ..........................................115 / 230 Volts
Load Current at 115 Volts AC .....................................30.4 Amps
Load Current at 230 Volts AC .....................................15.2 Amps
Frequency ........................................................60 Hz
Phase .....................................................Single Phase
Fuel Capacity ................................................ 6.6 gal (25 L
Engine Displacement .......................................16.48 ci (270 cc)
Oil Capacity ....................................... 35 - 37 oz (1.05 - 1.09 L)
Spark Plug Gap .........................................0.030 in (0.76 mm)
Spark Plug Torque ........................................275 lb-in (31 Nm)
Intake Valve Clearance ........................ 0.005 - 0.007 in (0.13 - 0.18 mm)
Exhaust Valve Clearance ...................... 0.005 - 0.007 in (0.13 - 0.18 mm)
Model(s) 030590, 030591
Starting Wattage ..............................................6,500 Watts
Rated Wattage* ...............................................6,000 Watts
AC Output Voltage ..........................................115 / 230 Volts
Load Current at 115 Volts AC .....................................52.1 Amps
Load Current at 230 Volts AC .....................................26.0 Amps
Frequency ........................................................60 Hz
Phase .....................................................Single Phase
Fuel Capacity ................................................6.6 gal (25 L)
Engine Displacement .......................................25.63 ci (420 cc)
Oil Capacity ....................................... 35 - 37 oz (1.05 - 1.09 L)
Spark Plug Gap .........................................0.030 in (0.76 mm)
Spark Plug Torque ........................................275 lb-in (31 Nm)
Intake Valve Clearance ........................ 0.005 - 0.007 in (0.13 - 0.18 mm)
Exhaust Valve Clearance ...................... 0.005 - 0.007 in (0.13 - 0.18 mm)
Common Service Parts
Air Cleaner - Engine Model 106200 ................................... 591717
Air Cleaner - Engine Model 160000 ................................... 591778
Air Cleaner - Engine Model 250000 ................................... 591778
Spark Plug - Engine Model 106200 ................................... 491055
Spark Plug - Engine Model 160000 ................................... 797235
Spark Plug - Engine Model 250000 ................................... 797235
Power Ratings: The gross power rating for individual gas engine models is labeled in accordance with SAE (Society of Automotive Engineers) code J1940 (Small Engine Power &
Torque Rating Procedure), and rating performance has been obtained and corrected in accordance with SAE J1995 (Revision 2002-05). Torque values are derived at 3060 RPM;
horsepower values are derived at 3600 RPM. The gross power curves can be viewed at www.BRIGGSandSTRATTON.COM. Net power values are taken with exhaust and air cleaner
installed whereas gross power values are collected without these attachments. Actual gross engine power will be higher than net engine power and is affected by, among other
things, ambient operating conditions and engine-to-engine variability. Given the wide array of products on which engines are placed, the gas engine may not develop the rated gross
power when used in a given piece of power equipment. This difference is due to a variety of factors including, but not limited to, the variety of engine components (air cleaner,
exhaust, charging, cooling, carburetor, fuel pump, etc.), application limitations, ambient operating conditions (temperature, humidity, altitude), and engine-to-engine variability. Due to
manufacturing and capacity limitations, Briggs & Stratton may substitute an engine of higher rated power for this Series engine.
* This generator is rated in accordance with ISO 8528 G1.
15
Page 16

Not for
Reproduction
BRIGGS & STRATTON PORTABLE GENERATOR OWNER WARRANTY POLICY
Effective September 1, 2012; replaces all undated Warranties and all Warranties dated before September 1, 2012.
LIMITED WARRANTY
Briggs & Stratton warrants that, during the warranty period specified below, it will repair or replace, free of charge, any part that is defective in material or workmanship or
both. Transportation charges on product submitted for repair or replacement under this warranty must be borne by purchaser. This warranty is effective for and is subject to
the time periods and conditions stated below. For warranty service, find the nearest Authorized Service Dealer in our dealer locator map at BRIGGSandSTRATTON.com. The
purchaser must contact the Authorized Service Dealer, and then make the product available to the Authorized Service Dealer for inspection and testing.
There is no other express warranty. Implied warranties, including those of merchantability and fitness for a particular purpose, are limited to one year from purchase,
or to the extent permitted by law. All other implied warranties are excluded. Liability for incidental or consequential damages are excluded to the extent exclusion
is permitted by law. Some states or countries do not allow limitations on how long an implied warranty lasts, and some states or countries do not allow the exclusion or
limitation of incidental or consequential damages, so the above limitation and exclusion may not apply to you. This warranty gives you specific legal rights and you may also
have other rights which vary from state to state or country to country.**
WARRANTY PERIOD
ITEM CONSUMER USE COMMERCIAL USE
EQUIPMENT
Models: 030588, 030589, 030590, 030591
Models: 030566, 030576, 030570, 030583
030596, 030597, 030598, 030599
Engine 2 year 1 year
Battery (if equipped) 1 year 1 year
** In Australia - Our goods come with guarantees that cannot be excluded under the Australian Consumer Law. You are entitled to a replacement or refund for a major failure and
for compensation for any other reasonably foreseeable loss or damage. You are also entitled to have the goods repaired or replaced if the goods fail to be of acceptable quality
and the failure does not amount to a major failure. For warranty service, find the nearest Authorized Service Dealer in our dealer locator map at BRIGGSandSTRATTON.COM, or by
calling 1300 274 447, or by emailing or writing to salesenquires@briggsandstratton.com.au, Briggs & Stratton Australia Pty Ltd, 1 Moorebank Avenue, NSW, Australia, 2170.
The warranty period begins on the date of purchase by the first retail end user, and continues for the period of time stated above. “Consumer Use” means personal residential
household use by a retail consumer. “Commercial Use” means all other uses, including use for commercial, income producing or rental purposes. Once equipment has experienced
commercial use, it shall thereafter be considered as commercial use for purposes of this warranty. Equipment used for prime power in place of utility are not applicable to this
warranty.
NO WARRANTY REGISTRATION IS NECESSARY TO OBTAIN WARRANTY ON BRIGGS & STRATTON PRODUCTS. SAVE YOUR PROOF OF PURCHASE RECEIPT. IF YOU DO NOT
PROVIDE PROOF OF THE INITIAL PURCHASE DATE AT THE TIME WARRANTY SERVICE IS REQUESTED, THE MANUFACTURING DATE OF THE PRODUCT WILL BE USED TO
DETERMINE THE WARRANTY PERIOD.
2 year
1 year
1 year
1 year
ABOUT YOUR WARRANTY
We welcome warranty repair and apologize to you for being inconvenienced. Any Authorized Service Dealer may perform warranty repairs. Most warranty repairs are handled
routinely, but sometimes requests for warranty service may not be appropriate. For example, warranty service would not apply if equipment damage occurred because of misuse,
lack of routine maintenance, shipping, handling, warehousing or improper installation. Similarly, the warranty is void if the manufacturing date or the serial number on the portable
generator has been removed or the equipment has been altered or modified. During the warranty period, the Authorized Service Dealer, at its option, will repair or replace any part
that, upon examination, is found to be defective under normal use and service. This warranty will not cover the following repairs and equipment:
• Normal Wear: Outdoor Power Equipment, like all mechanical devices, needs periodic parts and service to perform well. This warranty does not cover repair when normal
use has exhausted the life of a part or the equipment.
• Installation and Maintenance: This warranty does not apply to equipment or parts that have been subjected to improper or unauthorized installation or alteration and
modification, misuse, negligence, accident, overloading, overspeeding, improper maintenance, repair or storage so as, in our judgment, to adversely affect its performance
and reliability. This warranty also does not cover normal maintenance such as adjustments, fuel system cleaning and obstruction (due to chemical, dirt, carbon, lime, etc.).
• Other Exclusions: This warranty excludes wear items such as o-rings, filters, etc., or malfunctions resulting from accidents, abuse, modifications, alterations, or improper
servicing or freezing or chemical deterioration. Accessory parts such as generator adapter cord sets and storage covers are excluded from the product warranty. This
warranty excludes failures due to acts of God and other force majeure events beyond the manufacturers control. Also excluded is used, reconditioned, and demonstration
equipment; equipment used for prime power in place of utility power and equipment used in life support applications. 198195E, Rev. D, 08/24/2012
BRIGGS & STRATTON CORPORATION
MILWAUKEE, WI, USA
16 BRIGGSandSTRATTON.COM
Page 17

Not for
Reproduction
17
Page 18

Not for
Reproduction
Obrigado por adquirir este excelente gerador produzido pela Briggs & Stratton®. Ficamos felizes por você depositar sua confiança na marca Briggs & Stratton. Quando operado e
mantido de acordo com as instruções dente manual, o seu gerador Briggs & Stratton fornecerá muitos anos de funcionamento confiável.
Este manual contém informações de segurança para informá-lo sobre os perigos e riscos associados aos geradores e como evitá-los. Este gerador foi desenvolvido apenas para o
fornecimento de alimentação elétrica para iluminação, utensílios, ferramentas e cargas de motor elétricos, e não deve ser utilizado para qualquer outro propósito. O usuário deve ler
e compreender totalmente estas instruções antes de tentar ligar ou operar este equipamento. Guarde estas instruções originais para referência futura.
Este gerador exige uma montagem final antes do uso. Consulte a seção Montagem deste manual de instruções para obter os procedimentos da montagem final. Siga as
instruções completamente.
Onde nos encontrar
Você nunca terá que procurar muito para encontrar assistência e manutenção Briggs & Stratton para o seu gerador. Há milhares de centros de serviço autorizados Briggs & Stratton
ao redor do mundo, prontos para lhe atender com qualidade. Você pode localizar o Centro de Serviço Autorizado mais próximo através do nosso mapa localizador na Internet em
BRIGGSandSTRATTON.COM.
Gerador
Número de Modelo
Revisão
Número de série
Data de aquisição
Índice
Segurança do operador. .. . .. . .. . .. . .. . .. . .. . .. . .. . .. . .5
Montagem ..........................................7
Recursos e controles..................................7
Operação .. . .. . .. . .. . .. . .. . .. . .. . .. . .. . .. . .. . .. . .. . .8
Manutenção. .. . .. . .. . .. . .. . .. . .. . .. . .. . .. . .. . .. . .. .11
Solução de problemas ...............................14
Especificações .....................................15
Garantias ..........................................16
Motor
Número de modelo
Número de tipo
Número de código
Copyright © 2017 Briggs & Stratton Corporation
Milwaukee, WI, USA. Todos os direitos reservados.
BRIGGS & STRATTON é uma marca comercial registrada
da Briggs & Stratton Corporation
4 BRIGGSandSTRATTON.COM4 BRIGGSandSTRATTON.COM
Page 19
Not for
Reproduction
Segurança do operador
Descrição do equipamento
Leia este manual atentamente e se familiarize com o seu gerador.
Conheça as suas aplicações, seus limites e todos os perigos envolvidos.
Empregamos grande esforço para assegurar a precisão e atualidade das informações
deste manual. Contudo, o fabricante mantém o direito de mudar, alterar ou aprimorar
de qualquer outra maneira o gerador e a respectiva documentação, a qualquer
momento, sem aviso prévio.
Importantes informações de segurança
O fabricante não tem como prever todas as circunstâncias possíveis que possam
envolver perigo. Os alertas deste manual, e as etiquetas e adesivos afixados à unidade
não são, portanto, absolutamente inclusivos. Se você usa um procedimento, um
método de trabalho ou uma técnica de operação não recomendada especificamente
pelo fabricante, ficará a seu critério julgar se é seguro para você e para outrem. Você
também deve garantir que o procedimento, a técnica de operação ou o método de
trabalho que você escolher não torna o uso do gerador perigoso.
Símbolos de segurança e significados
Vapores tóxicos
Fogo
Rebote
Manual do
Operador
Choque elétrico
Explosão
Sufocamento
Sufocamento
O símbolo de alerta de segurança indica o perigo de ferimento pessoal potencial.
Uma palavra de sinalização (PERIGO, ADVERTÊNCIA ou CUIDADO) é usada com o
símbolo de alerta para designar um grau ou nível de gravidade para o perigo. Um símbolo
de segurança pode ser usado para representar o tipo de perigo. A palavra de sinalização
AVISO é usada em referência a práticas sem relação com ferimentos pessoais.
PERIGO indica um perigo que, se não evitado,resultará em morte ou ferimentos
graves.
ADVERTÊNCIA indica um perigo que, se não evitado,poderá resultar em morte
ou ferimentos graves.
CUIDADO indica um perigo que, se não evitado,pode resultar em ferimentos
leves a moderados.
AVISO trata de práticas não relacionadas a ferimentos pessoais.
ADVERTÊNCIA PERIGO DE GÁS VENENOSO. A exaustão do motor contém
monóxido de carbono, um gás venenoso que pode causar sua morte em
minutos. NÃO é possível identificar esse gás visualmente, pelo cheiro ou
pelo sabor. Não sentir o cheiro dos vapores de exaustão não significa
que você não está exposto ao gás monóxido de carbono. Se você
começar a se sentir mal, tonto ou fraco durante o uso deste produto, desligue-o e
vá para o ar livre IMEDIATAMENTE. Procure atendimento médico. Você corre risco
de envenenamento por monóxido de carbono.
• Opere este produto APENAS ao ar livre, longe de janelas, portas e passagens de
ventilação para evitar o risco de acúmulo de monóxido de carbono e sua entrada
em áreas ocupadas.
• Instale alarmes de monóxido de carbono operados por bateria ou alarmes de
monóxido de carbono adaptados para encaixe, com back-up de bateria, de acordo
com as instruções do fabricante. Alarmes de fumaça não são capazes de detectar
gás carbônico.
• NÃO opere este produto dentro de residências, garagens, porões, vãos, abrigos ou
outros espaços parcialmente fechados, mesmo com o uso de ventiladores ou de
portas e janelas abertas para ventilação. O monóxido de carbono pode se acumular
rapidamente e perdurar por horas, mesmo após o desligamento do produto.
• SEMPRE posicione este produto a favor do vento e aponte a exaustão para longe
de áreas ocupadas.
Peças móveis Objetos
Alarme de monóxido
de carbono
Afogador RUN
Voltímetro Nível do óleo Combustível Partida
lançados no ar
Alarme Ligado à terra Terminal de
(em funcionamento)
Superfície
quente
OFF ON
Objetos pesados
aterramento
ADVERTÊNCIA A retração rápida (rebote) da corda de partida puxará sua
mão e braço na direção do motor antes que você consiga soltá-la,
oquepoderá causar fraturas ósseas, cortes, distensões, contusões ou
ferimentos graves.
• Ao dar partida no motor, puxe a corda lentamente até sentir resistência e, então,
puxe rapidamente para evitar o rebote.
• NUNCA dê partida ou desligue o motor com dispositivos elétricos conectados
eligados.
ADVERTÊNCIA A voltagem do gerador pode causar choques elétricos ou
queimaduras graves e até mesmo fatais.
• Use equipamentos de transferência aprovados para evitar retroalimentação
isolando o gerador dos trabalhadores de serviço elétrico.
• Ao usar o gerador para energia de emergência, notifique a companhia prestadora
do serviço.
• Use um dispositivo de corrente residual (DCR) em qualquer área úmida ou altamente
condutora como, por exemplo, superfícies metálicas ou estruturas de aço.
• NÃO toque em fios desencapados ou soquetes.
• NÃO use o gerador com cabos elétricos desgastados, desfiados ou danificados
dequalquer outra maneira.
• NÃO opere o gerador na chuva ou em clima úmido.
• NÃO opere ou toque no gerador ou nos cabos elétricos enquanto estiver na água,
descalço ou com as mãos ou os pés molhados.
• NÃO permita que pessoas não qualificadas ou crianças operem ou façam a
manutenção do gerador.
!
Disjuntor Controle do motor Não dê partida
no motor
5 5
Page 20
Not for
Reproduction
ADVERTÊNCIA O calor e os gases da exaustão podem provocar a ignição
O contato com a área de escapamento e exaustão pode causar queimaduras e
ferimentos graves.
• NÃO toque em partes quentes e MANTENHA DISTÂNCIA dos gases quentes
daexaustão.
• Espere o equipamento esfriar antes de tocá-lo.
• Mantenha ao menos 1,5 m (5 ft) de distância de todos os lados do gerador,
incluindo acima dele.
• Contate o fabricante de equipamento original, varejista ou concessionário para
obter um protetor de faísca projetado para o sistema de escapamento instalado
neste motor.
• As peças de reposição deverão ser iguais e instaladas na mesma posição que as
peças originais.
ADVERTÊNCIA Fagulhamento acidental pode causar incêndios ou choques
decombustíveis e estruturas ou danificar o tanque de
combustível provocando incêndios, o que pode resultar em
mortes, ferimentos graves e/ou danos a propriedades.
elétricos, que podem provocar morte ou ferimentos graves.
CUIDADO
em pequenos ferimentos e/ou danos ao gerador.
Velocidades excessivamente baixas impõem uma sobrecarga.
• NÃO altere a mola mestra, as ligações ou outras peças para aumentar o giro
domotor.
• NÃO modifique o gerador de nenhuma forma.
AVISO
ogerador e/ou dispositivos elétricos conectados a ele.
• NÃO exceda a capacidade de vatagem/amperagem do gerador. ConsulteNão
sobrecarregue o gerador na seção Operação.
• Dê partida no gerador e deixe o motor se estabilizar antes de conectar cargas
elétricas.
• Conecte cargas elétricas na posição desligada (OFF) e, somente então, mude para
aposição ligada (ON) para operação.
• DESLIGUE as cargas elétricas e, então, desconecte-as do gerador antes de parar
ogerador.
Velocidades de operação excessivamente elevadas podem resultar
Exceder a capacidade de vatagem/amperagem do gerador pode danificar
AO AJUSTAR OU REPARAR O SEU GERADOR
• Desconecte o cabo da vela de ignição da vela de ignição e coloque o cabo onde
ele não possa entrar em contato com a vela de ignição.
AO TESTAR A VELA DE IGNIÇÃO
• Use um testador de vela de ignição aprovado.
• NÃO teste a existência de ignição com a vela de ignição removida.
ADVERTÊNCIA O mecanismo de partida ou outras partes que giram podem
prender suas mãos, cabelos, roupas ou adornos, o que pode causar
ferimentos graves.
• NUNCA opere o gerador sem alojamento ou coberturas de proteção.
• NÃO use roupas largas, joias ou qualquer coisa que possa ser aprisionada na
partida ou em peças rotativas.
• Se tiver cabelo longo ou usar joias, prenda o cabelo e retire as joias.
ADVERTÊNCIA Os combustíveis e seus vapores são extremamente
AO ACRESCENTAR OU DRENAR COMBUSTÍVEL
• Desligue o motor (OFF) e deixe-o esfriar por, pelo menos, 2 minutos antes de
retirar a tampa do combustível. Vagarosamente desaperte a tampa para aliviar
apressão no tanque.
• Encha ou drene o tanque ao ar livre.
• NÃO encha o tanque excessivamente. Deixe espaço para a expansão do
combustível no tanque.
• Se houver derrame de combustível, aguarde até que evapore antes de acionar omotor.
• Mantenha a gasolina distante de fagulhas, chamas vivas, luzes piloto, calor ou
outras fontes de ignição.
• Verifique as linhas de combustível, o tanque, a tampa e os encaixes
frequentemente àprocura de rachaduras ou vazamentos. Substitua, se necessário.
• NÃO acenda um cigarro ou fume.
AO ACIONAR O EQUIPAMENTO
• Certifique-se de que a vela de ignição, o silencioso, o tampão do tanque
decombustível e o purificador de ar se encontram cada um no seu lugar.
• Não ligue o motor com a vela de ignição removida.
AO OPERAR O EQUIPAMENTO
• NÃO OPERE este produto dentro de casas ou outras construções, garagens, pórticos,
varandas, equipamentos móveis, aplicações marítimas ou espaços fechados.
• NÃO incline o motor ou o equipamento para um ângulo que poderá provocar
oderramamento de combustível.
• NÃO pare o motor movendo o controle do afogador para a posição “Afogar” (
AO TRANSPORTAR, MOVER OU REPARAR EQUIPAMENTO
• Transporte/mova/repare com o tanque de combustível VAZIO ou com a válvula
de desligamento de combustível FECHADA.
• NÃO incline o motor ou o equipamento para um ângulo que poderá provocar
oderramamento de combustível.
• Desconecte o cabo da vela de ignição.
AO ARMAZENAR COMBUSTÍVEL OU EQUIPAMENTO COM COMBUSTÍVEL NO TANQUE
• Armazene afastado de fornalhas, fogões, aquecedores de água, secadores
deroupa ou outros aparelhos que tenham uma chama piloto ou outra fonte
deignição, uma vez que poderão inflamar os vapores do combustível.
inflamáveis e explosivos, e podem causar queimaduras,
incêndios ou explosões, que poderão resultar em morte,
ferimentos graves e/ou danos à propriedade.
O tratamento inadequado do gerador pode danificá-lo e abreviar sua vida útil.
AVISO
• Use o gerador apenas para os usos previstos.
• Se você tiver perguntas sobre o uso correto, pergunte ao revendedor ou entre em
contato com o centro de serviço local.
• Opere o gerador apenas sobre superfícies niveladas.
• NÃO exponha o gerador a excesso de umidade, pó, poeira ou vapores corrosivos.
• NÃO insira objeto algum através das aberturas de arrefecimento.
• Em caso de superaquecimento dos dispositivos conectados, desligue-os e
desconecte-os do gerador.
• Desligue o gerador se:
-a saída elétrica for perdida;
-o equipamento emitir faísca, fumaça ou chamas;
-a unidade vibrar excessivamente.
).
6 BRIGGSandSTRATTON.COM6 BRIGGSandSTRATTON.COM
Page 21
Not for
Reproduction
Montagem
O seu gerador está pronto para o uso após a manutenção adequada com o combustível
e o óleo recomendados.
Se você tiver qualquer problema com a manutenção do seu gerador, entre em contato
com o seu centro de serviço Briggs & Stratton local. Se você precisar de ajuda, tenha
o modelo, a revisão e o número de série para identificação à mão. Consulte Recursos
econtroles para obter a localização das etiquetas de identificação.
Desembale o gerador
1. Repouse a caixa sobre uma superfície rígida e plana.
2. Remova todo o conteúdo da caixa.
3. Abra completamente a caixa cortando todos os cantos do topo à base.
Acrescente óleo Figura 2
1. Coloque o gerador sobre uma superfície plana.
2. Limpe a área de abastecimento de óleo removendo completamente os resíduos.
3. Para adicionar óleo, despeje-o lentamente dentro do bocal de enchimento
deóleo (4,A).
4. Remova a vareta (2,A) e passe um pano limpo.
5. Insira a vareta mas não a enrosque. O nível de óleo deve estar na marca FULL
(cheio) (2,B). Adicione óleo, se necessário, para chegar à marca CHEIO (FULL).
6. Recoloque e enrosque a vareta.
AVISO
O tratamento inadequado do gerador pode danificá-lo e abreviar sua vida útil.
• NÃO tente acionar ou dar partida no motor antes da manutenção adequada com o
óleo recomendado. Isso pode resultar em uma falha do motor.
Acrescente combustível Figura 1
O combustível deve atender a estes requisitos:
• Gasolina limpa, nova e sem chumbo.
• Gasolina de octanagem 87 no mínimo/87 AKI (91 RON). Para altas altitudes,
consulte Alta altitude.
• Gasolina com até 10% de etanol (álcool combustível) é aceitável.
AVISO
Não use gasolina não aprovada, como E15 e E85. Não misture óleo à gasolina
ou modifique o motor para funcionar com combustíveis alternativos. O uso de
combustíveis não aprovados danificará os componentes do motor e invalidará a
garantia do motor.
Para proteger o sistema de combustível contra a formação de goma, adicione um
estabilizador de combustível à gasolina. Consulte Armazenamento. Os combustíveis
não são todos iguais. Se ocorrerem problemas de partida ou de desempenho, troque
de fornecedor de combustível ou de marca. Este motor é certificado para operar com
gasolina. O sistema de controle de emissões deste motor é EM (Modificações do motor).
ADVERTÊNCIA Os combustíveis e seus vapores são extremamente
AO ACRESCENTAR COMBUSTÍVEL
• Desligue o motor (OFF) e deixe-o esfriar por, pelo menos, 2 minutos antes
deretirar a tampa do combustível. Vagarosamente desaperte a tampa para aliviar
a pressão no tanque.
• Abasteça o tanque de combustível em área aberta.
• NÃO encha o tanque excessivamente. Deixe espaço para a expansão do
combustível no tanque.
• Se houver derrame de combustível, aguarde até que evapore antes de acionar o motor.
• Mantenha a gasolina distante de fagulhas, chamas vivas, luzes piloto, calor ou
outras fontes de ignição.
• Verifique as linhas de combustível, o tanque, a tampa e os encaixes
frequentemente à procura de rachaduras ou vazamentos. Substitua, se necessário.
• NÃO acenda um cigarro ou fume.
1. Limpe a área em torno do tampão do tanque de combustível, remova o tampão.
2. Lentamente, adicione combustível sem chumbo ao tanque (1,C). Tenha cuidado
para não preencher acima da linha indicadora vermelha (3,A). Isso permite o
espaço adequado para expansão conforme mostrado.
3. Instale o tampão do tanque de combustível e permita que todo o combustível
evapore antes de dar partida no motor.
inflamáveis e explosivos, e podem causar queimaduras,
incêndios ou explosões, que poderão resultar em morte,
ferimentos graves e/ou danos à propriedade.
4
3
Alta altitude
Em altitudes acima de 1.524 metros (5.000 pés), é aceitável uma gasolina de no mínimo
85 octanas/85 AKI (89 RON) É necessário um ajuste para alta altitude, para manter
o motor em conformidade com os níveis de emissão permitidos. A operação sem
esse ajuste causará redução no desempenho, aumento no consumo de combustível
e emissões. Entre em contato com uma Assistência Técnica Autorizada da Briggs &
Stratton para obter informações de ajuste para alta altitude.
Não é recomendável que o motor opere a altitudes abaixo de 762 metros (2.500 pés)
com o kit para alta altitude.
Conecte o cabo negativo da bateria Figura
Em modelos com motores com arranque elétrico, conecte o cabo negativo da bateria
como segue:
1. Corte a braçadeira que prende a extremidade solta do cabo negativo (preto).
2. Usando uma chave soquete de 8 mm, remova o parafuso (C), a arruela de
pressão (C) e a arruela plana (C) em um terminal negativo da bateria (A).
3. Deslize a arruela de pressão, a arruela plana e o cabo negativo da bateria (B)
sobre o parafuso, conforme mostrado.
4. Recoloque o parafuso no terminal negativo da bateria e aperte.
5. Verifique se todas as conexões na bateria e no gerador estão bem apertadas
efirmes.
Recursos e controles
Leia este Manual do Operador e regras de segurança antes de operar
oseu gerador. Compare as ilustrações com o seu gerador, para se
familiarizar com os locais de vários controles e ajustes. Guarde este manual
para futuras consultas.
A - Número de identificação do motor — Fornece o modelo, o tipo e o código do
motor. Mantenha essas informações à mão ao ligar em busca de assistência.
B - Número de identificação do gerador — Fornece o modelo e o número de série do
gerador. Mantenha essas informações à mão ao ligar em busca de assistência.
C - Tanque de combustível — Verifique e acrescente combustível sem chumbo.
D - Fixador da terra — Consulte a agência local com jurisdição sobre os requisitos
deaterramento da sua região.
E - Medidor de combustível — Exibe a quantidade de combustível no tanque
decombustível.
F - Saída CA — Pode ser usada para fornecer energia elétrica para a operação
decargas CA, monofásicas, elétricas, de iluminação, de utensílios, de ferramentas
e de motores.
G - Disjuntor — Os receptáculos são fornecidos com disjuntores para proteger
ogerador contra sobrecargas elétricas.
H - Voltímetro — Usado para medir potencial elétrico.
J - Tampa do reservatório de óleo/vareta de óleo — Verifique e acrescente o óleoaqui.
K - Tampa do tanque de óleo — Drene o óleo do motor aqui.
L - Válvula de combustível — Usado para ligar e desligar o suprimento de combustível
para o motor.
M - Alça de arranque — Usado para dar partida manual no motor.
N - Purificador de ar — Protege o motor filtrando poeira e detritos na entrada de ar.
P - Protetor de faísca do silenciador — O silenciador do exaustor reduz o ruído do
motor e é equipado com uma tela de proteção contra faíscas.
R - Vela de ignição — Um dispositivo no cabeçote do cilindro do motor que produz
aignição da mistura de combustível através de uma faísca elétrica.
S - Controle do afogador — Usado para iniciar o motor frio.
T - Interruptor de arranque elétrico (arranque elétrico) — Gire a chave para dar
partida ( ) posição para dar partida no motor. Gire a chave para a posição
desligado (O) para parar o motor.
U - Luz de advertência de óleo baixo — A luz de advertência de óleo baixo foi projetada
para impedir danos causados ao motor por falta de óleo.
Figura
5
1
7 7
Page 22
Not for
Reproduction
Operação
Aterramento do sistema
O gerador é fornecido com um fixador para o aterramento. O gerador possui um
aterramento para o sistema que conecta os componentes da estrutura do gerador aos
terminais de aterramento e as conexões de saída de CA. O aterramento do sistema
éconectado ao cabo neutro de CA (o cabo neutro é ligado à estrutura do gerador).
Requisitos especiais
Esses requerimentos podem ser códigos federais e locais ou normais aplicáveis ao
uso previsto do gerador. Consulte um eletricista adequado, um inspetor elétrico ou
aagência local responsável:
• Em algumas áreas, geradores devem ser registrados com companhias
deserviço local.
• Se o gerador é usado em um local de construção, talvez haja normais
adicionais que devem ser observadas.
Como conectar ao sistema elétrico de um edifício
As conexões para energia de reserva com o sistema elétrico de um edifício deve utilizar
uma chave de transferência instalada por um eletricista licenciado. A conexão deve
isolar a energia do gerador da energia da rede e deve estar de acordo com todos os
códigos elétricos e leis aplicáveis.
ADVERTÊNCIA A voltagem do gerador pode causar choques elétricos ou
queimaduras graves e até mesmo fatais.
• Use equipamentos de transferência aprovados para evitar retroalimentação
isolando o gerador dos trabalhadores de serviço elétrico.
• Ao usar o gerador para energia de emergência, notifique a companhia prestadora
do serviço.
• Use um dispositivo de corrente residual (DCR) em qualquer área úmida ou altamente
condutora como, por exemplo, superfícies metálicas ou estruturas de aço.
• NÃO toque em fios desencapados ou soquetes.
• NÃO use o gerador com cabos elétricos desgastados, desfiados ou danificados
dequalquer outra maneira.
• NÃO opere o gerador na chuva ou em clima úmido.
• NÃO opere ou toque no gerador ou nos cabos elétricos enquanto estiver na água,
descalço ou com as mãos ou os pés molhados.
• NÃO permita que pessoas não qualificadas ou crianças operem ou façam a
manutenção do gerador.
Localização do gerador Figura 6
ADVERTÊNCIA PERIGO DE GÁS VENENOSO. A exaustão do motor contém
monóxido de carbono, um gás venenoso que pode causar sua morte em
minutos. NÃO é possível identificar esse gás visualmente, pelo cheiro ou
pelo sabor. Não sentir o cheiro dos vapores de exaustão não significa
que você não está exposto ao gás monóxido de carbono. Se você
começar a se sentir mal, tonto ou fraco durante o uso deste produto, desligue-o e
vá para o ar livre IMEDIATAMENTE. Procure atendimento médico. Você corre risco
de envenenamento por monóxido de carbono.
• Opere este produto APENAS ao ar livre, longe de janelas, portas e passagens de
ventilação para evitar o risco de acúmulo de monóxido de carbono e sua entrada
em áreas ocupadas.
• Instale alarmes de monóxido de carbono operados por bateria ou alarmes de
monóxido de carbono adaptados para encaixe, com back-up de bateria, de acordo
com as instruções do fabricante. Alarmes de fumaça não são capazes de detectar
gás carbônico.
• NÃO opere este produto dentro de residências, garagens, porões, vãos, abrigos
ou outros espaços parcialmente fechados, mesmo com o uso de ventiladores ou de
portas e janelas abertas para ventilação. O monóxido de carbono pode se acumular
rapidamente e perdurar por horas, mesmo após o desligamento do produto.
• SEMPRE posicione este produto a favor do vento e aponte a exaustão para longe
de áreas ocupadas.
7
Ligando o motor Figura
AVISO
Este motor foi enviado sem óleo. Antes de dar partida no motor, lembre-se de
adicionar óleo de acordo com as instruções neste manual. Se o motor for acionado sem
óleo, ele será danificado sem possibilidade de reparo e não estará coberto pela garantia.
Antes de dar partida no motor, certifique-se de que todos os dispositivos
AVISO
elétricos estão desconectados das saídas do gerador.
1. Certifique-se de que a unidade está sobre uma superfície plana e nivelada.
Não ligar e operar a unidade sobre uma superfície plana e nivelada fará com
AVISO
que a unidade não dê partida ou desligue durante a operação.
2. Gire a válvula do combustível (L) para a posição (I).
3. Puxe o controle do afogador (S) para fora para fechar o afogador (
4A. Para dar partida elétrica, gire a chave de partida e a mantenha na posição (T)
de partida ( ) até o gerador funcionar. Para prolongar a vida dos
componentes do motor de partida, NÃO segure a chave na posição de partida (
) durante mais de 15 segundos e aguarde pelo menos 1 minuto antes de
uma nova tentativa de partida.
• Se o motor ligar, continue para a etapa 6.
• Se o motor não ligar, continue para a etapa 5.
AVISO
Se a bateria estiver descarregada, use as instruções de partida manual.
ADVERTÊNCIA A retração rápida (rebote) da corda de partida puxará sua
mão e braço na direção do motor antes que você consiga soltá-la,
o que poderá causar fraturas ósseas, cortes, distensões, contusões ou
ferimentos graves.
• Ao dar partida no motor, puxe a corda lentamente até sentir resistência e, então,
puxe rapidamente para evitar o rebote.
• NUNCA dê partida ou desligue o motor com dispositivos elétricos conectados
eligados.
4B. Para partida manual, vire a chave no interruptor de partida até a posição de
funcionamento ((I)), segure a alça de arranque (M) e puxe lentamente até sentir
uma leve resistência. Em seguida, puxe rapidamente de uma só vez para dar
partida no motor.
• Se o motor ligar, continue para a etapa 6.
• Se o motor não ligar, continue para a etapa 5.
5. Empurre a haste do afogador até a metade, vire a chave no interruptor
departida até a posição de funcionamento (I) e puxe a alça de arranque duas
vezes ou gire a chave para a posição de partida (
como descrito na etapa 4A.
• Se o motor não ligar, repita as etapas 3 e 4.
6. Abra o afogador gradualmente à medida que o motor aquecer empurrando
ahaste do afogador.
AVISO
Se o motor afogar, empurre a haste do afogador totalmente e acione até
omotor pegar.
Se o motor não ligar após puxar 3 vezes, ou se o motor desligar durante a
AVISO
operação, certifique-se de que a unidade está sobre uma superfície nivelada e verifique
o nível do óleo adequado no cárter. Esta unidade é equipada com um dispositivo de
proteção contra falta de óleo. Em caso positivo, o óleo deve estar no nível adequado
para que o motor ligue.
ADVERTÊNCIA O calor e os gases da exaustão podem provocar a ignição
O contato com a área de escapamento e exaustão pode causar queimaduras
eferimentos graves.
• NÃO toque em partes quentes e MANTENHA DISTÂNCIA dos gases quentes
daexaustão.
• Espere o equipamento esfriar antes de tocá-lo.
• Mantenha ao menos 1,5 m (5 ft) de distância de todos os lados do gerador,
incluindo acima dele.
• Contate o fabricante de equipamento original, varejista ou concessionário para
obter um protetor de faísca projetado para o sistema de escapamento instalado
neste motor.
• As peças de reposição deverão ser iguais e instaladas na mesma posição que as
peças originais.
decombustíveis e estruturas ou danificar o tanque de
combustível provocando incêndios, o que pode resultar em
mortes, ferimentos graves e/ou danos a propriedades.
1
).
) e mantenha pressionada
8 BRIGGSandSTRATTON.COM8 BRIGGSandSTRATTON.COM
Page 23

Not for
Reproduction
Conectando cargas elétricas Figura
ADVERTÊNCIA
• Use equipamentos de transferência aprovados para evitar retroalimentação
isolando o gerador dos trabalhadores de serviço elétrico.
• Ao usar o gerador para energia de emergência, notifique a companhia prestadora
do serviço.
• Use um dispositivo de corrente residual (DCR) em qualquer área úmida ou altamente
condutora como, por exemplo, superfícies metálicas ou estruturas de aço.
• NÃO toque em fios desencapados ou soquetes.
• NÃO use o gerador com cabos elétricos desgastados, desfiados ou danificados
dequalquer outra maneira.
• NÃO opere o gerador na chuva ou em clima úmido.
• NÃO opere ou toque no gerador ou nos cabos elétricos enquanto estiver na água,
descalço ou com as mãos ou os pés molhados.
• NÃO permita que pessoas não qualificadas ou crianças operem ou façam a
manutenção do gerador.
Use apenas cabos de extensão de alta qualidade e bem isolados com as saídas CA do
gerador. Inspecione cabos de extensão antes de cada uso. Verifique se todos os cabos
de extensão estão corretamente classificados e livres de danos.
queimaduras graves e até mesmo fatais.
A voltagem do gerador pode causar choques elétricos ou
1
Chave e luz de advertência do nível do óleo Figura 1
Se o nível de óleo estiver baixo demais, uma chave desligará o motor e ativará uma luz
de advertência (U) no gerador. Se o nível de óleo estiver baixo demais ao ligar o motor,
a chave ativará a luz de advertência. Se a luz de advertência estiver ativada, certifiquese de que a unidade está sobre uma superfície nivelada e verifique se o nível de óleo
está adequado. Consulte a seção Como verificar/adicionar óleo.
Se o nível de óleo estiver abaixo da marca ADD, acrescente óleo até que alcance a
marca FULL. Ligue o motor e verifique se há vazamentos de óleo antes de continuar
com a operação.
Se o nível de óleo estiver entre as marcas ADD (adicionar) e FULL (cheio), não ligue
omotor. Contate um revendedor autorizado Briggs & Stratton para solicitar a inspeção
do seu motor.
ADVERTÊNCIA
• Use APENAS cabos de extensão classificados adequadamente.
• Siga todas as instruções de segurança para cabos de extensão.
• Inspecione cabos antes de cada uso.
1. Deixe o motor estabilizar e aquecer por alguns minutos antes de dar a partida.
2. Verifique o voltímetro (H) para garantir a voltagem correta.
3. Certifique-se de que a carga do dispositivo elétrico está dentro da saída
classificada do gerador.
AVISO
Conexões podem ser marcadas com um valor de classificação superior
àcapacidade de saída do gerador.
• NUNCA tente energizar um dispositivo que exige amperagem superior à capacidade
do gerador ou da conexão.
• NÃO sobrecarregue o gerador. Consulte Capacidade do gerador.
4. Certifique-se de que o dispositivo elétrico está desligado. Em seguida, conecte
o dispositivo elétrico à saída CA do gerador (F). Após a conexão do dispositivo
elétrico, ligue o dispositivo elétrico.
5. Ao conectar dispositivos elétricos adicionais, certifique-se de que a carga
total não excede a capacidade de vatagem do gerador. Consulte a seção
Especificações.
Não exceda a capacidade de vatagem do gerador. Exceder a capacidade de
AVISO
vatagem pode danificar o gerador e/ou dispositivos elétricos conectados.
6. Antes de parar o motor, desligue todos os dispositivos elétricos e, em seguida,
desconecte-os.
Parando o motor Figura 8
1. Antes de parar o motor, desligue todos os dispositivos elétricos e, em seguida,
desconecte-os.
2. Deixe o motor funcionar sem carga por alguns minutos para estabilizar as
temperaturas internas do motor e do gerador.
3. Gire a válvula do combustível para a posição (
4. Partida elétrica: Gire a chave de partida (T) para a posição ( ) desligada (off).
causar superaquecimento, arcos elétricos e queimaduras com potencial
para morte, ferimentos graves e/ou danos a propriedades.
Cabos elétricos danificados ou sobrecarregados podem
9
).
ADVERTÊNCIA Os combustíveis e seus vapores são extremamente
• NÃO pare o motor movendo o controle do afogador para a posição “Afogar” (
inflamáveis e explosivos, e podem causar queimaduras,
incêndios ou explosões, que poderão resultar em morte,
ferimentos graves e/ou danos à propriedade.
).
9 9
Page 24

Not for
Reproduction
Disjuntor Figura
Os disjuntores (G) abrirão automaticamente se a carga exceder a saída classificada
do gerador. Se o disjuntor abrir, reduza a carga da saída e ajuste o disjuntor antes
de retomar a operação. Para determinar a carga de saída máxima, consulte a seção
Capacidade do gerador.
1
Não sobrecarregue o gerador
Capacidade
Certifique-se de que a Vatagem inicial* está em conformidade ou excede os Watts
nominais (em operação) e de Surto adicional (partida) dos dispositivos elétricos.
1. Selecione os itens que você alimentará simultaneamente.
2. Some os watts nominais (em operação) desses itens. Essa é a quantidade
de energia que o seu gerador deve produzir para manter os seus itens em
funcionamento. Consulte do Guia de referência de vatagem
3. Estime quantos watts de surto (partida) serão necessários. A vatagem de surto
é o primeiro pico de energia necessário para ligar ferramentas ou utensílios
movidos a motor como, por exemplo, uma serra circular ou uma geladeira.
Como nem todos os motores ligam ao mesmo tempo, os watts de surto totais
podem ser estimados adicionando apenas os itens com mais watts de surto
adicionais aos watts nominais totais da etapa 2.
Ferramenta ou utensílio
Ventilador de janela 300 600
Congelador profundo 500 500
Televisão 500 —
Sistema de segurança 180 —
Lâmpada (75 watts) 75 —
Exemplo:
Total de watts nominais (em operação) 1555
Watts de surto adicionais mais elevados + 600
Saída total exigida do gerador =2.155
Se a saída total exigida do gerador não contiver watts de surto adicionais,
AVISO
NÃOexceda a vatagem nominal do gerador.**
*Consulte Vatagem inicial na seção Especificações.
**Consulte Vatagem nominal na seção Especificações.
Gerenciamento de energia
A falha em conectar adequadamente dispositivos elétricos pode resultar em danos
ao gerador ou a dispositivos elétricos conectados. A administração correta e segura
da energia do gerador consiste em adicionar sequencialmente dispositivos elétricos
(cargas) como segue:
1. Antes de dar partida no motor, certifique-se de que todos os dispositivos
elétricos estão desconectados das saídas do gerador.
2. Dê partida no motor (consulte a seção Como dar partida no motor).
3. Conecte o dispositivo elétrico que exige mais watts (carga).
4. Aguarde a estabilização da saída do gerador (funcionamento homogêneo e
constante do motor).
5. Conecte o próximo dispositivo elétrico.
6. Novamente, aguarde a estabilização da saída do gerador.
7. Continue seguindo as etapas a seguir para adicionar dispositivos elétricos.
Certifique-se de que os watts totais (carga) de todos os dispositivos elétricos
não excedem a capacidade de voltagem do gerador (consulte a seção
Especificações).
Exceder a capacidade de vatagem/amperagem do gerador pode danificar
AVISO
ogerador e/ou dispositivos elétricos conectados a ele.
• NÃO exceda a capacidade de vatagem/amperagem do gerador.
• Dê partida no gerador e deixe o motor se estabilizar antes de conectar cargas elétricas.
• Conecte cargas elétricas na posição desligada (OFF) e, somente então, mude para
aposição ligada (ON) para operação.
• DESLIGUE as cargas elétricas e, então, desconecte-as do gerador antes de parar
ogerador.
Watts nominais
(em operação)
1.555 watts totais
emoperação
Watts de surto
(partida) adicionais
Máximo de 600 watts
de surto
Guia de referência de vatagem
Ferramenta ou utensílio
Itens fundamentais
Lâmpada - 75 watts 75 —
Congelador profundo 500 500
Bomba do tanque 800 1.200
Refrigerador/congelador - 18 cf 800 1.600
Bomba para poço de água - 1/3 cv 1.000 2.000
Aquecimento/arrefecimento
AC de janela - 10.000 BTU 1.200 1.800
Ventilador de janela 300 600
Soprador do ventilador da fornalha - 1/2 cv 800 1.300
Cozinha
Forno de micro-ondas - 1.000 watts 1.000 —
Cafeteira 1.500 —
Forno elétrico - elemento único 1.500 —
Sala de estar
Reprodutor de DVD/CD 100 —
Gravador de videocassete 100 —
Receptor estéreo 450 —
Televisão a cores - 27 pol 500 —
Computador pessoal com monitor de 17 pol 800 —
Outros
Sistema de segurança 180 —
Rádio-relógio AM/FM 300 —
Abridor de porta de garagem - 1/2 cv 480 520
Faça você mesmo/local do trabalho
Luz de trabalho de halogêneo de quartzo 1.000 —
Pulverizador sem ar - 1/3 cv 600 1.200
Serra de permutação 960 960
Broca elétrica - 1/2 cv 1.000 1.000
Serra circular - 7-1/4 pol 1.500 1.500
Watts nominais*
(em operação)
Watts de surto
(partida) adicionais
10 BRIGGSandSTRATTON.COM10 BRIGGSandSTRATTON.COM
Page 25

Not for
Reproduction
Manutenção
Cronograma de manutenção
Siga os intervalos de horas ou do calendário, o que vier primeiro. É necessária a
realização mais frequente da manutenção durante a operação nas condições adversas
observadas abaixo.
Primeiras 5 horas
• Troque o óleo do motor
A cada 8 horas ou diariamente
• Limpeza de resíduos
• Verifique o nível do óleo
A cada 25 horas ou anualmente
• Manutenção do filtro de ar do motor†
A cada 50 horas ou anualmente
• Troque o óleo do motor
A cada 100 horas ou anualmente
• Válvula de combustível de serviço
• Ajuste a vela de ignição
• Inspecione o silenciador e o protetor de faísca
• Limpe o sistema de arrefecimento
† Realize a manutenção com maior frequência em condições empoeiradas ou sujas.
Recomendações gerais
A manutenção regular garantirá maior desempenho e durabilidade para o motor
Consulte qualquer revendedor autorizado para solicitar manutenção.
A garantia do gerador não cobre itens submetidos a abuso ou negligência do operador.
Para receber o valor integral da garantia, o operador deve realizar a manutenção do
gerador conforme instruído neste manual.
O tratamento inadequado do gerador pode danificá-lo e abreviar sua vida útil.
AVISO
• NUNCA opere o gerador sem o abrigo ou as coberturas de proteção para garantir
oesfriamento adequado.
Alguns ajustes terão que ser realizados periodicamente para a manutenção adequada
do seu gerador.
Todos os serviços e ajustes devem ser realizados ao menos uma vez a cada estação.
Siga os requerimentos na tabela Cronograma de manutenção acima.
Uma vez por ano, você deve limpar ou substituir a vela de ignição e o filtro
AVISO
dear. Uma nova vela de ignição e um filtro de ar limpo asseguram a mistura adequada
de combustível e ar e auxilia o bom funcionamento e a durabilidade do seu motor.
Manutenção do gerador
A manutenção do gerador consiste em limpar e secar a unidade. Opere e armazene o
gerador em um ambiente seco e limpo onde não haja poeira, sujeira, mistura ou qualquer
vapor corrosivo em excesso. Os encaixes do ar refrigerador no gerador e no motor não
devem ficar entupidos com a neve, folhas ou qualquer outro material externo.
NÃO use água ou outros líquidos para limpar o gerador. Líquidos podem
AVISO
penetrar no sistema de combustível do motor, provocando mau desempenho e/ou
falhas. Além disso, em caso de entrada de líquido nas aberturas de ar para
arrefecimento, parte do líquido ficará retida em vãos e rachaduras do isolamento
dorotor e do estator. O acúmulo de líquidos e de poeira nas reentrâncias internas
dogerador acabará por reduzir a resistência do isolamento dessas áreas.
†
†
Limpeza
Diariamente ou antes do uso, procure sinais de vazamento de combustível e de óleo no
motor e ao seu redor. Limpe detritos acumulados dentro e fora do gerador. Mantenha
as conexões, as molas e demais controles do motor limpos. Mantenha a área em
torno e atrás do silencioso livre de resíduos combustíveis. Inspecione os encaixes e
asaberturas do ar refrigerador no gerador. Essas aberturas devem ser mantidas limpas
e desobstruídas.
As peças do motor devem ser mantidas limpas para reduzir o risco de
superaquecimento e ignição dos resíduos acumulados
• Use um pano úmido para limpar as superfícies exteriores.
O tratamento inadequado do gerador pode danificá-lo e abreviar sua vida útil.
AVISO
• NÃO exponha o gerador a excesso de umidade, pó, poeira ou vapores corrosivos.
• NÃO insira objeto algum através das aberturas de arrefecimento.
• Use uma escova com cerdas macias para soltar a solidificação de sujeira ou
deóleo.
• Use um aspirador de pó para extrair sujeira e resíduos soltos.
Manutenção do sistema de combustível Figura 8
ADVERTÊNCIA Os combustíveis e seus vapores são extremamente
inflamáveis e explosivos, e podem causar queimaduras,
incêndios ou explosões, que poderão resultar em morte,
ferimentos graves e/ou danos à propriedade.
• Mantenha a gasolina distante de fagulhas, chamas vivas, luzes piloto, calor ou
outras fontes de ignição.
• Verifique frequentemente as linhas de combustível, a tampa do tanque e os
encaixes à procura de rachaduras ou vazamentos. Substitua, se necessário.
• Se houver derrame de combustível, aguarde até que evapore antes de acionar
omotor.
Como limpar/substituir o filtro de detritos
1. Remova o tampão de combustível (11,A).
2. Remova o filtro de detritos (11,B).
3. Se o filtro de detritos estiver sujo, limpe-o. Se o filtro de detritos estiver
rasgado ou danificado de qualquer outra forma, substitua-o. Caso seja
necessária a substituição do filtro de detritos, certifique-se de que seja utilizado
um filtro de detritos original.
Como limpar a cuba para sedimentos de combustível
A válvula de combustível é equipada com uma cuba para sedimentos de combustível
que pode ser limpada como segue:
1. Mova a válvula de combustível para a posição desligada.
2. Remova a cuba para sedimentos (8,A) da válvula de combustível.
3. Lave a cuba para sedimentos em um solvente não inflamável. Seque
completamente.
4. Instale a cuba para sedimentos e aperte bem.
5. Mova a válvula de combustível para a posição ligada e verifique se há
vazamentos. Caso haja vazamento de combustível, substitua por uma válvula
de combustível de substituição original.
11
Manutenção da bateria
Não há manutenção necessária para a bateria de arranque, se ela estiver equipada.
Mantenha a bateria e os terminais limpos e secos.
A bateria de arranque é carregada apenas durante a operação do gerador.
AVISO
11 11
Page 26

Not for
Reproduction
Manutenção do motor
ADVERTÊNCIA Fagulhamento acidental pode causar incêndios ou choques
AO AJUSTAR OU REPARAR O SEU GERADOR
• Desconecte o cabo da vela de ignição da vela de ignição e coloque o cabo onde
ele não possa entrar em contato com a vela de ignição.
AO TESTAR A VELA DE IGNIÇÃO
• Use um testador de vela de ignição aprovado.
• NÃO teste a existência de ignição com a vela de ignição removida.
Ajuste do carburador e da velocidade do motor
Nunca ajuste o carburador ou a velocidade do motor. O carburador foi ajustado na
fábrica para operar de forma eficiente na maioria das condições. Não altere o regulador
do motor, as ligações ou outras peças para aumentar a velocidade do motor. Se for
necessário algum ajuste, contate um revendedor autorizado Briggs & Stratton.
CUIDADO
em pequenos ferimentos e/ou danos ao gerador.
Velocidades excessivamente baixas impõem uma sobrecarga.
• NÃO altere a mola mestra, as ligações ou outras peças para aumentar o giro
domotor.
• NÃO modifique o gerador de nenhuma forma.
Óleo
Recomendações sobre óleo
Recomendamos o uso dos óleos Briggs & Stratton com certificação de garantia para
um melhor desempenho. Outros óleos detergentes de alta qualidade são aceitáveis,
caso estejam classificados para serviço SF, SG, SH, SJ ou mais alto. Não use aditivos
especiais.
As temperaturas ao ar livre determinam a viscosidade adequada do óleo para o motor.
Use a tabela para selecionar a melhor viscosidade para a faixa de temperatura ao ar
livre esperada.
elétricos, que podem provocar morte ou ferimentos graves.
Velocidades de operação excessivamente elevadas podem resultar
Verificando o nível de óleo
O nível de óleo deve ser verificado antes de cada uso ou ao menos a cada 8 horas
deoperação. Mantenha o nível de óleo.
1. Certifique-se de que o gerador está sobre uma superfície plana e nivelada.
2. Limpe a área em torno da abertura para preenchimento de óleo (4,A), remova
atampa do óleo/vareta e limpe a vareta com um pano limpo. Troque a vareta
denível. Remova e verifique o nível de óleo.
NÃO enrosque a vareta de nível ao verificar o nível do óleo.
AVISO
3. Verifique se o óleo está na posição indicadora de preenchimento completo
(2,B) na vareta de nível. Substitua e aperte a tampa de óleo/vareta de nível.
Adicionando óleo para motor
1. Certifique-se de que o gerador está sobre uma superfície plana e nivelada.
2. Verifique o nível de óleo conforme descrito em Verificando o nível de óleo.
3. Se necessário, despeje óleo vagarosamente na abertura para reabastecimento
de óleo, até a marca Cheio (Full--orifício superior) da vareta de nível. NÃO
PERMITA que transborde.
O preenchimento com óleo em excesso pode fazer com que o motor não
AVISO
arranque, ou provocar uma partida difícil.
• NÃO PERMITA que transborde.
• Se acima da marca de Cheio na vareta de nível, drene óleo para reduzir o nível
deóleo até a marca Cheio da vareta.
4. Substitua e aperte a tampa de óleo/vareta de nível.
TROCA DE ÓLEO DO MOTOR
Se você estiver usando o seu gerador em condições extremamente sujas ou
empoeiradas, ou em temperaturas extremamente quentes, troque o óleo com maior
frequência.
CUIDADO Evite contato prolongado ou repetido da pele com óleo de
motorusado.
• O óleo de motor usado demonstrou causar câncer de pele em certos animais
delaboratório.
• Lave abundantemente as áreas expostas com água e sabão.
MANTENHA LONGE DO ALCANCE DE CRIANÇAS. NÃO POLUA. PRESERVE
RECURSOS. ENCAMINHE O ÓLEO USADO A CENTROS DE COLETA.
Figura 1 2 4
* O óleo SAE 30, quando utilizado a temperaturas inferiores a 4°C, provocará uma
partida difícil do motor.
** O óleo 10W-30, quando utilizado a temperaturas superiores a 27°C, poderá causar
aumento no consumo de óleo Verifique o nível de óleo com maior frequência.
Troque o óleo enquanto o motor ainda está quente, após a operação, como segue:
1. Certifique-se de que a unidade está sobre uma superfície nivelada.
2. Desconecte o cabo da vela de ignição da vela de ignição e coloque o cabo onde
ele não possa entrar em contato com a vela de ignição.
3. Limpe a área em torno da tampa de drenagem de óleo (1,K). A tampa de
drenagem de óleo está localizada na base do motor, oposta ao carburador.
4. Remova a tampa de drenagem de óleo e drene o óleo completamente para um
recipiente adequado.
5. Reinstale a tampa de drenagem de óleo e aperte-a firmemente. Remova a
tampa de óleo/vareta de nível.
6. Repita as etapas de 3 a 4 para adicionar óleo de motor conforme descrito em
Adicionando óleo para motor.
7. Limpe todo o óleo derramado com um pano.
12 BRIGGSandSTRATTON.COM12 BRIGGSandSTRATTON.COM
Page 27

Not for
Reproduction
Figura
9
10
Vela de ignição de manutenção
A troca da vela de ignição ajuda seu motor a pegar com mais facilidade e a funcionar
melhor.
1. Limpe a área ao redor da vela de ignição.
2. Remova e inspecione a vela de ignição.
3. Verifique a folga do eletrodo com o medidor de metal e reajuste a folga da vela
de ignição para o valor recomendado se necessário (consulte Especificações).
4. Substitua a vela de ignição se os eletrodos estiverem perfurados ou queimados
ou se a porcelana estiver rachada. Use a vela de ignição de substituição
recomentada. Consulte Especificações.
5. Instale a vela de ignição e aperte firmemente.
AVISO
Em algumas áreas, a legislação local exige a utilização de uma vela de ignição
com resistência interna (resistor) para suprimir os sinais de ignição. Se este motor
for originalmente equipado com uma vela de ignição resistiva, use o mesmo tipo para
substituição.
Inspecione o silenciador e o protetor de faísca
Inspecione o silenciador para ver se há rachaduras, corrosão ou outros danos. Remova
o protetor de faísca, se houver, e inspecione-o para ver se há danos ou entupimento
por carbonização. Se peças de reposição forem necessárias, certifique-se de usar só
peças de reposição originais do equipamento.
ADVERTÊNCIA Contato com a área do silenciador pode causar queimaduras
• NÃO toque em partes quentes e MANTENHA DISTÂNCIA dos gases quentes
daexaustão.
• Espere o equipamento esfriar antes de tocá-lo.
• Mantenha uma distância mínima de 1,5 m (5 ft) de todos os lados do gerador,
inclusive acima dele.
• Contate o fabricante de equipamento original, varejista ou concessionário para
obter um protetor de faísca projetado para o sistema de escapamento instalado
neste motor.
• As peças de reposição deverão ser iguais e instaladas na mesma posição que as
peças originais.
Purificador de ar de manutenção
O seu motor não funcionará adequadamente e pode ser danificado se você o operar
com um purificador de ar sujo. Realize a manutenção com maior frequência em caso
de operação em condições empoeiradas ou sujas.
Para realizar a manutenção do purificador de ar, realize os seguintes passos:
1. Solte a tampa do purificador de ar no topo e na base e remova a tampa (A).
2. Retire cuidadosamente o purificador de ar (B) a fim de evitar a penetração
dedetritos no carburador.
3. Lave o purificador de ar em detergente líquido e água. Esprema em um pano
limpo até ficar seco.
4. SATURE o elemento de espuma do filtro de ar em óleo de motor e esprema-o
em um pano limpo para retirar o excesso de óleo.
5. Reinstale o elemento de espuma do filtro de ar, novo ou lavado, na base (C).
6. Monte a tampa do purificador de ar na base e prenda-a.
Figura
sérias.
O calor e os gases da exaustão podem provocar a ignição
decombustíveis e estruturas ou danificar o tanque de
combustível, causando um incêndio.
Limpe o sistema de arrefecimento
Com a passagem do tempo, poderão acumular-se resíduos nas aletas de arrefecimento
do cilindro, podendo apenas ser observados através da desmontagem parcial do
motor Por esse motivo, recomendamos que a limpeza do sistema de arrefecimento
seja realizada por um representante autorizado Briggs & Stratton nos intervalos
recomendados (consulteCronograma de manutenção na seção Manutenção). É também
importante manter a parte de cima do motor livre de resíduos Consulte também Limpeza.
Armazenamento
Se você não for usar o gerador por mais de 30 dias, use as seguintes diretrizes para
prepará-lo para armazenamento.
Armazenagem do gerador
• Limpe o gerador conforme descrito em Limpeza.
• Verifique se os encaixes e as aberturas do ar refrigerador estão abertos e
desobstruídos.
Instruções para armazenamento a longo prazo
O combustível pode se danificar quando armazenado por mais de 30 dias. O
combustível danificado provoca a formação de depósitos de ácido e goma no sistema
de combustível ou nas partes essenciais do carburador. Para manter o combustível
em condições ideais, use o Briggs & Stratton® Advanced Formula Fuel Treatment &
Stabilizer, disponível onde quer que peças de reposição genuínas da Briggs & Stratton
sejam vendidas.
Não há necessidade de drenar a gasolina do motor se um estabilizador de combustível
for adicionado de acordo com as instruções. Deixe o motor funcionar por 2
minutos para circular o estabilizador em todo o sistema de combustível antes do
armazenamento. Se a gasolina no motor não for tratada com um estabilizador de
combustível, deverá ser escoada dentro de um recipiente aprovado. Ligue o motor
até parar por falta de combustível. O uso de um estabilizador de combustível no
reservatório de armazenamento é recomendado para manter o frescor.
ADVERTÊNCIA Os combustíveis e seus vapores são extremamente
inflamáveis e explosivos, e podem causar queimaduras,
incêndios ou explosões, que poderão resultar em morte,
ferimentos graves e/ou danos à propriedade.
AO ARMAZENAR COMBUSTÍVEL OU EQUIPAMENTO COM COMBUSTÍVEL NO TANQUE
• Armazene longe de fornalhas, fogões, aquecedores de água, secadores de roupa
ou outros aparelhos que tenham uma chama piloto ou outra fonte de ignição,
uma vez que poderão inflamar os vapores do combustível.
AO DRENAR COMBUSTÍVEL
• Desligue o motor (OFF) e deixe-o esfriar por, pelo menos, 2 minutos antes
deretirar a tampa do combustível. Vagarosamente desaperte a tampa para aliviar
apressão no tanque.
• Drene o tanque em área aberta.
• Mantenha a gasolina distante de fagulhas, chamas vivas, luzes piloto, calor ou
outras fontes de ignição.
• Verifique as linhas de combustível, o tanque, a tampa e os encaixes
frequentemente à procura de rachaduras ou vazamentos. Substitua, se necessário.
• NÃO acenda um cigarro ou fume.
Troque o óleo do motor
Enquanto o motor ainda estiver quente, drene o óleo do cárter. Encha novamente com
a classificação correta. Consulte Trocando o óleo do motor.
Outras dicas de armazenagem
1. NÃO armazene combustível de uma estação para outra, a não ser que ele
tenhasido tratado conforme descrito em Instruções para armazenamento
delongo prazo.
2. Substitua o recipiente de combustível se ele começar a enferrujar. Ferrugem
e/ou poeira podem causar problemas se forem usadas com esta unidade.
3. Cubra a unidade com uma cobertura protetora adequada que não retenha
umidade.
ADVERTÊNCIA As tampas de armazenamento podem provocar incêndios
que podem causar a morte, ferimentos graves ou danos à propriedade.
• NÃO coloque uma cobertura de armazenamento sobre um gerador quente.
• Deixe o equipamento esfriar por tempo suficiente antes de colocar a cobertura
sobre o equipamento.
4. Armazene o gerador em uma área limpa e seca.
13 13
Page 28

Not for
Reproduction
Solução de problemas
Problema Causa Correção
1. Reajuste o disjuntor.
2. Entre em contato com a assistência técnica autorizada.
3. Verifique e repare.
4. Conecte outro dispositivo que esteja em boa condição.
1. Desconecte a carga elétrica em curto.
2. Entre em contato com a assistência técnica autorizada.
3. Consulte Não sobrecarregue o gerador na seção Operação.
4. Entre em contato com a assistência técnica autorizada.
5. Limpe ou substitua o filtro de combustível.
1. Gire a válvula do combustível para a posição (I).
2. Preencha o cárter até o nível adequado ou repouse o
3. Limpe ou substitua o purificador de ar.
4. Limpe ou substitua o filtro de combustível.
5. Preencha o tanque de combustível.
6. Drene o tanque de combustível e o carburador; preencha
7. Conecte o cabo à vela de ignição.
8. Substitua a vela de ignição.
9. Drene o tanque de gás e o carburador; preencha com
10. Aguarde 5 minutos e ative novamente o motor.
11. Entre em contato com a assistência técnica autorizada.
12. Entre em contato com a assistência técnica autorizada.
13. Entre em contato com a assistência técnica autorizada.
14. Gire a chave de parada elétrica para a posição ligada.
15. Troque ou substitua a bateria.
1. Consulte Não sobrecarregue o gerador.
2. Substitua o filtro de ar.
3. Limpe ou substitua o filtro de combustível.
1. Entre em contato com a assistência técnica autorizada.
2. Limpe ou substitua o filtro de combustível.
O motor está funcionando, mas nenhuma
saída de CA está disponível.
O motor funciona bem sem carga mas
"engasga" quando cargas são
conectadas.
O motor não dá partida; desliga durante
aoperação ou dá partida e
funcionalmal.
Falta energia no motor.
O motor "engasga" ou falha.
1. Disjuntor aberto.
2. Falha do gerador.
3. Má conexão ou cabo de extensão danificado.
4. Dispositivo elétrico inoperante.
1. Curto-circuito em dispositivo elétrico conectado.
2. Velocidade do motor lenta demais.
3. Gerador sobrecarregado.
4. Curto-circuito no gerador.
5. Filtro de combustível sujo ou entupido.
1. Válvula de desligamento de combustível na posição
desligado (O).
2. Baixo nível de óleo.
3. Filtro de ar sujo.
4. Filtro de combustível sujo ou entupido.
5. Sem combustível.
6. Combustível danificado.
7. Cabo da vela de ignição não conectado à vela de ignição.
8. Vela de ignição danificada.
9. Água no combustível.
10. Carburador afogado.
11. Mistura de combustível excessivamente rica.
12. Vareta da válvula de entrada presa na posição aberta
oufechada.
13. O motor perdeu a compressão.
14. Interruptor de partida elétrica na posição desligado.
15. Bateria descarregada.
1. Gerador sobrecarregado.
2. Filtro de ar sujo.
3. Filtro de combustível sujo ou entupido.
1. O carburador está em operação com força ou
fraquezaexcessiva.
2. Filtro de combustível sujo ou entupido.
gerador sobre uma superfície nivelada.
com combustível novo.
combustível novo.
Consumo de energia
Consumo de energia (gasolina) durante a operação normal com 50% de carga 1,12 l/h 1,63 l/h 2,04 l/h
Consumo de energia (gasolina) no modo inativo Não é aplicável Não é aplicável Não é aplicável
Produto ou serviço fornecido por unidades de energia consumida Não é aplicável Não é aplicável Não é aplicável
2.300 watts 3.500 watts 6.000 watts
14 BRIGGSandSTRATTON.COM14 BRIGGSandSTRATTON.COM
Page 29

Not for
Reproduction
Especificações do produto
Modelo(s) 030566, 030596
Vatagem de partida ............................................ 2.500 watts
Vatagem nominal* .............................................2.300 watts
Voltagem da saída de CA ..........................................230 volts
Corrente de carga a 230 volts CA ....................................10 amps
Frequência ........................................................60 Hz
Fase .......................................................Monofásico
Capacidade de combustível .......................................15 l (4 gal)
Cilindrada do motor .........................................9,95 ci (163 cc)
Capacidade de óleo ..................................18 - 20 oz (0,54 - 0,59 l)
Vão da vela de ignição ....................................0,03 pol (0,76 mm)
Torque da vela de ignição .................................180 lb-pol (20 Nm)
Abertura válvula de entrada .................... 0,004 - 0,006 pol (0,1 - 0,15 mm)
Folga da válvula de exaustão ................... 0,006 - 0,008 pol (0,15 - 0,2 mm)
Modelo(s) 030570, 030597
Vatagem de partida ............................................ 4.000 watts
Vatagem nominal* .............................................3.500 watts
Voltagem da saída de CA ..........................................230 volts
Corrente de carga a 230 volts CA ..................................15,2 amps
Frequência ........................................................60 Hz
Fase .......................................................Monofásico
Capacidade de combustível .....................................6,6 gal (25 l)
Cilindrada do motor ........................................16,48 ci (270 cc)
Capacidade de óleo ..................................35 - 37 oz (1,05 - 1,09 l)
Vão da vela de ignição ....................................0,03 pol (0,76 mm)
Torque da vela de ignição .................................275 lb-pol (31 Nm)
Abertura válvula de entrada ................... 0,005 - 0,007 pol (0,13 - 0,18 mm)
Folga da válvula de exaustão .................. 0,005 - 0,007 pol (0,13 - 0,18 mm)
Modelo(s) 030576, 030583, 030598, 030599
Vatagem de partida ............................................ 6.500 watts
Vatagem nominal* .............................................6.000 watts
Voltagem da saída de CA ..........................................230 volts
Corrente de carga a 230 volts CA ....................................26 amps
Frequência ........................................................60 Hz
Fase .......................................................Monofásico
Capacidade de combustível .....................................6,6 gal (25 l)
Cilindrada do motor ........................................25,63 ci (420 cc)
Capacidade de óleo ..................................35 - 37 oz (1,05 - 1,09 l)
Vão da vela de ignição ....................................0,03 pol (0,76 mm)
Torque da vela de ignição .................................275 lb-pol (31 Nm)
Abertura válvula de entrada ................... 0,005 - 0,007 pol (0,13 - 0,18 mm)
Folga da válvula de exaustão .................. 0,005 - 0,007 pol (0,13 - 0,18 mm)
Modelo(s) 030588
Vatagem de partida ............................................ 2.500 watts
Vatagem nominal* .............................................2.300 watts
Voltagem da saída de CA ..........................................115 volts
Corrente de carga a 115 volts CA ....................................20 amps
Frequência ........................................................60 Hz
Fase .......................................................Monofásico
Capacidade de combustível .....................................4,0 gal (15 l)
Cilindrada do motor .........................................9,95 ci (163 cc)
Capacidade de óleo ..................................18 - 20 oz (0,54 - 0,59 l)
Vão da vela de ignição ....................................0,03 pol (0,76 mm)
Torque da vela de ignição .................................180 lb-pol (20 Nm)
Abertura válvula de entrada .................... 0,004 - 0,006 pol (0,1 - 0,15 mm)
Folga da válvula de exaustão ................... 0,006 - 0,008 pol (0,15 - 0,2 mm)
Modelo(s) 030589
Vatagem de partida ............................................ 4.000 watts
Vatagem nominal* .............................................3.500 watts
Voltagem da saída de CA ..................................... 115 / 230 volts
Corrente de carga a 115 volts CA ..................................30,4 amps
Corrente de carga a 230 volts CA ..................................15,2 amps
Frequência ........................................................60 Hz
Fase .......................................................Monofásico
Capacidade de combustível ......................................6,6 gal (25 l
Cilindrada do motor ........................................16,48 ci (270 cc)
Capacidade de óleo ..................................35 - 37 oz (1,05 - 1,09 l)
Vão da vela de ignição ....................................0,03 pol (0,76 mm)
Torque da vela de ignição .................................275 lb-pol (31 Nm)
Abertura válvula de entrada ................... 0,005 - 0,007 pol (0,13 - 0,18 mm)
Folga da válvula de exaustão .................. 0,005 - 0,007 pol (0,13 - 0,18 mm)
Modelo(s) 030590, 030591
Vatagem de partida ............................................ 6.500 watts
Vatagem nominal* .............................................6.000 watts
Voltagem da saída de CA ..................................... 115 / 230 volts
Corrente de carga a 115 volts CA ..................................52,1 amps
Corrente de carga a 230 volts CA ....................................26 amps
Frequência ........................................................60 Hz
Fase .......................................................Monofásico
Capacidade de combustível .....................................6,6 gal (25 l)
Cilindrada do motor ........................................25,63 ci (420 cc)
Capacidade de óleo ..................................35 - 37 oz (1,05 - 1,09 l)
Vão da vela de ignição ....................................0,03 pol (0,76 mm)
Torque da vela de ignição .................................275 lb-pol (31 Nm)
Abertura válvula de entrada ................... 0,005 - 0,007 pol (0,13 - 0,18 mm)
Folga da válvula de exaustão .................. 0,005 - 0,007 pol (0,13 - 0,18 mm)
Peças de serviço comuns
Filtro de ar - modelo de motor 106200 ................................ 591717
Filtro de ar - modelo de motor 160000 ................................ 591778
Filtro de ar - modelo de motor 250000 ................................ 591778
Vela de ignição - modelo de motor 106200 ............................. 491055
Vela de ignição - modelo de motor 160000 ............................. 797235
Vela de ignição - modelo de motor 250000 ............................. 797235
Classificações de potência: A potência bruta para os modelos de motor a gás individuais é classificada conforme o código J1940 (Small Engine Power & Torque Rating
Procedure – Procedimento de Classificação de Potência e Torque para Pequenos Motores) da SAE (Society of Automotive Engineers – Sociedade de Engenheiros Automotivos) e
o desempenho da classificação foi obtido e corrigido de acordo com o código SAE J1995 (Revisão de 2002-05). Os valores de torque são derivados a 3.060 RPM; os valores de
cavalo-vapor são derivados a 3.600 RPM. As curvas de potência bruta podem ser vistas em www.BRIGGSandSTRATTON.COM. Os valores de potência nominal são obtidos com
os sistemas de exaustão e de filtragem de ar instalados, enquanto que os valores de potência bruta são obtidos sem que esses acessórios estejam instalados. A potência bruta
real do motor será maior do que a potência nominal e é afetada, entre outras coisas, pelas condições do ambiente operacional e variações que existem entre um motor e outro.
Devido à grande variedade de produtos que utilizam motores, um motor a gasolina pode não desenvolver a potência bruta especificada quando for instalado em um determinado
tipo de equipamento. Esta diferença se deve a vários fatores, incluindo mas não se limitando a acessórios (filtro de ar, escapamento, carga, arrefecimento, carburador, bomba
de combustível, etc.), limitações da aplicação, condições do ambiente operacional (temperatura, umidade, altitude), e variações que existem entre um motor e outro. Devido às
limitações de fabricação e capacidade, a Briggs & Stratton pode substituir o motor desta Série por outro de potência maior.
* Este gerador é classificado de acordo com ISO 8528 G1.
15 15
Page 30

Not for
Reproduction
BRIGGS & STRATTON, POLÍTICA DA GARANTIA DO PROPRIETÁRIO DO GERADOR PORTÁTIL
Vigente a partir de 1º de setembro de 2012; substitui todas as Garantias sem data e todas as Garantias datadas de antes de 1º de setembro de 2012.
GARANTIA LIMITADA
A Briggs & Stratton garante que, durante o período de garantia especificado abaixo, reparará ou substituirá, gratuitamente, qualquer peça com defeito material ou de
fabricação, ou com ambos. Contudo, todos os custos de transporte dos produtos dentro da cobertura desta Garantia submetidos para reparo ou substituição ficarão a cargo
do comprador Esta garantia está em vigor durante os períodos de tempo e sujeita às condições estabelecidas abaixo Para o serviço de garantia, localize o Centro de Serviço
Autorizado mais próximo usando nosso localizador de revendedores em www.BRIGGSandSTRATTON.com. O comprador deve entrar em contato com o Centro de Serviço
Autorizado e, em seguida, disponibilizar o produto ao Centro de Serviço Autorizado para inspeção e teste.
Não há nenhuma outra garantia expressa. As garantias implícitas, inclusive as de comercialização e adequação a um fim específico, estão limitadas a um ano da data
de aquisição ou até o limite permitido pela lei. Todas as outras garantias implícitas estão excluídas. A responsabilidade por danos consequenciais ou incidentais sob
toda e qualquer garantia está excluída na extensão permitida por lei. Alguns países ou estados não permitem limitações no tempo de duração de garantias implícitas,
e outros países ou estados não permitem exclusão ou limitação de danos consequências ou acidentais, portanto a limitação e exclusão acima podem não se aplicar. Esta
garantia lhe dá direitos legais específicos e você também pode ter outros direitos que variam de estado para estado ou de país para país.**
PERÍODO DE GARANTIA
ITEM USO DO CONSUMIDOR USO COMERCIAL
EQUIPAMENTOS
Modelos: 030588, 030589, 030590, 030591
Modelos: 030566, 030576, 030570, 030583
030596, 030597, 030598, 030599
Motor 2 anos 1 ano
Bateria (se equipada) 1 ano 1 ano
2 anos
1 ano
1 ano
1 ano
** Na Austrália - Nossos produtos vêm com garantias que não podem ser excluídas sob a Lei do Consumidor Australiana. Você tem direito a uma substituição ou a um reembolso
devido a um grande defeito ou a compensação por qualquer outra perda ou dano razoavelmente previsível. Você também tem direito a reparo ou a substituição se os produtos não
tiverem qualidade aceitável ou se o defeito não chegar a ser uma grande falha. Para obter manutenção coberta pela garantia, localize o Centro de Serviço Autorizado mais próximo
no nosso mapa de localização de revendedores em BRIGGSandSTRATTON.COM, ou ligando para 1300 274 447, ou enviando um e-mail para salesenquiries@briggsandstratton.
com.au, ou escrevendo para Briggs & Stratton Australia Pty Ltd, 1 Moorebank Avenue, NSW, Austrália, 2170.
O período de garantia tem início na data de compra pelo primeiro consumidor de varejo ou usuário comercial final e continua pelo período de tempo acima declarado. “Uso pelo
consumidor” significa o uso doméstico residencial pessoal por um consumidor pessoa física. "Uso comercial" significa todos os outros usos, incluindo uso para propósitos
comerciais, de produção de renda ou de aluguel. Para fins desta garantia, assim que o equipamento for utilizado comercialmente, dessa data em diante ele será considerado como
uso comercial Esta garantia não se aplica aos equipamentos usados como fonte de energia principal em vez da rede elétrica.
NÃO É NECESSÁRIO NENHUM REGISTRO PARA OBTER GARANTIA DOS PRODUTOS BRIGSS & STRATTON. BASTA GUARDAR SEU RECIBO DE PROVA DE COMPRA. SE VOCÊ
NÃO APRESENTAR O COMPROVANTE COM A DATA DE COMPRA AO SOLICITAR O SERVIÇO DE GARANTIA, SERÁ USADA A DATA DE FABRICAÇÃO DO PRODUTO PARA
CALCULAR OPRAZO DE GARANTIA.
SOBRE NOSSA GARANTIA
Aceitamos de bom grado os reparos na garantia e nos desculpamos por qualquer inconveniência. Qualquer Centro de Serviço Autorizado pode realizar reparos de garantia. A maior
parte deles é tratada rotineiramente, mas por vezes os pedidos de reparo poderão não parecer justificados Por exemplo, o serviço de garantia não seria aplicável se o dano do
equipamento ocorresse devido ao uso incorreto, falta de manutenção rotineira, expedição, manuseio, estocagem ou instalação inadequados De modo semelhante, a garantia será
inválida se a data de fabricação ou o número de série do equipamento for removido ou se o equipamento for alterado ou modificado. Durante o período de garantia, o Fornecedor
autorizado de serviços poderá, por exclusiva opção sua, reparar ou substituir qualquer peça que conforme testes seja considerada defeituosa em condições normais de uso e de
manutenção Esta garantia não cobre os seguintes reparos e equipamentos:
• Desgaste normal: O Equipamento de Força ao Ar Livre, assim como todos os dispositivos mecânicos, precisa de peças e manutenção periódicas para funcionar bem. Esta
garantia não cobre reparos quando o desgaste normal exauriu a vida útil de uma peça ou do equipamento.
• Instalação e manutenção: Esta garantia não é aplicável a equipamentos ou a peças submetidas a instalação ou alteração e a modificações não autorizadas, a uso incorreto,
a negligência, a acidentes, sobrecarga, a excesso de velocidade e a manutenção, reparo ou armazenamento inadequados que, de acordo com os nossos critérios, tenham
prejudicado o desempenho e a confiabilidade dos mesmos Esta garantia também não cobre manutenção normal, como ajustes, limpeza do sistema de combustível e
obstrução (devido a produtos químicos, sujeira, carvão, cal, etc.).
• Outras exclusões: Esta garantia exclui itens de desgaste como anéis retentores em O, filtros, etc., ou defeitos resultantes de acidentes, de abuso, de modificações,
alterações ou manutenção inadequada ou deterioração por congelamento ou químicos. Peças acessórias como, por exemplo, conjuntos de cabos adaptadores do gerador e
tampas de armazenamento, são excluídas da garantia do produto. Esta garantia exclui falhas devido a fenômenos da natureza e outros eventos de força maior, que fujam ao
controle dos fabricantes Também são excluídos equipamentos usados, recondicionados e de demonstração; equipamentos usados como fonte de energia principal em vez
da rede elétrica e equipamentos usados em aplicações de suporte à vida. 198195P, Rev. D, 24/08/2012
BRIGGS & STRATTON CORPORATION
MILWAUKEE, WI, USA
16 BRIGGSandSTRATTON.COM16 BRIGGSandSTRATTON.COM
Page 31

Not for
Reproduction
17 17
Page 32

Not for
Reproduction
Gracias por adquirir este generador Briggs & Stratton® de calidad. Le agradecemos la confianza que ha depositado en la marca Briggs & Stratton. Si lo maneja y mantiene tal y
como se indica en este manual, su generador Briggs & Stratton le proporcionará muchos años de funcionamiento fiable.
Este manual contiene información sobre seguridad para advertirle sobre los peligros y riesgos asociados con los generadores y cómo evitarlos. Este generador está diseñado e indicado
para suministrar energía eléctrica a equipos de iluminación, aparatos, herramientas y motores eléctricos compatibles, y no debe utilizarse para ningún otro fin. Es importante que, antes
de arrancar o hacer funcionar este equipo, lea estas instrucciones con detenimiento y las comprenda totalmente. Conserve estas instrucciones para poder consultarlas en el futuro.
Debe montar este generador antes de utilizarlo. Para obtener instrucciones sobre el procedimiento de montaje final, consulte la sección Montaje de este manual. Siga las
instrucciones al pie de la letra.
Dónde encontrarnos
No tendrá que ir muy lejos para encontrar el servicio técnico de Briggs & Stratton para su generador. Hay miles de distribuidores autorizados de Briggs & Stratton en todo el
mundo que proporcionan un servicio de alta calidad. También podrá localizar el servicio técnico autorizado más próximo en el mapa de distribuidores que se ofrece en Internet en
BRIGGSandSTRATTON.COM.
Generador
Número de modelo
Versión
Número de serie
Fecha de compra
Índice
Seguridad del usuario ................................5
Montaje ............................................7
Características y mandos ..............................7
Funcionamiento. .. . .. . .. . .. . .. . .. . .. . .. . .. . .. . .. . .. . .8
Mantenimiento .....................................11
Solución de problemas. .. . .. . .. . .. . .. . .. . .. . .. . .. . .. .14
Características .....................................15
Garantías ..........................................16
Motor
Número de modelo
Número de tipo
Código
Copyright © 2017 Briggs & Stratton Corporation
Milwaukee, WI, EE.UU. Reservados todos los derechos.
BRIGGS & STRATTON es una marca
registrada de Briggs & Stratton Corporation
4 BRIGGSandSTRATTON.COM4 BRIGGSandSTRATTON.COM
Page 33

Not for
Reproduction
Seguridad del usuario
Descripción del equipo
Lea atentamente este manual y familiarícese con el generador. Conozca
sus aplicaciones, limitaciones y riesgos.
Se ha intentado por todos los medios que la información contenida en este manual
sea precisa y esté actualizada. No obstante, el fabricante se reserva el derecho de
modificar, alterar o mejorar de cualquier otra forma el generador y este documento en
cualquier momento y sin previo aviso.
Información importante sobre seguridad
El fabricante no puede prever todas las circunstancias posibles que podrían acarrear
riesgos. Por lo tanto, las advertencias incluidas en este manual, así como las etiquetas
y pegatinas colocadas sobre el aparato, no tienen carácter exhaustivo. Si utiliza
un procedimiento, método de trabajo o técnica que el fabricante no recomienda
específicamente, debe cerciorarse de que sea seguro para usted y otras personas.
También debe comprobar que el procedimiento, método de trabajo o técnica que haya
elegido no haga que el generador deje de ser seguro.
Símbolos de seguridad y su significado
Humos tóxicos
Fuego
Retroceso
Manual de
instrucciones
Descarga
eléctrica
Explosión
Asfixia
Asfixia
El símbolo de alerta de seguridad indica un riesgo de lesiones físicas. Para indicar
el grado o nivel de gravedad del riesgo, se utiliza una palabra de señalización (PELIGRO,
ADVERTENCIA o PRECAUCIÓN) junto con el símbolo de alerta. Para representar el tipo
de riesgo, se puede utilizar un símbolo de seguridad. La palabra de señalización AVISO
se utiliza para designar prácticas no relacionadas con lesiones físicas.
PELIGRO indica un riesgo que, de no evitarse, provocará lesiones graves o la muerte.
ADVERTENCIA indica un riesgo que, de no evitarse, podría provocar lesiones
graves o la muerte.
PRECAUCIÓN indica un riesgo que, de no evitarse, podría provocar lesiones
leves o moderadas.
AVISO hace referencia a prácticas no asociadas a lesiones físicas.
ADVERTENCIA PELIGRO DE GAS VENENOSO. El escape del motor contiene
monóxido de carbono, un gas venenoso que podría provocar la muerte
en unos minutos. NO DEBE mirarlo, olerlo ni probarlo. Incluso sin que
usted perciba el olor a humo de escape, podría estar expuesto al
monóxido de carbono. Si empieza a sentir náuseas, mareo o debilidad
mientras usa este producto, apáguelo y salga INMEDIATAMENTE a tomar aire
fresco. Vaya al médico. Podría haberse envenenado con monóxido de carbono.
• Utilice este producto ÚNICAMENTE en el exterior y lejos de ventanas, puertas o
conductos de ventilación para reducir el riesgo de que se acumule el monóxido
decarbono y de que pueda introducirse en espacios habitados.
• Instale alarmas de detección de monóxido de carbono, con batería o con
alimentación eléctrica y batería de reserva, tal como se indica en las instrucciones
del fabricante. Los detectores de humo no detectan el monóxido de carbono.
• NO utilice este producto dentro de casa, garajes, sótanos, espacios entre plantas,
naves u otros espacios cubiertos parcialmente, ni siquiera usando ventiladores o
abriendo puertas y ventanas para facilitar la ventilación. El monóxido de carbono
se puede acumular rápidamente en estos espacios y permanecer durante horas,
incluso después de que el producto se haya apagado.
• Coloque SIEMPRE este producto a favor del viento y no dirija el escape del motor
hacia lugares habitados.
ADVERTENCIA El retroceso (retracción rápida) del cable de arranque tirará
dela mano y el brazo hacia el motor con fuerza, por lo que podría causar
contusiones, esguinces, fracturas de huesos u otras lesiones graves.
Piezas móviles Objetos
Alarma de monóxido
de carbono
Estrangular Abrir
Voltímetro Nivel de aceite Combustible Arranque
Cortocircuito Controles
propulsados
Alarma Conectado
delmotor
Superficie
caliente
atierra
Apagar Encender
No arrancar
elmotor
• Para arrancar el motor, tire lentamente del cable de arranque hasta que sienta
Objetos
pesados
Terminal de
puesta a tierra
resistencia y entonces tire con rapidez para evitar el retroceso.
• NUNCA arranque o pare el motor mientras haya dispositivos eléctricos
enchufados y encendidos.
ADVERTENCIA
• Utilice material de transferencia homologado para evitar que se produzcan
inversiones de corriente eléctrica al aislar el generador de los trabajadores de la
red eléctrica.
• Cuando utilice el generador como fuente de alimentación de reserva, debe
notificarlo a la empresa local de suministro eléctrico.
• Utilice un interruptor diferencial (ID) en lugares húmedos o de conductividad alta,
como cubiertas metálicas o construcciones de acero.
• NO toque los receptáculos o cables pelados.
• NO use el generador con cables eléctricos que estén desgastados, deshilachados,
pelados o deteriorados de algún otro modo.
• NO utilice el generador bajo la lluvia o con mucha humedad ambiental.
• NO maneje el generador o los cables eléctricos si está descalzo, sobre agua, o
con las manos o los pies mojados.
• NO deje que niños o personas sin cualificación utilicen o reparen el generador.
La tensión generada puede causar quemaduras o descargas
eléctricas, que podrían acarrear lesiones graves o la muerte.
!
5 5
Page 34

Not for
Reproduction
ADVERTENCIA El calor o los gases del escape podrían prender objetos
inflamables, estructuras o dañar el depósito de combustible,
y causar incendios que podrían provocar daños materiales,
lesiones graves o incluso la muerte.
El contacto con la zona del silenciador podría causar quemaduras y lesiones graves.
• NO toque las partes calientes y EVITE los gases de escape.
• Deje que el aparato se enfríe antes de tocarlo.
• Mantenga despejada una zona de como mínimo 1,5 m alrededor del generador,
también por encima del mismo.
• Para obtener una pantalla antichispas diseñada para el sistema de escape instalado
en este motor, acuda al fabricante original del aparato o a un distribuidor.
• Las piezas de repuesto deben ser iguales e instalarse en la misma posición que
las originales.
ADVERTENCIA Si salieran chispas, podrían causar incendios o descargas
eléctricas, que podrían acarrear lesiones graves o la muerte.
AL AJUSTAR O REPARAR EL GENERADOR
• Desconecte el cable de la bujía y colóquelo donde no pueda hacer contacto con
labujía.
COMPROBACIÓN DEL ENCENDIDO DEL MOTOR
• Utilice un probador de bujías que esté homologado.
• NO compruebe el encendido con la bujía desconectada.
ADVERTENCIA El motor de arranque y otras partes giratorias podrían atrapar
manos, cabellos, ropas o accesorios y causar lesiones graves.
• NUNCA utilice el generador sin las tapas o carcasas protectoras.
• NO lleve ropa suelta, joyas u otros objetos que podrían engancharse en el motor
de arranque o en otras piezas giratorias.
• Recójase el pelo largo y quítese las joyas.
PRECAUCIÓN
estropear el generador o causar lesiones leves.
Un régimen demasiado bajo supone una sobrecarga.
• NO manipule el muelle del regulador, las varillas u otras partes para incrementar
el régimen del motor.
• NO modifique el generador de ninguna forma.
Superar la capacidad de potencia o intensidad del generador puede estropear
AVISO
el generador o los dispositivos eléctricos conectados a él.
• NO supere la capacidad de potencia o intensidad del generador. Consulte No
sobrecargue el generador en la sección Funcionamiento.
• Antes de conectar cargas eléctricas, arranque el generador y deje que el motor
seestabilice.
• Para utilizar cargas eléctricas, conéctelas apagadas y a continuación enciéndalas.
• Antes de detener el generador, apague las cargas eléctricas y desconéctelas
delgenerador.
Un cuidado inadecuado del generador puede estropearlo y acortar su vida útil.
AVISO
• Utilice el generador solo para los usos previstos.
• En caso de dudas sobre su uso, pregunte al distribuidor o acuda a un centro
deservicio técnico.
• Utilice el generador solo en superficies horizontales.
• NO exponga el generador a un exceso de humedad, polvo, suciedad o vapores
corrosivos.
• NO introduzca objetos por las rendijas de refrigeración.
• Si los dispositivos conectados se recalientan, apáguelos y desconéctelos
delgenerador.
• Apague el generador si:
-se pierde la salida eléctrica;
-del equipo salen chispas, humo o llamas;
-la unidad vibra en exceso.
El funcionamiento a un régimen demasiado alto podría
ADVERTENCIA El combustible y sus vapores son muy inflamables y
ADICIÓN O VACIADO DEL COMBUSTIBLE
• Apague el motor del generador y, antes de retirar el tapón del combustible, deje
que se enfríe durante al menos 2 minutos. Afloje el tapón lentamente para liberar
la presión acumulada en el depósito.
• Rellene o vacíe el depósito de combustible al aire libre.
• NO rellene el depósito en exceso. Deje espacio para la expansión del combustible.
• Si se derrama combustible, espere a que se evapore para arrancar el motor.
• Mantenga el combustible alejado de chispas, llamas abiertas, pilotos luminosos,
calor y otras fuentes de ignición.
• Verifique a menudo que no haya grietas o fugas en los tubos de combustible, el
depósito, el tapón y los racores. Cámbielos si es necesario.
• NO fume ni encienda cigarrillos.
ARRANQUE DEL GENERADOR
• Asegúrese de que la bujía, el silenciador, el tapón de combustible y el depurador
de aire estén bien colocados.
• NO arranque el motor si la bujía no está en su sitio.
USO DEL GENERADOR
• NO utilice este producto dentro de edificios, cobertizos para coches, porches,
equipos móviles, embarcaciones o recintos.
• NO incline el motor o el generador con un ángulo que haga que se derrame el
combustible.
• NO pare el motor desplazando el control del estrangulador a la posición
“Estrangular” (
TRANSPORTE, TRASLADO O REPARACIÓN DEL GENERADOR
• Transporte/traslade/repare el generador con el depósito de combustible VACÍO o
con la llave de paso cerrada.
• NO incline el motor o el generador con un ángulo que haga que se derrame el
combustible.
• Desconecte el cable de la bujía.
ALMACENAJE DE COMBUSTIBLE O DEL GENERADOR CON COMBUSTIBLE DENTRO
• Almacénelos lejos de hornos, cocinas, calentadores de agua, secadoras de ropa u
otros electrodomésticos que tengan pilotos luminosos u otras fuentes de ignición,
porque podrían prender los vapores del combustible.
explosivos, por lo que pueden causar quemaduras, incendios
o explosiones y derivar en daños materiales, lesiones graves
o incluso la muerte.
).
6 BRIGGSandSTRATTON.COM6 BRIGGSandSTRATTON.COM
Page 35

Not for
Reproduction
Montaje
El generador está listo para el uso en cuanto se abastece con el combustible y el aceite
recomendados.
Si tiene algún problema con el mantenimiento del generador, acuda a un centro de
servicio técnico de Briggs & Stratton. En caso de necesitar asistencia, tenga a mano
elmodelo, la versión y el número de serie que figuran en la etiqueta identificativa.
Paraconocer la ubicación de dicha etiqueta, consulte Características y mandos.
Desembalaje del generador
1. Coloque la caja sobre una superficie plana y rígida.
2. Saque todo el contenido de la caja.
3. Corte la caja de arriba abajo por las cuatro esquinas para abrirla por completo.
Abastecimiento de aceite Figura 2
1. Coloque el generador sobre una superficie bien nivelada.
2. Limpie la suciedad que pueda haber en el área de llenado del aceite.
3. Eche el aceite lentamente en el depósito de aceite del motor (4, A).
4. Quite la varilla de nivel de aceite (2, A) y límpiela con un trapo limpio.
5. Introduzca la varilla pero no la enrosque. El aceite debe llegar hasta la marca
dellenado FULL (2, B). En caso necesario, añada aceite hasta llegar a la marca
de llenado FULL.
6. Vuelva a colocar la varilla de nivel de aceite y enrósquela.
AVISO
Un cuidado inadecuado del generador puede estropearlo y acortar su vida útil.
• NO intente arrancar o poner en marcha el motor antes de abastecerlo con el aceite
recomendado. Podría provocar una avería en el motor.
Abastecimiento de combustible Figura 1
El combustible debe cumplir estos requisitos:
• Gasolina sin plomo, reciente y limpia.
• Mínimo de 87 octanos/87 AKI (91 RON). Para uso a grandes alturas, consulte
Gran altura.
• También se puede utilizar gasolina con un porcentaje de hasta 10% de etanol
(gasohol).
No utilice gasolinas no homologadas, como E15 y E85. No haga mezclas con
AVISO
la gasolina ni realice modificaciones en el motor para hacerlo funcionar con otros
combustibles. Hacer tal cosa dañaría los componentes del motor y anularía su garantía.
Para proteger el sistema de combustible de la formación de resinas, mezcle un
estabilizador con el combustible. Consulte Almacenaje. No todos los combustibles
son iguales. Si tiene problemas durante el arranque o el funcionamiento, cambie de
proveedor o marca de combustible. El funcionamiento de este motor con gasolina está
certificado. El sistema de control de emisiones para este motor es EM (Modificaciones
de motores).
ADVERTENCIA El combustible y sus vapores son muy inflamables y
ADICIÓN DE COMBUSTIBLE
• Apague el motor del generador y, antes de retirar el tapón del combustible, deje
que se enfríe durante al menos 2 minutos. Afloje el tapón lentamente para liberar
la presión acumulada en el depósito.
• Rellene el depósito de combustible al aire libre.
• NO rellene el depósito en exceso. Deje espacio para la expansión del combustible.
• Si se derrama combustible, espere a que se evapore para arrancar el motor.
• Mantenga el combustible alejado de chispas, llamas abiertas, pilotos luminosos,
calor y otras fuentes de ignición.
• Verifique a menudo que no haya grietas o fugas en los tubos de combustible, el
depósito, el tapón y los racores. Cámbielos si es necesario.
• NO fume ni encienda cigarrillos.
1. Limpie la zona del tapón del combustible y quítelo.
2. Agregue gasolina sin plomo lentamente para llenar el depósito de combustible
(1, C). Procure no llenar el depósito por encima la línea roja de indicación
(3, A). Esto permite que quede el espacio adecuado para la expansión del
combustible.
3. Antes de arrancar el motor, coloque el tapón y deje que se evapore el
combustible que se haya derramado.
explosivos, por lo que pueden causar quemaduras, incendios
o explosiones y derivar en daños materiales, lesiones graves o
incluso la muerte.
4
3
Gran altura
A altitudes superiores a los 1.524 metros (5.000 pies), es aceptable una gasolina
de 85octanos/85 AKI (89 RON). Para que las emisiones se atengan a la norma,
serequiere un ajuste especial para gran altura. Sin este ajuste, el generador perderá
rendimiento y aumentarán el consumo de combustible y las emisiones. Para
información sobre el ajuste especial para gran altura, consulte a un distribuidor
autorizado de Briggs & Stratton.
No se recomienda hacer funcionar el motor con el kit para grandes alturas a altitudes
inferiores a los 762 metros (2.500 pies).
Conexión del cable negativo de la batería Figura
En los modelos con motores de arranque eléctrico, conecte el cable negativo a la
batería del siguiente modo:
1. Corte el seguro del envoltorio que sujeta el extremo suelto del cable negativo
(negro).
2. Con una llave de tubo de 8 mm, retire el tornillo(C), la arandela de seguridad
(C) y la arandela plana (C) o del polo negativo de la batería (A).
3. Deslice la arandela de seguridad, la arandela plana y el cable negativo de la
batería (B) por encima del tornillo como se muestra.
4. Vuelva a colocar el tornillo en el polo negativo de la batería y apriételo.
5. Verifique que las conexiones con la batería y el generador estén bien realizadas
y aseguradas.
Características y mandos
Antes de utilizar el generador, lea este manual de instrucciones y las
normas de seguridad. Compare las ilustraciones con el generador para
familiarizarse con la situación de los distintos mandos y ajustes. Guarde
estemanual para consultas futuras.
A - Número de identificación del motor: proporciona el modelo, el tipo y código
delmotor. Tenga esta información a mano cuando llame para pedir asistencia.
B - Número de identificación del generador: proporciona el modelo y el número
de serie del generador. Tenga esta información a mano cuando llame para pedir
asistencia.
C - Depósito de combustible: permite comprobar el nivel del combustible y añadir
gasolina sin plomo.
D - Enganche de conexión a tierra: consulte al organismo responsable de los
requisitos de conexión a tierra en su zona.
E - Calibre del combustible: indica la cantidad de combustible que queda en
eldepósito.
F - Toma de CA: permite suministrar energía eléctrica para alimentar equipos de
iluminación, aparatos, herramientas y motores eléctricos monofásicos de CA.
G - Cortocircuito: los receptáculos se entregan con cortocircuitos para proteger el
generador de una sobrecarga eléctrica.
H - Voltímetro: se utiliza para medir la potencia eléctrica.
J - Tapa de llenado/varilla de nivel de aceite: permite comprobar el nivel de aceite
del motor y agregar aceite.
K - Tapón de drenaje de aceite: permite drenar el aceite del motor.
L - Llave de paso del combustible: se utiliza para abrir o cortar el suministro
decombustible.
M - Tirador de arranque: sirve para arrancar el motor a mano.
N - Depurador de aire: filtra el polvo y la suciedad del aire de entrada para proteger
elmotor.
P - Pantalla antichispas: el silenciador del escape reduce el ruido del motor y está
dotado de una pantalla antichispas.
R - Bujía: dispositivo en la cabeza del cilindro del motor que prende la mezcla de
combustible mediante una chispa eléctrica.
S - Palanca del estrangulador: sirve para cerrar la entrada de aire y facilitar el
arranque en frío.
T - Interruptor de arranque eléctrico: la llave se debe girar a la posición de arranque
) para arrancar el motor. La llave se debe girar a la posición de parada (O) para
(
apagar el motor.
U - Indicador de aceite bajo: este LED está diseñado para impedir que el motor se
estropee por no tener suficiente aceite.
Figura
1
5
7 7
Page 36

Not for
Reproduction
Funcionamiento
Conexión a tierra
El generador se suministra con un enganche de conexión a tierra. El generador dispone
de una conexión a tierra que conecta los componentes del cuadro del motor a los
terminales de puesta a tierra en los receptáculos de salida CA. La conexión a tierra está
conectada al cable CA neutral (el cable neutral está conectado al cuadro del generador).
Requisitos especiales
Es posible que existan reglamentos locales o nacionales que afecten al uso que
pretende hacer del generador. Consulte a un electricista cualificado, a un inspector
eléctrico o al organismo local pertinente:
• En algunos lugares, los generadores deben registrarse en las empresas locales
de suministro de electricidad.
• Si el generador se usa en unas obras de construcción, se deberán tener en
cuenta normativas adicionales.
Conexión al sistema eléctrico de un edificio
Las conexiones de suministro de electricidad de reserva para el sistema eléctrico de un
edificio deben utilizar un conmutador homologado que haya instalado un electricista
autorizado. La conexión debe aislar la electricidad del generador de la electricidad de la
red de suministro local, y debe cumplir todas las normativas y códigos relevantes.
ADVERTENCIA La tensión generada puede causar quemaduras o descargas
eléctricas, que podrían acarrear lesiones graves o la muerte.
Arranque del motor Figura
AVISO
El motor se entrega sin aceite. Antes de arrancar el motor, asegúrese de añadir
aceite según las instrucciones de este manual. Si arranca el motor sin aceite, resultará
dañado, no podrá repararse y los daños no serán cubiertos por la garantía.
Antes de arrancar el motor, compruebe que todos los dispositivos eléctricos
AVISO
se hayan desconectado de las tomas del generador.
1. Asegúrese de que el generador esté sobre una superficie lisa y horizontal.
Si se arranca y utiliza el generador sobre una superficie que no esté lisa y
AVISO
horizontal, es posible que no arranque o que se apague durante el uso.
2. Gire la llave de paso del combustible (L) a la posición de abertura (I).
3. Tire de la palanca del estrangulador (S) para cerrarlo (
4A. Para el arranque eléctrico, gire la llave del interruptor de arranque (T) a la
posición de arranque ( ) y manténgala ahí hasta que el generador arranque.
A fin de prolongar la vida útil de los componentes del arranque, NO mantenga
la llave en la posición de arranque (
una pausa de al menos 1 minuto entre un intento de arranque y el siguiente.
• Si el motor arranca, continúe con el paso 6.
• Si no arranca, vaya al paso 5.
AVISO
Si la batería está descargada, siga las instrucciones de arranque manual.
ADVERTENCIA El retroceso (retracción rápida) del cable de arranque tirará
de la mano y el brazo hacia el motor con fuerza, por lo que podría causar
contusiones, esguinces, fracturas de huesos u otras lesiones graves.
1
).
) durante más de 15 segundos, y haga
• Utilice material de transferencia homologado para evitar que se produzcan
inversiones de corriente eléctrica al aislar el generador de los trabajadores de la
red eléctrica.
• Cuando utilice el generador como fuente de alimentación de reserva, debe
notificarlo a la empresa local de suministro eléctrico.
• Utilice un interruptor diferencial (ID) en lugares húmedos o de conductividad alta,
como cubiertas metálicas o construcciones de acero.
• NO toque los receptáculos o cables pelados.
• NO use el generador con cables eléctricos que estén desgastados, deshilachados,
pelados o deteriorados de algún otro modo.
• NO utilice el generador bajo la lluvia o con mucha humedad ambiental.
• NO maneje el generador o los cables eléctricos si está descalzo, sobre agua, o
con las manos o los pies mojados.
• NO deje que niños o personas sin cualificación utilicen o reparen el generador.
Ubicación del generador Figura 6
ADVERTENCIA PELIGRO DE GAS VENENOSO. El escape del motor contiene
monóxido de carbono, un gas venenoso que podría provocar la muerte
en unos minutos. NO DEBE mirarlo, olerlo ni probarlo. Incluso sin que
usted perciba el olor a humo de escape, podría estar expuesto al
monóxido de carbono. Si empieza a sentir náuseas, mareo o debilidad
mientras usa este producto, apáguelo y salga INMEDIATAMENTE a tomar aire
fresco. Vaya al médico. Podría haberse envenenado con monóxido de carbono.
• Utilice este producto ÚNICAMENTE en el exterior y lejos de ventanas, puertas o
conductos de ventilación para reducir el riesgo de que se acumule el monóxido de
carbono y de que pueda introducirse en espacios habitados.
• Instale alarmas de detección de monóxido de carbono, con batería o con
alimentación eléctrica y batería de reserva, tal como se indica en las instrucciones
del fabricante. Los detectores de humo no detectan el monóxido de carbono.
• NO utilice este producto dentro de casa, garajes, sótanos, espacios entre plantas,
naves u otros espacios cubiertos parcialmente, ni siquiera usando ventiladores o
abriendo puertas y ventanas para facilitar la ventilación. El monóxido de carbono
se puede acumular rápidamente en estos espacios y permanecer durante horas,
incluso después de que el producto se haya apagado.
• Coloque SIEMPRE este producto a favor del viento y no dirija el escape del motor
hacia lugares habitados.
7
• Para arrancar el motor, tire lentamente del cable de arranque hasta que sienta
resistencia y entonces tire con rapidez para evitar el retroceso.
• NUNCA arranque o pare el motor mientras haya dispositivos eléctricos
enchufados y encendidos.
4B. Para el arranque manual, gire la llave en el interruptor de arranque a la posición
de marcha (I), sujete el tirador (M) y tire lentamente hasta que note una leve
resistencia. Luego tire una vez rápidamente para arrancar el motor.
• Si el motor arranca, continúe con el paso 6.
• Si no arranca, vaya al paso 5.
5. Empuje la palanca del estrangulador hasta la mitad, gire la llave en el
interruptor de arranque a la posición de marcha (I) y tire dos veces del tirador
o gire la llave del interruptor de arranque a la posición de arranque (
manténgala allí como se describe en el paso 4A.
• Si sigue sin arrancar, repita los pasos 3 y 4.
6. Abra el estrangulador gradualmente a medida que el motor se caliente; para
ello, empuje el tirador.
AVISO
Si el motor se ahoga, empuje el tirador del estrangulador a fondo y pruebe
aarrancar hasta que lo consiga.
Si el motor se pone en marcha después de tres tirones pero continúa sin
AVISO
funcionar, asegúrese de que el generador esté sobre una superficie horizontal y de que
el nivel del aceite en el cárter sea el adecuado. Este generador está equipado con un
dispositivo de protección para un nivel bajo de aceite. Por lo tanto, para que arranque,
el nivel debe superar el mínimo.
ADVERTENCIA El calor o los gases del escape podrían prender objetos
El contacto con la zona del silenciador podría causar quemaduras y lesiones graves.
• NO toque las partes calientes y EVITE los gases de escape.
• Deje que el aparato se enfríe antes de tocarlo.
• Mantenga despejada una zona de como mínimo 1,5 m alrededor del generador,
también por encima del mismo.
• Para obtener una pantalla antichispas diseñada para el sistema de escape instalado
en este motor, acuda al fabricante original del aparato o a un distribuidor.
• Las piezas de repuesto deben ser iguales e instalarse en la misma posición que
las originales.
inflamables, estructuras o dañar el depósito de combustible,
y causar incendios que podrían provocar daños materiales,
lesiones graves o incluso la muerte.
) y
8 BRIGGSandSTRATTON.COM8 BRIGGSandSTRATTON.COM
Page 37

Not for
Reproduction
Conexión de cargas eléctricas Figura
ADVERTENCIA
• Utilice material de transferencia homologado para evitar que se produzcan
inversiones de corriente eléctrica al aislar el generador de los trabajadores de la
red eléctrica.
• Cuando utilice el generador como fuente de alimentación de reserva, debe
notificarlo a la empresa local de suministro eléctrico.
• Utilice un interruptor diferencial (ID) en lugares húmedos o de conductividad alta,
como cubiertas metálicas o construcciones de acero.
• NO toque los receptáculos o cables pelados.
• NO use el generador con cables eléctricos que estén desgastados, deshilachados,
pelados o deteriorados de algún otro modo.
• NO utilice el generador bajo la lluvia o con mucha humedad ambiental.
• NO maneje el generador o los cables eléctricos si está descalzo, sobre agua, o
con las manos o los pies mojados.
• NO deje que niños o personas sin cualificación utilicen o reparen el generador.
En las tomas de CA del generador, utilice únicamente alargues de gran calidad y con
un buen aislamiento. Examine los alargues antes de cada uso. Compruebe que todos
tengan las características adecuadas y no estén estropeados.
eléctricas, que podrían acarrear lesiones graves o la muerte.
La tensión generada puede causar quemaduras o descargas
1
Interruptor de nivel de aceite y LED de advertencia Figura 1
Si el nivel del aceite es demasiado bajo, un interruptor detendrá el motor y activará
un LED de advertencia (U) en el generador. Si el nivel del aceite es demasiado bajo
cuando se arranca el motor, el interruptor activará el LED de advertencia. Si el LED
de advertencia se ha activado, asegúrese de que la unidad esté colocada sobre una
superficie plana y compruebe que el nivel de aceite sea el correcto. Consulte la sección
Cómo comprobar el nivel de aceite/agregar aceite.
Si el nivel del aceite no alcanza la marca ADD (Añadir), agregue aceite hasta que
alcance la marca FULL (Lleno). Arranque el motor y compruebe que no haya fugas
deaceite antes de continuar con el funcionamiento.
Si el nivel del aceite se encuentra entre las marcas ADD (Añadir) y FULL (Lleno),
noarranque el motor. Acuda a un distribuidor autorizado de Briggs & Stratton para
que revisen el motor.
ADVERTENCIA
• Utilice ÚNICAMENTE alargues con las características apropiadas.
• Siga todas las instrucciones relacionadas con la seguridad de los alargues.
• Examine los cables antes de cada uso.
1. Deje que el motor se estabilice y caliente durante unos minutos después
dearrancarlo.
2. Compruebe si el voltímetro (H) indica el voltaje correcto.
3. Asegúrese de que la carga del dispositivo eléctrico esté dentro de la salida
nominal del generador.
AVISO
Los receptáculos podrían estar señalizados con valores normales de
funcionamiento que superen la capacidad de salida del generador.
• NUNCA intente alimentar un dispositivo que requiera más amperios de los que el
generador o el receptáculo puedan suministrar.
• NO sobrecargue el generador. Consulte Capacidad del generador.
4. Asegúrese de que el dispositivo eléctrico esté apagado. Luego conecte el
dispositivo eléctrico a la toma de CA del generador (F). Después de conectar
eldispositivo eléctrico, enciéndalo.
5. Si se conectan dispositivos eléctricos adicionales, compruebe que la carga
total no supere la capacidad de potencia del generador. Consulte la sección
Características.
No supere la capacidad de potencia del generador. Si supera la capacidad
AVISO
de potencia del generador, puede dañar el generador o los dispositivos eléctricos
conectados a él.
6. Antes de parar el motor, apague todos los dispositivos eléctricos y desconéctelos.
Parada del motor Figura 8
1. Antes de parar el motor, apague todos los dispositivos eléctricos y desconéctelos.
2. Deje que el motor funcione sin carga varios minutos para que se estabilicen las
temperaturas internas del motor y el generador.
3. Gire la llave de paso del combustible a la posición de cierre (
4. Arranque eléctrico: Gire el interruptor de arranque eléctrico (T) a la posición
deparada (
sobrecalentarse, formar arcos eléctricos y arder, con el consiguiente
riesgo de daños materiales, lesiones graves y muerte.
Unos cables eléctricos dañados o sobrecargados podrían
9
).
).
ADVERTENCIA El combustible y sus vapores son muy inflamables y
• NO pare el motor desplazando el control del estrangulador a la posición
“Estrangular” (
explosivos, por lo que pueden causar quemaduras, incendios
o explosiones y derivar en daños materiales, lesiones graves
o incluso la muerte.
).
9 9
Page 38

Not for
Reproduction
Cortocircuito Figura
Los cortocircuitos (G) se disparan automáticamente cuando la carga supera la salida
nominal del generador. Si se dispara el cortocircuito, reduzca la carga de salida y
restablezca el cortocircuito antes de continuar. Para determinar la carga máxima
desalida, consulte la sección Capacidad del generador.
1
No sobrecargue el generador
Capacidad
Asegúrese de que la potencia inicial* del generador coincida o exceda los vatios nominales
(funcionamiento) y transitorios adicionales (arranque) de los dispositivos eléctricos.
1. Seleccione los aparatos que alimentará al mismo tiempo.
2. Sume la potencia nominal (en funcionamiento) de esos aparatos. Esa es la
cantidad de potencia que el generador debe producir para mantenerlos en
funcionamiento. Consulte la Guía de referencia sobre la potencia.
3. Estime cuánta potencia transitoria (en el arranque) necesitará. Esos son los
vatios que, durante un corto período de tiempo, requieren para ponerse en
marcha los aparatos o herramientas impulsadas por motores eléctricos, como
sierras circulares o frigoríficos. Como no todos los motores arrancan al mismo
tiempo, la potencia total transitoria puede estimarse sumando los aparatos con
la mayor potencia transitoria adicional y la potencia nominal total obtenida en
elpaso 2.
Herramienta o aparato
Ventilador de ventana 300 600
Ultracongelador 500 500
Televisor 500 —
Sistema de seguridad 180 —
Bombilla (75 W) 75 —
Ejemplo:
Potencia nominal total (en funcionamiento) 1555
Potencia transitoria adicional máxima + 600
Salida total necesaria del generador =2155
AVISO Si la salida total necesaria del generador no incluye la potencia transitoria
adicional, NO supere la potencia nominal del generador.**
*Consulte la potencia inicial en la sección Características.
**Consulte la potencia nominal en la sección Características.
Gestión de la electricidad
Si no se conectan correctamente los dispositivos eléctricos, se podrían producir daños
en el generador o en los dispositivos eléctricos conectados. La forma correcta y segura
de gestionar la electricidad generada es añadir secuencialmente las cargas, como sigue:
1. Antes de arrancar el motor, compruebe que todos los dispositivos eléctricos se
hayan desconectado de las tomas del generador.
2. Arranque el motor (consulte la sección Cómo arrancar el motor).
3. Conecte el dispositivo eléctrico que requiera más potencia (carga).
4. Deje que la salida del generador se estabilice (el motor marcha con suavidad).
5. Conecte el siguiente dispositivo eléctrico.
6. Una vez más, permita que la salida del generador se estabilice.
7. Repita los pasos anteriores para agregar dispositivos eléctricos. Compruebe
que la potencia total (carga) de todos los dispositivos eléctricos no supere la
capacidad de potencia del generador (consulte la sección Características).
AVISO
Superar la capacidad de potencia o intensidad del generador puede estropear
el generador o los dispositivos eléctricos conectados a él.
• NO supere la capacidad de potencia o intensidad del generador.
• Antes de conectar cargas eléctricas, arranque el generador y deje que el motor
seestabilice.
• Para utilizar cargas eléctricas, conéctelas apagadas y a continuación enciéndalas.
• Antes de detener el generador, apague las cargas eléctricas y desconéctelas
delgenerador.
Potencia (W) nominal
funcionando
1555 W de potencia total
en funcionamiento
Potencia (W) transitoria
adicional en el arranque
600 W de potencia
transitoria máxima
Guía de referencia sobre la potencia
Herramienta o aparato
Elementos esenciales
Bombilla de 75 W 75 —
Ultracongelador 500 500
Bomba de sentina 800 1200
Frigorífico/congelador de 500 litros 800 1600
Bomba de pozo de agua de 0,3 CV 1000 2000
Calefacción/refrigeración
Aire acondicionado de ventana
de2500frigorías
Ventilador de ventana 300 600
Extractor de aire de horno de 0,5 CV 800 1300
Cocina
Horno microondas de 1000 W 1000 —
Cafetera 1500 —
Horno eléctrico con un solo elemento 1500 —
Sala de estar
Reproductor de DVD/CD 100 —
Grabador de vídeo (VCR) 100 —
Receptor estéreo 450 —
Televisor en color de 27 pulgadas 500 —
Ordenador personal con monitor
de17pulgadas
Otros
Sistema de seguridad 180 —
Radio AM/FM con reloj 300 —
Apertura de puerta de garaje de 0,5 CV 480 520
Bricolaje o trabajo
Luz halógena de cuarzo de trabajo 1000 —
Atomizador sin aire de 0,3 CV 600 1200
Sierra de vaivén 960 960
Taladro eléctrico de 0,5 CV 1000 1000
Sierra circular de 18 cm 1500 1500
Potencia
(W)* nominal
funcionando
1200 1800
800 —
transitoria adicional
Potencia (W)
en el arranque
10 BRIGGSandSTRATTON.COM10 BRIGGSandSTRATTON.COM
Page 39

Not for
Reproduction
Mantenimiento
Plan de mantenimiento
Respete los intervalos de funcionamiento o temporales, lo que suceda antes. Si el
generador funciona en las condiciones adversas indicadas más abajo, el mantenimiento
debe ser más frecuente.
Primeras 5 horas
• Cambiar el aceite del motor
Cada 8 horas de funcionamiento o a diario
• Limpiar restos
• Comprobar el nivel del aceite del motor
Cada 25 horas de funcionamiento o cada año
• Mantenimiento del depurador de aire del motor†
Cada 50 horas de funcionamiento o cada año
• Cambiar el aceite del motor
Cada 100 horas de funcionamiento o cada año
• Revisar la llave de paso del combustible
• Revisar la bujía
• Inspeccionar el silenciador y la pantalla antichispas
• Limpiar el sistema de refrigeración
† Realice el mantenimiento con más frecuencia en condiciones de mucho polvo
osuciedad.
Recomendaciones generales
El mantenimiento periódico mejorará el rendimiento y alargará la vida útil del
generador. Para revisiones o reparaciones, acuda a un distribuidor autorizado.
La garantía del generador no cubre los elementos sometidos a un uso indebido o
negligente por parte del usuario. Para hacer valer la garantía, el usuario debe mantener
el sistema según las instrucciones de este manual.
Un cuidado inadecuado del generador puede estropearlo y acortar su vida útil.
AVISO
• Para garantizar una refrigeración adecuada, NUNCA utilice el generador sin las tapas
o carcasas protectoras.
Para mantener el generador en buen estado, será necesario realizar algunos ajustes
periódicamente.
La totalidad del mantenimiento y los ajustes se deben realizar al menos una vez por
temporada. Siga los requisitos de la tabla Plan de mantenimiento.
Una vez al año debe limpiar o sustituir la bujía, así como reemplazar el filtro
AVISO
de aire. Una bujía nueva y un filtro de aire limpio aseguran la mezcla adecuada de
combustible y aire y contribuyen a mejorar el rendimiento del motor y a prolongar
suvida útil.
Mantenimiento del generador
El mantenimiento del generador consiste en conservarlo limpio y seco. Utilice y guarde
el generador en un lugar limpio y seco, donde no esté expuesto a exceso de polvo,
suciedad, humedad o vapores corrosivos. Las rendijas de refrigeración no deben
quedar obstruidas por nieve, hojas u otros tipos de cuerpos extraños.
NO use agua u otros líquidos para limpiar el generador. Los líquidos pueden
AVISO
entrar en el sistema de combustible del motor y causar un funcionamiento inadecuado
o producir daños en el generador. Además, si entra líquido en el generador a través
de las rendijas de refrigeración, parte de él se retendrá en huecos y grietas del rotor y
el aislamiento del devanado del estátor. La acumulación de líquidos o suciedad en el
devanado interno del generador acabará por disminuir la resistencia de su aislamiento.
†
†
Limpieza
Cada día o antes del uso, compruebe alrededor y debajo del generador si hay fugas
de aceite o combustible. Limpie los residuos acumulados en el interior y el exterior
del generador. Mantenga limpias las varillas, los muelles y otros mandos del motor.
Mantenga limpia de residuos de combustible la zona de alrededor y de detrás del
silenciador. Examine las rendijas y aberturas de refrigeración del generador. Deben
estar limpias y despejadas.
Mantenga limpios los componentes del motor con el fin de reducir el riesgo de
sobrecalentamiento e ignición de los residuos acumulados:
• Utilice un paño húmedo para limpiar las superficies exteriores.
Un cuidado inadecuado del generador puede estropearlo y acortar su vida útil.
AVISO
• NO exponga el generador a un exceso de humedad, polvo, suciedad o vapores
corrosivos.
• NO inserte ningún objeto por las ranuras de enfriamiento.
• Utilice un cepillo de cerdas suaves para soltar las costras de suciedad o aceite.
• Utilice una aspiradora para eliminar los restos sueltos de suciedad.
Mantenimiento del sistema de combustible Figura 8
ADVERTENCIA El combustible y sus vapores son muy inflamables y
explosivos, por lo que pueden causar quemaduras, incendios
o explosiones y derivar en daños materiales, lesiones graves
o incluso la muerte.
• Mantenga el combustible alejado de chispas, llamas abiertas, pilotos luminosos,
calor y otras fuentes de ignición.
• Verifique a menudo que no haya grietas o fugas en los tubos de combustible, el
tapón del depósito y los racores. Cámbielos si es necesario.
• Si se derrama combustible, espere a que se evapore para arrancar el motor.
Cómo limpiar/cambiar el filtro de residuos
1. Retire la tapa del combustible (11, A).
2. Retire el filtro de residuos (11, B).
3. Si el filtro está sucio, límpielo. Si el filtro está rasgado o dañado, cámbielo.
Si ha de cambiar el filtro de residuos, asegúrese de que utiliza un
repuestooriginal.
Cómo limpiar el recipiente de sedimentos del combustible
La llave de paso del combustible dispone de un recipiente para los sedimentos del
combustible. El recipiente se puede limpiar de la siguiente manera:
1. Gire la llave de paso a la posición de cierre.
2. Retire el recipiente de sedimentos (8, A) de la llave de paso del combustible.
3. Limpie el recipiente de sedimentos con un disolvente no inflamable.
Séquelobien.
4. Coloque el recipiente de sedimentos y asegúrese de que queda bien sujeto.
5. Gire la llave de paso a la posición de abertura y verifique que no hay fugas. Si la
llave de paso de combustible presenta fugas, cámbiela por un repuestooriginal.
11
Mantenimiento de la batería
La batería de arranque, si está instalada, no requiere mantenimiento. Mantenga la batería
y sus terminales limpios y secos.
La batería de arranque se carga únicamente mientras el generador está
AVISO
enmarcha.
11 11
Page 40

Not for
Reproduction
Mantenimiento del motor
ADVERTENCIA Si salieran chispas, podrían causar incendios o descargas
AL AJUSTAR O REPARAR EL GENERADOR
• Desconecte el cable de la bujía y colóquelo donde no pueda hacer contacto con
labujía.
COMPROBACIÓN DEL ENCENDIDO DEL MOTOR
• Utilice un probador de bujías que esté homologado.
• NO compruebe el encendido con la bujía desconectada.
Ajuste del carburador y del régimen del motor
Nunca realice ajustes en el carburador o en el régimen del motor. El carburador ha
sido ajustado con valores de fábrica para que pueda funcionar de un modo eficaz en la
mayoría de las condiciones. NO manipule el muelle del regulador, las varillas u otras
partes para incrementar el régimen del motor. Si fuera necesario realizar algún ajuste,
acuda a un distribuidor autorizado de Briggs & Stratton.
PRECAUCIÓN
estropear el generador o causar lesiones leves.
Un régimen demasiado bajo supone una sobrecarga.
• NO manipule el muelle del regulador, las varillas u otras partes para incrementar
el régimen del motor.
• NO modifique el generador de ninguna forma.
Aceite
Recomendaciones sobre el aceite
Para obtener un rendimiento óptimo, se recomienda el uso de aceites certificados por
Briggs & Stratton. Otros aceites con detergentes de alta calidad son aceptables
sicuentan con la clasificación de servicio SF, SG, SH, SJ o superior. NO utilice aditivos
especiales.
La temperatura exterior determina la viscosidad adecuada del aceite para el motor.
Use la tabla para seleccionar la mejor viscosidad para el intervalo de temperaturas
exteriores que se prevea.
eléctricas, que podrían acarrear lesiones graves o la muerte.
El funcionamiento a un régimen demasiado alto podría
Comprobación del nivel de aceite
El nivel del aceite debe comprobarse antes de cada uso y al menos cada 8 horas
defuncionamiento. No deje de revisar el nivel del aceite.
1. Asegúrese de que el generador esté sobre una superficie horizontal.
2. Limpie la zona del depósito de aceite (4, A), retire el tapón y la varilla del
aceite y limpie la varilla con un trapo limpio. Introduzca la varilla. Sáquela y
compruebe el nivel de aceite.
NO enrosque la varilla al comprobar el nivel de aceite.
AVISO
3. Compruebe que el aceite llegue hasta la marca Full (2, B) de la varilla. Vuelva
acolocar la varilla de nivel de aceite y ajústela en su posición.
Adición de aceite de motor
1. Asegúrese de que el generador esté sobre una superficie horizontal.
2. Compruebe el nivel de aceite tal como se indica en Comprobación del nivel
deaceite.
3. Si fuera necesario, vierta aceite lentamente por orificio de llenado hasta que
elnivel llegue a la marca Full de la varilla. NO llene en exceso.
El llenado de aceite en exceso podría impedir el arranque del motor o provocar
AVISO
dificultades de arranque.
• NO llene en exceso.
• Si el nivel de aceite está por encima de la marca FULL de la varilla de nivel, drene
algo de aceite para reducir el nivel hasta la marca FULL de la varilla.
4. Vuelva a colocar la varilla de nivel de aceite y ajústela en su posición.
Cambio del aceite del motor
Si utiliza el generador en un ambiente muy sucio, polvoriento o caluroso, cambie el
aceite con mayor frecuencia.
PRECAUCIÓN Evite el contacto prolongado o repetido de la piel con aceite
de motor usado.
• Se ha comprobado que el aceite de motor usado causa cáncer de piel en ciertos
animales de laboratorio.
• Lávese a fondo con agua y jabón las partes que hayan estado expuestas.
MANTÉNGASE FUERA DEL ALCANCE DE LOS NIÑOS. NO CONTAMINE.
CONSERVE LOS RECURSOS NATURALES. ENVÍE EL ACEITE USADO
ACENTROS DE RECOGIDA.
Figura 1 2 4
* Por debajo de 4°C (40°F) el uso de SAE 30 provocará un arranque fuerte.
** Por encima de 27°C (80°F) el uso de 10W30 podría causar un aumento del
consumo de aceite. Compruebe el nivel de aceite con mayor frecuencia.
Cambie el aceite mientras el motor no se haya enfriado del todo después de suuso,
como sigue:
1. Asegúrese de que el generador esté sobre una superficie horizontal.
2. Desconecte el cable de la bujía y colóquelo donde no pueda hacer contacto con
la bujía.
3. Limpie la zona de alrededor del tapón de drenaje de aceite (1, K). El tapón
de drenaje de aceite está situado en la base del motor, en el lado opuesto
alcarburador.
4. Retire el tapón de drenaje de aceite. Deje que se drene todo el aceite y que se
vierta en un recipiente adecuado.
5. Coloque de nuevo el tapón de drenaje de aceite y ajústelo bien. Retire la tapa
dellenado/varilla de nivel de aceite (1).
6. Añada aceite siguiendo los pasos 3 y 4 descritos en Adición de aceite de motor.
7. Limpie con un trapo el aceite que se haya podido derramar.
12 BRIGGSandSTRATTON.COM12 BRIGGSandSTRATTON.COM
Page 41

Not for
Reproduction
Revisión de la bujía
Cambiar la bujía hará que el motor arranque más fácilmente y funcione mejor.
1. Limpie la zona de alrededor de la bujía.
2. Extraiga e inspeccione la bujía.
3. Compruebe la separación entre los electrodos con un calibrador y, si es
necesario, ajústela a la separación recomendada (consulte Características
delproducto).
4. Cambie la bujía si los electrodos están picados o quemados o si la porcelana
está agrietada. Utilice las bujías de repuesto recomendadas. Consulte
Características del producto.
5. Instale la bujía y apriétela con firmeza.
AVISO
En algunos lugares, las leyes locales requieren el uso de una bujía con
resistencia para suprimir señales de encendido. Si un motor vino originalmente
equipado con una bujía con resistencia, asegúrese de usar el mismo tipo de bujía
cuando la vaya a cambiar.
Inspección del silenciador y de la pantalla antichispas
Inspeccione el silenciador por si presenta fisuras, corrosión u otros daños. Retire
la pantalla antichispas, si está instalada, e inspeccione si presenta daños o acumula
carbonilla. Si debe reemplazar alguna pieza, utilice solo repuestos originales.
ADVERTENCIA El contacto con la zona del silenciador puede causar
• NO toque las partes calientes y EVITE los gases de escape.
• Deje que el aparato se enfríe antes de tocarlo.
• Mantenga despejada una zona de como mínimo 1,5 m alrededor del generador,
también por encima del mismo.
• Para obtener una pantalla antichispas diseñada para el sistema de escape instalado
en este motor, acuda al fabricante original del aparato o a un distribuidor.
• Las piezas de repuesto deben ser iguales e instalarse en la misma posición que
las originales.
Mantenimiento del depurador de aire
Si el motor se utiliza con un depurador de aire sucio, no funcionará correctamente y
es posible que se estropee. Su mantenimiento debe ser más frecuente si funciona en
ambientes sucios o donde haya polvo.
Para realizar el mantenimiento del depurador de aire, siga estos pasos:
1. Desbloquee la tapa del depurador de aire por arriba y por abajo, y retírela (A).
2. Retire con cuidado el depurador de aire (B) para evitar que caigan residuos
dentro del carburador.
3. Limpie el depurador de aire con agua y un detergente líquido. Escúrralo bien y
séquelo con un trapo limpio.
4. EMPAPE la espuma del depurador de aire con aceite de motor, escúrrala y
retire el exceso de aceite con un trapo limpio.
5. Coloque la espuma del depurador de aire limpia o nueva en su lugar (C).
6. Monte la tapa del depurador de aire en su lugar y bloquéela.
Figura
quemaduras graves.
El calor o los gases del escape podrían prender objetos
inflamables, estructuras o dañar el depósito de combustible,
ycausar un incendio.
9
Figura
10
Limpieza del sistema de refrigeración
Con el tiempo, se pueden acumular residuos en las aletas de refrigeración del cilindro
y pasar inadvertidos mientras no se desmonte parcialmente el motor. Por este motivo,
recomendamos que encargue la limpieza del sistema de refrigeración a un distribuidor
autorizado de servicio siguiendo los intervalos recomendados (consulte el Plan de
mantenimiento en la sección Mantenimiento). Es igualmente importante que no se
acumulen residuos en el motor. También consulte la sección Limpieza.
Almacenaje
Si no va a utilizar el generador durante más de 30 días, siga estas pautas para
prepararlo para el almacenaje.
Almacenaje del generador
• Limpie el generador como se describe en Limpieza.
• Compruebe que las rendijas y aberturas de refrigeración del generador estén
despejadas.
Instrucciones de almacenaje a largo plazo
El combustible puede haberse echado a perder si se ha almacenado por más de 30
días. El combustible echado a perder provoca la formación de residuos ácidos y de
carbonilla en el sistema de combustible y en los componentes básicos del carburador.
Para mantener el combustible en buen estado, use Briggs & Stratton® Advanced
Formula Fuel Treatment & Stabilizer, disponible donde sea que se vendan piezas
de servicio originales de Briggs & Stratton.
No es necesario vaciar el motor de gasolina si se añade estabilizador de combustible
conforme a las instrucciones. Ponga en funcionamiento el motor durante 2
minutos para que el estabilizador circule por todo el sistema de combustible antes
de almacenarlo. Si la gasolina del motor no se ha tratado con un estabilizador de
combustible, debe drenarse en un contenedor aprobado para tal fin. Haga funcionar el
motor hasta que se detenga por la falta de combustible. Para mantener la frescura de
la gasolina, se recomienda añadir estabilizador en el recipiente.
ADVERTENCIA El combustible y sus vapores son muy inflamables y
explosivos, por lo que pueden causar quemaduras, incendios
o explosiones y derivar en daños materiales, lesiones graves o
incluso la muerte.
ALMACENAJE DE COMBUSTIBLE O DEL GENERADOR CON COMBUSTIBLE DENTRO
• Almacénelos lejos de hornos, cocinas, calentadores de agua, secadoras de ropa u
otros electrodomésticos que tengan pilotos luminosos u otras fuentes de ignición,
porque podrían prender los vapores del combustible.
VACIADO DEL COMBUSTIBLE
• Apague el motor del generador y, antes de retirar el tapón del combustible, deje
que se enfríe durante al menos 2 minutos. Afloje el tapón lentamente para liberar
la presión acumulada en el depósito.
• Vacíe el depósito de combustible al aire libre.
• Mantenga el combustible alejado de chispas, llamas abiertas, pilotos luminosos,
calor y otras fuentes de ignición.
• Verifique a menudo que no haya grietas o fugas en los tubos de combustible, el
depósito, el tapón y los racores. Cámbielos si es necesario.
• NO fume ni encienda cigarrillos.
Cambio del aceite del motor
Antes de que el motor se haya enfriado del todo, vacíe el aceite del cárter. Rellene
aceite del grado recomendado. Consulte la sección Cambio del aceite del motor.
Otros consejos de almacenaje
1. NO guarde combustible de una temporada a otra si no lo trata como se
describe en Instrucciones de almacenaje a largo plazo.
2. Reemplace el recipiente de combustible si empieza a producir óxido. La
presencia de herrumbre y suciedad en el combustible puede causar problemas
en este generador.
3. Cubra la unidad con una funda adecuada que no retenga la humedad.
ADVERTENCIA Las fundas de almacenaje podrían causar incendios con el
consiguiente riesgo de daños materiales, lesiones graves y muerte.
• Si el generador está caliente, NO lo cubra con una funda de almacenaje.
• Antes de colocar la fundar sobre el generador, deje que se enfríe durante tiempo
suficiente.
4. Guarde el generador en un lugar limpio y seco.
13 13
Page 42

Not for
Reproduction
Solución de problemas
Problema Causa Corrección
1. Restablezca el cortocircuito.
2. Acuda a un servicio técnico autorizado.
3. Compruebe y repare.
4. Conecte otro aparato que sepa que funciona bien.
1. Desconecte la carga cortocircuitada.
2. Acuda a un servicio técnico autorizado.
3. Consulte No sobrecargue el generador en la sección
Funcionamiento.
4. Acuda a un servicio técnico autorizado.
5. Limpie o reemplace el filtro de combustible.
1. Gire la llave de paso de combustible a la posición
deabertura (I).
2. Llene el cárter hasta el nivel adecuado o coloque el
generador sobre una superficie horizontal.
3. Limpie o reemplace el depurador de aire.
4. Limpie o reemplace el filtro de combustible.
5. Llene el depósito de combustible.
6. Vacíe el depósito de combustible y el carburador; llene
con combustible nuevo.
7. Conecte el cable a la bujía.
8. Cambie la bujía.
9. Vacíe el depósito de combustible y el carburador; llene
con combustible nuevo.
10. Espere 5 minutos y vuelva a arrancar el motor.
11. Acuda a un servicio técnico autorizado.
12. Acuda a un servicio técnico autorizado.
13. Acuda a un servicio técnico autorizado.
14. Gire el interruptor de parada eléctrica a la posición
demarcha.
15. Recargue o cambie la batería.
1. Consulte No sobrecargue el generador.
2. Reemplace el filtro de aire.
3. Limpie o reemplace el filtro de combustible.
1. Acuda a un servicio técnico autorizado.
2. Limpie o reemplace el filtro de combustible.
El motor funciona pero no hay salida de CA.
El motor funciona bien sin carga,
pero«seviene abajo» cuando se
conectan cargas.
El motor no arranca; se para mientras
estáfuncionando o arranca pero
funciona mal.
Al motor le falta potencia.
El motor funciona con irregularidad
o«vacila».
1. Se ha disparado el cortocircuito.
2. Avería del generador.
3. Mala conexión o alargue defectuoso.
4. Dispositivo eléctrico no operativo.
1. Cortocircuito en el dispositivo eléctrico conectado.
2. La velocidad del motor es demasiado lenta.
3. Se ha sobrecargado el generador.
4. Cortocircuito en el generador.
5. El filtro del combustible está obstruido o sucio.
1. Llave de paso de combustible en posición de cierre (O).
2. Nivel de aceite bajo.
3. Filtro de aire sucio.
4. Filtro del combustible obstruido o sucio.
5. Sin combustible.
6. Combustible en mal estado.
7. El cable de la bujía no está conectado a la bujía.
8. La bujía se ha estropeado.
9. Hay agua en el combustible.
10. Carburador ahogado.
11. Mezcla de combustible demasiado rica.
12. La válvula de admisión se queda abierta o cerrada.
13. Pérdida de compresión en el motor.
14. Interruptor de arranque eléctrico en la posición de apagado.
15. Batería descargada.
1. Se ha sobrecargado el generador.
2. Filtro de aire sucio.
3. Filtro del combustible obstruido o sucio.
1. El carburador funciona con una mezcla demasiado rica
odemasiado pobre.
2. Filtro del combustible obstruido o sucio.
Consumo de energía
Consumo de energía (gasolina) en funcionamiento normal al 50% de carga 1,12 l/h 1,63 l/h 2,04 l/h
Consumo de energía (gasolina) en modo inactivo No es pertinente No es pertinente No es pertinente
Producto o servicio suministrado por unidades de energía consumidas No es pertinente No es pertinente No es pertinente
2.300 vatios 3.500 vatios 6.000 vatios
14 BRIGGSandSTRATTON.COM14 BRIGGSandSTRATTON.COM
Page 43

Not for
Reproduction
Características del producto
Modelo(s) 030566, 030596
Potencia inicial ................................................2.500 vatios
Potencia nominal* .............................................2.300 vatios
Voltaje de salida de CA ..........................................230 voltios
Corriente de carga en 230 voltios CA ..................................10,0 A
Frecuencia ....................................................... 60 Hz.
Fase .......................................................Monofásico
Capacidad de combustible .............................................15 L
Cilindrada ........................................................163 cc
Capacidad de aceite ...........................................0,54 - 0,59 L
Separación de bujía ..............................................0,76 mm
Par de bujía ......................................................20 Nm
Luz de válvula de admisión ...................................0,10 - 0,15 mm
Luz de válvula de escape .....................................0,15 - 0,20 mm
Modelo(s) 030570, 030597
Potencia inicial ................................................4.000 vatios
Potencia nominal* .............................................3.500 vatios
Voltaje de salida de CA ..........................................230 voltios
Corriente de carga en 230 voltios CA ..................................15,2 A
Frecuencia ....................................................... 60 Hz.
Fase .......................................................Monofásico
Capacidad de combustible .............................................25 L
Cilindrada ........................................................270 cc
Capacidad de aceite ...........................................1,05 - 1,09 L
Separación de bujía ..............................................0,76 mm
Par de bujía ......................................................31 Nm
Luz de válvula de admisión ...................................0,13 - 0,18 mm
Luz de válvula de escape .....................................0,13 - 0,18 mm
Modelo(s) 030576, 030583, 030598, 030599
Potencia inicial ................................................6.500 vatios
Potencia nominal* .............................................6.000 vatios
Voltaje de salida de CA ..........................................230 voltios
Corriente de carga en 230 voltios CA ..................................26,0 A
Frecuencia ....................................................... 60 Hz.
Fase .......................................................Monofásico
Capacidad de combustible .............................................25 L
Cilindrada ........................................................420 cc
Capacidad de aceite ...........................................1,05 - 1,09 L
Separación de bujía ..............................................0,76 mm
Par de bujía ......................................................31 Nm
Luz de válvula de admisión ...................................0,13 - 0,18 mm
Luz de válvula de escape .....................................0,13 - 0,18 mm
Modelo(s) 030588
Potencia inicial ................................................2.500 vatios
Potencia nominal* .............................................2.300 vatios
Voltaje de salida de CA ..........................................115 voltios
Corriente de carga en 115 voltios CA ..................................20,0 A
Frecuencia ....................................................... 60 Hz.
Fase .......................................................Monofásico
Capacidad de combustible .............................................15 L
Cilindrada ........................................................163 cc
Capacidad de aceite ...........................................0,54 - 0,59 L
Separación de bujía ..............................................0,76 mm
Par de bujía ......................................................20 Nm
Luz de válvula de admisión ...................................0,10 - 0,15 mm
Luz de válvula de escape .....................................0,15 - 0,20 mm
Modelo(s) 030589
Potencia inicial ................................................4.000 vatios
Potencia nominal* .............................................3.500 vatios
Voltaje de salida de CA ......................................115/230 voltios
Corriente de carga en 115 voltios CA ..................................30,4 A
Corriente de carga en 230 voltios CA ..................................15,2 A
Frecuencia ....................................................... 60 Hz.
Fase .......................................................Monofásico
Capacidad de combustible .............................................25 L
Cilindrada ........................................................270 cc
Capacidad de aceite ...........................................1,05 - 1,09 L
Separación de bujía ..............................................0,76 mm
Par de bujía ......................................................31 Nm
Luz de válvula de admisión ...................................0,13 - 0,18 mm
Luz de válvula de escape .....................................0,13 - 0,18 mm
Modelo(s) 030590, 030591
Potencia inicial ................................................6.500 vatios
Potencia nominal* .............................................6.000 vatios
Voltaje de salida de CA ......................................115/230 voltios
Corriente de carga en 115 voltios CA ..................................52,1 A
Corriente de carga en 230 voltios CA ..................................26,0 A
Frecuencia ....................................................... 60 Hz.
Fase .......................................................Monofásico
Capacidad de combustible .............................................25 L
Cilindrada ........................................................420 cc
Capacidad de aceite ...........................................1,05 - 1,09 L
Separación de bujía ..............................................0,76 mm
Par de bujía ......................................................31 Nm
Luz de válvula de admisión ...................................0,13 - 0,18 mm
Luz de válvula de escape .....................................0,13 - 0,18 mm
Repuestos frecuentes
Depurador de aire - Modelo de motor 106200 .......................... 591717
Depurador de aire - Modelo de motor 160000 .......................... 591778
Depurador de aire - Modelo de motor 250000 .......................... 591778
Bujía - Modelo de motor 106200 ..................................... 491055
Bujía - Modelo de motor 160000 ..................................... 797235
Bujía - Modelo de motor 250000 ..................................... 797235
Clasificación de la potencia: Las características de potencia bruta de cada modelo de motor a gasolina están identificadas de conformidad con el código J1940 (Procedimiento de
cálculo de potencia y par de motores pequeños) de la SAE (Society of Automotive Engineers) y se han obtenido y corregido de conformidad con el código J1995 de la SAE (modificación
2002-05). Los valores de par se han obtenido a 3060 r.p.m., los de potencia, a 3600 r.p.m. Se pueden consultar las curvas de potencia bruta en www.BRIGGSandSTRATTON.COM.
Los valores de potencia neta se toman con el escape y el depurador de aire instalados, mientras que los valores de potencia bruta se registran sin estos complementos. La potencia
bruta real del motor será mayor que la potencia neta, y se ve afectada, entre otras cosas, por las condiciones ambientales de funcionamiento y la variabilidad de un motor a otro.
Dada la gran variedad de productos en que se colocan los motores, el motor de gasolina podría no desarrollar la potencia nominal bruta cuando se emplee en un determinado equipo
eléctrico. Estas diferencias son debidas a una amplia variedad de factores, incluidos, entre otros, la variedad de componentes del motor (depurador de aire, tubos de escape, carga,
refrigeración, carburador, bomba de combustible, etc.), limitaciones de aplicación, condiciones ambientales de funcionamiento (temperatura, humedad, altitud) y la variabilidad entre
motores. A causa de las limitaciones de fabricación y de capacidad, Briggs & Stratton podrá emplear un motor de mayor potencia nominal en lugar del motor de esta serie.
* Las características de este generador cumplen con la norma ISO 8528 G1.
15 15
Page 44

Not for
Reproduction
GARANTÍA PARA EL PROPIETARIO DEL GENERADOR PORTÁTIL DE BRIGGS & STRATTON
Fecha de entrada en vigor: 1 de septiembre de 2012. Sustituye a todas las garantías sin fecha y a las de fecha anterior al 1 de septiembre de 2012.
GARANTÍA LIMITADA
Briggs & Stratton se compromete a que, durante el período de garantía especificado a continuación, reparará o sustituirá, de manera gratuita, cualquier pieza con defectos de
material o fabricación, o de ambos. El comprador deberá correr con los gastos de transporte del producto que envíe para reparación o reemplazo al amparo de esta garantía.
Esta garantía tiene vigencia y está sujeta a las condiciones que se establecen más adelante. Para recurrir al servicio en garantía, busque el servicio técnico autorizado más
cercano en el mapa localizador de distribuidores que hay disponible en www.BRIGGSandSTRATTON.com. El comprador debe ponerse en contacto con el distribuidor de
servicio autorizado y hacerle llegar el producto para que lo inspeccione y lo pruebe.
No existe otra garantía expresa. Las garantías implícitas, inclusive aquellas de comerciabilidad y de idoneidad para un propósito en particular se limitan a un año a
partir de la fecha de compra o hasta los límites permitidos por la ley. Se excluye cualquier otra garantía implícita. La responsabilidad por daños fortuitos o indirectos
está excluida en tanto lo permita le ley. Algunos estados o países no permiten limitaciones sobre la duración de una garantía implícita o la exclusión o limitación de daños
fortuitos o indirectos, por lo que puede que la limitación y exclusión anteriores no sean aplicables en todos los casos. Esta garantía le otorga derechos legales específicos;
también podría tener otros que varían según el estado o el país.**
PERÍODO DE GARANTÍA
ELEMENTO USO PARTICULAR USO COMERCIAL
EQUIPO
Modelos: 030588, 030589, 030590, 030591
Modelos: 030566, 030576, 030570, 030583
030596, 030597, 030598, 030599
Motor 2 años 1 año
Batería (si está instalada) 1 año 1 año
2 años
1 año
1 año
1 año
** En Australia: nuestros productos disponen de una garantía que no se puede excluir de acuerdo con las leyes del consumidor de Australia. Tiene derecho a la sustitución o
devolución del producto si hay un error grave de funcionamiento y a una indemnización por cualquier pérdida o daño previsible. También tiene derecho a que el producto sea
reparado o sustituido si la calidad no es aceptable, aunque no se considere un error grave. Para el servicio de garantía, busque el servicio técnico autorizado más cercano en el
mapa localizador de distribuidores que hay disponible en BRIGGSandSTRATTON.COM, llame al 1300 274 447, envíe un correo electrónico a salesenquires@briggsandstratton.com.
au o escriba a Briggs & Stratton Australia Pty Ltd, 1 Moorebank Avenue, NSW, Australia, 2170.
El período de garantía comienza en la fecha de la compra por el primer usuario final y se extiende durante el período de tiempo que se indica en la tabla anterior. «Uso particular»
significa uso doméstico residencial personal por un consumidor minorista. «Uso comercial» significa los demás usos, lo que incluye el uso para propósitos comerciales, generar
ingresos o alquiler. Una vez que el producto se haya usado para fines comerciales, en adelante se considerará como para uso comercial a los efectos de esta garantía. Los equipos
utilizados para suministrar energía en sustitución de un servicio local de suministro eléctrico no pueden acogerse a esta garantía.
NO ES NECESARIO REGISTRARSE PARA OBTENER LA GARANTÍA EN LOS PRODUCTOS DE BRIGGS & STRATTON. GUARDE LA FACTURA O EL COMPROBANTE DE LA
COMPRA. SI NO DISPONE DE UN JUSTIFICANTE DE LA FECHA DE COMPRA INICIAL EN EL MOMENTO DE SOLICITAR SERVICIO DE GARANTÍA, EL PERÍODO DE GARANTÍA SE
DETERMINARÁ EN FUNCIÓN DE LA FECHA DE FABRICACIÓN DEL PRODUCTO.
ACERCA DE LA GARANTÍA
Aceptamos las reparaciones en garantía y nos disculpamos por las molestias. Cualquier servicio técnico autorizado puede realizar reparaciones al amparo de la garantía. La mayor
parte de las reparaciones bajo garantía se atienden de manera rutinaria, pero algunas veces las solicitudes de reparaciones bajo garantía podrían no ser apropiadas Por ejemplo, el
servicio de garantía no sería aplicable si el producto ha sufrido daños por mal uso, falta de mantenimiento periódico, o envío, manipulación, almacenaje o instalación incorrectos.
Del mismo modo, la garantía es nula si se han eliminado la fecha de fabricación o el número de serie del generador portátil o si el aparato ha sido alterado o modificado. Durante
el período de garantía, el servicio técnico autorizado reparará o reemplazará, a su criterio, cualquier pieza que, al examinarla, se considere defectuosa con un uso y mantenimiento
normales. Esta garantía no cubrirá las reparaciones y componentes que se señalan a continuación:
• Desgaste normal: los equipos eléctricos para uso al aire libre, como todos los dispositivos mecánicos, necesitan un mantenimiento periódico para funcionar bien. Esta
garantía no cubrirá la reparación cuando el uso normal haya agotado la vida útil de una pieza o del aparato.
• Instalación y mantenimiento: esta garantía no da cobertura a aparatos o piezas que han estado sometidos a instalaciones, alteraciones o modificaciones inadecuadas
o no autorizadas, a mal uso, negligencia, accidente, sobrecarga, régimen excesivo o mantenimiento, reparación o almacenaje inadecuados que, a nuestro juicio, hayan
afectado negativamente a su funcionamiento y fiabilidad. Esta garantía tampoco cubre el mantenimiento normal, por ejemplo, ajustes, limpieza del sistema de combustible
uobstrucciones (por productos químicos, suciedad, carbonilla, cal, etc.).
• Otras exclusiones: esta garantía excluye los elementos sometidos a desgaste, tales como juntas tóricas, filtros, etc., o averías que sean consecuencia de accidentes, abuso,
modificaciones, alteraciones o mantenimiento inadecuado, o congelación o deterioro químico. Las piezas accesorias, como juegos de cables del adaptador del generador y
fundas de almacenaje, están excluidas de la garantía del producto. Esta garantía excluye los fallos debidos a hechos fortuitos y a otros acontecimientos de fuerza mayor que
escapan al control del fabricante. También están excluidos los equipos usados, reparados y los equipos de demostración; los equipos usados para generar energía principal
en sustitución de un servicio local de suministro eléctrico y aquellos equipos que se usen en aplicaciones de soporte vital. 198195S, Rev. D, 08/24/2012
BRIGGS & STRATTON CORPORATION
MILWAUKEE, WI, EE. UU.
16 BRIGGSandSTRATTON.COM16 BRIGGSandSTRATTON.COM
Page 45

Not for
Reproduction
17 17
Page 46

Not for
Reproduction
感謝您購買這款高品質的
發電機將為您提供數年的可靠服務。
Stratton
本手冊包含安全資訊,以便您瞭解與發電機相關的危險及風險以及如何避免此類危險及風險。本發電機旨在並且僅用於提供電源,以便操作具有相容性的電氣照明、
設備、工具及電機負載。此外,本發電機不得用於任何其他用途。在嘗試啟動或操作本設備前,完整地閱讀並理解這些說明至關重要。
參考。
本發電機需要在使用前進行最後裝配。請參看本手冊的裝配部分,瞭解關於最後裝配流程的說明。請完全遵照說明。
在哪裡可以聯絡到我們
您無需到很遠的地方為您的發電機尋找
BRIGGSandSTRATTON.COM
Briggs & Stratton®
,在網際網路上我們的經銷商定位地圖中查找離您最近的授權服務經銷商。
發電機。您對
Briggs & Stratton
Briggs & Stratton
支援及服務。全球各地共有數千家
品牌的信任,我們感到非常欣慰。在依照本手冊中的說明操作及維護時,您的
Briggs & Stratton
Briggs &
儲存這些原始說明,以供將來
授權服務經銷商,它們均可提供優質服務。您還可登陸
發電機
採購日期
型號
版本
序列號
目錄
操作員安全說明
裝配
. .. . .. . .. . .. . .. . .. . .. . .. . .. . .. . .. . .. . .. . .. . .. . .7
功能及控件
操作
. .. . .. . .. . .. . .. . .. . .. . .. . .. . .. . .. . .. . .. . .. . .. . .8
維護
. .. . .. . .. . .. . .. . .. . .. . .. . .. . .. . .. . .. . .. . .. . .. .11
疑難排解
規格
. .. . .. . .. . .. . .. . .. . .. . .. . .. . .. . .. . .. . .. . .. . .. .15
保固
. .. . .. . .. . .. . .. . .. . .. . .. . .. . .. . .. . .. . .. . .. . .. .16
.....................................5
. .. . .. . .. . .. . .. . .. . .. . .. . .. . .. . .. . .. . .. . .7
..........................................14
發動機
型號
類型編號
代碼
版權所有
© 2017 Briggs & Stratton Corporation
美國,威斯康辛州,密爾瓦基保留所有權利。
BRIGGS & STRATTON 是 Briggs & Stratton Corporation
的一個注冊商標
4 BRIGGSandSTRATTON.COM4 BRIGGSandSTRATTON.COM
Page 47

Not for
Reproduction
操作員安全說明
設備描述
認真閱讀此說明書以熟悉您的發電機。瞭解它的應用範圍、局限性和
涉及到的任何危險。
我們已盡一切努力確保本手冊中資訊的準確性和適用性。然而,製造商有權
隨時改變、更改或改進此發電機及此文檔,恕不另行
重要安全資訊
製造商不可能預測所有可能造成危險的潛在情況。因此,本手冊中、設備標籤
和封裝上的警告並不包括所有情況。如果您使用製造商並未特殊推薦的步驟、
工作方法和操作技術,您必須說服自己,這關係到您和其他人的安全。您也必
須確保您選擇的步驟、工作方法和操作技術不會致使發電機發生不安全情況。
安全
標誌和意義
有毒煙霧
火災
反沖
操作員手冊
電休克
爆炸
通知。
窒息
窒息
安全警告標誌表明潛在的人身傷害風險。信號詞(危險、警告或注意)與
警告標誌一同使用以指定危害嚴重性的程度或層次。安全標誌可能被用來代表
危險的類型。信號詞
危險表明如果不避免的話會有危險,將會造成死亡或嚴重傷害。
警告表明如果不避免的話會有危險,
注意表明如果不避免的話會有危險,
注意
用於解釋與人身傷害不相關的操作。
警告 有毒氣體危害。發動機排放氣體中含有一氧化碳等有毒氣體,
可以在幾分鐘內令人致死。一氧化碳無色、無嗅、無味。即使您
沒有嗅到廢氣的氣味,您仍然會暴露於一氧化碳氣體中。如果您
在使用本產品時開始感覺噁心、眩暈或虛弱,請立即關閉並到新
鮮的空氣環境中去。馬上就醫。您可能已經一氧化碳中毒。
僅在遠離窗戶、入口及通風孔的外部環境中操作本產品,以減少一氧化碳
•
氣體積聚以及可能接近有人空間的風險。
根據製造商的說明安裝電池供電的一氧化碳報警器或帶有備用電池的插入
•
式一氧化碳報警器。煙霧警報器不能檢測一氧化碳氣體。
請勿在房屋、車庫、地下室、狹小空隙、棚屋或其他局部封閉的空間內運
•
行本產品,即使使用風扇或通道口及窗戶通風,亦是如此。一氧化碳能夠
快速地在這些空間內積聚,並且能夠停留數小時,即使是在產品已被關閉
後,亦是這樣。
始終將本產品放在下風處,並且使發動機排氣遠離有人空間。
•
警告 起動器繩索反沖(快速收縮)會將您的手和手臂拉向發動機,讓
您不能及時拉回手和手臂,這可能會導致斷骨、骨折、擦傷、扭傷
或造成重傷。
啟動發動機時,緩慢拉動繩索,直至感受到阻力,然後迅速拉動,以免產
•
生反沖。
請勿在發動機上的電氣設備接通電源或開啟時,啟動或停止發動機。
•
注意
用於解釋與人身傷害不相關的操作。
可能會
造成死亡或嚴重傷害。
可能會
造成死亡或嚴重傷害。
活動零件
一氧化碳
警報器
阻氣門 運行
電壓表 油位 燃料 啟動
不明飛行物
警報器 接地 地面終端
熱表面
關閉 開啟
!
斷路器 發動機控制 請勿啟動
發動機
重物
設備
發電機電壓可能引起電休克或灼傷,從而導致死亡或重傷。
警告
使用經認可的轉換設備,將發電機與電氣設施工作人員分離開,以防產生
•
激烈反應。
當將發電機作為備用電源使用時,請告知公用事業公司。
•
在任何潮濕或具有高導電性的區域(如金屬承板或鋼結構區域)使用剩餘
•
電流裝置
請勿觸摸裸露的電線或插座。
•
請勿使用電線磨損、裸露或有其他損壞的發電機。
•
請勿在雨天或潮濕的天氣下操作發電機。
•
請勿站在水中、赤腳、或手腳潮濕的情況下處理發電機或電線。
•
請勿允許不合格的人員或兒童操作或檢修發電機。
•
(RCD)
。
5 5
Page 48

Not for
Reproduction
警告 廢熱/廢氣可能點燃可燃物、易燃結構體或損害油箱,引起火災
請勿觸摸熱部件和避免接觸熱排放氣體。
•
設備冷卻後再進行觸摸。
•
在發電機的所有側面(包括其頂部)保持至少
•
聯絡原始設備製造商、零售商、或經銷商,以獲得用於安裝在此發動機中
•
的排氣系統的火花熄滅器。
更換零件時必須使用原裝零件並安裝在相同的位置上。
•
警告 意外引發的火花可能引起火災或電擊,導致死亡或嚴重受傷。
調整或維修您的發電機時
從火花塞處斷開火花塞的電線,然後將電線放置在不能接觸火花塞的地方。
•
測試發動機火花時
使用經批准的火花塞測試儀。
•
請勿在火花塞移除時檢查火花。
•
警告 起動器和其他旋轉部件可能會捲住手、頭髮、衣服、或配飾導致
嚴重傷害。
沒有保護外殼或保護罩時,請勿操作發電機。
•
請勿穿著寬鬆的衣服、佩戴珠寶首飾或任何可能被起動器或其他旋轉部件
•
捲住的物件。
綁好長髮並摘掉珠寶首飾。
•
並導致死亡、嚴重傷害和/或財產損失。
接觸消聲器區域可能會導致燒傷造成嚴重的傷害。
英尺(即
5
米)的空隙。
1.5
操作速度過高可能導致輕微損傷和/或發電機受損。
注意
速度過低會造成沉重的負荷。
請勿擺弄調速器彈簧、連結或其他部件以加快發動機轉速。
•
請勿以任何方式更改發電機。
•
注意
超過發電機功率/電流容量,可能使發電機和/或連接至發電機的電氣設
備受損。
請勿超過發電機功率/電流容量。請參看
•
啟動發電機,並在連接電負載前使發電機處於穩定狀態。
•
在關閉狀態下連接電負載,然後打開以便操作。
•
關閉電負載,並在停止發電機之前從發電機處斷開。
•
注意
不當處理發動機可能使其受損並縮短其壽命。
發電機僅限用於預期用途。
•
如果您對預期用途存有疑問,請詢問經銷商或聯絡當地服務中心。
•
僅限在平坦的地面上操作發電機。
•
請勿將發電機暴露在過於潮濕、含有過多灰塵、污垢、或腐蝕性過強的
•
氣體中。
請勿透過冷卻槽插入任何物體。
•
如果連接的設備過熱,關掉並斷開發電機。
•
如果出現下列情況,關閉發電機:
•
無電力輸出;
-
設備出現火花、煙霧、火苗等現象;
-
裝置異常震動。
-
操作
部分中的
請勿使發電機超載
。
警告 燃料和其蒸氣極其易燃易爆,這可能引起燒傷、火災或爆炸,
添加或排空燃料時
關閉發電機的發動機,在移除油箱蓋前讓它冷卻至少
•
箱蓋以減小油缸壓力。
在戶外添加或排空燃料箱。
•
請勿對燃料箱加油過滿。留出燃料膨脹的空間。
•
如果燃料溢出,等它蒸發之後再啟動發動機。
•
保持燃料遠離火花、明火、母火、高溫、和其他點火源。
•
頻繁檢查燃料管線、箱蓋和配件有無裂縫或洩漏情況。如有必要,請進行
•
更換。
請勿點燃香煙或吸煙。
•
啟動設備時
確保火花塞、消聲器、油箱蓋和空氣濾清器均準備就緒。
•
請勿在火花塞移除後給發動機安裝曲柄。
•
操作設備時
請勿在任何建築物、車棚、門廊、移動設備、航運工業應用或圍場內操作
•
本產品。
請勿將發動機或設備至傾斜至某一角度,這會導致燃料洩漏。
•
請勿透過將阻氣門控制裝置移動至「
•
運輸、移動或修理設備時
• 運輸/移動/
請勿將發動機或設備至傾斜至某一角度,這會導致燃料洩漏。
•
斷開火花塞線。
•
貯藏燃料或燃料箱中有燃料的設備時
貯藏時遠離熔爐、爐灶、熱水器、烘乾機和其他帶有指示燈或其他點火源
•
的電器,因為它們可以點燃燃料蒸氣。
導致死亡、嚴重傷害和/或財產損失。
分鐘。慢慢旋松油
2
阻氣門」位置 ( )停止發動機。
修理設備時,確保油箱為空或燃料關閉閥已關閉。
6 BRIGGSandSTRATTON.COM6 BRIGGSandSTRATTON.COM
Page 49

Not for
Reproduction
裝配
經過使用推薦的燃料和機油進行合理的維護後,您的發電機已準備好進行使用。
如果您就發電機的服務存有任何疑問,請聯絡您當地的
中心。如果您需要幫助,請提供您設備上可用的識別標籤上的型號、版次和
序號。請參看
功能與控件
以找尋識別標籤的位置。
Briggs & Stratton
打開發電機的包裝
將紙板箱放在一個堅固且平整的表面上。
1.
移除紙板箱的所有物件。
2.
透過從上至下剪開各個角落,即可完全打開紙板箱。
3.
添加機油
1.
2.
3.
4.
5.
6.
注意
在發動機被正確地注入推薦機油之前,請勿嘗試起動或發動它。此舉可能導
•
致發動機故障。
添加燃料
燃料必須滿足下列要求:
•
•
•
注意
發動機以使用代用燃料發動。使用未經承認的燃料將會損害發動機零件並使發
動機的保固失效。
為了防止燃料系統發黏,請將燃料穩定劑混入燃料中。請參看「貯藏」。
並非所有燃料都是相同的。如果出現啟動或性能問題,請更換燃料提供商或
更換品牌。經認證,該發動機可使用汽油發動。該發動機的排放控制系統為
(發動機改型)。
EM
1.
添加燃料時
•
•
•
•
•
•
•
2.
3.
高海拔
在超過
85/85AKI (89 RON)
進行調整。未進行此類調整便運轉,將會降低性能、增加燃料消耗量並提高
排放量。請聯絡
整資訊。
在低於
動機。
圖
將發電機放在一個水平面上。
清除機油箱區域的任何垃圾。
如要添加機油,請緩慢地將機油倒入機油箱內(
取下量油尺(
插入量油尺,但請勿將其擰入。油位應位於「滿油「標記處(
若需要,請添加機油,以達到「滿油「標記。
把量油尺放回原處,並擰緊。
不當處理發動機可能使其受損並縮短其壽命。
圖
乾淨、新鮮且不含鉛的汽油。
辛烷值至少為
可以接受含多達
請勿使用未經承認的汽油,如
清潔油箱蓋周圍區域,然後取下蓋子。
警告 燃料和其蒸氣極其易燃易爆,這可能引起燒傷、火災或爆炸,
關閉發電機的發動機,在移除油箱蓋前讓它冷卻至少
箱蓋以減小油缸壓力。
在戶外加滿燃料箱。
請勿對燃料箱加油過滿。留出燃料膨脹的空間。
如果燃料溢出,等它蒸發之後再啟動發動機。
保持燃料遠離火花、明火、母火、高溫、和其他點火源。
頻繁檢查燃料管線、箱蓋和配件有無裂縫或洩漏情況。如有必要,請進行
更換。
請勿點燃香煙或吸煙。
緩慢地將不含鉛燃料添加到燃料箱(
超過紅色指標線(
所示。
安裝油箱蓋,並讓任何溢出的燃料在啟動發動機之前蒸發。
英尺(即
5,000
英尺(即
2,500
4
2
、A)。
4
、A),然後使用清潔布擦拭。
2
3
1
87/87 AKI (91 RON)
乙醇的汽油(酒精-汽油混合燃料)。
10%
導致死亡、嚴重傷害和/或財產損失。
、A)。此舉使燃料有充足的空間進行擴散,如圖
3
米)的高海拔處,可以接受辛烷值至少為
1,524
的汽油。為了使排放量持續符合標準,需要在高海拔地區
Briggs & Stratton
米)的高海拔處,不建議使用高海拔裝備運轉發
762
。如用於高海拔地區,請參看
E15 及 E85
授權服務經銷商,瞭解關於高海拔地區的調
。請勿在汽油中混合機油或改動
分鐘。慢慢旋松油
2
、C)。請格外小心,不要讓燃料
1
、B)。
2
高海拔
服務
。
連接電池負極電纜
在帶有電啟動式發動機的模型上,將電池負極電纜連線至電池,步驟如下:
切斷綁帶,以固定負極(黑色)電纜未繫住的一端。
1.
2. 使用 8
3.
4.
5.
功能及控件
發動機識別號
A -
預備好這些資訊。
發電機識別號
B -
這些資訊。
燃料箱
C -
接地緊固件
D -
燃料量表
E -
交流電插座
F -
的操作提供電源。
斷路器
G -
電壓計
H -
油箱蓋/量油尺
J -
排油塞
K -
燃料閥
L -
反沖起動器
M -
空氣濾清器
N -
火花避雷器消音器
P -
螢幕。
火花塞
R -
阻氣門控制
S -
電啟動開關
T -
到關閉
低油位警示燈
U -
毫米套筒扳手,卸下電池負極接線柱(A)上的螺釘(C)、防松
墊圈(C)及平墊圈(C)。
將防松墊圈、平墊圈及電池負極電纜(B)滑過螺釘,如圖所示。
將螺釘重新連接至電池負極接線柱,然後擰緊。
確認到電池及發電機的連接均具有緊密性及牢固性。
請在運轉您的發電機之前,閱讀本「操作員手冊」及安全條例。將說
明與您的發電機相比較,以便您熟悉不同控件及調節裝置的位置。儲
存本手冊,以供將來參考。
提供發動機的型號、類型及代碼。請在致電獲取協助時,
—
提供發電機的型號及序號。請在致電獲取協助時,預備好
—
在此處檢視並添加不含鉛燃料。
—
諮詢您所在區域具有接地要求管轄權的當地代理商。
—
顯示燃料箱中可用的燃料數量。
—
可用來為交流電、單相、電、照明、設備、工具及電機負載
—
與斷路器一同提供的插座旨在防止發電機電超載。
—
用於測量電勢。
—
在此處檢視並添加機油。
—
在此處排出機油。
—
用來打開及關閉發動機的燃料供給。
—
用來手動啟動發動機。
—
透過過濾進風流中的灰塵及垃圾,保護發動機。
—
發動機汽缸蓋中的一個裝置,它透過電火花點燃燃料混合物。
—
在冷啟動發動機時使用。
—
將鑰匙轉動到啟動
—
位置,以便關閉發動機。
(O)
低油位警示燈旨在防止發動機因機油不夠而受損。
–
5
圖
1
圖
排氣消音器可降低發動機噪音,並配有火花避雷器
—
位置,以便启动发动机。將鑰匙轉動
(
)
7 7
Page 50

Not for
Reproduction
操作
系統接地
發電機配有一個接地緊固件。發電機有一個系統接地,用於將發電機機座零件
連接至交流電輸出插座上的接地端。系統接地被連接至交流電中線(而中線被
搭接到發電機機座)。
特殊要求
聯邦、當地法規或條例可能適用於發電機的預期用途。請諮詢合格的電工、
電氣檢查員或具有管轄權的當地代理商:
在某些地區,發電機需要在當地公用事業公司進行登記。
•
如果是在建築工地使用發電機,則可能必須遵守額外的規章。
•
連接至建築物的電氣系統
至建築物之電氣系統的連接(為了獲得備用電源),必須採用列示的轉換開
關,並由持牌電工執行安裝操作。此連接必須使發電機電源與公用電源分離,
同時必須遵守所有適用的法律及電氣規範。
發電機電壓可能引起電休克或灼傷,從而導致死亡或重傷。
警告
使用經認可的轉換設備,將發電機與電氣設施工作人員分離開,以防產生
•
激烈反應。
當將發電機作為備用電源使用時,請告知公用事業公司。
•
在任何潮濕或具有高導電性的區域(如金屬承板或鋼結構區域)使用剩餘
•
電流裝置
請勿觸摸裸露的電線或插座。
•
請勿使用電線磨損、裸露或有其他損壞的發電機。
•
請勿在雨天或潮濕的天氣下操作發電機。
•
請勿站在水中、赤腳、或手腳潮濕的情況下處理發電機或電線。
•
請勿允許不合格的人員或兒童操作或檢修發電機。
•
發電機位置
警告 有毒氣體危害。發動機排放氣體中含有一氧化碳等有毒氣體,
僅在遠離窗戶、入口及通風孔的外部環境中操作本產品,以減少一氧化碳
•
氣體積聚以及可能接近有人空間的風險。
根據製造商的說明安裝電池供電的一氧化碳報警器或帶有備用電池的插入
•
式一氧化碳報警器。煙霧警報器不能檢測一氧化碳氣體。
請勿在房屋、車庫、地下室、狹小空隙、棚屋或其他局部封閉的空間內運
•
行本產品,即使使用風扇或通道口及窗戶通風,亦是如此。一氧化碳能夠
快速地在這些空間內積聚,並且能夠停留數小時,即使是在產品已被關閉
後,亦是這樣。
始終將本產品放在下風處,並且使發動機排氣遠離有人空間。
•
。
(RCD)
6
7
圖
可以在幾分鐘內令人致死。一氧化碳無色、無嗅、無味。即使您
沒有嗅到廢氣的氣味,您仍然會暴露於一氧化碳氣體中。如果您
在使用本產品時開始感覺噁心、眩暈或虛弱,請立即關閉並到新
鮮的空氣環境中去。馬上就醫。您可能已經一氧化碳中毒。
啟動發動機
注意
本發動機是無油裝運。在您啟動發動機之前,請務必依照本手冊中的說
明添加機油。如果您啟動無油的發動機,則將造成無法補救的損害,並且不包
含在保固範圍內。
注意
在您啟動發動機之前,請確保所有電氣設備均與發電機的電源插座斷開。
確保裝置位於一個平整的水平面上。
1.
注意
如果在一個平整的水平面上啟動及操作裝置時出現故障,這將導致裝置
無法在操作期間啟動或關閉。
將燃料閥
2.
拔出阻氣門控制裝置
3.
對於電啟動,將啟動開關
4A.
發電機啟動。爲了延長起動器零件的壽命,請勿將鑰匙保持在啟動
位置超過
•
•
注意
•
•
4B.
•
•
5.
•
6.
注意
直至發動機啟動。
注意
關閉,則請確保裝置位於一個水平面上,並請檢視曲軸箱中的油位是否適當。
本裝置配有低油位防護設備。如果是這樣的話,機油必須位於適當的油位處,
發動機方可啟動。
•
•
•
•
•
如果發動機啟動,則繼續執行步驟 6。
如果發動機啟動失敗,則繼續執行步驟 5。
如果電池放電,請使用手動啟動說明。
警告 起動器繩索反沖(快速收縮)會將您的手和手臂拉向發動機,
讓您不能及時拉回手和手臂,這可能會導致斷骨、骨折、擦傷、
扭傷或造成重傷。
啟動發動機時,緩慢拉動繩索,直至感受到阻力,然後迅速拉動,以免產
生反沖。
請勿在發動機上的電氣設備接通電源或開啟時,啟動或停止發動機。
對於手動啟動,將啟動開關中的鑰匙轉動到運行
,並緩慢地拉動,直至感受到些微阻力。然後快速地拉動一次,即可
(M)
啟動發動機。
如果發動機啟動,則繼續執行步驟 6。
如果發動機啟動失敗,則繼續執行步驟 5。
在半途中推入阻氣門手柄,將啟動開關中的鑰匙轉動到運行
然後拉動反沖手柄兩次或者將啟動開關中的鑰匙轉動並保持在啟動
位置,如步驟
如果發動機啟動失敗,則請重複步驟
當發動機變熱時,在阻氣門手柄上執行推入操作,即可逐漸打開阻氣門。
如果發動機出現溢流現象,則請一直推入阻氣門手柄,然後轉動曲柄,
如果發動機在
警告 廢熱/廢氣可能點燃可燃物、易燃結構體或損害油箱,引起火災
請勿觸摸熱部件和避免接觸熱排放氣體。
設備冷卻後再進行觸摸。
在發電機的所有側面(包括其頂部)保持至少
聯絡原始設備製造商、零售商、或經銷商,以獲得用於安裝在此發動機中
的排氣系統的火花熄滅器。
更換零件時必須使用原裝零件並安裝在相同的位置上。
1
圖
轉動到位置
(L)
秒鐘,同時,請在相繼的啟動嘗試之間至少暫停
15
中所述。
4A
次拉動後啟動,但無法運行,或者如果裝置在操作期間
3
並導致死亡、嚴重傷害和/或財產損失。
接觸消聲器區域可能會導致燒傷造成嚴重的傷害。
。
(I)
,以便關閉阻氣門
(S)
中的鑰匙轉動並保持在啟動
(T)
)
(
至步驟 4。
3
英尺(即
5
。
位置,握住反沖手柄
(I)
)
(
1
(I)
米)的空隙。
1.5
位置,直至
(
分鐘。
位置,
(
)
)
8 BRIGGSandSTRATTON.COM8 BRIGGSandSTRATTON.COM
Page 51

Not for
Reproduction
連接電負載
警告
使用經認可的轉換設備,將發電機與電氣設施工作人員分離開,以防產生
•
激烈反應。
當將發電機作為備用電源使用時,請告知公用事業公司。
•
在任何潮濕或具有高導電性的區域(如金屬承板或鋼結構區域)使用剩餘
•
電流裝置
請勿觸摸裸露的電線或插座。
•
請勿使用電線磨損、裸露或有其他損壞的發電機。
•
請勿在雨天或潮濕的天氣下操作發電機。
•
請勿站在水中、赤腳、或手腳潮濕的情況下處理發電機或電線。
•
請勿允許不合格的人員或兒童操作或檢修發電機。
•
僅將高品質、絕緣效果良好的延長電纜與發電機的交流電電源插座一同使用。
請在每次使用前,檢查延長電纜。檢視所有延長電纜是否具有適當的額定值,
並且未受到任何損壞。
警告 損壞或超載的電纜可能過熱、形成電弧並有可能燃燒,導致死亡、
嚴重傷害和/或財產損失。
僅限使用適合的額定延長電纜。
•
遵循延長電纜的所有安全說明。
•
每次使用前檢查電纜。
•
啟動發動機後,讓它保持穩定並加熱幾分鐘。
1.
檢視電壓計
2.
確保電氣設備的負載在發電機的額定輸出範圍內。
3.
通知
可以使用大於發電機輸出容量的額定值,對插座進行標記。
對於某個所需的電流強度比發電機或插座能夠提供之電流強度更多的設備而
•
言,請勿嘗試接通它的電源。
請勿使發電機超載。請參看
•
確保電氣設備處於關閉狀態。然後,將電氣設備連接至發電機的交流電
4.
電源插座
在連接其他電氣設備時,請確保總負載不超過發電機的功率容量。請參
5.
規格
看
注意
請勿超過發電機的功率容量。超過功率容量可能損壞發電機及/或連接的
電氣設備。
在停止發動機之前,請關閉所有電氣設備,然後斷開它們的電源。
6.
1
圖
發電機電壓可能引起電休克或灼傷,從而導致死亡或重傷。
。
(RCD)
是否具有適當的電壓。
(H)
發電機容量。
。當電氣設備連接完畢後,打開電氣設備。
(F)
部分。
停止發動機
1.
2.
3.
4.
請勿透過將阻氣門控制裝置移動至「
•
圖 8
在停止發動機之前,請關閉所有電氣設備,然後斷開它們的電源。
讓發動機在空載狀態下運行數分鐘,以使發動機及發電機的內部溫度保
持穩定。
將燃料閥轉動到關閉
電啟動:將電啟動開關
警告 燃料和其蒸氣極其易燃易爆,這可能引起燒傷、火災或爆炸,
油位開關及警示燈
如果油位太低,開關將停止發動機並啟動發電機上的警示燈
動機時油位太低,開關將啟動警示燈。如果警示燈被啟動,請確保裝置位於一個
水平面上,並請檢視油位是否適當。請參看
如果油位低於「加油」標記,請加油,直至油位達到「滿油」標記。啟動發動
機,然後在繼續操作之前檢視漏油情況。
如果油位介於「加油」標記及「滿油」標記之間,
權經銷商,以便讓其檢查發動機。
9
位置。
)
(
轉動到關閉
(T)
導致死亡、嚴重傷害和/或財產損失。
阻氣門」位置 ( )停止發動機。
位置。
)
(
圖 1
如何檢視/添加機油
請勿啟動發動機。請諮詢授
。如果在啟動發
(U)
部分。
9 9
Page 52

Not for
Reproduction
圖
1
發電機容量
部分。
將自動打開。如果斷路器處於打
(G)
斷路器
如果負載超過發電機的額定輸出,斷路器
開狀態,那麼請在恢復操作之前減少輸出負載並重置斷路器。如要確定最大輸
出負載,請參看
請勿使發電機超載
容量
確保發電機的啟動功率*滿足或超過電氣設備的額定功率(操作時)及額外浪湧
功率(啟動時)。
選擇您將同時產生功率的項目。
1.
計算這些項目的額定總功率(運行時)。為保證您的專案處於運轉狀態,
2.
這是您的發電機必須產生的功率數。請參看「功率參考指南」。
估算您將需要多少浪湧功率(啟動時)。浪湧功率是指啟動電機驅動
3.
工具或設備(如圓鋸或冰箱)所需的短時功率。由於並非所有的電機都
同時啟動,因此浪湧總功率可以透過僅將具有最高額外浪湧功率的專案
添加至步驟
工具或設備 額定功率(運行時) 額外浪湧功率(啟動時)
窗扇
深冷器
電視機
安全系統
燈(
瓦)
75
例如:
額定總功率(運行時)
最高額外浪湧功率
所需的發電機總輸出
注意
如果所需的發電機總輸出不包含額外浪湧功率,則請勿超過發電機的額
定功率。
**
規格
請參看
*
規格
請參看
**
電源管理
不能正確地連接電氣設備可能導致發電機或連接的電氣設備受損。管理發電機
電源的正確且安全的方法是依照下列順序添加電氣設備(負載):
在您啟動發動機之前,請確保所有電氣設備均與發電機的電源插座斷開。
1.
啟動發動機(請參看
2.
連接需要最大功率(負載)的電氣設備。
3.
使發電機的輸出穩定(發動機平穩地運轉)。
4.
連接下一個電氣設備。
5.
再次使發電機的輸出穩定。
6.
繼續依照上述步驟,添加電氣設備。確保所有電氣設備的總功率
7.
(負載)不超過發電機的功率容量(請參看
超過發電機功率/電流容量,可能使發電機和/或連接至發電機的電氣設備
注意
受損。
請勿超過發電機功率/電流容量。
•
啟動發電機,並在連接電負載前使發電機處於穩定狀態。
•
在關閉狀態下連接電負載,然後打開以便操作。
•
關閉電負載,並在停止發電機之前從發電機處斷開。
•
中所得的額定總功率來估算。
2
300 600
500 500
500 —
180 —
75 —
運行總功率為
1555
+ 600
=2155
部分中的「啟動功率」。
部分中的「額定功率」。
如何啟動發動機
瓦 最高浪湧功率為
1555
部分)。
規格
部分)。
600
瓦
功率參考指南
工具或設備
必需品
電燈泡
深冷器
淺池泵
冰箱/冷藏箱
水井泵
加熱/冷卻設備
窗型冷氣機
窗扇
鍋爐風機
廚房用具
微波爐
咖啡機
電爐
居家設備
DVD/CD
VCR 100 —
立體音收音機
彩色電視
配有
其他
安全系統
AM/FM
車庫門開門器
DIY/
石英鹵素工作燈
無氣式噴槍
往復鋸
電鑽
圓鋸
瓦
– 75
– 18 cf 800 1600
馬力
– 1/3
– 10,000 BTU 1200 1800
– 1/2 馬力 800 1300
瓦
– 1000
單一單元
–
播放機
英吋
– 27
英吋顯示器的個人電腦
17
鬧鐘收音機
馬力
– 1/2
工作現場
– 1/3 馬力 600 1200
– 1/2 馬力 1000 1000
– 7-1/4 英吋 1500 1500
額定*功率
(運行時)
75 —
500 500
800 1200
1000 2000
300 600
1000 —
1500 —
1500 —
100 —
450 —
500 —
800 —
180 —
300 —
480 520
1000 —
960 960
額外浪湧功率
(啟動時)
10 BRIGGSandSTRATTON.COM10 BRIGGSandSTRATTON.COM
Page 53

Not for
Reproduction
維護
維護計劃
遵照小時或日曆間隔,以先出現的為准。在下述惡劣條件下操作時,需要進行
更頻繁的維護保養。
更加頻繁地在骯髒或粉塵條件下進行維護保養。
†
最初
小時
5
更換發動機機油
•
每
小時或每日
8
清潔碎片
•
檢查機油油位
•
每
小時或每年
25
維修發動機空氣濾清器
•
每
小時或每年
50
更換發動機機油
•
每
小時或每年
100
維修燃料閥
•
維修火花塞
•
檢查消音器和火花避雷器
•
清潔冷卻系統
•
一般建議
定期維護將提高發電機的性能並延長其壽命。請諮詢任何授權經銷商,瞭解關
於維護保養的資訊。
發電機的保固不包含因操作員的濫用或疏忽而使項目受損的情況。為了享有保
固的完全價值,操作員必須依照本手冊中的說明對發電機進行維護。
注意
不當處理發動機可能使其受損並縮短其壽命。
請勿操作不帶防護罩或蓋的發電機,以保證適當的冷卻。
•
需要定期作出某些調整,以便對您的發電機進行適當的維護。
所有維護保養及調整都應至少每個季度進行一次。遵照上方「維護計劃」表中
的要求。
注意
每年,您應該清潔或更換一次火花塞,並更換一次空氣濾清器。新的火
花塞及乾淨的空氣濾清器可保證適當的燃料-空氣混合物,並有助於您的發動機
更好地運行及擁有更長的壽命。
發電機維護
發電機維護包含使裝置保持乾淨及乾燥。在清潔且乾燥的環境中,操作並貯藏
裝置。在此種環境中,裝置不會暴露在過於潮濕、含有過多灰塵、污垢、或
腐蝕性過強的氣體中。發電機中的冷卻空氣孔不得被雪、樹葉或任何其他異物
阻塞。
注意
請勿使用水或其他液體清洗發電機。液體能夠進入發動機燃料系統,從而
導致性能低下和/或故障現象出現。另外,如果液體透過冷卻空氣孔進入發電機,
那麼某些液體將保留在轉子及定子繞組絕緣的空隙及裂縫中。液體及污物積聚
在發電機的內部繞組上,最終將會減少這些繞組的絕緣電阻。
†
†
†
清潔
每天或在使用前,請查看發電機的四周及下面是否有漏油或燃料洩漏的跡象。
從發電機的內部及外部,清潔積聚的垃圾。使聯動裝置、彈簧及其他發動機控
件保持乾淨。使消音器周圍及後面區域沒有任何可燃垃圾。檢查發電機上的
冷卻空氣孔及通道。這些通道必須保持乾淨且暢通無阻。
應該使發動機零件保持乾淨,以降低積聚的垃圾過熱及著火之風險。
使用濕布將外表面擦乾淨。
•
不當處理發動機可能使其受損並縮短其壽命。
注意
請勿將發電機暴露在過於潮濕、含有過多灰塵、污垢、或腐蝕性過強的
•
氣體中。
請勿透過冷卻孔插入任何物體。
•
使用柔軟的鬃刷散開結成塊的污物或油蹟。
•
使用真空吸塵器吸走鬆散的污物及垃圾。
•
燃料系統維護
警告 燃料和其蒸氣極其易燃易爆,這可能引起燒傷、火災或爆炸,
保持燃料遠離火花、明火、母火、高溫、和其他點火源。
•
頻繁檢查燃料管線、箱蓋和配件有無裂縫或洩漏情況。如有必要,請進行
•
更換。
如果燃料溢出,等它蒸發之後再啟動發動機。
•
如何清潔/更換垃圾過濾器
拆下油箱蓋(
1.
拆下垃圾過濾器(
2.
如果垃圾過濾器髒了,請將其清洗乾淨。如果垃圾過濾器破損或者其他
3.
方面受損,請更換它。如果您要更換垃圾過濾器,請確保使用原裝設備
替代垃圾過濾器進行更換。
如何清潔燃料沉澱杯
燃料閥配有一個燃料沉澱杯,可遵照下述步驟進行清潔:
將燃料閥移動至關閉位置。
1.
將沉澱杯(
2.
在不易燃溶劑中清洗沉澱杯。使沉澱杯徹底乾燥。
3.
安裝沉澱杯並牢牢地擰緊。
4.
將燃料閥移動至打開位置,然後檢視是否存在洩漏現象。如果燃料閥存
5.
在洩漏現象,請使用原裝設備替代燃料閥進行更換。
圖 8
、A)從燃料閥中取出。
8
11
導致死亡、嚴重傷害和/或財產損失。
、A)。
11
、B)。
11
電池維護
沒有針對起動電池的必要維護(若配有)。使電池及端子保持乾淨及乾燥。
注意
起動電池僅在發電機工作時充電。
11 11
Page 54

Not for
Reproduction
發動機維護
警告 意外引發的火花可能引起火災或電擊,導致死亡或嚴重受傷。
調整或維修您的發電機時
從火花塞處斷開火花塞的電線,然後將電線放置在不能接觸火花塞的地方。
•
測試發動機火花時
使用經批准的火花塞測試儀。
•
請勿在火花塞移除時檢查火花。
•
汽化器及發動機速度調整
請勿對汽化器或發動機速度進行調整。汽化器已在工廠進行設置,以在大多數
條件下高效運行。請勿篡改調速器彈簧、聯動裝置或其他零件以更改發動機
速度。如果需要進行調整,請諮詢
注意 操作速度過高可能導致輕微損傷和/或發電機受損。
速度過低會造成沉重的負荷。
請勿擺弄調速器彈簧、連結或其他部件以加快發動機轉速。
•
請勿以任何方式更改發電機。
•
Briggs & Stratton
機油
機油推薦
我們建議採用
品質的去垢油被分類為
受的。請勿使用特殊添加劑。
室外溫度可決定發動機的油黏度是否適當。使用下表選擇適用於預期的室外溫度
範圍之最佳黏度。
Briggs & Stratton
保固認證的機油,以獲得最佳性能。如果其他高
SF、SG、SH、SJ
或更高保養級別,則它們也是可以接
授權經銷商。
檢視油位
圖 1 2 4
在每次使用前或每次操作至少
確保發電機位於一個水平面上。
1.
清潔油箱周圍區域(
2.
量油尺。更換量油尺。取下量油尺並檢視油位。
注意
在檢視油位時,請勿擰入量油尺。
確認油位是否位於量油尺上的「滿油「標記(
3.
量油尺。
添加機油
確保發電機位於一個水平面上。
1.
檢視油位
依照
2.
若需要,緩慢地將機油倒入油箱口中,直至達到量油尺上的「滿油」
3.
標記。請勿裝到滿溢。
注意
機油裝到滿溢可能導致發動機無法啟動或者啟動非常困難。
請勿裝到滿溢。
•
如果超過量油尺上的「滿油」標記,請將機油排出,以使油位降低至量油
•
尺上的「滿油」標記。
更換並擰緊機油蓋/量油尺。
4.
更換機油
如果您正在極度骯髒或粉塵的條件下或者在極熱的天氣條件下使用您的發電機,
請更頻繁地更換機油。
注意 避免皮膚長期或反復的接觸舊機油。
舊機油已在某些動物實驗上證明能導致皮膚癌。
•
用肥皂和水徹底清洗暴露的部位。
•
防止兒童接觸。愛護環境。保護資源。將廢機油返回至收集中心。
中的描述,檢視油位。
小時前,應檢視油位。請維持油位。
8
、A),取下機油蓋/量油尺,然後使用清潔布擦拭
4
、B)處。更換並擰緊機油蓋
2
/
當室外溫度低於
*
當室外溫度高於
**
地檢視油位。
4°C (40°F)
27°C (80°F)
時,使用
時,使用
將導致啟動非常困難。
SAE 30
可能導致油耗量增加。請更頻繁
10W30
如要在發動機仍在運行時產生熱量的情況下更換機油,請遵照下列步驟:
確保裝置位於一個水平面上。
1.
從火花塞處斷開火花塞的電線,然後將電線放置在不能接觸火花塞的
2.
地方。
清潔排油塞(
3.
對面。
取下排油塞,然後將機油完全排放到一個適當的容器中。
4.
重新安裝排油塞,然後牢牢地擰緊。取下油箱蓋/量油尺。
5.
添加機油
依照
6.
擦除任何溢出的機油。
7.
、K)周圍區域。排油塞位於發動機的基座上,即汽化器
1
中的描述,重複步驟
至步驟 4,以便添加機油。
3
12 BRIGGSandSTRATTON.COM12 BRIGGSandSTRATTON.COM
Page 55

Not for
Reproduction
檢修火花塞
更換火花塞將有助於您的發動機更容易啟動並更好地運行。
清潔火花塞周圍區域。
1.
取下並檢視火花塞。
2.
使用測隙規檢視電極間隙,然後重置火花塞間隙至建議的間隙(若必
3.
要)(請參看
如果電極有凹痕或烙印,或者陶瓷破碎,請更換火花塞。使用推薦的
4.
替換火花塞。請參看
安裝火花塞並牢牢地擰緊。
5.
注意
在某些地區,當地法律規定使用電阻式火花塞來抑制點火信號。如果
發動機本來就配有電阻式火花塞,則請使用相同型號的火花塞進行替換。
檢查消音器及火花避雷器
檢查消音器是否有裂紋、腐蝕或其他損壞。取下火花避雷器(若配備),
然後檢查其是否有損壞或碳塊。如果需要替換零件,請務必只是用原裝設備
替換零件。
警告 接觸消聲器區域可以導致嚴重的燒傷。
請勿觸摸熱部件和避免接觸熱排放氣體。
•
設備冷卻後再進行觸摸。
•
在發電機的所有側面(包括其頂部)保持至少
•
聯絡原始設備製造商、零售商、或經銷商,以獲得用於安裝在此發動機中
•
的排氣系統的火花熄滅器。
更換零件時必須使用原裝零件並安裝在相同的位置上。
•
檢修空氣濾清器
如果您的發動機與骯髒的空氣濾清器一同運轉,那麼它將不會正確地運行並且
可能受損。如果在骯髒或粉塵條件下操作,請更頻繁地進行檢修。
如要檢修空氣濾清器,請遵照下列步驟:
打開空氣濾清器頂部及底部的蓋子,然後取下蓋子
1.
小心地取下空氣濾清器
2.
在液體溶劑及水中清洗泡沫式空氣濾清器。使用清潔布將空氣濾清器
3.
擦乾。
將泡沫式空氣濾清器浸入機油中,然後使用清潔布擠壓,以便去除
4.
餘油。
在基座
5.
將空氣濾清器的蓋子裝配到基座及碰鎖上。
6.
9
圖
規格
)。
規格
。
廢熱/廢氣可能點燃可燃物、易燃結構體或損害燃料箱引起
火災。
英尺(即
5
10
圖
(A)
,以防垃圾落入汽化器中。
(B)
上重新安裝乾淨或新的泡沫式空氣濾清器。
(C)
米)的空隙。
1.5
。
清潔冷卻系統
隨著時間的流逝,垃圾可能積聚在汽缸的散熱片中,並且在未局部拆卸發動機
的情況下無法發現。鑒於此,我們建議您在每個建議的間隔期間,聘請
& Stratton
要的是,使發動機的頂部沒有垃圾。另請參看
授權經銷商清潔冷卻系統(請參看
維護
清潔
部分中的
。
維護計劃
Briggs
)。同樣重
貯藏
如果您不使用發電機的時間將超過
藏工作。
發電機的貯藏
清潔
中所述的內容,清潔發電機。
依照
•
檢視發電機上的冷卻空氣孔及通道是否處於打開狀態並且暢通無阻。
•
長期貯藏說明
當貯藏時間超過
必不可少的汽化器部件上形成酸質及膠質沉澱物。為了保持燃料新鮮,請使用
Briggs & Stratton®
處有售。
如果依照說明添加了燃料穩定劑,則不需要將汽油從發動機中排出。在貯藏前,
運行發動機
尚未使用燃料穩定劑進行處理,則必須將汽油排入一個經認可的容器中。運行
發動機,直至它因缺乏燃料而停止。建議在貯藏容器中使用燃料穩定劑,以便
保持新鮮度。
警告 燃料和其蒸氣極其易燃易爆,這可能引起燒傷、火災或爆炸,
貯藏燃料或燃料箱中有燃料的設備時
貯藏時遠離熔爐、爐灶、熱水器、烘乾機和其他帶有指示燈或其他點火源
•
的電器,因為它們可以點燃燃料蒸氣。
燃料耗盡時
關閉發電機的發動機,在移除油箱蓋前讓它冷卻至少
•
箱蓋以減小油缸壓力。
在戶外排乾燃料箱。
•
保持燃料遠離火花、明火、母火、高溫、和其他點火源。
•
頻繁檢查燃料管線、箱蓋和配件有無裂縫或洩漏情況。如有必要,請進行
•
更換。
請勿點燃香煙或抽煙。
•
更換機油
當發動機仍有熱量時,請將曲軸箱中的油排出。補充建議等級的機油。請參看
更換機油
。
其他貯藏技巧
請勿將燃料從一個季節貯藏到另一個季節,除非已經依照
1.
中的描述加以處理。
如果燃料容器開始生銹,請將其更換。如果在使用本裝置時,燃料中存
2.
在鏽跡及/或汙物,那麼它們可能導致各種問題。
使用一個適當的保護蓋(即不會保留水分的保護蓋)來覆蓋裝置。
3.
天時,燃料會變得陳舊。陳舊的燃料可導致燃油系統中或
30
高級配方燃料處理劑及穩定劑。此類產品在銷售原廠維修件
分鐘,以使穩定劑在整個燃油系統中循環。如果發動機中的汽油
2
導致死亡、嚴重傷害和/或財產損失。
日,請使用下列指南來準備發電機的貯
30
分鐘。慢慢旋松油
2
長期貯藏說明
警告 貯藏蓋可能引起火災導致死亡、嚴重傷害和/或財產損失。
請勿把貯藏蓋置於熱的發電機上。
•
讓設備充分冷卻後再將蓋置於設備上。
•
將發電機貯藏在乾淨且乾燥的區域。
4.
13 13
Page 56

Not for
Reproduction
疑難排解
問題 原因 糾正措施
發動機正在運行,但沒有可用的
交流電輸出。
發動機空載運行良好,但當連接負載時
陷於「停頓」狀態。
發動機開啟失敗;在運行或啟動以及
運行不暢時停止運轉。
斷路器開啟。
1.
發電機故障。
2.
連接不良或延長電纜受損。
3.
電氣設備不起作用。
4.
連接電器設備時短路。
1.
發動機轉速太慢。
2.
發電機超載。
3.
發電機短路。
4.
燃油濾清器堵塞或過髒。
5.
燃料關閉閥處於關閉
1.
低油位。
2.
空氣濾清器過。
3.
燃油濾清器堵塞或過髒。
4.
燃料用盡。
5.
燃料變質。
6.
火花塞線沒有連接火花塞。
7.
受損的火花塞。
8.
燃料中有水。
9.
汽化器被淹沒。
10.
過於豐富的燃料混合物。
11.
進氣閥無法開啟或關閉。
12.
發動機已經不再受壓。
13.
電啟動開關處於關閉位置。
14.
電池放電。
15.
(O)
的位置。
重設斷路器。
1.
聯絡授權服務組織。
2.
檢查維修。
3.
連接另一運行良好的設備。
4.
斷開短路的電力負荷。
1.
聯絡授權服務組織。
2.
操作
部分中的
請參看
3.
聯絡授權服務組織。
4.
清潔或更換燃油濾清器。
5.
將燃料閥旋轉至
1.
將曲軸箱填充至適當油位或將發電機放置於水平面。
2.
清潔或更換空氣濾清器。
3.
清潔或更換燃油濾清器。
4.
加滿燃料箱。
5.
排乾燃料箱和汽化器;加滿新的燃料。
6.
將電線連接至火花塞。
7.
更換火花塞。
8.
排乾汽油箱和汽化器;加滿新的汽油。
9.
10. 等待 5
11.
12.
13.
14.
15.
分鐘,重新給發動機裝曲柄。
聯絡授權服務組織。
聯絡授權服務組織。
聯絡授權服務組織。
將電停開關旋轉至運行位置。
充電或更換電池。
請勿使發電機超載
位置。
(I)
。
發電機超載。
1.
發動機沒有電源。
發動機「振蕩」或抖動。
空氣濾清器過。
2.
燃油濾清器堵塞或過髒。
3.
汽化器運行太快或太慢。
1.
燃油濾清器堵塞或過髒。
2.
能源消耗
正常運行時的能源消耗(汽油)為負荷的
空閒模式下的能源消耗(汽油) 不適用 不適用 不適用
每消耗一單位能源所交付的產品或服務 不適用 不適用 不適用
50% 1.12 l/h 1.63 l/h 2.04 l/h
2,300
1.
2.
3.
1.
2.
瓦
請勿使發電機超載
請參看
更換空氣濾清器。
清潔或更換燃油濾清器。
聯絡授權服務組織。
清潔或更換燃油濾清器。
3,500
。
瓦
6,000
瓦
14 BRIGGSandSTRATTON.COM14 BRIGGSandSTRATTON.COM
Page 57

Not for
Reproduction
產品規格
型號
030566, 030596
啟動功率
. . . . . . . . . . . . . . . . . . . . . . . . . . . . . . . . . . . . . . . . . . . . . . . . . . . . . . 2,500
額定功率
*. . . . . . . . . . . . . . . . . . . . . . . . . . . . . . . . . . . . . . . . . . . . . . . . . . . . . 2,300
交流電輸出電壓
交流電輸出電壓為
頻率
. . . . . . . . . . . . . . . . . . . . . . . . . . . . . . . . . . . . . . . . . . . . . . . . . . . . . . . . . . . 60
相位
........................................................
燃料容量
發動機排水量
機油容量
火花塞間隙
火花塞扭矩
進氣門間隙
排氣門間隙
型號
030570, 030597
啟動功率
額定功率
交流電輸出電壓
交流電輸出電壓為
頻率
. . . . . . . . . . . . . . . . . . . . . . . . . . . . . . . . . . . . . . . . . . . . . . . . . . . . . . . . . . . 60
相位
........................................................
燃料容量
發動機排水量
機油容量
火花塞間隙
火花塞扭矩
進氣門間隙
排氣門間隙
型號
030576, 030583, 030598, 030599
啟動功率
額定功率
交流電輸出電壓
交流電輸出電壓為
頻率
. . . . . . . . . . . . . . . . . . . . . . . . . . . . . . . . . . . . . . . . . . . . . . . . . . . . . . . . . . . 60
相位
........................................................
燃料容量
發動機排水量
機油容量
火花塞間隙
火花塞扭矩
進氣門間隙
排氣門間隙
. . . . . . . . . . . . . . . . . . . . . . . . . . . . . . . . . . . . . . . . . . . . . . . . . . 230
伏的負載電流
230
. . . . . . . . . . . . . . . . . . . . . . . . . . . . . . . . . . . . . . . . . . . . . . 4.0
. . . . . . . . . . . . . . . . . . . . . . . . . . . . . . . . . . . . . . . . . . . . . 9.95 ci (163 cc)
. . . . . . . . . . . . . . . . . . . . . . . . . . . . . . . . . . . . 18 - 20
. . . . . . . . . . . . . . . . . . . . . . . . . . . . . . . . . . . . . . 0.030
. . . . . . . . . . . . . . . . . . . . . . . . . . . . . . . . . . . . .180 磅-
. . . . . . . . . . . . . . . . . . . . . . . . . . . 0.004 - 0.006
. . . . . . . . . . . . . . . . . . . . . . . . . . . 0.006 - 0.008
. . . . . . . . . . . . . . . . . . . . . . . . . . . . . . . . . . . . . . . . . . . . . . . . . . . . . . 4,000
*. . . . . . . . . . . . . . . . . . . . . . . . . . . . . . . . . . . . . . . . . . . . . . . . . . . . . 3,500
. . . . . . . . . . . . . . . . . . . . . . . . . . . . . . . . . . . . . . . . . . . . . . . . . . 230
伏的負載電流
230
. . . . . . . . . . . . . . . . . . . . . . . . . . . . . . . . . . . . . . . . . . . . . 6.6 加侖 (25 升)
. . . . . . . . . . . . . . . . . . . . . . . . . . . . . . . . . . . . . . . . . . . . 16.48 ci (270 cc)
. . . . . . . . . . . . . . . . . . . . . . . . . . . . . . . . . . . . 35 - 37
. . . . . . . . . . . . . . . . . . . . . . . . . . . . . . . . . . . . . . 0.030
. . . . . . . . . . . . . . . . . . . . . . . . . . . . . . . . . . . . 275 磅-英吋 (31
. . . . . . . . . . . . . . . . . . . . . . . . . . . 0.005 - 0.007
. . . . . . . . . . . . . . . . . . . . . . . . . . . 0.005 - 0.007
. . . . . . . . . . . . . . . . . . . . . . . . . . . . . . . . . . . . . . . . . . . . . . . . . . . . . . 6,500
*. . . . . . . . . . . . . . . . . . . . . . . . . . . . . . . . . . . . . . . . . . . . . . . . . . . . . 6,000
. . . . . . . . . . . . . . . . . . . . . . . . . . . . . . . . . . . . . . . . . . . . . . . . . . 230
伏的負載電流
230
. . . . . . . . . . . . . . . . . . . . . . . . . . . . . . . . . . . . . . . . . . . . . 6.6 加侖 (25 升)
. . . . . . . . . . . . . . . . . . . . . . . . . . . . . . . . . . . . . . . . . . . . 25.63 ci (420 cc)
. . . . . . . . . . . . . . . . . . . . . . . . . . . . . . . . . . . . 35 - 37
. . . . . . . . . . . . . . . . . . . . . . . . . . . . . . . . . . . . . . 0.030
. . . . . . . . . . . . . . . . . . . . . . . . . . . . . . . . . . . . 275 磅-英吋 (31
. . . . . . . . . . . . . . . . . . . . . . . . . . . 0.005 - 0.007
. . . . . . . . . . . . . . . . . . . . . . . . . . . 0.005 - 0.007
............................ 10.0
盎司(
英吋(
英吋(
英吋(
0.10 - 0.15
英吋(
0.15 - 0.20
............................ 15.2
盎司(
英吋(
英吋(
0.13 - 0.18
英吋(
0.13 - 0.18
............................ 26.0
盎司(
英吋(
英吋(
0.13 - 0.18
英吋(
0.13 - 0.18
單一相位
加侖(
15
0.54 - 0.59
0.76
牛頓米)
20
單一相位
1.05 - 1.09
0.76
牛頓米)
單一相位
1.05 - 1.09
0.76
牛頓米)
安培
赫茲
升)
升)
毫米)
毫米)
毫米)
安培
赫茲
升)
毫米)
毫米)
毫米)
安培
赫茲
升)
毫米)
毫米)
毫米)
型號 030588
瓦
啟動功率. . . . . . . . . . . . . . . . . . . . . . . . . . . . . . . . . . . . . . . . . . . . . . . . . . . . . . 2,500 瓦
瓦
額定功率*. . . . . . . . . . . . . . . . . . . . . . . . . . . . . . . . . . . . . . . . . . . . . . . . . . . . . 2,300 瓦
伏
交流電輸出電壓. . . . . . . . . . . . . . . . . . . . . . . . . . . . . . . . . . . . . . . . . . . . . . . . . . 115 伏
交流電輸出電壓為 115 伏的負載電流 ............................ 20.0 安培
頻率. . . . . . . . . . . . . . . . . . . . . . . . . . . . . . . . . . . . . . . . . . . . . . . . . . . . . . . . . . . 60 赫茲
相位 ........................................................ 單一相位
燃料容量. . . . . . . . . . . . . . . . . . . . . . . . . . . . . . . . . . . . . . . . . . . . . . 4.0 加侖(15 升)
發動機排水量. . . . . . . . . . . . . . . . . . . . . . . . . . . . . . . . . . . . . . . . . . . . . 9.95 ci (163 cc)
機油容量. . . . . . . . . . . . . . . . . . . . . . . . . . . . . . . . . . . . 18 - 20 盎司(0.54 - 0.59 升)
火花塞間隙. . . . . . . . . . . . . . . . . . . . . . . . . . . . . . . . . . . . . . 0.030 英吋(0.76 毫米)
火花塞扭矩. . . . . . . . . . . . . . . . . . . . . . . . . . . . . . . . . . . . .180 磅-英吋(20 牛頓米)
進氣門間隙. . . . . . . . . . . . . . . . . . . . . . . . . . . 0.004 - 0.006 英吋(0.10 - 0.15 毫米)
排氣門間隙. . . . . . . . . . . . . . . . . . . . . . . . . . . 0.006 - 0.008 英吋(0.15 - 0.20 毫米)
型號 030589
瓦
啟動功率. . . . . . . . . . . . . . . . . . . . . . . . . . . . . . . . . . . . . . . . . . . . . . . . . . . . . . 4,000 瓦
瓦
額定功率*. . . . . . . . . . . . . . . . . . . . . . . . . . . . . . . . . . . . . . . . . . . . . . . . . . . . . 3,500 瓦
伏
交流電輸出電壓. . . . . . . . . . . . . . . . . . . . . . . . . . . . . . . . . . . . . . . . . . . . . 115 / 230 伏
交流電輸出電壓為 115 伏的負載電流 ............................ 30.4 安培
交流電輸出電壓為 230 伏的負載電流 ............................ 15.2 安培
頻率. . . . . . . . . . . . . . . . . . . . . . . . . . . . . . . . . . . . . . . . . . . . . . . . . . . . . . . . . . . 60 赫茲
相位 ........................................................ 單一相位
燃料容量. . . . . . . . . . . . . . . . . . . . . . . . . . . . . . . . . . . . . . . . . . . . . . 6.6 加侖(25 升)
發動機排水量. . . . . . . . . . . . . . . . . . . . . . . . . . . . . . . . . . . . . . . . . . . . 16.48 ci (270 cc)
機油容量. . . . . . . . . . . . . . . . . . . . . . . . . . . . . . . . . . . . 35 - 37 盎司(1.05 - 1.09 升)
火花塞間隙. . . . . . . . . . . . . . . . . . . . . . . . . . . . . . . . . . . . . . 0.030 英吋(0.76 毫米)
火花塞扭矩. . . . . . . . . . . . . . . . . . . . . . . . . . . . . . . . . . . . 275 磅-英吋 (31 牛頓米)
進氣門間隙. . . . . . . . . . . . . . . . . . . . . . . . . . . 0.005 - 0.007 英吋(0.13 - 0.18 毫米)
排氣門間隙. . . . . . . . . . . . . . . . . . . . . . . . . . . 0.005 - 0.007 英吋(0.13 - 0.18 毫米)
瓦
型號 030590,030591
瓦
啟動功率. . . . . . . . . . . . . . . . . . . . . . . . . . . . . . . . . . . . . . . . . . . . . . . . . . . . . . 6,500 瓦
伏
額定功率*. . . . . . . . . . . . . . . . . . . . . . . . . . . . . . . . . . . . . . . . . . . . . . . . . . . . . 6,000 瓦
交流電輸出電壓. . . . . . . . . . . . . . . . . . . . . . . . . . . . . . . . . . . . . . . . . . . . . 115 / 230 伏
交流電輸出電壓為 115 伏的負載電流 ............................ 52.1 安培
交流電輸出電壓為 230 伏的負載電流 ............................ 26.0 安培
頻率. . . . . . . . . . . . . . . . . . . . . . . . . . . . . . . . . . . . . . . . . . . . . . . . . . . . . . . . . . . 60 赫茲
相位 ........................................................ 單一相位
燃料容量. . . . . . . . . . . . . . . . . . . . . . . . . . . . . . . . . . . . . . . . . . . . . 6.6 加侖 (25 升)
發動機排水量. . . . . . . . . . . . . . . . . . . . . . . . . . . . . . . . . . . . . . . . . . . . 25.63 ci (420 cc)
機油容量. . . . . . . . . . . . . . . . . . . . . . . . . . . . . . . . . . . . 35 - 37 盎司(1.05 - 1.09 升)
火花塞間隙. . . . . . . . . . . . . . . . . . . . . . . . . . . . . . . . . . . . . . 0.030 英吋(0.76 毫米)
火花塞扭矩. . . . . . . . . . . . . . . . . . . . . . . . . . . . . . . . . . . . 275 磅-英吋 (31 牛頓米)
進氣門間隙. . . . . . . . . . . . . . . . . . . . . . . . . . . 0.005 - 0.007 英吋(0.13 - 0.18 毫米)
排氣門間隙. . . . . . . . . . . . . . . . . . . . . . . . . . . 0.005 - 0.007 英吋(0.13 - 0.18 毫米)
普通維修件
空氣濾清器
空氣濾清器
空氣濾清器
火花塞
火花塞
火花塞
額定功率值:個人燃氣發動機型號的總額定功率是依照
SAEJ1995(2002 - 05
線圖。淨功率值的獲得需要安裝排氣管和空氣濾清器,而沒有這些附件也能獲得總功率值。實際的發動機總功率將高於淨發動機功率,同時在其他方面會受到環境
操作條件和發動機之間可變性的影響。考慮到需要安裝發動機的產品系列廣泛,當用於指定電力設備時,氣體發動機可能不會增加額定總功率。這種差異起因於多種
因素,包括但不限於,各類發動機組件(空氣濾清器、排氣管、充電器、冷卻元件、汽化器、燃料泵等)、應用的局限性、環境操作條件(溫度、濕度、高度)和
動機之間的可變性。由於製造和能力限制,
此發電機按照
*
修訂)獲得並更正。扭矩值按每分鐘
Briggs & Stratton
ISO 8528 G1
進行評級。
發動機型號
—
發動機型號
—
發動機型號
—
發動機型號
—
發動機型號
—
發動機型號
—
(汽車工程師學會)代碼
SAE
3060
可能用更高額定功率的發動機替代此系列發動機。
106200 ................................. 591717
160000 ................................. 591778
250000 ................................. 591778
106200 ..................................... 491055
160000 ..................................... 797235
250000 ..................................... 797235
(小型發動機功率和扭矩評級過程)進行標注,其性能等級依照
轉速得出,功率值按每分鐘
J1940
轉速得出。可以在
3600
www.BRIGGSandSTRATTON.COM
上查看總功率曲
15 15
Page 58

Not for
Reproduction
BRIGGS & STRATTON
有效期至
2012 年 9 月 1
Briggs & Stratton
或更換的運費必須由買方承擔。本保固有效的時間期限和條件說明如下。如需保固服務,請造訪
離您最近的授權服務經銷商。買方必須聯絡授權服務經銷商,然後讓授權經銷商對產品進行檢查和測試。
無其他明示保證。默示保證,其中包括適銷性、適用於特定用途的產品,僅限於購買一年內或法律允許的範圍內。所有其他默示保證除外。按照法律許可的排
除程度,偶然和間接的損害賠償責任被排除。一些州或國家不允許限制默示保證的期限時間,並且一些州或國家不允許排除或限制偶然和間接損害賠償,因此
上述限制和排除可能不適用於您。此保固授予您特殊的法律權利,您可以擁有各州之間或各個國家之間不同的其他權利。
保固期
在澳洲——我們的貨物擁有《澳洲消費者法》的保證。對於重大故障,您有權換貨或退款,對於其他合理的可預見的損失或損害,您有權要求賠償。如果貨物未
**
能達到可接受的品質要求及故障未達到重大故障的程度,你也有權要求對商品進行維修或更換。如需保固服務,請造訪
定位地圖中查找離您最近的授權服務經銷商。或者致電
Pty Ltd, 1 Moorebank Avenue, NSW, Australia, 2170
保固期開始於第一個零售終端使用者的購買日期,並於上面所述時間段内持續有效。「消費者使用」是指零售消費者的個人住宅家庭使用。「商業使用」是指所有
其他的用途,包括用於商業、收入生產或租賃目的的使用。一旦設備經歷了商業使用後,應當被本保固認定為商業使用目的。本保固不適用於用於原動力代替效用
的設備。
無需保固登記便可獲得
期來確定。
保證,在以下規定的保固期內,將免費維修或更換具有材料缺陷、工藝缺陷或兩者缺陷兼有的任何零件。在此保固中,提交產品以進行維修
項目 消費者使用 商業使用
設備
型號:
030588、030589、030590、030591
型號:
030566、030576、030570、030583
030596、030597、030598、030599
發動機
電池(如已配備)
BRIGGS & STRATTON
產品保固。保存好您的購買憑證收據。如果您不能提供保固服務所需的初始購買日期證明,產品的保固期將由其製造日
日;請更換所有未標明保修日期及保修日期為
1300 274 447
。
可擕式發電機所有者保固政策
有限保固
2 年
1 年
年
2
年
1
,或發送電子郵件至
salesenquires@briggsandstratton.com.au
2012 年 9 月 1
BRIGGSandSTRATTON.com
日之前的設備。
1 年
1 年
年
1
年
1
BRIGGSandSTRATTON.COM
,在我們的經銷商定位地圖中查找
**
,在我們的經銷商
,或寫信至
Briggs & Stratton Australia
關於您的保固
我們提供保固服務,對於為此給您帶來的不便我們深表歉意。任何授權服務經銷商都可執行此保固服務。大多數保固服務能夠正常處理,但有時某些保固服務的
要求可能並不恰當。例如,保固服務將不適用於因為使用不當、缺乏日常維護、運輸、裝卸、倉儲或錯誤安裝而造成的設備損害。同樣,如果可攜式發電機上的生產
日期或序號已被移除或設備已被改造或改良,則保固無效。在保固期內,授權服務經銷商有權選擇,對在正常使用與服務中出現瑕疵的任何零件進行檢修或更換。
本保固不會涵蓋下列情況下的維修和設備:
正常磨損:戶外動力設備,同所有的機械裝置一樣,需要定期進行零件更換和維護才能正常運行。本保固不包括維修正常使用時已經耗損的零件或設備。
•
安裝及維護:本保固不適用於受到不適當的或未經授權的安裝或變更、改良、誤用、疏忽、事故、超載、超速、不正確的維護、修理或貯藏等不當處理的
•
設備或零件,根據我們的判斷,這可能會對其性能和可靠性造成不利的影響。本保固不包括日常維護,如調整、燃油系統的清潔和阻塞(由於化學物質、
污垢、碳、石灰等造成的)。
其他例外情況:本保固不包括
•
(如發電機適配器繩套和貯藏蓋)都排除在產品保固之外。本保固不包括由於天災和其他不可抗力事件超出製造商的控制而造成的故障。同時也不包括二手
設備、改造設備和演示設備;用於原動力代替公用電源效用的設備和用於維持生命的設備。
形圈、濾器等一些磨損的零件,或由於事故、使用不當、改良、變更、不當維修、冷凍或化學腐蝕而造成的故障。附屬零件
O
,版本
198195C
BRIGGS & STRATTON CORPORATION
美國,威斯康辛州,密爾瓦基
D, 08/24/2012
16 BRIGGSandSTRATTON.COM16 BRIGGSandSTRATTON.COM
Page 59

Not for
Reproduction
17 17
Page 60

Not for
Reproduction
고품질을 추구하는 저희 Briggs & Stratton® 발전기를 구입해 주셔서 감사합니다. Briggs & Stratton 브랜드를 신뢰하고 성원을 보내주시는 고객 여러분에게 감사
드립니다. 이 설명서의 지침에 따라 작동하고 정비를 충실하게 하신다면 Briggs & Stratton 발전기는 몇 년은 끄떡없이 믿을만한 성능을 유지할 것입니다.
이 설명서는 안전 정보를 포함하여 발전기와 연관된 위험과 이러한 위험을 피하는 방법을 수록하고 있습니다. 이 발전기는 호환 가능한 전기 조명, 어플라이언스,
도구 및 모터 부하를 작동시키기 위한 전력을 공급하기 위한 목적만을 위해 설계되고 계획되었으며, 다른 목적을 위해 설계되지 않았습니다. 이 장비를 시작하거나
작동하기 전에 이러한 지침을 철저히 읽고 이해하는 것이 중요합니다. 나중에 참조하기 위해 원본 지침을 보관해 두십시오.
조립
이 발전기는 사용하기 전에 최종 조립을 해야 합니다. 최종 조립 절차에 대한 지시사항은 이 설명서의
문의처
사용 중인 발전기의 Briggs & Stratton 지원 및 서비스는 근처에서 이용 가능합니다. 전세계에 품질 서비스를 제공하는 Briggs & Stratton 공식 서비스 대리점이 수
천개가 있습니다. 또한 인터넷에서 BRIGGSandSTRATTON.COM을 방문하여 대리점 위치 찾기 지도에서 가장 가까운 공식 서비스 대리점을 찾을 수 있습니다.
섹션을 참조하십시오. 지침을 완전히 따릅니다.
발전기
모델 번호
수정
일련 번호
구매일
목차
작업자 안전 .. . .. . .. . .. . .. . .. . .. . .. . .. . .. . .. . .. . .. . .5
조립. .. . .. . .. . .. . .. . .. . .. . .. . .. . .. . .. . .. . .. . .. . .. . .7
기능 및 컨트롤. .. . .. . .. . .. . .. . .. . .. . .. . .. . .. . .. . .. . .7
작동. .. . .. . .. . .. . .. . .. . .. . .. . .. . .. . .. . .. . .. . .. . .. . .8
정비. .. . .. . .. . .. . .. . .. . .. . .. . .. . .. . .. . .. . .. . .. . .. .11
문제 해결 .........................................14
사양. .. . .. . .. . .. . .. . .. . .. . .. . .. . .. . .. . .. . .. . .. . .. .15
보증. .. . .. . .. . .. . .. . .. . .. . .. . .. . .. . .. . .. . .. . .. . .. .16
엔진
모델 번호
유형 번호
코드 번호
Copyright © 2017 Briggs & Stratton Corporation
Milwaukee, WI, USA. All rights reserved.
BRIGGS & STRATTON 는 Briggs & Stratton Corporation의 등록 상표입니다.
4 BRIGGSandSTRATTON.COM4 BRIGGSandSTRATTON.COM
Page 61

Not for
Reproduction
작업자 안전
장비 설명
이 설명서를 주의 깊게 읽고 발전기에 친숙해 지십시오. 이 장비의
응용, 제한사항 및 관련 위험을 알아둡니다.
이 설명서의 내용은 정확하고 최신 정보가 되도록 모든 노력을 기울였습니다.
그러나, 제조업체는 사전 통보 없이 언제든지 발전기와 이 설명서를 변경,
수정하거나 향상시키는 권한을 보유합니다.
중요 안전 정보
제조업체는 위험과 관련될 수 있는 가능한 모든 상황을 예상할 수는 없습니다.
따라서, 이 설명서의 경고와 단위에 부착된 태그 및 장식은 모두 포함되지
않습니다. 제조업체가 특멸히 추천하지 않은 절차, 작업 방법 및 작동 기술을
사용할 경우 작업자와 다른 사람들에게 안전함을 스스로 만족해야 합니다. 또한
사용자가 선택한 절차, 작업 방법 또는 작동 기술이 발전기가 안전하지 않음을
확인해야 합니다.
안전 기호 및 의미
유독 가스
킥백
전기 충격
질식
안전 경고 기호는 잠재적인 개인 부상 위험을 나타냅니다. 단일
단어(위험, 경고 또는 주의)가 경고 기호와 함께 사용되어 위험 심각성의
정도또는 수준을 지정합니다. 안전 기호를 사용하여 위험 유형을 나타낼
수있습니다. 시그널 워드
때사용됩니다.
위험은 피하지 않으면 사망 또는 심각한 부상을
나타냅니다.
경고는 피하지 않으면 사망 또는 심각한 부상을
나타냅니다.
주의는 피하지 않으면 경미하거나 중간 정도의 부상을
위험을 나타냅니다.
알림
은 개인 부상과 관련 없는 유의 사항을 나타냅니다.
경고 유독 가스 위험. 배기가스는 몇 분 이내에 죽일 수 있는 유독
가스인 일산화탄소를 함유합니다. 이 가스는 무색, 무취,
무맛입니다. 배기가스를 맡지 않더라도, 일산화탄소 가스에는
여전히 노출될 수 있습니다. 이 제품을 사용하는 동안 아프거나,
어지럽거나, 약해지기 시작하면 끄고 당장 나가서 신선한 공기를
들이마십시오. 의사에게 진찰을 받습니다. 일산화탄소 중독일 수 있습니다.
• 창, 문 또는 환기구에서 멀리 떨어진 외부에서만 작동하여 일탄화탄소가
누적되고 잠재적으로 점유 공간으로 배출될 위험을 줄이십시오.
• 제조업체의 지시사항에 따라 배터리를 백업하여 배터리로 작동되는
일산화탄소 알람을 설치하거나 일산화탄소 알람의 코드를 꽂으십시오.
연기 알람은 일산화탄소 가스를 감지할 수 없습니다.
• 팬을 사용하거나 환기를 위해 문과 창문을 열더라도, 집, 차고, 지하실,
좁은 공간, 작업장 또는 기타 부분적으로 닫힌 공간에서 이 제품을
운행하지 마십시오. 일산화탄소는 이러한 공간에서 빠르게 쌓이고 제품을
끝 후에도 수 시간 동안 남아 있을 수 있습니다.
• 항상 이 제품을 바람이 부는 방향으로 놓고 배기가스가 점유 공간 밖을
향하도록 합니다.
알림
은 개인 부상과 관련 없는 유의 사항을 알릴
초래하는
위험을
초래할 수 있는
초래할 수 있는
위험을
화재
이동 부품 비행 물체
일산화탄소 알람
질식 실행
볼트 미터 오일 수준 연료 시작
작동 설명서
알람 접지에 결합됨 접지 터미널
폭발
표면 뜨거움
끄기 켜기
질식
무거운 물체
경고 스타터 코드 킥백(신속한 수축)은 걸어갈 수 있는 것보다 더
빠르게 손과 팔을 엔진 쪽으로 당겨 뼈 부러짐, 골절, 타박상 또는
삠을 발생시켜 심각한 부상을 초래할 수 있습니다.
• 엔진을 시작할 때 저항이 느껴질 때까지 천천히 코드를 당긴 다음 빨리
당겨 킥백을 피합니다.
• 전기 장치의 코드를 꽂고 전원을 켠 상태에서 엔진을 시작하거나 중지하지
마십시오.
경고 발전기 전압은 전기 충격이나 화재를 일으켜 사망 또는 심각한
부상을 초래할
• 승인된 이송 장비를 사용하여 전기사업 직원에게서 발전기를
분리함으로써 역류를 방지하십시오.
• 백업 전력용으로 발전기를 사용할 때 공익기업에 알리십시오.
• 금속 데킹 또는 강철 작업과 같은 축축하거나 전도성이 매우 높은
영역에서 차단기를 사용하십시오.
• 맨 선이나 콘센트를 만지지 마십시오.
• 전기 코드가 마모되거나 해지거나 맨 상태거나 손상된 발전기를 사용하지
마십시오.
• 비가 오거나 습기가 많은 날씨에 발전기를 작동하지 마십시오.
• 물 속에 서 있거나 맨발이거나 손이나 발이 젖은 상태에서 발전기나 전기
코드를 다루지 마십시오.
• 무자격자나 어린이가 발전기를 작동시키거나 수리하지 않도록 하십시오.
수
있습니다.
!
회로 차단기 엔진 제어 엔진을 시작하지
마십시오.
5 5
Page 62

Not for
Reproduction
경고 배기열/가스는 연소성 물질, 구조 또는 위험 연료 탱크를
점화하여 화재를 일으켜 사망이나 심각한 부상 및/또는
재산 손상을 초래할 수 있습니다.
머플러 영역에 접촉하면 화상을 입어 심각한 부상을
입을 수 있습니다.
• 뜨거운 부품을 만지지 마시고 뜨거운 배기가스를 피하십시오.
• 만지기 전에 장비를 식히십시오.
• 오버헤드를 포함하여 발전기의 모든 면에서 1.5m(5ft.) 간극을 두십시오.
• 원래 장비 제조업체, 소매업체 또는 대리점에 연락하여 이 엔진에 설치된
배기 시스템용으로 설계된 불꽃 방지 장치를 얻으십시오.
• 교체 부품은 원래 부품과 동일하고 동일한 위치에 설치되어야 합니다.
경고 실수로 생긴 불꽃에 화재가 발생하여 사망 또는 심각한 부상을
초래할 수 있습니다.
발전기를 조정하거나 수리해야 할 때
• 점화 플러그에서 점화 플러그 선을 연결 해제하고 선을 점화 플러그와
연결할 수 없는 곳에 두십시오.
엔진 불꽃 테스트 시
• 승인된 점화 플러그 테스터를 사용하십시오.
• 점화 플러그를 제거한 상태에서 불꽃을 확인하지 마십시오.
경고 스타터 및 기타 회전 부품에 손, 머리카라, 옷 또는 액세서리가
걸려 심각한 부상을 초래할 수 있습니다.
• 보호 하우징 또는 덮개 없이 발전기를 작동하지 마십시오.
• 헐렁한 옷, 보석류 또는 스타터 또는 기타 회전 부품에 걸려들 수 있는
것을 착용하지 마십시오.
• 긴 머리를 묶어 올리고 보석류를 뺍니다.
주의
초래할 수 있습니다.
지나치게 낮은 속도는 하중을 무겁게 합니다.
• 가버너 스프링, 링크 또는 기타 부품을 조작하여 엔진 속도를 증가하지
• 발전기를 어떤 형태로든 수정하지 마십시오.
알림
발전기에 연결된 전기 장치가 손상될 수 있습니다.
• 발전기 전력량(W)/전류 세기(암페어) 용량을 초과하지 마십시오.
섹션의
• 발전기를 시작하고 전기 부하를 연결하기 전에 엔진이 안정화되도록 둡니다.
• 전기 부하를 끄기(OFF) 위치에서 연결한 다음 작동을 위해 켭니다(ON).
• 전기 부하를 끄고 발전기를 중지하기 전에 발전기에서 연결 해제합니다.
알림
• 계획된 용도에만 발전기를 사용하십시오.
• 계획된 용도에 대하여 질문이 있으시면 대리점에 묻거나 지역 서비스 센터에
문의하십시오.
• 수평 표면에서만 발전기를 작동합니다.
• 지나치게 많은 습기, 먼지, 때 또는 부식성 증기에 발전기를 노출시키지
마십시오.
• 냉각 슬롯에 물체를 넣지 마십시오.
• 연결된 장치가 과열되면 장치를끄고 발전기에서 연결 해제하십시오.
• 다음과 같은 경우 발전기를 끄십시오.
-전기 출력이 유실된 경우
-장비에불꽃이 튀거나, 연기가 나거나, 불이 나는 경우
-장치가 지나치게 진동하는 경우
지나치게 높은 작동 속도는 가벼운 부상 및/또는 발전기 손상을
마십시오.
발전기 전력량(W)/전류 세기(암페어) 용량을 초과하면 발전기 및/또는
발전기 과부하하지 않음
발전기를 잘못 다룰 경우 발전기가 손상되고 수명이 단축될 수 있습니다.
을 참조하십시오.
작동
경고 연료 및 증기는 가연성과 폭발성이 매우 높아서 연소, 화재 또는
연료 추가 또는 배출 시
• 발전기 엔진을 끄고 연료 캡을 제거하기 전에 최소 2분간 식히십시오. 캡을
천천히 풀어 탱크를 감압합니다.
• 실외에서 연료 탱크를 보충하거나 배출합니다.
• 탱크를 넘치게 하지 마십시오. 연료 팽창을 위한 공간을 두십시오.
• 연료가 쏟아질 경우 엔진을 시작하기 전에 증발할 때까지 기다리십시오.
• 연료를 불꽃, 화로, 점화용 불씨, 열 및 기타 점화원과 떨어진 곳에
두십시오.
• 연료선, 탱크, 캡 및 피팅의 균열 또는 누출을 자주 점검하십시오. 필요한
경우 교환하십시오.
• 담배나 연기에 붙을 켜지 마십시오.
장비 시작 시
• 점화 플러그, 머플러, 연료 캡 및 공기 청정기가 적절하게 있어야 합니다.
• 점화 플러그를 제거한 상태에서 엔진을 크랭크하지 마십시오.
장비 작동 시
• 건물, 간이 차고, 포치, 이동 장비, 해양 응용 제품 또는 인클로저 내에서 이
제품을 작동하지 마십시오.
• 연료가 흐르게 되는 각도로 엔진 또는 장비를 기울이지 마십시오.
• 초크 컨트롤을 “질식” 위치(
장비 운송, 이동 또는 수리 시
• 연료 탱크를 비우거나 연료 차단 밸브를 끈 상태에서 운송/운동/
수리하십시오.
• 연료가 흐르게 되는 각도로 엔진 또는 장비를 기울이지 마십시오.
• 점화 플러그 회선 연결을 해제하십시오.
연료 또는 탱크에 연료를 채운 장비 보관 시
• 로, 스토브, 온수기, 옷 드라이어 또는 연료 증기를 점화시킬 수 있으므로
점화용 불씨 또는 기타 점화원이 있는 다른 어플라이언스와 떨어진 곳에
보관하십시오.
폭발을 일으켜 사망이나 심각한 부상 및/또는 재산
손상을 초래할 수 있습니다.
)로 이동하여 엔진을 중지하지 마십시오.
6 BRIGGSandSTRATTON.COM6 BRIGGSandSTRATTON.COM
Page 63

Not for
Reproduction
조립
발전기는 적절하게 점검을 받은 후 권장된 연료 및 오일로 사용할 준비가
되었습니다.
발전기 점검에 문제가 발생하면 해당 지역의 Briggs & Stratton 서비스 센터에
문의하십시오. 지원이 필요하다면 ID 레이블에서 모델, 수정 및 일련 번호를
준비하십시오. ID 레이블 위치는
발전기 포장 풀기
1. 딱딱하고 평평한 표면에 상자를 놓습니다.
2. 상자에 있는 모든 것을 꺼냅니다.
3. 위에서 아래로 각 가장자리를 절단하여 상자를 완전히 엽니다.
오일 추가
1. 수평 표면에 발전기를 놓습니다.
2. 오일 보충 영역의 잔류물을 청소합니다.
3. 오일을 추가하려면 오일을 천천히 엔진 오일 보충고에 붓습니다(4,A).
4. 딥 스틱을 제거하고(2,A) 깨끗한 천으로 닦습니다.
5. 딥 스틱을 삽입하지만 돌려 넣지 마십시오. 오일 수준은 가득 참(FULL)
6. 딥 스틱을 다시 끼우고 조입니다.
알림
• 권장된 오일을 채우고 엔진을 적절하게 점검하기 전까지 엔진을 크랭크 또는
연료 추가
연료는 다음 요건을 충족해야 합니다.
• 깨끗하고 신선하고 탁하지 않은 석유
• 최소 87 옥테인/87 AKI (91 RON). 높은 고도에서 사용할 경우,
• 최대 10%의 에탄올(가소홀)이 섞인 석유는 수용 가능합니다.
알림
오일을 섞거나 대체 연료로 운전하기 위해 엔진을 개조하지 마십시오. 승인되지
않은 연료를 사용하면 엔진 부품이 손상되고 엔진 보증이 무효화됩니다.
연료 시스템에 수지가 형성되지 않게 하기 위해 연료 안정제를 연료에
섞으십시오. 보관을 참조하십시오. 모든 연료가 동일하지는 않습니다.
시작 또는 성능 문제가 발생하면 연료 제공업체를 변경하거나 브랜드를
변경하십시오. 이 엔진은 가솔린에서 작동하도록 인증 받았습니다. 이 엔진용
방출 제어 시스템은 EM(Engine Modifications)입니다.
1. 연료 보충 캡 주변 영역을 청소하고 캡을 벗깁니다.
2. 탁하지 않은 연료를 천천히 연료 탱크에 붓습니다(1,C). 빨간색 표시기
연료 추가 시
• 발전기 엔진을 끄고 연료 캡을 제거하기 전에 최소 2분간 식히십시오. 캡을
• 실외에서 연료 탱크를 채웁니다.
• 탱크를 넘치게 하지 마십시오. 연료 팽창을 위한 공간을 두십시오.
• 연료가 쏟아질 경우 엔진을 시작하기 전에 증발할 때까지 기다리십시오.
• 연료를 불꽃, 화로, 점화용 불씨, 열 및 기타 점화원과 떨어진 곳에 두십시오.
• 연료선, 탱크, 캡 및 피팅의 균열 또는 누출을 자주 점검하십시오. 필요한
• 담배나 연기에 붙을 켜지 마십시오.
3. 연료 캡을 씌우고 엔진을 시작하기 전에 흘린 연료가 증발하도록
그림
2
표시에 있어야 합니다(2,B). 가득 참(FULL) 표시에 도달할 때까지 필요한
오일을 추가합니다.
발전기를 잘못 다룰 경우 발전기가 손상되고 수명이 단축될 수 있습니다.
시작하지 마십시오. 엔진이 고장날 수 있습니다.
그림
1
참조하십시오.
E15 및 E85와 같은 승인되지 않은 가솔린을 사용하지 마십시오. 가솔린에
선 위로 보충하지 않도록 주의하십시오(3,A). 그림과 같이 연료 팽창을
위한 적당한 공간을 마련합니다.
경고 연료 및 증기는 가연성과 폭발성이 매우 높아서 연소, 화재 또는
천천히 풀어 탱크를 감압합니다.
경우 교환하십시오.
두십시오.
폭발을 일으켜 사망이나 심각한 부상 및/또는 재산
손상을 초래할 수 있습니다.
기능 및 컨트롤
4
3
을 참조하십시오.
높은 고도
를
높은 고도
5,000 ft(1524 m) 이상의 고도에서 최소 85 옥테인 / 85 AKI(89 RON) 가솔린이
수용 가능합니다. 방출 준수를 유지하려면 높은 고도 조정이 필요합니다.
이러한 조정 없이 작동할 경우 성능이 줄어들고 연료 소비가 증가하고 방출이
증가합니다. 높은 고도 조정 정보는 Briggs & Stratton 인증된 서비스 대리점에
문의하십시오.
높은 고도 키트로 2,500 ft(762 m) 아래 고도에서 엔진을 작동하는
않습니다.
권장되지
네거티브 배터리 케이블 연결
전기 시작 엔진을 사용하는 모델에서 다음과 같이 네거티브 배터리 케이블을
배터리에 연결합니다.
1. 네거티브(검정색) 케이블의 느슨한 끝을 고정시키는 타이랩을
잘라냅니다.
2. 8 mm 소켓 렌치를 사용하여 나사(C), 잠금 와셔(C) 및 플랫 와셔(C)를
네거티브 배터리 단자(A)에서 제거합니다.
3. 잠금 와셔, 플랫 와셔 및 네거티브 배터리 케이블(B)을 그림과 같이 나사
위로 밉니다.
4. 네거티브 배터리 단자에 나사를 다시 끼우고 조입니다.
5. 배터리 및 발전기 연결이 팽팽하고 단단한지 확인하십시오.
기능 및 컨트롤
발전기를 작동하기 전에 이 작동 설명서와 안전 규칙을 읽으십시오.
그림과 사용 중인 발전기를 비교하여 다양한 컨트롤의 위치와 조정에
익숙해 지십시오. 이후 참조를 위해 이 설명서를 보관해 둡니다.
A - 엔진 ID 번호 — 엔진의 모델, 유형 및 코드를 제공합니다. 지원을 요청할
경우 이 정보를 준비하십시오.
B - 발전기 ID 번호 — 발전기의 모델 및 일련 번호를 제공합니다. 지원을 요청할
경우 이 정보를 준비하십시오.
C - 연료 탱크 — 여기서 탁하지 않은 연료를 확인하고 추가합니다.
D - 접지 패스너 — 해당 지역의 접지 요건은 해당 지역의 사법 기관에
문의하십시오.
E - 연료 게이지 — 연료 탱크에 있는 사용 가능한 연료량을 표시합니다.
F - AC 출구 — AC, 단상, 전기, 조명, 어플라이언스, 도구 및 모터 부하 작동을
위한 전력을 공급하는 데 사용될 수 있습니다.
G - 회로 차단기 — 콘센트와 함께 발전기의 전기 과부하를 방지하기 위한 회로
차단기가 제공됩니다.
H - 전압계 — 전기 잠재성을 측정하는 데 사용됩니다.
J - 오일 보충 캡/딥 스틱 — 여기서 엔진 오일을 점검하고 추가합니다.
K - 오일 배출 플러그 — 여기서 엔진 오일을 배출합니다.
L - 연료 밸브 — 엔진의 연료 공급장치를 켜고 끄는 데 사용됩니다.
M - 리코일 스타터 — 엔진을 수동으로 시작하는 데 사용됩니다.
N - 공기 청정기 — 흡입 공기에서 먼지 및 잔류물을 필터링하여 엔진을
보호합니다.
P - 불꽃 방지 장치 머플러 — 배기 머플러는 엔진 소음을 낮추고 불꽃 방지
장치 화면이 장착되어 있습니다.
R - 점화 플러그 — 전기 불꽃으로 연료 혼합물을
헤드에 있는 장치.
S - 초크 컨트롤 — 냉각된 엔진을 시작할 때 사용됩니다.
T - 전기 시작 스위치(전기 시작) — 키를 시작(
시작합니다. 엔진을 끄려면 키를 끄기(O) 위치로 돌립니다.
U - 오일 부족 경고등 — 오일 부족 경고등은 엔진 오일 부족으로 인한 엔진
손상을 방지하기 위해 설계되었습니다.
그림
1
5
그림
점화시키는 엔진의 실린더
) 위치로 돌려 엔진을
방법은
7 7
Page 64

Not for
Reproduction
작동
시스템 접지
발전기는 접지 패스너와 함께 제공됩니다. 발전기에는 발전기 프레임
구성요소를 AC 출력 콘센트의 접지 단자에 연결하는 시스템 접지가 있습니다.
시스템 접지는 AC 중성선에 연결됩니다(중성은 발전기 프레임에 결합됨).
특별 요건
발전기 사용 범위에 적용되는 연방, 지방법 또는 법령이 있을 수 있습니다. 자격
있는 전기 기사, 전기 점검자 또는 지방 사법 기관에 문의하십시오.
• 일부 지역에서는 발전기가 지역 공익기업에 등록되어야 합니다.
• 발전기가 시공 지역에서 사용될 경우 준수해야 하는 추가 규정이 있을
수 있습니다.
건물 전기 시스템에 연결
건물의 전기 시스템에 공급할 대기 전력 연결은 목록에 있는 전송 스위치를
사용하여 현재 면허를 소지한 전기 기사가 설치해야 합니다. 연결은 공공시설
전력에서 발전기 전력을 분리해야 하고 모든 법과 전기 규정을 준수해야 합니다.
경고 발전기 전압은 전기 충격이나 화재를 일으켜 사망 또는 심각한
부상을 초래할 수 있습니다.
• 승인된 이송 장비를 사용하여 전기사업 직원에게서 발전기를 분리함으로써
역류를 방지하십시오.
• 백업 전력용으로 발전기를 사용할 때 공익기업에 알리십시오.
• 금속 데킹 또는 강철 작업과 같은 축축하거나 전도성이 매우 높은 영역에서
차단기를 사용하십시오.
• 맨 선이나 콘센트를 만지지 마십시오.
• 전기 코드가 마모되거나 해지거나 맨 상태거나 손상된 발전기를 사용하지
마십시오.
• 비가 오거나 습기가 많은 날씨에 발전기를 작동하지 마십시오.
• 물 속에 서 있거나 맨발이거나 손이나 발이 젖은 상태에서 발전기나 전기
코드를 다루지 마십시오.
• 무자격자나 어린이가 발전기를 작동시키거나 수리하지 않도록 하십시오.
발전기 위치
들이마십시오. 의사에게 진찰을 받습니다. 일산화탄소 중독일 수 있습니다.
• 창, 문 또는 환기구에서 멀리 떨어진 외부에서만 작동하여 일탄화탄소가
누적되고 잠재적으로 점유 공간으로 배출될 위험을 줄이십시오.
• 제조업체의 지시사항에 따라 배터리를 백업하여 배터리로 작동되는
일산화탄소 알람을 설치하거나 일산화탄소 알람의 코드를 꽂으십시오.
연기 알람은 일산화탄소 가스를 감지할 수 없습니다.
• 팬을 사용하거나 환기를 위해 문과 창문을 열더라도, 집, 차고, 지하실,
좁은 공간, 작업장 또는 기타 부분적으로 닫힌 공간에서 이 제품을
운행하지 마십시오. 일산화탄소는 이러한 공간에서 빠르게 쌓이고 제품을
끝 후에도 수 시간 동안 남아 있을 수 있습니다.
• 항상 이 제품을 바람이 부는 방향으로 놓고 배기가스가 점유 공간 밖을
향하도록 합니다.
그림
경고 유독 가스 위험. 배기가스는 몇 분 이내에 죽일 수 있는 유독
가스인 일산화탄소를 함유합니다. 이 가스는 무색, 무취,
무맛입니다. 배기가스를 맡지 않더라도, 일산화탄소 가스에는
여전히 노출될 수 있습니다. 이 제품을 사용하는 동안 아프거나,
어지럽거나, 약해지기 시작하면 끄고 당장 나가서 신선한 공기를
6
7
엔진 시작
알림
지시사항에 따라 오일을 추가하십시오. 오일 없이 엔진을 시작할 경우 수리할
수 없을 정도로 손상되고 이것은 보증을 받지 못합니다.
알림
해제되었음을 확인하십시오.
1. 평평한 수평 표면에 있는지 확인하십시오.
통지
시작되지 않거나 작동 도중 종료됩니다.
2. 연료 밸브를 (L) 켜기 위치(I)로 돌립니다.
3. 초크 컨트롤(S)을 밖으로 당겨 초크(
4A. 전기 시작의 경우 발전기가 시작할 때까지 시작 스위치(T)의 키를 시작
• 엔진이 시작하면 6단계로 진행합니다.
• 엔진이 시작하지 않으면 5단계로 진행합니다.
통지
• 엔진을 시작할 때 저항이 느껴질 때까지 천천히 코드를 당긴 다음 빨리
• 전기 장치의 코드를 꽂고 전원을 켠 상태에서 엔진을 시작하거나 중지하지
4B. 수동 시작의 경우 시작 스위치의 키를 운전(I) 위치로 돌리고 리코일
• 엔진이 시작하면 6단계로 진행합니다.
• 엔진이 시작하지 않으면 5단계로 진행합니다.
5. 초크 손잡이를 반 정도 밀어넣고 시작 스위치의 키를 운전(I) 위치로
• 엔진이 시작하지 않으면 3~4단계를 반복합니다.
6. 초크 손잡이를 눌러 엔진이 예열할 때 초크를 점차적으로 엽니다.
통지
때까지 크랭크합니다.
통지
중단되면 장치가 수평 표면에 있는지 확인하고 크랭크실의 오일 수준이 적절한
지 확인하십시오. 이 장치에는 오일 부족 보호 장치가 장착되어 있습니다. 그럴
경우, 엔진이 시작하려면 오일이 적절한 수준에 있어야 합니다.
입을 수 있습니다.
• 뜨거운 부품을 만지지 마시고 뜨거운 배기가스를 피하십시오.
• 만지기 전에 장비를 식히십시오.
• 오버헤드를 포함하여 발전기의 모든 면에서 1.5m(5ft.) 간극을 두십시오.
• 원래 장비 제조업체, 소매업체 또는 대리점에 연락하여 이 엔진에 설치된
• 교체 부품은 원래 부품과 동일하고 동일한 위치에 설치되어야 합니다.
이 엔진은 오일 없이 배송되었습니다. 엔진을 시작하기 전에 이 설명서의
엔진을 시작하기 전에 모든 전기 장치가 발전기 출구에서 연결
장치를 평평한 수평 표면에서 시작하고 작동하지 못하면 장치가
( ) 위치로 돌리고 고정시킵니다. 스타터 부품 수명을 오래 가게 하기
위해 시작(
시까지 최소 1분은 일시 정지하십시오.
배터리가 방전될 경우 수동 시작 지시사항을 사용하십시오.
경고 스타터 코드 킥백(신속한 수축)은 걸어갈 수 있는 것보다 더
빠르게 손과 팔을 엔진 쪽으로 당겨 뼈 부러짐, 골절, 타박상 또는
삠을 발생시켜 심각한 부상을 초래할 수 있습니다.
당겨 킥백을 피합니다.
마십시오.
손잡이를 잡고(M) 약간 저항이 느껴질 때까지 천천히 당깁니다. 그런
다음 한 번만 빨리 당겨 엔진을 시작합니다.
돌리고 리코일 손잡이를 두 번 당기거나 4A 단계에서 설명한 대로 시작
스위치의 키를 시작(
엔진이 넘치면 초크 손잡이를 전체적으로 밀어넣고 엔진이 시작할
3번 당긴 후 엔진이 시작하지만 운전하지 않거나, 작동 도중 장치가
경고 배기열/가스는 연소성 물질, 구조 또는 위험 연료 탱크를
배기 시스템용으로 설계된 불꽃 방지 장치를 얻으십시오.
1
그림
)를 닫습니다.
) 위치에서 키를 15초 이상 누르지 마시고, 다음 시도
) 위치로 돌리고 고정시킵니다.
점화하여 화재를 일으켜 사망이나 심각한 부상 및/또는
재산 손상을 초래할 수 있습니다.
머플러 영역에 접촉하면 화상을 입어 심각한 부상을
8 BRIGGSandSTRATTON.COM8 BRIGGSandSTRATTON.COM
Page 65

Not for
Reproduction
전기 부하 연결
경고 발전기 전압은 전기 충격이나 화재를 일으켜 사망 또는 심각한
• 승인된 이송 장비를 사용하여 전기사업 직원에게서 발전기를 분리함으로써
역류를 방지하십시오.
• 백업 전력용으로 발전기를 사용할 때 공익기업에 알리십시오.
• 금속 데킹 또는 강철 작업과 같은 축축하거나 전도성이 매우 높은 영역에서
차단기를 사용하십시오.
• 맨 선이나 콘센트를 만지지 마십시오.
• 전기 코드가 마모되거나 해지거나 맨 상태거나 손상된 발전기를 사용하지
마십시오.
• 비가 오거나 습기가 많은 날씨에 발전기를 작동하지 마십시오.
• 물 속에 서 있거나 맨발이거나 손이나 발이 젖은 상태에서 발전기나 전기
코드를 다루지 마십시오.
• 무자격자나 어린이가 발전기를 작동시키거나 수리하지 않도록 하십시오.
발전기의 AC 출구에는 품질이 우수한, 절연 처리가 잘 된 확장 케이블만
사용하십시오. 사용 전 항상 확장 케이블을 점검하십시오. 모든 확장 케이블이
적절한 규격이며 손상되지 않았음을 점검합니다.
경고 손상되거나 과부하된 전기 케이블이 과열, 호 및 화상을 일으켜
• 적절한 정격 확장 케이블만 사용하십시오.
• 확장 케이블의 모든 안전 지침을 따르십시오.
• 사용 전 항상 케이블을 점검하십시오.
1. 시작 후 몇 분 간 엔진이 안정되고 예열되도록 합니다.
2. 전압계(H)의 전압이 적절한지 확인합니다.
3. 전기 장치의 부하가 발전기의 규격 출력 내에 있는지 확인하십시오.
주의
콘센트는 발전기 출력 용량보다 높은 정격 값으로 표시되어 있을 수
있습니다.
• 발전기 또는 콘센트가 공급할 수 있는 전류보다 많은 전류량이 필요한
장치에는 전원을 공급하지 마십시오.
• 발전기를 과부하하지 마십시오.
4. 전기 장치가 꺼졌는지 확인하십시오. 그런 다음 전기 장치를 발전기의
AC 출구(F)에 연결합니다. 전기 장치가 연결된 후, 전기 장치를 켭니다.
5. 추가 전기 장치를 연결할 때 총 부하가 발전기의 전력량(W)을 초과하지
않도록 하십시오.
알림
발전기 전력량(W)을 초과하지 마십시오. 전력 용량을 초과하면 발전기
및/또는 연결된 전기 장치가 손상될 수 있습니다.
6. 엔진을 중지하기 전에 모든 전기 장치를 끈 다음 연결을 해제합니다.
부상을 초래할 수 있습니다.
사망이나 심각한 부상 및/또는 재산 손상을 초래할 수 있습니다.
1
그림
사양
섹션을 참조하십시오.
발전기 용량을 참조하십시오.
오일 수준 스위치 및 경고등
오일 수준이 너무 낮으면 스위치가 엔진을 정지시키고 발전기의 경고등(U)을
활성화합니다. 엔진을 시작할 때 오일 수준이 너무 낮으면 스위치가 경고등을
활성화시킵니다. 경고등이 활성화된 경우 장치가 수평 표면에 있는지 확인하고
오일 수준이 적절한지 확인합니다.
오일 수준이 추가(ADD) 표시 아래에 있으면 가득 참(FULL) 표시에 도달할
때까지 오일을 추가합니다. 엔진을 시작하고 작동을 계속하기 전에 오일 누출을
점검합니다.
오일 수준이 추가(ADD) 표시와 가득 참(FULL) 표시 사이에 있으면 엔진을
시작하지 마십시오. Briggs & Stratton 인증 대리점을 확인하여 엔진을 점검
받도록 합니다.
그림
1
오일 점검/추가 방법
섹션을 참조하십시오.
엔진 정지
1. 엔진을 중지하기 전에 모든 전기 장치를 끈 다음 연결을 해제합니다.
2. 엔진이 몇 분 동안 부하 없이 돌아가게 하여 엔진 및 발전기의 내부
3. 연료 밸브를 끄기(
4. 전기 시작: 전기 시작 스위치(T)를 끄기( ) 위치로 돌립니다.
• 초크 컨트롤을 “질식” 위치(
그림
온도를 안정화시킵니다.
경고 연료 및 증기는 가연성과 폭발성이 매우 높아서 연소, 화재 또는
9
8
) 위치로 돌립니다.
폭발을 일으켜 사망이나 심각한 부상 및/또는 재산
손상을 초래할 수 있습니다.
)로 이동하여 엔진을 중지하지 마십시오.
9 9
Page 66

Not for
Reproduction
회로 차단기
부하가 발전기의 정격 출력을 초과할 경우 회로 차단기(G)가 자동으로
열립니다. 회로 차단기가 열리면 작업을 재개하기 전에 출력 부하를 줄이고
회로 차단기를 재설정합니다. 최대 출력 부하를 판별하려면
참조하십시오.
그림
1
발전기 용량
섹션을
발전기 과부하하지 않음
용량
발전기의 시작 전력량(W)*이 전기 장치의 정격(작동) 및 추가 서지(시작)
전력(W)을 총족하거나 초과하는지 확인하십시오.
1. 동시에 전원을 공급할 항목을 선택합니다.
2. 이러한 항목의 정격(운전) 전력(W)을 총계합니다. 이것은 선택한 항목을
계속 운전하려면 발전기가 생성해야 하는 전력량입니다. 전력량(W) 참조
안내서를 참조하십시오.
3. 필요한 서지(시작) 전력(W)을 측정합니다. 서지 전력량(W)은 둥근 톱
또는 냉장고와 같은 전기 모터 구동 도구나 어플라이언스를 시작하는
데 필요한 전력의 짧은 버스트입니다. 모든 모터가 동시에 시작하지는
않으므로, 총 서지 전력(W)은 추가 서지 전력(W)이 가장 높은 항목만 2
단계의 총 정격 전력(W)에 추가하여 추정할 수 있습니다.
도구 또는 어플라인스 정격(운전) 전력(W) 추가 서지(시작) 전략(W)
창 팬
초저온냉동고
TV 500 —
보안 시스템
조명(75W)
1555 총 실행 전력량(W) 600 최고 서지 전력량(W)
예:
총 정격(운전) 전력(W) 1555
최고 추가 서지 전략(W) + 600
필요한 총 발전기 출력 =2155
알림
필요한 총 발전기 출력이 추가 서지 전력(W)을 포함하지 않으면 발전기의
정격 전력량(W)을 초과하지 않습니다.**
사양
섹션의 시작 전력량(W)을 참조하십시오.
*
사양
섹션의 정격 전력량(W)을 참조하십시오.
**
전원 관리
전기 장치를 적절하게 연결하지 못하면 발전기 또는 연결된 전기 장치가
손상될 수 있습니다. 발전기 전원을 관리하는 올바르고 안전한 방법은 다음과
같이 순차적으로 전기 장치(부하)를 추가하는 것입니다.
1. 엔진을 시작하기 전에 모든 전기 장치가 발전기 출구에서 연결
해제되었음을 확인하십시오.
2. 엔진을 시작합니다(
3. 가장 많은 와트(부하)가 필요한 전기 장치를 연결합니다.
4. 발전기 출력이 안정화되도록 합니다(엔진이 부드럽게 돌아감).
5. 다음 전기 장치를 연결합니다.
6. 다시 발전기 출력이 안정화되도록 합니다.
7. 계속 위의 단계에 따라 전기 장치를 추가합니다. 모든 전기 장치의
총 와트(부하)가 발전기의 전력량 용량을 초과하지 않음을
확인하십시오(
알림
발전기 전력량(W)/전류 세기(암페어) 용량을 초과하면 발전기 및/또는
발전기에 연결된 전기 장치가 손상될 수 있습니다.
• 발전기 전력량(W)/전류 세기(암페어) 용량을 초과하지 마십시오.
• 발전기를 시작하고 전기 부하를 연결하기 전에 엔진이 안정화되도록 둡니다.
• 전기 부하를 끄기(OFF) 위치에서 연결한 다음 작동을 위해 켭니다(ON).
• 전기 부하를 끄고 발전기를 중지하기 전에 발전기에서 연결 해제합니다.
사양
섹션 참조).
300 600
500 500
180 —
75 —
엔진 시작 방법
섹션 참조).
전력량(W) 참조 안내서
도구 또는 어플라인스
필수
전구 - 75W
초저온냉동고
오수 펌프
냉장고/냉동고 - 18 cf
양수기 - 1/3 hp
가열/냉각
창 AC - 10,000 BTU
창 팬
로용 팬 송풍기 - 1/2 hp
부엌
전자레인지 - 1000 W
커피메이커
전기 스토브 - 1개
거실
DVD/CD 플레이어
VCR 100 —
스테레오 수신기
컬러 TV - 27인치
개인 컴퓨터 + 17인치 모니터
기타
보안 시스템
AM/FM 시계 라디오
차고문 오프너 - 1/2 hp
DIY/작업 지역
석영 할로겐 작업등
에어리스 스프레이 - 1/3 hp
회전 반복톱
전기 드릴 - 1/2 hp
둥근 톱 - 7-1/4 in
정격* (운전)
전력(W)
75 —
500 500
800 1200
800 1600
1000 2000
1200 1800
300 600
800 1300
1000 —
1500 —
1500 —
100 —
450 —
500 —
800 —
180 —
300 —
480 520
1000 —
600 1200
960 960
1000 1000
1500 1500
추가 서지(시작)
전략(W)
10 BRIGGSandSTRATTON.COM10 BRIGGSandSTRATTON.COM
Page 67

Not for
Reproduction
정비
정비 일정
(우선 발생하는) 매시간 또는 달력 간격을 따릅니다. 아래에 명시된 좋지 않은
조건에서 작동할 때는 더 자주 점검해야 합니다.
처음 5시간
• 엔진 오일 교체
8시간마다 또는 매일
• 잔류물 청소
• 엔진 오일 수준 점검
25시간마다 또는 매일
• 엔진 공기 청정기 점검†
50시간마다 또는 매일
• 엔진 오일 교체
100시간마다 또는 매일
• 연료 밸브 점검
• 점화 플러그 점검
• 머플러 및 불꽃 방지 장치 점검
• 냉각 시스템 청소
† 때 또는 먼지가 많은 상태에서는 더 자주 점검하십시오.
일반 권장사항
정기 정비는 발전기의 성능을 향상시키고 수명을 연장시킵니다. 인증된 서비스
대리점을 참조하십시오.
발전기의 보증은 작업자 남용 또는 부주의로 손상된 항목은 포함하지 않습니다.
보증 혜택이 모두 적용되려면 작업자가 이 설명서에 설명된 대로 발전기를
정비해야 합니다.
알림
발전기를 잘못 다룰 경우 발전기가 손상되고 수명이 단축될 수 있습니다.
• 적절하게 냉각되도록 보호 하우징 또는 덮개 없이 발전기를 작동하지
마십시오.
발전기를 적절하게 정비하기 위해 주기적으로 부분 조정을 해야 합니다.
모든 점검 및 조정은 각 세션에 한 번 이상 해야 합니다. 위의 정비 일정 차트에
있는 요건을 따르십시오.
알림
1년에 한 번은 점화 플러그를 청소하거나 교체하고 공기 필터를 교체해야
합니다. 새 점화 플러그와 깨끗한 공기 필터로 교체 시 적절한 연료-공기 혼합이
보장되고 엔진이 더 잘 돌아가고 더 오래 지속시키는 데 도움이 됩니다.
발전기 정비
발전기 정비는 장치 청소와 건조로 구성됩니다. 지나치게 많은 먼지, 때,
습기 또는 부식성 증기에 노출되지 않는 깨끗하고 건조한 환경에서 장치를
작동시키고 보관합니다. 발전기의 냉기 슬롯이 눈, 잎 또는 기타 외부 물질로
막혀선 안됩니다.
알림
발전기를 청소하기 위해 물이나 다른 액체를 사용하지 마십시오.
액체가엔진 연료 시스템으로 들어가
있습니다. 뿐만 아니라, 액체가 냉기 슬롯을 통해 발전기로 들어가는 경우 일부
액체는 빈 공간에 그대로 남아 로터 및 고정자 권선 절연에 균열을 일으킵니다.
발전기 내부 권선에 액체 및 오염물이 적재되면 결국 이러한 권선의 절연
저항이 줄어듭니다.
†
†
, 성능 저하 및/또는 고장을 발생시킬 수
청소
매일 또는 사용하기 전에 발전기 주변과 아래에 오일 또는 연료 누출 징후가
있는지 살펴보십시오. 발전기 내부 및 외부의 누적된 잔류물을 청소합니다.
연결 장치, 스프링 및 기타 엔진 컨트롤을 깨끗이 합니다. 머플러 주변
영역과 뒤에서 연소성 잔류물을 치웁니다. 발전기의 냉기 슬롯 및 개구부를
점검합니다. 이러한 개구부가 깨끗하고 장애물이 없도록 해야 합니다.
누적된 잔류물의 과열 및 점화 위험을 줄이기 위해 엔진 부품을 깨끗하게
관리하십시오.
• 젖은 천으로 외부 표면을 깨끗이 닦아냅니다.
알림
발전기를 잘못 다룰 경우 발전기가 손상되고 수명이 단축될 수 있습니다.
• 지나치게 많은 습기, 먼지, 때 또는 부식성 증기에 발전기를 노출시키지
마십시오.
• 냉각 슬롯에 물체를 넣지 마십시오.
• 연모솔을 사용하여 딱딱해진 오염물 또는 오일을 떨어지게 합니다.
• 진공 청소기를 사용하여 떨어진 먼지 및 잔류물을 집어올립니다.
연료 시스템 정비
경고 연료 및 증기는 가연성과 폭발성이 매우 높아서 연소, 화재 또는
• 연료를 불꽃, 화로, 점화용 불씨, 열 및 기타 점화원과 떨어진 곳에 두십시오.
• 연료선, 탱크 캡 및 피팅의 균열 또는 누출을 자주 점검하십시오. 필요한
경우 교환하십시오.
• 연료가 쏟아질 경우 엔진을 시작하기 전에 증발할 때까지 기다리십시오.
잔류물 스트레이너 청소/교체 방법
1. 연료 캡(11,A)을 제거합니다.
2. 잔류물 스트레이너(11,B)를 제거합니다.
3. 잔류물 스트레이너가 더러우면 청소합니다. 잔류물 스트레이너가
찢어지거나 손상되었으면 교체합니다. 잔류물 스트레이너를 교체할
경우 원래 장비 교체 잔류물 스트레이너를 사용하십시오.
연료 침전물 컵 청소 방법
연료 밸브에는 다음과 같이 청소할 수 있는 연료 침전물 컵이 장착되어 있습니다.
1. 연료 밸브를 끄기 위치로 이동합니다.
2. 연료 밸브에서 침전물 컵(8,A)을 제거합니다.
3. 비가연성 용제에 침전물 컵을 씻습니다. 완전히 말립니다.
4. 침전물 컵을 설치하고 단단히 조입니다.
5. 연료 밸브를 켜기 위치로 이동하고 누출을 점검합니다. 연료 밸브가
누출되면 원래 장비 교체 연료 밸브로 교체합니다.
그림
폭발을 일으켜 사망이나 심각한 부상 및/또는 재산
손상을 초래할 수 있습니다.
8
11
배터리 정비
시작 배터리가 장착된 경우, 시작 배터리에 필요한 정비는 없습니다. 배터리와
단자가 깨끗하고 건조하도록 합니다.
알림
시작 배터리는 발전기가 작동 중인 경우에만 충전됩니다.
11 11
Page 68

Not for
Reproduction
엔진 정비
경고
의도하지 않은 불꽃에 화재나 전기 충격이 발생하여 사망 또는
심각한 부상이 초래될 수 있습니다.
발전기를 조정하거나 수리해야 할 때
• 점화 플러그에서 점화 플러그 선을 연결 해제하고 선을 점화 플러그와
연결할 수 없는 곳에 두십시오.
엔진 불꽃 테스트 시
• 승인된 점화 플러그 테스터를 사용하십시오.
• 점화 플러그를 제거한 상태에서 불꽃을 확인하지 마십시오.
기화기 및 엔진 속도 조정
기화기 또는 엔진 속도를 조정하지 마십시오. 기화기는 대부분의 조건에서
효율적으로 작동하도록 공장에서 설정되었습니다. 가버너 스프링, 연결 장치
또는 기타 부품을 조작하여 엔진 속도를 변경하지 마십시오. 조정이 필요한
경우 Briggs & Stratton 공인 대리점에 문의 하십시오.
주의
초래할 수 있습니다.
지나치게 낮은 속도는 하중을 무겁게 합니다.
• 가버너 스프링, 링크 또는 기타 부품을 조작하여 엔진 속도를 증가하지
• 발전기를 어떤 형태로든 수정하지 마십시오.
오일
오일 권장사항
최상의 성능을 발휘하기 위해 Briggs & Stratton 보증 인증 오일을 사용할 것을
권장합니다. SF, SG, SH, SJ 이상의 서비스로 분류된 경우 기타 고품질 정제유도
사용 가능합니다. 특수 첨가제를 사용하지 마십시오.
실외 온도로 엔진의 적절한 오일 점성이 결정됩니다. 차트를 사용하여 예상된
실외 온도 범위에 가장 적합한 점성을 선택하십시오.
지나치게 높은 작동 속도는 가벼운 부상 및/또는 발전기 손상을
마십시오.
그림
오일 수준 점검
항상 사용하기 전 또는 작동 시 최소 8시간 마다 오일 수준을 점검하십시오.
오일 수준을 유지 관리합니다.
1. 발전기가 평평한 수평 표면에 있는지 확인하십시오.
2. 오일 보충 주변 영역(4,A)을 청소하고 오일 캡/딥 스틱을 제거하고
깨끗한 천으로 딥 스틱을 닦아냅니다. 딥 스틱을 다시 끼웁니다.
오일수준을 점검합니다.
알림
오일 수준을 점검할 때 딥 스틱을 돌려 넣지 마십시오.
3. 오일이 딥 스틱의 가득 참(FULL) 표시(2,B)에 있는지 확인합니다.
오일캡/딥 스틱을 다시 끼우고 조입니다.
엔진 오일 추가
1. 발전기가 평평한 수평 표면에 있는지 확인하십시오.
오일 수준 점검
2.
3. 필요한 경우, 오일을 천천히 오일 보충구에 딥 스틱의 가득
참(FULL) 표시까지 붓습니다. 넘치지 않게 하십시오.
알림
오일을 넘치게 채우면 엔진이 시작하지 않거나, 시작하는 데 힘들
수있습니다.
• 넘치지 않게 하십시오.
• 딥 스틱의 가득 참(FULL) 표시를 넘으면 오일을 빼내어 오일 수준을
딥스틱의 가득 참(FULL) 표시까지 줄입니다.
4. 오일 캡/딥 스틱을 다시 끼우고 조입니다.
엔진 오일 교체
지나치게 더럽거나 먼지가 많은 조건에서 또는 매우 더운 날씨에 발전기를
사용하는 경우 오일을 더 자주 교체하십시오.
주의 피부가 사용된 모터 오일에 오래 동안 또는 반복적으로 접촉하지
않도록 하십시오.
• 사용된 모터 오일은 특정 실험 동물에서 피부암을 일으키는 것으로
나타났습니다.
• 비눗물에 노출된 부위를 깨끗이 씻으십시오.
어린이 손이 닿지 않게 하십시오. 오염시키지 마십시오. 자원을
보존하십시오. 사용한 오일을 수거 센터에 반환하십시오.
1 2 4
에 설명된 대로 오일 수준을 점검합니다.
* 4°C (40°F) 미만에서 SAE 30을 사용하면 시작하는 데 힘듭니다.
** 27°C (80°F) 이상에서 10W30을 사용하면 오일 소비가 증가할 수 있습니다.
오일 수준을 더 자주 점검합니다.
엔진에 여전히 운전 열이 있는 동안, 다음과 같이 오일을 교체합니다.
1. 장치가 평평한 수평 표면에 있는지 확인하십시오.
2. 점화 플러그에서 점화 플러그 선을 연결 해제하고 선을 점화 플러그와
연결할 수 없는 곳에 두십시오.
3. 오일 배출 플러그 주변 영역(1,K)을 청소합니다. 오일 배출 플러그는
기화기의 반대쪽, 엔진의 베이스에 있습니다.
4. 오일 배출 플러그를 제거하고 적합한 용기에 오일을 완전히 배출합니다.
5. 오일 배출 플러그를 다시 설치하고 단단히 조입니다. 오일 보충 캡/딥
스틱을 제거합니다.
6. 3단계와 4단계를 반복하여
추가합니다.
7. 흘린 오일을 닦아냅니다.
엔진 오일 추가
에 설명된 대로 엔진 오일을
12 BRIGGSandSTRATTON.COM12 BRIGGSandSTRATTON.COM
Page 69

Not for
Reproduction
점화 플러그 점검
점화 플러그를 변경하면 엔진이 더 쉽게 시작되고 더 잘 돌아갈 수 있습니다.
1. 점화 플러그 주변 영역을 청소합니다.
2. 점화 플러그를 제거하고 점검합니다.
3. 와이어 틈새 게이지로 전극 간격을 점검하고 필요한 경우 점화 플러그
간격을 권장된 간격으로 재설정합니다(
4. 전극이 패였거나 탔거나 자기가 균열된 경우 점화 플러그를 교체합니다.
권장된 교체 점화 플러그를 사용하십시오. 사양을 참조하십시오.
5. 점화 플러그를 설치하고 꽉 조입니다.
알림
일부 지역에서는 지역 법에 따라 점화 신호를 억제하기 위해 저항기 점화
플러그를 사용해야 합니다. 원래 엔진에 저항기 점화 플러그가 장착되었으면
교체용으로 동일한 유형을 사용하십시오.
경고 머플러 영역에 접촉하면 심각한 화상을 초래할 수 있습니다.
• 뜨거운 부품을 만지지 마시고 뜨거운 배기가스를 피하십시오.
• 만지기 전에 장비를 식히십시오.
• 오버헤드를 포함하여 발전기의 모든 면에서 최소 1.5 m(5 ft) 간극을
두십시오.
• 원래 장비 제조업체, 소매업체 또는 대리점에 연락하여 이 엔진에 설치된
배기 시스템용으로 설계된 불꽃 방지 장치를 얻으십시오.
• 교체 부품은 원래 부품과 동일하고 동일한 위치에 설치되어야 합니다.
머플러 및 불꽃 방지 장치 점검
머플러의 균열, 부식 또는 기타 손상을 점검합니다. 불꽃 방지 장치가 장착된
경우, 이 장치를 제거하고 손상 또는 탄소 폐색을 점검합니다. 교체 부품이
필요한 경우 원래 장비 교체 부품만 사용하십시오.
공기 청정기 점검
더러운 공기 청정기와 함께 엔진을 돌리면 엔진이 적절하게 돌아가지 않고
손상될 수 있습니다. 때 또는 먼지가 많은 상태에서 작동할 경우 더 자주
점검하십시오.
공기 청정기를 점검하려면 다음 단계를 따르십시오.
1. 상단과 하단의 공기 청정기 덮개를 풀고 덮개를 제거합니다(A).
2. 조심스럽게 공기 청정기(B)를 제거하여 잔류물이 기화기에 떨어지지
않도록 합니다.
3. 액체 세제 또는 물에 폼 공기 청정기를 씻습니다. 깨끗한 천으로
말립니다.
4. 폼 공기 청정기를 엔진 오일에 흠뻑 적시고 깨끗한 천으로 물기를
닦아내어 과다한 오일을 제거합니다.
5. 깨끗한, 혹은 새로운 폼 공기 청정기를 베이스(C)에 다시 설치합니다.
6. 공기 청정기 덮개를 베이스에 조립하고 걸쇠로 잠급니다.
9
그림
사양
참조).
배기열/가스는 연소성 물질, 구조 또는 위험 연료 탱크를
점화하여 화재를 일으킬 수 있습니다.
10
그림
냉각 시스템 청소
시간이 지나면서 잔류물이 실린더 냉각 팬에 누적될 수 있지만, 부분적인 엔진
분해 없이 볼 수 없습니다. 이런 이유로 해서, Briggs & Stratton 공인 대리점이
권장된 시간 간격을 두고 냉각 시스템을 청소하도록 할 것을 권장합니다(
섹션의
정비 일정
중요합니다.
참조). 마찬가지로 엔진 상단에 잔류물이 없도록 하는 것도
청소
를 참조하십시오.
정비
보관
30일 이상 발전기를 사용하지 않으면 다음 지침에 따라 보관 준비를 하십시오.
발전기 보관
청소
•
• 발전기의 냉기 슬롯 및 개구부가 열려 있고 장애물이 없음을
장기간 보관 지침
30일 이상 보관될 때 연료는 퀴퀴한 냄새가 날 수 있습니다. 퀴퀴한 냄새가
나는
형성시킵니다. 연료를 신선하게 유지하려면 Briggs & Stratton 순정 서비스
부품을 판매하는 곳에서 구할 수 있는 Briggs & Stratton® Advanced Formula Fuel
Treatment & Stabilizer를 사용하십시오.
지침에 따라 연료 안정제가 추가된 경우 엔진에서 가솔린을 배출할 필요가
없습니다. 보관하기 전에 엔진을 2분 동안 돌려 연료 시스템 전체로 안정제를
순환시킵니다. 엔진의 가솔린이 연료 안정제로 처리되지 않았으면 승인된
용기에 배출해야 합니다. 연료가 없어서 멈출 때까지 엔진을 운전합니다.
신선함의 유지를 위해 보관 용기에 연료 안정제를 사용하는 것이 좋습니다.
연료 또는 탱크에 연료를 채운 장비 보관 시
• 로, 스토브, 온수기, 옷 드라이어 또는 연료 증기를 점화시킬 수 있으므로
연료 배출 시
• 발전기 엔진을 끄고 연료 캡을 제거하기 전에 최소 2분간 식히십시오. 캡을
• 연료 탱크를 실외로 배출합니다.
• 연료를 불꽃, 화로, 점화용 불씨, 열 및 기타 점화원과 떨어진 곳에
• 연료선, 탱크, 캡 및 피팅의 균열 또는 누출을 자주 점검하십시오. 필요한
• 담배나 연기에 붙을 켜지 마십시오.
엔진 오일 교체
엔진이 여전히 따뜻한 상태에서 크랭크실에서 오일을 배출합니다. 권장된
등급으로 보충합니다.
기타 보관 팁
1.
2. 연료 용기가 녹슬기 시작하면 교체합니다. 연료가 이 장치에서
3. 습기를 유지하지 않는 장치를 적합한 보호 덮개로 덮습니다.
에 설명된 대로 발전기를 청소하십시오.
확인하십시오.
연료는 연료 시스템 또는 필수 기화기 부품에 산성 및 수지 침전물을
경고 연료 및 증기는 가연성과 폭발성이 매우 높아서 연소, 화재 또는
점화용 불씨 또는 기타 점화원이 있는 다른 어플라이언스와 떨어진 곳에
보관하십시오.
천천히 풀어 탱크를 감압합니다.
두십시오.
경우 교환하십시오.
장기간 보관 지침
때 연료를 보관하지 마십시오.
사용되므로, 연료의 녹 및/또는 먼지가 문제를 일으킬 수 있습니다.
폭발을 일으켜 사망이나 심각한 부상 및/또는 재산
손상을 초래할 수 있습니다.
엔진 오일 교체
에 설명된 대로 연료를 처리하지 않았으면 시즌이 바뀔
를 참조하십시오.
경고 보관 덮개가 화재를 일으켜 사망이나 심각한 부상 및/또는 재산
손상을 초래할 수 있습니다.
• 뜨거운 발전기 위해 보관 덮개를 씌우지 마십시오.
• 장비에 덮개를 씌우기 전에 충분한 시간 동안 장비를 식히십시오.
4. 발전기를 깨끗하고 건조한 곳에 보관합니다.
13 13
Page 70

Not for
Reproduction
문제 해결
문제점 원인 수정
1. 회로 차단기를 재설정합니다.
2. 승인된 서비스 시설에 문의합니다.
3. 점검하고 수리합니다.
4. 양호한 상태의 다른 장치를 연결합니다.
엔진이 실행 중이지만 사용 가능한
AC출력이 없습니다.
1. 회로 차단기가 열렸습니다.
2. 발전기 고장입니다.
3. 연결이 좋지 않거나 확장 케이블이 손상되었습니다.
4. 작동하지 않는 전기 장치입니다.
엔진이 부하가 없을 때는 잘
실행되지만부하가 연결되면
"꼼짝하지 않습니다".
엔진이 시작하지 않습니다. 운전 중일
때 종료하거나 시작해도 힘들게
돌아갑니다.
엔진에 전력이 없습니다.
1. 연결된 전기 장치에서 단락이 발생합니다.
2. 엔진 속도가 너무 느립니다.
3. 발전기가 과부하되었습니다.
4. 발전기가 단락되었습니다.
5. 연료 필터가 막혔거나 더럽습니다.
1. 연료 차단 밸브가 끄기(O) 위치에 있습니다.
2. 오일 수준이 낮습니다.
3. 공기 필터가 더럽습니다.
4. 연료 필터가 막혔거나 더럽습니다.
5. 연료 부족.
6. 연료질이 나쁩니다.
7. 점화 플러그 회선이 점화 플러그에 연결되지
않았습니다.
8. 점화 플러그가 손상되었습니다.
9. 연료에 물이 있습니다.
10. 기화기가 넘쳤습니다.
11. 지나치게 많은 연료가 혼합되었습니다.
12. 흡입 밸브 장치가 열렸거나 닫혔습니다.
13. 엔진의 압력이 유실되었습니다.
14. 전기 시작 스위치가
15. 배터리가 방전되었습니다.
1. 발전기가 과부하되었습니다.
2. 공기 필터가 더럽습니다.
3. 연료 필터가 막혔거나 더럽습니다.
끄기(OFF) 위치에
있습니다.
1. 단락된 전기 부하를 연결 해제합니다.
2. 승인된 서비스 시설에 문의합니다.
3.
작동
섹션의
참조하십시오.
4. 승인된 서비스 시설에 문의합니다.
5. 연료 필터를 청소하거나 교체합니다.
1. 연료 밸브를 켜기(I) 위치로 돌립니다.
2. 크랭크실을 적절한 수준까지 채우거나 발전기를
수평 표면에 놓습니다.
3. 공기 청정기를 청소하거나 교체합니다.
4. 연료 필터를 청소하거나 교체합니다.
5. 연료 탱크를 채웁니다.
6. 연료 탱크 및 기화기를 비우고 새 연료로
채웁니다.
7. 회선을 점화 플러그에 연결합니다.
8. 점화 플러그를 교체합니다.
9. 가스 탱크 및 기화기를 비우고 새 연료로
채웁니다.
10. 5분 기다렸다가 엔진을 다시 크랭크합니다.
11. 승인된 서비스 시설에 문의합니다.
12. 승인된 서비스 시설에 문의합니다.
13. 승인된 서비스 시설에 문의합니다.
14. 전기 정지 스위치를 실행 위치로 돌립니다.
15. 배터리를 충전하거나 교체합니다.
1.
발전기 과부하하지 않음
2. 공기 필터를 교체합니다.
3. 연료 필터를 청소하거나 교체합니다.
발전기 과부하하지 않음
을 참조하십시오.
을
엔진이 "찾고 있거나" 불안정합니다.
에너지 소비
50% 부하에서 정상 작동 시 에너지 소비(가솔린)
유휴 모드에서 에너지 소비(가솔린) 해당 안 됨 해당 안 됨 해당 안 됨
에너지 소비 단위 당 제공된 제품 또는 서비스 해당 안 됨 해당 안 됨 해당 안 됨
1. 기화기가 너무 많이 또는 너무 적게 실행되고 있습니다.
2. 연료 필터가 막혔거나 더럽습니다.
2,300 W 3,500 W 6,000 W
1.12 l/h 1.63 l/h 2.04 l/h
1. 승인된 서비스 시설에 문의합니다.
2. 연료 필터를 청소하거나 교체합니다.
14 BRIGGSandSTRATTON.COM14 BRIGGSandSTRATTON.COM
Page 71

Not for
Reproduction
제품 사양
모델 030566, 030596
시작 전력량(W) .................................................2,500 W
정격 전력량(W)* ................................................2,300 W
AC 출력 전압 .....................................................230 V
230 V AC에서 부하 전류 ........................................10.0 Amps
주파수. . . . . . . . . . . . . . . . . . . . . . . . . . . . . . . . . . . . . . . . . . . . . . . . . . . . . . . . . . . 60 Hz
위상 ............................................................ 단상
연료 용량 ..................................................4.0 gal(15 L)
엔진 변위 ................................................ 9.95 ci(163 cc)
오일 용량 .........................................18 - 20 oz(0.54 - 0.59 L)
점화 플러그 틈 ........................................ 0.030 in(0.76 mm)
점화 플러그 토크 ........................................180 lb-in(20 Nm)
흡입 밸브 간극 .............................0.004 - 0.006 in(0.10 - 0.15 mm)
배기 밸브 간극 ...........................0.006 - 0.203 mm(0.15 - 0.20 mm)
모델 030570, 030597
시작 전력량(W) .................................................4,000 W
정격 전력량(W)* ................................................3,500 W
AC 출력 전압 .....................................................230 V
230 V AC에서 부하 전류 ........................................15.2 Amps
주파수. . . . . . . . . . . . . . . . . . . . . . . . . . . . . . . . . . . . . . . . . . . . . . . . . . . . . . . . . . . 60 Hz
위상 ............................................................ 단상
연료 용량 ..................................................24.98 l(25 L)
엔진 변위 ............................................... 16.48 ci(270 cc)
오일 용량 .................................... 35 - 1,048.93 g(1.05 - 1.09 L)
점화 플러그 틈 ........................................ 0.030 in(0.76 mm)
점화 플러그 토크 .....................................124.74 kg-in(31 Nm)
흡입 밸브 간극 ...........................0.005 - 0.178 mm(0.13 - 0.18 mm)
배기 밸브 간극 ...........................0.005 - 0.178 mm(0.13 - 0.18 mm)
모델 030576, 030583, 030598, 030599
시작 전력량(W) .................................................6,500 W
정격 전력량(W)* ................................................6,000 W
AC 출력 전압 .....................................................230 V
230 V AC에서 부하 전류 ........................................26.0 Amps
주파수. . . . . . . . . . . . . . . . . . . . . . . . . . . . . . . . . . . . . . . . . . . . . . . . . . . . . . . . . . . 60 Hz
위상 ............................................................ 단상
연료 용량 ..................................................24.98 l(25 L)
엔진 변위 ............................................... 25.63 ci(420 cc)
오일 용량 .................................... 35 - 1,048.93 g(1.05 - 1.09 L)
점화 플러그 틈 ........................................ 0.030 in(0.76 mm)
점화 플러그 토크 .....................................124.74 kg-in(31 Nm)
흡입 밸브 간극 ...........................0.005 - 0.178 mm(0.13 - 0.18 mm)
배기 밸브 간극 ...........................0.005 - 0.178 mm(0.13 - 0.18 mm)
모델 030588
시작 전력량(W) .................................................2,500 W
정격 전력량(W)* ................................................2,300 W
AC 출력 전압 .....................................................115 V
115 V AC에서 부하 전류 ........................................20.0 Amps
주파수. . . . . . . . . . . . . . . . . . . . . . . . . . . . . . . . . . . . . . . . . . . . . . . . . . . . . . . . . . . 60 Hz
위상 ............................................................ 단상
연료 용량 ..................................................4
엔진 변위
오일 용량 .........................................18 - 20 oz(0.54 - 0.59 L)
점화 플러그 틈 ........................................ 0.030 in(0.76 mm)
점화 플러그 토크 ........................................180 lb-in(20 Nm)
흡입 밸브 간극 .............................0.004 - 0.006 in(0.10 - 0.15 mm)
배기 밸브 간극 ...........................0.006 - 0.203 mm(0.15 - 0.20 mm)
모델 030589
시작 전력량(W) .................................................4,000 W
정격 전력량(W)* ................................................3,500 W
AC 출력 전압 ................................................115 / 230 V
115 V AC에서 부하 전류 ........................................30.4 Amps
230 V AC에서 부하 전류 ........................................15.2 Amps
주파수. . . . . . . . . . . . . . . . . . . . . . . . . . . . . . . . . . . . . . . . . . . . . . . . . . . . . . . . . . . 60 Hz
위상 ............................................................ 단상
연료 용량 ..................................................6.6 gal(25 L)
엔진 변위 ............................................... 16.48 ci(270 cc)
오일 용량 .................................... 35 - 1,048.93 g(1.05 - 1.09 L)
점화 플러그 틈 ........................................ 0.030 in(0.76 mm)
점화 플러그 토크 .....................................124.74 kg-in(31 Nm)
흡입 밸브 간극 ...........................0.005 - 0.178 mm(0.13 - 0.18 mm)
배기 밸브 간극 ...........................0.005 - 0.178 mm(0.13 - 0.18 mm)
모델 030590, 030591
시작 전력량(W) .................................................6,500 W
정격 전력량(W)* ................................................6,000 W
AC 출력 전압 ................................................115 / 230 V
115 V AC에서 부하 전류 ........................................52.1 Amps
230 V AC에서 부하 전류 ........................................26.0 Amps
주파수. . . . . . . . . . . . . . . . . . . . . . . . . . . . . . . . . . . . . . . . . . . . . . . . . . . . . . . . . . . 60 Hz
위상 ............................................................ 단상
연료 용량 ..................................................24.98 l(25 L)
엔진 변위 ............................................... 25.63 ci(420 cc)
오일 용량 .................................... 35 - 1,048.93 g(1.05 - 1.09 L)
점화 플러그 틈 ........................................ 0.030 in(0.76 mm)
점화 플러그 토크 .....................................124.74 kg-in(31 Nm)
흡입 밸브 간극 ...........................0.005 - 0.178 mm(0.13 - 0.18 mm)
배기 밸브 간극 ...........................0.005 - 0.178 mm(0.13 - 0.18 mm)
................................................ 9.95 ci(163 cc)
.0 gal(15 L)
일반 점검 부품
공기 청정기 - 엔진 모델 106200 ................................... 591717
공기 청정기 - 엔진 모델 160000 ................................... 591778
공기 청정기 - 엔진 모델 250000 ................................... 591778
불꽃 방지 플러그 - 엔진 모델 106200 ............................... 491055
불꽃 방지 플러그 - 엔진 모델 160000 ............................... 797235
불꽃 방지 플러그 - 엔진 모델 250000 ............................... 797235
전력 소요량: 개별 가스 엔진 모델의 총 전력 소요량은 SAE(Society of Automotive Engineers) 코드 J1940(소형 엔진 전력 및 토크 소요량 절차)에 따라 레이블이
지정되어 있으며, 소요량 성능은 SAE J1995(수정 2002-05)에 따라 얻고 수정되었습니다. 토크 값은 3060 RPM에서 도출되고, 마력 값은 3600 RPM에서
전력
곡선은 www.BRIGGSandSTRATTON.COM에서 볼 수 있습니다. 순 전력값은 설치된 배기가스 및 공기 청정기로 가져오는 반면 총 전력값은 이러한 장치 연결 없이
수집됩니다. 실제 총 엔진 전력은 순 엔진 전력보다 높고 무엇보다도 주변 작동 조건과 엔진 간 다양성의 영향을 받습니다. 엔진이 놓이는 광범위한 제품을 제공하면
지정된 전력 장비에서 사용될 때 가스 엔진이 정격 총 전력을 초과하지 않을 수 있습니다. 이 차이는 다양한 엔진 구성요소(공기 청정기, 배기, 충전, 냉각, 기화기,
연료 펌프 등), 적용 제한, 주변 작동 조건(온도, 습도, 고도) 및 엔진 간 다양성을 포함하되, 제한하지 않고 다양한 요인들로 인한 것입니다. 제조 및 역량 한계로 인해
Briggs & Stratton은 이 시리즈 엔진을 더 높은 정격의 전력 엔진으로 대체할 수 있습니다.
* 이 발전기는 ISO 8528 G1에 따라 평가됩니다.
도출됩니다. 총
15 15
Page 72

Not for
Reproduction
BRIGGS & STRATTON 휴대용 발전기 소유자 보증 정책
2012년 9월 1일 효력: 날짜가 적혀 있지 않은 모든 보증과 2012년 9월 이전 날짜의 모든 보증을 대체합니다.
제한된 보증
Briggs & Stratton은 아래 지정된 보증 기간 동안 재료 또는 제작 상에 결함이 있는 부품을 무료로 수리 또는 교환함을 보증합니다. 이 보증 하에서 수리
또는 교환을 위해 제출된 제품의 운송비는 구매자가 부담해야 합니다. 이 보증은 아래 명기된 기간 및 조건에 유효하고 따릅니다. 보증 서비스의 경우
BRIGGSandSTRATTON.com에 있는 대리점 위치 찾기 지도에서 가장 가까운 인증된 서비스 대리점을 찾으십시오. 구매자는 인증된 서비스 대리점에 연락한
다음승인된 서비스 대리점에서 제품을 조사하고 테스트할 수 있게 해야 합니다.
다른 명시적 보증은 없습니다. 특정 목적을 위한 판매성 및 적합성의 보증을 포함하여 암시적 보증은 구매일로부터 1년 또는 법이 허용한 최대 범위로
제한됩니다. 기타 묵시적 보증은 모두 제외됩니다. 우발적 또는 필연적 손상에 대한 책임은 법이 허용하는 최대 면책 범위로 제외됩니다. 일부 주 또는
국가에서는 묵시적 보증이 지속되는 기간에 대한 제한을 허용하지 않으며, 일부 주 또는 국가에서는 우발적 또는 필연적 손상의 제외 또는 제한을 허용하지
않으므로, 위의 제한사항 및 제외사항이 적용되지 않을 수 있습니다. 이 보증은 사용자에게 특정 법적 권리를 제공하고 사용자는 주 또는 국가마다 다른 기타
권리도 가질 수 있습니다.**
보증 기간
항목 소비자 사용 상업적 사용
장비
모델: 030588, 030589, 030590, 030591
모델: 030566, 030576, 030570, 030583,
030596, 030597, 030598, 030599
엔진 2년 1년
배터리(장착된 경우) 1년 1년
2년
1년
1년
1년
** 호주 지역 - 당사의 상품은 호주 소비자 보호법 하에 제외될 수 없는 보증을 제공합니다. 큰 고장에 대해 교환 또는 환불을 받고 기타 상당히 예측 가능한 손실이나
손상에 대한 보상을 받을 수 있습니다. 또한 상품의 품질이 수용할 수 없고 고장이 큰 고장을 초래하지 않는 경우에는 상품을 수리 받거나 교환할 수 있습니다.
보증 서비스의 경우 BRIGGSandSTRATTON.COM 에 있는 지도 대리점 위치 찾기 지도에서, 또는 1300 274 447로 전화를 하거나 salesenquires@briggsandstratton.com.
au로 이메일을 작성하거나 Briggs & Stratton Australia Pty Ltd, 1 Moorebank Avenue, NSW, Australia, 2170으로 편지를 작성하여 가장 가까운 인증된 서비스 대리점을
찾으십시오.
보증은 첫 소매 최종 사용자의 구입일에서 시작하여 위에서 명시된 기간 동안 계속됩니다. "소비자 사용"은 소매 소비자가 개인 거주 집에서 사용함을 의미합니다. "
상업적 사용"은 상업적, 수익성 또는 임대 목적을 위한 사용을 포함하여 기타 모든 사용을 의미합니다. 장비의 상업적 사용을 경험하게 되면 장비는 이 보증 목적을
위해 상업적 사용으로 고려됩니다. 공공시설에서 전원 공급전력에 사용된 장비는 이 보증에 해당되지 않습니다.
BRIGGS & STRATTON 제품에 대한 보증을 얻는 데 필요한 보증 등록은 없습니다. 구매 영수증을 보관하십시오. 보증 서비스를 요청할 때 처음 구매 날짜의 증서를
제공하지 않으면 제품의 제조일을 사용하여 보증 기간을 판단합니다.
보증 정보
보증 수리를 환영하며 불편을 드려 죄송합니다. 인증된 서비스 대리점에서 보증 수리를 수행할 수 있습니다. 대부분의 보증 수리는 일상적으로 처리되지만,
때때로 보증 서비스에 대한 요청이 적합하지 않을 수 있습니다. 예를 들어, 잘못된 사용, 정기 정비 결여, 배송, 처리, 창고 또는 부적절한 설치로 인해 장비 손상이
발생했다면 보증 서비스가 적용되지 않습니다. 마찬가지로, 휴대용 발전기의 제조일자나 일련 번호가 제거되었거나 장비가 변경 또는 수정된 경우에도 보증이
무효화됩니다. 보증 기간 동안 인증된 서비스 대리점은 조사 결과 정상적인 사용 및 서비스 하에서 결함으로 확인된 부품을 재량껏 수리하거나 교체합니다. 이
보증은 다음 수리 및 장비에는 적용되지 않습니다.
• 정상적인 마모: 모든 기계 장치와 마찬가지로, 실외 전력 장비는 주기적으로 부품을 교체하고 서비스를 잘 수행해야 합니다. 이 보증은 정상적인 사용으로
부품 또는 장비가 수명을 다한 경우의 수리에는 적용되지 않습니다.
• 설치 및 정비: 이 보증은 당사가 부적절하거나 허가되지 않은 설치 또는 변경 및 수정, 오용, 부주의, 사고, 과부하, 과속, 부적절한 정비, 수리 또는 보관 등으로
인해 성능 및 안정성에 부정적인 영향을 주었다고 판단된 장비 또는 부품에는 적용되지 않습니다. 또한 이 보증은 (화학물질, 더러움, 탄소, 석회 등으로 인한)
조정, 연료 시스템 청소 및 막힘과 같은 정상적인 정비에는 적용되지 않습니다.
• 기타 제외사항: 이 보증은 O-링,
제외합니다. 발전기 어댑터 코드 세트 및 보관 덮개와 같은 액세서리 부품은 제품 보증에서 제외됩니다. 이 보증은 불가항력 및 그 밖의 제조업체가 통제할 수
없는 불가항력의 사건으로 인한 고장을 제외합니다. 또한 사용 및 수리된 장비 및 데모 장비, 공공시설 전력이 있는 곳에 전원 공급전력을 위해 사용된 장비와
수명 지원 분야에서 사용된 장비도 제외합니다. 198195K, Rev. D, 2012/08/24
필터 등과 같은
항목 마모나 사고, 남용, 수정, 변경 또는 부적절한 서비스 또는 동결 또는 화학적 변질로 인한 오작동을
BRIGGS & STRATTON CORPORATION
MILWAUKEE, WI, USA
16 BRIGGSandSTRATTON.COM16 BRIGGSandSTRATTON.COM
 Loading...