

compact twin motor
hand and stand mixer

2
IMPORTANT SAFETY INSTRUCTIONS. READ CAREFULLY AND
KEEP FOR FUTURE REFERENCE
This appliance can be used by children aged from 8 years and
above and persons with reduced physical, sensory or mental
capabilities or lack of experience and knowledge if they have
been given supervision or instruction concerning use of the
appliance in a safe way and understand the hazards involved.
Children shall not play with the appliance. Cleaning and user
maintenance shall not be made by children unless they are
older than 8 and supervised. Keep the appliance and its cord
out of the reach of children aged less than 8 years.
Always disconnect the appliance from the mains supply
socket if it is left unattended and before assembling,
disassembling or cleaning.
If the supply cord is damaged, it must be replaced by the
manufacturer, its service agent or similarly qualied persons
in order to avoid a hazard.
product safety

3
! Never use this appliance for anything other than its intended use. This appliance is for
household use only. Do not use this appliance outdoors.
! Always ensure that hands are dry before handling the plug or switching on the
appliance.
! Always use the appliance on a stable, secure, dry and level surface.
! This appliance must not be placed on or near any potentially hot surfaces (such as a
gas or electric hob).
! Never immerse any part of the appliance or power cord and plug in water or any other
liquid.
! Never let the power cord hang over the edge of a work top, touch hot surfaces or
become knotted, trapped or pinched.
! Do not use the appliance if it has been dropped, if there are any visible signs of
damage or if it is leaking.
! Never use any accessory or attachment not recommended by the manufacturer.
! Remove attachments from the appliance before washing or cleaning them.
! Keep ngers, hair and clothing away from the moving parts of the appliance when it is
in use.
! Do not attempt to eject, t or remove attachments until the appliance has come to a
complete stop.
product safety

4
features and parts
1. Mixer stand/bowl turntable
Two speed turntable provides a powerful and thorough mixing action.
2. Stainless steel bowl
3. Detachable hand mixer
Can be detached from the stand for hand use.
4. Beater release button
Press the beater release button to remove the beaters or dough hooks.
5. On/off switch and 5-way speed selector
Turns your mixer on or off and selects one of 5 speed ranges. When used in
conjunction with the speed range selector switch, up to 10 speeds can be selected.
6. Speed range selector switch
Selects the high or low range of mixer speeds. Used in conjunction with the 5-way
speed selector.
7. Boost button
When held down, operates your mixer at its highest speed.
8. Mixer head lock release button
Press to release the head lock and tilt or lower the mixer head.
9. Hand mixer release button
When the mixer head is in the raised position the button can be pressed to detach
the hand mixer.
10. Bowl speed control
Selects Off, Hi or Lo speed for the mixing bowl turntable.
11. Dough hooks
Stainless steel dough hooks ideal for kneading dough and cookie mixes. The
dough hook with the red collar must be inserted into the red recess on the mixer.
Dishwasher safe.
12. Beaters
Suitable for making cakes, biscuits, pastry, scones, icing, llings, etc. Dishwasher
safe.
13. Whisk beaters
Suitable for eggs, cream, fatless sponges, mousses, soufés, meringues, pancakes,
batters, etc. Dishwasher safe.
14 Spatula
Shaped to t the contours of the bowl for efcient mixing. Dishwasher safe.

5
Due to our policy of continuous improvement, the actual product may differ slightly from the one illustrated in these instructions.
features and parts

6
using your mixer on the stand
Before rst use
Make sure your mixer is switched off and unplugged from the mains supply
socket before cleaning, detaching or tting it to the mixer stand or before tting or
removing the beaters or dough hooks.
Before using your mixer for the rst time, wash the beaters, dough hooks, spatula and
stainless steel bowl in warm, soapy water. Rinse and dry thoroughly. Do not use harsh
abrasives, chemicals or oven cleaners. Using a damp cloth or sponge, wipe the exterior
of the hand mixer and mixer stand. Dry thoroughly.
Using
Always avoid contact with moving parts while the appliance is in operation.
Keep hands, hair, clothing as well as other utensils away from the beaters/dough
hooks during operation.
Never attempt to remove or replace the beaters/dough hooks whilst your food
mixer is in operation, or plugged in to the mains supply.
Never attempt to make pastry with the mixer on the stand. For best results, remove
the mixer and use by hand.
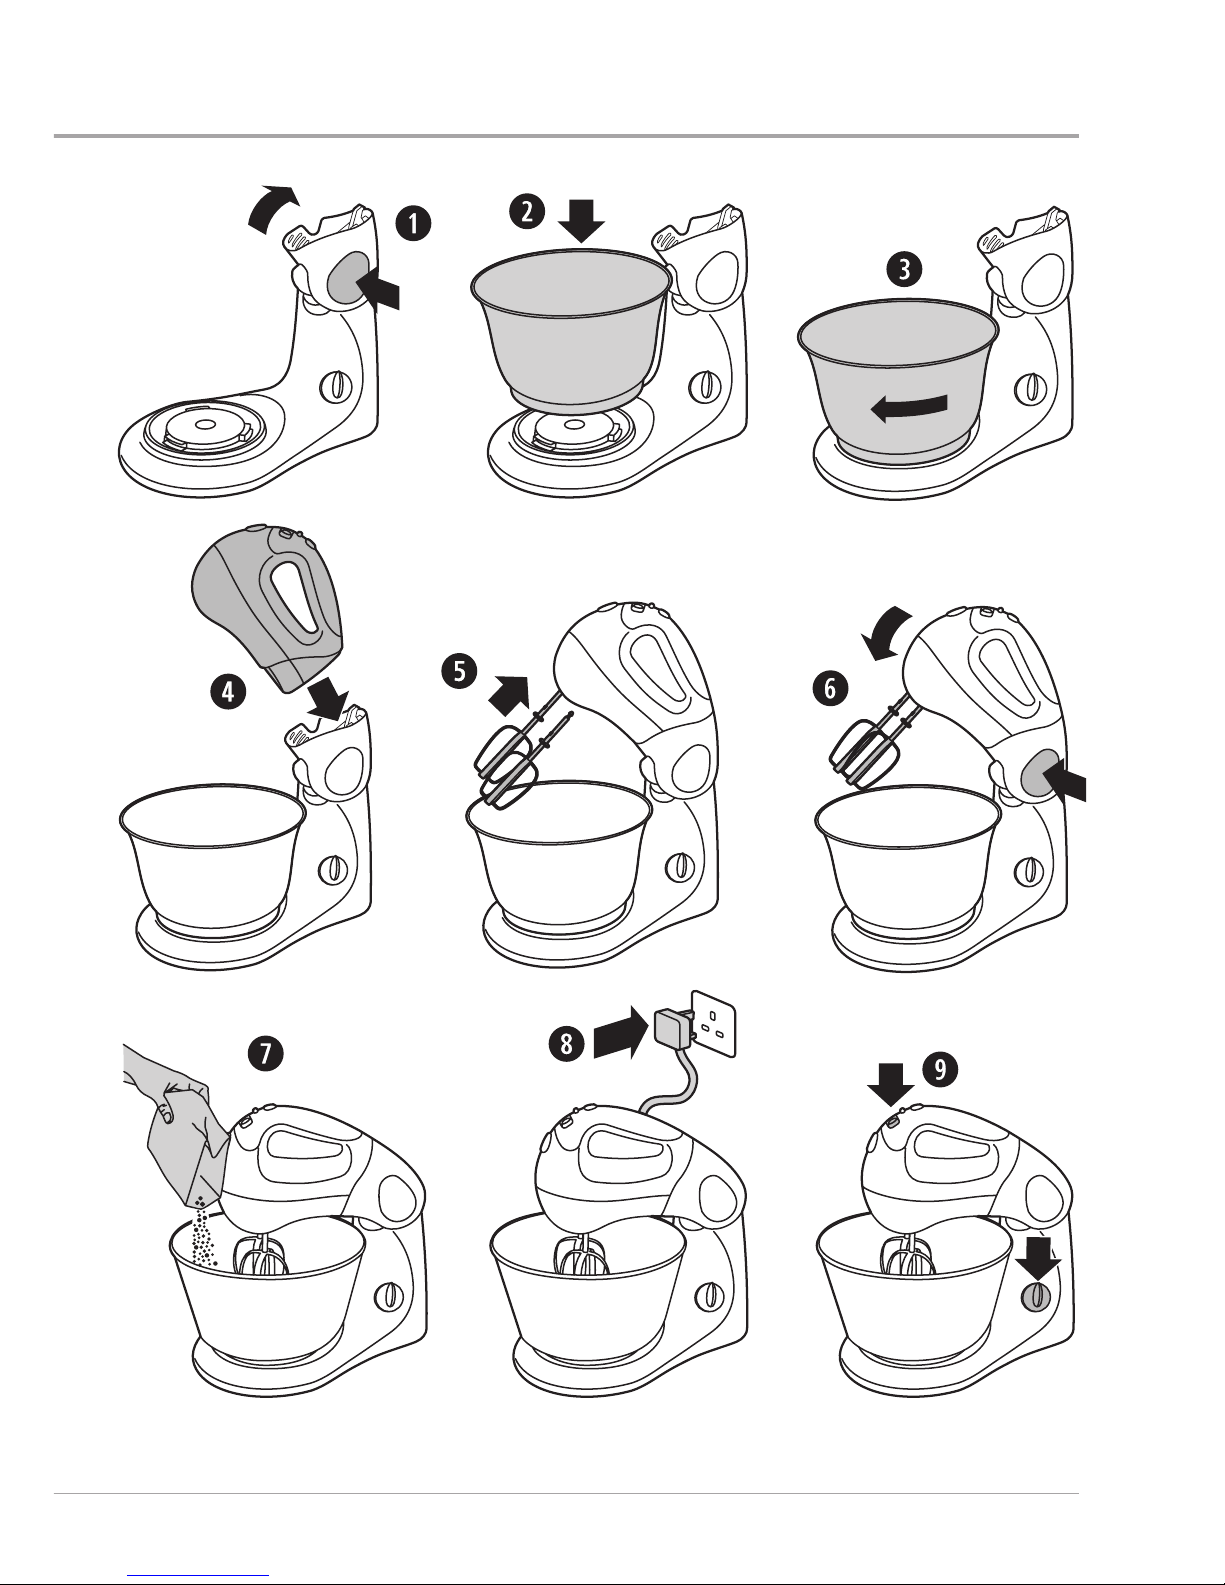
1. Ensure that your mixer is unplugged from the supply socket and the speed selector
is set to 0 (off). Press the mixer head lock release button and raise the mixer stand
head until it clicks.
2. Position the lower rim of the stainless steel mixing bowl over the mixing bowl
turntable.
3. Rotate the mixing bowl in a clockwise direction until it clicks into position.
4. Connect the hand mixer to the mixer stand by locate the two prongs on the stand
into the two rectangular holes in the heel of the hand mixer. Press the hand mixer
down until it clicks into place. Ensure that the hand mixer and mixer stand are rmly
connected together.
5. Insert one of the beaters into one of the recesses and push it rmly into place. Insert
the remaining beater into its recess pushing it rmly into place. When correctly tted,
both beaters should be locked in place.
To use the dough hooks, insert the dough hook with the red collar into the red recess.
Insert the other dough hook into the remaining recess. Don’t use the dough hooks
any other way round.
6. Press the mixer head lock release button and lower the mixer head into the bowl until
the head clicks. Never plug in or switch on your stand mixer before the mixer head
has been lowered into the mixing bowl.
7. Add the ingredients to the mixing bowl.
8. Plug your mixer into the mains supply socket.
9. Turn the on/off speed selector switch to 1 to start mixing. Adjust the speed as
required (see Mixing speeds on page 8). Use the bowl speed control to select the
appropriate bowl speed.
7
using your mixer on the stand
8
using your mixer by hand
Make sure your mixer is switched off and unplugged from the mains supply
socket before cleaning, detaching or tting it to the mixer stand or before tting or
removing the beaters or dough hooks.
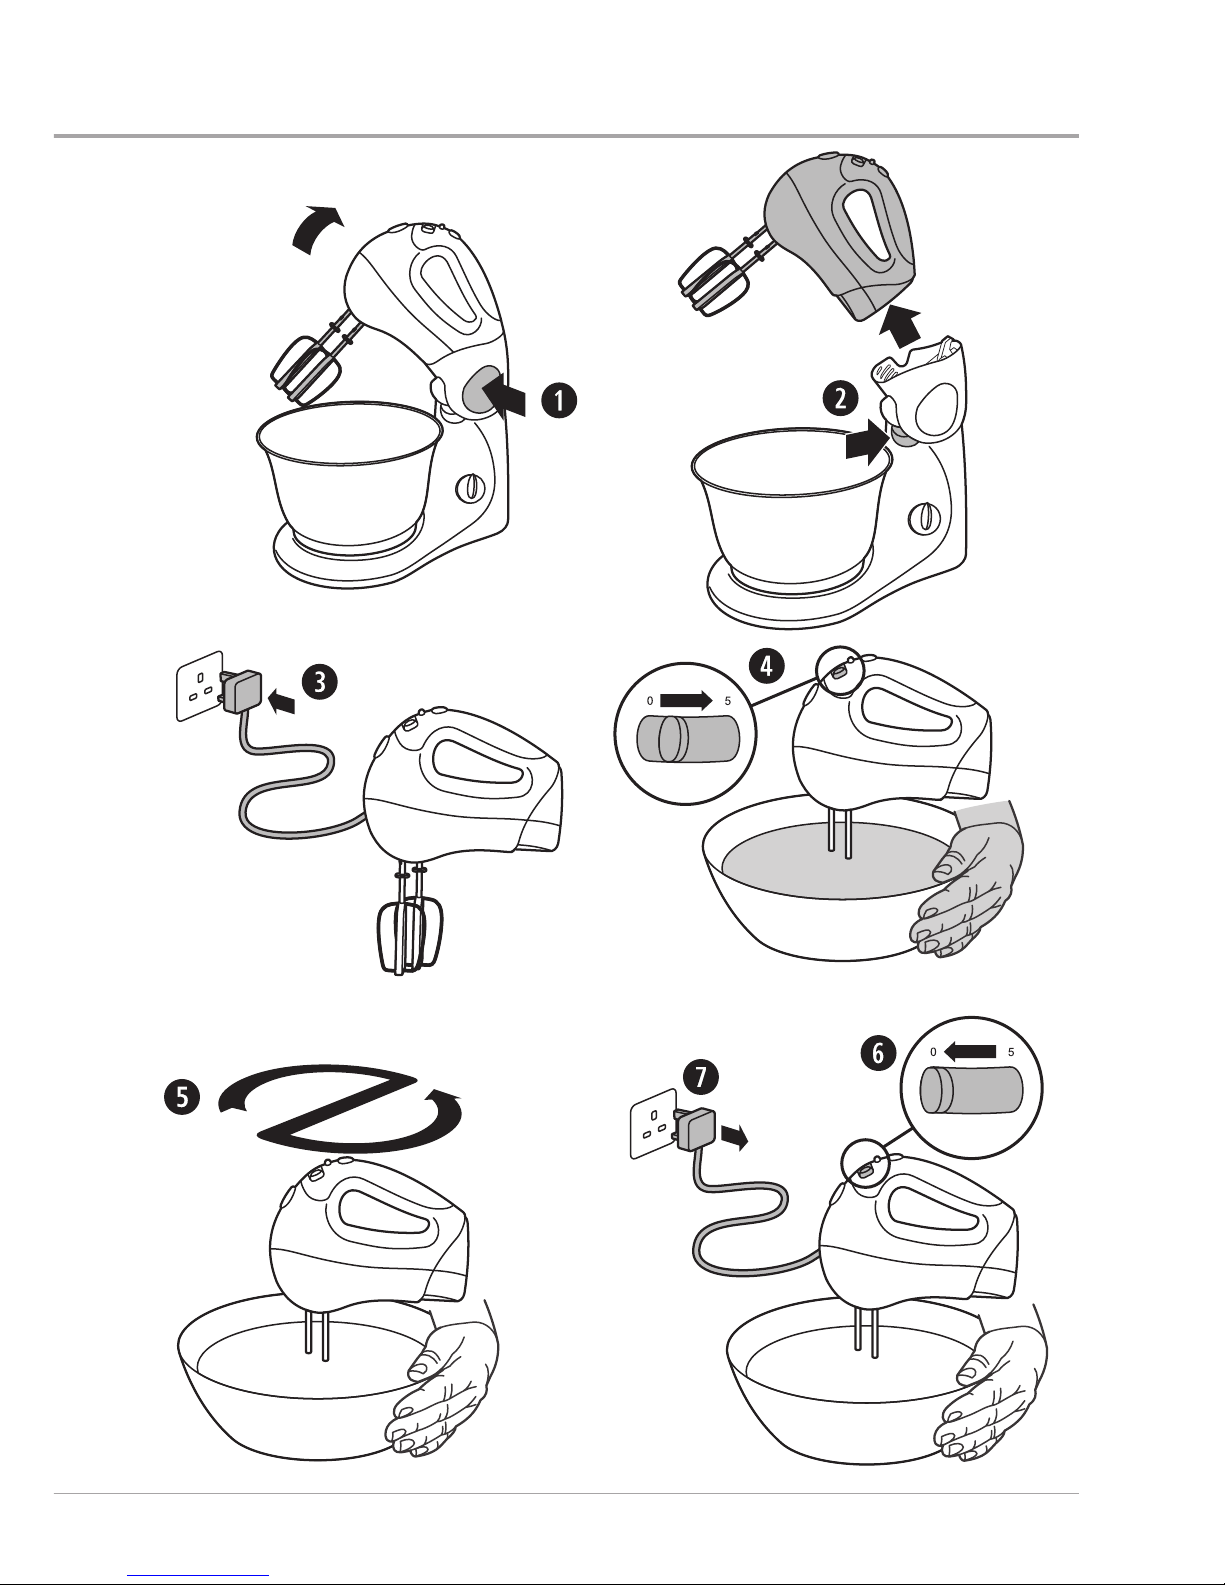
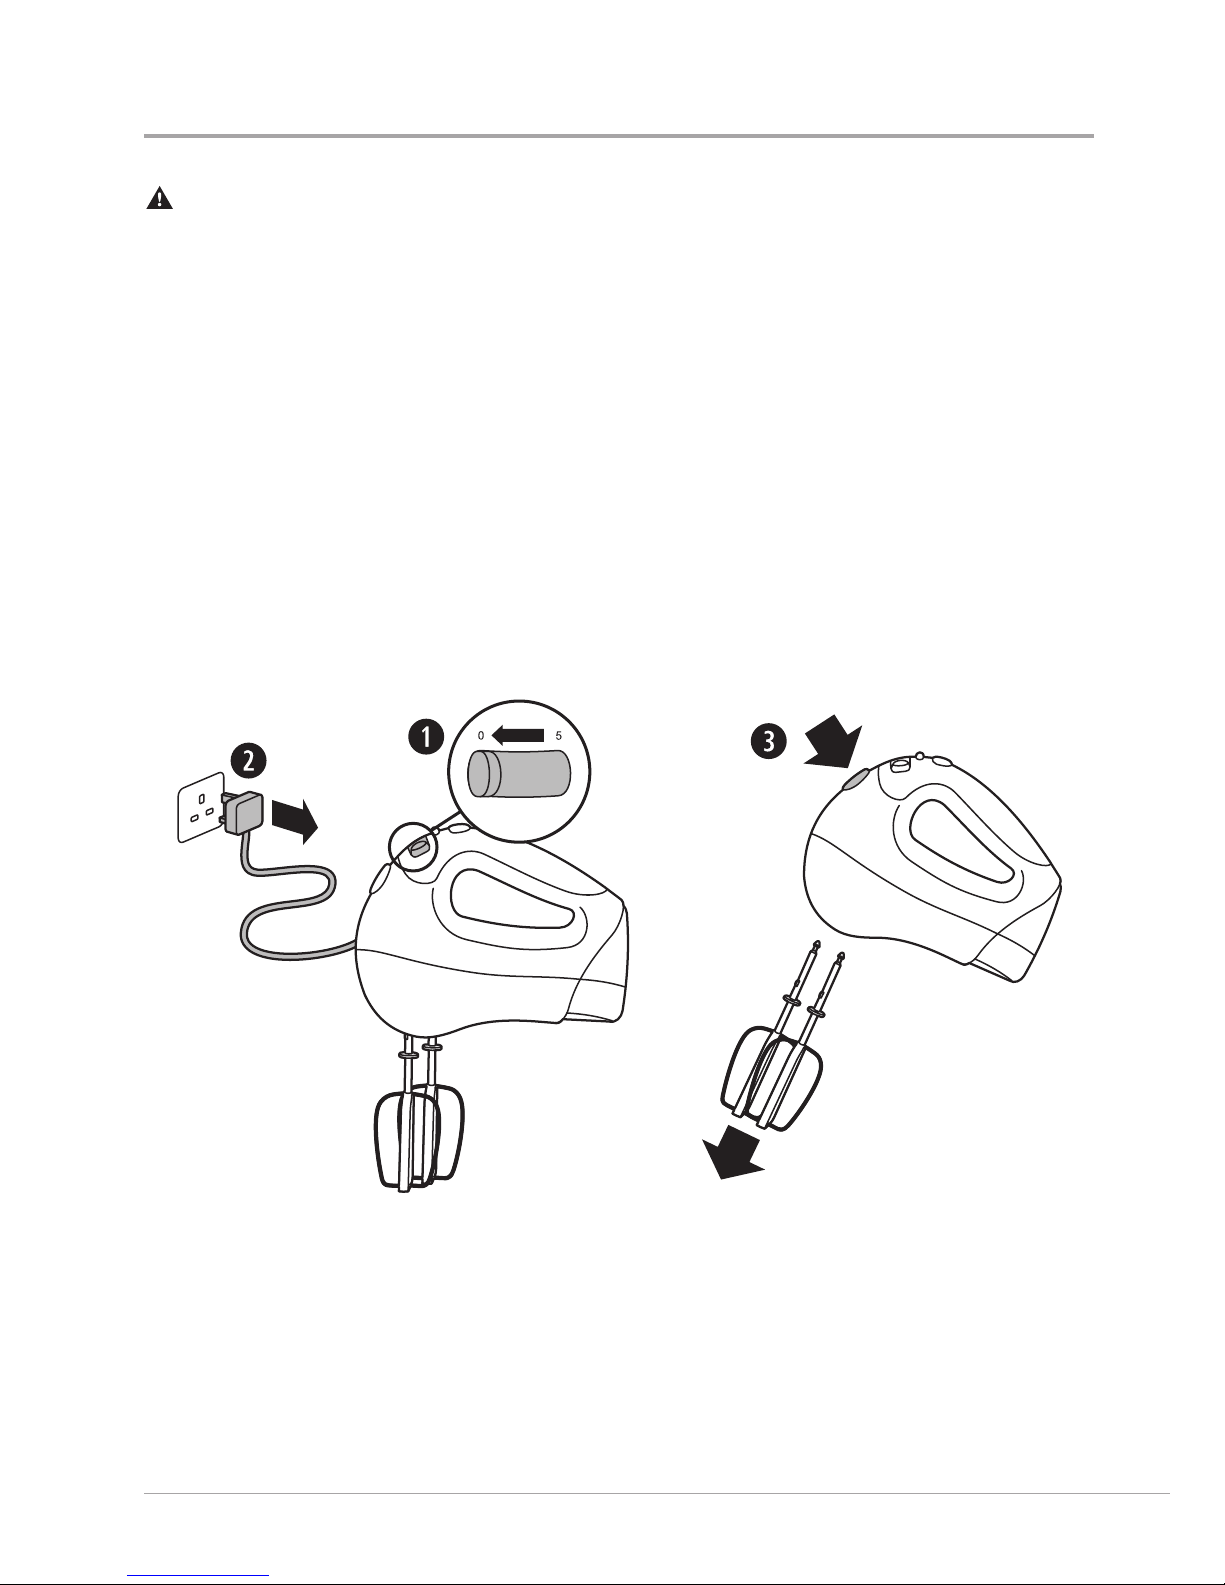
1. Ensure that your mixer is unplugged from the supply socket and the speed selector
is set to 0 (off). Press the mixer head lock release button and raise the mixer stand
head until it clicks.
2. Press and hold the hand mixer release button while lifting the hand mixer from the
mixer stand.
3. Plug your hand mixer into the mains supply socket.
4. Place the beaters/dough hooks into the ingredients to be mixed. Always support the
container or bowl in which you are mixing ingredients whilst operating your hand
mixer. Set the on/off speed selector switch to 1 to start mixing. Adjust the speed as
required (see Mixing speeds below).
5. When mixing, guide the hand mixer through the centre and around the sides of the
mixing bowl. When making pastry, use the mixer by hand and not on the stand. For
best results always make sure that you:
• use twin beaters
• soften the butter/margarine/lard before use
• disperse fat evenly into the our before mixing
6. When you have nished mixing the ingredients, set the on/off speed selector to 0
(off). Scrape the beaters/dough hooks around the bowl to remove any remaining
ingredients.
7. Unplug your hand mixer from the mains supply socket.
Always avoid contact with moving parts while the appliance is in operation.
Keep hands, hair, clothing as well as other utensils away from the beaters/dough
hooks during operation.
Never attempt to remove or replace the beaters/dough hooks whilst your food
mixer is in operation, or plugged in to the mains supply.
Mixing speeds
Task Speed Range Selector
Switch
Recommended Speed
Blending and folding LO 1 and 2
Light mixing LO 3 and 4
Creaming and beating HI
LO
2 and 3
5
Whipping and aerating HI 4, 5 or Boost button
9
using your mixer by hand
10
care, cleaning and storage
Make sure your mixer is switched off and unplugged from the mains supply
socket before cleaning, detaching or tting it to the mixer stand or before tting or
removing the beaters or dough hooks.
To make cleaning easier, clean your hand mixer and the beaters/dough hooks as soon as
you have nished using them.
1. Set the speed selector to 0 (off) and unplug your hand mixer from the mains supply
socket.
2. Eject the beaters/dough hooks from your hand mixer by pressing the eject button.
The beaters/dough hooks are heavy and care should be taken not to let them fall
onto fragile surfaces or items when they are being ejected.
3. Wash the beaters/dough hooks in warm soapy water. Alternatively, wash them in a
dishwasher.
4. Rinse and dry the beaters/dough hooks before storing or using again.
5. Using a dampened cloth, wipe the body of your hand mixer.
Storage
Store your hand mixer in a clean, dry place, out of the reach of children, ensuring that all
the parts are dismantled.
 Loading...