

Breville RM-BBL600XL Instruction Booklet
RM-BBL600XL
ikon Hemisphere™ LCD Blender
Instruction Booklet
Breville is a registered trademark of Breville Pty. Ltd. A.B.N. 98 000 092 928.
Copyright Breville Pty. Ltd. 2012.
Due to continued product improvement, the products illustrated/photographed
in this booklet may vary slightly from the actual product.
Models RM-BBL600XL Issue - A11
Breville Consumer Service Center
Website:
brevilleusa.com/certified
Toll Free:
1-855-273-8456
Hours:
8am to 5pm (Pacific Time)
Monday through Friday, excluding holidays

Congratulations
on the purchase of your Breville Certified Remanufactured Product
Contents
Page
Breville recommends safety first 4
Know your Breville ikon HemisphereTM LCD Blender 5
Why is the Breville ikon HemisphereTM LCD Blender superior? 6
Operating your Breville ikon HemisphereTM LCD Blender 7
Care and Cleaning 13
Tips on how to use your Breville ikon HemisphereTM LCD Blender 14
Suggested uses for your Breville ikon HemisphereTM LCD Blender 16
Ice making capabilities of you Breville ikon HemisphereTM LCD Blender 17
Troubleshooting 18
2
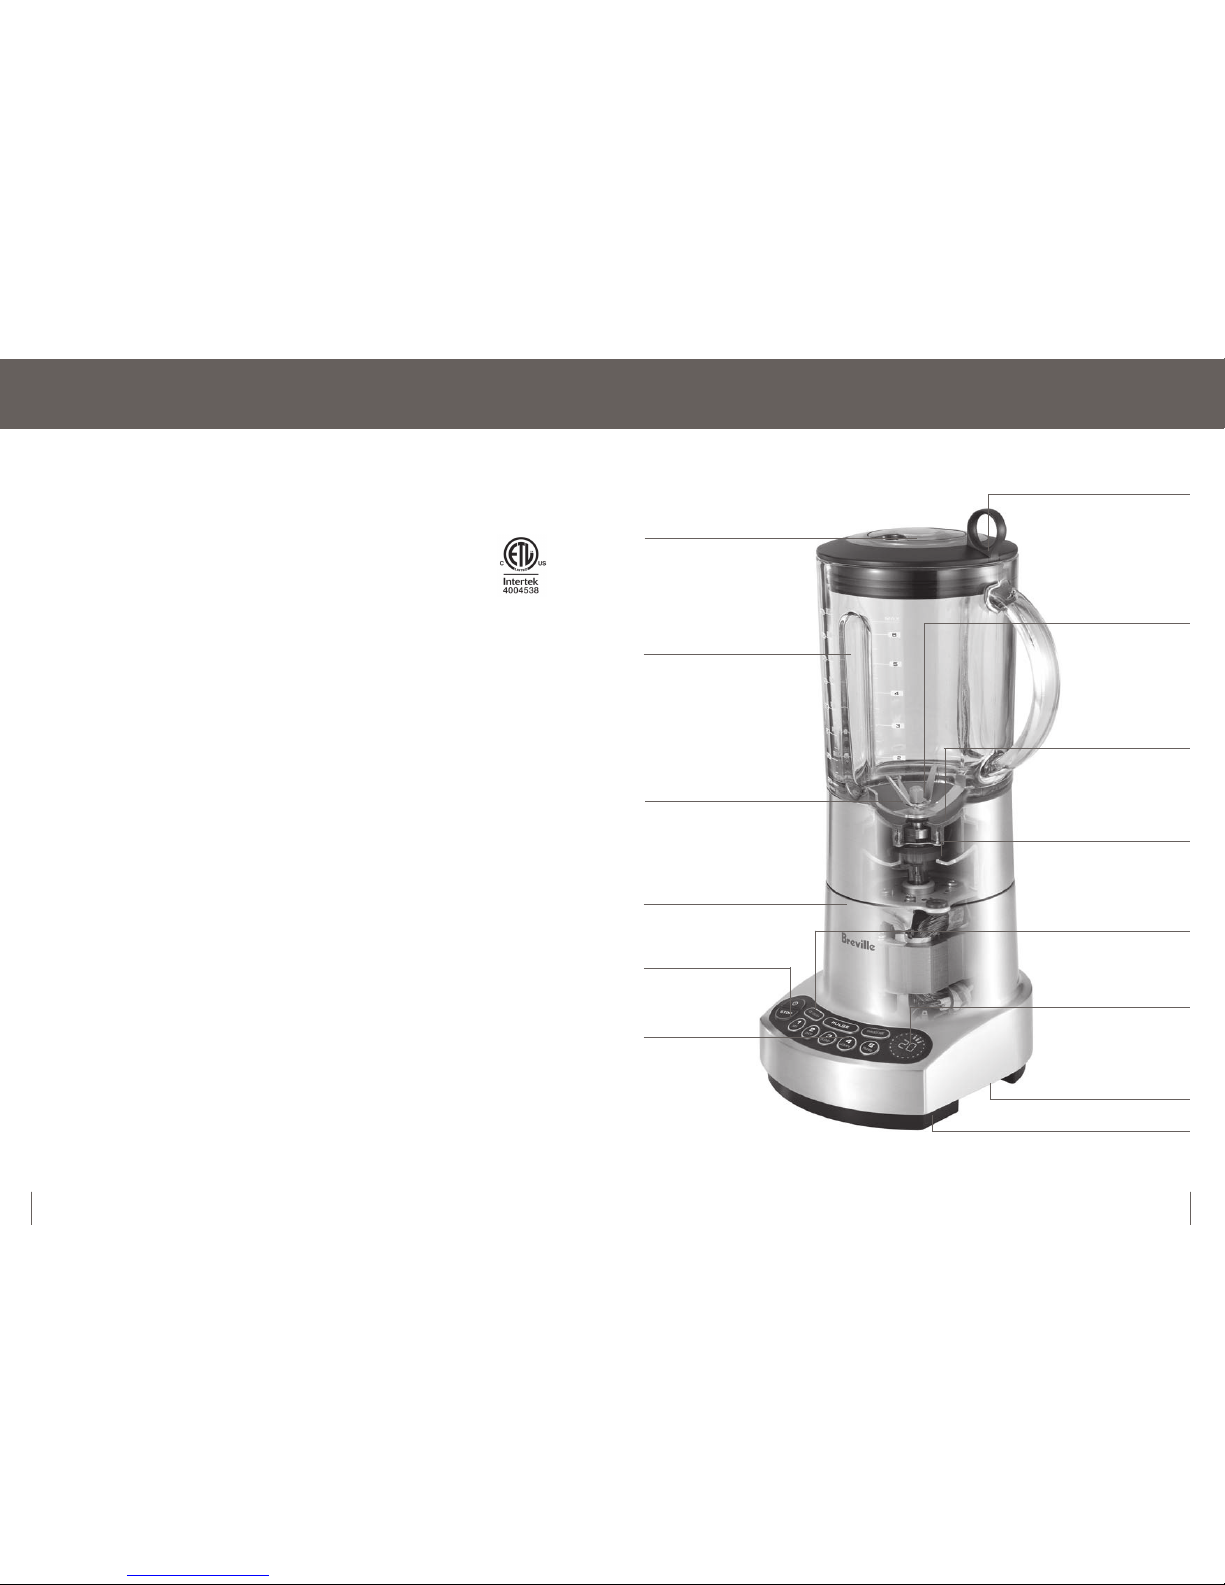
Know your Breville ikon HemisphereTM LCD Blender
5
Breville recommends safety first
IMPORTANT SAFEGUARDS
We at Breville are very safety conscious. We design and manufacture consumer products with the safety of you,
our valued customer, foremost in mind. In addition, we ask that you exercise a degree of care when using any
electrical appliance and adhere to the following precautions:
IMPORTANT SAFEGUARDS FOR YOUR
BREVILLE iKON HEMISPHERE
TM
LCD BLENDER
• Read all instructions.
• To protect against electrical shock, do not
immerse cord, plug or motor base in water or
any other liquid.
• Always use the appliance on a dry, level surface.
• The use of attachment not sold or recommended
by the manufacturer may cause fire, electric shock
or injury.
• Do not remove the blender pitcher from the motor
base while blender is in operation.
• Do not place hands in the pitcher unless the unit is
disconnected from the power outlet. A scraper
maybe used but must be used only when the
blender is not running.
• Disconnect the blender from the power outlet
before removing pitcher from base. Blades are
sharp - handle carefully.
• To reduce risk of injury, never place blade
assembly on base without jar properly attached.
• Always operate blender with cover in place.
• Do not use this blender for any purpose other than
food or beverage preparation.
• Do not blend a dry, thick or heavy mixture for more
than 10 seconds without turning the blender off.
Then, stir ingredients before continuing to blend.
• Do not process boiling liquids. Let cool before
placing in pitcher.
• Do not leave the appliance unattended when in
use. Young children should be supervised when
near the appliance.
• Do not allow cord to hang over the edge of a table
or counter, touch hot surfaces, or become knotted.
• Do not place appliance on or near a hot gas
or electric burner, or where it could touch any other
source of heat.
• Unplug appliance from the power outlet when not
is use, before putting on or taking off parts, and
before cleaning.
• This appliance is for household use only. Do not
use this appliance for anything other than its
intended use. Do not use outdoors.
• This appliance has a polarized plug. To reduce the
risk of electric shock, this plug will fit in a polarized
outlet only one way. If the plug does not fit fully into
the outlet, reverse the plug. If it still does not fit,
contact a qualified electrician. Do not modify the
plug in any way.
• For any maintenance other than cleaning call Breville
Consumer Service Center at 1-855-273-8456.
4
SAVE THESE INSTRUCTIONS
Pre-programmed ‘Ice Crush’
and ‘Smoothie’ settings
automatically alter speeds to
optimize blending results, then
switch off automatically.
Heavy duty die-cast metal base
for long lasting,
professional performance.
Large 51oz (1.5 liter) glass pitcher
unique dual ribs continually pass
ingredients onto the blades for
perfectly blended results.
Illuminated buttons
for clarity make reading easier.
Heavy duty, commercial grade
components for durability
Inner measuring lid
for adding ingredients while blending.
Electronic 5 speed
control plus pulse
electronic controls
ensure that the RPM
speed is maintained
for consistent results
every time.
Breville Assist™ lid
unique ring pull design ensures the
lid is easy to remove yet sealed
tight during operation.
Hemisphere™ Blade System
1
Blade removal
one twist and the blades
are easily removed for
fast and easy cleaning.
Cord storage
Non skid feet
LCD display
counts up on speed settings
and down for pre-programmed
settings for complete control
when blending.
Stainless steel blades
extra wide blades are
contoured to the base of
the jug so there are
no food traps.

Operating your Breville ikon Hemisphere
TM
LCD Blender
7
Why is the Breville ikon Hemisphere
TM
Blender superior?
6
What makes this blender superior?
The secret to the Hemisphere™ Blade is the
continuous movement created inside the pitcher. It
allows the Breville ikon Hemisphere
TM
LCD Blender to
combine the functions of a blender with a mini food
processor for the ultimate in versatility.
Combined with a powerful motor and heavy duty
commercial grade components, the Breville ikon
Hemisphere
TM
LCD Blender is built for durability,
reliability and professional results superior to
all other blenders.
Before first use
Before using your Breville ikon HemisphereTM LCD
Blender for the first time, remove any packaging
material and promotional labels. Make sure the
appliance is switched off at the power outlet and the
power cord is unplugged. Wash the lid, inner lid
blender pitcher and blade assembly (refer to
Disassembling the blender pitcher on Page 11) of the
Breville ikon Hemisphere
TM
LCD Blender in warm, soapy
water with a soft cloth. Rinse and dry thoroughly.You
may opt to wash the parts in the top shelf of any
dishwasher and the pitcher in the base section of the
dishwasher.The motor base can be wiped with a damp
cloth. Dry thoroughly.
• When using your Breville ikon Hemisphere
TM
LCD Blender for the first time, you may notice an
odor coming from the motor. This is normal
and will dissipate with use.
• The blending blades are extremely sharp. Avoid
any contact with fingers and hands.
Note
Step 2.
Step 3.
Turn the blender pitcher upright and insert onto
the motor base. The handle of the blender pitcher
can be positioned to the left or right hand side of
the appliance.
Step 4.
Add food or liquid into the blender pitcher ensuring
not to exceed the ‘MAX’ mark. Place the blender lid
firmly into position on the top of the blender pitcher.
Insert the clear inner lid into the blender lid and turn
clockwise to lock into position. (see Fig 1)
Fig 1
To reassemble ensure the lower part of
the Blade Holder is clipped into place by aligning the
parts and squeezing together at the edges until they
snap together, and then replace the silicon seal onto
the blade assembly with the raised rim of the
Removable Silicone Gasket facing downward. Place
the Gasket onto the Blade Assembly and push down
until it clicks into place. You should be able to read
THIS WAY UP on the gasket. (see Page 12 - Fig 1).
You will notice 2 notches on the blade assembly
(see pg 11- Fig 1). Place these notches into the 2
slots on the bottom of the jug (see 12 Fig 2). Twist
the Blade Removal System counterclockwise in the
direction of the indicator symbol until firmly locked
into position.
Assembling and attaching the blender
Step 1.
Place the motor base on a flat, dry surface such as a
table top. Make sure that the motor base is turned off
at the power outlet and the power cord is unplugged.
Motor overload protection
Your blender is equipped with motor overload
protection.
If your blender is overloaded the motor will stop and
the "Overload Protection" warning on the LCD will
start to flash.
Please do not attempt to use the blender while the
“Overload Protection” warning is flashing.
Once the warning stops flashing the blender has
cooled sufficiently and is ready to use again.
Re-select the desired speed or function button. If you
have turned the blender off you will need to switch it
back on, wait for the flashing to stop then re-select
the desired speed or function.
We recommend removing a portion of the mixture,
cutting food into smaller pieces of even size and/or
processing a smaller amount per batch.
 Loading...