

Breville LBM250BSS2IAN1 User Manual for LBM250BSS2IAN1
the Baker's Dozen
Instruction Book - LBM250
TM

Contents
IMPORTANT
SAFEGUARDS
2 Breville Recommends Safety First
6 Components
8 Operating your Bread Maker
14 Hints & Tips for
Better Bread Making
17 Care, Cleaning & Storage
19 Recipes
25 Troubleshooting
BREVILLE
RECOMMENDS
SAFETY FIRST
At Breville we are very safety
conscious. We design and
manufacture consumer
products with the safety of you,
our valued customer, foremost
in mind. In addition, we ask
that you exercise a degree of
care when using any electrical
appliance and adhere to the
following precautions.
READ ALL INSTRUCTIONS
BEFORE USE AND SAVE
FOR FUTURE REFERENCE
• Remove and safely discard
any packaging material and
promotional labels before
using the bread maker for the
first time.
• To eliminate a choking hazard
for young children, remove and
safely discard the protective
cover fitted to the power plug
of this bread maker.
• Do not place the bread maker
near the edge of a bench or
table during operation. Ensure
the surface is level, clean and
free of water, flour and other
substances. Vibration during
the kneading cycles may cause
the machine to move slightly.
• Do not place this bread maker
on or near a hot gas or electric
burner, or where it could touch
a heated oven. Position the
bread maker at a minimum
distance of 20cm away from
walls. This will help prevent the
possibility of discolouration
due to radiated heat.
2

• Always operate the bread
maker on a stable and heat
resistant surface. Do not use on
a cloth-covered surface, near
curtains or other flammable
materials.
• Do not operate the bread
maker on a sink drain board.
• Always ensure the bread maker
is properly assembled before
connecting to a power outlet
and operating. Follow the
instructions provided in this
book.
• The bread maker is not
intended to be operated by
means of an external timer
or separate remote control
system.
• The lid and the outer surface
may get hot when the bread
maker is operating.
• The temperature of accessible
surfaces may be high when the
bread maker is operating.
• Do not touch hot surfaces.
Allow the bread maker to cool
before cleaning any parts.
• Steam vents are very hot
during baking. Do not place
anything on top of the lid.
• Do not cover the air vents when
the bread maker is in use.
• Always place the ingredients
into the bread pan in the precise
order listed in the recipe.
Not doing so may cause the
ingredients to fail to incorporate
properly for a poor result.
• Use oven mitts when removing
the hot bread or any contents
from the pan.
• Take care when pouring jam
from the bread pan as the jam
will be extremely hot.
• Do not place any ingredients
directly into the baking
chamber. Place ingredients into
the bread pan or fruit and nut
dispenser only.
• The maximum quantities of
flour and raising agent that may
be used shall not exceed the
quantities stated in the Recipes.
• Do not pour liquids into the
fruit and nut dispenser. Do
not overpack the fruit and nut
dispenser as this may cause
them to compact and they may
not drop.
• Do not place fingers or hands
inside the bread maker during
operation. Avoid contact with
moving parts.
• Ensure the bread maker
is switched off and then
unplugged from the power
outlet when not in use and
before cleaning.
3

• Do not immerse the bread
pan in water. Doing so
may interfere with the free
movement of the drive shaft.
Wash only the interior of the
bread pan.
• Do not leave the lid standing
open for extended periods of
time.
• Always ensure the kneading
blade is removed from the
base of the baked loaf prior to
slicing.
• Do not place the bread maker
in direct sunlight. Colour
fading and discolouration may
occur when the bread maker is
consistently exposed to UV light.
• Keep the inside and outside of
the bread maker clean. Follow
the cleaning instructions
provided in this book.
IMPORTANT
SAFEGUARDS
FOR ALL
ELECTRICAL
APPLIANCES
• Fully unwind the power cord
before use.
• Connect only to 230V or 240V
power outlet.
4
• Do not let the power cord hang
over the edge of a bench or
table, touch hot surfaces or
become knotted.
• To protect against electric
shock, do not immerse the
power cord, power plug or
bread maker in water or any
other liquid.
• The bread maker is not
intended for use by persons
(including children) with
reduced physical, sensory or
mental capabilities, or lack of
experience and knowledge,
unless they have been given
supervision or instruction
concerning use of the bread
maker, by a person responsible
for their safety.
• Children should be supervised
to ensure that they do not play
with the bread maker.
• It is recommended to inspect
the bread maker regularly.
Do not use the bread maker if
the power supply cord, plug,
connector or bread maker
becomes damaged in anyway.
• Return the entire bread maker
to the nearest authorised
Breville Service Centre for
examination and/or repair.
• Any maintenance other than
cleaning should be performed
at an authorised Breville
Service Centre.

• This bread maker is for
household use only. Do not use
this bread maker for other than
its intended use. Do not use in
moving vehicles or boats.
Do not use outdoors. Misuse
may cause injury.
• The installation of a residual
current device (safety switch)
is recommended to provide
additional safety protection
when using electrical bread
makers. It is advisable that
a safety switch with a rated
residual operating current
not exceeding 30mA be
installed in the electrical circuit
supplying the bread maker.
See your electrician for
professional advice.
• During electrical storms,
the bread maker should be
disconnected from the power
source at the wall socket to
prevent any electrical surges that
may arise during the storm and
which may inadvertently cause
damage to the bread maker and
its electronic componentry.
• Always turn the bread maker
to the OFF position, switch off
at the power outlet and unplug
at the power outlet when the
bread maker is not in use.
• Before cleaning, always turn
the bread maker to the OFF
position, switch off at the
power outlet, unplug at the
power outlet and remove the
power cord, if detachable, from
the bread maker and allow all
parts to cool.
• Do not place this bread maker
on or near a heat source, such
as hot plate, oven or heaters.
• Position the bread maker at a
minimum distance of 20cm
away from walls, curtains and
other heat or steam sensitive
materials and provide adequate
space above and on all sides for
air circulation.
WARNING
Food particles on the heating
element in the baking chamber
may cause smoke to emanate
from the bread maker. Ensure
the baking chamber is clean
before use.
WARNING
Steam vents are very hot
during baking.
FOR HOUSEHOLD USE ONLY
SAVE THESE INSTRUCTIONS
5

Components
B
A
C
D
E
A. Lid with Fruit and Nut Dispenser
B. Viewing Window
C. Control Panel
D. Bread Maker Housing
E. Base
F. Bread Pan
G. Kneading Blade
H. Measuring Spoon
6
G
F
I J
H
I. Measuring Cup
J. Kneading Blade Hook
Not Shown
• Non-slip Feet for Stability
• Drive Shaft
• Power Cord
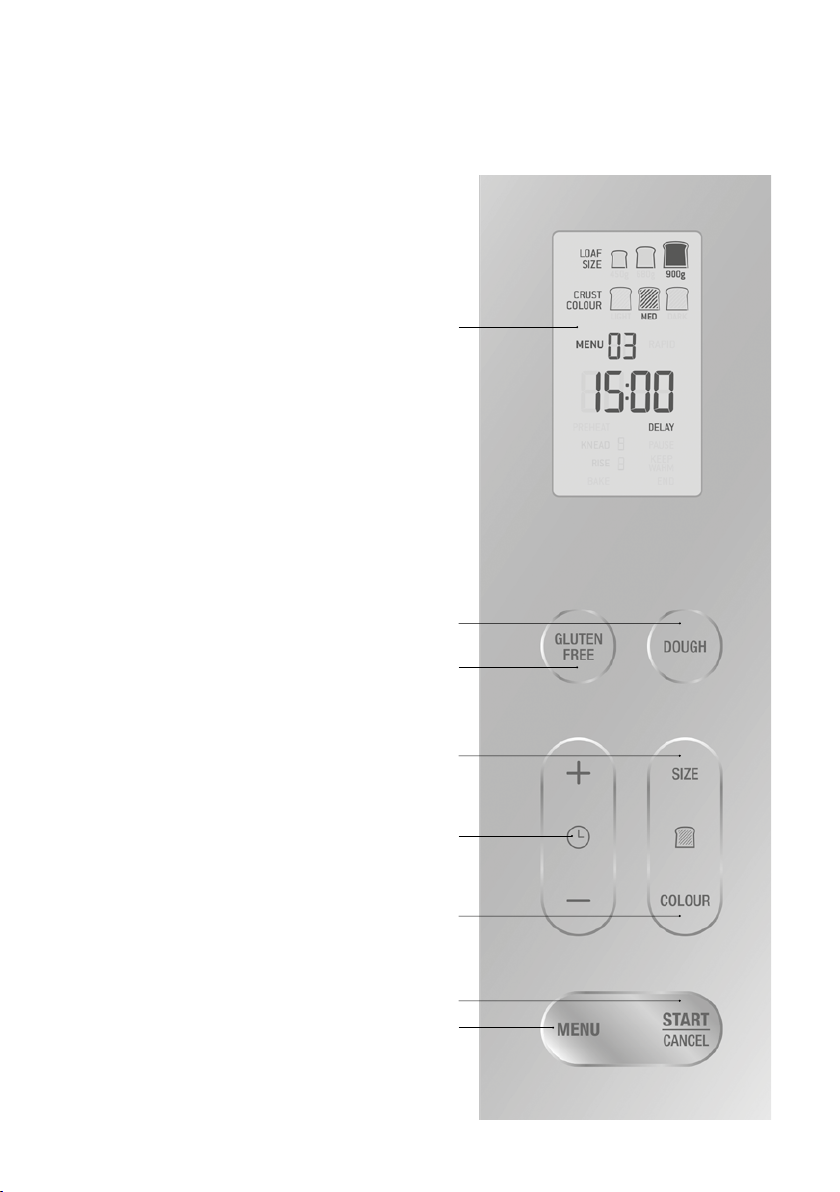
CONTROL PANEL
A. ILLUMINATED DISPLAY SCREEN
The LCD display indicates the menus and
settings selected.
B. DOUGH BUTTON SHORTCUT
Press to go directly to the dough function.
C. GLUTEN FREE BUTTON SHORTCUT
Press to go directly to the gluten free bread
function.
D. LOAF SIZE SELECTOR
E. DELAY START TIMER
or - to increase or decrease start
Press
+
time.
F. CRUST COLOUR SELECTOR
G. MENU
In standby mode, pressing the MENU
button will cycle through the menu options.
1. Basic
2. French
3. Whole Wheat
4. Sweet
5. Express 680g
6. Express 900g
7. Yeast Free
8. Continental
9. Dough
10. Gluten Free
11. Jam
12. Bake
13. Yoghurt
H. START/CANCEL
A
B
C
D
E
F
H
G
7

Operating Your Bread Maker
BREAD, DOUGH, YOGHURT &
JAM SETTINGS
SETTINGS CRUST
COLOUR
BASIC
FRENCH
LIGHT 450g 3 hours 13 mins
LIGHT 680g 3 hours 18 mins
LIGHT 900g 3 hours 25 mins
MEDIUM 450g 3 hours 13 mins
MEDIUM 680g 3 hours 18 mins
MEDIUM 900g 3 hours 25 mins
DARK 450g 3 hours 13 mins
DARK 680g 3 hours 18 mins
DARK 900g 3 hours 25 mins
RAPID 450g 2 hours 12 mins
RAPID 680g 2 hours 17 mins
RAPID 900g 2 hours 24 mins
LIGHT 450g 3 hours 30 mins
LIGHT 680g 3 hours 35 mins
LIGHT 900g 3 hours 40 mins
MEDIUM 450g 3 hours 30 mins
MEDIUM 680g 3 hours 35 mins
MEDIUM 900g 3 hours 40 mins
DARK 450g 3 hours 30 mins
DARK 680g 3 hours 35 mins
DARK 900g 3 hours 40 mins
RAPID 450g 2 hours 30 mins
RAPID 680g 2 hours 35 mins
RAPID 900g 2 hours 40 mins
WHOLE
WHEAT LIGHT 450g 3 hours 45 mins
LIGHT 680g 3 hours 50 mins
LIGHT 900g 3 hours 55 mins
MEDIUM 450g 3 hours 45 mins
MEDIUM 680g 3 hours 50 mins
MEDIUM 900g 3 hours 55 mins
DARK 450g 3 hours 45 mins
DARK 680g 3 hours 50 mins
DARK 900g 3 hours 55 mins
RAPID 450g 2 hours 30 mins
RAPID 680g 2 hours 35 mins
RAPID 900g 2 hours 40 mins
LOAF
SIZE
TOTAL
TIME
SETTINGS CRUST
COLOUR
SWEET
EXPRESS 680G 680g 1 hour 20 mins
EXPRESS 900G 900g 1 hour 55 mins
YEAST FREE 1 hour 50 mins
CONTINENTAL 3 hours 25 mins
DOUGH 1 hour 30 mins
GLUTEN FREE 2 hours 45 mins
JAM 1 hour 05 mins
BAKE 5 mins to 1 hour
YOGHURT 4 hours to
LIGHT 450g 3 hours 17 mins
LIGHT 680g 3 hours 22 mins
LIGHT 900g 3 hours 27 mins
MEDIUM 450g 3 hours 17 mins
MEDIUM 680g 3 hours 22 mins
MEDIUM 900g 3 hours 27 mins
DARK 450g 3 hours 17 mins
DARK 680g 3 hours 22 mins
DARK 900g 3 hours 27 mins
RAPID 450g 2 hours 37 mins
RAPID 680g 2 hours 42 mins
RAPID 900g 2 hours 47 mins
LOAF
SIZE
TOTAL
TIME
30 mins
12 hours
NOTE
Total times for the bread functions
do not include the Keep Warm time.
8

Functions
BEFORE FIRST USE
Before first use, remove and safely discard any
packing material, promotional labels , transparent
protective film on the control panel and tape
from the bread maker. Check for any missing or
damaged parts. Clean all parts according to the
Care, Cleaning & Storage section in this book.
OPERATING YOUR BREVILLE BREAD
MAKER
1. Open the lid of the bread maker and remove
the bread pan using the handle.
2. If required, align the groove on the top of the
kneading blade to the one on top of the drive
shaft and slide the blade down onto the drive
shaft, in the bread pan.
NOTE
If using the delay start timer, make sure the
yeast is on top of the dry ingredients to avoid
contact with water, salt and sugar, otherwise
the yeast activity will be affected.
4. Lock the bread pan into the base of the
bread maker by twisting slightly clockwise
until the bowl sits horizontal.
5. Fold the handle down and close the lid.
NOTE
The bread pan is locked in place correctly if
you cannot lift it from the bread maker without
twisting.
6. If fruits and/or nuts are required press and
hold the latch upwards under the handle
of the dispenser holder located on the rear
of the lid. Pull out the dispenser holder
and add ingredients before closing the
dispenser.
7. Plug the bread maker into a 220–240V
power outlet and switch the outlet on. The
bread maker is now in standby mode and
the display screen will illuminate for
1 minute.
3. Add ingredients to the bread pan in the order
listed in the recipe. First add liquids, fats, salt,
sugar and add the yeast in last.
IMPORTANT
Ensure all ingredients for making bread or dough
are added in the exact order listed. Failing to do
so may lead to a poor result and/or ingredients
being expelled out of the bread pan.
NOTE
Ensure yeast does not come into contact with
sugars, salt or liquid.
NOTE
In standby mode, the LCD screen will show the
first MENU selection Basic Bread, displaying
MENU 1 900g MEDIUM TIMER 3:25. Press the
MENU button repeatedly to cycle through the
MENU choices 1–13.
9
 Loading...