

Page 1

the Multi Mash
Instruction Booklet
™
BSB380
BSB380_IB_B13_FA.indd 2 8/02/13 4:21 PM
Page 2

CONGRATULATIONS
on the purchase of your new
Breville product
BSB380_IB_B13_FA.indd 2 8/02/13 4:21 PM
Page 3

CONTENTS
4 Breville recommends safety first
7 Know your Breville product
9 Operating your Breville product
13 Care, cleaning & storage for your
Breville product
15 Recipes
3
BSB380_IB_B13_FA.indd 3 8/02/13 4:21 PM
Page 4

BREVILLE RECOMMENDS SAFETY FIRST
At Breville we are very safety conscious. We design and
manufacture consumer products with the safety of you, our
valued customer, foremost in mind. In addition we ask that you
exercise a degree of care when using any electrical appliance
and adhere to the following precautions.
IMPORTANT SAFEGUARDS
READ ALL
INSTRUCTIONS
BEFORE USE AND
SAVE FOR FUTURE
REFERENCE
• Remove any packaging
material and promotional
stickers before using the
masher for the first time.
• Do not place the masher
near the edge of a bench
or table during operation.
Ensure the surface is level,
clean and free of water,
flour, etc.
• Do not place the masher on
or near a hot gas or electric
burner, or where it could
touch a heated oven.
• If using the masher to puree
hot food in a saucepan
over heat, remove the
saucepan from the heat
source and ensure the
power cord and body of
appliance are also kept
away from any heat source.
• Always make sure the
masher is completely
and properly assembled
before operating.
• Ensure the masher is
turned off at the trigger
switch, the power is
switched off at the power
outlet and the cord is
unplugged from the power
outlet before attempting
to attach any of the
accessories.
• Always ensure the mashing
leg is securely fitted onto
the masher motor body
before operating.
• Do not use attachments
other than those provided
with the masher.
• Do not attempt to operate
the masher by any method
other than those described
in this booklet.
• Do not operate the
appliance continuously for
more than 1 minute. Allow
the motor to rest for
1 minute between each use.
4
BSB380_IB_B13_FA.indd 4 8/02/13 4:21 PM
Page 5

BREVILLE RECOMMENDS SAFETY FIRST
• When using heavy loads,
the appliance should not be
operated for more than
30 seconds.
• Recipes in this instruction
booklet are not considered
heavy loads.
• Always ensure the masher
is turned off, the power is
switched off at the power
outlet and the cord is
unplugged from the power
outlet before attempting to
move the appliance, when
not in use, if left unattended
and before disassembling,
cleaning or storing.
• If food becomes lodged
around the mashing
blade or in the adjustable
texture section, release
the ON button, switch the
power off at the power
outlet and unplug the cord.
Use a spatula to dislodge
the food.
• To protect against electric
shock do not immerse the
motor body, cord or power
plug in water or any
other liquid.
• Do not remove the masher
from ingredients during
operation. Ensure the
appliance is switched off and
has stopped turning before
removing, to avoid contact
with moving blade or whisk.
• Do not leave the masher
unattended when in use.
• Keep the appliance clean.
Follow the cleaning
instructions provided in
this book.
• Do not use the masher with
wet hands.
SAVE THESE
INSTRUCTIONS
5
5
BSB380_IB_B13_FA.indd 5 8/02/13 4:21 PM
Page 6

BREVILLE RECOMMENDS SAFETY FIRST
IMPORTANT
SAFEGUARDS FOR
ALL ELECTRICAL
APPLIANCES
• Unwind the cord fully
before use.
• Do not let the cord hang
over the edge of a table or
counter, touch hot surfaces
or become knotted.
• This appliance can be
used by children aged
from 8 years and above
and persons with reduced
physical, sensory or mental
capabilities or lack of
experience and knowledge
if they have been given
supervision or instruction
concerning use of the
appliance in a safe way
and understand the
hazards involved.
• Keep the appliance
and its cord out of reach
of children.
• Children shall not play with
the appliance.
• Cleaning and user
maintenance shall not be
made by children without
supervision.
• It is recommended to
regularly inspect the
appliance. Do not use the
appliance if power supply
cord, plug or appliance
becomes damaged in any
way. Return the entire
appliance to the nearest
authorised Breville service
centre for examination
and/or repair.
• Any maintenance, other
than cleaning, should be
performed at an authorised
Breville Service Centre.
• This appliance is for
household use only. Do
not use this appliance for
anything other than its
intended use. Do not use in
moving vehicles or boats.
Do not use outdoors.
• The installation of a
residual current device
(safety switch) is
recommended to provide
additional safety protection
when using electrical
appliances. It is advisable
that a safety switch with a
rated residual operating
current not exceeding
30mA be installed in
the electrical circuit
supplying the appliance.
See your electrician for
professional advice.
6
BSB380_IB_B13_FA.indd 6 8/02/13 4:21 PM
Page 7

KNOW
your Breville product
BSB380_IB_B13_FA.indd 7 8/02/13 4:21 PM
Page 8
PAGE HEADER.....
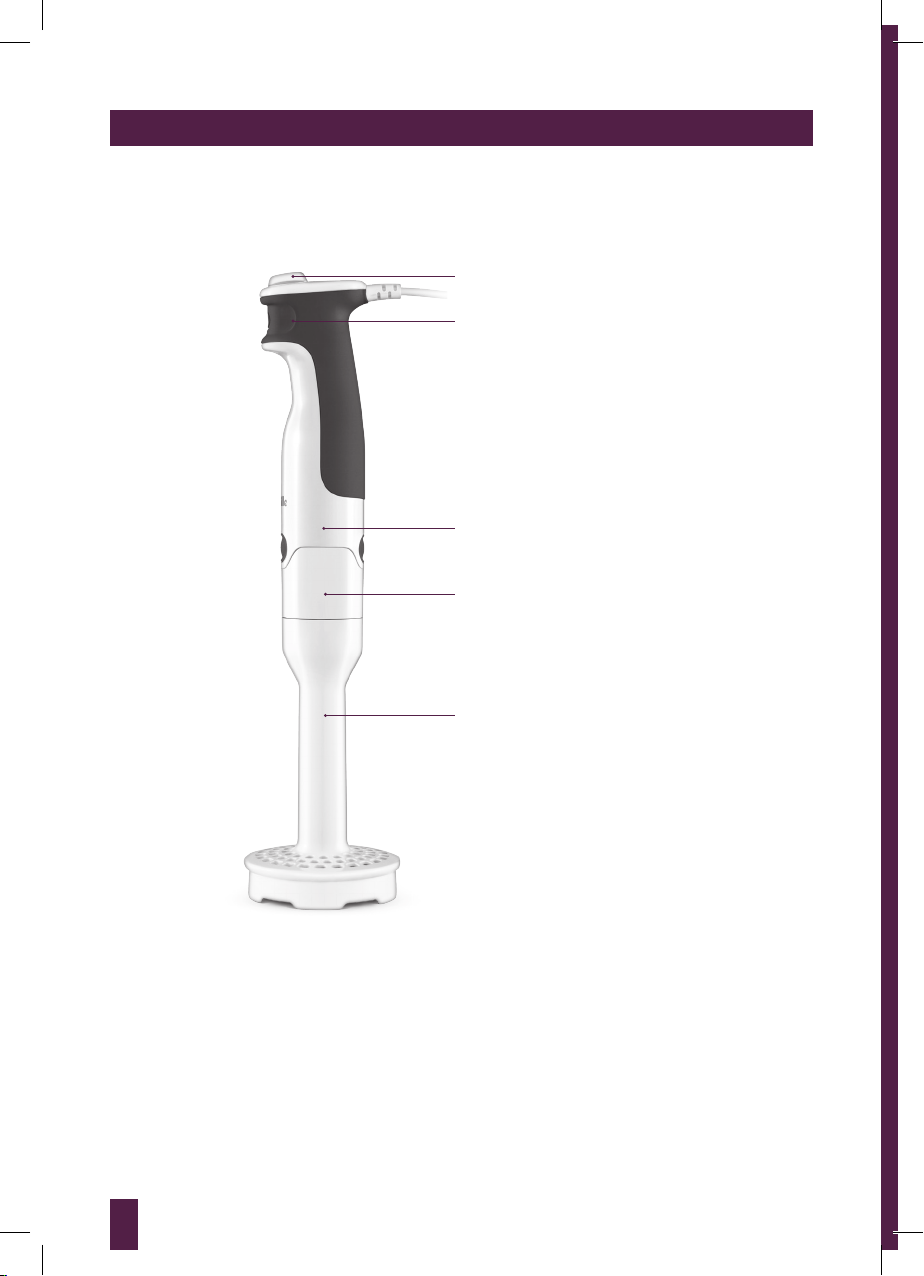
KNOW YOUR BREVILLE PRODUCT
A
B
C
D
E
A. Speed Control Dial
B. Easy Grip Trigger Switch
C. Motor Body
D. Detachable Gear Box
E. Detachable Mashing Leg
8
BSB380_IB_B13_FA.indd 8 8/02/13 4:22 PM
Page 9

ASSEMBLY & OPERATION
of your Breville product
BSB380_IB_B13_FA.indd 9 8/02/13 4:22 PM
Page 10

PAGE HEADER.....
ASSEMBLY & OPERATION
ASSEMBLY OF THE POTATO
MASHER LEG
Before first use
Remove any packaging material and
promotional labels. Wash blade and two
parts of the mashing leg before use.
CAUTION
Never immerse the motor body or
gearbox in water or any other liquid.
NOTE
If the variable masher leg is already
assembled start from step 3.
1. Holding the outer leg and insert the
gearbox making sure ALIGN arrows
are aligned.
2. Hold both outer leg and gearbox firmly
with one hand and insert inner leg until
it clicks and locks into place.
3. Rotate gearbox while holding outer leg
to lock into place until it clicks.
10
BSB380_IB_B13_FA.indd 10 8/02/13 4:22 PM
Page 11

PAGE HEADER.....
ASSEMBLY & OPERATION
4. Align the mashing leg with the motor
body and push the two parts together
until it clicks.
5. Place blade on underside of the mashing
head. To lock the blade rotate in a
anticlockwise direction. Blade will not
attach if the leg is not attached to the
motor body.
5. Place the potato masher into food and
press the trigger switch to turn the
masher on.
6. Move the masher through the
ingredients with a gentle raising and
lowering action until desired texture
is achieved.
7. Switch off the motor by releasing the
trigger switch before lifting the masher
out of the bowl. Switch off at the power
outlet and remove the power plug.
TO DETACH THE POTATO
MASHING LEG
1. Ensure the trigger switch is released, the
power is turned off at power point and
the appliance is unplugged.
2. Before removing motor body, remove
masher blade by holding onto the blade
and turning clockwise to unlock.
3. Once blade is removed, hold the motor
body with one hand, and using thumb
and finger of the other hand, press on
the two EJECT buttons on either side
of the motor body. Pull the motor body
away from the masher to detach.
TO USE THE POTATO MASHER LEG
For food preparation tips and recipes
refer to the recipes section. Ensure the
potato masher is completely and properly
assembled.
1. Place food to be mashed into a
sufficiently large mixing bowl or
container or in saucepan.
2. Insert the plug into a 230/240V power
outlet and turn the power on.
3. Select the desired setting on the
variable mashing leg: textured, smooth
or creamy.
4. Select a high speed on the speed
control dial.
BSB380_IB_B13_FA.indd 11 8/02/13 4:22 PM
NOTE
Mashing blade will not attach/detach
if the leg is not attached to the
motor body.
11
Page 12

PAGE HEADER.....
ASSEMBLY & OPERATION
RECOMMENDATIONS WHEN USING
WITH THE POTATO MASHING LEG
• Release the trigger switch and ensure
the masher has completely stopped
turning before removing the masher
from the food during operation.
• Place the mixing bowl on a damp cloth
during mashing. This will keep the
mixing bowl stable.
12
BSB380_IB_B13_FA.indd 12 8/02/13 4:22 PM
Page 13

CARE, CLEANING
& STORAGE
of your Breville product
BSB380_IB_B13_FA.indd 13 8/02/13 4:22 PM
Page 14

PAGE HEADER.....CARE, CLEANING & STORAGE
MOTOR BODY
To remove any food residue wipe the motor
body and cord with a damp cloth only.
Do not use abrasive cleaners or steel wool.
Never immerse the motor body in water or
any other liquid. Do not place motor body
in dishwasher.
CAUTION
Never immerse the motor body or
gearbox in water or any other liquid.
POTATO MASHER LEG
Before cleaning, turn the power off at the
power outlet and then remove the plug.
Remove the motor body and masher
gearbox from the mashing leg. The masher
leg can be hand washed in hot soapy water,
rinsed and dried thoroughly after each use.
TO DISASSEMBLE THE POTATO
MASHING LEG
1. Ensure the motor is unplugged. Before
removing the masher leg, unlock
the blade by rotating in a clockwise
direction. Blade will not detach once the
masher leg is released from motor body.
3. Unclip the gear box from motor body,
turn the masher leg to align and remove
the inner and outer legs from the gear
box together.
4. The inner and outer legs can now
be separated.
Both of the legs can now be washed in hot
soapy water, rinsed and dried thoroughly.
Alternatively, the masher can be washed in
the dishwasher.
CAUTION
Do not use abrasive cleaners or steel
wool.
NOTE
Masher gear box is not dishwasher
2. Once the blade is removed hold the
motor body with one hand, and using
thumb and finger of the other hand,
press on the two EJECT buttons on
either side of the motor body. Pull the
motor body away from the masher
to detach.
BSB380_IB_B13_FA.indd 14 8/02/13 4:22 PM
safe.
Page 15

RECIPES
BSB380_IB_B13_FA.indd 15 8/02/13 4:22 PM
Page 16

PAGE HEADER.....
RECIPES
CREAMY MASHED POTATO
Serves 4–6
INGREDIENTS
1 kg medium size brushed potato such as Sebago
80g butter
200ml warm milk
Salt, to taste
METHOD
1. Peel potatoes and cut into 2.5cm pieces.
Place potatoes into a large saucepan and
cover with cold water. Cover and bring
to the boil over a high heat. Once boiling
remove lid and cook for about 20–25
minutes or until potatoes are tender and
a skewer can be inserted easily. Drain
potatoes well.
2. Place potatoes back into the dry
saucepan and gently shake the potatoes
in the saucepan over a low heat for 1–2
minutes to remove excess moisture.
Remove from heat and allow to cool for 5
minutes. Transfer potatoes to a straight
sided bowl or mash in saucepan. Add the
butter and warm milk.
3. Assemble the motor body with the
potato masher attachment set to the
desired masher setting; using speed 15
mash potatoes until smooth. Do not over
process as this will cause the potatoes to
go gluey.
Season to taste with salt and serve.
ROASTED GARLIC MASH
Serves 4–6
INGREDIENTS
1 garlic bulb
1 kg medium size brushed potato such as Sebago
80g butter
200ml warm milk or cream
Salt, to taste
METHOD
1. Preheat oven to 200°C. Cut top off garlic
and place onto a baking tray and drizzle
with oil. Bake for 30 minutes or until
tender. Remove from oven and set aside
to cool completely.
2. Peel potatoes and cut into 2.5cm pieces.
Place potatoes into a large saucepan and
cover with cold water. Cover and bring
to the boil over a high heat. Once boiling
remove lid and cook for about 20–25
minutes or until potatoes are tender and
a skewer can be inserted easily. Drain
potatoes well.
3. Place potatoes back into the dry
saucepan and gently shake the potatoes
in the saucepan over a low heat for 1–2
minutes to remove excess moisture.
Remove from heat and allow to cool for
5 minutes. Transfer potatoes to a
straight sided bowl or mash in saucepan.
Add the butter and warm milk. Squeeze
garlic out of skin over potatoes.
4. Assemble the motor body with the
potato masher attachment set to the
desired masher setting; using speed 15
mash potatoes until smooth. Do not over
process as this will cause the potatoes to
go gluey.
Season to taste with salt and serve.
16
BSB380_IB_B13_FA.indd 16 8/02/13 4:22 PM
Page 17

PAGE HEADER.....
RECIPES
SWEET POTATO MASH
Serves 4–6
INGREDIENTS
1.2 kg sweet potato
80g butter
Salt and pepper
METHOD
1. Peel sweet potatoes and cut into 2.5cm
pieces. Place into a microwave safe
bowl with 2 tablespoons water. Cover
loosely with plastic wrap or a microwave
food cover. Cook on HIGH (100%)
for approximately 10 minutes or until
tender. Allow to cool slightly.
2. Drain off excess water and transfer to a
straight edge bowl.
3. Assemble the motor body with the
masher attachment set to the desired
masher setting; using speed 15 mash
sweet potato and butter until smooth.
Season to taste with salt pepper and serve.
GUACAMOLE
Serves 6
INGREDIENTS
3 ripe avocados
1 small red onion, finely chopped
1 medium tomato, finely chopped
1
⁄3 cup chopped fresh coriander
2–3 teaspoons lemon juice
5–6 drops Tabasco
Sea salt and freshly ground black pepper
METHOD
1. Cut avocados in half and remove seeds.
Scoop flesh into a large bowl.
2. Assemble the motor body with the
potato masher attachment set to the
course setting; using speed 15 mash
avocado until desired texture
is achieved.
3. Combine avocado and remaining
ingredients and stir to combine. Season
with salt and pepper.
Serve with corn chips.
17
BSB380_IB_B13_FA.indd 17 8/02/13 4:22 PM
Page 18

PAGE HEADER.....
RECIPES
TWICE BAKED POTATOES
Serves 4
INGREDIENTS
4 large potatoes
2 bacon rashers
½ cup sour cream
30g unsalted butter
2 green onions, thinly sliced
1 teaspoon garlic salt
¼ teaspoon cayenne pepper (optional)
2
⁄3 cup grated tasty cheese
Salt & pepper to taste
METHOD
1. Pre heat oven to 200°C.
2. Wash and scrub potatoes then dry. Place
into pre heated oven right onto the wire
rack. Cook for 1 hour or until potatoes
give a little when squeezed.
3. Remove potatoes and let them cool
slightly. Lay potatoes on their side and
cut the tops off of them. Scrape out
potato insides into a large mixing bowl
with a spoon leaving about 5mm on the
walls so the skin will hold shape.
4. Cook bacon in a non stick frying pan
until crisp; drain on paper towelling.
Finely chop.
5. Reduce oven temperature to 190°C.
6. Assemble the motor body with the
potato masher attachment set to the
finest setting; using speed 15 mash
potatoes until smooth. Do not over
process as this will cause the potatoes to
be gluey.
7. Add half the bacon, sour cream, butter,
green onions, garlic salt, cayenne and
half the cheese into mixing bowl with
potatoes and mix together with a spoon
or spatula.
8. Spoon potato mixture back into potato
skins slightly over filling and place on
a baking tray. Sprinkle the remaining
cheese and bacon on top of each potato.
9. Place potatoes back into oven for 20
minutes or until heated through and the
cheese is melted.
18
BSB380_IB_B13_FA.indd 18 8/02/13 4:22 PM
Page 19

PAGE HEADER.....
RECIPES
POTATO GNOCCHI WITH PESTO
Serves 4–6
INGREDIENTS
1 kg medium size Desiree, Dutch Cream or
Nicola potatoes
1 egg, lightly beaten
¾ cup (110g) plain four, plus extra for dusting
salt
Pesto
1 cup firmly packed basil leaves
1 clove garlic
1 teaspoon lemon juice
2 tablespoons toasted pine nuts
3 tablespoons grated Parmesan cheese
¼ cup olive oil
Salt and freshly ground black pepper
METHOD
1. To make pesto, combine all ingredients
into a small processor or blender.
Process until smooth. Season to taste
with salt and pepper.
2. Peel potatoes and cut into 2.5cm pieces.
Place potatoes into a large saucepan and
cover with cold water. Cover and bring
to the boil over a high heat. Once boiling
remove lid and cook for about 20–25
minutes or until potatoes are tender and
a skewer can be inserted easily. Drain
potatoes well.
3. Place potatoes back into the dry
saucepan and gently shake the potatoes
in the saucepan over a low heat for 1–2
minutes to remove excess moisture.
Remove from heat and allow to cool for
5 minutes.
4. Assemble the motor body with the
potato masher attachment set to the
finest setting; using speed 15 mash
potatoes until smooth. Do not over
process as this will cause the potatoes to
go gluey.
5. Place potato onto a clean flat work
surface and make a well in the centre.
Pour egg into the centre and add flour
and salt. Knead mixture gently together
to form a soft dough.
6. Cut dough into 10 portions and roll into
a long thin logs 2cm in diameter. Cut
each log into 1.5 cm portions.
7. Bring a large pot of water to the boil;
once boiling add salt. Gently drop 20–25
gnocchi into cooking water. Stir once;
when gnocchi rises to the top, scoop
out with a slotted spoon and place into
a large bowl. Repeat with remaining
gnocchi.
Serve gnocchi stirred through pesto.
19
BSB380_IB_B13_FA.indd 19 8/02/13 4:22 PM
Page 20

PAGE HEADER.....
RECIPES
PUMPKIN GNOCCHI
WITH BURNT BUTTER
Serves 4
INGREDIENTS
1kg Kent pumpkin
salt
1 egg, lightly beaten
Pinch nutmeg
2 cups (300g) plain four, approximately
100g good quality butter
12 sage leaves
METHOD
1. Preheat oven to 180°C. Line baking tray
with baking paper.
2. Remove seeds from pumpkin and cut
into 5-6cm pieces with the skin still on.
3. Place pumpkin on tray and coat with a
little oil spray. Season with salt. Bake in
oven for 40–50 minutes, until tender.
Remove from oven and allow to cool
until cool enough to handle.
4. Remove skin and any dry, crispy edges
and place into a straight edge bowl.
5. Assemble the motor body with the
potato masher attachment set to the
finest setting; using speed 15 mash
pumpkin until smooth.
6. Once pumpkin is smooth add egg
into the centre and add half the flour;
season with salt. Using a flat edge knife
mixture gently together adding another
quarter of the flour until the mixture
forms a dough.
7. Sprinkle remaining flour over a work
bench. Place dough on surface and
gently knead.
TIP
The dough can be quite sticky but this
is normal.
8. Cut dough into 6 portions and roll into a
long thin logs 2cm in diameter. Cut each
log into 1.5 cm portions.
9. Bring a large pot of water to the boil;
once boiling add salt. Gently drop
15–20 gnocchi into cooking water. Stir
once; when gnocchi rises to the top,
scoop out with a slotted spoon and
place into a large bowl. Repeat with
remaining gnocchi.
10. To make burnt butter sauce. Add butter
to pan and heat until butter begins to
foam. At this point, add the sage and
cook until butter has browned. Set aside.
Serve gnocchi drizzled with burnt butter
sauce and sage.
20
BSB380_IB_B13_FA.indd 20 8/02/13 4:22 PM
Page 21

PAGE HEADER.....
NOTES
21
BSB380_IB_B13_FA.indd 21 8/02/13 4:22 PM
Page 22

NOTES
22
BSB380_IB_B13_FA.indd 22 8/02/13 4:22 PM
Page 23

NOTES
23
BSB380_IB_B13_FA.indd 23 8/02/13 4:22 PM
Page 24

Breville Customer Service Centre
Australian Customers
Mail: PO Box 22
Botany, NSW, 2019
AUSTRALIA
Phone: 1300 139 798
Fax: (02) 9384 9601
Email: Customer Service:
askus@breville.com.au
New Zealand Customers
Mail: Private Bag 94411
Greenmount, Auckland
NEW ZEALAND
Phone: 0800 273 845
Fax: 0800 288 513
Email: Customer Service:
askus@breville.com.au
www.breville.com.au
Breville is a registered trademark of Breville Pty. Ltd. A.B.N. 98 000 092 928.
Due to continued product improvement, the products illustrated/photographed
in this brochure may vary slightly from the actual product.
Alternatively any existing Breville BSB510 Stick Mixer motor unit can be used with this Model Pack.
This model number includes a BSB510 Breville Stick Mixer motor unit.
Copyright Breville Pty. Ltd. 2013
BSB380 Issue - B13
BSB380_IB_B13_FA.indd 1 8/02/13 4:21 PM
 Loading...