

Page 1

Breville Customer Service Centre
the Multi Grain
Instruction Booklet
™
Australian Customers
Mail: PO Box 22
Botany NSW 2019
AUSTRALIA
Phone: 1300 139 798
Fax: (02) 9384 9601
Customer Service:
Email:
askus@breville.com.au
www.breville.com.au
www.breville.co.nz
Breville is a registered trademark of Breville Pty. Ltd. A.B.N. 98 000 092 928.
Due to continued product improvement, the products illustrated/photographed
in this brochure may vary slightly from the actual product.
Copyright Breville Pty. Ltd. 2015.
New Zealand Customers
Mail: Private Bag 94411
Botany Manukau 2163
Auckland NEW ZEALAND
Phone:
Fax: 0800 288 513
Email:
askus@breville.co.nz
0800 273 845
Customer Service:
BRC550 ANZ A15
BRC550
Page 2

CONTENTS
CONTENTS BREVILLE RECOMMENDS SAFETY FIRST
3 Breville recommends safety first
5 Know your Breville product
6 Operating your Breville product
6 - Assembling your rice cooker
6 - RICE|STEAM setting
8 - SAUTÉ|SEAR setting
8 - RISOTTO setting
9 - PORRIDGE setting
9 - LENTILS setting
10 - QUINOA setting
10 - KEEP WARM setting
11 Cooking tables
11 - Rice
13 - Steaming
16 - Porridge, lentils & quinoa
17 Care and cleaning
18 Troubleshooting
At Breville we are very safety conscious. We design and manufacture consumer products with
the safety of you, our valued customer, foremost in mind. In addition we ask that you exercise
a degree of care when using any electrical appliance and adhere to the following precautions.
IMPORTANT SAFEGUARDS
READ ALL INSTRUCTIONS
BEFORE USE AND SAVE FOR
FUTURE REFERENCE
• Remove and safely discard any
packaging material and promotional
labels before use.
• To eliminate a choking hazard for young
children, remove and safely discard the
protective cover fitted to the power plug
of this appliance.
• Always ensure the appliance is properly
assembled before use. Follow the
instructions provided in this book.
• Do not touch hot surfaces. Appliance
surfaces are hot during and after
operation. To prevent burns or personal
injury, always use protective hot pads or
insulated oven mitts, or use handles or
knobs where available.
• Always insert the connector end of the
power cord into the appliance inlet
before inserting power plug into the
power outlet and switching on appliance.
Ensure the appliance inlet is completely
dry before inserting the connector end
of the power cord.
• Take care to avoid spillage on the
connector.
• Do not place the appliance near the edge
of a bench or table during operation.
Ensure that the surface is dry, level,
clean and free of any liquid and other
substances.
• Always operate the appliance on a stable
and heat resistant surface. Do not use
on a cloth-covered surface, and position
the appliance at a minimum distance of
20cm away from walls, curtains, cloths
and other heat sensitive materials.
• Do not place this appliance on or near
a hot gas or electric burner, or where it
could touch a heated oven.
• Do not operate the appliance on a sink
drain board.
• Before removing the non-stick cooking
bowl from housing, always ensure the
appliance is switched off at the power
outlet and power cord is unplugged.
• Always use heat protective gloves or
oven mitts when removing the lid
and the non-stick cooking bowl from
the appliance.
• Always position steam vent on lid away
from yourself to avoid scalding from
escaping steam.
• Always lift and remove the lid carefully,
angling it away from yourself to avoid
scalding from escaping steam.
• Do not use harsh abrasives, caustic
cleaners or oven cleaners when cleaning
this appliance. Keep the appliance clean
and refer to care and cleaning section.
• Do not attempt to operate the appliance
by any method other than those
described in this booklet. Do not leave
the appliance unattended when in use.
IMPORTANT SAFEGUARDS FOR
ALL ELECTRICAL APPLIANCES
• Unwind the power cord fully before use.
• Do not let the power cord hang over
the edge of a bench or table, touch hot
surfaces or become knotted.
• Connect only to a 230V or 240V
power outlet.
2 3
Page 3
BREVILLE RECOMMENDS SAFETY FIRST
KNOW YOUR BREVILLE PRODUCT
• To protect against electric shock, do not
immerse the power cord, power plug or
appliance in water or any other liquid.
• Always turn the power off at the power
outlet, remove the plug and allow all
parts to cool before attempting to move
the appliance, when the appliance is not
in use, before cleaning and when storing.
• This appliance is not intended for use
by persons (including children) with
reduced physical, sensory or mental
capabilities, or lack of experience and
knowledge, unless they have been given
supervision or instruction concerning
use of the appliance by a person
responsible for their safety.
• Children should be supervised to ensure
that they do not play with the appliance.
• It is recommended to regularly inspect
the appliance. Do not use the appliance
if the power cord, power plug or
appliance becomes damaged in any
way. Return the entire appliance to the
nearest authorised Breville Service
Centre for examination and/or repair.
• Any maintenance, other than cleaning,
should be performed at an authorised
Breville Service Centre.
• The use of attachments not sold or
recommended by Breville may cause fire,
electric shock or injury.
• This appliance is for household use only.
Do not use this appliance for other than
its intended use. Do not use in moving
vehicles or boats. Do not use outdoors.
Misuse may cause injury.
• The appliance is not intended to be
operated by means of an external timer
or separate remote control system.
• The installation of a residual current
device (safety switch) is recommended
to provide additional safety protection
when using electrical appliances. It
is advisable that a safety switch with
a rated residual operating current
not exceeding 30mA be installed in
the electrical circuit supplying the
appliance. See your electrician for
professional advice.
IMPORTANT
Fully unwind the cord before use
Ensure appliance is fully cooled
before storing power cord inside
removable cooking bowl.
A
B
F
C
D
E
K
L
G
H
I
J
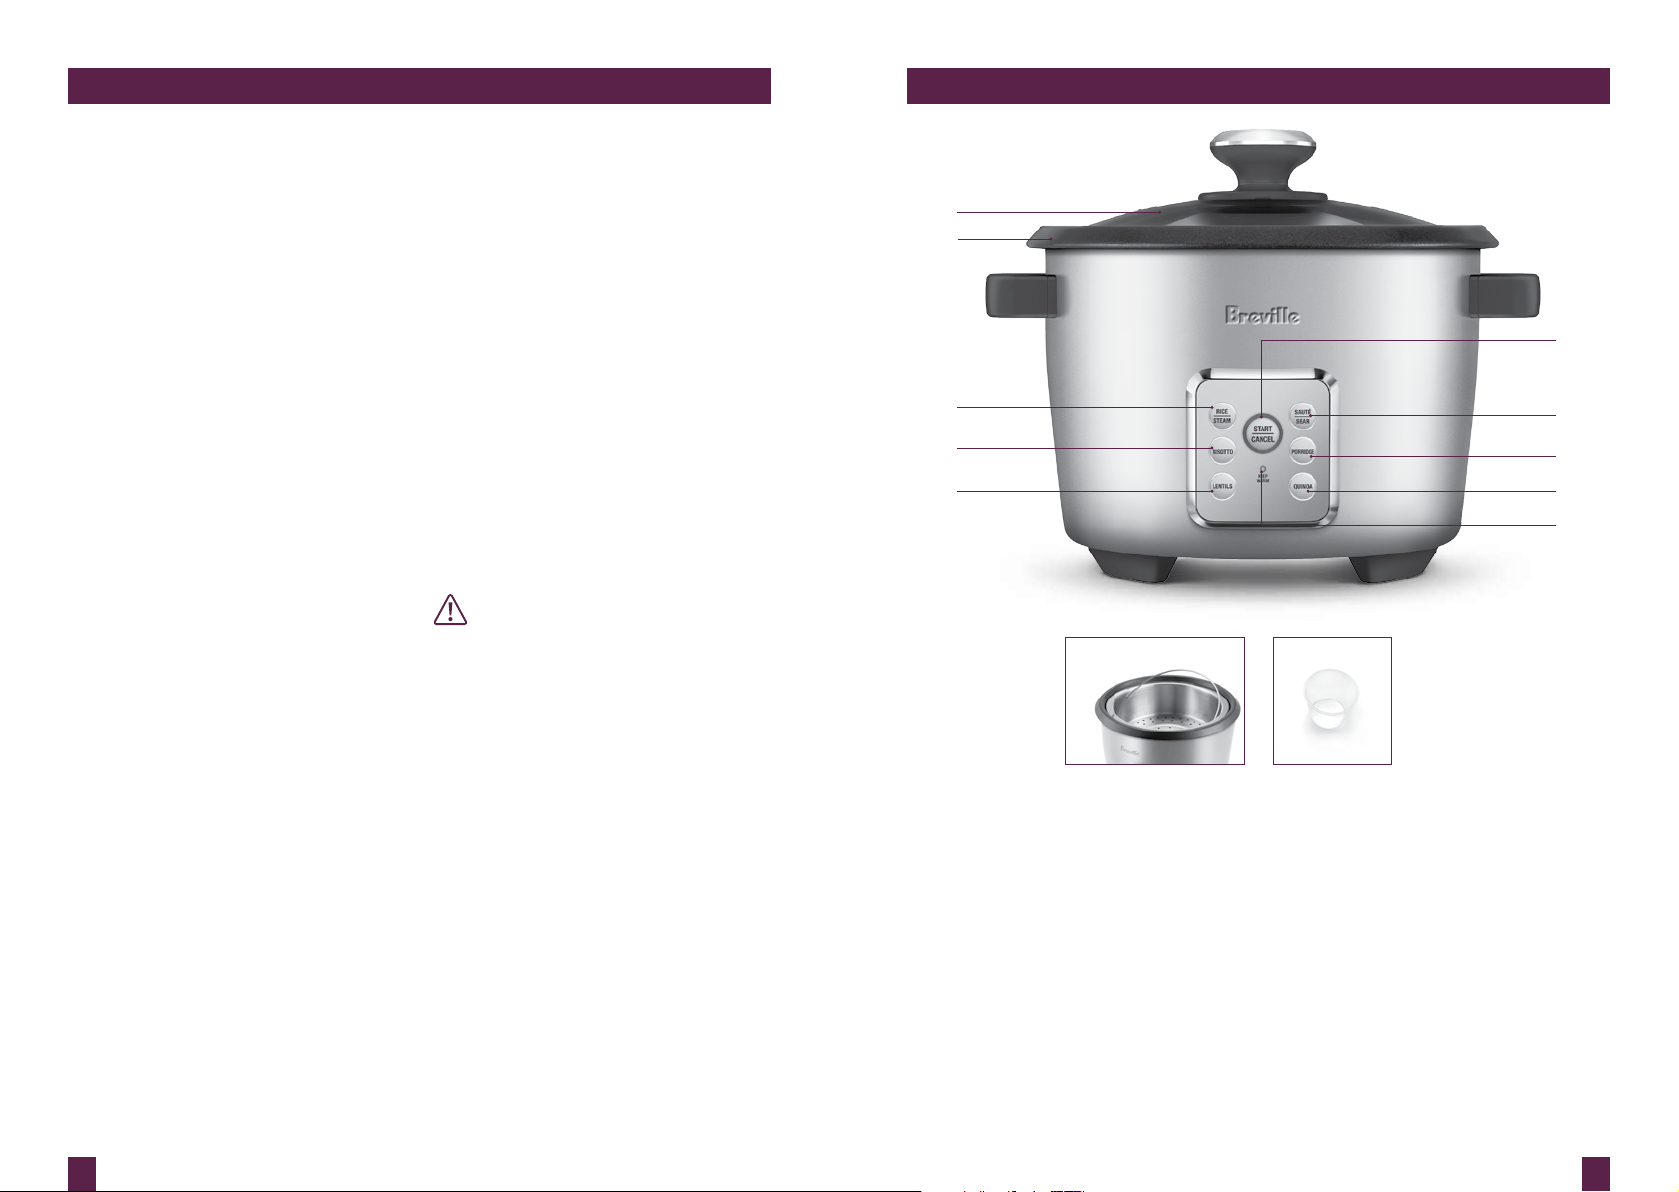
A. Toughened glass lid
With steam vent. Dishwasher safe.
B. Removable non-stick cooking bowl
Prevents risotto and rice from sticking.
C. RICE | STEAM setting
Large 10 cup capacity cooks up to
20 cups of cooked rice.
D. RISOTTO setting
E. LENTILS setting
F. START | CANCEL button
G. SAUTÉ | SEAR setting
H. PORRIDGE setting
I. QUINOA setting
J. KEEP WARM light
Automatically switches on after
rice or risotto are cooked.
K. Stainless steel steaming tray
Ideal for vegetables, seafood and poultry.
L. Measuring cup
SAVE THESE INSTRUCTIONS
4 5
Page 4

OPERATING YOUR BREVILLE PRODUCTOPERATING YOUR BREVILLE PRODUCT
ASSEMBLING YOUR RICE COOKER
1. Before first use, remove all packaging
material and promotional labels.
2. Wash the non-stick removable cooking
bowl, stainless steel steaming tray and
glass lid in hot soapy water, rinse and
dry thoroughly. To prevent scratching
the non-stick surface of the removable
cooking bowl, always use wooden or
plastic utensils.
3. Ensure the exterior of the removable
cooking bowl is clean before placing it
in the housing (this will ensure proper
contact with the inner cooking surface)
(Fig 2).
4. Plug power cord into a 230V or 240V
power outlet. The START|CANCEL
button and RICE|STEAM button
surround will illuminate white. The rice
cooker is now ready for use.
RICE|STEAM SETTING
RICE COOKING
1. Follow assembly instructions on page 6.
Fig. 1
2. Use the scoop provided to measure
the required quantity of rice (refer
to cooking tables - page 17). Always
measure level scoops, not heaped (Fig 1).
3. Place measured rice into a separate bowl
and wash with cold water to remove
any excess starch. The rice is ready for
cooking when water runs clear from the
rice. Drain well.
4. Add the washed rice to the removable
cooking bowl, ensuring rice is spread
evenly across the bottom of the bowl and
not heaped to one side (Fig 2).
Fig. 2
5. Add water using the following ratios:
White Rice = 1 scoop rice : 1 scoop water.
Brown Rice = 1 scoop rice : 1½ scoops
water.
6. Place the glass lid into position.
7. Press the RICE|STEAM button if not
already selected, the button surround
will illuminate white. Press the
START|CANCEL button to activate
the setting, the button surround
will illuminate red and cooking will
commence.
8. When cooking is complete, the ready
beeps will sound and the rice cooker
will automatically switch to the
KEEP WARM setting for up to 5 hours.
To stop the keep warm setting, switch
off the power outlet and unplug the
cord.
9. Open the lid and turn the rice over with
a non-metal spoon. Replace the lid and
allow the rice to stand for 10–15 minutes
before serving. This allows any excess
moisture to be absorbed, resulting in a
fluffier rice texture.
STEAMING
Foods may be steamed by placing food in the
stainless steel steaming tray over stock or
water and covering with the glass lid.
Keep the glass lid on while steaming food
unless the recipe or chart specifically states
to remove the lid. By removing the lid
unnecessarily steam is lost and the cooking
time will be extended.
1. Follow assembly instructions on page 6.
2. Measure 3 rice scoops or more of water or
stock and pour into the removable cooking
bowl. Use up to a maximum of 6 rice scoop
cups of water.
3. Place food to be steamed directly into
the stainless steel steaming tray and
insert into the removable cooking bowl.
(Refer to the Steaming Charts on page
22–24 for approximate cooking times).
4. Press the RICE|STEAM button if not
already selected, the button surround
will illuminate white. Press the
START|CANCEL button to activate
the setting, the button surround
will illuminate red and cooking
will commence.
5. When steaming is complete, the ready
beeps will sound and the rice cooker
will automatically switch to the
KEEP WARM setting.
6. If no further steaming is required, press
the START|CANCEL button to cease
operation and turn the rice cooker off at
the power outlet and then unplug power
cord. Allow to cool before cleaning.
HINTS AND TIPS FOR
STEAMING VEGETABLES
• Smaller pieces will steam faster than
larger pieces.
• Try to keep vegetables to a standard size
to ensure even cooking.
• Fresh or frozen vegetables may
be steamed.
• If steaming frozen vegetables, do
not thaw.
• The size and shape of vegetables, as
well as personal taste, may call for
adjustments to the cooking time. If
softer vegetables are required, allow
extra cooking time.
• Do not allow water or stock to reach the
stainless steel tray. The steaming will
not be effective.
WARNING
Always lift and remove the lid carefully,
angling it away from yourself to avoid
scalding from escaping steam.
6 7
Page 5

OPERATING YOUR BREVILLE PRODUCT OPERATING YOUR BREVILLE PRODUCT
HOW TO MAKE RISOTTO
SAUTÉ|SEAR setting
1. Follow assembly instructions on page 6.
2. Press the SAUTÉ|SEAR button, the
button surround will illuminate white.
Press the START|CANCEL button to
activate the setting, the button surround
will illuminate red.
3. Cover with lid and allow to pre-heat for
approximately 2–3 minutes (do not
pre-heat for longer than 5 minutes).
4. Add oil/butter and allow to heat/melt
for approximately 1 minute.
5. If using chicken or seafood in the recipe,
sear in small batches, cover with lid and
stir occasionally until food is cooked.
Remove from cooking bowl.
6. Add extra oil/butter to cooking bowl if
necessary or if recipe states. Allow to
heat for approximately 1 minute.
7. Add ingredients such as onions and
garlic. Sauté, cover with lid if necessary
and stir occasionally for about
4 to 5 minutes or until cooked to
desired brownness.
8. Stir in Arborio or carnaroli rice and
mix well. Sauté for approximately
2–3 minutes, stirring occasionally.
9. Pour in wine (if using) and cook
uncovered until rice has absorbed all
liquid and alcohol has evaporated,
stirring frequently.
10. Press the START|CANCEL button to
stop the SAUTÉ|SEAR setting.
11. Refer to step 1 in the RISOTTO
setting section below.
RISOTTO Setting
1. Follow steps 1–11 in the SAUTÉ|SEAR
setting section above.
2. Add stock or water and stir well. Cover
with lid and press the RISOTTO button,
then press the START|CANCEL
button to activate the setting. The
START|CANCEL button surround
will illuminate red and cooking
will commence.
3. Allow to cook until the ready beeps
sound and the rice cooker automatically
switches to the KEEP WARM setting.
This will take approximately 20–30
minutes depending on the recipe. For
optimum results, we recommend you
stir once after 15–20 minutes.
4. Remove lid and stir well using a non
metal spoon. At this stage remaining
ingredients can be added i.e., butter,
parmesan cheese, herbs, salt and pepper.
5. The rice cooker will remain on the
KEEP WARM setting for 30 minutes
before switching OFF. However, risotto
is best served as soon as possible after
completion of cooking. To stop the keep
warm setting, switch off the power outlet
and unplug the cord.
PORRIDGE SETTING
1. Follow assembly instructions on page 6.
Fig. 1
2. Use the rice scoop provided to measure
the required quantity of oats (refer
to cooking tables - page 17). Always
measure level scoops, not heaped (Fig 1).
3. Add the oats to the removable cooking
bowl, ensuring oats are spread evenly
across the bottom of the bowl and not
heaped to one side (Fig 2).
Fig. 2
4. Add water using the following ratio:
Oats = 1 scoop oats : 2 scoop water.
5. Keep the glass lid off.
6. Press the PORRIDGE button, the
button surround will illuminate white.
Press the START|CANCEL button to
activate the setting, the button surround
will illuminate red and cooking will
commence.
7. When cooking is complete, the
ready beeps will sound and the
START|CANCEL button surround will
illuminate white.
8. Stir in extra milk or water to reach
desired consistency. Serve immediately.
LENTILS SETTING
1. Follow assembly instructions on page 6.
Fig. 1
2. Use the rice scoop provided to measure
the required quantity of dry lentils (refer
to cooking tables - page 17). Always
measure level scoops, not heaped (Fig 1).
3. Add the lentils to the removable cooking
bowl, ensuring lentils are spread evenly
across the bottom of the bowl and not
heaped to one side (Fig 2).
Fig. 2
4. Add water using the following ratio:
Lentils = 1 scoop lentils : 3 scoop water.
5. Place glass lid into position.
6. Press the LENTILS button, the button
surround will illuminate white. Press
the START|CANCEL button to activate
the setting, the button surround
will illuminate red and cooking will
commence.
7. When cooking is complete, the
ready beeps will sound and the
START|CANCEL button surround will
illuminate white.
8. Serve immediately.
8 9
Page 6

OPERATING YOUR BREVILLE PRODUCT COOKING TABLES
QUINOA SETTING
1. Follow assembly instructions on page 6.
Fig. 1
2. Use the rice scoop provided to measure
the required quantity of quinoa (refer
to cooking tables - page 17). Always
measure level scoops, not heaped (Fig 1).
3. Add the quinoa to the removable
cooking bowl, ensuring quinoa is spread
evenly across the bottom of the bowl and
not heaped to one side (Fig 2).
Fig. 2
7. When cooking is complete, the
ready beeps will sound and the
START|CANCEL button surround will
illuminate white.
8. Serve immediately.
KEEP WARM SETTING
The rice cooker will automatically switch to
the KEEP WARM setting once the RICE and
RISOTTO settings have finished cooking. It
will keep KEEP WARM for up to 5 hours on
the RICE setting and up to 30 minutes on
the RISOTTO setting.
NOTE
There may be occasions when the rice
cooker switches to the KEEP WARM
setting or switches off before cooking
is complete. If this occurs, simply
press the desired cooking button,
then press the START|CANCEL
button. The START|CANCEL button
surround will illuminate red and the
selected setting will be activated.
This is a safety mechanism to prevent
overheating due to certain cooking
conditions.
The rice scoop provided with your rice cooker is used in the following tables.
NOTE
The provided rice scoop is not a standard metric measuring cup.
1 rice scoop is equal to 150g of uncooked rice and 180ml of water.
(1 Australian standard metric measuring cup is equal to 200g of uncooked rice)
If your rice scoop is lost or misplaced, use another cup but maintain the same cooking
ratios and ensure you do not exceed the 10 scoop maximum line in the removable
cooking bowl:
White Rice = 1 scoop rice + 1 scoop water
Brown Rice = 1 scoop rice + 1½ scoops water
INGREDIENT WATER
Rice 1 : 1 RICE ON YES Max 10 scoops YES
Brown rice 1 : 1.5 RICE ON YES Max 10 scoops YES
Risotto 1 : 3.5 RISOTTO ON YES Max 4 scoops YES, for 30 min
Oats 1 : 2 PORRIDGE OFF NO Max 4 scoops NO
Lentils, dry 1 : 3 LENTILS ON NO Max 3 scoops NO
Quinoa and
other grains*
Quinoa flakes 1 : 2 PORRIDGE ON NO Max 4 scoops NO
RATIO
Scoops =
Bowl Water
Level
SETTING LID AUTO
QUINOA ON YES Max 4 scoops NO
Using the provided rice scoop
}
SWITCH
OFF
MAX
QUANTITY
TO COOK
KEEP WARM
INITIATED
*Frekkeh, amaranth, buckwheat, millet
4. Add water using the water level
markings inside the removable
cooking bowl. Match the water level
to the number of scoops for example
2 scoops of quinoa will require water to
be filled to level 2 inside the removable
cooking bowl.
5. Place glass lid into position.
6. Press the QUINOA button, the button
surround will illuminate white. Press
the START|CANCEL button to activate
the setting, the button surround
will illuminate red and cooking will
commence.
10 11
NOTE
Due to the additional water needed
to cook brown rice, some starchy
water bubbles may rise to the lid
while cooking.
Page 7

COOKING TABLES COOKING TABLES
RICE VARIATIONS
SAVORY RICE
Prepare rice in the rice cooker as specified,
substituting all the water with the same
quantity of chicken, beef, fish, or
vegetable stock.
SWEET RICE
Prepare rice in the rice cooker as specified
substituting half the water with apple juice,
orange juice or pineapple juice. Cooking rice
with milk or cream is not recommended as
it will burn onto the bottom of removable
cooking bowl.
SAFFRON RICE
Add a pinch saffron threads to every 2 cups
of water. Use the white rice cooking tables.
Mix well.
ARBORIO RICE
Arborio rice is short round-grained pearly
rice often used for Italian risotto cooking.
Use the brown rice cooking tables.
JASMINE RICE
Jasmine rice is fragrant long grain rice.
Use the white rice cooking tables.
BASMATI RICE
Basmati rice is an aromatic long grain rice.
Use the white rice cooking tables.
WILD RICE
It is not recommended to cook wild rice
alone in the rice cooker as it requires a
substantial amount of water. It is possible
to cook wild rice as a blend with white or
brown rice.
SUSHI
Sushi rice is short grained rice used in
Japanese cooking. Use the brown rice
cooking tables.
TIP
• Add a little extra water for fluffier
rice and a little less water for
firmer rice.
• Some rice varieties may require
more water for cooking, such as
wild rice blends, Arborio rice
or short grain rice. Follow the
directions on the packet or use the
brown rice cooking table.
STEAMING
VEGETABLES PREPARATION & TIPS QUANTITY COOKING TIME
Asparagus trim, leave as spears 2 bunches 12–14
Beans top and tail, leave whole 250g 13–15
Broccoli cut into florets 250g 8–10
Brussel sprouts cut a cross in the base 375g 17–19
Carrots cut into strips 3 medium 14–16
Corn whole corn cobs 2 small cobs 20–22
Snow peas topped and tailed 250g 4–5
Peas fresh, peeled
Potatoes all purpose, whole 4 (150-180g each) 35–40
Sweet potato &
pumpkin
Zucchini sliced 350g 6
frozen
cut into pieces 300g 20–25
250g
250g
(MINUTES)
8–10
4–5
12 13
Page 8

COOKING TABLES COOKING TABLES
HINTS AND TIPS FOR STEAMING
FISH AND SEAFOOD
• Season fish with fresh herbs, onions,
lemon etc. before cooking.
• Ensure fish fillets are in a single layer
and do not overlap.
• Fish is cooked when it flakes easily with
a fork and is opaque in color.
TYPE SUGGESTIONS AND TIPS COOKING TIME
(MINUTES)
Fish – fillets Steam until opaque and easy to flake. 8–10
Mussels – in shell Steam until just opened 12–14
Prawns - in shell Steam until pink 8–10
HINTS AND TIPS FOR
STEAMING POULTRY
• Select similar sized pieces of poultry for
even cooking.
• For even cooking results arrange poultry
in a single layer.
• Remove visible fat and skin.
• To obtain a browned appearance,
sear the chicken before steaming.
• Check poultry is cooked by piercing
the thickest part. The poultry is cooked
when the juices run clear.
HINTS AND TIPS FOR STEAMING
DUMPLINGS
• Fresh or frozen dumplings and savoury
buns can be steamed.
• Place small pieces of baking paper, or
cabbage or lettuce leaves, under the
dumplings to avoid sticking to the
steaming tray.
TYPE SUGGESTIONS AND TIPS COOKING TIME (MINUTES)
BBQ pork or chicken buns Cook from frozen 10–12
Dumplings – frozen Separate before cooking 8–10
TYPE SUGGESTIONS AND TIPS COOKING TIME
(MINUTES)
Breast fillet Place skin side up 20–25
14 15
Page 9

CARE & CLEANING
TROUBLESHOOTING
Unplug the power cord from the
power outlet.
Allow all parts to cool before removing
the removable cooking bowl. Wash the
removable cooking bowl, stainless steel
steaming tray and glass lid in hot, soapy
water, rinse and dry thoroughly.
Breville does not recommend that any
parts of your rice cooker are washed in a
dishwasher as harsh detergents and hot
water temperatures may stain or distort the
removable cooking bowl and accessories.
Do not use abrasive cleaners, steel wool, or
metal scouring pads as these can damage
the non-stick surface.
The housing can be wiped over with a damp
cloth and then dried thoroughly.
To prevent damage to appliance do not use
alkaline cleaning agents when cleaning, use
a soft cloth and a mild detergent.
NOTE
If rice has cooked onto the bottom of
the removable cooking bowl, fill the
bowl with hot, soapy water and leave
to stand for approximately 10 minutes
before cleaning.
WARNING
The appliance connector must be
removed before the rice cooker is
cleaned and that the appliance inlet
must be dried before the rice cooker is
used again.
Do not immerse housing or power cord
in water or any other liquid as this may
cause electrocution.
PROBLEM WHAT TO DO
the Multi Grain
the Multi Grain
setting before cooking is complete.
™ suddenly switches off. • Ensure power plug is connected
properly to the appliance and to power
outlet.
• The appliance has been stressed or
has overheated due to cooking
conditions. Press the desired cooking
button, then press the START|CANCEL
button. Allow a few minutes for
appliance to reheat and continue
cooking.
™ has switched to WARM
• Press the desired cooking button, then
press the START|CANCEL button and
continue cooking. If you need to reset
the appliance, adjust the cooking time
accordingly.
16 17
Page 10

NOTES NOTESNOTES
18 19
 Loading...