

Page 1
2 Slice
stainless steel jug kettle
ELECTRONIC TOASTER
Page 2

CONTENTS
Important Instructions ............................................................... 3
Parts overview ........................................................................ 4
Control panel ........................................................................... 5
Getting started ........................................................................ 6
Using the bread maker ............................................................ 8
Setting the delay timer ........................................................... 12
Program guide ...................................................................... 14
Hints and Tips ....................................................................... 16
Program and baking cycle information................................... 19
Troubleshooting .................................................................... 21
Care and cleaning ................................................................. 23
Storage ................................................................................. 24
Connection to the mains supply ............................................. 25
Recipe Book ......................................................................... 26
After sales service................................................................. 46
Guarantee ............................................................................. 47
2
Page 3

IMPORTANT INSTRUCTIONS
ALWAYS
✔
Always remove all packaging material from the
breadmaker.
✔
Always peel off the plastic protective film from
the control panel, and remove all point of sale
labels.
✔
Always wash the bread pan and blade in warm
soapy water and dry thoroughly to remove any
residues that may have remained from the
manufacturing process.
✔
Always ensure hands are dry before handling
the plug or operating the appliance.
✔
Always make sure that your mains supply
voltage is the same as the one indicated on the
bottom of this appliance.
✔
Always turn the breadmaker on using the on/off
switch located to the rear of the breadmaker.
NEVER
✘ Never immerse cord, plug or appliance in water
to protect against electric shock.
✘ Never immerse the bread pan base in water.
✘ Never use harsh abrasives, caustic cleaners or
oven cleaners to clean this appliance as they
may scratch the non-stick surface.
✘ Never put the bread pan or kneading blade into
the dishwasher.
✘ Never let the cord set hang over the edge of the
table or counter or touch hot surfaces.
✘ Never place this appliance on or near a hot gas
or electric burner, or where it could touch a
heated oven.
Before using
Whilst in use
This breadmaker has a built in power interruption program protection to maintain your baking cycle in the event
of a short interruption in your power supply. However in a prolonged interruption of power this may result in the
program being cancelled. See page 13 for full details
ALWAYS
✔
Always take care near hot surfaces, parts of this
appliance do get hot during operation. Take care
near hot surfaces especially when the lid is open
during or after use.
✔
Always allow adequate air space on all sides for
air circulation.
✔
Always follow all recipe instructions carefully.
NEVER
✘ Never open the lid or remove the bread pan
during operation except as indicated in the
instructions.
✘ Never allow this appliance to touch curtains, wall
coverings, dishtowels or other flammable
materials.
✘ Never cover the lid or vents. CAUTION is
required on surfaces where heat may cause a
problem - an insulated heat pad is
recommended.
Where to use
ALWAYS
✔
Always use the appliance on a dry, level
surface.
✔
Always place the unit at least 200mm away from
walls as they may be discoloured by the heat.
NEVER
✘ Never use the breadmaker where it will be
exposed to direct sunlight or other heat sources,
such as an oven.
✘ Never place on top of any other appliance.
✘ Never allow children to use this appliance. Close
supervision is necessary when the appliance is
near children.
✘ Never place this appliance near to the edge of a
table or counter.
After use
ALWAYS
✔
Always switch off and remove the plug from the
socket after use and before cleaning.
✔
Always use oven mitts when removing the bread
pan after baking.
ALWAYS
✔
Always allow the breadmaker to cool before
cleaning or storing.
✔
Always read the instructions before cleaning. To
protect against electrical hazard do not immerse
any part of the main appliance or cord set and
plug in water or any other liquid.
Safety precautions
ALWAYS
✔
Always take care when moving the appliance.
Never move whilst in operation or before it has
cooled after use.
✔
Always remove the plug by grasping the plug
itself, never pull on the cord set.
✔
Always carry out regular close checks on the
cord set to ensure no damage is evident. Should
there be any signs that the cord is damaged in
the slightest degree the entire appliance should
be returned to the Breville customer service
department.
NEVER
✘ Never use any attachments other than those
supplied with the machine.
✘ Never use this appliance outdoors.
✘ Never use the appliance for anything other than
the intended use. This appliance is for household
use only.
✘ Never operate the appliance if damaged, after
the appliance malfunctions or if it has been
damaged in any manner. Return to the Breville
customer service department for examination,
repair or adjustment because special purpose
tools are required.
3
Page 4
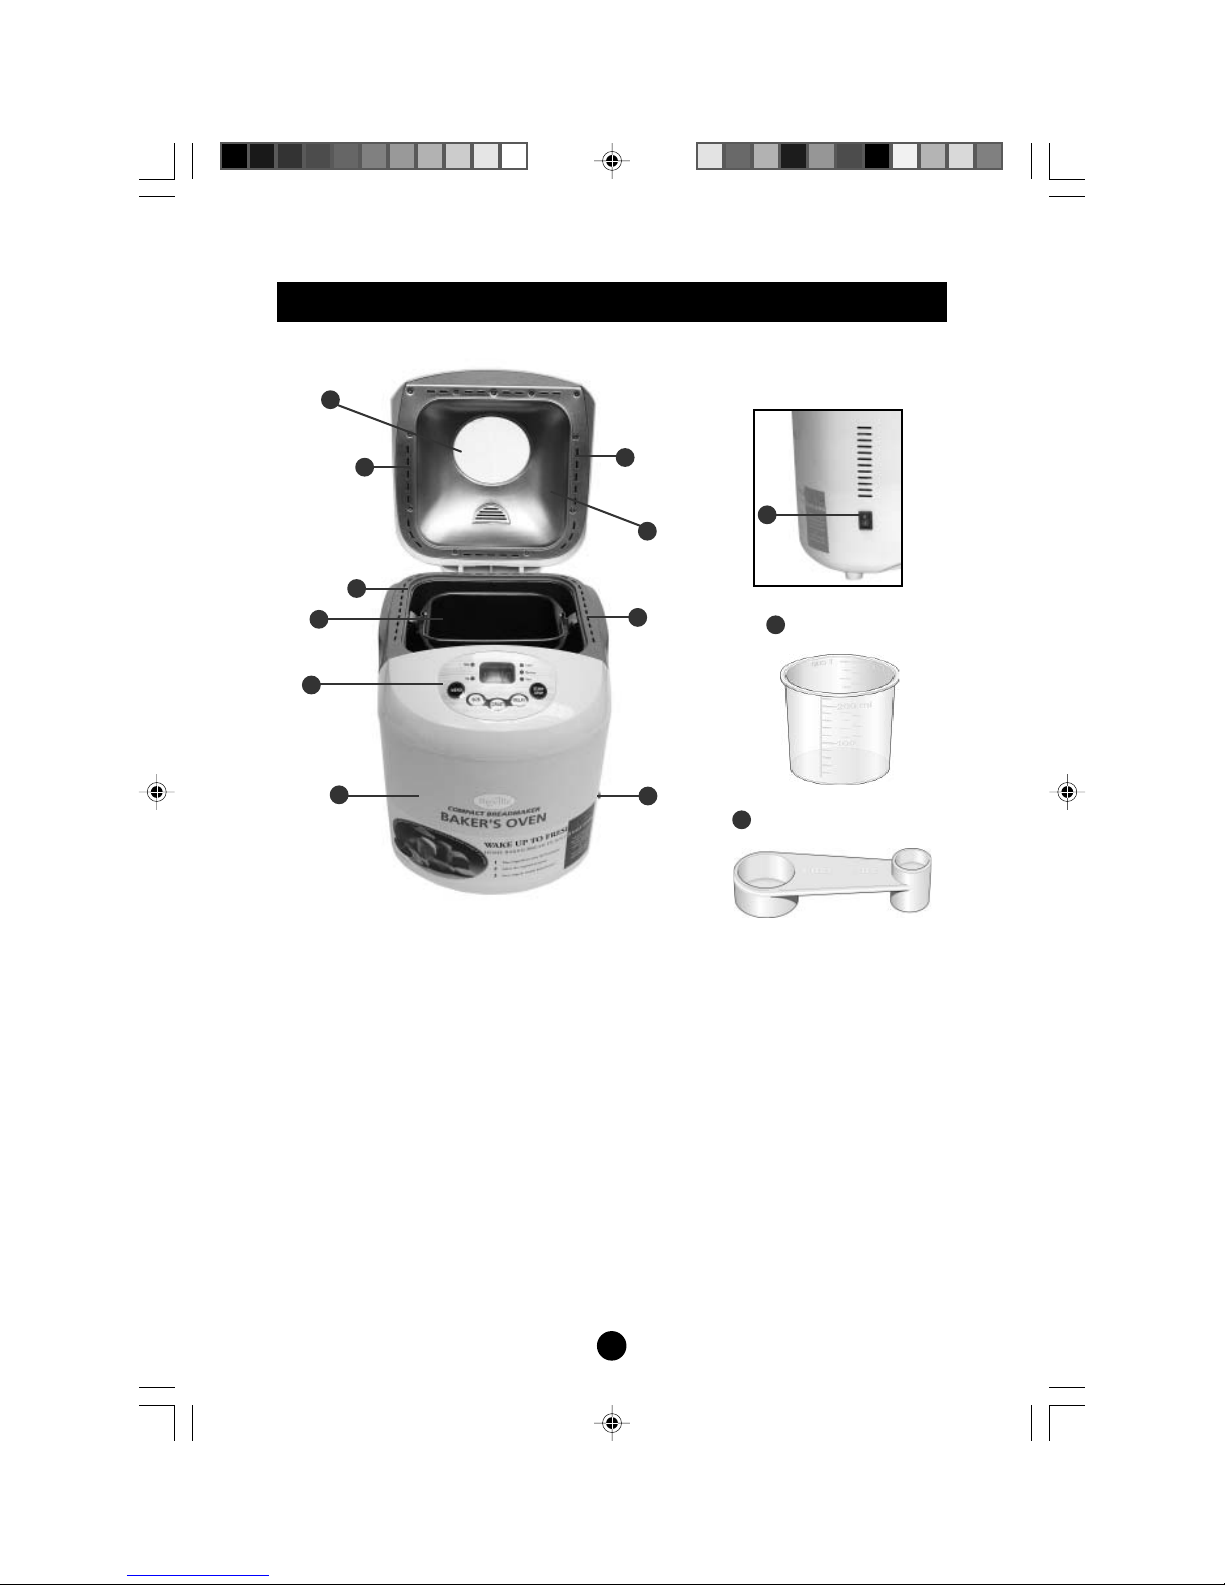
PARTS OVERVIEW
5
4
4
3
2
1
4
6
4
7
Right side
7
8
9
1 Body
2 Control Panel
3 Bread Pan
4 Air Vents
5 Viewing Window
6 Lid
7 Power On/Off Switch
8 Measuring Cup
9 Measuring Spoon
4
Page 5

10
CONTROL PANEL
11
12
17
16
10 Loaf Size Indicator
11 Display Window
12 Crust Colour Indicator
13 Start/Stop/Reset button
14 Delay Timer Button
15 Crust Colour Button
13
14
15
16 Loaf Size Button
17 Menu Select Button
5
Page 6

GETTING STARTED
Please read the instructions and warnings in this book before use.
Remove your Breville Breadmaker carefully from the box. You may wish to
store the packaging for future use.
In the box
•
Breadmaker
• Bread Pan
• Measuring Cup
• Measuring Spoon
• Instruction Book
Cleaning
Before using your Breadmaker for the first time, wash the bread pan (inside
only), measuring cup and measuring spoon with hot, soapy water. Rinse
and dry thoroughly. Using a damp cloth or sponge, wipe the exterior of the
Breadmaker. Make sure you only use a mild detergent solution.
Positioning and s witching on
Position your Breadmaker on a dry flat surface away from any potential heat
source (cooking hobs, oven, etc.).
Plug the Breadmaker into the mains socket and switch on. Ensure the
mains lead does not hang over the work surface edge. Locate the power on/
off switch on the bottom right side, and set to the on (‘I’) position.’0:00’ will
flash in the display window and a ‘beep’ will sound.
6
Page 7

GETTING STARTED continued..
Using Ingredients
To achieve optimum results when bread making;
• Use fresh ingredients.
• Check the expiry dates.
• All ingredients except liquids, should be at room temperature.
• Measure ingredients accurately
Basic Ingredients for bread making
Yeast
Yeast is a vital ingredient when bread making, without it the bread will not
rise. Your Breadmaker maintains the optimum temperature for the yeast to
take effect, during the breadmaking process.
Important: only use dried yeast with this Breadmaker. Using fresh or tinned
yeast will produce poor results.
Note: Some yeast may require the use of a bread improver. A bread
improver will provide additional gluten to the flour to produce a better loaf.
Flour
In order for the bread to rise, the flour used has to have a sufficiently high
protein content. Breville recommend the use of a good quality strong plain or
bread flour.
Liquids
When liquids are mixed with flour, gluten is formed. Gluten is necessary for
the bread to rise. Most recipes use dry milk and water, but other liquids
such as fresh milk and fruit juice can be used.
Salt
In small amounts salt adds flavour and controls yeast action. Too much salt
will inhibit the yeast and the bread will not rise properly.
Important: when adding ingredients to the bread pan, yeast and salt should
be kept separate.
7
Page 8

USING THE BREADMAKER
For your first loaf of bread, we would recommend that you try the standard
750g or 1kg white bread recipe. When you have tasted the resulting loaf, it
will allow you to vary the settings to suit your individual taste.
Adding the ingredients
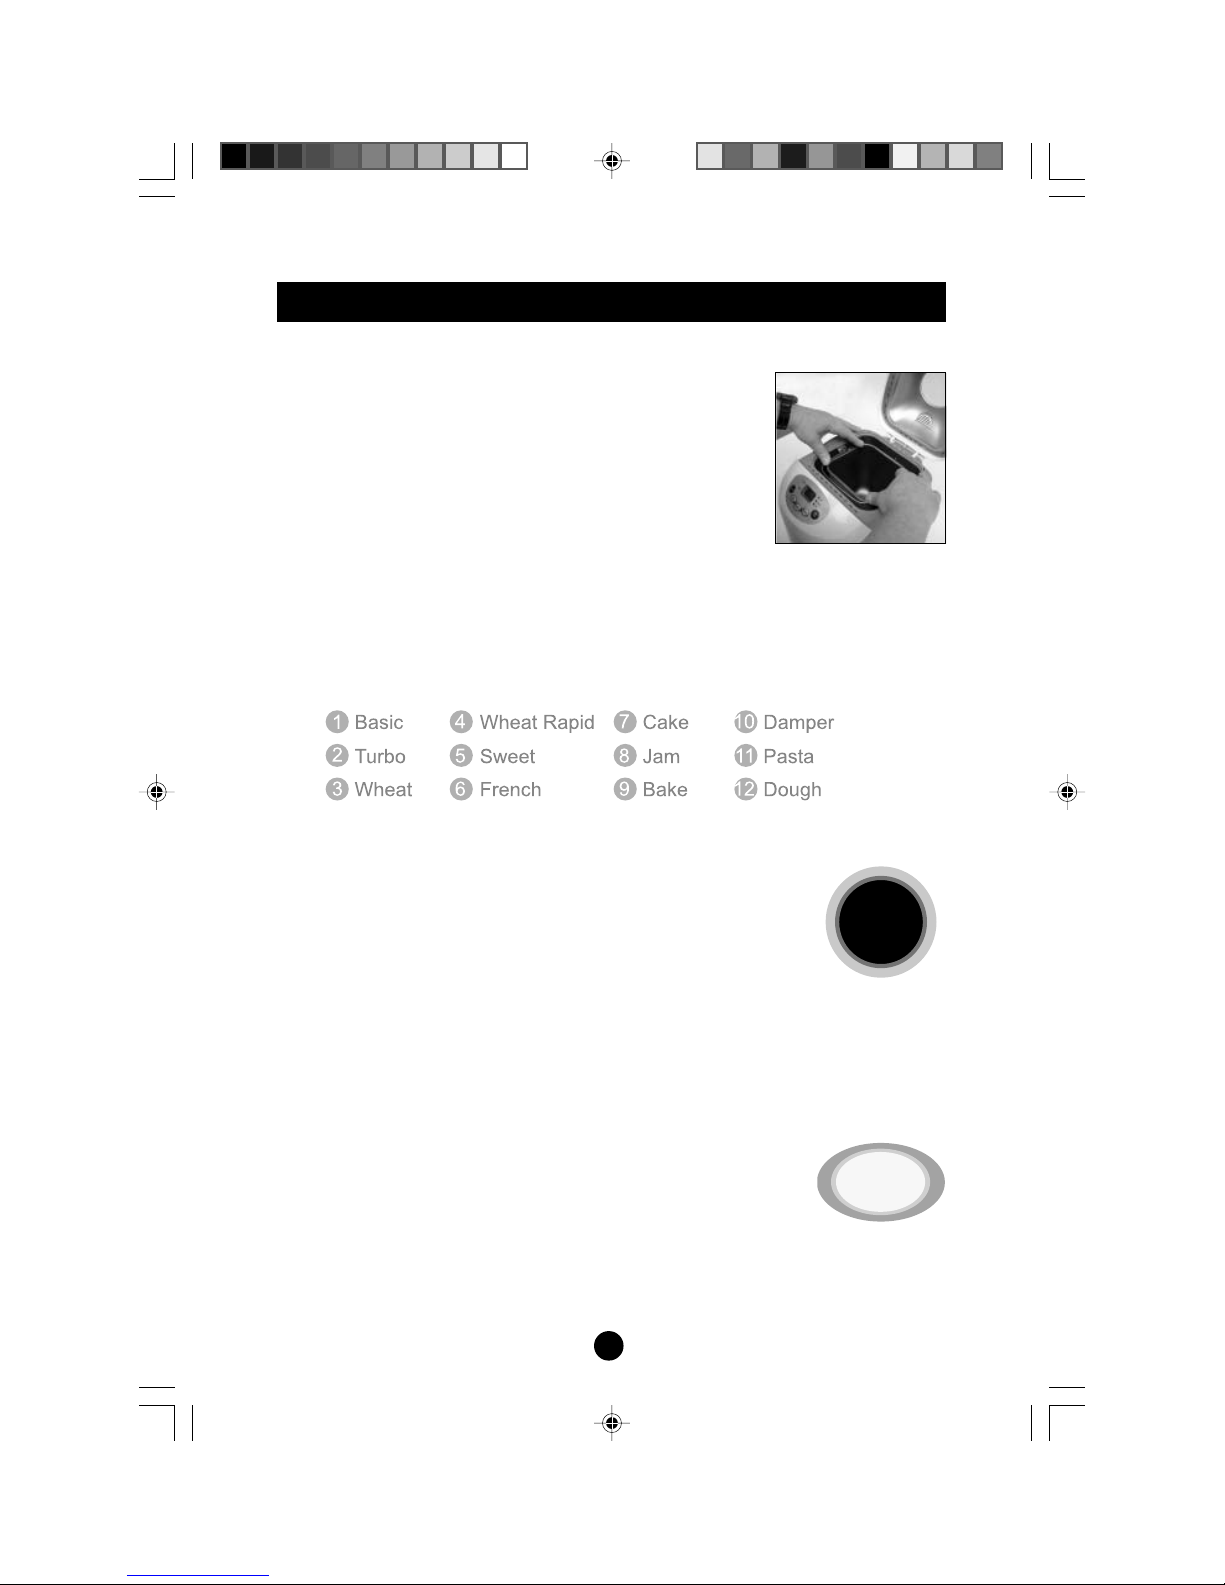
1 Open the lid and remove the bread pan by pulling
the bread pan handle upwards, until it releases
from the retaining clips.
2 Place all ingredients in the bread pan.
Important:
• always place ingredients into the bread pan in the order listed in the
recipe.
• make sure you do not leave out any of the ingredients.
• always measure the ingredients carefully, as a small variation can affect
the quality of the bread.
• never use larger quantities of ingredients than recommended, as this is
likely to produce poor results and may damage your Breadmaker.
• all ingredients (except liquids) should be at room temperature (70-80°F/
21-27°C).
When placing ingredients into the bread pan, always put liquids in first,
followed by salt, and then flour. When adding yeast, make a small ‘well’ in
the flour to place into.
Important: do not let yeast come into contact with salt and liquids.
Yeast
Ingredients
Water
8
Page 9
USING THE BREADMAKER continued..
3 Place the bread pan inside the baking chamber. To do this, align the
bread pan handle with the retaining clips on either
side of the baking chamber. Fold down the bread
pan handle.
Using both hands apply downwards pressure on
the bread pan until it locks into place. Ensure the
bread pan has locked correctly.
4 Close the lid, plug in and switch the Breadmaker
on at the main. Set the power on/off switch to the on position (‘I’).
When the Breadmaker is first switched on a ‘beep’ will sound and ‘0:00’
will flash in the display window until a program setting is selected.
Selecting a Program Setting
5 To select a program setting, press the MENU button on
the control panel, ‘1’ will appear in the display window.
Each time this is pressed the next program setting is
selected and a ‘beep’ will sound. When you reach
program 12, pressing the MENU button again will
display program 1.
MENU
For a description of each program setting, refer to the Program Guide
on page 13.
Selecting loaf size
Note: loaf size can not be adjusted for programs 8-12.
6 By default the loaf size will be set to 1kg. To change the
loaf size press the SIZE button. The 750g loaf indicator
will illuminate, indicating your current selection.
The display window will show the bread making duration.
Each press of the SIZE button changes the loaf size, and the duration
accordingly.
SIZE
9
Page 10

USING THE BREADMAKER continued..
Selecting crust colour
Note: crust colour can not be adjusted for programs 8-12.
7 By default the crust colour will be set to ‘Medium’. To
select the desired crust colour, press the CRUST
button. Each press of the button cycles through Light,
Medium or Dark crust. The indicator for each setting will
illuminate to indicate the setting you have chosen.
Starting the bread making cycle
Note: if you wish to delay the start of the bread making cycle, see setting
the delay timer section on page11.
8 To start the bread making cycle, press the START/
STOP button. You will hear a beep and the duration time
on the display window will start counting down in
minutes.
Note: When using certain program settings, the Breadmaker will take a few
minutes before starting the bread cycle. This is to allow the ingredients in
the bread pan to warm sufficiently.
CRUST
START
STOP
The dough consistency can be checked through the viewing window
during the mixing cycle.
The dough should form a soft, tacky ball. If too dry or too moist, add
water or flour one tablespoon at a time, until the correct consistency is
reached. The more you use your Breadmaker, the better you will get at
judging the appearance of the dough.
Do not open the lid during the rising or baking cycles, as this may affect
the quality of the finished loaf.
9 When the bread making cycle is complete, you will hear a beep and the
display window will read ‘0:00’.
10
Page 11

USING THE BREADMAKER continued..
Removing the bread pan
Important: steam may escape when the lid is opened. Always use oven
gloves when opening the lid and removing the pan.
10 Wearing oven gloves, hold the handle securely
and lift the pan from the Breadmaker.
Using oven gloves, turn the bread pan upside
down and gently shake it to release the bread.
Place the bread on a wire rack to allow the
steam to escape and the bread to cool.
Note: if the bread cannot be easily removed, using an oven glove, turn the
drive shafts on the bottom of the bread pan in both directions to loosen the
bread.
Fruit and nut beep
If you are baking bread which requires the addition of other ingredients, such
as dried fruit or nuts, 8 beeps will sound during the kneading cycle. This
feature applies to programs 1 (Basic) and 8 (Sweet).
Cancelling a program setting
If for any reason you wish to cancel a program, press and hold the START/
STOP button until you hear a beep.
Po wer loss memory
This feature automatically resumes the bread making cycle where it left off,
in the event of a short-term power loss. Note that a long delay during the
bread making process (for example, a power cut) is likely to affect the
quality of the finished loaf.
Keep warm function
This prevents the bread from getting soggy by keeping the baked bread
warm for up to an hour after baking. This function stops when the START/
STOP button is pressed or the Breadmaker is unplugged.
11
Page 12

USING THE DELAY TIMER
The Breadmaker is equipped with a delay timer to enable the breadmaking
cycle to start at a predetermined time.
Note: the timer should not be used in conjunction with certain recipes. Avoid
using recipes, which contain fresh milk, eggs, fruit or vegetable purees when
using the timer, as they could spoil.
When using the delay timer function, you are setting the number of hours to
completion of the baking cycle.
Important: you do not have to consider the time it takes to bake the loaf,
as this is automatically taken into account. For example, if you want your
loaf to be ready in 8 hours, all you have to do is set the timer to 8 hours!
Setting the delay timer
1 Choose the desired bread recipe - ensuring that it is suitable for timer
cooking.
2 Select the required program setting (see page 8).
3 Select the correct loaf size (see page 8).
4 Select the desired crust colour (see page 9).
5 Set the delay timer. To do this, press the DELAY
button. The duration time will appear in the display
window. Each press advances the duration time in 10
minute increments.
If you go past the desired time, simply continue pressing the DELAY
button. Once the timer reaches ‘15:00’ , pressing the DELAY button
again resets the duration time.
Holding the DELAY button makes the numbers advance quickly.
6 When the timer is set, press the START/STOP button. The display will
start to count down the time to completion.
Note: once you have pressed the start button you can not alter the timer.
12
DELAY
Page 13

USING THE DELAY TIMER continued..
Example:
If the time is 8:00 PM and you want the bread to be ready at 7.00 AM, you
need to set the timer for an 11 hour delay.
Press DELAY button until 11:00 appears on the display window, then press
the START/STOP button. The time will begin counting down.
The Breadmaker will automatically start mixing the ingredients at precisely
the right moment and your bread will be ready at the desired time.
Important: If you forget to press the START/STOP button, the delay timer
will not work.
Always add carefully measured ingredients in the correct sequence: liquids,
salt, dry ingredients then the yeast. The yeast must always be kept away
from the liquids and salt, especially when using the timer.
13
Page 14

PROGRAM GUIDE
1. Basic
This program is primarily used for breads that use white flour. The bread will
be slightly denser than French or Sweet breads, as there are fewer rising
cycles and the overall cycle time is shorter.
2. Turbo
The Turbo setting is used to decrease the overall completion time of your
bread. This is especially handy when you need bread in a hurry. The breads
made using this setting may be shorter and denser because of a decrease
in rising time. The Turbo setting should only be selected when baking White
and Wheat breads.
3. Wheat
This program is used for recipes which contain significant amounts of whole
wheat or rye flour, oats or bran. It begins with a rest period during which the
flours and grains absorb the liquid - this softens the ingredients and helps
them to combine properly. The program also incorporates an additional rise
cycle which helps the heavier wheat and grains to expand.
14
Page 15

PROGRAM SETTINGS GUIDE continued...
4. Wheat Rapid
This program is similar to the Wheat program but with a shorter completion
time. However it is not suitable to use 100% granary or wholemeal flour.
5. Sweet
Use this program for recipes that include fruit juice, additional sugar or
added ingredients such as coconut, raisins or chocolate. The baking
temperature is reduced to prevent burning and an additional rise cycle gives
the loaf a lighter texture.
6. French
Traditionally, French bread has a crispier crust and lighter texture than basic
breads. These recipes do not usually include additional fats or milk.
7. Cake
Make a variety of sweet and savoury home-made cakes on this setting. You
can use this setting to mix and bake cakes. We recommend the use of
prepackaged cake mixes. Select the light crust colour to prevent the sides
from burning.
8. Jam
Use this setting to make fresh savoury and sweet jams. The process is a
simple case of mixing and heating.
9. Bake
When you select the Bake setting, the Breadmaker Baker’s oven will
immediately start baking. This setting will bake for 1 hour and can be
controlled manually by pressing the Start/Stop button to stop the function at
any time.
10. Damper
This program is specially design to make a tradition Damper style bread.
Damper style breads have a rich flavour and are heavy and dense in texture.
The bread will take its own shape throughout the rising cycle but generally
remain flat.
11. Pasta
This program allows you to make pasta dough. Feed the pasta dough
through a pasta machine to make fettuccini, ravioli and lasagne.
12. Dough
This program allows you to create a variety of dough’s for breadsticks, bread
rolls and pizza to bake in a conventional oven.
15
Page 16

HINTS AND TIPS
Important measuring tips
Each ingredient in the loaf of bread plays a specific role, so it is extremely
important to measure the ingredients correctly to get the best results.
Wherever possible we recommend weighing bulk ingredients such as flour
on a kitchen scale. However, for your convenience, if kitchen scales are not
available, the recipes also include volumes by cup. Other dry ingredients
can be measured using the spoon and cup provided, and some butter
wrappers provide weight guidelines.
• Liquids
Fill the spoon or cup provided to the level indicated. Check your cup
measurements by placing the measuring cup on a flat surface and
reading the measurement at eye level.
• Solid fats
When using butter and margarine it is important to chop the
ingredients into cubes before adding to the bread pan. Butter and
margarine should be added at room temperature. Use unsalted butter
or margarine.
• Adding Fruit and Nuts
Fruit and nuts are added towards the end of the kneading cycle. The
machine will beep to let you know it is time to add fruit or nuts. If they
are added before the Fruit and Nut beep, the fruit will be pureed due to
excessive kneading.
• Dry Ingredients
Use the spoon or cup provided. (Do not use tableware spoons or
cups). Put the dry ingredients loosely into the spoon or cup and level
off with a flat knife. This is particularly important with flour. Do not pack
dry ingredients down into the cup, unless otherwise stated in the
recipe.
16
Page 17

HINTS AND TIPS continued...
Order of Ingredients
Always put the liquid in first, the dry ingredients in next and the yeast in
last. Fruit and nuts are added later, after the machine has completed the
first knead. This will ensure a crisp and evenly baked loaf every time.
1 All liquids ie: water, milk, syrup, honey, oil.
2 Fat ie: butter, oil, margarine. If using butter or hard margarine chop into
small pieces.
3 Salt and sugar.
4 Flour.
5 Dry milk powder.
6 Yeast - make a small well in the top of the flour and place the yeast in
the well.
• Wipe away any spills from around the outside of the pan.
• Ensure ingredients are evenly distributed in layers unless stated
otherwise in the recipe.
17
Page 18

HINTS AND TIPS continued...
Freshness
Ensure all ingredients are fresh and used before the specified use-by-date.
Avoid using perishable ingredients such as milk, yoghurt, eggs or cheese
with the time delay function.
Store dry ingredients in airtight containers, to prevent drying out.
Slicing Bread
For best results, wait at least 10 minutes before slicing, as the bread needs
time to cool. Place loaf on its side and cut in a sawing motion with a bread
knife. For easy and even slicing we recommend using a bread knife or
electric knife.
Freezing Bread
Make sure the bread has completely cooled. Slice and wrap the bread in
plastic, before freezing.
Removing bread from the bread pan
Like a cake, the bread needs to cool slightly before removing from the bread
pan. Allow the bread to sit in the pan for approximately 10 minutes before
removing. If you remove the bread pan whilst it is still hot you must use oven
gloves.
Toppings
Ingredients such as herbs, sesame seeds and chopped bacon can be added
to the top of the bread during the baking stage. Open the lid of the ‘Compact’
Breadmaker Baker’s Oven, gently brush the top of the loaf with a little milk
or egg yolk and sprinkle with topping. (Do not allow ingredients to fall
outside the pan). Close the lid and allow baking to continue.
Note: this step needs to be done quickly to prevent bread from sinking.
Important: The Breadmaker gets very hot during baking, always use
caution to prevent injury.
18
Page 19
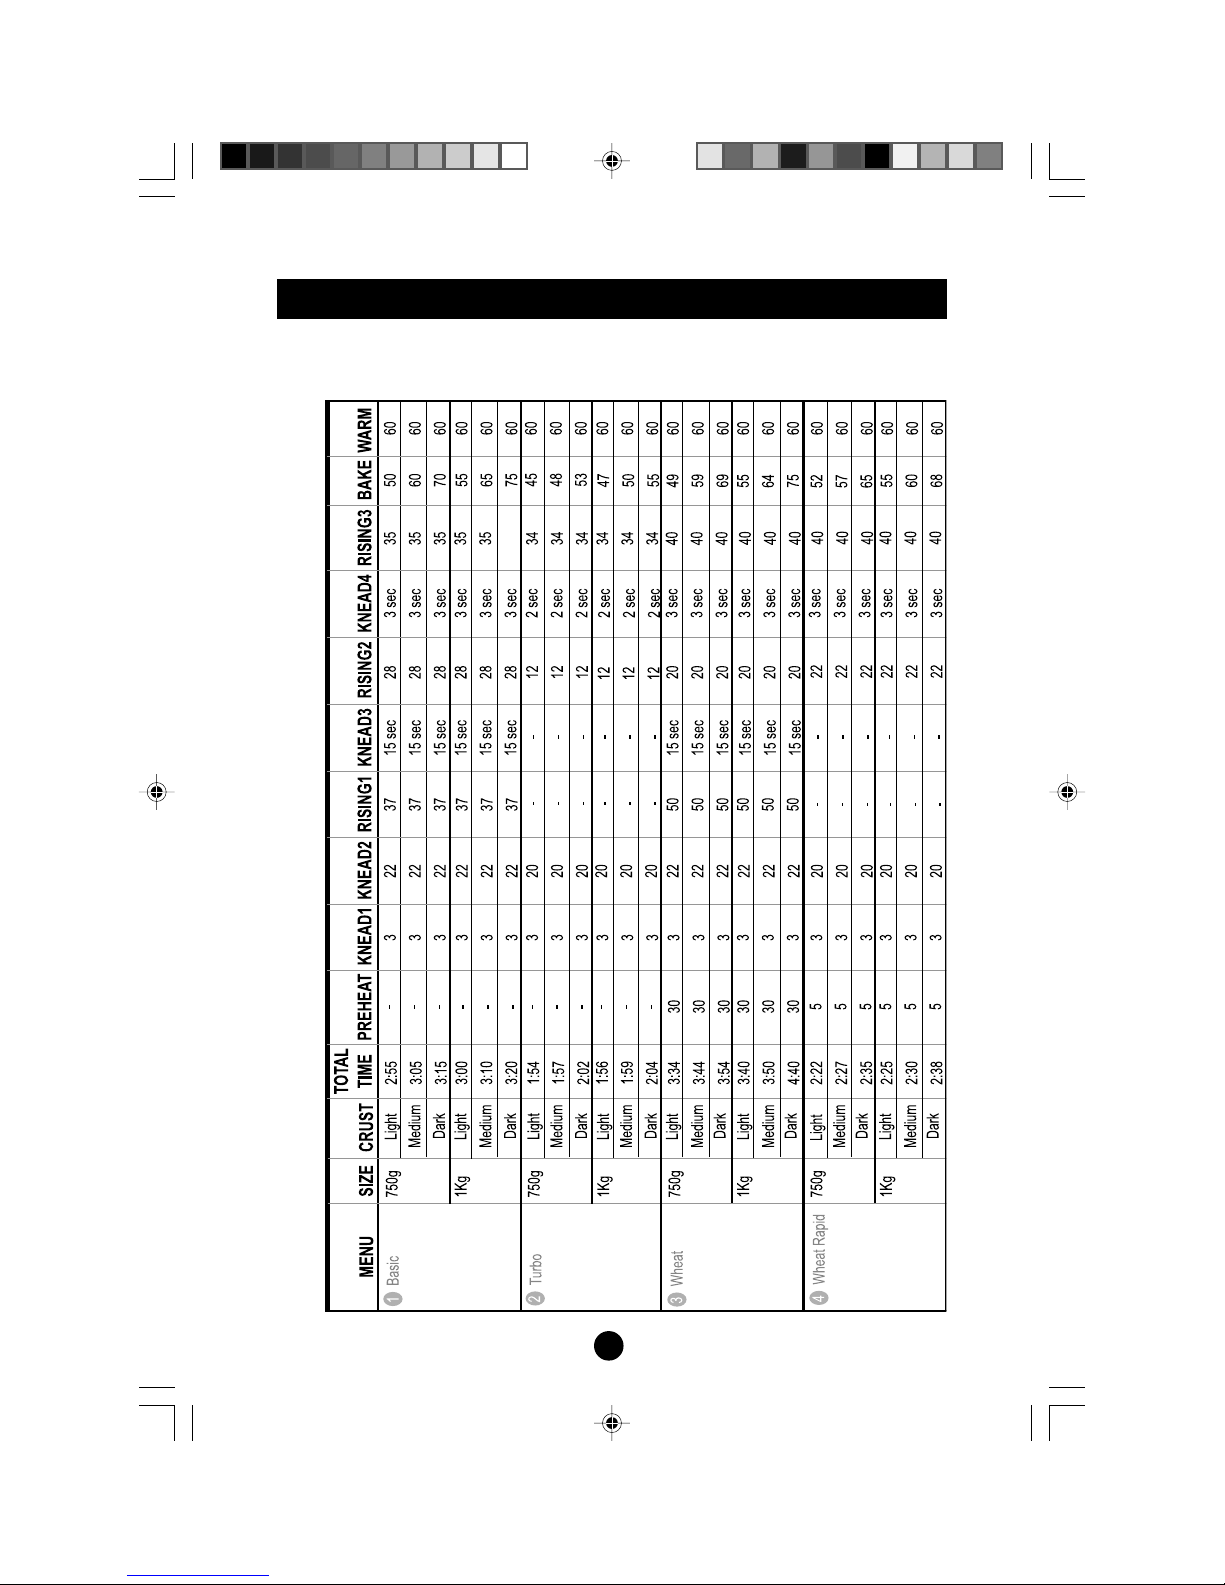
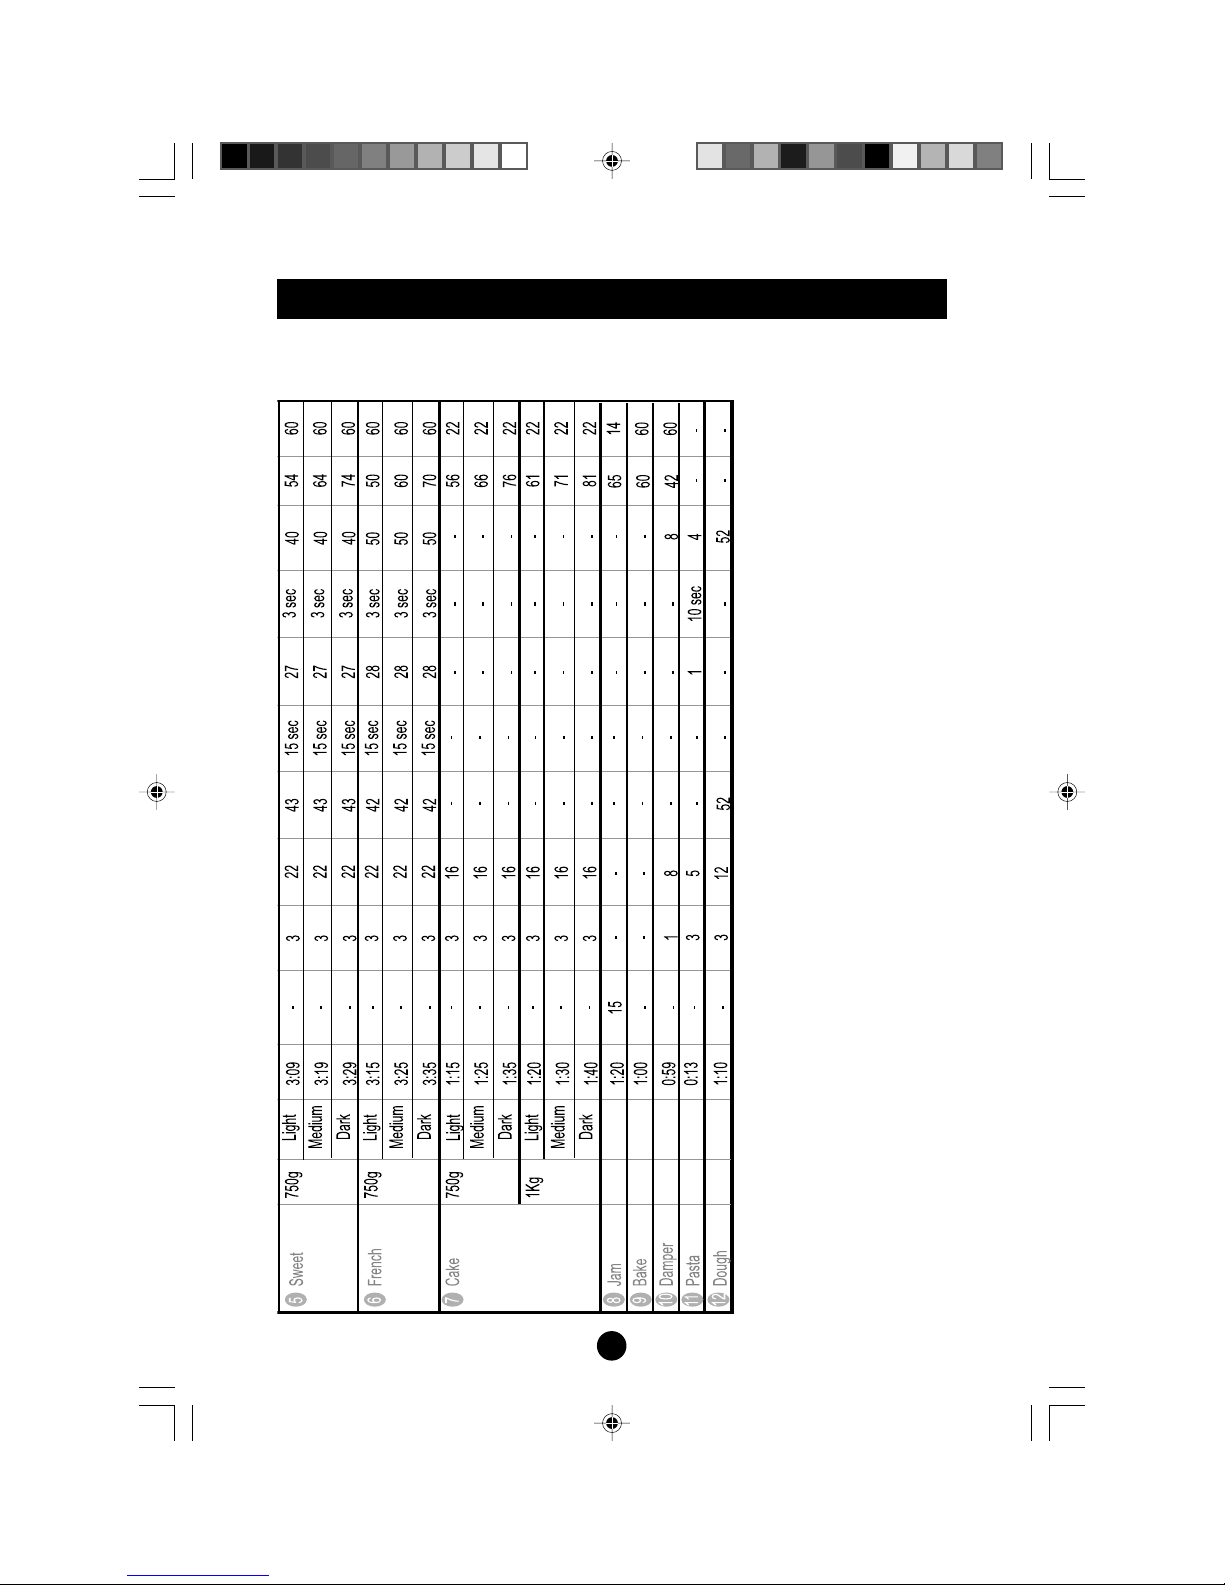
PROGRAM AND BAKING CYCLE INFORMATION
The table below displays details of the baking cycle, times and setting of
each program setting.
19
Page 20
PROGRAM AND BAKING CYCLE INFORMATION
20
Page 21

TROUBLESHOOTING
Frequently asked questions
The Breadmaker does not work?
• Make sure it is plugged into the mains supply, the socket is switched
on and the power on/off switch Is also on.
Nothing happened when I pressed Start?
• Some program settings start with a pre-heat procedure which makes
sure all the ingredients and interior are at the correct temperature.
The Breadmaker beeped part way through the process?
• This is a prompt. Some Recipes require ingredients, like fruit or nuts, to
be added at a particular stage during the process. Refer to appropriate
recipes for more information.
I tried to make another loaf shortly after the completion of the
previous one but the Breadmaker would not start?
• The Breadmaker must be allowed to cool thoroughly before any other
program can be started again. The display window may show E:01 until
the machine has cooled properly.
Problems you may encounter while making bread
Dough does not rise enough
• Liquids are too hot (above 105°F/40°C).
• Inactive yeast or not enough yeast.
• Ingredients are too cold.
• Too much salt. Salt can be used to control the effect of the yeast within
the dough. Too much salt may make the yeast inactive.
• Check brand and type of flour.
Bread flops over sides of bread pan
• Too much dough.
• Bread has over-risen (reduce amount of yeast slightly).
• Not enough sugar.
21
Page 22

TROUBLESHOOTING continued...
Crust pale in colour
• Not enough sugar.
• Adjust crust setting.
Loaves spread out or lose shape instead of rising
• Dough too soft.
Bread falls during bake cycle
• Bread over-risen (reduce amount of yeast slightly).
Bread has coarse texture; crumbly
• Bread over-risen (reduce amount of yeast slightly).
Bread has unusual aroma
• Stale ingredients used.
• Too much yeast.
Sticky bread which slices unevenly
• Always use a serrated bread knife.
• Allow bread to cool longer before slicing.
Bread shape and height varies with each use
• Ensure accurate measurement of ingredients.
• Room temperature and length of the timer cycle not constant.
The bread has a floured corner
• Sometimes flour in the corner of the bread pan may not have been
completely kneaded into the dough. Scrape it off with a wooden or
plastic utensil.
The bread rises too high and comes into contact with the lid
• Too much yeast/water or flour.
• Too little salt. Salt can be used to control the effect of the yeast.
However too much salt may make the yeast inactive.
22
Page 23

CARE AND CLEANING
Warning! Always ensure the Breadmaker is switched off, has cooled down
and is unplugged at the mains supply.
Warning! Do not use a dishwasher to clean any parts of this Breadmaker.
Warning! Do not use abrasive cleaning materials (e.g. steel wool) or
detergents, to clean any part of this Breadmaker.
Exterior
•
Wipe the body with a damp cloth and dry thoroughly.
Warning! Do not put the body or mains lead in water or any other liquid.
Interior
• After use, ensure the interior has cooled and wipe out any
crumbs or flour.
Bread Pan
• Wipe the bread pan with a damp cloth, then dry thoroughly.
• If necessary fill the bread pan with warm, soapy water and leave
to soak for an hour. Rinse and dry thoroughly.
Warning! When cleaning, to prevent damage to the nonstick coating inside
the bread pan, do not use abrasive cleaning materials (i.e. steel wool) or
metal utensils.
Warning! Avoid filling the bread pan completely as this may damage the
seals on the kneading shaft.
Measuring cup and spoon
Note: to make cleaning easier, rinse the measuring spoon and cup
immediately after use.
• Wash the measuring cup and measuring spoon in warm soapy water
and dry thoroughly.
23
Page 24

STORAGE
Before storing the Breadmaker:
• Set the power switch to the off position (‘0’) and unplug from the mains
supply.
• Allow to cool down completely.
• Make sure all removable parts are cleaned and dried thoroughly.
• Fit the bread pan securely inside the Breadmaker and close the lid.
24
Page 25

CONNECTION TO THE MAINS SUPPLY
When using electrical appliances, basic safety precautions should
always be followed.
WARNING: THIS APPLIANCE MUST BE EARTHED
If this appliance is fitted with a rewirable BS1363, 13 amp plug, the fuse should
be rated at 13 amps and be ASTA approved to BS1362. However if the plug is
unsuitable, it should be dismantled and removed from the supply cord and an
appropriate plug fitted as detailed below.
If this appliance is fitted with a moulded BS1363 13 amp plug, the fuse should
be rated at 13 amps and be ASTA approved to BS1362. If the fuse in a nonrewirable plug needs to be changed, the fuse cover must be refitted. The
appliance must not be used without the fuse cover fitted.
In the event of the plug being unsuitable, it should be changed and an appropriate
plug fitted as detailed below. If you remove the plug it must not be connected
to a 13 amp socket and the plug must be disposed of immediately.
As the colours of the wires in the mains lead of this appliance may not
correspond with the coloured markings identifying the terminals in your plug,
proceed as follows:
The wires of the mains lead are coloured in accordance with the following code:
GREEN & YELLOW = EARTH BLUE = NEUTRAL B ROWN = LI VE.
The wire which is coloured GREEN & YELLOW must be connected to the
terminal in your plug which is marked with an E or by the EARTH SYMBOL
or coloured GREEN or GREEN & YELLOW.
The wire which is coloured BLUE must
be connected to the terminal in your
plug which is marked with the letter N or
coloured BLACK.
The wire which is coloured BROWN
must be connected to the terminal in
your plug which is marked with the letter
L or coloured RED.
If any other plug is used, a 13 amp fuse
must be fitted either in the plug or adaptor
or at the distributor board.
(Green & Yellow)
Plug should be BS1363/A approved.
Fit a 13 Amp fuse.
EARTH
NEUTRAL
(Blue)
13 AMP
FUSE
LIVE
(Brown)
Ensure that the outer sheath of the cable is
firmly held by the clamp.
25
Page 26

WHITE BREADS
Traditional White Bread 750g 1Kg
Water 315ml 415ml
Table salt 11/2teaspoons 2 teaspoons
Butter, chopped 30g 35g
Strong plain flour 600g (3
3
/4 cups) 680g (41/4 cups)
Sugar 1 tablespoon 2 tablespoons
Skimmed milk powder 1 tablespoon 1 tablespoon
Bread improver 1
1
/2teaspoons 1 teaspoon
Dried sachet yeast 1
1
/2teaspoons 11/2teaspoons
Method
1 Pour the water and salt into the bread pan and
add chopped butter. Combine flour with sugar,
skimmed milk powder, bread improver and
add to pan. Make a small pocket in the top
and fill with the yeast. Wipe any spills from the
outside of the pan.
2. Place the bread pan into the breadmaker,
lower the bread pan handle and close the lid.
3. Press the Menu button to programme (1)
Basic.
4. Select Size, Crust Colour and press “Start”.
Bread will be baked in the number of hours
indicated.
White Bread 750g 1Kg
Water 315ml 415ml
Table salt 11/2teaspoons 2 teaspoon
Butter, chopped 30g 35g
Strong plain flour 600g (33/4cups) 680g (41/4 cups)
Sugar 1 tablespoon 2 tablespoons
Skimmed milk powder 1 tablespoon 1 tablespoon
Bread improver 1
1
/2teaspoons 1 teaspoon
Dried sachet yeast 1
1
/2teaspoons 11/2teaspoons
Method
1 Pour the water and salt into the bread pan and
add chopped butter. Combine flour with sugar,
skimmed milk powder, bread improver and
add to the pan. Make a small pocket in the top
and fill with the yeast. Wipe any spills from the
outside of the pan.
2. Place the bread pan into the breadmaker,
lower the bread pan handle and close the lid.
3. Press the Menu button to programme (2)
Turbo.
4. Select Size, Crust Colour and press “Start”.
Bread will be baked in the number of hours
indicated.
BR6 RECIPE BOOK
WHITE BREADS
26
Page 27

WHITE BREADS
Method
1 Place beer, water and salt into the bread pan.
Add chopped margarine, chopped onion,
chopped bacon and mustard and stir with a
plastic spatula. Combine plain flour with sugar,
skimmed milk powder, bread improver and
add to the pan. Make a small pocket in the top
and fill with yeast. Wipe any spills from the
outside of the pan.
2. Place the bread pan into the breadmaker,
lower the bread pan handle and close the lid.
3. Press the Menu button to programme (1)
Basic.
4. Select Size, Crust Colour and press “Start”.
Bread will be baked in the number of hours
indicated.
Note: This recipe is only suitable for a 750g loaf
size.
Bacon and Beer Bread 750g
Flat beer 140ml
Water 140ml
Table salt 1
1
/2teaspoons
Margarine, chopped 20g
Onions, chopped
1
/2 cup
Cooked bacon
1
/3 cup
Mustard 1 tablespoon
Strong plain flour 600g (3
3
/4 cups)
Sugar 1 tablespoon
Skimmed milk powder 1 tablespoon
Bread improver 1 teaspoon
Dried sachet yeast 1
1
/2teaspoons
Brioche 750g
Water, luke warm 160ml
Table salt
1
/2teaspoon
Butter, melted 100g
Egg yolks 3
Strong plain flour 360g (2
1
/4 cups)
Dried sachet yeast 2 teaspoons
Method
1 Whisk water, egg yolks and salt together and
pour into the bread pan. Add melted butter
and then flour and make a small pocket in the
top. Place yeast in the pocket and wipe any
spills from the outside of the pan.
2. Place the bread pan into the breadmaker,
lower the bread pan handle and close the lid.
3. Press the Menu button to programme (1)
Basic.
4. Select Size, Crust Colour and press “Start”.
Bread will be baked in the number of hours
indicated.
Note: This recipe is only suitable for a 750g loaf
size.
WHITE BREADS
27
Page 28

WHITE BREADS
Wholemeal Bread 750g 1Kg
Water 355ml 420ml
Table salt 1
1
/2teaspoons 2 teaspoons
Margarine, chopped 1 tablespoon 2 tablespoons
Self-raising flour 350g 400g
Wholemeal plain flour 250g 300g
Brown sugar 1 tablespoon 2 tablespoons
Skimmed milk powder 1 tablespoon 2 tablespoons
Bread improver 2 teaspoons 2 teaspoons
Dried sachet yeast 2 teaspoons 3 teaspoons
Method
1 Pour water and salt into the bread pan and
add chopped margarine. Combine self-raising
flour with wholemeal plain flour, brown sugar,
skimmed milk powder, bread improver and
add to the pan. Make a small pocket in the top
and fill with the yeast. Wipe any spills from the
outside of the pan.
2. Place the bread pan into the breadmaker,
lower the bread pan handle and close the lid.
3. Press the Menu button to programme (2)
Turbo.
4. Select Size, Crust Colour and press “Start”.
Bread will be baked in the number of hours
indicated.
Salami Cheese Bread 750g
Water 315ml
Table salt 1
1
/2teaspoons
Margarine, chopped 30g
Sugar 1 tablespoon
Skimmed milk powder 1 tablespoon
Bread improver 1 teaspoon
Oregano, dried
1
/2teaspoon
Salami, chopped 100g (
2
/3 cup)
Mozzarella cheese, grated 50g (
1
/3 cup)
Strong plain flour 600g (3
3
/4 cups)
Dried sachet yeast 1
1
/2teaspoons
Method
1 Place the ingredients into the bread pan in the
order listed. Stir mixture to roughly combine.
Wipe any spills from the outside of the pan.
2. Place the bread pan into the breadmaker,
lower the bread pan handle and close the lid.
3. Press the Menu button to programme (1)
Basic.
4. Select Size, Crust Colour and press “Start”.
Bread will be baked in the number of hours
indicated.
Note: This recipe is only suitable for a 750g loaf
size.
TURBO
WHITE BREADS
TURBO
28
Page 29

TURBO
Cajun Herb Bread 750g
Water 315ml
Table salt 1
1
/2teaspoons
Butter, chopped 30g
Onions, finely chopped
1
/4cup
Fresh mixed herbs: basil, fennel & 3 tablespoons
thyme, roughly chopped
Garlic, finely chopped 1 large clove
Strong plain flour 600g (3
3
/4cups)
Sugar 1 tablespoon
Skimmed milk powder 1 tablespoon
Paprika, ground 1 teaspoon
Bread improver 1 teaspoon
Dried sachet yeast 1
1
/2teaspoons
Method
1 Pour the water and salt into the bread pan.
Add chopped butter, finely chopped onion,
fresh mixed herbs and garlic and stir with a
plastic spatula. Combine flour with sugar,
skimmed milk powder, paprika and bread
improver and add to the pan. Make a small
pocket in the top and fill with the yeast. Wipe
any spills from the outside of the pan.
2. Place the bread pan into the breadmaker,
lower the bread pan handle and close the lid.
3. Press the Menu button to programme (2)
Turbo.
4. Select Size, Crust Colour and press “Start”.
Bread will be baked in the number of hours
indicated.
Note: This recipe is only suitable for a 750g loaf
size.
White Bread 750g 1Kg
Water 315ml 415ml
Table salt 1
1
/2teaspoons 2 teaspoons
Butter, chopped 30g 35g
Strong plain flour 600g (3
3
/4cups) 680g (41/4 cups)
Sugar 1 tablespoon 2 tablespoons
Skimmed milk powder 1 tablespoon 1 tablespoon
Bread improver 1
1
/2teaspoons 1 teaspoon
Dried sachet yeast 1
1
/2teaspoons 11/2teaspoons
Method
1 Pour the water and salt into the bread pan and
add chopped butter. Combine flour with sugar,
skimmed milk powder, bread improver and
add to the pan. Make a small pocket in the top
and fill with the yeast. Wipe any spills from the
outside of the pan.
2. Place the bread pan into the breadmaker,
lower the bread pan handle and close the lid.
3. Press the Menu button to programme (2)
Turbo.
4. Select Size, Crust Colour and press “Start”.
Bread will be baked in the number of hours
indicated.
TURBO
29
Page 30

All Wheat and Wheat Rapid cycles begin with a 30 minute pre-heat of ingredients. No blade movement
occurs in the pan during this stage.
Wholemeal Bread 1Kg
Water, luke warm 375ml
Table salt 11/2teaspoons
Butter, chopped 30g
Wholemeal plain flour 320g
Strong plain flour 300g
Brown sugar 1 tablespoon
Bread improver 1 teaspoon
Dried sachet yeast 2 teaspoons
Method
1. Pour water and salt into the bread pan and
add chopped butter. Combine wholemeal plain
flour with plain flour, brown sugar, bread
improver and add to pan. Make a small pocket
in the top and fill with the yeast. Wipe any
spills from the outside of the pan.
2. Place the bread pan into the breadmaker,
lower the bread pan handle and close the lid.
3. Press the Menu button to programme (3)
Wheat or (4) Wheat Rapid.
4. Select Size, Crust Colour and press “Start”.
Bread will be baked in the number of hours
indicated.
NOTE: This recipe is only suitable for a 1Kg loaf
size.
WHEAT BREADS
Soy and Linseed Bread 750g
Water 325ml
Table salt 1 teaspoon
Butter, chopped 30g
Wholemeal plain flour 320g (2 cups)
Strong plain flour 200g (1
1
/4cups)
Linseed meal
1
/3cup
Brown sugar 2 tablespoons
Bread improver 1 teaspoon
Dried sachet yeast 1 teaspoon
Method
1. Pour water and salt into the bread pan and
add chopped butter. Combine wholemeal plain
flour with plain flour, linseed meal, brown
sugar, bread improver and add to the
pan. Make a small pocket in the top and fill
with the yeast. Wipe any spills from the
outside of the pan
2. Place the bread pan into the bread maker,
lower the bread pan handle and close the lid.
3. Press the Menu button to programme (3)
Wheat or (4) Wheat Rapid.
4. Select Size, Crust Colour and press “Start”.
Bread will be baked in the number of
hours indicated.
NOTE: This recipe is only suitable for a 750g loaf
size.
WHITE BREADS
30
Page 31

WHEAT BREADS
Sour Rye Bread 1Kg
Beer 200ml
Water 125ml
Table salt
1
/4teaspoon
Strong plain flour 300g
Rye flour 200g
Bread improver 1 teaspoon
Dried sachet yeast 21/2teaspoons
Method
1. Pour beer, water and salt into the bread pan.
Combine plain flour with rye flour, bread
improver and add to pan. Make a small pocket
in the top and fill with the yeast. Wipe any
spills from the outside of the pan.
2. Place the bread pan into the breadmaker,
lower the bread pan handle and close the lid.
3. Press the Menu button to programme (3)
Wheat or (4) Wheat Rapid.
4. Select Size, Crust Colour and press “Start”.
Bread will be baked in the number of
hours indicated.
NOTE: This recipe is only suitable for a 1Kg loaf
size.
For optimum results, always select the Light Crust Colour to prevent the crust from burning
Old Fashioned Oatmeal Bread 750g
Water 290ml
Table salt 11/2teaspoons
Honey
1
/4cup
Butter, chopped 35g
Strong plain/bread flour 480g (3 cups)
Rolled oats 200g (2 cups)
Skimmed milk powder 2 tablespoons
Bread improver 1 teaspoon
Dried sachet yeast 2 teaspoons
Method
1. Pour water and salt into the bread pan. Add
honey and chopped butter and stir with plastic
spatula. Combine plain flour with rolled oats,
skimmed milk powder, bread improver and
add to the pan. Make a small pocket in the top
and fill with the yeast. Wipe any spills from the
outside of the pan.
2. Place the bread pan into the breadmaker,
lower the bread pan handle and close the lid.
3. Press the Menu button to programme (5) Sweet.
4. Select Size, Crust Colour and press “Start”.
Bread will be baked in the number of
hours indicated.
Do not use Time Delay Setting when baking
Sweet bread as the ingredients will spoil.
NOTE: This recipe is only suitable for a 750g loaf
size.
SWEET BREADS
WHITE BREADS
SWEET BREADS
31
Page 32

Chocolate Bread 750g
Water 250ml
Table salt 1
1
/2teaspoons
Butter, chopped 35g
Strong plain/bread flour 480g (3 cups)
Sugar 2 tablespoons
Skimmed milk powder 2 tablespoons
Cocoa powder 1 tablespoon
Bread improver 1 teaspoon
Dried sachet yeast 2 teaspoons
Mix-ins: Choc chips
3
/4cup
Method
1. Pour water and salt into the bread pan and
add chopped butter. Combine flour with sugar,
skimmed milk powder, cocoa powder, bread
improver and add to the pan. Make a small
pocket in the top and fill with the yeast. Wipe
any spills from the outside of the pan.
2. Place the bread pan into the breadmaker,
lower the bread pan handle and close the lid.
3. Press the Menu button to programme (5) Sweet.
4. Select Size, Crust Colour and press “Start”.
Bread will be baked in the number of
hours indicated.
Do not use Time Delay Setting when baking
Sweet bread as the ingredients will spoil.
Mix-in sound (8 short beeps) will indicate when
to add choc chips during the kneading stage.
NOTE: This recipe is only suitable for a 750g loaf
size.
SWEET BREADS
Apple Spice Bread 750g
Water 250ml
Table salt 1
1
/2teaspoons
Margarine, chopped 1 tablespoon
Plain flour 500g (3 cups)
Brown sugar 2 tablespoons
Skimmed milk powder 1 tablespoon
Cinnamon, ground 2 teaspoons
Bread improver 1 teaspoon
Dried sachet yeast 2 teaspoons
Mix-ins: Dried apple, chopped 70g (1 cup)
SWEET BREADS
32
Page 33

Method
1. Pour water and salt into bread pan and add
chopped butter. Combine flour with mixed
dried fruit, brown sugar, skimmed milk powder,
ground nutmeg, ground cloves, bread
improver and add to the pan. Make a small
pocket in the top and fill with the yeast. Wipe
any spills from around the pan.
2. Place the bread pan into the breadmaker and
close lid.
3. Press the Menu button to program (5) Sweet
and press ‘Start’.
4. Select Size, Crust Colour and press “Start”.
Bread will be baked in the number of
hours indicated.
Do not use Time Delay Setting when baking
Sweet bread as the ingredients will spoil.
NOTE: This recipe is only suitable for a 750g loaf
size.
SWEET BREADS
Method
1. Pour water and salt into the bread pan and
add chopped margarine. Combine flour with
brown sugar, skimmed milk powder, ground
cinnamon, bread improver and add to the pan.
Make a small pocket in the top and fill with the
yeast. Wipe any spills from the outside of
the pan.
2. Place the bread pan into the breadmaker,
lower the bread pan handle and close the lid.
3. Press the Menu button to programme (5) Sweet.
4. Select Size, Crust Colour and press “Start”.
Bread will be baked in the number of
hours indicated.
Do not use Time Delay Setting when baking
Sweet bread as the ingredients will spoil.
Mix-in sound (8 short beeps) will indicate when
to add dried apple during the kneading stage.
NOTE: This recipe is only suitable for a 750g loaf
size.
Mixed fruit bread 750g
Water 250ml
Table salt 1
1
/2teaspoons
Butter, chopped 30g
Plain flour 500g ( 3 cups)
Mixed dried fruit
1
/3cup
Brown sugar 2 tablespoons
Skimmed milk powder 1 tablespoon
Ground nutmeg 2 teaspoons
Ground cloves 1
1
/2teaspoons
Bread improver 1 teaspoon
Dried sachet yeast 2 teaspoons
SWEET BREADS
33
Page 34

Method
1. Pour water and salt into the bread pan and
add chopped butter. Combine flour with sugar,
bread improver and add to the pan. Make
a small pocket in the top and fill with the
yeast. Wipe any spills from the outside of
the pan.
2. Place the bread pan into the breadmaker,
lower the bread pan handle and close the lid.
3. Press the Menu button to programme (6)
French.
4. Select Size, Crust Colour and press “Start”.
Bread will be baked in the number of
hours indicated.
NOTE: This recipe is only suitable for a 750g loaf
size.
French Bread 750g
Water 290ml
Table salt 1 teaspoon
Butter, chopped 30g
Strong plain flour 520g (3
1
/4cups)
Sugar 1 tablespoon
Bread improver 1 teaspoon
Dried sachet yeast 1
1
/2teaspoons
Method
1. Whisk water, salt, yoghurt and lemon juice
together and pour into the bread pan. Add
chopped butter. Combine plain flour with
sugar, bread improver and add to pan. Make a
small pocket in the top and fill with the yeast.
Wipe any spills from the outside of the pan.
2. Place the bread pan into the breadmaker,
lower the bread pan handle and close the lid.
3. Press the Menu button to programme (6)
French.
4. Select Size, Crust Colour and press “Start”.
Bread will be baked in the number of hours
indicated.
NOTE: This recipe is only suitable for a 750g loaf
size.
Do not use Time Delay Setting when baking
the Sourdough bread as the ingredients will
spoil.
Sourdough Bread 750g
Water 220ml
Table salt 1 teaspoon
Plain yoghurt
1
/2cup
Lemon juice 2 teaspoons
Butter, chopped 30g
Strong plain/bread flour 540g (3
1
/3cups)
Sugar 1 tablespoon
Bread improver 1 teaspoon
Dried sachet yeast 2 teaspoons
FRENCH BREADS
FRENCH BREADS
34
Page 35

Method
1. Mix cake following the instructions on the cake
mix and pour into the bread pan. Wipe any
spills from the outside of the pan.
2. Place the bread pan into the breadmaker,
lower the bread pan handle and close the lid.
3. Press the Menu button to programme (7)
Cake.
4. Select Size, Crust Colour and press “Start”.
Bread will be baked in the number of hours
indicated.
NOTE: This recipe is only suitable for a 1Kg loaf
size
Do not use Time Delay Setting when baking
the Orange Poppy Seed Cake as the ingredients
will spoil.
Allow the cake to cool in the bread pan for a
least 5 minutes, before removing. Loosen the
sides with a heatproof plastic spatula and gently
slide out.
Orange Poppy Seed Cake 1Kg
1 packet Orange Poppy Seed Cake mix 750g
Eggs 3 x 60g
Water 200ml (3/4cup)
Margarine or butter, softened 30g
CAKES
Handy hints for optimum results
• It is normal for cakes to rise only
1
/2or 3/4of
the way up the bread pan. The texture should
be nice and light.
• The sugar and fat content in the cake mix will
affect the colouring of the cake. We suggest
you always select the light crust colour to
prevent the sides from burning.
• Avoid using double quantities of cake mix, as
the cake may be dense in texture.
Note: We recommend you use packet cake
mixes available from all supermarket.
CAKES
35
Page 36

Method
1. Place ingredients into bread pan in the order
listed. Wipe spills from the outside of the pan.
2. Place bread pan into the breadmaker, lower
the bread pan handle and close the lid.
3. Press the Menu button to programme (8) Jam
and press “Start”. Allow to mix for 5 minutes,
open lid and scrape down sides of bread pan
with a plastic spatula.
Jam will be cooked in the number of hours indicated.
4. Skim the top layer from the surface and
pour into hot sterilised jars, seal and label.
Jam will set on cooling.
Makes: 600ml (3 x 200ml jars)
Strawberry Jam
Strawberries, hulled and cut into halves 500g
Preserving sugar 1
1
/2 cups
Jam Setting Mix 3 tablespoons
JAM
Jam Making Instructions
• Always use the exact amounts of preserving
sugar, fruit and jam setting mix. Do not reduce
sugar or use substitutes.
• Use only fresh, ripe fruit for best flavour and
natural pectin level.
• Remove stems, seeds or pips from fruit
before slicing.
• Do not puree fruit. Jam should contain pieces
of fruit. Fruit can be chopped with a food
processor using a pulse action.
• Jam setting mix is usually found in the sugar
aisle in your local supermarket and is often
labelled Pectin or Jam Setting.
• Recipes should not exceed 3
1
/2cups. Weigh
fruit after slicing.
• The gel, texture, flavour, aroma and colour of
the cooled jam may vary when compared to
commercially made jams. The natural pectin,
ripeness, juiciness, etc., of the fruit used will
influence the finished product.
• Due to the natural pectin of some fruits, if the
jam appears to be thickening before the total
cooking time has elapsed and no further
cooking is required, press the Start/Stop
button then complete the bottling procedure.
• Jam setting mix contains the ingredient
‘pectin’ which is a naturally occurring
substance found in fresh fruit. It is this pectin
in fruit which when cooked produces a gel.
The addition of ‘jam setting mix’ in our recipes
ensures a thicker setting action occurs. This
product is available at most supermarkets in
sachets.
Handy hints for optimum results
1. Use ripe, fresh fruit. Large fruits should be cut
into small pieces.
2. Avoid processing fruit as the jam should be
chunky and contain pieces of fruit.
3. Do not reduce the amount of sugar specified
or use substitutes.
4. Always use preserving sugar for jam. You will
find Pectin/Jam Setting Mix in your local
supermarket. It will state on packaging that it
is suitable for jam making.
5. Never add more of less of any ingredients
specified in the recipe.
6. Pour the hot jam into sterilised jars, leaving
approximately 2 cm from the top of the jar.
Seal the jars immediately.
7. Label jam, allow to cool and then refrigerate.
8. Each recipe requires Jam Setting Mix, often
referred to as Pectin. Pectin is naturally
occurring in fruit. This helps form the gel like
structure of the jam when cooled. Jam Setting
Mix can be purchased from most supermarkets
in the sugar aisle and it will state on the
packaging that it is suitable for jam making.
Always use preserving sugar for jam.
NOTE: It is normal for excess steam to escape
from the steam vent during the cooking
process.
JAM
36
Page 37

JAM
Method
1. Place ingredients into bread pan in the order
listed. Wipe spills from the outside of the pan.
2. Place bread pan into the breadmaker, lower
the bread pan handle and close the lid.
3. Press the Menu button to programme (8) Jam
and press “Start”. Allow to mix for 5 minutes,
open lid and scrape down sides of bread pan
with a plastic spatula.
Jam will be cooked in the number of hours indicated.
4. Skim the top layer from the surface and
pour into hot sterilised jars, seal and label.
Jam will set on cooling.
Makes: 500ml (2 x 250ml jars)
Apple & Rhubarb Jam
Granny Smith apples, peeled and chopped 160g
Rhubarb, cut into 3cm lengths 300g
Preserving sugar 1
1
/2 cups
Jam setting mix 3 tablespoons
Lemon juice 2 tablespoons
Method
1. Place chopped tomatoes, onion and garlic in a
bowl and stir in salt. Cover and stand for 12
hours or overnight. Strain liquid from tomato
mixture and place pulp into bread pan. Add
vinegar, sugar, jam setting mix, mustard and
curry powders and stir with a plastic spatula.
Wipe any spills from the outside of the pan.
2. Place bread pan into the breadmaker, lower
the bread pan handle and close the lid.
3. Press the Menu button to programme (8) Jam
and press “Start”. Allow to mix for 5 minutes,
open lid and scrape down sides of bread pan
with a plastic spatula.
Relish will be cooked in the number of hours
indicated.
Pour relish into hot sterilised jars, seal and label.
Relish will be a fresh, light consistency on cooling.
Delicious served with roasted or barbequed meat,
fish and poultry.
Makes: 1 litre (4 cups)
Tomato Relish
Peeled tomatoes, chopped 1Kg
Peeled onions, chopped 250g
Peeled garlic, chopped 30g
Table salt 100g (1/3cup)
Malt vinegar 125ml (
1
/2cup)
Sugar 350g (1
1
/2cups)
Jam setting mix/Pectin 4 tablespoons
Mustard powder 3 teaspoons
Curry powder 3 teaspoons
JAM
37
Page 38

Method
1. Beat the butter, sugar and egg yolks until
creamy. Add flour, lemon rind and juice and
stir with a plastic spatula. Slowly add the milk.
Beat egg whites until stiff and fold into lemon
mixture. Pour into bread pan and wipe any
spills from the outside of the pan.
2. Place bread pan into the breadmaker, lower
the bread pan handle and close the lid.
3. Press the Menu button to programme (9) Bake
and press “Start”. Pudding will be cooked in
one hour. If the pudding needs longer repeat
the baking cycle. The program can be
controlled manually by pressing the Start/Stop
button to stop the function at any time.
Serve pudding warm, or cold with cream
and/or vanilla ice cream.
Makes: 4 serves
Lemon Delicious Pudding
Butter, softened 60g
Caster sugar 175g (
3
/4cup)
Eggs, separated 2
Self-raising flour 40g (4 tablespoons)
lemons, grated rind and juice 2 (
1
/3cup juice)
Milk 310ml (1
1
/4cups)
Method
1. Place onion, garlic, rice, stock, wine and
mushrooms into bread pan. Wipe any spills
from around the outside of the pan.
2. Place the bread pan into the breadmaker and
close lid.
3. Press the Menu button to program (9) Bake
and press ‘Start’.
Risotto will be cooked in the number of hours indicated.
Mix through Parmesan cheese and parsley, and serve.
Makes: 6 cups (Serves 4)
Mushroom Rissotto
Onion, finely chopped 1
Large clove garlic, finely chopped 1
Arborio rice 2 cups
Beef, chicken or vegetable stock (boiling) 1 litre (4 cups)
White wine 125ml (
1
/2cup)
Button mushrooms, sliced 250g (2 cups)
Parmesan cheese, grated
1
/2cup
Parsley, chopped
1
/4cup
BAKE
When you select the Bake setting, the ‘Compact’ Breadmaker Baker’s Oven will immediately start baking.
This setting will bake for 1 hour and can be controlled manually by pressing the Start/Stop button to stop the
function at any time.
BAKE
38
Page 39

Method
1. Heat oil in a shallow frying pan and lightly fry
bacon. Pour into bread pan and add remaining
ingredients. Stir gently with a plastic spatula
and wipe any spills from around the outside of
pan.
2. Place the bread pan into the breadmaker
and close lid.
3. Press the Menu button to program (9) Bake
and press ‘Start’.
Frittata will be cooked in the number of hours
indicated.
Serve warm or cold.
Makes: 4-6 serves
Zucchini Frittata
Vegetable oil 2 tablespoons
Chopped bacon 2 rashers
Grated zucchini 200g
Small onion, grated 1
Self-raising flour 80g (
1
/2cup)
Cheddar cheese, grated
1
/2cup
Eggs, beaten 3
Fresh basil, roughly chopped 2 tablespoons
Method
1. Combine apples, lemon juice and sugar and
place into bread pan.
2. Combine wholemeal plain flour with remaining
dry ingredients and rub in butter. Sprinkle
crumble over apple mixture in bread pan.
Wipe any spills from around the outside of pan.
3. Place the bread pan into the breadmaker and
close lid.
4. Press the Menu button to program (9) Bake
and press ‘Start’.
Apple Crumble will be cooked in the number of
hours indicated.
Serve warm with vanilla custard or ice cream.
Makes: 4 serves
Apple Crumble
Granny Smith apples, peeled, cored and cut into small wedges 700g
Lemon juice 60ml (
1
/4cup)
Sugar
1
/4cup
Crumble Topping
Wholemeal plain flour
1
/2cup
Traditional rolled oats
1
/4cup
Brown sugar 2 tablespoons
Ground cloves
1
/2teaspoon
Ground cinnamon
1
/2teaspoon
Ground nutmeg
1
/2teaspoon
Butter, softened 30g
BAKE
BAKE
39
Page 40

Method
1. Pour milk, water and melted butter into the
bread pan. Add flour and salt and wipe any
spills from around the outside of the pan.
2. Place the bread pan into the breadmaker and
close lid.
3. Press the Menu button to program (10)
Damper and press ‘Start’.
Damper will be cooked in the number of hours
indicated.
Damper
Milk 150ml
Water 130ml
Butter, melted 20g
Plain strong flour 500g (3 cups)
Table salt
1
/2teaspoon
Method
1. Whisk eggs and water together and pour into
the bread pan. Add flour and salt and wipe
any spills from around the outside of the pan.
2. Place the bread pan into the breadmaker and
close lid.
3. Press the Menu button to program (11) Pasta
and press ‘Start’.
Pasta dough will be kneaded, ready for rolling,
shaping and cooking in the number of minutes
indicated.
Makes: 600g dough
If pasta dough appears too sticky, knead dough
with additional flour.
Variations
Spinach pasta:
Add 100g of very well drained spinach to the
dough recipe
Tomato pasta:
Add 2 tablespoons concentrated tomato paste to
dough recipe.
Pasta Dough
Eggs 4 x 60g
Water 3 tablespoons
Strong plain flour 500g (3 cups)
Table Salt
1
/2teaspoon
DAMPER (SPECIALITY LOAF)
PASTA DOUGH
Damper style breads have a rich flavour and are heavy and dense in texture. They should be
approximately 15cm in height. Sometimes the damper will not be the width of the bread pan. This is
normal as the damper will take its own shape throughout the rising cycle.
DAMPER (SPECIALITY LOAF)
PASTA DOUGH
40
Page 41

Method
1. Combine all filling ingredients in a large bowl.
Mix well to combine.
2. Divide dough into 4 portions. Roll each portion
on a lightly floured surface, into a 30cm x
30cm square.
3. Place 1 teaspoon of filling every 5cm apart on
2 sheets of the rolled out pasta dough. Brush
edges with a beaten egg and top each with
the remaining sheets of pasta dough. Press
firmly between the filling and sides to seal. Cut
ravioli into squares using a pastry wheel.
4. Cook ravioli in a large saucepan of boiling
water for 4-5 minutes or until al dente.
Drain well and serve with your favourite
tomato or cream sauce.
Serves: 4-6
Pumpkin and Cheese Ravioli
1 quantity pasta dough (see recipe on page 31)
Filling
Pumpkin, skin removed, baked and mashed 1
1
/2cups
Dry breadcrumbs 1
1
/2cups
Ricotta cheese, mashed
1
/2cup
Garlic, minced 2 large cloves
Salt 1 teaspoon
Ground nutmeg
1
/4teaspoon
PASTA DOUGH
PASTA DOUGH
41
Page 42

DOUGH
Method
1. Pour water and salt into bread pan and add
chopped butter. Combine flour with sugar,
bread improver and add to pan. Make a small
pocket in the top and fill with the yeast. Wipe
any spills from around the pan.
2. Place the bread pan into the breadmaker and
close lid.
3. Press the Menu button to program (12) Dough
and press ‘Start’. Dough will be kneaded,
ready for shaping, proving and baking in the
number of hours indicated.
4. Remove dough from bread pan and knead
gently on a lightly floured surface. Divide into
30 pieces and roll each piece into a 20cm
rope shaped breadstick.
5. Place breadsticks 2.5cm apart on a baking
paper lined baking tray. Cover lightly with a
cloth, sit in a warm place and allow dough to
rise for 30 minutes.
6. Topping: Beat egg with water and lightly
brush over breadsticks. Sprinkle with sea salt
flakes and bake at 200ºC for 20 minutes.
Makes: 30 breadsticks.
Breadsticks
Dough
Water 240ml
Table salt
1
/2teaspoon
Butter, chopped 30g
Strong plain flour 500g (3 cups)
Sugar 2 teaspoons
Bread improver 1 teaspoon
Dried sachet yeast 2 teaspoons
Topping (Egg Wash)
Egg 1
Water 2 teaspoons
Sea salt flakes 3-4 tablespoons
DOUGH
42
Page 43

DOUGH
Method
1. Whisk water, salt and egg together and pour
into bread pan. Add chopped butter. Combine
plain flour with sugar, bread improver and add
to pan. Make a small pocket in the top and fill
with the yeast. Wipe any spills from around
the pan.
2. Place the bread pan into the breadmaker and
close lid.
3. Press the Menu button to program (12) Dough
and press ‘Start’. Dough will be kneaded,
ready for shaping, proving and baking in the
number of hours indicated.
4. Remove dough from bread pan and knead
gently on a lightly floured surface. Divide into
12 x 60g portions and shape each into a small
ball.
5. Place on a baking paper lined baking tray.
Cover lightly with a cloth, sit in a warm place
and allow dough to rise for 30 minutes.
6. Topping: Beat egg with water and lightly
brush over Bread rolls. Sprinkle with poppy
seeds. Bake at 200ºC for 25-30 minutes.
Makes: 12 rolls
Bread Rolls
Dough
Water 250ml (
1
/2cup)
Table salt
1
/2teaspoon
Egg 1 x 60g
Butter, chopped 30g
Strong plain flour 520g (3
1
/4cups)
Sugar
1
/4cup
Bread improver 1 teaspoon
Dried sachet yeast 2 teaspoons
Topping (Egg Wash)
Egg 1
Water 2 teapoons
White and black poppy seeds 2 tablespoons
DOUGH
43
Page 44

DOUGH
Method
1. Pour water, salt and oil into bread pan. Add
sugar and flour. Make a small pocket in the
top and fill with the yeast. Wipe any spills from
around the pan.
2. Place the bread pan into the breadmaker and
close lid.
3. Press the Menu button to program (12) Dough
and press ‘Start’. Dough will be kneaded,
ready for shaping, proving and baking in the
number of hours indicated.
4. Remove completed dough from bread pan.
Divide dough in half. Roll dough to fit 2 pizza
trays. Spread with favourite toppings and bake
for 20 minutes at 180ºC or until cooked.
Method
1. Pour water, salt and oil into bread pan.
Combine flour with skimmed milk powder,
sugar and add to pan. Make a small pocket in
the top and fill with the yeast. Wipe any spills
from around the pan.
2. Place the bread pan into the breadmaker and
close lid.
3. Press the Menu button to program (12) Dough
and press ‘Start’. Dough will be kneaded,
ready for shaping, proving and baking in the
number of hours indicated.
4. Remove dough from bread pan and knead
very lightly on a lightly floured surface. Shape
into a 12cm x 30cm rectangle and place on an
oiled baking tray. Cover with a cloth and sit in
a warm place to rise for 30 minutes. Using
your knuckles, press small indents into dough.
5. Brush Foccacia with oil and sprinkle with
herbs. Bake in a preheated oven at 180ºC for
30 minutes or until golden.
Pizza Dough
Water 290ml
Table salt
1
/2teaspoon
Vegetable oil 3 tablespoons (45ml)
Sugar 1 teaspoon
Strong plain flour 500g (3 cups)
Dried sachet yeast 2
1
/2teaspoons
Herb Foccacia
Dough
Water 330ml
Table salt
1
/2teaspoon
Olive oil 1 tablespoon (15ml)
Strong plain flour 500g (3 cups)
Skimmed milk powder 1 tablespoon
Sugar 2 teaspoons
Dried sachet yeast 2
1
/2teaspoons
Topping
Olive oil 2 tablespoons
Dried oregano leaves 1 teaspoon
Dried chopped basil 1 teaspoon
DOUGH
44
Page 45

DOUGH
Method
1. Beat egg, salt and water together and pour
into bread pan. Add chopped butter. Combine
flour with brown sugar, salt and Allspice and
stir in dried fruit. Add to bread pan. Make a
small pocket in the top and fill with the yeast.
Wipe any spills from around the pan.
2. Place the bread pan into the breadmaker and
close lid.
3. Press the Menu button to program (12) Dough
and press ‘Start’. Dough will be kneaded,
ready for shaping, proving and baking in the
number of hours indicated.
4. Remove dough from bread pan and knead
very lightly on a lightly floured surface. Divide
dough into 12 pieces and shape into small
buns. Place close together on a lightly
greased baking tray. Cover with a cloth and sit
in a warm place to rise for 30 minutes.
5. CROSSES: Combine plain flour with water
and sugar to form a smooth paste. Pipe paste,
to make crosses on top of each risen bun.
Bake at 200ºC for 25 minutes.
6. GLAZE: Place water, sugar, and gelatine in a
small pan and stir over heat until dissolved.
Brush over buns whilst hot.
Makes: 12 buns
Hot Cross Buns
Dough
Egg 1 x 60g
Water, warm 150ml
Table salt
1
/2teaspoon
Butter, chopped 35g
Strong plain flour 280g (13/4cups)
Brown sugar 2 tablespoons
Allspice, ground
1
/2teaspoon
Dried mixed fruit 1 cup
Dried sachet yeast 2 teaspoons
Crosses
Plain flour 40g (1/4cup)
Water 40ml
Sugar 1 teaspoon
Glaze
Water 2 tablespoons
Sugar 2 tablespoons
Gelatine 1 teaspoon
DOUGH
45
Page 46

AFTER SALES SERVICE
These appliances are built to the very highest of standards. There are no
user-serviceable parts. Follow these steps if the unit fails to operate:
1 Check instructions have been followed correctly.
2 Check fuse has not blown.
3 Check mains supply is functional.
If the appliance will not operate, return the appliance to the place it was
purchased for a replacement. To return the appliance to the Customer
Service Department, follow the steps below:
1 Pack it carefully (preferably in the original carton). Ensure unit is clean.
2 Enclose your name and address and quote model number BR6 on all
correspondence.
3 Give the reason why you are returning it.
4 If within the guarantee period, state when and where it was purchased
and include proof of purchase (eg. till receipt).
5 Send it to our Customer Service Department at the address below:
Customer Service Department
Pulse Home Products Limited
Middleton Road
Royton
Oldham
OL2 5LN, UK.
Telephone: 0161 621 6900 Fax: 0161 626 0391
e-mail: [email protected]
46
46
Page 47
GUARANTEE
This product is guaranteed for a period of 1 year from the date of
purchase against mechanical and electrical defects.
This guarantee is only valid if the appliance is used solely for
domestic purposes in accordance with the instructions provided,
that it is not connected to an unsuitable electricity supply,
dismantled or interfered with in any way or damaged through
misuse. Under this guarantee we undertake to repair or replace
free of charge any parts found to be defective.
Nothing in this guarantee or the instructions relating to the product
excludes, restricts or otherwise affects your statutory rights.
In line with our policy of continuous development, we reserve the
right to change this product, packaging and documentation without
notice.
This product is manufactured to comply with the radio interference
requirements of EEC directive 93/68 EEC.
Vine Mill, Middleton Road, Royton, Oldham, OL2 5LN, UK.
Breville is a registered trademark of Pulse Home Products limited
www.breville.co.uk
© Pulse Home Products limited
92083-3
DBF-REV1-JAN05-PDF
 Loading...