

Breville BMF600XL User Manual

Breville Customer Service Center
the Milk Café™
Instruction Booklet
US Customers
Mail: Breville USA
19400 S. Western Ave
Torrance CA
CA 90501-1119
Phone: Customer Service
1 (866) BREVILLE
Email:
Customer Service:
askus@brevilleusa.com
www.breville.com
Breville is a registered trademark of Breville Pty. Ltd. A.B.N. 98 000 092 928.
Due to continued product improvement, the products illustrated/photographed
in this booklet may vary slightly from the actual product.
Copyright Breville Pty. Ltd. 2011.
Model BMF600XL Issue - E11
Canada Customers
Mail: Breville Canada
2555, Avenue de l’Aviation
Pointe-Claire (Montreal)
Quebec H9P 2Z2
Phone:
1 (866) BREVILLE
Email:
askus@breville.ca
Customer Service
Customer Service:
Instruction Book - Livret d’instructions
BMF600XL

CONGRATULATIONS
CONTENTS
4 Breville recommends safety first
7 Know your Breville Milk Café™
on the purchase of your new
Breville Milk Café™
10 Operating your Breville
Milk Café™
16 Care & cleaning
18 Hints & tips
20 Troubleshooting
24 Recipes
29 One Year Limited Warranty
30 French
3

BREVILLE RECOMMENDS SAFETY FIRSTBREVILLE RECOMMENDS SAFETY FIRST
We at Breville are very safety conscious. We design and manufacture consumer products with
the safety of you, our valued customer, foremost in mind. In addition, we ask that you exercise a
degree of care when using any electrical appliance and adhere to the following precautions:
IMPORTANT SAFEGUARDS
This product is an ISM device that complies with Part 18 of the FCC Rules and with
Canadian ICES-001.
READ ALL INSTRUCTIONS
• Carefully read all instructions before
operating the appliance for the first time
and save for future reference.
• Remove and safely discard any
packaging materials and promotional
labels before using the appliance for the
first time.
• To eliminate a choking hazard for young
children, remove and safely discard the
protective cover fitted to the power plug
of this appliance.
• To protect against electrical shock, do not
immerse the power cord, power plug or
motor base in water or any other liquid, or
allow moisture to come into contact with
these parts.
• Do not place the appliance near the edge
of a bench or table during operation.
• Do not place the appliance on or near
a hot gas or electric burner, or where it
could touch any other source of heat.
• Do not use on a sink drain board.
• Always use the appliance on a dry,
level surface.
• Keep the appliance clear of walls,
curtains and other heat or steam
sensitive materials.
• Provide adequate space above and
on all sides for air circulation around
the appliance.
• Unwind the power cord fully before use.
• Do not allow the power cord to hang
over the edge of a table or counter, touch
hot surfaces or become knotted.
• The appliance is not intended to be
operated by means of an external timer
or separate remote control system.
• Do not touch hot surfaces. Use handles
or knobs.
• The appliance has been designed
specifically for the purpose of foaming
milk and other dairy milk alternatives
and is not intended to whip, thicken
or heat other food substances eg. oil,
eggs, butter, heavy whipping cream,
soups, gravies etc.
• The appliance is not designed to mix a
large quantity of dry ingredients or melt
large food pieces eg. cubed chocolate,
ground nuts, whole spices, fresh herbs,
ice cubes etc.
• The underside of the jug must always
be clean and dry before placing onto the
power base.
• Attach the jug lid securely to the jug
before operation. Do not remove the jug
lid during operation.
• Use caution when pouring foamed milk
from the jug as the jug and hot milk
may scald.
• Do not operate the appliance without
liquid. Always fill to at least the ‘MIN’
marking and no more than the ‘MAX’
marking inside the jug.
• The jug must only be used with the
power base provided. Do not use
attachments other than those provided
with the appliance as it may result in fire,
electric shock or injury to persons.
• Do not put metal or similar items into
the jug as this may damage or affect the
operation of the appliance.
• To disconnect, press the START|STOP
button (the button surround should stop
flashing), then remove the plug from
from power outlet.
• Always remove the plug from the power
outlet and allow to cool if the appliance
is not in use, before attempting to
move the appliance, before cleaning,
disassembling, assembling and when
storing the appliance.
• Keep the appliance and accessories clean.
Strictly follow the care and cleaning
instructions described in this book.
• Do not use harsh abrasive, caustic
cleaners or oven cleaners when
cleaning the appliance.
• This appliance is for household use
only. Do not use the appliance for
anything other than its intended
purpose as described in this book.
Do not use outdoors. Do not use in
moving vehicles or boats.
• Do not leave the appliance unattended
when in use.
• This appliance is not intended for use
by young children or infirm persons
without supervision. Young children
should be supervised to ensure that
they do not play with the appliance.
• Regularly inspect the power cord, power
plug and actual appliance for any damage.
Do not operate if damaged in any way
or after the appliance malfunctions.
Immediately cease use of the appliance
and visit www.Breville.com or call Breville
Customer Service at 1-866-BREVILLE
for examination, repair or adjustment.
• For any maintenance other than
cleaning, visit www.Breville.com
or call Breville Customer Service at
1-866-BREVILLE.
• This appliance is equipped with a
power cord having a grounding wire
with a grounding plug. The appliance
must be grounded using a 3-hole
properly grounded outlet. In the event
of an electrical short circuit, grounding
reduces the risk of electrical shock.
• If the appliance is of the grounded
type, the extension cord should be
a grounding 3-wire cord.
• If the power outlet is a standard
2-prong wall outlet, it is your personal
responsibility and obligation to have
it replaced with a properly grounded
3-prong wall outlet.
• Do not, under any circumstances, cut or
remove the third (ground) prong from
the power cord or use an adapter.
• Consult a qualified electrician if
the grounding instructions are not
completely understood, or if doubt
exists as to whether the appliance is
properly grounded.
WARNING
Always ensure the frothing disc is
securely attached to the milk jug
before use.
WARNING
Frothing disc is a choking hazard.
Children must always be supervised and
never left unattended with appliance.
WARNING
Never immerse the power base, power
cord or power plug in water or allow
moisture to come into contact with
these parts.
4 5
5

BREVILLE RECOMMENDS SAFETY FIRST
NOTE
This product has been tested
and found to comply with the
limits for ISM equipment. These
limits are designed to provide
reasonable protection against
harmful interference in a residential
installation. This product generates,
uses, and can radiate radio
frequency energy and, if not used
in accordance with the instructions,
may cause harmful interference to
radio communications. There is no
guarantee that interference will not
occur in a particular installation.
Apart from general care and cleaning of
the product, no maintenance of the radio
frequency system is required. Changes or
modifications to the product could void the
user’s authority to operate the equipment.
If this product does cause harmful
interference to radio or television reception
– which can be determined by turning the
product off and on – the user is encouraged
to correct the interference by one or more of
the following measures:
− Reorient or relocate the product.
− Increase the separation between the
product and the receiver.
− Connect the product into an outlet on
a circuit different from that to which
the receiver is connected.
BREVILLE ASSIST™ PLUG
Your Breville appliance comes with a unique
Assist™ Plug, conveniently designed with
a finger hole in the power plug for easy
and safe removal from the wall outlet. For
safety reasons it is recommended you
plug your Breville appliance directly into
its own electrical outlet on a dedicated
circuit separate from other appliances. If
the electric circuit is overloaded with other
appliances, your appliance may not function
properly. Use in conjunction with a power
strip or extension cord is not recommended.
SHORT CORD INSTRUCTIONS
Your Breville appliance is fitted with a short
power supply cord as a safety precaution to
prevent personal injury or property damage
resulting from pulling, tripping or becoming
entangled with a longer cord. Do not allow
children to use or be near this appliance
without close adult supervision. Longer
detachable power supply cords or extension
cords are not recommended but may be
used if care is exercised. If an extension cord
is used, (1) the marked electrical rating of
the cord set or extension cord should be at
least as great as the electrical rating of the
appliance, (2) the cord should be arranged
so that it will not drape over the countertop
or tabletop where it can be pulled on by
children or tripped over unintentionally
and (3) the extension cord must include a
3-prong grounding plug.
KNOW
your Breville Milk Café™
FOR HOUSEHOLD USE ONLY
SAVE THESE INSTRUCTIONS
6
KNOW YOUR BREVILLE MILK CAFəKNOW YOUR BREVILLE MILK CAFə
A
B
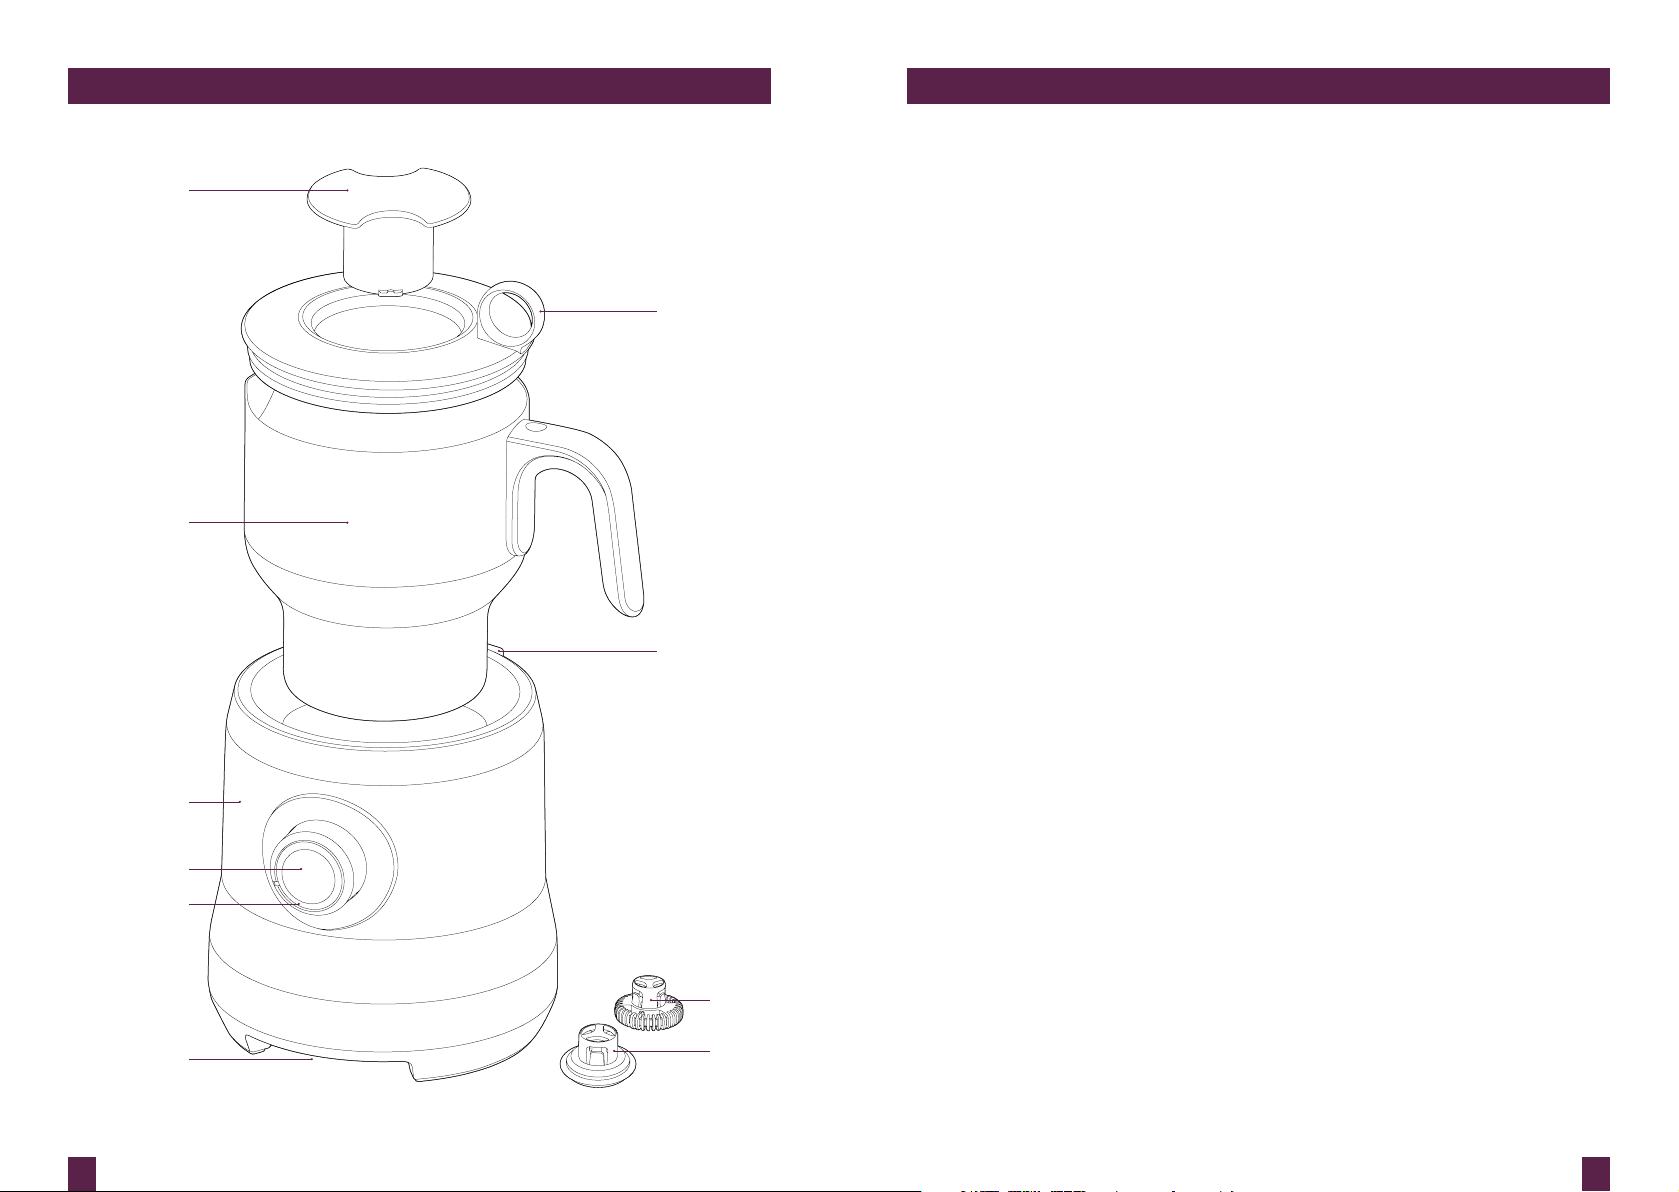
A. Measuring Cap
For measuring and adding ingredients
once mixing has started.
B. Jug Lid
With Breville Assist™ Ring-Pull Removal.
C. Dishwasher Safe Milk Jug
Stainless steel jug with inner measurement
markings and pouring spout.
D. Power Base
C
Induction Heating Technology provides
gentle, even heat distribution.
E. START | STOP Push-Dial
Press the center of the dial to start or
stop operation. Turn the dial to adjust
the temperature. ‘COLD STIR’ setting
H
stirs without heating.
F. LED Indicator
Button surround illuminates when power
is on; flashes when the frothing cycle is
activated; or will cease to illuminate in
standby mode.
G. Cord Wrap
D
H. ‘On Board’ Disc Storage
I. ‘Cappuccino’ Frothing Disc
For thick and creamy froth.
E
F
J. ‘Latte’ Frothing Disc
For smooth and silky milk.
I
G
8 9
J
OPERATING
your Breville Milk Café™
OPERATING YOUR BREVILLE MILK CAFÉ™
BEFORE FIRST USE
Before first use, ensure you have all parts
and accessories - power base, milk jug,
latte disc, cappuccino disc, jug lid and
measuring cap.
Remove and safely discard all promotional
labels and packing materials attached to the
Breville Milk Cafe™.
Wash the milk jug, frothing discs, lid and
measuring cap in warm soapy water then
rinse and dry thoroughly. Wipe the exterior
of the power base with a soft damp cloth
then dry thoroughly.
CAPP LATTÉ
FROTHING HOT MILK
1. Place the milk frother on a flat level
surface and plug the power cord
into a 110V-120V power outlet.
The START | STOP button surround
will illuminate.
NOTE
After 30 seconds of non-use, the
milk frother will enter standby mode.
The button surround will cease to
illuminate. To reactivate, turn or
press the START | STOP push-dial.
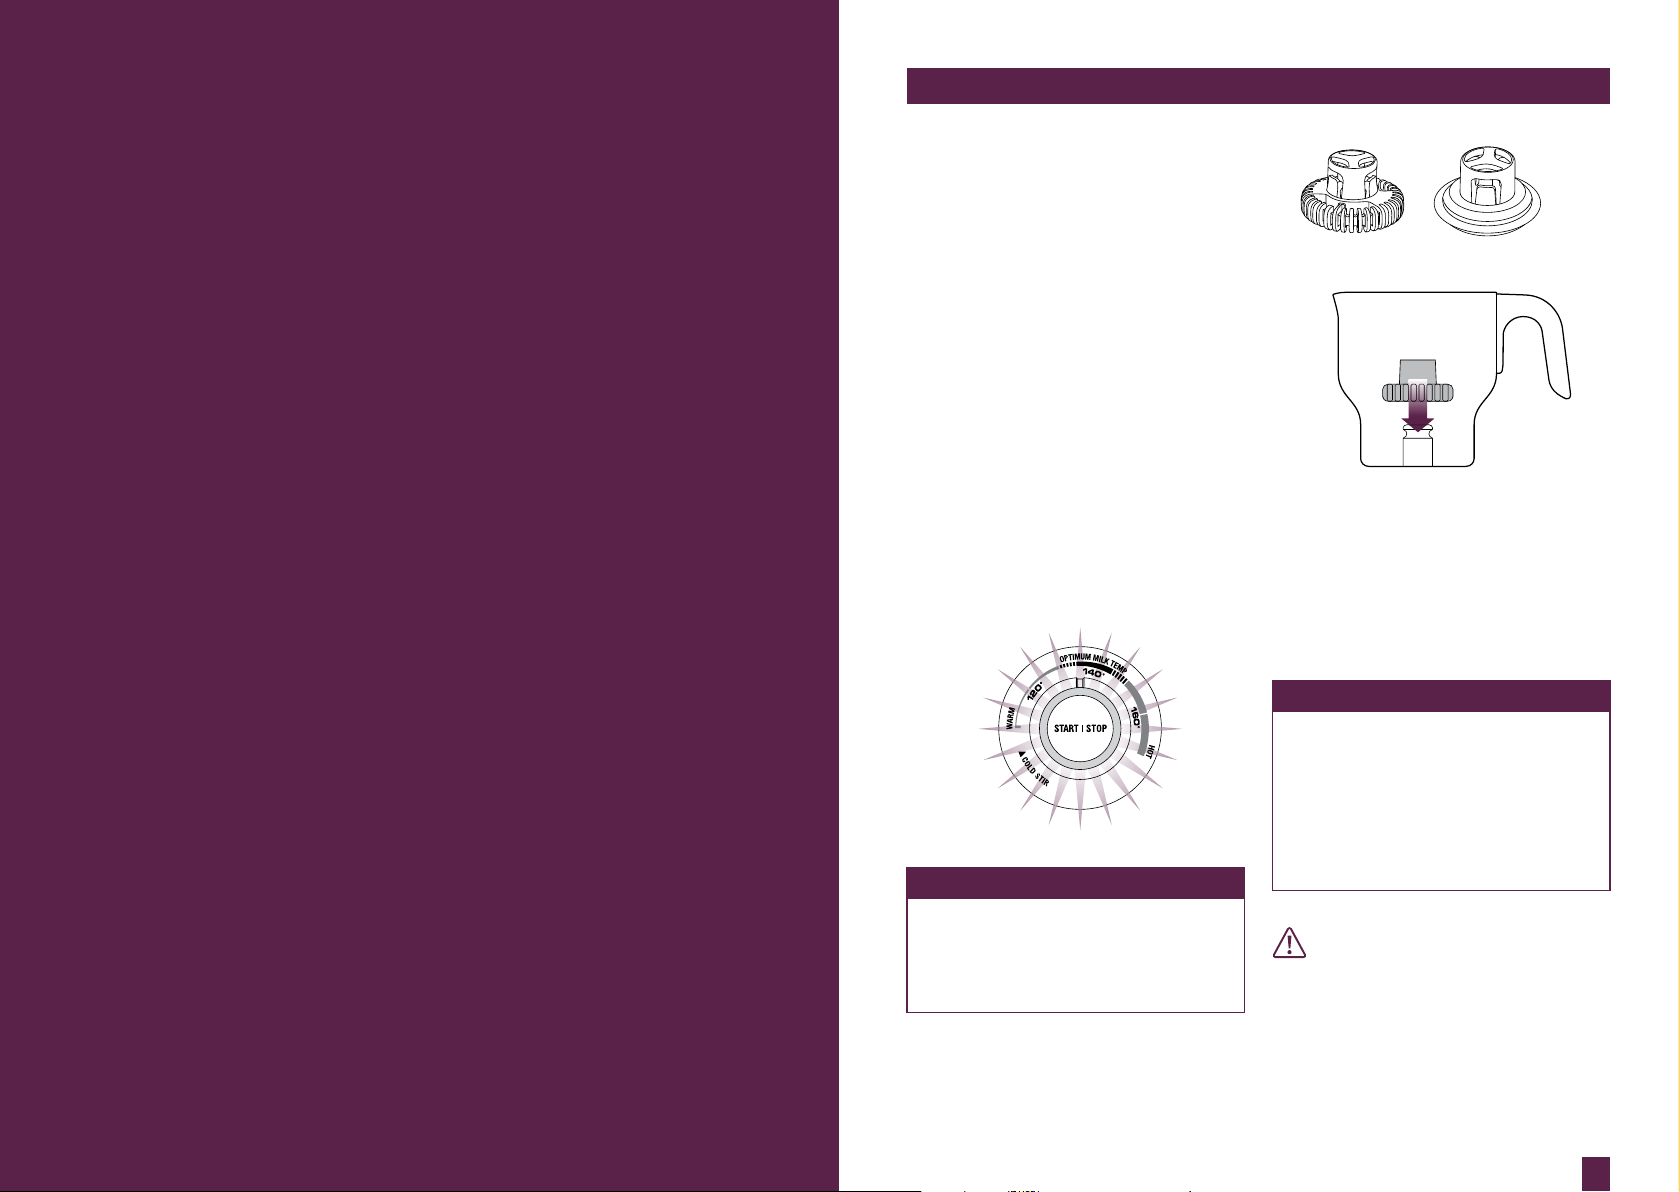
2. Select the ‘Capp’ or ‘Latté’ frothing disc.
Choose the ‘Capp’ disc for thick and
creamy froth or the ‘Latté’ disc for
smooth and silky milk.
WIDER DISC END FACES DOWN
3. Insert the frothing disc onto the shaft at
the base of the milk jug. Ensure the disc
is inserted the correct way with the
wider part of the disc at the bottom of
the jug. The disc should ‘click’ securely
onto the shaft.
NOTE
If the disc is not inserted correctly
it may dislodge during operation, a
grinding noise may be heard, or milk
will not swirl.
Do not operate the milk frother
without a frothing disc inserted into
the milk jug as this can cause uneven
heating and burning.
WARNING
Frothing disc is a choking hazard.
Children must always be supervised
and never left unattended with
the appliance.
11
OPERATING YOUR BREVILLE MILK CAFəOPERATING YOUR BREVILLE MILK CAFə
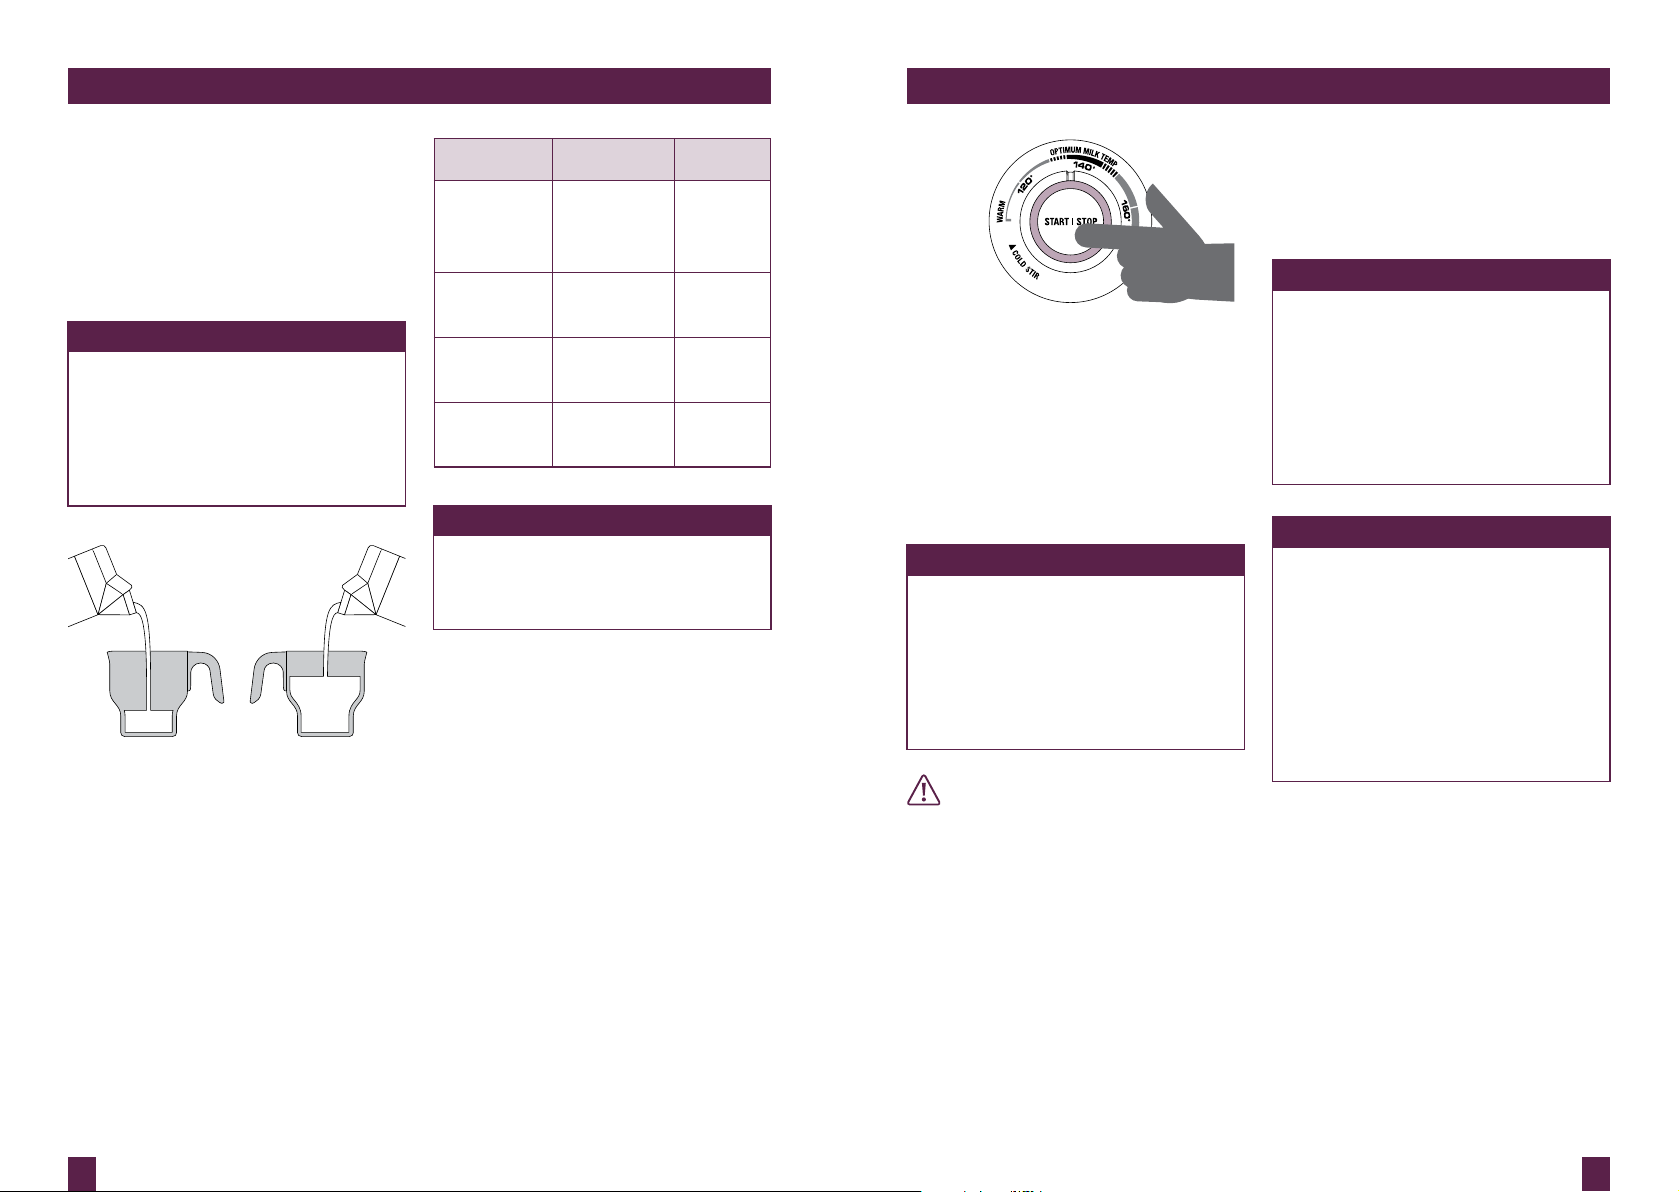
4. Pour the required amount of cold,
fresh (or freshly opened) milk into the
milk jug then cover with the jug lid.
Always use cold milk and fill the milk
jug between the MIN and MAX level
markings. Overfilling may result in
spillage, while underfilling prevents the
frothing disc from working optimally.
NOTE
Never operate without the minimum
level of liquid in the milk jug. The milk
frother will automatically turn off if the
milk jug is empty. If this occurs, you
will need to wait for the milk frother
to cool down before re-use, refer to
page 14.
MIN MAX
For optimum results, there are different
measurement markings within the milk
jug. The chart on the right shows the
approximate number of cups produced
at each of the measurement markings.
This is a guide only as the frothing
disc selected and the type of milk, for
example whole milk (vitamin D), 2%,
1%, fat-free, half-and-half etc., can create
different amounts of froth.
JUG MARKING FROTHING DISC MAKES
HOT CHOC MAX
25 fl.oz (750ml)
CAPP / LATTE MAX
16 fl.oz (500ml)
8 fl.oz (250ml) Cappuccino
MIN Cappuccino
Cappuccino
(recommended)
OR
Latte
Cappuccino
OR
Latte
OR
Latte
OR
Latte
APPROX.
3 cups
2-3 cappuccinos
1-2 cappuccinos
1 cappuccino
NOTE
For optimum froth, do not exceed the
CAPP/LATTE MAX (16 fl.oz, 500ml)
measurement marking inside the
milk jug.
5. Ensure the jug lid is securely attached
and the outside of the milk jug is clean.
Place the milk jug onto the power base,
ensuring the jug is sitting flat.
6. Turn the START | STOP push-dial
to the desired temperature. When
frothing milk for a cappuccino or
latte, we recommend staying within
the ‘OPTIMUM MILK TEMP’ range,
however this is up to your personal
preference.
If the temperature setting is changed
during operation, the milk frother will
stop at the new temperature selected.
The exception is if a lower temperature
is selected mid-cycle and the milk has
already exceeded the lower temperature.
In this case, the milk frother will
immediately stop.
ONLY PRESS ONCE, FIRMLY
7. Only press the START | STOP
push-dial once, firmly.. Frothing has
started once the milk frother beeps
once and the button surround slowly
flashes. If the milk frother does not do
this, try pushing the START | STOP
push-dial again to ensure it has been
properly activated.
NOTE
Do not remove the milk jug from the
power base during operation. Doing
so may dislodge the frothing disc
and cause a grinding noise. Always
press the center of the START | STOP
push-dial before removing the jug.
Operation has stopped once the button
surround has stopped flashing.
WARNING
Appliance surfaces will be hot during
and after operation.
8. When the milk has reached the selected
temperature, the milk frother will
automatically stop and beep twice. This
will take anywhere between 2 -7 minutes
depending on the quantity of milk used.
Carefully remove the milk jug from the
power base as the milk jug and contents
will be hot. Be careful not to place the
milk jug on a table cloth, plastic surface
or heat sensitive surface which may
scorch or melt. Remove the jug lid, pour
and/or spoon out the frothed milk.
9. Clean the milk jug and frothing disc
immediately after use. Both will be hot,
so follow the instructions on page 17 and
allow them to cool completely before
disassembling.
NOTE
When frothing multiple batches,
to prevent the Boil Dry Protection
from activating (see page 14), we
recommend allowing the milk jug
to cool for approximately 5 minutes,
or filling the milk jug with water for
faster cooling. For best results, we
also recommend cleaning the milk
jug and frothing disc before re-use.
NOTE
After frothing the first batch of
milk you may notice the power base
begin to hum. This is normal. It
is the cooling fan preventing the
milk frother from overheating and
will automatically cease to hum
once adequately cooled. During
this time, you may still use the milk
frother unless the Boil Dry Overheat
Protection as been activated
(see page 14).
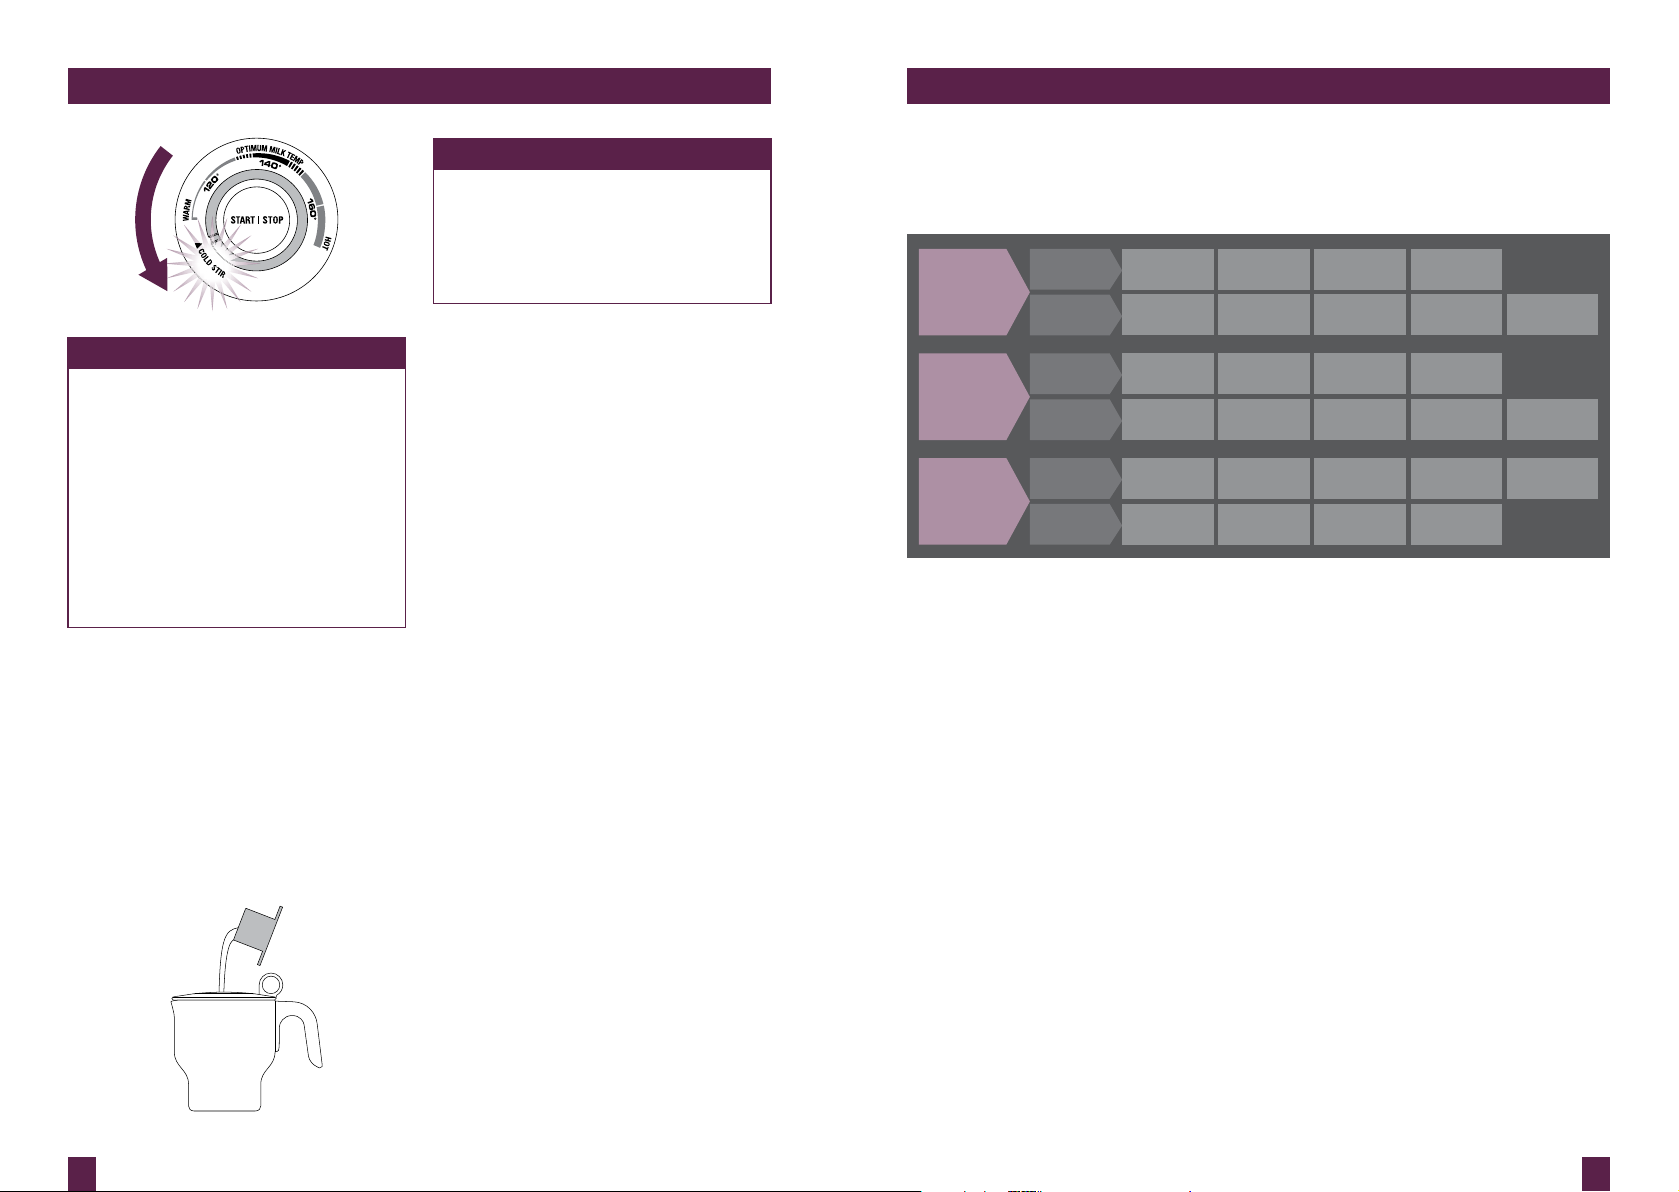
USING THE ‘COLD STIR’ SETTING
The ‘Cold Stir’ setting allows you to
stir already cold or hot milk without
additional heat.
Use it to froth milk for cold beverages
such as an iced cappuccino; to blend in
syrups and flavorings for an iced chocolate
or mocha; or to stir in dissolvable instant
drinking powders into milk or water.
The ‘Cold Stir’ setting will operate for 60
seconds before automatically stopping. You
can re-select the ‘Cold Stir’ setting if desired.
12 13
OPERATING YOUR BREVILLE MILK CAFÉ™ OPERATING YOUR BREVILLE MILK CAFÉ™
NOTE
The milk frother has been designed
specifically for the purpose of
foaming milk and other dairy milk
alternatives and is not intended to
whip, thicken or heat other food
substances eg. oil, eggs, butter, heavy
whipping cream, soups, gravies etc.
The milk frother is not designed
to mix a large quantity of dry
ingredients or melt large food pieces
eg. cubed chocolate, ground nuts,
whole spices, fresh herbs or ice cubes.
ADDING INGREDIENTS
Always allow the milk frother to start for
a few seconds before using the measuring
cap to gradually add ingredients. If using
one of the heated settings, this will allow
the milk to warm up and help dissolve the
additional ingredients.
Always add ingredients slowly and in small
quantities. Adding ingredients too quickly
can cause the frothing disc to dislodge or
stop spinning.
NOTE
Frothing results differ depending on
the ingredients used. For example,
adding dense ingredients like thick
syrups, heavy powders and large
flakes can significantly reduce the
amount of foam.
SAFETY FEATURES
Standby
After 30 seconds of non-use, the milk
frother will enter standby mode. The
button surround will cease to illuminate.
To reactivate the milk frother out of standby
mode, turn or press the START | STOP
push-dial.
Boil Dry, Overheating Protection
The milk frother will automatically cease to
operate if the milk jug overheats. This can
be caused if the milk jug is empty, if liquid
is below the MIN measurement marking, or
after consecutive uses. If this occurs, 3 alerts
will sound. Unplug the power cord from the
power outlet, wait approximately 5 minutes
for the milk frother to cool down or fill the
milk jug with water for faster cooling. Once
adequately cooled, you will be able to reactive
the milk frother and recommence frothing.
Thermal Fuse & Current Protection
This feature protects the milk frother in
case of major fault. If this occurs, the milk
frother will automatically turn off and will not
reactivate. Immediately cease use, remove the
power plug from the power outlet and visit
www.Breville.com or call Breville Customer
Service at 1-866-BREVILLE for examination,
repair or adjustment.
PREPARATION GUIDE
As a general guide, the chart below shows some suggested milks, ingredients and uses
for the milk frother.
SUITABLE
LIQUIDS
SUITABLE
INGREDIENTS
RECIPES
FRESH
MILK
UHT
MILK
POWDERS /
FLAKES
TOPPINGS /
SYRUPS
HOT
DRINKS
COLD
DRINKS
COW
Full cr eam
low fat, s kim
COW
Full cr eam
low fat, s kim
DRINKING
CHOCOLATE
CHOCOLATE CARAMEL
HOT
CHOCOLATE
ICED
CHOCOLATE
SOY
Full cr eam
& low fat
SOY
Full cr eam
& low fat
COCOA
POWDER
CAPPUCCINO LATTÉ
ICED
COFFEE
GOAT
GOAT /
SHEEP
CHAI
TEA
CHAI
TEA
ICED
MOCHA
SHEEP
OAT /
RICE
CHOCOLATE
FLAKES
HONEY MAPLE
MAPLE
FLAT
WHITE
ICED
CARAMEL
LATTÉ
ALMOND
CHAI
LATTÉ
14 15

CARE & CLEANING
for your Breville Milk Café™
CARE & CLEANING FOR YOUR BREVILLE MILK CAFÉ™
Both the milk jug and frothing disc should
be cleaned immediately after each use to
prevent build-up of milk residue.
1. Unplug the power cord from the power
outlet before cleaning.
2. The milk jug and frothing disc will be
hot immediately after use, so carefully
remove the milk jug from the power
base and fill with tap water. Once the
milk jug and frothing disc have cooled
completely, remove the frothing disc and
rinse off any milk in warm water.
3. Wash the milk jug, jug lid, measuring
cap and frothing disc in warm soapy
water, rinse and dry thoroughly.
The seal from the lid can be removed
and washed separately.
4. Wipe the exterior of the power base with
a soft damp cloth. Dry thoroughly.
NOTE
Do not use alkaline or abrasive cleaning
agents, steel wool or scouring pads on
any part of the milk frother as these can
damage the appliance surfaces.
NOTE
Never immerse the power base in
water or any other liquid. The outside
of the milk jug must always be clean
and dry before placing on the power
base prior to use.
NOTE
The milk jug, jug lid, measuring cap
and frothing discs can be washed in
the dishwasher (top shelf only).
However to extend the life of the
frothing discs, we recommend these
are washed by hand.
17
 Loading...