

Page 1
MicroSet 40x-1024x
Art. No. 88-55002
DE
Bedienungsanleitung
GB
Operating Instructions
FR
Mode d’emploi
NL
Handleiding
IT
Istruzioni per l’uso
ES
Instrucciones de uso
PT
Manual de utilização
Page 2

DE
Bedienungsanleitung ................................... 4
GB
Operating Instructions ...............................10
FR
Mode d’emploi ............................................ 16
NL
Handleiding .................................................22
IT
Istruzioni per l’uso ......................................28
ES
Instrucciones de uso ..................................34
PT
Manual de utilização ..................................40
ACHTUNG!
Beinhaltet funktionale scharfkantige
Ecken und Punkte! Kleine Teile,
Erstickungsgefahr. Nicht für Kinder
unter 3 Jahren geeignet.
WARNING!
Contains functional sharp edges and
points. Choking hazard – small parts.
Not for children under three years.
0-3
Page 3
B/C
D
F
G
H
I
J
1)
1!
1@
1#
1$
1^
1&
1&
1*
abcd
2)
2$
1(
2^
2%
E
2#
2&
2!
2@
1%
Fig. 1
Fig. 6
Page 4

GEFAHR für Ihr Kind!
Für die Arbeit mit diesem Gerät werden
häufi g scharfkantige und spitze Hilfsmittel eingesetzt. Bewahren Sie deshalb dieses Gerät sowie alle Zubehörteile und Hilfsmittel an einem für Kinder unzugänglichen Ort
auf. Es besteht
VERLETZUNGSGEFAHR!
Dieses Gerät beinhaltet Elektronikteile, die
über eine Stromquelle (Netzteil und/oder
Batterien) betrieben werden. Lassen Sie Kinder beim Umgang mit dem Gerät nie unbeaufsichtigt! Die Nutzung darf nur wie in der
Anleitung beschrieben erfolgen, andernfalls
besteht
GEFAHR eines STROMSCHLAGS!
Kinder sollten das Gerät nur unter Aufsicht
benutzen. Verpackungsmaterialien (Plastiktüten, Gummibänder, etc.) von Kindern fernhalten! Es besteht
ERSTICKUNGSGEFAHR!
Die mitgelieferten Chemikalien und Flüssigkeiten gehören nicht in Kinderhände! Chemikalien nicht trinken! Hände nach Gebrauch
unter fl ießendem Wasser gründlich säubern.
Bei versehentlichem Kontakt mit Augen oder
Mund mit Wasser ausspülen. Bei Beschwerden unverzüglich einen Arzt aufsuchen und
die Substanzen vorlegen.
BRAND-/EXPLOSIONSGEFAHR!
Setzen Sie das Gerät keinen hohen
Temperaturen aus. Benutzen Sie nur
das mitgelieferte Netzteil oder die empfohlenen Batterien. Gerät und Batterien nicht
kurzschließen oder ins Feuer werfen! Durch
übermäßige Hitze und unsachgemäße Handhabung können Kurzschlüsse, Brände und
sogar Explosionen ausgelöst werden!
GEFAHR von Sachschäden!
Bauen Sie das Gerät nicht auseinan-
der! Wenden Sie sich im Falle eines
Defekts bitte an Ihren Fachhändler. Er nimmt
mit dem Service-Center Kontakt auf und kann
das Gerät ggf. zwecks Reparatur einschicken.
Platzieren Sie Ihr Gerät so, dass es jederzeit vom Stromnetz getrennt werden kann.
Die Netzsteckdose sollte sich immer in der
Nähe Ihres Geräts befi nden und gut zugänglich sein, da der Stecker des Netzkabels als
Trennvorrichtung zum Stromnetz dient.
Setzen Sie das Gerät keinen Temperaturen
über 60° C aus!
HINWEISE zur Reinigung
Trennen Sie das Gerät vor der
Reinigung von der Stromquelle
(Netzstecker ziehen oder Batterien
entfernen)!
Reinigen Sie das Gerät nur äußerlich mit einem trockenen Tuch. Benutzen Sie keine
Reinigungsfl üssigkeit, um Schäden an der
Elektronik zu vermeiden.
Reinigen Sie die Linsen (Okulare und/oder
Objektive) nur mit dem beiliegeden Linsenputztuch oder mit einem anderen weichen
und fusselfreien Tuch (z.B. Microfaser) ab.
Das Tuch nicht zu stark aufdrücken, um ein
Verkratzen der Linsen zu vermeiden.
Zur Entfernung stärkerer Schmutzreste befeuchten Sie das Putztuch mit einer BrillenReinigungsfl üssigkeit und wischen Sie damit
die Linsen mit wenig Druck ab.
Schützen Sie das Gerät vor Staub und Feuchtigkeit! Bewahren Sie es in der mitgelieferten
Tasche oder Transportverpackung auf. Batterien sollten aus dem Gerät entfernt werden,
wenn es längere Zeit nicht benutzt wird.
4
Page 5

ENTSORGUNG
Entsorgen Sie die Verpackungsmate-
rialien sortenrein. Informationen zur
ordnungsgemäßen Entsorgung erhalten Sie
beim kommunalen Entsorgungsdienstleister
oder Umweltamt.
Werfen Sie Elektrogeräte nicht in den
Hausmüll!
Gemäß der Europäischen Richtlinie
2002/96/EG über Elektro- und ElektronikAltgeräte und deren Umsetzung in nationales
Recht müssen verbrauchte Elektrogeräte getrennt gesammelt und einer umweltgerechten
Wiederverwertung zugeführt werden.
Entladene Altbatterien und Akkus müssen
vom Verbraucher in Batteriesammelgefäßen
entsorgt werden. Informationen zur Entsorgung alter Geräte oder Batterien, die nach
dem 01.06.2006 produziert wurden, erfahren Sie beim kommunalen Entsorgungsdienstleister oder Umweltamt.
5
DE
EG-Konformitätserklärung
Eine „Konformitätserklärung“ in Über-
einstimmung mit den anwendbaren
Richtlinien und entsprechenden Normen ist
von der Bresser GmbH erstellt worden. Diese
kann auf Anfrage jederzeit eingesehen werden.
Page 6

6
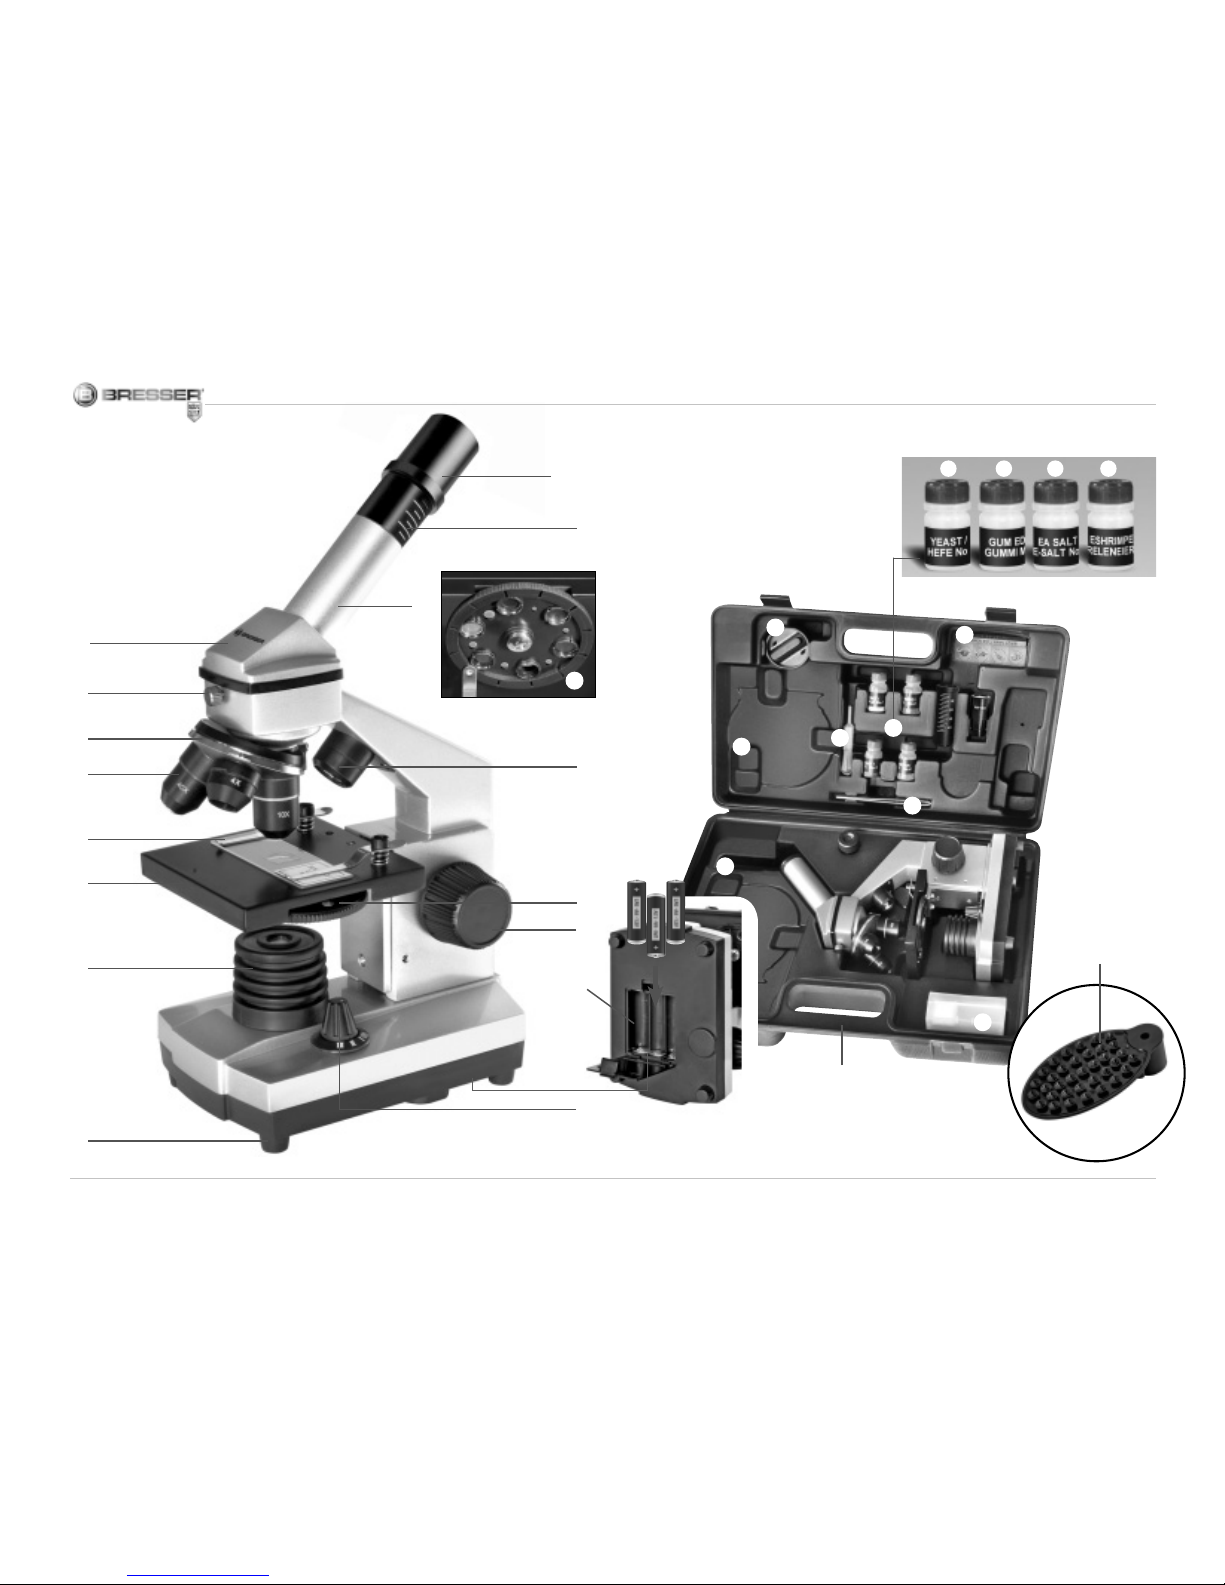
Aus diesen Teilen besteht dein Mikroskop
1 10x WF Okular
2 16x WF Okular
3 Barlowlinse
4 Fach für optionales Zubehör
5 Okularstutzen
6 Mikroskopkopf
7 Feststellschraube
8 Objektivrevolver
9 Objektiv
10 Halteklammer
11 Mikroskoptisch
12 LED-Beleuchtung (Durchlicht)
13 Mikroskopfuß
14 Wählrad für Beleuchtung
15 Batteriefach (3x AA)
16 Scharfeinstellungsrad
17 Farbilterscheibe
18 LED-Beleuchtung (Aufl icht)
19 Fach für optionales Zubehör
20 5 Objektträger, 10 Deckgläser
und 5 Dauerpräparate in Kunststoffbox
21 Präparate:
a) Hefe
b) Einschlussmittel „Gum-Media“
c) Seesalz
d) Garneleneier
22 Smartphone-Halterung
23 Dünnschnittapparatur
24 Garnelenbrutanlage
25 Pinzette
26 Pipette
27 Transportkoffer
Wo mikroskopiere ich?
Bevor Du das Mikroskop aufbaust, achte darauf, dass der Tisch, Schrank oder worauf Du
es stellen möchtest, stabil ist und fest steht,
ohne zu wackeln.
Wie bediene ich die elektrische LEDBeleuchtung?
Vor Inbetriebnahme lege bitte die mitgelieferten Batterien in das Batteriefach (15) in der
Bodenplatte ein. Entferne zunächst die Batteriefachabdeckung durch leichten Druck auf
den Deckelverschluß. Lege nun die Batterien
(3x AA) in die dafür vorgesehenen Halterungen. Wichtig! Achte unbedingt auf die in den
Halterungen vorgegebene Polung.
Am Mikroskop befi nden sich zwei Lampen.
Sie leuchten nicht mit Glühbirnen, sondern
mit modernen Leuchtdioden (LED). Die erste Lampe scheint von unten auf das Präparat
und die zweite Lampe von oben herab. (Das,
was Du unter dem Mikroskop betrachten
willst, heißt übrigens Objekt oder Präparat.)
Du kannst jede Lampe einzeln benutzen, aber
auch beide zusammen. Dafür gibt es ein Wählrad (Abb. 1, 14). Dieses besitzt drei Nummern:
I, II und III.
Wählst du die…
I, so kommt das Licht nur von unten (Durch-
licht).
II, so scheint das Licht nur von oben (Auf-
licht).
III, so werfen beide Lampen Licht auf das
Präparat.
Für durchsichtige Objekte (Durchlichtobjekte)
ist die I am besten. Um feste, undurchsichtige Objekte (Aufl ichtobjekte) zu betrachten,
wähle die II. Für halbdurchsichtige Objekte
kannst Du am besten die III wählen.
Die Betriebsart III ist für Durchlichtobjekte auf
Objektträgern nicht empfehlenswert, da es
hier zu Spiegelungen auf dem Objektträger
kommen kann, die stören.
Wofür verwende ich die Farbfi lterscheibe?
Die Farbfi lterscheibe (Abb. 1, 17) befi ndet
sich unter dem Mikroskoptisch (Abb. 1, 11).
Sie hilft dir bei der Betrachtung sehr heller
oder klarsichtiger Präparate. Du kannst hier
zwischen verschiedenen Farben wählen.
Farblose oder durchsichtige Objekte (z. B.
Stärkekörner, Einzeller) sind so besser in ihren Bestandteilen zu erkennen.
Page 7
7
DE
Wie stelle ich mein Mikroskop richtig
ein?
Zu erst löse die Schraube (Abb. 1, 7) und
drehe den Mikroskopkopf (Abb. 1, 6) in eine
bequeme Beobachtungsposition.
Jede Beobachtung wird mit der niedrigsten
Vergrößerung begonnen.
Fahre den Mikroskoptisch (Abb. 1, 11) zunächst ganz hinunter. Dann drehe den Objektivrevolver (Abb. 1, 8) so weit, bis er auf
der niedrigsten Vergrößerung (Objektiv 4x)
einrastet.
Hinweis:
Bevor Du die Objektiveinstellung wechselst, fahre den Mikroskoptisch (Abb. 1,
11) immer erst ganz
herunter. Dadurch
kannst Du eventuelle
Beschädigungen vermeiden!
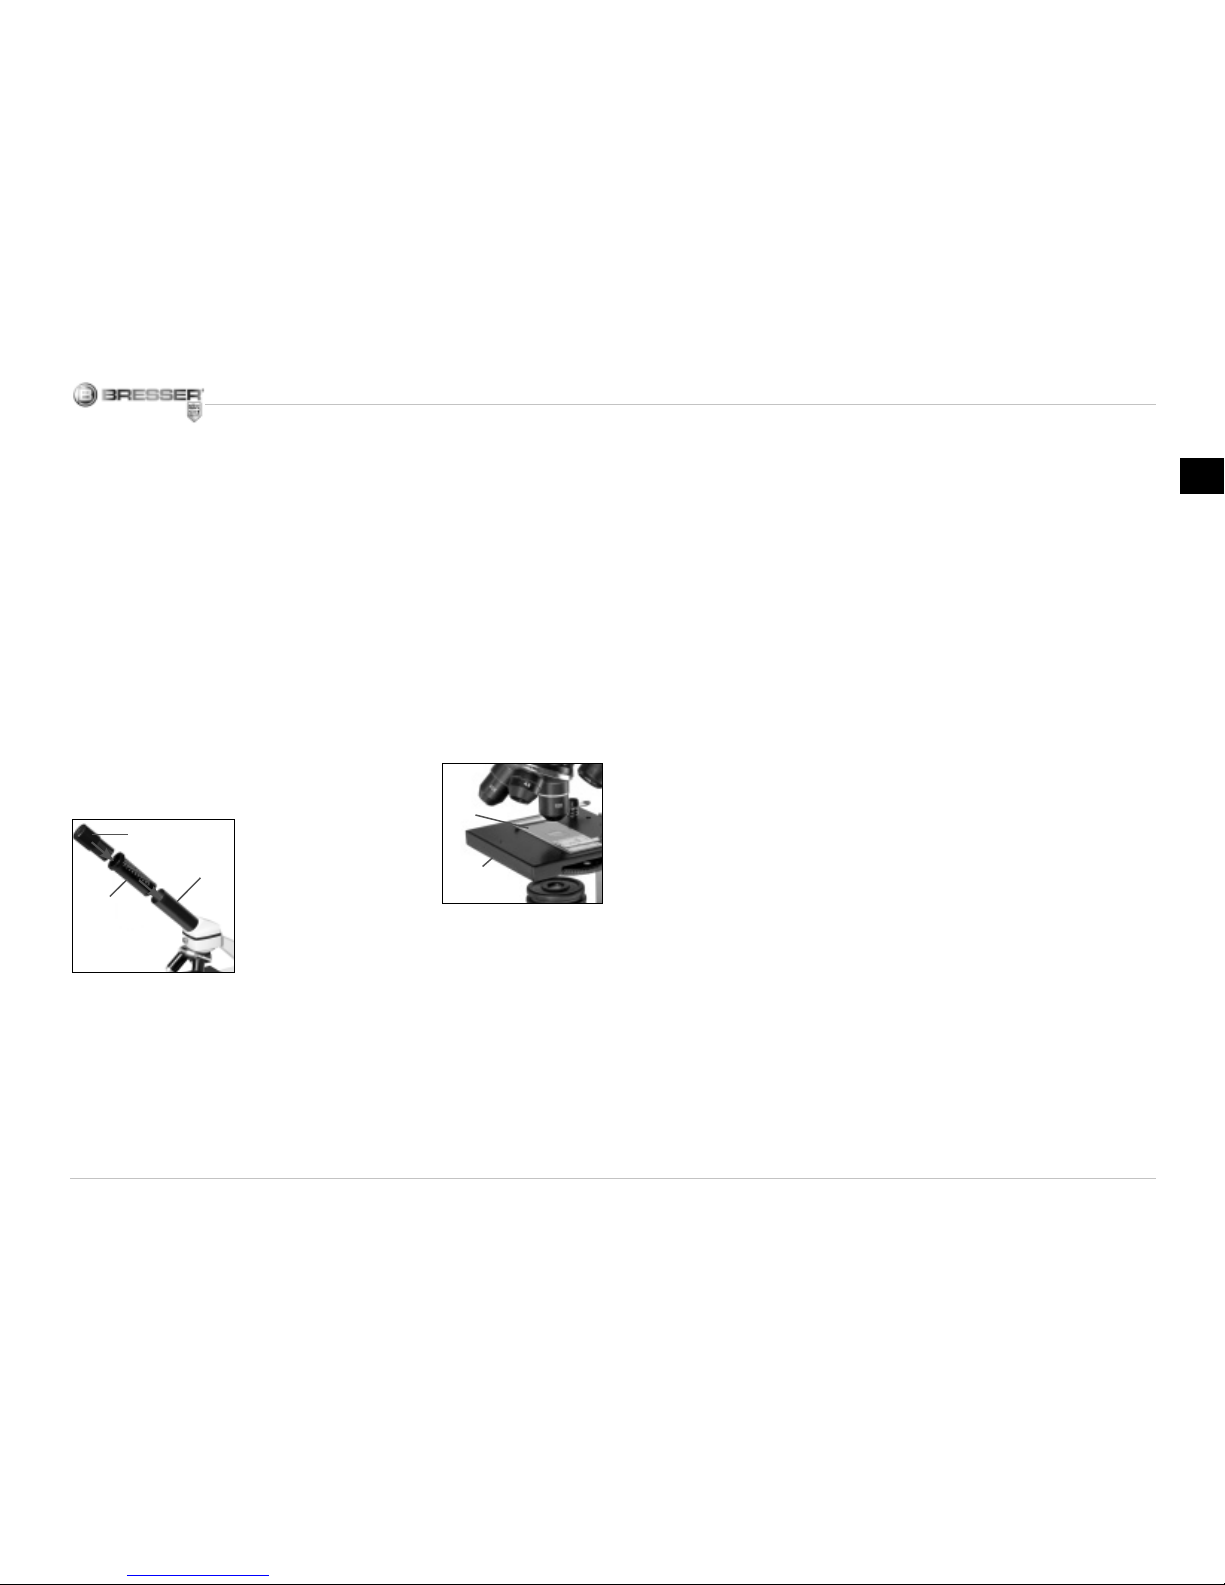
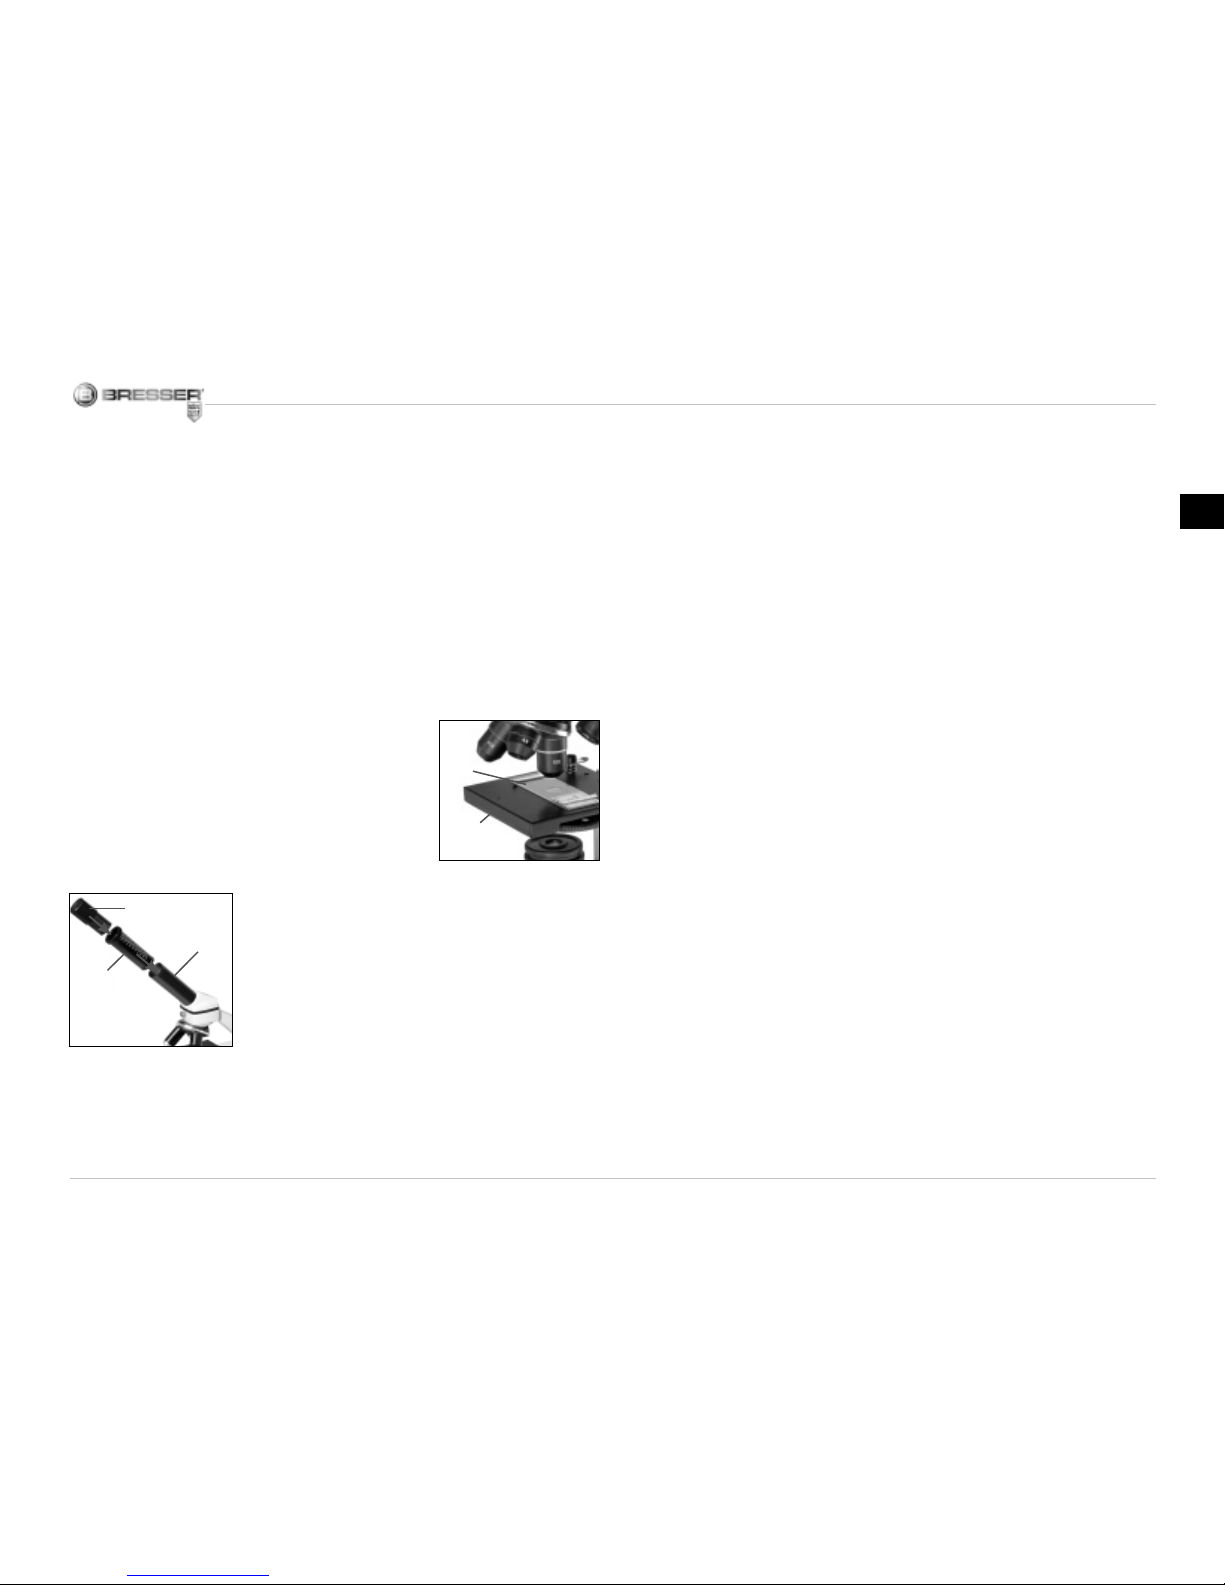
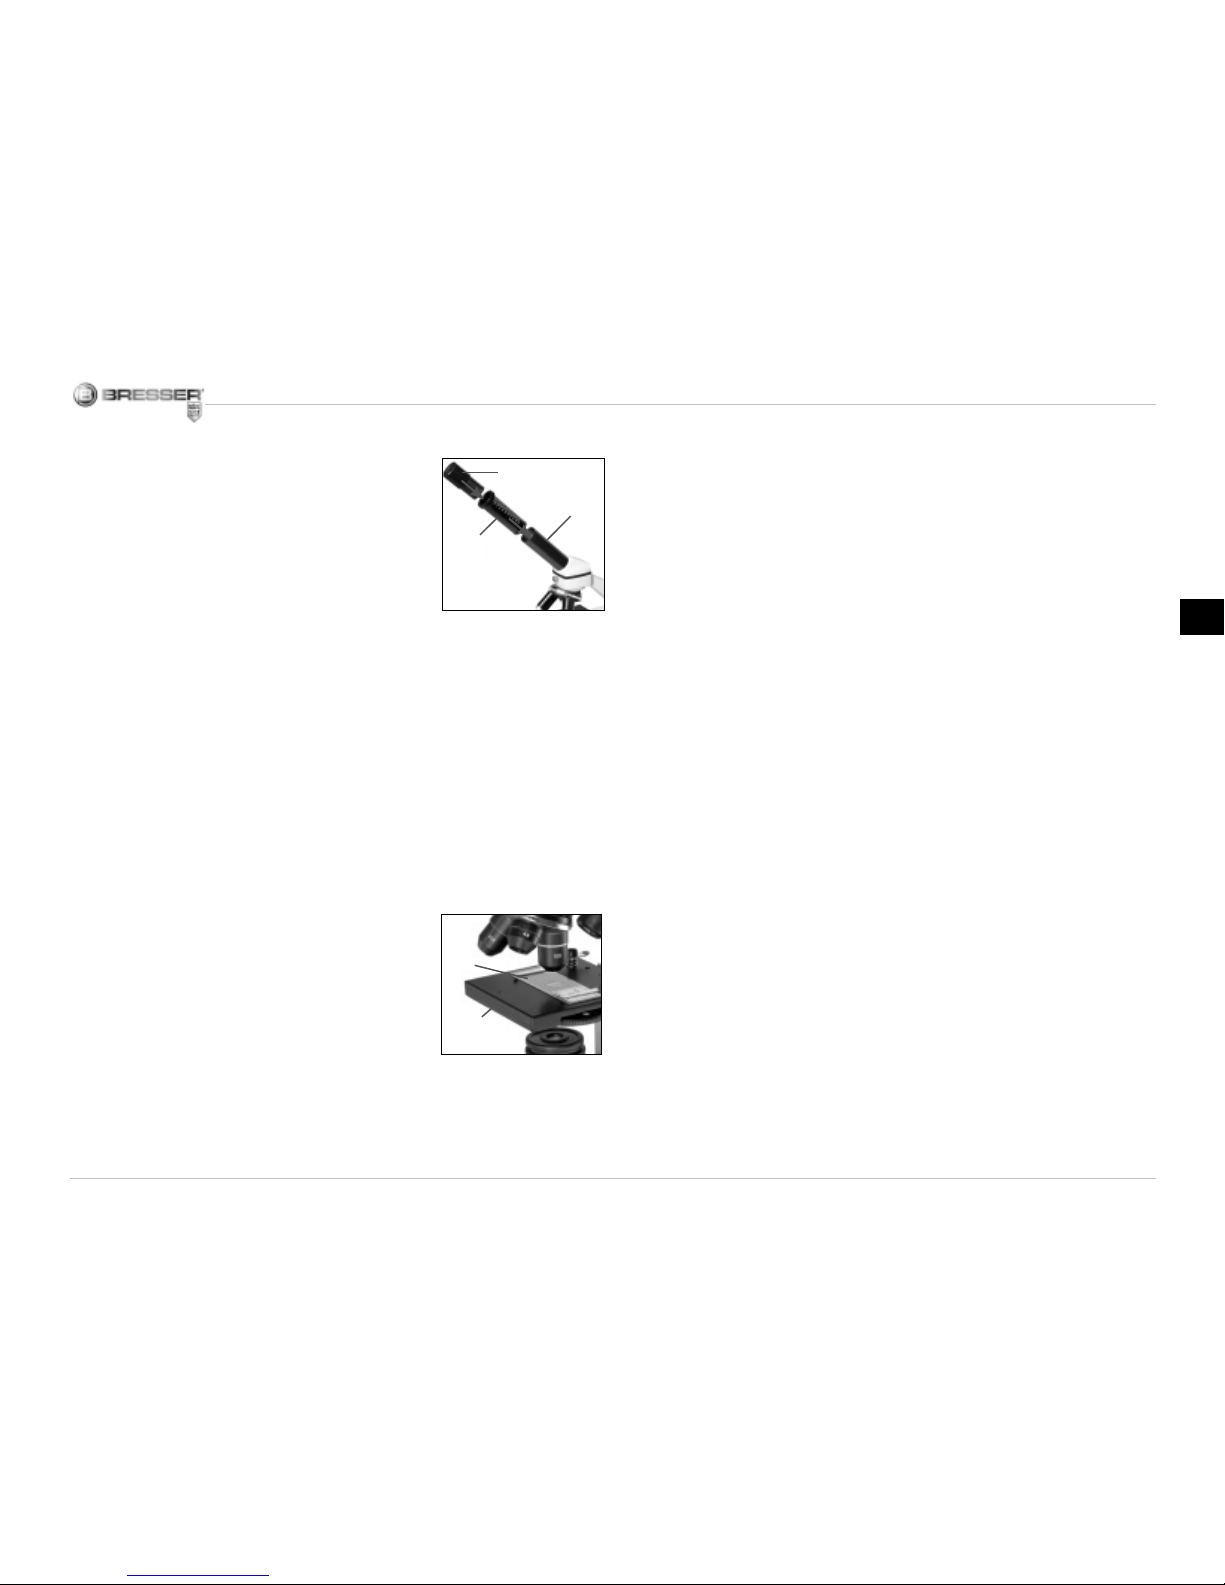
Nun setze das Okular 10x (Abb. 1, 1) in die
Barlowlinse (Abb. 1, 3) ein. Achte darauf,
dass die Barlowlinse ganz im Okularstutzen
(Abb. 1, 5) steckt und nicht herausgezogen
ist (Abb. 2).
Wie beobachte ich das Präparat?
Nachdem Du das Mikroskop mit der passenden Beleuchtung aufgebaut und eingestellt
hast, gelten folgende Grundsätze:
Beginne mit einer einfachen Beobachtung
bei niedrigster Vergrößerung. So ist es leichter, das Objekt in die Mitte zu bekommen
(Zentrierung) und das Bild scharf zu stellen
(Fokussierung).
Je höher die Vergrößerung ist, desto mehr
Licht brauchst Du für eine gute Bildqualität.
Nun lege ein Dauerpräparat (Abb. 6, 20)
direkt unter dem Objektiv auf den Mikroskoptisch (Abb. 3). Das
zu beobachtende Objekt soll hierbei genau
über der Beleuchtung (Abb. 1, 12) liegen.
Im nächsten Schritt schaust Du durch das
Okular (Abb. 1, 1) und drehst vorsichtig am
Scharfeinstellungsrad (Abb. 1, 16) bis das
Bild scharf zu sehen ist.
Jetzt kannst Du eine höhere Vergrößerung
einstellen, indem Du langsam die Barlowlinse (Abb. 1, 3) aus dem Okularstutzen (Abb.
1, 5) herausziehst. Wenn die Barlowlinse fast
vollständig herausgezogen wird, kann die
Vergrößerung auf nahezu das Doppelte gesteigert werden.
Wenn Du noch höhere Vergrößerungen
möchtest, setze das Okular 16x (Abb. 1, 2)
ein und drehe den Objektivrevolver (Abb. 1,
8) auf höhere Einstellungen (10x oder 40x).
Wichtiger Hinweis:
Nicht bei jedem Präparat ist die höchste Vergrößerung auch gleichzeitig die beste!
Beachte:
Bei veränderter Vergrößerungseinstellung
(Okular- oder Objektivwechsel, Herausziehen
der Barlowlinse) muss die Bildschärfe am
Scharfeinstellungsrad (Abb. 1, 16) neu eingestellt werden. Gehe hierbei sehr vorsichtig
vor. Wenn Du den Mikroskoptisch zu schnell
herausfährst, können sich Objektiv und Objektträger berühren und beschädigt werden!
Welches Licht für welches Präparat?
Mit diesem Gerät, einem Aufl icht- und Durchlichtmikroskop, können durchsichtige, halbdurchsichtige sowie undurchsichtige Objekte
beobachtet werden.
Das Bild des jeweiligen Beobachtungsobjektes wird über das Licht „transportiert”. Daher
entscheidet die richtige Beleuchtung darüber,
ob Du etwas sehen kannst oder nicht!
Abb. 3
I
2)
Abb. 2
D
f
B/C
Page 8
8
Betrachtest Du undurchsichtige (opake) Objekte (z. B. kleinere Tiere, Pfl anzenteile, Steine, Münzen usw.) mit diesem Mikroskop, so
fällt das Licht auf den zu betrachtenden Gegenstand.
Von dort wird das Licht zurückgeworfen und
gelangt durch Objektiv und Okular (bewirken
die Vergrößerung) ins Auge. Dies ist die Auflichtmikroskopie.
Bei durchsichtigen (transparenten) Objekten
(z. B. Einzeller) hingegen scheint das Licht
von unten durch die Öffnung im Mikroskoptisch und dann durch das Beobachtungsobjekt.
Der Weg des Lichts führt weiter durch Objektiv und Okular, wo wiederum die Vergrößerung erfolgt und gelangt schließlich ins Auge.
Dies ist die Durchlichtmikroskopie.
Viele Kleinlebewesen des Wassers, Pfl anzenteile und feinste tierische Bestandteile sind
bereits von Natur aus transparent. Andere
müssen erst noch entsprechend vorbereitet
(präpariert) werden. Sei es, dass wir sie mit
einer Vorbehandlung oder Durchdringung
mit geeigneten Stoffen (Medien) durchsichtig machen oder dadurch, dass wir feinste
Scheibchen von ihnen abschneiden (Handschnitt, Dünnschnitt) und diese dann untersuchen. Mehr dazu kannst Du in den folgenden
Abschnitten lesen.
Wie stelle ich dünne Präparatschnitte
her?
Bitte nur unter Aufsicht Deiner Eltern oder anderer Erwachsener durchführen.
Wie ich schon sagte, werden von einem Objekt möglichst dünne Schnitte gemacht. Um
zu besten Ergebnissen zu kommen, benötigen wir etwas Wachs oder Paraffi n. Nimm Dir
am besten eine Kerze. Das Wachs gibst Du
in einen Topf um es über einer Flamme kurz
zu erwärmen. Nun tauchst Du das Objekt
mehrere Male in das fl üssige Wachs. Danach
lasse das Wachs hart werden. Mit der Dünnschnittapparatur (Abb. 6, 23) oder einem
Messer/Skalpell werden jetzt feinste Schnitte
von dem mit Wachs umhüllten Objekt abgeschnitten. Diese Schnitte werden auf einen
Glasobjektträger gelegt und mit einem Deckglas abgedeckt.
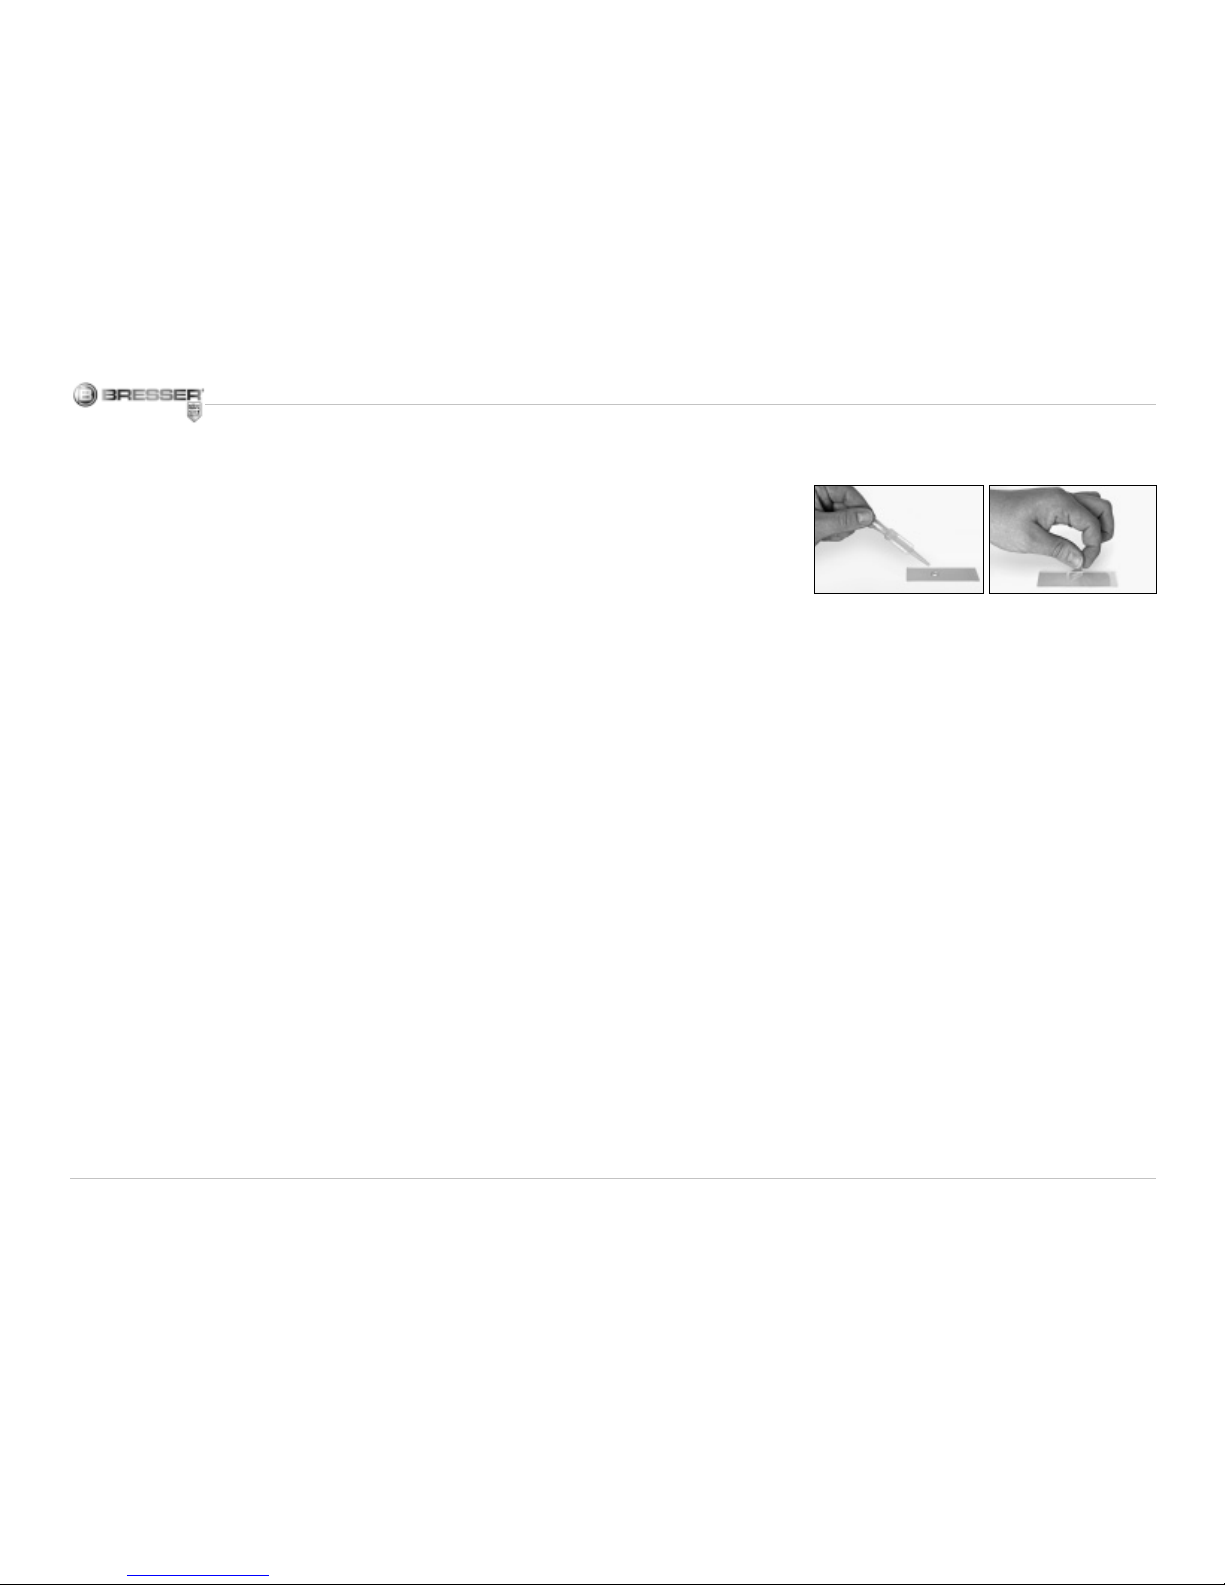
Wie stelle ich mein eigenes Präparat her?
Abb. 7 Abb. 8
2^
Nimm das Objekt, das Du beobachten möchtest und lege es auf einen Glasobjektträger
(Abb. 6, 20). Dann gebe mit einer Pipette
(Abb. 7, 26) einen Tropfen destilliertes Wasser auf das Objekt (Abb. 7). Nun setzte ein
Deckglas senkrecht am Rand des Wassertropfens an, so dass das Wasser entlang der
Deckglaskante verläuft. Danach senke das
Deckglas langsam über dem Wassertropfen
ab (Abb. 8).
Hinweis:
Das mitgelieferte Einschlussmittel „GumMedia“ (Abb. 6, 21b) dient zur Herstellung
von Dauerpräparaten. Gib dieses anstelle
von destilliertem Wasser hinzu. Wenn Du also
möchtest, dass das Objekt dauerhaft auf dem
Objektträger verbleibt, so nehme das aushärtende „Gum Media“.
Page 9

9
DE
Smartphone-Halterung
Die Smartphone-Halterung (22) wird auf das
Okular aufgesteckt.
Die Saugnäpfe müssen sauber und frei von
Staub und Schmutz sein. Ein leichtes Anfeuchten ist hilfreich. Drücke dein Smartphone auf die Halteplatte und stelle sicher, dass
es richtig fest sitzt. Als Sicherung solltest du
es mit der beiliegenden Gummischlaufe befestigen. Smartphones mit einer rauen Oberfl äche halten weniger gut als welche mit einer
glatten Oberfl äche.
Starte nun die Kamera-App. Die Kamera
muss genau über dem Okular aufl iegen.
Zentriere das Smartphone genau mittig über
dem Okular, sodass das Bild genau zentriert
auf deinem Display zu sehen ist. Eventuell ist
es nötig, durch die Zoomfunktion das Bild
Display füllend darzustellen. Eine leichte Abschattung an den Rändern ist möglich.
Nimm das Smartphone nach dem Gebrauch
wieder von der Halterung ab!
HINWEIS:
Achten Sie darauf, dass das Smartphone
nicht von der Halterung rutschen kann.
Bei Beschädigungen durch ein herabgefallenes Smartphone übernimmt die Bresser
GmbH keine Haftung!
Fehlerbehebung
Fehler Lösung
kein Bild erkennbar • Licht einschalten
• Schärfe neu einstellen
Bild fl immert (bei Beobachtung mit optional
erhältlichem MikrOkular) = Bildwiederholfrequenz des Monitors
nicht ausreichend
• ggf. Aufl ösung der
Grafi kkarte herabsetzen
Wie pfl ege ich mein Mikroskop und wie
gehe ich damit um?
Dein Mikroskop ist ein hochwertiges optisches Gerät. Deshalb solltest Du es vermeiden, dass Staub oder Feuchtigkeit mit
Deinem Mikroskop in Berührung kommt.
Vermeide auch Fingerabdrücke auf allen optischen Flächen (z. B. Okular).
Sollte dennoch Schmutz oder Staub auf dein
Mikroskop oder das Zubehör geraten sein,
entfernst Du diesen zuerst mit einem weichen
Pinsel. Danach reinigst Du die verschmutzte
Stelle mit einem weichen, fusselfreien Tuch.
Fingerabdrücke auf den optischen Flächen
entfernst Du am besten mit einem fusselfreien, weichen Tuch, auf das Du vorher etwas
Alkohol gegeben hast.
Nach der Benutzung solltest Du das Mikroskop und das Zubehör wieder in den dazugehörigen Behältnissen verstauen.
Bedenke:
Ein gut gepfl egtes Mikroskop behält auf Jahre
hinaus seine optische Qualität und so seinen
Wert.
Page 10
10
RISK to your child.
Aids with sharp edges and tips are so-
metimes used with this device. Please
store the device and all of its accessories and
aids out of the reach of children. There is a
risk of
INJURY.
This device contains electronic components
that are powered by either a mains connection or batteries. Never leave a child unsupervised with this device. The device should
only be used as per these instructions otherwise there is a serious
RISK of ELECTRICAL
SHOCK.
Children should only use this device under supervision. Keep packaging materials (plastic
bags, rubber bands, etc.) away from children.
There is a risk of
SUFFOCATION.
The chemicals and liquids provided should
be kept out of reach of children. Do not drink
the chemicals! Hands should be washed
thoroughly under running water after use. In
case of accidental contact with the eyes or
mouth rinse with water. Seek medical treatment for ailments arising from contact with the
chemical substances and take the chemicals
with you to the doctor.
FIRE-/ DANGER OF EXPLOSION!
Do not expose the device to high tem-
peratures. Use only the mains adapter
supplied or those battery types recommended. Never short circuit the device or batteries or throw into a fi re. Exposure to high temperatures or misuse of the device can lead to
short circuits, fi re or even explosion!
RISK of material damage
Never take the device apart. Please
consult your dealer if there are any
defects. The dealer will contact our service
centre and send the device in for repair if needed.
Position your device so that it can be disconnected from the power supply at any time. The
wall socket should always be located near the
device and be easily accessible, since the
plug on the power cord serves as a disconnecting device for the power supply.
Do not subject the device to temperatures exceeding 60° C.
TIPS on cleaning
Remove the device from it’s energy source before cleaning (remove
plug from socket / remove batteries).
Clean the exterior of device with a dry cloth.
Do not use cleaning fl uids so as to avoid
causing damage to electronic components.
Clean the lens (objective and eyepiece) only
with the cloth supplied or some other soft lintfree cloth (e.g. micro-fi bre). Do not use excessive pressure - this may scratch the lens.
Dampen the cleaning cloth with a spectacle
cleaning fl uid and use it on very dirty lenses.
Protect the device from dust and moisture.
Store the device in the bag supplied or in its
original packaging. Batteries should be removed from the device if it is not going to be
used for a long period of time.
Page 11

11
GB
DISPOSAL
Dispose of the packaging material/s as
legally required. Consult the local au-
thority on the matter if necessary.
Do not dispose of electrical equipment
in your ordinary refuse. The European
guideline 2002/96/EU on Electronic
and Electrical Equipment Waste and relevant
laws applying to it require such used equipment to be separately collected and recycled
in an environment-friendly manner. Empty batteries and accumulators must be disposed of
separately. Information on disposing of all
such equipment made after 01 June 2006
can be obtained from your local authority.
EC Declaration of Conformity
Bresser GmbH has issued a ‘Decla-
ration of Conformity’ in accordance
with applicable guidelines and corresponding
standards. This can be viewed any time upon
request.
Page 12

12
Here are the parts of your microscope
(Fig. 1-6):
1 10x WF Eyepiece
2 16x WF Eyepiece
3 Barlow Lens
4 Compartment for optional accessories
5 Eyepiece supports
6 Microscope Head
7 Set Screw
8 Objective Nosepiece
9 Objective
10 Clips
11 Microscope Stage
12 LED Illumination (transmitted light)
13 Microscope Base
14 Selection Knob for Illumination
15 Battery compartment (3x AA)
16 Focus knob
17 Color Filter
18 LED Illumination (refl ected light)
19 Compartment for optional accessories
20 5 Slides, 10 Cover Sips and 5 Prepared
Specimens plastic box
21 Specimens:
a) Yeast
b) “Gum Media” Glue
c) Sea Salt
d) Shrimp Eggs
22 Smartphone holder
23 Specimen Slicer
24 Shrimp Hatchery
25 Tweezers
26 Pipette
27 Carrying Case
How do I use my microscope?
Before you assemble your microscope, make
sure that the table, desk or whatever surface
that you want to place it on is stable, and does
not wobble.
How do I operate the electric LED
illumination?
The batteries supplied should be inserted into
the battery compartment (15) located in the
base plate before use.
Remove the battery compartment cover by
pressing lightly on the cover clip. Insert the
batteries (3x AA) into the holder.
There are two lights on the microscope. They
do not use light bulbs, but rather light-emitting
diodes (LED). The fi rst lamp shines onto the
specimen from below and the second from
above. (The thing that you want to observe
with the microscope is called the object or
specimen, by the way.) You can use each
lamp on its own, or both of them together.
There is a selection knob for this (Fig. 1, 14).
It has three numbers: I, II and III.
If you select the …
I, the light only comes from below (transmit-
ted light).
II, the light only comes from above (refl ected
light).
III, both lamps shine light on the specimen.
For transparent objects (transmitted-light objects), number I is best. In order to observe
fi rm, non-transparent objects (direct-light objects), select number II. For semi-transparent
objects, it is best to select number III.
It is not recommended to use number III for
transmitted-light objects on slides, since the
light may cause refl ections on the surface of
the slide, which will disturb your observation.
When do I use the color fi lters?
The color fi lters (Fig. 1, 17) are located below
the microscope stage (Fig. 1, 11). They help
you when you are observing very bright or
clear specimens. Here, you can choose from
various colors. This helps you better recognize the components of colorless or transparent objects (e.g. grains of starch, protozoa).
Page 13
13
GB
How do I adjust my microscope correctly?
First, loosen the screw (Fig. 1, 7) and turn the
microscope head (Fig. 1, 6) into a comfortable viewing position.
Each observation starts with the lowest magnifi cation.
Adjust the microscope stage (Fig. 1, 11) so
that it goes all the way down to the lowest
position. Then, turn the objective nosepiece
(Fig. 1, 8) until it clicks into place at the lowest
magnifi cation (objective 4x).
Note:
Before you change the objective setting, always move the microscope stage (Fig. 1, 11)
to its lowest position. This way, you can avoid
causing any damage!
Now, insert the 10x
eyepiece (Fig. 1, 1)
into the Barlow lens
(Fig. 1, 3). Make sure
that the Barlow lens
is placed all the way
into the eyepiece supports (Fig. 1, 5) and is
not pulled out (Fig. 2).
How do I observe the specimen?
After you have assembled the microscope
with the adequate illumination and adjusted it
correctly, the following basic rules are to be
observed:
Start with a simple observation at the lowest
magnifi cation. This way, it is easier to position
the object in the middle (centering) and make
the image sharp (focusing).
The higher the magnifi cation, the more light
you will require for a good image quality.
Now place the prepared specimen (Fig.
6, 20) directly under
the objective on the
microscope stage
(Fig. 3). The object
should be located di-
rectly over the illumination (Fig. 1, 12).
In the next step, take a look through the eyepiece (Fig. 1, 1) and carefully turn the focus
knob (Fig. 1, 16) until the image appears clear
and sharp.
Now you can select a higher magnifi cation
by slowly removing the Barlow lens (Fig. 1, 3)
from the eyepiece support (Fig. 1, 5). When
the Barlow lens is almost completely pulled
out, the magnifi cation can be increased to almost double.
If you would like an even higher level of mag-
nifi cation, insert the 16x eyepiece (Fig. 1, 2)
and turn the objective nosepiece (Fig. 1, 8) to
a higher setting (10x or 40x).
Important tip:
The highest magnifi cation is not always the
best for every specimen!
Note:
Each time the magnifi cation changes (eyepiece or objective change, pulling out the
Barlow lens), the image sharpness must be
readjusted with the focus knob (Fig. 1, 16).
When doing this, make sure to be careful. If
you move the microscope stage too quickly,
the objective and the slide could come into
contact and become damaged!
Which light for which specimen?
With this unit, a refl ected light and transmitted
light microscope, you can observe transparent, semi-transparent as well as non-transparent objects. The image of the given object of
observation is “transported” through the light.
As a result, only the correct light will allow you
to see something!
If you are observing non-transparent (opaque)
objects (e.g. small animals, plant components, stones, coins, etc.) with this microscope, the light falls on the object that is being observed.
Fig. 3
I
2)
Fig. 2
D
f
B/C
Page 14

14
From there, the light is refl ected back and
passes through the objective and eyepiece
(where it gets magnifi ed) into the eye. This is
refl ected light microscopy.
For transparent objections (e.g. protozoa), on
the other hand, the light shines from below,
through the opening in the microscope stage
and then through the object.
The light travels further through the objective
and eyepiece, where it is also magnifi ed, and
fi nally goes into the eye. This is transmittedlight microscopy.
Many microorganisms in water, many plan
components and the smallest animal parts
are already transparent in nature. Others have
to be prepared. We may make them transparent through a treatment or penetration with
the right materials (media), or by taking the
thinnest slices from them (using our hand or
a specimen slicer), and then examine them.
You can read more about this in the following
sections.
How do I make thin specimen slices?
Only do this with the supervision of your parents or another adult.
As I already pointed out, the thinnest slices
possible are taken from an object. In order to
get the best results, we need some wax or
paraffi n. It is best if you get a candle. Place
the wax in a pot and heat it carefully over a
low burner. Now, dip the object in the liquid
wax a few times. Then, let the wax get hard.
Using the specimen slicer (Fig. 6, 23) or a
knife/scalpel, cut the smallest slices from the
object that is covered with wax. These slices
are to be laid on a slide and covered with a
cover slip.
How do I make my own specimens?
Fig. 7 Fig. 8
2^
Take the object that you want to observe and
place it on a glass slide (Fig. 6, 20). Then,
add a few drops of distilled water on the object (Fig. 7) using a pipette (Fig. 7, 26). Now,
place a cover slip vertically at the edge of the
drop of water, so that the water runs along the
edge of the cover slip. Then, slowly lower the
cover slip over the water drops (Fig. 8).
Note:
The included glue “gum media” (Fig. 5, 21b)
is used to make permanent prepared specimens. Use this in place of the distilled water.
If you want to keep the object in place on the
slide permanently, use the gum media.
Smartphone holder
Attach the smartphone holder (22) to the
eyepiece. The suction cups must be clean
and free from dust and dirt. A slight moistening is helpful.
Now press your smartphone on the retaining plate and make sure that it is properly
secured.
As a backup, you should secure it with the
enclosed rubber strap.
Smartphones with a rough surface will not
hold as good as smartphones with a smooth
surface.
Now start the Camera app. The camera
needs to rest just above the eyepiece.
Center the smartphone exactly over the
eyepiece, so the image can be seen precisely centered on your screen. In some cases
you need to adjust with the zoom function to
display the image fullscreen. A light shading
at the edges is possible.
Take the smartphone carefully off the holder
after use.
NOTE:
Make sure that the smartphone can not slip
out of the holder. Bresser GmbH assumes
no liability for any damages caused by a
dropped smartphone.
Page 15

15
GB
Troubleshooting
Error Solution
No recognizable
image
• Turn on light
• Readjust focus
Image fl ickers (while
observing with
optional available
MicrOcular)
= Monitor refresh
rate not adequate
• If necessary, increase resolution
of graphics card
Make sure your microscope has a long
service life.
Clean the lens (objective and eyepiece) only
with the cloth supplied or some other soft lintfree cloth (e.g.microfi bre). Do not press hard
as this might scratch the lens.
Ask your parents to help if your microscope
is really very dirty. The cleaning cloth should
be moistened with cleaning fl uid and the lens
wiped clean using little pressure.
Make sure your microscope is always protected against dust and dirt. After use leave it in
a warm room to dry off. Then install the dust
caps and keep it in the case provided.
Page 16

16
DANGER pour votre enfant !
Le travail avec cet appareil entraîne
souvent l’utilisation d’accessoires
pointus et à angles vifs. Conservez donc cet
appareil ainsi que tous ses accessoires à un
endroit inaccessible aux enfants.
RISQUE DE
BLESSURES !
Cet appareil contient des pièces électroniques
fonctionnant à l‘aide d’une source de courant
(bloc secteur et/ou piles). Ne laissez jamais
vos enfants sans surveillance utiliser cet appareil ! L’appareil doit impérativement être utilisé selon les instructions du mode d’emploi :
DANGER de CHOC ÉLECTRIQUE !
Les enfants ne devraient utiliser l’appareil
que sous surveillance. Gardez hors de leur
portée les matériaux d’emballage (sachets
en plastique, élastiques etc.) !
DANGER
D’ÉTOUFFEMENT !
Les produits chimiques et les liquides inclus à
la livraison doivent être tenus hors de la portée des enfants ! Ne pas boire les produits
chimiques ! Bien se laver les mains sous l’eau
courante après utilisation. En cas de contact
involontaire avec les yeux ou la bouche, bien
rincer à l’eau claire. En cas de troubles, consultez sans tarder un médecin et montrez-lui
les substances.
DANGER D’INCENDIE/D’EXPLOSION !
N’exposez pas l’appareil à de fortes
températures. Utilisez uniquement
le bloc secteur inclus à la livraison ou bien
les piles recommandées. Ne court-circuitez
pas l’appareil avec les piles et ne les jetez
pas dans le feu ! Une chaleur excessive ou
un mauvais maniement peut provoquer des
courts-circuits, des incendies voire des explosions !
DANGER de dommages sur le
matériel !
Ne démontez jamais l’appareil ! En cas
d’endommagement, adressez-vous à
votre revendeur. Il prendra contact avec le
centre de service et pourra, le cas échéant,
envoyer l’appareil au service de réparations.
Placez votre appareil de façon à ce qu’il
puisse être déconnecté à tout moment de
l‘alimentation. La prise de courant doit toujours être située près de l‘appareil et être facilement accessible, dans la mesure ou la prise
sur le cordon d‘alimentation sert de dispositif
déconnexion de l‘alimentation.
N’exposez jamais l’appareil à des températures de plus de 60° C !
REMARQUES concernant le nettoyage
Avant de procéder au nettoyage de
l’appareil, séparez-le de la source
de courant (retirez le bloc secteur
de la prise ou retirez les piles) !
Ne nettoyez que l’extérieur de l’appareil et à
l’aide d’un chiffon propre. N’utilisez pas de
liquide de nettoyage afi n d’éviter tout dommage au système électronique.
Pour nettoyer les lentilles (oculaires et /ou
objectifs), utilisez uniquement le chiffon à
lentilles ci-joint ou bien un chiffon doux et
non pelucheux (par exemple en microfi bre).
N’appuyez pas trop fortement le chiffon sur
les lentilles pour ne pas les rayer.
Pour retirer des traces de saleté plus résistantes, humidifi ez légèrement le chiffon avec un
liquide prévu pour le nettoyage des lunettes
et passez sur les lentilles en exerçant une légère pression.
Tenez l’appareil à l’abri de la poussière et de
l’humidité ! Conservez-le dans la sacoche incluse à la livraison ou bien dans l’emballage
de transport. Retirez les piles de l‘appareil
si vous ne n’utilisez pas pendant un certain
temps !
Page 17

17
FR
ÉLIMINATION
Éliminez les matériaux d’emballage
selon le type de produit. Pour plus
d’informations concernant l’élimination
conforme, contactez le prestataire communal
d’élimination des déchets ou bien l’offi ce de
l’environnement.
Ne jetez pas d’appareils électriques
dans les ordures ménagères !
Selon la directive européenne 2002/96/
EG relative aux déchets d‘équipements électriques et électroniques et à sa mise en
œuvre au niveau du droit national, les équipements électriques doivent être triés et
déposés à un endroit où ils seront recyclés
de façon écologique.
Les piles et les accumulateurs usagés
doivent être déposés dans des conteneurs de
collectes de piles prévus à cet effet. Pour
plus d’informations concernant l’élimination
conforme d’appareils usagés et de piles
usagées produites après le 01.06.2006,
contactez le prestataire d’élimination communal ou bien l’offi ce de l’environnement.
Déclaration de conformité CE
Bresser GmbH a émis une « déclarati-
on de conformité » conformément aux
lignes directrices applicables et aux normes
correspondantes. Celle-ci peut être consultée à tout moment sur demande.
Page 18

18
Voici les pièces de ton microscope
(Illustr. 1-6):
1 Oculaire 10x WF
2 Oculaire 16x WF
3 Lentille Barlow
4 Compartiment pour accessoires optionnels
5 Supports d’oculaire
6 Tête de microscope
7 Vis de serrage
8 Nez de l’objectif
9 Objectif
10 Clip maintien
11 Table du microscope
12 Eclairage LED (par transparence)
13 Pied de microscope
14 Roue de sélection pour l’éclairage
15 Compartiment à piles (3x AA)
16 Roue de focalisation
17 Disque de fi ltre à couleur
18 Eclairage LED (Lumière réfl échie)
19 Compartiment pour accessoires optionnels
20 5 Porte-objectif, 10 Lamelle
couvre-objets et 5 préparation
durable dans une boîte en plastique
21 Préparations :
a) Levure
b) Produit pour inclusion du papier collant
« Gum-Media »
c) Eau de mer
d) Œuf de crevette
22 Support pour Smartphone
23 Appareil à coupe
24 Accessoires bruts des crevettes
25 Pincette
26 Pipette
27 Valise de transport
Où puis-je utiliser mon microscope ?
Avant que tu ne montes ton microscope,
veille à ce que la table, le placard, ou l’endroit
où tu souhaites le placer, soit stable et solide
et qu’il ne vacille pas.
Comment dois-je utiliser l’éclairage LED
électrique ?
Avant la mise en service, veuillez insérer la
batterie fournie dans le compartiment (15)
de batterie située dans le fond. Pour ce
faire, veuillez d’abord déposer le couvercle
du compartiment en exerçant une légère
pression sur son mécanisme de fermeture.
Insérez ensuite la batterie (3x AA) dans son
support. Attention ! Veillez impérativement à
la bonne polarité de la batterie indiquée sur
le support.
Deux lampes se trouvent dans le microscope.
Elles n’éclairent pas avec des ampoules, mais
avec des diodes électroluminescentes (LED).
La première lampe éclaire la préparation par
en dessous, et la seconde lampe par au-des-
sus. (Ce que tu veux observer sous le microscope est désigné par Objet ou Préparation.)
Tu peux utiliser chaque lampe séparément,
mais également ensemble. Pour cela, il y a
une roue de sélection (Illustr. 1,14). Celle-ci
possède trois numéros: I, II et III.
Si tu choisis l’option…
I, la lumière n’éclaire que par en dessous
(par transparence).
II, la lumière n’éclaire que par le dessus
(lumière réfl échie).
III, les deux lampes éclairent la préparation.
Pour les objets transparents l’option I est la
meilleure. Pour contempler des objets durs
et transparents (objets en lumière réfl échie)
choisis l’option II. Pour les objets semi-transparents, choisis plutôt l’option III.
Le mode de fonctionnement III pour les objets transparents placés sur les portes-objets
n’est pas recommandé, car il peut y avoir des
refl ets qui perturbent.
Pourquoi j’utilise le disque de fi ltre à
couleur ?
Le disque de fi ltre (Illustr. 1,17) se trouve sous
la table du microscope (Illustr. 1,11). Il t’aide
à observer des préparations très claires ou
lucides. Ici tu peux choisir entre différentes
couleurs. Les objets sans couleur ou transparents (par ex. grains d’amidon, organisme
Page 19

19
FR
unicellulaire) sont plus faciles à reconnaître
dans leurs composants.
Comment régler correctement mon
microscope ?
Tout d’abord, desserre la vis (Illustr. 1,7) et
tourne la tête du microscope (Illustr. 1,6)
dans une position d’observation confortable.
Chaque observation commence avec le grossissement le plus faible.
Tout d’abord, descends complètement la
table du microscope (Illustr. 1,11). Puis tourne
le nez de l’objectif (Illustr. 1, 8) au point que le
grossissement (Objectif 4x) le plus faible soit
enclenché.
Indication :
Avant de changer le réglage de l’objectif,
commence toujours par bien descendre la
table du microscope (Illustr. 1,11). Ainsi tu
peux éviter d’éventuels dommages !
Maintenant, place
l’oculaire 10x (Illustr.
1,1) dans la lentille de
Barlow (Illustr. 1,3).
Veille à ce que la lentille de Barlow soit
entièrement dans les
supports oculaires (Il-
lustr. 1,5) et qu’elle ne soit pas retirée (Illustr.
2).
Comment dois-je observer la préparation ?
Une fois que tu as monté et réglé le microscope avec l’éclairage approprié, les principes
suivants doivent s’appliquer :
Commence par une observation simple au
grossissement le plus faible. Ainsi, il est plus
facile de mettre l’objet au milieu (Centrage) et
de mettre l’image au point (Focalisation).
Plus le grossissement est élevé, plus tu as
besoin de lumière pour une bonne qualité
d’image.
Maintenant, pose une
préparation durable
(Illustr. 6, 20) directement sous l’objectif
sur la table du microscope (Illustr. 3). L’objet
à observer ne doit pas
être placé directement sur l’éclairage (Illustr.
1, 12).
Pour l’étape suivante, tu dois regarder à travers l’oculaire (Illustr. 1, 1) puis tourner la roue
de focalisation avec précaution (illustr. 1, 16)
jusqu’à ce que l’image soit nette.
Maintenant, tu peux régler à un grossisse-
ment plus élevé, en retirant lentement la lentille de Barlow (Illustr. 1, 3) des supports de
l’oculaire (Illustr. 1, 5). Si la lentille de Barlow
est retirée entièrement et rapidement, le
grossissement peut être augmenté d’environ
le double.
Si tu souhaites avoir des grossissements plus
élevés, règle l’oculaire 16x (Illustr. 1,2) et
tourne le nez de l’objectif (Illustr. 1,8) sur des
réglages plus élevés (10x ou 40x).
Indication importante :
Le grossissement le plus élevé n’est pas le
meilleur pour toutes les préparations !
Attention :
En cas de réglage différent du grossissement
(changement d’oculaire ou d’objectif, retrait
de la lentille de Barlow) la netteté de l’image
doit être à nouveau réglée sur la roue de focalisation 1,16). Sois très prudent lors de cette
manipulation. Si tu sors la table de microscope trop vite, l’objectif et le porte-objet peuvent
se toucher et être endommagés !
Quelle lumière pour quelle préparation ?
Avec cet appareil, un microscope à lumière
réfl échie et transparente, les objets transparents, semi-transparents ainsi que les objets
non transparents peuvent être observés.
L’image de l’objet observé en question sera
« transportée » sur la lumière. Puis, le bon
Fig. 3
I
2)
Fig. 2
D
f
B/C
Page 20

20
éclairage décide si tu peux voir quelque
chose ou pas !
Si tu observes des objets non transparents
(opaques) (par ex. de petits animaux, des
parties de plante, des pierres, des pièces,
etc.) avec ce microscope, alors la lumière se
répand sur l’objet à observer.
De là, la lumière sera retransmise et arrive
aux yeux par l’objectif et l’oculaire (ce qui provoque le grossissement). Ceci est la microscopie à lumière réfl échie.
Pour les objets transparents (par ex. Organisme unicellulaire) la lumière brille par en
dessous à travers l’ouverture dans la table du
microscope puis à travers l’objet observé.
Le chemin de la lumière mène jusqu’à l’objectif et l’oculaire, ou il y a encore un grossissement, puis elle arrive aux yeux. Ceci est la
microscopie transparente.
Plusieurs petits êtres marins, des parties de
plante et les composants les plus fi ns sont
de nature déjà transparents. D’autres doivent
d’abord être préparés de façon adéquate. A
moins que nous les rendions transparents
avec un traitement préalable ou une pénétration avec des matières (fl uides) ou en coupant
les éléments les plus fi ns de ces derniers
(coupe, lame mince) et que nous analysons.
Tu peux en apprendre plus sur ce procédé
dans les paragraphes suivants.
Comment fabriquer des tranches de préparation fi nes ?
Tu ne dois les effectuer que sous la supervision de tes parents.
Comme je l’ai déjà dit, un objet doit être
transformé en fi nes tranches. Pour obtenir de
meilleurs résultats, nous avons besoin d’un
peu de cire ou de paraffi ne. Prends plutôt
une bougie. Place la cire dans une casserole
pour la faire chauffer un peu à feux doux.
Maintenant, plonge l’objet plusieurs fois dans
la cire liquide. Puis laisse la cire se solidifi er.
Avec l’appareil de coupe (Illustr. 6, 23) ou un
couteau/scalpel, des tranches fi nes doivent
maintenant être coupées de l’objet enduit
de cire. Ces tranches seront posées sur un
porte-objet en verre et couvertes avec un
cache.
Comment effectuer ma propre
préparation ?
Fig. 7 Fig. 8
2^
Prends l’objet que tu souhaites observer et
pose le sur un porte-objet en verre (Illustr. 6,
20). Puis ajoute une goutte d’eau distillée sur
l’objet (Illustr.7) à l’aide d’une pipette (Illustr. 7,
26). Maintenant pose un cache à la verticale
au bord de la goutte d’eau, de sorte que l’eau
s’écoule le long du rebord du cache. Puis
baisse le cache lentement sur la goutte d’eau
(Illustr. 8).
Indication :
Le produit pour inclusion inclus « Gum-Media » (Illustr. 6, 21b) sert à la fabrication de
préparations durables. Ajoute ceci à la place
de l’eau distillée. Si tu souhaites également
que l’objet demeure sur le porte-objet, alors
prends le « Gum-Media » durci par vieillissement.
Page 21

21
FR
Adaptateur pour Smartphone
L’adaptateur de Smartphone (22) est fi xé à
l‘oculaire du microscope.
Les ventouses doivent être propres et exemptes de poussière et de saleté. Une légère
humidifi cation est utile. Maintenant, appuyez
votre Smartphone sur la plaque de retenue
et assurez-vous qu‘il est bien fi xé. Pour sécuriser le montage, vous devez le fi xer avec
le bracelet en caoutchouc. Les Smartphones avec une surface rugueuse sont moins
bien adaptés à ce type de montage que les
Smartphones avec une surface lisse.
Maintenant, lancez l‘application Appareil
photo. La caméra doit se trouver juste audessus de l‘oculaire. Centrez le Smartphone
exactement au-dessus de l‘oculaire, de telle
sorte que l‘image soit précisément au centre
de votre écran.
Dans certains cas, vous devrez jouer avec
la fonction du zoom pour affi cher l‘image en
plein écran. Un léger ombrage sur les bords
est possible.
Retirez soigneusement le Smartphone de
son support après utilisation.
REMARQUE:
Assurez-vous que le Smartphone ne puisse
pas glisser hors du support.
Bresser GmbH décline toute responsabilité
pour tout dommage causé en cas de chute
du Smartphone.
Dépannage
Erreur Solution
Aucune image n’est
identifi able
• Allumer la lumière
• Faire une nouvelle
mise au point
L’image scintille (lors
de l’observation
avec le optionnels
microculaire)
= La fréquence de
répétition de l’image
du moniteur n’est
pas suffi sante)
• si besoin,
diminuer la
résolution de la
carte graphique
Pour pouvoir profi ter longtemps de ton
microscope...
Nettoie les lentilles (oculaires et/ou objectifs)
uniquement avec le chiffon à lentilles ci-joint
ou bien avec un autre chiffon doux et non
pelucheux (par exemple en microfi bre). N’appuie pas le chiffon trop fort sur les lentilles,
car elles sont très fragiles et tu risquerais de
les rayer !
Si ton microscope est très sale, demande à
tes parents de t’aider à les nettoyer. Demande-leur d’humidifi er le chiffon avec un peu de
liquide de nettoyage et de nettoyer les lentilles en appuyant très peu.
Veille à toujours tenir ton microscope à l’abri
de la poussière et de l’humidité ! Après l’avoir
utilisé, le quelque temps chez toi à température ambiante afi n que le reste d’humidité
puisse s’évaporer. Conserve ton microscope
dans la pochette que tu as reçue à la livraison.
Page 22

22
GEVAAR voor uw kind!
Bij het werken met dit apparaat wor-
den vaak scherpe en puntige hulpmiddelen gebruikt. Bewaar dit apparaat daarom
samen met alle onderdelen en hulpmiddelen
op een plaats die niet voor kinderen toegankelijk is. Uw kind kan
LETSEL oplopen!
Dit apparaat bevat elektronische onderdelen
die via een stroombron (stroomvoorziening
of batterijen) worden aangedreven. Zorg dat
kinderen tijdens de bediening altijd onder
toezicht staan! Gebruik mag uitsluitend plaats
vinden zoals in de gebruiksaanwijzing staat
omschreven, anders bestaat het
GEVAAR van
een ELEKTRISCHE SCHOK!
Kinderen mogen het apparaat uitsluitend
onder toezicht gebruiken. Houdt het verpakkingsmateriaal (plastic zakken, elastiekjes,
e.d.) buiten bereik van kinderen! Hierdoor
kunnen ze
STIKKEN!
De bijgeleverde chemicaliën en vloeistoffen
mogen niet in de handen van kinderen vallen!
Chemische stoffen niet drinken! Handen na
gebruik met stromend water grondig schoonmaken. Bij onbedoeld contact met ogen of
mond met water uitspoelen. Bij klachten onmiddellijk een arts raadplegen en de substanties laten zien.
BRAND-/EXPLOSIEGEVAAR!
Stel het apparaat niet bloot aan hoge
temperaturen. Gebruik uitsluitend de
meegeleverde adapter of de aanbevolen batterijen. Apparaat en batterijen niet kortsluiten
en niet in open vuur gooien! Door overmatige
hitte en onoordeelkundig gebruik kunnen
kortsluiting, brand en zelfs explosies optreden!
GEVAAR voor schade aan het materiaal!
Haal het apparaat niet uit elkaar! Neem
in geval van storingen contact op met
de speciaalzaak. Deze neemt contact op met
het servicecentrum en kan het apparaat indien nodig ter reparatie versturen.
Plaats uw toestel zodanig dat u op elk moment de stroomvoorziening kunt onderbreken. De wandcontactdoos moet nooit in de
buurt van het toestel zijn en moet altijd goed
toegankelijk zijn, aangezien de stekker van
het netsnoer voorzien is als elektrische scheidingsinstallatie.
Stel het apparaat niet bloot aan temperaturen
boven de 60ºC!
TIPS voor het schoonmaken
Ontkoppel het apparaat vóór het
schoonmaken van de stroombron
(stekker uit het stopcontact nemen
of batterijen verwijderen)!
Reinig het apparaat uitsluitend aan de buitenzijde met een droge doek. Gebruik geen
reinigingsvloeistof om schade aan de elektronische onderdelen te voorkomen.
Reinig de lenzen (oculairglazen en/of objectiefglazen) uitsluitend met het meegeleverde
lenspoetsdoekje of met een andere zachte en
pluisvrije doek (bv. Velcro). Druk het doekje
er niet te stevig op om krassen op de lenzen
te voorkomen.
Om grotere vuildeeltjes te verwijderen maakt
u het poetsdoekje nat met een schoonmaakvloeistof voor brillen en wrijft u daarmee de
lenzen met zachte druk af.
Bescherm het apparaat tegen stof en vocht!
Bewaar het in de meegeleverde tas of verpakking. De batterijen dienen uit het apparaat te
worden verwijderd als het gedurende langere
tijd niet wordt gebruikt.
Page 23

23
NL
AFVALVERWERKING
Bied het verpakkingsmateriaal op soort
gescheiden als afval aan. Informatie
over de juiste afvalverwerking kunt u van uw
plaatselijke afvalverwerkingsbedrijf of de milieudienst krijgen.
Gooi elektrische apparaten niet weg
met het huisvuil!
Volgens de Europese Richtlijn
2002/96/EG over afgedankte elektrische
en elektronische apparaten alsmede de daaraan gerelateerde nationale wetgeving moeten
gebruikte elektrische apparaten gescheiden
worden ingezameld en volgens de milieurichtlijnen worden gerecycled.
Lege batterijen en accu’s moeten door de
gebruiker bij inzamelingspunten voor batterijen worden aangeboden. Informatie over de
afvalverwerking van oude apparaten of batterijen die na 1 juni 2006 zijn gemaakt, krijgt u
van uw plaatselijke afvalverwerkingsbedrijf of
de milieudienst.
EG-conformiteitsverklaring
Een “conformiteitsverklaring” in
overeenstemming met de van toepassing zijnde richtlijnen en overeenkomstige
normen is door Bresser GmbH afgegeven.
Deze kan elk moment op aanvraag worden
ingezien.
Page 24

24
Je microscoop bestaat uit de volgende
onderdelen (afb.1-6):
1 10x WF oculair
2 16x WF oculair
3 Barlow-lens
4 Vak voor optionele accessoires
5 Oculairbuis
6 Microscoopkop
7 Blokkeerschroef
8 Objectiefrevolver
9 Objectief
10 Klem
11 Microscooptafel
12 LED-lampje (doorvallend licht)
13 Microscoopvoet
14 Regelwiel voor de verlichting
15 Batterijvak (3x AA)
16 Scherpteregeling
17 Kleurenfi lterschijf
18 LED-lampje (oplicht)
19 Vak voor optionele accessoires
20 5
objectglazen, 10 dekglaasjes en 5 houdbare
preparate in een box van kunststof
21 Preparaten:
a) Gist
b) Inbedmedium „Gum-Media“
c) Zeezout
d) Garnaleneieren
22 Smartphone houder
23 Microtoom, apparaat om hele dunne plak-
jes te snijden
24 Garnalenbroedtank
25 Pincet
26 Pipet
27 Transportkoffer
Waar werk ik het best met de microscoop?
Let erop dat de tafel of kast of waar je de microscoop op neer wilt zetten, stabiel is en stevig staat zonder te wiebelen.
Bovendien moet er een stopcontact in de
buurt zijn om de lamp van de microscoop van
stroom te voorzien (220-230V).
Hoe bedien ik de elektrische
LED-verlichting?
Voor de verlichting heb je de trafo met netstekker en stroomkabel nodig (afb. 6, 22). Eerst
steek je de kleine stekker van de stroomkabel
in het contact aan de achterkant van de microscoop (afb. 1, 15). Steek de grote netstekker daarna in het stopcontact.
De microscoop heeft twee lampen. Er zitten
geen gloeilampen in, maar moderne lichtdiodes (LED). De eerste lamp schijnt van onder
op het preparaat en de tweede lamp van boven. (Dat, wat je onder de microscoop wilt bekijken, heet trouwnes object of preparaat.) Je
kunt elke lamp apart gebruiken, maar ook allebei tegelijk. Hiervoor dient het regelwiel (afb.
1, 14). Hier staan drie nummers op: I, II en III.
Kies je voor…
I, dan komt het licht van onderen (doorlicht).
I, dan schijnt het licht alleen van boven
(oplicht).
III, dan belichten beide lampen het preparaat.
Voor doorzichtige objecten (doorlicht-objecten) is nr. I het best. Om vaste, ondoorzichtige objecten (oplicht-objecten) te bekijken,
kies je voor nr. II. Voor halfdoorzichtige objecten gebruik je het best nr. III.
Stand III is voor doorlicht-objecten op objectglazen niet prettig werken, omdat er storende
spiegelingen op de objectdrager kunnen optreden.
Waarvoor gebruik ik de kleurenfi lterschijf?
De kleurenfi lterschijf (afb. 1, 17) bevindt zich
onder de microscooptafel (afb. 1, 11). De
schijf is handig om erg lichte of doorzichtige
preparaten beter te kunnen bekijken. Je kunt
hierbij voor verschillende kleuren kiezen. Zo
kun je de details van kleurloze of doorzichtige
objecten (bijv. zetmeelkorrels, ééncelligen)
beter bekijken.
Hoe stel ik mijn microscoop goed in?
Draai eerst de schroef (afb. 1, 7) los en draai
de microscoopkop (afb. 1, 6) in een prettige
observatiestand.
Page 25

25
NL
Begin elke observatie met de laagste vergroting.
Breng de microscooptafel (afb. 1, 11) helemaal naar beneden. Draai vervolgens de objectiefrevolver (afb. 1, 8) zo ver door, dat hij op
de laagste vergroting (objectief 4x) vastklikt.
Opmerking:
Breng de microscooptafel altijd eerst helemaal naar beneden
(afb. 1, 11) voordat je
van objectief wisselt.
Hiermee voorkom je
eventuele beschadigingen!
Schuif nu het 10x oculair (afb. 1, 1) in de Barlow-lens (afb. 1, 3). Let erop dat de Barlowlens helemaal in de oculairbuis (afb. 1, 5) zit
en er niet half is uitgetrokken (afb. 2).
Hoe bekijk ik het preparaat?
Nadat je de microscoop met de juiste belichting hebt opgebouwd en ingesteld, gelden de
volgende basisprincipes:
Begin met een eenvoudige observatie met de
laagste vergrotingsfactor. Zo is het gemakkelijker om het object in het midden te krijgen
(centreren) en het beeld scherp te stellen (focusseren).
Hoe hoger de ingestelde vergrotingsfactor,
des te meer licht is er nodig voor een goed
belicht beeld.
Leg nu een houdbaar
preparaat (afb. 6, 20)
direct onder het objectief op de microscooptafel (afb. 3). Het te
observeren object
dient hierbij precies
boven het lampje (afb. 1, 12) te liggen.
In de volgende stap kijk je door het oculair
(afb. 1, 1) en draai je voorzichtig aan de
scherpteregeling (afb. 1, 16) tot het beeld
zich scherp aftekent.
Nu kun je een hogere vergroting instellen
door de Barlow-lens (afb. 1, 3) langzaam uit
de oculairbuis (afb. 1, 5) te trekken. Als de
Barlow-lens bijna helemaal is uitgetrokken,
wordt de vergroting bijna dubbel zo groot.
Als je nu nog sterkere vergrotingen wilt zien,
gebruik je het oculair 16x (afb. 1, 2) en draai
je de objectiefrevolver (afb. 1, 8) op hogere
instellingen (10x of 40x).
Let op:
Niet bij elk preparaat is de hoogste vergrotingsfactor ook de beste!
Denk erom: Bij een andere instelling van de
vergroting (wisselen van oculair of objectief,
uittrekken van de Barlow-lens) moet de
scherpte van het beeld opnieuw worden ingesteld met de scherpteregeling (afb. 1, 16).
Ga hierbij voorzichtig te werk. Als je de microscooptafel te snel naar boven laat komen,
kunnen het objectief en de objectdrager met
elkaar botsen en beschadigd raken!
Welk licht voor welk preparaat?
Met dit apparaat, een opvallend- en doorvallend-lichtmicroscoop, kunnen zowel doorzichtige, halfdoorzichtige als niet-doorzichtige objecten worden bekeken.
Het beeld van het geobserveerde object
wordt via het licht „getransporteerd”. Daarom
bepaalt de juiste belichting, of je iets kunt zien
of niet!
Als je niet-doorzichtige (opake) objecten (bijv.
kleine beestjes, delen van planten, stenen,
munten enz.) met deze microscoop bekijkt,
dan valt het licht op het voorwerp zelf.
Van daar uit wordt het licht teruggekaatst en
komt het door het objectief en het oculair (zorgen voor de vergroting) in het oog terecht. Dit
wordt opvallend-licht-microscopie genoemd.
Afb. 3
I
2)
Afb. 2
D
f
B/C
Page 26

26
Bij doorzichtige (transparante) objecten (bijv.
ééncelligen) schijnt het licht echter van onderen door de opening in de microscooptafel en
dan door het bekeken voorwerp.
Van daar uit gaat het licht verder door het objectief en het oculair, waar weer de vergroting
plaatsvindt, en komt tenslotte in het oog terecht. Dit wordt doorvallend-licht-microscopie
genoemd.
Veel kleine waterdiertjes, plantendelen en delicate gedeelten van dieren zijn al van nature
transparant. Anders moeten we er zelf voor
zorgen dat ze transparant worden door ze te
prepareren. Dit kan door ze voor te behandelen of te doordrenken met hiervoor geschikte
middelen (media), waardoor ze doorzichtig
worden of door ze in hele dunne plakjes te
snijden (met de hand of met de micronoom)
en deze plakjes dan te onderzoeken. Dit
wordt in de volgende alinea’s uitgelegd.
Hoe maak ik dunne
preparaatdoorsnedes?
Doe dit uitsluitend samen met je ouders of andere volwassenen.
Zoals ik al zei, moeten er van een voorwerp
liefst zo dun mogelijke doorsnedes worden
gemaakt. Voor een goed resultaat hebben we
wat was of parafi ne nodig. Neem hiervoor gewoon een kaars. Doe de was in een pan en
verhit tot de was smelt. Dompel het voorwerp
nu meerdere malen in de vloeibare was. Laat
de was daarna hard worden. Met de dunsnijder of microtoom (afb. 6, 23) of een mes of
scalpel worden nu hele fi jne doorsnedes van
het met was omhulde object afgesneden. Leg
de plakjes op een objectglas en dek ze met
een dekglaasje af.
Hoe maak ik mijn eigen preparaat?
Afb. 7 Afb. 8
2^
Neem het object dat je wilt bekijken en leg
het op een objectglas (afb. 6, 20). Doe er
dan met een pipet (afb. 7, 26) een druppeltje gedestilleerd water op (afb. 7). Zet nu
een dekglaasje loodrecht op de rand van de
waterdruppel, zodat het water zich langs de
rand van het dekglaasje verdeelt. Laat het
dekglaasje nu langzaam bovenop de waterdruppel zakken (afb. 8).
Opmerking:
Het meegeleverde inbedmiddel „Gum-Media“
(afb. 6, 21b) is voor houdbare preparaten bedoeld. Gebruik het op dezelfde manier als de
druppel water. Als je dus wilt dat het voorwerp
langdurig op het objectglas bewaard blijft,
neem je het uithardende „Gum Media“.
Smartphone houder
De smartphone houder (22) zal aan het
oculair worden bevestigd.
De zuignappen moet schoon en vrij van stof
en vuil zijn. Een lichte bevochtiging nuttig.
Druk nu op uw smartphone op de bevestigingsplaat en zorg ervoor dat het goed is
beveiligd. Als back-up, moet je het vast met
de bijgeleverde rubberen band. Smartphones met een ruw oppervlak te houden
minder goed dan smartphones met een glad
oppervlak.
Nu start de camera app. De camera moet
rusten net boven het oculair. Centreer de
smartphone precies boven het oculair, zodat
het beeld gezien nauwkeurig kan worden
gecentreerd op uw scherm. In sommige
gevallen moet je aan te passen met de
zoom-functie om het beeld volledig scherm
weer te geven. Een lichtafschermende aan
de randen mogelijk. Neem de smartphone
voorzichtig uit de houder na gebruik.
LET OP:
Zorg ervoor dat de smartphone niet kan
wegglijden uit de houder. Bresser GmbH
aanvaardt geen aansprakelijkheid voor eventuele schade veroorzaakt door een afgevallen smartphone.
Page 27

27
NL
Storingen oplossen
Fout Oplossing
Geen beeld te zien • Doe het licht aan
• Stel de scherpte
opnieuw in
Beeld fl ikkert (bij
observatie met optionele MicrOculair)
= herhalingsfrequentie beeldscherm niet
toereikend)
• verlaag evt. de
resolutie van de
grafi sche kaart
Om zo lang mogelijk plezier van je
microscoop te hebben…
Reinig de lenzen (oculairglazen en/of objectiefglazen) uitsluitend met het meegeleverde
lenspoetsdoekje of met een andere zachte en
pluisvrije doek (bv. Velcro). Je mag het doekje
er niet te stevig op drukken! De lenzen zijn
namelijk erg gevoelig en kunnen misschien
krassen krijgen.
Als je microscoop erg vuil is, vraag dan aan je
ouders om je bij het schoonmaken te helpen.
Vraag of ze het poetsdoekje met een beetje
reinigingsvloeistof nat maken en daarmee de
lenzen met weinig druk schoonvegen.
Let erop dat je microscoop steeds tegen stof
en vochtigheid is beschermd! Laat hem na
gebruik een tijdje in een warme ruimte staan,
zodat eventueel resterend vocht kan verdampen. Breng de stofkapjes aan en bewaar de
microscoop in de meegeleverde tas.
Page 28

28
PERICOLO per i bambini!
Nell’utilizzo del presente apparecchio
si ricorre spesso all‘uso di strumenti
ausiliari appuntiti o dotati di spigoli taglienti.
Conservare quindi l’apparecchio, gli accessori e gli strumenti ausiliari in un luogo inaccessibile ai bambini.
PERICOLO DI LESIONI!
Il presente apparecchio contiene parti elettroniche che funzionano con l’apporto di energia
da sorgenti elettriche (alimentatore e/o batteria). Non lasciare i bambini incustoditi mentre
utilizzano l’apparecchio! L’utilizzo dell‘apparecchio è consentito esclusivamente nel rispetto delle istruzioni per l’uso fornite. In caso
contrario sussiste il
RISCHIO di SCARICHE
ELETTRICHE!
Non lasciare mai incustoditi i bambini quando usano l’apparecchio. Tenere i materiali di
imballaggio (buste di plastica, elastici, ecc.)
lontano dalla portata dei bambini!
PERICOLO
DI SOFFOCAMENTO!
Le sostanze chimiche ed i liquidi in dotazione non devono essere lasciati in mano
ai bambini! Non bere le sostanze chimiche!
Dopo l‘uso lavare accuratamente le mani risciacquandole abbondantemente con acqua
corrente. In caso di contatto accidentale con
occhi o bocca risciacquare abbondantemente con acqua. In caso di disturbi a seguito del
contatto con le sostanze consultare immediatamente un medico e mostrargli le sostanze.
PERICOLO DI INNESCO DI INCENDI/
ESPLOSIONE
Non esporre l‘apparecchio a tempera-
ture elevate. Utilizzare esclusivamente
l’alimentatore in dotazione o le batterie consigliate. Non cortocircuitare l’apparecchio
e/o le batterie e non metterli a contatto con
fi amme! L’esposizione a temperature eccessive o un uso improprio dell‘apparecchio può
provocare cortocircuiti, incendi e addirittura
esplosioni!
PERICOLO per danni a cose!
Non smontare l’apparecchio! In caso
di difetti all’apparecchio rivolgersi al
rivenditore specializzato. Il rivenditore si metterà in contatto con il servizio di assistenza
clienti ed eventualmente manderà l‘apparecchio in riparazione.
Collocare l’apparecchio in modo da poterlo
staccare dalla rete elettrica in qualsiasi momento. La presa di rete si deve trovare sempre in prossimità dell’apparecchio e deve
essere facilmente accessibile, in quanto il
connettore del cavo di rete funge da dispositivo di disinnesto dalla rete elettrica.
Non esporre l‘apparecchio a temperature superiori ai 60°C!
AVVERTENZE per la pulizia
Per pulire l’apparecchio, scollegarlo dalla sorgente di energia elettrica
(scollegare l’alimentatore oppure
rimuovere le batterie)!
Pulire l’apparecchio solo esternamente con
un panno asciutto. Non utilizzare liquido detergente per evitare che i componenti elettronici dell’apparecchio si danneggino.
Pulire le lenti (oculare e/o obiettivo) solo con
l‘apposito panno in dotazione oppure con un
altro panno morbido che non lasci peli (per
es. in microfi bra). Non premere con il panno
sulle lenti per evitare che si graffi no.
Per rimuovere i residui di sporco più ostinati
inumidire il panno con un liquido detergente
per occhiali e pulire le lenti esercitando solo
una lieve pressione.
Proteggere l’apparecchio da polvere e umidità! Conservarlo nella custodia in dotazione o
nella confezione originale. Laddove l’apparecchio resti inutilizzato per un periodo di tempo
prolungato, rimuovere le batterie.
Page 29

29
IT
SMALTIMENTO
Smaltire i materiali di imballaggio dopo
averli suddivisi. Per informazioni sul
corretto smaltimento, si prega di rivolgersi
all‘azienda municipale che si occupa dello
smaltimento dei rifi uti o all’uffi cio pubblico
competente.
Non gettare apparecchi elettrici nei
comuni rifi uti domestici!
Secondo la direttiva europea 2002/96/
CE sulle apparecchiature elettriche ed elettroniche e ai sensi della legge nazionale che
la recepisce, gli apparecchi elettrici devono
essere differenziati e smaltiti separatamente
per poter essere trattati e riciclati nel rispetto
dell’ambiente.
Le batterie scariche, anche quelle ricaricabili, devono essere smaltite dal consumatore presso gli appositi punti di raccolta.
Per maggiori informazioni sullo smaltimento di apparecchi o batterie, prodotti dopo il
01.06.2006, rivolgersi all‘azienda municipale
che si occupa dello smaltimento dei rifi uti o
all’uffi cio pubblico competente.
Dichiarazione di conformità CE
Bresser GmbH ha redatto una “di-
chiarazione di conformità” in linea
con le disposizioni applicabili e le rispettive
norme. Su richiesta, è visionabile in qualsiasi
momento.
Page 30

30
Il tuo microscopio comprende le
seguenti parti (fi g. 1-6):
1 Oculare a largo campo WF 10x
2 Oculare a largo campo WF 16x
3 Lente di Barlow
4 Compartimento per Accessori opzionali
5 Portaoculari
6 Testa del microscopio
7 Vite di regolazione
8 Revolver portaobiettivi
9 Obiettivo
10 Clip di fi ssaggio
11 Tavolino portaoggetti
12 Illuminazione a LED (illuminazione dal
basso)
13 Base del microscopio
14 Ruota selettrice per l’illuminazione
15 Vano batterie (3x AA)
16 Ruota della messa a fuoco
17 Filtri a disco colorati
18 Illuminazione a LED (illuminazione dall’al-
to)
19 Compartimento per Accessori opzionali
20
5 vetrini portaoggetti, 10 coprivetrini e 5
preparati permanenti in custodia di plastica
21 Preparati:
a) Lievito
b) Mezzo di inclusione per preparati
c) Sale marino
d) Uova di gamberetto
22 Supporto Smartphone
23 Microtomo
24 Schiuditoio per gamberetti
25 Pinzetta
26 Pipetta
27 Valigetta per il trasporto
Dove è meglio posizionare il mio
microscopio?
Prima di montare il microscopio controlla se il
tavolo o il piano sul quale lo vuoi appoggiare
è stabile e solido.
Inoltre, ci deve essere una presa elettrica a
portata di mano perché per l‘illuminazione del
microscopio serve la corrente (220-230 V).
Come si accende e si spegne l‘illuminazione elettrica a LED?
Per far funzionare la luce del tuo microscopio
ti serve il trasformatore con la spina e il cavo
per il collegamento alla rete di alimentazione
elettrica (fi g. 6,22). Collega prima il connettore piccolo del cavo alla presa elettrica situata
sul retro del microscopio (fi g. 1,15). Successivamente inserisci la spina grande nella presa elettrica.
Il microscopio è dotato di due lampade. Non
sono lampadine ad incandescenza, ma dei
moderni diodi luminosi (LED). La prima lampada illumina il preparato dal basso, mentre la
seconda lo illumina dall’alto. (A proposito: per
“preparato“ in microscopia si intende l’oggetto che vuoi osservare, detto anche “oggetto“.)
Puoi utilizzare una sola delle due lampade e
anche tutte due insieme. Per selezionare la
lampada o le lampade usa la ruota selettrice
(fi g. 1,14). Sulla ruota sono riportati i numeri
romani: I, II e III.
Se selezioni il numero …
I la luce proviene solo dal basso (luce
passante o trasmessa);
II la luce proviene solo dall’alto (luce
incidente o rifl essa);
III il preparato è illuminato da entrambe le
lampade.
Per gli oggetti trasparenti (microscopia in luce
trasmessa) è meglio selezionare il numero I.
Per osservare corpi solidi e opachi (microscopia in luce rifl essa) è meglio selezionare il
numero II. Per oggetti semi-trasparenti è meglio selezionare il numero III.
La modalità di funzionamento III non è consigliabile per oggetti trasparenti posti su vetrini,
poiché si possono creare dei rifl essi sul vetrino che disturbano l’osservazione.
A che cosa servono i fi ltri a disco colorati?
I fi ltri a disco colorati (fi g. 1,17) si trovano sotto
il tavolino portaoggetti del microscopio (1,11).
Page 31
31
IT
I fi ltri colorati servono per osservare preparati di colore molto chiaro o trasparente. Puoi
scegliere uno dei diversi colori. Le parti che
compongono gli oggetti incolori e trasparenti
(ad es. granelli di amido, organismi unicellulari) possono essere così meglio riconoscibili.
Come si regola il microscopio in modo
corretto?
Per prima cosa allenta la vite (fi g. 1,7) e gira la
testa del microscopio (fi g. 1,6) in una posizione nella quale puoi osservare al microscopio
comodamente.
Inizia sempre le tue osservazioni con l’ingrandimento più basso.
Abbassa completamente il tavolino portaoggetti (fi g. 1,11) del microscopio. Successivamente, gira il revolver portaobiettivi (fi g. 1,8)
fi nché non l’obiettivo con l’ingrandimento più
basso (obiettivo 4x) non scatterà in posizione.
Informazione importante:
Prima di cambiare l’obiettivo, devi sempre
abbassare completamente il tavolino portaoggetti (fi g. 1,11). In questo modo eviterai
eventuali danneggiamenti degli obiettivi!
Inserisci ora l’oculare 10x (fi g. 1,1) nella lente
di Barlow (fi g. 1,3). Assicurati che la lente di
Barlow non sia sollevata (fi g. 2), ma che
sia invece ben inserita
nel portaoculare (fi g.
1,5).
Come si osservano i preparati?
Dopo aver selezionato l’illuminazione adatta
segui il seguente procedimento di base:
Comincia sempre con un’osservazione semplice con l’ingrandimento più basso. In questo modo è più facile centrare correttamente
l’oggetto e mettere bene a fuoco l‘immagine.
Quanto maggiore è l’ingrandimento, tanta più
luce ti serve per ottenere una buona qualità
dell‘immagine.
Inserisci uno dei vetrini preparati (fi g. 6,20)
direttamente sotto
l’obiettivo sul tavolino
portaoggetti (fi g. 3).
L’oggetto da osservare
deve essere posizionato esattamente sopra l’illuminazione (fi g.
1,12).
Successivamente, guarda attraverso l‘oculare
(fi g. 1,1) e gira con cautela la ruota della messa a fuoco (fi g. 1,16) fi nché l’immagine non
apparirà nitida.
Ora puoi usare un ingrandimento maggiore.
Per cambiare l’ingrandimento estrai lentamente la lente di Barlow (fi g. 1,3) dal portaoculare (fi g. 1,5). Quando la lente di Barlow è
quasi completamente estratta, l’ingrandimento è pressoché raddoppiato rispetto a quello
iniziale.
Se vuoi usare ingrandimenti ancora maggiori,
inserisci l’oculare 16 x (fi g. 1,2) e gira il revolver portaobiettivi (fi g. 1,8) selezionando un
altro obiettivo (10x oppure 40x).
Avvertenza importante:
Non sempre l’ingrandimento maggiore ti consente di vedere meglio un preparato!
Ricorda:
Tutte le volte che cambi l’ingrandimento (cambiando l’oculare oppure l‘obiettivo, estraendo
la lente di Barlow) l‘immagine deve essere
nuovamente messa a fuoco con l‘apposita
ruota (fi g. 1,16). Ricorda inoltre di procedere con molta cautela. Se abbassi il tavolino
portaoggetti troppo velocemente l’obiettivo
può entrare in contatto con il vetrino e danneggiarsi!
Fig. 3
I
2)
Fig. 2
D
f
B/C
Page 32

32
Quale illuminazione è la migliore per
quale preparato?
Con questo microscopio, cosiddetto “a luce
rifl essa e luce trasmessa”, è possibile osservare oggetti trasparenti, semi-trasparenti e
opachi.
L’immagine dell’oggetto osservato viene “trasportata”, per così dire, dalla luce. Quindi
l’illuminazione giusta è decisiva per poter vedere bene!
Se osservi un oggetto opaco (per es. un insetto, delle parti di piante, pietre, monete,
ecc.) la luce cade sull’oggetto.
La superfi cie dell’oggetto rifl ette la luce che
passa attraverso l’obiettivo e l’oculare (che
svolgono una funzione di ingrandimento) e arriva al tuo occhio. Questo tipo di microscopia
è chiamata “microscopia in luce rifl essa”.
Nel caso degli oggetti trasparenti, invece,
(per es. gli organismi unicellulari) la luce illumina l’oggetto da sotto mediante l’apertura
situata nel tavolino portaoggetti e attraversa
quindi l’oggetto.
La luce che passa attraverso l’oggetto prosegue attraverso l’obiettivo e l’oculare, dove avviene l’ingrandimento, e arriva al tuo occhio.
Questo tipo di microscopia è detta “microscopia in luce trasmessa”.
Molti microrganismi che vivono nell’acqua,
molte parti di piante e di insetti o animali sono,
per loro natura, trasparenti. Altri oggetti, invece, devono essere preparati nel modo giusto.
Ciò signifi ca che li dobbiamo rendere trasparenti con un pretrattamento o facendo penetrare delle sostanze idonee (mezzi) oppure tagliandoli in fettine sottilissime (taglio manuale
o con il microtomo) per poterli osservare. Nei
paragrafi che seguono ti verrà spiegato come
fare.
Come si realizzano delle sezioni sottili di
preparato?
Ti raccomandiamo di eseguire queste operazioni con l’aiuto dei tuoi genitori o sotto la
sorveglianza di un adulto.
Come abbiamo già detto, alcuni oggetti vanno preparati per poter essere osservati ed un
metodo di preparazione consiste nel tagliare
l‘oggetto in fettine sottili. Per raggiungere i migliori risultati è necessario usare della cera o
della paraffi na. Prendi una candela. Riscalda
la cera in un pentolino sul fuoco di un fornello.
Immergi l’oggetto più volte nella cera liquida.
Aspetta fi nché la cera non si sarà indurita.
Con il microtomo (fi g. 6, 23) o un coltello/
bisturi taglia ora l’oggetto avvolto nella cera in
fette sottilissime. Le fettine saranno poi messe su un vetrino portaoggetti e coperte con
un coprivetrino.
Come posso realizzare i miei preparati?
Fig. 7 Fig. 8
2^
Prendi l’oggetto che vuoi osservare e mettilo
su un vetrino portaoggetti (fi g. 6,20). Con la
pipetta (fi g. 7,26) aggiungi una goccia di acqua distillata facendola cadere sull’oggetto
(fi g. 7). Metti un coprivetrino in verticale accanto alla goccia per farla defl uire lungo il
bordo del coprivetrino. Successivamente abbassa lentamente il coprivetrino sulla goccia
d‘acqua (fi g. 8).
Informazione importante:
Il mezzo di inclusione (fi g. 6,21b) compreso
nella dotazione del microscopio serve a realizzare i preparati permanenti. Puoi utilizzarlo
al posto dell’acqua distillata. Se desideri conservare per lungo tempo l’oggetto sul vetrino
utilizza il mezzo di inclusione indurente.
Page 33

33
IT
Supporto Smartphone
Il titolare smartphone (22) verrà allegato
all’oculare.
Le ventose devono essere puliti e privi di polvere e sporcizia. Una leggera umidifi cazione
è utile. Ora premete il vostro smartphone
sul piastra di supporto e assicurarsi che sia
fi ssata correttamente. Come un backup, è
necessario fi ssarlo con il cinturino in gomma
in dotazione. Smartphone con una superfi cie
ruvida detengono meno buono di smartphone con una superfi cie liscia.
Ora avviare l’applicazione Fotocamera.
La telecamera deve trovarsi appena sopra
l’oculare. Centrare lo smartphone esattamente
sopra l’oculare, in modo da l’immagine può
essere vista esattamente centrata sullo schermo. In alcuni casi è necessario regolare con
la funzione di zoom per visualizzare l’immagine
a schermo intero. Un ombreggiatura luce ai
bordi è possibile. Prendere lo smartphone con
cautela il supporto dopo l’uso.
NOTA:
Assicurarsi che lo smartphone non può
scivolare fuori dal supporto.
Bresser GmbH non si assume alcuna
responsabilità per eventuali danni causati da
uno smartphone caduto.
Eliminazione dei problemi
Problema Soluzione
Non si vede
nessuna immagine
• Attivare
l’illuminazione
• Regolare nuovamente la messa a
fuoco
L’immagine sfarfalla
(osservazione con
MicrOculare opzionali)
= la frequenza di
aggiornamento
dell’immagine del
monitor è insuffi ciente
• Ridurre la
risoluzione della
scheda grafi ca
Per poterti divertire a lungo con il tuo
microscopio…
Pulisci le lenti (oculare e/o obiettivo) solo con
l‘apposito panno in dotazione oppure con un
altro panno morbido che non lasci peli (per
es. in microfi bra). Non spingere troppo con il
panno sulle lenti mentre pulisci! Le lenti sono
molto delicate e si potrebbero graffi are.
Se le lenti del tuo microscopio sono molto
sporche, chiedi ai tuoi genitori di aiutarti a
pulirle. Chiedi loro di inumidire il panno con
un po’ di liquido detergente e pulisci le lenti
sempre cercando di non premere eccessivamente.
Proteggi sempre il tuo microscopio dalla polvere e dall’umidità! Dopo averlo utilizzato lascialo per qualche tempo in una stanza riscaldata per fare in modo che l’umidità residua
evapori completamente. Applica i coperchi di
protezione antipolvere sulle lenti e conserva il
tuo microscopio nella custodia in dotazione.
Page 34

34
¡PELIGRO para su hijo!
A menudo, para trabajar con este apa-
rato es necesario utilizar instrumentos
cortantes o puntiagudos. Por consiguiente,
guarde este aparato junto con todos sus accesorios e instrumentos en un lugar que esté
fuera del alcance de los niños. ¡Existe
PELI-
GRO DE PROVOCARSE HERIDAS!
Este aparato incluye componentes electrónicos operados a través de una fuente de
electricidad (equipo de alimentación y/o pilas). ¡No deje que los niños manejen nunca
el aparato sin su supervisión! ¡Sólo se puede
utilizar tal como se indica en el manual de instrucciones, ya que en caso contrario existe
PELIGRO de una DESCARGA ELÉCTRICA!
Los niños sólo pueden usar el aparato bajo la
supervisión de un adulto. ¡Mantener fuera del
alcance de los niños los materiales de embalaje (bolsas de plástico, cintas de goma,
etc.)!
¡Existe PELIGRO DE ASFIXIA!
¡Los productos químicos y los líquidos suministrados no deben llegar a manos de los niños!
¡No beber productos químicos! Después de
usarlo, limpiar cuidadosamente las manos con
agua corriente. Si se produce un contacto fortuito con los ojos o la boca, enjuagar con agua.
En caso de molestias, recurrir inmediatamente
a un médico y mostrarle las sustancias.
¡PELIGRO DE INCENDIO/EXPLOSIÓN!
No exponga el aparato a temperaturas
elevadas. Utilice exclusivamente el
equipo de alimentación suministrado o las pilas recomendadas. ¡No poner en cortocircuito el aparato ni las pilas, ni arrojarlos al fuego!
¡Si se calientan en exceso o se manejan de
modo inadecuado se pueden producir cortocircuitos, incendios o incluso explosiones!
¡PELIGRO de daños materiales!
¡No desmonte el aparato! En caso de
que perciba un defecto, diríjase a su tienda
especializada. En ella se pondrán en contacto con el centro de servicio técnico y, si
procede, enviarán el aparato para que sea
reparado.
Posición de su dispositivo para que pueda
ser desconectado de la fuente de alimentación en cualquier momento. La toma de corriente debe estar siempre cerca del aparato
y ser fácilmente accesible, ya que el enchufe del cable de alimentación actúa como un
dispositivo de desconexión de la fuente de
alimentación.
¡No exponga el aparato a temperaturas superiores a 60 °C!
INDICACIONES sobre la limpieza
Antes de limpiarlo, retire el aparato
de la fuente de alimentación eléctrica (extraer el equipo de alimentación o retirar las pilas).
Limpie el aparato con un paño seco y sólo
por la parte exterior. No utilice ningún agente
limpiador líquido, a fi n de evitar daños en el
sistema electrónico.
Limpie las lentes (del ocular y/o del objetivo)
sólo con el paño especial para lentes adjunto
o con otro paño suave y sin pelusas (p. ej.
microfi bras). No ejercer una excesiva presión
con el paño, a fi n de evitar que las lentes se
rayen.
Para eliminar restos persistentes de
suciedad, humedezca el paño con un líquido
de limpieza de gafas y frote con él las lentes
sin excesiva presión.
¡Proteja el aparato del polvo y la humedad!
Guárdelo en el maletín suministrado o en
el embalaje de transporte. Se recomienda
retirar las pilas del aparato si no se va a utilizar
durante un período prolongado.
Page 35

35
ES
ELIMINACIÓN
Elimine los materiales de embalaje
separándolos según su clase. Puede
obtener información sobre la eliminación reglamentaria de desechos en su proveedor de
servicios de eliminación de desechos municipal o bien en su ofi cina de medio ambiente.
¡No deposite aparatos eléctricos en la
basura doméstica!
Con arreglo a la Directiva Europea
2002/96/CE sobre aparatos eléctricos y
electrónicos usados y a su aplicación en
las respectivas legislaciones nacionales, los
aparatos eléctricos usados deben recopilarse por separado y destinarse a un reciclaje
adecuado desde el punto de vista medioambiental.
Las pilas y los acumuladores gastados o
descargados deben ser eliminados por el
consumidor en recipientes especiales para
pilas usadas. Puede obtener información sobre la eliminación de pilas usadas o aparatos
fabricados después del 1 de junio de 2006
dirigiéndose a su proveedor de servicios de
eliminación de desechos municipal o bien a
su ofi cina de medio ambiente.
Declaración de conformidad
Bresser GmbH ha emitido una “De-
claración de conformidad” de acuerdo con las directrices y normas correspondientes. Esto se puede ver en cualquier
momento, previa petición.
Page 36

36
Éstas son las partes de tu microscopio
(Fig. 1-6):
1 Ocular 10x WF
2 Ocular 16x WF
3 Lente de Barlow
4
Compartimiento para accesorios opcionales
5 Soporte del ocular
6 Cabeza del microscopio
7 Tornillo de sujeción
8 Revólver con objetivos
9 Objetivo
10 Clips de sujeción
11 Mesa del microscopio
12 Iluminación con LED (luz transmitida)
13 Pie del microscopio
14 Rueda de selección para la iluminación
15 Compartimento de las pilas (3x AA)
16 Tornillo micrométrico
17 Lámina de fi ltrado de color
18 Iluminación con LED (luz incidente)
19
Compartimiento para accesorios opcionales
20 5 portaobjetos, 10 cubiertas de cristal y
5 preparaciones permanentes en caja de
plástico
21 Preparaciones:
a) Levadura
b) Material de incrustación «Gum-Media»
c) Sal marina
d) Huevos de gamba
22 Soporte para teléfonos Smartphone
23 Aparatos de corte fi no
24 Instalación para la cría de gambas
25 Pinza
26 Pipeta
27 Maletín de transporte
¿Dónde debo utilizar mi microscopio?
Antes de montar el microscopio, presta atención a que la mesa, armario, o cualquier otro
lugar donde lo quieras colocar sea estable y
seguro, y que no cojee.
Por lo demás, necesitas electricidad para la
lámpara del microscopio (220-230 V).
¿Cómo se maneja la iluminación
eléctrica con LED?
Para la iluminación necesitas el transformador
con clavija y el cable eléctrico (Fig. 6, 22).
En primer lugar, introduces la pequeña clavija
que hay en el cable eléctrico en la conexión
de corriente que hay en la parte trasera del
microscopio (Fig. 1, 15). A continuación introduces el enchufe grande en la toma de
corriente.
En el microscopio hay dos lámparas. No funcionan con bombillas, sino con modernos
diodos de luz (LED). La primera lámpara brilla
desde abajo sobre la preparación, la segunda lámpara desde arriba. (Por lo demás, no
está mal que sepas que eso que vas a observar bajo tu microscopio se llama «objeto»
o «preparación».) Puedes usar cada lámpara
por separado, pero también las dos al mismo
tiempo. Para ello hay una rueda de selección
(Fig. 1, 14) que tiene tres números: I, II y III.
Si seleccionas el...
I, la luz procede exclusivamente desde aba-
jo (luz transmitida).
II, la luz procede sólo desde arriba (luz
incidente).
III, ambas lámparas arrojan luz sobre la
preparación.
Para objetos transparentes (luz transmitida),
el I es el mejor. Para observar objetos opacos
(luz incidente), selecciona el II. Lo mejor para
objetos semitransparentes es el número III.
El modo de funcionamiento III no es recomendable sobre el portaobjetos para objetos
con luz transmitida, ya que se pueden producir molestos refl ejos sobre el portaobjetos.
¿Para qué sirve la lámina de fi ltrado de
color?
La lámina de fi ltrado de color (Fig. 1, 17) se
encuentra bajo la mesa del microscopio (Fig.
1, 11). Ayuda a la hora de observar preparaciones muy claras o transparentes. Para ello
puedes escoger diferentes colores. Así pueden reconocerse mejor las partes integrantes
Page 37

37
ES
de los objetos incoloros o transparentes (p.
ej. gránulos de almidón, protozoos).
¿Cómo se ajusta correctamente el
microscopio?
En primer lugar, afl oja el tornillo (Fig. 1, 7)
y gira la cabeza del microscopio (Fig. 1, 6)
hasta ponerla en una posición de observación cómoda.
Cada observación comienza con el aumento
más pequeño.
Desplaza la mesa del microscopio (Fig. 1, 11)
primero completamente hacia abajo. A continuación, gira el revólver con objetivos (Fig. 1,
8) hasta que quede encajado en el aumento
más pequeño (objetivo 4x).
Indicación:
Antes de cambiar el ajuste del objetivo, primero debes bajar siempre hasta el tope la
mesa del microscopio (Fig. 1, 11). ¡De este
modo puedes evitar eventuales desperfectos!
Ahora introduce el
ocular 10x (Fig. 1, 1)
en la lente de Barlow
(Fig. 1, 3). Presta
atención para que la
lente de Barlow se
introduzca completamente en el soporte del
ocular (Fig. 1, 5) y no quede nada fuera (Fig.
2).
¿Cómo puedo observar la preparación?
Una vez que hayas instalado el microscopio
con la iluminación apropiada y lo hayas ajustado, son válidos los siguientes principios:
Comienza con una observación sencilla, con
el aumento más pequeño. Así es más fácil
conseguir poner el objeto en el centro (proceso de centrado) y lograr una imagen nítida
(tornillo de enfoque).
Cuanto mayor es el aumento, más luz necesitas para obtener una buena calidad de imagen.
Ahora coloca una preparación permanente
(Fig. 6, 20) en la mesa
del microscopio (Fig.
3) directamente bajo
el objetivo. Para ello,
el objeto a observar debe estar colocado
exactamente sobre la iluminación (Fig. 1, 12).
El siguiente paso es mirar por el ocular (Fig.
1, 1) y girar con cuidado el tornillo micrométrico (Fig. 1, 16) hasta que se vea la imagen
con nitidez.
Ahora puedes aplicar un aumento mayor extrayendo lentamente la lente de Barlow (Fig.
1, 3) del soporte del ocular (Fig. 1, 5). Cuando la lente de Barlow se haya extraído casi
por completo, se puede subir el aumento casi
al doble.
Si deseas aumentos aún mayores, introduce
el ocular 16x (Fig. 1, 2) y gira el revólver con
objetivos (Fig. 1, 8) a un ajuste superior (10x
o 40x).
Indicación importante:
¡El aumento más grande no es necesariamente el mejor para todas y cada una de las
preparaciones!
Ten en cuenta:
Al modifi car el ajuste del aumento (cambio de
ocular o de objetivo, extracción de la lente de
Barlow) es necesario volver a ajustar la nitidez
de la imagen en el tornillo micrométrico (Fig.
1, 16). Al hacerlo, procede con cuidado. ¡Si
sacas demasiado rápido la mesa del microscopio, es posible que choquen el objetivo y el
portaobjetos y que se dañen!
¿Qué luz para qué preparación?
Con este aparato, un microscopio de luz incidente y luz transmitida, es posible observar
objetos transparentes, semitransparentes y
opacos.
Fig. 3
I
2)
Fig. 2
D
f
B/C
Page 38

38
La imagen del respectivo objeto de observación se «transporta» a través de la luz. Por
consiguiente, ¡una iluminación correcta determina si puedes ver algo o no!
Si estás observando objetos opacos (p. ej.
pequeños animales, partes de plantas, piedras, monedas, etc.) con este microscopio,
la luz cae sobre el objeto a observar.
Desde allí, la luz rebota y accede al ojo a través del objetivo y el ocular (que generan el
aumento). Ésta es la microscopia de luz incidente.
Al contrario, en el caso de objetos transparentes (p. ej. protozoos), la luz brilla desde abajo
través de la abertura que hay en la mesa del
microscopio, y a continuación a través del objeto observado.
El trayecto de la luz continua a través del objetivo y el ocular, donde se produce de nuevo el
aumento, para terminar llegando hasta el ojo.
Ésta es la microscopia de luz transmitida.
Muchos pequeños seres vivos acuáticos,
partes de plantas y órganos de animales muy
pequeños son transparentes por naturaleza.
Otros deben prepararse primero correspondientemente. Dichos objetos pueden hacerse transparentes mediante un tratamiento
previo o una impregnación con las sustancias
adecuadas (medios) o bien elaborando a partir de ellos unas rebanadas fi nísimas (corte
manual, corte fi no) para analizarlas a continuación. Puedes encontrar más información
al respecto en los siguientes párrafos.
¿Cómo se elaboran rebanadas fi nas de
preparaciones?
Por favor, haz esto exclusivamente bajo la supervisión de tus padres o de otro adulto.
Como ya he comentado, a partir de un objeto
se pueden realizar rebanadas lo más fi nas posible. Para obtener los mejores resultados se
necesita algo de cera o parafi na. Lo mejor es
que cojas una vela. Debes introducirla en una
cacerola y calentarla brevemente con una llama. Después sumerge el objeto varias veces
en la cera líquida. Después deja que la cera
se endurezca. Con ayuda de los aparatos de
corte fi no (Fig. 6, 23) o un cuchillo/escalpelo, puedes cortar ahora unas rebanadas muy
fi nas del objeto envuelto en cera. A continuación, pones las rebanadas en un portaobjetos de cristal y las tapas con una cubierta de
cristal.
¿Cómo puedo elaborar mi propia
preparación?
Fig. 7 Fig. 8
2^
Toma el objeto que deseas observar y
colócalo sobre un portaobjetos de cristal
(Fig. 6, 20). A continuación echa sobre el
objeto (Fig. 7) una gota de agua destilada
con ayuda de una pipeta (Fig. 7, 26). Coloca
después una cubierta de cristal en posición
vertical junto al borde de la gota de agua,
de modo que el agua discurra a lo largo del
canto de la cubierta de cristal. Ahora baja
despacio la cubierta de cristal sobre la gota
de agua (Fig. 8).
Indicación:
El material de incrustación suministrado
«Gum-Media» (Fig. 6, 21b) sirve para elaborar preparaciones permanentes. Añádelo en
lugar del agua destilada. Si quieres que el
objeto se conserve de forma duradera sobre
el portaobjetos, debes usar el «Gum-Media»
para endurecerlo.
Page 39

39
ES
Soporte de Smartphone
El soporte de Smartphone (22) se conecta
al ocular del Microscopio.
Las ventosas deben estar limpias y libres de
polvo y suciedad. Humedecerlas ligeramente
es útil. Ahora apriete el smartphone en la
placa y asegúrese de que esté bien sujeto.
Como protección sujételo con la correa de
goma. Los Smartphones con una superfi cie
áspera se sujetan peor que los que tienen
una superfi cie lisa.
Ponga en marcha ahora la App de la cámara
La cámara necesita estar colocada justo por
encima del ocular. Coloque el Smartphone
centrado exactamente sobre el ocular, para
que la imagen se pueda ver centrada en la
pantalla. Puede ser necesario visualizar las
imágenes en la pantalla, cuando se usa la
función de zoom. Es posible que se observe
un sombreado claro en los bordes.
¡Coja el Smartphone del soporte después
de su uso!
NOTA:
Asegúrese de que el smartphone no puede
salirse del soporte. ¡Bresser GmbH no se
responsabilizará de los daños que sufra su
Smartphone por una caída!
Solución de errores
Error Solución
No se reconoce
ninguna imagen
• encender la luz
• ajustar de nuevo
la nitidez
La imagen tiembla
(al observarla con
MikrOkular opcionales) = la frecuencia de repetición de
imagen del monitor
no es sufi ciente)
• dado el caso,
reducir la
resolución de la
tarjeta gráfi ca
Para que puedas disfrutar mucho tiempo
con tu(s) microscopio ...
Limpia las lentes (del ocular y/o del objetivo)
sólo con el paño especial para lentes adjunto
o con otro paño suave y que no suelte pelusas (p. ej. microfi bras). ¡No puedes presionar
el paño con demasiada fuerza! Las lentes son
de por sí muy sensibles y podrían rayarse.
Si tu(s) microscopio está(n) muy sucio(s), pídeles a tus padres que te ayuden a limpiarlo(s).
Humedece el paño con un poco de líquido de
limpieza y frota con él las lentes sin hacer excesiva presión.
¡Presta atención para que tu(s) microscopio
esté(n) protegido(s) siempre del polvo y la humedad! Tras utilizarlo(s), déjalo(s) un tiempo
en una habitación cálida para que se evapore
la humedad que pueda quedar. Coloca las
tapas de protección contra el polvo y guarda
el(los) microscopio en el maletín suministrado.
Page 40

40
PERIGO para crianças!
Para trabalhar com este aparelho são
utilizados meios auxiliares pontiagudos e com arestas vivas. Por essa razão,
guarde este aparelho, e todos os componentes e meios auxiliares, num local inacessível
às crianças.
RISCO DE FERIMENTOS!
Este aparelho contém componentes electrónicos, que são operados por uma fonte
de corrente (fonte de alimentação e/ou pilhas). Não deixe as crianças sem vigilância
durante o manuseamento do aparelho!
A utilização deve efectuar-se conforme o
manual, caso contrário há
RISCO de CHOQUE
ELÉCTRICO!
As crianças só devem utilizar o aparelho sob
vigilância. Manter os materiais da embalagem
(sacos de plástico, elásticos, etc.) afastados
das crianças!
RISCO DE ASFIXIA!
Os químicos e os líquidos fornecidos devem
ser mantidos afastados das crianças! Não
ingerir os químicos! Depois de os utilizar,
lavar muito bem as mãos em água corrente.
No caso de contacto acidental com os olhos
ou com a boca, lavar com água. Em caso de
dores, consultar imediatamente um médico e
apresentar a substância.
RISCO DE INCÊNDIO/EXPLOSÃO!
Nunca sujeite o aparelho a altas tem-
peraturas. Utilize apenas a fonte de alimentação fornecida ou as pilhas recomendadas. Não curto-circuitar nem atirar para o fogo
o aparelho nem as pilhas! O calor excessivo e
o manuseamento incorrecto podem provocar
curto-circuitos, incêndios e até explosões!
RISCO de danos materiais!
Não desmonte o aparelho! Em caso
de defeito, consulte o seu distribuidor
especializado. Ele contactará o Centro de
Assistência e poderá enviar o aparelho para
uma eventual reparação.
Posicione o seu aparelho de forma que ele
possa ser desligado da rede elétrica a qualquer momento. A tomada de corrente deve
encontrar-se sempre perto do aparelho e estar bem acessível, pois a fi cha do cabo de
rede serve de dispositivo de separação da
rede elétrica.
Não sujeite o aparelho a temperaturas superiores a 60° C!
INDICAÇÕES sobre a limpeza
Antes de limpar a fonte de corrente,
desligue o aparelho (retirar a fi cha
de rede ou remover as pilhas)!
Limpe o aparelho apenas no exterior com um
pano seco. Não utilize produtos de limpeza, a
fi m de evitar danos no sistema electrónico.
Limpe as lentes (oculares e/ou objectivas)
apenas com o pano de limpeza fornecido ou
com um outro pano macio e sem fi os (p. ex.
em microfi bra). Não exercer muita força com
o pano, para não arranhar as lentes.
Para remover restos de sujidade mais difíceis
humedeça o pano de limpeza com um líquido de limpeza para óculos e limpe as lentes,
exercendo uma leve pressão.
Proteja o aparelho do pó e da humidade!
Guarde-o na bolsa fornecida ou na embalagem de transporte. As pilhas devem ser retiradas do aparelho, se este não for usado
durante algum tempo.
Page 41

41
PT
ELIMINAÇÃO
Separe os materiais da embalagem.
Pode obter mais informações sobre a
reciclagem correcta nos serviços municipais
ou na agência do meio ambiente.
Não deposite os seus aparelhos
electrónicos no lixo doméstico!
De acordo com a Directiva Europeia
2002/96/CE sobre aparelhos eléctricos e
electrónicos e sua conversão na legislação
nacional, os aparelhos electrónicos em fi m
de vida devem ser separados e sujeitos a
uma reciclagem ambientalmente correcta.
Pilhas e baterias antigas descarregadas têm
de ser depositadas pelo consumidor em
recipientes especiais de recolha para pilhas (pilhões). Pode obter mais informações
sobre aparelhos obsoletos ou pilhas,
produzidas após 01.06.2006, nos serviços
municipais ou na agência do meio ambiente.
Declaração de conformidade CE
Foi criada pela Bresser GmbH uma
“Declaração de conformidade“ de
acordo com as directivas e respectivas normas aplicáveis. A sua visualização pode ser
solicitada a qualquer momento.
Page 42

42
Estes são os componentes do teu
microscópio (fi g. 1-6):
1 Ocular WF 10x WF
2 Ocular WF 16x
3 Lente barlow
4
Compartimento para acessórios opcionais
5 Apoio da ocular
6 Cabeça do microscópio
7 Parafuso de ajuste
8 Revólver das objectivas
9 Objectiva
10 Pinça de retenção
11 Mesa do microscópio
12 Iluminação LED (luz transmitida)
13 Base do microscópio
14 Roda selectora da iluminação
15 Compartimento das pilhas (3x AA)
16 Roda de ajuste da nitidez
17 Filtro de cor
18 Iluminação LED (luz incidente)
19
Compartimento para acessórios opcionais
20 5 suportes de objectiva, 10 lamelas de
vidro e 5 preparados permanentes em
caixa de plástico
21 Preparados:
a) Levedura
b) Solução de inclusão “Gum-Media”
c) Salmoura
d) Ovos de camarão
22 Suporte Smartphone
23 Aparelho de corte fi no
24 Incubadora de camarões
25 Pinça
26 Pipeta
27 Mala de transporte
Onde posso observar ao microscópio?
Antes de montares o microscópio, presta
atenção para que mesa, armário ou qualquer
outro local onde o coloques, seja estável e
fi xo, sem oscilações.
Além disso, precisarás de corrente para a
lâmpada do microscópio (220-230V).
Com opero a iluminação LED eléctrica?
Para a iluminação necessitas do transformador com cabo de corrente (fi g. 6, 22). Primeiro encaixas a pequena fi cha do cabo de
corrente na ligação de corrente na parte de
trás do microscópio (fi g. 1, 15). Em seguida,
encaixas a fi cha de rede maior na tomada.
No microscópio existem duas lâmpadas. A
sua iluminação não se faz da forma convencional, mas sim com modernos díodos luminosos (LED). A primeira lâmpada ilumina o
preparado desde a parte de baixo e a segunda lâmpada ilumina-o desde a parte de cima.
(aquilo que queres observar por baixo do microscópio chama-se objecto ou preparado.)
Podes utilizar cada lâmpada individualmente
ou as duas em conjunto. Para esse efeito
existe a roda selectora (fi g. 1, 14). Esta possui três números: I, II e III.
Se seleccionares…
I, a luz incide apenas por baixo (luz transmi-
tida).
II, a luz incide apenas por cima (luz inciden-
te).
III, o preparado é iluminado por ambas as
lâmpadas.
Para objectos transparentes (objectos de luz
transmitida) recomenda-se o I. Para observar
objectos sólidos, opacos (objectos de luz incidente), selecciona o II. Para objectos semitransparentes, o melhor será seleccionares
o III.
O tipo de operação III não se recomenda a
objectos de luz transmitida em porta-objectos, pois ocorrem refl exos no porta-objectos
que perturbam a observação.
Para que se utiliza o fi ltro de cor?
O fi ltro de cor (fi g. 1, 17) encontra-se por baixo da mesa do microscópio (fi g. 1, 11). Ele
auxilia na observação de preparados muito
claros ou transparentes. Podes seleccionar diferentes cores. Objectos incolores ou
transparentes (p. ex. grãos de amido, proto-
Page 43

43
PT
zoários) são muito mais fáceis de reconhecer
pelos seus componentes.
Como ajusto correctamente o meu
microscópio?
Primeiro solta o parafuso (fi g. 1, 7) e gira a
cabeça do microscópio (fi g. 1, 6) para um posição de observação confortável.
Cada observação deve começar com a ampliação mais reduzida.
Em primeiro lugar, desloca a mesa do microscópio (fi g. 1, 11) totalmente para baixo. Em
seguida, gira o revólver das objectivas (fi g. 1,
8) até encaixar na ampliação mais reduzida
(objectiva 4x).
Nota:
Antes do ajuste da objectiva, desloca sempre
a mesa do microscópio (fi g. 1, 11) primeiro
para baixo. Dessa forma, podes evitar eventuais danos!
Agora insere a ocular
10x (fi g. 1, 1) na lente barlow (fi g. 1, 3).
Presta atenção para
que a lente barlow
encaixe totalmente no
apoio da ocular (fi g.
1, 5) e não sobressaia
para fora (fi g. 2).
Como observo o preparado?
Depois de teres equipado e ajustado o microscópio com a iluminação adequada são
válidos os seguintes princípios:
Começa com uma observação simples na
ampliação mais reduzida. Assim é mais fácil
colocar o objecto no centro (centragem) e
ajustar a nitidez da imagem (focagem).
Quanto maior for a ampliação, tanto mais luz
será necessária para atingires uma boa qualidade de imagem.
Agora coloca um preparado permanente
(fi g. 6, 20) directamente por baixo da
objectiva na mesa do
microscópio (fi g. 3).
O objecto a ser observado deve encontrar-se mesmo por baixo da
iluminação (fi g. 1, 12).
No passo seguinte, observas através da
ocular (fi g. 1, 1) e rodas cuidadosamente a
roda de ajuste da nitidez (fi g. 1, 16) até a imagem fi car nítida.
Agora podes ajustar uma ampliação maior,
extraindo lentamente a lente barlow (fi g. 1, 3)
do apoio da ocular (fi g. 1, 5). Quando a len-
te barlow estiver quase totalmente extraída,
a ampliação pode ser aumentada para quase
o dobro.
Se quiseres ampliações ainda maiores, coloca a ocular 16x (fi g. 1, 2) e gira o revólver
das objectivas (fi g. 1, 8) para um ajuste maior
(10x ou 40x).
Nota importante:
Não é em todos os preparados que a maior
ampliação é a melhor!
Presta atenção:
No caso de uma alteração do ajuste da
ampliação (troca de ocular ou de
objectiva, extracção da lente barlow) a nitidez
da imagem tem de ser reajustada na roda
de ajuste da nitidez (fi g. 1, 16). Neste caso,
tens de ser muito cuidadoso. Se deslocares
a mesa do microscópio demasiado rápido, a
objectiva e o porta-objectos podem tocar-se
e danifi car-se!
Qual a melhor luz para que preparado?
Com este aparelho, um microscópio de luz
incidente ou de luz transmitida, podem ser
observados objectos transparentes, semitransparentes e opacos.
A fi gura do respectivo objecto de observação
é “transportada” pela luz. Por isso, tens de
ajustar a iluminação conforme o que consegues ver ou não!
Fig. 3
I
2)
Fig. 2
D
f
B/C
Page 44

44
Se observares objectos opacos (p. ex. pequenos animais, partes de plantas, pedras,
moedas, etc.) com este microscópio, a luz
incide no objecto a ser observado.
Desse ponto, a luz é refl ectida e chega aos
olhos (pela ampliação) através da objectiva e
da ocular. A isto se chama microscopia de luz
incidente.
No caso de objectos transparentes (p. ex.
protozoários) a luz incide pela parte de baixo
através da abertura na mesa do microscópio
e, em seguida, através do objecto de observação.
O trajecto da luz passa através da objectiva e
da ocular, onde a ampliação se faz e chega,
por fi m, ao olho. A isto se chama microscopia
de luz transmitida.
Muitos seres microscópicos da água, partes
de plantas e elementos animais muito fi nos já
são transparentes por natureza. Outros ainda
têm de ser preparados. Podemos analisá-los
em seguida tornando-os transparentes com
o auxílio de um tratamento prévio ou de infi ltração com materiais (meios) adequados ou
efectuando pequenos recortes (corte manual, corte fi no). Poderás saber mais sobre este
assunto nas secções que se seguem.
Como preparo cortes fi nos de
preparado?
Realiza a preparação com a ajuda dos teus
pais ou de um outro adulto.
Tal como já disse, são feitos cortes fi nos num
objecto. Para obtermos melhores resultados,
necessitamos de alguma cera e parafi na. O
melhor será arranjares uma vela. Colocas a
cera num tacho para a aqueceres brevemente numa chama. Em seguida, mergulhas o
objecto várias vezes na cera líquida. Depois,
deixas a cera endurecer. Com o aparelho de
corte fi no (fi g. 6, 23) ou uma faca/escalpelo são cortadas agora partes muito fi nas do
objecto envolvido em cera. Estes cortes são
colocados num porta-objectos em vidro e cobertos com uma lamela de vidro.
Como fabrico o meu próprio preparado?
Fig. 7 Fig. 8
2^
Pegas no objecto que pretendes observar e
coloca-lo num porta-objectos em vidro (fi g. 6,
20). Em seguida, com uma pipeta (fi g. 7, 26)
coloca uma gota de água destilada no objecto (fi g. 7). Agora coloca uma lamela em vidro
na vertical no rebordo da gota de água, de
forma que a água escorra ao longo do canto
da lamela de vidro. Em seguida, baixa a lamela de vidro lentamente por cima da gota de
água (fi g. 8).
Nota:
A solução de inclusão fornecida “Gum-Media” (fi g. 6, 21b) destina-se ao fabrico de preparados permanentes. Adiciona-a no lugar da
água destilada. Se quiseres que o objecto
permaneça continuamente no porta-objectos, utiliza o “Gum Media” endurecedor.
Page 45

45
PT
Smartphone Suporte
Suporte smartphones (22) está ligado na
ocular do microscópio.
As ventosas devem estar limpos e livres de
poeira e sujeira. Umedeça levemente útil.
Agora aperte o smartphone no prato e certifi que-se de que é seguro.
Para proteger seguro com a pulseira de
borracha. Smartphones com uma superfície
rugosa são presos pior do que aqueles com
uma superfície lisa.
Comece agora a câmera App
A câmera precisa ser colocado logo acima
do olho. Coloque a smartphones exactamente centrado na ocular, de modo a que
a imagem pode ser visto no centro da tela.
Pode ser necessário para ver as imagens na
tela quando a função de zoom é usado. É
possível que um sombreamento luz é observada nas bordas.
Remover o suporte do Smartphone após o
uso!
NOTA:
Verifi que se o smartphone não pode sair do
suporte. Bresser GmbH não se responsabiliza por danos sofridos por uma queda do
seu smartphone!
Eliminação de erros
Erro Solução
Não se vê a imagem • Ligar a luz
• Ajustar
novamente a
nitidez
Imagem vibra (durante a observação
com a micro-ocular
opcionais)
= frequência
de repetição da
imagem do monitor
insufi ciente)
• Event. reduzir
a resolução do
gráfi co
Para que te divirtas com o teu
microscópio durante muito tempo...
Limpa as lentes (oculares e/ou objectivas)
apenas com o pano de limpeza fornecido ou
com um outro pano macio e sem fi os (p. ex.
em microfi bra). Não deves exercer muita força no pano! As lentes são muito sensíveis e
podem arranhar-se com facilidade.
Se o teu microscópio estiver muito sujo,
pede ajuda aos teus pais para o limpares.
Humedece o pano com um pouco de
detergente e limpa as lentes suavemente.
Presta atenção para que o teu microscópio esteja sempre protegido do pó e da
humidade! Após a utilização, deixa-os durante algum tempo num lugar quente, para
que a humidade restante se possa evaporar.
Coloca as tampas protectoras do pó e guarda
o microscópio na bolsa fornecida.
Page 46

BRESSER GmbH
Gutenbergstr. 2
DE-46414 Rhede
Germany
www.bresser-junior.de
Irrtümer und technische Änderungen vorbehalten. · Errors and technical changes reserved. · Sous réserve d’erreurs et de modifi cations techniques.
Vergissingen en technische veranderingen voorbehouden. · Con riserva di errori e modifi che tecniche. · Queda reservada la posibilidad de incluir
modifi caciones o de que el texto contenga errores. · Erros e alterações técnicas reservados.
ANL8855002MSP0915BRESSER
 Loading...