

Page 1

Elektronisches
Prüfgerät
Electronic tester
Multi-Test MT 6 S/2
Directions for use .............................................. 7
Page 2

Operating Instructions
Important Notice:
1) This testing device is only suitable for use in dry
rooms and my not be used for voltages above the
specified values.
2) Operate only at ambient temperatures -10°C and
+50°C and in the frequency range between 50 and
500 Hz.
3) The sensitivity of the display can be impeded by unfavourable lighting conditions, e.g. strong sunlight
or by unfavourable locations, e.g. wooden stepladders or insulating carpet padding and in alternating
current nets that are not properly grounded.
4) The testing device must be tested for proper
function prior to first use (self test).
5) The testing device may not be used in damp
conditions (e.g. dew or rain).
6) The testing probe is only designed to perform
voltage tests. Do not attempt to perform other work
on voltage-carrying appliances or devices with it.
7) Defective testers, whose function and/or safety is
obviously impaired, may not be used.
8) The tester can acquire a static charge from friction
and then produce false readings.
9) Never attempt to alter any internal components of
this tester.
10)These instructions contain important safety information. Store these instructions with the device.
11) To clean the tester, use a damp cloth but never use
scouring agents or solvents.
12) If the tester is used for purposes other than those
intended by the manufacturer, the safety functions
of the device can be impeded.
13) In cases of doubt, please contact a qualified
technician.
Inserting the Batteries
Remove the screw by turning counter-clockwise.
Insert the three button cells, negative pole first into the
battery compartment and then re-tighten the screw.
Battery type: 3 button cells 1.5V (392A, AG3, LR41,
V3GA, G3-A or similar).
7
Page 3
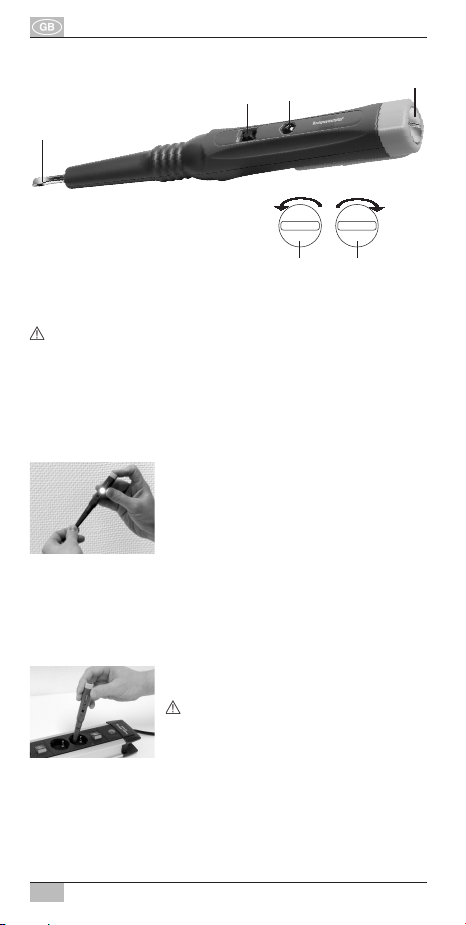
Operating Instructions MT6 S/2
Testing probe
Button
High intensity LED
Screw
Open
Close
ATTENTION:
With the exception of the batteries, never attempt to
remove any components from the device.
Do not use the device if the screw has been removed.
Tighten the screw completely (clockwise).
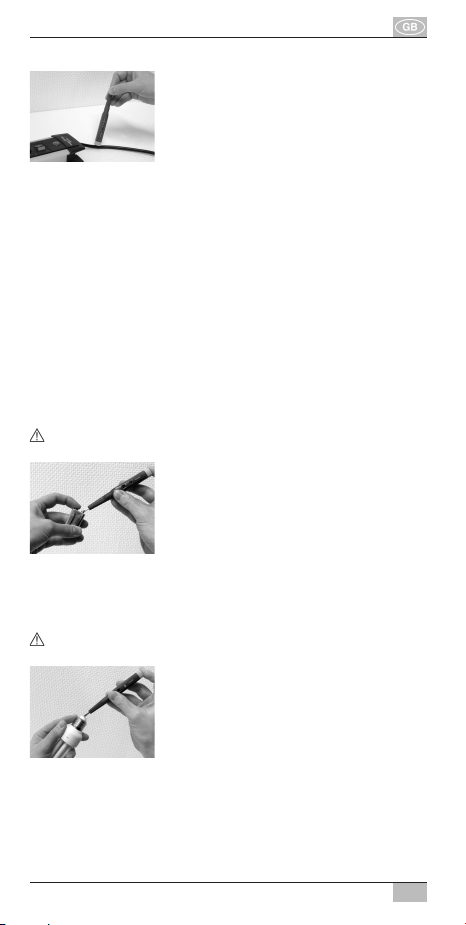
Prior to Use
Self Test
Before each use of the device, a self
test must be performed in order to
assure correct function. Just touch
the probe with one hand and the
screw on the device with the other.
The blinking of the LED indicates
that the device is functioning correctly.
If this does not happen, stop using the device.
When the LED starts to weaken, the batteries need to
be replaced!
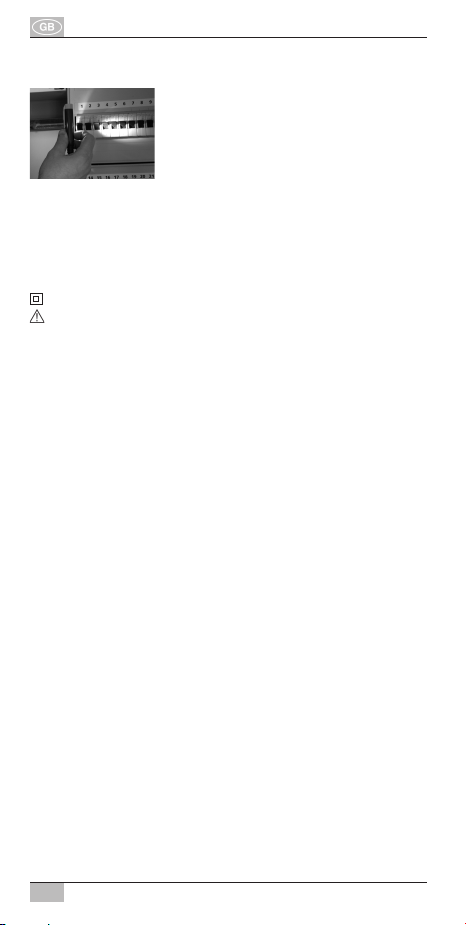
Voltage Test (Alternating Current)
(1) direct voltage test
(70-250 VAC)
ATTENTION!
As soon as the probe is in direct
contact with the external conductor
(phase) of electrical outlets, the LED
blinking.
Note: For this test method we recommend that you not
touch the screw on the device.
8
Page 4
MT6 S/2 Operating Instructions
(2) touch-free voltage test
(100-250 VAC)
Hold the tester as shown in the
picture and run it slowly along the
wire to be tested. If there is alter-
will start blinking. If there is a wire break, the LED
display will go out. This function can also be used to
find alternating current, e.g. in electrical outlets and
plugs.
Notes:
1) To increase the sensitivity of the tester for
performing the touch-free voltage test, hold the
tester at the point of the probe.
2) The sensitivity can be reduced in high relative
humidity.
3) Perform the test at different points along the wire,
especially if the wire is twisted.
4) The test is not reliable on shielded wires.
Polarity test (direct current 3-36 VDC)
WARNING! Make sure that there is no alternating
current or high voltage current!
The LED will blink at the positive (+) pole.
The LED will not light up on the negative (-) pole.
nating current in the wire, the LED
When testing, a finger of one hand
must touch the screw on the device.
At the same time, the tester’s probe
must contact one pole of the
battery and your free hand must
touch the other.
Conductivity test
WARNING! Make sure that there is no alternating
current or high voltage current!
When testing, a finger of one hand
must touch the screw on the device.
At the same time, touch the testing
site with the probe and touch the
object opposite the testing site with
your free hand. If there is conductivity, the LED will blink. This function can be used to
test, e.g. fuses, light bulbs, etc.
9
Page 5
Operating Instructions MT6 S/2
Flashlight Function
Sample Applications
Test the function of lamps and fuses (continuity test)
Locating cable breaks (touch-free voltage test)
Testing of alternating current (voltage test)
Safety symbols
= Protection Class II (protective insulation)
= Read the operating instructions
ATTENTION! = Pay attention to the max. voltage
CAT.II = Overvoltage Category II
The integrated LED has been tested according to
IEC/EN 62471.
Press the button to use the tester
as a flashlight.
10
Page 6

MT6 S/2 Operating Instructions
Technical Data:
Voltage test 70-250 VAC
Touch-free voltage test:
a) >=100 VAC (with single insulation)
b) 200-250 VAC
Polarity test 3-36 VDC
Continuity test 0-5 MOhm
Disposal
Please dispose of your used electronic devices in an environmentally friendly manner!
Electronic devices do not belong in your house-
hold waste. compliant with European Guideline
2002/96/EG concerning Electrical and Electronic
Devices, used electronic devices must be collected
separately and taken to a facility for environmentally
sound recycling. You can find out about your options
for disposing of your used electronic devices from your
community or city government.
Improper disposal of batteries can harm the
environment!
Batteries do not belong in your household waste.
They can contain poisonous heavy metals and are
subject to treatment as hazardous waste. For this ,
please take your used batteries to your local collection
site.
11
Page 7

Page 8

Hugo Brennenstuhl GmbH & Co. KG
Seestraße 1-3 · 72074 Tübingen · Germany
lectra-t
Blegistrasse 13 · CH-6340 Baar
H. Brennenstuhl S.A.S.
F-67460 Souffelweyersheim
www.brennenstuhl.com
0451780/311
 Loading...