

Page 1

Energiemessgerät
Page 2

DE
Bedienungsanleitung EM 231
WICHTIGER HINWEIS:
Lesen Sie diese Bedienungshinweise und bewahren
Sie sie für späteres Nachschlagen auf.
Beachten und befolgen Sie die Sicherheitshinweise.
Schließen Sie kein Gerät mit mehr als 16 A an.
Der Stecker muss immer vollständig in der Steckdose
des Energiemessgeräts eingesteckt sein.
WARNUNG:
Page 3

DE
EM 231 Bedienungsanleitung
Inhalt
1. Einleitung .....................................................................4
2. Lieferumfang
................................................................4
3. Technische Daten
........................................................5
4. Bedienungshinweise
....................................................6
4.1 Sicherheitshinweise für dieses Gerät
...................6
4.2 Frontansicht
..........................................................7
4.3 Bedienelemente, Funktionen und Display
............8
4.4 Bedienung
............................................................10
Page 4

DE
Bedienungsanleitung EM 231
Bedienungsanleitung
1. Einleitung
Lesen Sie diese Bedienungsanleitung aufmerksam und
vollständig durch. Sie ist ein wesentlicher Bestandteil Ihres
neuen Energiemessgeräts und enthält wichtige Informationen zu Betrieb und Pflege. Beachten Sie alle Sicherheitshinweise bei der Benutzung dieses Produkts. Bei Fragen
zur Benutzung dieses Produkts wenden Sie sich bitte an
Ihren Fachhändler oder an unseren Kundendienst. Bewah-
Page 5

DE
EM 231 Bedienungsanleitung
3. Technische Daten
Produkt: Energiemessgerät
EM 231
Schutzklasse: IP20
Nennspannung: 230 V ~ 50 Hz
Max. Last: 3600 W (230 V ~ 16 A)
Messbereich Spannung: 190 - 276 V AC
Messgenauigkeit Spannung: +/- 1 %
Messbereich Strom: 0,01 - 16 A
Messgenauigkeit Strom: +/- 1 % oder +/- 0,01 A
Page 6

DE
Bedienungsanleitung EM 231
4. Bedienungshinweise
4.1 Sicherheitshinweise für dieses Gerät
• Lesen Sie alle Sicherheits- und Bedienungshinweise,
bevor Sie das Energiemessgerät in Betrieb nehmen.
• Bewahren Sie die Sicherheits- und Bedienungshinweise
für späteres Nachschlagen auf.
• Beachten Sie genauestens alle Warnhinweise auf dem
Produkt und in der Bedienungsanleitung.
Page 7

DE
EM 231 Bedienungsanleitung
• Benutzen Sie das Gerät nicht weiter, wenn das Energiemessgerät oder die integrierte Steckdose beschädigt ist,
ziehen Sie das Gerät aus der Steckdose und vom Gerät
ab.
• Reparaturen dürfen nur durch einen autorisierten Kundendienst erfolgen.
• Das Energiemessgerät ist nicht zur Benutzung durch
Personen (einschließlich Kinder) mit verminderten
körperlichen, sensorischen oder geistigen Fähigkeiten
oder fehlender Erfahrung und Kenntnis geeignet, es sei
Page 8

DE
Bedienungsanleitung EM 231
Display
10 11 12 13 14
15
16
17
18
19
20
21
28
Page 9

DE
EM 231 Bedienungsanleitung
3 Rückstelltaste
MASTER CLEAR
Mit spitzem Gegenstand zur Löschung aller Daten im Speicher
drücken, einschließlich Uhrzeit
und Programmierungen.
4 Aufwärtstaste UP Uhrzeit, Preis und Preisprogram-
me zusammen mit Einstelltaste
SET einstellen.
5 Einstelltaste SET Uhrzeit, Preis und Preisprogram-
me zusammen mit Aufwärtstaste
Page 10

DE
Bedienungsanleitung EM 231
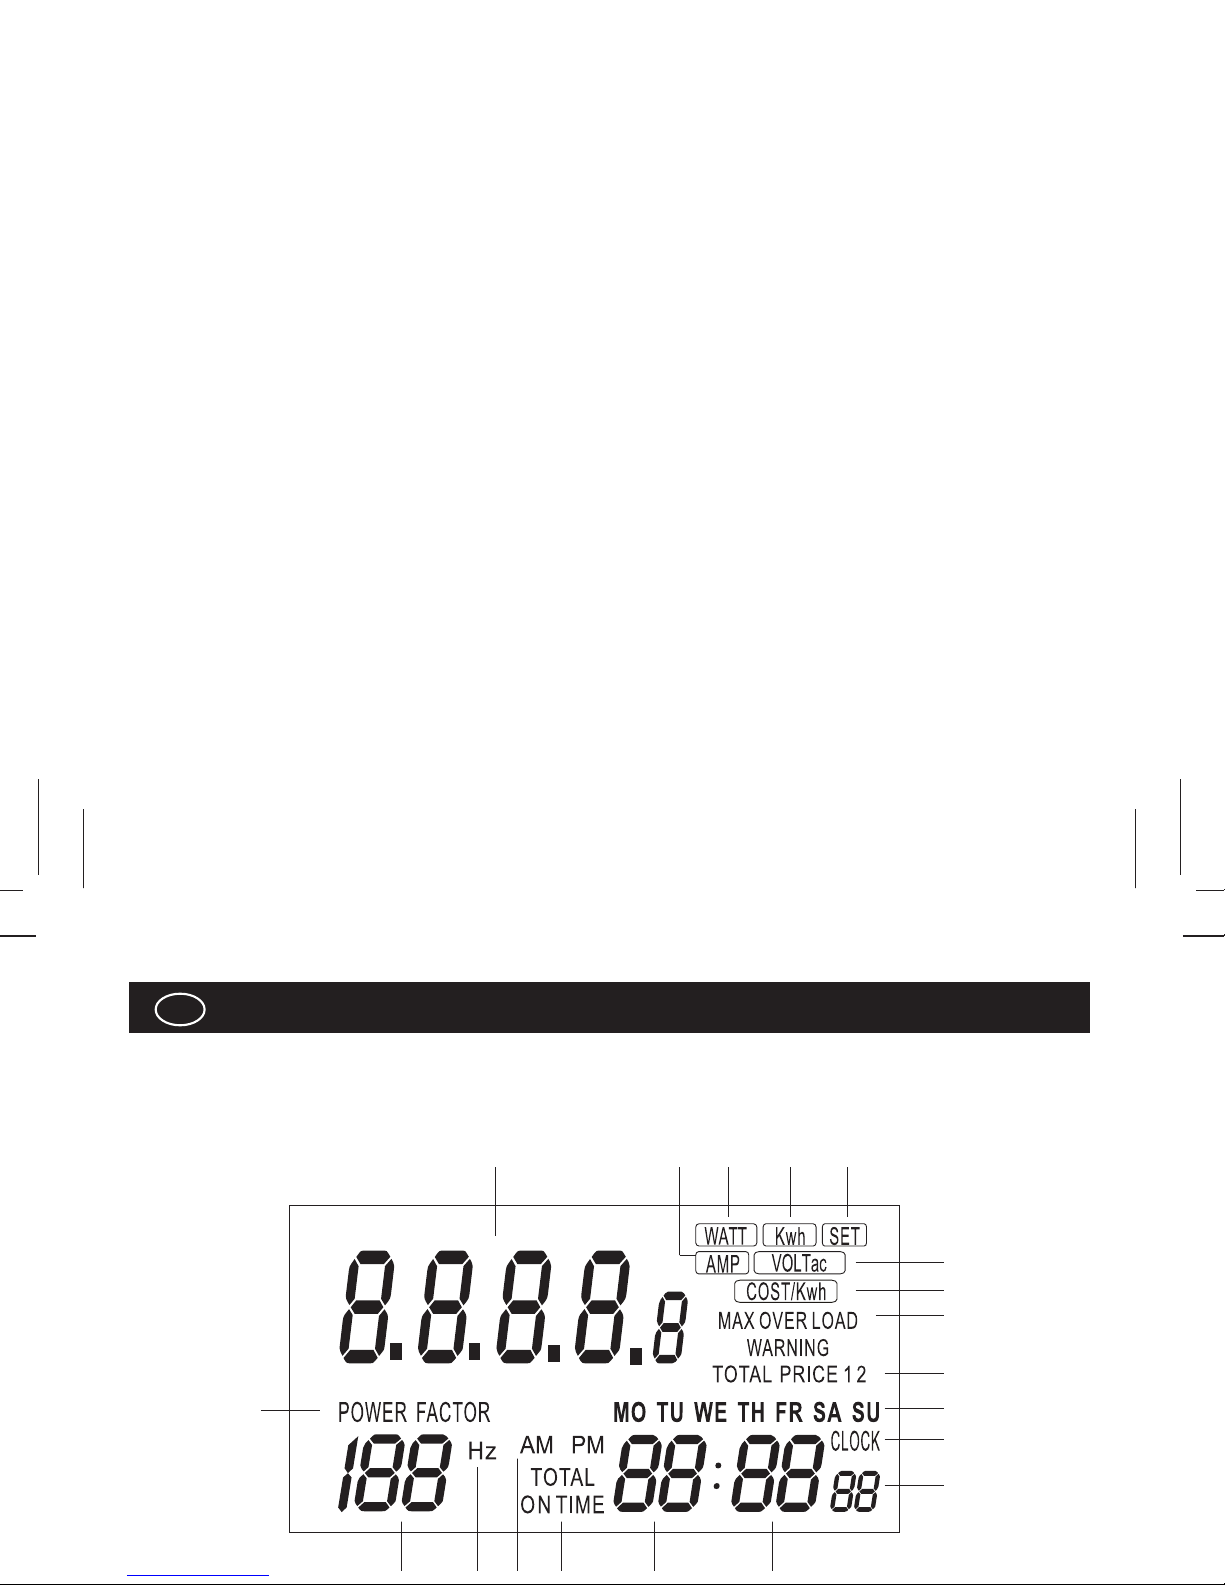
16 Anzeige COST/kWh.
17 Anzeige MAX OVERLOAD WARNING.
18 Anzeige PRICE 1 und 2, TOTAL PRICE 1 und 2.
19 Anzeige Wochentag MO, TU, WE, TH, FR, SA, SU.
20 Anzeige CLOCK.
21 Anzeige Sekunden.
22 Anzeige Minuten.
23 Anzeige Stunden.
Page 11

DE
EM 231 Bedienungsanleitung
Display angezeigt wird.
Drücken Sie einmal SET (5), der Wochentag (19) blinkt.
Drücken Sie UP (4), um den Wochentag (19) auf MO, TU,
WE, TH, FR, SA oder SU einzustellen.
Drücken Sie erneut SET (5), um den Wochentag zu bestätigen, nun blinken die Stunden (23).
Drücken Sie UP (4), um die Stunden (23) der Uhrzeit
einzustellen.
Drücken Sie erneut SET (5), um die Stunden zu bestäti-
Page 12

DE
Bedienungsanleitung EM 231
mindestens 2 Sekunden gedrückt halten, um sich die
Kosten/kWh (16) anzeigen zu lassen. Wenn bereits zwei
Preise eingegeben wurden, können Sie sich anschließend
beide abwechselnd durch kurzes drücken der Taste FUNC
(6) anzeigen lassen.
Kosten/kWh einstellen (Preis 1)
Wenn Sie die Kosten/kWh einstellen wollen, drücken
Sie nachdem die Kosten/kWh für Preis 1 (18) im Display
Page 13

DE
EM 231 Bedienungsanleitung
Wenn Sie einen zweiten Preis (z.B. Tag-/Nacht-Tarif)
eingeben wollen, müssen Sie zuerst noch für den Preis 1
einen Start-Zeitpunkt festlegen. Stellen Sie hierzu während
dem Blinken der Uhrzeit hinter ON TIME (24) für den Preis
1 (18) durch drücken der Taste UP (4) den Wochentag für
den Start-Zeitpunkt ein (siehe Abschnitt zuvor). Anschließend drücken Sie SET (5) bis die Stundenanzeige blinkt
und stellen diese mit UP (4) auf den Start-Zeitpunkt ein.
Wiederholen Sie diesen Vorgang für die Minutenanzeige.
Page 14

DE
Bedienungsanleitung EM 231
lassen: VOLTAGE, CURRENT, WATT – kWh - TOTAL
PRICE (10, 18).
Mit der Funktionstaste FUNC (6) zeigen Sie die Stromaufnahme des angeschlossenen Geräts im Wertefeld (10)
des Displays an, AMP (11) wird für die Einheiten sowie der
Leistungsfaktor POWER FACTOR (27, 28) angezeigt.
Mit erneutem Tastendruck auf FUNC (6) zeigen Sie die
Wattzahl des angeschlossenen Geräts im Wertefeld (10)
des Displays an, WATT (12) wird für die Einheiten sowie
Page 15

DE
EM 231 Bedienungsanleitung
4.4.3 Standbymodus
Das Display (2) kehrt etwa 10 Sekunden nach dem letzten
Tastendruck in den Standbymodus zurück und zeigt Uhrzeit (20, 21, 22, 23, 25), Wochentag (19), Netzspannung
(10, 15) und Frequenz (26, 27) an.
4.4.4 Rückstelltaste
Drücken Sie die Rückstelltaste MASTER CLEAR mit einem
spitzen Gegenstand, um alle Daten im Speicher zu löschen,
Page 16

DE
Bedienungsanleitung EM 231
verbiegen.
Das Batteriefach muss vor Benutzung geschlossen sein.
Während längerer Nichtbenutzung nehmen Sie die Batterien aus dem Energiemessgerät, um ein Auslaufen zu
vermeiden.
Ausgelaufene Batterien können zu Stromschlag und Schäden am Energiemessgerät führen.
Wechseln Sie Batterien nur aus, wenn das Energiemessgerät vom Stromnetz abgetrennt ist.
Page 17
DE
EM 231 Bedienungsanleitung
6. Entsorgung
Das Energiemessgerät darf am Ende seiner
Nutzungstauglichkeit nicht mit dem Hausmüll
entsorgt werden. Es muss bei einer Sammelstelle für Elektroaltgeräte zur Entsorgung abgegeben
werden.
Erkundigen Sie sich bei Ihrer Stadt oder Gemeindeverwaltung nach Möglichkeiten einer umweltund sachgerechten Entsorgung des Produktes.
Page 18
GB
Operating instructions EM 231
IMPORTANT:
Read and keep these operating instructions.
Make note of and follow the safety instructions.
Do not plug in an appliance with a load exceeding
16 Amp.
Always ensure that the plug of any appliance is fully
inserted into the meter outlet.
WARNING:
Page 19

GB
EM 231 Operating instructions
Table of Contents
1. Introduction ..................................................................20
2. Package Contents
.......................................................20
3. Technical Data
.............................................................21
4. Operation
.....................................................................22
4.1 Safety Instructions for This Product......................22
4.2 Front View
............................................................23
4.3 Location of Controls, Functions and Display
........24
4.4 Use Instructions
....................................................26
Page 20

GB
Operating instructions EM 231
Operating Instructions
1. Introduction
These operating instructions must be read carefully in full.
They are part of your newly purchased power meter and
contain important information concerning its operation and
maintenance. All precautions are to be observed when
using this product. If you have any questions concerning
the use of this product, contact your dealer or our service
office. These operating instructions are to be kept safely
Page 21

GB
EM 231 Operating instructions
3. Technical Data
Product:
Power Meter EM 231
Type of protection: IP20
Nominal voltage: 230 V ~ 50 Hz
Max. load: 36 00 W (230 V ~ 16 A)
Measuring range voltage: 190 - 276 V AC
Measuring accuracy voltage: +/-1%
Measured range current: 0.01 - 16 A
Measuring accuracy current: +/-1% or +/-0.01 A
Page 22

GB
Operating instructions EM 231
4. Operation
4.1 Safety Instructions for This Product
• All safety and operating instructions should be read
before the power meter is operated.
• The safety and operating instruction should be retained
for future reference.
• All warnings on the product and in the operating instruc-
tions should be strictly observed.
Page 23

GB
EM 231 Operating instructions
• Stop using if the power meter or the integrated socket is
damaged, disconnect it immediately from mains power
supply and the appliance.
• Repairs to the product should only be carried out by a
specialist.
• This power meter is not intended for use by persons
(including children) with reduced physical, sensory, or
mental capacities, or lack of experience and knowledge,
unless they have been given supervision or instruction
Page 24
GB
Operating instructions EM 231
Display
10 11 12 13 14
15
16
17
18
19
20
21
28
Page 25

GB
EM 231 Operating instructions
3 Reset button
MASTER CLEAR
Press with pointed object to clear
all data in memory including current time and all programs.
4 UP button Set current time, price, price
programs in combination with
SET button.
5 SET button Set current time, price, price
programs in combination with UP
button.
Page 26

GB
Operating instructions EM 231
17 Display MAX OVERLOAD WARNING.
18 Display PRICE 1 and 2, TOTAL PRICE 1 and 2.
19 Display day of the week MO, TU, WE, TH, FR,
SA, SU.
20 Display CLOCK.
21 Display seconds.
22 Display minutes.
23 Display hours.
Page 27

GB
EM 231 Operating instructions
in the bottom right corner on the LCD.
Press the SET button (5) once; the day of the week (19)
starts flashing.
Press the UP button (4) to set the day of the week (19) to
MO, TU, WE, TH, FR, SA or SU.
Press the SET button (5) again to confirm the day of the
week setting; the hours (23) start flashing.
Press the UP button (4) to set the hours (23) of the current
time.
Page 28

GB
Operating instructions EM 231
until Cost/kWh (16) is shown. If already 2 prices were
entered these can be displayed in turn by pressing the
FUNC button (6).
Set Cost/kWh (Price 1)
Press and hold the SET button (5) until the fist digit flashes
to set the cost/kWh after the cost/kWh for price 1 (18) are
displayed. Set the correct value for the first digit with the
UP button (4). Now press the SET button (5) again until
Page 29

GB
EM 231 Operating instructions
(see previous section). Now press the SET button (5) until
the hour display starts flashing and press the UP button (4)
to set the hours for the starting point. Repeat this procedure for the minute display. Finally press the SET button (5)
to finish price 1 settings.
Set Cost/kWh (Price 2)
Setting the cost/kWh for price 2 is similar to price 1.
Ensure that at the beginning price 2 (18) is displayed.
Press the FUNC button (6) to toggle the display to show
Page 30

GB
Operating instructions EM 231
Press the FUNC button (6) again to display the power
consumption of the connected appliance in the value field
(10) on the LCD. kWh (13) is displayed in the unit section
and the POWER FACTOR (27, 28).
Press the FUNC button (6) again to display the TOTAL
PRICE (10, 18) and the TOTAL ON TME (21, 22, 24) in
minutes of the connected appliance.
Press the FUNC button (6) again to display the VOLTac.
(15) and the Hz (26, 27). Hold the FUNC button (6) at
least 2 seconds to display COST/kWh.
Page 31

GB
EM 231 Operating instructions
4.4.5 Change Batteries
The power meter comes ex factory with 3 x 1.5 V LR44/
AG13 button cells installed in the battery compartment. To
exchange the batteries, please follow these steps:
The battery compartment is located at the rear of the
unit. Use a flat screwdriver to carefully lift the cover of the
battery compartment. Remove the empty batteries and
replace them with new ones. Observe the polarity (+/-) as
indicated inside the cover (flat side (+) to the left). Carefully replace the cover again. Take care not to damage the
Page 32

GB
Operating instructions EM 231
5. Maintenance and Care
This product is maintenance-free. Never open or disassemble the product. Before cleaning disconnect the power
meter from the wall outlet and the appliance.
Clean the exterior only with a clean and soft cloth.
6. Disposal
The power meter should not be disposed of in
the regular household waste at the end of its operational lifetime. It must be taken to a collection
Page 33

NL
EM 231 Gebruiksaanwijzing
BELANGRIJK:
Lees gebruiksaanwijzing en bewaar hem.
Besteed aandacht aan de veiligheidsaanwijzingen en
volg ze op.
Sluit geen een apparaat aan met een belasting van
meer dan 16 Amp.
Zorg er altijd voor dat de stekker van enig apparaat
altijd volledig in de aansluiting op het toestel wordt
gestoken.
Page 34

NL
Gebruiksaanwijzing EM 231
Inhoudsopgave
1. Inleiding .......................................................................35
2. Inhoud van de Verpakking
...........................................35
3. Technische Gegevens
.................................................36
4. Bediening
.....................................................................37
4.1 Veiligheidsaanwijzingen voor het Apparaat
..........37
4.2 Vooraanzicht
.........................................................39
4.3 Plaats van de Bedieningsorganen,
Functies en Scherm
.............................................40
Page 35

NL
EM 231 Gebruiksaanwijzing
Gebruiksaanwijzing
1. Inleiding
Deze gebruiksaanwijzing dient volledig en zorgvuldig te
worden gelezen. Ze vormen een onderdeel van uw nieuw
aangeschafte energiemeettoestel en bevatten belangrijke
informatie met betrekking tot de bediening en het onderhoud. Alle voorzorgsmaatregelen dienen in acht te worden
genomen bij het gebruik van dit apparaat. Als u vragen
hebt met betrekking tot het gebruik van dit apparaat, neem
Page 36

NL
Gebruiksaanwijzing EM 231
3. Technische Gegevens
Product: Energiemeettoestel
EM 231
Soort bescherming: IP20
Nominale spanning: 230 V ~ 50 Hz
Maximale. belasting: 3600 W (230 V ~ 16 A)
Meetbereik spanning: 190 - 276 V ~
Meetnauwkeurigheid spanning: +/-1%
Meetbereik stroom: 0,01 - 16 A
Meetnauwkeurigheid stroom: +/-1% of +/-0,01 A
Page 37

NL
EM 231 Gebruiksaanwijzing
4. Bediening
4.1 Veiligheidsaanwijzingen voor het Apparaat
• Alle veiligheids- en gebruiksaanwijzingen dienen te
worden gelezen voordat de energiemeettoestel in gebruik
wordt genomen.
• De veiligheids- en gebruiksaanwijzing dienen voor toekomstige raadpleging te worden bewaard.
• Alle waarschuwingen op het apparaat en in de gebruiks-
Page 38

NL
Gebruiksaanwijzing EM 231
wordt gebruikt, haal hem dan uit het stopcontact en bewaar hem op een droge, koele plaatst, buiten het bereik
van kinderen.
• Gebruik de energiemeettoestel niet als het apparaat zelf
of de geïntegreerde stekkerdoos is beschadigd. Haal
hem onmiddellijk uit het stopcontact en haal de stekker
van het aangesloten apparaat eruit.
• Reparaties aan het apparaat dienen uitsluitend door een
specialist te worden uitgevoerd.
Page 39

NL
EM 231 Gebruiksaanwijzing
4.2 Vooraanzicht
1
2
3
4
5
6
7
8
9
Page 40

NL
Gebruiksaanwijzing EM 231
4.3 Plaats van de Bedieningsorganen, Functies en
Scherm
1 Batterijvak Het batterijvak bevindt zich aan
de achterkant van het apparaat.
Plaats 3 knoopcellen LR44/AG13
met de juiste polariteit, zoals
aangegeven in the batterijvak.
2 Scherm Hier worden alle waardes van
ingestelde parameters en metin-
Page 41

NL
EM 231 Gebruiksaanwijzing
7 Netaansluiting Steek deze in een stopcontact
met 230 V ~ 50 Hz.
8 Stekkerdoos Sluit het te meten apparaat
hierop aan.
9 Aardcontact Aardpen.
10 Schermeenheden voor gebruikswaardes.
11 Geef weer: AMP.
12 Geef weer: WATT.
13 Geef weer: kWh.
Page 42

NL
Gebruiksaanwijzing EM 231
25 Geef weer: AM, PM.
26 Geef weer: Hz.
27 Geef waarde vermogensfactor weer.
28 Geef weer: POWER FACTOR.
4.4 Aanwijzingen voor het Gebruik
Steek de netaansluiting (7) van de energiemeettoestel in
een standaard stopcontact met 230 V 50 Hz. Het scherm
(2) gaat automatisch aan en geeft de huidige tijd (20, 21,
Page 43

NL
EM 231 Gebruiksaanwijzing
Druk opnieuw de SET toets (5) om de ureninstelling te bevestigen; de minutenaanduiding (22) begint te knipperen.
Druk de UP toets (4) om de minuten (22) van de tijd in te
stellen en druk opnieuw de SET toets (5) om de instelling
van de tijd te bevestigen.
Steek nu de stekker van het te meten apparaat in het
toestel en schakel het in. De energiemeettoestel begint het
verbruik te meten.
Page 44

NL
Gebruiksaanwijzing EM 231
cijfer begint te knipperen. De kosten/kWu kan nu ingesteld
worden. Stel de juiste waarde voor het eerste cijfer in met
de UP-toets (4). Druk nu opnieuw de SET-toets (5) totdat
het tweede cijfer begint te knipperen en stel de juiste
waarde in met de UP-toets (4). Herhaal deze procedure
voor het derde en vierde cijfer.
U kunt de decimaalpunt verplaatsen door de SET-toets (5)
in te drukken totdat de decimaalpunt begint te knipperen,
waarna u hem naar de gewenste positie kunt verplaatsen
Page 45

NL
EM 231 Gebruiksaanwijzing
minutenaanduiding. Druk tenslotte de SET-toets (5) om de
instellingen voor prijs 1 te voltooien.
Instellen Kosten/kWu (Prijs 2)
Het instellen van de kosten/kWu voor prijs 2 is vergelijkbaar met die van prijs 1.
Zorg ervoor dat bij het begin prijs 2 (18) wordt weergegeven.
Druk de FUNC-toets (6) om naar het weergeven van prijs
Page 46

NL
Gebruiksaanwijzing EM 231
wordt weergegeven in de apparatensectie en de POWER
FACTOR (27, 28).
Druk opnieuw de FUNC toets (6) om de energieverbruik
van het aangesloten apparaat weer te geven in het veld
voor de waarde (10) op het LCD-scherm. kWh (13) wordt
weergegeven in de apparatensectie en de POWER FACTOR (27, 28).
Druk opnieuw de FUNC toets (6) om TOTAL PRICE (10,
18) en TOTAL ON TIME (21, 22, 24) in minuten weer te
Page 47

NL
EM 231 Gebruiksaanwijzing
4.4.4 Herinsteltoets
Druk met een puntig voorwerp de herinsteltoets MASTER
CLEAR om alle gegevens in het geheugen te wissen,
inclusief de huidige tijd en alle programma’s. Gedurende
een paar seconden wordt het volledige scherm (2) met alle
parameters weergegeven.
4.4.5 Vervangen van de Batterijen
De energiemeettoestel wordt vanaf de fabriek geleverd
Page 48

NL
Gebruiksaanwijzing EM 231
voorkomen.
Lekkende batterijen kunnen elektrische schokken en
schade aan de energiemeettoestel veroorzaken.
Vervang de batterijen alleen als de energiemeettoestel uit
het stopcontact is gehaald.
Vervang de batterijen alleen maar door batterijen van het
zelfde soort. Gebruik geen lege en nieuwe batterijen door
elkaar.
Gooi batterijen niet weg bij het huishoudelijk afval. Lever
Page 49

NL
EM 231 Gebruiksaanwijzing
6. Afvoer
De energiemeettoestel dient aan het eind van
zijn levensduur niet te worden weggegooid bij het
normale huishoudelijk afval. Hij dient te worden
ingeleverd bij een verzamelpunt voor het verwerken van elektrische en elektronische apparaten.
Neem contact op met uw gemeente voor opties
voor het afvoeren van dit apparaate op een
milieubewuste en verantwoorde wijze.
Page 50

S(
Bruksanvisning EM 231
VIKTIGT:
Läs och behåll denna bruksanvisning.
Observera och följ säkerhetsinstruktionerna.
Anslut inte en apparat med en last som överstiger 16 A.
Se alltid till att apparatens stickkontakt är fullständigt
införd i mätarens uttag.
VARNING:
Koppla inte ihop två eller flera mätare!
Page 51

S(
EM 231 Bruksanvisning
Innehållsförteckning
1. Inledning ......................................................................52
2. I förpackningen
............................................................52
3. Tekniska data
...............................................................53
4. Handhavande
..............................................................54
4.1 Säkerhetsinstruktioner för produkten
...................54
4.2 Framsidesvy
.........................................................55
4.3 Placering av reglage, funktioner och display
........56
4.4 Bruksanvisning
.....................................................58
Page 52

S(
Bruksanvisning EM 231
Bruksanvisning
1. Inledning
Denna bruksanvisning måste läsas noggrant och i sin helhet. De hör till din nyköpta elenergimätare och innehåller
viktig information om dess användning och underhåll. Alla
säkerhetsföreskrifter måste iakttas när produkten används.
Om du har några frågor angående produktens användning, kontakta din återförsäljare eller vårt servicecentrum.
Denna bruksanvisning ska förvaras säkert och vid behov
Page 53

S(
EM 231 Bruksanvisning
3. Tekniska data
Produkt: Elenergimätare EM 231
Skyddsklass: IP20
Märkspänning: 230 V ~ 50 Hz
Max. belastning: 3600 W (230 V ~ 16 A)
Mätintervall för spänning: 190 - 276 V AC
Mätnoggrannhet för spänning: ±1%
Mätintervall för ström: 0,01 - 16 A
Mätnoggrannhet för ström: ±1% eller ±0,01 A
Page 54

S(
Bruksanvisning EM 231
4. Handhavande
4.1 Säkerhetsinstruktioner för produkten
• Alla säkerhets- och användningsinstruktioner bör läsas
innan elenergimätaren används.
• Säkerhets- och användningsinstruktionerna bör behållas
för framtida behov.
• Alla varningar på produkten och i bruksanvisningen ska
följas till fullo.
Page 55

S(
EM 231 Bruksanvisning
• Om elenergimätaren skadas, koppla omedelbart bort
den från elnätet och apparaten och upphör med vidare
användning.
• Reparationer av produkten får endast genomföras av en
specialist.
• Denna elenergimätare är inte avsedd för bruk av personer (inklusive barn) med nedsatta fysiska, sinnes- eller
mentala förmågor, eller brist på erfarenhet och kunskap,
såvida de inte av en person med ansvar för deras säker-
Page 56

S(
Bruksanvisning EM 231
Display
10 11 12 13 14
15
16
17
18
19
20
21
28
Page 57

S(
EM 231 Bruksanvisning
4 UP-knapp Ställer in aktuell tid, pris och
prisprogram i kombination med
knappen SET.
5 SET-knapp Ställer in aktuell tid, pris och
prisprogram i kombination med
knappen UP.
6 FUNC-knapp Tryck för att ändra visningsläge.
7 Stickkontakt Anslut till ett 230 V 50 Hz väggut-
tag.
Page 58

S(
Bruksanvisning EM 231
20 Symbol CLOCK.
21 Sekunder.
22 Minuter.
23 Timmar.
24 Symbol TOTAL ON TIME.
25 Symboler AM, PM.
26 Symbol Hz.
27 Visat värde, effektfaktor.
Page 59

S(
EM 231 Bruksanvisning
MO, TU, WE, TH, FR, SA eller SU.
Tryck på knappen SET (5) igen för att bekräfta inställd
veckodag; timmarna (23) börjar blinka.
Tryck på knappen UP (4) för att ställa in aktuell timme (23).
Tryck på knappen SET (5) igen för att bekräfta inställd
timme; minuterna (22) börjar blinka.
Tryck på knappen UP (4) för att ställa in minuterna (22)
och tryck på knappen SET (5) igen för att bekräfta tiden.
Page 60

S(
Bruksanvisning EM 231
pris 1 (18) visas. Ställ in korrekt värde för första siffran
med knappen UP (4). Tryck åter på knappen SET (5) tills
den andra siffran börjar blinka och ställ in korrekt värde
med knappen UP (4). Upprepa proceduren för den tredje
och den fjärde siffran.
Du kan flytta decimalen genom att trycka på knappen
SET (5) tills den börjar blinka och sedan flytta den med
knappen UP (4) tills den hamnar rätt.
Tryck åter på knappen SET (5) så börjar tidsangivelsen
Page 61

S(
EM 231 Bruksanvisning
Ställ in kostnad/kWh (pris 2)
Att ställa in kostnad/kWh för pris 2 liknar pris 1.
Se först till så att pris 2 (18) visas.
Tryck på knappen FUNC (6) för att växla visningen till pris
2 (18) innan inställningen påbörjas med knappen SET (5).
Visa mätfunktioner
Tryck upprepat på knappen FUNC (6) för att växla mellan
följande information: SPÄNNING, STRÖM, WATT – kWh -
Page 62

S(
Bruksanvisning EM 231
TOTAL ON TIME (21, 22, 24) i minuter.
Tryck på knappen FUNC (6) igen för att visa VOLTac (15)
och Hz (26, 27). Håll knappen FUNC (6) nedtryckt i minst
2 sekunder för att visa kostnad per kilowattimme (COST/
kWh).
Om den maximala belastningen överskrids så blinkar MAX
OVERLOAD WARNING (17) på displayen (2).
4.4.3 Viloläge
Page 63

S(
EM 231 Bruksanvisning
Batteriutrymmet finns på enhetens baksida. Använd en
platt skruvmejsel för att försiktigt lyfta batteriutrymmets
lock. Avlägsna de tomma batterierna och ersätt med nya.
Iakttag polariteten (±) som anges på lockets insida (den
platta sidan (+) till vänster). Sätt försiktigt tillbaka locket
igen. Var försiktig så att inte anslutningspolerna skadas
när du stänger locket.
Locket måste vara på plats före användning.
Om elenergimätaren inte ska användas under en längre tid
Page 64

S(
Bruksanvisning EM 231
6. Kassering
När elenergimätaren är förbrukad får den inte
kastas i det vanliga hushållsavfallet. Den måste
lämnas in för kassering till ett uppsamlingsställe
för elektriska och elektroniska enheter.
Kontakta kommunkontoret för information om
miljömässiga alternativ för korrekt kassering av
produkten.
7. Försäkran om överensstämmelse
Page 65

ES
EM 231 Instrucciones de uso
IMPORTANTE:
Lea y conserve estas instrucciones de uso.
Tenga en cuenta y obedezca las instrucciones de
seguridad.
No lo conecte a un aparato con una carga superior a
16 amperios.
Asegúrese de que el enchufe de cualquier aparato
esté totalmente introducido en la salida del medidor.
Page 66

ES
Instrucciones de uso EM 231
Índice
1. Introducción .................................................................67
2. Contenido del embalaje
...............................................67
3. Datos técnicos
.............................................................68
4. Utilización
....................................................................69
4.1 Instrucciones de seguridad para este producto
...69
4.2 Vista frontal
..........................................................70
4.3 Ubicación de controles, funciones y pantalla
.......71
4.4 Instrucciones de uso
............................................73
Page 67

ES
EM 231 Instrucciones de uso
Instrucciones de uso
1. Introducción
Estas instrucciones de uso deben leerse cuidadosamente
y por completo. Son un elemento integral de su nuevo
potenciómetro y contienen información importante sobre
su uso y mantenimiento. Deben obedecerse todas las
precauciones cuando use este producto. Si tiene dudas
acerca del uso de este producto, contacte con su vendedor o su centro de servicio. Estas instrucciones de uso
Page 68

ES
Instrucciones de uso EM 231
3. Datos técnicos
Producto: Potenciómetro
EM 231
Tipo de protección: IP20
Tensión nominal: 230 V ~ 50 Hz
Carga máx.: 3600 W (230 V ~ 16 A)
Rango de medición de tensión: 190 - 276 V CA
Precisión de medición de tensión: +/-1%
Rango de medición de corriente: 0,01 - 16 A
Precisión de medición de corriente: +/-1% o +/-0.01 A
Page 69

ES
EM 231 Instrucciones de uso
4. Utilización
4.1 Instrucciones de seguridad para este producto
• Deben leerse todas las instrucciones de seguridad y uso
antes de utilizar el potenciómetro.
• Las instrucciones de seguridad y uso deben conservarse
como referencia en el futuro.
• Deben cumplirse estrictamente todas las advertencias en
el producto y en las instrucciones de uso.
Page 70

ES
Instrucciones de uso EM 231
están dañados, y desconéctelo inmediatamente de la
alimentación y del aparato.
• Las reparaciones del producto deben ser realizadas
exclusivamente por un especialista.
• Este potenciómetro no está pensado para ser usado por
personas (incluyendo niños) con capacidades físicas,
sensoriales o mentales reducidas, falta de experiencia o
conocimientos, salvo si reciben supervisión o instrucciones sobre el uso del aparato por una persona responsable de su seguridad. Los niños deben ser vigilados para
Page 71

ES
EM 231 Instrucciones de uso
Pantalla
10 11 12 13 14
15
16
17
18
19
20
21
28
Page 72

ES
Instrucciones de uso EM 231
3 Botón de reinicio
MASTER CLEAR
Presiónelo con un objeto puntiagudo para borrar todos los datos
de la memoria, incluyendo la
hora actual y los programas.
4 Botón UP Establecer hora actual, precio,
programas de precios conjuntamente con el botón SET.
5 Botón SET Establecer hora actual, precio,
programas de precios conjunta-
Page 73

ES
EM 231 Instrucciones de uso
15 Indicación VOLTac.
16 Indicación COST/kWh.
17 Indicación MAX OVERLOAD WARNING.
18 Indicación PRICE 1 y 2, TOTAL PRICE 1 y 2.
19 Indicación de día de la semana MO, TU, WE, TH,
FR, SA, SU
20 Indicación CLOCK.
21 Indicación de segundos.
Page 74

ES
Instrucciones de uso EM 231
4.4.1 Configuración de la hora actual
Pulse el botón FUNC (6) hasta que se muestre CLOCK (20)
en la esquina inferior derecha del LCD.
Pulse el botón SET (5) una vez; el día de la semana (19)
comenzará a parpadear.
Pulse el botón UP (4) para establecer el día de la semana
(19) en MO, TU, WE, TH, FR, SA o SU.
Pulse el botón SET (5) de nuevo para confirmar la configu-
ración del día de la semana; las horas (23) comenzarán a
Page 75

ES
EM 231 Instrucciones de uso
Establecer y mostrar Coste/kWh
Si aparece VOLTAGE / CURRENT /WATT en la pantalla,
presione y mantenga el botón FUNC (6) durante al menos
2 segundos hasta que se muestre Cost/kWh (16). Si ya se
han introducido 2 precios se pueden mostrar secuencialmente pulsando el botón FUNC (6).
Establecer Coste/kWh (Precio 1)
Presione y mantenga el botón SET (5) hasta que parpadee
Page 76

ES
Instrucciones de uso EM 231
Para introducir un segundo precio (por ejemplo, tarifa
diurna/nocturna) debe establecer también un momento de
inicio para el precio 1. Cuando parpadee la indicación de
hora tras ON TIME (24) para el precio 1 (18) pulse el botón ARRIBA (4) para establecer el día de la semana para
el momento de inicio (ver sección anterior). Ahora pulse el
botón SET (5) hasta que la indicación de hora comience
a parpadear y pulse el botón ARRIBA (4) para establecer
las horas del punto de inicio. Repita el proceso para la
Page 77

ES
EM 231 Instrucciones de uso
Pulse el botón FUNC (6) para mostrar el consumo de
corriente del aparato conectado en el campo del valor (10)
en el LCD, AMP (11) se muestra en la sección de unidad y
el POWER FACTOR (27, 28).
Pulse el botón FUNC (6) de nuevo para mostrar los vatios
del aparato conectado en el campo del valor (10) en el
LCD, WATT (12) se muestra en la sección de unidad y el
POWER FACTOR (27, 28).
Pulse el botón FUNC (6) de nuevo para mostrar el
Page 78

ES
Instrucciones de uso EM 231
(20, 21, 22, 23, 25), el día de la semana (19), la tensión de
la línea (10, 15) y la frecuencia (26, 27).
4.4.4 Botón de reinicio
Pulse el botón de reinicio MASTER CLEAR con un objeto
puntiagudo para borrar todos los datos de la memoria,
incluidos la hora actual y todos los programas. Durante
unos segundos se mostrará la pantalla completa (2) con
todos los parámetros.
Page 79

ES
EM 231 Instrucciones de uso
las baterías del potenciómetro para evitar fugas de las
baterías.
Las baterías con fugas pueden provocar electrocuciones y
dañar el potenciómetro.
Cambie las baterías exclusivamente cuando el potenciómetro esté desconectado de la alimentación.
Cambie las baterías exclusivamente con otras del mismo
tipo. No mezcle baterías nuevas con baterías gastadas.
No deseche las baterías con los residuos domésticos.
Page 80

ES
Instrucciones de uso EM 231
electrónicos para su eliminación.
Consulte con su ayuntamiento para conocer las
opciones de eliminación correcta y respetuosa
con el medioambiente de este producto.
7. Declaración de cumplimiento
El símbolo CE se utiliza en cumplimiento de las siguientes
normativas europeas:
2006/95/EC Normativa de baja tensión
Page 81

Page 82

Page 83

Page 84

 Loading...