


CB674A
Brema CB674A, CB1265A18, CB640A, CB425A, CB249A User Manual
...
AUTOMATIC ICE-CUBE MAKER
MACHINE AUTOMATIQUE A GLAÇONS
PRODUCTOR AUTOMATICO DE HIELO EN CUBITOS
INSTRUCTIONS
AND
WARNINGS
INSTRUCTIONS
ET
REMARQUES
INSTRUCCIONES Y
ADVERTENCIAS


E
E
n
n
g
g
l
l
i
i
s
s
h
h
Dear Customer, Congratulations on having chosen a quality product which will certainly fully
meet your expectations. Thank you for having purchased one of our products. Please read
this instruction manual carefully before using your new automatic ice-cube maker.
TABLE OF CONTENTS
1 IMPORTANT ADVICE AND RECOMMENDATIONS
2 TECHNICAL SPECIFICATIONS
3 ADVICE ABOUT TRANSPORTATION
4 UNPACKING
5 INSTALLATION
5.1 CONNECTION DIAGRAM
5.2 POSITIONING
5.3 CONNECTION TO WATER MAINS
5.3.a WATER SUPPLY
5.3.b DRAIN
5.4 CONNECTION TO THE ELECTRICITY MAINS
5.5 IMPROPER USE OF APPLIANCE
6 START-UP
6.1 CLEANING INTERNAL PARTS
6.2 START-UP
7 MAIN CAUSES OF OPERATING FAILURE
8 OPERATION
9 MAINTENANCE
9.1 CLEANING THE FILTER OF WATER SUPPLY SOLENOID VALVE
9.2 AIR-COOLED MODELS
9.3 CLEANING AND SANITIZING OPERATIONS
9.3.a CLEANING
9.3.b SANITIZING
10 PERIODS AT A STANDSTILL
The figures in this manual are of a general nature. Some details may therefore differ
depending on the specific model.
The Manufacturer declines all liability for any inaccuracies in this Instruction Manual due to
printing or transcription errors. The Manufacturer also reserves the right to make any
modifications to the products that may be necessary or useful, also in the interests of the
user, without impairing the products’ essential features of functionality and safety.

1 IMPORTANT ADVICE AND RECOMMENDATIONS
This instruction manual forms an integral part of the automatic ice-cube maker (also more
simply called “appliance” in the text) and must be kept for possible future consultation.
In the event of the appliance being sold or transferred to another person, this Manual must be handed
over to the new user, in order to enable him to become familiar with the operation of the equipment and
the corresponding advice and recommendations.
‼
Before installing and using the appliance, read the advice and recommendations contained
in this instruction manual very carefully. They are given in order to ensure safe installation, use
and maintenance of the appliance.
• always remove the plug from the power socket before proceeding with any cleaning or maintenance
operations
• to ensure the appliance operates efficiently and correctly, it is essential to comply with the
Manufacturer’s instructions and to make sure that maintenance is performed by specially qualified
personnel
• always lift the appliance to move it, even slightly. Do not push or pull it
• any use of the appliance other than for the production of ice cubes using cold drinking water is to be
considered as improper use
• in the event of a defect and/or malfunction of the appliance, switch off with the switch fitted at the
installation stage, unplug the appliance and turn off the water supply tap. Do not make any attempt
to repair or modify the appliance; only contact one of the Authorized Service Centers
• in addition to rendering any form of warranty null and void, modifying (or attempting to modify) this
appliance is extremely dangerous
• any specific information or diagrams regarding particular models will be attached to this Instruction
Manual
‼
Use of this electrical appliance requires compliance with certain fundamental rules; in particular:
• do not touch the appliance with wet or damp hands or feet
• do not use the appliance when you are barefoot
• do not use extensions in premises such as bathrooms or shower rooms
• do not tug on the power supply cable to disconnect it from the mains
• do not allow the appliance to be used by children or by incapable persons
• supervise children to ensure that they do not play with the appliance
• do not insert anything between the moving parts and the guards
Should you decide to scrap appliance, first disconnect the power cable from the mains, and then cut the
cable off.
In addition, proceed as follows:
• break off and remove the door in order to prevent the possible danger of a child getting trapped inside
• do not allow the coolant gas and oil in the compressor to disperse into the environment
• dispose of or recover the various materials according to the terms of the local regulations in force in
your State
This appliance does not contain coolant that damages the ozone layer.
‼
The Manufacturer shall not be liable for any damage to the environment, animals, persons
or objects caused by incorrect installation.
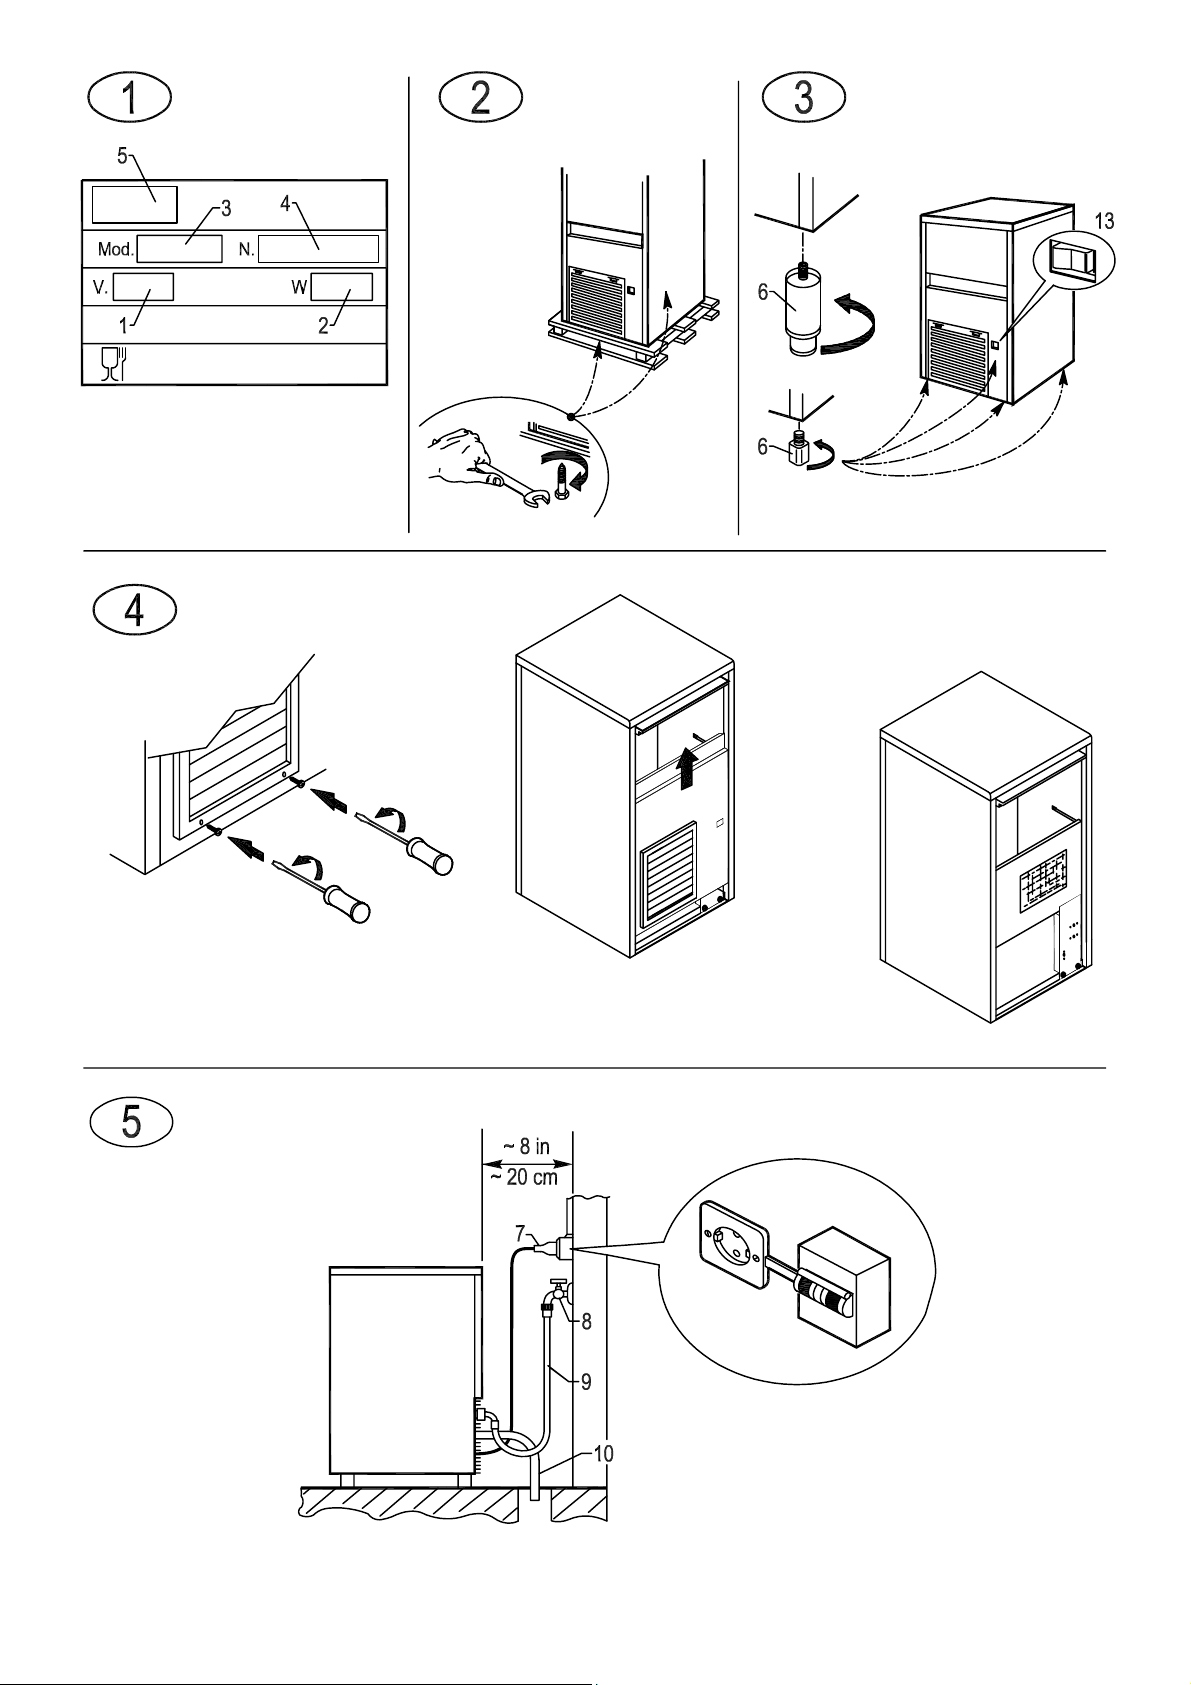
2 TECHNICAL DATA (Fig. 1)
The voltage and frequency are given on the data plate on the appliance. Refer to this data plate to
check compliance.
Voltage (1), power (2), model (3), serial No. (4), Manufacturer (5).

E
E
n
n
g
g
l
l
i
i
s
s
h
h
The weighted equivalent continuous sound level A of this appliance is less than 70 dB (A). The
measurements were made over an entire production cycle, at a distance of 1 m from the surface of the
appliance and at a height of 1.60 m from the floor.
During normal operation the appliance does not generate vibrations which can cause actual or potential
danger situations.
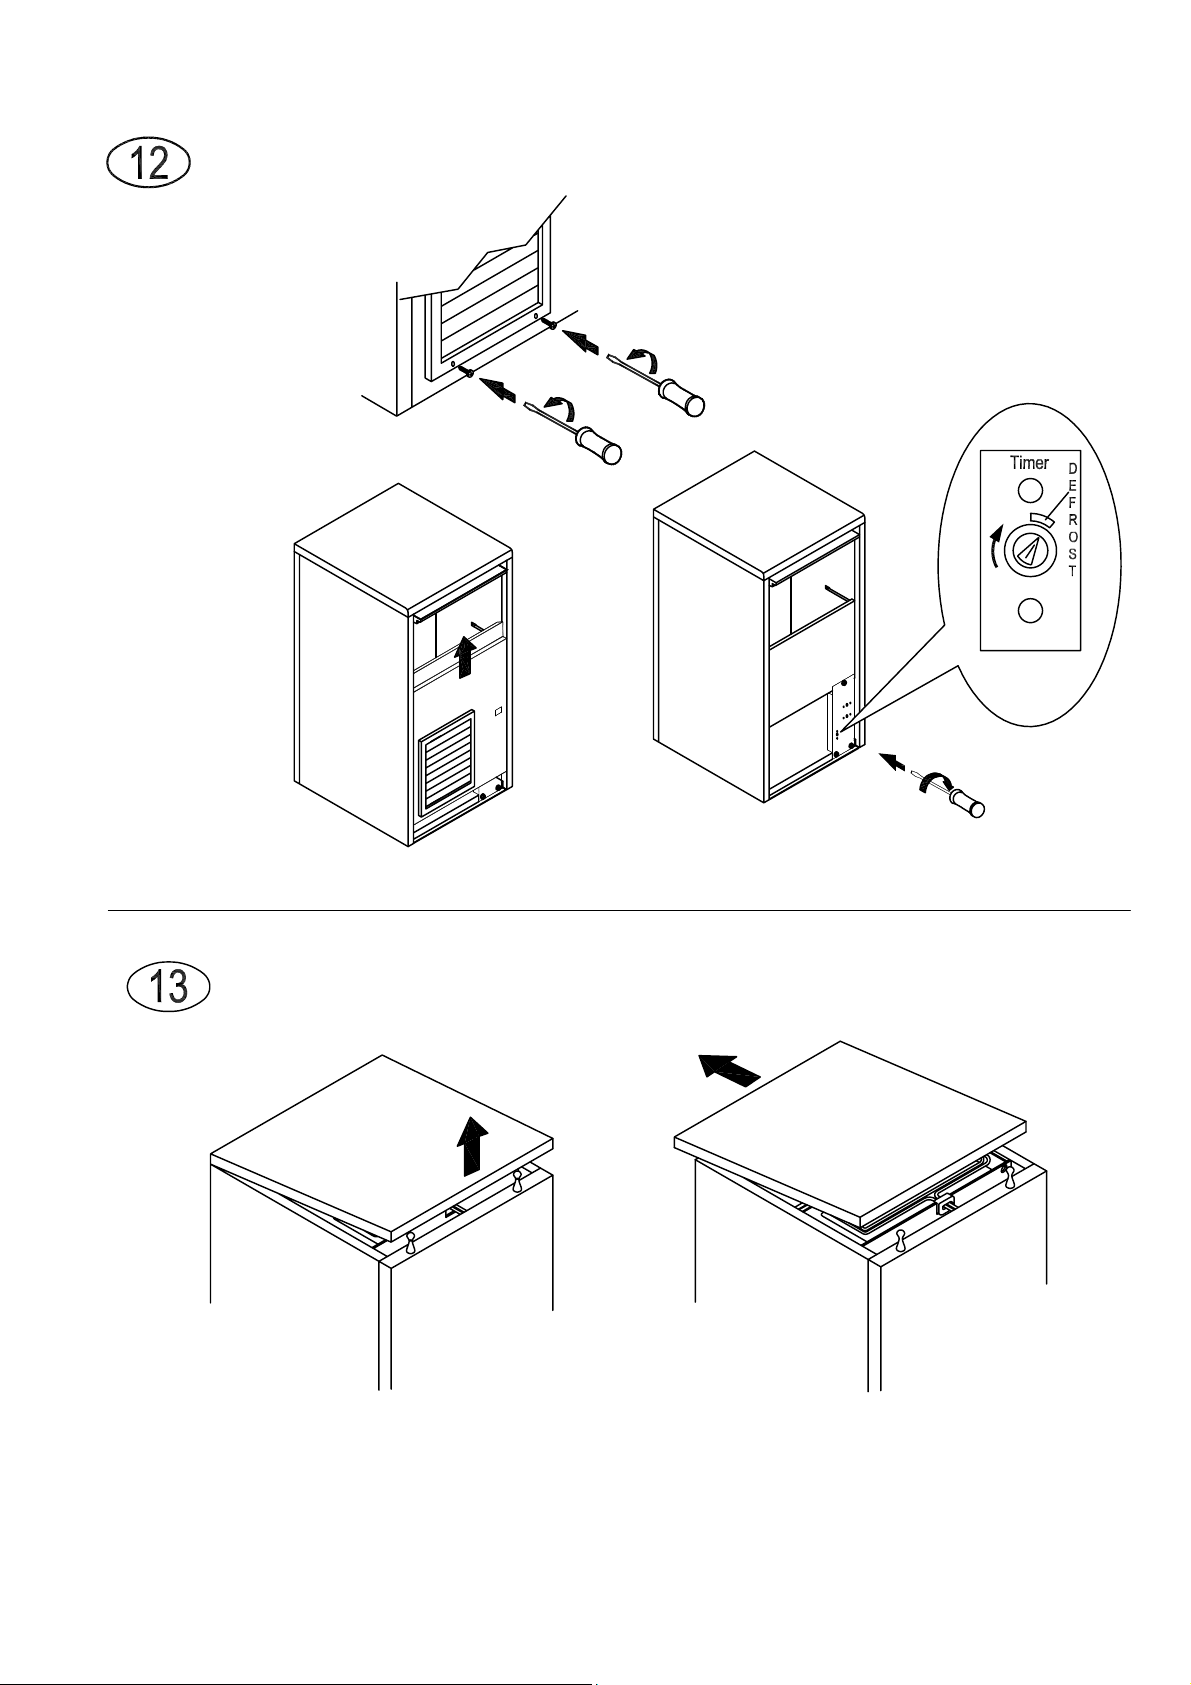
The wiring diagram is stuck on the front counterpanel of the appliance.
In order to gain access thereto, unplug the appliance from the power source, loosen screws holding the
front panel, and slide it away after first opening the door (Fig. 4).
3 ADVICE ABOUT TRANSPORTATION
The net weight and the weight including packaging of the appliance are given on the cover of this
Instruction Manual. Please refer to the instructions on the packaging in order to correctly transport and
lift the appliance.
To prevent the oil in the compressor from flowing back into the coolant circuit, always make sure that
the appliance is kept upright during transport, storage, and handling. Follow the instructions given on
the packaging.
4 UNPACKING
The appliance must be installed by authorized personnel, in compliance with the local laws in
force and the Manufacturer’s instructions.
Once you have removed the packaging according to the instructions on the box, MAKE SURE THAT
THE APPLIANCE IS IN A PERFECTLY GOOD CONDITION. IF IN DOUBT DO NOT USE IT AND
IMMEDIATELY CONTACT THE DEALER who sold it to you.
All the packaging items (plastic bags, cardboard, polystyrene foam, nails, etc.) must be removed
and put out of the reach of children, as they are potential sources of danger.
Rest the wooden pallet on the floor and, using a hex socket wrench, loosen and remove the bolts
(Fig. 2) that fix the appliance to the pallet.
Lift the appliance using equipment fit to bear its weight. Separate the appliance from the wooden pallet
and fit the supplied legs into the housings on the base plate provided for the purpose (6 in Fig. 3).
Use a spirit level to ensure that the appliance is standing perfectly level. If necessary, adjust the legs.
5 INSTALLATION
It is the user’s responsibility to provide everything necessary for the correct installation of the appliance,
in particular:
• preparation of an installation area which is sufficiently ventilated and accessible for maintenance
operations
• connection to the mains power supply, mains water supply and sewage network, including any
masonry work or pipes which may be required, in compliance with local regulations
5.1 CONNECTION DIAGRAM (Fig. 5)
7. electrical connection controlled by omnipolar circuit-breaker with residual current device
8. water tap
9. water supply pipe
10. water drainage pipe
5.2 POSITIONING
‼
The appliance must be installed in a hygienically clean location; it is advisable to avoid
rooms like cellars and store-rooms, because failure to meet hygiene requirements is likely to
lead to the formation and proliferation of bacteria in the appliance.

It is advisable to install the appliance in a room where the temperature is between 50°F (10°C)
and 95°F (35°C), and with a water supply temperature of between 38°F (3°C) and 77°F (25°C).
Avoid installing the appliance where it may be exposed to direct sunlight or near heat sources
such as radiators, stoves, dishwashers, etc.
‼
This appliance:
• must not be used outdoors
• must not be installed in damp places or where it is liable to be sprayed with water
• must not be cleaned with jets of water
• must be positioned at a distance of at least 2 inches (5 cm) from the side walls
5.3 CONNECTION TO THE WATER MAINS
‼
IMPORTANT:
• the appliance must be connected to the water mains by professionally qualified personnel in
accordance with the Manufacturer’s instructions
• this appliance must be only be supplied with cold water for human consumption (drinking water)
• the operating pressure must be between 14.5 and 87 PSI (0.1 and 0.6 MPa)
• a tap must be installed between the water mains and the feed pipe of the appliance, so that the
water supply may be shut off if necessary
• where the feed water is particularly hard, you are advised to install a softener. Any solid particles
(e.g. sand) may be eliminated by installing a mechanical filter, which must be periodically inspected
and cleaned. These devices must comply with local standards
• never turn the water supply tap off when the appliance is working
5.3.a WATER SUPPLY (Fig. 6)
Connect water supply solenoid valve (11) located at the back of the appliance to the mains water
supply in accordance with local regulations.
5.3.b DRAIN (Fig. 6)
Connect drainage connector (12) located at the back of the appliance to the sewer network in
accordance with local regulations. Check that:
• the water drain hose is not throttled at any point throughout its length
• the drain hose slopes downwards by at least 15%
5.4 CONNECTION TO THE ELECTRICITY MAINS
‼
IMPORTANT:
• the appliance must be connected to the electricity mains by professionally qualified
personnel in accordance with the local laws in force
• before connecting the appliance to the electricity mains, make sure that the mains voltage rating
corresponds to the value indicated on the rating plate
• make sure that the appliance is connected to an efficient earthing system
• make sure that the capacity of the power supply system suits the maximum power value indicated
on the rating plate of the appliance
• the appliance is supplied with a plug; prepare a specific socket controlled by an omnipolar
thermomagnetic circuit breaker (7 in Fig. 5) conforming to local safety regulations, fitted with fuses,
with associated differential, positioned in such a way that it can easily be reached. Insert plug into
socket controlled by switch (7 in Fig. 5)
• the plug must only be replaced by professionally qualified and authorized personnel, and the
new plug must comply with current local safety standards
• make sure that you fully uncoil the power supply cable and check that it is not crushed in any way
• if the power supply cable is damaged, it must be replaced by qualified, authorized personnel using
the special cable available from one of the Authorized Service Centers
 Loading...