

Page 1

Instruction book
pag. 1
•
Mode d’emploi pag. 23
Gebrauchsanleitung pag. 45 • Manuale di funzionamento pag. 67
Manual de instrucciones pag. 89
CHRONO ALARM
YM52
Page 2

Thank you very much for purchasing a BREIL WATCH. To ensure its correct use,
please read these instructions carefully.
In order to be able to make full use of the guarantee service (subject to the
guarantee terms), please ensure that the Breil international guarantee card is
supplied with the watch at the time of purchase.
Nous vous remercions de la préférence que vous nous avez accordée en achetant
une montre BREIL. En vue d'une utilisation correcte de celle-ci, lire attentivement
les instructions contenues dans ce livret.
Lors de l'achat, contrôlez que la montre soit accompagnée de la garantie qui devra
être présentée pour obtenir les prestations qui y sont décrites.
Wir danken Ihnen für das Vertrauen, daß Sie uns mit dem Kauf einer BREIL
QUARTZ-Uhr erwiesen haben. Damit Sie Ihre Uhr immer einwandfrei gebrauchen
können, möchten wir Sie bitten, die in dieser Gebrauchsanleitung enthaltenen
Anweisungen gewissenhaft zu lesen.
Beim Kauf sollten Sie kontrollieren, ob Ihnen zusammen mit der Uhr auch die
Garantiekarte ausgehändigt wurde, denn diese Karte müssen Sie vorlegen, um die
darin genannten Leistungen in Anspruch nehmen zu können.
Vi ringraziamo per la preferenza accordataci con l’acquisto di un orologio BREIL.
Per un corretto uso dello stesso, Vi preghiamo leggere attentamente le istruzioni
contenute in questo libretto.
Al momento dell’acquisto controllate che insieme all’orologio Vi venga fornita
anche la garanzia, da presentare per ottenere le prestazioni in essa descritte.
Le agradecemos su preferencia por un reloj BREIL. Para poder utilizar
correctamente el reloj, le rogamos leer atentamente las instrucciones contenidas
en este folleto.
Al comprarlo, controle que junto al reloj le sea entregada la garantía que debe ser
presentada para obtener los servicios que en la misma se describen.
Page 3

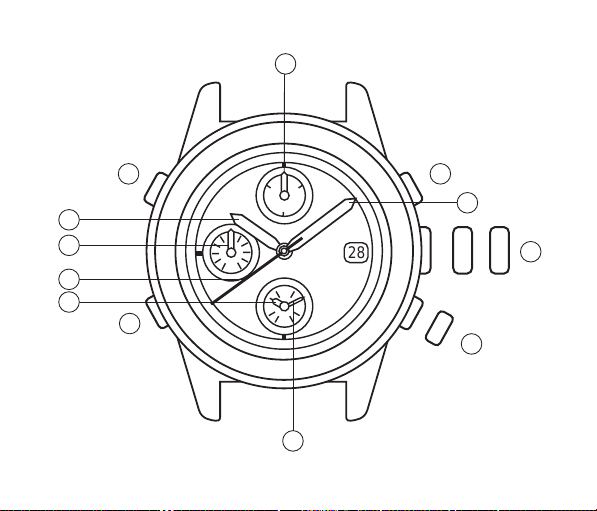
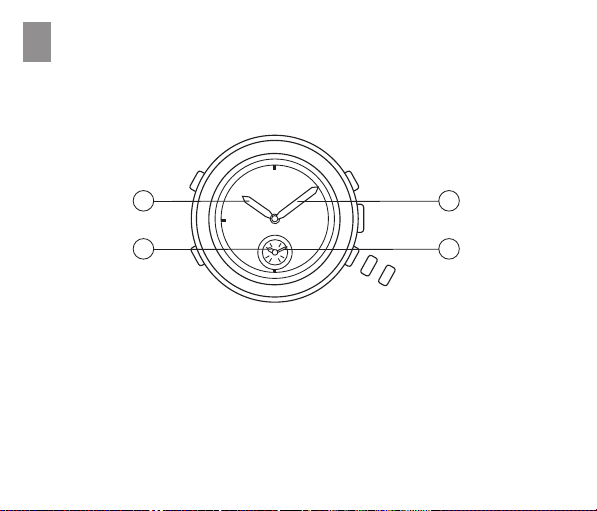
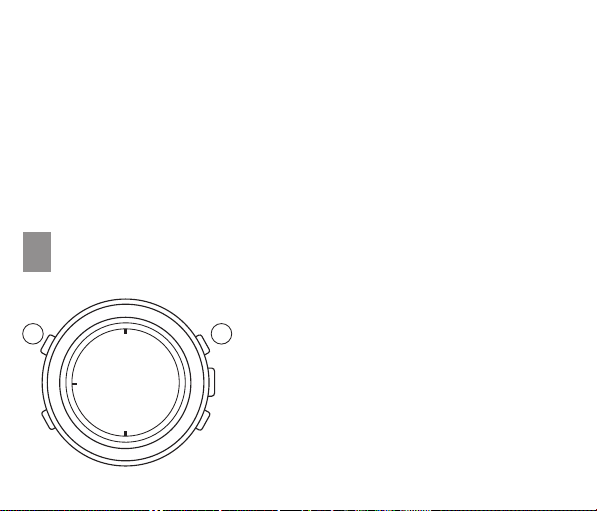
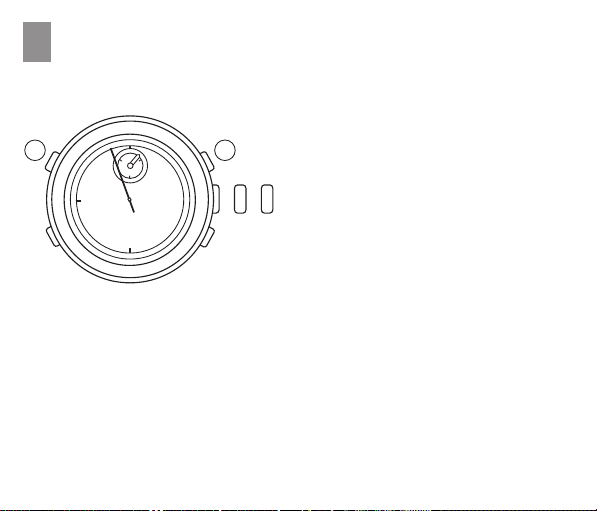
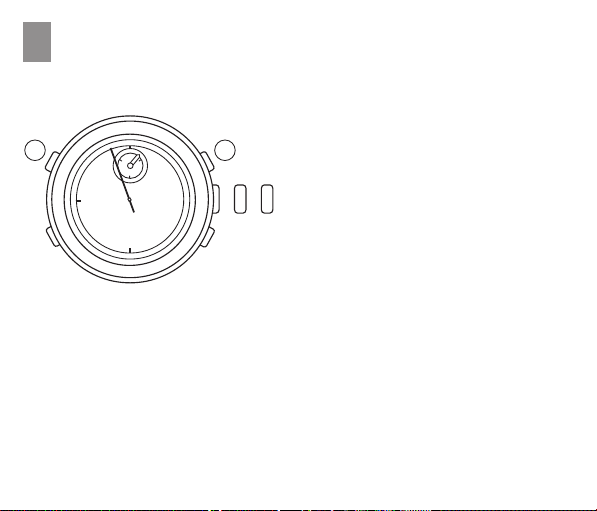
When reading this instruction booklet, keep the watch diagram on the
left unfolded and in full view. The symbols (A, B, etc.) on the diagram
are those referred to in the section describing the operating instructions.
Pendant la lecture de ce mode d'emploi, gardez le schéma d'illustration
de la montre ci-contre ouvert et bien en vue. Les symboles (A, B, etc.)
utilisés dans les différents chapitres du mode d'emploi correspondent à
ceux indiqués sur ce schéma.
Zur Lektüre dieser Gebrauchsanleitung sollten Sie die nebenstehend
gezeigte Übersichtsdarstellung der Uhr ausklappen und im Blick
behalten. Die in den einzelnen Abschnitten der Gebrauchsanleitung
verwendeten Zeichen (A, B, usw.) entsprechen den Kennzeichnungen
in dieser Übersicht.
Durante la lettura di questo manuale di istruzioni, tenere lo schema
illustrativo dell’orologio a sinistra aperto e in vista. I simboli (A, B, ecc.)
usati nelle sezioni delle istruzioni sul funzionamento corrispondono a
quelli indicati in questo schema.
Mientras lee este manual de instrucciones, mantenga el esquema
ilustrativo del reloj aquí presentado al lado izquierdo, abierto y bien
visible. Los símbolos (A, B, etc.) utilizados en las secciones de
instrucciones sobre el funcionamiento, corresponden a los que se
utilizan en este esquema.
Page 4
6
•
l
l
•
l
l
B
1
7
3
•
l
l
l
l
•
l
l
l
l
•
60
l
l
l
l
•
l
l
l
l
•
l
l
l
30
l
•
l
l
•
l
l
l
4
C
l
l
l
30
l
•
l
l
•
l
l
l
l
l
1020
l
•
l
l
•
l
l
l
l
•
l
l
l
l
•
l
l
l
l
•
l
l
l
l
•
l
l
l
•
l
l
•
l
l
l
l
•
12
l
l
l
l
•
l
l
l
l
•
l
l
l
6
l
•
l
l
l
l
28
l
l
l
•
l
l
l
l
•
l
l
l
l
39
•
l
l
l
l
•
l
l
l
l
•
(0)
(0)
(1)
A
2
E
(2)
(1)
D
5
Page 5

GB
CONTENTS
A 2
MAIN COMPONENTS
FEATURES
B
TIME SETTING
C
D
DATE SETTING
E
ALARM
F
STOPWATCH
G
HOW TO USE THE TA CHYMETER
H
ADJUSTING THE HAND POSITION
I
RESETTING THE BUILT-IN IC
J
BATTERY LIFE INDICATOR
K
PRECAUTIONS AND USEFUL INFORMATION
4
5
6
7
10
12
15
16
17
18
Page 6
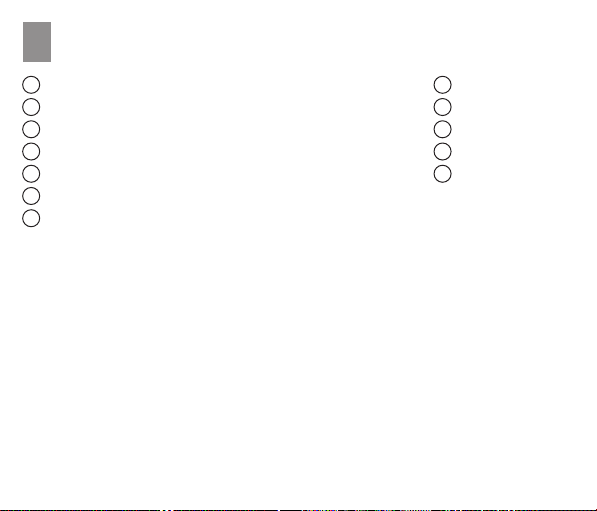
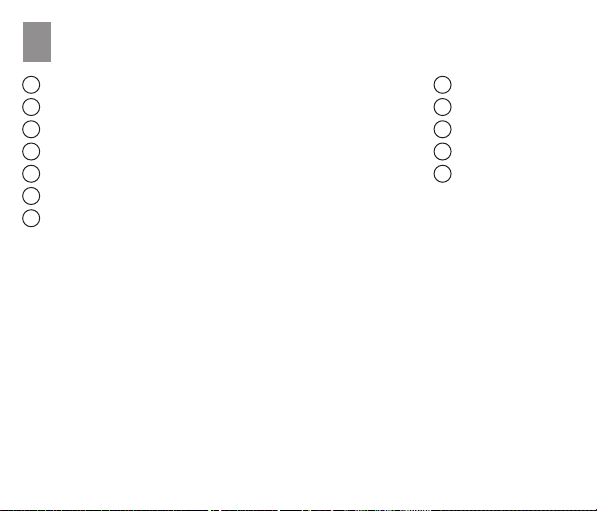
MAIN COMPONENTS
A
1
Hour hand
Minute hand
2
Stopwatch second hand
3
Alarm hour hand
4
Alarm minute hand
5
Stopwatch minute hand
6
Continuous second small hand
7
E Crown 1
0) Normal position: Free
1) First click:
Clockwise: Date setting
Counterclockwise: Free
2) Second click: Main time setting
D Crown 2
0) Normal position: Free
1) First click: Alarm engagement
2) Second click: Alarm hour and minute hand setting
2
A
B
C
D
E
Botton
Botton
Botton
Crown 2
Crown 1
Page 7

SCREW DOWN CROWN
(For the models with a screw down crown)
How to unlock the crown
•
Unscrew the crown by turning it counterclockwise until you no longer feel the threads
turning.
The crown can be pulled out to the first or second click for time/calendar setting.
How to lock the crown
•
After all the adjustments are completed, push the crown back to the normal position.
Turn the crown clockwise while pressing it lightly until tight.
3
Page 8

FEATURES
B
This is a multi-display analogue watch featuring alarm and stopwatch functions.
MAIN TIME DISPLA Y
Hour and minute hands with a continuous second small hand.
CALENDAR
Date in displayed in numerals.
ALARM
The alarm is set on a 12-hour basis with 2 small hands displaying the designated alarm
time.
STOPWATCH
It can measure up to 30 minutes.
BATTERY LIFE INDICATOR
The continuous second small hand moves at two-second intervals when the battery
needs to be replaced.
TACHYMETER
Some models are provided with a tachymeter with a graduated dial.
4
Page 9
TIME SETTING
C
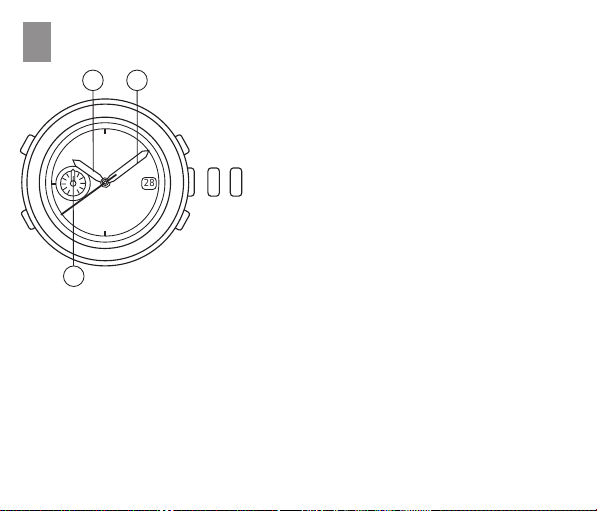
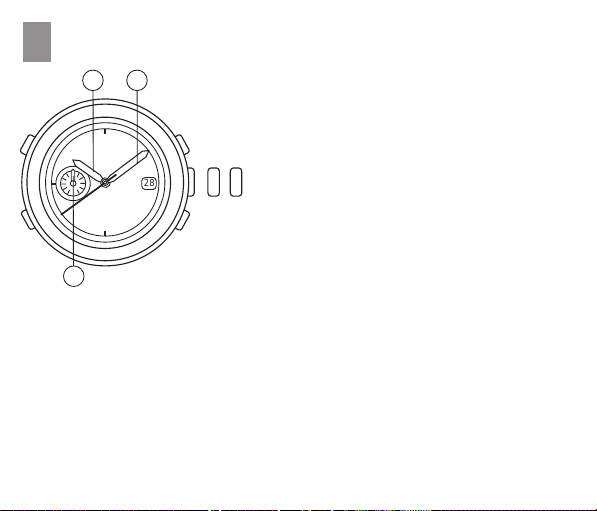
1 2
Pull out crown “1” all the way to the
1.
second click when the continuous
second small hand ➆ is at the 12
o’clock position.
•
l
l
l
l
•
l
l
•
l
l
l
l
l
l
•
60
l
l
•
l
l
l
l
l
l
•
l
l
•
l
l
l
l
•
l
l
•
l
l
l
30
l
l
l
•
l
l
•
l
l
l
28
l
l
(1)(0) (2)
Crown 1
2.
Turn crown “1” to set the hour and
minute hands ➀ and ➁ to the
current time.
3.
Push crown “1” back in to the
normal position in accordance with
a time signal.
7
Notes:
When setting the hour hand, check that AM/PM is correctly set. The watch is so
1.
designed that the date changes once in 24 hours. Turn crown “1” clockwise until the
hour hand passes the 12 o’clock marker to determine whether the watch is set for
the A.M. or P.M. period. If the date does not changes, the time is set for the A.M.
period. If the date does not change, the time is set for the P.M. period.
When setting the minute hand, advance it 4 to 5 minutes ahead of the desired time
2.
and then turn it back to the exact minute.
5
Page 10
DATE SETTING
D
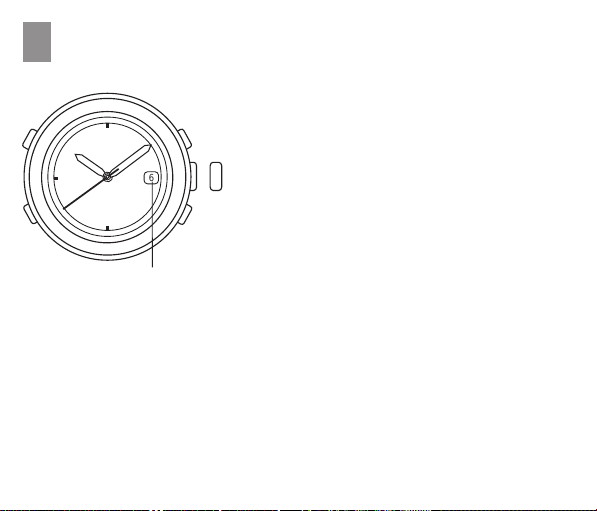
Pull out crown “1” to the first click.
1.
Turn crown “1” clockwise till the date for
2.
the previous day appears.
Pull out crown “1” to the second click,
3.
(1)(0)
6
Crown 1
Date
Note
Do not set the date between 9:00 p.m. and 3:00 a.m. Otherwise, the date may not
change properly. If it is necessary to set the date during that time period, first change
the time to any time outside this period, set the date and then reset the correct time.
advance the hour and minute hands till the
desired date appears. Reset the time
according to time setting.
4.
Push crown “1” back in to the normal
position.
6
Page 11
ALARME
The alarm time is set on a 12-hour basis and indicated by the alarm hour and minute
hands that move independently of the main time hands.
1 2
•
l
l
l
l
•
l
l
•
l
l
l
l
l
l
•
12
l
l
•
l
l
l
l
l
l
•
l
l
39
•
4 5
Alarm setting
For alarm setting, first set the alarm hands to the current time (time indicated by the
main time hands), and then set them to the alarm time.
1.
Pull out crown “2” all the way to the second click.
There is a beep for one second.
2.
Turn crown “2” to set the alarm hands to the time that the main time hands indicate.
* When setting the alarm minute hand, advance it 4 to 5 minutes ahead of the
desired alarm time and then turn it back to the exact minute.
l
l
l
l
l
l
•
l
l
•
l
l
l
l
6
l
l
•
l
l
•
l
l
l
(0)
Crown 2
(1)
(2)
7
Page 12
3.
Push back crown “2” all the way in to the normal position.
Then, pull it out again to the first click. The alarm demonstration sound beeps, if crown
“2” is pulled out to the first click within one minute after being pushed back in to the
normal position. Press C repeatedly to set the desired alarm time.
* With each press of C the alarm hands move one minute.
They move quickly if C is kept pressed.
Push back crown “2” in to the normal position.
4.
The alarm hands move to show the current time.
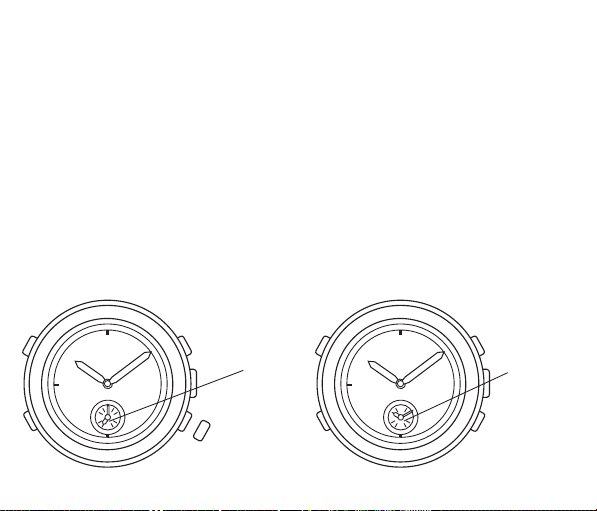
Alarm engagement/disengagement
To engage the alarm, pull out cronw “2” to the first click. The alarm hands move to
•
indicate the designated alarm time set previously.
*
The alarm rings at the designated time for 20 seconds. To stop it manually, press
A, B or C, or push back crown “2” in to the normal position.
When crown “2” is at the normal position, the alarm is disengaged, and the alarm
•
hands indicate the current time.
[Alarm
engaged]
First click
[Alarm
disengaged]
Normal
position
•
l
l
l
l
•
l
l
•
l
l
l
l
l
l
•
12
l
l
•
l
l
l
l
l
l
•
l
l
39
•
l
l
l
l
l
l
•
l
l
•
l
l
l
l
6
l
l
•
l
l
•
l
l
l
(0)
Crown 2
(1)
•
l
l
l
l
•
l
l
•
l
l
l
l
l
l
•
12
l
l
•
l
l
l
l
l
l
•
l
l
39
•
l
l
l
l
l
l
•
l
l
•
l
l
l
l
6
l
l
•
l
l
•
l
l
l
Crown 2
(0)
8
Page 13

Note:
Please note, if crown “2” is pulled out to the second click, the designated alarm time is
canceled with a beep. In that case, set the alarm hour and minute hands to the main
time again, push crown “2” back in to the normal position, and then, pull it out to the
first click and set the desired alarm time again by pressing C. However, if crown “2” is
pushed back in to the normal position before the beep stops, the designated alarm
time will not be canceled.
9
Page 14
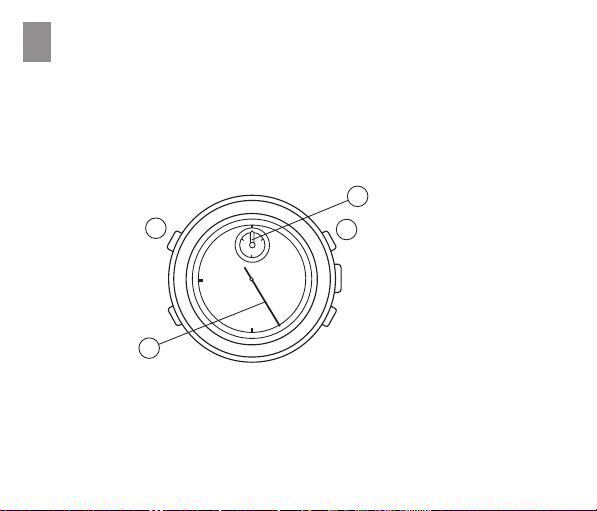
STOPWATCHF
The stopwatch can measure up to 30 minutes at 1 second intervals. After 30 minutes,
it will start counting again from “0” repeatedly up to 6 hours.
*
Before using the stopwatch, be sure to check that crowns “1” and “2” are set at the
normal position, and press “B” to reset the stopwatch hands to “0” position.
6
•
l
l
•
B
3
10
l
l
l
l
l
30
l
•
l
l
•
l
l
l
l
l
1020
l
•
l
l
•
l
l
l
A
Crown 1
Crown 2
Page 15
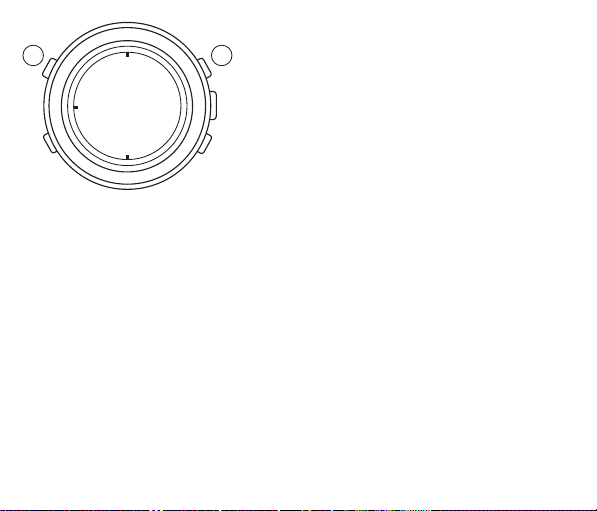
1.2.Standard measurement
BA
3.
Split (intermediate) time measurement
To start
To measure split time
To release split time
*
Measurement and release of the split time can be repeated
by pressing “B”.
To stop
To reset
Measurement of two competitors
4.
To start
To measure the finish time of the first competitor
When the second competitor finishes
To measure the finish time of the second competitor
To reset
To start
To stop
To reset
Accumulated elapsed time
measurement
To start
To stop
To restart
To stop
* Restart and stop of the stopwatch can
be repeated by pressing A.
To reset
: Press A
: Press A
: Press B
: Press A
: Press A
: Press A
: Press A
: Press B
: Press A
: Press B
: Press B
: Press A
: Press B
: Press A
: Press B
: Press A
: Press B
: Press B
11
Page 16
Notes on crown operation while the stopwatch is in use
Crown “1”:
Crown “2”:
When the stopwatch has been reset and A is pressed before the hand reaches “0”
*
position, the stopwatch still starts counting time when A is pressed.
Even if crown “1” is pulled out to the first click, the stopwatch continues
measuring. However, if it is pulled out to the second click, the stopwatch
hands are reset to “0” position.
If crown “2” is pulled out to the first or second click, the stopwatch hands
are reset to “0” position.
HOW TO USE THE TACHYMETERG
(For the models with a tachymeter scale on the dial)
•
Use the tachymeter with the stopwatch.
BA
12
Stopwatch operation (Standard
measurement)
To start
To stop
To reset
The tachymeter can be used for the following
purposes.
: Press A
: Press A
: Press B
Page 17
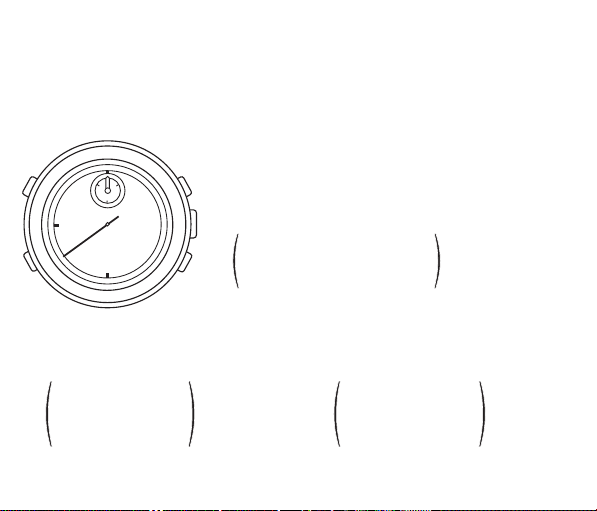
To measure the hourly average speed of a vehicle(1)
•
Use the stopwatch to determine how many seconds it takes to go one kilometer (or
one mile). The tachymeter scale indicated by the stopwatch second hand gives the
average speed per hour.
Please note that the tachymeter scale can be used only when the time required is
*
less than 60 seconds. If it exceeds 60 seconds, shorten the measuring distance.
(Refer to “Ex. 2” below.)
•
l
l
•
l
l
l
l
l
30
l
•
l
l
•
l
l
l
l
l
1020
l
•
l
l
•
l
l
l
Ex.: 1)
If it takes 40 seconds to go one kilometer (or one mile), the
stopwatch second hand indicates “90” on the tachymeter
scale. This means that the aver age speed of the vehicle is
90 kilometers (or miles) per hour .
90
Tachymeter scale
figure at 40 seconds
x 1 (km or mile)
position
= 90 km/h (o mph)
Ex.: 2)
If the measuring distance is extended to 2 kilometers (or miles) or shortened to 0.5
kilometers (miles), multiply the figure on the tachymeter scale by 2 or 0.5 respectively.
We recommend that y ou utilize the tachymeter in a rally, speedwa y or circuit r ace.
Tachymeter
90
scale figure
at 40 seconds position
= 180 km/h (o mph)
x 2
(Kilometers
or miles)
90
= 45 km/h (o mph)
Tachymeter
scale figure
at 40 seconds position
x 0,5
(Kilometers
or miles)
13
Page 18
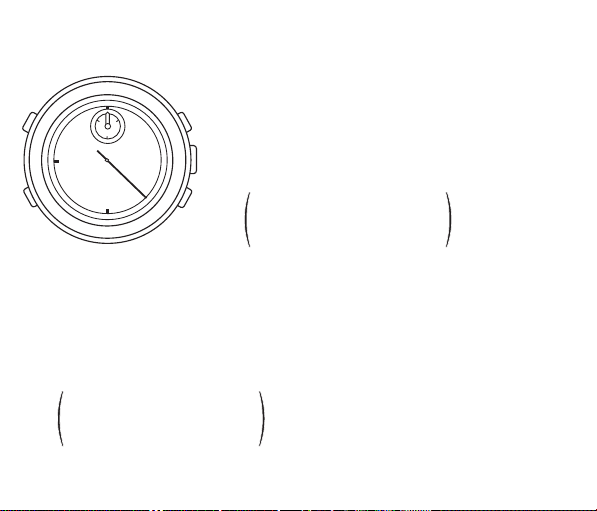
(2) T o measure the hourly rate of operation
The tachymeter is extremely useful in calculating factory operation efficiency or
machine products amount.
Ex.: 1)
•
l
l
•
l
l
l
l
l
30
l
•
l
l
•
l
l
l
l
l
1020
l
•
l
l
•
l
l
l
Use the stopwatch to measure the time required to
complete one job.
If it takes 20 seconds, the stopw atch second hand
indicates “180” on the tachymeter scale . This means that
180 jobs will be accomplished in one hour .
180
Tachymeter scale
figure at 20 seconds
x 1 job
position
= 180 jobs
Ex.: 2)
Use the stopwatch to determine how many jobs are accomplished in a specific period
of time.
If 15 jobs are completed in 20 seconds, multiply “180”, the figure on the tachymeter
scale indicated by the stopwatch second hand, by 15. Thus, it is estimated that 2,700
jobs will be accomplished in one hour.
180
Tachymeter scale
figure at 20 seconds
x 15 jobs
position
= 2,700 jobs per hour
14
Page 19
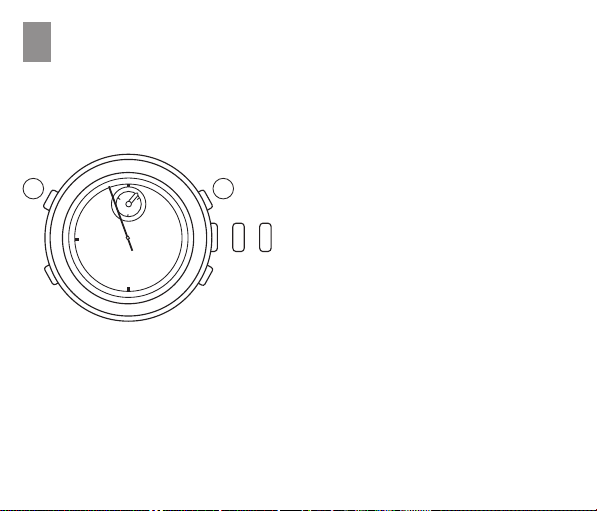
ADJUSTING THE HAND POSITION
H
• If the stopwatch hands ➂ and ➅ will not return to the 12 o’clock position when the
stopwatch is reset or when the battery is replaced with a new one, follow the
procedure below to reset the hands to the 12 o’clock position.
1.
Pull out crown “1” to the second click.
2.
•
l
l
•
l
l
B
l
l
l
30
l
•
l
l
•
l
l
l
l
l
1020
l
•
l
l
•
l
l
l
A
(0) (1) (2)
Crown 1
Press A and B repeatedly but
separately to reset the stopwatch hands
to the 12 o’clock position, respectively.
*
The hands move quickly if the
respective buttons are kept pressed.
3.
Push crown “1” back in to the normal
position.
15
Page 20
RESETTING THE BUILT-IN IC
I
• In case any of the watch hands should move improperly, follow the procedure below to
adjust the hand movement.
1.
Pull out crown “1” to the second click.
2.
•
l
l
•
l
l
B
l
l
l
30
l
•
l
l
•
l
l
l
l
l
1020
l
•
l
l
•
l
l
l
A
(0) (1) (2)
Press A and B simultaneously.
3.
Push back crown “1” in to the normal
position. The built-in IC will be reset,
and normal movement of the hands will
return. Before using the watch again, be
Crown 1
sure to set the main time and alarm
hands to the desired time and adjust
the position of the stopwatch hands
following the procedure in “Adjusting
the hand position”.
16
Page 21

BATTERY LIFE INDICATOR
J
When the battery nears to its end, the small second hand moves at two-second
intervals instead of normal one-second intervals to indicate that the battery needs to
be replaced with a new one.
Note:
If the alarm is used while the small second hand is moving at two-second intervals,
the watch may stop operating.
Therefore, if you see the small second hand moving at two-second intervals replace
the battery with a new one as soon as possible.
17
Page 22
PRECAUTIONS AND USEFUL INFORMATION
K
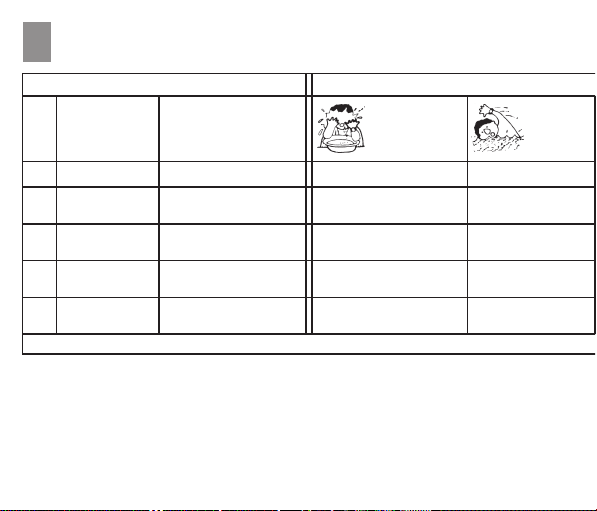
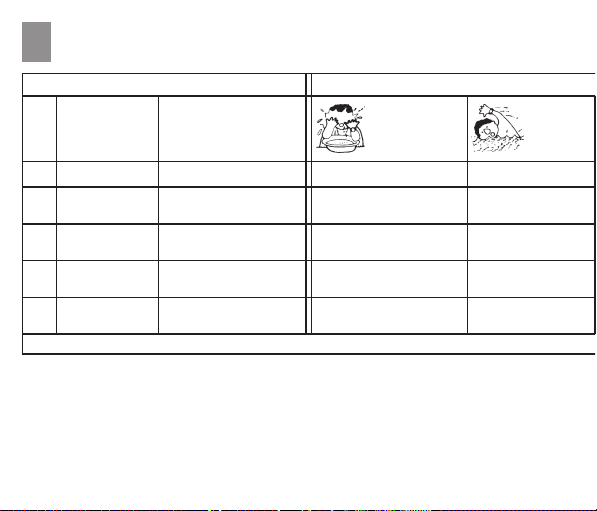
Indication
Spray, sweat,
Dial Case
Degree of water
resistance
A
B
C
D
E
In order to prevent water coming into contact with the internal mechanism, never pull
–
the crown out when the watch is wet.
If any watches designed for sportswear or use in water come into contact with salt
–
water or heavy sweating, they should be rinsed in fresh water and dried thoroughly.
Contact with water may cause a deterioration in the quality of some leather straps.
–
—
—
WATER RESISTANT
50M (5bar)
WATER RESISTANT
100M (10bar)
WATER RESISTANT
200M (20bar) or more
The words “WATER RESISTANT” may sometimes be abbreviated to “WATER RESIST”.
—
WA TER RESISTANT
WA TER RESISTANT
WA TER RESISTANT
WA TER RESISTANT
light rain,
washing, etc.
NO
YES
YES
YES
YES
18
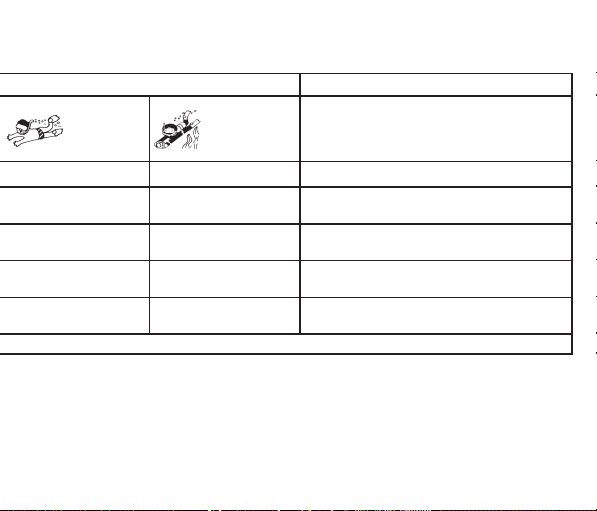
Use in
Swimming,
etc.
NO
NO
YES
YES
YES
Page 23
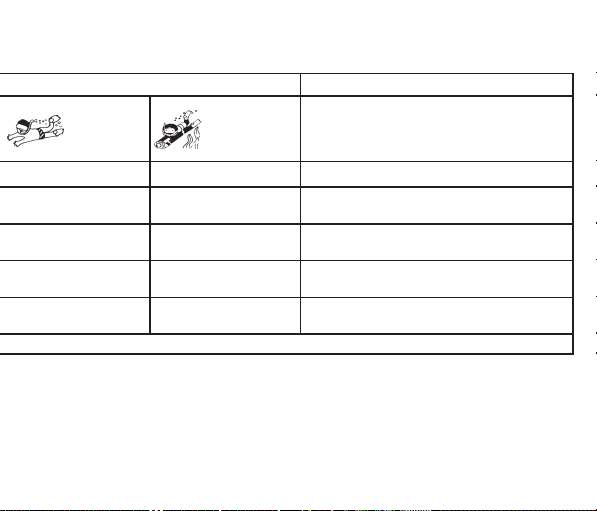
water
Skin-diving
NO
NO
NO
YES
YES
–
As the internal parts of the watch can retain moisture, when the outside temperature
is lower than the inside, the watch glass may mist-up. This phenomenon is purely
temporary and should not create any problems. However, if it persists for any length
of time, the watch should be checked by the shop where it was purchased or by the
nearest Authorised Service Centre.
Scuba diving
NO
NO
NO
NO
YES
Not water resistant. Must be kept away from water and moisture
Average water resistance. Can withstand spray, sweat,
light rain, washing, etc. during daily use
Can be worn while swimming but not diving
Suitable for skin-diving
Suitable for scuba diving
Water-resistance
characteristics
19
Page 24

Temperature
Do not leave the watch exposed to direct sunlight or temperature extremes for long
periods of time.
Long exposure, in fact, may adversely affect the operation of the watch and actually
shorten battery life, causing it to gain or lose time and affect its other functions.
Impact
This watch can withstand normal everyday impacts and shocks and those normally
imparted by non-contact sports such as golf and baseball. Serious damage, however,
may result if the watch is dropped or subjected to severe shock.
Magnetic fields
This watch is antimagnetic up to 60 gauss, and is therefore not affected by magnetic
fields produced by normal domestic appliances. If used near strong magnetic fields, its
operation may be temporarily affected.
Static electricity
The integrated circuits present inside the watch are sensitive to static electricity. If the
watch is exposed to intense electrical fields, the time display may temporarily lose
some of its accuracy.
Chemicals and gases
Avoid wearing the watch in the presence of strong gases or chemical substances.
Parts of the watch may discolour, dissolve or even break if brought into contact with
benzol or petroleum based products such as solvents, thinners, detergents,
adhesives etc.
20
Page 25

Pay special attention to avoiding contact with chemicals.
The watch case and strap may discolour if they come into contact with mercury from a
broken thermometer or other equipment.
Keeping the watch clean
Use an absorbent soft cloth to clean off any dirt or damp from the watch glass. Wearing
the watch when the strap or back of the case is dirty can cause skin irritation. Keeping
the watch clean also keeps shirt cuffs clean.
Cleaning the watch strap.
•
Metal bands:
•
Plastic or rubber straps:
•
Leather straps:
opposite side with a cloth and alcohol.
Periodic inspection
In order to guarantee long trouble-free operation, it is advisable to have the watch
checked by an authorised assistance centre once every 12 months or two years.
Keep batteries out of the reach of children
If a battery is accidentally swallowed, consult a doctor immediately.
Use a toothbrush and soapy warm water to wash the dirt off.
Wash with water. Do not use solvents.
Gently rub the face of the strap using a soft dry cloth. Clean the
21
Page 26

22
Page 27

INDEX
F
A COMPONENTES PRINCIPALES
CARACTERISTIQUES
B
REGLAGE DE L’HEURE
C
REGLAGE DE LA DATE
D
SONNERIE
E
F
CHRONOMETRE
G
UTILISATION DU TACHYMETRE
H
AJUSTEMENT DE LA POSITION DES AIGUILLES
I
RE-INITIALISATION DU CIRCUIT INTEGRE INCORPORE
J
TEMOIN DE CHARGE DE LA PILE
K
PRECAUTIONS D’UTILISATION ET INFORMATIONS UTILES
24
26
27
28
29
32
34
37
38
39
40
23
Page 28
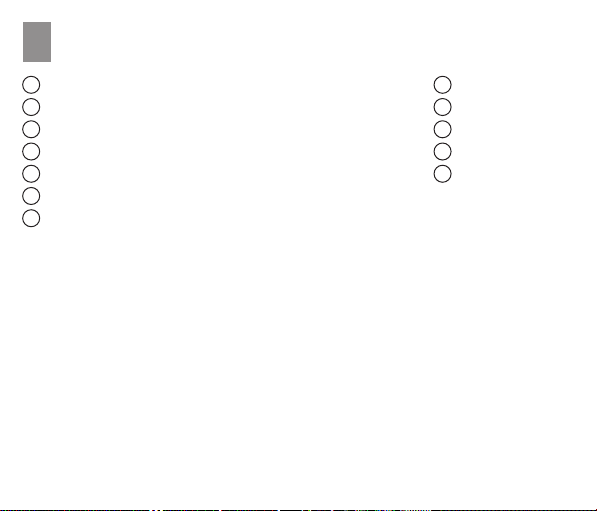
PIECES PRINCIPALES
A
1
Aiguille des heures
Aiguille des minutes
2
Trotteuse des secondes de chronomètre
3
Aiguille des heures de sonnerie
4
Aiguille des minutes de sonnerie
5
Aiguille des minutes de chronomètre
6
Petite trotteuse des secondes continus
7
E Remontoir 1
0) Position normale: Libre
1) Premier déclic:
Sens horaire: Réglage de date
Sens anti-horaire: Libre
2) Second déclic: Réglage de l’heure principale
D Remontoir 2
0) Position normale: Libre
1) Premier déclic: Mise en service sonnerie
2) Second déclic: Réglage aiguille des heures et minutes de sonnerie
24
A
Bouton
Bouton
B
Bouton
C
Remontoir 2
D
Remontoir 1
E
Page 29

REMONTOIR DEVISSABLE
(Pour les modéles à remontoir dévissable)
Pour débloquer le remontoir
•
Dévisser le remontoir en le tournant dans le sens anti-horaire jusqu’à ne plus sentir la
rotation du pas de vis.
Le remontoir peut alors être retiré jusqu’au premier ou an second déclic pour le
réglage de l’heure/calendrier.
Pour bloquer le remontoir
•
Après avoir achevé tous les réglages, repousser le remontoir à sa position normale.
Tourner celui-ci dans le sens horaire tout en le poussant légèrement jusqu’à vissage
complet.
25
Page 30

CARACTERISTIQUES
B
Cette montre analogique multi-affichage dispose des fonctions de sonnerie et de
chronométrage.
AFFICHAGE HORAIRE PRINCIPAL
Aiguilles des heures et des minutes avec petite trotteuse des secondes continus.
CALENDRIER
La date est affichée par des chiffres.
SONNERIE
Le moment programmé pour la sonnerie, réglable en cycle de 12 heures, est affiché
par deux petites aiguilles.
CHRONOMETRE
Il peut mesurer jusqu’à concurrence de 30 minutes en 1/5 de seconde.
TEMOIN DE CHARGE DE PILE
La petite trotteuse des secondes continus se déplace à intervalles de deux secondes
quand la pile doit être remplacée.
TACHYMETRE
Certains modèles sont pourvus d’un tachymètre à cadran gradué.
26
Page 31
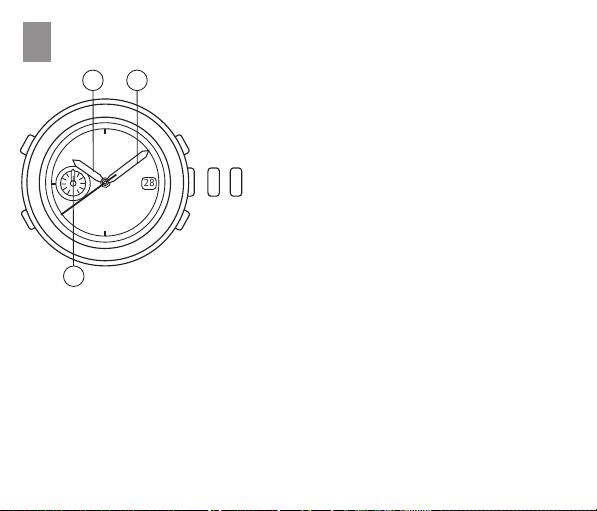
REGLAGE DE L’HEURE
C
1 2
Retirer le remontoir “1” au fond
1.
jusqu’au second déclic quand la petite
trotteuse des secondes continus ➆
atteint la position 12 heures.
•
l
l
l
l
•
l
l
•
l
l
l
l
l
l
•
60
l
l
•
l
l
l
l
l
l
•
l
l
•
l
l
l
l
•
l
l
•
l
l
l
30
l
l
l
•
l
l
•
l
l
l
28
l
l
(1)(0) (2)
Remontoir 1
2.
Tourner le remontoir “1” pour régler
les aiguilles des heures et des
minutes ➀ et ➁ à l’heure actuelle.
3.
Régler le remontoir “1” en position
normale en accord avec un top
horaire officiel.
7
Remarques:
Lors du réglage de l’aiguille des heures, vérifier si AM/PM (matin/soir) est
1.
correctement posé. La montre est conçue pour que la date change une fois toutes
les 24 heures. Tourner le remontoir “1” dans le sens horaire jusqu’à ce que l’aiguille
des heures passe au-delà de 12 heures pour déterminer si la montre est réglée
pour le matin (AM) ou le soir (PM). Si la date change, l’heure est réglée pour le
matin; dans le cas contraire, elle l’est pour le soir.
Lors du réglage des minutes, dépasser la minute voulue de 4 à 5 minutes; puis
2.
revenir à la position exacte.
27
Page 32
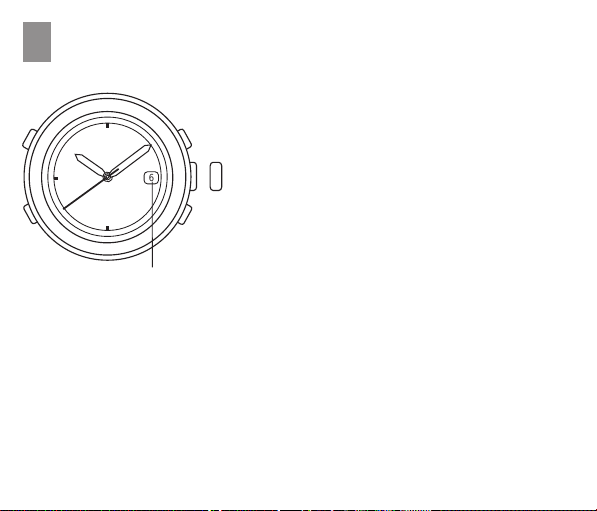
REGLAGE DE LA DATE
D
Retirer le remontoir “1” au premier délic.
1.
Tourner le remontoir “1” dans le sens
2.
horaire jusqu’à apparition de la date
précédente.
Tirer le remontoir “1” jusqu’au second
(1)(0)
6
Remontoir 1
Date
Remarque:
Ne pas poser la date entre 9:00 du soir et 3:00 du matin car elle ne changerait pas
correctement. S’il est nécessaire de poser la date pendant cette période, changer
d’abord l’heure à une autre période du jour régler la date et revenir à l’heure correcte.
3.
déclic, avancer les aiguilles des heures et
minutes jusqu’à apparition de la date
voulue. Ramener les aiguilles à l’heure
exacte.
4.
Repousser le remontoir “1” en position
normale.
28
Page 33
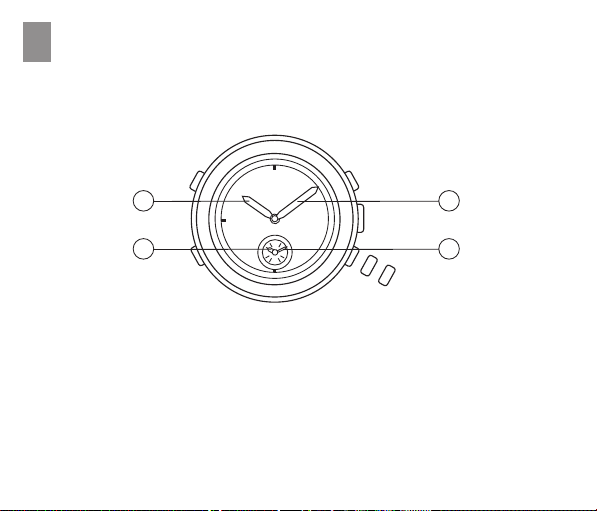
SONNERIEE
L’heure de la sonnerie qui se pose en cycle de 12 haures et elle est affichée par les
aiguilles des heures et des minutes de sonnerie, qui tournent indépendamment des
aiguilles principales.
1 2
•
l
l
l
l
•
l
l
•
l
l
l
l
l
l
•
12
l
l
•
l
l
l
l
l
l
•
l
l
39
•
4 5
Réglage de la sonnerie
Pour le réglage de la sonnerie, régler tout d’abord les aiguilles de sonnerie à l’heure
actuelle (heure indiquée par les aiguilles de l’heure principale), puis les ajuster à
l’heure de la sonnerie.
Retirer le remontoir “2” à fond jusqu’au second déclic.
1.
Une tonalité avertisseuse est audible pendant une seconde.
Tourner le remontoir “2” dans le sens horaire ou anti-horaire pour poser les aiguilles
2.
de sonnerie à l’heure indiquée par les aiguilles principales.
* Lors du réglage de l’aiguille des minutes, avancer celle-ci de 4 à 5 minutes au-delà
du moment souhaité et revenir ensuite en arrière à la minute exacte.
l
l
l
l
l
l
•
l
l
•
l
l
l
l
6
l
l
•
l
l
•
l
l
l
(0)
(1)
(2)
Remontoir 2
29
Page 34
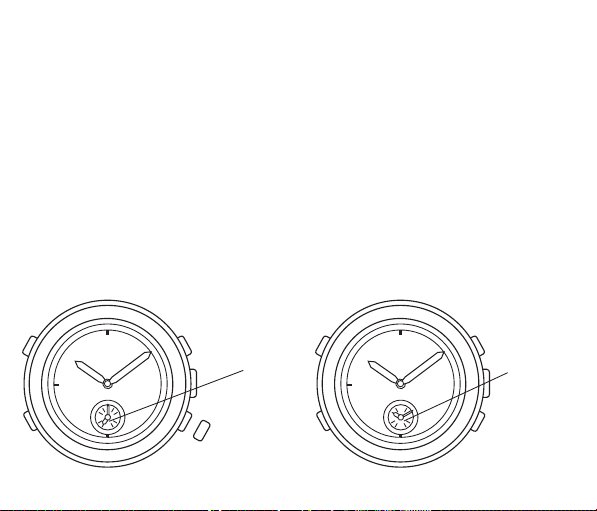
Régler le remontoir “2” à sa position originale. Le retirer ensuite au premier déclic. Le
3.
son de démonstration de la sonnerie retentit si le remontoir “2” est retiré au premier
déclic dans la minute qui suit après l’avoir repoussé à la position normale. Appuyer de
façon répétée sur C pour régler l’heure souhaitée pour la sonnerie.
* Chaque poussée sur C fait changer les aiguilles de sonnerie d’une minute. Elles
changent rapidement par une poussée continue sur C.
Regler le remontoir “2” à sa position originale
4.
Les aiguilles de sonnerie se déplacent pour indiquer l’heure actuelle.
Mise en/hors service de la sonnerie
Pour mettre la sonnerie en service, retirer le remontoir “2” au premier déclic. Les
•
aiguilles de sonnerie indiquent le moment programmé pour son fonctionnement.
*
Au moment progr ammé, la sonnerie retentit pendant 20 secondes. Pour l’arrêter,
appuyer sur A, B ou C, ou repousser le remontoir “2” à la position normale.
Quand le remontoir “2” est à la position normale, la sonnerie est hors service et les
•
aiguilles de sonnerie indiquent l’heure actuelle.
30
[Sonnerie
en service]
Premier déclic
[Sonnerie
hors service]
Position
normale
•
l
l
l
l
•
l
l
•
l
l
l
l
l
l
•
12
l
l
•
l
l
l
l
l
l
•
l
l
39
•
l
l
l
l
l
l
•
l
l
•
l
l
l
l
6
l
l
•
l
l
•
l
l
l
(0)
(1)
Remontoir 2
•
l
l
l
l
•
l
l
•
l
l
l
l
l
l
•
12
l
l
•
l
l
l
l
l
l
•
l
l
39
•
l
l
l
l
l
l
•
l
l
•
l
l
l
l
6
l
l
•
l
l
•
l
l
l
Remontoir 2
(0)
Page 35

Remarques:
Prière de noter que si le remontoir “2” est retiré au second déclic, l’heure de sonnerie
désignée est annulée avec une tonalité d’avertissement. Dans ce cas, régler à
nouveau les aiguilles des heures et des minutes à l’heure principale, repousser le
remontoir “2” à la position normale, puis le retirer à nouveau au premier déclic et
programmer à nouveau la sonnerie à l’heure voulue en appuyant sur C. Cependant, si
le remontoir “2” est repoussé à la position normale avant l’arrêt de la tonalité
d’avertissement, l’heure de sonnerie programmée ne sera pas annulée.
31
Page 36
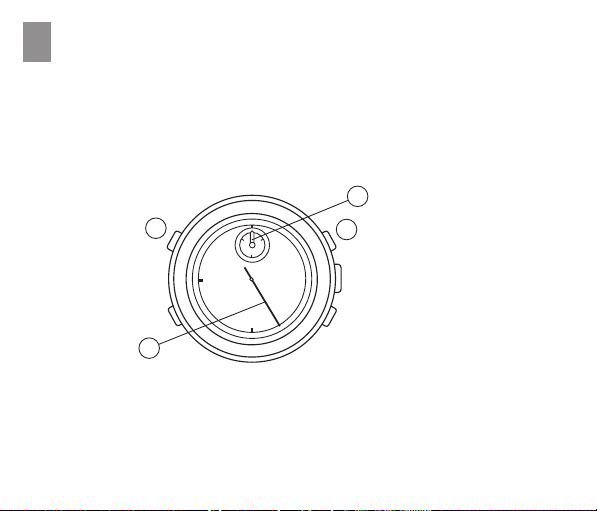
CHRONOMETREF
Le chronomètre peut mesurer jusqu’à 30 minutes en unités de 1 seconde. Après 30
minutes, le chronométrage recommence à partir de “0” et ce, jusqu’à concurrence de
6 heures.
Avant d’utiliser le chronomètre, confirmer que les remontoirs “1” et “2” se trouvent à
*
la position normale et appuyer sur “B” pour ramener les aiguilles de chronomètre à la
position “0”.
6
•
l
l
•
B
3
32
l
l
l
l
l
30
l
•
l
l
•
l
l
l
l
l
1020
l
•
l
l
•
l
l
l
A
Remontoir 1
Remontoir 2
Page 37
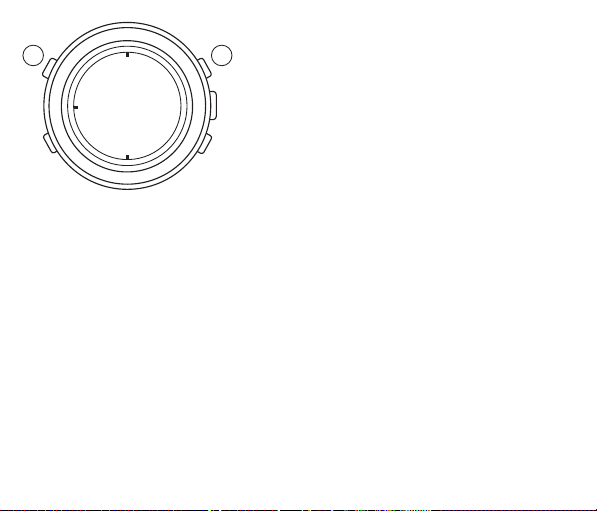
1.2.Chronométrage ordinaire
BA
3.
Mesure du temps divisé (intermédiaire)
Mise en marche
Mesure du temps divisé
Libération du temps divisé
*
La mesure et la libération du temps divisé peuvent être
répétées par poussées sur “B”.
Arrêt
Remise à zéro
Mesure du temps de deux concurrents
4.
Mise en marche
Mesure du temps du 1er concurrent à l’arrivée
A l’arrivée du 2ème concurrent
Mesure du temps du 2ème concurrent à l’arrivée
Remise à zéro
Mise en marche
Arrêt
Remise à zéro
Mesure par accumulation du temps écoulé
Mise en marche
Arrêt
Remise en marche
Arrêt
* La remise en marche et l’arrêt peuvent être
répétés par poussées sur A.
Remise à zéro
: Appuyer sur A
: Appuyer sur A
: Appuyer sur B
: Appuyer sur A
: Appuyer sur A
: Appuyer sur A
: Appuyer sur A
: Appuyer sur B
: Appuyer sur A
: Appuyer sur B
: Appuyer sur B
: Appuyer sur A
: Appuyer sur B
: Appuyer sur A
: Appuyer sur B
: Appuyer sur A
: Appuyer sur B
: Appuyer sur B
33
Page 38
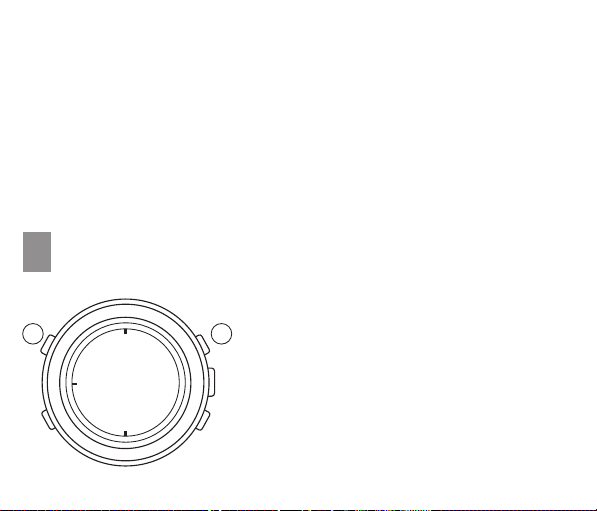
Remarques sur l’emploi du remontoir pendant le chronométrage
Remontoir “1”:
Remontoir “2”:
Si le chronomètre a été ramené à zéro et que “A” est actionné avant que l’aiguille
*
n’arrive à la position “0”, le chronométrage commencera à partir du moment où “A” a
été actionné.
Un retrait du remontoir “1” au premier déclic n’arrête pas le
chronométrage. En revanche, les aiguilles du chronomètre sont
ramenées à “0” s’il est retiré au second déclic.
Les aiguilles du chronomètre sont ramenées à “0” si le remontoir “2” est
retiré au premier ou au second déclic.
UTILISATION DU TACHYMETREG
(Pour les modèles, dotés d’une échelle de tachymètre sur le cadran.)
•
Emploi du tachymètre avec le chronomètre.
BA
34
Chronométrage (Mesure ordinaire)
Mise en marche
Arrêt
Remise à zéro
Le tachymètre sera utile pour les calculs suivants:
: Appuyer sur A
: Appuyer sur A
: Appuyer sur B
Page 39
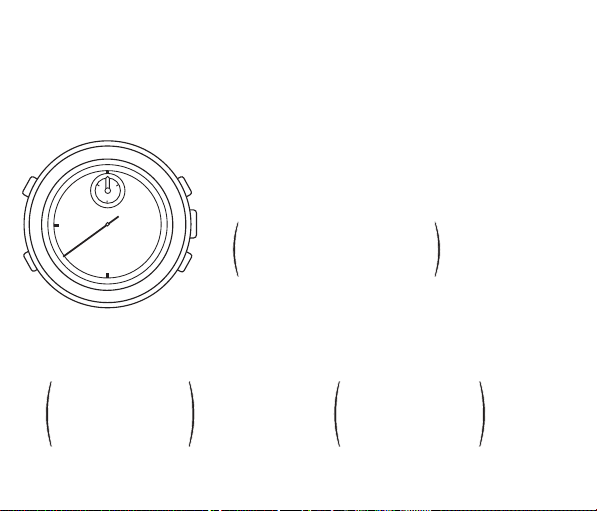
Mesure de la moyenne horaire d’un véhicule(1)
•
Se servir du chronomètre pour connaître le nombre de secondes, requis pour
parcourir un kilomètre (ou un mile). L’échelle du tachymètre, indiquée par la trotteuse
du chronomètre, donne la moyenne horaire.
Remarquer que l’échelle du tachtmètre ne peut servir que si la durée requise est
*
inférieure à 60 secondes. Au delà de 60 secondes, réduir la distance de mesure.
(Voir sous “Ex. 2” ci-après.)
Ex.: 1)
•
l
l
•
l
l
l
l
l
30
l
•
l
l
•
l
l
l
l
l
1020
l
•
l
l
•
l
l
l
S’il faut 40 secondes pour parcourir un kilomètre (ou un
mile), la trotteuse du chronomètre indique “90” sur l’échelle
du tachymètre, ce qui représente une moyenne horaire de
90 km/heure ou (mile/h).
90
Chiffre d’échelle
de tachymètre à la position
40 secondes
x 1
(kilomètre ou mile)
= 90 km/h (mph)
Ex.: 2)
Si la distance mesurée est allongée à 2 kilomètres (ou miles) ou raccourcie à 0,5 kilomètre
(ou mile), multiplier le chiffre de l’échelle du tachymètre par 2 ou par 0,5 respectivement.
L’emploi du tachtmètre est recommancé pour les rallyes ou autres compétitions de sports
moteurs, par exemple.
Chiffre d’échelle
90
de tachymètre à la
position 40 secondes
= 180 km/h (mph)
x 2
(kilomètre
ou mile)
Chiffre d’échelle
90
de tachymètre à la
position 40 secondes
= 45 km/h (mph)
x 0,5
(kilomètre
ou mile)
35
Page 40
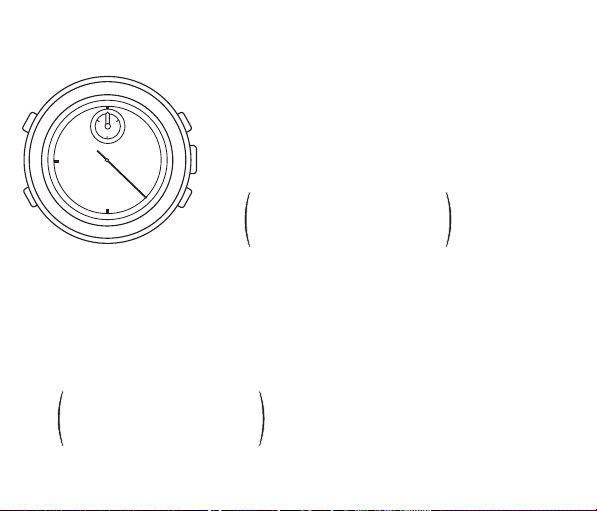
(2) Mesure de la cadence horaire d’un travail
Le tachymètre s’a vère très utile pour calculer l’efficacité d’un travail usine ou la
production d’une machine.
Ex.: 1)
•
l
l
•
l
l
l
l
l
30
l
•
l
l
•
l
l
l
l
l
1020
l
•
l
l
•
l
l
l
A l’aide du chronomètre, mesure le temps nécessaire pour
accomplir une tâche donnée.
S’il faut 20 secondes, la trotteuse du chronomètre indique
“180” sur l’échelle du tachymètre, ce qui signifie que 180
tâches seront accomplies en une heure.
180
Chiffre d’échelle de
tachymètre à la position
x 1 tâche
20 secondes
= 180 tâches
Ex.: 2)
A l’aide du chronomètre, déterminer le nombre de tâches accomplies pendant une
durée donnée.
Si 15 tâches ont été accomplies en 20 secondes, multiplier “180”, le chiffre indiqué par
la trotteuse du chronomètre sur l’échelle du tachymètre, par 15. On peut ainsi calculer
que 2.700 tâches seront accomplies par heure.
180
Chiffre d’échelle de
tachymètre à la position
x 15 tâches
20 secondes
= 2.700 tâches
36
Page 41
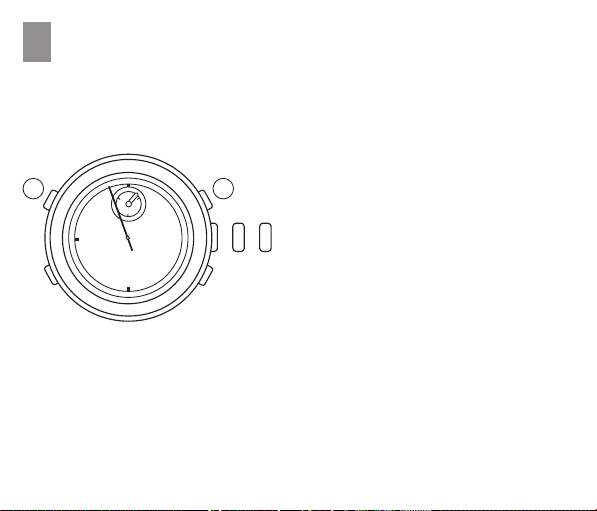
AJUSTEMENT DE LA POSITION DES AIGUILLES
H
• Si les aiguilles du chronomètre ➂ et ➅ ne reviennent pas à la position 12 heures
quand le chronomètre est ré-initialisé ou quand la pile est remplacée par une neuve,
effectuer les démarches ci-après pour ramener les aiguilles à la position 12 heures.
1.
Retirer le remontoir “1” au second
•
l
l
•
l
l
B
l
l
l
30
l
•
l
l
•
l
l
l
l
l
1020
l
•
l
l
•
l
l
l
A
(0) (1) (2)
déclic.
2.
Appuyer de façon répétée mais
séparée sur A et B pour ramener les
aiguilles du chronomètre à la position
12 heures.
*
Remontoir 1
Les aiguilles se déplacent rapidement
si le bouton est maintenu enfoncé.
3.
Repousser le remontoir “1” à la position
normale.
37
Page 42
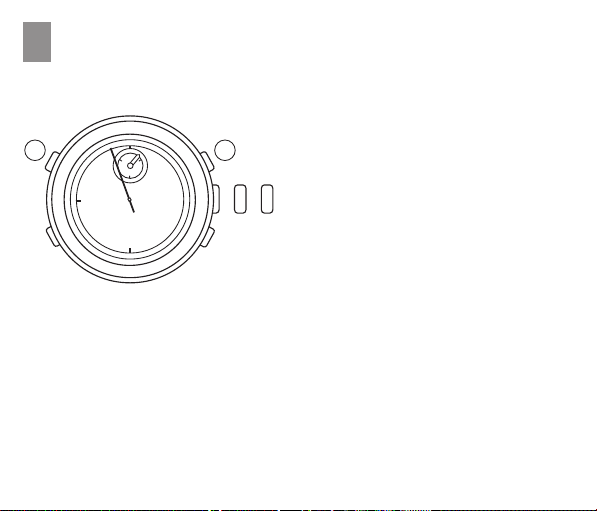
RE-INITIALISATION DU CIRCUIT
I
INTEGRE INCORPORE
• Si les aiguilles de la montre changent de façon inadéquate, effectuer les démarches
suivantes pour ajuster leur mouvement.
1.
Retirer le remontoir “1” au second
•
l
l
•
l
l
B
l
l
l
30
l
•
l
l
•
l
l
l
l
l
1020
l
•
l
l
•
l
l
l
A
(0) (1) (2)
déclic.
2.
Appuyer simultanément sur A et B.
3.
Repousser le remontoir “1” à la position
normale. Le circuit imprimé incorporé
sera ré-initialisé et les aiguilles se
Remontoir 1
déplaceront normalement. Avant
d’utiliser à nouveau la montre, veiller à
ajuster les aiguilles de l’heure principale
et de la sonnerie à l’heure souhaitée et
à ajuster la position des aiguilles du
chronomètre en suivant les démarches
sous “Réglage de la position des
aiguilles”.
38
Page 43

TEMOIN DE CHARGE DE LA PILE
J
Quand la pile est presque épuisée, la petite trotteuse se déplace à intervalles de deux
secondes au lieu des intervalles normaux d’une seconde afin de signaler que la pile
doit être remplacée par une neuve.
Remarque:
Si la sonnerie est utilisée alors que la petite trotteuse se déplace à intervalles de deux
secondes, la montre risque de s’arrêter. Par conséquent, si l’on constate que la petite
trotteuse se déplace à intervalles de deux secondes, remplacer la pile le plus tôt
possible.
39
Page 44
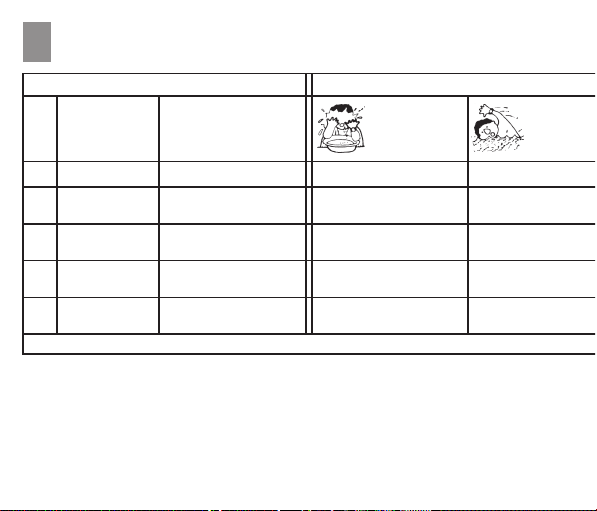
PRECAUTIONS D'UTILISATION ET INFORMATIONS UTILES
K
Indication
Eclaboussure,
Cadran Boîtier
Niveau
d’étanchéité
A
B
C
D
E
L’indication “WATER RESISTANT” (étanche) peut parfois être abrégée en “WATER RESIST”.
–
Pour éviter que l'eau entre dans le mécanisme interne de la montre, la couronne ne
doit jamais être extraite quand la montre est mouillée.
–
Si les montres conçues pour le sport ou pour fonctionner sous l'eau sont exposées à
l'eau salée ou à une sueur abondante, elles doivent être rincées à l'eau douce puis
complètement essuyées.
Dans certains cas, l'eau peut provoquer un endommagement de la qualité de
–
certains bracelets en cuir.
—
—
WATER RESISTANT
50M (5bar)
WATER RESISTANT
100M (10bar)
WATER RESISTANT
200M (20bar) ou plus
—
WA TER RESISTANT
WA TER RESISTANT
WA TER RESISTANT
WA TER RESISTANT
sueur, pluie légère,
ablutions, etc.
NON
OUI
OUI
OUI
OUI
Utilisation
40
Natation,
etc.
NON
NON
OUI
OUI
OUI
Page 45
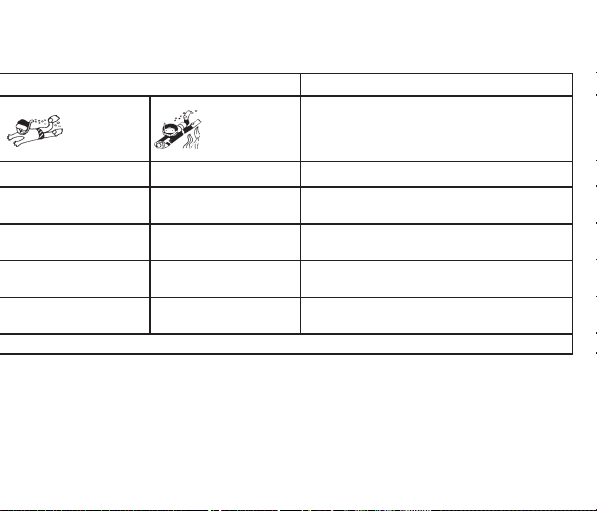
sous l’eau
Immersion
NON
NON
NON
OUI
OUI
jours placer la couronne dans sa position normale. * Serrer complètement la vis de la couronne.
–
Les parties internes de la montre peuvent retenir l'humidité quand la température e xterne
est plus basse de celle interne et le verre du cadran peut parfois s'embuer. Si le
phénomène est momentané, cela ne crée aucun problème, mais si il persiste dans le
temps, il faut informer le revendeur de la montre ou le Centre d'Assistance autorisé le
plus proche.
Immersion en
profondeur
NON
NON
NON
NON
OUI
Non étanche. Doit être protégée de l’eau et de l’humidité.
Etanchéité normale. Résiste aux éclaboussures, à la sueur, à la pluie
légère, aux ablutions, etc. pendant l’utilisation quotidienne.
Utilisation possible pendant la natation mais
déconseillée pour la plongée.
Adaptée à la plongée peu profonde.
Adaptée à la plongée en profondeur.
Caractéristiques
d’étanchéité
41
Page 46

Température
Ne pas laisser la montre exposée aux rayons directs du soleil ou dans des endroits
extrêmement chauds ou extrêmement froids pendant une longue période. Cela pourrait
en effet provoquer un mauvais fonctionnement de la montre ou réduire la durée de la
pile, ou encore un ralentissement ou une accélération de la montre et des
conséquences sur les autres fonctions.
Chocs
Cette montre peut supporter les chocs et les secousses qui ont lieu normalement
pendant l'utilisation quotidienne et lors de la pratique de sports ne comportant pas de
contacts directs, comme le golf ou le base-ball. Si la montre tombe par terre ou est
soumise à des chocs très forts, elle peut être endommagée ou mal fonctionner.
Champs magnétiques
Cette montre est anti-magnétique jusqu'à 60 Gauss et n'est donc pas influencée par les
champs magnétiques produits par les appareils électroménagers normaux. Si elle est
utilisée près de champs magnétiques très forts, ses fonctions peuvent momentanément
être altérées.
Electricité statique
Les circuits intégrés utilisés dans la montre sont sensibles à l'électricité statique. Si la
montre est exposée à une électricité intense, l'indication de l'heure peut perdre en
précision.
Substances chimiques et gaz
Ne pas porter la montre en présence de substances chimiques fortes ou de gaz.
Si la montre entre en contact avec des solvants, comme le benzène, ou avec des
produits contenant des substances telles que essence, cires, détergents, adhésifs, ses
42
Page 47

pièces peuvent se décolorer, se dissoudre ou se rompre. Faire particulièrement
attention à éviter les substances chimiques. Le boîtier de la montre et le bracelet
peuvent se décolorer s'ils entrent en contact avec le mercure d'un thermomètre cassé
ou de toute autre provenance.
Maintenir la montre propre
Frotter avec un chiffon doux et absorbant la terre et l'humidité sur le verre de la montre.
Si la montre est portée quand l'arrière du boîtier et le bracelet son sales, cela peut
provoquer une irritation cutanée car ils sont en contact direct avec la peau. Maintenir la
montre propre également pour ne pas salir les poignets de chemise.
Comment nettoyer le bracelet.
•
Bracelet en métal : laver les endroits sales avec une brosse à dents mouillée avec de
l'eau tiède savonneuse.
•
Bracelet en plastique ou en caoutchouc : laver à l'eau. Ne pas utiliser de solvants.
•
Bracelet en cuir : frotter délicatement sur le côté extérieur avec un chiffon doux et
sec. Pour le nettoyage du côté opposé, utiliser un chiffon humidifié avec de l'alcool.
Inspection périodique
Nous recommandons de faire contrôler la montre par un centre d'assistance autorisé
une fois par an ou tous les deux ans pour assurer une utilisation prolongée et sans
problèmes.
Tenir les piles hors de la portée des enfants
Dans le cas où une pile serait accidentellement avalée, consulter immédiatement un
médecin.
43
Page 48

44
Page 49

INHALT
D
A HAUPTBESTANDTEILE DER UHR
MERKMALE
B
EINSTELLUNG DER ZEIT
C
EINSTELLUNG DES DATUM
D
ALARM
E
F
CHRONOMETRE
G
VERWENDUNG DES TACHYMETERS
H
EINSTELLUNG DER ZEIGERPOSITION
I
RÜCKSTELLUNG DES EINGEBAUTEN IC
J
BATTERIELEBENSDAUER-ANZEIGE
K
HINWEISE ZUM TRAGEN DER UHR
46
48
49
50
51
54
56
59
60
61
62
45
Page 50
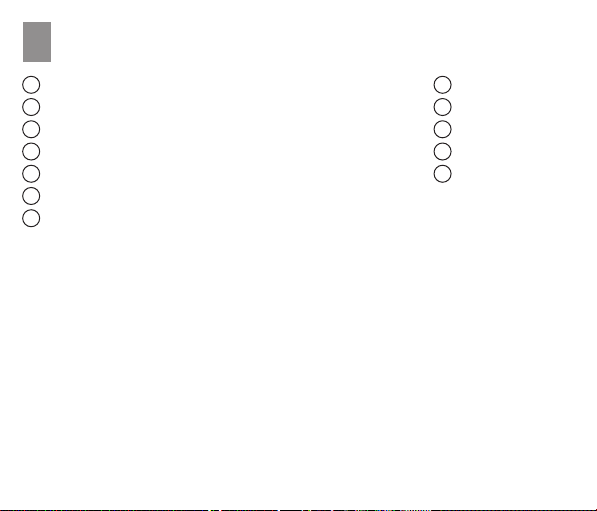
ANZEIGE UND KRONEN-BETÄTIGUNG
A
1
Stundenzeiger
Minutenzeiger
2
Stoppuhr-Sekundenzeiger
3
Alarm-Stundenzeiger
4
Alarm-Minutenzeiger
5
Stoppuhr-1/5-Minutenzeiger
6
Kleiner Sekundenzeiger
7
D Krone 1
0) Normalposition: Frei
1) 1. Einrastposition:
Im Uhrzeigersinn: Datumseinstellung
Entgegen Uhrzeigersinn: Frei
2) 2. Einrastposition: Hauptzeiteinstellung
E Krone 2
0) Normalposition: Frei
1) 1. Einrastposition: Alarm-Aktivierung
2) 2. Einrastposition: Einstellung von kleinem Alarm- Stunden- und Minutenzeiger
A
B
C
D
E
Taste
Taste
Taste
Krone 2
Krone 1
46
Page 51

FESTSCHRAUBBARER KRONE
(Für die Modelle mit festschraubbarer Krone)
Lösen der Krone
•
Die Krone so lange entgegen dem Uhrzeigersinn drehen, bis das Gewinde frei kommt.
Die Krone kann zur 1. oder 2. Einrastposition zum Einstellen von Uhrzeit/Kalender
herausgezogen werden.
Festdrehen der Krone
•
Nach Durchführung aller Einstellungen die Krone zurück in die Normalposition
drücken.
Die Krone unter leichtem Druck im Uhrzeigersinn drehen, bis sie angezogen ist.
47
Page 52

MERKMALE
B
Diese Analoguhr mit Mehrfach-Anzeige verfügt über Alarm- und Stoppuhr-Funktionen.
HAUPTZEITANZEIGE
Stunden- und Minutenzeiger sowie kleiner Sekundenzeiger.
KALENDER
Datum wird numerisch angezeigt.
ALARM
Kann bis zu 12 Stunden im Voraus eingestellt werden, die eingestellte Alarmzeit kann
mit zwei kleinen Zeigern angezeigt werden.
STOPPUHR
Kann bis zu 30 Minuten messen.
BATTERIELEBENSDAUER-ANZEIGE
Die beiden kleinen Zeiger rücken in Schritten von ZWEI Sekunden weiter, wenn die
Batterie ersetzt werden muß.
TACHYMETER
Einige Modelle sind mit einem Tachymeter mit unterteiltem Ziffernblatt ausgestattet.
48
Page 53
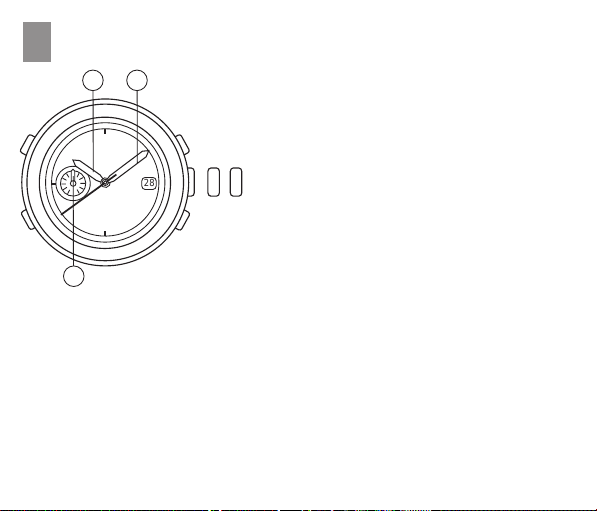
EINSTELLUNG DER ZEIT
C
1 2
Die Krone “1” ganz zur 2.
1.
Einrastposition herausziehen, wenn
der kleine Sekundenzeiger sich auf
der 12-Uhr-Position befindet.
•
l
l
l
l
•
l
l
•
l
l
l
l
l
l
•
60
l
l
•
l
l
l
l
l
l
•
l
l
•
l
l
l
l
•
l
l
•
l
l
l
30
l
l
l
•
l
l
•
l
l
l
28
l
l
(1)(0) (2)
Krone 1
2.
Die Krone “1” drehen, um den
Stunden- und Minutenzeiger ➀ und ➁
auf die Uhrzeit einzustellen.
3.
Die Krone “1” zurück in die
Normalposition drücken, indem sie mit
dem Standardsignal synchronisiert ist.
7
Hinweise:
Es muß darauf geachtet werden, den Stundenzeiger richtig auf vor Mittag/nach
1.
Mittag einzustellen. Das Datum springt einmal in 24 Stunden weiter. Durch Drehen
von Krone “1” im Uhrzeigersinn, bis der Stundenzeiger die 12-Uhr-Position passiert,
kann festgestellt werden, ob die Uhr auf vor Mittag oder nach Mittag eingestellt ist.
Wenn das Datum weiterspringt, ist die Zeit auf vor Mittag eingestellt, und wenn das
Datum nicht weiterspringt, ist die Zeit auf nach Mittag eingestellt.
Den Minutenzeiger bei der Einstellung um 4 bis 5 Minuten weiterdrehen und dann
2.
zurück auf die genaue Uhrzeit drehen.
49
Page 54
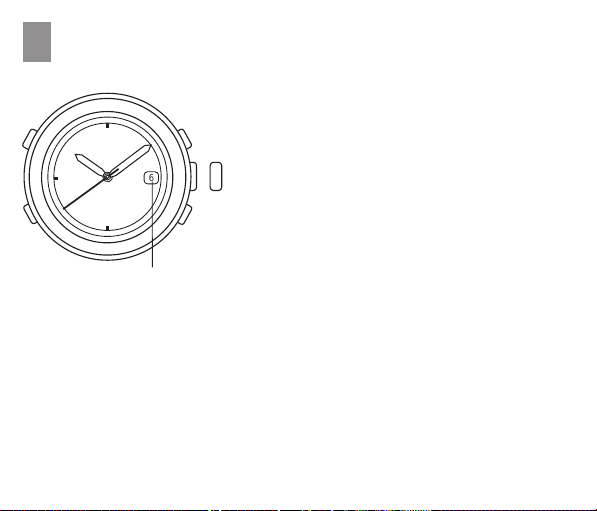
EINSTELLUNG DES DATUMS
D
Die Krone “1” zur 1. Einrastposition
1.
herausziehen.
Die Krone “1” im Uhrzeigersinn drehen, bis
2.
das Datum des Vortages erscheint.
Die Krone “1” zur 2. Einrastposition
(1)(0)
6
Krone 1
Datum
Hinweis
Das Datum nicht zwischen 21:00 und 3:00 einstellen, weil sonst das Datum eventuell
nicht richtig weiterrückt. Wenn das Datum während dieses Zeitraums eingestellt
werden muß, zuerst eine Uhrzeit außerhalb dieses Zeitraums einstellen, dann das
Datum einstellen und anschließend wieder die richtige Uhrzeit einstellen.
3.
herausziehen und den Stunden- und
Minutenzeiger weiterbewegen, bis das
richtige Datum erscheint.
4.
Die Krone “1” zurück in die Normalposition
drücken.
50
Page 55
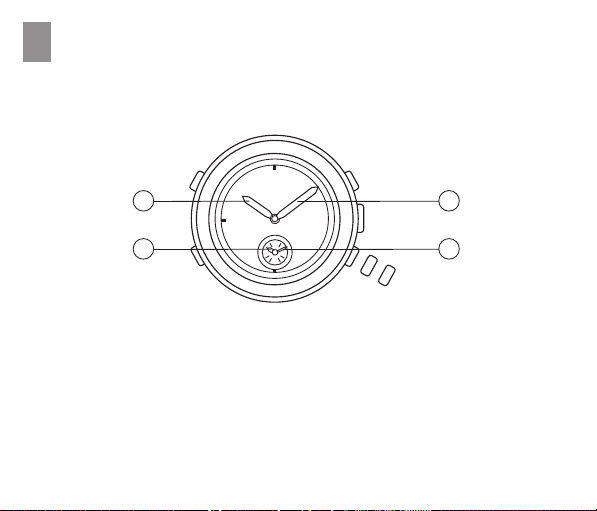
ALARME
Der Alarm kann bis zu 12 Stunden im Voraus eingestellt werden. Er wird vom
Alarm-Stunden- und -Minutenzeiger, die unabhängig von den Hauptzeitzeigern
eingestellt werden, angezeigt.
1 2
•
l
l
l
l
•
l
l
•
l
l
l
l
l
l
•
12
l
l
•
l
l
l
l
l
l
•
l
l
39
•
4 5
Einstellung des Alarms
Zur Einstellung des Alarms zuerst die Alarmzeiger auf die Uhrzeit (die auch von den
Hauptzeigern angezeigt wird) und anschließend auf die Alarmzeit einstellen.
1.
Die Krone “2” ganz zur 2. Einrastposition herausziehen.
Ein Signalton ertönt für eine Sekunde.
2.
Die Krone “2” im und entgegen dem Uhrzeigersinn drehen, um die Alarmzeiger auf die
Uhrzeit einzustellen, die die Hauptzitzeiger anzeigen.
* Den Minutenzeiger zum Einstellen 4 oder 5 Minuten weiterdrehen und dann zurück
auf die richtige Zeit drehen.
l
l
l
l
l
l
•
l
l
•
l
l
l
l
6
l
l
•
l
l
•
l
l
l
(0)
Krone 2
(1)
(2)
51
Page 56
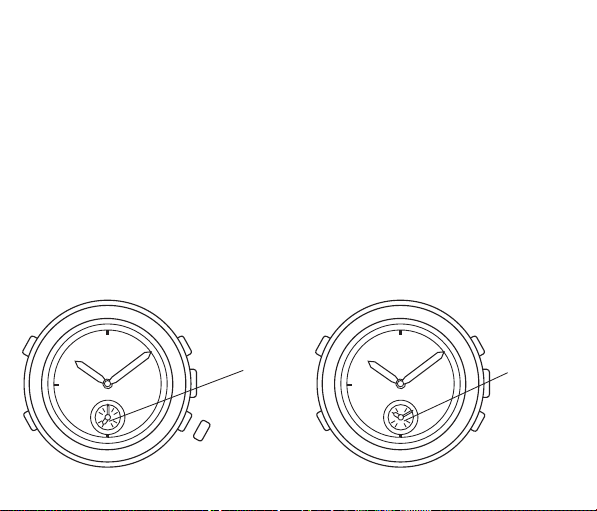
Die Krone “2” zurück in die Normalposition drücken und dann erneut zur 1.
3.
Einrastposition herausziehen. Der Alarm-Demonstrationston ertönt, wenn die Krone
“2” innerhalb von einer Minute, nachdem sie zurück in die Normalposition gedrückt
wurde, zur 1. Einrastposition herausgezogen wird. Die gewünschte Alarmzeit durch
mehrfaches Drücken von C einstellen.
* Mit jedem Drücken von C bewegen sich die Alarmzeiger um eine Minute weiter.
Sie bewegen sich schnell weiter, wenn C gedrückt gehalten wird.
Die Krone “2” zurück in die Normalposition drücken.
4.
Die Alarmzeiger bewegen sich und zeigen die Uhrzeit an.
Aktivieren/Desaktivieren des Alarms
Zum Aktivieren des Alarms die Krone “2” zur 1. Einrastposition herausziehen. Dann
•
zeigen die Alarmzeiger die eingestellte Alarmzeit an.
*
Der Alarm ertönt zur eingestellten Zeit für 20 Sekunden. Um del Alarm manuell zu
stoppen, A, B oder C drücken oder die Krone “2” zurück in die Normalposition
drücken.
Wenn die Krone “2” sich in der Normalposition befindet, ist der Alarm desaktiviert,
•
und die Alarmzeiger zeigen die Uhrzeit an.
[Alar aktiviert]
[Alarm
desaktiviert]
Eingestellte
Alarmzeit
•
l
l
l
l
•
l
l
•
l
l
l
l
l
l
•
12
l
l
•
l
l
l
l
l
l
•
l
l
39
•
l
l
l
l
l
l
•
l
l
•
l
l
l
l
6
l
l
•
l
l
•
l
l
l
(0)
Krone 2
(1)
•
l
l
l
l
•
l
l
•
l
l
l
l
l
l
•
12
l
l
•
l
l
l
l
l
l
•
l
l
39
•
l
l
l
l
l
l
•
l
l
•
l
l
l
l
6
l
l
•
l
l
•
l
l
l
(0)
Krone 2
52
Uhrzeit
Page 57

Hinweis:
Wenn die Krone “2” zur 2. Einrastposition herausgezogen wird, wird die eingestellte
Alarmzeit mit einem Warnton gelöscht. In diesem Fall den Alarm-Stunden- undMinutenzeiger wieder auf die Uhrzeit einstellen, die Krone “2” zurück in die
Normalposition drücken und dann zur 1. Einrastposition herausziehen und die
Alarmzeit durch Drücken von C erneut einstellen. Wenn die Krone “2” jedoch zurück in
die Normalposition gedrückt wird, bevor der Warnton stoppt, wird die eingestellte
Alarmzeit nicht gelöscht.
53
Page 58
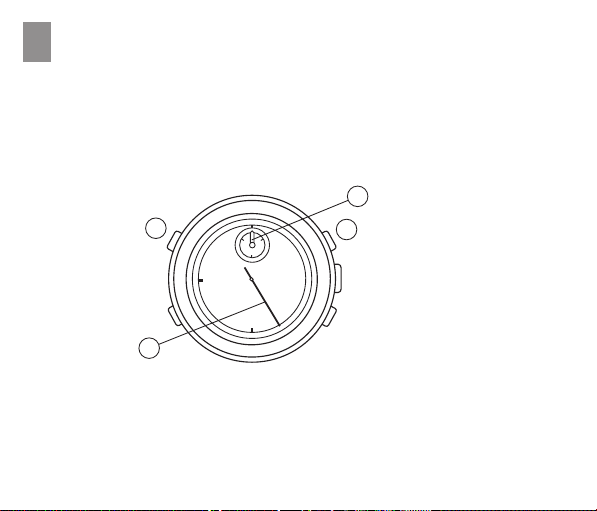
STOPPUHRF
Die Stoppuhr kann bis zu 30 Minuten in Schritten von 1 Sekunde messen. Nach 30
Minuten fängt sie wieder an, von “0” zu messen. Diese wird bis zu 6 Stunden
wiederholt.
Vor Verwendung der Stoppuhr sicherstellen, daß die Krone “1” und “2” sich in der
*
Normalposition befinden, und “B” drücken, um die Stoppuhrzeiger auf die “0”-Position
zurückzustellen.
6
•
l
l
•
B
3
54
l
l
l
l
l
30
l
•
l
l
•
l
l
l
l
l
1020
l
•
l
l
•
l
l
l
A
Krone 1
Krone 2
Page 59
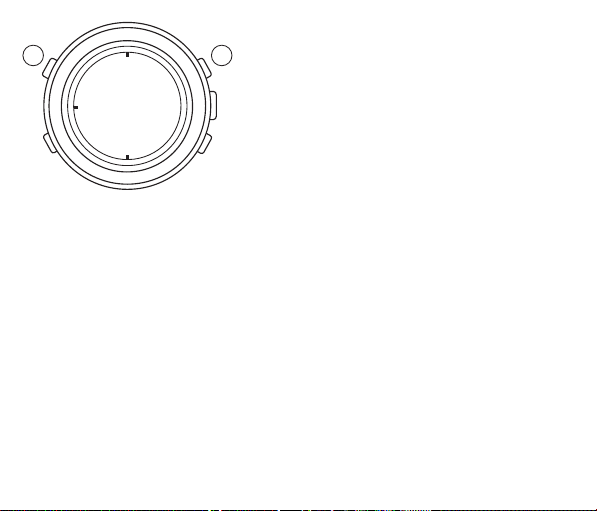
1.2.Normale Messung
BA
3.
Messung von Zwischenzeiten
Start
Zwischenzeit-Messung
Zwischenzeit-Löschung
*
Messung und Löschung von Zwischenzeiten können durch Drücken
von “B” wiederholt werden.
Stop
Rückstellung
Zielzeitmessung von zwei Wettläufern
4.
Für Start
Für Zielzeit des ersten Läufers
Wenn der zweite Läufer das Ziel erreicht
Für Anzeige der Zielzeit des zweiten Läufers
Für Rückstellung
Start
Stop
Rückstellung
Aufaddierende Messung
Start
Stop
Forsetzung
Stop
* Forsetzung und Stop der Stoppuhr können
durch Drücken von A wiederholt werden.
Rückstellung
: A
: A
: B
: A
: A
: A
: A
: B
: A
: B
: B
: A
: B
: A
: B
: A
: B
: B
drücken
drücken
drücken
drücken
drücken
drücken
drücken
drücken
drücken
drücken
drücken
drücken
drücken
drücken
drücken
drücken
drücken
drücken
55
Page 60
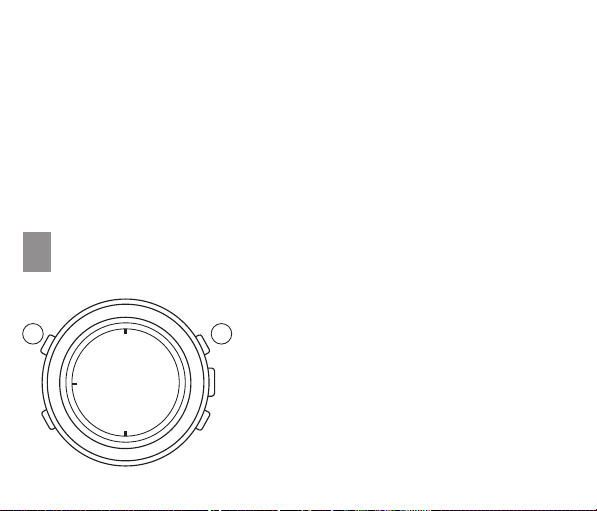
Hinweise zur Kronen-Betätigung während der Verwendung der Stoppuhr
Krone “1”:
Krone “2”:
*
Wenn die Krone “1” zur 1. Einrastposition herausgezogen wird, setzt die
Stoppuhr die Zeitmessung fort. Wenn sie jedoch zur 2 Einrastposition
herausgezogen wird, werden die Stoppuhrzeiger auf die “0”-Position
zurückgestellt.
Wenn die Krone “2” zur 1. oder 2. Einrastposition herausgezogen wird,
werden die Stoppuhrzeiger auf die “0”-Position zurückgestellt.
Wenn die Stoppuhr zurückgestellt wurde und “A” gedrückt wird, bevor der Zeiger die
“0”-Position erreicht, fängt die Stoppuhr noch mit der Zeitmessung an, wenn “A”
gedrückt wird.
VERWENDUNG DES TACHYMETERSG
(Für die Modelle mit einer Tachymeter-Skala auf dem Ziffernblatt)
•
Das Tachymeter wird zusammen mit der
BA
56
Stoppuhr verwendet.
Stoppuhr-Betätigung (Normale Messung)
Start
Stop
Rückstellung
Das Tachymeter kann für die folgenden Zwecke
eingesetzt werden.
: A
: A
: B
drücken
drücken
drücken
Page 61
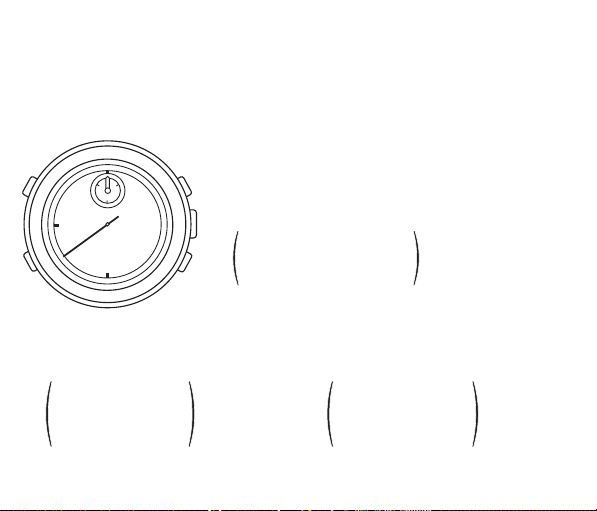
Messung der stündlichen Durchsc hnittsgeschwindigkeit eines Fahrzeugs(1)
•
Mit der Stoppuhr feststellen, wieviele Sekunden für einen Kilometer (oder eine Meile)
benötigt werden. Dann kennzeichnet der Tachymeter-Skalenstrich, auf den der
Stoppuhr-Sekundenzeiger weist, die Durchschnittsgeschwindigkeit pro Stunde.
Es muß beachtet werden, daß die Tachymeterskala nur dann verwendet werden kann,
*
wenn die benötigte Zeit weniger als 60 Sekunden beträgt. Wenn sie 60 Sekunden
überschreitet, sollte die Distanz für die Messung verkürzt werden. (Siehe “Bspl. 2” unten.)
Bspl. 1)
Wenn für einen Kilometer (oder eine Meile) 40 Sekunden
•
l
l
•
l
l
l
l
l
30
l
•
l
l
•
l
l
l
l
l
1020
l
•
l
l
•
l
l
l
benötigt werden, zeigt der Stoppuhr-Sekundenzeiger “90”
auf der Tachymeterskala an. Das bedeutet, daß die
Durchschnittsgeschwindigkeit des Fahrzeugs 90 Kilometer
(oder Meilen) pro Stunde beträgt.
Bspl. 2)
Tachymeterskalenwert
90
an 40-Sekunden- P osition
= 90 km/h S(M/h)
x 1
(Kilometer oder Meile)
Wenn die Meßentfernung auf 2 Kilometer (oder Meilen) verlängert oder auf 0,5 Kilometer
(oder Meile) verkürzt wird, muß der Wert der Tachymeterskala mit 2 bzw. 0,5 multipliziert
werden. Wir empfehlen, das Tachymeter bei Rallyes , Rennen usw. einzusetzen.
Tachymeterskalenwert
90
an 40-Sekunden-
P osition
= 180 km/h (M/h)
x 2
(Kilometer
oder Meilen)
Tachymeterskalenwert
90
an 40-Sekunden-
P osition
= 45 km/h (M/h)
x 0,5
(Kilometer
oder Meilen)
57
Page 62
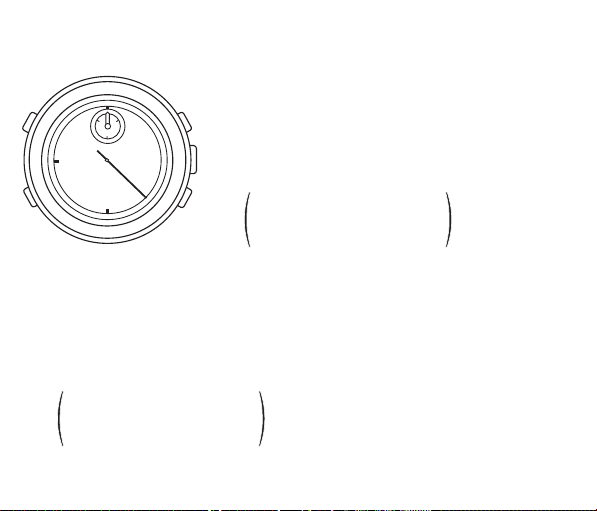
(2) Messung der stündlichen Betriebsrate
Das Tachymeter ist außerst praktisch zur Berechnung der Effizienz eines
F abrikationsbetriebs oder des Produktionsbetrags eines Maschine.
Bspl.: 1)
•
l
l
•
l
l
l
l
l
30
l
•
l
l
•
l
l
l
l
l
1020
l
•
l
l
•
l
l
l
Mit der Stoppuhr die Zeit messen, die für die Durchführung
eines Arbeitsgangs benötigt wird.
Wenn 20 Sekunden benötigt werden, zeigt der
Stoppuhr-Sekundenzeiger auff “180” auf der
Tachymeterskala. Das bedeutet, daß 180 Arbeitsgänge in
einer Stunde durchgeführt werden.
180
Tachymeterskalenwert
an 20- Sekunden-
x 1 Arbeitsgang
P osition
= 180 Arbeitsgänge
Bslp 2)
Mit der Stoppuhr festellen, wieviele Arbeitsgänge in einer bestimmten Zeitdauer
durchgeführt werden.
Wenn 15 Arbeitsgänge in 20 Sekunden durchgeführt werden, die Zahl “180” auf der
Tachymeterskala, auf die der Stoppuhr-Sekundenzeiger weist, mit 15 multiplizieren.
Das Ergebnis zeigt, daß 2700 Arbeitsgänge in einer Stunde durchgeführt werden.
180
Tachymeterskalenwert
an 20-Sekunden
P osition
= 2.700 Arbeitsgänge pro Stunde
58
x 15 Arbeitsgänge
Page 63
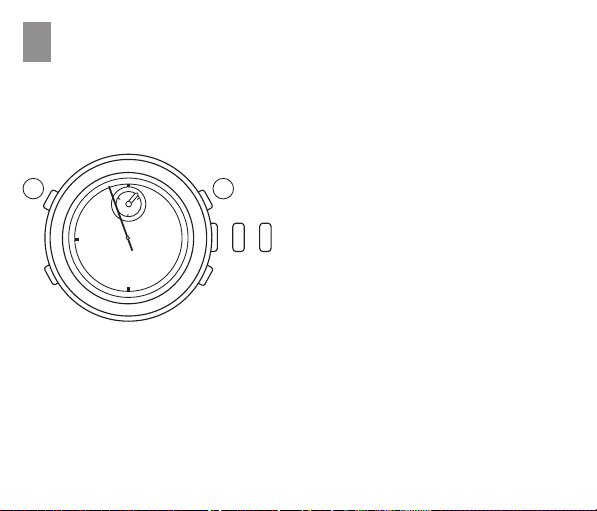
EINSTELLUNG DER ZEIGERPOSITION
H
H
• Wenn die Zeiger der Stoppuhrmessung nicht zur 12-Uhr-Position zurückkehren, wenn
die Stoppuhrzurückgestellt wird oder wenn die Batterie durch eine neue ausgetauscht
wurde, die Zeiger nach dem folgenden Verfahren auf die 12-Uhr-Position
zurückstellen.
1.
Die Krone “1” zur 2. Einrastposition
•
l
l
•
l
l
B
l
l
l
30
l
•
l
l
•
l
l
l
l
l
1020
l
•
l
l
•
l
l
l
A
(0) (1) (2)
Krone 1
herausziehen.
2.
A und B wiederholt, aber einzeln,
drücken, um den Stoppuhrzeiger auf die
12-Uhr-Position zurückzustellen.
*
Die Zeiger bewegen sich schnell,
wenn die jeweiligen Tasten gedrückt
gehalten werden.
3.
Die Krone “1” zurück in die
Normalposition drücken.
59
Page 64
I
RÜCKSTELLUNG DES EINGEBAUTEN IC
• Falls sich einer der Zeiger der Uhr nicht einwandfrei bewegen sollte, die
Zeigerbewegung nach dem folgenden Verfahren einstellen.
1.
Die Krone “1” zur 2. Einrastposition
•
l
l
•
l
l
B
l
l
l
30
l
•
l
l
•
l
l
l
l
l
1020
l
•
l
l
•
l
l
l
A
(0) (1) (2)
herausziehen.
2.
A und B gleichzeitig drücken.
3.
Die Krone “1” zurück in die
Normalposition drücken. Dadurch wird
der eingebaute IC (integrierter
Krone 1
Schaltkreis) zurückgestellt, so daß die
Zeiter wieder normal weiterrücken. Vor
der erneuten Verwendung der Uhr
müssen die Uhrzeit und die
Alarmzeiger eingestellt werden,
außerdem muß die Position der
Stoppuhrzeiger nach den Anweisungen
unter “Einstellung der zeigeposition”
eingestellt werden.
60
Page 65

BATTERIELEBENSDAUER-ANZEIGE
J
Wenn die Batterie fast entladen ist, bewegt sich der kleine Sekundenzeiger in Schritten
von zwei Sekunden anstelle einer Sekunde. Dann muß die Batterie gegen eine neue
ausgetauscht werden.
Hinweis:
Wenn der Alarm verwendet wird, während der kleine Sekundenzeiger sich in Schritten
von zwei Sekunden bewegt, ist es möglich, daß die Uhr stehenbleibt. Daher sollte die
Batterie so schnell wie möglich gegen eine neue ausgetauscht werden, wenn der
kleine Sekundenzeiger sich in Schritten von zwei Sekunden bewegt.
61
Page 66
HINWEISE ZUM TRAGEN DER UHR
K
Angabe
Spritzwasser,
Ziffernblatt Gehäuse
Wasser-
dichtheit
A
B
C
D
E
Die Angabe “WATER RESISTANT” (wasserdicht) wird gelegentlich als “WATER RESIST” abgekürzt. * Bringen
–
Damit kein Wasser in das Uhrwerk eindringen kann, darf man die Stellkrone nie bei
nasser Uhr herausziehen.
–
Uhren, die für Sportaktivitäten oder zum Tauchen geeignet sind, muß man bei
Kontakt mit Salzwasser oder viel Körperschweiß nach dem Gebrauch mit Süßwasser
abwaschen und anschließend vollständig abtrocknen.
Wasser kann in einigen Fällen eine Qualitätsminderung der Lederbänder bewirken.
–
—
—
WATER RESISTANT
50M (5bar)
WATER RESISTANT
100M (10bar)
WATER RESISTANT
200M (20bar) o più
—
WA TER RESISTANT
WA TER RESISTANT
WA TER RESISTANT
WA TER RESISTANT
Schweifl,
leichter Regen,
Waschen, usw.
NEIN
JA
JA
JA
JA
Einsatz
Schwimmen
usw.
NEIN
NEIN
JA
JA
JA
62
Page 67
in Wasser
Tauchen
NEIN
NEIN
NEIN
JA
JA
Sie die Stellkrone immer in ihre Normalstellung. * Ziehen Sie dei Schraube der Stellkrone vollständig fest.
–
Die inneren Bauteile der Uhr können Feuchtigk eit enthalten. Wenn die Außentemperatur
niedriger als die Innentemperatur ist, kann das Glas über dem Ziffernblatt beschlagen.
Wenn diese Erscheinung n ur kurz anhält, ist sie nicht von Bedeutung. Sollte Sie dagegen
länger andauern, so sollten Sie das Problem Ihrem Fachhändler, bei dem sie die Uhr
gekauft haben, oder dem nächsten Kundendienst mitteilen.
Tieftauchen
NEIN
NEIN
NEIN
NEIN
JA
Dichtheit
Nicht wasserdicht. Vor Wasser und Feuchte schützen.
Normal wasserdicht. Widersteht Spritzwasser, Schweiß,
leichtem Regen, Waschen usw. im täglichen Gebrauch.
Kann zum Schwimmen eingesetzt werden, zum Tauchen
nicht empfohlen.
Zum Tauchen ohne Flaschen geeignet.
Zum Tieftauchen geeignet.
63
Page 68

Temperatur
Setzen Sie die Uhr nie längerer Zeit direkter Sonneneinstrahlung aus und legen Sie sie
nicht an besonders heißen oder kalten Orten ab.
Dies kann die Funktionsweise der Uhr beeinträchtigen und die Lebensdauer der Batterie
verkürzen, was einen schnelleren oder langsameren Lauf der Uhr bewirkt und auch
Auswirkungen auf ihre sonstige Funktionen hat.
Stoßfestigkeit
Diese Uhr widersteht allen Stößen und Schlägen, die bei normalem täglichem Gebrauch
oder Sportarten ohne direkten Körperkontakt wie Golf oder Baseball auftreten.
Fällt die Uhr hingegen auf den Boden fällt oder sehr schweren Stößen ausgesetzt ist,
kann sie Schaden nehmen und ihre Funktion beeinträchtigt sein.
Magnetfelder
Diese Uhr ist bis zu einer induktiven Feldstärke von 60 Gauss antimagnetisch und wird
daher durch magnetische Felder, die von üblichen Haushaltsgeräten erzeugt werden,
nicht beeinflußt. Kommt die Uhr in sehr starke magnetische Felder, so können ihre
Betriebsfunktionen vorübergehend verändert sein.
Elektrostatische Aufladung
Die in der Uhr verwendeten integrierten Schaltkreise reagieren empfindlich auf
elektrostatische Aufladung. Wird die Uhr einem starken elektrischen Feld ausgesetzt,
kann die Zeitanzeige an Genauigkeit verlieren.
Chemikalien und Gase
Tragen Sie die Uhr nicht in Räumen, in denen aggressive chemische Substanz en oder
Gase vorhanden sind. Kommt die Uhr mit Lösungsmitten wie Benzol oder chemischen
Substanzen wie Benzin, Poliermittel, Waschflüssigkeiten oder Klebstoffen in Berührung,
64
Page 69

können ihre Komponenten entfärben, sich auflösen oder zerbrechen.
Achten Sie besonders darauf, daß Sie Chemikalien meiden.
Gehäuse und Armband der Uhr können entfärben, wenn sie z. B. mit dem Quecksilber
eines zerbrochenen Thermometers in Berührung kommen.
Sauberkeit der Uhr
Reinigen Sie das Uhrglas mit einem weichen, saugfähigen Tuch von Staub und
Feuchtigkeit. Wenn Sie die Uhr mit verschmutztem Gehäuseboden und Band anlegen,
kann dies an den Berührungsstellen zu Hautreizungen führen. Halten Sie die Uhr auch
sauber, um die Ärmel nicht zu verschmutzen.
Reinigung des Armbandes:
•
Metallband:
Seifenlauge waschen.
•
Kunststoff- oder Gummiband:
verwenden.
•
Lederband:
Zur Reinigung der Innenseite ein mit Alkohol angefeuchtetes Tuch verwenden.
Regelmäßige Inspektion
Wir raten Ihnen, die Uhr alle ein bis zwei Jahre von einem autorisierten Kundendienst
überprüfen zu lassen. Dies sichert eine langjährige Benutzung der Uhr, ohne das
Funktionsstörungen auftreten.
Die Batterien von Kindern fern halten
Falls eine Batterie versehentlich verschluckt wurde, unverzüglich einen Arzt
verständigen.
Die verschmutzten Stellen mit einer Zahnbürste und lauwarmer
Mit Wasser abwaschen. Keine Lösungsmittel
Die Außenseite leicht mit einem weichen und trockenen Tuch abreiben.
65
Page 70

66
Page 71

I
INDICE
A 68
COMPONENTI PRINCIPALI
CARATTERISTICHE
B
PREDISPOSIZIONE DELL’ORA
C
D
PREDISPOSIZIONE DELLA DATA
E
SUONERIA
F
CRONOMETRO
G
USO DEL TACHIMETRO
H
REGOLAZIONE DELLA POSIZIONE DELLE LANCETTE
I
AZZERAMENTO DEL CI INCORPORATO
J
INDICATORE DELLA DURATA DELLA BATTERIA
K
PRECAUZIONI PER L’USO E NOTIZIE UTILI
70
71
72
73
76
78
81
82
83
84
67
Page 72
COMPONENTI PRINCIPALI
A
1
Lancetta delle ore
Lancetta dei minuti
2
Lancetta dei secondi del cronometro
3
Lancetta delle ore della suoneria
4
Lancetta dei minuti della suoneria
5
Lancetta dei minuti del cronometro
6
Piccola lancetta dei secondi continui
7
E Corona 1
0) Posizione normale: Libera
1) Primo scatto:
Rotazione in senso orario: Predisposizione della data
Rotazione in senso antiorario: Libera
2) Secondo scatto: Predisposizione dell’ora
D Corona 2
0) Posizione normale: Libera
1) Primo scatto: Inserimento della suoneria
2) Secondo scatto: Predisposizione delle piccole lancette ore e minuti della suoneria.
A
B
C
D
E
Pulsante
Pulsante
Pulsante
Corona 2
Corona 1
68
Page 73

CORONA A BLOCCAGGIO A VITE
(Per i modelli con la corona a bloccaggio a vite)
Sbloccaggio della corona
•
Svitare la corona ruotandola in senso antiorario sino a quando non si nota più il
ruotare dentro la filettatura.
A questo punto la corona può essere estratta sino al primo o al secondo scatto per la
predisposizione dell’ora e del calendario.
Bloccaggio della corona
•
Al termine di tutte le regolazioni, ritornare la corona alla sua posizione normale.
Ruotarla poi in senso orario, premendola leggermente, sino a quando risulta ben
stretta.
69
Page 74

CARATTERISTICHE
B
Si tratta di un orologio analogico ad indicazioni multiple, dotato delle funzioni di
suoneria e di cronometro.
INDICAZIONE PRINCIPALE DELL’ORA
Lancette delle ore e dei minuti, con una piccola lancetta per i secondi continui.
CALENDARIO
La data è visualizzata in cifre.
SUONERIA
Predisponibile nella gamma di indicazione su 12 ore. L’ora designata viene visualizzata
per mezzo di due piccole lancette.
CRONOMETRO
Può misurare sino ad un massimo di 30 minuti.
INDICATORE DELLA DURATA DELLA BATTERIA
La lancetta piccola dei secondi continui inizierà a muoversi ad intervalli di due secondi
per volta quando la batteria deve essere sostituita.
TACHIMETRO
Certi modelli sono anche dotati di un tachimetro con una scala graduata.
70
Page 75
C
PREDISPOSIZIONE DELL’ORA
C
1 2
Estrarre la corona “1” completamente
1.
sino al secondo scatto quando la
piccola lancetta dei secondi continui ➆
si trova in corrispondenza delle ore 12.
•
l
l
l
l
•
l
l
•
l
l
l
l
l
l
•
60
l
l
•
l
l
l
l
l
l
•
l
l
•
l
l
l
l
•
l
l
•
l
l
l
30
l
l
l
•
l
l
•
l
l
l
28
l
l
(1)(0) (2)
Corona 1
2.
Ruotando la corona “1” predisporre le
lancette delle ore e dei minuti ➀ e ➁
sull’ora corrente.
3.
Far ritornare la corona “1” alla sua
posizione normale in concomitanza con
un segnale orario.
7
Note:
Nel predisporre la lancetta delle ore verificare se si tratta di ore antimeridiane o
1.
pomeridiane. La data è studiata in modo da cambiare ogni 24 ore. Ruotare la
corona “1” in senso orario sino a quando la lancetta delle ore oltrepassa la
posizione corrispondente alle ore 12. Se la data cambia, le ore 12 sono in realtà le
24, e le ore precedenti sono quelle della sera e le successive quelle del mattino del
giorno dopo. Se la data non cambia, le ore 12 corrispondono al mezzogiorno del
giorno indicato, le ore precedenti sono quelle del mattino e le successive quelle del
pomeriggio.
Nel predisporre la lancetta dei minuti, farla avanzare di 4 o 5 minuti oltre l’ora
2.
desiderata e farla poi retrocedere sino all’esatta posizione voluta.
71
Page 76
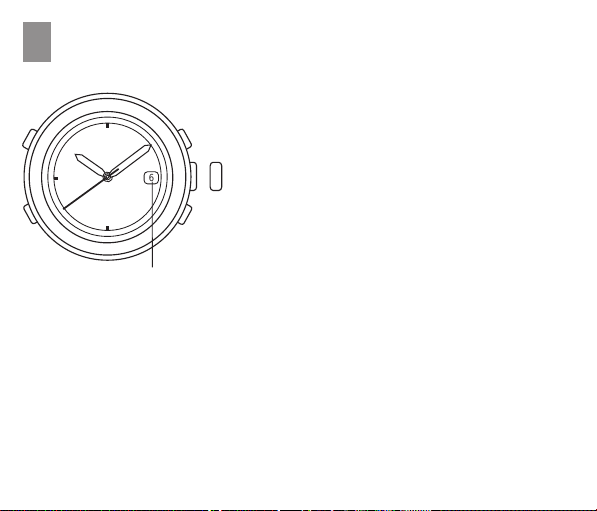
PREDISPOSIZIONE DELLA DATA
D
Estrarre la corona “1” sino al primo scatto.
1.
Ruotare la corona “1” in senso orario sino
2.
a quando appare la data del giorno
precedente a quello che si intende
(1)(0)
6
Corona 1
Data
Nota:
Evitare di predisporre la data fra le 21:00 e le 3:00 del mattino dopo, poichè in tal caso
la data potrebbe non cambiare in modo corretto. Qualora sia necessario eseguire la
regolazione in questo lasso di tempo, portare prima l’ora al di fuori di questa gamma,
predisporre la data, e ripristinare poi l’ora voluta.
predisporre.
3.
Estrarre la corona “1” sino al secondo
scatto, far avanzare le lancette delle ore e
dei minuti sino a quando compare la data
che si intende predisporre. Ripristinare
l’ora iniziale.
4.
Rispingere la corona “1” nella sua
posizione normale.
72
Page 77
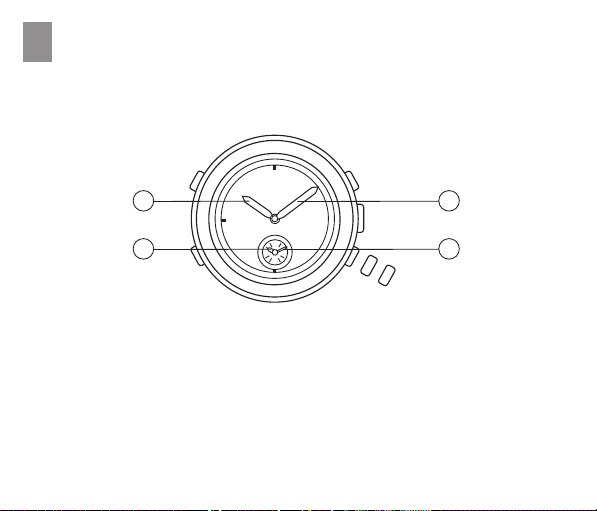
SUONERIAE
L’ora di entrata in funzione della suoneria, che viene impostata su una base di 12 ore,
è visualizzata tramite le lancette delle ore e dei minuti della suoneria che si regolano
indipendentemente dalle lancette dell’ora principale.
1 2
•
l
l
l
l
•
l
l
•
l
l
l
l
l
l
•
12
l
l
•
l
l
l
l
l
l
•
l
l
39
•
4 5
Predisposizione dell’ora della suoneria
Per la predisposizione dell’ora per la suoneria, regolare prima le lancette della
suoneria sull’ora attuale (indicata dalle lancette dell’ora principale) e predisporle poi
sull’ora desiderata per l’entrata in funzione della suoneria.
Estrarre completamente la corona “2” sino al secondo scatto.
1.
Si udrà un suono “bip” di conferma di 1 secondo.
Ruotare la corona “2” in senso orario o antiorario sino a predisporre le lancette della
2.
suoneria sulla stessa ora indicata dalle lancette principali dell’ora.
* Per predisporre la lancetta dei minuti, farla avanzare di 4 o 5 minuti oltre il punto
voluto, facendola poi retrocedere sino ad indicare i minuti esatti desiderati.
l
l
l
l
l
l
•
l
l
•
l
l
l
l
6
l
l
•
l
l
•
l
l
l
(0)
(1)
Corona 2
(2)
73
Page 78
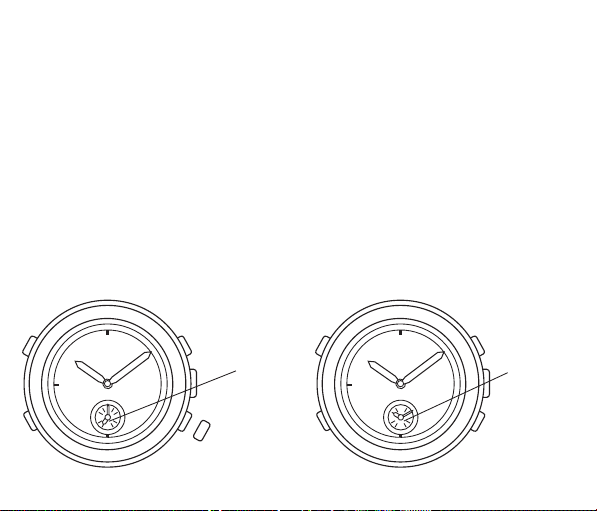
Riposizionare la corona “2” nella sua posizione originale e riestrarla poi di nuovo sino
3.
al primo scatto. La suoneria entra in funzione a scopo dimostrativo se la corona “2”
viene estratta sino al primo scatto entro un minuto dopo essere stata reinserita nella
sua posizione normale. Per la predisposizione dell’ora desiderata per la suoneria
agire ripetutamente su C.
* Ad ogni pressione di C le lancette della suoneria si spostano di un minuto, e si
muovono invece rapidamente se si tiene premuto il tasto.
Riposizionare la corona “2” nella sua posizione originale.
4.
Le lancette della suoneria si spostano ad indicare l’ora corrente.
Inserimento e disinserimento della suoneria
Per inserire la suoneria, estrarre la corona “2” sino al primo scatto. Le lancette della
•
suoneria si spostano ad indicare l’ora designata per la suoneria.
La suoneria entra in funzione all’ora designata per un periodo di 20 secondi. Se la
*
si vuole interrompere manualmente prima della fine, premere uno qualunque dei
tasti A, B o C, o rispingere in dentro la corona “2” nella sua posizione normale.
Quando la corona “2” si trova nella sua posizione normale, la suoneria è disinserita,
•
e le lancette dell’ora della suoneria indicano l’ora corrente.
[Suoneria
inserita]
[Suoneria
disinserita]
Ora designata
per la suoneria
Ora
corrente
•
l
l
l
l
•
l
l
•
l
l
l
l
l
l
•
12
l
l
•
l
l
l
l
l
l
•
l
l
39
•
l
l
l
l
l
l
•
l
l
•
l
l
l
l
6
l
l
•
l
l
•
l
l
l
(0)
Corona 2
(1)
•
l
l
l
l
•
l
l
•
l
l
l
l
l
l
•
12
l
l
•
l
l
l
l
l
l
•
l
l
39
•
l
l
l
l
l
l
•
l
l
•
l
l
l
l
6
l
l
•
l
l
•
l
l
l
Corona 2
(0)
74
Page 79

Nota:
Notare che estraendo erroneamente la corona “2” sino al secondo scatto si udrà un
segnale sonoro “bip” che avverte che è così stata cancellata l’ora predisposta per la
suoneria. In tal caso riportare di nuovo le lancette dell’ora della suoneria sulla stessa
posizione dell’ora principale, reinserire la corona “2” indietro nella sua posizione
normale, estrarla poi di nuovo sino al primo scatto e premere C per ripredisporre l’ora
desiderata per la suoneria. Nel caso in cui si riesca a fare in tempo a rispingere la
corona “2” prima che suoni il segnale di avvertimento, l’ora predisposta per la
suoneria non verrà cancellata.
75
Page 80
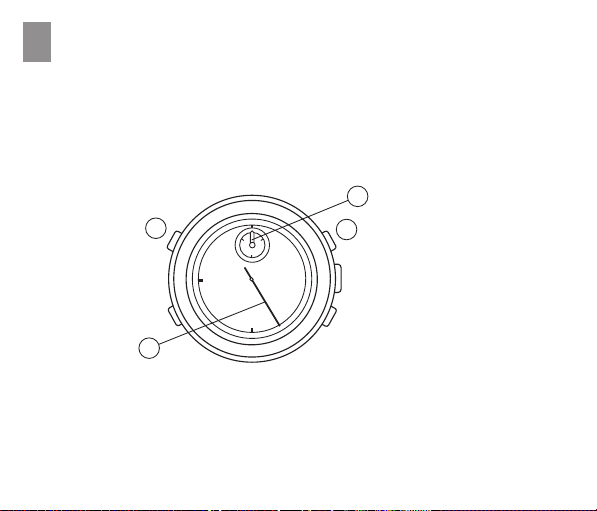
CRONOMETROF
Il cronometro può misurare sino ad un massimo di 30 minuti in unità di 1 secondo.
Dopo 30 minuti di misurazione il conteggio riprende di nuovo dalla posizione“0”. La
misurazione continua così sino ad un massimo di 6 ore.
*
Prima di utilizzare il cronometro verificare che la corona “1” e “2” si trovino nella loro
posizione normale. Premere poi il tasto B per riazzerare le lancette del cronometro
alla posizione “0”.
6
•
l
l
•
B
3
76
l
l
l
l
l
30
l
•
l
l
•
l
l
l
l
l
1020
l
•
l
l
•
l
l
l
A
Corona 1
Corona 2
Page 81
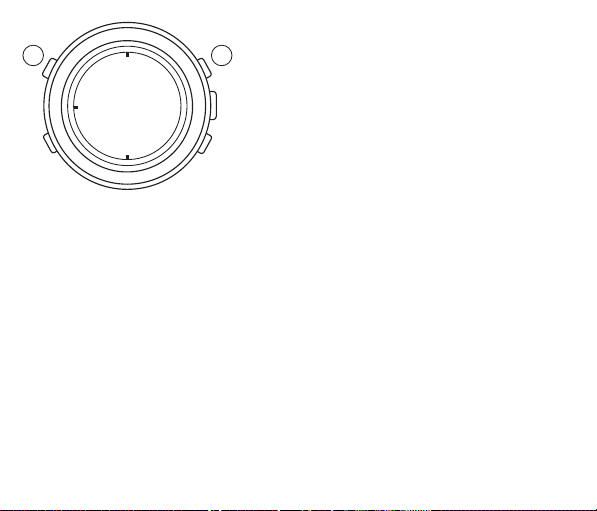
1.2.Misurazione standard
BA
3.4.Misurazione di tempi parziali (intermedi)
Avvio
Misurazione tempo parziale
Ripresa della misurazione normale
* La misurazione ed il disinserimento del tempo parziale possono
essere ripetuti in continuazione solo premendo il tasto B.
Arresto:
Riazzeramento:
Misurazione dei tempi di due concorrenti
Avvio
Misurazione del tempo finale del primo concorrente
Quando il secondo concorrente giunge al traguardo
Visualizzazione del tempo finale del secondo concorrente
Azzeramento
Avvio
Arresto
Riazzeramento
Misurazione di tempi parziali accumulati
Avvio
Arresto
Riavvio
Arresto
* La ripresa (riavvio) e l’arresto dell’orologio
possono essere ripetuti continuamente
premendo il tasto A.
Riazzeramento
: Premere A
: Premere A
: Premere B
: Premere A
: Premere A
: Premere A
: Premere A
: Premere B
: Premere A
: Premere B
: Premere B
: Premere B
: Premere B
: Premere A
: Premere B
: Premere A
: Premere B
: Premere B
77
Page 82
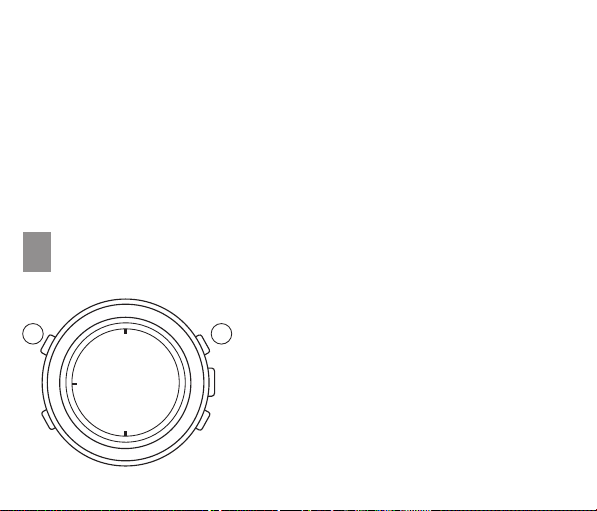
Nota sul funzionamento della corona mentre il cronometro è in funzione
Corona “1”:
Corona “2”:
Dopo il riazzeramento dell’orologio, se si preme il tasto A mentre le lancette del
*
cronometro si stanno ancora portando verso la posizione “0”, la misurazione riprende
comprendendo anche il tempo necessario del momento in cui A è stato premuto.
Il cronometro continua la misurazione anche se si estrae la corona “1” al
primo scatto. Se si estrae la corona al secondo scatto, invece, le lancette
del cronometro vengono riportate alla posizione “0”.
Estraendo la corona “2” al primo o al secondo scatto, le lancette del
cronometro vengono riportate alla posizione iniziale “0”.
USO DEL TACHIMETROG
(per i modelli dotati di scala per la misurazione della velocità)
•
Uso del tachimetro in unione al cronometro.
BA
78
Funzionamento del cronometro (misurazione
standard)
Avvio
Arresto
Azzeramento
Il tachimetro può essere utilizzato ai seguenti
scopi.
: Premere A
: Premere A
: Premere B
Page 83
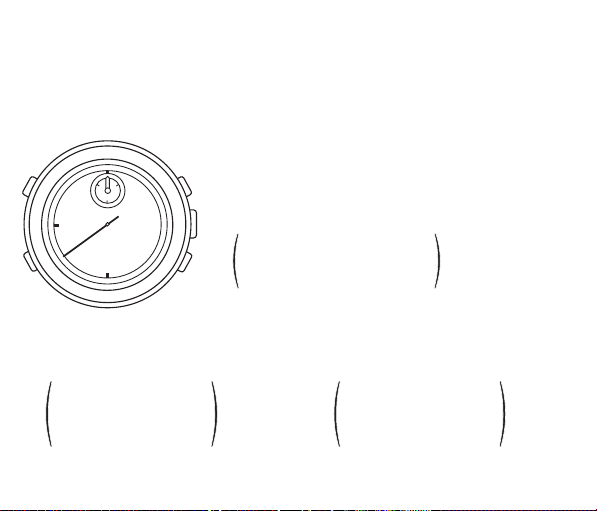
Misurazione della velocità media oraria di un autoveicolo(1)
•
Usare il cronometro per determinare quanti secondi occorrono per percorrere un
kilometro (o un miglio). Sulla scala graduata del tachimetro si può leggere la velocità
oraria media, indicata dalla lancetta dei secondi.
Notare che la scala del tachimetro può essere utilizzata solamente se il tempo
*
necessario alla percorrenza è inferiore ai 60 secondi. Per misurazioni oltre i 60
secondi, diminuire la distanza misurata.
Vedi in proposito l’esempio 2, più sotto.
•
l
l
•
l
l
l
l
l
30
l
•
l
l
•
l
l
l
l
l
1020
l
•
l
l
•
l
l
l
Es.: 1)
Se occorrono 40 secondi per percorrere un kilometro (o un
miglio), la lancetta dei secondi indicherà la cifra “90” sulla
scala del tachimetro. Ciò significa che la velocità media
oraria del veicolo misurato è di 90 km. (o miglia) all’ora.
Cifra sulla scala del tachimetro
90
in corrispondenza della
x 1 (km o miglio)
posizione sui 40 secondi
= 90 km/h (o mph)
Es.: 2)
Se la distanza misurata è di 2 km o di 0,5 km (o miglia) moltiplicare la cifra data dalla scala
del tachimetro rispettivamente per 2 o per 0,5.
Il tachimetro può essere utilmente utilizzato durante un rally, una corsa, o in un circuito.
Cifra sulla scala del
90
tachimetro in
corrispondenza della
posizione sui 40 secondi
= 180 km/h (o mph)
x 2
(km o
miglio)
Cifra sulla scala del
90
tachimetro in
corrispondenza della
posizione sui 40 secondi
= 45 km/h (o mph)
x 0,5
(km o
miglio)
79
Page 84
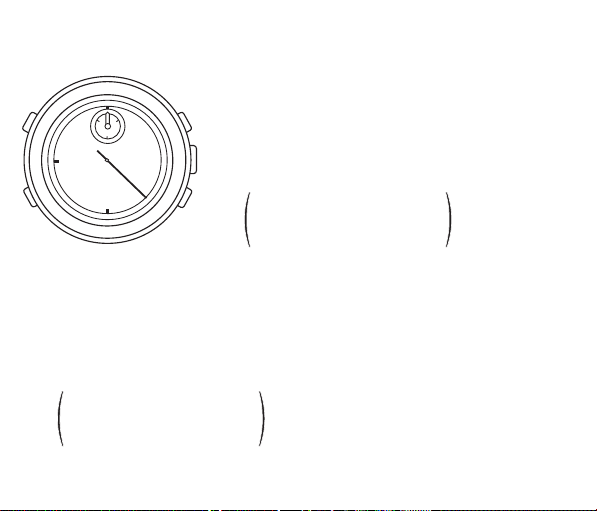
(2) Misurazione di una entità oraria di produzione
Il tachimetro è molto utile per calcolare l’efficienza produttiva di una fabbrica, o la
quantità di produzione di una macchina.
Es.: 1)
•
l
l
•
l
l
l
l
l
30
l
•
l
l
•
l
l
l
l
l
1020
l
•
l
l
•
l
l
l
Usare il cronometro per misurare il tempo necessario a
completare un certo lavoro.
Se ci vogliono 20 secondi, la lancetta dei secondi del
cronometro si trova ad indicare la cifr a “180” sulla scala del
tachimetro. Ciò significa che 180 di quei lavori possono
essere compiuti nel giro di un’ora.
Cifra sulla scala del tachimetro
180
in corrispondenza della
x 1 lavoro
posizione sui 20 secondi
= 180 lavori
Es.: 2)
Usare il cronometro per determinare quanto certi lavori specifici vengono completati nel
corso di un certo periodo di tempo.
Se sono stati completati 15 lavori in 20 secondi, moltiplicare 180 (la cifra indicata dalla
lancetta dei secondi sulla scala del tachimetro in corrispondenza ai 20 secondi) per 15.
La cifra ottenuta, 2.700 indica il presumibile numero di lavori di quel tipo completati nel
giro di un’ora.
180
Cifra sulla scala del
tachimetro in corrispondenza
x 15 lavori
della posizione sui 20 secondi
= 2.700 lavori
80
Page 85
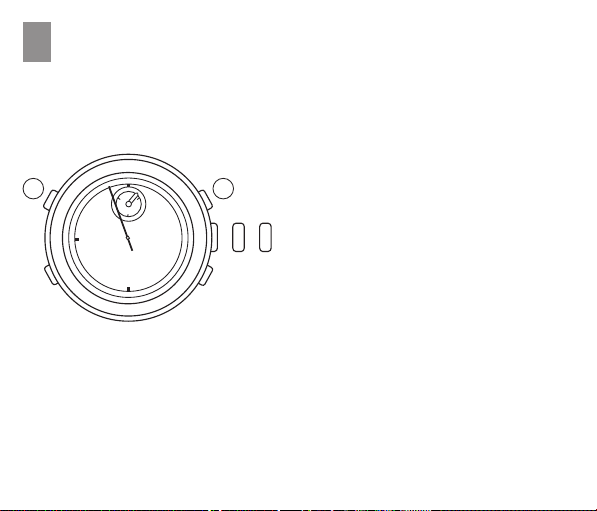
REGOLAZIONE DELLA POSIZIONE
H
DELLE LANCETTE
• Se le lancette della misurazione cronografica ➂ e ➅ non ritornano nella posizione
delle ore 12 quando il cronometro viene azzerato o quando la batteria viene sostituita
con una nuova, attenersi alla procedura seguente per riportare le lancette sulla
posizione delle ore 12.
1.
Estrarre la corona “1” sino al secondo
•
l
l
•
l
l
B
l
l
l
30
l
•
l
l
•
l
l
l
l
l
1020
l
•
l
l
•
l
l
l
A
(0) (1) (2)
Corona 1
scatto.
2.
Premere A e B ripetutamente ma
separatamente per riportare le lancette
del cronometro sulla posizione delle ore
12.
Le lancette si muovono velocemente
*
se si tiene premuto il tasto.
3.
Rispingere la corona “1” nella sua
posizione normale.
81
Page 86
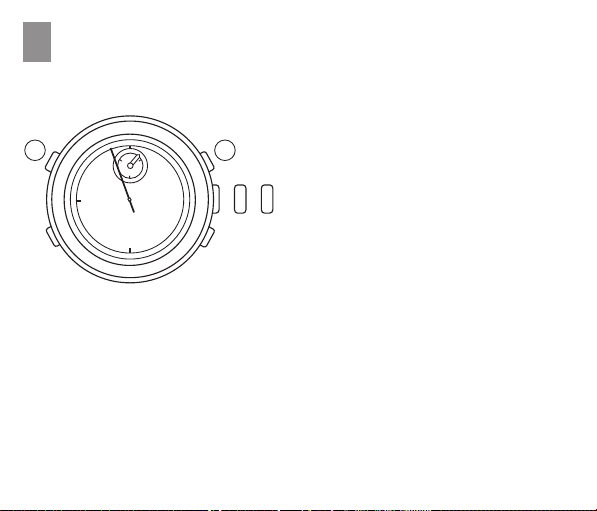
AZZERAMENTO DEL C.I. INCORPORATO
I
• Nel caso in cui una delle lancette dell’orologio si muova in modo scorretto, attenersi
alla procedura seguente per normalizzare il movimento delle lancette.
1.
Estrarre la corona “1” sino al secondo
•
l
l
•
l
l
B
l
l
l
30
l
•
l
l
•
l
l
l
l
l
1020
l
•
l
l
•
l
l
l
A
(0) (1) (2)
scatto.
2.
Premere A e B contemporaneamente.
3.
Rispingere la corona “1” nella sua
posizione normale. Il circuito integrato
contenuto nell’orologio è stato così
Corona 1
riazzerato ed il movimento delle
lancette ridiventerà normale. Prima di
usare di nuovo l’orologio sarà
necessario ripredisporre nuovamente
l’ora principale e l’ora desiderata per la
suoneria, e procedere alla regolazione
delle lancette del cronometro come
indicato al paragrafo “Regolazione
della posizione delle lancette”.
82
Page 87

INDICATORE DELLA DURATA DELLA BATTERIA
J
Quando la batteria è prossima alla fine, la piccola lancetta dei secondi inizia a
muoversi ad intervalli di due secondi invece che al normale intervallo di un secondo
per volta, ad indicare che la batteria deve essere sostituita con una nuova.
Nota:
Se la suoneria viene utilizzata mentre la piccola lancetta dei secondi si sta spostando
ad intervalli di due secondi per volta, l’orologio potrebbe cessare di funzionare. Se si
nota pertanto questo movimento particolare della piccola lancetta dei secondi, è
necessario procedere quanto prima alla sostituzione della batteria.
83
Page 88
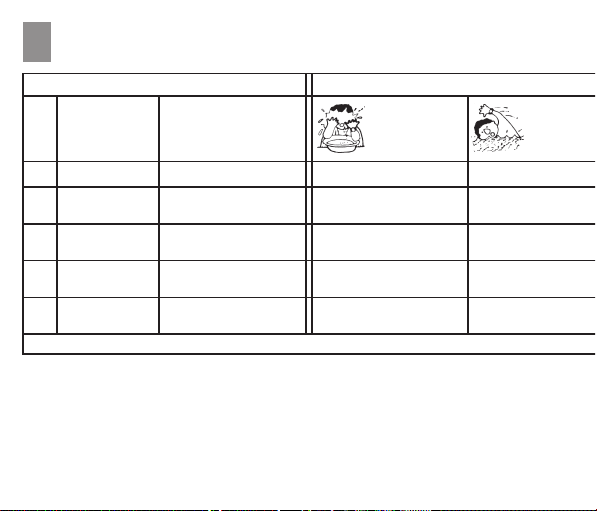
PRECAUZIONI PER L’USO E NOTIZIE UTILI
K
Indicazione
Spruzzi, sudore,
Quadrante Cassa
Grado di
impermeabilità
A
B
C
D
E
L’indicazione “WATER RESISTANT” (impermeabile) può essere a volte abbreviata in “WATER RESIST”.
–
Per evitare che l’acqua entri nei meccanismi interni dell’orologio, la corona non deve
mai essere tirata fuori quando l’orologio è bagnato.
–
Se gli orologi che sono stati concepiti per lo sport o per funzionare in acqua vengono
esposti all’acqua salata o ad abbondante sudore, devono essere risciacquati con
acqua dolce e quindi completamente asciugati.
L’acqua può in taluni casi provocare un deterioramento della qualità di alcuni cinturini
–
in cuoio.
—
—
WATER RESISTANT
50M (5bar)
WATER RESISTANT
100M (10bar)
WATER RESISTANT
200M (20bar) o più
—
WA TER RESISTANT
WA TER RESISTANT
WA TER RESISTANT
WA TER RESISTANT
pioggia leggera,
abluzioni, ecc.
NO
SI
SI
SI
SI
Uso in
Nuoto ecc.
NO
NO
SI
SI
SI
84
Page 89
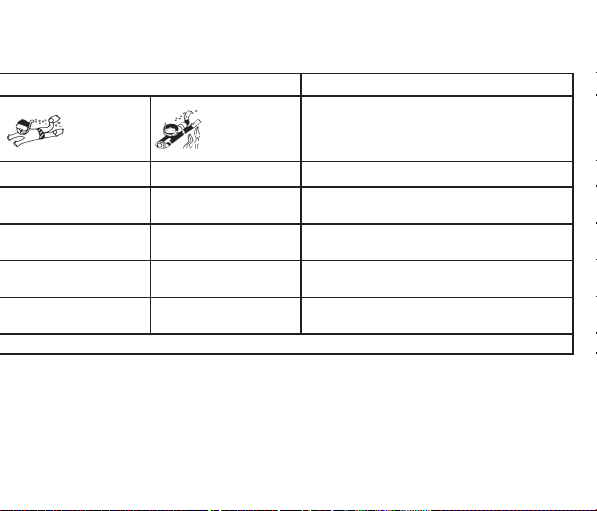
acqua
Immersione
NO
NO
NO
SI
SI
* Portare sempre la corona nella sua posizione normale. * Stringere del tutto la vite della corona.
–
Le parti interne dell’orologio possono trattenere umidità, quando la temperatura esterna
è più bassa di quella interna, il vetro del quadrante a volte può appannarsi. Se il
fenomeno è momentaneo, ciò non crea alcun problema, ma se invece perdura a lungo ,
occorre far presente il prob lema al negoziante presso cui l’orologio è stato acquistato o al
Centro di Assistenza Autorizzato più vicino .
Immersione
in profondità
NO
NO
NO
NO
SI
Non impermeabile. Va protetto da acqua ed umidità.
Impermeabilità normale. Resiste a spruzzi, sudore,
pioggia leggera, abluzioni ecc. durante l’uso quotidiano.
Utilizzabile durante il nuoto ma sconsigliato per
immersioni
Adatto ad immersioni poco impegnative.
Adatto ad immersioni impegnative in profondità.
Caratteristiche di
impermeabilità
85
Page 90

Temperatura
Non lasciare l’orologio sotto i raggi diretti del sole o in luoghi estremamente caldi o
estremamente freddi per un lungo periodo di tempo.
Ciò potrebbe infatti creare degli inconvenienti al funzionamento dell’orologio ed
accorciare la durata della batteria, provocando anche un rallentamento o
un’accelerazione dell’orologio e conseguenze sulle altre funzioni.
Urti
Questo orologio può sopportare gli urti e gli scossoni che normalmente avvengono
durante l’uso quotidiano ed anche quando si pratichino sport in cui non ci sia contatto
diretto, quali golf e baseball. Se l’orologio cade per terra o riceve colpi molto f orti, può
subire danni o guasti al funzionamento.
Campi magnetici
Questo orologio è antimagnetico fino a 60 gauss e quindi non viene influenzato dai
campi magnetici prodotti dai normali elettrodomestici. Se viene usato nelle vicinanz e di
campi magnetici molto forti, le sue funzioni possono venire momentaneamente alterate.
Elettricità statica
I circuiti integrati usati nell’orologio sono sensibili all’elettricità statica. Se l’orologio viene
esposto a intensa elettricità, l’indicazione del tempo può perdere in precisione.
Sostanze chimiche e gas
Non indossare l’orologio quando ci si trova in presenza di forti sostanze chimiche e di
gas. Se l’orologio viene a contatto di solventi, come benz ene, oppure con prodotti
contenenti sostanze come benzina, lucidi, detergenti, adesivi, le sue parti possono
scolorarsi, dissolversi o spaccarsi.
86
Page 91

Fare particolare attenzione ad evitare le sostanze chimiche.
La cassa dell’orologio e il cinturino possono scolorirsi se vengono a contatto con il
mercurio di un termometro rotto o di altra provenienza.
Tenere l’orologio pulito
Strofinare con un panno soffice assorbente il terriccio e l’umidità dal vetro dell’orologio.
Se l’orologio viene indossato quando il retro della cassa e la cinghia sono sporchi,
questi possono provocare un’irritazione cutanea in quanto a contatto diretto con la
pelle. Tenere l’orologio pulito anche per non sporcarsi i polsini.
Come pulire il cinturino.
•
Cinturino in metallo:
con acqua tiepida saponata.
•
Cinturino in plastica o in gomma:
•
Cinturino in cuoio:
asciutto. Per la pulizia del lato opposto, servirsi di un panno inumidito con alcool.
Ispezione periodica
Si raccomanda di far controllare da un centro assistenza autorizzato, l’orologio ogni
uno o due anni per assicurare un uso prolungato e senza problemi.
Tenete le batterie fuori portata dei bambini
Qualora una batteria fosse accidentalmente ingerita, consultate subito il medico.
Lavare le zone sporche con uno spazzolino da denti bagnato
Lavare con acqua. Non usare solvente.
Strofinare delicatamente sul lato frontale con un panno soffice ed
87
Page 92

88
Page 93

E
INDICE
A 90
COMPONENTES PRINCIPALES
CARACTERISTICAS
B
FIJACION DE HORA
C
D
FIJACION DE FECHA
E
ALARMA
F
CRONOGRAFO
G
COMO USAR EL TAQUIMETRO
H
ADJUSTE DE POSICION DE AGUJAS
I
ESTABILIZACION DEL CI INCORPORADO
J
INDICACION DE DURACION DE PILA
K
PRECAUCIONES PARA EL USO E INFORMACIONES UTILES
100
103
104
105
106
92
93
94
95
98
89
Page 94
COMPONENTES PRINCIPALES
A
1
Horario
Minutero
2
Segundero 1/5 del cronógrafo
3
Horario de alarma
4
Minutero de alarma
5
Minutero del cronógrafo
6
Pequeño segundero
7
D Corona 1
0) Posición normal: Libre
1) Primer clic:
Dirección de las agujas: Fijarión de fecha
Contradirección de las agujas: Libre
2) Segundo clic: Fijación de la hora principal:
E Corona 2
0) Posición normal: Libre
1) Primer clic: Activación de alarma
2) Segundo clic: Fijación del pequeño horario y minutero (de la alarma)
A
B
C
D
E
90
Botón
Botón
Botón
Corona 1
Corona 2
Page 95

CORONA A TORNILLO
(Para modelos con corona a tornillo)
Cómo destornillar la corona
•
La corona se destornilla girándola hacia la izquierda hasta que la rosca queda libre.
La corona se saca hasta el primer o segundo crujido para ajustar hora/calendario.
Cómo atornillar la corona
•
Completados los ajustes, empujar la corona a su posición normal.
Girar la corona hacia la derecha empujándola suavemente hasta que quede apretada.
91
Page 96

CARACTERISTICAS
B
Este reloj analógico de cuarzo presenta indicación múltiple con alarma y cronógrafo.
INDICACION PRINCIPAL DE HORA
Agujas de horario y minutero con un pequeño segundero.
CALENDARIO
La fecha de horario y minutero se expresa con un pequeño segundero.
ALARMA
Se puede fijar en indicación de 12 horas y el tiempo señalado de alarma se puede
indicar con dos pequeñas agujas.
CRONOGRAFO
Puede medir hasta 30 minutos en 1/5 segundo.
INDICADOR DE DURACION DE PILA
El pequeño segundero avanza en intervalos de dos segundos cuando se tiene que
recambiar la pila.
TAQUIMETRO
Algunos modelos tienen un taquímetro con un dial graduato.
92
Page 97
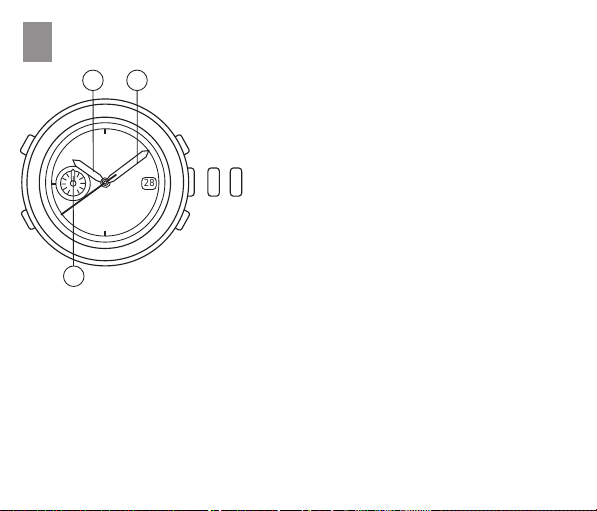
FIJACION DE HORA
C
1 2
Tirar de la corona “1” completamente
1.
hasta el segundo clic cuando el
pequeño segundero está en la
posición de las 12.
•
l
l
l
l
•
l
l
•
l
l
l
l
l
l
•
60
l
l
•
l
l
l
l
l
l
•
l
l
•
l
l
l
l
•
l
l
•
l
l
l
30
l
l
l
•
l
l
•
l
l
l
28
l
l
(1)(0) (2)
Corona 1
2.
Girar la corona “1” para poner el
horario y el minutero a la hora actual.
3.
Presionar la corona “1” a su posición
normal de acuerdo con la señal
horaria.
7
Notas:
Al fijar el horario, mirar si AM/PM está marcado correctamente. El reloj está
1.
diseñado de manera que cambia cada 24 horas.
Girar la corona hasta que la aguja de hora pase del punto de las 12 para determinar
si el reloj está fijado en el período de A.M. o P.M. Si cambia la fecha, la hora está
fijada en A.M., y si no, en el de P.M.
Al fijar el minutero, avanzarlo de 4 a 5 minutos respecto del tiempo deseado y luego
2.
retrocederlo hasta la hora exacta.
93
Page 98
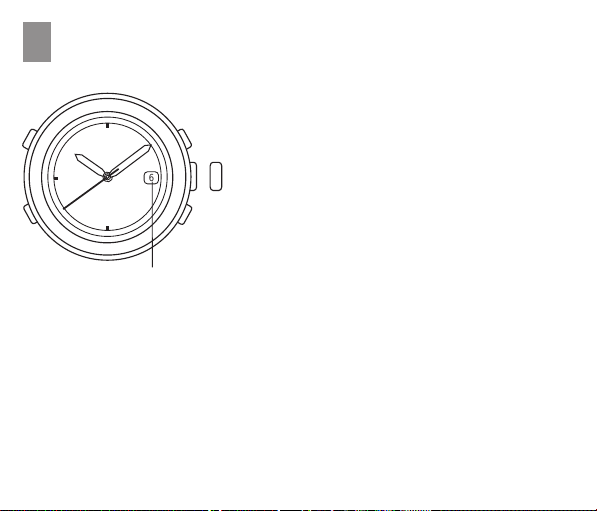
FIJACION DE FECHA
D
Tirar de la corona “1” hasta el primer clic.
1.
Girar la corona “1” en dirección de las
2.
agujas hasta que aparezca la fecha
previa.
Tirar de la corona “1” hasta el segundo
(1)(0)
6
Corona 1
Fecha
Nota:
No fijar la fecha entre las 9:00 p.m. y las 3:00 a.m. De hacerlo en este intervalo no se
logradá el debido cambio. Si es necesario fijar la fecha en este tiempo, cambiar
primero la hora fuera del período, fijar la fecha, y luego la hora correcta.
3.
clic, y avanzar el horario y el minutero
hasta que aparezca la fecha deseada y
reponer la hora de acuerdo con la fijación
de hora.
4.
Presionar la corona “1” a su posición
normal.
94
Page 99
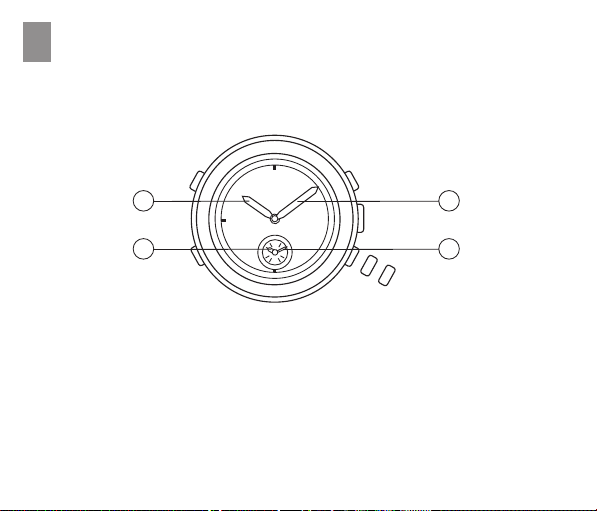
ALARMAE
La hora de alarma se fija en la indicación de 12 horas y es indicada por las manecillas
de horario y minutero de alarma que se mueven independientemente de las
manecillas de hora principal.
1 2
•
l
l
l
l
•
l
l
•
l
l
l
l
l
l
•
12
l
l
•
l
l
l
l
l
l
•
l
l
39
•
4 5
Fijación de alarma
Para fijar la alarma, primero hay que hacer coincidir las manecillas de alarma con la
hora actual (la indicada por las manecillas principales), y luego ponerlas a la hora de
alarma.
Tirar de la corona “2” completamente hasta el segundo clic. Sonará un pitido de aviso
1.
por un segundo.
Girar la corona “2” en sentido de las agujas o en contra para fijar las manecillas de
2.
alarma en la hora que marcan las de la hora principal.
* Para ajustar el minutero, se deben sobrepasar 4 ó 5 minutos y luego retroceder
hasta el minuto correcto.
l
l
l
l
l
l
•
l
l
•
l
l
l
l
6
l
l
•
l
l
•
l
l
l
(0)
(1)
Corona 2
(2)
95
Page 100
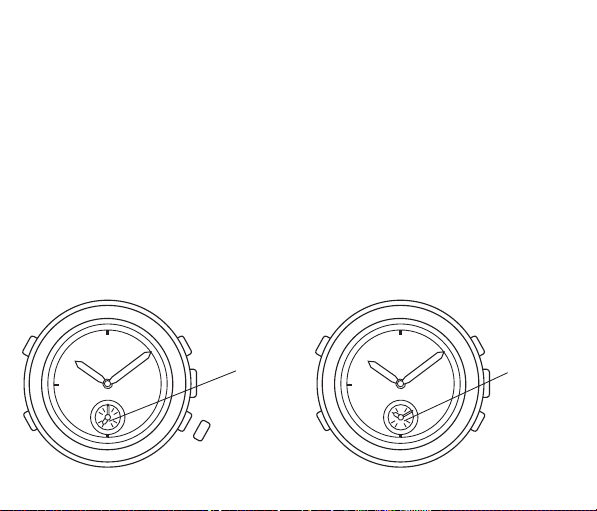
Presionar la corona “2” hasta su posición normal. Luego, sacarla de nuevo hasta el
3.
primer clic. Sonará el sonido de demostración de alarma, si se saca la corona “2”
hasta el primer clic antes de pasar un minuto de haberla empujado hasta su posición
normal. Presionar C repetidamente para fijar la hora de alarma deseada.
* Con cada presión de C las manecillas de alarma se mueven un minuto.
Se moverán rápidamente si C se mantiene presionado.
Presionar de nuevo completamente la corona “2” a su posición normal.
4.
La manecillas de alarma se mueven para indicar la hora actual.
Activación/desactivación de la alarma
Para activar la alarma, levantar la corona “2” hasta el primer clic. Las manecillas de
•
alarma indicarán el tiempo fijado de alarma.
La alarma sonará en el tiempo prefijado durante 20 segundos. Para pararla
*
manualmente, presíonar A, B o C, o presionar a su posición normal la corona “2”.
Cuando la corona “2” está en su posición normal, la alarma está desactivada y las
•
manecillas de la misma indican la hora actual.
[Alarma
activada]
[Alarma
desactivada]
Tiempo fijado
de alarma
Hora actual
96
•
l
l
l
l
•
l
l
•
l
l
l
l
l
l
•
12
l
l
•
l
l
l
l
l
l
•
l
l
39
•
l
l
l
l
l
l
•
l
l
•
l
l
l
l
6
l
l
•
l
l
•
l
l
l
(0)
Corona 2
(1)
•
l
l
l
l
•
l
l
•
l
l
l
l
l
l
•
12
l
l
•
l
l
l
l
l
l
•
l
l
39
•
l
l
l
l
l
l
•
l
l
•
l
l
l
l
6
l
l
•
l
l
•
l
l
l
Corona 2
(0)
 Loading...