

Page 1

Instruction book pag. 1 • Mode d’emploi pag. 13
Gebrauchsanleitung
pag. 25 •
Manuale di funzionamento pag. 37
Manual de instrucciones pag. 49
CHRONO 1/100
OT10
Page 2

Thank you very much for purchasing a BREIL WATCH. To ensure its correct use,
please read these instructions carefully.
In order to be able to make full use of the guarantee service (subject to the
guarantee terms), please ensure that the Breil international guarantee card is
supplied with the watch at the time of purchase.
Nous vous remercions de la préférence que vous nous avez accordée en achetant
une montre BREIL. En vue d'une utilisation correcte de celle-ci, lire attentivement
les instructions contenues dans ce livret.
Lors de l'achat, contrôlez que la montre soit accompagnée de la garantie qui devra
être présentée pour obtenir les prestations qui y sont décrites.
Wir danken Ihnen für das Vertrauen, daß Sie uns mit dem Kauf einer BREIL
QUARTZ-Uhr erwiesen haben. Damit Sie Ihre Uhr immer einwandfrei gebrauchen
können, möchten wir Sie bitten, die in dieser Gebrauchsanleitung enthaltenen
Anweisungen gewissenhaft zu lesen.
Beim Kauf sollten Sie kontrollieren, ob Ihnen zusammen mit der Uhr auch die
Garantiekarte ausgehändigt wurde, denn diese Karte müssen Sie vorlegen, um die
darin genannten Leistungen in Anspruch nehmen zu können.
Vi ringraziamo per la preferenza accordataci con l’acquisto di un orologio BREIL.
Per un corretto uso dello stesso, Vi preghiamo leggere attentamente le istruzioni
contenute in questo libretto.
Al momento dell’acquisto controllate che insieme all’orologio Vi venga fornita
anche la garanzia, da presentare per ottenere le prestazioni in essa descritte.
Le agradecemos su preferencia por un reloj BREIL. Para poder utilizar
correctamente el reloj, le rogamos leer atentamente las instrucciones contenidas
en este folleto.
Al comprarlo, controle que junto al reloj le sea entregada la garantía que debe ser
presentada para obtener los servicios que en la misma se describen.
Page 3

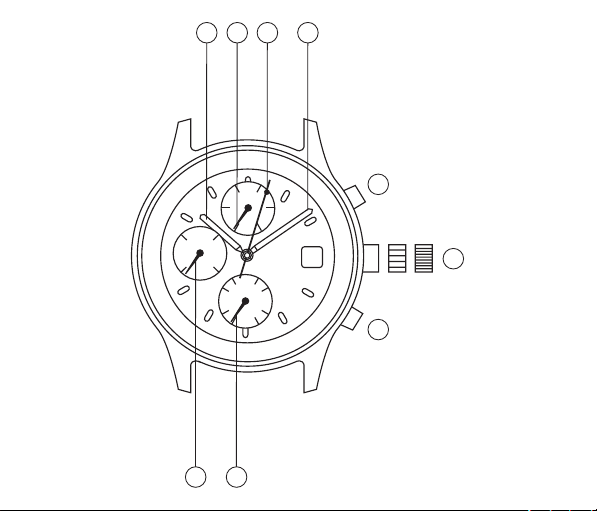
When reading this instruction booklet, keep the watch diagram on the
left unfolded and in full view. The symbols (A, B, etc.) on the diagram
are those referred to in the section describing the operating instructions.
Pendant la lecture de ce mode d'emploi, gardez le schéma d'illustration
de la montre ci-contre ouvert et bien en vue. Les symboles (A, B, etc.)
utilisés dans les différents chapitres du mode d'emploi correspondent à
ceux indiqués sur ce schéma.
Zur Lektüre dieser Gebrauchsanleitung sollten Sie die nebenstehend
gezeigte Übersichtsdarstellung der Uhr ausklappen und im Blick
behalten. Die in den einzelnen Abschnitten der Gebrauchsanleitung
verwendeten Zeichen (A, B, usw.) entsprechen den Kennzeichnungen
in dieser Übersicht.
Durante la lettura di questo manuale di istruzioni, tenere lo schema
illustrativo dell’orologio a sinistra aperto e in vista. I simboli (A, B, ecc.)
usati nelle sezioni delle istruzioni sul funzionamento corrispondono a
quelli indicati in questo schema.
Mientras lee este manual de instrucciones, mantenga el esquema
ilustrativo del reloj aquí presentado al lado izquierdo, abier to y bien
visible. Los símbolos (A, B, etc.) utilizados en las secciones de
instrucciones sobre el funcionamiento, corresponden a los que se
utilizan en este esquema.
Page 4
1
l
l
l
l
l
l
l
50
l
l
l
40
l
l
24
l
l
618
l
l
12
l
l
l
l
0
l
l
l
30
l
l
l
l
l
2
65
l
l
l
l
l
l
0
l
l
10
l
20
30
7
l
1545
l
l
l
l
l
l
l
l
A
l
l
l
l
l
l
l
l
l
l
l
(0)
(1)
(2)
C
B
34
Page 5
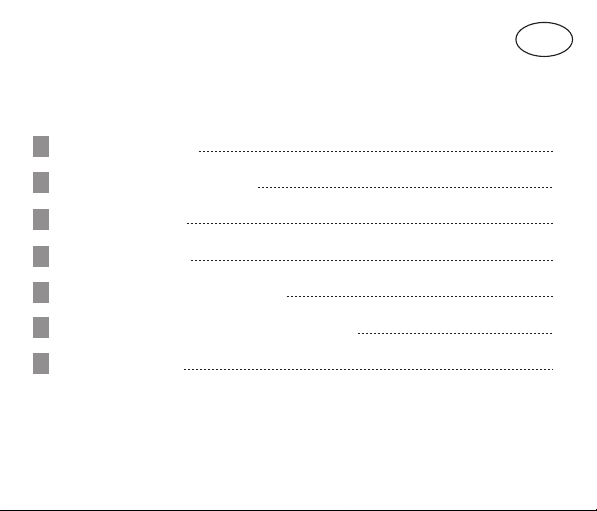
A
MAIN COMPONENTS
B
CHRONOGRAPH OPERATION
C
SETTING THE TIME
GB
CONTENTS
3
4
6
SETTING THE DATE
D
ADJUSTING THE CHRONOGRAPH
E
F
PRECAUTIONS AND USEFUL INFORMATION
G
TECHNICAL DATA
6
7
8
12
Page 6

2
Page 7
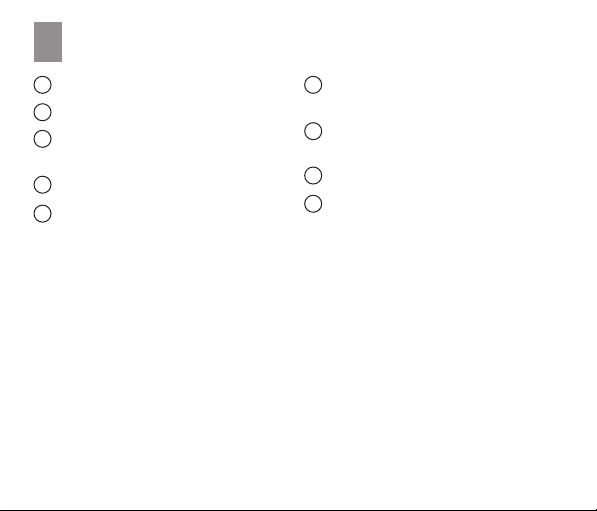
MAIN COMPONENTS
A
1
Hour hand
2
Minute hand
3
Continuous second hand
and CHR second hand
4
24 hour hand
5
CHR second hand (up to 61 seconds)
or CHR minute hand
6
CHR one hundredth of a second hand
(up to 61 seconds) or CHR second hand
CHR start/stop button,
A
CHR 1/100th of a second display
B
CHR reset button
C
Crown
Legend: CHR = chronograph
3
Page 8
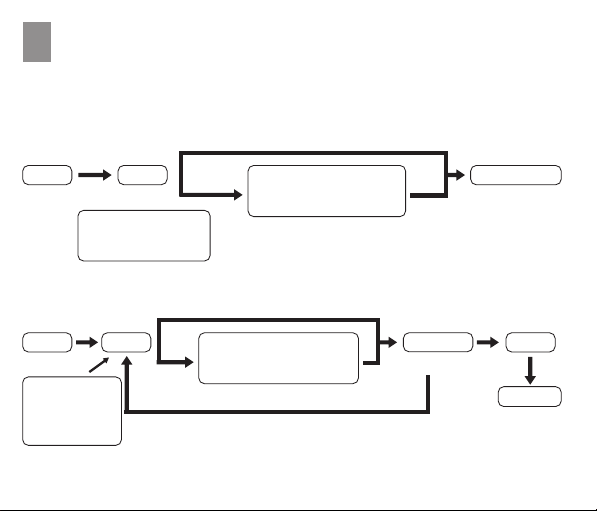
CHRONOGRAPH OPERATION
B
The chronograph can measure up to 60 minutes in 1/100th of a second intervals.
Standard measurement
Measurements less than 61 seconds
Start
훽
Accumulated elapsed time measurement
Start
훽
Reading of
minutes and
seconds on the
chronograph
* Pressing button 훽 repeats the accumulation.
Stop
훽
Reading of minutes
and seconds on
the chronograph
Measurements less than 61 seconds
Stop
훽훽
Measurements of more than 61 seconds
훽 Reading of
hundredths of a second
on the chronograph
Measurements of more than 61 seconds
훽 Reading of
hundredths of a second
on the chronograph
4
Reset
훾
Restart Stop
훽
Reset
훾
Page 9

The chronograph hundredths of a second hand ➅
•
The hundredths of a second hand moves for 61 seconds after the measurement has
been started. After this time period, it stops at 0. The display will then change to show
one rotation every minute.
To start the chronograph
•
Press button 훽
•
The small second hand ➂ will move to zero at the same time as the chronograph is
started and will star t to count the seconds. Similarly, hand ➄ will, after one minute and
one second from the start of the chronograph, change to function as the minute hand
of the chronograph.
To stop the chronograph
•
Press button 훽
•
When the measured time is less than 61 seconds, the minute hand, second hand and
1/100th of a second hand of the chronograph will stop at the measured time.
•
When the measured time is more than 61 seconds, the minute and second hands of
the chronograph will stop at the measured time. The 1/100th of a second hand of the
chronograph will stop at zero. The minutes and seconds can be read from the
chronograph display.
Subsequently, press button 훽 again to advance the 1/100th of a second hand of the
chronograph to the measured time. It is then possible to read the time in hundredths of
a second.
To reset the chronograph
•
Press button 훾
•
The second hand of the chronograph ➂ will change its function to indicate the
continuous seconds of the current time. The other hands, ➄ and ➅ will return to zero.
5
Page 10

SETTING THE TIME
C
Unscrew the crown 훿 and pull it out to position (2), the continuous second hand
1.
➂ will stop at "0".
Tu rn the crown to adjust the minute hand ➀, hour hand ➁ and 24 hour hand ➃ to
2.
the correct time.
NOTE: The 24 hour hand ➃ is integral with the hour/minute hands ➀/➁
Return the crown 훿 to its original position (0) (a confirmation beep will be heard).
3.
The small second hand will start to move.
If the watch is not used for a long period of time, in order to save power, it is
advisable to stop the watch by placing the crown 훿 in position ➁.
SETTING THE DATE
D
Pull out the crown 훿 to position (1)
1.
Rotate the crown anticlockwise until the required date appears.
Do not set the date between 9.00 p.m. and 1.00 a.m. as the automatic date
2.
change mechanism may not work correctly.
Push the crown 훿 back to position (0)
3.
6
Page 11

ADJUSTING THE CHRONOGRAPH
E
After replacing the battery or if the hands of the chronograph do not return to the "0"
position when the chronograph is reset:
1.
Pull the crown out to position (2)
2.
Press button 훽 or 훾 to move the chronograph hands to the "0" position.
Button 훽: moves the hundredths of a second hand ➅ to “0”.
3.
Button 훾: moves the second hand of the chronograph ➂ to "0"
The chronograph hands can be advanced rapidly by keeping buttons 훽 and 훾
pressed.
4.
When the chronograph hands have been set to "0", reset the time or date as
required (paragraphs C and D) and then move the crown 훿 back to position "0"
7
Page 12
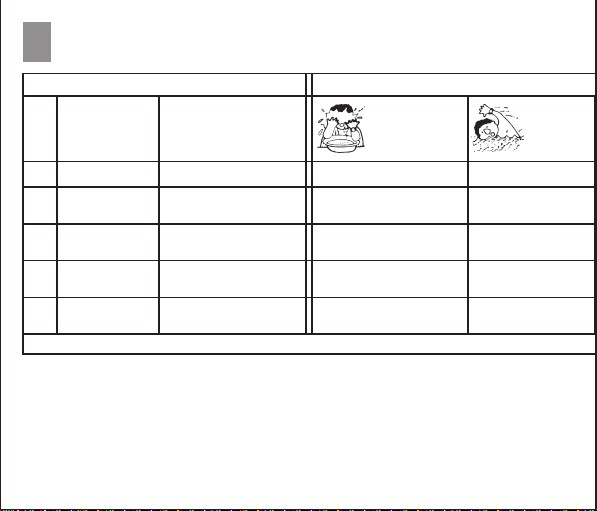
PRECAUTIONS AND USEFUL INFORMATION
F
Indication
Spray, sweat,
Dial Case
Degree of water
resistance
A
B
C
D
E
In order to prevent water coming into contact with the internal mechanism, never pull
–
the crown out when the watch is wet.
If any watches designed for sportswear or use in water come into contact with salt
–
water or heavy sweating, they should be rinsed in fresh water and dried thoroughly.
–
Contact with water may cause a deterioration in the quality of some leather straps.
—
—
WATER RESISTANT
50M (5bar)
WATER RESISTANT
100M (10bar)
WATER RESISTANT
200M (20bar) or more
The words “WATER RESISTANT” may sometimes be abbreviated to “WATER RESIST”.
—
WATER RESISTANT
WATER RESISTANT
WATER RESISTANT
WATER RESISTANT
light rain,
washing, etc.
NO
YES
YES
YES
YES
8
Use in
Swimming,
etc.
NO
NO
YES
YES
YES
Page 13
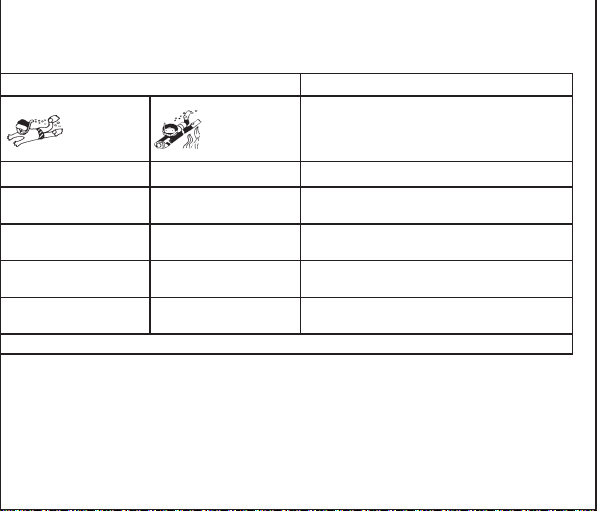
Water
Skin-diving
NO
NO
NO
YES
YES
*Always keep the crown in its normal position. *Fully tighten crown screw lock.
As the internal parts of the watch can retain moisture, when the outside
–
temperature is lower than the inside, the watch glass may mist-up. This
phenomenon is purely temporary and should not create any problems. However, if
it persists for any length of time, the watch should be checked by the shop where
it was purchased or by the nearest Authorised Service Centre.
Scuba diving
NO
NO
NO
NO
YES
Not water resistant. Must be kept away from water and moisture
Average water resistance. Can withstand spray, sweat,
light rain, washing, etc. during daily use
Can be worn while swimming but not diving
Suitable for skin-diving
Suitable for scuba diving
Water-resistance
characteristics
9
Page 14

Temperature
Do not leave the watch exposed to direct sunlight or temperature extremes for long
periods of time.
Long exposure, in fact, may adversely affect the operation of the watch and actually
shorten battery life, causing it to gain or lose time and affect its other functions.
Impact
This watch can withstand normal everyday impacts and shocks and those normally
imparted by non-contact sports such as golf and baseball. Serious damage, however,
may result if the watch is dropped or subjected to severe shock.
Magnetic fields
This watch is antimagnetic up to 60 gauss, and is therefore not affected by magnetic
fields produced by normal domestic appliances. If used near strong magnetic fields, its
operation may be temporarily affected.
Static electricity
The integrated circuits present inside the watch are sensitive to static electricity. If the
watch is exposed to intense electrical fields, the time display may temporarily lose some
of its accuracy.
Chemicals and gases
Avoid wearing the watch in the presence of strong gases or chemical substances.
Par ts of the watch may discolour, dissolve or even break if brought into contact with
benzol or petroleum based products such as solvents, thinners, detergents,
adhesives etc.
10
Page 15

Pay special attention to avoiding contact with chemicals.
The watch case and strap may discolour if they come into contact with mercury from a
broken thermometer or other equipment.
Keeping the watch clean
Use an absorbent soft cloth to clean off any dirt or damp from the watch glass. Wearing
the watch when the strap or back of the case is dirty can cause skin irritation. Keeping
the watch clean also keeps shirt cuffs clean.
Cleaning the watch strap.
•
Metal bands:
•
Plastic or rubber straps:
•
Leather straps:
opposite side with a cloth and alcohol.
Periodic inspection
In order to guarantee long trouble-free operation, it is advisable to have the watch
checked by an authorised assistance centre once every 12 months or two years.
Keep batteries out of the reach of children
If a battery is accidentally swallowed, consult a doctor immediately.
Use a toothbrush and soapy warm water to wash the dirt off.
Wash with water. Do not use solvents.
Gently rub the face of the strap using a soft dry cloth. Clean the
11
Page 16

TECHNICAL DATAG
1.
Type: Analog quartz watch
2.
Calibre: Miyota OT10
3.
Accuracy: ±20 seconds per month at normal temperatures (5°C - 35°C)
Quartz oscillation frequency: 32,768 Hz
4.
Effective operating temperature range: -10°C to +60°C
5.
Additional characteristics:
6.
Date
•
Chronograph: can measure up to 60 minutes in 1/100th of a second intervals
•
Battery life: Approximately 2 years (using the chronograph for 1 hour per day)
7.
Battery: Type SR927
8.
In order to improve the product, the technical specifications may be modified without
prior notice.
12
Page 17
INDEX
A
COMPOSANTS PRINCIPAUX
B
FONCTIONNEMENT DU CHRONOGRAPHE
C
COMMENT REGLER L'HEURE
F
15
16
18
COMMENT REGLER LA DATE
D
REGLAGE DU CHRONOGRAPHE
E
F
PRECAUTIONS POUR L'UTILISATION ET INFORMATIONS UTILES
G
INFORMATIONS TECHNIQUES
18
19
20
24
13
Page 18

14
Page 19
COMPOSANTS PRINCIPAUX
A
1
Aiguille des heures
2
Aiguille des minutes
3
Aiguille des secondes continues
ou des secondes du CHR
4
Aiguille 24 heures
5
Aiguille secondes du CHR (jusqu'à
61 secondes) ou minutes du CHR
6
Aiguille centièmes de seconde du CHR
(jusqu'à 61 sec.) ou secondes du CHR
Touche mise en marche / arrêt CHR,
A
affichage des centièmes de seconde CHR
B
Touche de mise à zéro CHR
C
Couronne
Légende: CHR = chronographe
15
Page 20
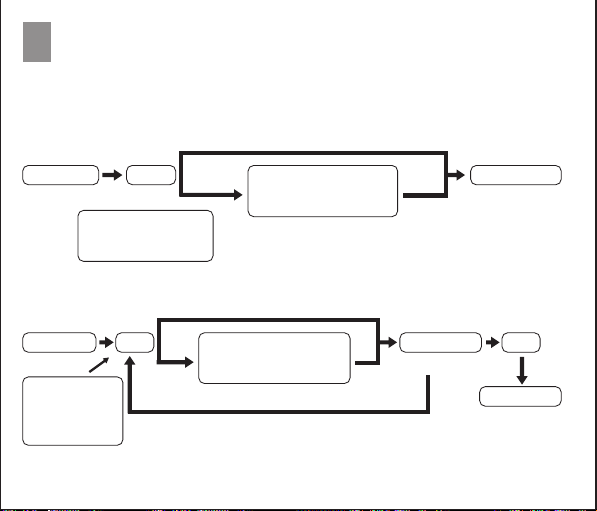
FONCTIONNEMENT DU CHRONOGRAPHE
B
Le chronographe peut mesurer jusqu'à 60 minutes avec des augmentations de 1/100
de seconde.
Mesure standard
Mesures inférieures à 61 sec.
Mise en marche
훽
Mesures accumulées du temps écoulé
Mise en marche
훽
Lecture des
minutes et des
secondes du
chronographe
*Appuyer sur le bouton 훽 pour accumuler plusieurs mesures.
Arrêt
훽
Lecture des minutes
et des secondes du
chronographe
Mesures inférieures à 61 sec.
Arrêt
훽훽
Mesures supérieures à 61 sec.
훽 Lecture des
centièmes de seconde
du chronographe
Mesures supérieures à 61 sec.
훽 Lecture des
centièmes de seconde
du chronographe
16
Mise à zéro
Remise en marche
Mise à zéro
훾
Arrêt
훽
훾
Page 21

L'aiguille des centièmes de seconde du chronographe ➅
L'aiguille des centièmes de seconde avance pendant les 61 secondes qui suivent le
•
début de la mesure, après quoi elle s'arrête en position 0. Passé ce laps de temps, elle
effectuera une rotation par minute.
Pour faire partir le chronographe
Appuyer sur la touche 훽
•
La petite aiguille des secondes ➂ avancera pour se mettre en position zéro au moment
•
de la mise en marche du chronographe. Elle commence à compter les secondes, tout
comme l'aiguille ➄ qui, après un laps de temps d'une minute et une seconde,
fonctionnera comme aiguille des minutes du chronographe.
Pour arrêter le chronographe
Appuyer sur le bouton 훽
•
Lorsque le temps mesuré est inférieur à 61 secondes, les aiguilles des minutes, des
•
secondes et des centièmes de seconde s'arrêtent sur le temps mesuré.
Lorsque le temps mesuré est supérieur à 61 secondes, les aiguilles des minutes et des
•
secondes du chronographe s'arrêtent sur le temps mesuré. L'aiguille des centièmes de
seconde du chronographe reste arrêtée en position zéro. Lire les secondes et les minutes
indiquées par le chronographe.
Ensuite, appuyer de nouveau sur le bouton 훽 pour faire avancer l'aiguille des centièmes
de seconde du chronographe sur le temps mesuré. Lire le temps en centièmes de
seconde indiqué par le chronographe.
Pour mettre le chronographe à zéro
Appuyer sur le bouton 훾.
•
L'aiguille des secondes du chronographe ➂ change de fonction pour indiquer les
•
secondes continues de l'heure courante. Les aiguilles ➄ et ➅ restent en position 0.
17
Page 22

COMMENT REGLER L'HEURE
C
Dévisser la couronne 훿 et l'extraire en position (2). L'aiguille des secondes ➂ s'arrête
1.
en position (0).
Tourner la couronne pour régler l'aiguille des minutes ➀, celles de l'heure ➁ et des 24
2.
heures ➃ sur les valeurs correctes.
N.B. : L'aiguille 24 heures ➃ est solidaire de l'aiguille des heures/minutes ➀/➁
Remettre la couronne 훿 en position (0) (au niveau d'un petit repère correspondant);
3.
l'aiguille des petites secondes ➂ commencera à tourner.
Si vous n'utilisez pas votre montre pendant de longues périodes, nous vous conseillons
de l'arrêter afin d'économiser la pile. Pour arrêter la montre, mettre la couronne 훿 en
position ➁.
COMMENT REGLER LA DATE
D
Extraire la couronne 훿 et la mettre en position (1).
1.
Tourner la couronne dans le sens contraire des aiguilles jusqu'à ce que la date voulue
apparaisse.
Ne pas régler la date entre 21h00 et 01h00 car le changement de date pourrait ne pas
2.
s'effectuer correctement.
Remettre la couronne 훿 en position (0).
3.
18
Page 23

REGLAGE DU CHRONOGRAPHE
E
Après avoir remplacé la pile ou si les aiguilles du chronographe ne reviennent pas en
position "0" lors d'une remise à zéro du chronographe,
1.
Extraire la couronne et la mettre en position (2).
2.
Appuyer sur le bouton 훽 ou 훾 pour mettre les aiguilles du chronographe en position
"0".
Bouton 훽 : il met l'aiguille des centièmes de seconde ➅ en position "0".
3.
Bouton 훾 : il met l'aiguille des secondes du chronographe ➂ en position "0".
Pour faire avancer rapidement les aiguilles du chronographe, appuyer sans relâcher
sur le bouton 훽 ou sur le bouton 훾.
4.
Une fois que les aiguilles du chronographe sont en position "0", régler si nécessaire
l'heure et la date (paragraphes C et D), puis remettre la couronne 훿 en position "0".
19
Page 24
u
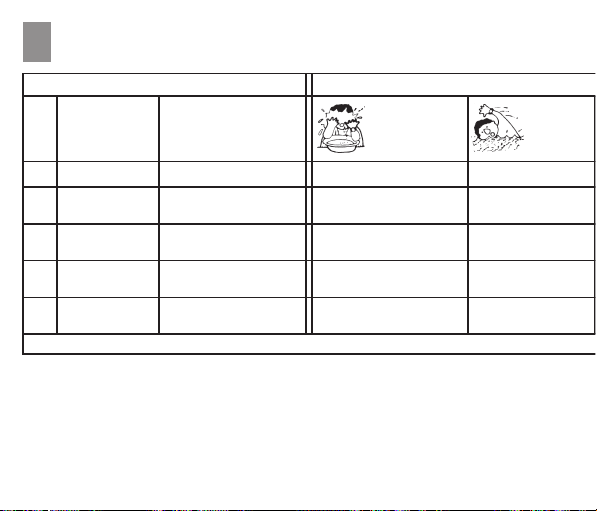
PRECAUTIONS D'UTILISATION ET INFORMATIONS UTILES
F
Indication
Eclaboussure,
Cadran Boîtier
Niveau
d’étanchéité
A
B
C
D
E
L’indication “WATER RESISTANT” (étanche) peut parfois être abrégée en “WATER RESIST”. * To
–
Pour éviter que l'eau entre dans le mécanisme interne de la montre, la couronne ne
doit jamais être extraite quand la montre est mouillée.
–
Si les montres conçues pour le sport ou pour fonctionner sous l'eau sont exposées à
l'eau salée ou à une sueur abondante, elles doivent être rincées à l'eau douce puis
complètement essuyées.
Dans certains cas, l'eau peut provoquer un endommagement de la qualité de
–
certains bracelets en cuir.
—
—
WATER RESISTANT
50M (5bar)
WATER RESISTANT
100M (10bar)
WATER RESISTANT
200M (20bar) ou plus
—
WATER RESISTANT
WATER RESISTANT
WATER RESISTANT
WATER RESISTANT
sueur, pluie légère,
ablutions, etc.
NON
OUI
OUI
OUI
OUI
Utilisation
Natation,
etc.
NON
NON
OUI
OUI
OUI
20
Page 25
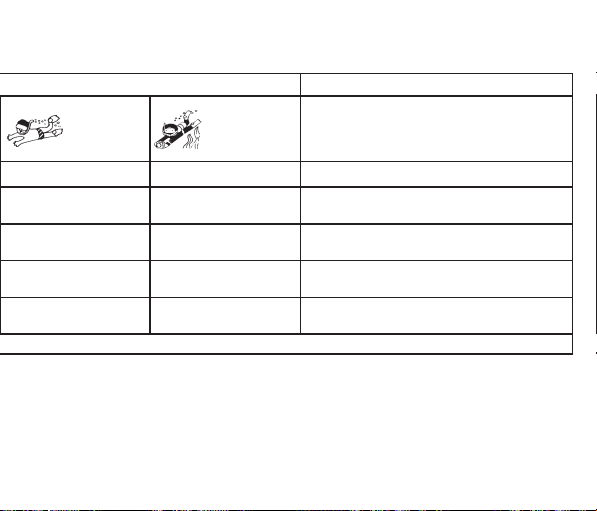
sous l’eau
Immersion
NON
NON
NON
OUI
OUI
jours placer la couronne dans sa position normale. * Serrer complètement la vis de la couronne.
–
Les parties internes de la montre peuvent retenir l'humidité quand la température externe
est plus basse de celle interne et le verre du cadran peut parfois s'embuer. Si le
phénomène est momentané, cela ne crée aucun problème, mais s’il persiste dans le
temps, il faut informer le revendeur de la montre ou le Centre d'Assistance autorisé le
plus proche.
Immersion en
profondeur
NON
NON
NON
NON
OUI
Non étanche. Doit être protégée de l’eau et de l’humidité.
Etanchéité normale. Résiste aux éclaboussures, à la sueur, à la pluie
légère, aux ablutions, etc. pendant l’utilisation quotidienne.
Utilisation possible pendant la natation mais
déconseillée pour la plongée.
Adaptée à la plongée peu profonde.
Adaptée à la plongée en profondeur.
Caractéristiques
d’étanchéité
21
Page 26

Température
Ne pas laisser la montre exposée aux rayons directs du soleil ou dans des endroits
extrêmement chauds ou extrêmement froids pendant une longue période. Cela pourrait
en effet provoquer un mauvais fonctionnement de la montre ou réduire la durée de la
pile, ou encore un ralentissement ou une accélération de la montre et des
conséquences sur les autres fonctions.
Chocs
Cette montre peut supporter les chocs et les secousses qui ont lieu normalement
pendant l'utilisation quotidienne et lors de la pratique de sports ne comportant pas de
contacts directs, comme le golf ou le base-ball. Si la montre tombe par terre ou est
soumise à des chocs très forts, elle peut être endommagée ou mal fonctionner.
Champs magnétiques
Cette montre est anti-magnétique jusqu'à 60 gauss et n'est donc pas influencée par les
champs magnétiques produits par les appareils électroménagers normaux. Si elle est
utilisée près de champs magnétiques très forts, ses fonctions peuvent momentanément
être altérées.
Electricité statique
Les circuits intégrés utilisés dans la montre sont sensibles à l'électricité statique. Si la
montre est exposée à une électricité intense, l'indication de l'heure peut perdre en
précision.
Substances chimiques et gaz
Ne pas porter la montre en présence de substances chimiques fortes ou de gaz.
Si la montre entre en contact avec des solvants, comme le benzène, ou avec des
produits contenant des substances telles que essence, cires, détergents, adhésifs, ses
22
Page 27

pièces peuvent se décolorer, se dissoudre ou se rompre. Faire particulièrement
attention à éviter les substances chimiques. Le boîtier de la montre et le bracelet
peuvent se décolorer s'ils entrent en contact avec le mercure d'un thermomètre cassé
ou de toute autre provenance.
Maintenir la montre propre
Frotter avec un chiffon doux et absorbant la terre et l'humidité sur le verre de la montre.
Si la montre est portée quand l'arrière du boîtier et le bracelet son sales, cela peut
provoquer une irritation cutanée car ils sont en contact direct avec la peau. Maintenir la
montre propre également pour ne pas salir les poignets de chemise.
Comment nettoyer le bracelet.
•
Bracelet en métal : laver les endroits sales avec une brosse à dents mouillée avec
de l'eau tiède savonneuse.
•
Bracelet en plastique ou en caoutchouc : laver à l'eau. Ne pas utiliser de solvants.
•
Bracelet en cuir : frotter délicatement sur le côté extérieur avec un chiffon doux et
sec. Pour le nettoyage du côté opposé, utiliser un chiffon humidifié avec de l'alcool.
Inspection périodique
Nous recommandons de faire contrôler la montre par un centre d'assistance
autorisé une fois par an ou tous les deux ans pour assurer une utilisation
prolongée et sans problèmes.
Tenir les piles hors de la portée des enfants
Dans le cas où une pile serait accidentellement avalée, consulter immédiatement
un médecin.
23
Page 28

INFORMATIONS TECHNIQUESG
1.
Type: montre à quartz analogique
2.
N° Calibre: Miyota OT 10
3.
Précision: ± 20 secondes par mois à température normale (5°C - 35°C)
Fréquence oscillations quartz: 32.768 Hz
4.
Plage efficace de la température: -10°C - 60°C
5.
Caractéristiques supplémentaires:
6.
Calendrier
•
Chronographe: il peut mesurer jusqu'à 60 minutes avec des augmentations en
•
centièmes de seconde.
7.
Durée pile: Environ 2 ans (en utilisant le chronographe 1 heure par jour)
8.
Numéro pile: Type SR 927
En raison de l'amélioration du produit, les notices techniques peuvent subir des
modifications sans préavis.
24
Page 29
INHALTSVERZEICHNIS
A
HAUPTBESTANDTEILE DER UHR
B
FUNKTIONSWEISE DES CHRONOGRAPHEN
C
EINSTELLUNG DER UHRZEIT
D
27
28
30
EINSTELLUNG DES DATUMS
D
EINSTELLUNG DER STOPPUHR
E
F
HINWEISE ZUM TRAGEN DER UHR
G
TECHNISCHE DATEN
30
31
32
36
25
Page 30

26
Page 31
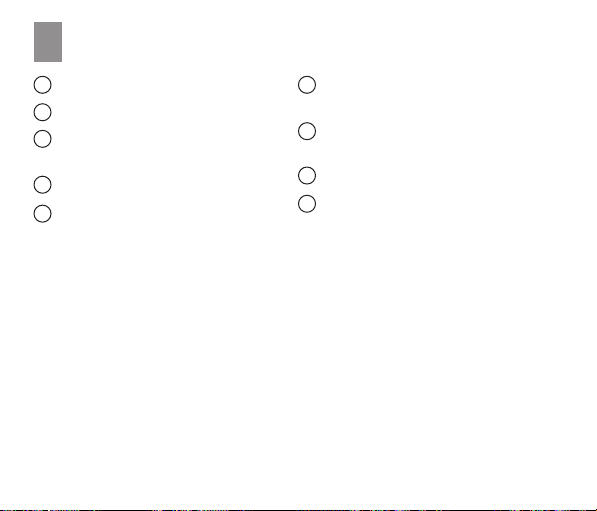
HAUPTBESTANDTEILE DER UHR
A
1
Stundenzeiger
2
Minutenzeiger
3
Durchlaufender Sekundenzeiger
oder Sekundenzeiger des CHR
4
24-Std.-Zeiger
5
Sekundenzeiger (bis 61 Sek.)
bzw. Minutenzeiger des CHR
6
1/100-Sek.-Stoppuhrzeiger (bis 61 Sek.)
bzw. Sekundenzeiger des CHR
Start/Stop-Knopf d. CHR,
A
1/100-Sek.-Anzeige d. CHR
B
Nullstell-Knopf CHR
C
Stellkrone
Zeichenerklärung: CHR= Chronograph
27
Page 32
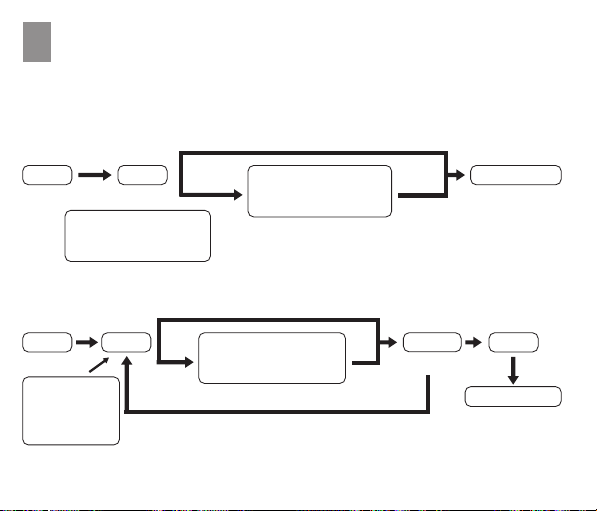
FUNKTIONSWEISE DER STOPPUHR
B
Die Stoppuhr kann bis zu 60 Minuten in
1/100-Sekunden-Intervallen messen.
Standard-Zeitmessung
Zeitmessungen unter 61 Sekunden
Start
훽
Additionsmessung der abgelaufenen Zeit
Start
훽
Ablesung der
Minuten und
Sekunden der
Stoppuhr
* Durch Drücken von 훽 kann man mehrfach addieren.
Stop
훽
Ablesung der Minuten
und Sekunden der
Stoppuhr
Zeitmessungen unter 61 Sekunden
Stop
훽훽
Zeitmessungen über 61 Sekunden
훽 Ablesung der
1/100-Sekunden der
Stoppuhr
Zeitmessungen über 61 Sekunden
훽 Ablesung der
1/100-Sekunden
der Stoppuhr
28
Wiederstart
Nullstellen
훾
Stop
훽
Nullstellen
훾
Page 33

Der 1/100-Sek.-Zeiger der Stoppuhr ➅
Der Hundertstel-Sekunden-Zeiger der Stoppuhr läuft ab dem Star t der Zeitmessung 61
•
Sekunden lang. Danach stoppt er in Stellung 0. Nach dieser Zeitspanne wechselt er
seinen Anzeigemodus und macht 1 Umdrehung pro Minute.
Einschaltung der Stoppuhrfunktion
Drücken Sie Knopf 훽.
•
Der kleine Sekundenzeiger ➂ geht beim Start der Stoppuhr in Nullstellung und läuft
•
dann als Sekundenzeiger.
Eine Minute und eine Sekunde nach dem Start der Stoppuhr wechselt der
Sekundenzeiger seinen Anzeigemodus und wird zum Minutenzeiger ➄ der Stoppuhr.
Anhalten der Stoppuhr
Drücken Sie Knopf 훽.
•
Wenn die gemessene Zeit kürzer als 61 Sekunden ist, halten der Minuten-, Sekunden-
•
und 1/100-Sek.-Zeiger auf der gemessenen Zeit.
Wenn die gemessene Zeit mehr als 61 Sekunden beträgt, halten der Minuten- und
•
Sekundenzeiger der Stoppuhr auf der gemessenen Zeit. Der 1/100-Zeiger der Stoppuhr
bleibt unbewegt in Stellung 0. Lesen Sie nun die Sekunden und Minuten von der
Stoppuhr ab.
Drücken Sie danach erneut Knopf 훽, um den 1/100-Sek.-Zeiger auf die gestoppte Zeit
zu bewegen. Lesen Sie nun die 1/100-Sekunden von der Stoppuhr ab.
Nullstellen der Stoppuhr
Drücken Sie Knopf 훾.
•
Der Sekundenzeiger ➂ der Stoppuhr wechselt nun seine Funktion und zeigt die
•
Sekunden der aktuellen Uhrzeit an. Die Zeiger ➄ und ➅ der Stoppuhr kehren in Stellung
0 zurück.
29
Page 34

EINSTELLUNG DER UHRZEIT
C
Drehen Sie die Stellkrone 훿 los und ziehen Sie sie bis Raststellung (2) heraus. Der
1.
Sekundenzeiger ➂ bleibt in Stellung (0) stehen.
Stellen Sie den Minuten-➀, Stunden-➁ und 24-Stunden-Zeiger ➃ auf die korrekte
2.
Uhrzeit ein.
HINWEIS: Der 24-Stunden-Zeiger ➃ ist fest mit den Stunden-/Minutenzeigern ➀/➁
verbunden.
Bringen Sie die Krone 훿 in Stellung (0) zurück. Gleichzeitig mit einem kurzen
3.
Signalton beginnt der kleine Sekundenzeiger ➂ zu laufen.
Falls die Uhr längere Zeit nicht benutzt wird, empfiehlt es sich, sie zum
Energiesparen mit Stellkrone (C) auf Stellung ➁ anzuhalten.
EINSTELLUNG DES DATUMS
D
Ziehen Sie die Stellkrone 훿 bis Raststellung (1) heraus.
1.
Drehen Sie die Krone nach links, bis das gewünschte Datum erscheint.
Stellen Sie das Datum nicht zwischen 21:00 und 01:00 Uhr ein. In diesem Fall kann es
2.
sein, daß das Datum nicht korrekt wechselt.
Bringen Sie die Krone 훿 in Raststellung (0) zurück.
3.
30
Page 35

EINSTELLUNG DER STOPPUHR
E
Diese Einstellung ist erforderlich, wenn Sie die Batterie ausgewechselt haben oder
die Zeiger beim Nullstellen der Stoppuhr nicht auf "0" zurückkehren.
1.
Ziehen Sie die Krone bis Raststellung (2) heraus.
2.
Drücken Sie Knopf 훽 bzw. 훾, um die Zeiger der Stoppuhr auf (0) zu bringen.
Knopf 훽: Stellt den 1/100-Sekunden-Zeiger ➅ auf "0".
3.
Knopf 훾: Stellt den Sekundenzeiger der Stoppuhr ➂ auf "0".
Die Zeiger der Stoppuhr laufen schnell vor, wenn man Knopf 훽 bzw. 훾 gedrückt
hält.
4.
Wenn die Zeiger der Stoppuhr auf "0" stehen, stellen Sie die genaue Uhrzeit und
das Datum ein (Abschnitt C und D). Anschließend bringen Sie die Stellkrone
wieder in Ausgangsstellung "0" zurück.
31
Page 36
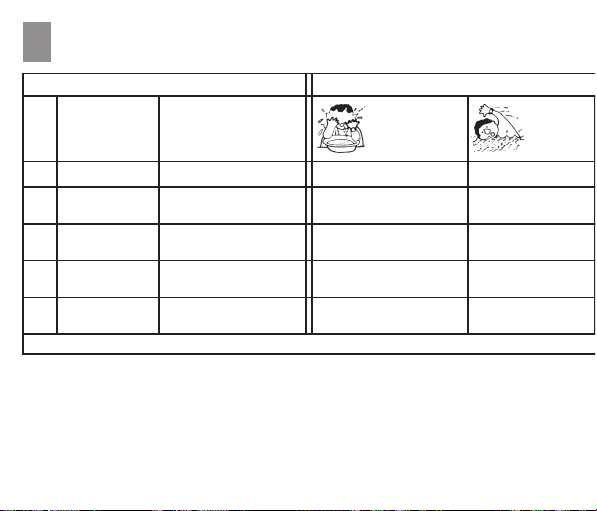
e
HINWEISE ZUM TRAGEN DER UHR
F
Angabe
Spritzwasser,
Ziffernblatt Gehäuse
Wasser-
dichtheit
A
B
C
D
E
Die Angabe “WATER RESISTANT” (wasserdicht) wird gelegentlich als “WATER RESIST” abgekürzt. * Bring
Damit kein Wasser in das Uhrwerk eindringen kann, darf man die Stellkrone nie bei
–
nasser Uhr herausziehen.
Uhren, die für Sportaktivitäten oder zum Tauchen geeignet sind, muß man bei Kontakt
–
mit Salzwasser oder viel Körperschweiß nach dem Gebrauch mit Süßwasser
abwaschen und anschließend vollständig abtrocknen.
Wasser kann in einigen Fällen eine Qualitätsminderung der Lederbänder bewirken.
–
—
—
WATER RESISTANT
50M (5bar)
WATER RESISTANT
100M (10bar)
WATER RESISTANT
200M (20bar) o più
—
WATER RESISTANT
WATER RESISTANT
WATER RESISTANT
WATER RESISTANT
Schweifl,
leichter Regen,
Waschen, usw.
NEIN
JA
JA
JA
JA
Einsatz
Schwimmen
usw.
NEIN
NEIN
JA
JA
JA
32
Page 37
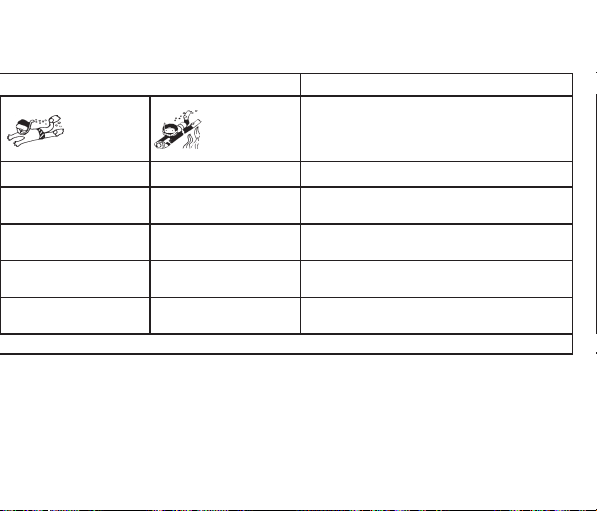
in Wasser
Tauchen
NEIN
NEIN
NEIN
JA
JA
n Sie die Stellkrone immer in ihre Normalstellung. * Ziehen Sie dei Schraube der Stellkrone vollständig fest.
–
Die inneren Bauteile der Uhr können Feuchtigkeit enthalten. Wenn die Außentemperatur
niedriger als die Innentemperatur ist, kann das Glas über dem Ziffernblatt beschlagen.
Wenn diese Erscheinung nur kurz anhält, ist sie nicht von Bedeutung. Sollte Sie dagegen
länger andauern, so sollten Sie das Problem Ihrem Fachhändler, bei dem sie die Uhr
gekauft haben, oder dem nächsten Kundendienst mitteilen.
Tieftauchen
NEIN
NEIN
NEIN
NEIN
JA
Dichtheit
Nicht wasserdicht. Vor Wasser und Feuchte schützen.
Normal wasserdicht. Widersteht Spritzwasser, Schweiß,
leichtem Regen, Waschen usw. im täglichen Gebrauch.
Kann zum Schwimmen eingesetzt werden, zum Tauchen
nicht empfohlen.
Zum Tauchen ohne Flaschen geeignet.
Zum Tieftauchen geeignet.
33
Page 38

Temperatur
Setzen Sie die Uhr nie längerer Zeit direkter Sonneneinstrahlung aus und legen Sie sie
nicht an besonders heißen oder kalten Orten ab.
Dies kann die Funktionsweise der Uhr beeinträchtigen und die Lebensdauer der Batterie
ver kürzen, was einen schnelleren oder langsameren Lauf der Uhr bewirkt und auch
Auswirkungen auf ihre sonstige Funktionen hat.
Stoßfestigkeit
Diese Uhr widersteht allen Stößen und Schlägen, die bei normalem täglichem Gebrauch
oder Sportar ten ohne direkten Körperkontakt wie Golf oder Baseball auftreten.
Fällt die Uhr hingegen auf den Boden fällt oder sehr schweren Stößen ausgesetzt ist,
kann sie Schaden nehmen und ihre Funktion beeinträchtigt sein.
Magnetfelder
Diese Uhr ist bis zu einer induktiven Feldstärke von 60 Gauss antimagnetisch und wird
daher durch magnetische Felder, die von üblichen Haushaltsgeräten erzeugt werden,
nicht beeinflußt. Kommt die Uhr in sehr starke magnetische Felder, so können ihre
Betriebsfunktionen vorübergehend verändert sein.
Elektrostatische Aufladung
Die in der Uhr verwendeten integrierten Schaltkreise reagieren empfindlich auf
elektrostatische Aufladung. Wird die Uhr einem starken elektrischen Feld ausgesetzt,
kann die Zeitanzeige an Genauigkeit verlieren.
Chemikalien und Gase
Tr agen Sie die Uhr nicht in Räumen, in denen aggressive chemische Substanzen oder
Gase vorhanden sind. Kommt die Uhr mit Lösungsmitten wie Benzol oder chemischen
Substanzen wie Benzin, Poliermittel, Waschflüssigkeiten oder Klebstoffen in Berührung,
34
Page 39

können ihre Komponenten entfärben, sich auflösen oder zerbrechen.
Achten Sie besonders darauf, daß Sie Chemikalien meiden.
Gehäuse und Armband der Uhr können entfärben, wenn sie z. B. mit dem Quecksilber
eines zerbrochenen Thermometers in Berührung kommen.
Sauberkeit der Uhr
Reinigen Sie das Uhrglas mit einem weichen, saugfähigen Tuch von Staub und
Feuchtigkeit. Wenn Sie die Uhr mit verschmutztem Gehäuseboden und Band anlegen,
kann dies an den Berührungsstellen zu Hautreizungen führen. Halten Sie die Uhr auch
sauber, um die Ärmel nicht zu verschmutzen.
Reinigung des Armbandes:
•
Metallband:
Seifenlauge waschen.
•
Kunststoff- oder Gummiband:
verwenden.
•
Lederband:
Zur Reinigung der Innenseite ein mit Alkohol angefeuchtetes Tuch verwenden.
Regelmäßige Inspektion
Wir raten Ihnen, die Uhr alle ein bis zwei Jahre von einem autorisierten Kundendienst
überprüfen zu lassen. Dies sichert eine langjährige Benutzung der Uhr, ohne das
Funktionsstörungen auftreten.
Die Batterien von Kindern fern halten
Falls eine Batterie versehentlich verschluckt wurde, unverzüglich einen Arzt verständigen.
Die verschmutzten Stellen mit einer Zahnbürste und lauwarmer
Mit Wasser abwaschen. Keine Lösungsmittel
Die Außenseite leicht mit einem weichen und trockenen Tuch abreiben.
35
Page 40

TECHNISCHE DATENG
1.
Typ: Analoge Quarzuhr
2.
Kalibrierung: Miyota OT 10
3.
Ganggenauigkeit: ± 20 Sekunden pro Monat bei Normaltemperatur (5°C - 35°C)
Schwingungsfrequenz des Quarzes: 32.768 Hz
4.
Temperaturbereich: -10°C bis 60°C
5.
Sonstige Eigenschaften:
6.
Datumsanzeige
•
Stoppuhr: Messung bis 60 Minuten in 1/100-Sekunden-Schritten
•
Lebensdauer der Batterie: ca. 2 Jahre (Benutzung der Stoppuhrfunktion
7.
1 Stunde täglich)
Nummer der Batterie: Typ SR927
8.
Aufgrund techn. Verbesserungen des Produkts können diese Spezifikationen ohne
Vo r ankündigung abweichen.
36
Page 41
A
COMPONENTI PRINCIPALI
B
FUNZIONAMENTO DEL CRONOGRAFO
C
COME REGOLARE L’ORA
I
INDICE
39
40
42
COME IMPOSTARE LA DATA
D
REGOLAZIONE DEL CRONOGRAFO
E
F
PRECAUZIONI PER L’USO E NOTIZIE UTILI
G
DATI TECNICI
42
43
44
48
37
Page 42

38
Page 43
COMPONENTI PRINCIPALI
A
1
Lancetta delle ore
2
Lancetta dei minuti
3
Lancetta dei secondi continui
o secondi del CHR
4
Lancetta 24 ore
5
Lancetta secondi del CHR
(fino a 61 secondi) o minuti del CHR
6
Lancette centesimi di secondo del CHR
(fino a 61 sec.) o secondi del CHR
Tasto avvio/stop CHR, visualizzazione
A
dei centesimi di secondo CHR
B
Tasto azzeramento CHR
C
Corona
Legenda: CHR = cronografo
39
Page 44
FUNZIONAMENTO DEL CRONOGRAFO
B
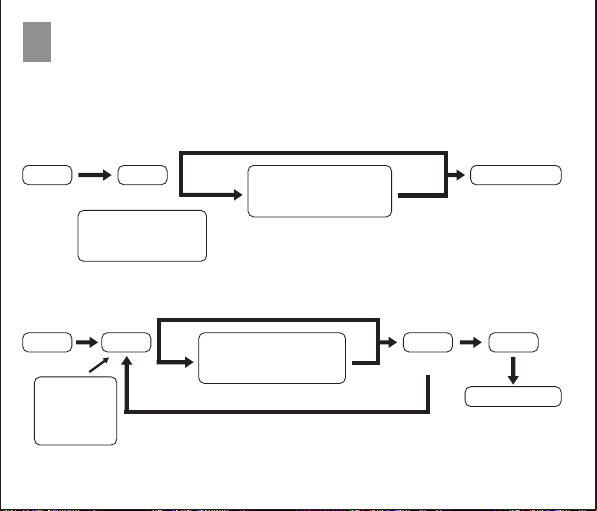
Il cronografo può misurare sino a 60 minuti con incrementi di 1/100 di secondo.
Misurazione standard
Misurazioni inferiori a 61 sec.
Avvio
훽
Misurazione accumulata del tempo trascorso
Avvio
훽
Lettura dei
minuti e dei
secondi del
cronografo.
*Premendo 훽 si può accumulare ripetutamente
Stop
훽
Lettura dei minuti e
dei secondi del
cronografo.
Misurazioni inferiori a 61 sec.
Stop
훽훽
Misurazioni superiori a 61 sec.
훽 Lettura dei
centesimi di secondo
del cronografo
Misurazioni superiori a 61 sec.
훽 Lettura dei
centesimi di secondo
del cronografo
40
Azzeramento
훾
Riavvio Stop
훽
Azzeramento
훾
Page 45

La lancetta dei centesimi di secondo del cronografo ➅
La lancetta dei centesimi di secondo si muove per 61 secondi dopo l’avvio della
•
misurazione. Dopo questo tempo si fermerà nella posizione 0. Trascorso questo periodo,
poi cambia nel funzionamento dimostrativo facendo una rotazione ogni minuto.
Per avviare il cronografo
Premere il pulsante 훽
•
La lancetta piccola dei secondi ➂ avanzerà nella posizione zero nello stesso momento
•
in cui il cronografo viene avviato e poi inizia a conteggiare i secondi, così come la
lancetta ➄ che, trascorso un minuto e un secondo dall’avvio del cronografo, cambierà
per funzionare come lancetta minuti del cronografo.
Tr ascorsi un minuto e un secondo dall’avvio del cronografo la lancetta dei secondi del
cronografo cambierà per funzionare come lancetta minuti del cronografo ➄.
Per fermare il cronografo
Premere il pulsante 훽
•
Quando il tempo misurato è inferiore ai 61 secondi, le lancette dei minuti, dei secondi e
•
dei centesimi di secondo si fermeranno sul tempo misurato.
Quando il tempo misurato è superiore ai 61 secondi, le lancette dei minuti e dei secondi
•
del cronografo si fermeranno sul tempo misurato. La lancetta dei centesimi di secondo
del cronografo rimarrà ferma sulla posizione zero. In questo momento leggere i secondi
e i minuti dal cronografo.
Successivamente, premere il pulsante 훽 di nuovo per far avanzare la lancetta dei
centesimi di secondo del cronografo sul tempo misurato. In questo momento leggere il
tempo in centesimi di secondo al cronografo.
Per azzerare il cronografo
Premere il pulsante 훾.
•
La lancetta dei secondi del cronografo ➂ cambierà funzione per indicare i secondi
•
continui dell’ora corrente. Le rimanenti lancette ➄ e ➅ ritorneranno in posizione 0.
41
Page 46

COME REGOLARE L’ORA
C
Svitare la corona 훿 ed estrarla in posizione (2), la lancetta dei secondi continui ➂ si
1.
fer ma nella posizione (0).
Girare la corona per fissare le lancette dei minuti ➀, dell’ora ➁ e delle 24 ore ➃
2.
secondo l’ora corretta.
N.B.: La lancetta 24 ore ➃ è solidale alle lancette ore/minuti ➀/➁
Rimettere la corona 훿 in posizione (0) (in sincronizzazione con un piccolo segnale) la
3.
lancetta dei piccoli secondi ➂ inizierà a muoversi.
In caso di mancato utilizzo per lunghi periodi è consigliabile, al fine di risparmiare
energia, mantenere l’orologio fermo mediante posizionamento della corona 훿 sulla
posizione ➁.
COME IMPOSTARE LA DATA
D
Estrarre la corona 훿 in posizione (1).
1.
Girare la corona in senso antiorario finchè non appare la data desiderata.
Non regolate la data fra le 9:00 PM e l’1:00 AM. In questo caso la data potrà
2.
non cambiare in modo corretto.
Rimettere la corona 훿 nella posizione (0).
3.
42
Page 47

REGOLAZIONE DEL CRONOGRAFO
E
Dopo la sostituzione della batteria o se le lancette del cronografo non ritornano
nella posizione “0” quando si azzera il cronografo.
1.
Estrarre la corona nella posizione (2).
2.
Premere il pulsante 훽 o 훾 per regolare le lancette del cronografo nella posizione
“0”.
Pulsante 훽: Regola la lancetta dei centesimi di secondo ➅ nella posizione “0”.
3.
Pulsante 훾: Regola la lancetta dei secondi del cronografo ➂ nella posizione “0”.
Le lancette del cronografo possono avanzare rapidamente premendo
continuamente sia i pulsante 훽 che 훾.
4.
Una volta che le lancette del cronografo sono state fissate nella posizione “0”,
regolare se il caso ora e data (paragrafi C e D) e, in seguito, rimettere la corona 훿
nella posizione “0”.
43
Page 48
PRECAUZIONI PER L’USO E NOTIZIE UTILI
F
Indicazione
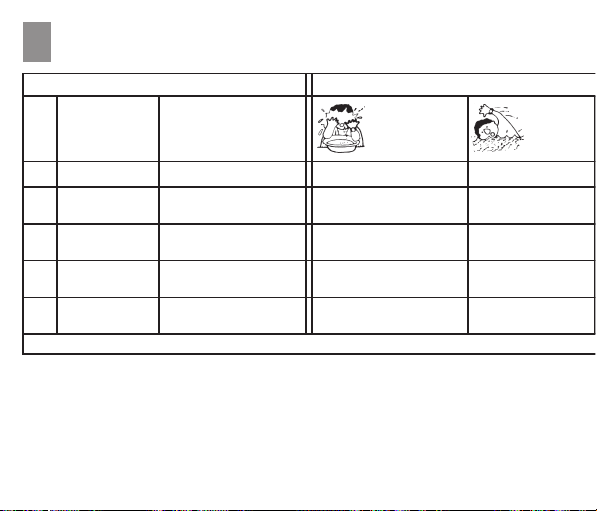
Spruzzi, sudore,
Quadrante Cassa
Grado di
impermeabilità
A
B
C
D
E
L’indicazione “WATER RESISTANT” (impermeabile) può essere a volte abbreviata in “WATER RESIST”.
–
Per evitare che l’acqua entri nei meccanismi interni dell’orologio, la corona non deve
mai essere tirata fuori quando l’orologio è bagnato.
–
Se gli orologi che sono stati concepiti per lo sport o per funzionare in acqua vengono
esposti all’acqua salata o ad abbondante sudore, devono essere risciaquati con
acqua dolce e quindi completamente asciugati.
L’acqua può in taluni casi provocare un deterioramento della qualità di alcuni cinturini
–
in cuoio.
—
—
WATER RESISTANT
50M (5bar)
WATER RESISTANT
100M (10bar)
WATER RESISTANT
200M (20bar) o più
—
WATER RESISTANT
WATER RESISTANT
WATER RESISTANT
WATER RESISTANT
pioggia leggera,
abluzioni, ecc.
NO
SI
SI
SI
SI
Uso in
Nuoto
ecc.
NO
NO
SI
SI
SI
44
Page 49
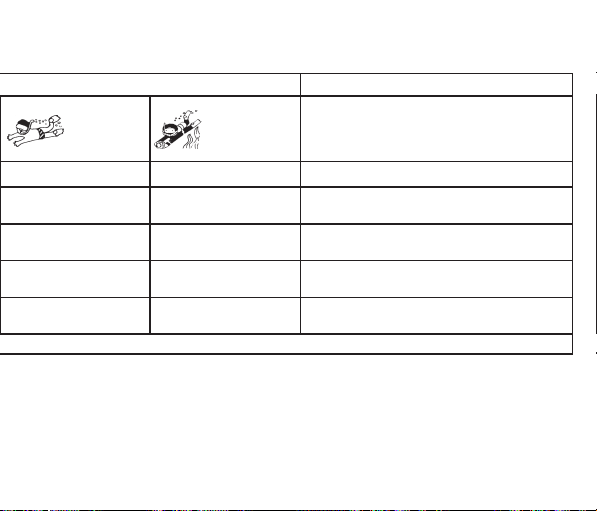
acqua
Immersione
NO
NO
NO
SI
SI
* Portare sempre la corona nella sua posizione normale. * Stringere del tutto la vite della corona.
–
Le parti interne dell’orologio possono trattenere umidità, quando la temperatura esterna
è più bassa di quella interna, il vetro del quadrante a volte può appannarsi. Se il fenomeno
è momentaneo, ciò non crea alcun problema, ma se invece perdura a lungo, occorre far
presente il problema al negoziante presso cui l’orologio è stato acquistato o al Centro di
Assistenza Autorizzato più vicino.
Immersione
in profondità
NO
NO
NO
NO
SI
Non impermeabile. Va protetto da acqua ed umidità.
Impermeabilità normale. Resiste a spruzzi, sudore,
pioggia leggera, abluzioni ecc. durante l’uso quotidiano.
Utilizzabile durante il nuoto ma sconsigliato per
immersioni
Adatto ad immersioni poco impegnative.
Adatto ad immersioni impegnative in profondità.
Caratteristiche di
impermeabilità
45
Page 50

Temperatura
Non lasciare l’orologio sotto i raggi diretti del sole o in luoghi estremamente caldi o
estremamente freddi per un lungo periodo di tempo.
Ciò potrebbe infatti creare degli inconvenienti al funzionamento dell’orologio ed accorciare
la durata della batteria, provocando anche un rallentamento o un’accelerazione dell’orologio
e conseguenze sulle altre funzioni.
Urti
Questo orologio può sopportare gli ur ti e gli scossoni che normalmente avvengono durante
l’uso quotidiano ed anche quando si pratichino sport in cui non ci sia contatto diretto, quali
golf e baseball. Se l’orologio cade per terra o riceve colpi molto forti, può subire danni o
guasti al funzionamento.
Campi magnetici
Questo orologio è antimagnetico fino a 60 gauss e quindi non viene influenzato dai campi
magnetici prodotti dai normali elettrodomestici. Se viene usato nelle vicinanze di campi
magnetici molto forti, le sue funzioni possono venire momentaneamente alterate.
Elettricità statica
I circuiti integrati usati nell’orologio sono sensibili all’elettricità statica. Se l’orologio viene
esposto a intensa elettricità, l’indicazione del tempo può perdere in precisione.
Sostanze chimiche e gas
Non indossare l’orologio quando ci si trova in presenza di forti sostanze chimiche e di gas.
Se l’orologio viene a contatto di solventi, come benzene, oppure con prodotti contenenti
sostanze come benzina, lucidi, detergenti, adesivi, le sue parti possono scolorarsi,
dissolversi o spaccarsi.
46
Page 51

Fare particolare attenzione ad evitare le sostanze chimiche.
La cassa dell’orologio e il cinturino possono scolorirsi se vengono a contatto con il
mercurio di un termometro rotto o di altra provenienza.
Tenere l’orologio pulito
Strofinare con un panno soffice assorbente il terriccio e l’umidità dal vetro dell’orologio.
Se l’orologio viene indossato quando il retro della cassa e la cinghia sono sporchi,
questi possono provocare un irritazione cutanea in quanto a contatto diretto con la
pelle. Tenere l’orologio pulito anche per non sporcarsi i polsini.
Come pulire il cinturino.
•
Cinturino in metallo:
con acqua tiepida saponata.
•
Cinturino in plastica o in gomma:
•
Cinturino in cuoio:
asciutto. Per la pulizia del lato opposto, servirsi di un panno inumidito con alcool.
Ispezione periodica
Si raccomanda di far controllare da un centro assistenza autorizzato, l’orologio ogni
uno o due anni per assicurare un uso prolungato e senza problemi.
Tenete le batterie fuori portata dei bambini
Qualora una batteria fosse accidentalmente ingerita, consultate subito il medico.
Lavare le zone sporche con uno spazzolino da denti bagnato
Lavare con acqua. Non usare solvente.
Strofinare delicatamente sul lato frontale con un panno soffice ed
47
Page 52

DATI TECNICIG
1. Tipo: Orologio al quarzo analogico
2. N° Calibro: Miyota OT10
3. Precisione: ± 20 secondi al mese a temperatura normale (5°C - 35°C)
4. Frequenza oscillazioni quarzo: 32.768 Hz
5. Campo efficace della temperatura: -10°C - 60°C
6. Caratteristiche supplementari:
• Datario
• Cronografo: può misurare fino a 60 minuti con incrementi in centesimi di secondo.
7. Durata batteria: Circa 2 anni (usando il cronografo 1 ora al giorno)
8. Numero batteria: Tipo SR927
Per il miglioramento del prodotto, le specifiche possono subire modifiche senza preavviso.
48
Page 53
A
COMPONENTES PRINCIPALES
B
FUNCIONAMIENTO DEL CRONOGRAFO
C
COMO REGULAR LA HORA
E
INDICE
51
52
54
COMO REGULAR LA FECHA
D
REGULACION DEL CRONOGRAFO
E
F
PRECAUCIONES PARA EL USO E INFORMACIONES UTILES
G
DATOS TECNICOS
54
55
56
60
49
Page 54

50
Page 55
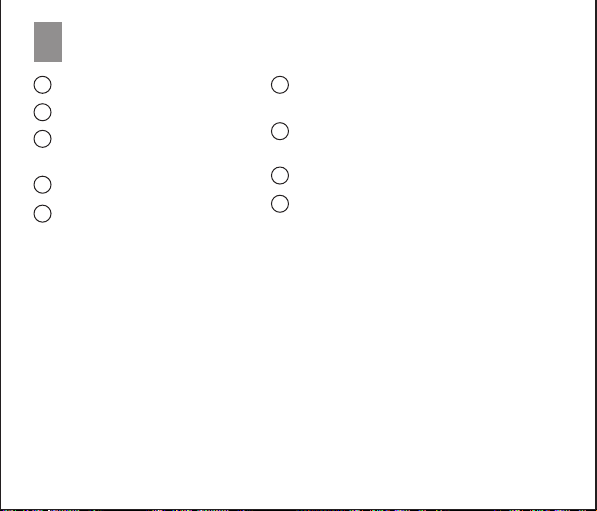
COMPONENTES PRINCIPALES
A
1
Horario
2
Minutero
3
Aguja de los segundos
continuos o segundos del CHR
4
Aguja 24 horas
5
Segundero del CHR (hasta 61
segundos) o minutero del CHR
6
Aguja centésimos de segundo del CHR
(hasta 61 segundos) o de segundos del CHR
Botón arranque/parada CHR, visualización
A
de los centésimos de segundo CHR
B
Botón puesta en cero CHR
C
Corona
Leyenda: CHR = cronógrafo
51
Page 56
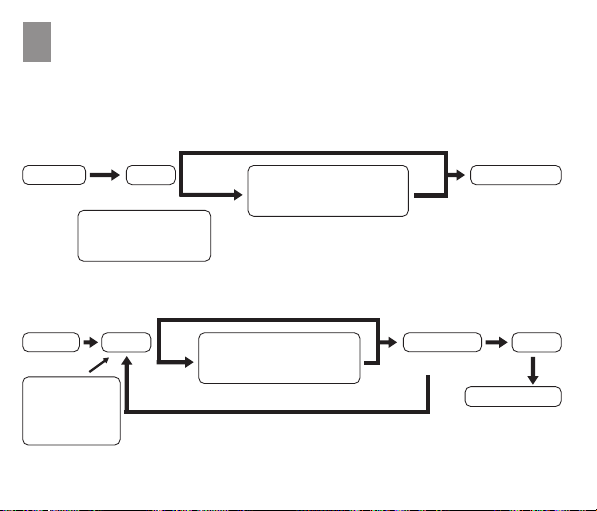
FUNCIONAMIENTO DEL CRONOGRAFO
B
El cronógrafo puede medir hasta 60 minutos con incrementos de 1/100 de segundo.
Medición estándar
Mediciones inferiores a 61 seg.
Arranque
훽
Medición acumulada del tiempo transcurrido
Arranque
훽
Lectura de
los minutos y
segundos del
cronógrafo
*Apretando 훽 se puede acumular repetidamente.
Par ada
훽
Lectura de los
minutos y segundos
del cronógrafo
Mediciones inferiores a 61 seg.
Par ada
훽훽
Mediciones superiores a 61 seg.
훽 Lectura de los
centésimos de segundo
del cronógrafo
Mediciones superiores a 61 seg.
훽 Lectura de los
centésimos de segundo
del cronógrafo
52
Nuevo arranque
Puesta en cero
Puesta en cero
훾
Par ada
훽
훾
Page 57

La aguja de los centésimos de segundo del cronógrafo ➅
•
La aguja de los centésimos de segundo se mueve durante 61 segundos contados a
partir del comienzo de la medición.
Después de este tiempo se detiene en la posición 0. Transcurrido este período, pasa
al funcionamiento demostrativo haciendo una rotación al minuto.
Para dar inicio al cronógrafo
Apriete el botón 훽.
•
La aguja pequeña de los segundos ➂ avanzará hasta la posición cero en el mismo
•
momento en que el cronógrafo es puesto en funcionamiento y después comienza a
girar como la aguja de los segundos.
Tr anscurridos 1 minuto y 1 segundo desde el arranque del cronógrafo, la aguja de los
segundos del cronógrafo ➄ cambia para pasar a funcionar como aguja de los minutos
del cronógrafo.
Para detener el cronógrafo
Apriete el botón 훽.
•
Cuando el tiempo medido es inferior a 61 segundos, las agujas de los minutos, de los
•
segundos y de los centésimos de segundo se detendrán en el tiempo medido.
Cuando el tiempo medido es superior a 61 segundos, las agujas de los minutos y de
•
los segundos del cronógrafo se detendrán en el tiempo medido.
La aguja de los centésimos de segundo del cronógrafo permanecerá en la posición
cero. Lea en ese momento los segundos y minutos del cronógrafo.
Sucesivamente, apriete nuevamente el botón 훽 para hacer avanzar la aguja de los
centésimos de segundo del cronógrafo hasta el tiempo medido. Lea en ese momento
el tiempo en centésimos de segundo del cronógrafo.
Para poner en cero el cronógrafo
Apriete el botón 훾.
•
La aguja de los segundos del cronógrafo ➂ cambiará para funcionar como aguja de
•
los segundos en función de la hora normal. Las otras agujas del cronógrafo ➄ y ➅
volverán a la posición cero.
53
Page 58

COMO REGULAR LA HORA
C
Destornille la corona 훿 y extráigala hasta la posición (2), la aguja de los segundos
1.
continuos ➂ se detiene en la posición (0).
Gire la corona para regular el minutero ➀, el horario ➁ y la aguja de las 24 horas ➃
2.
según la hora correcta.
Atención: el funcionamiento de la aguja de las 24 horas ➃ está directamente
relacionado con el del horario ➀ y el minutero ➁.
Vuelva a colocar la corona 훿 en la posición (0) (en sincronización con una pequeña
3.
señal). Simultáneamente, la aguja pequeña de los segundos ➂ comenzará a moverse.
Para ahorrar energía: cuando prevé que el reloj se mantendrá inutilizado durante un
largo período, se aconseja pararlo colocando la corona 훿 en la posición ➁.
COMO PROGRAMAR LA FECHA
D
Extraiga la corona 훿 hasta la posición .
1.
Gire la corona en sentido antihorarioj hasta que aparezca la fecha deseada.
No regule la fecha entre las 9:00 P.M. y la 1:00 A.M. En este caso, la fecha podría
2.
cambiar de modo incorrecto.
Vuelva a colocar la corona 훿 en la posición (0).
3.
54
Page 59

REGULACION DEL CRONOGRAFO
E
Después de substituir la pila o si las agujas del cronógrafo no vuelven a la posición
"0" cuando el mismo se pone en cero.
1.
Extraiga la corona hasta la posición (2).
2.
Apriete el botón 훽 ó 훾 para poner las agujas del cronógrafo en la posición (0).
Botón 훽: regula la aguja de los centésimos de segundo ➅ en la posición "0".
3.
Botón 훾: regula la aguja de los segundos del cronógrafo ➂ en la posición "0".
Las agujas del cronógrafo pueden avanzar rápidamente manteniendo apretado el
botón 훽 o el 훾.
4.
Si es necesario, después que las agujas del cronógrafo han sido colocadas en la
posición "0", regule la hora y la fecha (párrafos C y D). Una vez regulada, vuelva a
poner la corona 훿 en la posición "0".
55
Page 60
PRECAUCIONES PARA EL USO E
F
INFORMACIONES UTILES
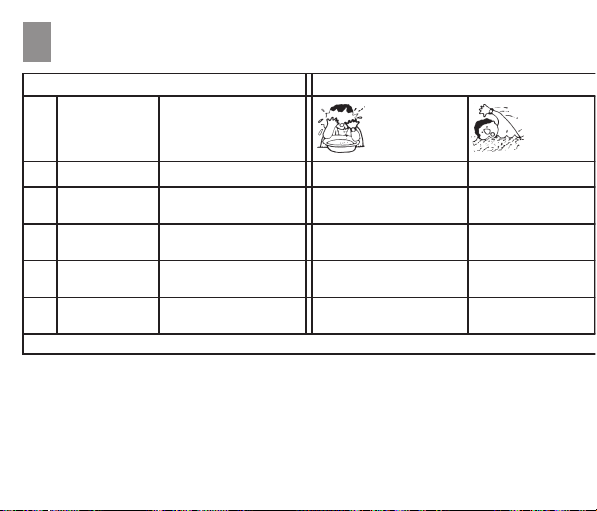
Indicación
Salpicaduras,
Esfera Caja
Grado de
impermeabilidad
A
B
C
D
E
Algunas veces la indicación “WATER RESISTANT” (impermeable) puede estar abreviada en “WATER RESIST”.
–
Para evitar que el agua entre en los mecanismos internos del reloj, cuando éste está
mojado nunca se debe extraer la corona.
–
Si los relojes concebidos para el deporte o para funcionar en el agua se exponen al
agua salada o a la transpiración abundante, después del uso deben ser enjuagados
con agua dulce y secados completamente.
En algunos casos, el agua puede deteriorar la calidad de algunas correas de cuero
–
o de piel.
—
—
WATER RESISTANT
50M (5bar)
WATER RESISTANT
100M (10bar)
WATER RESISTANT
200M (20bar) o più
—
WATER RESISTANT
WATER RESISTANT
WATER RESISTANT
WATER RESISTANT
transpiración,
llovizna,
abluciones, etc.
NO
SI
SI
SI
SI
Uso en
Natación,
etc.
NO
NO
SI
SI
SI
56
Page 61
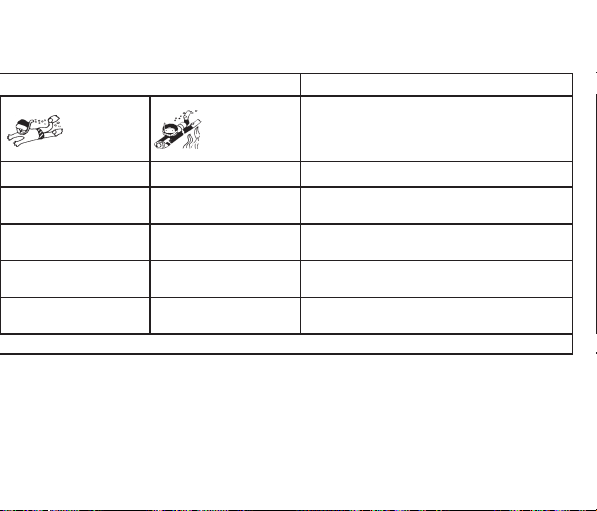
el agua
Inmersión
NO
NO
NO
Inmersión en
profundidad
(con balones
de oxígeno)
NO
NO
NO
Características de
impermeabilidad
No es impermeable. Debe protegerse del agua y la humedad.
Impermeabilidad normal. Durante el uso cotidiano resiste a
salpicaduras, transpiración, llovizna llovizna, abluciones, etc.
Utilizable durante la natación pero no para inmersiones
SI
SI
* Lleve siempre la corona a su posición normal. * Apriete completamente el tornillo de la corona.
–
Cuando la temperatura ambiente externa es más baja que la interna, las partes internas
del reloj pueden conservar humedad y a veces, el vidrio de la esfera se empaña. Si el
fenómeno es pasajero, no crea ningún problema. Si, viceversa, perdura por largo tiempo,
es necesario señalar el problema al negociante en cuyo local se adquirió el reloj o al
centro de asistencia técnica autorizado más cercano.
NO
SI
Idóneo para inmersiones poco importantes.
Idóneo para inmersiones importantes de profundidad.
57
Page 62

Temperatura
No exponga nunca el reloj a los rayos directos del sol ni lo deje en lugares
extremadamente calurosos o fríos durante un largo período de tiempo.
En todos estos casos, se podría afectar el funcionamiento del reloj y acortar la duración
de la pila. Además, podría verificarse una reducción o una aceleración del reloj con
consecuencias sobre las demás funciones.
Golpes
Este reloj puede soportar los impactos y los movimientos que suceden normalmente
durante el uso cotidiano y también aquellos derivados de prácticas deportivas en las
cuales no haya contacto directo, como por ejemplo golf y béisbol.
Si el reloj se cae al suelo o recibe golpes muy fuertes, puede sufrir daños o averías de
funcionamiento.
Campos magnéticos
Este reloj es antimagnético hasta 60 gauss. Por lo tanto no sufre la influencia de los
campos magnéticos producidos por los aparatos electrodomésticos normales. Si se usa
cerca de campos magnéticos muy fuertes sus funciones pueden alterarse
momentáneamente.
Electricidad estática
Los circuitos integrados usados en el reloj son sensibles a la electricidad estática. Si se
expone el reloj a cargas eléctricas intensas, la indicación del tiempo podría perder
precisión.
Substancias químicas y gas
No se ponga el reloj cuando se encuentra en presencia de fuertes substancias químicas
o de gas. Si el reloj entra en contacto con solventes como el benceno, o con
58
Page 63

productos que contienen substancias como bencina, barnices, bruñidores, detergentes
o adhesivos, sus partes pueden desteñirse, disolverse o romperse.
Ponga mucha atención para evitar las sustancias químicas.
La caja y la correa del reloj pueden desteñirse si entran en contacto con el mercurio de
un termómetro roto o de otra proveniencia.
Mantenga limpio el reloj
Frote el polvo y la humedad del vidrio del reloj con un paño absorbente delicado. Si se
pone el reloj cuando la parte posterior de la caja y la correa están sucias, dado que
éstas están en contacto directo con la piel podrían provocarle una irritación cutánea.
Por otra parte, la limpieza del reloj también es importante para mantener limpios los
puños de las camisas.
Como limpiar la correa.
•
Correa metálica:
tibia jabonosa.
•
Correa de plástico o de goma:
•
Correa de cuero:
limpiar el lado opuesto utilice un paño humedecido en alcohol.
Inspección periódica
Para garantizarse un uso prolongado y exento de problemas, se recomienda hacer
controlar el reloj cada uno o dos años por un centro de asistencia autorizado.
Mantenga la pila fuera del alcance de los niños
Si accidentalmente una pila fuese ingerida, contacte inmediatamente el médico.
lave las partes sucias con un cepillo de dientes mojado con agua
lave con agua. No use solventes.
Frote suavemente el lado frontal con un paño delicado y seco. Para
59
Page 64

DATOS TECNICOSG
1.
Tipo: Reloj analógico al cuarzo.
2.
Nº de calibre: Miyota OT10.
3.
Precisión: ± 20 segundos por mes con temperaturas normales (entre 5 -35ºC).
Frecuencia de oscilación del cuarzo: 32.768 Hz.
4.
Campo eficaz de la temperatura: -10ºC - 60ºC.
5.
Funciones adicionales:
6.
Calendario.
•
Cronógrafo: puede medir hasta 60 minutos con incrementos en centésimos
•
de segundo.
7.
Duración de la pila: alrededor de 2 años (usando el cronógrafo 1 hora al día).
8.
Número pila: Tipo SR927.
Para mejorar el producto, se pueden modificar sus características
técnicas sin aviso previo.
60
 Loading...