

Page 1
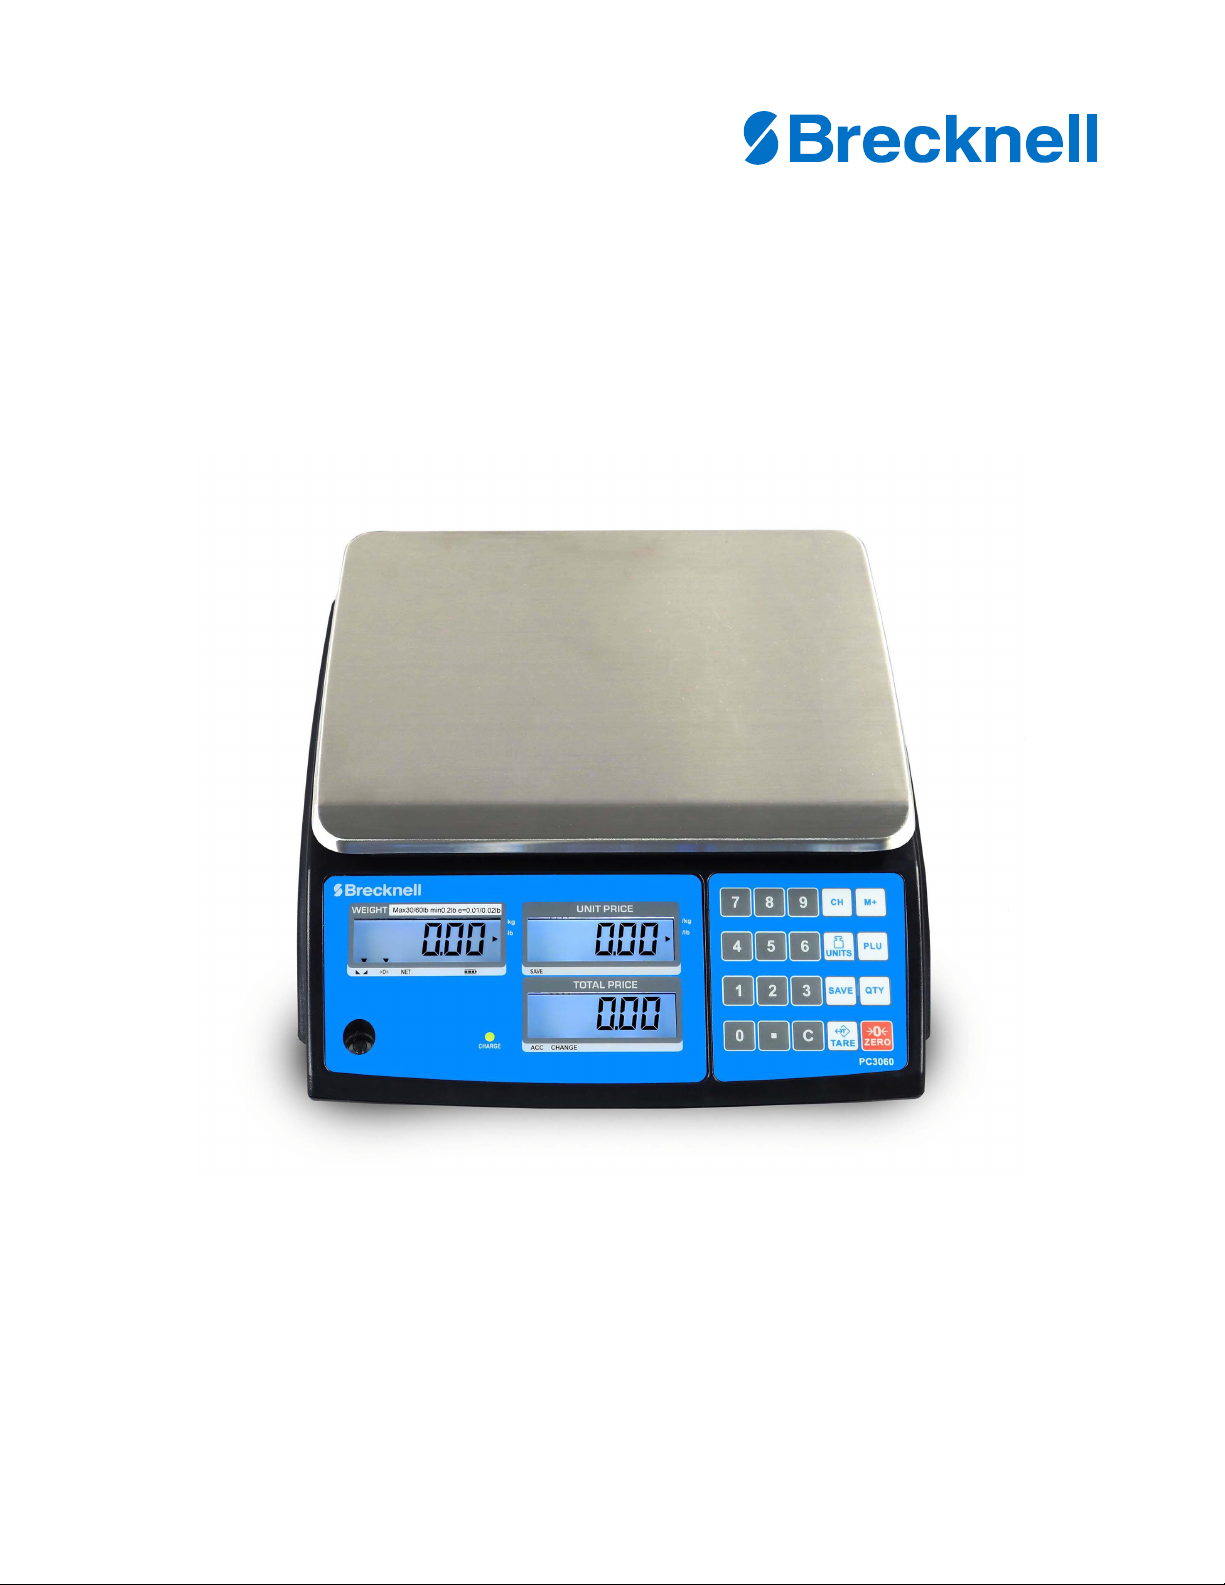
PC3060
Price Computing Scale
User Instructions
AWT 35-501856
Issue AA
Page 2

Avery Weigh-Tronix is a trademark of the Illinois Tool Works group of companies whose ultimate parent company is
Illinois Tool Works Inc (“Illinois Tool Works”). Copyright © 2019 Illinois Tool Works. All rights reserved.
No part of this publication may be reproduced by making a facsimile copy, by the making of a copy in three dimensions of a two-dimensional
work and the making of a copy in two dimensions of a three-dimensional work, stored in any medium by electronic means, or transmitted in
any form or by any means, including electronic, mechanical, broadcasting, recording or otherwise without the prior written consent of the
copyright owner, under license, or as permitted by law.
This publication was correct at the time of going to print, however Avery Weigh-Tronix reserves the right to alter without notice the
specification, design, price or conditions of supply of any product or service at any time.
PC3060_u_en_501856.book
Page 3

Table of Contents
page
Chapter 1 General information and warnings ......................................................................................... 5
About this manual ..............................................................................................................5
Text conventions ......................................................................................................... 5
Special messages ....................................................................................................... 5
Installation .......................................................................................................................... 6
Electrical installation ..........................................................................................................6
Pluggable equipment ................................................................................................... 6
Safe handling of equipment with batteries .................................................................. 7
Routine maintenance ......................................................................................................... 7
Cleaning the machine ........................................................................................................ 8
Training .............................................................................................................................. 8
Sharp objects ..................................................................................................................... 8
FCC and EMC declarations of compliance ........................................................................ 8
Chapter 2 Specifications ........................................................................................................................... 9
Dimensions ...................................................................................................................... 10
Chapter 3 Introduction ............................................................................................................................ 12
Installation ........................................................................................................................ 12
Unpacking ................................................................................................................. 12
Level Adjusting .......................................................................................................... 12
Connect Adaptor ....................................................................................................... 13
Parts description ..............................................................................................................14
Keyboard ................................................................................................................... 14
Displays ..................................................................................................................... 15
Chapter 4 Operation ................................................................................................................................ 16
Initial startup ..................................................................................................................... 16
Power ON/OFF .......................................................................................................... 16
Zero ...........................................................................................................................16
Tare ...........................................................................................................................16
Sample weighing ....................................................................................................... 16
Unit price setting ........................................................................................................ 17
Unit Price Memory ..................................................................................................... 17
Back light ................................................................................................................... 18
Automatic Unit Price Clear ........................................................................................ 19
Units of Measure ....................................................................................................... 19
Accumulation function ............................................................................................... 19
Give Change ............................................................................................................. 20
Commodities Without Weighing ................................................................................ 20
Chapter 5 Parameter Settings ................................................................................................................ 22
Getting into Parameter Menu ........................................................................................... 22
Enter Fxx Menu settings ............................................................................................ 22
Activating the Parameters ......................................................................................... 23
Parameter Menu Block .............................................................................................. 23
Chapter 6 Calibration .............................................................................................................................. 25
Chapter 7 Miscellaneous ......................................................................................................................... 26
RS232 output ...................................................................................................................26
Print Format ............................................................................................................... 26
Error codes ...................................................................................................................... 27
PC3060 Price Computing Scale User Instructions 3
Page 4

Replacement parts .......................................................................................................... 27
Sealing ............................................................................................................................. 28
4 PC3060 Price Computing Scale User Instructions
Page 5
1 General information and warnings
1.1 About this manual
This manual is divided into chapters by the chapter number and the large text at the top
of a page. Subsections are labeled as shown by the 1 and 1.1 headings shown above.
The names of the chapter and the next subsection level appear at the top of alternating
pages of the manual to remind you of where you are in the manual. The manual name
and page numbers appear at the bottom of the pages.
1.1.1 Text conventions
Key names are shown in bold and reflect the case of the key being described. This
applies to hard keys and onscreen or soft keys.
Displayed messages appear in bold italic type and reflect the case of the displayed
message.
1.1.2 Special messages
Examples of special messages you will see in this manual are defined below. The
signal words have specific meanings to alert you to additional information or the relative
level of hazard.
ELECTRICAL WARNING!
THIS IS AN ELECTRICAL WARNING SYMBOL.
ELECTRICAL WARNINGS MEAN THAT FAILURE TO FOLLOW
SPECIFIC PRACTICES OR PROCEDURES MAY RESULT IN
ELECTROCUTION, ARC BURNS, EXPLOSIONS OR OTHER HAZARDS
THAT MAY CAUSE INJURY OR DEATH.
CAUTION!
This is a Caution symbol.
Cautions give information about procedures that, if not observed, could result
in damage to equipment or corruption to and loss of data.
NOTE: This is a Note symbol. Notes give additional and important information, hints
and tips that help you to use your product.
PC3060 Price Computing Scale User Instructions 5
Page 6
1.2 Installation
DANGER: RISK OF ELECTRICAL SHOCK. NO USER SERVICEABLE
PARTS. REFER TO QUALIFIED SERVICE PERSONNEL FOR SERVICE.
DISCONNECT ALL POWER TO THIS UNIT BEFORE INSTALLING,
CLEANING, OR SERVICING. FAILURE TO DO SO COULD RESULT IN
BODILY HARM OR DAMAGE THE UNIT.
l The PC3060 price computing scale is a precision electronic instrument.
Handle it carefully.
l Do not install the scale in direct sunlight.
l Verify the local voltage and receptacle type are correct for the scale.
l Only use the original adaptor as others could cause damage to the scale.
l Pluggable equipment must be installed near an easily accessible power
socket outlet.
l Avoid unstable power sources. Do not use near large users of electricity
such as welding equipment or large motors.
l Avoid sudden temperature changes, vibration, wind and water.
l Avoid heavy RF noise.
l Keep the scale clean.
1.3 Electrical installation
CAUTION: The power cable must be connected to an earth-grounded electrical
outlet. The electrical supply must have a circuit breaker with an appropriate
rating to protect from over-current conditions.
For your protection, all electrical (110V or 230V) equipment used out of doors or
in wet or damp conditions should be supplied from a correctly fused power
source and protected by an approved ground fault protection device (RCD,
GFCI etc.)
IF IN DOUBT SEEK ADVICE FROM A QUALIFIED ELECTRICIAN.
1.3.1 Pluggable equipment
Pluggable equipment must be installed near an easily accessible socket outlet.
6 PC3060 Price Computing Scale User Instructions
Page 7
1.3.2 Safe handling of equipment with batteries
CAUTION: Danger of explosion if battery is incorrectly replaced. Replace only
with the same or equivalent type recommended by the manufacturer. Dispose
of used batteries according to the manufacturer’s instructions.
ATTENTION: Il y a danger d'explosion s'il y a remplacement incorrect de la
batterie, remplacer uniquement avec une batterie du même type ou d'un type
équivalent recommandé par le constructeur. Mettre au rebut les batteries
usagées conformément aux instructions du fabricant.
Safe Battery Disposal
Please be aware this product contains a lead acid battery which MUST be removed
and disposed of safely prior to any disposal of the scale.
This battery can be easily accessed by removing the battery cover found on the
underside of the scale.
1.4 Routine maintenance
IMPORTANT: This equipment must be routinely checked for proper operation
and calibration.
Application and usage will determine the frequency of calibration required for
safe operation.
Always turn off the machine and isolate from the power supply before starting any
routine maintenance to avoid the possibility of electric shock.
Make sure that it is placed securely on a flat and level surface.
PC3060 Price Computing Scale User Instructions 7
Page 8
1.5 Cleaning the machine
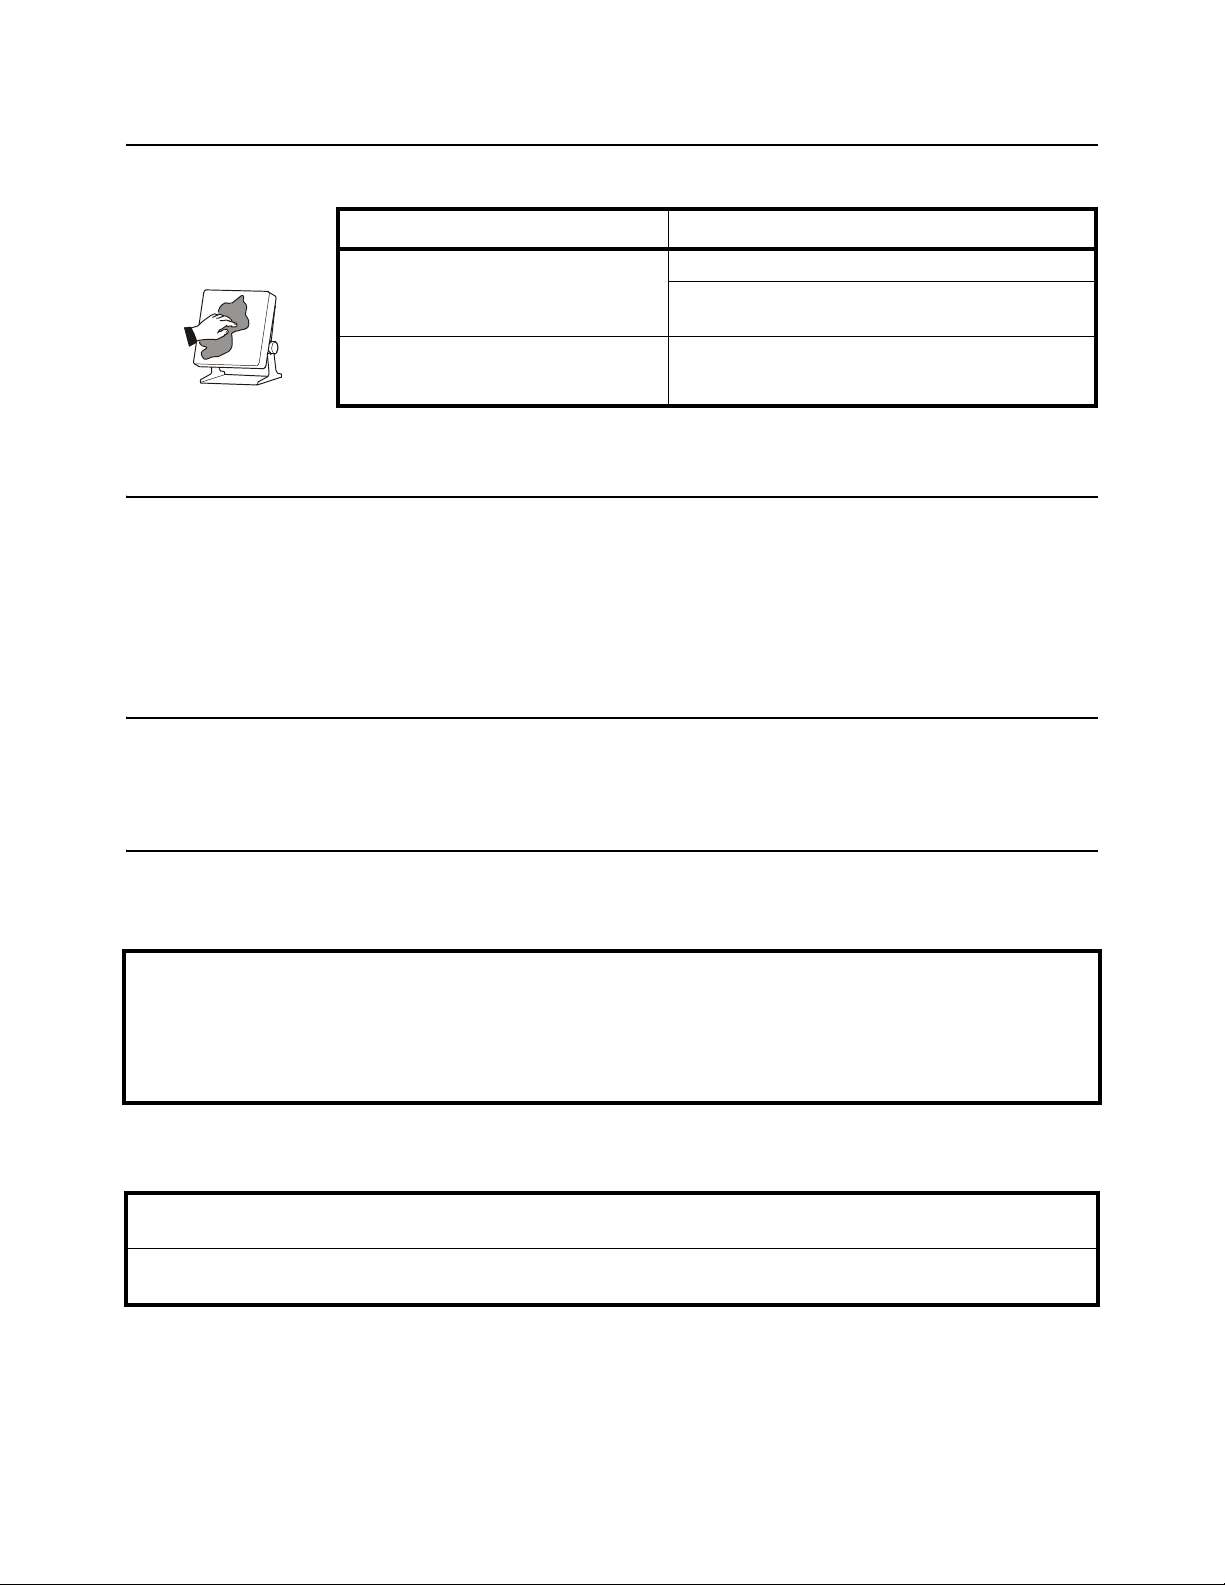
Table 1.1 Cleaning DOs and DON’Ts
DO DO NOT
Wipe down the outside of standard products
with a clean cloth, moistened with water and
a small amount of mild detergent
Spray the cloth when using a proprietary
cleaning fluid
Attempt to clean the inside of the machine
Use harsh abrasives, solvents, scouring cleaners or
alkaline cleaning solutions
Spray any liquid directly on to the display windows
1.6 Training
Do not attempt to operate or complete any procedure on a machine unless you have
received the appropriate training or read the instruction books.
To avoid the risk of RSI (Repetitive Strain Injury), place the machine on a surface which
is ergonomically satisfactory to the user. Take frequent breaks during prolonged usage.
1.7 Sharp objects
Do not use sharp objects such as screwdrivers or long fingernails to operate the keys.
1.8 FCC and EMC declarations of compliance
United States
This equipment has been tested and found to comply with the limits for a Class A digital device, pursuant to Part 15 of the FCC Rules.
These limits are designed to provide reasonable protection against harmful interference when the equipment is operated in a
commercial environment. This equipment generates, uses, and can radiate radio frequency energy and, if not installed and used in
accordance with the instruction manual, may cause harmful interference to radio communications. Operation of this equipment in a
residential area is likely to cause harmful interference in which case the user will be required to correct the interference at his own
expense.
Canada
This digital apparatus does not exceed the Class A limits for radio noise emissions from digital apparatus set out in the Radio
Interference Regulations of the Canadian Department of Communications.
Le présent appareil numérique n’émet pas de bruits radioélectriques dépassant les limites applicables aux appareils numériques de
la Classe A prescrites dans le Règlement sur le brouillage radioélectrique edicté par le ministère des Communications du Canada.
8 PC3060 Price Computing Scale User Instructions
Page 9
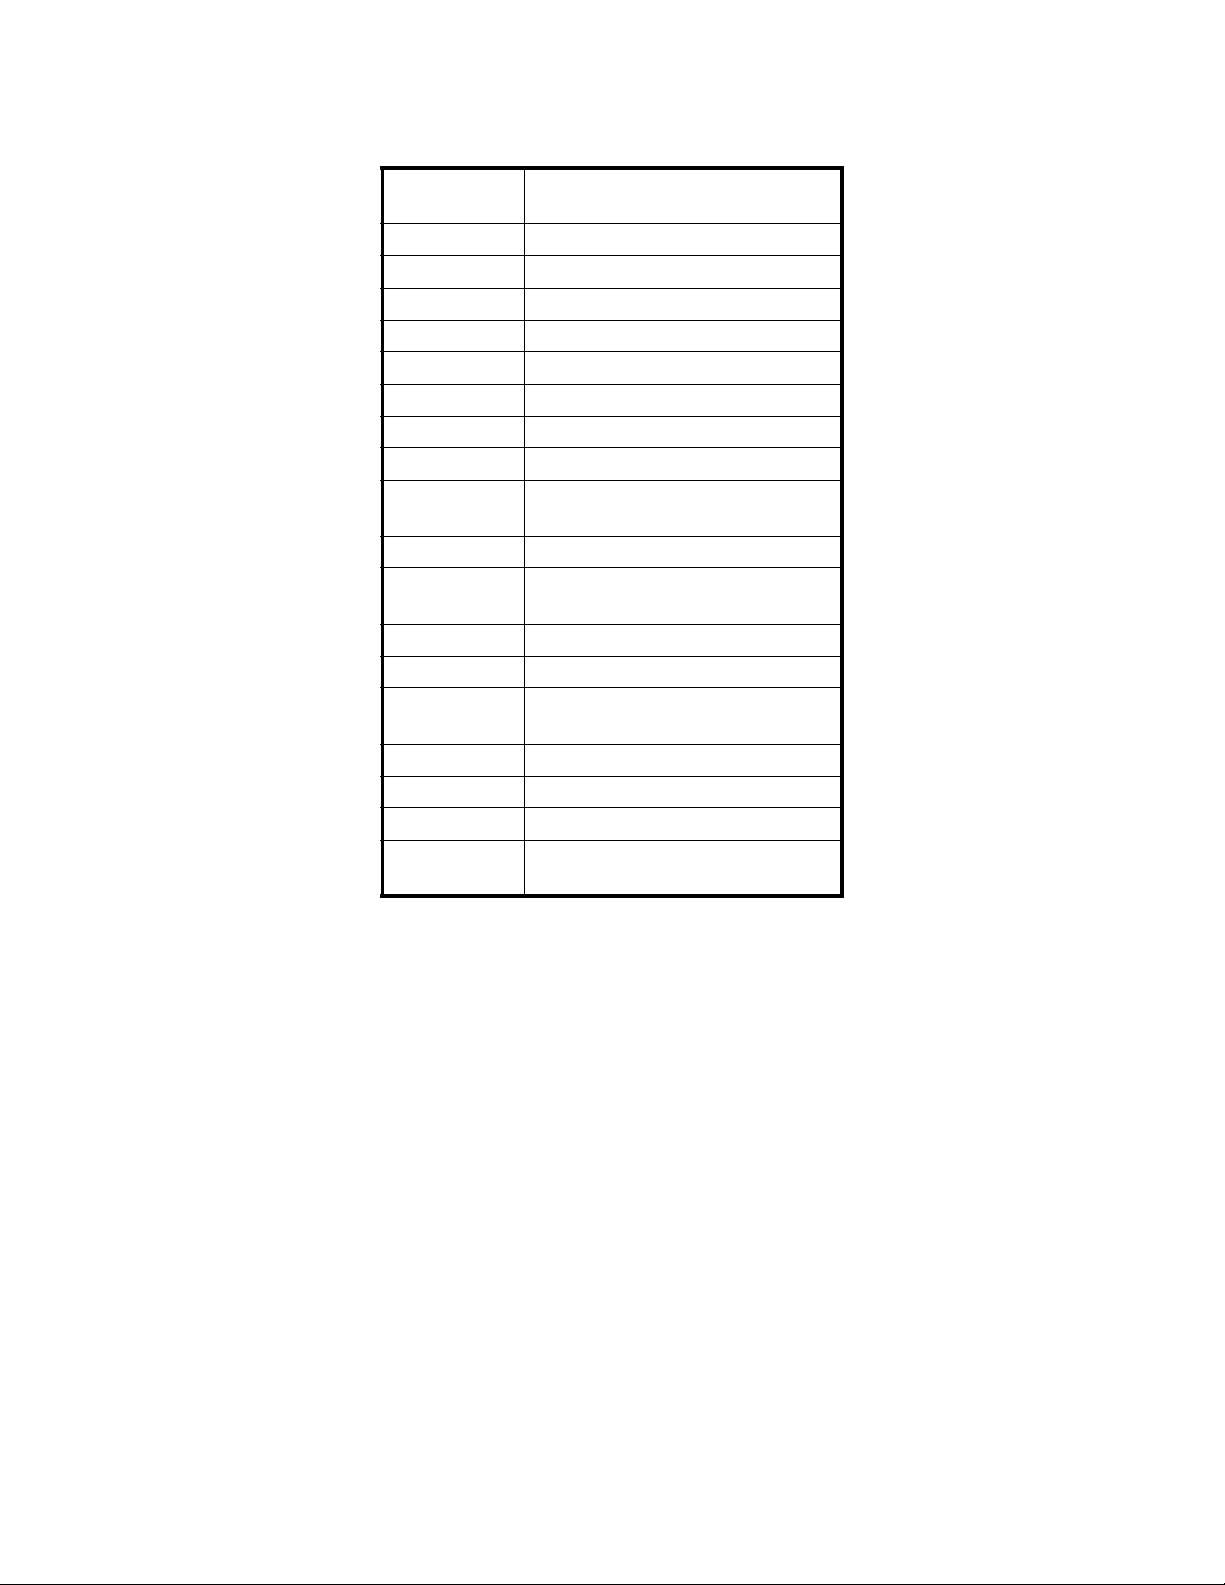
2 Specifications
Display 15mm/0.59inch LCD Display
Gross weight 4.1kg (9lb)
Capacity 15/30kg (30/60lb)
Readability 5/10g (0.01/02 lb)
Max. Divisions 2 x 3000e
Weighing Units Kg/lb
Pan size 204 x 263mm/8.03 x 10.35inch
Housing ABS Plastic and Stainless Steel pan
Interface RS232 Output standard
Operation
Temperature
Stabilisation Time 1 Seconds typical
Power AC Adaptor 12V/500mA,
Keypad 20 keys
Zero range 0mV~5mV
Signal input
range
ADC Sigma delta
Internal counts 600,000
ADC update Max 60 times/second
Load cell drive
voltage
with white LED back Light
-10°C -+ 40°C/14°F - 104°F
Rechargeable Battery 6V/3.2Ah
0~15mV
Max 5V/150mA
PC3060 Price Computing Scale User Instructions 9
Page 10
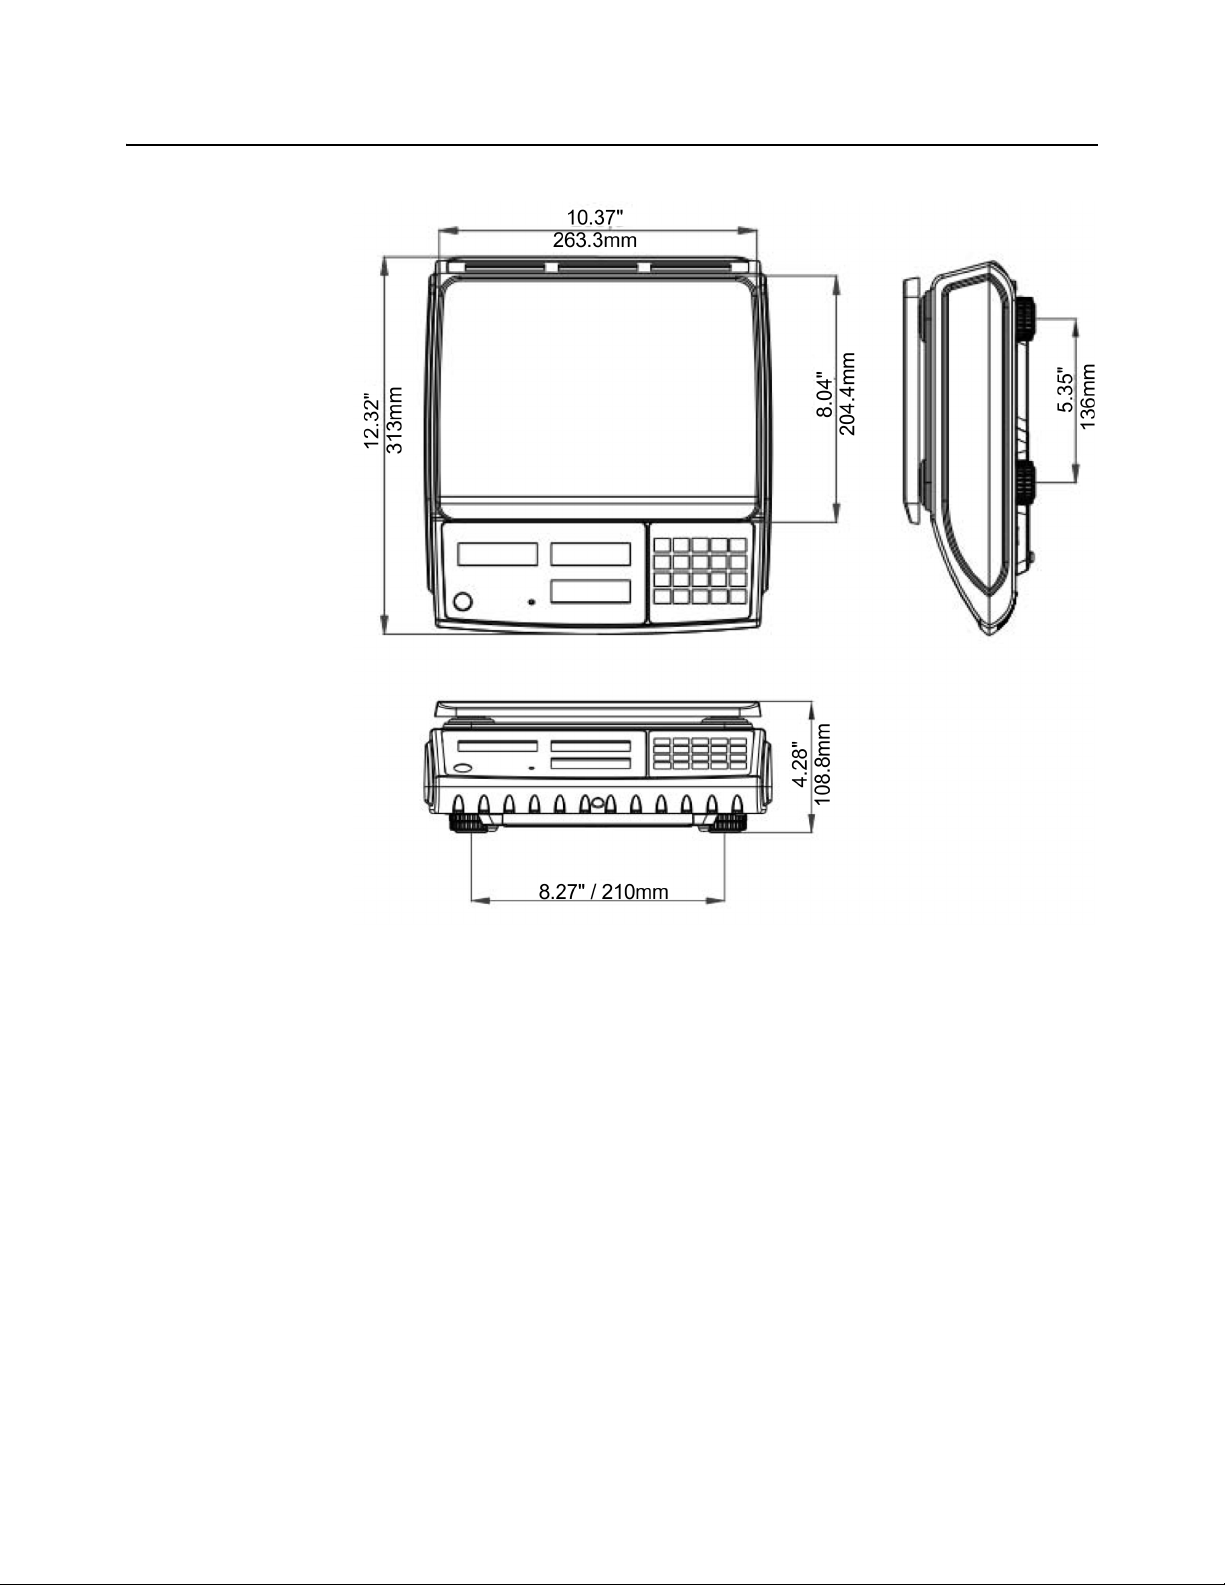
2.1 Dimensions
10 PC3060 Price Computing Scale User Instructions
Page 11

PC3060 Price Computing Scale User Instructions 11
Page 12

3 Introduction
The PC3060 price computing scales are accurate, compact, and very reliable.
l 3 easy-to-read backlit LCD displays; both front and rear make it ideal for use
l 10 indirect PLUs, can store up to 10 unit price values for quick and easy
l Easy-to-use Accumulation and Change function
l Auto unit price clear operation
l Weighing units conversion(kg/lb)
l Standard RS-232 ideal for connecting to a printer or a cash register.
3.1 Installation
3.1.1 Unpacking
Carefully take the scale out of its package. Make sure it is not damaged, and all
accessories are included.
in low light conditions.
recall
Accessories:
l Scale
l Power adaptor
l Stainless steel pan
l User manual
3.1.2 Level Adjusting
Place the scale on a flat, level surface.
Check the level bubble to see if the scale is level. If the bubble is not in the center level
ring, adjust the leveling feet until it is centered correctly.
12 PC3060 Price Computing Scale User Instructions
Page 13
3.1.3 Connect Adaptor
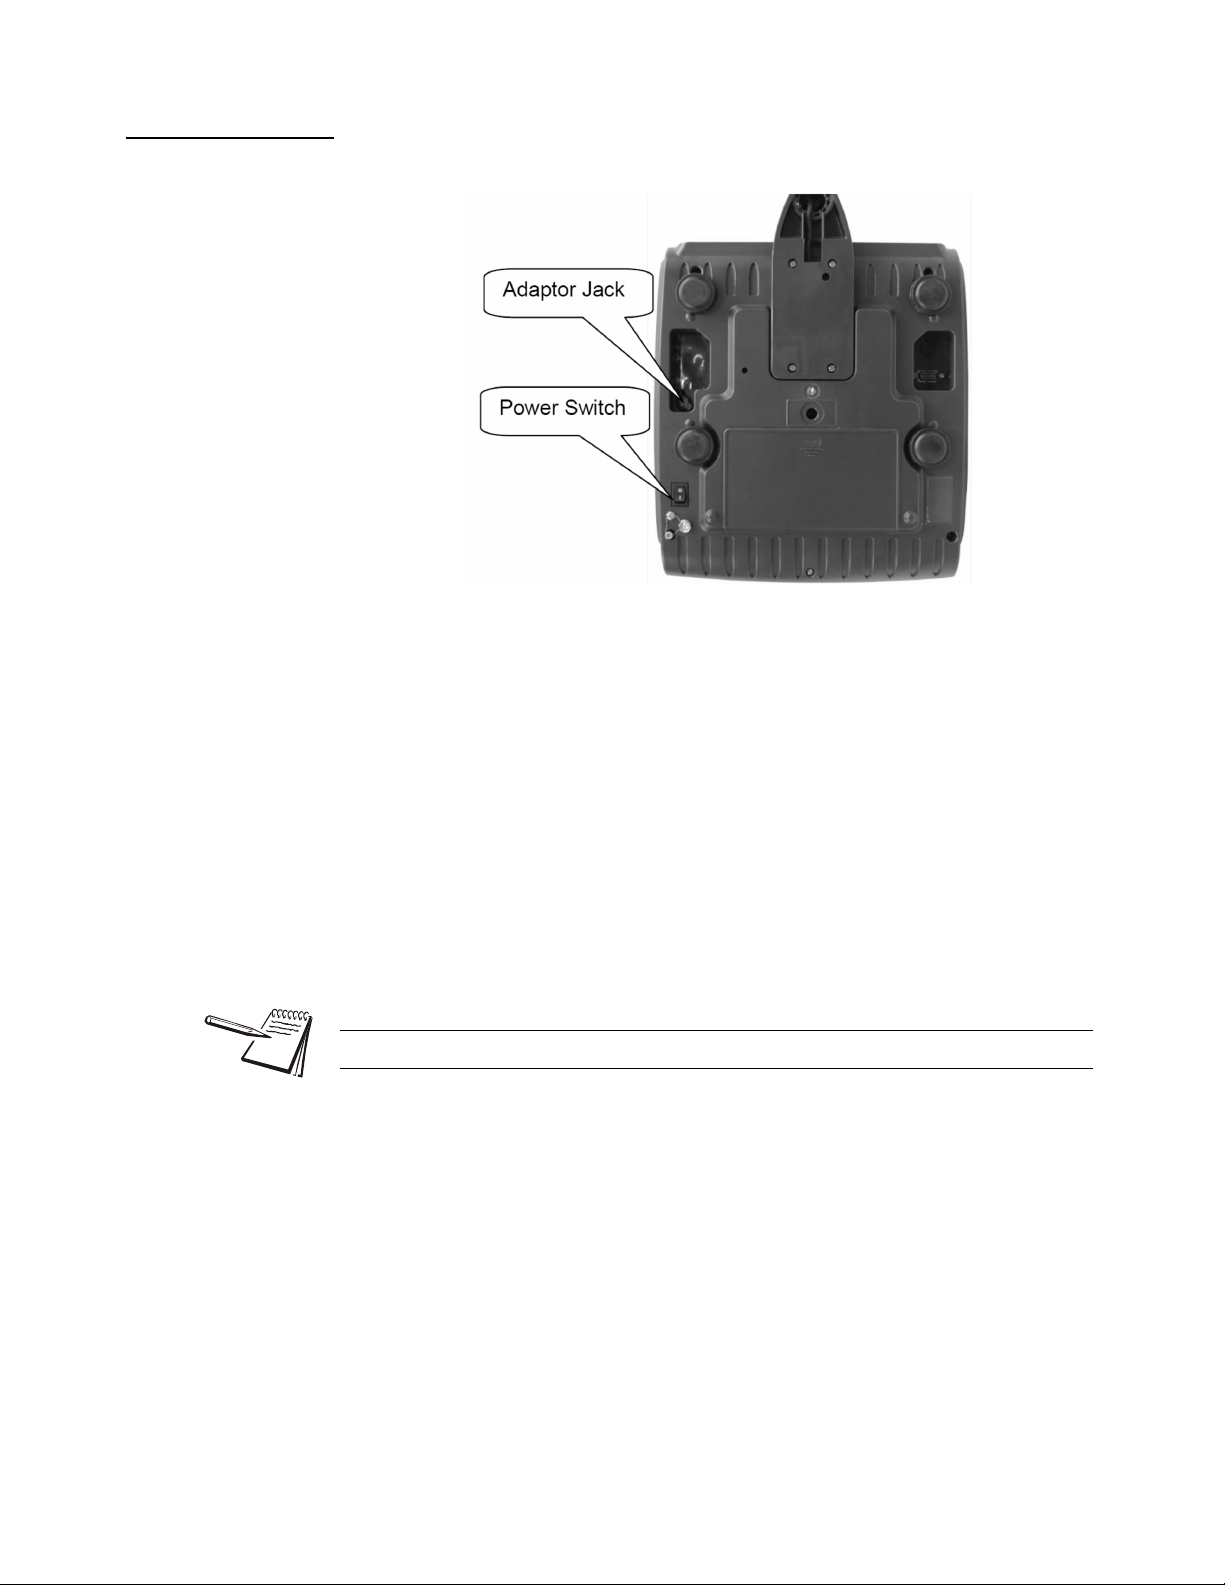
l To charge the battery, insert the adaptor pin into to jack socket on
theunderside of the scale. Plug the power adaptor into the mains power.
l The scale will charge even when the scale is turned off.
l The scale should be charged for at least 12 hours to fully recharge its
battery.
l The CHARGE LED on the front of the scale will show the status of the
battery. When the scale is plugged into the mains power, the internal battery
will automatically start charging. If the LED is green, this means the battery
has a full charge. If the LED is red, the battery is nearly discharged and will
require charging. If the LED is yellow, the battery is being charged.
l Do not use any other type of power adaptor than the one supplied with the
scale.
l Verify that the AC power socket outlet is properly protected.
Charge the battery before using the scale for the first time.
PC3060 Price Computing Scale User Instructions 13
Page 14
3.2 Parts description
7
1
0
5
8
2
6
9
3
C
CH M+
UNITS
PLU
QTYSAVE
TARE
ZERO
PC3060
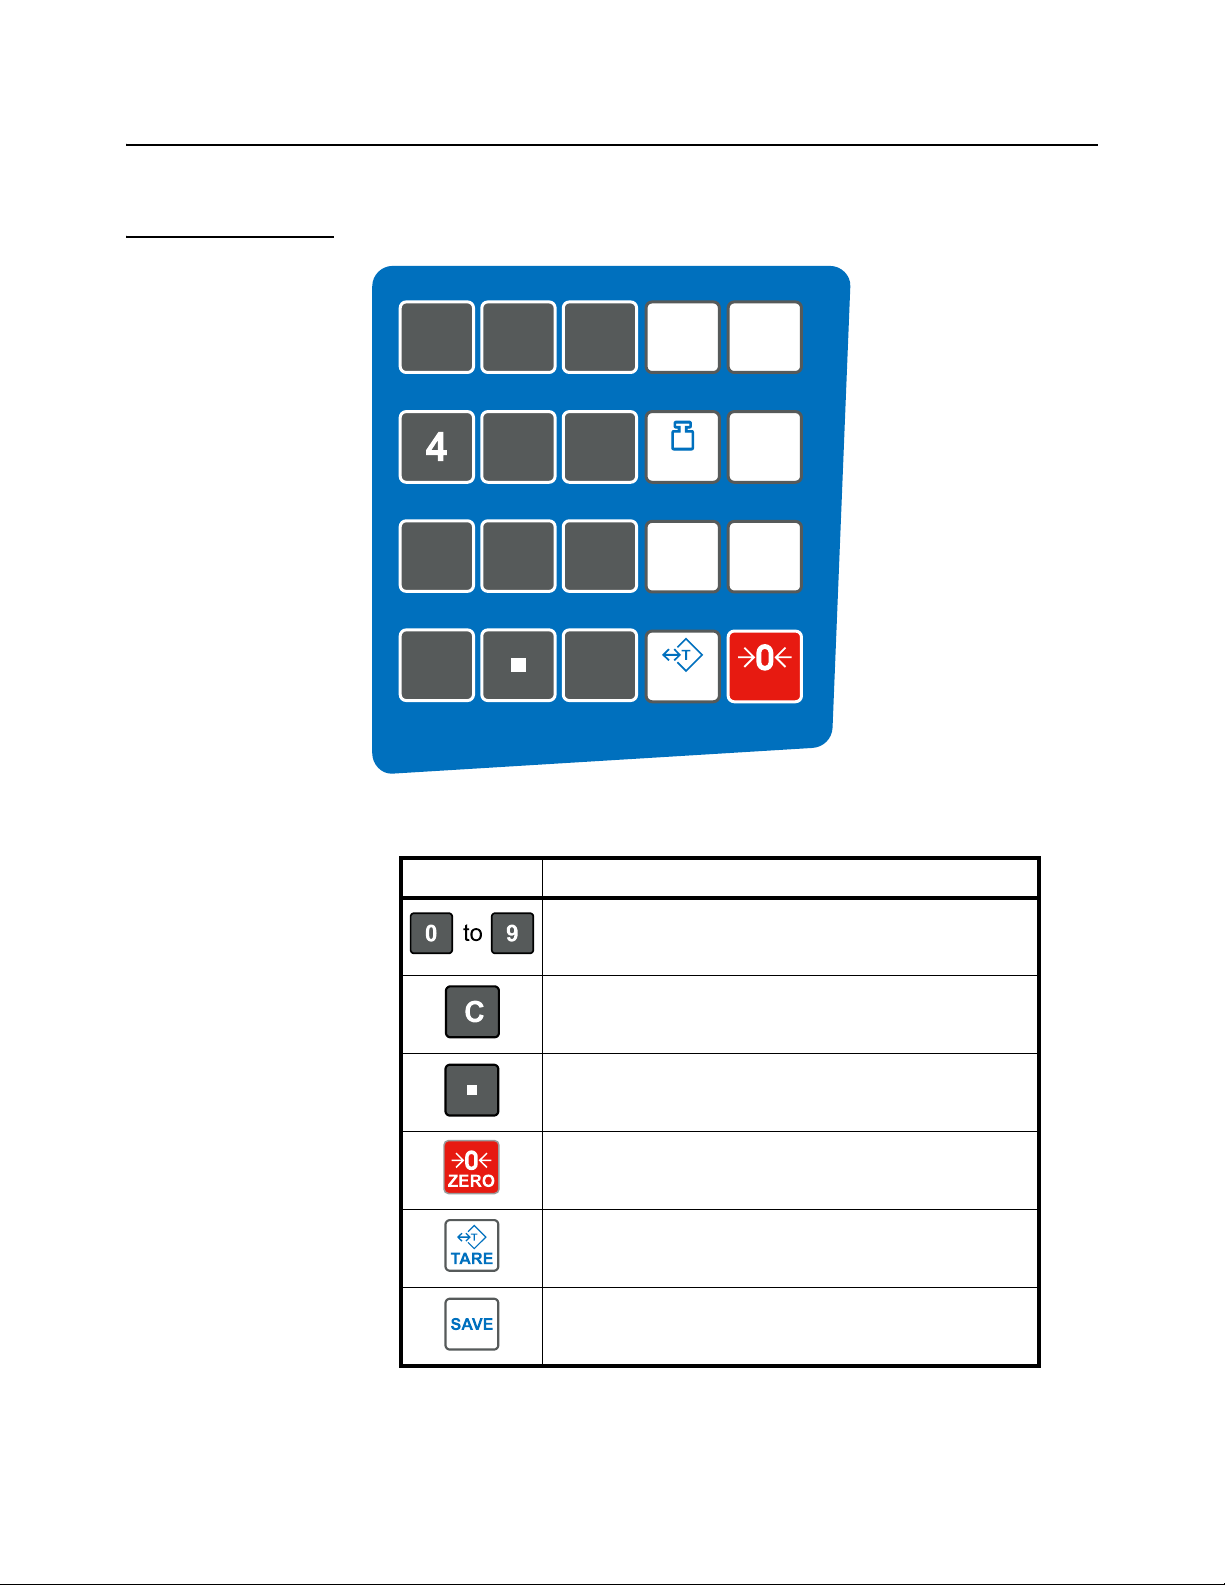
3.2.1 Keyboard
Keys Press this key to
Numeric Keys, used to enter unit price/PLU. In setting mode, press
numeric keys to enter parameters setting.
Clear incorrect entries and error conditions
In fixed mode, press to input double zero. In float mode, press to
insert a decimal point.
Returns the display to zero. In parameter settings, used to escape
from the menu.
Subtracts the tare values, change from gross to net mode and to
enter parameter settings.
Enter to auto clear mode
14 PC3060 Price Computing Scale User Instructions
Page 15
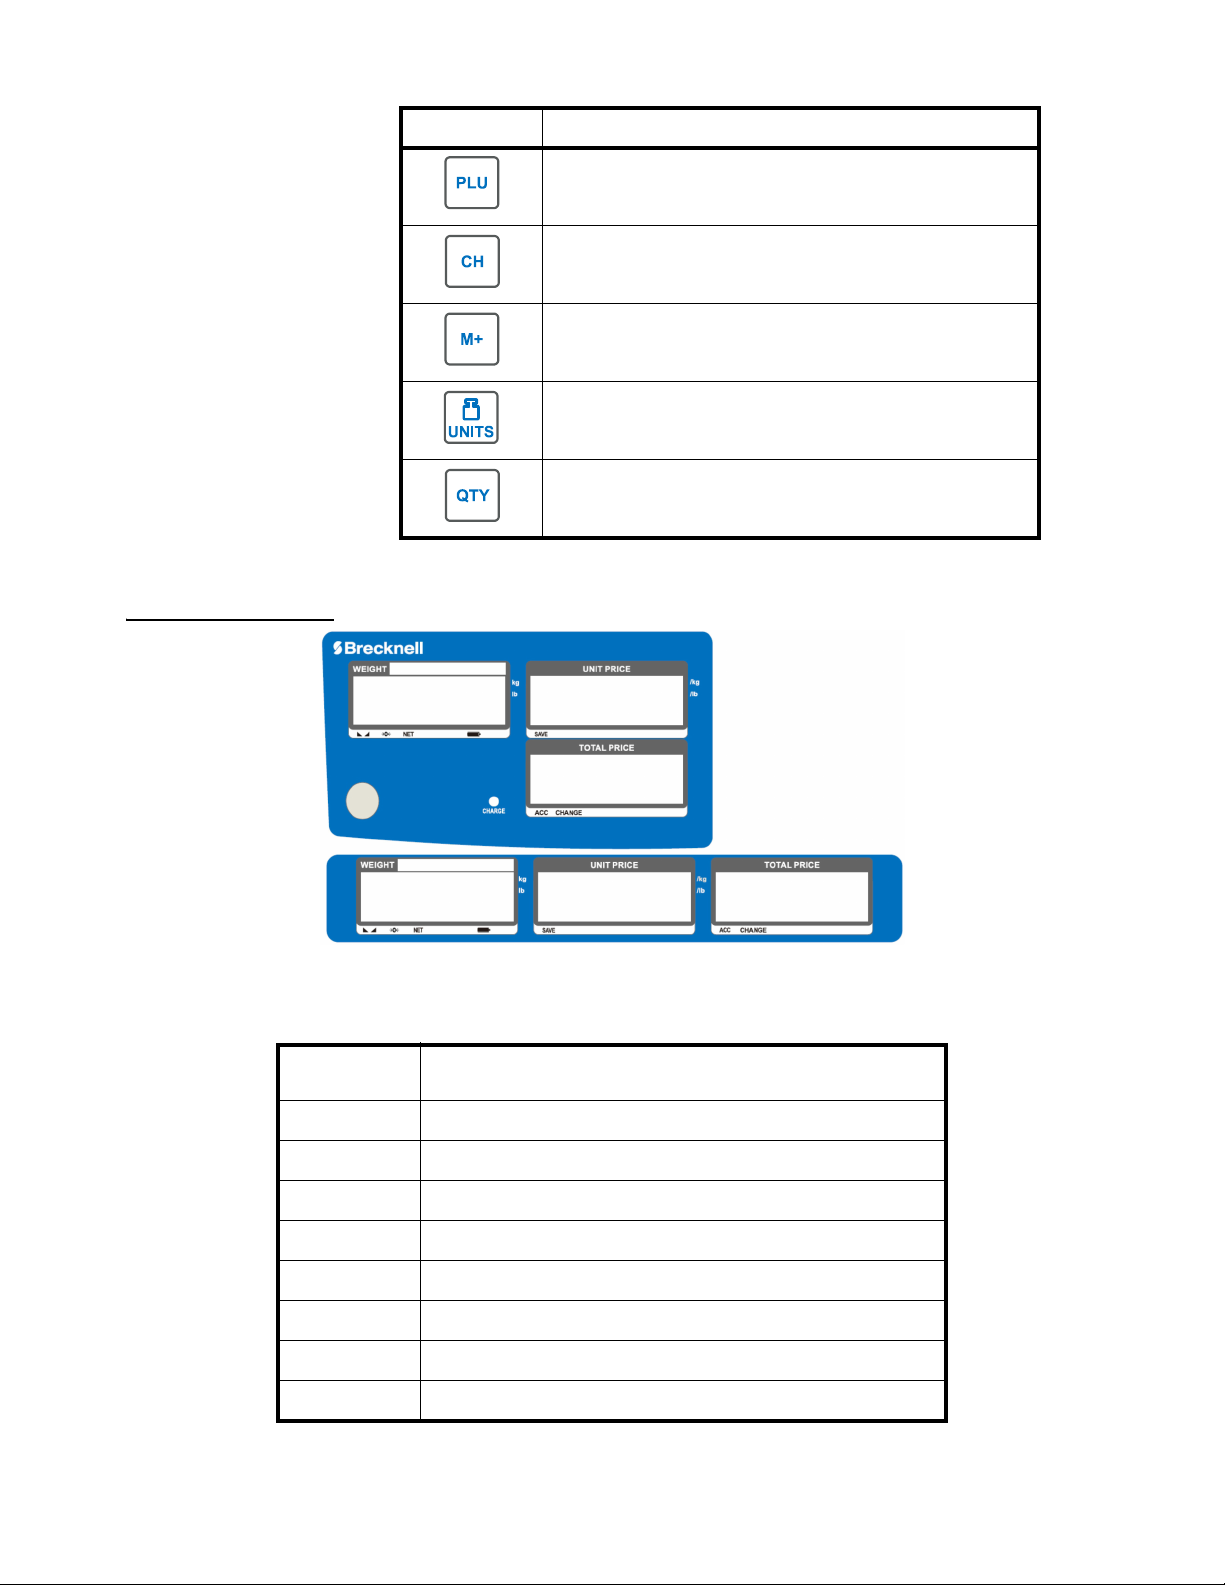
3.2.2 Displays
Keys Press this key to
Used to store or recall unit price. In parameter setting mode, it is
used to scroll down the menu.
Used to give change operation.
Add the current data to memory. In parameter setting mode, it is
used to scroll up the menu.
Used to change units of weight & unit price (kg/lb)
Quantity key, use for entering in quantities without weighing.
Display Symbols
BATT
NET Net Weight
STABLE Stable indicator. When illuminated, the scale is stable.
ZERO Zero indicator. When illuminated, the scale is within the Zero window.
kg/lb Current weighing unit
SAVE Save Indicator
CHARGE Battery charging indicator
ACC Accumulation indicator
CH Checkout indicator
PC3060 Price Computing Scale User Instructions 15
Battery indicator. When illuminated, battery requires recharging. Plug in
power adaptor to recharge.
Page 16

4 Operation
4.1 Initial startup
To get the best performance from your PC3060, please allow a warm-up time of around
15 minutes to help stabilize the measured values after switching on.
4.1.1 Power ON/OFF
Power switch is located under the scale on the right-hand side. To switch on the scale,
press and hold the on/off switch until the scale Beeps. The scale will turn on and the
display will run through self-test screens before showing zero.
To switch off scale press the on/off switch again.
4.1.2 Zero
If the weight display does not return to zero with no weight on the scale, the display can
easily be re-zeroed by pressing the ZERO key.
4.1.3 Tare
When weighing produce on a tray, film or, container, the weight of any container can
easily be tared off, so you only see the Net weight of the produce being weighed.
1. Place the empty container to be tared off on the weighing pan and press the
TARE key.
2. To clear a tare weight, remove all weight from the weighing pan and press the
TARE key again. The display will return to Gross Zero and the NET
annunciator will turn off.
4.1.4 Sample weighing
1. Place goods to be weighed on the weighing pan. Wait a few seconds for the
display to stabilize.
2. Read the result.
To avoid overloading, when ol appears, reduce the load or unload the weight from the
scale.
The display will tare off this weight and show a Net Zero weight on the
display with the NET annunciator illuminated.
16 PC3060 Price Computing Scale User Instructions
Page 17
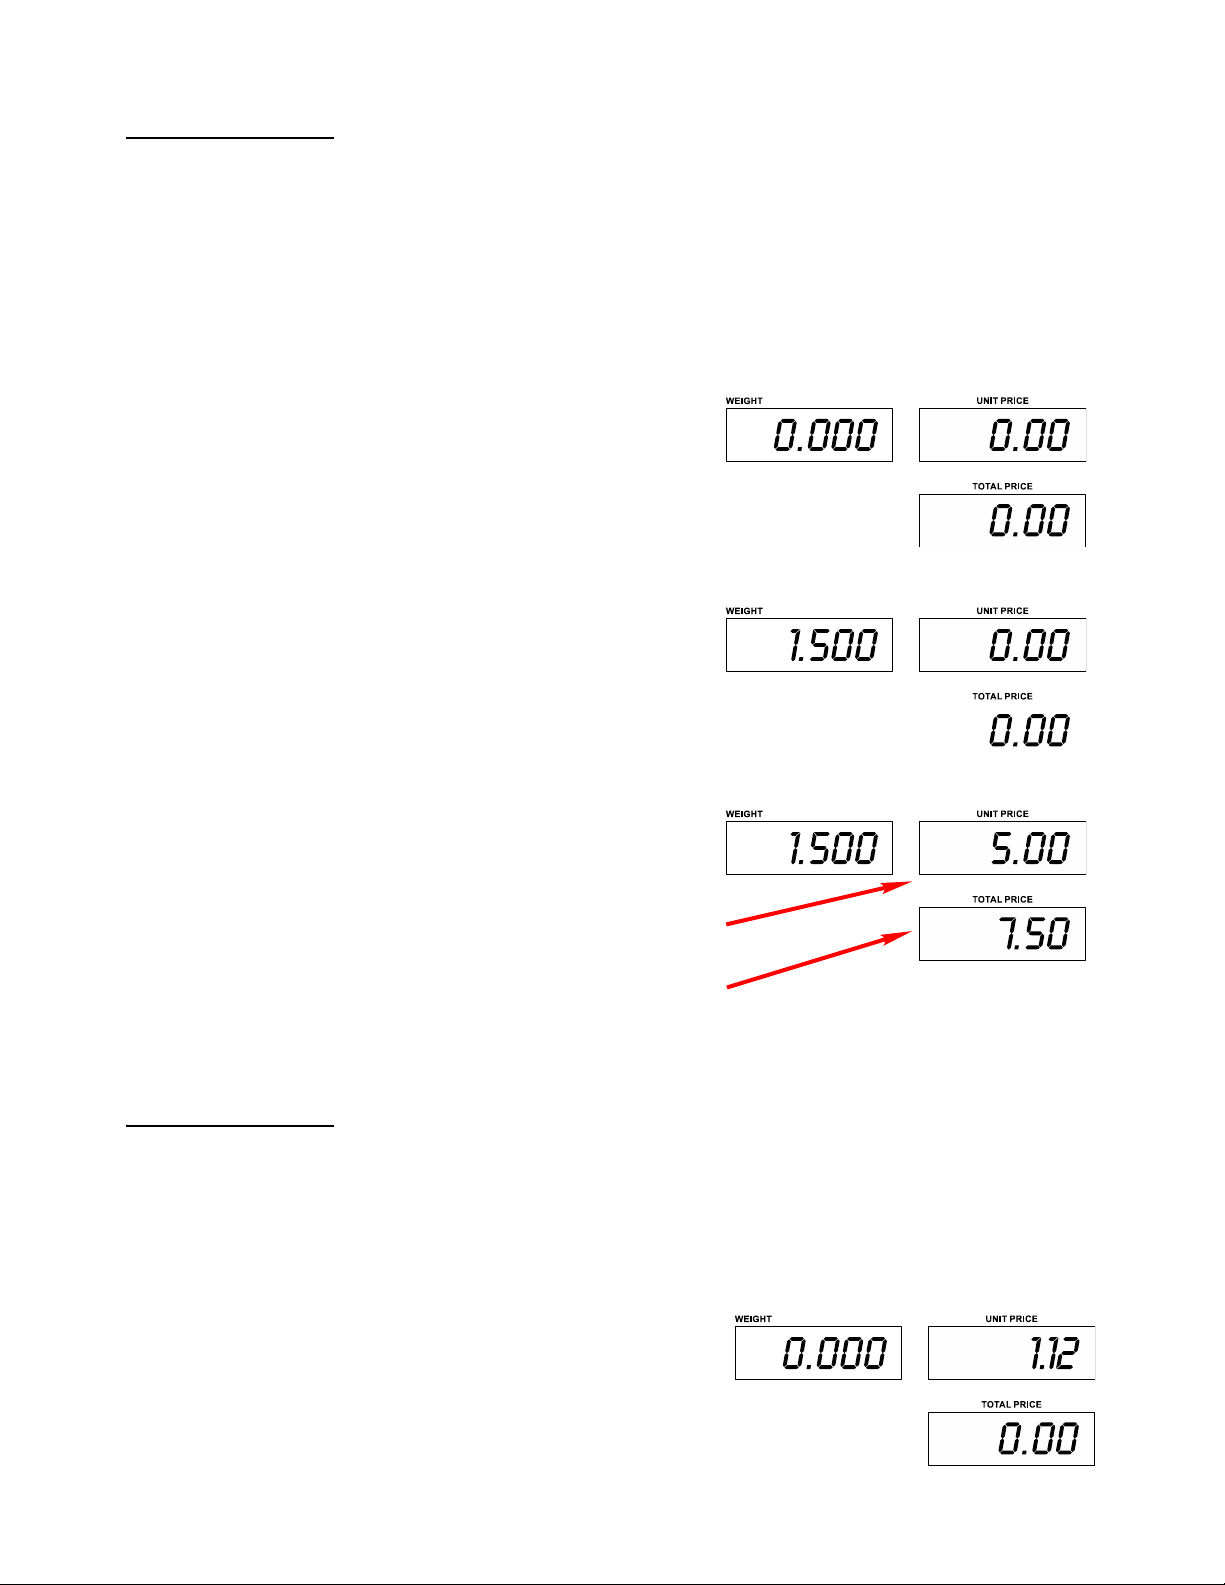
4.1.5 Unit price setting
Manual entry of unit price
The unit price will be based off the unit of measure the scale is set up to work within.
This is calculated based off one of the following:
l Price per lb
l Price per kg
This is easily identified by the right-hand annunciator in the weight display area.
1. Make sure platform is empty and
the display is showing zero.
2. Place goods to be weighed on the
weighing pan. (e.g.1.5 lb)
3. Enter in the unit price by pressing
numeric keys. In this example
$5.00 is shown. Key in 500 or 5
followed by a decimal.
4.1.6 Unit Price Memory
The PC3060 can store up to 10 unit price values. Price values can easily be selected
using the 0 to 9 numeric keys.
Saving a Unit Price to PLU memory
1. Make sure you are in the correct unit of measure before starting.
2. Use the numeric keys and enter in
the unit price per the selected unit
of measure. ($1.12 per lb in this
example)
This will now be displayed
in the UNIT PRICE display.
Total price will be
calculated automatically
and shown on the TOTAL
PRICE display.
PC3060 Price Computing Scale User Instructions 17
Page 18
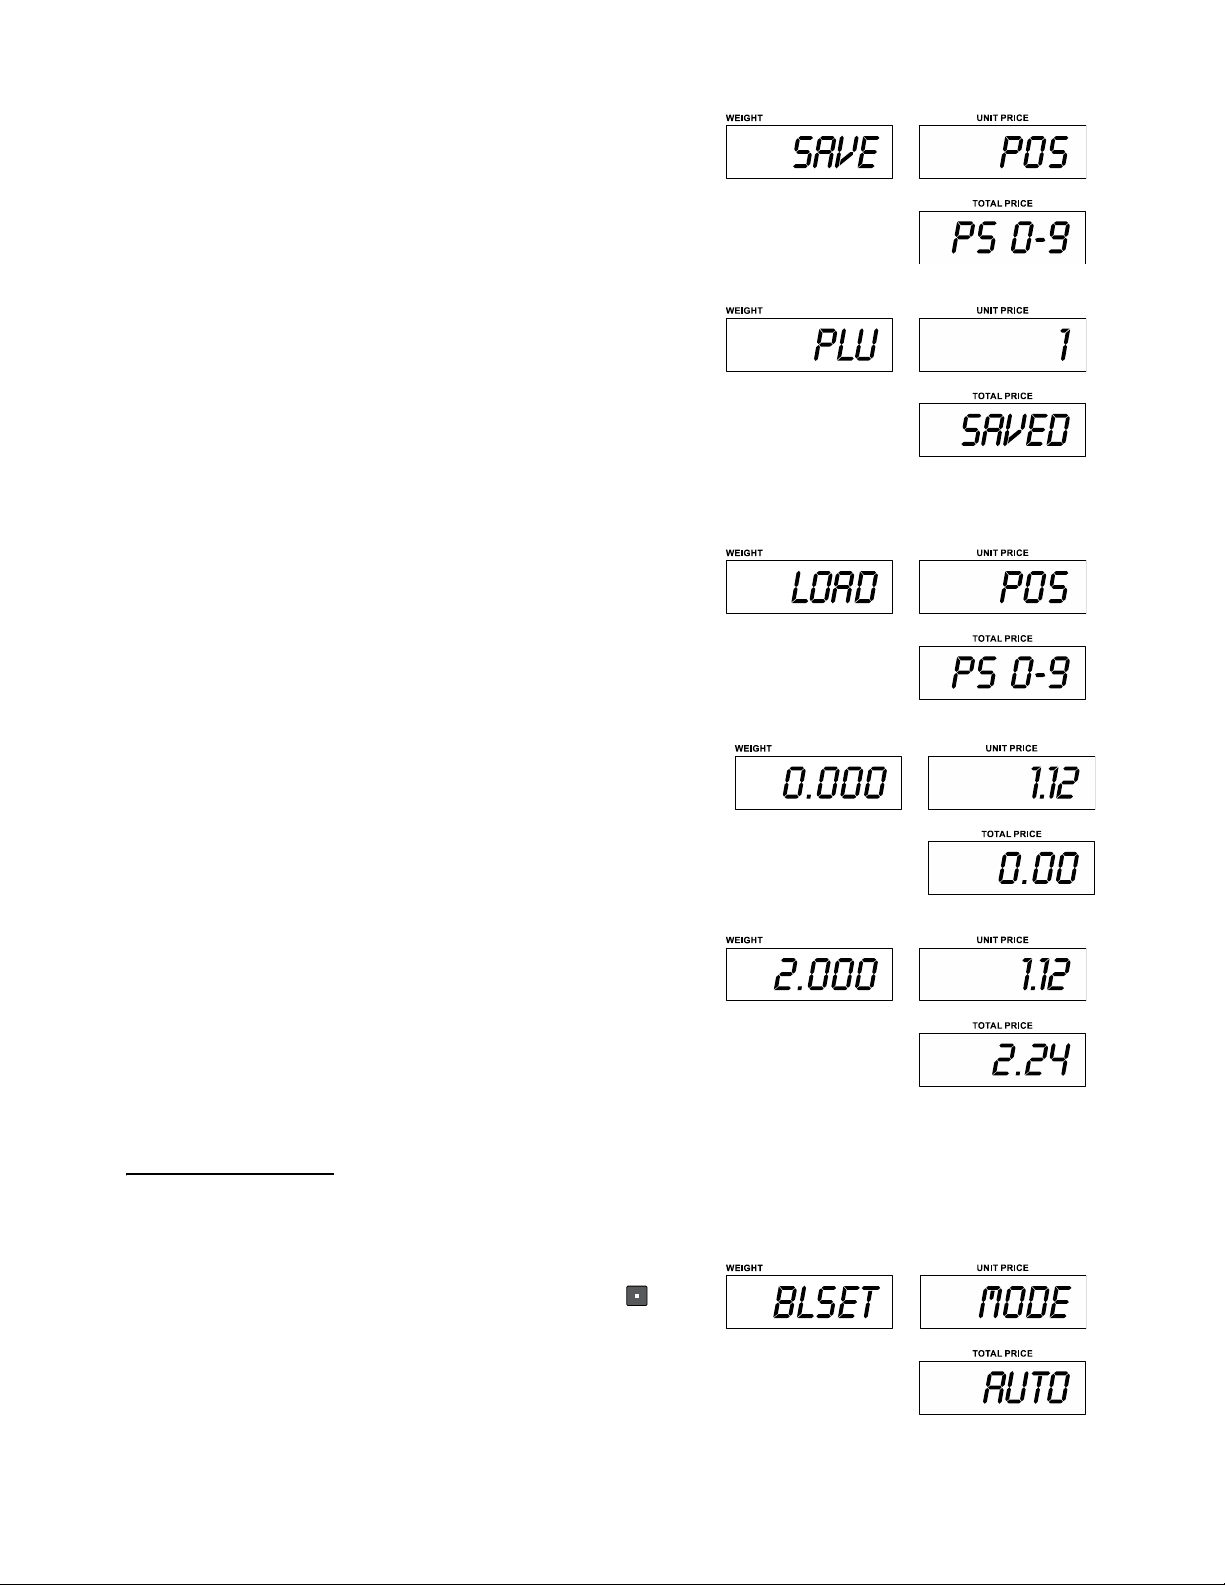
3. Press and hold the PLU key. The
display at right is shown.
4. Press a numeric key (0 to 9) to
select the PLU stored location. If
you want to select PLU 1, press
numeric key 1.
PLU key 1 is now saved
with $1.12 per lb
Recalling a stored PLU Unit Price
1. To recall a stored PLU unit price,
press the PLU key. The display at
right is shown:
Key in the desired stored PLU
number (0 to 9).
4.1.7 Back light
2. To recall PLU 1, press 1.
Display will now load the
stored unit price per the
selected unit of measure.
3. Place the item to be weighed on
the weighing pan and the PC3060
will automatically calculate the
total price based on the recalled
PLU unit price. See example at
right.
The PC3060 has the option to change the back light setting to help save battery life.
Choices are AUTO – ON –OFF. Factory default is AUTO.
1. In normal weighing mode, press
and hold the decimal key, , until
the display at right appears.
18 PC3060 Price Computing Scale User Instructions
Page 19
2. Press the M+ key to scroll through the backlight settings, AUTO – ON –OFF.
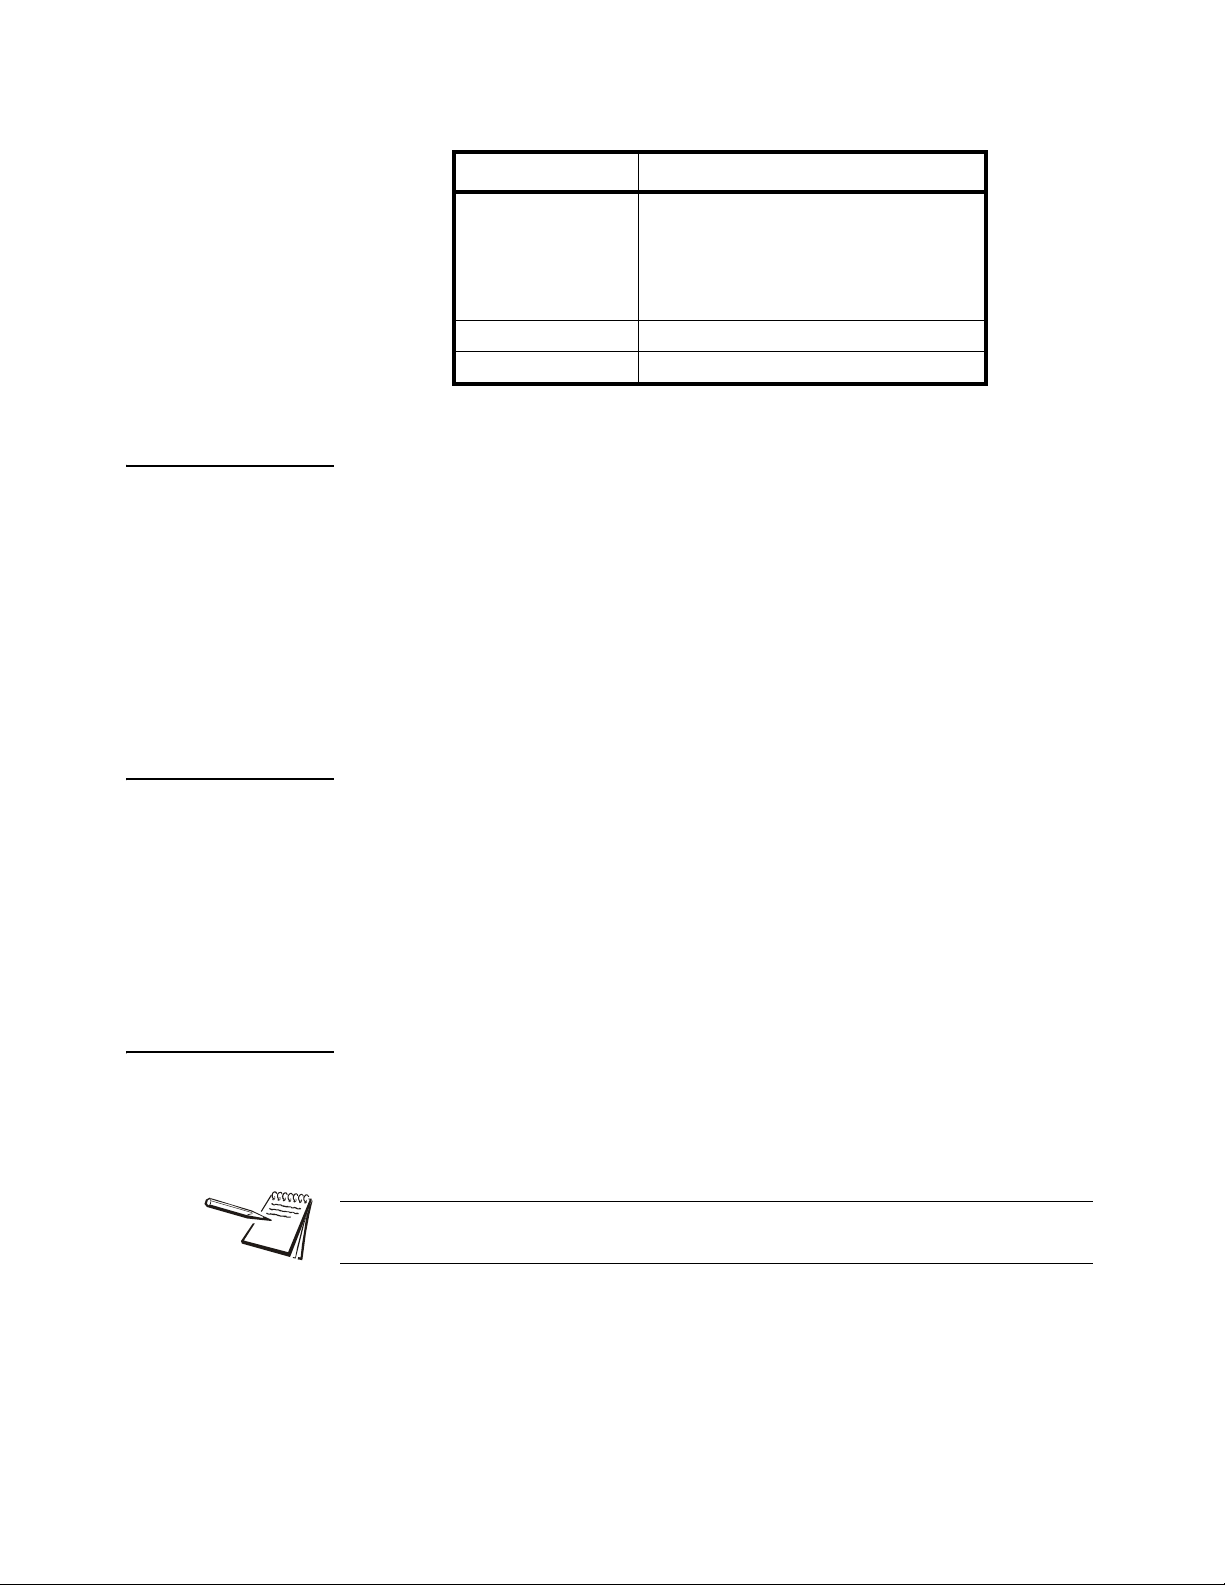
Display Description
bLSEt ModE AUto
bLSEt ModE on Backlight will be always on
bLSEt ModE oFF Backlight function will be always off
4.1.8 Automatic Unit Price Clear
The PC3060 scale can be set to automatically clear the unit prices once the scale
returns to zero weight.
To activate the Automatic Unit Clear function, press and hold the SAVE key while
turning off the scale.
Now when a unit price is entered and used, once the weight display returns to Zero, the
unit price will automatically be cleared.
Backlight will be turned on, only at startup or
when a change in weight is seen on the scale.
Back light will go off after 5 seconds once the
weight becomes stable or at zero.
To turn off this feature, repeat this process.
4.1.9 Units of Measure
Subject to the markets the PC3060 is to be used in, the UNITS key may be deactivated
so the unit of measure cannot be changed.
In the markets where lb and kg can legally be used, the UNITS key is active.
To change the unit of measure from lb to kg, make sure the scale is at zero. Press the
UNITS key to change weighing unit from lb to kg. The lb annunciator will go out and the
kg annunciator will illuminate.
4.1.10 Accumulation function
The scale can be set to accumulate manually by pressing the M+ key.
To turn on the accumulation functions see the F11 RS232>mode>tpup parameter on
page 24.
Before entering parameters, press the calibration switch. Switch is located below the
scale and may only be accessed if the scale has not been sealed.
To use this feature, the scale needs to have a stable reading and be able to return to
zero; only accumulated weight over 20 divisions can be accumulated.
The values (price) displayed may be added to the accumulated values by pressing the
M+ key. The TOTAL PRICE display will show the total price for two seconds before
reverting to the next item.
PC3060 Price Computing Scale User Instructions 19
Page 20
The scale must return to zero or a negative value before another sample can be stored.
Other products may be added by pressing the M+ key. It may take up to 99 entries or
until it reaches the maximum displayable digits.
To view the total price stored, press the M+ key when there is no weight on the scale.
The total will be displayed for two seconds.
To clear the memory, press the CLEAR key, , to clear all values.
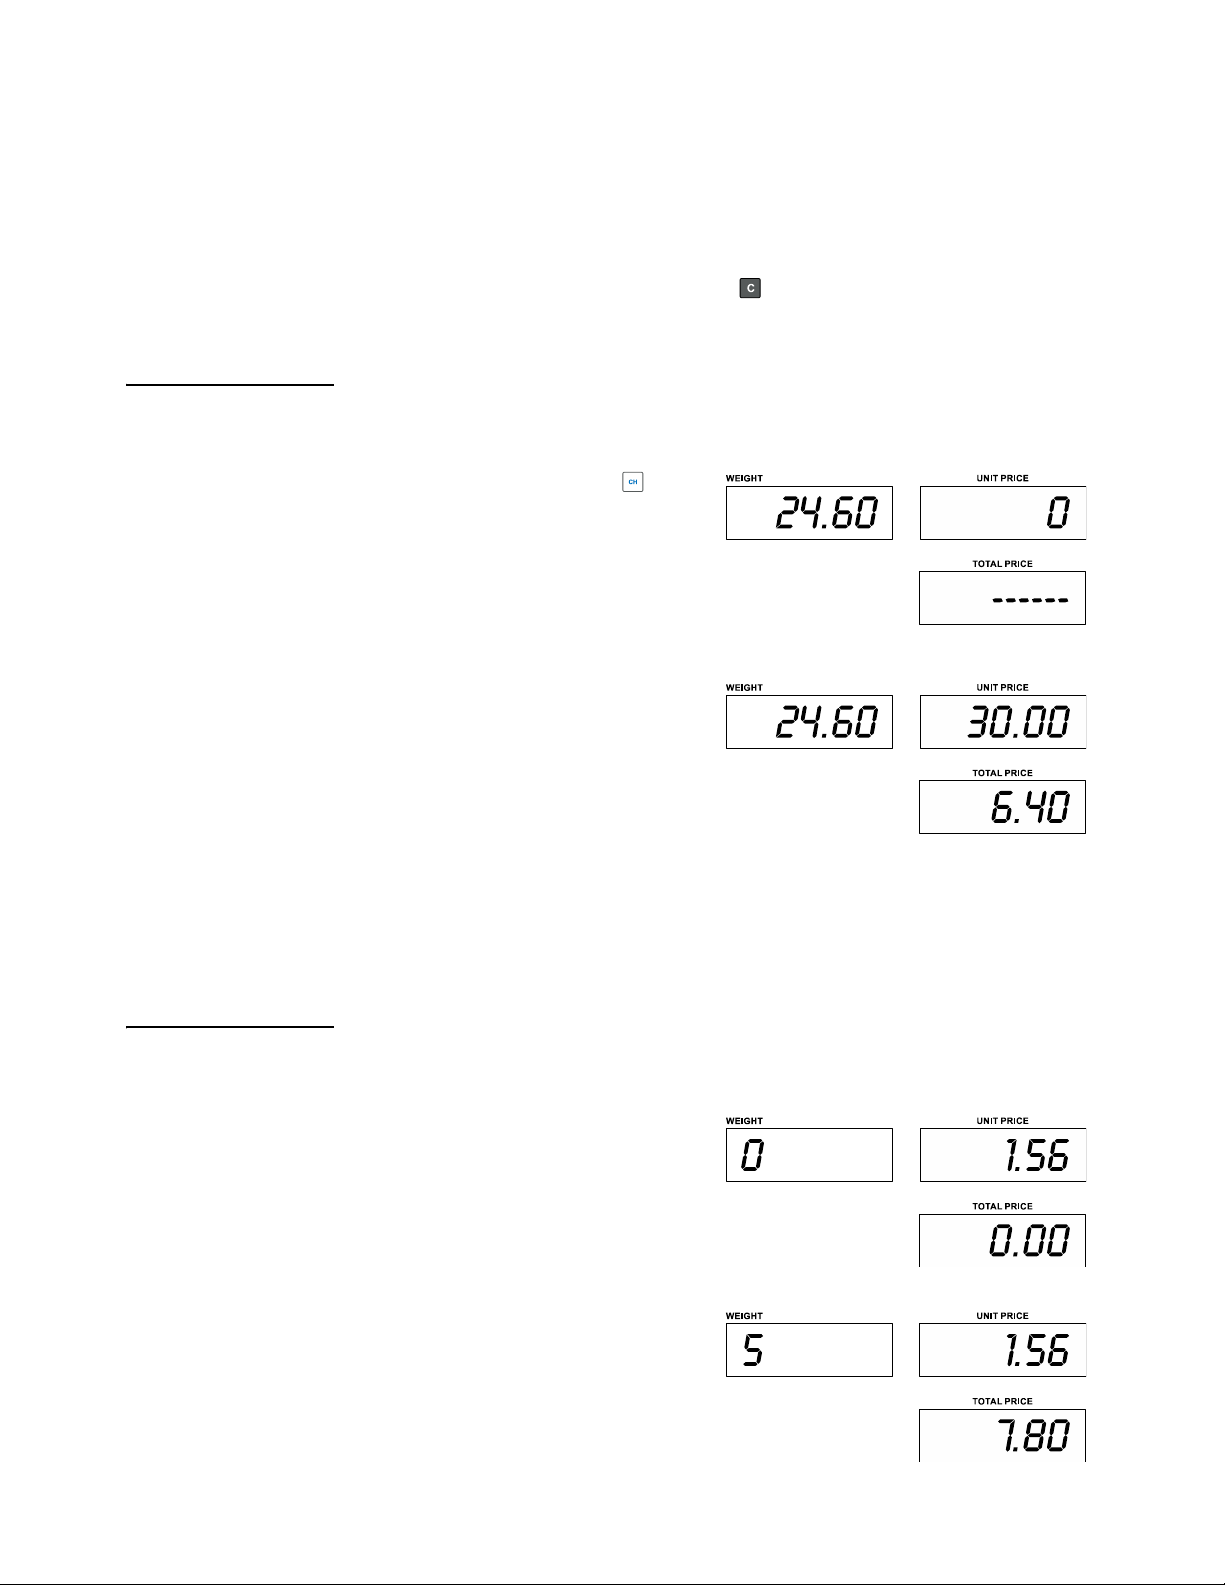
4.1.11 Give Change
After accumulating total price, you can use the CHANGE key to work out the exact
change that needs to be given. (total being $24.60 in the example shown below)
1. Press the CHANGE key, , and
2. Use the numeric keys to enter in
the Change annunciator in the
TOTAL PRICE display will
illuminate.
The total cost will now be
shown in the WEIGHT
display.
the money handed over by the
customer ($30.00 in this
example).
This will be shown in the
UNIT PRICE display and
the change will be shown in
the total price display.
3. Press the TARE key to return the scale to normal weighing mode and clear the
account memory.
4.1.12 Commodities Without Weighing
For products that are not weighed but are priced individually per item, these can easily
be added by using the QTY key.
1. Use the numeric keys to enter the
unit price of the item ($1.56 each
in the example at right) and then
press the QTY key.
2. Enter the quantity (a quantity of
5). The WEIGHT display will show
5 and the TOTAL PRICE display
will now show the total price
($7.80).
20 PC3060 Price Computing Scale User Instructions
Page 21

3. Press the QTY key to return normal weighing mode
PC3060 Price Computing Scale User Instructions 21
Page 22

5 Parameter Settings
5.1 Getting into Parameter Menu
1. Turn on the scale. Press and hold the TA R E key during the self-test.
Pn is shown briefly, asking you to enter a PIN number. The default PIN
number is 0000.
2. Press the 0 four times to enter the PIN number to get into the parameter menu.
. The display will show Pn - - - -.
3. Press the TA RE key to confirm. The scale will now give you access to the
parameter settings of the PC3060 and the display will show menu unit kg or
lb.
5.1.1 Enter Fxx Menu settings
Press the TARE key to enter the parameter listed on the display.
Press the M+ key to move up or the PLU key to move down the parameter menu list.
Press the TARE key to enter the parameter.
Press the ZERO key to escape from the menu and exit back to weighing mode.
22 PC3060 Price Computing Scale User Instructions
Page 23
5.1.2 Activating the Parameters
To access or change any parameter, the CAL switch located on bottom of the scale
may have to be pressed.
Press the CAL switch to enable parameters.
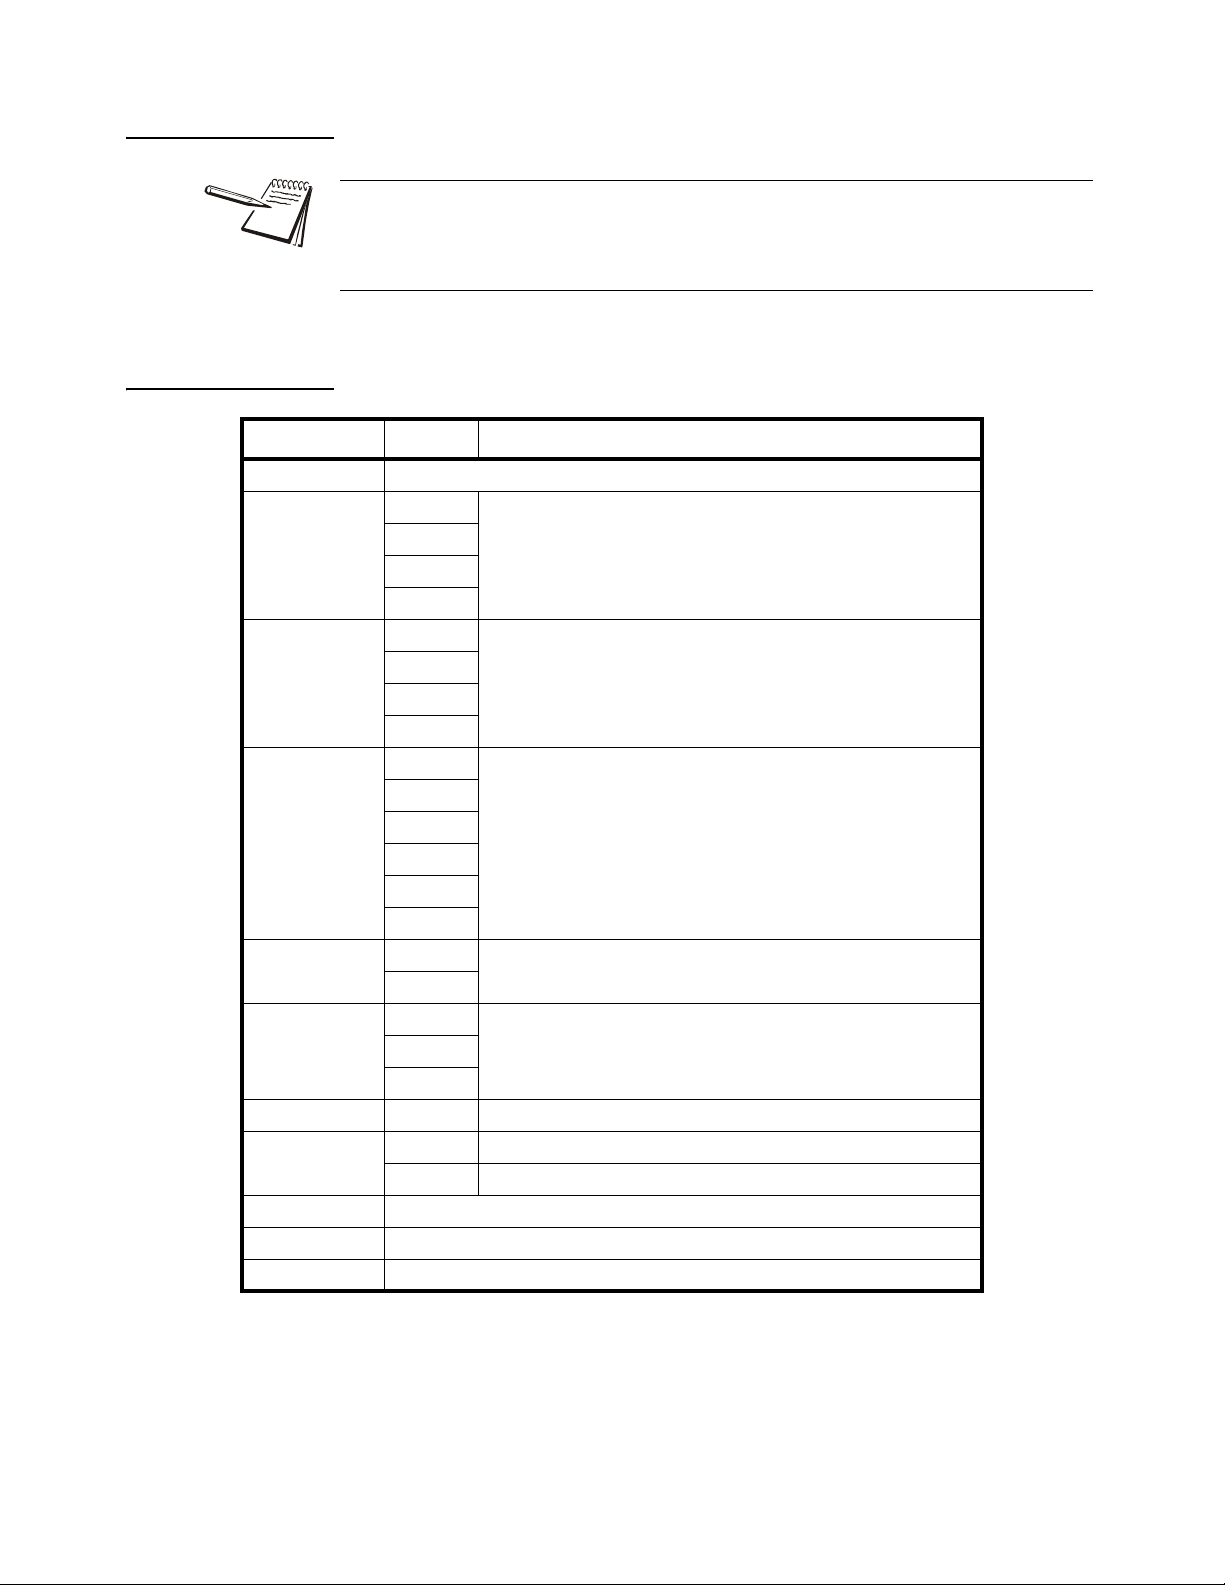
5.1.3 Parameter Menu Block
Menu Sub-Menu Description
F0 CAL Calibration
3000
F1 rES
F2 CAP
F3 PdECi
F4 PdESC
F5 SPEED
F6 Min coin 1/2/5/10 Select minimum coin
F7 SCSIUE tare
F8 ISN This display will show XXXXX for indicating the internal counts.
F9 Gra To set your local gravity value.
F10 Reset Factory default settings
6000
Dual-i
Dual-r
3KG/6lb
6KG/12lb
15KG/30lb
30kg/60lb
0
0
0.0
0.00
0.000
0.0000
FIX
FLOAT
Slow
Fast
ON Multi - Tare function ON
OFF Multi - Tare function OFF
Set external resolution
Set Scale Capacity
Set Price Decimal Point
Set unit Price to FIXED or FLOATING
To select A/D speedMedium
PC3060 Price Computing Scale User Instructions 23
Page 24
Menu Sub-Menu Description
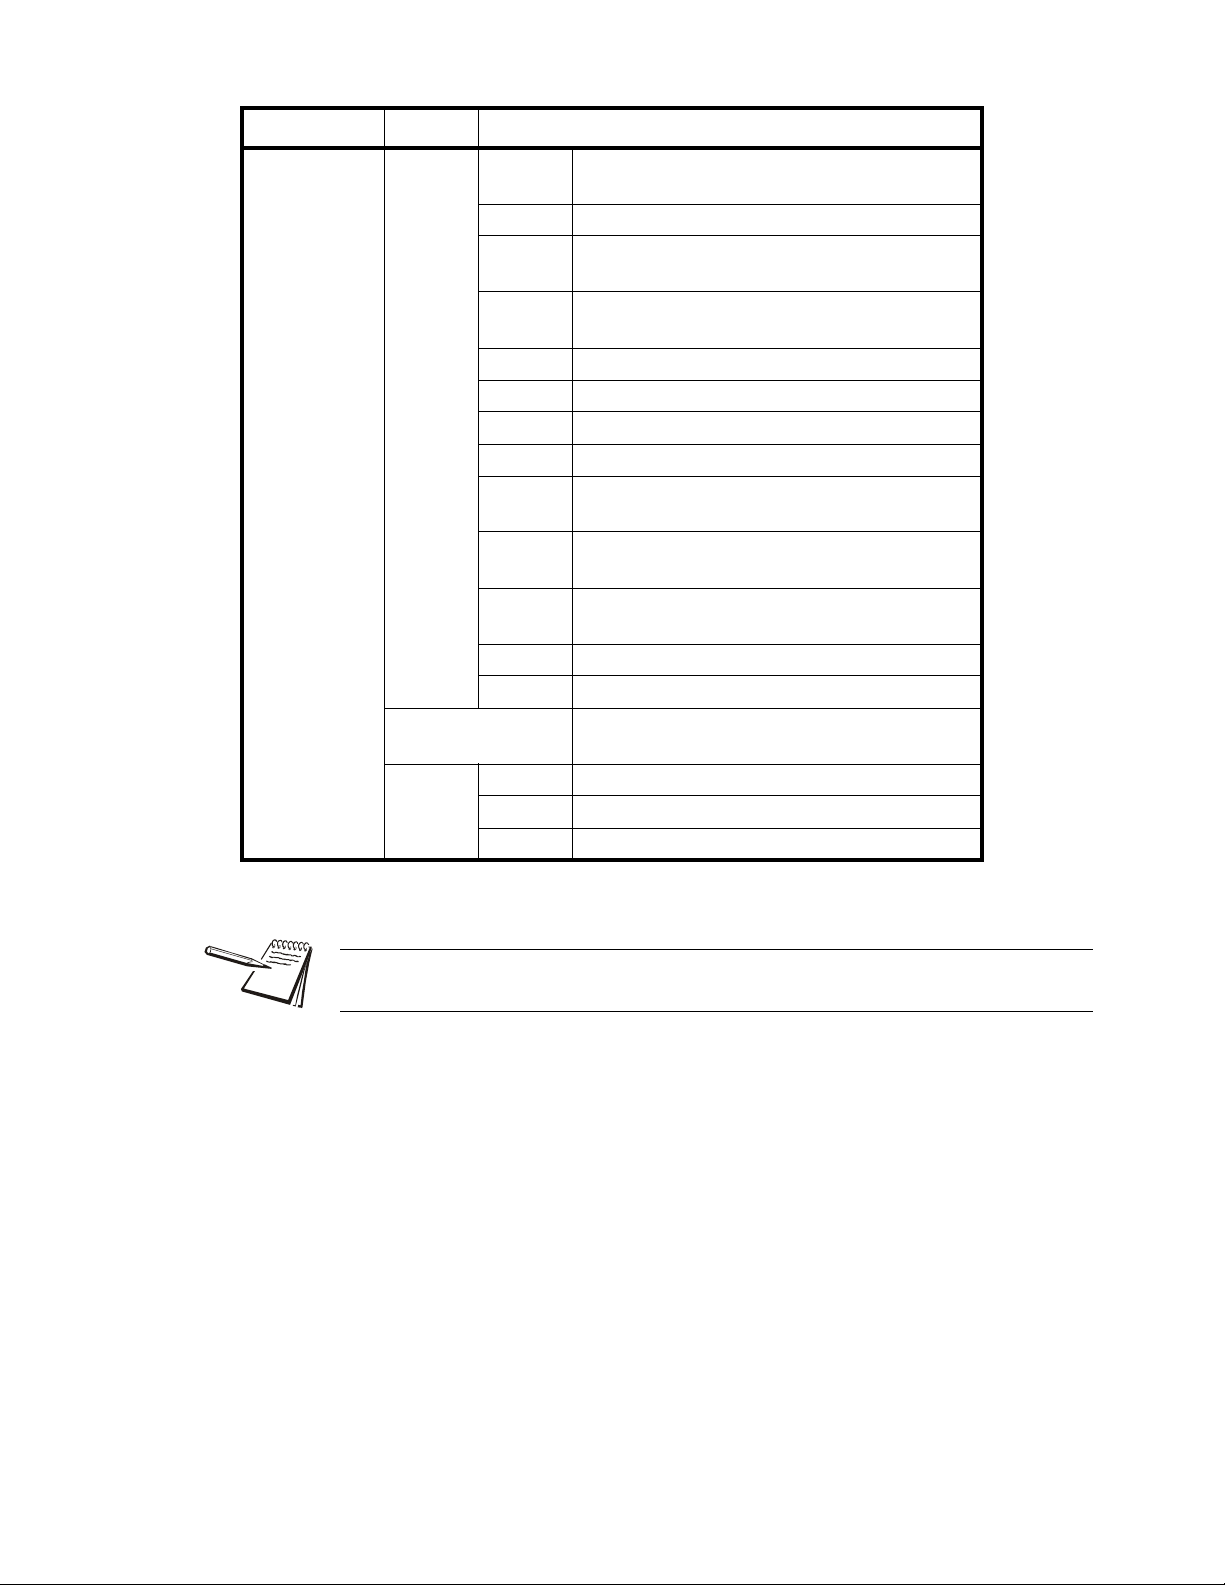
F11 rS232
ModE
baud
Pr
prin
The scale RS232 protocol will be determined by the
Baud & Pr
tr settings
tpup
Lp50
Enable accumulation function, and press M+ key to
send data to printer
Enable accumulation function, and press M+ key to
send data to printer
POS Protocol Type: POS
oFF RS232 function disable
Cont Continuous data transmission
StC Stable data sending continues
tole
do
ncie
cr
ncig
en
Protocol Type 1: Toledo
Protocol Type 2: NCI-ECR
Protocol Type 3: NCI-General
tec Protocol Type 4: TEC
easy Protocol Type 5: Easy Weigh
Set baud rate to (1200/2400/4800/9600/19200/38400/
115200)
8n1 8 data bits, no verify, 1 stop bit
7E1 7 data bits, Even verify, 1 stop bit
7o1 7 data bits, Odd verify, 1 stop bit
Press the UNITS key to choose kg or lb unit in the setting mode, capacity will be
shown in kg or lb values.
24 PC3060 Price Computing Scale User Instructions
Page 25

6 Calibration
1. Turn on the scale and press and hold the TAR E key during the self-test.
2. Key in the PIN number to get into the scales parameter menu. The default PIN
number is 0000.
3. Press the 0 numeric key four times…
4. Press the TARE key to enter the parameter settings.
5. Press the TARE key to confirm…
Display will show “Pn”.
Pn - - - - is displayed.
menu unit kg is displayed.
a. If calibrating in kg, continue to step 5.
b. If calibrating in lb, press the UNITS key until lb is shown on the
display.
f0 cal is displayed.
Press calibration switch to enable these settings and allow calibration to be
completed.
The calibration switch below the scale may be sealed if legally trade stamped. It
is recommended that recalibration is only carried out by a qualified technician.
6. Remove all weight from weighing pan and make sure STABLE indication is
visible on the display.
7. Press the TARE key to confirm…
unload is displayed.
8. Press the TARE key to confirm…
CAP loadXX is displayed.
9. If necessary, press the M+ key to select the calibration weight value and then
place the calibration weight on the weighing pan.
10. When the weight becomes stable, press the TARE key to confirm…
PASS is briefly displayed and then F0 Cal.
11. Calibration is now complete.
12. Remove calibration weight from the platform.
13. Press the ZERO key to go back to the weighing mode.
PC3060 Price Computing Scale User Instructions 25
Page 26

7 Miscellaneous
************************
Tot al
$ 300.00
Pay
$ 310.00
Change
$ 10.00
************************
************************
NET 10.000
Unit Price
$ 30.00 /kg
Price
$ 300.00
Tot al
$ 300.00
************************
************************
NET 10.000
Unit Price
$ 30.00 /lb
Price
$ 300.00
To ta l
$ 300.00
************************
************************
To ta l
$ 300.00
Pay
$ 310.00
Change
$ 10.00
************************
7.1 RS232 output
The PC3060 Series of scales can be connected to a standard printer using the RS-232
output found under the scale.
7.1.1 Print Format
26 PC3060 Price Computing Scale User Instructions
Page 27
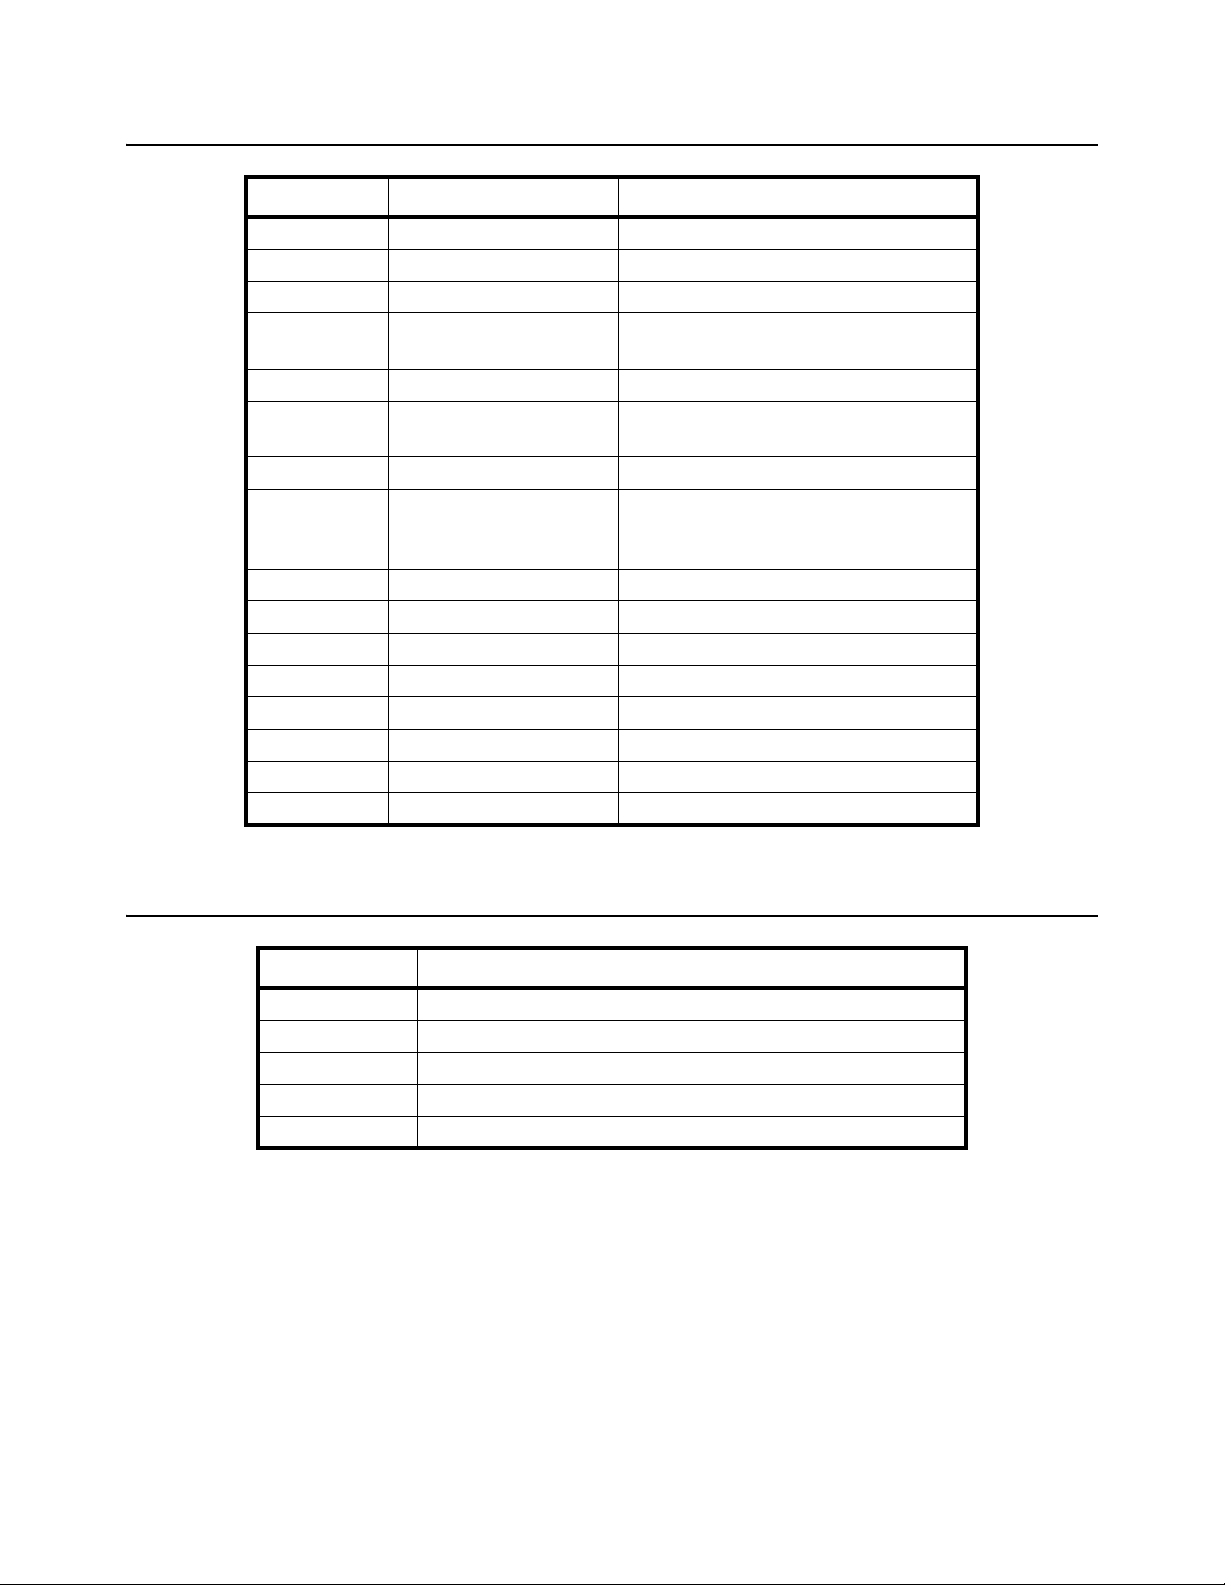
7.2 Error codes
Error Message Description Solution
----- Maximum load exceeded Unload or reduce weight
Err 1 Incorrect date Enter the date by using format “yy:mm:dd”
Err 2 Incorrect time Enter the time by using format “hh:mm:ss”
Err 4 Zero setting error
Err 5 Key board error Check the keys and connecter.
Err 6 A/D value out of range
Err 7 Percentage error Value should be (0.01% weight must > 0.5d)
Err 9 Unstable Reading
Err 10 Communication error No data (RS-232, continuous communication)
Err 15 Enter gravity error Gravity range (0.9~1.0)
Err 17 Tare out of range Remove the load and restart scale again.
Err19 Initial zero error Calibrate the scale.
--ol-- Over range Remove the load. Recalibrate
Fai l h/ fail Calibration Error Recalibrate
Err p Printer error Check the printer and settings
Ba lo/ lo ba Battery low Recharge battery, check the voltages.
Zero setting range exceeded due to switching
on. (4%max) Make sure platform is empty.
Make sure platform empty and check the pan is
installed proper. Check the load cell connectors.
Check any air variation, vibration, RF noise and
touching somewhere. Check the load cell and
connectors.
7.3 Replacement parts
Part number Description
AWT25-502479 Power supply USA (input 100-240V 50/60Hz 0.25A output 12V 0.5A)
AWT25-502480 Power supply UK (input 100-240V 50/60Hz 0.25A output 12V 0.5A)
Replacement battery
AWT20-509299 Replacement feet Kit (4 feet and lock nuts)
AWT20-509300 Replacement top pan
PC3060 Price Computing Scale User Instructions 27
Page 28
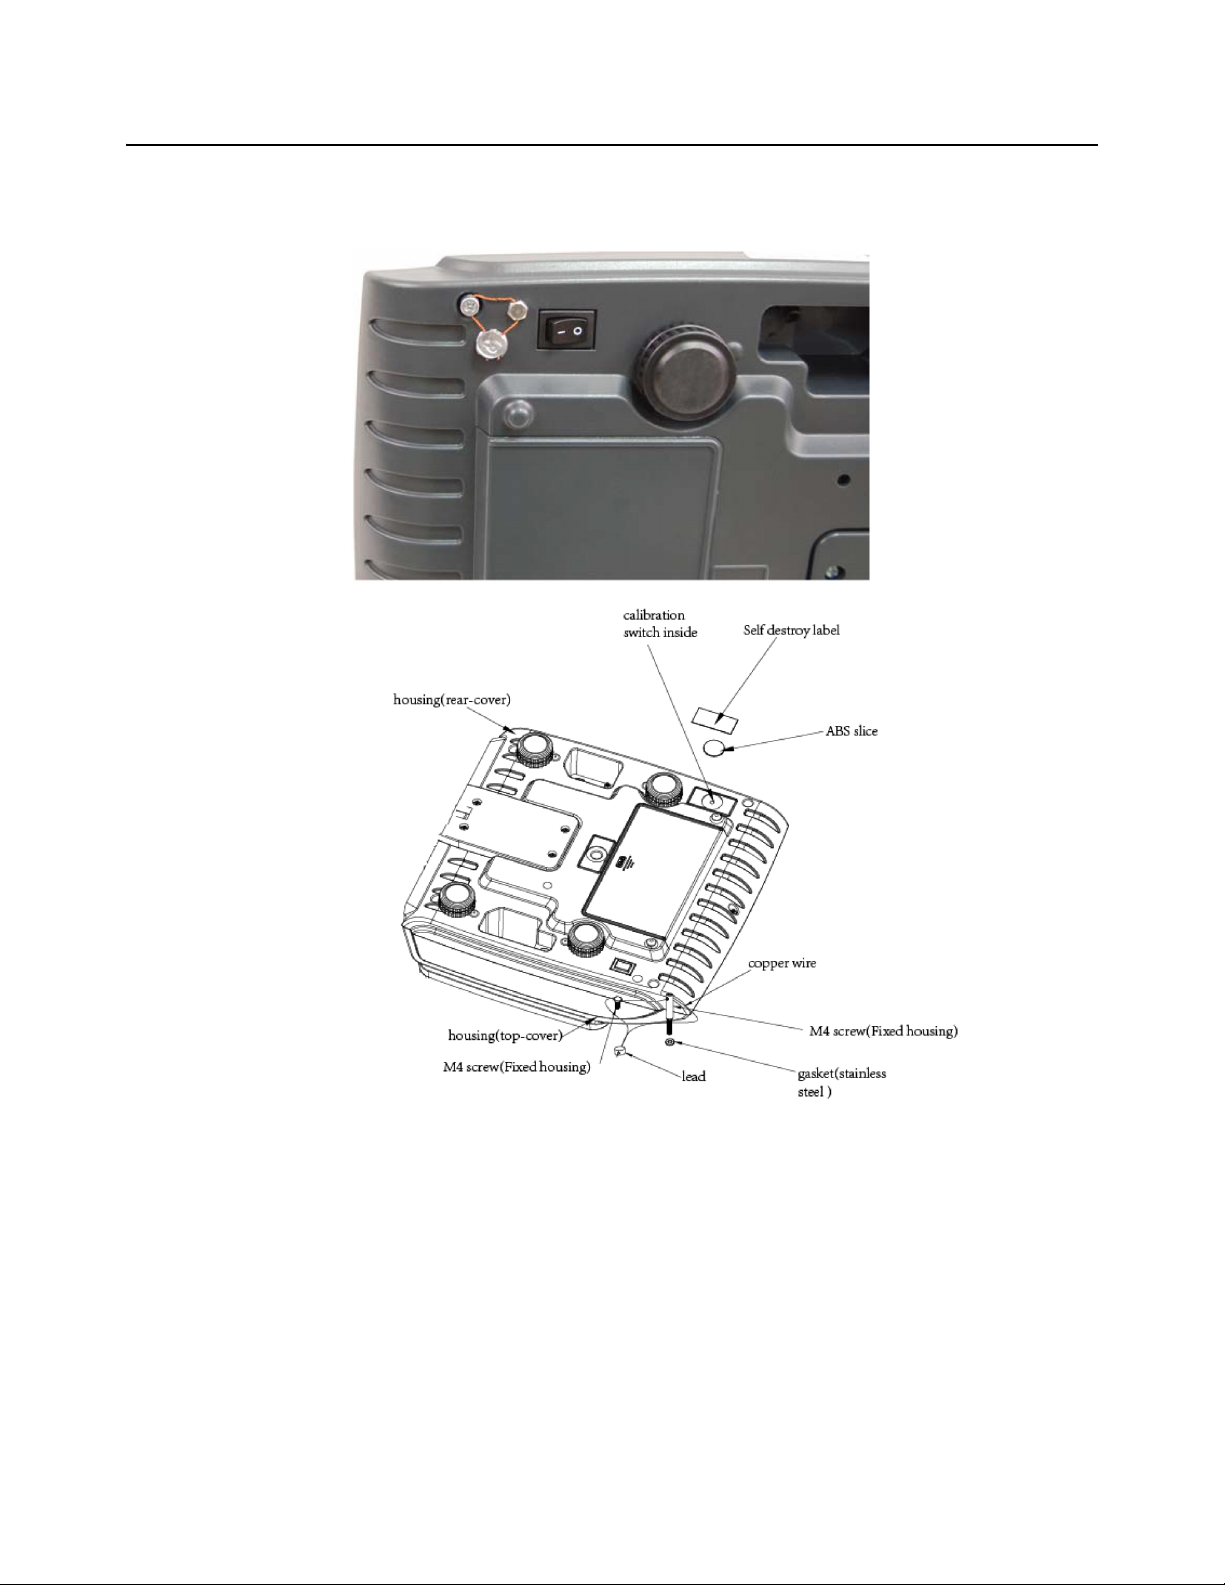
7.4 Sealing
A wire seal is passed
through the holes in
two sealing screws
mounted on the
bottom of the scale.
All sealing to be carried out in line with NTEP CC #18-119, or EC approval cert:
0200-NAWI-05154,
28 PC3060 Price Computing Scale User Instructions
Page 29

Page 30

Brecknell USA
1000 Armstrong Dr.
Fairmont MN 56031
Toll free:800-637-0529
Tel:507-238-8702
Fax:507-238-8271
Email:[email protected]
http://brecknellscales.com
Brecknell UK
Foundry lane,
Smethwick, West Midlands
England, B66 2LP
Tel:+ 44 (0) 8452 466717
Fax:+44 (0) 8452 466718
Email:[email protected]
http://brecknellscales.com
 Loading...