


X 2 0 0 0 . 2
X 2 4 0 0 . 2
G R A P H I C E D I T I O N S
B E D I E N U N G S A N L E I T U N G I N S T R U C T I O N M A N U A L

Dear customer
Congratulations on your purchase of this high-quality BRAX product.
You may be interested to know that we have been working now for 23 years in the development and production of top-quality high-end hifi components.
Within just a few years, we have succeeded in giving the BRAX brandname world wide recognition. Our efforts in creating these quality products have also been rewarded through the award of various honours by the major car audio magazines, not to mention numerous world wide innovation prizes.
In keeping with the tradition thus established, we have again provided our new BRAX amplifiers with everything they require in order to assume their rightful position as the pace-setters in the market. Offering the maximum possible level of engineering quality, they combine outstanding sound reproduction, solid craftmanship and the noblest of materials to provide a completely new dimension in individuality.
We are proud to offer you this high-end product MADE IN GERMANY. and wish you many hours of enjoyment with your new BRAX amplifier.
AUDIOTEC FISCHER GMBH
Heinz Fischer
Contents |
|
|
Page |
Introduction / Contents |
9 |
Installation X2000.2 / X2400.2 . . . . . . . . . . . . . . . . . . . . . . . . . . |
. . . . . 9 |
Connection X2000.2 / X2400.2 . . . . . . . . . . . . . . . . . . . . . . . . . . |
. . . 10 |
Connection of the power supply X2000.2 / X2400.2 . . . . . . . . . |
. . . 10 |
Equipment features and control elements X2000.2 . . . . . . . . . |
11 - 12 |
Connection of speakerand power cables X2000.2 . . . . . . . . . . |
. . . 12 |
Equipment features and control elements X2400.2 . . . . . . . . . . |
13 - 14 |
Connection of speakerand power cables X2400.2 . . . . . . . . . . |
. . . 14 |
Troubleshooting . . . . . . . . . . . . . . . . . . . . . . . . . . . . . . . . . . . . . . . |
. . . 15 |
Technical specifications . . . . . . . . . . . . . . . . . . . . . . . . . . . . . . . . . |
. . . 15 |
Installation X2000.2 / X2400.2 / GRAPHIC EDITIONS
In order to maintain the quality of this product and ensure safe operation, we recommend that our amplifiers be installed by an authorized BRAX dealer. Installation by a qualified and accredited technician will qualify you for our special lifetime warranty.Your BRAX dealer will also assist you in selecting the correct additional components and in ensuring that proper consideration is given to all the safety and sound-related aspects.
Important:
Before commencing installation, disconnect the car battery at the negative terminal. Once again we would urge you to have the installation work carried out by a specialist, as verification of correct installation and connection of the unit is a prerequisite for warranty cover of the BRAX by AUDIOTEC FISCHER Germany.
Fig. 1
Installation in the car
1.Install your amplifier at a dry location in the car where there is sufficient air circulation to ensure adequate cooling of the equipment.Also ensure that there is sufficient clearance available for making the cable connections and operating the controls.
2.For safety reasons, the amplifier must be secured in a professional manner.This is performed by means of four fixing screws (see Fig. 1) screwed into a mounting surface offering sufficient retention and stability. Before drilling the holes for the screws, carefully examine the area around the installation position and make sure that there are no electrical cables or components, hydraulic brake lines or any part of the petrol tank located behind the mounting surface - otherwise these could be damaged. You should be aware of the fact that such components may also be concealed in the double-skin trim panels/moldings.
+ |
+ |
+ |
+ |
9
Connection X2000.2 / X2400.2 / GRAPHIC EDITIONS
The above amplifier models may only be installed in motor vehicles which have a 12-volt negative terminal connected to the chassis ground. Any other system could cause damage to the amplifier and the electrical system of the vehicle.
The positive lead from the battery for the complete system should be provided with a line fuse at a distance of max. 30 cm from the battery. The amperage rating of the fuse is calculated from the maximum total current input of the car/vehicle hifi system.
Never bridge fuses or replace them with fuses with a higher amperage rating as such actions could lead to the destruction both of the amplifier and the entire electrical system of the vehicle.
As already mentioned, the negative lead from the vehicle battery to the chassis should be disconnected in order to prevent the occurence of short-circuiting. Install the cabling in a manner which precludes any danger of the leads being exposed to shear, crushing or rupture forces. If there are sharp edges in the vicinity (e.g holes in the body work), all the cables must be cushioned and protected to prevent fraying.
Never lay the power supply cables adjacent to leads and lines connecting other vehicle equipment (fan motors, fire detection modules, gas/petrol lines etc.).
In order to avoid cross-talk distortion, audio cables should never be laid together with electrical leads (with the exception of the screened BRAX POWER TRAX power supply cables).
In order to ensure safe installation, use only high-quality connection materials, and comply with the recommended minimum cross sections/gauge values of the cables for the individual amplifier modules.
As an aid to calculating the cross-sectional requirements of power cables which are not longer than 5 m, we advise a figure of max. 5 A per mm2. For the X 1000 and X 1400 BRAX amplifiers described and for the X 2000 and X 2400 a minimum cross section of 20 mm2 /gauge 5 for the positive 12-volt supply lead and for the ground (chassis) cable. In order to ensure optimum sound quality and interference-free music reproduction, we recommend that installation be performed with BRAX POWER TRAX power supply cables.The remote lead should have a cross section of at least 1 mm2.
Connection of the power supply X2000.2 / X2400.2 / GRAPHIC EDITIONS
The +12 volt power supply cable (see Fig. 2) should be connected directly to the positive terminal of the battery. A fuse should also be provided at a distance of max. 30 cm from the battery.The amperage rating of the fuse is calculated from the maximum total current input of the car/vehicle hifi system.
The fuse holder appertaining to the amplifier is supplied with the amplifier module.This must be installed at a distance of max. 20 cm from the positive terminal of the amplifier and equipped with the original BRAX fuse provided.
The fuse ratings are: for amplifier X 1000 = 60 A, for amplifier X 1400 = 60 A, for amplifier X 2000 = 100 A, for amplifier X 2400 = 100 A.
Failure to comply nullifies the warranty.
The ground (chassis) cable (see Fig. 2) should be connected to the central ground reference point (this is located where the negative terminal of the battery is grounded at the metal chassis of the vehicle), or to a bright bare-metal location on the vehicle chassis, i.e. an area which has been cleaned of all paint residues. It must be ensured that resistance values to the power sources (alternator, generator, battery) are minimized as excessive resistance can appreciably affect the audio quality and dynamics of the system.The „Remote“ cable (see Fig. 2) is connected to the „Remote“ connection or the automatic antenna connection of the control unit (tuner/radio).The antenna connection is only activated if the control unit is switched ON. This ensures that, with the control unit switched off, the amplifier is also switched off to safe the battery.
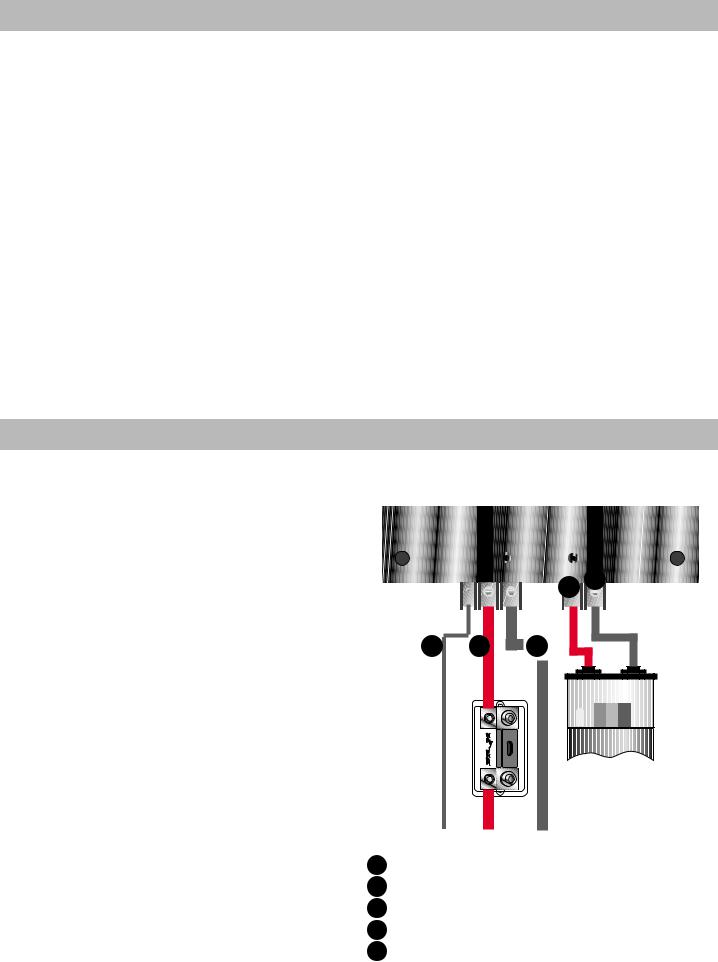
Fig. 2
|
|
5 |
|
|
4 |
1 |
2 |
3 |
1 Control lead (Remote)
2
3Ground cable
4Positive (+) connection BRAX Power Stabilizer
5Negative (-) connection BRAX Power Stabilizer
10
 Loading...