


Multi Cooker
OWNER’S MANUAL
Model MC665H
120V., 60Hz., 900 Watts
Copyright © Euro-Pro Operating LLC 2006
USA: EURO-PRO OPERATING LLC Canada: EURO-PRO OPERATING LLC
94 Main Mill Street, Door 16 4400 Bois Franc
Plattsburg, NY 12901 St. Laurent, QC H4S 1A7
Tel.: 1 (800) 798-7398

Model
MC665H
ONE (1) YEAR LIMITED WARRANTY
EURO-PRO Operating LLC warrants this product to be free from defects in material and
workmanship for a period of one (1) year from the date of the original purchase, when utilized for
normal household use, subject to the following conditions, exclusions and exceptions.
If your appliance fails to operate properly while in use under normal household conditions within
the warranty period, return the complete appliance and accessories, freight prepaid to:
U.S.: EURO-PRO Operating LLC, 94 Main Mill Street, Door 16, Plattsburgh, NY 12901
CANADA: EURO-PRO Operating LLC, 4400 Bois Franc, St Laurent, Qc, H9S 1A7
If the appliance is found to be defective in material or workmanship, EURO-PRO Operating LLC
will repair or replace it free of charge. Proof of purchase date must be included. *
Non-durable parts including, without limitation, sealing gasket and electrical parts which normally
require replacement are specifically excluded from warranty.
The liability of EURO-PRO Operating LLC is limited solely to the cost of the repair or replacement
of the unit at our option. This warranty does not cover normal wear of parts and does not apply to
any unit that has been tampered with or used for commercial purposes. This limited warranty does
not cover damage caused by misuse, abuse, negligent handling or damage due to faulty
packaging or mishandling in transit. This warranty does not cover damage or defects caused by
or resulting from damages from shipping or repairs, service or alterations to the product or any of
its parts, which have been performed by a repair person not authorized by EURO-PRO Operating
LLC.
This warranty is extended to the original purchaser of the unit and excludes all other legal and/or
conventional warranties. The responsibility of EURO-PRO Operating LLC if any, is limited to the
specific obligations expressly assumed by it under the terms of the limited warranty. In no event is
EURO-PRO Operating LLC liable for incidental or consequential damages of any nature
whatsoever. Some states do not permit the exclusion or limitation of incidental or consequential
damages, so the above may not apply to you.
This warranty gives you specific legal rights, and you may also have other rights which vary from
state to state or from province to province.
*Important: Carefully pack item to avoid damage in shipping. Be sure to include proof of
purchase date and to attach tag to item before packing with your name, complete address
and phone number with a note giving purchase information, model number and what you
believe is the problem with item. We recommend you insure the package (as damage in
shipping is not covered by your warranty). Mark the outside of your package “ATTENTION
CUSTOMER SERVICE”. We are constantly striving to improve our product s, therefore the
specifications contain ed her ein are subject to change without noti c e.
-----------------------------------------------------------------------------------
OWNERSHIP REGISTRATION CARD
Please fill out and mail the product registration card within ten (10) days of purchase. The
registration will enable us to contact you in the unlikely event of a product safety notification. By
returning this card you acknowledge to have read and understood the instructions for use, and
warnings set forth in the accompanying instructions
U.S.: EURO-PRO Ope r ati ng LLC, 94 Main Mill Street, Door 16, Plattsburgh, N.Y., 12901
Model MC665H
______________________________________________________________________
Appliance model
______________________________________________________________________
Date purchased Name of store
______________________________________________________________________
Owner' s name
______________________________________________________________________
Address City State Zip Code
Printed in China
.
17

Troubleshooting
TROUBLESHOOTING
PROBLEM POSSIBLE CAUSE POSSIBLE SOLUTION
Buttons will not
work when
pressed
Multi cooker
suddenly fails
Steam leaking
Safety floating
valve is not rising
The unit continues
to beep.
Whenever rice is
cooking it burns
1. The electronic memory is
not cleared.
2. Unit is not plugged in
correctly.
1. The heating plate is dirty
impeding contact with
cooking pot.
1. Steamer vent is not
installed properly.
2. Water collector full.
1. Insufficient food in the
cooking pot.
1. Pressing buttons does
not stop the unit beeping.
1. The heating plate inside
the unit is dirty, impeding
contact with cooking pot.
1. Press the stop button to clear
the memory, then select
desired function.
2. Remove plug from unit and
wall, reinsert into unit then
wall plug.
1. Wipe away debris with a
slightly damp cloth.
1. Re-install steaming vent.
2. Empty water collector.
1. Add more food and/or water
according to the recipe.
1. Unplug the unit from the wall
outlet. Call customer service.
1. Wipe away debris with a
slightly damp cloth.
IMPORTANT SAFETY INSTRUCTIONS
When using your Multi Cooker basic safety precautions should always be
observed, including the following:
1. Read all instructions before using your
Multi Cooker.
2. To protect against fire, electric shock
and injury to persons, do not immerse
cord, plugs, or main unit in water or
other liquid.
3. Do not touch hot surfaces. Always
use handles or knobs.
4. Close supervision is necessary when
any appliance is used by or near
children.
5. Do not let cord hang over edge of
table or counter, or touch hot surfaces.
6. Do not operate any appliance with a
damaged cord or plug or after the
appliance malfunctions or has been
dropped or damaged in any manner.
Return appliance to EURO-PRO
Operating LLC for examination, repair
or adjustment.
7. The use of accessory attachments not
recommended by the appliance
manufacturer may result in fire, electric
shock or injury to persons.
8. Do not place on or near a hot gas or
electric burner or in a heated oven.
9. To avoid possible steam damage,
place multi cooker away from walls or
cabinets during use.
10. Unplug from electrical outlet when not
in use and before cleaning. Allow the
appliance to cool before putting on or
taking off parts, and before cleaning.
11. To disconnect, press the “Stop” button,
then remove the plug from electrical
outlet. Always hold the plug, and
never pull the cord.
12. Extreme caution must be used when
moving an appliance containing hot
oil or other hot liquids. Always use
pot holders when moving your multi
cooker.
13. This appliance generates steam.
Improper use may result in scalding
injury. Make certain unit is properly
closed before operating. See
“Operating Instructions”.
14. When using this appliance, provide
adequate air space above and on all
sides for air circulation. On surfaces
where heat may cause a problem,
an insulated heat pas is
recommended.
15. Do not attempt to dislodge food
when appliance is plugged in.
16. Do not obstruct the steam release
vent during use.
17. Do not fill the unit over the “MAX”
line. When cooking foods that
expand during cooking such as rice
or dried vegetables, do not fill the
unit over 1/2 full. See “Cooking with
your Multi Cooker”.
18. Do not use this appliance for deep
frying with oil or shortening.
19. Never operate the appliance without
any liquid inside. Do not allow the
multi cooker to boil dry.
20. Always wear protective, insulated
oven mitts when opening the steam
release vent, the cover of the unit or
removing cooking pot or pasta/
steamer insert.
21. Do not use this appliance outdoors.
22. Do not use this appliance other than
intended use.
23. Caution: To reduce the risk of
electric shock, cook only in the
removable cooking pot. Never place
anything into the housing.
24. Do not use without the removable
cooking pot in place.
25. Use extreme caution when removing
the cover after cooking. Serious
burns can result from steam inside.
Always lift and tilt the cover away
from you and allow water to drip into
the unit.
26. Let the multi cooker cool before
cleaning.
27. Do not use with foods that can
overcook easily and quickly.
28. Do not place removable cooking pot
onto direct heat from stove elements
or otherwise.
16
SAVE THESE INSTRUCTIONS
For Household Use Only
1 Rev. 06/06

IMPORTANT SAFETY INSTRUCTIONS
RECIPES
WARNING: Danger of Scalding. Please use caution when using
the multi cooker. The steam emitted from this appliance is
very hot.
GROUNDING INSTRUCTIONS
This appliance must be grounded. If it should malfunction or
breakdown, grounding provides a path of least resistance for
electric current to reduce the risk of electric shock. This appliance
is equipped with a cord having an equipment-grounding conductor
and grounding plug. The plug must be inserted into an appropriate
outlet that is properly installed and grounded in accordance with all
local codes and ordinances.
WARNING: Improper connection of the equipment-
grounding conductor can result in a risk of electric shock.
Consult with a qualified electrician or service person if you are in
doubt as to whether the outlet is properly grounded. Do not modify
the plug provided with the appliance - if it will not fit the outlet, have
a proper outlet installed by a qualified electrician.
This appliance is for use on a nominal 120-volt circuit, and has a
grounding attachment plug that looks like the plug illustrated at
right. Make sure that the appliance is connected to an outlet having
the same configuration as the plug. No adaptor should be used
with this appliance.
1. If it is necessary to use an
extension cord, use only a 3-wire
extension cord that has a 3-blade
grounding plug and a 3-slot
receptacle that will accept the plug
on the appliance. The marked
rating of the extension cord should
be equal to or greater than the
electrical rating of the appliance.
OR
2. Do not use an extension cord. If
the power cord is too short, have a
qualified electrician or serviceman
install an outlet near the appliance.
Please Note:
1. A short power supply cord is provided
to reduce the risks resulting from
becoming entangled in or tripping
over a longer cord.
2. Extension cords may be used is care
is exercised in their use.
3. If a long cord or extension cord is used,
(1) the marked electrical rating of the
cord set or extension cord should be at
least as great as the electrical rating of
the appliance, (2) the extension cord
must be a grounding-type 3-wire cord,
and (3) the longer cord should be
arranged so that it will not drape over
the countertop or tabletop where it can
be pulled on by children or tripped over
accidentally.
Easy Cobbler Cake
4 cups frozen peaches
2 cups frozen blueberries
1 tsp cinnamon
1tbs sugar
1 18.25 oz white cake mix; (Prepared according to package directions)
2 tbs butter
vanilla ice cream
Remove the fruit from the freezer and let thaw. When thawed, pat away any excess
moisture with paper towels and place in a medium mixing bowl. Toss gently together
with the cinnamon and sugar; set aside.
Mix the cake mix according to package directions; set aside.
Grease the cooking pot with butter. Place the pot into the multi cooker, press the
function button to select the bake function.
Pour the batter into the pot and then top with the fruit. Close the cover and cook for the
entire default (60 minutes) of the bake function.
When done scoop into bowls and top with vanilla ice cream.
Note: If the cake isn’t completely done, just turn the cooker back onto the back setting
and continue to bake, checking at five (5) minute intervals, until the center is set.
Pineapple Upside Down Cake
¼ cup light brown sugar
3 tbs butter
1 20 oz can pineapple chunks; (drained)
1 10 oz jar maraschino cherries; (drained)
1 pineapple cake mix; (prepared according to package directions)
Place cooking pot into the unit. Plug unit into wall outlet. Press the function button and
select pasta function. Add the butter to the pot. When melted add the brown sugar,
pineapple and cherries; stir until blended.
Pour the prepared cake batter over the fruit. Press stop button to stop the cooker and
press the function button to select the bake function.
Cook the entire cycle of the default bake function. (50 minutes) Open the cover and
allow to cool for 5-10 minutes before flipping onto a platter.
2
15

RECIPES
Breakfast Casserole
3 Tbs vegetable oil
¼ cup onion; (chopped)
1 lb small red potatoes; (peeled, sliced and par-boiled)
12 large eggs
¼ cup cold water,
¼ tsp salt
¼ tsp paprika
2 cups shredded cheddar cheese
1/3 cup real bacon
Place the cooking pot into the unit and plug into wall outlet. Press the function button
to select the pasta function. Add the oil. When the oil is hot, add the onion, potatoes,
salt and paprika. Cook, stirring often, until the cooker beeps.
Whisk the eggs together with the water in a large mixing bowl. Stir in 1 cup of the
cheese. Pour the mixture over the potatoes. Sprinkle the remaining cheese and the
bacon bits evenly over the top of the eggs.
Close the cover and press the function button to select the bake function. Adjust the
timer for 40 minutes and cook. Press stop once the unit beeps and allow food to stand
for 5 minutes or until ready to serve.
Use serving spoon or other non-metal utensil to serve.
Mock Paella
2 tbs olive oil
½ lb boneless, skinless chicken breasts; (cut into small pieces)
8 oz Salami or Pepperoni; (cut into small cubes)
1 med onion; (chopped)
1 14.5 oz can petite diced tomatoes
1 10 oz package saffron yellow rice
1 14.5 oz petite diced tomatoes
2 cups chicken broth
1 lb 16-20 count shrimp; (peeled, deveined)
*12 little neck clams or mussels; (scrubbed and bearded)
3 small bay leaves
Place cooking pot into the unit. Plug unit into wall outlet. Press the function button and
select pasta function. Add the oil to the cooking pot. When the oil is hot, add the
chicken, salami and onion. Cook, stirring often for about 5 minutes. Add the garlic and
continue cooking until the cooker beeps.
Add the rice, tomatoes and broth; stir well. Gently stir in the shrimp, the clams or
mussels (if desired) and the bay leaves.
Close the cover and press the function button to select the cook rice function. Cook
until the machine switches to the keep warm function.
Serve hot with a bottle of hot sauce such as Tabasco.
Parts and Components
1. Main Unit
2. Start Button
3. Function Button
4. Stop Button
5. LCD Control Panel
6. Cover Release Button
7. Sealing Ring
8. Cover
9. Steam Vent
10. Water Collector
11. Carry Handle
12. Cooking Pot
13. Pasta/Steamer Insert Handle
14. Pasta/Steamer Insert
15. Poacher/Warmer
16. Spoon
17. Measure Cup
18. Break-away Power Cord
14
Technical Specifications
Voltage: 120V., 60Hz.
Power: 900 Watts
NOTE: *Illustrations may vary from actual product
3

Features of Your Multi Cooker
RECIPES
Cooking with your new Multi Cooker is
simple and easy to use. The electronic
controls allow you to select the function
required for your cooking needs.
1. Start Button
Press this button to begin the
cooking process of the selected
function.
2. Start Light
The “Start” light will remain lit while
the appliance is still “ON”.
3. Stop Button
Press this button to stop the cooking
process or to cancel a selected
function
4. Stop Light
The “Stop” light will Illuminate when
the unit is plugged in and when the
cooking process has been stopped.
5. LCD Display Screen
The LCD screen will display the time.
6. Function
Press the “Function” button to
select the cooking function required
for the type of food being prepared.
As you press on the “Function”
button, the arrow “◄” will move from
function to function.
7. Cook Rice
The arrow “◄” shows that the “Cook
Rice” function is selected. Use this
function to cook rice perfectly with
the touch of one button. This function
has a preset time and is not
adjustable.
8. Soup
The arrow “◄” shows that the
“Soup” function is selected. Use this
function for soups, stews or sauces.
The default time for this function is
50 minutes, but can be adjusted up
to four (4) hours.
9. Pasta
The arrow “◄” shows that the
“Pasta” function is selected. Use
this function for cooking perfect
pasta or for other dishes.
00:00
10. Bake
The arrow “◄” shows that the “Bake”
function is selected. Use this
function to bake cakes, breads, etc.
This function has a default time of 50
minutes.
11. Slow Cook
The arrow “◄” shows that the “Slow
Cook” function is selected. Use this
this function for longer cooking times
such as stews and sauces. The
cooking time is programmable up to
four (4) hours.
12. Keep Warm
The “Keep Warm” function has two
options. The multi cooker will
automatically cycle to the “Keep
Warm” function after the selected
cooking function has been
completed. It will keep the food
warm for up to a maximum of six (6)
hours. You can also select the “Keep
Warm” function manually. The arrow
“◄” will show that the “Keep Warm”
function is selected.
13. Timer
The “Timer” button can be used with
some of the cooking function to set
the desired cooking time.
14. Adjust
Use the “Adjust” button to adjust to
time for the adjustable functions.
Potato Leek Soup (Vichyssoise)
3 Tbs butter
3-4 thick leeks, white and light green parts only; cleaned and sliced thin
4 cups water
3 Yukon Gold potatoes; (approx 1 lb) peeled and cut into 1 inch dices
1 bay leaf
3 sprigs of thyme, (tied together)
2 tsp salt
½ tsp pepper
¼ cup half and half
1 bunch – ½ cup chives, (sliced thin)
Place the cooking pot into the unit and plug into wall outlet. Press the function button
to select the pasta function. Add the butter and the leeks. Sauté 4-5 minutes or until
the leeks are wilted but not brown. Add the water and close the cover.
When the unit beeps (water is boiling) add the remaining ingredients (except half and
half and the chives) and press the stop button. Press the function button and select the
soup function.
Cook for 30 minutes or until the potatoes can be easily smashed against the side of
the pot with a wooden spoon. Remove thyme and bay leaf. Pour the soup into a food
processor and blend until very smooth.
Serve hot or chill completely in the refrigerator to serve as Vichyssoise; either way
sprinkle chopped chives on the individual bowls of soup before serving.
Cheesy Grits and Eggs
2 cup quick cook grits (not instant)
4 cups water
¼ tsp salt
2 tbs butter
1 cup shredded Colby jack cheese;
Place cooking pot into the unit. Plug unit into wall outlet. Press the function button and
select pasta function. Add the water, salt and butter to the cooking pot. Close the cover
and wait for the unit to beep.
Meanwhile, grease the poacher/warmer with butter and add 2 eggs to each side. Insert
the handle onto the pasta/steamer insert and place the poacher/warmer on top of the
pasta/steamer insert.
When the machine beeps (water is boiling) stir the grits into the boiling water in the
cooking pot. Press the adjust button to adjust the time to 8 minutes, place the
pasta/steamer insert into the main unit. (The pasta/steamer insert will sit above the
grits in the cooking pot.) Remove the handle from the pasta/steamer insert and close
the cover. (See note below)
When the unit beeps press the stop button and carefully open the cover and place the
handle into the pasta/steamer insert to remove. Stir the cheese into the grits.
Serve the grits with the eggs on top.
Note: Depending on the texture of eggs you like, you may have to adjust the cooking
time or remove the eggs earlier.
4
13

RECIPES
Operating Instructions
Steamed Vegetable Medley
4 cups water
2 cups cauliflower pieces
2 cups broccoli florets (optional)
2 cups sliced yellow or zucchini squash
1 cup cherry tomatoes
½ lemon
1 Tbs butter buds
Place cooking pot in unit and add the water. Close the cover and plug the unit in.
Press the function button to select the pasta function. Meanwhile, arrange the
vegetables in order listed into the pasta/steamer insert. Attach the handle. When the
unit beeps, adjust the timer to 7 minutes and place the pasta/steamer insert into the
cooking pot.
Remove the handle, squeeze the lemon over the vegetables and sprinkle with butter
buds if desired.
Close the cover, press start. If a more crisp texture is desired reduce the cooking time.
Beef, Barley & Vegetable Soup
2 tbs vegetable oil
1 medium onion, diced
1 clove garlic, minced
6 beef bouillon cubes
1 14.5 oz can petite diced tomatoes
6 cups water
2 medium bay leaves
2 lbs stewing beef
½ cup medium barley (uncooked)
1 14.5 oz can petite diced tomatoes
1 9 oz package frozen mixed vegetables
Place cooking pot into the unit. Plug unit into wall outlet. Press the function button and
select pasta function. Add the oil to the cooking pot. When the oil is hot, add the onion,
celery and garlic and sauté for 3-4 minutes. Add 1 cup of water and the bullion; stir
until bouillon is dissolved.
Press the stop function, the select the soup function, the default time will be 1 hour.
Add the beef the remaining 5 cups of water and the bay leaves. Cook until the unit
beeps.
When the unit switches to the keep warm function, press stop. Add the barley and the
can of tomatoes. Press the function button and select the soup function, adjust the
time for 30 minutes. When the unit beeps add the frozen vegetables, reselect the soup
function and adjust time for 30 minutes.
* Additional water may be needed if soup becomes too thick upon standing.
Preparing Your Multi Cooker
Before using the multi cooker for the first
time:
1. Remove the cooking pot, egg poacher,
and pasta/steamer insert from the unit.
2. Wash all parts removed with warm,
soapy water. The cooking pot, pasta/
steamer insert and poacher/warmer
may also be washed in a dishwasher.
3. Remove the steam vent from the cover:
open the cover and pull the inside
section of the steam vent out. (Fig. 1)
Close the cover and
pull the outside
component of the
steam vent upwards,
(Fig. 2) and wash
thoroughly. Do not
wash steam vent
in a dishwasher.
Allow the steam vent
to air dry or dry with a
paper towel before
inserting back into
the cover.
4. To disassemble the steam vent grasp
the tab and turn the inner cover counter
clockwise then lift out of outer cover.
(Fig. 3)
Fig. 3
5. The cover of the multi cooker may
be washed with warm, soapy water
and rinsed with a damp cloth. Do not
place unit with cover in water.
Fig. 1
Fig. 2
Important: Do not place the steam vent
parts in the dishwasher, hand wash only.
Using Your Multi Cooker
Once all parts are washed and dried, your
multi cooker is ready for use.
The multi cooker cover locks into position
when closed.
Caution: Do not touch hot surfaces, use
handle.
To remove the cover:
1. Press on the cover release button, the
cover will open.
2. Place the cooking pot into the base of
the unit.
Note: Never place food into the unit itself,
always use the cooking pot.
3. Place the food that you want to cook
inside the cooking pot.
4. Press down on the cover until it clicks
into place.
5. Plug the detachable cord into the rear
of the unit and then plug the cord into
a grounded-type 120V AC electrical
wall outlet.
Using the Functions
Each time the function button is pressed
an arrow will appear at the appropriate
function on the LCD display. (Fig. 4)
Cook Rice Selected
Fig. 4
Using the Rice Function
1. Place cooking pot
into the unit.
Twist the pot from
side to side to
ensure contact
with heating plate.
(Fig. 5)
2. Measure the dry rice for
the desired amount with the
measuring cup provided. (1/2 cup,
180 ml) Rinse dry rice under cool
water then add to cooking pot.
Fig. 5
Note: This unit makes 2-10 cups of
rice.
3. Using the measuring cup add 1-1/2
cups-2 cups water depending on
rice variety to the cooking pot.
(See Rice Chart below)
Important: Always use the cooking
pot in the unit.
Type of Rice / 1 cup Water
Oriental/White 2 cups
Basmati/Indian Firm 1-1/2 cups
Long Grain Brown 2 cups + 2 tbsp
Short Grain Brown 2-1/2 cups
Wild 3 cups
12
5
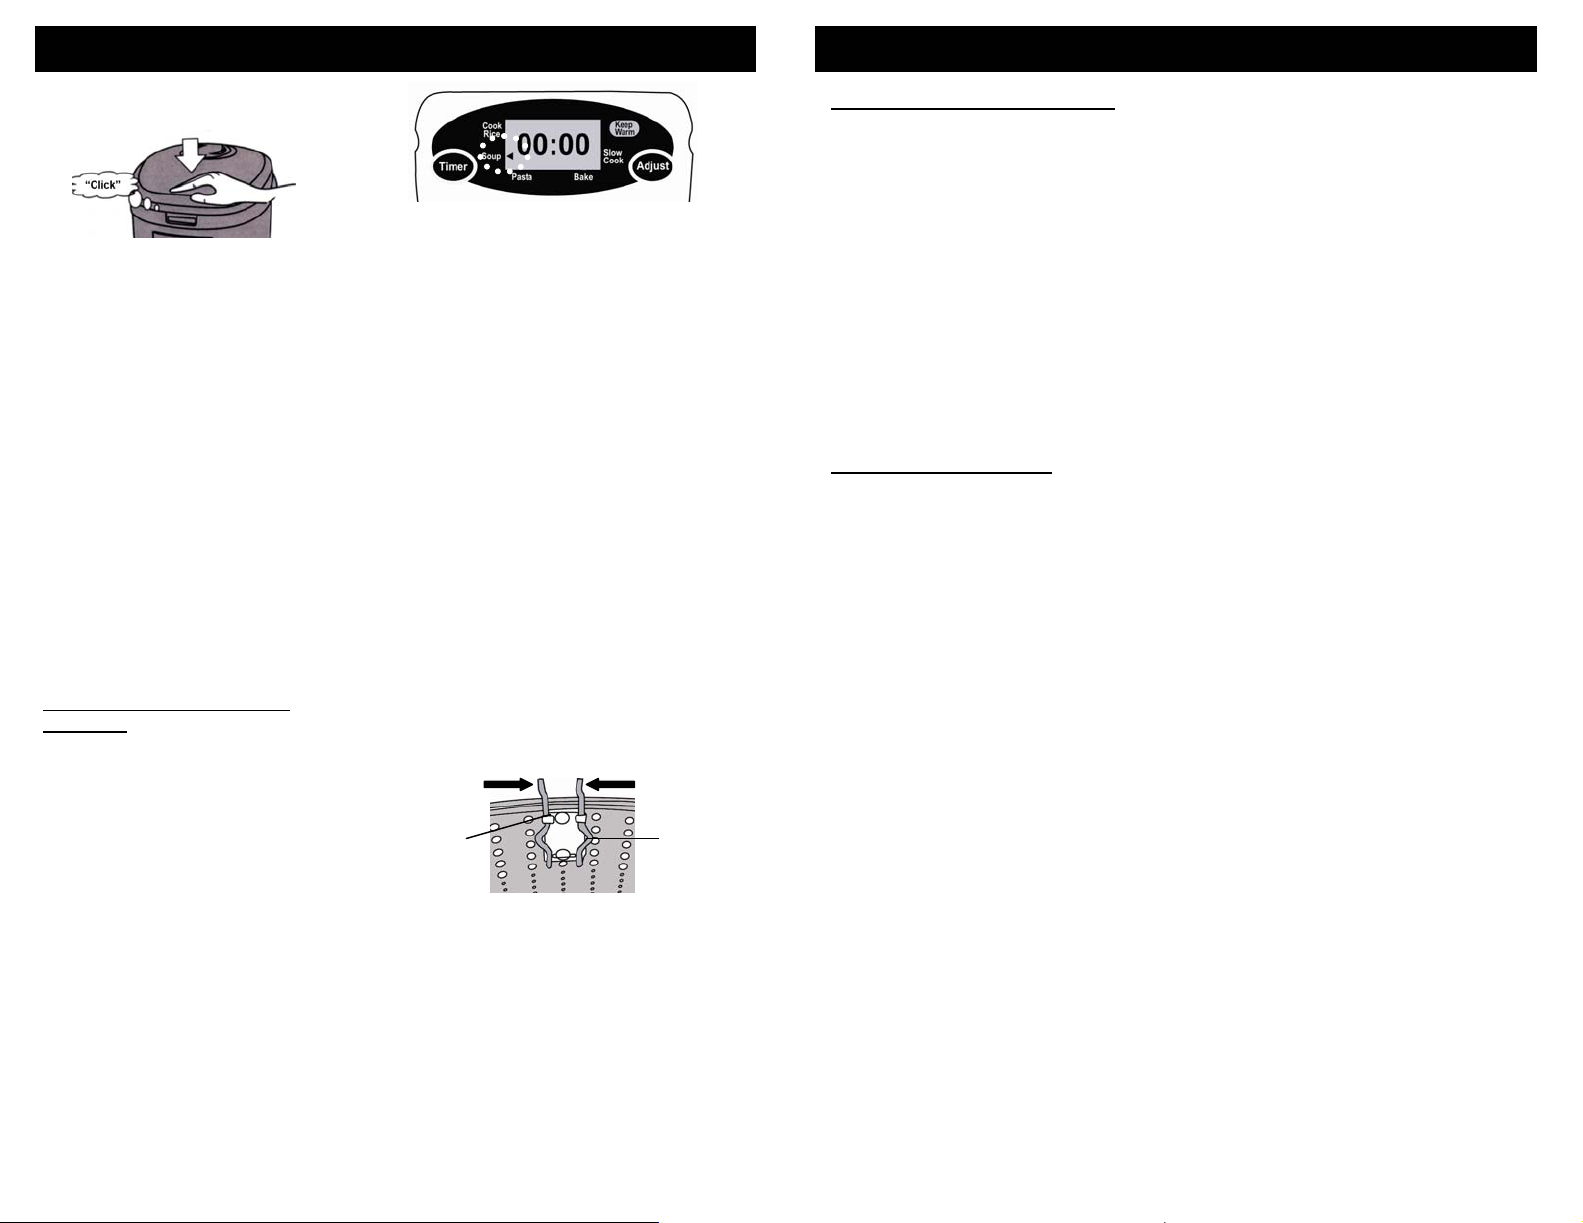
Operating Instructions
RECIPES
4. Press down on the cover until it
clicks into the locked position.
(Fig. 6)
Fig. 6
5. Plug the unit into the wall outlet.
6. Press the function button one (1)
time. Ensure the arrow appears
next to the “Cook Rice” function on
the display panel.
7. Press the start button. The green
start light will illuminate. The LCD
display will count up the minutes
until the rice is done. Rice will be
complete in approximately 40
minutes depending on amount of
rice being prepared.
8. When the rice is done the unit will
beep. After one minute the unit will
switch to keep warm until the stop
button is pressed.
9. Loosen the rice before serving.
10.Unplug the unit from the outlet.
11.Empty the water collector after
each use.
Note: Allow the unit to cool
completely before cleaning.
Using the Soup Function for
Steaming
The soup function can be used for
cooking soups, stews or steaming
vegetables.
To steam vegetables:
1. Plug unit into the wall outlet.
2. Fill the cooking pot up to the
minimum mark with water.
3. Place the pasta/steamer insert into
the cooking pot. It will sit above the
water.
4. Add washed and cut vegetables to
the pasta/steamer insert.
5. Press down on the cover until it
clicks into place.
6. Press the function button two (2)
times until the arrow on the LCD
display is pointing to the soup
function. (Fig. 7) The numbers “01”
will flash on the LCD display. The
default time for this function is 1
hour (60 minutes).
Fig. 7Soup Selected
7. Press the timer button to get the
“:00” to flash. This means the
minutes can be set for the
steaming time required.
8. Press the adjust button to increase
the minutes required for steaming.
The minutes can be adjusted up to
:59 minutes. Choose the steaming
time required based on type of
steaming and amount.
9. Press the start button to begin the
cooking process. The “:” (colon) on
the LCD display will flash
indicating that the timer is counting
down.
10.When the function is complete, the
unit will beep. One minute later if
the stop button has not been
pressed, the unit will switch to the
keep warm function. Press the
stop button when ready to serve
and press the cover release button
to open the cover.
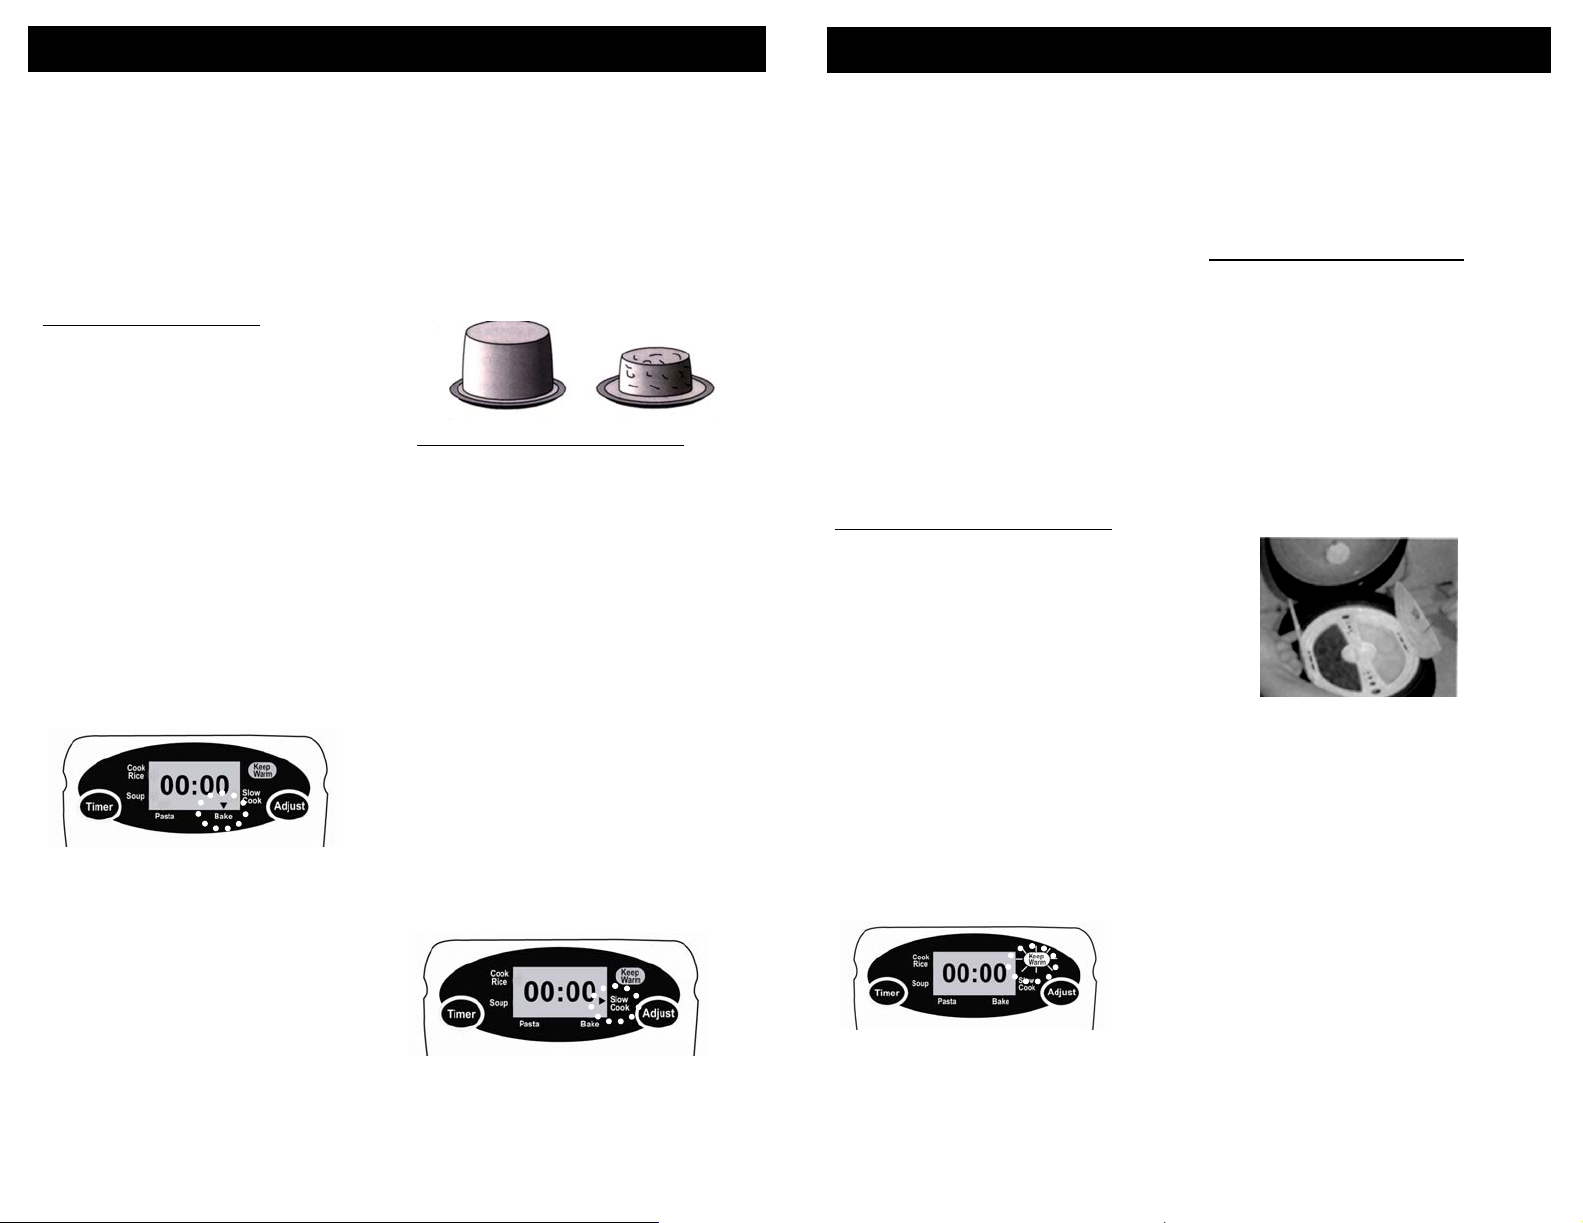
11.To remove the pasta/steamer
insert, squeeze the ends of the
handle and slide into guides on
pasta/steamer insert and release
the ends of the handle. (Fig. 8)
Guides
12.Using the attached handle,
carefully remove the
pasta/steamer insert.
13.Empty the water collector after
each use.
Handle
Fig. 8
Note: To avoid over done steamed
vegetables it is recommended that the
food be removed shortly after the
cooking process has been completed.
Mussels Marinara & Spaghetti
2 cups clam juice
1 cup water
2 lbs fresh mussels
1 26 oz Jar marinara sauce
8 oz Spaghetti Rigati or any medium thickness spaghetti; broken in half.
4 large basil leaves sliced
1 lemon cut in half
Put the clam juice, water, marinara sauce and basil leaves into the cooking pot. Place
the cooking pot into the main unit and plug the unit in.
Press the function button and select pasta function.
When the multi cooker beeps, add the pasta and adjust the time using the adjust
button to 6 minutes. (Press the adjust button three (3) times). When the timer reads 3
minutes, add the mussels. Squeeze the lemon half on top and arrange the slices over
the mussels.
Perfect Chicken ‘n Rice
3 Tbs vegetable oil
¼ tsp Garlic powder
1 ½ lbs. boneless, skinless chicken breasts; cut into bite-sized pieces
½ medium onion; minced in your food processor
1 cup baby carrots; minced in your food processor
3 cups long grain white rice
6 cups chicken broth
Place cooking pot into unit, and plug the unit in. Press the function button until the
pasta function has been selected. Add the oil to the pot. When the oil is hot add the
chicken, onion and carrots. Cook until the machine beeps and turns off or the chicken
is lightly browned.
Press the function button to select the rice function. Add the rice and broth. Stir well.
Close the cover and cook until the unit switches to the keep warm function. Press stop
and remove food. Serve hot.
6
11

Operating Instructions
Operating InstructionsOperating Instructions
Cleaning and Maintenance
The multi cooker should be cleaned
thoroughly after every use:
1. Unplug unit from the wall outlet
and allow to cool completely.
2. Remove the detachable cord from
the main unit.
3. Do not immerse the main unit into
water or other liquids.
4. Do not use abrasive cleaners,
scouring pads or steel wool.
5. To wash the cooking pot,
pasta/steamer insert, or the
poacher/warmer; fill with hot
water and let it soak. Hand wash
with a sponge and mild detergent.
These components are also top
rack dishwasher safe.
6. Remove the steam vent and clean
all parts thoroughly and allow to air
dry before replacing in unit.
7. Lift the carry handle to remove the
water collector from the rear of the
unit and hand wash with warm
soapy water.
8. The cover and inside the main unit
should be wiped down with a damp
soapy cloth and then rinsed with a
clear water cloth.
9. To clean the exterior of the unit,
lightly wipe with a damp cloth.
10. If rice or other grains are found on
the heating plate inside the main
unit, they must be removed to
avoid inadequate cooking. Use a
damp sponge to wipe the surface
of the heating plate clean. Do not
use any detergent on the heating
plate.
Note: Do not use metal utensils or
sharp metal objects such as a knife to
remove food particles, this will
damage the non-stick surfaces of the
unit.
Hints and Tips for Perfect Ric e
• For best results when cooking
rice, leave the rice settle in the
unit for a few minutes before
opening cover.
• Stir rice thoroughly before
serving.
• To obtain a softer rice, allow the
rice to soak in the cooking pot for
10-15 minutes before cooking.
• Do not keep rice warm for more
than 10 hours.
• Do not use metal utensils to stir
rice, wooden utensils work best
for perfect tasting rice.
10
Using the Soup Function for
Soups or Stews
Note: If using meat, see recipe
section for directions on browning.
1. Plug unit into the wall outlet.
2. Fill the cooking pot with ingredients
for stew or soup.
3. Press down on the cover until it
clicks into place.
4. Press the function button two (2)
times until the arrow on the LCD
display is pointing to the soup
function. (Fig. 9) The numbers “01”
will flash on the LCD display. The
default time for the soup function is
1 hour.
Soup Selected
5. If more than one hour is required,
press the adjust button to change
the number of hours up to a
maximum of 4 hours.
6. Press the timer button to get the
“:00” to flash. This means the
minutes can be set for the
steaming time required.
7. Press the adjust button to increase
the minutes required for soups or
stews. The minutes can be
adjusted up to :59 minutes.
Choose the cooking time required
based on type of dish being
prepared and amount.
8. Press the start button to begin the
cooking process. The “:” (colon) on
the LCD display will flash
indicating that the timer is counting
down.
9. When the function is complete the
unit will beep. One minute later if
the stop button has not been
pressed the unit will switch to the
keep warm function for six (6)
hours.
10.Empty the water collector after
each use. Allow the unit to cool
completely before cleaning.
Fig. 9
Using the Pasta Function
When using the pasta function do not
go beyond the max line, in the cooking
pot as the water will boil over and leak
out of the pot. The maximum level of
water is 1.6 qt (1.8L).
1. Place cooking pot into the unit.
2. Fill the cooking pot with the
required amount of water and 1 tsp
oil, salt if desired.
3. Press down on the cover until it
clicks into place.
4. Plug the detachable cord into the
rear of the unit then plug the cord
into a grounded-type 120V AC
electrical wall outlet.
5. Press the function button three (3)
times until the arrow on the LCD
display is pointing to the pasta
function. (Fig. 10) The numbers on
the LCD display will not flash.
Pasta Selected
6. Press the start button.
7. The unit will begin to boil the water.
8. Once the water has come to a boil
the unit will beep.
9. Prepare the pasta by placing in the
pasta/steamer insert. Break in half if
too long for the insert.
10.To insert the handle onto the pasta/
steamer insert, squeeze the ends of
the handle and slide into guides on
pasta/steamer insert and release the
handle ends.
11.Open the cover and carefully place
the pasta/steamer insert into the
cooking pot.
Caution: The water and steam are hot
add the insert with extreme caution to
avoid burns or injury.
12.Remove the handle from the pasta/
steamer insert.
13.Close the cover and press the adjust
button to adjust the minutes required
for cooking the type of pasta. The
maximum time that can be set on the
pasta function is 18 minutes.
14.Press the start button.
15.When the unit beeps again the pasta
is ready. Press the stop button and
7
unplug the unit.
Fig. 10
Operating Instructions
Operating InstructionsOperating Instructions
16.Place the handle back onto the
pasta/steamer insert and slowly
remove the insert allowing water to
drain as the insert is lifted up.
Caution: Remove the pasta/steamer
insert carefully to avoid burns or injury.
Note: Allow the unit to cool completely
before cleaning.
17.Empty the water collector after each
use. Allow the unit to cool
completely before cleaning.
Using the Bake Function
Use the baking function for cake mixes,
bread mixes, or light deserts.
Do not fill the cooking pot past the “max”
line with batter or below the “min.” line.
This could result in the mixture being
under cooked or burnt.
1. Prepare mixture in a separate bowl.
2. Lightly grease the inside of the
cooking pot.
3. Pour batter into the cooking pot and
place into the unit.
4. Plug the unit into the wall outlet.
5. Press down on the cover until it clicks
into place.
6. Press the function button four (4)
times until the arrow on the LCD
display is pointing to the bake
function. (Fig. 11) The numbers will
not flash on the LCD display. The
default time for the bake function is
50 minutes.
Bake Selected
Fig. 11
7. Press the start button.
8. Allow the mix to bake for complete
baking cycle of 50 minutes to
ensure that cake is baked right
through.
Note: If the food being baked is not
done, re-select the bake function,
press start and cook for an additional
5 minutes. The unit will have to be
stopped manually when baking is
done. Time is not adjustable on this
function.
9. When the cycle is complete the
unit will beep. Press the stop
button.
10.Using pot holders remove the
cooking pot from the unit and allow
to cool for a minimum of 2 minutes
before removing the baked goods
from the cooking pot.
11.To remove the baked goods from
the cooking pot, place a plate over
the top of the cooking pot, holding
the plate and cooking pot, turn
upside down, and allow the cake to
fall onto the plate. Lift cooking pot
up gently. (Fig. 12)
Using the Slow Cook Function
Use the slow cook function for a
variety of meals that require a longer
cooking time. Do not fill the cooking
pot past the “max” line with food or
below the “min.” line. This could result
in the food boiling over or burning.
1. Prepare dish to be cooked.
3. Place food into the cooking pot
and place into the unit.
4. Plug the unit into the wall outlet.
5. Press down on the cover until it
clicks into place.
6. Press the function button five (5)
times until the arrow on the LCD
display is pointing to the slow cook
function. (Fig. 13) The numbers
“01” will flash on the LCD display.
7. Press the adjust button to increase
the number of hours. The
maximum hours that can be set is
four (4) hours.
8. Press the timer button to get the
“:00” to flash. This means the
minutes can be set for the
slow cook time required.
Slow Cook Selected
8
Fig. 12
Fig. 13
9. Press the adjust button to increase
the minutes required for food being
cooked. The minutes can be
adjusted up to :59 minutes. Choose
the cooking time required based on
type of dish being prepared and
amount.
10. Press the start button to begin the
cooking process. The “:” (colon) on
the LCD display will flash indicating
that the timer is counting down.
11. When the function is complete the
unit will beep. One minute later if the
stop button has not been pressed
the unit will switch to the keep warm
function. After 6 hours the unit will
automatically shut off.
12. Press the stop button and unplug the
unit.
13. Allow the unit to cool completely
before cleaning.
Using the Keep Warm Function
The keep warm function can be used to
keep foods that have been prepared
warm until ready for serving, or to keep
foods warm that have been prepared in
advance.
Important: Do not use this function to
cook food.
In most functions, once the cooking
process has been completed the unit will
automatically go to the keep warm
function after one (1) minute. To initiate
the keep warm function manually:
1. Plug unit into the wall outlet.
2. Fill the cooking pot with ingredients
to keep warm.
3. Press down on the cover until it clicks
into place.
4. Press the function button five (5)
times until the keep warm light
illuminates. (Fig. 14)
Keep Warm Selected
Fig. 14
5. Press the start button to begin the
keep warm process. The “:” (colon)
on the LCD display will flash
indicating that the timer is counting
up.
Note: The unit will automatically shut off
after a 6 hour period has elapsed.
Using the Poacher/Warmer
The poacher/warmer can be used
alone or when preparing other items
such as pasta or steamed vegetables.
To use the poacher/warmer the
pasta/steamer insert must be used:
1. Add required amount of water to
the cooking pot for food being
prepared in the pasta/steamer
insert.
2. Add food to be prepared into the
pasta/steamer insert and close
lids.
3. Place the poacher/warmer into the
pasta/steamer insert. (Fig. 15)
Fig. 15
4. Press down on the cover until it
clicks into place.
5. Plug the unit into the wall outlet.
6. Select the function required and
adjust time.
7. Press stop when cooking is
complete, insert handle into
pasta/steamer and remove food.
8. Remove plug from wall outlet and
allow unit to cool completely before
cleaning.
Note: If warming a sauce in the
warmer it can be left in the
poacher/warmer safely until the food
being cooked in the pasta/steamer
insert is complete.
9
 Loading...