


Convection Microwave Oven
OWNER'S MANUAL
Model K5309H
120V., 60Hz., 1400 Watts
USA: EURO-PRO OPERATING LLC CANADA: EURO-PRO OPERATING LLC
94 Main Mill Street, Door 16 4400 Bois Franc
Plattsburg, NY 12901 St. Laurent, QC H4S 1A7
Tel.: 1 (800) 798-7398


IMPORTANT SAFETY INSTRUCTIONS
Warning: For your safety, the information in this
manual must be followed to minimize the risk of fire,
explosion, electric shock or to prev ent property
damage, personal injury or loss of life.
When using an electrical appliance, basic safety
precautions should always be observed, including the
following:
1. Read all instructions before using the appliance.
2. Read and follow the specific “PRECAUTIONS TO AVOID
POSSIBLE EXPOSURE TO EXCESSIVE MICROWAVE
ENERGY” found on page 3 of this manual.
3. This appliance must be grounded. Connect only to
properly grounded outlet. See grounding instructions.
4. Use this appliance only for its intended use as described
in this manual. Do not use corrosive chemicals or vapors
in this appliance. This type of oven is specifically designed
to heat, cook or dry food. It is not designed for industrial or
laboratory use.
5. Do not operate the appliance in microwave mode
when empty.
6. Do not operate appliance with damaged cord or plug or
after the appliance malfunctions or has been damage in
any manner. Return appliance to EURO-PRO Operating
LLC for examination, repair or adjustment.
7. Close supervision is necessary when any appliance is
used by or near children.
8. Do not cover or block any openings on the appliance.
9. Do not store or use this appliance outdoors.
10. Do not place or use this appliance near water, i.e. near a
kitchen sink, near a swimming pool, in a wet basement,
etc.
11. Never immerse cord or plug in water or any other liquid.
12. Keep cord away from heated surfaces.
13. Do not let cord hang over edge of a table or counter.
14. To reduce the risk of fire in the oven cavity:
a. Do not over cook food. Carefully attended the
appliance when heating food in plastic or paper
containers.
b. Remove wire twist-ties from paper or plastic bags
before placing bag in oven.
c. If materials inside the oven ignite, KEEP OVEN DOOR
CLOSED, turn the oven “Off”, and disconnect the
power cord or shut off power from the fuse or circuit
breaker panel.
d. Never use the microwave for storage. Do not place
paper products, cooking utensils or food in the
oven when not in use.
15. Never heat liquid or other food in sealed containers as
they are liable to explode.
16. The contents of feeding bottles and baby food jars should
be stirred or shaken and the temperature should be
checked on the inside of your wrist, before serving in
order to avoid burns.
17. Liquids heated in certain shaped containers (especially
cylindrical-shaped containers) may become overheated.
The liquid may splash out with a loud noise during or after
heating or when adding ingredients (instant coffee, etc.),
resulting in harm to the oven and possible injury. In all
containers, for best results, stir the liquid several times
before heating. Always stir liquid several times between
re-heating.
18. Microwave heating of beverages can result in delayed
eruptive boiling, care must be taken when handling the
containers.
19. Liquids such as water, coffee, hot chocolate, or tea are
able to be overheated beyond the boiling point. Visible
bubbling or boiling when the container is removed from
the microwave oven is not always present. THIS COULD
RESULT IN VERY HOT LIQUIDS SUDDENLY BOILING
OVER WHEN THE CONTAINER IS DISTURBED OR A
SPOON OR OTHER UTENSIL IS INSERTED INTO THE
LIQUID. To Avoid this from occurring:
a. Do not over heat liquid.
b. Stir the liqui d before and halfway through heating it.
c. After heating, allow the container to stand in the
microwave oven for a short time before removing
the container.
d. Use extreme care when inserting a spoon or other
utensil into the container.
e. Do not use straight-sided containers with narrow
necks.
20. Do not fry food in the microwave oven. Hot oil can
damage oven parts and utensils and even result in
personal injuries.
21. Some products such as whole eggs and sealed containers
should not be heated in the microwave oven. For
example, heating eggs in their shells, whole hard-boiled
eggs or closed glass jars can explode and should not be
heated in the microwave oven.
22. Pierce foods with heavy skins such as potatoes, whole
squashes, apples and chestnuts before cooking.
23. Avoid heating small-necked containers like honey or
syrup bottles.
24. Avoid using corrosive and vapors, such as sulfide and
chloride.
25. Cooking containers may become hot because of heat
transferred from the heated food. Use potholders to
remove the containers from the microwave oven.
26. Always make sure that your cooking containers are
microwave safe.
27. WARNING: It is hazardous for anyone other than a
trained person to carry out any service or repair operation
which involves the removal of any cover which gives
protection against exposure to microwave energy.
SAVE THESE INSTRUCTIONS
For Household Use Only
1
Rev. 07/06A

PRECAUTIONS TO AVOID POSSIBLE EXPOSURE TO
EXCESSIVE MICROWAVE ENERGY
1. Do not attempt to operate this microwav e oven
with the door open. An open door operation can
result in harmful exposure to microwave energy. It is
important not to defeat or tamper with the safety
interlocks.
2. Do not place any object bet ween the oven front
face and the door. Do not allow soil or cleaner
residue to accumulate on sealing surfaces.
3. Do not operate the oven if it is damaged in any
way. It is particularly important that the oven door
closes properly and that there is no damage to the:
- Door (bent)
- Hinges and or latches (broken or loosened)
- Door seals or sealing surfaces (damaged or
cracked)
4. The oven should not be adjusted or repa ired by
anyone except a properly qualified service
technician.
GROUNDING INSTRUCTIONS
This appliance must be grounded. If it should malfunction or breakdown, grounding provides
a path of least resistance for electric current to reduce the risk of electric shock. This
appliance is equipped with a cord having an equipment-grounding conductor and grounding
plug. The plug must be inserted into an appropriate outlet that is properly installed and
grounded in accordance with all local codes and ordinances.
WARNING: Improper connection of the equipment-grounding conductor can
result in a risk of electric shock. Consult with a qualified electrician or service
person if you are in doubt as to whether the outlet is properly grounded. Do not modify the
plug provided with the appliance - if it will not fit the outlet, have a proper o utlet
installed by a qualified el ectrician.
This appliance is for use on a nominal 120-volt circuit, and has a grounding attachment
plug that looks like the plug illustrated at right. Make sure that the appliance is connected to
an outlet having the same configuration as the plug. No adaptor should be used with this
appliance.
1. If it is necessary to use an extension cord, use only a
3-wire extension cord that has a 3-blade grounding
plug and a 3-slot receptacle that will accept the plug
on the appliance. The marked rating of the extension
cord should be equal to or greater than the electrical
rating of the appliance.
OR
2. Do not use an extension cord. If the power cord is too
short, have a qualified electricia n or servicem an in st all
an outlet near the appliance.
Please Note:
1. A short power supply cord is provided to reduce the
risks resulting from becoming e n t an gl e d in or trip pi ng
over a longer cord.
2. Extension cords may be used is care is exercised in
their use.
3. If a long cord or extension cord is used, (1) the
marked electrical rating of the cord set or extension
cord should be at least as great as the electrical rating
of the appliance, (2) the extension cord must be a
grounding-type 3-wire cord, and (3) the longer cord
should be arranged so that it will not drape over the
countertop or tabletop where it can be pulled on by
children or tripped over accidentally.
2

Getting to Know Your Microwave Oven
1. Control Panel
2. Turntable Shaft
3. Glass Turntable
4. Turntable Ring
5. Grill Rack
6. Door Assembly
7. Safety Interlock System
8. Observation Window
9. Heating Element
10. Door Release Button
Note: Always leave the
turntable drive plate
and the glas
in the oven.
s turntable
CONTROL PANEL
DIGITAL
DISPLAY
• Digital Display
The digital display includes a clock and indicators that tell you the time of
day, the set cooking time, and the cooking function that you have selected.
• Auto Menu
Preset cooking functions: Popcorn, Baked Potato, Frozen Pizza, Beverage,
Warm, Pasta, Auto Reheat, Fresh Vegetable, Frozen Vegetable.
• M.W. (Microwave) + Grill + Convection
Press the different buttons to select either Microwave cooking, Grill Cooking,
Microwave and Grill cooking, Convection cooking, or Microwave and
Convection Cooking.
• Memory
The Memory button allows for saving a cooking program for future cooking
use.
• Pre-set
Use this feature in order to pre-set the time for future cooking.
• Defrost by Weight and Defrost by Time
Use these functions to either defrost food given a specific weight or a
specific time.
• Express Cook
Pressing buttons from 1 to 6 will automatically start microwave cooking
according to button (i.e.: press button “1” for one minute, press button “2” for
two minutes).
• Clock
Use this function to set the time that appears on digital display.
• AM/PM
Use this to set specify whether the time is A.M. or P.M.
• Stop/Clear
Use this function to either stop cooking or to clear program setting.
• Start/+30SEC
Use this button to start the cooking process or to add 30 seconds of cooking
time to the cooking process.
3

Getting to Know Your Microwave Oven
Cooking Comparison Guide
Cooking with your new convection microwave oven offers
a wide variety of food preparation options such as
microwave cooking, convection cooking and combination
cooking.
Microwave cooking: Uses high-frequency
electromagnetic radiation. Microwave cooking heats the
food directly, not the cookware or the interior of the oven.
Reheating is simple and defrosting is convenient because
less time is spent in food preparation and food does not
stay out on a counter to defrost where it can spoil.
MICROWAVE CONVECTION COMBINATION
COOKING METHOD
HEAT SOURCE
BENEFITS
Microwave energy is
distributed evenly
throughout the oven for
fast thorough cooking.
Microwave energy. Circulating heated air. Microwave and circulating heated air.
• Fast, efficient cooking.
• Oven and cookware
does not get hot.
• Easy clean-up.
Hot air circulates
around the food to
brown the food and
seal in the juices.
• Browns and seals in
the flavor of foods.
• Cooks food faster
than conventional
ovens.
Convection cooking: Uses hot air movement by means
of a fan to provide faster cooking. The fan gently sends
air to every area of the food, q uickly brownin g , crisping
and sealing in moisture and flavor. It produces more even
temperature all around the food by air movement, so that
food cooks evenly.
Combination cooking: Combines the microwave energy
with the convection to cook with speed and accuracy,
while browning and crisping to perfection.
The following guide shows the difference and the
advantages for each type of cooking.
A combination of microwave energy and
convection heat combine to shorten the
cooking time while browning and sealing
in the juices of the food at the same time.
• Shortened cooking times from
microwave energy.
• Browning from convection heat.
Cookware Guide
Microwave cooking: Most heat-resistant, non-metallic cookware is safe for your microwave oven. However, to test the
cookware before using, place the empty cookware into the microwave with a glass measuring cup filled with water next to it.
Microwave on 100% power for 1 minute. If the cookware is warm, then it should not be used for microwave cooking.
Convection cooking: Metal pans are recommended for all types of baked products, but especially if browning and crusting
is important. Dark or dull finished metal pans are best for breads and pies because they absorb heat and produce a crisper
crust. Shiny aluminum pans are best for cakes, cookies or muffins because these pans reflect heat and help produce a
light, tender crust. You can also use oven safe glass or ceramic cookware.
Combination cooking: Glass or glass-ceramic bake ware is recommended. Be sure not use items with metal trim as it
may cause arcing (sparking) with the oven wall or oven shelf., damaging the oven wall, shelf or oven. Heat-resistant plastic
microwave cookware (safe to 450˚F) may be used, but it is not recommended for foods that require crusting or all around
browning.
Cookware Microwa ve Convection/Grill Combination
Heat-Res i stant G l ass Yes Yes Yes
Non-Heat Res i st ant Gl ass No No No
Heat Res i st ant Cerami c Yes Yes Yes
Microwave-Safe P l ast i c Yes No No
Pl at i c Wrap, Wax P aper Yes No No
Met al Cookware No Yes No
Paper P roduc ts Yes No No
Al um i num Foi l , Al um inum Pans No Yes No
* Combination: applicable for both “microwave + grill, and “microwave + convection” cooking
4
4

Using Your Accessories
Turntable Ring
A
Getting to Know Your Microwave Oven
✔ Possible Use
✗ Do Not Use
Glass Turntable
B
Grill Rack
C
COMBINATIONCONVECTION/GRILLMICROWAVE
A + B*
✓✓✓
A + B + C
✗✓✗
* Note: Turntable Drive Plate (A) and Glass Turntable (B) must always be placed in the unit.
Turntable Installation
1. Never place the glass tray upside down. The glass tray should never be restricted.
2. Both glass tray and turntable ring assembly must always be used during cooking.
3. All food and containers of food are always placed on the glass tray for cooking.
4. If glass tray or turntable ring assembly cracks or breaks contact your nearest
authorized service center.
Before Installing Your Microwave Oven
1. Read all sections of the instructions manual carefully prior to installing and first use of the microwave ov en.
2. Ensure that you are familiar with all the parts of the microwave before installing and first use of the
microwave oven.
3. Prior to installing and first use, make sure that all packing materials are removed from the oven. Remove any
protective film found on the microwave oven cabinet surface.
4. Wash all removable parts such as the glass turntable, turntable drive plate, and grill according to the
cleaning instructions found in the “Maintenance & Cleaning Instructions” section before placing back
into the microwave.
Warning: Check your oven for any damage, such as a misaligned or bent door, damaged door seals and sealing surface,
broken or loose door hinges, loose latches and dents inside the cavity or on the door. If there is any damage, do not
operate the oven. Contact customer service at: 1 (800) 798-7398.
Glass
Turntable
Turntable
Ring
Important Notes on Stopping, Starting, and Opening Your Microwave Oven
• Push the door release button in order to open the door. The microwave oven will not function when the door is
open. To re-start the microwave oven after opening during the cooking cycle, press the “Start/+30SEC” button.
• Press the “Stop/Clear” button once to pause the cooking process, or press it twice to clear and cancel the cooking
process. To resume cooking after having paused the cooking cycle, press the “Start/+30SEC” button. However,
when the cooking process is cleared and cancelled the microwave oven is no longer in operation, and in order to restart the cooking process, the microwave oven must be reset.
5

Before Using Your Microwave Oven
Installing Your Microwave Oven
• Make sure that all packaging materials are removed
from the oven.
Warning: Check the microwave oven for any damage,
•
such as misaligned or bent door, damaged door seals
and sealing surface, broken or loose door hinges, loose
latches and dents inside the cavity or on the door.
Contact customer service at 1 (800) 798-7398.
• The microwave must be placed on a flat, stable surface
to hold its weight and the heaviest food likely to be
cooked in the oven.
• Do not place the oven where heat, moisture or high
humidity are generated or near combustible
materials.
• Allow at least 4 inches (10 cm) of space at the top,
sides and back of the oven for proper ventilation. Do
not cover or block any openings on the appliance.
Do not remove the feet of the mic rowave.
• For safety purposes this microwave oven must be
plugged into a 20 Amp circuit. No other electrical
appliance or lighting circuits should be on this
line. If in doubt, consult a licensed electrician.
• The voltage used at the wall receptacle must be the
same as specified on the oven rating plate. Use of a
higher voltage is dangerous and may result in a fire or
other type of accident causing oven damage. Low
voltage will cause slow cooking. In case your
microwave oven does not perform normally in spite
rect voltage, remove and reinsert the plug. If
of cor
problem continues, try another outlet or call customer
service at 1 (800) 798-7398.
• Do not operate the microwave oven without the glass
turntable or turntable drive plate in their proper
positions. Never place the glass turntable upside
down in the microwave.
• Make sure that the power supply cord is undamaged
and does not run underneath the microwave oven or
over any hot or sharp surface.
• Microwave oven operation may interfere with TV or
radio reception. If there is interference, it may be
reduced or eliminated by:
a. Clean door and sealing surface of the oven.
b. Reorient the receiving antenna of the radio or the
TV.
c. Plug the microwave into a different outlet so that
the microwave oven and the receiver are on
different branch circuits.
d. Relocate the radio or the TV.
• This microwave should not be built in to cabinetry
or mounted on a shelf above an electric or gas
range.
• Wash all removable parts such as the glass turntable,
turntable ring and metal rack before using and let dry
completely before placing back into the microwave
oven.
Child Lock
This is a safety feature that prevents unwanted oven
operation, such as use by children. Once the child lock
is set, no cooking can be done. To set the child lock,
press and hold the “Stop/Clear” button until you hear a
beep, and the lock indicator symbol will appear on the
digital display.
To cancel the child lock, press and hold the “Stop/Clear”
button until you hear a beep, and the lock indicator will
disappear. The oven is now ready for use.
Setting the Clock
When the microwave oven is connected to a power
source the digital display will have “0:00” on it, and the
buzzer will ring once.
Because the clock works in a 12-hour cycle, the input
time must be within 1:00 – 12:59. For example, to set the
clock to 12:12:
1. Press the “Clock “ button on the control panel, and
“00:00” will be displayed.
2. Press the numbers “1”-“2”-“1”-“2” on the key pad
to enter the clock time.
3. Press “AM/PM” to choose either AM or PM.
Note: If neither AM or PM is selected, then it will be AM
as default.
4. Press the “Clock” button to confirm the time setting.
“:” will flash, and the time will light.
Pre-Set
Use this function to set your oven to start cooking
automatically at a pre-determined time, perform th e
following steps:
1. Input one or two cooking programs you would like to
use.
Note: Defrost by Weight or Defrost by Time cannot be
programmed within the Pre-Set feature.
2. Press “Pre-Set” to display the current time.
3. Press the number keys on the control panel to set a
future time that you would like to cook at. Press
“AM/PM” to specify whether the time is AM or PM.
Important: Please note that in order for this feature to
work accurately you must have programmed the clock on
the microwave oven to the right time (A.M. and P.M.
included).
Note: Because the clock works in a 12-hour cycle, you
may not have the pre-set cooking time occur more than
12 hours after having set the pre-set cooking feature.
6

Operating Instructions
Microwave Cooking
Microwave cooking allows you to cook food for a desired
amount of time.
1. Press the “Microwave” button on the key pad and the
digital display will show the microwave symbol in t he
top left-hand corner and the power at 100%. (Fig. 1)
Fig. 1
By repeatedly pressing on the “Microwave” button,
you can select the desired power level from 100% to
10%. For example:
Press Power Description
Once P100 (100%) High
Twice P90 (90%)
3 Times P80 (80%)
4 Times P70 (70%)
5 Times P60 (60%)
6 Times P50 (50%)
7 Times P40 (40%)
8 Times P30 (30%)
9 Times P20 (20%)
10 Times P10 (10%)
Medium
High
Medium
Medium
Low/Defrost
Low
Suggested
Use
Boiling water,
cooking
chicken,
making candy
Reheating
rice, pasta
and
vegetables
Reheating
sandwiches
Cooking
cakes,
breads,
melting
chocolate
Cooking
puddings,
custards,
whole fish &
veal
Cooking rib
roast and
sirloin tip
Defrosting
meat, poultry,
seafood
Cooking less
tender meats,
defrosting fish
Softening
butter
Keeping
meals warm,
softening
butter &
cream cheese
2. After you have selected the desired power level,
press the number buttons on the control panel to set
the desired cooking time (up to a maximum cooking
time of 99 minutes and 99 seconds).
3. Ensure that door is closed securely and press the
“Start/+30SEC” button to start the cooking process.
The cooking time will begin to count down
immediately.
Note: If you would like to temporarily stop the cooking
process, press the “Stop/Clear” button on the control
panel once to stop it and then press the “Start /+30SEC”
button to restart the cooking process.
You can also stop the cooking process by opening the
door. To restart the cooking process, close the door and
press the “Start/+30SEC” button.
If you want to cancel a cooking process, press the
“Stop/Clear” button twice to cancel.
Note: If needed, press the “Start/+30SEC” button to add
an additional 30 seconds of cooking time once cooking
has commenced. You may press this button more than
once to increase the time by 30 second increments.
4. When cooking is complete, the microwave will beep 5
times to signal that it is finished.
Important: If stopping cooking process prematurely,
press the “Stop/Clear” button to clear the display and
reset the system before starting another cooking session.
Grill
Grill cooking is useful for thin slices of meat, steaks,
chops, kebabs, sausages and pieces of chicken. You can
also use it to make hot sandwiches and au gratin dishes.
Important: Grill cooking power is set for 100% grill
power automatically by the oven. The maximum
cooking time that you can program is 99:99 (99 minutes
and 99 seconds).
1. Press the “Grill” button on the control panel and the
digital display will show the grill symbol and “G-1”
Fig. 2
2. Select the cooking time by pressing the numbers on
the control panel.
3. Ensure that door is closed securely and press the
“Start/+30SEC” button to start the cooking process.
The cooking time will begin to count down immediately.
7

Operating Instructions
Note: If you would like to temporarily stop the cooking
process, press the “Stop/Clear” button on the control
panel once to stop it and then press the “Start /+30SEC”
button to restart the cooking process.
You can also stop the cooking process by opening the
door. To restart the cooking process, close the door and
press the “Start/+30SEC” button.
If you want to cancel a cooking process, press the
“Stop/Clear” button twice to cancel.
Note: If needed, press the “Start/+30SEC” button to add
additional cooking time once cooking has commenced.
You may press this button more than once to increase the
time by 30 second increments.
Helpful Hint: When half the cooking time has passed,
the microwave oven will pause and beep twice. This is
normal. Simply press the “Start/+30SEC” button to
resume cooking- or for best results, turn food over for
even browning and grilling. Please note that if the
“Start/+30SEC” button is pressed during the first half of
the grilling time then the oven will adjust to the new time
and stop at the new halfway point. However, if the
“Start/+30SEC” button is pressed during the second half
of the grilling time the unit will not stop again until it is
finished.
Note: When using the grill function, if the grilling time is
set for less than 5 minutes then the unit will not stop at
the half-way point.
4. When cooking is complete, the microwave will beep 5
times to signal that it is finished.
Important: If stopping cooking process prematurely,
press the “Stop/Clear” button to clear the display and
reset the system before starting another cooking session.
M.W. + Grill Cooking
M.W. + Grill Cooking is a cooking process which
combines microwave cooking and grilling.
1. Press the “M.W.+Grill” button on the key pad. By
pressing on the “M.W.+Grill” button once you will see
the microwave and grill symbols, and “G-2” on the
digital display. (Fig. 3) Press it a second time and you
will see the microwave and grill symbols, and “G-3”
on the digital display. (Fig.4)
3. Ensure that door is closed securely and press the
“Start/+30SEC” button to start the cooking process.
The cooking time will begin to count down
immediately.
Note: If you would like to temporarily stop the cooking
process, press the “Stop/Clear” button on the control
panel once to stop it and then press the “Start /+30SEC”
button to restart the cooking process.
You can also stop the cooking process by opening the
door. To restart the cooking process, close the door and
press the “Start/+30SEC” button.
If you want to cancel a cooking process, press the
“Stop/Clear” button twice to cancel.
Note: If needed, press the “Start/+30SEC” button to add
an additional 30 seconds of cooking time once cooking
has commenced. You may press this button more than
once to increase the time by 30 second increments.
4. When cooking is complete, the microwave will beep 5
times to signal that it is finished.
Important: If stopping cooking process prematurely,
press the “Stop/Clear” button to clear the display and
reset the system before starting another cooking session.
Convection Cooking
Convection cooking circulates hot air through the oven
cavity with a fan. The constantly moving air surrounds the
food that is cooking which heats the outer portion of the
food quickly to brown and make the food crisp quickly and
evenly.
You can program the oven to cook at 10 different pre-set
temperatures: 220ºF, 240ºF, 260ºF, 280ºF, 300ºF, 320ºF,
340ºF, 360ºF, 380ºF, and 400ºF.
Convection Cooking (with preheating)
1. Press once on the “Convection” button on the control
panel and the digital display will show the convection
and grill symbols, and the temperature at 220ºF.
(Fig. 5) Continue to press the “Convection” button
until you have reached the desired convection
cooking temperature.
Fig. 3 Fig. 4
PRESS DISPLAY MICROWAVE GRILL
ONCE G-2 36% 64%
TWICE G-3 55% 45%
2. Press the number buttons on the control panel to set
the desired cooking time (up to a maximum cooking
time of 99 minutes and 99 seconds).
Fig. 5
Note: When first pressing the “Convection” button, the
temperature will be at 220ºF. With each press of the
“Convection” button, the convection cooking temperature
increases by 20ºF.
2. Press the “Start/+30SEC” button to start preheating.
The temperature will flash on the digital display once
the microwave oven has reached the set
temperature and it will beep twice as a reminder to
put the food in the microwave oven.
8
Operating Instructions
3. Once the desired temperature has been reached and
the food has been put in the microwave oven, close
the door securely and set the desired time using the
number buttons on the control panel.
4. To start the convection cooking process, press the
“Start/+30SEC”. The cooking time will begin to
countdown immediately.
Note: If you would like to temporarily stop the cooking
process, press the “Stop/Clear” button on the control
panel once to stop it and then press the “Start /+30SEC”
button to restart the cooking process.
You can also stop the cooking process by opening the
door. To restart the cooking process, close the door and
press the “Start/+30SEC” button.
If you want to cancel a cooking process, press the
“Stop/Clear” button twice to cancel.
Note: If needed, press the “Start/+30SEC” button to add
an additional 30 seconds of cooking time once cooking
has commenced. You may press this button more than
once to increase the time by 30 second increments.
Note: If you want to check the temperature during the
cooking cycle, press the “Convection” button once and
the digital display will show you the selected temperature.
5. When cooking is complete, the microwave will beep
5 times to signal that it is finished.
Important: If stopping cooking process prematurely,
press the “Stop/Clear” button to clear the display and
reset the system before starting another cooking session.
Convection Cooking (without preheating)
1. Press once on the “Convection” button on the
control panel and the digital display will show the
convection and grill symbols, and the temperature at
220ºF. (Fig. 5) Continue to press the “Convection”
button until you have reached the desired convection
cooking temperature.
Note: When first pressing the “Convection” button, the
temperature will be at 220ºF. With each press of the
“Convection” button, the convection cooking temperature
increases by 20ºF.
2. Press the number buttons on the control panel to set
the desired cooking time (up to a maximum cooking
time of 99 minutes and 99 seconds). .
3. Ensure that door is closed securely and press the
“Start/+30SEC” button to start the cooking process.
The cooking time will begin to count down
immediately.
Note: If you would like to temporarily stop the cooking
process, press the “Stop/Clear” button on the control
panel once to stop it and then press the “Start /+30SEC”
button to restart the cooking process.
You can also stop the cooking process by opening the
door. To restart the cooking process, close the door and
press the “Start/+30SEC” button.
If you want to cancel a cooking process, press the
“Stop/Clear” button twice to cancel.
Note: If needed, press the “Start/+30SEC” button to add
an additional 30 seconds of cooking time once cooking
has commenced. You may press this button more than
once to increase the time by 30 second increments.
Note: If you want to check the temperature during the
cooking cycle, press the “Convection” button once and
the digital display will show you the selected temperature.
4. When cooking is complete, the microwave will beep 5
times to signal that it is finished.
Important: If stopping cooking process prematurely,
press the “Stop/Clear” button to clear the display and
reset the system before starting another cooking session.
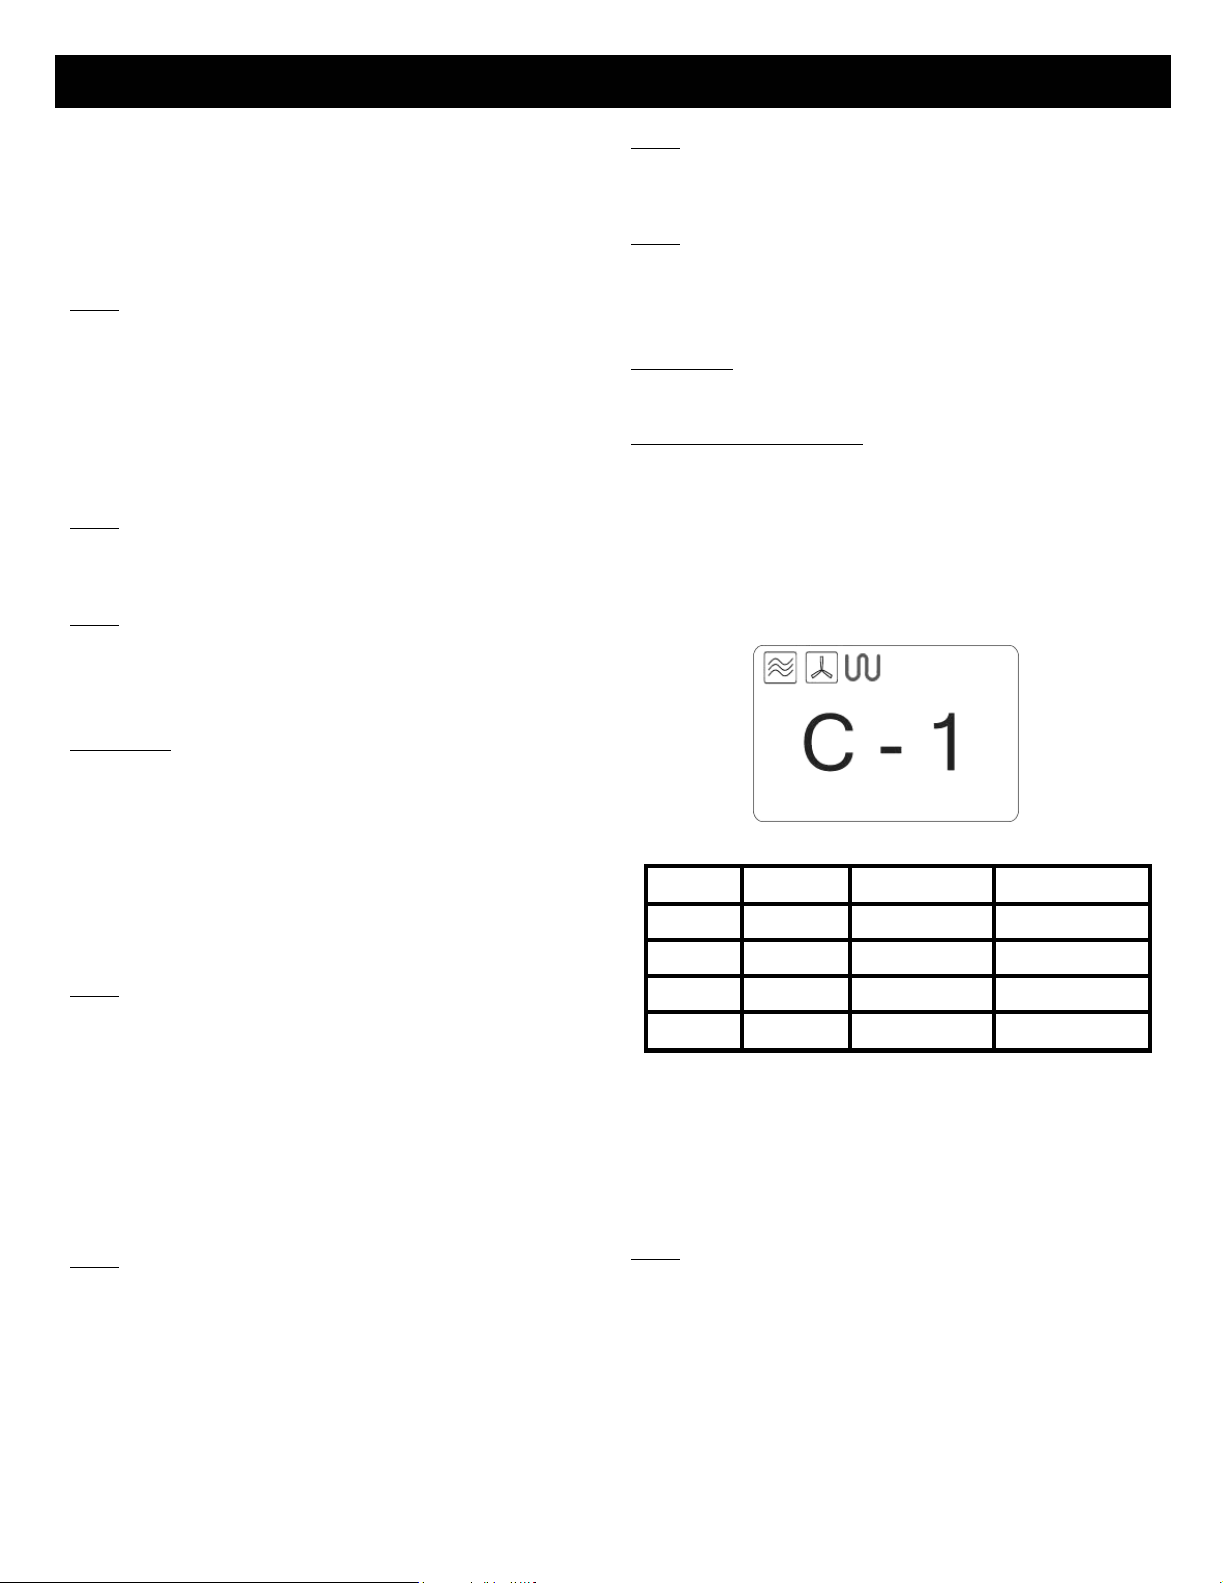
M.W. + Conv. Cooking
M.W. + Conv. Cooking is a cooking process which
combines microwave cooking and convection cooking.
1. Press the “M.W.+Conv.” button on the control panel
and the digital display will show the microwave,
convection, and grill symbols and “C-1”. (Fig. 6) By
continually pressing the “M.W.+Conv.” button, you
will be able to reach different levels of microwave and
convection cooking:
Fig. 6
PRESS DISPLAY MICROWAVE CONVECTION
ONCE C-1 61% 39% (280ºF)
TWICE C-2 52% 48% (300ºF)
TIMES C-3 39% 61% (320ºF)
3
4 TIMES
2. Press the number buttons on the control panel to set
the desired cooking time (up to a maximum cooking
time of 99 minutes and 99 seconds).
3. Ensure that door is closed securely and press the
“Start/+30SEC” button to start the cooking process.
The cooking time will begin to count down
immediately.
C-4 27% 73% (340ºF)
Note: If you would like to temporarily stop the cooking
process, press the “Stop/Clear” button on the control
panel once to stop it and then press the “Start /+30SEC”
button to restart the cooking process.
You can also stop the cooking process by opening the
door. To restart the cooking process, close the door and
press the “Start/+30SEC” button.
If you want to cancel a cooking process, press the
“Stop/Clear” button twice to cancel.
9

Operating Instructions
Note: If needed, press the “Start/+30SEC” button to add
an additional 30 seconds of cooking time once cooking
has commenced. You may press this button more than
once to increase the time by 30 second increments.
Note: If you want to check the temperature during the
cooking cycle, press the “Convection” button once and
the digital display will show you the selected temperature.
4. When cooking is complete, the microwave will beep 5
times to signal that it is finished.
Important: If stopping cooking process prematurely,
press the “Stop/Clear” button to clear the display and
reset the system before starting another cooking session.
Tips for Convection Cooking
1. Do not cover the glass turntable or any other
container with aluminum foil. It interferes with the
flow of air that cooks the food.
2. Round pizza pans are excellent cooking utensils for
many convection-only items.
3. When baking cakes, cookies, breads, rolls or other
baked foods, most recipes call for preheating.
Preheat the oven just as you do a regular oven.
4. All heatproof cookware can be used in convection
cooking.
5. Always use oven gloves when removing food and
cookware from the oven.
6. Do not use lightweight plastic containers or paper
products during any convection cooking cycle.
You can also stop the defrosting process by opening the
door. To restart the defrosting process, close the door
and press the “Start/+30SEC” button.
If you want to cancel a defrosting process, press the
“Stop/Clear” button twice to cancel.
Note: If needed, press the “Start/+30SEC” button to add
an additional 30 seconds of defrosting time once cooking
has commenced. You may press this button more than
once to increase the time by 30 second increments.
4. When defrosting is complete, the microwave will beep
5 times to signal that it is finished.
Important: If stopping defrosting process prematurely,
press the “Stop/Clear” button to clear the display and
reset the system before starting another cooking session.
Defrost by Time
1. Remove frozen food from packaging and place on
glass turntable plate. Close microwave d o or.
2. Press “Defrost by Time”, and the digital display will
show the microwave and defrost symbols, and
“dEF2”. (Fig. 8)
Defrosting
Defrost by Weight
1. Remove frozen food from packaging and place on
glass turntable plate. Close microwave d o or.
2. Press “Defrost by Weight”, and the digital display
will show the microwave and defrost symbols , and
“dEF1”. (Fig. 7)
Fig. 7
3. Press the number buttons on the control panel to set
the defrosting weight within the range of 4 to 100 oz.
4. Ensure that door is closed securely and press the
“Start/+30SEC” button to start the defrosting process.
The defrosting time will begin to count down
immediately.
Note: If you would like to temporarily stop the defrostin g
process, press the “Stop/Clear” button on the control
panel once to stop it and then press the “Start /+30SEC”
button to restart the defrosting process.
Fig. 8
3. Press the number buttons on the control panel to set
the desired defrosting time (up to a maximum cooking
time of 99 minutes and 99 seconds).
4. Ensure that door is closed securely and press the
“Start/+30SEC” button to start the defrosting process.
The defrosting time will begin to count down
immediately.
Note: If you would like to temporarily stop the defrosting
process, press the “Stop/Clear” button on the control
panel once to stop it and then press the “Start /+30SEC”
button to restart the defrosting process.
You can also stop the defrosting process by opening the
door. To restart the defrosting process, close the door
and press the “Start/+30SEC” button.
If you want to cancel a defrosting process, press the
“Stop/Clear” button twice to cancel.
Note: If needed, press the “Start/+30SEC” button to add
an additional 30 seconds of defrosting time once cooking
has commenced. You may press this button more than
once to increase the time by 30 second increments.
4. When defrosting is complete, the microwave will beep
5 times to signal that it is finished.
Important: If stopping cooking process prematurely,
press the “Stop/Clear” button to clear the display and
reset the system before starting another cooking session.
10

Operating Instructions
Multi-Stage Cooking
Multi-Stage cooking is a useful feature when the need
for two different stages or levels of cooking are needed.
This oven can be programmed for up to 2 stages of
cooking. For example, cooking with 100% microwave
power for 5 minutes, and then 70% microwave power for
10 minutes:
1. Press “Microwave” once to select power level of
100% (“P100” will shown on the digital display
indicating that the oven at 100% power).
2. Press the number buttons on the control panel to set
the desired cooking time for 5 minutes by pressing
“5”–“0”–“0”.
3. Press “Microwave” four times to select power level of
70% (“P70” will shown on the digital display indicating
that the oven at 70% power).
4. Press the number buttons on the control panel to set
the desired cooking time for 10 minutes by pressing
“1”-“0”-“0”–“0”.
5. Ensure that door is closed securely and press the
“Start/+30SEC” button to start the cooking process.
The cooking time will begin to count down
immediately.
Important: The oven will beep once after the first stage
of cooking, and then the second stage will begin.
Note: If you would like to temporarily stop the cooking
process, press the “Stop/Clear” button on the control
panel once to stop it and then press the “Start /+30SEC”
button to restart the cooking process.
You can also stop the cooking process by opening the
door. To restart the cooking process, close the door and
press the “Start/+30SEC” button.
If you want to cancel a cooking process, press the
“Stop/Clear” button twice to cancel.
Note: If needed, press the “Start/+30SEC” button to add
an additional 30 seconds of cooking time once cooking
has commenced. You may press this button more than
once to increase the time by 30 second increments.
4. When cooking is complete, the microwave will beep 5
times to signal that it is finished.
Important: If stopping cooking process prematurely,
press the “Stop/Clear” button to clear the display and
reset the system before starting another cooking session.
Express Cooking
Cooking at 100% power level can be achieved quickly
and easily by using the express cooking method. The
numbers “1”to “6” on the control panel act as quick-start
cooking times in minutes (i.e. number “1” is one minute,
“2” is two minutes, etc). To use the express cooking
function:
1. Press on one of the numbers “1” through “6” and the
cooking process and time count down will begin
immediately.
Note: If you would like to temporarily stop the cooking
process, press the “Stop/Clear” button on the control panel
once to stop it and then press the “Start /+30SEC” button to
restart the cooking process.
You can also stop the cooking process by opening the door.
To restart the cooking process, close the door and press
the “Start/+30 Sec.” button.
If you want to cancel a cooking process, press the
“Stop/Clear” button twice.
Note: If needed, press the “Start/+30SEC” button to add
an additional 30 seconds of cooking time once cooking has
commenced. Press the “Start/+30SEC” more than once for
more than 30 seconds.
2. When cooking is complete, the microwave will beep 5
times to signal that it is finished.
Important: If stopping cooking process prematurely, press
the “Stop/Clear” button to clear the display and reset the
system before starting another cooking session.
Memory
Use this feature to save a cooking program with up to two
stages of cooking. You can save up to three different
memory programs. To use this feature:
1. Press the “Memory” button once and the digital
display will show the number “1”.
2. Set one or two stages of cooking (for two stages of
cooking follow the directions for “Muti-Stage
Cooking”).
3. Once finished having entered the cooking stages,
press the “Memory” button to confirm and save.
Repeat the previous steps in order to save two other
cooking programs (for step 1 you would press it twice for
the second saved program or three times for the third saved
program). When wanting to use one of the three saved
programs, press the memory button until you have selected
the correct one (“1”, “2”, or “3”), and then press the
“Start/+30SEC” button.
Auto-Menu
There are nine different auto-menu buttons. Each button is
pre-set for temperature and given weights, and when using
the auto-menu buttons there is no need to set the time
because it is already pre-determined. To use these auto-
menu functions:
1. Press the one of the nine auto-menu buttons. All
auto-menu buttons can be pressed up to three times
in order to match the actual weight of the food with the
pre-set weights (see table on following page).
2. Press the “Start/+30SEC” button to start the cooking
process. The cooking time will begin to countdown
immediately.
11

Operating Instructions
Note: If you would like to temporarily stop the cooking
process, press the “Stop/Clear” button on the control
panel once to stop it and then press the “Start /+30SEC”
button to restart the cooking process.
You can also stop the cooking process by opening the
door. To restart the cooking process, close the door and
press the “Start/+30SEC” button.
If you want to cancel a cooking process, press the
“Stop/Clear” button twice to cancel.
Note: If needed, press the “Start/+30SEC” button to add
an additional 30 seconds of cooking time once cooking
has commenced. You may press this button more than
once to increase the time by 30 second increments.
3.When cooking is complete, the microwave will beep 5
times to signal that it is finished.
Important: If stopping cooking process prematurely,
press the “Stop/Clear” button to clear the display and
Description of Auto-Menu Buttons
• Popcorn: For making popcorn in the microwave.
• Baked Potato: For making baked potatoes in the
microwave.
• Frozen Pizza: Used for cooking frozen pizzas in the
microwave.
• Beverage: Used for making hot beverages such as
coffee, tea, and hot chocolate.
• Warm: Best used for foods and liquids that need to be
warmed but not reheated.
• Pasta: Use this button for cooking pasta in the
microwave.
• Auto-Reheat: Used for reheating foods given a certain
weight.
• Fresh Vegetable: Use this for cooking fresh
vegetables.
• Frozen Vegetables: Use this for cooking frozen
vegetables.
reset the system before starting another cooking session.
MENU NUMBER OF
PRESSES
Popcorn 11.75 oz
23.00
33.50
Baked Potato 18.00
2 16.00
3 24.00
Frozen Pizza 16.00
29.00
3 12.00
Beverage 18.00
2 16.00
3 24.00
WEIGHT (Oz)
3.00 oz
3.50 oz
8.00 oz
16.00 oz
24.00 oz
6.00 oz
9.00 oz
12.00 oz
8.00 oz
16.00 oz
24.00 oz
DISPLAY (Oz) EXAMPLE OF DIGITAL DISPLAY
1.75
Warm 14.00
26.00
38.00
Pasta 11.75
23.50
36.00
Auto-Reheat 16.00
29.00
3 12.00
Fresh Vegetable 14.00
28.00
3 16.00
Frozen Vegetable 14.00
28.00
3 16.00
1.75 oz (with water 15 oz)
3.50 oz (with water 28 oz)
6.00 oz (with water 42 oz)
4.00 oz
6.00 oz
8.00 oz
6.00 oz
9.00 oz
12.00 oz
4.00 oz
8.00 oz
16.00 oz
4.00 oz
8.00 oz
16.00 oz
12

Maintenance & Cleaning Instructions
Maintenance & Cleaning
To clean your convection microwave oven:
1. Press the “Stop/Clear” to turn the convection
microwave oven off and remove the plug from the
electrical outlet.
2. Let the oven cool completely before cleaning the
inside.
3. Wipe the inside of the oven with a damp cloth. You
can use a mild detergent if the oven gets very dirty.
Do not use oven cleaning sprays or harsh
cleansers as they may damage the surface of the
microwave oven.
4. Wipe the outside surface of the convection
microwave oven with a damp clot h. Do not allow any
water to seep into the ventilation openings.
5. Wipe the door, window door seal and control panel
with a damp cloth frequently to remove any spills or
spatters. Do not use any abrasive cleansers as it
will damage the finish.
6. Do not allow the control panel to become wet.
When cleaning the control panel, leave the door open
slightly to prevent the oven from turning on
accidentally.
7. If steam accumulates inside or around the oven door,
wipe with a dry, soft cloth. This may occur when the
microwave is used under high humidity conditions.
8. Clean the glass turntable, turntable drive plate, and
metal rack in warm, soapy water or place in the
dishwasher.
9. Clean the bottom of the oven with a damp cloth and a
mild detergent.
10. To remove odors from your oven, place a cup of
water with the juice of a lemon and the lemon rind in
a deep microwaveable dish and microwave for 5
minutes. After the oven has cooled, wipe with a dry,
soft cloth.
Troubleshooting
1. Oven does not start.
a) Is the power cord plugged in?
b) Chec k fuse or circuit breaker in your home.
c) Is the door closed?
d) Is the cooking time set?
e) Press the “Start” button.
2. Arcing or sparking.
a) Are you using approved cookware?
b) Is the oven empty?
3. Incorrect time of day.
a) Have you tried to reset the time of day?
4. Unevenly cooked foods.
a) Are you using approved cookware?
b) Is the glass turntable in the oven?
c) Did you stir the food while it was cooking?
d) Were the foods completely defrosted?
e) Was the time/cooking power level correct?
5. Over coo ke d foods.
a) Was the time/cooking power level correct?
6. Undercook ed foods.
a) Are you using approved cookware?
b) Were the foods completely defrosted?
c) Was the time/cooking power level correct?
d) Are the ventilation ports clear?
7. Improper defrosting.
a) Are you using approved cookware?
b) Was the time/cooking power level correct?
c) Did you turn or stir the food during the defrosting
cycle?
Questions & Answers
1. Will the microwave oven be damaged if it operates
empty?
Never operate the oven empty or without the
glass turntable when using the microwave mode.
When using the pre-heat and/or the convection fan
setting, then you can operate it empty.
2. Does microwave energy pass through the viewing
screen of the door?
No. the screen bounces the energy back into the
oven cavity. The holes allow only the light to pass
through.
3. Can my microwave oven be damaged if the food is
cooked for too long?
Like any other cooking appliance, it is possible to
overcook food to the point that the food creates
smoke and possibly even fire and damage the
inside of the oven. It is always best to be near the
oven when you are cooking.
If the food that you are cooking catches fire, turn the
oven “Off” and remove the plug from the electrical
outlet. DO NOT OPEN THE DOOR.
4. Why do some ba ked foods have a dry, brown spot?
A hard, dry spot indicates overcooking. Sh ort en t he
cooking time.
5. Why do eggs s ometimes pop?
When baking, frying or poaching eggs, the yolk may
pop due to steam buildup inside the yolk. To prevent
this, pierce the yolk before cooking.
Caution: Never microwave eggs in the shell.
6. Why is standing time recommended after
microwave cooking time is over?
Standing time allows foods to continue cooking
evenly for a few minutes after the act ual microwav e
oven cooking cycle ends. The amount of standing
time depends on the density of the foods. Follow
the recipe suggestions.
7. Why is additional time required for cooking food
that was stored in the refrigerator?
As in convention cooking, the initial temperature of
the food affects the total cooking time.
13

Troubleshooting
PROBLEM POSSIBLE CAUSE POSSIBLE SOLUTION
Oven will not start
Arcing or sparking
Unevenly cooked foods
Overcooked foods
Undercooked foods
1. Electrical cord is not plugged in.
2. Door is open.
3. Wrong operation is set.
1. Materials to be avoided in
microwave oven were used.
2. The oven was operated when
empty.
3. Spilled food remains in the cavity.
1. Materials to be avoided in
microwave were used.
2. Food is not defrosted completely.
3. Cooking time and/or power level is
not suitable.
4. Food was not turned or stirred.
1. Cooking time and/or power level is
not suitable.
1. Materials to be avoided in
microwave were used.
2. Food is not defrosted completely.
3. Oven ventilation ports are
restricted.
4. Cooking time and/or power level is
not correct.
1. Plug into the outlet.
2. Close the door and try
again.
3. Check instructions.
1. Use microwave-safe
cookware only.
2. Do not operate with oven
empty.
3. Clean cavity with wet towel.
1. Use microwave-safe
cookware only.
2. Completely defrost food.
3. Use correct cooking time
and/or power level.
4. Turn or stir food frequently.
1. Use correct cooking time
and/or power level.
1. Use microwave-safe
cookware only.
2. Completely defrost food.
3. Check to see that oven
ventilation ports are not
restricted.
4. Use correct cooking time
and/or power level.
Improper defrosting
1. Materials to be avoided in
microwave oven were used.
2. Cooking time and/or power level is
not correct..
3. Food is not turned or stirred.
1. Use microwave-safe
cookware only.
2. Use correct cooking time
and/or power level.
3. Turn or stir food frequently.
14

Model K5309H
ONE (1) YEAR LIMITED WARRANTY
EURO-PRO Operating LLC warrants this product to be free from defects in material and wo rkmanship for a period of one
(1) year from the date of the original purchase, when utilized for normal household use, subject to the following conditions,
exclusions and exceptions.
If your appliance fails to operate properly while in use under normal household conditions wi thin the war ranty per iod, re turn
the complete appliance and accessories, freight prepaid to
In U.S.: EURO-PRO Operating LLC, 94 Main Mill Street, Door 16., Plattsburg, N.Y. 12901
In Canada:EURO-PRO Operating LLC, 4400 Bois Franc, St. Laurent, Quebec H4S 1A7
If the appliance is found to be defective in material o r workmanship, EURO-PRO Operating LLC will repair or replace it
free of charge. Proof of purchase date must be included. *
The liability of EURO-PRO Operating LLC is limited solely to the cost of the repair or replacement of the unit at our option.
This warranty does not cover normal wear of par ts and does not apply to any unit that has been ta mpered with or used for
commercial purposes. This limited warranty does not cover damage caused by misuse, abuse, negligent handling or
damage due to faulty packaging or mishandling in transit. This warranty does not cover da mage or defects caused by or
resulting from damages from shipping or repairs, service or alterations to the product or any of its par ts, which have been
performed by a repair person not authorized by EURO-PRO Operating LLC.
This warranty is extended to the origina l purchaser of the unit and excludes all other legal and/or conventional warranties .
The responsibility of EURO-PRO Operating LLC if any, is limited to the spec ific ob ligations express ly assu med by it under
the terms of the limited warranty. In no event is EURO-PRO Operating LLC liable for inciden tal or consequential damages
of any nature whatsoever. Some states/provinces do not permit the exclusion or limitation of incidental o r consequential
damages, so the above may not apply to you.
This warranty gives you specific legal rights , and you may also have other r ights which var y from state to state or province
to province.
*Important: Carefully pack item to avoid damage in shipping. Be sure t o include proof of purchase date a nd to
attach tag to item before packing with your name, complete address and phone number with a note giving
purchase information, mode l number and what you believe is the problem with item . We recommend you insure
the package (as damage in shipping is not covered by your warranty). Mark the outside of your package
“ATTENTION CUSTOMER SERVICE”. We are constantly striving to improve our products, therefore the
specifications contained herein are s ubje ct to change without notice.
OWNERSHIP REGISTRATION CARD
Please fill out and mail the product registration card within ten (10) days of purchase. The registration will enable us to
contact you in the unlikely event of a product safety notification. By return ing this card you acknowledge to have read and
understood the instructions for use, and warnings set forth in the accompanying instructions.
RETURN TO: EURO-PRO Operating LLC, 94 Main Mill Street, Door 16, Plattsburgh, NY 12901
Model K5309H
_________________________________________________________________________________
Appliance model
________________________________________________________________________________
Date purchased Name of store
________________________________________________________________________________
Owner’s name
________________________________________________________________________________
Address City State Zip code
Printed in China
15

Copyright © Euro-Pro Operating LLC 20 06
 Loading...