


Swivel Head Food Processor
OWNER’S MANUAL
Model FP110H
120V., 60Hz., 550 Watts
COPYRIGHT © EURO-PRO OPERATING LLC 2006
USA: EURO-PRO OPERATING LLC Canada: EURO-PRO OPERATING LLC
94 Main Mill Street, Door 16 4400 Bois Franc
Plattsburg, NY 12901 St. Laurent, QC H4S 1A7
Tel.: 1 (800) 798-7398


Model FP110H
_
_
_
_
EURO-PRO Operating LLC warrants this product to be free from defects in material and
workmanship for a period of one (1) year from the date of purchase when utilized for normal
household use.
If your appliance fails to operate properly while in use under normal household conditions within the
warranty period, return the complete appliance and accessories, freight prepaid to:
US: EURO-PRO Operating LLC, 94 Main Mill Street, Door 16, Platts burgh, NY 12901
Canada: EURO-P RO Op erating LLC, 4400 Bois Franc, St Laurent, Qc , H4S 1A7
If the appliance is found to be defective in material or workmanship, EURO-PRO Operating LLC
will repair or replace it free of charge. Proof of purchase date must be included.*
The liability of EURO-PRO Operating LLC is limited solely to the cost of the repair or replacement
of the unit at our option. This warranty does not cover normal wear of parts and does not apply to
any unit that has been tam pered with or used for comm ercial purposes. This limit ed warranty does
not cover damage caused by misuse, abuse, negligent handling or damage due to faulty packaging
or mishandling in transit.
This warranty is extended to the original purchaser of the unit and excludes all other legal and/or
conventional warranties. The responsibility of EURO-PRO Operating LLC if any, is limited to the
specific obligations expressly assumed by it under the terms of t he limited warranty. In no event is
EURO-PRO Operating LLC liable for incidental or consequential damages of any nature
whatsoever. Some states do not permit the exclusion or limitation of incidental or consequential
damages, so the above may not apply to you.
This warranty gives you specific legal rights, and you may also have other rights which vary from
state to state.
*Important: Carefully pack item to avoid damage in shipping. Be sure to include proof of
purchase date and to attach tag to item before packing with your name, complete address
and phone number with a note giving purchase information, model number and what you
believe is the problem with item. We recommend you insure the package (as damage in
shipping is not covered by your warranty). Mark the outside of your package “ATTENTION
CUSTOMER SERVICE”. We are constantly striving to improve our products, therefore the
specifications contained herein are subject to change without notice.
Please fill out and mail the product registration card within ten (10) days of purchase. The
registration will enable us to contact you in the unlikely event of a product safety notification. By
returning this card you acknowledge to have read and understood the instructions for use, and
warnings set forth in the accompanying instructions. RETURN TO:
EURO-PRO OP ERATING LLC, 94 Main Mill Street, Door 16, Plattsburgh, NY 12901
_____________________________________________________________________
FP110H
Appliance model
ONE (1) YEAR LIMITED WARRANTY
OWNERSHIP RE GISTRATION CARD
_____________________________________________________________________
Date purchased Name of store
_____________________________________________________________________
Owner’s name
_____________________________________________________________________
Address City State Zip Code
IMPORTANT SAFETY INSTRUCTIONS
When using electrical appliances, basic safety precautions should always be followed,
including the following:
1. Read all instructions before using
the appliance. It is suggested
that you keep these instructions
in a safe place for future
reference.
2. Your voltage must correspond to
the voltage printed on the bottom
of the appliance.
3. To protect against electrical
shock, do not immerse the motor
housing (base), cord, or plug in
water or other liquid.
4. Close supervision is necessary
when the appliance is used by or
near children.
5. Unplug appliance from outlet
when not in use, before putting
on or taking off parts and before
cleaning.
6. Avoid touching moving parts at
all times.
7. Do not operate the appliance with
a damaged cord or plug, or after
the appliance malfunctions, has
been dropped or damaged in any
manner. Return the appliance to
EURO-PRO Operating LLC for
examination, repair, electrical or
mechanical adjustment.
9. Do not use outdoors.
10. Do not let cord hang over edge of
table or counter or touch hot
surfaces.
11. Keep hands and utensils away
from moving blades or discs
while processing food to reduce
the risk of severe injury to
persons or damage to the food
processor. A scraper may be
used but must be used only when
the food processor is not running.
12. Blades are sharp. Handle
carefully. When handling the
chopper blade always hold it by
the plastic hub.
13. To reduce the risk of injury, never
place cutting blades or discs on
the base without first putting bowl
properly in place.
14. Be certain cover is securely
locked in place before operating
appliance.
15. Never feed food by hand. Always
use food pusher.
16. Do not attempt to by-pass the
cover interlock mechanism.
17. Always operate food processor
with the cover in place.
8. The use of attachments including
canning jars not recommended
by the manufacturer may cause
fire, electric shock or injury to
persons.
SAVE THESE INSTRUCTIONS
FOR HOUSEHOLD USE ONLY
Printed in Turkey
12
1
REV. 05/06

Operating Instructions
Cleaning & Maintenance Instructions
Congratulations! As the owner of a new Swivel Head Food Processor, you are
about to use a very versatile and powerful kitchen appliance that will quickly become
an indispensable item in your kitchen. Bravetti Platinum Pro products are engineered
to meet the highest quality standards and are designed to offer the ultimate in ease of
operation and convenience.
IMPORTANT INFORMATION
Please read all the following instructions carefully:
IMPORTANT
For your protection, the Swivel Head Food Processor has a double safety switch so
that it cannot run unless the bowl with lid is locked in place. Do not attempt to by-pass
the safety interlock mechanism.
IMPORTANT
The swivel head will not rotate to the unlock position unless the control dial is in the
“Off” position.
IMPORTANT NOTICE
This appliance has a polarized plug (one blade is wider than the other). To reduce the
risk of electrical shock, this plug will fit in a polarized outlet only one way. If the plug
does not fit fully in the outlet, reverse the plug. If it still does not fit, contact a qualified
electrician. Do not modify the plug in any way.
Caution: Remove the protective blade guards from blades before using in the
food processor.
Cleaning and Maintenance
Caution: Make sure that the unit is
unplugged from the power source and
the speed control dial is in the “OFF”
position and press the swivel head
release button before inserting or
removing attachments.
• Never immerse the unit, cord or
plug in water or any other liquid.
• Clean the main unit with a damp
cloth only.
• Use extreme caution when
cleaning the chopping blade as
the blades are very sharp.
• All other parts can be cleaned in
warm sudsy water using regular
dishwashing liquid.
• If food has spilled over on to the
main unit, use the pointy end of the
spatula to clean the cracks and
crevices of the base under the food
processor bowl.
• The processor lid, protective blade
guards, anti-slip pad and the sealing
ring may be washed in lukewarm
water and a mild dishwashing liquid.
DO NOT place these in the
dishwasher.
Using the Storage Compartment
The food processor comes with a blade
storage compartment.
1. Pull the storage compartment out
from the back of the unit. (Fig. 17)
Fig. 17
2. Place blades into the assigned slots
inside as shown below. (Fig. 18)
Note: The blades only fit in each slot
one way, with face of blade facing
towards the center of the blade storage
compartment. The G (large fry blade,
faces the rear of the storage
compartment.
SAVE THESE INSTRUCTIONS
FOR HOUSEHOLD USE ONLY
2
Fig. 18
11

Operating Instructions
Re-settable Thermal Safety
Device
Your Swivel Head Food Processor
has been designed with a unique safety
system which prevents damage to the
unit’s motor and drive system, should
you inadvertently overload your
appliance. The safety system will
automatically cut the electric power to
the appliance when the device senses
an overload or excessive temperature
in the motor or drive system. Should
this occur during use and the appliance
stops functioning, following is the resetting procedure:
1. Turn the On/Off speed control dial
to the “Off” position
2. Unplug the unit from the wall
receptacle and press the swivel
head release button before
inserting or removing attachments.
3. Remove and empty the processor
bowl. Ensure that no
food is jamming the cutting blades
or attachments.
4. Allow the appliance to cool down
for a minimum of 30 minutes.
5. Re-install the processor bowl, turn
the swivel head to the locked
position and re-plug appliance in
the wall outlet.
6. Proceed to use the appliance as
before. Should the appliance still
fail to operate, turn the On/Off
speed control to the “Off” position
and unplug from the wall outlet.
Allow the appliance to cool down
for an additional 1 to 2 hours.
After this time has passed, repeat
the restart procedure, steps 5 and
6 above.
GETTING TO KNOW YOUR
SWIVEL HEAD FOOD PROCESSOR
1. Swivel Head
2. Turbo Pulse Button
3. Speed Control Dial
4. Swivel Head Release Button
5. Food Processor Body
6. Blade Storage Compartment
7. Suction Cups
8. Food Processor
Food Pusher
9. Processor Lid
10. Processor Lid Seal
11. Whipping Blade
12. Processor Double Blade
13. Protective Blade Guards
(For storage purposes only)
14. Processor Main
Chopping Blade
15. Processor Spindle
16. Food Processor Bowl
17. Processor Bowl Shaft
18. Julienne Blade
19. Grater
20. Thick Shredding Blade
21. Thin Shredding Blade
22. Thick Slicing Blade
23. Thin Slicing Blade
24. Main Blade Holder
25. French Fry Blade
26. French Fry Blade Holder
27. Spatula
(x2)
10
Technical Specifications
Voltage: 120V., 60Hz.
Power: 550 Watts
Food Processor Capacity: 6 Cups (1.5 Liters)
* Note: Illustrations may differ from actu al product
3
Operating Instructions
Operating Instructions
Speed Control Dial
The speed control dial has speed
settings as follows:
• Off
• 1 to 9
• Max
• Pulse/Turbo
The speed can be adjusted while the
food processor is in use. (Fig. 1)
Use of the Pulse/Turbo button allows
greater control over the texture of the
food being processed. Use "Pulse"
when the unit is in the "Off" position.
Use "Turbo" when the unit is in the
"On" position and you need a burst of
power.
Pulse
Fig. 1
Caution: The "Pulse" and "Turbo"
function is only intended to be used for
short "bursts" of processing. Damage
to the unit may occur if this function is
used for prolonged periods of time.
Operating The Food Processor
Setting Up:
Caution: Make sure that the unit is
un-plugged from the power source and
the swivel head is in the off position
before inserting or removing any
attachments and before cleaning.
Caution: Do not operate the unit for
intervals longer than 20 seconds. If
longer chopping or mixing is required,
run for 20 seconds, allow motor to stop
and run again for another 20 seconds.
1. Place the food processor bowl onto
the processor body. (Fig. 2)
Caution: BLADES ARE SHARP!
Always hold the blade assembly
from the top. ALWAYS remove the
chopping blade protective guards
before using.
2. Assemble the main chopping blade
onto the spindle. Ensure that the
tabs on the underside of the spindle
are aligned with the main chopping
blade. (Fig. 3)
Tabs
Main Chopping Blade
Fig. 3
3. Fit the spindle with chopping blade
onto the motor shaft located on the
bottom of the bowl. (Fig. 4)
Blade & Spindle
Motor Shaft
Fig. 4
4. Fit the processor lid onto the food
processor bowl firmly.
Important: The unit will NOT
operate without the processor lid in
place and the swivel head in the
locked position.
5. When fitted correctly, the lip on the
processor lid will fit into the notch on
the food processor body. (Fig. 5)
Lip on
Safety
Cover
Whipping Blade
Caution: Make sure that the unit is
unplugged from the power source
and the speed dial is in the “Off”
position. Press the swivel head
release button so that the swivel
head is in the unlocked position
before inserting or removing
attachments.
Caution: Do not operate the unit for
intervals longer than 20 seconds. If
longer chopping or mixing is required,
run for 20 seconds, allow the motor to
stop and run again for another 20
seconds.
1. Fit the processor bowl and spindle
as previously described.
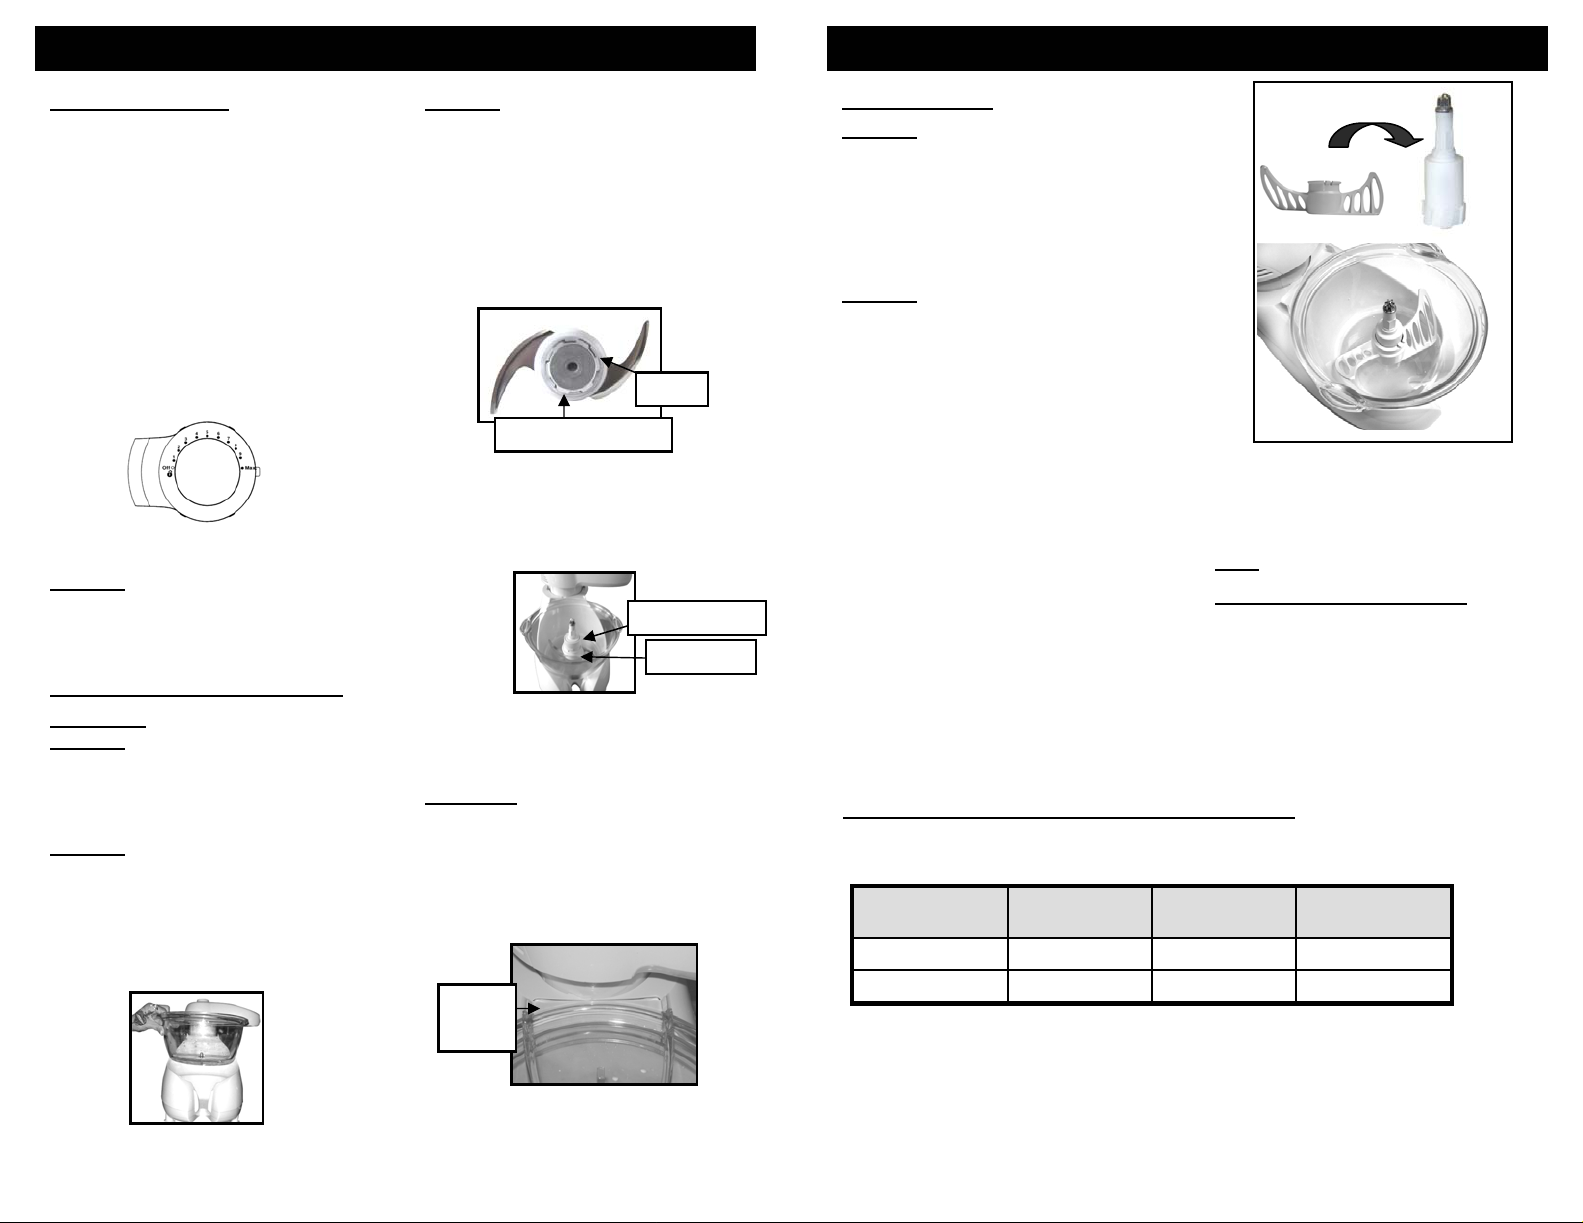
2. Fit the whipping blade over the
spindle and press firmly into place.
(Fig. 16)
3. Place the ingredients into the bowl.
4. Fit the lid onto the bowl. Rotate the
swivel head and press to lock into
position. Insert food pusher into
feed chute.
5. Plug in the food processor.
6. Turn the food processor “On”
selecting high speed.
7. Remove the whipping blade from
FOR SAFETY, ALWAYS LEAVE
THE PUSHER IN PLACE WHILE
OPERATING THE PROCESSOR.
Note: Do not use for dough.
Hints & Tips for Whipping:
• Use to make whip egg whites or
whipped cream.
• When whipping egg whites make sure
that eggs are at room temperature for
best results.
Fig. 16
the bowl before removing the
whipped ingredients.
Processing Examples With The Whipping Blade
The processing times indicated below are approximate and also depend on the
quantity of the food to be processed and the degree of fineness you require.
PRODUCT QUANTITY RECOMMENDED
SPEED
EGGS 4 LARGE EGGS 1-MAX 10 –20 SECONDS
WHIPPING CREAM 17.5 OZ/500mL 8 –MAX 15 – 30 SECONDS
* Always allow food to cool before placing in the bowl.
OPERATION
TIMES
Fig. 2
Fig. 5
4
9

Operating Instructions
Operating Instructions
WARNING: USE THE FOOD
PUSHER TO ADD FOOD INTO THE
PROCESSOR BOWL THROUGH THE
FEEDER TUBE.
7. Do not overload the food
processor bowl. In one operation,
you can process a maximum of 5
cups (1250mL) of food.
French Fry Blade Assembly
Caution: Make sure that the unit is
unplugged from the power source
and the swivel head is in the “Off”
position before inserting or
removing attachments.
Caution: Do not operate the unit for
intervals longer than 20 seconds. If
longer chopping or mixing is required,
run for 20 seconds, allow the motor to
stop and run again for another 20
seconds.
The French Fry blade (G) may
already be assembled onto the
French Fry blade holder. (Marked as
Fry Blade Holder.)
Note: The French Fry blade will only
fit into the French Fry blade holder;
identified by the higher hub.
1. Place the spindle into the food
processor bowl.
2. Using the finger holes in the French
fry blade holder, fit it over the
spindle and press firmly into place.
(Fig. 15)
G –French
Fry Blade
Fig. 15
Higher
Hub
WARNING: USE EXTREME
CAUTION WHEN HANDLING
BLADES. BLAD ES ARE SHARP.
3. Place the lid on the food processor
bowl, and lock the swivel head into
position.
4. Plug in the processor.
WARNING: USE THE FOOD
PUSHER TO ADD FOOD INTO THE
PROCESSOR BOWL THROUGH THE
FEEDER TUBE.
5. Do not overload the bowl. In one
operation, you can process a
maximum 5 cups (1250 ml) of
food.
Processing Examples
Recommended speed for processing
with chopping blades is High.
Thin Shredding
A
B
C
D
E
F
G
(carrots, potatoes,
cucumbers, cabbage)
Thick Shredding
(Lettuce, carrots, onions)
Thick Slicing
(Cabbage, carrots,
onions)
Thin Slicing
(Carrots, cucumbers, raw
potatoes, lettuce)
Grating
(Hard Cheeses)
Julienne
(Vegetables)
French Fry
(Potatoes)
Hints & Tips for French Fry,
Shredding, Slicing, Grating &
Julienne Blades
• For shredding, place food
horizontally into the feeder tube.
• For slicing place the food vertically.
• If grating potatoes or apples, add 1
tsp lemon juice to prevent them
from turning black.
• Potatoes can be sliced us ing the
thin slicing blade for chips or use
the large French Fry blade if making
French fries.
6. Turn the swivel head clockwise until
it stops turning and push down until
it “clicks” into place. (Fig. 6)
Unlocked Position Locked Position
Fig. 6
7. Plug in the processor and turn the
speed control dial to the desired
speed. If the processor does not
come on, check that the swivel head
and processor lid are both correctly
fitted and locked into place. For
safety, always use the food
pusher when putting food into the
feeder tube. NEVER feed by hand.
(Fig. 7)
Fig. 7
Important
: The food processor has a
swivel head system. It cannot run
unless the swivel head is locked. The
swivel head cannot be opened unless
the On/Off knob is turned to the “Off”
position.
Using the Double Chopping
Blade
Always disconnect unit from power
source before cleaning or changing
accessories.
Warning: USE EXTREME CAUTION
WHEN HANDLING THE BLADES.
THEY ARE EXTREMELY SHARP.
ALWAYS remove the chopping
blade protective guards before
using.
Important Note: Do NOT operate
continuously for more than 20
seconds at one time.
The food processor may be used with
one blade or two blades, depending on
type of food, finer chopping results, or
speed of processing. (Fig. 8)
Double
Blade
Main
Blade
Fig. 8
1. To open the food processor, ensure
that the speed control dial is in the
“Off” position and press the swivel
head release button. (Fig. 9)
Fig. 9
2. To use with a double blade, carefully
slip the first blade onto the spindle.
Hold this blade by the base. Hold
second blade from top grip and place
second blade on top of first. Turn
second blade clockwise to lock into
position. (Fig. 10)
Fig. 10
3. Then place the blade assembly onto
the shaft of the processor bowl.
Always hold the chopping blade
assembly by the top of the spindle.
Spindle
8
5

Operating Instructions
Operating Instructions
4. Place ingredients to be processed
in the bowl.
5. Place the processor lid onto the
bowl with lip inside of the notch on
the food processor body. Rotate the
swivel head and press to lock into
position. Insert the food pusher into
the feeder tube.
6. Plug the processor into a wall outlet.
7. Turn the speed control dial to the
desired speed setting.
Note: The food processor unit will not
operate if the swivel head is not locked
securely.
8. Keep hands and utensils away from
the cutting blades while chopping
food to reduce the risk of severe
injury to persons or damage to the
food processor. A scraper may be
used, but ONLY when the food
processor is NOT running and has
been unplugged. Never feed food
by hand. Always use the food
pusher. (Fig. 11)
9. When finished processing the
ingredients, turn the speed control
dial to the “Off” position and
press the swivel head release
button. The swivel head will
automatically turn to allow you to
remove the bowl lid.
10. Remove the chopping blade(s) first
before removing the processed
food.
FOR SAFETY, ALWAYS USE
THE FOOD PUSHER WHEN
PUTTING FOOD INTO THE THE
FEEDER TUBE. NEVER FEED
Fig. 11
BY HAND.
Processing Examples With The Double Chopping Blade
The processing times indicated below are approximate and also depend on the
quantity of the food to be processed and the degree of fineness you require.
PRODUCT QUANTITY RECOMMENDED
SPEED
MEAT* 24.5 oz / 700 gr. MAX 15 - 30 SECONDS
ONIONS 24.5 oz / 700 gr. 5 - 6 15 - 30 SECONDS
NUTS 21 oz / 600 gr. 8-MAX 15 - 30 SECONDS
FISH* 24.5 oz / 700 gr. 1 - 8 15 - 30 SECONDS
CHEESE 24.5 oz / 700 gr. 1 - 8 15 – 30 SECONDS
LIQUIDS (SOUPS) 24.5 oz / 700 gr. 1 - 8 10 – 20 SECONDS
CARROTTS 24.5 oz / 700 gr. 6 - 8 30 SECONDS
BREAD 4 SLICES 6 - 8 15 – 30 SECONDS
APPLES 24.5 oz / 700 gr. 8 – MAX 15 – 30 SECONDS
PARSLEY MAX 4 BUNDLES MAX 15 – 30 SECONDS
OPERATION TIMES
(used in 10 - 20 second intervals)
Hints & Tips for
Chopping Blades:
• T he double chopping blade can be
used for chopping meat, fish,
vegetables, cheese, etc. setting the
speed to maximum.
• For finer chopping, incre ase th e
length of time you process.
• For coarser chopping, use the pulse
button for a few seconds and
monitor food texture.
• Pre-cut larger pieces to make them
fit into the feeder tube. When
chopping hard foods (e.g. meat,
cheese) cut into 1-inch ( 2.4 cm)
cubes.
Slicing, Shredding, Grating &
Julienne Blade Assembly
Caution: Make sure that the unit is
unplugged from the power source
and the speed control dial is in the
“Off” position. Press the swivel
head release button so that the
swivel head is in the unlocked
position before inserting or
removing attachments.
Caution: Do not operate the unit for
intervals longer than 20 seconds. If
longer chopping or mixing is required,
run for 20 seconds, allow the motor to
stop and run again for another 20
seconds.
1. Place the blade of your choice on
the blade holder. Insert the longer
tab on the side of the blade holder
first. (Fig. 12)
Longer Tab
Fig. 12
2. Press the other end of the blade
until it clicks into place. (Fig. 13)
Fig. 13
3. Place the spindle into the food
processor bowl.
4. Using the finger holes in the blade
holder, fit it over the spindle and
press firmly into place as indicated.
(Fig. 14)
Fig. 14
Warning: Use Extreme Caution
When Handling Blades. Blades Are
Sharp.
5. Place the lid on the food processor
bowl, and lock the swivel head into
position.
6. Plug in the processor and select
desired speed on speed control
dial.
* Remove all bones before processing.
** Always allow food to cool before plac ing in the bowl.
6
7
 Loading...