

Page 1
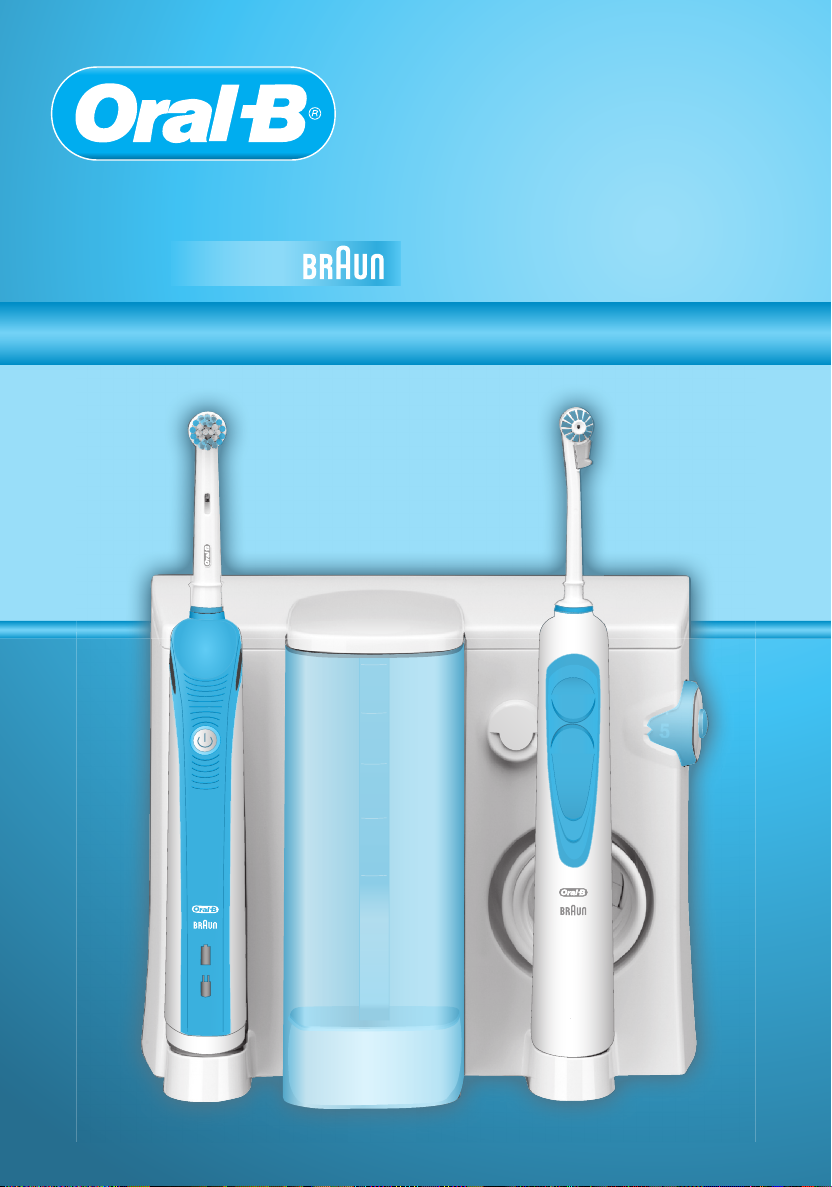
PROFESSIONAL
powered
CARE
OXYJET
OXYJET
+
+
by
3000
3000
600
500
400
00
3
200
ml
air
filter
5
OxyJet
Page 2

6
English 10
Internet:
www.oralb.com
www.braun.com
www.service.braun.com
Braun GmbH
Frankfurter Straße 145
61476 Kronberg/Germany
CN
GB
0 800 783 7010
IE
1 800 509 448
OC20.575.3X
Type 3724
99508255/VI-10
China/GB
Page 3
Ora
1
11
8
9
10
click!
7
6
5
4
3
2
1
B
-
Oral
600
500
12
13
400
14
300
15
200
ml
Ox
yJ
e
t
16
17
2
18
a
click!
4
b
Page 4
3
0
s
e
c
3
0
s
e
c
3
0
s
e
c
3
0
s
e
c
A
a
B
l
ra
17 h
O
OxyJ
e
t
b
B
c
ml
d
180°
e
f
g
i
j
h
2
k
5
l
Page 5

678
Page 6

Page 7

Ni-MH
Page 8

9
Page 9

English
Please read the usage instructions carefully before
first use and save it for future reference.
Important
The appliance must be mounted in a way that it
•
cannot fall into water or drop to the floor. The plug
should always be accessible.
Periodically check the cord for damage. A damaged
•
or non-functioning unit must no longer be used. If
the cord is damaged, take the charging unit to an
Oral-B Braun Service Centre.
This product is not intended for use by children
•
under age 12.
This appliance is not intended for use by children
•
or persons with reduced physical, sensory or
mental capabilities, unless they are supervised by
a person responsible for their safety. In general,
we recommend that you keep the appliance out of
reach of children.
Children should be supervised to ensure that they
•
do not play with the appliance.
If the toothbrush handle is dropped, the brush
•
head should be replaced before the next use even
if no damage is visible.
Do not place or store the appliance where it can
•
fall or be pulled into a tub or sink.
Do not place the appliance in water or other
•
liquid.
Do not reach for an appliance that has fallen into
•
water. Unplug immediately.
Do not modify or repair the product. This may
•
cause fire, electric shock or injury. Consult your
dealer for repairs or contact an Oral-B Braun
Service Centre. Do not disassemble the product
except when disposing of the battery.
When taking out the battery from the toothbrush
•
handle for disposal, use caution not to short the
positive (+) and negative (–) terminals.
Do not insert any object into any opening of the
•
appliance.
Do not touch the power plug with wet hands. This
•
can cause an electric shock.
When unplugging, always hold the power plug
•
instead of the cord.
Use this product only for its intended use as
•
described in this manual. Do not use attachments
or chargers not recommended by the
manufacturer.
If you are undergoing treatment for any oral care
•
condition, consult your dental professional prior to
use.
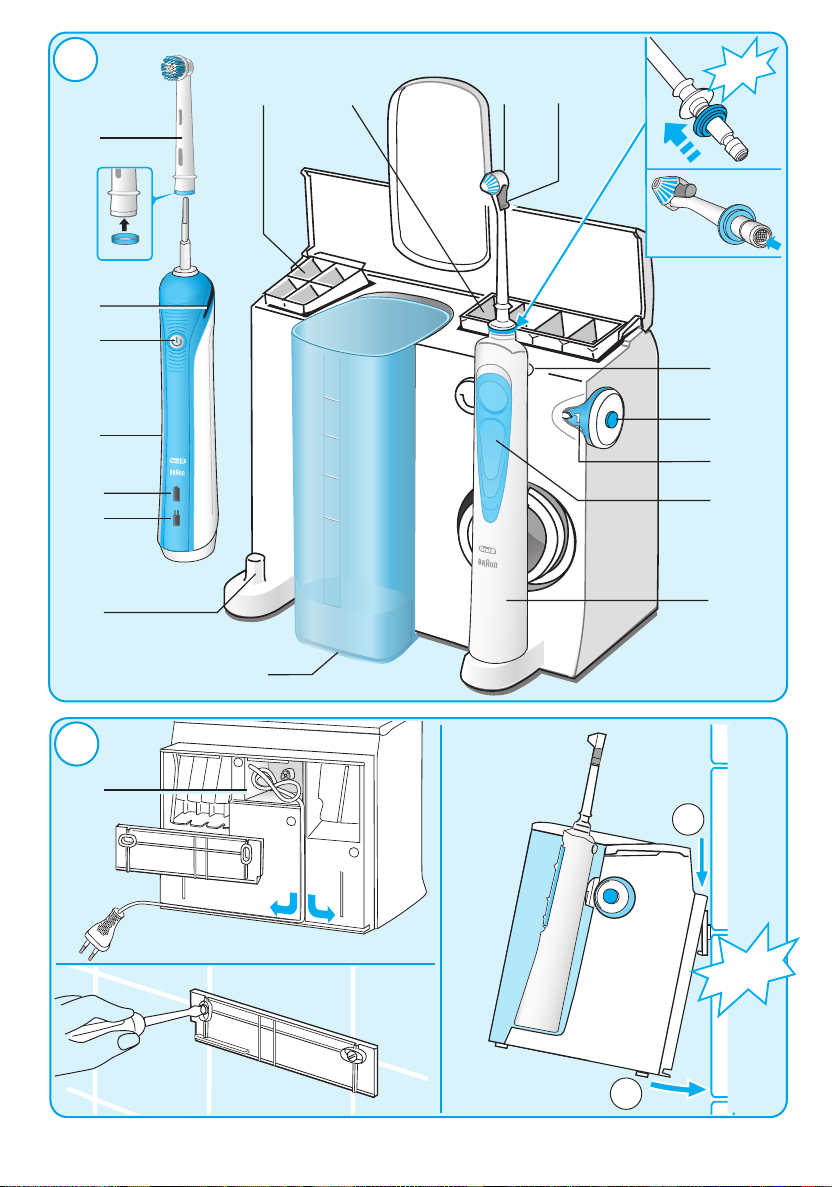
Description
Toothbrush
1 Charger base
2 Low Charge Indicator light
3 Charge Indicator light
4 Toothbrush handle (rechargeable)
10
5 On/off button
6 Pressure sensor light
7 Brush head
(see «Brush heads and accessories»)
8 Brush head compartment
Irrigator
9 Jet compartment
10 Irrigator jet
11 Jet switch
12 Jet release button
13 On/off switch
14 Water pressure control dial
15 Handle switch (water stop and go)
16 Irrigator handle
17 Water container (600 ml)
18 Cord storage
Specifications:
For voltage specifications please refer to the bottom
of the charging unit.
Your Oral-B Professional Care OxyJet +3000 comes
with a convenient wall holder. It can be mounted
easily using the attached items (see picture 2,
page 4).
A Using your toothbrush
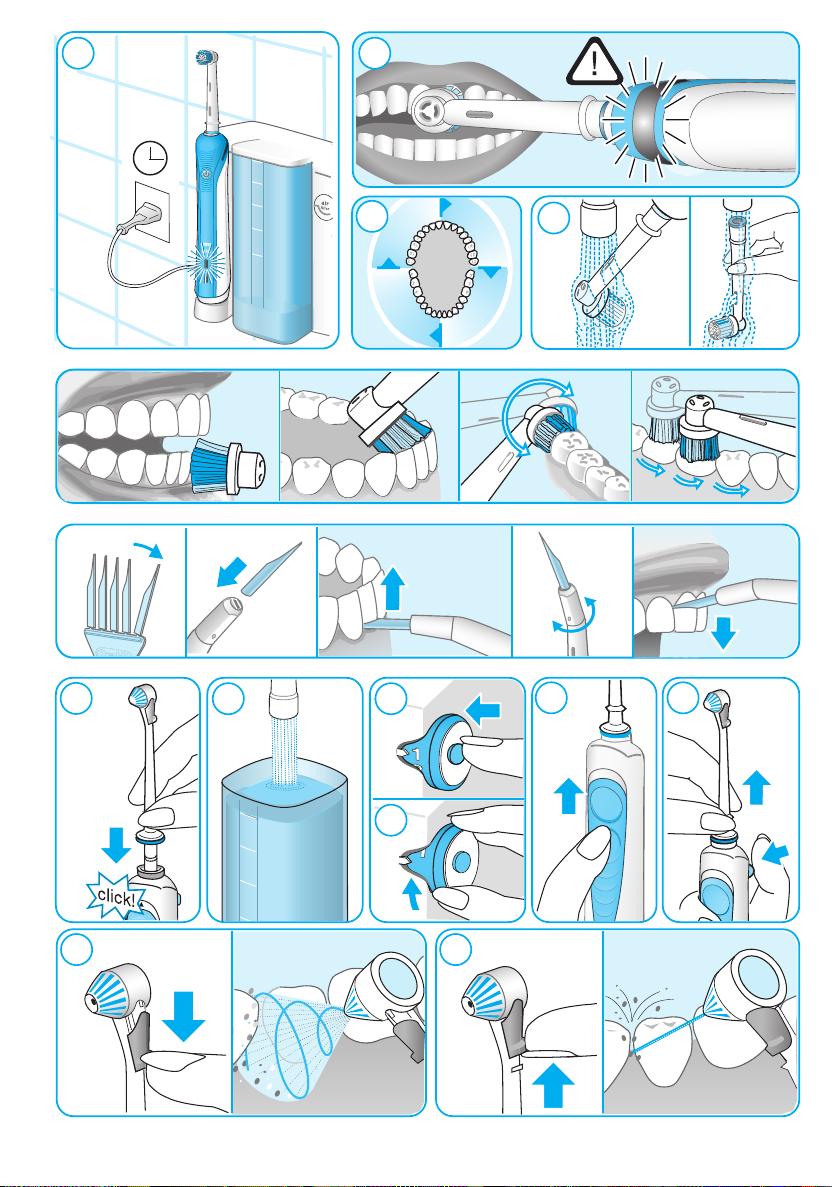
Connecting and charging
Your toothbrush has a waterproof handle, is
electrically safe and designed for use in the bathroom.
Plug the appliance into an electrical outlet and
•
place the toothbrush handle (4) on the charger
base (1), (see picture a, page 5).
The green charge indicator light (3) flashes, while
•
the handle is being charged. Once it is fully
charged, the green charge indicator light shines
continuously for 5 seconds; then it turns off.
A full charge takes at least 17 hours and enables
approximately one week of regular brushing (twice
a day, 2 minutes). To check the charging status
when the charging light is off, shortly lift up and
return your handle on the charging unit. The
charge indicator light will shine permanently for
5 seconds and turns off when your handle is fully
charged.
When the rechargeable battery is low, the red low
•
charge indicator light (2) starts blinking after
turning off your toothbrush.
For everyday use, the toothbrush handle can be
•
stored on the charging unit to maintain it at full
power. Overcharging is impossible. However for
environmental reasons, Oral-B recommends to
unplug the charging unit until the next recharge is
required. Please note that you need to plug in the
appliance when using the irrigator.
Page 10

To maintain the maximum capacity of the
•
rechargeable battery, unplug the charging unit and
fully discharge the handle with regular use at least
every 6 months.
Please note: If the charge indicator light is not
flashing immediately, continue charging. It will
appear in 10–15 minutes.
A long stuttering sound indicates the end of the
professionally recommended 2-minute brushing time
(see picture c, page 5).
The elapsed brushing time is memorised, even when
the handle is briefly switched off during brushing.
When pausing longer than 30 seconds the timer
resets to the initial starting point.
Brushing modes
Your toothbrush offers different brushing modes to
best meet your individual oral care needs.
«Daily Clean» Exceptional mouth cleaning
«Sensitive» Gentle, yet thorough cleaning for
«Whitening» Exceptional polishing for occasional
How to switch between brushing modes:
When pressing the on/off button (5) your tooth-
•
brush automatically starts in the «Daily Clean»
mode.
To switch to the «Sensitive» and «Whitening»
•
mode, successively press the on/off button.
To turn off your toothbrush from the «Whitening»
•
mode, push the on/off button once more.
If you wish to turn off your toothbrush from either
•
the «Daily Clean» or «Sensitive»mode, push and
hold down the on/off button until the motor stops.
Brushing technique
Attach the brush head (7) to the toothbrush handle.
You can use any kind of toothpaste. To avoid
splashing, first guide the brush head to your teeth
before switching on the appliance. Guide the brush
head slowly from tooth to tooth, spending a few
seconds each tooth surface. Brush both the gums
and the teeth; first the outsides, then the insides and
finally the chewing surfaces. Do not press too hard
or scrub.
Pressure Sensor
Helping protect your teeth and gums from hard
brushing, your toothbrush has a pressure control
feature installed (see picture b, page 5). If too much
pressure is applied, the red pressure sensor light (6)
will light up reminding you to reduce pressure. In
addition you will also hear a different sound while
brushing. Periodically check the operation of the
pressure sensor by pressing lightly on the brush
head during use.
sensitive areas
or everyday use
In the first days of using the toothbrush, your gums
may bleed slightly. In general, bleeding should stop
after a few days. Should it persist after 2 weeks,
please consult your dentist or dental hygienist. If you
have sensitive teeth and gums, Oral-B recommends
using the «Sensitive» mode.
Brush heads and accessories (depending on
model)
The Oral-B Professional Care offers you a variety of
brush heads and accessories, allowing you to select
those which best meet your oral care needs.
Replacement brush heads and accessories are
available in stores that sell Oral-B products.
Oral-B Precision Clean brush head
The Oral-B Precision Clean brush head
cups each tooth with a curved bristle trim
and reaches deep between teeth at the
same time.
Oral-B ProWhite brush head
The Oral-B ProWhite brush head features
a dentist-inspired polishing cup to
remove surface stains from coffee, tea
and tobacco for effective brightening.
We do not recommend using the Oral-B ProWhite
brush head with braces. Children under 12 years old
should not use the Braun Oral-B ProWhite brush
head.
All brush heads feature blue INDICATOR® bristles to
help you monitor brush head replacement need. With
thorough brushing, twice a day for two minutes, the
light blue color will fade halfway approximately within
3 months, signaling it is time to change the brush
head.
Oral-B Power Tip
Cleans deep between teeth as well as
around orthodontic appliances.
Professional Timer
A short stuttering sound at 30-second intervals
reminds you to brush equally all four quadrants of
your mouth.
Tongue Cleaner
The Tongue Cleaner is designed to help
remove oral malodor and can be used
every day – before or after brushing. You
can use mouthwash with the Tongue
11
Page 11

Cleaner. Attach it to the handle, turn the appliance
on and drag it across the tongue from back to
front. We recommend using the «Sensitive» mode
(depending on model) for enhanced control during
use. Rinse after use. Replace the Tongue Cleaner
when the material becomes worn.
Interdental Cleaner
The Interdental Cleaner effectively cleans
between teeth and helps keep your gums
healthy. It should be used before
brushing. Break one pick cleaner off the
base and insert it into the slot in the neck of the
white pick holder. Attach the Interdental Cleaner to
the handle and turn the appliance on. Depending on
which part of your mouth you are cleaning, the pick
holder should be adjusted by turning it, so that the
blunt side always faces your gums. Guide the
cleaner between your teeth and clean systematically
from space to space. We recommend using the
«Sensitive» mode (depending on model) for
enhanced control during use. A pick cleaner can be
used approximately three times until it becomes too
soft to effectively fit and clean between the teeth.
Replacement cleaners are available separately.
Cleaning recommendations
After brushing rinse your brush head or accessory
carefully under running water for some seconds with
the handle switched on. Switch off the handle and
remove the brush head or accessory. Clean both
parts separately under running water (see picture d,
page 5); then wipe them dry before reassembling the
toothbrush. Put the toothbrush handle back on the
charger base.
start the water stream (see picture i, page 5). Keep
your mouth slightly open to allow the water to run
into the washbasin.
You can choose between two different jet functions
by sliding the jet switch (11) down or up (before
doing so, turn off the water stream by sliding the
handle switch down):
Rotating stream for general cleaning and gum
massage (jet switch in lower position): The rotation
of the water stream and its micro-bubbles is
designed for easy penetration and gentle gum
massage (see picture k, page 5).
Mono stream (jet switch in upper position):
The straight water stream is designed for targeted
cleaning (see picture l, page 5).
Maximal operation time: 15 minutes
Cooling off time: 2 hours
To ensure the jet functions, a small sieve is incorporated in the lower end of the shaft. If you should
notice reduced water pressure, please check the
sieve for any deposits. Remove the deposits, e.g. by
carefully tapping the shaft on a flat surface.
After use
Always empty the water container entirely to prevent
bacteria from collecting in the standing water. If your
dentist has recommended the use of a chlorhexidine
solution with your irrigator, allow some water to run
through the irrigator after use to prevent any deposit
build-up.
B Using your irrigator
Before using the irrigator first time, fill the water
container (17) and allow the water to run through
completely by holding the irrigator handle (16) over
a washbasin.
Attach one of the irrigator jets (10) to the handle
•
until it locks into place (see picture e, page 5). Fill
the water container with lukewarm water and add
mouthwash, if desired (see picture f, page 5).
Turn on the irrigator by pressing the on/off switch
•
(13) (see picture g, page 5). When doing so,
the handle switch should be in the lower position
= water stop.
Select the water pressure with the pressure
•
control dial (14) (1 = gentle, 5 = strong) (see
picture h, page 5). We recommend that you start
with setting 1, especially if your gums tend to
bleed or if children are using the irrigator.
Bend over a washbasin and guide the jet to your
•
teeth and gums. Slide the handle switch (15) up to
12
Press the on/off switch to turn off the irrigator.
To take off the irrigator jet, press the jet release
button (12), (see picture j, page 5). The jets can be
stored in the jet compartment (9). Wipe the handle
dry and place it back onto its base.
Cleaning recommendations
Regularly clean the housing with a damp cloth.
The water container and the jet compartment are
removable and dishwasher-safe.
Page 12

Removing Batteries
At the end of the product’s useful life, open the
handle as shown, remove the rechargeable battery
and dispose of it according to local environmental
regulations.
Warning:
Do not disassemble the product at any time other
than when disposing of it. Failure to observe this
point may result in short circuit, fire or injury. For
repair or maintenance (such as battery replacement),
take the product to an authorized service centre.
Guarantee
We grant 2 years limited guarantee on the product
commencing on the date of purchase. Within the
guarantee period we will eliminate, free of charge,
any defects in the appliance resulting from faults in
materials or workmanship, either by repairing or
replacing the complete appliance as we may
choose. This guarantee extends to every country
where this appliance is supplied by Braun or its
appointed distributor.
This guarantee does not cover: damage due to
improper use, normal wear or use, especially
regarding the brush heads, as well as defects that
have a negligible effect on the value or operation of
the appliance. The guarantee becomes void if
repairs are undertaken by unauthorised persons and
if original Braun parts are not used.
To obtain service within the guarantee period, hand
in or send the complete appliance with your sales
receipt to an authorised Oral-B Braun Service
Centre.
For UK only:
This guarantee in no way affects your statutory
rights.
Ni-MHNi-MH
Caution!
Opening the handle will destroy the appliance
and invalidate the warranty.
Please make sure the rechargeable battery is
completely discharged before disassembling the
appliance for product disposal.
Subject to change without notice.
Environmental notice
This product contains rechargeable batteries.
In the interest of protecting the environment,
please do not dispose of the product in the
household waste at the end of its useful life.
Disposal can take place at an Oral-B Braun Service
Centre or at appropriate collection points provided
in your country.
13
 Loading...