

Page 1
8000-9000
Stapled booklet, 120 x 170 mm, 16 pages, 2/2c = black + PMS300u
Charger Type 3757
Handle Type 3765
Travel Case Type 3760
Smart Plug Type 492-5214
Page 2
KR
If you should require further
assistance, please call our
Consumer Service line.
Internet:
www.oralb.com
www.braun.com
www.service.braun.com
Braun GmbH
Frankfurter Straße 145
61476 Kronberg/Germany
Charger Type 3757
Handle Type 3765
Travel Case Type 3760
Smart Plug Type 492-5214
90715581/IV-16
KR/EN
Page 3
Oral-B
10
10d
10c
1
A
10b10a
1
B
-
Oral
11
11d 11e
2
2.
1.
3.
!
click!
Ora
l
-
11a
2
3
11b
11c
12
B
M
I
N
SE
K
II
Pause D
3
MI
N
S
E
K
I
I
P
aus
e
D
on
one
e
4
4
5
6
2.
1.
7
8
1
B
O
r
a
l
B
2 3
B
-
l
a
r
O
EK
S
N
MI
ne
o
ause D
I P
9
4
I
Page 4
1
3
0
s
3
0
s
3
0
s
3
0
s
2
B
l
ra
O
3
4
5
5
Page 5
67891011121314
Page 6
Page 7
Page 8

Page 9

Page 10

Page 11

Page 12

Page 13

English
Welcome to Oral-B!
Before operating this toothbrush, please
read these instructions and save this manual
for future reference.
IMPORTANT
•
Periodically check the entire
product/cords/accessories for
damage. A damaged or nonfunctioning unit should no
longer be used. If the product/
cords/accessories are damaged, take it to an Oral-B
Service Centre. Do not modify
or repair the product. This may
cause fire, electric shock or
injury.
•
Usage by children under age
3 is not recommended. Toothbrushes can be used by children and persons with reduced
physical, sensory or mental
capabilities or lack of experience and knowledge, if they
have been given supervision
or instruction concerning use
of the appliance in a safe way
and understand the hazards
involved.
•
Cleaning and maintenance
shall not be performed by
children.
•
Children shall not play with the
appliance.
•
Use this product only for its
intended use as described in
this manual. Do not use attachments which are not rec-
ommended by the manufacturer.
WARNING
• If the product is dropped, the brush head
should be replaced before the next use
even if no damage is visible.
• Do not place the charger, smart plug or
charging travel case in water or liquid or
store where it can fall or be pulled into a
tub or sink. Do not reach for it when fallen
into water. Unplug immediately.
• Do not open and dissemble device. For
battery recycling please dispose whole
device according to local environmental
regulations. Opening the handle will
destroy the appliance and invalidate the
warranty.
• When unplugging, always hold the power
plug instead of the cord. Do not touch the
power plug with wet hands. This can
cause an electric shock.
• If you are undergoing treatment for any
oral care condition, consult your dental
professional prior to use.
• This toothbrush is a personal care device
and is not intended for use on multiple
patients in a dental practice or institution.
• Replace brush (head) every 3 months or
sooner if brush head becomes worn.
• Your charging travel case is provided with
a special cord set (smart plug), which has
an integrated Safety Extra Low Voltage
power supply. Do not exchange or tamper
with any part of it, otherwise there is risk
of an electric shock. Only use the special
cord set provided with your appliance.
Important Information
• Your Oral-B toothbrush can be used
with your smartphone (find details
under «Connecting your toothbrush to
your Smartphone»).
• To avoid electromagnetic interference
and/or compatibility conflicts, deactivate
the radio transmission of your toothbrush
handle (5) before using it in restricted
surroundings, such as aircrafts or specially marked areas in hospitals.
• Deactivate radio transmission by simul-
taneously pressing the on/off (3) and
mode button (4) for 2 seconds until the
radio transmission display (7) goes off.
Page 14

Follow the same procedure to reactivate
transmission again.
• Persons with pacemakers should
always keep the toothbrush more than
six inches (15 centimeters) from the
pacemaker while turned on. Anytime
you suspect interference is taking
place, deactivate the radio transmission
of your handle.
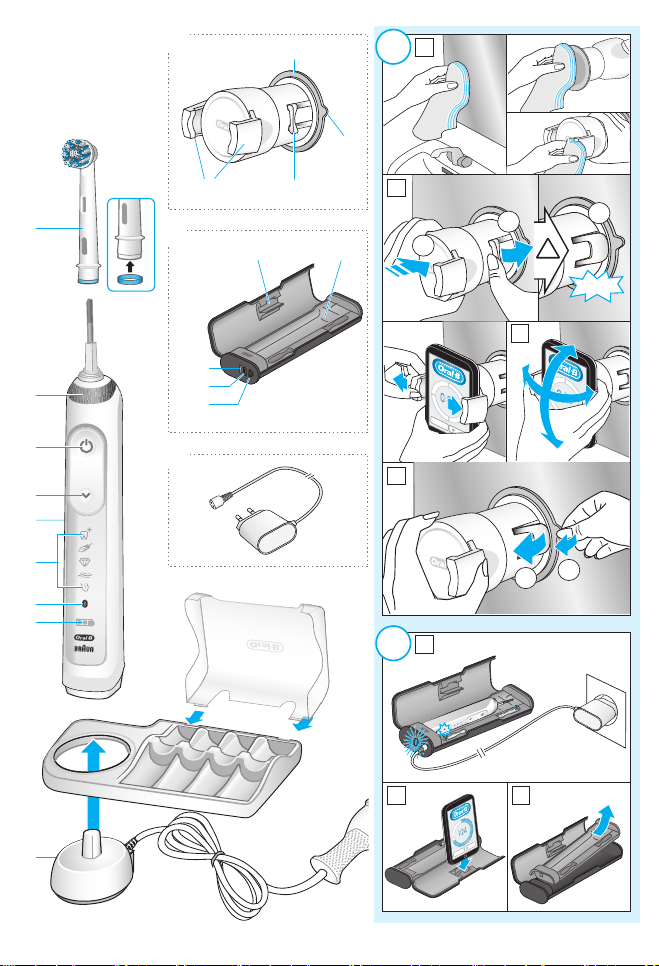
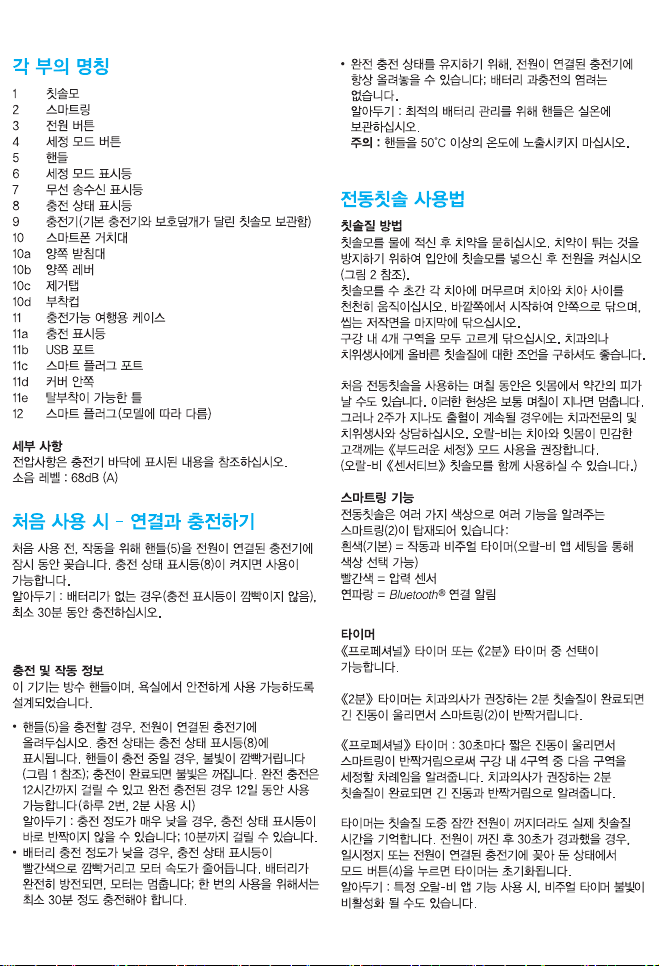
Description
1 Brush head
2 Smart Ring
3 On/off button
4 Brushing mode button
5 Handle
6 Brushing mode display
7 Radio transmission display
(with Bluetooth
8 Charge level display
9 Charging unit (basic charger and brush
head compartment with protective
cover)
10 Smartphone holder
10a Holding brackets
10b Lever arm
10c Pull tab
10d Suction cup
11 Charging travel case (depending on
model)
11a Charge indicator light
11b USB port
11c Smart plug port
11d Inner lid (with smartphone holder)
11e Removable inlay
12 Smart plug (depending on model)
Specifications
For voltage specifications refer to the bottom
of the charging unit.
Noise level: 68 dB (A)
®
wireless technology)
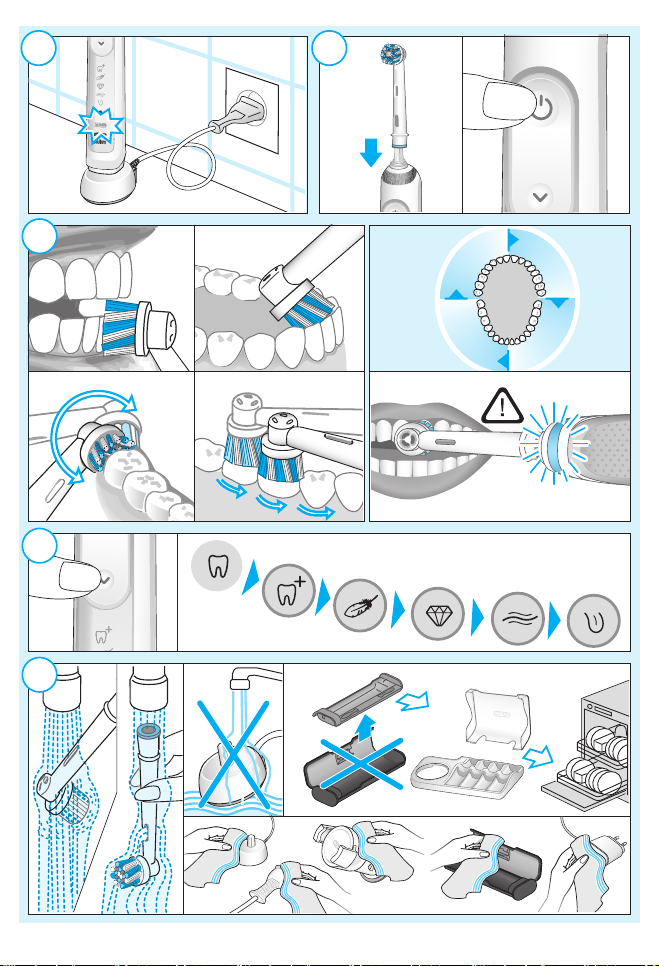
First use – connecting
and charging
Prior to first use, briefly place the handle (5)
on the plugged-in charging unit (9) to activate it. Once the charge level display (8)
illuminates, it is ready for use.
Note: In case battery is empty (no lights
illuminated on charge level display), charge
at least for 30 minutes.
Charging and operating information
Your toothbrush has a waterproof handle, is
electrically safe and designed for use in the
bathroom.
• To charge the handle (5), place it on the
plugged-in charging unit (9). The charge
level is indicated on the charge level display (8).
The flashing lights indicate that the handle
is charging (picture
charged, the lights turn off. A full charge
takes about 12 hours and enables up to
12 days of regular brushing (twice a day,
2 minutes).
Note: At a very low charge level, the lights
might not flash immediately; it can take up
to 10 minutes.
• If the battery is running low, a red light is
flashing on the charge level display and
the motor is reducing its speed. Once the
battery is empty, the motor will stop; it will
need at least a 30-minute charge for one
usage.
• You can always store the handle on the
plugged-in charging unit to maintain it at
full power; a battery overcharge is prevented by device.
Note: Store handle at room temperature
for optimal battery maintenance.
Caution: Do not expose handle to temperatures higher than 50 °C.
); once it is fully
1
Using your toothbrush
Brushing technique
Wet brush head and apply any kind of toothpaste. To avoid splashing, guide the brush
head to your teeth before switching on the
handle (picture
slowly from tooth to tooth, spending a few
seconds on each tooth surface. Start brushing the outsides, then the insides and
finally the chewing surfaces. Brush all four
quadrants of your mouth equally (picture
You may also consult your dentist or dental
hygienist about the right technique for you.
In the first days of using any electric toothbrush, your gums may bleed slightly. In
general, bleeding should stop after a few
days. Should it persist after 2 weeks, please
consult your dentist or dental hygienist.
If you have sensitive teeth and/or gums,
). Guide the brush head
2
3
).
15
Page 15

Oral-B recommends using the «Sensitive»
mode (optional in combination with an
Oral-B «Sensitive» brush head).
Smart Ring features
Your toothbrush is equipped with a Smart
Ring (2) that has various functionalities indicated via different colors of light:
White (default)= Operating and visual timer
light (choose individual color via Oral-B
app settings)
Red = Pressure sensor light
Blue = Bluetooth
®
pairing indicator
TM
Timer
You can choose between «Professional» or
«2-Minute» timer.
The «2-Minute» timer signals with a long
stuttering sound and a flashing light of the
Smart Ring (2) that the professionally
recommended 2-minute brushing time has
been reached.
The «Professional» timer signals with a short
stuttering sound and a flashing light of the
Smart Ring at 30-seconds intervals to move
to the next quadrant of your mouth (picture
). A long stuttering sound and a flashing
3
light indicate the end of the professionally
recommended 2-minute brushing time.
The timer memorizes the elapsed brushing
time, even when the handle is briefly switched off during brushing. The timer resets if
pausing longer than 30 seconds, briefly
pressing the mode button (4) during pause
or placing the handle on the plugged-in
charger.
Note: During the use of special Oral-B
features, the visual timer light may be deacti-
TM
app
vated.
Timer setup:
Your toothbrush comes with the «Professional» timer activated. To change this, press
and hold the mode button (4) for 2 seconds.
Toggle between timer selection by pressing
the on/off button (3). Confirm selection by
pressing the mode button.
• 2 LED’s illuminated indicate «2-Minute»
timer
• 4 LED’s illuminated indicate «Professional»
timer
16
Note: You can also set/advance the timer
functionality via Oral-B
Pressure sensor
If you put excessive pressure on your teeth,
the Smart Ring (2) will light up in red and the
motor speed will be reduced in «Daily
Clean», «Pro Clean» and «Sensitive» mode
(picture
of the pressure sensor by pressing moder-
). Periodically check the operation
3
TM
App.
ately on the brush head during use.
Brushing modes (depending on model)
Your toothbrush offers different brushing
modes indicated on the brushing mode display (6) on your handle («Daily Clean» mode
does not illuminate on the brushing mode
display):
«Daily Clean» – Standard mode for daily
mouth cleaning
«Pro Clean» – For an extraordinary
clean feeling (operated
with a higher frequency)
«Sensitive» – Gentle, yet thorough
cleaning for sensitive
areas
«3D White» – Polishing for occasional
or everyday use
«Gum Care» – Gentle massage of gums
«Tongue Clean» – Tongue cleaning for
occasional or everyday
use
When operating the «Tongue Clean» mode,
we recommend using the «Sensitive» brush
head. You can brush your tongue either with
or without toothpaste. Brush the whole area
of your tongue systematically in gentle
movements. The recommended brushing
time is 20 seconds; indicated with a flashing
light of the Smart Ring.
Your toothbrush automatically starts in the
mode selected last. To switch to other
modes, successively press the mode button
during use (picture
mode back to «Daily Clean» mode, press and
). To return from any
4
hold the mode button (4).
Note: You can also set/advance the mode
functionality via Oral-B
TM
App.
Brush heads
Oral-B offers you a variety of different Oral-B
brush heads that fit your Oral-B toothbrush
handle.
Page 16

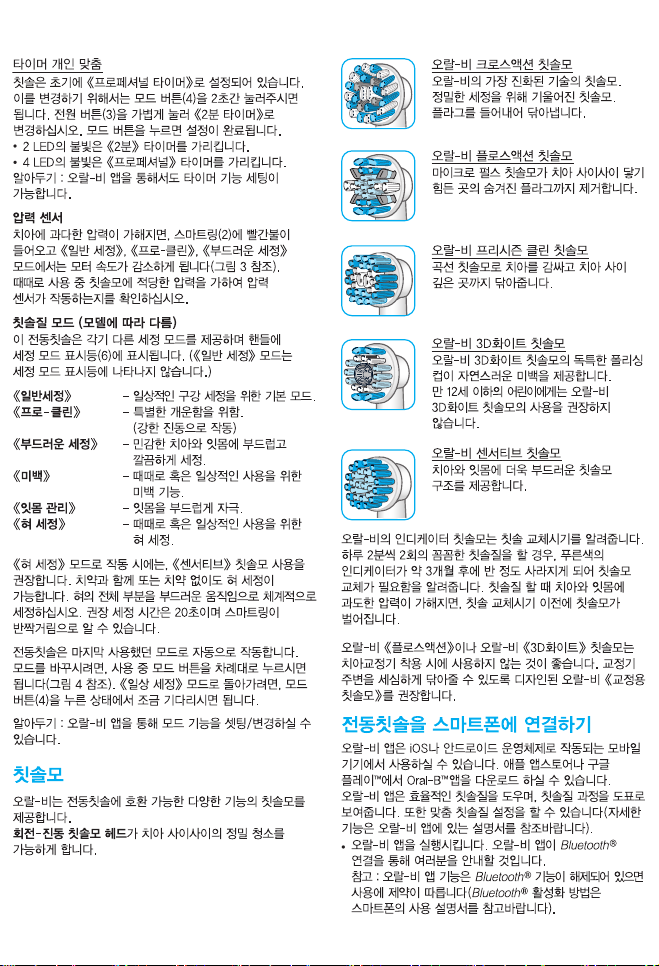
Our oscillating-rotating brush heads can be
used for tooth-by-tooth precision cleaning.
Oral-B CrossAction brush head
Our most advanced brush head.
Angled bristles for a precise
clean. Lifts and powers away
plaque.
Oral-B FlossAction brush head
features micropulse bristles
that allow for an outstanding
plaque removal in the interdental areas.
Oral-B 3D White brush head
features a special polishing
cup to naturally whiten your
teeth. Please note that children
use the Oral-B «3D White» brush head.
Oral-B brush heads feature light blue
INDICATOR
brush head replacement need. With thorough brushing, twice a day for two minutes,
the blue color will fade halfway approximately within 3 months, indicating the need
to exchange your brush head. If the bristles
splay before the color recedes, you may
exert too much pressure on teeth and gums.
We do not recommend using the Oral-B
«FlossAction» or Oral-B «3D White» brush
head with braces. You may use the Oral-B
«Ortho» brush head, specifically designed to
clean around braces and wires.
under 12 years old should not
Oral-B Sensitive brush head
features an extra soft bristle
structure that is gentle on teeth
and gums.
®
bristles to help you monitor
Connecting your
toothbrush to your
Smartphone
The Oral-BTM App is available for mobile
devices running iOS or Android operating
systems. It can be downloaded for free from
App Store
The Oral-B™ App gives you the opportunity
to chart your brushing progress and cus-
(SM)
or Google Play™.
tomize your toothbrush settings (for many
more benefits see the Oral-B™ App instructions).
• Start the Oral-B™ App. The app will guide
you through the entire Bluetooth pairing
procedure.
Note: Oral-B™ App functionality is limited
if Bluetooth wireless technology is deactivated on your smartphone (for directions
please refer to your smartphone’s user
manual).
• Any app instructions will be displayed on
your smartphone.
• If Bluetooth wireless technology is
activated on your handle, the Bluetooth
symbol on the radio transmission display
(7) illuminates. Once the handle is paired,
the Smart Ring (2) flashes briefly.
• Keep your smartphone in close proximity
(within 5m distance) when using it with the
handle. Make sure the smartphone is
safely positioned in a dry place.
Note: Your smartphone must support
Bluetooth 4.0 (or higher)/Bluetooth Smart
in order to pair your handle.
Cleaning recommendations
After brushing, rinse your brush head under
running water with the handle switched on.
Switch off and remove the brush head.
Clean handle and brush head separately;
wipe them dry before reassembling. Unplug
the charging unit before cleaning. Brush
head compartment and protective cover are
dishwasher-safe. Basic charger should be
cleaned with a damp cloth only (picture
).
5
Accessories
Smartphone Holder
• Before each use, make sure mirror, suction
cup surface (10d) and holding brackets
(10a) are always clean and dry (picture
A1). Press your smartphone holder (10)
gently, centered at nose level on the mirror.
Then mount the holder by carefully pressing the lever arm (10b) towards the mirror
until it snaps in (picture A2).
Note: Only affix on mirror to ensure safe
and correct conditions. For use in bathroom only. Do not use in automobiles.
17
Page 17

• Always make sure the smartphone holder
is securely mounted on the mirror before
inserting your smartphone. Place your
smartphone (portrait) sideways in between
the holding brackets (10a) by pressing
against one bracket with your phone and
sliding the other bracket to the side (picture
A2). Follow the same procedure to remove
your phone again.
• Adjust the overall position for the required
angle by moving the ball joint of the holder
(picture A3). Instructions for the best angle
will be given via app.
• Once done, remove your phone from the
holder. Take off the smartphone holder by
flipping the lever arm back and pulling the
tab carefully (picture A4 1./2.). Affix smartphone holder with each use again.
• The smartphone holder should be cleaned
with a damp cloth only. Store in clean and
dry place. If not in use, always remove your
smartphone from the holder.
Note: Smartphone width required for usage:
minimum 58mm, maximum 83mm.
Caution: Small parts may come off, keep
out of reach of children.
Charging Travel Case
• To charge your handle (5) place it on the
pin in the charging travel case (11) and
connect it to an electric outlet, using the
extra smart plug (12) provided.
• The flashing light (11a) of the charging
travel case indicates that the handle is
charging. Once the handle is fully charged
the light turns off. A full charge can take
up to 12 hours (picture B1).
Note: You may use the USB port (11b) to
charge an electric device while the charging travel case is plugged in. The handle
can only be charged with the smart plug
(12)/(11c) not via USB port.
• The inner lid of the travel case has a
built-in smartphone holder (11d), which
can hold your smartphone while using
(picture B2). Before use, make sure your
phone fits the stand and keeps stable.
• The removable inlay (11e) of the travel
case is dishwasher-safe (picture
The outer case should be cleaned with
a damp cloth only. Make sure that travel
case parts are completely dry before reassembling and toothbrush/brush heads are
dry before storing in the travel case.
18
).
5
Note: Clean stains on travel case surface
immediately. Store travel case in a clean and
dry place.
Subject to change without notice.
Environmental Notice
Product contains batteries and/or
recyclable electric waste. For
environment protection do not
dispose in household waste, but
for recycling take to electric waste collection
points provided in your country.
Guarantee
We grant 1 year limited guarantee on the
product commencing on the date of
purchase. Within the guarantee period we
will eliminate, free of charge, any defects in
the appliance resulting from faults in materials or workmanship, either by repairing
or replacing the complete appliance as we
may choose. This guarantee extends to
every country where this appliance is supplied by Braun or its appointed distributor.
This guarantee does not cover: damage due
to improper use, normal wear or use, especially regarding the brush heads, as well as
defects that have a negligible effect on the
value or operation of the appliance. The guarantee becomes void if repairs are undertaken by unauthorised persons and if original
Braun parts are not used.
This appliance is equipped with a Bluetooth
Smart approved radio module. Failure to
establish a Bluetooth Smart connection to
specific smart phones is not covered under
the device guarantee, unless the Bluetooth
radio module of this appliance is damaged.
The Bluetooth devices are warranted by their
own manufacturers and not by Oral-B. OralB does not influence or make any recommendations to device manufacturers, and
therefore Oral-B does not assume any
responsibility for the number of compatible
devices with our Bluetooth systems. Oral-B
Page 18

reserves the right, without any prior notice,
to make any technical modifications or
changes to system implementation of device
features, interface, and menu structure
changes that are deemed necessary to
ensure that Oral-B systems function reliably.
To obtain service within the guarantee
period, hand in or send the complete appliance with your sales receipt to an authorised
Braun Oral-B Service Centre.
Information
Bluetooth® radio module
Although all indicated functions on the Bluetooth device are supported, Oral-B does not
ensure 100% reliability in connection, and
feature operation consistency.
Operation performance and connection reliability are direct consequences of each individual Bluetooth device, software version, as
well as the operating system of those Blue-
tooth devices and company security regulations implemented on the device.
Oral-B adheres to and strictly implements
the Bluetooth standard by which Bluetooth
devices can communicate and function in
Oral-B toothbrushes.
However, if device manufacturers fail to
implement this standard, Bluetooth compatibility and features will be further compromised and the user may experience functional and feature-related issues. Please
note that the software on the Bluetooth
device can significantly affect compatibility
and operation.
1) Warranty – Exclusions and Limitations
This limited warranty applies only to the new
products manufactured by or for The Procter
& Gamble Company, its Affiliates or Subsidiaries («P&G») that can be identified by the
Braun / Oral-B trademark, trade name, or
logo affixed thereto. This limited warranty
does not apply to any non-P&G product
including hardware and software. P&G is not
liable for any damage to or loss of any programs, data, or other information stored on
any media contained within the product, or
any non-P&G product or part not covered by
this limited warranty. Recovery or reinstallation of programs, data or other information is
not covered under this limited warranty.
This limited warranty does not apply to (i)
damage caused by accident, abuse, misuse,
neglect, misapplication, or non-P&G product; (ii) damage caused by service performed by anyone other than Braun or
authorized Braun service location; (iii) a
product or part that has been modified without the written permission of P&G, and (iv)
damage arising out of the use of or inability
to use the Oral-B Smartphone stand/puck,
Smartphone mirror holder, or charging travel
case («Accessories»).
2) Using your smartphone holder
The Oral-B Accessories included in the
package has been designed to provide you
with a convenient way to position your smartphone while you are using the Oral-B app.
Try multiple orientations of your smartphone
in the Oral-B smartphone holder prior to use
to determine the best positioning of your
smartphone in the holder. Be sure to try this
in a manner which will not harm your smartphone if it falls out of the stand. Do not use
in automobiles.
LIMITATION OF LIABILITY
TO THE EXTENT PERMITTED BY APPLICABLE
LAW, IN NO EVENT SHALL P&G ITS
DISTRIBUTORS OR SUPPLIERS BE LIABLE
TO YOU OR ANY THIRD PARTY FOR ANY
DIRECT, INDIRECT, INCIDENTAL,
CONSEQUENTIAL, SPECIAL, EXEMPLARY
OR PUNITIVE DAMAGES, OF ANY NATURE
WHATSOEVER, ARISING OUT OF THE USE
OF OR INABILITY TO USE THE ORAL-B
ACCESSORIES, INCLUDING, WITHOUT
LIMITATION, INJURY TO PERSONS,
PROPERTY DAMAGE, LOSS OF VALUE OF
ANY THIRD PARTY PRODUCTS THAT ARE
USED IN OR WITH THE ORAL-B
ACCESSORIES, OR LOSS OF USE OF THE
ORAL-B ACCESSORIES OR ANY THIRD
PARTY PRODUCTS THAT ARE USED IN OR
WITH THE ORAL-B ACCESSORIES, EVEN IF
P&G HAS BEEN ADVISED OF THE
POSSIBILITY OF SUCH DAMAGES. WITHOUT
LIMITING THE FOREGOING, YOU
UNDERSTAND AND AGREE THAT P&G HAS
NO LIABILITY FOR ANY DAMAGE OR
DESTRUCTION TO CONSUMER
ELECTRONICS DEVICES OR OTHER
PERSONAL PROPERTY THAT ARE
CONTAINED ON OR EXTERIOR TO THE
ORAL-B ACCESSORIES, OR ANY LOSS OF
19
Page 19

DATA CONTAINED IN THE FOREGOING
DEVICES. IN NO EVENT SHALL ANY
RECOVERY AGAINST ORAL-B EXCEED THE
ACTUAL PRICE PAID FOR THE PURCHASE
OF THE PRODUCT.
Warranty replacement brush heads
Oral-B warranty will be voided if electric
rechargeable handle damage is found to be
attributed to the use of non-Oral-B replacement brush heads.
Oral-B does not recommend the use of non
Oral-B replacement brush heads.
• Oral-B has no control over the quality of
non-Oral-B replacement brush heads.
Therefore, we cannot ensure the cleaning
performance of non-Oral-B replacement
brush heads, as communicated with the
electric rechargeable handle at time of
initial purchase.
• Oral-B cannot ensure a good fit of non-
Oral-B replacement brush heads.
• Oral-B cannot predict the long-term
effect of non-Oral-B replacement brush
heads on handle wear.
All Oral-B replacement brush heads carry
the Oral-B logo and meet Oral-B’s high quality standards. Oral-B does not sell replacement brush heads or handle parts under any
other brand name.
Manufacturing date code:
To determine the year and month of
manufacture, refer to the production code
located on the type plate of charger and
handle. Identify the production code (min.
11 characters long) starting with a letter.
Charger:
First two digits of the production code refer
to the year of manufacture. Next two digits
refer to the month of manufacture.
Example: «1209» – means the product was
manufactured in September of 2012.
Handle:
First digit of the production code refers
to the year of manufacture. Next two digits
refer to the month of manufacture.
Example: «209» – means the product was
manufactured in September of 2012.
Device description (Bluetooth LE)
• Operating Frequency :
2,402 MHz ~ 2,480 MHz
• Transmitter Power : Below 10 mW/MHz
• Operating Temperature: 0°C ~ +40°C
• Operating Voltage : 3.6 VDC
Device description (Proprietary)
• Operating Frequency :
2,403 MHz ~ 2,452 MHz
• Transmitter Power : Below 10 mW/MHz
• Operating Temperature: 0°C ~ +40°C
• Operating Voltage : 3.6 VDC
Product name: Rechargeable Toothbrush
Warning statement: This device cannot do
any human safety related service because of
frequency interference
2020
Page 20

Trouble Shooting
Problem Possible reason Remedy
APP
Handle does
not operate
(properly) with
TM
App.
Oral-B
Reset to factory
settings.
1. Oral-BTM App is turned off.
2. Bluetooth interface is not acti-
vated on smartphone.
3. Radio transmission is deactivated on handle; radio transmission display (7) is turned off.
4. Bluetooth connection to smart-
phone has been lost.
5. Your smartphone does not support Bluetooth 4.0 (or higher)/
Bluetooth Smart.
6. Handle on plugged-in charger.
1. Turn on Oral-B
2. Activate Bluetooth interface on
smartphone (described in its
user manual).
3. Activate radio transmission by
simultaneously pressing on/off
(3) and mode button (4) for 2
seconds until radio transmission
display (7) turns on.
4. Pair handle and smartphone
again via app settings. Keep
your smartphone in close proximity when using it with handle.
5. Your smartphone must support
Bluetooth 4.0 (or higher)/
Bluetooth Smart in order to pair
handle.
6. Radio transmission is deactivated while handle is placed on
plugged-in charger.
Original functionality wanted. Press and hold on/off button (3)
for 10 seconds until all indicator
lights double blink simultaneously.
TM
App.
21
Page 21

TOOTHBRUSH
Handle is not
operating (during first use).
Handle does
not operate
with existing
SmartGuide in
household.
1. Short stuttering sounds/
flashing light
every 30 seconds or after
2 minutes.
2. Handle does
not operate
any timer.
Handle does
not charge and
blinks.
1. Handle has not been activated.
2. Battery has a very low charge
level; no lights illuminate.
1. Synchronizing with existing
SmartGuide failed.
2. Radio transmission is deactivated; radio transmission display
(7) is turned off.
3. SmartGuide is not compatible
with handle.
4. Two handles are already
assigned to SmartGuide.
5. Function is deactivated via App
feature.
1. «Professional timer» or
«2-Minute timer» activated.
2. Timer has been modified/
deactivated via App.
Ambient temperature for charging
is out of valid range (
60 °C).
≥
0 °C and
≤
1. Briefly place handle on
plugged-in charging unit. It may
take up to 10 min., until charge
level display (8) flashes.
2. Charge at least for 30 min.
1. Synchronize (existing) handle(s)
(again) via SmartGuide settings
in SmartGuide’s battery compartment: Press «h/min» for
3 seconds. Turn on handle that
you want to synchronize. Then
turn on second handle you want
to synchronize. Press «h/min» or
«set» to exit synchronization
mode.
2. Activate radio transmission by
simultaneously pressing on/off
(3) and mode button (4) for
2 seconds until radio transmission display (7) turns on.
3. Handle cannot be used with
existing SmartGuide.
4. You can synchronize a total of
2 handles only. Change handles
via SmartGuide settings (see 1.)
5. During use of special App features, transmission to SmartGuide may be deactivated. You
can also (de)activate any SmartGuide communication via App.
1. Set your timer to 2-Minute timer
(stuttering sounds/flashing light
after 2 min); or set your timer to
Professional timer (stuttering
sounds/flashing light every
30 seconds). Follow steps under
«Timer setup».
2. Use App to change timer settings or perform factory reset
(see App Trouble Shootings).
Recommended ambient temperature for charging is 5 °C to 35 °C.
2222
 Loading...