

Page 1
K 2000
K 3000
MultiSystem
4
6
8
10
12
14
Type 3211
Page 2

Braun Infoline
English 4, 13, 14
Français 6, 13, 14
Türkçe 8, 14
12, 10, 14
Türkiye’deki Tüketici Danıs¸ ma Servisi:
TR
0 800 261 19 53
0 800 415 51 27 (Alo Arıza)
3 -211 -177/ 00/ II-00
GB/F /TR/ Arab.
Printed in Germany
Internet:
www.braun.com
Page 3
10
9
7
11
pulse
e
s
l
u
off /0
p
.
o
t
u
a
6
5
4
on
2
4
6
8
10
12
14
8
8a
8b
3
12
2
1
ABCDE
3
Page 4

English
Our products are engineered to meet the
highest standards of quality, functionality
and design. We hope you thoroughly
enjoy your new Braun appliance.
Read all instructions carefully before
using this product.
Important
Your voltage must correspond to the
•
voltage printed on the bottom of the
appliance. Connect to alternating
current only.
•
Keep the appliance out of the reach
of children.
•
This appliance was constructed
for household use only to process
the listed quantities.
Do not use any part in the microwave
•
oven.
•
Do not allow the appliance to operate
unsupervised.
Braun electric appliances meet
•
applicable safety standards.
Repairs on electric appliances must
only be done by authorised service
personnel. Faulty, unqualified repair
work may cause accidents or injury
to the user.
•
The cord of the appliance may only
be replaced by an authorised Braun
Service Centre, because a special tool
is required.
•
Switch the appliance off and
disconnect from the mains before
storing.
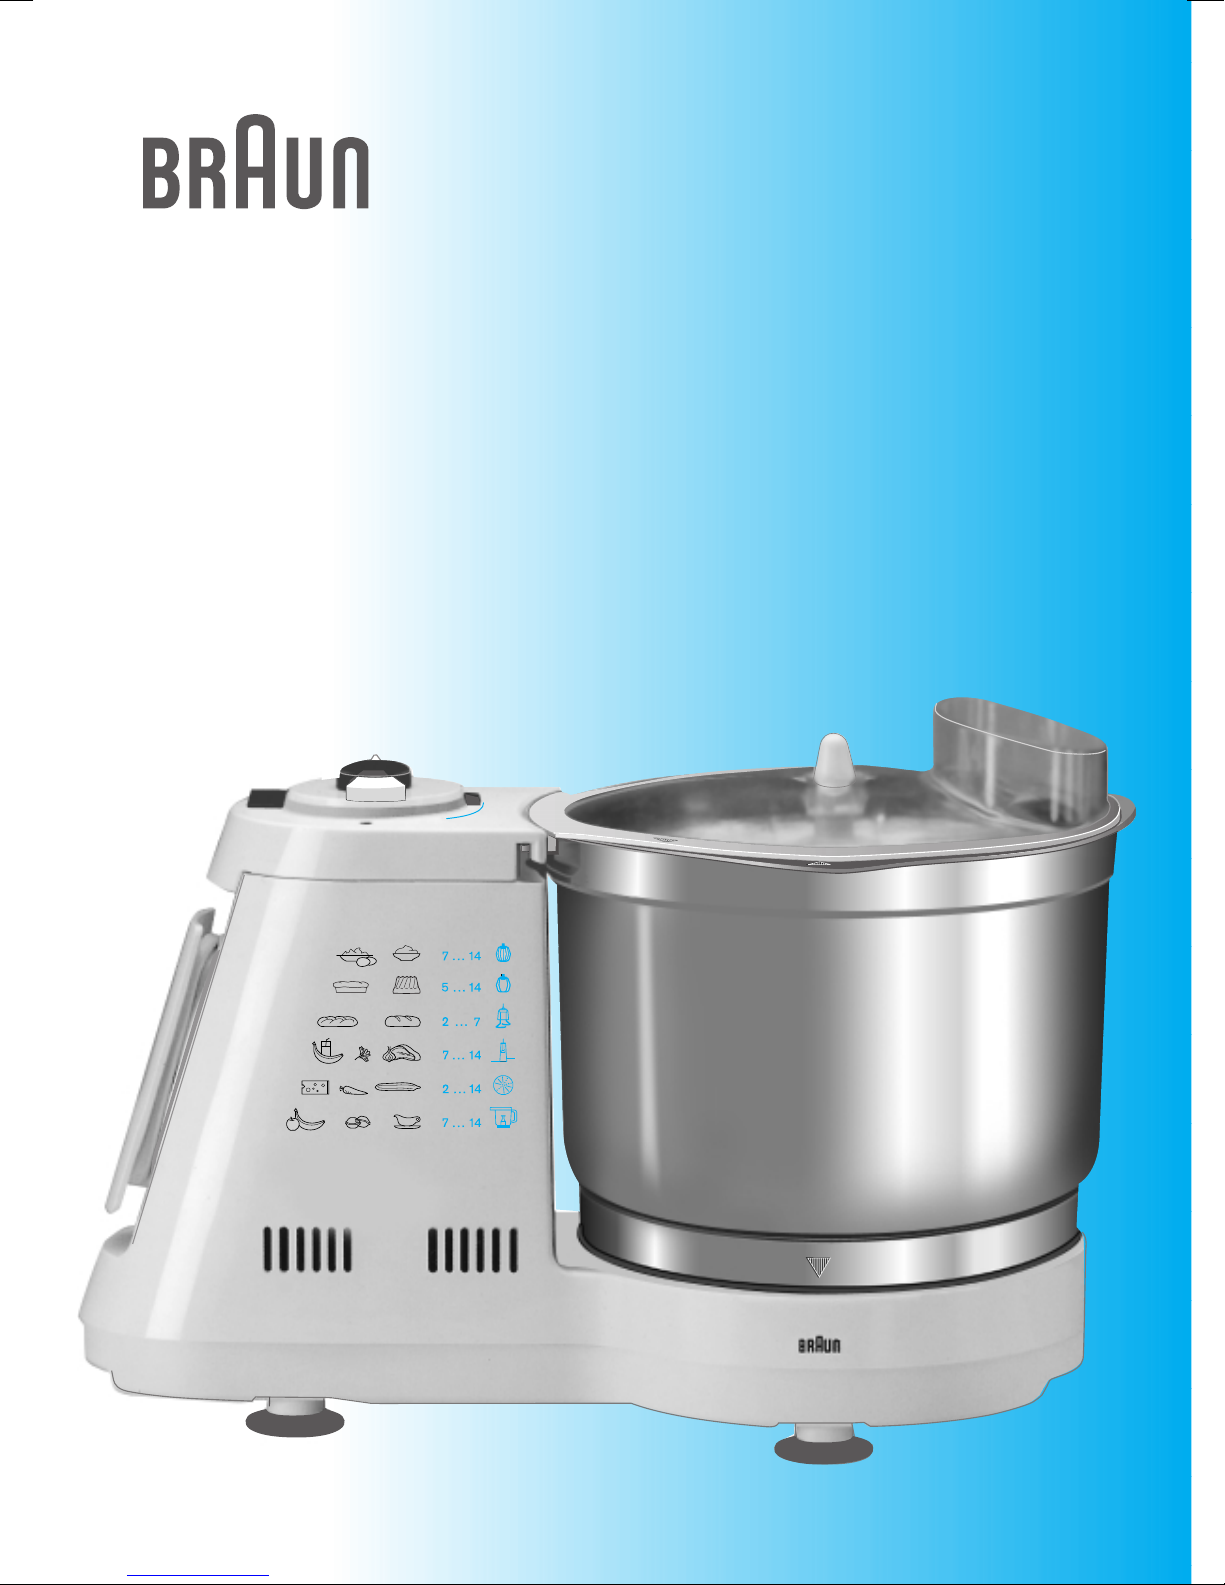
Description
The Braun K 2000 is a kitchen machine
system which fulfils highest demands for
kneading, mixing, beating and whipping,
simply and quickly.
The Braun K 3000 is an upgraded
version with the following attachments.
These attachments also available at
Braun Service Centres.
KU 1
Food processor bowl for mixing,
chopping, cutting, slicing, shredding,
grating.
KC 1
Glass liquidiser goblet for mixing,
blending, chopping and cutting small
quantities.
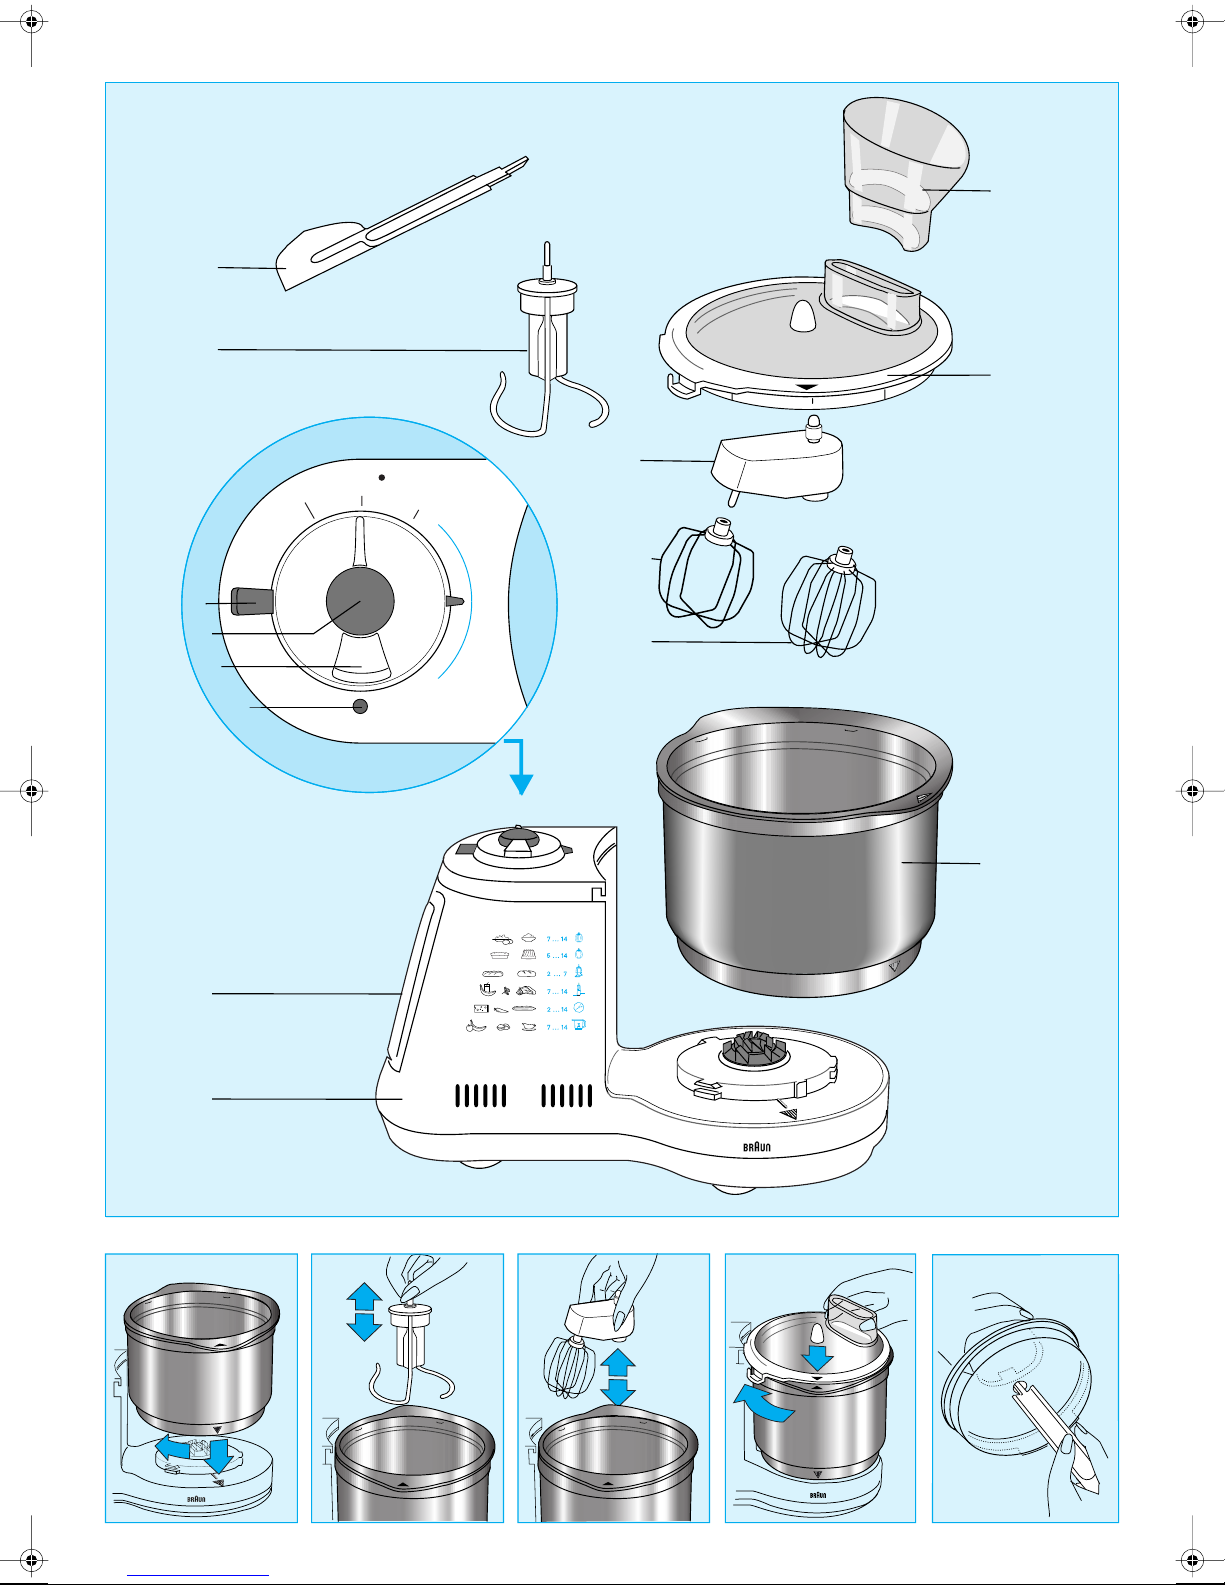
1
Motor block
2
Cord store
3
Control lamp for safety fuse
4
Motor switch (constant operation/
on: «I/on», off: «off/0»,
automatic pulse: «auto.pulse»)
Press button for manual pulse
5
6
Electronic speed regulator
(variable 2 –14, also with pulse mode)
Kneading attachment
7
Drive arm
8
Mixing attachment
H
Whisk attachment
h
9
Spatula
j
Filling tube
11
Lid
l
Dough bowl (stainless steel)
Safety fuse
The control lamp 3 flashes to indicate
that the motor is overloaded and will soon
switch off. As soon as the safety fuse has
switched off the motor, the control lamp
3
is constantly lit up. Turn the appliance
off with the motor switch 4 (switch
position «off/0»). Wait approximately
15 minutes to allow the motor to cool off.
Then switch the appliance on again using
the motor switch 4 (position «I/on»). If the
control lamp
the motor does not start, repeat the
cooling procedure as described above.
Important: lf the motor has automatically
switched itself off because of an
overload, the appliance can only
be switched back on with the motor
switch 4 if it had been switched off
(position «off/0») with this switch before.
3
should light up again and
Speed regulator
It is recommended to select the speed
first with the variable, electronic speed
regulator 6 and then switch on the
appliance in order to work with the
desired speed right from the beginning.
Attachment speed range*
——————————————————
Kneading attachment 2– 7
Mixing attachment 5–14
Whisk attachment 7–14
* see table on front panel of housing
The other symbols on the front panel refer
to further accessories which are available
at Braun Service Centres.
Recommended
Pulse mode
The pulse mode is useful for the following
applications:
•
Carefully adding flour to doughs so as
not to affect their creaminess.
Adding whipped eggs or cream to more
•
solid food.
Turn the motor switch 4 to the
«auto.
pulse»
the automatic
short bursts of operation of identical
length at the chosen speed. The function
„auto.pulse“ is switched off by switching
the appliance off (motor switch
«off/0»).
position in order to start
pulse mode. This causes
at
4
The manual
operated by pressing the button
when the appliance is switched off
(motor switch on «off/0»). Using the
manual pulse mode, you can vary the
length of the pulses. The appliance
operates at the chosen speed as long as
the button
button is released, the motor will stop.
pulse mode «pulse•» is
5
is pressed down. When the
5
Attaching and removing the
dough bowl and the lid
Please clean all parts before using for the
first time (see paragraph «Cleaning»).
For safety reasons, always carry or lift
the appliance with both hands.
Place the bowl l onto the motor block
!
so that the markings on the bowl
1
match those on the motor block.
Turn the bowl clockwise until it clicks.
‚/#
Push the attachment needed
as far as possible onto the drive shaft
in the bowl.
Place the lid on the bowl so that the
$
arrow on the lid matches the arrow on
the bowl l. Then turn the lid clockwise
until the nozzle (lug) on the lid enters
the safety lock on the motor block and
audibly snaps into place. To remove,
turn the lid anti-clockwise.
The filling tube
the lid’s opening so that the higher rim
is facing the inside. It allows more
convenient adding of ingredients while
processing.
Double safety lock: The motor can only
be started if both the bowl
11
are locked into place. The lid can only
be removed from the bowl, if the motor is
switched off.
When the appliance is switched off,
turn the lid anti-clockwise and lift it off
Take out the attachment. Turn the bowl
l
anti-clockwise to lift it off.
11
j
has to be inserted into
l
11
and the lid
Cleaning
Always switch off the motor first and then
unplug the appliance before cleaning.
Clean the motor block 1 with a damp
cloth only.
Some types of food (e.g., carrots) can
lead to discolouration; wipe off first with
cooking oil before washing.
The kneading attachment
arm 8 should only be cleaned manually.
All other parts can be washed in the
dishwasher at a maximum temperature
of 65 °C.
Parts which are difficult to reach, e.g.,
the indentation on the inside of the lid
should be well cleaned with the spatula
(E) and a brush if necessary.
9
Do not use sharp objects for cleaning.
and the drive
7
11
.
4
Page 5

Care and cleaning
instructions for the
stainless steel dough bowl
Rinse in hot soapy water before first
•
use.
•
Rinse in hot soapy water as soon
as possible after use, especially
after processing very salty food.
Stubborn food residues should be
•
soaked and removed with a sponge
(do not use a scouring pad) or brush.
•
When cleaning in a dishwasher,
remove the stainless steel bowl from
the dishwasher as soon as the cleaning
program is finished in order to prevent
stains from remaining water drops.
Be careful to avoid an overdose of
cleaner and decalcifier.
Carefully dry the bowl before storing
•
it away.
Kneading
The kneading attachment 7 is specially
designed for making yeast dough, pasta
and pastries. It is not suitable for making
cake dough. For cake dough, use the
mixing attachment
Place all ingredients into the dough bowl
l
after the kneading attachment has been
assembled.
H
.
Pasta dough
Flour quantity: min. 250 g
S
peed 2–7 approx. 3.5 minutes
Place the flour and other ingredients into
the dough bowl – except water. Pour the
required amount of water through the
filling tube
the dough has formed into a ball as the
water will not be evenly absorbed.
Kneading pastries
Flour quantity: min. 250 g
Speed 5–7 approx. 2.5 minutes
Place the flour into the dough bowl and
then add all the other ingredients.
For good results, do not use warm, soft
butter. The pastry is ready when it has
formed into a ball and has been kneaded
for a short time after that. The processing
time (approx. 2.5 mins) depends on the
dough quantity. The pastry will become
too soft if it is kneaded for too long.
j
max. 1 kg
. Do not add any water after
max. 750 g
Mixing, stirring, whipping
Use the mixing attachment h for mixing
cake mixtures, butter cream and mashed
potatoes etc. Add ingredients into the
bowl only after having inserted the mixing
attachment.
Push the whisk attachment onto the
drive arm and push both onto the drive
shaft in the dough bowl (C). Then place
the lid onto the dough bowl (D).
Subject to change without notice.
This product conforms to the EMCRequirements as laid down by the
Council Directive 89/336/EEC and
to the Low Voltage Regulation (73/23 EEC)
Yeast dough (bread, cake)
Up to 1.5 kg flour plus ingredients:
Speed 2–7
First, place the flour and then all other
ingredients - except milk - into the dough
bowl, including raisins, candied peel and
almonds. Put on the lid and choose
speed 2 to 7. Then set the motor switch
on constant operation (position «l/on»).
Add liquids through the filling tube
the motor is running.
Maximum quantity 2 kg flour
(processing of 1.5 – 2 kg flour).
S
peed 3–4
First make a basic dough by placing all
of the liquid and 1/3 of the flour with the
yeast into the dough bowl and then
kneading at speed 7 for approx. 1 min.
Leave the basic dough for approx.
15 mins. Add the rest of the flour and
knead at speed 3 for approx. 5 minutes.
Then remove the dough from the bowl and
allow to rise according to the recipe.
3 to 5 minutes
j
while
Maximum quantity: 1 kg flour (or less if
recipes included many other ingredients).
S
peed: 5–14
Push the mixing attachment onto the
drive arm and push both onto the drive
shaft in the dough bowl (C). Then lock
the lid onto the dough bowl (D).
Processing instructions:
The butter should neither be too hard nor
too soft. When making mashed potatoes,
use very hot ingredients and warm the
dough bowl beforehand with hot water.
Slowly mash the peeled, boiled potatoes
(speed 5–7, approx. 1 min). Then pour in
the hot milk through the filling tube
beat quickly (speed 11–13).
Use the whisk attachment h for whipping
or cream or egg-whites or for making
sponges. Add ingredients into the bowl
only after having inserted the whisk.
Do not use the whisk attachment
for cake mixtures.
Maximum quantity: Speed
Cream – 700 ml 9 –11
Egg-whites – 8 (approx. 240 ml) 14
Sponge – from 7 eggs 14
j
and
5
Page 6

Français
Nos produits sont conçus et fabriqués
pour satisfaire aux plus hautes exigences
de qualité, de fonctionnalité et de design.
Nous espérons que votre nouveau
préparateur culinaire Braun vous
apportera la plus entière satisfaction.
Lisez complètement et attentivement
le mode d’emploi avant d’utiliser
l’appareil.
Important
•
Votre voltage doit correspondre à celui
qui est inscrit au-dessous de votre
appareil. Effectuer le branchement
uniquement sur une prise à courant
alternatif.
Gardez l’appareil hors de portée des
•
enfants.
•
Cet appareil a été conçu pour une
usage uniquement domestique, et a été
prévu pour les différentes quantités
d’ingrédients qui sont indiqués.
•
N’utilisez aucun des éléments de
ce produit au micro-ondes.
•
Ne faites pas fonctionner cet appareil
sans surveillance.
Les appareils électriques Braun
•
répondent aux normes de sécurité en
vigueur. Leur réparation doit être
effectuée uniquement par les Centres
Services Agréés Braun (C.S.A. – voir liste
sur le 3615 Braun). Des réparations
effectuées par du personnel non qualifié
peuvent causer accidents ou blessures
à l’utilisateur.
•
Le changement du cordon électrique de
cet appareil ne doit être effectuée que
par les Centres Services Agréés Braun
(C.S.A. – voir liste sur le 3615 Braun),
dans la mesure où ce travail nécessite
des équipements spéciaux.
Toujours éteindre puis débrancher
•
l’appareil de la prise de courant, avant
de le ranger.
Description
Le Braun K 2000 est un appareil culinaire
qui répond efficacement aux besoins les
plus exigeants en ce qui concerne les
fonctions pétrir, mixer, battre et fouetter.
De manière simple et très rapide.
Le Braun K 3000 est une version
supérieure avec les accessoires suivants.
Ces accessoires sont également directement disponibles dans les Centres
Services Agréés Braun (C.S.A. – voir liste
des centres sur le 3615 Braun).
KU 1
Bol robot de préparation permettant de
mixer, hacher, couper, émincer, broyer et
gratter.
KC 1
Bol mixeur en verre pour mixer, mélanger,
hacher, et émincer de petites quantités.
Bloc moteur
1
Niche de rangement du cordon
2
Témoin lumineux de contrôle pour
3
une utilisation en toute sécurité
Interrupteur moteur
4
(fonctionnement constant / marche :
« I/on», arrêt: « off/0 », fonctionnement
instantané : « auto.pulse »)
5
Bouton de mise en marche pour la
fonction instantanée manuelle
Variateur électronique de vitesse
6
(variation de la vitesse 2 à la vitesse 14,
également avec le mode vitesse
instantané)
Accessoire pour pétrir
7
8
Bras conducteur
H
Accessoire pour mixer
h
Accessoire fouet
9
Spatule
j Tube de remplissage
11
Couvercle
l Bol à pâte (acier inoxydable)
Fusible de sécurité
Le témoin lumineux de contrôle 3 flashe
pour indiquer que le moteur est en état de
surchauffe et qu’il va bientôt s’arrêter.
Aussitôt que le fusible de sécurité a
arrêté le moteur, le témoin lumineux
de contrôle
constante. Arrêtez alors l’appareil à l’aide
de l’interrupteur du moteur
en position « off / 0 »). Attendez pendant
approximativement 15 minutes, pour
permettre au moteur de refroidir.
Rallumez ensuite l’appareil en utilisant
l’interrupteur moteur
Si le témoin lumineux de contrôle
s’allume de nouveau et si le moteur ne
se met pas en marche, recommencez la
procédure de refroidissement telle que
décrite ci-dessus.
Important : si le moteur s’est automatiquement arrêté à cause d’une surchauffe,
l’appareil peut alors être remis en marche
à l’aide de l’interrupteur moteur
(si celui-ci avait été préalablement arrêté
en remettant l’interrupteur en position
arrêt (position « off/0»).
3 reste allumé de manière
4 (interrupteur
4 (position « I/on »).
3
4
Variateur de vitesse
Il est recommandé de sélectionner
d’abord la vitesse à l’aide du variateur
électronique de vitesse
d’allumer l’appareil pour le faire
fonctionner à la vitesse désirée dès
le départ.
Accessoire Vitesse
———————————————————
Accessoire pour pétrir 2 – 7
Accessoire pour mixer 5 –14
Accessoire fouet 7 – 14
* Voir la table se trouvant sur le devant de
l’appareil.
Les autres symboles sur le devant de
l’appareil, font référence à des
accessoires supplémentaires qui sont
6, et ensuite
recommandée*
disponibles dans les Centres Services
Agréés Braun.
Le mode « pulse »
ou vitesse instantané
Le mode « pulse » ou vitesse instantané
est utile dans les cas suivants :
• Ajout délicat de farine à la pâte avec
pour intention de ne pas affecter son
aspect crémeux.
• Ajout d’oeufs battus ou de crème à des
aliments solides.
Positionnez l’interrupteur moteur
4 en position « auto.pulse » de manière
à mettre en route le mode automati
« pulse ». Ceci provoque de courtes
accélérations de fonctionnement de
durées identiques à la vitesse désirée.
La fonction « auto.pulse » s’arrête en
éteignant l’appareil (interrupteur moteur
que
4 en position « off/0»).
Le mode «
manuelle se met en marche en appuyant
le bouton
en marche (interrupteur moteur en
position « off / 0 »). En utilisant le mode
« pulse
manuelle, vous pouvez faire varier la durée
des accélérations. L’appareil fonctionne
à la vitesse désirée tant que le bouton
demeure enclenché. Quand le bouton est
relâché, le moteur s’arrête.
pulse •» ou vitesse instantanée
5 quand l’appareil n’est pas
ou vitesse instantanée
•»
5
Montage et démontage du
bol à pâte et du couvercle
Merci de bien vouloir nettoyer tous les
composants de cet appareil avant de
l’utiliser pour la première fois (voir
paragraphe « Nettoyage »). Pour des
raisons de sécurité, transportez ou
déplacez toujours l’appareil en le portant
avec les deux mains.
! Placez le bol l sur le bloc moteur
1 de manière à ce que la marque qui
se trouve sur le bol coincide avec celui
du bloc moteur. Tournez le bol dans le
sens des aiguilles d’une montre jusqu’à
ce qu’il clique.
‚/# Poussez l’accessoire à utiliser
aussi loin que possible sur l’axe
d’entraînement qui se trouve dans
le bol.
$ Placez le couvercle sur le bol,
de telle sorte que la flèche qui se trouve
sur le couvercle coincide avec celle
qui se trouve sur le bol
le couvercle dans le sens des aiguilles
d’une montre jusqu’à ce que le tube
(lug) se trouvant sur le couvercle rentre
dans le loquet de sécurité sur le bloc
moteur avec le bruit significatif indiquant clairement qu’il s’est enclenché.
Pour l’enlever, tournez le couvercle
dans le sens contraire des aiguilles
d’une montre.
11
l. Tournez alors
6
Page 7

Le tube de remplissage
dans le couvercle ouvert de manière à
ce que le bord le plus grand soit retourné
vers l’intérieur. Cela permet de rajouter
de manière plus pratique des ingrédients
pendant la préparation.
Double système de verrouillage : le moteur
ne peut être mis en marche que si le bol
et le couvercle sont correctement
enclenchés. Le couvercle ne peut être
retiré du bol, que si le moteur est arrêté.
Quand l’appareil est arrêté, tournez le
couvercle dans le sens contraire des
aiguilles d’une montre et retirez-le.
Enlevez l’accessoire en place. Tournez le
bol
l dans le sens contraire des aiguilles
d’une montre pour le retirer.
11
11
j doit être inséré
l
Nettoyage
Vous devez toujours éteindre l’appareil,
puis le débrancher de la prise de courant
avant de le nettoyer.
Nettoyez le bloc moteur
à l’aide d’un chiffon mouillé.
Certain types d’aliments (ex : carottes)
peuvent entraîner une décoloration ;
dans ce cas essuyez d’abord l’appareil
avec de l’huile de cuisine avant de le laver.
L’accessoire pour pétrir
bras conducteur
manuellement. Tous les autres
composants peuvent être nettoyés au
lave-vaisselle à la température 65°C.
Les parties difficiles à atteindre, par
exemple les rainures qui se trouvent à
l’intérieur du couvercle doivent nettoyés
avec la spatule
brosse si cela est nécessaire.
N’utilisez en aucun cas des objets pointus
ou tranchants pour le nettoyage.
9 (E) ainsi qu’avec une
1 uniquement
7 ainsi que le
8 doivent être nettoyés
11
Fonction pétrir
L’accessoire pour pétrir 7 a été
spécialement conçu pour préparer de
la pâte avec levure, des pâtes ou des
patisseries. Il n’est pas adapté pour la
préparation de pâte à cake. Pour préparer
de la pâte à cake, utilisez l’accessoire
mixeur
H.
Placez tous les ingrédients dans le bol à
pétrir
l après que l’accessoire pour pétrir
ait été installé.
Pâte à levure (pain, cake)
Jusqu’à 1,5 kg de farine plus les
ingrédients :
Vitesse 2
Placez en premier lieu la farine et
seulement à ce moment-là mettez les
autres ingrédients – à l’exception du lait –
dans le bol, y compris raisins, et autres
amandes. Mettez le couvercle en place
et choisissez une vitesse de 2 à 7.
Mettez alors le moteur en marche
permanente (en position « I/on »).
Ajoutez les liquides à travers le tube de
remplissage
est en marche.
Quantité maximale de 2 kgs de farine
(préparation de 1,5 – 2 kgs de farine).
Vitesse 3
Faites en premier une pâte simple en
plaçant tous les liquides et 1/3 de la farine
avec la levure dans le bol à pâte et
pétrissez à la vitesse 7 pendant environ
1 minute. Laissez reposer la pâte simple
pendant environ 15 minutes. Ajoutez le
reste de la farine et pétrissez à la vitesse 3
pendant environ 5 minutes. Retirez alors
la pâte du bol et laissez-la monter selon
les indications de la recette.
– 7 pendant 3 à 5 minutes
j pendant que le moteur
– 4
est prête quand elle aura formé une boule
et aura été pétrie pendant une courte
durée après cela. La durée de préparation
(environ 2 minutes 1/2) dépend de la
quantité de pâte. La patisserie deviendra
trop molle si la pâte est pétrie trop longtemps.
Mixer, mélanger, fouetter
Utilisez l’accessoire mixeur H pour mixer
les mélanges pour cakes, la crème de
beurre et la purée de pommes de terre,
...etc. Ajoutez les ingrédients dans le bol
seulement après avoir inséré l’accessoire
mixeur.
Quantité maximale : 1 kg de farine
(ou moins si la recette inclut plusieurs
autres ingrédients)
Vitesse
: 5 – 14
Poussez l’accessoire mixeur sur le bras
guide et poussez les deux en même temps
sur l’axe d’entraînement qui se trouve
dans le bol à pétrir (C). Bloquez alors le
couvercle sur le bol à pâte (D).
Instructions de préparation :
Le beurre ne doit être ni trop dur ni trop
mou. Quand vous faites de la purée de
pommes de terre, utilisez des ingrédients
très chauds et chauffez au préalable le bol
à pétrir avec de l’eau chaude. Ecrasez
lentement les pommes de terre épluchées
(vitesse 5 – 7, environ 1 minute). Mettez
alors le résultat obtenu à travers le tube de
remplissage
(vitesse 11 – 13).
Utilisez l’attachement fouet
fouetter la crème ou les blancs d’oeufs
ou pour préparer des mousses. Ajoutez
les ingrédients dans le bol seulement
après avoir mis le fouet en place.
j et battez rapidement
h pour
Instructions d’entretien et
de nettoyage pour le bol
à pâte en acier inoxydable
• Rincez avec de l’eau savonneuse
chaude avant la première utilisation.
• Rincez avec de l’eau savonneuse
chaude aussitôt que possible après
utilisation, spécialement après avoir
effectué des préparations salées.
• Les résidus d’aliment résistants doivent
être mouillés et enlevés à l’aide d’une
éponge (n’utilisez en aucun cas une
éponge à récurer ou une brosse).
• Pour un nettoyage au lave-vaisselle,
retirez le bol en acier inoxydable dès que
le programme de lavage est achevé pour
éviter à la matière de conserver des
traces de gouttes d’eau.
• Essuyez ou séchez avec précaution le
bol avant de le ranger.
Pâte à pâtes
Quantité de farine : minimum 250 g
Vitesse 2
Placez la farine et les autres ingrédients
dans le bol à pâte – à l’exception de
l’eau. Introduisez la quantité d’eau requise
à travers le tube de remplissage
Ne rajoutez pas d’eau après que la pâte
ait formé une boule dans la mesure où
l’eau ne sera pas absorbée.
Pétrir des patisseries
Quantité de farine : minimum 250 g
Vitesse 5
Placez la farine dans le bol à pâte et
ajoutez les autres ingrédients.
Pour obtenir de bons résultats, n’utilisez
pas de beurre chaud ou mou. La patisserie
–7 environ 3 minutes 1/2
–7 environ 2 minutes 1/2
maximum 1 kg
j.
maximum 750 g
N’utilisez en aucun cas l’attachement
fouet pour les mélanges pour cake.
Quantité maximale
Crème – 700 ml 9 –11
Blanc d’oeufs – 8 (environ 240 ml) 14
Mousse – à partir de 7 oeufs 14
Poussez l’accessoire fouet sur le
bras guide et poussez sur l’arbre de
transmission qui se trouve dans le bol
à pétrir (C). Placez alors le couvercle
sur le bol à pétrir (D).
Sujet à modification sans préavis.
Cet appareil est conforme aux
normes Européennes fixées par la
directive 89/336/EEC et par la
directive basse tension (73/23 EEC).
: Vitesse
7
Page 8

Türkçe
Ürünlerimiz, kalite, kullanım ve tasarımda
en yüksek standartlara ulaµılabilmek üzere
üretilmiµtir. Yeni Braun ürününüzden
memnun kalacaπınızı umarız.
Cihazı kullanmaya baµlamadan önce
bu kullanma kılavuzunu dikkatlice
okuyunuz.
Önemli
• Ωehir cereyan geriliminin cihazın altında
yazan voltajla uygunluπunu kontrol
ediniz.
• Cihazı çocukların eriµebilecekleri
yerlerden uzak tutunuz.
• Bu cihaz aµaπıda listelenen miktarlara
ve ev kullanımına uygun olarak tasarlanmıµtır.
• Cihazın hiçbir parçası mikro dalgada
kullanılamaz.
• Cihazın gözetimsiz kullanılmasına izin
vermeyiniz.
• Braun elektrikli ev aletleri güvenlik
standartlarına uygun olarak üretilmiµtir.
Ev aletleriyle ilgili her türlü onarımın
yetkili Braun personeli tarafından
yapılması gerekmektedir. Eksik veya
kalitesiz olarak yapılan onarım kazalara
ve kullanıcının yaralanmasına sebep
olabilir.
• Cihazın elektrik kablosu, bu iµlem için
özel bir alet gerektiπinden, ancak Braun
yetkili teknik servislerince deπiµtirilebilir.
• Cihazı kullandıktan sonra kapatıp fiµini
elektrik prizinden çektikten sonra saklayınız.
Tanımlamalar
Braun K 2000 yoπurma, karıµtırma ve
çırpma iµlemlerini hızlı ve kolay bir µekilde
yapmanızı saπlayan bir mufak robotudur.
Braun K 3000 aµaπıdaki ataçmanları
ile daha üst bir modeldir. Bu ataçmanlar
Braun yetkili servis istasyonlarından
saπlanabilir.
KU 1
Karıµtırma, doπrama, kesme, dilimleme,
rendeleme iµlemleri için iµlem kabı.
KC 1
Az mikralardaki yiyecekleri karıµtırma,
doπrama ve kesme iµlemleri için cam
sıvı kabı.
Motor bölümü
1
2 Kablo saklama bölümü
3 Güvenlik için kontrol lambası
4 Motor düπmesi (sürekli operasyon/
açık: «I/on», kapalı: «off/0»,
otomatik durdurma: «auto.pulse»)
5 Manuel geçici durdurma düπmesi
6 Elektronik hız seçici (2–14 arası
ve durdurma seçeneπi)
7 Yoπurma ataçmanı
8 Ataçman kolu
H Karıµtırma ataçmanı
h Çırpma ataçmanı
9 Spatula
j Doldurma haznesi
11
Kapak
l Hamur kabı (paslanmaz çelik)
Güvenlik kontrolü
Kontrol lambası 3 cihaz çok fazla
doldurulduπunda yanacaktır. Bu kısa bir
süre içinde motorun kapanacaπını gösterir.
Motor düπmesini
getirerek cihazı kapatınız. Motorun
soπuması için yaklaµık 15 dakika kadar
bekleyiniz. Daha sonra motor düπmesini
«I/on» pozisyonuna getirerek cihazı tekrar
çalıµtırınız. Kontrol lambası
devam eder ve motor çalıµmazsa, yukarda
anlatılan soπutma iµlemini tekrarlayınız.
Önemli: Motorun fazla yüklenmeden
dolayı, kendiliπinden otomatik olarak
kapanması halinde, cihaz, dahaönce
motor düπmesi
(«off/0» konumu) tekrar, ancak motor
düπmesi ile açılabilir.
4 «off/0» konumuna
4
3 yanmaya
4 ile kapatılmıµ ise
Hız seçici
∑µleme baµladıπınız andan itibaren cihazı
seçtiπiniz hızda çalıµtırabilmek için,
önce elektronik hız seçiciyi
istediπiniz hızı seçmenizi ve daha sonra
cihazı çalıµtırmanızı öneririz.
Ataçman Önerilen hız aralıπı*
———————————————————
Yoπurma ataçmanı 2– 7
Karıµtırma ataçmanı 5–14
Çırpma ataçmanı 7–14
* cihazın ön bölümünde bulunan tabloya
bakınız
Cihazın ön bölümünda bulunan diπer
semboller Braun servis istasyonlarında
bulabileceπiniz diπer ataçmanları gösterir.
6 kullanarak
Geçici durdurma fonksiyonu
Geçici durdurma fonksiyonu aµaπıdaki
uygulamalar için uygundur:
• hamurlu karıµımların kıvamını
bozmamak için yavaµça un eklerken,
• katı yiyeceklere çırpılmıµ yumurta
eklerken.
Otomatik
çalıµtırmak için, motor düπmesini
«auto.
cihazın seçtiπiniz hızda belirli aralıklarla
kısaca duraklamasını saπlar. «auto.pulse»
(otomatik geçici durdurma) fonksiyonu,
geçici durdurma fonksiyonunu
4
pulse» konumuna getiriniz. Bu iµlem
motor düπmesi 4 «off/0» konumuna
getirilerek cihaz kapatıldıπı zaman
devreden çıkar.
Manuel geçici durdurma fonksiyonu
«
pulse•», cihaz kapalı konumda iken
(motor düπmesi «off/0» konumuna)
manuel geçici durdurma düπmesi
basılı tutulduπunda çalıµır. Manuel geçici
durdurma fonksiyonunu kullanarak,
durdurma aralıklarını deπiµtirebilirsiniz.
Manuel geçici durdurma düπmesi
tutulduπu sürece cihaz seçilen hızda
çalıµmaya devam edecektir. Düπme
sermest bırakıldıπında motor durur.
5
5 basılı
Hamur kabı ve kapaπı takma
ve çıkarma
∑lk kullanmadan önce tüm parçaları temizleyiniz («Temizleme» bölümüne bakınız).
Güvenlik sebebiyle, cihazı iki elinizle
yerinden kaldırınız ve taµıyınız.
! ∑µlem kabını l motor bölümünün 1
üzerine kabın üzerindeki iµaretler motor
bölümünün üzerindeki iµaretlerle aynı
hizaya gelecek µekilde yerleµtiriniz.
Kabı yerine yerleµinceye kadar saat
yönünde çeviriniz.
‚/# Kullanacaπınız ataçmanı, iµlem
kabındaki ataçman koluna iyice iterek
yerleµtiriniz.
$ Kapaπı iµlem kabına kapak
üzerindeki oklarla iµlem kabı
üzerindeki oklar aynı hizaya gelecek
µekilde yerleµtiriniz. Daha sonra
kaπpaπı, üzerindeki çıkıntı motor
bölümü üzerindeki güvenlik kilidine
yerleµinceye kadar saat yönünde
çeviriniz. Çıkarmak için, kapaπı saat
yönünün tersine doπru çeviriniz.
Doldurma haznesi
yüksek kenarı iç tarafa bakacak µekilde
yerleµtirilmelidir. Böylece, iµlem sırasında
malzemelerin kaba daha kolay konması
saπlanmıµ olur.
Çift güvenlik kilidi: Motor ancak iµlem
kabı
durumda ise çalıµtırılabilir. Kapak iµlem
kapından ancak motor kapalıyken çıkarılabilir.
11
l
j kapaπın çıkıµlarına
l ve kapak yerlerine yerleµmiµ
11
Temizleme
Temizlemeden önce mutlaka motoru
kapatınız ve cihazın fiµini elektrik prizinden
çekiniz.
Motor bölümünü
silerek temizleyiniz.
Havuç gibi bazı yiyecekler renk solmasına
sebep olabilir. Rengi solan parçaları yıkamadan önce yemek piµirme yaπı ile siliniz.
Yoπurma ataçmanı
yıkanarak temizlenmelidir. Diπer tüm
parçalar bulaµık makimesinde maksimum
65 °C sıcaklıkta yıkanabilir.
1 sadece nemli bir bezle
7 ve µaftı 8 elde
8
Page 9

Kapaπın iç kısmındaki girinti gibi ulaµılması güç parçalar spatula
fırça yardımı ile temizlenebilir.
Cihazınızı temizlemek için keskin ve sert
nesneler kullanmayınız.
11
9 (E) veya bir
Paslanmaz çelikten
yapılmıµ hamur kabının
bakım ve temizliπi
• ∑lk kullanımdan önce sıcak sabunlu su
ile yıkayınız.
Hamur iµleri
Un miktarı: minimum 250 g
Hız 2–7
Su dıµındaki tüm malzemeyi ve unu hamur
kabına yerleµtiriniz. Gerekli miktardaki
suyu doldurma haznesinden
kabına doldurunuz. Hamur top µekline
geldikten sonra suyu emmeyeceπinden
daha fazla su ilave etmeyiniz.
maksimum 1 kg
ortalama 3.5 dakika
j iµlem
Maksimum miktar: Hız
Krema – 700 ml 9-11
Yumurta akı – 8 (ortalama 240 ml) 14
Pandispanya hamuru 7 yumurtayla 14
Çırpma ataçmanını ataçman koluna iterek
yerleµtirdikten sonra her iki parçayı hamur
kabının içindeki µafta oturtunuz (C). Daha
sonra kapaπı hamur kabına kapatınız (D).
Bildirim yapılmadan deπiµtirilebilir.
• Her kullanımdan sonra özellikle de çok
tuzlu yiyecekler iµlemden geçirdiyseniz,
mümkün olduπunca çabuk yıkayınız.
• Sert yiyecek kalıntıları suyla, süngerle
veya fırçayla temizlenmelidir (telli sünger
kullanmayınız).
• Bulaµık makinesinde yıkarken, paslan-
maz çelik kabı su damlası lekelerinden
korumak için hemen makineden
çıkarınız. Çok fazla temizleme maddesi
veya kireç çözücü kullanmayınız.
• ∑µlem kabını kaldırmadan önce iyice
kurulayınız.
Yoπurma
Yoπurma ataçmanı 7, mayalı hamur,
hamur iµi ve pasta hazırlayabilmeniz için
özel olarak tasarlanmıµtır. Kek hamuru
hazırlamak için uygun deπildir. Kek
hamuru hazırlamak için, karıµtırma
ataçmanını
Yoπurma ataçmanını takmadan önce
iµlemden geçireceπiniz tüm malzemeleri
hamur kabına
H kullanınız.
l yerleµtiriniz.
Tatlı hamuru yoπurma
Un miktarı: minimum 250 g
Hız 5
–7 ortalama 2.5 dakika
Unu hamur kabına koyunuz ve diπer
malzemeleri ekleyiniz.
Daha iyi bir sonuç elde edebilmek için,
ılık yumuµak yaπ kullanmayınız.
Hamur bir top haline geldiπinde ve daha
sonra kısa bir süre daha yoπurulduπunda
olması gereken kıvama gelmiµ demektir.
∑µlem süresi (ortalama 2.5 dakika)
hamurun miktarına göre deπiµir. Hamur,
çok fazla yoπutulursa fazla yumuµak
olabilir.
maksimum 750 g
Karıµtırma, çırpma
Çırpma ataçmanını H kek hamuru,
krema ve patates püresi hazırlamak için
uygundur. ∑µlemden geçirilecek malzemeyi, çırpma ataçmanını yerleµtirdikten
sonra kaba koyunuz.
Maksimum miktar: 1 kg un (konulacak
diπer malzemeler çok fazla ise daha az
un koyulabilir).
Hız: 5
–14
Mayalı hamur (ekmek, kek)
1.5 kg’a kadar un ve diπer malzemeler:
Hız 2–7
Önce unu ve daha sonra süt dıµında diπer
tüm malzemeleri (kuru üzüm, meyve
kabukları ve badem dahil) hamur kabına
yerleµtiriniz. Kapaπı kapatınız ve 2–7
hız aralıπını seçiniz. Daha sonra motor
düπmesini sürekli operasyon («I/0»)
konumuna ayarlayınız. Motor çalıµır
durumdayken sıvıları doldurma hazneine
3–5 dakika
j koyunuz.
Maksimum miktar: 2 kg un
(1.5–2 kg un iµlemi)
Hız 3
–4
Önce, tüm sıvıları ve unun 3’ te 1’ini iµlem
kabına koyup 7 hız ayarında 1 dk kadar
yoπurarak ilk hamuru hazırlayınız.
Daha sonra ilk hamuru 15 dk kadar
bekletiniz. Unun geri kalan kısmını da
ekleyerek 3 hız ayarını seçiniz ve 5 dk
kadar yoπurunuz. Hamuru iµlem kabından
çıkarınız ve reçeteye göre kabarmaya
bırakınız.
Çırpma ataçmanını ataçman koluna iterek
yerleµtirdikten sonra her iki parçayı hamur
kabının içindeki µafta oturtunuz (C). Daha
sonra kapaπı hamur kabına kapatınız (D).
∑µlem bilgileri:
Yaπın çok katı veya çok yumuµak
olmaması gerekmektedir. Patates püresi
hazırlarken, kullandıπınız malzemelerin
sıcak olmasına dikkat ediniz ve kullanmadan önce iµlem kabını ılık suyla ısıtınız.
Soyulmuµ ve haµlanmıµ patatesleri
yavaµça püre haline getiriniz (hız 5–7,
ortalama 1 dakika). Daha sonra, sıcak
sütü doldurma haznesinden
doldurunuz ve hızlıca karıµtırınız
(hız 11–13).
Krema, yumurta akı veya pandispanya
hamuru hazırlamak için, çırpma
ataçmanını
geçirilecek malzemeyi, çırpma ataçmanını
yerleµtirdikten sonra kaba koyunuz.
Kek karı
kullanmayınız.
h kullanınız. ∑µlemden
µımları için çırpma ataçmanını
j kaba
9
Page 10

Country of origin: Germany
Year of manufacture
To determine the year of manufacture,
refer to the 3-digit production code
located near the type plate. The first digit
of the production code refers to the last
digit of the year of manufacture. The
next two digits refer to the calendar
week in the year of the manufacture.
Example: “915” – The product was
manufactured in week 15 of 1999.
A-ÚøA---‡ä Ë TÂØô
EØÔña mAâ
gAÅøºa õr ña eUíRña IíãÎ ,EØÔña mAâ ÎëR‡
.eUШсa ОТЪЛф bRб dUнU‡au mAбrд 3 Nµ Fс‹Ç‡a
mAâ Ë ãî<ªa äRña ña ãî©I õr Nµ luªa äRña
eUŒèªa ña nA-ÚñA-Åña nA-ªRña ãΩI A¥ØIœ EØÔña
.EØÔñ mAâ Ë ø·a
15 eUŒèªa Ë GÅ؇a EØô MÅ – « 915 » :lA-Ùµ
.1999 mAâ Nµ
alCman
NCmn hDa aõhaR #dH snH uaxdH abtdao mn tarîÒ
alÈùao usnum Xvl fÅãHalCman bdu‹n mqabl böRalH
äI eiub Ë aõhaR naÅíH en eiub Ë ·uad äu
·cneiH öma böcvxh äu asrbdal ägR‹ao mnh äu
asrbdal aõhaR Œãmth xsb ma µãah u¥Òtarh.
hDa alCman v ISml: altlf alnaÅí en avstemal
Eîã alcxix (rSEil aõhaR eñ tiar äu flziH Eîã
ÜixH äu tucilaõhaR öñ mqBs khr‹baÓÚ Xazy
äu alkèù), albñ ualtlf ualtlf alzbieiÎø
ualeiub alåÚ L-a täTîã öWal eñ alqimH äu rSEil
aõhaR. Icbx alCman vÀ öDa ÅM öcvx aõhaR mn
qbl äfrad Eîã metmdÎø äu ÅM astXdam qze Eiar Eîã
äcliH mcdrha Eîã Œãau‹n. Ièù‹I alCman fqz öDa
ÅM tä‹kid tarîÒ alÈùao mnqbl albéye buaszH ÒåM
Òac bh utuqieh eñ BzaqH alCman u‹BzaqH
alrsgil. hDa alCman ISml ” bld u‹r¶dt ölih
Œãau‹n äghRåHa äu mn qbl u“óHa umu‹ReÎHa ·etmdÎø
uäinma v tugd qiud eñ avstîãad äu luaÓò qanuniH
äXr‹i teiq äu ÅMne ÒdmH ·SmulH ŒHDa alCman.
iNåHI alCman eñ aÄgR‹iao äu aõhaR balAml
alqablH lÖsrbdal end anqCao hDa alCman eñ
aõhaR. Ë xalH ·zalbH ŒMugb hDa alCman µãgu
rslÎM Aml aõhaR me BzaqH alCman alsar‹IH öñ
albéye/alukil äu ärslhm-a mea öñ äqrb mrkR XdmH
tabe lŒãau‹n. AfH ·zalbét aÄXr‹i ŒM-a Ë Dlk
altlfiat aln-aÅíH en hDa alCman Ì Eîã mSmulH
öv öDa Ant msyulirna qanuna mlRmH.
„tqlib uÒfq
ön mÔùb : I≤stXdm ølz „egîø „nég,
ukr‹ÎMH „R‹bdH umhr‹us „bzaza uEîã Dlk. t¡uCe
·kunat bed Åã‹kib mÔùb Òlz Ë „ciIniH.
„®iH „qcu‹i 1 kE dqiq (ultxCîã ucfat
Åòtag añ mkunat kTîãH fanh zbqa lDlk tku‹n
®iH „dqiq äql).
„èùeH 5 añ 41
rkb mÔùb Òlz eñ ktlH a·rk u‹bed Dlk
rkb avTnîø mea eñ ;u‹r dfe cIniH Òlz Ô,
æM TBt „Ezao Ê fu‹q cIniH Òlz.
telimat „txCîã:
hÜ „R‹bdH eñ drgH xrarH „bIyH uend ÅíhîÃ
mhr‹us „bzaza xÔ¶ù ·kunat uÌ xarH gda
u‹ä brsXîø cIniH Òlz ŒMéo saXn.
ahrs „bzaza ·qÈùH u·sluqH BS” hady
(eñ „èùeH 5 añ 7 u#dH dqiqH uaxdH). æM
cb blzf òlib „saXn eœã änbub a#∞ =
uqzeha BèùeH (eñ „èùeH 11 añ 31).
ön mÔùb „qSzH ÷ IstXdm #Rg „qSzH
u‹biaC „biC ultxCîã eîãH „Bsku‹it. Ce
·kunat bed Åã‹kib mÔùb „qSzH Ë „cIniH.
v rstXdm mÔùb „qSzH ltxCîã „egîø
„sayl.
10
„®iat „qcu‹i „èùeH
·zalbét aln-aSyH en equd albie me albéye
v ttäÆã ŒHDa alCman.
„qSzH – 007 ml 9 añ 11
biaC – 8 biCat
(eñ av‹kÆã 042 ml) 41
AinH „Bsku‹it (mn 7 qze biC) 41
rkb mÔùb „qSzH eñ íRo aÜÑ u‹bed Dlk
rkb avTnan mea eñ ;u‹r dfe cIniH Òlz Ô,
uTBt „Eza Ê fu‹q cIniH Òlz.
ön ·elumat qablH ñtEiîã.
Page 11

end astemal ®iH mn „dqiq öñ xd äqcah 2 kE
dqiq u‹i≤xÔù b®iH 5r1 öñ 2 kE eñ drgH
„èùeH 3 öñ 4
hÜ Ë „bdaiH „egîø avu‹Ñ, uDlk buCe ” ®iH
„suayl uTvTH ar‹bae ®iH „egîø me aXîãH Ë
cIniH „egn. aAn eñ „èùeH 7 u#dH dqiqH
uaxdH tqr‹ibª.
de „egîø avu‹Ñ #dH 51 dqiqH, bed Dlk äZf
bqiH „zxîø uaAn eñ „èùeH 3 añ 4 u#dH
5 dqayq. aXrg „egîø mn cIniH „egn udeh
itXm¶r xsb „ucfH „åÚ Åã‹id ÅòCîãha.
AinH ·ekr‹u‹nH
®iH mn „dqiq eñ avql 052 Eram
ueñ av‹kÆã 1 kE
„èùeH 2 añ 7 u#dH 3 dqayq uNcf tqr‹iba
Ce „dqiq u‹bqiH ·kunat – ma eda ·éo – Ë
cIniH „egn. æM cb ®iH ·éo „vRmH eœã änbub
a#∞ =, v rCf aiH ®iH mn ·éo bed tku‹r
„egîø vnh endyD v irÈùb ·éo BS” mteadl.
telimat cianH utnZif
cIniH Òlz „fuvDiH
•aEsl „cIniH ŒMéo saXn u‹ŒMnZf qbl
avstXdam aÄul æM t¡gff BS” gid.
•uaÄxsn än t¡Esl „cIniH mbaÈùH bed
astemaLé ba#éo „saXn ·cœø, uXacH
end ÅòCîã äzemH SdidH ·luxH.
• bll bqaia „zeam ·tbqiH blifH asfng
(v rsteml lifH medniH), u‹ÎMknk äICa
aRalåHa balfrSaH Œãfq.
• end Esl cIniH Òlz Ë ülH Esl avua¥Ú
aXrgha mbaÈùH uv tÅãkha lfÅãH vn Dlk iUdI
öñ rS” „bqe eñ „cIniH.
• Åínb avstemal ·frz Ë ·nZf äu madH µÃ‹e
„”s.
•axfZ cIniH Òlz uÌ gafH ÅMémª.
„egn
„egîø „nég
®iH „dqiq mn 052 Eram
eñ avql 057 Eram
eñ aÄ‹kÆã
ueñ „èùeH 2 añ 7 u#dH dqiqtan uNcf.
ön ädaH „egn / m≤cmmH Xcicª ltxCîã
AinH aXîãH, Aîø ·ekr‹unH u„egîø „nég.
uädaH „egn hDh v tnasb ltxCîã „egîø
„sayl uAîø „Bsku‹it.
v rCe ·kunat av bed än Å¡ã‹k√b ädaH „egn
Ë cIniH Òlz ƒ.
A Ce cIniH „egn ƒ eñ ktlH a·rk !
œòiT ttzabq „evmat eñ qzeH a·rk ueñ
cIniH „egn, ädr bed Dlk cIniH „egn
baÅíah eqarb „saeH öñ än rsme cut
astqrarha.
Œ/Ô ädXl ädaH „eml ·rEu‹bH eñ ;u‹r
„txr‹ik uaCEzha öñ äqô¤ú aÄsfl.
Ê Ce „Ezao ¡ eñ cIniH „egn añ än
itzabq „èÌm eñ „Ezao me „èÌm eñ
cIniH „egn ƒ æM ädr „Ezao baÅíah eqarb
„saeH öñ än i¥Ãl änf „Ezao Ë ftxH
sdadH aÄman Ë qaedH a·rk ursme cut
astqrarha Ë µHaiH ktlH a·rk. uend „fk
adr „Ezao beks aÅíah eqarb „saeH.
ön anbub a#∞ = Îã‹kb Ë ftxH „Ezao œòiT
än tku‹n „Rau‹iH „elia Ë „usz. u‹Isaedna anbub
·lo Ë öCafH ·kunat BèÌulH äTnao íliH
„txCîã.
NZam waiH mRdug: ön a·rk v ÎMkn „bdo
brSEilh av aDa Ant cIniH „egn ƒ ra‹kbH
BS” Üix me „Ezao ¡, ukDlk v ÎMkn µÃ‹e
„Ezao av end uquf a·rk.
i≤µÃ‹e „Ezao ¡ end uquf a·rk bödarth eks
aÅíah eqarb „saeH æM aµÃ‹e ädaH „eml. u‹ä œòl
cIniH „egn btxr‹ikha eks aÅíah eqarb
„saeH æM aµÃeha.
Ce „dqiq Ë cIniH „egn uCe ” ·kunat
„Ôù‹u‹r‹iH eñ „dqiq „rgao än v rCe R‹bdH
SdidH „qsauH v SdidH „zrauH. ön „egîø Icbx
gahR‹a aDa tku‹r u‹bed Dlk iåM Anh BS” Xfif
u#dH qcîãH. ön Rmn „txCîã (xuaÑ 5r2 dqiqH)
mrtbz bal®iH ·rad ÅòCîãha. uön „egn lfÅãH
zu‹ilH îíel „egîø lRga.
AinH aXîãH (ÒœÃ/„Atu)
end astemal ®iH mn „dqiq añ xd äqcah
5r1 kE aCafH ñmkunat tku‹n
„èùeH mn 2 öñ 7 u#dH 3 öñ 5 dqayq
Ce auv „zxîø Ë cIniH Òlz u‹bed Dlk bqiH
·kunat ŒMé fÎHa „R‹bIb uañimu‹n ·skr uañu‹R ma
eda òlib.
rkb „Ezao uaXÅã drgH „èùeH mn 2 öñ 7. SE√l
bed Dlk íhaR eñ aSarH xrkH a·rk ·stmrH
(end hiyH „rSEil «no/I»).
aCf „suayl ua·rk ieml mn Xvl änbub
a#∞ =.
„tnZif
qbl „tnZif äzÛ íhaR uaµÃ‹e „slk mn „tiar.
v t¡nZf ktlH a·rk av bqzeH ªaS mbñH.
end ÅòCîã äzemH ÅÒl√f luna (mTl íR‹r), mn
a·tml än tncbE avgR‹ao „bvsrikiH blu‹n hDh
·uad, fqbl Eslha ä ŒMsxha bqzeH ªaS elÎHa
qlil mn R‹it „zbX.
NZ√f ädaH „egn / uíRo ·iAniÏ ( idu‹iª
fqz. ” avgR‹ao avXr‹i ÎMkn Eslha Ë ülH Esl
avua¥Ú öñ drgH xrarH v tfu‹q 56 drgH myu‹iH.
avma‹kn „åÚ Iceb tnZifha mTl avXdud Ë
daXl „Ezao ¡ tnZ√f ba#sxaH ) (E), uend
„Ôù‹u‹rH t¡msx ” avduat gida bfrSaH qbl
Eslha.
v rstXdm äbdª äSiao xadH ñtnZif.
11
Page 12

*
äduat „eml drgH „èùeH ·stxbH
ädaH „egn mn 2 öñ 7
mÔùb Òlz mn 5 öñ 41
mÔùb „qSzH mn 7 öñ 41
*
aNZr öñ íhH aÄmamiH mn íhaR
1 UK
cIniH mteddH avstXdam Ølz, u„frm,
u„tqzie, u„œãS u„tqlib.
1 CK
ueao RgaR Ølz, ulfrm aŒm ulfrm „®iat
„qlilH.
0002 K
mcnueat¡na tl@ ” Èù‹uz „nueiH, u„uZifH
u„S” ÒarR. ntmµú än ttmte kTî㪠me ghaRk
ídid Œãau‹n.
„rgao qraoH telimat avstXdam ba‹®lha
bdqH qbl östemal íhaR.
ön bqiH „rmu‹R ·ugudH eñ uaghH íhaR ttelq
bäduat ÅòCîã äXr‹i me qze Eiarha, u„åÚ ÎMkn
òcul elÎHa mn mra‹kR XdmH „R‹baóø „eaydH
lÈùkH Œãau‹n.
„rSEil aŒZI
ön „rSEil aŒZI Isaed Ë Mavt „txCîã
„téliH:
•öCafH „zxîø öñ „egîø lÏ v ifqd S”h
„fCfaC.
•öCafH „biC ·Ôù‹ub äu „qSzH öñ muad
clbH.
end „rSEil aŒZI aÜÑ iuCe mftax a·rk $
eñ uCeiH «eslup.otua». hDa „uCe iUdI öñ
íl a·rk lfÅãat qcîãH ufÅãat „eml hDh tÅãafq
me fÅãat tuqf œòsb „èùeH a÷tarH.
öDa nqlt mftax a·rk eñ uCe «0/ffo» fan
„rSEil aŒZI aÜÑ ituqf en „eml.
„rSEil aŒZI „idu‹I «• eslup»
aCEz ¥òu avsfl eñ mftax „CEz „idu‹I bed
än iku‹n íhaR mtuqfa en òrkH (mftax a·rk
$ eñ uCe «0/ffo»).
ÎMknk „tx® Datia bedd fÅãat „tuqf endma
rstXdm „nbC aŒZI „idu‹I. Istmr íhaR
baleml eñ „èùeH „åÚ ÅM öXtiarha slf-ª za#é
astmr „CEz eñ mftax „nbC aŒZI „idu‹I
%. uendma ituqf „CEz fan a·rk ituqf
en „du‹ran.
! ktlH a·rk
" mAn lf slk „tucil
§ mcbax ñtNbih end avghad
$ mftax a·rk („rSEil ·tuacl: end „eml
eñ «no/I» uend „uquf eñ «0/ffo»,
uñrSEil aŒZI eñ «eslup.otua»).
% mftax „CEz end „rSEil aŒZI „idu‹I
& ;dd drgat „èùeH
/ ghaR „egn
( íRo ·iAniÏ
: mÔùb Òlz
÷ mÔùb „qSzH
) msxaH (aumluaq)
= änbub a#∞
¡ Ezao lcIniH „egn
ƒ cIniH An mn „fuvD „nÁ
„uqaiH end avghad
ön mcbax „tNbih § ibdä balEmR end avghad
uhDa ieµÚ än a·rk qd teb uänh suf iqf en
„eml bed Rmn qcîã.
öDa ÅM tuqf a·rk üli-ª buaszH tuqf aYaiH
„DatiH fan mcbax „tNbih § ibá mnîãª. hna
auqf íhaR en zr‹iq tdu‹Îã mftax a·rk $
eñ uCe «0/ffo». antZr #dH 51 dqiqH xåú
iku‹n a·rk qd Œãd. bed Dlk SE√l íhaR mrH
gdidH (uCe mftax a·rk $ end xalH rSEil
«no/I»).
öDa äCao mcbax „tNbih § mrH äXr‹i u‹# inzlq
a·rk felik hna än teid tœãid a·rk O ÅM ucfh
sabq-ª.
xDar!
• îíb än tku‹n quH „tiar „khr‹baÓÚ mtzabqH me
„quH ·bInH eñ qaedH íhaR. uv Î≤ã‹Bz íhaR
öv briar khr‹baÓÚ mttabe.
• hDa íhaR îíb öbeadh en mtnaul äidI
aÄzfal.
•ön hDa íhaR mcmm lvstXdam Ë „txCîã
·¥Ã‹Ñ ultxCîã „®iat ·bInH.
•v rsteml hDh aÄghRH Ë ·kr‹ufH.
•v tde íhaR ieml bdu‹n mraqbH.
• än äghRH ÈùkH Œãau‹n „khr‹bayiH tnzbq elÎHa
tuciat aÄman ·tearf elÎHa, kDlk fan
„tclixat eñ aÄghRH „khr‹bayiH îíb än
Åí≤r‹I mn qbl äXcaÓÚ metmd lÈùkH Œãau‹n, ön
„qiam böcvxat eñ íhaR mn zrf Ùc
Eîã metmd qd t¡UdI öñ xuadT äu öcabat
XzrH #stXdm ÕhaR.
•än tbdil slk íhaR ·ucl vbd än tqum bh
u‹rSH metmdH, NZrª vstXdam äduat XacH.
• I≤zfä íhaR æM i≤µÃ‹e „slk en „khr‹bao u‹bed
Dlk i≤uCe Ë mAnh.
ucf aÜlH
12
ön ülH Œãau‹n 0002 K ttälf mn µueH äduat
Åã‹kib ufk cIniH „egn
u„Ezao
„rgao än tnZf ” aÄgR‹ao qbl aÖstXdam aÄul
(aNZr mqze «„tnZif») uvsbab uqayiH îíb
daÓMé wl äu rfe íhaR b”ta „idÎø.
;dd drgat „èùeH
end astXdam ;dd drgat „èùeH & avlkÅã‹uniH
u„Eîã mdr¶gH I≤stxb än ÅÒtar äu‚ „èùeH, æM
rSE¶l íhaR ñeml me „èùeH ·rEu‹bH mnD
„bdaiH.
ñtxCîã ·zbÆ tl@ äqô¤ú „rEbat end „egn,
u„tqlib uÒfq.
äma ülH Œãau‹n 0003 K fhI ¥MuDg ä‹kÆã rzu‹rª
bavCafH öñ edd mn „txsInat „téliH, u„åÚ
ÎMkn ÈùaóHa mnfrdH Ë mra‹kR XdmH „R‹baóø.
Page 13

English
Guarantee
We grant a 1 year guarantee on the product
commencing on the date of purchase.
Within the guarantee period we will eliminate, free
of charge, any defects in the appliance resulting
from faults in material or workmanship either by
repairing, or exchanging parts or exchanging the
whole appliance as we may choose. Not covered
by this guarantee: damage arising from improper
use (operation with incorrect current/voltage,
plugging
it into an unsuitable power point, breakage),
normal wear and defects which have a negligible
effect
on the value or operation of the appliance. The
guarantee becomes void if repairs are undertaken
by unauthorized persons and if original Braun parts
are not used.
This guarantee extends to every country where
this appliance is supplied by Braun or its appointed
distributor and where no import restrictions or
other legal regulations hinder or prevent service
being given under guarantee.
Service under the guarantee does not affect the
expiry date of the guarantee. The guarantee on
parts or entire appliances which are exchanged
ends when the guarantee on this appliance
expires.
In the event of a claim under this guarantee, hand
in the complete appliance with the valid guarantee
card to your dealer, or send both to the nearest
Braun Customer Service Centre.
All other claims including for damages resulting
from this guarantee are excluded unless our
liability is legally mandatory.
Those claims arising out of the sales contract with
the vendor are not affected by this guarantee.
Français
Garantie
Nous accordons une garantie d’un an sur ce
produit, à partir de la date d’achat.
Pendant la durée de la garantie, Braun prendra
gratuitement à sa charge la réparation des vices de
fabrication ou de matières, en se réservant le droit
de décider si certaines pièces doivent être
réparées ou échangées, ou encore si l’appareil luimême doit être échangé.
Les dommages occasionnés par une utilisation
inadéquate (branchement sur courant continu,
erreur de voltage, prise inappropriée, choc),
l’usure normale et les défauts ne portant préjudice
ni au bon fonctionnement ni à la valeur de l’appareil
excluent toute prétention à la garantie.
La garantie devient caduque si des réparations
ont été effectuées par des personnes non agréées
par Braun et si des pièces de rechange ne
provenant pas de Braun ont été utilisées.
La garantie ne sera valable que si, la date d’achat
ainsi que le cachet et la signature du magasin
figurent sur la carte de garantie et la carte de
contrôle.
Cette garantie est reconnue dans tous les pays
où Braun ou son distributeur exclusif
commercialise l’appareil et où aucune restriction
d’importation
ou règlement officiel n’empêchent d’assurer le
service prévu par la garantie.
Pour toutes réclamations intervenant pendant la
période de garantie, envoyez l’appareil ainsi que sa
carte de garantie à votre revendeur ou à la station
service Braun la plus proche.
Toutes autres formes de prétention à la garantie
sont exclues sauf si des dispositions légales
spécifient le contraire.
Clause speciale pour la France
Outre les dispositions ci-dessus relatives aux
garanties offertes par la société Braun au-delà du
champ d’application de la garantie légale prévue
par le Code civil français, par exemple, après
l’expiration du bref délai de l’article 1648 du Code
civil, s’applique en tout état de cause la garantie
légale qui oblige le vendeur professionnel à
garantir l’acheteur contre toutes les conséquences
des défauts ou vices cachés de la chose vendue
ou du service rendu dans les conditions des
articles 1641 et suivants du Code civil.
13
Page 14

Guarantee and Service Centers
Bureaux de garantie et centrales
service après-vente
Garanti bürolari ve merkezi
servis yerleri
Bundesrepublik Deutschland
Braun GmbH, Kundendienst,
Westerbachstr. 23 H, 61476 Kronberg,
“ 00 800 / 27 28 64 63
Argentina
Central de Reparación
de Afeitadoras S.A.,
Paraguay 757,
1057 Buenos Aires,
“ 1 311 44 00
Australia
Braun Australia Pty. Ltd.,
Private Bag 920, Shoppingworld P. O.,
North Sydney 2059 - NSW,
“ 1 800 656 808
Bahrain
Yaquby Stores,
Bab Al Bahrain Road,
P. O. Box 158,
Manama,
“ 21 09 56
Barbados
Dacosta Mannings Inc.,
Pier Head, P. O. Box 176, Bridgetown,
“ 431-8700
Belarus
Electroservice & Co,
RM 412, Ul. Chemistevskogo10 A,
220 600 Minsk,
“ 0172 66 02 15
Belgium
Braun Belgium,
Leuvensesteenweg, 573,
1930 Zaventem,
“ 02/ 7 18 29 11
Bermuda
Stuart’s Ltd., Reid Street,
P. O. Box HM 2705, Hamilton,
“ 2 95 54 96
Brasil
Picolli Service,
Rua Túlio Teodoro de Campos, 209,
Jd. Aeroporto – CEP 04360- 040,
São Paulo – SP,
“ 0 800 162 627
Bulgaria
Stambouli (Bulgaria) Ltd.,
16/A Srebarna Street,
Hladilnika, 1407 Sofia,
“ 29 62 50 00
Canada
Braun Canada Div., Gillette Canada Inc.,
110 Matheson Blvd.W., Suite 200,
Mississauga,
Ontario L5R 3T4,
“ (905) 712- 54 00
Ceská Republika
PH servis, s.r.o.
V Mezihori 2,
18000 Praha 8,
“ (02) 66310574
Chile
Reifschneider Foto S.A. C.I.,
Lautaro 836, Santiago de Chile,
“ 22 04 10 70
China
Braun (Shanghai) Co. Ltd.,
588 Yan-an Road (East),
E, Floor 24, East Ocean Centre,
200001 Shanghai,
“ 21 635 274 64
Croatia
Iskra elektronika d.o.o.,
Bozidara Magovca 63,
10020 Zagreb – Hrvatska,
“ 01 - 6 60 17 77
Curacao
Boolchand Pessoomal,
Heerenstraat 4 B, P. O. Box 36,
Curacao, Netherlands Antilles,
“ 4 61 22 62
Cyprus
V. H. R. Electrical Co. Ltd.,
Megaelectric, P. O. Box 8813,
2032 Nicosia,
“ 2 323 220
Danmark
Gillette Group Danmark A/S,
Teglholm Allé 15,
2450 Kobnhavn SV,
“ 33 26 91 00
Djibouti (Republique de)
Magasin de la Seine,
12 Place du 27 Juin, B.P. 2500,
Djibouti,
“ 35 19 91
Egypt
Zahran Trading Co.,
14 May Road – Semouha,
Alexandria,
“ 34 20 81 01/2/ 3
España
Braun Iberia Market,
Enrique Granados, 30,
08950 Esplugues de Llobregat
(Barcelona),
“ 3 40 19 45 1
Estonia
Serwest Ltd.,
Liimi 1, 0006 Tallinn,
“ 6 56 30 51
France
Braun France SA,
9, Place Marie Jeanne Bassot,
92693 Levallois Perret Cédex,
“ (1) 4748 70 00,
Minitel 3615 code Braun.
Liste Centres-Service sur demande
Great Britain
Braun (UK) Limited,
Customer Service Department,
Dolphin Estate, Windmill Road,
Sunbury- On-Thames,
Middlesex,
“ 9 32 78 56 11
Greece/Ellas
Berson S.A.,
47, Agamemnonos Str.,
17675 Athens,
“ 01-9 40 94 00
Guadeloupe
Ets. André Haan S.A.,
B.P. 335,
97161 Pointe-à-Pitre,
“ 32 56 56
Hong Kong
Audio Supplies Company,
Room 506,
St. George’s Building,
2 ICE House Street,
Hong Kong,
“ 25 24- 93 77
Hungary
Kisgep KFT,
Pannonia U. 23,
1136 Budapest,
“ 3 49 49 55
Iceland
Verzlunin Pfaff h.f., Grensasvegur 13,
Box 714, 121 Reykjavik,
“ 5 33 22 22
India
Olympia Service
Centre (I ) Pvt. Ltd.,
55-A, Siddhartha chamber,
Ground Floor,
Near Azad Appts.,
Hauz Khas – New Delhi,
“ 11 696 1108
Ireland (Republic of)
Gavins Shaver Centre,
83/84, Lower Camden Street,
Dublin 2,
“ 47571 09
Israel
DELTA ELECTRICAL
QUALITY PRODUCTS LTD,
10 Haharuzim St., Park Si’im,
P. O. B. 8228, New Ind. Area,
Netanya 42293,
“ 98 63 03 33
Italia
Braun Italia s.r.l.,
Via G.B. Pirelli, 18,
20124 Milano,
“ 02 / 66 78 61
Servizio Assistenza
Consultare le pagine gialle della propria
città alla voce elettrodomestici
riparazione.
Jordan
Dajani International Co.,
Sherif Abdul Hamid Sharae Street,
Shmeisani Area, Amman,
“ 6 66 35 76
Kenya
Radbone-Clark Kenya Ltd.,
P. O. Box 40883,
Power Techn. Komplex,
Mombasa Rd.,
Nairobi,
“ 2 86 36 60
Korea
STC Industries Corp. Braun Division,
32, Mullae- dong 3 ka,
Youngdungpo-Ku,
Seoul 150-090,
“ 2 58 25 89
Kuwait
Union Trading Co., P. O. Box,
13001 Safrat,
“ 2 42 33 51
Latvia
LATINTERTEHSERVISS,
72 Bullu street, house 2,
Riga LV 1067,
“ 2 40 37 19
Lebanon
Aurora s.a. r.l.,
Sin el Fil, P. O. Box 110-773,
Beirut,
“ 1 42 54 50
Lituania
Elektronas,
Joint Stock Company,
Kareiviu 6,
2600 Vilnius,
“ 277 76 17
Luxembourg
Sogel S. A.,
1 Dernier Sol, BP 1941,
L -1019 Luxembourg,
“ 4 00 50 51
Malaysia
Braun Malaysia c/o Gillette,
11 A Persian Selangor,
P. O. B. 7013,
409991 Shah Alam,
Selangor Darul Ehsan,
“ 35 59 21 16
Malta
D.I. N.K. Ltd.,
Kind’s, Mosta Road,
Lija Bzn 09,
“ 24 71 18
Maroc
Gillette Morocco S.A.,
Braun Division,
Espace Porte d’Anfa, No 17,
Rue Bab El Mansour-Bat.B,
BP 2554 Casablanca,
“ 212 2 95 09 75
Martinique
Decius Absalon,
23 Rue du Vieux-Chemin, P. O. Box 71,
97201 Fort-de-France Cedex,
“ 73 43 15
Mauritius
J. Kalachand & Co. Ltd.,
Dem Industrial Estate,
Plaine Lauzun,
“ 2 12 84 10
Mexico
Braun de México y Cia. de C.V.,
Calle Cuatro No.4,
Fracc. Industrial Alce Blanco,
Naucalpan de Juárez
53370, Estado de México,
“ 387-1900
Nederland
Braun Nederland BV,
Visseringlaan 22,
2288 Rijswijk,
“ 70 -4 13 16 58
New Zealand
Key Service Ltd.,
c/o Gillette NZ,
59-63 Druces Rd.,
Manukau City,
“ 9 -262 58 38
Nippon
Braun Japan KK,
Siber Hegner Bldg.7 F,
89-1 Yamashito.
Cho – Naka. Ku,
Yokohama 231 - Kanagawa,
“ 4 56 81 79 51
Norge
Gillette Group Norge AS,
Nils Hansen vei 4,
Postboks 79 Bryn,
0611 Oslo,
“ 22 72 88 10
Österreich
Braun Electric Austria GmbH,
Römergasse 39,
1160 Wien,
“ 1 48 53 61 61 16
Oman (Sultanate of )
Naranjee Hirjee,
P. O. Box 9, Ruwi High Street,
Postal Code 113, Muscat,
“ 70 36 60
Pakistan
Anis Ahmed & Bros.,
4, J.C. H.S., Block 7/ 8,
Main Shahra-e-Faisal,
Karachi 75350,
“ 2 14 53 63 48
Paraguay
Paraguay Trading S.A.,
Avda. Artigas y Cacique Cara Cara,
Asunción,
“ 203 - 346/348/350
Philippines
Braun Philippines,
c/o Gillette (Philippines) Inc.,
Villongco Road, BO- SN Dionisio,
Sucat Paranaque,
Metro Manila,
Poland
Gillette Poland S.A.,
Mokotów Business Park,
Budynek Orion, I pietro,
ul. Domaniewska 41,
02-672 Warszawa,
“ 548 88 88
“ 8 42 05 71
14
Page 15

Portugal
Braun Espanhola S.A.,
Sucursal Portuguesa,
Centro Empresarial
Torres de Lisboa,
Rua Tomás da Fonseca,
Torre G-9ºB,
1600 Lisboa,
“ 17 22 00 65
Qatar
Al-Baker Trading Co.,
P. O. Box 9, Doha,
“ 41 50 59
Réunion
Dindar Confort,
58, rue Maréchal Leclerc,
P. O. Box 12,
97400 St. Denis,
“ 20 03 03
Romania
Tamisa Trading,
Complexul Hotelier Bucaresti,
Str. Luterana 2-4, Sc. E,
ET 6, Ap. 16, Bucarest 7000,
Sector 1,
“ 0 13 12 58 12
Russia
RTC Sovinservice,
Jasnyi Proezd, 10. RRTC,
129081 Moscow,
“ 09 52 58 6270
Saudi Arabia
Salem M. Bakhashwain
Sons Co., P. O. Box 743,
21421 Jeddah,
“ 26 48 47 71
Schweiz/Suisse/Svizzera
Telion AG, Rütistrasse 26,
8952 Schlieren,
“ 17 32 15 11
Singapore (Republic of)
Beste (S) Pte.Ltd.,
50 Tagore Lane,
# B1-04 Siang How
Warehouse,
Singapore 787494,
“ 45 52 24 22
Slovenia
Elektrotehna Set d.d.,
Pod tranco 2, 1000 Ljubljana,
“ 61 21 44 83
Slovenská Republika
Techno Servis
Bratislava spol. s.r.o., Druzstevná 2,
83104 Bratislava SR,
“ 07 566 3749
South Africa (Republic of)
Postal address:
Gillette S.A. Limited
Braun Division,
P. O. Box 784868,
Sandton, 2146,
“ (011) 320 4690
After Sales Service
Tel.: (011) 315 9260
Physical addr
Gillette S.A. Limited
Braun Division, 3rd Floor,
„Grayston 66”,
2 Norwich Close, Sandown,
Sandton, 2146
South Pacific
Woodward’s Agencies,
39 Taylor’s Rd., Kingston,
Norfolk Island,
St. Maarten
Boolchand’s Ltd.,
52 Front Street, P.O. Box 105,
Philipsburg,
Netherlands Antilles,
“ 52 22 45
St.Thomas
Boolchand’s Ltd.,
Main Street, Charlotte Amalie,
P. O. Box 3559, 00801 St. Thomas,
US. Virgin Islands,
“ (1-340) 7 76 07 94
ess:
“ 24 05
Sudan
K.S. Ganbert & Sons (Sudan) Ltd.,
Slavos Building, Gamhuria Avenue,
P. O. Box 615, Khartoum,
“ 77 13 12
Suomi
Gillette Group Finland Oy/Braun,
Niittykatu 8, PL 9, 02200 Espoo,
Asiakaspalvelu 0203 77877
Tekninen neuvonta 09-45 28 71
Sverige
Gillette Group Sverige AB,
Esplanaden 3 D,
172 22 Sundbyberg,
“ 020-21 33 21
Syria
Unisyria, P. O. Box 35002,
Damascus,
“ (963) 11 441 9002
Taiwan, R.O.C.
Audio & Electr. Supplies Ltd.,
Brothers Bdlg., 10 th Floor,
85 Chung Shan N Rd., Sec.1,
Taipei,
“ 02 52 33 283
Thailand
Braun Thailand,
Vongvanij Bldg. B, 29 th floor,
Unit A3, 100/100 Rama IX Road,
Huay Kwang, Bangkok 10310,
“ 64 50 80 03
Tunesie
Generale d’Equipement Industr.,
5, Rue 7182 El Manar 1,
Tunis,
“ 1 89 07 50
Turkey
Bosas,
Bakim Onarim Servis A.S.,
Cumhuriyet Bul.
Akhan No. 64/3,
Konak – Izmir,
“ 23 24 89 92 01
United Arab Emirates
The New Store,
P. O. Box 3029,
Dubai,
“ 14 53 45 06
Uruguay
Driva S.A.,
Marcelilno Sosa 2078,
11800 Montevideo,
“ 2 9248 033
USA
Braun U.S. Div., The Gillette Co.,
400 Unicorn Park Drive,
Woburn, MA 01801-3376
“ 1- 800-272 -86 11 or
“ 1- 800- BRAUN -11
Venezuela
Coral C.A.,
Edificio Larco,
Calle la Limonera,
La Trinidad – Caracas,
“ 2 93 38 77
Yemen (Republic of)
Saba Stores,
26th September Street, P. O. Box 5278,
Taiz,
“ 4 22 63 59
Yugoslavia
BG Elektronik Servis Centar,
Bulevar revolucije 34,
11000 Beograd – Jugoslavia,
“ 011 - 3240 - 030
15
 Loading...