

Braun Multiquick system 100, Multiquick system 200, Multiquick system 300, Multiquick system 400, Multiquick system 500 Use Instructions
Page 1

Multiquick system 100
Multiquick system 200
Multiquick system 300
Multiquick system 400
Multiquick system 500
Type 4249
English
Use Instructions
Guarantee
Service Centers
Page 2
▲
Page 3

Additional attachments available
ZK 3
Blender
KX4
Glass
blende
ZK 4
Slicer/
shredder
ZK 7
Food
chopper
KGZ 4
Meat
mincer
MXK 4
Spice/
coffee mill
● ● ● ● ●
ZK 7
Food chopper
● ● ● ●
ZK 7
Food chopper
MXK 4
Spice /
coffe mill
● ● ●
ZK 4
Slicer/
shredder
ZK 7
Food chopper
● ● ●
ZK 4
Slicer/
shredder
ZK 7
Food chopper
MXK 4
Spice/
coffee mill
● ●
● ● ● ● ●
ZK 7
Food chopper
MXK 4
Spice/
coffee mill
● ● ●
ZK 7
Food chopper
KGZ 4
Meat
mincer
MXK 4
Spice/
coffee mill
● ●
Caution!
Read all insructions carefully before using this
product.
Unwind the cord in the bottom of the basic unit
(motor part) entirely to avoid obstructing the
ventilation. Your voltage must correspond to the
voltage printed on the bottom of the basic unit
(motor part). Connect to alternating current (~) only.
When connecting to an outlet, the motor must
always be turned off (switch
"
at «0»). This
appliance is constructed for normal household use
only. Please ensure that it is kept out of the reach of
children. Braun electric appliances meet applicable
safety standards. Repairs on electrical appliances
must only be done by authorized service personnel.
Faulty, unqualified repair work may cause accidents
or injury to the user.
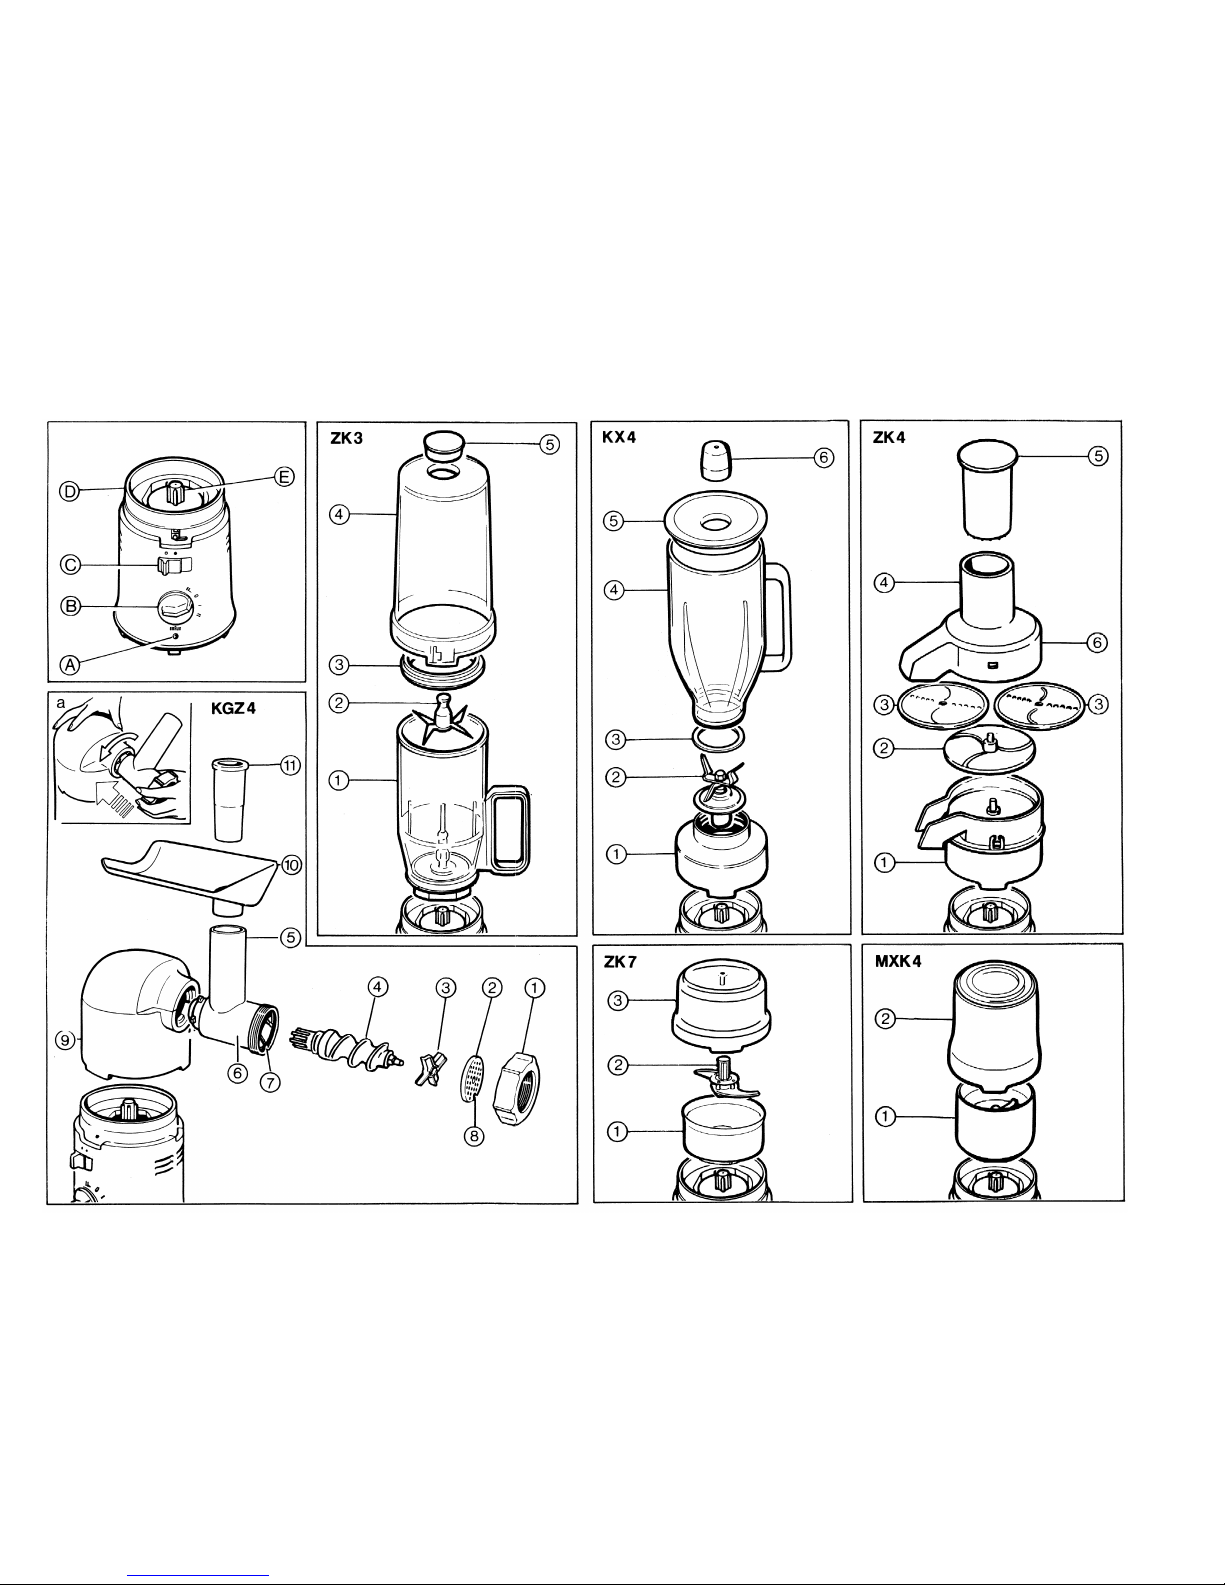
Basic Unit (motor part)
Specifications
Voltage/wattage: see typeplate
on the bottom of the appliance.
Operating time and max. capacity: see processing
instructions.
Safety fuse
If the unit should stop – without an interruption in the
electrical power supply being the cause – check
whether the red lamp
!
is lit.
The red lamp indicates that the electronic safety
fuse has been activated. In this case, turn the unit
off (switch set at «0») and wait for at least 15
minutes before turning the unit on again. If the
motor still will not start, is has not yet cooled off
sufficiently.
Turn the unit off again (switch set at «0») and wait
long enough for the motor to thoroughly cool off.
The unit will then start to run when switched on
again. Store the appliance after use only after
having turned it off, and pull the plug out of the
socket.
Description
!
Safety fuse lamp
"
Switch
$
Basic unit (motor part)
#
Safety lock
Safety lock
#
O = unlocked ● = locked
For safety reasons, the motor can only be switched
on if the attachment has been locked properly.
Switch
"
0 = off
I = low speed
II = hight speed
IL = pulsator setting (low speed)
The switch does not catch at this setting;
it springs back to «0» (= off) as soon as it is
released.
For safety reasons, the attachments can only be
unlocked if the switch is set at «0» (= off).
Cleaning
Always turn the motor off and pull the plug out of the
socket first. Clean the housing with a damp cloth
only. Never immerse into water.
Subject to change without notice.
This product conforms to the EMCRequirements as laid down by the Council
Directive 89/336/EEC.
Food Chopper
Attachment ZK 7
Caution!
When removing and replacing the blade insert
2
,
only take hold of it by the plastic shaft. The blades
are very sharp! Do not reach into or underneath the
blades. The safety lock
#
on the basic unit (motor
part) must not be opened before the blade insert
has come to a rest. Do not operate the food chopper
attachment longer than 1 minute without
interruption. Allow the appliance to cool off for some
time after that.
Notice: When processing food with high power
consumption – e. g. 150 g prunes (approximately
750 W) – do not exceed an operating time of 15
seconds.
Description
1
Container
2
Blade insert
3
Lid
Assembling
• Set the switch
"
on the basic unit (motor part) to
«0» (= off).
• Firmly place the container
1
on the basic unit.
• First put the blade insert
2
into the container and
over the drive shaft as far as it will go, and then:
• put in the food you want to process.
Im
portant: Do not put the blade insert in top of the
food.
5
Page 4

3
over the containter, press down
#
.
Processing examples
• What you should not
process:
extremely hard and juicy or liquid substances (for
instance: coffe beans, nutmeg, juicy fruits and
vegetables).
• For best results, do not fill the container with
quantities over the levels listed. The processing
times are dependent on the quality of the food,
the degree of fineness you want, etc.
• Before processing meat, be sure that all bones
have been removed first.
"
set to «0».
#
set to «O».
3
and remove the container
1
2
. Then empty the
Cleaning
The container
1
, blade insert
2
and lid
3
can be
washed in warm water with normal dishwashing
liquids. The container and the blade insert are also
suited for the dishwasher. The blades in this
appliance are very sharp and should be handled
with caution.
Subject to change without notice.
150 gr. meat cut in 2 cm cubes II
Liquidizer
Attachment
ZK 3
Caution
When removing and replacing the blade insert
2
,
only hold the plastic shaft intended for this purpose.
The blades are ver
y sharp! Do not touch them or
reach under them. The safety lock
#
(basic unit)
must not be opened before the blades come to a
rest. Do not use with very hot liquids (over 80°C).
Assembling
• Ensure that the basic unit is turned off (switch
"
set at «0».
• Place the liquidizer
1
on top of the basic unit
$
.
Make sure that it is securely located. Press the
blade insert
2
onto the shaft
%
, turning it slightly,
until the metal shaft top protrudes through the
plastic holding knob on the blade insert.
• Add the ingredients to be processed (see
«Applications»).
• Then place the safety cover
4
over the liquidizer,
insert the small inner cap
5
and lock the basic
unit.
The motor can only be turned on if the attachment has been locked properly.
Applications
Ca
pacity: 1 liter maximum
Mixin
g: Liquids of all kinds
Puréein
g: Legumes, tomatoes, spinach and other
vegetables, apples, stoned fruit
Grindin
g: Grain, rice, legumes
Gratin
g: Potatoes, nuts, radish, bread for
breadcrumbs
Blendin
g: Butter, cottage cheese and yoghurt
dishes, milk-shakes, soups
To add in additional ingredients (when mixing
drinks or making apple sauce, for instance) remove
the small inner cap
5
and add to the mixture when
the unit is in operation.
Note
: Should the circulation of the food being
processed be blocked, switch on the pulsator
setting a few times consecutively.
The degree of fineness depends on the processing
time. Here are some examples:
Breadcrumbs: Break 2-3 pieces of hard bread.
Process 3 times briefly with the pulsator setting IL,
then continue on setting I (total of 15-20 seconds).
Hazelnuts: 250 gr. of hazelnuts. Process on setting
II for approx. 5 seconds.
Apple sauce (hot, up to 80°C): Fill in cooked apples
up to a maximum of 1 liter. Process approx. 6
seconds on setting I or II.
Peanut butter: 250 gr. of shelled peanuts.
Process approx. 30 seconds on setting I or II.
Disassembly
• Turn the motor off: Switch
"
set to «0».
• Unlock attachment: Safety lever
#
set to «O».
Cleaning
All parts of the liquidizer can be cleaned with normal
dishwashing liquids and warm water (do not put into
the dishwasher). Occasionally, remove the seal
3
from the safety cover
4
for cleaning. Do not forget
to replace the seal before using the liquidizer again.
Subject to change without notice.
Blender Attachment
KX 4
Applications
Ca
pacity: 1 liter maximum
Mixin
g: Liquids of all kinds
Puréein
g: Legumes, tomatoes, spinach and other
vegetables, apples, stoned fruit
Grindin
g: Grain, rice, legumes
Gratin
g: Potatoes, nuts, radishes, bread for
breadcrumbs
Blendin
g: Butter, cottage cheese and yoghurt
dishes, milk-shakes, soups
Cho
pping: Soup vegetables, carrots, onions
Assembling
• Place the collar
1
on the basic unit
$
. Press
down firmly and lock with the safety lever
#
.
• Lay the sealing ring
3
on the rim of the blade part
2
and insert it through the collar
1
and onto the
pin
%
of the basic unit.
• Then screw the glass jar
4
securely into the
collar
1
.
Caution
: Never switch the unit on before it is
completely assembled.
Using
Put the food to be processed into the glass jar
4
.
Place the lid
5
on the jar and loosel
y insert the cap
6
into the opening.
Turn the unit on:
Mixing drinks, coarse chopping: pulsator IL
Mayonnaise: setting I
Most other types of blending: setting II
7
Page 5

5
on. To add other
4
and fill half full
6
on and off to
#
of the basic unit and lift
1
.
2
under running water; do not
4
when the motor
5
to guide food through
"
set at
6
from the lower part
1
of
2
onto the shaft of the
on top of the carrier
• Place the lid
6
on the lower part
1
and then
press the whole slicer/shredder attachment
evenly on the basic unit. Locking the safety lever
#
of the basic unit also tightens the lid
6
onto the
lower part
1
.
The motor can only be turned on if the attachment has been locked properly.
Im
portant: Always lock the safety lever
#
of the
basic unit before filling.
Processing
Only fill in food to be processed when the unit is
switched off. Additional ingredients can be added
when the unit is in operation.
We recommend using setting I to process the food.
Exam
ples: Slicing (coarse and fine): e. g. beans,
cabbage, cucumbers, turnips, carrots, onions, raw
potatoes, apples, lettuce and leeks.
Grating (coarse and fine): e. g. raw potatoes,
vegetables, apples for baby and dietary foods,
candied fruits.
Important: Please do not use for extremely hard
goods such as Parmesan cheese, hard root-crops
and similar items.
Disassembly
• Turn the motor off: Switch
"
set to «0».
• Unlock attachment: Safety lever
#
set to «O».
Cleaning
The lower part
1
and the carrier disc
2
must only
be cleaned under running water.
All other parts of the slicer/shredder ZK 4 can be
washed in the dishwasher.
Subject to change without notice.
Meat Mincer
Attachment KGZ 4
Do not reach into the filling shaft
5
while the motor
is running; always use the pusher
k
.
When processing large amounts of meat:
After processing 12 kg of meat at a time, allow the
unit to cool off for approx. 30 minutes before
proceeding.
Discs
2
Discs household size 5 (hole diameters 3 mm,
4.5 mm, 8 mm). All discs are not standard in all
versions; they are commercially available.
Before using
All parts of the mincer were covered with a
lubricating film before leaving the factory. They
must be washed before using the first time (see
«Cleaning»).
Assembling
Please note the correct assembly order (see
illustration).
• Put the disc into the metal housing
6
, locating
the notch
8
on disc
2 over the protrusion 7 in
the housing.
• Screw the cap
1 securely onto the metal
housing
6.
• Place the drive unit
9 onto the basic unit #.
Press down firmly and lock in place with the
safety lever
# of the basic unit.
• The assembled metal housing
6 is joined to the
drive unit
9 with a bayonet lock. Insert the metal
housing into the drive unit
9 by holding the filling
shaft
5 at a 45° angle to the right (a) (arrow on
the metal housing must coincide with the arrow
on the drive unit). Turn the metal housing
6
counter-clockwise until the filling shaft
5 latches
into place in an upright position.
• Place the food tray
j on the filling shaft 5.
Mincing
turn the motor on first before filling in food to be
minced.
Operating speed for mincer: setting II (
" of the basic
unit).
Meat is easier to insert and process, if cut into strips
and freed of tendons first. Besides meat, the mincer
will also process vegetables, onions, soaked bread
rolls, boiled potatoes, stoned plums for jam, etc.
If meat is crushed instead of being minced properly,
please check if the mincer is assembled correctly
(e. g. whether you have perhaps overlooked
inserting one of the parts) or clean the blade
3 and
disc
2.
Cleaning
Wipe drive unit
9 with a damp cloth only. All other
parts can be washed in warm water with normal
dishwashing liquids. The cross-shaped blade
3
and perforated disc
2 should be wiped dry to avoid
rust. Do not dry parts on hot stove plates.
Subject to change without notice.
Spice/Coffee Grinder
Attachment MXK 4
Important
Do not process seeds or kernals that contain fat (e.
g. nuts) in your spice grinder. Very hard spices such
as ginger are better to grind in smaller quantities.
Using
Fit the grinding container
1 over the pin % of the
basic unit and press firmly onto the basic unit
$.
Fill in the spices you want to grind.
Maximum filling capacity: 1 cm from the top of the
container.
Then place the cover
2 over the grinding container
1, and press firmly onto the basic unit $. Lock in
place with the safety lever
# of the basic unit.
Operate the grinder at speed II.
When finished, unlock by activating the safety lever
#. Take off the cover 2 and the grinding container
1. Empty the ground spices using the attached
brush, if necessary.
Cleaning
Clean the grinding container
1 with the attached
brush or a cloth only. The cover
2 can be washed
in warm water and normal dishwashing liquids.
Subject to change without notice.
8
Page 6

rights under
 Loading...