

Page 1
Multiquick 5
MR 570 Patisserie
t
u
r
b
o
6
0
0
W
o
b
r
u
t
t
a
t
www.braun.com
Type 4191
Page 2

Deutsch 6
English 9
Français 12
Polski 15
âesk˘ 19
Slovensk˘ 22
Magyar 25
Hrvatski 28
Braun Infolines
D
A 00 800 27 28 64 63
00 800 BRAUNINFOLINE
CH
08 44 - 88 40 10
GB
0800 783 70 10
IRL
1 800 509 448
F
0 800 944 802
B
0 800 14 592
PL
0 801 127 286
0 801 1 BRAUN
Slovenski 31
Românå 34
Türkçe 37
кЫТТНЛИ 40
ì͇ªÌҸ͇ 44
Å˙΄‡ÒÍË 48
55
Internet:
www.braun.com
www.service.braun.com
221 804 335
CZ
02/5710 1135
SK
(06-1) 451-1256
H
01/6690 330
HR
SLO
080 2822
0 800 261 63 65
TR
RUS
8 800 200 20 20
UA
+ 38 044 428 65 05
HK
852-25249377
(Audio Supplies Company Ltd.)
Braun GmbH
Frankfurter Straße 145
61476 Kronberg/Germany
99268734/V-10
D/GB/F/PL/CZ/SK/H/HR/SLO/RO/TR/RUS/UA/BG/Arab
Page 3
2
15
3
t
u
r
b
o
4
1
5
16
6
17a
17b
17
7
17c
10
8
18
19
9
20
21
11
12
22a
13
22b
22c
22
3
A
14
t
u
r
b
o
a
t
u
r
b
o
b
t
u
r
b
o
c
t
u
r
b
o
click!
Page 4
B
15…20°C
4…8°C
max.
4 x
t
u
r
b
o
a
t
u
r
b
o
b
t
u
r
b
o
max. 400 ml
c
t
u
r
b
o
click!
C
a
t
u
r
b
o
d
t
u
r
b
o
e
t
u
r
b
o
b
f
t
u
r
b
o
c
g
j
max.
sec.
hi
Parmesan
1cm
1cm
100 g10100 g2050 g510 g57
1 - 15 1 - 15 1 - 15 1 17 - 15 15
80 g1080 g5100 g1090 g
5
45
+
25
ml
4
D
d
t
u
r
b
o
click!
+5 sec +5 sec
t
o
u
r
b
turbo
a
b
+5 sec
turbo turbo
turboturbo
c
1
2
e
t
u
r
b
o
t
u
r
b
o
f
t
u
r
b
o
click!
Page 5
1
2
g
2
1
h
i
1
2
E
j
t
c
click!
Parmesan
1cm 1cm
max.
sec.
700 g
500 g30500 g1030 g203020500 g15500 g25500 g30500 g20400 g
15-30
45-60
200 g
60
1 - 4 1 - 15 1 - 15 8 - 15 8 - 15 6 - 9
+5 sec +5 sec
t
u
r
b
o
turbo turbo
b
f
t
u
r
b
o
t
o
u
b
r
a
1
u
r
b
o
2
de
t
u
r
b
o
t
u
r
b
o
turboturboturboturbo turbo
click!
F
g
hi
1
j
1 - 7 9 - 11 6 - 9 9 - 15 7 - 9 6 - 9
22a
1 - 7
22b
7 - 9 7 - 9 3 - 5 7 - 9 7 - 9 7 - 9
22c
1 - 7
1 - 7
9 - 15
9 - 15
7 - 9 9 - 15
6 - 9
t
u
r
b
o
Parmesan
turbo
2
t
o
u
b
r
t
u
r
b
o
5
Page 6

Deutsch
Unsere Produkte werden hergestellt, um
höchste Ansprüche an Qualität, Funktionalität
und Design zu erfüllen. Wir wünschen Ihnen
mit Ihrem neuen Braun Produkt viel Freude.
Vorsicht
Bitte lesen Sie die Gebrauchsanweisung
sorgfältig und vollständig, bevor Sie das
Gerät in Betrieb nehmen.
• Die Messer und Einsätze (22a-c) sind
sehr scharf! Behandeln Sie Schneidwerkzeuge mit äußerster Vorsicht, um
Verletzungen zu vermeiden.
• Kinder oder Personen mit eingeschränkten
physischen, sensorischen oder geistigen
Fähigkeiten dürfen dieses Gerät nicht
benutzen, es sei denn, sie werden durch
eine für ihre Sicherheit zuständige Person
beaufsichtigt. Wir empfehlen außerdem, das
Gerät außer Reichweite von Kindern
aufzubewahren sowie sicherzustellen, dass
Kinder nicht mit dem Gerät spielen.
• Dieses Gerät ist für die Verarbeitung haus-
haltsüblicher Mengen konstruiert.
• Ziehen Sie immer den Netzstecker vor dem
Zusammensetzen, Auseinandernehmen,
Reinigen oder Aufbewahren des Gerätes,
oder wenn es unbeaufsichtigt ist.
• Vor der Inbetriebnahme prüfen, ob die auf
dem Gerät angegebene Spannung mit Ihrer
Netzspannung übereinstimmt.
• Stellen Sie sicher, dass der Stabmixer nicht
eingeschaltet ist, insbesondere wenn Sie ihn
in heiße Flüssigkeiten eintauchen oder aus
solchen herausnehmen.
• Weder das Motorteil (1) noch das Getriebe-
teil (7) für den Schlagbesen unter fließendes Wasser halten oder ins Wasser tauchen.
• Der Messbecher (9) ist nicht mikrowellen-
geeignet.
• Das Multifunktions-Zubehör (15) darf nur
betrieben werden, wenn die Verriegelung
(17c) eingerastet ist und der Stopfer (16)
sich im Einfüllschacht (17b) befindet.
• Zum Einfüllen in den Einfüllschacht (17b)
stets den Stopfer, keine anderen Gegenstände benutzen.
• Schalten Sie immer das Gerät aus, bevor
Sie den Deckel (17) abnehmen.
• Der Deckel (17) kann unter fließendem
Wasser gereinigt werden, darf aber weder
in Wasser getaucht noch im Geschirrspüler
gereinigt werden.
• Der Arbeitsbehälter (18) ist nicht mikrowel-
lengeeignet.
• Braun Geräte entsprechen den einschlägi-
gen Sicherheitsbestimmungen. Reparaturen
und das Auswechseln der Anschlussleitung
dürfen nur autorisierte Fachkräfte vornehmen. Durch unsachgemäße Reparaturen
können erhebliche Gefahren für den Benutzer entstehen.
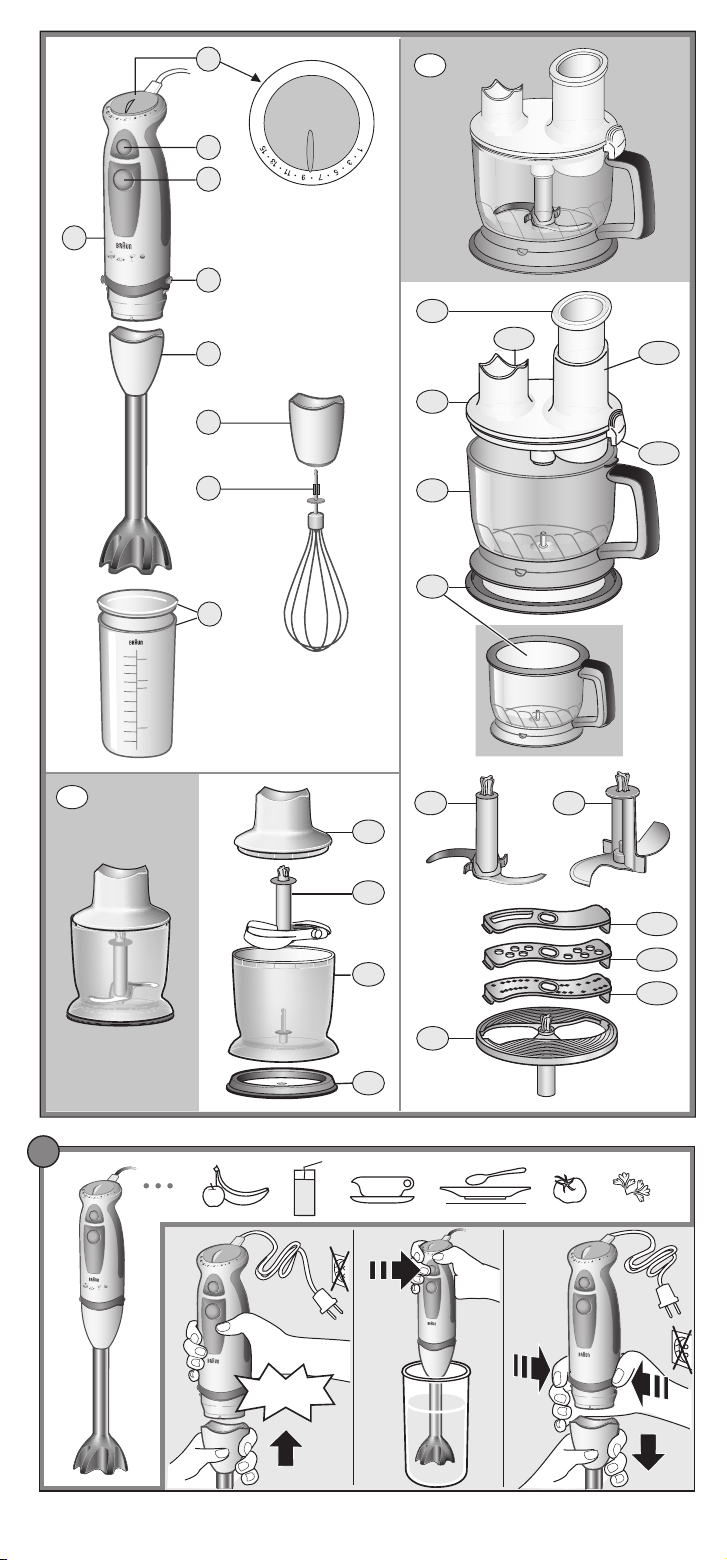
Gerätebeschreibung
1 Motorteil
2 Stufenloser Geschwindigkeitsregler
3 Ein-/Ausschalter für variable Geschwin-
digkeit
4 Turbo-Schalter
5 Drucktasten zum Lösen der Einsätze
6 Pürierstab
7 Getriebeteil für Schlagbesen
8 Schlagbesen
9 Messbecher
10 Zerkleinerer
11 Oberteil
12 Messer
6
13 Arbeitsbehälter
14 Stützdeckel
15 Multifunktions-Zubehör (FP)
16 Stopfer
17 Deckel
17a Kupplung für Motorteil
17b Einfüllschacht
17c Verriegelung
18 Arbeitsbehälter
19 Rutschfester Stützdeckel (dient
auch zum Verschließen des Arbeits-
behälters)
20 Messer
21 Knetwerkzeug
22 Einsatzträger für Schneid-/Raspel-
zubehör
22a Schneideinsatz
22b Raspeleinsatz (grob)
22c Raspeleinsatz (fein)
Einstellen der Geschwindigkeit
Wird der Schalter (3) betätigt, entspricht die
Verarbeitungsgeschwindigkeit der Einstellung
des stufenlosen Geschwindigkeitsreglers (2).
Je höher die Einstellung, desto schneller die
Verarbeitung.
Die höchste Verarbeitungsgeschwindigkeit
erreichen Sie mit dem Turbo-Schalter (4). Er
kann auch für kraftvolle Momentschaltungen
eingesetzt werden, ohne dass der Geschwindigkeitsregler betätigt werden muss.
Je nach Anwendung werden folgende Einstellungen empfohlen:
Stabmixer 1...turbo
Schlagbesen 3...15
Zerkleinerer siehe Verarbeitungs-
tabellen im Bildteil
Multifunktions-Zubehör siehe Verarbeitungs-
tabellen im Bildteil
„
‰, Â
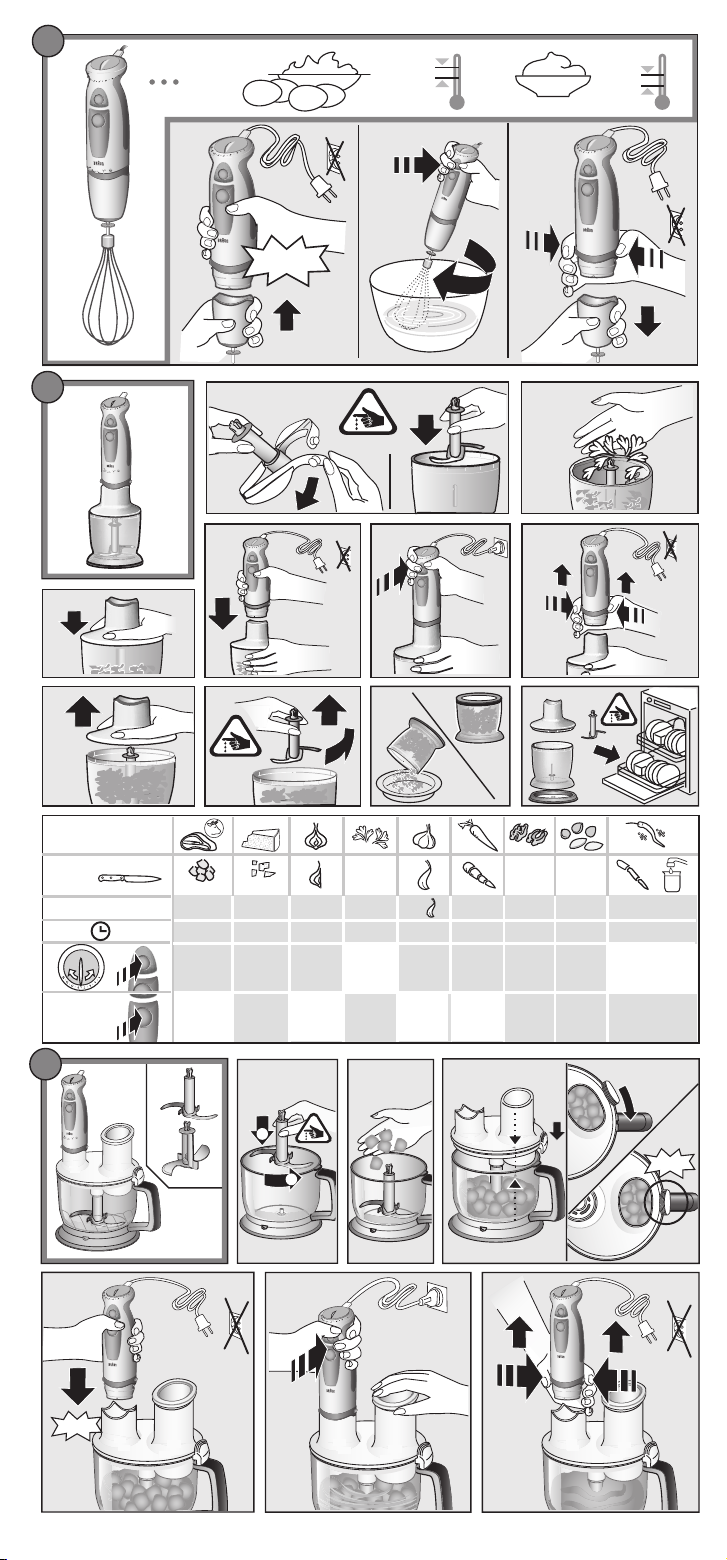
A So bedienen Sie Ihren Braun
Stabmixer
Der Stabmixer eignet sich z.B. für die Zubereitung von Dips, Saucen, Suppen, Mayonnaise, Baby-Nahrung sowie zum Mixen von
Getränken und Milch-Shakes.
a) Motorteil (1) auf den Pürierstab (6) setzen
und einrasten lassen.
b) Stabmixer in das zu verarbeitende Gut
eintauchen und erst dann mit Schalter (3)
oder (4) einschalten.
c) Zum Abnehmen des Pürierstabs die beiden
Drucktasten (5) drücken und den Pürierstab abziehen.
Sie können den Stabmixer in dem Messbecher (9) verwenden, aber auch in jedem
anderen Gefäß. Wenn Sie beim Kochen direkt
im Kochtopf arbeiten wollen, nehmen Sie den
Topf vom Herd, um den Stabmixer nicht zu
überhitzen.
Rezept-Beispiel: Mayonnaise
200–250 ml Öl
1 Ei (Eigelb und Eiweiß)
1 EL Zitronensaft oder Essig
Salz und Pfeffer nach Geschmack
Zutaten in der genannten Reihenfolge in den
Becher geben. Stabmixer senkrecht in den
Messbecher stellen und den Turbo-Schalter
(4) drücken. Den Stabmixer in dieser Position
halten, bis das Öl emulgiert.
Ohne auszuschalten den Stabmixer dann
langsam anheben und wieder senken, bis die
Mayonnaise fertig ist.
Page 7

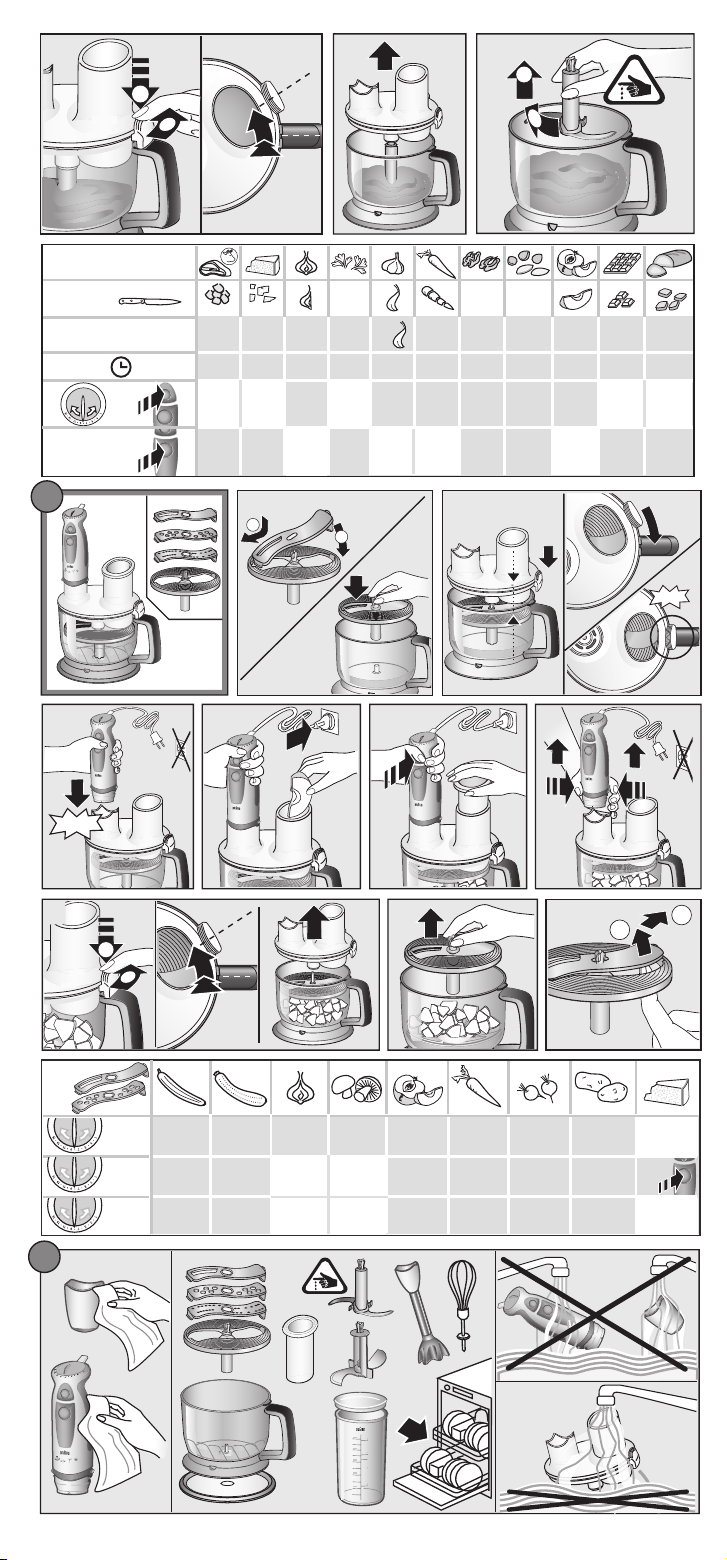
B So bedienen Sie Ihren
Schlagbesen
Benutzen Sie den Schlagbesen ausschließlich
zum Schlagen von Sahne, Eiweiß, Biskuitteig
und Fertig-Desserts.
a) Schlagbesen (8) in das Getriebeteil (7)
stecken, anschließend das Motorteil (1) in
das Getriebeteil setzen und einrasten
lassen.
b) Schlagbesen in das Gut eintauchen, erst
dann mit Schalter (3) einschalten.
c) Zum Abnehmen die beiden Drucktasten (5)
drücken und das Getriebeteil abziehen.
Anschließend den Schlagbesen vom Getriebeteil abziehen.
Für beste Ergebnisse ...
• benutzen Sie eine breitere Schüssel anstelle
des Messbechers,
• Schlagbesen leicht schräg halten und im
Uhrzeigersinn bewegen.
Schlagsahne:
Maximal 400 ml gekühlte Sahne verwenden
(min. 30 % Fettgehalt, 4–8 °C).
Beginnen Sie mit einer niedrigen Geschwindigkeit (Stufe «1») und erhöhen Sie diese während des Schlagens langsam auf Stufe «15».
f) Nach Gebrauch die Drucktasten (5)
betätigen, um das Motorteil abzunehmen.
g) Oberteil abnehmen.
h) Messer vorsichtig herausnehmen.
i) Dann das Gut ausleeren. Der Stützdeckel
dient auch zum Verschließen des Arbeits-
behälters.
Rezeptbeispiel: Vanille-Honig-Pflaumen
(als Pfannkuchen-Füllung oder Brotaufstrich)
(verwenden Sie den Zerkleinerer (10) bei
Geschwindigkeit «turbo»)
Füllen Sie 60 g cremigen Honig und 50 g
Pflaumen in den Arbeitsbehälter (13) und
mixen Sie 10 Sekunden, fügen Sie dann 30 ml
Wasser (mit Vanille-Aroma) hinzu und mixen
Sie noch 3 Sekunden weiter.
D/E So verwenden Sie das
Multifunktions-Zubehör
Mit dem Multifunktions-Zubehör (15) können
Sie …
– zerkleinern und mixen (siehe Bildteil ‰)
– kneten (Teigmengen bis maximal 250 g
Mehl)
– schneiden und raspeln (siehe Bildteil
Â)
Eischnee:
Maximal 4 Eiweiße schlagen.
Beginnen Sie mit einer mittleren Geschwindigkeit (Stufe «7») und erhöhen Sie diese
während des Schlagens auf Stufe «15».
C So bedienen Sie Ihren
Zerkleinerer
Mit dem Zerkleinerer (10) können Sie Fleisch,
Käse, Zwiebeln, Kräuter, Knoblauch, Chilis
(mit Wasser), Karotten, Walnüsse, Mandeln,
Trockenpflaumen etc. perfekt hacken und
zerkleinern.
Verwenden Sie für das Zerkleinern harter Güter
(z.B. harter Käse) den Turbo-Schalter (4).
Bitte beachten: Extrem hartes Gut (z.B.
Eiswürfel, Muskatnüsse, Kaffeebohnen und
Getreide) darf nicht zerkleinert werden.
Vor dem Zerkleinern ...
• großes Gut in Stücke schneiden,
• Stiele und Nuss-Schalen entfernen,
• alle Knochen, Sehnen und Knorpelanteile
bei Fleisch entfernen.
Für beste Ergebnisse die in der Verarbeitungstabelle empfohlenen Geschwindigkeitseinstellungen beachten.
Zerkleinern (siehe Bildabschnitt „)
a) Vor dem Einsetzen des Messers (12) die
Kunststoffhülle vorsichtig entfernen.
Vorsicht: Das Messer ist sehr scharf! Nur
am Kunststoffschaft anfassen und auf die
Achse im Arbeitsbehälter (13) setzen.
Herunterdrücken und um 90° drehen.
Arbeitsbehälter immer auf den Stützdeckel
(14) setzen.
b) Das zu verarbeitende Gut einfüllen.
c) Oberteil (11) auf den Arbeitsbehälter
setzen.
d)
Das Motorteil (1) in das Oberteil (11)
stecken, bis es einrastet.
e) Motorteil mit Schalter (3) oder (4) einschal-
ten. Halten Sie während der Verarbeitung
das Motorteil mit der einen, den Zerklei-
nerer mit der anderen Hand fest. Den Zer-
kleinerer pro Anwendung maximal 2 Minu-
ten lang benutzen.
Zerkleinern (siehe Bildabschnitt ‰)
Das Messer (20) eignet sich hervorragend zum
Hacken und Zerkleinern von Fleisch, Käse,
Zwiebeln, Kräutern, Knoblauch, Karotten,
Walnüssen, Mandeln etc.
Wählen Sie für das Zerkleinern harter Güter
(z.B. harter Käse) den Turbo-Schalter (4).
Bitte beachten: Dieses Gerät ist nicht für das
Zerkleinern von extrem hartem Gut (z.B.
Muskatnüsse, Kaffeebohnen oder Getreide)
geeignet.
Vor dem Zerkleinern ...
• großes Gut in Stücke schneiden,
• Kräuterstiele und Nuss-Schalen entfernen,
• alle Knochen, Sehnen und Knorpelanteile
bei Fleisch entfernen.
a) Vor dem Einsetzen des Messers (20) die
Kunststoffhülle vorsichtig entfernen.
Vorsicht: Das Messer ist sehr scharf.
Immer am Kunststoffschaft anfassen. Das
Messer auf die Achse im Arbeitsbehälter
(18) setzen und leicht drehen, damit es
einrastet. Arbeitsbehälter immer auf den
Stützdeckel (19) setzen.
b) Das zu verarbeitende Gut einfüllen.
c) Beim Aufsetzen des Deckels (17) muss
sich die Verriegelung (17c) rechts neben
dem Handgriff befinden. Dann den Deckel
im Uhrzeigersinn drehen, so dass die
Verriegelung hörbar über dem Handgriff
einrastet.
d) Motorteil (1) auf die Kupplung (17a) setzen
und einrasten lassen. Stopfer (16) in den
Einfüllschacht (17b) setzen.
e) Schalter (3) oder (4) betätigen und mit der
anderen Hand den Arbeitsbehälter fest-
halten.
f) Nach Gebrauch die Drucktasten (5)
betätigen, um das Motorteil abzunehmen.
Stopfer entnehmen.
g) Zum Abnehmen des Deckels die Verriege-
lung (17c) gedrückt halten und den Deckel
gegen den Uhrzeigersinn drehen, um ihn
zu lösen.
h) Messer zunächst etwas drehen, dann
vorsichtig herausnehmen. Anschließend
können Sie das verarbeitete Gut entneh-
men.
7
Page 8

Mixen leichter Teige
Sie können das Messer (20) auch für das
Mixen leichter Teige verwenden (z.B. Pfannkuchenteig oder Fertigmischungen für bis zu
250 g Mehl).
Bei Pfannkuchenteig, z.B, zuerst flüssige
Zutaten in den Arbeitsbehälter füllen, dann
Mehl und schließlich Eier hinzufügen. TurboSchalter (4) drücken und den Teig mixen, bis
er glatt ist.
Kneten von Teig
(Bildteil
‰ a–i gilt prinzipiell auch für die
Verwendung des Knetwerkzeugs.)
Das Knetwerkzeug (21) eignet sich hervorragend für das Kneten von unterschiedlichen
Teigsorten wie Hefe- oder Mürbteig (basierend
auf 250 g Mehl).
• Setzen Sie das Knetwerkzeug in den
Arbeitsbehälter (18) ein.
• Füllen Sie zuerst Mehl in den Arbeitsbehälter, dann die übrigen Zutaten außer Flüssigkeit.
• Flüssigkeit wird erst bei laufendem Motor
durch den Einfüllschacht hinzugefügt.
• Nach einer Knetzeit von einer Minute sollten
Sie das Motorteil für 10 Minuten abkühlen
lassen.
Hefeteig (für Pizza, Brot, Tarte-Boden)
Verwenden Sie maximal 250 g Mehl plus
Zutaten. Geschwindigkeit «15», maximale
Knetzeit: 1 Minute.
Füllen Sie zuerst Mehl in den Arbeitsbehälter,
dann die übrigen Zutaten außer Flüssigkeit.
Flüssigkeit wird erst bei laufendem Motor
durch den Einfüllschacht hinzugefügt.
Mürbteig (für Kuchen, Quiche-Boden)
Verwenden Sie maximal 250 g Mehl plus
Zutaten. Geschwindigkeit «15», maximale
Knetzeit: 1 Minute.
Füllen Sie zuerst Mehl in den Arbeitsbehälter,
dann die übrigen Zutaten.
Verwenden Sie weder zu harte, noch zu
weiche Butter. Stellen Sie das Kneten ein,
wenn sich der Teig zu einem Ballen geformt
hat. Zu langes Kneten macht den Teig zu
weich.
f) Nach Gebrauch die Drucktasten (5) betä-
tigen, um das Motorteil abzunehmen.
Stopfer entnehmen.
g) Zum Abnehmen des Deckels die Verriege-
lung (17c) gedrückt halten und den Deckel
gegen den Uhrzeigersinn drehen, um ihn
zu lösen.
h) Entnehmen Sie zuerst den Einsatzträger,
dann das verarbeitete Gut. Zum Entnehmen der Einsätze (22a – 22c) aus dem
Einsatzträger, drücken Sie das nach unten
ragende Ende des Einsatzes nach oben.
Reinigung
Das Motorteil (1) und das Getriebeteil für den
Schlagbesen (7) nur mit einem feuchten Tuch
abwischen. Der Deckel (17) kann unter
fließendem Wasser gereinigt werden, darf
aber weder in Wasser getaucht noch im
Geschirrspüler gereinigt werden. Alle anderen
Teile sind spülmaschinengeeignet.
Bei farbstoffreichen Gütern (z.B. Karotten)
können die Kunststoffteile des Gerätes
beschlagen und sich verfärben. Wischen Sie
diese Teile mit Speiseöl ab, bevor Sie sie
spülen.
Zubehör
(beim Braun Kundendienst erhältlich, jedoch
nicht in allen Ländern)
• BC: Zerkleinerer, ideal für das Zerkleinern
großer Mengen sowie das Zubereiten von
Shakes, leichten Teigen und das Zerkleinern
von Eiswürfeln.
• Wandhalter
Änderungen vorbehalten.
Das Gerät darf am Ende seiner
Lebensdauer nicht mit dem Hausmüll
entsorgt werden. Die Entsorgung kann
über den Braun Kundendienst oder
lokal verfügbare Rückgabe- und Sammelstellen erfolgen.
Schneid-/Raspelzubehör (siehe Bildteil
Mit dem Schneideinsatz (22a) können Sie z.B.
Gurken, Zwiebeln, Pilze, Äpfel, Möhren,
Radieschen, rohe Kartoffeln, Zucchini oder
Kohl schneiden.
Mit den Raspeleinsätzen (22b, 22c) können
Sie z.B. Äpfel, Möhren, rohe Kartoffeln, Rote
Beete, Kohl oder Käse (weich bis mittelhart)
raspeln.
a) Einsatz (22a–22c) in den Einsatzträger (22)
einsetzen und einrasten lassen. Einsatzträger auf die Achse im Arbeitsbehälter
setzen und drehen, damit er hörbar einrastet.
b) Beim Aufsetzen des Deckels (17) muss
sich die Verriegelung (17c) rechts neben
dem Handgriff befinden. Dann den Deckel
im Uhrzeigersinn drehen, so dass die
Verriegelung hörbar über dem Handgriff
einrastet.
c) Motorteil auf die Kupplung (17a) setzen
und einrasten lassen. Geschwindigkeit
entsprechend der Verarbeitungstabelle (j)
einstellen.
d) Das zu verarbeitende Gut in den Einfüll-
schacht geben. Nie bei laufendem Gerät in
den Einfüllschacht greifen. Immer den
Stopfer (16) verwenden.
e) Zum Einschalten des Motorteils Schalter
(3) oder (4) betätigen.
8
Â)
Garantie
Als Hersteller übernehmen wir für dieses
Gerät – nach Wahl des Käufers zusätzlich zu
den gesetzlichen Gewährleistungsansprüchen
gegen den Verkäufer – eine Garantie von
2 Jahren ab Kaufdatum. Innerhalb dieser
Garantiezeit beseitigen wir nach unserer Wahl
durch Reparatur oder Austausch des Gerätes
unentgeltlich alle Mängel, die auf Materialoder Herstellungsfehlern beruhen. Die
Garantie kann in allen Ländern in Anspruch
genommen werden, in denen dieses Braun
Gerät von uns autorisiert verkauft wird.
Von der Garantie sind ausgenommen:
Schäden durch unsachgemäßen Gebrauch,
normaler Verschleiß und Verbrauch sowie
Mängel, die den Wert oder die Gebrauchstauglichkeit des Gerätes nur unerheblich
beeinflussen. Bei Eingriffen durch nicht von
uns autorisierte Braun Kundendienstpartner
sowie bei Verwendung anderer als Original
Braun Ersatzteile erlischt die Garantie.
Im Garantiefall senden Sie das Gerät mit
Kaufbeleg bitte an einen autorisierten
Braun Kundendienstpartner. Die Anschrift
finden Sie unter www.service.braun.com
oder können Sie kostenlos unter
00800/27 28 64 63 erfragen.
Page 9

English
Our products are engineered to meet the
highest standards of quality, functionality and
design. We hope you thoroughly enjoy your
new Braun appliance.
Caution
Please read the use instructions carefully
and completely before using the appliance.
17b Filling tube
17c Lid interlock
18 Bowl
19 Anti-slip base (also serves as a lid)
20 Blade
21 Kneading tool
22 Tool holder
22a Slicing tool
22b Shredding tool (coarse)
22c Shredding tool (fine)
• The blades and the tools (22a-c) are
very sharp! To avoid injuries, please
handle blades with utmost care.
• This appliance is not intended for use by
children or persons with reduced physical,
sensory or mental capabilities, unless they
are given supervision by a person
responsible for their safety. In general, we
recommend that you keep the appliance out
of reach of children. Children should be
supervised to ensure that they do not play
with the appliance.
• The appliance is constructed to process
normal household quantities.
• Always unplug the appliance when it is left
unattended and before assembling, disassembling, cleaning or storing.
• Before operating, check whether your
voltage corresponds to the voltage printed
on the bottom of the appliance.
• Especially when operating the handblender
attachment in hot liquids, do not immerse
the blender shaft into – or remove it from the
liquid while the appliance is switched on.
• Do not hold the motor part (1) or the whisk
gearbox (7) under running water, nor
immerse them in water.
• The beaker (9) is not microwave-proof.
• Before operating the food preparation
attachment (15), make sure that the lid
interlock (17c) is properly clicked in and that
the pusher (16) is in place.
• Do not insert other tools than the pusher
(16) into the filling tube during processing.
• Always switch off the appliance before
removing the lid (17).
• The lid (17) can be cleaned under running
water, but do not immerse it in water, nor
clean it in a dishwasher.
• The bowl (18) is not microwave-proof.
• Braun electric appliances meet applicable
safety standards. Repairs or the replacement of the mains cord must only be done
by authorised service personnel. Faulty,
unqualified repair work may cause considerable hazards to the user.
Description
1 Motor part
2 Variable speed regulator
3 On/off switch for variable speed
4 Turbo switch
5 Release buttons
6 Blender shaft
7 Whisk gearbox
8 Whisk
9 Measuring beaker
10 Chopper attachment
11 Upper part
12 Blade
13 Chopper bowl
14 Anti-slip base/lid
15 Food preparation attachment (FP)
16 Pusher
17 Lid
17a Coupling for motor part
Setting the speed
When activating switch (3) the processing
speed corresponds to the setting of the
variable speed regulator (2). The higher
the speed setting, the faster and finer the
chopping results will be. For maximum
processing speed, press the turbo switch (4).
You may also use the turbo switch for instant
powerful pulses without having to manipulate
the speed regulator. Depending on your
application, we recommend the following
speed settings:
Handblender 1 ... turbo
Whisk 3 ... 15
Chopper attachment see speed tables in
picture section
Food preparation
attachment see speed tables in
picture sections $, %
„
A How to operate your
handblender
The handblender is perfectly suited for
preparing dips, sauces, soups, mayonnaise
and baby food as well as for mixing drinks
and milkshakes.
a) Insert the motor part (1) into the blender
shaft (6) until it locks.
b) Introduce the handblender vertically into
the vessel, then press switch (3) or turbo
switch (4).
c) To release the blender shaft after use,
press buttons (5) and pull it off.
You can operate the handblender in the
measuring beaker (9) and just as well in any
other vessel. When blending directly in the
saucepan while cooking, take the pan from
the stove first to protect the appliance from
overheating.
Recipe example: Mayonnaise
200 – 250 ml oil,
1 egg (yolk and white),
1 tbsp. lemon juice or vinegar,
salt and pepper to taste
Put all ingredients into the beaker according
to the a.m. order. Introduce the handblender
to the base of the beaker. Pressing the turbo
switch (4) keep the handblender in this
position until the oil emulsifies. Then, without
switching off, slowly move it up and down
until the mayonnaise is well combined.
B How to operate your whisk
Use the whisk (7) only for whipping cream,
beating egg whites and mixing sponges and
ready-mix desserts:
a) Insert the whisk (8) into the whisk gearbox
(7) then insert the motor part (1) into the
gearbox until it locks.
b) Place the whisk in a vessel and only then,
press switch (3)‚ to operate it.
c) To release, press buttons (5) and pull off
the gearbox. Then pull the whisk out of the
gearbox.
9
Page 10

For best results ...
• use a wide bowl rather than the beaker,
• move the whisk clockwise, holding it slightly
inclined.
– kneading dough (based on 250 g flour
maximum)
– slicing and shredding (see picture
section
%)
Whipped cream:
Only whip up to 400 ml chilled cream (min.
30 % fat content, 4 – 8 °C). Start with a low
speed setting «1» and while whipping,
increase the speed to setting «15».
Egg snow:
Only whip up to 4 egg whites. Start with a
medium speed setting «7» and while beating,
increase the speed to setting «15».
C How to operate your chopper
attachment
The chopper (10) is perfectly suited for
chopping meat, cheese, onions, herbs,
garlic, chillies (with water) carrots, walnuts,
hazelnuts, almonds, prunes etc. When
chopping hard goods (e.g. hard cheese),
use the turbo switch (4).
N.B. Do not chop extremely hard food, such
as ice cubes, nutmeg, coffee beans or grains.
Before chopping ...
• pre-cut meat, cheese, onions, garlic,
carrots, chillies,
• remove stalks from herbs, un-shell nuts,
• remove bones, tendons and gristle from
meat.
For best results, please refer to the speed
settings recommended in the processing
table.
Chopping (see picture section „)
a) Carefully remove the plastic cover from
the blade (12). Caution: the blade is very
sharp! Always hold it by the upper plastic
part. Place the blade on the centre pin of
the chopper bowl (13) and give it a turn to
lock into place. Always place the bowl on
the anti-slip base (14).
b) Place the food in the chopper bowl.
c) Put the upper part (11) on the chopper
bowl.
d) Insert the motor part (1) into the upper part
(11) until it locks into place.
e) Press switch (3) or (4) to operate the chop-
per. During processing, hold the motor
part with one hand and the chopper bowl
with the other. Do not use the chopper for
longer than 2 minutes.
f) After use, press the release buttons (5) to
remove the motor part.
g) Then remove the upper part.
h) Carefully take out the blade.
i) Remove the processed food from the
chopper bowl. The anti-slip base (14) also
serves as a lid for the chopper bowl.
Recipe example: Vanilla-Honey-Prunes
(as a pancake stuffing or spread)
(use the chopper attachment (10), speed
«turbo»)
Fill 60 g creamy honey and 50 g prunes into
the chopper bowl and chop 10 seconds, then
add 30 ml water (vanilla-flavoured) and
resume chopping for 3 seconds.
D/E How to operate your food
preparation attachment
You can use the food preparation attachment
(15) for:
– chopping and blending (see picture
section $)
10
Chopping (see picture section $)
The blade (20) is perfectly suited for chopping
meat, cheese, onions, herbs, garlic, carrots,
walnuts, hazelnuts, almonds etc.
For chopping hard goods, use the turbo
switch (4).
Do not chop extremely hard food, such as
nutmeg, coffee beans and grains.
Before chopping …
• pre-cut meat, cheese, onions, garlic,
carrots, chilies,
• remove stalks from herbs, un-shell nuts,
• remove bones, tendons and gristle from
meat.
a) Carefully remove the plastic cover from the
blade (20). Caution: the blade is very
sharp! Always hold it by the upper plastic
part. Place the blade on the centre pin of
the bowl (18) and give it a turn to lock into
place. Always place the bowl on the antislip
base (19).
b) Place the food in the chopper bowl.
c) Attach the lid (17) onto the bowl with the
interlock (17c) positioned next to the bowl
handle. To lock the lid, turn it clockwise so
that the interlock engages with a «click»
above the handle.
d) Insert the motor part (1) into the coupling
(17a) until it locks. Make sure the pusher is
in place.
e) To operate, press switch (3) or (4) on the
motor part and take hold of the bowl with
your other hand.
f) After use, press the release buttons (5) to
remove the motor part. Remove the
pusher.
g) Pressing the lid interlock (17c), turn the lid
(17) counter-clockwise to unlatch it and lift
it up.
h) Carefully take out the blade by turning and
pulling it, before removing the processed
food.
Mixing light dough
Using the blade (20), you may also mix light
dough like a pancake batter or a cake mixture
based on up to 250 g fl our. For a pancake
batter, for instance, first pour liquids into the
bowl, then add flour and finally eggs. Pressing
the turbo switch (4) and mix the batter until
smooth.
Kneading dough
(Picture section $ a–i also applies for the use
of the kneading tool.)
The kneading tool (21) is ideally suited for
kneading different dough types like yeast
dough or pastry (based on 250 g flour).
• Place the kneading tool into the food
processor bowl (18).
• First fill the flour into the food processor
bowl, then add the other ingredients except
liquids.
• Then add liquids through the filling tube
while the motor is running.
• After 1-minute kneading time, please allow
the motor part to cool down for 10 minutes.
Yeast dough (for pizza, bread, cake)
Max. 250 g flour plus ingredients. Speed «15»,
maximum kneading time: 1 minute.
First fill the flour into the food processor bowl,
Page 11

then add the other ingredients except liquids.
Add liquids through the filling tube while the
motor is running.
Pastry (for quiche, cake)
Max. 250 g flour plus ingredients. Speed «15»,
maximum kneading time: 1 minute.
First fill the flour into the food processor bowl,
then add the other ingredients.
For good results, do not use warm, soft butter.
Stop kneading shortly after dough has formed
a ball. Dough will become too soft from
excessive kneading.
Slicing / shredding (see picture section
Using the slicing tool (22a), you can slice e.g.
cucumbers, onions, mushrooms, apples,
carrots, radishes, raw potatoes, courgettes,
cabbage. Using the shredding tools (22b-c),
you can shred e.g. apples, carrots, raw
potatoes, beetroot, cabbage, cheese (soft to
medium).
a) Place a tool (22a-c) into the tool holder (22)
and snap into position. Place the tool
holder on the centre pin of the bowl and
give it a turn to lock into place.
b) Attach the lid (17) onto the bowl with the
interlock (17c) positioned next to the bowl
handle. To lock the lid, turn it clockwise so
that the interlock engages with a «click»
above the handle.
c) Insert the motor part into the coupling until
it locks. Select speed settings according to
recommendations in picture (j).
d) Fill the food to be processed into the filling
tube. Never reach into the filling tube when
the appliance is switched on. Always use
the pusher (16) to feed in food.
e) Press switch (3) or (4) on the motor part to
operate.
f) After use, press buttons (5) to remove the
motor part.
g) Pressing the lid interlock (17c), turn the lid
counter-clockwise to unlatch it and lift it
up.
h) Take out the tool holder before removing
the processed food. To remove the tool,
push it up at the end that protrudes at the
bottom of the tool holder.
%)
Guarantee
We grant a 2 year guarantee on the product
commencing on the date of purchase. Within
the guarantee period we will eliminate any
defects in the appliance resulting from faults
in materials or workmanship, free of charge
either by repairing or replacing the complete
appliance at our discretion.
This guarantee extends to every country
where this appliance is supplied by Braun or
its appointed distributor.
This guarantee does not cover: damage due
to improper use, normal wear or use as well
as defects that have a negligible effect on
the value or operation of the appliance.
The guarantee becomes void if repairs are
undertaken by unauthorised persons and if
original Braun parts are not used.
To obtain service within the guarantee period,
hand in or send the complete appliance with
your sales receipt to an authorised Braun
Customer Service Centre (address information
available online at www.service.braun.com).
For UK only:
This guarantee in no way affects your rights
under statutory law.
Cleaning the appliance
Clean the motor part (1) and the whisk
gearbox (7) with a damp cloth only. The lid
(17) can be cleaned under running water, but
do not immerse it in water, nor clean it in a
dishwasher. All other parts can be cleaned in
a dishwasher.
When processing foods with colour (e.g.
carrots), the plastic parts of the appliance may
become discoloured. Wipe these parts with
vegetable oil before cleaning them.
Accessories
(available at Braun Service Centres; however
not in every country)
• BC: Chopper attachment, perfectly suited
for chopping large quantities as well as for
preparing shakes, making light doughs and
crushing ice cubes.
• Wall mount
Subject to change without notice.
Please do not dispose of the product in
the household waste at the end of its
useful life. Disposal can take place at a
Braun Service Centre or at appropriate
collection points provided in your country.
11
Page 12

Français
Nos produits sont conçus et fabriqués pour
satisfaire aux plus hautes exigences de
qualité, de fonctionnalité et de design.
Nous espèrons que votre nouveau préparateur
culinaire Braun vous apportera entière satisfaction.
Attention
Lisez le mode d’emploi attentivement et en
entier avant d’utiliser cet appareil.
• Les lames et les outils (22a-c) sont
•
• Cet appareil a été conçu pour la préparation
• Débranchez systématiquement l’appareil
• Avant de brancher l’appareil, bien vérifier
• Durant l’utilisation du mixeur dans des
• Ne pas passer le bloc moteur (1) ni le
• Le bol mesureur (9) ne peut être utilisé dans
• Avant d’utiliser le kit d’accessoires de
• Ne pas insérer d’autres instruments que le
• Toujours éteindre l’appareil avant de retirer
• Le couvercle (17) peut être nettoyé à l’eau
• Le bol (18) ne peut être utilisé dans un four
• Les appareils électriques Braun répondent
Description
1 Bloc moteur
2 Variateur de vitesses électronique
3 Interrupteur marche/arrêt pour utilisation
4 Touche turbo
5
6 Pied mixeur
7 Système d’entraînement du fouet
8 Fouet métal
9 Bol mesureur
10 Hachoir
11 Entraîneur
12 Lame
13 Bol du hachoir
14 Socle anti-déparant
12
très coupants ! Pour ne pas vous
blesser, manipulez les lames avec
précaution.
Cet appareil n’est pas destiné à des enfants
ou à des personnes aux capacités
mentales, sensorielles et physiques réduites
à moins qu’elles ne soient sous la
surveillance d’un adulte responsable de leur
sécurité. Il convient de surveiller les enfants
pour s’assurer qu’ils ne jouent pas avec
l’appareil. Conserver hors de portée des
enfants.
de quantités domestiques classiques.
lorsque vous ne l’utilisez pas, et avant de
monter ou de démonter des accessoires, de
le nettoyer ou de le ranger.
que la tension correspond à celle indiquée
sous l’appareil (bloc moteur).
liquides chauds, ne pas immerger le pied
mixeur ou le retirer du liquide lorsque
l’appareil est en marche.
système d’entraînement du fouet (7) sous
l’eau, ni les plonger dans l’eau.
un four à micro-ondes.
préparation (15), vérifier que le couvercle
(17c) et le poussoir (16) sont bien en place
poussoir (16) et le tube de remplissage du
bol (17b) pendant l’utilisation.
le couvercle (17).
claire, mais ne pas l’immerger sous l’eau, ni
le laver au lave vaisselle.
à micro-ondes.
aux normes de sécurité en vigueur. Leur
réparation ou le remplacement du cordon
d’alimentation doivent être effectués
uniquement par les Centres de Service
Agréés Braun. Des réparations effectuées
par du personnel non qualifié peuvent
causer accidents ou blessures à l’utilisateur.
avec le variateur de vitesses
Bouton de déverrouillage des accessoires
15 Kit d’accessoires de préparation (FP)
16 Poussoir
17 Couvercle
17a Fixation pour bloc moteur
17b Tube pour remplissage du bol
17c Système de fermeture du couvercle
18 Bol
19 Base anti-dérapante (sert aussi de
couvercle)
20 Couteaux
21 Outil de pétrissage
22 Disque de soutien des accessoires
22a Accessoire pour émincer
22b Accessoire pour râper (épais)
22c Accessoire pour râper (fin)
Utilisation des vitesses
Lorsque vous appuyez sur la touche marche/
arrêt (3), la vitesse correspond à celle
sélectionnée avec le variateur de vitesses
électronique (2). Plus la vitesse sélectionnée
est élevée, plus les résultats sont rapides.
Cependant, la vitesse maximum ne peut être
atteinte qu’en appuyant sur la touche turbo
(4). Vous pouvez aussi utiliser la fonction
turbo pour utiliser le maximum de puissance
de manière instantanée sans avoir à faire
de changement sur le variateur de vitesses
électronique.
Selon le type d’utilisation, nous vous recommandons l’utilisation des vitesses suivantes :
Pied mixeur 1…turbo
Fouet métal 3…15
Hachoir se référer aux dessins
Kit d’accessoires se référer aux dessins
‰, Â
„
A Comment utiliser votre mixeur
Le mixeur est parfaitement adapté à la
préparation de sauces, soupes, mayonnaise,
aliments pour bébé, ainsi qu’à celle des
boissons mixées et milk-shakes:
a) Insérez le bloc moteur (1) dans le pied
mixeur (6) jusqu’à ce qu’il s’enclenche et
se verrouille.
b) Introduisez verticalement le mixeur dans le
récipient et ensuite seulement appuyez sur
la touche marche/arrêt (3) ou sur la touche
turbo (4).
c) Pour démonter l’accessoire pied mixeur,
appuyez sur le bouton (5) et retirez le pied
mixeur.
Vous pouvez utiliser le mixeur dans le bol
mesureur (9), aussi bien que dans d’autres
récipients. Si vous utilisez le mixeur directement dans une casserole pendant la cuisson,
retirez-la d’abord du feu pour protéger votre
mixeur de toute chaleur excessive.
Exemple de recette: Mayonnaise
200–250 ml d’huile
1 oeuf
1 cuillère à soupe de jus de citron ou vinaigre
Sel et poivre
Mettre tous les ingredients dans le bol
mesureur dans l’ordre mentionné ci-dessus.
Introduire le pied mixeur jusqu’au fond du bol,
le mettre en marche (utiliser la touche turbo
(4)), tenir le mixeur dans cette position jusqu’à
ce que l’huile se mélange au reste de la
préparation. Ensuite, sans arrêter le mixeur, le
bouger doucement de haut en bas jusqu’à ce
que tout soit bien mélangé et que la mayonnaise ait épaissi.
B Comment utiliser le fouet métal
Utilisez le fouet métal uniquement pour fouetter la crème, monter les blancs en neige, mixer
gâteaux, mousselines et desserts réalisés à
base de préparations:
Page 13

a) Insérez le fouet métal (8) dans le système
d’entraînement du fouet (7), puis insérez le
bloc moteur (1) dans le système d’entraînement jusqu’à ce qu’il s’enclenche.
b) Introduisez le fouet métal dans un récipient
et ensuite seulement appuyez sur la touche
marche/arrêt (3) pour le faire fonctionner.
c) Pour démonter l’accessoire fouet métal
après l’utilisation, appuyez sur le bouton
(5) et retirez le système d’entraînement.
Ensuite, retirez le fouet métal du système
d’entraînement.
Pour de meilleurs résultats ...
• ne pas utiliser le bol mesureur, mais un bol
plus grand,
• déplacer le fouet dans le sens des aiguilles
d’une montre en le maintenant légèrement
incliné.
Crème fouettée
Fouettez jusqu’à 400 ml de crème fraîche (min
30% de matière grasse, 4–8 °C) Commencez
à vitesse basse « 1 », puis, tout en fouettant,
augmentez la vitesse jusqu’à « 15 ».
Oeufs en neige
Fouettez jusqu’à 4 blancs d’oeufs à la fois.
Commencez à vitesse moyenne « 7 », puis,
tout en fouettant, augmentez la vitesse
jusqu’à « 15 ».
C Mode d’emploi de l’accessoire
hachoir
Le hachoir (10) convient parfaitement pour la
viande, le fromage, les oignons, les fines
herbes, l’ail, le piment (avec de l’eau), les
carottes, les noix, les noisettes, les amandes,
les pruneaux, etc.
Lorsque vous mixez des aliments durs
(fromages secs par exemple), utilisez le
bouton turbo (4).
N.B. : Ne pas hacher d’aliments extrêmement
durs, tels que glaçons, noix de muscade,
grains de café ou grains de blé.
Avant de hacher ...
• pré-découper la viande, le fromage, les
oignons, l’ail, les carottes, le piment,
• retirer la tige des fines herbes, écaler les
noix, les noisettes, etc.,
• retirer les os, les tendons et le cartilage de
la viande.
Pour de meilleurs résultats, regardez la vitesse
recommandée dans le guide d’utilisation.
Hacher (voir image de la section „)
a) Faire très attention en retirant l’étui en
plastique de la lame (12). Attention : La
lame est très coupante ! Toujours la tenir
par sa partie supérieure en plastique.
Placer la lame sur l’axe central du bol du
hachoir (13).
tourner de 90° pour la mettre en place.
Toujours placer le bol sur son socle anti-
dérapant (14).
b) Placer les aliments dans le bol du hachoir.
c)
Placer l’entraîneur (11) sur le bol du hachoir.
d)
Verrouiller le bloc moteur (1) sur l’entraîneur
(11).
e) Appuyer sur (3) ou (4) pour faire fonction-
ner le hachoir. Pendant le fonctionnement,
maintenir le moteur d’une main et le bol du
hachoir de l’autre. Ne pas utiliser le hachoir
plus de 2 minutes.
f) Après utilisation, appuyer sur le bouton (5)
pour enlever le bloc moteur.
g) Débrancher l’appareil et retirer l’entraîneur.
h) Sortir la lame avec le plus grand soin.
i) Retirer les aliments hachés du bol. Le
socle anti-dérapant sert également de cou-
vercle au bol du hachoir.
Appuyer sur la lame et la faire
Exemple de recette : Vanille-miel-pruneaux
(Utilisez le hachoir (10), vitesse : turbo)
Versez 60 g de miel et 50 g de pruneaux
dans le bol du hachoir et hachez pendant
10 secondes, puis ajoutez 30 ml d‘eau
(parfumée à la vanille) et hachez à nouveau
pendant 3 secondes.
D/E Comment utiliser le kit
d’accessoires de préparation
Vous pouvez utiliser l‘accessoire de préparation des aliments (15) pour :
– le broyage et le mélange (voir image de la
section ‰)
– le pétrissage (pâte à base de 250 g de
farine maximum)
– le découpage et le déchiquetage (voir
image de la section Â)
Hacher (voir image de la section ‰)
Les couteaux (20) sont tout à fait adaptés
pour hacher de la viande, du fromage, des
oignons, des herbes des carottes, des noix,
des amandes. Pour hacher des aliments durs
(exemple: grains de café et fromages à pâte
dure), utiliser la fonction turbo (4)
.
Remarque : Ne hachez pas des aliments
extrêmement durs, tels que noix de muscade,
grains de café et autres grains.
Avant de hacher …
• découper la viande, le fromage, les oignons,
les herbes, les carottes, les piments,
• enlever les tiges et dénoyauter les aliments,
• enlever les os, tendons et nerfs de la viande.
a) Enlever avec précaution le plastique des
couteaux (20). Attention : les lames sont
très tranchantes! Manipulez-les toujours en
tenant la partie supérieure en plastique.
Placer les couteaux sur l’axe central du bol
(18) et faites-les pivoter jusqu’à ce qu’il
s’enclenche. Toujours placer le bol sur son
socle anti-dérapant (19).
b) Mettez les aliments dans le bol.
c) Placer le couvercle (17) sur le bol en
plaçant le système de fermeture près de la
poignée du bol (17c). Pour fermer le
couvercle du bol, le tourner dans le sens
des aiguilles d’une montre, jusqu’à
entendre un « clic » de fermeture au niveau
de la poignée.
d) Insérer le bloc moteur (1) dans le système
de fixation pour bloc moteur jusqu’à ce
qu’il s’enclenche (17a). S’assurer que le
poussoir (16) est bien en place.
e) Appuyer sur le bouton (3) ou (4) du bloc
moteur pour la mise en marche. Maintenir
le bloc moteur avec une main et le bol
avec l’autre.
f) Après utilisation, appuyer sur le bouton (5)
pour enlever le bloc moteur. Enlever le
poussoir.
g) Appuyer sur le système de fermeture (17c)
pour enlever le couvercle. Vous pouvez
ensuite enlever le couvercle (17) en le
tournant dans le sens inverse des aiguilles
d’une montre pour le dévérouiller et
l’enlever.
h) Retirer le couteau avec précaution en les
tournant et les tirant, avant d’enlever les
aliments préparés.
Mixer des pâtes légères
En utilisant les couteaux (20), vous pouvez
mélanger des pâtes légères comme la pâte à
crêpes ou pâte à gateaux ayant une base de
250 g de farine.
Pour la pâte à crêpes par exemple, verser
d’abord les liquides dans le bol, ajouter
ensuite la farine, puis les oeufs. Appuyer sur
13
Page 14

la touche turbo (4), mélanger la pâte jusqu’à
ce qu’elle soit lisse.
Pétrissage de la pâte
(Les images a–i de la section ‰ illustrent
également l’utilisation de l’outil de pétrissage.)
L’outil de pétrissage (21) est idéal pour pétrir
différents types de pâtes tels que la pâte
levée ou la pâte feuilletée (à base de 250 g de
farine).
• Placez l’outil de pétrissage dans le bol (18).
• Versez en premier les ingrédients secs dans
le bol.
• Ajoutez uniquement les liquides par le biais
du tube de remplissage lorsque le moteur
est en marche.
• Après une durée de pétrissage de 1 minute,
laissez le moteur refroidir pendant 10 minutes.
Pâte levée (pour les pizzas, le pain, les
gâteaux)
250 g de farine max. plus les ingrédients.
Vitesse « 15 », durée de pétrissage maximum :
1 minute.
Versez d’abord la farine dans le bol du robot
de cuisine, puis ajoutez les autres ingrédients,
sauf les liquides. Ajoutez les liquides par le
biais du tube de remplissage lorsque le
moteur est en marche.
Pâte feuilletée (pour les quiches, les gâteaux)
250 g de farine max. plus les ingrédients.
Vitesse « 15 », durée de pétrissage maximum :
1 minute.
Versez d’abord la farine dans le bol du robot
de cuisine, puis ajoutez les autres ingrédients.
Pour obtenir de bons résultats, n’utilisez pas
de beurre chaud ou mou. Cessez de pétrir la
pâte dès que vous êtes parvenu à former une
boule. Si vous pétrissez trop la pâte, elle
devient trop molle.
Emincer / Râper (voir image de la section Â)
En utilisant l’accessoire pour émincer (22a), vous
pouvez couper des concombres, des oignons,
des champignons, des pommes, des carottes,
des radis, des courgettes et des choux.
En utilisant l’accessoires pour râper (22b,
22c), vous pouvez râper des concombres, des
oignons, des champignons, des pommes, des
carottes, des radis, des courgettes, du
fromage et des choux.
a) Placer l’accessoire (22a – 22c) dans le
disque de soutien des accessoires (22)
jusqu’au clic. Le placer sur l’axe central du
bol et le faire pivoter jusqu’à sa mise en
place.
b) Placer le couvercle (17) sur le bol en
plaçant le système de fermeture près de
la poignée du bol (17c). Pour fermer le
couvercle du bol, le tourner dans le sens
des aiguilles d’une montre, jusqu’à entendre un « clic » de fermeture au niveau de la
poignée.
c) Insérer le bloc moteur sur le système
d’entraînement (17a) jusqu’à ce qu’il
s’enclenche. Sélectionner les vitesses en
suivant les recommandations données dans.
d) Remplir le bol avec les aliments à hacher.
Ne pas remplir le bol pendant le fonctionnement de l’appareil. Toujours utiliser le
poussoir (16) pour remplir le bol de
nourriture.
e) Appuyer sur le bouton (3) ou (4) sur le bloc
moteur pour mettre en fonctionnement.
f) Après utilisation, appuyer sur le bouton (5)
pour enlever le bloc moteur. Enlever le
poussoir.
g) Appuyer sur le système de fermeture (17c)
pour enlever le couvercle. Vous pouvez
ensuite enlever le couvercle en le tournant
14
dans le sens inverse des aiguilles d’une
montre pour le dévérouiller.
h) Enlever le disque de soutien des accessoires
avant d’enlever les aliments préparés. Pour
enlever les accessoires pour émincer ou
râper du disque de soutien, appuyer sur le
haut du niveau de la languette métallique à
l’extrémité de l’accessoire.
Nettoyage
Nettoyer le bloc moteur (1) et le système
d’entraînement du fouet (7) avec un tissu
humide seulement. Le couvercle (17) peut être
rincé sous l’eau du robinet, mais ne doit pas
être plongé dans l’eau ou nettoyé au lavevaisselle.
Tous les autres éléments peuvent être
nettoyés au lave-vaisselle. Si vous utilisez
le mixeur pour la préparation de légumes
colorés (ex : les carottes), les parties en plastique de l’appareil peuvent s’être colorées.
Dans ce cas, enduisez ces parties avec de
l’huile végétale avant de les mettre dans le
lave-vaisselle.
Accessoires
(disponibles auprès des Centres de service
Braun, mais pas dans tous les pays)
• BC : Bol hachoir, parfaitement adapté pour
hacher de grandes quantités, pour préparer
des milk-shakes, des pâtes légères et piler
de la glace.
• Support mural
Sujet à modification sans préavis.
A la fin de vie de votre appareil, veuillez
ne pas le jeter avec vos déchets
ménagers. Remettez-le à votre Centre
Service agréé Braun ou déposez-le
dans des sites de récupération appropriés
conformément aux réglementations locales
ou nationales en vigueur.
Garantie
Nous accordons une garantie de 2 ans sur ce
produit, à partir de la date d‘achat.
Pendant la durée de la garantie, Braun
prendra gratuitement à sa charge la réparation
des vices de fabrication ou de matière en
se réservant le droit de décider si certaines
pièces doivent être réparées ou si l‘appareil
lui-même doit être échangé.
Cette garantie s‘étend à tous les pays où cet
appareil est commercialisé par Braun ou son
distributeur exclusif.
Cette garantie ne couvre pas : les dommages
occasionnés par une utilisation inadéquate
et l‘usure normale. Cette garantie devient
caduque si des réparations ont été effectuées
par des personnes non agréées par Braun et
si des pièces de rechange ne provenant pas
de Braun ont été utilisées.
Pour toute réclamation intervenant pendant la
période de garantie, retournez ou rapportez
l‘appareil ainsi que l‘attestation de garantie à
votre revendeur ou à un Centre Service Agréé
Braun.
Se référez à www.service.braun.com ou
appelez 08.10.30.97.80 pour connaitre le
Centre Service Agrée Braun le plus proche
de chez vous.
Clause spéciale pour la France
Outre la garantie contractuelle exposée cidessus, nos clients bénéficient de la garantie
légale des vices cachés prévue aux articles
1641 et suivants du Code civil.
Page 15

Polski
wyprodukowane tak, aby spełniać wszelkie
wymagania dotyczące jakości, funkcjonalności
i estetyki. Gratulujemy udanego zakupu i
życzymy dużo zadowolenia z użytkowania
nowego urządzenia.
Uwaga
Proszę uważnie i całkowicie przeczytać
instrukcję obsługi przed rozpoczęciem
używania urządzenia.
• Noże i narzędzia (22a–c) są bardzo
•
•
•
•
•
•
•
•
•
•
•
•
•
Opis
1 Blok silnika
2 Pokrętło płynnej regulacji prędkości
3 Przycisk włączony/wyłączony
4 Przycisk turbo
5 Przyciski zwalniające
6 Przystawka miksująca
7 Przekładnia przystawki ubijającej
8 Przystawka ubijająca
9 Pojemnik do miksowania
ostre! Aby uniknąć obrażeń, proszę
obchodzić się z nimi uważnie.
Urzàdzenie to nie mo˝e byç u˝ywane przez
dzieci lub osoby fizycznie lub umys∏owo
upoÊledzone, jeÊli nie znajdujà si´ one
pod nadzorem osoby odpowiedzialnej za
ich bezpieczeƒstwo. Zalecamy
przechowywaç urzàdzenie w miejscu
niedost´pnym dla dzieci. Dzieci powinny
byç nadzorowane podczas u˝ywania
urzàdzenia w celu zapewnienia
odpowiedniego bezpieczeƒstwa.
To urządzenie zostało stworzone wyłącznie
do użytku domowego.
Zawsze wyłączaj urządzenie, gdy jest pozostawione bez nadzoru, jak również podczas
montażu, demontażu lub w trakcie przechowywania.
Przed włączeniem do sieci należy sprawdzić, czy podane na urządzeniu napięcie
znamionowe jest zgodne z napięciem
w sieci.
Gdy urządzenie jest włączone, nie wprowadzaj i nie wyjmuj przystawek miksera
z płynów, szczególnie, gdy płyn jest gorący.
Nie wprowadzaj bloku silnika (1), ani przekładni przystawki ubijającej (7) pod strumień
wody, ani nie zanurzaj ich w wodzie.
Pojemnik do miksowania i odmierzania ze
szczelną pokrywą (9) nie może być używany
w kuchenkach mikrofalowych.
Przed użyciem przystawki siekającej (15)
upewnij się, że zamknięcie (17c) jest prawidłowo umiejscowione oraz, że popychacz
(16) jest prawidłowo umieszczony.
Podczas pracy, nie umieszczaj innych akcesoriów oprócz popychacza (16) w otworze
wprowadzającym.
Zawsze wyłączaj urządzenie przed zdjęciem
pokrywy przystawki siekającej (17).
Pokrywa przystawki siekającej (17) może
być czyszczona pod strumieniem wody, ale
nie wolno zanurzać jej w wodzie lub czyścić
w zmywarce do naczyń.
Pojemnik przystawki siekającej (18) nie
może być używany w kuchenkach mikrofalowych.
Urządzenia elektryczne Braun spełniają
standardy związane z bezpieczeństwem.
Naprawianie lub wymiana przewodu
zasilającego może być przeprowadzona
jedynie przez autoryzowany serwis.
Naprawa wykonana przez niewykwalifikowane osoby może doprowadzić do
porażenia prądem użytkownika.
Rozdrabniacz
10
11 Górna cz´Êç rozdrabniacza
12 Nó˝
13 Naczynie rozdrabniacza
14 Podstawka antypoÊlizgowa/
przykrywka
15 Przystawka siekająca (FP)
16 Popychacz
17 Pokrywa pojemnika przystawki
siekającej
17a Miejsce przyłączenia bloku silnika
17b Otwór do wprowadzania składników
17c Zamknięcie pokrywy przystawki
18 Pojemnik przystawki siekającej
19 Gumowana podstawa pojemnika
przystawki siekającej
20 Ostrze
21 Narzędzie do ugniatania ciasta
22 Baza do montowania tarcz
22a Przystawka do krojenia w plasterki
22b Przystawka szatkujàca (grube
kawa∏ki)
22c Przystawka szatkujàca (drobne
kawa∏ki)
Ustawianie prędkości
Po przyciśnięciu przycisku (3), prędkość pracy
urządzenia odpowiada ustawieniu pokrętła
płynnej regulacji prędkości (2). Im większa
prędkość, tym szybsze rezultaty.
W celu osiągnięcia maksymalnej prędkości
pracy, przyciśnij przycisk turbo (4). Możesz
także używać przycisku turbo dla chwilowej
pracy pulsacyjnej, bez potrzeby regulacji
prędkości.
W zależności od zastosowania, rekomendujemy następujące ustawienia prędkości:
Przystawka miksująca 1... turbo
Przystawka ubijająca 3... 15
Rozdrabniacz w tabeli prędkości na
rysunkach sekcji
Przystawka
siekającazobacz w tabeli prędkości na
rysunkach sekcji
„
‰, Â
A Jak używać przystawki
miksującej
Przystawka miksująca doskonale nadaje się
do przygotowywania dipów, sosów, zup,
majonezu i pokarmu dla dzieci jak również do
mieszania napojów i koktajli mlecznych:
a) Nałóż blok silnika (1) na przystawkę
miksującą (6) do usłyszenia kliknięcia.
b) Wprowadź pionowo urządzenie z założoną
przystawką miksującą do naczynia, a
następnie naciśnij przycisk (3) lub przycisk
turbo (4).
c) Aby po użyciu zdjąć przystawkę miksującą
z bloku silnika naciśnij jednocześnie z obu
stron przyciski (5) i zdejmij przystawkę.
Możesz używać przystawki miksującej
w pojemniku do miksowania (9), jak również
w każdym innym naczyniu. Gdy używasz
przystawki miksującej bezpośrednio w rondlu
podczas gotowania, zdejmij najpierw rondel
z palnika celem zabezpieczenia urządzenia
przed wysoką temperaturą.
Przykłady przepisów: Majonez
200-250 ml oleju,
1 jajko całe,
1 łyżeczka soku z cytryny lub octu,
sól i pieprz do smaku
Umieść wszystkie składniki w pojemniku do
miksowania w kolejności pokazanej powyżej.
Umieść urządzenie z założoną przystawką
15
Page 16

miksującą w pojemniku. Naciskając przycisk
turbo (4), trzymaj mikser pionowo do momentu,
aż warstwa oleju zniknie. Następnie, bez
wyłączania urządzenia, powoli wykonuj
mikserem ruchy do góry i do dołu, do momentu
w którym majonez będzie posiadał klarowną
konsystencję.
B Jak używać przystawki
ubijającej
Możesz używać przystawki ubijającej do
przygotowania kremu, ubijania piany z białek
jaj oraz do mieszania biszkoptu i gotowych
deserów:
a) Umieść przystawkę ubijającą (8) w prze-
kładni przystawki ubijającej (7), a następnie
całość umieść w bloku silnika (1) do
usłyszenia kliknięcia.
b) Umieść przystawkę ubijającą w naczyniu i
dopiero wtedy naciśnij przycisk (3) celem
rozpoczęcia pracy.
c) Aby zdjąć przystawkę naciśnij z obu stron
przyciski (5).
Dla osiągnięcia najlepszych rezultatów ...
używaj szerokiej miski zamiast pojemnika do
•
miksowania,
wykonuj urządzeniem ruchy koliste zgodnie
•
z ruchem wskazówek zegara, trzymając je
lekko pochylone.
Ubijanie kremu:
Ubijaj maksymalnie 400 ml chłodnego kremu
(min. 30 % tłuszczu, 4 – 8 °C)
Rozpocznij pracę na niskiej prędkości «1»
i podczas ubijania zwiększaj prędkość do
ustawienia «15».
Ubijanie piany z jajek:
Ubijaj maksymalnie do 4 białek jaj.
Rozpocznij pracę na średniej prędkości «7»
i podczas ubijania zwiększaj prędkość do
ustawienia «15».
C Obs∏uga rozdrabniacza
Rozdrabniacz doskonale nadaje si´ do
siekania mi´sa, sera, cebuli, zió∏, czosnku,
chili (z wodà), marchwi, orzechów w∏oskich,
orzechów laskowych, migda∏ów, suszonych
Êliwek itp.
Gdy siekasz twardy pokarm (np. twardy ser)
u˝yj prze∏àcznika turbo (4).
Uwaga: Nie wolno rozdrabniaç wyjàtkowo
twardej ˝ywnoÊci, takiej jak kostki lodu,
ga∏ka muszkato∏owa, ziarna kawy czy ziarna
zbó˝.
Przed przystàpieniem do rozdrabniania ...
wst´pnie pokroiç mi´so, ser, cebul´,
•
czosnek, marchew
usunàç ∏odygi zió∏ i wy∏uskaç orzechy
•
z mi´sa usunàç koÊci, Êci´gna i chrzàstki.
•
Dla osignicia najlepszych rezultatów, uywaj
prdkoci rekomendowanych w tej instrukcji (j).
Rozdrabnianie (patrz rysunki w sekcji „)
a) Ostro˝nie zdejmowaç plastikowà os∏on´
z no˝a (12). Uwaga: Nó˝ (12) jest bardzo
ostry! Nale˝y chwytaç tylko za górnà,
plastikowà cz´Êç. Za∏o˝yç nó˝ na bolec
znajdujàcy si´ na Êrodku naczynia rozdrabniacza (13). Nacisnàç nó˝ i obróciç o 90°
a˝ si´ zablokuje. Naczynie rozdrabniacza
stawiaç zawsze na podstawce antypoÊlizgowej (14).
b) UmieÊciç ˝ywnoÊç w naczyniu rozdra-
bniacza.
16
c) Za∏o˝yç górnà cz´Êç (11) na naczynie
rozdrabniacza.
d) Na górnà cz´Êç rozdrabniacza (11)
na∏o˝yç blok silnika (1) i nacisnàç a˝ si´
zablokuje.
e) Nacisnàç wy∏àcznik (3) lub (4), aby
w∏àczyç rozdrabniacz. Podczas siekania
jednà r´kà trzymaç blok silnika, a drugà
naczynie rozdrabniacza. Nie w∏àczaç
rozdrabniacza na d∏u˝ej ni˝ 2 minuty.
f) Po użyciu, naciśnij jednocześnie przyciski
(5) celem zdjęcia bloku silnika.
g) Nast´pnie zdjàç górnà cz´Êç rozdrabnia-
cza.
h) Ostro˝nie wyjàç nó˝.
i) Podstawka antypoÊlizgowa s∏u˝y równie˝
do szczelnego zamykania naczynia.
Przykładowy przepis: Wanilia-Miód-Suszone
śliwki
(jako nadzienie do naleśników lub krem)
(użyj przystawki do siekania (10), prędkość:
«turbo»)
Do pojemnika wlej 60 g płynnego miodu i 50 g
suszonych śliwek i siekaj przez 10 sekund,
potem dodaj 30 ml wody (z dodatkiem wanilii) i
wznów siekanie na 3 sekundy.
D/E Jak używać przystawki
siekającej
Przystawki do przygotowywania jedzenia (15)
możesz użyć do:
– siekania i mieszania (patrz rysunki w
sekcji ‰)
– ugniatania (ciasto maksymalnie z 250 g
mąki)
– krojenia i rozdrabniania (patrz rysunki w
sekcji
Â)
Siekanie (patrz rysunki w sekcji ‰)
Ostrze (20) doskonale nadaje się do siekania
mięsa, sera, cebuli, ziół, czosnku, marchwi,
orzechów ziemnych, orzechów laskowych,
migdałów etc. Do siekania twardych produktów, używaj przycisku turbo (4).
Nie siekaj wyjątkowo twardych produktów
takich jak gałka muszkatołowa, ziarna kawy
czy ziarna zbóż.
Przed siekaniem ...
podziel na mniejsze kawałki mięso, ser,
•
cebulę, czosnek, marchew, chili,
usuń łodygi z ziół, skorupki orzechów,
•
usuń kości, ścięgna i chrząstki z mięsa.
•
a) Ostrożnie zdejmij plastikową ochronę
ostrza (20). Uwaga: ostrze jest bardzo
ostre! Zawsze trzymaj je za część
plastikową. Umieść ostrze na bolcu w
centralnej części pojemnika (18) i obróć
ostrze, aż zaskoczy na bolcu. Pojemnik
umieszczaj zawsze na gumowanej
podstawie (19).
b) Umieść składniki w pojemniku.
c) Załóż pokrywę (17) na pojemnik tak, aby
zamkniecie pokrywy (17c) było umieszc-
zone przy rączce pojemnika. Aby
zatrzasnąć pokrywę, obróć ją zgodnie z
ruchem wskazówek zegara, do momentu
usłyszenia kliknięcia w okolicach rączki.
d) Załóż blok silnika (1) na miejsce do tego
przeznaczone (17a) do usłyszenia
kliknięcia. Upewnij się, że popychacz (16)
jest wprowadzony do otworu (17b).
e) Aby rozpocząć pracę, naciśnij przycisk (3)
lub (4) na bloku silnika i trzymaj pojemnik
przystawki siekającej drugą ręką.
f) Po użyciu, naciśnij jednocześnie przyciski
(5), aby zdjąć blok silnika. Wyjmij popy-
chacz.
Page 17

g) Naciskając zamknięcie (17c), obróć
pokrywę (17) w kierunku przeciwnym do
ruchu wskazówek zegara. Zdejmij pokrywę.
h) Wyjątkowo ostrożnie wyjmij ostrze poprzez
obrócenie i pociągniecie do siebie, przed
usunięciem przetworzonego pokarmu.
Mieszanie lekkiego ciasta
Używając ostrza (20), można także mieszać
lekkie ciasto, jak rzadkie ciasto naleśnikowe
lub ciasto do przygotowania ciastek o zawartości mąki nie większej niż 250 g.
W celu przygotowania ciasta na naleśniki,
najpierw wlej produkty płynne do pojemnika,
a dopiero potem dodaj mąkę i na końcu jajka.
Naciskając przycisk turbo (4), mieszaj ciasto
do uzyskania jednolitej masy.
Ugniatanie ciasta
(Rysunki z sekcji
wania narzędzia do ugniatania.)
Narzędzie do ugniatania (21) jest doskonałe
do ugniatania różnego rodzaju ciast, takich jak
ciasta drożdżowe, czy wypieki (z 250 g mąki).
Umieść narzędzie tnące w misie (18).
•
Wsyp suche składniki.
•
Płyny dodaj w trakcie pracy urządzenia.
•
Po jednej minucie ugniatania, pozwól
•
urządzeniu odpocząć na 10 minut.
Ciasto drożdżowe (pizza, chleb, ciasta)
Maksymalnie 250 g mąki plus reszta
składników. Szybkość 15, maksymalny czas
ugniatania: 1 minuta. Wsyp mąkę do misy,
następnie dodaj resztę składników poza
płynami. Płyny dodaj w trakcie pracy urządzenia.
‰ dotyczą również użytko-
e) Naciśnij przycisk (3) lub (4) na bloku
silnika.
f) Po użyciu, naciśnij jednocześnie przyciski
(5) celem zdjęcia bloku silnika.
g) Naciskając zamknięcie pokrywy (17c),
obróć pokrywę w kierunku przeciwnym do
ruchu wskazówek zegara. Zdejmij pokrywę.
h) Zdejmij bazę do montowania tarcz przed
wyjęciem przetworzonych składników.
Aby usunąć tarczę z bazy, popchnij tarczę
od spodu.
Czyszczenie urządzenia
Czyść blok silnika (1) oraz przekładnię
przystawki ubijającej (7) wyłącznie za pomocą
wilgotnej ściereczki. Pokrywa (17) może być
czyszczona pod strumieniem wody. Nie może
być jednak zanurzana całkowicie w wodzie,
ani czyszczona w zmywarce.
Gdy przygotowujesz posiłek używając składników barwiących (np. marchwi), plastikowe
elementy urządzenia mogą się odbarwić.
Przetrzyj te miejsca ściereczką nasączoną
olejem roślinnym przed przystąpieniem do
procesu czyszczenia.
Akcesoria
(dost´pne w serwisowych Braun)
BC: Urzàdzenie siekajàce, iIdealne do
•
siekania du˝ych iloÊci ale tak˝e dobre do
przygotowywania koktajli, delikatnych
klusek, kruszenia lodu.
Uchwyt Êcienny
•
Wypieki (tarty, ciasta)
Maksymalnie 250 g mąki plus reszta
składników. Szybkość 15, maksymalny czas
ugniatania: 1 minuta. Wsyp do misy mąkę,
potem dodaj pozostałe składniki. Użyj masła w
temperaturze pokojowej. Przestań ugniatać na
krótko po tym jak ciasto uformuje się na kształt
piłki. Od nadmiernego ugniatania ciasto stanie
się zbyt delikatne.
Krojenie na plastry / ścieranie (patrz rysunki
w sekcji
Używając tarczy do nó˝ krojàcy na plasterki
(22a), możesz kroić ogórki, cebulę, grzyby,
jabłka, marchew, rzodkiewkę, surowe ziemniaki, cukinię, kabaczki. Używając tarczy do
nó˝ Êcierajàcy (22b, 22c) możesz ścierać
jabłka, marchew, surowe ziemniaki, buraki,
kabaczki, ser (miękki lub o średniej twardości).
a) Umieść tarczę (22a–22c) w bazie do
b) Nałóż pokrywę (17) na pojemnik, z zam-
c) Umieść blok silnika w miejscu do tego
d) Wprowadź składniki, które mają zostać
Â)
montowania tarcz (22). Nałóż bazę do
montowania tarcz na bolcu w centalnej
części pojemnika i obróć bazę celem
poprawnego zamontowania.
knięciem (17c) umieszczonym w okolicy
rączki pojemnika. Aby zablokować
pokrywę, obróć ją zgodnie z ruchem
wskazówek zegara do usłyszenia kliknięcia
w okolicy rączki.
przeznaczonym. Wybierz odpowiednią
prędkość zgodnie z rekomendacjami
zawartymi w instrukcji (j).
przetworzone przez otwór do wprowadzania składników. Nigdy nie przepychaj
składników ręką przez otwór, gdy urządzenie jest włączone. Zawsze używaj
popychacza (16), celem przepychania
składników.
Zastrzega si´ prawo do dokonywania zmian.
Ten symbol oznacza, że zużytego
sprzętu nie można wyrzucać łącznie
z odpadami socjalnymi. Zużyty produkt
należy zostawić w jednym z punktów
zbiórki zużytego sprzętu elektrycznego
i elektronicznego. Odpowiednie przetworzenie
zużytego sprzętu zapobiega potencjalnym
negatywnym wpływom na środowisko lub
zdrowie ludzi, wynikającym z obecności
składników niebezpiecznych w sprzęcie.
Warunki gwarancji
1. Procter and Gamble DS Polska sp. z.o.o.
z siedzibà w Warszawie przy ul.
Zabranieckiej 20, gwarantuje sprawne
dzia∏anie sprz´tu w okresie 24 miesi´cy
od daty jego wydania Kupujàcemu.
Ujawnione w tym okresie wady b´dà
usuwane bezp∏atnie, przez wymieniony
przez firm´ Procter and Gamble DS
Polska sp. z.o.o. autoryzowany punkt
serwisowy, w terminie 14 dni od daty
dostarczenia sprz´tu do autoryzowanego
punktu serwisowego.
2. Kupujący może wysłać sprzęt do naprawy
do najbliżej znajdującego się
autoryzowanego punktu serwisowego
wymienionego przez firmę Procter and
Gamble DS Polska sp. z.o.o. lub
skorzystać z pośrednictwa sklepu, w
którym dokonał zakupu sprzętu. W takim
wypadku termin naprawy ulegnie
wydłużeniu o czas niezbędny do
dostarczenia i odbioru sprzętu.
17
Page 18

3. Kupujący powinien dostarczyć sprzęt w
oryginalnym opakowaniu fabrycznym
dodatkowo zabezpieczonym przed
uszkodzeniem. Uszkodzenia spowodowane
niedostatecznym zabezpieczeniem sprzętu
nie podlegają naprawom gwarancyjnym.
4. Niniejsza gwarancja jest ważna z
dokumentem zakupu i obowiązuje na
terytorium Rzeczypospolitej Polskiej.
5. Okres gwarancji przedłuża się o czas od
zgłoszenia wady lub uszkodzenia do
naprawy sprzętu.
6. Naprawa gwarancyjna nie obejmuje
czynności przewidzianych w instrukcji, do
wykonania których Kupujący zobowiązany
jest we własnym zakresie i na własny
koszt.
7. Ewentualne oczyszczenie sprzętu
dokonywane jest na koszt Kupującego
według cennika danego autoryzowanego
punktu serwisowego i nie będzie
traktowane jako naprawa gwarancyjna.
8. Gwarancją nie są objęte:
a) mechaniczne uszkodzenia sprzętu
spowodowane w czasie jego
użytkowania lub w czasie dostarczania
sprzętu do naprawy;
b) uszkodzenia i wady wynikłe na skutek:
– używania sprzętu do celów innych niż
osobisty użytek;
– niewłaściwego lub niezgodnego z
instrukcją użytkowania, konserwacji,
przechowywania lub instalacji;
– używania niewłaściwych materiałów
eksploatacyjnych;
– napraw dokonywanych przez
nieuprawnione osoby; stwierdzenie
faktu takiej naprawy lub
samowolnego otwarcia sprzętu
powoduje utratę gwarancji;
– przeróbek, zmian konstrukcyjnych lub
używania do napraw nieoryginalnych
części zamiennych firmy Braun;
c) części szklane, żarówki oświetlenia;
d) ostrza i folie do golarek oraz materiały
eksploatacyjne.
9. Bez nazwy i modelu sprzętu, daty jego
zakupu potwierdzonej pieczątką i podpisem
sprzedawcy karta gwarancyjna jest
nieważna.
10. Niniejsza gwarancja na sprzedany towar
konsumpcyjny nie wyłącza, nie ogranicza
ani nie zawiesza uprawnień Kupującego
wynikających z niezgodności towaru z
umową.
18
Page 19

Česky
Naše výrobky jsou vyráběny tak, aby odpovídaly nejvyšším nárokům na kvalitu, funkčnost
a design.
Přejeme Vám hodně potěšení při používání
nového přístroje značky Braun.
Upozornění
Předtím, než uvedete přístroj do provozu,
přečtěte si, prosím, pečlivě celý návod
k použití.
• Nože a nástavce (22a–c) jsou velmi
•
•
•
•
•
•
•
•
•
•
•
•
•
Popis
1 Motorová jednotka
2 Regulátor rychlosti
3 Spínač zapnutí/vypnutí regulované
4 Spínač turbo
5 Tlačítka pro uvolnění pracovních dílů
6 Nástavec s nožem
7 Převodovka pro šlehací metlu
8 Metla
9 Odměrná nádobka
10 Sekací mixér
11 Horní ãást
12 NÛÏ
ostré! Aby nedošlo k poranění,
zacházejte s nimi, prosím, mimořádně
opatrně.
Pfiístoj nesmí pouÏívat dûti ani osoby se
sníÏen˘mi fyzick˘mi nebo psychick˘mi
schopnostmi bez dohledu osoby, která je
zodpovûdná za jejich bezpeãnost. Obecnû
je doporuãeno uchovávat pfiístroj mimo
dosah dûtí. Dûti by mûly b˘t pod dozorem,
aby se zajistilo, Ïe nebudou spotfiebiã
pouÏívat na hraní.
Vždy odpojte přístroj od sítě, pokud jej
budete nechávat bez dozoru a před tím, než
jej budete sestavovat, rozebírat, čistit nebo
ukládat.
Před uvedením do provozu zkontrolujte, zda
síťové napětí vytištěné na spodku přístroje
souhlasí s napětím v místní síti.
Obzvláště když používáte ruční mixér v horkých tekutinách, neponořujte ani nevyjímejte
nástavec mixéru z tekutiny během doby, kdy
je přístroj zapnutý.
Motorovou jednotku (1) ani převodovku pro
šlehací metlu (7) neomývejte pod tekoucí
vodou, ani ji neponořujte do vody.
Nádobku (9) lze ne používat v mikrovlnné
troubě.
Než zapnete provoz nástavce pro zpracování potravin (15), ujistěte se, že západka
víčka (17c) je správně zaklapnuta a že
pěchovátko (16) je na svém místě.
Během zpracovávání potravin nevkládejte
do plnícího otvoru jiné nástroje, než dodávané pěchovátko (16).
Před sejmutím víčka (17) vždy přístroj
vypněte.
Víčko (17) můžete čistit pod tekoucí vodou,
ale do vody je neponořujte, ani je neumývejte v myčce nádobí.
Pracovní nádobu (18) lze ne používat v
mikrovlnné troubě.
Elektropřístroje značky Braun odpovídají
příslušným bezpečnostním standardům.
Opravu nebo výměnu síťového přívodu smí
provádět pouze odborníci v autorizovaném
servisu. Neodbornou opravou mohou
uživateli vzniknout závažné škody.
Deklarovaná hodnota emise hluku tohoto
spotfiebiãe je 63 dB(A), coÏ pfiedstavuje
hladinu A akustického v˘konu vzhledem na
referenãní akustick˘ v˘kon 1 pW.
rychlosti
13 Pracovní nádobka fiezacího strojku
14 Protiskluzná podloÏka/víãko
15 Nástavec pro zpracování potravin (FP)
16 Pěchovátko
17 Víčko
17a Část pro připojení motorového dílu
17b Plnící otvor
17c Západka víčka
18 Pracovní nádoba
19 Protiskluzná podložka (slouží také
jako víčko)
20 Nůž
21 Hnětací nástavec
22 Držák pracovního nástroje
22a Krájecí vložka
22b Strouhací vložka pro hrubé strouhání
22c Strouhací vložka pro jemné
strouhání
Nastavení rychlosti
Aktivací spínače (3) se zvolí rychlost
zpracovávání potravin, odpovídající nastavení
regulátoru rychlosti (2). Čím vyšší nastavení,
tím rychlejší zpracování a jemnější rozsekání
potraviny.
Maximální rychlost však můžete zvolit stisknutím tlačítka turbo (4). Spínač turbo můžete
také použít na rychlé pulzní zvýšení rychlosti,
aniž byste museli manipulovat s regulátorem
rychlosti.
Podle způsobu použití doporučujeme
následující nastavení rychlosti:
Ponorný mixér 1…turbo
Šlehání 3…15
Sekací mixér viz tabulky rychlostí
v obrazové sekci „
Nástavec pro
zpracování potravin viz tabulky rychlostí
v obrazové sekci ‰, Â
A Použití ponorného mixéru
Tento ponorný mixér se perfektně hodí na
přípravu pomazánek, omáček, polévek,
majonézy a dětských jídel, stejně jako pro
mixování nápojů a mléčných koktejlů:
a) Nasaďte motorový díl (1) na nástavec
s nožem (6) tak, až se zaaretuje.
b) Ponořte mixér svisle do nádoby a pak
stiskněte spínač (3) nebo spínač turbo (4).
c) Chcete-li nástavec s nožem po použití
uvolnit, stiskněte tlačítka (5) a nástavec
vytáhněte.
Ponorný mixér můžete používat spolu
s praktickou odměrnou nádobkou (9), ale
i v jakékoli jiné nádobce. Pokud budete chtít
mixovat přímo v hrnci, ve kterém jste vařili,
sejměte jej nejprve z plotny, aby se ponorný
mixér nepřehřál.
Příklad receptu: Majonéza
200-250 ml oleje
1 vejce (žloutek a bílek)
1 polévková lžíce citrónové šťávy nebo octa
sůl a pepř podle chuti
Všechny přísady vložte ve výše uvedeném
pořadí do odměrné nádobky. Mixér ponořte až
na dno nádobky. Stiskněte spínač turbo (4) a
podržte mixér ve svislé poloze, až olej vytvoří
emulzi. Potom, aniž byste jej vypnuli, pohybujte jím pomalu nahoru a dolů tak dlouho,
dokud majonéza není hotová.
B Použití šlehací metly
Šlehací metlu používejte pouze pro přípravu
šlehačky, sněhu z bílků, řídkého piškotového
těsta a dezertů, připravovaných šleháním:
19
Page 20

a) Nasaďte šlehací metlu (8) do převodovky
(7) a pak nasaďte motorový díl (1) na
převodovku tak, až se zajistí.
b) Ponořte metlu do nádoby a pak teprve
stiskněte spínač (3).
c) Chcete-li metlu uvolnit, stiskněte tlačítka (5)
a převodovku s metlou vytáhněte. Pak
vytáhněte metlu z převodovky.
Pro dosažení optimálních výsledků ...
nepoužívejte úzkou sklenici, ale širší
•
nádobku,
pohybujte metlou ve směru hodinových
•
ručiček, držte ji přitom mírně nakloněnou.
Šlehačka:
Šlehejte maximálně 400 ml vychlazené smetany (min. 30% tuku, 4 – 8 °C).
Začněte s nastavením na pomalejší rychlost
«1» a v průběhu šlehání zvyšujte rychlost až
na nastavení «15».
Sníh z bílků:
Šlehejte maximálně 4 bílky.
Začněte s nastavením na střední rychlost «7»
a v průběhu šlehání zvyšujte rychlost až na
nastavení «15».
C PouÏití nástavce s fiezacím
strojkem
Řezací strojek je vynikající pro sekání masa,
s˘ru, cibule, bylinek, ãesneku, chili papriãek
(s vodou), karotky, vla‰sk˘ch i lískov˘ch
ofií‰kÛ, mandlí, su‰en˘ch ‰vestek atd.
Při sekání tvrdých potravin (např. tvrdého
sýru) použijte spínač turbo (4).
POZOR: Nezpracovávejte extrémnû tvrdé
potraviny, jako napfi. kostky ledu, mu‰kátov˘
ofiech, kávová zrna a obilí.
Pred pouÏitím rezacího strojku ...
rozkrájejte maso, s˘r, cibuli, cesnek,
•
karotku, chili papricky
z bylinek odstraÀte silné stonky, ofiechy
•
vyloupejte
z masa odstraÀte kosti, ‰lachy a chrupavky.
•
Pro dosažení optimálních výsledků viz doporučené rychlosti uvedené v tabulce (j).
Sekání (viz obrázek „)
a) Opatrnû sejmûte umûlohmotn˘ kryt noÏe
(12). Upozornûní: NÛÏ je velmi ostr˘! VÏdy
jej drÏte za horní umûlohmotnou ãást. NÛÏ
nasaìte na osu v pracovní nádobce (13).
Zatlaãte nÛÏ dolÛ a otoãte jej o 90°, aÏ se
zaaretuje. VÏdy postavte pracovní
nádobku na protiskluznou podloÏku (14).
b) Do pracovní nádobky vloÏte potraviny.
c) Nasaìte horní ãást (11) na pracovní
nádobku fiezacího strojku.
d) NasuÀte motorovou jednotku (1) do horní
ãásti (11), aÏ se zaaretuje.
e) Stisknûte spínaã (3) nebo (4), abyste
fiezací strojek zapnuli. Bûhem zpraco-
vávání pokrmu pfiidrÏujte motorovou ãást
jednou rukou a nádobku fiezacího strojku
druhou rukou. NepouÏívejte fiezací strojek
déle neÏ 2 minuty.
f) Po použití stiskněte tlačítka (5), abyste
mohli motorovou jednotku sejmout.
g) Pak sejmûte horní ãást.
h) Opatrnû vyjmûte nÛÏ.
i) Pak vyjmûte zpracovan˘ pokrm z pracovní
nádobky. Protiskluzná základna také
slouÏí jako vzduchotûsné víãko na
pracovní nádobku.
20
Recept: Vanilka – med – sušené švestky
(jako náplň do palačinek nebo pomazánka)
(použijte nádobu a sekací nástavec (10),
rychlost: «turbo»)
Do nádoby na sekání vložte 60 g tekutého
medu a 50 g sušených švestek a motor
zapněte na 10 sekund. Pak přidejte 30 ml
vody (ochucené vanilkou) a motor opět na
3 sekundy zapněte.
D/E Použití nástavce pro
zpracování potravin
Nádobu a nástavce na zpracování potravin
(15) můžete použít k:
– sekání a míchání (viz obrázek ‰),
– hnětení (těsto připravované z maximálně
250 g mouky),
– krájení a strouhání (viz obrázek Â).
Sekání (viz obrázek ‰)
Nůž (20) se perfektně hodí pro sekání masa,
sýru, cibule, bylinek, česneku, karotky,
vlašských ořechů, lískových oříšků, mandlí
atd.
Pro rozmělnění tvrdých potravin použijte
spínač turbo (4).
POZNÁMKA: Nezpracovávejte extrémně tvrdé
potraviny, jako např. muškátový ořech, kávová
zrna a obilí.
Před sekáním …
rozkrájejte maso, sýr, cibuli, česnek,
•
karotku, chilli,
z bylinek odstraňte silné stonky, ořechy
•
vyloupejte,
z masa odstraňte kosti, šlachy a chrupavky.
•
a) Opatrně sejměte umělohmotný kryt nože
(20). Pozor: Nůž je velmi ostrý! Vždy jej
držte za horní umělohmotnou část. Nůž
nasaďte na osu v pracovní nádobce (18) a
otočte jej, až se zajistí. Vždy postavte
pracovní nádobku na protiskluznou
podložku (19).
b) Do pracovní nádobky vložte potraviny.
c) Upevněte víčko (17) na pracovní nádobku
se západkou (17c) umístěnou vedle drža-
dla nádobky. Abyste víčko zajistili, otočte
jím ve směru hodinových ručiček tak, aby
se západka zajistila se «zacvaknutím» nad
držadlem.
d) Nasuňte motorovou jednotku (1) do
spojovacího dílu (17a) tak, aby se zajistila.
Ujistěte se, že pěchovátko je na svém
místě.
e) Abyste přístroj zapnuli, stiskněte spínač (3)
nebo (4) na motorové jednotce a pracovní
nádobku přidržujte druhou rukou.
f) Po použití stiskněte tlačítka (5), abyste
mohli motorovou jednotku sejmout.
g) Stiskněte západku víčka (17c) a otočte
víčkem (17) ve směru hodinových ručiček,
aby se odblokovalo a sejměte je.
h) Před vyjímáním zpracovaného pokrmu
opatrně vyjměte nůž tak, že jím otočíte a
vytáhnete jej.
Míchání lehkého těsta
S pomocí nože (20) můžete také míchat lehké
či lité těsto, jako např. na palačinky nebo
moučníky, až do 250 g mouky.
Pro přípravu těsta na palačinky nejprve nalijte
do pracovní nádoby tekutiny, pak přidejte
mouku a nakonec vejce. Stiskněte spínač
turbo (4) a mixujte těsto, dokud není hladké.
Hnětení těsta
(Obrázky v části ‰ platí i pro použití hnětacího
nástavce.)
Page 21

Hnětací nástavec (21) je vhodný pro hnětení
různých druhů těsta, například kynutého nebo
nekynutého těsta (s obsahem max. 250 g
mouky).
Hnětací nástavec vložte do nádoby (18).
•
Do nádoby nejprve vložte suché ingre-
•
dience.
Tekuté přísady přidávejte pouze přes plnicí
•
otvor ve víčku při zapnutém motoru.
Po 1 minutě hnětení nechte motorovou část
•
na 10 minut vychladnout.
Kynuté těsto (na pizzu, chléb, koláč)
Maximálně 250 g mouky plus další ingredience. Rychlost «15», maximální délka
hnětení: 1 minuta.
Do pracovní nádoby nejprve nasypte mouku a
pak přidejte další přísady kromě tekutých.
Tekuté přísady přidávejte plnicím otvorem ve
víčku, když je motor zapnutý.
Nekynuté těsto (na křehké pečivo a koláče)
Maximálně 250 g mouky plus další ingredience. Rychlost «15», maximální délka
hnětení: 1 minuta.
Do pracovní nádoby nejprve nasypte mouku a
pak přidejte další přísady.
Používejte máslo, které má pokojovou teplotu.
Hnětení zastavte krátce poté, co se z těsta
vytvoří koule. Nadměrné hnětení způsobí, že
těsto bude příliš křehké.
Kráječe / struhadla (viz obrázek
S použitím kráječe (22a) můžete krouhat např.
okurky, cibuli, houby, jablka, mrkev, ředkvičky,
syrové brambory, tykev, zelí. S pomocí
struhadla (22b, 22c) můžete strouhat např.
jablka, mrkev, syrové brambory, řepu, zelí, sýr
(najemno až středně).
a) Nasaďte krájecí nebo strouhací nástroj
(22a – 22c) do držáku (22) a zajistěte jej
na místě. Umístěte držák s nástrojem na
středový čep pracovní nádoby a otočením
zajistěte.
b) Nasaďte víčko (17) na pracovní nádobu
tak, že západka (17c) je vedle držadla
nádobky. Abyste víčko zajistili, otočte jím
ve směru hodinových ručiček, až se
západka se «zacvaknutím» zajistí nad
držadlem.
c) Vložte motorovou jednotku (1) do spojo-
vacího dílu (17a) tak, aby se zajistila.
Nastavte rychlost podle doporučení na
obrázku (j).
d) Potraviny, které chcete zpracovávat, vložte
plnícím otvorem do nádoby. Do plnícího
otvoru nikdy nesahejte, pokud je přístroj
zapnutý. Vždy použijte pěchovátko (16).
e) Stiskněte spínač (3) nebo (4) na motorové
jednotce, aby se přístroj zapnul.
f) Po použití stiskněte tlačítka (5), abyste
mohli motorovou jednotku sejmout.
g) Stiskněte západku víčka (17c) a otočte
víčkem ve směru hodinových ručiček, aby
se odblokovalo a sejměte je.
h) Před vyjímáním zpracovaného pokrmu
vyjměte držák s nástrojem na krájení/
strouhání. Abyste nástroj sejmuli, stiskněte
jej nahoře na konci, který vyčnívá na
spodku držáku nástroje.
Â)
Čištění
Motorovou jednotku (1) a převodovku pro
šlehací metlu (7) pouze otírejte vlhkým
hadříkem. Víčko (17) lze opláchnout pod
tekoucí vodou, neponořujte je však do vody,
ani nemyjte v myčce nádobí.
Při zpracování potravin, které obsahují barviva
(např. karotka), se mohou umělohmotné části
strojku zabarvit. Potřete je před tím, než je
budete umývat, rostlinným jedlým olejem.
Pfiíslu‰enství
(k dostání v servisním stfiedisku Braun,
nemusí v‰ak b˘t dostupné v kaÏdé zemi)
BC: Nástavec s fiezacím strojkem, ideální
•
na zpracovávání velkého mnoÏství
potravin, stejnû jako na pfiípravu mléãn˘ch
koktejlÛ, lehk˘ch tûst a drcení kostek ledu.
Nástûnn˘ drÏák
•
Změny vyhrazeny bez předchozího
upozornění.
Po skonãení Ïivotnosti neodhazujte
prosím tento v˘robek do bûÏného
domovního odpadu. MÛÏete jej
odevzdat do servisního stfiediska
Braun nebo na pfiíslu‰ném sbûrném
místû zfiízeném dle místních pfiedpisÛ.
Záruka
Na tento v˘robek poskytujeme záruku po
dobu 2 let od data prodeje spotfiebiteli.
Bûhem této záruãní doby bezplatnû
odstraníme závady na v˘robku, zpÛsobené
vadami materiálu nebo chybou v˘roby.
Oprava bude provedena podle na‰eho
rozhodnutí buì opravou nebo v˘mûnou
celého v˘robku. Tato záruka platí pro
v‰echny zemû, kam je tento v˘robek dodáván
firmou Braun nebo jejím autorizovan˘m
distributorem.
Tato záruka se nevztahuje: na po‰kození,
vzniklá nesprávn˘m pouÏíváním a údrÏbou,
na bûÏné opotfiebení, jakoÏ i na defekty,
mající zanedbateln˘ vliv na hodnotu a
pouÏitelnost pfiístroje. Záruka pozb˘vá
platnosti, pokud byl v˘robek mechanicky
po‰kozen nebo pokud jsou opravy provedeny
neautorizovan˘mi osobami nebo pokud
nejsou pouÏity originální díly Braun. Pfiístroj
je urãen v˘hradnû pro domácí pouÏití. Pfii
pouÏití jin˘m zpÛsobem nelze uplatnit záruku.
Poskytnutím záruky nejsou dotãena práva
spotfiebitele, která se ke koupi vûci váÏí podle
zvlá‰tních právních pfiedpisÛ.
Záruka platí jen tehdy, je-li záruãní list fiádnû
vyplnûn (datum prodeje, razítko prodejny a
podpis prodavaãe) a je-li souãasnû s ním
pfiedloÏen prodejní doklad (dále jen doklady
o koupi).
Chcete-li vyuÏít servisních sluÏeb v záruãní
dobû, pfiedejte nebo po‰lete kompletní
pfiístroj spolu s doklady o koupi do autorizovaného servisního stfiediska Braun. Aktualizovan˘ seznam servisních stfiedisek je
k dispozici v prodejnách v˘robkÛ Braun.
Volejte bezplatnou infolinku 0800 11 33 22
pro informaci o nejbliωím servisním stfiedisku
Braun.
O pfiípadné v˘mûnû pfiístroje nebo zru‰ení
kupní smlouvy platí pfiíslu‰ná zákonná
ustanovení. Záruãní doba se prodluÏuje o
dobu, po kterou byl v˘robek podle záznamu
z opravny v záruãní opravû.
21
Page 22

Slovenský
Naše výrobky sú vyrobené tak, aby zodpovedali najvyšším nárokom na kvalitu, funkčnosť
a dizajn.
Želáme vám veľa potešenia pri používaní
nového prístroja značky Braun.
Upozornenie
Pred uvedením prístroja do prevádzky si
pozorne prečítajte celý návod na použitie.
• Nože a nadstavce (22a-c) sú veľmi
•
•
•
•
•
•
•
•
•
•
•
•
•
•
Popis
1 Motorová jednotka
2 Regulátor rýchlosti
3 Spínač zapnutia/vypnutia regulovanej
4 Spínač turbo
5 Tlačidlá pre uvoľnenie pracovných dielov
6 Nadstavec s nožom
7 Prevodovka pre šľahací nástavec –
8 Metlička
9 Odmerná nádobka
22
ostré! Narábajte s nimi mimoriadne
opatrne, aby ste zabránili poraneniam.
Tento prístroj nie je urãen˘ pre deti a osoby
so zníÏen˘mi fyzick˘mi a mentálnymi
schopnosÈami, ak pri jeho pouÏívaní nie sú
pod dozorom osoby, ktorá je zodpovedná
za ich bezpeãnosÈ. Vo v‰eobecnosti
odporúãame, aby ste prístroj uchovávali
mimo dosahu detí. Dávajte pozor, aby deti
prístroj nepouÏívali na hranie.
Prístroj je skonštruovaný na spracovávanie
bežného množstva potravín v domácnosti.
Vždy odpojte prístroj od siete, pokiaľ ho
budete nechávať bez dozoru a pred tým,
než ho budete zostavovať, rozoberať, čistiť
alebo ukladať.
Pred uvedením do prevádzky skontrolujte, či
sieťové napätie vytisnuté na spodku prístroja
súhlasí s napätím v miestnej sieti.
Obzvlášť keď používate ručný mixér v horúcich tekutinách, neponárajte ani nevyberajte
nástavec mixéru z tekutiny behom doby,
kedy je prístroj zapnutý.
Motorovú jednotku (1) ani prevodovku pre
šľahaciu metlu (7) neomývajte pod tečúcou
vodou, ani ju neponárajte do vody.
Nádobku (9) je ne možné používať v mikrovlnnej rúre.
Než zapnete prevádzku nástavca pre
spracovanie potravín (15), uistite sa, že
západka viečka (17c) je správne zaklapnutá
a že napchávadlo (16) je na svojom mieste.
Behom spracovávania potravín nevkladajte
do plniaceho otvoru iné nástroje, než dodávané napchávadlo (16).
Pred sňatím viečka (17) vždy prístroj
vypnite.
Viečko (17) môžete čistiť pod tečúcou
vodou, ale do vody ho neponárajte, ani ho
neumývajte v umývačke riadu.
Pracovnú nádobu (18) je ne možné používať
v mikrovlnnej rúre.
Elektrické prístroje značky Braun zodpovedajú príslušným bezpečnostným štandardom. Opravu alebo výmenu sieťového
prívodu môžu uskutočňovať iba odborníci
autorizovaného servisu. Neodbornou
opravou môžu vzniknúť užívateľovi závažné
škody.
Deklarovaná hodnota emisie hluku tohto
spotrebiča je 63 dB(A), čo predstavuje
hladinu A akustického výkonu vzhľadom na
frekvenčný akustický výkon 1 pW.
rýchlosti
metličku
10 Aprító
11 Hornú ãasÈ
12 NôÏ
13 Nádoba na sekanie
14 Anti-‰myková podloÏka/vrchnák
15 Nástavec pre spracovanie potravín (FP)
16 Napchávadlo
17 Viečko
17a Časť pre pripojenie motorového dielu
17b Plniaci otvor
17c Západka viečka
18 Pracovná nádobka
19 Protišmyková podložka (slúži tiež
ako viečko)
20 Nôž
21 Nadstavec na miesenie
22 Držiak pracovného nástroja
22a Nadstavec na krájanie
22b Nadstavec na hrubé strúhanie
22c Nadstavec na jemné strúhanie
Nastavenie rýchlosti
Aktiváciou spínača (3) sa zvolí rýchlosť
spracovávania potravín, odpovedajúca
nastaveniu regulátora rýchlosti (2). Čím vyššie
nastavenie, tým rýchlejšie spracovanie a
jemnejšie rozsekanie potraviny.
Maximálnu rýchlosť však môžete zvoliť stisnutím tlačidla turbo (4). Spínač turbo môžete tiež
použiť na rýchle pulzné zvýšenie rýchlosti, bez
toho aby ste museli manipulovať s regulátorom
rýchlosti.
Podľa spôsobu použitia doporučujeme
nasledujúce nastavenie rýchlosti:
Ponorný mixér 1…turbo
Šľahanie 3…15
Aprító viď tabuľky rýchlostí
v obrazovej sekcii „
Nástavec pre
spracovanie potravín
v obrazovej sekcii ‰, Â
viď tabuľky rýchlostí
A Použitie ponorného mixéra
Tento ponorný mixér je ideálne vhodný na
prípravu nátierky, omáčok, polievok, majonézy
a detských jedál, rovnako ako pre mixovanie
nápojov a mliečnych kokteilov:
a) Nasaďte motorový diel (1) na nástavec
s nožom (6) tak, aby zacvakol.
b) Ponorte mixér zvislo do nádoby a následne
stlačte ovládač (3) alebo turbo (4).
c) Ak chcete nástavec s nožom po použitiu
uvoľniť, stisnite tlačidlá (5) a nástavec
vytiahnite.
Ponorný mixér môžete používať spolu s praktickou odmernou nádobkou (9), ale aj v spolu
s akoukoľvek inou nádobou. Ak budete chcieť
mixovať priamo v nádobe v ktorej varíte, túto
dajte najprv preč zo šporáka, aby sa ponorný
mixér neprehrial.
Príklad receptu: Majonéza
200-250 ml oleja
1 vajce (žĺtok a bielok)
1 polievková lyžica citrónovej šťavy alebo octu
soľ a čierne korenie podľa chuti
Všetky prísady vložte v uvedenom poradí do
odmernej nádobky. Mixér ponorte až na dno
nádobky. Stlačte ovládač turbo (4) a mixér
podržte v zvislej polohe, až olej vytvorí
emulziu. Potom bez toho, aby ste ho vypli,
pohybujte mixérom pomaly smerom nahor a
dolu tak dlho, až kým bude majonéza hotová.
Page 23

B Použitie šľahacej metličky
Šľahaciu metličku používajte iba pre prípravu
šľahačky, snehu z bielok, riedkeho
piškótového cesta a dezertov, pripravovaných
šľahaním:
a) Nasaďte šľahaciu metličku (8) do prevo-
dovky (7) a následne nasaďte motorový
diel (1) na prevodovku tak, až sa zaistil.
b) Ponorte metličku do nádoby a až následne
stlačte ovládač (3).
c) Ak chcete metlu uvoľniť, stisnite tlačidlá (5)
a prevodovku s metlou vytiahnite.
Následne vytiahnite metličku z prevodovky.
Pre dosiahnutie optimálnych výsledkov ...
•
nepoužívajte úzky pohár, ale širšiu nádobku,
•
pohybujte metlou v smere hodinových
ručičiek, držte ju pritom mierne naklonenú.
Šľahačka:
Šľahajte maximálne 400 ml vychladenej
smotany (min. 30% tuku, 4–8 °C).
Začnite s nastavením na pomalšiu rýchlosť
«1» a v priebehu šľahania zvyšujte rýchlosť až
na nastavenie «15».
Sneh z bielkov:
Šľahajte maximálne 4 bielka.
Začnite s nastavením na strednú rýchlosť «7»
a v priebehu šľahania zvyšujte rýchlosť až na
nastavenie «15».
podloÏka sa pouÏíva aj ako vzduchotesn˘
kryt na nádobu na sekanie.
Recept: Vanilka – med – sušené slivky
(ako plnka do palaciniek alebo nátierka)
(použite nádobu a nadstavec na sekanie (10),
rýchlosť: «turbo»)
Do nádoby na sekanie vložte 60 g tekutého
medu a 50 g sušených sliviek a motor na
10 sekúnd zapnite. Potom pridajte 30 ml
vody (ochutenej vanilkou) a motor opäť na
3 sekundy zapnite.
D/E Použitie nástavca pre
spracovanie potravín
Nádobu a nadstavce na spracovanie potravín
(15) môžete použiť na:
– sekanie a miešanie (pozri obrázok ‰),
– miesenie (cesto s obsahom max. 250 g
múky),
– krájanie a strúhanie (pozri obrázok Â).
Sekanie (pozri obrázok ‰)
Nôž (20) je vynikajúci na sekanie mäsa, syra,
cibule, byliniek, cesnaku, karotky, vlašských
aj lieskových orieškov, mandlí atď. Pre
rozdrobenie tvrdých potravín použite ovládač
turbo (4).
POZNÁMKA: Nepokúšajte sa spracovať
extrémne tvrdé potraviny, ako napr. muškátový orech, kávové zrnká a obilie.
C Ako pouÏívaÈ prídavn˘ sekáã
Sekáã je perfektne prispôsoben˘ na sekanie
mäsa, syra, cibule, byliniek, cesnaku, chili
papriãiek (s vodou), mrkvy, vla‰sk˘ch orechov,
orie‰kov, mandlí, su‰en˘ch sliviek atì.
Pri sekaní tvrdých potravín (napr. tvrdého
syra) používajte spínač turbo (4).
POZOR: V sekáãi nesekajte ºadové kocky
alebo extrémne tvrdé potraviny, ako mu‰kátov˘ orech, kávové zrnká a obilie.
Pred sekaním ...
pokrájajte mäso, syr, cibulu, cesnak,
•
karotku
z byliniek odstráÀte silné steblá, orechy
•
vylúskajte
z mäsa odstráÀte kosti, ‰ºachy a chrupavky.
•
Pre dosiahnutie optimálnych výsledkov sa
prosím podívajte na odporúčané nastavenia
rýchlosti v tabuľke (j).
Sekanie (pozri obrázok „)
a) Opatrne odstráÀte umelohmotn˘ kryt
z noÏa (12). Upozornenie: NôÏ je veºmi
ostr˘! VÏdy ho drÏte za hornú umelohmotnú ãasÈ. NôÏ nasaìte na os v
pracovnej nádobke (13). Stlaãte nôÏ dolu
a otoãte ho o 90°, k˘m nezapadne.
VÏdy poloÏte nádobu na sekanie na
proti‰mykovú podloÏku (14).
b) Do nádoby na sekanie vloÏte potraviny.
c) Nasaìte hornú ãasÈ (11) na nádobu na
sekanie.
d) NasuÀte motorovou jednotku (1) do hornej
ãasti (11), aÏ sa zaistí.
e)
Stlaãte spínaã (3) alebo (4), ãím spustíte
sekáã. Poãas prevádzky drÏte motorovou
jednotku jednou rukou a nádobu na
sekanie druhou rukou. NepouÏívajte sekáã
dlh‰ie ako 2 minúty.
f) Po použití stisnite tlačidlá (5), aby ste mohli
motorovú jednotku sňať.
g) Potom demontujte hornú ãasÈ.
h) Opatrne vyberte nôÏ.
i) Potom vyberte spracovávané potraviny
z nádoby na sekanie. Proti‰myková
Pred sekaním …
rozkrájajte mäso, syr, cibuľu, cesnak,
•
karotku, čili,
z byliniek dstráňte silné stonky, orechy
•
vylúpajte,
z mäsa odstráňte kosti, šľachy a chrupavky.
•
a) Opatrne odstráňte umelohmotný kryt noža
(20). Upozornenie: Nôž je veľmi ostrý!
Vždy ho držte za hornú umelohmotnú časť.
Nôž nasaďte na os v pracovnej nádobke
(18) a otočte ho, až zaklapne. Pracovnú
nádobku vždy postavte na protišmykovú
podložku (19).
b) Do pracovnej nádobky vložte potraviny.
c) Upevnite viečko (17) na pracovnú nádobku
so západkou (17c) umiestenou vedľa drža-
dla nádobky. Aby ste viečko zaistili, otočte
ním vo smeru hodinových ručičiek tak, aby
sa západka zaistila so «zacvaknutím» nad
držadlom.
d) Nasuňte motorovú jednotku (1) do spojova-
cieho dielu (17a) tak, aby sa zaistila. Uistite
sa, že napchávadlo je na svojom mieste.
e) Aby ste prístroj zapli, stisnite spínač (3)
nebo (4) na motorovej jednotke a pracovnú
nádobku pridržujte druhou rukou.
f) Po použití stisnite tlačidlá (5), aby ste mohli
motorovú jednotku sňať.
g) Stisnite západku viečka (17c) a otočte
viečkom (17) v smere hodinových ručičiek,
aby sa odblokovalo a snímte ho.
h) Pred vyňatím spracovaného pokrmu
opatrne vyberte nôž tak, že ním otočíte
a vytiahnete ho.
Miešanie ľahkého cesta
S pomocou noža (20) môžete tiež miešať
ľahké alebo liate cesto, ako napr. na
palacinky alebo múčniky, až do 250 g múky.
Pre prípravu liateho cesta na palacinky najprv
vlejte mlieko do pracovnej nádobky, potom
pridajte múku a nakoniec vajce. Stlačte
ovládač turbo (4) a mixujte cesto, až je hladké.
Miesenie cesta
(Obrázky v časti D sa vzťahujú aj na použitie
nadstavca na miesenie.)
Nadstavec na miesenie (21) je vhodný na
23
Page 24

miesenie rôznych druhov cesta, ako napríklad
kysnutého alebo nekysnutého cesta
(s obsahom max. 250 g múky).
Nadstavec na miesenie vložte do nádoby
•
(18).
Do nádoby najskôr pridajte suché prísady.
•
Tekuté prísady pridávajte len cez plniaci
•
otvor, keď je motor zapnutý.
Po 1 minúte miesenia nechajte motorovú
•
jednotku na 10 minút vychladnúť.
Kysnuté cesto (na pizzu, chlieb, koláč)
Max. 250 g múky plus ďalšie prísady.
Rýchlosť «15», maximálna dĺžka miesenia:
1 minúta. Do pracovnej nádoby najskôr vsypte
múku a potom pridajte ďalšie prísady okrem
tekutých. Tekuté prísady pridávajte cez plniaci
otvor, keď je motor zapnutý.
jedlým olejom ešte pred tým ako ich vložíte do
umývačky riadu.
Príslu‰enstvo
(toto príslu‰enstvo v servisnom centre firmy
Braun, av‰ak nie je vo v‰etk˘ch krajinách)
BC: V˘konn˘ sekací mixér ideálny na
•
sekanie väã‰ieho mnoÏstva potravín, na
prípravu kokteilov, ºah‰ieho cesta a sekanie
kociek ºadu.
DrÏiak na stenu
•
Zmeny vyhradené bez predchádzajúceho
upozornenia.
Nekysnuté cesto (na krehké pečivo a koláče)
Max. 250 g múky plus ďalšie prísady.
Rýchlosť «15», maximálna dĺžka miesenia:
1 minúta. Do pracovnej nádoby najskôr vsypte
múku a potom pridajte ďalšie prísady.
Používajte maslo, ktoré má izbovú teplotu.
Miesenie zastavte krátko po tom, ako cesto
nadobudne guľový tvar. Nadmerné miesenie
spôsobí, že cesto bude príliš krehké.
Krájanie / strúhanie (pozri obrázok
S použitím nadstavec na krájanie (22a)
môžete krájať napr. uhorky, cibuľu, huby,
jablka, mrkvu, reďkvičky, surové zemiaky,
tekvicu, kapustu.
S pomocou nadstavec na strúhanie (22b, 22c)
môžete strúhať napr. jablka, mrkvu, surové
zemiaky, repu, kapustu, syr (najemno až
stredne).
a) Nasaďte krájací alebo strúhací nástroj
(22a–22c) do držiaku (22) a zaistite ho na
mieste. Umiestite držiak s nástrojom na
stredový čap pracovnej nádoby a otočením
zaistite.
b) Nasaďte viečko (17) na pracovnú nádobu
tak, že západka (17c) je vedľa držadla
nádobky. Aby ste viečko zaistili, otočte
ním vo smeru hodinových ručičiek, až sa
západka so «zacvaknutím» zaistí nad
držadlom.
c) Vložte motorovú jednotku (1) do spojova-
cieho dielu (17a) tak, aby sa zaistila.
Nastavte rýchlosť podľa doporučenia na
obrázku (j).
d) Potraviny, ktoré chcete spracovávať, vložte
plniacim otvorom do nádoby. Do plniaceho
otvoru nikdy nesiahajte, pokiaľ je prístroj
zapnutý. Vždy použite napchávadlo (16).
e) Stisnite spínač (3) alebo (4) na motorovej
jednotke, aby sa prístroj zapol.
f) Po použití stisnite tlačidlá (5), aby ste mohli
motorovú jednotku sňať.
g) Stisnite západku viečka (17c) a otočte
viečkom vo smeru hodinových ručičiek,
aby sa odblokovalo a snímte ho.
h) Pred vyňatím spracovaného pokrmu
vyberte držiak s nástrojom na krájanie/
strúhanie. Aby ste nástroj sňali, stisnite ho
hore na konci, ktorý vyčnieva na spodku
držiaku nástroja.
Â)
Čistenie
Motorovú jednotku (1) a prevodovku pre
šľahaciu metličku (7) otrite vlhkou handričkou.
Viečko (17) je možno opláchnuť pod tečúcou
vodou, neponárajte ho však do vody, ani
neumývajte v umývačke riadu.
Pri spracovaní potravín, ktoré obsahujú farbivá
(napr. karotka), sa môžu umelohmotné časti
strojčeka zafarbiť. Vyutierajte ich rastlinným
24
Po skonãení Ïivotnosti neodhadzujte
zariadenie do beÏného domového
odpadu. Zariadenie odovzdajte do
servisného strediska Braun alebo na
príslu‰nom zbernom mieste zriadenom
podºa miestnych predpisov a noriem.
Záruka
Na tento v˘robok poskytujeme záruku po
dobu 2 rokov odo dÀa predaja spotrebiteºovi.
Poãas tejto záruãnej doby bezplatne
odstránime závady na v˘robku, spôsobené
vadami materiálu alebo chybou v˘roby a to
podºa ná‰ho rozhodnutia buì opravou alebo
v˘menou celého v˘robku. Táto záruka platí
pre v‰etky krajiny, kde tento v˘robok dodáva
firma Braun alebo jej autorizovan˘ distribútor.
Táto záruka sa nevzÈahuje: na po‰kodenia,
ktoré vzniknú nesprávnym pouÏívaním a
údrÏbou, na beÏné opotrebenie ako aj na
defekty, ktoré majú zanedbateºn˘ vplyv na
hodnotu a pouÏitie prístroja. Záruka stráca
platnosÈ v prípade, Ïe v˘robok bol mechanicky po‰koden˘, alebo sa uskutoãnili opravy
neautorizovan˘mi osobami, alebo sa
nepouÏili originálne diely Braun. Prístroj je
v˘hradne urãen˘ na domáce pouÏitie. Pri
pouÏití in˘m spôsobom nie je moÏné záruku
uplatniÈ.
Poskytnutím záruky nie sú ovlyvnené
spotrebiteºské práva, ktoré sa ku kúpe
predmetu viaÏu podºa zvlá‰tnych predpisov.
Záruka platí iba vtedy, ak je záruãn˘ list
riadne vyplnen˘ (dátum predaja, peãiatka
predajne a podpis predavaãa) a zároveÀ s
ním predloÏen˘ doklad o predaji (ìalej iba
doklady o zakúpení).
Ak chcete vyuÏiÈ servisné sluÏby v záruãnej
dobe, kompletn˘ prístroj spolu s dokladmi
o zakúpení odovzdajte alebo za‰lite do
autorizovaného servisného strediska Braun.
Aktualizovan˘ zoznam servisn˘ch stredísk je
k dispozícii v predajniach v˘robkov Braun.
Vzhºadom na prípadnú v˘menu prístroja
alebo na zru‰enie kúpnej zmluvy platia
príslu‰né zákonné ustanovenia. Záruãná
doba sa predlÏuje o dobu, poãas ktorej bol
v˘robok podºa záznamu z opravovne v
záruãnej oprave.
Page 25

Magyar
Termékeinket a legmagasabb minőségi,
funkcionalitás és design elvárások kielégítésére tervezték. Reméljük, örömét leli új Braun
készülékében.
Figyelem!
Kérjük, hogy a készülék használata előtt
alaposan olvassa el a használati utasítást.
• A kések, és egyéb kiegésztő
•
•
•
•
•
•
•
•
•
•
•
•
•
Leírás
1 Motor
2 Sebesség szabályzó
3 Be/kikapcsoló a változtatható
4 Be/kikapcsoló a turbó sebesség
5 Kioldó gomb
6 Mixelőrúd
7 Habverő meghajtó
8 Habverő
9 Mérőpohár
10 Aprító
11 FelsΠelem
12 Kés
13 Aprító edény
14 Csúszásgátló talp/fedŒ
eszközök (22a–c) rendkívül élesek!
A sérülések elkerülése érdekében
kérjük, hogy ezeket az éles szerszámokat rendkívüli óvatossággal
kezelje!
A készüléket mozgássérültek, szellemi
vagy értelmi fogyatékosságban szenvedŒ
gyermekek vagy személyek, – kizárólag a
biztonságukért felelŒs felügyelet mellett
használják! Javasoljuk, hogy a terméket
gyermekektŒl elzárva tartsa! Általában
javasoljuk, hogy a készüléket tartsa
gyermekek által nem hozzáférhetŒ helyen!
A készülék kizárólag háztartásban szokásos
mennyiségek feldolgozására alkalmas.
Mindig húzza ki a vezetéket a konnektorból
a készülék összeszerelésekor, szétszerelésekor, tisztításakor vagy tárolásakor.
Használat előtt ellenőrizze, hogy a hálózati
feszültség megfelel-e a készülék alján jelzett
értéknek.
Amennyiben a készüléket a botmixer
kiegészítővel használja, ügyeljen arra, hogy
a forró folyadékba (pl.: levesek) merítés
és kiemelés közben a készülék ki legyen
kapcsolva.
A motorrészt (1) és a habverő meghajtót (7)
folyóvízben elmosni, vagy vízbe meríteni
tilos.
A mérőpohár (9) mikrohullámú sütőben nem
használható.
A feldolgozóegység (15) használata előtt
győződjön meg arról, hogy a munkatartály
fedélrögzítője (12c) a helyére kattant és a
tömőrúd (16) is a helyén van.
A tömőrúdon (16) kívül ne használjon más
eszközt az élelmiszerek betolásához.
A fedél (17) levétele előtt mindig kapcsolja ki
a készüléket.
A fedél (17) folyóvíz alatt tisztítható, de soha
ne merítse vízbe, és ne tegye mosogatógépbe.
A műanyag munkatartály (18) mikrohullámú
sütőben nem használható.
A Braun elektromos készülékek megfelelnek
a biztonsági előírásoknak. A készülékek
javítását biztonságtechnikai okokból kizárólag Braun márkaszerviz végezheti.
A hibás, szakszerűtlen javítás balesetet
vagy a felhasználó sérülését okozhatja.
sebességfokozatokhoz
fokozathoz
15 Feldolgozóegység (FP)
16 Tömőrúd
17 Munkatartály fedél
17a A motorrész csatlakozópontja
17b Adagolónyílás
17c Fedél rögzítő
18 Munkatartály
19 Csúszásgátló alj/fedél
20 Kés
21 Dagasztó feltét
22 Feltét-tartó
22a Szeletelő feltét
22b Reszelő feltét (nagy lyukakkal)
22c Reszelő feltét (kis lyukakkal)
Sebesség beállítás
Amikor bekapcsolja a (1) gombot, a sebesség
megegyezik a sebesség szabályzón (2)
feltüntetett sebességgel. Minél nagyobb
sebességbe állítja a készüléket, annál gyorsabban működik.
A maximális sebesség eléréséhez nyomja
meg a turbó sebességfokozat gombot (4).
Szintén használhatja ezt a fokozatot azonnali
erős pulzálásra anélkül, hogy átállítaná a
sebesség szabályzót.
Felhasználástól függően a következő sebesség fokozatokat ajánljuk:
Botmixer 1...turbó
Habverő 3...15
Aprító az „ rész képes
ábrái szerint
Feldolgozóegység az
ábrái szerint
‰, Â rész képes
A A botmixer használata
A Braun botmixer segítségével mártásokat,
leveseket, püréket, szószokat, majonézt és
bébi ételeket készíthet, valamint italokat
mixelhet, és turmixokat készíthet:
a) Összeszereléskor csatlakoztassa a
motorra (1) a mixelőrudat (6), amíg az a
helyére nem kattan.
b) Helyezze függőlegesen a botmixert a
mixelőpohárba és kapcsolja be az be/ki
kapcsoló gombot (3) vagy a turbó gombot
(4).
c) Ahhoz, hogy használat után leszedhesse a
mixelőrudat a motorról, nyomja meg a (5)
kioldó gombot és húzza le azt.
A mixert használhatja a mérőpohárban (9),
vagy bármilyen más edényben. Amikor
közvetlen lábasban/serpenyőben szeretné
használni a botmixert főzés közben, először
vegye le a lábast/serpenyőt a tűzről, s azután
használja a készüléket, hogy megóvja a
túlmelegedéstől.
Recept ajánlatok: Majonéz
200-250 ml olaj
1 egész tojás
1 evőkanál citromlé vagy ecet, só és bors
Tegye az összes alapanyagot a mixelő
pohárba. Helyezze a botmixert a tartály
legaljára. Nyomja meg a turbó (4) gombot,
tartsa a botmixert ebben a helyzetben, amíg
az olaj fel nem oldódik. Aztán anélkül, hogy
kikapcsolná a készüléket, lassan mozgassa
fel és le, amíg a majonéz alaposan el nem
keveredik.
B A habverő használata
A habverőt kizárólag csak tejszínhab készítéséhez, tojásfehérje felveréséhez, piskóta
készítéséhez, valamint desszert porokból
történő ételek készítéséhez használja:
25
Page 26

a) Összeszereléskor helyezze a habverőt (8)
a habverő meghajtóba (7), azután csatlakoztassa a motorra (1) amíg az be nem
kattan a helyére.
b) A kispriccelés elkerülése érdekében
először helyezze a habverőt az edénybe,
és csak ezután kapcsolja be a be/ki
kapcsoló gombot (3).
c) Szétszereléskor nyomja meg a (5) kioldó
gombot és húzza le a habverő meghajtót a
motorról. Ezután húzza le a habverőt a
habverő meghajtóról.
A legjobb eredmény eléréséhez ...
használjon széles szájú tálat a mérőpohár
•
helyett,
a bekapcsolt mixert körkörösen, az
•
óramutató járásával megegyező irányba
mozgassa.
Tejszín felverése:
Egyszerre csak 400 ml (min. 30 % zsírtartalmú, 4–8 °C hőmérsékletű) lehűtött tejszínt
verjen fel a habverővel.
Alacsony sebesség fokozattal kezdje «1» és a
művelet alatt növelje a sebességet «15»-ös
sebességi fokozatig.
Tojásfehérje felverése:
Egyszerre csak 4 tojásfehérjét verjen fel.
Közepes sebesség fokozattal kezdje «7» és a
művelet alatt növelje a sebességet «15»-ös
sebességi fokozatig.
C Hogyan használjuk az aprítót
Az aprító (10) hús, sajt, vöröshagyma, fıszernövények, fokhagyma, chili (vízzel) répa, dió,
mogyoró, mandula, aszalt szilva stb. aprítására alkalmas.
Kemény állagú ételek (pl. kemény sajtok)
aprításához, használja a turbo kapcsolót! (4)
Megjegyzés: Különösen kemény anyagok, pl.
jég, szerecsendió, kávé, gabona aprítására
ne használja a készüléket.
Aprítás elŒtt ...
Darabolja fel a húst, sajtot, vöröshagymát,
•
fokhagymát, répát, chilit.
A fıszernövények szárát távolítsa el, a
•
magvakat törje fel.
Távolítsa el a csontokat, ínszalagokat és
•
porcokat a húsból.
A nagyobb hatékonyság érdekében, kérjük,
vegye figyelembe az ajánlott sebességfokozatokat (j).
Aprítás (lásd:
a) Óvatosan távolítsa el a mıanyag
védŒréteget a késekrŒl (12). Figyelem: A
kés nagyon éles! Mindig a felsŒ, mıanyag
résznél fogja. Helyezze a kést az aprító
edény tengelyére (13). Nyomja le, és
forgassa el 90°-kal. Mindig helyezze az
aprító edényt a csúszásgátló talpra (14).
b) Helyezze az ételt az edénybe.
c) Tegye a felsŒ elemet (11) az aprító
edényre.
d) Csatlakoztassa a motoregységet (1) a
felsŒ elemre, kattanással rögzítse.
e) Nyomja meg a (3) vagy (4) gombot az
indításhoz. Az egyik kezével tartsa a
motoregységet, a másikkal az aprító
edényt. Ne használja az aprítót 2 percnél
hosszabb ideig.
f) Használat után nyomja meg a kioldó
gombot (5), hogy le tudja venni a motor-
részt.
26
„ melléklet illusztrációi)
g) Majd vegye le a felsΠelemet.
h) Óvatosan vegye ki a kést.
i) Vegye ki a felaprított ételt az edénybŒl.
A csúszásgátló talp egyben tetŒként is
szolgál.
Recept Ötlet: Mézes-vaníliás aszalt szilva
(palacsinta tölteléknek vagy lekvárnak)
(használja az aprító-kiegészítőt (10), «turbó»
sebességi fokozaton)
Helyezzen 60 g krémes állagú mézet, és
50 g aszalt szilvát az aprítóedénybe, majd
működtesse a készüléket 10 másodpercen
keresztül! Ezt követően adjon hozzá 30 ml
(vaníliával ízesített) vizet, majd további
3 másodperc aprítást követően fejezze be a
műveletet!
D/E A feldolgozóegység
használata
Az ételkészítéshez használatos konyhai
szettet (15) az alábbi műveletekhez
alkalmazhatja:
– aprítás és keverés (lásd:
illusztrációi)
– dagasztás (maximum 250 g lisztet
tartalmazó tésztafélékhez)
– szeletelés és reszelés (lásd:
illusztrációi)
Aprítás (lásd: ‰ melléklet illusztrációi)
A kés (20) segítségével tökéletesen aprítható
hús, sajt, hagyma, gyógynövény,
fűszernövény, fokhagyma, répa, dió, mogyoró,
mandula, stb…
Kemény anyagok (pl. kemény sajt) aprításához, használja a turbó gombot (4).
Figyelem: Ne aprítson rendkívül kemény
ételeket, mint pl. szerecsendiót, kávébabot és
gabonaszemeket.
Aprítás előtt ...
vágja fel a húst, sajtot, hagymát, fokhagy-
•
mát, sárgarépát, chilit,
távolítsa el a növényeknek szárát, pucolja
•
meg a dió héját,
távolítsa el a csontokat, ínakat és mócsingot
•
a húsokról.
a) Óvatosan távolítsa el a kés (20) műanyag
borítását. Figyelmeztetés: a kés nagyon
éles! Mindig a felső, műanyag részénél
fogva tartsa. Helyezze a kést a munkatartály (18) közepén lévő tengelyre, és
fordítsa el, amíg az a helyére nem kattan.
A munkatartályt mindig a csúszásgátló
aljra (19) helyezve használja.
b) Tegye a feldolgozandó alapanyagokat a
munkatartályba.
c) Helyezze a fedelet (17) a munkatartályra
úgy, hogy a fedélrögzítő (17c) a tartály
fogantyújával legyen egy vonalban. Ezután
az óra járásával megegyező irányba
forgassa el mindaddig, amíg a fedélrögzítő
(17c) egy kattanással a fogantyúhoz nem
kapcsolódik.
d) Csatlakoztassa a motort (1) a fedélen lévő
motorrész csatlakozópontjához (17a) kattanás jelzi, ha az pontosan összekapcsolódott.
e) Ellenőrizze, hogy a tömőrúd (16) a helyén
van. A művelet ideje alatt egyik kezével
tartsa a motorrészt, a másikkal pedig a
munkatartályt.
f) Használat után nyomja meg a kioldó gom-
bot (5), hogy le tudja venni a motorrészt.
Vegye ki a tömőrudat.
g) A fedélrögzítő (17c) megnyomásával egyi-
dejűleg forgassa az óramutató járásával
‰ melléklet
 melléklet
Page 27

ellentétes irányba a munkatartály fedelét
(17) és emelje le azt.
h) Óvatosan, nehogy megvágja magát kicsit
elforgatva vegye ki a kést. Ezután
kiszedheti a feldolgozott ételt a munkatartá-
lyból.
Kevert- és piskótatészták készítése
A kés (20) használatával készíthet lágy tésztákat, mint pl. palacsintatészta, vagy egyéb
kevert tésztákat, amelyeknél a hozzávaló max.
250 gramm liszt plusz a többi alapanyag.
Például palacsintatészta készítésekor először
a folyadékot töltse be munkatartályba, ezután
adagolja hozzá a lisztet és a tojásokat.
Nyomja be a turbókapcsoló gombot (4), és
keverje a megfelelő állagig.
Tésztadagasztás
(A
‰ melléklet illusztrációi, ugyancsak utalnak
a dagasztóeszköz használatára.)
A dagasztóeszköz (21) ideális a különböző
tésztafélék, pl. kelt,- és leveles tészták
dagasztásához. (max. 250 g lisztet tartalmazó
tésztákhoz!)
Helyezze a dagasztólapátokat az edénybe!
•
(18)
Mindenekelőtt adagolja a száraz alapanya-
•
gokat az edénybe!
Indítsa be a készüléket, és az adagolónyílá-
•
son keresztül öntse hozzá a kívánt folyadékmennyiséget!
Egy perc dagasztást követően, kb. 10
•
percen át pihentesse a motort, és hagyja
hogy az lehűljön!
Kelt tészta (pizzához, kenyérhez, süteményekhez)
Max. 250 g liszt, plusz az egyéb hozzávalók.
«15»-ös sebességi fokozat, a maximális
dagasztási idő: 1 perc.
Helyezze a lisztet a feldolgozó edénybe, majd
adja hozzá a többi hozzávalót, a folyékony
állagúakat kivéve! Indítsa be a készüléket,
és csak ezt követően töltse a folyadékot az
adagolónyíláson keresztül az edénybe!
Leveles tészta (Quiche, vagy sütemények
elkészítéséhez)
Max. 250 g liszt, plusz az egyéb hozzávalók.
«15»-ös sebességi fokozat, a maximális
dagasztási idő: 1 perc.
Mindenekelőtt helyezze a lisztet a feldolgozó
edénybe, majd adja hozzá az egyéb
alapanyagokat. Szobahőmérsékletű vajat
használjon. Röviddel azután hogy a tészta
labdaformát öltött, fejezze be a dagasztást,
a tészta ugyanis meglágyulhat a túlzott
dagasztás következtében!
Szeletelés / reszelés (lásd:
illusztrációi)
A szeletelő betét (22a) használatával
könnyedén szeletelhet pl.: uborkát, hagymát,
gombát, almát, sárgarépát, retket, nyers
burgonyát, cukkínit, káposztát.
A gyalu betét (22b, 22c) használatával
reszelhet pl.: almát, répát, nyers burgonyát,
céklát, káposztát, sajtokat (puha vagy
közepesen kemény).
a) Helyezze a megfelelő feltétet (22a–22c)
a feltét- tartóba (22) és kattintsa be a
helyére. Helyezze a feltét-tartót a munka-
tartály meghajtótengelyére és forgassa el,
amíg a helyére nem kattan.
b) Helyezze a fedelet (17) a munkatartályra
úgy, hogy a fedélrögzítő (17c) a tartály
fogantyújával legyen egy vonalban. Ezután
az óra járásával megegyező irányba
forgassa el mindaddig, amíg a fedélrögzítő
 melléklet
(17c) egy kattanással a fogantyúhoz nem
kapcsolódik.
c) Csatlakoztassa a motort (1) a fedélen lévő
motorrész csatlakozópontjához (17a).
Állítsa be a művelethez kiválasztott megfelelő sebességfokozatot (j táblázat).
d) A feldolgozandó élelmiszert töltse az
adagolónyílásba. Soha ne nyúljon bele a
készülék bekapcsolt állapotában a betöltőnyílásba. Az élelmiszerek betolásához
mindig használja a tömőrudat (16).
e) Bekapcsoláshoz nyomja meg a motor-
részen található be/ki kapcsoló gombot (3)
vagy a turbó gombot (4).
f) Használat után nyomja meg a kioldó gom-
bot (5), hogy le tudja venni a motorrészt.
g) A fedélrögzítő (17c) megnyomásával egyi-
dejűleg forgassa az óramutató járásával
ellentétes irányba a munkatartály fedelét
és emelje le azt.
h) Emelje ki a feltéttartót. Ezután kiszedheti a
feldolgozott ételt a munkatartályból. A feltét
levételéhez nyomja azt alulról felfelé, a
feltét-tartón lévő nyíláson keresztül.
Tisztítás
A motorrészt (1) és a habverő meghajtót (7)
csak nedves ruhával törölje át.
A fedél (17) folyóvíz alatt tisztítható, de soha
ne merítse vízbe, és ne tegye mosogatógépbe.
Amikor nagyon intenzív színű ételeket
készít (pl.: sárgarépa) a műanyag részek
elszíneződhetnek. Törölje át ezeket a részeket
növényi olajjal, mielőtt elmosogatná vagy a
mosogatógépbe tenné.
A gyártó az esetleges változtatások jogát
fenntartja.
A környezetszennyezés elkerülése
érdekében arra kérjük, hogy a
készülék hasznos élettartalma végén
ne dobja azt a háztartási szemétbe.
A mıködésképtelen készüléket leadhatja
a Braun szervizközpontban, vagy az
országa szabályainak megfelelŒ módon
dobja a hulladékgyıjtŒbe.
Garancia
A Braun – ismerve termékei megbízhatóságát, készülékeire két év garanciát
vállal, azzal a megkötéssel, hogy a jótállási
igényt a készülék csomagolásában található
Jótállási Nyilatkozatban feltüntetett Braun
márkaszervizekben lehet érvényesíteni.
A garancia hatálya alól kivételt képeznek
azok a meghibásodások, amelyek a készülék
szakszerıtlen, vagy nem rendeltetésszerı
használatára vezethetŒk vissza, valamint
azok az apróbb hibák, amelyek a készülék
értékét, vagy használhatóságát nem
befolyásolják.
A garancia nem vonatkozik a gyorsan kopó,
rendszeresen cserélendŒ tartozékokra (pl.
Borotvaszita, kés, stb.)
A jótállási igény érvényesítésére vonatkozó
részletes tájékoztató a készülék csomagolásában található.
27
Page 28

Hrvatski
Naši proizvodi dizajnirani su tako da zadovoljavaju najviše standarde kvalitete, funkcionalnosti i dizajna. Nadamo se da ćete i Vi uživati
u korištenju svog novog Braun uređaja.
Upozorenje
Prije korištenja aparata, molimo pomno
pročitajte uputstva za korištenje.
• Noževi i nastavci (22a–c) su vrlo
•
•
•
•
•
•
•
•
•
•
•
•
•
Opis
1 Motorni dio
2 Regulator brzine
3 Prekidač za uključenje/isključenje
4 Turbo prekidač
5 Tipke za otpuštanje radnih dijelova
6 Osovina miksera
7 Mjenjačka kutija miksera
8 Nastavak za mlaćenje
9 Mjerna posuda
10 Nastavak za usitnjavanje
11 Gornji dio
12 Nož
13 Posuda usitnjavača
14 Protuklizna podloga/poklopac
15 Dodatak za usitnjavanje hrane (FP)
16 Nastavak za guranje
17 Poklopac
17a Spojka za motorni dio
17b Cijev za punjenje
28
oštri! Kako biste izbjegli ozljede
molimo noževima rukujte s najvećom
pažnjom.
Nije predvi∂eno da ovaj ure∂aj koriste djeca
ili osobe smanjenih fiziãkih ili mentalnih
sposobnosti, osim ako ih ne nadgleda
osoba odgovorna za njihovu sigurnost.
Opçenito, preporuãujemo da ovaj ure∂aj
drÏite van dosega djece, a kada ga koriste
pripazite da se ne igraju s njime.
Uređaj je konstruiran tako da zadovoljava
količinske potrebe prosječnog kućanstva.
Uvijek isključite uređaj prije sastavljanja,
rastavljanja, čišćenja ili spremanja.
Prije uključivanja u struju provjerite odgovara
li vaš napon, naponu otisnutom na dnu
uređaja.
Ne uranjajte osovinu miksera u tekućinu niti
ga vadite iz nje dok uređaj radi, posebno ne
radite s vrućim tekućinama.
Nikada nemojte motorni dio (1) ili njegov
nastavak (7) uranjati u vodu ili ih držati pod
tekućom vodom.
Mjerna posuda (9) može se ne koristiti u
mikrovalnim pećnicama.
Prije korištenja dodatka za usitnjavanje
hrane (15) provjerite da je spojka poklopca
pravilno zahvatila poklopac i da je nastavak
za guranje (16) na svom mjestu.
Ne umećite nikakve druge nastavke osim
nastavka za guranje u cijev za punjenje.
Uvijek isključite uređaj prije nego skinete
poklopac (17).
Poklopac (17) se može čistiti pod tekućom
vodom, ali ne uranjajte ga u vodu niti ga
perite u perilici posuďa.
Zdjela (18) se ne smije koristiti u mikrovalnoj
pećnici.
Braun električki uređaji zadovoljavaju
primjenljive sigurnosne standarde. Popravak
ili zamjenu mrežnog kabela smije vršiti samo
ovlašteno servisno osoblje. Neispravan,
nekvalificirani popravak može uzrokovati
značajne opasnosti za korisnika.
promjenljive brzine
17c Spojka poklopca
18 Zdjela
19 Protuklizna podloga (koristi se i kao
poklopac)
20 Noževi
21 Nastavak za miješanje tijesta
22 Držač noževa
22a Nastavak za sjeckanje
22b Nastavak za mljevenje (grubo)
22c Nastavak za mljevenje (fino)
Podešavanje brzine
Pritiskom na prekidač (3), radna brzina
odgovara podešenosti regulatora brzine (2).
Što je brzina veća, usitnjavanje je brže i finije.
Ipak, najveća brzina obrade može se postići
samo pritiskom na turbo prekidač (4). Turbo
prekidač možete koristiti i za trenutne jake
impulse bez da rukujete regulatorom brzine.
Ovisno o primjeni, preporučujemo sljedeće
podešenosti brzine:
Ručni mješač 1... turbo
Mikser 3... 15
Nastavak za
usitnjavanje pogledajte tablice brzina
na slikama „
Dodatak za
usitnjavanje pogledajte tablice brzina
na slikama ‰, Â
A Rad štapnim mikserom
Štapni mikser savršeno odgovara za pripravu
umaka, sokova, juha, majoneze i dječje hrane,
kao i za miješanje pića i mliječnih napitaka:
a) Uložite motorni dio (1) u osovinu miksera
(6) dok ne uskoči.
b) Stavite štapni mikser u posudu, potom
pritisnite prekidač (3) ili turbo prekidač (4).
c) Za otpuštanje osovine miksera nakon
uporabe, pritisnite tipke (5) i izvucite ju.
Štapnim mikserom možete raditi u mjernoj
posudi (9) i jednako tako dobro u bilo kojoj
drugoj posudi. Kod miješanja izravno u posudi
tijekom kuhanja, najprije maknite posudu
s peći radi zaštite Vašeg ručnog miksera od
pregrijavanja.
Primjer recepta: Majoneza
200–250 ml ulja,
1 jaje (žumanjak i bjelanjak),
1 jušna žlica limunovog soka ili octa,
soli i papra prema ukusu
Stavite sve sastojke u mjernu posudu prema
gore spomenutom redu. Stavite mikser na dno
mjerne posude. Pritiskom na turbo prekidač
(4), držite mikser u tom položaju dok ulje ne
emulgira. Potom ga lagano pomičite gore –
dolje, bez isključivanja, dok majoneza nije
dobro promiješana.
B Rad nastavkom za mlaćenje
Ovaj nastavak koristite samo za izradu
tučenog vrhnja, snijega od bjelanjka i smjese
za biskvit, te gotovih smjesa za deserte.
a) Uložite nastavak (8) u mjenjačku kutiju (7),
a potom u mjenjačku kutiju uložite motorni
dio (1) dok ne uskoči.
b) Stavite nastavak u posudu i tek tada
pritisnite prekidač za uključivanje (3).
c) Za otpuštanje, pritisnite tipke (5) i izvucite
mjenjačku kutiju. Tada izvucite iz mjenjačke
kutije izvucite nastavak.
Za najbolje rezultate ...
ne rabite mjernu posudu, već širu zdjelu,
•
pomičite nastavak u smjeru kazaljke na satu,
•
držeći ga malo nagnuto.
Page 29

Tučeno vrhnje:
Miješajte samo do 400 ml hladnog vrhnja (min.
30 % sadržaja masti, 4–8 °C).
Počnite s nižom brzinom «1» i dok miješate,
povećavajte brzinu do «15».
Snijeg od bjelanjka:
Miješajte samo do 4 bjelanjka.
Počnite sa srednjom brzinom «7» i dok tučete,
povećavajte brzinu do «15».
C Rad nastavkom za usitnjavanje
Nastavak za usitnjavanje (10) savršeno je
prikladan za usitnjavanje mesa, sira, luka,
začinskog bilja, češnjaka, čili-papričica
(s vodom), mrkve, oraha, lješnjaka, badema,
šljiva itd.
Kod usitnjavanja tvrđe hrane (npr. tvrdog sira)
korisitite turbo prekidač (4).
Napomena: Ne usitnjavajte vrlo tvrdu hranu,
poput muškatnih oraščića, kave u zrnu i
žitarica.
Prije usitnjavanja ...
narežite meso, sir, luk, češnjak, mrkvu, čili
•
i sl.
uklonite peteljke aromatičnog biljka, ljuske
•
od oraha i sl.
s mesa uklonite kosti, žile i hrskavicu.
•
Za najbolje rezultate, molimo slijedite preporučene brzine u uputama za preradu.
Sjeckanje (pogledajte ilustracije
a) Pažljivo odstranite plastičnu zaštitu s noža
(12). Pažnja: noževi su vrlo oštri! Uvijek
ih držite za gornji, plastični dio. Postavite
nož na središnju osovinu zdjele i okrenite
ga dok ne sjedne na mjesto. Uvijek držite
zdjelu na protukliznoj podlozi (14).
b) Stavite namirnice u zdjelu.
c) Na posudu usitnjavača stavite gornji dio
(11).
d) Umetnite motorni dio (1) na gornji dio (11)
dok ne sjedne na svoje mjesto.
e) Za upotrebu pritisnite prekidač (3) ili (4) na
motornom dijelu, a drugom rukom držite
zdjelu. Nastavak za sjeckanje ne koristite
duže od 2 minute.
f) Nakon upotrebe pritisnite tipku (5) i odvojite
motorni dio.
g) Zatim skinite i gornji dio.
h) Prije nego što izvadite hranu pažljivo izva-
dite nož okrećući ga i dižući ga.
i) Iz posude usitnjavača izvadite prerađenu
hranu. Protuklizna podloga služi i kao
poklopac posude usitnjavača.
Primjer recepta: Vanilija-med-šljive
(kao namaz ili punjenje za palačinke)
(koristite manji dodatak za usitnjavanje (10),
brzina: «turbo»)
U zdjelu stavite 60 g meda i 50 g šljiva te
usitnjavajte 10 sekundi, zatim dodajte 30 ml
vode (s okusom vanilije) te nastavite usitnjavati još 3 sekunde.
„)
D/E Rad sdodatkom za
usitnjavanje hrane
Veći dodatak za usitnjavanje (15) možete
koristiti za:
– sjeckanje i miješanje mekših namirnica
(pogledajte ilustracije ‰)
– miješanje tijesta (tijesto s najviše 250 g
brašna)
– sjeckanje na kriške i usitnjavanje tvrđih
namirnica (pogledajte ilustracije Â)
Sjeckanje (pogledajte ilustracije
Nož (20) je savršeno prikladan za usitnjavanje
mesa, sira, luka, aromatičnog bilja, češnjaka,
mrkve, oraha, lješnjaka, badema itd. Kod usitnjavanja tvrďe hrane rabite turbo prekidač (4).
Napomena: Ne usitnjavajte vrlo tvrdu hranu,
poput muškatnih oraščića, zrna kave i žitarica.
Prije usitnjavanja ...
narežite meso, sir, luk, češnjak, mrkvu, čili i
•
sl.
uklonite peteljke aromatičnog biljka, ljuske
•
od oraha i sl.
s mesa uklonite kosti, žile i hrskavicu.
•
a) Pažljivo odstranite plastičnu zaštitu s noža
(20). Pažnja: noževi su vrlo oštri! Uvijek ih
držite za gornji, plastični dio. Postavite nož
na središnju osovinu zdjele (18) i okrenite
ga dok ne sjedne na mjesto. Uvijek držite
zdjelu na protukliznoj podlozi (19).
b) Stavite namirnice u zdjelu.
c) Pričvrstite poklopac (17) na zdjelu tako da
je spojka poklopca (17c) postavljena uz
dršku zdjele. Poklopac ćete učvrstiti tako
da ga okrenete u smjeru kazaljke na satu
dok se ne zakači iznad drške zdjele (čut
ćete «klik»).
d) Umetnite motorni dio (1) u spojku za
motorni dio (17a) dok ne sjedne na svoje
mjesto. Nastavak za guranje (16) mora biti
na svom mjestu.
e) Za upotrebu pritisnite prekidač (3) ili (4) na
motornom dijelu, a drugom rukom držite
zdjelu.
f) Nakon upotrebe pritisnite tipku (5) i odvojite
motorni dio. Izvadite i nastavak za guranje.
g) Pritisnite spojku poklopca (17c), okrenite
poklopac (17) u smjeru suprotnom od
smjera kazaljke na satu kako biste ga
otkvačili i onda ga podignite.
h) Prije nego što izvadite hranu pažljivo izva-
dite nož okrećući ga i dižući ga.
Miješanje rijetkog tijesta
Koristeći nož (20) možete zamijesiti i rijetka
tijesta kao što su tijesto za palačinke i smjesa
za biskvit s najviše 250 g brašna.
Na primjer, pripremate li tijesto za palačinke
najprije ulijte tekućinu u vrč, potom dodajte
brašno i na kraju jaja. Pritisnite turbo prekidač
(4) i miješajte smjesu dok ne bude jednolika.
Miješanje tijesta
(Ilustracije
nastavka za miješanje tijesta.)
Nastavak za miješanje (21) savršeno je
prikladan za miješanje različitih vrsta tijesta
kao što su tijesto s kvascem ili prhko tijesto
Nastavak za miješanje tijesta stavite u zdjelu
•
(18).
U zdjelu zatim prvo stavite suhe sastojke.
•
Tekuće sastojke ulijevajte kroz otvor za
•
punjenje dok motor radi.
Nakon 1 minute miješanja, pustite motor da
•
se hladi 10 minuta.
Tijesto s kvascem (za pizzu, kruh, kolač)
Max. 250 g brašna plus ostali sastojci. Brzina
«15», maksimalno vrijeme miješanja: 1 minuta
U zdjelu uređaja prvo stavite brašno, a zatim
sve ostale sastojke osim tekućina. Tekućine
dodajte kroz otvor za punjenje dok motor radi.
Prhko tijesto
Max. 250 g brašna plus ostali sastojci. Brzina
«15», maksimalno vrijeme miješanja: 1 minuta
U zdjelu uređaja prvo stavite brašno, a zatim
sve ostale sastojke osim tekućina.
Maslac neka bude sobne temperature.
‰ odnose se i na primjenu
‰)
29
Page 30

Prestanite s miješanjem nekoliko trenutaka
nakon što se tijesto oblikuje u kuglu. Ako se
previše miješa tijesto će postati premekano.
Rezanje na kriške / kosanje (pogledajte
ilustracije
Koristeći pribor za rezanje na kriške (22a)
možete narezati na kriške krastavce, luk,
gljive, jabuke, mrkvu, rotkvicu, sirove krumpire,
tikvice, kupus i sl. Koristeći pribor za sjeckanje
(22b, 22c) možete iskosati jabuke, mrkvu,
sirove krumpire, ciklu, repu, kupus, sir (meki
do srednje tvrdi) i sl.
a) Postavite nož (22a–c) na držač noževa
b) Pričvrstite poklopac (17) na zdjelu tako da
c) Umetnite motorni dio (1) u spojku za
d) Namirnice ubacujte kroz cijev za punjenje.
e) Za upotrebu pritisnite prekidač (3) ili (4) na
f) Nakon upotrebe pritisnite tipku (5) i odvojite
g) Pritisnite spojku poklopca (17c), okrenite
h) Prije nego što izvadite hranu izvadite držač
Â)
(22) dok ne uskoči. Postavite nož na
središnju osovinu zdjele i okrenite ga dok
ne sjedne na mjesto.
je spojka poklopca (17c) postavljena uz
dršku zdjele. Poklopac ćete učvrstiti tako
da ga okrenete u smjeru kazaljke na satu
dok se ne zakači iznad drške zdjele (čut
ćete «klik»).
motorni dio (17a) dok ne sjedne na svoje
mjesto. Podesite brzinu prema preporukama na slici (j).
Nikad ne stavljajte prste u cijev za punjenje
dok je uređaj uključen. Uvijek koristite
nastavak za guranje namirnica kroz cijev.
motornom dijelu.
motorni dio.
poklopac (17) u smjeru suprotnom od
smjera kazaljke na satu kako biste ga
otkvačili i onda ga podignite.
noževa. Kako biste ga izvadili prvo ga
povucite na krajevima koji vire iz dna
držača noževa.
Jamstveni list
Jamstvo ne vrijedi za o‰teçenja nastala
neispravnom uporabom, normalnu
istro‰enost (npr. mreÏice ili bloka noÏa) i
nedostatke koji samo neznatno utjeãu na
vrijednost ili valjanost uporabe aparata.
Ovo jamstvo vrijedi u svakoj zemlji gdje su
proizvodi distribuirani od strane Brauna ili
sluÏbenog distributera.
Jamstvo ne vrijedi za o‰teçenja nastala
neispravnom uporabom, normalnu
istro‰enost i nedostatke koji samo neznatno
utjeãu na vrijednost ili valjanost uporabe
aparata. Jamstvo prestaje kod popravka
od strane neovla‰tene osobe ili uporabe
neoriginalnih dijelova umjesto Braun
rezervnih dijelova.
Jamstvo vrijedi samo uz predoãenje raãuna
i pravilno ispunjenog jamstvenog lista.
Braunov servis moÏete kontaktirati na broj
telefona 00 385 1 66 01 777.
Čišćenje uređaja
Motorni dio (1) i mjenjačku kutiju nastavka za
mlaćenje (7) čistite samo vlažnom krpom.
Poklopac (17) možete čistiti pod tekućom
vodom, ali ga nikad nemojte uroniti u vodu niti
prati u perilici posuďa.
Kad pripremate neke namirnice s jakom bojom
plastični dijelovi uređaja mogu se obojati.
Takve dijelove premažite biljnim uljem prije
čišćenja.
Dodaci
(dostupni u Braunovim servisnim centrima, ali
ne u svakoj zemlji)
BC: Nastavak za usitnjavanje, savr‰eno
•
prikladan za usitnjavanje velikih koliãina
kao i pripremanje frapea, rijetkih tijesta i
mljevenje kockica leda.
DrÏaã za zid
•
Podložno promjenama bez prethodne
obavijesti.
Molimo Vas da ne bacate ure∂aj u
kuçni otpad nakon prestanka njegovog
radnog vijeka. Ostaviti ga moÏete u
Braun servisnom centru ili na odgovarajuçim odlagali‰tima u Va‰oj zemlji.
30
Page 31

Slovenski
Naši izdelki so zasnovani tako, da ustrezajo
najvišjim standardom kakovosti, funkcionalnosti in dizajna. Želimo vam, da bi svoj novi
Braunov aparat z veseljem uporabljali.
Opozorilo
Pred prvo uporabo naprave natančno in
v celoti preberite navodila za uporabo.
• Rezila in nastavki (22a–c) so zelo
•
•
•
•
•
•
•
•
•
•
•
•
•
Opis
1 Enota z motorjem
2 Regulator hitrosti
3 Stikalo za vklop/izklop delovanja
4 Stikalo za turbo funkcijo
5 Tipki za sprostitev nastavkov
6 Nastavek za mešanje
7 Pogonski nastavek metlice
8 Metlica
9 Mešalna posoda
10 Sekljalnik
11 Zgornji del
12 Rezilo
13 Posoda sekljalnika
14 Nedrseč podstavek/pokrov
15 Nastavek za pripravo živil (FP)
16 Potisni nastavek
17 Pokrov
17a Pogonski nastavek za enoto
ostri! V izogib poškodbam jih uporabljajte zelo previdno.
Ta naprava ni namenjena, da bi jo
uporabljali otroci ali osebe z zmanj‰ano
fiziãno in umsko sposobnostjo, razen pod
nadzorom osebe odgovorne za njihovo
varnost. Priporoãamo vam, da napravo
hranite izven dosega otrok oziroma
zagotovite, da se otroci ne igrajo z njo.
Naprava je namenjena obdelavi običajnih
količin za potrebe gospodinjstva.
Napravo morate vedno izključiti električnega
omrežja, preden jo pustite brez nadzora
oziroma preden jo sestavite, razstavite,
očistite ali pospravite.
Pred uporabo naprave preverite, če napetost
vašega omrežja ustreza tisti, ki je navedena
na dnu naprave.
Ko s paličnim mešalnikom obdelujete vroče
tekočine, nastavka za mešanje ne smete
potopiti v tekočino ali ga odstraniti iz tekočine, ko je naprava vklopljena.
Enote z motorjem (1) in pogonskega nastavka metlice (7) ne smete čistiti pod tekočo
vodo ali ju potopiti v vodo.
Posoda (9) ni primerna za uporabo v mikrovalovni pečici.
Preden uporabite nastavek za pripravo živil
(15), se prepričajte, da je zaskočka pokrova
(17c) ustrezno zaprta in da je potisni nastavek (16) na svojem mestu.
Med obdelovanjem živil lahko v polnilno cev
vstavite samo potisni nastavek (16).
Preden odstranite pokrov (17), morate
napravo izklopiti.
Pokrov (17) lahko čistite pod tekočo vodo,
vendar ga ne smete potopiti v vodo ali ga
pomivati v pomivalnem stroju.
Posoda (18) ni primerna za uporabo v mikrovalovni pečici.
Braunove električne naprave so skladne
z veljavnimi varnostnimi predpisi. Popravila
ali zamenjavo priključne vrvice sme opraviti
le pooblaščeni serviser. Nepravilno ali
nestrokovno popravilo lahko ogrozi varnost
uporabnika.
(pri različnih hitrostih)
z motorjem
17b Polnilna cev
17c Zaskočka pokrova
18 Posoda
19 Nedrseči podstavek (služi tudi
kot pokrov)
20 Rezilo
21 Nastavek za gnetenje
22 Držalo za nastavke
22a Nastavek za rezanje
22b Nastavek za strganje (grobo)
22c Nastavek za strganje (fino)
Nastavitev hitrosti
Ko pritisnete na stikalo (3), hitrost delovanja
naprave ustreza nastavitvi regulatorja hitrosti
(2). Tem višja je nastavitev hitrosti, tem hitreje
in bolj drobno sesekljano bo živilo.
Če želite uporabiti najvišjo hitrost delovanja,
pritisnite na stikalo za turbo funkcijo (4). Na
stikalo za turbo funkcijo lahko pritisnete tudi,
kadar želite takoj doseči močne sunke, ne da
bi morali z regulatorjem spreminjati nastavitev
hitrosti.
Priporočene nastavitve hitrosti glede na
uporabljeni nastavek:
Palični mešalnik 1... turbo
Metlica 3... 15
Sekljalnik glejte tabelo
hitrosti na sliki „
Nastavek za
pripravo živil glejte tabelo
hitrosti na sliki ‰, Â
A Uporaba paličnega mešalnika
Palični mešalnik je namenjen pripravi omak,
juh, majoneze in hrane za dojenčke ter raznih
mešanic pijač in mlečnih napitkov:
a) Enoto z motorjem (1) vstavite v nastavek
za mešanje (6), tako da se zaskoči.
b) Palični mešalnik postavite navpično
v posodo, nato pritisnite stikalo (3) ali
stikalo turbo (4).
c) Po uporabi sprostite mešalni nastavek
s pritiskom na tipki (5) in ga odstranite.
Palični mešalnik lahko uporabljate v mešalni
posodi (9) ali v kateri koli drugi posodi. Če
ga želite uporabiti neposredno v posodi med
kuhanjem, posodo najprej odstavite s štedilnika, da se mešalnik ne bi preveč segrel.
Recepti: Majoneza
200–250 ml olja
1 jajce (rumenjak in beljak)
1 jedilna žlica limoninega soka ali kisa
sol in poper po okusu
Vse sestavine dajte v mešalno posodo po
zgoraj navedenem vrstnem redu. Palični
mešalnik potisnite na dno mešalne posode.
Pritisnite stikalo za turbo funkcijo (4), palični
mešalnik pa zadržite v tem položaju, dokler
olje ne emulgira. Paličnega mešalnika ne
izključite, temveč ga počasi pomikajte navzgor
in navzdol, da se sestavine dobro premešajo.
B Uporaba metlice za stepanje
Metlico lahko uporabljate le za stepanje
smetane in beljakov ter za mešanje biskvitnega testa in pripravljenih mešanic za sladice:
a) Metlico (8) vstavite v pogonski nastavek
(7), nato pa enoto z motorjem (1) vstavite
v pogonski nastavek metlice, tako da se
zaskoči.
b) Metlico najprej postavite v posodo, šele
nato vključite mešalnik s pritiskom na
stikalo (3).
31
Page 32

c) Pogonski nastavek metlice sprostite tako,
da pritisnete na tipki (5) in ga snamete.
Nato metlico odstranite iz nastavka.
Nasveti za optimalne rezultate ...
uporabite široko posodo (skledo),
•
metlico držite v rahlo nagnjenem položaju in
•
jo pomikajte v smeri urinega kazalca.
Stepena smetana:
Hkrati stepajte le do 400 ml ohlajene smetane
(z min. 30 % maščobe, 4–8 °C).
Začnite z nižjo nastavitvijo hitrosti «1», nato pa
med stepanjem povečajte hitrost na nastavitev
«15».
Sneg iz beljakov:
Hkrati stepajte največ 4 beljake.
Začnite s srednjo nastavitvijo hitrosti «7», nato
pa med stepanjem povečajte hitrost na nastavitev «15».
C Uporaba sekljalnika
Sekljalnik (10) je nadvse primeren za sekljanje
mesa, sira, čebule, zelišč, česna, čilijev
(z vodo), korenja, orehov, lešnikov, mandljev,
suhih sliv itn.
Pri obdelavi trdih živil (npr. trdega sira) uporabljajte tipko turbo (4).
OPOZORILO: Sekljalnik ni primeren za
obdelavo izjemno trdih živil, na primer ledenih
kock, muškatnega oreščka ter kavnih ali žitnih
zrn.
Pred uporabo sekljalnika …
meso, sir, čebulo, česen, korenje in ohlajeno
•
hrano najprej narežite,
odstranite stebla zelenjave in lupine
•
oreščkov,
z mesa odstranite kosti, kite in hrustanec.
•
Za kar najboljše rezultate, uporabite priporočene nastavitve hitrosti, ki so napisane v tabeli
(j) za obdelavo hrane.
Sekljanje (glejte sliko pri sekciji
a) Z rezila previdno odstranite plastično
zaščito (12). Opozorilo: Rezilo je zelo ostro!
Vedno ga primite za zgornji plastični del.
Rezilo namestite na sredinski zatič posode
in ga zavrtite, da se zaskoči. Posodo vedno
postavite na nedrseči podstavek (14).
b) V posodo sekljalnika vstavite živilo oziroma
živila.
c) Zgornji del (11) namestite na posodo
sekljalnika.
d) V zgornji del sekljalnika (11) vstavite enoto
z motorjem (1), tako da se zaskoči.
e) Sekljalnik vključite s pritiskom na tipko (3)
ali (4). Med uporabo z eno roko držite
enoto z motorjem, z drugo pa pridržite
posodo sekljalnika. Sekljalnika ne smete
neprekinjeno uporabljati več kot 2 minuti.
f) Po uporabi pritisnite gumb za sprostitev (5),
da odstranite enoto z motorjem.
g) Nato snemite zgornji del sekljalnika.
h) Previdno odstranite tudi rezilo.
i) Iz posode vzemite sesekljano hrano.
Nedrseč podstavek služi tudi kot neprodu-
šen pokrov za posodo sekljalnika.
Recept: Vanilija – med – suhe slive
(kot nadev za palačinke ali namaz)
(uporabite nastavek za sekljanje (10), hitrost:
«turbo»)
V posodo sekljalnika vstavite 60 g kremnega
medu in 50 g suhih sliv ter sekljajte 10 sekund,
nato dodajte 30 ml vode (z okusom vanilije) in
sekljajte še 3 sekunde.
„)
D/E Uporaba nastavkov za
pripravo živil
Nastavek za predelavo živil (15) lahko
uporabite za:
– sekljanje in mešanje (glejte sliko pri
sekciji ‰)
– gnetenje (testo, ki vsebuje do 250 g moke)
– rezanje in strganje (glejte sliko pri
sekciji Â)
Sekljanje (glejte sliko pri sekciji
Rezilo (20) je primerno za sekljanje mesa,
sira, čebule, zelišč, česna, korenja, orehov,
lešnikov, mandljev itn. Za sekljanje trdih živil
pritisnite na stikalo turbo (4).
OPOZORILO: Sekljalnik ni primeren za obdelavo izjemno trdih živil, na primer muškatnega
oreščka, kavnih zrn ali žitnih zrn.
Pred uporabo sekljalnika …
•
meso, sir, čebulo, česen, korenje ali čili
najprej narežite,
•
zeliščem odstranite stebla, orehom
odstranite lupino,
•
mesu odstranite kosti, kite in hrustanec.
a) Z rezila (20) previdno odstranite plastično
zaščito. Pozor: Rezilo je zelo ostro! Vedno
ga primite za zgornji plastični del. Rezilo
namestite na os posode (18) in ga zavrtite,
da se zaskoči na svoje mesto. Posodo
vedno postavite na nedrseč podstavek
(19).
b) V posodo sekljalnika dajte živilo.
c) Pokrov (17) pritrdite na posodo s pomočjo
zaskočke (17c), ki mora biti poravnana z
ročajem posode. Pokrov zaprite tako, da ga
zavrtite v smeri urinega kazalca, dokler ne
slišite «klik», da se je zaskočka nad roča-
jem zaskočila.
d) V pogonski nastavek (17a) vstavite enoto
z motorjem (1), tako da se zaskoči.
Prepričajte se, da je potisni nastavek na
svojem mestu.
e) Za uporabo pritisnite stikalo (3) ali (4) na
enoti z motorjem in z drugo roko primite
ročaj posode.
f) Po koncu uporabe pritisnite na tipki (5), da
odstranite enoto z motorjem. Odstranite
potisni nastavek.
g) Pokrov lahko sprostite in odprete tako, da
istočasno pritiskate zaskočko pokrova
(17c) in zavrtite pokrov (17) v nasprotni
smeri urinega kazalca.
h) Preden iz posode vzamete sesekljana
živila, morate iz nje previdno vzeti rezilo.
To storite tako, da ga zavrtite in izvlečete.
Priprava rahlega testa
Z rezilom (20) lahko pripravljate tudi rahlo
testo, kot sta na primer masa za palačinke ali
mešanica testa za pecivo, ki je narejena iz do
250 g moke.
Za pripravo mase za palačinke, na primer,
najprej v vrč nalijte vso tekočino, nato dodajte
moko, na koncu pa še jajca. Pritisnite na
stikalo turbo (4) in zamešajte gladko testo.
Gnetenje testa
(Slika pri sekciji
nastavka za gnetenje)
Nastavek za gnetenje (21) je idealen za
gnetenje različnih tipov testa, kot je kvašeno
ali listnato testo (na osnovi 250 g moke).
Položite nastavek za gnetenje v posodo
•
(18).
V posodo vstavite najprej suhe sestavine.
•
Tekočine dodajajte le skozi cev za polnjenje
•
medtem, ko motor deluje.
Po 1 minuti gnetenja, naj se motor aparata
•
ohlaja 10 minut.
‰ se nanaša tudi na uporabo
‰)
32
Page 33

Kvašeno testo (za pico, kruh, pecivo)
Max. 250 g moke s primesmi. Hitrost «15»,
maksimalni čas gnetenja: 1 minuta.
V posodo aparata za predelavo živil vstavite
najprej moko, nato dodajte druge sestavine
razen tekočin. Tekočine dodajte skozi cev za
polnjenje medtem, ko motor deluje.
Listnato testo (za pecivo)
Max. 250 g moke s primesmi. Hitrost «15»,
maksimalni čas gnetenja: 1 minuta.
V posodo aparata za predelavo živil vstavite
najprej moko, nato dodajte še druge sestavine.
Uporabite maslo sobne temperature.
Z gnetenjem prenehajte kmalu po tem, ko
testo naredi kroglo. Zaradi prekomernega
gnetenja lahko testo postane premehko.
za pripravo me‰anih napitkov, rahlega testa
in drobljenja ledenih kock.
Stenski obe‰alnik
•
Pridržujemo si pravico do sprememb brez
predhodnega opozorila.
OdsluÏene naprave ne smete odvreãi
skupaj z gospodinjskimi odpadki.
Odnesite jo v Braunov servisni center
ali na ustrezno zbirno mesto v skladu
z veljavnimi predpisi.
Rezanje / strganje (glejte sliko pri sekciji
S pomočjo nastavka za rezanje (22a) lahko
razrežete na primer kumarice, čebulo, gobice,
jabolka, korenje, redkvice, surov krompir,
bučke, zelje.
S pomočjo nastavka za strganje (22b, 22c)
lahko drobite na primer jabolka, korenje, surovi
krompir, peso, zelje, sir (mehak ali srednje
mehak).
a) Nastavek (22a–c) namestite v držalo za
nastavke (22) in poskrbite, da se zaskoči.
Držalo za nastavke namestite na os
posode in ga zavrtite, da se zaskoči na
svoje mesto.
b) Pokrov (17) pritrdite na posodo s pomočjo
zaskočke (17c), ki mora biti poravnana
z ročajem posode. Pokrov zaprite tako, da
ga zavrtite v smeri urinega kazalca, dokler
ne slišite «klik», da se je zaskočka nad
ročajem zaskočila.
c) V pogonski nastavek vstavite enoto z mo-
torjem, tako da se zaskoči. Hitrost delovanja nastavite v skladu s priporočenimi
vrednostmi na sliki (j).
d) V posodo skozi polnilno cev vstavite živila,
ki jih želite obdelati. Kadar je aparat vklopljen, nikoli ne smete posegati v potisno
cev. Za potiskanje živil v polnilno cev lahko
uporabljate samo potisni nastavek (16).
e) S pritiskom na stikalo (3) ali (4) lahko
vklopite enoto z motorjem.
f) Po koncu uporabe pritisnite na tipki (5), da
odstranite enoto z motorjem.
g) Pokrov lahko sprostite in odprete, tako da
istočasno pritiskate zaskočko pokrova
(17c) in zavrtite pokrov (17) v nasprotni
smeri urinega kazalca.
h) Preden iz posode vzamete obdelana živila,
morate iz nje vzeti držalo za nastavke.
Nastavek odstranite tako, da ga potisnete
navzgor na tistem delu, ki izstopa na
spodnjem koncu držala za nastavke.
Â)
Garancija
Za izdelek valja dvoletna garancija, ki zaãne
veljati z datumom nakupa. V ãasu trajanja
garancije bomo brezplaãno odpravili vse
napake, ki so posledica slabega materiala
ali izdelave, bodisi s popravilom bodisi
z zamenjavo celega izdelka.
Ta garancija velja v vsaki drÏavi, kjer je
izdelek dobavljen od BRAUN ali njegovega
poobla‰ãenega distributerja.
Garancija ne pokriva po‰kodb, ki so posledica nepravilne uporabe, normalne obrabe ali
uporabe in tudi ne napak, ki v zanemarljivi
meri vplivajo na vrednost ali delovanje
aparata. Garancija preneha veljati, ãe
popravilo izvr‰i nepoobla‰ãena oseba
oziroma, ãe pri popravilu niso uporabljeni
originalni Braunovi nadomestni deli.
Za popravilo v garancijskem roku izroãite
ali po‰ljite kompleten izdelek z raãunom
poobla‰ãenemu Braunovemu servisu.
Za informacije pokliãite poobla‰ãeni servis
ISKRA PRINS tel. + 386 1 476 98 00.
Čiščenje aparata
Enoto z motorjem (1) in pogonski nastavek
metlice (7) lahko očistite samo z vlažno krpo.
Pokrov (17) lahko čistite pod tekočo vodo,
vendar ga ne smete potopiti v vodo ali ga
pomivati v pomivalnem stroju.
Če obdelujete živila intenzivnih barv (npr.
korenje), se plastični deli naprave lahko obarvajo. V tem primeru plastične dele pred čiščenjem obrišite s krpico, na katero ste nanesli
malo rastlinskega olja.
Dodatni nastavki
(na voljo v Braunovih servisnih centrih,
odvisno od drÏave)
BC: Nastavek za sekljanje, ki je nadvse
•
primeren za sekljanje veãjih koliãin kot tudi
33
Page 34

Română
Produsele Braun sunt proiectate să întrunească cele mai înalte standarde de calitate,
funcţionalitate şi design. Sperăm să vă
bucuraţi pe deplin de noul d-voastră aparat
Braun.
Atenţie!
Înainte de a folosi acest produs, vă rugăm
să citiţi cu atenţie toate instrucţiunile.
• Cuţitele şi accesoriile (22a-c) sunt
•
•
•
•
•
•
•
•
•
•
•
•
•
Descriere
1 Motor
2 Selector viteză
3 Comutator pornit/oprit pentru diferite
4 Comutator pentru viteza turbo
5 Butoane pentru demontare
6 Axul mixerului
7 Mecanism pentru fixarea telului
8 Tel
9 Vas gradat cu capac
10 Accesoriu pentru tocat
11 Parte superioară
12 Cuţit
34
foarte ascuţite! Pentru a evita producerea de accidente recomandăm
manipularea cu multă atenţie a
cuţitelor.
Acest produs nu este destinat uzului copiilor
sau al persoanelor cu handicap fizic sau
mental, cu excepøia cazului când sunt
supravegheaøi de o persoanå responsabilå
pentru siguranøa lor. În general, vå
recomandåm så øineøi acest produs într-un
loc în care copii nu au acces. În general, vå
recomandåm så nu låsaøi aparatul la
îndemâna copiilor.
Acest produs a fost conceput pentru uz
casnic.
Întotdeauna scoateţi aparatul din priză
înainte de asamblare, spălare sau atunci
când nu îl folosiţi.
Înainte de a conecta aparatul la priză, verificaţi dacă voltajul prizei este acelaşi cu cel
înscris pe aparat.
Când folosiţi mixerul în lichide fierbinţi, aveţi
grijă să îl opriţi în momentul introducerii sau
scoaterii aparatului din vas, pentru a evita
stropirea.
Nu ţineţi sub jet de apă motorul (1) sau
mecanismul de fixare a telului (7) şi nici nu
le scufundaţi în apă.
Vasul gradat (9) nu poate fi folosit în cuptorul cu microunde.
Înainte de a utiliza accesoriul pentru prepararea alimentelor (15), asiguraţi-vă că este
închis corespunzător şi că dispozitivul de
împingere a alimentelor (16) este bine fixat.
Nu introduceţi în tubul din capacul pentru
prepararea alimentelor alte obiecte decât
dispozitivul de împingere a alimentelor (16)
Opriţi aparatul înainte de ridicarea capacului
(17).
Capacul (17) se poate spăla sub jet de apă,
însă nu trebuie scufundat în apă sau introdus în maşina de spălat vase.
Recipientul (18) nu poate fi folosit în cuptorul
cu microunde.
Aparatele electrice Braun întrunesc
standardele corespunzătoare de siguranţă în
utilizare. Reparaţiile sau înlocuirea cablului
electric trebuie efectuate numai de către
personalul autorizat. Reparaţiile efectuate de
persoane necalificate pot expune utilizatorul
unor riscuri majore.
viteze
13 Recipient/vas
14 Suport împotriva alunecării (poate fi
folosit şi în loc de capac)
15 Accesoriu pentru prepararea alimentelor
(FP)
16 Dispozitiv de împingere
17 Capac
17a Cuplaj pentru motor
17b Tub de umplere
17c Închidere de siguranţă
18 Recipient (vas)
19 Suport împotriva alunecării (poate fi
folosit şi în loc de capac)
20 Cuţit
21 Accesoriu pentru aluat
22 Suport pentru cuţite
22a Accesoriu pentru tăiat rondele
22b Răzătoare (aspră)
22c Răzătoare (ascuţită)
Selectarea vitezei
Când acţionaţi comutatorul (3) în poziţia pornit,
viteza de procesare corespunde celei fixate cu
selectorul de viteza (2). Cu cât viteza selectată
este mai mare, cu atât procesul de maruntire
va fi mai rapid.
Pentru a obţine viteza maximă de rocesare,
acţionaţi butonul pentru viteza turbo (4). De
asemenea, butonul turbo se poate acţiona
pentru impulsuri puternice, de moment, fără
a acţiona selectorul de viteză. În funcţie de
utilizare, se recomandă următoarele viteze:
Mixer 1…turbo
Tel 3...15
Accesoriu pentru tocat –
consultati tabelele din imaginile „.
Accesoriu pentru prepararea alimentelor –
consultati tabelele din imaginile ‰, Â.
A Cum funcţionează mixerul
Mixerul este destinat preparării sosurilor,
supelor, maionezelor şi preparatelor pentru
copii, precum si pentru amestecarea băuturilor
si a milkshake-urilor:
a) Introduceţi unitatea motorului (1) în axului
mixerului (6) până la fixare.
b) Introduceţi mixerul în vas apoi apăsaţi
butonul pornit/oprit (3) sau butonul turbo
(4).
c) Pentru a demonta mixerul, apăsaţi butoa-
nele (5) şi trageţi în afară.
Puteţi utiliza mixerul în vasul gradat (9) şi
de asemenea în orice alt tip de vas. Când
amestecaţi direct în vasul în care gătiţi, mai
întâi îndepărtaţi vasul de pe aragaz, pentru a
proteja produsul de supraîncălzire.
Exemple de reţete: Maioneză
200–250 ml ulei
1 ou (gălbenuş şi albuş)
1 linguriţă suc de lămâie sau oţet
sare şi piper după gust
Introduceţi toate ingredientele în paharul
gradat, în ordinea de mai sus. Introduceţi
mixerul în vas. Ţineţi apăsat pe viteza turbo
(4) până la emulsionarea uleiului, apoi, fără
să opriţi motorul, efectuaţi mişcări repetate
sus-jos până când maioneza este bine
omogenizată.
B Cum funcţionează telul
Folosiţi telul numai pentru a bate frisca şi
albuşurile de ouă sau pentru amestecarea
cremelor moi şi a deserturilor semi-preparate.
Page 35

a) Introduceţi telul (8) în mecanismul pentru
fixarea telului (7), apoi introduceţi motorul
(1) în mecanismul pentru fixarea telului
până la fixare.
b) Introduceţi telul în vas şi numai după aceea
acţionaţi comutatorul (3) pentru a-l pune în
funcţiune.
c) Pentru demontare, apăsaţi butoanele (5) şi
scoateţi mecanismul de fixare a telului.
Scoateţi apoi telul.
Pentru rezultate optime ...
folosiţi un vas cu deschidere mai largă decât
•
vasul gradat,
mişcaţi telul în sensul acelor de ceasornic şi
•
ţineţi-l usor înclinat.
mixerului şi amestecaţi timp de 10 secunde,
apoi adaugaţi 30 ml apă (cu aromă de vanilie)
şi amestecaţi din nou timp de 3 secunde.
D/E Cum funcţionează accesoriul
pentru prepararea alimentelor
Puteţi folosi accesoriul destinat preparării
alimentelor (15) pentru:
– Tăiere şi amestecare (a se vedea imaginea
din secţiunea
– Frământare (pornind de la maxim 250 g
făină)
– Tranşare peşte (a se vedea imagine
secţiunea Â)
‰)
Frişcă:
Amestecaţi maxim 400 ml cremă rece (frişcă)
(min. 30% grăsime, 4–8 °C). Începeţi cu viteza
minimă «1» şi apoi creşteţi treptat până la cea
maximă «15».
Albuş bătut spumă:
Amestecţi maxim 4 albuşuri de ou. Începeţi cu
o viteză medie «7» şi apoi creşteţi treptat până
la cea maximă «15».
C Cum funcţionează accesoriul
pentru tocat
Accesoriul pentru tocat (10) este potrivit pentru
a toca carne, bânză, ceapă, verdeaţă, usturoi,
chili, morcovi, arahide, alune, migdale, prune
uscate etc. Pentru a tăia alimentele tari utilizaţi
butonul turbo (4).
Notă: Nu tăiaţi produse extrem de tari, cum ar
fi boabe de cafea şi boabe de cereale.
Înainte de a toca…
tăiaţi în bucăţi mai mari carnea, brânza,
•
ceapa, usturoiul, morcovii, chili,
îndepărtaţi tulpinile verdeţurilor, decojiţi
•
arahidele,
îndepărtaţi oasele, tendoanele şi zgârciurile
•
de la carne.
Pentru a obţine rezultate optime, ţineţi cont de
recomandările pentru selectarea vitezei din
tabel (j).
Tocarea (a se vedea imagine secţiunea „)
a) Scoateţi cu atenţie învelişul din plastic al
cuţitului (12). Atenţie! Cuţitul este foarte
ascuţit. Apucaţi-l întotdeauna de partea
superioară din plastic. Plasaţi cuţitul în axul
din centrul vasului pentru tăiat (13) şi rotiţi-l
până la fixare. Aşezaţi întotdeauna vasul
pe suportul împotriva alunecării (14).
b) Introduceţi alimentele în vas.
c) Aşezaţi partea superioară (11) deasupra
vasului.
d) Introduceţi unitatea motorului (1) în partea
superioara (11) şi apăsaţi până la fixare.
e) Pentru pornire, acţionaţi comutatorul (3)
sau butonul (4). În timpul utilizării, sustineţi
motorul cu o mână iar cu cealaltă mână
susţineţi vasul. Nu utilizaţi accesoriul
pentru tocat mai mult de 2 minute.
f) După utilizare, apăsaţi butoanele (5) pentru
a demonta unitatea motorului (1).
g) Îndepărtaţi partea superioară.
h) Îndepărtaţi cu atenţie cuţitul.
i) Scoateţi alimentele tocate din vas. Suportul
împotriva alunecării poate fi folosit şi în loc
de capac.
Exemple de reţete: Cremă cu vanilie, miere şi
prune
(folosiţi accesoriul (10), viteza: «turbo»)
Introduceţi 60 g miere şi 50 g prune în vasul
Dispozitivul pentru tăiat (a se vedea imagine
secţiunea ‰)
Cuţitul (20) este perfect potrivit pentru a tăia în
bucăţi carne, brânză, ceapă, verdeţuri, usturoi,
morcovi, arahide, alune, migdale etc. Pentru a
tăia alimentele tari utilizaţi butonul turbo (4).
Notă: Nu tăiaţi produse extrem de tari, cum ar
fi boabe de cafea şi boabe de cereale.
Înainte de a tăia …
tăiaţi în bucăţi mai mari carnea, brânza,
•
ceapa, usturoiul, morcovii,
îndepărtaţi tulpinile verdeţurilor, decojiţi
•
arahidele,
îndepărtaţi oasele, tendoanele şi zgârciurile
•
de la carne.
a) Scoateţi cu atenţie învelişul din plastic al
cuţitului (20). Atenţie! Cuţitul este foarte
ascuţit. Apucaţi-l întotdeauna de partea
superioară din plastic. Plasaţi cuţitul în axul
din centrul vasului pentru tăiat (18) şi rotiţi-l
până la fixare. Aşezaţi întotdeauna vasul
pe suportul împotriva alunecării (19).
b) Introduceţi alimentele în vas.
c) Aşezaţi capacul (17) deasupra vasului
folosind sistemul de închidere (17c), care
se află chiar lângă mânerul vasului. Pentru
a închide capacul, învârtiţi-l în sensul
acelor de ceasornic, până când se va auzi
un clic.
d) Introduceţi unitatea motorului (1) în cuplaj
(17a) şi apăsaţi până la fixare. Asiguraţi-vă
ca dispozitivul de împingere (16) se află la
locul său.
e) Pentru pornire, acţionaţi cu o mână comuta-
torul (3) sau butonul (4), iar cu cealaltă
mână susţineţi vasul.
f) După utilizare, apăsaţi butoanele (5) pentru
a demonta unitatea motorului. Îndepărtaţi
dispozitivul de împingere.
g) Apăsaţi sistemul de închidere (17c) şi rotiţi
capacul (17) în sensul contrar acelor de
ceasornic pentru a-l putea îndepărta.
h) Înainte de a scoate alimentele din vas,
îndepărtaţi cu atenţie cuţitul.
Amestecarea cremelor moi
Folosind cuţitul (20), se pot amesteca de
asemenea creme uşoare ca cele pentru clătite
sau prăjituri, care conţin maxim 250 g de făină.
Amestecul pentru clătite: introduceţi întâi
lichidele în vas, apoi adaugaţi făina şi la final
ouăle. Apăsaţi butonul turbo (4) şi amestecaţi
până se obţine o compoziţie cremoasă.
Frământare aluat
(Imaginea din secţiunea
pentru utilizarea accesoriului pentru frământarea aluatului)
Accesoriu (21) este ideal pentru frământarea
diferitelor tipuri de aluat, precum aluatul cu
drojdie sau cel pentru produse de patiserie
(pornind de la maxim 250 g făină)
‰ este valabilă şi
35
Page 36

Plasaţi accesoriul pentru aluat în axul din
•
centrul vasului (18).
Introduceţi alimentele în vas.
•
Introduceţi lichidele doar prin tubul de
•
umplere, atunci când motorul este pornit.
După 1 minut timp de frământare, aşteptaţi
•
10 minute pentru a se răci motorul.
Conform Hotãrârii nr. 672 din 19 iulie 2001
privind stabilirea conditiilor de introducere pe
piatã a aparatelor electrocasnice în functie de
nivelul zgomotului transmis prin aer, valoarea
de zgomot dB(A) pentru acest aparat este de
63 dB(A).
Aluat cu drojdie (pentru pizza, pâine, chec)
Maxim 250 g făină plus ingrediente.
Viteza: «15»; timp maxim de frământare:
1 minut.
Introduceţi mai întâi făina în vas, apoi adăugaţi
celelalte ingrediente cu excepţia lichidelor.
Ulterior, adăugaţi lichidele prin tubul de
umplere în timp ce motorul este pornit.
Aluat (pentru produse de patiserie)
Maxim 250 g făină plus ingrediente.
Viteza: «15»; timp maxim de frământare:
1 minut.
Introduceţi mai întâi făina în vas, apoi adăugaţi
celelalte ingrediente. Utilizaţi unt la temperatura camerei. Opriţi frământarea aluatului la
scurt timp după ce acesta a luat forma unei
mingii. Aluatul va deveni prea moale după o
frământare excesivă.
Tăierea în rondele/răzuire (a se vedea imagine secţiunea
Accesoriul pentru tăiat rondele (22a) este
potrivit pentru a tăia rondele castraveţi, ceapă,
ciuperci, mere, morcovi, cartofi cruzi, dovlecei,
varză. Cuţitul pentru răzuire (22b, 22c) poate fi
folosit pentru a răzui mere, morcovi, cartofi
cruzi, sfeclă, varză, brânză.
a) Ataşaţi accesoriul (22a–c) în dispozitivul
(22). Aşezaţi suportul pentru cuţit în centrul
vasului şi rotiţi până la fixare.
b) Ataşaţi capacul (17) la vas utilizând închi-
derea de siguranţă (17c). Pentru a închide
capacul, rotiţi-l în sensul acelor de ceasornic, până când se aude un clic.
c) Introduceţi unitatea motorului în mecanis-
mul pentru tăiat şi apăsaţi până la fixare.
Selectaţi viteza conform recomandărilor din
tabelul (j).
d) Introduceţi alimentele în tub. Nu puneţi
niciodată mâna în tub dacă aparatul se află
în funcţiune. Folosiţi întotdeauna dispozitivul de împingere (16).
e)
Pentru pornire, acţionaţi butonul (3) sau (4).
f) După utilizare, apăsaţi butonul (5), pentru
a înlătura unitatea motorului.
g) Apăsaţi închiderea de siguranţă (17c) şi
rotiţi capacul (17) în sensul contrar acelor
de ceasornic pentru a-l înlătura.
h) Înainte de a scoate alimentele din vas,
îndepărtaţi suportul de cuţite.
Â)
Pot fi modificate fårå înµtiinøare prealabilå.
A nu se arunca produsul împreună cu
deşeurile menajere; a se preda la
centrele de colectare specializate.
Garanøie
Acordåm produsului o garanøie de doi ani
începând cu data cumpårårii. În perioada
de garanøie eliminåm, gratuit, orice defect al
produsului rezultat dintr-un viciu al materialelor
sau datoritå execuøiei, putem alege fie pentru
repararea fie pentru înlocuirea completå a
aparatului.
Aceastå garanøie se extinde în fiecare øarå
unde aparatul este furnizat de compania
Braun sau de distribuitorii såi.
Aceastå garanøie nu acoperå situaøiile
urmåtoare: defectårile datorate utilizårii
necorespunzåtoare, uzura normalå sau
defectele care au un efect neglijabil asupra
valorii sau utilizårii aparatului µi permit
utilizarea acestuia aµa cum este. Garanøia
devine nulå dacå reparaøia este realizatå de
persoane neautorizate µi dacå nu sunt utilizate
piese originale Braun pentru reparaøie.
Pentru reparaøii în perioada de garanøie,
predaøi sau trimiteøi unui centru de reparaøii
autorizat Braun, aparatul complet µi chitanøa
de vânzare.
Curăţarea
Curăţaţi unitatea motorului (1) şi mecanismul
de fixare a telului (7) numai cu o cârpă umedă.
Capacul (17) poate fi clătit sub jet de apă; nu-l
scufundaţi în apă.
Dacă se procesează alimente colorate (de ex.
morcovii), componentele din plastic se pot
păta. Se recomandă ca aceste componente
să se şteargă cu ulei vegetal înainte de a le
curăţa.
Accesorii
(disponibile la Centrele Service Braun de
Asistenţă pentru Clienţi).
BC: Accesoriu pentru tăiere, destinat unor
•
cantităţi mari sau pentru a prepara milkshakeuri şi pentru a tăia cuburi de gheaţă
Dispozit pentru montare pe perete
•
36
Page 37

Türkçe
Ürünlerimiz kalite, kullanım ve tasarımda en
yüksek standartlara ulaşabilmek üzere tasarlanmıştır. Yeni Braun ürününüzden memnun
kalacağınızı umarız.
Uyarı
Cihazı kullanmaya başlamadan önce lütfen
kullanım kılavuzunu dikkatlice ve eksiksiz
okuyunuz.
• Bıçaklar ve ataçmanlar(22a–c) çok
•
•
•
•
•
•
•
•
•
•
•
•
•
Tanımlama
1 Motor Kısmı
2 Değişken hız ayarlayıcı
3 Değişebilir hız ayarı için açma/kapama
4 Turbo hız düğmesi
5 Çalışan parçaları çıkarma düğmesi
6 Blendır Şaftı
7 Çırpıcı dişli kutusu
8 Çırpıcı
9 Ölçüm kabı
10 Doπray∂c∂
11 Üst bölüm
12 B∂çak
13 Doπray∂c∂ kasesi
14 Kaymay∂ önleyen taban/kapak
15 Yemek hazırlama (FP) ataçmanı
16 tici
17 Kapak
keskindirler! Yaralanmalara karşı,
lütfen bıçakları çok dikkatli bir şekilde
tutun.
Bu aygıt sorumlu bir kiµinin gözetiminde
olmaksızın çocukların ve fiziksel yada ruhsal
engelli kiµilerin kullanmasına uygun de©ildir.
Aygıtınızı çocukların ulaµabilece©i yerlerden
uzak tutmanızı öneririz. Çocukların cihazla
oynamasını engellemek için gözetim altında
tutunuz.
Cihaz normal ev kullanım miktarlarına uygun
olarak üretilmiştir.
Cihazı kullanmanız sona erdiğinde,
parçalarını çıkarıp takarken, temizlerken ve
muhafaza ederken daima fişten çekiniz.
Cihazı prize takmadan önce, şebeke cereyan geriliminin, cihazın altında yazılı olan
voltaj ile uygunluğunu kontrol ediniz.
El blendırı ataçmanını özellikle sıcak
sıvıların içinde kullanacağınız zaman cihaz
açıkken blendır şaftını sıvının içine batırmayınız ya da sıvıdan çıkarmayınız.
Motor kısmını (1) ve çırpıcı dişli kutusunu (7)
akan suyun altına tutmayınız ve suyun içine
batırmayınız.
Ölçüm kabı (9) mikro dalga fırında kullanım
için uygun değildir.
Yemek hazırlama ataçmanını (15) çalıştırmadan önce, kapak kilidinin (17c) doğru
şekilde takılmış olduğundan ve iticinin (16)
yerine yerleştiğinden emin olunuz.
şlem sırasında doldurma tübüne iticiden
başka bir nesne yerleştirmeyiniz.
Kapağı kaldırmadan önce her zaman cihazı
kapatınız.
Kapak (17) akan suyun altında yıkanabilir,
ancak suyun içine sokmayın ya da bulaşık
makinesinda yıkamayın.
şlem kabı (18) mikrodalgada kullanıma
uygun değildir.
Braun elektrikli ev aletleri uygun güvenlik
standartlarına göre üretilmiştir. Elektrikli
cihazlar ile ilgili her türlü tamirat ve değişim
mutlaka yetkili teknik servis personeli
tarafından yapılmalıdır. Yanlış ve kalitesiz
onarımlar kazalara veya kullanıcının
yaralanmasına sebep olabilir.
düğmesi
17a Motor için bağlantı parçası
17b Doldurma tübü
17c Kapak kilidi
18 şlem kabı
19 Kaymaz taban (kapak olarak da
görev görür)
20 Bıçak
21 Yoğurma ataçmanı
22 Ataçman tutucu
22a Dilimleme bıçağı
22b Kıyma bıçağı (kaba)
22c Kıyma bıçağı (ince)
Hız Ayarı
Açma/kapama düğmelerini (3), aktif hale
getirdiğiniz zaman işlem hızı, değişken hız
ayarlayıcının (2) durumuna göre belirlenir. Hız
ayarı yükseltildikçe doğrayıcı daha hızlı ve
daha iyi sonuç verir.
Maksimum hız ayarı için turbo düğmesine (4)
basınız. Ayrıca, turbo düğmesini değişken hız
ayarlayıcıyı değiştirmeden anlık hız değişimleri
için kullanabilirsiniz.
Uygulamanıza göre tavsiye edilen hız ayarları:
El Blendırı 1... turbo
Çırpıcı 3... 15
Doπray∂c∂ „ bölümlerindeki
hız tablolarına bakınız
Yemek hazırlama
ataçmanı ‰, Â bölümlerindeki
hız tablolarına bakınız
A El Blendırınızı nasıl
çalıştıracaksınız
El Blendırınız çorba, mayonez ve bebek
maması hazırlamak; sos, içki ve milkshake
yapmak için son derece uygundur:
a) Motor kısmını (1) blendır şaftına (6) kilitle-
nene kadar oturtunuz.
b) El blendırınızı, çalıştırmadan önce, işlem
yapacağınız kaba dik olarak koyunuz, daha
sonra açma/kapama düğmesine (3) ya da
turbo düğmesine (4) basarak çalıştırınız.
c) Kullandıktan sonra blendır şaftını çıkarmak
için düğmelere (5) basınız ve çekiniz.
El blendırınızı ölçme kabında (9) veya diğer
herhangi bir kapta kullanabilirsiniz. Pişirme
esnasında tencere içerisinde direkt karıştırma
yapmak isterseniz, el blederinizin ısıdan etkilenmemesi için öncelikle tencerenizi ocaktan
alınız.
Tarif Örnekleri: Mayonez
200-250 ml yağ,
1 yumurta,
1 çorba kaşığı limon suyu veya sirke,
Tadına gore tuz ve karabiber
Yukarıda miktarları verilen tüm malzemeleri
sırasıyla işlem kabına koyunuz. El blendırınızı
ölçüm kabının tabanına yerleştiriniz. Turbo
düğmesine (4) basarak, yağ tam olarak
karışana kadar el blenderinizi bu pozisyonda
tutunuz. Mayonez güzelce karışıp akıcı
kıvamına ulaşana kadar el blenderinizi
kapamadan yavaşça yukarı ve aşağıya doğru
hareket ettiriniz.
B Çırpıcınızı nasıl çalıştıracaksınız
Çırpıcınızı sadece krema, yumurta çırpmak,
kek hamuru ve hazır tatlıları karıştırmak için
kullanınız:
a) Çırpıcıyı (8), çırpıcı dişli kutusu (7) içine
yerleştiriniz ve motor kısmını (1), dişli
kutusu kilitlenene kadar oturtunuz.
37
Page 38

b) Çırpıcıyı işlem yapacağınız kaba koyunuz
ve çalıştırmak için düğmesine (3) basınız.
c) Çırpıcıyı çıkartmak için, düğmelere (5)
basınız ve dişli kutusunu çıkartınız. Daha
sonra çırpıcıyı dişli kutusundan çekip
çıkartınız.
En iyi sonuca ulaşmak için ...
ölçüm kabı yerine daha geniş bir işlem kabı
•
kullanınız,
çırpıcıyı saat yönünde, hafif eğik şekilde
•
hareket ettiriniz.
Çırpılmış Krema
En fazla 400 ml dondurulmuş kremayı (4 – 8 °C
arasında ve en az % 30 yağ içeren) çırpın.
En düşük hız seviyesinden başlayın «1»;
çırpma esnasında hızı, en yüksek hız seviyesi
olan «15»’e kadar çıkarın.
Örnek Tarif: Vanilya-Bal-Siyah Erik
(krep olarak)
(küçük doğrayıcı kabını(10) kullanın, hız ayarı:
«turbo»)
60 g sıvı balı ve 50 g siyah erigi doğrayıcı
kaba yerleştirip 10 saniye karıştırın, sonra 30
ml vanilya ile tadlandırılmış su ekleyip 3 saniye
daha karıştırın.
D/E Yemek hazırlama ataçmanını
nasıl çalıştıracaksınız
Yemek hazırlama ataçmanını(15) aşağıdaki
işler için kullanabilirsiniz:
– doğrama ve karıştırma (bakınız resim ‰)
– yoğurma (maksimum 250g undan
hazırlanmış hamur)
– dilimleme ve rendeleme (bakınız resim Â)
Yumurta karışımı
En fazla 4 yumurtayı çırpın.
Orta hız seviyesinden «7» başlayın, çırpma
esnasında hızı en yüksek hız seviyesi olan
«15»’e kadar çıkarın.
C Doπray∂c∂ ataçman∂n∂ nas∂l
çal∂µt∂racak∂n∂z
Doπray∂c∂ et, peynir, soπan, yeµillik, sar∂msak,
k∂rm∂z∂ biber (su ile), havuç, ceviz, f∂nd∂k,
badem, kuru erik vs. doπramak için çok
uygundur.
Sert gıdaları (sert peynirler gibi) parçalarken
turbo düπmesini (4) kullanın.
Not: Buz, hindistan cevizi-kahve çekirdeπi
veya tah∂l gibi aµ∂r∂ sert maddeleri parçalamak
için kullanmay∂n∂z.
Doπramadan önce ...
et, peynir, soπan, sar∂msak ve havuçlar∂
•
parçalara ay∂r∂n∂z
yeµilliklerin saplar∂n∂ ve kuruyemiµlerin
•
kabuklar∂n∂ ay∂r∂n∂z
kemikleri, k∂k∂rdaklar∂ ve sinirleri etten
•
ay∂r∂n∂z.
En iyi sonuca ulaşmak için işlem kılavuzunda
önerilen hız ayarlarına (j) bakınız.
Doπrama iµlemi (bakınız resim „)
a) Plastik k∂l∂f∂ (12) b∂çaktan dikkatlice
ç∂kar∂n∂z. Uyar∂: Doπray∂c∂n∂z∂n b∂çaπ∂ çok
keskindir! B∂çaπ∂ daima üst plastik bölümünden tutunuz. B∂çaπ∂ doπray∂c∂ kab∂n∂n
ortas∂ndaki mile yerleµtiriniz (13).
Kilitlemek için b∂çaπ∂ aµaπ∂ya doπru bast∂r∂p
90° döndürünüz.
Doπrama kab∂n∂ herzaman kaymayan
taban (14) üzerine koyunuz.
b) Yiyecekleri doπrama kasesine yerleµtiriniz.
c) Üst bölümü (11) doπrama kasesinin üzerine
koyunuz.
d) Motor bölümünü (1) üst bölümün içine
kilitleninceye kadar yerleµtiriniz.
e) Doπray∂c∂y∂ çal∂µt∂rmak için (3) veya (4)
düπmelerine bas∂n∂z. ∑µlem s∂ras∂nda bir
elinizle motor bölümünü diπer elinizle de
doπray∂c∂ kasesini tutunuz. Doπray∂c∂y∂
2 dakikadan fazla kullanmay∂n∂z.
f) Kullanım bittikten sonra, motor kısmını
çıkarmak için çalışan parçaları çıkarma
düğmesine (5) basınız ve iticiyi çıkarınız.
g) Daha sonra üst bölümü ç∂kar∂n∂z.
h) B∂çaπ∂ dikkatli bir µekilde ç∂kar∂n∂z.
i) ∑µlemi tamamlanm∂µ yiyecekleri doπrama
kasesinden ç∂kar∂n∂z. Kaymayan taban
ayn∂ zamanda doπray∂c∂ kasesi için hava
geçirmez kapak olarak da kullan∂labilir.
Doğrama (bakınız resim ‰)
Bıçak (20) et, peynir, soğan, maydanoz,
sarımsak, havuç, ceviz, fındık ve badem gibi
yiyecekleri doğramak için son derece
uygundur. Sert yiyecekleri doğrarken, turbo
hız düğmesini (4) kullanınız.
Not: Hindistan cevizi, kahve çekirdeği ve
tohum gibi çok sert yiyecekleri doğramayınız.
Doğramadan önce ...
eti, peyniri, soğanı, sarımsağı, havucu
•
önceden kesiniz,
bitkilerin saplarını ve kuruyemişlerin
•
kabuklarını ayırınız,
kemikleri, sinirleri ve kıkırdakları etten
•
ayırınız.
Bıçağınızın (20) üzerindeki plastik koruyu-
a)
cuyu dikkatlice çıkartınız. Dikkat: Bıçak
çok keskindir ! bıçağı herzaman üzerindeki
plastik kısmından tutunuz. Bıçağı, işlem
kabının (18) ortasındaki mile yerleştiriniz
ve yerine kilitlenmesini sağlamak için
döndürünüz. şlem kabını her zaman
kaymaz tabanın (19) üzerine yerleştiriniz.
b) Yiyeceği doğrama kabının içine koyunuz.
c) Kapağı (17) ölçü kabının üzerine koyup,
kabın tutma yerinin yanında bulunan kapak
kilidi ile (17c) birbirine kenetleyiniz. Kapağı
kilitlemek için, kapağı saat yönünde çevirip
«klik» sesini duyun.
d) Motor kısmını (1) motor bağlantı parçasının
(17a) içine kilitlenene kadar yerleştirin.
ticinin yerine oturduğundan emin olunuz.
e) Çalıştırmak için motor kısmının üzerindeki
açma/kapama düğmesine (3) ya da (4)
basınız; diğer elinizle de kabı tutunuz.
f) Kullanım bittikten sonra, motor kısmını
çıkarmak için çalışan parçaları çıkarma
düğmesine (5) basınız ve iticiyi çıkarınız.
g) Kapağı çıkarmak için kapak kilidine (17c)
basarak, kapağı (17) saat yönünün tersine
çeviriniz ve kaldırınız.
h) şlemi tamamlanmış yiyeceği çıkarmadan
önce bıçağı çevirip çekerek dikkatlice
çıkarınız.
Yumuşak Hamuru karıştırmak
Bıçağı (20) kullanarak, 250 grama kadar unla
yapılmış kek karışımını ya da pancake hamuru
gibi hamurları karıştırabilirsiniz.
Örneğin, pancake hamuru için işlem kabının
içerisine önce sıvıları dökün, daha sonra un ve
son olarak da yumurtaları ekleyin. Turbo düğmesine (4) basarak hamuru, kıvamına gelene
kadar karıştırınız.
Hamur yoğurma
(Resim
‰ yoğurma ataçmanı kullanımını için
de uygundur)
Yoğurma ataçmanı(21) mayalı hamur veya
pasta hamuru gibi farklı hamur tiplerinin
38
Page 39

yoğrulması için (250g undan hazırlanmış
hamurlar için) uygundur.
Yoğurma ataçmanını yoğurma haznesine
•
(18) yerleştirin.
Önce kuru malzemeleri hazneye yerleştirin.
•
Sıvı maddeleri sadece motor çalışırken
•
doldurma tüpünden ekleyiniz.
1 dakikalık yoğurma süresinden sonra,
•
motor bölümünün soğuması için 10 dakika
bekleyiniz.
Mayalı hamur (pizza, ekmek, kek için)
Maksimum 250 g un + diğer malzemeler.
Hız ayarı «15», maksimum yoğurma süresi:
1 dakika.
Önce unu yoğurma haznesine yerleştirin,
sonra sıvılar hariç diğer tüm malzemeleri
ekleyiniz. Sıvıları doldurma tüpünden motor
çalışırken ekleyiniz.
Pasta hamuru (Kiş bir çeşit sebzeli talyan
omleti, kek için)
Maksimum 250 g un + diğer malzemeler.
Hız ayarı «15», maksimum yoğurma süresi:
1 dakika. Önce unu yoğurma haznesine
yerleştirin, sonra diğer tüm malzemeleri
ekleyiniz.
Tereyağını oda sıçaklığında kullanın. Hamur
top şekline geldikten kısa bir süre sonra
yoğurma işlemini durdurun. Aşırı yoğurmadan
dolayı hamur çok yumuşak hale gelecektir.
Dilimlemek / Rendeleme (bakınız resim
Dilimleme ataçmanını (22a) kullanarak
salatalık, soğan, mantar, elma, havuç, turp,
çiğ patates, kabak ve lahana gibi yiyecekleri
dilimleyebilirsiniz. Rendeleme ataçmanı
(22b, 22c) kullanarak da elma, havuç, çiğ
patates, pancar, lahana ve peynir (yumuşak
ya da orta) gibi yiyecekleri parçalayabilirsiniz.
Â)
Aksesuarlar
(Braun sat∂µ yetkili Servis merkezlerinden temin
edilebilir. Yine de her ülkede bulunmayabilir.)
BC: Doπrayıcı ataçmanı, fazla miktardaki
•
yiyecekleri doπramak, milkshake yapmak,
yumuµak hamur hazırlamak ve buz
parçalarını kırmak için mükemmel olarak
üretilmiµtir.
Duvar tutucu
•
Bilgiler haber verilmeden değiştirilebilir.
EEE STANDARTLARINA UYGUNDUR
Bakanlıkça tespit ve ilan edilen kullanım ömrü
7 yıldır.
Üretici firma ve CE işareti uygunluk
değerlendirme kuruluşu:
Braun GmbH
Frankfurter Straße 145
61476 Kronberg / Germany
“ (49) 6173 30 0
Fax (49) 6173 30 28 75
P & G Sat. ve Dağ. Ltd. Şti.
Serin Sok. No: 9 34752 çerenköy/stanbul
tarafından ithal edilmiştir.
P & G Tüketici Hizmetleri
0 800 261 63 65,
trconsumers@custhelp.com
a) Ataçman tutucusunun (22) içine (22a–c)
ataçmanlarından birini yerleştiriniz.
Ataçman tutucusunu işlem kabının ortasındaki mile yerleştirin ve yerine oturması için
çeviriniz.
b) Kapağı (17) işlem kabının üzerine koyup,
kabın tutma yerinin yanında bulunan kapak
kilidi ile (17c) birbirine kenetleyin. Kapağı
kilitlemek için kapağı saat yönünde çevirip
«klik» sesini duyunuz.
c)
Motor kısmını motor bağlantı parçasının
içine kilitlenene kadar yerleştirin. Hız ayarını
(j) resmindeki önerilere gore seçiniz.
d) şlemden geçecek olan yiyeceği doldurma
tübünün içerisine yerleştiriniz. Cihaz
açıkken asla doldurma tübünün içine
dokunmayın. Yiyecekleri koymak için her
zaman iticiyi (16) kullanınız.
e) Çalıştırmak için motor kısmındaki açma/
kapama düğmesine ((3) ya da (4)) basınız.
f) Kullanım bittikten sonra, motor kısmını
çıkarmak için düğmeye basınız (5).
g) Kapağı çıkarmak için kapak kilidine (17c)
basarak, kapağı (17) saat yönünün tersine
çeviriniz ve kaldırınız.
h) şlemi tamamlanmış yiyeceği çıkarmadan
once ataçman tutucusunu çıkarın.
Ataçmanı çıkarmak için yukarı itiniz.
Cihazı nasıl temizleyeceksiniz
Motor kısmını (1) ve çırpıcı dişli kutusunu (7)
sadece nemli bir bezle silin. Kapak (17) akan
suda yıkanabilir, ancak suyun içerisine daldırmayın ya da bulaşık makinesında yıkamayın.
Renk içeren yiyecekler (örneğin havuç) plastik
parçaların renklerini değiştirebilirler.
Bu parçaları, temizlemeden once bitkisel yağ
ile siliniz.
39
Page 40

Русский
Наша продукция отвечает самым высоким
стандартам качества, функциональности
и дизайна. Надеемся, вы в полной мере
будете довольны вашим новым приобретением — блендером Braun.
Внимание
Перед использованием электроприбора
внимательно и полностью прочтите
данную инструкцию.
• Лезвия и детали (22а–с) очень
•
•
•
•
•
•
•
•
•
•
•
•
•
Описание прибора
1 Моторная часть
2 Регулятор скорости вращения
3 Переключатель режимов вкл./выкл.
4 Кнопка включения «turbo»-режима
5 Кнопки высвобождения рабочих
6 Насадка-блендер
7 Зубчатая часть венчика
8 Венчик
9
40
острые! Во избежание травм,
пожалуйста, обращайтесь с лез-
виями очень осторожно.
Всегда отключайте прибор от источника
электропитания при его сборке, разборке, чистке и хранении.
щЪУЪ ФЛ·У МВ ФВ‰М‡БМ‡˜ВМ ‰Оfl
ЛТФУО¸БУ‚‡МЛfl ‰ВЪ¸ПЛ ЛОЛ ‰Ы„ЛПЛ
ОЛˆ‡ПЛ ·ВБ ФУПУ˘Л Л ФЛТПУЪ‡, ВТОЛ Лı
ЩЛБЛ˜ВТНЛВ, ТВМТУМ˚В ЛОЛ ЫПТЪ‚ВММ˚В
ТФУТУ·МУТЪЛ МВ ФУБ‚УОfl˛Ъ ЛП ·ВБУФ‡ТМУ
В„У ЛТФУО¸БУ‚‡Ъ¸. мТЪУИТЪ‚У ‰УОКМУ
ı‡МЛЪ¸Тfl ‚ МВ‰УТЪЫФМ˚ı ‰Оfl ‰ВЪВИ
ПВТЪ‡ı. зВУ·ıУ‰ЛПУ НУМЪУОЛУ‚‡Ъ¸,
˜ЪУ·˚ ‰ВЪЛ МВ ЛТФУО¸БУ‚‡ОЛ ‰‡ММУВ
ЫТЪУИТЪ‚У ‚ Н‡˜ВТЪ‚В Л„Ы¯НЛ.
Не разрешается погружать моторную
часть (1), зубчатую часть венчика (7) для
взбивания под струю воды, а также
погружать их в воду.
Не погружайте насадку-блендер в горячие жидкости на долгое время.
Перед эксплуатацией электроприбора
следует удостовериться, что напряжение,
указанное на приборе, соответствует
напряжению Вашей электросети.
Прибор рассчитан на обработку небольших объемов продуктов, типичных для
домашнего хозяйства.
Мерный стакан (9) нельзя использовать
в микроволновой печи.
Перед началом работы с использованием
чаши-измельчителя, убедитесь, что
крышка чаши надежно закреплена и
проталкиватель на месте.
Для погружения продуктов в чашу
используйте только проталкиватель.
Всегда выключайте прибор перед тем,
как снять крышку (17).
Крышку (17) чаши измельчителя нужно
промывать под проточной водой, не
рекомендуется погружать в воду и мыть
в посудомоечной машине.
Чашу-измельчитель (18) нельзя
использовать в микроволновой печи.
Электрические приборы компании Вrаun
отвечают требованиям соответствующих
стандартов в отношении техники безопасности. Ремонт или замена шнура
электропитания должна выполняться
сервисным работником из числа специа листов по техническому обслуживанию и
ремонту. Неквалифицированно выполненный, ремонт может явиться причиной
несчастных случаев и травм пользователей.
частей
Мерный стакан
10 аБПВО¸˜ЛЪВО¸
11 ÇÂıÌflfl ˜‡ÒÚ¸
12 çÓÊ
13 󇯇 ЛБПВО¸˜ЛЪВОfl
14 иУЪЛ‚УТНУО¸Бfl˘ВВ ÓÒÌÓ‚‡ÌËÂ/
Í˚¯Í‡
15 Насадка для нарезки и шинковки (FP)
16 Толкатель
17 Крышка
17a Сцепление моторной части
17b Трубка для продуктов
17c Фиксатор крышки
18 Чаша
19 Подставка для чаши (также
может использоваться в качестве
крышки)
20 Нож
21 Насадка для приготовления теста
22 Держатель лезвия
22a Лезвие для нарезки
22b Лезвие для крупной шинковки
22c Лезвие для мелкой шинковки
Регулировка скорости
вращения
При включении переключателя режимов
(3) в положение вкл. скорость вращения
будет соответствовать текущей установке
регулятора (2). Чем выше установленный
параметр скорости, тем больше число
оборотов измельчителя.
Наибольшее число оборотов достигается
только при нажатии кнопки ускорителя
«turbo» (4), которую можно включать и
минуя регулятор для кратковременнного
повышения мощности.
В зависимости от цели применения
рекомендуются следующие параметры
установки скорости вращения:
Блендер 1…turbo
Венчик 3…15
аБПВО¸˜ЛЪВО¸ см. таблицы на
рисунках „
Насадка для
нарезки и шинковки см. таблицы на
рисунках ‰, Â
A Порядок работы со
блендером
Блендер идеально пригоден для приготовления соусов, подливок, супов, майонезов,
детского питания, а также всех видов
коктейлей:
a) Вставьте моторную часть (1) в насадку-
блендер (6) до фиксации.
b) Опустите блендер в посуду (желательно
с высокими краями) и нажмите переключатель (3) или ускоритель «turbo» (4).
c) По окончании работы нажмите кнопки
(5) для высвобождения насадки-блендера и выньте его из посуды.
Блендер можно использовать по назначению также в мерном стакане (9) и любой
другой глубокой посуде.
При перемешивании в процессе приготовления кастрюлю следует снимать с нагревательной поверхности (плиты) с целью
уберечь блендер от перегрева.
Рецепты: Майонез
200-250 мг растительного масла
одно яйцо (с желтком)
1 столовая ложка лимонного сока или
уксуса, соли и перца (по вкусу)
Поместите все ингредиенты в мерный
стакан в вышеуказанной последователь-
Page 41

ности. Погрузите блендер до дна стакана,
включите прибор переключателем (4) и
удерживайте его в этом положении до
растворения масла. Далее, не выключая
блендер, медленно перемещайте его
вверх-вниз до приобретения майонезом
однородного цвета и консистенции.
B Порядок работы с венчиком
Используйте венчик только для взбивания
крема, яичного белка, пористых субстанций (дрожжевого теста) и готовых к употреблению десертов:
a) Вставьте последовательно венчик (8)
в моторную часть (1) до фиксации.
b) Поместите венчик в посуду и лишь
затем включите прибор, нажав переключатель (3).
c) Для высвобождения венчика нажмите
кнопки (5), затем выньте из моторной
части венчик.
Для получения наилучших результатов
работы ...
используйте широкий сосуд для
•
взбивания,
взбивайте одновременно не более.
•
Взбитые сливки
Залейте до 400 мл охлажденных сливок
(минимум 30% жирности, 4–8 °C).
Начните взбивать с небольшой скорости
«1» и постепенно увеличивайте скорость
до «15».
Взбитые яичные белки
Взбейте 4 яичных белка
Начните взбивать с «7» скорости и
постепенно увеличивайте ее до «15».
C д‡Н ЛТФУО¸БУ‚‡Ъ¸ М‡Т‡‰НЫ
‰Оfl ЛБПВО¸˜ВМЛfl
аБПВО¸˜ЛЪВО¸ (10) ФВ‚УТıУ‰МУ ФУ‰ıУ‰ЛЪ
‰Оfl ЛБПВО¸˜ВМЛfl ПflТ‡, Т˚‡, ОЫН‡, Ъ‡‚,
˜ВТМУН‡, ФВˆ‡ ˜ЛОЛ (Т ‚У‰УИ), ПУНУ‚Л,
„ВˆНЛı УВıУ‚, ОВТМ˚ı УВıУ‚, ПЛМ‰‡Оfl,
˜ВМУТОЛ‚‡ Л Ъ.‰.
Для измельчения твердых продуктов,
например, сыра, используйте режим
«turbo» (4).
Важно: зВ ЛБПВО¸˜‡ИЪВ У˜ВМ¸ КВТЪНЛВ
ФУ‰ЫНЪ˚, Ъ‡НЛı, Н‡Н ОВ‰flМ˚В НЫ·ЛНЛ,
ПЫТН‡ЪМ˚И УВı, НУЩВИМ˚В БВМ‡.
иВВ‰ ЛБПВО¸˜ВМЛВП ...
Ô‰‚‡ËÚÂθÌÓ Ì‡ÂÁ‡ÈÚ ÏflÒÓ, Ò˚,
•
ОЫН, ˜ВТМУН, ПУНУ‚¸
Ы‰‡ОflИЪВ ТЪВ·ОЛ Ъ‡‚, ТНУОЫФЫ УВıУ‚
•
Ы‰‡ОflИЪВ НУТЪЛ, ТЫıУКЛОЛfl Л ıfl˘Л ЛБ
•
ÏflÒ‡.
Для получения налучшего результата,
следуйте рекомендациям скоростного
режима в таблице приложения.
c) ìÒÚ‡ÌÓ‚ËÚ ‚ÂıÌ˛˛ ˜‡ÒÚ¸ (11) ̇ ˜‡¯Û
ЛБПВО¸˜ЛЪВОfl.
d) ÇÒÚ‡‚¸Ú ÏÓÚÓÌÛ˛ ˜‡ÒÚ¸ (1) ‚ ‚Âı-
М˛˛ ˜‡ТЪ¸ (11) Ъ‡Н, ˜ЪУ·˚ УМ‡ ·˚О‡
Б‡ЩЛНТЛУ‚‡М‡ М‡ ПВТЪВ.
e) з‡КПЛЪВ ‚˚НО˛˜‡ЪВО¸ ‚ ЛОЛ (4), ˜ЪУ·˚
ФЛ‚ВТЪЛ ЛБПВО¸˜ЛЪВО¸ ‚ ‰ВИТЪ‚ЛВ. иЛ
У·‡·УЪНВ ‰ВКЛЪВ ПУЪУМЫ˛ ˜‡ТЪ¸
У‰МУИ ЫНУИ, ‡ ˜‡¯Ы ЛБПВО¸˜ЛЪВОfl
‰Ы„УИ ЫНУИ.
зВ ‚НО˛˜‡ИЪВ ЛБПВО¸˜ЛЪВО¸ ·УОВВ ˜ВП
М‡ 2 ПЛМЫЪ˚.
f) После использования, нажмите кнопки
высвобождения рабочих частей (5),
снимите моторную часть и толкатель.
g) иУТОВ ˝ЪУ„У Ы‰‡ОЛЪВ ‚ВıМ˛˛ ˜‡ТЪ¸.
h) AННЫ‡ЪМУ ‚˚М¸ЪВ МУК.
i) иВВОУКЛЪВ ЛБПВО¸˜ВММ˚В ФУ‰ЫНЪ˚
ЛБ ˜‡¯Л ЛБПВО¸˜ЛЪВОfl ‚ ‰Ы„Ы˛
ФУТЫ‰Ы. иУЪЛ‚УТНУО¸Бfl˘ВВ УТМУ‚‡МЛВ
У‰МУ‚ВПВММУ ТОЫКЛЪ Н˚¯НУИ ˜‡¯Л
ЛБПВО¸˜ЛЪВОfl.
Пример рецепта: Чернослив с медом и
ванилью
(для начинки или топпинга к блинам)
Используйте насадку-измельчитель (10),
скорость – «turbo».
Поместите в чашу измельчителя 60 г меда
вязкой консистенции и 50 г чернослива.
Измельчайте в течение 10 секунд.
Затем добавьте 30 мл воды, смешанной с
ванилью, и возобновите измельчение еще
в течение 3 секунд.
D/E Порядок работы с насадкой
для нарезки и шинковки
Насадку для приготовления пищи (15)
можно использовать для:
– измельчения и смешивания
(см. рисунок секции ‰)
– замеса теста
(до 250 г муки на одну порцию)
– нарезки и шинковки
(см. рисунок секции Â)
Порядок работы с насадкойизмельчителем (см. рисунок секции ‰)
Нож (20) измельчителя идеально подходят
для нарезки мяса, сыра, лука, зелени, чеснока, моркови, грецких орехов, фундука,
миндаля и пр.
Для нарезки твердых субстанций, например, сыра, используйте режим «turbo» (4).
Примечание: Не измельчайте очень
твердые субстанции, например, кубики
льда, мускатный орех, зерна кофе, крупу.
иВВ‰ УФВ‡ˆЛВИ ЛБПВО¸˜ВМЛfl
ТОВ‰ЫВЪ ...
• ÔÓÂÁ‡Ú¸ ̇ ÍÛÒÓ˜ÍË ÏflÒÓ, Ò˚, ÎÛÍÓ-
‚Лˆ˚, ˜ВТМУН, ПУНУ‚¸,
• Û‰‡ÎËÚ¸ ÒÚ·ÎË Ú‡‚˚ Ë ÒÍÓÎÛÔÛ ÓÂıÓ‚,
• Ы‰‡ОЛЪ¸ НУТЪЛ, ТЫıУКЛОЛfl Л ıfl˘Л.
аБПВО¸˜ВМЛВ (см. рисунок секции „)
a) AННЫ‡ЪМУ ТМЛПЛЪВ ФО‡ТЪП‡ТТУ‚Ы˛
Н˚¯НЫ Т МУК‡ (12). иВ‰УТЪВВКВМЛВ:
зУК У˜ВМ¸ УТЪ˚И! ЗТВ„‰‡ ‰ВКЛЪВ В„У
Б‡ ‚ВıМ˛˛ ФО‡ТЪП‡ТТУ‚Ы˛ ˜‡ТЪ¸.
мТЪ‡МУ‚ЛЪВ МУК М‡ ˆВМЪ‡О¸М˚И ¯ЪЛЩЪ
˜‡¯Л ЛБПВО¸˜ЛЪВОfl (13).
з‡КПЛЪВ М‡ МУК Л ФУ‚ВМЛЪВ В„У М‡ 90°,
˜ЪУ·˚ Б‡ЩЛНТЛУ‚‡Ъ¸. ЗТВ„‰‡ ЫТЪ‡М‡‚ОЛ‚‡ИЪВ ˜‡¯Ы ЛБПВО¸˜ЛЪВОfl М‡ ФУЪЛ‚УТНУО¸Бfl˘ВВ УТМУ‚‡МЛВ (14).
b) иУОУКЛЪВ ФУ‰ЫНЪ˚ ‚ ˜‡¯Ы ЛБПВО¸˜Л-
ÚÂÎfl.
a) Осторожно снимите нож с пластикового
стержня. Внимание: лезвие ножа
очень острое! Всегда держите нож за
пластиковый стержень. Поместите нож
в центр чаши-измельчителя и нажмите,
чтобы зафиксировать его. Всегда
ставьте чашу на подставку (19).
b) Продукты для измельчения помещайте
вчашу (18).
c) Наденьте крышку (17) на чашу, чтобы
фиксатор крышки (17с) был около ручки
чаши. Поверните фиксатор крышки по
часовой стрелке до щелчка.
41
Page 42

d) Вставьте моторную часть (1) в сцепление
для моторной части (17a) и закрепите.
Убедитесь, что толкатель на месте.
e) Чтобы начать процесс нарезки или
шинковки, нажмите кнопку вкл./выкл. (3)
или кнопку «turbo»-режима (4) на моторной части и удерживайте чашу.
f) После использования, нажмите кнопки
высвобождения рабочих частей (5), снимите моторную часть и толкатель.
g) Нажмите на фиксатор крышки (17с),
поверните крышку (17) против часовой
стрелки и снимите ее.
h) Осторожно снимите нож перед тем, как
вынуть нарезанные продукты.
Смешивание жидкого теста
Используя чашу измельчитель и нож (20)
вы можете приготовить жидкое тесто для
блинов или пирогов (не более 250 гр.).
Чтобы сделать тесто для блинов, сначала
влейте жидкость, потом добавьте муку и
затем яйца. Используйте кнопку «turbo»режима (4), смешайте тесто до образования однородной массы.
Приготовление теста
(Узнать, как работает насадка для
приготовления теста, можно по рисунку
‰)
секции
Насадка для приготовления теста (21)
идеально подходит для замешивания
разных видов теста, например, дрожжевого или сдобного (250 г муки на порцию).
Поместите насадку для приготовления
•
теста в чашу (18).
Вначале наполните чашу сухими ингре-
•
диентами.
Жидкие ингредиенты добавляйте только
•
через наливной патрубок и при работающем двигателе.
После одной минуты замешивания теста
•
необходимо охладить двигатель в течение 10 минут.
Дрожжевое тесто (для пиццы, хлеба,
торта)
До 250 г муки, плюс ингредиенты.
Скорость – «15», время замеса – не более
1 минуты.
Вначале наполните мукой чашу, затем
добавьте другие ингредиенты (кроме
жидких). Добавляйте жидкие ингредиенты
через наливной патрубок при работающем
двигателе.
Сдобное тесто (для пирога, торта)
До 250 г муки, плюс ингредиенты.
Скорость – «15», время замеса – не более
1 минуты.
Вначале наполните мукой чашу, затем
добавьте другие ингредиенты.
Используйте масло комнатной температуры. Прекращайте замешивание, как
только тесто приобретет форму шара. Изза чрезмерного замешивания тесто
становится слишком мягким.
Порядок работы с насадкой для резки и
шинковки (см. рисунок секции Â)
Используя насадку для нарезки и шинковки (22a), вы можете нарезать огурцы,
лук, яблоки, морковь, редьку, картофель,
кабачки, капусту. Лезвия для шинковки
(22b, 22c) в большей степени подходит
для шинковки яблок, моркови, картофеля,
свеклы, капусты, сыра.
a) Поместите лезвие для нарезки (22a–c)
в держатель лезвий (22) и поверните до
упора.
42
b) Наденьте крышку (17) на чашу, чтобы
фиксатор крышки (17с) был около ручки
чаши. Поверните фиксатор крышки по
часовой стрелке до щелчка.
c) Вставьте моторную часть (1) в
сцепление для моторной части (17a) и
закрепите. Убедитесь, что толкатель на
месте. При работе следуйте указанием
скоростного режима в иснтрукции (j).
d) Продукты для измельчения помещайте
в трубку для продуктов и овощей в
трубку.
e) Чтобы начать процесс нарезки или
шинковки, нажмите кнопку вкл./выкл. (3)
или кнопку «turbo»-режима (4) на
моторной части и удерживайте чашу.
f) После использования, нажмите кнопки
высвобождения рабочих частей (5),
снимите моторную часть и толкатель.
g) Нажмите на фиксатор крышки (17с),
поверните крышку (17) против часовой
стрелки и снимите ее.
h) Сначала выньте держатель лезвий, а
потом уже нарезанные продукты. Чтобы
снять лезвие с держателя, осторожно
подтолкните его снизу вверх.
Чистка прибора
Протирайте моторную часть (1) и зубчатую
часть венчика (7) только влажной тканью.
Крышку (17) можно промывать под проточной водой, не погружая ее в воду.
При работе с продуктами, имеющими
насыщенный цвет, например, морковью,
пластмассовые детали могут окрашиваться, поэтому пред мойкой блендера в
посудомоечной машине протирайте детали
прибора с добавлением растительного
масла.
СУФУОМЛЪВО¸М˚В
ФЛМ‡‰ОВКМУТЪЛ
(ПУКМУ НЫФЛЪ¸ ‚ лВ‚ЛТМ˚ı ˆВМЪ‡ı
НУПФ‡МЛЛ Braun; МУ МВ ‚У ‚ТВı ТЪ‡М‡ı)
•
Зл: ‰УФУОМЛЪВО¸М‡fl М‡Т‡‰Н‡ЛБПВО¸˜ЛЪВО¸, Л‰В‡О¸МУ ФУ‰ıУ‰ЛЪ ‰Оfl М‡ВБНЛ
·УО¸¯Лı У·˙ВПУ‚ ФУ‰ЫНЪУ‚, ‡ Ъ‡НКВ
ФЛ„УЪУ‚ОВМЛfl ПУОУ˜М˚ı НУНЪВИОВИ,
ОВ„НУ„У ЪВТЪ‡ Л НУОНЛ НЫ·ЛНУ‚ О¸‰‡.
•
лНУ·‡ М‡ТЪВММУ„У НВФОВМЛfl ·ОВМ‰В‡
ЗУБПУКМ˚В ПУ‰ЛЩЛН‡ˆЛЛ ·ВБ
ФВ‰‚‡ЛЪВО¸МУ„У Ы‚В‰УПОВМЛfl.
С‡ММУВ ЛБ‰ВОЛВ ТУУЪ‚ВЪТЪ‚ЫВЪ
‚ТВП ЪВ·ЫВП˚П В‚УФВИТНЛП
Л УТТЛИТНЛП ТЪ‡М‰‡Ъ‡П
·ВБУФ‡ТМУТЪЛ Л „Л„ЛВМ˚.
дЫıУММ‡fl П‡¯ЛМ‡ - ˝ОВНЪЛ˜ВТНЛИ ПЛНТВ
(·ОВМ‰В), MR 570, ЪЛФ 4191, 500-600 ‚‡ЪЪ.
àÁ„ÓÚÓ‚ÎÂÌÓ ‚ èÓθ¯Â ‰Îfl ŇÛÌ ÉÏ·ï,
ÉÂχÌËfl/Braun GmbH,
Frankfurter Strasse 145,
61476, Kronberg, Germany.
RU: аПФУЪВ/лОЫК·‡ ФУЪВ·ЛЪВОВИ:
OOO «иУНЪВ ˝М‰ Й˝П·О
СЛТЪЛ·¸˛ЪУТН‡fl дУПФ‡МЛfl», кУТТЛfl,
125171, еУТН‚‡, гВМЛМ„‡‰ТНУВ ¯УТТВ,
16A, ТЪ.2. нВО. 8-800-200-20-20.
BY: аПФУЪВ: ййй «щОВНЪУТВ‚ЛТ Л
дУ», ЕВО‡ЫТ¸, 220012, „. еЛМТН, ЫО.
уВМ˚¯В‚ТНУ„У, 10A, Н. 412A3. лВ‚ЛТМ˚И
ˆВМЪ: ййй «д‡ЪЛНТ», ЕВО‡ЫТ¸, 220012,
„. еЛМТН, ЫО. уВМ˚¯В‚ТНУ„У, 10A, Н.409.
Page 43

Й‡‡МЪЛИМ˚В У·flБ‡ЪВО¸ТЪ‚‡ ЩЛП˚
BRAUN
СОfl ‚ТВı ЛБ‰ВОЛИ П˚ ‰‡ВП „‡‡МЪЛ˛ М‡
‰‚‡ „У‰‡, М‡˜ЛМ‡fl Т ПУПВМЪ‡ ФЛУ·ВЪВМЛfl
ЛБ‰ВОЛfl.
З ЪВ˜ВМЛВ „‡‡МЪЛИМУ„У ФВЛУ‰‡ П˚
·ВТФО‡ЪМУ ЫТЪ‡МЛП ФЫЪВП ВПУМЪ‡,
Б‡ПВМ˚ ‰ВЪ‡ОВИ ЛОЛ Б‡ПВМ˚ ‚ТВ„У ЛБ‰ВОЛfl
О˛·˚В Б‡‚У‰ТНЛВ ‰ВЩВНЪ˚, ‚˚Б‚‡ММ˚В
МВ‰УТЪ‡ЪУ˜М˚П Н‡˜ВТЪ‚УП П‡ЪВЛ‡ОУ‚ ЛОЛ
Т·УНЛ.
З ТОЫ˜‡В МВ‚УБПУКМУТЪЛ ВПУМЪ‡ ‚
„‡‡МЪЛИМ˚И ФВЛУ‰ ЛБ‰ВОЛВ ПУКВЪ ·˚Ъ¸
Б‡ПВМВМУ М‡ МУ‚УВ ЛОЛ ‡М‡ОУ„Л˜МУВ ‚
ТУУЪ‚ВЪТЪ‚ЛЛ Т б‡НУМУП У Б‡˘ЛЪВ Ф‡‚
ФУЪВ·ЛЪВОВИ.
Й‡‡МЪЛfl У·ВЪ‡ВЪ ТЛОЫ ЪУО¸НУ ВТОЛ ‰‡Ъ‡
ФУНЫФНЛ ФУ‰Ъ‚ВК‰‡ВЪТfl ФВ˜‡Ъ¸˛ Л
ФУ‰ФЛТ¸˛ ‰ЛОВ‡ (П‡„‡БЛМ‡) М‡ ФУТОВ‰МВИ
ТЪ‡МЛˆВ УЛ„ЛМ‡О¸МУИ ЛМТЪЫНˆЛЛ ФУ
˝НТФОЫ‡Ъ‡ˆЛЛ BRAUN, НУЪУ‡fl fl‚ОflВЪТfl
„‡‡МЪЛИМ˚П Ъ‡ОУМУП.
щЪ‡ „‡‡МЪЛfl ‰ВИТЪ‚ЛЪВО¸М‡ ‚ О˛·УИ
ТЪ‡МВ ‚ НУЪУЫ˛ ˝ЪУ ЛБ‰ВОЛВ
ФУТЪ‡‚ОflВЪТfl ЩЛПУИ BRAUN ЛОЛ
М‡БМ‡˜ВММ˚П ‰ЛТЪЛ·¸˛ЪУУП Л „‰В
МЛН‡НЛВ У„‡МЛ˜ВМЛfl ФУ ЛПФУЪЫ ЛОЛ
‰Ы„ЛВ Ф‡‚У‚˚В ФУОУКВМЛfl МВ
ФВФflЪТЪ‚Ы˛Ъ ФВ‰УТЪ‡‚ОВМЛ˛
„‡‡МЪЛИМУ„У У·ТОЫКЛ‚‡МЛfl.
Й‡‡МЪЛfl МВ ФУН˚‚‡ВЪ ФУ‚ВК‰ВМЛfl,
‚˚Б‚‡ММ˚В МВФ‡‚ЛО¸М˚П ЛТФУО¸БУ‚‡МЛВП
(ТП. Ъ‡НКВ ТФЛТУН МЛКВ) МУП‡О¸М˚И ЛБМУТ
·ЛЪ‚ВММ˚ı ТВЪУН Л МУКВИ, ‰ВЩВНЪ˚,
УН‡Б˚‚‡˛˘ЛВ МВБМ‡˜ЛЪВО¸М˚И ˝ЩЩВНЪ М‡
Н‡˜ВТЪ‚У ‡·УЪ˚ ФЛ·У‡.
щЪ‡ „‡‡МЪЛfl ЪВflВЪ ТЛОЫ ВТОЛ ВПУМЪ
ФУЛБ‚У‰ЛОТfl МВ ЫФУОМУПУ˜ВММ˚П М‡
ЪУ ОЛˆУП Л ВТОЛ ЛТФУО¸БУ‚‡М˚ МВ
УЛ„ЛМ‡О¸М˚В ‰ВЪ‡ОЛ ЩЛП˚ BRAUN.
З ТОЫ˜‡В ФВ‰˙fl‚ОВМЛfl ВНО‡П‡ˆЛЛ ФУ
ЫТОУ‚ЛflП ‰‡ММУИ „‡‡МЪЛЛ, ФВВ‰‡ИЪВ
ЛБ‰ВОЛВ ˆВОЛНУП ‚ПВТЪВ Т „‡‡МЪЛИМ˚П
Ъ‡ОУМУП ‚ О˛·УИ ЛБ ˆВМЪУ‚ ТВ‚ЛТМУ„У
У·ТОЫКЛ‚‡МЛfl ЩЛП˚ BRAUN.
ЗТВ ‰Ы„ЛВ ЪВ·У‚‡МЛfl, ‚НО˛˜‡fl
ЪВ·У‚‡МЛfl ‚УБПВ˘ВМЛfl Ы·˚ЪНУ‚,
ЛТНО˛˜‡˛ЪТfl, ВТОЛ М‡¯‡ УЪ‚ВЪТЪ‚ВММУТЪ¸
МВ ЫТЪ‡МУ‚ОВМ‡ ‚ Б‡НУММУП ФУfl‰НВ.
кВНО‡П‡ˆЛЛ, Т‚flБ‡ММ˚В Т НУППВ˜ВТНЛП
НУМЪ‡НЪУП Т ФУ‰‡‚ˆУП МВ ФУФ‡‰‡˛Ъ ФУ‰
˝ЪЫ „‡‡МЪЛ˛.
З ТУУЪ‚ВЪТЪ‚ЛЛ Т Б‡НУМУП ко ‹ 2300-1
УЪ 7.02.1992 „. «й б‡˘ЛЪВ Ф‡‚
ФУЪВ·ЛЪВОВИ» ЩЛП‡ BRAUN
ЫТЪ‡М‡‚ОЛ‚‡ВЪ ТУН ТОЫК·˚ М‡ Т‚УЛ
ЛБ‰ВОЛfl ‡‚М˚П ‰‚ЫП „У‰‡П Т ПУПВМЪ‡
ФЛУ·ВЪВМЛfl ЛОЛ Т ПУПВМЪ‡
ФУЛБ‚У‰ТЪ‚‡, ВТОЛ ‰‡ЪЫ ФУ‰‡КЛ
ЫТЪ‡МУ‚ЛЪ¸ МВ‚УБПУКМУ.
аБ‰ВОЛfl ЩЛП˚ BRAUN ЛБ„УЪУ‚ОВМ˚ ‚
ТУУЪ‚ВЪТЪ‚ЛЛ Т ‚˚ТУНЛПЛ ЪВ·У‚‡МЛflПЛ
В‚УФВИТНУ„У Н‡˜ВТЪ‚‡. иЛ ·ВВКМУП
ЛТФУО¸БУ‚‡МЛЛ Л ФЛ ТУ·О˛‰ВМЛЛ Ф‡‚ЛО
ФУ ˝НТФОЫ‡Ъ‡ˆЛЛ, ФЛУ·ВЪВММУВ З‡ПЛ
ЛБ‰ВОЛВ ЩЛП˚ BRAUN, ПУКВЪ ЛПВЪ¸
БМ‡˜ЛЪВО¸МУ ·УО¸¯ЛИ ТУН ТОЫК·˚, ˜ВП
ТУН ЫТЪ‡МУ‚ОВММ˚И ‚ ТУУЪ‚ВЪТЪ‚ЛЛ Т
кУТТЛИТНЛП Б‡НУМУП.
– ‚МВТВМЛВ ЪВıМЛ˜ВТНЛı ЛБПВМВМЛИ;
– ПВı‡МЛ˜ВТНЛВ ÔÓ‚ÂʉÂÌËfl;
– ÔÓ‚ÂʉÂÌËfl ÔÓ ‚ËÌ ÊË‚ÓÚÌ˚ı,
„˚БЫМУ‚ Л М‡ТВНУП˚ı (‚ ЪУП ˜ЛТОВ
ÒÎÛ˜‡Ë ̇ıÓʉÂÌËfl „˚ÁÛÌÓ‚ Ë
М‡ТВНУП˚ı ‚МЫЪЛ ФЛ·УУ‚);
– ‰Îfl ÔË·ÓÓ‚, ‡·ÓÚ‡˛˘Ëı ÓÚ
·‡Ú‡ÂÂÍ, – ‡·ÓÚ‡ Ò ÌÂÔÓ‰ıÓ‰fl˘ËÏË
ËÎË ËÒÚÓ˘ÂÌÌ˚ÏË ·‡Ú‡ÂÈ͇ÏË,
β·˚ ÔÓ‚ÂʉÂÌËfl, ‚˚Á‚‡ÌÌ˚Â
ËÒÚÓ˘ÂÌÌ˚ÏË ËÎË ÚÂÍÛ˘ËÏË
·‡Ъ‡ВИН‡ПЛ (ТУ‚ВЪЫВП ФУО¸БУ‚‡Ъ¸Тfl
ÚÓθÍÓ Ô‰Óı‡ÌÂÌÌ˚ÏË ÓÚ
‚˚ÚÂ͇ÌËfl ·‡Ú‡ÂÈ͇ÏË);
– ‰Îfl ·ËÚ‚ – ÒÏflÚ‡fl ËÎË ÔÓ‚‡Ì̇fl
ÒÂÚ͇.
ЗМЛП‡МЛВ! йЛ„ЛМ‡О¸М˚И Й‡‡МЪЛИМ˚И
н‡ОУМ ФУ‰ОВКЛЪ ЛБ˙flЪЛ˛ ФЛ У·‡˘ВМЛЛ ‚
ТВ‚ЛТМ˚И ˆВМЪ ‰Оfl „‡‡МЪЛИМУ„У
ВПУМЪ‡. иУТОВ ФУ‚В‰ВМЛfl ВПУМЪ‡
Й‡‡МЪЛИМ˚П н‡ОУМУП ·Ы‰ВЪ fl‚ОflЪ¸Тfl
Б‡ФУОМВММ˚И УЛ„ЛМ‡О гЛТЪ‡ ‚˚ФУОМВМЛfl
ВПУМЪ‡ ТУ ¯Ъ‡ПФУП ТВ‚ЛТМУ„У ˆВМЪ‡ Л
ФУ‰ФЛТ‡ММ˚И ФУЪВ·ЛЪВОВП ФУ ФУОЫ˜ВМЛЛ
ЛБ‰ВОЛfl ЛБ ВПУМЪ‡. нВ·ЫИЪВ
ФУТЪ‡‚ОВМЛfl ‰‡Ъ˚ ‚УБ‚‡Ъ‡ ЛБ ВПУМЪ‡,
ТУН „‡‡МЪЛЛ ФУ‰ОВ‚‡ВЪТfl М‡ ‚ВПfl
М‡ıУК‰ВМЛfl ЛБ‰ВОЛfl ‚ ТВ‚ЛТМУП ˆВМЪВ.
З ТОЫ˜‡В ‚УБМЛНМУ‚ВМЛfl ТОУКМУТЪВИ
Т ‚˚ФУОМВМЛВП „‡‡МЪЛИМУ„У ЛОЛ
ФУТОВ„‡‡МЪЛИМУ„У У·ТОЫКЛ‚‡МЛfl ФУТ¸·‡
ТУУ·˘‡Ъ¸ У· ˝ЪУП ‚ аМЩУП‡ˆЛУММЫ˛
лОЫК·Ы лВ‚ЛТ‡ ЩЛП˚ BRAUN ФУ
ЪВОВЩУМЫ 8 800 200 20 20 (Б‚УМУН ЛБ
кУТТЛЛ ·ВТФО‡ЪМУ).
ëÎÛ˜‡Ë, ̇ ÍÓÚÓ˚ „‡‡ÌÚËfl ÌÂ
‡ÒÔÓÒÚ‡ÌflÂÚÒfl:
– ‰ВЩВНЪ˚, ‚˚Б‚‡ММ˚В ЩУТ-
χÊÓÌ˚ÏË Ó·ÒÚÓflÚÂθÒÚ‚‡ÏË;
– ЛТФУО¸БУ‚‡МЛВ ‚ ФУЩВТТЛУМ‡О¸М˚ı
ˆÂÎflı;
– ̇ۯÂÌË Ú·ӂ‡ÌËÈ ÛÍÓ‚Ó‰ÒÚ‚‡ ÔÓ
˝НТФОЫ‡Ъ‡ˆЛЛ;
– ÌÂÔ‡‚Ëθ̇fl ÛÒÚ‡Ìӂ͇ ̇ÔflÊÂÌËfl
ÔËÚ‡˛˘ÂÈ ÒÂÚË (ÂÒÎË ˝ÚÓ Ú·ÛÂÚÒfl);
43
Page 44

ì͇ªÌҸ͇
Наша продукція розроблена у відповідності до вимог високих стандартів якості,
функціональності та дизайну.
Сподіваємося, вам дуже сподобається наш
новий побутовий пристрій Braun.
Заходи застереження
Просимо уважно та повністю прочитати
інструкцію для користування перед
застосуванням пристрою.
• Леза та деталі (22а-с) дуже гострі!
•
•
•
•
•
•
•
•
•
•
•
•
•
Опис
1 Електромотор
2 Регулятор швидкості
3 Перемикач вкл./викл. для регулювання
4 Перемикач turbo режиму
5 Кнопки для зняття робочих частин
6 Вал блендера
7 Редуктор збивання
8 Збивач
9 Мірний стакан
10 èÓ‰¥·Ì˛‚‡˜
11 ê‰ÛÍÚÓ ÔÓ‰¥·Ì˛‚‡˜‡
12 ç¥Ê
Щоб уникнути травм, будь ласка,
поводьтеся з лезами дуже
обережно.
сВИ ФЛО‡‰ МВ ФЛБМ‡˜ВМЛИ ‰Оfl
‚ЛНУЛТЪ‡ММfl ‰¥Ъ¸ПЛ ˜Л О˛‰¸ПЛ Б
У·ПВКВМЛПЛ Щ¥БЛ˜МЛПЛ ‡·У УБЫПУ‚ЛПЛ
Б‰¥·МУТЪflПЛ ·ВБ М‡„Оfl‰Ы О˛‰ЛМЛ, ˘У
‚¥‰ФУ‚¥‰‡π Б‡ ªı ·ВБФВНЫ. ᇄ‡ОУП,
ВНУПВМ‰У‚‡МУ Б·В¥„‡ЪЛ ФЛО‡‰ ФУ‰‡О¥
‚¥‰ ‰¥ЪВИ. зВУ·ı¥‰МУ НУМЪУО˛‚‡ЪЛ, ˘У·
‰¥ЪЛ МВ ‚ЛНУЛТЪУ‚Ы‚‡ОЛ ‰‡МЛИ ФЛТЪ¥И
flН ¥„‡¯НЫ.
Пристрій розроблений для приготування
звичайних побутових кількостей.
Завжди вимикайте пристрій, коли він не
застосовується та перед установкою,
складанням, розбиранням, очищенням та
зберіганням.
Перед роботою, перевірте чи відповідає
ваша напруга, напрузі, що вказана внизу
пристрою.
Особливо при роботі з додатковим пристроєм, ручним блендером з гарячими
рідинами, не занурюйте вал блендера
в рідину/або вийміть її з рідини, коли
пристрій буде увімкнено.
Не занурюйте електромотор (1),
редуктор збивалки (7) під проточну воду,
не занурюйте їх у воду.
Мірний стакан (9) не придатний для
використання у мікрохвильовій печі.
Перед роботою з насадкою для приготування їжі (15), переконайтеся, що кришка
блокиратора (17c) належно клацнула та
виштовхувач (16) зафіксовано.
Не вставляйте інші засоби крім виштовхувача (16) в заправну трубку під час
приготування.
Завжди вимикайте пристрій перед
зняттям кришки (17).
Кришку (17) можна мити під проточною
водою, але не занурювати в воду, не
мийте її в посудомийній машині.
Місткість (18) не є придатною для
використання у мікрохвильовій печі.
Електричний пристрій Braun відповідає
стандартам безпеки, що застосовуються.
Ремонт або заміна мережевого шнура
мають бути виконані тільки уповноваженим сервіс-персоналом. Дефектний,
некваліфікований ремонт може спричинити значну загрозу користувачу.
швидкості
13 ëڇ͇Ì
14 иУЪЛНУ‚БМ‡ УТМУ‚‡ / НЛ¯Н‡
Насадка для приготування продукту (FP)
15
16 Виштовхувач
17 Кришка
17a З’єднувач для електромотору
17b Заправна трубка
17c Кришка-блокиратор
18 Ємність
19 Поверхня з покриттям проти
ковзання (також служить як
кришка)
20 Лезо
21 Насадка для приготування тіста
22 Футляр з інструментами
22a Для нарізки шматочками
22b Для шинкування (крупного)
22с Для шинкування (дрібного)
Установка швидкості
При активації перемикача (3), швидкість
приготування відповідає установкам
регулятора швидкості (2). Чим вище швидкість установки, тим швидше та дрібніше
буде нарізний продукт.
Для максимальної швидкості приготування,
натисніть перемикач turbo режиму (4). Ви
можете також користуватися перемикачем
турбо режиму для миттєвого, ефективного
тиску без маніпулювання регулятором
швидкості.
Ми рекомендуємо такі установки швидкості, в залежності від вашої потреби:
Ручний блендер 1... turbo
Збивач 3... 15
èÓ‰¥·Ì˛‚‡˜ див. таблиці швидкості
на мал.
Насадка для
приготування їжі див. таблиці швидкості
на мал.
„
‰, Â
A Користування ручним
блендером
Ручний блендер ідеально підходить для
приготування соусів, супів, майонезу та
дитячої їжі, та методом занурення в
рідину, так само як і для змішування напоїв
та молочних коктейлів:
a) Вставте електромотор (1) в вал блен-
дера (6) та зафіксуйте.
b) Вставте ручний блендер вертикально
в посуд, тоді натисніть перемикач (3)
або перемикач turbo режиму (4).
c) Натисніть кнопку (5) для зняття валу
блендера після користування.
Ви можете користуватися ручним блендером в мірному стакані (9), так само як і в
будь-якому іншому посуді. При змішуванні
прямо в каструлі під час приготування,
зніміть спочатку посуд з плити, щоб захистити пристрій від перегрівання.
Рецепт: Майонез
200-250 мл. олії,
1 яйце (жовток та білок),
1 столова ложка лимонного соку або оцту,
сіль та перець за смаком
Покладіть всі інгредієнти в мірний стакан
відповідно до вищевказаного порядку.
Опустіть ручний блендер до дна мірного
стакану. Натисніть перемикач turbo режиму
(4), тримайте ручний блендер в цій позиції
доки олія не перетвориться на емульсію.
Потім, не вимикаючи, повільно рухайте
44
Page 45

його вверх і вниз доки майонез добре не
змішається.
B Користування збивачем
Збивач має застосовуватися тільки для
збиття вершків, збиття яєчного білка та
змішування бісквіту та готових сумішей для
десертів:
a) Вставте збивач (8) в редуктор збивання
(7), потім вставте електромотор (1) в
редуктор доки він не буде зафіксований.
b) Вставте збивач в посуд и тільки тоді
натисніть перемикач (3) для роботи.
c) Для виймання натисніть кнопку (5) та
вийміть редуктор. Тоді виштовхніть
збивач з редуктора.
Для найкращих результатів ...
краще користуватися широкою ємністю
•
ніж мірним стаканом,
рухайте збивач за годинниковою стріл-
•
кою, тримайте його злегка нахиливши.
Збиті вершки:
Швидко готує 400 мл охолодженого крему
(мінімум 30 % вмісту жиру, 4–8 °C).
Почати с низьких установок швидкості «1»
та під час приготування, підвищувати установки швидкості до «15».
Збитий яєчний білок:
Швидко готує тільки 4 яєчних білка.
Почати з середніх установок швидкості «7»
та під час збивання, підвищувати установки швидкості до «15».
C üÍ Ô‡ˆ˛‚‡ÚË Á ̇‚¥ÒÌËÏ
ÔÓ‰¥·Ì˛‚‡˜ÂÏ
иУ‰¥·М˛‚‡˜ (10) – ¥‰В‡О¸МВ БМ‡fl‰‰fl ‰Оfl
ФУ‰¥·МВММfl П’flТ‡, Ъ‚В‰У„У ТЛЫ, ˆЛ·ЫО¥,
Ъ‡‚, ˜‡ТМЛНЫ, ПУН‚Л, ‚УОУТ¸НЛı „У¥ı¥‚,
ПЛ„‰‡О˛, ˜УМУТОЛ‚Ы ¥ М‡‚¥Ъ¸ Ъ‡НЛı
Ъ‚В‰Лı ФУ‰ЫНЪ¥‚ flН ТЛ Ф‡ПВБ‡М ‡·У
¯УНУО‡‰.
вУ„У Ъ‡НУК ПУКМ‡ ‚ЛНУЛТЪУ‚Ы‚‡ЪЛ
‰Оfl ФЛ„УЪЫ‚‡ММfl ¥БМУП‡М¥ЪМЛı ТЪ‡‚,
М‡ФЛНО‡‰ НУНЪВИО¥‚, М‡ФУª‚, Ф˛В, ОВ„НЛı
‚Л‰¥‚ Ъ¥ТЪ‡.
Для нарізки твердих продуктів (наприклад,
твердого сиру) використовуйте режим
turbo (4).
è‡Ï’flÚ‡ÈÚÂ:
ç ÔÓ‰¥·Ì˛ÈÚ ‰ÛÊ ڂ‰¥ ÔÓ‰ÛÍÚË, ڇͥ
flÍ ÏÛÒ͇ÚÌËÈ „Ó¥ı, ͇‚Ó‚¥ ÁÂ̇ Ú‡ ÍÛÔË.
è¯ Ì¥Ê ÔÓ‰¥·Ì˛‚‡ÚË ...
•
ÔÓ¥ÊÚ ϒflÒÓ, ڂ‰ËÈ ÒË, ˆË·Ûβ,
˜‡ÒÌËÍ, ÏÓÍ‚Û, ÒÚÛ˜ÍÓ‚ËÈ Ôˆ¸;
•
‚ˉ‡Î¥Ú¸ ÒÚ·· Ú‡‚, ÔÓÎÛ˘ËÚ¸ „Ó¥ıË;
•
‚ˉ‡Î¥Ú¸ Á Ï’flÒ‡ Í¥ÒÚÍË, ÊËÎË Ú‡ ıfl˘¥
Á Ï’flÒ‡.
Для найкращого результату просимо
звернути увагу на установки швидкості, що
рекомендовані в посібнику до експлуатації.
(ôÓ· ‰ÓÒfl„ÚË Ì‡È͇˘Ëı ÂÁÛθڇڥ‚,
Á‚ÂÌ¥Ú¸ Û‚‡„Û Ì‡ ÔÓ‡‰Ë ˘Ó‰Ó ¯‚ˉÍÓÒÚ¥
ÔÂÂÓ·ÍË, ÔÓ‰‡Ì¥ Û è‡‚Ë·ı.)
èÓ‰¥·ÌÂÌÌfl (див. малюнок секції
a) й·ВВКМУ БМ¥П¥Ъ¸ ФО‡ТЪЛНУ‚ЛИ ˜УıУО Б
МУК‡ (12). ЕЫ‰¸ЪВ Ы‚‡КМЛПЛ: ОВБУ ‰ЫКВ
„УТЪВ! нЛП‡ИЪВ ИУ„У ОЛ¯В Б‡ ‚ВıМ˛
ФО‡ТЪЛНУ‚Ы ˜‡ТЪЛМЫ. 燉¥М¸ЪВ М¥К М‡
ˆВМЪ‡О¸М¥И ТЪЛКВМ¸ ТЪ‡Н‡М‡ (13) ¥
М‡ЪЛТМ¥Ъ¸ Ъ‡Н, ˘У· ‚¥М Б‡Щ¥НТЫ‚‡‚Тfl.
й·У‚’flБНУ‚У ТЪ‡‚ЪВ ТЪ‡Н‡М М‡ ФУЪЛНУ‚БМЫ УТМУ‚Ы (14).
„)
b) èÓÍ·‰¥Ú¸ ÔÓ‰ÛÍÚË ‚ Òڇ͇Ì.
c) ÇÒÚ‡ÌÓ‚¥Ú¸ ‰ÛÍÚÓ (11) ̇ Òڇ͇Ì.
d) ÇÒÚ‡ÌÓ‚¥Ú¸ ·ÎÓÍ ‰‚Ë„Û̇ ̇ ‰ÛÍÚÓ
Ú‡Í, ˘Ó· ‚¥Ì Á‡Ù¥ÍÒÛ‚‡‚Òfl.
e) ç‡ÚËÒÌ¥Ú¸ ‚ËÏË͇˜ (3) ‡·Ó (4) ˘Ó·
Ы‚¥ПНМЫЪЛ ФУ‰¥·М˛‚‡˜. и¥‰ ˜‡Т У·УЪЛ
ЪЛП‡ИЪВ ·ОУН ‰‚Л„ЫМ‡ У‰М¥π˛ ЫНУ˛, ‡
ТЪ‡Н‡М – ¥М¯У˛.
f) Після застосування натисніть кнопку (5),
щоб вийняти електромотор.
g) иУЪ¥П БМ¥П¥Ъ¸ В‰ЫНЪУ.
h) й·ВВКМУ ‚ЛИП¥Ъ¸ М¥К.
i) ЗЛ‰‡О¥Ъ¸ ФВВУ·ОВМЛИ ФУ‰ЫНЪ Б
ТЪ‡Н‡МЫ. иУЪЛНУ‚БМ‡ УТМУ‚‡ Ъ‡НУК π
НЛ¯НУ˛ ТЪ‡Н‡М‡.
Приклад рецепта: Чорнослив із медом та
ваніллю
(для начинки або топінгу до млинців)
Використовуйте насадку-подрібнювач (10),
швидкість – «turbo».
Покладіть до чаші подрібнювача 60 г меду
в’язкої консистенції та 50 г чорносливу.
Подрібнюйте упродовж 10 секунд. Потім
додайте 30 мл води з ваніллю і знову
подрібнюйте упродовж 3 секунди.
D/E Користування насадкою
для приготування їжі
Насадку для приготування їжі можна використовувати для:
– подрібнення та змішування (див. малю-
нок секції
– замішування тіста (до 250 г борошна на
одну порцію)
– нарізання та шаткування (див. малюнок
секції Â)
Здрібнювання (див. малюнок секції ‰)
Лезо (20) ідеально підходить для нарізання
м’яса, сиру, цибулі, кухонних трав, часнику,
моркви, грецьких горіхів, лісних горіхів,
мигдалю та ін. Для здрібнювання твердих
продуктів користуйтеся перемикачем turbo
режиму (4).
Увага: Не подрібнюйте занадто тверді
продукти, такі як: мускатні горіхи, кофейні
зерна та зернові культури.
Перед подрібненням ...
порізати м’ясо, сир, цибулю, часник,
•
моркву, перець,
видалити стебла з кухонних трав,
•
розколоти горіхи,
видалити кістки, жили та хрящі з м’яса.
•
а) Обережно зняти пластмасовий футляр
з леза (20). Увага: лезо дуже гостре!
Завжди тримайте його пластмасовою
частиною вверх. Встановіть лезо на вал
ємності (18) та проверніть, щоб воно
було зафіксовано. Завжди встановлюйте ємність на поверхню з покриттям проти ковзання (19).
b) Покладіть продукти в ємність для
подрібнення.
c) Накрийте кришкою (17) ємність з блоки-
ратором (17c), що встановлена біля
ємності, що утримується в руках. Для
закриття кришки, поверніть її за годинникової стрілкою так, щоб блокиратор
було введено в контакт «клацанням»
над ручкою.
d) Вставте електромотор (1) в З’єднувач
(17a) доки воно не буде зафіксоване.
Переконайтеся, що виштовхувач
зафіксовано.
e) Для роботи натисніть перемикач (3) або
(4) електромотор, та утримуйте ємність
іншою рукою.
‰)
45
Page 46

f) Після застосування натисніть кнопку (5),
щоб вийняти електромотор. Вийміть
виштовхувач.
g) Натисніть кришку блокиратора (17c),
поверніть кришку (17) проти годинникової стрілки для відкривання та підніміть
вверх.
h) Обережно вийміть лезо повертаючи,
його та витягуючи, перед вийманням
переробленого продукту.
Змішування легкого тіста
Користуючись лезом (20), Ви можете
також замісити легке тісто, як масло для
млинців або суміші для торту в основі до
250 г муки.
Для масла для млинців, наприклад, спочатку налийте рідину в ємність, потім додайте
муки та нарешті яйця. Натисніть перемикач
турбо режиму (4), змішайте масло до змазування.
c) Вставте електромотор в З’єднувач доки
воно не зафіксується. Виберіть
установки швидкості згідно з рекомендаціями на мал. (j).
d) Покладіть продукт для приготування
в заправну трубку. Ніколи не лізьте
у заправну трубку. коли пристрій
увімкнено. Завжди користуйтеся
штовхачем (16) для подачі продукту.
e) Натисніть перемикач (3) або (4) елек-
тромотор для роботи.
f) Після користування, натисніть кнопки
(5), щоб вийняти електромотор.
g) Натисніть кришку блокиратора (17c),
поверніть кришку (17) проти годинникової стрілки для відкривання та підніміть
вверх.
h) Вийміть футляр з інструментами перед
тим як вийняти оброблений продукт.
Щоб вийняти інструменти, натисніть на
виступ внизу футляру з інструментами.
Приготування тіста
(Дізнатися, як працює насадка для приготування тіста, можна з малюнка секції ‰)
Насадка для приготування тіста (21)
ідеально підходить для замішування різних
видів тіста, наприклад, дріжджового або
здобного (250 г борошна на порцію).
Розташуйте насадку для приготування
•
тіста в чаші (18).
Спочатку наповніть чашу сухими інгре-
•
дієнтами.
Рідкі інгредієнти додавайте лише через
•
наливний патрубок, коли працює двигун.
Після однієї хвилини замішування тіста
•
необхідно охолодити двигун упродовж
10 хвилин.
Дріжджове тісто (для піци, хліба, торта)
До 250 г борошна, плюс інгредієнти.
Швидкість – «15», час замішування – не
більше 1 хвилини.
Спочатку покладіть борошно в чашу, потім
додайте інших інгредієнтів (окрім рідких).
Додавайте рідкі інгредієнти через
наливний патрубок, коли працює двигун.
Здобне тісто (для пирога, торта)
До 250 г борошна, плюс інгредієнти.
Швидкість – «15», час замішування – не
більше 1 хвилини.
Спочатку наповніть борошном чашу, потім
додайте інших інгредієнтів.
Використовуйте масло кімнатної температури. Припиняйте замішування, як тільки
тісто набуде форми кулі. Через надмірне
замішування тісто стає занадто м’яким.
Нарізка / Шатківниця (див. малюнок
секції
Â)
Користуючись iнструменти для нарізання
(22a), Ви можете нарізати наприклад
огірки, цибулю, гриби, яблука, моркву,
редьку, тверду картоплю, кабачки, капусту.
Користуючись iнструменти для подрібнення (22b, 22c), Ви можете нашаткувати
наприклад яблука, моркву, тверду картоплю, буряк, капусту, сир (від м’якого до
середнього).
Очищення пристрою
Очищення електромотору (1) та редуктора
збивалки (7) має бути тільки вологою
ганчіркою. Кришка (17) може бути очищена
під проточною водою, але не має бути
занурена в воду, а також в посудомийну
машину.
При обробці кольорових продуктів
(наприклад моркви), пластмасові частини
пристрою можуть стати знебарвленими.
Протріть ці частини рослинною олією
перед їх очищенням.
СУ‰‡ЪНУ‚¥ ФЛМ‡ОВКМУТЪ¥
(ПУКМ‡ НЫФЛЪЛ ‚ лВ‚¥ТМЛı ˆВМЪ‡ı
НУПФ‡М¥ª Braun; ‡ОВ МВ ‚ ЫТ¥ı Н‡ªМ‡ı)
Çë: ‰Ó‰‡ÚÍÓ‚‡ ̇҇‰Í‡-ÔÓ‰¥·Ì˛‚‡˜,
•
¥‰В‡О¸МУ Ф¥‰ıУ‰ЛЪ¸ ‰Оfl М‡¥Б‡ММfl
‚ВОЛНЛı У·Тfl„¥‚ ФУ‰ЫНЪ¥‚, ‡ Ъ‡НУК
ФЛ„УЪЫ‚‡ММfl ПУОУ˜МЛı НУНЪВИО¥‚,
ОВ„НУ„У Ъ¥ТЪ‡ Ъ‡ НУО¥ММfl НЫ·ЛН¥‚ О¸У‰Ы.
лНУ·‡ М‡ТЪ¥ММУ„У Н¥ФОВММfl ·ОВМ‰В‡
•
При внесенні змін без попередження.
дУПФ‡М¥fl Б‡ОЛ¯‡π Б‡ ТУ·У˛ Ф‡‚У
‚МУТЛЪЛ БП¥МЛ ‚ НУМТЪЫНˆ¥˛ ФЛТЪУ˛ ·ВБ ТФВˆ¥‡О¸МУ„У У„УОУ¯ВММfl.
ᇄ‡Î¸Ì¥ ÛÏÓ‚Ë Á·Â¥„‡ÌÌfl
ЗЛУ·Л Щ¥ПЛ Braun ВНУПВМ‰У‚‡МУ
Б·В¥„‡ЪЛ Ы КЛЪОУ‚УПЫ ФЛП¥˘ВММ¥ Б‡
ЫПУ‚ Н¥ПМ‡ЪМУª ЪВПФВ‡ЪЫЛ Ъ‡ МУП‡О¸МУª ‚УОУ„УТЪ¥.
ЗЛУ·МЛН Б‡ОЛ¯‡π Б‡ ТУ·У˛ Ф‡‚У М‡
‚МВТВММfl БП¥М ·ВБ ФУФВВ‰М¸У„У
ФУ‚¥‰УПОВММfl.
Товар Сертифіковано
а) Вставте інструмент (22a–22c) в футляр
з інструментами (22) та зафіксуйте.
Вставте футляр з інструментами в
центральний вал ємності та проверніть,
щоб зафіксувати.
b) Прикріпіть кришку (17) на ємність з
блокиратором (17c) біля ручки ємності.
Для закриття кришки, поверніть її за
годинниковою стрілкою так щоб блокиратор «клацнув» над ручкою.
46
ЦОВНЪЛ˜МЛИ Ы˜МЛИ ·ОВМ‰В Braun
MR 570, ЪЛФ 4191, 500-600 ‚‡ЪЪ.
ÇË„ÓÚÓ‚ÎÂÌÓ ‚ èÓθ˘¥ ‰Îfl ŇÛÌ ÉÏ·ï,
ç¥Ï˜˜Ë̇/Braun GmbH,
Frankfurter Strasse 145,
61476, Kronberg, Germany.
Page 47

A‰ÂÒ‡ ‚ ì͇ªÌ¥:
íéÇ «èÓÍÚ Ẩ ÉÂÏ·Î íÂȉ¥Ì„
ì͇ªÌ‡», ì͇ªÌ‡, 04070, Ï.ä˪‚, ‚ÛÎ.
燷ÂÂÊÌÓ-Úˈ¸Í‡, 5/13,
ÍÓÔÛÒ Î¥Ú. A.
íÂÎ. (0-800) 505-000.
www.pg.com.ua
нУ‚‡ ‚ЛНУЛТЪУ‚Ы‚‡ЪЛ Б‡ ФЛБМ‡˜ВММflП,
‚¥‰ФУ‚¥‰МУ ‰У ¥МТЪЫНˆ¥ª Б ВНТФОЫ‡Ъ‡ˆ¥ª.
С‡Ъ‡ ‚Л„УЪУ‚ОВММfl ФУ‰ЫНˆ¥ª Braun ‚Н‡Б‡М‡
·ВБФУТВВ‰М¸У М‡ ‚ЛУ·¥ (‚ П¥Тˆ¥
П‡НЫ‚‡ММfl) ¥ ТНО‡‰‡πЪ¸Тfl Б Ъ¸Уı ˆЛЩ:
ФВ¯‡ ˆЛЩ‡ π УТЪ‡ММ¸У˛ ˆЛЩУ˛ УНЫ
‚Л„УЪУ‚ОВММfl, ¥М¯¥ ‰‚¥ ˆЛЩЛ π ФУfl‰НУ‚ЛП
МУПВУП ЪЛКМfl Ы Уˆ¥.
Й‡‡МЪ¥fl – 2 УНЛ. м ‡Б¥ МВУ·ı¥‰МУТЪ¥
„‡‡МЪ¥ИМУ„У ˜Л ФУТЪ„‡‡МЪ¥ИМУ„У
У·ТОЫ„У‚Ы‚‡ММfl, Б‚ВЪ‡ИЪВТfl ‰У „УОУ‚МУ„У
УЩ¥ТЫ ТВ‚¥ТМУ„У ˆВМЪЫ Braun ‚ мН‡ªМ¥:
ии «Я.Е.л.», ‚ЫО. ЙОЛ·У˜Лˆ¸Н‡ 53, П. дЛª‚.
нВО. (044) 4286505.
ɇ‡ÌÚ¥ÈÌ¥ ÁÓ·Ó‚’flÁ‡ÌÌfl Çraun
СОfl ‚Т¥ı ‚ЛУ·i‚ ПЛ ‰‡πПУ „‡‡МЪ¥˛
М‡ ‰‚‡ УНЛ, ФУ˜ЛМ‡˛˜Л Б ПУПВМЪЫ
ФЛ‰·‡ММfl ‚ЛУ·Ы.
èÓÚfl„ÓÏ „‡‡ÌÚ¥ÈÌÓ„Ó ÔÂ¥Ó‰Û ÏË
·ВБНУ¯ЪУ‚МУ ЫТЫ‚‡πПУ ¯ОflıУП
ВПУМЪЫ, Б‡ПiМЛ ‰ВЪ‡ОВИ ‡·У Б‡П¥МЛ
‚Т¸У„У ‚ЛУ·Ы ·Ы‰¸-flН¥ Б‡‚У‰Т¸Н¥
‰ВЩВНЪЛ, ‚ЛНОЛН‡М¥ МВ‰УТЪ‡ЪМ¸У˛
flН¥ТЪ˛ П‡ЪВ¥‡О¥‚ ‡·У ТНО‡‰‡ММfl.
м ‚ЛФ‡‰НЫ ФВ‰’fl‚ОВММfl ВНО‡П‡ˆИ¥ª
Б‡ ЫПУ‚‡ПЛ ‰‡МУª „‡‡МЪ¥ª, ФВВ‰‡ИЪВ
‚Лi· Ы НУПФОВНЪ¥ ‡БУП Б
„‡‡МЪ¥ИМЛП Ъ‡ОУМУП Ы ·Ы‰¸-flНЛИ ¥Б
ˆВМЪ¥‚ ТВ‚¥ТМУ„У У·ТОЫ„У‚Ы‚‡ММfl
Зr‡un.
ЗТ¥ ¥М¯¥ ‚ЛПУ„Л, ‡БУП Б ‚ЛПУ„‡ПЛ
‚¥‰¯НУ‰Ы‚‡ММfl Б·ЛЪН¥‚, МВ ‰¥ИТМ¥,
flН˘У М‡¯‡ ‚¥‰ФУ‚i‰‡О¸М¥ТЪ¸ МВ
‚ТЪ‡МУ‚ОВМ‡ Б‡НУММЛП ˜ЛМУП.
ÇËÔ‡‰ÍË, ̇ flÍ¥ Ì ÓÁÔÓ‚Ò˛‰ÊÛπÚ¸Òfl
„‡‡ÌÚ¥fl:
– ‰ВЩВНЪЛ, ‚ЛНОЛН‡М¥ ЩУТ-П‡КУМЛПЛ
Ó·ÒÚ‡‚Ë̇ÏË;
– ‚ËÍÓËÒÚ‡ÌÌfl Á ÔÓÙÂÒ¥ÈÌÓ˛ ÏÂÚÓ˛;
– ÔÓÛ¯ÂÌÌfl ‚ËÏÓ„ ¥ÌÒÚÛ͈¥ª Á
ВНТФОЫ‡Ъ‡ˆ¥ª;
– Ì‚iÌ ‚ÒÚ‡ÌÓ‚ÎÂÌÌfl ̇ÔÛ„Ë ÏÂÂÊi
ÊË‚ÎÂÌÌfl (flÍ˘Ó ˆÂ ‚Ëχ„‡πÚ¸Òfl);
– Б‰iИТМВММfl ЪВıМ¥˜МЛı БП¥М;
– ПВı‡М¥˜Мi ÔÓ¯ÍÓ‰ÊÂÌÌfl;
– ‰Îfl ÔË·‰¥‚, ˘Ó Ô‡ˆ˛˛Ú¸ ̇
·‡Ú‡ÂÈ͇ı – Ó·ÓÚ‡ Á Ì‚i‰ÔÓ‚¥‰ÌËÏË
‡·Ó ÒÔ‡ˆ¸Ó‚‡ÌËÏË ·‡Ú‡ÂÈ͇ÏË,
·Ы‰¸flН¥ ФУ¯НУ‰КВММfl, ‚ЛНОЛН‡М¥
ÒÔ‡ˆ¸Ó‚‡ÌËÏË ‡·Ó Ô¥‰Ú¥Í‡˛˜ËÏË
·‡Ú‡ÂÈ͇ÏË;
– ‰Îfl ·ËÚ‚ – Á¥Ï’flÚ‡ ‡·Ó ÔÓ‚‡Ì‡ Ò¥Ú͇.
м ‚ЛФ‡‰НЫ ‚ЛМЛНМВММfl ЪЫ‰МУ˘¥‚ Б
‚ЛНУМ‡ММflП „‡‡МЪ¥ИМУ„У ‡·У
Ф¥ТОfl„‡‡МЪ¥ИМУ„У У·ТОЫ„У‚Ы‚‡ММfl
ФУı‡ММfl Б‚ВЪ‡ЪЛТ¸ ‰У ТВ‚¥ТМУ„У
ˆВМЪЫ Зr‡un ‚ мН‡ªМ¥.
м ‚ЛФ‡‰НЫ МВПУКОЛ‚УТЪ¥ ВПУМЪЫ ‚
„‡‡МЪ¥ИМЛИ ФВ¥У‰ ‚Л¥· ПУКВ ·ЫЪЛ
Б‡П¥МВМЛИ М‡ МУ‚ЛИ ‡·У ‡М‡ОУ„¥˜МЛИ
‚¥‰ФУ‚¥‰МУ ‰У б‡НУМЫ ФУ Б‡ıЛТЪ Ф‡‚
ТФУКЛ‚‡˜¥‚.
Й‡‡МЪ¥fl М‡·Ы‚‡π ТЛОЛ ОЛ¯В, flН˘У
‰‡Ъ‡ НЫФ¥‚О¥ Ф¥‰Ъ‚В‰КЫπЪ¸Тfl
ФВ˜‡ЪНУ˛ Ъ‡ Фi‰ФЛТУП ‰ЛОВ‡
(П‡„‡БЛМЫ) М‡ УЛ„¥М‡О¸МУПЫ
„‡‡МЪ¥ИМУПЫ Ъ‡ОУМ¥ З„aun ‡·У М‡
УТЪ‡ММ¥И ТЪУ¥Мˆ¥ УЛ„¥М‡О¸МУª
¥МТЪЫНˆ¥ª Б ВНТФОЫ‡Ъ‡ˆ¥ª Зr‡un, flН‡
Ъ‡НУК ПУКВ ·ЫЪЛ „‡‡МЪiИМЛП
Ъ‡ОУМУП.
сfl „‡‡МЪ¥fl ‰¥ИТМ‡ Ы ·Ы‰¸-flН¥И Н‡ªМ¥,
‚ flНЫ ˆВИ ‚Л¥· ФУТЪ‡‚ОflπЪ¸Тfl Зr‡un
‡·У ФЛБМ‡˜ВМЛП ‰ЛТЪЛ·‘˛ЪУУП, Ъ‡
‰В КУ‰М¥ У·ПВКВММfl
Б ¥ПФУЪЫ ‡·У ¥М¯¥ Ф‡‚У‚¥ ФУОУКВММfl
МВ ФВВ¯НУ‰К‡˛Ъ¸ М‡‰‡ММ˛
„‡‡МЪ¥ИМУ„У У·ТОЫ„У‚Ы‚‡ММfl.
б‰¥ИТМВММfl „‡‡МЪ¥ИМУ„У
У·ТОЫ„У‚Ы‚‡ММfl МВ ‚ФОЛ‚‡π М‡ ‰‡ЪЫ
Б‡Н¥М˜ВММfl ЪВП¥МЫ „‡‡МЪ¥ª. Й‡‡МЪ¥fl
М‡ Б‡П¥МВМ¥ ˜‡ТЪЛМЛ Б‡Н¥М˜ЫπЪ¸Тfl ‚
ПУПВМЪ Б‡НiМ˜ВММfl „‡‡МЪ¥ª М‡ ‰‡МЛИ
‚Лi·.
Й‡‡МЪ¥fl МВ ФУНЛ‚‡π ФУ¯НУ‰КВММfl,
‚ЛНОЛН‡М¥ МВ‚iМЛП ‚ЛНУЛТЪ‡ММflП
(‰Л‚. Ъ‡НУК ФВВОiН МЛК˜В)
МУП‡О¸МВ БМУ¯Ы‚‡ММfl Т¥ЪУН Ъ‡ МУК¥‚
‰Оfl „УОiММfl, ‰ВЩВНЪЛ, ˘У МВБМ‡˜МЛП
˜ЛМУП ‚ФОЛ‚‡˛Ъ¸ М‡ flН¥ТЪ¸ У·УЪЛ
ФЛО‡‰Ы. сfl „‡‡МЪ¥fl ‚Ъ‡˜‡π ТЛОЫ,
flН˘У ВПУМЪ Б‰iИТМ˛πЪ¸Тfl МВ
‚ФУ‚МУ‚‡КВМУ˛ ‰Оfl ˆ¸У„У УТУ·У˛
Ъ‡, flН˘У ‚ЛНУЛТЪУ‚Ы˛Ъ¸Тfl МВ
УЛ„¥М‡О¸Мi ‰ВЪ‡О¥ Зr‡un.
47
Page 48

Български
Продуктите Braun отговарят на найвисоките стандарти за качество, функционалност и дизайн.
Надяваме се да бъдете удовлетворени от
вашия нов уред Braun.
Внимание
Прочетете внимателно инструкциите
преди употреба на уреда!
• Остриетата и приставките (22а–с)
•
•
•
•
•
•
•
•
•
•
•
•
•
•
Описание
1 Моторен блок
2 Регулатор за различни скорости
3
4 «turbo» бутон
5 Бутони за освобождаване на
48
са много остри! За избягване на
наранявания, моля боравете с
остриетата изключително внимателно.
нУБЛ ЫВ‰ МВ В ФВ‰М‡БМ‡˜ВМ Б‡ ФУОБ‚‡МВ
УЪ ‰Вˆ‡ ЛОЛ ОЛˆ‡ Т М‡П‡ОВМЛ ЩЛБЛ˜ВТНЛ
ЛОЛ ЫПТЪ‚ВМЛ ТФУТУ·МУТЪЛ, УТ‚ВМ ‡НУ МВ
Т‡ ФУ‰ М‡·О˛‰ВМЛВ М‡ ОЛˆВ, УЪ„У‚‡fl˘У
Б‡ ЪflıМ‡Ъ‡ ·ВБУФ‡Т-МУТЪ. д‡ЪУ ˆflОУ
ФВФУ˙˜‚‡ПВ ‰‡ Ф‡БЛЪВ ЫВ‰‡ УЪ ‰Вˆ‡.
Този уред не е предназначен за употреба
от деца или хора с намалени физически
или умствени възможности, освен под
наблюдението на човека, отговорен за
тяхната сигурност и безопасност.
Уредът е предназначен за употреба в
домашни условия и обичайните за домакинството количества.
Винаги изключвайте уреда, когато не го
използвате и преди сглобяване, разглобяване, почистване или съхранение.
Преди да включите уреда, проверете
дали напрежението на мрежата съответства на написаното на уреда.
Когато използвате пасиращата
приставка в топли или горещи течности,
не потапяйте и не изваждайте пасиращия накрайник от течността, докато
пасаторът работи.
Не поставяйте моторния блок (1) или
задвижващия механизъм на телта за
разбиване (7) под течаща вода и не ги
потапяйте във вода.
Купата за разбиване (9) не е подходяща
за микровълнова фурна.
Преди употреба на приставката за
приготвяне на храна (15), уверете се, че
капака (17c) е правилно поставен и че
буталото (16) е на мястото си.
Не поставяйте в отвора на капака други
предмети или инструменти освен буталото (16) при употребата на приставката.
Винаги изключвайте уреда преди да
свалите капака (17).
Капакът (17) може да се почиства под
течаща вода, но не го потапяйте във
вода и не го почиствайте в миялна
машина.
Купата (18) не е подходяща за микровълнова фурна.
Електрическите уреди Braun отговарят
на действащите стандарти за сигурност.
Техният ремонт или смяната на захранващия кабел трябва винаги да се извършват от оторизиран сервизен техник.
Неправилният ремонт може да доведе
до допълнителни повреди или до нараняване на потребителя.
Бутон за включване/изключване на
променливите скорости
отделните части
6 Пасираща приставка с режещ нож
7 Задвижващ механизъм на телта за
разбиване
8 Тел за разбиване
Мерителна купа
9
10 Приставка за нарязване на продукти
(резачка)
11 Капак
12 Нож
13 Купа на резачката
14 Подложка против плъзгане (може
да се използва и като капак)
15 Приставка за приготвяне на храна (FP)
16 Бутало за притискане
17 Капак
17a Свързване с моторния блок
17b Отвор за подаване на продукти
17c Затварящ механизъм на капака
18 Купа
19 Подложка против плъзгане (може
да се използва и като капак)
20 Острие
21 Приставка за месене на тесто
22 Държач на рендетата
22a Ренде за рязаве на шайби
22b Ренде за настъргване (едро)
22c Ренде за настъргване (фино)
Скорост
При натискане на бутон (3), скоростта отговаря на позаната на регулатора за скоростите (2). Колкото по-висока е скоростта,
толкова по-бързо е действието на уреда и
финно нарязани/пасирани са продуктите.
За максимална скорост, натиснете «turbo»
бутона (4). Може да използвате «turbo»
бутона и за мощни моментни пулсации без
да променяте регулатора на скоростта.
В зависимост от употребата препоръчваме
следните скорости:
Пасатор от 1…до turbo
Тел за разбиване от 3... до 15
Резачка – виж скоростите в
Приставка за приготвяне
на храна – виж скоростите в
таблиците в секцията
‰, Â.
таблиците в секцията
„.
A Използване на пасиращия
накрайник
Пасаторът е изключително подходящ за
приготвяне на яхнии, сосове, майонеза,
бебешка храна, както и за разбъркване на
напитки и шейкове.
a) Монтирайте моторния блок (1) към
пасиращата приставка (6) и натиснете
докато щракне.
b) Поставете пасатора вертикално в
купата за разбиване и след това
натиснете бутона за включване/
изключване (3) или бутон «turbo» (4).
c) За да свалите пасиращата приставка
след употреба, натиснете бутоните за
освобождаване (5) и издърпайте
накрайника.
Може да работите с пасиращия накрайник
в купата за разбиване, както и във всеки
друг съд. При пасиране докато готвите,
отстранете съда от котлона, за да предпазите пасатора от прегряване.
Примерна рецепта: Майонеза
Необходими продукти:
200–250 мл олио,
1 яйце (жълтък и белтък),
Page 49

1 супена лъжица лимонов сок или оцет,
сол и пипер на вкус
Приготвяне: Поставете всички продукти
в купата за разбиване, по реда, в който са
посочени по-горе. Вкарайте пасатора до
дъното на купата. Натиснете «turbo» бутон
(4). Задръжте пасатора в тази позиция,
докато продуктите се смесят, след което
без да го изключвате бавно започнете да
движите нагоре и надолу, докато мойонезата не получи желаната гъстота.
B Използване на телта за
разбиване
Телта за разбиване трябва да се използва
само за разбиване на сметана, белтъци
на сняг, кремове, полуготови десерти и за
приготвяне на леки теста (например за
палачинки).
a) Поставете телта за разбиване (8) в
задвижващия механизъм (7) и след
това монтирайте към моторния блок (1),
натиснете докато щракне.
b) Поставете телта за разбиване в съда,
който ще използвате и едва след това
натиснете бутона за включване (3).
c) За да свалите приставката, натиснете
бутоните за освобождаване (5) и издърпайте приставката. След това свалете
телта за разбиване от задвижващия
механизъм чрез издърпване.
За най-добри резултати ...
използвайте по-широка купа вместо
•
купата за разбиване
движете телта за разбиване по посока на
•
часовниковата стрелка, като държите
уреда леко под наклон
Разбиване на сметана:
Разбивайте най-много 400 мл добре
изстудена сметана (мин. 30% масленост,
4–8 °C). Започнете с по-ниска скорост «1»
и докато разбивате, увеличете скоростта
до «15».
Разбиване на белтъци на сняг:
Разбивайте най-много 4 белтъка.
Започнете със средна скорост «7» и
докато разбивате, увеличете скоростта
до «15».
C Приставка за нарязване
(резачка)
Приставката за нарязване (10) (резачката)
е подходяща за месо, сирене, лук, листни
подправки, чесън, люти чушлета (с вода),
моркови, ядки и др. Когато нарязване потвърди продукти (например по-твърди
сирена използвайте «turbo» бутон (4).
ВНИМАНИЕ: Не се опитвайте да режете
много твърди продукти като индийско
орехче, кафе на зърна, зърна от житни
култури, кубчета лед.
Преди рязане ...
предварително нарежете месото,
•
сиренето, лука, чесъна, морковите,
лютите чушлета
отстранете стъблата на листните
•
подправки и черупките на ядките
отстранете костите, сухожилията и
•
хрущялите от месото
За най-добри резултати може да направите справка за препоръчваната скорост
в таблицата.
Нарязване (виж илюстрация в раздел
a) Внимателно свалете пластмасовия
предпазител на ножовете (12).
ВНИМАНИЕ: Остриетата на ножа са
много остри! Винаги дръжте само за
вертикалната пластмасова част.
Поставете ножовете върху оста в
центъра на купата (13) и завъртете,
за да се захванат на място. Винаги
поставяйте купата върху подложката
против плъзгане (14).
b) Поставете продуктите в купата.
c) Поставете капака (11) върху купата.
d) Закрепете неподвижно моторния блок
(1) към капака (11), натиснете докато
щракне.
e) Натиснете бутон (3) или «turbo» бутон
(4), за да включите. Дръжте моторния
блок с една ръка и купата с другата.
Не използвайте приставката за повече
от 2 минути.
f) След употреба, натиснете бутоните за
освобождавене (5) и свалете моторния
блок (1).
g) Свалете капака.
h) Внимателно извадете ножовете.
i) Извадете нарязаните продукти от
купата. Подложката против плъзгане
може да се използва и като капак.
Примерна рецепта: Сливи с ванилия и мед
(като пълнеж или за мазане)
(използвайте приставка за кълцане (10),
скорост: «turbo»)
Сипете 60 г мед и 50 г сливи в купата за
кълцане и кълцайте в продължение на
10 секунди, а после добавете 30 мл вода
(с есенция ванилия) и продължете кълцането за още 3 секунди.
„)
D/E Приставка за приготвяне
на храна
Може да използвате приставката за
обработка на храна (15) за:
– рязане и смесване (виж илюстрация
в раздел ‰)
– месене на тесто (тесто на основата
на максимално количество от 250 г
брашно)
– рязане и раздробяване (виж илюстра-
ция в раздел Â)
Нарязване (резачка) (виж илюстрация
в раздел
Острието (20) са напълно подходящи за
рязане на месо, сирене, лук, листни
подправки, чесън, моркови, ядки и др.
За рязане на по-твърди продукти използвайте «turbo» бутона (4).
ВНИМАНИЕ: Не се опитвайте да режете
много твърди продукти като инийско
орехче, кафе на зърна и зърна от житни
култури.
Подготовка за рязането …
•
•
•
a) Внимателно свалете пластмасовия
‰)
Предварително нарежете месото,
сиренето, лука, чесъна, морковите,
лютите чушлета.
Отстранете стъблата на листните
подправки и черупките от ядките.
Отстранете костите, сухожилията и
хрущялите от месото.
предпазител от ножовете (20).
ВНИМАНИЕ: Остриетата са много
остри! Винаги дръжте само за верти-
калната пластмасова част. Поставете
ножа върху оста в центъра част на
49
Page 50

купата (18) и завъртете, за да се
захванат стабилно. Винаги поставяйте
купата върху подложката против
плъзгане (19).
b) Поставете продуктите в купата.
c) Поставете капака (17) върху купата,
като затварящият механизъм (17c) да
е обърнат към дръжката. За да зат-
ворите неподвижно капака, завъртете
по посока на часовниковата стрелка,
докато затварящия механизъм не се
захване с щракване над дръжката.
d) Закрепете неподвижно моторния блок
(1) в свързващия отвор (17a).
Уверете се че буталото е на мястото си.
e) За да включите, натиснете бутон (3) или
«turbo» бутон (4) върху моторния блок,
като държите купата с другата ръка.
f) След употреба, натиснете бутоните
за освобождаване (5), за да свалите
моторния блок. Извадете буталото.
g) Като натискате затварящия механизъм
(17c), завъртете капака (17) по посока
обрятна на часовниковата стрелка, за
да го откачите и отворите.
h) Внимателно извадете ножовете като
въртите и дърпате, преди да извадите
нарязаните продукти.
Разбиване на леко тесто
С ножовете (20) може да разбивате леки
теста, като смес за палачинки или тесто за
кекс с не повече от 250 грама брашно.
За сместа за палачинки, например, първо
налейте в купата течностите, добавете
брашното и най-накрая яйцата. Натиснете
«turbo» бутона (4) и разбивайте докато
получите еднородна смес.
Месене на тесто
(Илюстрацията в раздел
прилага към употреба на приставката за
месене на тесто)
Приставката за месене на тесто (21) е
идеално пригодена за месене на различни
видове тесто, като тесто с мая или тесто
за сладки (тесто на основата на количество от 250 г брашно)
•
Поставете приставката за месене на
тесто в купата (18).
•
Първо сипете сухите съставки в купата.
•
Сипвайте течности само през отвора за
пълнене, при работещ двигател.
•
След 1 минута време за месене дайте
на двигателя време за охлаждане от
10 минути.
Тесто с мая (за пица, хляб, кекс)
Максимум 250 г брашно плюс съставките.
Скорост «15», максимално време за
месене: 1 минута.
Първо сипете брашното в купата на
устройството за обработка на храна, после
сипете другите съставки, без течностите.
Добавете течностите през отвора за
пълнене при работещ двигател.
Тесто за сладки (за киш, кекс)
Максимум 250 г брашно плюс съставките.
Скорост «15», максимално време за
месене: 1 минута.
Първо сипете брашното в купата на
устройството за обработка на храна, после
сипете другите съставки. Използвайте
масло на стайна температура. Спрете
месенето малко след като тестото стане
на топка. Тестото ще омекне твърде много
при прекомерно месене.
‰ също се
шайби (22a) може да режете краставици,
лук, гъби, ябълки, моркови, репички,
сурови картофи, тиквички, зеле и др.
С помощта на рендето за настъргване
(22b, 22c), може да настържете ябълки,
моркови, сурови картофи, цвекло, зере,
сирене (от меко до средно твърдо).
a) Поставете избраният от вас нож (22a–c)
в държача (22) и го закрепете на място.
Поставете държача върху оста в центъра на купата и завъртете, за да се
захване стабилно.
b) Сложете капака (17) върху купата, като
затварящият механизъм (17c) е обърнат към дръжката на купата.
За да затворите неподвижно капака,
завъртете по посока на часовниковата
стрелка, докато затварящият механизъм не се захване с щракване над
дръжката.
c) Закрепете неподвижно моторният блок
(1) в свързващия отвор (17a). Настройте
скоростта съобразно препоръките в
илюстрация (j).
d) Поставете продуктите в тръбата за
подаване на продукти. Никога не
бъркайте в тръбата за подаване на
продукти, когато уредът е включен.
Винаги използвайте буталото (16), за да
придвижвате продуктите към рендето.
e) За да включите натиснете бутон (3) или
«turbo» бутон (4) върху моторния блок.
f) След употреба, натиснете бутоните за
освобождаване (5), за да освободите
моторния блок.
g) Като натискате затварящия механизъм
(17c), завъртете капака (17) в посока
обратна на часовниковата стрелка, за
да го откачите и повдигнете.
h) Извадете държача, преди да извадите
нарязаните продукти. Ножът може да
свалите, като го избутате нагоре от
края, който се подава от долната
страна на държача.
Почистване на уреда
Почиствайте моторния блок (1) и задвижващия механизъм на телта за разбиване
(7) само с влажна кърпа.
Капакът на приставката за храна (17) и
този на резачката могат да се почистват
под течаща вода, но не ги потапяйте във
вода, както и не се мият в съдомиялна
машина.
При обработката на силно оцветяващи
продукти (например моркови), пластмасовите части на уреда могат да се оцветят.
Избършете ги с растителна мазнина,
преди да ги почистите.
Приставки
(Може да закупите от сервизните центрове
на Braun, но в някои страни това не е
възможно)
BC: Приставка за рязане, идеална за
•
нарязване на по-големи количества
продукти, както и за приготвяне на
шейкове, леки теста и натрошаване на
кубчета лед.
Стойка за стена
•
Промени в уреда и/или тази инструкция
могат да се извършват без предизвестие.
Рязане на шайби/рендосване
(виж илюстрация в раздел
С помощта на рендето за нарязване на
50
Â)
Page 51

След изтичане на срока на употреба на
уреда
Когато приключи употребата на продукта,
отпадъкът, който се образува се събира
разделно.
Забрянява се изхвърлянето му в контейнери за смесени битови отпадъци.
Изхвърляйте само в определените за
това контейнери!
Потърсете информация за възможна
повторна употреба.
Производител:
Виж на опаковката
Страна на произход:
Виж на опаковката
Вносител:
Кавен Орбико ООД, Булстат: 131012382,
София 1592, ул. Източна Тангента № 161,
тел.: 02/ 40 24 900
Гаранция
Нашите продукти са с гаранция 2 години,
считано от датата на покупката. В рамките
на гаранционния срок безплатно се
отстраняват дефектите в материалите и
производството чрез поправка, смяна на
части или целия уред, по преценка на
сервизния център. Тази гаранция се
признава във всички страни, където Braun
и неговият изключителен дистрибутор
продават този уред и няма ограничение
за внос или официална разпоредба не
забранява да се извърши предвиденото
гаранционно обслужване.
Гаранцията не покрива: повреди от
неправилна употреба (работа при
неподходящо напрежение, включване в
неподходящ източник на електрически
ток, счупване); износване и незначителни
дефекти, които не пречат на нормалната
работа на уреда. Гаранцията не се
признава при поправка на уреда от
неоторизирани лица или ако не са
използвани оригинални резервни части
на Braun.
Гаранцията е валидна при правилно
попълнени: дата на покупката, печат и
подпис в гаранционната карта.
За всички рекламации, възникнали в
гаранционния срок, изпратете уреда както
и гаранционната му карта в най-близкия
сервиз на Braun. За справки 0800 11 003 –
национален телефон на БГ сервиз без
увеличение на телефонната услуга или
www.bgs.bg.
51
Page 52

525354
Page 53

Page 54

Page 55

55
 Loading...