

Page 1

Multiquick® 7
Stapled booklet, 148x210 mm, 48 p (incl. 8 p cover), 1/1c = black
®
Minipimer
Cordless Hand Processor
7
Type 4130
www.braun.com/register
MR 740 cc
Page 2
Deutsch 6
English 9
Français 14
Español 18
Português 21
Italiano 25
Nederlands 28
Dansk 31
Norsk 34
Svenska 37
Suomi 40
∂ППЛУИО¿ 43
Braun Infolines
A
D
00 800 27 28 64 63
00 800 BRAUNINFOLINE
CH
08 44 - 88 40 10
GB
0800 783 70 10
IRL
1 800 509 448
F
0 800 944 802
B
0 800 14 592
E
901 11 61 84
P
808 20 00 33
I
(02) 6 67 86 23
NL
0 800-445 53 88
DK
70 15 00 13
N
22 63 00 93
Internet:
www.braun.com
www.service.braun.com
Braun GmbH
Frankfurter Straße 145
61476 Kronberg/Germany
S
020 - 21 33 21
FIN
020 377 877
AUS
1 800 641 820
NZ
0 800 108 909
HK
852-25249377
(Audio Supplies Company Ltd.)
99571533/IV-10
D/GB/F/E/P/I/NL/DK/N/S/FIN/GR
Page 3
2
1
1
2
3
4
5 5
6
7
10
8
STOP
9
a
click!
4
b
c
Page 4

A
2
1
2
1
10
a
1
2
3
B
b
d
10
c
e
f
4
1
click!
5
8 9
2
6 7
3
4 5 6
7
click!
er
reez
F
C
Parmesan
milk
+
max.
sec.
1cm
250 g
30
1cm
200 g
45
200 g
15 15
30 g
15
30 250 g 5 350 g
15
400 g 150 g + 700 ml
15 60 15
+
5
Page 5
Deutsch
Unsere Produkte werden hergestellt, um höchste
Ansprüche an Qualität, Funktionalität und Design zu
erfüllen. Wir wünschen Ihnen mit Ihrem neuen Braun
Produkt viel Freude.
Bitte lesen Sie die Gebrauchsanweisung sorgfältig und vollständig, bevor Sie das Gerät in
Betrieb nehmen.
Achtung
•
Unbeabsichtigtes Einschalten birgt Verletzungs-
•
gefahr! Da es sich um ein Akkugerät handelt, ist
das Gerät jederzeit betriebsbereit (in geladenem
Zustand).
Das Gerät nicht direkter Sonneneinstrahlung
•
aussetzen.
Wenn die Messer blockiert sind, den Pürierstab
•
von der Motoreinheit abnehmen, bevor blockierendes Mixgut entfernt wird.
Vor dem Reinigen immer den Pürierstab vom
•
Motorteil abnehmen.
Dieses Gerät ist für die Verarbeitung haushalts-
•
üblicher Mengen konstruiert.
Dieses Gerät ist mit einem Spezialkabel mit
•
integriertem Netzteil ausgestattet. Es dürfen
weder Teile ausgetauscht noch Veränderungen
vorgenommen werden, da sonst Stromschlaggefahr besteht.
Verwenden Sie das Gerät nur mit der mitgelie-
•
ferten Ladestation.
Die Ladestation kann permanent am Netz ange-
•
schlossen sein.
Schützen Sie Motorteil, Ladestation und Spezial-
•
kabel vor Nässe. Motorteil und Netzteil des
Spezialkabels dürfen nicht mehr benutzt werden,
falls sie in Wasser getaucht wurden.
Kinder oder Personen mit eingeschränkten
•
physischen, sensorischen oder geistigen Fähigkeiten dürfen das Gerät nicht benutzen, es sei
denn sie werden durch eine für ihre Sicherheit
zuständige Person beaufsichtigt. Wir empfehlen
außerdem, das Gerät außer Reichweite von
Kindern aufzubewahren sowie sicherzustellen,
dass Kinder nicht mit dem Gerät spielen.
Vor Benutzung Ladestation und Spezialkabel
•
auf Beschädigungen prüfen. Braun Geräte entsprechen den einschlägigen Sicherheitsbestimmungen.
Reparaturen und das Auswechseln des Spezial-
•
kabels dürfen nur autorisierte Fachkräfte vornehmen.
Durch unsachgemäße Reparaturen können
•
erhebliche Gefahren für den Benutzer entstehen.
Die Messer sind sehr scharf! Behandeln
Sie Schneidwerkzeuge mit äußerster
Vorsicht, um Verletzungen zu vermeiden.
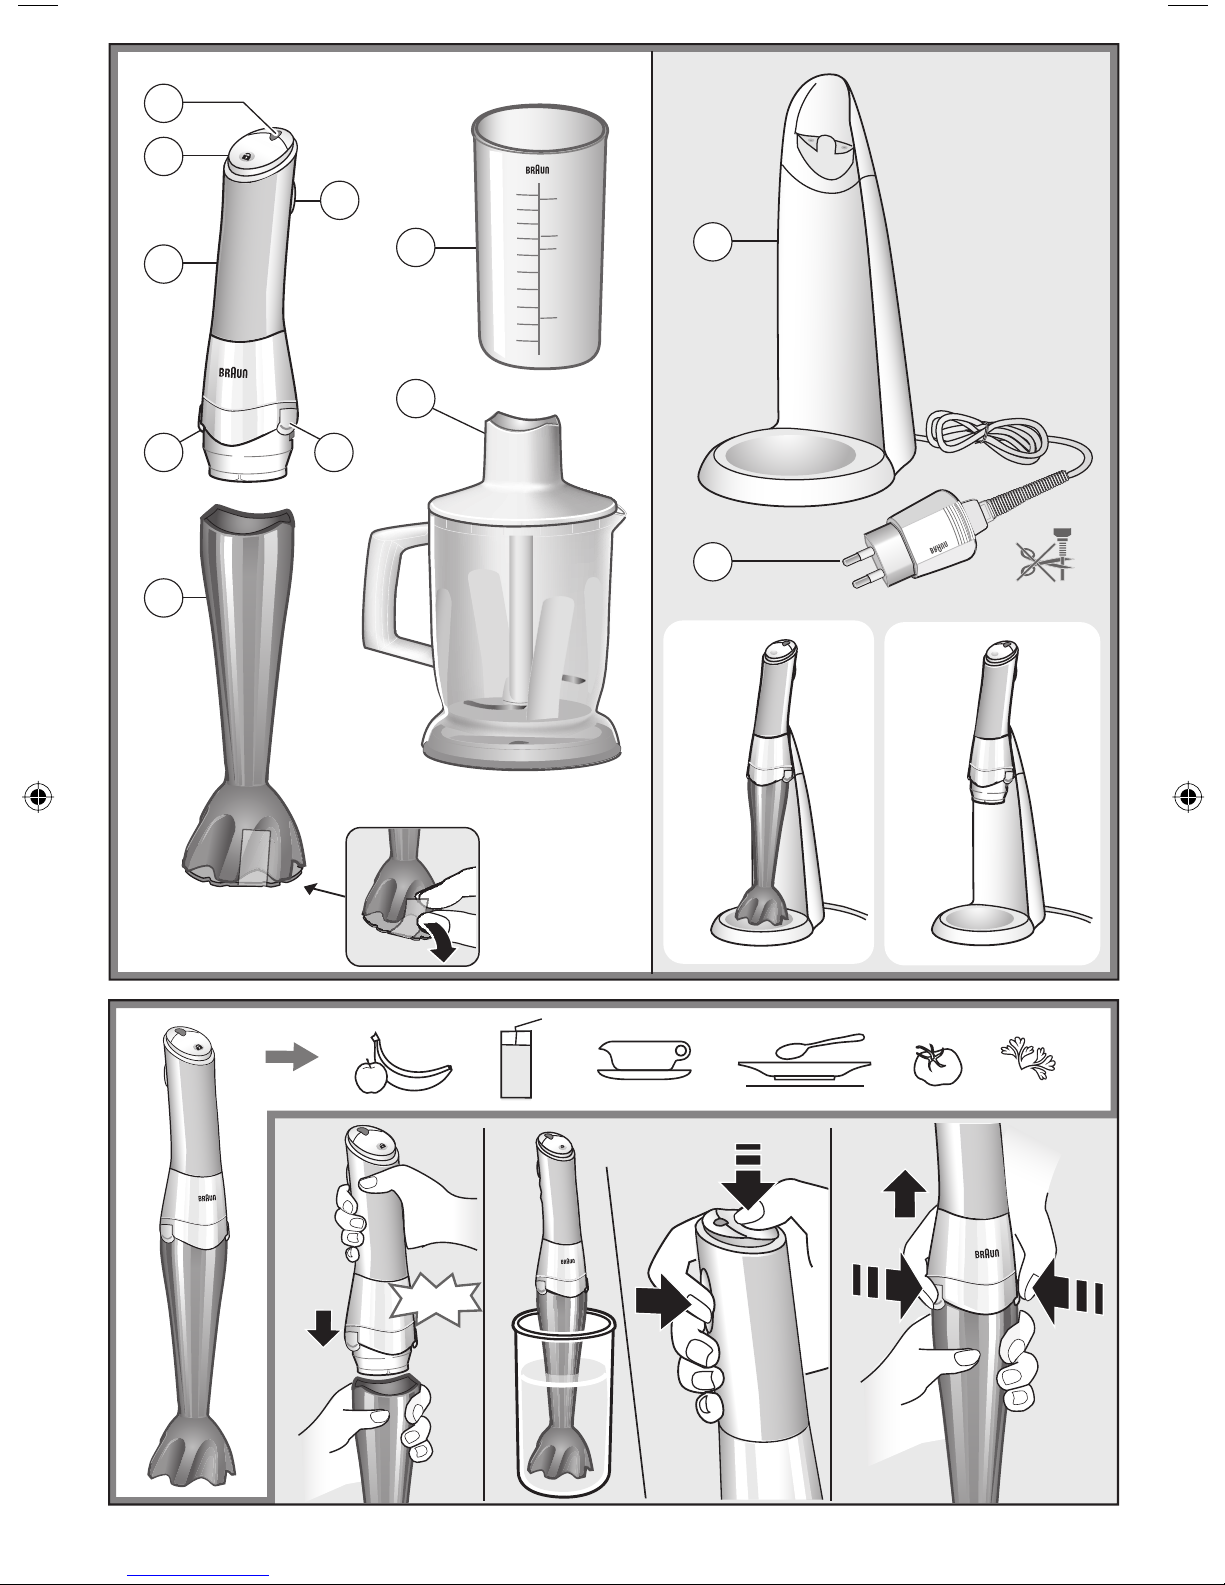
Gerätebeschreibung
1 Kontroll-Leuchte
2 Entriegelungstaste
3 Einschalttaste
4 Motorteil
5 Drucktasten zum Lösen der Zubehörteile
6 Pürierstab
7 Mixbecher
8 Ladestation (mit Kabelstaufach)
9 Spezialkabel
10 Zerkleinerer-Zubehör
(a) Getriebe-Deckel
(b) Messer
(c) Arbeitsbehälter
(d) Anti-Rutsch-Unterlage/Deckel
(e) Eismesser
(f) Eiswürfel-Zerkleinerer
Aufladen des Gerätes
Die Umgebungstemperatur sollte idealerweise
zwischen 15 °C und 35 °C liegen.
Stellen Sie sicher, dass die Ladestation (8) auf einer
ebenen Fläche steht. Schließen Sie die Ladestation
über das Spezialkabel ans Netz an.
Zum Laden hängen Sie den kompletten Stabmixer in
die Ladestation (8) – Motorteil allein auch möglich.
Die Kontroll-Leuchte blinkt grün, wenn sich das
Gerät korrekt in der Ladestation befindet und geladen wird.
Vollladung: ca. 2 Stunden
•
Nach Vollladung: grünes Aufleuchten der Kontroll-
•
Leuchte in längeren Abständen
Die Laufzeit des Gerätes beträgt ca. 20 Minuten
•
(abhängig von der Art der Anwendung).
Laden Sie das Gerät nach jeder Benutzung in der
Ladestation nach, um immer den optimalen Ladezustand bereitzuhalten. Sie können das Gerät auch
in der Station stehen lassen. Ein Überladen ist nicht
möglich.
Die Lithium-Ionen Akkus sorgen dafür, dass auch bei
längerer Nichtbenutzung die Akkuladung weitestgehend erhalten bleibt.
Die Akkus sind gegen Tiefentladung geschützt. Bei
entladenem Akku wird verhindert, dass das Gerät
eingeschaltet werden kann. Nach einer Mindestladezeit von ca. 15 Minuten, können Sie das Gerät
wieder für eine Anwendung (z.B. Suppe) verwenden.
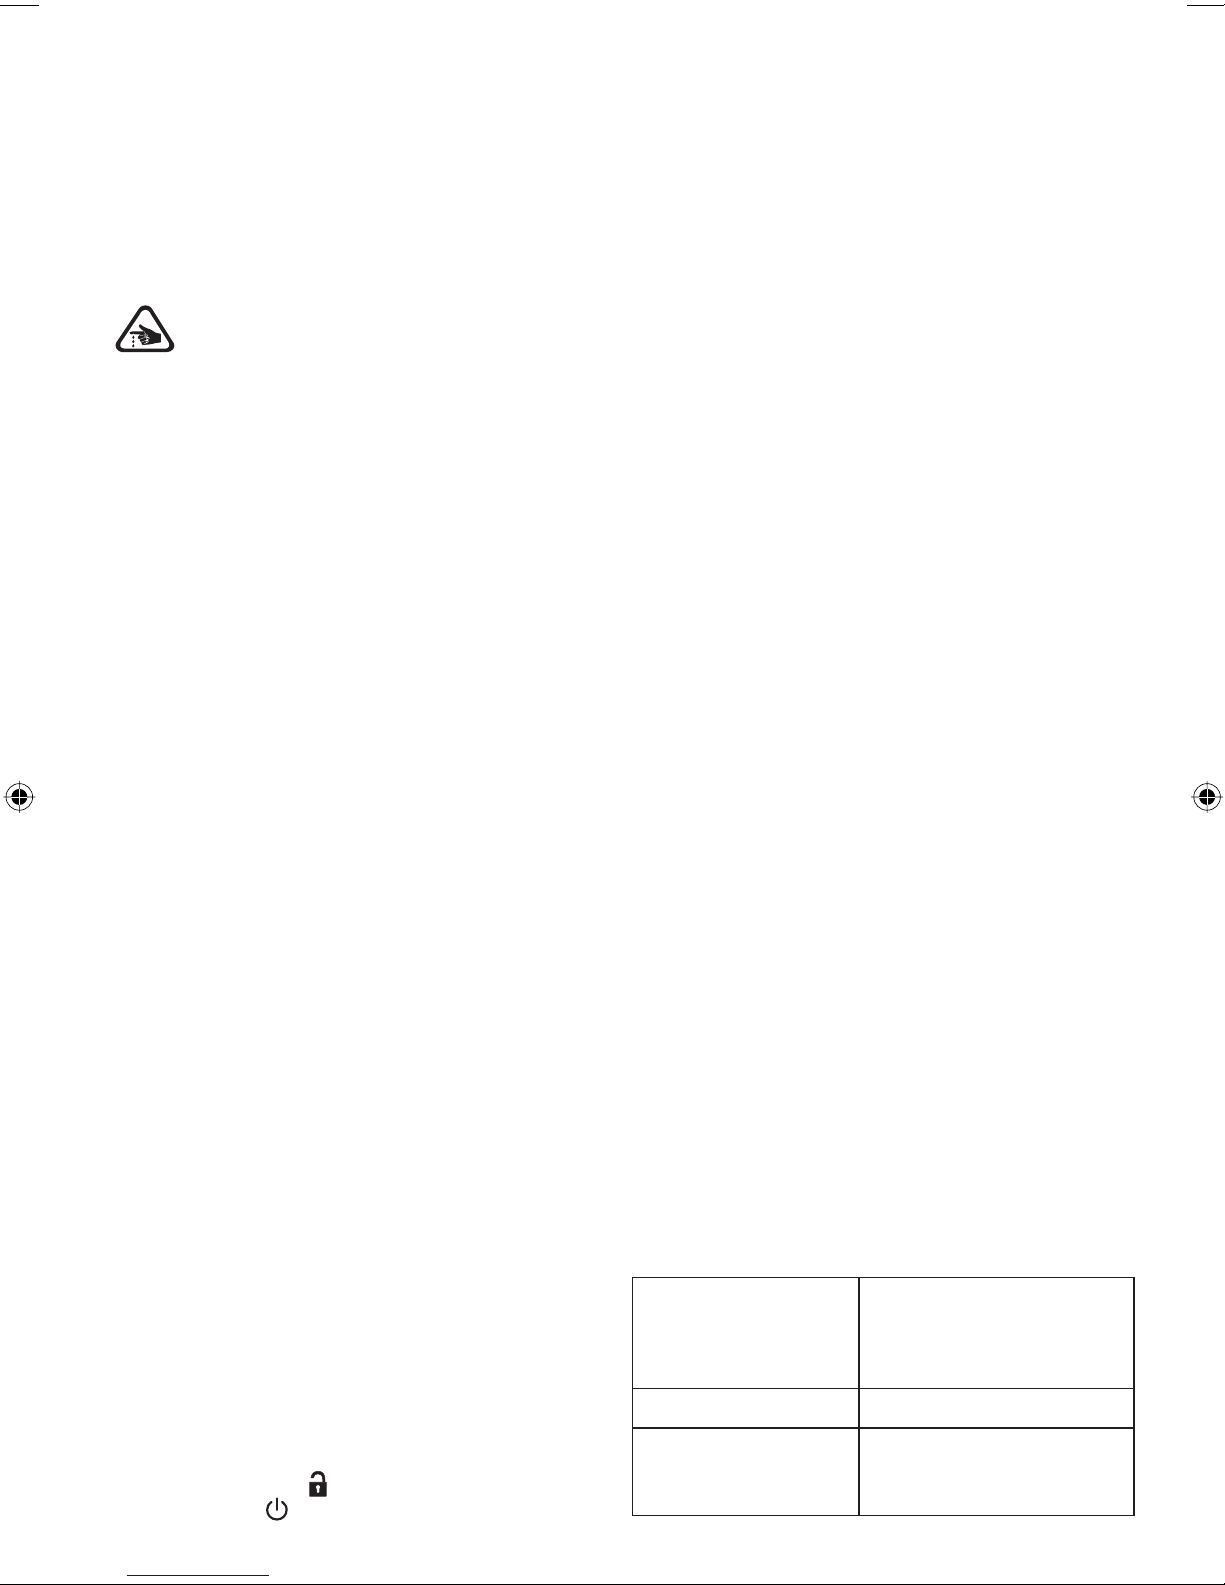
Kontroll-Leuchte
Anzeige wenn Gerät
in der Ladestation
(am Netz
angeschlossen)
Grünes Blinken Akku wird geladen
Grünes Aufleuchten
(in längeren
Abständen)
Akkulade-/
Betriebszustand
Akku ist geladen
6
Page 6
Anzeige bei
gedrückter Entriegelungstaste (2)
Grün Akku ist voll
Rot/Grünes Blinken Noch mind. 1 Anwendung
Rot Akku ist leer
Rot Überlastungsschutz aktiv
Akkulade-/
Betriebszustand
möglich
(siehe Sicherheitseinrichtungen A Überlastungsschutz)
Sicherheitseinrichtungen
Einschalten des Gerätes / Einschaltsperre
Das Gerät ist mit einer Einschaltsperre ausgestattet.
Zum sicheren Einschalten gehen Sie wie folgt vor:
1 Zuerst die Entriegelungstaste (2) mit dem Daumen
drücken und halten.
2 Dann die Einschalttaste (3) drücken. Während des
Betriebs kann man die Entriegelungstaste
loslassen.
Wird die Einschalttaste nicht innerhalb von
•
5 Sekunden gedrückt, lässt sich das Gerät nicht
einschalten. Die Kontroll-Leuchte erlischt.
Zum Einschalten dann erneut bei Punkt 1
•
beginnen.
Überlastungsschutz
Wenn der Überlastungsschutz aktiv ist, schaltet
das Gerät aus und die Kontroll-Leuchte leuchtet
konstant rot bei gedrückter Einschalttaste.
Mögliche Ursachen Behebung
Mixgut blockiert das
Messer
1. Motorteil abnehmen
2. Blockierung / Mixgut
entfernen
3. Motorteil mind.
1 Sekunde in die
Ladestation (am Netz
angeschlossen) stellen
4. Verarbeitung kann
fortgesetzt werden
Automatisches Abschalten
Aus Sicherheitsgründen schaltet das Gerät nach ca.
4 Minuten Dauerbetrieb ab. Das Gerät kann direkt
wieder eingeschaltet werden.
Verwendung des Stabmixers
Der Stabmixer eignet sich z.B. für die Zubereitung
von Dips, Saucen, Suppen, Mayonnaise, Babynahrung sowie zum Mixen von Getränken und MilchShakes.
a) Entfernen Sie den Messerschutz unten am
Pürierstab, indem Sie den Klebestreifen abziehen.
Vorsicht: Das Messer ist sehr scharf! Motorteil (4)
auf den Pürierstab (6) setzen und einrasten
lassen.
b) Stabmixer in das Mixgut eintauchen, Entriege-
lungstaste (2) drücken und halten, dann die
Einschalttaste (3) drücken.
c) Zum Abnehmen des Pürierstabs die beiden
Drucktasten (5) drücken und den Pürierstab
abziehen.
Achten Sie beim Mixen heißer Flüssigkeiten darauf,
dass Sie den Stabmixer nicht im eingeschalteten
Zustand eintauchen bzw. aus der heißen Flüssigkeit
nehmen.
Rezept-Beispiel:
Mayonnaise
200–250 ml Öl
1 Ei (Eigelb und Eiweiß)
1 EL Zitronensaft oder Essig
Salz und Pfeffer nach Geschmack
Zutaten in der genannten Reihenfolge in den Mixbecher geben. Stabmixer senkrecht in den Becher
stellen und einschalten. Den Stabmixer in dieser
Position halten, bis das Öl emulgiert. Ohne auszuschalten, den Stabmixer dann langsam anheben und
wieder senken, bis die Mayonnaise fertig ist.
Verwendung des Zerkleinerer-Zubehörs
Mit dem Zerkleinerer können Sie Fleisch, Käse,
Zwiebeln, Kräuter, Knoblauch, Karotten, Walnüsse,
Mandeln, Trockenpflaumen etc. perfekt hacken und
zerkleinern.
Gerät ist überhitzt Folgen Sie den Punkten
1.–4.
Falls Kontroll-Leuchte beim
nächsten Einschaltversuch
noch rot leuchtet, Gerät
ca. 1 Stunde in der Ladestation abkühlen lassen.
Dabei blinkt die KontrollLeuchte grün.
Bitte beachten:
Extrem hartes Gut (z.B. Muskatnüsse, Kaffeebohnen
und Getreide) darf nicht zerkleinert werden.
Vor dem Zerkleinern ...
großes Gut in Stücke schneiden (siehe
•
Verarbeitungstabelle S. 5)
Stiele und Nuss-Schalen entfernen
•
alle Knochen, Sehnen und Knorpelanteile bei
•
Fleisch entfernen.
7
Page 7

Hacken und Zerkleinern
(siehe Bildabschnitt A)
1. Vor dem Einsetzen des Messers (10b) die Kunststoffhülle vorsichtig entfernen.
Vorsicht: Das Messer ist sehr scharf. Immer am
Kunststoffschaft anfassen.
Das Messer auf die Achse im Arbeitsbehälter (10c)
drücken und einrasten lassen. Arbeitsbehälter
immer auf die Anti-Rutsch-Unterlage/Deckel (10d)
setzen.
2. Das Gut einfüllen.
3. Getriebe-Deckel (10a) auf den Arbeitsbehälter
setzen.
4. Das Motorteil auf den Getriebe-Deckel stecken,
bis es einrastet.
5. Entriegelungstaste (2) drücken und halten, dann
die Einschalt-Taste (3) drücken. Halten Sie
während der Verarbeitung das Motorteil mit der
einen, den Zerkleinerer mit der anderen Hand fest.
Beim Zerkleinern harter Güter das Motorteil fest
nach unten drücken.
6. Nach Gebrauch Drucktasten drücken, um das
Motorteil abzunehmen.
7. Getriebe-Deckel abnehmen.
8. Messer vorsichtig herausnehmen.
9. Dann das Gut ausleeren. Die Anti-RutschUnterlage/Deckel dient auch zum luftdichten
Verschließen des Arbeitsbehälters.
Milchshakes, Mixgetränke, Pürees
Wenn Pürees besonders fein sein sollen, können Sie
auch den Stabmixer im Arbeitsbehälter verwenden.
heraus und setzen Sie den Eiswürfel-Zerkleinerer
(10f) und das Eismesser (10e) ein. So können Sie
dann Eiswürfel direkt in die pürierten Früchte
zerkleinern.
Reinigung
Vor jedem Reinigen das Motorteil abnehmen.
Motorteil (4) und Ladestation (8) weder in Wasser
tauchen noch unter fließendes Wasser halten. Diese
Teile können mit einem feuchten Tuch abgewischt
werden. Vor dem Reinigen der Ladestation das
Spezialkabel vom Netz trennen.
Das Getriebeteil des Zerkleinerers (10a) ist nicht
spülmaschinengeeignet.
Alle anderen Teile sind spülmaschinengeeignet.
Bei farbstoffreichen Gütern (z.B. Karotten) können
die Kunststoffteile beschlagen oder sich verfärben.
Wischen Sie diese Teile mit Speiseöl ab, bevor Sie
sie in die Spülmaschine geben.
Elektrische Angaben siehe Bedruckung auf dem
Spezialkabel. Das Spezialkabel sorgt für eine
automatische Spannungsanpassung zwischen
100 und 240 Volt.
Änderungen vorbehalten.
Dieses Gerät enthält Li-Ionen Akkus.
Es darf am Ende seiner Lebensdauer
nicht mit dem Hausmüll entsorgt werden.
Die Entsorgung kann über den Braun
Kundendienst oder lokal verfügbare
Rückgabe- und Sammelsysteme erfolgen.
Leichte Teige (Pfannkuchenteig)
Zuerst flüssige Zutaten in den Arbeitsbehälter füllen,
dann Mehl und schließlich Eier hinzufügen.
Zerkleinern von Eiswürfeln
(siehe Bildabschnitt B)
1. Eiswürfel-Zerkleinerer (10f) in den Arbeitsbehälter
einsetzen und sicherstellen, dass er richtig sitzt.
2. Die Achse des Eismessers (10e) in die mittlere
Öffnung im Eiswürfel-Zerkleinerer einsetzen und
herunterdrücken.
3. Eiswürfel einfüllen.
4. Getriebe-Deckel auf den Arbeitsbehälter setzen.
5. Das Motorteil auf den Getriebe-Deckel stecken,
bis es einrastet.
6. Entriegelungstaste (2) drücken und halten, dann
die Einschalt-Taste (3) drücken. Nach Gebrauch
Drucktasten drücken und das Motorteil abnehmen. Dann nacheinander den Getriebe-Deckel,
das Eismesser und den Eiswürfel-Zerkleinerer
herausnehmen.
7. Das zerkleinerte Eis ausleeren oder einfach das zu
servierende Getränk direkt in den Arbeitsbehälter
füllen.
Alternativ können Sie zunächst Früchte mit dem
Messer (10b) im Arbeitsbehälter zerkleinern (bis
max. 0,5 l). Nehmen Sie dann das Messer (10b)
Garantie
Als Hersteller übernehmen wir für dieses Gerät –
nach Wahl des Käufers zusätzlich zu den
gesetzlichen Gewährleistungsansprüchen gegen
den Verkäufer – eine Garantie von 2 Jahren ab
Kaufdatum. Innerhalb dieser Garantiezeit beseitigen
wir nach unserer Wahl durch Reparatur oder
Austausch des Gerätes unentgeltlich alle Mängel,
die auf Material- oder Herstellungsfehlern beruhen.
Die Garantie kann in allen Ländern in Anspruch
genommen werden, in denen dieses Braun Gerät
von uns autorisiert verkauft wird.
Von der Garantie sind ausgenommen: Schäden
durch unsachgemäßen Gebrauch, normaler
Verschleiß und Verbrauch sowie Mängel, die den
Wert oder die Gebrauchstauglichkeit des Gerätes
nur unerheblich beeinflussen. Bei Eingriffen durch
nicht von uns autorisierte Braun Kundendienstpartner sowie bei Verwendung anderer als Original
Braun Ersatzteile erlischt die Garantie.
Im Garantiefall senden Sie das Gerät mit Kaufbeleg
bitte an einen autorisierten Braun Kundendienstpartner. Die Anschrift finden Sie unter www.service.
braun.com oder können Sie kostenlos unter
00800/27 28 64 63 erfragen.
8
Page 8
English
Our products are engineered to meet the highest
standards of quality, functionality and design. We
hope that you thoroughly enjoy your new Braun
appliance.
Please read the use instructions carefully and
completely before using the appliance.
Caution
•
High risk of injury by switching on the appliance
•
unintentionally. As this is a rechargeable
appliance, it is ready for use anytime (when
charged).
Do not expose the appliance to direct sunlight.
•
When the blades are blocked remove motor part
•
from blender shaft, before removing the food/
blockage.
Before cleaning, remove blender shaft from motor
•
part.
The appliance is constructed to process normal
•
household quantities.
This appliance is provided with a special cord set
•
with an integrated Safety Extra Low Voltage
power supply. Do not exchange or manipulate any
part of it. Otherwise there is risk of electric shock.
Only use the appliance with the charging unit
•
supplied.
The charging unit can remain permanently
•
connected to the mains.
Protect the motor part, the charging unit and
•
special cord set against humidity. Motor part and
power supply of special cord set must no longer
be used after they have been immersed in water.
This appliance is not intended for use by children
•
or persons with reduced physical or mental
capabilities, unless they are given supervision by
a person responsible for their safety. In general,
we recommend that you keep the appliance out of
reach of children. Children should be supervised
to ensure that they do not play with the appliance.
Before use, make sure that charging unit and
•
special cord set are not damaged. Braun electric
appliances meet applicable safety standards.
Repairs or the replacement of the mains cord
•
must only be done by authorised service
personnel.
Faulty, unqualified repair work may cause
•
considerable hazards to the user.
The blades are very sharp! Handle blades
with utmost care in order to prevent
injuries.
Description
1 Pilot light
2 Switch release button
3 On switch
4 Motor part
5 Push buttons for releasing the accessories
6 Blender shaft
7 Beaker
8 Charging unit (incl. cord storage)
9 Special cord set
10 Chopper attachment
(a) Gear lid
(b) Blade
(c) Chopper bowl
(d) Anti-slip base/lid
(e) Ice blade
(f) Ice crusher insert
Charging
The ideal temperature range for charging is between
15 °C and 35 °C.
Make sure that the charging unit (8) is located on a
level surface. Connect the charging unit to the mains
via the special cord set.
For charging, place the complete handblender in the
charging unit (8) – (motor part alone also possible).
The green pilot light confirms that the appliance is
properly inserted in the charging unit and that it is
being charged.
Full charge: ca. 2 hours
•
Fully charged: the pilot light flashes with longer
•
intervals
Operation time is ca. 20 minutes (depending on
•
way of usage)
After every usage, place the appliance back onto
the charging unit for recharging. This will make sure
that it is always ready for use with optimum charging
conditions. You may as well store the appliance on
the charging unit. Even if not in use for a long period
of time, the lithium ion batteries implemented maintain their charging level to a large extent.
The batteries are protected against deep discharge.
A completely discharged appliance has to be
charged for at least ca. 15 minutes before it can be
used for an application (e.g. soup).
Pilot Light
Appliance in
charging unit
(connected to the
mains)
Green flashing Battery is charging
Green flashing
(in longer intervals)
Charging or operation
conditions
Battery is fully charged
9
Page 9

Switch release
button (2) pressed
down
Green Battery is fully charged
Red/green flashing Charge sufficient for at
Charging or operation
conditions
least one usage
Auto Off
For safety reasons the appliance turns off after
4 minutes of permanent usage. The appliance can
be turned directly on again.
Red Battery is discharged
Red Overheating protection
active (go to Safety
features A Overheat
protection)
Safety features
Switching on the appliance / Switch lock
The appliance has a switch lock. To safely switch it
on, follow these points:
1 First press the switch release button (2) with your
thumb and hold.
2 Then press the On switch (3). During operation,
you can stop pressing the switch release button.
•
If the On switch (3) is not pressed within
5 seconds, the appliance cannot be switched
on. The pilot light goes off.
In order to switch the appliance on, start again
•
with step 1.
Overheat protection
When the overheat protection feature is active,
the appliance turns off and the pilot light shines
permanently red.
Reason Trouble shooting
Blade is blocked
Appliance is
overheated
1. Remove motor part
2. Remove the food/
blockage
3. Place the motor part
into the charging unit
(connected to the mains)
for at least 1 second
4. Processing can be
continued
Follow points 1.-4.
If the pilot light still shines
red when switching on the
appliance, place the motor
part back into the charging
unit and let it cool down
for ca. 1 hour. During this
time, the pilot light flashes
green.
Using your handblender
The handblender is perfectly suited for preparing
dips, sauces, soups, mayonnaise and baby food as
well as for mixing drinks and milkshakes.
a) Remove knife protection at the bottom of the
blender shaft by removing the adhesive tape.
Insert the motor part (4) into the blender shaft (6)
until it locks.
b) Introduce the handblender vertically into the
vessel, keep the switch release (2) pressed down,
then press the On switch (3).
c) To remove the blender shaft from the motor part,
press push buttons (5).
When operating the handblender in hot liquids do
not immerse the blender shaft into – or remove it
from the liquid while the appliance is switched on.
Recipe example:
Mayonnaise
200–250 ml oil,
1 egg (yolk and white),
1 tbsp. lemon juice or vinegar,
salt and pepper to taste
Put all ingredients into the beaker according to the
a.m. order. Introduce the handblender to the base of
the beaker. After switching on, keep the handblender
in this position until the oil emulsifies. Then, without
switching off, slowly move it up and down until the
mayonnaise is well combined.
Using your chopper attachment
The chopper is perfectly suited for chopping meat,
cheese, onions, herbs, garlic, carrots, walnuts,
almonds, prunes etc.
N.B.: Do not chop extremely hard food, such as
nutmeg, coffee beans and grains.
Before chopping ...
pre-cut meat, cheese, onions, garlic, carrots, chilis
•
(see processing guide S. 5)
remove stalks from herbs, un-shell nuts
•
remove bones, tendons and gristle from meet.
•
10
Page 10

Chopping
(see picture section A)
1. Carefully remove the plastic cover from the blade
(10b). Caution: the blade is very sharp! Always
hold it by the upper plastic part.
Press the blade onto the centre pin of the chopper
jug (10c) until it locks. Always place the chopper
jug on the anti-slip base (10d).
2. Place the food in the chopper jug.
3. Put the gear lid (10a) on the chopper jug.
4. Insert the motor part into the gear lid until it locks.
5. Keep the switch release button (2) pressed down
and press the On switch (3) to operate the
chopper. During processing, hold the motor part
with one hand and the chopper jug with the other.
When chopping hard foods, press down the motor
part.
6. After use, press buttons to remove the motor part.
7. Then remove the gear lid.
8. Carefully take out the blade.
9. Remove the processed food from the chopper
jug. The anti-slip base also serves as an airtight lid
for the chopper jug.
Shakes, drinks, purées
For purées, when very fine results are preferred, you
may also use the handblender shaft in the jug.
Cleaning
Before cleaning remove the motor part. Do not
immerse the motor part (4) and charging unit (8) in
water nor hold them under running water. These
parts can only be cleaned with a damp cloth.
The chopper gear lid (10a) is not dishwasher-proof.
All other parts are dishwasher-proof.
When processing foods with colour (e.g. carrots),
the plastic parts of the appliance may become
discoloured. Wipe these parts with vegetable oil
before cleaning them.
For electric specifications, please see printing on the
special cord set. The special cord set automatically
adapts to any worldwide AC voltage.
Subject to change without notice.
This appliance contains Li-Ion rechargeable
batteries. Please do not dispose of the
product in the household waste at the end
of its useful life. Disposal can take place at
a Braun Service Centre or at appropriate
collection points provided in your country.
Light dough (pancake batter)
First pour liquids into the jug, then add flour and
finally eggs.
Crushed ice
(see picture section B)
1. Place the ice crusher insert (10f) into the jug.
Ensure it fits properly.
2. Place the shaft of the ice blade (10e) into the
centre hole of the ice crusher insert and press it
down.
3. Fill ice cubes into the ice crusher insert.
4. Fit the gear lid on the jug.
5. Insert the motor part into the gear lid until it locks.
6. Keep the switch release button (2) pressed down
and press the On switch (3) to operate the
chopper. After use, press buttons to remove the
motor part. Then remove gear lid, ice blade and
ice crusher insert.
7. Remove the crushed ice or simply fill your drink
into the jug for serving at the table.
Alternative: First mix fruits in the jug with the
chopper blade (10b), filling it up to 0.5 litres
maximum. Remove the blade and place the ice
crusher insert into the jug in order to crush ice
directly into the pureed fruits.
For UK only:
Guarantee
We grant 2 years guarantee on the product
commencing on the date of purchase. Within the
guarantee period we will eliminate, free of charge,
any defects in the appliance resulting from faults in
materials or workmanship, either by repairing or
replacing the complete appliance as we may
choose.
This guarantee extends to every country where this
appliance is supplied by Braun or its appointed
distributor.
This guarantee does not cover: damage due to
improper use, normal wear and tear (e.g. shaver foil
or cutter block) as well as defects that have a
negligible effect on the value or operation of the
appliance. The guarantee becomes void if repairs
are undertaken by unauthorised persons and if
original Braun parts are not used.
To obtain service within the guarantee period, hand
in or send the complete appliance with your sales
receipt to an authorised Braun Customer Service
Centre.
This guarantee in no way affects your rights under
statutory law.
11
Page 11

For Australia & New Zealand only:
Warranty
We grant a 24 Month Replacement Warranty on this
appliance commencing on the date of purchase.
This warranty applies in all States and Territories
of Australia and in New Zealand and is in addition
to any mandatory statutory obligations imposed
on Procter & Gamble Australia Pty. Ltd., its
distributors and its manuacturer. This express
warranty does not purport to exclude, restrict or
modify any such mandatory statutory obligations.
This warranty only covers defects in the appliance
resulting from faults in workmanship or materials.
Therefore, if your appliance becomes faulty as a
result of faults in workmanship or materials, it will be
exchanged by your retailer, on presentation of proof
of purchase.
This warranty only applies to domestic or household
use of this appliance and the warranty will only apply
if the correct operating instructions included with
this product have been followed. The warranty on
any appliance replaced under this warranty ends on
the expiry of the warranty period that applied to the
original appliance.
This warranty does not cover:
A. Damage arising from improper use or operation
on incorrect voltages.
B. Breakages to shaver foils, glass jars, etc.
C. Normal wear due to moving parts.
D. Repairs undertaken by unauthorised service
personnel or use of non genuine parts.
E. Appliances that are outside the warranty period
or are not faulty.
This appliance is not intended for use by young
children or infirm persons without supervision.
Young children should be supervised to ensure that
they do not play with the appliance.
If the appliance is powered by a cord extension set
or electrical portable outlet device these should be
positioned so they are not subject to splashing or
ingress of moisture.
To the extent permitted by the laws of the
Commonwealth of Australia and New Zealand and
applicable laws of a State or Territory of Australia,
and subject to the second paragraph of this
warranty above, this warranty is given in exchange
for any other rights you may have against Procter &
Gamble Australia Pty. Ltd. or its distributors or
manufacturer, whether at law, in tort (including
negligence), in equity or under statute.
Please retain proof of purchase of this appliance.
If you have any questions in relation to this warranty,
please call our Consumer Service line (see below
for numbers).
Repairs and service
If you are sending your appliance for repair, please
pack the appliance adequately and send it to your
nearest Service Agent.
For service or replacement parts refer to the
authorised Service Agents listed overleaf. Local
Service Agents may change from time to time – in
that event please contact the Consumer Service free
call number below for updated local service agent
details.
Australian Consumer Service (free call):
1 800 641 820
New Zealand Consumer Service (free call):
0 800 108 909
N2820
Australian & New Zealand Service Agents
VICTORIA & TASMANIA
Statewide Services Pty Ltd
trading as J A Appliances
17-19 Hossack Avenue
Coburg North, VIC 3058
Tel. (03) 8371 9100
Fax. (03) 9355 8644
Email: jaappliances@
statewideservices.com.au
QUEENSLAND
Walters Import trading as
Brisbane Appliance Service Centre
449 Beaudesert Road
Moorooka
QLD 4105
Tel. (07) 3277 0360
Fax. (07) 3274 2909
Email: basc@waltersimport.com.au
WESTERN AUSTRALIA
Mark 1 Appliances
Unit 1, 46 Abernethy Road
Belmont, WA 6104
Tel. (08) 9475 0911
Fax. (08) 9475 0922
Email: mark1app@iinet.net.au
12
Page 12

NEW SOUTH WALES & ACT
Faulder Appliance Services Pty Ltd
Shop 4, 9 Evans Road,
Rooty Hill, NSW 2766
Tel. (02) 9625 3064
Fax. (02) 9625 3037
Email: fas16@bigpond.com
SOUTH AUSTRALIA & NT
Adelaide Service Centre
Shop B2,
Parkholme Shopping Centre
319 Oaklands Road, Parkholme
Adelaide, SA 5043
Tel. (08) 8357 5800
Fax. (08) 8357 5833
Email: ascpkh@adam.com.au
NEW ZEALAND
Key Service Ltd
7D Echelon Place
East Tamaki
Manukau City
Auckland
New Zealand
(PO Box 38569, Howick, Auckland,
New Zealand)
Tel. (09) 916 0960
Fax. (09) 916 0970
Email: key-service-ltd@xtra.co.nz
13
Page 13
Français
Nos produits sont conçus afin de répondre aux plus
hautes exigences en termes de qualité, de fonctionnalité et de design. Nous espérons que votre nouvel
appareil Braun vous apportera entière satisfaction.
Lisez attentivement toutes les instructions avant
d’utiliser l’appareil.
Attention
•
La mise en marche involontaire de l’appareil
•
peut entraîner un grand risque de blessure.
Cet appareil rechargeable est toujours prêt à
l’emploi (lorsqu’il est rechargé).
Ne pas exposer l’appareil directement à la
•
lumière du soleil.
Lorsque les lames sont bloquées, arrêtez
•
l’appareil, puis séparez le bloc moteur du pied
mixeur, avant de retirer la nourriture ou ce qui
bloque.
Pour le nettoyage, retirez le pied mixeur du bloc
•
moteur.
Cet appareil est uniquement destiné à un usage
•
domestique.
Cet appareil est équipé d’un câble d’alimentation
•
spécifique avec une alimentation basse tension.
Ne démontez et ne remplacez aucune des pièces
car il y a un risque de court circuit électrique.
N’utilisez l’appareil qu’avec le chargeur fourni.
•
Le chargeur peut rester branché au secteur en
•
permanence.
Protégez de l’humidité le bloc moteur, le chargeur
•
et le câble d’alimentation spécifique. Le bloc
moteur et le chargeur électrique ainsi que le câble
d’alimentation ne doivent plus être utilisés s’ils ont
été plongés dans l’eau.
Cet appareil ne doit pas être utilisé par des
•
enfants ou des personnes aux capacités motrices
ou mentales réduites, sauf s’ils sont assistés par
une personne responsable de leur sécurité. De
manière générale, nous vous recommandons de
maintenir cet appareil hors de portée des enfants.
Afin qu’ils ne jouent pas avec l’appareil, les
enfants doivent être surveillés.
Avant utilisation, assurez-vous que le chargeur et
•
le câble d’alimentation spécifique ne sont pas
endommagés. Les appareils électriques Braun
répondent aux normes de sécurité en vigueur.
La réparation ou le remplacement du cordon
•
d’alimentation doivent être effectués uniquement
dans les Centres Service Agréés Braun.
Des réparations effectuées par des personnes
•
non qualifiées pourraient entraîner de graves
dommages pour l’utilisateur.
Les lames sont très coupantes !
Manipulez-les avec précaution afin d’éviter
toute blessure.
3 Interrupteur
4 Bloc moteur
5 Boutons de déverrouillage des accessoires
6 Pied mixeur
7 Bol mesureur
8 Chargeur (avec emplacement pour cordon)
9 Câble d’alimentation spécifique
10 Bol hachoir
(a) Système d’entraînement
(b) Lame
(c) Bol hachoir
(d) Socle/couvercle anti-dérapant
(e) Couteau pour la glace
(f) Accessoire pour piler la glace
Charge
La température idéale pour la charge de l’appareil se
situe entre 15 °C et 35 °C.
Assurez-vous que le chargeur (8) soit sur une
surface plane. Connectez le chargeur au secteur à
l’aide du câble d’alimentation spécifique.
Pour recharger l’appareil, placez le mixeur complet
dans le chargeur (8) – il est possible de n’y installer
que le bloc moteur.
Le voyant vert clignote, indiquant que l’appareil est
correctement positionné dans le chargeur et qu’il est
en train de charger.
Charge complète : environ 2 heures
•
Charge terminée : le voyant vert clignote plus
•
lentement (avec des intervalles plus longs)
La durée d’utilisation est d’environ 20 minutes
•
(selon utilisation)
Après chaque utilisation, replacez l’appareil sur
le chargeur, ainsi l’appareil sera toujours prêt à
l’emploi. Vous pouvez aussi si vous le souhaitez
ranger l’appareil sur son chargeur. Même si vous
n’utilisez pas l’appareil pendant de longues
périodes, la batterie au lithium garde très longtemps
son niveau de charge.
La batterie est protégée contre la décharge
complète. Un appareil totalement déchargé doit être
rechargé pendant au moins 15 minutes avant d’être
utilisé (pour faire une soupe par exemple).
Voyant lumineux
Appareil dans le
chargeur (connecté
au secteur)
Charge ou conditions
d’utilisation
Description
1 Voyant lumineux
2 Bouton poussoir
14
Voyant vert clignotant La batterie est en charge
Voyant vert clignotant
(intervalles plus longs)
La batterie est chargée
Page 14

Bouton poussoir (2)
enfoncé
Vert La batterie est chargée
Voyant vert/rouge
clignotant
Rouge La batterie est déchargée
Rouge Protection anti-surchauffe
Charge ou conditions
d’utilisation
Charge suffisante pour au
moins une utilisation
active (consultez les
Dispositifs de sécurité A
Protection anti-surchauffe)
Dispositifs de sécurité
Mise en marche de l’appareil / Verrouillage
L’appareil est équipé d’un système de verrouillage.
Pour actionner celui-ci en toute sécurité, suivez les
instructions suivantes :
1 Appuyez d’abord sur le bouton poussoir (2) avec
votre pouce et maintenez-le enfoncé.
2 Appuyez ensuite sur le bouton (3). Pendant cette
opération, vous pouvez relâcher le bouton
poussoir.
Si le bouton (3) n’est pas enclenché dans les
•
5 secondes qui suivent, l’appareil ne peut pas
être mis en marche. Le voyant s’éteint.
Pour mettre l’appareil en marche, recommencez
•
l’étape 1.
Arrêt automatique
Pour des raisons de sécurité, l’appareil s’arrête
automatiquement après 4 minutes d’utilisation sans
pause. L’appareil peut être directement remis en
marche.
Utilisation de votre mixeur plongeant
Le mixeur plongeant est parfaitement adapté à la
préparation de sauces, soupes, mayonnaises et
aliments pour bébés ; ainsi qu’à celle de boissons
mixées et de milk-shakes.
a) Retirez la protection du couteau en bas du pied
mixeur en enlevant le ruban adhésif. Insérez le
pied mixeur (6) sur le bloc moteur (4) jusqu’à ce
qu’il s’enclenche et se verrouille.
b) Introduisez verticalement le mixeur plongeant
dans le récipient, pressez le bouton poussoir (2),
puis appuyez sur la touche (3).
c) Pour retirer le pied mixeur du bloc moteur,
appuyez sur les boutons de déverrouillage des
accessoires (5).
Lorsque vous utilisez le mixeur dans des liquides
chauds, veillez à ne pas le mettre en marche au
moment de le plonger ou de le sortir du récipient.
Exemple de recette :
Mayonnaise
200–250 ml d’huile,
1 œuf (entier),
1 cuillère à soupe de jus de citron ou de vinaigre, sel
et poivre à votre convenance
Protection anti-surchauffe
Lorsque la protection de surchauffe s’active,
l’appareil s’arrête et le voyant rouge s’éclaire.
Cause Résolution du problème
La lame est bloquée 1. Retirez le bloc moteur
2. Retirez la nourriture/ce
qui bloque
3. Placez le bloc moteur
sur le chargeur
(connecté au secteur)
pendant au moins
1 seconde
4. Vous pouvez alors
reprendre l’opération
L’appareil est en
surchauffe
Suivez les étapes 1 à 4.
Si le voyant est toujours
rouge lorsque vous
rebranchez l’appareil,
placez le bloc moteur dans
le chargeur et laissez-le
refroidir pendant environ
1 heure. Pendant ce
temps, le voyant vert
clignote.
Mettez tous les ingrédients à l’intérieur du bol
mesureur dans l’ordre mentionné ci-dessus.
Introduisez le mixeur plongeant jusqu’au fond du
bol. Après avoir mis l’appareil en marche, laissez le
mixeur dans cette position jusqu’à ce que l’huile se
mélange au reste de la préparation. Ensuite, sans
arrêter le mixeur, faites-le bouger doucement de
haut en bas jusqu’à ce que tous les ingrédients
soient bien mélangés.
Comment utiliser votre bol hachoir
Le bol hachoir est parfaitement adapté pour hacher
de la viande, du fromage, des oignons, des herbes,
de l’ail, des carottes, des noix, des amandes, des
pruneaux, etc.
Remarque : Ne mixez pas d’aliments trop durs tels
que les noix de muscade, les grains de café ou
autres graines.
Avant de hacher ...
• prédécoupez la viande, le fromage, les oignons,
l’ail, les carottes, les piments (voir le mode
d’emploi)
• enlevez les tiges des herbes aromatiques, l’écorce
des noix/cacahuètes
• enlevez les os, les tendons et le cartilage de la
viande
15
Page 15

Hacher
(voir section A de l’illustration)
1. Enlevez avec précaution le couteau (10b) de son
emballage plastique. Attention : les lames sont
très coupantes ! Toujours prendre le couteau par
la partie supérieure en plastique.
Enfoncez le couteau sur l’axe au centre du grand
bol (10c) jusqu’à ce qu’il s’enclenche. Placez
toujours le bol hachoir sur le fond anti-dérapant
(10d).
2. Placez les aliments dans le bol hachoir.
3. Placez le système d’entraînement (10a) sur le bol
hachoir.
4. Mettez en place et enclenchez le bloc moteur sur
le système d’entraînement.
5. Maintenez le bouton poussoir (2) enfoncé, puis
appuyez sur la touche (3) pour mettre l’appareil en
marche. Pendant l’opération, maintenez le bloc
moteur d’une main et le bol hachoir de l’autre.
Lorsque vous mixez des aliments durs, appuyez
sur le bloc moteur pour immobiliser le hachoir sur
le plan de travail.
6. Après utilisation, appuyez sur les boutons pour
séparer le bloc moteur.
7. Retirez ensuite le système d’entraînement.
8. Enlevez avec précaution le couteau.
9. Videz les aliments du bol hachoir. Le fond antidérapant sert également de couvercle hermétique
au bol hachoir.
Milk-shakes, boissons, purées
Pour les purées, si vous souhaitez obtenir une
texture très fine, vous pouvez également utiliser le
mixeur plongeant à l’intérieur du grand bol.
Pâtes légères (pâte à crêpes)
Versez d’abord les liquides à l’intérieur du grand bol,
ajoutez la farine puis les œufs.
Glace pilée
(voir section B de l’illustration)
1. Placez l’accessoire pour piler la glace (10f) à
l’intérieur du grand bol. Assurez-vous qu’il soit
correctement positionné.
2. Placez l’axe du couteau pour la glace (10e) dans
le trou central du bol pour piler la glace et
appuyez.
3. Mettez les glaçons à l’intérieur du bol à glace.
4. Placez le système d’entraînement sur le grand
bol.
5. Mettez en place et enclenchez le bloc moteur sur
le système d’entraînement.
6. Maintenez le bouton poussoir (2) enfoncé, puis
appuyez sur la touche ON (3) pour mettre l’appareil en marche. Après utilisation, appuyez sur les
boutons pour séparer le bloc moteur. Enlevez
ensuite le système d’entraînement, le couteau à
glace et l’accessoire pour piler la glace.
7. Retirez la glace pilée ou versez directement la
boisson à l’intérieur du grand bol pour la servir à
table.
Autre possibilité : Mixez d’abord des fruits dans le
grand bol avec le couteau (10b), en le remplissant
à 0,5 litres maximum. Puis enlevez le couteau et
placez l’accessoire pour piler la glace à l’intérieur
du grand bol, de manière à piler la glace qui
s’écoulera directement sur les fruits mixés.
Enlevez l’accessoire à glace pour servir
directement.
Nettoyage
Avant le nettoyage, retirez le bloc moteur.
Ne plongez pas le bloc moteur (4), le chargeur (8)
dans l’eau, ne les rincez pas non plus au robinet.
Ces éléments ne doivent être nettoyés qu’avec un
chiffon humide.
Le système d’entraînement du bol hachoir (10a) ne
peut pas être nettoyé au lave-vaisselle.
Tous les autres éléments peuvent être nettoyés au
lave-vaisselle. Lorsque vous utilisez le mixeur pour
la préparation de légumes colorés (tels que les
carottes), les parties en plastique de l’appareil
peuvent se colorer. Dans ce cas, enduisez-les
d’huile végétale avant de les nettoyer.
Pour les spécifications électriques, veuillez vous
reporter aux indications mentionnées sur le câble
d’alimentation spécifique. Le câble d’alimentation
spécifique s’adapte automatiquement à toutes les
tensions internationales CA.
Susceptible d’être modifié sans notification
préalable.
Cet appareil contient une batterie Li-Ion
rechargeable. En fin de vie ne jetez pas ce
produit avec les ordures ménagères. Vous
pouvez le déposer dans un Centre Service
Agréé Braun ou dans un point de collecte de votre
ville selon le pays.
Garantie
Nous accordons une garantie de 2 ans sur ce
produit, à partir de la date d‘achat.
Pendant la durée de la garantie, Braun prendra
gratuitement à sa charge la réparation des vices de
fabrication ou de matière en se réservant le droit de
décider si certaines pièces doivent être réparées ou
si l‘appareil lui-même doit être échangé.
Cette garantie s‘étend à tous les pays où cet
appareil est commercialisé par Braun ou son
distributeur exclusif.
16
Page 16

Cette garantie ne couvre pas : les dommages
occasionnés par une utilisation inadéquate et l‘usure
normale. Cette garantie devient caduque si des
réparations ont été effectuées par des personnes
non agréées par Braun et si des pièces de rechange
ne provenant pas de Braun ont été utilisées.
Pour toute réclamation intervenant pendant la
période de garantie, retournez ou rapportez
l‘appareil ainsi que l‘attestation de garantie à votre
revendeur ou à un Centre Service Agréé Braun.
Se référez à www.service.braun.com ou appelez
08.10.30.97.80 pour connaitre le Centre Service
Agrée Braun le plus proche de chez vous.
Clause spéciale pour la France
Outre la garantie contractuelle exposée ci-dessus,
nos clients bénéficient de la garantie légale des
vices cachés prévue aux articles 1641 et suivants du
Code civil.
17
Page 17

Español
Nuestros productos han sido diseñados para
alcanzar los más altos niveles de calidad, funcionalidad y diseño. Esperamos que disfrute de su nuevo
aparato Braun.
Lea detenidamente todas las instrucciones antes
de utilizar este aparato.
Precaución
•
Existe un riesgo elevado de accidentes si el
•
aparato se enciende sin querer. Dado que se trata
de un aparato recargable, está listo para usarse
en cualquier momento (suponiendo que esté
cargado).
No exponga el aparato directamente a la luz del
•
sol.
Si las cuchillas se bloquean, extraiga el motor de
•
la batidora antes de retirar los alimentos.
Antes de limpiarla, separe el mango del motor.
•
Este aparato se ha fabricado para triturar
•
cantidades domésticas normales.
El aparato cuenta con un cable especial con
•
batería integrada de Voltaje de Seguridad Extra
Bajo. No cambie ni manipule ninguna de sus
partes. De lo contrario podría producirse una
descarga eléctrica.
Utilice el aparato sólo con el cargador incluido.
•
El cargador puede conectarse permanentemente
•
a la red.
Proteja el motor, cargador y cable especial contra
•
la humedad. El motor y la batería del cable
especial deben dejar de utilizarse si se han
sumergido en agua.
Este aparato no está pensado para que lo usen
•
los niños o las personas con minusvalías físicas
o mentales, salvo que cuenten con la supervisión
de una persona responsable de su seguridad.
En general, recomendamos mantener el aparato
fuera del alcance de los niños. Se debe vigilar
que los niños no jueguen con el aparato.
Antes de usarlo, asegúrese de que el cargador y
•
el cable especial no estén dañados. Los aparatos
eléctricos de Braun cumplen la normativa de
seguridad vigente.
Tanto las reparaciones como la sustitución del
•
cable de red deben ser realizadas por personal
técnico autorizado.
Las reparaciones defectuosas efectuadas por
•
personas no capacitadas pueden provocar daños
considerables al usuario.
¡Las cuchillas están muy afiladas! Maneje
las cuchillas con el máximo cuidado para
evitar accidentes.
4 Motor
5 Extracción de accesorios
6 Cuerpo de la batidora
7 Vaso
8 Cargador (con guardacable)
9 Cable especial
10 Accesorio picador
(a) Tapa
(b) Cuchilla
(c) Vaso picador
(d) Base antideslizante/tapa
(e) Cuchilla de hielo
(f) Accesorio pica-hielo
Recarga
La temperatura ideal de recarga es entre 15 °C y
35 °C.
Asegúrese de que el cargador (8) esté sobre
una superficie plana. Conecte el cargador a la red
mediante el cable especial.
Para recargar, coloque la batidora montada en el
cargador (8). (También se puede colocar sólo el
motor).
El piloto verde confirma que el aparato está correctamente colocado y cargándose.
Carga completa: 2 horas aprox.
•
Cargado: el piloto parpadea en intervalos más
•
largos
El tiempo de operación es de unos 20 minutos
•
(dependiendo del uso)
Después de cada uso, vuelva a colocar el aparato
en el cargador. Así se asegurará de que siempre
esté listo para usarse con la carga máxima. También
puede guardar el aparato en el cargador. Aunque no
lo utilice durante mucho tiempo, las baterías de ionlitio mantienen el nivel de carga hasta cierto punto.
Las baterías están protegidas contra el vaciado total
de la carga. Un aparato totalmente descargado
debe cargarse durante al menos 15 minutos aprox.
antes de poder usarlo (para una sopa, por ejemplo).
Piloto
Aparato en el
cargador (conectado
a la red)
Carga o condiciones de
operación
Descripción
1 Luz piloto
2 Desbloqueo del interruptor
3 Interruptor
18
Luz verde intermitente La batería se está
cargando
Luz verde intermitente
(en intervalos más
largos)
La batería está cargada del
todo
Page 18

El desbloqueo del
interruptor (2) está
presionado
Verde La batería está cargada del
Carga o condiciones de
operación
todo
Apagado automático
Por motivos de seguridad, el aparato se apaga
después de 4 minutos de uso continuo. Puede
volver a encenderlo otra vez.
Luz roja/verde
intermitente
Rojo La batería está descargada
Rojo La protección anti
La carga es suficiente para
un uso como mínimo
recalentamiento está
activada (vea las
Prestaciones de seguridad
A Protección anti
recalentamiento)
Prestaciones de seguridad
Encendido del aparato/bloqueo del interruptor
Este aparato cuenta con bloqueo del interruptor.
Para encenderlo con seguridad, haga lo siguiente:
1 Presione el desbloqueo del interruptor (2) con el
pulgar y manténgalo apretado.
2 A continuación presione el interruptor (3). Durante
su funcionamiento puede parar levantando el
dedo del interruptor.
Si no presiona el interruptor al cabo de 5 segun-
•
dos, el aparato no podrá encenderse.
El piloto se apaga.
Para encender el aparato, empiece de nuevo en
•
el punto 1.
Protección anti recalentamiento
Cuando la protección anti recalentamiento está
activada, el aparato se apaga y el piloto emite una
luz roja continua.
Uso de la batidora
La batidora es ideal para preparar salsas, sopas,
mayonesa y papillas, así como mezclar bebidas y
preparar batidos.
a) Retire la protección de las cuchillas en la parte
inferior del cuerpo de la batidora, despegando la
cinta adhesiva. Inserte el motor (4) en el cuerpo
de la batidora (6) hasta fijarlo en posición.
b) Introduzca la batidora verticalmente en el reci-
piente, mantenga presionado el desbloqueo del
interruptor (2) y apriete el interruptor (3).
c) Para separar el cuerpo de la batidora del motor,
presione los botones de extracción (5).
Cuando maneje la batidora con líquidos calientes,
no sumerja ni extraiga el cuerpo de la batidora
dentro del líquido con el aparato encendido.
Receta:
Mayonesa
200–250 ml de aceite
1 huevo (clara y yema)
1 cucharada de zumo de limón o vinagre, sal y
pimienta al gusto
Introduzca todos los ingredientes en el vaso en el
mismo orden. Apoye la batidora en el fondo del
vaso. Una vez encendida, mantenga la batidora en
posición hasta que el aceite se emulsione. Después,
sin apagarla, muévala lentamente arriba y abajo
hasta que la mayonesa esté bien mezclada.
Problema Solución
Se han
bloqueado las
cuchillas
El aparato se ha
recalentado
1. Extraiga el motor.
2. Retire los alimentos.
3. Coloque el motor en el
cargador (conectado a la red)
durante 1 segundo como
mínimo.
4. Ahora puede seguir usándolo.
Siga los puntos 1-4.
Si el piloto sigue emitiendo una
luz roja cuando enciende el
aparato, vuelva a colocar el
motor en el cargador y deje que
se enfríe durante 1 hora aprox.
Durante ese tiempo el piloto
emitirá una luz verde.
Uso del picador
El picador es ideal para picar carne, queso,
cebollas, hierbas, ajo, zanahorias, nueces,
almendras, pasas, etc.
Advertencia: no pique alimentos demasiado duros,
como nuez moscada o granos de café.
Antes de picar …
Corte la carne, queso, cebollas, ajo, zanahorias,
•
chiles (vea la guía de funcionamiento).
Separe los tallos de las hierbas y pele los frutos
•
secos.
Retire los huesos, tendones y cartílagos de la
•
carne.
19
Page 19

Picar
(Diagrama A)
1. Retire cuidadosamente la funda de plástico de la
cuchilla (10b). Advertencia: ¡las cuchillas están
muy afiladas! Sujételo siempre por la parte
superior de plástico.
Empuje la cuchilla en el centro de la jarra de picar
(10c) hasta fijarla en posición. Sitúe siempre la
jarra sobre la superficie antideslizante (10d).
2. Introduzca los alimentos en la jarra.
3. Coloque la tapa (10a) en la jarra.
4. Introduzca el motor en la tapa hasta fijarlo en
posición.
5. Mantenga presionado el desbloqueo del interruptor (2) y apriete el interruptor (3) para utilizar la
picadora. Durante su funcionamiento, sujete el
motor con una mano y la jarra con la otra.
6. Cuando termine, presione los botones para retirar
el motor.
7. A continuación, extraiga la tapa.
8. Retire con cuidado la cuchilla.
9. Vacíe los alimentos de la jarra. La base antideslizante también sirve de tapa hermética para
la jarra.
Limpieza
Antes de limpiar el aparato, extraiga el motor. No
sumerja el motor (4), el cargador (8) en agua ni los
mantenga bajo agua corriente. Estas piezas deben
limpiarse únicamente con un trapo húmedo.
El motor del vaso picador (10a) no es apto para el
lavavajillas.
Las demás piezas son aptas para el lavavajillas.
Si tritura alimentos de color (como zanahorias), las
piezas de plástico del aparato pueden descolorarse.
Límpielas con aceite vegetal antes de lavarlas.
Puede consultar las especificaciones eléctricas en el
texto impreso en el cable especial. El cable especial
se adapta automáticamente a cualquier voltaje AC
internacional.
Sujeto a modificaciones sin previo aviso.
Este aparato contiene pilas recargables Li-Ion.
No tire el producto a la basura al final de su
vida útil. Puede hacerlo en un Centro de
Servicio Braun o en el punto verde de su
zona.
Batidos, bebidas y purés
Si quiere hacer un puré muy fino, puede utilizar la
batidora dentro de la jarra.
Masa ligera (para tortitas)
Vierta primero los líquidos en la jarra, añada la
harina y, al final, los huevos.
Hielo picado
(Diagrama B)
1. Coloque el accesorio pica-hielo (10f) en la jarra.
Asegúrese de que encaje correctamente.
2. Coloque el cuerpo de la cuchilla de hielo (10e) en
el agujero central del accesorio pica-hielo y
empuje hacia abajo.
3. Introduzca los cubitos de hielo en el accesorio
pica-hielo.
4. Tape la jarra.
5. Inserte el motor en la tapa hasta fijarlo en
posición.
6. Mantenga presionado el desbloqueo del
interruptor (2) y apriete el interruptor (3) para
utilizar la picadora. Cuando termine, presione los
botones para extraer el motor. Después, retire la
tapa, la cuchilla de hielo y el accesorio pica-hielo.
7. Vacíe el hielo picado o vierta en la jarra la bebida
y sírvala en la mesa.
Alternativa: primero triture fruta en la jarra con
la cuchilla de picar (10b), hasta un máximo de
0,5 litros. Retire la cuchilla y coloque el accesorio
pica-hielo en la jarra para picar el hielo directamente sobre el puré de fruta.
Garantía
Braun concede a este producto 2 años de garantía
a partir de la fecha de compra.
Dentro del periodo de garantía, subsanaremos,
sin cargo alguno, cualquier defecto del aparato
imputable tanto a los materiales como a la
fabricación, ya sea reparando, sustituyendo piezas,
o facilitando un aparato nuevo según nuestro
criterio.
La garantía no ampara averías por uso indebido,
funcionamiento a distinto voltaje del indicado,
conexión a un enchufe inadecuado, rotura, desgaste
normal por el uso que causen defectos o una
disminución en el valor o funcionamiento del
producto.
La garantía perderá su efecto en caso de ser
efectuadas reparaciones por personas no
autorizadas, o si no son utilizados recambios
originales de Braun.
La garantía solamente tendrá validez si la fecha
de compra es confirmada mediante la factura o el
albarán de compra correspondiente.
Esta garantía tiene validez en todos los países
donde este producto sea distribuido por Braun
o por un distribuidor asignado por Braun.
En caso de reclamación bajo esta garantía, diríjase
al Servicio de Asistencia Técnica de Braun más
cercano: www.service.braun.com.
Solo para España
Servicio al consumidor: Para localizar a su Servicio
Braun más cercano o en el caso de que tenga Vd.
alguna duda referente al funcionamiento de este
producto, le rogamos contacte con el teléfono de
este servicio 901 11 61 84.
20
Page 20

Português
Os nossos produtos foram desenvolvidos para ir ao
encontro dos mais elevados padrões de qualidade,
funcionalidade e design. Esperamos que desfrute
em pleno deste seu novo aparelho Braun.
Antes de utilizar o aparelho pela primeira vez,
leia atentamente as instruções de utilização.
Precauções
•
cuidado.
Se ligar o aparelho inadvertidamente, corre um
•
elevado risco de se ferir. Dado tratar-se de um
aparelho recarregável, está sempre pronto a ser
utilizado (quando carregado).
Não exponha o aparelho à luz directa do sol.
•
Se as lâminas ficarem presas, retire o corpo do
•
motor do pé da varinha antes de retirar os
alimentos/ingredientes que estiverem a obstruir
as lâminas.
Antes de limpar o aparelho, retire o pé da varinha
•
do corpo do motor.
Este aparelho foi desenvolvido para preparar
•
quantidades normais para uso doméstico.
Este aparelho vem equipado com um cabo de
•
alimentação, que possui um transformador de
tensão de segurança muito baixa integrado.
Para evitar risco de choque eléctrico, não troque
ou manipule nenhuma das peças que compõem
o aparelho.
Utilize apenas a base de carregamento fornecida
•
com o aparelho.
A base de carregamento pode estar ligada de
•
modo permanente à corrente eléctrica.
Proteja o corpo do motor, a base de carrega-
•
mento e o cabo de alimentação da humidade.
O corpo do motor e a fonte de alimentação do
cabo não deverão voltar a ser utilizados após
terem estado mergulhados em água.
Este aparelho não deve ser usado por crianças ou
•
pessoas com capacidades físicas ou mentais
reduzidas, excepto quando estejam sob a supervisão de alguém responsável pela sua segurança.
Em geral, recomendamos que mantenha o aparelho fora do alcance de crianças. As crianças
devem ser supervisionadas de forma a garantir
que não brincam com o aparelho.
Antes de utilizar o aparelho, assegure-se de que
•
a base de carregamento e o cabo de alimentação
não se encontram danificados. Os electrodomésticos da Braun cumprem com as normas
internacionais de segurança em vigor.
A reparação ou a substituição do cabo de
•
alimentação deve ser feita apenas por pessoal
autorizado.
As reparações efectuadas por pessoal não
•
qualificado podem causar acidentes ou sérios
danos ao utilizador.
As lâminas encontram-se muito afiadas!
Para evitar acidentes e ferimentos,
manipule as lâminas com o máximo
Descrição
1 Luz indicadora
2 Botão de ejecção
3 Interruptor para ligar
4 Corpo do motor
5 Botões de extracção dos acessórios
6 Pé da varinha
7 Copo misturador / medidor
8 Base de carregamento (inclui compartimento
para arrumar o cabo)
9 Cabo de alimentação
10 Acessório picador
(a) Tampa acopladora
(b) Lâmina
(c) Recipiente picador
(d) Base/tampa anti-deslizante
(e) Lâmina para triturar gelo
(f) Picador de gelo
Carregamento
A temperatura ambiente ideal para efectuar o
carregamento da bateria situa-se entre os 15 °C e
os 35 °C.
Assegure-se que a unidade de carregamento (8) se
encontra colocada numa superfície plana e estável.
Ligue a base de carregamento à corrente eléctrica,
utilizando para o efeito o cabo de alimentação.
Para carregar a varinha, coloque-a na base de
carregamento (8) – também é possível colocar
apenas o corpo do motor.
A luz indicadora verde confirma que o aparelho se
encontra correctamente inserido na base de carregamento e que está a carregar.
Carregamento completo: 2 horas aproximada-
•
mente.
Totalmente carregado: a luz indicadora pisca em
•
intervalos mais prolongados.
O tempo de funcionamento é de cerca de
•
20 minutos (dependendo do modo de utilização).
Após cada utilização, coloque o aparelho na base
de carregamento para o manter completamente
carregado. Este procedimento assegura que o
aparelho está sempre pronto a ser utilizado nas
melhores condições de carregamento. Também
pode deixar o aparelho na base de carregamento.
Mesmo quando o aparelho não é utilizado durante
longos períodos de tempo, as baterias de iões de
lítio praticamente não perdem capacidade de carga.
As baterias estão protegidas contra perda de
carga. Um aparelho descarregado por completo,
21
Page 21

necessitará de aproximadamente 15 minutos antes
de ser novamente utilizado (para uma sopa, por
exemplo).
Luz Indicadora
Aparelho na base de
carregamento
(ligado à corrente
eléctrica)
Luz verde a piscar Bateria a carregar
Luz verde a piscar
(em intervalos mais
prolongados)
Botão de ejecção (2)
pressionado para
baixo
Verde Bateria totalmente
Condições de
carregamento ou
funcionamento
Bateria totalmente
carregada
Condições de
carregamento ou
funcionamento
carregada
Motivo Resolução de problemas
A lâmina está
presa
O aparelho está
sobreaquecido
1. Retire o corpo do motor.
2. Retire os alimentos que que
estiverem a obstruir as
lâminas.
3. Coloque o corpo do motor na
base de carregamento (ligado
à corrente eléctrica) durante,
pelo menos, um segundo.
4. Pode continuar a utilizar o
aparelho.
Siga os passos 1.-4.
Se a luz indicadora ainda se
mantiver vermelha quando ligar
o aparelho, volte a colocar o
corpo do motor na base de
carregamento e deixe-o
arrefecer durante cerca de
1 hora. Durante este período de
tempo a luz indicadora verde
pisca.
Vermelho/verde a
piscar
Vermelho Bateria descarregada
Vermelho Protecção contra
Carga suficiente para, pelo
menos, uma utilização
sobreaquecimento
accionada (consulte
Dispositivos de segurança
A Protecção contra
sobreaquecimento)
Dispositivos de segurança
Ligar o aparelho / Bloqueio do interruptor
O aparelho possui um sistema de desligar automático. Para ligar o aparelho com segurança, siga os
seguintes passos:
1 Em primeiro lugar, prima o botão de ejecção (2)
com o polegar e mantenha-o pressionado.
2 De seguida, pressione o interruptor para ligar (3).
Enquanto o aparelho estiver a funcionar pode
deixar de pressionar o botão de ejecção.
Se não se pressionar o interruptor num prazo
•
de 5 segundos, o aparelho não liga e a luz
indicadora apaga-se.
Para ligar o aparelho, repita novamente o
•
passo 1.
Protecção contra sobreaquecimento
Sempre que a protecção contra sobreaquecimento
estiver accionada, o aparelho desliga-se e a luz
indicadora fica permanentemente vermelha.
Desligar automático
Por razões de segurança, o aparelho desliga
automaticamente após 4 minutos de funcionamento.
Pode-se voltar a ligar o aparelho directamente.
Utilizar a varinha
A varinha está desenhada para confeccionar
molhos, sopas, maionese e comidas para bebés,
bem como para misturar bebidas ou preparar
batidos.
a) Retire a protecção de plástico que cobre a lâmina
do pé da varinha. Introduza o corpo do motor (4)
no pé da varinha (6) até encaixar.
b) Introduza a varinha verticalmente no recipiente,
mantenha pressionado o botão de ejecção (2) e,
em seguida, prima o interruptor para ligar (3).
c) Para retirar o pé da varinha do corpo do motor,
pressione os botões de extracção (5).
Quando utilizar a varinha em líquidos quentes, não
mergulhe o pé da varinha nem o retire do líquido se
o aparelho estiver ligado.
Exemplo de receita:
Maionese
200–250 ml de óleo,
1 ovo (gema e clara),
1 colher de sopa de sumo de limão ou de vinagre,
Sal e pimenta a gosto
Coloque todos os ingredientes no copo misturador /
medidor, seguindo a ordem indicada acima.
22
Page 22

Introduza a varinha até ao fundo do copo, ligue-a
e mantenha-a nessa posição até que o óleo se
misture com os outros ingredientes. De seguida,
mantendo a varinha ligada, mova-a suavemente de
cima para baixo até que a maionese fique bem
ligada.
Utilizar o acessório picador
O acessório picador é ideal para triturar carne,
queijo, cebolas, ervas aromáticas, alho, cenouras,
nozes, amêndoas, ameixas secas, etc.
Nota: Não utilize o acessório picador para triturar
alimentos extremamente duros, como noz moscada,
grãos de café e cereais.
Antes de picar ...
corte em pequenos pedaços a carne, queijo,
•
cebolas, alhos, cenouras, chilis (ver guia de
processamento);
retire os talos das ervas aromáticas e descasque
•
os frutos secos;
retire ossos, tendões e cartilagens da carne.
•
Picar
(ver imagem da secção A)
1. Retire cuidadosamente a protecção de plástico
da lâmina (10b). Cuidado: a lâmina encontra-se
muito afiada! Segure-a sempre pela parte superior
de plástico. Pressione a lâmina para baixo no
espigão do centro do jarro picador (10c) até
encaixar. Coloque sempre o jarro picador sobre a
base anti-deslizante (10d).
2. Coloque os alimentos no jarro picador.
3. Coloque a tampa acopladora (10a) no jarro
picador.
4. Insira o corpo do moto na tampa acopladora,
assegurando-se de que está correctamente
encaixada.
5. Para colocar o aparelho em funcionamento, prima
o botão de ejecção (2), mantendo-o pressionado
e pressione o interruptor para ligar (3). Enquanto
o aparelho estiver em funcionamento, segure
sempre o corpo do motor com uma mão
enquanto mantém o copo liquidificador seguro
com a outra. Quando picar alimentos duros,
pressione o corpo do motor para baixo.
6. Quando terminar, pressione os botões para retirar
o corpo do motor.
7. De seguida, retire a tampa acopladora.
8. Retire cuidadosamente a lâmina.
9. Finalmente, retire os alimentos picados do jarro.
A base anti-deslizante também pode ser utilizada
como tampa hermética para o jarro picador.
Batidos, bebidas e purés
Para os purés, quando é preciso que fique muito
fino, também se pode utilizar o pé da varinha no
copo liquidificador.
Massas leves (panquecas)
Em primeiro lugar, verta os líquidos no copo
liquidificador, depois adicione a farinha e, por fim,
os ovos.
Gelo picado
(ver imagem na secção B)
1. Coloque o picador de gelo (10f) no copo,
assegurando-se de que está correctamente
encaixad
2. Coloque a lâmina para triturar gelo (10e) no
buraco central do picador de gelo e pressione-o
para baixo.
3. Coloque os cubos de gelo no picador de gelo.
4. Encaixe a tampa acopladora.
5. Insira o corpo do motor na tampa acopladora até
encaixar.
6. Para colocar o aparelho em funcionamento, prima
o botão de ejecção (2), mantendo-o pressionado
e pressione o interruptor para ligar (3).
Após a utilização, pressione os botões para retirar
o corpo do motor. De seguida, retire a tampa
acopladora, a lâmina para triturar gelo e o picador
de gelo.
7. Retire o gelo picado ou junte a sua bebida no
copo liquidificador para servir à mesa.
Alternativa: Primeiro triture os frutos no copo
liquidificador com a lâmina para picar (10b) e
adicione um máximo de 0,5 litros de líquido.
Retire a lâmina e coloque o picador de gelo no
copo liquidificador para triturar o gelo directamente no puré de frutos.
Limpeza
Antes de limpar o aparelho, retire sempre o corpo
do motor. Não mergulhe o corpo do motor (4)
e a base de carregamento (8) em água nem os
mantenha sob água corrente. Estas peças só
podem ser limpas com um pano húmido.
A tampa acopladora do picador (10a) não foi
concebida para ser lavada na máquina de lavar
loiça.
Todas as restantes peças podem ser lavadas na
máquina de lavar loica. Quando se prepararam
alimentos de cores intensas (como cenouras, por
exemplo), as peças de plástico do aparelho podem
ficar manchadas. Limpe-as com óleo vegetal
alimentar antes de as lavar.
Para especificações eléctricas, consulte a informação impressa no cabo de alimentação.
O cabo de alimentação adapta-se automaticamente
a qualquer corrente alternada mundial.
Sujeito a alterações sem aviso prévio.
23
Page 23

Este aparelho contém baterias de iões de
lítio (Li-Ion) recarregáveis. Por favor não deite
o produto no lixo doméstico, no final da sua
vida útil. Entregue-o num dos Serviços de
Assistência Técnica da Braun ou em locais de
recolha específica, colocados à disposição no seu
país.
Garantia
Os nossos produtos dispõem de uma garantia de 2
anos a partir da data de compra. Qualquer defeito
do aparelho imputável, quer aos materiais, quer ao
fabrico, que torne necessário reparar, substituir
peças ou trocar de aparelho dentro de período de
garantia não terá custos adicionais,
A garantia não cobre avarias por utilização indevida,
funcionamento a voltagem diferente da indicada,
ligação a uma tomada de cor-rente eléctrica
incorrecta, ruptura, desgaste normal por utilização
que causem defeitos ou diminuição da qualidade de
funciona-mento do produto.
A garantia perderá o seu efeito no caso de serem
efectuadas reparações por pessoas não autorizadas
ou se não forem utilizados acessórios originais
Braun.
A garantia só é válida se a data de compra for
confirmada pela apresentação da factura ou
documento de compra correspondente.
Esta garantia é válida para todos os países onde
este produto seja distribuído pela Braun ou por um
distribuidor Braun autorizado.
No caso de reclamação ao abrigo de garantia, dirija-
-se ao Serviço de Assistência Técnica Oficial Braun
mais próximo: www.service.braun.com.
Só para Portugal
Apoio ao consumidor: Para localizar o seu Serviço
Braun mais próximo, no caso de surgir alguma
dúvida relativamente ao funcionamento deste
produto, contacte-nos por favor pelo telefone
808 20 00 33.
24
Page 24

Italiano
Nello studio dei nostri prodotti perseguiamo sempre
tre obiettivi: qualità, funzionalità e design.
Ci auguriamo che il prodotto Braun da voi acquistato soddisfi pienamente le vostre esigenze.
Leggere attentamente e completamente le
istruzioni d’uso prima di usare il prodotto.
Cautela
•
Alto rischio di infortuni accendendo il prodotto
•
non intenzionalmente. Essendo un prodotto
ricaricabile, è pronto all’uso in qualsiasi momento
(quando carico).
Non esporre direttamente ai raggi del sole.
•
Quando le lame sono bloccate, rimuovere il corpo
•
motore dal gambo, prima di rimuovere i rimasugli
di cibo/il blocco.
Prima di pulire rimuovere il gambo dal corpo
•
motore.
Questo prodotto è stato progettato solo per uso
•
domestico.
Questo apparecchio è provvisto di un cavo con
•
integrato un caricatore di Sicurezza ad Extra
Basso Voltaggio. Non scambiarlo o manipolarlo,
causa rischio di schock elettrico.
Usare l’apparecchio esclusivamento con il carica-
•
tore elettrico incluso.
Il caricatore puà rimanere sempre attaccato alla
•
corrente,
Proteggere il corpo motore, il caricatore e il cavo
•
di alimentazione dall’umidità. Il corpo motore,
il cavo e il caricatore non devono più essere
utilizzate dopo essere venuti a contatto con
l’acqua.
L’apparecchio non è progettato per essere
•
utilizzato da bambini o persone con ridotta
capacità fisica o mentale, senza la supervisione
di una persona responsabile della loro sicurezza.
In generale, raccomandiamo di tenere l’apparecchio fuori dalla portata dei bambini. I bambini
dovrebbero essere supervisionati per evitare che
giochino con il prodotto.
Prima dell’uso assicurarsi che il caricatore e il
•
cavo di alimentazione non siano danneggiati. Gli
apparecchi elettrici Braun rispettano gli standard
di sicurezza applicabili.
La riparazione o la sostituzione del cavo devono
•
essere eseguiti esclusivamente da personale di
servizio autorizzato.
Riparazioni imperfette, non autorizzate, possono
•
causare incidenti o danni al consumatore.
Le lame sono molto affilate! Maneggiarle
con la massima cura per evitare infortuni.
5 Pulsanti di rilascio per rimuovere gli accessori
6 Gambo frullatore
7 Bicchiere
8 Unità di ricarica (possibilità di riporre il cavo
all’interno)
9 Cavo di alimentazione
10 Accessorio tritatutto
(a) Coperchio
(b) Lama
(c) Ciotola tritatutto
(d) Base/coperchio anti-scivolo
(e) Lama per ghiaccio
(f) Accessorio rompighiaccio
Carica
La temperatura ideale per la fase di ricarica è
compresa tra 15 °C e 35 °C.
Assicurarsi che l’unità di ricarica (8) sia su una
superificie piana. Connettere l’unità di ricarica alla
corrente tramite la spina.
Per ricaricare, inserire il frullatore ad immerisone
completo nell’unità di ricarica (8) – è possibile
inserire anche il solo corpo motore.
La luce pilota verde conferma che l’apparecchio è
inserito correttamente nell’unità di carica e che si sta
caricando.
Ricarica completa: ca. 2 ore
•
Ricaricato completamente: la luce pilota lampeg-
•
gia ad intervalli più lunghi
Tempo di autonomia circa 20 minuti (a seconda
•
dell’utilizzo)
Dopo ogni utilizzo inserire l’apparecchio nell’unità di
ricarica. In questo modo l’apparecchio sarà sempre
pronto per l’uso in condizioni ottimali di ricarica.
È anche possibile conservare il frullatore nell’unità di
ricarica. Anche se non utilizzate per lungo tempo, le
batterie lithium ion mantengono il loro livello carica a
lungo.
Le batterie sono protette contro lo scaricamento
completo. Un apparecchio completamente scarico
deve essere ricaricato per almeno 15 minuti prima di
poter essere usato (per esempio per una zuppa).
Luce pilota
Apparecchio
nell’unità di ricarica
(connesso alla
corrente)
Condizioni di carica
Descrizione
1 Luce Pilota
2 Pulsante di attivazione
3 Pulsante d’accensione
4 Corpo motore
Luce verde
lampeggiante
Luce verde
lampeggiante (ad
intervalli più lunghi)
Batteria in ricarica
Batteria completamente
carica
25
Page 25

Pulsante di rilascio
(2) premuto
Verde Batteria completamente
Condizioni di carica
carica
Auto spegnimento
Pe ragioni di sicurezza l’apparecchio si spegne dopo
4 minuti di uso continuato. L’aparecchio può essere
riaccesso ancora.
Rosso/verde
lampeggiante
Rosso Batteria scarica
Rosso Protezione anti
Livello carica sufficient per
almeno un utilizzo
surriscaldamento attiva
(vai a norme di sicurezza
protezione contro il
surriscaldamento)
Norme di sicurezza
Accendere l’applicazione / Pulsante blocco
L’apparecchio ha un pulsante di blocco. Per accenderlo in sicurezza, seguire i seguenti punti:
1 Innanzitutto premere il pulsante di rilascio (2) con
il pollice e tenerlo premuto.
2 Premere in seguito il pulsante di accensione (3).
Durante questa operazione è possibile lasciare il
pulsante di attivazione.
Se il pulsante di accensione non viene premuto
•
entro 5 secondi, l’apparecchio non può essere
acceso. La luce pilota si spegne.
Per accendere l’apparecchio ricominciare dal
•
punto 1.
Protezione anti surriscaldamento
Quando la protezione anti surriscaldamento è attiva,
l’apparecchio si spegne e la luce pilota emette una
luce rossa costante.
Come utilizzare il vostro frullatore
Il frullatore ad immersione è perfettamente progettato per preparare zuppe, salse, maionese ed omogeneizzati così come frullare drinks e frullati.
a) Rimuovere la protezione della lama in fondo al
gambo, rimuovendo il nastro adesivo. Inserire il
corpo motore (4) nel gambo (6) fino a quando si
chiudono.
b) Introdurre il frullatore ad immersione in posizione
verticale nel recipiente, mantenere premuto il
pulsante di attivazione (2), poi premere il pulsante
di accensione (3).
c) Per rimuovere il gambo dal corpo motore premere
i pulsanti di rilascio (5).
Quando si lavora con liquidi molto caldi non immergere il gambo – o rimuoverlo quando l’apparecchio
è acceso.
Esempio di ricetta:
Maionese
200-250 ml di olio
1 uovo (tuorlo e albume)
1 cucchiao da tavola di succo di limone o aceto
Sale e pepe qb
Mettere tutti gli ingredienti nel bicchiere graduato
secondo l’ordine sopra descritto. Introdurre il
frullatore nel bicchiere fino a toccarne il fondo.
Dopo l’accensione, mantenere il frullatore in questa
posizione finché l’olio si emulsiona. Poi, senza
spegnere l’apparecchio, muoverlo delicatamente
su e giù fino a quando la maionese è composta e
soffice.
Ragione Risoluzione problema
La lama è
bloccata
L’apparecchio è
surriscaldato
26
1. Rimuovere il corpo motore
2. Rimuovere il cibo/blocco
3. Inserire il corpo motore
nell’unità di ricarica (collegata
alla corrente elettrica) per
almeno un secondo
4. La lavorazione può continuare
Seguire i punti 1.-4.
Se la luce pilota rimane
rossa quando si accende
l’apparecchio, inserire di nuovo
il corpo motore nell’unità di
ricarica e lasciarlo raffreddare
per ca 1 ora. Nel frattempo la
luce pilota lampeggia verde.
Come utilizzare il vostro accesorio
tritatutto
Il tritatutto è perfettamente adatto per tritare carne,
formaggio, cipolle, aromi, aglio, carote, noci,
mandorle, nocciole etc.
N.B. Non tritare cose estremamente dure come
cubetti di ghiaccio, noci moscate, chicchi di caffè o
granaglie.
Prima di tritare ...
Tagliare a pezzi la carne, il formaggio, le cipolle,
•
l’aglio, le carote, peperoncino (vedere la guida al
funzionamento)
Togliere il gambo dalle erbe, sgusciare le noci
•
Rimuovere ossa, tendini e cartilagini dalla carne
•
Page 26

Tritare
(vedere figura sezione A)
1. Rimuovere attentamente la copertura di plastica
dalle lame (10b). Attenzione: Le lame sono molto
affilate! Maneggiarle sempre tenendole dalla parte
superiore in plastica. Posizionare le lame sul
perno al centro della ciotola (10c). Premere le
lame verso il basso finché sibloccano. Inserire
sempre la ciotola nella base antiscivolo (10d).
2. Mettere il cibo nella ciotola/bicchiere tritatutto.
3. Mettere la parte superiore (10a) sulla ciotola
tritatutto.
4. Inserire il corpo motore sulla parte superiore fino
a quando si blocca.
5. Mantenere premuto il tasto di attivazione (2) e
premere il tasto di accensione (3) per accendere il
tritatutto. Durante la lavorazione, tenere il corpo
motore con una mano e la ciotola con l‘altra
mano. Quando si tritano cibi duri, tenere premuto
il corpo motore verso il basso.
6. Dopo l’utilizzo, premere il tasto per rimuovere il
corpo motore.
7. Quindi rimuovete la parte superiore.
8. Togliere la lame con attenzione.
9. Rimuovere il cibo dalla ciotola/bicchiere. La base
antiscivolo può servire come tappo per la ciotola
bicchiere.
Frullati, bevande, purée
per la preparazione di purèe, quando si vogliono
ottenere dei risultati ancora migliori, si può utilizzare
direttamente il gambo flullatore all’interno del
bicchiere.
del tritatutto (10b), fino ad una quantità massima
di 0,5 litri. Rimuovete le lame ed inserite l’accessorio rompighiaccio per tritare il ghiaccio direttamente sul frullato di frutta.
Pulire l’apparecchio
Prima di pulire rimuovere il corpo motore.
Non immergere il corpo motore (4) e l’unità di carica
(8) in acqua né risciacquarli sotto l’acqua corrente.
Queste parti possono essere pulite solo con un
panno umido. Il coperchio del tritatutto (10a) non è
lavabile in lavastoviglie.
Tutte le altre parti sono lavabili in lavastoviglie.
Quando si lavora cibo pigmentato (ad esempio le
carote), le parti in plastica dell’apparecchio possono
perdere il colore originario. Immergere queste parti
in olio vegetale prima di pulirle.
Per specifiche elettriche osservare le indicazioni
stampate sul cavo di alimentazione. Il cavo di
alimentazione si adatta automaticamente ad ogni
voltaggio AC nel mondo.
Soggetto a cambiamenti senza notifica.
Quest’apparecchio contiene batterie
ricaricabili Li-Ion. Per lo smaltimento,
rivolgersi ad un qualsiasi Centro Assistenza
Braun o ad un centro specifico.
Per impasti leggeri
Inserire per primi i liquidi, poi la farina ed infine le
uova.
Rompere il ghiaccio
(vedere la figura nella sezione B)
1. Inserire l’accessorio per rompere il ghiaccio (10f)
nel bicchiere. Assicurarsi sia inserito correttamente.
2. Posizionare il gambo della lama per il ghiaccio
(10e) nel foro al centro dell’accessorio rompighiaccio e premere verso il basso.
3. Porre dei cubetti di ghiaccio nell’accessorio.
4. Mettere il coperchio con gli ingranaggi sul
bicchiere.
5. Inserire il blocco motore sul coperchio fintanto
che si blocca.
6. Mantenere premuto il tasto di attivazione (2) e
premere il tasto di accensione (3) per accendere
il tritatutto. Dopo l’utilizzo premere il tasto per
rimuovere il motore. Togliere il coperchio, le lame
e l’accessorio rompighiaccio.
7. Servire il ghiaccio o riempire il bicchiere della
bevanda per servirla in tavola.
In alternativa: Frullate prima la frutta con le lame
Garanzia
Braun fornisce una garanzia valevole per la durata di
2 anni dalla data di acquisto.
Nel periodo di garanzia verranno eliminati,
gratuitamente, i guasti dell’apparecchio conseguenti
a difetti di fabbrica o di materiali, sia riparando il
prodotto sia sostituendo, se necessario, l’intero
apparecchio.
Tale garanzia non copre: danni derivanti dall’uso
improprio del prodotto, la normale usura
conseguente al funzionamento dello stesso, i difetti
che hanno un effetto trascurabile sul valore o sul
funzionamento dell’apparecchio.
La garanzia decade se vengono effettuate riparazioni
da soggetti non autorizzati o con parti non originali
Braun.
Per accedere al servizio durante il periodo di
garanzia, è necessario consegnare o far pervenire il
prodotto integro, insieme allo scontrino di acquisto,
ad un centro di assistenza autorizzato Braun.
Contattare www.service.braun.com o il numero
02/6678623 per avere informazioni sul Centro di
assistenza autorizzato Braun più vicino.
27
Page 27

Nederlands
Onze producten voldoen aan de hoogste eisen
voor kwaliteit, functionaliteit en ontwerp.
Wij hopen dat u veel plezier zult beleven aan uw
nieuwe Braun-apparaat.
Let op
Lees alle instructies zorgvuldig door voordat u
het apparaat in gebruik neemt.
Waarschuwing
•
Hoog risico met het onbedoeld aanzetten van
•
het apparaat. Omdat dit apparaat oplaadbaar is,
is het op elk moment gebruiksklaar (wanneer
opgeladen).
Niet aan direct zonlicht blootstellen.
•
Wanneer de messen geblokkeerd zijn, verwijder
•
het motor gedeelte van de blenderstaaf voordat u
het voedsel/blokkage verwijdert.
Verwijder voor het schoonmaken, het motor
•
gedeelte van de blender staaf.
Het apparaat is gemaakt voor normale huishoude-
•
lijke hoeveelheden.
Dit apparaat is voorzien van een speciale draad
•
met een geïntegreerde extra lage stroomvoorziening. Verwissel of manipuleer deze niet. Anders
is er een risico van een elektrische schok.
Gebruik dit apparaat alleen met de bijgeleverde
•
oplader.
Het apparaat kan pertinent verbonden zijn met het
•
stopcontact.
Bescherm het motor gedeelte, batterij en speciale
•
draad tegen vochtigheid. Motor gedeelte en
oplaadgedeelte met de stekker niet onder stromend water noch onder water houden.
Dit apparaat is niet bedoeld voor gebruik door
•
kinderen of personen met verminderde fysieke
of mentale capaciteiten, tenzij zij het apparaat
gebruiken onder toezicht van een persoon
verantwoordelijk voor hun veiligheid. Over het
algemeen raden wij aan dit apparaat buiten bereik
van kinderen te houden.
Controleer voordat u het apparaat gebruikt of de
•
batterij en het speciale draad niet beschadigd zijn.
De elektrische apparaten van Braun voldoen aan
de hiervoor geldende veiligheidsnormen.
Reparaties en vervanging van het snoer dienen
•
alleen uitgevoerd te worden door daartoe
bevoegd onderhoudspersoneel.
Wanneer reparaties onjuist of door ondeskundige
•
personen worden uitgevoerd, kan dit gevaar
opleveren voor de gebruiker.
De messen zijn zeer scherp! Ga zeer
voorzichtig om met de messen om
verwondingen te voorkomen.
4 Motor gedeelte
5 Knoppen om de werkende onderdelen los te
klikken
6 Steel van de staafmixer
7 Beker
8 Oplader (inc. opslag voor de draad)
9 Speciale draad set
10 Snij hulpstuk
(a) Tandwielgedeelte voor snij-hulpstuk
(b) Mes
(c) Snijkom
(d) Antislip oppervlak
(e) IJs sikkelmes
(f) IJs vergruizer
Opladen
De ideale temperatuur range om de batterij op te
laden is tussen 15 °C en 35 °C. Zorg ervoor dat de
oplader (8) op een vlak oppervlak staat. Steek de
stekker van de oplader in het stopcontact. Om het
apparaat op te laden, plaats de complete staafmixer
in de oplader (8) – motor gedeelte apart is ook
mogelijk.
Het groene licht geeft aan dat het apparaat correct
bevestigd is in de oplader en dat deze wordt
opgeladen.
Volledig opgeladen: na circa 2 uur.
•
Wanneer het apparaat volledig is opgeladen
•
knippert het lampje met langere intervallen.
Gebruikstijd snoerloos mixen; circa 20 minuten
•
(afhankelijk van gebruiksmanier).
Na elk gebruik, plaats het apparaat terug in de
oplader om weer bij te laden. Dit zorgt ervoor dat het
apparaat altijd klaar voor gebruik is en in optimale
conditie. Het is ook mogelijk het apparaat op te
slaan in de oplader. Zelfs wanneer het apparaat
lange tijd niet gebruikt wordt, blijft het apparaat haar
energie houden, door de lithium ion batterijen.
De batterijen zijn beschermd tegen een langere tijd
zonder stroom. Wanneer de batterij volledig op is
dient deze voor minstens 15 minuten te worden
opgeladen voordat je het apparaat weer gebruikt
voor een bereiding (vb soep).
Licht
Apparaat in oplader
(verbonden aan het
hoofd)
Oplaad of
conditietoestand van het
apparaat
Beschrijving
1 Aan/uit lichtje
2 Veiligheidsknop
3 Aan knop
28
Knipperend groen Batterij wordt opgeladen
Knipperend groen
(in langere intervals)
Batterij is volledig
opgeladen
Page 28

Veiligheidsknop (2)
Groen Batterij is volledig
Oplaad of
conditietoestand van het
apparaat
opgeladen
Automatisch uitschakelen van de mixer
Uit veiligheidsoverweging schakelt het apparaat
zichzelf na 4 minuten permanent gebruik uit. Het
apparaat kan hierna direct weer worden aangezet.
Rood/groen
knipperend
Rood Batterij is niet opgeladen
Rood Bescherming tegen het
Apparaat geschikt om
minstens 1x te gebruiken
oververhit raken van de
mixer actief. (ga naar
Veiligheidsvoorschriften A
bescherming tegen
oververhit raken)
Veiligheidsvoorschriften
Het apparaat aanzetten / veiligheidsslot
Dit apparaat heeft een veiligheidsslot. Om het
veiligheidsslot te gebruiken, volg de volgende
instructies:
1 Klik op de veiligheidsknop (2) met je duim en houd
deze vast.
2 Klik dan op de aan knop (3). Tijdens de handeling,
mag je stoppen met het drukken op de veiligheidsknop.
Wanneer de aan knop nu niet binnen 5 seconde
•
wordt ingedrukt, kan het apparaat niet aan
worden gezet. Het lampje zal uitgaan.
Om het apparaat weer aan te zetten, start
•
opnieuw met stap 1.
Bescherming oververhit raken
Wanneer het apparaat oververhit raakt, zal het
apparaat uit gaan en het lichtje rood zijn.
Reden Oplossing
De bediening van de staafmixer
De staafmixer is bij uitstek geschikt voor het bereiden van (dip)sauzen, soep, mayonaise en babyvoedsel, maar ook voor het mixen van drankjes en
milkshakes.
a) Verwijder de bescherming van het antislip
gedeelte op de bodem door het plakband te
verwijderen Steek het motorgedeelte (4) in de
steel van de mixer (6) totdat het vastklikt.
b) Houd de staafmixer verticaal in de schaal/kom/
pan en druk op de aan/uitschakelaar (3).
c) Om de steel na gebruikt van de mixer weer los te
klikken, houdt u de knoppen (5) ingedrukt terwijl u
aan de steel trekt.
Dompel de steel van de staaf niet in hete vloeistoffen
om te verkomen dat de staafmixer oververhit raakt.
Recept voorbeeld:
Mayonaise (met staafmixer)
200–250 ml olie,
1 ei (zowel de dooier als het eiwit)
1 eetlepel citroensap of azijn
naar smaak zout en peper toevoegen
Doe alle ingrediënten in de bovenstaande volgorde
in de maatmaker. Houd de staafmixer net boven de
bodem van de beker. Druk op de aan knop en houd
de mixer in haar positie totdat het geheel goed vermengd is. Vervolgens beweegt u de mixer, zonder
hem uit te zetten, langzaam van boven naar beneden
totdat ere en mooie gelijkmatige massa ontstaat.
Mes is
geblokkeerd
Apparaat is
oververhit
1. Verwijder motor gedeelte.
2. Verwijder het voedsel /
blokkade.
3. Plaats het motor gedeelte in de
oplader (bevestig aan kop) voor
minstens 1 seconde.
4. Apparaat kan weer gebruikt
worden.
Volg punt 1-4
Wanneer het licht rood blijft
wanneer je het apparaat aan probeert te klikken, plaats het motor
gedeelte terug in de oplader en
laat het afkoelen voor ongeveer
1 uur. Gedurende deze tijd zal het
licht weer op groen gaan.
De bediening van snij-hulpstuk
Het snij hulpstuk is bij uitstek geschikt voor het
hakken van vlees, kaas, uien, kruiden, knoflook,
wortelen, walnoten, amandelen, pruimen etc.
NB. Snijd geen extreem harde producten zoals
ijsblokjes, nootmuskaat, koffiebonen en granen.
Voor u begint met snijden ...
snijd vlees, kaas, uien, knoflook, wortelen alvast in
•
kleine stukken
verwijder steeltjes van kruiden en ontdoe noten
•
van hun schaal
ontdoe vlees van botten, pezen en kraakbeen.
•
29
Page 29

Snijden
(zie afbeelding sectie A)
1. Voorzichtig: Verwijder voorzichtig het plastic
beschermkapje van het mes (10b). Het mes is
zeer scherp! Pak het altijd bovenaan bij het plastic
vast. Schuif het mes over de pin in het midden
van de snijkom (10c). Druk het naar beneden
totdat het vastklikt. Plaats de snijkom altijd op het
antislip oppervlak (10d).
2. Doe de voedingsmiddelen in de snijkom.
3. Plaats het tandwielgedeelte (10a) op de snijkom.
4. Steek het motorgedeelte in het tandwielgedeelte
totdat dit vastklikt.
5. Druk op de schakelaar (3) om de hakmolen te
bedienen. Tijdens het snijden houdt u met de ene
hand het motorgedeelte vast en met de andere de
snijkom.
6. Na gebruik drukt u op de knoppen om het
motorgedeelte los te klikken.
7. Verwijder vervolgens het tandwielgedeelte.
8. Haal daarna voorzichtig het mes uit de snijkom.
9. Verwijder het bereidde voedsel uit de snijkom. Het
antislip oppervlak dient ook als een luchtdichte
deksel voor op de snijkom.
Milkshakes, drankjes, purees
Voor purees, indien zeer fijne resultaten gewenst
zijn, kunt u ook de staafmixer op de BC beker
gebruiken.
Schoonmaken
Verwijder voor het schoonmaken het motorgedeelte.
Dompel het motorgedeelte (4), batterij (8) niet onder
water. Deze delen kunnen alleen schoon worden
gemaakt met een vochtig doekje.
Het snij-hulpstuk (10a) is niet vaatwasmachinebestendig. Alle andere onderdelen zijn vaatwasmachinebestendig. Bij het snijden van gekleurd
voedsel (bijvoorbeeld wortels) kunnen de plastic
onderdelen verkleuren. Veeg deze onderdelen af
met plantaardige olie voordat u ze in de vaatwasser
doet.
Voor elektrische specificaties, kijk op de stekker van
de oplader. Deze draad past zich automatisch aan
elke wereldwijde voltage aan.
Onderwerp te veranderen zonder opmerking
Deze applicatie bevat Li-Ion oplaadbare
batterijen. Gooi dit apparaat aan het eind van
zijn nuttige levensduur niet bij het huisafval.
Lever deze in bij een Braun service center of
bij de door uw gemeente aanwezigen
inleveradressen.
Licht deeg (pannenkoekenbeslag)
Schenk de vloeibare bestandsdelen in de kom, voeg
daarna bloem en tenslotte eieren toe.
IJs vergruizen
(zie afbeelding B)
1. Plaats de IJs vergruizer (10f) in de beker. Zorg
ervoor dat deze goed op zijn plaats zit.
2. Plaats het aandrijfdeel van het IJs sikkelmes (10e)
in de middelste opening van de IJs vergruizer en
druk deze naar beneden.
3. Vul de IJs vergruizer met ijsklontjes.
4. Plaats het tandwielgedeelte op de beker.
5. Plaats het motorgedeelte op het tandwielgedeelte
totdat dit vastklikt.
6. Druk op de schakelaar (3) om de hakmolen te
bedienen. Na gebruik drukt u op de knoppen (5)
om het motorgedeelte los te klikken. Verwijder
vervolgens het tandwielgedeelte, ijs sikkelmes en
de ijs vergruizer.
7. Verwijder het vergruisde ijs of schenk uw drankje
in de beker om zo te serveren.
Alternatief: Meng eerst het fruit in de beker met
het sikkelmes (10b), maximaal tot 0,5 liter vullen.
Verwijder het sikkelmes en plaats de ijs vergruizer
in de beker om het ijs direct in het gepureerde fruit
te vergruizen.
Garantie
Op dit produkt verlenen wij een garantie van 2 jaar
geldend vanaf datum van aankoop. Binnen de
garantieperiode zullen eventuele fabricagefouten
en/of materiaalfouten gratis door ons worden
verholpen, hetzij door reparatie, vervanging van
onderdelen of omruilen van het apparaat.
Deze garantie is van toepassing in elk land waar dit
apparaat wordt geleverd door Braun of een officieel
aangestelde vertegenwoordiger van Braun.
Beschadigingen ten gevolge van onoordeelkundig
gebruik, normale slijtage en gebreken die de werking
of waarde van het apparaat niet noemenswaardig
beinvloeden vallen niet onder de garantie.
De garantie vervalt bij reparatie door niet door ons
erkende service-afdelingen en/of gebruik van niet
originele Braun onderdelen.
Om gebruik te maken van onze service binnen de
garantieperiode, dient u het complete apparaat met
uw aankoopbewijs af te geven of op te sturen naar
een geauthoriseerd Braun Customer Service Centre:
www.service.braun.com.
Bel 0 800 44 55 388 voor een Braun Customer
Service Centre bij u in de buurt.
30
Page 30

Dansk
Vores produkter er skabt til at opfylde de største
krav med hensyn til kvalitet, funktionalitet og design.
Vi håber, at du vil få stor glæde af dit nye apparat fra
Braun.
Læs hele brugervejledningen omhyggeligt, før
apparatet tages i brug.
NB!
•
Der er stor risiko for skader, hvis man ved et uheld
•
kommer til at tænde for apparatet. Da dette er et
genopladeligt apparat, er det altid klar til brug (når
det er ladet op).
Må ikke udsættes for direkte sollys.
•
Hvis knivene bliver blokerede, skal man tage
•
motordelen af blenderskaftet, inden man fjerner
maden/blokeringen.
Inden rengøring tages blenderskaftet af motor-
•
delen.
Apparatet er konstrueret til mængder, som
•
normalt indgår i en husholdning.
Apparatet er forsynet med en specialledning med
•
integreret strømforsyning og ekstra lav spænding
for større sikkerhed. Ingen af dens dele må
udskiftes eller manipuleres. I modsat fald risikerer
man at få elektrisk stød.
Brug kun apparatet med opladerenheden.
•
Opladerenheden kan være forbundet til strøm
•
permanent.
Beskyt motordelen, opladerenheden og special-
•
ledningen mod fugt. Motordelen og strømforsyningen fra specialledningen må ikke anvendes,
efter de har været i vand.
Apparatet er ikke beregnet til, at børn eller
•
personer med nedsat fysiske eller mentale evner
kan bruge det, medmindre de overvåges af en
person, som er ansvarlig for deres sikkerhed.
Generelt anbefaler vi, at apparatet opbevares
utilgængeligt for børn. Børn skal være under
opsyn for at sikre, at de ikke leger med apparatet.
Inden brug skal man sikre sig, at opladerenheden
•
og specialledningen ikke er beskadiget. Brauns
elektriske apparater overholder gældende sikkerhedsforskrifter.
Reparationer eller udskiftning af el-ledning må kun
•
udføres af autoriseret personale.
Fejlbehæftede, ukvalificerede reparationer kan
•
medføre stor risiko for brugeren.
Knivene er meget skarpe! Håndter knivene
meget forsigtigt for at undgå skader.
6 Blenderskaft
7 Bæger
8 Opladerenhed (inkl. ledningsopbevaring)
9 Specialledning
10 Hakketilbehør
(a) Låg
(b) Kniv
(c) Hakkeskål
(d) Skridsikkert underlag/låg
(e) Iskniv
(f) Isknuser-indsats
Opladning
Opladning foregår bedst ved en temperatur mellem
15 °C og 35 °C.
Sørg for, at opladerenheden (8) er placeret på en
plan overflade. Tilslut opladerenheden til stikkontakten med specialledningen.
Ved opladning placeres hele stavblenderen i opladerenheden (8) – kan også ske med motordelen alene.
Den grønne kontrollampe bekræfter, at apparatet er
placeret korrekt i opladerenheden, og at opladning
er i gang.
Fuld opladning: ca. 2 timer
•
Fuld opladning: Kontrollampen blinker med
•
længere intervaller
Driftstiden er ca. 20 minutter (afhængig af brug)
•
Efter brug placeres apparatet i opladerenheden igen
for genopladning. Det sikrer, at apparatet altid er
klar til brug med optimal opladning. Du kan også
opbevare apparatet på opladerenheden. Selvom
apparatet ikke bliver brugt i lang tid, opretholder de
implementerede ion-batterier i stor udstrækning
deres opladning.
Batterierne er beskyttet mod lav batterispænding.
Et helt afladet apparat skal oplades i mindst ca.
15 minutter, inden det kan anvendes til en opgave
(f.eks. suppe).
Kontrollampe
Beskrivelse
1 Kontrollampe
2 Udløsningsknap
3 Tænd-/slukknap
4 Motordel
5 Trykknapper til udløsning af tilbehør
Apparat i
opladerenhed
(tilsluttet stikkontakt)
Grønt blink Batteriet lader op
Grønt blink
(i længere intervaller)
Opladnings- eller
driftsforhold
Batteriet er fuldt opladet
31
Page 31

Udløserknap (2)
trykket ned
Grøn Batteriet er fuldt opladet
Rødt/grønt blink Opladning ikke tilstrækkelig
Rødt Batteriet er afladet
Rødt Beskyttelse mod
Opladnings- eller
driftsforhold
til brug mindst én gang
overophedning aktiv
(se Sikkerhedsfunktioner A
Beskyttelse mod
overophedning)
Sikkerhedsfunktioner
Tænd for apparatet/kontaktlås
Apparatet er forsynet med en kontaktlås.
Gør følgende for at tænde for den:
1 Tryk først på udløserknappen (2) med tommel-
fingeren og hold den nede.
2 Tryk derefter på Tænd-/slukknappen (3). Under
brug kan du slippe udløserknappen.
Hvis Tænd-/slukklappen ikke trykkes ned inden
•
for 5 sekunder, kan man ikke tænde for apparatet. Kontrollampen slukker.
For at tænde for apparatet skal man starte
•
forfra med trin 1.
Beskyttelse mod overophedning
Når beskyttelsen mod overophedning er aktiveret,
slukker apparatet, og kontrollampen lyser permanent
rødt.
Automatisk slukning
Af sikkerhedsmæssige årsager slukker apparatet
automatisk efter 4 minutters permanent brug. Det er
muligt at tænde apparatet igen med det samme.
Brug af din stavblender
Stavblenderen er perfekt til at tilberede dips, saucer,
supper, mayonnaise, babymad samt til at blande
drinks og milkshakes.
a) Fjern knivbeskyttelsen i bunden af blenderskaftet
ved at fjerne tapen. Sæt motordelen (4) fast på
blenderskaftet (6), indtil den låser.
b) Sæt stavblenderen lodret ned i beholderen, hold
udløserknappen (2) nedtrykket, tryk derefter på
Tænd-/slukknappen (3).
c) Tryk på trykknapperne (5) for at tage blender-
skaftet af motordelen.
Når stavblenderen anvendes i varm væske, må
blenderskaftet ikke føres ned i eller fjernes fra
væsken, mens apparatet er tændt.
Eksempler på opskrifter:
Mayonnaise
2-2,5 dl olie
1 æg (blomme og hvide)
1 spsk. citronsaft eller vineddike, salt og peber
Fyld alle ingredienser i målebægeret i den orden,
de står opført ovenfor. Sæt stavblenderen helt ned
i bunden af målebægeret. Tænd for blenderen, og
hold den i denne stilling, til olien tykner. Uden at
slukke bevæges blenderen langsomt op og ned, til
mayonnaisen er ensartet.
Årsag Fejlfinding
Kniven er blokeret 1. Fjern motordelen
2. Fjern mad/blokering
3. Placer motordelen i
opladerenheden
(tilsluttet stikkontakten)
i mindst 1 sekund
4. Fortsæt arbejdet
Apparatet er
overophedet
32
Følg punkt 1-4.
Hvis kontrollampen stadig
lyser rødt, når der tændes
for apparatet, placeres
motordelen i opladerenheden igen, så den kan
køle ned i ca. 1 time.
I denne periode lyser
kontrollampen grønt.
Brug af hakketilbehøret
Hakkeren er meget velegnet til at hakke kød, ost,
løg, krydderurter, hvidløg, gulerødder, valnødder,
mandler, hasselnødder, etc.
N.B.: Hak ikke ekstremt hårde madvarer som
muskatnød, kaffebønner og korn.
Før du hakker …
Skær kød, løg, hvidløg, gulerødder og chili i
•
mindre stykker (se brugervejledningen)
Fjern stilke fra krydderurter, knæk nødder og fjern
•
skallerne
Fjern ben, sener og brusk fra kød.
•
Page 32

Brug af hakkeren
(se billede afsnit A)
1. Fjern forsigtigt plastdækslet fra kniven (10b).
Advarsel: kniven er meget skarp! Hold altid i den
øverste plastikdel.
Pres kniven fast på hakkekandens centrale pind
(10c), til det låser fast. Placer altid hakkekanden
på det skridsikre underlag (10d).
2. Placer maden i hakkekanden.
3. Sæt overdelen (10a) på hakkekanden.
4. Sæt motordelen fast på overdelen, indtil den låser
fast.
5. Hold udløserknappen (2) trykket ned og tryk på
Tænd-/slukknappen (3) for at bruge hakkeren.
Hold motordelen med den ene hånd og hakkekanden med den anden, mens der hakkes. Ved
hakning af hårde madvarer trykkes motordelen
ned.
6. Tryk på knapperne efter brug for at løsne
motordelen.
7. Derefter fjernes overdelen.
8. Tag forsigtigt kniven ud.
9. Hæld de hakkede madvarer ud af hakkekanden.
Det skridsikre underlag fungerer også som et
lufttæt låg til hakkekanden.
Milkshakes, drinks, pureer
Hvis der skal bruges meget finthakkede ting til
pureer, kan stavblenderen også anvendes i kanden.
Rengøring
Fjern motordelen inden rengøring. Undgå at komme
motordelen (4) og opladerenheden (8) i vand eller
holde dem under rindende vand. Disse dele kan kun
rengøres med en fugtig klud.
Hakkerens overdel (10a) tåler ikke opvaskemaskine.
Alle andre dele tåler opvaskemaskine. Hvis der
hakkes stærkt farvede fødevarer (fx gulerødder), kan
apparatets plastikdele blive misfarvede. Gnid disse
dele med vegetabilsk olie, inden de rengøres.
Elektriske specifikationer findes på specialledningen.
Specialledningen tilpasses automatisk alle vekselstrømspændinger.
Der tages forbehold for ændringer uden
forudgående varsel.
Dette apparat indeholder genopladelige
Li-Ion-batterier. Apparatet bør efter endt
levetid ikke kasseres sammen med
husholdningsaffaldet. Bortskaffelse kan ske
på et Braun Servicecenter eller egnede, lokale
opsamlingssteder.
Let dej (pandekagedej)
Hæld først de flydende ingredienser i kanden, tilsæt
derefter mel og til sidst æg.
Knust is
(se billede afsnit B)
1. Plader isknuser-indsatsen (10f) i kanden. Sørg for,
at den sidder rigtigt.
2. Placer isknivens skaft (10e) hullet i centrum af
isknuser-indsatsen og tryk ned.
3. Hæld isterninger i isknuser-indsatsen.
4. Placer overdelen på kanden.
5. Sæt motordelen fast på overdelen, indtil den låser
fast.
6. Hold udløserknappen (2) trykket ned og tryk på
Tænd-/slukknappen (3) for at bruge hakkeren.
Tryk på knapperne efter brug for at løsne motordelen. Fjern derefter overdelen, iskniven og
isknuser-indsatsen.
7. Fjern den knuste is, eller hæld din drink ned i
kanden til servering.
Alternativ: Blend først frugt i kanden med hakke-
kniven (10b), fyldes op til maksimum 0,5 liter.
Fjern kniven, og placer isknuser-indsatsen i
kanden for at knuse isen direkte i den blendede
frugt.
Garanti
Braun yder 2 års garanti på dette produkt gældende
fra købsdatoen. Inden for garantiperioden vil
Braun for egen regning afhjælpe fabrikations- og
materialefejl efter vort skøn gennem reparation eller
ombytning af apparatet. Denne garanti gælder i alle
lande, hvor Braun er repræsenteret.
Denne garanti dækker ikke skader opstået ved
fejlbetjening, normalt slid eller fejl som har ringe
effekt på værdien eller funktionsdygtigheden af
apparatet. Garantien bortfalder ved reparationer
udført af andre end de af Braun anviste reparatører
og hvor originale Braun reservedele ikke er anvendt.
Ved service inden for garantiperioden afleveres eller
indsendes hele apparatet sammen med købsbevis til
et autoriseret Braun Service Center: www.service.
braun.com.
Ring 7015 0013 for oplysning om nærmeste Braun
Service Center.
33
Page 33

Norsk
Våre produkter er laget for å imøtekomme høyeste
standard når det gjelder kvalitet, funksjonalitet og
design. Vi håper at du blir fornøyd med ditt nye
Braun-produkt.
Les hele brukerveiledningen grundig før du tar
apparatet i bruk.
Advarsel
•
Det er stor risiko for skade hvis apparatet utilsiktet
•
blir slått på. Fordi dette er et oppladbart apparat,
er det alltid klart til bruk (når det er oppladet).
Apparatet må ikke utsettes for direkte sollys.
•
Hvis knivbladene blir blokkert, må motordelen
•
kobles fra blandestaven før fjerning av mat/blokkeringer.
Før rengjøring må blandestaven kobles fra motor-
•
delen.
Dette apparatet er beregnet for å bearbeide mat-
•
mengder for vanlige husholdninger.
Apparatet er utstyrt med et spesialledningssett
•
med en integrert lavspenningsadapter. Du må
aldri bytte ut eller foreta endringer på ledningen.
Gjør du det, risikerer du å få elektrisk støt.
Bruk bare apparatet med den medfølgende
•
ladeenheten.
Ladeenheten kan være permanent tilkoblet
•
strømnettet.
Beskytt motordelen, ladeenheten og spesialled-
•
ningssettet mot fukt. Motordelen og støpselet på
spesialledningssettet må ikke brukes hvis de har
ligget i vann.
Dette produktet bør ikke brukes av barn eller
•
personer med nedsatt fysisk eller mental funksjon,
med mindre de har tilsyn av noen som tar ansvar
for deres sikkerhet. Vi anbefaler generelt at apparatet oppbevares utilgjengelig for barn. Ha alltid
barn under oppsikt for å sikre at de ikke leker med
apparatet.
Før bruk må du kontrollere at ladeenheten og
•
spesialledningssettet ikke er skadet. Elektriske
apparater fra Braun tilfredsstiller gjeldende sikkerhetsstandarder.
Reparasjoner eller bytte av strømledning må kun
•
foretas av autorisert servicepersonell.
Mangelfulle, ukvalifiserte reparasjoner kan utsette
•
brukeren for stor fare.
Knivbladene er svært skarpe! Håndter
knivbladene ytterst forsiktig for å hindre
skader.
7 Blandebeger
8 Ladeenhet (inkl. ledningsoppbevaring)
9 Spesialledningssett
10 Hakketilbehør
(a) Lokk
(b) Kniv
(c) Hakkebeger
(d) Antiskli-underlag/lokk
(e) Ishakker
(f) Ishakkerinnsats
Opplading
Den mest ideelle temperaturen for opplading er
mellom 15 °C og 35 °C.
Sørg for at ladeenheten (8) er plassert på en jevn
overflate. Koble ladeenheten til strømnettet ved hjelp
av spesialledningssettet.
For opplading plasserer du hele stavmikseren i
ladeenheten (8) – du kan også kun lade selve
motordelen.
Det grønne indikatorlyset bekrefter at stavmikseren
er satt riktig på plass i ladeenheten og at den er
under opplading.
Full opplading: ca. 2 timer
•
Fullt oppladet: indikatorlyset blinker med lengre
•
intervaller
Driftstid er ca. 20 minutter (avhengig av bruks-
•
måte)
Plasser stavmikseren på ladeenheten etter bruk for
opplading. Dette sikrer at den alltid er klar til bruk
ved optimale oppladingsforhold. Du kan også
oppbevare stavmikseren på ladeenheten. Selv om
stavmikseren ikke er i bruk over en lengre periode,
vil litium-batteriene i stor grad opprettholde
ladenivået.
Batteriene er beskyttet mot full utladning. Hvis
stavmikseren er helt utladet, må den lades i minst
15 minutter før den kan brukes til bearbeiding av
mat (f.eks. til supper).
Indikatorlampe
Beskrivelse
1 Indikatorlys
2 Strømbryter
3 På-knapp
4 Motordel
5 Knapper for utløsing av tilbehør
6 Blandestav
34
Stavmikseren
er i ladeenheten
(tilkoblet strømnettet)
Grønt blinkende lys Batteriet lades
Grønt blinkende
lys (med lengre
intervaller)
Oppladings- eller
driftstilstand
Batteriet er fullt oppladet
Page 34

Strømbryter (2)
trykket inn
Grønt Batteriet er fullt oppladet
Oppladings- eller
driftstilstand
Automatisk avstenging
Av sikkerhetsgrunner slår stavmikseren seg av etter
4 minutter med permanent bruk, men den kan
umiddelbart slås på igjen.
Rødt/grønt blinkende
lys
Rødt Batteriet er utladet
Rødt Overopphetingsvern
Nok oppladet til å kunne
brukes minst en gang
aktivert (les mer i
Sikkerhetsfunksjoner A
Overopphetingsvern)
Sikkerhetsfunksjoner
Slå på stavmikseren/strømlås
Stavmikseren er utstyrt med et strømlås. Følg disse
punktene for å slå stavmikseren sikkert på:
1 Trykk først på strømbryteren (2) med tommelen og
hold den inne.
2 Trykk deretter på På-knappen (3).
Når stavmikseren er i drift, trenger du ikke å holde
strømbryteren inne.
Hvis På-knappen ikke trykkes inn innen 5 sekun-
•
der, kan stavmikseren ikke slås på. Indikatorlyset
slukkes.
For å kunne slå på stavmikseren, starter du på
•
nytt fra punkt 1.
Overopphetingsvern
Når overopphetingsvernet er aktivert, slukkes
apparatet og indikatorlyset lyser kontinuerlig rødt.
Bruk av stavmikseren
Stavmikseren passer utmerket til tilberedning av
dipper, sauser, supper, majones og babymat så vel
som miksing av drinker og milkshake.
a) Fjern knivbeskyttelsen nederst på blandestaven
ved å ta av tapen. Sett motordelen (4) på blandestaven (6) til den klikker på plass.
b) Plasser stavmikseren vertikalt ned i blandebe-
geret, hold strømbryteren (2) inne og trykk på
På-knappen (3).
c) For å ta blandestaven fra motordelen, trykker du
på utløserknappene (5).
Når du bruker stavmikseren i varme væsker, må
du ikke senke blandestaven i væsken eller fjerne
stavmikseren fra væsken mens apparatet er påslått.
Eksempel på oppskrift:
Majones
200-250 ml olje
1 egg (plomme og hvite)
1 ss sitronsaft eller eddik
salt og pepper etter smak
Hell alle ingrediensene i blandebegeret i ovenfor
nevnte rekkefølge. Hold stavmikseren mot bunnen
av blandebegeret. Slå på apparatet og behold
stavmikseren i denne stillingen til oljen emulgerer.
Deretter beveger du stavmikseren sakte opp og ned
til majonesen er godt blandet.
Årsak Problemløsing
Kniven er blokkert 1. Ta av motordelen
2. Fjern maten/blokkeringen
3. Sett motordelen på
ladeenheten (tilkoblet
strømnettet) i minst
1 sekund
4. Matbearbeidingen kan
fortsette
Apparatet er
overopphetet
Følg punkt 1.-4.
Hvis indikatorlyset fortsatt
blinker rødt når du slår på
stavmikseren, setter du
motordelen tilbake på
ladeenheten og lar den
kjøle ned i ca. 1 time.
I løpet av nedkjølingstiden
vil indikatorlyset blinke
grønt.
Slik bruker du hakketilbehøret
Hakkeren passer perfekt til å hakke kjøtt, ost, løk,
urter, hvitløk, gulrøtter, valnøtter, hasselnøtter,
mandler osv.
NB.: Ikke hakk ekstremt harde ingredienser, som for
eksempel muskatnøtter, kaffebønner og korn.
Før du hakker ...
må du først skjære opp kjøtt, ost, løk, hvitløk,
•
gulrøtter (se tilberedningsguide)
fjerne stilkene fra urter og skallet fra nøtter
•
fjerne ben, brusk og sener fra kjøttet
•
Hakking
(se bilder i del A)
1. Ta forsiktig av plastbeskyttelsen på hakkekniven
(10b). Advarsel: Kniven er meget skarp! Hold alltid
i den øvre plastdelen.
35
Page 35

Press hakkekniven ned på midtstangen i hakke-
begeret (10c) til den låses på plass. Sett alltid
hakkebegeret på antiskli-underlaget (10d).
2. Legg ingrediensene i hakkebegeret.
3. Sett lokket (10a) på hakkebegeret.
4. Press motordelen ned på lokket til den klikker på
plass.
5. Hold inne strømbryteren (2) og trykk på På-knappen (3) for å slå på hakkeren. Hold motordelen
med den ene hånden og hakkebegeret med den
andre. Trykk motordelen ned når du hakker harde
ingredienser.
6. Etter bruk trykker du på utløserknappene for å ta
av motordelen.
7. Ta deretter av lokket.
8. Ta forsiktig ut hakkekniven.
9. Ta den bearbeidede maten ut av hakkebegeret.
Antiskli-underlaget kan benyttes som et lufttett
lokk på hakkebegeret.
Milkshake, drinker og pureer
Når du vil ha ekstra fin puré, kan du også bruke
blandestaven i hakkebegeret.
Lette deiger (pannekakerøre)
Hell først væsken i hakkebegeret, deretter mel og til
slutt eggene.
Knust is
(se bildene i del B)
1. Sett isknuserinnsatsen (10f) i begeret. Sørg for at
den er satt riktig på plass.
2. Sett isknivskaftet (10e) i åpningen på isknuserinnsatsen og trykk ned.
3. Fyll isterninger i isknuserinnsatsen.
4. Sett lokket på begeret.
5. Plasser motordelen på lokket til den klikker på
plass.
6. Hold inne strømbryteren (2) og trykk på På-knappen (3) for å slå på hakkeren. Etter bruk trykker du
på utløserknappene for å ta av motordelen. Ta av
lokket, iskniven og isknuserinnsatsen.
7. Ta ut den knuste isen eller fyll drinken i begeret for
å servere ved bordet.
Alternativt: Bland først frukt i begeret med
hakkekniven (10b), og fyll opp til maks 0,5 liter.
Ta ut kniven og sett isknuserinnsatsen i begeret
for å knuse isen direkte i den moste frukten.
Rengjøring
Ta av motordelen før rengjøring. Senk ikke motordelen (4) og ladeenheten (8) i vann eller ha dem
under rennende vann. Disse delene skal kun
rengjøres med en fuktig klut.
Lokket til hakkeren (10a) kan ikke vaskes i oppvaskmaskin.
Alle de andre delene kan vaskes i oppvaskmaskin.
Ved bearbeiding av mat med mye farge (for eksempel gulrøtter), kan apparatets plastdeler bli misfarget.
Tørk av disse delene med vegetabilsk olje før
rengjøring.
Elektriske spesifikasjoner er angitt på spesialledningssettet. Spesialledningssettet tilpasses
automatisk alle spenningssystemer.
Med forbehold om endringer.
Dette apparatet inneholder oppladbare
litium-ion-batterier. Ikke kast dette produktet
sammen med husholdningsavfall. Det kan
leveres til et Braun servicesenter eller på en
kommunal miljøstasjon.
Garanti
Vi gir 2 års garanti på produktet gjeldende fra
kjøpsdato.
I garantitiden vil vi gratis rette eventuelle
fabrikasjons- eller materialfeil, enten ved reparasjon
eller om vi finner det hensiktsmessig å bytte hele
produktet.
Denne garanti er gyldig i alle land der Braun eller
Brauns distributør selger produktet.
Denne garanti dekker ikke: skader på grunn av feil
bruk, normal slitasje eller skader som har ubetydelig
effekt på produktets verdi og virkemåte. Garantien
bortfaller dersom reparasjoner utføres av ikke
autorisert person eller hvis andre enn originale Braun
reservedeler benyttes.
For service i garantitiden skal hele produktet leveres
eller sendes sammen med kopi av kjøpskvittering til
nærmeste autoriserte Braun Serviceverksted: www.
service.braun.com.
Ring 22 63 00 93 for å bli henvist til nærmeste
autoriserte Braun Serviceverksted.
NB
For varer kjøpt i Norge har kunden garanti i henhold
til NEL’s Leveringsbetingelser.
36
Page 36

Svenska
Våra produkter är utformade för att uppfylla de
högsta standarder vad gäller kvalitet, funktion och
design. Vi hoppas att du kommer att ha mycket
nytta av din nya apparat från Braun.
Läs bruksanvisningen noga och i sin helhet innan
du använder apparaten.
Varning!
•
Hög skaderisk om apparaten slås på av misstag.
•
Eftersom apparaten är laddningsbar kan den
användas när som helst (när den är laddad).
Får ej utsättas för direkt solljus.
•
När bladen är blockerade ska motorenheten
•
avlägsnas från mixerstaven, innan maten/blockeringen avlägsnas.
Avlägsna mixerstaven från motorenheten innan
•
rengöring.
Apparaten är utformad för hantering av normala
•
hushållsmängder.
Den här apparaten har en specialsladd med en
•
inbyggd säker elförsörjning med extra låg spänning. Du ska därför inte byta ut eller ändra någon
del av den. Det finns då en risk för att du utsätts
för elektriska stötar.
Använd endast apparaten med medföljande
•
laddningsenhet.
Laddingsenheten kan vara permanent ansluten till
•
nätspänning.
Skydda motorenheten, laddningsenheten och
•
specialsladden mot fukt. Motorenheten och
nätdelen till specialsladden får ej användas om
de har sänkts ned i vatten.
Produkten är ej avsedd att användas av barn eller
•
personer med nedsatt fysisk eller mental förmåga,
om användningen inte övervakas av en person
som är ansvarig för deras säkerhet.
Vi rekommenderar att apparaten förvaras utom
räckhåll för barn. Barn ska övervakas för att
garantera att de inte leker med apparaten.
Se till att laddningsenheten och specialsladden
•
inte är skadade före användning. Brauns elektriska apparater uppfyller tillämpliga säkerhetsnormer.
Reparationer eller byte av nätsladd får endast
•
utföras av auktoriserad fackman.
Felaktiga och icke fackmannamässigt utförda
•
reparationsarbeten kan innebära avsevärd risk för
personskador för användaren.
Knivbladen är väldigt vassa! Hantera
knivbladen med yttersta försiktighet för att
förhindra skador.
Beskrivning
1 Kontrollampa
2 Frigörningsknapp
3 Startknapp
4 Motorenhet
5 Knappar för att lossa tillbehören
6 Mixerskaft
7 Bägare
8 Laddningsenhet (inkl. sladdförvaring)
9 Specialsladd
10 Hackningstillbehör
(a) Växellock
(b) Knivblad
(c) Hackningsskål
(d) Antiglidbas/lock
(e) Iskniv
(f) Insats för att krossa is
Laddning
Bästa omgivningstemperatur vid laddning är
15–35 °C.
Se till att laddningsenheten (8) är placerad på en
jämn yta. Anslut laddningsenheten till nätspänning
med specialsladden.
Placera hela mixerstaven i laddningsenheten (8) –
enbart motorenheten går också bra.
Den gröna kontrollampan bekräftar att apparaten
sitter korrekt i laddaren och att den laddas.
Fulladdad: ca 2 timmar
•
Fulladdad: kontrollampan blinkar med längre
•
intervaller
Drifttiden är ca 20 minuter (beroende på använd-
•
ningssätt)
Sätt tillbaka apparaten i laddaren för laddning efter
varje användning. Det här gör att den alltid är redo
att användas, om optimala laddningsförhållanden
föreligger. Du kan även förvara apparaten i laddaren.
Även om den inte används under en lång period,
bibehåller litium-jonbatterierna sin laddningsnivå i
stor utsträckning.
Batterierna skyddas mot urladdning. En helt
urladdad apparat ska laddas i minst 15 minuter
innan den kan används med ett tillbehör (t.ex. för
soppor).
Kontrollampa
Apparat i laddare
(ansluten till
nätspänning)
Grön blinkning Batteri laddas
Grön blinkning
(i längre intervaller)
Laddnings- eller
driftförhållanden
Batteriet är fulladdat
37
Page 37

Frigörningsknapp (2)
nedtryckt
Grön Batteriet är fulladdat
Röd/grön blinkning Tillräcklig laddning för
Röd Batteriet är urladdat
Röd Överhettningsskydd
Laddnings- eller
driftförhållanden
minst en användning
aktivt (gå till
Säkerhetsfunktioner A
Överhettningsskydd)
Säkerhetsfunktioner
Sätt på apparaten / Låskontakt
Apparaten har en låsbrytare. Följ dessa punkter för
att sätta på den säkert:
1 Tryck först på frigörningsknappen (2) med tum-
men och håll in denna.
2 Tryck sedan på startknappen (3). Du kan släppa
frigörningsknappen när du använder apparaten.
Om startknappen inte är intryckt inom 5 sekun-
•
der kan apparaten inte sättas på.
Kontrollampan släcks.
Börja om med steg 1 för att starta apparaten på
•
nytt.
Överhettningsskydd
När funktionen överhettningsskydd är aktiv, stängs
apparaten av och kontrollampan lyser rött med ett
stadigt sken.
Använda din handmixer
Mixerstaven är perfekt vid tillredning av dippsåser,
såser, soppor, majonnäs och barnmat samt för att
blanda drinkar och milkshake.
a) Avlägsna knivskyddet längst ned på staxmixern
genom att avlägsna skyddstejpen. För in motorenheten (4) i mixerskaftet (6) tills den spärras i rätt
läge.
b) Placera stavmixern lodrätt i kärlet, håll kontakten
(2) nedtryckt och tryck sedan på startknappen (3).
c) Tryck på knapparna (5) för att avlägsna stavmixern
från motorenheten.
När du använder mixerstaven i het vätska måste du
vara försiktig och tänka på att inte doppa mixerskaftet i den heta vätskan eller lyfta upp det när
mixerstaven är påslagen.
Receptexempel:
Majonnäs
200-250 ml olja,
1 ägg (gula och vita)
1 msk citronsaft eller vinäger, salt och peppar för
smaksättning
Tillsätt alla ingredienser i bägaren i den ordning de
anges i receptet ovan. Placera mixerstaven i bägaren och se till att den nedre delen av mixerstaven
nuddar botten. När mixerstaven är påslagen ska den
hållas i detta läge tills oljan emulgerar. För sedan
mixerstaven – utan att stänga av den – uppåt och
nedåt i bägaren tills majonnäsen har önskad
konsistens.
Orsak Felsökning
Knivbladet är
blockerat
Apparaten är
överhettad
Automatisk avstängning
Av säkerhetsskäl stängs apparaten av efter 4 minuters användning. Apparaten kan slås på direkt igen.
1. Avlägsna motorenheten
2. Avlägsna maten/
blockeringen
3. Placera motorenheten
i laddaren (ansluten till
nätspänning) i minst
1 sekund
4. Bearbetningen kan
fortsätta
Följ punkt 1-4.
Om kontrollampan
fortfarande lyser röd när
apparaten stängs av,
placera motorenheten i
laddaren och låt svalna
i ca 1 timme. Under tiden
blinkar kontrollampan
grönt.
Använd hackningstillbehöret
Hackaren är perfekt för att hacka kött, ost, lök, örter,
vitlök, morötter, valnötter, mandel, plommon osv.
OBS: Hacka inte ingredienser med väldigt hård
konsistens, som muskotnöt, kaffebönor och gryn.
Före hackning …
•
skär kött, ost, lök, vitlök, morot, chilipeppar i
mindre bitar (se guiden)
•
avlägsna stjälkar från kryddörter och skala nötter
•
avlägsna ben, senor och brosk när du ska hacka
kött.
Hackning
(se bildavsnitt A)
1. Avlägsna försiktigt plastskyddet från knivbladet
(10b). Varning! Knivbladet är väldigt vasst! Håll
alltid i den övre plastdelen.
Tryck fast bladet på hackarens mittapp (10c) tills
det låser fast. Ställ alltid hackningsbehållaren på
antiglidplattan (10d).
38
Page 38

2. Lägg den ingrediens som ska hackas i hackningsbehållaren.
3. Sätt fast växellocket (10a) på hackningsbehållaren.
4. Placera motorenheten i växellocket tills den
spärras i rätt läge.
5. Håll frigörningsknappen (2) nedtryckt och tryck
på startknappen (3) för att använda hackaren.
Håll motorenheten med en hand och hackningsbehållaren med en annan under beredning.
Tryck motorenheten nedåt när du hackar hårda
livsmedel.
6. När du är klar trycker du på knapparna för att ta
bort motorenheten.
7. Avlägsna sedan växellocket.
8. Avlägsna kniven försiktigt.
9. Avlägsna den bearbetade maten från
hackningsbehållaren. Antiglidbasen fungerar även
som ett lufttätt lock åt hackningsbehållaren.
Shakes, drycker, puréer
För puréer kan man även använda mixerstaven i
behållaren när man vill ha ett fint resultat.
Smet (pannkakssmet)
Häll först vätskorna i behållaren, tillsätt sedan mjöl
och slutligen ägg.
Krossad is
(se bildavsnitt B)
1. Placera tillbehöret för att krossa is (10f) i behållaren. Kontrollera att det sitter rätt.
2. Placera skaftet med iskniven (10e) i iskrossinsatsens mitt och tryck nedåt.
3. Fyll på isbitar för att krossa is.
4. Sätt fast växellocket på behållaren.
5. För in motordelen i växellocket tills den spärras i
rätt läge.
6. Håll frigörningsknappen (2) nedtryckt och tryck på
startknappen (3) för att använda hackaren. När du
är klar trycker du på knapparna för att avlägsna
motorenheten. Avlägsna sedan växellocket,
iskniven och iskrossinsatsen.
7. Avlägsna den krossade isen eller fyll helt enkelt
dryck i behållaren för servering vid bordet.
Alternativ: Mixa frukt i behållaren med hacknings-
kniven (10b), fyll till max 0,5 liter. Avlägsna kniven
och placera iskrossinsatsen i behållaren för att
krossa is direkt i den pureade frukten.
Övriga delar kan diskas i diskmaskin. Vid tillredning
av ingredienser med färgämnen (t.ex. morötter) kan
apparatens plastdelar missfärgas. Torka av berörda
delar med vegetabilisk olja innan du rengör dem.
För elektriska specifikationer, se texten på specialsladden. Specialsladden anpassas automatiskt till
växelström över hela världen.
Kan ändras utan föregående meddelande.
Den här apparaten innehåller laddningsbara
Li-jon-batterier. Av hänsyn till miljön ber vid
dig att inte slänga den här apparaten i de
vanliga hushållssoporna när den är uttjänt.
Du kan lämna in den uttjänta produkten hos ett
Braun-servicecenter eller till en återvinningsstation.
Garanti
Vi garanterar denna produkt för två år från och med
inköpsdatum. Under garantitiden kommer vi utan
kostnad, att avhjälpa alla brister i apparaten som är
hänförbara till fel i material eller utförande, genom att
antingen reparera eller byta ut hela apparaten efter
eget gottfinnande.
Denna garanti gäller i alla länder där denna apparat
levereras av Braun eller deras auktoriserade
återförsäljare.
Garantin gäller ej: skada på grund av felaktig
användning eller normalt slitage, liksom brister som
har en försumbar inverkan på apparatens värde eller
funktion. Garantin upphör att gälla om reparationer
utförs av icke behörig person eller om Brauns
originaldelar inte används.
För att erhålla service under garantitiden skall den
kompletta apparaten lämnas in tillsammans med
inköpskvittot, till ett auktoriserat Braun verkstad:
www.service.braun.com.
Ring 020-21 33 21 för information om närmaste
Braun verkstad.
Rengöring
Avlägsna motorenheten innan rengöring. Sänk inte
ned motorenheten (4) och laddningsenheten (8)
i vatten och håll dem inte heller under rinnande
vatten. De här delarna bör endast rengöras med en
fuktig trasa.
Hackarens växellock (10a) tål inte diskmaskin.
39
Page 39

Suomi
Tuotteemme on suunniteltu täyttämään korkeimmat
laadun, toimivuuden ja muotoilun vaatimukset.
Toivottavasti saat paljon iloa ja hyötyä uudesta
Braun-laitteestasi.
Lue nämä käyttöohjeet huolellisesti ennen
laitteen käyttöönottoa.
Varoitus
•
Loukkaantumisvaara on suuri laitteen käyn-
•
nistyessä tahattomasti. Tämä ladattava laite on
käyttövalmis milloin tahansa (kun se on ladattu).
Älä säilytä laitetta suorassa auringonvalossa.
•
Mikäli terät tukkeutuvat, irrota moottoriosa
•
sekoitinvarresta ennen raaka-aineen tai tukoksen
poistamista.
Irrota sekoitinvarsi moottoriosasta ennen
•
puhdistusta.
Tämä laite on suunniteltu tavalliseen kotitalous-
•
käyttöön.
Laitteen verkkojohto on varustettu matalajännite-
•
sovittimella. Sähköiskun vaaran välttämiseksi
älä vaihda siihen mitään osia tai tee mitään
muutoksia.
Käytä laitetta ainoastaan sen mukana toimitetun
•
latauslaitteen kanssa.
Latauslaite voi olla kytkettynä koko ajan verk-
•
kovirtaan.
Suojaa moottoriosaa, latauslaitetta ja verkkojohtoa
•
kosteudelta. Moottoriosaa ja verkkojohdon
matalajännitesovitinta ei saa käyttää, mikäli ne on
upotettu veteen.
Tätä laitetta ei ole tarkoitettu lasten eikä fyysisesti
•
tai henkisesti rajoittuneiden henkilöiden käyttöön,
ellei heidän turvallisuudestaan vastaava henkilö
valvo laitteen käyttöä. Suosittelemme ylipäänsä
laitteen pitämistä poissa lasten ulottuvilta.
Lapsia tulisi valvoa ja varmistaa, että he eivät leiki
laitteella.
Varmista ennen käyttöä, että latauslaite ja
•
verkkojohto ovat vahingoittumattomia. Braunsähkölaitteet täyttävät niitä koskevien turvallisuussäädösten määräykset.
Verkkojohto voidaan korjata tai vaihtaa ainoastaan
•
valtuutetussa huoltoliikkeessä.
Puutteellinen valtuuttamaton huoltotyö voi
•
aiheuttaa vakavia vaaratilanteita käyttäjälle.
Terät ovat hyvin teräviä! Käsittele teriä
varoen vammojen ehkäisemiseksi.
6 Sekoitinvarsi
7 Mittakulho
8 Latauslaite (sis. johdon säilytystilan)
9 Verkkojohto
10 Leikkuriosa
(a) Yläosa
(b) Terä
(c) Leikkurikulho
(d) Liukumaton pohja/kansi
(e) Jääterä
(f) Jäämurskainosa
Lataaminen
Ihanteellinen latauslämpötila on 15–35 °C.
Varmista, että latauslaite (8) on tasaisella pinnalla.
Kytke latauslaite verkkojohdolla verkkovirtaan.
Kun haluat ladata laitteen, aseta koko pikasekoitin
latauslaitteeseen (8) (myös pelkästään moottoriosan
asettaminen latauslaitteeseen on mahdollista).
Vihreä merkkivalo vahvistaa, että laite on asetettu
oikein latauslaitteeseen ja laite latautuu.
Täysi lataus: noin kaksi tuntia.
•
Valmis lataus: merkkivalo vilkkuu pidemmin
•
väliajoin.
Toiminta-aika on noin 20 minuuttia (käyttötavan
•
mukaan).
Aseta laite jokaisen käyttökerran jälkeen takaisin
latauslaitteeseen latautumaan. Tällä varmistat,
että laite on aina käyttövalmiina ja optimaalisesti
ladattuna. Voit myös säilyttää laitetta latauslaitteessa. Litiumioniakut säilyttävät lataustasonsa hyvin
pitkälle, vaikka laitetta ei käytettäisi pitkään aikaan.
Akuissa on suojaus ylipurkautumiselta. Jos laitteen
akut ovat tyhjentyneet kokonaan, laitetta tulee ladata
vähintään 15 minuuttia ennen käyttöä (esim. keiton
valmistamista).
Merkkivalo
Laite
latauslaitteessa
(kytketty
verkkovirtaan)
Lataus- tai
toimintaolosuhteet
Laitteen osat
1 Merkkivalo
2 Käynnistyksen vapautuspainike
3 Virtakytkin
4 Moottoriosa
5 Lisäosien vapautuspainikkeet
40
Vihreä vilkkuva valo Akku latautuu
Vihreä vilkkuva valo
(pidemmin väliajoin)
Akku on latautunut täyteen
Page 40

Käynnistyksen
vapautuspainike (2)
painettu alas
Vihreä Akku on latautunut täyteen
Lataus- tai
toimintaolosuhteet
Automaattinen virrankatkaisu
Laite sammuu turvallisuussyistä neljän minuutin
yhtäjaksoisen käytön jälkeen. Laite voidaan käynnistää heti uudestaan.
Punainen/vihreä
vilkkuva valo
Punainen Akku on tyhjä
Punainen Ylikuumenemissuoja
Lataus riittää vähintään
yhteen käyttökertaan
aktiivinen (katso
Turvatoiminnot A
Ylikuumenemissuoja)
Turvatoiminnot
Laitteen käynnistäminen / Käynnistyksen lukitus
Laitteessa on käynnistyksen lukitus. Käynnistä laite
turvallisesti seuraavasti:
1 Paina ensin peukalolla käynnistyksen vapautus-
painiketta (2) ja pidä sitä painettuna.
2 Paina sen jälkeen virtakytkintä (3). Käynnistyksen
vapautuspainiketta ei tarvitse painaa käytön
aikana.
Mikäli virtakytkintä ei paineta viiden sekunnin
•
kuluessa, laitetta ei voi kytkeä päälle.
Merkkivalo sammuu.
Käynnistä laite aloittamalla uudestaan
•
vaiheesta 1.
Ylikuumenemissuoja
Kun ylikuumenemissuoja on aktiivinen, laite sammuu
ja merkkivalo palaa yhtäjaksoisesti punaisena.
Pikasekoittimen käyttö
Pikasekoitin soveltuu erinomaisesti dippien, kastikkeiden, keittojen, majoneesin ja vauvanruokien
valmistukseen sekä juomien ja pirtelöiden
sekoitukseen.
a) Poista sekoitinvarren pohjassa oleva teräsuoja
irrottamalla kiinnitysteippi. Kiinnitä moottoriosa (4)
sekoitinvarteen (6) siten, että se lukkiutuu
paikoilleen.
b) Vie pikasekoitin pystysuorassa astiaan, pidä
käynnistyksen vapautuspainiketta (2) painettuna
ja paina virtakytkintä (3).
c) Irrota sekoitinvarsi moottoriosasta painamalla
vapautuspainikkeita (5).
Jos käytät pikasekoitinta kuumissa nesteissä,
sekoitinvartta ei saa upottaa nesteeseen eikä
poistaa nesteestä laitteen ollessa käynnissä.
Ruokaohje-esimerkki:
Majoneesi
200–250 ml öljyä
1 kananmuna (keltuainen ja valkuainen)
1 rkl sitruunamehua tai viinietikkaa, suolaa ja
pippuria maun mukaan
Lisää kaikki aineet mittakulhoon yllä mainitussa
järjestyksessä. Vie pikasekoitin mittakulhon pohjaan
saakka. Käynnistä pikasekoitin ja pidä sitä tässä
asennossa, kunnes öljy emulgoituu. Liikuta sen
jälkeen pikasekoitinta hitaasti ylös ja alas laitetta
sammuttamatta, kunnes majoneesi on sekoittunut
kunnolla.
Syy Ongelmanratkaisu
Terä on tukossa 1. Irrota moottoriosa.
2. Irrota ruoka/tukos.
3. Aseta moottoriosa
latauslaitteeseen
(joka on kytketty
verkkovirtaan) vähintään
yhdeksi sekunniksi.
4. Jatka laitteen käyttöä.
Laite on
ylikuumentunut
Toimi kohtien 1.–4.
mukaan.
Mikäli merkkivalo palaa
yhä punaisena, kun laite
käynnistetään, aseta
moottoriosa takaisin
latauslaitteeseen ja anna
jäähtyä noin yksi tunti.
Tänä aikana merkkivalo
vilkkuu vihreänä.
Leikkurin käyttö
Leikkuri soveltuu erinomaisesti esimerkiksi lihan,
juuston, sipulin, yrttien, valkosipulin, porkkanoiden,
saksanpähkinöiden, hasselpähkinöiden, manteleiden
ja kuivattujen luumujen hienontamiseen.
Huom.! Älä hienonna erittäin kovia elintarvikkeita,
kuten muskottipähkinää, kahvipapuja tai jyviä.
Ennen hienontamista …
Paloittele liha, juusto, sipuli, valkosipuli, porkkanat
•
ja chilit (katso käyttötaulukko).
Poista yrteistä varret ja kuori pähkinät.
•
Poista lihasta luut, jänteet ja rustot.
•
Hienontaminen
(katso kuvaosio A)
1. Poista varovasti terän (10b) muovisuojus.
Varoitus: terä on erittäin terävä! Pidä aina kiinni
terän muovisesta yläosasta.
41
Page 41

Paina terä leikkurikannun (10c) keskitappiin siten,
että se lukkiutuu. Aseta leikkurikannu aina
liukumattomalle pohjalle (10d).
2. Laita raaka-aineet leikkurikannuun.
3. Aseta yläosa (10a) leikkurikannuun.
4. Kiinnitä moottoriosa yläosaan siten, että se
lukkiutuu paikalleen.
5. Käynnistä leikkuri pitämällä käynnistyksen
vapautuspainiketta (2) painettuna ja paina
virtakytkintä (3). Pidä käytön aikana kiinni toisella
kädellä moottoriosasta ja toisella leikkurikannusta.
Kun hienonnat kovia raaka-aineita, paina moottoriosa alas.
6. Irrota moottoriosa käytön jälkeen painamalla
vapautuspainikkeita.
7. Irrota sen jälkeen yläosa.
8. Ota terä varovasti pois.
9. Ota käsitellyt raaka-aineet leikkurikannusta.
Liukumaton pohja toimii myös leikkurikannun
ilmatiiviinä kantena.
Pirtelöt, juomat, soseet
Jos haluat erittäin hienojakoista sosetta, voit käyttää
myös pikasekoitinta kannussa.
Leikkurin yläosa (10a) ei kestä pesua astianpesukoneessa.
Kaikki muut osat voidaan pestä astianpesukoneessa. Laitteen muoviosat voivat värjääntyä
värillisiä raaka-aineita (esimerkiksi porkkanoita)
käsiteltäessä. Pyyhi nämä osat kasviöljyllä ennen
puhdistamista.
Katso sähkömääräyksiä koskevat tiedot matalajännitesovittimesta. Verkkojohto soveltuu automaattisesti kaikkeen vaihtovirtaan maailmanlaajuisesti.
Tiedot voivat muuttua ilman ennakkoilmoitusta.
Tässä laitteessa on ladattavat litiumioniakut.
Kun laite on tullut elinkaarensa päähän, älä
hävitä sitä kotitalousjätteiden mukana. Hävitä
tuote viemällä se Braun-huoltoliikkeeseen tai
asianmukaiseen keräyspisteeseen.
Ohuet taikinat (ohukaistaikina)
Valmista esimerkiksi ohukaistaikina kaatamalla ensin
neste kannuun ja lisäämällä sen jälkeen jauhot ja
viimeiseksi kananmunat.
Jäämurska
(katso kuvaosio B)
1. Aseta jäämurskainosa (10f) kannuun. Varmista,
että se on kunnolla paikallaan.
2. Aseta jääterän (10e) varsi jäämurskainosan
keskireikään ja paina se alas.
3. Lisää jääkuutiot jäämurskainosaan.
4. Aseta yläosa kannuun.
5. Kiinnitä moottoriosa yläosaan siten, että se
lukkiutuu paikalleen.
6. Käynnistä leikkuri pitämällä käynnistyksen
vapautuspainiketta (2) painettuna ja paina
virtakytkintä (3). Irrota moottoriosa käytön jälkeen
painamalla vapautuspainikkeita. Irrota sen jälkeen
yläosa, jääterä ja jäämurskainosa.
7. Poista jäämurska tai lisää juoma kannuun
tarjottavaksi.
Vaihtoehto: Lisää kannuun enintään 0,5 litraa
hedelmiä ja soseuta ne terällä (10b). Poista terä,
aseta kannuun jäämurskainosa ja murskaa jäät
suoraan soseutettujen hedelmien joukkoon.
Takuu
Tälle tuotteelle myönnämme 2 vuoden takuun
ostopäivästä lukien Suomessa voimassa olevien
alan takuuehtojen TE90 mukaan. Takuuaikana
korvataan veloituksetta kaikki viat, jotka aiheutuvat
materiaaliviasta tai valmistusvirheestä. Korvaus
tapahtuu harkintamme mukaan korjaamalla,
vaihtamalla viallinen osa tai vaihtamalla koko laite
uuteen. Takuu on voimassa kaikkialla maailmassa
sillä edellytyksellä, että laitetta myydään ko. maassa
Braunin tai virallisen maahantuojan toimesta.
Takuun piiriin eivät kuulu seuraavat viat: viat,
jotka johtuvat virheellisestä käytöstä, normaalista
kulumisesta tai viat, jolla on vähäinen merkitys
laitteen arvoon tai toimintaan. Takuun voimassaolo
lakkaa, jos laitetta korjataan muualla kuin
valtuutetussa Braun-huoltoliikkeessä tai jos
laitteessa käytetään muita kuin alkuperäisiä
varaosia.
Yksilöity ostokuitti riittää takuun voimassaolon
osoittamiseksi: www.service.braun.com.
Lisätietoa takuuseen liittyvistä asioista saa
asiakaspalvelukeskuksestamme numerosta
020-377 877.
Laitteen puhdistus
Irrota moottoriosa ennen puhdistusta. Älä upota
moottoriosaa (4), latauslaitetta (8) veteen äläkä pidä
niitä juoksevassa vedessä. Nämä osat voidaan
puhdistaa ainoastaan kostealla liinalla.
42
Page 42

Ελληνικα
Τα προϊόντα μας είναι κατασκευασμένα με τις
υψηλότερες προδιαγραφές ποιότητας, λειτουργικότητας και σχεδιασμού. Ελπίζουμε να απολαύσετε
τη νέα σας συσκευή Braun.
Παρακαλούμε διαβάστε προσεκτικά τις οδηγίες
χρήσης πριν χρησιμοποιήσετε τη συσκευή.
Προσοχή
•
Υπάρχει υψηλός κίνδυνος τραυματισμού εάν
•
θέσετε τη συσκευή σε λειτουργία άσκοπα. Καθώς
αυτή είναι μια επαναφορτιζόμενη συσκευή, είναι
έτοιμη προς χρήση ανά πάσα στιγμή (όταν είναι
φορτισμένη).
Μην εκθέτετε τη συσκευή σε άμεση ηλιακή
•
ακτινοβολία.
Όταν οι λεπίδες είναι μπλοκαρισμένες, αφαιρέ-
•
στε το μοτέρ από τη ράβδο πριν απομακρύνετε
την τροφή/μπλοκάρισμα.
Πριν τον καθαρισμό, αφαιρέστε τη ράβδο από το
•
μοτέρ.
Η συσκευή είναι κατασκευασμένη για να
•
επεξεργάζεται κανονικές ποσότητες τροφών.
Αυτή η συσκευή είναι εφοδιασμένη με ένα ειδικό
•
σετ καλωδίου, το οποίο διαθέτει ενσωματωμένο
μετασχηματιστή πολύ χαμηλής τάσης για περισσότερη ασφάλεια. Για τον λόγο αυτό δεν πρέπει
να αντικαταστήσετε ή τροποποιήσετε οποιοδήποτε μέρος του. Σε αντίθετη περίπτωση υπάρχει
κίνδυνος ηλεκτροπληξίας.
Χρησιμοποιείτε τη συσκευή μόνο με τη βάση
•
φόρτισης που διατίθεται.
Η βάση φόρτισης μπορεί να παραμείνει μόνιμα
•
συνδεδεμένη στην πρίζα.
Προστατεύστε το μοτέρ, τη βάση φόρτισης και
•
το ειδικό σετ καλωδίου από την υγρασία. Το
μοτέρ και το ειδικό σετ καλωδίου δεν πρέπει
πλέον να χρησιμοποιούνται αφού έχουν βυθιστεί
σε νερό.
Αυτή η συσκευή δεν προορίζεται για χρήση από
•
παιδιά ή άτομα με μειωμένες σωματικές ή διανοητικές ικανότητες, εκτός και αν επιτηρούνται
από άτομο υπευθυνο για την ασφάλειά τους.
Γενικά, συνιστούμε να κρατάτε τη συσκευή
μακριά από παιδιά. Τα παιδιά πρέπει να επιτηρούνται για να εξασφαλίζεται ότι δεν παίζουν με
τη συσκευή.
Πριν τη χρήση, βεβαιωθείτε ότι η βάση φόρτισης
•
και το ειδικό σετ καλωδίου δεν έχουν υποστεί
ζημιά. Οι ηλεκτρικές συσκευές Braun συμμορφώνονται με τα ισχύοντα πρότυπα ασφαλείας.
Οι επισκευές ή η αντικατάσταση του καλωδίου
•
ρεύματος πρέπει να πραγματοποιούνται μόνο
από εξουσιοδοτημένο προσωπικό service.
Η λανθασμένη επισκευή από μη εξουσιοδοτη-
•
μένα άτομα μπορεί να οδηγήσει σε σημαντικούς
κινδύνους για τον χρήστη.
Οι λεπίδες είναι πολύ αιχμηρές!
Να χειρίζεστε τις λεπίδες με μεγάλη
προσοχή για την αποφυγή τραυματισμού.
Περιγραφή
1 Ενδεικτική λυχνία
2 Πλήκτρο απελευθέρωσης διακόπτη
3 ∆ιακόπτης λειτουργίας
4 Μοτέρ
5 Πλήκτρα απελευθέρωσης εξαρτημάτων
6 Ράβδος
7 ∆οχείο μέτρησης
8 Βάση φόρτισης (περιλαμβάνει χώρο αποθή-
κευσης καλωδίου)
9 Ειδικό σετ καλωδίου
10 Κόφτης
(a) Κόμπλερ
(b) Λεπίδα
(c) Μπολ κοπής
(d) Αντιολισθητική βάση/καπάκι
(e) Λεπίδα θρυμματισμού πάγου
(f) Ειδικό δοχείο θρυμματισμού πάγου
Φόρτιση
Η ιδανική κλίμακα φόρτισης είναι μεταξύ 15 °C και
35 °C.
Βεβαιωθείτε ότι η βάση φόρτισης (8) είναι τοποθετημένη πάνω σε επίπεδη επιφάνεια. Συνδέστε τη
βάση φόρτισης στην πρίζα μέσω του ειδικού σετ
καλωδίου.
Για τη φόρτιση, τοποθετήστε ολόκληρο το
μπλέντερ χειρός στη βάση φόρτισης (8) – είναι
επίσης δυνατόν να τοποθετήσετε μόνο το μοτέρ.
Η πράσινη ενδεικτική λυχνία επιβεβαιώνει ότι η
συσκευή έχει τοποθετηθεί σωστά στη βάση
φόρτισης και ότι φορτίζεται.
Πλήρης φόρτιση: περίπου 2 ώρες
•
Πλήρως φορτισμένο: η ενδεικτική λυχνία
•
αναβοσβήνει με μεγαλύτερα διαστήματα
Ο χρόνος λειτουργίας είναι περίπου 20 λεπτά
•
(ανάλογα με τον τρόπο χρήσης)
Μετά από κάθε χρήση, τοποθετήστε τη συσκευή
στη βάση φόρτισης για να την επαναφορτίσετε.
Με αυτόν τον τρόπο θα εξασφαλίσετε ότι είναι
πάντα έτοιμη για χρήση με άριστες συνθήκες
φόρτισης. Μπορείτε επίσης να αποθηκεύσετε
τη συσκευή πάνω στη βάση φόρτισης. Ακόμα
και αν δεν χρησιμοποιούνται για μεγάλο χρονικό
διάστημα, οι μπαταρίες λιθίου διατηρούν το
επίπεδο φόρτισής τους σε μεγάλο βαθμό.
Οι μπαταρίες προστατεύονται από μεγάλη
αποφόρτιση. Μια πλήρως αποφορτισμένη συσκευή
πρέπει να φορτίζεται για τουλάχιστον 15 λεπτά
πριν χρησιμοποιηθεί για κάποια εφαρμογή (π.χ.
σούπα).
43
Page 43

Ενδεικτική Λυχνία
Αιτία Αντιμετώπιση προβλήματος
Συσκευή στη βάση
φόρτισης
(συνδεδεμένη στο
ρεύμα)
Αναβοσβήνει πράσινο Η μπαταρία φορτίζεται
Αναβοσβήνει πράσινο
(σε μεγαλύτερα
διαστήματα)
Πλήκτρο
απελευθέρωσης (2)
διακόπτη πατημένο
Πράσινο Η μπαταρία είναι πλήρως
Αναβοσβήνει κόκκινο/
πράσινο
Κόκκινο Η μπαταρία είναι
Κόκκινο Ενεργοποιημένη
Συνθήκες φόρτισης ή
λειτουργίας
Η μπαταρία είναι πλήρως
φορτισμένη
Συνθήκες φόρτισης ή
λειτουργίας
φορτισμένη
Φόρτιση επαρκής για
τουλάχιστον μία χρήση
αποφορτισμένη
προστασία από
υπερθέρμανση (ανατρέξτε
στα Χαρακτηριστικά
ασφαλείας A Προστασία
από υπερθέρμανση)
Η λεπίδα είναι
μπλοκαρισμένη
Η συσκευή έχει
υπερθερμανθεί
Αυτόματο Κλείσιμο
Για λόγους ασφαλείας η συσκευή απενεργοποιείται
μετά από 4 λεπτά σταθερής λειτουργίας.
Η συσκευή μπορεί να τεθεί απευθείας ξανά σε
λειτουργία.
1. Αφαιρέστε το μοτέρ
2. Απομακρύνετε την τροφή/
μπλοκάρισμα
3. Τοποθετήστε το μοτέρ στη
βάση φόρτισης (συνδεδεμένη
στην πρίζα) για τουλάχιστον
1 δευτερόλεπτο
4. Μπορείτε να συνεχίσετε την
επεξεργασία τροφών
Ακολουθήστε τα βήματα 1.-4.
Εάν η ενδεικτική λυχνία
εξακολουθεί να είναι κόκκινη
όταν ανάβετε τη συσκευή,
τοποθετήστε το μοτέρ στη
βάση φόρτισης και αφήστε το
να κρυώσει για περίπου 1 ώρα.
Κατά τη διάρκεια αυτή, η
ενδεικτική λυχνία αναβοσβήνει
πράσινο.
Χαρακτηριστικά ασφαλείας
Άναμμα της συσκευής / Κλείδωμα διακόπτη
Η συσκευή διαθέτει ένα κλείδωμα διακόπτη. Για να
τη θέσετε με ασφάλεια σε λειτουργία, ακολουθήστε
τα παρακάτω βήματα:
1 Πρώτα πιέστε και κρατήστε πατημένο το
πλήκτρο απελευθέρωσης διακόπτη (2) με τον
αντίχειρά σας.
2 Στη συνέχεια πιέστε τον διακόπτη λειτουργίας
(3). Κατά τη διάρκεια της λειτουργίας, μπορείτε
να σταματήσετε να πιέζετε το πλήκτρο απελευθέρωσης διακόπτη.
Εάν ο διακόπτης λειτουργίας δεν πιεστεί
•
εντός 5 δευτερολέπτων, η συσκευή δεν
μπορεί να τεθεί σε λειτουργία. Η ενδεικτική
λυχνία σβήνει.
Για να θέσετε τη συσκευή σε λειτουργία,
•
ξεκινήστε πάλι με το βήμα 1.
Προστασία από υπερθέρμανση
Όταν η επιλογή προστασίας από υπερθέρμανση
είναι ενεργοποιημένη, η συσκευή τίθεται εκτός
λειτουργίας και η ενδεικτική λυχνία ανάβει σταθερά
κόκκινη.
Χρήση του μπλέντερ χειρός
Το μπλέντερ χειρός είναι απόλυτα κατάλληλο
για να παρασκευάσετε ντιπ, σάλτσες, σούπες,
μαγιονέζα και παιδικές τροφές καθώς επίσης και
για να αναμείξετε ποτά και μιλκ-σέικ.
a) Βγάλτε το προστατευτικό λεπίδας που βρίσκεται
στον πάτο της ράβδου αφαιρώντας την αυτοκόλλητη ταινία. Εισάγετε το μοτέρ (4) μέσα στη
ράβδο (6) έως ότου ασφαλίσει.
b) Εισάγετε το μπλέντερ χειρός κάθετα μέσα
στο δοχείο, κρατήστε πατημένο το πλήκτρο
απελευθέρωσης διακόπτη (2), στη συνέχεια τον
διακόπτη λειτουργίας (3).
c) Για να αφαιρέσετε τη ράβδο από το μοτέρ, πιέστε
τα πλήκτρα απελευθέρωσης εξαρτημάτων (5).
Όταν χρησιμοποιείτε το μπλέντερ χειρός σε ζεστά
υγρά, μην βυθίζετε τη ράβδο – ή την αφαιρείτε από
το υγρό ενώ η συσκευή βρίσκεται σε λειτουργία.
Παράδειγμα συνταγής:
Μαγιονέζα
200–250 ml λάδι,
1 αυγό (κρόκος και ασπράδι),
1 κουταλιά της σούπας χυμός λεμόνι ή ξύδι, αλάτι
και πιπέρι
44
Page 44

Βάλτε όλα τα υλικά μέσα στο δοχείο. Εισάγετε
το μπλέντερ χειρός στη βάση του δοχείου. Αφού
θέσετε τη συσκευή σε λειτουργία, κρατήστε το
μπλέντερ σε αυτή τη θέση έως ότου το λάδι ομογενοποιηθεί. Στη συνέχεια, χωρίς να θέσετε τη
συσκευή εκτός λειτουργίας, μετακινήστε την αργά
προς τα πάνω και προς τα κάτω έως ότου η μαγιονέζα πήξει.
Σέικ, ποτά, πουρές
Για άριστα αποτελέσματα κατά την παρασκευή
πουρέ, μπορείτε επίσης να χρησιμοποιήσετε τη
ράβδο του μπλέντερ χειρός μέσα στην κανάτα.
Ελαφριά ζύμη (ζύμη για τηγανίτες)
Πρώτα αδειάστε τα υγρά μέσα στην κανάτα, στη
συνέχεια προσθέστε το αλεύρι και τέλος τα αυγά.
Χρήση του κόφτη
Ο κόφτης είναι απόλυτα κατάλληλος για να κόβετε
κρέας, τυρί, κρεμμύδια, λαχανικά, σκόρδο, καρότα,
καρύδια, αμύγδαλα, δαμάσκηνα κλπ.
ΣΗΜΕΙΩΣΗ: Μην κόβετε εξαιρετικά σκληρές
τροφές, όπως μοσχοκάρυδο, κόκκους καφέ και
δημητριακών.
Πριν το κόψιμο ...
•
κόψτε σε κομμάτια το κρέας, το τυρί, τα
κρεμμύδια, το σκόρδο, τα καρότα, τις πιπεριές
(δείτε τον οδηγό επεξεργασίας)
•
αφαιρέστε τα κοτσάνια από τα λαχανικά και τα
τσόφλια από τα καρύδια
•
αφαιρέστε τα κόκαλα, τους τένοντες και τους
χόνδρους από το κρέας.
Κόψιμο
(δείτε την εικόνα στο τμήμα A)
1. Αφαιρέστε προσεκτικά το πλαστικό κάλυμμα από
τη λεπίδα (10b). Προσοχή: η λεπίδα είναι πολύ
αιχμηρή! Να την κρατάτε πάντα από το άνω
πλαστικό τμήμα της.
Πιέστε τη λεπίδα πάνω στον κεντρικό άξονα της
κανάτας κοπής (10c) έως ότου ασφαλίσει.
Τοποθετείτε πάντα την κανάτα κοπής πάνω στην
αντιολισθητική βάση (10d).
2. Βάλτε τα υλικά μέσα στην κανάτα κοπής.
3. Τοποθετήστε το κόμπλερ (10a) πάνω στην
κανάτα κοπής.
4. Εισάγετε το μοτέρ μέσα στο κόμπλερ έως ότου
ασφαλίσει.
5. Κρατήστε πατημένο το πλήκτρο απελευθέρωσης
διακόπτη (2) και πιέστε τον διακόπτη (3) για να
θέσετε σε λειτουργία τον κόφτη. Κατά τη
διάρκεια της επεξεργασίας, κρατήστε το μοτέρ
με το ένα χέρι και την κανάτα κοπής με το άλλο.
Όταν κόβετε σκληρές τροφές, πιέστε προς τα
κάτω το μοτέρ.
6. Μετά τη χρήση, πιέστε τα πλήκτρα για να
αφαιρέσετε το μοτέρ.
7. Στη συνέχεια αφαιρέστε το κόμπλερ.
8. Βγάλτε προσεκτικά τη λεπίδα.
9. Αφαιρέστε την επεξεργασμένη τροφή από την
κανάτα κοπής. Η αντιολισθητική βάση χρησιμεύει
επίσης και ως αεροστεγές καπάκι για την κανάτα
κοπής.
Θρυμματισμός πάγου
(δείτε την εικόνα στο τμήμα B)
1. Τοποθετήστε το ειδικό δοχείο θρυμματισμού
πάγου (10f) μέσα στην κανάτα. Βεβαιωθείτε ότι
έχει τοποθετηθεί σωστά.
2. Τοποθετήστε τη λεπίδα θρυμματισμού πάγου
(10e) μέσα στην κεντρική οπή του ειδικού
δοχείου θρυμματισμού πάγου και πιέστε την
προς τα κάτω.
3. Γεμίστε το δοχείο με παγάκια.
4. Τοποθετήστε το κόμπλερ πάνω στην κανάτα.
5. Εισάγετε το μοτέρ μέσα στο κόμπλερ έως ότου
ασφαλίσει.
6. Κρατήστε πατημένο το πλήκτρο απελευθέρωσης
διακόπτη (2) και πιέστε τον διακόπτη (3) για να
θέσετε σε λειτουργία τον κόφτη. Μετά τη χρήση,
πιέστε τα πλήκτρα για να αφαιρέσετε το μοτέρ.
Στη συνέχεια αφαιρέστε το κόμπλερ, τη λεπίδα
θρυμματισμού πάγου και το ειδικό δοχείο
θρυμματισμού πάγου.
7. Βγάλτε τον θρυμματισμένο πάγο ή απλά
αδειάστε το ποτό σας μέσα στην κανάτα για να
το σερβίρετε στο τραπέζι.
Εναλλακτικά: Πρώτα αναμείξτε φρούτα μέσα
στην κανάτα με τη λεπίδα κοπής (10b), γεμίζοντας την κανάτα το πολύ μέχρι 0.5 λίτρα.
Αφαιρέστε τη λεπίδα και τοποθετήστε το ειδικό
δοχείο θρυμματισμού πάγου μέσα στην κανάτα
για να θρυμματίσετε πάγο απευθείας μέσα στα
πολτοποιημένα φρούτα.
Καθαρισμός
Πριν τον καθαρισμό αφαιρέστε το μοτέρ. Μην
βυθίζετε το μοτέρ (4) και τη βάση φόρτισης (8) σε
νερό και μην τα κρατάτε κάτω από τρεχούμενο
νερό. Αυτά τα τμήματα μπορούν να καθαριστούν
μόνο με ένα νωπό πανί.
Το κόμπλερ του κόφτη (10a) δεν πλένεται στο
πλυντήριο πιάτων.
Όλα τα άλλα τμήματα μπορούν να πλυθούν στο
πλυντήριο πιάτων. Όταν επεξεργάζεστε τροφές
με χρώμα (π.χ. καρότα), τα πλαστικά τμήματα της
συσκευής μπορεί να αποχρωματιστούν. Σκουπίστε
αυτά τα τμήματα με φυτικό λάδι πριν τα καθαρίσετε.
45
Page 45

Για ηλεκτρικές προδιαγραφές, παρακαλούμε
ανατρέξτε στην εκτύπωση που βρίσκεται πάνω
στο ειδικό σετ καλωδίου. Το ειδικό σετ καλωδίου
προσαρμόζεται αυτόματα σε οποιαδήποτε τάση
εναλλασσόμενου ρεύματος AC παγκοσμίως.
Υπόκειται σε αλλαγές χωρίς ειδοποίηση.
Αυτή η συσκευή περιέχει επαναφορτιζόμενες
μπαταρίες λιθίου. Παρακαλούμε μην
απορρίπτετε το προϊόν στα οικιακά
απορρίμματα στο τέλος της χρήσιμης ζωής
του. Η απόρριψη μπορεί να πραγματοποιηθεί σε
κάποιο Εξουσιοδοτημένο Κέντρο Service της
Braun ή σε κατάλληλα σημεία αποκομιδής που
παρέχονται στη χώρα σας.
∂ÁÁ‡ËÛË
¶·Ъ·¯ˆЪФ‡МВ ‰‡Ф ¯ЪfiУИ· ВББ‡ЛЫЛ, ЫЩФ ЪФ˚fiУ,
НВОИУТУЩ·˜ ·fi ЩЛУ ЛМВЪФМЛУ›· ·БФЪ¿˜.
ª¤Ы· ЫЩЛУ ВЪ›Ф‰Ф ВББ‡ЛЫЛ˜ О·П‡ЩФ˘МВ, ¯ˆЪ›˜
¯Ъ¤ˆЫЛ, ФФИ·‰‹ФЩВ ВП¿ЩЩˆМ· ЪФВЪ¯fiМВУФ ·fi
О·О‹ О·Щ·ЫОВ˘‹ ‹ О·О‹˜ ФИfiЩЛЩФ˜ ˘ПИОfi, В›ЩВ
ВИЫОВ˘¿˙ФУЩ·˜ В›ЩВ ·УЩИО·ıИЫЩТУЩ·˜ ФПfiОПЛЪЛ ЩЛ
Ы˘ЫОВ˘‹ Ы‡МхˆУ· МВ ЩЛУ ОЪ›ЫЛ М·˜.
∞˘Щ‹ Л ВББ‡ЛЫЛ ИЫ¯‡ВИ ЫВ fiПВ˜ ЩИ˜ ¯ТЪВ˜ Ф˘
ˆПФ‡УЩ·И Щ· ЪФ˚fiУЩ· Braun.
∏ ВББ‡ЛЫЛ ‰ВУ О·П‡ЩВИ: О·Щ·ЫЩЪФх‹ ·fi О·О‹
¯Ъ‹ЫЛ, х˘ЫИФПФБИО‹ хıФЪ¿ ‹ ВП·ЩЩТМ·Щ· ПfiБˆ
·М¤ПВИ·˜ ЩФ˘ ¯Ъ‹ЫЩЛ. ∏ ВББ‡ЛЫЛ ·О˘ЪТУВЩ·И ·У
¤¯Ф˘У Б›УВИ ВИЫОВ˘¤˜ ·fi МЛ ВНФ˘ЫИФ‰ФЩЛМ¤У·
¿ЩФМ· ‹ ‰ВУ ¤¯Ф˘У ¯ЪЛЫИМФФИЛıВ› БУ‹ЫИ·
·ÓÙ·ÏÏ·ÎÙÈο Braun.
°È· Ó· ÂÈÙ‡¯ÂÙ ۤÚßȘ ̤۷ ÛÙËÓ ÂÚ›Ô‰Ô Ù˘
ÂÁÁ‡ËÛ˘, ·Ú·‰ÒÛÙ ‹ ÛÙ›ÏÙ ÙËÓ Û˘Û΢‹ ÌÂ
ÙËÓ ·fi‰ÂÈÍË ·ÁÔÚ¿˜ Û ¤Ó· ∂ÍÔ˘ÛÈÔ‰ÔÙË̤ÓÔ
∫·Ù¿ÛÙËÌ· ™¤ÚßȘ Ù˘ Braun: www.service.braun.
com.
∫·П¤ЫЩВ ЫЩФ 01–9478700 БИ· У· ПЛЪФхФЪЛıВ›ЩВ
БИ· ЩФ ПЛЫИ¤ЫЩВЪФ ∂НФ˘ЫИФ‰ФЩЛМ¤УФ ∫·Щ¿ЫЩЛМ·
™¤ЪЯИ˜ ЩЛ˜ Braun.
46
 Loading...