

Page 1
Type 5544
Stapled booklet, 105 x 148 mm, 64 pages (incl. 4 pages cover), 1/1 = black
91835113/III-18
www.braun.com
Page 2

Braun Infolines
Deutsch 5
English 10
Français 17
Español 22
Português 27
Italiano 32
Nederlands 37
Dansk 41
Norsk 45
Svenska 49
Suomi 53
Ελληνικά 57
Braun GmbH
Frankfurter Straße 145
61476 Kronberg/Germany
www.braun.com
www.service.braun.com
DE / AT 00 800 27 28 64 63
00 800 BRAUNINFOLINE
CH 08 44 - 88 40 10
UK 0800 783 7010
IE 1 800 509 448
FR 0 800 944 802
(service & appel gratuits)
BE 0 800 14 592
ES 900 814 208
PT 808 20 00 33
IT 800 440 017
NL 0 800-445 53 88
DK 70 15 00 13
NO 22 63 00 93
SE 020 - 21 33 21
FI 020 377 877
GR 210-9478700
HK (852) 2986 9886
(DKSH Consumer Service
Centre)
DE/UK/FR/ES/PT/IT/NL/DK/NO/SE/
FI/GR
Page 3
2a
1c
1a
1b
1
1d
2
1e
3
4
2b* 2c*
2d* 2e*
5
6
7*
1h
7*
2
3
Page 4
4
Page 5
Deutsch
Bitte lesen Sie diese Gebrauchsanweisung vollständig durch, da sie
Sicherheitsinformationen enthält. Bitte bewahren Sie die Gebrauchsanweisung für zukünftige Fragen auf.
Achtung
Das Gerät ist geeignet zur Anwendung in der Dusche
oder Badewanne. Aus Sicherheitsgründen kann
das Gerät nur kabellos angewendet werden.
Dieses Gerät ist mit einem Spezialkabel mit integriertem
Netzteil für Sicherheitskleinspannung ausgestattet. Es dürfen
weder Teile ausgetauscht noch Veränderungen vorgenommen werden, da sonst Stromschlaggefahr besteht.
Verwenden Sie ausschließlich das mitgelieferte Spezialkabel.
Hat das Gerät die Markierung
491 oder 492,
kann jedes Braun Netzteil der Codes 491-XXXX oder 492XXXX verwendet werden.
Verwenden Sie das Gerät nie mit beschädigtem oder
defektem Zubehör wie z. B. Trimmer, Kammaufsätze oder
Spezialkabelset.
Das Gerät darf nicht auseinandergebaut bzw. geöffnet werden!
Dieses Gerät kann von Kindern ab 8 Jahren und von Personen
mit reduzierten physischen, sensorischen oder mentalen
Fähigkeiten oder Mangel an Erfahrung und/oder Wissen
benutzt werden, wenn sie beaufsichtigt oder bezüglich des
sicheren Gebrauchs des Gerätes unterwiesen wurden und
die daraus resultierenden Gefahren verstanden haben.
Kinder dürfen nicht mit dem Gerät spielen. Reinigung und
Benutzerwartung dürfen nicht durch Kinder durchgeführt
werden, es sei denn, sie sind älter als 8 Jahre und beaufsichtigt.
5
Page 6

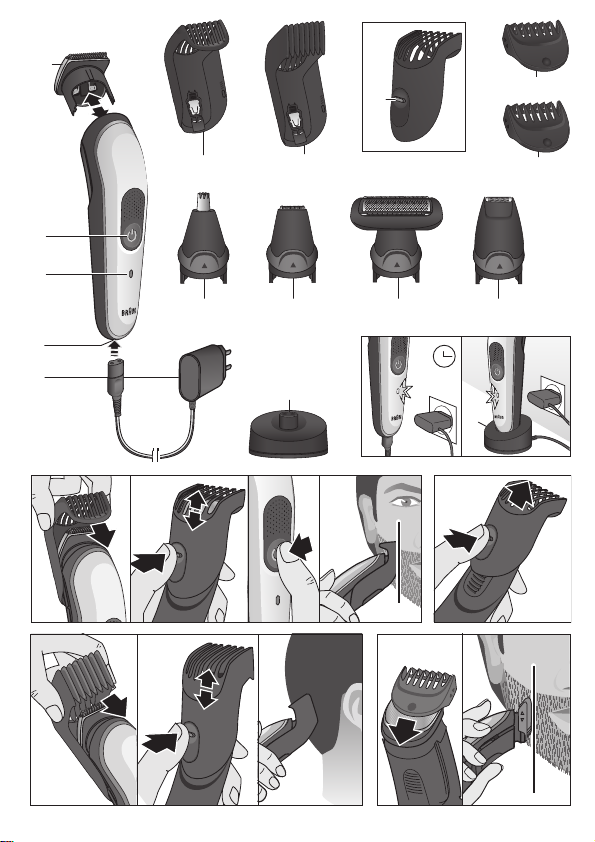
Beschreibung
1a Verstellbarer Bartkammaufsatz (3–11 mm in 2-mm-Schritten)
1b Verstellbarer Haarkammaufsatz (13–21 mm in 2-mm-Schritten)
1c Entriegelungstaste für verstellbare Kammaufsätze
1d Fixierter Kammaufsatz 1 (1 mm)
1e Fixierter Kammaufsatz 2 (2 mm)
2a Trimmerkopf
2b Ohr- und Nasenhaar-Trimmerkopf*
2c Präzisions-Trimmerkopf*
2d Bodygroomer-Kopf*
2e Schmaler Scherkopf*
3 Ein-/Ausschalter
4 Ladeanzeige
5 Steckerbuchse
6 Spezialkabelset (Design kann abweichen)
7 Ladestation/Halterung*
* nicht bei allen Modellen
Für elektrische Angaben, siehe Bedruckung auf dem Spezialkabelset.
Aufladen
Die empfohlene Umgebungstemperatur zum Laden ist 5 °C bis 35 °C.
Bei extrem niedrigen oder hohen Temperaturen kann es sein, dass der Akku
nicht richtig oder gar nicht lädt. Die empfohlene Umgebungstemperatur
zum Trimmen liegt bei 15 °C bis 35 °C. Das Gerät nicht längere Zeit höheren
Temperaturen als 50 °C aussetzen.
• Über das Spezialkabel (6) das ausgeschaltete Gerät am Netz aufladen.
• Eine vollständige Ladung dauert ca. 1 Stunde und bietet dann eine
kabellose Betriebszeit von bis zu 100 Minuten.
• Wenn das Gerät voll geladen ist, durch kabellosen Gebrauch wieder
entladen. Danach wieder voll aufladen.
Ladeanzeige (4)
• Die Ladeanzeige blinkt grün, wenn das Gerät geladen wird.
• Wenn der Akku voll geladen ist, leuchtet die Ladeanzeige für einige
Sekunden durchgehend grün. Während der Nutzung des Geräts leuchtet
die Anzeige ebenso durchgehend grün.
• Die Ladeanzeige leuchtet durchgehend rot, wenn der Akku fast leer ist.
Sobald die Anzeige rot blinkt sollten Sie das Gerät wieder mit dem
Stromnetz verbinden.
6
Page 7

Anwendung
Die Zubehörteile nur aufsetzen oder austauschen, wenn das Gerät ausgeschaltet ist. Drücken Sie den Ein-/Ausschalter (3), um das Gerät ein- bzw.
auszuschalten.
Einschaltsperre
Drücken Sie den Ein-/Ausschalter (3) für 3 Sekunden, um den Rasierer zu
sperren. Zur Bestätigung ertönt ein Piep-Ton. Zum Entsperren drücken Sie
den Ein-/Ausschalter wieder für 3 Sekunden. 3 Piep-Töne ertönen wenn
der Entsperr-Versuch fehlgeschlagen ist. Versuchen Sie es erneut, oder
verbinden Sie das Gerät einfach mit dem Strom.
Bart trimmen / Haare schneiden
Verstellbare Kammaufsätze (1a, 1b): Setzen Sie einen der Kämme auf den
Trimmerkopf (2a) auf. Drücken Sie die Entriegelungstaste (1c) und schieben
Sie den Kammaufsatz auf die gewünschte Länge.
Fixierte Kammaufsätze (1d, 1e): Setzen Sie einen der Kämme auf den
Trimmerkopf (2a) auf.
• Schneiden Sie gegen die Haarwuchsrichtung, indem Sie die flache Seite
des Kammaufsatzes über die Haut führen.
• Führen Sie das Gerät nicht schneller durch das Haar, als es schneiden kann.
• Vermeiden Sie ein Zusetzen des Kammaufsatzes mit Haaren. Entfernen
und Reinigen Sie den Kammaufsatz des Öfteren.
Präzisions- und Konturen-Trimmen
Verwenden Sie den Trimmerkopf (2a) ohne Kammaufsatz, Präzisions-Trimmerkopf (2c) oder schmalen Scherkopf, um Koteletten, Oberlippenbärte
und kurze Teilbärte zu formen.
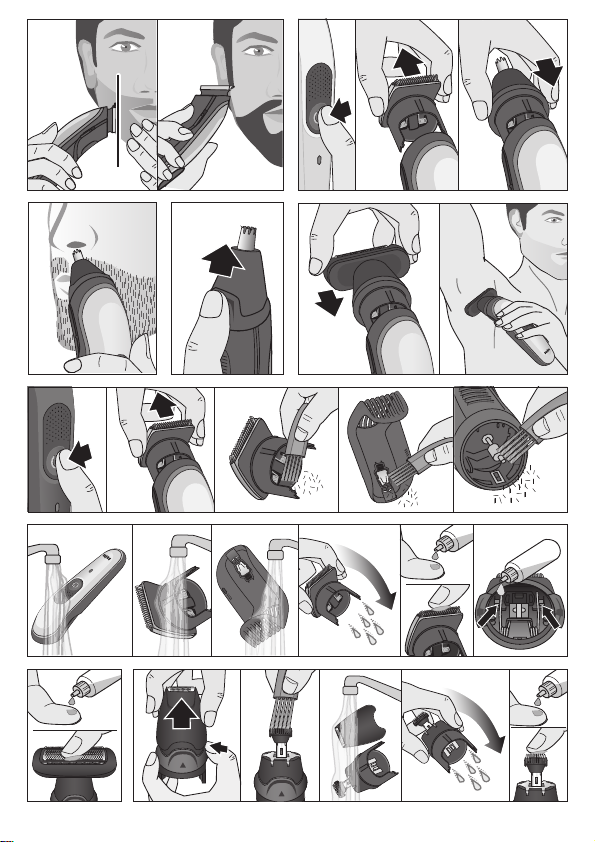
Ohr- und Nasenhaar-Trimmen
• Entfernen Sie jegliche Aufsätze und setzen Sie den Ohr- und NasenhaarTrimmerkopf (2b) auf das Gerät auf.
• Führen Sie das Gerät vorsichtig an die zu entfernenden Haare heran,
sodass sie in die Schneidevorrichtung hineinreichen. Vermeiden Sie, den
Trimmer tiefer als 5 mm (1/4˝) in Nase oder Ohr einzuführen.
Bodygrooming
Entfernen Sie jegliche Aufsätze und setzen Sie den Bodygroomer-Kopf (2d)
auf das Gerät auf. Der Bodygroomer eignet sich zum Rasieren und Trimmen
7
Page 8
von Bein-, Brust- und Achselbehaarung. Wenden Sie den Bodygroomer nur
auf trockener Haut an.
Reinigung und Pflege
• Schalten Sie das Gerät aus.
• Nehmen Sie den Trimmerkopf und den Kammaufsatz ab.
• Benutzen Sie die Bürste zum Reinigen der Trimmerköpfe, der Kammauf-
sätze und des Geräts. Reinigen Sie nicht die Scherfolien mit der Bürste, da
Sie diese beschädigen könnten.
• Der schmale Scherkopf kann für eine gründliche Reinigung auseinandergebaut werden. Falls der Scherfolienrahmen abgezogen wurde, kann er
ganz einfach wieder auf das Gehäuse gesteckt werden.
• Das Gerät, die Trimmerköpfe und die Kammaufsätze können unter fließendem Wasser gereinigt werden. Spülen Sie sie ab, bis alle Rückstände
entfernt sind. Lassen Sie die Teile vor einem erneuten Zusammensetzen
vollständig trocknen.
• Um die Leistung der verschiedenen Aufsätze zu erhalten, verteilen Sie
regelmäßig etwas Leichtmaschinenöl (nicht enthalten) auf dem Schneidsystem der Trimmerköpfe.
Umweltschutz
Das Gerät enthält Akkus und/oder wiederverwertbare Elektrobauteile.
Im Sinne des Umweltschutzes darf dieses Gerät am Ende seiner
Lebensdauer nicht im Hausmüll entsorgt werden, sondern kann bei
entsprechenden lokal verfügbaren Rückgabe- und Sammelstellen
abgegeben werden.
Änderungen vorbehalten.
Garantie
Als Hersteller übernehmen wir für dieses Gerät – nach Wahl des Käufers
zusätzlich zu den gesetz lichen Gewährleistungsansprüchen gegen den
Verkäufer – eine Garantie von 2 Jahren ab Kaufdatum. Innerhalb dieser
Garantiezeit beseitigen wir nach unserer Wahl durch Reparatur oder
Austausch des Gerätes unentgeltlich alle Mängel, die auf Material- oder
Herstellungsfehlern beruhen.
Die Garantie kann in allen Ländern in Anspruch genommen werden, in
denen dieses Braun Gerät von uns autorisiert verkauft wird.
8
Page 9

Von der Garantie sind ausgenommen: Schäden durch unsachgemäßen
Gebrauch, normaler Verschleiß und Verbrauch sowie Mängel, die den Wert
oder die Gebrauchstauglichkeit des Gerätes nur unerheblich beeinflussen.
Bei Eingriffen durch nicht von uns autorisierte Braun Kundendienst partner
sowie bei Verwendung anderer als Original Braun Ersatzteile erlischt die
Garantie.
Im Garantiefall senden Sie das Gerät mit Kauf beleg bitte an einen autorisierten
Braun Kundendienst partner. Die Anschrift finden Sie unter www.service.
braun.com oder können Sie kostenlos unter 00800/27 28 64 63 erfragen.
9
Page 10
English
Read these instructions completely, they contain safety information.
Keep them for future reference.
Warnings
This appliance is suitable for use in a bathtub or
shower. For safety reasons this appliance can
only be operated cordless.
The appliance is provided with a special cord set with
integrated Safety Extra Low Voltage power supply. Do not
exchange or manipulate any part of it. Otherwise there is a
risk of electric shock.
Only use the special cord set provided with your appliance.
If the appliance is marked
491 or 492, you can
use it with any Braun power supply coded 491-XXXX or 492XXXX.
Never use the appliance with any damaged accessory like
trimmers, combs or special cord set.
Do not open the appliance!
This appliance can be used by children aged from 8 years
and above and persons with reduced physical, sensory or
mental capabilities or lack of experience and knowledge if
they have been given supervision or instruction concerning
the safe use of the appliance and understand the hazards
involved. Children shall not play with the appliance. Cleaning
and user maintenance shall not be made by children unless
they are older than 8 years and supervised.
Description
1a Sliding beard comb (3–11 mm in 2 mm steps)
1b Sliding hair comb (13–21 mm in 2 mm steps)
10
Page 11

1c Release button sliding combs
1d Fix comb 1 (1 mm)
1e Fix comb 2 (2 mm)
2a Trimmer head
2b Ear & nose trimmer head*
2c Detailed trimmer head*
2d Body groomer head*
2e Mini foil shaver head*
3 On/off button
4 Charging indicator
5 Power socket
6 Special cord set (design can differ)
7 Charging stand*
* not with all models
For electric specifications, see printing on the special cord set.
Charging
Recommended ambient temperature for charging is 5 °C to 35 °C.
The battery may not charge properly or at all under extreme low or high
temperatures. Recommended ambient temperature for trimming is 15 °C to
35 °C. Do not expose the appliance to temperatures higher than 50 °C for
extended periods of time.
• Connect the appliance (switched off) via the special cord set (6) to an
electrical outlet.
• A full charge takes approx. 1 hour and provides up to 100 minutes of
cordless operation time.
• Once the appliance is completely charged, discharge it through normal
use. Then recharge again to full capacity.
Charging indicator (4)
• The charging indicator blinks green when the appliance is being charged.
• It lights up permanently green for a few seconds when the battery is fully
charged. During usage it shines permanently green.
• The charging indicator shines permanently red when the battery is
running low. Once it flashes red, connect the appliance to the mains.
Usage
Exchange the attachments only when the appliance is switched off. To turn
the appliance on, push the on/off button (3).
11
Page 12

Travel lock
Press the on/off button (3) for 3 seconds to lock the appliance. A beep confirms that the travel lock is activated. To unlock, press the on/off button 3
seconds. 3 beeps will sound when your unlock attempt failed. Try again or
simply connect the appliance to the mains.
Beard Trimming / Hair Clipping
Sliding combs (1a, 1b): Place one of the combs over the trimmer head (2a).
Press the release button (1c) and slide the comb to your desired length.
Fixed combs (1d, 1e): Click one of the combs onto the trimmer head (2a).
• Trim against hair growth by guiding the flat comb part over the skin.
• Do not force the appliance through the hair faster than it can be cut.
• Avoid clogging the comb with hair. Remove and clean it from time to time.
Precision and Contour Trimming
Use the trimmer head (2a) without comb attachment, the detailed trimmer
head (2c) or the mini foil shaver (2e) for shaping sideburns, moustaches
and partial short beards.
Ear/Nose Trimming
• Remove any head and click the ear & nose trimmer head (2b) onto the
handle of the appliance.
• Carefully guide the appliance to the hair to be trimmed so that they reach
into the cutting cage. Avoid introducing the trimmer more than 5 mm (1/4˝)
into nose or ear.
Body grooming
Remove any head and click the body groomer head (2d) onto the handle.
It is designed for shaving and trimming of hair on legs, chest and underarms.
Use it on dry skin only.
Cleaning and maintenance
• Switch off the appliance.
• Take off any head and comb.
• Use the brush to clean the heads, combs and the appliance. Do not clean
the foil of the body groomer head and mini foil shaver head with the brush
as this may damage it.
• The mini foil shaver head can be disassembled for proper cleaning. In
case the foil frame is pulled out, it can just be clicked into the housing
again.
• The handle, the heads and combs can be cleaned under running water.
Rinse until all residues have been removed. Let all parts dry completely
before reassembling them.
12
Page 13

• To keep the attachments working properly, oil the trimmer and the foils
with a drop of light machine oil (not included) regularly.
Environmental notice
Product contains batteries and/or recyclable electric waste.
For environment protection do not dispose of in household waste,
but for recycling take to electric waste collection points provided in
your country.
Subject to change without notice.
Guarantee
We grant a 2 year guarantee on the product commencing on the date of
purchase. Within the guarantee period we will eliminate any defects in the
appliance resulting from faults in materials or workmanship, free of charge
either by repairing or replacing the complete appliance at our discretion.
This guarantee extends to every country where this appliance is supplied by
Braun or its appointed distributor.
This guarantee does not cover: damage due to improper use, normal wear
or use as well as defects that have a negligible effect on the value or operation of the appliance. The guarantee becomes void if repairs are undertaken
by unauthorised persons and if original Braun parts are not used.
To obtain service within the guarantee period, hand in or send the complete
appliance with your sales receipt to an authorised Braun Customer Service
Centre (address information available online at www.service.braun.com).
For UK only:
This guarantee in no way affects your rights under statutory law.
For Australia & New Zealand only:
Warranty
In Australia, our goods come with guarantees that cannot be
excluded under the Australian Consumer Law. You are entitled to a
replacement or refund for a major failure and for compensation for any
other reasonably foreseeable loss or damage. You are also entitled
to have the goods repaired or replaced if the goods fail to be of
acceptable quality and the failure does not amount to a major failure.
The benefits given by this warranty are in addition to other rights and
remedies of the consumer law.
For warranty claims please contact:
Procter & Gamble Australia Pty Ltd
Level 4, 1 Innovation Road
Macquarie Park, NSW 2113
13
Page 14

Telephone (AU): 1 800 641 820
Telephone (NZ): 0 800 108 909
Email (AU and NZ): Visit link
https://pgconsumersupport.secure.force.com/ContactUs/emailus
Our Warranty
This appliance is also covered by a 24 Month Replacement Warranty commencing on the date of purchase (Our Warranty).
Our Warranty applies in all States and Territories of Australia and in
New Zealand and is in addition to any mandatory statutory obligations
imposed on Procter & Gamble Australia Pty. Ltd., its distributors and
its manufacturer. Our Warranty does not purport to exclude, restrict
or modify any such mandatory statutory obligations.
Our Warranty only covers defects in the appliance resulting from faults in
workmanship or materials. Therefore, if your appliance becomes faulty as a
result of faults in workmanship or materials, it will be exchanged by your
retailer, on presentation of proof of purchase.
Our Warranty only applies to domestic or household use of this appliance
and the warranty will only apply if the correct operating instructions included
with this product have been followed. For any appliance replaced under this
warranty, Our Warranty ends on the expiry of the warranty period that
applied to the original appliance.
Our Warranty does not cover:
A. Damage arising from improper use or operation on incorrect voltages.
B. Breakages to shaver foils, glass jars, etc.
C. Normal wear due to moving parts.
D. Repairs undertaken by unauthorised service personnel or use of non
genuine parts.
E. Appliances that are outside the warranty period or are not faulty.
This appliance is not intended for use by young children or infirm persons
without supervision. Young children should be supervised to ensure that
they do not play with the appliance.
If the appliance is powered by a cord extension set or electrical portable
outlet device these should be positioned so they are not subject to splashing or ingress of moisture.
To the extent permitted by the laws of the Commonwealth of Australia
and New Zealand and applicable laws of a State or Territory of Australia,
and without affecting any mandatory statutory obligations imposed by law,
Our Warranty is given in exchange for any other rights you may have
against Procter & Gamble Australia Pty. Ltd. or its distributors or manufacturer, whether at law, in tort (including negligence), in equity or under statute.
14
Page 15
Please retain proof of purchase of this appliance. If you have any questions
in relation to Our Warranty, please call our Consumer Service line (see
below for numbers).
If you intend to make a claim please telephone our Customer Service line
on the numbers set out below to obtain information about your claim and
any costs associated with claiming under Our Warranty. You will bear the
cost of returning your product to us.
Repairs and service
If you are sending your appliance for repair under Our Warranty, please
pack the appliance adequately and send it to your nearest Service Agent, at
your expense. For service or replacement parts refer to the authorised Service Agents listed overleaf. Local Service Agents may change from time to
time – in that event please contact the Consumer Service free call number
below for updated local service agent details.
Australian & New Zealand Service Agents
VICTORIA & TASMANIA
Statewide Services Pty Ltd trading
as J A Appliances
17-19 Hossack Avenue
Coburg North, VIC 3058
Tel. (03) 8371 9100
Fax. (03) 9355 8644
Email: jaappliances@statewideservices.com.au
WESTERN AUSTRALIA
Mark 1 Appliances
Unit 1, 46 Abernethy Road
Belmont, WA 6104
Tel. (08) 9475 0911
Fax. (08) 9475 0922
Email: mark1app@iinet.net.au
QUEENSLAND
Walters Import trading as Brisbane
Appliance Service Centre
449 Beaudesert Road
Moorooka QLD 4105
Tel. (07) 3277 0360
Fax. (07) 3274 2909
Email: basc@waltersimport.com.au
NEW SOUTH WALES & ACT
Faulder Appliance Services Pty Ltd
Shop 4,
9 Evans Road,
Rooty Hill, NSW 2766
Tel. (02) 9625 3064
Fax. (02) 9625 3037
Email: fas16@bigpond.com
15
Page 16

SOUTH AUSTRALIA & NT
Adelaide Service Centre
Shop B2,
Parkholme Shopping Centre
319 Oaklands Road, Parkholme
Adelaide, SA 5043
Tel. (08) 8357 5800
Fax. (08) 8357 5833
Email: ascpkh@adam.com.au
NEW ZEALAND
Key Service Ltd
34A Cryers Road
East Tamaki
Auckland
New Zealand
(PO Box 38569, Howick, Auckland,
New Zealand)
Tel. (09) 916 0960
Fax. (09) 916 0970
Email: admin@keyserviceltd.co.nz
16
Page 17
Français
Lisez attentivement ces instructions car elles contiennent des informations sur la sécurité. Conservez-les pour une consultation ultérieure.
Attention
Cet appareil peut être utilisé dans le bain ou sous la
douche. Pour des raisons de sécurité, l’appareil
ne peut être utilisé que sans fil.
Ce système de rasage est fourni avec un câble spécial, qui
possède une alimentation électrique sécurisée intégrée à très
basse tension. N’échangez ou ne manipulez aucune partie
de votre rasoir. Sous risque de recevoir un choc électrique.
Utilisez uniquement le cordon spécial fourni avec votre
appareil.
Si l’appareil porte la référence
491 ou 492, vous
pouvez l’utiliser avec n’importe quelle alimentation marquée 491-XXXX ou 492-XXXX.
Ne jamais utiliser l’appareil avec un accessoire endommagé,
tel que les lames, les sabots ou le cordon d’alimentation
spécial.
N’ouvrez pas l’appareil !
Cet appareil peut être utilisé par des enfants de 8 ans et
plus et par des personnes dont les capacités physiques,
sensorielles ou mentales sont réduites, ou des personnes
dénuées d’expérience ou de connaissance, si elles ont pu
bénéficier, par l’intermédiaire d’une personne responsable
de leur sécurité, d’une surveillance ou d’instructions préalables concernant l’utilisation de l’appareil en toute sécurité
et les dangers encourus. Les enfants ne doivent pas jouer
avec l’appareil. Le nettoyage et l’entretien ne doivent pas
être faits par des enfants, à moins qu’ils ne soient âgés de
plus de 8 ans et qu’ils ne soient sous surveillance.
17
Page 18

Description
1a Sabot coulissant pour la barbe (de 3 à 11 mm avec pas de 2 mm)
1b Sabot coulissant pour les cheveux (de 13 à 21 mm avec pas de 2 mm)
1c Bouton pour retirer les sabots coulissants
1d Sabot fixe 1 (1 mm)
1e Sabot fixe 2 (2 mm)
2a Tête de tondeuse
2b Tête de tondeuse oreilles et nez*
2c Tête de tondeuse de précision*
2d Tête de tondeuse spéciale corps*
2e Mini-tête de rasoir à grille*
3 Bouton marche/arrêt
4 Témoin de charge
5 Prise d’alimentation
6 Cordon d’alimentation spécial (le style peut varier)
7 Base de recharge*
* cela dépend des modèles
Pour les spécifications électriques, voir la notice sur le cordon spécial.
Chargement
La température ambiante recommandée pour le chargement est comprise
entre 5 et 35 °C. La batterie ne se rechargera pas correctement, voire pas
du tout, à des températures trop basses ou trop élevées. La température
ambiante recommandée pour la tonte est comprise entre 15 et 35 °C.
Ne pas soumettre l’appareil à une température supérieure à 50 °C pendant
une durée prolongée.
• Branchez l’appareil (éteint) directement sur une prise électrique à l’aide
du cordon spécial (6).
• Comptez approximativement 1 heure pour une charge complète et qui
fournit jusqu’à 100 minutes de temps de rasage sans fil.
• Lorsque l’appareil est complètement chargé, utilisez-le normalement
jusqu’à ce que la batterie soit complètement déchargée. Rechargez-le
ensuite jusqu’à pleine capacité.
Témoin de charge (4)
• Le témoin de charge clignote en vert lorsque l’appareil est en charge.
• Le témoin vert reste allumé en vert pendant quelques secondes une fois
la batterie complètement chargée. Pendant l’utilisation, le témoin reste
allumé en vert.
18
Page 19

• Le témoin de charge reste rouge lorsque le niveau de la batterie est faible.
Une fois qu’il clignote en rouge, branchez l’appareil sur secteur.
Utilisation
Échangez les accessoires uniquement lorsque l’appareil est éteint.
Pour allumer l’appareil, appuyez sur le bouton marche/arrêt (3).
Verrou de voyage
Appuyez sur le bouton marche / arrêt (3) pendant 3 secondes pour verrouiller l’appareil. Un bip sonore confirme que le verrou de voyage est activé.
Pour déverrouiller le rasoir, appuyez sur le bouton marche / arrêt pendant 3
secondes. 3 bips sonores retentissent lorsque votre tentative de déverrouillage a échoué. Réessayez ou branchez simplement l’appareil sur secteur.
Rasage de barbe / Coupe de cheveux
Sabots coulissants (1a, 1b) : Placez l’un des sabots sur la tête de la tondeuse (2a). Appuyez sur le bouton de verrouillage (1c) et faites glisser le
sabot jusqu’à la longueur souhaitée.
Sabots fixes (1d, 1e) : Insérez l’un des sabots sur la tête de la tondeuse (2a).
• Rasez dans le sens opposé de la pousse du poil en guidant la partie plate
du sabot le long de la peau.
• Ne passez pas l’appareil en forçant à travers les poils plus vite qu’il ne
peut les couper.
• Évitez d’obstruer le sabot avec des poils. De temps à autre, enlevez-le et
nettoyez-le.
Rasage de précision et des contours
Utilisez la tête de tondeuse (2a) sans sabot, la tête de tondeuse de précision (2c) ou la mini-tête de rasoir à grille (2e) pour définir les pattes, les
moustaches et les barbes courtes taillées.
Tonte du nez et des oreilles
• Enlevez la tête de tondeuse et insérez la tête de tondeuse oreilles et nez
(2b) sur la poignée de l‘appareil.
• Guidez doucement l’appareil vers les poils devant être coupés afin que
ces derniers entrent dans l’embout de coupe. Évitez de faire pénétrer la
tondeuse de plus de 5 mm dans le nez ou les oreilles.
Rasage du corps
Enlevez la tête de tondeuse et insérez la tête de tondeuse spéciale corps
(2b) sur la poignée de l’appareil. Elle est conçue pour raser et tondre les
19
Page 20

poils des jambes, du torse et des aisselles. Utilisez-la sur peau sèche
uniquement.
Nettoyage et entretien
• Éteignez l’appareil.
• Retirez la tête et le sabot, le cas échéant.
• Utilisez la brosse pour nettoyer les têtes, les sabots et l’appareil.
Ne nettoyez pas la grille avec une brosse car cela pourrait l’endommager.
• La mini-tête de rasoir à grille peut être démontée pour la nettoyer
correctement. Si la structure de la grille est détachée, il suffit juste de la
cliquer à nouveau au boîtier.
• La tête de rasage et les sabots peuvent être nettoyés à l’eau courante.
Rincez jusqu’à ce que tous les résidus aient disparu. Laissez complètement
sécher toutes les pièces avant de les réassembler.
• Pour préserver le bon fonctionnement des accessoires, appliquez régulièrement une goutte d’huile de machine légère (non fournie) sur la tondeuse et les grilles.
Note environnementale
Ce produit contient des piles et/ou des déchets électriques
recyclables. Pour la protection de l’environnement, ne pas jeter avec
les ordures ménagères, mais les porter dans les points de recyclage
de déchets électriques disponibles dans votre pays.
Sujet à des modifications sans préavis.
Garantie
Nous accordons une garantie de 2 ans sur ce produit, à partir de la date
d’achat.
Pendant la durée de la garantie, Braun prendra gratuitement à sa charge la
réparation des vices de fabrication ou de matière en se réservant le droit de
décider si certaines pièces doivent être réparées ou si l’appareil lui-même
doit être échangé.
Cette garantie s’étend à tous les pays où cet appareil est commercialisé par
Braun ou son distributeur exclusif.
Cette garantie ne couvre pas : les dommages occasionnés par une utilisation
inadéquate, l’usure normale (par exemple, grille et bloc-couteaux) ainsi
que les défauts d’usures qui ont un effet négligeable sur la valeur ou
l’utilisation de l’appareil. Cette garantie devient caduque si des réparations
20
Page 21

ont été effectuées par des personnes non agréées par Braun et si des
pièces de rechange ne provenant pas de Braun ont été utilisées.
Pour toute réclamation intervenant pendant la période de garantie,
retournez ou rapportez l’appareil ainsi que l’attestation de garantie à votre
revendeur ou à un Centre Service Agréé Braun.
Veuillez vous référer à www.service.braun.com ou appeler le 0 800 944 802
(service consommateurs – service & appel gratuits) pour connaître le Centre
Service Agréé Braun le plus proche de chez vous.
Clause spéciale pour la France
Outre la garantie contractuelle exposée ci-dessus, nos clients bénéficient
de la garantie légale des vices caches prévue aux articles 1641 et suivants
du Code civil.
21
Page 22

Español
Lee estas instrucciones completas, contienen información para tu
seguridad. Guárdalas para futuras consultas.
Precaución
Este aparato es apto para usarlo en la bañera o en
la ducha. Por motivos de seguridad, solo puede
utilizarse sin cable.
El aparato está provisto de un cable de alimentación especial
con fuente de alimentación VSEB (voltaje de seguridad
extra bajo). No intercambies ni manipules ninguna pieza.
De lo contrario, hay riesgo de descarga eléctrica.
Usa el aparato únicamente con el cable de alimentación
especial que se suministra.
Si el aparato incluye la inscripción
491 o 492,
puedes utilizarlo con cualquier cable de alimentación de
Braun con código tipo 491-XXXX o 492-XXXX.
No uses nunca el aparato si algún accesorio está dañado,
como las recortadoras, los peines o el cable de alimentación
especial.
No abrir el aparato.
Este aparato puede ser utilizado por niños a partir de los
8 años y personas con capacidades físicas, sensoriales
o mentales reducidas o con falta de experiencia y conocimiento, si lo hacen bajo supervisión o si se les ha dado
instrucciones adecuadas para el uso seguro del aparato
y entienden los riesgos que implica. Los niños no deben
jugar con el aparato. Los niños no deben realizar la limpieza
ni el mantenimiento del aparato a no ser que sean mayores
de 8 años y lo hagan bajo supervisión.
22
Page 23

Descripción
1a Peine deslizante para barba (3–11 mm en escalones de 2 mm)
1b Peine deslizante para cabello (13–21 mm en escalones de 2 mm)
1c Botón de liberación de los peines deslizantes
1d Peine fijo 1 (1 mm)
1e Peine fijo 2 (2 mm)
2a Cabezal de recortadora
2b Cabezal de recortadora para nariz y orejas*
2c Cabezal de recortadora para perfilar*
2d Cabezal de recortadora para el cuerpo*
2e Minicabezal de afeitado con lámina*
3 Botón de encendido/apagado
4 Indicador de carga
5 Toma de corriente
6 Cable especial (el diseño puede variar)
7 Base cargadora*
* no incluido con todos los modelos
Para ver las especificaciones eléctricas, lee el texto impreso en el cable de
alimentación especial.
Carga
La temperatura ambiente recomendada durante la carga es de 5 °C a 35 °C.
Si la temperatura es demasiado alta o baja, puede que la batería no se cargue
correctamente o no se cargue en absoluto. La temperatura ambiente
recomendada para recortar va de 15 °C a 35 °C. No expongas el aparato
a temperaturas superiores a 50 °C durante largos periodos de tiempo.
• Conecta el aparato (en modo apagado) a una toma de corriente mediante
el cable de alimentación especial (6).
• Una carga completa tarda aproximadamente 1 hora y proporciona hasta
100 minutos de funcionamiento inalámbrico.
• Una vez que el aparato esté totalmente cargado, deja que se descargue
con el uso normal. Luego vuelve a recargarlo hasta su capacidad máxima.
Indicador de carga (4)
• La luz indicadora de carga se vuelve verde y parpadea para indicar que el
aparato se está cargando.
• Cuando la batería está cargada por completo, la luz verde del indicador
se vuelve fija por unos pocos segundos. Durante el uso la luz se mantiene
verde.
23
Page 24

• Cuando el aparato se esté quedando bajo de batería, la luz indicadora se
volverá roja de manera permanente. Una vez esta se vuelva roja, conectar
el aparato a la red eléctrica.
Uso
Cambia los accesorios solo cuando el aparato esté apagado. Para encender el aparato, presiona el botón de encendido/apagado (3).
Bloqueo para viaje
Presionar el botón de encendido/apagado (3) durante 3 segundos para
bloquear el aparato. Un pitido confirmará que el bloqueo para viaje ha sido
activado. Para desbloquear, presionar el botón de encendido/apagado
durante 3 segundos. Si el intento de desbloqueo fallara, el aparato emite
3 pitidos. Inténtalo de nuevo o simplemente conecta el aparato a la red
eléctrica.
Recorte de barba/Corte de pelo
Peines deslizantes (1a, 1b): Coloca uno de los peines en el cabezal de la
recortadora (2a). Presiona el botón de liberación (1c) y desliza el peine
hasta llegar a la longitud deseada.
Peines fijos (1d, 1e): Inserta uno de los peines en el cabezal de la recortadora (2a).
• Recorta en sentido contrario al crecimiento del vello pasando la parte
plana del peine sobre la piel.
• No pases el aparato demasiado rápido por el pelo o no podrá cortarlo
adecuadamente.
• Evita que el peine se atasque con los pelos. Retíralo y límpialo de vez en
cuando.
Recorte preciso y de contornos
Utilizar el cabezal recortador (2a) sin el peine accesorio, el cabezal recortador para perfilar (2c) o la miniafeitadora con lámina (2e) para dar forma a
patillas, bigote y barba parcial corta.
Recorte de vello de nariz y orejas
• Retira cualquier cabezal e inserta el cabezal de recorte para nariz y orejas
(2b) en la parte superior del mango del aparato.
• Pasa el aparato con cuidado por el pelo que deseas recortar, de forma
que este se introduzca en el pequeño cabezal de corte. No introduzcas la
recortadora más de 5 mm (1/4˝) dentro de la nariz o la oreja.
24
Page 25

Depilación corporal
Retira cualquier cabezal e inserta el cabezal de recortadora para el cuerpo
(2d) en el mango. Está diseñado para afeitar y recortar el vello de las piernas,
el pecho y las axilas. Úsalo solo sobre la piel seca.
Limpieza y mantenimiento
• Apaga el aparato.
• Retira todos los cabezales y peines.
• Utiliza el cepillo para limpiar los cabezales, los peines y el aparato.
No limpies la lámina del cabezal con la escobilla, ya que esto podría
dañarla.
• El minicabezal de afeitadora con lámina se puede desmontar para poder
realizar una limpieza adecuada. En caso de que se haya sacado la
estructura de la lámina, se puede simplemente hacer de nuevo clic en la
carcasa.
• El mango, los cabezales y los peines pueden lavarse bajo el grifo. Aclara
hasta eliminar todos los restos. Deja que todas las piezas se sequen
completamente antes de volver a colocarlas.
• Para mantener el buen funcionamiento de los accesorios, lubrique
regularmente la recortadora y las láminas con una gota de aceite
lubricante (no incluido).
Normas de protección del medio ambiente
Este producto contiene una batería o residuos eléctricos
reciclables. Para proteger el medio ambiente, no tires este aparato
junto con los residuos caseros. En su lugar, llévalo a reciclar a algún
punto de recogida de residuos eléctricos de tu ciudad.
Sujeto a modificaciones sin previo aviso.
Garantía
Braun concede a este producto 2 años de garantía a partir de la fecha de
compra.
Dentro del periodo de garantía, subsanaremos, sin cargo alguno, cualquier
defecto del aparato imputable tanto a los materiales como a la fabricación,
ya sea reparando, sustituyendo piezas, o facilitando un aparato nuevo
según nuestro criterio.
La garantía no ampara averías por uso indebido, funcionamiento a distinto
voltaje del indicado, conexión a un enchufe inadecuado, rotura, uso o
25
Page 26

desgaste normal, así como defectos que supongan un impacto
insignificante en el valor o funcionamiento del producto.
La garantía perderá su efecto en caso de que se hayan realizado reparaciones
por personas no autorizadas o no se hayan utilizado recambios originales de
Braun.
La garantía solamente tendrá validez si la fecha de compra es confirmada
mediante la factura o el albarán de compra correspondiente.
Esta garantía tiene validez en todos los países donde este producto sea
distribuido por Braun o por un distribuidor asignado por Braun.
En caso de reclamación bajo esta garantía, diríjase al Servicio de Asistencia
Técnica de Braun más cercano: www.service.braun.com.
Solo para España
Servicio al consumidor: Para localizar a su Servicio Braun más cercano o
en el caso de que tenga Vd. alguna duda referente al funcionamiento de este
producto, le rogamos contacte con el teléfono de este servicio: 900 814 208.
26
Page 27

Português
Leia estas instruções na íntegra, pois contêm informações de
segurança. Guarde-as para referência futura.
Aviso
Este aparelho pode ser utilizado na banheira ou no
duche. Por motivos de segurança, o aparelho só
poderá ser utilizado sem fios.
O aparelho é disponibilizado com um conjunto especial de
cabos, com fonte de alimentação integrada de Extrabaixa
Tensão de Segurança. Não troque nem manipule nenhuma
das suas peças. Se o fizer, há um risco de choque elétrico.
Utilize apenas o conjunto de cabos especial fornecido com
o seu aparelho.
Caso o aparelho esteja marcado com
491 ou
492, pode utilizar qualquer fonte de alimentação Braun
com o código 491-XXXX ou 492-XXXX.
Nunca use o aparelho se algum acessório estiver danificado
(como aparadores, pentes ou conjunto especial de cabos).
Não abra o aparelho.
Este aparelho pode ser utilizado por crianças com idade
igual ou superior a 8 anos e por pessoas com capacidades
físicas, sensoriais ou mentais reduzidas, ou com falta de
experiência e conhecimento, desde que sejam supervisionadas ou lhes tenham sido dadas instruções quanto à
utilização segura do aparelho e que tenham compreendido
os perigos envolvidos. As crianças não devem brincar com
o aparelho. A limpeza e a manutenção do aparelho só são
permitidas a crianças com idade superior a 8 anos e que
estejam sob supervisão.
27
Page 28

Descrição
1a Pente deslizante para barba (3 a 11 mm em pentes com diferença de 2 mm)
1b Pente deslizante para cabelo (13 a 21 mm em pentes com diferença de 2 mm)
1c Botão de desencaixe dos pentes deslizantes
1d Pente fixo 1 (1 mm)
1e Pente fixo 2 (2 mm)
2a Cabeça de aparador
2b Cabeça de aparador para orelhas e nariz*
2c Cabeça de aparador para detalhes*
2d Cabeça de aparador corporal*
2e Minicabeça de barbear com lâmina*
3 Botão ligar/desligar
4 Indicador de carregamento
5 Tomada de alimentação
6 Cabo de alimentação especial (o design pode variar)
7 Base de carregamento*
* não incluído com todos os modelos
Para obter as especificações elétricas, consulte as instruções impressas no
conjunto especial de cabos.
Carregamento
A temperatura ambiente recomendada para carregar é de 5 °C a 35 °C.
A bateria poderá não carregar adequadamente, ou de todo, em condições
de temperaturas extremamente baixas ou altas. A temperatura ambiente
recomendada para aparar é de 15°C a 35°C. Não expor o aparelho a temperaturas superiores a 50°C por períodos prolongados.
• Ligue o aparelho a uma tomada elétrica (desligado), com o conjunto
especial de cabos (6).
• Um carregamento completo demora cerca de 1 hora e proporciona até
100 minutos de autonomia sem fios.
• Quando o aparelho estiver totalmente carregado, descarregue-o através
do uso normal. Depois, recarregue-o até à sua capacidade máxima.
Indicador de carregamento (4)
• A luz indicadora de carga fica verde e pisca para indicar que o dispositivo
está a carregar.
• Quando a bateria está totalmente carregada, a luz indicadora verde fica
fixa por alguns segundos. Durante a utilização, a luz fica verde
permanentemente.
28
Page 29

• Quando a bateria do aparelho está baixa, a luz indicadora ficará vermelha
permanentemente. Uma vez que a luz fique vermelha, conecte o
dispositivo à rede elétrica.
Utilização
Só deve trocar os acessórios com o aparelho desligado. Carregue no botão
ligar/desligar, para ligar o aparelho (3).
Bloqueio para viagem
Pressione o botão ligar/desligar (3) durante 3 segundos para bloquear o
aparelho. Um sinal sonoro confirmará que o bloqueio para viagem foi ativado. Para desbloquear, pressione o botão ligar/desligar durante 3
segundos. Se a tentativa de desbloqueio falhar, o aparelho emitirá 3 sinais
sonoros. Tente novamente ou simplesmente conecte o dispositivo à rede
elétrica.
Aparar barba / Aparar cabelo
Pentes deslizantes (1a, 1b): Encaixe um dos pentes na cabeça de aparador
(2a). Carregue no botão de desencaixe (1c) e deslize o pente até ao comprimento desejado.
Pentes fixos (1d, 1e): Encaixe um dos pentes na cabeça de aparador, até
ouvir um clique (2a).
• Apare no sentido contrário ao do crescimento do pelo deslizando sobre a
pele com a parte plana do pente.
• Não force a velocidade da passagem do aparelho no pelo ou cabelo além
do razoável.
• Evite a acumulação de pelos no pente. Retire-os e limpe-o de vez em quando.
Aparar contornos e precisão
Utilize a cabeça aparadora (2a) sem o pente acessório, a cabeça aparadora
para detalhes (2c) ou a minicabeça de barbear com lâmina (2e), para dar
forma a patilhas, bigodes e barbas parciais curtas.
Aparar orelhas/nariz
• Retire qualquer cabeça e encaixe a cabeça de aparador para orelhas e
nariz (2b), no punho do aparelho, até ouvir um clique.
• Deslize cuidadosamente o aparelho sobre o pelo a aparar para que seja
alcançado pela superfície de corte. Evite introduzir o aparador mais de
5 mm no nariz ou orelhas.
29
Page 30

Aparador corporal
Retire qualquer cabeça e encaixe a cabeça de aparador corporal (2d) no
punho. Foi concebida para a depilação dos pelos das pernas, peito e axilas.
Utilize apenas sobre pele seca.
Limpeza e manutenção
• Desligue o aparelho.
• Retire a cabeça e o pente.
• Utilize a escova para limpar as cabeças, os pentes e o aparelho. Não
limpe a lâmina da cabeça com a escova, pois pode danificá-la.
• Para poder efetuar uma limpeza adequada, pode desmontar a
minicabeça de barbear. Se a estrutura da lâmina foi removida, pode
simplesmente fazer de novo um clique na carcaça.
• O punho, as cabeças e os pentes podem ser lavados com água corrente.
Enxague até remover todos os resíduos. Deixe secar por completo todas
as peças, antes de recolocá-las.
• Para manter o bom funcionamento dos acessórios, lubrifique
frequentemente o aparador e as lâminas com uma gota de óleo
lubrificante (não incluído).
Aviso ambiental
Este produto contém uma bateria e/ou resíduos elétricos recicláveis.
Com o intuito de proteger o ambiente, não elimine o produto juntamente com o lixo doméstico. Entregue-o num dos pontos de recolha
de resíduos elétricos à disposição no seu país.
Sujeito a alterações sem aviso prévio.
Garantia
Os nossos produtos dispõem de uma garantia de 2 anos a partir da data
de compra. Qualquer defeito do aparelho imputável, quer aos materiais,
quer ao fabrico, que torne necessário reparar, substituir peças ou trocar
de aparelho dentro de período de garantia não terá custos adicionais.
A garantia não cobre avarias por utilização indevida, funcionamento a
voltagem diferente da indicada, ligação a uma tomada de corrente elétrica
incorreta, rutura, utilização ou desgaste normal, defeitos com um efeito
insignificante no valor ou no funcionamento do produto.
30
Page 31

A garantia perderá o seu efeito no caso de serem efetuadas reparações por
pessoas não autorizadas ou se não forem utilizados acessórios originais
Braun.
A garantia só é válida se a data de compra for confirmada pela apresentação
da fatura ou documento de compra correspondente.
Esta garantia é válida para todos os países onde este produto seja distribuído
pela Braun ou por um distribuidor Braun autorizado.
No caso de reclamação ao abrigo de garantia, dirija-se ao Serviço de
Assistência Técnica Oficial Braun mais próximo: www.service.braun.com.
Só para Portugal
Apoio ao consumidor: Para localizar o seu Serviço Braun mais próximo,
no caso de surgir alguma dúvida relativamente ao funcionamento deste
produto, contacte-nos por favor pelo telefone 808 20 00 33.
31
Page 32

Italiano
Leggere attentamente queste istruzioni, contengono informazioni di
sicurezza. Conservarle per una consultazione futura.
Attenzione
Questo apparecchio è adatto per un utilizzo nella
vasca da bagno o sotto la doccia. Per ragioni di
sicurezza può essere utilizzato solo senza fili.
L’apparecchio è fornito di uno speciale cavo di alimentazione
dotato di un sistema integrato di sicurezza a basso voltaggio. Non sostituire o manomettere nessuna sua parte. In
caso contrario, sussiste il rischio di scosse elettriche.
Utilizzare solo il cavo speciale fornito con l’apparecchio.
Se l’apparecchio è contrassegnato da 491 o
492, può essere utilizzato con qualsiasi alimentazione codificata Braun 491-XXXX o 492-XXXX.
Non usare l’apparecchio con rifinitori, pettini o cavi speciali
di alimentazione danneggiati.
Non aprire l’apparecchio!
L’apparecchio può essere utilizzato da bambini di almeno
8 anni e da persone con capacità fisiche, sensoriali o mentali
ridotte oppure prive di esperienza e conoscenze, purché
siano supervisionati o purché abbiano ricevuto istruzioni
sull’utilizzo corretto dell’apparecchio e siano a conoscenza
dei rischi derivanti dall’utilizzo. I bambini non devono giocare
con l’apparecchio. La pulizia e la manutenzione dell’apparecchio non devono essere effettuate da bambini di età
inferiore a 8 anni e senza la supervisione di un adulto.
32
Page 33

Descrizione
1a Pettine da barba estraibile (3–11 mm con intervalli di 2 mm)
1b Pettine da barba estraibile (13–21 mm con intervalli di 2 mm)
1c Pulsante di rilascio dei pettini estraibili
1d Pettine fisso 1 (1 mm)
1e Pettine fisso 2 (2 mm)
2a Testina del rifinitore
2b Testina del rifinitore naso e orecchie*
2c Testina del rifinitore di precisione*
2d Testina radente corpo*
2e Mini testina radente a lamina*
3 Interruttore acceso/spento
4 Indicatore di ricarica
5 Presa di corrente
6 Set di cavi speciali (il design può essere diverso)
7 Base di ricarica*
* non con tutti i modelli
Specifiche elettriche: vedere le indicazioni riportate sul cavo speciale.
Ricarica
La temperatura ambiente consigliata per la ricarica è compresa tra 5 °C
e 35 °C. La batteria potrebbe non caricarsi correttamente a temperature molto
basse o molto elevate. La temperatura ambiente consigliata per le rifiniture
è compresa tra 15 °C e 35 °C. Non esporre l’apparecchio a temperature
superiori a 50 °C per periodi di tempo prolungati.
• Collegare l‘apparecchio (spento) tramite il cavo speciale (6) ad una presa
elettrica.
• Una ricarica completa richiede circa 1 ora e consente l‘utilizzo
dell‘apparecchio senza fili per 100 minuti.
• Una volta che l‘apparecchio è completamente carico, scaricarlo con il
normale utilizzo. Quindi effettuare nuovamente un‘altra ricarica completa.
Indicatore di ricarica (4)
• L’indicatore di carica lampeggia in verde quando l’apparecchio è in
carica.
• Quando la batteria è completamente carica, l’indicatore si illumina in
verde per alcuni secondi. Durante l’utilizzo, l’indicatore verde resta illuminato.
33
Page 34

• L’indicatore di carica si illumina in rosso quando la batteria si sta esaurendo. Quando la luce rossa lampeggia, è necessario collegare l’apparecchio alla rete elettrica.
Utilizzo del rifinitore da barba
Cambiare gli accessori solo ad apparecchio spento. Per accendere l’apparecchio, premere l’interruttore acceso/spento.
Rifinitore barba / Taglio capelli
Pettini estraibili (1a, 1b): Posizionare uno dei pettini sulla testina del rifinitore (2a). Premere il pulsante di rilascio (1c) e regolare il pettine sulla lunghezza desiderata.
Pettini fissi (1d, 1e): Attivare uno dei pettini sulla testina del rifinitore (2a).
• Procedere contropelo facendo aderire la parte piatta del pettine sulla pelle.
• Non forzare l‘apparecchio procedendo al taglio troppo rapidamente.
• Evitare di ostruire il pettine con i peli. Rimuovere e pulire regolarmente
dopo ogni utilizzo.
Rifinitore di precisione per contorni
Utilizzare la testina del rifinitore (2a) senza pettine, la testina del rifinitore di
precisione (2c) o la mini testina radente a lamina (2e) per modellare
basette, baffi e barbe corte.
Rifinitore naso e orecchie
• Rimuovere la testina del rifinitore e fissare la testina del rifinitore naso e
orecchie (2b) sul manico dell‘apparecchio.
• Guidare delicatamente l‘apparecchio sulla zona da rifinire facendo in
modo che gli elementi di taglio raggiungano i peli. Evitare di inserire il
rifinitore più di 5 mm (1/4˝) nel naso o nell‘orecchio.
Rasatura corpo
Rimuovere qualsiasi altra testina e fissare la testina radente corpo (2d) sul
manico. L’apparecchio è stato progettato per la rasatura dei peli su gambe,
petto e ascelle. Utilizzare solo su pelle asciutta.
Pulizia e manutenzione
• Spegnere l’apparecchio.
• Smontare la testina e i pettini.
• Utilizzare la spazzolina di pulizia per pulire le testine, i pettini e l’apparecchio.
Non pulire la lamina della testina per non danneggiarla.
• La mini testina radente con lamina può essere smontata per una pulizia
34
Page 35

adeguata. Nel caso in cui la struttura della lamina venga estratta, può
essere semplicemente inserita nuovamente nell’alloggiamento.
• Il manico, le testine e i pettini sono facilmente lavabili sotto l’acqua
corrente. Risciacquare per rimuovere tutti i residui. Lasciare asciugare
completamente prima di riposizionarli.
• Affinché gli accessori funzionino in modo corretto, lubrificare
regolarmente il pettine radente e le lamine con una goccia di olio
lubrificante leggero (non incluso).
INFORMAZIONE AGLI UTILIZZATORI
Questo prodotto contiene batterie e/o rifiuti elettrici riciclabili.
Il simbolo del cassonetto barrato riportato sull’apparecchiatura o
sulla sua confezione indica che il prodotto alla fine della propria vita
utile deve essere raccolto separatamente dagli altri rifiuti. L’utente
dovrà, pertanto, conferire l’apparecchiatura giunta a fine vita agli idonei
centri comunali di raccolta differenziata dei rifiuti elettrotecnici ed elettronici.
In alternativa alla gestione autonoma è possibile consegnare l’apparecchiatura che si desidera smaltire al rivenditore, al momento dell’acquisto di una
nuova apparecchiatura di tipo equivalente. Presso i rivenditori di prodotti
elettronici con superficie di vendita di almeno 400 m2 è inoltre possibile
consegnare gratuitamente, senza obbligo di acquisto, i prodotti elettronici
da smaltire con dimensioni inferiori a 25 cm. L’adeguata raccolta differenziata per l’avvio successivo dell’apparecchiatura dismessa al riciclaggio,
al trattamento e allo smaltimento ambientalmente compatibile contribuisce
ad evitare possibili effetti negativi sull’ambiente e sulla salute e favorisce il
reimpiego e/o riciclo dei materiali di cui è composta l’apparecchiatura.
Documento soggetto a modifiche senza preavviso.
Garanzia
Braun fornisce una garanzia valevole per la durata di 2 anni dalla data di
acquisto.
Nel periodo di garanzia verranno eliminati, gratuitamente, i guasti
dell’apparecchio conseguenti a difetti di fabbrica o di materiali, sia
riparando il prodotto sia sostituendo, se necessario, l’intero apparecchio.
Tale garanzia non copre: i danni derivanti dall’uso improprio del prodotto,
la normale usura (ad esempio di lamina o blocco coltelli) conseguente al
funzionamento dello stesso, i difetti che hanno un effetto trascurabile sul
valore o sul funzionamento dell’apparecchio.
35
Page 36

La garanzia decade se vengono effettuate riparazioni da soggetti non
autorizzati o con parti non originali Braun.
Per accedere al servizio durante il periodo di garanzia, è necessario
consegnare o far pervenire il prodotto integro, insieme allo scontrino di
acquisto, ad un centro di assistenza autorizzato Braun.
Contattare www.service.braun.com o il numero 800 440 017 per avere
informazioni sul Centro di assistenza autorizzato Braun più vicino.
36
Page 37

Nederlands
Lees deze gebruiksaanwijzing volledig, ze bevat veiligheidsinformatie.
Bewaar het voor toekomstig gebruik.
Waarschuwing
Dit apparaat is geschikt voor gebruik in bad of in de
douche. Om veiligheidsredenen kan het alleen
draadloos worden bediend.
Uw scheerapparaat is voorzien van een speciaal snoer
met een geïntegreerd veiligheid laag-voltage aanpassingssysteem. Vervang of verwijder geen enkel onderdeel.
Anders loopt u risico op een elektrische schok.
Gebruik alleen de speciale snoerset dat bij het apparaat is
geleverd.
Indien het apparaat voorzien is van het teken
491
of 492, kunt u het gebruiken met elke Braun-stroomvoorziening met code 491-XXXX of 492-XXXX.
Gebruik het apparaat nooit met beschadigde accessoires
zoals trimmers, opzetstukken of beschadigde speciale
snoerset
Open het apparaat niet!
Dit apparaat is geschikt voor gebruik door kinderen ouder
dan 8 jaar en personen met een fysieke, sensorische of
mentale beperking indien zij het product gebruiken onder
begeleiding of instructies hebben gekregen over het veilig
gebruik van het apparaat en de gevaren inzien. Laat kinderen
niet met het apparaat spelen. Laat kinderen het apparaat
niet schoonmaken of onderhouden, behalve onder toezicht
en als ze 8 jaar of ouder zijn.
37
Page 38

Omschrijving
1a Glijdende kam voor baard (van 3 tot 11 mm in stapjes van 2mm)
1b Glijdende kam voor haar (van 13 tot 21 mm in stapjes van 2mm)
1c Ontgrendelingknop glijdende kammen
1d Vaste kam 1 (1 mm)
1e Vaste kam 2 (2 mm)
2a Trimkop
2b Oor- en neustrimmer*
2c Gedetailleerde trimkop*
2d kop voor lichaamstrimmer*
2e Minischeerkop*
3 Aan-/uitknop
4 Oplaadindicator
5 Snoeringang scheerapparaat
6 Speciaal snoerset (ontwerp kan verschillen)
7 Oplaadstandaard*
* niet bij alle modellen
Voor elektrische specificaties, zie de bedrukking op de speciale snoerset.
Opladen
De aanbevolen omgevingstemperatuur om op te laden is 5 °C tot 35 °C.
Bij extreme lage of hoge temperaturen kan het zijn dat de batterij niet helemaal of helemaal niet oplaadt. De aanbevolen omgevingstemperatuur voor
het scheren is 15 °C tot 35 °C. Stel het scheerapparaat niet voor langere tijd
bloot aan temperaturen hoger dan 50 °C.
• Sluit het apparaat aan op het lichtnet met de speciale snoerset (6).
• Een volledige oplaadbeurt duurt ongeveer 1 uur en is goed voor 100
minuten draadloos scheren.
• Zodra het scheerapparaat volledig is opgeladen, gebruik het dan op de
normale manier tot het leeg is. Laad het dan weer volledig op.
Oplaadindicator (4)
• De oplaadindicator knippert groen wanneer het apparaat wordt
opgeladen.
• Deze licht een paar seconden permanent groen op zodra de batterij
volledig is opgeladen. Tijdens gebruik brandt deze permanent groen.
• De oplaadindicator blijft permanent rood wanneer de batterij bijna leeg is.
Verbind deze met het stopcontact zodra deze rood knippert.
38
Page 39

Gebruik
Bevestig of verwissel de opzetstukken enkel wanneer het apparaat is uitgeschakeld. Druk op de aan-/uitknop (3) om het apparaat aan te zetten.
Reisslot
Houd de aan-/uitknop (3) gedurende 3 seconden ingedrukt om het apparaat te vergrendelen. Een biebgeluid bevestigt dat de reisvergrendeling is
geactiveerd. Houd de aan-/uitknop 3 seconden ingedrukt om te ontgrendelen. Je hoort 3 biebgeluiden als de poging om te ontgrendelen mislukt is.
Probeer het nogmaals of verbind het apparaat met de netspanning.
Baard trimmen / Haar knippen
Glijdende kammen (1a, 1b): Plaats een van de kammen op de trimkop (2a).
Druk op de ontgrendelingknop (1c) en schuif de kam op gewenste lengte.
Vaste kammen (1d, 1e): Plaats een van de kammen op de trimkop (2a).
• Trim tegen de haarrichting in en beweeg het vlakke gedeelte van de kam
over uw huid.
• Beweeg het apparaat niet sneller door het haar dan het kan knippen.
• Vermijd dat de kam komt vol te zitten met haar. Verwijder de haren en
maak de kam regelmatig schoon.
Contour Trimmen en Styling
Gebruik de trimmerkop (2a) zonder kamhulpstuk, de gedetailleerde trimmerkop (2c) of het minischeerapparaat (2e) voor het vormgeven van bakkebaarden, snorren en gedeeltelijk voor korte baarden.
Trimmen van neus/oren
• Verwijder de trimkop en bevestig de oor- en neustrimmer (2b) op de
handgreep van het apparaat.
• Breng het apparaat voorzichtig naar de te trimmen haartjes zodat deze
zich binnen de trimholtes bevinden. Ga met de trimmer niet dieper dan
5mm in de neus of oren.
Lichaamstrimmer
Verwijder de kop en bevestig de kop voor lichaamstrimmer (2d) op de
handgreep. Het is ontworpen voor het scheren en trimmen van been-,
borst- en okselhaar. Alleen op een droge huid gebruiken.
Reiniging en onderhoud
• Schakel het apparaat uit.
• Verwijder de trimkop en kammen.
39
Page 40

• Gebruik het borsteltje om de koppen, de kammen en het apparaat schoon
te maken. Reinig het scheerblad niet met het borstetje, dit kan het
scheerblad beschadigen.
• De minischeerkop kan uit elkaar worden gehaald om deze goed schoon
te kunnen maken. In geval het scheerblad eruit wordt gehaald, kan dit
gewoon weer in de behuizing worden geklikt.
• Handvat hoofd en de kammen kunnen onder stromend water gereinigd
worden. Spoel tot alle resten verwijderd zijn. Laat ze volledig opdrogen
vooraleer terug te bevestigen.
• Smeer de trimmer en het scheerblad regelmatig in met een druppel
naaimachineolie (niet inbegrepen) om de prestaties van de opzetstukken
optimaal te houden.
Mededeling ter bescherming van het milieu
Dit product bevat batterijen en/of recyclebaar elektrisch afval.
Ter bescherming van het milieu mag dit product niet met het gewone
huisvuil worden weggegooid. Verwijdering kan plaatsvinden bij de
bekende verzamelplaatsen in uw regio/land.
Wijzigingen zonder voorafgaande kennisgeving voorbehouden.
Garantie
Op dit produkt verlenen wij een garantie van 2 jaar geldend vanaf datum van
aankoop. Binnen de garantieperiode zullen eventuele fabricagefouten en/of
materiaalfouten gratis door ons worden verholpen, hetzij door reparatie,
vervanging van onderdelen of omruilen van het apparaat.
Deze garantie is van toepassing in elk land waar dit apparaat wordt geleverd
door Braun of een officieel aangestelde vertegenwoordiger van Braun.
Beschadigingen ten gevolge van onoordeelkundig gebruik, normale slijtage
en gebreken die de werking of waarde van het apparaat niet noemenswaardig
beïnvloeden vallen niet onder de garantie. De garantie vervalt bij reparatie
door niet door ons erkende service-afdelingen en/of gebruik van niet
originele Braun onderdelen.
Om gebruik te maken van onze service binnen de garantieperiode, dient u
het complete apparaat met uw aankoopbewijs af te geven of op te sturen
naar een geautoriseerd Braun Customer Service Center: www.service.
braun.com.
Bel 0 800 44 55 388 voor een Braun Customer Service Center bij u in de
buurt.
40
Page 41

Dansk
Læs denne brugervejledning fuldstændigt, da den indeholder
sikkerhedsinformation. Behold den til fremtidig reference.
Advarsel
Dette apparat kan anvendes i badet eller brusebadet.
Af sikkerhedsmæssige grunde må dette apparat
kun anvendes ledningsfrit.
Apparatet er forsynet med en specialledning med integreret
strømforsyning og ekstra lav spænding for større sikkerhed.
Ingen dele må udskiftes eller manipuleres. I modsat fald
risikerer man at få elektrisk stød.
Anvend kun specialkablet, der følger med apparatet.
Hvis apparatet er mærket med
491 eller 492, kan
det bruges med et hvert andet Braun-strømkabel med
koden 491-XXXX eller 492-XXXX.
Brug aldrig apparatet med beskadiget tilbehør som f.eks.
trimmere, kamme eller en specialledning.
Apparatet må ikke åbnes!
Dette apparat kan anvendes af børn fra 8 år og personer
med nedsatte fysiske, sansemæssige eller mentale evner
eller manglende erfaring eller viden, hvis de er under opsyn
og får instruktioner om sikker brug af apparatet og forstår
den involverede fare. Børn må ikke lege med apparatet.
Rengøring og brugervedligeholdelse må ikke udføres af
børn, medmindre de er over 8 år og er under opsyn.
Beskrivelse
1a Glidende skægkam (3–11 mm i trin af 2 mm)
1b Glidende hårkam (13–21 mm i trin af 2 mm)
1c Udløserknap til glidende kamme
1d Fast kam 1 (1 mm)
41
Page 42

1e Fast kam 2 (2 mm)
2a Trimmerhoved
2b Øre- og næsetrimmerhoved*
2c Detaljeret trimmerhoved*
2d Hoved til kropstrimmer*
2e Barberhoved med miniskæreblad*
3 Tænd-/slukknap
4 Opladningsindikator
5 Strømstik
6 Specialledning (designet kan variere)
7 Opladningsholder*
* følger ikke med alle modeller
Elektriske specifikationer findes på specialledningen.
Opladning
Anbefalet temperatur ved opladning er 5 °C til 35 °C. Batteriet oplades
måske ikke ordentligt eller slet ikke ved en ekstremt lav eller høj temperatur.
Anbefalet temperatur ved trimning er 15 °C til 35 °C. Apparatet må ikke
udsættes for temperaturer over 50 °C i længere perioder.
• Apparatet tilsluttes en stikkontakt (slukket) med specialledningen (6).
• En fuld opladning tager ca. 1 time og giver op til 100 minutters ledningsfri
brug.
• Når apparatet er fuldt opladet, aflades det (til det er tomt) ved normal brug.
Derefter genoplades apparatet til fuld kapacitet.
Opladningsindikator (4)
• Opladningsindikatoren blinker grønt, når apparatet er under opladning.
• Den lyser permanent grønt i nogle få sekunder, når batteriet er fuldt
opladet. Under brug lyser den permanent grønt.
• Opladningsindikatoren lyser permanent rødt, når batteriet er ved at være
fladt. Når den blinker rødt, skal apparatet tilsluttes strøm.
Anvendelse
Delene må kun udskiftes, når apparatet er slukket. Skub start/stop-knappen op for at tænde for apparatet (3).
Rejselås
Tryk på tænd-/sluk-knappen (3) i 3 sekunder for at låse apparatet. Et bip
bekræfter, at rejselåsen er aktiveret. Du låser op igen ved at trykke på
42
Page 43

tænd-/sluk-knappen i 3 sekunder. Der høres 3 bip, hvis dit forsøg på at låse
op mislykkes. Prøv igen, eller sæt apparatet i stikkontakten.
Skægtrimning / hårklipning
Glidende kamme (1a, 1b): Placer en af kammene over trimmerhovedet
(2a). Tryk på udløserknappen (1c), og skub kammen ud til den ønskede
hårlængde.
Faste kamme (1d, 1e): Klik en af kammene fast på trimmerhovedet (2a).
• Trim skægget mod hårenes vokseretning ved at føre den flade del af
kammen hen over huden.
• Tving ikke apparatet gennem håret, hurtigere end den kan klippe det.
• Undgå at kammen bliver stoppet med hår. Tag den af og rengør den ind
imellem.
Præsicions- og konturtrimning
Brug trimmerhovedet (2a) uden kammen, med det detaljerede trimmerhoved (2c) eller shaveren med miniskæreblad (2e) til at forme bakkenbarter,
overskæg og kort skæg.
Øre- og næsetrimning
• Tag trimmerhovedet af, og klik øre- og næsetrimmerhovedet (2b) fast på
apparatets håndtag.
• Nærm forsigtigt apparatet til hårene, der skal trimmes, så de når ind
i klippeenheden. Trimmeren må ikke komme mere end 5 mm (1/4˝) ind
i næse eller øre.
Kropspleje
Tag et evt. hoved af, og klik hovedet til kropstrimmeren (2d) fast på apparatets håndtag. Det er designet til barbering og trimning af hår på ben og
brystkasse og under armene. Må kun bruges på tør hud.
Rengøring og vedligeholdelse
• Sluk for apparatet.
• Afmonter evt. hoved og kamme.
• Brug børsten til at rengøre trimmerhoveder, kamme og apparatet.
Skærebladet må ikke rengøres med børsten, da det kan blive ødelagt.
• Shaverhovedet med miniskæreblad kan adskilles og gøres grundigt rent.
Hvis skærebladenes ramme trækkes ud, kan den nemt klikkes på plads
igen.
• Håndtaget, hovedet og kammene kan rengøres under rindende vand.
Skyl, indtil alle rester er væk. Lad alle delene tørre fuldstændig, før de
samles igen.
43
Page 44

• Smør trimmeren og skærebladene med en dråbe maskinolie (medfølger
ikke) regelmæssigt for at bevare optimal funktion for tilbehør.
Miljømæssige oplysninger
Produktet indeholder et batteri og/eller elektriske dele til genbrug.
For at beskytte miljøet må apparatet ikke bortskaffes med husholdningsaffald, men skal afleveres til genbrug af elektriske produkter på
en genbrugsstation i dit land.
Der tages forbehold for ændringer uden forudgående varsel.
Garanti
Braun yder 2 års garanti på dette produkt gældende fra købsdatoen. Inden
for garantiperioden vil Braun for egen regning afhjælpe fabrikations- og
materialefejl efter vort skøn gennem reparation eller ombytning af apparatet.
Denne garanti gælder i alle lande, hvor Braun er repræsenteret.
Denne garanti dækker ikke skader opstået ved fejlbetjening, normalt slid
eller fejl som har ringe effekt på værdien eller funktionsdygtigheden af
apparatet. Garantien bortfalder ved reparationer udført af andre end de af
Braun anviste reparatører og hvor originale Braun reservedele ikke er anvendt.
Ved service inden for garantiperioden afleveres eller indsendes hele
apparatet sammen med købsbevis til et autoriseret Braun Service Center:
www.service.braun.com.
Ring 7015 0013 for oplysning om nærmeste Braun Service Center.
44
Page 45

Norsk
Les hele denne bruksanvisningen. Den inneholder sikkerhetsinformasjon. Oppbevar den for senere bruk.
Advarsel
Dette apparatet kan brukes i badet eller dusjen.
Av sikkerhetsgrunner kan det bare brukes uten
ledning.
Apparatet er utstyrt med et spesialledningssett med integrert
lavspenningsadapter. Du må ikke bytte ut eller endre på noen
deler av apparatet. Gjør du det, risikerer du å få elektrisk støt.
Bruk kun spesialledningen som følger med barbermaskinen.
Hvis apparatet er merket med
491 eller 492, kan
du bruke det med alle strømledninger fra Braun merket
491-XXXX eller 492-XXXX.
Bruk aldri apparatet hvis trimmerne, kammene, spesialledningssettet eller annet tilbehør er skadet.
Apparatet må ikke åpnes!
Dette apparatet kan brukes av barn fra og med 8 år og
personer med reduserte fysiske, sensoriske eller mentale
evner, eller manglende erfaring og kunnskap, hvis de er
under tilsyn eller har fått instruksjon om sikker bruk av
apparatet og forstår farene ved bruk av apparatet. Barn
skal ikke leke med apparatet. Rengjøring og vedlikehold
av apparatet skal ikke foretas av barn med mindre de er
eldre enn 8 år og har tilsyn av en voksen.
Beskrivelse
1a Forlengbar skjeggkam (3–11 mm i 2 mm trinn)
1b Forlengbar hårkam (13–21 mm i 2 mm trinn)
1c Utløserknapp forlengbare kammer
1d Fast kam 1 (1 mm)
45
Page 46

1e Fast kam 2 (2 mm)
2a Trimmerhode
2b Øre-og nesetrimmerhode*
2c Detaljtrimmerhode*
2d Bodygroomerhode*
2e Barberhode med mini-skjæreblad*
3 På/av-knapp
4 Ladeindikator
5 Kontakt
6 Spesialledning (design kan variere)
7 Ladestasjon*
* ikke for alle modeller
Elektriske spesifikasjoner er angitt på spesialledningssettet.
Lading
Anbefalt omgivelsestemperatur for opplading er 5 °C til 35 °C. Ved ekstremt
lave eller høye temperaturer er det mulig at batteriet ikke blir ladet ordentlig
eller i det hele tatt. Anbefalt omgivelsestemperatur for trimming er 15 °C til
35 °C. Apparatet må ikke utsettes for temperaturer over 50 °C i lengre perioder.
• Koble apparatet (avslått) til et strømuttak med spesialledningen (6).
• En full opplading tar cirka 1 time og gir opptil 100 minutters trådløs
driftstid.
• Når apparatet er helt oppladet, bør det lade seg ut gjennom normal bruk.
Deretter lades det opp igjen til det er fulladet.
Ladeindikator (4)
• Indikatorlyset for lading blinker grønt når apparatet lades.
• Det lyser stabilt grønt i noen sekunder når batteriet er fullt oppladet.
Under bruk lyser det stabilt grønt.
• Indikatorlyset for lading lyser stabilt rødt når batteriet er nesten utladet.
Koble apparatet til strømuttaket når lyset blinker rødt.
Bruk
Sett på eller bytt tilbehør kun når apparatet er avslått. For å slå på apparatet, trykk på på-/av-bryteren (3).
Reiselås
Trykk inn på-/av-knappen (3) i 3 sekunder for å låse apparatet. Et lydsignal
bekrefter at reiselåset er aktivert. For å låse opp, trykker du inn på-/
46
Page 47

av-knappen i 3 sekunder. 3 lydsignaler høres hvis du ikke lykkes med å låse
opp apparatet. Prøv på nytt eller koble apparatet til strømnettet.
Skjeggtrimming/hårklipping
Forlengbare kammer (1a, 1b): Sett en av kammene over trimmerhodet (2a).
Trykk på utløserknappen (1c) og skyv kammen til ønsket lengde.
Faste kammer (1d, 1e): Klikk en av kammene på trimmerhodet (2a).
• Trim mot hårvekstretningen ved å føre den flate kamdelen over huden.
• Ikke skyv apparatet gjennom håret fortere enn det kan klippes.
• Unngå at kammen blir tilstoppet av hår. Ta den av og rens den fra tid til
annen.
Presisjons- og konturtrimming
Bruk trimmerhodet (2a) uten kam-tilbehøret, detaljtrimmerhodet (2c) eller
barberhodet med mini-skjæreblad (2e) for å forme kinnskjegg, barter og
mindre områder med kort skjegg.
Øre-/nesetrimming
• Ta av det aktuelle hodet og klikk øre- og nesetrimmerhodet (2b) på
apparatets håndtak.
• Før apparatet forsiktig til håret som skal trimmes slik at det kommer inn i
kuttedelen. Unngå å føre trimmeren mer enn 5 mm inn i nesen eller øret.
Bodygrooming
Ta av det aktuelle hodet og klikk bodygroomerhodet (2d) på apparatets
håndtak. Det er utformet for barbering og trimming av hår på ben, brystkasse og under armene. Bruk det kun på hud som er tørr.
Rengjøring og vedlikehold
• Slå av apparatet.
• Ta av eventuelle hoder og kammer.
• Bruk børsten til å rengjøre hoder, kammer og apparatet. Ikke rengjør
skjærebladet med børsten da det kan bli skadet.
• Barberhodet med mini-skjæreblad kan tas fra hverandre for rengjøring.
Hvis skjærebladrammen dras ut, kan den bare klikkes på kassetten igjen.
• Håndtaket, hoder og kammer kan rengjøres under rennende vann.
Skyll til alle rester er fjernet. La alle deler tørke helt før de settes på igjen.
• For at tilbehøret skal fungere optimalt, bør trimmer og skjærebladene
regelmessig oljes med en dråpe lett maskinolje (ikke inkludert).
47
Page 48

Miljømerknad
Produktet inneholder batterier og/eller resirkulerbart elektrisk avfall.
Av miljøhensyn bør ikke dette produktet kastes sammen med
husholdningsavfall, men leveres til et Braun servicesenter eller på en
kommunal miljøstasjon.
Med forbehold om endringer.
Garanti
Vi gir 2 års garanti på produktet gjeldende fra kjøpsdato.
I garantitiden vil vi gratis rette eventuelle fabrikasjons- eller materialfeil,
enten ved reparasjon eller om vi finner det hensiktsmessig å bytte hele
produktet. Denne garanti er gyldig i alle land der Braun eller Brauns distributør
selger produktet. Denne garanti dekker ikke: skader på grunn av feil bruk,
normal slitasje eller skader som har ubetydelig effekt på produktets verdi og
virkemåte. Garantien bortfaller dersom reparasjoner utføres av ikke autorisert
person eller hvis andre enn originale Braun reservedeler benyttes.
For service i garantitiden skal hele produktet leveres eller sendes sammen
med kopi av kjøpskvittering til nærmeste autoriserte Braun Serviceverksted:
www.service.braun.com.
Ring 22 63 00 93 for å bli henvist til nærmeste autoriserte Braun Serviceverksted.
NB
For varer kjøpt i Norge har kunden garanti i henhold til NEL’s Leveringsbetingelser.
48
Page 49

Svenska
Läs instruktionerna noggrant, de innehåller säkerhetsinformation.
Behåll instruktionerna för framtida bruk.
Varning
Den här apparaten är lämplig för användning i samband
med bad eller dusch.
Av säkerhetsskäl kan den
endast användas utan sladd.
Apparaten har en specialsladd med en inbyggd säker
elförsörjning med extra låg spänning. Du ska därför inte
byta ut eller ändra någon del av den. Annars finns det risk
för att du utsätts för en elektrisk stöt.
Använd endast den medföljande specialsladden.
Om apparaten är märkt med 491 eller 492 kan den
användas
med alla Braun-strömkablar som är märkta med
491-XXXX eller 492-XXXX.
Använd aldrig apparaten med ett skadat tillbehör som en
trimmer, kam eller specialsladd.
Öppna inte apparaten!
Apparaten kan användas av barn över 8 år och personer
med nedsatt fysisk eller mental förmåga eller bristande
erfarenhet och kunskap om användningen övervakas eller
om de har fått instruktioner om hur produkten ska användas
på ett säkert sätt och förstår riskerna med den. Barn ska
inte leka med produkten. Rengöring och underhåll ska inte
utföras av barn om de inte är över 8 år och övervakas av en
vuxen person.
Beskrivning
1a Skjutbar skäggkam (3–11 mm i steg om 2 mm)
1b Skjutbar hårkam (13–21 mm i steg om 2 mm)
1c Frigöringsknapp för skjutbara kammar
49
Page 50

1d Fixerad kam 1 (1 mm)
1e Fixerad kam 2 (2 mm)
2a Trimmerhuvud
2b Trimmerhuvud för öron och näsa*
2c Detaljtrimmerhuvud*
2d Trimmerhuvud för kroppen*
2e Mini-rakhuvud med skärblad*
3 På/av-knapp
4 Laddningsindikator
5 Stickkontakt
6 Specialsladd (utformning kan skifta)
7 Laddningsställ*
* gäller ej alla modeller
Se texten på specialsladden för elektriska specifikationer.
Laddning
Rekommenderad omgivningstemperatur vid laddning är 5 °C till 35 °C.
Vid extremt låga eller höga temperaturer kan det hända att batteriet inte
laddas ordentligt eller inte laddas alls. Rekommenderad omgivningstemperatur för trimning är 15°C till 35°C. Rakapparaten får inte utsättas för temperaturer överstigande 50°C under en längre tid.
• Anslut apparaten (i avstängt läge) via specialsladden (6) till ett eluttag.
• Det tar ungefär 1 timme att ladda batteriet fullt och det ger upp till 100
minuters sladdlös användning.
• När apparaten är fulladdad ska den användas tills den är helt urladdad.
Ladda sedan till full kapacitet igen.
Laddningsindikator (4)
• Laddningsindikatorn blinkar grönt när apparaten laddas.
• När batteriet är fulladdat kommer batterisymbolen att lysa grönt i några
sekunder. Under användning lyser den grönt.
• Laddningsindikatorn lyser rött när batteriet börjar ta slut. Anslut apparaten
till strömuttaget när den blinkar rött.
Användning
Tillbehören ska endast fästas eller bytas ut när apparaten är avstängd. Sätt
på apparaten genom att trycka på på-/av-knappen (3).
50
Page 51

Reselås
Tryck på på- / av-knappen (3) i 3 sekunder för att låsa apparaten. Ett pip
bekräftar att reselåset är aktiverat. Tryck på på-/av-knappen i 3 sekunder
för att låsa upp. 3 pip betyder att ditt upplåsningsförsök misslyckats. Prova
igen eller anslut apparaten till strömuttaget.
Skäggtrimning / Hårklippning
Skjutbara kammar (1a, 1b): Placera en av kammarna på trimmerhuvudet (2a).
Tryck på frigöringsknappen (1c) och skjut ut kammen till önskad längd.
Fixerade kammar (1d, 1e): Klicka på en av kammarna på trimmerhuvudet (2a).
• Trimma mot hårets växtriktning genom att föra den platta delen av
kammen över huden.
• Tvinga inte apparaten genom håret snabbare än att det kan klippas.
• Undvik att kammen blir igensatt av hårstrån. Avlägsna och rengör
kammen regelbundet.
Precisions- och konturtrimning
Använd trimmerhuvudet (2a) utan kamtillbehör, detaljtrimmerhuvudet (2c)
eller mini-rakhuvudet med skärblad (2e) för att forma polisonger, mustascher och hakskägg.
Öron-/nästrimning
• Avlägsna befintligt trimmerhuvud och klicka på trimmerhuvudet för öron
och näsa (2b) på apparatens handtag.
• För försiktigt apparaten till håret som ska trimmas så att det når in till
skärbladen. Undvik att föra in trimmern längre än 5 mm (1/4˝) i näsan eller
örat.
Kroppstrimning
Avlägsna befintligt trimmerhuvud och klicka på kroppstrimmerhuvudet (2d)
på apparatens handtag. Huvudet är utformat för att kunna raka och trimma
håret på ben, bröstkorg och under armarna. Får endast användas på torr
hud.
Rengöring och underhåll
• Stäng av apparaten.
• Avlägsna befintligt trimmerhuvud och kam.
• Använd borsten för att rengöra trimmerhuvuden, kammar och apparaten.
Skärbladet ska inte rengöras med borsten eftersom detta kan skada
bladet.
51
Page 52

• Mini-rakhuvudet med skärblad kan plockas isär för att rengöras
ordentligt. Om skärbladsramen dras fram kan den enkelt klickas tillbaka in
i höljet.
• Handtag, trimmerhuvud och kammar kan rengöras under rinnande vatten.
Skölj tills alla rester är borta. Låt delarna torka helt innan du sätter ihop
dem igen.
• Smörj regelbundet trimmer och skärblad med en droppe symaskinsolja
(ingår ej) för att tillbehören ska fortsätta fungera ordentligt.
Miljöskyddsmeddelande
Produkten innehåller ett batteri och/eller återvinningsbart elavfall.
Av hänsyn till miljön ska denna apparat inte slängas med hushållsavfallet. Återvinning bör ske enligt gällande lokala föreskrifter.
Med förbehåll för ändringar.
Garanti
Vi garanterar denna produkt för två år från och med inköpsdatum. Under
garantitiden kommer vi utan kostnad, att avhjälpa alla brister i apparaten
som är hänförbara till fel i material eller utförande, genom att antingen
reparera eller byta ut hela apparaten efter eget gottfinnande.
Denna garanti gäller i alla länder där denna apparat levereras av Braun eller
deras auktoriserade återförsäljare.
Garantin gäller ej: skada på grund av felaktig användning eller normalt
slitage, liksom brister som har en försumbar inverkan på apparatens värde
eller funktion. Garantin upphör att gälla om reparationer utförs av icke
behörig person eller om Brauns originaldelar inte används.
För att erhålla service under garantitiden skall den kompletta apparaten
lämnas in tillsammans med inköpskvittot, till ett auktoriserat Braun verkstad:
www.service.braun.com.
Ring 020-21 33 21 för information om närmaste Braun verkstad.
52
Page 53

Suomi
Lue nämä turvallisuustietoja sisältävät ohjeet huolellisesti.
Säilytä ohjeet myöhempää tarvetta varten.
Varoitus
Laitetta voi käyttää kylvyssä ja suihkussa. Turvallisuussyistä sitä voi käyttää vain johdottomana.
Laitteen virtajohto on varustettu matalajännitesovittimella.
Älä vaihda sen osia tai tee siihen muutoksia. Muutoin on
olemassa sähköiskun vaara.
Käytä ainoastaan laitteen mukana toimitettua virtajohtoa/
johtoja.
Jos laitteessa on merkintä
491 tai 492, voit käyttää sitä minkä hyvänsä Braun-virtalähteen kanssa, jossa on
merkintä 491-XXXX tai 492-XXXX.
Älä koskaan käytä laitetta yhdessä vaurioituneen osan,
kuten trimmerin, kamman tai virtajohdon kanssa.
Älä avaa laitetta!
Yli 8-vuotiaat lapset tai sellaiset henkilöt, joiden fyysinen,
sensorinen tai henkinen toimintakyky on rajoittunut tai
joilla ei ole tarvittavaa kokemusta tai tietoa laitteen käytöstä,
voivat käyttää laitetta, jos heitä valvotaan ja ohjeistetaan
laitteen turvallisen käytön osalta ja he ymmärtävät käyttöön
liittyvät vaaratekijät. Lasten ei saa antaa leikkiä laitteella.
Laitetta saavat puhdistaa vain yli 8-vuotiaat lapset, kun heitä
valvotaan.
Laitteen osat
1a Liukuva partakampa (3–1 mm 2 mm:n välein)
1b Liukuva hiuskampa (13–21 mm 2 mm:n välein)
53
Page 54

1c Liukuvien kampojen vapautuspainike
1d Kiinteä kampa 1 (1 mm)
1e Kiinteä kampa 2 (2 mm)
2a Trimmeripää
2b Korva- ja nenätrimmerikärkikappale*
2c Yksityiskohtainen trimmeripää*
2d Vartalon trimmaus -kärkikappale*
2e Miniteräverkolla varustettu ajopää*
3 Virtakytkin
4 Latauksen merkkivalo
5 Virtapistoke
6 Virtajohto (ulkomuoto saattaa vaihdella)
7 Latausteline*
* ei sisälly kaikkiin malleihin
Katso sähkömääräyksiä koskevat tiedot virtajohdosta.
Lataus
Latauksen kannalta suositeltu lämpötila on 5–35 °C. Akku ei ehkä lataudu
kunnolla tai ollenkaan erittäin alhaisissa tai korkeissa lämpötiloissa.
Trimmauksen kannalta suositeltu lämpötila on 15–35 °C. Älä säilytä laitetta
pitkään yli 50 °C:een lämpötilassa.
• Kytke laite (sammutettuna) virtajohdolla (6) verkkovirtaan.
• Akun lataaminen täyteen kestää noin tunnin. Täydellä akulla laitetta voi
käyttää johdottomasti jopa 100 minuuttia.
• Kun laite on täysin latautunut, anna akun tyhjentyä kokonaan normaalissa
käytössä. Lataa tämän jälkeen akku täyteen.
Latauksen merkkivalo (4)
• Latauksen merkkivalo vilkkuu vihreänä, kun laite latautuu.
• Se palaa vihreänä muutaman sekunnin ajan, kun akku on täysin
latautunut. Käytön aikana se palaa yhtäjaksoisesti vihreänä.
• Latauksen merkkivalo palaa yhtäjaksoisesti punaisena, kun akun
varaustaso on matala. Kun se vilkkuu punaisena, kytke laite verkkovirtaan.
Käyttö
Vaihda lisäosia vain laitteen ollessa pois päältä. Käynnistä laite painamalla
virtakytkintä (3).
54
Page 55

Matkalukko
Lukitse laite painamalla virtakytkintä (3) kolmen sekunnin ajan. Äänimerkki
vahvistaa, että matkalukko on aktivoitu. Poista lukitus painamalla virtakytkintä kolmen sekunnin ajan. Jos lukituksen avaaminen epäonnistuu, kuuluu
3 piippausta. Yritä uudelleen tai kytke laite verkkovirtaan.
Parran trimmaminen / hiusten leikkaaminen
Liukuvat kammat (1a, 1b): aseta yksi kammoista trimmeripäähän (2a).
Paina vapautuspainiketta (1c) ja liu´uta kampa haluttuun pituuteen.
Liukuvat kammat (1d, 1e): napsauta yksi kammoista trimmeripäähän (2a).
• Trimmaa vastakarvaan ohjaamalla kamman tasaista puolta iholla.
• Älä pakota laitetta karvojen läpi nopeammin kuin se ehtii leikkaamaan niitä.
• Vältä tukkimasta kampaa karvoilla. Poista ja huuhtele kampa aika ajoin.
Ääriviivojen muotoilu ja tarkka trimmaus
Käytä trimmeriosaa (2a) ilman kampalisäosaa, viimeistelytrimmerin kärkikappaletta (2c) tai miniteräverkolla varustettua ajopäätä (2e), kun muotoilet
pulisonkeja, viiksiä tai osittaista, lyhyttä partaa.
Korvien/nenän trimmaus
• Irrota edellinen kärkiosa ja napsauta nenä- ja korvatrimmerikärkiosa (2b)
laitteen runkoon.
• Ohjaa laite varovasti trimmattaviin karvoihin niin, että ne ulottuvat
trimmerin sisällä olevaan leikkuukehikkoon. Älä työnnä trimmeriä 5 mm:ä
pidemmälle nenään tai korviin.
Vartalon trimmaus
Irrota edellinen kärkikappale ja napsauta vartalon trimmaus -kärkikappale
(2d) laitteen runkoon. Se on suunniteltu säärien, rinnan ja kainaloiden
ihokarvojen ajamiseen ja trimmaukseen. Käytä sitä vain kuivalla iholla.
Puhdistus ja ylläpito
• Sammuta laite.
• Poista käyttämäsi kärkikappale tai kampa.
• Puhdista kärkiosat, kammat ja laite harjan avulla. Älä puhdista teräverkkoa
harjalla, sillä se voi johtaa teräverkon vaurioitumiseen.
• Miniteräverkolla varustettu ajopää voidaan purkaa kunnollista puhdistusta
varten. Jos teräverkon kehys vedetään ulos, se napsautetaan takaisin
paikalleen.
• Runko-osan, kärkiosat ja kammat voi puhdistaa juoksevalla vedellä.
Huuhtele, kunnes olet saanut pois kaikki jäämät. Anna osien kuivua täysin
ennen kuin kokoat laitteen uudelleen.
55
Page 56

• Jotta lisäosat toimivat kunnolla, voitele trimmeri ja teräverkot
säännöllisesti pisaralla ohutta koneöljyä (ei sisälly).
Ympäristönsuojeluun liittyviä seikkoja
Tuote sisältää akun/pariston ja/tai kierrätettäviä sähköosia.
Ympäristönsuojelullisista syistä tuotetta ei saa hävittää kotitalousjätteen mukana käyttöiän päättyessä. Hävitä tuote viemällä se asianmukaiseen keräyspisteeseen.
Tiedot voivat muuttua ilman ennakkoilmoitusta.
Takuu
Tälle tuotteelle myönnämme 2 vuoden takuun ostopäivästä lukien Suomessa
voimassa olevien alan takuuehtojen TE90 mukaan. Takuuaikana korvataan
veloituksetta kaikki viat, jotka aiheutuvat materiaaliviasta tai valmistusvirheestä.
Korvaus tapahtuu harkintamme mukaan korjaamalla, vaihtamalla viallinen
osa tai vaihtamalla koko laite uuteen. Takuu on voimassa kaikkialla
maailmassa sillä edellytyksellä, että laitetta myydään ko. maassa Braunin tai
virallisen maahantuojan toimesta.
Takuun piiriin eivät kuulu seuraavat viat: viat, jotka johtuvat virheellisestä
käytöstä, normaalista kulumisesta tai viat, jolla on vähäinen merkitys laitteen
arvoon tai toimintaan. Takuun voimassaolo lakkaa, jos laitetta korjataan
muualla kuin valtuutetussa Braun-huoltoliikkeessä tai jos laitteessa
käytetään muita kuin alkuperäisiä varaosia.
Yksilöity ostokuitti riittää takuun voimassaolon osoittamiseksi:
www.service.braun.com.
Lisätietoa takuuseen liittyvistä asioista saa asiakaspalvelukeskuksestamme
numerosta 020-377 877.
56
Page 57

Ελληνικά
Διαβάστε τις οδηγίες αυτές μέχρι το τέλος, καθώς περιλαμβάνουν
πληροφορίες ασφαλείας. Φυλάξτε τις οδηγίες για μελλοντική χρήση.
Προειδοποιήσεις
Αυτή η συσκευή είναι κατάλληλη για χρήση στη μπανιέρα
ή το ντους.
Για λόγους ασφαλείας, αυτή η συσκευή
μπορεί να λειτουργήσει μόνο ασύρματα.
Αυτή η συσκευή είναι εξοπλισμένη με ένα ειδικό σετ καλωδίου
το οποίο διαθέτει ενσωματωμένο μετασχηματιστή πολύ
χαμηλής τάσης για ολοκληρωμένη ασφάλεια . Δεν επιτρέπεται η αλλαγή ή η τροποποίηση οποιουδήποτε μέρους του. Σε
διαφορετική περίπτωση, υπάρχει κίνδυνος ηλεκτροπληξίας.
Να χρησιμοποιείτε μόνο το ειδικό σετ καλωδίου που παρέχεται με τη συσκευή σας.
Εάν η συσκευή φέρει σήμανση
491 ή 492, μπορείτε να την χρησιμοποιήσετε με οποιοδήποτε μετασχηματιστή Braun με κωδικό 491-XXXX ή 492-XXXX.
Μη χρησιμοποιείτε ποτέ τη συσκευή με ελαττωματικά εξαρτήματα όπως λεπίδες, χτένες ή ειδικό σετ καλωδίου.
Μην ανοίγετε την συσκευή!
Αυτή η συσκευή μπορεί να χρησιμοποιηθεί από παιδιά
8 ετών και άνω και άτομα με περιορισμένες φυσικές, αισθητήριες ή πνευματικές δυνατότητες ή έλλειψη εμπειρίας και
γνώσεων αν υπάρχει ανάλογη εποπτεία ή τους έχουν δοθεί
οδηγίες σχετικά με την ασφαλή χρήση της συσκευής και
υπάρχει κατανόηση των ενδεχόμενων κινδύνων. Τα παιδιά
δεν πρέπει να παίζουν με τη συσκευή. Ο καθαρισμός και η
συντήρηση της συσκευής δεν πρέπει να πραγματοποιούνται
από παιδιά, εκτός και αν είναι πάνω από 8 ετών και έχουν
ανάλογη εποπτεία.
57
Page 58

Περιγραφή
1a Επεκτεινόμενο χτένι για το μούσι (3–11 mm σε 2 mm βήματα)
1b Επεκτεινόμενο χτένι για τα μαλλιά (13–21 mm σε 2 mm βήματα)
1c Πλήκτρο απασφάλισης για τις ευέλικτες χτένες
1d Χτένα σταθεροποίησης 1 (1 mm)
1e Χτένα σταθεροποίησης 2 (2 mm)
2a Κεφαλή λεπίδας
2b Κεφαλή λεπίδας για τη μύτη και τα αυτιά*
2c Κεφαλή λεπίδας ακριβείας*
2d Κεφαλή περιποίησης σώματος*
2e Μικρή Ξυριστική κεφαλή*
3 Διακόπτης λειτουργίαςon on/off
4 Ένδειξη φόρτισης
5 Υποδοχή καλωδίου ρεύματος
6 Ειδικό σετ καλωδίου (το σχέδιο μπορεί να διαφέρει)
7 Βάση φόρτισης*
* Δεν διατίθεται σε όλα τα μοντέλα
Για τις ηλεκτρικές προδιαγραφές, ανατρέξτε στην ενότητα που αναφέρεται
στο σετ ειδικού καλωδίου.
Φόρτιση
Η θερμοκρασία περιβάλλοντος που συνιστάται για τη φόρτιση είναι από 5 °C
έως 35 °C. Η μπαταρία ενδέχεται να μη φορτίσει σωστά ή καθόλου κάτω από
υπερβολικά χαμηλές ή υψηλές θερμοκρασίες. Η θερμοκρασία περιβάλλοντος
που συνιστάται για το ψαλίδισμα είναι από 15 °C έως 35 °C. Μην εκθέτετε
την ξυριστική μηχανή σε θερμοκρασίες υψηλότερες των 50 °C για μεγάλα
χρονικά διαστήματα.
• Συνδέστε τη συσκευή (απενεργοποιημένη) μέσω του σετ ειδικού καλωδίου
(6) με μια ηλεκτρική πρίζα.
• Η πλήρης φόρτιση διαρκεί περίπου 1 ώρα και η συσκευή μπορεί να
λειτουργήσει έως και 100 λεπτά χωρίς καλώδιο.
• Μόλις έχει φορτίσει πλήρως, αποσυνδέστε την ξυριστική μηχανή και
χρησιμοποιήστε την κανονικά. Κατόπιν επαναφορτίστε την μέχρι να
ανακτήσει την πλήρη λειτουργική της ικανότητά.
Ένδειξη φόρτισης (4)
• Η ένδειξη φόρτισης αναβοσβήνει πράσινη όταν η συσκευή φορτίζει.
58
Page 59

• Ανάβει μόνιμα πράσινο χρώμα για μερικά δευτερόλεπτα όταν η μπαταρία
είναι πλήρως φορτισμένη. Κατά τη διάρκεια της χρήσης του, ο φωτισμός
είναι συνεχώς πράσινος.
• Η ένδειξη φόρτισης ανάβει μόνιμα κόκκινη όταν η μπαταρία είναι χαμηλή.
Μόλις αναβοσβήνει κόκκινο, συνδέστε τη συσκευή στο δίκτυο.
Χρήση
Αλλάξτε τα εξαρτήματα μόνο όταν η συσκευή είναι εκτός λειτουργίας.Για να
ανοίξετε τη συσκευή, πατήστε το κουμπί on/off (3).
Κλείδωμα ταξιδιού
Πατήστε το κουμπί ενεργοποίησης / απενεργοποίησης (4) για 3 δευτερόλεπτα για να κλειδώσετε τη συσκευή. Ένας ήχος (μπιπ) επιβεβαιώνει ότι ενεργοποιείται το κλείδωμα ταξιδιού. Για να το ξεκλειδώσετε, πατήστε το κουμπί
ενεργοποίησης / απενεργοποίησης για 3 δευτερόλεπτα. 3 ηχητικά σήματα
θα ακουστούν όταν η προσπάθεια ξεκλειδώματος σας αποτύχει. Δοκιμάστε
ξανά ή απλά συνδέστε τη συσκευή με το καλώδιο.
Ψαλιδίζοντας το μούσι / Κόβοντας τις τρίχες
Ευέλικτες χτένες (1a, 1b): Τοποθετήστε μία από τις χτένες πάνω στην
κεφαλή της λεπίδας (2α). Πατήστε το κουμπί απασφάλισης (1c) και σύρετε
τη χτένα στο επιθυμητό μήκος.
Χτένες σταθεροποίησης (1d, 1e): Ενώστε μία από τις χτένες στην κεφαλή
της λεπίδας (2α).
• Ψαλιδίστε τις τρίχες που εξέχουν οδηγώντας την επίπεδη πλευρά της
χτένας πάνω στην επιδερμίδα.
• Μη πιέζετε τη συσκευή πάνω στις τρίχες για να κοπούν πιο γρήγορα από
τις δυνατότητές της.
• Μη φράζετε τη χτένα με τρίχες. Αφαιρέστε και καθαρίστε την σε τακτά
χρονικά διαστήματα.
Ψαλίδισμα ακριβείας και περιγράμματος
Χρησιμοποιήστε την κεφαλή της λεπίδας (2α) χωρίς την εξαρτήματα της
χτένας ακριβείας, την λεπτομερή κεφαλή κοπής (2b) ή την ξυριστική κεφαλή
(2c) για να δώσετε σχήμα σε φαβορίτες, μουστάκια και γένια λίγων ημερών.
Ψαλίδισμα τριχών σε αυτιά και μύτη
• Αφαιρέστε την κεφαλή και ενώστε τη κεφαλή της λεπίδας για τα αυτιά και
τη μύτη (2b) στη λαβή της συσκευής.
59
Page 60

• Προσεκτικά καθοδηγήστε τη συσκευή στις τρίχες που πρέπει να
ψαλιδιστούν έτσι ώστε να φτάνουν στην πλευρά κοπής. Μην εισάγετε τη
λεπίδα περισσότερο από 5 mm (1/4˝) μέσα στη μύτη ή το αυτί σας.
Μηχανές περιποίησης της τριχοφυΐας του σώματος
Αφαιρέστε την κεφαλή και ενώστε την κεφαλή μηχανής περιποίησης σώματος (2d) στη λαβή. Έχει σχεδιαστεί για ξύρισμα και ψαλίδισμα των τριχών
στα πόδια, στο στήθος και στις μασχάλες.Χρησιμοποιείτε τη συσκευή μόνο
σε στεγνό δέρμα.
Καθάρισμα και συντήρηση
• Απενεργοποιήστε τη συσκευή.
• Βγάλτε την κεφαλή και τη χτένα.
• Χρησιμοποιήστε τη βούρτσα για να καθαρίσετε τις κεφαλές, τις χτένες και
τη συσκευή. Μην καθαρίζετε το πλέγμα της κεφαλής της μηχανής με τη
βούρτσα καθώς μπορεί να καταστραφεί.
• Το πλέγμα της ξυριστικής κεφαλής μπορεί να αποσυναρμολογηθεί για τον
σωστό καθαρισμό. Σε περίπτωση που το πλέγμα έχει φύγει από την θέση
του, μπορεί εύκολα να τοποθετηθεί ξανά.
• Η λαβή, οι κεφαλές και οι χτένες μπορούν να καθαριστούν σε τρεχούμενο
νερό. Ξεβγάλτε καλά για να μη μείνουν υπολείμματα. Αφήστε όλα τα μέρη
να στεγνώσουν τελείως πριν τα επανασυναρμολογήσετε.
• Για να λειτουργεί κατάλληλα η λεπίδα, λαδώστε τη τακτικά με
λεπτόρευστο λάδι μηχανής (δε περιλαμβάνεται).
Περιβαλλοντική σημείωση
Το προϊόν περιέχει μία μπαταρία ή/και ανακυκλώσιμα ηλεκτρικά
απόβλητα. Για την προστασία του περιβάλλοντος, μην την απορρίπτετε στα οικιακά απόβλητα, αλλά παραδώστε την για ανακύκλωση
στα σημεία συλλογής αποβλήτων που παρέχονται στη χώρα σας.
Υπόκειται σε τροποποίηση χωρίς προειδοποίηση.
Εγγύηση
Παραχωρούμε δύο χρόνια εγγύηση, στο προϊόν, ξεκινώντας από την ημερομηνία αγοράς. Μέσα στην περίοδο εγγύησης καλύπτουμε, χωρίς χρέωση,
οποιοδήποτε ελάττωμα προερχόμενο από κακή κατασκευή ή κακής ποιότητος υλικό, είτε επισκευάζοντας είτε αντικαθιστώντας ολόκληρη τη συσκευή
60
Page 61

σύμφωνα με την κρίση μας. Αυτή η εγγύηση ισχύει σε όλες τις χώρες που
πωλούνται τα προϊόντα Βraun.
Η εγγύηση δεν καλύπτει: καταστροφή από κακή χρήση, φυσιολογική φθορά
ή ελαττώματα λόγω αμέλειας του χρήστη. Η εγγύηση ακυρώνεται αν έχουν
γίνει επισκευές από μη εξουσιοδοτημένα άτομα ή δεν έχουν χρησιμοποιηθεί
γνήσια ανταλλακτικά Braun.
Για να επιτύχετε service μέσα στην περίοδο της εγγύησης, παραδώστε ή
στείλτε την συσκευή με την απόδειξη αγοράς σε ένα Εξουσιοδοτημένο Κατάστημα Service της Braun: www.service.braun.com.
Καλέστε στο 210-9478700 για να πληροφορηθείτε για το πλησιέστερο
Εξουσιοδοτημένο Κατάστημα Service της Braun.
61
 Loading...