

Braun FreeStyle Pro Series, SI 6245 FreeStyle, SI 6110 FreeStyle, SI 6225 FreeStyle User Manual
Page 1
English 4
Français 8
Español 11
Internet:
www.braun.com
4-699-375/00/IV-02
USA/CDN/MEX
Printed in Spain
Imprimé en l’Espagne
Impreso en España
Thank you for purchasing a Braun product.
We hope you are completely satisfied with your new
Braun FreeStyle.
If you have any questions, please call:
US residents 1-800-BRAUN-11
1-800-272-8611
Canadian residents 1-800-387-6657
Merci d’avoir fait l’achat d’un produit Braun.
Nous espérons que vous serez pleinement satisfaite
de votre nouveau Braun FreeStyle.
Si vous avez des questions, veuillez appeler
Braun Canada : 1 800 387-6657
Gracias por haber comprado un producto Braun.
Esperamos que Ud. quede completamente
satisfecha con su nueva Braun FreeStyle.
Si Ud. tiene alguna duda, por favor,
en México llame al: 01(800) 508-5800
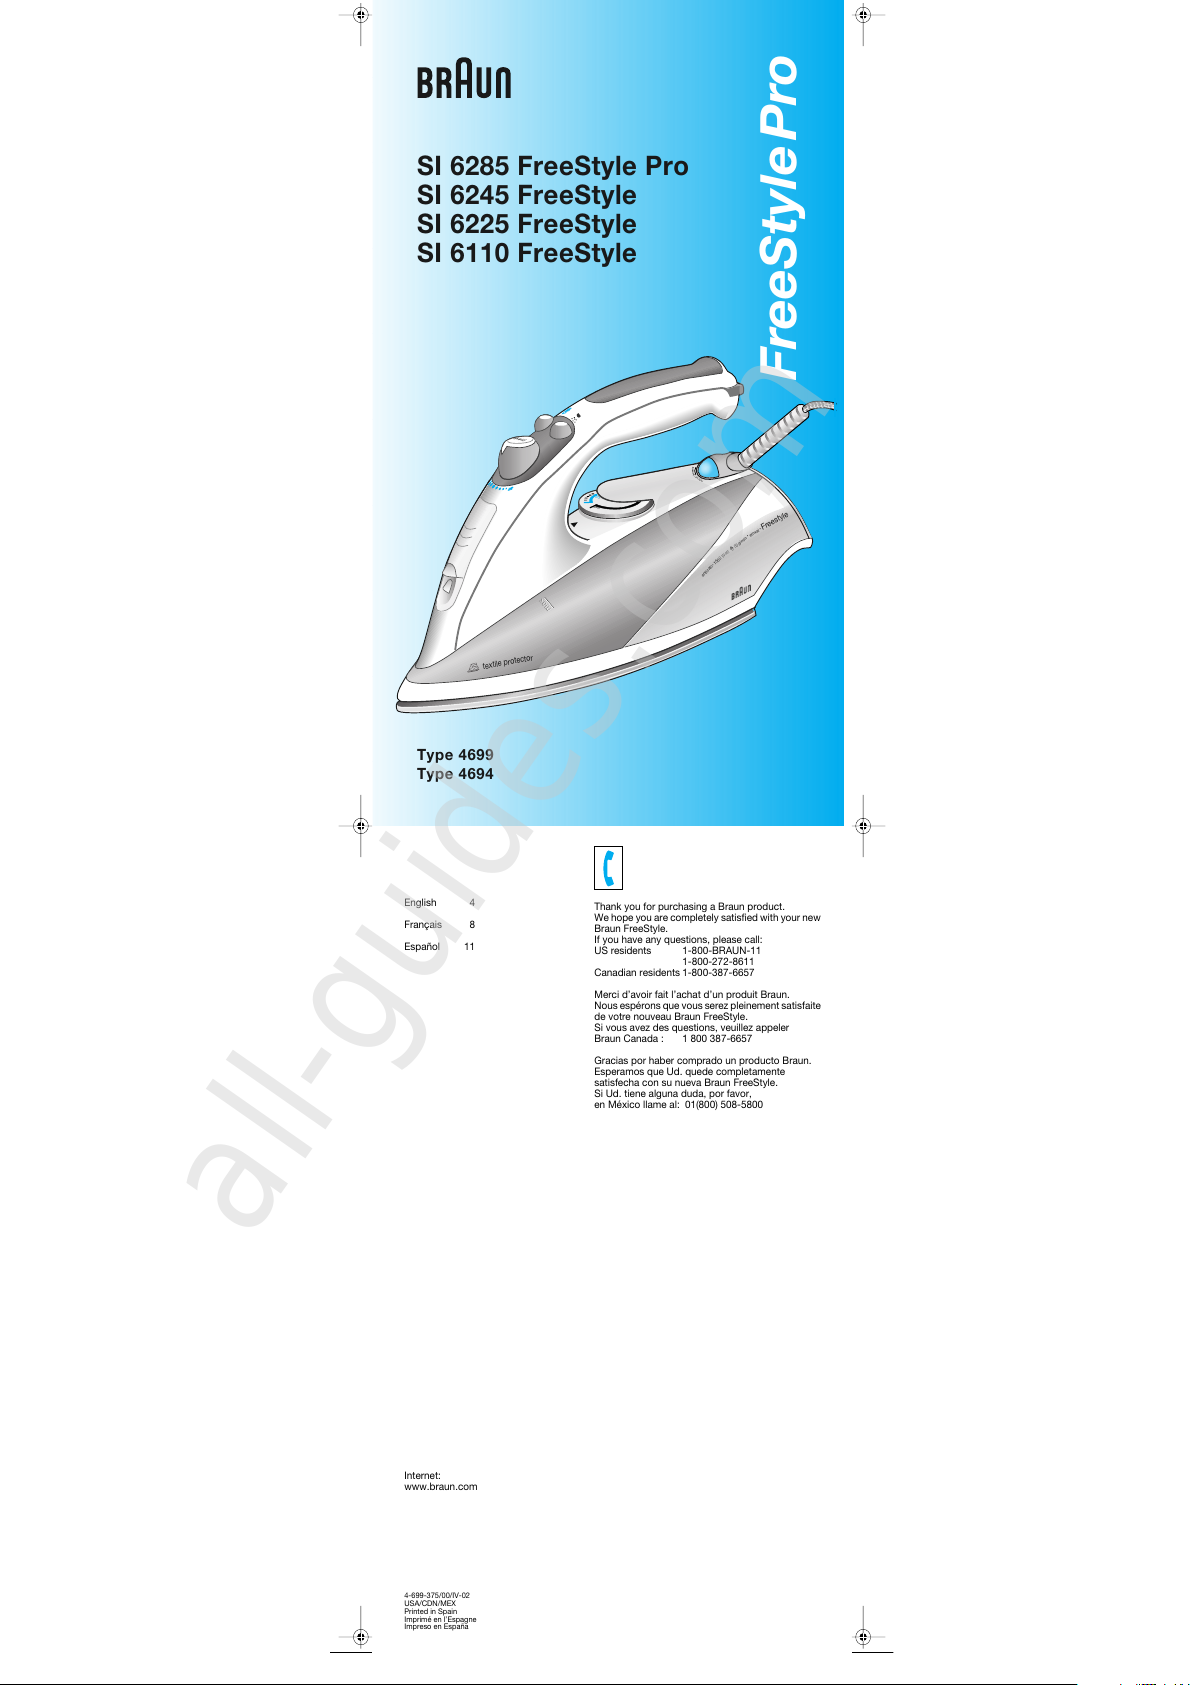
Type 4699
Type 4694
SI 6285 FreeStyle Pro
SI 6245 FreeStyle
SI 6225 FreeStyle
SI 6110 FreeStyle
FreeStylePro
max
min
press
max
max
a
u
t
o
-
o
f
f
/
t
h
e
r
m
o
s
t
a
t
textile protector
a
n
t
i
c
a
l
c
•
1
5
0
0
W
a
t
t
8
5
g
/
m
i
n
•
e
l
o
x
a
l
•
F
r
e
e
s
t
y
l
e
4699375_SI6000_NA Seite 1 Mittwoch, 10. April 2002 8:39 08
All manuals and user guides at all-guides.com
all-guides.com
Page 2
B
D
E
max
abc
chemicals
3
spray
vaporisation
press
vinegar or
lemon juice
vinaigre ou
jus de citron
79
56
8
press
max
min
4
dry
sec
press
press
F
Cleaning the «anti-calc» valve — Nettoyage de la tige anticalaire
— Système anticalcaire
1234
press
press
A
1
3
3a
45
2
7
8
press
6
max
min
C
1
steam on/off
press
press
max
min
2
press
max
min
78
!
100°C
6
press
press
press
«anti-calc» system
G
13245
press
max
max
min
10
11
12 13
4x
9
max
max
min
activation/
désactivation de la vapeur
power
shot
surplus de vapeur puissant
4699375_SI6000_NA Seite 2 Mittwoch, 10. April 2002 8:39 08
All manuals and user guides at all-guides.com
Page 3
3
English
1. Use iron only for its intended use.
2. To protect against a risk of electric
shock do not immerse the iron in
water or other liquids.
3. The iron's temperature selector
should always be turned to the «min»
position before plugging or unplug-
ging from outlet. Never yank cord to
disconnect from outlet; instead, grasp
plug and pull to disconnect.
4. Do not allow cord to touch hot
surfaces. Let iron cool completely
before putting away. Loop cord
loosely around iron when storing it.
5. Always disconnect iron from electrical
outlet when filling with water or
emptying and when not in use.
6. Do not operate iron with a damaged
cord or if the iron has been dropped
or damaged. To avoid risk of electric
shock, do not disassemble the iron;
take it to an authorized service center
for examination and repair.
Unauthorized repair may cause a risk
of electric shock, injury or property
damage.
7. Close supervision is necessary for
any appliance being used by or
near children. Do not leave the iron
unattended while plugged in or on an
ironing board.
8. Burns can occur from touching hot
metal parts, hot water or steam. Use
caution when you turn a steam iron
upside down, as there may be hot
water in the reservoir.
9. This product is intended for
household use only.
IMPORTANT SAFEGUARDS
When using your iron, basic safety precautions should always be followed, including
the following:
READ ALL INSTRUCTIONS BEFORE USING
1. This is a 1500 watt appliance.
To avoid a circuit overload, do not
operate another high wattage
appliance on the same circuit.
2. If an extension cord is absolutely
necessary, a 12.5-ampere cord must
be used.
Cords rated for less amperage may
overheat.
Care should be taken to arrange the
cord so that it cannot be pulled or
tripped over.
SPECIAL INSTRUCTIONS
SAVE THESE INSTRUCTIONS
4699375_SI6000_NA Seite 3 Mittwoch, 10. April 2002 8:39 08
All manuals and user guides at all-guides.com
Page 4
4
Braun products are engineered to meet the
highest standards of quality, functionality and
design. We hope you enjoy your new Braun
FreeStyle iron.
Notice:
Remove any labels affixed to the
soleplate before first use.
Important safeguards
•
Before using the iron read the use
instructions completely. Keep the use
instructions during the entire life of the iron.
•
Make sure your voltage corresponds to the
voltage printed on the iron. Connect the
•
iron to alternating current (AC) only.
•
Always unplug the iron and make sure the
steam button (3) is pushed down into the
lowered position (steam off) before filling
the tank with water. To unplug the iron
always pull by the plug, not the cord. The
cord should never come in contact with hot
objects or with the hot soleplate.
•
Never immerse the iron in water or other
liquids.
•
During pauses in ironing always place the
iron upright on the heel rest (8). Unplug it
when leaving the room, even if only for a
short time.
•
Never pull out the steam button (3) during
ironing.
•
Keep the iron away from children.
•
Electric irons combine high temperatures
and hot steam that could lead to burns.
•
Check the cord regularly for possible
damage.
•
If the appliance (including cord) shows any
defect, stop using it and take it to a Braun
service center for repair.
•
Faulty or unqualified repair work may cause
accidents or injury to the user.
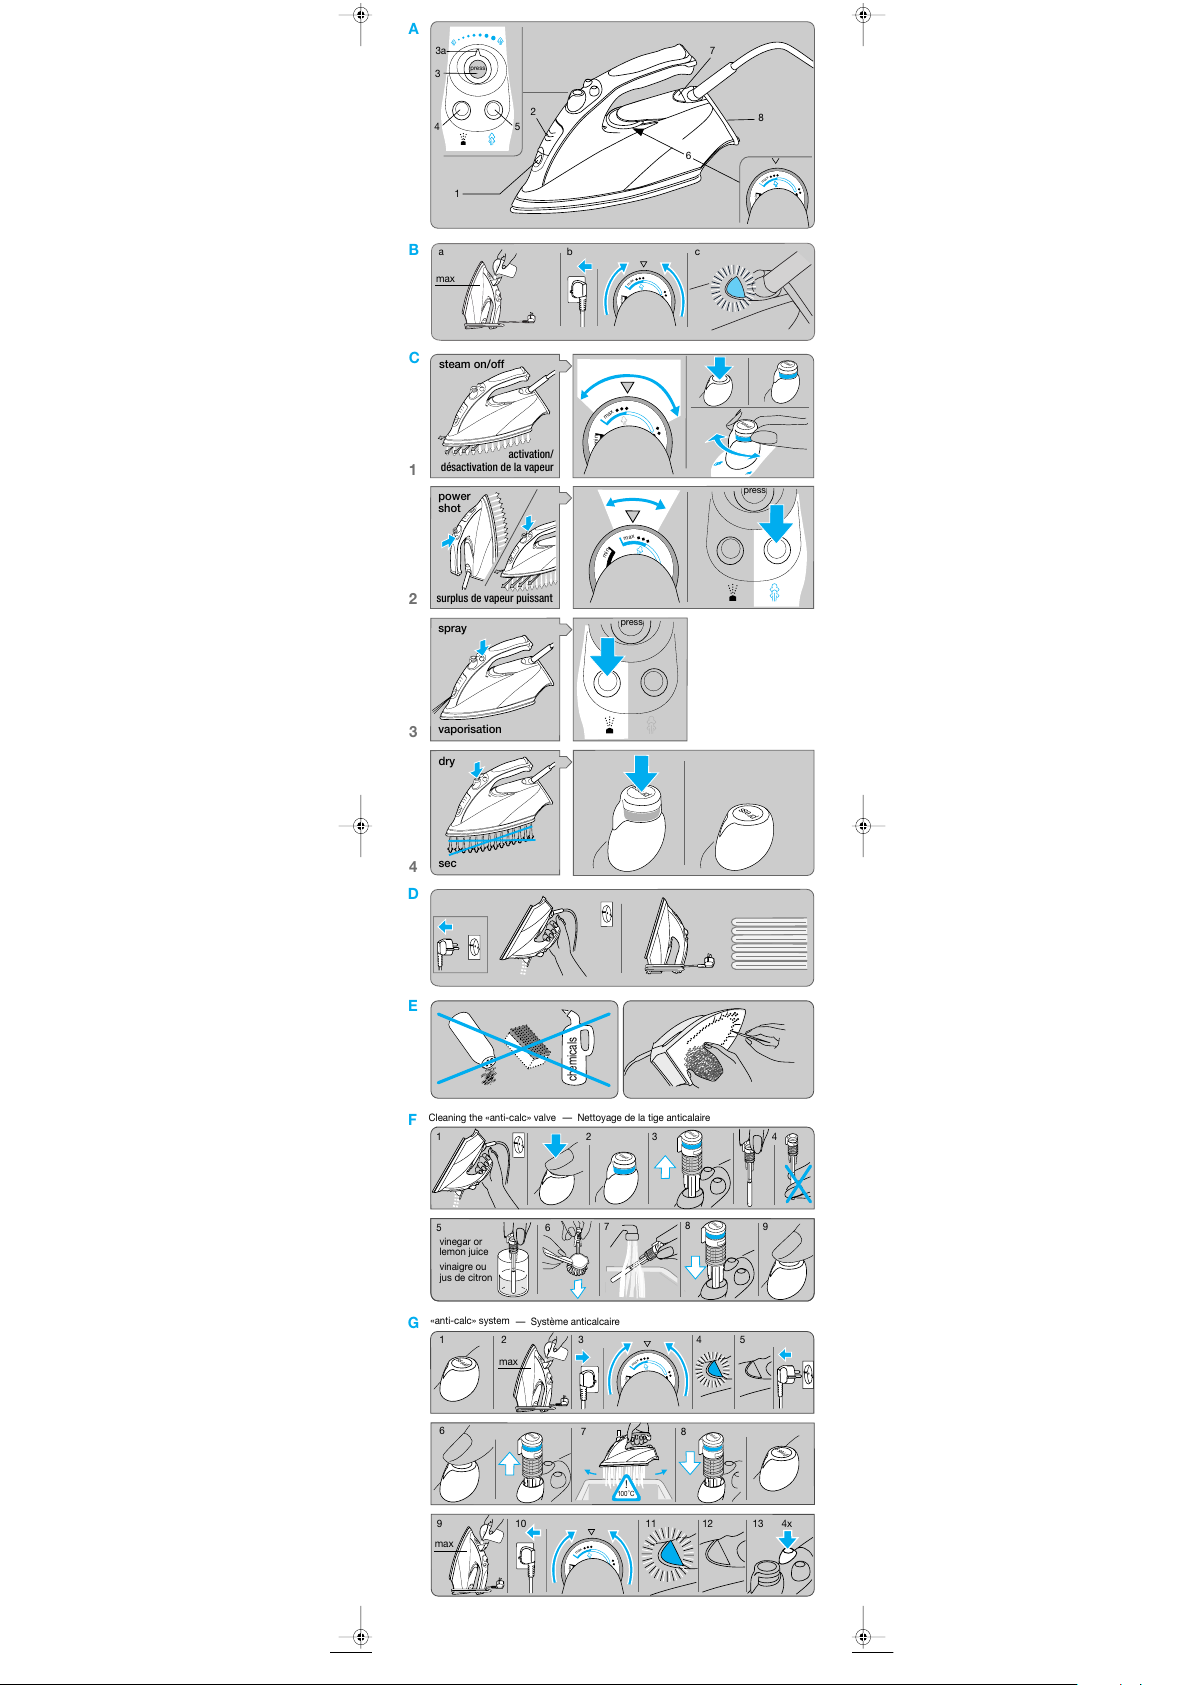
A Description
1 Spray nozzle
2 Water tank opening
3 Steam button
3a Steam regulator
4 Spray button
5 Power shot button
6 Temperature selector
7 Temperature / auto shut-off pilot light
8 Heel rest
B Before getting started
•
This iron is designed to be used with tap
water. If you have extremely hard water we
recommend using a mixture of 50% tap
water and 50% distilled water. Fill the water
tank to the «max» marking. Never use
distilled water exclusively. Do not add any
additives (e.g. starch).
•
Keep the iron in the upright position and
plug it into the outlet. Select the desired
temperature according to the ironing guide
on the heel rest (8) or the label in your
garment.
•
The temperature pilot light (7) goes off when
the desired temperature is reached (after
approximately 1 minute).
C Ironing
1 Steam on/off
For steam ironing, the temperature
selector (6) must be set within the red
range.
Press the steam button (3) to start the
steam mode.
steam on steam off
(upright position) (lowered position)
With the steam button (3) in the upright
position, turn the steam regulator (3a) to
adjust the steam quantity.
Pre-Conditioning Steam
(available on models SI 6285 and SI 6245)
Steam comes out of the channels on the
upper part of the soleplate around the
front of the iron. This preconditions the
fabric by «pre-steaming», thus making
ironing easier.
Use caution as steam comes out laterally.
2 Power shot
Prior to use, press the power shot button
(5) 3 to 4 times to activate it. Press the
power shot button (5) in intervals of at
least 5 seconds.
Power shot (5) can be activated when dry
ironing (see point 4 below). However,
the temperature selector (6) must be set in
the range between «•••» and «max». The
power shot function can also be used in
the vertical position for steaming hanging
garments or curtains.
3 Spray function
Press the spray button (4).
4 Dry ironing
Turn the steam mode off by pressing the
steam button (3) down so that it catches in
the lowered position.
5 Automatic Shut-Off
(available on models SI 6285, SI 6245 and
SI 6225)
Important: the auto shut-off feature is
mercury-free. The auto shut-off mecha-
nism causes a slight rattling noise during
ironing. This is normal and in no case
indicates a fault of the iron. The «auto-off»
pilot light (7) will flash when the automatic
shut-off is activated. This happens when
the iron has rested:
– horizontall
y on the soleplate for about
25 seconds
or
– vertically on the heel rest (8) for about
12.5 minutes
or
– when the iron has been lying on its side
for about 25 seconds.
To turn on the iron again, just move it.
When the «auto-off» pilot light (7) stops
flashing the electrical power is on again.
D After ironing
•
Unplug the iron and press the steam on/off
button (3) down so that it catches in the
lowered position (steam off).
•
To prolong the life of the iron empty the
water tank after each use.
•
Always allow the iron to cool down before
storing it in the upright position in a dry
place.
E Maintenance and cleaning
To clean the soleplate use steel wool.
Then wipe the soleplate clean with a cloth.
Never use a scourin
g pad, vinegar or other
chemicals. To clean the soft material on
the handle and the knobs, wipe with
soapy water.
F Cleaning the «anti-calc» valve
The iron's «anti-calc» valve is a long wand
that is located beneath the steam button
(3). This valve needs to be decalcified
regularly (e.g., when the steam develop-
ment is insufficient).
Proceed as follows:
1) Unplug the iron and empty the water tank.
2) Press the steam button (3) so that it is in
the upright position.
3) Remove the steam button (3) carefully
(some water may leak from the soleplate).
4) Be careful not to touch the «anti-calc»
valve.
5) Immerse the valve in white vinegar or
lemon juice until the limescale becomes
soft.
6) Using a brush with non-metallic bristles,
brush until all openings on the valve are
clean.
7) Rinse the valve under running water.
8) Insert the valve back into the iron and
press the steam button (3) down until it
clicks into place.
9) Press the steam button (3) to check the
steam on/off function.
Note:
never use the iron unless the steam
button (3) is securely in place.
G
Decalcifying / «anti-calc» system
When limescale particles come out of the
steam vents or when the steam
development is insufficient even after
cleaning the «anti-calc» valve, you should
clean the steam chamber as follows:
1) Make sure the steam button (3) is in the
lowered position (steam off).
2)– 3) Fill the water tank, plug in the iron and
select the «•••» temperature setting.
4)– 5) Wait until the pilot light (7) turns off,
then unplug the iron from the outlet.
6)– 7) Holding the iron over a sink, press the
steam button (3) so it is in the upright
position, carefully pull it up, turn it and let
it rest in that position.
Caution:
When the steam button (3) is
pulled up, hot water and steam will be
released from the soleplate.
8) Turn the steam button (3) back into place
by pushing it down until it clicks into
place.
9)– 10) Fill the water tank, plug the iron in and
select the «•••» temperature setting.
11)– 13) When the pilot light (7) goes off,
press the power shot button (5) 4 times to
rinse the iron. Disconnect the iron and
wait for the soleplate to cool off, then
clean it as described above in section E.
Note:
the iron must never be used without
the steam button (3).
H Troubleshooting Guide
Subject to change without notice.
press
press
Problem Remedy
Water drops
coming out of
the steam vents
Turn the steam
regulator (3a) counter-
clockwise to reduce
the steam or press the
steam button (3) down
to turn the steam off.
Wait for longer
intervals between
pressing the power
shot button (5).
Select a higher
temperature setting.
No steam at all Press the steam
button (3) so that it is
in the upright position.
Less steam
develops or no
steam at all
Clean the «anti-calc»
valve (see section F).
Calcium parti-
cles coming
through the
steam vents
Decalcify the steam
chamber (see section
G).
4699375_SI6000_NA Seite 4 Mittwoch, 10. April 2002 8:39 08
All manuals and user guides at all-guides.com
Page 5

5
For USA only
How to obtain service in the USA
Should your Braun product require service,
please call 1-800-BRAUN 11 (800-272-8611)
to be referred to the authorized Braun Service
Center closest to you.
To obtain service:
A. Take the product in to the authorized
Braun Service Center of your choice or,
B. Ship the product to the authorized Braun
Service Center of your choice.
Pack the product well. Ship the product
prepaid and insured (recommended).
Include a copy of your proof of purchase
to verify warranty coverage, if applicable.
To obtain original Braun replacement parts
and accessories:
Contact an authorized Braun Service Center.
Please call 1-800-BRAUN 11 (800-272-8611)
to be referred to the authorized Braun Service
Center closest to you.
To speak to a Braun Consumer Service
Representative:
Please call 1-800-BRAUN 11 (800-272-8611).
Limited Warranty
Braun warrants this Braun appliance to be
free of defects in material and workmanship
for a period of one year from the date
of original purchase at retail.
If the appliance exhibits such a defect, Braun
will, at its option, repair or replace it without
cost for parts and labor. The product must be
carried in or shipped, prepaid and insured
(recommended), to an authorized Braun
Service Center. Proof of date of original
purchase is required.
The cost to ship the product to an authorized
Service Center is the responsibility of the
consumer, the cost to return the product
to the consumer is the responsibility of
Braun.
This warranty does not cover finishes, normal
wear, nor does it cover damage resulting
from accident, misuse, dirt, water, tampering,
unreasonable use, service performed or
attempted by unauthorized service centers,
failure to provide reasonable and necessary
maintenance, including recharging, or units
that have been modified or used for
commercial purposes.
ALL IMPLIED WARRANTIES, INCLUDING
ANY IMPLIED WARRANTY OF MER-
CHANTABILITY OR FITNESS FOR ANY
PARTICULAR PURPOSE, ARE LIMITED IN
DURATION TO ONE YEAR FROM DATE OF
ORIGINAL PURCHASE. IN NO EVENT WILL
BRAUN BE RESPONSIBLE FOR
CONSEQUENTIAL DAMAGES RESULTING
FROM THE USE OF THIS PRODUCT.
Some states do not allow the exclusion or
limitation of incidental or consequential
damages, so the above limitation may not
apply to you.
This warranty gives you specific legal rights,
and you may have other legal rights which
vary from state to state.
For Canada only
How to obtain service in Canada
Should your Braun product require service,
please call 1-800-387-6657 to be referred to
the authorized Braun Service Center closest
to you.
To obtain service:
A. Carry the product in to the authorized
Braun Service Center of your choice or,
B. Ship the product to the authorized Braun
Service Center of your choice.
Pack the product well. Ship the product
prepaid and insured (recommended).
Include a copy of your proof of purchase
to verify warranty coverage, if applicable.
To obtain original Braun replacement parts &
accessories:
Contact an authorized Braun Service Center.
Please call 1-800-387-6657 to be referred to
the authorized Braun Service Center closest
to you.
To speak to a Braun Consumer Service
Representative:
Please call 1-800-387-6657.
Limited 1-year Warranty
In the event a Braun appliance fails to
function within the specified warranty period
because of defects in material or workman-
ship, and the consumer returns the unit to an
authorized service center, Braun Canada will,
at its option either repair or replace the unit
without additional charge to the consumer.
This warranty does not cover any product
which has been damaged by dropping,
tampering, servicing performed or attempted
by unauthorized service agencies, misuse or
abuse. This warranty excludes units which
have been modified or used for commercial
purposes.
To the extent allowed by law, Braun Canada
shall not be responsible for loss of the
product, loss of time, inconvenience,
commercial loss, special or consequential
damages.
The provisions of this warranty are in addition
to and not a modification of or subtraction
from the statutory warranties and other rights
and remedies contained in ap-plicable
provincial legislation.
4699375_SI6000_NA Seite 5 Mittwoch, 10. April 2002 8:39 08
All manuals and user guides at all-guides.com
Page 6

6
Français
1. Ne pas utiliser ce fer à des fins autres
que celles pour lesquelles il est
destiné.
2. Pour se protéger des risques de
décharge électrique, ne pas plonger
le fer dans l’eau ni dans d’autres
liquides.
3.
Toujours régler le sélecteur de tempér-
ature du fer en position « min » avant
de le brancher ou de le débrancher.
Ne jamais tirer le cordon d’un coup
sec. Tenir la fiche et tirer pour
débrancher.
4. Ne pas laisser le cordon entrer en
contact avec des surfaces chaudes.
Laisser refroidir le fer complètement
avant de le ranger. Enrouler le cordon
autour du fer sans serrer.
5. Toujours débrancher le fer avant de le
remplir d’eau ou de le vider, et quand
il ne sert pas.
6. Ne pas faire fonctionner un fer dont le
cordon est abîmé, ou qui est tombé
ou a été endommagé. Pour éviter le
risque d’une décharge électrique, ne
pas démonter le fer ; le retourner à un
centre de service après-vente agréé
pour inspection et réparation.
Toute réparation non autorisée peut
entraîner un risque de décharge
électrique, de blessure ou de dom-
mage matériel.
7. Une surveillance attentive est
nécessaire lorsque l’appareil est
utilisé par des enfants ou à proximité
de ceux-ci. Ne pas laisser le fer sans
surveillance lorsqu’il est branché ou
qu’il se trouve sur une planche à
repasser.
8. Des pièces chaudes en métal, l’eau
chaude et la vapeur peuvent causer
des brûlures. L’utilisateur doit faire
preuve de prudence lorsqu’il renverse
le fer, car le réservoir peut contenir de
l’eau chaude.
9. Ce produit est destiné à un usage
domestique seulement.
IMPORTANTES PRÉCAUTIONS DE
SÉCURITÉ
Lors de l’utilisation du fer, certaines précautions élémentaires de sécurité doivent
être observées, dont les suivantes :
LIRE TOUTES LES DIRECTIVES AVANT L’UTILISATION
1. La puissance de cet appareil est de
1 500 watts. Pour éviter une surcharge
du circuit, ne pas faire fonctionner un
autre appareil à haute puissance sur
le même circuit.
2. Si une rallonge est absolument
nécessaire, utiliser un cordon de
12,5 ampères.
Les cordons d’intensité nominale
moins élevée peuvent surchauffer.
Prendre soin de disposer le cordon de
façon à éviter les manipulations et les
chutes.
DIRECTIVES SPÉCIALES
CONSERVER CES DIRECTIVES
4699375_SI6000_NA Seite 6 Mittwoch, 10. April 2002 8:39 08
All manuals and user guides at all-guides.com
all-guides.com
Page 7

7
Les produits Braun sont conçus et fabriqués
selon les normes les plus rigoureuses de
qualité, de conception et de fonctionnalité.
Nous espérons que vous profiterez au
maximum des nombreux avantages de votre
nouveau fer Braun FreeStyle.
Avis :
Retirer toutes les étiquettes apposées
sur la semelle avant l’utilisation initiale.
Importantes précautions de sécurité
•
Lire soigneusement toutes les directives
avant d’utiliser le fer. Conserver les
directives d’utilisation pendant toute la
durée de vie du fer.
•
Prendre soin de vérifier que la tension
correspond bien à celle qui est inscrite sur
le fer. Brancher le fer uniquement sur une
alimentation en courant alternatif (c.a.).
•
Toujours débrancher le fer et s’assurer que
le bouton de vapeur (3) est enfoncé en
position abaissée (désactivation de la
vapeur) avant de remplir d’eau le réservoir.
Pour débrancher le fer, toujours tirer la fiche
et non le cordon. Le cordon ne doit jamais
entrer en contact avec des objets chauds ni
avec la semelle chaude.
•
Ne jamais plonger le fer dans l’eau ni dans
d’autres liquides.
•
Quand on ne repasse plus, toujours placer
le fer en position verticale sur le talon
d’appui (8). Le débrancher quand on quitte
la pièce où l’on repasse, même si c’est pour
peu de temps.
•
Ne jamais retirer le bouton de vapeur (3) au
cours du repassage.
•
Garder le fer hors de la portée des enfants.
•
Les fers électriques combinent de hautes
températures avec des jets de vapeur
chauds qui peuvent occasionner des
brûlures.
•
Vérifier régulièrement le bon état du cordon
d’alimentation.
•
Si l’appareil, y compris le cordon, présente
un défaut quelconque, cesser son emploi
et le retourner à un centre de service après-
vente Braun pour réparation.
•
Une remise en état incorrecte effectuée par
un personnel non qualifié risque d’entraîner
des accidents ou de blesser l’utilisateur.
A Description
1 Orifice de vaporisation
2 Orifice du réservoir d’eau
3 Bouton de vapeur
3a Régulateur de vapeur
4 Bouton de vaporisation
5 Bouton de surplus de vapeur puissant
6Sélecteur de température
7Témoin de température / d’arrêt
automatique
8 Talon d’appui
B Avant l’utilisation
•
Ce fer est conçu pour fonctionner avec
de l’eau du robinet. Cependant, s’il s’agit
d’une eau extrêmement dure, nous recom-
mandons l’utilisation d’un mélange de 50 %
d’eau du robinet et de 50 % d’eau distillée.
Remplir le réservoir d’eau jusqu’au repère
« max ». Ne jamais utiliser d’eau distillée
seule. Ne pas ajouter d’additifs (par
exemple, l’amidon).
•
Garder le fer en position verticale et le
brancher sur la prise de courant.
Sélectionner la température désirée en
fonction des indications données par le
guide de repassage qui se trouve sur le
talon d’appui (8), ou en fonction des
indications qui se trouvent sur les étiquettes
des vêtements.
•
Le témoin de température (7) s’éteint
lorsque la température désirée est atteinte
(après environ une minute).
C Repassage
1 Activation / désactivation de la vapeur
Pour le repassage à la vapeur, le sélecteur
de température (6) doit être positionné sur
la zone rouge. Appuyer sur le bouton de
vapeur (3) pour déclencher le mode
vapeur.
activationde désactivation
la vapeur de la vapeur
(position verticale) (position abaissée)
Le bouton de vapeur (3) étant en position
verticale, tourner le régulateur de vapeur
(3a) afin de régler la quantité de vapeur.
Vapeur de préconditionnement
(offerte sur les modèles SI 6285 et
SI 6245)
La vapeur se dégage des canaux situés
sur la partie supérieure de la semelle
autour de la pointe du fer. Ceci assure le
préconditionnement du tissu par une
« prévaporisation», ce qui facilite le
repassage. Faire preuve de prudence,
étant donné que la vapeur se dégage
latéralement.
2 Surplus de vapeur puissant
Avant l’utilisation, appuyer sur le bouton
de surplus de vapeur puissant (5), de trois
à quatre fois, pour l’activer. Appuyer sur le
bouton de surplus de vapeur puissant (5)
par intervalles d’au moins 5 secondes.
Le bouton de surplus de vapeur puissant
(5) peut être activé au cours du repassage
à sec (voir point 4 ci-dessous).
Cependant, le sélecteur de température
(6) doit être positionné sur la zone située
entre « •••» et « max ». La fonction de
surplus de vapeur puissant peut égale-
ment être utilisée en position verticale
pour vaporiser des vêtements suspendus
ou des rideaux.
3 Fonction de vaporisation
Appuyer sur le bouton de vaporisation (4).
4 Repassage à sec
Désactiver le mode vapeur en appuyant
sur le bouton de vapeur (3) afin de le
placer en position abaissée.
5 Arrêt automatique
(offert sur les modèles SI 6285, SI 6245 et
SI 6225)
Important : La fonction d’arrêt auto-
matique ne contient pas de mercure.
Le mécanisme d’arrêt automatique se
manifeste par un petit bruit durant le
repassage. Ceci est absolument normal et
n’est en aucun cas synonyme de
problème ou de défaut de la part du fer. Le
témoin d’« arrêt automatique » (7) clignote
quand cette fonction est activée. Ceci se
produit quand le fer est resté :
– en
position horizontale posé sur sa
semelle pendant environ 25 secondes ou
– en position verticale posé sur le talon
d’appui (8) pendant environ 12
,5 minutes
et demie ou
– lorsque le fer repose sur le côté
pendant
environ 25 secondes
.
Il suffit de bouger le fer pour le faire
fonctionner de nouveau. Quand le témoin
d’« arrêt automatique » (7) cesse de
clignoter, cela signifie que le fer est de
nouveau alimenté en courant électrique.
D Après le repassage
•
Débrancher le fer et appuyer sur le bouton
d’activation / de désactivation de la vapeur
(3) afin de le placer en position abaissée
(désactivation de la vapeur).
•
Pour prolonger la durée de vie du fer, vider
le réservoir d’eau après l’utilisation.
•
Toujours laisser le fer refroidir avant de le
ranger en position verticale dans un endroit
sec.
E Entretien et nettoyage
Utiliser de la laine d’acier pour nettoyer la
semelle. Nettoyer ensuite la semelle avec
un chiffon. Ne jamais utiliser de tampon à
récurer, du vinaigre ou tout autre produit
chimique. Nettoyer le matériel de la
poignée et des boutons à l’aide d’un
chiffon et d’eau savonneuse.
F Nettoyage de la tige
anticalcaire
La longue tige anticalcaire du fer se trouve
sous le bouton de vapeur (3). Cette tige
doit être détartrée régulièrement (c’est-à-
dire à chaque fois que le débit de vapeur
est insuffisant).
Procéder comme suit :
1) Débrancher le fer et vider le réservoir
d’eau.
2) Appuyer sur le bouton de vapeur (3) afin
qu’il soit en position verticale.
3) Retirer le bouton de vapeur (3) avec
précaution (une certaine quantité d’eau
peut s’échapper de la semelle).
4) Faire attention à ne pas toucher la tige
anticalcaire.
5) Tremper la tige dans du vinaigre blanc ou
du jus de citron jusqu’à ce que les résidus
entartrés s’amollissent.
6) Nettoyer, à l’aide d’une brosse à soies
non métalliques, tous les orifices de la tige
jusqu’à ce qu’ils soient bien propres.
7) Rincer la tige sous l’eau du robinet.
8) Réintroduire la tige dans le fer et appuyer
sur le bouton de vapeur (3) jusqu’à
l’enclenchement.
9) Appuyer sur le bouton de vapeur (3) afin
de vérifier la fonction d’activation / de
désactivation de la vapeur.
Remar
que : Ne jamais utiliser le fer avant
que le bouton de vapeur (3) ne soit bien en
place.
G Détartrage / système
anticalcaire
Lorsque les particules entartrées se
dégagent des évents à vapeur ou que le
débit de vapeur est insuffisant, même
après le nettoyage de la tige anticalcaire,
il faut nettoyer la chambre de vaporisation
comme suit :
1) S’assurer que le bouton de vapeur (3) est
en position abaissée (désactivation de la
vapeur).
2)– 3) Remplir d’eau le réservoir, brancher le
fer et sélectionner le réglage de
température « •••».
4)– 5) Attendre que le témoin (7) s’éteigne,
puis débrancher le fer.
6)– 7) Tout en maintenant le fer au-dessus
d’un évier, appuyer sur le bouton de
vapeur (3) afin qu’il se trouve en position
verticale, le tirer avec précaution vers le
haut, le tourner et le laisser dans cette
position.
Mise en
garde : Lorsque le bouton de
vapeur (3) est tiré vers le haut, l’eau
chaude et la vapeur se dégagent de la
semelle.
8) Remettre le bouton de vapeur (3) en
place en l’abaissant jusqu’à ce qu’il
s’enclenche.
9)– 10) Remplir d’eau le réservoir, brancher
le fer et sélectionner le réglage de
température « •••».
11)– 13) Lorsque le témoin (7) s’éteint,
appuyer sur le bouton de surplus de
vapeur puissant (5) à quatre reprises pour
rincer le fer. Débrancher le fer et attendre
que la semelle refroidisse, puis procéder
au nettoyage conformément à la
description ci-dessus à la section E.
Remar
que : Ne jamais utiliser le fer sans
le bouton de vapeur (3).
press
press
4699375_SI6000_NA Seite 7 Mittwoch, 10. April 2002 8:39 08
All manuals and user guides at all-guides.com
Page 8

8
H Guide de dépannage
Sous réserve de modifications sans préavis.
Seulement pour
le Canada
Service après-vente au Canada
Pour obtenir des services après-vente pour
un produit Braun, veuillez composer le
1 800 387-6657 afin d’être dirigé vers le
centre de service après-vente agréé Braun
le plus proche.
Pour obtenir des services après-vente :
A. Veuillez remettre le produit au centre de
service après-vente agréé Braun de votre
choix. Ou :
B. Veuillez expédier le produit au centre de
service après-vente agréé Braun de votre
choix.
Assurez-vous de bien emballer le produit.
Expédiez le produit, port payé et assuré
(recommandé). N’oubliez pas d’inclure
une copie de votre preuve d’achat afin de
confirmer la couverture de la garantie, le
cas échéant.
Pour obtenir des pièces et accessoires de
rechange Braun d’origine :
Communiquez avec un centre de service
après-vente agréé Braun.
Veuillez composer le 1 800 387-6657 afin
d’être dirigé vers le centre de service après-
vente agréé Braun le plus proche.
Pour communiquer avec un représentant du
Service à la clientèle Braun :
Veuillez composer le 1 800 387-6657.
Garantie limitée d’un an
En l’occurrence d’un défaut à un appareil
Braun au cours de la période de garantie
mentionnée, soit par suite d'un vice de
matières ou de fabrication, et du renvoi de
l’appareil par le consommateur à un centre
de service après-vente agréé, Braun Canada
se réserve le choix de réparer ou remplacer
l’appareil sans aucuns frais supplémentaires
pour le consommateur. Cette garantie
devient invalide si le produit est endommagé
par une chute, une modification, un abus, une
utilisation incorrecte ou s’il a été soumis à un
entretien ou à des tentatives d’entretien par
des centres de service après-vente non
agréés. Cette garantie exclut les appareils
modifiés ou utilisés à des fins commerciales.
Dans la mesure permise par la loi, Braun
Canada n’est pas responsable pour une
perte d’utilisation, une perte de temps, un
inconvénient, une perte commerciale, un
dommage spécial ou indirect, causés par
l’appareil.
Les clauses de cette garantie constituent
une addition et non une modification ou
soustraction aux garanties statutaires
et autres droits et recours contenus dans
la législation provinciale applicable.
Problème Solution
De l’eau
s’écoule des
évents à vapeur
Tourner le régulateur
de vapeur (3a) vers la
gauche afin de réduire
la vapeur ou appuyer
sur le bouton de
vapeur (3) pour arrêter
la vapeur.
Attendre plus
longtemps entre
chaque enfoncement
du bouton de surplus
de vapeur puissant (5).
Sélectionner un
réglage de tem-
pérature plus élevée.
Il n’y a pas de
vapeur
Appuyer sur le bouton
de vapeur (3) afin qu’il
soit en position
verticale.
Il y a peu ou pas
du tout de
vapeur
Nettoyer la tige
anticalcaire (voir
section F).
Des particules
de calcium
sont libérées à
travers les
évents à vapeur
Procéder à un
détartrage de la
chambre de
vaporisation (voir
section G).
4699375_SI6000_NA Seite 8 Mittwoch, 10. April 2002 8:39 08
All manuals and user guides at all-guides.com
Page 9

9
Español
1. Utilice exclusivamente la plancha
para el uso específico para el cuál ha
sido diseñado.
2. Para protegerse de una descarga
eléctrica, no ponga nunca el cable, el
enchufe o el aparato dentro de agua o
cualquier otro líquido.
1. Antes de conectar/desconectar la
plancha, la temperatura debería
siempre posicionarse en «min».
Jamás tire del cable para desconec-
tar el enchufe; en cambio, sujetando
desde el enchufe, tire sutílmente para
desconectar.
2. No permita que el cable entre en
contacto con superficies calientes.
Antes de guardar, permita que la
plancha se enfríe. Enrolle el cable
alrededor de la base cuando guarde
la plancha.
3. Siempre que este llenando o
vaciando la plancha con agua,
verifique que la plancha no este
conectada a la red eléctrica.
4. No utilice la plancha, si el cable esta
dañado o si la plancha se ha caído y/
o dañado. Para evitar el riesgo de una
descarga eléctrica, no desarme la
plancha; llévelo a un Servicio de
Asistencia Técnica Braun para su
revisión o reparación. Reparaciones
por agentes no autorizados pueden
causar daño a la plancha, lesiones o
riesgos de descargas eléctricas.
5. Es necesario supervisar cuidadosa-
mente cuando un aparato es usado
por niños o en cercanía de ellos.
6. Quemaduras pueden resultar si se
tocan metales calientes como la
suela, agua caliente e inclusive vapor.
Tenga ciudado cuando de vuelta una
plancha que tenga agua caliente en el
depósito.
7. Este producto ha sido diseñado
únicamente para uso doméstico.
PRECAUCIONES IMPORTANTES
Siempre que utilice su plancha, deberá respetar las precauciones básicas de
seguridad, incluyendo las siguientes:
LEA TODAS LAS INSTRUCCIONES ANTES DE USAR
1. Este es un artefacto de 1500 watts
de potencia. Para evitar un recalenta-
miento del circuito électrico, no utilice
otro artefacto de alta potencia en el
mismo circuito.
2. Si una extensión de cable es absolu-
tamente necesaria, utilice un cable de
12,5 amperes debe ser usado. Cables
con menor amperaje pueden causar
recalentamiento. En caso de una
extensión, debe tenerse cuidado con
el cable para no tropezarse.
INSTRUCCIONES ESPECIALES
GUARDE ESTAS INSTRUCCIONES
4699375_SI6000_NA Seite 9 Mittwoch, 10. April 2002 8:39 08
All manuals and user guides at all-guides.com
Page 10

10
Los productos Braun han sido desarrollados
para alcanzar los más altos estándares de
calidad, funcionalidad y diseño. Esperamos
que disfrute de su nueva plancha Braun
FreeStyle.
Nota:
Antes de usar la plancha por primera
vez, retire la etiqueta de la suela.
Importante
•
Antes de usar la plancha lea cuidadosa-
mente las instrucciones. Guarde las
instrucciones de uso durante toda la vida
útil de la plancha.
•
Asegúrese de que el voltaje de su red se
corresponde con el que está impreso en la
plancha. Conecte la plancha únicamente a
una tensión alterna (AC).
•
Desconecte siempre la plancha antes de
llenar el depósito con agua y asegúrese de
que el botón de vapor (3) se encuentra en la
posición mínima (vapor desconectado).
Para desconectar la plancha, siempre tire
del enchufe y no del cable. Evite el contacto
del cable con objetos calientes o con la
misma suela de su plancha.
•
No sumerja la plancha en el agua u otros
líquidos.
•
Durante las pausas en el planchado, deje la
plancha en posición vertical sobre la base
de apoyo (8). Desenchúfela cuando salga
de la habitación aunque sea por poco
tiempo.
•
Nunca retire el botón de vapor (3) durante el
planchado.
•
Mantenga la plancha fuera del alcance de
los niños. Las planchas eléctricas alcanzan
temperaturas elevadas y usan vapor
caliente, por lo que debe prestarse especial
atención a posibles quemaduras.
•
Revise periódicamente el cable de su
plancha.
•
Si la plancha (incluido el cable) presenta
algún defecto, deje de usarla y llévela a un
Servicio de Asistencia Técnica Braun para
su reparación.
•
Reparaciones por agentes no autorizados o
mal hechas pueden causar accidentes o
daños al usuario.
Características eléctricas
Potencia nominal: 1500 W
Tensión de alimentación: 120 V ~
Frecuencia de operación: 60 Hz
A Descripción
1 Boquilla del spray
2 Boca del depósito de agua
3 Botón de vapor
3a Regulador de vapor
4 Botón de spray
5 Botón de super-vapor a presión
6 Selector de temperatura
7 Luz piloto de temperatura
8 Base de apoyo
B Antes de empezar
•
Esta plancha está diseñada para utilizar
agua corriente del grifo. Si el agua es muy
dura, recomendamos utilizar una mezcla de
50% de agua del grifo y 50% de agua
destilada. Llene el depósito de agua hasta
la señal «max». Nunca use agua destilada
únicamente. No añada aditivos
(por ejemplo, almidón).
•
Coloque la plancha en posición vertical y
enchúfela a la red. Seleccione la tempera-
tura de acuerdo con las instrucciones que
aparecen en la base de apoyo (8) de la
plancha o en la etiqueta de su prenda de
ropa.
•
Cuando la luz piloto de temperatura (7) se
apague, la plancha habrá alcanzado la
temperatura seleccionada
(apróximadamente 1 minuto después).
C Planchado
1 Conexión/desconexión de vapor
Para el planchado con vapor, el selector
de temperatura (6) debe estar situado
dentro de la franja roja.
Presione el botón de vapor (3) para
conectar el modo de vapor.
Vapor Vapor
conectado desconectado
Cuando el botón de vapor esté en su
posición alzada, gire el regulador de vapor
(3a) para ajustar la cantidad de vapor.
El vapor pre-acondicionador
(disponible en los modelos SI 6285 y
SI 6245)
El vapor es propulsado horizontalmente
hacia la parte frontal de la suela. Esta pre-
vaporización prepara la ropa y hace el
planchado más fácil.
Tenga cuidado, ya que también vapor sale
por los laterales.
2 Super-vapor a presión
Antes de empezar a planchar, presione el
botón de super-vapor a presión (5) 3 ó 4
veces para activarlo. Presione el botón de
super-vapor a presión en intervalos no
inferiores a 5 segundos.
El super-vapor a presión (5) puede
activarse aún durante el planchado en
seco (ver abajo en punto 4). Sin embargo,
el selector de temperatura deberá estar
dentro del rango comprendido entre «•••»
y «max». La función de super-vapor a
presión puede usarse también para el
planchado vertical de prendas o cortinas.
3 Función de spray
Presione el botón de spray (4).
4 Planchado en seco
Desconecte el modo de vapor presio-
nando el botón de vapor (3) de forma que
éste se sitúe en la posición inferior
(presionado).
5 Apagado automático (disponible en
modelos SI6285, SI6245 y SI6225).
Importante: La función de apagado
automático es libre de mercurio. El
mecanismo de apagado automático
causa un pequeño ruido durante el
planchado. Esto es absolutamente normal
y no debe interpretarse como una falla de
la plancha. La luz piloto «auto-off» (7) se
encenderá en forma intermitente cuando
el apagado automático está activado.
El apagado automático ocurre cuando la
plancha ha sido dejada en forma:
– horizontal apoyandosé sobre la suela
por alrededor de 25 se
gundos o
– vertical descansando sobre la base de
apoyo (8) por alrededor de 12,5 minutos o
– acostada sobre su costado por alrede-
dor de 25 se
gundos.
Con solo mover la plancha, la misma se
encenderá. Cuando la luz piloto «auto-
off» (7) deja de encenderse en forma
intermitente, significa que esta en
funcionamiento nuevamente.
D Después del planchado
•
Desenchufe la plancha y presione el botón
de vapor (3) de forma que se sitúe en la
posición inferior (vapor desconectado).
•
Para prolongar la vida de la plancha, vacíe
el depósito de agua luego de cada uso.
•
Guarde la plancha ya enfriada en un lugar
seco y siempre en posición vertical.
E Conservación y limpieza
Use una esponja de acero para limpiar
la suela de la plancha. Luego, pase un
paño por la suela limpia. No use nunca
esponjas de fibra, vinagre ni otros
productos químicos. Para limpiar el
material blando del mango y de los
botones de vapor y spray, use agua con
jabón.
F Limpieza de la válvula «anti-cal»
La plancha dispone de una válvula «anti-
cal» que se encuentra en la parte inferior
del botón de vapor (3). La válvula «anti-
cal»debe ser descalcificada regularmente
(por ejemplo cuando la producción de
vapor sea insuficiente).
Siga los siguientes pasos:
1) Desconecte la plancha y vacíe el depósito
de agua.
2) Presione el botón de vapor de forma que
quede levantado.
3) Retire cuidadosamente el botón (3) – es
posible que se derrame un poco de agua.
4) Tenga cuidado de no tocar la válvula
«anti-cal», que se encuentra en la parte
inferior.
5) Sumérjala en vinagre (no en esencia de
vinagre) o en zumo de limón hasta que la
cal se ablande.
6) Use un cepillo no metálico para retirar los
residuos de los orificios.
7) Enjuage el botón (3) con agua corriente.
8) Vuelva a colocar el botón en su sitio (3).
9) Presione el botón de vapor (3) para
comprobar la función de conexión/
desconexión de vapor.
Im
portante: nunca utilice la plancha si el
botón de vapor no está colocado en su
sitio.
G Descalcificación / Sistema
«anti-cal»
Cuando observe partículas residuales en
las salidas de vapor o cuando la función
de vapor no funcione correctamente
incluso después de haber limpiado la
válvula «anti-cal», deberá proceder a
limpiar la cámara de vapor del siguiente
modo:
1) Asegúrese que el botón de vapor (3) se
encuentra en su posición inferior
(presionado).
2)– 3) Llene el depósito de agua, conecte la
plancha y seleccione la posición de
temperatura «•••».
4)– 5) Espere hasta que la luz piloto (7) se
apague. Desconecte la plancha.
6)– 7) Sosteniendo la plancha encima del
fregadero, presione el botón de vapor (3)
de forma que quede levantado y
cuidadosamente gírelo dejándolo
descansar en esa posición.
Atención:
cuando el botón de vapor (3)
esté levantado, puede salir agua muy
caliente y vapor por toda la suela.
8) Presione el botón de vapor (3) situándolo
en la posición inferior (presionado).
9)– 10) Llene el depósito de agua, conécte
la plancha y seleccione la posición de
temperatura «•••».
11)– 13) Cuando la luz piloto (7) se apague,
presione el botón de super-vapor a
presión (5) 4 veces para drenar los
conductos. Desconecte la plancha y
espere a que la suela se enfrie hasta que
pueda limpiarla siguiendo los pasos del
apartado E.
Im
portante: nunca utilice la plancha sin el
botón de vapor (3) colocado en su sitio.
press
press
4699375_SI6000_NA Seite 10 Mittwoch, 10. April 2002 8:39 08
All manuals and user guides at all-guides.com
Page 11

11
H Problemas y soluciones
Modificaciones reservadas.
Solo para México
Garantia
La Compañía Braun consciente de lo que
significa para el usuario un servicio post-
venta, brinda a este aparato una garantia
por un año, a partir de la fecha de entrega.
Dentro del plazo de garantía subsanaremos
cualquier defecto de fabricación o mano
de obra, bien sea reparando, cambiando
algunas piezas o sustituyendo el aparato
según sea el desperfecto de éste.
Las piezas o aparatos que hayan sido
sustituidos serán de nuestra propiedad.
La garantia perderá validez en los siguientes
casos:
a) Cuando el producto no hubiese sido
operado de acuerdo al instructivo anexo.
b) Cuando el producto se hubiese utilizado
en condiciones distintas a las normales.
c) Cuando el producto hubiese sido alterado
o reparado por personas no autorizadas.
Para hacer efectiva esta garantia, presentar
la misma junto con el aparato al Centro de
Servicio Autorizado más cercano. Braun
cubrirá el importe de la reparación y el flete,
siempre y cuando el producto esté dentro de
la garantía. De lo contrario dichos gastos
correrán por cuenta del usuario previa
autorización.
El tiempo de reparación en ningún caso
excederá de 30 días a partir de la fecha de
recepción del producto.
En caso de extravio de la presente garantía,
el consumidor puede recurrir a su proveedor
para que se expida otra póliza de garantia,
previa presentación de la nota de compra o
factura correspondiente. La garantia tendrá
validez a partir de la fecha de entrega con-
firmada por la tienda vendedora mediante su
firma y sello sobre el recuadro inferior.
Importado y/o distribuído por:
Gillette Manufactura, S.A. de C.V./ Gillette
Distribuidora, S.A. de C.V.
Atomo No. 03
Parque Industrial Naucalpan
Naucalpan de Juarez
Estado de México
Código Postal 53370
R.F.C. GMA 940301 MV7 /
R.F.C. GDI 930706 NZ1
Servicio al consumidor.
Tel.: 01-800-50-858-00
Aparato Modelo
Nombre y/o razón social del distribuidor
Problema Solución
Gotas de agua
en las salidas
de vapor
Gire el regulador de
vapor (3a) en el
sentido opuesto a las
agujas del reloj, para
disminuir el vapor o
presione el botón de
vapor (3) para
desactivarlo.
Deje un intervalos
mayores de tiempo
cuando presione
varias veces el botón
de super-vapor a
presión (5).
Seleccione una
temperatura más alta.
Sin vapor Presione el botón de
vapor (3) de forma que
quede levantado.
Poco vapor o
carencia de
vapor
Limpie la válvula «anti-
cal» (ver apartado F).
Partículas de
cal en las
salidas de
vapor
Descalcifique la
cámara de vapor ver
apartado G).
4699375_SI6000_NA Seite 11 Mittwoch, 10. April 2002 8:39 08
All manuals and user guides at all-guides.com
all-guides.com
Page 12

12
English
Textile Protector
(available on model SI 6285)
The Braun Textile Protector protects fabrics
from heat damage and reduces shiny
patches while allowing full steam output. It
can therefore be used to iron delicate and
dark fabrics without having to use a cloth
between the iron and the garment.
Before ironing with the Textile Protector
Before using the Textile Protector for the first
time, be certain to iron for approximately two
minutes without it.
To attach the Textile Protector, lay it flat on
the ironing board, position the tip of the iron
into the Textile Protector tip, pull back the
plastic release, place the iron into the Textile
Protector, and click it into place by letting go
of the plastic release.
After attaching the Textile Protector, wait
approximately 1
1
/2 minutes before you start
ironing.
Ironing with the Textile Protector
The Textile Protector allows you to have the
temperature selector (6) at «
•••
» or «max»
so that you can use all the steam functions
offered on the iron. The heat from the
soleplate will be absorbed by the Textile
Protector and will not be transferred onto the
fabric.
Before you start ironing, we recommend
ironing a small section of the fabric on the
reverse side to check the reaction of the
fabric.
After ironing with the Textile Protector
To remove the Textile Protector, pull back the
plastic release and lift up the iron.
Caution: The Textile Protector does retain
heat.
Never stand your iron in the upright position
on the Textile Protector as the rubber anti-
skid strips will become damaged.
Always store your iron with the Textile
Protector detached.
Français
Protecteur de textile
(offert sur le modèle SI 6285)
Le protecteur textile de Braun protège les
tissus des dommages causés par la chaleur
et réduit les effets de brillance tout en
assurant une vaporisation maximale.
Il permet de repasser les tissus délicats et
foncés sans utiliser de chiffon entre le fer
et le vêtement.
Avant le repassage à l’aide du protecteur
textile
Avant d’utiliser le protecteur textile pour la
première fois, s’assurer de repasser pendant
environ deux minutes sans ce protecteur.
Pour fixer le protecteur textile, le poser à plat
sur la planche à repasser, placer la pointe du
fer sur la pointe du protecteur textile, tirer sur
la bande en plastique, placer le fer sur le
protecteur textile et l’enclencher en relâchant
la bande en plastique.
Après avoir fixé le protecteur textile, attendre
environ une minute et demie avant de com-
mencer le repassage.
Repassage à l’aide du protecteur textile
Le protecteur textile permet de régler le
sélecteur de température (6) à « •••» ou
« max » afin d’utiliser toutes les fonctions de
vaporisation offertes sur le fer. La chaleur qui
se dégage de la semelle sera absorbée par le
protecteur textile et ne sera pas transférée
sur le tissu. Avant de commencer le repas-
sage, nous recommandons de faire un essai
préalable sur une petite partie de l’envers du
tissu.
A
près le repassage à l’aide du protecteur
textile
Pour retirer le protecteur textile, tirer sur la
bande en plastique et soulever le fer.
Mise en garde : Le protecteur textile conserve
la chaleur.
Ne jamais laisser le fer en position verticale
sur le protecteur textile, car les bandes
antiglissantes en caoutchouc s’endom-
mageront.
Toujours ranger le fer sans le protecteur
textile.
Español
Protector de Tela
(disponible en el modelo SI 6285).
El «Textile Protector» de Braun proteje las
telas del daño que causa las excesivas
temperaturas y reduce la manchas brillosas
de las telas oscuras, aún permitiendo
conducir la cantidad óptima de vapor. Por
ello, puede ser utilizada para planchar telas
delicadas y oscuras, sin tener que utilizar un
paño entre la plancha y la prenda.
Antes de planchar con el Protector de Tela
Antes de utilizar el Protector de Tela por la
primera vez, aseguresé de planchar por lo
menos 2 minutos sin él.
Para adjuntar el Protector de Tela, apoyeló
sobre la tabla de planchar, posicione la punta
de la plancha dentro de la punta superior del
Protector de Tela, empuje para atrás el clip
de plástico, e introduzca la plancha dentro
del Protector de Tela, el cuál quedará
sujetado al soltar el clip de plástico.
Luego de adjuntar el Protector de Tela,
espere apróximadamente por 1
1
/2 minutos
antes de comenzar a planchar.
Planchando con el Protector de Tela
El Protector de Tela le permite regular el
selector de temperatura (6) entre «
•••
» y
«max», para permitirle utilizar todas las
variantes de intensidad de vapor que ofrece
la plancha. El exceso de calor de la suela será
absorvido por el Protector de Tela, y no será
transferido hacia las prendas.
Antes de comenzar a planchar, recomenda-
mos que empieze por planchar una pequeña
sección de la tela del lado reverso de la
prenda, para verificar la reacción de la tela.
Después de planchar con el Protector de Tela
Para remover el Protector de Tela, presione el
clip de plástico y levante la plancha para
desacoplarla.
Cuidado: El Protector de Tela retiene calor.
Nunca descanse su plancha en forma vertical
sobre el Protector de Tela, ya que derritirá las
bandas anti-deslizantes de la base de apoyo
(8).
Siempre guarde desacoplados su plancha y
el Protector de Tela
4699375_SI6000_NA Seite 12 Mittwoch, 10. April 2002 8:39 08
All manuals and user guides at all-guides.com
 Loading...