

Page 1
washable
5775
start•stop
washable
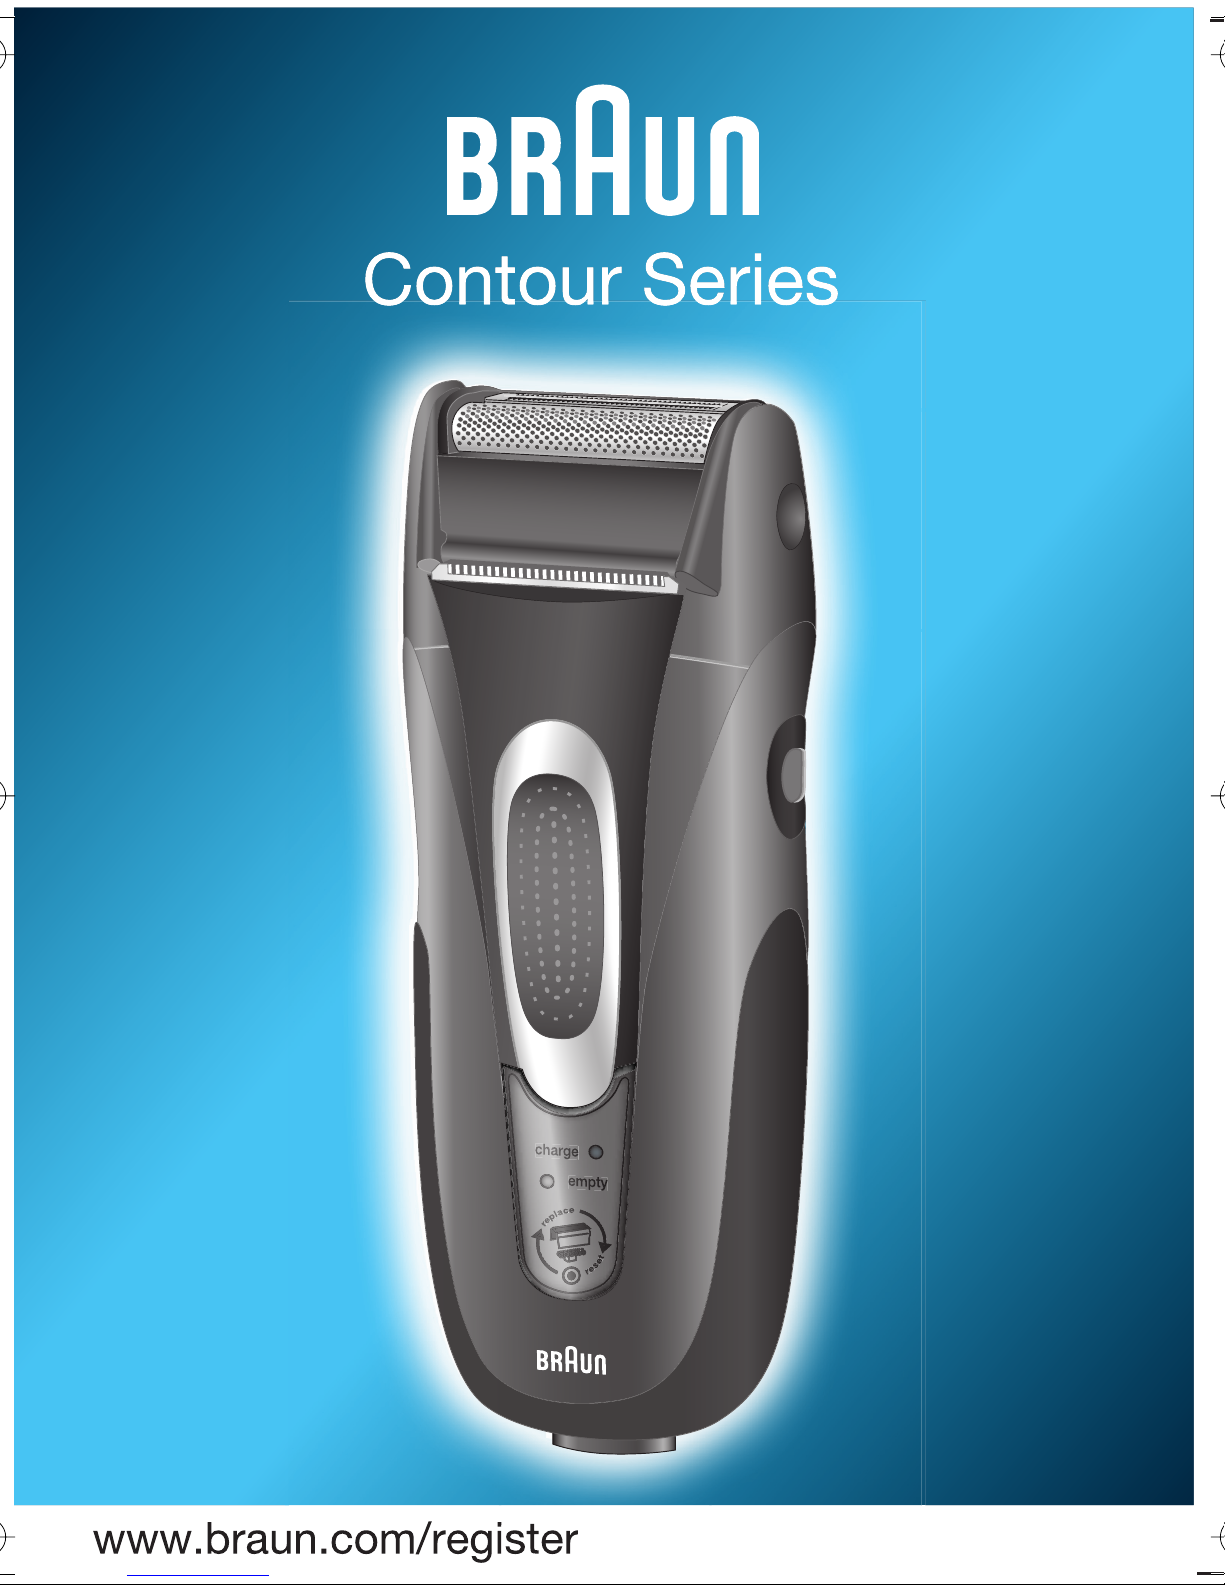
Contour 5775
Type 5738
Modèle 5738
Modelo 5738
Page 2

English 4
Français 9
Español 14
Thank you for purchasing a Braun product.
We hope you are completely satisfied with
your new Braun shaver.
If you have any questions, please call:
US residents 1-800-BRAUN-11
1-800-272-8611
Canadian residents 1-800-387-6657
Merci d’avoir fait l’achat d’un produit Braun.
Nous espérons que vous serez pleinement
satisfait de votre nouveau rasoir Braun.
Si vous avez des questions, veuillez appeler
Braun Canada : 1-800-387-6657
Gracias por haber comprado un producto
Braun.
Esperamos que Ud. quede completamente
satisfecho con su nueva afeitadora Braun.
Si Ud. tiene alguna duda, por favor llame al:
01(800) 508-5800
5-736-464/01/III-06
USA / CDN / MEX
Printed in Germany
Imprimé en Allemagne
Impreso en Alemania
Page 3
1
2
5000
6000
Series
100%
100%
start• stop
2
5
6
7
8
9
10
washable
start• stop
washable
Contour 5775
3
4
Contour
5000
6000
Series
1
on •
off
oil
Page 4

English
IMPORTANT SAFETY
INSTRUCTIONS
When using an electrical appliance, basic precautions should always be
followed, including the following:
Read all instructions before using this appliance.
When disconnected, the hand-held part of this shaving appliance may be
cleaned under water.
DANGER
To reduce the risk of electric shock:
1. Use only in dry condition.
2. Do not submerge in water.
3. Do not reach for an appliance that has fallen into water. Unplug immediately.
4. Do not use while bathing or in a shower.
5. Do not place, store or charge the appliance where it can fall or be pulled into a
tub or sink. Do not place in or drop into water or other liquid.
6. Except when charging, always unplug this appliance from the electrical outlet
immediately after using.
7. Unplug this appliance before cleaning.
8. This appliance is provided with a special cord set with integrated Safety Extra
Low Voltage power supply. Do not exchange or manipulate any part of it.
9. Do not use an extension cord with this appliance.
FOR HOUSEHOLD USE ONLY
4
Page 5

WARNING
To reduce the risk of burns, fire, electric shock, or injury to persons:
1. Close supervision is necessary when this appliance is used by, on, or near
children or invalids.
2. Use this appliance only for its intended use as described in this manual.
Do not use attachments not recommended by the manufacturer.
3. Never operate this appliance if it has a damaged cord or plug, if it is not
working properly, if it has been dropped or damaged, or if the power supply
has been dropped into water. Return the appliance to a service center for
examination and repair.
4. Keep the cord away from heated surfaces.
5. Never drop or insert any object into any opening.
6. Do not use outdoors or operate where aerosol (spray) products are being
used or where oxygen is being administered.
7. Do not use this appliance with a damaged or broken foil, as serious skin
injuries may occur.
8. Always attach plug to appliance first, then to outlet.
To disconnect, turn all controls to «off», then remove plug from outlet.
SAVE THIS INSTRUCTIONS
5
Page 6

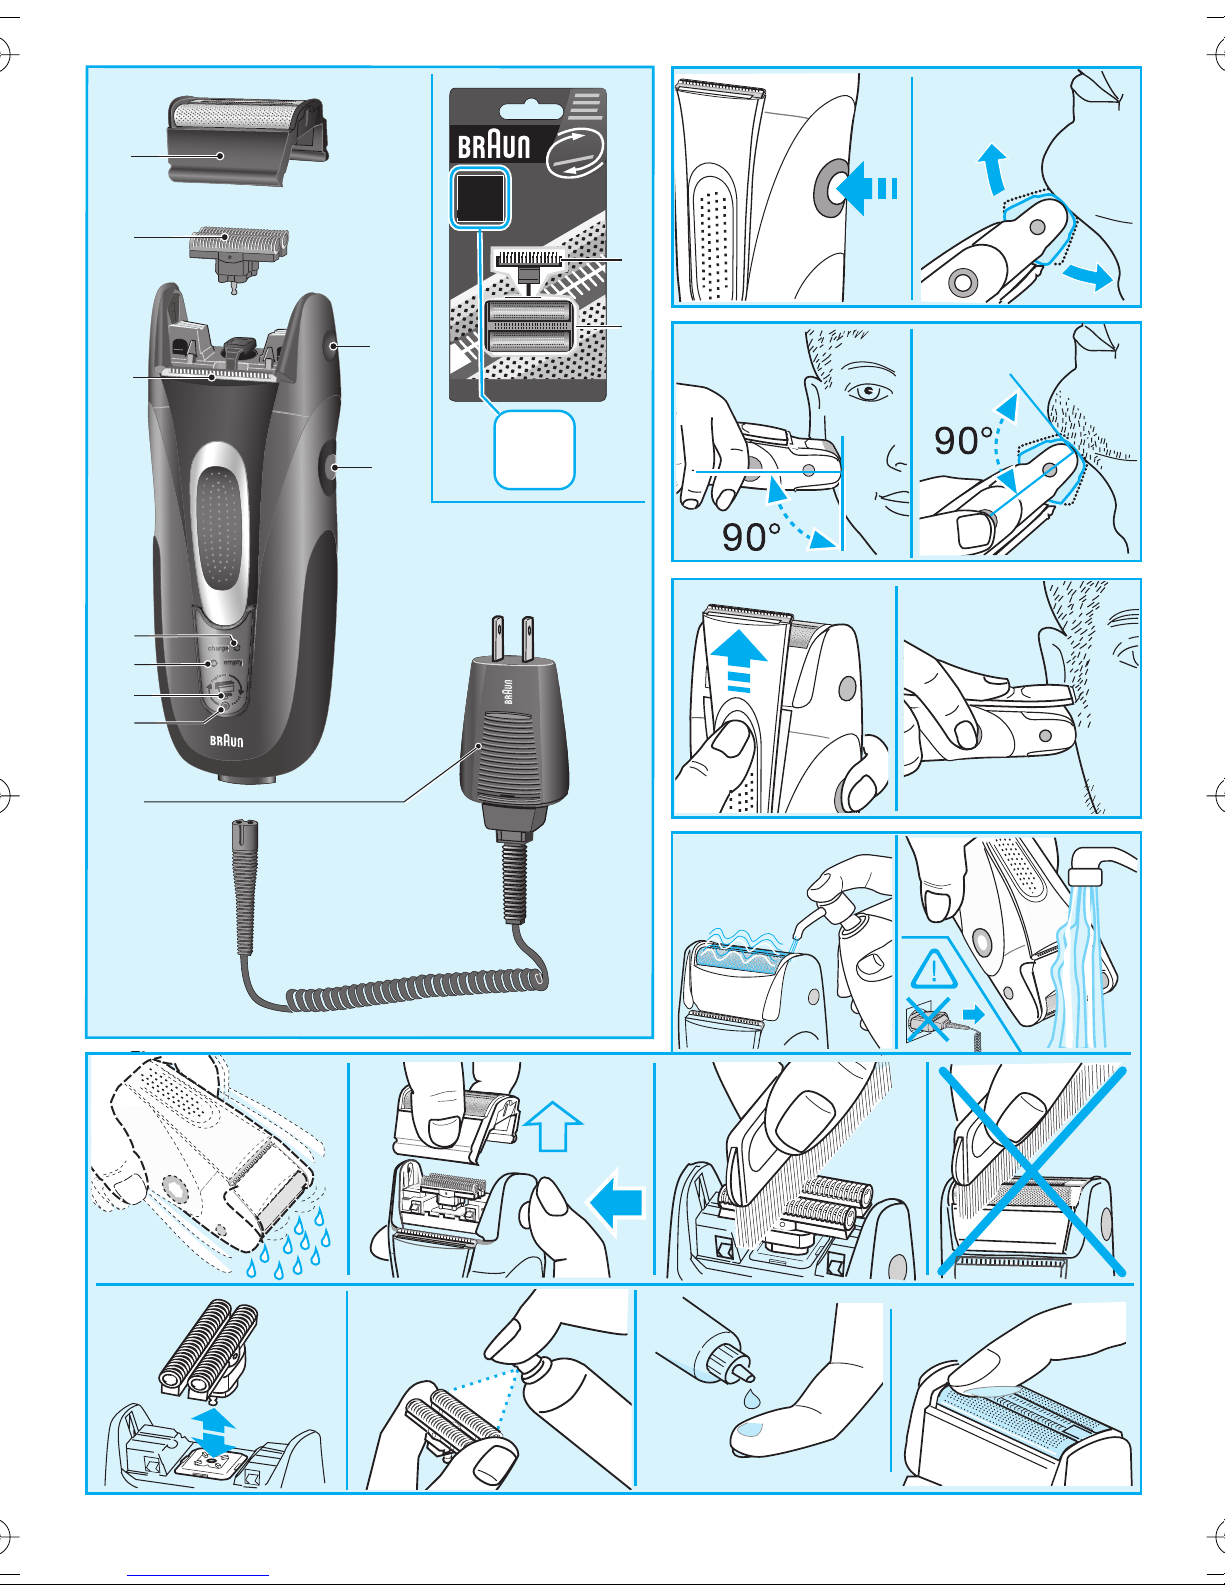
Description
Shaving
1 Shaver foil
2 Cutter block
3 Release button
4 On/off switch («start/stop»)
5 Long hair trimmer
6 Charging lights (green)
7 Low-charge light (red)
8 Replacement light for shaving parts
9 Reset button
10 Special cord set
Charging
The best environmental temperature for
charging is between 60 °F to 95 °F/15 °C and
35 °C.
• Using the special cord set, connect the
shaver/charging stand to an electrical outlet
with the motor switched off.
•
The green charging light blinks when the
shaver is being charged. When the battery is
fully charged, the charging light lights
permanently.
• When charging for the first time, leave the
shaver to charge continuously for 4 hours.
• Once the shaver is completely charged,
discharge the shaver through normal use.
Then recharge to full capacity. Subsequent
charges will take about 1 hour.
• A full charge provides up to 50 minutes of
cordless shaving time depending on your
beard growth.
• Maximum battery capacity will only be
reached after several charging/discharging
cycles.
• The red low-charge light flashes when the
battery capacity has dropped below 20%,
provided the shaver is switched on. The remaining capacity will then be sufficient for 2
to 3 shaves.
• If the rechargeable batteries are discharged,
you may also shave by connecting the
shaver to an electrical outlet via the special
cord set.
Turn on the shaver («start»):
The pivoting cutting system automatically
adjusts to every contour of your face.
Trimmer:
When the long hair trimmer is activated, it allows
the controlled trimming of moustache or
sideburns.
Tips for the perfect shave
• It can take up to 14-21 days for your beard
to adjust to the new shaving system.
• Shave before washing your face or taking
a shower, as skin tends to swell after
washing.
• The drier the skin, the closer the shaving
results will be.
• Hold the shaver at right angles (90°) to the
skin. Stretch the skin and shave against
the direction of beard growth.
• To maintain 100% shaving performance,
replace the shaver foil and cutter block,
when the replacement light (8) comes on
(after about 18 months), or when the
shaving parts are worn.
Cleaning
The hand-held unit should be detached from
the power supply cord before cleaning. The
shaver should not be used until it has dried.
Regular cleaning ensures better shaving
performance. Rinsing the shaving head after
each shave under running water is an easy and
fast way to keep it clean:
• Switch the shaver on (cordless) and rinse
the shaving head under hot running water.
A natural based soap may also be used
provided it contains no particles or abrasive
substances. Rinse off all foam and let the
shaver run for a few more seconds.
• Next, switch off the shaver, remove the
shaver foil and the cutter block. Then leave
the disassembled shaving parts to dry.
6
Page 7

Alternatively, you may clean the shaver using
the brush provided:
• Switch off the shaver. Remove the shaver
foil.
• Using the brush, clean the cutter block and
the inner area of the shaver head. However,
do not clean the shaver foil with the brush as
this may damage the foil.
• Put a drop of light machine oil onto the long
hair trimmer and the shaver foil.
Replacement light for shaving parts / Reset
To maintain 100% shaving performance,
replace your foil and cutter block, when the
replacement light for shaving parts (8) comes on
(after about 18 months) or when worn.
Change both parts at the same time for a closer
shave with less skin irritation.
(Shaver foil and cutter block: 5000/6000 series)
Environmental notice
This appliance is provided with nickelcadmium rechargeable batteries.
To protect the environment, do not
dispose of the appliance in the household
waste at the end of its useful life. Disposal can
take place at a Braun Service Center or
appropriate collection sites.
Caution: Opening the housing will destroy the
appliance and invalidate the guarantee.
Subject to change without notice.
For electric specifications, see printing on the
special cord set.
The replacement light will remind you during the
next 7 shaves to replace the shaving parts. Then
the shaver will automatically reset the display.
After you have replaced the shaving parts (foil
and cutter block), use a ball-pen to push the
reset button (9) for at least 3 seconds to reset
the counter.
While doing so, the replacement light blinks
and goes off when the reset is complete.
The manual reset can be done at any time.
Preserving the batteries
In order to maintain the optimum capacity of the
rechargeable batteries, the shaver has to be
fully discharged (by shaving) every 6 months
approximately. Then recharge the shaver to
full capacity. Do not expose the shaver to
temperatures higher than 122 °F/50 °C for
extended periods of time.
7
Page 8

FOR USA ONLY
FOR CANADA
2 year limited warranty
(foil and cutter block excluded)
Braun warrants this Braun shaver (except foil
and cutter block) to be free of defects in
material and workmanship for a period of two
years from the date of original purchase.
If the shaver exhibits such a defect, Braun will,
at its option, either repair or replace it for the
consumer without charge.
Please call 1-800-Braun 11 (800-272-8611) to
be referred to the authorized Braun Service
Center closest to you.
This warranty does not cover foils, cutter
blocks or damage resulting from accident,
misuse, abuse, dirt, water, tampering,
unreasonable use, normal wear, servicing
performed or attempted by unauthorized
service agencies or failure to provide
reasonable and necessary maintenance,
including recharging.
ALL IMPLIED WARRANTIES, INCLUDING ANY
IMPLIED WARRANTY OF MERCHANTABILITY OR
FITNESS FOR ANY PARTICULAR PURPOSE, ARE
LIMITED IN DURATION TO 2 YEARS FROM DATE
OF ORIGINAL PURCHASE.
IN NO EVENT WILL BRAUN BE RESPONSIBLE
FOR CONSEQUENTIAL DAMAGES RESULTING
FROM THE USE OF THIS PRODUCT.
ONLY
2 year limited warranty
(foil and cutter block excluded)
In the event a Braun Shaver fails to function
within 2 years from date of purchase, because
of defects in material or workmanship, and the
consumer returns the unit to an authorized
service center, Braun Canada, will, at its
option, either repair or replace the unit without
additional charge to the consumer.
This guarantee does not cover any product,
which has been damaged by dropping,
tampering, wrong current, servicing performed or attempted by unauthorized service
agencies, misuse or abuse,
ver foil as well as the normal wear of the
shearing parts.
Exclusion of Warranties:
warranty is the sole warranty offered by Braun
Canada. Braun Canada hereby disclaims any
implied warranty or merchantability or fitness
for any particular purpose. In no event will
Braun Canada be responsible for consequential damages resulting from the use
of this product.
kinks in the sha-
The foregoing
Some states do not allow the exclusion or
limitation of incidental or consequential
damages, so the above limitation or exclusion
may not apply to you.
This warranty gives you specific legal rights,
and you may also have other legal rights
which vary from state to state.
8
Page 9

Français
PRÉCAUTIONS IMPORTANTES
Lors de l’utilisation d’appareils électriques, toujours prendre les mesures de
précaution suivantes :
Lire toutes les directives avant d’utiliser cet appareil.
Une fois le système de rasage débranché, la pièce à main peut être
nettoyée à l’eau.
DANGER
Pour réduire les risques de choc électrique, suivre les directives suivantes :
1. Utiliser uniquement en milieu sec.
2. Ne pas immerger dans l’eau.
3. Ne pas toucher l’appareil s’il est entré en contact avec de l’eau. Le débrancher immédiatement.
4. Ne pas utiliser pendant le bain ou la douche lorsque l’appareil est branché sur
une prise de courant.
5. Ne pas placer ni ranger ni recharger l’appareil à un endroit d’où il peut tomber
ou glisser dans une baignoire ou un lavabo. Ne pas immerger dans l’eau ni
aucun autre liquide.
6. Sauf dans le cas d'une recharge, toujours débrancher l'appareil de la prise
murale immédiatement après l'utilisation.
7. Débrancher l’appareil avant le nettoyage.
8. Cet appareil comprend un cordon spécial muni d’un dispositif de sécurité
intégré assurant une alimentation très basse tension. Par conséquent, il faut
éviter d’échanger ou de manipuler les pièces.
9. Ne pas utilisier une rallonge avec cet appareil.
POUR USAGE DOMESTIQUE
9
Page 10

AVERTISSEMENT
Pour réduire les risques de brûlure, d’incendie, de choc électrique ou de
blessure, suivre les directives suivantes :
1. Exercer une surveillance attentive lorsque l’appareil est utilisé par ou pour des
enfants ou des personnes invalides, ou près de ceux-ci.
2. Ne pas utiliser cet appareil à des fins autres que celles indiquées dans ce
manuel. Ne pas employer d’accessoires non recommandés par le fabricant.
3. Ne jamais faire fonctionner un appareil dont la fiche ou le cordon est abîmé,
qui n’est pas en bon état de fonctionnement, est tombé, a été endommagé ou
mis en contact avec de l’eau. Retourner l’appareil à un centre de service pour
inspection et réparation.
4. Ne pas laisser le cordon entrer en contact avec des surfaces chaudes.
5. Ne jamais laisser tomber ni insérer d’objets dans les orifices de l’appareil.
6. Ne pas utiliser à l’extérieur, dans un endroit où des produits en aérosol
(vaporisateurs) sont utilisés ni là où l’on administre de l’oxygène.
7. Ne pas utiliser un appareil dont la grille est endommagée ou brisée ; cela
pourrait entraîner des blessures graves au visage.
8. Toujours relier la fiche à l’appareil avant de brancher sur la prise de courant.
Pour débrancher l’appareil, placer l’interrupteur à « arrêt », puis retirer la fiche
de la prise.
CONSERVER CES DIRECTIVES
10
Page 11

Description
1 Grille de rasage
2 Bloc-couteaux
3 Bouton d’ouverture de la tête de rasage
4 Bouton «marche/arrêt» («start/stop»)
5 Tondeuse retractable
6 Témoin lumineux de charge (vert)
7 Témoin de décharge (rouge)
8 Témoin de remplacement des pièces de
rasage
9 Bouton de réinitialisation
10 Cordon d’alimentation spécial
Recharge
La température environnante idéale pour un
programme de recharge est comprise entre
60 °F to 95 °F/
• En utilisant le cordon d’alimentation, reliez
le rasoir et la station de chargement à une
prise de courant lorsque le moteur est
éteint.
• Le témoin de chargement vert clignote
lorsque le rasoir est en cours de chargement. Lorsque la batterie est complètement
pleine, le témoin de chargement s’allume de
façon permanente.
• Lorsque vous chargez votre rasoir pour la
première fois, laissez le rasoir se charger en
continue pendant au moins 4 heures.
• Une fois que le rasoir est complètement
chargé, déchargez-le à travers une utilisation normale. Puis rechargez-le jusqu’à
atteindre une pleine capacité. Une pleine
charge prendra environ 1 heure.
• Une pleine charge procurera environ 50
minutes de rasage sans fil, selon la nature
de votre barbe.
• La capacité optimum de la batterie sera
atteinte après plusieurs cycles de chargement et de déchargement.
• Le témoin lumineux de décharge rouge
clignote lorsque la capacité de la batterie
est descendue en dessous de 20% et que le
rasoir est en marche. La capacité restante
sera alors suffisante pour 2 ou 3 autres
rasages.
• Si votre batterie est déchargée, vous
15 °C et 35 °C.
pouvez aussi vous rasez en branchant votre
rasoir sur une prise de courant grâce au
cordon d’alimentation spécial.
Rasage
Allumez votre rasoir en appuyant sur «start» :
Le système de coupe pivotant s’adapte
parfaitement à tous les contours de votre
visage.
Tondeuse :
Quand la tondeuse rétractable est activée, elle
permet d’ajuster la taille de la moustache et
des pattes.
Conseils d’utilisation pour un rasage
parfait
• Prévoir une période de transition pouvant
aller de 14 à 21 jours pour permettre à la
barbe de s’adapter au nouveau système
de rasage.
• Se raser avant de laver son visage ou de
prendre une douche, car la peau tend à
enfler après la toilette.
• Plus la peau est sèche, plus le rasage est
précis.
• Tenir le rasoir à angle droit (90°) par
rapport à la peau. Étirer la peau et raser
dans le sens opposé à la repousse.
• Pour conserver 100% de la performance
de votre rasoir, remplacez votre grille et
votre bloc-couteaux lorsque le témoin
lumineux de remplacement (8) s’allume
(après environ 18 mois) ou lorsqu’elles
sont usées.
Nettoyage
Retirer le cordon d’alimentation avant de
nettoyer l’unité à main. Laisser sécher le rasoir
avant de l’utiliser.
Un nettoyage régulier assure une performance
de rasage optimale. Rincer la tête de rasage
après chaque utilisation est une façon simple et
rapide de le garder propre :
11
Page 12

• Allumez votre rasoir (sans le cordon
d’alimentation) et rincez la tête de rasage
sous l’eau chaude. Vous pouvez également
utiliser un savon naturel dans la mesure où il
ne contient ni particules ni substances corrosives. Rincez toute la mousse et laissez
le rasoir fonctionner encore quelques
secondes.
• Puis, éteignez le rasoir, retirez la grille de
rasage et le bloc-couteaux. Laissez-les
alors sécher.
Maintenir la batterie en bon état
Afin d’optimiser la capacité maximum de
la batterie, le rasoir doit être déchargé
complètement (lors de l’utilisation courante)
tous les 6 mois environ. Puis rechargez à
nouveau le rasoir à pleine capacité.
N’exposez pas le rasoir à des températures
supérieures à 122 °F/50 °C pendant de longue
durée.
Avis environnemental
Alternativement, vous pouvez nettoyer votre
rasoir en utilisant la brosse fournie :
• Eteignez votre rasoir. Retirez la grille de
rasage.
• Cependant, ne nettoyez pas la grille de
rasage avec la brosse car cela pourrait
l’endommager.
• Appliquez une goutte d’huile de machine à
coudre sur la grille du rasoir.
Témoin lumineux pour les pièces de
rasage /Initialisation
Pour conserver 100% de la performance de
votre rasoir, remplacez votre grille et votre
bloc-couteaux lorsque le témoin de remplacement des pièces de rasage (8) s’allume (après
environ 18 mois) ou lorsqu’elles sont usées.
Pour un rasage plus précis et moins
d’irritations, changez les deux pièces en
même temps. (Grille de rasoir (1) et bloccouteaux (2) : 5000/6000 series)
Cet appareil est muni de piles
rechargeables au nickel-cadmium.
Pour protéger l’environnement, ne pas
jeter cet appareil dans les ordures ménagères
lorsqu’il n’est plus utilisable, mais le retourner
à un centre de service après-vente Braun ou à
un centre de collecte approprié.
Sujet à modifications sans préavis.
Caractéristiques électriques : voir inscriptions
sur le cordon d’alimentation.
Le témoin lumineux de remplacement des
pièces de rasage clignotera pendant les
7 prochains rasages. Puis le rasoir réinitialisera automatiquement le témoin. Après avoir
changer les pièces de rasage (grille et bloccouteaux), utilisez la mine d’un stylo pour
appuyer sur le bouton reset (9) durant au
moins 3 secondes pour réinitialiser le
compteur. Pendant la manipulation, la lumière
de remplacement clignote et s'éteint lorsque
la réinitialisation est complète. La réinitialisation manuelle peut être faite à tout moment.
12
Page 13

POUR LE CANADA SEULEMENT
Garantie restreinte de deux ans (grille et bloc de coupe exclus)
Advenant un défaut de fonctionnement d’un rasoir Braun survenant au cours de la période de
deux ans suivant la date d’achat, en raison d’un vice de matière ou de fabrication, et pourvu que
le consommateur retourne l’appareil à un centre de service après-vente agréé, Braun Canada se
réserve le choix de le réparer ou de le remplacer, sans aucuns frais supplémentaires pour le
consommateur.
La présente garantie ne couvre pas tout produit endommagé par une chute, une modification,
l’utilisation d’un courant inapproprié, un entretien ou des tentatives d’entretien par des centres
de service après-vente non agréés, un usage impropre ou abusif,
de rasage ou par l’usure normale des pièces de la tondeuse.
des anomalies dans la grille
Exclusion des garanties :
Par la présente, Braun Canada rejette toute garantie implicite à l’égard de la qualité marchande
ou de l’aptitude à des fins particulières. En aucun cas Braun ne sera tenue responsable des
dommages indirects résultant de l’utilisation de ce produit.
La présente garantie est la seule garantie offerte par Braun Canada.
13
Page 14

Español
INSTRUCCIONES IMPORTANTES
DE SEGURIDAD
Cuando use un aparato eléctrico, básicas precauciones deberían de ser siempre
seguidas, tales como las siguientes:
Lea todas las instrucciones antes de usar este aparato.
Una vez desconectada, solamente la afeitadora (or rasuradora, according
to what you have been using before) puede ser lavada con agua.
PELIGRO
Para reducir el riesgo de electrocución:
1. Usar en seco únicamente.
2. No sumergir en agua.
3. Nunca agarre un aparato que ha caído en el agua. Desconecte el aparato de
inmediato.
4. Nunca use el aparato mientras se bañe o se duche cuando el aparato está
conectado.
5. Nunca deje, guarde o recargue el aparato donde puede caer en la bañera o el
lavamanos. Nunca ponga o deje caer en agua u otro líquido.
6. Desconecte siempre el aparato del enchufe excepto, cuando se este cargando.
7. Desconecte el aparato antes de limpiarlo.
8. Este aparato viene con un juego de cableo con resistor integrado «Safety
Extra Low Voltage». No cambie o manipule ninguna parte de ello.
9. No utilice un cordón de extensión con este aparato.
PARA USO DOMÉSTICO ÚNICAMENTE
14
Page 15

ADVERTENCIA
Para reducir el riesgo de quemaduras, incendio, electrocución o lesiones a las
personas:
1. Es necesario un cercano control cuando esta máquina es utilizada por o cerca
de personas discapacitadas o niños.
2. Utilice esta máquina para el uso doméstico previsto, tal como se describe en
este manual.
No utilice accesorios no recomendados por el fabricante.
3. No utilice nunca esta máquina si el cordón o el enchufe están dañados, si no
funcionan correctamente, si ha sufrido una caída o se ha dañado o si se ha
caído al agua. Lleve la máquina a un centro de servicio autorizado de Braun
para que sea examinada y reparada.
4. Mantenga el cordón alejado de las superficies calientes.
5. Nunca deje caer ni inserte objeto alguno en ninguna de las aberturas.
6. No utilice esta máquina mientras está al aire libre, ni donde se estén utilizando
productos en aerosol (pulverizadores) o donde se esté administrando oxígeno.
7. No use este aparato si el papel metálico protector está roto o dañado, porque
puede resultar en heridas faciales muy graves.
8. Ponga siempre el cordón en el enchufe de la máquina primero y luego en la
toma de corriente. Para desconectar, apague la máquina y después
desconecte el cable del enchufe.
GUARDE ESTAS INSTRUCCIONES
15
Page 16

Description
Afeitado
1 Lámina
2 Bloque de cuchillas
3 Botones para liberar la lámina
4 Botón de encendido/apagado
(«start/stop»)
5 Corta-patillas
6 Piloto indicador de carga (verde)
7 Piloto de carga baja (rojo)
8 Piloto indicador de sustitución de lámina y
bloque de cuchillas
9 Botón para borrar y reiniciar
10 Cable de conexión a la red eléctrica
Carga
La temperatura ambiente adecuada para
efectuar la carga es de
35 °C.
• Durante la primera carga, conecte un cable
de conexión a la red eléctrica con la
afeitadora apagada.
• El piloto indicador de carga (verde)
parpadea mientras la afeitadora está en
proceso de carga. Una vez que la batería ha
sido cargada totalmente, la luz de carga se
mantendrá encendida.
• Déjala cargar durante al menos 4 horas.
• Una vez la afeitadora se haya cargado por
completo, aféitese hasta agotar la carga de
la batería. Se recargará de nuevo a su
capacidad completa en 1 hora.
• Una carga completa proporcionará más de
50 minutos de afeitado sin cable, dependiendo del tipo de barba.
• La capacidad máxima de la batería se
alcanzará sólo después de haber efectuado
varios ciclos de carga y descarga.
• El piloto indicador de batería baja se
iluminará intermitentemente, siempre y
cuando la afeitadora esté encendida,
cuando la capacidad de la batería está al
20%, lo que supone que tiene lo suficiente
para efectuar 2 o 3 afeitados más.
• Si la batería se encuentra descargada, es
posible recargarla conectando la afeitadora
a la red eléctrica usando el cable de conexión a la red eléctrica.
60 °F to 95 °F/
15 °C a
Encienda la afeitadora presionando el botón
de encendido/apagado («start/stop») (5)
El sistema de afeitado con el cabezal
basculante se adapta automáticamente a
todos los contornos de la cara.
Corta-patillas:
Con el corta-patillas activado, se puede
recortar bigotes y patillas
Consejos para un apurado perfecto
• Su barba puede tardar de 14 a 21 días en
adaptarse al nuevo sistema de afeitado.
• Recomendamos que se afeite antes de
lavarse o bañarse, ya que la piel tiende a
hincharse después de lavarse.
• Entre más seca esté su piel, obtendrá
mejores resultados.
• Mantenga la afeitadora en ángulo recto
con la piel (90°). Estire la piel y deslice la
afeitadora en la dirección contraria al
crecimiento de la barba.
• Para lograr un apurado perfecto 100%,
sustituya el bloque cuchillas y la lámina
cuando el piloto indicador de sustitución
de lámina y bloque de cuchillas (8) lo
indique (una vez cada 18 meses) o cuando
éstas se hayan desgastado por el uso.
Limpieza
Antes de lavar la afeitadora, la misma debe
estar desconectada de la red eléctrica. Luego,
la afeitadora no debe ser usada hasta que se
haya secado.
Una limpieza regular asegura una buen
apurado. Limpie la afeitadora bajo el agua de
forma fácil y rápida:
• Encienda la afeitadora, sin el cable
conectado a la red eléctrica, y enjuague el
cabezal de la afeitadora bajo el agua del
grifo. Es posible usar un jabón natural que
no contenga sustancias abrasivas. Aclare el
jabón y deja la afeitadora en funcionamiento
durante unos segundos más.
16
Page 17

• A continuación, apague la afeitadora, retire
la lamina y el bloque de cuchillas y déjalas
desmontadas hasta que se sequen.
También, puede limpiar la afeitadora usando
el cepillo:
• Apague la afeitadora. Extraiga la lamina y
de unos pequeños golpecitos sobre una
superficial lisa, para que se desprendan los
restos de pelo.
• Con un cepillo, limpie la cara interna del
cabezal. No debe limpiar ni la lámina ni las
cuchillas con el cepillo ya que éstas podrían
resultar dañadas.
• Ponga una gota de lubricante en el
cortapatillas y en la lámina.
Piloto de sustitución de lámina y bloque de
cuchillas / borrar y reiniciar (Reset)
Para lograr un apurado perfecto 100%,
sustituya el bloque cuchillas y la lámina
cuando la luz indicadora de sustitución lo
indique (8) (una vez cada 18 meses) o cuando
éstas se hayan desgastado por el uso.
Se recomienda cambiar las dos al mismo
tiempo para conseguir un afeitado más
apurado y una menor irritación en la piel.
(Lámina (1) y bloque de cuchillas (2): serie
5000/6000)
aproximadamente. Después es necesario
cargarla al máximo de capacidad. No exponga
la afeitadora a temperaturas más altas de
122 °F/50º C durante largos periodos de
tiempo.
Aviso ecológico
Este aparato utiliza baterías de níquel
de hidruro. Para protejer el ambiente,
no deseche el aparato en los desechos
normales al final de su vida útil. Puede desecharlo en los Centros de Servicio Braun o en
lugares apropiados para colectarlos.
Sujeto a cambio sin previo aviso.
Características eléctricas
Potencia nominal: 7 W
Tensión de alimentación:
100–240 V ~ / 50–60 Hz
(se adapta automáticamente)
Voltaje de salida del adaptador: 12 V
Voltaje de la afeitadora: 3,5 V
Sujeto a cambios sin previo aviso.
El piloto de sustitución se encenderá durante
siete afeitados para recordar que es necesario
cambiar el bloque de cuchillas y la lámina.
Después se borrará automáticamente.
Una vez el bloque de cuchillas y la lámina han
sido cambiadas, con ayuda de un bolígrafo
presionar el botón de borrar y reiniciar (9)
durante 3 segundos para poner manualmente
el contador a cero
Mientras se hace el cambio del bloque de
cuchillas y la lámina el piloto de sustitución
parpadeará y se apagará cuando se ha
finalizado el proceso de sustitución. El reinicio
se puede hacer siempre que se desee.
Conservación de la batería
Para mantener la batería en su óptimo de
capacidad, debe descargarla completamente
(en condiciones de uso habitual) cada 6 meses
Importado y/o distribuido por:
Procter & Gamble Manufactura,
S. de R.L. de C.V.,
Promotora de Bienes y Valores,
S. de R.L. de C.V., and
Compañía Procter & Gamble Mexico,
S. de R.L. de C.V.
Loma Florida #32, co. Lomas de Vista
Hermosa,
Delg. Cuajimalpa, 05100 México, D.F.
17
Page 18

SÓLO PARA MEXICO
2 años de garantía limitada
La compañía Procter & Gamble Manufactura, S. de R.L. de C.V. consciente de lo que significa
para el usuario un servicio post-venta, brinda a este aparato una garantía por 2 año, a partir de
la fecha señalada en el comprobante de compra original, entendiéndose por ésta, la misma en
que el consumidor recibió el producto. Dentro del plazo de garantía subsanaremos cualquier
defecto de fabricación o mano de obra, bien sea reparando, cambiando algunas piezas o
sustituyendo el aparato, según sea el desperfecto de éste. Las piezas o aparatos que hayan sido
sustituidos serán de nuestra propiedad.
La garantía perderá validez en los siguientes casos:
a) Cuando el producto no hubiese sido operado de acuerdo al instructivo anexo.
b) Cuando el producto se hubiese utilidado en condiciones distintas a las normales.
c) Cuando el producto hubiese sido alterado o reparado por personas no autorizadas.
Para poder hacer efectiva esta garantía, se deberá presentar el comprobante de compra junto
con el aparato al Centro de Servicio ubicado en: Braun de México, Calle cuatro número 4,
Fraccionamiento Industrial Alce Blanco, Naucalpan, Estado de México, C. P. 53370. Igualmente
podrá acudir a este domicilio para la obtención de partes consumibles, accesorios y refacciones,
o bien, acudir a los Centros de Servicio autorizados.
Los gastos de envío del producto al Centro de Servicio, razonablemente erogados, serán
cubiertos por Procter & Gamble Manufactura, S. de R.L. de C.V.
Para información respecto de otros domicilios de los Centros de Servicio Autorizados a nivel
nacional, le sugerimos comunicarse sin costo al 01-800-508-58-00.
18
 Loading...