


MultiGrill 7
Register your product
www.braunhousehold.com/register
CG 7020
CG 7010

DE
S. 4 page 19 page 33 pág. 47 pág. 61
EN
FR
ES
PT
IT
pag. 75 pag. 89 σελ. 103 Бет. 117 с тр. 136
UA
сто.152
NL
EL
KZ
RU
MultiGrill www.braunhousehold.com
2

13
3
2
4
5
13a
12
1
6
3
7
10
8
11
9
13b
14
3

WICHTIGE WARNHINWEISE
Sicherheitshinweise
Gefahr!
Die Nichtbeachtung dieses Warnhinweises kann zu
lebensgefährlichen Verletzungen durch Stromschlag führen.
- Vor dem Anschluss des Gerätes an die Steckdose muss
geprüft werden, dass:
● Die auf dem Typenschild des Gerätes angegebene
Netzspannung mit der Netzspannung Ihrer elektrischen
Anlage übereinstimmt;;
● die Steckdose geerdet ist und über eine Mindestleistung
von 16A verfügt.
● Jeder gewerbliche, unsachgemäße oder von der
Bedienungsanleitung abweichende Gebrauch befreit
den Hersteller von jeglicher Haftung.
- Sicherstellen, dass das Netzkabel nicht
mit Geräteteilen in Berührung kommt,
die sich während des Gebrauchs
erhitzen. Das Netzkabel muss bei
Beschädigung vom Hersteller oder
von seinem technischen Kundendienst
ausgewechselt werden, um jedes
Risiko auszuschließen.
- Vor dem Wegstellen des Gerätes oder dem Entfernen der Grillplatten und vor allen Reinigungs- und
Wartungsarbeiten das Gerät ausschalten, indem der
Wahlschalter auf „●" gedreht wird, und den Stecker
aus der Steckdose ziehen. Sicherstellen, dass das Gerät
vollständig abgekühlt ist.
- Das Gerät nicht im Freien benutzen.
- Das Gerät nicht ins Wasser tauchen.
- Das Gerät darf nicht über einen
externen Timer oder mittels eines
separaten Fernbedienungssystems
betrieben werden.
- Verwenden Sie nur Verlängerungskabel, die den
geltenden Sicherheitsvorschriften entsprechen.
Überprüfen Sie, dass sie sich in einwandfreiem Zustand
benden und einen angemessenen Querschnitt haben.
- Den Netzstecker nicht am Kabel aus der Steckdose
ziehen.
Achtung!
Die Nichtbeachtung dieser Warnhinweise kann zu
Verletzungen von Personen oder Schäden am Gerät führen.
- Reinigen Sie die Außenseite der Grillplatte mit einem
weichen Schwamm oder einem Tuch, das mit Wasser
und einem milden Reinigungsmittel angefeuchtet ist.
- Dieses Gerät ist zum Garen von Speisen bestimmt. Es
darf zu keinem anderen Zweck verwendet und in keiner
Weise verändert oder manipuliert werden.
- Dieses Gerät ist ausschließlich für
den Hausgebrauch bestimmt. Der
Gebrauch ist nicht vorgesehen
in: Mitarbeiterküchen von
Geschäften, Büros und
anderen Arbeitsumgebungen,
in Landgasthöfen, Hotels,
Zimmervermietungen,
Motels und sonstigen
Übernachtungseinrichtungen.
- Dieses Gerät darf von Kindern ab
8 Jahren und von Personen mit
eingeschränkten Kenntnissen
hinsichtlich seiner Handhabung
bzw. einer Beeinträchtigung der
Sinnesorgane verwendet werden,
unter der Voraussetzung, sie werden
überwacht und im sicheren Gebrauch
des Gerätes geschult, und sind sich
der damit verbundenen Gefahren
bewusst. Kinder dürfen nicht mit dem
Gerät spielen.
- Die Reinigung und Wartung durch den Anwender darf
nicht von Kindern durchgeführt werden, es sei denn, sie
sind mindestens 8 Jahre alt und werden überwacht.
Gerät und Netzkabel außerhalb der Reichweite von
Kindern unter 8 Jahren aufbewahren.
- Das Gerät außerhalb der Reichweite von Kindern
betreiben und nicht unbeaufsichtigt lassen.
- Das Gerät nicht ohne Grillplatten betreiben.
- Das Gerät erst dann wegstellen, wenn es vollständig
abgekühlt ist.
- Das Gerät nicht während des Gebrauchs verstellen.
Verbrennungsgefahr!!
Bei Nichtbeachtung dieses Warnhinweises besteht
Verbrennungsgefahr.
- Wenn das Gerät in Betrieb ist, kann
4

die Temperatur der Außenäche sehr
hoch werden. Benutzen Sie immer
den Gri (2) oder, sofern erforderlich,
Ofenhandschuhe.
- Die Grillplatten erst dann entfernen oder austauschen,
wenn das Gerät vollständig abgekühlt ist.
Hinweis:
Dieses Symbol weist auf Ratschläge und wichtige
Informationen für den Anwender hin.
- Keine Lebensmittel garen, die in Kunststo- oder
Aluminiumfolien bzw. in Polyethylenbeuteln verpackt
sind, um Brandgefahr zu vermeiden.
Dieses Produkt erfüllt die Anforderungen
der Richtlinie 1935/2004/EWG über Materialien und
Gegenstände, die dazu bestimmt sind, mit Lebensmitteln in
Berührung zu kommen.
DEUTSCHLAND: AKTUALISIERTE INFORMATIO
NEN ZUR ENTSORGUNG VON ALTGERÄTEN
Das Elektro- und Elektronikgerätegesetz (ElektroG) enthält
eine Vielzahl von Anforderungen an den Umgang mit Elektro
und Elektronikgeräten. Die wichtigsten sind hier zusammengestellt.
1. Getrennte Erfassung von Altgeräten
Elektro- und Elektronikgeräte, die zu Abfall geworden sind,
werden als Altgeräte bezeichnet. Besitzer von Altgeräten haben diese einer vom unsortierten Siedlungsabfall getrennten
Erfassung zuzuführen. Altgeräte gehören insbesondere nicht
in den Hausmüll, sondern in spezielle Sammel- und Rückgabesysteme.
2. Batterien und Akkus sowie Lampen
Besitzer von Altgeräten haben Altbatterien und Altakkumulatoren, die nicht vom Altgerät umschlossen sind, sowie
Lampen, die zerstörungsfrei aus dem Altgerät entnommen
werden können, im Regelfall vor der Abgabe an einer Erfassungsstelle vom Altgerät zu trennen. Dies gilt nicht, soweit
Altgeräte einer Vorbereitung zur Wiederverwendung unter
Beteiligung eines öentlich-rechtlichen Entsorgungsträgers
zugeführt werden.
3. Möglichkeiten der Rückgabe von Altgeräten
Besitzer von Altgeräten aus privaten Haushalten können
diese bei den Sammelstellen der öentlich-rechtlichen Entsorgungsträger oder bei den von Herstellern oder Vertreibern
im Sinne des ElektroG eingerichteten Rücknahmestellen un-
entgeltlich abgeben.
Rücknahmepichtig sind Geschäfte mit einer Verkaufsäche
von mindestens 400 m2 für Elektro- und Elektronikgeräte sowie diejenigen Lebensmittelgeschäfte mit einer Gesamtverkaufsäche von mindestens 800 m2, die mehrmals pro Jahr
oder dauerhaft Elektro- und Elektronikgeräte anbieten und
auf dem Markt bereitstellen. Dies gilt auch bei Vertrieb unter Verwendung von Fernkommunikationsmitteln, wenn die
Lager- und Versandächen für Elektro- und Elektronikgeräte
mindestens 400 m2 betragen oder die gesamten Lager- und
Versandächen mindestens 800 m2 betragen. Vertreiber haben die Rücknahme grundsätzlich durch geeignete Rückgabemöglichkeiten in zumutbarer Entfernung zum jeweiligen
Endnutzer zu gewährleisten.
Die Möglichkeit der unentgeltlichen Rückgabe eines Altgerätes besteht bei rücknahmepichtigen Vertreibern unter
anderem dann, wenn ein neues gleichartiges Gerät, das
im Wesentlichen die gleichen Funktionen erfüllt, an einen
Endnutzer abgegeben wird. Wenn ein neues Gerät an einen
privaten Haushalt ausgeliefert wird, kann das gleichartige
Altgerät auch dort zur unentgeltlichen Abholung übergeben
werden; dies gilt bei einem Vertrieb unter Verwendung von
Fernkommunikationsmitteln für Geräte der Kategorien 1,
2 oder 4 gemäß § 2 Abs. 1 ElektroG, nämlich „Wärmeüberträger“, „Bildschirmgeräte“ oder „Großgeräte“ (letztere mit
mindestens einer äußeren Abmessung über 50 Zentimeter).
Zu einer entsprechenden Rückgabe-Absicht werden Endnutzer beim Abschluss eines Kaufvertrages befragt. Außerdem
besteht die Möglichkeit der unentgeltlichen Rückgabe bei
Sammelstellen der Vertreiber unabhängig vom Kauf eines
neuen Gerätes für solche Altgeräte, die in keiner äußeren Abmessung größer als 25 Zentimeter sind, und zwar beschränkt
auf drei Altgeräte pro Geräteart.
4. Datenschutz-Hinweis
Altgeräte enthalten häug sensible personenbezogene Daten. Dies gilt insbesondere für Geräte der Informations- und
Telekommunikationstechnik wie Computer und Smartphones. Bitte beachten Sie in Ihrem eigenen Interesse, dass für
die Löschung der Daten auf den zu entsorgenden Altgeräten
jeder Endnutzer selbst verantwortlich ist.
5. Bedeutung des Symbols „durchgestrichene Mülltonne“
Das auf Elektro- und Elektronikgeräten regelmäßig abgebil-
dete Symbol einer durchgestrichenen Mülltonne
weist darauf hin, dass das jeweilige Gerät am
Ende seiner Lebensdauer getrennt vom unsortierten Siedlungsabfall zu erfassen ist.
5

BESCHREIBUNG
CLICK
CLICK
1. Boden und Deckel: solide Konstruktion aus Edelstahl
mit selbstjustierendem Deckel.
2. Gri: robuster Gri aus Metallguss, um den Deckel der
Dicke des Grillguts anzupassen.
3. Entsperrstasten des Grillplatte: zum Entsperren und
Entfernen der Grillplatte drücken.
4. Vorrichtung zum Arretieren/Entsperren der
unteren Grillplatte und zur Höhenverstellung der
oberen Grillplatte/des Deckels
5. Entsperrstaste des Scharniers: ermöglicht das
vollständige Aufklappen des Deckels zu einer ebenen
Grilläche
6. Höhenverstellung der Platte „Ofengrill-
Funktion”: um die Grillplatte/den oberen Deckel in
der gewünschten Höhe zu arretieren, um Speisen zu
garen, die nicht fest zusammengedrückt werden sollen.
7. Betriebsleuchte (grün): Die Kontrolllampe ist
eingeschaltet, wenn das Gerät an das elektrische
Stromnetz angeschlossen ist.
8. Kontrolllampe obere Grillplatte (rot): Die
Kontrolllampe ist eingeschaltet, wenn die Heizelemente
gespeist sind, und schaltet sich aus, wenn die
Temperatur erreicht wird und die Grillplatte bereit ist.
9. Kontrolllampe untere Grillplatte (rot): Die
Kontrolllampe ist eingeschaltet, wenn die Heizelemente
gespeist sind, und schaltet sich aus, wenn die
Temperatur erreicht wird und die Grillplatte bereit ist.
10. Thermostatknopf der oberen Grillplatte: Auf MED
- MAX oder "●" stellen, um die Temperatur der oberen
Grillplatte zu regeln.
11. Thermostatknopf der unteren Grillplatte: Auf
WARM - LOW - MED - MAX oder "●" stellen, um die
Temperatur der unteren Grillplatte zu regeln.
12. Vordere Stellfüße.
13. Herausnehmbare Grillplatten: antihaftbeschichtet
und für Geschirrspüler geeignet, leicht zu reinigen. DIE
ANZAHL UND ART DER GRILLPLATTEN KÖNNEN NACH
MODELL UNTERSCHIEDLICH SEIN.
13a Gerielte Grillplatte: perfekt zum Grillen von Steaks,
Hamburgern, Hähnchen und Gemüse
13b. Glatte Grillplatte: für die gelungene Zubereitung von
Pfannkuchen, Eiern, Speck und Krustentieren.
14. Fettauangschale: in das Gerät integriert und
abnehmbar für die einfache Reinigung.
INBETRIEBNAHME
Das gesamte Verpackungsmaterial und die Werbeaufkleber
vom Grill entfernen. Vor dem Wegwerfen des
Verpackungsmaterials sicherstellen, dass alle Teile des neuen
Gerätes entnommen wurden. Es wird empfohlen, den Karton
und das Verpackungsmaterial für den späteren Gebrauch
aufzubewahren.
Hinweis: Vor dem Gebrauch Boden, Deckel
und Drehregler mit einem feuchten Tuch abwischen,
um transportbedingte Staubrückstände zu entfernen.
Die Grillplatten, die Fettauangschale und den
Reinigungsschaber sorgfältig reinigen. Die Grillplatten und
die Fettauangschale können im Geschirrspüler gereinigt
werden.
Hinweis: Beim ersten Gebrauch des Gerätes kann ein
leichter Geruch entstehen und kann sich etwas Rauch bilden.
Dies ist bei allen Geräten mit Antihaftbeschichtung eine
normale Erscheinung.
Hinweis: die abnehmbaren Grillplatten (gerielt und
glatt) können gegeneinander ausgetauscht werden.
Einsetzen der Grillplatten
- Das Gerät vollständig aufgeklappt aufstellen (siehe
Abbildung 1). Die Grillplatten nacheinander einsetzen.
- Jede Grillplatte kann sowohl in das Gehäuseoberteil als
auch in das Gehäuseunterteil eingesetzt werden (siehe
Abbildung 2).
6

Um die Grillplatten zu entfernen
Das Gerät vollständig aufgeklappt aufstellen.
Die Entsperrstasten der Grillplatten (3) an der rechten
Seite ausndig machen. Die Taste kräftig drücken, um die
Grillplatte vom Boden zu lösen. Die Grillplatte mit beiden
Händen festhalten und entlang der Metallhalterungen aus
dem Boden ziehen. Auch die andere Entsperrstaste drücken,
um die zweite Grillplatte auf die gleiche Weise zu entnehmen.
Verbrennungsgefahr!! Die Grillplatten erst dann
entfernen oder austauschen, wenn das Gerät abgekühlt ist.
Aufstellen der Fettauangschale
Während des Grillvorgangs muss die Fettauangschale in
ihre Aufnahme an der rechten Seite des Gerätes eingesetzt
werden. Das aus dem Grillgut austretende Fett läuft durch
die Önung an der Grillplatte ab und wird in der Schale
aufgefangen.
Hinweis: Während des Grillvorgangs die
Fettauangschale häug kontrollieren und herausziehen,
um zu viel üssiges Fett zu vermeiden.
Nach dem Grillvorgang muss das aufgefangene Fett
vorschriftsmäßig entsorgt werden.
Die Fettauangschale kann im Geschirrspüler gereinigt
werden.
Achtung! Während des Grillvorgangs ist stets größte
Vorsicht geboten.
Um das Gerät zu önen, den Gri anfassen, der kalt bleibt.
Die Teile aus Aluminiumguss hingegen werden sehr heiß
und dürfen während und sofort nach dem Grillvorgang nicht
berührt werden. Bevor das Gerät gehandhabt wird, muss es
abkühlen (für mindestens 30 Minuten).
Beim Garen muss die Fettauangschale immer eingesetzt
sein. Die Fettauangschale nicht leeren, bis das Gerät nicht
vollständig abgekühlt ist. Die Fettauangschale vorsichtig
herausziehen, um keine Flüssigkeit zu verschütten.
Fleisch und dünn geschnittenes Fleisch, Gemüse und
Brötchen zu garen. Die Funktion Kontaktgrill ist perfekt, um
Speisen in kurzer Zeit oder auf gesunde Weise zuzubereiten.
Mit dem Kontaktgrill gart das Grillgut schnell, da es auf
beiden Seiten gleichzeitig mit den Grillplatten in Berührung
kommt (siehe Abbildung 3).
Durch die Ablaufrinnen der Grillplatte und die Önung an
der Rückseite des Gerätes kann das Fett ablaufen und in der
Fettauangschale aufgefangen werden.
Das Gerät ist mit einem speziellen Gri und einem Scharnier
ausgestattet, mit denen die obere Grillplatte der Dicke des
Grillguts angepasst werden kann. Wenn mit dem Kontaktgrill
unterschiedliches Grillgut gleichzeitig gegart werden soll,
dann sollte das Grillgut die gleiche Dicke aufweisen, damit
der Deckel (die obere Grillplatte) gleichmäßig auiegt.
Aufgeklappter Grill
Die obere Grillplatte bendet sich auf gleicher Ebene mit
der unteren Grillplatte. Die untere und die obere Grillplatte
benden sich auf gleicher Ebene und bilden so eine große
Grilläche. In dieser Stellung kann das Gerät als BarbecueGrill mit gerielter oder glatter Grillplatte verwendet
werden. Um das Gerät in diese Stellung zu bringen, muss
zunächst die Entsperrtaste für das Scharnier auf der rechten
Seite ausndig gemacht werden. Den Gri mit der linken
Hand festhalten und mit der rechten Hand die Entsperrtaste
für das Scharnier drücken (siehe Abbildung 4).
BETRIEBSSTELLUNGEN DES GERÄTES
Kontaktgrill (geschlossene Stellung)
Die obere Grillplatte liegt auf der unteren Grillplatte auf.
Dies ist die Ausgangsstellung und die Stellung zum Garen,
wenn das Gerät als Kontaktgrill verwendet wird. Die obere
Grillplatte passt sich automatisch der Dicke des Grillguts auf
der unteren Grillplatte an. Auf diese Weise gart das Grillgut
gleichmäßig auf beiden Seiten.
Der Kontaktgrill ist ideal, um Hamburger, knochenloses
Den Gri nach hinten schieben, bis der Deckel vollständig
aufgeklappt ist (siehe Abbildung 5).
7

Wenn der Gri leicht angehoben wird, bevor die Entsperrtaste
gedrückt wird, verringert sich der Druck auf das Scharnier
und der Önungsvorgang geht leichter vor sich.
Das Gerät kann als Barbecue-Grill verwendet werden, um
Hamburger, Steaks, Hähnchen und Fisch zuzubereiten. Die
Funktion Barbecue-Grill ist die vielseitigste Betriebsart des
Gerätes. Die Grillplatten sind aufgeklappt, wodurch die
doppelte Grilläche genutzt werden kann.
Auf getrennten Grillplatten kann unterschiedliches Grillgut
zubereitet werden, ohne die Grillsäfte zu vermischen, oder
es kann eine größere Menge des gleichen Grillguts zubereitet
werden. Bei aufgeklapptem Deckel können verschiedene
Fleischsorten mit unterschiedlicher Dicke bis zur jeweils
gewünschten Garstufe gegrillt werden. In dieser Stellung
muss das Grillgut während des Grillvorgangs gewendet
werden. Das Gerät kann auch mit den glatten Grillplatten
verwendet werden, um Pfannkuchen, Käse, Eier und Speck
zum Frühstück zuzubereiten (siehe Abbildung 6).
Ideal für die Zubereitung von Gemüse mit hohem
Wassergehalt, da das Wasser verdampfen kann.
Diese Betriebsstellung kann verwendet werden, um weiche
Sandwiches und Speisen zuzubereiten, die nicht fest
zusammengedrückt werden sollen
- Das Grillgut auf die unteren Grillplatte legen.
- Die obere Grillplatte am Gri absenken, bis sie sich nahe
am Grillgut bendet (Abb. A).
- Die Vorrichtung zum Arretieren/Entsperren (4)
der Grillplatten durch Verstellen des Hebels in die
gewünschten Grillstellung bringen.
- Die obere Grillplatte wird in ihrer Stellung arretiert. Es
gibt 5 verschiedene Höheneinstellungen (Abb. B).
Auf der großen Garäche kann gleichzeitig unterschiedliches
Grillgut oder eine größere Menge des gleichen Grillguts
zubereitet werden.
Ofengrill
Diese Stellung (siehe Abbildung 7) ist perfekt, um sehr dickes
Grillgut zu grillen, das langsam und gleichmäßig gegart
werden muss.
GEBRAUCH
Betrieb
Nachdem das Gerät richtig vorbereitet wurde und wenn der
Grillvorgang beginnen soll, über die Thermostatknöpfe 10
und 11 für jede der beiden Grillplatten (obere und untere) die
8

gewünschte Temperatur wählen.
Die Kontrolllampen der oberen und unteren Platte (8 - 9)
schalten sich ein.
Je nach gewählter Temperatur dauert es einige Minuten,
bis das Gerät aufgeheizt ist. Wenn der Thermostat die
gewünschte Temperatur erreicht hat, schalten sich die
Kontrolllampen der oberen und unteren Platte aus und das
Gerät ist betriebsbereit.
Die Temperatureinstellung kann jederzeit während des
Grillvorgangs geändert und dem Grillgut angepasst werden.
Hinweis: Das Gerät hat 2 vordere Stellfüße (16), die
das Ablaufen des Öls in die Fettauangschale erleichtern.
REINIGUNG UND WARTUNG
Wartung durch den Anwender
- Keine Utensilien aus Metall verwenden, da sie die
antihaftbeschichteten Grillplatten verkratzen können.
Utensilien aus Holz oder hitzebeständigem Kunststo
verwenden.
- Utensilien aus Kunststo dürfen nicht längere Zeit mit
den heißen Grillplatten in Kontakt kommen.
- Zwischen zwei Zubereitungen die Grillgutrückstände
entfernen und über die Fettablaufönung in der
darunterliegenden Schale auangen, dann mit einem
Küchentuch säubern und mit der nächsten Zubereitung
beginnen.
- Bevor das Gerät gereinigt wird, muss es vollständig
abgekühlt sein (für mindestens 30 Minuten).
einem milden Reinigungsmittel angefeuchtet ist.
Keine Metallgegenstände verwenden, um die Grillplatten zu
reinigen.
TECHNISCHE EIGENSCHAFTEN
Versorgungsspannung 220-240 V / 50-60 Hz
Leistungsaufnahme 2000W
Reinigung und Pege
Hinweis: Vor der Reinigung des Gerätes sicherstellen,
dass es vollständig abgekühlt ist.
Nach Beendigung des Grillvorgangs die Drehregler auf „●"
stellen und das Gerät vom Stromnetz trennen. Das Gerät
mindestens 30 Minuten abkühlen lassen. Grillgutrückstände
von den Grillplatten entfernen. Die Fettauangschale leeren.
Die Fettauangschale kann von Hand oder im Geschirrspüler
gereinigt werden.
Die Entsperrtasten der Grillplatten (3) drücken, um die
Platten aus dem Gerät zu entfernen. Vor Berühren der
Grillplatten sicherstellen, dass sie vollständig abgekühlt
sind. Die Grillplatten können im Geschirrspüler gereinigt
werden, wenn auch häuges Reinigen die Eigenschaften
der Beschichtung beeinträchtigen könnte. Es wird daher
empfohlen, die Außenseite der Grillplatte mit einem weichen
Schwamm oder einem Tuch zu reinigen, das mit Wasser und
9

GARTABELLE
RIND DICKE
Steak 0,5 - 1 2 G u t
Steak 0,5 - 1 4 G u t
Filet 3-4 4 Blutig KONTAKT
Filet 3-4 4 Mittel KONTAKT
Filet 3-4 4 G u t
T-Bone-
Steak
T-Bone-
Steak
T-Bone-
Steak
T-Bone-Steak
Hambur-
ger
Nein.
GAR-
FUNKTION GRILLPLATTEN THERMOSTAT-
(cm)
STÜCK
STUFE
KONTAKT
durch
GRILL
AUFGE-
durch
KLAPPTER
GRILL
GRILL
GRILL
KONTAKT
durch
GRILL
2-3 2 Mittel KONTAKT
GRILL
2-3 2 G u t
2-3 4 Mittel AUFGE-
2-3 4 G u t
2-3 6 G u t
durch
durch
durch
KONTAKT
GRILL
KLAPPTER
GRILL
AUFGEKLAPPTER
GRILL
KONTAKT
GRILL
MIN. EMPFEHLUNGEN
KNOPF
unten oben oben
GRILL GL ATT MAX MAX 2 - 3 das Grillgut gut mit Öl
GRILL GL ATT MAX MAX 5 - 6 das Grillgut gut mit Öl
GRILL GL ATT MAX MAX 4 - 5 das Grillgut gut mit Öl
GRILL GL ATT MAX MAX 7 - 8 das Grillgut gut mit Öl
GRILL GL ATT MAX MAX 10 - 11 das Grillgut gut mit Öl
GRILL GL ATT MAX MAX 4 - 5 das Grillgut gut mit Öl
GRILL GL ATT MAX MAX 7 - 8 das Grillgut gut mit Öl
GRILL GL ATT MAX MAX 10 - 12 das Grillgut gut mit Öl
GRILL GL ATT MAX MAX 14 - 16 das Grillgut gut mit Öl
GRILL GL ATT MAX MAX 8 - 10 das Grillgut gut mit Öl
(10)
unten
(11)
einfetten
einfetten, nach halber
Garzeit wenden
einfetten
einfetten
einfetten
einfetten
einfetten
einfetten, nach halber
Garzeit wenden
einfetten, nach halber
Garzeit wenden
einfetten
Spieße 6 G u t
durch
KONTAKT
GRILL
GRILL GL ATT MAX MAX 13 - 15 das Grillgut gut mit Öl
einfetten, nach halber
Garzeit wenden
10

LAMM DICKE
Koteletts 1,5-3 6 Mittel KONTAKT
Koteletts 1,5-3 6 Gut durch KONTAKT
(cm)
Nein.
STÜCK
GAR-
FUNKTION GRILLPLATTEN THERMOSTATKNOPF MIN. EMPFEHLUN-
STUFE
GRILL
GRILL
GEN
unten oben oben
GRILL GL ATT MAX MAX 10 - 12 das Grillgut
GRILL GL ATT MAX MAX 12 - 14
(10)
unten
(11)
gut mit Öl
einfetten,
die Koteletts
nach halber
Garzeit wenden
SCHWEIN DICKE
(cm)
Steak 1-2 4 KONTAKT
Steak 1-2 8 Geöffnete
Kotelett <2,5 4 KONTAKT
Kotelett <2,5 8 Geöffnete
Spareribs 6-8 KONTAKT
Speck 4 KONTAKT
Bratwürste 8 KONTAKT
Spieße 6 KONTAKT
Frankfurter
Würstchen
Nein.
FUNKTION GRILLPLATTEN THERMOSTAT-
STÜCK
GRILL
STELLUNG
GRILL
STELLUNG
GRILL
GRILL
GRILL
GRILL
6 KONTAKT
GRILL
MIN. EMPFEHLUNGEN
KNOPF
unten oben oben
GRILL GL ATT MAX MAX 7 - 9 das Grillgut gut mit Öl
GRILL GL ATT MAX MAX 14 - 16 das Grillgut gut mit Öl
GRILL GL ATT MAX MAX 9 - 11 das Grillgut gut mit Öl
GRILL GL ATT MAX MAX 11 - 13 das Grillgut gut mit Öl
GRILL GL ATT MED MED 20 - 25 zwei- oder dreimal
GRILL GL ATT MAX MAX 1 - 2
GRILL GL ATT MED MED 16 - 18 die Bratwürste mit einer
GRILL GL ATT MAX MAX 14 - 16 das Grillgut gut mit Öl
GRILL GL ATT MAX MAX 8 - 10
(10)
unten
(11)
einfetten
einfetten, nach halber
Garzeit wenden
einfetten, nach halber
Garzeit wenden
einfetten, nach halber
Garzeit wenden
wenden
Gabel aufstechen
einfetten, 1-2 Mal wenden
11

HÄHN-
CHEN- UND
TRUT-
HAHN-
FLEISCH
Brust <1 4 KONTAKT
Schenkel 3 KONTAKT
Flügel 6 KONTAKT
Hamburger 1,5-2 4 KONTAKT
Hamburger 1,5-2 8 AUFGE-
Spieße 6 KONTAKT
Frankfurter
Würstchen
Feu-
rig-scharfes
Hähnchen
vom Grill
DICKE
(cm)
Nein.
FUNKTION GRILLPLATTEN THERMOSTAT-
STÜCK
GRILL
GRILL
GRILL
GRILL
KLAPPTER
GRILL
GRILL
6 KONTAKT
GRILL
1 KONTAKT
GRILL
MIN. EMPFEHLUNGEN
KNOPF
unten oben oben
GRILL G LAT T MAX MAX 3 - 4 das Grillgut gut mit Öl
GRILL G LAT T MED MED 20 - 25 während des Garvor-
GRILL G LAT T MED MED 14 - 16 während des Garvor-
GRILL G LAT T MAX MAX 6-8
GRILL G LAT T MAX MAX 14 - 16 nach halber Garzeit
GRILL G LAT T MAX MAX 11 - 13 während des Garvor-
GRILL G LAT T MAX MAX 6 - 8
GRILL G LAT T MED MED 40 - 45 während des Garvor-
(10)
unten
(11)
einfetten
gangs ein- oder zweimal wenden
gangs ein- oder zweimal wenden
wenden
gangs ein- oder zweimal wenden
gangs ein- oder zweimal wenden
BROT Nein.
Toasts/
Sandwi-
ches
Belegte
Brötchen
Brotschei-
ben
STÜCK
2 OFEN-
2 KON
4 AUFGE-
KLAPPTER
FUNKTI-
ON
GRILL
TAKT
GRILL
GRILL
GRILLPLATTEN THERMOSTATKNOPF MIN. EMPFEHLUNGEN
unten oben oben
GL ATT GRILL MED MED 3 - 5 die obere Grillplatte so
GRILL G LATT MED MED 2 - 3
GL ATT GRILL MAX MAX 4 - 5 nach halber Garzeit
(10)
unten
(11)
positionieren, dass sie
das Brot berührt, ohne es
zusammenzudrücken
wenden
12

GEMÜSE Nein.
Auberginen in
Scheiben
Zucchini in
Scheiben
FUNKTION GRILLPLATTEN THERMOSTATKNOPF MIN. EMPFEHLUNGEN
STÜCK
1 KONTAKT
GRILL
2 KONTAKT
GRILL
unten oben oben
GRILL G LAT T MAX MAX 4 - 6 das Grillgut gut mit Öl
GRILL G LAT T MAX MAX 6 - 8 das Grillgut gut mit Öl
(10)
unten
(11)
einfetten
einfetten
Paprika
geviertelt
Tomaten in
Scheiben
Zwiebeln in
Scheiben
FISCH MENGE Nein.
Am Stück 250 g 1 KONTAKT
Filet 500 g 1 OFEN-
In
Stücken
Spieße 500 g 6 AUFGE-
Kalmare 400 g 1-2 KONTAKT
Garnelen 400 g 10-12 KONTAKT
2 KONTAKT
GRILL
1 AUFGE-
KLAPPTER
GRILL
2 KONTAKT
GRILL
FUNKTION GRILLPLATTEN THERMOSTAT-
STÜCK
GRILL
GRILL
450 g 4 KONTAKT
GRILL
KLAPPTER
GRILL
GRILL
GRILL
GRILL G LAT T MAX MAX 8 - 10 das Grillgut gut mit Öl
einfetten
GL ATT GRILL MAX MAX 5 - 7 das Grillgut gut mit Öl
einfetten; nach halber
Garzeit wenden
GL ATT GRILL MAX MAX 5 - 7 das Grillgut gut mit Öl
einfetten, häug mit
einem Pfannenwender
umrühren
MIN. EMPFEHLUNGEN
KNOPF
unten oben oben
GRILL G LAT T MED MED 8 - 10 das Grillgut gut mit Öl
GL ATT GRILL MAX MAX 25 - 30 das Grillgut mit Öl
GRILL G LAT T MED MED 8 - 10 das Grillgut gut mit Öl
GRILL G LAT T MAX MAX 10 - 12 das Grillgut gut mit Öl
GRILL G LAT T MED MED 10 - 12 das Grillgut gut mit Öl
GRILL G LAT T MED MED 4 - 6 das Grillgut gut mit Öl
(10)
unten
(11)
einfetten
einfetten, die obere
Grillplatte so positionieren, dass sie sich so
nahe wie möglich am
Grillgut berührt, ohne
es zu berühren
einfetten
einfetten; zwei- oder
dreimal wenden
einfetten
einfetten
13

DESSERT Nein.
Eierkuchen 4 AUFGE-
Ananas in
Scheiben
FUNKTI-ONGRILLPLATTEN THERMOSTATKNOPF MIN. EMPFEHLUNGEN
STÜCK
KLAPPTER GRILL
4 KON
TAKT
GRILL
unten oben oben
GL ATT GRILL MED MED 4 - 5 die Grillplatten mit Butter
GRILL GL ATT MED MED 5 - 6 die Grillplatten mit Butter
REZEPTE
RÜHREI, GERÄUCHERTER SPECK UND TOAST
ZUTATEN:
- 2 Eier
- 2 Scheiben Speck
- 1 Esslöel Milch
- Salz und Pfeer n.B.
- 2 Scheiben Toastbrot
ZUBEREITUNG:
Die Eier mit Milch und Salz verquirlen, bis eine leichte
und schaumige Masse entsteht. Die glatte Grillplatte in
das Gehäuseunterteil und die gerielte Grillplatte in das
Gehäuseoberteil einsetzen und das Gerät als AUFGEKLAPPTEN
GRILL verwenden. Den unteren und oberen Thermostatknopf
auf MAX stellen. Die Taste START/STOP drücken, um den
Grill vorzuheizen. Wenn sich die Kontrolllampen der oberen
und unteren Grillplatte ausschalten, die geschlagenen Eier
in eine Ecke der Grillplatte geben und 2-3 Minuten garen,
dabei vorsichtig mit einem Holzkochlöel umrühren, damit
sie gleichmäßig garen. In der Zwischenzeit auf der gleichen
Grillplatte auch die Speckscheiben 3-4 Minuten garen und nach
halber Garzeit wenden, und auf der anderen glatten Grillplatte
das Brot für 3-4 Minuten toasten und nach halber Garzeit
wenden. Auf dem Teller anrichten und servieren.
GERÖSTETES BROT MIT AUBERGINENSCHAUM
ZUTATEN:
- 1 Aubergine
- 100g Ricotta
- Knoblauchpulver n.B.
- Petersilie n.B.
- 4 Esslöel Olivenöl
- Salz n.B.
- Pfeer n.B.
- 1 Baguette
unten
(10)
(11)
einfetten, nach halber Garzeit
wenden
einfetten
ZUBEREITUNG:
Die Auberginen waschen, schälen und in dicke Scheiben
schneiden.
Die gerielte Grillplatte in das Gehäuseunterteil und die glatte
Grillplatte in das Gehäuseoberteil einsetzen und das Gerät als
KONTAKTGRILL verwenden. Den unteren und oberen Thermostatknopf auf MAX stellen. Die Taste START/STOP drücken, um
den Grill vorzuheizen. Wenn sich die Kontrolllampen der oberen
und unteren Grillplatte ausschalten, die Auberginen auf die
untere Grillplatte legen und für etwa 8-10 Minuten garen, bis
sie weich sind. Die Auberginenscheiben grob schneiden und
mit Ricotta, Knoblauch und gehackter Petersilie, etwas Salz
und Pfeer und Öl in einen Mixer geben. Pürieren, bis eine
eine glatte, feinkörnige Masse entstanden ist. Das (in Scheiben
geschnittene) Brot mit Ölivenöl beträufeln und auf Temperaturstufe MAX auf den glatten Grillplatten in der Betriebsstellung
KONTAKTGRILL für 1-2 Minuten garen, bis es den gewünschten
Bräunungsgrad aufweist.
Die Auberginencreme auf das geröstete Brot geben, mit zwei
Esslöeln Olivenöl beträufeln und servieren.
FLEISCHSALAT MIT RAUKE UND KIRSCHTOMATEN
ZUTATEN:
- 2 Scheiben Kalbeisch
- 100g Rauke
- 10-12 Kirschtomaten
- 100g Parmesansplitter
- Salz n.B.
- Olivenöl n.B.
ZUBEREITUNG:
Aus Rauke und Kirschtomaten einen Salat zubereiten: die Rauke
waschen und zum Abtrocknen auf ein sauberes Handtuch
legen, die Kirschtomaten vierteln. Die gerielte Grillplatte
in das Gehäuseunterteil und die glatte Grillplatte in das
14

Gehäuseoberteil einsetzen und das Gerät als KONTAKTGRILL
verwenden. Den unteren und oberen Thermostatknopf auf MAX
stellen. Die Taste START/STOP drücken, um den Grill vorzuheizen.
Wenn sich die Kontrolllampen der oberen und unteren Grillplatte
ausschalten, die zuvor mit Öl bestrichenen Fleischscheiben auf
die untere Grillplatte legen, mit der oberen Grillplatte andrücken
und, je nach gewünschter Garstufe, 2-3 Minuten garen. Das
Fleisch in Streifen schneiden und auf dem Rucola und den
Kirschtomaten anrichten, salzen und mit Parmesansplittern
bestreuen. Mit etwas Öl beträufeln
T-BONE-STEAKS MIT KAFFEE AROMATISIERT
ZUTATEN:
- T-Bone-Steaks (2 zu je 250g)
- Olivenöl
FÜR DIE KAFFEEMISCHUNG:
- 2 Teelöel Kümmelsamen
- 2 Teelöel Kaeebohnen
- 1 Esslöel milde Peperoni
- 1 Teelöel Paprika
- 1 Teelöel grobes Salz
- 1 Teelöel Pfeer
ZUBEREITUNG:
Die Kaeemischung zubereiten: die Kümmelsamen und den
Kaee in eine Küchenmaschine geben und nicht zu fein mahlen.
Das so erhaltene Pulver in eine Schüssel geben, die anderen
Zutaten dazugeben und gut verrühren.
Das Fleisch leicht mit Öl einfetten und würzen; das Ganze
zudecken und etwa 30 Minuten bei Zimmertemperatur
marinieren. Die gerielte Grillplatte unten und die glatte
Grillplatte oben einsetzen und das Gerät als KONTAKTGRILL
verwenden. Den unteren und oberen Thermostatknopf auf MAX
stellen. Die Taste START/STOP drücken, um den Grill vorzuheizen.
Wenn sich die Kontrolllampen der oberen und unteren Grillplatte
ausschalten, das Fleisch auf die untere Grillplatte legen, mit der
oberen Grillplatte andrücken und, je nach gewünschter Garstufe,
6-8 Minuten garen. Heiß servieren.
RINDERFILET MIT PILZSAUCE
ZUTATEN:
- 4 Rinderlets
- Salz n.B.
- frisch gemahlener schwarzer Pfeer n.B.
- 2 Knoblauchzehen
- 2 Esslöel Dijon-Senf
- 60g Butter
- Olivenöl n.B.
ZUTATEN FÜR DIE PILZSAUCE:
- 30g Butter
- 1 Esslöel Gorgonzola
- 2 Schalotten
- 300g Pilze
- 1/2 Glas Whisky
- 200g Sahne
- Zitronensaft n.B.
- Petersilie n.B.
ZUBEREITUNG:
Das Fleisch salzen und pfeern und etwa eine Stunde bei
Zimmertemperatur ruhen lassen. Zubereitung der Pilzsauce:
in einer Pfanne die Butter schmelzen lassen, die in Ringe
geschnittenen Schalotten dazugeben und für 2-3 Minuten
garen. Die Pilze dazugeben und für weitere 5 Minuten garen.
Mit Whisky ablöschen, für eine Minute garen, ein Glas Wasser
dazugeben und für etwa eine weitere Minute garen. Flüssige
Sahne, Zitronensaft, Petersilie und Gorgonzola dazugeben und
zum Kochen bringen. Kochen lassen, bis die Sauce eingedickt
ist; mit Salz und Pfeer abschmecken und zur Seite stellen. In
der Zwischenzeit die Marinade für das Fleisch zubereiten, mit
dem die Filets während des Grillvorgangs bestrichen werden;
in eine kleine Pfanne Butter, Senf und Knoblauch geben. Die
Butter bei kleiner Flamme schmelzen lassen. Warmhalten.
Die gerielte Grillplatte unten und die glatte Grillplatte oben
einsetzen und das Gerät als KONTAKTGRILL verwenden. Den
unteren und oberen Thermostatknopf auf MAX stellen. Die Taste
START/STOP drücken, um den Grill vorzuheizen. Wenn sich die
Kontrolllampen der oberen und unteren Grillplatte ausschalten,
die (zuvor auf beiden Seiten mit der Marinade bestrichenen)
Filets auf die untere Grillplatte legen und den Grill schließen.
Je nach gewünschter Garstufe und nach Dicke der Filets für 6-8
Minuten garen. Anschließend die Filets entnehmen, mit der
zuvor zubereiteten Pilzsauce bedecken und servieren.
HAMBURGER MIT GETOASTETEM ROGGENBROT
ZUTATEN:
- 8 Scheiben Roggenbrot
- 500g Hackeisch erster Wahl
- 100g Emmentaler in Scheiben
- 2 Esslöel Olivenöl
- 2 Zwiebeln in Scheiben
- Butter mit Zimmertemperatur n.B.
- 2 Teelöel Worcestersauce
- Salz n.B.
- Pfeer n.B.
- 1 halber Teelöel Zucker
15

ZUBEREITUNG:
Zubereitung der Hamburger: in einer Schüssel Hackeisch,
Worcestersauce, Salz und Pfeer gut miteinander vermischen.
Mit den Händen etwa 2 cm dicke Hamburger formen. Das Gerät
als AUFGEKLAPPTEN GRILL verwenden und die glatte Grillplatte
in das Gehäuseunterteil und die gerielte Grillplatte in das
Gehäuseoberteil einsetzen. Den unteren und oberen Thermostatknopf auf MAX stellen. Die Taste START/STOP drücken, um
den Grill vorzuheizen.
Wenn sich die Kontrolllampen der oberen und unteren Grillplatte
ausschalten, die mit Olivenöl beträufelten und gezuckerten
Zwiebelscheiben auf die untere Grillplatte legen und für etwa
5-6 Minuten garen.
Dabei häug mit einem Pfannenwender umrühren, damit sie
gleichmäßig garen und weich werden. Gleichzeitig auf der
anderen Grillplatte die Hamburger für etwa 12 Minuten garen
und nach etwa 5-6 Minuten wenden (die Garzeit hängt von der
Dicke der Hamburger ab).
Sobald die Zwiebeln gar sind, von der Grillplatte nehmen und
die mit Butter bestrichenen Brotscheiben auf nur einer Seite für
1-2 Minuten toasten.
Die Brotscheiben mit der getoasteten Seite nach oben auf ein
Schneidbrett legen, mit den Zwiebeln und den Hamburgern
belegen und mit Käse bedecken. Die Brotscheibe mit der
getoasteten Seite nach unten darauegen. Warten, bis die
Grillplatte wieder heiß ist, dann die Toasts auf die Grillplatte
legen und mit der oberen Grillplatte fest andrücken.
Für etwa 2-3 Minuten bis zur gewünschten Röststufe garen.
LAMMKOTELETTS MIT BALSAMICO-ESSIG UND
ROSMARIN
ZUTATEN:
- 6 Lammkoteletts
- 10g Rosmarin gemahlen
- 10g Knoblauch gemahlen
- 100ml Balsamico-Essig
- 15g Zucker
- Salz n.B.
- Pfeer n.B.
ZUBEREITUNG:
Alle Zutaten in einem ausreichend großen Gefäß vermengen;
zudecken und das Lamm im Kühlschrank für mindestens 1-2
Stunden marinieren lassen. Die gerielte Grillplatte unten
und die glatte Grillplatte oben einsetzen und das Gerät als
KONTAKTGRILL verwenden. Den unteren und oberen Thermostatknopf auf MAX stellen. Die Taste START/STOP drücken, um
den Grill vorzuheizen. Wenn sich die Kontrolllampen der oberen
und unteren Grillplatte ausschalten, die Lammkoteletts auf die
untere Grillplatte legen. Je nach gewünschter Garstufe und
nach Dicke der Lammkoteletts für etwa 11-13 Minuten garen
(wir empfehlen, sie nach halber Garzeit zu wenden, da die obere
Grillplatte durch den Knochen nicht auf dem Fleisch auiegt). In
der Zwischenzeit die Marinade in einer Pfanne reduzieren und
als Sauce zu den gegrillten Lammkoteletts servieren.
HÄHNCHENSPIESSE HONIG-LIMETTEN-CREME
ZUTATEN:
- 500g Hähnchenbrust
ZUTATEN FÜR DIE MARINADE:
- 1 Teelöel Chili
- 1 Teelöel Koriander
- 10 cl Olivenöl
- 2 Schalotten
- 3 Knoblauchzehen
- 1 Esslöel Ingwer gerieben
- 1 Esslöel Zucker
- 1 Esslöel Limettensaft
- 1 Esslöel grobes Salz
- Pfeer n.B.
ZUTATEN FÜR DIE HONIGZITRONENCREME:
- 5 cl Sahne
- 1/2 Teelöel Limettenschale gerieben
- 1 Esslöel Limettensaft
- 1 Esslöel Olivenöl
- 1 Esslöel Honig
- Salz n.B.
ZUBEREITUNG:
Zubereitung der Marinade: alle Zutaten in eine Küchenmaschine
geben und pürieren, bis eine eine homogene Masse entstanden
ist. Das in 2 cm große Würfel geschnittene Hähnchen in einen
tiefen Teller geben, die Marinade dazugeben und das ganze
Hähnchen gleichmäßig damit bedecken. Mit Frischhaltefolie
zudecken und 1-2 Stunden marinieren. Für die Zubereitung
der Creme alle Zutaten in einer Schüssel vermengen, mit
Frischhaltefolie zudecken und im Kühlschrank aufbewahren. Die
Hähnchenstücke auf die Spieße stecken. Die gerielte Grillplatte
unten und die glatte Grillplatte oben einsetzen und das Gerät als
KONTAKTGRILL verwenden. Den unteren und oberen Thermostatknopf auf MAX stellen. Die Taste START/STOP drücken, um
den Grill vorzuheizen. Wenn sich die Kontrolllampen der oberen
und unteren Grillplatte ausschalten, das Fleisch auf die untere
Grillplatte legen, mit der oberen Grillplatte andrücken und, je
nach gewünschter Garstufe, 11-13 Minuten garen. Die Spieße
zusammen mit der Honig-Zitronen-Creme heiß servieren.
16

PROVENZALISCHE HÄHNCHENSCHENKEL
ZUTATEN:
- 3 Hähnchenschenkel (550g)
ZUTATEN FÜR DIE MARINADE:
- 25cl trockener Weißwein
- 4 Esslöel Olivenöl
- 3 körniger Senf
- 3 Esslöel Weißweinessig
- 2 Esslöel provenzalische Kräuter
- 2 gehackte Knoblauchzehen
- 2 Teelöel grobes Salz
- 1 Teelöel Cayennepfeer
Den unteren und oberen Thermostatknopf auf MED stellen. Die
Taste START/STOP drücken, um den Grill vorzuheizen.
Wenn sich die Kontrolllampen der oberen und unteren
Grillplatte ausschalten, die Garnelen aus der Marinade nehmen,
abtropfen lassen und auf die untere Grillplatte legen, mit der
oberen Grillplatte andrücken und 4-6 Minuten garen. Den Teller
mit Zitronenscheiben garnieren und die Garnelen mit Gemüse
servieren.
LACHS VOM GRILL MIT JOGHURTSAUCE
ZUTATEN:
- 500g Lachslet
- Olivenöl n.B.
ZUBEREITUNG:
Für die Zubereitung der Marinade alle Zutaten in einer
Schüssel vermengen. Mit einem scharfen Messer die
Hähnchenschenkel am Fleisch einschneiden und leicht önen.
Die Hähnchenschenkel in die Schüssel legen und gleichmäßig
mit der Marinade bedecken; 2-3 Stunden marinieren lassen.
Die gerielte Grillplatte unten und die glatte Grillplatte oben
einsetzen und das Gerät als KONTAKTGRILL verwenden. Den
unteren und oberen Thermostatknopf auf MED stellen. Die Taste
START/STOP drücken, um den Grill vorzuheizen. Wenn sich die
Kontrolllampen der oberen und unteren Grillplatte ausschalten,
die Hähnchenschenkel auf die untere Grillplatte legen, mit der
oberen Grillplatte andrücken und, je nach gewünschter Garstufe,
20-25 Minuten garen, dabei 2-3 Mal wenden. Sobald die
Hähnchenschenkel gar sind, auf einen Teller legen und servieren.
GARNELEN VOM GRILL
ZUTATEN:
- 16-20 Garnelen
ZUTATEN FÜR DIE MARINADE:
- Petersilie n.B.
- 2 Zitronen
- Salz n.B.
- Pfeer n.B.
- 2 Knoblauchzehen
ZUBEREITUNG:
Zubereitung der Marinade: Knoblauch und Petersilie fein hacken
und den Zitronensaft dazugeben; salzen und mit etwas Pfeer
bestreuen.
Die Garnelen waschen, gut abtrocknen und mindestens eine
halbe Stunde marinieren.
Die gerielte Grillplatte unten und die glatte Grillplatte oben
einsetzen und das Gerät als KONTAKTGRILL verwenden.
ZUTATEN FÜR DIE SAUCE:
- 250g griechischer Joghurt
- 1 Knoblauchzehe
- 1 Teelöel Salz
- 1 Prise Zucker
- 20g Schnittlauch
- 20g Petersilie
- weißer Pfeer n.B.
ZUBEREITUNG:
Zubereitung der Sauce: Petersilie und Schnittlauch waschen und
gut abtrocknen, den Knoblauch hacken.
Joghurt in eine Schüssel geben, Gewürze, Knoblauch, Salz, Zucker
und Pfeer dazugeben und pürieren, bis eine weiche Creme
entstanden ist. In den Kühlschrank stellen und mindestens
30 Minuten ruhen lassen. Die glatte Grillplatte unten und die
gerielte Grillplatte oben einsetzen und das Gerät als OFENGRILL
verwenden. Den unteren und oberen Thermostatknopf auf MAX
stellen. Die Taste START/STOP drücken, um den Grill vorzuheizen.
Wenn sich die Kontrolllampen der oberen und unteren Grillplatte
ausschalten, das zuvor mit Öl eingefettete Filet auf die untere
Grillplatte legen, die obere Grillplatte in der Betriebsstellung
OFENGRILL schließen (so nahe wie möglich am Grillgut, doch
ohne es zu berühren) und für etwa 25-30 Minuten garen (für ein
besseres Resultat wird empfohlen, den Lachs nach halber Garzeit
um 180° drehen, da sich die Grillplatte im hinteren Teil näher am
Grillgut bendet). Nach Beendigung des Garvorgangs den Lachs
auf einen Teller legen und zusammen mit der Joghurtsauce
servieren.
17

TINTENFISCH VOM GRILL
ZUTATEN:
- großer Tintensch 400 g
- 1 Zitrone
- 1 Bund Petersilie
- Olivenöl n.B.
- Oregano n.B.
- Salz n.B.
- Chilipulver n.B.
ZUBEREITUNG:
Den Tintensch ausnehmen, Kopf und Knorpel im Fisch
entfernen und den Fisch gut waschen. Die gerielte Grillplatte
unten und die glatte Grillplatte oben einsetzen und das Gerät
als KONTAKTGRILL verwenden. Den unteren und oberen
Thermostatknopf auf MED stellen. Die Taste START/STOP drücken,
um den Grill vorzuheizen. Wenn sich die Kontrolllampen der
oberen und unteren Grillplatte ausschalten, den zuvor mit Öl
eingefetteten Tintensch auf die untere Grillplatte legen, mit
der oberen Grillplatte andrücken und für etwa 10-12 Minuten
garen. Für die Zubereitung der Marinade in einer Schüssel Öl
mit gehackter Petersilie, Zitronensaft, einer Prise Oregano, einer
Prise Salz und etwas Chili vermischen.
Sobald der Tintensch gar ist, vom Grill nehmen und mit dieser
Sauce vermengen. Auf dem Teller anrichten und servieren.
EIERKUCHEN MIT BANANE
ZUTATEN:
- 1 Banane
- 2 Eier (1 ganzes Ei + 1 Eiweiß)
- 150 ml Milch
- 100g Mehl Type 00
- 70g Butter
- Salz n.B.
- 1 Esslöel Zucker
- 16g Backpulver
AUFGEKLAPPTEN GRILL verwenden.
Den unteren und oberen Thermostatknopf auf MED stellen. Die
Taste START/STOP drücken, um den Grill vorzuheizen. Wenn
sich die Kontrolllampen der oberen und unteren Grillplatte
ausschalten, die Grillplatten mit etwas Butter einfetten, 1-2
Esslöel Teig auf die Platten geben und schnell kreisförmig glatt
streichen. Für etwa 2 Minuten garen, bis an der Oberäche des
Eierkuchens kleine Blasen zu sehen sind, dann den Eierkuchen
wenden und ungefähr weitere 2 Minuten garen. Eierkuchen
können auf vielfältige Weise serviert werden:mit Schokocreme,
Ahornsirup, frischen Heidelbeeren, Schokosplittern, Honig,
Schlagsahne oder Puderzucker.
ANANAS VOM GRILL MIT EIS
ZUTATEN:
- 1 Ananas
- Honig n.B.
- Rohrzucker n.B.
- frische Minze n.B.
- Puderzucker n.B.
- Vanilleeis n.B.
ZUBEREITUNG:
Die Blätter entfernen und die Ananas schälen. Die Ananas
in etwa 1-2 cm dicke Scheiben schneiden und jede Scheibe
auf beiden Seiten mit Rohrzucker bestreuen. Die gerielte
Grillplatte unten und die glatte Grillplatte oben einsetzen und
das Gerät als KONTAKTGRILL verwenden. Den unteren und
oberen Thermostatknopf auf MED stellen. Die Taste START/
STOP drücken, um den Grill vorzuheizen. Wenn sich die
Kontrolllampen der oberen und unteren Grillplatte ausschalten,
die Ananas auf beiden Seiten mit Honig bestreichen und auf den
Grill legen. Den Grill schließen und für 5-6 Minuten garen. Die
garen Ananasscheiben auf einen Teller legen, mit frischer Minze
garnieren, mit Puderzucker bestreuen und mit den Eiskugeln
servieren.
ZUBEREITUNG:
Die Banane schälen und mit einer Gabel zerdrücken. In einer
anderen Schüssel ein Ei mit Zucker verschlagen und nach
und nach unter ständigem Rühren die Milch dazugeben.
50 g geschmolzene Butter und anschließend das gesiebte
und mit Backpulver vermischte Mehl sowie eine Prise Salz
dazugeben; die zerdrückte Banane dazugeben und alle Zutaten
gut vermengen, die Masse für 10 Minuten in den Kühlschrank
stellen. In der Zwischenzeit das Eiweiß zu steifem Schnee
schlagen. Die Masse aus dem Kühlschrank nehmen und den
Eischnee vorsichtig unterheben. Die glatte Grillplatte unten
und die gerielte Grillplatte oben einsetzen und das Gerät als
18

IMPORTANT WARNINGS
Safety warnings
Danger!
Failure to observe the warning may result in life threatening
injury by electric shock.
- Before plugging the appliance into the mains, make
sure that:
● The voltage indicated on the appliance rating plate
corresponds to your mains voltage;
● The mains socket is earthed and has a minimum rating
of 16A.
● Professional or inappropriate use or failure to observe
the safety instructions absolves the manufacturer
of all liability.
- Make sure the power cord does not
come into contact with parts of the
appliance which become hot during
use. If the power cord is damaged, it
must be replaced by the manufacturer
or the manufacturer's customer
services in order to avoid all risk.
- Before putting the appliance away, removing
the cooking plates or performing cleaning and
maintenance, Turn the dials to "●" position and unplug
the appliance from the mains. Ensure that the appliance
has completely cooled down.
- Never use the appliance outdoors.
- Never immerse the appliance in water.
- The appliance must not be operated by
an external timer or a separate remote
control system.
- Use extension cords complying with current safety
regulations and standards only. Ensure they are in
proper working condition, with an adequate cross
section.
- Never unplug from the mains socket by pulling on the
cord.
Important!
Failure to observe the warning could result in injury or
damage to the appliance.
- Clean the outside of the cooking plate with a soft sponge
or cloth dampened with water and mild detergent.
- This appliance is designed to cook food. It must never be
used for other purposes, modied or tampered with in
any way.
- This is an household appliance only.
It is not intended to be used in: sta
kitchen areas in shops, oces and
other working environments; farm
houses; by clients in hotels, motels and
other residential type environments;
bed and breakfast type environments.
- This appliance can be used by children
aged from 8 years and above and
persons with reduced physical, sensory
or mental capabilities or lack of
experience and knowledge if they have
been given supervision or instruction
concerning use of the appliance in a
safe way and understand the hazards
involved. Children shall not play with
the appliance.
- Cleaning and user maintenance shall not be made
by children unless they are aged from 8 years and
supervised.
Keep the appliance and its cord out of the reach of
children aged 8 and younger.
- Do not leave the appliance within reach of children or
unattended while in operation.
- Never use the appliance without the cooking plates.
- Wait until the appliance is completely cold before
putting away.
- Do not move the appliance during use.
Danger of burns!!
Failure to observe the warning could result in burns or scalds.
- When the appliance is in operation,
the outside surfaces may become very
hot. Always use the handgrip (2) or
oven gloves if necessary.
- Remove or change the cooking plates when the
appliance has completely cooled down.
Please note:
This symbol indicates recommendations and important
information for the user.
- To avoid the risk of re, do not cook food wrapped in
plastic lm or tinfoil or in plastic bags.
19
This appliance conforms to EC Regulation 1935/2004
CLICK
CLICK
on materials and articles intended to come into contact with
food.
Disposing of the appliance
The appliance must not be disposed of with
household waste, but taken to an authorised waste
separation and recycling centre.
DESCRIPTION
1. Base and cover: solid stainless steel structure with
self-adjusting cover.
2. Handgrip: strong cast metal handgrip to adjust the
upper plate/cover according to the thickness of the food.
3. Plate release buttons: press to release and remove
the plate.
4. Grill plates lock/release device and upper plate/
cover height adjustment
5. Hinge release button: enables the appliance to be
fully opened to cook in the at position.
6. Height oven position: to lock the upper plate/cover
at the required height, to prepare food that does not
require pressing.
7. Power light (green): that light is ON when the
appliance is connected to the mains.
8. Upper plate light (red): that light is ON when the
heating elements is powered and become OFF when
temperature is reached and plate is ready.
9. Lower plate light (red): that light is ON when the
heating elements is powered and become OFF when
temperature is reached and plate is ready.
10. Upper plate thermostat dial: to adjust the
temperature from MED to MAX, or "●" the upper plate.
11. Lower plate thermostat dial: to adjust the
temperature to WARM - LOW - MED - MAX, or "●" the
lower plate.
12. Adjustable front feet.
13. Removable plates: non-stick, dishwasher safe, easy
to clean. THE NUMBER AND THE TYPE OF PLATES CAN
RANGE ACCORDING TO MODEL.
13a. Grill plate: perfect for grilling steak, hamburger,
chicken and vegetables.
13b. Griddle plate: to prepare perfect pancakes, eggs,
bacon and shellsh.
14. Grease tray: integrated with appliance and removable
for easy cleaning.
USING FOR THE FIRST TIME
Remove all packaging and labels from the plate. Before
throwing the packing material away, make sure you have
removed all parts of the new appliance. We recommend you
keep the box and packing to re-use in the future.
Please note: Before use, clean the base, cover
and dials with a damp cloth to remove dust accumulated
during transport. Clean the cooking plates and grease tray
thoroughly. The plates, grease tray are dishwasher safe.
Please note: The rst time you use the appliance, it
may give o a slight odor and a little smoke. This is normal
and common to all appliances with non-stick surfaces.
Please note: the removable grill plates (grill and
griddle) are fully interchangeable on the appliance.
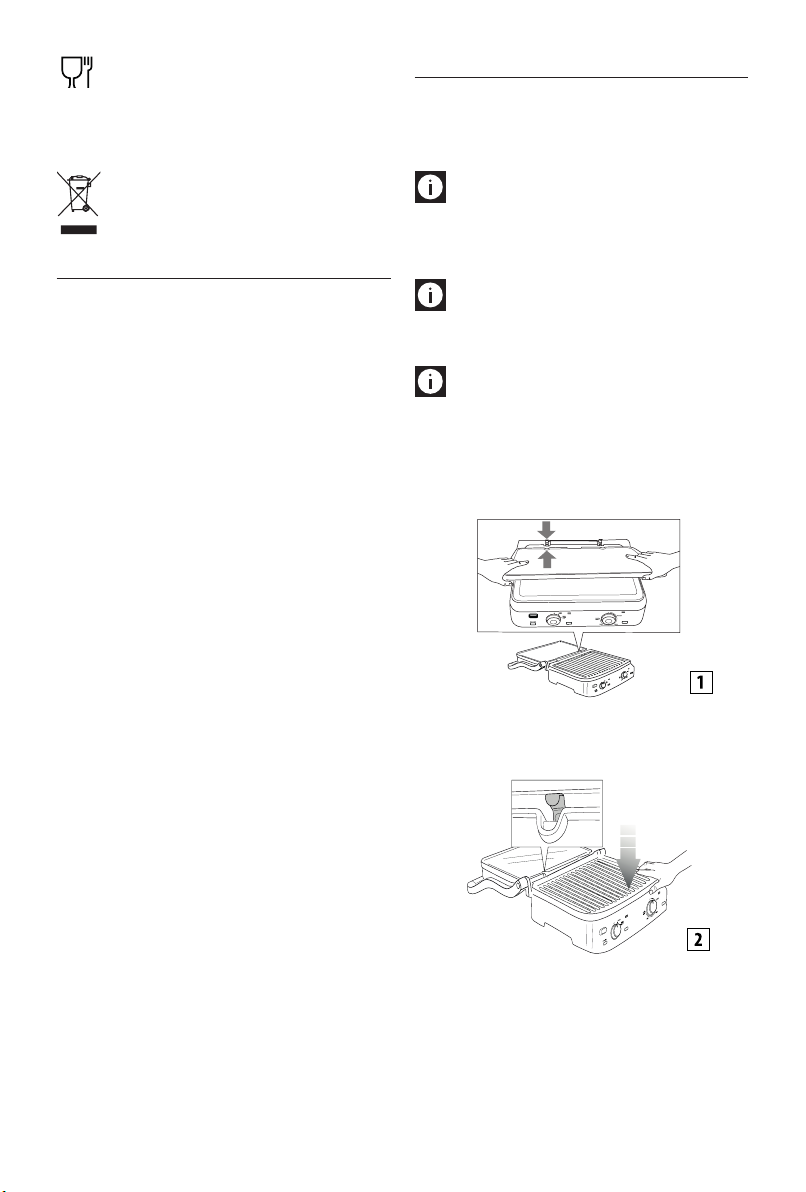
Inserting the cooking plates
- Place the appliance in the at position (see gure 1).
Insert one plate at a time.
- Each plate can be inserted in either the upper or lower
housing (see gure 2).
To remove the plates
Place the appliance in the at position.
Identify the plate release buttons (3) on the left side. Press
the button decisively to eject the plate from the base. Hold
the plate with both hands, slide it along the metal supports
and remove it from the base. Press the other release button
to remove the second plate, following the same operations.
20
Danger of burns!! Remove or change the cooking
plates when the appliance has cooled down.
Positioning the grease tray
During cooking, the grease tray must be inserted in its
housing on the right side of the appliance. The grease coming
from the food is drained towards the hole in the plate and
gathered in the tray.
The grease from the food is drained and collected by
the grooves on the plate and the hole at the back and is
collected in the grease tray.
The appliance has a special handgrip and hinge
allowing the upper plate to be adjusted according to the
thickness of the food. If you want to cook a number of
dierent types of food simultaneously using the contact
grill, the various foods should have the same thickness
to allow the cover to be closed evenly.
Please note: During cooking, check the grease tray
frequently and pull out to avoid excess liquid grease.
After cooking, dispose of the grease collected appropriately.
The grease tray is dishwasher safe.
Important! Pay attention during cooking.
To open the appliance, hold the handgrip which remains
cold. The die-cast aluminum parts become very hot, avoid
touching them during and immediately after cooking.
Before performing any operation on the appliance, leave to
cool down for at least 30 minutes.
Cook only with the grease tray in place. Do not empty the
grease tray until the appliance is completely cool. Take care
when pulling out the grease tray in order to avoid spilling the
liquid.
COOKING POSITIONS
Contact grill (closed position)
- The upper plate rests on the lower plate. This is the
starting position and also one of the cooking positions
when the appliance is used as a contact grill. The cover
automatically adjusts to the thickness of the food on the
plate. The food will thus be cooked evenly on both sides.
The contact grill is ideal for cooking hamburgers,
deboned meat and thin meat slices, vegetables and
sandwiches. The “contact” function is perfect to prepare
food rapidly and healthily. When you use the contact
grill, the food cooks quickly as it is in contact with the
plates on both sides at once (see gure 3).
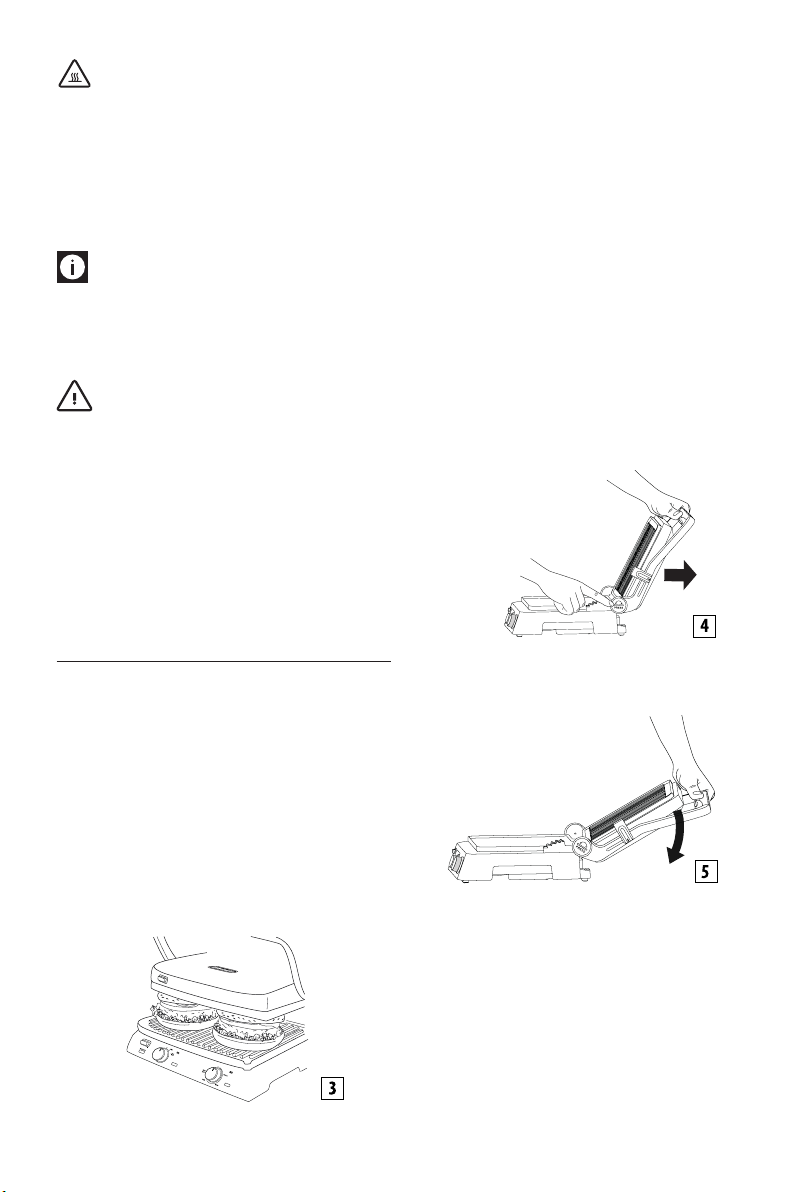
Open Grill
- The upper plate is level with the lower plate. The lower
and upper plates are both at the same level, forming a
large cooking surface. In this position, the appliance can
be used in barbecue mode with either the grill plate or
the griddle plate. To place the appliance in this position,
rst identify the hinge release button on the right. Hold
the handgrip with the left hand and with the right, press
the hinge release button (see gure 4).
Push the handgrip backwards until the cover rests
upside down in the at position (see gure 5).
Lifting the handgrip slightly before press the hinge
release button lightens pressure on the hinge and
facilitates the operation.
The appliance can be used as a grill/barbecue to prepare
hamburgers, steak, chicken and sh. The grill/barbecue
mode is the most versatile. The grill plates are in the
open position, doubling the cooking surface.
You can prepare a number of dierent foods on the
separate plates without mixing the avors, or cook more
21

of the same food.
The grill/barbecue position can be used to grill cuts of
meat with dierent thicknesses, each with the preferred
level of cooking. In this position, you need to turn the
food during cooking.
- The appliance can also be used as a griddle/barbecue
plate to prepare pancakes, eggs, cheese, fritters and
bacon and sausages for breakfast (see gure 6).
The large cooking surface enables a number of dierent
foods to be prepared simultaneously, or to cook more of
the same food.
Oven Grill
This position (see gure 7) is suitable for grilling without
contact thick foodstus that need to be roasted slowly and
uniformly.
It is ideal for preparing vegetables with high water content,
so the water can evaporate.
You can also use this hot plate position to prepare soft
sandwiches and foods which do not require pressing.
- Place the food on the lower plate.
- Bring the upper plate near the food, holding the handle
(g. A).
- Put the grill plates lock/release device (4) to desired
oven position by sliding the lever.
- The upper plate is locked in position. There are 5
positions of height regulation (g. B).
USE
Operation
When the appliance has been prepared correctly and you
are ready to cook, you can set the desired temperature for
each grill plate (upper and lower) independently (using the
thermostat dials 10 and 11).
The top and bottom plates lights will turn on (8 - 9).
The appliance takes some minutes to heat up depending
on the set temperature. When the thermostat reaches the
required temperature, the upper and lower plates lights turn
o and the appliance is ready to use.
The temperature can be changed at any time during cooking,
depending on the type of food being prepared.
Please note: the appliance is equipped with 2
adjustable front feet (16) that facilitate the draining of the
oil into the grease tray.
CLEANING AND MAINTENANCE
User maintenance
- Never use metal cleaning tools which could scratch the
non-stick plates. Use wood or heat-resistant plastic
tools.
- Never leave plastic tools in contact with the hot plates.
- Between cooking one food and the next, remove food
22

residues through the grease drain hole and collect them
in the grease tray, then clean with kitchen paper and
move on to the next cooking operation.
- Before cleaning the appliance, always leave the
appliance to cool down for at least 30 minutes.
Cleaning and care
Please note: Before cleaning the appliance, make
sure it has cooled down completely.
At the end of cooking, turn the dials to "●" and unplug the
appliance from the mains. Leave the appliance to cool down
for at least 30 minutes. Remove any food residues from the
plates. Empty the grease tray. The grease tray can be washed
by hand or in the dishwasher.
Press the plate release buttons (3) to remove the plates from
the appliance. Before touching them, make sure they have
cooled down completely. The cooking plates can be cleaned
in dishwasher although frequent washing in a dishwasher
could reduce the properties of the coating. You are therefore
recommended to clean the outside of the cooking plate
with a soft sponge or cloth dampened with water and mild
detergent.
Do not use metal tools to clean the plates.
TECHNICAL CHARACTERISTICS
Supply voltage 220-240 V / 50-60Hz
Absorbed power 2000W
23

COOKING TABLE
BEEF
Steak 0,5 - 1 2 Well
Steak 0,5 - 1 4 Well
Fillet 3-4 4 Rare
Fillet 3-4 4 Medium
Fillet 3-4 4 Well
Rib steak 2-3 2 Medium
Rib steak 2-3 2 Well
Rib steak 2-3 4 Medium
Rib steak 2-3 4 Well
Hamburger
Kebab 6 Well
THICKNESS
(cm)
2-3 6 Well
No.
PIECES
COOKING
LEVEL
done
done
done
done
done
done
done
MODE
CONTACT
GRILL
OPEN
GRILL
CONTACT
GRILL
CONTACT
GRILL
CONTACT
GRILL
CONTACT
GRILL
CONTACT
GRILL
OPEN
GRILL
OPEN
GRILL
CONTACT
GRILL
CONTACT
GRILL
PLATES THERMOSTAT
DIAL
lower upper upper
GRILL GRIDDLE MAX MAX
GRILL GRIDDLE MAX MAX
GRILL GRIDDLE MAX MAX
GRILL GRIDDLE MAX MAX
GRILL GRIDDLE MAX MAX
GRILL GRIDDLE MAX MAX
GRILL GRIDDLE MAX MAX
GRILL GRIDDLE MAX MAX
GRILL GRIDDLE MAX MAX
GRILL GRIDDLE MAX MAX
GRILL GRIDDLE MAX MAX
(10)
lower
(11)
MIN. TIPS
2 - 3
oil the food
well
5 - 6
oil the food
well, turn
halfway
through
cooking
4 - 5
oil the food
well
7 - 8
oil the food
well
10 - 11
oil the food
well
4 - 5
oil the food
well
7 - 8
oil the food
well
10 - 12
oil the food
well, turn
halfway
through
cooking
14 - 16
oil the food
well, turn
halfway
through
cooking
8 - 10
oil the food
well
13 - 15
oil the food
well, turn
halfway
through
cooking
24

LAMB
THICKNESS
(cm)
Cutlet 1.5-3 6 Medium CONTACT
Cutlet 1.5-3 6 Well
No.
PIECES
COOKING
LEVEL
done
MODE PLATES THERMOSTAT
GRILL
CONTACT
GRILL
MIN. TIPS
DIAL
lower upper upper
GRILL GRIDDLE MAX MAX 10 - 12 oil the food
GRILL GRIDDLE MAX MAX 12 - 14
(10)
lower
(11)
well, turn
the cutlets
halfway
through
cooking
PORK
Steak 1-2 4 CONTACT
Steak 1-2 8 OPEN
Chop <2,5 4 CONTACT
Chop <2,5 8 OPEN
Spare rib 6-8 CONTACT
Bacon 4 CONTACT
Sausage 8 CONTACT
Kebab 6 CONTACT
Frankfurter 6 CONTACT
THICKNESS
(cm)
No.
PIECES
MODE PLATES THERMOSTAT
GRILL
GRILL
GRILL
GRILL
GRILL
GRILL
GRILL
GRILL
GRILL
MIN. TIPS
DIAL
lower upper upper
GRILL GRIDDLE MAX MAX 7 - 9 oil the food well
GRILL GRIDDLE MAX MAX 14 - 16 oil the food well,
GRILL GRIDDLE MAX MAX 9 - 11 oil the food well,
GRILL GRIDDLE MAX MAX 11 - 13 oil the food well,
GRILL GRIDDLE MED MED 20 - 25 turn two or three
GRILL GRIDDLE MAX MAX 1 - 2
GRILL GRIDDLE MED MED 16 - 18 pierce the sausages
GRILL GRIDDLE MAX MAX 14 - 16 oil the food well, turn
GRILL GRIDDLE MAX MAX 8 - 10
(10)
lower
(11)
turn halfway through
cooking
turn halfway through
cooking
turn halfway through
cooking
times
with a fork
once or twice
25

CHICKEN
AND
TURKEY
Breast <1 4 CONTACT
Haunch 3 CONTACT
Wing 6 CONTACT
Hamburger 1.5-2 4 CONTACT
Hamburger 1.5-2 8 OPEN
Kebab 6 CONTACT
Frankfurter 6 CONTACT
Flat grilled
chicken
THICKNESS
(cm)
No.
MODE PLATES THERMOSTAT
PIECES
GRILL
GRILL
GRILL
GRILL
GRILL
GRILL
GRILL
1 CONTACT
GRILL
MIN. TIPS
DIAL
lower upper upper
GRILL GRIDDLE MAX MAX 3 - 4 oil the food well
GRILL GRIDDLE MED MED 20 - 25 turn once or twice
GRILL GRIDDLE MED MED 14 - 16 turn once or twice
GRILL GRIDDLE MAX MAX 6-8
GRILL GRIDDLE MAX MAX 14 - 16 turn halfway through
GRILL GRIDDLE MAX MAX 11 - 13 turn once or twice
GRILL GRIDDLE MAX MAX 6 - 8
GRILL GRIDDLE MED MED 40 - 45 turn once or twice
(10)
lower
(11)
during cooking
during cooking
cooking
during cooking
during cooking
BREAD No.
PIECES
Toast/
sandwich
Roll 2
Slices of
bread
MODE PLATES
2 OVEN
GRILL
CONTACT
GRILL
4 OPEN
GRILL
lower upper
GRIDDLE GRILL
GRILL GRIDDLE
GRIDDLE GRILL
THERMOSTAT DIAL
upper
MED MED
MED MED
MAX MAX
lower
(10)
26
MIN. TIPS
(11)
3 - 5 position the top plate so
that it touches the bread
without crushing it
2 - 3
4 - 5 turn halfway through
cooking

VEGETABLES N o.
PIECES
Sliced eggplant 1 CONTACT
Sliced zucchini 2 CONTACT
Quartered
sweet pepper
Sliced tomato 1 OPEN
Sliced onion 2 CONTACT
MODE PLATES THERMOSTAT DIAL MIN. TIPS
GRILL
GRILL
2 CONTACT
GRILL
GRILL
GRILL
lower upper upper
GRILL GRIDDLE MAX MAX 4 - 6 oil the food well
GRILL GRIDDLE MAX MAX 6 - 8 oil the food well
GRILL GRIDDLE MAX MAX 8 - 10 oil the food well
GRIDDLE GRILL MAX MAX 5 - 7 oil the food well, turn
GRIDDLE GRILL MAX MAX 5 - 7 oil the food well, mix
(10)
lower
(11)
halfway through cooking
often with a spatula
FISH QUANTITY No.
PIECES
Whole 250 g 1
Fillet 500 g 1 OVEN
Slice 450 g 4 CONTACT
Kebab 500 g 6 OPEN
Squid 400 g 1-2 CONTACT
Prawns 400 g 10-12 CONTACT
MODE PLATES
CONTACT
GRILL
GRILL
GRILL
GRILL
GRILL
GRILL
lower upper
GRILL GRIDDLE
GRIDDLE GRILL
GRILL GRIDDLE
GRILL GRIDDLE
GRILL GRIDDLE
GRILL GRIDDLE
THERMOSTAT
DIAL
upper
lower
(10)
(11)
MED MED
MAX MAX
MED MED
MAX MAX
MED MED
MED MED
MIN. TIPS
8 - 10 oil the food well
25 - 30 oil the food, position
the top plate so
that it just brushes
the food without
touching it
8 - 10 oil the food well
10 - 12 oil the food well;
turn two or three
times
10 - 12 oil the food well
4 - 6 oil the food well
27

DESSERTS No.
PIECES
Pancakes 4 OPEN
Sliced
pineapple
REC
IPES
MODE PLATES THERMOSTAT DIAL MIN. TIPS
lower upper upper
GRIDDLE GRILL MED MED 4 - 5 butter the plates, turn
GRILL
4 CONTACT
GRILL
GRILL GRIDDLE MED MED 5 - 6 butter the plates
EGG SCRAMBLE, BACON AND TOAST
INGREDIENTS:
- eggs 2
- bacon 2 slices
- milk 1 dsp
- salt and pepper to taste
- bread for toast 2 slices
PREPARATION:
Beat the eggs with the milk and salt until it forms a light
frothy mixture. Insert the griddle plate in the lower housing
and the grill one up, then position the appliance in OPEN
GRILL mode. Adjust the lower thermostat dial to
the upper dial to
preheat the grill. When the upper and lower plates lights
turn o, pour the egg mix onto a corner of the plate and
cook for 2-3 min., mixing well with a wooden spatula
to ensure it cooks evenly. In the meantime, on the same
plate, cook the bacon slices for 3-4 min., turning about
halfway through cooking; on the other at plate, toast the
bread for 3-4 min., turning about halfway through cooking.
Compose the dish and serve.
MAX
. Press the START/STOP button to
MAX
and
lower
(10)
(11)
halfway through cooking
one up then put the appliance in CONTACT GRILL mode.
Adjust the lower thermostat dial to
to
MAX
. Press the START/STOP button to preheat the grill.
When the upper and lower plates lights turn o, place the
eggplants on the lower grill and cook for about 8-10 min.
until soft. Cut the eggplant slices coarsely and place in a
mixer with the ricotta, garlic, chopped parsley, pinch of
salt, pinch of pepper and oil. Mix to obtain a smooth ne
mixture. Cut the bread into slices and oil with the olive oil,
then cook at
for 1-2 minutes until they are browned to taste.
Spread the eggplant cream onto the toasted bread, sprinkle
with two dessert spoons of oil and serve.
MAX
with the plates in CONTACT GRILL mode
MAX
and the upper dial
MEAT, ARUGULA AND CHERRY TOMATO SALAD
INGREDIENTS:
- veal slices 2
- arugula 100 g
- cherry tomatoes 10-12
- grana cheese akes 100 g
- salt to taste
- olive oil to taste
CROUTONS AND EGGPLANT CREAM
INGREDIENTS:
- eggplant 1
- ricotta 100 g
- powdered garlic to taste
- parsley to taste
- olive oil 4 dsp
- salt to taste
- pepper to taste
- baguette 1
PREPARATION:
Wash the eggplants well, peel and cut into thick slices.
Insert the grill plate in the lower housing and the griddle
PREPARATION:
Prepare the arugula and cherry tomato salad: wash the
arugula, place on a clean cloth to dry and cut the cherry
tomatoes into four. Insert the grill plate in the lower
housing and the griddle one up then put the appliance in
CONTACT GRILL mode.
Adjust the lower thermostat dial to
to
MAX
. Press the START/STOP button to preheat the grill.
When the upper and lower plates lights turn o, position
the previously oiled veal slices, press with the upper plate
and cook for 2-3 min. to taste. Cut the meat into strips and
arrange them on the bed of arugula and cherry tomatoes,
salt to taste and add the akes of grana cheese. Flavour
with a little oil.
MAX
and the upper dial
28

COFFEE FLAVOURED RIB STEAKS
INGREDIENTS:
- rib steaks (2 x 250 g each)
- olive oil
FOR THE COFFEE MIXTURE:
- cumin seeds 2 tsp
- coee beans 2 tsp
- sweet chilli pepper 1 dsp
- paprika 1 tsp
- coarse salt 1 tsp
- pepper 1 tsp
PREPARATION:
Prepare the coee mixture: pour the cumin seeds and coee
into a food processor and grind into a powder (not too ne).
Pour the powder into a bowl, add the other ingredients and
mix well. Oil the meat lightly and avour with the spices,
cover and leave at room temperature for about 30 min.
Insert the grill plate at the lower and the griddle one at the
upper, then put the appliace in CONTACT GRILL mode.
Adjust the lower thermostat dial to
to
MAX
. Press the START/STOP button to preheat the grill.
When the upper and lower plates lights turn o, place the
meat on the lower plate, press with the upper plate and
cook for 6-8 min. to taste. Serve hot.
MAX
and the upper dial
BEEF FILLET WITH MUSHROOM SAUCE
INGREDIENTS:
- beef llets 4
- salt to taste
- black peppercorns for grinding to taste
- garlic cloves 2
- Dijon mustard 2 dsp
- butter 60 g
- olive oil to taste
PREPARATION:
Flavour the meat with the salt and pepper and leave
at room temperature for about an hour. Prepare the
mushroom sauce: melt the butter in a pan, add the sliced
shallots and cook for 2-3 min. Add the mushrooms and
cook for a further 5 min. Add the whisky, cook for 1 min.,
add a glass of water and cook for about a minute more. Add
the liquid cream, lemon juice, parsley and gorgonzola and
bring to the boil. Cook until the sauce thickens, adjust the
salt and pepper and set aside. In the meantime, prepare
the avouring to be brushed on the llet during cooking:
in a small pan, melt the butter, mustard and garlic. Cook
over a low heat until the butter melts. Keep warm. Insert
the grill plate at the lower and the griddle one at the upper,
then put the appliance in CONTACT GRILL mode. Adjust the
lower thermostat dial to
the START/STOP button to preheat the appliance. Brush the
llets with the avouring on both sides, then when the
upper and lower plates lights turn o, place them on the
lower plate and close the grill. Cook for 6-8 min. according
to taste and the thickness of the llets. When cooked,
remove the llets and serve covered with the mushroom
sauce prepared previously.
MAX
and the top dial to
MAX
. Press
HAMBURGER WITH TOASTED RYE BREAD
INGREDIENTS:
- rye bread 8 slices
- top quality beef mince 500 g
- sliced Emmenthal 100 g
- olive oil 2 dsp
- sliced onions 2
- butter at room temperature as required
- Worcester sauce 2 tsp
- salt to taste
- pepper to taste
- sugar half a tsp
INGREDIENTS FOR THE MUSHROOM SAUCE:
- butter 30 g
- gorgonzola 1 dsp
- shallots 2
- mushrooms 300 g
- whisky 1/2 small glass
- cream 200 g
- lemon juice to taste
- parsley to taste
PREPARATION:
Prepare the hamburgers: mix the mince, Worcester sauce,
salt and pepper thoroughly in a bowl. By hand, shape 4
hamburgers about 2 cm thick. Position the appliance in
OPEN GRILL mode and insert the griddle plate at the lower
and the grill one at the top. Adjust the lower thermostat
dial to
MAX
and the top dial to
button to preheat the grill.
When the upper and lower plates lights turn o, place the
sliced onions avoured with the olive oil and sugar on the
lower plate and cook for about 5-6 min., mixing well with
MAX
. Press the START/STOP
29

a spatula to ensure they cook evenly and are tender. At the
same time, on the other plate, cook the hamburgers for
about 12 min., turning after about 5-6 min. (the cooking
time varies according to the thickness of the hamburger).
As soon as the onions are cooked, remove from the plate
and toast the buttered slices of bread on one side only for
1-2 min.
Place the slices of bread on a chopping board with the
toasted side upwards, sprinkle with the onions, add the
hamburgers and cover with the cheese. Close the sandwich
with the slice of bread with the toasted side facing
downwards. Wait for the plate to be hot again, then insert
the sandwiches and press well with the top plate.
Cook for about 2-3 min. to taste.
LAMB CUTLETS WITH BALSAM VINEGAR AND
ROSEMARY
INGREDIENTS:
- lamb cutlets 6
- chopped rosemary 10 g
- chopped garlic 10 g
- balsam vinegar 100 ml
- sugar 15 g
- salt to taste
- pepper to taste
PREPARATION:
Mix all the ingredients well in a suciently large recipient,
cover and leave the lamb to marinate in the refrigerator for
at least 1-2 hours. Insert the grill plate at the lower and the
griddle one at the top, then put the appliance in CONTACT
GRILL mode. Adjust the lower thermostat dial to
the top dial to
the grill. When the upper and lower plates lights turn o,
place the cutlets on the lower plate. Cook for about 11-13
min. according to taste and the thickness of the cutlets (you
are recommended to turn them halfway through cooking
as the bone prevents the top plate from touching the meat
on the top). In the meantime, reduce the marinade in a pan
and serve as a sauce on the grilled lamb cutlets.
MAX
. Press the START/STOP button to preheat
MAX
and
CHICKEN KEBABS WITH HONEY AND LIME CREAM
INGREDIENTS:
- chicken breast 500 g
INGREDIENTS FOR THE MARINADE:
- chilli pepper 1 tsp
- coriander 1 tsp
- olive oil 10 cl
- spring onions 2
- garlic cloves 3
- grated ginger 1 dsp
- sugar 1 dsp
- lime juice 1 dsp
- coarse salt 1 dsp
- pepper to taste
INGREDIENTS FOR THE HONEY AND LIME CREAM:
- cooking cream 5 cl
- grated lime peel 1/2 tsp
- lime juice 1 dsp
- olive oil 1 dsp
- honey 1 dsp
- salt to taste
PREPARATION:
Prepare the marinade: place all ingredients in a food
processor and blend to obtain a smooth mixture. Place
the chicken cut into 2 cm wide cubes on a deep plate, add
the marinade and cover all the chicken evenly. Cover with
food lm and marinate for 1-2 hours. Prepare the cream by
mixing all the ingredients in a bowl, cover with transparent
lm and keep in the refrigerator. Thread the chicken pieces
onto the kebab skewers. Insert the grill plate at the lower
and the griddle one at the top, then put the appliance in
CONTACT GRILL mode. Adjust the lower thermostat dial to
MAX
and the top dial to
to preheat the grill. When the upper and lower plates lights
turn o, place the kebabs on the lower plate, press with the
top plate and cook for about 11-13 min., turning once or
twice. Serve hot accompanied with the lime and honey
cream.
MAX
. Press the START/STOP button
30

PROVENCE STYLE CHICKEN LEGS
INGREDIENTS:
- chicken legs 3 (550 g)
INGREDIENTS FOR THE MARINADE:
- dry white wine 25 cl
- olive oil 4 dsp
- mustard with seeds 3 dsp
- white wine vinegar 3 dsp
- Provence herbs 2 dsp
- chopped garlic 2 cloves
- coarse salt 2 tsp
- Cayenne pepper 1 tsp
PREPARATION:
Prepare the marinade by mixing all the ingredients in a
bowl. With a sharp knife, cut the eshy part of the chicken
legs at a number of points to open them slightly. Place the
legs in the bowl with the marinade and turn them so that
both sides are well covered; leave to marinate for 2-3 hours.
Insert the grill plate at the lower and the griddle one at the
top, then put the appliance in CONTACT GRILL mode. Adjust
the lower thermostat dial to MED and the top dial to MED.
Press the START/STOP button to preheat the grill. When the
upper and lower plates lights turn o, place the chicken legs
on the lower plate, press with the top plate and cook for
about 20-25 min., turning 2-3 times. When cooked, place
on a plate and serve.
GRILLED PRAWNS
INGREDIENTS:
- prawns 16/20
INGREDIENTS FOR THE MARINADE:
- parsley to taste
- lemons 2
- salt to taste
- pepper to taste
- garlic cloves 2
to MED. Press the START/STOP button to preheat the grill.
When the upper and lower plates lights turn o, place the
drained prawns on the lower plate, press with the top plate
and cook for about 4-6 min. To serve, decorate the plate
with lemon slices and green salad.
GRILLED SALMON WITH YOGHURT SAUCE
INGREDIENTS:
- salmon llet 500 g
- olive oil to taste
INGREDIENTS FOR THE SAUCE:
- Greek yoghurt 250 g
- garlic clove 1
- salt 1 tsp
- sugar 1 pinch
- chives 20 g
- parsley 20 g
- white pepper to taste
PREPARATION:
Prepare the sauce: wash the parsley and chives and dry
thoroughly, chop the garlic separately.
Pour the yoghurt into a bowl, add the herbs, garlic, salt,
sugar and pepper and blend to a smooth cream. Place in
the refrigerator and leave for at least 30 min. Insert the
griddle plate at the lower and the grill one at the top, then
put the appliance in OVEN GRILL mode. Adjust the lower
thermostat dial to MAX and the top dial to MAX. Press the
START/STOP button to preheat the grill. When the upper
and lower plates lights turn o, place the previously oiled
llet on the lower plate, close the top plate in OVEN GRILL
mode (as near as possible to the food without touching
it) and cook for about 25-30 min. (for best results, turn
the salmon through 180° about halfway through cooking
as towards the back, the plate is nearer the food). When
cooked, place the salmon on a serving plate and serve with
the yoghurt sauce.
PREPARATION:
Prepare the marinade: chop the garlic and parsley nely,
add the lemon juice, salt and a sprinkling of pepper.
Wash the prawns, dry well and leave to marinate for at least
half an hour.
Insert the grill plate at the lower and the griddle one at the
top, then put the appliance in CONTACT GRILL mode.
Adjust the lower thermostat dial to MED and the top dial
31

GRILLED SQUID
INGREDIENTS:
- large squid 400 g
- lemon 1
- parsley 1 sprig
- olive oil to taste
- oregano to taste
- salt to taste
- chilli pepper powder to taste
PREPARATION:
Prepare the squid by removing the intestines, head and
bone, then rinse thoroughly. Insert the grill plate at the
lower and the griddle one at the top, then put the appliance
in CONTACT GRILL mode. Adjust the lower thermostat dial to
MED and the top dial to MED. Press the START/STOP button
to preheat the grill. When the upper and lower plates lights
turn o, place the previously oiled squid on the lower plate,
press with the top plate and cook for about 10-12 min. In
a bowl, prepare the avouring by mixing the oil with the
chopped parsley, lemon juice, a pinch of oregano, a pinch of
salt and a pinch of chilli pepper.
When the squid is cooked, remove from the grill and avour
with the sauce. Compose the dish and serve.
BANANA PANCAKES
INGREDIENTS:
- banana 1
- eggs 2 (1 whole + 1 white)
- milk 150 ml
- plain our 100 g
- butter 70 g
- salt to taste
- sugar 1 dsp
- baking powder 16 g
appliance in OPEN GRILL mode. Set the lower thermostat
dial to MED and the top dial to MED. Press the START/STOP
button to preheat the grill. When the upper and lower plates
lights turn o, grease the plates with a little butter and pour
on 1-2 dessert spoons of the pancake mixture, spreading it
rapidly over the surface to obtain a circle. Leave to cook for
about 2 minutes until you see bubbles all over the surface
of the pancake, then turn and cook the other side for about
2 minutes. The pancakes can be served in numerous ways:
chocolate cream, maple syrup, fresh bilberries, chocolate
chips, honey, whipped cream and icing sugar.
GRILLED PINEAPPLE WITH ICE-CREAM
INGREDIENTS:
- pineapple 1
- honey as required
- cane sugar as required
- fresh mint as required
- icing sugar as required
- vanilla ice-cream as required
PREPARATION:
Take the pineapple, remove the leaves and peel. Cut into
slices about 1-2 cm thick and sprinkle each slice with cane
sugar on both sides. Insert the grill plate at the lower
and the griddle one at the top, then put the appliance in
CONTACT GRILL mode. Set the lower thermostat dial to MED
and the top dial to MED. Press the START/STOP button to
preheat the grill. When the upper and lower plates lights
turn o, brush the pineapple on both sides with honey and
place on the grill. Close the grill and cook for 5-6 min. Once
cooked, place the slices on a serving plate, decorate with
fresh mint leaves, dust with icing sugar and serve with balls
of ice-cream.
PREPARATION:
Peel the banana and mash well with a fork. Beat the whole
egg and sugar in a bowl and add the milk slowly mixing
all the time. Add 50 g of melted butter, then add the our
sieved with the baking powder and a pinch of salt a little
at a time, followed by the mashed banana. Mix all the
ingredients thoroughly and then place the mixture in the
refrigerator for 10 min. In the meantime, whip the egg
white until rm. Take the mixture from the refrigerator and
blend in the whipped egg white with delicate movements
from the lower towards the top. Insert the griddle plate
at the lower and the grill one at the top, then position the
32

PRÉCAUTIONS D'EMPLOI
Consignes de sécurité
Danger!
Le non-respect de ces consignes peut entrainer un risque de
chocs électriques potentiellement mortels.
- Avant de brancher l'appareil à la prise de courant,
vérier que:
● La tension du secteur indiquée sur la plaquette de
l'appareil correspond à celle de votre installation
électrique;
● la prise de courant a une intensité nominale de 16 A et
qu'elle est munie d'une mise à la terre..
● Une utilisation professionnelle du produit, non
appropriée ou non conforme au mode d'emploi dégage
le fabricant de toute responsabilité.
- S'assurer que le câble n'entre pas en
contact avec les parties de l'appareil
qui deviennent chaudes pendant
l'utilisation. Si le câble d'alimentation
est endommagé, il doit être remplacé
par le fabricant ou le service
d'assistance à la clientèle du fabricant
pour éviter tout risque.
- Avant de ranger l'appareil ou de retirer les plaques
de cuisson et avant toute opération de nettoyage et
d'entretien, éteindre l'appareil en tournant le bouton
sur "●" et débrancher la che de la prise de courant.
Laisser refroidir complètement l'appareil.
- Ne pas utiliser l'appareil à l'extérieur.
- Ne pas plonger l’appareil dans l’eau.
- Ne pas faire fonctionner l'appareil à
l'aide d'une minuterie extérieure ou
d'un système de commande à distance.
- Utiliser uniquement des rallonges conformes aux
normes de sécurité en vigueur. Vérier qu'elles sont en
bon état et qu'elles ont une section appropriée.
- Ne jamais débrancher la che de la prise de courant en
tirant sur le câble.
Attention!
Le non-respect de ces consignes peut entrainer des blessures
ou des dommages à l'appareil.
- Il est conseillé de nettoyer les plaques avec une éponge
douce ou un chion humidié avec de l'eau et un
détergent délicat.
- Cet appareil est prévu pour la cuisson des aliments. Il ne
doit pas être utilisé pour un autre usage ni être modié
ou transformé.
- Cet appareil est destiné exclusivement
à un usage domestique. Il n'est
pas destiné à être utilisé dans les
espaces cuisine destinés au personnel
de magasins, bureaux et autres
environnements professionnels, gites
ruraux, hôtels, meublés, motels et
autres hébergements.
- Cet appareil peut être utilisé par
des enfants de 8 ans et plus et par
des personnes ayant des capacités
physiques, sensorielles ou mentales
réduites, ou manquant d'expérience et
de connaissances, à condition qu'elles
aient reçu une supervision et des
instructions concernant l'utilisation de
l'appareil en toute sécurité et qu'elles
soient conscientes des risques liés à
l'utilisation. Ne pas laisser les enfants
jouer avec l'appareil.
- Le nettoyage et l'entretien ne doivent pas être eectués
par des enfants, à moins que ceux-ci ne soient âgés de
plus de 8 ans et surveillés par un adulte.
Maintenir l'appareil et le câble hors de portée des
enfants de moins de 8 ans.
- Maintenir l'appareil hors de portée des enfants et ne pas
le laisser en marche sans surveillance.
- Ne jamais utiliser l'appareil sans plaques de cuisson.
- Ranger l'appareil uniquement lorsqu'il est
complètement refroidi.
- Ne pas déplacer l'appareil durant son utilisation.
Danger de brûlures!
Le non-respect des précautions d'usage peut entraîner un
risque de brûlures supercielles ou profondes.
- La surface extérieure peut devenir
très chaude lorsque l'appareil est en
fonctionnement. Toujours utiliser
la poignée (2) ou des gants à four si
nécessaire.
- Retirer ou changer les plaques de cuisson lorsque
33
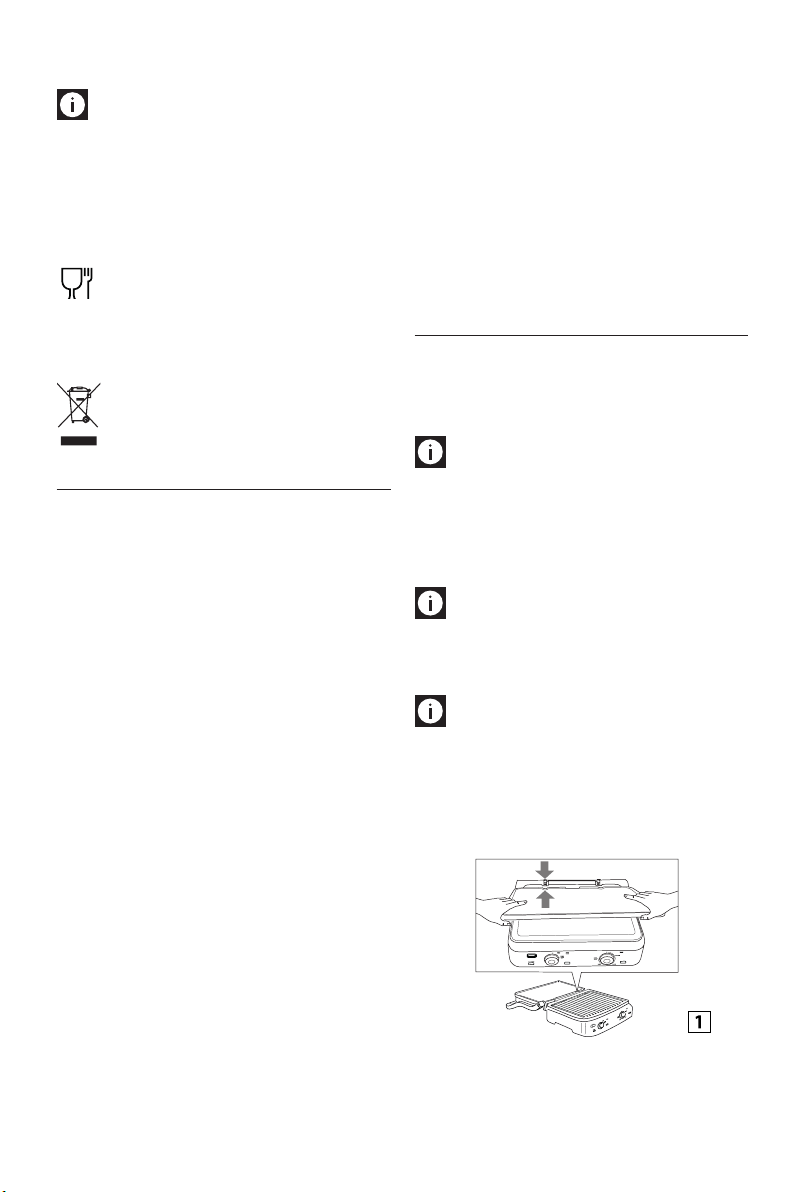
l'appareil est complètement refroidi .
N.B.:
Ce symbole signale des recommandations et des informations
importantes pour l'utilisateur.
- Ne pas faire cuire des aliments enveloppés dans des
lms en plastique, dans des feuilles d'aluminium ou
dans des sachets en polyéthylène an d'éviter tout
risque d'incendie.
Cet appareil est conforme au règlement CEE
1935/2004 concernant les matériaux et objets destinés à
entrer en contact avec des denrées alimentaires.
Élimination de l'appareil
Ne pas éliminer l'appareil avec les déchets ménagers,
mais le déposer dans un centre de collecte agréé.
DESCRIPTION
1. Base et couvercle: structure solide en acier inox avec
couvercle à charnière ottante.
2. Poignée: poignée robuste en métal moulé permettant
d'ajuster la hauteur du couvercle en fonction de
l'épaisseur des aliments.
3. Bouton de déverrouillage de la plaque: appuyer
pour déverrouiller et retirer la plaque
4. Dispositif de verrouillage/déverrouillage plaque
inférieure et réglage en hauteur de la plaque
supérieure/couvercle
5. Bouton de déverrouillage charnière: il permet
d'ouvrir complètement l'appareil à 180°
6. Réglage en hauteur de la plaque "fonction four
grill": pour bloquer la plaque supérieure/couvercle à
la hauteur voulue, pour préparer des plats qui n'ont pas
besoin d'être pressés.
7. Voyant d'alimentation (vert): le voyant est allumé
quand l'appareil est branché sur le secteur.
8. Voyant plaque supérieure (rouge): Le voyant est
allumé quand les résistances sont alimentées et s'éteint
quand la température est atteinte et la plaque est prête.
9. Voyant plaque inférieure (rouge): le voyant est
allumé quand les résistances sont alimentées et s'éteint
quand la température est atteinte et la plaque est prête
10. Bouton du thermostat de la plaque supérieure:
mettre sur MED - MAX ou “●” pour régler la température
de la plaque supérieure.
11. Bouton du thermostat de la plaque inférieure:
mettre sur WARM - LOW - MED - MAX ou “●” pour
régler la température de la plaque inférieure.
12. Pieds avant réglables.
13. Plaques amovibles: anti-adhésives et lavables en
lave-vaisselle, faciles à nettoyer LE NOMBRE ET LE TYPE
DES PLAQUES VARIENT SELON LE MODÈLE.
13a. Plaque grill: parfaite pour griller steaks, hamburgers,
poulet et légumes
13b. Plaque lisse: pour préparer crêpes, œufs, bacon et
crustacés
14. Bac de récupération des graisses: intégré dans
l'appareil et amovible pour faciliter le nettoyage.
PREMIÈRE MISE EN SERVICE
Retirer tout l'emballage et les autocollants qui se trouvent
sur la plaque. S'assurer qu'il ne reste aucune pièce de
l'appareil dans l'emballage avant de le jeter . Il est conseillé
de conserver la boîte et l'emballage pour les réutiliser.
N.B.
: Avant l'utilisation, nettoyer la base, le couvercle
et les boutons de commande avec un chion humide pour
éliminer la poussière accumulée durant le transport. Nettoyer
soigneusement les plaques de cuisson, le bac de récupération
des graisses et l'ustensile de nettoyage. Les plaques et le bac de
récupération des graisses peuvent être lavés en lave-vaisselle.
N.B.: Lors de la première utilisation, l'appareil peut
dégager une légère odeur et un peu de fumée. Ce phénomène
est normal et commun à tous les appareils ayant des surfaces
anti-adhésives.
N.B. : les plaques amovibles (grill et lisses) sont
parfaitement interchangeables.
Mise en place des plaques de cuisson
- Ouvrir l'appareil à 180° (voir gure 1). Installer une
plaque à la fois.
- Chaque plaque peut être installée aussi bien dans le
logement supérieur que dans le logement inférieur (voir
gure 2).
34
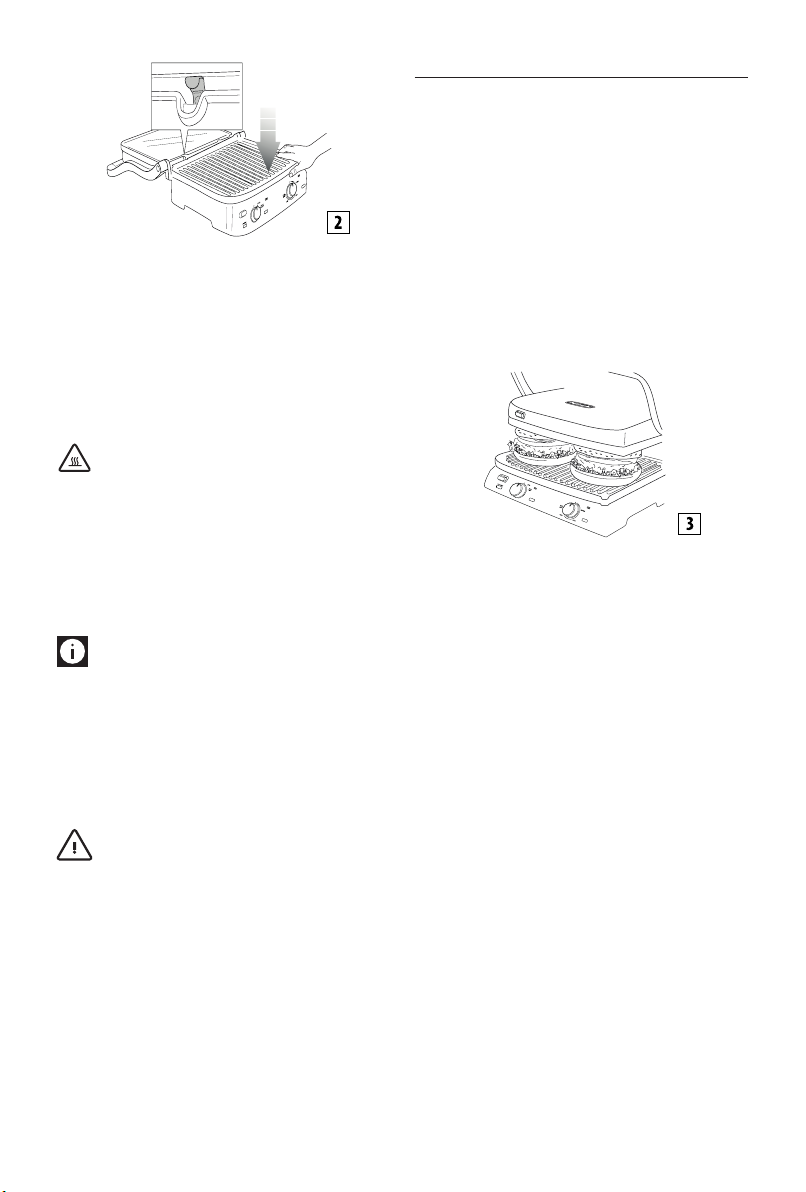
Retrait des plaques
CLICK
CLICK
Ouvrir l'appareil à 180°.
Repérer les boutons de déverrouillage (3) des plaques
sur le côté droit. Appuyer fermement sur le bouton pour
déverrouiller la plaque. Saisir la plaque à deux mains, la
faire coulisser le long des supports métalliques et l'extraire
de la base. Appuyer sur l'autre bouton de déverrouillage
pour retirer la deuxième plaque en eectuant les mêmes
opérations.
Danger de brûlures! Retirer ou remplacer les plaques
de cuisson lorsque l'appareil est complètement refroidi.
Installation du bac de récupération des graisses
Durant la cuisson, le bac de récupération des graisses doit
être inséré dans son logement sur le côté droit de l'appareil.
La graisse provenant des aliments s'écoule dans le bac par la
rigole prévue à cet eet sur la plaque.
N.B.: Pendant la cuisson, contrôler fréquemment le
bac de récupération des graisses et le vider si nécessaire pour
éviter qu'il n'y ait trop de graisse liquide.
Après la cuisson, éliminer la graisse récupérée conformément
à la règlementation.
Le bac de récupération des graisses peut être lavé au lavevaisselle.
Important! Durant la cuisson, faire preuve de la plus
grande prudence.
Pour ouvrir l'appareil, saisir la poignée qui reste froide. Les
parties en aluminium moulé sous pression deviennent
en revanche très chaudes, éviter de les toucher durant ou
immédiatement après la cuisson.
Avant d'eectuer toute opération sur l'appareil, le laisser
refroidir (pendant au moins 30 minutes).
Toujours cuisiner avec le bac à graisse installé. Ne pas vider
le bac de récupération des graisses tant que l'appareil n'est
pas complètement refroidi. Lors de l'extraction du bac faire
attention à ne pas renverser les liquides qui s'y sont écoulés.
POSITIONS D'UTILISATION DE L'APPAREIL
Grill par contact (position fermée)
La plaque supérieure recouvre la plaque inférieure. C'est
la position initiale et de cuisson quand on utilise l'appareil
comme gril à contact. La plaque supérieure s'adapte
automatiquement à l'épaisseur des aliments placés sur la
plaque inférieure. De cette manière, les aliments sont cuits
de manière uniforme des deux côtés.
Le grill par contact est idéal pour cuire les steaks hachés,
la viande désossée et en tranches nes, les légumes et les
sandwichs. La fonction "par contact" permet une cuisson
rapide et saine des aliments. Lorsqu'on utilise le grill par
contact, les aliments cuisent rapidement puisqu'ils sont en
contact avec les plaques des deux côtés à la fois (gure 3).
Les rainures de la plaque et la rigole à l'arrière de l'appareil
permettent à la graisse de s'écouler dans le bac prévu à cet
eet.
L'appareil est équipé d'une poignée spéciale et d'une
charnière qui permettent de régler la plaque supérieure
en fonction de l'épaisseur des aliments. Pour préparer
plusieurs aliments à la fois avec le grill par contact, il faut
que les diérents aliments aient la même épaisseur an de
permettre une fermeture uniforme du couvercle (plaque
supérieure).
Grill ouvert
La plaque supérieure et la plaque inférieure sont toutes les
deux à plat. Placées l'une à côté de l'autre elles orent une
large surface de cuisson.
Dans cette position, l'appareil peut être utilisé en mode
barbecue avec plaque grill ou plaque lisse.
Pour régler l'appareil dans cette position, il faut d'abord
repérer le bouton de déverrouillage de la charnière, qui
se trouve sur le côté droit. Saisir la poignée d'une main et
de l'autre appuyer sur le bouton de déverrouillage de la
charnière ( gure 4).
35
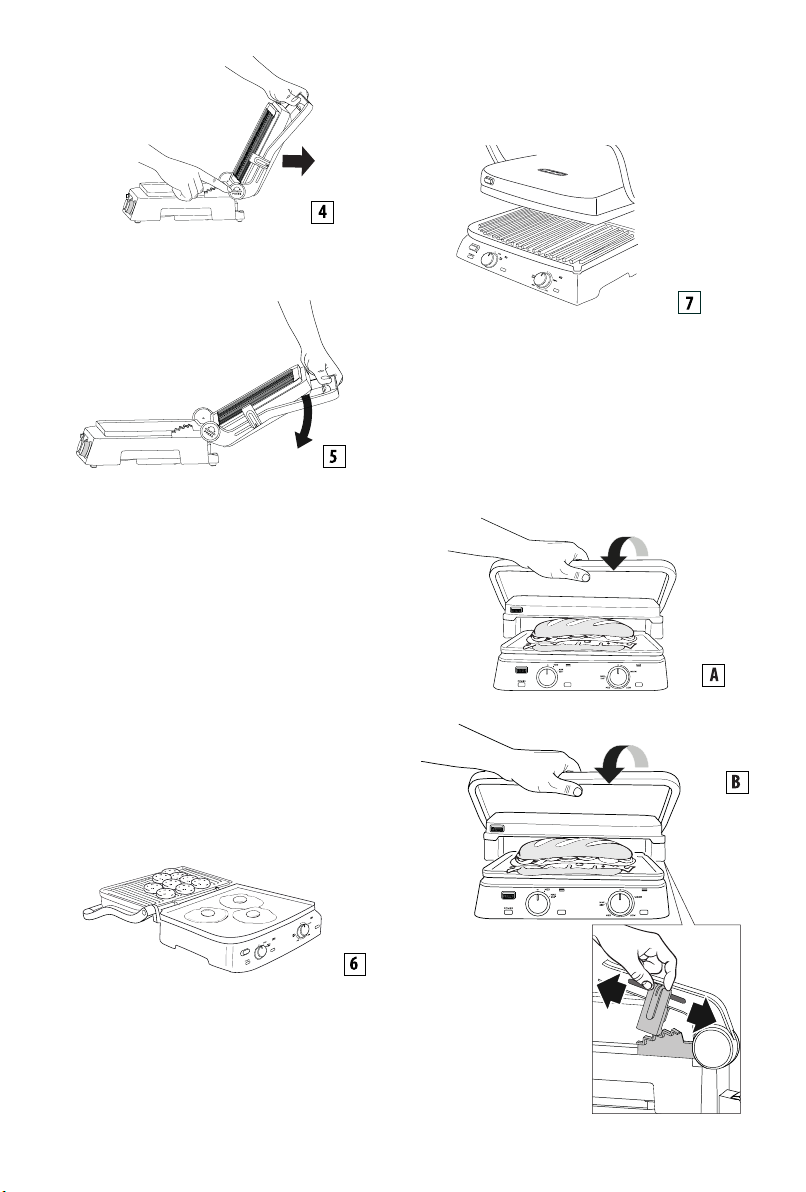
Basculer la plaque supérieure vers l'arrière jusqu'à ce que
l'appareil soit complètement ouvert (gure 5).
Si on soulève légèrement la poignée avant d'appuyer sur
le bouton de déverrouillage, la pression sur la charnière est
moindre et l'ouverture est plus facile.
L'appareil peut être utilisé comme grill/barbecue pour
préparer des steaks hachés, des biftecks, du poulet et du
poisson. Le mode grill/barbecue est le plus polyvalent. Le gril
est ouvert à 180° et ore une double surface de cuisson.
Il est possible de préparer diérents aliments sur des plaques
séparées sans mélanger les saveurs ou de cuisiner une plus
grande quantité d'un même aliment.
La position grill/barbecue permet de griller diérents
morceaux de viande de diérentes épaisseurs, avec le degré
de cuisson préféré pour chacun d'eux. Dans cette position, il
est nécessaire de retourner les aliments durant la cuisson.
L’appareil peut être utilisé également avec les plaques lisses
pour préparer des crêpes, du fromage, des œufs et du bacon
pour le petit déjeuner (gure 6).
Four grill
Cette position (voir gure 7) est parfaite pour griller sans
contact des aliments de grande épaisseur qui demandent
une cuisson lente et uniforme.
Idéal pour la préparation de légumes à forte teneur en eau,
car l'eau peut s'évaporer.
Il est possible d'utiliser cette position de cuisson pour
préparer des sandwichs moelleux et des aliments qui n'ont
pas besoin d'être pressés.
- Placer les aliments sur la plaque inférieure.
- Saisir la poignée et abaissez la plaque supérieure (g.
A).
La grande surface de cuisson permet de préparer
simultanément diérents aliments ou une plus grande
quantité du même aliment.
36

- Régler la plaque supérieure à la hauteur voulue en
faisant coulisser le levier de verrouillage (4) des plaques.
- La plaque supérieure est verrouillée à la hauteur voulue.
Il y a 5 réglages de hauteur diérents (g. B).
UTILISATION
Fonctionnement
Lorsque l'appareil et les aliments sont prêts, sélectionner
la température voulue pour chacune des deux plaques
(supérieure et inférieure) à l'aide des boutons des
thermostats 10 et 11.
Les voyants des plaques supérieure et inférieure (8-9)
s'allument.
Selon la température choisie, il peut être nécessaire
d'attendre quelques minutes pour que l'appareil chaue.
Quand la température voulue est atteinte les voyants des
plaques supérieure et inférieure s'éteignent et l'appareil est
prêt.
Il est possible de modier le réglage de la température à tout
moment durant la cuisson, en fonction du type d'aliment à
préparer.
N.B.: l'appareil est muni de 2 pieds avant réglables
(16) qui facilitent l'écoulement de l'huile dans le bac de
récupération des graisses.
NETTOYAGE ET ENTRETIEN
Entretien par l'utilisateur
- Ne pas utiliser d'ustensiles métalliques qui peuvent
rayer les plaques anti-adhésives. Utiliser des ustensiles
en bois ou en plastique résistant à la chaleur.
- Ne pas laisser les ustensiles en plastique en contact avec
les plaques chaudes.
- Après la cuisson faire tomber les résidus d'aliments dans
le bac de récupération à travers la rigole d'évacuation
des graisses, puis nettoyer avec un papier essuie tout
avant de passer à la cuisson suivante.
- Avant toute opération de nettoyage, laisser refroidir
l'appareil pendant au moins 30 minutes.
graisses. Le bac à graisse peut être lavé à la main ou au lavevaisselle.
Appuyer sur les boutons de déverrouillage des plaques (3)
pour retirer ces dernières. Avant de les toucher vérier que
les plaques sont complètement refroidies. Les plaques de
cuisson passent au lave-vaisselle mais les lavages répétés
peuvent réduire les propriétés du revêtement. Il est donc
conseillé de nettoyer la plaque de cuisson avec une éponge
douce ou un chion humidié avec de l'eau additionnée d'un
détergent doux.
Ne pas utiliser d'objets métalliques pour nettoyer les plaques.
CARACTÉRISTIQUES TECHNIQUES
Tension d'alimentation 220-240 V / 50-60 Hz
Puissance absorbée 2000W
Nettoyage et entretien
N.B.: Avant de nettoyer l'appareil, s'assurer qu'il est
complètement refroidi.
En n d'utilisation tourner le bouton sur "●"et débrancher
l'appareil de la prise de courant. Laisser refroidir l'appareil
pendant au moins 30 minutes. Retirer les résidus alimentaires
collés sur les plaques. Vider le bac de récupération des
37

TABLEAU DE CUISSON
BŒUF ÉPAIS-
Bifteck 0,5 - 1 2 Bien cuit GRILL
Bifteck 0,5 - 1 4 Bien cuit GRILL
Filet 3-4 4 Saignant GRILL
Filet 3-4 4 Moyenne GRILL
Filet 3-4 4 Bien cuit GRILL
Côte 2-3 2 Moyenne GRILL
Côte 2-3 2 Bien cuit GRILL
Côte 2-3 4 Moyenne GRILL
Côte 2-3 4 Bien cuit GRILL
Steak
haché
Brochette 6 Bien cuit GRILL
Nbre
DEGRÉ DE
SEUR
PIÈCES
CUISSON
(cm)
2-3 6 Bien cuit GRILL
MODE
PAR
CONTACT
OUVERT
PAR
CONTACT
PAR
CONTACT
PAR
CONTACT
PAR
CONTACT
PAR
CONTACT
OUVERT
OUVERT
PAR
CONTACT
PAR
CONTACT
PLAQUES BOUTON DU
THERMOSTAT
infé-
supé-
rieure
rieure
GRILL LISSE MAX MAX 2 - 3 bien huiler
GRILL LISSE MAX MAX 5 - 6 bien huiler
GRILL LISSE MAX MAX 4 - 5 bien huiler
GRILL LISSE MAX MAX 7 - 8 bien huiler
GRILL LISSE MAX MAX 10 - 11 bien huiler
GRILL LISSE MAX MAX 4 - 5 bien huiler
GRILL LISSE MAX MAX 7 - 8 bien huiler
GRILL LISSE MAX MAX 10 - 12 bien huiler
GRILL LISSE MAX MAX 14 - 16 bien huiler
GRILL LISSE MAX MAX 8 - 10 bien huiler
GRILL LISSE MAX MAX 13 - 15 bien huiler
supé-
rieure
(10)
inférieure
(11)
MIN SUGGESTIONS
les aliments
les aliments,
retourner à
mi-cuisson
les aliments
les aliments
les aliments
les aliments
les aliments
les aliments,
retourner à
mi-cuisson
les aliments,
retourner à
mi-cuisson
les aliments
les aliments,
retourner à
mi-cuisson
38

AGNEAU ÉPAISSEUR
(cm)
Côtelette 1,5-3 6 Moyenne GRILL PAR
Côtelette 1,5-3 6 Bien cuit GRILL PAR
Nbre
PIÈCES
DEGRÉ DE
CUISSON
MODE PLAQUES BOUTON DU
CONTACT
CONTACT
MIN SUGGESTIONS
THERMOSTAT
infé-
supé-
supé-
inférieure
rieure
rieure
rieure
(11)
(10)
GRILL LISSE MAX MAX 10 - 12
GRILL LISSE MAX MAX 12 - 14
bien huiler
les aliments, retourner les
côtelettes à
mi-cuisson
PORC ÉPAISSEUR
(cm)
Bifteck 1-2 4 GRILL PAR
Bifteck 1-2 8 POSITION
Côtelette <2,5 4 GRILL PAR
Côtelette <2,5 8 POSITION
Travers de
porc (ribs)
Poitrine de
porc
Saucisse 8 GRILL PAR
Brochette 6 GRILL PAR
Saucisse de
Strasbourg
Nbre
PIÈCES
MODE PLAQUES BOUTON DU
CONTACT
OUVERTE
CONTACT
OUVERTE
6-8 GRILL PAR
CONTACT
4 GRILL PAR
CONTACT
CONTACT
CONTACT
6 GRILL PAR
CONTACT
MIN SUGGESTIONS
THERMOSTAT
infé-
supé-
supé-
infé-
rieure
GRILL LISSE MAX MAX 7 - 9
GRILL LISSE MAX MAX 14 - 16
GRILL LISSE MAX MAX 9 - 11
GRILL LISSE MAX MAX 11 - 13
GRILL LISSE MED MED 20 - 25
GRILL LISSE MAX MAX 1 - 2
GRILL LISSE MED MED 16 - 18
GRILL LISSE MAX MAX 14 - 16
GRILL LISSE MAX MAX 8 - 10
rieure
rieure
(10)
rieure
(11)
bien huiler les aliments
bien huiler les aliments, retourner à
mi-cuisson
bien huiler les aliments, retourner à
mi-cuisson
bien huiler les aliments, retourner à
mi-cuisson
retourner deux ou
trois fois
percer les saucisses
avec une fourchette
bien huiler les aliments, retourner 1-2
fois
39

VIANDE DE
POULET ET
DE DINDE
Blanc <1 4 GRILL
Cuisse 3 GRILL
Steak haché 1,5-2 4 GRILL
Steak haché 1,5-2 8 GRILL
Brochette 6 GRILL
Saucisse de
Strasbourg
Poulet en
crapaudine
à la diable
ÉPAISSEUR
Aile 6 GRILL
(cm)
Nbre
MODE PLAQUES BOUTON DU THERMOSTAT MIN
PIÈCES
PAR
CONTACT
PAR
CONTACT
PAR
CONTACT
PAR
CONTACT
OUVERT
PAR
CONTACT
6 GRILL
PAR
CONTACT
1 GRILL
PAR
CONTACT
inférieure supérieure supérieure
GRILL LISSE MAX MAX 3 - 4
GRILL LISSE MED MED 20 - 25
GRILL LISSE MED MED 14 - 16
GRILL LISSE MAX MAX 6-8
GRILL LISSE MAX MAX 14 - 16
GRILL LISSE MAX MAX 11 - 13
GRILL LISSE MAX MAX 6 - 8
GRILL LISSE MED MED 40 - 45
(10)
inférieure
(11)
SUGGESTIONS
bien huiler les
aliments
retourner une ou
deux fois pendant
la cuisson
retourner une ou
deux fois pendant
la cuisson
retourner à micuisson.
retourner une
ou deux fois
pendant la
cuisson
retourner une ou
deux fois pendant
la cuisson
PAIN Nbre
Croque-
monsieur /
sandwich
Sandwich 2 GRILL
Tranches
de pain
MODE PLAQUES BOUTON DU
PIÈCES
2 FOUR
GRILL
PAR
CONTACT
4 GRILL
OUVERT
THERMOSTAT
inférieure supérieure supérieure
LISSE GRILL
GRILL LISSE
LISSE GRILL MAX MAX 4 - 5
inférieure
(10)
MED MED
MED MED
(11)
40
MIN SUGGESTIONS
3 - 5
placer la plaque
supérieure de sorte
qu'elle touche le pain
sans l'écraser
2 - 3
retourner à mi-cuisson.

LÉGUMES Nbre
PIÈCES
Aubergines
en tranches
Courgettes
en tranches
Poivrons en
quartiers
Tomates en
tranches
Oignons en
tranches
MODE PLAQUES BOUTON DU THER-
inférieure supérieure supérieure
1 GRILL
P A R
CONTACT
2 GRILL
P A R
CONTACT
2 GRILL
P A R
CONTACT
1 GRILL OU-
VERT
2 GRILL
P A R
CONTACT
GRILL LISSE MAX MAX 4 - 6 bien huiler les aliments
GRILL LISSE MAX MAX 6 - 8 bien huiler les aliments
GRILL LISSE MAX MAX 8 - 10 bien huiler les aliments
LISSE GRILL MAX MAX 5 - 7 bien huiler les aliments,
LISSE GRILL MAX MAX 5 - 7 bien huiler les aliments,
(10)
MIN SUGGESTIONS
MOSTAT
inférieure
(11)
retourner à mi-cuisson
remuer souvent avec
une spatule
POISSON QUANTITÉ Nbre
PIÈCES
Entier 250 g 1 GRILL PAR
Filet 500 g 1 FOUR
Darne 450 g 4 GRILL PAR
Brochette 500 g 6 GRILL
Calmars 400 g 1-2 GRILL PAR
Gambas 400 g 10-12 GRILL PAR
MODE PLAQUES BOUTON DU
CONTACT
GRILL
CONTACT
OUVERT
CONTACT
CONTACT
MIN SUGGESTIONS
THERMOSTAT
inférieure supé-
rieure
GRILL LISSE MED MED 8 - 10 bien huiler les aliments
LISSE GRILL MAX MAX 25 - 30 huiler les aliments,
GRILL LISSE MED MED 8 - 10 bien huiler les aliments
GRILL LISSE MAX MAX 10 - 12 bien huiler les ali-
GRILL LISSE MED MED 10 - 12 bien huiler les aliments
GRILL LISSE MED MED 4 - 6 bien huiler les aliments
supérieure
(10)
infé-
rieure
(11)
placer la plaque supérieure de façon à ce
qu'elle ne touche pas
les aliments.
ments; retourner deux
ou trois fois
41

DESSERT Nbre
PIÈCES
Pancake 4 GRILL
Tranches
d'ananas
MODE PLAQUES BOUTON DU THERMOSTAT MIN SUGGESTIONS
OUVERT
4 GRILL
PAR
CONTACT
infé-
rieure
LISSE GRILL MED MED 4 - 5 beurrer les plaques, retourner
GRILL LISSE MED MED 5 - 6 beurrer les plaques
supérieure
RECETTES
ŒUFS BROUILLÉS, LARD FUMÉ ET TOAST
INGRÉDIENTS:
- 2 œufs
- 2 tranches de bacon
- 1 cuillère à soupe de lait
- sel et poivre
- 2 tranches de pain pour toast
PRÉPARATION:
Fouetter les œufs avec le lait et le sel jusqu'à ce que le
mélange soit léger et mousseux. Insérer la plaque lisse dans
le logement inférieur et la plaque grill dans le logement
supérieur et mettre l'appareil en position GRILL OUVERT.
Mettre le bouton du thermostat inférieur et supérieur sur
MAX. Appuyer sur le bouton START / STOP pour préchauer le
grill. Quand les voyants des plaques supérieure et inférieure
s'éteignent verser le mélange d'œufs sur la plaque et cuire
pendant 2-3 minutes en ayant soin de bien les mélanger
avec une spatule en bois pour les cuire uniformément.
Entre temps, cuire sur la même plaque les tranches de
bacon pendant 3-4 minutes en les retournant à mi-cuisson;
sur l'autre plaque griller le pain pendant 3-4 minutes en le
retournant à mi-cuisson. Composer le plat et servir.
CROSTINI À LA MOUSSE D'AUBERGINE
INGRÉDIENTS:
- 1 aubergine
- 100g de ricotta
- poudre d'ail q.s.
- persil q.s.
- 4 cuillères à soupe d'huile d'olive
- sel
- poivre
- 1 baguette
supérieure
(10)
PRÉPARATION:
Laver les aubergines, les éplucher et les couper en tranches
épaisses.
Insérer la plaque grille dans le logement inférieur, la plaque
lisse dans le logement supérieur et mettre l'appareil en
mode GRILL PAR CONTACT. Mettre le bouton du thermostat
inférieur et supérieur sur MAX. Appuyer sur le bouton START /
STOP pour préchauer le grill. Quand les voyants des plaques
supérieure et inférieure s'éteignent, placer les aubergines
sur la plaque inférieure et laisser cuire 8-10 minutes environ
jusqu'à ce qu'elles soient fondantes. Couper les tranches
d'aubergines grossièrement et les mettre dans un mixeur
avec la ricotta, la gousse d'ail et le persil haché, une pincée
de sel et une pincée de poivre, ainsi que l'huile. Mixer jusqu'à
obtenir un mélange lisse et peu granuleux. Huiler le pain
(coupé en tranches) avec l'huile d'olive et le faire cuire à
température MAX avec les plaques lisses en mode GRILL PAR
CONTACT pendant 1-2 minutes selon le dorage souhaité.
Étaler la crème d'aubergine sur le pain grillé, arroser avec
deux cuillères à soupe d'huile et servir.
inférieure
(11)
à mi-cuisson
SALADE DE VIANDE, ROQUETTE ET TOMATES CERISES
INGRÉDIENTS:
- 2 tranches de viande de veau
- 100g de roquette
- 10-12 tomates cerises
- 100g de copeaux de grana padano
- sel
- huile d'olive
PRÉPARATIO :
Préparer la salade de roquette et tomates cerises : laver
la roquette, la mettre sur un torchon propre pour la laisser
sécher, couper les tomates cerises en 4. Insérer la plaque
grille dans le logement inférieur, la plaque lisse dans le
logement supérieur et mettre l'appareil en mode GRILL PAR
42

CONTACT.
Mettre le bouton du thermostat inférieur et supérieur sur
MAX. Appuyer sur le bouton START / STOP pour préchauer
le grill. Quand les voyants des plaques supérieure et
inférieure s'éteignent, mettre les tranches de viande huilées
au préalable sur la plaque inférieure, presser avec la plaque
supérieure et cuire 2-3 minutes selon le degré de cuisson
voulu. Couper la viande en lamelles et les placer sur le lit de
roquette et tomates cerises, saler et ajouter les copeaux de
grana padano. Assaisonner avec un let d'huile.
CÔTES AROMATISÉES AU CAFÉ
INGRÉDIENTS:
- côtes de bœuf (2 de 250g chacune)
- huile d'olive
POUR LE MÉLANGE D'ÉPICES AU CAFÉ:
- 2 cuillères à café de graines de cumin
- 2 cuillères à café de grains de café
- 1 cuillère à soupe de piment doux
- 1 cuillère à café de paprika
- 1 cuillère à café de gros sel
- 1 cuillère à café de poivre
PRÉPARATION :
Préparer le mélange au café: verser les graines de cumin et
le café dans un robot et les réduire en poudre pas trop ne.
Verser la poudre obtenue dans un saladier, ajouter les autres
ingrédients et bien mélanger. Huiler légèrement la viande et
assaisonner avec les épices; couvrir et laisser à température
ambiante pendant environ 30min. Insérer la plaque grill en
bas, la plaque lisse en haut, mettre l'appareil en mode GRILL
PAR CONTACT. Mettre le bouton du thermostat inférieur et
supérieur sur MAX. Appuyer sur le bouton START / STOP pour
préchauer le grill.
Quand les voyants des plaques supérieure et inférieure
s'éteignent, placer la viande sur la plaque inférieure et presser
avec la plaque supérieure, puis cuire pendant 6-8 minutes en
fonction de la cuisson voulue. Servir chaud.
FILET DE BŒUF SAUCE AUX CHAMPIGNONS
INGRÉDIENTS:
- 4 lets de bœuf
- sel
- poivre noir du moulin
- 2 gousses d'ail
- 2 cuillères à soupe de moutarde de Dijon
- 60g de beurre
- huile d'olive
INGRÉDIENTS POUR LA SAUCE AUX CHAMPIGNONS:
- 30g de beurre
- 1 cuillère à soupe de gorgonzola
- 2 échalotes
- 300g de champignons
- 1/2 verre à liqueur de whisky
- 200g de crème
- jus de citron
- persil q.s.
PRÉPARATION:
Assaisonner la viande avec sel et poivre et la laisser reposer
à température ambiante pendant une heure environ.
Préparer la sauce aux champignons: dans une poêle faire
fondre le beurre, ajouter les échalotes émincées ; laisser
cuire pendant 2-3 minutes. Ajouter les champignons et
cuire 5 minutes, déglacer avec le whisky, faire cuire pendant
1 minute, ajouter un verre d'eau et cuire encore une minute
environ. Ajouter la crème liquide, le jus d'un citron, le persil
et porter à ébullition. Cuire jusqu'à ce que la crème soit bien
dense ; saler, poivrer et mettre de côté. Entre temps, préparer
l'assaisonnement de la viande avec lequel badigeonner
les lets durant la cuisson: mettre le beurre, la moutarde
et l'ail dans une petite casserole. Faire cuire à feux doux
jusqu'à ce que le beurre fonde. Garder au chaud. Insérer la
plaque grill en bas, la plaque lisse en haut, mettre l'appareil
en mode GRILL PAR CONTACT. Mettre le bouton du thermostat inférieur et supérieur sur MAX. Appuyer sur le bouton
START / STOP pour préchauer le grill. Quand les voyants des
plaques supérieure et inférieure s'éteignent, placer les lets
(badigeonnés, au préalable, des deux côtés avec la sauce )
sur la plaque inférieure et fermer le grill. Faire cuire pendant
6-8 minutes en fonction de la cuisson voulue et de l'épaisseur
des lets. À la n de la cuisson, retirer les lets et les servir
nappés de la sauce aux champignons.
HAMBURGERS AU PAIN DE SEIGLE GRILLÉ
INGRÉDIENTS:
- 8 tranches de pain de seigle
- 500g de viande hachée pur bœuf
- 100g d'emmenthal en tranches
- 2 cuillères à soupe d'huile d'olive
- 2 oignons émincés
- beurre à température ambiante
- 2 cuillères à café de sauce worchester
- sel
- poivre
- 1/2 cuillère à café de sucre
43

PRÉPARATION:
Préparer les steaks hachés : dans une terrine mélanger la
viande hachée, la sauce worchester, le sel, le poivre et bien
amalgamer le tout. Former avec les mains 4 hamburgers
d'environ 2 cm d'épaisseur. Placer le grill en mode GRILL
OUVERT et insérer la plaque lisse dans le logement inférieur
et la plaque grill dans le logement supérieur. Mettre le bouton
du thermostat inférieur et supérieur sur MAX. Appuyer sur le
bouton START / STOP pour préchauer le grill.
Quand les voyants des plaques supérieure et inférieure
s'éteignent, placer les oignons émincés assaisonnés avec
l'huile d'olive et le sucre sur la plaque inférieure et les faire c uire
pendant 5-6 minutes environ en remuant constamment avec
une spatule an d'obtenir une cuisson uniforme et qu'ils soient
bien fondants. En même temps, cuire les steaks hachés sur
l'autre plaque pendant 12 minutes environ en les retournant
au bout de 5-6 minutes environ (le temps de cuisson varie en
fonction de l'épaisseur des steaks hachés). Dès que les oignons
sont cuits, les retirer de la plaque et faire griller les tranches de
pain beurrées d'un seul côté pendant 1-2 minutes. Mettre les
tranches de pain sur une planche à découper, le côté grillé vers
le haut, déposer dessus les oignons, poser les steaks hachés et
recouvrir avec le fromage. Fermer le sandwich avec la tranche
de pain, côté grillé vers le bas. Attendre que la plaque soit à
nouveau chaude, puis poser les burgers et bien presser avec
la plaque supérieure. Faire cuire pendant 2-3 minutes environ
pour obtenir le dorage souhaité.
CÔTELETTES D'AGNEAU AU VINAIGRE BALSAMIQUE
ET AU ROMARIN
INGRÉDIENTS:
- 6 côtelettes d'agneau
- 10g de romarin haché
- 10g d'ail haché
- 100ml de vinaigre balsamique
- 15g de sucre
- sel
- poivre
PRÉPARATION :
Mélanger tous les ingrédients dans un récipient assez grand,
couvrir et laisser mariner l'agneau au réfrigérateur pendant
au moins 1-2 heures. Insérer la plaque grill en bas, la plaque
lisse en haut, mettre l'appareil en mode GRILL PAR CONTACT.
Mettre le bouton du thermostat inférieur et supérieur sur
MAX. Appuyer sur le bouton START / STOP pour préchauer le
grill. Quand les voyants des plaques supérieure et inférieure
s'éteignent, poser les côtelettes sur la plaque inférieure. Faire
cuire pendant 11-13 minutes environ en fonction du degré de
cuisson désiré et de l'épaisseur de la côtelette (il est conseillé
de les retourner à mi-cuisson parce que l'os ne permet pas à
la plaque supérieure d'être en contact avec la viande). Entre
temps, faire réduire la marinade dans une casserole et en
napper les côtelettes d'agneau grillées avant de servir.
BROCHETTES DE POULET CRÈME AU MIEL ET CITRON
VERT
INGRÉDIENTS:
- 500g de blanc de poulet
INGRÉDIENTS POUR LA MARINADE:
- 1 cuillère à café de piment
- 1 cuillère à café de coriandre
- 10cl d'huile d'olive
- 2 oignons blancs
- 3 gousses d'ail
- 1 cuillère à soupe de gingembre râpé
- 1 cuillère à soupe de sucre
- 1 cuillère à soupe de jus de citron vert
- 1 cuillère à soupe de gros sel
- poivre
INGRÉDIENTS POUR LA CRÈME AU MIEL ET CITRON:
- 5cl de crème fraîche
- 1/2 cuillère à café de zeste de citron vert râpé
- 1 cuillère à soupe de jus de citron vert
- 1 cuillères à soupe d'huile d'olive
- 1 cuillère à soupe de miel
- sel
PRÉPARATION:
Préparer la marinade : mettre tous les ingrédients dans
un robot de cuisine et mixer jusqu'à obtenir un mélange
homogène. Mettre dans un plat creux le poulet coupé en
dés de 2 cm de largeur et le recouvrir entièrement avec la
marinade. Couvrir avec un lm alimentaire et laisser mariner
pendant 1-2 heures. Préparer la crème en mélangeant tous les
ingrédients dans un saladier, couvrir avec le lm transparent
et conserver au réfrigérateur. Piquer les morceaux de poulet
sur les brochettes. Insérer la plaque grill en bas, la plaque
lisse en haut, mettre l'appareil en mode GRILL PAR CONTACT.
Mettre le bouton du thermostat inférieur et supérieur sur
MAX. Appuyer sur le bouton START / STOP pour préchauer le
grill. Quand les voyants des plaques supérieure et inférieure
s'éteignent placer la viande sur la plaque inférieure et presser
avec la plaque supérieure, puis cuire pendant 11-13 minutes
en fonction du degré de cuisson désiré. Servir les brochettes
accompagnées de la crème au miel et citron.
44

CUISSES DE POULET À LA PROVENÇALE
INGRÉDIENTS:
- 3 cuisses de poulet (550 gr)
INGRÉDIENTS POUR LA MARINADE:
- 25cl de vin blanc sec
- 4 cuillères à soupe d'huile d'olive
- 3 cuillères à soupe de moutarde à l'ancienne
- 3 cuillères à soupe de vinaigre de vin blanc
- 2 cuillères à soupe d'herbes de Provence
- 2 gousses d'ail hachées
- 2 cuillères à café de gros sel
- 1 cuillère à café de piment de Cayenne
PRÉPARATION:
Préparer la marinade en mélangeant tous les ingrédients
dans un saladier. À l'aide d'un couteau bien aiguisé, pratiquer
quelques incisions dans la partie charnue des cuisses et les
ouvrir légèrement. Plonger les cuisses dans le saladier et
les enduire de marinade uniformément ; laisser mariner 2
à 3 heures. Insérer la plaque grill en bas, la plaque lisse en
haut, mettre l'appareil en mode GRILL PAR CONTACT. Mettre
le thermostat inférieur et supérieur sur MED. Appuyer sur
le bouton START / STOP pour préchauer le grill. Quand les
voyants de la plaque supérieure et inférieure s'éteignent
poser les cuisses de poulet sur la plaque inférieure, presser
avec la plaque supérieure et laisser cuire 20-25 minutes en
retournant 2 ou 3 fois. Lorsqu'elles sont cuites, les placer dans
un plat et servir.
GAMBAS AU GRILL
INGRÉDIENTS:
- 16/20 gambas
INGRÉDIENTS POUR LA MARINADE:
- persil q.s.
- 2 citrons
- sel
- poivre
- 2 gousses d'ail
sur le bouton START / STOP pour préchauer le grill.
Quand les voyants de la plaque supérieure et inférieure
s'éteignent, placer les gambas égouttées sur la plaque
inférieure et presser avec la plaque supérieure, puis faire cuire
4-6 minutes environ. Au moment de servir, décorer l'assiette
avec quelques tranches de citron et des petits légumes.
SAUMON AU GRILL AVEC SAUCE AU YAOURT
INGRÉDIENTS:
- 500g de let de saumon
- huile d'olive q.s.
INGRÉDIENTS POUR LA SAUCE:
- 250g de yaourt grec
- 1 gousse d'ail
- 1 cuillère à café de sel
- 1 pincée de sucre
- 20g de ciboulette
- 20g de persil
- poivre blanc
PRÉPARATION:
Préparer la sauce: laver et bien sécher le persil et la ciboulette
et hacher l'ail à part.
Verser le yaourt dans un saladier, ajouter les aromates, l'ail,
le sel, le sucre, le poivre et mixer jusqu'à obtenir une crème
onctueuse. Laisser reposer au réfrigérateur pendant au moins
30 min. Insérer la plaque lisse en bas, la plaque gril en haut et
mettre l'appareil en mode FOUR GRILL. Mettre le thermostat
inférieur et supérieur sur MAX. Appuyer sur le bouton START
/ STOP pour préchauer le grill. Quand les voyants de la
plaque supérieure et inférieure s'éteignent, poser le let
huilé au préalable sur la plaque inférieure, refermer la plaque
supérieure en mode FOUR GRILL (juste au-dessus de l'aliment
mais sans le toucher) et faire cuire pendant 25-30 minutes
environ (pour un meilleur résultat, retourner le saumon de
180° à mi-cuisson environ car la plaque est plus proche de
l'aliment dans la partie arrière). Une fois la cuisson terminée,
placer le saumon dans un plat et servir accompagné de la
sauce au yaourt.
PRÉPARATION:
Préparer la marinade : hacher nement l'ail et le persil,
ajouter le jus du citron, saler et poivrer.
Laver les gambas, bien les sécher et les laisser mariner
pendant au moins une demi-heure.
Insérer la plaque grill en bas, la plaque lisse en haut, mettre
l'appareil en mode GRILL PAR CONTACT.
Mettre le thermostat inférieur et supérieur sur MED. Appuyer
45

CALAMAR AU GRILL
INGRÉDIENTS:
- 400 gr calmar
- 1 citron
- quelques brins de persil
- huile d'olive
- origan
- sel
- piment en poudre
PRÉPARATION :
Vider le calamar, enlever la tête, retirer l'os à l'intérieur et
bien le rincer. Insérer la plaque grill en bas, la plaque lisse en
haut, mettre l'appareil en mode GRILL PAR CONTACT. Mettre
le thermostat inférieur et supérieur sur MED. Appuyer sur
le bouton START / STOP pour préchauer le grill. Quand les
voyants de la plaque supérieure et inférieure s'éteignent,
placer le calamar huilé au préalable sur la plaque inférieure
et presser avec la plaque supérieure, puis faire cuire
pendant 10-12 minutes environ. Dans un saladier, préparer
l'assaisonnement en mélangeant l'huile avec le persil haché,
le jus de citron, une pincée d'origan, une pincée de sel et de
piment.
Quand le calamar est cuit, le retirer du grill et l'assaisonner
avec la sauce. Composer le plat et servir.
PANCAKE À LA BANANE
INGRÉDIENTS:
- 1 banane
- 2 œufs (1 entier + 1 blanc)
- 150 ml de lait
- 100g de farine T45
- 70g de beurre
- sel
- 1 cuillère à soupe de sucre
- 16g de levure chimique
inférieur et supérieur sur MED. Appuyer sur le bouton START /
STOP pour préchauer le grill. Quand les voyants des plaques
supérieure et inférieure s'éteignent, beurrer légèrement
les plaques, y verser 1 ou 2 cuillerées de pâte et l'étaler en
formant un cercle. Laisser cuire 2 minutes environ, dès que
des bulles se forment à la surface, le retourner et laisser
cuire 2 minutes sur l'autre face. Les pancakes peuvent être
agrémentés de nombreuses manières : crème au chocolat,
sirop d'érable, myrtilles fraîches, copeaux de chocolat, miel,
crème chantilly, sucre glace.
ANANAS GRILLÉ À LA GLACE
INGRÉDIENTS:
- 1 ananas
- miel à volonté
- sucre de canne
- menthe fraîche
- sucre glace
- glace à la vanille
PRÉPARATION :
Retirer les feuilles et la peau de l'ananas. Couper ensuite
le fruit en tranches d'une épaisseur d'environ 1-2 cm et
saupoudrer chaque tranche de sucre de canne des deux côtés.
Insérer la plaque grill en bas, la plaque lisse en haut, mettre
l'appareil en mode GRILL PAR CONTACT. Mettre le thermostat
inférieur et supérieur sur MED. Appuyer sur le bouton START /
STOP pour préchauer le grill. Quand les voyants de la plaque
supérieure et inférieure s'éteignent, badigeonner l'ananas
de miel des deux côtés et le poser sur la plaque. Fermer le
grill et faire cuire 5-6 min. Lorsqu'elles sont cuites, mettre les
tranches dans un plat, décorer avec des feuilles de menthe
fraîche, saupoudrer de sucre glace et servir avec des boules
de glace.
PRÉPARATION:
Éplucher la banane et l'écraser à la fourchette en purée . Dans
un bol battre 1 œuf entier avec le sucre et verser le lait en let
en continuant de mélanger. Ajouter 50g de beurre fondu,
puis verser petit à petit la farine tamisée avec la levure et une
pincée de sel; ajouter la banane écrasée en mélangeant bien
tous les ingrédients et mettre le mélange au réfrigérateur
pendant 10 minutes. Entre temps, monter le blanc en
neige bien ferme. Reprendre le mélange et y incorporer le
blanc monté avec des mouvements délicats de bas en haut.
Insérer la plaque lisse en bas, la laque grill en haut et mettre
l'appareil en mode GRILL OUVERT. Mettre le thermostat
46

ADVERTENCIAS IMPORTANTES
Advertencias de seguridad
¡Peligro!
El incumplimiento de esta advertencia implica el riesgo de
descargas eléctricas con peligro de muerte.
- Antes de conectar el aparato a la red eléctrica,
compruebe:
● que el voltaje indicado en la placa de características
corresponda al de la red eléctrica;
● que la toma de corriente esté equipada con puesta a
tierra y que tenga una capacidad mínima de 16A.
● Un uso profesional del producto, inadecuado o no
conforme con las instrucciones de uso, exime al Fabricante de toda responsabilidad.
- Compruebe que el cable de
alimentación no tenga contacto con
partes del aparato que se calientan
durante el uso. Si el cable de
alimentación estuviera dañado, deberá
ser reemplazado por el fabricante, o
por su servicio de asistencia técnica
con el n de evitar cualquier riesgo.
- Antes de guardar el aparato o retirar las placas de
cocción y antes de hacer cualquier operación de limpieza
y mantenimiento, apague el aparato girando el selector
hacia la posición "●" y desconéctelo de la red eléctrica.
Asegúrese de que el aparato se haya enfriado por
completo.
- No utilice nunca el aparato al aire libre.
- No sumerja nunca el aparato en el agua.
- No haga funcionar el aparato con un
temporizador externo o con un sistema
de mando a distancia separado.
- Use solo cables alargadores que respondan a las normas
de seguridad vigentes. Compruebe que estén en buenas
condiciones y que tengan la sección adecuada.
- Nunca desenchufe el aparato de la corriente tirando del
cable.
¡Advertencia!
El incumplimiento de la advertencia puede provocar lesiones
personales o dañar el aparato.
- Limpie la parte exterior de la placa de cocción con
una esponja suave o un paño humedecido con agua y
detergente neutro.
- Este aparato ha sido diseñado para la cocción de
alimentos. Por consiguiente, no debe ser utilizado para
otros nes ni ser modicado o alterado bajo ningún
concepto.
- Este aparato ha sido concebido solo
para el uso doméstico. No se contempla
el uso en lugares destinados a cocinas
para el personal de tiendas, ocinas
y otros lugares de trabajo, casas
de turismo rural, hoteles, moteles,
residencias de tipo «bed and breakfast»
y en otras estructuras hoteleras.
- El aparato puede ser utilizado por niños
mayores de 8 años y por personas con
capacidades físicas, sensoriales o
mentales reducidas o con falta de
experiencia y de conocimiento si están
vigiladas o si han recibido instrucciones
relativas al uso seguro del aparato y
han comprendido los peligros que este
conlleva. Los niños no deben jugar con
el aparato.
- La limpieza y el mantenimiento que debe ser efectuado
por el usuario, no deben ser realizados por niños
menores de 8 años y sin supervisión.
Mantenga el aparato y su cable alejados del alcance de
los niños menores de 8 años.
- No deje el aparato al alcance de los niños ni encendido
sin vigilancia.
- No utilice el aparato sin las placas de cocción.
- Guarde el aparato solamente cuando se haya enfriado
del todo.
- No desplace el aparato durante su uso.
¡Peligro de quemaduras!
El incumplimiento de esta advertencia puede implicar el
riesgo de quemaduras.
- Cuando el aparato está funcionando,
la supercie exterior puede aumentar
mucho de temperatura. Siempre
utilice el asa (2) o guantes para horno
si fuera necesario.
- Quite o cambie las placas de cocción cuando el aparato
esté completamente frío.
47

Nota:
Este símbolo destaca consejos e información importantes
para el usuario.
- Para evitar el riesgo de incendio, no cueza alimentos
envueltos en película de plástico o aluminio o en bolsas
plásticas.
Este aparato responde al Reglamento (CE) 1935/2004
sobre los materiales y objetos destinados a entrar en contacto
con alimentos.
12. Pies de apoyo delanteros regulables.
13. Placas extraíbles: antiadherentes y lavables en
lavavajillas, fáciles de limpiar. LA CANTIDAD Y EL TIPO
DE PLACAS PUEDE VARIAR SEGÚN EL MODELO.
13a. Placa grill: perfecta para asar bistecs, hamburguesas,
pollo y verduras.
13b. Placa lisa: para preparar crepes, huevos, tocino y
mariscos de forma impecable.
14. Bandeja recogegrasa: integrada con el aparato, se
puede extraer para facilitar la limpieza.
Eliminación del aparato
El aparato no debe eliminarse con los residuos
domésticos, sino que se deberá llevar a un centro
autorizado para la recogida selectiva y reciclaje.
DESCRIPCIÓN
1. Base y tapa: estructura robusta de acero inoxidable
con tapa ajustable.
2. Asa: asa robusta de metal fundido para ajustar la tapa
según el grosor del alimento.
3. Botones de desenganche de la placa: púlselos para
desenganchar y quitar la placa.
4. Dispositivo de bloqueo/desbloqueo de la placa
inferior y regulación en altura de la placa
superior/tapa
5. Botón de desenganche de la bisagra: permite abrir
por completo el aparato y cocer en posición en plano.
6. Regulación en altura de la placa «función horno
grill»: para bloquear la placa/tapa superior a la altura
deseada, para preparar alimentos que no necesitan ser
comprimidos.
7. Indicador luminoso de llegada de tensión (verde):
el indicador luminoso se enciende cuando el aparato
está conectado a la red eléctrica.
8. Indicador luminoso placa superior (rojo): El
indicador luminoso se enciende cuando se encienden
las resistencias y se apaga cuando se alcanza la
temperatura y la placa está lista.
9. Indicador luminoso placa inferior (rojo): el
indicador luminoso se enciende cuando se encienden
las resistencias y se apaga cuando se alcanza la
temperatura y la placa está lista.
10. Mando termostato de la placa superior: coloque
en MED - MAX o "●" para regular la temperatura de la
placa superior.
11. Mando del termostato de la placa inferior: coloque
en WARM - LOW - MED - MAX o "●" para regular la
temperatura de la placa inferior.
PRIMERA PUESTA EN SERVICIO
Elimine el embalaje y las etiquetas de la placa. Antes de
desechar el material de embalaje, compruebe que no haya
quedado dentro ninguna pieza del aparato. Le recomendamos
guardar la caja y el embalaje para utilizarlo en un futuro.
Nota: Antes del uso, limpie la base, tapa y mandos
con un paño húmedo para eliminar la suciedad acumulada
durante el transporte. Limpie meticulosamente las placas de
cocción, la bandeja recogegrasa y el accesorio de limpieza.
Las placas y la bandeja recogegrasa pueden lavarse en
lavavajillas.
Nota: La primera vez que utilice el aparato, podría
desprender un ligero olor y un poco de humo. Esto es normal
en todos los aparatos con supercies antiadherentes.
Nota: las placas extraíbles (grill y lisas) son
perfectamente intercambiables.
Montaje de las placas de cocción
- Coloque el aparato en posición horizontal (véase la
gura 1). Monte una placa por vez.
- Cada placa puede introducirse en el alojamiento
superior o inferior (véase la gura 2).
48
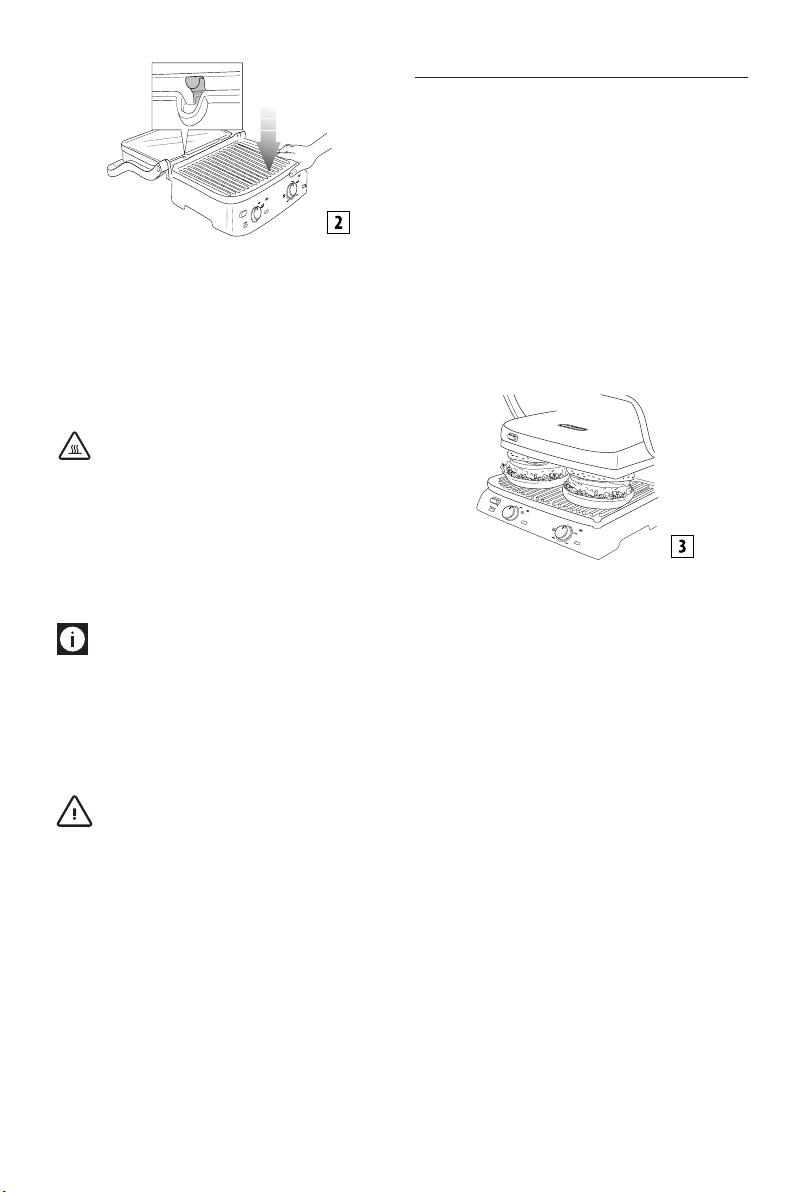
Para quitar las placas
CLICK
CLICK
Coloque el aparato en posición plana.
Ubique los botones de desenganche de la placa (3) a la
derecha. Presione el botón rmemente para expulsar la
placa de la base. Sostenga la placa con ambas manos, hágala
deslizar por los soportes de metal y quítela de la base. Pulse
el otro botón de desenganche para quitar la segunda placa,
siguiendo las mismas operaciones.
¡Peligro de quemaduras! Quite o cambie las placas
de cocción cuando el aparato esté completamente frío.
Coloque la bandeja recogegrasa
Durante la cocción, la bandeja recogegrasa debe estar
montada en la parte derecha del aparato. La grasa que se
desprende de los alimentos se desliza hacia un agujero en la
placa y es recogida en la bandeja.
Nota: Durante la cocción, controle con frecuencia la
bandeja recogegrasa y retírela para evitar el exceso de grasa
líquida.
Después de la cocción, elimine la grasa recogida de manera
adecuada.
La bandeja recogegrasa se puede lavar en lavavajillas.
¡Advertencia! Tenga cuidado durante las operaciones
de cocción.
Para abrir el aparato, sostenga el asa que no se calienta.
Por el contrario, las piezas de aluminio fundido a presión
se calientan mucho, evite tocarlas durante la cocción e
inmediatamente después.
Antes de llevar a cabo cualquier operación en el aparato, deje
enfriar durante 30 minutos como mínimo.
Al cocer, la bandeja recogegrasa siempre debe estar en su
lugar. Vacíe la bandeja recogegrasa cuando el aparato se
haya enfriado completamente. Tenga cuidado cuando quite
la bandeja recogegrasa para que no se derramen los líquidos.
POSICIONES DE USO DEL APARATO
Grill de contacto (posición cerrada)
La placa superior reposa sobre la placa inferior. Es la
posición inicial y también una posición de cocción cuando el
aparato se utiliza como Grill de Contacto. La tapa se ajusta
automáticamente al grosor del alimento colocado sobre la
placa. El alimento se cuece de forma uniforme de ambos
lados.
El grill de contacto es ideal para cocer hamburguesas, carne
sin hueso y lonchas nas de carne, verduras y bocadillos.
La función “Contact” es perfecta para preparar alimentos
saludables, rápidamente. Cuando se utiliza el grill de
contacto, la comida se cuece rápidamente porque está en
contacto constante con las placas de ambos lados al mismo
tiempo (véase la gura 3).
La grasa del alimento es recogida en los acanalados de la
placa y sale por el agujero en la parte trasera, cayendo en la
bandeja recogegrasa.
El aparato tiene un asa y una bisagra que permite ajustar la
placa superior según el grosor del alimento. Si quiere cocer
diferentes tipos de alimentos que utilizan simultáneamente
el Grill de contacto, los alimentos deben tener el mismo
grosor para permitir el cierre uniforme de la tapa (placa
superior).
Grill abierto
La placa superior queda al mismo nivel que la placa inferior.
Las placas inferior y superior quedan al mismo nivel,
formando una supercie de cocción amplia. En esta posición,
el aparato se puede utilizar en el modo barbacoa, tanto con la
placa grill como con la placa lisa.
Para colocar el aparato en esta posición, identique primero
el botón de desbloqueo de la bisagra en el lado derecho.
Sujete el asa con la mano izquierda y con la derecha presione
el botón de desbloqueo de la bisagra (véase la gura 4).
49
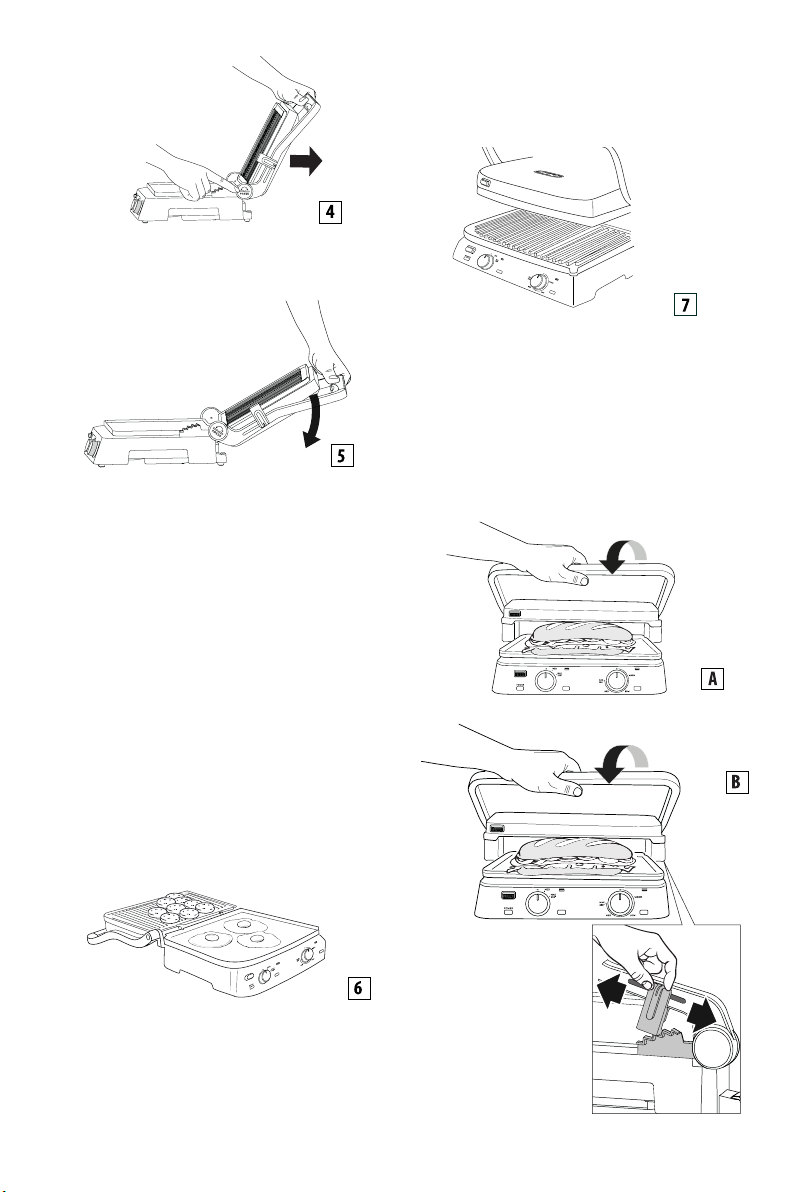
Empuje el asa hacia atrás hasta que la tapa quede
completamente volcada en posición plana (véase la gura 5).
Si levanta el asa ligeramente antes de presionar el botón
de desbloqueo, se libera la presión sobre la bisaegra y la
operación de apertura es más fácil.
El aparato se puede utilizar como un grill/barbacoa para
preparar hamburguesas, bistecs, pollo y pescado. El modo
grill/barbacoa es el modo más versátil de usar el aparato. Las
placas están en la posición abierta, por lo que se dispone de
una doble supercie de cocción.
Es posible preparar diferentes alimentos en las placas
separadas, sin mezclar los sabores, o preparar más cantidad
del mismo alimento.
La posición de grill / barbacoa puede ser utilizada para asar
cortes de carne con diferentes grosores, cada uno con el grado
de cocción favorito. En esta posición, es necesario voltear el
alimento durante la cocción.
El aparato también se puede utilizar con las placas lisas para
preparar crepes, queso, huevos y tocino para el desayuno
(véase la gura 6).
Horno Grill
Esta posición (véase la gura 7) es ideal para asar sin contacto,
alimentos gruesos que necesitan ser asados de forma lenta y
uniforme.
Es ideal para preparar verduras con alto contenido de agua,
de manera que el agua se evapore.
También se puede utilizar esta posición de cocción para
preparar bocadillos blandos y alimentos que no necesitan ser
comprimidos.
- Coloque los alimentos en la placa inferior.
- Baje la placa superior, cerca del alimento, sosteniendo el
asa (g. A).
La amplia supercie de cocción permite preparar un número
de diferentes alimentos simultáneamente, o cocer más
cantidad del mismo alimento.
50

- Coloque el dispositivo de bloqueo/desbloqueo (4) de las
placas en la posición grill deseada deslizando la palanca.
- La placa superior se engancha en dicha posición. Hay 5
posiciones diferentes de regulación en altura (g. B).
USO
Funcionamiento
Cuando haya preparado correctamente el aparato y cuando
esté listo para cocinar, seleccione la temperatura deseada
para cada una de los dos placas (superior e inferior) utilizando
los mandos del termostato 10 y 11.
Se encienden los indicadores luminosos de las placas superior
e inferior (8 - 9).
Dependiendo de la temperatura seleccionada, el aparato
tarda unos minutos en calentarse. Cuando el termostato
alcanza la temperatura deseada, los indicadores luminosos
de las placas superior e inferior se apagan y el aparato está
listo para su uso.
Es posible modicar la regulación de la temperatura en
cualquier momento durante la cocción, dependiendo del tipo
de comida que se esté preparando.
Nota: el aparato tiene 2 pies de apoyo delanteros
regulables (16) que facilitan el drenaje del aceite en la
bandeja recogegrasa.
LIMPIEZA Y MANTENIMIENTO
Mantenimiento a cargo del usuario
- No utilice utensilios de metal que puedan rayar las
placas antiadherentes. Utilice utensilios de madera o de
plástico resistente al calor.
- No deje utensilios de plástico en contacto con las placas
calientes.
- Entre la cocción de un alimento y otro, elimine los restos
de alimento a través del agujero de drenaje de la grasa
y recójalos en la bandeja recogegrasa, luego limpie con
papel de cocina y siga con la preparación sucesiva.
- Deje enfriar el aparato (por lo menos 30 minutos) antes
de realizar cualquier operación de limpieza.
Presione los botones de desbloqueo de las placas (3) para
quitarlas del aparato. Antes de tocarlas, asegúrese de que las
placas se hayan enfriado por completo. Las placas de cocción
se pueden lavar en el lavavajillas, aunque un lavado frecuente
podría reducir las propiedades del revestimiento. Por tanto,
se recomienda limpiar la parte exterior de la placa de cocción
con una esponja suave o un paño humedecido con agua y un
detergente suave.
No utilice utensilios de metal para limpiar las placas.
CARACTERÍSTICAS TÉCNICAS
Tensión de alimentación 220-240 V / 50-60 Hz
Potencia absorbida 2000 W
Limpieza y cuidado
Nota: Antes de limpiar el aparato, deje que se enfríe.
Al nal de la cocción, gire los mandos hacia «"●" y desconecte
el aparato de la red eléctrica. Deje enfriar el aparato durante
al menos 30 minutos. Retire los restos de comida de las
placas. Vacíe la bandeja recogegrasa. La bandeja recogegrasa
se puede lavar a mano o en el lavavajillas.
51

TABLA DE COCCIÓN
VACA GROSOR
Bistec 0,5 - 1 2 Muy
Bistec 0,5 - 1 4 Muy
Filete 3-4 4 San-
Filete 3-4 4 Al punto GRILL DE
Filete 3-4 4 Muy
Chuletón 2-3 2 Al punto GRILL DE
Chuletón 2-3 2 Muy
Chuletón 2-3 4 Al punto GRILL
Chuletón 2-3 4 Muy
(cm)
Cant.
PIEZAS
GRADO
DE
COCCIÓN
hecha
hecha
grante
hecha
hecha
hecha
MODO
GRILL DE
CONTACTO
GRILL
ABIERTO
GRILL DE
CONTACTO
CONTACTO
GRILL DE
CONTACTO
CONTACTO
GRILL DE
CONTACTO
ABIERTO
GRILL
ABIERTO
PLACAS MANDO
TERMOSTATO
inferior superior supe-
rior
(10)
GRILL LISA MÁX. MÁX. 2 - 3 untar bien
GRILL LISA MÁX. MÁX. 5 - 6 untar bien con
GRILL LISA MÁX. MÁX. 4 - 5 untar bien
GRILL LISA MÁX. MÁX. 7 - 8 untar bien
GRILL LISA MÁX. MÁX. 10 - 11 untar bien
GRILL LISA MÁX. MÁX. 4 - 5 untar bien
GRILL LISA MÁX. MÁX. 7 - 8 untar bien
GRILL LISA MÁX. MÁX. 10 - 12 untar bien con
GRILL LISA MÁX. MÁX. 14 - 16 untar bien con
MÍN. SUGERENCIAS
infe-
rior
(11)
con aceite el
alimento
aceite el alimento, voltear
a mitad de la
cocción
con aceite el
alimento
con aceite el
alimento
con aceite el
alimento
con aceite el
alimento
con aceite el
alimento
aceite el alimento, voltear
a mitad de la
cocción
aceite el alimento, voltear
a mitad de la
cocción
52

Hambur-
guesa
Pinchos 6 Muy
2-3 6 Muy
hecha
hecha
GRILL DE
CONTACTO
GRILL DE
CONTACTO
GRILL LISA MÁX. MÁX. 8 - 10 untar bien
con aceite el
alimento
GRILL LISA MÁX. MÁX. 13 - 15 untar bien con
aceite el alimento, voltear
a mitad de la
cocción
CORDE-ROGROSOR
Chuleta 1,5-3 6 Al punto GRILL DE
Chuleta 1,5-3 6 Muy
CERDO GROSOR
Bistec 1-2 4 GRILL DE
Bistec 1-2 8 POSICIÓN
Chuleta <2,5 4 GRILL DE
Chuleta <2,5 8 POSICIÓN
Costillas de
cerdo
Tocino 4 GRILL DE
(cm)
(cm)
Cant.
PIEZAS
Cant.
PIEZAS
6-8 GRILL DE
GRADO DE
COCCIÓN
hecha
MODO PLACAS MANDO TERMOS-
CONTACTO
GRILL DE
CONTACTO
MODO PLACAS MANDO
infe-
rior
GRILL LISA MÁX. MÁX. 7 - 9 untar bien con aceite el ali-
CONTACTO
GRILL LISA MÁX. MÁX. 14 - 16 untar bien con aceite el ali-
ABIERTA
GRILL LISA MÁX. MÁX. 9 - 11 untar bien con aceite el ali-
CONTACTO
GRILL LISA MÁX. MÁX. 11 - 13 untar bien con aceite el ali-
ABIERTA
GRILL LISA MED MED 20 - 25 dar vuelta dos o tres veces
CONTACTO
GRILL LISA MÁX. MÁX. 1 - 2
CONTACTO
MÍN. SUGERENCIAS
TATO
infe-
superior supe-
rior
GRILL LISA MÁX. MÁX. 10 - 12 untar bien
GRILL LISA MÁX. MÁX. 12 - 14
TERMOSTATO
superior supe-
rior
(10)
inferior
rior
(11)
(10)
MÍN. SUGERENCIAS
infe-
rior
(11)
con aceite el
alimento, voltear las chuletas a mitad de
la cocción
mento
mento, voltear a mitad de la
cocción
mento, voltear a mitad de la
cocción
mento, voltear a mitad de la
cocción
53

Chorizo
parrillero
Pinchos 6 GRILL DE
Salchicha
frankfurt
8 GRILL DE
CONTACTO
CONTACTO
6 GRILL DE
CONTACTO
GRILL LISA MED MED 16 - 18 pinchar los chorizos parrille-
ros con un tenedor
GRILL LISA MÁX. MÁX. 14 - 16 untar bien con aceite el ali-
mento, voltear 1-2 veces
GRILL LISA MÁX. MÁX. 8 - 10
CARNE DE
POLLO Y
PAVO
Pechuga <1 4 GRILL DE
Muslo 3 GRILL DE
Ala 6 GRILL DE
Hambur-
guesa
Hambur-
guesa
Pinchos 6 GRILL DE
Salchicha
frankfurt
Pollo
picante a la
parrilla
GROSOR
(cm)
1,5-2 4 GRILL DE
1,5-2 8 GRILL
Cant.
PIEZAS
CONTACTO
CONTACTO
CONTACTO
CONTACTO
ABIERTO
CONTACTO
6 GRILL DE
CONTACTO
1 GRILL DE
CONTACTO
MODO PLACAS MANDO TERMOS-
MÍN. SUGERENCIAS
TATO
inferior superior supe-
GRILL LISA MÁX. MÁX. 3 - 4 untar bien con aceite
GRILL LISA MED MED 20 - 25 voltear una o dos ve-
GRILL LISA MED MED 14 - 16 voltear una o dos ve-
GRILL LISA MÁX. MÁX. 6-8
GRILL LISA MÁX. MÁX. 14 - 16 voltear a mitad de la
GRILL LISA MÁX. MÁX. 11 - 13 voltear una o dos ve-
GRILL LISA MÁX. MÁX. 6 - 8
GRILL LISA MED MED 40 - 45 voltear una o dos ve-
rior
(10)
inferior
(11)
el alimento
ces durante la cocción
ces durante la cocción
cocción
ces durante la cocción
ces durante la cocción
PAN Cant.
PIEZAS
Tostado/
bocadillo
Bocadillo 2 GRILL DE
Rodajas de
pan
MODO PLACAS MANDO TERMOSTATO MÍN. SUGERENCIAS
2 HORNO
GRILL
CONTAC
TO
4 GRILL
ABIERTO
inferior superior superior
LISA GRILL
GRILL LISA
LISA GRILL MÁX. MÁX. 4 - 5 voltear a mitad de la cocción
inferior
(10)
MED MED
MED MED
(11)
3 - 5 colocar la placa superior en con-
tacto con el pan sin aplastarlo
2 - 3
54

VERDURAS Cant.
PIEZAS
Berenjenas en
rodajas
Calabacines en
láminas
Pimiento en
cuartos
Tomate en
rodajas
Cebolla en
rodajas
MODO PLACAS MANDO TERMOS-
inferior superior supe-
1 GRILL DE
CONTAC
2 GRILL DE
CONTAC
2 GRILL DE
CONTAC
1 GRILL
ABIERTO
2 GRILL DE
CONTAC
GRILL LISA MÁX. MÁX. 4 - 6 untar bien con aceite el
TO
GRILL LISA MÁX. MÁX. 6 - 8 untar bien con aceite el
TO
GRILL LISA MÁX. MÁX. 8 - 10 untar bien con aceite el
TO
LISA GRILL MÁX. MÁX. 5 - 7 untar bien con aceite
LISA GRILL MÁX. MÁX. 5 - 7 untar bien con aceite el
TO
rior
(10)
MÍN. SUGERENCIAS
TATO
inferior
(11)
alimento
alimento
alimento
el alimento, voltear a
mitad de la cocción
alimento, mezclar frecuentemente con una
paleta
Pescado CANTIDAD Cant.
PIEZAS
Entero 250 g 1 GRILL DE
Filete 500 g 1 HORNO
Reba-
nada
Pinchos 500 g 6 GRILL
Calama-
res
Langosti-
nos
450 g 4 GRILL DE
400 g 1-2 GRILL DE
400 g 10-12 GRILL DE
MODO PLACAS MANDO TERMOS-
CONTACTO
GRILL
CONTACTO
ABIERTO
CONTACTO
CONTACTO
MÍN. SUGERENCIAS
TATO
inferior superior superior
GRILL LISA MED MED 8 - 10 untar bien con aceite el
LISA GRILL MÁX. MÁX. 25 - 30 untar con aceite el ali-
GRILL LISA MED MED 8 - 10 untar bien con aceite el
GRILL LISA MÁX. MÁX. 10 - 12 untar bien con aceite la
GRILL LISA MED MED 10 - 12 untar bien con aceite el
GRILL LISA MED MED 4 - 6 untar bien con aceite el
(10)
inferior
(11)
alimento
mento, colocar la placa
superior de manera
que roce el alimento sin
tocarlo
alimento
comida; voltear dos o
tres veces
alimento
alimento
55

POSTRE Cant.
Tortitas
americanas
Rodajas de
piña
RECETAS
PIEZAS
4 GRILL
ABIERTO
4 GRILL DE
CONTAC
MODO PLACAS MANDO TERMOSTATO MÍN. SUGERENCIAS
inferior superior supe-
LISA GRILL MED MED 4 - 5 untar con mantequilla las
GRILL LISA MED MED 5 - 6 untar con mantequilla las
TO
rior
(10)
inferior
(11)
placas, voltear a mitad de
la cocción
placas
HUEVOS REVUELTOS, TOCINO AHUMADO Y PAN
TOSTADO
INGREDIENTES:
- huevos 2
- tocino 2 lonchas
- leche 1 cucharada
- sal y pimienta al gusto
- pan para tostada 2 rebanadas
PREPARACIÓN:
Batir los huevos con la leche y la sal hasta que se forme
una mezcla ligera y espumosa. Introduzca la placa lisa en el
alojamiento inferior y la placa grill en el alojamiento superior
y coloque el aparato en modo GRILL ABIERTO.
Colocar el mando del termostato inferior y superior en MAX.
Pulsar el interruptor ENCENDIDO/APAGADO para precalentar
el aparato.
Cuando se apaguen los indicadores luminosos de las placas
superior e inferior, verter la mezcla de huevos en una esquina
de la placa y cocer durante 2-3 minutos, mezclando con una
paleta de madera y cocer de forma uniforme.
Mientras tanto, en la misma placa, cocer también las lonchas
de tocino durante 3-4 minutos, volteándolas a mitad de la
cocción, mientras que en la otra placa tostar el pan durante
3-4 minutos, volteándolo a mitad de la cocción. Armar el
plato y servir.
TOSTADAS CON ESPUMA DE BERENJENAS
INGREDIENTES:
- berenjena 1
- requesón 100 g
- ajo en polvo al gusto
- perejil al gusto
- aceite de oliva 4 cucharadas
- sal al gusto
- pimienta al gusto
- pan baguette 1
PREPARACIÓN:
Lavar las berenjenas, pelarlas y cortarlas en rodajas gruesas.
Introducir la placa grill en el alojamiento inferior, la placa
lisa en el alojamiento superior y colocar el aparato en modo
GRILL DE CONTACTO. Colocar el mando del termostato
inferior y superior en MAX. Pulsar el interruptor ENCENDIDO/
APAGADO para precalentar el aparato. Cuando se apaguen
los indicadores luminosos de las placas superior e inferior,
colocar las berenjenas en la placa inferior y cocer durante
unos 8-10 minutos hasta que estén blandas. Cortar las rodajas
de berenjena y colocarlas en una mezcladora batidora con el
requesón, el diente de ajo y el perejil picado, una pizca de sal
y una de pimienta, además del aceite. Batir hasta obtener
una mezcla lisa y de textura na. Untar el pan (cortado en
rebanadas) con aceite de oliva y cocerlo a temperatura MAX
con las placas lisas en modo GRILL DE CONTACTO durante 1-2
minutos hasta obtener el tostado deseado.
Untar el pan tostado con la crema de berenjena, rociar con
dos cucharadas de aceite y servirlo.
56

ENSALADA DE CARNE CON RÚCULA Y TOMATES
CHERRY
INGREDIENTES:
- lonchas nas de carne de ternera 2
- rúcula 100 g
- tomates cherry 10-12
- trozos de queso de rallar (parmesano) 100 g
- sal al gusto
- aceite de oliva al gusto
PREPARACIÓN:
Preparar la ensalada de rúcula y tomates: lavar la rúcula,
dejarla secar, cortar los tomates cherry en 4 partes. Introducir
la placa grill en el alojamiento inferior, la placa lisa en el
alojamiento superior y colocar el aparato en modo GRILL DE
CONTACTO.
Colocar el mando del termostato inferior y superior en MAX.
Pulsar el interruptor ENCENDIDO/APAGADO para precalentar
el aparato. Cuando se apaguen los indicadores luminosos
de las placas superior e inferior, colocar las lonchas de carne
untadas con aceite en la placa inferior, comprimir con la placa
superior y cocer durante 2-3 minutos dependiendo del grado
de cocción deseado. Cortar la carne en tiras y colocarla sobre
el lecho de rúcula y tomates cherry, sazonar con sal y añadir
los trozos de parmesano. Aderezar con un hilo de aceite.
CHULETÓN AROMATIZADO CON CAFÉ
INGREDIENTES:
- chuletón de vaca (2 de 250 g cada uno)
- aceite de oliva
PARA LA MEZCLA DE CAFÉ:
- semillas de comino 2 cucharaditas
- granos de café 2 cucharaditas
- guindilla dulce 1 cucharada
- páprika 1 cucharadita
- sal gruesa 1 cucharadita
- pimienta 1 cucharadita
PREPARACIÓN:
Preparar la mezcla de café: echar las semillas de comino y el
café en un robot de cocina y moler hasta obtener un polvo no
muy no. Colocar el polvo obtenido en un recipiente, añadir
los demás ingredientes y mezclar bien. Untar ligeramente
con aceite la carne y aderezarla con las especias; cubrir todo
y dejar a temperatura ambiente durante unos 30 minutos.
Introducir la placa grill abajo, la placa lisa arriba y colocar el
aparato en modo GRILL DE CONTACTO.
Colocar el mando del termostato inferior y superior en MAX.
Pulsar el interruptor ENCENDIDO/APAGADO para precalentar
el aparato.
Cuando se apaguen los indicadores luminosos de las placas
superior e inferior, colocar la carne en la placa inferior,
comprimir con la placa superior y cocer durante 6-8 minutos
dependiendo del grado de cocción deseado. Servir caliente.
FILETE DE VACA CON SALSA DE SETAS
INGREDIENTES:
- lete de vaca 4
- sal al gusto
- pimienta negra a moler en el momento al gusto
- dientes de ajo 2
- mostaza de Dijon 2 cucharadas
- mantequilla 60 g
- aceite de oliva al gusto
INGREDIENTES PARA LA SALSA DE SETAS:
- mantequilla 30 g
- queso gorgonzola 1 cucharada
- escaloña 2
- setas 300 g
- whisky 1/2 vaso
- nata 200 g
- zumo de limón al gusto
- perejil al gusto
PREPARACIÓN:
Aderezar la carne con sal y pimienta y dejarla reposar a
temperatura ambiente durante una hora aproximadamente.
Preparar la salsa de setas: en una sartén derretir la
mantequilla, añadir las escaloñas cortadas en rodajas y cocer
durante 2-3 minutos. Añadir las setas y cocer durante otros
5 minutos. Entonces rociar con el whisky, cocer durante 1
minuto, añadir un vaso de agua y cocer durante otro minuto
más. Añadir la nata líquida, el zumo de limón, el perejil, el
queso gorgonzola y llevar a ebullición. Cocer hasta que la
salsa esté bien espesa; sazonar con sal, pimienta y dejarla
a un lado. Mientras tanto, preparar el aderezo de la carne
para pincelar los letes durante la cocción; en una sartén
pequeña poner mantequilla, mostaza y ajo. Cocer a fuego
lento hasta que la mantequilla se derrita. Mantener caliente.
Introducir la placa grill abajo, la placa lisa arriba y colocar el
aparato en modo GRILL DE CONTACTO. Colocar el mando del
termostato inferior y superior en MAX. Pulsar el interruptor
ENCENDIDO/APAGADO para precalentar el aparato. Cuando se
apaguen los indicadores luminosos de las placas superior e
inferior, colocar los letes (previamente untados con la salsa
por ambos lados) en la placa inferior y cerrar el grill. Cocer
57

durante 6-8 min dependiendo del grado de cocción deseado
y del grosor de los letes. Al concluir, quitar los letes y
servirlos recubiertos con la salsa de setas antes preparada.
HAMBURGUESA CON PAN DE CENTENO TOSTADO
INGREDIENTES:
- pan de centeno 8 rebanadas
- carne picada de primera calidad 500 g
- queso emmenthal en rodajas 100 g
- aceite de oliva 2 cucharadas
- cebollas en rodajas 2
- mantequilla a temperatura ambiente al gusto
- salsa worchester 2 cucharaditas
- sal al gusto
- pimienta al gusto
- azúcar media cucharadita
PREPARACIÓN:
Preparar las hamburguesas: en un recipiente mezclar la carne
picada, la salsa Worchester, la sal, la pimienta y mezclar
bien. Formar con las manos 4 hamburguesas de unos 2 cm
de grosor. Colocar el aparato en modo GRILL ABIERTO e
introducir la placa lisa en el alojamiento inferior y la placa grill
en el alojamiento superior. Colocar el mando del termostato
inferior y superior en MAX. Pulsar el interruptor ENCENDIDO/
APAGADO para precalentar el aparato.
Cuando se apaguen los indicadores luminosos de las placas
superior e inferior, colocar las cebollas cortadas aderezadas
con aceite de oliva y azúcar en la placa inferior y cocer durante
unos 5-6 minutos, mezclando con una paleta para uniformar
la cocción y ablandarlas. Al mismo tiempo, en la otra placa,
cocer las hamburguesas durante 12 minutos, volteándolas
después de unos 5-6 minutos (el tiempo de cocción depende
del grosor de las hamburguesas).
Apenas las cebollas se hayan cocido, retirarlas de la placa y
tostar las rebanadas de pan untadas con mantequilla solo
de un lado durante 1-2 minutos. Poner las rebanadas de pan
en una tabla con el lado tostado hacia arriba, cubrir con las
cebollas, colocar la hamburguesa y recubrir con el queso.
Cerrar el bocadillo con la otra rebanada de pan con el lado
tostado hacia abajo. Esperar a que la placa se caliente de
nuevo, colocar los bocadillos y comprimir bien con la placa
superior.
Cocer durante unos 2-3 minutos hasta lograr el grado de
tostado deseado.
CHULETAS DE CORDERO CON VINAGRE BALSÁMICO Y
ROMERO
INGREDIENTES:
- chuletas de cordero 6
- romero picado 10 g
- ajo picado 10 g
- vinagre balsámico 100 ml
- azúcar 15 g
- sal al gusto
- pimienta al gusto
PREPARACIÓN:
Mezclar todos los ingredientes en un recipiente bastante
grande; cubrir y dejar marinar el cordero en el refrigerador
durante al menos 1-2 horas. Introducir la placa grill abajo,
la placa lisa arriba y colocar el aparato en modo GRILL
DE CONTACTO. Colocar el mando del termostato inferior
y superior en MAX. Pulsar el interruptor ENCENDIDO/
APAGADO para precalentar el aparato. Cuando se apaguen
los indicadores luminosos de las placas superior e inferior,
colocar las chuletas en la placa inferior. Cocer durante unos
11-13minutos, dependiendo del grado de cocción deseado y
del grosor de la chuleta, (se recomienda voltearla a mitad de
la cocción porque el hueso no permite que la placa superior
entre en contacto con la carne). Mientras tanto, reducir el
adobo en una sartén y servir como salsa sobre las chuletas
de cordero asadas.
PINCHOS DE POLLO CON CREMA DE MIEL Y LIMÓN
VERDE
INGREDIENTES:
- pechuga de pollo 500 g
INGREDIENTES PARA EL ADOBO:
- guindilla 1 cucharadita
- coriandro 1 cucharadita
- aceite de oliva 10 cl
- cebolletas 2
- dientes de ajo 3
- jengibre rallado 1 cucharada
- azúcar 1 cucharada
- zumo de limón 1 cucharada
- sal gruesa 1 cucharada
- pimienta al gusto
INGREDIENTES PARA LA CREMA DE MIEL Y LIMÓN:
- nata para cocinar 5 cl
- piel rallada de lima 1/2 cucharadita
- zumo de limón 1 cucharada
58

- aceite de oliva 1 cucharadas
- miel 1 cucharada
- sal al gusto
PREPARACIÓN:
Preparar el adobo: poner todos los ingredientes en un robot
de cocina y batir hasta obtener una mezcla homogénea.
Poner en un plato hondo el pollo cortado en daditos de 2
cm de ancho, añadir el adobo y cubrir todo el pollo de forma
homogénea. Cubrir con una película para alimentos y dejar
marinar durante 1-2 horas. Preparar la crema mezclando
todos los ingredientes en un recipiente, cubrir con película
y guardar en el refrigerador. Preparar los pinchos de pollo.
Introducir la placa grill abajo, la placa lisa arriba y colocar el
aparato en modo GRILL DE CONTACTO. Colocar el mando del
termostato inferior y superior en MAX. Pulsar el interruptor
ENCENDIDO/APAGADO para precalentar el aparato. Cuando se
apaguen los indicadores luminosos de las placas superior e
inferior, colocar la carne en la placa inferior, comprimir con la
placa superior y cocer durante 11-13 minutos dependiendo
del grado de cocción deseado. Servir los pinchos calientes
acompañados con la crema de limón y miel.
MUSLOS DE POLLO A LA PROVENZAL
INGREDIENTES:
- muslos de pollo 3 (550 g)
LANGOSTINOS A LA PLANCHA
INGREDIENTES:
- langostinos 16/20 pzs.
INGREDIENTES PARA EL ADOBO:
- perejil al gusto
- limones 2
- sal al gusto
- pimienta al gusto
- dientes de ajo 2
PREPARACIÓN:
Preparar el adobo: picar el ajo muy no y el perejil y añadir el
zumo de limón; salar y espolvorear con pimienta.
Lavar los langostinos, secarlos bien y dejarlos marinar
durante una media hora como mínimo.
Introducir la placa grill abajo, la placa lisa arriba y colocar el
aparato en modo GRILL DE CONTACTO.
Colocar el mando del termostato inferior y superior en MED.
Pulsar el interruptor ENCENDIDO/APAGADO para precalentar
el aparato. Cuando se apaguen los indicadores luminosos
de las placas superior e inferior, colocar los langostinos
escurridos del adobo en la placa inferior, comprimir con
la placa superior y cocer durante unos 4-6 minutos. En el
momento de servir, decorar el plato con algunas rodajas de
limón y guarnición de verduras.
INGREDIENTES PARA EL ADOBO:
- vino blanco seco 25 cl
- aceite de oliva 4 cucharadas
- mostaza con semillas 3 cucharadas
- vinagre de vino blanco 3 cucharadas
- hierbas provenzales 2 cucharadas
- ajo picado 2 dientes
- sal gruesa 2 cucharadita
- pimienta de cayena 1 cucharadita
PREPARACIÓN:
Preparar el adobo mezclando todos los ingredientes en un
recipiente. Con un cuchillo alado, cortar en varios lugares
la parte carnosa del muslo y abrirlo ligeramente. Colocar los
muslos en el recipiente y dejarlos marinar durante 2-3 horas.
Introducir la placa grill abajo, la placa lisa arriba y colocar el
aparato en modo GRILL DE CONTACTO. Colocar el mando del
termostato inferior y superior en MED. Pulsar el interruptor
ENCENDIDO/APAGADO para precalentar el aparato. Cuando se
apaguen los indicadores luminosos de las placas superior e
inferior, colocar los muslos en la placa inferior, comprimir con
la placa superior y cocer durante 20-25 minutos volteando
2-3 veces. Una vez cocidos, colocarlos en una fuente y servir.
SALMÓN A LA PARRILLA CON SALSA DE YOGUR
INGREDIENTES:
- lete de salmón 500 g
- aceite de oliva al gusto
INGREDIENTES PARA LA SALSA:
- yogur griego 250 g
- ajo 1 diente
- sal 1 cucharadita
- azúcar 1 pizca
- cebollín 20 g
- perejil 20 g
- pimienta blanca al gusto
PREPARACIÓN:
Preparar la salsa: lavar y secar bien el perejil y el cebollino, por
separado picar el ajo.
Poner el yogur en un recipiente, añadir los aromas, el ajo, la
sal, el azúcar, la pimienta y batir hasta obtener una crema
suave. Poner en el refrigerador a reposar durante unos
30 minutos como mínimo Introducir la placa lisa abajo,
la placa grill arriba y colocar el aparato en modo HORNO
59

GRILL. Colocar el mando del termostato inferior y superior
en MAX. Pulsar el interruptor ENCENDIDO/APAGADO para
precalentar el aparato. Cuando se apaguen los indicadores
luminosos de las placas superior e inferior, colocar el lete,
previamente untado con aceite, en la placa inferior, cerrar
la placa superior en modo HORNO GRILL (en la posición más
cercana al alimento sin tocarlo) y cocer durante unos 25-30
minutos (para obtener un mejor resultado, se recomienda
girar el salmón 180° a mitad de la cocción porque en la parte
posterior la placa está más cerca del alimento). Al terminar la
cocción, colocar el salmón en una fuente y servir acompañado
con la salsa de yogur.
CALAMAR A LA PLANCHA
INGREDIENTES:
- calamar grande 400 g
- limón 1
- perejil 1 manojo
- aceite de oliva al gusto
- orégano al gusto
- sal al gusto
- guindilla en polvo al gusto
PREPARACIÓN:
Eviscerar el calamar, quitarle la cabeza, quitarle la pluma del
interior y lavarlo bien. Introducir la placa grill abajo, la placa
lisa arriba y colocar el aparato en modo GRILL DE CONTACTO.
Colocar el mando del termostato inferior y superior en MED.
Pulsar el interruptor ENCENDIDO/APAGADO para precalentar
el aparato. Cuando se apaguen los indicadores luminosos de
las placas superior e inferior, colocar el calamar untado con
aceite en la placa inferior, comprimir con la placa superior y
cocer durante unos 10-12 minutos. Preparar en un recipiente
el aderezo mezclando el aceite con el perejil picado, el zumo
de limón, una pizca de orégano, una pizca de sal y guindilla.
Una vez que el calamar esté cocido, quitarlo de la parrilla y
aderezarlo con la salsa. Armar el plato y servir.
TORTITAS AMERICANAS DE PLÁTANO
INGREDIENTES:
- plátano 1
- huevos 2 (1 entero + 1 clara)
- leche 150 ml
- harina 100 g
- mantequilla 70 g
- sal al gusto
- azúcar 1 cucharada
- polvo de hornear 16 g
PREPARACIÓN:
Pelar el plátano y hacer un puré aplastándolo bien con un
tenedor. Batir en otro recipiente 1 huevo entero con el azúcar
y añadir la leche lentamente, revolviendo siempre. Añadir
50 g de mantequilla derretida, añadir poco a poco la harina
tamizada con el polvo de hornear y una pizca de sal; añadir
la pulpa pisada de los plátanos mezclando bien todos los
ingredientes y poner la mezcla en el frigoríco durante 10
minutos. Mientras tanto montar la clara de huevo a punto
de nieve rme. Recuperar la mezcla e incorporar la clara
montada con movimientos delicados de abajo hacia arriba.
Introducir la placa lisa abajo, la placa grill arriba y colocar
el aparato en modo GRILL ABIERTO. Colocar el mando del
termostato inferior y superior en MED. Pulsar el interruptor
ENCENDIDO/APAGADO para precalentar el aparato. Cuando se
apaguen los indicadores luminosos de las placas superior e
inferior, untar las placas con un poco de mantequilla, echar
1-2 cucharadas de masa extendiéndola rápidamente sobre la
supercie para obtener un círculo. Dejar cocer durante unos 2
minutos hasta que se formen burbujas en toda la supercie
de la tortita, luego voltearla y dejarla cocer durante unos
2 minutos más. Las tortitas americanas se pueden servir
de muchas maneras: con crema de chocolate, jarabe de
arce, arándanos frescos, escamas de chocolate, miel, nata
montada, azúcar glas.
PIÑA ASADA CON HELADO
INGREDIENTES:
- piña 1
- miel al gusto
- azúcar de caña al gusto
- menta fresca al gusto
- azúcar glas al gusto
- helado de vainilla al gusto
PREPARACIÓN:
Retirar las hojas y pelar la piña. Cortar la piña en rodajas de
unos 1-2 cm y espolvorear cada rodaja con azúcar de caña de
ambos lados. Introducir la placa grill abajo, la placa lisa arriba
y colocar el aparato en modo GRILL DE CONTACTO. Colocar el
mando del termostato inferior y superior en MED. Pulsar
el interruptor ENCENDIDO/APAGADO para precalentar el
aparato. Cuando se apaguen los indicadores luminosos de las
placas superior e inferior, untar la piña por ambos lados con
miel y colocarla en el grill. Cerrar el grill y cocer durante 5-6
minutos. Una vez cocidas, poner las rodajas en una fuente,
decorar con las hojas de menta fresca, espolvorear con azúcar
glas y servir con las bolas de helado.
60

ADVERTÊNCIAS IMPORTANTES
Advertências de segurança
Perigo!
O incumprimento desta advertência implica o risco de
choques elétricos com risco de vida.
- Antes de ligar o aparelho à tomada de alimentação,
certique-se de que:
● A tensão da rede indicada na chapa de características do
aparelho corresponde à da sua instalação elétrica;
● A tomada de alimentação dispõe de ligação à terra e
tem uma capacidade mínima de 16A.
● Qualquer utilização prossional do produto que não seja
adequada ou que não esteja em conformidade com as
instruções de utilização isenta o fabricante de toda e
qualquer responsabilidade.
- Certique-se de que o cabo de
alimentação não entra em contacto
com partes do aparelho que aquecem
durante a utilização. Se o cabo de
alimentação estiver danicado, deverá
ser substituído pelo fabricante ou pelo
seu serviço de assistência técnica, de
forma a prevenir todo e qualquer risco.
- Antes de arrumar o aparelho ou de remover as placas
de cozedura, e antes de qualquer operação de limpeza
e manutenção, desligue o aparelho rodando o seletor
para a posição "●" e retire a cha da tomada de
alimentação. Certique-se de que o aparelho arrefeceu
completamente.
- Não utilize o aparelho no exterior.
- Não mergulhe o aparelho em água.
- O aparelho não deve ser posto a
funcionar através de um temporizador
externo ou com um sistema de
comando à distância separado.
- Utilize apenas extensões que estejam em conformidade
com as normas de segurança vigentes. Certique-se de
que estão em bom estado e que são de secção adequada.
- Não retire a cha da tomada de alimentação puxando
pelo cabo.
Atenção!
O incumprimento destas advertências implica o risco de
lesões pessoais ou danos no aparelho.
- Limpe o exterior da placa de cozedura com uma
esponja macia ou um pano humedecido com água e um
detergente delicado.
- Este aparelho foi concebido para a cozedura de
alimentos. Não deve ser, por isso, utilizado para outros
ns nem modicado ou adulterado de nenhum modo.
- Este aparelho destina-se apenas a um
uso doméstico. Não está prevista a sua
utilização em cozinhas de funcionários
de lojas, escritórios e outros ambientes
de trabalho, unidades de turismo rural,
hotéis, casas de hóspedes, motéis e
outras estruturas de alojamento.
- Este aparelho pode ser utilizado por
crianças com mais de 8 anos e por
pessoas com capacidades físicas,
sensoriais ou mentais reduzidas, ou
com uma experiência e conhecimentos
insucientes, desde que sejam
atentamente vigiadas e ensinadas a
utilizar o aparelho de forma segura
e consciente dos riscos associados à
sua utilização. As crianças não devem
brincar com o aparelho.
- As operações de limpeza e manutenção que cabem
ao utilizador não devem ser realizadas por crianças, a
menos que tenham mais de 8 anos e sejam vigiadas.
Mantenha o aparelho e o cabo fora do alcance das
crianças de idade inferior a 8 anos.
- Mantenha o aparelho fora do alcance das crianças e não
o deixe a trabalhar sem vigilância.
- Não utilize o aparelho sem as respetivas placas de
cozedura.
- Arrume o aparelho só quando ele tiver arrefecido
completamente.
- Não desloque o aparelho durante a utilização.
Perigo de queimaduras!!
O incumprimento desta advertência pode comportar o risco
de abrasões ou queimaduras.
- Quando o aparelho está a funcionar,
a temperatura da superfície externa
pode car muito alta. Utilize sempre
a pega (2) ou luvas de forno, se
necessário.
61

- Remova ou substitua as placas de cozedura quando o
aparelho tiver arrefecido completamente.
Nota:
Este símbolo evidencia conselhos e informações importantes
para o utilizador.
- Não cozinhe alimentos embrulhados em películas de
plástico, de alumínio ou em sacos de polietileno para
evitar o risco de incêndio.
Este aparelho está em conformidade com a diretiva
CEE 1935/2004 relativa aos materiais e objetos destinados a
entrar em contacto com produtos alimentares.
Eliminação do aparelho
Não elimine o aparelho juntamente com os resíduos
domésticos; deposite-o num centro de recolha
seletiva ocial.
DESCRIÇÃO
1. Base e tampa: estrutura sólida em aço inox com tampa
de autorregulação.
2. Pega: pega robusta em metal fundido para regular a
tampa consoante a espessura dos alimentos.
3. Botões de libertação da placa: prima para
desbloquear e remover a placa
4. Dispositivo de bloqueio/desbloqueio da placa
inferior e regulação em altura da placa superior/
tampa
5. Botão de libertação da dobradiça: permite abrir
completamente o aparelho para cozinhar na posição
plana
6. Regulação em altura da placa “função forno
grill”: para bloquear a placa/tampa superior à altura
desejada, para preparar alimentos que não precisam de
ser prensados.
7. Indicador luminoso de alimentação (verde): o
indicador luminoso está aceso quando o aparelho está
ligado à rede elétrica.
8. Indicador luminoso da placa superior (vermelho):
O indicador luminoso está aceso quando as resistências
estão alimentadas e apaga-se quando a temperatura é
atingida e a placa está pronta.
9. Indicador luminoso da placa inferior (vermelho):
o indicador luminoso está aceso quando as resistências
estão alimentadas e apaga-se quando a temperatura é
atingida e a placa está pronta.
10. Seletor do termóstato da placa superior: coloque
em MED - MAX ou "●" para regular a temperatura da
placa superior.
11. Seletor do termóstato da placa inferior: coloque
em WARM - LOW - MED - MAX ou "●" para regular a
temperatura da placa inferior.
12. Pés frontais reguláveis.
13. Placas amovíveis: antiaderentes e laváveis na
máquina de lavar loiça, fáceis de limpar. O NÚMERO E O
TIPO DE PLACAS PODEM VARIAR SEGUNDO O MODELO.
13a. Placa grill: perfeita para grelhar bifes, hambúrgueres,
frango e legumes
13b. Placa lisa: para preparar impecavelmente crepes,
ovos, bacon e crustáceos.
14. Tabuleiro de recolha de gordura: integrado no
aparelho e amovível para uma fácil limpeza.
PRIMEIRA UTILIZAÇÃO
Retire todo o material da embalagem e as etiquetas
promocionais da placa. Antes de deitar fora o material da
embalagem, certique-se de que retirou todas as partes
do novo aparelho. Recomendamos que conserve a caixa e o
material da embalagem para as utilizações seguintes.
Nota: Antes da utilização, limpe a base, a tampa e os
seletores de controlo com um pano húmido para remover o
pó acumulado durante o transporte. Limpe cuidadosamente
as placas de cozedura, o tabuleiro de recolha de gordura e o
utensílio de limpeza. As placas e o tabuleiro de recolha de
gordura podem ser lavados na máquina de lavar loiça.
Nota: Aquando da primeira utilização, o aparelho pode
libertar algum cheiro e um pouco de fumo. Isto é normal e
comum a todos os aparelhos com superfícies antiaderentes.
Nota: as placas amovíveis (grill e lisas) são
perfeitamente intermutáveis.
Introdução das placas de cozedura
- Coloque o aparelho numa posição plana (ver a gura 1).
Insira uma placa de cada vez.
- Cada placa pode ser inserida tanto no compartimento
62

superior como no inferior (ver a gura 2).
CLICK
CLICK
Para remover as placas
Coloque o aparelho numa posição plana.
Identique no lado direito os botões de desbloqueio (3) das
placas. Prima rmemente o botão para retirar a placa da
base. Pegue na placa com duas mãos, faça-a deslizar ao longo
dos suportes metálicos e extraia-a da base. Prima também o
outro botão de desbloqueio para remover a segunda placa,
realizando as mesmas operações.
Perigo de queimaduras!! Remova ou substitua as
placas de cozedura quando o aparelho tiver arrefecido.
Posicionar o tabuleiro de recolha de gordura
Durante a cozedura o tabuleiro de recolha de gordura deve
ser inserido no respetivo lugar no lado direito do aparelho.
A gordura proveniente dos alimentos é escoada através da
abertura situada na placa e recolhida no tabuleiro.
Nota: Durante a cozedura, verique frequentemente
o tabuleiro de recolha de gordura e retire-o para evitar o
excesso de gordura líquida.
Após a cozedura, elimine corretamente a gordura recolhida.
O tabuleiro de recolha de gordura pode ser lavado na
máquina de lavar loiça.
Atenção! Preste sempre a máxima atenção durante a
cozedura.
Para abrir o aparelho, segure na pega que se mantém fria.
Pelo contrário, as partes em alumínio fundido cam muito
quentes; evite tocar nelas durante ou logo após a cozedura.
Antes de realizar qualquer operação no aparelho, deixe-o
arrefecer (durante pelo menos 30 minutos).
Cozinhe exclusivamente com o tabuleiro de recolha de
gordura inserido. Não esvazie o tabuleiro de recolha de
gordura enquanto o aparelho não estiver completamente
frio. Preste atenção quando extrair o tabuleiro para evitar
derramar líquidos.
POSIÇÕES DE UTILIZAÇÃO DO APARELHO
Grelhador de placas (posição fechada)
A placa superior pousa sobre a placa inferior. É a posição inicial
e de cozedura quando se utiliza o aparelho como grelhador
de placas. A placa superior adapta-se automaticamente à
espessura dos alimentos colocados na placa inferior. Deste
modo, os alimentos são cozidos uniformemente de ambos os
lados.
O grelhador de placas é ideal para cozinhar hambúrgueres,
carne desossada e em fatias nas, legumes e sandes. A
função de “contacto” é perfeita para preparar os alimentos
em pouco tempo ou de forma salutar. Utilizando o grelhador
de placas, os alimentos cozem rapidamente, precisamente
porque estão em contacto com as placas de ambos os lados
em simultâneo (ver a gura 3).
As estrias da placa e a abertura na parte traseira do aparelho
permitem o escoamento e a recolha da gordura no respetivo
tabuleiro.
O aparelho é dotado de uma pega especial e de uma
dobradiça que permitem regular a tampa superior consoante
a espessura dos alimentos. Se desejar preparar várias coisas
em simultâneo com o grelhador de placas, convém que os
vários alimentos tenham a mesma espessura para permitir o
fecho uniforme da tampa (placa superior).
Grelha aberta
A placa superior está ao mesmo nível da placa inferior. A placa
inferior e a superior estão no mesmo plano, formando uma
ampla superfície de cozedura.
Nesta posição, o aparelho pode ser utilizado no modo
barbecue com a placa grill ou a placa lisa.
Para regular o aparelho nesta posição é, antes de mais,
preciso identicar o botão de desbloqueio da dobradiça,
situado à direita. Segure na pega com a mão esquerda e, com
a direita, prima o botão de desbloqueio da dobradiça (ver a
gura 4).
63

Empurre a pega para trás até virar completamente a tampa
para a posição plana (ver a gura 5).
Se levantar ligeiramente a pega antes de premir o botão de
desbloqueio, aliviará a pressão sobre a dobradiça e a operação
de abertura será mais fácil.
O aparelho pode ser utilizado como grill/barbecue para
preparar hambúrgueres, bifes, frango e peixe. O modo grill/
barbecue é o modo mais versátil de utilizar o aparelho.
As placas encontram-se na posição aberta cando, assim,
disponível uma dupla superfície de cozedura.
Podem-se preparar diversos alimentos em placas separadas
sem misturar os sabores, ou cozinhar uma maior quantidade
do mesmo alimento.
A posição grill/barbecue permite grelhar diversas peças de
carne de várias espessuras, cada uma com o grau de cozedura
que se preferir. Nesta posição, é necessário virar os alimentos
durante a cozedura.
O aparelho também pode ser utilizado com as placas lisas
para preparar crepes, queijo, ovos e bacon para o pequenoalmoço (ver a gura 6).
Forno Grill
Esta posição (ver a gura 7) é perfeita para grelhar sem
contacto alimentos de grande espessura que exigem uma
cozedura lenta e uniforme.
Ideal para a preparação de legumes com um elevado teor de
água, pois a água pode evaporar.
Poderá usar esta posição de cozedura para preparar sandes
moles e alimentos que não precisam de ser prensados.
- Coloque os alimentos na placa inferior.
- Segurando nela pela pega, baixe a placa superior para
junto dos alimentos (g. A).
A ampla superfície de cozedura permite preparar
simultaneamente diversos alimentos ou uma maior
quantidade do mesmo alimento.
64

- Posicione o dispositivo de bloqueio/desbloqueio (4)
das placas na posição grill desejada fazendo deslizar a
alavanca.
- A placa superior bloqueia na posição. Existem 5
regulações em altura diferentes (g. B).
UTILIZAÇÃO
Funcionamento
Uma vez preparado corretamente o aparelho, e quando
estiver pronto para cozinhar, selecione a temperatura
desejada para cada uma das duas placas (superior e inferior)
utilizando os seletores do termóstato 10 e 11.
Os indicadores luminosos das placas superior e inferior (8 - 9)
acendem-se.
Consoante a temperatura selecionada, podem ser necessários
alguns minutos para que o aparelho aqueça. Quando o
termóstato atingir a temperatura desejada, os indicadores
luminosos das placas superior e inferior apagam-se e o
aparelho está pronto a usar.
É possível variar a regulação da temperatura a qualquer
momento durante a cozedura, em função do tipo de
alimentos em preparação.
Nota: o aparelho é dotado de 2 pés frontais reguláveis
(16) que facilitam a eliminação do óleo que está no tabuleiro
de recolha de gordura.
pelo menos 30 minutos. Remova eventuais resíduos de
comida das placas. Esvazie o tabuleiro de recolha de gordura.
O tabuleiro de recolha de gordura pode ser lavado à mão ou
na máquina de lavar loiça.
Prima os botões de desbloqueio das placas (3) para as
remover do aparelho. Antes de tocar nelas, certique-se
de que as placas estão completamente frias. As placas de
cozedura podem ser lavadas na máquina de lavar loiça, ainda
que as lavagens frequentes possam reduzir as propriedades
do revestimento. Aconselha-se, por isso, a limpar o exterior
da placa de cozedura com uma esponja macia ou um pano
humedecido com água e um detergente delicado.
Não utilize objetos metálicos para limpar as placas.
CARACTERÍSTICAS TÉCNICAS
Tensão de alimentação 220-240 V / 50-60 Hz
Potência absorvida 2000W
LIMPEZA E MANUTENÇÃO
Manutenção por parte do utilizador
- Não utilize utensílios metálicos que possam riscar as
placas antiaderentes. Utilize antes utensílios de madeira
ou de plástico termorresistente.
- Não deixe utensílios de plástico em contacto com as
placas quentes.
- Entre uma preparação e a seguinte, remova os resíduos
de alimentos através da abertura para o escoamento da
gordura e recolha-os no recipiente subjacente; depois
limpe com um pedaço de papel e passe à preparação
seguinte.
- Antes de realizar qualquer operação de limpeza, deixe
arrefecer o aparelho (durante pelo menos 30 minutos).
Limpeza e cuidados
Nota: Antes de limpar o aparelho, certique-se de que
ele arrefeceu completamente.
No m da cozedura, rode os seletores para "●” e desligue o
aparelho da rede elétrica. Deixe arrefecer o aparelho durante
65

TABELA DE COZEDURA
VACA ESPES-
SURA
(cm)
Bife 0,5 - 1 2 Bem
Bife 0,5 - 1 4 Bem
Lombo de
vaca
Lombo de
vaca
Lombo de
vaca
Costeletão 2-3 2 Média GRELHA
Costeletão 2-3 2 Bem
Costeletão 2-3 4 Média GRELHA
Costeletão 2-3 4 Bem
Hambúr-
guer
Espetada 6 Bem
3-4 4 Mal
3-4 4 Média GRELHA
3-4 4 Bem
2-3 6 Bem
N.º
PEDA-
ÇOS
NÍVEL DE
COZEDU-
RA
passado
passado
passado
passado
passado
passado
passado
passado
MODO
GRELHA
DOR DE
PLACAS
GRELHA
ABERTA
GRELHA
DOR DE
PLACAS
DOR DE
PLACAS
GRELHA
DOR DE
PLACAS
DOR DE
PLACAS
GRELHA
DOR DE
PLACAS
ABERTA
GRELHA
ABERTA
GRELHA
DOR DE
PLACAS
GRELHA
DOR DE
PLACAS
PLACAS SELETOR DO
TERMÓSTATO
inferior superior supe-
rior
(10)
GRILL LISA MÁX. MÁX. 2 - 3 untar bem os
GRILL LISA MÁX. MÁX. 5 - 6 untar bem os
GRILL LISA MÁX. MÁX. 4 - 5 untar bem os
GRILL LISA MÁX. MÁX. 7 - 8 untar bem os
GRILL LISA MÁX. MÁX. 10 - 11 untar bem os
GRILL LISA MÁX. MÁX. 4 - 5 untar bem os
GRILL LISA MÁX. MÁX. 7 - 8 untar bem os
GRILL LISA MÁX. MÁX. 10 - 12 untar bem os
GRILL LISA MÁX. MÁX. 14 - 16 untar bem os
GRILL LISA MÁX. MÁX. 8 - 10 untar bem os
GRILL LISA MÁX. MÁX. 13 - 15 untar bem os
MIN. SUGESTÕES
infe-
rior
(11)
alimentos
alimentos, virar a meio da
cozedura
alimentos
alimentos
alimentos
alimentos
alimentos
alimentos, virar a meio da
cozedura
alimentos, virar a meio da
cozedura
alimentos
alimentos, virar a meio da
cozedura
66

Borrego ESPES-
SURA
(cm)
Costeleta 1,5-3 6 Média GRELHA
Costeleta 1,5-3 6 Bem
N.º
PEDA-
ÇOS
NÍVEL DE
COZEDU-
RA
passado
MODO PLACAS SELETOR DO
DOR DE
PLACAS
GRELHA
DOR DE
PLACAS
MIN. SUGESTÕES
TERMÓSTATO
infe-
superior supe-
rior
GRILL LISA MÁX. MÁX. 10 - 12 untar bem
GRILL LISA MÁX. MÁX. 12 - 14
rior
(10)
inferior
(11)
os alimentos, virar as
costeletas
a meio da
cozedura
PORCO ESPESSURA
(cm)
Bife 1-2 4 GRELHADOR
Bife 1-2 8 POSIÇÃO
Costeleta <2,5 4 GRELHADOR
Costeleta <2,5 8 POSIÇÃO
Entrecosto 6-8 GRELHADOR
Bacon 4 GRELHADOR
Salsichas 8 GRELHADOR
Espetada 6 GRELHADOR
Salsichas 6 GRELHADOR
N.º
PEDA-
ÇOS
MODO PLACAS SELETOR DO
DE PLACAS
ABERTA
DE PLACAS
ABERTA
DE PLACAS
DE PLACAS
DE PLACAS
DE PLACAS
DE PLACAS
MIN. SUGESTÕES
TERMÓSTATO
infe-
superior supe-
rior
GRILL LISA MÁX. MÁX. 7 - 9 untar bem os ali-
GRILL LISA MÁX. MÁX. 14 - 16 untar bem os ali-
GRILL LISA MÁX. MÁX. 9 - 11 untar bem os ali-
GRILL LISA MÁX. MÁX. 11 - 13 untar bem os ali-
GRILL LISA MÉD. MÉD. 20 - 25 virar duas ou três
GRILL LISA MÁX. MÁX. 1 - 2
GRILL LISA MÉD. MÉD. 16 - 18 picar as salsichas
GRILL LISA MÁX. MÁX. 14 - 16 untar bem os ali-
GRILL LISA MÁX. MÁX. 8 - 10
rior
(10)
inferior
(11)
mentos
mentos, virar a
meio da cozedura
mentos, virar a
meio da cozedura
mentos, virar a
meio da cozedura
vezes
com um garfo
mentos, virar 1-2
vezes
67

CARNE DE
FRANGO E
PERU
Peito <1 4 GRELHA
Coxa 3 GRELHA
Asa 6 GRELHA
Hambúr-
guer
Hambúr-
guer
Espetada 6 GRELHA
Salsichas 6 GRELHA
Frango
grelhado
ESPES-
SURA
(cm)
1,5-2 4 GRELHA
1,5-2 8 GRELHA
N.º
PEDA-
ÇOS
ABERTA
1 GRELHA
MODO PLACAS SELETOR DO
DOR DE
PLACAS
DOR DE
PLACAS
DOR DE
PLACAS
DOR DE
PLACAS
DOR DE
PLACAS
DOR DE
PLACAS
DOR DE
PLACAS
MIN. SUGESTÕES
TERMÓSTATO
inferior superior supe-
GRILL LISA MÁX. MÁX. 3 - 4 untar bem os alimen-
GRILL LISA MÉD. MÉD. 20 - 25 virar uma ou duas
GRILL LISA MÉD. MÉD. 14 - 16 virar uma ou duas
GRILL LISA MÁX. MÁX. 6-8
GRILL LISA MÁX. MÁX. 14 - 16 Virar a meio da coze-
GRILL LISA MÁX. MÁX. 11 - 13 virar uma ou duas
GRILL LISA MÁX. MÁX. 6 - 8
GRILL LISA MÉD. MÉD. 40 - 45 virar uma ou duas
rior
(10)
inferior
(11)
tos
vezes durante a cozedura
vezes durante a cozedura
dura
vezes durante a cozedura
vezes durante a cozedura
PÃO N.º
Tosta/san-
duiche
Sandes 2 GRELHA
Fatias de
pão
MODO PLACAS SELETOR DO
PEDA-
ÇOS
2 FORNO
GRILL
DOR DE
PLACAS
4 GRELHA
ABERTA
MIN. SUGESTÕES
TERMÓSTATO
inferior superior superior
LISA GRILL MÉD. MÉD. 3 - 5 posicionar a placa superior
GRILL LISA MÉD. MÉD. 2 - 3
LISA GRILL MÁX. MÁX. 4 - 5 Virar a meio da cozedura
(10)
inferior
(11)
de forma a tocar no pão
sem o esmagar
68

LEGUMES N.º
Beringelas às
rodelas
MODO PLACAS SELETOR DO
PEDA-
ÇOS
1 GRELHADOR
DE PLACAS
MIN. SUGESTÕES
TERMÓSTATO
inferior superior supe-
GRILL LISA MÁX. MÁX. 4 - 6 untar bem os alimentos
rior
(10)
inferior
(11)
Courgettes às
rodelas
Pimentos aos
quartos
Tomate às
rodelas
Cebola às
rodelas
PEIXE QUANTI-
Inteiro 250 g 1 GRELHADOR
Lombo
de vaca
Tranche 450 g 4 GRELHADOR
Espetada 500 g 6 GRELHA
Lulas 400 g 1-2 GRELHADOR
Gambas 400 g 10-12 GRELHADOR
2 GRELHADOR
DE PLACAS
2 GRELHADOR
DE PLACAS
1 GRELHA
ABERTA
2 GRELHADOR
DE PLACAS
N.º
DADE
PEDA-
ÇOS
500 g 1 FORNO GRILL LISA GRILL MÁX. MÁX. 25 - 30 untar os alimentos,
MODO PLACAS SELETOR DO
DE PLACAS
DE PLACAS
ABERTA
DE PLACAS
DE PLACAS
GRILL LISA MÁX. MÁX. 6 - 8 untar bem os alimentos
GRILL LISA MÁX. MÁX. 8 - 10 untar bem os alimentos
LISA GRILL MÁX. MÁX. 5 - 7 untar bem os alimen-
tos; virar a meio da
cozedura
LISA GRILL MÁX. MÁX. 5 - 7 untar bem os alimen-
tos, mexer muitas vezes
com uma espátula
MIN. SUGESTÕES
TERMÓSTATO
inferior superior supe-
GRILL LISA MÉD. MÉD. 8 - 10 untar bem os ali-
GRILL LISA MÉD. MÉD. 8 - 10 untar bem os ali-
GRILL LISA MÁX. MÁX. 10 - 12 untar bem os ali-
GRILL LISA MÉD. MÉD. 10 - 12 untar bem os ali-
GRILL LISA MÉD. MÉD. 4 - 6 untar bem os ali-
rior
(10)
infe-
rior
(11)
mentos
posicionar a placa
superior de forma a
aorar os alimentos
sem tocar neles
mentos
mentos; virar duas
ou três vezes
mentos
mentos
69

SOBREME-
SAS
Panquecas 4 GRELHA
Rodelas de
ananás
N.º
PEDA-
ÇOS
ABERTA
4 GRELHA
DOR DE
PLACAS
MODO PLACAS SELETOR DO TERMÓS-
inferior superior supe-
LISA GRILL MÉD. MÉD. 4 - 5 untar as placas com mantei-
GRILL LISA MÉD. MÉD. 5 - 6 untar as placas com man-
RECEITAS
OVOS MEXIDOS, TOUCINHO FUMADO E TOSTA
INGREDIENTES:
- ovos 2
- bacon 2 fatias
- leite 1 colher de sopa
- sal e pimenta q.b.
- pão para tostas 2 fatias
PREPARAÇÃO:
Bata os ovos com o leite e o sal até formar um composto leve
e espumoso. Insira a placa lisa no compartimento inferior e a
placa grill no compartimento superior e coloque o aparelho
no modo GRELHA APERTA. Regule o seletor do termóstato
inferior e superior para MAX. Prima a tecla START/STOP para
pré-aquecer a grelha. Quando os indicadores luminosos das
placas superior e inferior se apagarem, deite a mistura de
ovos num canto da placa e cozinhe durante 2-3 minutos,
tendo o cuidado de os mexer bem com uma espátula de
madeira para os cozer uniformemente. Entretanto, na
mesma placa, cozinhe também as fatias de bacon durante
3-4 minutos, virando-as a meio da cozedura, enquanto na
outra placa plana tosta o pão durante 3-4 minutos, virando-o
a meio da cozedura. Componha o prato e sirva.
TOSTINHAS COM ESPUMA DE BERINGELA
INGREDIENTES:
- beringelas 1
- requeijão 100 g
- alho em pó q.b.
- salsa q.b.
- azeite 4 colheres de sopa
- sal q.b.
- pimenta q.b.
- baguete 1
MIN. SUGESTÕES
TATO
inferior
rior
(10)
(11)
ga, virar a meio da cozedura
teiga
PREPARAÇÃO:
Lave as beringelas, descasque-as e corte-as às rodelas
espessas.
Insira a placa grill no compartimento inferior, a placa lisa
no compartimento superior e coloque o aparelho no modo
GRELHADOR DE PLACAS. Regule o seletor do termóstato
inferior e superior para MAX. Prima a tecla START/STOP para
pré-aquecer a grelha. Quando os indicadores luminosos das
placas superior e inferior se apagarem, coloque as beringelas
na placa inferior e cozinhe-as durante cerca de 8-10
minutos até carem macias. Corte as rodelas de beringelas
grosseiramente e, com uma varinha mágica, rale-as com o
requeijão, o dente de alho e a salsa picada, uma pitada de sal
e uma de pimenta, para além do azeite. Rale até obter um
composto liso e de grão no. Unte o pão (cortado às fatias)
com o azeite e grelhe-o à temperatura MAX com as placas
planas no modo GRELHADOR DE PLACAS durante 1-2 minutos
até obter o grau de dourado desejado.
Barre o pão tostado com o creme de beringelas, regue com
duas colheres de sopa de azeite e sirva-as.
SALADA DE CARNE COM RÚCULA E TOMATE CEREJA
INGREDIENTES:
- fatias de carne de vitela 2
- rúcula 100 g
- tomates cereja redondos 10-12
- lascas de queijo grana 100 g
- sal q.b.
- azeite q.b.
PREPARAÇÃO:
Prepare a salada de rúcula e tomate cereja: lave a rúcula,
coloque-a num pano de cozinha limpo para a deixar
secar, corte os tomates em 4 partes. Insira a placa grill no
70

compartimento inferior, a placa lisa no compartimento
superior e coloque o aparelho no modo GRELHADOR DE
PLACAS.
Regule o seletor do termóstato inferior e superior para MAX.
Prima a tecla START/STOP para pré-aquecer a grelha.
Quando os indicadores luminosos das placas superior e
inferior se apagarem, coloque as fatias de carne previamente
untadas na placa inferior, prense com a placa superior e coza
durante 2-3 minutos consoante o grau de cozedura desejado.
Corte a carne às tiras e disponha-as sobre a cama de rúcula e
tomate cereja, adicione sal e acrescente as lascas de queijo
grana. Tempere com um o de azeite.
COSTELETÃO AROMATIZADO COM CAFÉ
INGREDIENTES:
- costeletão de vaca (2 de 250 g cada)
- azeite
PARA A MISTURA DE CAFÉ:
- sementes de cominhos 2 colheres de chá
- grãos de café 2 colheres de chá
- pimentão doce 1 colher de sopa
- paprika 1 colher de chá
- sal grosso 1 colher de chá
- pimenta 1 colher de chá
PREPARAÇÃO:
Prepare a mistura de café: deite as sementes de cominhos e o
café num robot de cozinha e reduza-as a pó, não demasiado
no.
Deite o pó obtido numa taça, adicione os outros ingredientes
e mexa bem. Unte ligeiramente a carne e tempere-a com
as especiarias; tape tudo e deixe à temperatura ambiente
durante cerca de 30 minutos. Insira a placa grill em baixo, a
placa lisa em cima e coloque o aparelho no modo GRELHADOR
DE PLACAS.
Regule o seletor do termóstato inferior e superior para MAX.
Prima a tecla START/STOP para pré-aquecer a grelha.
Quando os indicadores luminosos das placas superior e
inferior se apagarem, coloque a carne na placa inferior,
prense com a placa superior e cozinhe durante 6-8 minutos
consoante o grau de cozedura desejado. Sir va quentes.
LOMBO DE VACA COM MOLHO DE COGUMELOS
INGREDIENTES:
- bifes do lombo 4
- sal q.b.
- pimenta preta a moer no momento q.b.
- dente de alho 2
- mostarda de Dijon 2 colheres de sopa
- manteiga 60 g
- azeite q.b.
INGREDIENTES PARA O MOLHO DE COGUMELOS:
- manteiga 30 g
- gorgonzola 1 colher de sopa
- chalotas 2
- cogumelos 300 g
- whisky 1/2 copo
- natas 200 g
- sumo de limão q.b.
- salsa q.b.
PREPARAÇÃO:
Tempere a carne com sal e pimenta e deixe-a repousar à
temperatura ambiente durante cerca de uma hora. Prepare
o molho de cogumelos: numa frigideira derreta a manteiga,
adicione as chalotas cortadas às rodelas e coza durante
2-3 minutos. Adicione os cogumelos e coza durante mais
5 minutos. Flameje, então, com o whisky, coza durante 1
minuto, adicione um copo de água e coza durante mais
um minuto aproximadamente. Adicione as natas líquidas,
o sumo de um limão, a salsa, o gorgonzola e deixe ferver.
Coza até o molho car bem denso; retique o sal e pimenta
e reserve. Entretanto prepare o condimento da carne com o
qual pincelará os bifes durante a cozedura; numa pequena
frigideira deite a manteiga, a mostarda e o alho. Coza em
lume brando até a manteiga derreter. Mantenha quente.
Insira a placa grill em baixo, a placa lisa em cima e coloque
o aparelho no modo GRELHADOR DE PLACAS. Regule o
seletor do termóstato inferior e superior para MAX. Prima
a tecla START/STOP para pré-aquecer a grelha. Quando
os indicadores luminosos das placas superior e inferior se
apagarem, coloque os bifes (previamente pincelados com
o molho de ambos os lados) sobre a placa inferior e feche
a grelha. Coza durante 6-8 minutos consoante o grau de
cozedura desejado e a espessura dos bifes. No m, retire
os bifes e sirva-os cobertos com o molho de cogumelos
previamente preparado.
71

HAMBÚRGUER COM PÃO DE CENTEIO TOSTADO
INGREDIENTES:
- pão de centeio 8 fatias
- carne picada primeira categoria 500 g
- Emmenthal às fatias 100 g
- azeite 2 colheres de sopa
- cebolas às rodelas 2
- manteiga à temperatura ambiente q.b.
- molho worchester 2 colheres de chá
- sal q.b.
- pimenta q.b.
- açúcar meia colher de chá
PREPARAÇÃO:
Prepare os hambúrgueres: numa taça, misture a carne
picada, o molho Worchester, o sal, a pimenta e amasse bem.
Com as mãos forme 4 hambúrgueres com cerca de 2 cm de
espessura. Coloque o aparelho no modo GRELHA ABERTA e
insira a placa lisa no compartimento inferior e a placa grill
no compartimento superior. Regule o seletor do termóstato
inferior e superior para MAX. Prima a tecla START/STOP para
pré-aquecer a grelha.
Quando os indicadores luminosos das placas superior e
inferior se apagarem, coloque as cebolas cortadas às rodelas
temperadas com o azeite e o açúcar sobre a placa inferior
e cozinhe-as durante cerca de 5-6 minutos, mexendo-as
frequentemente com uma espátula de modo a uniformizar
a cozedura e a torná-las macias. Simultaneamente, na outra
placa, cozinhe os hambúrgueres durante cerca de 12 minutos
virando-os ao m de 5-6 minutos (o tempo de cozedura
varia consoante a espessura dos hambúrgueres). Mal as
cebolas estejam cozidas, retire-as da placa e toste durante
1-2 minutos as fatias de pão pinceladas com manteiga só de
um lado.
Coloque as fatias de pão num prato com o lado tostado
virado para cima, polvilhe com as cebolas, acrescente os
hambúrgueres e cubra com o queijo. Feche a sandes com a
fatia de pão, com o lado tostado virado para baixo. Aguarde
que a placa que novamente quente e, depois, insira as tostas
e prense bem com a placa superior.
Cozinhe durante cerca de 2-3 minutos até obter o grau de
tostado desejado.
COSTELETAS DE BORREGO COM VINAGRE BALSÂMICO
E ROSMANINHO
INGREDIENTES:
- costeletas de borrego 6
- rosmaninho triturado 10 g
- alho picado 10 g
- vinagre balsâmico 100 ml
- açúcar 15 g
- sal q.b.
- pimenta q.b.
PREPARAÇÃO:
Mexa todos os ingredientes num recipiente bastante grande;
tape e deixe marinar o borrego no frigoríco durante pelo
menos 1-2 horas. Insira a placa grill em baixo, a placa lisa em
cima e coloque o aparelho no modo GRELHADOR DE PLACAS.
Regule o seletor do termóstato inferior e superior para MAX.
Prima a tecla START/STOP para pré-aquecer a grelha. Quando
os indicadores luminosos das placas superior e inferior se
apagarem, coloque as costeletas na placa inferior. Cozinhe
durante 11-13 minutos consoante o grau de cozedura
desejado e a espessura da costeleta (recomendamos que as
vire a meio da cozedura porque o osso impede que a placa
superior que em contacto com a carne). Entretanto, reduza
a marinada numa frigideira e sirva-a como molho sobre as
costeletas de borrego grelhadas.
ESPETADAS DE FRANGO COM CREME DE MEL E LIMÃO
VERDE
INGREDIENTES:
- peito de frango 500 g
INGREDIENTES PARA A MARINADA:
- piripíri 1 colher de chá
- coentros 1 colher de chá
- azeite 10 cl
- alho francês 2
- dente de alho 3
- gengibre ralado 1 colher de sopa
- açúcar 1 colher de sopa
- sumo de lima 1 colher de sopa
- sal grosso 1 colher de sopa
- pimenta q.b.
INGREDIENTES PARA O CREME DE MEL E LIMÃO:
- natas de culinária 5 cl
- raspa de lima 1/2 colher de chá
- sumo de lima 1 colher de sopa
- azeite 1 colheres de sopa
72

- mel 1 colher de sopa
- sal q.b.
PREPARAÇÃO:
Prepare a marinada: coloque todos os ingredientes num
robot de cozinha e rale até obter um composto homogéneo.
Coloque num prato fundo o frango cortado aos cubos com 2
cm de largura, adicione a marinada e tape todo o frango de
modo homogéneo. Tape com película para alimentos e deixe
marinar durante 1-2 horas. Prepare o creme mexendo todos
os ingredientes numa taça, cubra com a película transparente
e mantenha no frigoríco. Ene os pedaços de frango nas
espetadas. Insira a placa grill em baixo, a placa lisa em cima
e coloque o aparelho no modo GRELHADOR DE PLACAS.
Regule o seletor do termóstato inferior e superior para MAX.
Prima a tecla START/STOP para pré-aquecer a grelha. Quando
os indicadores luminosos das placas superior e inferior se
apagarem, coloque a carne na placa inferior, prense com a
placa superior e cozinhe durante 11-13 minutos consoante
o grau de cozedura desejado. Sirva as espetadas quentes
acompanhadas com o creme de limão e mel.
COXAS DE FRANGO À PROVENÇAL
INGREDIENTES:
- coxas de frango 3 (550 g)
INGREDIENTES PARA A MARINADA:
- vinho branco seco 25 cl
- azeite 4 colheres de sopa
- mostarda com sementes 3 colheres de sopa
- vinagre de vinho branco 3 colheres de sopa
- ervas provençais 2 colheres de sopa
- alho picado 2 dentes
- sal grosso 2 colher de chá
- piripíri de cayenna 1 colher de chá
PREPARAÇÃO:
Prepare a marinada mexendo todos os ingredientes numa
taça. Com uma lâmina aada corte em vários pontos a parte
carnuda das coxas abrindo-as ligeiramente. Coloque as coxas
na taça e envolva-as uniformemente com a marinada; deixe
marinar durante 2-3 horas. Insira a placa grill em baixo, a
placa lisa em cima e coloque o aparelho no modo GRELHADOR
DE PLACAS. Regule o seletor do termóstato inferior e superior
para MED. Prima a tecla START/STOP para pré-aquecer a
grelha. Quando os indicadores luminosos das placas superior
e inferior se apagarem, coloque as coxas de frango na placa
inferior, prense com a placa superior e cozinhe durante 20-25
minutos virando-as 2-3 vezes. Uma vez cozinhadas, coloqueas numa travessa e sirva.
GAMBAS NA GRELHA
INGREDIENTES:
- gambas 16/20 unidades
INGREDIENTES PARA A MARINADA:
- salsa q.b.
- limões 2
- sal q.b.
- pimenta q.b.
- dente de alho 2
PREPARAÇÃO:
Prepare a marinada: pique namente o alho e a salsa e
adicione o sumo do limão; adicione sal e uma pitada de
pimenta.
Lave as gambas, seque-as bem e deixe-as marinar durante
pelo menos meia hora.
Insira a placa grill em baixo, a placa lisa em cima e coloque o
aparelho no modo GRELHADOR DE PLACAS.
Regule o seletor do termóstato inferior e superior para MED.
Prima a tecla START/STOP para pré-aquecer a grelha.
Quando os indicadores luminosos das placas superior e
inferior se apagarem, coloque as gambas escorridas da
marinada na placa inferior, prense com a placa superior e
cozinhe durante cerca de 4-6 minutos. No momento de servir,
decore o prato com algumas rodelas de limão e o contorno
de legumes.
SALMÃO NA GRELHA COM MOLHO DE IOGURTE
INGREDIENTES:
- lete de salmão 500 g
- azeite q.b.
INGREDIENTES PARA O MOLHO:
- iogurte grego 250 g
- alho 1 dente
- sal 1 colher de chá
- açúcar 1 pitada
- cebolinho 20 g
- salsa 20 g
- pimenta branca q.b.
PREPARAÇÃO:
Prepare o molho: lave e seque bem a salsa e o cebolinho, à
parte pique o alho.
Deite o iogurte numa taça, adicione os aromas, o alho, o sal,
o açúcar, a pimenta e rale até obter um creme macio. Deixe
a repousar no frigoríco durante pelo menos 30 minutos.
Insira a placa lisa em baixo, a placa grill em cima e coloque
o aparelho no modo FORNO GRILL. Regule o seletor do
73

termóstato inferior e superior para MAX. Prima a tecla START/
STOP para pré-aquecer a grelha. Quando os indicadores
luminosos das placas superior e inferior se apagarem, coloque
o lete previamente untado na placa inferior, feche a placa
superior no modo FORNO GRILL (na posição mais próxima
dos alimentos sem tocar neles) e cozinhe durante cerca de
25-30 minutos (para um melhor resultado, aconselha-se
a rodar o salmão a 180° a meio da cozedura pois, na parte
de trás, a placa está mais próxima dos alimentos). Uma vez
terminada a cozedura, coloque o salmão numa travessa e
sirva acompanhado com o molho de iogurte.
LULAS NA GRELHA
INGREDIENTES:
- lula grande 400 g
- limão 1
- salsa 1 ramo
- azeite q.b.
- orégãos q.b.
- sal q.b.
- piripíri em pó q.b.
PREPARAÇÃO:
Amanhe a lula, retire a cabeça, retire o osso do interior e
lave-a bem. Insira a placa grill em baixo, a placa lisa em
cima e coloque o aparelho no modo GRELHADOR DE PLACAS.
Regule o seletor do termóstato inferior e superior para MED.
Prima a tecla START/STOP para pré-aquecer a grelha. Quando
os indicadores luminosos das placas superior e inferior se
apagarem, coloque a lula previamente untada na placa
inferior, prense com a placa superior e cozinhe durante cerca
de 10-12 minutos.
Numa taça, prepare o condimento misturando o azeite com a
salsa picada, o sumo de limão, um punhado de orégãos, uma
pitada de sal e de piripíri.
Quando a lula estiver cozida, retire-a da grelha e tempere-a
com o molho. Componha o prato e sirva.
PANQUECAS DE BANANA
INGREDIENTES:
- bananas 1
- ovos 2 (1 inteiro + 1 clara)
- leite 150 ml
- farinha 00 100 g
- manteiga 70 g
- sal q.b.
- açúcar 1 colher de sopa
- fermento para bolos 16 g
PREPARAÇÃO:
Descasque a banana e reduza-a a puré esmagando-a bem
com um garfo. Numa outra terrina, bata 1 ovo inteiro
com o açúcar e acrescente o leite em o mexendo sempre.
Adicione 50 g de manteiga derretida, depois, junte pouco
a pouco a farinha peneirada com o fermento e uma pitada
de sal; adicione também a polpa esmagada das bananas
amalgamando bem todos os ingredientes e coloque o
composto no frigoríco durante 10 minutos. Entretanto, bata
a clara em castelo bem rme. Pegue novamente no composto
e incorpore-lhe a clara montada com movimentos delicados
de baixo para cima. Insira a placa lisa em baixo, a placa grill
em cima e coloque o aparelho no modo GRELHA ABERTA.
Regule o seletor do termóstato inferior e superior para MED.
Prima a tecla START/STOP para pré-aquecer a grelha. Quando
os indicadores luminosos das placas superior e inferior se
apagarem, unte as placas com um pouco de manteiga,
deite 1-2 colheres de massa, alargando-a rapidamente na
superfície de modo a obter um círculo. Deixe cozer durante
cerca de 2 minutos até notar bolhas em toda a superfície da
panqueca; depois, vire-a e deixe cozer durante mais cerca
de 2 minutos. As panquecas podem ser servidas de muitas
maneiras:com creme de chocolate, xarope de ácer, mirtilos
frescos, raspa de chocolate, mel, natas batidas, açúcar em pó.
ANANÁS GRELHADO COM GELADO
INGREDIENTES:
- ananás 1
- mel q.b.
- açúcar de cana q.b.
- menta fresca q.b.
- açúcar em pó q.b.
- gelado de baunilha q.b.
PREPARAÇÃO:
Retire as folhas e a casca ao ananás. Corte o fruto às rodelas
com 1-2 cm de espessura e polvilhe cada fatia com açúcarde
canade ambos os lados. Insira a placa grill em baixo, a placa
lisa em cima e coloque o aparelho no modo GRELHADOR DE
PLACAS. Regule o seletor do termóstato inferior e superior
para MED. Prima a tecla START/STOP para pré-aquecer a
grelha. Quando os indicadores luminosos das placas superior
e inferior se apagarem, pincele o ananás de ambos os lados
com mel e coloque-o na grelha. Feche a grelha e coza
durante 5-6 minutos. Uma vez cozidas, coloque as rodelas
numa travessa, decore com folhas de menta fresca, polvilhe
com açúcar em pó e sirva com bolas de gelado.
74

AVVERTENZE IMPORTANTI
Avvertenze di sicurezza
Pericolo!
La mancata osservanza di questa avvertenza implica il
rischio di scosse elettriche con pericolo per la vita.
- Prima di collegare l’apparecchio alla presa di corrente,
vericare che:
● La tensione di rete indicata sulla targhetta
dell’apparecchio corrisponda a quella del vostro
impianto elettrico;
● La presa di corrente sia dotata di messa a terra e abbia
una portata minima di 16A.
● Un uso professionale del prodotto, non appropriato o
non conforme alle istruzioni per l'uso, solleva il costruttore da qualsiasi responsabilità.
- Assicurarsi che il cavo di alimentazione
non venga a contatto con parti
dell'apparecchio che si riscaldano
durante l'uso. Se il cavo di
alimentazione è danneggiato deve
essere sostituito dal costruttore, o dal
suo servizio di assistenza tecnica, in
modo da prevenire ogni rischio.
- Prima di riporre l’apparecchio o rimuovere le piastre
di cottura e prima di ogni operazione di pulizia e
manutenzione, spegnere l’apparecchio ruotando il
selettore in posizione "●" ed estrarre la spina dalla
presa di corrente. Accertarsi che l’apparecchio si sia
rareddato completamente.
- Non usare l’apparecchio all’esterno.
- Non immergere l’apparecchio in acqua.
- L'apparecchio non deve essere fatto
funzionare per mezzo di un timer
esterno o con un sistema di comando
a distanza separato.
- Utilizzare soltanto prolunghe conformi alle vigenti
norme di sicurezza. Vericare che siano in buono stato
e di sezione adeguata.
- Non disinserire la spina dalla presa di corrente tirando il
cavo.
Attenzione!
La mancata osservanza di queste avvertenze implica il rischio
di lesioni personali o danni all’apparecchio.
- Pulire l'esterno della piastra di cottura con una spugna
morbida o un panno inumidito con acqua e detergente
delicato.
- Questo apparecchio è progettato per la cottura dei
cibi. Non deve quindi essere utilizzato per altri ni, né
modicato o manomesso in alcun modo.
- Questo apparecchio è destinato
esclusivamente all’uso domestico. Non
è previsto l’uso in ambienti adibiti a
cucina per il personale di negozi, uci
e altri ambienti di lavoro, agriturismi,
hotel, atta camere, motel e altre
strutture ricettive.
- Questo apparecchio può essere
utilizzato da bambini da 8 anni in su e
da persone con ridotte capacità siche,
sensoriali o mentali o mancanza di
esperienza e conoscenza, a condizione
che siano attentamente sorvegliate
e istruite riguardo l’uso in sicurezza
dell’apparecchio e siano consapevoli
dei rischi connessi. I bambini non
devono giocare con l’apparecchio.
- Pulizia e manutenzione da parte dell’utente non deve
essere eseguita da bambini a meno che non siano di età
superiore a 8 anni e siano sorvegliati.
Tenere l’apparecchio e il cavo lontano dalla portata dei
bambini sotto gli 8 anni di età.
- Tenere l’apparecchio lontano dalla portata dei bambini e
non lasciarlo in funzione senza sorveglianza.
- Non utilizzare l’apparecchio senza piastre di cottura.
- Riporre l’apparecchio solo quando si è rareddato
completamente.
- Non spostare l’apparecchio durante l'uso.
Pericolo di ustioni!!
La mancata osservanza di questa avvertenza può comportare
il rischio di ustioni o scottature.
- Quando l’apparecchio è in funzione, la
temperatura della supercie esterna
può diventare molto calda. Utilizzare
sempre l’impugnatura (2) o dei guanti
da forno se necessario.
- Rimuovere o sostituire le piastre di cottura quanto
l’apparecchio si è rareddato completamente.
75

Nota bene:
Questo simbolo segnala raccomandazioni e informazioni
importanti per l’utente.
- Non cuocere alimenti avvolti in pellicole di plastica,
di alluminio o in sacchetti di polietilene per evitare il
rischio di incendio.
Questo apparecchio è conforme alla direttiva CEE
1935/2004 relativa a materiali ed oggetti destinati a venire
a contatto con i prodotti alimentari.
Smaltimento dell’apparecchio
Non smaltire l’apparecchio insieme ai riuti domestici
ma consegnarlo ad un centro di raccolta dierenziata
uciale.
lavastoviglie, facili da pulire. IL NUMERO E IL TIPO DI
PIASTRE POSSONO VARIARE IN BASE AL MODELLO.
13a. Piastra grill: perfetta per grigliare bistecche,
hamburger, pollo e verdure
13b. Piastra liscia: per preparare impeccabilmente
crespelle, uova, pancetta e crostacei.
14. Vassoio di raccolta grassi: integrato nell'apparecchio
e rimovibile per una facile pulizia.
PRIMA MESSA IN SERVIZIO
Rimuovere tutto il materiale di imballaggio e le etichette
dall'apparecchio. Prima di cestinare il materiale di
imballaggio, assicurarsi di aver estratto tutte le parti del
nuovo apparecchio. Si consiglia di conservare la scatola e il
materiale di imballaggio per usi successivi.
DESCRIZIONE
1. Base e coperchio: struttura solida in acciaio inox con
coperchio autoregolante.
2. Impugnatura: impugnatura robusta in metallo per
regolare il coperchio in base allo spessore dei cibi.
3. Pulsanti di sgancio della piastra: premere per
sbloccare e rimuovere la piastra
4. Dispositivo di blocco/sblocco e regolazione in
altezza piastra superiore/coperchio
5. Pulsante di sgancio cerniera: consente di aprire
completamente l'apparecchio per cuocere in posizione
piana
6. Regolazione in altezza della piastra “funzione
forno grill”: per bloccare la piastra/coperchio
superiore all'altezza desiderata, per preparare pietanze
che non necessitano di pressatura.
7. Spia di alimentazione (verde): la spia è accesa
quando l'apparecchio è collegato alla rete elettrica.
8. Spia piastra superiore (rossa): La spia è accesa
quando le resistenze sono alimentate e si spegne
quando viene raggiunta la temperatura e la piastra è
pronta.
9. Spia piastra inferiore (rossa): la spia è accesa quando
le resistenze sono alimentate e si spegne quando viene
raggiunta la temperatura e la piastra è pronta.
10. Manopola termostato della piastra superiore:
posizionare su MED - MAX o “●” per regolare la
temperatura della piastra superiore.
11. Manopola termostato della piastra inferiore:
posizionare su WARM - LOW - MED - MAX o "●” per
regolare la temperatura della piastra inferiore.
12. Piedini anteriori regolabili.
13. Piastre removibili: antiaderenti e lavabili in
Nota bene: Prima dell’uso, pulire la base, il coperchio
e le manopole di controllo con un panno umido per
rimuovere la polvere accumulatasi durante il trasporto. Pulire
accuratamente le piastre di cottura e il vassoio di raccolta
grassi. Le piastre e il vassoio raccogligrasso possono essere
lavati in lavastoviglie.
Nota bene: Al primo utilizzo l’apparecchio può
emanare un leggero odore e un po’ di fumo. Questo è normale
e comune a tutti gli apparecchi con superci antiaderenti.
Nota bene: le piastre removibili (grill e lisce) sono
perfettamente intercambiabili.
Inserimento delle piastre di cottura
- Sistemare l’apparecchio in posizione piana (v. gura 1).
Inserire una piastra alla volta.
- Ogni piastra può essere inserita sia nell‘alloggiamento
superiore che inferiore (v. gura 2).
76

P e r
CLICK
CLICK
rimuovere le piastre
Sistemare l’apparecchio in posizione piana.
Individuare sul lato sinistro i pulsanti di sblocco (3) delle
piastre. Premere il pulsante con decisione per espellere
la piastra dalla base. Aerrare la piastra a due mani, farla
scorrere lungo i supporti metallici ed estrarla dalla base.
Premere anche l’altro pulsante di sblocco per rimuovere la
seconda piastra, eseguendo le stesse operazioni.
Pericolo di ustioni!! Rimuovere o sostituire le piastre
di cottura quanto l’apparecchio si è rareddato.
Posizionare il vassoio raccogligrasso
Durante la cottura il vassoio raccogligrasso va inserito nella
relativa sede sul lato destro dell'apparecchio. Il grasso
proveniente dal cibo viene drenato attraverso l’apertura sulla
piastra e raccolto nel vassoio.
Nota bene: Durante la cottura, controllare
frequentemente il vassoio raccogligrasso ed estrarlo per
evitare l’eccesso di grasso liquido.
Dopo la cottura, smaltire opportunamente il grasso raccolto.
Il vassoio raccogligrasso può essere lavato in lavastoviglie.
Attenzione! Durante la cottura prestare sempre la
massima attenzione.
Per aprire l’apparecchio, aerrare l’impugnatura che
rimane fredda. Al contrario, le parti in alluminio pressofuso
diventano molto calde, evitare di toccarle durante o subito
dopo la cottura.
Prima di eseguire qualunque operazione sull’apparecchio,
lasciarlo rareddare (per almeno 30 minuti).
Cucinare esclusivamente con il vassoio raccogligrasso inserito.
Non svuotare il vassoio raccogligrasso nché l'apparecchio
non è completamente freddo. Fare attenzione quando si
estrae il vassoio per evitare di versare liquidi.
come griglia a contatto. La piastra superiore si adatta
automaticamente allo spessore del cibo sistemato sulla
piastra inferiore. In questo modo, il cibo viene cotto
uniformemente su entrambi i lati.
La griglia a contatto è ideale per cucinare hamburger, carne
disossata e a fette sottili, verdure e panini. La funzione “a
contatto” è perfetta per preparare i cibi in poco tempo o in
modo salutare. Utilizzando la griglia a contatto, il cibo cuoce
rapidamente proprio perché a contatto delle piastre da
entrambi i lati contemporaneamente (vedi gura 3).
Le scanalature della piastra e l’apertura sul lato posteriore
dell'apparecchio consentono il drenaggio e la raccolta
del grasso nell'apposito vassoio. L’apparecchio è dotato
di un’impugnatura particolare e di una cerniera che
consentono di regolare la piastra superiore in base allo
spessore degli alimenti. Se si desidera preparare più cose
contemporaneamente con la griglia a contatto, è opportuno
che i vari alimenti abbiamo lo stesso spessore per consentire
la chiusura uniforme del coperchio (piastra superiore).
Griglia aperta
La piastra superiore è allo stesso livello della piastra inferiore.
La piastra inferiore e quella superiore si trovano sullo stesso
piano, formando un’ampia supercie di cottura. In questa
posizione l’apparecchio può essere utilizzato in modalità
barbecue con piastra grill o piastra liscia.
Per regolare l’apparecchio in questa posizione, occorre
innanzitutto individuare il pulsante di sblocco della cerniera,
posto sulla destra. Aerrare l’impugnatura con la mano
sinistra e con la destra premere il pulsante di sblocco della
cerniera (v. gura 4).
POSIZIONI DI UTILIZZO DELL’APPARECCHIO
Griglia a contatto (posizione chiusa)
La piastra superiore poggia sulla piastra inferiore. È la
posizione iniziale e di cottura quando si utilizza l’apparecchio
77

Spingere all’indietro l’impugnatura no a ribaltare
completamente il coperchio in posizione piana (vedi gura
5).
Se si solleva leggermente l’impugnatura prima di premere il
pulsante di sblocco, si alleggerisce la pressione sulla cerniera
e l’operazione di apertura risulta più agevole.
L’apparecchio può essere utilizzato come un grill/barbecue
per preparare hamburger, bistecche, pollo e pesce. La
modalità grill/barbecue è il modo più versatile di utilizzare
l’apparecchio. Le piastre si trovano in posizione aperta ed è
quindi disponibile una doppia supercie di cottura.
Si possono preparare diversi alimenti su piastre separate
senza mischiare i sapori, oppure cucinare una maggiore
quantità dello stesso cibo. La posizione grill/barbecue
permette di grigliare diversi tagli di carne di vario spessore,
ciascuno con il grado di cottura che preferite. In questa
posizione è necessario girare i cibi durante la cottura.
L’apparecchio può essere utilizzato anche con le piastre
lisce per preparare crespelle, formaggio, uova e bacon per
colazione (vedi gura 6).
Ideale per la preparazione di verdure con elevato contenuto di
acqua in quanto l'acqua può evaporare.
Potete usare questa posizione di cottura per preparare
morbidi sandwich e cibi che non richiedono di essere pressati.
- Posizionare gli alimenti sulla piastra inferiore.
- Aerrandola per l'impugnatura, abbassare la piastra
superiore vicino al cibo (g. A).
L’ampia supercie di cottura consente di preparare
contemporaneamente diversi alimenti, oppure una maggiore
quantità dello stesso cibo.
Forno Grill
Questa posizione (vedi gura 7) è perfetta per grigliare senza
contatto cibi di grosso spessore che richiedono una cottura
lenta e uniforme.
- Posizionare il dispositivo di blocco/sblocco delle piastre
grill (4) nella posizione forno desiderata facendo
scorrere la leva.
- La piastra superiore si blocca in posizione. Vi sono 5
diverse regolazioni in altezza (g. B).
78

USO
Funzionamento
Una volta preparato correttamente l’apparecchio e quando si
è pronti per cucinare, selezionare la temperatura desiderata
per ciascuna delle due piastre (superiore e inferiore)
utilizzando le manopole del termostato 10 e 11.
Le spie delle piastre superiore e inferiore (8 - 9) si accendono.
A seconda della temperatura selezionata, sono necessari
alcuni minuti anché l’apparecchio si riscaldi. Quando il
termostato raggiunge la temperatura desiderata, le spie
delle piastre superiore e inferiore si spengono e l'apparecchio
è pronto per l'uso.
È possibile variare la regolazione della temperatura in
qualunque momento durante la cottura, in funzione del tipo
di cibo in preparazione.
Nota bene: l'apparecchio è dotato di 2 piedini
anteriori regolabili (16) che facilitano lo scarico dell'olio nella
vaschetta raccogli grasso.
PULIZIA E MANUTENZIONE
Manutenzione da parte dell’utente
- Non utilizzare utensili metallici che possono graare le
piastre antiaderenti. Utilizzare invece utensili in legno o
in plastica termoresistente.
- Non lasciare utensili in plastica a contatto con le piastre
calde.
- Tra una preparazione e l’altra, rimuovere i residui di
cibo attraverso l’apertura per il drenaggio dei grassi e
raccoglierli nella vaschetta sottostante, quindi pulire
con un panno di carta e passare alla preparazione
successiva.
- Prima di eseguire qualunque operazione di pulizia,
lasciare rareddare l’apparecchio (per almeno 30
minuti).
che le piastre si siano completamente rareddate. Le
piastre di cottura possono essere lavate in lavastoviglie
anche se frequenti lavaggi potrebbero ridurre le proprietà
del rivestimento Si consiglia quindi di pulire l'esterno della
piastra di cottura con una spugna morbida o un panno
inumidito con acqua e detergente delicato.
Non utilizzare oggetti metallici per pulire le piastre.
CARATTERISTICHE TECNICHE
Tensione di alimentazione 220-240 V / 50-60 Hz
Potenza assorbita 2000W
Pulizia e cura
Nota bene: Prima di pulire l’apparecchio, assicurarsi
che si sia completamente rareddato.
Al termine della cottura, ruotare le manopole su "●"e
scollegare l'apparecchio dalla rete elettrica. Lasciare
rareddare l’apparecchio per almeno 30 minuti. Rimuovere
eventuali residui di cibo dalle piastre. Svuotare la vaschetta
raccogligrasso. La vaschetta raccogligrasso può essere lavata
a mano o in lavastoviglie.
Premere i pulsanti di sblocco delle piastre (3) per rimuovere
queste ultime dall’apparecchio. Prima di toccarle, assicurarsi
79

TABELLA DI COTTURA
MANZO
Bistecca 0,5 - 1 2 Ben
Bistecca 0,5 - 1 4 Ben
Filetto 3-4 4
Filetto 3-4 4 Media
Filetto 3-4 4 Ben
Costata 2-3 2 Media
Costata 2-3 2 Ben
Costata 2-3 4 Media
Costata 2-3 4 Ben
Hamburger
SPESSORE
No.
(cm)
PEZZI
2-3 6 Ben
LIVELLO
COTTURA
sangue
cotta
cotta
Al
cotta
cotta
cotta
cotta
MODALITÀ
GRIGLIA A
CONTATTO
GRIGLIA
APERTA
GRIGLIA A
CONTATTO
GRIGLIA A
CONTATTO
GRIGLIA A
CONTATTO
GRIGLIA A
CONTATTO
GRIGLIA A
CONTATTO
GRIGLIA
APERTA
GRIGLIA
APERTA
GRIGLIA A
CONTATTO
PIASTRE MANOPOLA
TERMOSTATO
inferiore superiore
GRILL LISCIA MAX MAX
GRILL LISCIA MAX MAX
GRILL LISCIA MAX MAX
GRILL LISCIA MAX MAX
GRILL LISCIA MAX MAX
GRILL LISCIA MAX MAX
GRILL LISCIA MAX MAX
GRILL LISCIA MAX MAX
GRILL LISCIA MAX MAX
GRILL LISCIA MAX MAX
superiore
(10)
inferiore
(11)
MIN. SUGGERI-
MENTI
2 - 3
oliare
bene il
cibo
5 - 6
oliare
bene
il cibo,
ruotare
a metà
cottura
4 - 5
oliare
bene il
cibo
7 - 8
oliare
bene il
cibo
10 - 11
oliare
bene il
cibo
4 - 5
oliare
bene il
cibo
7 - 8
oliare
bene il
cibo
10 - 12
oliare
bene
il cibo,
ruotare
a metà
cottura
14 - 16
oliare
bene
il cibo,
ruotare
a metà
cottura
8 - 10
oliare
bene il
cibo
80

Spiedino 6 Ben
cotta
GRIGLIA A
CONTATTO
GRILL LISCIA MAX MAX
13 - 15
oliare
bene
il cibo,
ruotare
a metà
cottura
AGNELLO
Costoletta 1,5-3 6 Media
Costoletta 1,5-3 6 Ben
MAIALE
Bistecca 1-2 4 GRIGLIA A
Bistecca 1-2 8 POSIZIONE
Braciola <2,5 4 GRIGLIA A
Braciola <2,5 8 POSIZIONE
Puntine
di maiale
Pancetta 4 GRIGLIA A
Salsiccia 8 GRIGLIA A
Spiedino 6 GRIGLIA A
Wurstel 6 GRIGLIA A
SPESSORE
(cm)
SPESSORE
(cm)
No.
LIVELLO
PEZZI
COTTURA
cotta
No.
MODALITÀ
PEZZI
CONTATTO
APERTA
CONTATTO
APERTA
6-8 GRIGLIA A
CONTATTO
CONTATTO
CONTATTO
CONTATTO
CONTATTO
MODALITÀ
GRIGLIA A
CONTATTO
GRIGLIA A
CONTATTO
inferiore superiore
GRILL LISCIA MAX MAX 7 - 9 oliare bene il cibo
GRILL LISCIA MAX MAX
GRILL LISCIA MAX MAX
GRILL LISCIA MAX MAX
GRILL LISCIA MED MED
GRILL LISCIA MAX MAX
GRILL LISCIA MED MED
GRILL LISCIA MAX MAX
GRILL LISCIA MAX MAX
PIASTRE MANOPOLA
TERMOSTATO
inferiore superiore
GRILL LISCIA MAX MAX 10 - 12 oliare
GRILL LISCIA MAX MAX 12 - 14
PIASTRE MANOPOLA
TERMOSTATO
superiore
(10)
superiore
(10)
inferiore
(11)
inferiore
14 - 16
9 - 11
11 - 13
20 - 25
16 - 18
14 - 16
8 - 10
MIN. SUGGERI-
(11)
MIN. SUGGERIMENTI
oliare bene il cibo,
ruotare a metà cottura
oliare bene il cibo,
ruotare a metà cottura
oliare bene il cibo,
ruotare a metà cottura
girare due o tre
volte
1 - 2
bucare le salsicce
con una forchetta
oliare bene il cibo,
girare 1-2 volte
81
MENTI
bene
il cibo,
ruotare
le costolette
a metà
cottura

CARNE DI
POLLO E
TACCHINO
Petto <1 4
Coscia 3
Aletta 6
Hamburger 1,5-2 4
Hamburger 1,5-2 8
Spiedino 6
Wurstel 6
Pollo alla
diavola alla
griglia
SPESSORE
(cm)
PEZZI
No.
MODALITÀ PIASTRE MANOPOLA
inferiore superiore superiore
1
GRIGLIA A
CONTATTO
GRIGLIA A
CONTATTO
GRIGLIA A
CONTATTO
GRIGLIA A
CONTATTO
GRIGLIA
APERTA
GRIGLIA A
CONTATTO
GRIGLIA A
CONTATTO
GRIGLIA A
CONTATTO
GRILL LISCIA MAX MAX 3 - 4
GRILL LISCIA MED MED 20 - 25
GRILL LISCIA MED MED 14 - 16
GRILL LISCIA MAX MAX 6-8
GRILL LISCIA MAX MAX 14 - 16
GRILL LISCIA MAX MAX 11 - 13
GRILL LISCIA MAX MAX 6 - 8
GRILL LISCIA MED MED 40 - 45
TERMOSTATO
(10)
inferiore
(11)
MIN.
SUGGERIMENTI
oliare bene il cibo
girare una o due
volte durante la
cottura
girare una o due
volte durante la
cottura
girare a metà
cottura
girare una o due
volte durante la
cottura
girare una o due
volte durante la
cottura
PANE No.
Toast/
sandwich
Panino 2
Fette di
pane
MODALITÀ PIASTRE
PEZZI
2 FORNO
GRILL
GRIGLIA A
CONTATTO
4 GRIGLIA
APERTA
inferiore superiore
LISCIA GRILL
GRILL LISCIA
LISCIA GRILL
MANOPOLA
TERMOSTATO
superiore
(10)
MED MED
MED MED
MAX MAX
82
MIN. SUGGERIMENTI
inferiore
(11)
3 - 5 posizionare la piastra
superiore in modo che
tocchi il pane senza
schiacciarlo
2 - 3
4 - 5 girare a metà cottura

VERDURE No.
Melanzane a
fette
Zucchine a fette 2 GRIGLIA A
Peperone a
quarti
Pomodoro a
fette
Cipolla a fette 2 GRIGLIA A
MODALITÀ PIASTRE MANOPOLA
PEZZI
1 GRIGLIA A
CONTATTO
CONTATTO
2 GRIGLIA A
CONTATTO
1 GRIGLIA
APERTA
CONTATTO
MIN. SUGGERIMENTI
TERMOSTATO
inferiore superiore superiore
GRILL LISCIA MAX MAX 4 - 6 oliare bene il cibo
GRILL LISCIA MAX MAX 6 - 8 oliare bene il cibo
GRILL LISCIA MAX MAX 8 - 10 oliare bene il cibo
LISCIA GRILL MAX MAX 5 - 7 oliare bene il cibo; gira-
LISCIA GRILL MAX MAX 5 - 7 oliare bene il cibo, me-
(10)
inferiore
(11)
re a metà cottura
scolare spesso con una
spatola
PESCE
Intero 250 g 1
Filetto 500 g 1
Trancio 450 g 4
Spiedino 500 g 6
Calamari 400 g 1-2
Gamberoni 400 g 10-12
QUANTITA'
No.
PEZZI
MODALITÀ
GRIGLIA A
CONTATTO
FORNO
GRILL
GRIGLIA A
CONTATTO
GRIGLIA
APERTA
GRIGLIA A
CONTATTO
GRIGLIA A
CONTATTO
PIASTRE
inferiore superiore
GRILL LISCIA
LISCIA GRILL
GRILL LISCIA
GRILL LISCIA
GRILL LISCIA
GRILL LISCIA
MANOPOLA
TERMOSTATO
superiore
(10)
MED MED
MAX MAX
MED MED
MAX MAX
MED MED
MED MED
inferiore
(11)
MIN.
8 - 10
25 - 30
8 - 10
10 - 12
10 - 12
4 - 6
SUGGERIMENTI
oliare bene il cibo
oliare il cibo,
posizionare la
piastra superiore
in modo che
sori il cibo senza
toccarlo
oliare bene il cibo
oliare bene il
cibo; girare due o
tre volte
oliare bene il cibo
oliare bene il cibo
83

DESSERT No.
Pancake 4 GRIGLIA
Fette di
ananas
MODALITÀ PIASTRE MANOPOLA
PEZZI
inferiore superiore superiore
LISCIA GRILL MED MED 4 - 5 imburrare le piastre, girare
APERTA
4 GRIGLIA A
CONTATTO
GRILL LISCIA MED MED 5 - 6 imburrare le piastre
RICETTE
UOVA STRAPAZZATE, PANCETTA AFFUMICATA E TOAST
INGREDIENTI:
- uova 2
- bacon 2 fette
- latte 1 cucchiaio
- sale e pepe q.b.
- pane da toast 2 fette
PREPARAZIONE:
Sbattere le uova con il latte e il sale no a quando non
si forma un composto leggero e spumoso. Inserire la
piastra liscia nell'alloggiamento inferiore e la piastra grill
nell’alloggiamento superiore e posizionare l’apparecchio
in modalità GRIGLIA APERTA. Impostare la manopola del
termostato inferiore e superiore
START/STOP per preriscaldare la griglia. Quando le spie
delle piastre superiore e inferiore si spengono, versate il
mix di uova in un angolo della piastra e cucinate per 2-3
min avendo cura con una spatola in legno di mescolarle
bene per cuocerle uniformemente. Nel frattempo, sulla
stessa piastra, cucinate anche le fette di bacon per 3-4min,
girandole a metà cottura, mentre sull'altra piastra piana
tostate il pane per 3-4min girandolo a metà cottura.
Comporre il piatto e servire.
CROSTINI ALLA SPUMA DI MELANZANE
INGREDIENTI:
- melanzane 1
- ricotta 100gr
- aglio in polvere q.b.
- prezzemolo q.b.
- olio di oliva 4 cucchiai
- sale q.b.
- pepe q.b.
- baguette 1
su MAX
. Premere il tasto
MIN. SUGGERIMENTI
TERMOSTATO
inferiore
(10)
PREPARAZIONE:
Lavare le melanzane, pelarle e tagliarle a fette spesse.
Inserire la piastra grill nell'alloggiamento inferiore, la piastra
liscia nell’alloggiamento superiore e disporre l’apparecchio
in modalità GRIGLIA A CONTATTO. Impostare la manopola
del termostato inferiore e superiore
START/STOP per preriscaldare la griglia. Quando le spie
delle piastre superiore e inferiore si spengono, posizionare
le melanzane sulla piastra inferiore e cuocere per 8-10 min
circa no a quando saranno morbide. Tagliare le fette di
melanzane grossolanamente e mettetele in un mixer con
la ricotta, lo spicchio d'aglio e il prezzemolo sminuzzato, un
pizzico di sale e uno di pepe, oltre all'olio. Frullare no a
ottenere un composto liscio e a grana ne.
(tagliato a fette) con l'olio d'oliva e cuocerlo a temperatura
MAX con le piastre piane in modalità GRIGLIA A CONTATTO per
1-2 minuti no ad ottenere la doratura desiderata.
Spalmare sul pane abbrustolito la crema di melanzane,
irrorare con due cucchiai di olio e servirle.
INSALATA DI CARNE CON RUCOLA E POMODORINI
INGREDIENTI:
- fettine di carne di vitello 2
- rucola 100gr
- pomodorini tondi 10-12
- scaglie di grana 100gr
- sale q.b.
- olio di oliva q.b.
PREPARAZIONE:
Preparare l’insalata di rucola e pomodorini: lavare la
rucola, mettetela su un canovaccio pulito per lasciarla
asciugare, tagliare i pomodorini in 4 parti. Inserire la
piastra grill nell'alloggiamento inferiore, la piastra liscia
nell’alloggiamento superiore e disporre l’apparecchio in
modalità GRIGLIA A CONTATTO.
(11)
a metà cottura
su MAX
. Premere il tasto
Ungere il pane
84

Impostare la manopola del termostato inferiore e superiore
su MAX
. Premere il tasto START/STOP per preriscaldare la
griglia. Quando le spie delle piastre superiore e inferiore si
spengono, posizionare le fettine di carne precedentemente
oliate sulla piastra inferiore, pressare con la piastra
superiore e cuocere per 2-3min a seconda del grado di
cottura desiderato. Tagliare la carne a listarelle e disporle
sul letto di rucola e pomodorini, salare e aggiungere le
scaglie di grana. Condire con un lo d'olio.
INGREDIENTI PER LA SALSA DI FUNGHI:
- burro 30gr
- gorgonzola 1 cucchiaio
- scalogni 2
- funghi 300gr
- whisky 1/2 bicchierino
- panna 200gr
- succo di limone q.b.
- prezzemolo q.b.
COSTATE AROMATIZZATE AL CAFFE'
INGREDIENTI:
- costate di manzo (2 da 250gr l'una)
- olio d'oliva
PER LA MISCELA AL CAFFÈ:
- semi di cumino 2 cucchiaini
- chicchi di caè 2 cucchiaini
- peperoncino dolce 1 cucchiaio
- paprika 1 cucchiaino
- sale grosso 1 cucchiaino
- pepe 1 cucchiaino
PREPARAZIONE:
Preparare la miscela al caè: versare i semi di cumino e il
caè in un robot da cucina e ridurli in polvere, non troppo
ne. Versare la polvere ottenuta in una ciotola, aggiungere
gli altri ingredienti e mescolare bene. Oliare leggermente
la carne e condirla con le spezie; coprire il tutto e lasciare a
temperatura ambiente per 30min circa. Inserire la piastra
grill sotto, la piastra liscia sopra e disporre l’apparecchio in
modalità GRIGLIA A CONTATTO.
Impostare la manopola del termostato inferiore e superiore
su MAX
. Premere il tasto START/STOP per preriscaldare la
griglia. Quando le spie delle piastre superiore e inferiore
si spengono, posizionare la carne sulla piastra inferiore,
pressare con la piastra superiore e cuocere per 6-8 min a
seconda del grado di cottura desiderato. Servire calde.
FILETTO DI MANZO CON SALSA DI FUNGHI
INGREDIENTI:
- letti di manzo 4
- sale q.b.
- pepe nero da macinare al momento q.b.
- spicchio d'aglio 2
- senape di Digione 2 cucchiai
- burro 60gr
- olio di oliva q.b.
PREPARAZIONE:
Condire la carne con sale e pepe e lasciatela riposare a
temperatura ambiente per un ora circa. Preparare la salsa
di funghi: in una padella sciogliere il burro, aggiungere
gli scalogni aettati e cucinare per 2-3min. Aggiungere i
funghi e cuocere per altri 5 min. A questo punto sfumare
con il whisky, cuocere per 1 minuto, aggiungere un bicchiere
d'acqua e cuocere per un altro minuto circa. Aggiungere
la panna liquida, il succo di un limone, il prezzemolo, il
gorgonzola e portare a bollore Cuocere nchè la salsa non
sarà bella densa; aggiustare di sale e pepe e metterla da
parte. Nel frattempo preparare il condimento della carne
con cui spennellerete i letti durante la cottura; in una
piccola padella mettere il burro, la senape e l’aglio. Cuocete
a amma dolce no a quando il burro non si scioglie. Tenete
in caldo. Inserire la piastra grill sotto, la piastra liscia sopra
e disporre l’apparecchio in modalità GRIGLIA A CONTATTO.
Impostare la manopola del termostato inferiore e superiore
su MAX
. Premere il tasto START/STOP per preriscaldare la
griglia. Quando le spie delle piastre superiore e inferiore
si spengono, posizionare i letti (precedentemente
spennellati con la salsa su entrambi i lati) sopra la piastra
inferiore e chiudere la griglia. Cuocere per 6-8 min a
seconda del grado di cottura desiderata e dello spessore dei
letti. Al termine togliere i letti e servirli ricoperti con la
salsa di funghi preparata precedentemente.
HAMBURGER CON PANE DI SEGALE TOSTATO
INGREDIENTI:
- pane di segale 8 fette
- carne macinata di prima scelta 500gr
- emmenthal a fette 100gr
- olio di oliva 2 cucchiai
- cipolle aettate 2
- burro a temperatura ambiente q.b.
- salsa worchester 2 cucchiaini
- sale q.b.
- pepe q.b.
85

- zucchero mezzo cucchiaino
PREPARAZIONE:
Preparare gli hamburger: in una terrina mescolare la carne
macinata, la salsa worchester, il sale, il pepe e amalgamare
bene il tutto. Formare con le mani 4 hamburger di circa 2cm
di spessore. Posizionare l’apparecchio in modalità GRIGLIA
APERTA e inserire la piastra liscia nell’alloggiamento
inferiore e la piastra grill nell’alloggiamento superiore.
Impostare la manopola del termostato inferiore e superiore
su MAX
. Premere il tasto START/STOP per preriscaldare la
griglia.
Quando le spie delle piastre superiore e inferiore si
spengono, posizionare le cipolle aettate condite con
l'olio di oliva e lo zucchero sopra la piastra inferiore e
cuocerle per 5-6 min circa mescolandole spesso con una
spatola in modo da uniformare la cottura e renderle
tenere. Contemporaneamente, sull'altra piastra cuocere
gli hamburger per 12min circa girandoli dopo 5-6 min circa
(il tempo di cottura varia a seconda dello spessore degli
hamburger). Appena le cipolle saranno cotte, toglierle dalla
piastra e tostare le fette di pane imburrate, solo da un lato,
per 1-2 minuti.
Mettere le fette di pane su un tagliere con il lato tostato
rivolto verso l'alto, cospargere con le cipolle, aggiungere gli
hamburger e ricoprire con il formaggio. Chiudere il panino
con la fetta di pane, con il lato tostato rivolto verso il basso.
Attendere che la piastra sia nuovamente calda dopodiché
inserire i toast e pressare bene con la piastra superiore.
Cuocere per 2-3 min circa no ad ottenere il grado di
tostatura desiderato.
COSTOLETTE DI AGNELLO ALL'ACETO BALSAMICO E
ROSMARINO
INGREDIENTI:
- costolette di agnello 6
- rosmarino tritato 10gr
- aglio tritato 10gr
- aceto balsamico 100ml
- zucchero 15gr
- sale q.b.
- pepe q.b.
PREPARAZIONE:
Mescolare tutti gli ingredienti in un recipiente abbastanza
grande; coprire e lasciare marinare l’agnello in frigo per
almeno 1-2 ore. Inserire la piastra grill sotto, la piastra
liscia sopra e disporre l’apparecchio in modalità GRIGLIA
A CONTATTO. Impostare la manopola del termostato
inferiore e superiore
per preriscaldare la griglia. Quando le spie delle piastre
superiore e inferiore si spengono, posizionare le costolette
sulla piastra inferiore. Cuocere per 11‘-13‘ minuti circa a
seconda del grado di cottura desiderata e dello spessore
della costoletta (consigliamo di girarle a metà cottura
perché l'osso impedisce alla piastra superiore di venire a
contatto con la carne). Nel frattempo, ridurre la marinata in
una padella e servirla come salsa sulle costolette di agnello
grigliate.
SPIEDINI DI POLLO CREMA AL MIELE E LIMONE VERDE
INGREDIENTI:
- petto di pollo 500gr
INGREDIENTI PER LA MARINATA:
- peperoncino 1 cucchiaino
- coriandolo 1 cucchiaino
- olio di oliva 10cl
- cipollotti 2
- spicchio d'aglio 3
- zenzero grattugiato 1 cucchiai
- zucchero 1 cucchiaio
- succo di lime 1 cucchiaio
- sale grosso 1 cucchiai
- pepe q.b.
INGREDIENTI PER LA CREMA AL MIELE E LIMONE:
- panna da cucina 5 cl
- scorza grattugiata di lime 1/2 cucchiaino
- succo di lime 1 cucchiaio
- olio di oliva 1 cucchiai
- miele 1 cucchiaio
- sale q.b.
PREPARAZIONE:
Preparare la marinatura: mettere tutti gli ingredienti in
un robot da cucina e frullare no ad ottenere un composto
omogeneo. Mettere in un piatto fondo il pollo tagliato a cubi
di 2cm di larghezza, aggiungere la marinatura e ricoprire
tutto il pollo in modo omogeneo. Coprire con una pellicola
per alimenti e lasciare marinare per 1-2 ore. Preparare
la crema mescolando tutti gli ingredienti in una ciotola,
coprire con la pellicola trasparente e tenere in frigorifero.
Inlare i pezzi di pollo negli spiedini. Inserire la piastra
grill sotto, la piastra liscia sopra e disporre l’apparecchio
in modalità GRIGLIA A CONTATTO. Impostare la manopola
su MAX
. Premere il tasto START/STOP
86

del termostato inferiore e superiore
START/STOP per preriscaldare la griglia. Quando le spie
delle piastre superiore e inferiore si spengono, posizionare
la carne sulla piastra inferiore, pressare con la piastra
superiore e cuocere per 11-13 min a seconda del grado di
cottura desiderato. Servire gli spiedini caldi accompagnati
con la crema al limone e miele.
COSCE DI POLLO ALLA PROVENZALE
INGREDIENTI:
- cosce di pollo 3 (550gr)
INGREDIENTI PER LA MARINATA:
- vino bianco secco 25cl
- olio di oliva 4 cucchiai
- senape con semi 3 cucchiai
- aceto di vino bianco 3 cucchiai
- erbe provenzali 2 cucchiai
- aglio tritato 2 spicchi
- sale grosso 2 cucchiaino
- peperoncino di cayenna 1 cucchiaino
PREPARAZIONE:
Preparare la marinata mescolando tutti gli ingredienti in
una ciotola. Con una lama alata, tagliare in più punti la
parte carnosa delle cosce aprendole leggermente. Mettere
le cosce nella ciotola e bagnarle uniformemente con la
marinata; lasciare marinare per 2-3 ore. Inserire la piastra
grill sotto, la piastra liscia sopra e disporre l’apparecchio in
modalità GRIGLIA A CONTATTO.
Impostare la manopola del termostato inferiore e superiore
su MED. Premere il tasto START/STOP per preriscaldare la
griglia. Quando le spie della piastra superiore e inferiore
si spengono, posizionare le cosce di pollo sulla piastra
inferiore, pressare con la piastra superiore e cuocere per 2025 min girando 2-3 volte. Una volta cotte, sistemarle su un
piatto da portata e servire.
GAMBERONI ALLA GRIGLIA
INGREDIENTI:
- gamberoni 16/20 pz
INGREDIENTI PER LA MARINATA:
- prezzemolo q.b.
- limoni 2
- sale q.b.
- pepe q.b.
- spicchio d'aglio 2
su MAX
. Premere il tasto
PREPARAZIONE:
Preparare la marinata: tritare nemente l'aglio e il
prezzemolo e aggiungere il succo del limone; salare e
aggiungere una spolverata di pepe. Lavate i gamberoni,
asciugarli bene e lasciarli marinare per almeno mezz'ora.
Inserire la piastra grill sotto, la piastra liscia sopra e disporre
l’apparecchio in modalità GRIGLIA A CONTATTO. Impostare
la manopola del termostato inferiore e superiore su MED.
Premere il tasto START/STOP per preriscaldare la griglia.
Quando le spie della piastra superiore e inferiore si
spengono, sistemare i gamberoni scolati dalla marinatura
sulla piastra inferiore, pressare con quella superiore e
cuocere per 4-6 min circa. Al momento di servire, decorate il
piatto conqualche fetta di limone e il contorno di verdurine.
SALMONE ALLA GRIGLIA CON SALSA ALLO YOGURT
INGREDIENTI:
- letto di salmone 500gr
- olio di oliva q.b.
INGREDIENTI PER LA SALSA:
- yogurt greco 250gr
- aglio 1 spicchio
- sale 1 cucchiaino
- zucchero 1 pizzico
- erba cipollina 20gr
- prezzemolo 20gr
- pepe bianco q.b.
PREPARAZIONE:
Preparare la salsa: lavare ed asciugare bene il prezzemolo e
l'erba cipollina, a parte tritare l'aglio.
Versare lo yogurt in una ciotola, aggiungere gli aromi,
l'aglio, il sale, lo zucchero il pepe e frullare no ad ottenere
una crema morbida. Mettere in frigo a riposare per almeno
30min. Inserire la piastra liscia sotto, la piastra grill sopra e
disporre l’apparecchio in modalità FORNO GRILL. Impostare
la manopola del termostato inferiore e superiore su
MAX. Premere il tasto START/STOP per preriscaldare la
griglia. Quando le spie della piastra superiore e inferiore
si spengono, posizionare il letto precedentemente oliato
sulla piastra inferiore, chiudere la piastra superiore in
modalità FORNO GRILL (nella posizione più vicina al cibo,
senza toccarlo) e cuocere per 25-30 min circa (per un
miglior risultato, si consiglia di ruotare il salmone di 180°
a metà cottura perché nella parte posteriore la piastra è più
vicina al cibo). Terminata la cottura, sistemare il salmone su
un piatto da portata e servire accompagnato con la salsa
allo yogurt.
87

CALAMARO ALLA GRIGLIA
INGREDIENTI:
- calamaro grande 400gr
- limone 1
- prezzemolo 1 ciuo
- olio di oliva q.b.
- origano q.b.
- sale q.b.
- peperoncino in polvere q.b.
PREPARAZIONE:
Eviscerare il calamaro, staccare la testa, togliere l'osso
all'interno e lavarlo bene. Inserire la piastra grill sotto, la
piastra liscia sopra e disporre l’apparecchio in modalità
GRIGLIA A CONTATTO. Impostare la manopola del
termostato inferiore e superiore su MED. Premere il tasto
START/STOP per preriscaldare la griglia. Quando le spie
della piastra superiore e inferiore si spengono, sistemare
il calamaro precedentemente oliato sulla piastra inferiore,
pressare con quella superiore e cuocere per 10-12 min circa.
In una ciotola, preparare il condimento mescolando l'olio
con il prezzemolo tritato, il succo di limone, una presa di
origano, un pizzico di sale e di peperoncino.
Una volta che il calamaro è cotto, toglierlo dalla griglia e
condirlo con la salsina. Comporre il piatto e servire.
PANCAKE ALLA BANANA
INGREDIENTI:
- banane 1
- uova 2 (1 intero + 1 albume)
- latte 150 ml
- farina 00 100gr
- burro 70gr
- sale q.b.
- zucchero 1 cucchiaio
- lievito per dolci 16gr
PREPARAZIONE:
Sbucciare la banana e ridurla in purea schiacciandola bene
con una forchetta. In un’altra terrina, sbattere 1 uovo
intero con lo zucchero e aggiungere il latte a lo sempre
mescolando. Aggiungere 50 g di burro fuso, quindi unire
poco a poco la farina setacciata con il lievito ed un pizzico
di sale; aggiungere anche la polpa schiacciata delle
banane amalgamando bene tutti gli ingredienti e mettere
il composto in frigorifero per 10 minuti. Nel frattempo,
montare l'albume a neve ben ferma. Riprendete il
composto e incorporatevi l'albume montato con movimenti
delicati dal basso verso l'alto. Inserire la piastra liscia
sotto, la piastra grill sopra e posizionare l’apparecchio in
modalità GRIGLIA APERTA. Impostare la manopola del
termostato inferiore e superiore su MED. Premere il tasto
START/STOP per preriscaldare la griglia. Quando le spie
delle piastre superiore e inferiore si spengono, ungere con
un po' di burro le piastre, versarvi 1-2 cucchiai di pastella
allargandola velocemente sulla supercie in modo da
ottenere un cerchio. Lasciare cuocere per circa 2 minuti no
a quando si formeranno delle bollicine su tutta la supercie
del pancake, quindi girarlo e farlo cuocere per altri 2 minuti
circa. I pancake possono essere serviti in molti modi: con
crema al cioccolato, sciroppo d'acero, mirtilli freschi, scaglie
di cioccolato, miele, panna montata, zucchero a velo.
ANANAS GRIGLIATO CON GELATO
INGREDIENTI:
- ananas 1
- miele q.b.
- zucchero di canna q.b.
- menta fresca q.b.
- zucchero a velo q.b.
- gelato alla vaniglia q.b.
PREPARAZIONE:
Togliere foglie e buccia dall’ananas. Tagliare il frutto a
fette dello spessore di 1-2 cm e cospargere ogni fetta
dizucchero di cannasu entrambi i lati. Inserire la piastra
grill sotto, la piastra liscia sopra e disporre l’apparecchio in
modalità GRIGLIA A CONTATTO. Impostare la manopola del
termostato inferiore e superiore su MED. Premere il tasto
START/STOP per preriscaldare la griglia. Quando le spie
della piastra superiore e inferiore si spengono, spennellare
l'ananas su entrambi i lati con miele e porlo sulla griglia.
Chiudere la griglia e cuocere per 5-6min. Una volta cotte,
sistemare le fette in un piatto da portata, decorare con
foglioline di menta fresca, spolverare con zucchero a velo e
servire con palline di gelato.
88

BELANGRIJKE WAARSCHUWINGEN
Veiligheidswaarschuwingen
Gevaar!
Veronachtzaming van deze waarschuwing brengt het risico
van elektrische schokken met gevaar voor het leven met zich
mee.
- Controleer, alvorens het apparaat op het stopcontact
aan te sluiten, of:
● de netspanning van uw elektriciteitsnet overeenkomt
met de spanning aangeduid op het typeplaatje van het
apparaat;
● het stopcontact geaard is en een minimum vermogen
van 16A heeft.
● Elk beroepsmatig, oneigenlijk gebruik of gebruik van
het product dat niet conform de gebruiksaanwijzingen
is, ontheft de fabrikant van elke aansprakelijkheid.
- Controleer of het netsnoer niet in
contact komt met delen van het
apparaat die warm worden tijdens
het gebruik. Indien het netsnoer
beschadigd is, mag het uitsluitend
vervangen worden door de fabrikant of
zijn technische servicedienst teneinde
elk risico te voorkomen.
- Alvorens het apparaat op te bergen of de bakplaten te
verwijderen, dient u het apparaat uit te schakelen door
de keuzeschakelaar in stand "●" te zetten en de stekker
uit het stopcontact te halen. Controleer of het apparaat
volledig afgekoeld is.
- Gebruik het apparaat niet buitenshuis.
- Dompel het apparaat niet onder in water.
- Het apparaat mag niet werken door
middel van een externe timer of een
apart systeem voor afstandsbediening.
- Gebruik alleen verlengsnoeren die conform de
geldende veiligheidsvoorschriften zijn. Controleer of ze
in goede toestand verkeren en de geschikte doorsnede
hebben.
- Trek niet aan het snoer om de stekker uit het stopcontact
te halen.
Opgelet!
Veronachtzaming van deze waarschuwingen brengt het
risico van persoonlijk letsel of schade aan het apparaat met
zich mee.
- Reinig de buitenkant van de bakplaat met een zachte
spons of een doek bevochtigd met water en een mild
schoonmaakmiddel.
- Dit apparaat is ontworpen voor het bereiden van
voedsel. Het mag dus niet gebruikt worden voor andere
doeleinden en mag op geen enkele manier gewijzigd of
eigenhandig gerepareerd worden.
- Dit apparaat is uitsluitend bestemd
voor huishoudelijk gebruik. Gebruik in
de volgende ruimten is niet voorzien:
personeelskeukens in winkels,
kantoren en andere werkomgevingen,
vakantieboerderijen, hotels,
kamerverhuurders, motels en andere
logiesgelegenheden.
- Dit apparaat mag gebruikt worden door
kinderen ouder dan 8 jaar en personen
met verstandelijke, lichamelijke
en zintuiglijke beperkingen of met
onvoldoende ervaring of kennis, mits
ze onder streng toezicht staan en
bekend zijn met het veilige gebruik
van het apparaat en de risico’s die
eraan verbonden zijn. Kinderen mogen
niet met het apparaat spelen.
- De reiniging en het onderhoud mogen niet worden
uitgevoerd door kinderen, tenzij ze ouder zijn dan 8 jaar
en onder toezicht staan.
Houd het apparaat en het netsnoer buiten het bereik
van kinderen jonger dan 8 jaar.
- Houd het apparaat buiten het bereik van kinderen en
laat het niet zonder toezicht werken.
- Gebruik het apparaat niet zonder bakplaten.
- Berg het apparaat pas op wanneer het volledig
afgekoeld is.
- Verplaats het apparaat niet tijdens het gebruik
Gevaar voor brandwonden!!
Veronachtzaming van deze waarschuwing kan de oorzaak
zijn van brandwonden.
- Wanneer het apparaat in werking is,
kan het buitenoppervlak zeer heet
worden. Gebruik altijd de handgreep
(2) of ovenwanten indien nodig.
- Verwijder of vervang de bakplaten wanneer het
89

apparaat volledig is afgekoeld.
Nota bene:
Dit symbool duidt op belangrijke tips en informatie voor de
gebruiker.
- Bereid geen voedsel dat gewikkeld is in plasticfolie,
aluminiumfolie of polyethyleen zakjes, om brandgevaar
te voorkomen.
Dit apparaat is in overeenstemming met Verordening
(EG) nr. 1935/2004 inzake materialen en voorwerpen
bestemd om met levensmiddelen in contact te komen.
Verwerking van het apparaat
Verwerk het apparaat niet samen met het
huishoudelijk afval, maar breng het naar een ocieel
inzamelcentrum.
BESCHRIJVING
1. Onderstuk en deksel: stevige roestvrijstalen structuur
met zelfregelend deksel.
2. Handgreep: robuuste handgreep van gesmolten
metaal om het deksel op basis van de dikte van het
voedsel af te stellen.
3. Ontgrendelknoppen plaat: druk hierop om de plaat
te ontgrendelen en te verwijderen
4. Vergrendelings-/ontgrendelingsmechanisme
voor onderste plaat en hoogteverstelling van de
bovenste plaat/deksel
5. Ontgrendelknop scharnier: hiermee kan het
apparaat compleet geopend worden om in vlakke stand
te werken
6. Hoogteverstelling van de plaat "grill/oven
functie": om de bovenste plaat/deksel op de
gewenste hoogte vast te zetten, om gerechten te
bereiden die niet hoeven te worden samengedrukt.
7. Stroomindicatielampje (groen): het controlelampje
brandt wanneer het apparaat op het elektriciteitsnet is
aangesloten.
8. Controlelampje bovenste plaat (rood): Het lampje
brandt wanneer de verwarmingselementen van stroom
worden voorzien en gaat uit wanneer de temperatuur is
bereikt en de plaat klaar is.
9. Controlelampje onderste plaat (rood): het lampje
brandt wanneer de verwarmingselementen van stroom
worden voorzien en gaat uit wanneer de temperatuur is
bereikt en de plaat klaar is.
10. Thermostaatknop van de bovenste plaat: plaats op
MED - MAX of "●" om de temperatuur van de bovenste
plaat in te stellen.
11. Thermostaatknop van de onderste plaat: plaats op
WARM - LOW - MED - MAX of "●" om de temperatuur
van de onderste plaat in te stellen.
12. Verstelbare voorste pootjes
13. Verwijderbare platen: met anti-aanbaklaag en
wasbaar in de vaatwasser, eenvoudig te reinigen. HET
AANTAL EN HET SOORT PLATEN HANGT AF VAN HET
MODEL.
13a. Grillplaat: perfect om biefstukken, hamburgers, kip
en groenten te grillen.
13b. Gladde plaat: voor de perfecte bereiding van crêpes,
eieren, spek en schaaldieren.
14. Vetopvangbak: opgenomen in het apparaat en
verwijderbaar voor eenvoudige reiniging.
IN GEBRUIK NEMEN
Verwijder al het verpakkingsmateriaal en de etiketten
van de plaat. Controleer of alle onderdelen van het nieuwe
apparaat uit het verpakkingsmateriaal zijn verwijderd
alvorens het weg te gooien. Men adviseert om de doos en het
verpakkingsmateriaal voor het volgende gebruik te bewaren.
Nota bene: Reinig vóór gebruik het onderstuk,
het deksel en de bedieningsknoppen met een vochtige
doek om stof dat zich tijdens het transport heeft afgezet
te verwijderen. Reinig zorgvuldig de bakplaten, de
vetopvangbak en het reinigingsgereedschap. De platen en
de vetopvangbak mogen in de vaatwasser gewassen worden.
Nota bene: De eerste keer dat het apparaat gebruikt
wordt, kan het een lichte geur en een beetje rook afgeven.
Dit is volkomen normaal en gebruikelijk voor alle apparaten
met een anti-aanbaklaag.
Nota bene: de verwijderbare platen (grillplaten en
gladde platen) zijn perfect uitwisselbaar.
Inbrengen van de bakplaten
- Plaats het apparaat in de vlakke stand (zie guur 1).
Breng één plaat per keer aan.
90

- Elke plaat kan zowel in de bovenste als in de onderste
CLICK
CLICK
zitting worden ingebracht (zie guur 2).
Om de platen te verwijderen
Plaats het apparaat in de vlakke stand.
Zoek aan de rechterkant de ontgrendelknoppen (3) van de
platen. Druk de knop stevig in om de plaat uit het onderstuk
te verwijderen. Pak de plaat met beide handen beet, schuif
hem langs de metalen steunen en til hem uit het onderstuk.
Druk op de andere ontgrendelknop om de tweede plaat op
dezelfde manier te verwijderen.
Gevaar voor brandwonden!! Verwijder of vervang
de bakplaten wanneer het apparaat volledig is afgekoeld.
Plaatsen van de vetopvangbak
Tijdens de werking van het apparaat moet de vetopvangbak
in zijn zitting aan de rechterkant van het apparaat zijn
ingebracht. Het vet uit het voedsel loopt via de afvoeropening
in de platen in de vetopvangbak.
Nota bene: Controleer tijdens de bereiding dikwijls de
vetopbangbak en verwijder deze om overtollig vloeibaar vet
te voorkomen.
Na de bereiding moet het verzamelde vet op de juiste wijze
verwerkt worden.
De vetopvangbak mag in de vaatwasmachine gewassen
worden.
Opgelet! Tijdens de bereiding moet altijd maximale
aandacht worden betracht.
Pak, om het apparaat te openen, de handgreep beet die
altijd koud blijft. De onderdelen van drukgegoten aluminium
worden daarentegen zeer heet: raak ze niet aan tijdens of
meteen na de bereiding van het voedsel.
Laat het apparaat afkoelen (minstens 30 minuten) alvorens
werkzaamheden uit te voeren.
Laat het apparaat uitsluitend werken met ingebrachte
vetopvangbak. Leeg de vetopvangbak pas als het apparaat
helemaal koud is. Wees voorzichtig bij het verwijderen van
de bak om morsen van vloeistoen te voorkomen.
GEBRUIKSSTANDEN VAN HET APPARAAT
Contactgrill (gesloten stand)
De bovenste plaat rust op de onderste plaat. Dit is de eerste
bereidingsstand, wanneer het apparaat als contactgrill wordt
gebruikt. De bovenste plaat past zich automatisch aan de
dikte van het voedsel aan dat op de onderste plaat is gelegd.
Op die manier wordt het voedsel op gelijkmatige wijze aan
beide kanten bereid.
De contactgrill is ideaal voor het bereiden van hamburgers,
ontbeend vlees in dunne plakken, groenten en broodjes. De
"contactfunctie" is perfect om in korte tijd en op gezonde
wijze voedsel te bereiden. Met een contactgrill kan voedsel
snel bereid worden omdat het aan beide kanten contact
maakt met de platen (zie guur 3).
De groeven in de plaat en de opening aan de achterkant van
het apparaat zorgen ervoor dat het vet uit het voedsel wordt
afgevoerd en in een speciale bak wordt opgevangen.
Het apparaat heeft een speciale handgreep en scharnier
waarmee de bovenste plaat aan de hand van de dikte van
het voedsel geregeld kan worden. Als men meerdere soorten
voedsel tegelijkertijd met de contactgrill wil bereiden,
moeten deze van dezelfde dikte zijn zodat het deksel
(bovenste plaat) gelijkmatig kan sluiten.
Open grill
De bovenste plaat bevindt zich op hetzelfde niveau als
de onderste plaat. De onderste en de bovenste plaat
bevinden zich op hetzelfde niveau en vormen samen één
groot bereidingsoppervlak. In deze stand kan het apparaat
gebruikt worden als barbecue met grillplaat of gladde plaat.
Om het apparaat in deze stand te zetten, moet eerst de
ontgrendelknop van de scharnier aan de rechterkant worden
opgezocht.
Pak de handgreep met uw linkerhand vast en druk met uw
rechterhand op de ontgrendelknop van het scharnier (zie
guur 4).
91

Duw de handgreep naar achteren totdat het deksel volledig
in de vlakke stand is gekanteld (zie guur 5).
Als de handgreep iets wordt opgetild alvorens op de
ontgrendelknop te drukken, wordt de druk op het scharnier
verminderd en wordt het openen vereenvoudigd.
Het apparaat kan als grill/barbecue worden gebruikt voor
de bereiding van hamburgers, biefstukken, kip en vis. Grill/
barbecue is de meest veelzijdige wijze om het apparaat te
gebruiken. De platen bevinden zich in geopende stand en
men beschikt dus over een dubbel bereidingsoppervlak.
Er kunnen diverse soorten voedsel op de afzonderlijke platen
worden bereid, zonder dat de smaken vermengen, of een
grotere hoeveelheid van dezelfde soort voedsel.
Dankzij de grill/barbecue-stand kunnen verschillende
soorten vlees van verschillende dikte worden gegrild, elk
met de gewenste bereidingsgraad. In deze stand moet het
voedsel tijdens de bereiding omgekeerd worden.
Het apparaat kan ook met de gladde platen worden gebruikt,
voor het bereiden van pannenkoeken, kaas, eieren en spek
voor het ontbijt (zie guur 6).
Oven-grill
Deze stand (zie guur 7) is perfect voor het contactloos grillen
van dikke stukken voedsel die een langzame en gelijkmatige
bereiding vereisen.
Ideaal voor het bereiden van groenten met een hoog
watergehalte aangezien het water op deze manier kan
verdampen.
U kunt deze bereidingsstand gebruiken voor het bereiden van
zachte sandwiches en voedsel dat niet samengedrukt hoeft
te worden.
- Leg het voedsel op de onderste plaat.
- Pak de bovenste plaat bij de handgreep beet en plaats
hem vlak boven het voedsel (g. A).
Het grote bereidingsoppervlak staat gelijktijdige bereiding
van diverse soorten voedsel of een grotere hoeveelheid van
hetzelfde voedsel toe.
92

- Plaats de vergrendel-/ontgrendelinrichting (4) van de
platen in de gewenste grillpositie door de hendel te
verschuiven.
- De bovenste plaat wordt in zijn stand vergrendeld. Er
zijn 5 verschillende hoogteregelingen (g. B).
GEBRUIK
Werking
Zodra het apparaat correct is voorbereid en u klaar bent om
te beginnen, kiest u de gewenste temperatuur voor elk van
beide platen (bovenste en onderste) met de thermostaat
knoppen 10 en 11.
De controlelampjes van de bovenste en onderste plaat (8 - 9)
gaan branden.
Afhankelijk van de gekozen temperatuur, zijn er enkele
minuten nodig om het apparaat op te warmen. Wanneer de
thermostaat de gewenste temperatuur heeft bereikt, gaan
de lampjes van de bovenste en onderste plaat uit en is het
apparaat klaar voor gebruik.
Het is mogelijk om de temperatuur tijdens het grillen te
veranderen, afhankelijk van het type te bereiden voedsel.
Nota bene: Het apparaat is uitgerust met 2 verstelbare
voorste pootjes (16) die het gemakkelijker maken de olie in
de vetopvangbak te laten lopen.
REINIGING EN ONDERHOUD
Onderhoud door de gebruiker
- Gebruik geen metalen voorwerpen die de platen
met anti-aanbaklaag kunnen beschadigen. Gebruik
daarentegen houten voorwerpen of voorwerpen van
hittebestendige kunststof.
- Laat geen plastic voorwerpen in contact met de warme
platen.
- Verwijder tussen de ene en de andere bereiding de
voedselresten via de vetafvoeropening en vang ze op in
de opvangbak, reinig vervolgens de platen met een stuk
keukenpapier en ga weer met de volgende bereiding
door.
- Laat het apparaat afkoelen (minstens 30 minuten)
alvorens reinigingswerkzaamheden uit te voeren.
Laat het apparaat minstens 30 minuten afkoelen. Verwijder
etensresten van de platen. Leeg de vetopvangbak. De
vetopvangbak kan met de hand of in de vaatwasser
gewassen worden.
Druk op de ontgrendelknoppen van de platen (3) om de platen
uit het apparaat te verwijderen. Zorg ervoor dat de platen
volledig zijn afgekoeld voordat u ze aanraakt. De bakplaten
kunnen in de vaatwasmachine worden afgewassen, hoewel
veelvuldig afwassen de eigenschappen van de coating kan
verminderen. Wij raden daarom aan de buitenkant van de
bakplaat schoon te maken met een zachte spons of een doek
bevochtigd met water en een mild afwasmiddel.
Gebruik geen metalen voorwerpen om de platen te reinigen.
TECHNISCHE GEGEVENS
Voedingsspanning 220-240 V / 50-60 Hz
Stroomverbruik 2000W
Reiniging en verzorging
Nota bene: Controleer of het apparaat volledig is
afgekoeld alvorens het te reinigen.
Draai aan het einde van het bereiden de knoppen op "●”
en haal de stekker van het apparaat uit het stopcontact.
93

BEREIDINGTABEL
RUND-
VLEES
Biefstuk 0,5 - 1 2 Doorbak-
Biefstuk 0,5 - 1 4 Doorbak-
Runderlet,
haas
Runderlet,
haas
Runderlet,
haas
Ribstuk,
entrecote
Ribstuk,
entrecote
DIKTE
Nee.
BAKNI-
(cm)
STUKS
3-4 4 Rood van
3-4 4 Gemid-
3-4 4 Doorbak-
2-3 2 Gemid-
2-3 2 Doorbak-
VEAU
binnen
deld
deld
ken
ken
ken
ken
MODUS
CONTACT
GRILL
OPEN
GRILL
CONTACT
GRILL
CONTACT
GRILL
CONTACT
GRILL
CONTACT
GRILL
CONTACT
GRILL
PLATEN THERMOSTAAT-
KNOP
onderste bovenste boven-
ste
(10)
GRILL GLAD MAX MAX 2 - 3 vet het voed-
GRILL GLAD MAX MAX 5 - 6 vet het voed-
GRILL GLAD MAX MAX 4 - 5 vet het voed-
GRILL GLAD MAX MAX 7 - 8 vet het voed-
GRILL GLAD MAX MAX 10 - 11 vet het voed-
GRILL GLAD MAX MAX 4 - 5 vet het voed-
GRILL GLAD MAX MAX 7 - 8 vet het voed-
MIN. TIPS
on-
derste
(11)
sel goed in
sel goed in,
draai halverwege bereidingstijd om
sel goed in
sel goed in
sel goed in
sel goed in
sel goed in
Ribstuk,
entrecote
Ribstuk,
entrecote
Hambur-
gers
Spiesjes 6 Doorbak-
2-3 4 Gemid-
deld
2-3 4 Doorbak-
ken
2-3 6 Doorbak-
ken
ken
OPEN
GRILL
OPEN
GRILL
CONTACT
GRILL
CONTACT
GRILL
GRILL GLAD MAX MAX 10 - 12 vet het voed-
sel goed in,
draai halverwege bereidingstijd om
GRILL GLAD MAX MAX 14 - 16 vet het voed-
sel goed in,
draai halverwege bereidingstijd om
GRILL GLAD MAX MAX 8 - 10 vet het voed-
sel goed in
GRILL GLAD MAX MAX 13 - 15 vet het voed-
sel goed in,
draai halverwege bereidingstijd om
94

LAMS-
DIKTE
Nee.
BAKNI-
VLEES
(cm)
STUKS
Kotelet 1,5-3 6 Gemid-
Kotelet 1,5-3 6 Doorbak-
VEAU
deld
ken
MODUS PLATEN THERMOSTAATKNOP MIN. TIPS
CONTACT
GRILL
CONTACT
GRILL
onderste bovenste boven-
GRILL GLAD MAX MAX 10 - 12 vet het voed-
GRILL GLAD MAX MAX 12 - 14
ste
(10)
onderste
(11)
sel goed in,
draai koteletten halverwege bereidingstijd om
VARKENS-
VLEES
Biefstuk 1-2 4 CONTACT
Biefstuk 1-2 8 GEOPENDE
Karbonade <2,5 4 CONTACT
Karbonade <2,5 8 GEOPENDE
Spareribs 6-8 CONTACT
Bacon 4 CONTACT
Worstjes 8 CONTACT
Spiesjes 6 CONTACT
Knakworstjes 6 CONTACT
DIKTE
(cm)
Nee.
MODUS PLATEN THERMOSTAAT-
STUKS
GRILL
STAND
GRILL
STAND
GRILL
GRILL
GRILL
GRILL
GRILL
MIN. TIPS
KNOP
onder-
bovenste bo-
ste
GRILL GLAD MAX MAX 7 - 9 vet het voedsel goed in
GRILL GLAD MAX MAX 14 - 16 vet het voedsel goed in,
GRILL GLAD MAX MAX 9 - 11 vet het voedsel goed in,
GRILL GLAD MAX MAX 11 - 13 vet het voedsel goed in,
GRILL GLAD MED MED 20 - 25 draai twee à drie keer om
GRILL GLAD MAX MAX 1 - 2
GRILL GLAD MED MED 16 - 18 prik de worstjes door met
GRILL GLAD MAX MAX 14 - 16 vet het voedsel goed in,
GRILL GLAD MAX MAX 8 - 10
venste
(10)
on-
derste
(11)
draai halverwege bereidingstijd om
draai halverwege bereidingstijd om
draai halverwege bereidingstijd om
een vork
draai 1 à 2 maal om
95

KIP- EN
KALKOEN-
VLEES
Filet <1 4 CONTACT
Dijen en
poten
Vleugels 6 CONTACT
Hamburgers 1,5-2 4 CONTACT
Hamburgers 1,5-2 8 OPEN
Spiesjes 6 CONTACT
Knakworst-
jes
Gegrilde
pikante kip
DIKTE
(cm)
Nee.
MODUS PLATEN THERMOSTAAT-
STUKS
GRILL
3 CONTACT
GRILL
GRILL
GRILL
GRILL
GRILL
6 CONTACT
GRILL
1 CONTACT
GRILL
MIN. TIPS
KNOP
onderste bovenste boven-
GRILL GLAD MAX MAX 3 - 4 vet het voedsel goed
GRILL GLAD MED MED 20 - 25 draai een à twee maal
GRILL GLAD MED MED 14 - 16 draai een à twee maal
GRILL GLAD MAX MAX 6-8
GRILL GLAD MAX MAX 14 - 16 draai halverwege de
GRILL GLAD MAX MAX 11 - 13
GRILL GLAD MAX MAX 6 - 8
GRILL GLAD MED MED 40 - 45 draai een à twee maal
ste
(10)
onder-
ste
(11)
in
om tijdens het bakken
om tijdens het bakken
bereidingstijd om
draai een à twee maal
om tijdens het bakken
om tijdens het bakken
BROOD Nee.
STUKS
Toast/
sandwich
Broodje/
sandwich
Sneden
brood
MODUS PLATEN THERMOSTAATKNOP MIN. TIPS
onderste bovenste boven-
2 OVEN-GRILL GLAD GRILL
2 CONTACT
GRILL
4 OPEN GRILL GLAD GRILL MAX MAX 4 - 5 draai halverwege de berei-
GRILL GLAD
onderste
ste
(11)
(10)
MED MED
MED MED
3 - 5 plaats de bovenste plaat
zodanig dat hij het brood
aanraakt zonder het plat te
drukken
2 - 3
dingstijd om
96

GROENTEN Nee.
STUKS
Plakken
aubergine
Plakken
courgette
1 CONTACT
2 CONTACT
MODUS PLATEN THERMOSTAATKNOP MIN. TIPS
onderste bovenste boven-
GRILL GLAD MAX MAX 4 - 6 vet het voedsel goed in
GRILL
GRILL GLAD MAX MAX 6 - 8 vet het voedsel goed in
GRILL
ste
(10)
onderste
(11)
Paprika’s in
vieren
Plakken tomaat 1 OPEN
Plakken ui 2 CONTACT
VIS HOEVEEL-
Heel 250 g 1 CONTACT
Runder-
let, haas
Moot 450 g 4 CONTACT
Spiesjes 500 g 6 OPEN
Pijlinkt-
vissen
Garnalen 400 g 10-12 CONTACT
2 CONTACT
GRILL
GRILL
GRILL
Nee.
MODUS PLATEN THERMOSTAAT-
HEID
500 g 1 OVEN-
400 g 1-2 CONTACT
STUKS
GRILL
GRILL
GRILL
GRILL
GRILL
GRILL
GRILL GLAD MAX MAX 8 - 10 vet het voedsel goed in
GLAD GRILL MAX MAX 5 - 7 vet het voedsel goed in;
draai halverwege bereidingstijd om
GLAD GRILL MAX MAX 5 - 7 vet het voedsel goed in;
hussel dikwijls om met
een spatel
MIN. TIPS
KNOP
onderste bovenste boven-
GRILL GLAD MED MED 8 - 10 vet het voedsel goed in
GLAD GRILL MAX MAX 25 - 30 vet het voedsel in,
GRILL GLAD MED MED 8 - 10 vet het voedsel goed in
GRILL GLAD MAX MAX 10 - 12 vet het voedsel goed
GRILL GLAD MED MED 10 - 12 vet het voedsel goed in
GRILL GLAD MED MED 4 - 6 vet het voedsel goed in
ste
(10)
onder-
ste
(11)
plaats de bovenste
plaat zodanig dat hij
het voedsel bijna aanraakt
in; draai twee à drie
maal om
97

DESSERTS Nee.
STUKS
Pannen-
koeken
Plakken
ananas
MODUS PLATEN THERMOSTAATKNOP MIN. TIPS
onderste bovenste boven-
4 OPEN
GRILL
4 CONTACT
GRILL
GLAD GRILL MED MED 4 - 5 boter de platen in, draai hal-
GRILL GLAD MED MED 5 - 6 boter de platen in
RECEPTEN
ROEREI, GEROOKT SPEK EN TOAST
INGREDIËNTEN:
- 2 eieren
- 2 plakjes bacon
- 1 eetlepel melk
- peper en zout naar believen
- 2 sneden toastbrood
BEREIDING:
Klop de eieren met melk en zout tot ze een licht en schuimig
mengsel vormen. Breng de gladde plaat in de onderste
behuizing en de grillplaat in de bovenste behuizing in en zet
het apparaat in de modus OPEN GRILL. Zet de onderste en
bovenste thermostaatknop op MAX. Druk op de START/STOPtoets om de grill voor te verwarmen. Wanneer de lampjes van
de onderste en bovenste plaat doven, giet u het eimengsel in
een hoek van de plaat en laat u het gedurende 2-3 minuten
koken, waarbij u erop let dat u het goed mengt met een
houten spatel om het gelijkmatig te bereiden. Ondertussen
bakt u op de dezelfde plaat ook de plakjes bacon gedurende
3 à 4 minuten terwijl u ze halverwege de bereidingstijd
omdraait; op de andere plaat roostert u het brood gedurende
3 à 4 minuten terwijl u het halverwege de bereidingstijd
omdraait. Leg alles op een bord en dien op.
CROUTONS MET AUBERGINEMOUSSE
INGREDIËNTEN:
- 1 aubergine
- 100 gram ricotta
- knoookpoeder naar believen
- peterselie naar believen
- 4 eetlepels olijfolie
- zout naar believen
- peper naar believen
- 1 baguette
onderste
ste
(10)
BEREIDING:
Was de aubergine, schil hem en snij hem in dikke plakken.
Breng de grillplaat in de onderste behuizing en de gladde
plaat in de bovenste behuizing in en zet het apparaat in
de modus CONTACTGRILL. Zet de onderste en bovenste
thermostaatknop op MAX. Druk op de START/STOP-toets om
de grill voor te verwarmen. Plaats, wanneer de lampjes van
de bovenste en onderste plaat doven, de plakken aubergine
op de onderste plaat en bak ze ongeveer 8 à 10 minuten tot
ze zacht zijn. Snij de plakken aubergine in grove stukken en
doe deze in een blender samen met de ricotta, de knoook
en de gehakte peterselie, een snue zout en peper plus de
olie. Blend tot het mengsel glad en jnkorrelig is. Smeer
het brood (in plakjes gesneden) met olijfolie in en bak het
met de MAX temperatuur op de gladde platen in de modus
CONTACTGRILL gedurende 1 à 2 minuten tot de gewenste
bruiningsgraad is bereikt.
Smeer de auberginecrème op het geroosterde brood,
besprenkel met twee eetlepels olijfolie en serveer.
(11)
verwege bereidingstijd om
VLEESSALADE MET RUCOLA EN KERSTOMAATJES
INGREDIËNTEN:
- 2 lapjes kalfsvlees
- 100 gram rucola
- 10-12 kerstomaatjes
- 100 gram Parmezaanse of Grana kaas
- zout naar believen
- olijfolie naar believen
BEREIDING:
Maak de salade van rucola en kerstomaatjes klaar: was de
rucola, leg haar op een schone theedoek te drogen, snij de
tomaatjes in 4 partjes. Breng de grillplaat in de onderste
behuizing en de gladde plaat in de bovenste behuizing in en
zet het apparaat in de modus CONTACTGRILL.
Zet de onderste en bovenste thermostaatknop op MAX. Druk
98

op de START/STOP-toets om de grill voor te verwarmen.
Wanneer de lampjes van de bovenste en onderste plaat
doven, legt u de vooraf met olie ingevette vleeslapjes op de
onderste plaat, drukt u ze aan met de bovenste plaat en bakt
u ze, afhankelijk van de gewenste gaarheid, 2 à 3 minuten.
Snij het vlees in reepjes en schik ze op het bedje van rucola en
kerstomaatjes, voeg zout en snippers Parmezaanse kaas toe.
Besprenkel met een beetje olijfolie.
MET KOFFIE GEAROMATISEERD RIBSTUK/
ENTRECOTE
INGREDIËNTEN:
- ribstuk/entrecote (2 van elk 250 gram)
- olijfolie
VOOR HET KOFFIEMENGSEL:
- 2 theelepels komijnzaad
- 2 theelepels koebonen
- 1 eetlepel zoete peper
- 1 theelepel paprikapoeder
- 1 theelepel grof zout
- 1 theelepel peper
BEREIDING:
Bereid het koemengsel: doe het komijnzaad en de
koebonen in een keukenmachine en vermaal ze tot een
niet al te jn poeder.
Doe het verkregen poeder in een kom, voeg de overige
ingrediënten toe en meng goed. Vet het vlees licht in
en bedek het met de specerijen; dek af en laat ongeveer
30 minuten op kamertemperatuur intrekken. Breng de
grillplaat onder en de gladde plaat boven aan en zet het
apparaat in de modus CONTACTGRILL.
Zet de onderste en bovenste thermostaatknop op MAX. Druk
op de START/STOP-toets om de grill voor te verwarmen.
Wanneer de lampjes van de bovenste en onderste plaat
doven, legt u het vlees op de onderste plaat, drukt u het aan
met de bovenste plaat en bakt u 6 à 8 minuten afhankelijk
van de gewenste gaarheid. Serveer warm.
RUNDSFILET MET PADDESTOELENSAUS
INGREDIËNTEN:
- 4 rundslets
- zout naar believen
- vers gemalen zwarte peper naar believen
- 2 teentjes knoook
- 2 eetlepels Dijon-mosterd
- 60 gram boter
- olijfolie naar believen
INGREDIËNTEN VOOR DE PADDENSTOELENSAUS:
- 30 gram boter
- 1 eetlepel gorgonzola
- 2 sjalotten
- 300 gram paddenstoelen
- 1/2 glaasje whisky
- 200 gram room
- citroensap naar believen
- peterselie naar believen
BEREIDING:
Bestrooi het vlees met zout en peper en laat het
ongeveer een uur op kamertemperatuur rusten. Bereid
de paddenstoelensaus: smelt de boter in een pan, voeg
de gesneden sjalotten toe en bak 2 à 3 minuten. Voeg de
paddenstoelen toe en bak nog eens 5 minuten. Schenk nu de
whisky in de pan, laat 1 minuut koken, voeg een glas water
toe en kook nog eens 1 minuut. Voeg de room, het sap van
een citroen, de peterselie en de gorgonzola toe en breng aan
de kook. Kook de saus in tot een mooie, dikke saus, kruid
met zout en peper en zet de saus opzij. Bereid ondertussen
de botersaus waarmee het vlees zal worden ingesmeerd
tijdens de bereiding; doe boter, mosterd en knoook in een
klein pannetje. Verwarm op een zacht vuur totdat de boter
is gesmolten. Houd dit mengsel warm. Breng de grillplaat
onder en de gladde plaat boven aan en zet het apparaat
in de modus CONTACTGRILL. Zet de onderste en bovenste
thermostaatknop op MAX. Druk op de START/STOP-toets om
de grill voor te verwarmen. Leg, wanneer de lampjes van de
bovenste en onderste plaat doven, de rundslets (waarvan
beide kanten eerder zijn ingesmeerd met de botersaus) op de
onderste plaat en sluit de grill. Bak gedurende 6-8 minuten
afhankelijk van de gewenste bereidingsgraad en de dikte
van de lets. Neem de lets van de grill af en serveer ze
overgoten met de eerder bereide champignonsaus.
HAMBURGERS MET GEROOSTERD ROGGETARWEBROOD
INGREDIËNTEN:
- 8 plakjes rogge-tarwebrood
- 500 gram rundergehakt van topkwaliteit
- 100 gram plakken Emmentaler kaas
- 2 eetlepels olijfolie
- 2 in ringen gesneden uien
- boter op kamertemperatuur naar believen
- 2 theelepels Worcestersaus
- zout naar believen
- peper naar believen
- 1/2 theelepel suiker
99

BEREIDING:
Bereid de hamburgers: meng in een kom het rundergehakt,
de Worcestersaus, zout, peper en meng alles goed. Vorm
met uw handen 4 hamburgers met een dikte van ongeveer
2 cm. Plaats het apparaat in de stand OPEN GRILL en breng
de gladde plaat in de onderste behuizing en de grillplaat
in de bovenste behuizing in. Zet de onderste en bovenste
thermostaatknop op MAX. Druk op de START/STOP-toets
om de grill voor te verwarmen. Wanneer de lampjes van
de bovenste en onderste plaat doven, legt u de in ringen
gesneden uien besprenkeld met olijfolie en suiker op de
onderste plaat en bakt u ze gedurende 5 à 6 minuten, waarbij
u ze dikwijls met een houten spatel husselt om ze gelijkmatig
te bereiden en zacht te houden. Tegelijkertijd bakt u op de
andere plaat de hamburgers ongeveer 12 minuten. Draai ze
na 5 à 6 minuten om (de bereidingstijd is afhankelijk van de
dikte van de hamburgers). Zodra de uien gaar zijn, verwijdert
u ze van de plaat en roostert u de beboterde sneden brood 1
à 2 minuten slechts aan één kant. Leg de sneden brood op
een snijplank met de geroosterde zijde naar boven, bestrooi
met de uien, leg hierop de hamburgers neer en bedek met
de kaas. Leg hierop de snede brood met de geroosterde kant
naar beneden gericht. Wacht tot de plaat opnieuw heet is,
leg de toasts erop en druk ze goed aan met de bovenste plaat.
Bereid ongeveer 2 à 3 minuten tot de gewenste roostergraad
is bereikt.
LAMSKOTELETTEN MET BALSAMICOAZIJN EN
ROZEMARIJN
INGREDIËNTEN:
- 6 lamskoteletten
- 10 gram gehakte rozemarijn
- 10 gram gehakte knoook
- 100 ml balsamicoazijn
- 15 gram suiker
- zout naar believen
- peper naar believen
BEREIDING:
Meng alle ingrediënten in een vrij grote kom; dek af en
laat minstens 1 à 2 uur in de koelkast marineren. Breng de
grillplaat onder en de gladde plaat boven aan en zet het
apparaat in de modus CONTACTGRILL. Zet de onderste en
bovenste thermostaatknop op MAX. Druk op de START/STOPtoets om de grill voor te verwarmen. Plaats de koteletten
op de onderste plaat wanneer de lampjes van de bovenste
en onderste plaat doven. Bak ongeveer 11-13 minuten
afhankelijk van de gewenste bereidingsgraad en de dikte
van de koteletten (we raden aan om ze halverwege de
bereidingstijd om te draaien, aangezien de bovenste plaat
vanwege het bot niet met het bovenste vlees in aanraking
kan komen). Laat in de tussentijd de marinade in een
pannetje indikken en serveer deze als saus op de gegrilde
lamskoteletten.
KIPSPIESJES MET CRÈME VAN HONING EN LIMOEN
INGREDIËNTEN:
- 500 gram kippenborst
INGREDIËNTEN VOOR DE MARINADE:
- 1 theelepel pepertjes
- 1 theelepel koriander
- 10 cl olijfolie
- 2 bosuitjes
- 3 teentjes knoook
- 1 eetlepel geraspte gember
- 1 eetlepel suiker
- 1 eetlepel limoensap
- 1 eetlepel grof zout
- peper naar believen
INGREDIËNTEN VOOR DE CRÈME VAN HONING EN
LIMOEN:
- 5 cl keukenroom
- 1/2 theelepel geraspte limoenschil
- 1 eetlepel limoensap
- 1 eetlepels olijfolie
- 1 eetlepel honing
- zout naar believen
BEREIDING:
Bereid de marinade: doe alle ingrediënten in een
keukenmachine en mix tot een glad mengsel is verkregen.
Doe de in blokjes van 2 cm gesneden kip in een ondiepe
schotel, voeg de marinade toe en bedek hiermee alle stukjes
kip. Dek af met plasticfolie en laat marineren gedurende 1
à 2 uur. Bereid de crème door alle ingrediënten in een kom
te mengen, dek af met plasticfolie en zet in de koelkast.
Rijg de stukjes kip aan de spiesjes. Breng de grillplaat
onder en de gladde plaat boven aan en zet het apparaat
in de modus CONTACTGRILL. Zet de onderste en bovenste
thermostaatknop op MAX. Druk op de START/STOP-toets om
de grill voor te verwarmen. Leg, wanneer de controlelampjes
van de bovenste en onderste plaat doven, het vlees op de
onderste plaat, druk de bovenste plaats aan en bereid 1113 minuten afhankelijk van de gewenste bereidingsgraad.
Serveer de warme spiesjes vergezeld van de crème van
honing en limoen.
100
 Loading...