

Braun 5411, A SERIES, 390cc-4 Quick Manual

+
limited motorsport edition
Stapled booklet, 120x170mm, 24pages (incl. 8pages cover), 2/2c = black+HKS43N
Series 3
r
i
e
e
s
S
r
i
e
e
s
S
3
3
+
-
Type 5411
390cc-4
www.braun.com

Braun Infolines
English 6
кЫТТНЛИ 10
ì͇ªÌҸ͇ 16
GB
0800 783 70 10
IRL
1 800 509 448
RUS
8 800 200 20 20
UA
+ 38 044 428 65 05
www.service.braun.com
Braun GmbH
Frankfurter Straße 145
61476 Kronberg/Germany
www.braun.com
99781044/III-11
GB/RUS/UA
+
1
S
e
r
i
e
s
3
S
e
r
i
e
s
3
-
+
+
+
4
2
3
r
i
e
e
s
S
r
i
e
e
s
S
3
3
+
5
6
7
8
9
10
-
11
STOP
3
oil
A
+
B
90°
full
full
click!
4
1
2
loc
k
l
o
c
k
l
oc
k
C
•••
•••
1
2
new
3
a
4
•••
5
b
•••
c
-
+
old
new
-
+
5
-
-
+
+
-
+

English
Our products are designed to meet the
highest standards of quality, functionality
and design. We hope you enjoy your new
Braun Shaver.
Warning
Your shaving system is provided with a
special cord set, which has an integrated
Safety Extra Low Voltage power supply.
Do not exchange or tamper with any part
of it, otherwise there is risk of an electric
shock.
Do not shave with a damaged foil or cord.
This appliance is not intended for use
by children or persons with reduced
physical, sensory or mental capabilities,
unless they are given supervision by a
person responsible for their safety. In
general, we recommend that you keep
the appliance out of reach of children.
Children should be supervised to ensure
that they do not play with the appliance.
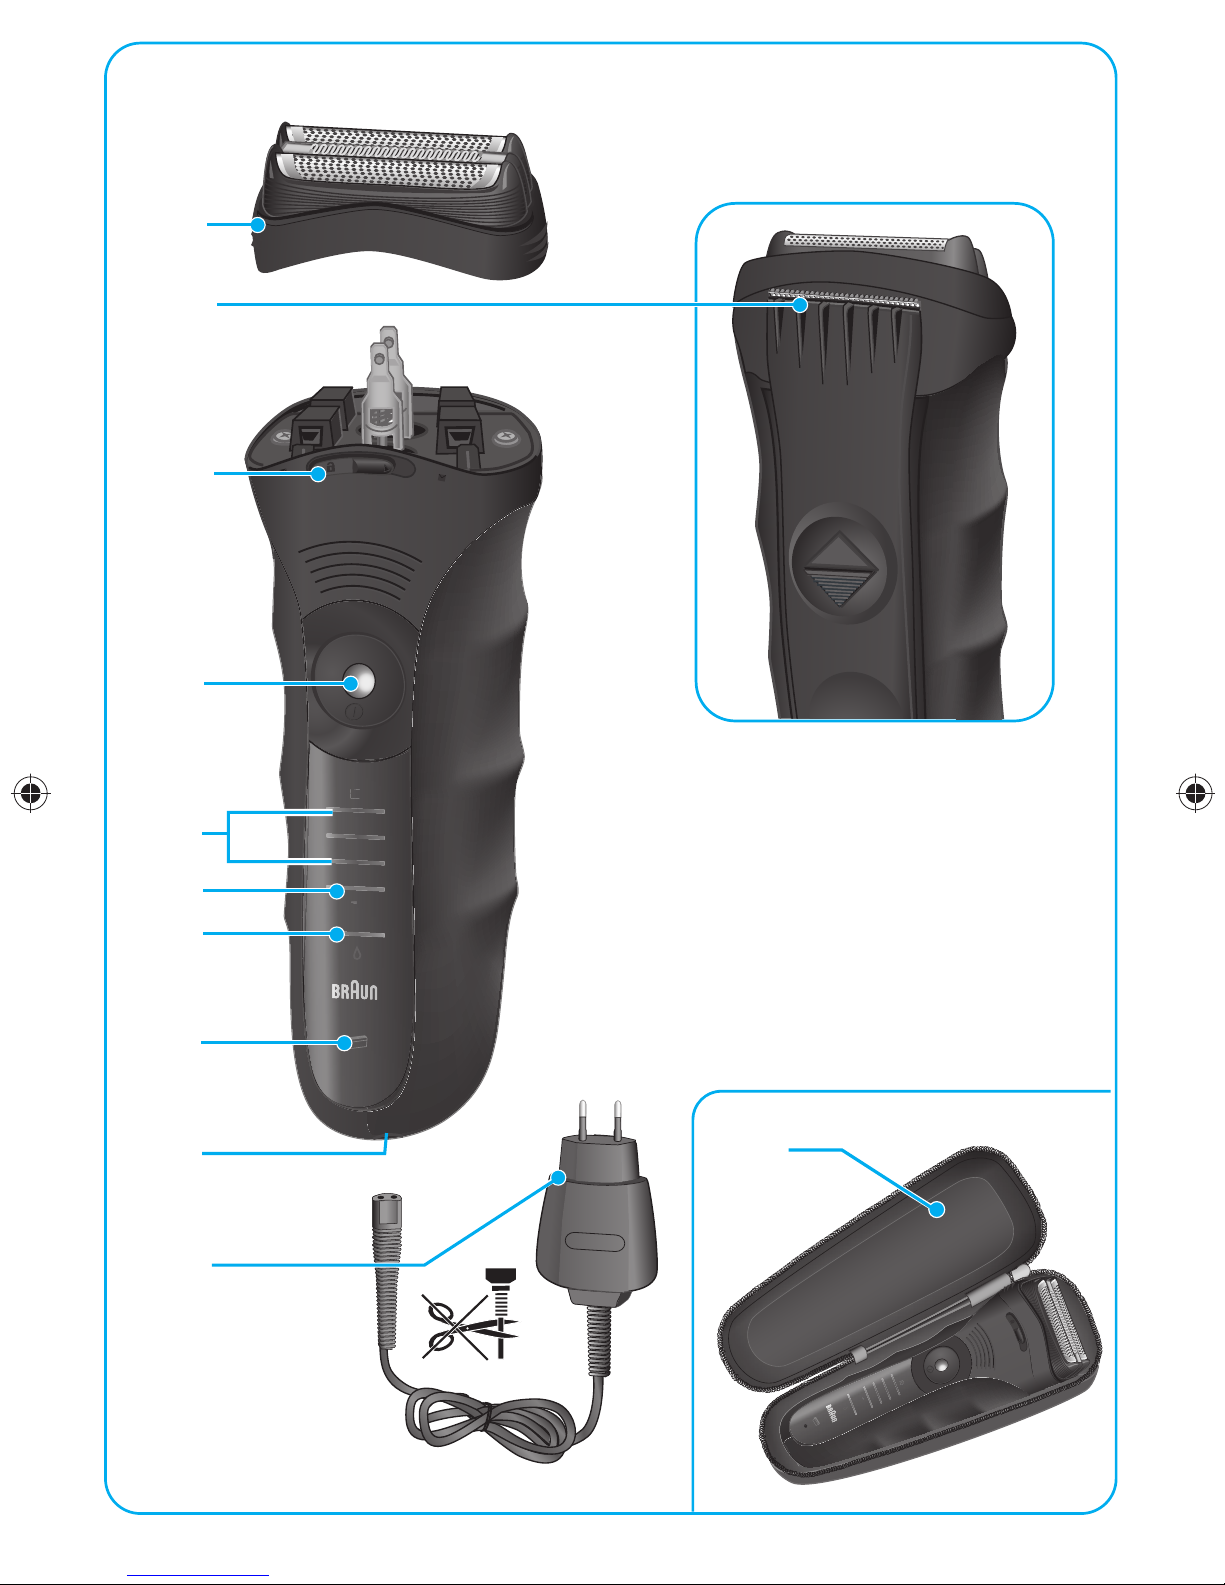
Description
1 Foil & Cutter cassette
2 Long hair trimmer
3 Precision setting switch (« »)
4 On/off switch
5 Charging lights (green)
6 Low-charge light (red)
7 Cleaning light (yellow)
8 Replacement light for shaving parts
9 Shaver power socket
10 Special cord set
11 Travel pouch
• When charging for the first time, leave
the shaver to charge continuously for
4 hours. Subsequent charges will take
about 1 hour.
• A full charge provides up to 45 minutes
of cordless shaving time depending on
your beard growth.
• Shave without the cord. With normal
use the shaver will be charged automatically after every cleaning in the
Clean&Renew (see «C Clean&Renew»).
• Maximum battery capacity will only
be reached after several charging/discharging cycles.
• 5-minute quick charge (with the special
cord set (10)) is sufficient for a shave.
• If the rechargeable batteries are discharged,
necting the shaver to an electrical outlet
via the special cord set.
Charging lights (5)
The green charging lights show the
charge status of the batteries. The green
charging light blinks when the shaver is
being charged or switched on. When the
battery is fully charged, all green charging
lights shine permanently, provided the
shaver is connected to an electrical
outlet.
Low-charge light (6)
The red low-charge light flashes when the
battery is running low.
You should be able to finish your shave.
you may also shave by con-
Charging
The best environmental temperature for
charging is between 15 °C to 35 °C.
Do not expose the shaver to temperatures
higher than 50 °C for extended periods of
time.
• Using the special cord set (10), connect
the shaver to an electrical outlet with
the motor switched off.
6
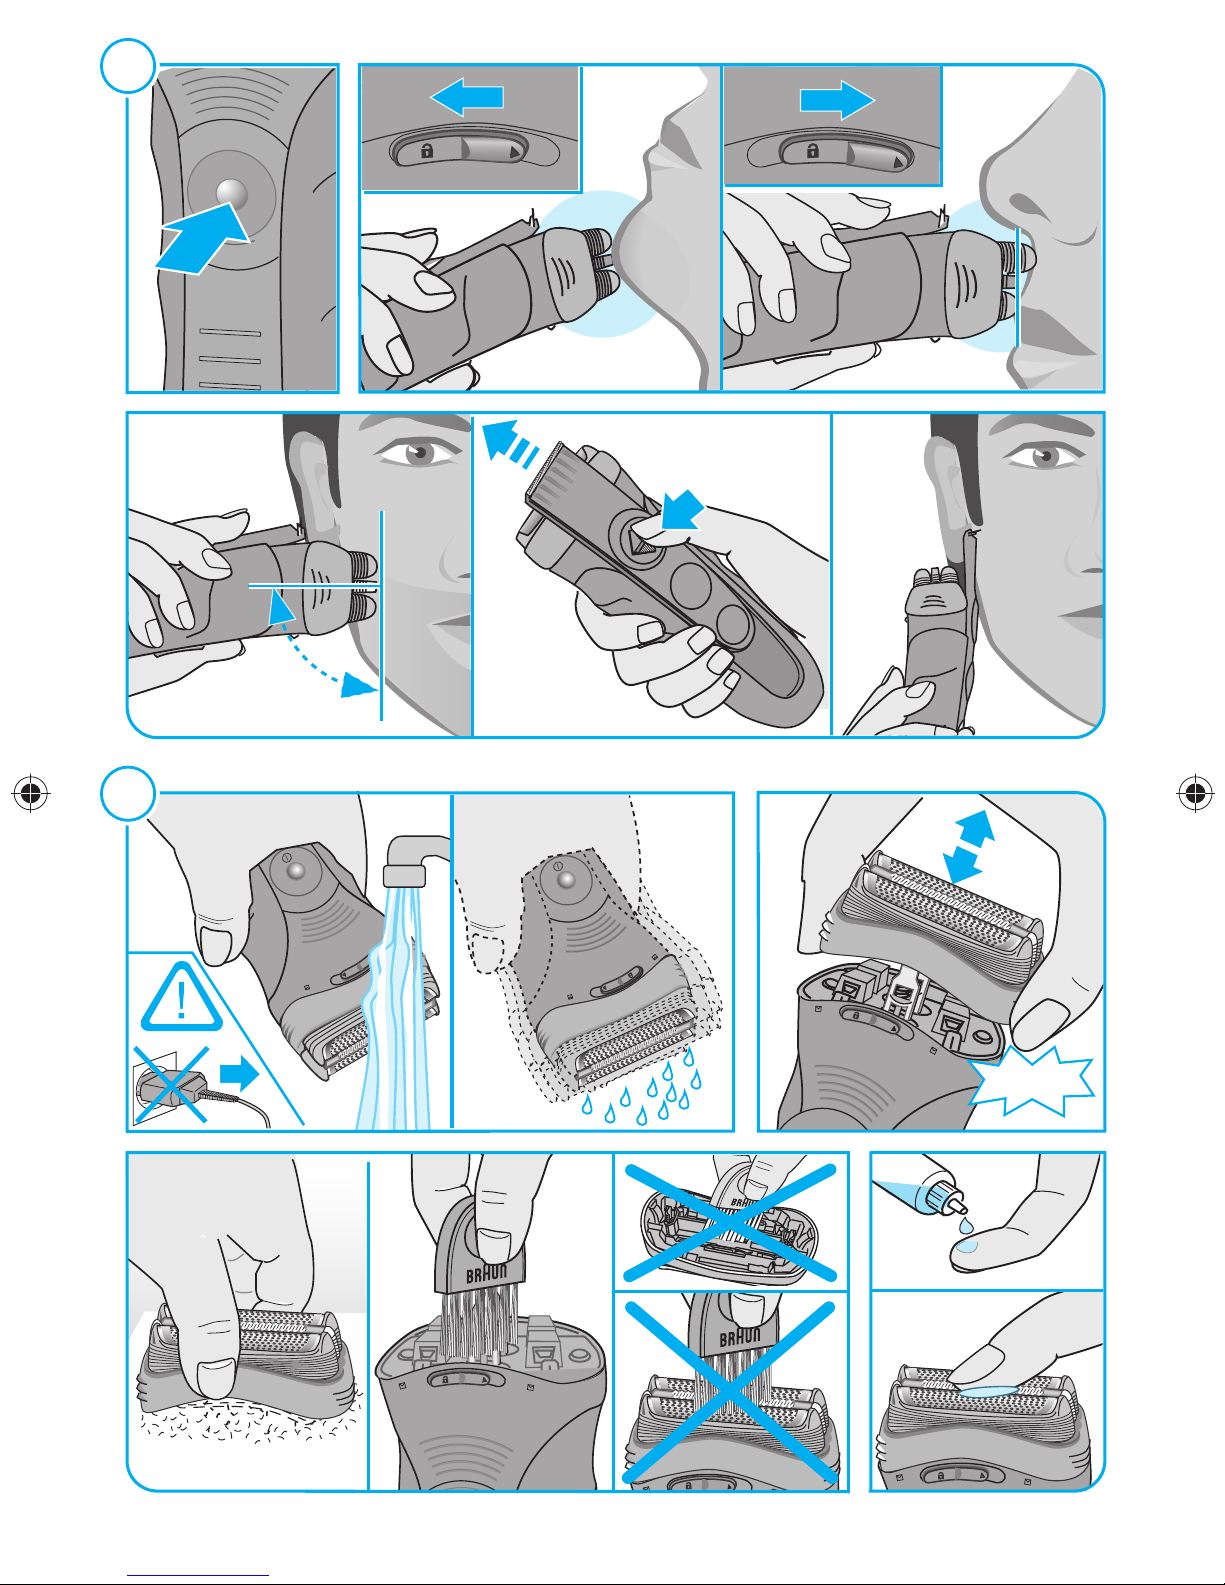
A Shaving
Press the on/off switch (4) to operate the
shaver (picture A).
The flexible shaving foils automatically
adjust to every contour of your face
(picture A).
Long hair trimmer (2)
To trim sideburns, moustache or beard,
slide the long hair trimmer upwards.
Precision setting switch («
For precise handling in hard to shave
areas (e.g. under the nose) slide the
switch (3) to the right to position « ».
The centre trimmer and one foil will be
lowered.
» ) (3)
Manual cleaning
The shaver head is suitable for
cleaning under running tap water.
Warning: Detach the shaver from
the power supply before cleaning
the shaver head in water.
Tips for the perfect shave
For best results, Braun recommends
you follow 3 simple steps:
1. Always shave before washing your
face.
2. At all times, hold the shaver at right
angles (90°) to your skin.
3. Stretch your skin and shave against
the direction of your beard growth.
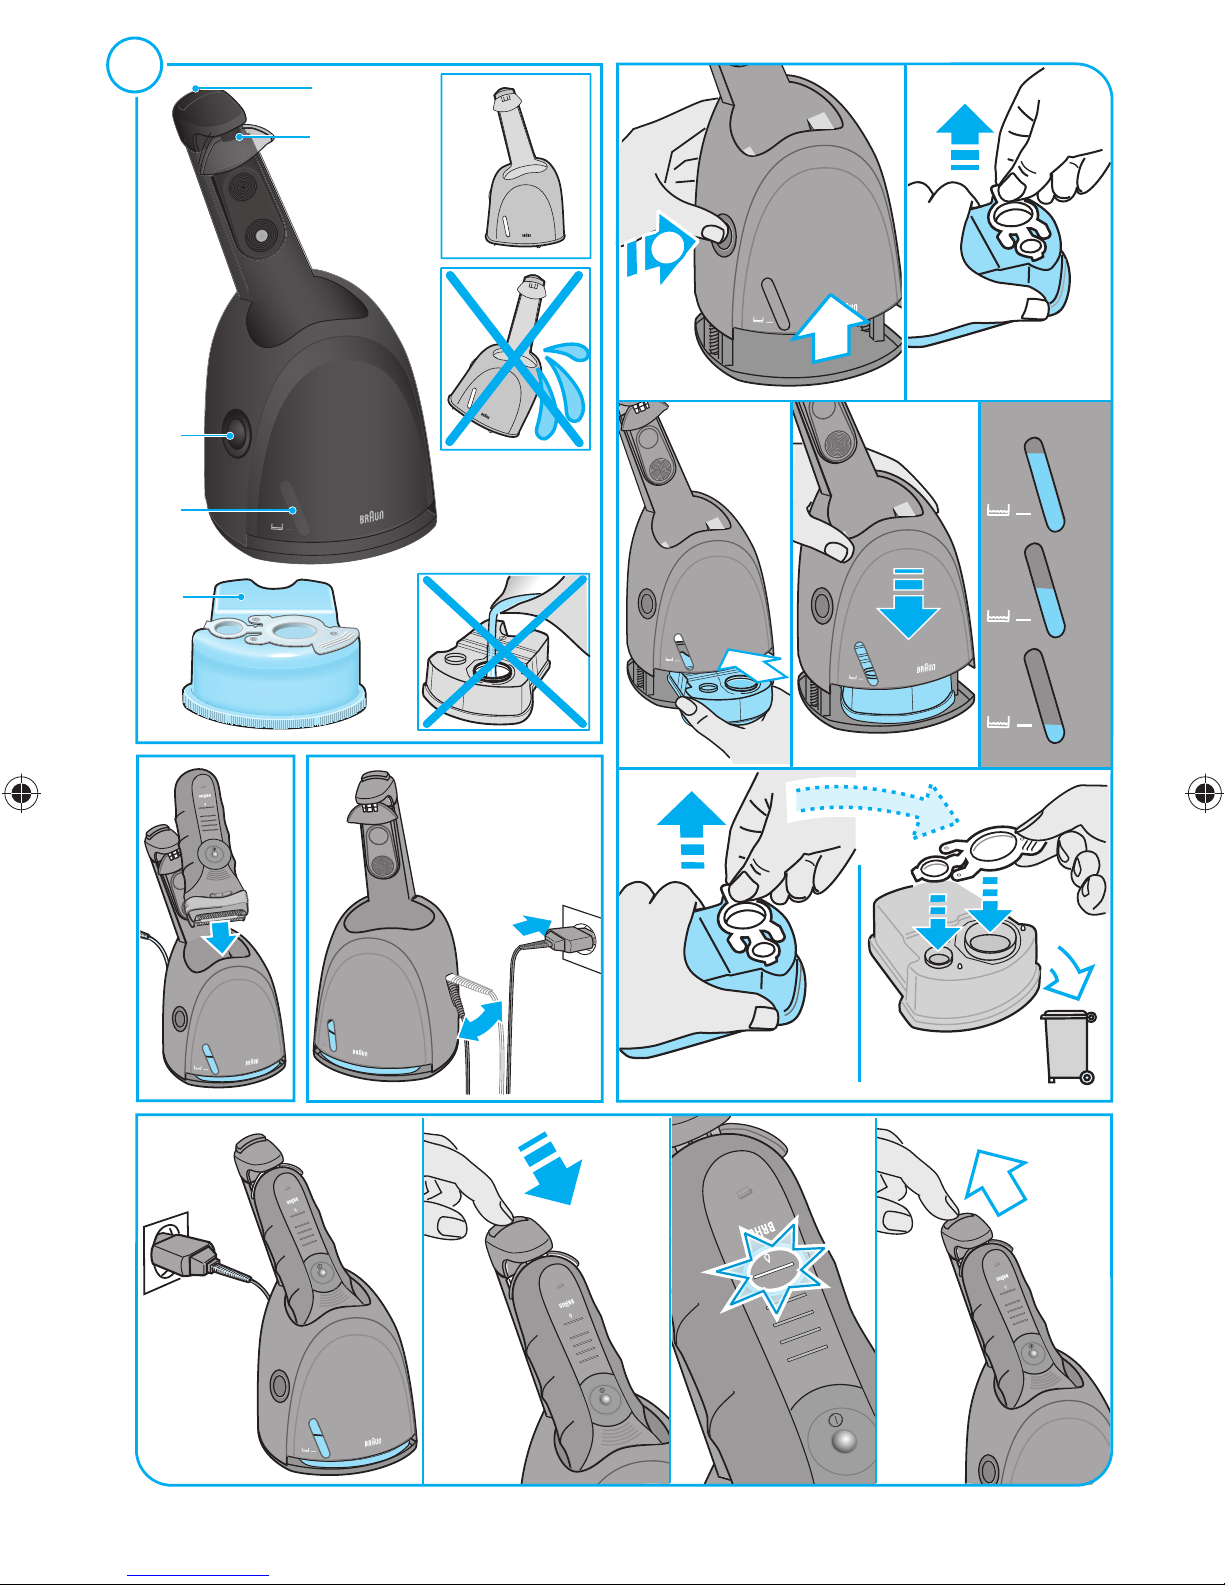
B Keeping your shaver in
top shape
Cleaning indicator
Your shaver should be cleaned daily in
the Clean&Renew, and certainly when the
yellow cleaning light (7) shines constantly
after shaving. If this is not done, the
yellow light will go out after some time.
The shaver’s electronics will then assume
it has been cleaned manually and a new
calculation of the time when the next
cleaning is required will be started. During
the cleaning process in the Clean&Renew
the yellow light will flash and will go off
after approx. 4 hours when cleaning is
finished.
Automatic cleaning
Once the shaver is put into the
Clean&Renew, it is cleaned automatically
(see «C Clean&Renew»).
Manual cleaning is recommended only
when the Clean&Renew is not available,
e. g. when travelling.
Regular cleaning ensures better shaving
performance. Rinsing the shaver head
under running water after each shave is
an easy and fast way to keep it clean:
• Switch the shaver on (cordless) and
rinse the shaver head under hot running
water. You may use liquid soap without
abrasive substances. Rinse off all foam
and let the shaver run for a few more
seconds.
• Next, switch off the shaver, remove the
shaver Foil & Cutter cassette (1) and let
it dry.
• If you regularly clean the shaver under
water, then once a week apply a drop
of light machine oil onto the long hair
trimmer (2) and shaver Foil & Cutter
cassette (1).
Alternatively, you may clean the shaver
using a brush:
• Switch off the shaver. Remove the
shaver Foil & Cutter cassette and tap it
out on a flat surface.
• Using a brush, clean the inner area of
the shaver head. However, do not clean
the shaver Foil & Cutter cassette with a
brush as this may damage it.
Replacement light for shaving parts /
Reset
To maintain 100% shaving performance,
replace the shaver Foil & Cutter cassette
(1), when the replacement light for
shaving parts (8) comes on (after about
18 months) or when worn.
The replacement light will remind you
during the next 7 shaves to replace the
foil and cutter cassette. Then the shaver
will automatically reset.
7
 Loading...