

Braun 7 Series Manual
www.braun.com/register
high
clean
eco
normal
intensive
auto select
low
empty
s
t
a
r
t
c
l
e
a
n
i
n
g
f
a
s
t
c
l
e
a
n
washable
washable
reset
trimmer
trimmer
trimmer
on
offonoff
Type 5671
Modèle 5671
Modelo 5671
790 cc
Series7
All manuals and user guides at all-guides.com
all-guides.com
Thank you for purchasing a Braun product.
We hope you are completely satisfied with
your new Braun shaver.
If you have any questions, please call:
US residents 1-800-BRAUN-11
1-800-272-8611
Canadian residents 1-800-387-6657
Merci d’avoir fait l’achat d’un produit Braun.
Nous espérons que vous serez pleinement
satisfait de votre nouveau rasoir Braun.
Si vous avez des questions, veuillez appeler
Braun Canada : 1-800-387-6657
Gracias por haber comprado un producto
Braun.
Esperamos que quede completamente
satisfecho con su nueva afeitadora Braun.
Si tiene alguna duda, por favor llame al:
01(800) 508-5800
English 4
Français 15
Español 25
98574367/XI-07
USA / CDN / MEX
Printed in Germany
Imprimé en Allemagne
Impreso en Alemania
All manuals and user guides at all-guides.com
washable
washable
reset
trimmer
trimmer
trimmer
reset
trimmer
trimmer
trimmer
on
offonoff
high
clean
eco
normal
intensive
auto select
low
empty
s
t
a
r
t
c
l
e
a
n
i
n
g
f
a
s
t
c
l
e
a
n
34
6
5
1
2
4a
9
8
10
11
12
13
14
15
16
17
7
18
All manuals and user guides at all-guides.com
4
English
IMPORTANT SAFETY
INSTRUCTIONS
When using an electrical appliance, basic precautions should
always be followed, including the following:
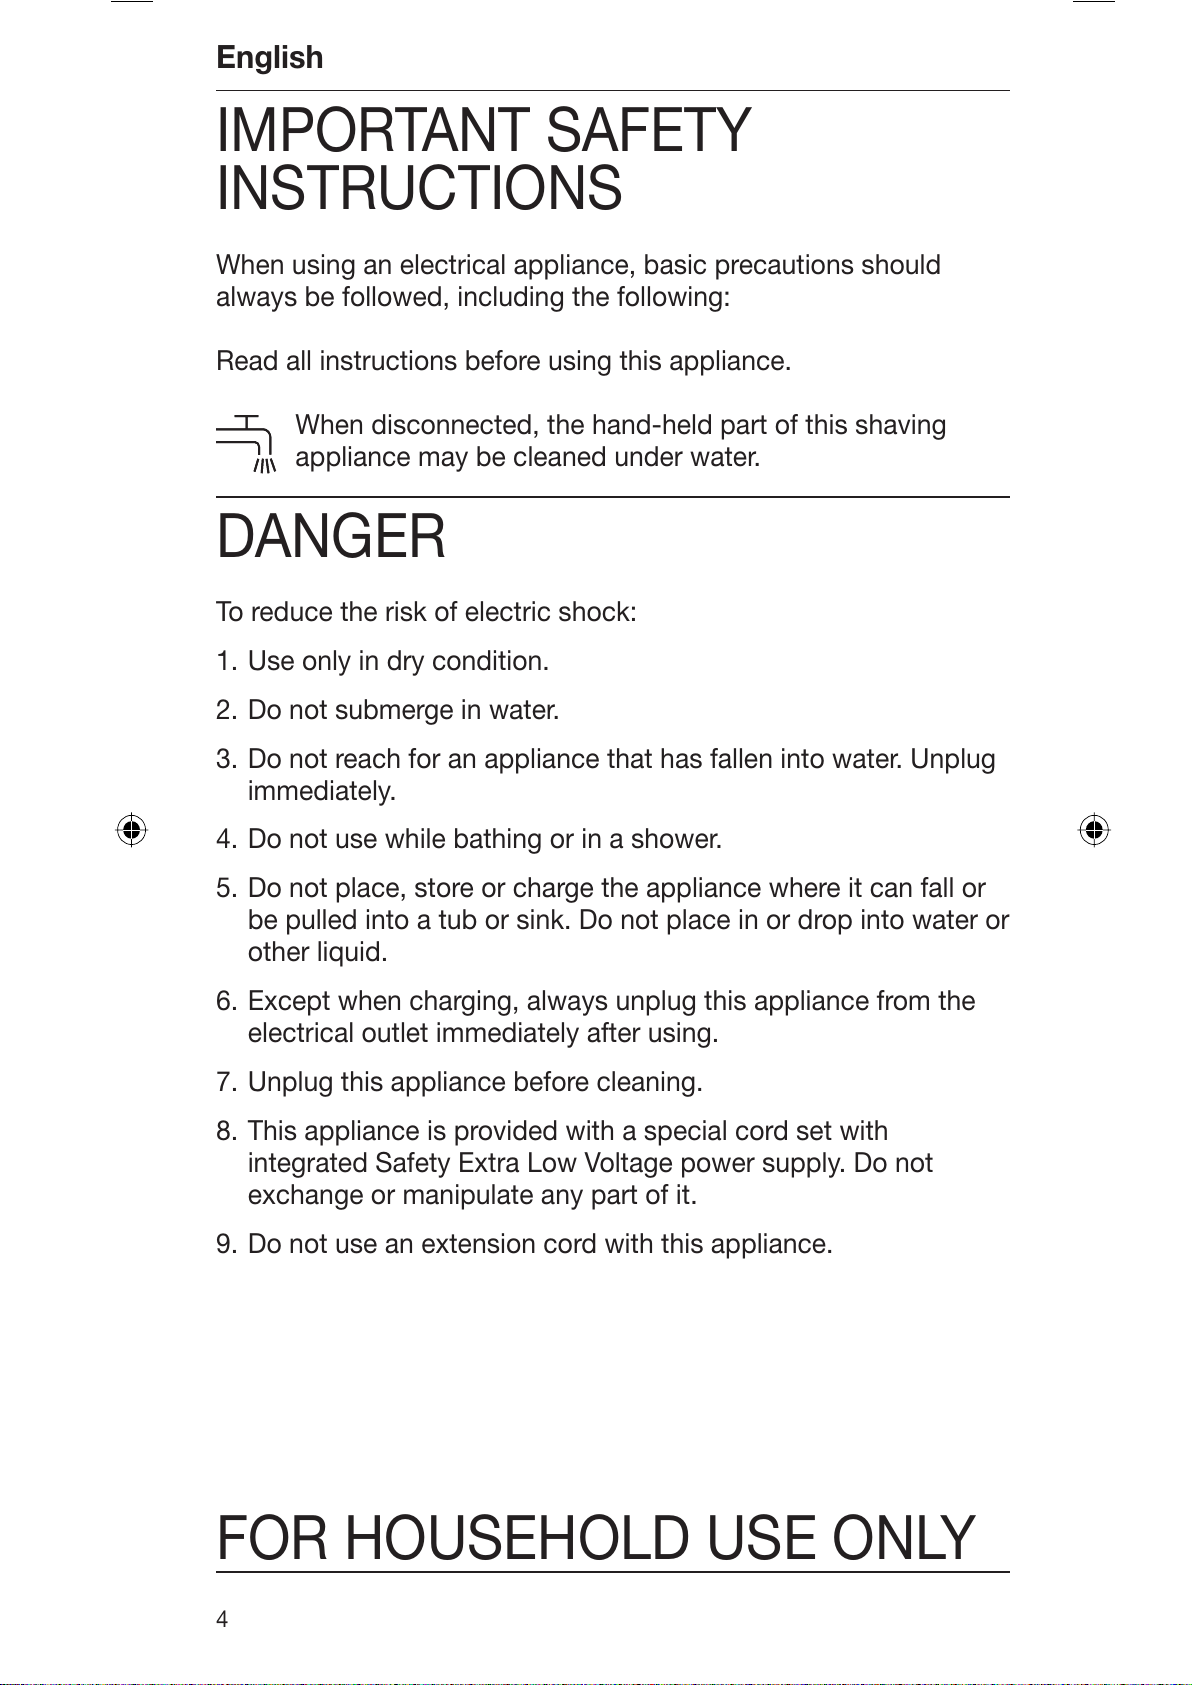
Read all instructions before using this appliance.
When disconnected, the hand-held part of this shaving
appliance may be cleaned under water.
DANGER
To reduce the risk of electric shock:
1. Use only in dry condition.
2. Do not submerge in water.
3. Do not reach for an appliance that has fallen into water. Unplug
immediately.
4. Do not use while bathing or in a shower.
5. Do not place, store or charge the appliance where it can fall or
be pulled into a tub or sink. Do not place in or drop into water or
other liquid.
6. Except when charging, always unplug this appliance from the
electrical outlet immediately after using.
7. Unplug this appliance before cleaning.
8. This appliance is provided with a special cord set with
integrated Safety Extra Low Voltage power supply. Do not
exchange or manipulate any part of it.
9. Do not use an extension cord with this appliance.
FOR HOUSEHOLD USE ONLY
All manuals and user guides at all-guides.com
5
WARNING
To reduce the risk of burns, fire, electric shock, or injury to
persons:
1. Close supervision is necessary when this appliance is used by,
on, or near children or invalids.
2. Use this appliance only for its intended use as described in this
manual.
Do not use attachments not recommended by the manufacturer.
3. Never operate this appliance if it has a damaged cord or plug, if
it is not working properly, if it has been dropped or damaged, or
if the power supply has been dropped into water. Return the
appliance to a service center for examination and repair.
4. Keep the cord away from heated surfaces.
5. Never drop or insert any object into any opening.
6. Do not use outdoors or operate where aerosol (spray) products
are being used or where oxygen is being administered.
7. Do not use this appliance with a damaged or broken foil, as
serious skin injuries may occur.
8. Always attach plug to appliance first, then to outlet.
To disconnect, turn all controls to «off», then remove plug from
outlet.
9. When plugging to an electrical outlet outside the USA, use a
plug adapter to match the outlet’s pin configuration.
SAVE THESE INSTRUCTIONS
All manuals and user guides at all-guides.com
6
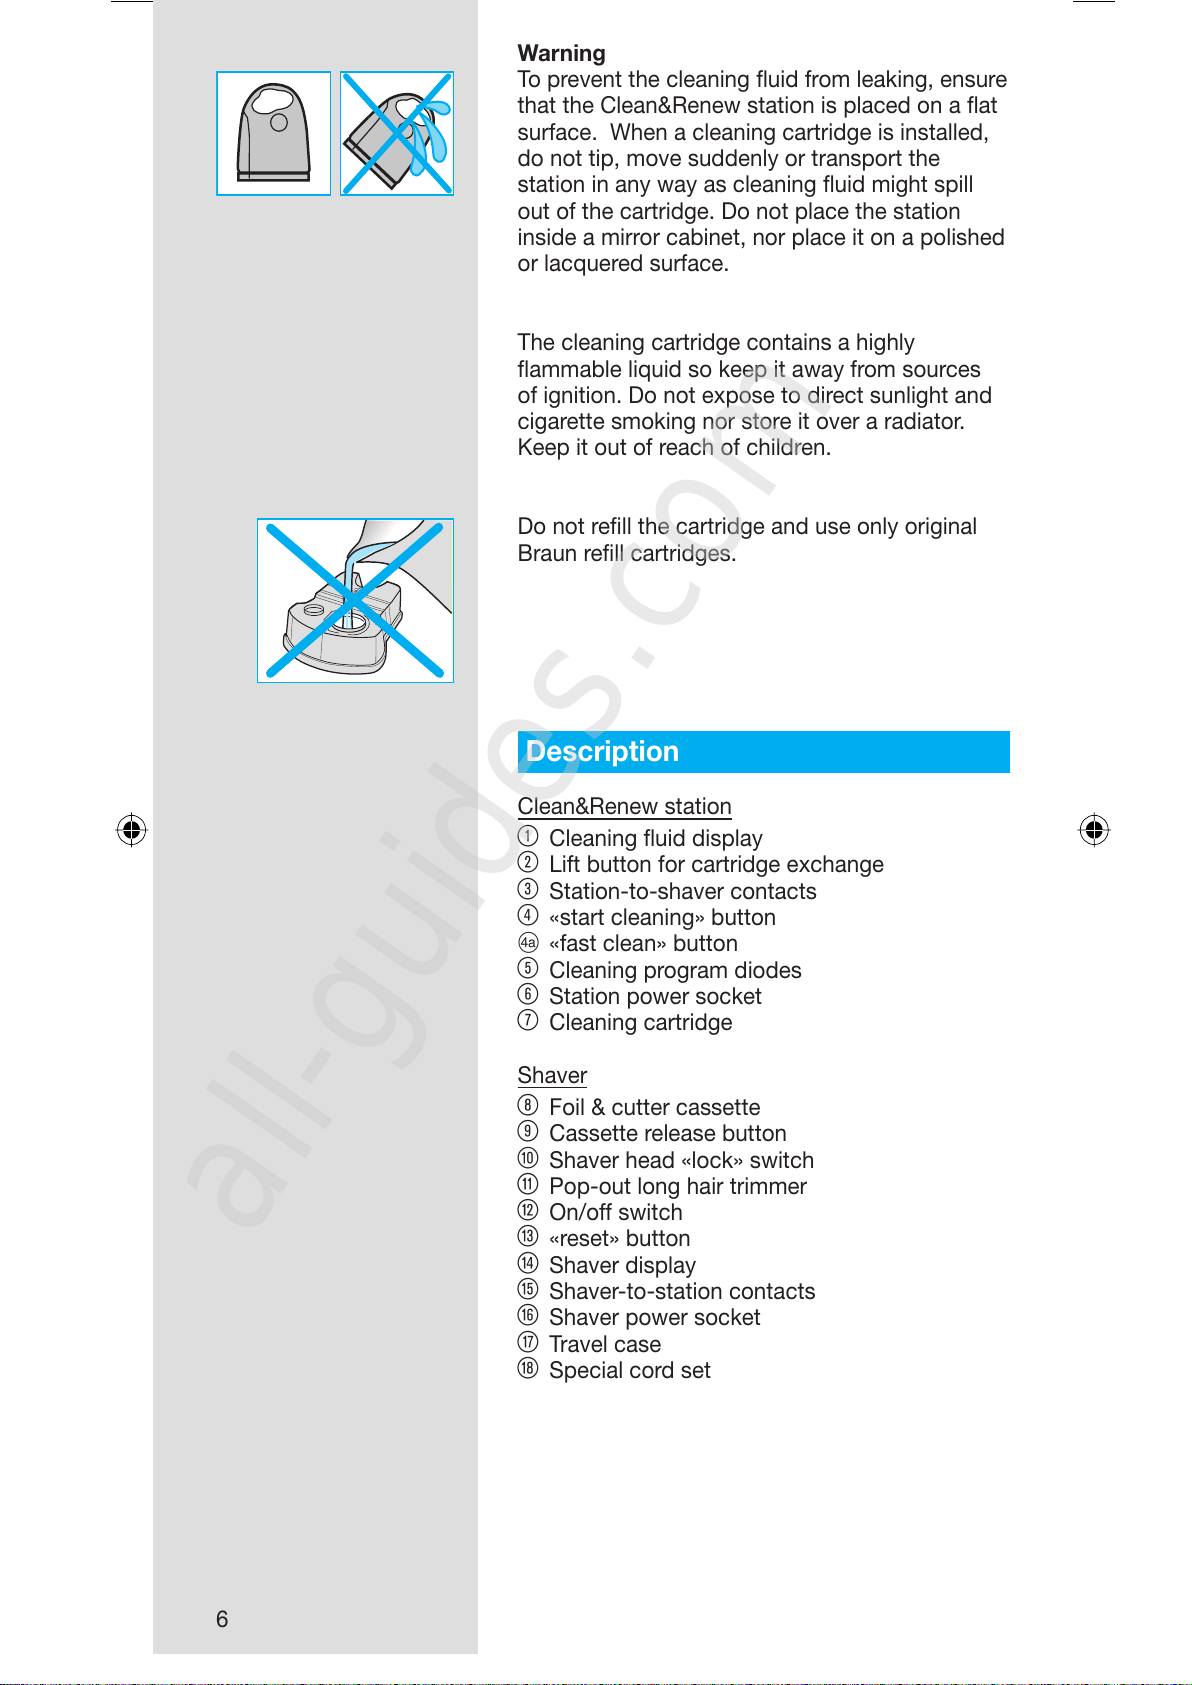
Warning
To prevent the cleaning fl uid from leaking, ensure
that the Clean&Renew station is placed on a fl at
surface. When a cleaning cartridge is installed,
do not tip, move suddenly or transport the
station in any way as cleaning fl uid might spill
out of the cartridge. Do not place the station
inside a mirror cabinet, nor place it on a polished
or lacquered surface.
The cleaning cartridge contains a highly
fl ammable liquid so keep it away from sources
of ignition. Do not expose to direct sunlight and
cigarette smoking nor store it over a radiator.
Keep it out of reach of children.
Do not refi ll the cartridge and use only original
Braun refi ll cartridges.
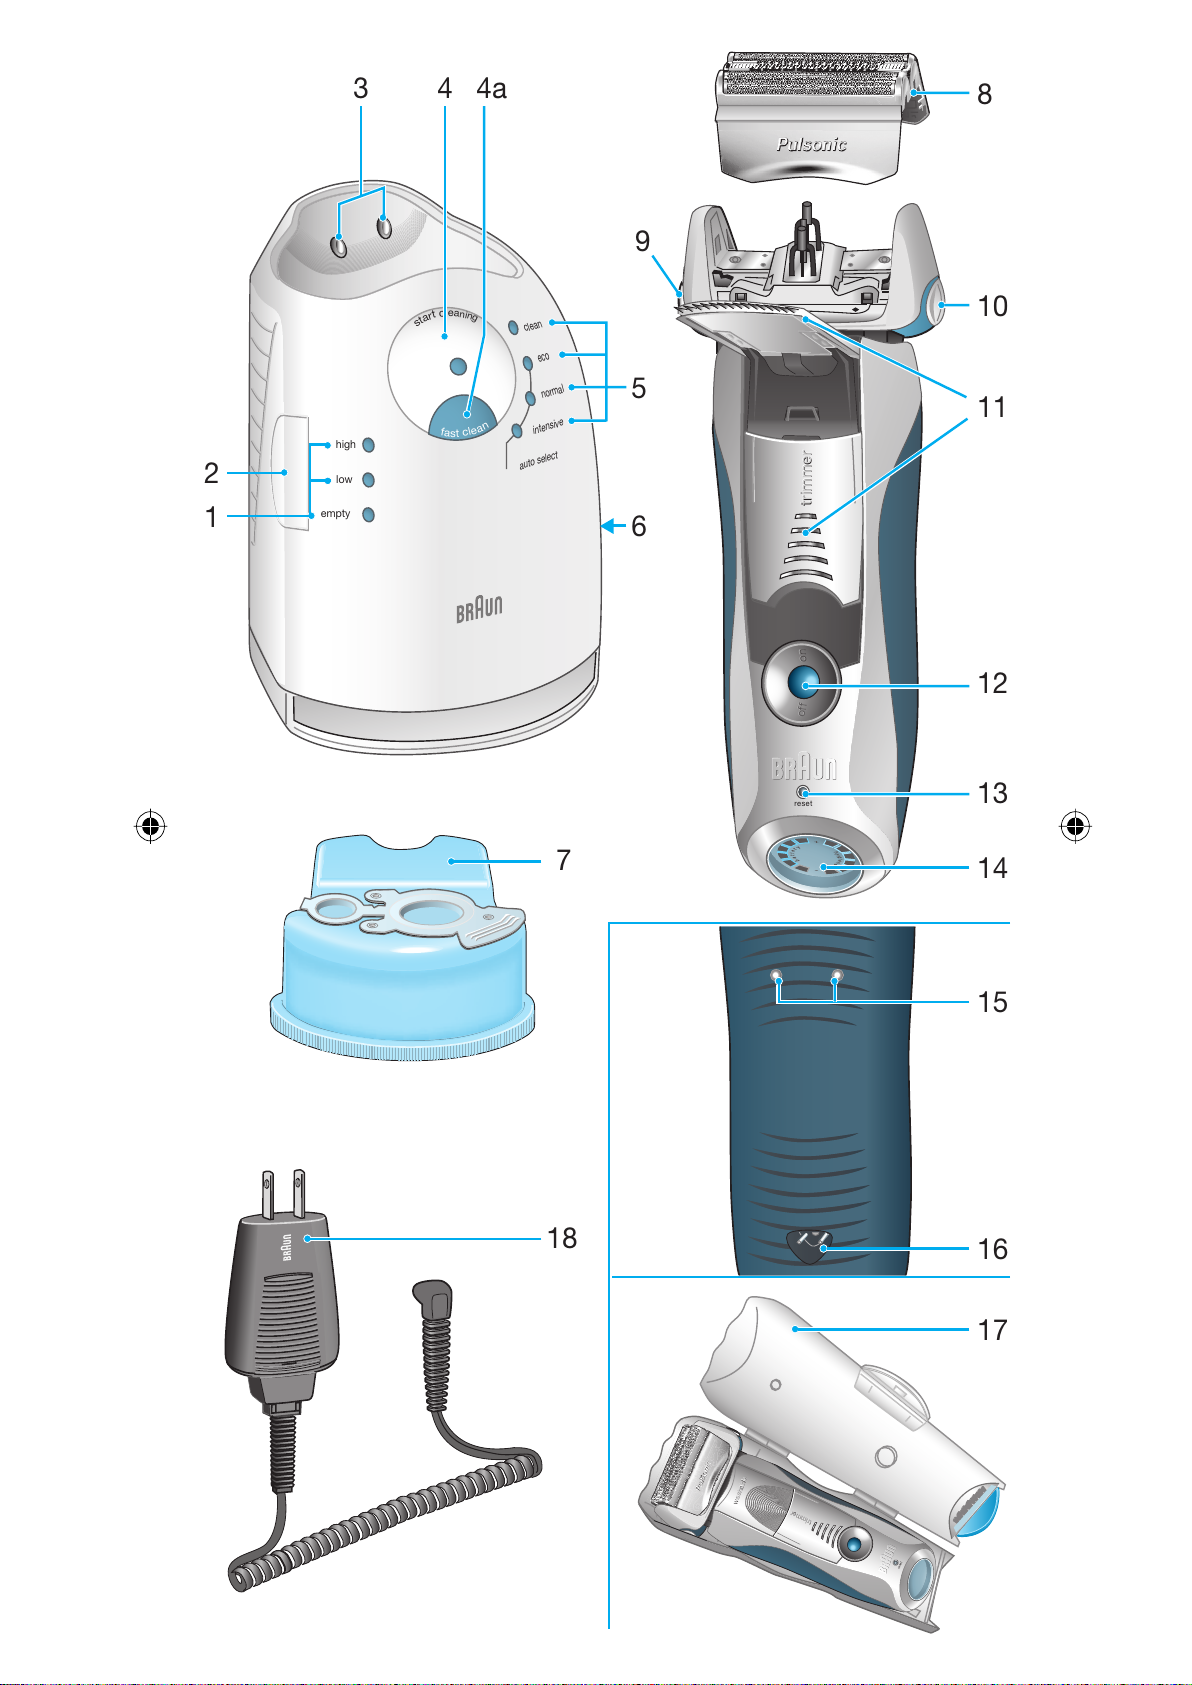
Description
Clean&Renew station
1 Cleaning fl uid display
2 Lift button for cartridge exchange
3 Station-to-shaver contacts
4 «start cleaning» button
D «fast clean» button
5 Cleaning program diodes
6 Station power socket
7 Cleaning cartridge
Shaver
8 Foil & cutter cassette
9 Cassette release button
0 Shaver head «lock» switch
q Pop-out long hair trimmer
w On/off switch
e «reset» button
r Shaver display
t Shaver-to-station contacts
z Shaver power socket
u Travel case
i Special cord set
All manuals and user guides at all-guides.com
all-guides.com
7
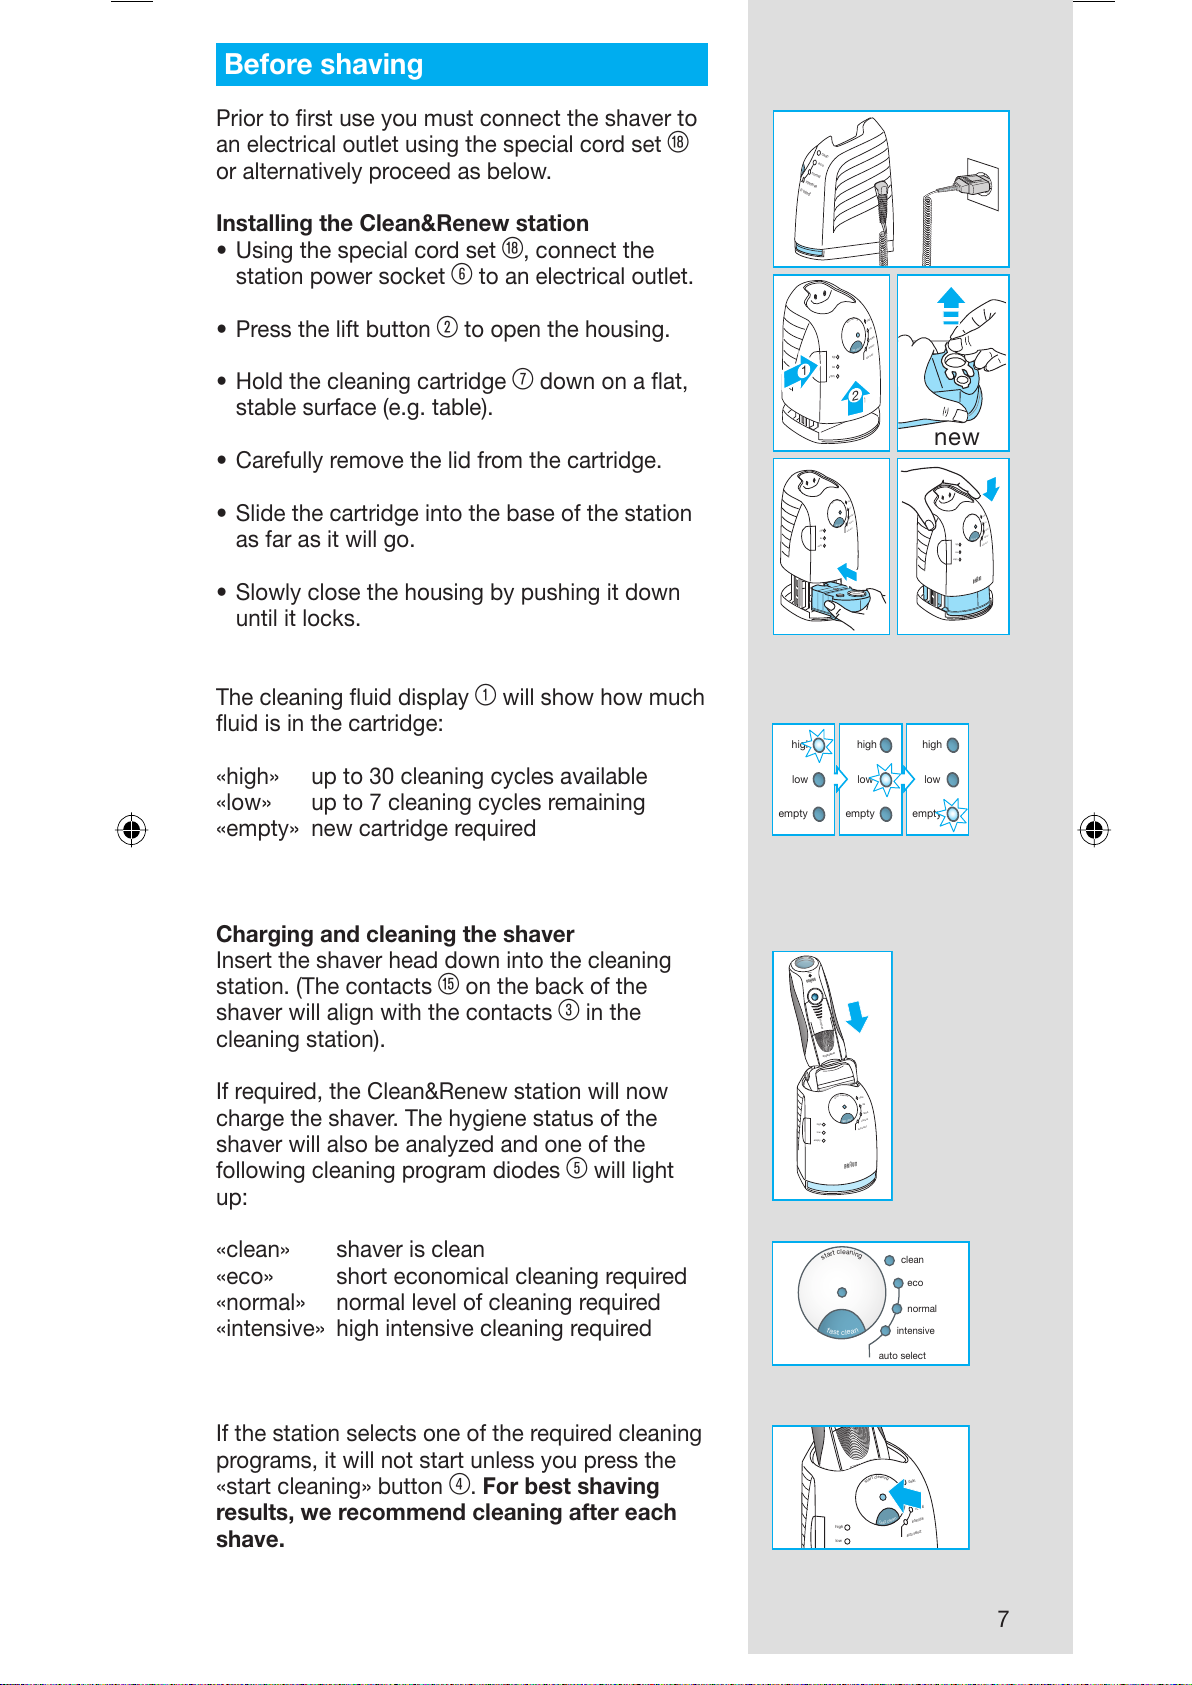
Before shaving
Prior to fi rst use you must connect the shaver to
an electrical outlet using the special cord set i
or alternatively proceed as below.
Installing the Clean&Renew station
• Using the special cord set i, connect the
station power socket 6 to an electrical outlet.
• Press the lift button
2 to open the housing.
• Hold the cleaning cartridge 7 down on a fl at,
stable surface (e.g. table).
• Carefully remove the lid from the cartridge.
• Slide the cartridge into the base of the station
as far as it will go.
• Slowly close the housing by pushing it down
until it locks.
The cleaning fl uid display 1 will show how much
fl uid is in the cartridge:
«high» up to 30 cleaning cycles available
«low» up to 7 cleaning cycles remaining
«empty» new cartridge required
Charging and cleaning the shaver
Insert the shaver head down into the cleaning
station. (The contacts t on the back of the
shaver will align with the contacts 3 in the
cleaning station).
If required, the Clean&Renew station will now
charge the shaver. The hygiene status of the
shaver will also be analyzed and one of the
following cleaning program diodes 5 will light
up:
«clean» shaver is clean
«eco» short economical cleaning required
«normal» normal level of cleaning required
«intensive» high intensive cleaning required
If the station selects one of the required cleaning
programs, it will not start unless you press the
«start cleaning» button 4. For best shaving
results, we recommend cleaning after each
shave.
new
f
a
s
t
c
l
e
a
n
high
cle
an
e
co
n
orm
a
l
intensive
a
u
to
s
e
le
c
t
low
empty
s
t
a
r
t
c
l
e
a
n
i
n
g
cle
an
eco
nor
mal
in
te
n
s
ive
a
u
to
sel
e
c
t
f
a
s
t
c
l
e
a
n
high
clean
eco
normal
intensive
au
to select
low
empty
s
t
a
r
t
c
l
e
a
n
i
n
g
f
a
s
t
c
l
e
a
n
high
clean
eco
normal
intensive
auto select
low
empty
s
t
a
r
t
c
l
e
a
n
i
n
g
2
1
f
a
s
t
c
l
e
a
n
f
a
s
t
c
l
e
a
n
f
a
s
t
c
l
e
a
n
high
low
empty
high
low
empty
high
low
empty
high
low
empty
high
low
empty
high
low
empty
high
clean
eco
normal
intensive
auto select
low
empty
s
t
a
r
t
c
l
e
a
n
i
n
g
w
ashable
trim
mer
reset
f
a
s
t
c
l
e
a
n
high
clean
eco
normal
intensive
auto select
low
empty
s
t
a
r
t
c
l
e
a
n
i
n
g
w
ashable
trim
mer
reset
f
a
s
t
c
l
e
a
n
auto select
intensive
normal
eco
clean
s
t
a
r
t
c
l
e
a
n
i
n
g
f
a
s
t
c
l
e
a
n
auto select
intensive
normal
eco
clean
s
t
a
r
t
c
l
e
a
n
i
n
g
f
a
s
t
c
l
e
a
n
high
clean
eco
normal
intensive
auto select
low
washable
s
t
a
r
t
c
l
e
a
n
i
n
g
f
a
s
t
c
l
e
a
n
high
clean
eco
normal
intensive
auto select
low
washable
s
t
a
r
t
c
l
e
a
n
i
n
g
f
a
s
t
c
l
e
a
n
All manuals and user guides at all-guides.com
8
While cleaning is in progress, the respective
cleaning program diode will blink. Each cleaning
program consists of several cycles, where
cleaning fl uid is fl ushed through the shaver head
and a heat drying process dries the shaver.
Depending on the program selected the total
cleaning time will range from 32 to 43 minutes.
The cleaning programs should not be
interrupted. Please note that while the shaver is
drying, the shaving head may be hot and wet.
When the program is fi nished, the blue «clean»
diode will light up. Your shaver is now clean and
ready for use.
Fast cleaning
Push the «fast clean» button
D to activate
the fast clean program without drying. This
program takes about 25 seconds only and is
recommended when you do not have time to
wait for one of the automatic cleaning programs.
If you remove the shaver just after the program
has fi nished, wipe off the shaver head with a
tissue to avoid dripping.
Stand-by mode
10 minutes after completing the charging or
cleaning session, the Clean&Renew station
switches to the stand-by mode: The diodes of
the Clean&Renew station turns off.
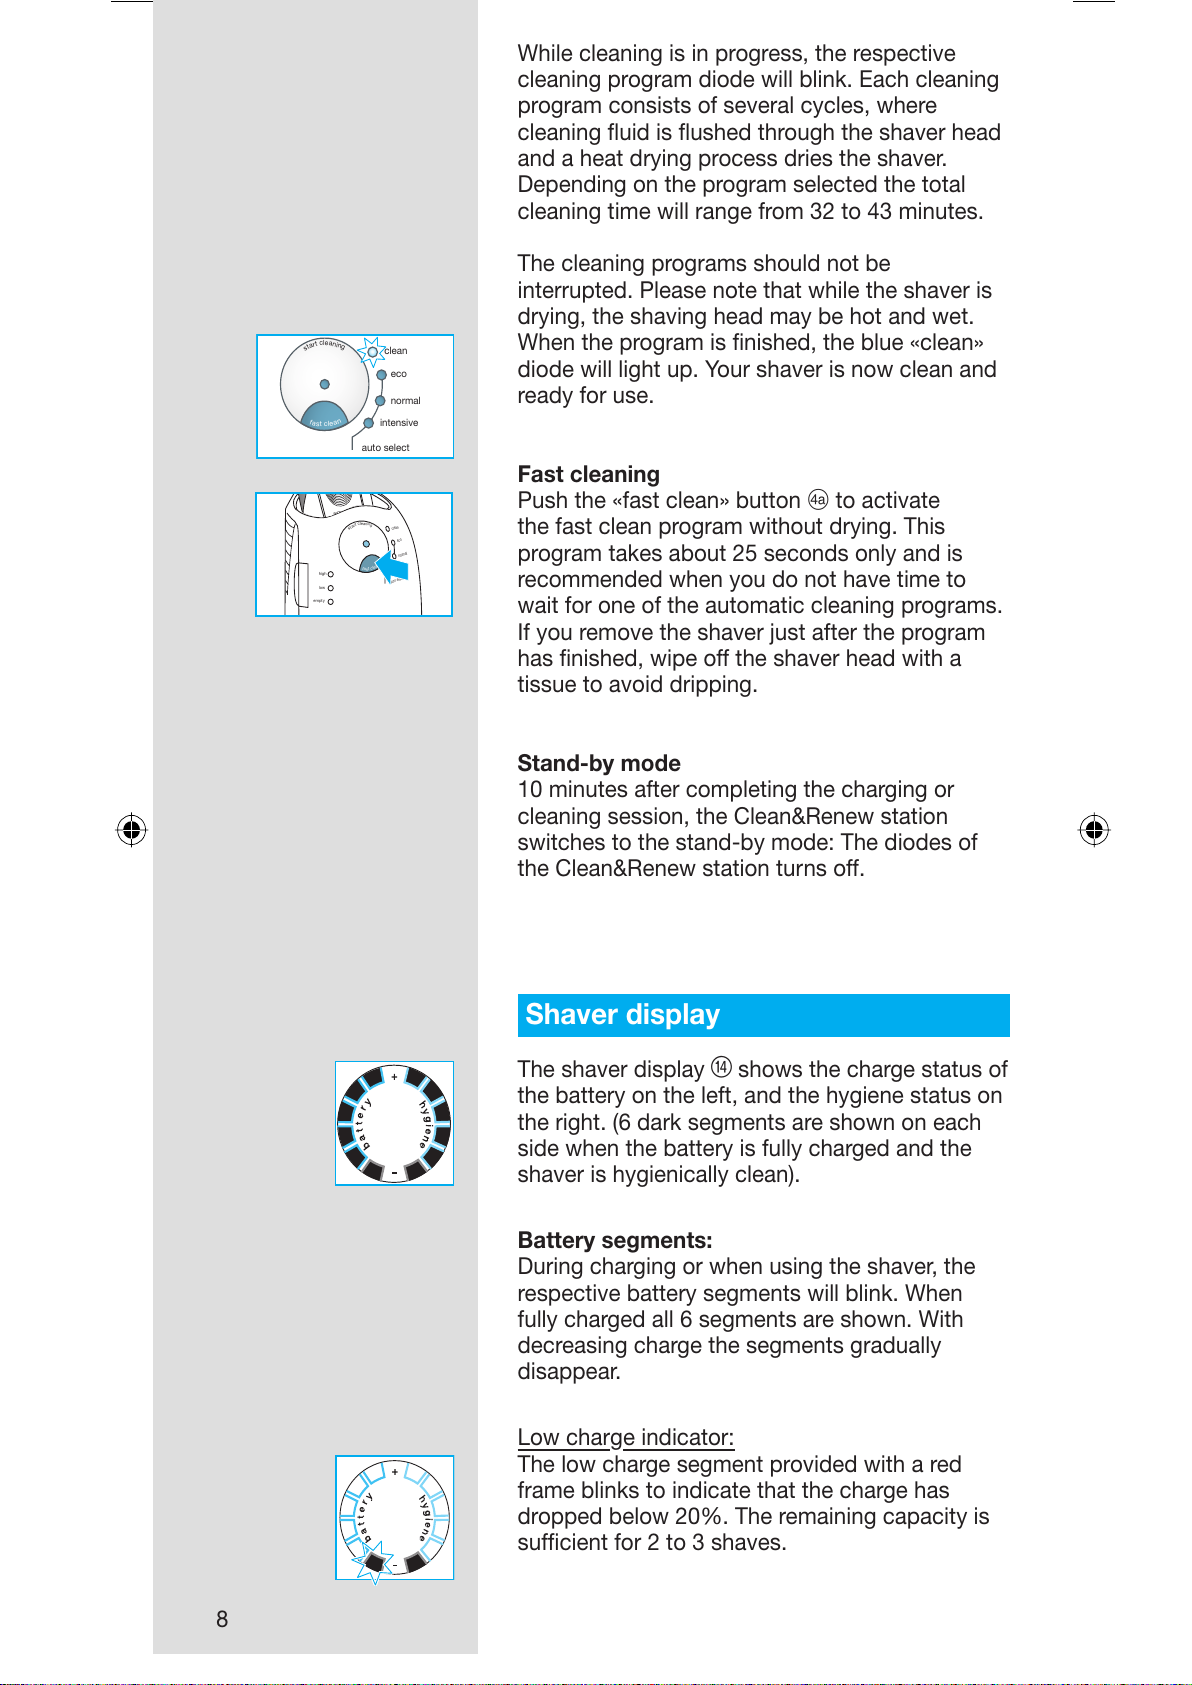
Shaver display
The shaver display r shows the charge status of
the battery on the left, and the hygiene status on
the right. (6 dark segments are shown on each
side when the battery is fully charged and the
shaver is hygienically clean).
Battery segments:
During charging or when using the shaver, the
respective battery segments will blink. When
fully charged all 6 segments are shown. With
decreasing charge the segments gradually
disappear.
Low charge indicator:
The low charge segment provided with a red
frame blinks to indicate that the charge has
dropped below 20%. The remaining capacity is
suffi cient for 2 to 3 shaves.
auto select
intensive
normal
eco
clean
s
t
a
r
t
c
l
e
a
n
i
n
g
f
a
s
t
c
l
e
a
n
auto select
intensive
normal
eco
clean
s
t
a
r
t
c
l
e
a
n
i
n
g
f
a
s
t
c
l
e
a
n
high
clean
eco
normal
intensive
auto select
low
empty
washable
s
t
a
r
t
c
l
e
a
n
i
n
g
f
a
s
t
c
l
e
a
n
high
clean
eco
normal
intensive
auto select
low
empty
washable
s
t
a
r
t
c
l
e
a
n
i
n
g
f
a
s
t
c
l
e
a
n
All manuals and user guides at all-guides.com
9
Hygiene segments:
All 6 hygiene segments will appear after the
shaver has been cleaned in the Clean&Renew
station. When the shaver is being used, the
hygiene segments will gradually disappear.
Once the shaver is returned to the station, the
system will automatically select the appropriate
cleaning program and restore the segments
to maximum hygiene. Given that rinsing the
shaver under tap water is not as hygienic as the
cleaning station, the hygiene segments will only
restore themselves when the shaver has been
cleaned in the Clean&Renew station.
Charging information
• A full charge provides up to 50 minutes
of cordless shaving time. This may vary
according to your beard growth.
• The best environmental temperature for
charging is between 41 °F to 95 °F / 5 °C to
35 °C. Do not expose the shaver to
temperatures higher than 122 °F / 50 °C for
extended periods of time.
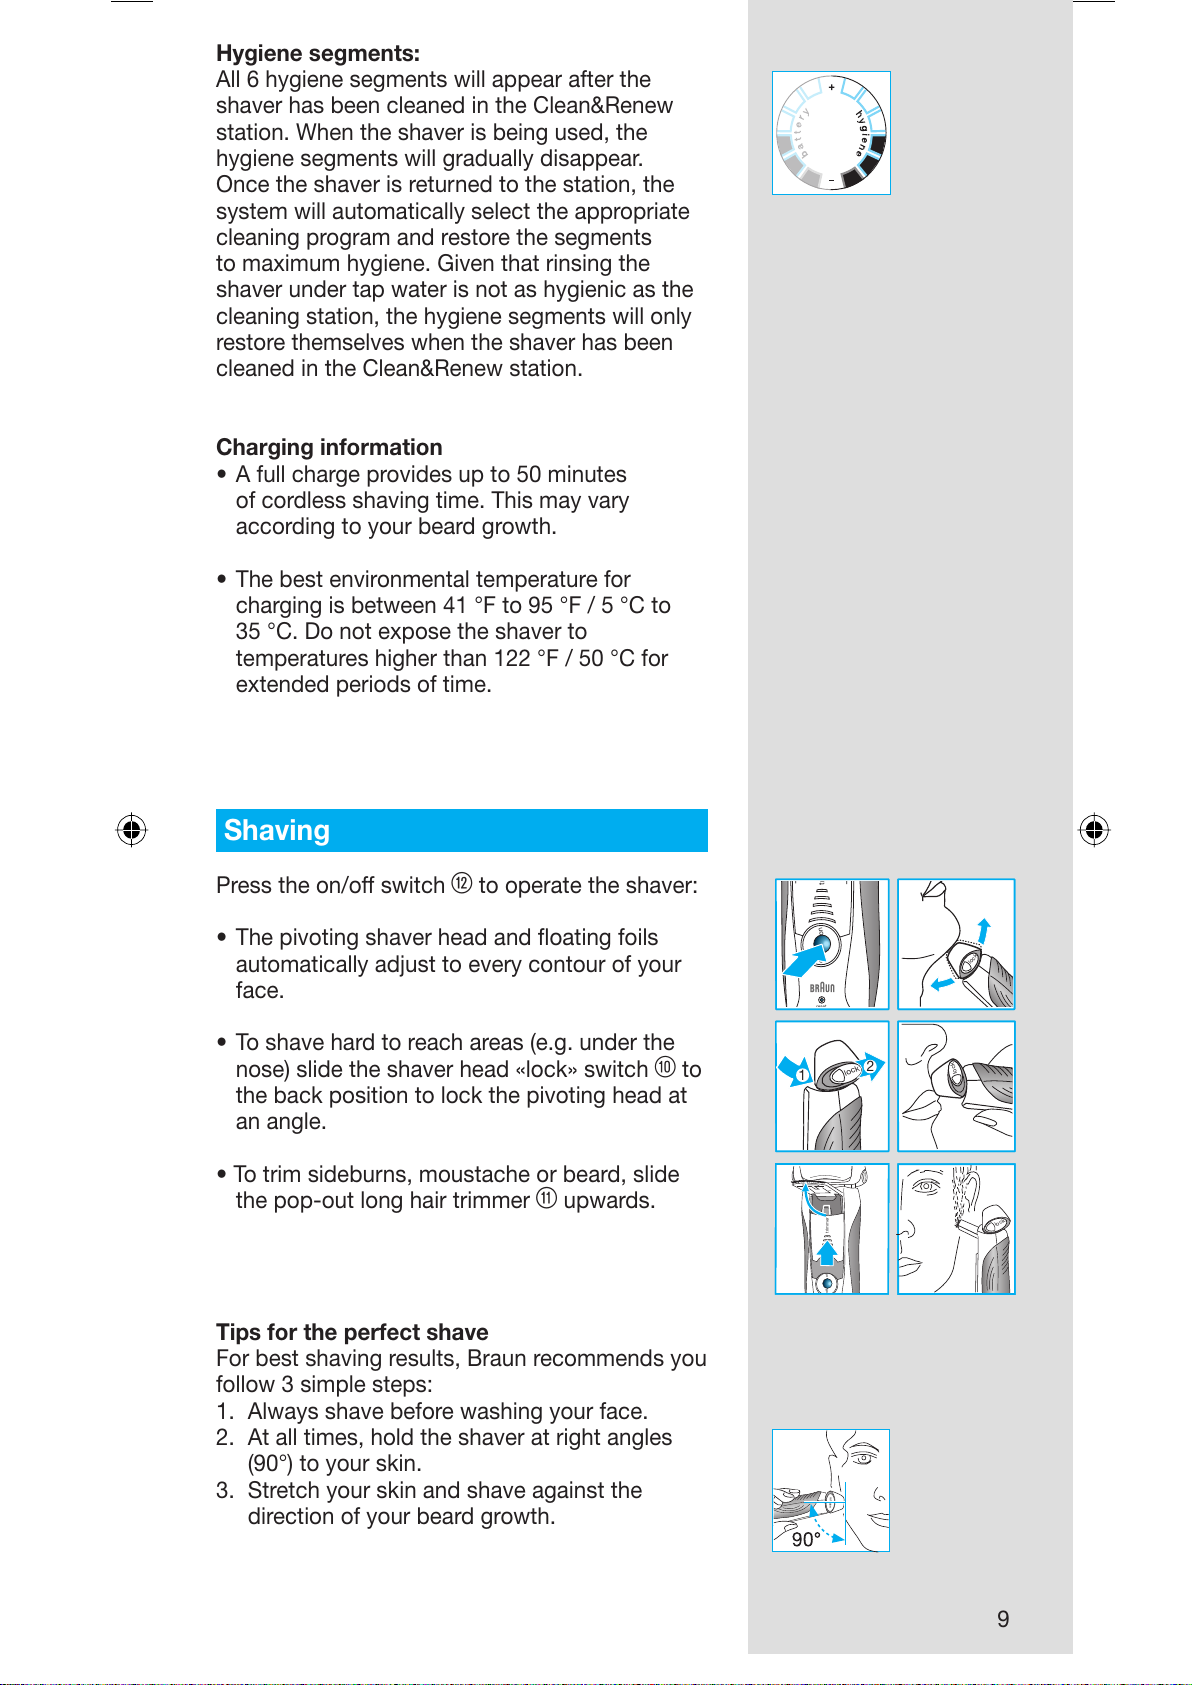
Shaving
Press the on/off switch w to operate the shaver:
• The pivoting shaver head and fl oating foils
automatically adjust to every contour of your
face.
• To shave hard to reach areas (e.g. under the
nose) slide the shaver head «lock» switch 0 to
the back position to lock the pivoting head at
an angle.
• To trim sideburns, moustache or beard, slide
the pop-out long hair trimmer q upwards.
Tips for the perfect shave
For best shaving results, Braun recommends you
follow 3 simple steps:
1. Always shave before washing your face.
2. At all times, hold the shaver at right angles
(90°) to your skin.
3. Stretch your skin and shave against the
direction of your beard growth.
tr
lock
1
2
trimmer
lock
lock
lock
on
on
off
off
tr
lock
1
2
trimmer
lock
lock
lock
on
on
off
off
releaserelea
se
All manuals and user guides at all-guides.com
10
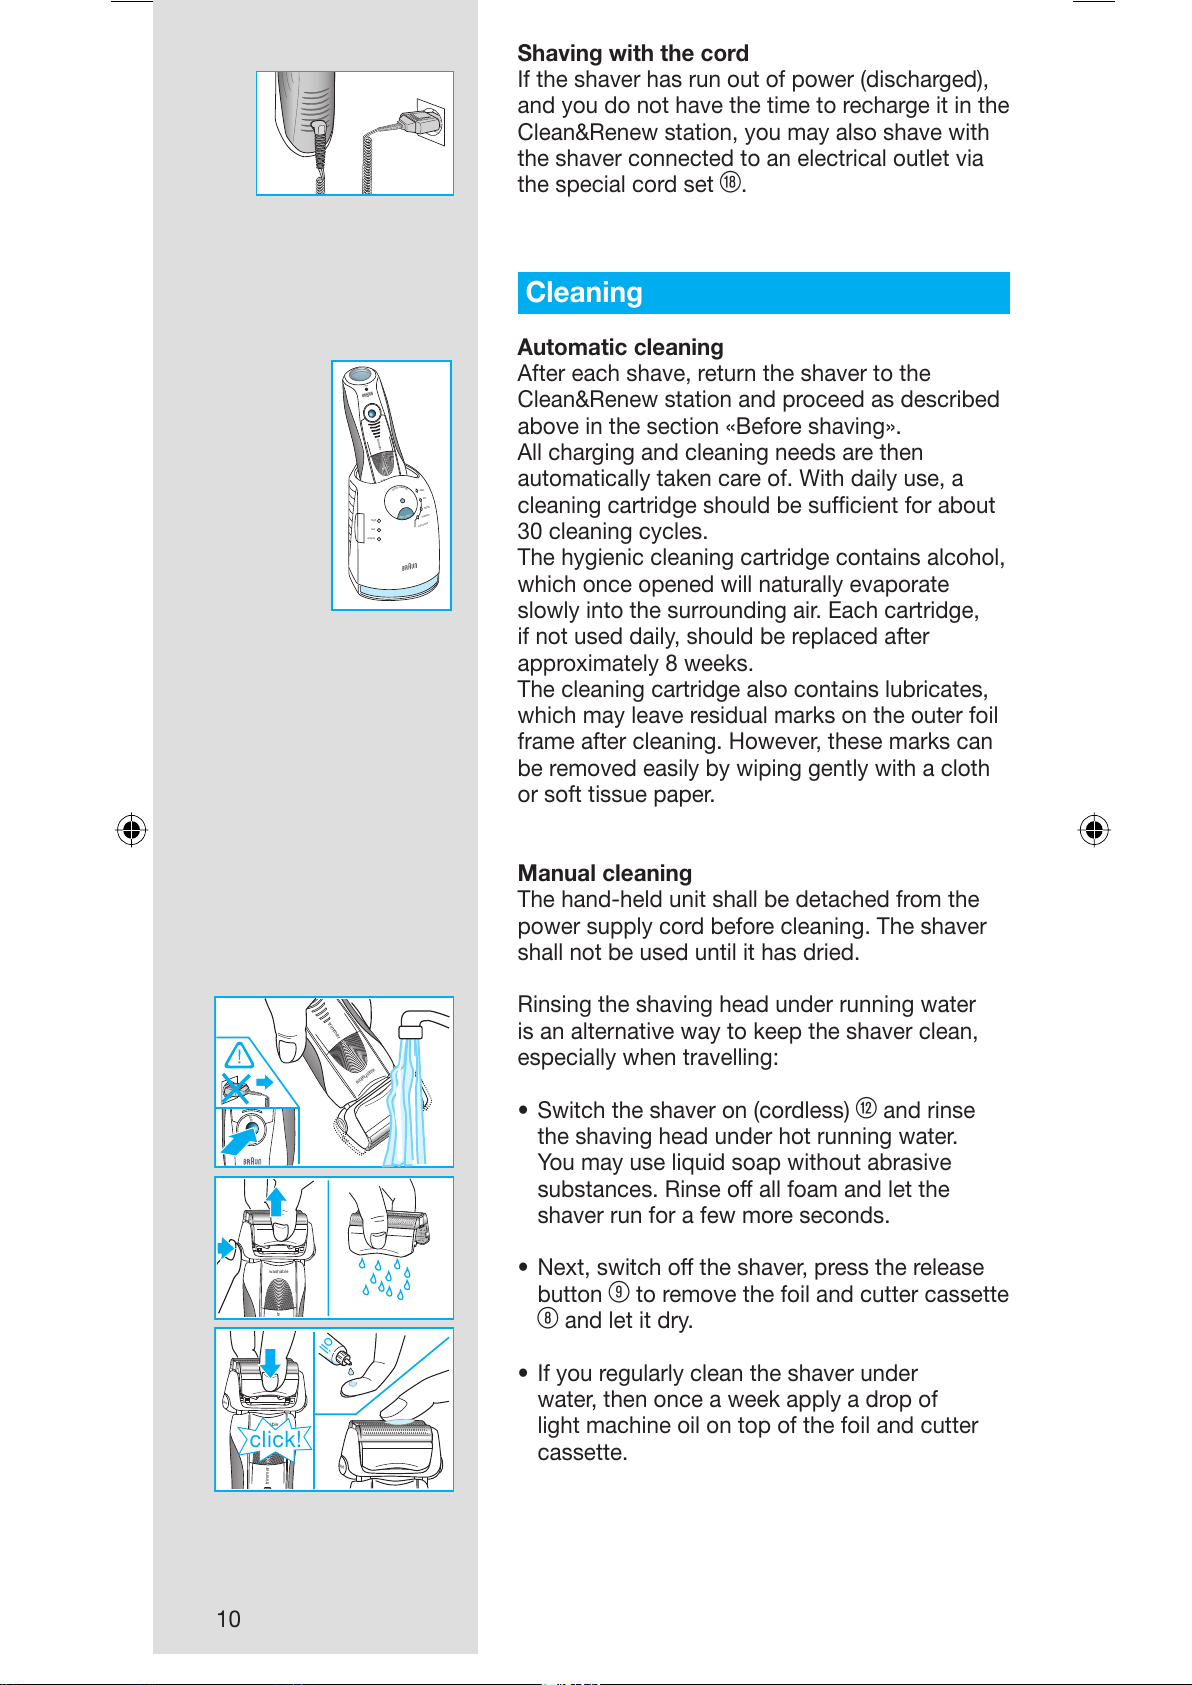
Shaving with the cord
If the shaver has run out of power (discharged),
and you do not have the time to recharge it in the
Clean&Renew station, you may also shave with
the shaver connected to an electrical outlet via
the special cord set
i.
Cleaning
Automatic cleaning
After each shave, return the shaver to the
Clean&Renew station and proceed as described
above in the section «Before shaving».
All charging and cleaning needs are then
automatically taken care of. With daily use, a
cleaning cartridge should be suffi cient for about
30 cleaning cycles.
The hygienic cleaning cartridge contains alcohol,
which once opened will naturally evaporate
slowly into the surrounding air. Each cartridge,
if not used daily, should be replaced after
approximately 8 weeks.
The cleaning cartridge also contains lubricates,
which may leave residual marks on the outer foil
frame after cleaning. However, these marks can
be removed easily by wiping gently with a cloth
or soft tissue paper.
Manual cleaning
The hand-held unit shall be detached from the
power supply cord before cleaning. The shaver
shall not be used until it has dried.
Rinsing the shaving head under running water
is an alternative way to keep the shaver clean,
especially when travelling:
• Switch the shaver on (cordless) w and rinse
the shaving head under hot running water.
You may use liquid soap without abrasive
substances. Rinse off all foam and let the
shaver run for a few more seconds.
• Next, switch off the shaver, press the release
button 9 to remove the foil and cutter cassette
8 and let it dry.
• If you regularly clean the shaver under
water, then once a week apply a drop of
light machine oil on top of the foil and cutter
cassette.
high
clean
eco
normal
inten
sive
auto select
low
empty
s
t
a
r
t
c
l
e
a
n
i
n
g
washable
trimmer
re
s
e
t
f
a
s
t
c
l
e
a
n
high
clean
eco
normal
inten
sive
auto select
low
empty
s
t
a
r
t
c
l
e
a
n
i
n
g
washable
trimmer
re
s
e
t
f
a
s
t
c
l
e
a
n
oil
washable
trim
mer
on
washable
er
re
le
a
s
e
washable
trimmer
re
le
a
s
e
re
le
a
s
e
click!
oil
washable
trim
mer
on
washable
er
re
le
a
s
e
washable
trimmer
re
le
a
s
e
re
le
a
s
e
click!
All manuals and user guides at all-guides.com
11
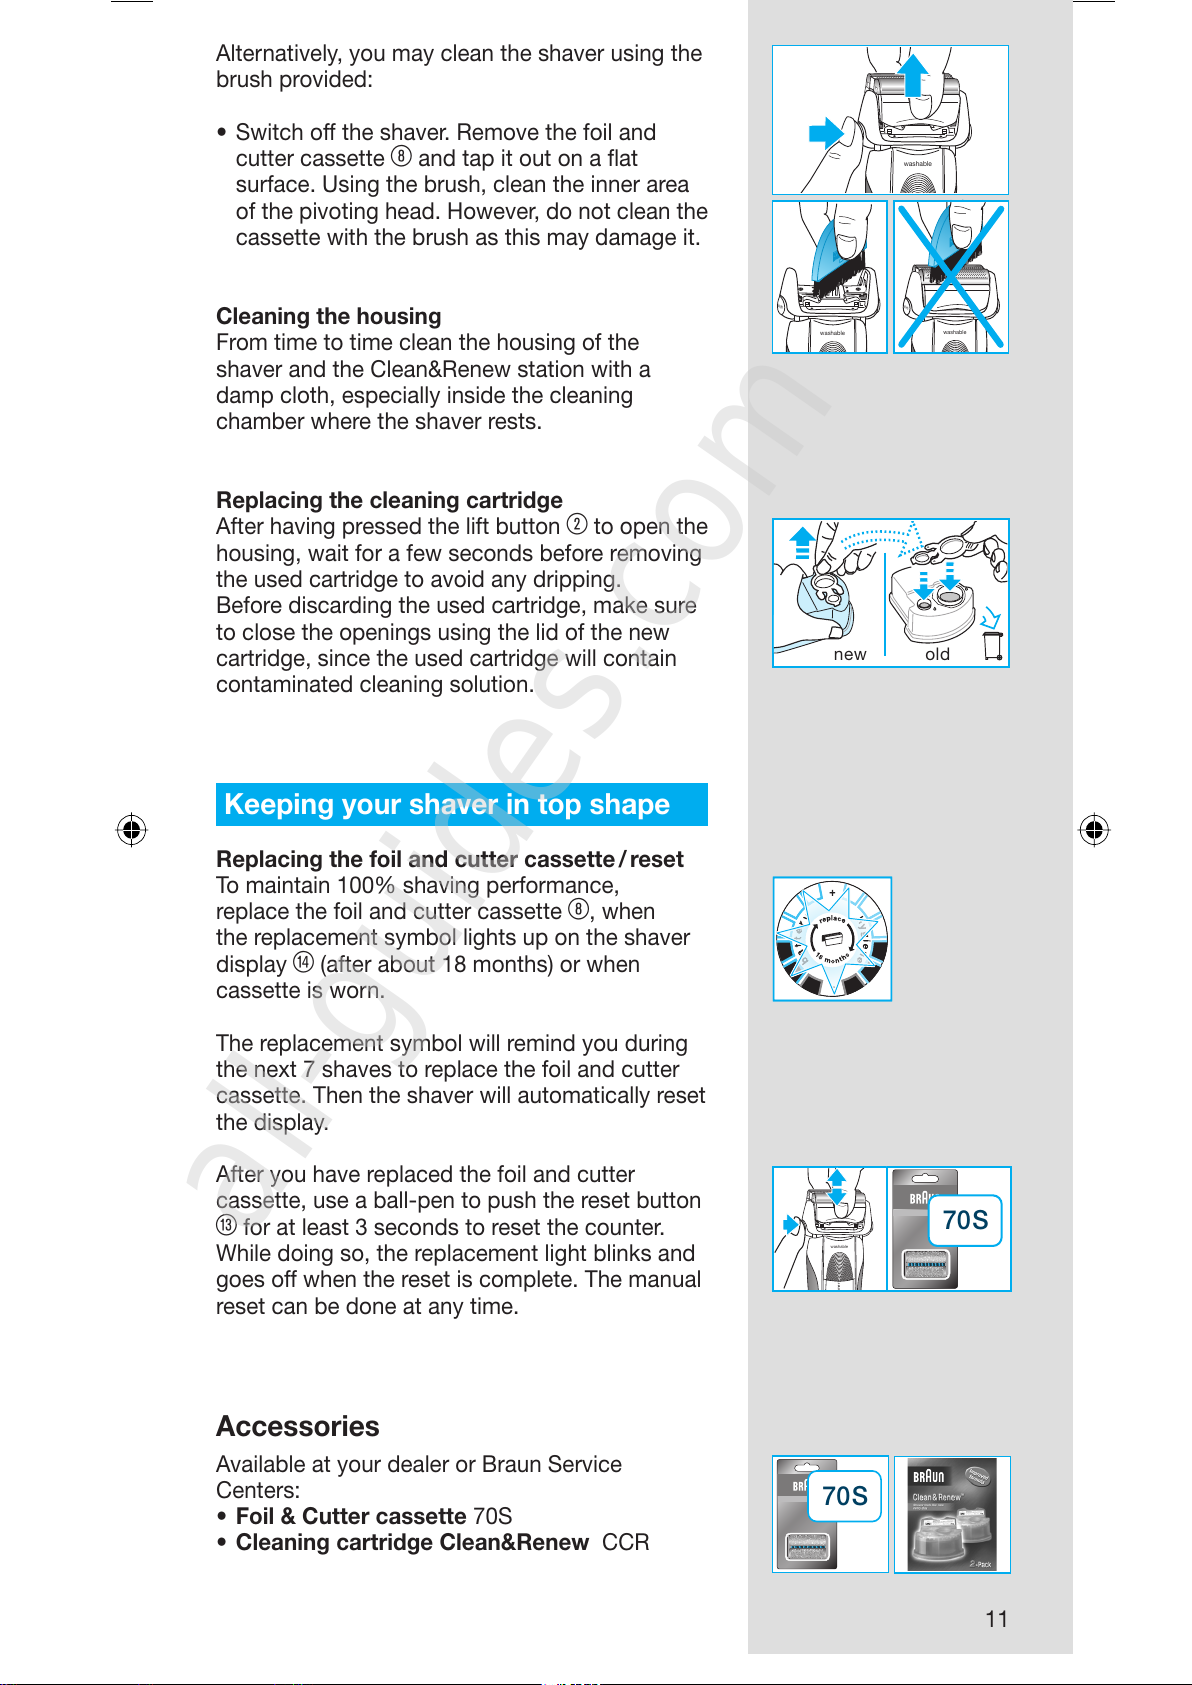
Alternatively, you may clean the shaver using the
brush provided:
• Switch off the shaver. Remove the foil and
cutter cassette
8 and tap it out on a fl at
surface. Using the brush, clean the inner area
of the pivoting head. However, do not clean the
cassette with the brush as this may damage it.
Cleaning the housing
From time to time clean the housing of the
shaver and the Clean&Renew station with a
damp cloth, especially inside the cleaning
chamber where the shaver rests.
Replacing the cleaning cartridge
After having pressed the lift button
2 to open the
housing, wait for a few seconds before removing
the used cartridge to avoid any dripping.
Before discarding the used cartridge, make sure
to close the openings using the lid of the new
cartridge, since the used cartridge will contain
contaminated cleaning solution.
Keeping your shaver in top shape
Replacing the foil and cutter cassette / reset
To maintain 100% shaving performance,
replace the foil and cutter cassette 8, when
the replacement symbol lights up on the shaver
display r (after about 18 months) or when
cassette is worn.
The replacement symbol will remind you during
the next 7 shaves to replace the foil and cutter
cassette. Then the shaver will automatically reset
the display.
After you have replaced the foil and cutter
cassette, use a ball-pen to push the reset button
e for at least 3 seconds to reset the counter.
While doing so, the replacement light blinks and
goes off when the reset is complete. The manual
reset can be done at any time.
Accessories
Available at your dealer or Braun Service
Centers:
• Foil & Cutter cassette 70S
• Cleaning cartridge Clean&Renew CCR
washable
re
le
a
s
e
washable
re
le
a
s
e
washable
re
le
a
s
e
washable
re
le
a
s
e
washable
re
le
a
s
e
washable
re
le
a
s
e
new
old
new
old
360°Complete
9000
Series
9000
Series
washable
er
re
le
a
s
e
360°Complete
9000
Series
9000
Series
washable
er
re
le
a
s
e
washable
er
re
le
a
s
e
70S
washable
er
re
le
a
s
e
70S
70S70S
All manuals and user guides at all-guides.com
all-guides.com
 Loading...