

Page 1
Series 7
Stapled booklet, 110x200 mm, 42 p (incl. 6 p cover), 2/2c = black + HKS43N
Series 7Series 7
Series 7
trimmer
trimmer
trimmer
Type 5693
Modèle 5693
Modelo 5693
www.braun.com/register
760 cc-4
Page 2

English 4
Français 18
Español 30
Thank you for purchasing a Braun product.
We hope you are completely satisfied with
your new Braun shaver.
If you have any questions, please call:
US residents 1-800-BRAUN-11
1-800-272-8611
Canadian residents 1-800-387-6657
Merci d’avoir fait l’achat d’un produit Braun.
Nous espérons que vous serez entièrement
satisfait de votre nouveau rasoir Braun.
Si vous avez des questions, veuillez appeler
Braun Canada au : 1-800-387-6657
Gracias por haber comprado un producto
Braun.
Esperamos que quede completamente
satisfecho con su nueva afeitadora Braun.
Si tiene alguna duda, por favor llame al:
01(800) 508-5800
99479749/II-10
USA / CDN / MEX
Page 3
Series 7
3
t
r
imme
r
t
r
i
mme
r
t
r
i
m
m
e
r
Ser
i
e
s
7
Se
r
i
e
s
7
S
e
r
i
e
s 7
4
Series 7
Series 7
8
9
10
5
11
2
1
6
trimmer
trimmer
trimmer
trimmer
trimmer
trimmer
n
n
o
o
ff
off
o
12
13
14
15
7
16
17
20
18
19
Page 4

English
IMPORTANT SAFETY
INSTRUCTIONS
When using an electrical appliance, basic precautions should
always be followed, including the following:
Read all instructions before using this appliance.
When disconnected, the hand-held part of this shaving
appliance may be cleaned under water.
DANGER
To reduce the risk of electric shock:
1. Use only in dry conditions.
2. Do not submerge in water.
3. Do not reach for an appliance that has fallen into water. Unplug
immediately.
4. Do not use while bathing or in a shower.
5. Do not place, store or charge the appliance where it can fall or
be pulled into a tub or sink. Do not place in or drop into water or
other liquid.
6. Except when charging, always unplug this appliance from the
electrical outlet immediately after using.
7. Unplug this appliance before cleaning.
8. This appliance is provided with a special cord set with
integrated Safety Extra Low Voltage power supply. Do not
exchange or manipulate any part of it.
9. Do not use an extension cord with this appliance.
FOR HOUSEHOLD USE ONLY
4
Page 5

WARNING
To reduce the risk of burns, fire, electric shock, or injury to
persons:
1. Close supervision is necessary when this appliance is used by,
on, or near children or invalids.
2. Use this appliance only for its intended use as described in
this manual. Do not use attachments not recommended by the
manufacturer.
3. Never operate this appliance if it has a damaged cord or plug,
if it is not working properly, if it has been dropped or damaged,
or if the power supply has been dropped into water. Return the
appliance to a service center for examination and repair.
4. Keep the cord away from heated surfaces.
5. Never drop or insert any object into any opening.
6. Do not use outdoors or operate where aerosol (spray)
products are being used or where oxygen is being
administered.
7. Do not use this appliance with a damaged or broken foil, as
serious skin injuries may occur.
8. Always attach plug to appliance first, then to outlet.
To disconnect, turn all controls to «off», then remove plug from
outlet.
9. When plugging to an electrical outlet outside the USA, use a
plug adapter to match the outlet’s pin configuration.
10. Caution: The battery used in this device may present a fire or
chemical burn hazard if mistreated. Do not disassemble heat
above 100 °C (212 °F) or incinerate.
SAVE THESE INSTRUCTIONS
5
Page 6
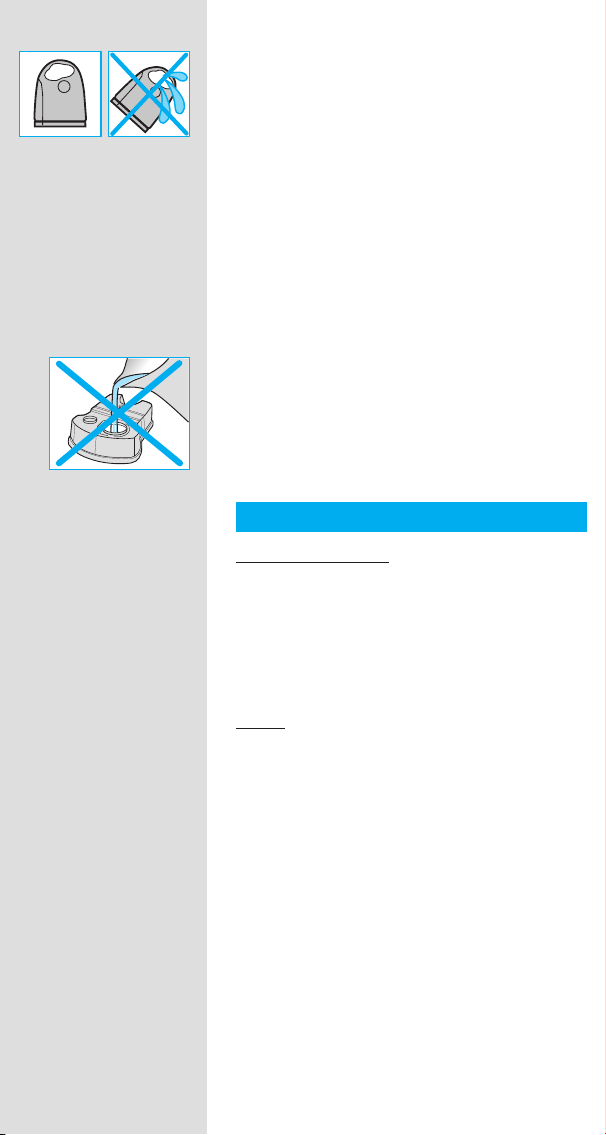
Warning
To prevent the cleaning fl uid from leaking, ensure
that the Clean&Renew station is placed on a fl at
surface. When a cleaning cartridge is installed,
do not tip, move suddenly or transport the
station in any way as cleaning fl uid might spill
out of the cartridge. Do not place the station
inside a mirror cabinet, nor over a radiator, nor
place it on a polished or lacquered surface.
The cleaning cartridge contains a highly
fl ammable liquid so keep it away from sources
of ignition. Do not expose to direct sunlight and
cigarette smoking nor store it over a radiator.
Keep it out of reach of children.
Do not refi ll the cartridge and use only original
Braun refi ll cartridges.
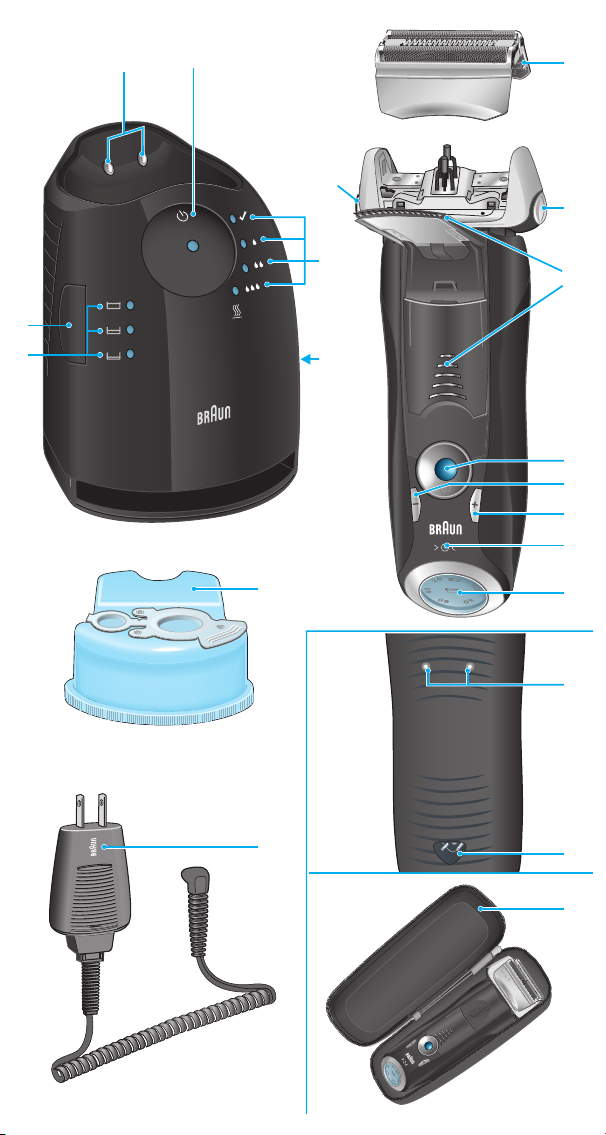
Description
Clean&Renew station
1 Cleaning fl uid display
2 Lift button for cartridge exchange
3 Station-to-shaver contacts
4 Start button
5 Cleaning program indicators
6 Station power socket
7 Cleaning cartridge
Shaver
8 Foil & Cutter cassette
9 Cassette release button
0 Shaver head «lock» switch
q Pop-out long hair trimmer
w On/off switch
e (–) setting button (sensitive)
r (+) setting button (intensive)
t Reset button
z Shaver display
u Shaver-to-station contacts
i Shaver power socket
o Travel case
p Special cord set
6
Page 7
Before shaving
trim
mer
trim
mer
Prior to fi rst use you must connect the shaver to
an electrical outlet using the special cord set p
or alternatively proceed as below.
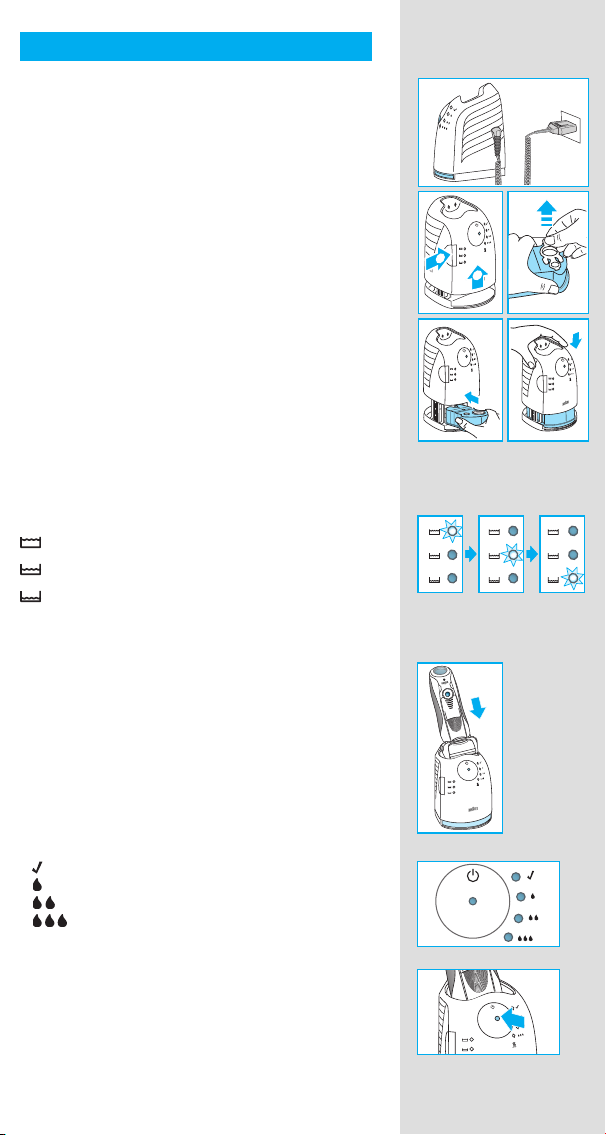
Installing the Clean&Renew station
• Using the special cord set p, connect the
station power socket
6 to an electrical outlet.
• Press the lift button 2 to open the housing.
• Hold the cleaning cartridge 7 down on a fl at,
stable surface (e.g. table).
• Carefully remove the lid from the cartridge.
• Slide the cartridge into the base of the station
as far as it will go.
• Slowly close the housing by pushing it down
until it locks.
The cleaning fl uid display 1 will show how much
fl uid is in the cartridge:
up to 30 cleaning cycles available
up to 7 cleaning cycles remaining
new cartridge required
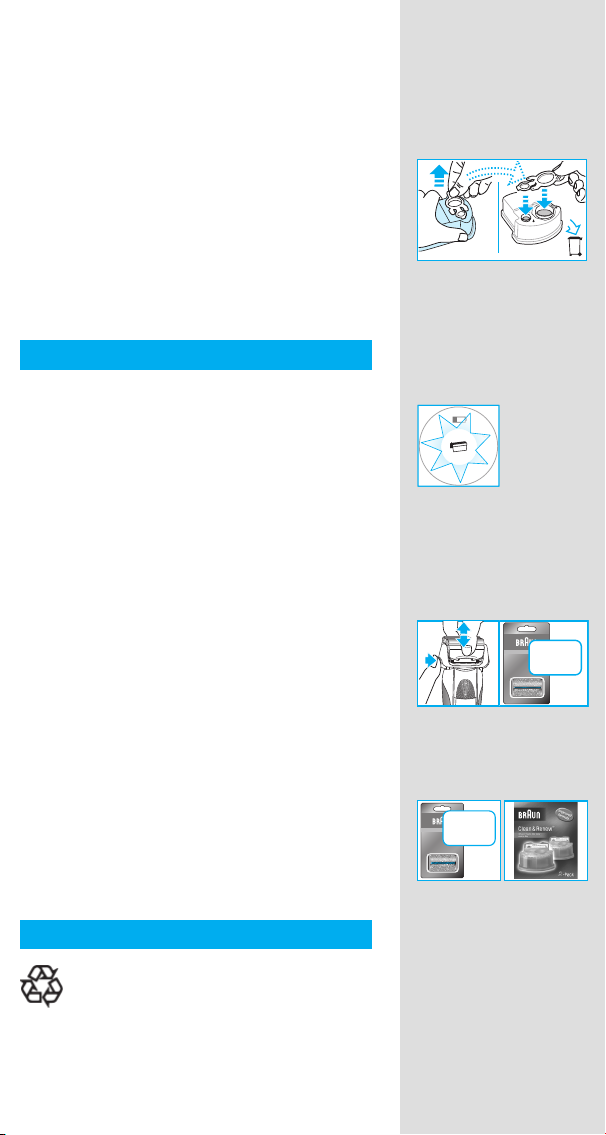
Charging and cleaning the shaver
Insert the shaver head down into the cleaning
station. (The contacts u on the back of the
shaver will align with the contacts 3 in the
cleaning station).
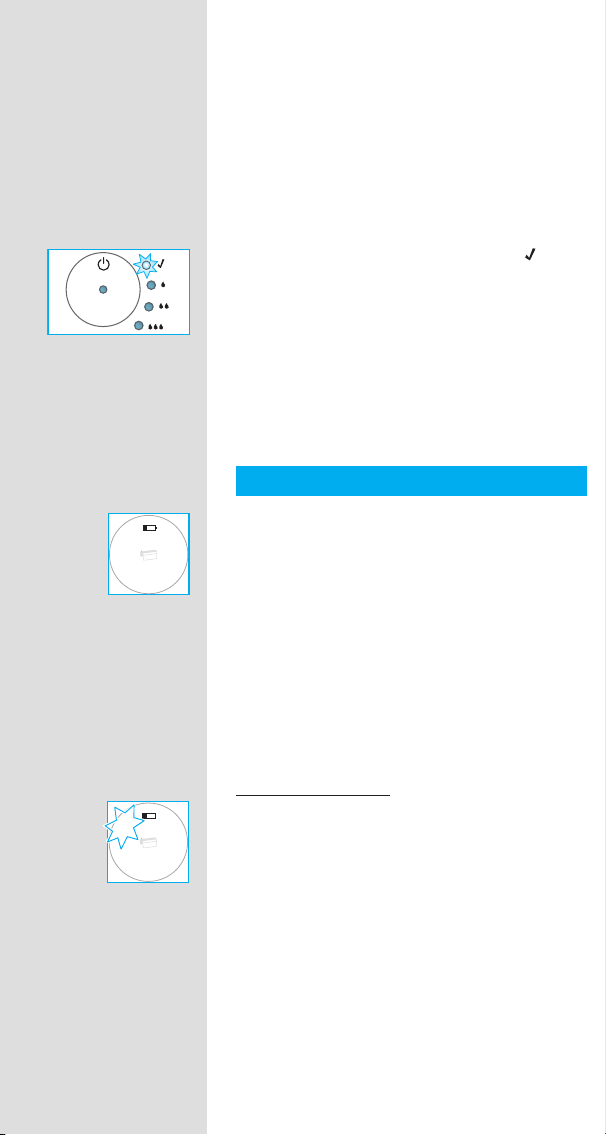
If required, the Clean&Renew station will automatically charge the shaver. The hygiene status
of the shaver will also be analyzed and one of
the following cleaning program indicators 5 will
light up:
1
1
2
2
n
n
a
a
f
f
e
e
l
l
a
a
c
c
s
s
t
t
n
n
a
a
f
f
e
e
l
l
a
a
c
c
s
s
t
t
Series 7
Series 7
new
new
n
n
a
a
f
f
e
e
l
l
a
a
c
c
t
t
s
s
« » shaver is clean
« » short economical cleaning required
« » normal level of cleaning required
« » high intensive cleaning required
If the station selects one of the required cleaning
programs, it will not start unless you press the
start button 4. For best shaving results, we
recommend cleaning after each shave.
7
Page 8
While cleaning is in progress, the respective
cleaning program indicator will blink. Each
cleaning program consists of several cycles,
where cleaning fl uid is fl ushed through the
shaver head and a heat drying process dries
the shaver. Depending on the program selected
the total cleaning time will range from 32 to 43
minutes.
The cleaning programs should not be interrupted. Please note that while the shaver is
drying, the shaving head may be hot and wet.
When the program is fi nished, the blue «
»
indicator will light up. Your shaver is now clean
and ready for use.
Stand-by mode
10 minutes after completing the charging or
cleaning session, the Clean&Renew station
switches to the stand-by mode: The indicators
of the Clean&Renew station turn off.
Shaver display
1
1
0
0
0
0
2
2
0
0
0
0
8
8
4
4
0
0
0
0
6
6
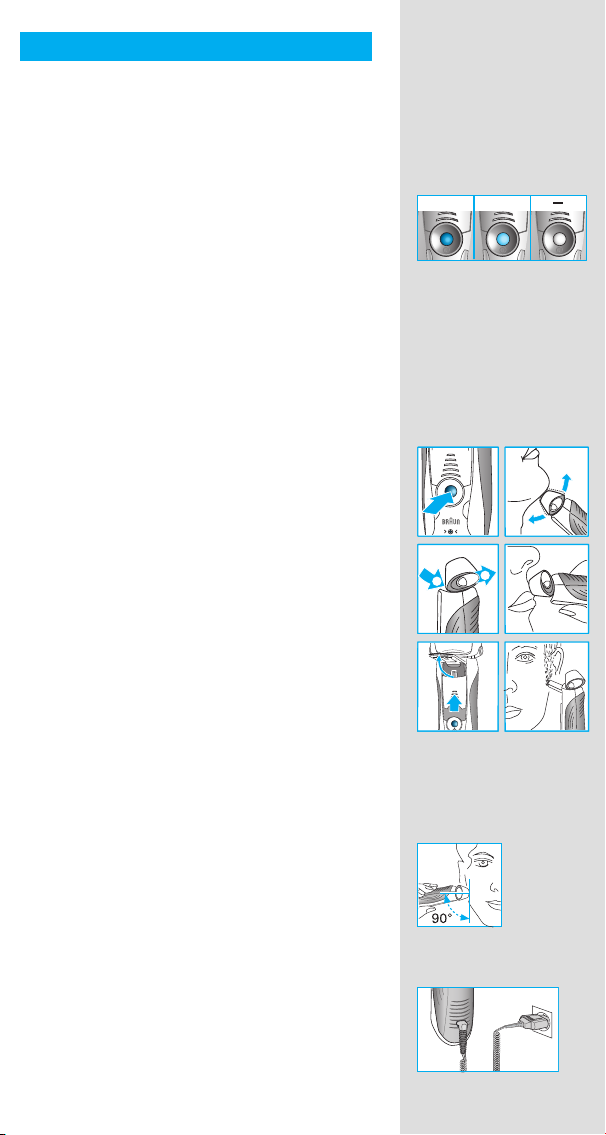
The shaver display z shows the charge status
of the battery. During charging or when using the
shaver, the respective green charge status will
blink. When the battery is fully charged the green
charge status will light up continously, provided
the shaver is switched on or connected to an
electrical outlet.
Stand-by mode
(Shaver is switched off but connected to the
power grid)
Some minutes after completing the charging,
the shaver switches to the stand-by-mode:
The display turns off.
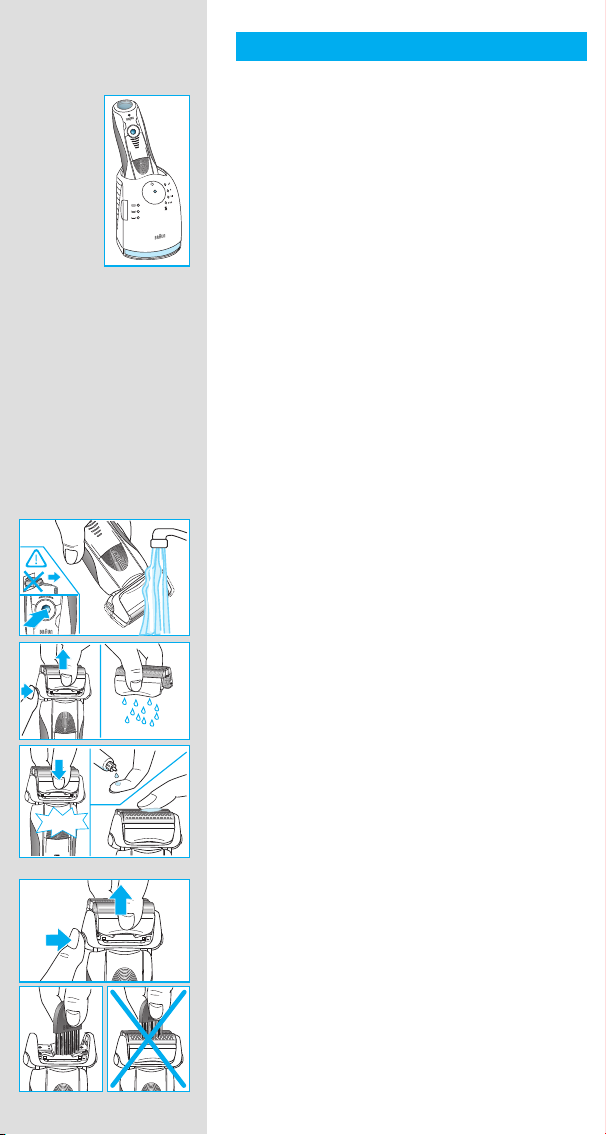
Low charge indicator:
1
1
0
0
0
0
2
2
0
0
0
0
8
8
4
4
0
0
0
0
6
6
The red «low» charge indicator blinks to
indicate that the charge has dropped below
20%, provided the shaver is switched on.
The remaining battery capacity is suffi cient
for 2 to 3 shaves.
Charging information
• A full charge provides up to 50 minutes
of cordless shaving time. This may vary
according to your beard growth.
• The best environmental temperature for
charging is between 41 °F to 95 °F / 5 °C to
35 °C. Do not expose the shaver to
temperatures higher than 122 °F / 50 °C for
extended periods of time.
8
Page 9
Personalizing your shaver
r
r
releaserelease
Personalizing your shaver
With the (–) e and (+) r buttons you can choose
the best setting for shaving different areas of
your face and as per your specifi c needs.
The different settings are indicated by the pilot
light incorporated in the on/off switch w:
• dark blue (powerful shave)
• light blue (normal)
• white (for a thorough comfortable shave in
sensitive areas of your face such as neck)
For a thorough and fast shave we recommend
the (+) setting.
When switching on next time, the last used
setting will be activated.
normal+normal
+
How to use
Press the on/off switch
w to operate the shaver:
• The pivoting shaver head and fl oating foils
automatically adjust to every contour of your
face.
• To shave hard to reach areas (e.g. under the
nose) slide the shaver head «lock» switch 0 to
the back position to lock the pivoting head at
an angle.
• To trim sideburns, mustache or beard, slide the
pop-out long hair trimmer q upwards.
Tips for the perfect shave
For best shaving results, Braun recommends you
follow 3 simple steps:
1. Always shave before washing your face.
2. At all times, hold the shaver at right angles
(90°) to your skin.
3. Stretch your skin and shave against the
direction of your beard growth.
Shaving with the cord
If the shaver has run out of power (discharged),
and you do not have the time to recharge it in the
Clean&Renew station, you may also shave with
the shaver connected to an electrical outlet via
the special cord set p.
t
t
lock
+
+
2
2
lock
lock
1
1
trimmer
trimmer
lock
lock
lock
lock
lock
9
Page 10
Cleaning
trimmertrimmer
re
le
a
s
e
re
le
a
s
e
Automatic cleaning
After each shave, return the shaver to the
Clean&Renew station and proceed as described
above in the section «Before shaving».
All charging and cleaning needs are then
automatically taken care of. With daily use, a
cleaning cartridge should be suffi cient for about
30 cleaning cycles.
The hygienic cleaning cartridge contains alcohol,
which once opened will naturally evaporate
slowly into the surrounding air. Each cartridge,
if not used daily, should be replaced after
approximately 8 weeks.
The cleaning cartridge also contains lubricants,
which may leave residual marks on the outer foil
frame after cleaning. However, these marks can
be removed easily by wiping gently with a cloth
or soft tissue paper.
Manual cleaning
The hand-held unit shall be detached from the
power supply cord before cleaning. The shaver
shall not be used until it has dried.
trim
trim
m
m
er
er
Rinsing the shaving head under running water
is an alternative way to keep the shaver clean,
especially when travelling:
• Switch the shaver on (cordless) and rinse the
shaving head under hot running water.
You may use liquid soap without abrasive
substances. Rinse off all foam and let the
shaver run for a few more seconds.
• Next, switch off the shaver, press the release
button
9 to remove the Foil & Cutter cassette
8 and let it dry.
• If you regularly clean the shaver under
water, then once a week apply a drop of
light machine oil on top of the Foil & Cutter
cassette.
re
re
le
le
a
a
s
s
e
e
re
re
le
le
a
a
s
s
e
e
Series 7
Series 7
click!
click!
Series
Series
trimmer
trimmer
Series
Series
er
er
oil
oil
Series 7
Series 7
Alternatively, you may clean the shaver using the
brush provided:
Series 7
Series 7
re
re
le
le
a
a
s
s
e
e
• Switch off the shaver. Remove the Foil & Cutter
cassette 8 and tap it out on a fl at surface.
Using the brush, clean the inner area of the
pivoting head. However, do not clean the
cassette with the brush as this may damage it.
Series 7
re
re
le
le
a
a
s
s
e
e
10
Series 7
re
re
le
le
a
a
s
s
e
e
Page 11
Cleaning the housing
From time to time clean the housing of the
shaver and the Clean&Renew station with a
damp cloth, especially inside the cleaning
chamber where the shaver rests.
Replacing the cleaning cartridge
After having pressed the lift button
2 to open the
housing, wait for a few seconds before removing
the used cartridge to avoid any dripping.
Before discarding the used cartridge, make sure
to close the openings using the lid of the new
cartridge, since the used cartridge will contain
contaminated cleaning solution.
Keeping your shaver in top shape
Replacing the Foil & Cutter cassette / reset
To maintain 100% shaving performance, replace the Foil & Cutter cassette 8, when the
replacement symbol lights up on the shaver
display z (after about 18 months) or when
cassette is worn.
The replacement symbol will remind you during
the next 7 shaves to replace the Foil & Cutter
cassette. Then the shaver will automatically reset
the display.
old
new
new
0
0
2
2
0
0
4
4
0
0
6
6
old
1
1
0
0
0
0
8
8
0
0
After you have replaced the Foil & Cutter
cassette, use a ball-point pen to push the reset
button t for at least 3 seconds to reset the
counter. While doing so, the replacement light
blinks and goes off when the reset is complete.
The manual reset can be done at any time.
Accessories
Available at your dealer or Braun Service
Centers:
• Foil & Cutter cassette 70S
• Cleaning cartridge Clean&Renew CCR
Environmental notice
This appliance contains rechargeable
batteries. To protect the environment,
do not dispose of the appliance in the
household waste at the end of its useful life.
Disposal can take place at a Braun Service
Center or appropriate collection sites.
re
re
le
le
a
a
s
s
e
e
Series 7
Series 7
er
er
70S70S
70S
70S
11
Page 12

The cleaning cartridge can be disposed with
regular household waste.
Subject to change without notice.
For electric specifi cations, see printing on the
special cord set.
12
Page 13

How to obtain service in the USA
60 day money back satisfaction guarantee
Should your Braun product require service,
please call 1-800-BRAUN 11 (272-8611) to be referred to
the Authorized Braun Service Center closest to you.
To obtain service:
A. Carry the product in to the Authorized Braun Service Center
of your choice or,
B. Ship the product to the Authorized Braun Service Center
of your choice.
Pack the product well.
Ship the product prepaid and insured (recommended).
Include a copy of your proof of purchase to verify warranty
coverage, if applicable.
To obtain original Braun replacement parts and accessories:
Contact a Braun Authorized Service Center.
Please call 1-800-BRAUN 11 (272-8611) to be referred to the
Authorized Braun Service Center closest to you.
To speak to a Braun Consumer Service Representative:
Please call 1-800-BRAUN 11 (272-8611).
13
Page 14

How to obtain service in Canada
60 day money back satisfaction guarantee
Should your Braun product require service,
please call 1-800-387-6657 to be referred to
the Authorized Braun Service Center closest to you.
To obtain service:
A. Carry the product in to the Authorized Braun Service Center
of your choice or,
B. Ship the product to the Authorized Braun Service Center
of your choice.
Pack the product well.
Ship the product prepaid and insured (recommended).
Include a copy of your proof of purchase to verify warranty
coverage, if applicable.
To obtain original Braun replacement parts & accessories:
Contact a Braun Authorized Service Center.
Please call 1-800-387-6657 to be referred to the Authorized Braun
Service Center closest to you.
To speak to a Braun Service Representative:
Please call 1-800-387-6657.
14
Page 15

60 day money back satisfaction guarantee
for men’s grooming products
Braun Shavers
Braun Beard Trimmers
Once you have tried your new Braun shaver or beard trimmer, we
are confident you will appreciate its performance. We suggest
using the product regularly for 2 to 3 weeks. If you are not
satisfied with the product, please call 1-800-211-6661 within
60 days of purchase. Retain original cash receipt, product and all
product parts, including the box. Do not return to the retailer for
guarantee fulfillment.
Please note: No refunds will be made for any product damaged by
accident, neglect or unreasonable use.
Your product must be shipped in its original packaging, with your
original sales slip indicating the date of purchase.
Please include the following information when you return your
product:
Name
Street
City
State Zip code
Telephone number
Please allow 6-8 weeks for handling.
15
Page 16

FOR USA ONLY
2 year limited warranty
(foil and cutter cassette excluded)
Braun warrants this Braun shaver (except foil and cutter cassette)
to be free of defects in material and workmanship for a period of
two years from the date of original purchase.
If the shaver exhibits such a defect, Braun will, at its option, either
repair or replace it for the consumer without charge.
Please call 1-800-Braun 11 (800-272-8611) to be referred to the
authorized Braun Service Center closest to you.
This warranty does not cover foil and cutter cassette or damage
resulting from accident, misuse, abuse, dirt, water, tampering,
unreasonable use, normal wear, servicing performed or attempted
by unauthorized service agencies or failure to provide reasonable
and necessary maintenance, including recharging.
ALL IMPLIED WARRANTIES, INCLUDING ANY IMPLIED
WARRANTY OF MERCHANTABILITY OR FITNESS FOR ANY
PARTICULAR PURPOSE, ARE LIMITED IN DURATION TO
2 YEARS FROM DATE OF ORIGINAL PURCHASE. IN NO EVENT
WILL BRAUN BE RESPONSIBLE FOR CONSEQUENTIAL
DAMAGES RESULTING FROM THE USE OF THIS PRODUCT.
Some states do not allow the exclusion or limitation of incidental
or consequential damages, so the above limitation or exclusion
may not apply to you.
This warranty gives you specific legal rights, and you may also
have other legal rights which vary from state to state.
16
Page 17

FOR CANADA ONLY
2 year limited warranty
(foil and cutter cassette excluded)
In the event a Braun Shaver fails to function within 2 years from
date of purchase, because of defects in material or workmanship,
and the consumer returns the unit to an authorized service center,
Braun Canada, will, at its option, either repair or replace the unit
without additional charge to the consumer.
This guarantee does not cover any product, which has been
damaged by dropping, tampering, wrong current, servicing
performed or attempted by unauthorized service agencies, misuse
or abuse, kinks in the shaver foil as well as the normal wear of
the shearing parts.
Exclusion of Warranties: The foregoing warranty is the sole
warranty offered by Braun Canada. Braun Canada hereby
disclaims any implied warranty or merchantability or fitness for any
particular purpose. In no event will Braun Canada be responsible
for consequential damages resulting from the use of this product.
17
Page 18

Français
PRÉCAUTIONS IMPORTANTES
Lors de l’utilisation d’appareils électriques, toujours prendre les
mesures de sécurité de base suivantes :
Lire toutes les directives avant d’utiliser cet appareil.
Lorsqu’il est débranché, et hors du système Clean&Renew,
le rasoir peut être nettoyé sous l’eau.
DANGER
Pour réduire les risques de choc électrique :
1. Utiliser uniquement en milieu sec.
2. Ne pas immerger dans l’eau.
3. Ne pas toucher l’appareil s’il est tombé dans l’eau.
Le débrancher immédiatement.
4. Ne pas utiliser pendant le bain ou la douche.
5. Ne pas placer, ranger ou recharger l’appareil à un endroit d’où
il pourrait tomber ou glisser dans une baignoire ou un évier.
Ne pas immerger dans l’eau ni dans aucun autre liquide.
6. Sauf dans le cas d’une recharge, toujours débrancher l’appareil
de la prise électrique immédiatement après l’utilisation.
7. Débrancher l’appareil avant le nettoyage.
8. Cet appareil comprend un cordon spécial muni d’un dispositif
de sécurité intégré assurant une alimentation à très basse
tension. Par conséquent, il faut éviter d’échanger ou de
manipuler les pièces de ce dispositif.
9. Ne pas utiliser une rallonge pour cet appareil.
RÉSERVÉ À L’USAGE
DOMESTIQUE
18
Page 19

AVERTISSEMENT
Pour réduire les risques de brûlure, d’incendie, de choc électrique
ou de blessure, suivre les directives suivantes :
1. Surveiller attentivement lorsque l’appareil est utilisé par ou
pour des enfants ou des personnes handicapées, ou près de
ceux-ci.
2. Ne pas utiliser cet appareil à des fins autres que celles
indiquées dans ce manuel. Ne pas utiliser d’accessoires non
recommandés par le fabricant.
3. Ne jamais faire fonctionner cet appareil si sa fiche ou son
cordon sont abîmés, ont été échappés ou sont endommagés,
ou bien si son cordon électrique a été échappé dans l’eau.
Retourner l’appareil à un centre de services pour inspection et
réparation.
4. Tenir le cordon loin des surfaces chauffées.
5. Ne jamais laisser tomber l’appareil ni insérer d’objets dans les
orifices.
6. Ne pas utiliser à l’extérieur, dans un endroit où des produits en
aérosol (vaporisateurs) sont utilisés ni là où l’on administre de
l’oxygène.
7. Ne pas utiliser cet appareil si sa grille est endommagée ou
brisée; cela pourrait entraîner des blessures graves au visage.
8. Toujours relier la fiche à l’appareil avant de brancher à la prise
électrique. Pour débrancher, placer tous les interrupteurs à
« off » (arrêt), puis retirer la fiche de la prise.
9. Pour brancher à une prise électrique à l’extérieur des É.-U.,
utiliser une fiche d’adaptation conforme à la configuration des
broches de la prise.
10. Mise en garde : La pile qui se trouve dans cet appareil peut
causer un incendie ou une brûlure chimique si elle n’est pas
utilisée adéquatement. Ne pas la désassembler à des
températures supérieures à 100 ºC (212 ºF) ni la jeter au feu.
CONSERVER CES DIRECTIVES
19
Page 20

Avertissement
Pour empêcher les fuites de liquide nettoyant,
s’assurer que le système Clean&Renew est
placé sur une surface plane. Lors de l’installation
d’une cartouche de nettoyage, ne pas incliner,
déplacer brusquement ni transporter le système
de quelque façon que ce soit, car le liquide
nettoyant risque de s’échapper de la cartouche.
Ne pas ranger le système dans une armoire
à miroir ni le placer sur une surface polie ou
laquée.
La cartouche de nettoyage contient un liquide
hautement infl ammable. Tenir loin des sources
d’infl ammation. Ne pas exposer à la lumière
directe du soleil et à la fumée de cigarette, ni
placer sur un radiateur. Tenir hors de la portée
des enfants.
Ne pas recharger la cartouche. N’utiliser que des
cartouches de rechange fabriquées par Braun.
Description
Système Clean&Renew
1 Indicateur du liquide nettoyant
2 Bouton d’ouverture pour changer la
cartouche
3 Broches de connexion du système au rasoir
4 Bouton de démarrage du nettoyage
5 Diodes des programmes de nettoyage
6 Prise d’alimentation du système
7 Cartouche de nettoyage
20
Rasoir
8 Boîtier grille de rasage et bloc-couteaux
9 Bouton de déclenchement du boîtier
0 Interrupteur de verrouillage de la tête
de rasage
q Tondeuse escamotable pour poils longs
w Interrupteur marche-arrêt
e (–) Bouton de réglage (sensitif)
r (+) Bouton de réglage (intensif)
t Bouton de réinitialisation
z Affi cheur du rasoir
u Broches de connexion du rasoir au système
i Prise d’alimentation du rasoir
o Étui de voyage
p Cordon d’alimentation spécial
Page 21

Avant le rasage
trimmer
trimmer
Avant la première utilisation, brancher le rasoir
à une prise de courant à l’aide du cordon
d’alimentation spécial p ou procéder comme
suit :
Installation du système Clean&Renew
• À l’aide du cordon d’alimentation spécial
relier la prise du système 6 à une prise de
courant.
• Appuyer sur le bouton d’ouverture 2 pour
ouvrir le boîtier.
• Tenir la cartouche de nettoyage 7 à plat sur
une surface plane et stable (par exemple une
table).
p,
1
1
2
2
n
n
a
a
f
f
e
e
l
l
a
a
c
c
s
s
t
t
new
new
• Retirer délicatement le couvercle de la
cartouche.
• Insérer la cartouche le plus loin possible dans
la base du système.
• Fermer lentement le boîtier en appuyant
jusqu’à ce qu’il s’enclenche.
L’indicateur du liquide nettoyant 1 affi che la
quantité de liquide dans la cartouche :
jusqu’à 30 cycles de nettoyage offerts
jusqu’à 7 cycles de nettoyage restants
cartouche neuve requise
Charge et nettoyage du rasoir
Enfoncer la tête de rasage dans le système de
nettoyage. (Les broches de connexion u au dos
du rasoir doivent être alignées sur les broches 3
du système de nettoyage).
S’il y a lieu, le système Clean&Renew chargera
automatiquement le rasoir. L’état d’hygiène
du rasoir sera également analysé et l’une
des diodes des programmes de nettoyage 5
suivants s’allumera :
« » le rasoir est propre
« » nettoyage bref et économique requis
« » niveau normal de nettoyage requis
« » nettoyage haute intensité requis
n
n
n
a
a
f
f
e
e
l
l
a
a
c
c
s
s
t
t
Series 7
Series 7
n
a
a
f
f
e
e
l
l
a
a
c
c
t
t
s
s
21
Page 22

Si le système sélectionne l’un des programmes
de nettoyage requis, il ne démarrera que si
l’on appuie sur le bouton de démarrage du
nettoyage 4. Pour un rasage optimal, nous
recommandons de nettoyer après chaque
utilisation.
Au cours du processus de nettoyage, la diode du
programme de nettoyage sélectionné clignote.
Chaque programme de nettoyage comprend
plusieurs cycles, au cours desquels le liquide
nettoyant s’écoule dans la tête de rasage et un
processus de séchage à la chaleur permet de
sécher le rasoir. Selon le programme sélectionné,
le nettoyage complet dure de 32 à 43 minutes.
Ne pas interrompre les programmes de
nettoyage. Noter que pendant le séchage du
rasoir, la tête de rasage peut être chaude et
mouillée.
Au terme du programme, la diode bleue «
»
s’allume. Le rasoir est désormais propre et prêt
à être utilisé.
Mode d’attente
Dix minutes après la charge ou la séance de
nettoyage, le système Clean&Renew passe
au mode d’attente : les diodes du système
Clean&Renew et l’affi cheur du rasoir s’éteignent.
Affi cheur du rasoir
22
1
1
0
0
0
0
2
2
0
0
0
0
8
8
4
4
0
0
0
0
6
6
L’affi cheur du rasoir z affi che l’état de charge
de la pile. Pendant le chargement ou l’utilisation
du rasoir, le voyant vert du niveau de charge
correspondant clignote. Lorsque la pile est
complètement chargée, le voyant vert du niveau
de charge est allumé en continu quand le rasoir
fonctionne ou qu’il est branché à une prise de
courant.
Mode d’attente
(Le rasoir est branché à une prise de courant et
l’interrupteur est à la position marche)
Quelques minutes après avoir complété la
charge, le rasoir passe au mode d’attente :
L’affi cheur se ferme.
Indicateur de faible charge:
1
1
0
0
0
0
2
2
0
0
0
0
8
8
4
4
0
0
0
0
6
6
Le voyant lumineux rouge de charge faible
(« low ») clignote pour indiquer que le niveau de
charge est inférieur à 20 %. La capacité restante
de la pile est suffi sante pour 2 à 3 rasages.
Information sur la charge
• Une charge complète procure jusqu’à
50 minutes de rasage sans cordon. Cette
durée peut varier selon la longueur de la barbe.
Page 23

• La température ambiante idéale pour le
r
r
releaserelea
se
chargement est de 5 ºC à 35 ºC / de 41 ºF
à 95 ºF. Ne pas exposer le rasoir à des
températures supérieures à 50 °C / 122 °F
pendant des périodes de temps prolongées.
Personnaliser son rasoir
Personnaliser son rasoir
À l’aide des boutons de réglage (–) e et (+) r,
sélectionner le meilleur réglage pour raser
les différentes zones de votre visage et pour
répondre à vos besoins précis. Les différents
réglages sont indiqués par le voyant lumineux
intégré à l’interrupteur marche / arrêt w :
• bleu foncé (rasage puissant)
• bleu clair (normal)
• blanc (pour un rasage complet et confortable
des zones sensibles comme le cou)
Pour un rasage complet et rapide, nous
recommandons le réglage « + ».
Lors de la prochaine mise en marche, le dernier
réglage utilisé sera sélectionné.
normal+normal
+
Comment utiliser le rasoir
Appuyer sur l’interrupteur marche-arrêt w pour
mettre le rasoir en marche :
• La tête de rasage pivotante et les grilles
fl ottantes suivent automatiquement tous les
contours du visage.
• Pour raser les endroits diffi ciles à atteindre (par
exemple sous le nez), pousser l’interrupteur
de verrouillage de la tête de rasage 0 vers
l’arrière afi n de verrouiller la tête pivotante en
biais.
• Pour tailler les favoris, la moustache ou la
barbe, pousser la tondeuse escamotable pour
poils longs q vers le haut.
Conseils pour un rasage parfait
Pour un rasage optimal, Braun recommande de
suivre ces trois étapes simples :
1. Toujours se raser avant de se laver le visage.
2. Toujours tenir le rasoir à angle droit (90º) par
rapport à la peau.
3. Tendre la peau et raser dans le sens opposé
à la repousse.
t
t
lock
+
+
2
2
lock
lock
1
1
trimmer
trimmer
lock
lock
lock
lock
lock
23
Page 24

Rasage avec cordon
trimmertrimmer
re
le
a
s
e
re
le
a
s
e
Si le rasoir est déchargé et que le temps manque
pour le recharger dans le système Clean&Renew,
se raser en branchant le rasoir à une prise de
courant à l’aide du cordon d’alimentation
p.
spécial
Nettoyage
Nettoyage automatique
Après chaque utilisation, remettre le rasoir dans
le système Clean&Renew et suivre les directives
décrites dans la section « Avant le rasage »
ci-dessus.
Le système répond alors à tous les besoins en
matière de chargement et de nettoyage. Utilisée
tous les jours, la cartouche de nettoyage devrait
procurer environ 30 cycles de nettoyage.
La cartouche de nettoyage hygiénique contient
de l’alcool qui, dès l’ouverture, s’évapore
naturellement et lentement dans l’air
environnant. Toutes les cartouches non utilisées
quotidiennement devraient être remplacées
après environ huit semaines.
La cartouche de nettoyage contient également
des lubrifi ants pouvant laisser des marques
résiduelles sur l’extérieur du boîtier grille de
rasage après le nettoyage. Toutefois, vous
pouvez enlever ces marques facilement en
essuyant délicatement à l’aide d’un chiffon ou
d’un mouchoir doux.
Nettoyage manuel
Retirer le cordon d’alimentation avant de
nettoyer le rasoir. Laisser sécher le rasoir avant
de l’utiliser.
trim
trim
m
m
er
er
Le rinçage de la tête de rasage à l’eau du robinet
est une autre façon de garder le rasoir propre,
particulièrement en voyage :
• Mettre le rasoir sous tension (sans cordon)
et rincer la tête de rasage à l’eau chaude du
robinet. Il est possible d’utiliser du savon
liquide sans substances abrasives. Rincer pour
enlever toute la mousse et laisser le rasoir en
Series
Series
re
re
le
le
a
a
s
s
e
e
Series 7
Series 7
re
re
le
le
a
a
s
s
e
e
click!
click!
trimmer
trimmer
24
Series
Series
er
er
oil
oil
Series 7
Series 7
marche pendant quelques secondes.
• Ensuite, mettre le rasoir hors tension, appuyer
sur le bouton de déclenchement 9 pour
dégager du boîtier grille de rasage et bloccouteaux 8 et laisser sécher.
• Si le rasoir est nettoyé régulièrement à l’eau,
appliquer une fois par semaine une goutte
d’huile mouvement sur le dessus du boîtier
grille de rasage et bloc-couteaux.
Page 25

Le rasoir peut aussi être nettoyé à l’aide de la
brosse fournie :
• Mettre le rasoir hors tension. Enlever le boîtier
grille de rasage et bloc-couteaux
8 et le
tapoter sur une surface plane. À l’aide de la
brosse, nettoyer l’intérieur de la tête pivotante.
Toutefois, ne pas nettoyer le boîtier à l’aide de
la brosse, car cela risquerait de l’endommager.
Nettoyage du boîtier
De temps à autre, nettoyer le boîtier du rasoir et
le système Clean&Renew à l’aide d’un chiffon
humide, particulièrement l’intérieur du réceptacle
où le rasoir est logé.
Remplacement de la cartouche de nettoyage
Après avoir appuyé sur le bouton d’ouverture
2
pour ouvrir le boîtier, attendre quelques
secondes avant d’enlever la cartouche usée
afi n d’éviter tout écoulement. Avant de jeter
la cartouche usée, s’assurer de fermer les
ouvertures à l’aide du couvercle de la cartouche
neuve, car la cartouche usée contient de la
solution de nettoyage contaminée.
Pour garder le rasoir en parfait état
re
re
le
le
a
a
s
s
e
e
new/neuve
new/neuve
Series 7
Series 7
re
re
le
le
a
a
s
s
e
e
Series 7
Series 7
re
re
le
le
a
a
s
s
e
e
old/usée
old/usée
Remplacement du boîtier grille de rasage et
bloc-couteaux / réinitialisation
Pour un rasage optimal, remplacer le boîtier
grille de rasage et bloc-couteaux 8 lorsque
le symbole de remplacement s’allume sur
l’affi cheur du rasoir (après z mois environ) ou
lorsque le boîtier est usé.
Le symbole de remplacement rappellera de
remplacer le boîtier grille de rasage et bloccouteaux durant les sept rasages suivants.
Puis, le rasoir réinitialisera automatiquement
l’affi cheur.
Après avoir remplacé le boîtier grille de rasage
et bloc-couteaux, utiliser un stylo à bille pour
enfoncer le bouton de réinitialisation t pendant
au moins trois secondes afi n de réinitialiser le
compteur. Pendant la manipulation, le témoin
de remplacement clignote et s’éteint lorsque
la réinitialisation est achevée. La réinitialisation
manuelle peut être effectuée en tout temps.
1
1
0
0
0
0
2
2
0
0
0
0
8
8
4
4
0
0
0
0
6
6
Series 7
Series 7
re
re
le
le
a
a
s
s
e
e
er
er
70S
70S
25
Page 26

70S70S
Accessoires
Offerts chez les distributeurs et aux centres de
services Braun :
• Boîtier grille de rasage et bloc-couteaux
70S
• Cartouche de nettoyage Clean&Renew CCR
Avis environnemental
Cet appareil contient des piles
rechargeables. Pour protéger
l’environnement, ne pas jeter cet appareil
dans les ordures ménagères lorsqu’il
n’est plus utilisable, mais le retourner à un
centre de services Braun ou à un centre
de collecte approprié.
La cartouche de nettoyage peut être jetée dans
les ordures ménagères habituelles.
Sous réserve de modifi cations sans préavis.
Spécifi cations électriques imprimées sur le
cordon d’alimentation spécial.
26
Page 27

Service après-vente au Canada
Garantie de satisfaction ou remboursement
(60 jours)
Pour obtenir des services après-vente pour un produit Braun,
veuillez composer le 1 800 387-6657 afin d’être dirigé vers le
centre de service après-vente agréé Braun le plus proche.
Pour obtenir des services après-vente :
A. Veuillez remettre le produit au centre de service après-vente
agréé Braun de votre choix. Ou :
B. Veuillez expédier le produit au centre de service après-vente
agréé Braun de votre choix.
Assurez-vous de bien emballer le produit.
Expédiez le produit, port payé et assuré (recommandé).
N’oubliez pas d’inclure une copie de votre preuve d’achat
afin de confirmer la couverture de la garantie, le cas
échéant.
Pour obtenir des pièces et accessoires de rechange Braun
d’origine,
communiquez avec un centre de service après-vente agréé Braun.
Veuillez composer le 1 800 387-6657 afin d’être dirigé vers le
centre de service après-vente agréé Braun le plus proche.
Pour communiquer avec un représentant du Service après-vente
Braun,
veuillez composer le 1 800 387-6657.
27
Page 28

Garantie de satisfaction ou remboursement
(60 jours)
Rasoirs Braun
Tondeuses à barbe Braun
À notre avis, vous serez satisfait de la performance de votre
nouveau rasoir ou nouvelle tondeuse à barbe de Braun.
Nous suggérons l’utilisation régulière du produit pendant 2 à 3
semaines. Si vous n’êtes pas satisfait du produit, veuillez
composer le 1-800-211-6661 dans les 60 jours suivant la date
d’achat. Conservez le reçu de caisse original, le produit, toutes les
pièces ainsi que la boîte. Ne vous présentez pas chez le détaillant
pour que la garantie soit honorée.
Veuillez noter qu’aucun remboursement ne sera autorisé pour tout
appareil endommagé à la suite d’un accident, de négligence ou
d’un usage impropre.
Votre produit doit être expédié dans son emballage original, avec
votre reçu de caisse indiquant la date d’achat.
Lors du retour du produit, veuillez inclure l’information suivante:
Nom
Rue
Ville
Province Code postal
Téléphone
Prévoir un délai de 6 à 8 semaines pour le traitement.
28
Page 29

POUR LE CANADA SEULEMENT
Garantie restreinte de deux ans
(boîtier grille de rasage et bloc-couteaux exclus)
Advenant un défaut de fonctionnement d’un rasoir Braun
survenant au cours de la période de deux ans suivant la date
d’achat, en raison d’un vice de matière ou de fabrication, et
pourvu que le consommateur retourne l’appareil à un centre de
services agréé, Braun Canada se réserve le choix de le réparer ou
de le remplacer, sans aucuns frais supplémentaires pour le
consommateur.
La présente garantie ne couvre pas tout produit endommagé par
une chute, une modification, l’utilisation d’un courant inapproprié,
un entretien ou des tentatives d’entretien par des centres de
services non agréés, un usage impropre ou abusif, des anomalies
dans la grille de rasage ou par l’usure normale des pièces de
la tondeuse.
Exclusion des garanties : La présente garantie est la seule
garantie offerte par Braun Canada. Par la présente, Braun Canada
rejette toute garantie implicite à l’égard de la qualité marchande ou
de l’aptitude à des fins particulières. En aucun cas Braun ne sera
tenue responsable des dommages indirects résultant de
l’utilisation de ce produit.
29
Page 30

Español
MEDIDAS DE SEGURIDAD
IMPORTANTES
Cuando use un aparato eléctrico, siempre tome las medidas de
seguridad básicas, entre las que se incluyen las siguientes:
Lea todas las instrucciones antes de usar este aparato.
Una vez desconectada, la afeitadora se puede lavar con
agua.
PELIGRO
Para disminuir el riesgo de descarga eléctrica:
1. Use en seco únicamente.
2. No sumerja en agua.
3. Si el aparato cae al agua, no trate de sacarlo. Desenchúfelo de
inmediato.
4. No use el aparato mientras se baña o se ducha.
5. No coloque, almacene ni ponga a recargar el aparato en lugares
donde pudiera caerse a la bañera o al lavamanos. No coloque o
deje caer al agua ni en otros líquidos.
6. Desconecte siempre el aparato del enchufe excepto cuando se
está cargando.
7. Desenchufe el aparato antes de limpiarlo.
8. Este aparato está equipado con un cable de alimentación
especial que tiene integrado un transformador de seguridad de
voltaje extra bajo. No cambie ni manipule ninguna de sus
piezas.
9. No use extensiones eléctricas con este aparato.
SOLAMENTE PARA USO
DOMÉSTICO
30
Page 31

ADVERTENCIA
Para disminuir el riesgo de quemaduras, incendio, descarga
eléctrica o lesiones:
1. Se debe supervisar detenidamente el uso de este aparato
cuando se emplee por o cerca de niños o personas
discapacitadas.
2. Use este producto solamente para el propósito indicado tal
como se describe en este manual. No utilice accesorios que
no estén recomendados por el fabricante.
3. No use este producto si el cable o el enchufe están dañados,
si no funciona debidamente, si se ha caído o dañado o si el
cargador se ha caído al agua. Envíe el aparato a un centro de
servicio técnico para su revisión y reparación.
4. Mantenga el cable alejado de las superficies calientes.
5. Nunca lo deje caer ni introduzca ningún objeto en las
aberturas.
6. No lo use al aire libre o en lugares donde se estén usando
productos en aerosol (spray) o donde se esté administrando
oxígeno.
7. No use este aparato si las láminas afeitadoras están dañadas
o rotas, ya que podría causar lesiones graves en la piel.
8. Siempre conecte primero el enchufe al aparato y luego al
tomacorriente. Para desconectar, apague todos los controles
con «off», y luego desenchufe del tomacorriente.
9. Si enchufa el aparato a un tomacorriente fuera de los Estados
Unidos, use un adaptador que se acople a la configuración de
pines del tomacorriente.
10. Precaución: Este aparato usa una batería que puede
ocasionar incendios o quemaduras químicas si se somete a
maltratos. No la desarme ni la caliente a temperaturas
superiores a 100 °C (212 °F) ni la incinere.
GUARDE ESTAS
INSTRUCCIONES
31
Page 32

Advertencia
Para evitar fugas de la solución limpiadora,
asegúrese de que el soporte Clean&Renew se
encuentre sobre una superfi cie plana. Si hay
un cartucho limpiador instalado, no vuelque el
soporte ni lo mueva bruscamente ni lo transporte
de manera que la solución limpiadora se pueda
salir del cartucho. No coloque el soporte dentro
del botiquín de pared ni sobre el radiador, ni lo
coloque sobre superfi cies pulidas o laqueadas.
El cartucho limpiador contiene un líquido
altamente infl amable, por lo que debe
mantenerlo alejado de fuentes de ignición.
No fume cerca del soporte. No lo exponga a la
luz solar directa durante períodos prolongados ni
lo almacene encima de un radiador. Manténgalo
fuera del alcance de los niños.
No rellene el cartucho. Use solamente cartuchos
de repuesto Braun originales.
Descripción
Soporte Clean&Renew
1 Indicador de nivel de solución limpiadora
2 Botón de apertura para recambio de
cartuchos
3 Contactos del soporte a la afeitadora
4 Botón de inicio de limpieza
5 Indicadores del ciclo de limpieza
6 Entrada del enchufe al soporte
1 Cartucho limpiador
32
Afeitadora
8 Cartucho de láminas y cuchillas
9 Botón para liberar el cartucho de láminas y
cuchillas
0 Botón para bloquear el cabezal rasurador
«lock»
q Recortador de vellos largos extensible
w Interruptor de encendido y apagado
e Selector de nivel (–) (sensible)
r Selector de nivel (+) (intensivo)
t Botón de reinicio (reset)
z Indicador de carga de la afeitadora
u Contactos de la afeitadora al soporte
i Entrada del enchufe a la afeitadora
o Estuche de viaje
p Cable de alimentación especial
Page 33

Antes de afeitarse
trimm
er
trimm
er
Antes de usar la afeitadora por primera vez,
debe conectar la afeitadora al tomacorriente
usando el cable de alimentación especial p o
seguir los pasos que se indican más adelante.
Instalación del soporte Clean&Renew
• Con el cable de alimentación especial
p,
conecte la entrada del enchufe al soporte 6 a
un tomacorriente.
• Oprima el botón de apertura 2 para abrir la
cubierta.
• Coloque el cartucho limpiador 7 en una
superfi cie plana y estable (por ejemplo, una
mesa).
• Quite cuidadosamente la tapa del cartucho.
• Deslice el cartucho en la base del soporte
hasta que llegue al fondo del compartimiento.
• Cierre la cubierta lentamente hasta que vuelva
a quedar fi ja.
El indicador de nivel de solución limpiadora 1
mostrará cuánta solución hay en el cartucho:
hasta 30 ciclos de limpieza disponibles
hasta 7 ciclos de limpieza restantes
se requiere un nuevo cartucho
Cómo recargar y limpiar la afeitadora
Introduzca el cabezal de la afeitadora en el
soporte de limpieza. (Los contactos u ubicados
en la parte trasera de la afeitadora se alinearán
con los contactos 3 del soporte de limpieza).
Si fuese necesario, el soporte Clean&Renew
recargará automáticamente la afeitadora.
Además, el estado de limpieza de la afeitadora
se analizará y uno de los siguientes indicadores
del ciclo de limpieza 5 se encenderá:
1
1
2
2
n
n
a
a
f
f
e
e
l
l
a
a
c
c
s
s
t
t
n
n
a
a
f
f
e
e
l
l
a
a
c
c
s
s
t
t
Series 7
Series 7
new
new
n
n
a
a
f
f
e
e
l
l
a
a
c
c
t
t
s
s
« » La afeitadora está limpia
« » Se requiere limpieza rápida
« » Se requiere limpieza normal
« » Se requiere limpieza intensiva
Si el soporte selecciona uno de los ciclos de
limpieza requeridos, no lo iniciará sino hasta que
se oprima el botón de inicio de limpieza 4.
Para obtener resultados óptimos durante
la afeitada, recomendamos que limpie la
afeitadora después de cada uso.
33
Page 34

Mientras se realiza la limpieza, el indicador de
ciclo de limpieza correspondiente parpadeará.
Cada ciclo de limpieza consta de varias etapas
durante las que la solución limpiadora pasa por
el cabezal de la afeitadora, y de una fase de
secado con calor que seca la afeitadora. Según
el ciclo elegido, el tiempo total de limpieza
puede variar de 32 a 43 minutos.
Los ciclos de limpieza no deben interrumpirse.
Tenga en cuenta que cuando la afeitadora se
está secando, el cabezal puede estar caliente y
húmedo.
Cuando el ciclo de limpieza haya concluido, el
indicador azul «
» se encenderá. La afeitadora
está limpia y lista para usarse.
Modo de espera
10 minutos después de completada la recarga
o la limpieza, el soporte Clean&Renew cambia
a modo de espera: Los indicadores del soporte
Clean&Renew se apagarán.
Indicador de carga de la afeitadora
34
1
1
0
0
0
0
2
2
0
0
0
0
8
8
4
4
0
0
0
0
6
6
El indicador de carga de la afeitadora z muestra
el nivel de carga de la batería. Durante la recarga
o cuando la afeitadora se esté usando, la luz
verde del nivel de carga respectivo parpadeará.
Cuando la batería está totalmente cargada, la
luz verde del nivel de carga estará encendida de
modo constante, siempre y cuando la afeitadora
esté encendida o conectada a un tomacorriente.
Modo de espera
(La afeitadora está apagada pero conectada al
suministro de energía)
Unos minutos después de completada la
recarga, la afeitadora cambia a modo de espera:
El indicador de carga se apaga.
Indicador de carga baja:
1
1
0
0
0
0
2
2
0
0
0
0
8
8
4
4
0
0
0
0
6
6
La luz roja del indicador de carga baja «low»
parpadeará cuando la carga sea inferior al 20%,
siempre y cuando la afeitadora esté encendida.
La capacidad restante de la batería será
sufi ciente para 2 ó 3 afeitadas.
Información sobre la carga
• Una batería con carga completa proporciona
hasta 50 minutos de afeitado sin usar el cable
de alimentación. Esto puede variar según el
crecimiento de la barba.
Page 35

• La temperatura ambiente ideal para la recarga
r
r
releaserelea
se
es de 41 °F a 95 °F / de 5 °C a 35 °C.
No exponga la afeitadora a temperaturas
superiores a 122 °F / 50 °C durante períodos
prolongados.
Cómo personalizar su afeitadora
Cómo personalizar su afeitadora
Con los botones (–) e y (+) r, usted puede
elegir el mejor nivel para afeitar diferentes zonas
del rostro según sus necesidades específi cas.
La luz piloto incorporada en el interruptor de
encendido y apagado w indica los diferentes
niveles:
• azul oscuro (afeitada potente)
• azul claro (afeitada normal)
• blanco (para una afeitada profunda y cómoda
en las áreas sensibles de su rostro, como por
ejemplo el cuello)
Para una afeitada rápida y precisa,
recomendamos el nivel (+).
La próxima vez que encienda la afeitadora, se
activará el último ajuste que realizó.
normal+normal
+
Instrucciones
Oprima el interruptor de encendido y apagado w
para encender la afeitadora:
• El cabezal basculante y las láminas fl otantes
se amoldan automáticamente a todos los
contornos del rostro.
• Para afeitar las zonas difíciles de alcanzar (por
ejemplo, debajo de la nariz), deslice hacia
atrás el botón de bloqueo «lock» 0 para
bloquear el cabezal basculante en el ángulo
deseado.
• Para recortar las patillas, el bigote o la
barba, deslice el recortador de vellos largos
extensible q hacia arriba.
Consejos para la afeitada perfecta
Para obtener resultados óptimos durante la
afeitada, Braun le recomienda seguir 3 sencillos
pasos:
1. Siempre aféitese antes de lavarse la cara.
2. Siempre sostenga la afeitadora perpendicular
a su rostro; es decir, en un ángulo de
90 grados.
3. Estire la piel y afeite en dirección contraria al
crecimiento de la barba.
t
t
lock
+
+
2
2
lock
lock
1
1
trimmer
trimmer
lock
lock
lock
lock
lock
35
Page 36

Afeitado con cable de alimentación
trimmertrimmer
re
le
a
s
e
re
le
a
s
e
Si la afeitadora no tiene más potencia (está
descargada), y no hay tiempo de recargarla en el
soporte Clean&Renew, también es posible
afeitarse enchufándola a un tomacorriente por
medio del cable de alimentación especial
p.
Recomendaciones de limpieza
Limpieza automática
Después de cada afeitada, vuelva a colocar la
afeitadora en el soporte Clean&Renew y siga las
instrucciones que se describen anteriormente en
la sección «Antes de afeitarse».
De esta manera, todas las necesidades de
recarga y limpieza quedarán automáticamente
cubiertas. Con el uso diario, un cartucho
limpiador debería rendir aproximadamente
30 ciclos de limpieza.
El cartucho limpiador higiénico contiene alcohol.
Una vez que el cartucho se abre, el alcohol se
evapora naturalmente poco a poco. Por eso, si no
se usa a diario, el cartucho debe reemplazarse
aproximadamente cada 8 semanas.
El cartucho limpiador también contiene
lubricantes que podrían dejar marcas residuales
alrededor de las láminas afeitadoras después
de la limpieza. No obstante, es posible quitar
estas marcas fácilmente frotando suavemente
con un trapo o pañuelo de papel.
Limpieza manual
Antes de limpiar la afeitadora, debe
desconectarla del enchufe. No debe usar la
afeitadora hasta que esté seca.
trim
trim
m
m
er
er
El cabezal de la afeitadora se puede enjuagar
bajo el agua corriente para mantenerlo limpio,
especialmente durante viajes:
• Encienda la afeitadora (sin el cable de
alimentación) y enjuague el cabezal bajo el
agua corriente caliente del grifo. Puede usar
jabón líquido que no contenga abrasivos.
Enjuague toda la espuma y deje la afeitadora
Series
Series
re
re
le
le
a
a
s
s
e
e
Series 7
Series 7
re
re
le
le
a
a
s
s
e
e
click!
click!
trimmer
trimmer
36
Series
Series
er
er
oil
oil
Series 7
Series 7
encendida unos cuantos segundos más.
• Luego, apague la afeitadora, oprima el botón
liberador 9 para retirar el cartucho de láminas
y cuchillas 8 y deje secar.
• Si acostumbra lavar la afeitadora bajo el
agua corriente, una vez por semana aplique
una gota de aceite liviano para máquinas en
la parte superior del cartucho de láminas y
cuchillas.
Page 37

También puede limpiar la afeitadora usando el
cepillo provisto:
• Apague la afeitadora. Retire el cartucho de
láminas y cuchillas
8 y sacúdalo suavemente
sobre una superfi cie plana. Con el cepillo,
limpie la parte interna del cabezal basculante.
No obstante, no limpie el cartucho con el
cepillo ya que podría dañarlo.
Limpieza de la cubierta
Ocasionalmente limpie la cubierta de la
afeitadora y el soporte Clean&Renew con
un trapo húmedo, especialmente dentro del
compartimiento de limpieza donde se coloca la
afeitadora.
Cambio del cartucho limpiador
Después de oprimir el botón de apertura
2
para abrir la cubierta, espere algunos segundos
antes de retirar el cartucho usado a fi n de evitar
goteos. Antes de desechar el cartucho usado,
asegúrese de tapar las aberturas con la tapa
del cartucho nuevo, ya que el cartucho usado
contiene solución limpiadora contaminada.
Cómo mantener su afeitadora en
excelentes condiciones
Series 7
Series 7
re
re
le
le
a
a
s
s
e
e
Series 7
re
re
le
le
a
a
s
s
e
e
new
new
Series 7
re
re
le
le
a
a
s
s
e
e
old
old
Cambio del cartucho de láminas y cuchillas y
reinicio
Para mantener un desempeño óptimo durante
la afeitada, reemplace el cartucho de láminas y
cuchillas 8 cuando el símbolo de repuesto se
encienda en el indicador de carga z (después
de aproximadamente 18 meses) o cuando
el cartucho se haya gastado.
El símbolo de repuesto le recordará durante
las siguientes 7 afeitadas que debe reemplazar
el cartucho de láminas y cuchillas. Luego, la
afeitadora reajustará el indicador de carga
automáticamente.
Una vez que haya reemplazado el cartucho
de láminas y cuchillas, oprima con ayuda de
un bolígrafo el botón de reinicio t durante al
menos 3 segundos para reiniciar el contador.
Mientras lo hace, la luz indicadora de repuesto
parpadeará y cuando el proceso haya concluido,
se apagará. Este proceso de reinicio manual se
puede realizar en cualquier momento.
1
1
0
0
0
0
2
2
0
0
0
0
8
8
4
4
0
0
0
0
6
6
Series 7
Series 7
re
re
le
le
a
a
s
s
e
e
er
er
70S
70S
37
Page 38

70S70S
Accesorios
A la venta en su tienda detallista o en los
Centros de Servicio Braun:
• Cartucho de láminas y cuchillas 70S
• Cartucho limpiador Clean&Renew CCR
Aviso acerca del medio ambiente
Este aparato contiene baterías
recargables. Con el fi n de proteger el
medio ambiente, no deseche este
aparato junto con la basura doméstica al fi nal de
su vida útil. El producto puede desecharse en
un Centro de Servicio Braun o en los centros de
recolección de residuos correspondientes.
El cartucho limpiador se puede desechar con la
basura doméstica.
Sujeto a cambios sin previo aviso.
Para ver las especifi caciones eléctricas, refi érase
al texto impreso en el cable de alimentación
especial.
Características eléctricas
Potencia nominal: 7 W
Tensión de alimentación:
100 – 240 V ~ / 50 – 60 Hz
(se adapta automáticamente)
Voltaje de salida del adaptador: 12 V
38
Page 39

Page 40

Cómo obtener servicio técnico en los EE. UU.
Garantía de satisfacción con reembolso de
60 días
Si su producto Braun requiere servicio técnico, sírvase llamar al
1-800-BRAUN 11 (272-8611) para que lo remitan al Centro de
Servicio Braun autorizado de su localidad.
Para obtener servicio de reparación:
A. Lleve el producto al Centro de Servicio Braun autorizado de su
elección, o
B. Envíe el producto al Centro de Servicio Braun autorizado de su
elección.
Empaque bien el producto.
Envíelo por correo prepagado y asegurado (opción
recomendada).
Incluya una copia del comprobante de compra para
corroborar la cobertura de la garantía, si corresponde.
Para obtener accesorios y repuestos originales Braun:
Comuníquese con un Centro de Servicio Braun autorizado.
Sírvase llamar al 1-800-BRAUN 11 (272-8611) para que lo remitan
al Centro de Servicio Braun autorizado de su localidad.
Si desea hablar con un representante de atención al consumidor
de Braun:
Sírvase llamar al 1-800-BRAUN 11 (272-8611).
40
Page 41

Garantía de satisfacción con reembolso de
60 días para los productos de cuidado personal
para hombres
Afeitadoras Braun
Recortadores de barba Braun
Cuando haya probado la nueva afeitadora o el nuevo recortador
de barba Braun, estamos seguros que estará satisfecho con su
desempeño. Le sugerimos usar el producto regularmente durante
2 ó 3 semanas. Si no está satisfecho con el producto, sírvase
llamar al 1-800-211-6661 dentro de los 60 días posteriores a la
compra. Conserve el recibo de compra original, el producto y
todas sus piezas, incluida la caja. No devuelva el producto a la
tienda detallista para el cumplimiento de la garantía.
Nota: No se realizarán reembolsos para los productos dañados
por accidentes, uso negligente o irracional.
El producto deberá enviarse en su empaque original, con el recibo
de venta original que indica la fecha de compra.
Le rogamos incluya la siguiente información al momento de
devolver el producto:
Nombre
Calle
Ciudad
Estado Código postal
Número de teléfono
Espere de 6 a 8 semanas para recibir su reembolso.
41
Page 42

SÓLO PARA MEXICO
2 años de garantía limitada
La compañía Procter & Gamble Manufactura, S. de R.L. de C.V.
consciente de lo que significa para el usuario un servicio postventa, brinda a este aparato una garantía por 2 años, a partir
de la fecha señalada en el comprobante de compra original,
entendiéndose por ésta, la misma en que el consumidor recibió
el producto. Dentro del plazo de garantía subsanaremos cualquier
defecto de fabricación o mano de obra, bien sea reparando,
cambiando algunas piezas o sustituyendo el aparato, según sea
el desperfecto de éste. Las piezas o aparatos que hayan sido
sustituidos serán de nuestra propiedad.
La garantía perderá validez en los siguientes casos:
a) Cuando el producto no hubiese sido operado de acuerdo
al instructivo anexo.
b) Cuando el producto se hubiese utilizado en condiciones
distintas a las normales.
c) Cuando el producto hubiese sido alterado o reparado por
personas no autorizadas.
Para poder hacer efectiva esta garantía así como para obtener
partes consumibles, accesorios y refacciones, o bien acudir a los
centros de servicio autorizados, le sugerimos comunicarse sin
costo al 01-800-508-58-00.
Importado y/o distribuido por:
Procter & Gamble International Operations, SA
Loma Florida #32, Col. Lomas de Vista Hermosa,
Del. Cuajimalpa,
05100 México, D.F.
42
 Loading...