

Page 1

5412
5410
onoff
5412
www.braun.com/register
trimmerhead lock
Flex Integral +
Type 5474
Page 2
Braun Infolines
Deutsch 4, 30
English 6, 30
Français 8, 30
Español 10, 31
Português 12, 31
Italiano 14, 31
Nederlands 16, 32
Dansk 18, 32
Norsk 20, 32
Svenska 22, 33
Suomi 24, 33
Türkçe 26
∂ППЛУИО¿ 28, 33
D A
CH
GB
IRL
F
B
E
P
I
NL
DK
N
S
FIN
TR
HK
00 800 27 28 64 63
00 800 BRAUNINFOLINE
08 44 - 88 40 10
0800 783 70 10
1 800 509 448
0 810 309 780
0 800 14 952
901 11 61 84
808 20 00 33
(02) 6 67 86 23
0 800-445 53 88
70 15 00 13
22 63 00 93
020 - 21 33 21
020 377 877
0212 - 473 7585
852-25249377
(Audio Supplies Company Ltd.)
Braun GmbH
Frankfurter Straße 145
61476 Kronberg/Germany
5-474-300/01/VI-06/M
D/GB/F/E/P/I/NL/DK/N/S/FIN/TR/GR
Printed in Germany
Page 3
Flex Integral + 5412
1
2
5410
onoff
trimmerhead lock
3
54
8
10
4
onoff
trimmerhead lock
7
5
5412
6
Page 4

Deutsch
on
off
trimmer
Unsere Produkte werden hergestellt, um höchste
Ansprüche an Qualität, Funktionalität und Design zu
erfüllen. Wir wünschen Ihnen mit Ihrem neuen Braun
Rasierer viel Freude.
Achtung
• Das Gerät trocken halten.
• Gelegentlich das Netzkabel auf Schadstellen prüfen
und ggf. durch ein neues ersetzen, wenn es im
Rasierer zu locker sitzt.
• Netzkabel nicht um das Gerät wickeln.
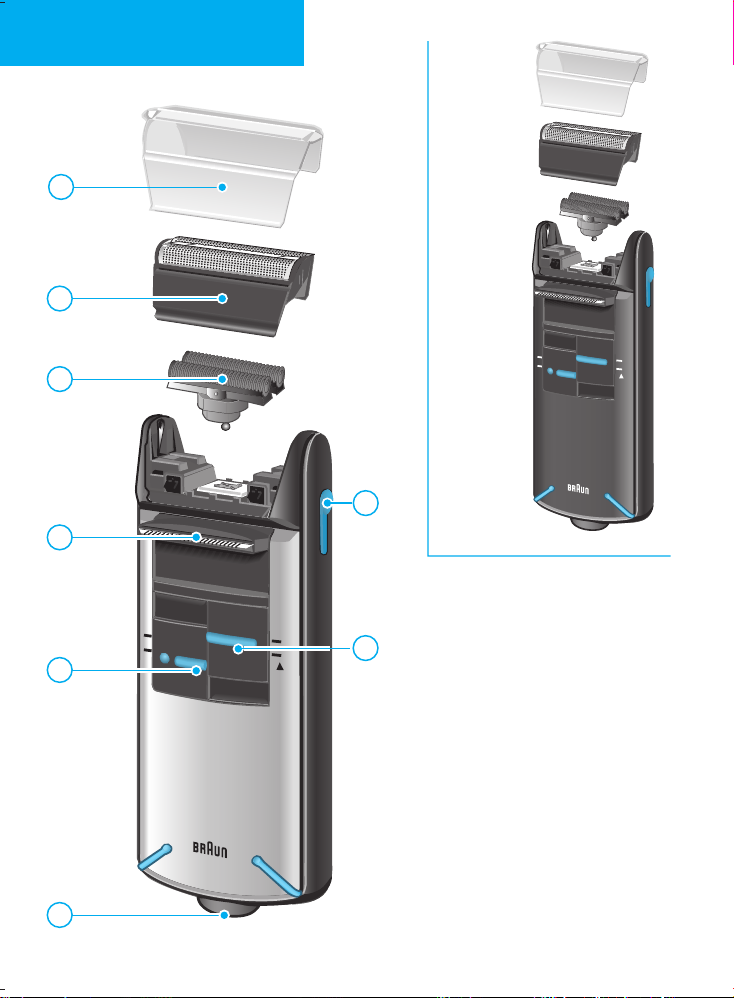
1 Produktbeschreibung
1
Schutzkappe
2
Scherfolie
3
Klingenblock
4
Ausklappbarer Langhaarschneider («trimmer»)
5
Ein-/Ausschalter («on/off»)
6
Steckerbuchse
7
Schalter zum Arretieren des Schwingkopfes
(«head lock») und zum Zuschalten des Langhaarschneiders («trimmer»)
8
Entriegelungstaste
2 Rasieren
Schalterstellungen
off
= Aus
on
= Ein Rasur mit beweglichem Schwingkopf.
Das bewegliche Schersystem sorgt
automatisch für eine optimale Anpassung an die Gesichtsform.
head lock
trimmer
head lock
4
head lock
trimmer
Rasur mit arretiertem Schwingkopf
(Rasur an engen Gesichtspartien, z. B.
unter der Nase)
Langhaarschneider ist zugeschaltet
(zum kontrollierten Trimmen von
Schnauzbart und Haaransatz).
Page 5
Tipps für eine optimale Rasur
• Wir empfehlen, vor dem Waschen zu rasieren, da
nach dem Waschen die Haut leicht aufgequollen ist.
• Rasierer im rechten Winkel (90°) zur Haut halten.
Haut straffen und gegen die Bartwuchsrichtung
rasieren.
• Um 100% der Rasierleistung zu erhalten, wechseln
Sie die Scherfolie und den Klingenblock spätestens
alle 18 Monate oder sobald sie Verschleißerscheinungen zeigen.
3 So halten Sie Ihren Rasierer in
Bestform
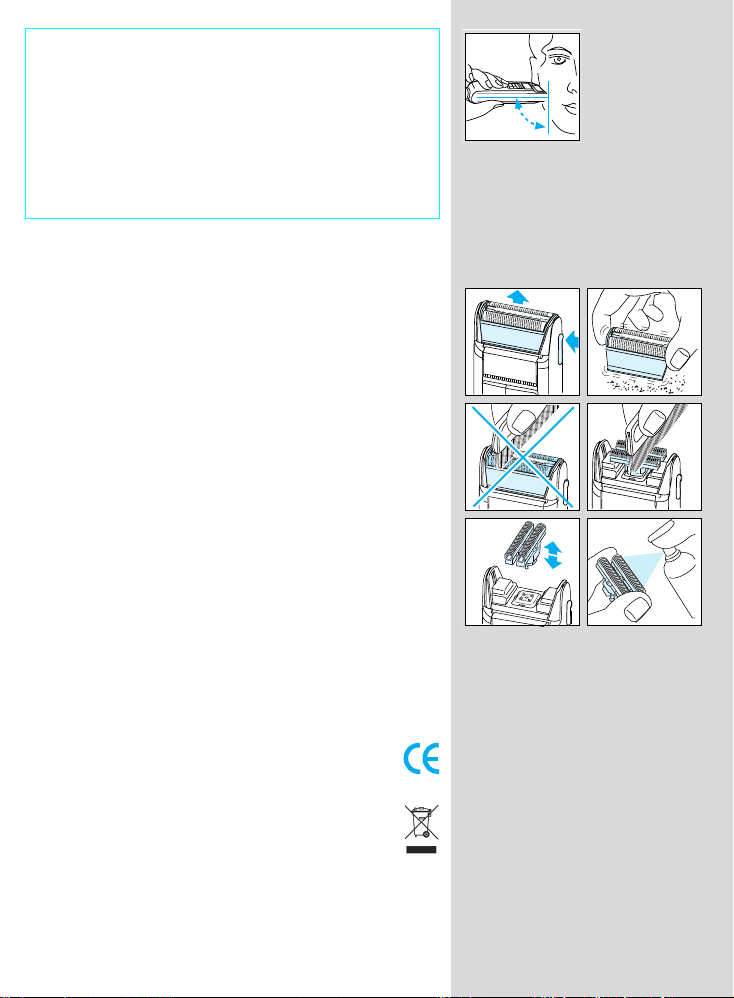
3.1 Reinigung
• Nach jeder Rasur das Gerät ausschalten, die
Entriegelungstaste drücken und die Scherfolie
abnehmen und ausklopfen.
• Den Klingenblock mit der Bürste reinigen und auch die
Innenseiten des Schwingkopfes ausbürsten.
Ca. alle 4 Wochen den Klingenblock mit Braun
Reinigungsmitteln reinigen.
• Wenn Sie sehr trockene Haut haben und die Laufzeit
des Rasierers nachlässt, verteilen Sie einen Tropfen
Nähmaschinenöl auf die Scherfolie.
3.2 Scherteile-Wechsel
Um 100% der Rasierleistung zu erhalten, wechseln Sie
die Scherfolie und den Klingenblock alle 18 Monate
oder sobald sie Verschleißerscheinungen zeigen.
Für eine gründlichere Rasur mit weniger Hautreizung
sollten Sie beide Teile gleichzeitig wechseln.
(Scherfolie und Klingenblock:
Ersatzteile-Nr. 5000/6000)
90°
Änderungen vorbehalten.
Dieses Gerät entspricht den EU-Richtlinien EMV
89/336/EWG und Niederspannung 73/23/EWG.
Dieses Gerät darf am Ende seiner Lebensdauer
nicht mit dem Hausmüll entsorgt werden. Die
Entsorgung kann über den Braun Kundendienst
oder lokal verfügbare Rückgabe- und Sammelsysteme erfolgen.
Elektrische Angaben siehe Bedruckung auf dem Gerät.
5
Page 6

English
on
off
trimmer
Our products are designed to meet the highest
standards of quality, functionality and design. We
hope you entirely enjoy your new Braun shaver.
Warning
• Keep the appliance dry.
• For safety reasons, periodically check the cord for
damage and replace it, if it is loose in the shaver
socket.
• Do not wind the cord around the shaver.
1 Description
1
Foil protection cap
2
Shaver foil
3
Cutter block
4
Pop-out long hair trimmer
5
«on/off» switch
6
Shaver socket
7
Switch for locking the pivoting head («head lock»)
and for activating the pop-out long hair trimmer
(«trimmer»)
8
Release button
2 Shaving
Switch positions
off
on
Shaving with the pivoting head.
The pivoting cutting system automatically adjusts to every contour
of your face.
head lock
trimmer
head lock
6
head lock
trimmer
Shaving with the pivoting head locked
(to permit shaving in difficult areas,
e.g. under the nose).
The long hair trimmer is activated (for
trimming sideburns, moustache and
beard).
Page 7
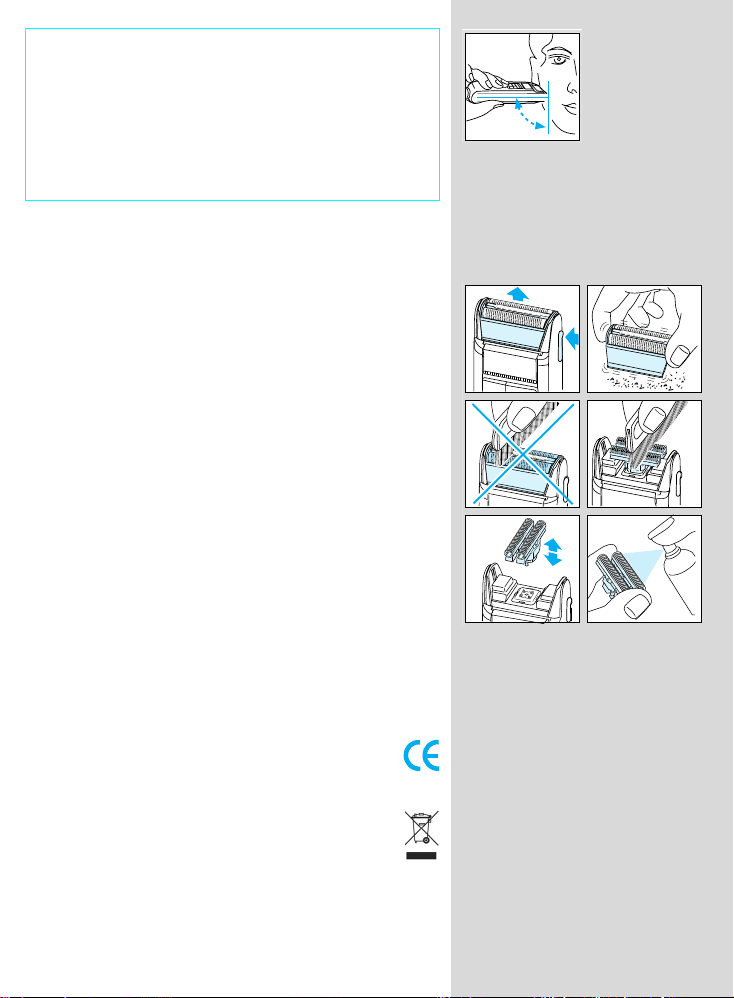
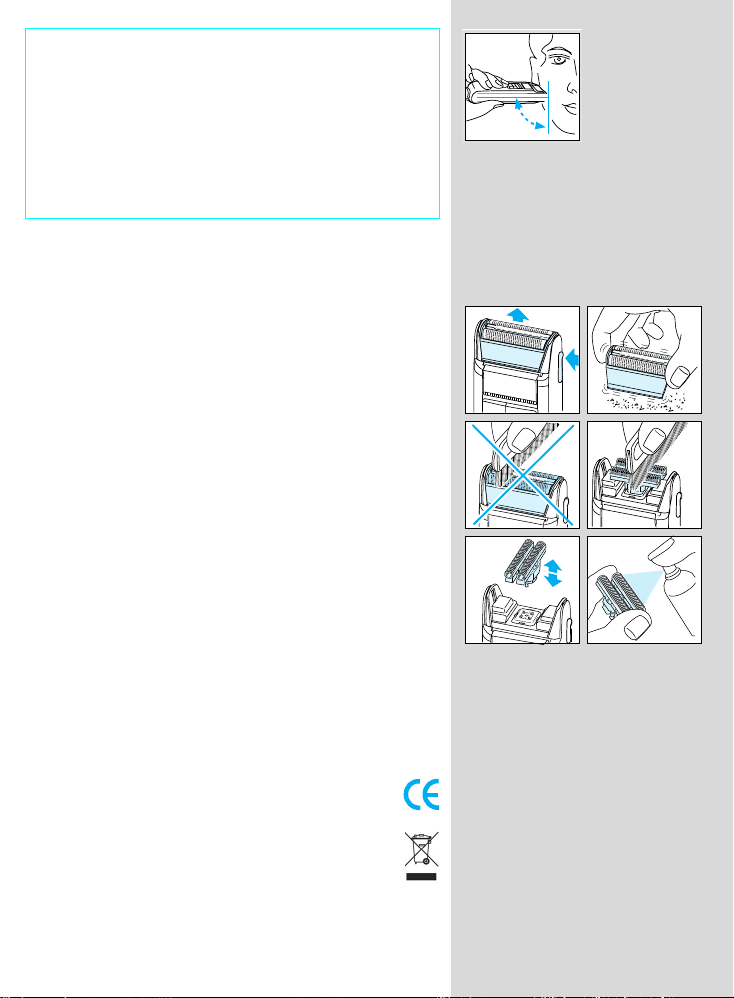
Tips for the perfect shave
• We recommend that you shave before washing, as
the skin tends to be slightly swollen after washing.
• Hold the shaver at right angles (90°) to the skin.
Stretch the skin and shave against the direction of
beard growth.
• To maintain 100% shaving performance, replace
your foil and cutter block at least every 18 months or
when worn.
3 Keeping your shaver in top shape
3.1 Cleaning
• After shaving, switch the shaver off. Press the release
button, take off the shaver foil and gently tap it out on
a flat surface.
• Then thoroughly clean the cutter block with the brush
as well as the inner area of the pivoting head. About
every four weeks, clean the cutter block with Braun
cleaning agents.
• If you have a very dry skin and you notice a reduced
operation time of the shaver, you should put a drop of
sewing machine oil onto the shaver foil.
3.2 Replacing the shaving parts
To maintain 100% shaving performance, replace your
foil and cutter block every 18 months or when worn.
Change both parts at the same time for a closer shave
with less skin irritation.
(Shaver foil and cutter block:
part no. 5000/6000)
90°
Subject to change without notice.
This product conforms to the European
Directives EMC 89/336/EEC and Low Voltage
73/23/EEC.
Please do not dispose of the product in the
household waste at the end of its useful life.
Disposal can take place at a Braun Service
Centre or at appropriate collection points
provided in your country.
For electric specifications, see printing on the housing.
7
Page 8

Français
on
off
trimmer
Nos produits sont conçus pour satisfaire aux plus
hautes exigences en matière de qualité, fonctionnalité
et design. Nous espérons que vous serez pleinement
satisfait de votre nouveau rasoir Braun.
Précautions
• Ne jamais laisser l’appareil se mouiller.
• Vérifiez periodiquement les deux extrêmités du cordon
d’alimentation, le remplacer s’il tient mal dans la prise
du rasoir ou est endommagé.
• N’enroulez pas le cordon autour du rasoir.
1 Description
1
Capot de protection de la grille
2
Grille de rasage
3
Bloc-couteaux
4
Tondeuse escamotable («trimmer»)
5
Interrupteur («on/off»)
6
Prise d’alimentation du rasoir
7
Interrupteur pour bloquer la tête pivotante («head
lock») et pour activer la tondeuse escamotable
(«trimmer»)
8
Bouton d’overture
2 Rasage
Positions de l’interrupteur
off
= arrêt
on
= marche Rasage avec la tête pivotante.
Le système de coupe pivotant
s’adapte automatiquement aux
contours du visage.
head lock
trimmer
head lock
8
head lock
trimmer
Rasage avec la tête pivotante bloquée
(pour faciliter le rasage sur les zones
difficiles, telles que sous le nez).
Tondeuse en fonctionnement (pour
tailler les pattes, la moustache et la
barbe)
.
Page 9
Conseils d’utilisation pour un rasage parfait
• Toujours se raser avant de se nettoyer le visage car
la peau a tendance à gonfler légèrement lorsqu’elle
est humide.
• Tenir le rasoir perpendiculairement (90°) au visage.
Tendre la peau et se raser dans le sens contraire de
la pousse du poil.
• Pour une performance de rasage optimale, changez
la grille et le bloc-couteaux tous les 18 mois ou
lorsqu’ils sont usés.
3 Maintenir le rasoir au meilleur de sa
forme
3.1 Nettoyage
• Après le rasage, arrêtez l’appareil. Appuyez sur le
bouton d’ouverture de la tête de coupe, retirez la grille
de rasage et tapotez-la doucement sur une surface
plane.
• Puis nettoyer soigneusement le bloc-couteaux ainsi
que la face interne de la tête pivotante avec la brossette. Environ toutes le 4 semaines, nettoyer le bloccouteaux avec la lotion de nettoyage Braun.
• Si vous avez une peau très sèche et constatez en
même temps une diminution du temps de rasage,
versez une goutte d’huile pour machine à coudre sur la
grille de rasage.
3.2 Remplacement des pièces de rasage
Pour une performance de rasage optimale, changez
vos grilles et bloc-couteaux tous les 18 mois ou
lorsqu’ils sont usés. Pour un rasage précis sans
irritations de la peau, changez les deux éléments
simultanément.
(Grille et bloc-couteaux : référence n° 5000/6000)
Sujet à modifications sans préavis.
Cet appareil est conforme aux normes
Européennes fixées par les Directives 89/336/
EEC et la directive Basse Tension 73/23/EEC.
A la fin de vie de votre appareil, veuillez ne pas
le jeter avec vos déchets ménagers. Remettezle à votre Centre Service agréé Braun ou
déposez-le dans des sites de récupération
appropriés conformément aux réglementations
locales ou nationales en vigueur.
Caractéristiques électriques : voir inscriptions sur
le boîtier.
90°
9
Page 10

Español
on
off
trimmer
Nuestros productos están desarrollados para alcanzar
los más altos estándares de calidad, funcionalidad y
diseño. Esperamos que su afeitadora Braun satisfaga
por completo sus necesidades.
Precaución
• No permita que el aparato se moje.
• Por razones de seguridad, revise el cable periódicamente y sustitúyalo si éste no encaja perfectamente en
la conexión de la afeitadora.
• No rodee la afeitadora con el cable conector.
1 Descripción
1
Protector de lámina
2
Lámina
3
Bloque de cuchillas
4
Cortapatillas extensible («trimmer»)
5
Interruptor de encendido/apagado («on/off»)
6
Conexión de la afeitadora
7 Interruptor para bloquear el cabezal giratorio («head
lock») y para activar el cortapatillas («trimmer»)
8 Botón de extracción
2 Afeitado
Posiciones del interruptor
off = apagado
on = encendido Afeitado con el cabezal basculante.
El conjunto de triple afeitado se
ajusta automáticamente a los
contornos de la cara.
10
head lock
trimmer
head lock
head lock Afeitado con el cabezal basculante
fijo que permite un mejor apurado en
áreas difíciles como debajo de la
nariz.
trimmer Activa el cortapatillas para cortar
patillas, bigote y barba.
Page 11

Consejos para un apurado perfecto
• Recomendamos afeitarse antes de lavarse la cara,
ya que la piel tiende a hincharse ligeramente
después de lavarse.
• Mantenga la afeitadora en un ángulo recto (90°)
con la piel. Estire la piel y deslice la afeitadora en
la dirección contraria al crecimiento de la barba.
• Para mantener su afeitadora rindiendo al 100%,
recomendamos reemplazar la lámina y el bloque
de cuchillas cada 18 meses, o cuando se hayan
deteriorado.
3 Mantenga su afeitadora en óptimo
estado
3.1 Limpieza
• Después del afeitado apague la afeitadora. Presione
los botones de extracción, retire la lámina y golpéela
suavemente en una superficie plana.
• Limpie cuidadosamente el bloque de cuchillas y la
zona interna del cabezal basculante con el cepillo.
Aproximadamente cada cuatro semanas, limpie el
bloque de cuchillas con los spray limpiadores Braun.
• Si usted tiene una piel muy reseca y observa que la
acción de su afeitadora disminuye, será necesario que
ponga una gota de aceite de máquina (tipo máquina
de coser) en la lámina.
3.2 Cambio de componentes
Para asegurar un rendimiento 100% de su afeitadora,
conviene sustituir la lámina y el bloque de cuchillas
cada 18 meses, o cuando se encuentren gastados.
Sustituya las dos piezas al mismo tiempo para
asegurarse un apurado óptimo con la menor irritación
para la piel.
(Recambio de lámina y bloque de cuchillas
Nº 5000/6000)
Sujeto a cambios sin previo aviso.
Este producto cumple con las normas de
Compatibilidad Electromagnética (CEM)
establecidas por la Directiva Europea 89/336/EEC
y las Regulaciones para Bajo Voltaje (73/23 EEC).
No tire este producto a la basura al final de
su vida útil. Llévelo a un Centro de Asistencia
Técnica Braun o a los puntos de recogida
habilitados por los ayuntamientos.
Especificaciones eléctricas se indican en el aparato.
90°
11
Page 12

Português
on
off
trimmer
Os nossos produtos são projectados para alcançar os
mais elevados níveis de qualidade, funcionalidade e
design. Esperamos que a sua máquina de barbear
Braun satisfaça por completo as suas necessidades.
Precaução
• Não permita que o aparelho se molhe.
• Por razões de segurança, verifique periodicamente
o cabo e substitua-o caso este não encaixe perfeitamente na ligação da máquina.
• Não enrole o fio à máquina de barbear.
1 Descrição
1 Protector de rede
2 Rede de barbear
3 Conjunto de lâminas
4 Corta-patilhas extensível («trimmer»)
5 Interruptor de ligar/desligar («on/off»)
6 Ligação da máquina de barbear
7 Interruptor para bloquear a cabeça giratória («head
lock») e para activar o corta-patilhas («trimmer»)
8 Botão de extracção
2 Barbear
Posições do interruptor
off = desligado
on = ligado Barbear com a cabeça oscilante.
O conjunto de triplo barbear ajusta-se
automaticamente aos contornos do
rosto.
12
head lock
trimmer
head lock
head lock Barbear com a cabeça oscilante fixa,
o que permite um barbear mais apurado em zonas difíceis, como sob o
nariz.
trimmer Activa o corta-patilhas, para cortar
patilhas, bigode e barba.
Page 13

Conselhos práticos para um perfeito barbear
• Recomendamos que se barbeie antes do banho,
uma vez que a pele tem tendência a ficar mais mole
após o banho.
• Segure a Máquina a um ângulo (90°) contra a pele.
Estique a pele e barbeie na direcção contrária ao do
crescimento do pêlo.
• De modo a manter 100% de performance em cada
barbeado, substitua a rede e o conjunto de lâminas
a cada 18 meses.
3
Mantenha a sua máquina de barbear
em bom estado
3.1 Limpeza
• Depois de barbear, desligue a Máquina. Pressione os
botões de extração das peças, e retire a rede e bata
suavemente numa superfície plana.
• Limpe cuidadosamente o bloco de lâminas e a zona
interna de cabeça oscilante com uma escova. Em
cada quatro semanas, aproximadamente, limpe o
bloco de lâminas com os sprays de limpeza Braun.
• Se tiver a pele muito seca e observar que a eficácia da
sua máquina de barbear diminui, será necessário pôr
uma gota de óleo de máquina (tipo máquina de coser)
na ranhura central da rede.
3.2 Substituição de peças
De modo a manter 100% de performance em cada
barbeado, substitua a rede e o conjunto de lâminas a
cada 18 meses ou quando gastas. Substitua ambas as
peças simultaneâmente para um barbeado mais
apurado e com menor irritação.
(Rede de Barbear e Conjunto de Lâminas:
no. 5000/6000)
Sujeito a alterações sem aviso prévio.
Este aparelho cumpre com a directiva
EMC 89/336/EEC e com a Regulamentação
de Baixa Voltagem (73/23 EEC).
Por favor não deite o produto no lixo doméstico,
no final da sua vida útil. Entregue-o num dos
Serviços de Assistência Técnica da Braun, ou
em locais de recolha específica, à disposição no
seu país.
Especificações eléctricas se indicam no aparelho.
90°
13
Page 14

Italiano
on
off
trimmer
head lock
trimmer
I nostri prodotti sono studiati per rispondere ad elevati
standard di qualità, funzionalità e di design. Ci auguriamo che il nuovo rasoio Braun soddisfi pienamente
le vostre esigenze.
Attenzione
• Mantenere l’apparecchio asciutto.
• Per ragioni di sicurezza, controllate di tanto in tanto
che il cordone non sia danneggiato e fatelo sostituire
se non rimane ben saldo nella presa del rasoio.
• Non avvolgete il cordone intorno al rasoio.
1 Descrizione
1 Copritestina
2 Lamina
3 Blocco coltelli
4 Tagliabasette estraibile («trimmer»)
5 Interruttore di accensione/spegnimento («on/off»)
6 Presa di collegamento
7 Tasto per bloccare la testina oscillante («head lock»)
e per attivare il tagliabasette («trimmer»)
8 Pulsante di rilascio
2 Rasatura
Interruttore principale
off = spento
on = acceso Rasatura con sistema radente oscil-
lante.
Grazie alla testina oscillante il sistema
radente si adatta automaticamente al
contorno del viso.
head lock Rasatura con la testina oscillante
bloccata (per permettere la rasatura in
zone difficili da raggiungere, per
esempio sotto il naso).
14
head lock
trimmer Rasatura con tagliabasette estensibile
inserito (per regolare basette, baffi e
.
barba)
Page 15

Consigli per una rasatura perfetta
• E’ consigliabile radersi prima di lavare il viso dal
momento che la pelle risulta meno elastica dopo
essere stata bagnata.
• Impugnare il rasoio mantenendo la giusta angolazione (90°) rispetto alla pelle. Tendere leggermente la
pelle e radere in senso contrario alla direzione della
crescita della barba.
• Per mantenere il 100% delle prestazioni del rasoio,
sostituisci la lamina e il blocco coltelli ogni 18 mesi,
o quando sono consumati.
3 Come tenere il vostro rasoio in
condizioni perfette
3.1 Pulizia
• A rasatura ultimata, spegnere il rasoio. Premere il
pulsante per rimuovere la lamina, toglierla e batterla
leggermente su una superficie piana.
• Pulire interamente il blocco radente con lo spazzolino in dotazione, così come l’area interna della
testina oscillante. All’incirca ogni quattro settimane,
inoltre, detergere accuratamente il blocco coltelli
esclusivamente con i prodotti di pulizia Braun.
• Se avete una pelle molto secca e notate una riduzione
del tempo di funzionamento del rasoio, inserite una
goccia di olio per macchina da cucire sulla lamina.
3.2 Sostituzione delle parti radenti
Per mantenere il 100% delle prestazioni del rasoio,
sostituire la lamina e il blocco coltelli ogni 18 mesi,
anche prima se risultano usurati. Sostituire entrambe
le parti allo stesso tempo per una rasatura più a fondo
e con meno irritazioni. (Il codice identificativo della
lamina e del blocco coltelli è: 5000/6000)
Salvo cambiamenti.
Questo prodotto è conforme alle normative EMC
come stabilito dalla direttiva CEE 89/336 e alla
Direttiva Bassa Tensione (CEE 73/23).
Si raccomanda di non gettare il prodotto nella
spazzatura al termine della sua vita utile. Per lo
smaltimento, rivolgersi ad un qualsiasi Centro
Assistenza Braun o ad un centro specifico.
90°
Le specifiche elettriche sono riportate sul corpo
dell’apparecchio.
15
Page 16

Nederlands
on
off
trimmer
Onze produkten worden gemaakt om aan de hoogste
eisen van kwaliteit, functionaliteit en design te kunnen
voldoen. Wij wensen u veel plezier met uw nieuwe
Braun scheerapparaat.
Waarschuwing
• Houd het apparaat droog.
• Om veiligheidsredenen dient u het snoer regelmatig te
controleren op beschadigingen en te vervangen
wanneer het te los zit bij de netsnoeringang.
• Wikkel het snoer na gebruik niet om het scheerapparaat.
1 Omschrijving
1 Beschermkapje
2 Scheerblad
3 Messenblok
4 Uitklapbare tondeuse («trimmer»)
5 Aan/uit schakelaar («on/off»)
6 Netsnoeringang
7 Schakelaar om zwenkscheerhoofd vast te zetten
(«head lock») en om tondeuse uit te klappen
(«trimmer»)
8 Knop voor het ontgrendelen
2 Scheren
Aan/uit schakelstanden
off = uit
on = aan Scheren met het zwenkend scheer-
hoofd. Het zwenkende scheersysteem
volgt automatisch de contouren van
uw gezicht.
16
head lock
trimmer
head lock
head lock Scheren met daarbij het zwenkend
scheerhoofd vergrendeld in een vaste
stand (voor het scheren van moeilijk
bereikbare gedeelten van het gezicht,
bijvoorbeeld onder de neus).
trimmer De tondeuse is in werking (voor het
bijwerken van de bakkebaarden, snor
en baard).
Page 17

Tips voor perfect scheerresultaat
• Wij raden u aan zich te scheren vóór het wassen van
het gezicht, daar de huid na het wassen licht opgezwollen kan zijn
• Houdt het scheerapparaat altijd loodrecht (90°) op
de huid. De huid licht spannen en tegen de richting
van de baardgroei in scheren.
• Vervang het scheerblad en messenblok elke 11/2
jaar, of eerder wanneer de onderdelen zijn versleten,
om een optimaal scheerresultaat te behouden.
3 Reiniging en onderhoud
3.1 Reiniging
• Schakel het scheerapparaat uit. Druk op de ontgrendelingsknoppen om het scheerblad te verwijderen
en klop deze voorzichtig uit op een glad oppervlak.
• Reinig daarna het messenblok en de binnenkant van
het zwenkend scheerhoofd met het borsteltje. Reinig
ongeveer elke 4 weken het messenblok met Braun
reinigingsmiddel.
• Indien u een zeer droge huid heeft en een verminderde scheercapaciteit van het apparaat merkt,
dient u een druppel naaimachine olie op de scheerblad aan te brengen.
3.2 Vervangen van onderdelen
Vervang uw scheerblad en messenblok om de
18 maanden of eerder wanneer deze versleten zijn.
Vervang beide onderdelen tegelijkertijd voor een
gladder scheerresultaat met minder huidirritatie.
(Scheerblad en messenblok onderdeel
nr. 5000/6000)
Wijzigingen voorbehouden.
90°
Dit produkt voldoet aan de EMC-normen
volgens de EEG richtlijn 89/336 en aan de
EEG laagspannings richtlijn 73/23.
Gooi dit apparaat aan het eind van zijn nuttige
levensduur niet bij het huisafval. Lever deze in
bij een Braun Service Centre of bij de door uw
gemeente aangewezen inleveradressen.
Voor electrische specificaties: zie de print op het
motorhuis.
17
Page 18

Dansk
on
off
trimmer
head lock
trimmer
Vore produkter er fremstillet, så de opfylder de højeste
krav til kvaliteit, anvendelighed samt design. Vi håber,
at du vil få stor glæde af din nye Braun shaver.
Advarsel
• Hårtørreren må ikke blive våd.
• Af sikkerhedshensyn anbefales det med mellemrum at
kontrollere, om ledningen er i orden. Udskift ledningen,
hvis denne sidder løst i ledningsindgangen i bunden af
shaveren.
• Undgå at vikle ledningen omkring shaveren.
1 Beskrivelse
1 Beskyttelseskappe
2 Barbermaskine skæreblad
3 Lamelkniv
4 Langhårstrimmer («trimmer»)
5 Tænd/sluk omskifter («on/off»)
6 Ledningsindgang
7 Omskifter til fastlåsning af det svingbare skærehoved
(«head lock») til aktivering af den udfoldelige langhårstrimmer («trimmer»)
8 Udløsningsknap
2 Barbering
Omskifterens indstillinger
off = afbrudt
on = tilsluttet Barbering med det svingbare
shaverhoved.
Det svingbare barberingssystem
tilpasser sig automatisk dit ansigts
konturer og kurver.
head lock Barbering med det bevægelige
skærehoved fastlåst (for at gøre det
muligt at barbere problemområder,
såsom under næsen).
18
head lock
trimmer Langhårstrimmeren er tilsluttet (til
trimning af bakkenbarter, overskæg
og skæg).
Page 19

Tips til den perfekte barbering
• Vi anbefaler, at du barberer dig, før du vasker dig,
fordi huden svulmer en smule op efter vask.
• Hold barbermaskinen i en ret vinkel (90°) mod huden.
Stræk huden og barber mod skæggets vokseretning.
• For at opretholde en optimal barbering skal skæreblad og lamelkniv udskiftes efter 1,5 års brug, eller
når de er slidte.
3 Sådan holder du din shaver i topform
3.1 Rengøring
• Sluk for barbermaskinen, når du er færdig med at
barbere dig. Tryk på udløserknappen, tag skærebladet
af og bank det forsigtigt mod en flad overflade.
• Rens derefter lamelkniven og indersiden af det
bevægelige hoved grundigt med børsten. Ca. hver
fjerde uge renses lamelkniven med Brauns rensemiddel.
• Hvis du har meget tør hud, og du bemærker, at
barbermaskinen har nedsat funktionstid, dryppes en
dråbe symaskineolie på skærebladet.
3.2 Udskiftning af barbermaskinens dele
For at opretholde en optimal barbering skal skæreblad
og lamelkniv udskiftes efter 1,5 års brug, eller når de er
slidte. Udskift begge dele på samme tid for at få en
tættere barbering med mindre hudirritation.
(Skæreblad og lamelkniv:
Reservedel nr. 5000/6000)
90°
Der forbeholdes ret til ændringer uden forudgående
varsel.
Dette produkt er i overensstemmelse med
bestemmelserne i EMC Direktiv 89/336/EEC
og Lavspændingsdirektivet 73/23/EEC.
Apparatet bør efter endt levetid ikke kasseres
sammen med husholdningsaffaldet.
Bortskaffelse kan ske på et Braun Servicecenter
eller passende, lokale opsamlingssteder.
For elektriske specifikationer se skilt på kabinettet.
19
Page 20

Norsk
on
off
trimmer
Våre produkter er produsert for å imøtekomme de
høyeste standarder når det gjelder kvalitet, funksjon og
design. Vi håper du vil få mye glede av ditt nye Braun
produkt.
Advarsel
• Apparatet må ikke bli vått.
• Af sikkerhetsmessige årsaker bør ledningen sjekkes
jevnlig og byttes dersom den er løs i barbermaskinens
stikkontakt.
• Ledningen skal ikke vikles rundt maskinen.
1 Beskrivelse
1 Beskyttelseskappe for skjærebladet
2 Skjæreblad
3 Lamellkniv
4 Utskyvbar langhårtrimmer («trimmer»)
5 På/av bryter («on/off»)
6 Barbermaskinens stikkontakt
7 Bryter som låser det svingbare skjærehodet («head
lock») og aktiverer den utskyvbare langhårtrimmeren
(«trimmer»)
8 Frigjøringsknapp
2 Barbering
Bryter posisjoner
off = av
on = på Barbering med det svingbare
skjærehodet. Det svingbare
skjæresystemet tilpasser seg
automatisk ansiktets konturer.
20
head lock
trimmer
head lock
head lock Barbering med det svingbare
skjærehodet låst (for barbering i
vanskelige områder, f. eks. under
nesen).
trimmer Langhårtrimmeren er aktivert (for
trimming av kinnskjegg, bart og
skjegg).
Page 21

Råd for perfekt barbering
• Vi anbefaler at du barberer deg før du vasker deg
fordi huden har en tendens til å bli litt hoven etter
vask.
• Hold barbermaskinen i rett vinkel (90°) mot huden.
Strekk huden og barber mot skjeggvekstretningen.
• For å opprettholde 100% barberytelse bør skjærebladet og lamellkniven skiftes hver 18. måned eller
når de er utslitt.
3 Rengjøring og vedlikehold
3.1 Rengjøring
• Etter barbering slås barbermaskinen av. Trykk på
utløserknappen, ta av barbermaskinens skjæreblad og
slå det forsiktig mot en plan overflate.
• Rengjør så skjærehodet og de innvendige delene av
det fleksible hodet grundig med børsten. Cirka hver
fjerde uke skal skjærehodet rengjøres med Braun
rensemiddel.
• Hvis du har meget tørr hud, og du merker at barbermaskinen får redusert brukstid, skal du dryppe en
dråpe med symaskinolje på barbermaskinens skjæreblad.
3.2 Utskifting av deler
For å opprettholde 100% barberytelse bør skjæreblad og lamellkniv skiftes ut hver 18. måned eller når
de er utslitt. For å opprettholde en tettere barbering og
unngå hudirritasjon bør begge delene skiftes ut
samtidig.
(Skjæreblad og lamellkniv har delenummer 5000/6000)
90°
Endring forbeholdes.
Dette produktet oppfyller kravene i EUdirektivene EMC 89/336/EEC og Low Voltage
73/23/EEC.
Ikke kast dette produktet sammen med
husholdningsavfall når det skal kasseres.
Det kan leveres hos et Braun servicesenter
eller en miljøstasjon.
Elektriske spesifikasjoner: se typeskilt på huset.
21
Page 22

Svenska
on
off
trimmer
Våra produkter är framtagna för att uppfylla högsta
krav när det gäller kvalitet, funktion och design. Vi
hoppas att du får mycket glädje av din nya Braun
apparat.
Varning
• Låt inte apparaten bli våt.
• Kontrollera med jämna mellanrum om sladden är
skadad, och byt ut den speciellt om den är lös vid
uttaget.
• Vira inte sladden runt apparaten.
1 Beskrivning
1 Skyddshuv
2 Rakhuvud
3 Skärhuvud
4 Trimsax («trimmer»)
5 Strömbrytare på/av («on/off»)
6 Uttag
7 Lås för att låsa skärhuvudet («head lock») och aktivera
trimsaxen («trimmer»)
8 Knapp för att lossa
2 Rakning
Strömbrytare
off = av
on = på Rakning med det svängbara
skärhuvudet.
Det svängbara huvudet följer
automatiskt ansiktets konturer.
22
head lock
trimmer
head lock
head lock Rakning med låst skärhuvud (för
rakning av partier som är svårare
att komma åt t. ex. under näsan).
trimmer Trimsaxen är på (för att trimma
polisonger, mustasch och skägg).
Page 23

Tips för den perfekta rakningen
• Vi rekommenderar att du rakar dig innan du tvättar
dig eftersom hud har en tendens att bli lätt svullen
efter att man tvättat sig.
• Håll rakapparaten i rät vinkel (90°) mot huden. Sträck
huden och raka i riktning mot skäggväxten.
• För att behålla 100 % rakförmåga ska du ersätta
rakhuvud och skärhuvud var 18 månad eller när de är
utslitna.
3 Rengöring och bibehållande
3.1 Rengöring
• Stäng av rakapparaten efter rakningen. Tryck ned
frisläppningsknappen, lyft av skärbladet och knacka
det försiktigt mot en plan yta.
• Rengör sedan noggrant saxhuvudet samt insidan av
det rörliga huvudet med borsten. Rengör saxhuvudet
med Brauns rengöringsmedel ungefär var fjärde
vecka.
• Om du har mycket torr hud och märker att rakapparaten får en kortare funktionstid bör du lägga en drop-
• pe symaskinsolja på skärbladet.
3.2 Byt delar
För att behålla 100 % rakförmåga ska du ersätta
rakhuvud och skärhuvud var 18 månad eller när de är
utslitna. Byt båda delarna på samma gång för en tätare
rakning och mindre hudirritation.
(Skärblad och saxhuvud: del nr 5000/6000)
90°
Med förbehåll för ändringar.
Denna produkt uppfyller bestämmelserna i
EU-direktiven 89/336/EEG om elektromagnetisk
kompatibilitet (EMC) och 73/23/EEG om
lågspänningsutrustning.
När produkten är förbrukad får den inte kastas
tillsammans med hushållssoporna.
Avfallshantering kan ombesörjas av Braun
servicecenter eller på din lokala återvinningsstation.
Elektriska specifikationer finns tryckta på apparaten.
23
Page 24

Suomi
on
off
trimmer
head lock
Tuotteemme on suunniteltu täyttämään korkeimmat
laatu-, toimivuus- ja muotoiluvaatimukset. Toivomme,
että olet tyytyväinen uuteen parranajokoneeseesi.
Varoitus
• Älä käytä parranajokonetta vedellä täytetyn altaan
(esim. kylpyammeen, suihkualtaan tms.) lähellä tai
yläpuolella.
• Tarkista turvallisuussyistä silloin tällöin verkkojohdon
kunto ja vaihdata se, jos se tuntuu löysältä parranajokoneen runkokoskettimeen laitettaessa.
• Älä kierrä verkkojohtoa parranajokoneen ympärille.
1 Laitteen osat
1 Teräverkon suojus
2 Teräverkko
3 Leikkuri
4 Rajaaja («trimmer»)
5 Päälle/pois päältä-kytkin («on/off»)
6 Runkokosketin
7 Kytkin, jolla käynnistetään rajaaja («trimmer») ja
lukitaan kääntyvä ajopää («head lock»)
8 Vapautuspainike
2 Ajo
Kytkimen asennot
off = pois päältä
on = päällä Ajo kääntyvällä ajopäällä. Kääntyvä
ajopää myötäilee automaattisesti
kasvojen piirteitä.
head lock Ajo kääntyvä ajopää lukittuna
(helpottaa ajamista hankalista
kohdista, esim. nenän alta)
24
trimmer
head lock
trimmer Rajaaja kytkeytyy päälle (pulisonkien,
viiksien ja parran siistimiseksi)
Page 25

Vihjeitä paremman ajotuloksen saavuttamiseksi
• On suositeltavaa ajaa parta ennen kasvojen pesua,
sillä kasvojen peseminen turvottaa ihoa hieman.
• Pidä parranajokonetta suorassa kulmassa (noin 90°)
ihoon nähden. Venytä ihoa ja aja parta vasten
karvojen kasvusuuntaa.
• Parhaan mahdollisen ajotuloksen saavuttamiseksi
teräverkko ja leikkuri kannattaa vaihtaa 18
kuukauden välein tai kun ne ovat kuluneet.
3 Näin pidät parranajokoneesi
kunnossa
3.1 Puhdistus
• Kytke virta pois partakoneesta parranajon jälkeen.
Paina vapautuspainiketta, irrota teräverkko ja kopauta
sitä kevyesti tasaista pintaa vasten.
• Puhdista sen jälkeen leikkuuterä ja kääntyvän ajopään
sisäpuoli huolellisesti harjalla. Puhdista leikkuuterä
Braunin puhdistusaineella noin neljän viikon välein.
• Jos ihosi on erittäin kuiva ja käytät partakonetta
normaalia harvemmin, tipauta teräverkkoon hiukan
ompelukoneöljyä.
3.2 Parranajokoneen osien vaihtaminen
Parhaan mahdollisen ajotuloksen saavuttamiseksi
teräverkko ja leikkuri kannattaa vaihtaa 18 kuukauden
välein tai kun ne ovat kuluneet. Kun vaihdat molemmat
osat samanaikaisesti, lopputuloksena on tarkempi
parranajo vähäisemmällä ihoärsytyksellä.
(Teräverkko ja leikkuri: osanumero 5000/6000)
90°
Muutosoikeus pidätetään.
Tämä tuote täyttää EU-direktiivin 89/336/EEC
mukaiset EMC-vaatimukset sekä matalajännitettä koskevat säännökset (73/23 EEC).
Kun laite on tullut elinkaarensa päähän, säästä
ympäristöä äläkä hävitä sitä kotitalousjätteiden
mukana. Hävitä tuote viemällä se Braunhuoltoliikkeeseen tai asianmukaiseen
keräyspisteeseen.
Sähkövirtaan liittyvät tiedot ovat laitteen rungossa.
25
Page 26

Türkçe
on
off
trimmer
head lock
Ürünümüz en yüksek iµlev, kalite ve dizayn
standartlarında üretilmiµtir. Umarız bu yeni Braun
ürünümüzden memnun kalırsınız.
Önemli
• Cihazınızın su ile temas etmesini önleyiniz.
• Zaman zaman kablonun soketlerinde yıpranma olup
olmadı©ını kontrol ediniz.
• Kabloyu makinenin üstüne sarmayınız.
1 Tanımlamalar
1 Elek koruyucu kapak
2 Elek
3 Kesici blok (b∂çak)
4 Dıµarıya do©ru açılabilir uzun kıl kesici («trimmer»)
5
Açma/kapama
dü©mesi («on/off»)
6 Tıraµ makinesi soketi
7 Titreµen baµli©ı kilitlemek («head lock») ve uzun kıl
kesicisini de («trimmer») birlikte çalıµtırmak için µalter
8 Açma dü©mesi
2 Tıraµ olma
Anahtar konumları
off = Kapalı
on = Açık Oynar baµlık ile tıraµ otomatik olarak
head lock Oynar baµlıπın burun altı ve favoriler
yüzünüzdeki tüm konturlara rahatlıkla
ulaµabilmesini saπlar.
gibi zor bölgeleri tıraµ edebilmesi için
sabit açıda kilitlenmesi.
26
trimmer
head lock
trimmer Uzun kıllar ve sakal kesicisinin
çalıµması (bıyık, sakal).
Page 27

Mükemmel tıraµ için ipuçları
• Cildiniz y∂kand∂ktan sonra, az da olsa µiµmiµ
olacaπ∂ndan, cildinizi y∂kamadan önce t∂raµ olman∂z∂
öneririz.
• T∂raµ makinenizi cildinize dik olarak (90° aç∂ ile)
tutunuz. Cildinizi geriniz ve sakallar∂n∂z∂ ç∂kt∂klar∂
yönün tersine doπru t∂raµ ediniz.
• %100 t∂raµ performans∂n∂ elde etmek için, t∂raµ
makinenizin elek ve b∂çaπ∂n∂ her 18 ayda bir veya
y∂prand∂klar∂nda deπiµtiriniz.
3 Tıraµ makinenizi en iyi performansta
tutmak için
3.1 Temizleme
• T∂raµ iµlemi bittikten sonra cihaz∂ kapat∂p baµl∂k
ç∂kartma düπmesine basarak eleπi ç∂kart∂n∂z ve düz bir
yüzeye hafifçe vurarak temizleyiniz.
• Daha sonra kesici bloπu ve t∂raµ baµl∂π∂n∂n içini f∂rça
yard∂m∂ ile tamamen temizleyiniz. Her dört haftada bir
kesici bloπu Braun temizleme s∂v∂s∂ ile temizleyiniz.
• Eπer çok kuru bir cilde sahipseniz ve cihaz∂n∂z∂n µarj
süresinin azald∂π∂n∂ hissediyorsan∂z eleπin üzerine bir
damla makine yaπ∂ damlat∂n∂z.
3.2 Parçalar∂n deπiµtirilmesi
Cihaz∂n t∂raµ performans∂n∂ %100 koruyabilmek
için elek ve kesici bloπu her 18 ayda bir veya
y∂prand∂klar∂nda deπiµtiriniz. Her iki parçay∂ da
daha yak∂n ve hassasiyeti daha da azaltan bir t∂raµ
performans∂ elde etmek için, ayn∂ zamanda deπiµtiriniz.
(Elek ve kesici blok parça no. 5000/6000)
90°
Bildirim yapıilmadan deπiµtirilebilir.
Cihaz üzerinde yaz∂l∂ olan elektrik özelliklerine bak∂n∂z.
Üretici firma ve CE iµareti uygunluk de©erlendirme
kuruluµu:
Braun GmbH
Frankfurter Straße 145
61476 Kronberg / Germany
““
““
(49) 6173 30 0
Fax (49) 6173 30 28 75
Braun_infoline@Gillette.com
27
Page 28

∂ППЛУИО¿
on
off
trimmer
head lock
trimmer
∆a ЪФпfivta В›У·И О·Щ·ЫОВ˘aЫМ¤У· МВ ‚¿ЫЛ
ЩИ˜ ˘„ЛПfiЩВЪВ˜ ЪФ‰И·БЪ·К¤˜ ФИfiЩЛЩ·˜,
ПВИЩФ˘ЪБИОfiЩЛЩ·˜ О·И Ы¯В‰И·ЫМФ‡. ∂П›˙Ф˘МВ У·
В˘¯·ЪИЫЩЛıВ›ЩВ ЩЛ У¤· Ы·˜ Ы˘ЫОВ˘‹ Braun.
¶ÚÔÛÔ¯‹
•
ªËÓ ·Ê‹ÛÂÙ ÙË Û˘Û΢‹ Û·˜ Ó· ‚Ú·¯Â›.
• °È· ÏfiÁÔ˘˜ ·ÛÊ·Ï›·˜, ÂϤÁ¯ÂÙ ÂÚÈÔ‰Èο ÙÔ
ηÏÒ‰ÈÔ ÁÈ· ÊıÔÚ˜ Î·È ·ÓÙÈηٷÛÙ‹ÛÙ ÙÔ fiÙ·Ó
·˘Ùfi «·›˙ÂÈ» ÛÙËÓ Ú›˙·.
• ªËÓ Ù˘Ï›ÁÂÙ ÙÔ Î·ÏÒ‰ÈÔ Á‡Úˆ ·fi ÙËÓ Û˘Û΢‹.
1 ¶ВЪИБЪ·К‹
1 ¶ÚÔÛٷ٢ÙÈÎfi Î¿Ï˘ÌÌ· ÙÔ˘ ϤÁÌ·ÙÔ˜
2 ¶Ï¤ÁÌ· ͢ڛÛÌ·ÙÔ˜
3 ∫ÔÙÈÎfi Û‡ÛÙËÌ·
4 ∫fiÊÙ˘ ÁÈ· Ì·ÎÚȤ˜ ÙÚ›¯Â˜ («trimmer»)
5 ¢È·ÎfiÙ˘ ·УФИ¯Щfi/ОПВИЫЩfi («on/off»)
6 ¶Ú›˙· Ù˘ Û˘Û΢‹˜
7 ¢И·ОfiЩЛ˜ БИ· ЩФ ОПВ›‰ˆМ· ЩЛ˜ ОИУЛЩ‹˜ ОВК·П‹˜
(«head lock»), ТЫЩВ У· ПВИЩФ˘ЪБ‹ЫВИ ЩФ ВН·ЪЩЛМ· БИ·
ЩИ˜ ИФ М·ОЪИ¤˜ ЩЪ›¯В˜ («trimmer»)
8 ¶Ï‹ÎÙÚÔ ·Ô‰¤ÛÌ¢Û˘
2 •‡ÚÈÛÌ·
£¤ÛÂȘ ‰È·ÎfiÙË
off = ОПВИЫЩfi
on = ·УФИ¯Щfi •‡ЪИЫМ· МВ ЩЛУ ВЪИЫЩЪВКfiМВУЛ
head lock •‡ЪИЫМ· МВ ЩЛУ ВЪИЫЩЪВКfiМВУЛ
ОВК·П‹. ∆Ф ВЪИЫЩЪВКfiМВУФ
Ы‡ЫЩЛМ· ОФ‹˜ ЪФЫ·ЪМfi˙ВЩ·И
·˘ÙfiÌ·Ù· ÛÙËÓ ÂÈÊ¿ÓÂÈ· ÙÔ˘
ÚÔÛÒÔ˘ Û·˜.
ОВК·П‹ ·ЫК·ПИЫМ¤УЛ (БИ· Н‡ЪИЫМ· ЫВ
‰‡ЫОФПВ˜ ВЪИФ¯¤˜, . ¯. О¿Щˆ ·fi ЩЛ
М‡ЩЛ).
28
head lock
trimmer ∂УВЪБФФИВ›Щ·И Ф ОfiКЩЛ˜ БИ· М·ОЪИ¤˜
(ÁÈ· „·Ï›‰ÈÛÌ· Ù˘ Ê·‚ÔÚ›Ù·˜,
ЩЪ›¯В˜
ЩФ˘ МФ˘ЫЩ·ОИФ‡ О·И ЩЛ˜ БВУВИ¿‰·˜).
Page 29

™˘ÌßÔ˘Ï¤˜ ÁÈ· ¤Ó· Ù¤ÏÂÈÔ Í‡ÚÈÛÌ·
• ™˘УИЫЩФ‡МВ У· Н˘Ъ›˙ВЫЩВ Ъ›У ЩФ П‡ЫИМФ, О·ıТ˜ ЩФ
‰¤ÚÌ· Ù›ÓÂÈ Ó· Ú‹˙ÂÙ·È ÂÏ·õÚ¿ ÌÂÙ¿ ·fi ·˘Ùfi.
• £· Ъ¤ВИ У· ОЪ·Щ¿ЩВ ЩЛУ Н˘ЪИЫЩИО‹ МЛ¯·У‹ ЫВ
ФЪı‹ БˆУ›· (90°) ЪФ˜ ЩФ ‰¤ЪМ·. ∆ВУЩТЫЩВ ЩФ
‰¤ЪМ· О·И Н˘ЪИЫЩВ›ЩВ ·УЩ›ЫЩЪФх· ·fi ЩЛУ О·ЩВ‡ı˘УЫЛ Ф˘ х˘ЩЪТУФ˘У Щ· Б¤УИ· Ы·˜.
• °И· У· ‰И·ЩЛЪ‹ЫВЩВ ЩЛ М¤БИЫЩЛ ·fi‰ФЫЛ ЩЛ˜
Н˘ЪИЫЩИО‹˜ Ы·˜ МЛ¯·У‹˜, ı· Ъ¤ВИ ЩФ П¤БМ·
Н˘Ъ›ЫМ·ЩФ˜ О·И ЩФ ОФЩИОfi Ы‡ЫЩЛМ· У· ·УЩИО·ı›ЫЩ·УЩ·И О¿ıВ 18 М‹УВ˜ ‹ fiЩ·У Щ· ВН·ЪЩ‹М·Щ·
·˘Ù¿ ¤¯Ô˘Ó õı·Ú›.
3 °È· Ó· Îڷٿ٠ÙË Ì˯·Ó‹ Û·˜ ÛÂ
ηϋ ηٿÛÙ·ÛË
3.1 ∫·ı·ÚÈÛÌfi˜
•
∞хФ‡ Н˘ЪИЫЩВ›ЩВ, Б˘Ъ›ЫЩВ ЩФУ ‰И·ОfiЩЛ ЫЩЛ ı¤ЫЛ «off».
¶И¤ЫЩВ ЩФ П‹ОЩЪФ ·ВПВ˘ı¤ЪˆЫЛ˜, ЯБ¿ПЩВ ЩФ П¤БМ· О·И ··П¿ ¯Щ˘‹ЫЩВ ЩФ ЫВ М›· В›В‰Л ВИх¿УВИ·.
•
ŒВИЩ· О·ı·Ъ›ЫЩВ П‹Ъˆ˜ ЩФ ОfiхЩЛ МВ ЩФ ЯФ˘ЪЩЫ¿ОИ,
fiˆ˜ О·И ЩЛУ ВЫˆЩВЪИО‹ ВИх¿УВИ· ЩЛ˜ ОВх·П‹˜. ∞У¿
ВЪ›Ф˘ Щ¤ЫЫВЪИ˜ ВЯ‰ФМ¿‰В˜, У· О·ı·Ъ›˙ВЩВ ЩФУ
ОfiхЩЛ МВ Щ· ВИ‰ИО¿ О·ı·ЪИЫЩИО¿ ˘БЪ¿ ·fi ЩЛ Braun.
•
∂¿У ¤¯ВЩВ ¤У· ФП‡ НЛЪfi ‰¤ЪМ· О·И ‰И·ИЫЩТЫВЩВ
М›· МВ›ˆЫЛ ЫЩФ ¯ЪfiУФ ПВИЩФ˘ЪБ›·˜ ЩЛ˜ МЛ¯·У‹˜,
ı· Ъ¤ВИ У· Ъ›НВЩВ М›· ЫЩ·БfiУ· П¿‰И МЛ¯·У‹˜
Ъ·„›М·ЩФ˜ М¤Ы· ЫЩФ П¤БМ·.
3.2 ∞УЩИО·Щ¿ЫЩ·ЫЛ ЩˆУ хı·ЪЩТУ МВЪТУ
°И· У· ‰И·ЩЛЪ‹ЫВЩВ ЩЛ М¤БИЫЩЛ ·fi‰ФЫЛ ЩЛ˜ Н˘ЪИЫЩИО‹˜
Ы·˜ МЛ¯·У‹˜, ı· Ъ¤ВИ ЩФ П¤БМ· Н˘Ъ›ЫМ·ЩФ˜ О·И ЩФ
ОФЩИОfi Ы‡ЫЩЛМ· У· ·УЩИО·ı›ЫЩ·УЩ·И О¿ıВ 18 М‹УВ˜ ‹
fiЩ·У Щ· ВН·ЪЩ‹М·Щ· ·˘Щ¿ ¤¯Ф˘У хı·ЪВ›. ∞УЩИО·Щ·ЫЩ‹ЫЩВ
О·И Щ· ‰‡Ф ВН·ЪЩ‹М·Щ· Ы˘Б¯ЪfiУˆ˜, БИ· ·ОfiМ· ИФ Я·ı‡
Н‡ЪИЫМ· МВ ЩФУ ПИБfiЩВЪФ ‰˘У·Щfi ВЪВıИЫМfi ЩФ˘ ‰¤ЪМ·ЩФ˜.
¶Ï¤ÁÌ· ͢ڛÛÌ·ÙÔ˜ Î·È ∫ÔÙÈÎfi ™‡ÛÙËÌ· – ·ÚÈıÌfi˜
(
·УЩ·ПП·ОЩИОФ‡ 5000/6000
ÀfiÎÂÈÙ·È Û ÙÚÔÔÔ›ËÛË ¯ˆÚ›˜ ÚÔÂȉÔÔ›ËÛË.
∆Ф ЪФ˚fiУ ·˘Щfi ¤¯ВИ О·Щ·ЫОВ˘·ЫЩВ› Ы‡МКˆУ·
МВ ЩИ˜ ∂˘Ъˆ·˚О¤˜ O‰ЛБ›В˜ EMC 89/336/∂O∫
О·И Г·МЛПТУ ∏ПВОЩЪИОТУ ∆¿ЫВˆУ 73/23/∂O∫.
¶·Ъ·О·ПФ‡МВ МЛУ ВЩ¿НВЩВ ЩЛ Ы˘ЫОВ˘‹ ЫЩ·
ФИОИ·О¿ ·ФЪЪ›ММ·Щ· fiЩ·У КЩ¿ЫВИ ЩФ Щ¤ПФ˜ ЩЛ˜
¯Ъ‹ЫИМЛ˜ ˙ˆ‹˜ ЩЛ˜. ∏ ‰И¿ıВЫ‹ ЩЛ˜ МФЪВ› У·
Ъ·БМ·ЩФФИЛıВ› ЫВ ¤У· ·fi Щ· ВНФ˘ЫИФ‰ФЩЛМ¤У·
Ы˘УВЪБВ›· ЩЛ˜ Braun ‹ ЫЩ· О·Щ¿ППЛП· ЫЛМВ›·
Ы˘ППФБ‹˜ Ф˘ ·Ъ¤¯ФУЩ·И ЫЩЛ ¯ТЪ· Ы·˜.
¶ИУ·О›‰· ЩВ¯УИОТУ ¯·Ъ·ОЩЛЪИЫЩИОТУ ЯЪ›ЫОВЩ·И ЫЩЛ
Ы˘ЫОВ˘‹.
)
90°
29
Page 30

Deutsch
Garantie
Als Hersteller übernehmen wir für dieses Gerät –
nach Wahl des Käufers zusätzlich zu den
gesetzlichen Gewährleistungsansprüchen gegen
den Verkäufer – eine Garantie von 2 Jahren ab
Kaufdatum. Innerhalb dieser Garantiezeit
beseitigen wir nach unserer Wahl durch
Reparatur oder Austausch des Gerätes
unentgeltlich alle Mängel, die auf Material- oder
Herstellungsfehlern beruhen. Die Garantie kann
in allen Ländern in Anspruch genommen werden,
in denen dieses Braun Gerät von uns autorisiert
verkauft wird.
Von der Garantie sind ausgenommen: Schäden
durch unsachgemäßen Gebrauch, normaler
Verschleiß und Verbrauch sowie Mängel, die den
Wert oder die Gebrauchstauglichkeit des Gerätes
nur unerheblich beeinflussen. Bei Eingriffen
durch nicht von uns autorisierte Braun
Kundendienstpartner sowie bei Verwendung
anderer als Original Braun Ersatzteile erlischt die
Garantie.
Im Garantiefall senden Sie das Gerät mit
Kaufbeleg bitte an einen autorisierten Braun
Kundendienstpartner. Die Anschrift für
Deutschland können Sie kostenlos unter
00800/27 28 64 63 erfragen.
English
Guarantee
We grant 2 years guarantee on the product
commencing on the date of purchase. Within the
guarantee period we will eliminate, free of charge,
any defects in the appliance resulting from faults
in materials or workmanship, either by repairing
or replacing the complete appliance as we may
choose.
This guarantee extends to every country where
this appliance is supplied by Braun or its
appointed distributor.
This guarantee does not cover: damage due to
improper use, normal wear or use as well as
defects that have a negligible effect on the value
or operation of the appliance. The guarantee
becomes void if repairs are undertaken by
unauthorised persons and if original Braun parts
are not used.
30
To obtain service within the guarantee period,
hand in or send the complete appliance with your
sales receipt to an authorised Braun Customer
Service Centre.
For UK only:
This guarantee in no way affects your rights
under statutory law.
Français
Garantie
Nous accordons une garantie de 2 ans sur ce
produit, à partir de la date d'achat.
Pendant la durée de la garantie, Braun prendra
gratuitement à sa charge la réparation des vices
de fabrication ou de matière en se réservant le
droit de décider si certaines pièces doivent être
réparées ou si l'appareil lui-même doit être
échangé.
Cette garantie s'étend à tous les pays où cet
appareil est commercialisé par Braun ou son
distributeur exclusif.
Cette garantie ne couvre pas : les dommages
occasionnés par une utilisation inadéquate et
l'usure normale. Cette garantie devient caduque
si des réparations ont été effectuées par des
personnes non agréées par Braun et si des
pièces de rechange ne provenant pas de Braun
ont été utilisées.
Pour toute réclamation intervenant pendant la
période de garantie, retournez ou rapportez
l'appareil ainsi que l'attestation de garantie à
votre revendeur ou à un Centre Service Agréé
Braun.
Appelez au 08.10.30.97.80 (ou se référez à http:/
/www.braun.com/global/contact/
servicepartners/europe.country.html) pour
connaitre le Centre Service Agrée Braun le plus
proche de chez vous.
Clause spéciale pour la France
Outre la garantie contractuelle exposée cidessus, nos clients bénéficient de la garantie
légale des vices cachés prévue aux articles 1641
et suivants du Code civil.
Page 31

Español
Garantía
Braun concede a este producto 2 años de
garantía a partir de la fecha de compra.
Dentro del periodo de garantía, subsanaremos,
sin cargo alguno, cualquier defecto del aparato
imputable tanto a los materiales como a la
fabricación, ya sea reparando, sustituyendo
piezas, o facilitando un aparato nuevo según
nuestro criterio.
La garantía no ampara averías por uso indebido,
funcionamiento a distinto voltaje del indicado,
conexión a un enchufe inadecuado, rotura,
desgaste normal por el uso que causen defectos
o una disminución en el valor o funcionamiento
del producto.
La garantía perderá su efecto en caso de ser
efectuadas reparaciones por personas no
autorizadas, o si no son utilizados recambios
originales de Braun.
La garantía solamente tendrá validez si la fecha
de compra es confirmada mediante la factura o el
albarán de compra correspondiente.
Esta garantía tiene validez en todos los países
donde este producto sea distribuido por Braun o
por un distribuidor asignado por Braun.
En caso de reclamación bajo esta garantía,
diríjase al Servicio de Asistencia Técnica de
Braun más cercano.
Solo para España
Servicio al consumidor: Para localizar a su
Servicio Braun más cercano o en el caso de que
tenga Vd. alguna duda referente al
funcionamiento de este producto, le rogamos
contacte con el teléfono de este servicio
901 11 61 84.
Português
Garantia
Os nossos produtos dispõem de uma garantia
de 2 anos a partir da data de compra. Qualquer
defeito do aparelho imputável, quer aos
materiais, quer ao fabrico, que torne necessário
reparar, substituir peças ou trocar de aparelho
dentro de período de garantia não terá custos
adicionais,
A garantia não cobre avarias por utilização
indevida, funcionamento a voltagem diferente
da indicada, ligação a uma tomada de corrente
eléctrica incorrecta, ruptura, desgaste normal
por utilização que causem defeitos ou
diminuição da qualidade de funcionamento do
produto.
A garantia perderá o seu efeito no caso de
serem efectuadas reparações por pessoas não
autorizadas ou se não forem utilizados
acessórios originais Braun.
A garantia só é válida se a data de compra for
confirmada pela apresentação da factura ou
documento de compra correspondente.
Esta garantia é válida para todos os países onde
este produto seja distribuído pela Braun ou por
um distribuidor Braun autorizado.
No caso de reclamação ao abrigo de garantia,
dirija-se ao Serviço de Assistência Técnica
Oficial Braun mais próximo.
Só para Portugal
Apoio ao consumidor: Para localizar o seu
Serviço Braun mais próximo, no caso de surgir
alguma dúvida relativamente ao funcionamento
deste produto, contacte-nos por favor pelo
telefone 808 20 00 33.
Italiano
Garanzia
Braun fornisce una garanzia valevole per la
durata di 2 anni dalla data di acquisto.
Nel periodo di garanzia verranno eliminati,
gratuitamente, i guasti dell’apparecchio
conseguenti a difetti di fabbrica o di materiali, sia
riparando il prodotto sia sostituendo, se
necessario, l’intero apparecchio.
Tale garanzia non copre: danni derivanti dall’uso
improprio del prodotto, la normale usura
conseguente al funzionamento dello stesso, i
difetti che hanno un effetto trascurabile sul valore
o sul funzionamento dell’apparecchio.
La garanzia decade se vengono effettuate
riparazioni da soggetti non autorizzati o con parti
non originali Braun.
31
Page 32

Per accedere al servizio durante il periodo di
garanzia, è necessario consegnare o far
pervenire il prodotto integro, insieme allo
scontrino di acquisto, ad un centro di assistenza
autorizzato Braun.
Contattare il numero 02/6678623 per avere
informazioni sul Centro di assistenza autorizzato
Braun più vicino.
skøn gennem reparation eller ombytning af
apparatet. Denne garanti gælder i alle lande,
hvor Braun er repræsenteret.
Denne garanti dækker ikke skader opstået ved
fejlbetjening, normalt slid eller fejl som har ringe
effekt på værdien eller funktionsdygtigheden af
apparatet. Garantien bortfalder ved reparationer
udført af andre end de af Braun anviste
reparatører og hvor originale Braun reservedele
ikke er anvendt.
Nederlands
Garantie
Op dit produkt verlenen wij een garantie van 2
jaar geldend vanaf datum van aankoop. Binnen
de garantieperiode zullen eventuele
fabricagefouten en/of materiaalfouten gratis door
ons worden verholpen, hetzij door reparatie,
vervanging van onderdelen of omruilen van het
apparaat.
Deze garantie is van toepassing in elk land waar
dit apparaat wordt geleverd door Braun of een
officieel aangestelde vertegenwoordiger van
Braun.
Beschadigingen ten gevolge van
onoordeelkundig gebruik, normale slijtage en
gebreken die de werking of waarde van het
apparaat niet noemenswaardig beinvloeden
vallen niet onder de garantie. De garantie vervalt
bij reparatie door niet door ons erkende serviceafdelingen en/of gebruik van niet originele Braun
onderdelen.
Om gebruik te maken van onze service binnen de
garantieperiode, dient u het complete apparaat
met uw aankoopbewijs af te geven of op te sturen
naar een geauthoriseerd Braun Customer Service
Centre.
Bel 0 800 44 55 388 voor een Braun Customer
Service Centre bij u in de buurt.
Dansk
Garanti
Braun yder 2 års garanti på dette produkt
gældende fra købsdatoen. Inden for
garantiperioden vil Braun for egen regning
afhjælpe fabrikations- og materialefejl efter vort
32
Ved service inden for garantiperioden afleveres
eller indsendes hele apparatet sammen med
købsbevis til et autoriseret Braun Service Center.
Ring 7015 0013 for oplysning om nærmeste
Braun Service Center.
Norsk
Garanti
Vi gir 2 års garanti på produktet gjeldende fra
kjøpsdato.
I garantitiden vil vi gratis rette eventuelle
fabrikasjons- eller materialfeil, enten ved
reparasjon eller om vi finner det hensiktsmessig å
bytte hele produktet.
Denne garanti er gyldig i alle land der Braun eller
Brauns distributør selger produktet.
Denne garanti dekker ikke: skader på grunn av
feil bruk, normal slitasje eller skader
som har ubetydelig effekt på produktets verdi og
virkemåte. Garantien bortfaller dersom
reparasjoner utføres av ikke autorisert person
eller hvis andre enn originale Braun reservedeler
benyttes.
For service i garantitiden skal hele produktet
leveres eller sendes sammen med kopi av
kjøpskvittering til nærmeste autoriserte Braun
Serviceverksted.
Ring 22 63 00 93 for å bli henvist til nærmeste
autoriserte Braun Serviceverksted.
NB
For varer kjøpt i Norge har kunden garanti i
henhold til NEL’s Leveringsbetingelser.
Page 33

Svenska
Garanti
Vi garanterar denna produkt för två år från och
med inköpsdatum. Under garantitiden kommer vi
utan kostnad, att avhjälpa alla brister i apparaten
som är hänförbara till fel i material eller utförande,
genom att antingen reparera eller byta ut hela
apparaten efter eget gottfinnande.
Denna garanti gäller i alla länder där denna
apparat levereras av Braun eller deras
auktoriserade återförsäljare.
Garantin gäller ej: skada på grund av felaktig
användning eller normalt slitage, liksom brister
som har en försumbar inverkan på apparatens
värde eller funktion. Garantin upphör att gälla om
reparationer utförs av icke behörig person eller
om Brauns originaldelar inte används.
För att erhålla service under garantitiden skall
den kompletta apparaten lämnas in tillsammans
med inköpskvittot, till ett auktoriserat Braun
verkstad.
Ring 020-21 33 21 för information om närmaste
Braun verkstad.
Yksilöity ostokuitti riittää takuun voimassaolon
osoittamiseksi.
Lisätietoa takuuseen liittyvistä asioista saa
asiakaspalvelukeskuksestamme numerosta
020-377 877.
EППЛУИО¿
∂ÁÁ‡ËÛË
¶·Ъ·¯ˆЪФ‡МВ ‰‡Ф ¯ЪfiУИ· ВББ‡ЛЫЛ, ЫЩФ
ЪФ˚fiУ, НВОИУТУЩ·˜ ·fi ЩЛУ ЛМВЪФМЛУ›·
·ÁÔÚ¿˜.
ª¤Û· ÛÙËÓ ÂÚ›Ô‰Ô ÂÁÁ‡ËÛ˘ ηχÙÔ˘ÌÂ,
¯ˆÚ›˜ ¯Ú¤ˆÛË, ÔÔÈ·‰‹ÔÙ ÂÏ¿Ùو̷
ÚÔÂÚ¯fiÌÂÓÔ ·fi η΋ ηٷÛ΢‹ ‹ η΋˜
ÔÈfiÙËÙÔ˜ ˘ÏÈÎfi, ›Ù ÂÈÛ΢¿˙ÔÓÙ·˜ ›ÙÂ
·УЩИО·ıИЫЩТУЩ·˜ ФПfiОПЛЪЛ ЩЛ Ы˘ЫОВ˘‹
Ы‡МхˆУ· МВ ЩЛУ ОЪ›ЫЛ М·˜.
∞˘Щ‹ Л ВББ‡ЛЫЛ ИЫ¯‡ВИ ЫВ fiПВ˜ ЩИ˜ ¯ТЪВ˜ Ф˘
ˆПФ‡УЩ·И Щ· ЪФ˚fiУЩ· Braun.
∏ ВББ‡ЛЫЛ ‰ВУ О·П‡ЩВИ: О·Щ·ЫЩЪФх‹ ·fi О·О‹
¯Ъ‹ЫЛ, х˘ЫИФПФБИО‹ хıФЪ¿ ‹ ВП·ЩЩТМ·Щ· ПfiБˆ
·М¤ПВИ·˜ ЩФ˘ ¯Ъ‹ЫЩЛ. ∏ ВББ‡ЛЫЛ ·О˘ЪТУВЩ·И
·У ¤¯Ф˘У Б›УВИ ВИЫОВ˘¤˜ ·fi МЛ
ВНФ˘ЫИФ‰ФЩЛМ¤У· ¿ЩФМ· ‹ ‰ВУ ¤¯Ф˘У
¯ЪЛЫИМФФИЛıВ› БУ‹ЫИ· ·УЩ·ПП·ОЩИО¿ Braun.
Suomi
Takuu
Tälle tuotteelle myönnämme 2 vuoden takuun
ostopäivästä lukien Suomessa voimassa olevien
alan takuuehtojen TE90 mukaan. Takuuaikana
korvataan veloituksetta kaikki viat, jotka
aiheutuvat materiaaliviasta tai
valmistusvirheestä. Korvaus tapahtuu
harkintamme mukaan korjaamalla, vaihtamalla
viallinen osa tai vaihtamalla koko laite uuteen.
Takuu on voimassa kaikkialla maailmassa sillä
edellytyksellä, että laitetta myydään ko. maassa
Braunin tai virallisen maahantuojan toimesta.
Takuun piiriin eivät kuulu seuraavat viat: viat,
jotka johtuvat virheellisestä käytöstä, normaalista
kulumisesta tai viat, jolla on vähäinen merkitys
laitteen arvoon tai toimintaan. Takuun
voimassaolo lakkaa, jos laitetta korjataan muualla
kuin valtuutetussa Braun-huoltoliikkeessä tai jos
laitteessa käytetään muita kuin alkuperäisiä
varaosia.
°È· Ó· ÂÈÙ‡¯ÂÙ ۤÚßȘ ̤۷ ÛÙËÓ ÂÚ›Ô‰Ô Ù˘
ÂÁÁ‡ËÛ˘, ·Ú·‰ÒÛÙ ‹ ÛÙ›ÏÙ ÙËÓ Û˘Û΢‹
Ì ÙËÓ ·fi‰ÂÈÍË ·ÁÔÚ¿˜ Û ¤Ó·
∂ÍÔ˘ÛÈÔ‰ÔÙË̤ÓÔ ∫·Ù¿ÛÙËÌ· ™¤ÚßȘ Ù˘
Braun.
∫·П¤ЫЩВ ЫЩФ 01–9478700 БИ· У·
ПЛЪФхФЪЛıВ›ЩВ БИ· ЩФ ПЛЫИ¤ЫЩВЪФ
∂НФ˘ЫИФ‰ФЩЛМ¤УФ ∫·Щ¿ЫЩЛМ· ™¤ЪЯИ˜ ЩЛ˜
Braun.
33
 Loading...