

Page 1
Silk•épil
Stapled booklet, 120 x 170 mm, 40 pages (incl. 8 pages cover), 1/1c = black
®
9
9
9-521
Type 5377
Modèle 5377
Modelo 5377
www.braun.com
9-538
9-549
9-579
Page 2

Braun Infolines
English 6
Français 16
Español 27
Thank you for purchasing a Braun product.
We hope you are completely satisfied with
your new Braun Silk·épil.
If you have any questions, please call:
US residents 1-800-BRAUN-11
1-800-272-8611
Canadian residents 1-800-387-6657
Merci d’avoir fait l’achat d’un produit Braun.
Nous espérons que vous serez entièrement
satisfait de votre nouvel épilateur
Silk·épil
de Braun.
Si vous avez des questions, veuillez appeler
Braun Canada : 1-800-387-6657
Gracias por haber comprado un producto
Braun.
Esperamos que quede completamente
satisfecho con su nueva Silk·épil.
Si tiene alguna duda, por favor llame al:
01(800) 508-5800
96824904/VII-14
USA / CDN / MEX
Page 3
1b
1a
2
9-521
9-538
9-549
9-579
8
9
3
4
4a
5
I
I
I
0
I
I
9
6
0
I
7
10
11
12
1
2
6
3
Page 4
A
0
I
I
I
0
I
I
I
0
I
I
I
0
I
I
I
9
0
I
I
I
90°
90°
1 2
90°
90°
3
4
5
90°
6a
6b
O
I
I
I
4
Page 5
3.
B
a
I
II
b
III
c
d
e
1.
2.
f
5
1
1
2
1
1
2
Page 6

English
IMPORTANT SAFETY INSTRUCTIONS
When using an electrical appliance, basic precautions should always be
followed, including the following:
Read all instructions before using this appliance.
When disconnected, the hand-held part of this appliance may be
used in a bath or shower.
DANGER
To reduce the risk of electric shock:
1. The charger unit is not for immersion in water or for use in shower.
2. Do not reach for a charger that has fallen into water. Unplug
immediately.
3. Do not place, store or charge the appliance where it can fall or be
pulled into a tub or sink. Do not place in or drop into water or other
liquid.
4. Except when charging, always unplug this appliance from the electrical
outlet.
5. Unplug this appliance before cleaning.
6. Do not use an extension cord with this appliance.
FOR HOUSEHOLD USE ONLY
6
Page 7

WARNING
To reduce the risk of burns, fire, electric shock, or injury to persons:
1. Close supervision is necessary when this appliance is used by, on,
or near children or
2. Use this appliance only for its intended use as described in this
manual. Do not use attachments not recommended by the manufacturer.
3. Never operate this appliance if it has a damaged cord or plug, if it is
not working properly, if it has been dropped or damaged, or if the
power supply has been dropped into water. Return the appliance to
a service center for examination and repair.
4. Keep the cord away from heated surfaces.
5. Never drop or insert any object into any opening.
6. Do not use outdoors or operate where aerosol (spray) products are
being used or where oxygen is being administered.
7. Do not use this appliance with a damaged or broken foil, as serious
skin injuries may occur.
8. Always attach plug to appliance first, then to outlet. To disconnect,
turn all controls to «off», then remove plug from outlet.
9. When plugging to an electrical outlet outside the USA, use a plug
adapter to match the outlet’s pin configuration.
10. Caution: The battery used in this device may present a fire or
chemical burn hazard if mistreated. Do not disassemble, heat
above 100 °C (212 °F) or incinerate.
persons with disabilities.
SAVE THESE INSTRUCTIONS
7
Page 8

Our products are engineered to meet the
highest standards of quality, functionality
and design. We hope you thoroughly
enjoy using your Braun Silk·épil 9.
Please read the use instructions carefully
before using the appliance and keep
them for future reference.
Braun Silk·épil 9 has been designed to
make the removal of unwanted hair as
efficient, gentle and easy as possible.
The extra wide epilation head removes
the shortest hair (0.5 mm / 0.02 in) from
the root, leaving your skin smooth for
weeks.
Important
• For hygienic reasons, do not share this
appliance with other persons.
• When switched on, the appliance must
never come in contact with the hair on
your head, eyelashes, ribbons, etc. to
prevent any danger of injury as well as
to prevent blockage or damage to the
appliance.
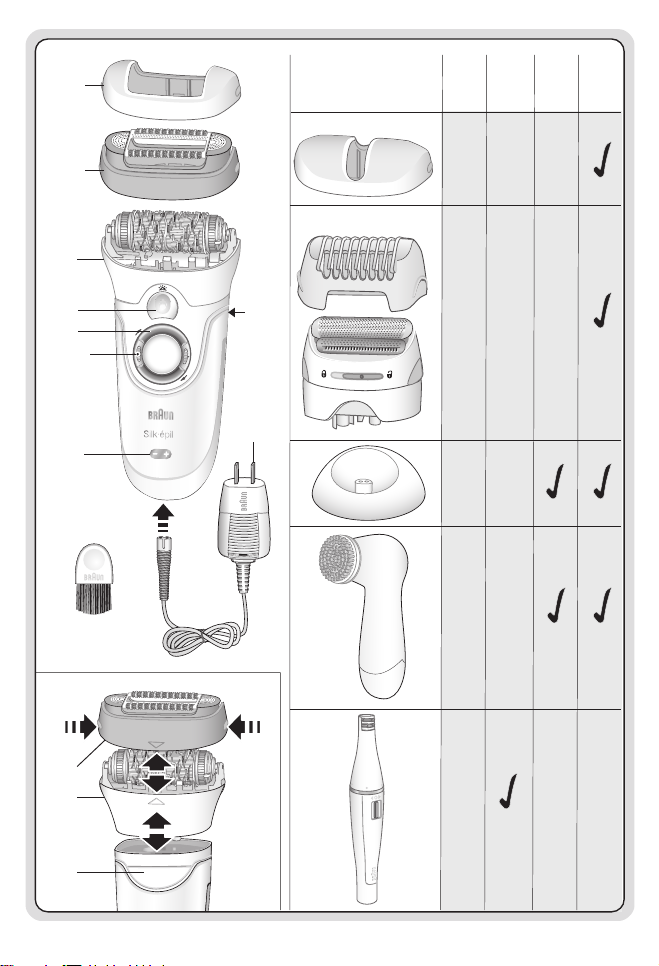
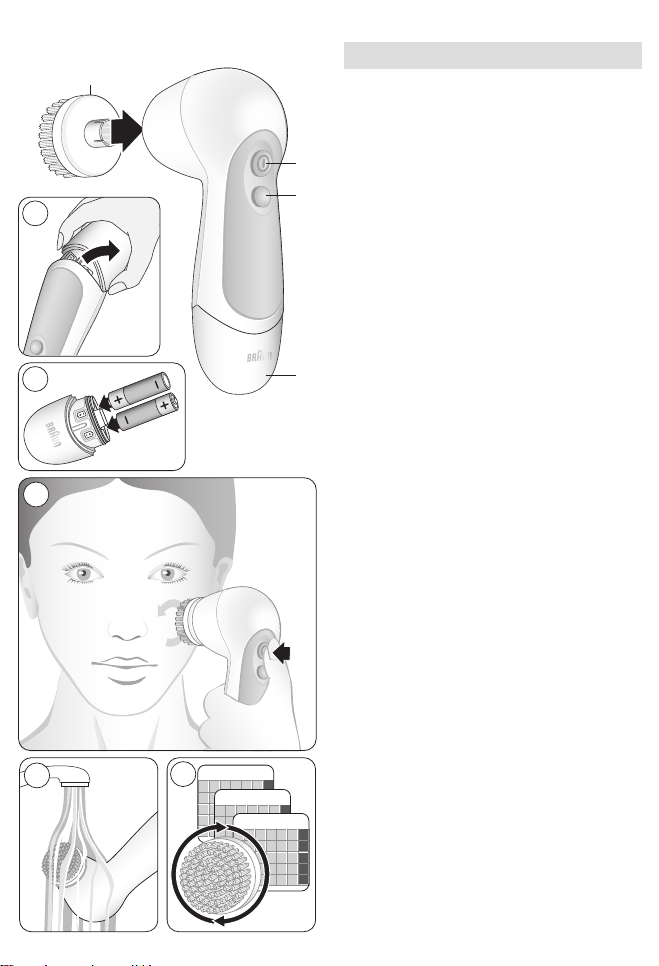
Description
1a High frequency massage cap
1b Skin contact cap
2 Extra wide epilation head
3 Smartlight
4 Switch with lock keys (4a)
5 Charging light
6 Release button
7 Special cord set
8 Facial cap *
9 Shaver head with trimmer cap *
10 Charging stand *
11 Facial cleansing brush*
12 Facial epilator *
* not with all models; see page 3
Charging
• Before use, charge the appliance. For
best performance, we recommend
that you always use a fully charged
appliance.
• Using the special cord set, connect
the appliance to an electrical outlet
8
with the motor switched off. Charging
time is approximately 1 hour.
• Models 9-549, 9-579:
Connect the charging stand (10) to an
electrical outlet and place the appliance onto the stand for charging.
• The charging light (5) flashes green
to show that the epilator is being
charged. When the battery is fully
charged, the charging light shines
permanently. Once fully charged, use
the appliance without cord.
• When the charging light flashes
red, reconnect the appliance to an
electrical outlet via the special cord
set to recharge.
• A full charge provides up to 40 minutes
of cordless operation time.
• Wet usage might reduce the operation
time. We recommend that you
recharge the appliance after each use.
• The best temperature range for
charging, using and storing the appliance is between 59 °F and 95 °F.
In case the temperature is far beyond
this range, the charging time might be
longer whereas the cordless operation
time might be reduced.
Overheating protection
As a safety feature to avoid the unlikely
event of the appliance overheating, it
may happen that the charging light
shines red for 8 seconds and then the
appliance turns off automatically. In
this case, turn the switch back to the
position «O» (off) and let the appliance
cool down.
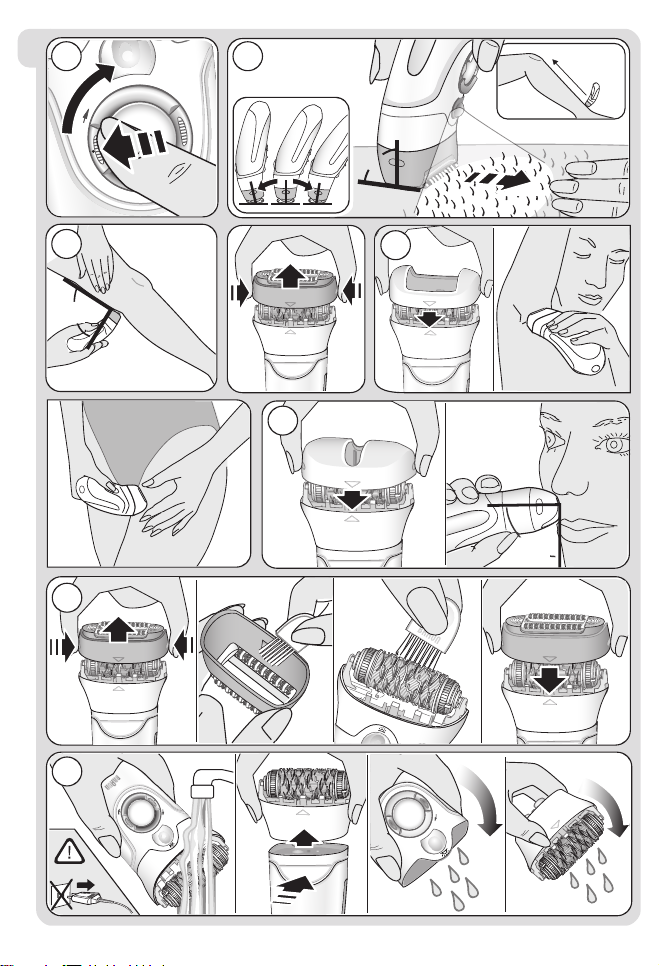
How to operate the appliance
Press one of the lock keys (4a) and turn
the switch (4) clockwise to position «I» or
«II». The Smartlight (3) shines as long
as the appliance is switched on. This
provides better visibility of fine hairs.
To remove the epilation head (2), press
the release button (6).
To change caps, press their lateral ribs
and pull off.
Page 9

A Epilation
Epilation tips
If you have not used an epilator before,
or if you have not epilated for a longer
period of time, it may take a short time
for your skin to adapt to epilation. The
discomfort experienced in the beginning
will decrease considerably with repeated
use as the skin adapts to the process.
When epilating for the first time, it is
advisable to epilate in the evening,
so that any possible reddening can
disappear overnight. To relax the skin
we recommend applying a moisture
cream after epilation.
Epilation is easier and more comfortable
when the hair is between 2 and 5 mm
(0.02 – 0.2 in). If hairs are longer, we
recommend that you shave first and
epilate the shorter, re-growing hairs after
1 or 2 weeks. Alternatively, you can trim
the hairs to 5 mm length.
Fine, regrowing hairs might not grow up
to the skin surface. The regular use of
massage sponges (e.g. after showering)
or exfoliation peelings helps to prevent
in-grown hair as the gentle scrubbing
action removes the upper skin layer and
fine hair can get through to the skin
surface.
Dry usage: Your skin must be dry and
free from grease or cream.
Wet usage: The appliance can be used
on wet skin, even under running water.
Make sure that the skin is very moist in
order to achieve optimum gliding conditions for the appliance.
2
Always stretch your skin when epilating.
Make sure that the epilation area is in
close contact with your skin.
Guide the appliance in a slow, continuous
movement without pressure against the
hair growth, in the direction of the switch.
As hair can grow in different directions,
it may also be helpful to guide the appliance in different directions to achieve
optimal results. The massage cap (1a)
ensures best skin comfort during epilation. If you are used to the sensation of
epilation, you may replace the massage
cap with the skin contact cap (1b) which
provides a closer skin contact and an
improved adaptation to all body areas.
3 Leg epilation
Epilate your legs from the lower leg in an
upward direction. When epilating behind
the knee, keep the leg stretched out
straight.
4 Underarm and bikini line epilation
In sensitive areas, we recommend using
the skin contact cap (1b).
Please be aware that especially at the
beginning, these areas are particularly
pain-sensitive. Therefore, we recommend that you select speed setting «I»
for the first few times. With repeated
usage the pain sensation will diminish.
Before epilating, thoroughly clean the
respective area to remove residues (like
deodorant). When epilating the underarm, keep your arm raised up so that the
skin is stretched and guide the appliance
in different directions. As skin may be
more sensitive directly after epilation,
avoid using irritating substances such as
deodorants with alcohol.
How to epilate
Make sure that the epilation head (2) is
clean and provided with a cap (1a or 1b).
1 Select speed «I» for a gentle epilation,
speed «II» for an efficient epilation.
5 Facial epilation
For removing any unwanted hair from the
face, use the epilation head (2) with the
(8) facial cap attached. For the first few
usages, we recommend that you select
speed setting «I» in order to get used to
9
Page 10

the epilation sensation in those sensitive
areas.
Prior to epilation, we recommend cleaning the skin with alcohol to promote good
hygiene. When epilating the face, stretch
the skin with one hand and slowly guide
the epilator with your other hand the
direction of the switch.
6 Cleaning the epilation head
Regular cleaning ensures better performance.
a Brush cleaning:
Remove the cap and brush it out.
Thoroughly clean the epilator head from
the rear side with the brush dipped into
alcohol. While doing so, turn the tweezer
element manually. This cleaning method
ensures best hygienic conditions for the
epilation head.
tend to diminish considerably with the
repeated use of Silk·épil.
In some cases inflammation of the skin
could occur when bacteria penetrate the
skin (e.g. when sliding the appliance
over the skin). Thorough cleaning of
the epilation head before each use will
minimize the risk of infection. If you have
any doubts about using this appliance,
please consult your physician. In the
following cases, this appliance should
only be used after prior consultation
with a physician: eczema, wounds,
inflamed skin reactions such as
folliculitis (purulent hair follicles),
varicose veins, around moles, reduced
immunity of the skin, e.g. diabetes
mellitus, during pregnancy, Raynaud’s
disease, haemophilia, Candida or
immune deficiency.
b Cleaning under running water:
After each wet usage, clean the appliance under running water. Remove the
cap. Hold the appliance with the epilation head under hot running water. Then
press the release button (6) to remove
the epilation head. Thoroughly shake
both, the epilation head and the appliance to make sure that remaining water
can drip out. Leave both parts to dry.
Before reattaching, make sure that they
are completely dry.
General information on epilation
All methods of hair removal from the root
can lead to in-grown hair and irritation
(e.g. itching, discomfort and reddening
of the skin) depending on the condition
of the skin and hair. This is a normal
reaction and should quickly disappear,
but may be stronger when you are
removing hair from the root for the first
few times or if you have sensitive skin.
If, after 36 hours, the skin still shows
irritation, we recommend that you
contact your physician. In general, the
skin reaction and the sensation of pain
10
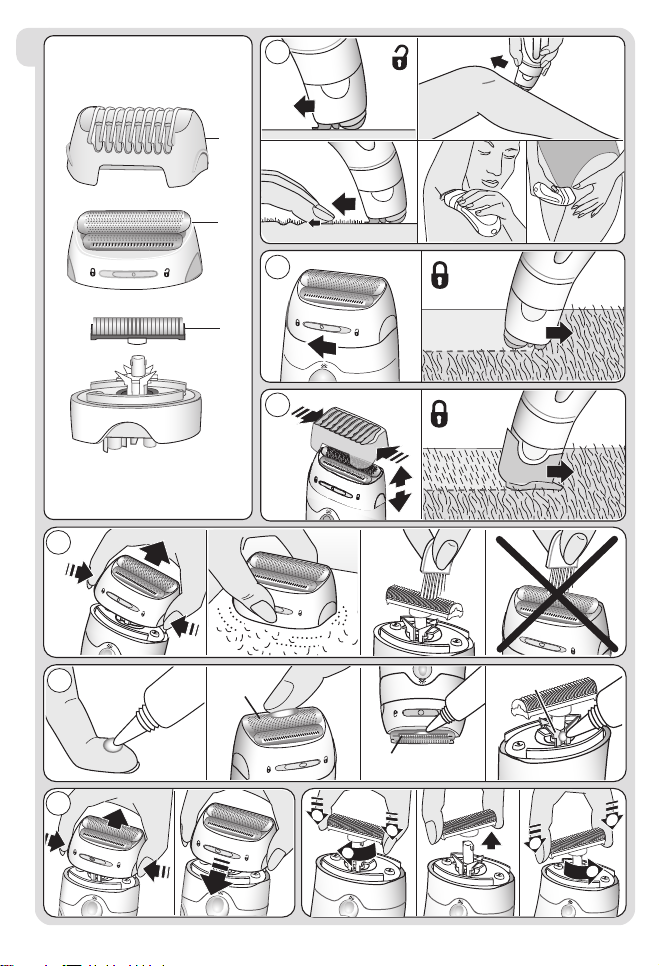
B How to use the shaver head
The shaver head (9) is designed for a
fast and close shave of legs, underarms
and bikini line, contour trimming and
cutting hair to 5 mm length. With the
shaver head attached, use the appliance
only on dry skin and with speed setting
«II».
a Shaving: select « ».
b Contour trimming: select « ».
c Trimming hair to 5 mm length: select
« » and put on the trimmer cap (I).
d Cleaning: Do not clean the shaver foil
(II) with the brush as this may damage
the foil.
e The shaving parts need to be lubri-
cated regularly every 3 months.
f
Replace the foil frame (II) and cutter
block (III) when you notice a reduced
shaving performance. Replacements
parts can be obtained from your
retailer, Braun Customer Service
Centers or via www.service.braun.com.
Do not shave with a damaged foil.
Page 11
1
3
3
C Facial cleansing brush
The facial cleansing brush (11) is waterresistant and can be used in the shower.
Important
Avoid direct contact with eyes and hair-
2
line. If skin irritation or redness occurs,
3
A
B
C
Jan.
D
E
456789
11 12 13 14 15 16 17
18 19 20 21 22 23 24
25 26 27 28 29 30 31
123
89
15 16 17
22 23 24
29
14 15 16 17
28 29 30 31
123
Feb.
4567
11 12 13 14
10
18 19 20 21
123
25 26 27 28
789
21 22 23 24
10
Mar.
10
456
11 12 13
18 19 20
25 26 27
discontinue use.
Description
1 Replaceable brush head
2 On/off switch
3 2-speed control switch
4 Battery compartment
Batteries
Pull firmly to remove the battery compartment (A). Insert two AA alkaline
4
batteries (1.5 V), e.g. Duracell. Observe
correct polarity by aligning +/– symbols
(B). Replace the battery compartment.
When brush power reduces, change the
batteries promptly. Replace all used
batteries at the same time to reduce the
chance for battery leakage conditions.
How to use the facial cleansing brush
• Click the brush head (1) onto the connection pin until it locks into position.
• Moisten facial skin and brush head lightly
with water. For best results, you may
dispense an exfoliating cleanser in your
hand and massage it over your face.
• Press the on/off switch (2) to turn on
the brush. You can change speeds by
pressing the 2-speed control switch (3).
• Gently brush your face with circular
movements for approximately one
minute. Avoid the eye area and hairline.
After use, turn off the brush.
• Rinse face with water. You may wish to
apply a moisturizer. Rinse the brush with
warm water. For best results, replace
the brush head every 3 months (E) or
sooner if bristles become deformed.
Brush head refills (ref. no. 89 Facial
Spa) are available from your retailer,
Braun Service Centers or via
www.braun.com.
11
Page 12
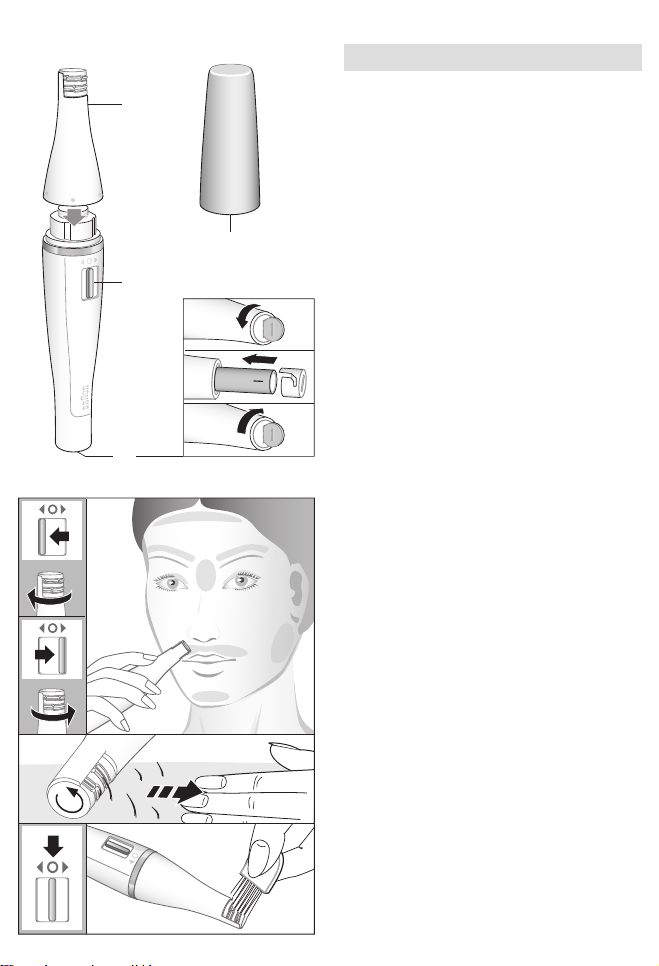
D Facial epilator
3
4
2
AA
1
The facial epilator (12) is ideal for
removing even the finest facial hairs from
the roots.
Important
Do not use the epilation head on
eyelashes. You may use the epilation
head for removing individual hairs
between or above the eyebrows, but not
for shaping eyebrows.
Never epilate with a damaged epilation
head.
Description
1 Battery compartment
2 On/off switch
3 Epilation head
4 Protective cap
Battery
Open the battery compartment (1) by
turning the bottom anti-clockwise with
a coin. Insert one AA alkaline battery
(1.5 V) observing correct polarity.
Replace the bottom by fitting it onto the
battery compartment and turning clockwise to lock it. Replace the battery as
needed. Make sure your hands and the
appliance are dry when replacing the
battery.
12
How to use the facial epilator
• Before use, make sure your skin and
the epilation head are thoroughly
clean.
• Turn on the appliance by sliding the
on/off switch (2) to the left or to the
right. The rotating direction of the
tweezers depends on the direction you
move the switch when turning on.
For best results, make sure that the
tweezers rotate against the direction
of hair growth.
• To become familiar with the appliance
we recommend trying it first on the
chin or near the outer corners of the
mouth.
Page 13

• Hold the appliance with the tweezers
against a section of skin that you keep
stretched with your free hand. Carefully guide it with gentle pressure
against the direction of hair growth.
Do not press too hard as this may lead
to skin injury. To stretch the upper lip
area, use your tongue to push from
below.
• After use, slide the on/off switch to the
«O» (= off) position.
• Carefully clean the epilation head
using the cleaning brush provided. You
may want to dip the brush into ethanol
(70 %). Alternatively, you can clean
the epilation head under running
water. Make sure that it is completely
dry before you re-attach it and close it
with the protective cap.
• To relax the skin we recommend
applying a moisturizing cream after
epilation.
• When epilating for the first time, it is
advisable to epilate in the evening, so
that any possible reddening can
disappear overnight.
Battery warnings
Keep batteries away from children and
pets. If swallowed, consult a physician at
once. For information on treatment call
Poison Control (202) 625-3333.
Batteries may explode or leak and cause
burn injury if recharged, disposed of in
fire, mixed with a different battery type,
inserted backwards or disassembled.
If a battery leaks, wipe the device with
a damp cloth and wash hands. If any
material gets in eyes, contact a physician immediately. Remove the batteries
before storing your appliance for extended periods.
Disposal
T
hese products contain batteries
and recyclable electronic waste.
To protect the environment,
do not discard them with the
household waste, but dispose of them
at appropriate local collection points.
Subject to change without notice.
13
Page 14

FOR USA ONLY
1 year limited warranty for Braun Silk·épil 9
Braun warrants this product to be free of defects in material and workmanship for a period of one year from the date of original purchase.
If the shaver exhibits such a defect, Braun will, at its option, either repair
or replace it for the consumer without charge.
Please call 1-800-Braun 11 (800-272-8611) to be referred to the
authorized Braun Service Center closest to you.
This warranty does not cover damage resulting from accident, misuse,
abuse, dirt, water, tampering, unreasonable use, servicing performed or
attempted by unauthorized service agencies or failure to provide
reasonable and necessary maintenance.
ALL IMPLIED WARRANTIES INCLUDING ANY IMPLIED WARRANTY OF
MERCHANTABILITY OR FITNESS FOR ANY PARTICULAR PURPOSE
ARE LIMITED IN DURATION TO 1 YEAR FROM DATE OF ORIGINAL
PURCHASE. IN NO EVENT WILL BRAUN INC. BE RESPONSIBLE FOR
CONSEQUENTIAL DAMAGES RESULTING FROM THE USE OF THIS
PRODUCT.
Some states do not allow the exclusion or limitation of incidental or
consequential damages, so the above limitation or exclusion may not
apply to you.
This warranty gives you specific legal rights, and you may also have other
legal rights which vary from state to state.
14
Page 15

FOR CANADA ONLY
1 year warranty for Braun Silk·épil 9
In the event a Braun Silk·épil fails to function within 1 year from date
of purchase, because of defects in material or workmanship, and the
consumer returns the unit to an authorized service center, Braun Canada,
will, at its option, either repair or replace the unit without additional
charge to the consumer.
This guarantee does not cover any product, which has been damaged by
dropping, tampering, wrong current, servicing performed or attempted by
unauthorized service agencies, misuse or abuse.
Exclusion of Warranties: The foregoing warranty is the sole warranty
offered by Braun Canada hereby disclaims any implied warranty or
merchantability or fitness for any particular purpose. In no event will
Braun Canada be responsible for consequential damages resulting from
the use of this product.
15
Page 16

Français
CONSIGNES DE SÉCURITÉ
IMPORTANTES
Lors de l’utilisation d’appareils électriques, toujours prendre les
mesures de sécurité de base suivantes :
Lire toutes les directives avant d’utiliser cet appareil.
Lorsqu’elle est débranchée, la partie de cet appareil que l’on
tient dans la main peut être utilisée dans le bain ou sous la
douche.
DANGER
Pour réduire le risque de choc électrique :
1. Le chargeur ne doit pas être immergé dans l’eau ni être utilisé sous la
douche.
2. Ne pas tenter de récupérer le chargeur s’il est tombé dans l’eau.
Le débrancher immédiatement.
3. Éviter de placer, de charger ou de ranger l’appareil à un endroit d’où
il pourrait tomber ou être poussé dans la baignoire ou le lavabo.
Ne pas immerger dans l’eau ni dans aucun autre liquide.
4. Sauf lorsqu’il est en train de recharger, toujours débrancher cet
appareil de la prise murale.
5. Débrancher cet appareil avant de le nettoyer.
6. Ne pas utiliser de rallonge pour faire fonctionner cet appareil.
RÉSERVÉ À L’USAGE DOMESTIQUE
16
Page 17

AVERTISSEMENT
Pour réduire les risques de brûlure, d’incendie, d’électrocution ou de
blessure, prendre note de ce qui suit :
1. L’utilisation de ce produit par un jeune enfant ou une personne
handicapée, ou en présence de ces derniers, doit être faite sous
supervision.
2. Ne pas utiliser cet appareil à des fins autres que celles indiquées
dans ce manuel. Ne pas utiliser d’accessoires non recommandés
par le fabricant.
3. Ne jamais utiliser cet appareil si la prise ou le cordon sont
endommagés, s’il ne fonctionne pas correctement, s’il est tombé,
s’il a été endommagé ou si le bloc d’alimentation a été échappé
dans l’eau. Retourner l’appareil à un centre de services autorisé
pour qu’il soit examiné et réparé.
4. Tenir le cordon d’alimentation loin des surfaces chaudes.
5. Ne jamais laisser tomber l’appareil ni insérer d’objets dans les
orifices.
6. Ne pas utiliser à l’extérieur ni dans les endroits où l’on utilise des
produits en aérosol (vaporisateurs) ou les endroits où l’on
administre de l’oxygène.
7. Ne pas utiliser un appareil dont la grille est endommagée ou brisée;
cela pourrait entraîner des blessures graves à la peau.
8. Toujours relier la fiche à l’appareil avant de brancher à la prise
électrique. Avant de débrancher, mettre les interrupteurs en position
arrêt, puis retirer la fiche de la prise.
9. Pour brancher à une prise électrique à l’extérieur de l’Amérique du
Nord, utiliser une fiche d’adaptation conforme à la configuration des
broches de la prise.
10. Mise en garde : La pile qui se trouve dans cet appareil peut causer
un incendie ou une brûlure chimique si elle n’est pas utilisée
adéquatement. Ne pas la désassembler, l’exposer à des
températures supérieures à 100 °C (212 °F) ni la jeter au feu.
CONSERVER CES DIRECTIVES
17
Page 18

Nos produits sont conçus pour répondre
aux normes les plus strictes en matière
de qualité, de fonctionnalité et de
conception. Nous espérons que vous
serez entièrement satisfaite de l’épilateur
Silk·épil 9 de Braun.
Veuillez lire attentivement ce mode
d’emploi avant d’utiliser l’appareil, et
le conserver pour référence ultérieure.
L’épilateur Silk·épil 9 de Braun a été
conçu pour enlever les poils indésirables
de façon aussi efficace, délicate et facile
que possible. La tête d’épilation extra
large enlève les poils les plus courts
(0,5 mm/0,02 po) à la racine, laissant
votre peau douce pendant des semaines.
Important
• Pour des raisons d’hygiène, ne pas
partager cet appareil avec d’autres
personnes.
• Lorsque l’appareil est en marche, il ne
doit jamais entrer en contact avec les
cheveux, les cils, les rubans ou autres
accessoires afin d’éviter les risques
de blessure et pour ne pas bloquer ou
endommager l’appareil.
Description
1a Embout de massage à haute
fréquence
1b Embout protecteur
2 Tête d’épilation extra large
3 Lumière Smartlight
4 Interrupteur avec touches
serrures (4a)
5 Témoin lumineux de charge
6 Bouton d’éjection
7 Cordon d’alimentation spécial
8 Embout pour le visage*
9 Tête de rasage avec embout
tondeuse*
10 Appui de recharge*
11 Brosse pour nettoyer le visage*
12 Épilateur pour le visage*
* n’est pas offert avec tous les modèles.
Se reporter à la page 3.
18
Mises en charge
• Charger l’appareil avant de l’utiliser.
Pour un rendement optimal, nous vous
recommandons de toujours utiliser un
appareil complètement chargé.
• À l’aide du cordon d’alimentation
spécial, brancher l’appareil en mode
arrêt à une prise de courant. Le temps
de recharge est d’environ 1 heure.
• Modèles 9-549, 9-579 :
Brancher l’appui de recharge (10) à
une prise électrique, puis déposer
l’appareil sur l’appui afin d’amorcer la
mise en charge.
• Le témoin lumineux de charge (5) vert
clignote pour indiquer que l’épilateur
est en recharge. Lorsque la pile est
totalement chargée, le témoin lumineux de charge s’allume de façon
permanente. Lorsque l’appareil est
complètement chargé, il peut être
utilisé sans cordon d’alimentation.
• Lorsque le témoin lumineux de
décharge rouge clignote, brancher
l’appareil à une prise de courant
à l’aide du cordon d’alimentation
spécial afin de le recharger.
• Une pleine charge procure environ
40 minutes d’utilisation sans cordon.
• Le temps d’utilisation peut être réduit
lorsque l’appareil est utilisé sur la
peau mouillée. Nous vous recommandons de recharger l’appareil après
chaque utilisation.
• La température idéale pour la mise en
charge et le rangement de l’appareil
se situe entre 15 °C et 35 °C (59 °F et
95 °F). Si la température est beaucoup
plus élevée, le temps de recharge
peut être plus long et le temps
d’utilisation sans cordon risque d’être
réduit.
Protection contre la surchauffe
Pour votre sécurité et pour éviter toute
surchauffe malencontreuse, il se peut
que le témoin lumineux de charge rouge
clignote pendant 8 secondes, puis que
l’appareil s’éteigne. Si cela se produit,
Page 19

éteignez l’appareil en le remettant en
position « O », puis laissez-le refroidir.
Comment mettre l’appareil en marche
Appuyer sur l’une des touches serrures
(4a) et tourner le bouton (4) dans le
sens horaire à la position « I » ou « II ».
Lorsque l’appareil est en marche, la
lumière Smartlight (3) reste allumée.
Cela permet de mieux voir les poils fins.
Pour enlever la tête d’épilation (2),
appuyer sur le bouton d’éjection (6).
Pour changer les embouts, appuyer sur
les fentes latérales et tirer.
A Épilation
Conseils d’épilation
Si vous n’avez jamais utilisé un épilateur
ou que vous ne vous êtes pas épilée
depuis longtemps, une courte période
d’adaptation peut être nécessaire pour
que votre peau s’adapte à l’épilation.
L’inconfort ressenti au début de l’épilation
diminuera considérablement avec l’utilisation répétée de l’appareil, à mesure
que la peau s’adaptera à l’épilation.
Il est préférable de s’épiler pour la
première fois le soir afin que les
rougeurs qui risquent d’apparaître
puissent disparaître durant la nuit. Nous
vous recommandons d’appliquer une
crème hydratante après l’épilation pour
détendre votre peau.
L’épilation est plus facile et plus confortable lorsque les poils mesurent 2 à
5 mm (0,02 à 0,2 po). Si vos poils sont
plus longs, nous vous recommandons
tout d’abord de les raser et d’épiler les
repousses 1 à 2 semaines plus tard.
Au besoin, il est possible de tailler les
poils à une longueur de 5 mm.
Des poils fins peuvent parfois repousser
sous la surface de la peau. Pour éviter
ces poils incarnés, il est conseillé
d’utiliser régulièrement un gant de crin
(après la douche) ou de procéder à des
exfoliations. En effet, l’action exfoliante
permettra de retirer les cellules mortes
afin que les poils fins puissent pousser
à la surface de la peau.
Utilisation sur la peau sèche : Votre peau
doit être sèche et exempte de toute
crème ou autre corps gras.
Utilisation sur la peau mouillée : L’appareil peut être utilisé sur la peau mouillée,
et même sous l’eau courante. Votre
peau doit être bien mouillée pour que
l’appareil glisse de façon optimale.
Pour vous épiler
Assurez-vous que la tête d’épilation (2) est
propre et munie d’un embout (1a ou 1b).
1 Choisissez la vitesse « I » pour une
épilation douce et la vitesse « II » pour
une épilation efficace.
2 Toujours tendre la peau pendant
l’épilation. Assurez-vous que la tête
d’épilation est toujours en contact avec
votre peau.
Déplacer l’appareil en un mouvement
lent et continu, sans exercer de
pression, dans le sens opposé à la
repousse et vers l’interrupteur. Comme
les poils peuvent repousser dans
des directions différentes, il peut
s’avérer utile de déplacer l’appareil en
conséquence afin d’obtenir un résultat
optimal. L’embout de massage (1a)
assure un meilleur confort pour la peau
durant l’épilation. Si vous êtes habituée
à la sensation de l’épilation, vous pouvez
remplacer l’embout de massage par
l’embout protecteur (1b). Ce dernier
permet un contact plus rapproché avec
la peau et s’adapte mieux à toutes les
parties du corps.
3 Épilation des jambes
Épiler les jambes du bas vers le haut.
Étirer la jambe pour mieux épiler l’arrière
du genou.
19
Page 20

4 Épilation des aisselles et de la zone
du bikini
Nous recommandons l’utilisation de
l’embout protecteur (1b) pour les zones
sensibles.
Veuillez noter que les aisselles et la zone
du bikini sont particulièrement sensibles
à la douleur, surtout lors des premières
épilations. C’est pourquoi nous vous
recommandons de choisir la vitesse « I »
pour les premières épilations. La sensation de douleur diminuera avec l’utilisation répétée de l’appareil.
Avant l’épilation, nettoyer à fond la
zone à épiler afin d’éliminer les résidus
(comme le désodorisant). Pour épiler les
aisselles, garder le bras levé pour bien
tendre la peau et déplacer l’appareil
dans différentes directions. Comme la
peau peut être plus sensible après l’épilation, éviter d’utiliser des substances
irritantes, comme les désodorisants
contenant de l’alcool.
5 Épilation du visage
Pour enlever les poils non désirables du
visage, utiliser la tête d’épilation (2) avec
l’embout pour le visage (8). Pour les
premières utilisations, nous vous recommandons de choisir la vitesse « I » afin de
vous habituer à la sensation d’épilation
dans ces zones sensibles.
Avant l’épilation, nous recommandons
de nettoyer la peau avec de l’alcool afin
de garder une bonne hygiène. Lors de
l’épilation du visage, étirer la peau avec
une main et guider lentement l’appareil
à l’aide de l’autre main en direction de
l’interrupteur.
6 Nettoyage de la tête d’épilation
Un nettoyage régulier assure une meilleure performance.
a Nettoyage à l’aide de la brosse :
Retirer l’embout et le brosser. Nettoyer
la tête d’épilation à fond à partir de
l’arrière à l’aide de la brossette trempée
dans l’alcool. Tourner les pincettes à
20
la main pendant le nettoyage. Cette
méthode de nettoyage assure une
meilleure hygiène de la tête de rasage.
b Nettoyage sous l’eau courante :
Après chaque utilisation sur la peau
mouillée, nettoyer l’appareil sous l’eau
courante. Retirer l’embout. Maintenir
l’appareil avec la tête d’épilation sous
l’eau chaude. Appuyer sur le bouton
d’éjection (6) pour retirer la tête d’épilation. Bien agiter la tête d’épilation et
l’appareil afin que toute l’eau s’écoule.
Laisser sécher les deux pièces. S’assurer qu’elles sont complètement sèches
avant de les assembler.
Renseignements généraux
concernant l’épilation
Selon l’état de la peau et le type de poil,
toutes les méthodes d’épilation des poils
à la racine peuvent causer des poils
incarnés et de l’irritation (p. ex. des
démangeaisons, de l’inconfort ou des
rougeurs sur la peau). Il s’agit d’une
réaction normale qui devrait disparaître
rapidement, mais elle peut s’avérer plus
forte lors des premières épilations ou si
vous avez la peau sensible. Si, après
36 heures, la peau est toujours irritée,
nous vous recommandons de communiquer avec votre médecin. En général,
la réaction cutanée et la sensation
de douleur tendent à diminuer considérablement avec l’utilisation répétée de
l’épilateur Silk·épil.
Dans certains cas, l’inflammation de
la peau peut se produire lorsque des
bactéries pénètrent dans la peau (p. ex.
au passage de l’appareil). Un nettoyage
complet de la tête d’épilation avant
chaque utilisation aidera à réduire les
risques d’infection. En cas de doute sur
l’utilisation de l’appareil, veuillez consulter votre médecin. Dans les cas
suivants, l’appareil ne devrait être utilisé
qu’après avoir consulté un médecin :
eczéma, lésions, inflammations de la
peau telles qu’une folliculite (follicules
Page 21

purulents), varices, autour des grains
de beauté, faible immunité de la peau
(p. ex. diabète sucré, durant la grossesse,
maladie de Raynaud), hémophilie,
Candida ou immunodéficience.
B Comment utiliser la tête
de rasage
La tête de rasage (9) est conçue pour
raser de près et rapidement les jambes,
les aisselles et la zone du bikini, ainsi
que pour tailler des lignes précises et
tailler les poils à une longueur de 5 mm.
Fixer la tête de rasage, puis utiliser
l’appareil sur la peau sèche seulement
en choisissant la vitesse « II ».
a Rasage : sélectionner « ».
b
Taille des contours : sélectionner « ».
c Taille des poils à une longueur de
5 mm : sélectionner « » et fixer
l’embout tondeuse (I).
d Nettoyage : Ne pas nettoyer la grille
de rasage (II) avec la brossette, car
cela risque de l’abîmer.
e Les pièces de rasage doivent être
lubrifiées tous les 3 mois.
f Remplacer la grille de rasage (II) et le
bloc-couteaux (III) lorsque la performance de rasage diminue. Vous
pouvez vous procurer des pièces de
remplacement chez votre détaillant,
dans un centre de service à la clientèle
de Braun ou au www.service.braun.
com. Ne jamais se raser lorsque la
grille est endommagée.
21
Page 22

1
3
3
C Brosse pour nettoyer le
visage
La brosse pour nettoyer le visage (11)
est résistante à l’eau et peut être utilisée
sous la douche.
2
Important
3
A
Éviter tout contact direct avec les yeux et
la naissance des cheveux. En cas d’irritation cutanée ou de rougeurs, cesser
l’emploi.
Description
1 Brosse remplaçable
2 Interrupteur marche/arrêt
3 2 vitesses de réglage
4 Compartiment à piles
B
4
Piles
Tirer fermement pour retirer le compartiment à piles (A). Insérer deux piles
alcalines AA (1,5 V) (par exemple,
Duracell). Respecter la polarité des piles
C
en faisant concorder les symboles +/–
(B). Replacer le couvercle du compartiment à piles.
Lorsque la puissance de la brosse
diminue, remplacer les piles immédiatement. Remplacer toutes les piles
usagées en même temps afin de réduire
les risques de fuites.
22
Comment utiliser la brosse
nettoyante pour le visage
• Fixer la brosse (1) sur l’appareil jusqu’à
ce qu’elle s’enclenche.
• Humecter légèrement votre visage et la
brosse avec de l’eau. Pour de meilleurs
Jan.
D
E
456789
11 12 13 14 15 16 17
18 19 20 21 22 23 24
25 26 27 28 29 30 31
123
89
15 16 17
22 23 24
29
123
Feb.
4567
11 12 13 14
10
18 19 20 21
123
25 26 27 28
789
14 15 16 17
21 22 23 24
28 29 30 31
10
Mar.
10
456
11 12 13
18 19 20
25 26 27
résultats, masser votre visage à l’aide
d’un nettoyant exfoliant.
• Appuyer sur le bouton marche/arrêt (2)
pour mettre la brosse en marche. Pour
changer la vitesse, appuyer sur le
bouton de réglage de la vitesse (3).
• Brosser délicatement votre visage en
effectuant des mouvements circulaires
pendant environ une minute. Éviter la
zone autour des yeux et la naissance
Page 23

des cheveux. Après l’utilisation,
éteindre la brosse.
• Rincer le visage avec de l’eau. L’utilisation d’une crème hydratante est
recommandée. Rincer la brosse à l’eau
tiède. Pour de meilleurs résultats,
remplacer la brosse tous les 3 mois (E),
ou plus tôt si les soies commencent à
s’effilocher. Les brosses de rechange
(nº de réf. 89 Facial Spa) sont
disponibles chez votre détaillant, dans
les centres de service Braun ou sur
Internet au www.braun.com.
23
Page 24

24
D Épilateur pour le visage
3
4
2
AA
1
L’épilateur pour le visage (12) est parfait
pour enlever même les poils du visage
les plus fins à la racine.
Important
Ne pas utiliser la tête d’épilation pour
épiler les cils. Il est possible d’utiliser la
tête d’épilation pour enlever les poils
entre ou au-dessus des sourcils, mais
pas pour les définir.
Ne jamais épiler si la tête d’épilation est
endommagée.
Description
1 Compartiment à piles
2 Interrupteur marche/arrêt
3 Tête d’épilation
4 Capuchon de protection
Pile
À l’aide d’une pièce de monnaie, ouvrir
le compartiment à piles (1) en tournant
la base dans le sens inverse des aiguilles
d’une montre. Insérer une pile alcaline
AA (1,5 V), en respectant la polarité.
Pour replacer la base, ajuster au compartiment à piles et tourner dans le sens
des aiguilles d’une montre. Remplacer la
pile au besoin. Prendre soin de remplacer
la pile lorsque les mains et l’appareil
sont secs.
Comment utiliser l’épilateur pour
le visage
• Avant d’utiliser l’appareil, s’assurer
que la peau et la tête d’épilation sont
bien propres.
• Mettre l’appareil en marche en
glissant l’interrupteur marche/arrêt (2)
vers la gauche ou vers la droite.
Le mouvement rotatif des pincettes
dépend de la direction donnée à
l’interrupteur lors de la mise en
marche. Pour des résultats optimaux,
s’assurer que les pincettes tournent
dans le sens opposé à la repousse.
• Pour vous familiariser avec l’appareil,
nous recommandons d’en faire l’essai
Page 25

sur le menton ou près des coins
extérieurs de la bouche.
• Maintenir l’appareil avec les pincettes
sur la peau tendue à l’aide de la main
libre. En exerçant une légère pression,
déplacer l’appareil avec soin dans le
sens opposé à la pousse des poils. Ne
pas appuyer trop fort, car cela pourrait
causer des lésions cutanées. Pour
étirer la zone au-dessus de la lèvre,
pousser sous la surface avec la langue.
• Après l’utilisation, faire glisser l’interrupteur marche/arrêt à la position « O »
(arrêt).
• Nettoyer délicatement la tête d’épilation à l’aide de la brosse de nettoyage
fournie. Vous pouvez aussi tremper la
brosse dans de l’éthanol (70 %). Il est
également possible de nettoyer la tête
d’épilation sous l’eau courante. Veillez
à ce qu’elle soit complètement sèche
avant de remettre le capuchon de
protection en place et de le fermer.
• Nous vous recommandons d’appliquer une crème hydratante après
l’épilation pour détendre votre peau.
• Il est préférable de s’épiler pour la
première fois le soir afin que les
rougeurs qui risquent d’apparaître
puissent disparaître durant la nuit.
Mise en garde concernant les piles
Tenir les piles hors de la portée des
enfants et des animaux. En cas d’ingestion, consulter immédiatement un
médecin. Pour obtenir de plus amples
renseignements sur les modes de traitement, appeler le centre antipoison au
202-625-3333.
Les piles peuvent exploser ou couler
et causer des brûlures si elles sont
rechargées, jetées au feu, combinées
à d’autres types de piles, insérées à
l’envers ou démontées.
Si la pile fuit, essuyer l’appareil à l’aide
d’un chiffon humide, puis se laver les
mains. Si toute substance entre en
contact avec les yeux, consulter
immédiatement un médecin.
Enlever les piles de l’appareil avant de le
ranger pendant une période de temps
prolongée.
Conseils pour jeter ces produits
Ces produits contiennent des piles
et des déchets électroniques
recyclables. Afin de protéger
l’environnement, ne les jetez pas
avec les ordures ménagères, mais
déposez-les dans un site de récupération
approprié.
Sous réserve de modifications sans
préavis.
25
Page 26

POUR LE CANADA SEULEMENT
Garantie de 1 an pour l’épilateur Silk·épil 9 de Braun
Advenant un défaut de fonctionnement d’un épilateur Silk·épil de
Braun survenant au cours de la période de un an suivant la date d’achat,
en raison d’un vice de matériau ou de fabrication, et pourvu que le
consommateur retourne l’appareil à un centre de services autorisé,
Braun Canada se réserve le choix de le réparer ou de le remplacer, sans
aucuns frais supplémentaires pour le consommateur.
La présente garantie ne couvre pas tout produit endommagé par une
chute, une modification, l’utilisation d’un courant inapproprié, un
entretien ou des tentatives d’entretien par des centres de services non
agréés, un usage impropre ou abusif.
Exclusion des garanties : Par la présente garantie, qui est la seule
garantie offerte par Braun Canada, celle-ci rejette toute garantie
implicite à l’égard de la qualité marchande ou de l’aptitude à des fins
particulières. En aucun cas Braun ne sera tenue responsable des
dommages indirects résultant de l’utilisation de ce produit.
26
Page 27

Español
MEDIDAS DE SEGURIDAD IMPORTANTES
Al usar aparatos eléctricos, siempre se deben tomar medidas de
seguridad básicas, entre las que se incluyen las siguientes:
Lea todas las instrucciones antes de usar este aparato.
Si está desconectado, este aparato se puede usar en la tina o en
la ducha.
PELIGRO
Para disminuir el riesgo de descarga eléctrica:
1. El cargador no debe sumergirse en agua ni usarse en la ducha.
2. Si el cargador cae al agua, no trate de sacarlo. Desenchúfelo de
inmediato.
3. No coloque, almacene ni ponga a recargar el aparato en donde
pueda caerse a la bañera o al lavamanos. No lo coloque ni lo deje
caer al agua ni a otros líquidos.
4. Salvo cuando lo esté recargando, siempre desenchufe el aparato del
tomacorriente.
5. Desenchufe el aparato antes de limpiarlo.
6. No use extensiones eléctricas con este aparato.
SOLAMENTE PARA USO DOMÉSTICO
27
Page 28

ADVERTENCIA
Para disminuir el riesgo de quemaduras, incendio, descarga eléctrica o
lesiones:
1. El uso de este aparato por parte de niños o personas discapacitadas, en ellos o cerca de ellos, debe supervisarse cuidadosamente.
2. Use este aparato solamente para los propósitos que se describen
en este manual. No utilice accesorios que no estén recomendados
por el fabricante.
3. Nunca use este aparato si el enchufe o el cable están dañados, si
no funciona debidamente, si se ha caído o dañado, o si el adaptador
de voltaje ha caído al agua. Envíe el aparato a un centro de servicio
técnico para su revisión y reparación.
4. Mantenga el cable alejado de las superficies calientes.
5. Nunca deje caer el aparato ni le introduzca ningún objeto en las
aberturas.
6. No lo use al aire libre ni en lugares donde se estén usando productos en aerosol (spray) o donde se esté administrando oxígeno.
7. No use este aparato si las láminas rasuradoras están dañadas o
rotas, pues podría causar lesiones graves en la piel.
8. Siempre conecte primero el enchufe al aparato y luego al tomacorriente. Para desconectar, apague todos los controles («off»), y
luego desenchufe del tomacorriente.
9. Si enchufa el aparato a un tomacorriente fuera de los Estados
Unidos, use un adaptador que se acople a la configuración de pines
del tomacorriente.
10. Precaución: Este aparato usa una batería que puede ocasionar
incendios o quemaduras químicas si se somete a maltratos. No la
desarme ni la caliente a temperaturas superiores a 100 ºC (212 ºF)
ni la incinere.
GUARDE ESTAS INSTRUCCIONES
28
Page 29

Nuestros productos se manufacturan
para cumplir con las normas más altas
de calidad, funcionalidad y diseño.
Esperamos que disfrute al máximo el uso
de su Braun Silk·épil 9.
Lea todas las instrucciones cuidadosamente antes de usar este aparato y
guárdelas para futuras consultas.
Braun Silk·épil 9 se diseñó para depilar
los vellos no deseados de la manera más
eficaz, delicada y fácil que fuese posible.
El cabezal de depilación extra ancho
elimina el vello más fino (0,5 mm) desde
la raíz y deja tu piel suave durante
semanas.
Importante
• Por razones de higiene, no comparta
este aparato con otras personas.
• Para evitar cualquier peligro de lesión
e impedir que el aparato se bloquee o
se dañe, el aparato encendido nunca
debe tocar el cabello, las pestañas,
cintas, etc.
Descripción
1a Tapa masajeadora de alta frecuencia
1b Tapa de contacto con la piel
2 Cabezal de depilación extra ancho
3 Luz inteligente
4 Interruptor con botones de
bloqueo (4a)
5 Luz indicadora de recarga
6 Botón de liberación
7 Cable eléctrico especial
8 Tapa facial *
9 Cabezal de rasuradora con tapa
recortadora *
10 Base cargadora *
11 Cepillo de limpieza facial*
12 Depiladora facial *
* no está disponible en todos los
modelos; ver página 3
Cómo recargar
• Antes de usar, cargue el aparato. Para
un funcionamiento óptimo, le recomen-
damos usar siempre el aparato con la
batería completamente cargada.
• Con el aparato apagado, conecte
el cable eléctrico especial a un
tomacorriente. El tiempo de recarga
es de 1 hora aproximadamente.
• Modelos 9-549, 9-579:
Conecte la base cargadora (10) a un
tomacorriente y coloque el aparato
sobre la base para cargarlo.
• La luz indicadora de recarga (5) verde
parpadeará para mostrar que la depiladora se está cargando. Cuando la
batería está completamente cargada,
la luz indicadora de carga permanecerá encendida continuamente. Una
vez cargado completamente, use el
aparato sin el cable.
• Cuando la luz indicadora de recarga
roja parpadee, recargue el aparato
conectando el cable eléctrico especial
a un tomacorrientes.
• Con la batería completamente cargada
se pueden obtener hasta 40 minutos
de operación sin usar el cable eléctrico.
• El uso en húmedo puede reducir el
tiempo de operación. Le recomendamos recargar el aparato después de
cada uso.
• Se recomienda recargar, usar y
guardar el aparato a una temperatura
entre 15 °C y 35 °C
Si la temperatura supera la temperatura
recomendada, el tiempo de carga
puede ser mayor y el tiempo de
operación sin cable puede reducirse.
Protección contra el
sobrecalentamiento
Como medida de seguridad en el caso
improbable de que el aparato se sobrecalentara, puede que la luz indicadora de recarga roja se encienda por
8 segundos y después el aparato se
apague automáticamente. Si eso sucediera, mueva el interruptor a la posición
«O» (apagado) y deje que el aparato se
enfríe.
29
Page 30

Cómo operar el aparato
Presione uno de los botones de bloqueo
(4a) y gire el interruptor (4) hacia la
derecha a la posición «I» o «II». La luz
inteligente (3) permanecerá encendida
mientras el aparato esté encendido. Esto
permite una mejor visibilidad de los
vellos finos.
Para quitar el cabezal de depilación (2),
presione el botón de liberación (6).
Para cambiar las tapas, presione las
marcas laterales y jale.
Uso en seco: La piel debe estar seca,
libre de grasa y cremas.
Uso en húmedo: El aparato se puede
utilizar en húmedo, incluso bajo agua
corriente. Asegúrese de que la piel esté
bien humectada para lograr el mejor
deslizamiento del aparato sobre la piel.
Cómo depilar
Asegúrese de que el cabezal de depilación (2) esté limpio y tenga puesta la
tapa (1a o 1b).
A Depilación
Consejos de depilación
Si nunca antes ha usado una depiladora
o si no se ha depilado durante mucho
tiempo, su piel podría necesitar un breve
periodo para adaptarse a la depilación. A
medida que la piel se adapta al proceso,
la incomodidad que se siente al principio
disminuye considerablemente con el uso
continuo.
Se sugiere que se depile de noche la
primera vez, para que cualquier posible
enrojecimiento pueda desaparecer
durante la noche. Para relajar la piel
recomendamos aplicar una crema
humectante después de la depilación.
La depilación es más fácil y cómoda si
el vello mide entre 2 y 5 mm (0,02 – 0,2
pulgadas). Si los vellos están más largo,
recomendamos rasurar primero y depilar
los vellos más cortos, después volver
a
depilar los vellos cuando vuelvan a
crecer en 1 o 2 semanas. También puede
recortar los vellos a un largo de 5 mm.
Puede que los vellos finos que vuelven
a crecer no alcancen la superficie de
la piel. El uso regular de esponjas de
masaje (por ejemplo, después de la
ducha) y los tratamientos de exfoliación
ayudan a evitar los vellos encarnados
pues la suave acción de frotación elimina
la capa superior de la piel y le permite al
vello fino llegar hasta la superficie.
30
1 Seleccione la velocidad «I» para una
depilación suave y la velocidad «II»
para una depilación eficiente.
2
Siempre estire la piel al depilar.
Asegúrese de que la sección depiladora
del aparato siempre se encuentre en
buen contacto con la piel.
Sin aplicar presión, guíe el aparato con
movimientos lentos y continuos en
dirección contraria al crecimiento del
vello y hacia donde apunte el interruptor.
Dado que los vellos pueden crecer en
distintas direcciones, podría ser útil que
guiara el aparato en varias direcciones
para obtener resultados óptimos. La
tapa masajeadora (1a) garantiza la
mayor comodidad para la piel durante
la depilación. Si está acostumbrada
a la sensación de la depilación, puede
reemplazar la tapa masajeadora con la
tapa de contacto con la piel (1b) que
permite un contacto más cercano con la
piel y una mejor adaptación a todas las
áreas del cuerpo.
3 Depilación de las piernas
Depile las piernas de abajo hacia arriba.
Al depilar detrás de la rodilla, mantenga
la pierna estirada.
4 Depilación de las axilas y la zona
de bikini
En las zonas sensibles, le recomendamos
usar la tapa de contacto con la piel (1b).
Page 31

Tenga presente que estas zonas son
particularmente sensibles al dolor,
especialmente al principio. Es por eso
que le recomendamos que seleccione la
velocidad «I» para las primeras veces.
Esta sensación de dolor disminuye con
el uso regular.
Antes de depilar, limpie completamente
el área a depilar para eliminar cualquier
residuo (como el desodorante). Al
depilar las axilas, mantenga el brazo
levantado para que la piel se estire, y
guíe el aparato en distintas direcciones.
Como la piel puede quedar más sensible
inmediatamente después de la
depilación, no use sustancias irritantes
como los desodorantes con alcohol.
5 Depilación facial
Para quitar el vello indeseable del rostro,
use el cabezal de depilación (2) con la
(8) tapa facial colocada. Para los primeros usos, recomendamos seleccionar la
velocidad «I» hasta que se acostumbre
a la sensación de depilación en esas
zonas sensibles.
Antes de depilar, recomendamos que
limpie la piel con alcohol para fomentar
la buena higiene. Al depilar la cara, estire
la piel con una mano y con la otra guíe
lentamente la depiladora hacia donde
apunta el interruptor.
6 Limpieza del cabezal de depilación
La limpieza regular asegura un mejor
rendimiento.
a Limpieza con el cepillo:
Quite la tapa y límpiela con el cepillo.
Limpie minuciosamente el cabezal de
depilación desde la parte posterior
usando el cepillo remojado en alcohol. Al
hacerlo, gire el mecanismo de las pinzas
manualmente. Este método de limpieza
asegura las mejores condiciones de
higiene para el cabezal de depilación.
b Limpieza bajo agua corriente:
Después de su uso en húmedo, limpie el
aparato con agua corriente. Retire la
tapa. Sostenga el aparato colocando
el cabezal de depilación bajo agua
corriente caliente. Después, oprima el
botón de liberación (6) para quitar el
cabezal de depilación. Sacuda bien el
cabezal de depilación y el aparato para
asegurar que toda el agua se escurra.
Deje que ambas partes se sequen al
aire. Antes de volver a armar el aparato,
asegúrese de que estén completamente
secas.
Información general sobre la
depilación
Todos los métodos de depilación de
vellos desde la raíz pueden provocar
vellos encarnados e irritación (por
ejemplo, comezón, molestias y
enrojecimiento de la piel) dependiendo
de las condiciones de la piel y el vello.
Esta es una reacción normal y debería
desaparecer rápidamente, pero podría
intensificarse las primeras veces que se
depilan los vellos desde la raíz o si la
persona tiene piel sensible. Si la piel
sigue irritada después de 36 horas, le
recomendamos que consulte a su
médico. En general, la reacción de la
piel y la sensación de dolor tienden a
disminuir considerablemente con el uso
continuo de Silk·épil.
En algunos casos podría ocurrir inflamación por bacterias que penetran la piel
(por ejemplo, al deslizar el aparato sobre
la piel). Para minimizar el riesgo de contraer una infección, limpie minuciosamente el cabezal de depilación antes de
cada uso. Si tiene alguna duda acerca
del uso de este aparato, consulte a su
médico. En los siguientes casos, este
aparato solo debe usarse después de
consultar a un médico: eczema, heridas,
reacciones de la piel inflamada como
foliculitis (folículos capilares purulentos)
y várices alrededor de lunares, inmunidad reducida de la piel como diabetes
mellitus, durante el embarazo, enfermedad de Raynaud, hemofilia, candidiasis
o inmunodeficiencia.
31
Page 32

B Cómo usar el cabezal de la
rasuradora
El cabezal de la rasuradora (9) está
diseñado para rasurar rápida y eficazmente las piernas, las axilas y la línea de
bikini y para recortar cabello hasta 5 mm
de largo. Con el cabeza de la rasuradora
colocado, use el aparato solo sobre la
piel seca y en la velocidad «II».
a Rasurado: seleccione «
b
Recorte de contornos: seleccione « ».
c Recorte del vello hasta 5 mm de largo:
seleccione « » y coloque la tapa
recortadora (I).
d Limpieza: No limpie la lámina rasura-
dora (II) con el cepillo porque podría
dañar la lámina rasuradora.
e Las partes de la rasuradora deben
lubricarse regularmente cada tres
meses.
f
Reemplace el marco de la lámina (II) y
el bloque de cuchillas (III) cuando note
que el rendimiento ha disminuido. Las
piezas de reemplazo pueden conseguirse en las tiendas al detal, en los
centros de atención al cliente Braun
o en el sitio www.service.braun.com.
No se rasure si la lámina está dañada.
Características eléctricas
Potencia nominal: 7 W
100–240 V ~ / 50–60 Hz
(se adapta automáticamente)
».
Voltaje de salida del adaptador: 12 V
Voltaje de la depiladora: 4,5 V
Sujeto a cambios sin previo aviso.
32
Page 33

1
3
3
C Cepillo de limpieza facial
El cepillo de limpieza facial (11) es
resistente al agua y puede usarse en la
ducha.
2
Importante
Evite el contacto directo con los ojos y la
3
A
línea de crecimiento del cabello. Si se
irrita o enrojece la piel, discontinúe el
uso.
Descripción
1 Cabezal del cepillo reemplazable
2 Interruptor de encendido y apagado
3 Interruptor de control de 2 veloci-
dades
4 Compartimiento de la batería
B
4
Baterías
Tire firmemente para extraer el compartimiento de la batería (A). Coloque dos
baterías alcalinas AA (1,5 V), por ejemplo
Duracell. Observe correctamente la
C
polaridad mediante la alineación de los
símbolos +/– (B). Reemplace el compartimiento de la batería.
Cuando la potencia de los cepillos disminuye, cambie las baterías inmediatamente. Reemplace todas las baterías
usadas al mismo tiempo para evitar las
posibilidades de pérdida de la batería.
Cómo usar el cepillo de limpieza
facial
• Encaje el cabezal del cepillo (1) hasta
hacer clic en el pasador de conexión.
• Humedezca con agua la piel del rostro
y el cabezal del cepillo. Para mejores
Jan.
D
E
456789
11 12 13 14 15 16 17
18 19 20 21 22 23 24
25 26 27 28 29 30 31
123
89
15 16 17
22 23 24
29
123
Feb.
4567
11 12 13 14
10
18 19 20 21
123
25 26 27 28
789
14 15 16 17
21 22 23 24
28 29 30 31
10
Mar.
10
456
11 12 13
18 19 20
25 26 27
resultados, puede colocar un limpiador
exfoliante en la mano y masajearlo en el
rostro.
• Presione el interruptor de encendido/
apagado (2) para encender el cepillo.
Para cambiar las velocidades presione
el interruptor de control de velocidad 2.
• Masajee lentamente el rostro con movimientos circulares durante aproximadamente un minuto. Evite el contacto con
33
Page 34

el área de los ojos y la línea de crecimiento del cabello. Después del uso,
apague el cepillo.
• Enjuague el rostro con agua. Puede
aplicar un humectante. Enjuague el
cepillo con agua tibia. Para mejores
resultados, reemplace el cabezal del
cepillo cada tres meses (E) o antes si la
cerda se deforma. Los repuestos para
los cabezales del cepillo (ref. n° 89
Facial Spa) están disponibles en las
tiendas al detal, en los centros de
servicio Braun o en el sitio
www.braun.com.
34
Page 35

D Depiladora facial
3
4
2
AA
La depiladora facial (12) es ideal para
quitar aun el vello más fino del rostro
desde la raíz.
Importante
No use el cabezal de depilación sobre
las pestañas. Puede usar el cabezal de
depilación para quitar vellos individuales
entre las cejas o encima de ellas, pero
no para darles forma.
No se depile si el cabezal de depilación
está dañado.
Descripción
1 Compartimiento de la batería
2 Interruptor de encendido y apagado
3 Cabezal de depilación
4 Tapa protectora
1
Batería
Abra el compartimiento de la batería (1)
al girar con una moneda la parte inferior
en sentido contrario a las manecillas del
reloj. Coloque una batería alcalina AA
(1,5 V) con la polaridad correcta.
Vuelva a colocar la parte inferior en el
compartimiento de la batería y gírela en
el sentido de las manecillas del reloj para
cerrarla. Reemplace la batería según
sea necesario. Asegúrese de que sus
manos y el aparato estén secos al
reemplazar la batería.
Cómo usar la depiladora facial
• Antes de usar el aparato, asegúrese
de que su piel y el cabezal de depilación estén bien limpios.
• Encienda el aparato al deslizar el interruptor de encendido y apagado (2)
hacia la izquierda o la derecha. La
dirección de rotación de las pinzas
depende de la dirección en que
mueve el interruptor al encenderlo.
Para obtener mejores resultados,
asegúrese de que las pinzas giren
en dirección contraria al crecimiento
del vello.
35
Page 36

• Para familiarizarse con el aparato, le
recomendamos probarlo primero en la
barbilla o cerca de las comisuras de la
boca.
• Mantenga el aparato con las pinzas
apoyadas sobre una parte de la piel
estirada con su mano libre. Muévala
cuidadosamente ejerciendo una
presión suave contra la dirección de
crecimiento del vello. No presione
muy fuerte porque puede lastimar la
piel. Para estirar el área de la zona del
bigote, puede empujar con la lengua
desde abajo.
• Después de usar el aparato, deslice el
interruptor de encendido y apagado a
la posición «O» (= off [apagado]).
• Limpie cuidadosamente el cabezal de
depilación con el cepillo limpiador que
se proporciona. Puede sumergir el
cepillo en etanol (70 %). También
puede limpiar el cabezal de depilación
debajo del chorro de agua. Asegúrese
de que está completamente seco
antes de volver a ensamblarlo y
cerrarlo con la tapa protectora.
• Para aliviar la piel, recomendamos
aplicar una crema humectante después de la depilación.
• Se sugiere que se depile de noche
la primera vez, para que cualquier
posible enrojecimiento pueda desaparecer durante la noche.
lávese las manos. Si entra material en
los ojos, consulte a un médico de
inmediato. Retire las baterías antes de
guardar el aparato durante períodos
prolongados.
Para desechar
Estos productos contienen
baterías y desechos electrónicos
reciclables. Para proteger el
medio ambiente, no deseche
junto con los residuos domésticos sino
en los puntos de recolección locales
adecuados.
Advertencias de batería
Mantenga las baterías alejadas de los
niños y las mascotas. Si se ingiere,
consulte a un médico de inmediato.
Para obtener información sobre el
tratamiento, llame al Control de intoxicaciones al (202) 625-3333 (sólo para
Estados Unidos).
Las baterías pueden explotar o gotear y
causar quemaduras si las recarga, las
expone al fuego, las mezcla con tipos de
baterías diferentes, las coloca al revés o
las desarma.
Si hay pérdidas en la batería, limpie el
dispositivo con un trapo húmedo y
36
Page 37

SÓLO PARA MEXICO
1 año de garantía limitada para Braun Silk·épil 9
Compañía Procter & Gamble México, S. de R.L. de C.V., con domicilio en
Loma Florida No. 32 Col. Lomas de Vista Hermosa Deleg. Cuajimalpa C.P. 05100
México D.F. consciente de lo que significa para el usuario un servicio postventa, brinda a este aparato una garantía de 1 año (depiladoras), a partir de la
fecha señalada en el sello (en la garantía) del establecimiento dónde se adquirió
el aparato, entendiéndose por ésta, la misma en que el consumidor recibió el
producto. Dentro del plazo de garantía subsanaremos cualquier defecto de
fabricación o mano de obra, bien sea reparando, cambiando algunas piezas
o sustituyendo el aparato, según sea el desperfecto de éste. Las piezas o
aparatos que hayan sido sustituidos serán de nuestra propiedad.
La garantía perderá validez en los siguientes casos:
a) Cuando el producto no hubiese sido operado de acuerdo al instructivo anexo.
b) Cuando el producto se hubiese utilizado en condiciones distintas a las
normales.
c) Cuando el producto hubiese sido alterado o reparado por personas no
autorizadas por Compañía Procter & Gamble México, S. de R.L. de C.V.
Para poder hacer efectiva esta garantía, se deberá presentar la misma
debidamente sellada junto con el producto a cualquiera de los Centros de
Servicio Autorizados (Consultar la lista anexa) o la factura, recibo o comprobante,
en el que consten los datos específicos del producto. Igualmente podrá acudir
al domicilio: Vicente Guerrero No. 3 local 7 Col. Mirador Tlalnepantla, Edo de
Méx. para la obtención de partes consumibles, accesorios y refacciones, o bien,
acudir a los Centros de Servicio Autorizados.
Cuando se requieran envíos de producto al Centro de Servicio que indique
nuestro Call Center, Compañía Procter & Gamble México, S. de R.L. de C.V.
cubrirá los fletes razonablemente erogados.
Para información en poblaciones donde no tengamos Centros de Servicio
Autorizados, le sugerimos comunicarse al (55) 53-65-16-60.
Sello del establecimiento:
Marca:
Modelo:
37
Page 38

Importado y/o distribuido por:
Procter & Gamble International Operations, SA
Loma Florida #32, Col. Lomas de Vista Hermosa,
Del. Cuajimalpa de Morelos, C.P. 05100 México, D.F.
Centros de Servicio Autorizados
Compañía Procter & Gamble México, S. de R.L. de C.V. en la República
Mexicana
Centros de Servicio Autorizados que reparan productos dentro y fuera de
GARANTÍA y venta de partes consumibles, accesorios y refacciones.
Servicio Central Braun
Calle Vicente Guerrero No. 3 local 7
Col. Mirador
Tlalnepantla, Edo. De Mex.
Tel. (55) 53-65-16-60
Casa Carrillo Alonso
Artículo 123 No. 7
Centro,
México, D. F
Tel. 01 (55) 55-12-30-46
Casa García
Av. Revolución No. 23 local 11
Col. Tacubaya
México, D. F.
Tel. 01 (55) 55-16-02-92
Partes Domésticas Díaz
Gral. J Aguilar Barraza No. 425 Pte.
Col. Centro
Culiacán, Sin.
Tel: 01 (667) 712-1547
Fernando Sepúlveda Refacciones
Ruperto Martínez 238 Ote.
Col. Centro
Monterrey, N.L.
Tel. 01 (81) 83-43-67-00
Torreón Eléctrico
Av. Hidalgo No. 978 Centro
Torreón, Coah.
Tel. 01 (871) 712-58-84
Mecánica Doméstica Industrial
Matamoros No. 38
Cuernavaca, Mor.
Tel. 01 (777) 312-46-12
38
Centro de Servicio Vázquez
Calzada Echegaray No. 28
Col. Rivera de Echegaray
Edo. de México
Tel: 01 (55) 53-73-89-42
Casa García
Av. Miguel Angel No. 170 local 18
Col. San Antonio (Gigante Mixcoac)
México, D. F.
Tel. 01 (55) 55-98-83-36
Corporación Casa García
Av. Patriotismo 875-B
Col. Mixcoac
México, D. F.
Tel. 01 (55) 55-63-87-23
Refacciones Económicas del Occidente
Garibaldi No. 1450 y 1451
Col. Ladrón de Guevara
Guadalajara, Jal.
Tel. 01 (33) 38-25-34-80
El Duende de Oaxaca
Guerrero No. 413
Col. Centro
Oaxaca, Oax.
Tel. 01 (951) 516-47-68
Torreón Eléctrico
Av. Artes Gráficas 1195 Ote.
Torreón, Coah.
Tel. 01 (871) 713-94-36
 Loading...