

Page 1
Series 5
Stapled booklet, 120 x 170 mm, 132 pages (incl. 8 pages cover), 2/2 = cyan + black
91092674/X-16
5197cc
5195cc
5190cc
wet&dry
Type 5769
www.braun.com
91092674_Series_5-2cc_wd_CEEMEA_S1.indd 191092674_Series_5-2cc_wd_CEEMEA_S1.indd 1 09.11.16 10:3609.11.16 10:36
Page 2
Braun Infolines
English 6
Français 14
Polski 23
Česk 32
Slovensk 40
Magyar 48
Hrvatski 56
Slovenski 64
Türkçe 72
Română (RO/MD) 82
Български 91
Русский 100
Українська 110
127
UK 0800 783 7010
IE 1 800 509 448
FR 0 800 944 802
(service & appel gratuits)
BE 0 800 14 592
PL 801 127 286
801 1 BRAUN
CZ 221 804 335
SK 02/5710 1135
HU (06-1) 451-1256
HR 091 66 01 777
SI 080 2822
TR 0 800 261 63 65
RO 021-224.30.35
RU 8 800 200 20 20
UA 0 800 505 000
HK 2926 2300
(Jebsen Consumer Service Centre)
Braun GmbH
Frankfurter Straße 145
ZA 0860 112 188
(Sharecall charged at local rates)
61476 Kronberg/Germany
www.braun.com
UK/FR/PL/CZ/SK/HU/HR/SI/TR/RO/
MD/BG/RU/UA/Arab
91092674_Series_5-2cc_wd_CEEMEA_S2.indd 191092674_Series_5-2cc_wd_CEEMEA_S2.indd 1 09.11.16 10:3709.11.16 10:37
www.service.braun.com
Page 3

Ser
ri
es
s 5
5
1
S
e
r
i
e
s
5
Series 5
2
Seri
e
s 5
6
3
4
S5
w
et
&dry
7
8
10
5
9
5b
5c5a
11
Series 5
12
5
w
S5
e
t&
d
r
y
5d
5197cc
5190cc
5195cc
16a 16b 16c
13
15
16
14
17
18
3
91092674_Series_5-2cc_wd_CEEMEA_S3.indd 191092674_Series_5-2cc_wd_CEEMEA_S3.indd 1 09.11.16 10:3809.11.16 10:38
Page 4
20°
10°
0°
10°
A
90°
S
er
i
es 5
20°
20°
10°
10°
20°
0°
0°
10°
10°
B
C
4
91092674_Series_5-2cc_wd_CEEMEA_S4.indd 191092674_Series_5-2cc_wd_CEEMEA_S4.indd 1 09.11.16 10:3809.11.16 10:38
Page 5
D
2
1
2
1
E
F
5
91092674_Series_5-2cc_wd_CEEMEA_S5.indd 191092674_Series_5-2cc_wd_CEEMEA_S5.indd 1 09.11.16 10:3809.11.16 10:38
Page 6
English
Our products are designed to meet the highest standards of quality, functionality and
design. Thank you for your trust in Braun’s quality and we hope you enjoy your new
Braun product.
Read these instructions completely, they contain safety information. Keep them
for future reference.
Warning
Your appliance is provided with a special cord set, which has an
integrated Safety Extra Low Voltage power supply. Do not
exchange or tamper with any part of it, otherwise there is risk of an
electric shock. Only use the special cord set provided with your
appliance.
If the appliance is marked
492, you can use it with any
Braun power supply coded 492-XXXX.
This appliance is suitable for cleaning under running water
and use in a bathtub or shower. For safety reasons it can
only be operated cordless.
Detach the shaver from the power supply before using it with water.
Do not shave with a damaged foil or cord.
This appliance can be used by children aged from 8 years and
above and persons with reduced physical, sensory or mental
capabilities or lack of experience and knowledge if they have been
given supervision or instruction concerning the safe use of the
appliance and understand the hazards involved. Children shall not
play with the appliance. Cleaning and user maintenance shall not be
made by children unless they are older than 8 years and supervised.
Clean&Charge Station
To prevent the cleaning fluid from leaking, ensure that the
Clean&Charge Station is placed on a flat surface. When a cleaning
cartridge is installed, do not tip, move suddenly or transport the
station in any way as cleaning fluid might spill out of the cartridge.
Do not place the station inside a mirror cabinet, nor place it on a
polished or lacquered surface.
6
91092674_Series_5-2cc_wd_CEEMEA_S6-132.indd 691092674_Series_5-2cc_wd_CEEMEA_S6-132.indd 6 23.11.16 15:4123.11.16 15:41
Page 7
The cleaning cartridge contains a highly flammable liquid so keep
it away from sources of ignition. Do not expose to direct sunlight
and cigarette smoking nor store it over a radiator.
Do not refill the cartridge and use only original Braun refill
cartridges.
Shaver
1 Foil & Cutter cassette
2 Cassette release button
3 MultiHeadLock switch
4 On/off switch
5 Shaver display
5a Lock symbol (travel lock)
5b Charging segments
5c Cleaning indicator
5d Battery symbol
6 Long hair trimmer
7 Shaver-to-station contacts
8 Release button for long hair trimmer
9 Shaver power socket
10 Special cord set (design can differ)
11 Protection cap*
12 Travel case*
* not with all models
First use and Charging
Connect the shaver to an electrical outlet by snapping the special cord set (10) into the
shaver power socket (9) or via the Clean&Charge Station (see Chapter «Clean&Charge
Station»).
Basic operating information
• A full charge provides up to 50 minutes of cordless shaving time. This may vary
according to your beard growth and environmental temperature.
• Recommended ambient temperature for charging is 5 °C to 35 °C. The battery may
not charge properly or at all under extreme low or high temperatures. Recommended
ambient temperature for storage and shaving is 15 °C to 35 °C.
• Do not expose the appliance to temperatures higher than 50 °C for extended periods
of time.
• When the shaver will be connected to an electrical outlet, it may take some minutes
until the display illuminates.
7
91092674_Series_5-2cc_wd_CEEMEA_S6-132.indd 791092674_Series_5-2cc_wd_CEEMEA_S6-132.indd 7 23.11.16 15:4123.11.16 15:41
Page 8
Charging / low charge
The charge status is shown in the shaver display (5).
• During charging the respective charging segment (5b) will blink.
• When the shaver is fully charged and connected to an electrical outlet, all 3 charging
segments will light up for a few seconds. Then the display turns off.
• The battery symbol (5d) will flash red, when the battery is running low. You should be
able to finish your shave. With switching off the shaver a beep sound reminds of the
low charge status.
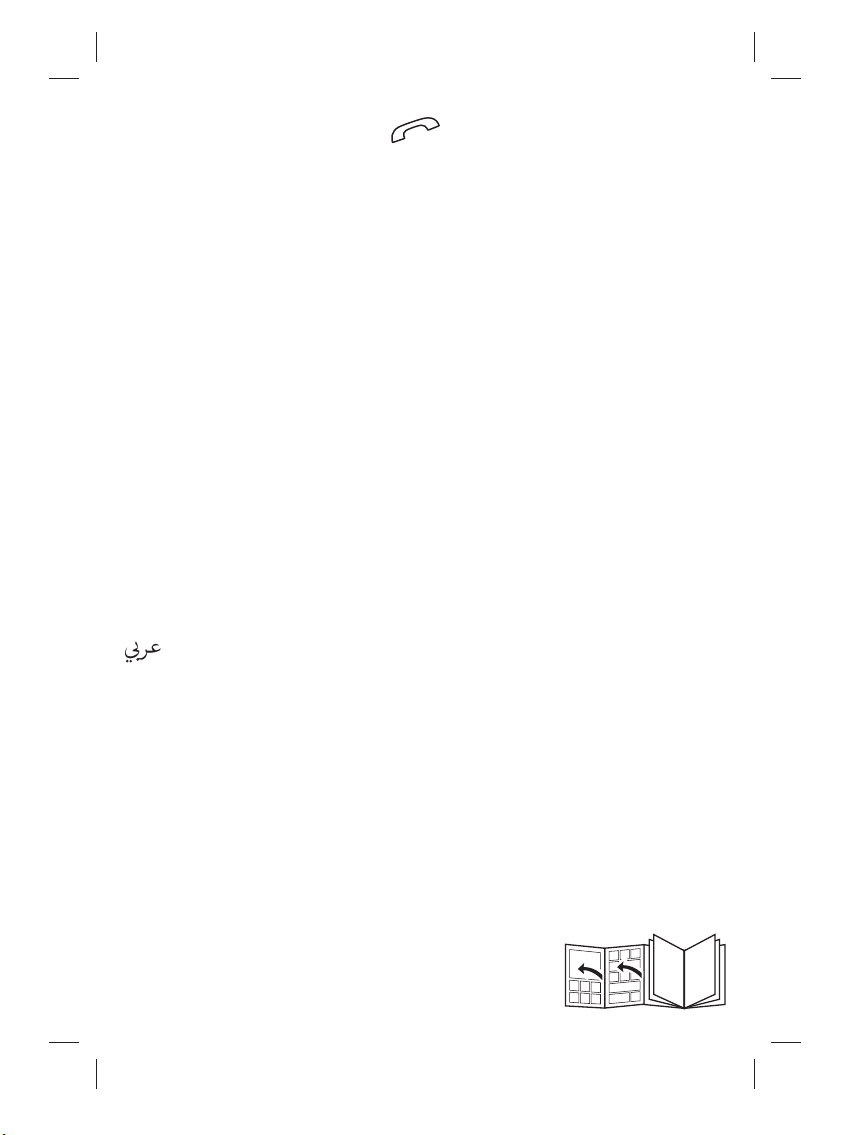
Using the shaver
Press the on/off switch (4) to operate the shaver.
Tips for a perfect dry shave
For best results, Braun recommends you to follow 3 simple steps:
1. Always shave before washing your face.
2. At all times, hold the shaver at the right angle (90°) to your skin.
3. Stretch your skin and shave against the direction of your beard growth.
MultiHeadLock switch (head lock)
• To shave hard-to-reach areas (e.g. under the nose) slide the MultiHeadLock switch
(3) down to lock the shaver head. The shaver head can be locked in five positions.
• To change position, move the shaver head with your thumb and forefinger back or
forth. It will automatically click into the next position.
• For automatic cleaning in the Clean&Charge Station the head lock should be
released.
Long hair trimmer
To trim sideburns, moustache or beard press the release button (8) and slide the long
hair trimmer (6) upwards.
Travel lock
The lock symbol (5a) lights up in the display when the shaver has been locked to avoid
unintended starting of the motor (e.g. for storing it in a suitcase).
• Activation: By pressing the on/off switch (4) for 3 seconds the shaver is locked. This is
confirmed by a beep sound and the lock symbol in the display. Afterwards the display
turns off.
• Deactivation: By pressing the on/off switch for 3 seconds again the shaver is
unlocked.
Manual cleaning of the shaver
Cleaning under running water
• Switch on the shaver (cordless) and rinse the shaver head under hot running
water until all residues have been removed. You may use liquid soap without
abrasive substances. Rinse off all foam and let the shaver run for a few more seconds.
8
91092674_Series_5-2cc_wd_CEEMEA_S6-132.indd 891092674_Series_5-2cc_wd_CEEMEA_S6-132.indd 8 23.11.16 15:4123.11.16 15:41
Page 9
• Next, switch off the shaver, press the release button (2) to remove the Foil & Cutter
cassette (1) and let it dry.
• If you regularly clean the shaver under water, then once a week apply a drop of light
machine oil on top of the Foil & Cutter cassette.
The shaver should be cleaned after each foam usage.
Cleaning with a brush
Switch off the shaver. Remove the Foil & Cutter cassette (1) and tap it out on a flat
surface. Using the brush, clean the inner area of the pivoting head. Do not clean the
cassette with the brush as this may damage it!
Clean&Charge Station (C&C)
The Clean&Charge Station has been developed for cleaning, charging, lubricating,
disinfecting, drying and storing your Braun shaver.
13 Station power socket
14 Lift button for cartridge exchange
15 Station-to-shaver contacts
16 Clean&Charge Station display
16a Level indicator
16b Status light
16c Cleaning program indicators
17 Start button
18 Cleaning cartridge
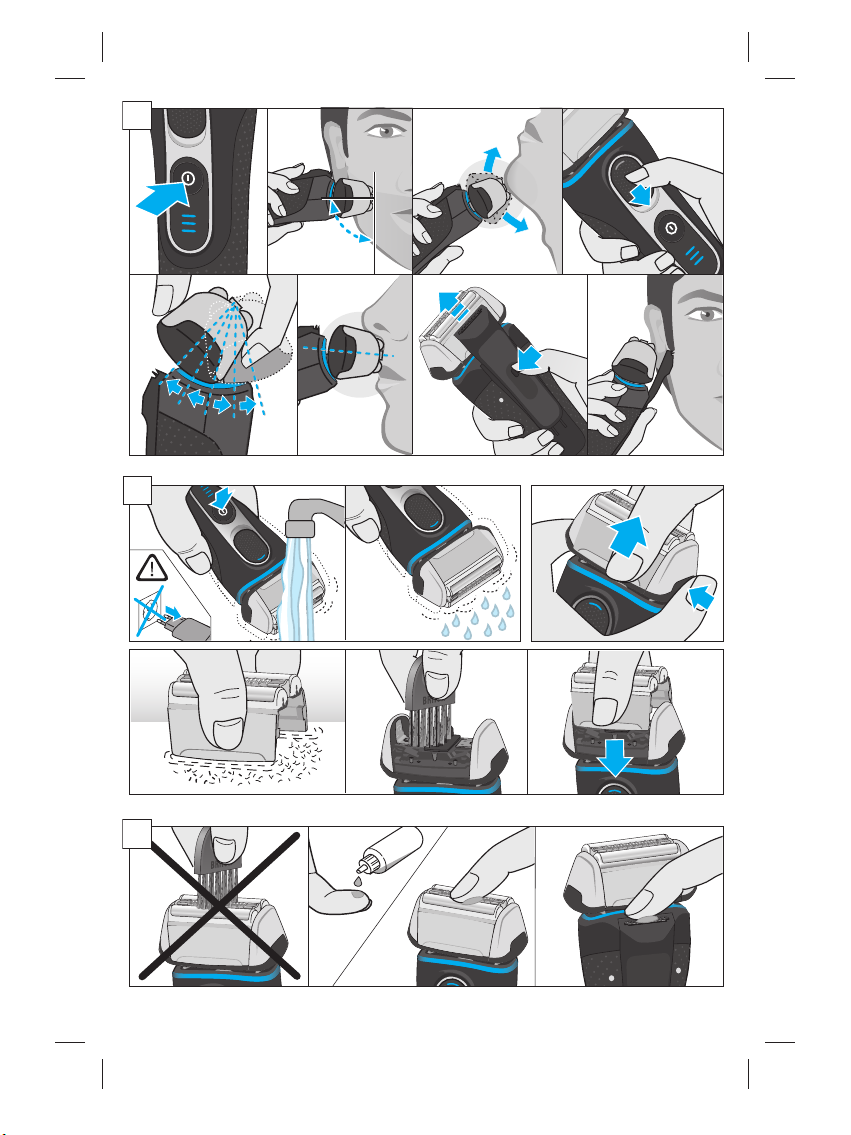
Installing the C&C
• Remove the protection foil from the C&C display.
• Press the lift button (14) at the rear side of the C&C to lift up the housing.
• Hold the cleaning cartridge (18) down on a flat, stable surface (e.g. table).
• Carefully remove the lid from the cartridge.
• Slide the cartridge from the rear side into the base of the station until it snaps into place.
• Slowly close the housing by pushing it down until it locks.
• Using the special cord set (10), connect the station power socket (13) to an electrical
outlet.
Using the C&C
Important: The shaver needs to be dry and free from any foam or soap residue!
Insert the shaver in the C&C upside down, with the front showing and released head
lock (3).
The contacts (7) on the back of the shaver need to align with the contacts (15) in the
C&C. Push the shaver in the correct position. A beep sound confirms that the shaver
sits properly in the C&C.
9
91092674_Series_5-2cc_wd_CEEMEA_S6-132.indd 991092674_Series_5-2cc_wd_CEEMEA_S6-132.indd 9 23.11.16 15:4123.11.16 15:41
Page 10
The C&C analyzes the hygiene status. The status is shown by the cleaning program
indicators (16c) in the C&C display (16).
Charging the shaver in the C&C
Charging will start automatically when the shaver has been placed in properly.
Cleaning the shaver in the C&C
When the cleaning indicator (5c) lights up in the shaver display, insert the shaver into
the C&C, as described above.
Cleaning programs
short economical cleaning
normal level of cleaning
high intensive cleaning
Start automatic cleaning
Start the cleaning process by pressing the start button (17). If status light (16b) does
not shine (C&C switches to stand-by after ca. 10 minutes), press start button twice.
Otherwise cleaning will not start. For best shaving results, we recommend cleaning
after each shave.
Each cleaning program consists of several cycles, where cleaning fluid is flushed
through the shaver head. Depending on your Clean&Charge Station model and/or
program selected, the cleaning time takes up to 3 minutes. During this time the status
light blinks. Leave the shaver in the station for drying. It takes several hours until
remaining moisture evaporates depending on the climatic conditions.
After completing the cleaning and charging procedure, all indicators turn off.
Removing the shaver from the C&C
Hold the C&C with one hand and tilt the shaver slightly to the front to release it.
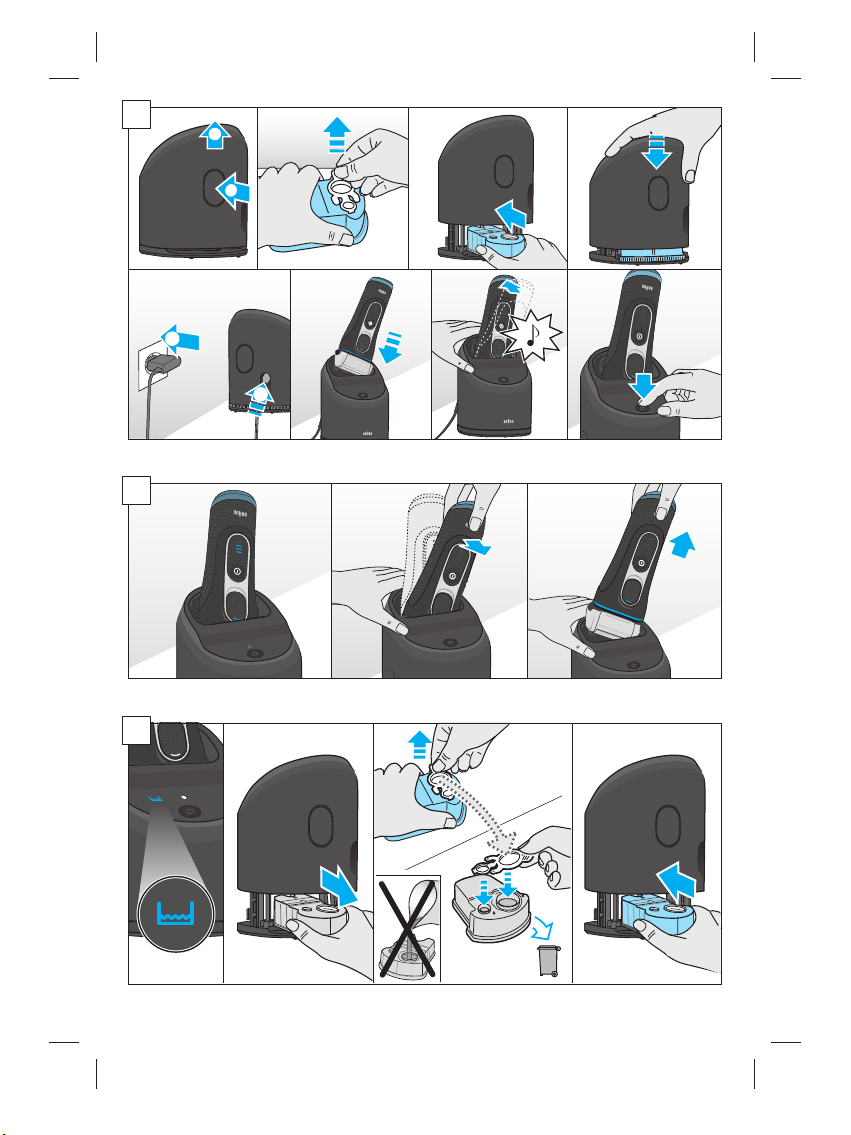
Cleaning cartridge / Replacement
When the level indicator (16a) lights up permanently red, the remaining fluid in the
cartridge is sufficient for about 3 more cycles. When the level indicator blinks red, the
cartridge needs to be replaced - about every 4 weeks when used daily.
After having pressed the lift button (14) to open the housing, wait for a few seconds
before removing the used cartridge to avoid any dripping. Before discarding the used
cartridge, make sure to close the openings using the lid of the new cartridge, since the
used cartridge will contain contaminated cleaning solution.
10
91092674_Series_5-2cc_wd_CEEMEA_S6-132.indd 1091092674_Series_5-2cc_wd_CEEMEA_S6-132.indd 10 23.11.16 15:4123.11.16 15:41
Page 11
The hygienic cleaning cartridge contains ethanol or isopropanol (specification see
cartridge), which once opened will naturally evaporate slowly. Each cartridge, if not
used daily, should be replaced after approximately 8 weeks to ensure optimal
disinfection. The cleaning cartridge also contains lubricants for the shaving system,
which may leave residual marks on the outer foil frame and the cleaning chamber of the
C&C. These marks can be removed easily by wiping gently with a damp cloth.
Accessories
Braun recommends changing your shaver’s Foil & Cutter cassette every 18 months to
maintain your shaver’s maximum performance.
Available at your dealer or Braun Service Centres:
• Foil & Cutter cassette: 52S/52B
• Cleaning Cartridge: CCR
• Braun Shaver cleaner spray
Environmental notice
Product contains batteries and/or recyclable electric waste. For environment
protection do not dispose of in household waste, but for recycling take to electric
waste collection points provided in your country.
The cleaning cartridge can be disposed of with regular household waste.
Subject to change without notice.
For electric specifications, see printing on the special cord set.
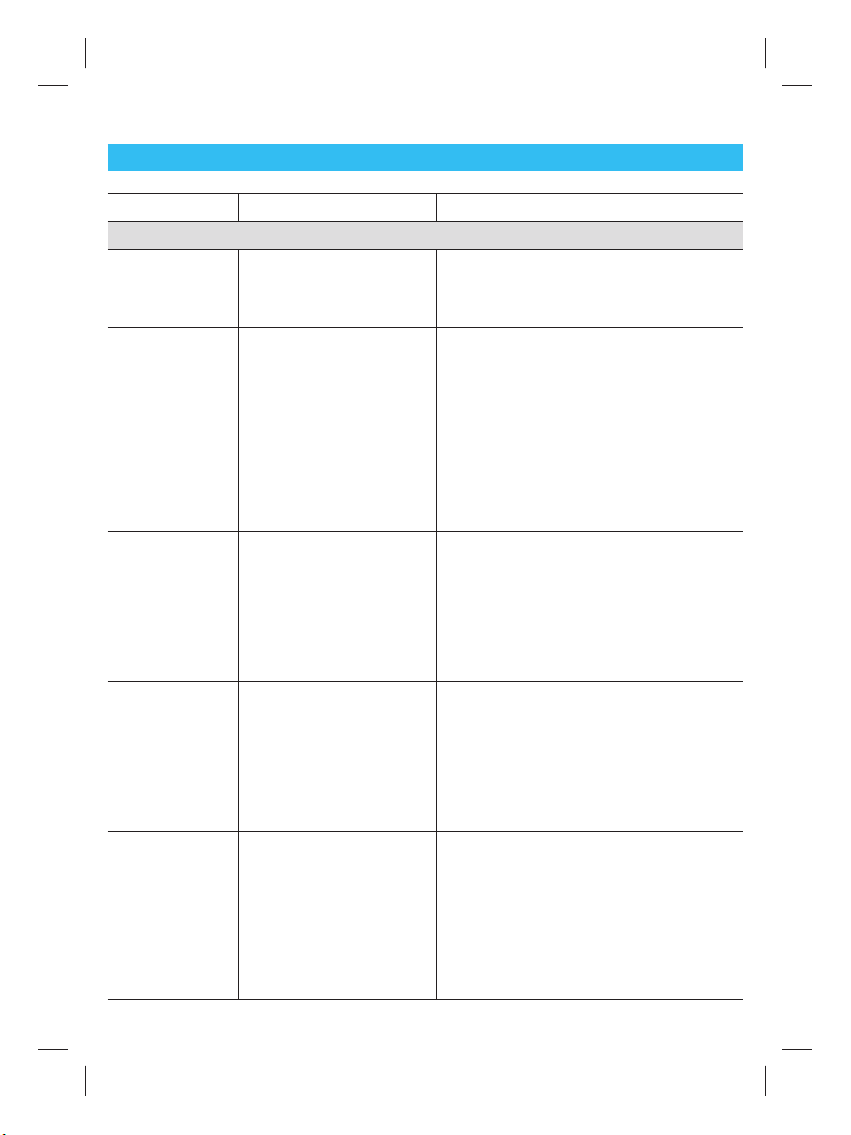
Trouble-Shooting
Problem Possible reason Remedy
SHAVER
Shaver does not
charge completely and
keeps blinking.
91092674_Series_5-2cc_wd_CEEMEA_S6-132.indd 1191092674_Series_5-2cc_wd_CEEMEA_S6-132.indd 11 23.11.16 15:4123.11.16 15:41
Ambient temperature is
out of valid range.
Recommended ambient temperature for
charging is 5 °C to 35 °C.
11
Page 12
Charging does
not start when
connected to
power socket.
1. Sometimes charging
could start delayed
(e.g. after long storage).
2. Ambient temperature
is out of valid range.
3. Special cord set is not
plugged in properly.
Unpleasant smell
from the shaver
head.
1. Shaver head is cleaned
with water.
2. Cleaning cartridge is in
use for more than
8 weeks.
Battery performance dropped
significantly.
1. Foil and cutter are
worn which requires
more power for each
shave.
2. Shaver head is regularly cleaned with
water but not lubricated.
Shaving performance dropped
significantly.
1. Foil and cutter are
worn.
2. Shaving system is
clogged.
Shaver head is
damp.
1. Drying time after automatic cleaning was too
short.
2. Drain of the
Clean&Charge Station
is clogged.
CLEAN&CHARGE STATION
Cleaning does
not start when
pressing the
start button.
1. Shaver is not placed
properly in the
Clean&Charge Station.
2. Cleaning cartridge
contains not enough
cleaning fluid (display
blinks red).
1. Wait a few minutes, if charging will
start automatically.
2. Recommended ambient temperature
for charging is 5 °C to 35 °C.
3. Special cord set needs to snap into
place.
1. When cleaning the shaver head with
water only use hot water and from time
to time some liquid soap (without
abrasive substances). Remove Foil &
Cutter cassette to let it dry.
2. Change cleaning cartridge at least
every 8 weeks.
1. Renew Foil & Cutter cassette.
2. If the shaver is regularly cleaned with
water, apply a drop of light machine oil
on top of the foil once a week for lubrication.
1. Renew Foil & Cutter cassette.
2. Soak the Foil & Cutter cassette into hot
water with a drop of dish liquid. Afterwards rinse it properly and tap it out.
Once dry apply a drop of light machine
oil on the foil.
1. Clean directly after shaving to allow
enough time for drying.
2. Clean the drain with a wooden toothpick.
1. Insert shaver into the Clean&Charge
Station and push it to the rear side of
the station (contacts of the shaver need
to align with contacts in the station).
2. Insert new cleaning cartridge. Press
start button again.
12
91092674_Series_5-2cc_wd_CEEMEA_S6-132.indd 1291092674_Series_5-2cc_wd_CEEMEA_S6-132.indd 12 23.11.16 15:4123.11.16 15:41
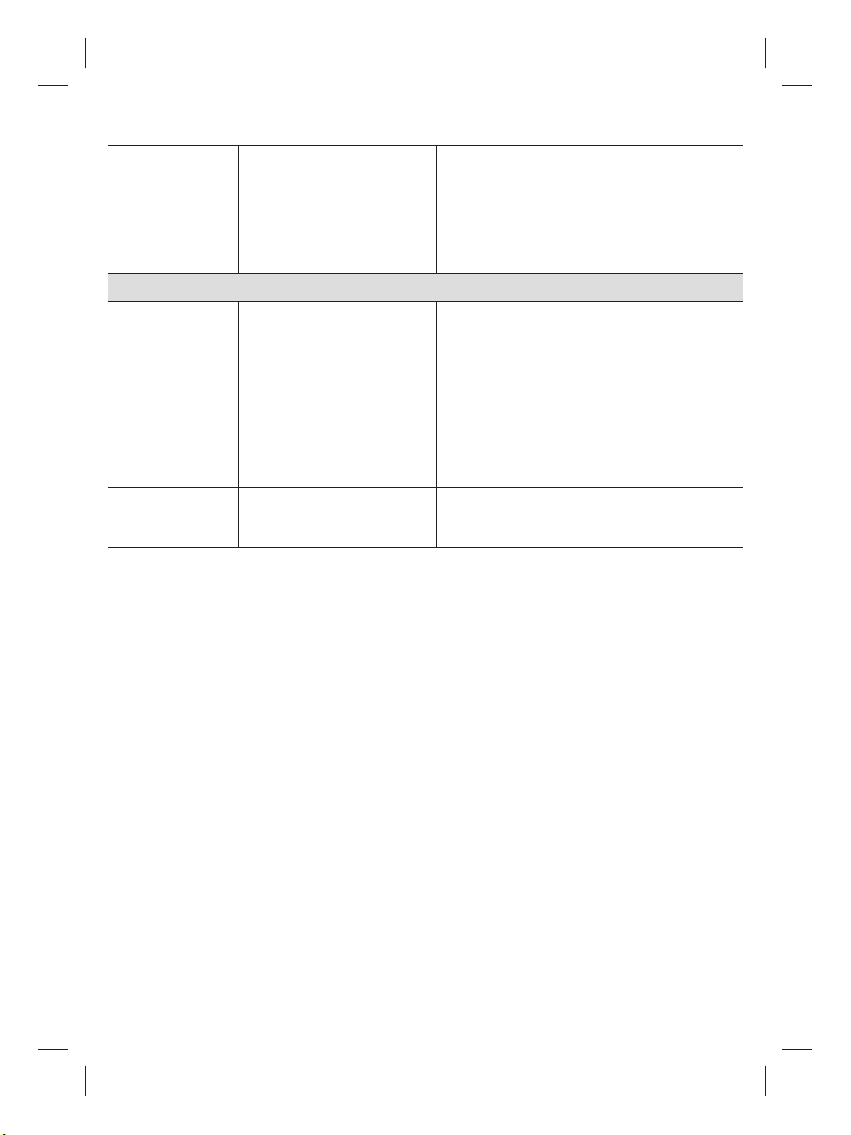
Page 13
Increased consumption of
cleaning fluid.
Drain of the Clean&
Charge station is
clogged.
– Clean the drain with a wooden tooth-
pick.
– Regularly wipe the tub clean.
Guarantee
We grant a 2 year guarantee on the product commencing on the date of purchase.
Within the guarantee period we will eliminate any defects in the appliance resulting from
faults in materials or workmanship, free of charge either by repairing or replacing the
complete appliance at our discretion.
This guarantee extends to every country where this appliance is supplied by Braun or its
appointed distributor.
This guarantee does not cover: damage due to improper use, normal wear or use as
well as defects that have a negligible effect on the value or operation of the appliance.
The guarantee becomes void if repairs are undertaken by unauthorised persons and if
original Braun parts are not used.
To obtain service within the guarantee period, hand in or send the complete appliance
with your sales receipt to an authorised Braun Customer Service Centre (address
information available online at www.service.braun.com).
For UK only:
This guarantee in no way affects your rights under statutory law.
13
91092674_Series_5-2cc_wd_CEEMEA_S6-132.indd 1391092674_Series_5-2cc_wd_CEEMEA_S6-132.indd 13 23.11.16 15:4123.11.16 15:41
Page 14
Français
Nos produits sont conçus pour répondre aux normes les plus élevées en matière de
qualité, fonctionnalité et design. Nous espérons que vous serez pleinement satisfait de
votre nouveau rasoir Braun.
Lisez attentivement ces instructions car elles contiennent des informations sur
la sécurité. Conservez-les pour une consultation ultérieure.
Avertissements
Ce système de rasage est fourni avec un câble spécial, qui
possède une alimentation électrique sécurisée intégrée à très
basse tension. N’échangez ou modifiez aucune partie du câble,
sous risque de recevoir un choc électrique. Utilisez uniquement le
cordon spécial fourni avec votre appareil.
Si l‘appareil porte la référence 492, vous pouvez l‘utiliser avec n‘importe quelle alimentation Braun marquée 492-XXXX.
Cet appareil peut être nettoyé sous l’eau courante et utilisé
dans le bain ou sous la douche. Pour des raisons de
sécurité, l’appareil ne peut être utilisé que sans fil.
Débranchez l’appareil de l’alimentation avant de le nettoyer à
l’eau.
Ne pas se raser avec une cassette de rasage ou un cordon d’alimentation abîmé.
Cet appareil peut être utilisé par des enfants de 8 ans et plus et par
des personnes dont les capacités physiques, sensorielles ou mentales sont réduites, ou des personnes dénuées d’expérience ou de
connaissance, si elles ont pu bénéficier, par l’intermédiaire d’une
personne responsable de leur sécurité, d’une surveillance ou d’instructions préalables concernant l’utilisation de l’appareil en toute
sécurité et les dangers encourus.Les enfants ne doivent pas jouer
avec l’appareil. Le nettoyage et l’entretien ne doivent pas être faits
par des enfants, à moins qu’ils ne soient âgés de plus de 8 ans et
qu’ils ne soient sous surveillance.
Station Clean&Charge
Pour éviter au liquide de nettoyage de couler, assurez-vous que la
Station Clean&Charge est placée sur une surface plane.
14
91092674_Series_5-2cc_wd_CEEMEA_S6-132.indd 1491092674_Series_5-2cc_wd_CEEMEA_S6-132.indd 14 23.11.16 15:4123.11.16 15:41
Page 15
Lorsqu’une cartouche de nettoyage est installée, ne pas basculer,
ne pas se déplacer brusquement ou transporter la station de quelque manière que le liquide de nettoyage pourrait déborder de la
cartouche. Ne pas placer la station dans une armoire à glace, ni la
placer sur une surface polie ou laquée.
La cartouche de nettoyage contient un liquide hautement inflammable donc gardez-la à l‘écart de toute source d‘ignition. Ne pas
exposer directement au soleil et au tabagisme, ni la stocker sur un
radiateur.
Ne pas remplir la cartouche et utiliser uniquement les cartouches originales de recharge Braun.
Rasoir
1 Grille et tête de rasage
2 Bouton d’éjection de la cassette de rasage
3 Interrupteur du MultiHeadLock
4 Bouton marche/arrêt
5 Voyants d’affichage
5a Symbole de verrouillage (verrou de sécurité pour le voyage)
5b Segments de charge
5c Indicateur de nettoyage
5d Symbole de batterie
6 Tondeuse poils longs
7 Plots de contact rasoir / système autonettoyant
8 Bouton de déverrouillage pour tondeuse poils longs
9 Prise d‘alimentation du rasoir
10 Cordon d’alimentation spécial (le style peut varier)
11 Capot de protection
12 Pochette de voyage*
*cela dépend des modèles
Première utilisation et mise en charge du rasoir
Branchez le rasoir éteint directement sur une prise électrique (9) à l’aide du cordon
spécial (10) ou via la station Clean & Charge (voir le chapitre «Station Clean & Charge»).
Informations générales et de mise en charge
• Un chargement complet fournit jusqu’à 50 minutes de rasage sans le cordon. Cela
peut varier selon la longueur et la densité de votre barbe ainsi que de la température
ambiante.
15
91092674_Series_5-2cc_wd_CEEMEA_S6-132.indd 1591092674_Series_5-2cc_wd_CEEMEA_S6-132.indd 15 23.11.16 15:4123.11.16 15:41
Page 16
• La température ambiante recommandée pour le chargement est comprise entre 5 et
35 °C. La batterie ne se rechargera pas correctement, voire pas du tout, à des
températures trop basses ou trop élevées. La température ambiante recommandée
pour le chargement est comprise entre 15 et 35 °C.
• Ne pas soumettre le rasoir à une température supérieure à 50 °C pendant une durée
prolongée.
• Quand le rasoir est branché sur une prise électrique, les voyants peuvent mettre
quelques minutes avant de s’éclairer.
Chargement / charge faible
L‘état de charge est affiché sur l‘écran du rasoir (5).
• Pendant la charge le symbole de la batterie (5b) clignote en vert.
• Lorsque le rasoir est complètement chargé et relié à une prise électrique, les 3
segments de charge de la batterie s‘allument en vert pendant quelques secondes.
Ensuite, l‘écran s’éteint
• Le voyant lumineux (5d) clignote en rouge quand la batterie doit être rechargée.
La charge restante est normalement suffisante pour que vous puissiez terminer votre
rasage. Lorsque vous arrêtez votre rasoir, un bip vous rappelle le niveau de faible
charge de la batterie.
Utilisation du rasoir
Appuyez sur l’interrupteur marche/arrêt (4) pour mettre en marche le rasoir.
Conseils pour un rasage parfait
Pour un résultat de rasage optimal, Braun vous recommande de suivre 3 étapes
simples :
1. Rasez-vous toujours avant de vous laver le visage.
2. Tenez toujours le rasoir à angle droit (90°) par rapport à la peau.
3. Tendez votre peau et rasez-vous dans le sens opposé à la pousse du poil.
Interrupteur du MultiHeadLock (loquet de sécurité)
• Pour raser les zones difficiles à atteindre (ex : sous le nez) faites glisser l’interrupteur
MultiHeadLock (3) vers le bas pour verrouiller la tête de rasage. La tête de rasage
peut être bloquée dans cinq positions différentes.
• Pour changer de position, déplacez la tête de rasage avec vos pouces et index
d’avant en arrière. La tête se bloquera automatiquement dans la nouvelle position.
• Pour le nettoyage automatique dans la station Clean & Charge le verrou de la tête doit
être désactivé.
Tondeuse poils longs
Pour tailler les pattes, la moustache et la barbe, appuyez sur le bouton de
déverrouillage (8) et faites coulisser la tondeuse poils longs (6) vers le haut.
Verrou de sécurité pour le voyage
Le symbole de verrouillage (5a) s‘allume sur l‘afficheur du rasoir lorsque le rasoir a été
16
91092674_Series_5-2cc_wd_CEEMEA_S6-132.indd 1691092674_Series_5-2cc_wd_CEEMEA_S6-132.indd 16 23.11.16 15:4123.11.16 15:41
Page 17
verrouillé pour éviter tout démarrage accidentel du moteur (par exemple lors du
stockage dans une valise).
• Activation : en appuyant sur l’interrupteur (marche/arrêt) (4) pendant 3 secondes, le
rasoir est verrouillé. Confirmation par un bip et l’affichage du symbole de verrouillage.
Puis l’affichage du symbole disparait.
• Désactivation : en appuyant sur l’interrupteur (marche/arrêt) pendant 3 secondes, le
rasoir est déverrouillé.
Nettoyage manuel du rasoir
Nettoyage sous l’eau courante
• Allumez le rasoir (sans le cordon) et rincez la tête du rasoir sous l’eau chaude
jusqu’à retirer tous les résidus. Vous pouvez utiliser du savoir liquide ne contenant
pas de substances abrasives. Rincez toute la mousse et laissez fonctionner le rasoir
pendant quelques secondes.
• Ensuite, arrêtez le rasoir, pressez sur le bouton d’éjection de la cassette de rasage
(2) afin de la dégrafer et de la retirer (1) pour la laisser sécher.
• Si vous nettoyez régulièrement votre rasoir sous l’eau, appliquez une fois par semaine
une goutte de l’huile fournie sur la tondeuse et sur la cassette de rasage.
Le rasoir doit être lavé après chaque utilisation avec de la mousse de rasage.
Nettoyage avec une brosse
Arrêtez le rasoir. Retirez la cassette de rasage (1) et tapotez-la sur une surface plane.
Avec la brosse, nettoyez l’intérieur de la tête de rasage. Ne pas nettoyer la cassette
avec la brosse car cela peut l’endommager.
Station Clean&Charge (C&C)
La station Clean&Charge a été développée pour nettoyer, charger, lubrifier, désinfecter,
sécher et ranger votre rasoir Braun.
13 Prise électrique
14 Bouton de déverrouillage pour remplacer la cartouche
15 Plots de contact Station-Rasoir
16 Zone d’affichage de la station Clean&Charge
16a Indicateur de niveau
16b Lumière d’état
16c Indicateur du programme de nettoyage
17 Bouton de démarrage
18 Cartouche de nettoyage
Installation de la station Clean&Charge
• Enlevez la grille protectrice de l’écran du système Clean&Charge.
• Appuyez sur le bouton-poussoir (14) à l’arrière du système Clean&Charge pour
soulever le boîtier.
• Posez la cartouche (18) sur une surface unie et stable (par exemple, une table).
17
91092674_Series_5-2cc_wd_CEEMEA_S6-132.indd 1791092674_Series_5-2cc_wd_CEEMEA_S6-132.indd 17 23.11.16 15:4123.11.16 15:41
Page 18
• Retirez délicatement l’opercule de la cartouche.
• Installez la cartouche à partir de l’arrière en la poussant dans la base du système
jusqu’à ce qu’elle s’enclenche.
• Abaissez délicatement le boîtier supérieur du système Clean&Charge jusqu’à ce qu’il
se verrouille pour le fermer.
• Utilisez le cordon spécial (10), branchez la prise d‘alimentation de la station (13) à une
prise électrique.
Utilisation de la station Clean&Charge
Important : Le rasoir doit être sec et exempt de tout résidu de mousse ou de
savon ! Mettez en place la rasoir face avant vers soi, et bouton de verrouillage de la
tête désactivé, dans le bac de nettoyage.
Les points de contact (7) au dos du rasoir doivent être alignés avec les points de
contact (15) du système. Poussez le rasoir pour bien le positionner. Un signal sonore
confirme que le rasoir est correctement placé dans le système.
Le système Clean&Charge analyse l’état de propreté. Le statut est indiqué par les
indicateurs du programme de nettoyage (16c) sur l’écran du système Clean&Charge
(16).
Mise en charge du rasoir dans la station Clean&Charge
La charge commencera automatiquement lorsque le rasoir aura été placé correctement.
Nettoyage du rasoir dans la station Clean&Charge
Lorsque l’indicateur de nettoyage du rasoir (5c) s’allume sur l’écran, mettez le rasoir
dans la station Clean&Charge, comme décrit ci-dessus.
Programmes de nettoyage
Nettoyage court économique
Nettoyage normal
Nettoyage intensif
Démarrer le nettoyage automatique
Démarrez le processus de nettoyage en appuyant sur le bouton de démarrage (17).
Si la lumière d’état (16b) ne s’allume pas (la station Clean&Charge passe en mode
veille après environ 10 minutes), appuyez une seconde fois sur le bouton de
démarrage. Sinon le nettoyage ne démarrera pas. Pour de meilleurs résultats de
rasage, nous recommandons de nettoyer votre rasoir après chaque rasage.
Chaque programme de nettoyage est constitué de plusieurs cycles, durant lesquels le
liquide de nettoyage est pompé dans la cartouche et circule vers la tête du rasoir.
Selon le modèle de votre Station Clean&Charge et/ou du programme sélectionné, le
nettoyage dure jusqu’à 3 minutes. Pendant ce temps le voyant d’état clignote.
Laissez le rasoir dans la station de séchage. Il faut plusieurs heures jusqu‘à ce que
l‘humidité restante s‘évapore en fonction des conditions climatiques.
18
91092674_Series_5-2cc_wd_CEEMEA_S6-132.indd 1891092674_Series_5-2cc_wd_CEEMEA_S6-132.indd 18 23.11.16 15:4123.11.16 15:41
Page 19
Une fois que le rasoir est complètement nettoyé et rechargé, la zone d’affichage
s’éteint.
Retirer le rasoir de la station Clean&Charge
Maintenez la station Clean&Charge avec une main et inclinez légèrement le rasoir vers
l’avant pour l’enlever.
Cartouche de nettoyage / Remplacement
Quand l’indicateur du niveau de liquide (16a) s’allume en rouge en permanence,
le liquide restant dans la cartouche est suffisant pour encore environ 3 cycles.
Quand le voyant clignote en rouge, la cartouche a besoin d’être remplacée - environ
toutes les 4 semaines pour un usage quotidien.
Après avoir appuyé sur le bouton de déverrouillage (14) pour ouvrir le boîtier, attendez
quelques secondes avant de retirer la cartouche usagée afin d’éviter qu’elle ne goutte.
Avant de jeter la cartouche usagée contenant le reste du liquide de
nettoyage souillé, refermez les ouvertures à l’aide du couvercle de la nouvelle
cartouche.
La cartouche de nettoyage hygiénique contient de l’éthanol et de l’isopropanol
(selon le pays – pour plus de précision, cf. cartouche), qui une fois ouverte va
naturellement s’évaporer doucement dans l’air environnant. Chaque cartouche, si elle
n’est pas utilisée quotidiennement, doit être remplacée après environ 8 semaines pour
assurer une désinfection optimale. La cartouche de nettoyage contient également des
lubrifiants pour le système de rasage, qui peuvent laisser des traces résiduelles sur
l’extérieur de la cassette de rasage et dans le bac de nettoyage de la station
Clean&Charge. Ces traces peuvent être retirées facilement en frottant délicatement
avec un tissu humide.
Accessoires
Braun vous recommande de changer la cassette de rasage tous les 18 mois afin de
conserver la performance maximum de votre rasoir.
Disponible auprès de votre revendeur ou des centres service agréés Braun :
• Cassette de rasage : 52S/52B
• Cartouche de liquide nettoyant Clean&Charge : CCR
• Lotion de nettoyage Braun Shaver
Note environnementale
Ce produit contient des piles et/ou des déchets électriques recyclables.
Pour la protection de l’environnement, ne pas jeter avec les ordures ménagères,
mais les porter dans les points de recyclage de déchets électriques disponibles
dans votre pays.
La cartouche de nettoyage peut être jetée avec les ordures ménagères.
19
91092674_Series_5-2cc_wd_CEEMEA_S6-132.indd 1991092674_Series_5-2cc_wd_CEEMEA_S6-132.indd 19 23.11.16 15:4123.11.16 15:41
Page 20
Sujet à des modifications sans préavis.
Voir les spécifications électriques mentionnées sur l’adaptateur basse tension.
Diagnostic de panne
Problème Raison possible Solution
RASOIR
Le rasoir ne se
recharge pas
complètement
et continue à
clignoter.
La recharge ne
démarre pas
lorsque le rasoir
est connecté à
une prise d’alimentation électrique
Odeur déplaisante provenant
de la tête de
rasage.
La performance
de la batterie a
considérablement diminué.
20
La température ambiante
est en-deca ou au-dessus des températures
valides.
1. Quelque fois la
recharge peut commencer après un laps
de temps (ex. Après
avoir été inutilisé pendant longtemps).
2. La température
ambiante est en-deca
ou au-dessus des températures valides.
3. Le cordon d’alimentation spécial n’est pas
correctement branché.
La tête de rasage est
nettoyée avec de l’eau.
1. La cassette de rasage
est usée ce qui utilise
davantage de puissance a chaque
rasage.
2. La tête de rasage est
nettoyée régulièrement avec de l’eau
mais n’est pas lubrifiée.
La température ambiante recommandée
pour la charge est comprise entre 5 °C et
35 °C.
1. Attendez quelques minutes, pour voir
si la recharge commence automatiquement.
2. La température ambiante recommandée pour la charge est comprise entre
5 °C et 35 °C.
3. Le cordon d’alimentation spécial doit
être bien mis en place.
Quand vous nettoyez la tête de rasage
avec de L’eau, utilisez de l’eau chaude
exclusivement et de temps en temps du
savon (sans substance abrasive).
Enlevez la cassette pour la laisser sécher.
1. Remplacez la cassette de rasage.
2. Si le rasoir est nettoyé régulièrement
avec de l’eau, appliquez une goutte
d’huile sur la grille une fois par
semaine pour la lubrifier.
91092674_Series_5-2cc_wd_CEEMEA_S6-132.indd 2091092674_Series_5-2cc_wd_CEEMEA_S6-132.indd 20 23.11.16 15:4123.11.16 15:41
Page 21
La performance
de rasage a
diminué considérablement.
La tête du rasoir
est humide.
1. La cassette de rasage
est usée.
2. Le système de rasage
est encrassé.
1. Le temps de séchage
après nettoyage le
automatique était trop
court.
2. L’orifice de la station
Clean&Charge est
bouché.
STATION CLEAN & CHARGE
Le nettoyage ne
démarre pas
quand vous
appuyez sur le
bouton.
1. Le rasoir n’est pas
positionné correctement dans la station
Clean&Charge.
2. La cartouche de nettoyage ne contient pas
assez de liquide de
nettoyage (la LED clignote rouge).
Augmentation de
la consommation de liquide de
L’orifice de la station
Clean&Charge est bouché.
nettoyage.
1. Remplacez la cassette de rasage.
2. Plongez la cassette de rasage dans
l’eau chaude avec une goutte de
liquide vaisselle. Puis bien la rincer et
la secouer. Une fois sec, appliquez
une goutte d’huile sur la grille.
1. Nettoyez immédiatement après le
rasage pour laisser suffisamment de
temps pour le séchage.
2. Nettoyez l’orifice avec un cure-dent en
bois.
1. Mettez en place le rasoir dans la station Clean&Charge et appliquez-le
contre le fond de la station (les plots
de contact du rasoir doivent être alignés avec les plots de contact de la
station).
2. Introduisez la nouvelle cartouche de
nettoyage. Appuyez de nouveau sur le
bouton marche.
– Nettoyez l’orifice avec un cure-dents
en bois.
– Nettoyez régulièrement le bac de net-
toyage.
Garantie
Nous accordons une garantie de 2 ans sur ce produit, à partir de la date d’achat.
Pendant la durée de la garantie, Braun prendra gratuitement à sa charge la réparation
des vices de fabrication ou de matière en se réservant le droit de décider si certaines
pièces doivent être réparées ou si l’appareil lui-même doit être échangé.
Cette garantie s’étend à tous les pays où cet appareil est commercialisé par Braun ou
son distributeur exclusif.
Cette garantie ne couvre pas : les dommages occasionnés par une utilisation
inadéquate, l’usure normale (par exemple, grille et bloc-couteaux) ainsi que les
défauts d’usures qui ont un effet négligeable sur la valeur ou l’utilisation de l’appareil.
Cette garantie devient caduque si des réparations ont été effectuées par des
personnes non agréées par Braun et si des pièces de rechange ne provenant pas de
Braun ont été utilisées.
21
91092674_Series_5-2cc_wd_CEEMEA_S6-132.indd 2191092674_Series_5-2cc_wd_CEEMEA_S6-132.indd 21 23.11.16 15:4123.11.16 15:41
Page 22

Pour toute réclamation intervenant pendant la période de garantie, retournez ou
rapportez l’appareil ainsi que l’attestation de garantie à votre revendeur ou à un
Centre Service Agréé Braun.
Veuillez vous référer à www.service.braun.com ou appeler le 0 800 944 802
(service consommateurs – service & appel gratuits) pour connaître le Centre Service
Agréé Braun le plus proche de chez vous.
Clause spéciale pour la France
Outre la garantie contractuelle exposée ci-dessus, nos clients bénéficient de la garantie
légale des vices caches prévue aux articles 1641 et suivants du Code civil.
22
91092674_Series_5-2cc_wd_CEEMEA_S6-132.indd 2291092674_Series_5-2cc_wd_CEEMEA_S6-132.indd 22 23.11.16 15:4123.11.16 15:41
Page 23
Polski
Nasze produkty zostały zaprojektowane tak, aby zaspokoić Państwa najwyższe
oczekiwania w zakresie jakości, funkcjonalności i wzornictwa. Dziękujemy, że zaufali
Państwo jakości firmy Braun i mamy nadzieję, że będą Państwo zadowoleni ze swojego
nowego produktu Braun.
Niniejszą instrukcję należy przeczytać w całości, gdyż zawiera ona informacje
dotyczące bezpieczeństwa. Należy ją zachować do późniejszego wglądu.
Ostrzeżenie
Urządzenie jest wyposażone w przewód z wtyczką z zintegrowanym bezpiecznym zasilaczem o bardzo małym napięciu. Nie należy
wymieniać ani modyfikować żadnej jego części, w przeciwnym
razie zaistnieje ryzyko porażenia prądem elektrycznym. Należy
używać tylko specjalnego przewodu dołączonego do urządzenia.
Jeśli urządzenie jest oznakowane kodem 492, może
być używane z dowolnym zasilaczem marki Braun oznaczonym
kodem 492-XXXX.
Urządzenie można czyścić pod bieżącą wodą oraz używać
w wannie bądź pod prysznicem. Ze względów bezpie-
czeństwa można go używać jedynie bezprzewodowo.
Przed stosowaniem golarki w wodzie należy odłączyć urządzenie
od prądu.
Nie należy używać urządzenia, gdy folia lub przewód są uszkodzone.
To urządzenie może być używane przez dzieci w wieku od lat 8,
a także przez osoby o ograniczonych zdolnościach fizycznych,
sensorycznych lub umysłowych oraz osoby niemające wystarczającego doświadczenia ani wiedzy, o ile są nadzorowane albo
zostały poinstruowane w zakresie bezpiecznego użytkowania tego
urządzenia i są świadome istniejących zagrożeń. Nie wolno zezwalać dzieciom na zabawę urządzeniem. Czyszczenie i konserwacja
urządzenia nie mogą być wykonywane przez dzieci, chyba że mają
więcej niż 8 lat i są nadzorowane.
23
91092674_Series_5-2cc_wd_CEEMEA_S6-132.indd 2391092674_Series_5-2cc_wd_CEEMEA_S6-132.indd 23 23.11.16 15:4123.11.16 15:41
Page 24

Baza ładująco-czyszcząca
Aby zapobiec wyciekaniu płynu czyszczącego, należy upewnić się,
że baza ładująco-czyszcząca jest ustawiona na płaskiej
powierzchni. Gdy zainstalowany jest wkład czyszczący, nie należy
przechylać, nagle przesuwać ani przenosić bazy w żaden sposób,
gdyż płyn czyszczący może wylać się z wkładu. Nie należy umieszczać bazy wewnątrz szafki łazienkowej ani też kłaść jej na
powierzchni polerowanej bądź lakierowanej.
Wkład czyszczący zawiera łatwopalny płyn, więc należy go przechowywać z dala od źródeł ognia. Nie wystawiać na bezpośrednie
działanie promieni słonecznych ani na dym papierosowy. Nie przechowywać nad grzejnikiem.
Nie należy ponownie napełniać wkładu, lecz używać jedynie
oryginalnych wkładów wymiennych firmy Braun.
Golarka
1 Kaseta na folię i nożyki
2 Przycisk wyjęcia kasety
3 Przełącznik MultiHeadLock
4 Włącznik
5 Wyświetlacz golarki
5a Symbol blokady (blokada podróżna)
5b Wskaźnik ładowania
5c Wskaźnik czyszczenia
5d Symbol akumulatora
6 Trymer do długiego zarostu
7 Styki łączące bazę z golarką
8 Przycisk zwalniający trymer do długiego zarostu
9 Gniazdko zasilania golarki
10 Specjalny przewód z wtyczką (jej konstrukcja może się różnić)
11 Nasadka ochronna*
12 Etui podróżne*
* niedołączane do wszystkich modeli
Pierwsze użycie i ładowanie
Podłączyć golarkę do gniazdka elektrycznego przez wetknięcie przewodu z wtyczką
(10) do gniazda zasilania golarki (9) lub przez bazę ładująco-czyszcząca (patrz rozdział
„Baza ładująco-czyszcząca”).
24
91092674_Series_5-2cc_wd_CEEMEA_S6-132.indd 2491092674_Series_5-2cc_wd_CEEMEA_S6-132.indd 24 23.11.16 15:4123.11.16 15:41
Page 25
Podstawowe informacje o użytkowaniu
• Pełne ładowanie zapewni do 50 minut golenia bezprzewodowego. Czas działania
zależy od długości brody i temperatury otoczenia.
• Zalecana temperatura otoczenia podczas ładowania wynosi od 5 °C do 35 °C.
Akumulator może nie naładować się prawidłowo w ekstremalnie niskiej lub wysokiej
temperaturze. Zalecana temperatura otoczenia do przechowywania urządzenia i
golenia wynosi od 15 °C do 35 °C.
• Nie należy wystawiać urządzenia na temperatury wyższe niż 50 °C przez dłuższy czas.
• Może upłynąć kilka minut od podłączenia golarki do gniazdka elektrycznego, zanim
zaświeci się wskaźnik.
Ładowanie / niski poziom naładowania
Stan ładowania wyświetla się na wyświetlaczu golarki (5).
• Podczas ładowania odpowiedni wskaźnik ładowania (5b) będzie migał.
• Gdy golarka będzie całkowicie naładowana i podłączona do gniazdka elektrycznego,
wszystkie trzy wskaźniki ładowania zaświecą się na kilka sekund. Po czym wskaźnik
wyłączy się.
• Symbol akumulatora (5d) zaświeci się na czerwono, kiedy jego poziom naładowania
będzie niski. Niski poziom naładowania akumulatora powinien umożliwić dokończenie
golenia. Podczas wyłączania się golarka wysyła krótki sygnał przypominający o
niskim naładowaniu akumulatora.
Używanie golarki
Wcisnąć włącznik (4), by użyć golarki.
Porady dotyczące idealnego golenia na sucho
Dla uzyskania najlepszych rezultatów Braun zaleca wykonanie trzech prostych
kroków:
1. Golić się zawsze przed umyciem twarzy.
2. Przez cały czas należy trzymać golarkę pod kątem prostym (90°) względem skóry.
3. Rozciągnąć lekko skórę i golić brodę pod włos.
Przełącznik MultiHeadLock (blokada głowicy)
• Do golenia trudno dostępnych miejsc (np. pod nosem) przesunąć przełącznik
MultiHeadLock (3) w dół w celu zablokowania głowicy golarki. Głowicę golarki można
blokować w pięciu pozycjach.
• Aby zmienić pozycję, głowicę golarki przesuwać kciukiem i palcem wskazującym do
tyłu lub do przodu. Automatycznie zatrzaśnie się ona na kolejnej pozycji.
• Należy zwolnić przycisk blokady głowicy przed automatycznym czyszczeniem w bazie
ładująco-czyszcząca.
Trymer do długiego zarostu
W celu przycięcia bokobrodów, wąsów lub brody należy nacisnąć przycisk zwalniający
(8) i wysunąć trymer do długiego zarostu (6) w górę.
25
91092674_Series_5-2cc_wd_CEEMEA_S6-132.indd 2591092674_Series_5-2cc_wd_CEEMEA_S6-132.indd 25 23.11.16 15:4123.11.16 15:41
Page 26
Blokada podróżna
Symbol blokady (5a) wyświetla się, kiedy golarka jest zablokowana w celu uniknięcia
niepożądanego uruchomienia się silnika (np. podczas przechowywania w bagażu).
• Aktywacja: Po naciśnięciu włącznika (4) przez 3 sekundy golarka blokuje się, co
potwierdza krótki sygnał oraz pojawienie się symbolu blokady na wyświetlaczu.
Następnie wyświetlacz wyłącza się.
• Dezaktywacja: Aby odblokować golarkę, należy po raz kolejny nacisnąć włącznik
przez 3 sekundy.
Czyszczenie ręczne golarki
Czyszczenie pod bieżącą wodą
• Należy włączyć golarkę (bezprzewodowo) i przepłukać głowicę golarki pod ciepłą
bieżącą wodą aż do usunięcia wszelkich pozostałości. Można do tego wykorzystać
mydło w płynie niezawierające substancji ściernych. Należy spłukać całą pianę i
uruchomić golarkę na kilka sekund.
• Następnie należy wyłączyć golarkę, wcisnąć przycisk wyjęcia kasety (2),
by wyjąć kasetę na folię i nożyki (1), i pozostawić do wyschnięcia.
• W przypadku regularnego mycia golarki wodą raz w tygodniu należy nanieść kroplę
lekkiego oleju maszynowego na górę kasety na folię i nożyki.
Golarkę należy wyczyścić po każdym zastosowaniu pianki.
Czyszczenie szczoteczką
Wyłączyć golarkę. Wyjąć kasetę na folię i nożyki (1) i usunąć nieczystości na płaską
powierzchnię. Przy użyciu szczoteczki wyczyścić wnętrze obrotowej głowicy. Nie należy
czyścić szczoteczką kasety, aby jej nie uszkodzić.
Baza ładująco-czyszcząca
Baza ładująco-czyszcząca została stworzona, aby czyścić, ładować, smarować,
dezynfekować, suszyć i przechowywać golarkę Braun.
13 Gniazdko elektryczne bazy
14 Przycisk podnoszący do wymiany wkładu
15 Styki łączące bazę z golarką
16 Wyświetlacz bazy ładująco-czyszczącej
16a Wskaźnik poziomu
16b Kontrolka stanu
16c Wskaźniki programu czyszczenia
17 Przycisk „Start”
18 Wkład czyszczący
Instalacja bazy ładująco-czyszczącej
• Usunąć folię ochronną z wyświetlacza bazy ładująco-czyszczącej.
• Nacisnąć przycisk podnoszący (14) w tylnej części bazy ładująco-czyszczącej i
26
91092674_Series_5-2cc_wd_CEEMEA_S6-132.indd 2691092674_Series_5-2cc_wd_CEEMEA_S6-132.indd 26 23.11.16 15:4123.11.16 15:41
Page 27
podnieść obudowę.
• Położyć wkład czyszczący (18) na płaskiej, stabilnej powierzchni (np. na stole).
• Ostrożnie zdjąć wieczko wkładu.
• Wsunąć wkład od tylnej części do podstawy bazy aż do momenty zatrzaśnięcia
wkładu na odpowiednim miejscu.
• Powoli zamknąć obudowę, dociskając ją w dół do zamknięcia.
• Używając przewodu z wtyczką (10), należy podłączyć gniazdko elektryczne bazy (13)
do gniazdka elektrycznego w sieci zasilającej.
Używanie bazy ładująco-czyszczącej
Ważne: Golarka musi być sucha i oczyszczona z resztek piany bądź mydła!
Włożyć golarkę głowicą skierowaną w dół do bazy ładująco-czyszczącej, stroną ze
wskaźnikami do siebie i ze zwolnioną blokadą głowicy (3).
Styki (7) z tyłu golarki muszą zrównać się ze stykami (15) bazy ładująco-czyszczącej.
Następnie docisnąć golarkę w celu ustawienia jej w odpowiedniej pozycji. Krótki sygnał
potwierdza prawidłowe umieszczenie golarki w bazie ładująco-czyszczącej.
Baza ładująco-czyszcząca analizuje stan higieny. Stan higieny wyświetlany jest przy
pomocy wskaźników programu czyszczenia (16c) na wyświetlaczu bazy ładującoczyszczącej (16).
Ładowanie golarki w bazie ładująco-czyszczącej
Ładowanie rozpocznie się automatycznie w momencie, gdy golarka zostanie
prawidłowo umieszczona w bazie.
Czyszczenie golarki w bazie ładująco-czyszczącej
Gdy zaświeci się wskaźnik czyszczenia (5c), należy umieścić golarkę w bazie ładującoczyszczącej, jak zostało opisane powyżej.
Programy czyszczenia
krótkie, ekonomiczne czyszczenie
normalne czyszczenie
dogłębne, intensywne czyszczenie
Rozpoczęcie automatycznego czyszczenia
Aby rozpocząć proces czyszczenia, należy nacisnąć przycisk „Start” (17).
Jeśli kontrolka stanu (16b) nie świeci się (baza ładująco-czyszcząca przełącza się w
tryb czuwania po ok. 10 minutach), należy nacisnąć przycisk „Start” dwa razy. W
przeciwnym razie czyszczenie nie rozpocznie się. By uzyskać najlepsze rezultaty
golenia, zalecamy czyszczenie po każdym goleniu.
Każdy program czyszczący składa się z kilku cykli, podczas których płyn czyszczący
przepłukuje głowicę golarki. W zależności od modelu bazy ładująco-czyszczącej i/lub
wybranego programu czyszczenie może trwać do 3 minut. Podczas czyszczenia
27
91092674_Series_5-2cc_wd_CEEMEA_S6-132.indd 2791092674_Series_5-2cc_wd_CEEMEA_S6-132.indd 27 23.11.16 15:4123.11.16 15:41
Page 28
kontrolka stanu miga. Należy pozostawić golarkę w bazie do wyschnięcia. W zależności
od warunków klimatycznych całkowicie wyschnięcie pozostałej wilgoci trwa kilka
godzin.
Po zakończeniu czyszczenia oraz ładowania wszystkie wskaźniki wyłączają się.
Wyjmowanie golarki z bazy ładująco-czyszczącej
Trzymając bazę ładująco-czyszczącą jedną ręką, należy delikatnie przechylić golarkę
do przodu, aby wyjąć urządzenie.
Wkład czyszczący / wymiana
Gdy wskaźnik poziomu (16a) świeci się stale na czerwono, pozostały płyn wkładu
wystarcza na około 3 cykle czyszczenia. Gdy wskaźnik poziomu miga na czerwono,
należy go wymienić. Przy codziennym używaniu wkład wystarcza na około 4 tygodnie.
Po wciśnięciu przycisku podnoszącego (14) w celu otwarcia obudowy należy zaczekać
chwilę przed wyjęciem zużytego wkładu, by uniknąć wyciekania. Przed wyrzuceniem
zużytego wkładu należy zamknąć jego otwory, używając wieczka nowego wkładu, gdyż
zużyty wkład zawiera zanieczyszczony roztwór czyszczący.
Higieniczny wkład czyszczący zawiera etanol lub izopropanol (specyfikacje znajdują się
na wkładzie), który po otwarciu w naturalny sposób powoli wyparowuje. W przypadku
nieużywania golarki codziennie wkład należy wymienić po około 8 tygodniach, aby
zapewnić optymalną dezynfekcję. Wkład czyszczący zawiera także środki smarujące dla
systemu golącego, które mogą pozostawiać ślady na zewnętrznej oprawie folii i
komorze czyszczenia bazy ładująco-czyszczącej . Można je łatwo usunąć, delikatnie
czyszcząc wilgotną szmatką.
Akcesoria
Firma Braun zaleca wymianę kasety na folię i nożyki w golarce co 18 miesięcy w celu
utrzymania maksymalnej wydajności golarki.
Dostępne u dystrybutora lub w centrach obsługi Braun:
• Kaseta na folię i nożyki: 52S/52B
• Wkład czyszczący: CCR
• Spray do czyszczenia golarek Braun
Uwagi na temat ochrony środowiska
Produkt zawiera akumulatory i/lub części elektryczne podlegające recyklingowi.
By chronić środowisko, nie należy go wyrzucać wraz z normalnymi odpadami,
lecz oddać do punktu zbiórki odpadów elektrycznych do recyklingu.
Wkład czyszczący można wyrzucać z normalnymi odpadami.
Zastrzega się prawo do dokonywania zmian.
Specyfikacje elektryczne przedstawiono na przewodzie z wtyczką.
28
91092674_Series_5-2cc_wd_CEEMEA_S6-132.indd 2891092674_Series_5-2cc_wd_CEEMEA_S6-132.indd 28 23.11.16 15:4123.11.16 15:41
Page 29
Rozwiązywanie problemów
Problem Możliwa przyczyna Zalecenie
SHAVER
Golarka nie
ładuje się
całkowicie i kontrolka nadal miga.
Ładowanie nie
rozpoczyna się
po podłączeniu
do gniazda zasilania.
Nieprzyjemny
zapach z głowicy
golarki
Wydajność akumulatora
znacznie się
zmniejszyła.
Wydajność golenia znacznie się
pogorszyła.
Temperatura otoczenia
jest poza prawidłowym
zakresem.
1. Czasami ładowanie
może rozpoczynać się
z opóźnieniem (np. po
długim przechowywaniu).
2. Temperatura otoczenia
jest poza prawidłowym
zakresem.
3. Przewód z wtyczką nie
jest prawidłowo
podłączony.
1. Głowica golarki jest
czyszczona wodą.
2. Wkład czyszczący jest
używany dłużej niż
przez 8 tygodni.
1. Folia i nożyki są zużyte,
co wymaga więcej
mocy przy każdym
goleniu.
2. Głowica golarki jest
regularnie czyszczona
wodą, lecz niesmarowana.
1. Folia i nożyki są zużyte.
2. System golenia jest
zapchany.
Zalecana temperatura otoczenia podczas
ładowania wynosi od 5 °C do 35 °C.
1. Odczekać kilka minut, jeśli ładowanie
zacznie się automatycznie.
2. Zalecana temperatura otoczenia w
trakcie ładowania wynosi od
5 °C do 35 °C.
3. Przewód z wtyczką musi zatrzasnąć się
dokładnie w gnieździe.
1. Czyszcząc głowicę golarki wodą,
należy stosować jedynie ciepłą wodę i
od czasu do czasu niewielką ilość
mydła w płynie (niezawierającego substancji ściernych). Należy wyjąć kasetę
na folię i nożyki, by ją wysuszyć.
2. Należy wymieniać wkład czyszczący
co 8 tygodni.
1. Należy wymienić kasetę na folię i nożyki.
2. Jeśli golarka jest regularnie
czyszczona wodą, należy nanieść kroplę lekkiego oleju maszynowego na
górę folii raz w tygodniu w celu naoliwienia.
1. Należy wymienić kasetę na folię i nożyki.
2. Należy włożyć kasetę na folię i nożyki
do ciepłej wody z dodatkiem kropli
płynu do mycia naczyń. Następnie
należy odpowiednio ją przepłukać i
strząsnąć krople wody. Po wysuszeniu
należy nanieść kroplę lekkiego oleju
maszynowego na folię.
29
91092674_Series_5-2cc_wd_CEEMEA_S6-132.indd 2991092674_Series_5-2cc_wd_CEEMEA_S6-132.indd 29 23.11.16 15:4123.11.16 15:41
Page 30
Głowica golarki
jest wilgotna.
1. Czas suszenia po
automatycznym
czyszczeniu był za
1. Czyścić bezpośrednio po goleniu, aby
umożliwić odpowiedni czas suszenia.
2. Należy wyczyścić odpływ wykałaczką.
krótki.
2. Odpływ Bazy ładująco-czyszczącej jest
zablokowany.
CLEAN&CHARGE STATION
Po wciśnięciu
przycisku „Start”
czyszczenie nie
rozpoczyna się.
1. Nie umieszczono
golarki we właściwy
sposób w bazie ładująco-czyszczącej.
2. Wkład czyszczący
zawiera niewystarczającą ilość płynu
1. Włożyć golarkę do bazy ładująco-czyszczącej i pchnąć ją do tylnej
części bazy (styki golarki muszą
pokrywać się ze stykami bazy).
2. Należy włożyć nowy wkład czyszczący.
Należy ponownie wcisnąć przycisk
„Start”.
czyszczącego
(wskaźnik miga na
czerwono).
Zwiększone
zużycie płynu
czyszczącego
Odpływ bazy ładująco-czyszczącej jest zapchany.
– Należy wyczyścić odpływ wykałaczką.
– Należy regularnie wycierać pojemnik
do czystości.
Warunki gwarancji
1. Procter & Gamble International Operation SA, z siedzibą w Route de St-Georges 47,
1213 Petit Lancy 1 w Szwajcarii, gwarantuje sprawne działanie sprzętu w okresie 24
miesięcy od daty jego wydania Konsumentowi. Ujawnione w tym okresie wady będą
usuwane bezpłatnie przez autoryzowany punkt serwisowy, w terminie 14 dni od daty
dostarczenia sprzętu do autoryzowanego punktu serwisowego.
2. Konsument może wysłać sprzęt do naprawy do najbliżej znajdującego się
autoryzowanego punktu serwisowego lub skorzystać z pośrednictwa sklepu, w
którym dokonał zakupu sprzętu. W takim wypadku termin naprawy ulegnie
wydłużeniu o czas niezbędny do dostarczenia i odbioru sprzętu.
3. Konsument powinien dostarczyć sprzęt w opakowaniu należycie zabezpieczonym
przed uszkodzeniem. Uszkodzenia spowodowane niedostatecznym
zabezpieczeniem sprzętu nie podlegają naprawom gwarancyjnym. Naprawom
gwarancyjnym nie podlegają także inne uszkodzenia powstałe w następstwie
okoliczności, za które Gwarant nie ponosi odpowiedzialności, w szczególności
zawinione przez Pocztę Polską lub firmy kurierskie.
4. Niniejsza gwarancja jest ważna jedynie z dokumentem zakupu i obowiązuje w
każdym kraju, w którym, to urządzenie jest rozprowadzane przez jednostkę
organizacyjną firmy Procter & Gamble lub upoważnionego przez nią dystrybutora.
5. Dokument zakupu musi być opatrzony datą i numerem oraz określać nazwę i model
sprzętu.
6. Okres gwarancji przedłuża się o czas od zgłoszenia wady lub uszkodzenia do
naprawy sprzętu i zwrotnego postawienia go do dyspozycji Konsumenta.
30
91092674_Series_5-2cc_wd_CEEMEA_S6-132.indd 3091092674_Series_5-2cc_wd_CEEMEA_S6-132.indd 30 23.11.16 15:4123.11.16 15:41
Page 31

7. Naprawa gwarancyjna nie obejmuje czynności przewidzianych w instrukcji, do
wykonania których, Konsument zobowiązany jest we własnym zakresie i na własny
koszt.
8. Ewentualne oczyszczenie sprzętu dokonywane jest na koszt Konsumenta według
cennika danego autoryzowanego punktu serwisowego i nie będzie traktowane jako
naprawa gwarancyjna, chyba, że oczyszczenie jest niezbędne do usunięcia wady w
ramach świadczeń objętych niniejszą gwarancją i nie stanowi czynności, o których
mowa w p. 7.
9. Gwarancją nie są objęte:
a) mechaniczne uszkodzenia sprzętu spowodowane w czasie jego użytkowania lub
w czasie dostarczania sprzętu do naprawy;
b) uszkodzenia i wady wynikłe na skutek:
– używania sprzętu do celów innych niż osobisty użytek;
– niewłaściwego lub niezgodnego z instrukcją użytkowania, konserwacji,
przechowywania lub instalacji;
– używania niewłaściwych materiałów eksploatacyjnych;
– napraw dokonywanych przez nieuprawnione osoby; stwierdzenie faktu takiej
naprawy lub samowolnego otwarcia sprzętu powoduje utratę gwarancji;
– przeróbek, zmian konstrukcyjnych lub używania do napraw nieoryginalnych
części zamiennych firmy Braun;
– części szklane, żarówki oświetlenia;
– ostrza i folie do golarek, wymienne końcówki do szczoteczek elektrycznych i
irygatorów oraz materiały eksploatacyjne.
10. Niniejsza gwarancja na sprzedany towar konsumpcyjny nie wyłącza, nie ogranicza
ani nie zawiesza uprawnień Kupującego wynikających z przepisów o rękojmi za wady
rzeczy sprzedanej.
31
91092674_Series_5-2cc_wd_CEEMEA_S6-132.indd 3191092674_Series_5-2cc_wd_CEEMEA_S6-132.indd 31 23.11.16 15:4123.11.16 15:41
Page 32

Česk
Naše výrobky splňují nejvyšší nároky na kvalitu, funkčnost a design. Děkujeme vám za
vaši důvěru, kterou vkládáte do kvality značky Braun, a doufáme, že budete se svým
novým produktem Braun spokojeni.
Pečlivě si přečtěte tento návod – obsahuje důležité bezpečnostní informace.
Návod uschovejte pro případné použití v budoucnu.
Upozornění
Váš přístroj je vybaven speciálním síťovým přívodem s integrovaným bezpečnostním síťovým adaptérem. Nevyměňujte ani nerozebírejte žádnou z jeho částí, jinak by mohlo dojít k úrazu elektrickým
proudem. Používejte pouze speciální kabel dodávaný společně s
přístrojem.
Nese-li přístroj označení 492, lze jej používat s jakýmkoliv napájecím zdrojem Braun s kódem 492-XXXX.
Tento přístroj je vhodný pro čištění pod tekoucí vodou a
používání ve vaně nebo ve sprše. Z bezpečnostních
důvodů smí být používán pouze bez připojení k elektrické síti.
Před čištěním strojku pod vodou ho vypojte z elektrické sítě.
Přístroj nepoužívejte, jestliže jsou planžeta nebo kabel poškozeny.
Děti starší 8 let a osoby se sníženou fyzickou pohyblivostí, schop-
ností vnímání či mentálním zdravím a osoby bez zkušeností nebo
odpovídajícího povědomí smí tento spotřebič používat pod dohledem nebo po obdržení pokynů k jeho bezpečnému používání a
seznámení se s možnými riziky. Spotřebič není určen jako hračka
pro děti. Děti bez dozoru a mladší 8 let nesmí provádět čištění a
údržbu přístroje.
Stanice Clean&Charge
Chcete-li zabránit úniku čisticí kapaliny, umístěte čisticí stanici
Clean&Charge na rovný povrch. Po instalaci čisticí kazety stanici
nenahýbejte, nijak s ní nepohybujte ani ji nepřemísťujte, protože by
z ní při manipulaci mohla vytéct čisticí kapalina. Stanici neumísťujte do zrcadlové skříňky ani na leštěné či lakované povrchy.
32
91092674_Series_5-2cc_wd_CEEMEA_S6-132.indd 3291092674_Series_5-2cc_wd_CEEMEA_S6-132.indd 32 23.11.16 15:4123.11.16 15:41
Page 33

Čisticí kazeta obsahuje vysoce hořlavou kapalinu, proto ji uchovávejte mimo možné zdroje vznícení. Nevystavujte přímému slunečnímu světlu ani cigaretovému kouři, nepokládejte nad radiátor.
Použitou čisticí kazetu nedoplňujte a používejte pouze originální náplň čisticí kazety Braun.
Holicí strojek
1 Kazeta s holicí planžetou a břitovým blokem
2 Uvolňovací tlačítko kazety
3 Přepínač MultiHeadLock
4 Vypínač
5 Displej holicího strojku
5a Uzamykací systém (cestovní zámek)
5b Oblasti nabíjení
5c Kontrolka čištění
5d Symbol baterie
6 Zastřihovač dlouhých vousů
7 Kontakty holicí strojek – čisticí stanice
8 Uvolňovací tlačítko pro zastřihovač dlouhých vousů
9 Síťová zásuvka holicího strojku
10 Speciální síťový přívod (design se může lišit)
11 Ochranný kryt*
12 Cestovní pouzdro*
*ne u všech modelů
První použití a nabíjení
Zapojte holicí strojek do elektrické zásuvky zacvaknutím speciálního síťového přívodu
(10) do napájecí zdířky (9) nebo pomocí stanice Clean&Charge (viz kapitola «Stanice
Clean&Charge»).
Základní informace o provozu
• Plné nabití umožňuje až 50 minut holení bez zapojení do sítě. Délka holení se může
lišit v závislosti na délce vousů a teplotě okolního prostředí.
• Doporučená okolní teplota pro nabíjení je 5 až 35 °C. Při extrémně nízkých nebo
vysokých teplotách se baterie nemusí nabít správně nebo se nenabije vůbec.
Doporučovaná teplota okolí pro ukládání a holení je 15 °C až 35 °C.
• Nevystavujte holicí strojek dlouhodobě teplotám přesahujícím 50 °C.
• Při zapojení holicího strojku do elektrické zásuvky může trvat až několik minut, než
displej začne svítit.
Nabíjení / nízké nabití baterie
Stav nabíjení se zobrazuje na displeji holicího strojku. (5).
91092674_Series_5-2cc_wd_CEEMEA_S6-132.indd 3391092674_Series_5-2cc_wd_CEEMEA_S6-132.indd 33 23.11.16 15:4123.11.16 15:41
33
Page 34

• V průběhu nabíjení bude příslušný segment blikat (5b).
• Je-li baterie plně nabitá a stále připojena do elektrické sítě, všechny tři segmenty
nabíjení se na několik vteřin rozsvítí. Displej se následně vypne.
• Kontrolka stavu baterie (5d) se rozsvítí červeně při nízkém stavu nabití. Měli byste být
schopni dokončit holení. Po vypnutí holicího strojku vás zvuková signalizace upozorní
na nízké nabití baterie.
Používání holicího strojku
Zapnutí holicího strojku provedete stisknutím hlavního vypínače on/off (4).
Tipy pro dokonalé oholení za sucha
Pro dosažení nejlepších výsledků vám Braun doporučuje dodržovat tři jednoduchá
pravidla:
1. Holte se vždy předtím, než si budete mýt obličej.
2. Holicí strojek držte vždy kolmo (90°) k pokožce.
3. Napněte pokožku a holte se proti směru růstu vousů.
Přepínač MultiHeadLock (uzamčení hlavy)
• Pro oholení těžko dostupných oblastí (např. pod nosem) posuňte přepínač
MultiHeadLock (3) směrem dolů a uzamkněte hlavu holicího strojku. Hlavu holicího
strojku lze uzamknout v pěti pozicích.
• Pro nabíjení posuňte hlavu holicího strojku palcem a ukazováčkem dozadu nebo
dopředu. Automaticky dojde k zacvaknutí do další pozice.
• Při automatickém čištění v stanici Clean&Charge je nutno uvolnit uzamčení hlavy.
Zastřihovač dlouhých vousů
K zastřihování kotlet, knírku nebo bradky vysuňte zastřihovač dlouhých vousů (8) a
posuňte zastřihovač dlouhých vousů (6) nahoru.
Cestovní zámek
Kontrolka uzamčení (5a) se na displeji rozsvítí, pokud je zastřihovač uzamčen, aby se
vyhnulo nechtěnému spuštění motoru (např. kvůli uložení v pouzdře).
• Aktivace: Stisknutím tlačítka on/off (4) po dobu tří vteřin dojde k uzamčení holicího
strojku. Zvuková signalizace potvrdí tento krok a kontrolka uzamčení se zobrazí na
displeji. Poté se displej vypne.
• Deaktivace: Opětovným stisknutím tlačítka on/off po dobu tří vteřin dojde k odemčení
holicího strojku.
Manuální čištění holicího strojku
Čištění pod tekoucí vodou
• Zapněte holicí strojek (bez síťového přívodu) a holicí hlavu opláchněte pod
teplou tekoucí vodou, dokud neodstraníte všechny nečistoty. Můžete použít
také tekuté mýdlo bez abrazivních látek. Opláchněte všechnu pěnu a nechejte holicí
strojek zapnutý ještě několik sekund.
34
91092674_Series_5-2cc_wd_CEEMEA_S6-132.indd 3491092674_Series_5-2cc_wd_CEEMEA_S6-132.indd 34 23.11.16 15:4123.11.16 15:41
Page 35

• Poté holicí strojek vypněte, stisknutím uvolňovacího tlačítka (2) uvolněte kazetu s
holicí planžetou a břitovým blokem (1) a nechte ji oschnout.
• Pokud holicí strojek pravidelně čistíte pod tekoucí vodou, pak na kazetu s holicí
planžetou a břitovým blokem jednou týdně aplikujte kapku jemného strojového oleje.
Po každém použití pěny by se měl holicí strojek vyčistit.
Čištění kartáčkem
Vypněte holicí strojek. Vyjměte kazetu s holicí planžetou a břitovým blokem (1) a
oklepejte ji na rovném povrchu. Pomocí kartáčku vyčistěte vnitřní část výkyvné holicí
hlavy. Kartáček však nepoužívejte k čištění kazety, neboť ta by se mohla poškodit!
Stanice Clean&Charge (C&C)
Stanice Clean&Charge slouží k čištění, nabíjení, promazávání, dezinfekci, vysoušení a
ukládání holicího strojku Braun.
13 Síťová zásuvka čisticí stanice
14 Uvolňovací tlačítko na výměnu kazety
15 Kontakty čisticí stanice – holicí strojek
16 Displej stanice Clean&Charge
16a Kontrolka úrovně
16b Kontrolka stavu
16c Indikátory čisticího program
17 Tlačítko zahájení čištění
18 Čisticí kazeta
Instalace stanice Clean&Charge
• Odstraňte z displeje stanice Clean&Charge ochrannou folii.
• Stiskněte na zadní straně stanice Clean&Charge uvolňovací tlačítko (14), abyste
zvedli kryt.
• Čisticí kazetu (18) položte na rovnou a stabilní plochu (např. na stůl).
• Z kazety opatrně odstraňte uzávěr.
• Kazetu spusťte na zadní straně do základny stanice, dokud nezapadne na místo.
• Kryt opatrně zavřete pomalým stlačováním dolů, dokud se nezavře.
• Pomocí speciálního síťového přívodu (10) zapojte zástrčku základny čisticí stanice
(13) do elektrické zásuvky.
Používání stanice Clean&Charge:
Důležité: Holicí strojek musí být čistý a bez jakýchkoli zbytků pěny či mýdla!
Vložte holicí strojek vzhůru nohama do C&C tak, aby byla vidět přední strana a uvolněte
zámek hlavy (3).
Kontakty (7) na zadní straně holicího strojku je třeba propojit s kontakty (15) v C&C.
Dejte holicí strojek do správné pozice. Signalizace potvrdí, že je holicí strojek v C&C
řádně usazen.
35
91092674_Series_5-2cc_wd_CEEMEA_S6-132.indd 3591092674_Series_5-2cc_wd_CEEMEA_S6-132.indd 35 23.11.16 15:4123.11.16 15:41
Page 36

C&C analyzuje stav hygieny. Stav se zobrazuje po vyčištění indikátorů čisticího
programu (16c) na displeji C&C (16).
Nabíjení holicího strojku v C&C
Nabíjení bude automaticky spuštěno, pokud je holicí strojek správně postaven na své
místo.
Čištění holicího strojku v C&C
Když se na displeji holicího strojku rozsvítí kontrolka čištění (5c), vložte holicí strojek do
C&C, jak je popsáno výše.
Programy čištění
krátké úsporné čištění
standardní čištění
vysoce intenzivní čištění
Zahájit automatické čištění
Proces čištění zahájíte stisknutím tlačítka start (17). Pokud kontrolka stavu (16b) nesvítí
(C&C se přepne do pohotovostního režimu po cca 10 minutách), stiskněte tlačítko start
dvakrát, jinak proces čištění nezačne. Pro dosažení nejlepších výsledků holení
doporučujeme strojek vyčistit po každém oholení.
Každý čisticí program se skládá z několika cyklů, kdy se holicí hlava strojku proplachuje
čisticí kapalinou. V závislosti na modelu stanice Clean&Charge a vybraném programu
zabere doba čištění až 3 minuty. V průběhu této doby začne kontrolka stavu blikat.
Nechte vyschnout holicí strojek ve stanici. V závislosti na klimatických podmínkách trvá
vypaření zbývající vlhkosti několik hodin.
Po dokončení čištění a nabíjení se všechny indikátory vypnou.
Odstranění holicího strojku ze stanice C&C
Držte C&C jednou rukou a nakloňte lehce holicí strojek dopředu, dokud se neuvolní.
Čisticí kazeta / výměna
Pokud indikátor úrovně (16a) nesvítí trvale červeně, zbývá v kazetě dostatek kapaliny na
přibližně další 3 cykly. Pokud indikátor hladiny bliká červeně, kazetu je nutno vyměnit
(přibližně každé 4 týdny, pokud je používána denně).
Po stisknutí uvolňovacího tlačítka (14) a otevření krytu čisticí stanice počkejte několik
sekund, než použitou čisticí kazetu odstraníte, abyste zabránili odkapávání. Předtím,
než použitou čisticí kazetu vyhodíte, ujistěte se, že jste uzavřeli otvory pomocí víčka z
36
91092674_Series_5-2cc_wd_CEEMEA_S6-132.indd 3691092674_Series_5-2cc_wd_CEEMEA_S6-132.indd 36 23.11.16 15:4123.11.16 15:41
Page 37

nové čisticí kazety, protože použitá kazeta obsahuje kontaminovaný čisticí roztok.
Hygienický roztok v čisticí kazetě obsahuje etanol nebo isopropanol (specifikace viz na
kazetě), které se po otevření přirozeně a pomalu vypařují do okolního vzduchu.
Každou kazetu, i když není používána denně, je třeba vyměnit přibližně po 8 týdnech,
aby se zajistila optimální dezinfekce.
Čisticí kazeta rovněž obsahuje lubrikant vhodný pro holicí systém, který může zanechat
zbytkové skvrny na vnějším rámu krytu a čisticí komoře C&C. Tyto skvrny se dají snadno
odstranit jemným otřením vlhkou utěrkou.
Příslušenství
Pro zachování maximálního výkonu holicího strojku doporučuje Braun výměnu kazety s
planžetou a břitovým blokem každých 18 měsíců.
K dostání u vašeho prodejce nebo v servisních centrech Braun:
• Kazeta s holicí planžetou a břitovým blokem: 52S/52B
• Čisticí kazeta: CCR
• Sprej na čištění holicího strojku Braun
Poznámka k ochraně životního prostředí
Výrobek obsahuje akumulátory nebo recyklovatelný elektrický odpad.
V zájmu ochrany životního prostředí nelikvidujte tento výrobek s běžným
domovním odpadem, ale odevzdejte jej k recyklaci na sběrné místo
elektrického odpadu zřízené ve vaší zemi.
Deklarovaná hodnota emise hluku tohoto spotřebiče je 63 dB(A), což představuje
hladinu A akustického výkonu vzhledem na referenční akustický výkon 1 pW.
Čisticí kazetu je možno vyhazovat do běžného domovního odpadu.
Může se bez upozornění měnit.
Elektrotechnické specifikace naleznete vytištěné na speciálním síťovém přívodu.
37
91092674_Series_5-2cc_wd_CEEMEA_S6-132.indd 3791092674_Series_5-2cc_wd_CEEMEA_S6-132.indd 37 23.11.16 15:4123.11.16 15:41
Page 38

Odstraňování poruch
Problém Možný důvod Náprava
SHAVER
Holicí strojek se
zcela nenabil a
stále bliká.
Při zapojení do
napájecí zdířky
nebude zahájeno nabíjení.
Z holicí hlavy
vychází nepříjemný zápach.
Výdrž baterie se
výrazně snížila.
Výkonnost holicího strojku se
výrazně snížila.
Okolní teplota je mimo
stanovené pásmo.
1. Někdy může dojít k
opoždění začátku
nabíjení (např. po
dlouhé době nečinnosti).
2. Okolní teplota je mimo
stanovené pásmo.
3. Speciální přívodní
kabel není řádně zapojen.
1. Holicí hlavu čistíte pod
tekoucí vodou.
2. Čisticí kazetu používáte více než 8 týdnů.
1. Planžeta a břity jsou
opotřebované a pro
každé oholení potřebují více energie.
2. Holicí hlavu pravidelně
čistíte pod tekoucí
vodou, ale nepromazáváte.
1. Planžeta a břity jsou
opotřebované.
2. Holicí systém je
ucpaný.
Doporučená okolní teplota pro nabíjení je
5 °C až 35 °C.
1. Počkejte několik minut, pokud nabíjení
začne automaticky.
2. Doporučená okolní teplota pro nabíjení
je 5 °C až 35 °C.
3. Speciální přívodní kabel je nutno
přesně zapojit do zdířky.
1. Při čištění holicí hlavy pod tekoucí
vodou používejte pouze teplou vodu a
příležitostně tekuté mýdlo (bez abrazivních látek). Vyjměte kazetu s holicí
planžetou a břitovým blokem a nechte
ji oschnout.
2. Vyměňujte čisticí kazetu alespoň každých 8 týdnů.
1. Vyměňte kazetu s holicí planžetou a
břitovým blokem.
2. Pokud holicí strojek pravidelně čistíte
pod tekoucí vodou, aplikujte jednou za
týden k promazání na planžetu kapku
jemného strojového oleje.
1. Vyměňte kazetu s holicí planžetou a
břitovým blokem.
2. Namočte kazetu s holicí planžetou a
břitovým blokem do horké vody s kapkou prostředku na mytí nádobí. Poté ji
důkladně opláchněte a oklepejte. Po
osušení aplikujte na planžetu kapku
jemného strojového oleje.
38
91092674_Series_5-2cc_wd_CEEMEA_S6-132.indd 3891092674_Series_5-2cc_wd_CEEMEA_S6-132.indd 38 23.11.16 15:4123.11.16 15:41
Page 39

Hlavice holicího
strojku je vlhká.
1. Doba sušení po automatickém čištění byla
příliš krátká.
2. Odvod vody stanice
1. Vyčistěte přímo po holení, aby byl
zajištěn dostatek času na vyschnutí.
2. Vyčistěte odtok pomocí dřevěného
párátka.
Clean&Charge je
ucpaný.
CLEAN&CHARGE STATION
Při stisknutí tla-
čítka pro zahájení čištění se
čištění nespustí.
1. Strojek není ve stanici
Clean&Charge správně
uložen.
2. Čisticí kazeta neobsahuje dostatek čisticí
kapaliny (displej bliká
1. Vložte holicí strojek do stanice Clean&Charge a zasuňte ho do zadní části
stanice (kontakty holicího strojku musí
být propojeny s kontakty stanice).
2. Vložte novou čisticí kazetu. Stiskněte
znovu tlačítko pro zahájení čištění.
červeně).
Zvýšená spotřeba čisticí
kapaliny.
Odtok čisticí stanice
Clean&Charge je ucpaný.
– Vyčistěte odtok pomocí dřevěného
párátka.
– Nádobku pravidelně otírejte.
Záruka
Poskytujeme dvouletou záruku na výrobek s platností od data jeho zakoupení. V záruční
lhůtě bezplatně odstraníme všechny vady přístroje zapříčiněné chybou materiálu nebo
výroby, a to buď formou opravy, nebo výměnou celého přístroje (podle našeho vlastního
uvážení). Uvedená záruka je platná v každé zemi, ve které tento přístroj dodává
společnost Braun nebo její pověřený distributor.
Záruka se netýká následujících případů: poškození zapříčiněné nesprávným použitím,
běžné opotřebování (například plátků holicího strojku nebo pouzdra zastřihovače),
jakož i vady, které mají zanedbatelný dosah na hodnotu nebo funkci přístroje. Pokud
opravu uskuteční neautorizovaná osoba a nebudou-li použity původní náhradní díly
společnosti Braun, platnost záruky bude ukončena.
Pokud v záruční lhůtě požadujete provedení servisní opravy, odevzdejte celý přístroj
s potvrzením o nákupu v autorizovaném servisním středisku společnosti Braun nebo jej
do střediska zašlete.
39
91092674_Series_5-2cc_wd_CEEMEA_S6-132.indd 3991092674_Series_5-2cc_wd_CEEMEA_S6-132.indd 39 23.11.16 15:4123.11.16 15:41
Page 40

Slovensk
Naše výrobky spĺňajú najvyššie nároky na kvalitu, funkčnosť a dizajn. Ďakujeme za vašu
dôveru v kvalitu výrobkov Braun a dúfame, že si užijete nový výrobok Braun.
Prečítajte si tieto pokyny celé, pretože obsahujú bezpečnostné informácie.
Pokyny si odložte, aby ste si ich mohli prečítať aj v budúcnosti.
Výstraha
Prístroj sa dodáva so špeciálnym káblom, ktorý obsahuje integrovaný bezpečnostný nízkonapäťový zdroj. So žiadnou časťou kábla
neodborne nemanipulujte ani ho nevymieňajte, pretože by mohlo
dôjsť k zásahu elektrickým prúdom. Používajte len špeciálny kábel
dodávaný so zariadením.
Ak je spotrebič označený číslom 492, môžete ho používať s ľubovoľným napájacím zdrojom Braun s kódovým označením
492-XXXX.
Prístroj je možné umývať pod tečúcou vodou a používať ho
vo vani alebo v sprche. Z bezpečnostných dôvodov je ho
možné používať len s odpojeným napájacím káblom.
Pred používaním holiaceho strojčeka s vodou ho odpojte od napájacieho zdroja.
Nepoužívajte strojček, pokiaľ je poškodená planžeta alebo kábel.
Deti staršie ako 8 rokov a osoby so zníženou fyzickou pohyblivos-
ťou, schopnosťou vnímania alebo mentálnym zdravím alebo bez
skúsenosti, alebo zodpovedajúceho povedomia, môžu tento prístroj používať pod dohľadom alebo po prijatí pokynov na jeho bezpečné používanie a po uvedomení si možných rizík. Dbajte na to,
aby sa deti nehrali so spotrebičom. Čistenie a spotrebiteľskú
údržbu by nemali vykonávať deti, pokiaľ nie sú staršie ako 8 rokov
a pod dohľadom dospelej osoby.
Čistiaca a nabíjacia stanica Clean&Charge
Aby sa zabránilo úniku čistiacej kvapaliny, čistiacu stanicu Clean&Charge umiestnite na rovný povrch. Po nainštalovaní čistiacej
kazety stanicu nenakláňajte, neposúvajte a ani nepremiestňujte,
pretože by mohlo dôjsť k úniku čistiacej kvapaliny.
40
91092674_Series_5-2cc_wd_CEEMEA_S6-132.indd 4091092674_Series_5-2cc_wd_CEEMEA_S6-132.indd 40 23.11.16 15:4123.11.16 15:41
Page 41

Čistiacu stanicu neumiestňujte do zrkadlovej skrinky ani na leštený
či lakovaný povrch.
Čistiaca kazeta obsahuje vysoko horľavú kvapalinu, preto ju udržujte mimo horľavých zdrojov. Nevystavujte ju priamemu slnečnému svetlu, cigaretovému dymu ani ju neskladuje na radiátore.
Čistiacu kazetu znovu nenapĺňajte a používajte iba originálne
kazety Braun.
Holiaci strojček
1 Kazeta s planžetou a holiacimi čepeľami
2 Tlačidlo na uvoľnenie kazety
3 Prepínač MultiHeadLock
4 Hlavný spínač
5 Displej holiaceho strojčeka
5a Symbol zámky (cestovná zámka)
5b Segmenty nabíjania
5c Indikátor čistenia
5d Symbol batérie
6 Zastrihávač dlhých vlasov
7 Elektrické kontakty pre čistiacu stanicu
8 Uvoľňovacie tlačidlo zastrihávača dlhých vlasov
9 Konektor napájania holiaceho strojčeka
10 Špeciálny kábel (vzhľad sa môže líšiť)
11 Ochranný nadstavec*
12 Cestovné puzdro*
* nie pri všetkých modeloch
Prvé použitie a nabitie
Zapojte holiaci strojček do elektrickej zásuvky zacvaknutím špeciálneho kábla (10) do
konektora napájania holiaceho strojčeka (9) alebo prostredníctvom stanice
Clean&Charge (pozri kapitolu Stanica Clean&Charge).
Základné informácie o prevádzke
• Úplné nabitie poskytne energiu na približne 50 minút bezdrôtového holenia. Uvedený
čas sa môže líšiť v závislosti od miery zarastenia a okolitej teploty.
• Odporúčaná okolitá teplota pri nabíjaní je 5 °C až 35 °C. Pri nadmerne nízkych alebo
vysokých teplotách sa batéria nemusí nabiť správne alebo vôbec.Odporúčaná okolitá
teplota pre skladovanie a holenie je 15 °C až 35 °C.
• Nevystavujte holiaci strojček dlhší čas teplotám vyšším ako 50 °C.
• Keď bude holiaci strojček pripojený k elektrickej zásuvke, môže trvať niekoľko minút,
kým sa displej rozsvieti.
41
91092674_Series_5-2cc_wd_CEEMEA_S6-132.indd 4191092674_Series_5-2cc_wd_CEEMEA_S6-132.indd 41 23.11.16 15:4123.11.16 15:41
Page 42

Nabíjanie/vybitá batéria
Stav nabíjania sa zobrazuje na displeji holiaceho strojčeka (5).
• Počas nabíjania bude blikať príslušný segment nabíjania (5b).
• Keď je holiaci strojček úplne nabitý a zapojený do elektrickej zásuvky, na niekoľko
sekúnd sa rozsvietia všetky 3 segmenty nabíjania. Následne sa displej vypne.
• Symbol batérie (5d) bude blikať načerveno, keď je batéria takmer vybitá. Mali by ste
byť schopný dokončiť holenie. Pri vypínaní holiaceho strojčeka zvukový signál
pripomína stav takmer vybitej batérie.
Používanie holiaceho strojčeka
Stlačením hlavného spínača (4) holiaci strojček zapnete a vypnete.
Tipy na dokonalé oholenie nasucho
Na dosiahnutie čo najlepších výsledkov odporúča spoločnosť Braun dodržať 3
jednoduché kroky:
1. Vždy sa hoľte predtým, ako si umyjete tvár.
2. Holiaci strojček držte vždy pod pravým uhlom (90°) k pokožke.
3. Napnite kožu a hoľte proti smeru rastu chlpov.
Prepínač MultiHeadLock (zámka hlavice)
• Ak chcete oholiť ťažko dosiahnuteľné miesta (napr. pod nosom), posuňte prepínač
MultiHeadLock (3) nadol, čím zamknete hlavicu holiaceho strojčeka. Hlavica
holiaceho strojčeka môže byť zamknutá v piatich polohách.
• Ak chcete zmeniť polohu, posuňte palcom a ukazovákom hlavicu holiaceho strojčeka
dozadu alebo dopredu. Automaticky zapadne do ďalšej polohy.
• Na automatické čistenie v stanici Clean&Charge by mala byť zámka hlavice uvoľnená.
Zastrihávač dlhých vlasov
Na úpravu bokombrád, fúzov alebo brady stlačte uvoľňovacie tlačidlo (8) a vysuňte
zastrihávač dlhých vlasov (6) do hornej polohy.
Cestovná zámka
Symbol zámky (5a) sa rozsvieti na displeji, keď je holiaci strojček zamknutý, aby sa
zabránilo neúmyselnému zapnutiu motorčeka (napr. pri uložení v kufri).
• Aktivácia: Stlačením hlavného spínača (4) na 3 sekundy sa holiaci strojček zamkne.
Potvrdí to zvukový signál a symbol zámky na displeji. Následne sa displej vypne.
• Deaktivácia: Stlačením hlavného spínača na 3 sekundy sa holiaci strojček odomkne.
Manuálne čistenie holiaceho strojčeka
Čistenie pod tečúcou vodou
• Zapnite holiaci strojček (bez pripojeného napájacieho kábla) a opláchnite
holiacu hlavicu pod horúcou tečúcou vodou, kým sa nevymyjú všetky zvyšky
nečistôt. Môžete tiež použiť tekuté mydlo bez abrazívnych prísad. Opláchnite všetku
42
91092674_Series_5-2cc_wd_CEEMEA_S6-132.indd 4291092674_Series_5-2cc_wd_CEEMEA_S6-132.indd 42 23.11.16 15:4123.11.16 15:41
Page 43

penu a nechajte holiaci strojček ešte niekoľko sekúnd v prevádzke.
• Potom strojček vypnite, stlačením tlačidla (2) uvoľnite kazetu s planžetou a holiacimi
čepeľami (1) a nechajte časti vyschnúť.
• Ak holiaci strojček pravidelne čistíte pod tečúcou vodou, raz za týždeň aplikujte na
kazetu s planžetou a holiacimi čepeľami kvapku riedkeho oleja určeného na stroje.
Holiaci strojček by sa mal vyčistiť po každom použití peny.
Čistenie kefkou
Holiaci strojček vypnite. Odpojte kazetu s planžetou a holiacimi čepeľami (1) a poklepte
ňou o rovný povrch. Pomocou kefky vyčistite vnútorné priestory otočnej hlavice. Kazetu
kefkou nečistite, pretože by ju mohla poškodiť.
Čistiaca a nabíjacia stanica Clean&Charge (C&C)
Stanica Clean&Charge je určená na čistenie, nabíjanie, mazanie, dezinfekciu, sušenie a
skladovanie holiaceho strojčeka Braun.
13 Konektor napájania čistiacej stanice
14 Vysúvacie tlačidlo na výmenu kazety
15 Elektrické kontakty pre holiaci strojček
16 Displej stanice Clean&Charge
16a Indikátor úrovne
16b Kontrolka stavu
16c Indikátory čistiaceho program
17 Tlačidlo Start
18 Čistiaca kazeta
Inštalácia stanice C&C
• Odstráňte ochrannú fóliu z displeja stanice C&C.
• Stlačte vysúvacie tlačidlo (14) na zadnej strane stanice C&C a nadvihnite kryt.
• Čistiacu kazetu (18) položte a pridržte na rovnej a stabilnej ploche (napríklad na
stole).
• Opatrne odstráňte z kazety uzáver.
• Posuňte kazetu zo zadnej strany do základne stanice, až kým nezapadne na miesto.
• Kryt pomaly zatvorte tak, že naň zatlačíte, kým nezacvakne na miesto.
• Pomocou špeciálneho napájacieho kábla (10) pripojte konektor napájania čistiacej
stanice (13) do elektrickej zásuvky.
Používanie stanice C&C
Dôležité: Holiaci strojček musí byť suchý a bez zvyškov peny a mydla.Vložte
holiaci strojček do stanice C&C hornou stranou nadol tak, aby bolo vidno prednú stranu,
a s uvoľnenou zámkou hlavice (3).
43
91092674_Series_5-2cc_wd_CEEMEA_S6-132.indd 4391092674_Series_5-2cc_wd_CEEMEA_S6-132.indd 43 23.11.16 15:4123.11.16 15:41
Page 44

Kontakty (7) na zadnej strane holiacej hlavice musia byť zarovnané s kontaktmi (15) v
stanici C&C. Zatlačte holiaci strojček do správnej polohy.Zvukový signál potvrdí správne
umiestnenie holiaceho strojčeka v stanici C&C.
Stanica C&C analyzuje hygienický stav strojčeka. Stav zobrazujú indikátory čistiaceho
programu (16c) na displeji stanice C&C (16).
Nabíjanie holiaceho strojčeka v stanici C&C
Nabíjanie sa začne automaticky, keď sa holiaci strojček správne umiestni.
Čistenie holiaceho strojčeka v stanici C&C
Keď svieti indikátor čistenia (5c) na displeji holiaceho strojčeka, vložte holiaci strojček
do stanice C&C tak, ako je opísané vyššie.
Programy čistenia
krátke úsporné čistenie
normálne čistenie
veľmi intenzívne čistenie
Spustenie automatického čistenia
Proces čistenia spustite stlačením tlačidla Start (17).
Ak kontrolka stavu (16b) nesvieti (stanica C&C sa po približne 10 minútach prepne do
pohotovostného režimu), stlačte tlačidlo Start dvakrát. Inak sa čistenie nespustí.
Na dosiahnutie čo najlepších výsledkov odporúčame čistiť strojček po každom
holení.
Každý čistiaci program má niekoľko cyklov, počas ktorých sa čistiaca kvapalina
preplachuje cez hlavicu holiaceho strojčeka. V závislosti od modelu stanice
Clean&Charge a/alebo zvoleného programu čistenie trvá najviac 3 minúty. Počas neho
bliká kontrolka stavu. Holiaci strojček nechajte v stanici vyschnúť. Vyparenie
zostávajúcej vlhkosti trvá niekoľko hodín v závislosti od klimatických podmienok.
Po dokončení procesu čistenia a nabíjania sa všetky indikátory vypnú.
Vybratie holiaceho strojčeka zo stanice C&C
Jednou rukou podržte stanicu C&C a holiaci strojček jemne nakloňte dopredu, čím ho
uvoľníte.
Čistiaca kazeta/výmena
Keď indikátor úrovne (16a) natrvalo svieti načerveno, zostávajúca kvapalina v kazete
postačuje ešte približne na 3 ďalšie cykly. Keď indikátor úrovne bliká načerveno, kazetu
je potrebné vymeniť – pri každodennom používaní približne raz za 4 týždne.
44
91092674_Series_5-2cc_wd_CEEMEA_S6-132.indd 4491092674_Series_5-2cc_wd_CEEMEA_S6-132.indd 44 23.11.16 15:4123.11.16 15:41
Page 45

Po stlačení vysúvacieho tlačidla (14) a otvorení krytu počkajte niekoľko sekúnd, aby sa
zabránilo kvapkaniu a potom vyberte použitú kazetu. Pred likvidáciou použitej kazety
uzavrite všetky otvory pomocou viečok z novej kazety, pretože použitá kazeta bude
obsahovať kontaminovaný čistiaci roztok.
Čistiaca kazeta obsahuje látky etanol a izopropanol (technické údaje nájdete na
kazete), ktoré sa po otvorení kazety pomaly vyparujú. Každú kazetu, ktorá sa nepoužíva
denne, je potrebné vymeniť približne po 8 týždňoch, aby sa zabezpečila optimálna
dezinfekcia. Čistiaca kazeta tiež obsahuje mazivá na holiaci systém, ktoré môžu
zanechávať stopy na vonkajšom okraji planžety a čistiacej komory stanice C&C.
Tieto stopy možno jednoducho odstrániť jemným utretím vlhkou handričkou.
Príslušenstvo
Spoločnosť Braun odporúča meniť kazetu s planžetou a holiacimi čepeľami holiaceho
strojčeka každých 18 mesiacov. Maximálny výkon holiaceho strojčeka tak zostane
zachovaný.
Dostupné u vášho predajcu alebo v servisných centrách:
• Kazeta s planžetou a holiacimi čepeľami: 52S/52B
• Čistiaca kazeta: CCR
• Sprej na čistenie holiacich strojčekov Braun
Upozornenie týkajúce sa životného prostredia
Tento prístroj obsahuje batérie a/alebo recyklovateľný elektronický odpad.
V záujme ochrany životného prostredia prístroj nelikvidujte s domovým odpadom,
ale ho odovzdajte na zbernom mieste pre elektronický odpad.
Deklarovaná hodnota emisie hluku tohto spotrebiča je 63 dB(A), čo predstavuje
hladinu A akustického výkonu vzhľadom na referenčný akustický výkon 1 pW.
Čistiacu kazetu možno zlikvidovať s bežným domovým odpadom.
Informácie sa môžu zmeniť bez upozornenia.
Elektrické špecifikácie nájdete na štítku špeciálneho napájacieho kábla.
45
91092674_Series_5-2cc_wd_CEEMEA_S6-132.indd 4591092674_Series_5-2cc_wd_CEEMEA_S6-132.indd 45 23.11.16 15:4123.11.16 15:41
Page 46

Riešenie problémov
Problém Možná príčina Riešenie
SHAVER
Holiaci strojček
sa úplne nenabije a stále bliká.
Pri pripojení do
napájacej
zásuvky sa nabíjanie nespustí.
Nepríjemný
zápach z holiacej
hlavice.
Výdrž batérie sa
výrazne skrátila.
Holiaci výkon sa
výrazne zhoršil.
Okolitá teplota je mimo
vhodného rozsahu.
1. Niekedy sa začatie
nabíjania môže oneskoriť (napr. po dlhom
odložení).
2. Okolitá teplota je mimo
vhodného rozsahu.
3. Špeciálny kábel nie je
správne zapojený.
1. Holiacu hlavicu umývate len vodou.
2. Čistiaca kazeta sa
používa už viac ako
8 týždňov.
1. Planžeta a holiace
čepele sú opotrebované, čo vyžaduje pri
každom holení viac
energie.
2. Holiacu hlavicu pravidelne umývate pod
vodou, ale nemažete
ju.
1. Planžeta a holiace
čepele sú opotrebované.
2. Holiaci systém je
upchatý.
Odporúčaná okolitá teplota na nabíjanie
je 5 °C až 35 °C.
1. Počkajte pár minút, či sa nabíjanie
začne automaticky.
2. Odporúčaná okolitá teplota na nabíjanie je 5 °C až 35 °C.
3. Špeciálny kábel musí zapadnúť na
miesto.
1. Ak umývate holiacu hlavicu len čistou
vodou, používajte horúcu vodu a z
času na čas trochu tekutého mydla
(bez abrazívnych prísad). Odpojte
kazetu s planžetou a holiacimi čepeľami a nechajte ju vyschnúť.
2. Čistiacu kazetu vymieňajte najmenej
raz za 8 týždňov.
1. Vymeňte kazetu s planžetou a holiacimi čepeľami.
2. Ak holiaci strojček pravidelne umývate
pod tečúcou vodou, raz za týždeň aplikujte na planžetu kvapku riedkeho
oleja určeného na stroje.
1. Vymeňte kazetu s planžetou a holiacimi čepeľami.
2. Namočte kazetu s planžetou a holiacimi čepeľami do horúcej vody s kvapkou saponátu na riad. Potom dôkladne
opláchnite a vyklepte. Po vyschnutí
aplikujte na planžetu kvapku riedkeho
oleja určeného na stroje.
46
91092674_Series_5-2cc_wd_CEEMEA_S6-132.indd 4691092674_Series_5-2cc_wd_CEEMEA_S6-132.indd 46 23.11.16 15:4123.11.16 15:41
Page 47

Holiaca hlavica
je vlhká.
1. Čas sušenia po automatickom čistení bol
príliš krátky.
2. Výpust stanice Clean&
1. Čistite hneď po holení, aby sa umožnil
dostatok času na vyschnutie.
2. Vyčistite výpust čistiacej stanice
pomocou špáradla.
Charge je upchatý.
CLEAN&CHARGE STATION
Po stlačení tla-
čidla Start sa
nespustí čistenie.
1. Holiaci strojček nie je
správne vložený do
čistiacej stanice
Clean&Charge.
2. Čistiaca kazeta neobsahuje dostatočné
množstvo čistiacej
1. Vložte holiaci strojček do stanice
Clean&Charge a pritlačte ho o zadnú
stranu stanice (kontakty holiaceho
strojčeka musia byť zarovnané s
kontaktmi v stanici).
2. Vložte novú čistiacu kazetu. Znovu
stlačte tlačidlo Start.
kvapaliny (displej bliká
načerveno).
Zvýšená spotreba čistiacej
kvapaliny.
Výpust čistiacej stanice
Clean&Charge je
upchatý.
- Vyčistite výpust čistiacej stanice
pomocou špáradla.
- Vaňu čistiacej komory pravidelne
utierajte do čista.
Záruka
Poskytujeme dvojročnú záruku na výrobok s platnosťou od dátumu jeho zakúpenia.
V záručnej lehote bezplatne odstránime všetky poruchy prístroja zapríčinené chybou
materiálu alebo výroby, a to buď formou opravy, alebo výmenou celého prístroja (podľa
nášho vlastného uváženia). Uvedená záruka je platná v každom štáte, v ktorom tento
prístroj dodáva spoločnosť Braun alebo jej poverený distribútor.
Záruka sa netýka nasledujúcich prípadov: poškodenie zapríčinené nesprávnym použitím,
normálne opotrebovanie (napríklad plátkov holiaceho strojčeka alebo puzdra
zastrihávača), ako aj poruchy, ktoré majú zanedbateľný účinok na hodnotu alebo
funkciu prístroja. Ak opravu uskutoční neautorizovaná osoba a ak sa nepoužijú pôvodné
náhradné súčiastky spoločnosti Braun, platnosť záruky bude ukončená.
Ak v záručnej lehote požadujete vykonanie servisnej opravy, odovzdajte celý prístroj
s potvrdením o nákupe v autorizovanom servisnom stredisku spoločnosti Braun alebo
ho do strediska zašlite.
47
91092674_Series_5-2cc_wd_CEEMEA_S6-132.indd 4791092674_Series_5-2cc_wd_CEEMEA_S6-132.indd 47 23.11.16 15:4123.11.16 15:41
Page 48

Magyar
Termékeinket úgy terveztük, hogy a legmagasabb minőségi, funkcionális és tervezési
elvárásoknak is megfeleljenek. Köszönjük, hogy bízik a Braun nyújtotta minőségben, és
reméljük, elégedett lesz ezzel az újonnan vásárolt Braun termékkel.
Olvassa el ezeket az utasításokat, mert biztonsági információkat tartalmaznak.
Őrizze meg őket, mert később szüksége lehet rájuk.
Figyelmeztetés
A készülék integrált, biztonságos, kisfeszültségű rendszerrel
működő speciális csatlakozókábellel rendelkezik. Ne cserélje vagy
alakítsa át az alkatrészeit, ellenkező esetben áramütés veszélye
léphet fel. Kizárólag a készülékhez mellékelt speciális csatlakozókábelt használja.
Ha a készülék 492-es jelzéssel rendelkezik, bármelyik
492-XXXX kóddal ellátott Braun tápkábellel használható.
A készülék vízsugár alatt tisztítható, illetve kádban vagy
zuhany alatt is használható. Biztonsági okokból csak
vezeték nélkül működtethető.
Vízzel történő használat előtt válassza le a borotvát az elektromos
hálózatról.
Ne használja a borotvát, ha a szita vagy a kábel sérült.
A készüléket 8 éven felüli gyermekek, illetve mozgásszervi, érzék-
szervi vagy értelmi fogyatékkal élő vagy tapasztalatlan személyek
csak felügyelet mellett, illetve olyan esetben használhatják, ha
előtte elmagyarázták nekik a készülék biztonságos kezelésének
módját, és megérttették velük a használat során fellépő kockázatokat. A készülékkel gyermekek nem játszhatnak. Tisztítást és karbantartást gyermekek kizárólag 8 év felett, felnőtt felügyelet mellett végezhetnek.
Clean&Charge tisztító- és töltőegység
A tisztítófolyadék szivárgásának megelőzése érdekében helyezze
sima felületre a Clean&Charge tisztító- és töltőegységet. Amikor a
tisztítópatron a helyén van, ne billentse meg, ne mozdítsa meg hirtelen, illetve ne szállítsa a tisztító- és töltőegységet, mivel a tisztítófolyadék kifolyhat a patronból.
48
91092674_Series_5-2cc_wd_CEEMEA_S6-132.indd 4891092674_Series_5-2cc_wd_CEEMEA_S6-132.indd 48 23.11.16 15:4123.11.16 15:41
Page 49

Ne helyezze a tisztító- és töltőegységet tükrös fürdőszobaszekrénybe, illetve fényezett vagy lakkozott felületre.
A tisztítópatron rendkívül gyúlékony folyadékot tartalmaz, ezért
gyújtóforrásoktól távol tartandó. Ne tegye ki közvetlen napfénynek
és cigarettafüstnek, illetve ne tárolja radiátor fölött.
Ne töltse újra a patront, és kizárólag eredeti Braun töltőpatronokat használjon.
Borotva
1 Szita- és nyíróegység
2 A tisztító- és töltőegység kioldó gombja
3 MultiHeadLock kapcsoló
4 Be-/kikapcsoló gomb
5 A borotva kijelzője
5a Lakat szimbólum (utazózár)
5b Töltöttségjelző sávok
5c A tisztítás jelzőfénye
5d Akkumulátor szimbólum
6 Hosszúszőr-vágó
7 A borotva és a töltőegység közötti érintkezők
8 Kioldógomb a hosszúszőr-vágóhoz
9 A borotva elektromos csatlakozójának bemenete
10 Speciális csatlakozókábel (eltérhet a képen láthatótól)
11 Védősapka*
12 Borotvatartó tok*
*nem jár minden modellhez
Első használat és töltés
Csatlakoztassa a borotvát elektromos aljzathoz: ehhez illessze a speciális
csatlakozókábelt (10) a borotva elektromos csatlakozójának bemenetébe (9) vagy a
Clean&Charge tisztító- és töltőegységbe (lásd a „Clean&Charge tisztító- és
töltőegység” című fejezetet).
Az alapvető üzemeltetéssel kapcsolatos tudnivalók
• A teljesen feltöltött készülék legfeljebb 50 perc vezeték nélküli borotválkozást tesz
lehetővé. Ez az idő a szakállhosszúságtól és a környezeti hőmérséklettől függően
eltérő lehet.
• A töltés környezeti hőmérsékleten (5–35 °C) javasolt. Előfordulhat, hogy
szélsőségesen alacsony vagy magas hőmérsékleten a borotva nem megfelelően vagy
egyáltalán nem tölt fel. A tárolás és borotválkozás szobahőmérsékleten (15–35 °C)
javasolt.
49
91092674_Series_5-2cc_wd_CEEMEA_S6-132.indd 4991092674_Series_5-2cc_wd_CEEMEA_S6-132.indd 49 23.11.16 15:4123.11.16 15:41
Page 50

• A készüléket ne tegye ki hosszabb ideig 50 °C-nál magasabb hőmérsékletnek.
• Amikor a borotvát az elektromos hálózathoz csatlakoztatja, néhány percig is eltarthat,
amíg a kijelző világítani kezd.
Töltés és alacsony töltöttségi szint
A töltöttségi állapot a borotva kijelzőjén (5) látható.
• Töltés alatt a megfelelő töltöttségjelző sáv (5b) villog.
• Amikor a borotva teljesen feltöltődött, és az elektromos hálózathoz csatlakozik,
néhány másodpercre mindhárom töltöttségjelző sáv felvillan. Ezután a kijelző
kikapcsol.
• Az akkumulátor szimbólum (5d) pirosan villog, amikor az akkumulátor lemerülőben
van. Ilyenkor általában be tudja fejezni a borotválkozást. A borotva kikapcsolásakor
hangjelzés emlékeztet az alacsony töltöttségi szintre.
A borotva használata
A borotva működtetéséhez nyomja meg a be-/kikapcsoló gombot (4).
Tippek a tökéletes száraz borotválkozáshoz
A minél tökéletesebb borotválkozás érdekében a Braun az alábbi 3 lépést javasolja:
1. Mindig arcmosás előtt borotválkozzon.
2. Borotválkozás közben a készüléket végig a bőrére merőlegesen (90°-os szögben)
tartsa.
3. Feszítse meg a bőrt, és a szakáll növekedési irányával ellentétesen borotválkozzon.
MultiHeadLock kapcsoló (fejretesz)
• A nehezen hozzáférhető területek (pl. az orr alatti terület) borotválásához csúsztassa
le a MultiHeadLock kapcsolót (3); ezzel rögzíti a borotvafejet. A borotvafej öt
különböző pozícióban rögzíthető.
• A megfelelő pozíció beállításához döntse előre vagy hátra a borotvafejet a hüvelyk- és
mutatóujjával. A fej automatikusan a következő pozícióba ugrik.
• A Clean&Charge tisztító- és töltőegység automatikus tisztításához ki kell oldani a
fejreteszt.
Hosszúszőr-vágó
A pajesz, a bajusz, illetve a szakáll nyírásához nyomja meg a kioldógombot (8), és
csúsztassa fel a hosszúszőr-vágót (6).
Utazózár
A lakat szimbólum (5a) világítani kezd a kijelzőn, amikor a borotva lezáródik, hogy
elkerülhető legyen a motor véletlenszerű elindulása (pl. bőröndben való tároláshoz).
• Aktiválás: A be-/kikapcsoló gomb (4) 3 másodpercig tartó lenyomva tartása után a
borotva lezáródik. Ekkor hangjelzés hallható, és megjelenik a kijelzőn a lakat
szimbólum. A kijelző ezután kikapcsol.
• Inaktiválás: A be-/kikapcsoló gomb újabb 3 másodpercig tartó lenyomva tartása után
a zárolás kiold.
50
91092674_Series_5-2cc_wd_CEEMEA_S6-132.indd 5091092674_Series_5-2cc_wd_CEEMEA_S6-132.indd 50 23.11.16 15:4123.11.16 15:41
Page 51

A borotva kézi tisztítása
Tisztítás vízsugárral
• Kapcsolja be a borotvát (vezeték nélkül), majd öblítse ki a borotvafejet forró
vízsugárral, amíg minden rajta maradt szennyeződést el nem távolít. A tisztítást
szemcsés összetevőktől mentes folyékony szappannal is végezheti. Mossa le a
habot, majd működtesse a készüléket még néhány másodpercig.
• Ezután kapcsolja ki a borotvát, nyomja meg a kioldógombot (2), vegye ki a szita- és
nyíróegységet (1), majd hagyja megszáradni.
• Ha a borotvát rendszeresen tisztítja vízben, akkor hetente egyszer cseppentsen egy
csepp könnyű gépolajat a szita- és nyíróegység tetejére.
A borotvát minden habhasználat után meg kell tisztítani.
Tisztítás kefével
Kapcsolja ki a borotvát. Vegye ki a szita- és nyíróegységet (1), majd finoman ütögesse
valamilyen sima felülethez. A kefe segítségével tisztítsa át a billenő borotvafej belsejét.
A nyíróegységet ne tisztítsa kefével, mert kárt tehet benne!
Clean&Charge tisztító- és töltőegység (C&C)
A Clean&Charge tisztító- és töltőegységet a Braun borotva tisztítására, töltésére,
kenésére, fertőtlenítésére, szárítására és tárolására fejlesztették ki.
13 A töltőegység elektromos csatlakozójának bemenete
14 Emelőgomb a patron cseréjéhez
15 A töltőegység és a borotva közötti érintkezők
16 A Clean&Charge tisztító- és töltőegység kijelzője
16a Szintjelző
16b Állapotjelző fény
16c A tisztítóprogram jelzői
17 Start gomb
18 Tisztítópatron
A C&C üzembe helyezése
• Húzza le a védőfóliát a C&C kijelzőjéről.
• Nyomja meg a C&C hátsó részén található emelőgombot (14) a burkolat
felemeléséhez.
• Sima, stabil felület (pl. egy asztal) felett fordítsa lefelé a tisztítópatront (18).
• Óvatosan vegye le a patron fedelét.
• Csúsztassa hátulról a patront a tisztító- és töltőegység alapjába, és pattintsa a
helyére.
• Lassan zárja le a burkolatot. Ehhez nyomja lefelé, amíg be nem záródik.
• A speciális csatlakozókábellel (10) csatlakoztassa a tisztító- és töltőegység
elektromos csatlakozó bemenetét (13) az elektromos hálózathoz.
51
91092674_Series_5-2cc_wd_CEEMEA_S6-132.indd 5191092674_Series_5-2cc_wd_CEEMEA_S6-132.indd 51 23.11.16 15:4123.11.16 15:41
Page 52

A C&C használata
Fontos: A borotva legyen száraz, és ne legyen rajta hab- vagy szappanmaradék!
Helyezze fejjel lefelé a borotvát a C&C egységbe úgy, hogy az eleje látszódjon, és a
fejretesz (3) ki legyen oldva.
A borotva hátulján lévő érintkezőknek (7) illeszkedniük kell a C&C egységen található
érintkezőkhöz (15). Nyomja a borotvát a megfelelő pozícióba. Hangjelzés hallható, ha a
borotva megfelelően helyezkedik el a C&C egységben.
A C&C ellenőrzi a higiéniai állapotot. Az állapotot a tisztítóprogram jelzői (16c) mutatják
a C&C kijelzőjén (16).
A borotva töltése a C&C egységben
A borotva megfelelő behelyezésekor a töltés automatikusan megkezdődik.
A borotva tisztítása a C&C egységben
Amikor a tisztítás jelzőfénye (5c) világítani kezd a borotva kijelzőjén, helyezze a borotvát
a C&C egységbe a korábban leírtak szerint.
Tisztítóprogramok
rövid, takarékos tisztítás
normál tisztítás
intenzív tisztítás
Az automatikus tisztítás elindítása
Indítsa el a tisztítási folyamatot a Start gomb (17) megnyomásával. Ha az állapotjelző
fény (16b) nem világít (a C&C kb. 10 perc után készenléti üzemmódra vált), nyomja meg
kétszer a Start gombot, ellenkező esetben nem indul el a tisztítás. A tökéletes
borotválkozás érdekében javasoljuk, hogy minden borotválkozás után végezzen
tisztítást.
Minden tisztítóprogram több ciklusból áll, amelyek során a folyadék átöblíti a
borotvafejet. A Clean&Charge tisztító- és töltőegység típusától és/vagy a választott
programtól függően a tisztítás akár 3 percig is tarthat. Az állapotjelző fény eközben
villog. Hagyja megszáradni a borotvát az egységben.
Az időjárási körülményektől függően néhány óra alatt a maradék nedvesség is
elpárolog.
A tisztítási és a töltési folyamat befejezése után minden jelzőfény kialszik.
A borotva eltávolítása a C&C egységből
Fogja a C&C egységet az egyik kezével, és a kioldáshoz döntse enyhén előre a
borotvát.
52
91092674_Series_5-2cc_wd_CEEMEA_S6-132.indd 5291092674_Series_5-2cc_wd_CEEMEA_S6-132.indd 52 23.11.16 15:4123.11.16 15:41
Page 53

Patron tisztítása/cseréje
Amikor a szintjelző (16a) folyamatosan piros színnel világít, a patronban lévő maradék
folyadék még körülbelül 3 ciklusra elég. Amikor a szintjelző pirosan villog, a patront ki
kell cserélni – napi használat esetén körülbelül 4 hetente.
A burkolat kinyitásakor a kiemelőgomb (14) megnyomása után várjon néhány
másodpercet, mielőtt eltávolítja a használt patront, így elkerülheti a folyadékcsöpögést.
Mielőtt eldobná a használt patront, ellenőrizze, hogy lezárta-e a nyílásokat az új patron
fedelével, mivel a használt patron szennyezett tisztítófolyadékot tartalmaz.
Ha nem használja őket naponta, a patronokat körülbelül 8 hetente kell kicserélni az
optimális fertőtlenítés biztosítása érdekében. A tisztítópatron kenőanyagokat is
tartalmaz a borotvarendszerhez, amelyek foltot hagyhatnak a külső szitakereten és a
C&C tisztítókamrájában. Ezek a foltok könnyen eltávolíthatók egy nedves ronggyal.
Kiegészítők
A Braun javasolja, hogy 18 havonta cserélje újra a borotva szita- és nyíróegységét a
borotva maximális teljesítményének megőrzése érdekében.
Megvásárolhatók a forgalmazóknál és a Braun szervizközpontokban:
• Szita- és nyíróegység: 52S/52B
• Tisztítópatron: CCR
• Tisztítóspray Braun borotvákhoz
Környezetvédelmi megjegyzések
A termék akkumulátorokat és/vagy újrahasznosítható elektromos
hulladékot tartalmaz. A környezet védelme érdekében ne dobja háztartási
hulladékba, hanem újrahasznosítás céljából vigye a kijelölt elektromoshulladékgyűjtő pontra.
A tisztítópatron rendes háztartási hulladékként kezelhető.
A változtatás jogát fenntartjuk.
Az elektromos specifikáció a speciális csatlakozókábelen található.
53
91092674_Series_5-2cc_wd_CEEMEA_S6-132.indd 5391092674_Series_5-2cc_wd_CEEMEA_S6-132.indd 53 23.11.16 15:4123.11.16 15:41
Page 54

Problémamegoldás
Probléma Lehetséges ok Megoldás
SHAVER
A borotva nem
töltődik fel teljesen, és folyamatosan villog.
Tápcsatlakozóhoz csatlakoztatás esetén a
töltés nem kezdődik meg.
Kellemetlen szag
érezhető a
borotvafejen.
Az akkumulátor
teljesítménye
jelentősen csökkent.
A borotva teljesítménye jelentősen csökkent.
A környezeti hőmérséklet
nem megfelelő.
1. Előfordulhat, hogy a
töltés később indul el
(pl. hosszú tárolás
után).
2. A környezeti hőmérséklet nem megfelelő.
3. A speciális csatlakozókábel nem csatlakozik
megfelelően a hálózathoz.
1. Mossa meg a borotvafejet vízzel.
2. A tisztítópatron már
több mint 8 hete van
használatban.
1. A szita- és nyíróegység
elhasználódott, így
minden borotválkozás
több áramot igényel.
2. A borotvafejet Ön
rendszeresen tisztítja,
ám nem használ
kenőanyagot.
1. A szita- és nyíróegység
elhasználódott.
2. A borotvarendszer
eldugult.
A töltéshez javasolt környezeti hőmérséklet 5–35 °C.
1. Várjon néhány percet addig, amíg a
töltés automatikusan el nem indul.
2. A töltéshez javasolt környezeti hőmérséklet 5–35 °C.
3. A speciális csatlakozókábelnek a
helyére kell pattannia.
1. Ha a borotvafejet csak vízzel szokta
tisztítani, meleg vizet használjon, időnként pedig egy kis folyékony szappant
(szemcsés összetevőket tartalmazó
szert azonban ne). Távolítsa el a szitaés nyíróegységet, majd hagyja megszáradni.
2. A tisztítópatront legalább 8 hetente
cserélje ki.
1. Cserélje ki a szita- és nyíróegységet.
2. Ha a borotvát rendszeresen tisztítja
vízzel, a kenés érdekében hetente
egyszer cseppentsen egy csepp könynyű gépolajat a szita tetejére.
1. Cserélje ki a szita- és nyíróegységet.
2. Áztassa a szita- és nyíróegységet forró
vízbe, és tegyen a vízbe egy csepp
mosogatószert. Ezt követően öblítse ki
alaposan, majd ütögesse ki belőle a
vizet. Ha megszáradt, cseppentsen
egy csepp könnyű gépolajat a szitára.
54
91092674_Series_5-2cc_wd_CEEMEA_S6-132.indd 5491092674_Series_5-2cc_wd_CEEMEA_S6-132.indd 54 23.11.16 15:4123.11.16 15:41
Page 55

A borotvafej
nedves.
1. Az automatikus tisztítást követő szárítási
idő túl rövid volt.
2. A Clean&Charge tisztító- és töltőegység
1. Végezze a tisztítást közvetlenül a
borotválkozás után, hogy elegendő idő
maradjon a szárításra.
2. Tisztítsa meg a szűrőt egy fogpiszkálóval.
szűrője eltömődött.
CLEAN&CHARGE STATION
A tisztítás csak
akkor indul el, ha
Ön megnyomta a
Start gombot.
1. Nem megfelelően
helyezte a borotvát a
Clean&Charge tisztítóés töltőegységbe.
2. A tisztítópatron nem
tartalmaz elegendő
tisztítófolyadékot (a
1. Helyezze a borotvát a Clean&Chargetisztító- és töltőegységbe, és nyomja
az egység hátsó része felé (a borotva
érintkezőinek az egységen lévő érintkezőkhöz kell illeszkedniük).
2. Helyezzen be új tisztítópatront. Nyomja
meg ismét a Start gombot.
kijelző pirosan villog).
Megnövekedett
a tisztítófolyadék-használat.
A Clean&Charge tisztítóés töltőegység szűrője
eltömődött.
– Tisztítsa meg a szűrőt egy fogpiszkáló-
val.
– Rendszeresen törölje tisztára a kádat.
Garancia
A vásárlás napjától számított 2 évig tartó garanciát biztosítunk a termékre. A garanciaidőszakon belül minden anyag- és kivitelezési hibát díjmentesen helyrehozunk,
belátásunk szerint vagy javítva, vagy cserélve a készüléket. Ez a garancia minden olyan
országra kiterjed, ahol a készülék a Braun vagy annak kijelölt viszonteladója
forgalmazásában kapható.
A garancia nem fedi a következőket: nem rendeltetésszerű használat miatt bekövetkező
károsodás; kopás és elhasználódás (pl. a borotva szita- és vágókazettája); illetve a
készülék értéke és működése szempontjából elhanyagolható jellegű hibák. A garancia
érvényét veszti, ha a javítást erre nem jogosult személy végzi, és ha nem Braun
alkatrészeket használnak.
A garancia-időszakon belüli javításhoz adja le vagy küldje el a teljes készüléket a
vásárláskor kapott számlával együtt valamely hivatalos Braun Ügyfélszolgálati
Szervizközpontnak vagy a vásárlás helyén.
55
91092674_Series_5-2cc_wd_CEEMEA_S6-132.indd 5591092674_Series_5-2cc_wd_CEEMEA_S6-132.indd 55 23.11.16 15:4123.11.16 15:41
Page 56

Hrvatski
Naši su proizvodi dizajnirani tako da zadovoljavaju najviše standarde kvalitete,
funkcionalnosti i dizajna. Zahvaljujemo se što vjerujete u Braunovu kvalitetu i nadamo se
da ćete uživati u novom Braunovom proizvodu.
Ove upute pročitajte u cijelosti jer sadrže informacije o sigurnosti. Zadržite ih za
buduću referencu.
Upozorenje
Uređaj ima poseban komplet kabela s ugrađenim napajanjem
sigurnosno malog napona (SELV). Nemojte mijenjati ili neovlašteno dirati neki njegov dio jer postoji opasnost od električnog
udara. Upotrebljavajte isključivo poseban komplet kabela isporučen s uređajem.
Ako je aparat označen brojem 492, možete ga upotrebljavati s bilo kojim Braunovim napajanjem s oznakom 492-XXXX.
Ovaj je uređaj pogodan za čišćenje pod tekućom vodom i
uporabi u kadi ili pod tušem. Zbog sigurnosnih razloga
smije se upotrebljavati samo bez kabela.
Prije upotrebe aparata za brijanje pod vodom isključite ga iz napajanja.
Nemojte se brijati ako su mrežica ili kabel oštećeni.
Ovaj aparat mogu upotrebljavati djeca starija od 8 godina te osobe
sa smanjenim fizičkim, osjetilnim i mentalnim sposobnostima, kao i
osobe koje nemaju prethodno dostatno iskustvo i znanje, pod
uvjetom da su pod nadzorom odrasle osobe ili da im je objašnjeno
kako se aparat upotrebljava na siguran način tako da u potpunosti
razumiju moguće rizike prilikom upotrebe. Djeca se ne smiju igrati
aparatom. Djeca ne smiju obavljati čišćenje i održavanje aparata,
osim ako nisu starija od 8 godina i pod nadzorom odrasle osobe.
Jedinica za čišćenje i punjenje (Clean&Charge)
Kako biste spriječili istjecanje tekućine za čišćenje, stavite jedinicu
Clean&Charge na ravnu površinu. Kada je umetnuta patrona za
čišćenje, jedinicu nemojte naginjati, naglo pomicati ili premještati
jer bi se tekućina za čišćenje mogla izliti iz patrone.
56
91092674_Series_5-2cc_wd_CEEMEA_S6-132.indd 5691092674_Series_5-2cc_wd_CEEMEA_S6-132.indd 56 23.11.16 15:4123.11.16 15:41
Page 57

Jedinicu ne spremajte u kupaonski ormarić s ogledalom ili na polirane ili lakirane površine.
Patrona za čišćenje sadrži visoko zapaljivu tekućinu stoga je držite
dalje od zapaljivih izvora. Nemojte je izlagati izravnoj sunčevoj svjetlosti ili duhanskom dimu te je nemojte stavljati iznad radijatora.
Ne punite patronu i upotrebljavajte samo originalne patrone
tvrtke Braun.
Aparat za brijanje
1 Kaseta s mrežicom i blokom noža
2 Gumb za otpuštanje kasete
3 Prekidač za blokiranje glave aparata za brijanje
4 Prekidač za uključivanje/isključivanje
5 Indikator aparata za brijanje
5a Simbol za zaključavanje (lokot)
5b Razina napunjenosti
5c Indikator za čišćenje
5d Simbol baterije
6 Podrezivač za duge dlačice
7 Kontakti gdje se aparat za brijanje priključuje na jedinicu
8 Gumb za otpuštanje podrezivača za duge dlačice
9 Utičnica aparata za brijanje
10 Poseban komplet kabela (dizajn se može razlikovati)
11 Nastavak za zaštitu*
12 Prijenosna kutija*
*nije dostupno uz sve modele
Prva uporaba i punjenje
Uključite aparat za brijanje u utičnicu priključivanjem posebnog kompleta kabela (10) u
utičnicu aparata za brijanje (9) ili putem jedinice za čišćenje i punjenje (pogledajte
odjeljak „Jedinica za čišćenje i punjenje (Clean&Charge)“).
Osnovne informacije o radu
• Potpuno punjenje omogućuje do 50 minuta bežičnog brijanja. To može varirati ovisno
o dužini brade i temperaturi okoline.
• Preporučena sobna temperatura za punjenje je od 5 °C do 35 °C. Pri ekstremno niskim
ili visokim temperaturama baterija se možda neće pravilno puniti ili se neće uopće
napuniti. Preporučena sobna temperatura za brijanje i čuvanje je od 15 °C do 35 °C.
• Ne izlažite aparat temperaturama višima od 50 °C na duža razdoblja.
• Kada se aparat za brijanje priključi na električnu utičnicu, možda će trebati nekoliko
minuta da indikator zasvijetli.
57
91092674_Series_5-2cc_wd_CEEMEA_S6-132.indd 5791092674_Series_5-2cc_wd_CEEMEA_S6-132.indd 57 23.11.16 15:4123.11.16 15:41
Page 58

Punjenje / prazna baterija
Indikator aparata za brijanje (5) prikazuje status napunjenosti baterije.
• Tijekom punjenja bljeskat će pripadajući segment za punjenje (5b).
• Kada je baterija u potpunosti napunjena i kada se aparat priključi na utičnicu,
sva će 3 segmenta za punjenje zasvijetliti na nekoliko sekundi. Poslije toga indikator
se isključuje.
• Simbol baterije (5d) bljeska crvenim svjetlom kada je baterija prazna. U tom biste
slučaju trebali moći završiti brijanje.
Uporaba aparata za brijanje
Za pokretanje aparata za brijanje pritisnite prekidač za uključivanje/isključivanje (4).
Savjeti za savršeno suho brijanje
Za najbolje rezultate Braun preporučuje da se pridržavate 3 jednostavna koraka:
1. Uvijek se brijte prije umivanja lica.
2. Aparat za brijanje sve vrijeme držite pod pravim kutom (90°) u odnosu na kožu.
3. Zategnite kožu i brijte se u smjeru suprotnom od rasta brade.
Prekidač za blokiranje glave aparata za brijanje (blokiranje glave)
• Za brijanje teško dostupnih područja (npr. ispod nosa) prekidač za blokiranje glave
aparata za brijanje (3) pomaknite prema dolje kako biste blokirali glavu. Glava aparata
može se blokirati u pet položaja.
• Za promjenu položaja pomaknite glavu aparata palcem i kažiprstom naprijed ili natrag.
Automatski će kliknuti u sljedećem položaju.
• Za automatsko čišćenje na jedinici Clean&Charge prekidač za blokiranje glave treba
biti otpušten.
Podrezivač za duge dlačice
Za podrezivanje zalizaka, brkova ili brade pritisnite gumb za otpuštanje (8) i povucite
podrezivač za duge dlačice (6) prema gore.
Zaključavanje
Simbol lokota (5a) zasvijetlit će kada je aparat za brijanje zaključan kako bi se spriječilo
nehotično pokretanje motora (npr. ako ga spremate u kofer).
• Aktivacija: Aparat za brijanje zaključava se pritiskom na prekidač za uključivanje/
isključivanje (4) u trajanju od 3 sekunde. Zaključavanje potvrđuju zvučni signal i simbol
lokota na indikatoru. Nakon toga indikator se isključuje.
• Deaktivacija: Aparat za brijanje otključavate ponovnim pritiskom na prekidač za
uključivanje/isključivanje u trajanju od 3 sekunde.
Ručno čišćenje aparata za brijanje
Čišćenje pod mlazom tekuće vode
• Uključite aparat za brijanje (bežično) i isperite glavu aparata pod mlazom
vruće tekuće vode dok ne uklonite sve ostatke. Smijete upotrebljavati tekući
58
91092674_Series_5-2cc_wd_CEEMEA_S6-132.indd 5891092674_Series_5-2cc_wd_CEEMEA_S6-132.indd 58 23.11.16 15:4123.11.16 15:41
Page 59

sapun bez abrazivnih tvari. Isperite svu pjenu i pustite da aparat za brijanje radi još
nekoliko sekundi.
• Zatim isključite aparat za brijanje, pritisnite gumb za otpuštanje (2) kako biste uklonili
kasetu s mrežicom i blokom noža (1) i ostavite aparat da se osuši.
• Ako aparat za brijanje redovito čistite pod mlazom tekuće vode, jednom tjedno
nanesite kap blagog strojnog ulja na kasetu s mrežicom i blokom noža.
Brijaći aparat treba čistiti nakon svake upotrebe s pjenom za brijanje.
Čišćenje četkom
Isključite aparat za brijanje. Uklonite kasetu s mrežicom i blokom noža (1) i lagano
kucnite njome po ravnoj površini. Četkom očistite unutrašnjost pokretne glave. Kasetu
nemojte čistiti četkom jer biste je tako mogli oštetiti!
Jedinica za čišćenje i punjenje (C&C)
Jedinica za čišćenje i punjenje namijenjena je čišćenju, punjenju, podmazivanju,
dezinfekciji, sušenju i čuvanju aparata za brijanje Braun.
13 Utičnica jedinice
14 Gumb za podizanje za zamjenu patrone
15 Kontakti gdje se aparat za brijanje priključuje na jedinicu
16 Zaslon jedinice za čišćenje i punjenje
16a Indikator razina
16b Svjetlo statusa
16c Indikatori programa za čišćenje
17 Gumb za pokretanje
18 Patrona za čišćenje
Postavljanje jedinice C&C
• Pažljivo skinite foliju sa zaslona jedinice C&C.
• Pritisnite gumb za podizanje (14) na stražnjoj strani jedinice C&C i podignite kućište.
• Patronu za čišćenje (18) držite na ravnoj i stabilnoj površini (npr. na stolu).
• Pažljivo skinite poklopac s patrone.
• Patronu gurajte u podnožje jedinice sa stražnje strane dok ne sjedne na svoje mjesto.
• Kućište polako zatvorite gurajući ga prema dolje dok se ne zaključa.
• Utičnicu jedinice (13) priključite posebnim kompletom kabela (10) na električnu
utičnicu.
Uporaba jedinice za čišćenje i punjenje (C&C)
Važno: Aparat za brijanje mora biti suh i bez ostataka pjene ili sapunice!
Umetnite glavu aparata za brijanje s vidljivom prednjom stranom i otpuštenom
blokadom glave (3) u jedinicu za čišćenje i punjenje.
Kontakti (7) na stražnjoj strani aparata za brijanje moraju biti poravnani s kontaktima
(15) u jedinici za čišćenje i punjenje. Zvučni signal potvrđuje da je aparat ispravno
postavljen u jedinicu C&C.
59
91092674_Series_5-2cc_wd_CEEMEA_S6-132.indd 5991092674_Series_5-2cc_wd_CEEMEA_S6-132.indd 59 23.11.16 15:4123.11.16 15:41
Page 60

C&C analizira status čistoće aparata za brijanje. Indikatori programa za čišćenje (16c)
pokazuju status na zaslonu jedinice C&C (16).
Punjenje aparata za brijanje na jedinici za čišćenje i punjenje (C&C)
Punjenje će automatski početi kada ispravno postavite aparat za brijanje.
Čišćenje aparata za brijanje u jedinici za čišćenje i punjenje (C&C)
Kada indikator programa za čišćenje (5c) zasvijetli na indikatoru aparata za brijanje,
postavite aparat u jedinicu C&C na gore opisani način.
Programi za čišćenje
kratko ekonomično čišćenje
normalna razina čišćenja
intenzivno čišćenje
Pokretanje automatskog čišćenja
Proces čišćenja započinjete pritiskom na gumb za pokretanje (17). Ako svjetlo statusa
(16b) ne zasvijetli (C&C prelazi u mirovanje nakon približno 10 minuta), pritisnite dvaput
gumb za pokretanje. U suprotnom čišćenje neće početi. Za najbolje rezultate brijanja
preporučujemo čišćenje nakon svakog brijanja.
Svaki program čišćenja sastoji se od nekoliko ciklusa u kojima tekućina za čišćenje
prolazi kroz glavu aparata za brijanje. Ovisno o odabranom programu čišćenja i
punjenja, čišćenje traje najviše 3 minute. U tom razdoblju svjetlo statusa bljeska. Aparat
za brijanje ostavite da se osuši u jedinici. Potrebno je nekoliko sati da bi preostala vlaga
isparila, ovisno o klimatskim uvjetima.
Nakon čišćenja i punjenja svi se indikatori isključuju.
Uklanjanje aparata za brijanja iz jedinice C&C
Jedinicu C&C držite jednom rukom, a aparat za brijanje lagano nagnite prema naprijed
kako biste ga oslobodili.
Patrona za čišćenje / zamjena
Kada indikator razine (16a) stalno svijetli crvenim svjetlom, preostala tekućina u patroni
dovoljna je za približno još tri ciklusa. Kada indikator razine bljeska crveno, patrona se
mora zamijeniti – otprilike na svaka četiri tjedna pri svakodnevnoj uporabi.
Nakon pritiska gumba za podizanje (14) radi otvaranja kućišta, pričekajte nekoliko
sekundi prije uklanjanja iskorištene patrone kako biste izbjegli kapanje. Prije nego što
bacite iskorištenu patronu, provjerite jeste li poklopcem nove patrone zatvorili otvore
budući da iskorištena patrona sadrži kontaminiranu otopinu za čišćenje.
60
91092674_Series_5-2cc_wd_CEEMEA_S6-132.indd 6091092674_Series_5-2cc_wd_CEEMEA_S6-132.indd 60 23.11.16 15:4123.11.16 15:41
Page 61

Higijenska patrona za čišćenje sadrži etanol ili izopropanol (specifikaciju pogledajte na
patroni) koji će prirodno polako hlapiti nakon što se patrona otvori. U slučaju da se
patrona ne upotrebljava svakodnevno, patronu je potrebno zamijeniti nakon približno
8 tjedana kako bi se zadržala optimalna moć dezinfekcije. Patrona za čišćenje sadrži i
sredstva za podmazivanje sustava za brijanje koja nakon čišćenja mogu ostaviti tragove
na vanjskom okviru mrežice i odjeljku za čišćenje jedinice C&C. Ti se tragovi mogu
jednostavno ukloniti vlažnom krpom.
Dodatna oprema
Braun preporučuje mijenjanje kasete s mrežicom i blokom noža svakih 18 mjeseci kako
bi se održala najbolja radna svojstva aparata.
Dostupno kod trgovca ili u servisnim centrima tvrtke Braun:
• Kaseta s mrežicom i blokom noža: 52S/52B
• Patrona za čišćenje: CCR
• Sprej za čišćenje aparata za brijanje Braun
Obavijest o zaštiti okoliša
Proizvod sadrži baterije i/ili elektronički otpad koji se može reciklirati.
Kako biste zaštitili okoliš, ne odlažite uređaj s kućnim otpadom, već ga
odnesite na mjesta za prikupljanje električnog otpada radi recikliranja.
Patronu za čišćenje možete baciti s običnim kućnim otpadom.
Podložno promjenama bez prethodne najave.
Za strujne specifikacije pogledajte natpis na kompletu posebnog kabela.
Rješavanje problema
Problem Mogući razlog Rješenje
SHAVER
Aparat za brija-
nje ne puni se do
kraja i nastavlja
bljeskati.
Punjenje ne
započinje spajanjem u utičnicu.
Sobna temperatura nije u
valjanom rasponu.
1. Ponekad punjenje
može kasniti (npr.
nakon dugog razdoblja
nekorištenja).
2. Sobna temperatura
nije u valjanom rasponu.
3. Poseban komplet
kabela nije pravilno
uključen.
Preporučena sobna temperatura za
punjenje je od 5 °C do 35 °C.
1. Pričekajte nekoliko minuta hoće li
punjenje automatski početi.
2. Preporučena sobna temperatura za
punjenje je od 5 °C do 35 °C.
3. Poseban komplet kabela mora sjesti
na pravo mjesto.
61
91092674_Series_5-2cc_wd_CEEMEA_S6-132.indd 6191092674_Series_5-2cc_wd_CEEMEA_S6-132.indd 61 23.11.16 15:4123.11.16 15:41
Page 62

Neugodan miris
iz glave aparata
za brijanje.
1. Glava aparata za brijanje čisti se vodom.
2. Patrona za čišćenje u
uporabi je duže od
8 tjedana.
Učinkovitost
baterije značajno
je smanjena.
1. Mrežica i nož su istrošeni što zahtijeva više
snage za svako brijanje.
2. Glava aparata za brijanje redovito se čisti
vodom, ali se ne podmazuje.
Učinkovitost brijanja značajno je
smanjena.
1. Mrežica i nož su istrošeni.
2. Sustav za brijanje je
začepljen.
Glava aparata za
brijanje je vlažna.
1. Vrijeme sušenja poslije
automatskog čišćenja
bilo je prekratko.
2. Odvod jedinice za
čišćenje i punjenje
(C&C) je začepljen.
CLEAN&CHARGE STATION
Čišćenje se ne
pokreće kada
pritisnete gumb
za pokretanje.
1. Aparat za brijanje
nije pravilno postavljen
u jedinicu Clean&
Charge.
2. Patrona za čišćenje ne
sadrži dovoljno tekućine za čišćenje (indikator bljeska crvenim
svjetlom).
Povećana
potrošnja teku-
Odvod jedinice Clean&
Charge je začepljen.
ćine za čišćenje.
1. Kada glavu aparata za brijanje čistite
vodom, upotrebljavajte samo vruću
vodu i povremeno tekući sapun (bez
abrazivnih tvari). Izvadite kasetu s mrežicom i blokom noža kako bi se osušila.
2. Patronu za čišćenje zamijenite najmanje svakih 8 tjedana.
1. Zamijenite kasetu s mrežicom i blokom
noža.
2. Ako se aparat za brijanje redovito čisti
vodom, nanesite kap laganog strojnog
ulja na vrh mrežice jednom tjedno radi
podmazivanja.
1. Zamijenite kasetu s mrežicom i blokom
noža.
2. Kasetu s mrežicom i blokom noža
namočite u vrućoj vodi s malo tekućeg
deterdženta. Nakon toga temeljito
isperite i tapkanjem odstranite vodu.
Kada se osuši, na mrežicu nanesite
kap blagog strojnog ulja.
1. Očistite odmah nakon brijanja kako
biste ostavili dovoljno vremena za
sušenje.
2. Drvenom čačkalicom očistite odvod.
1. Aparat za brijanje umetnite u jedinicu
za čišćenje i punjenje te ga gurnite na
stražnju stranu jedinice (kontakti na
aparatu za brijanje trebaju se poravnati
s kontaktima u jedinici).
2. Umetnite novu patronu za čišćenje.
Ponovno pritisnite gumb za pokretanje.
– Drvenom čačkalicom očistite odvod.
– Redovito brišite kadicu.
62
91092674_Series_5-2cc_wd_CEEMEA_S6-132.indd 6291092674_Series_5-2cc_wd_CEEMEA_S6-132.indd 62 23.11.16 15:4123.11.16 15:41
Page 63

Jamstvo
Za ovaj proizvod jamčimo jamstveno razdoblje od 2 godine od dana kupnje. U okviru tog
razdoblja besplatno ćemo otkloniti bilo kakvu neispravnost uređaja do koje je došlo
zbog zamora materijala ili pogrešaka u radu ili popravkom ili zamjenom uređaja ovisno o
procjeni.
Ovo jamstvo vrijedi za svaku zemlju u kojoj ovaj uređaj distribuira Braun ili njegov
ovlašteni distributer.
Ovo jamstvo ne pokriva: štetu nastalu zbog nepravilne upotrebe, normalno trošenje
materijala (npr. u slučaju trošenja mrežice na uređaju za brijanje), kao i oštećenja koja
imaju neosporan utjecaj na vrijednost ili rad uređaja. Jamstvo prestaje vrijediti ako
popravke vrše neovlaštene osobe te ako se ne koriste originalni Braunovi dijelovi.
Ako tijekom jamstvenog razdoblja zatrebate servis, donesite ili pošaljite cijeli uređaj
zajedno s računom na adresu Braunovog ovlaštenog servisnog centra.
Napomena : Ukoliko niste u mogućnosti riješiti Vaš problem putem priložene servisne
mreže ili na prodajnom mjestu molimo Vas da nazovete broj 01 66 26 555 ili 091 66 01
777 kako bi dobili daljnje upute.
SINGULI D.O.O., www.singuli.hr
10000, Zagreb, Primorska 3,
10000, Zagreb, CMP, Savica Šanci 145, ) 01 24 04 451
10000, Zagreb, Jospia Strganca 12, ) 01 37 79 029
JEŽIĆ COLOR SERVIS, 43000, Bjelovar, Petra Zrinskog 13, ) 043 243 500
ELMIN, 48350, Đurđevac, R. Boškovića 20, ) 048 813 365
MAGREL vl.Grković Marko, 51211, Rijeka / Matulji, Frana Supila 11, ) 095 911 0009
RTV SERVIS KALAICA, 34310, Pleternica, A.M.Relkovića 6, ) 034 252 000
SORIĆ ELEKTRONIKA, 44000, Sisak, A.Starčevića 35, ) 044 549 117
MERC&DUJMOVIĆ, 21000, Split, Alojzija Stepinca 6, ) 021 537 780
ELEKTRO OBRT MARKOVIĆ, 42000, Varaždin, K.Filića 9, ) 042 210 588
ALTA , 23000, Zadar, Vukovarska 3c, ) 023 327 666
01 37 72 644
)
63
91092674_Series_5-2cc_wd_CEEMEA_S6-132.indd 6391092674_Series_5-2cc_wd_CEEMEA_S6-132.indd 63 23.11.16 15:4123.11.16 15:41
Page 64

Slovenski
Naši izdelki so zasnovani tako, da ustrezajo najvišjim standardom kakovosti,
funkcionalnosti in oblike. Hvala za vaše zaupanje kakovosti Braun. Želimo vam obilo
užitkov z vašim novim izdelkom Braun.
Preberite celotna navodila za uporabo, saj vsebujejo pomembne varnostne
informacije. Shranite jih za poznejšo uporabo.
Opozorilo
Naprava ima poseben kabel z vgrajenim tokokrogom z varnostno
malo napetostjo SELV (»Safety Extra Low Voltage«). Ne posegajte
v sistem in ne menjavajte delov sistema, saj obstaja nevarnost električnega udara. Uporabljajte samo poseben kabel, ki je priložen
napravi.
Če je naprava označena s 492, lahko uporabljate katero
koli napajanje Braun, ki je označeno s 492-XXXX.
Napravo je mogoče čistiti pod tekočo vodo in uporabljati v
kadi ali pod tušem. Zaradi varnosti lahko napravo upo-
rabljate samo brez kabla.
Pred čiščenjem z vodo brivnik odklopite iz napajanja.
Brivnika ne uporabljajte, če sta kabel ali mrežica poškodovana.
Otroci, stari 8 let in več, ter osebe z zmanjšanimi telesnimi, zaznav-
nimi ali duševnimi sposobnostmi ali s pomanjkanjem izkušenj in
znanja lahko napravo uporabljajo samo pod nadzorom, razen če so
bile poučene o varni uporabi naprave in razumejo nevarnosti,
povezane z njeno uporabo. Otroci se ne smejo igrati z napravo.
Otroci naprave ne smejo čistiti in vzdrževati, razen če so starejši od
8 let in to izvajajo pod nadzorom.
Čistilna in polnilna postaja Clean&Charge
Da bi preprečili iztekanje čistilne tekočine, postavite postajo Clean&Charge na ravno površino.Ko vstavite čistilno kartušo, postaje
ne nagibajte, premikajte ali prenašajte na način, ki bi vodil v uhajanje čistilne tekočine iz kartuše. Postaje ne postavite v kopalniško
omarico, prav tako je ne postavite na polirano ali lakirano površino.
64
91092674_Series_5-2cc_wd_CEEMEA_S6-132.indd 6491092674_Series_5-2cc_wd_CEEMEA_S6-132.indd 64 23.11.16 15:4123.11.16 15:41
Page 65

Čistilna kartuša vsebuje zelo vnetljivo tekočino, ki je ne smete
shranjevati v bližini vnetljivih virov. Ne izpostavljajte neposredni
sončni svetlobi in cigaretnemu dimu, prav tako ne hranite nad radiatorjem.
Ne polnite kartuše in uporabljajte samo originalne nadomestne kartuše znamke Braun.
Brivnik
1 Kaseta z mrežico in rezalnikom
2 Gumb za sprostitev kasete
3 Stikalo za zaklepanje glave brivnika pod kotom
4 Stikalo za vklop/izklop
5 Prikazovalnik brivnika
5a Simbol zaklepanja (med prenašanjem)
5b Prikaz polnjenja
5c Indikator čiščenja
5d Simbol baterije
6 Prirezovalnik daljših dlak
7 Kontakti za povezavo brivnika in postaje
8 Gumb za sprostitev prirezovalnika daljših dlak
9 Vtičnica brivnika
10 Posebni kabel (oblika je lahko drugačna)
11 Zaščitni nastavek*
12 Potovalna torbica*
* ni na voljo pri vseh modelih
Prva uporaba in polnjenje
Brivnik priključite v električno omrežje s posebnim napajalnim kablom (10) v vtičnico na
brivniku (9) ali prek čistilne in polnilne postaje Clean&Charge (glejte poglavje „Čistilna in
polnilna postaja Clean&Charge“).
Osnovni podatki o delovanju
• Povsem napolnjeno napravo lahko uporabljate do 50 minut, ne da bi jo morali
priključiti na električno omrežje. Čas britja je odvisen od vzorca rasti brade in
temperature okolice.
• Priporočena temperatura prostora, v katerem poteka polnjenje, naj bo med 5 °C do
35 °C. Pri višjih ali nižjih temperaturah se baterija morda ne bo ustrezno napolnila.
Priporočena temperatura prostora za hranjenje brivnika in britje je od 15 °C do 35 °C.
• Naprave ne izpostavljajte temperaturam nad 50 °C za daljši čas.
• Ko je brivnik priklopljen na električno vtičnico, lahko traja nekaj minut preden
prikazovalnik zasveti.
65
91092674_Series_5-2cc_wd_CEEMEA_S6-132.indd 6591092674_Series_5-2cc_wd_CEEMEA_S6-132.indd 65 23.11.16 15:4123.11.16 15:41
Page 66

Polnjenje / prazna baterija
Status polnjenja je prikazan na prikazovalniku brivnika (5).
• Med polnjenjem prikaz polnjenja (5b) utripa.
• Ko je brivnik povsem napolnjen in priključen na električno vtičnico, za nekaj sekund
zasvetijo vsi trije segmenti polnjenja. Nato se prikazovalnik izklopi.
• Simbol baterije (5d) zasveti rdeče, ko je baterija prazna. Britje lahko dokončate. Ko
brivnik izklopite vas pisk opozori, da je baterija prazna.
Uporaba brivnika
Pritisnite na gumb za vklop/izklop (4) za vklop brivnika.
Nasveti za popolno suho britje
Za najboljše rezultate britja vam Braun priporoča, da sledite naslednjim 3 preprostim
korakom:
1. Vedno se brijte, preden si umijete obraz.
2. Brivnik morate vedno držati pravokotno (pod kotom 90°) na kožo.
3. Kožo napnite in z brivnikom drsite v nasprotni smeri rasti dlak.
Stikalo za zaklepanje glave pod kotom (zaklepanje glave)
• Za britje težko dosegljivih predelov (npr. pod nosom) preklopite stikalo za zaklepanje
glave pod kotom (3), da zaklenete glavo brivnika. Glavo brivnika je mogoče zakleniti v
pet različnih položajev.
• Da spremenite položaj, s palcem in kazalcem premaknite glavo brivnika nazaj ali
naprej. Glava se bo samodejno zaskočila v naslednji položaj.
• Za samodejno čiščenje na postaji Clean&Charge je treba glavo sprostiti.
Prirezovalnik daljših dlak
Za striženje zalizkov, brkov ali brade pritisnite gumb za sprostitev (8) in potisnite
prirezovalnik za daljše dlake (6) navzgor.
Gumb za zaklepanje med prenosom
Ko je brivnik zaklenjen, da se prepreči nenameren vklop (npr. med prenašanjem v
potovalki), na prikazovalniku sveti simbol zaklepanja (5a).
• Omogočanje: S pritiskom na gumb za vklop/izklop (4) za 3 sekunde se brivnik
zaklene. Zaklepanje nakaže pisk in simbol zaklepanja na prikazovalniku. Nato
prikazovalnik ugasne.
• Onemogočanje: S ponovnim pritiskom na gumb za vklop/izklop za 3 sekunde se
brivnik odklene.
Ročno čiščenje brivnika
Čiščenje pod tekočo vodo
• Brivnik vklopite (brez priklopljenega kabla) in sperite glavo brivnika pod toplo
tekočo vodo, da odstranite vse dlake. Uporabite lahko tudi tekoče milo brez
66
91092674_Series_5-2cc_wd_CEEMEA_S6-132.indd 6691092674_Series_5-2cc_wd_CEEMEA_S6-132.indd 66 23.11.16 15:4123.11.16 15:41
Page 67

agresivnih sestavin. Peno sperite in pustite brivnik delovati še nekaj sekund.
• Nato brivnik izključite, pritisnite na gumb za sprostitev kasete (2) in odstranite kaseto
z mrežico in rezalnikom (kaseto Foil & Cutter) (1) ter pustite, da se posuši.
• Če brivnik redno čistite pod vodo, morate enkrat tedensko nanesti kapljico lahkega
strojnega olja na vrh kasete z mrežico in rezalnikom.
Brivnik očistite po vsaki uporabi pene.
Čiščenje s ščetko
Brivnik izklopite. Odstranite kaseto z mrežico in rezalnikom (1) ter jo izpraznite tako, da z
njo nežno udarjate ob ravno površino. S krtačko očistite notranjost gibljive glave.
Vendar krtačke ne uporabljajte za čiščenje kasete, saj jo lahko poškodujete.
Čistilna in polnilna postaja Clean&Charge (C&C)
Na čistilni in polnilni postaji Clean&Charge poteka čiščenje, polnjenje, podmazovanje,
razkuževanje, sušenje in shranjevanje brivnika Braun.
13 Vtičnica postaje
14 Gumb za dvig pri menjavi kartuše
15 Kontakti za povezavo postaje in brivnika
16 Prikazovalnik postaje Clean&Charge
16a Indikator nivoja
16b Lučka statusa
16c Indikatorji programa čiščenja
17 Gumb za zagon
18 Čistilna kartuša
Namestitev C&C
• S prikazovalnika C&C odstranite zaščitno folijo.
• Pritisnite gumb za dvig (14) na zadnji strani C&C, da dvignete ohišje.
• Držite čistilno kartušo (18) na ravni, stabilni podlagi (npr. mizi).
• Previdno privzdignite pokrov kartuše.
• Kartušo z zadnje strani potisnite na dno postaje, dokler se ne zaskoči na mesto.
• Počasi zaprite ohišje in ga potisnite navzdol, dokler se ne zaklene.
• S posebno priključno vrvico (10) vključite vtičnico čistilne naprave (13) v električno
omrežje.
Uporaba C&C
Pomembno: Brivnik mora biti suh, na njem pa ne smejo biti ostanki pene ali mila.
Vstavite brivnik od zgoraj navzdol v postajo C&C, s prednjo stranjo naprej in tako, da
glava brivnika ni zaklenjena pod kotom (3).
Kontakti (7) na zadnji strani brivnika morajo biti poravnani s kontakti (15) v postaji C&C.
Potisnite brivnik v ustrezni položaj. Pisk potrdi, da je brivnik pravilno nameščen v postajo
C&C.
67
91092674_Series_5-2cc_wd_CEEMEA_S6-132.indd 6791092674_Series_5-2cc_wd_CEEMEA_S6-132.indd 67 23.11.16 15:4123.11.16 15:41
Page 68

Postaja C&C analizira status čistosti. Status je prikazan z indikatorji programa čiščenja
(16c) na prikazovalniku C&C (16).
Polnjenje brivnika v postaji C&C
Polnjenje se samodejno začne, ko je brivnik ustrezno nameščen.
Čiščenje brivnika v postaji C&C
Ko na prikazovalniku brivnika zasveti indikator čiščenja (5c), vstavite brivnik v postajo
C&C, kot je opisano zgoraj.
Programi čiščenja
kratko varčno čiščenje
običajno čiščenje
visoko intenzivno čiščenje
Zagon samodejnega čiščenja
Postopek čiščenja se začne s pritiskom na gumb za zagon (17). Če lučka statusa (16b)
ne zasveti (C&C po 10 minutah preklopi v način »v pripravljenosti« (stand-by), dvakrat
pritisnite gumb za zagon. Sicer se čiščenje ne bo začelo. Za najboljše rezultate britja
priporočamo, da čiščenje izvedete po vsaki uporabi.
Vsak program čiščenja je sestavljen iz več ciklov, med katerimi je glava brivnika
očiščena s čistilno tekočino. Glede na model postaje Clean&Charge in/ali izbrani
program, lahko čiščenje poteka do 3 minute. Medtem utripa lučka statusa. Pustite
brivnik v postaji, da se posuši. Da izhlapi še preostala vlaga, traja še nekaj ur, odvisno od
klimatskih razmer.
Po zaključenem postopku čiščenja in polnjenja se vsi indikatorji izklopijo.
Odstranitev brivnika iz postaje C&C
Postajo C&C držite z eno roko, brivnik pa rahlo nagnite naprej, da ga vzamete ven.
Čiščenje kartuše / Zamenjava
Ko indikator nivoja (16a) sveti rdeče, preostala tekočina v kartuši zadostuje še za
približno 3 cikle. Ko indikator nivoja utripa rdeče, je treba kartušo zamenjati – ob
vsakodnevni uporabi približno na 4 tedne.
Potem, ko pritisnete na gumb za dvig (14), da odprete ohišje, počakajte nekaj sekund
preden odstranite izrabljeno kartušo, da s tem preprečite kapljanje. Odprtine izrabljene
kartuše pred odlaganjem obvezno prekrijte s pokrovom nove kartuše, saj izrabljena
kartuša vsebuje onesnaženo čistilno tekočino.
Higienska čistilna kartuša vsebuje etanol ali izopropanol (glejte tehnične zahteve na
kartuši), ki po odprtju kartuše začne naravno izhlapevati. Če kartuše ne uporabljate
68
91092674_Series_5-2cc_wd_CEEMEA_S6-132.indd 6891092674_Series_5-2cc_wd_CEEMEA_S6-132.indd 68 23.11.16 15:4123.11.16 15:41
Page 69

vsak dan, jo je treba zamenjati po približno 8 tednih, da se zagotovi optimalno
razkuževanje. Čistilna kartuša vsebuje mazivo za sistem za britje, ki lahko ostane na
zunanjem okvirju mrežice in v čistilni komori C&C. Te ostanke lahko enostavno pobrišete
z vlažno krpo.
Dodatki
Braun priporoča, da kaseto z mrežico in rezalnikom zamenjate na 18 mesecev, da s tem
zagotovite maksimalno zmogljivost vašega brivnika.
Na voljo pri vašem trgovcu ali v servisnih centrih Braun:
• Kaseta z mrežico in rezalnikom (kaseta Foil & Cutter) 52S/52B
• Čistilna kartuša: CCR
• Čistilno razpršilo za brivnike Braun
Okoljsko opozorilo
Izdelek vsebuje baterije in/ali električne odpadke, ki jih je mogoče reciklirati.
Ne zavrzite ga med običajne gospodinjske odpadke, temveč ga za namen
recikliranja posredujte v zbirni center za električne in elektronske odpadke v vaši
državi.
Čistilno kartušo lahko zavržete med običajne gospodinjske odpadke.
Pridržujemo si pravico do sprememb brez predhodnega obvestila.
Za tehnične zahteve za napajanje glejte oznako na posebnem kablu.
Odpravljanje težav
Težava Možni vzrok Odprava težave
SHAVER
Brivnik se ne
napolni do konca
in še naprej
utripa.
Polnjenje se ne
začne, če je
priklopljeno na
vtičnico za napajanje.
Temperatura prostora je
zunaj dopustnega temperaturnega razpona.
1. Včasih se polnjenje
začne z zamikom (npr.
po daljšem obdobju
shranjevanja).
2. Temperatura prostora
je zunaj dopustnega
temperaturnega razpona.
3. Posebni napajalni kabel
ni pravilno priključen.
Priporočena temperatura ob polnjenju je
5 °C do 35 °C.
1. Počakajte nekaj minut, da se polnjenje
samodejno začne.
2. Priporočena temperatura ob polnjenju
je 5 °C do 35 °C.
3. Posebni napajalni kabel se mora
zaskočiti.
69
91092674_Series_5-2cc_wd_CEEMEA_S6-132.indd 6991092674_Series_5-2cc_wd_CEEMEA_S6-132.indd 69 23.11.16 15:4123.11.16 15:41
Page 70

Neprijetne
vonjave iz glave
brivnika.
1. Glavo brivnika čistite z
vodo.
2. Čistilno kartušo uporabljate že več kot
8 tednov.
Zmogljivost akumulatorja se je
bistveno zmanjšala
1. Mrežica in rezalnik sta
obrabljena, zato pri
vsakem britju porabita
več energije.
2. Glavo brivnika redno
čistite z vodo, vendar
nanjo ne nanašajte
olja.
Zmogljivost brivnika se je
bistveno zmanjšala.
Glava brivnika je
vlažna.
1. Mrežica in rezalnik sta
izrabljena.
2. Sistem za britje je
zamašen.
1. Čas sušenja po samodejnem čiščenju je bil
prekratek.
2. Odprtina za izpust
Postaje Clean&Charge
je zamašena.
CLEAN&CHARGE STATION
Ob pritisku
gumba za vklop
se čiščenje ne
prične.
1. Brivnik ni pravilno
nameščen na postajo
Clean&Charge.
2. V čistilni kartuši ni
dovolj čistilne tekočine
(prikazovalnik je
osvetljen rdeče).
Povečana
poraba čistilne
tekočine.
Odprtina za izpust na
postaji Clean&Charge je
zamašena.
1. Pri čiščenju glave brivnika z vodo uporabljajte samo toplo vodo in občasno
malce tekočega mila (brez agresivnih
sestavin). Čistilno kartušo menjajte
vsaj na 8 tednov.
2. Odstranite kaseto z mrežico in rezalnikom ter pustite, da se posuši.
1. Obnovite kaseto z mrežico in rezalnikom.
2. Če brivnik redno čistite z vodo, enkrat
tedensko na vrh mrežice kanite
kapljico lahkega strojnega olja, da jo
naoljite.
1. Obnovite kaseto z mrežico in rezalnikom.
2. Kaseto z mrežico in rezalnikom namočite v toplo vodo s tekočim čistilom za
posodo. Kaseto nato dobro sperite in
jo povsem izpraznite s trkanjem po
površini. Ko se posuši, na vrh mrežice
kanite kapljico lahkega strojnega olja.
1. Brivnik čistite takoj po britju, da zagotovite dovolj časa za sušenje.
2. Odprtino za izpust očistite z zobotrebcem.
1. Brivnik vstavite v postajo Clean&Charge in ga potisnite nazaj (kontakti na brivniku morajo biti poravnani s
kontakti na postaji).
2. Vstavite novo čistilno kartušo. Znova
pritisnite gumb za vklop.
– Odprtino za izpust očistite z zobotreb-
cem.
– Redno brišite posodo.
70
91092674_Series_5-2cc_wd_CEEMEA_S6-132.indd 7091092674_Series_5-2cc_wd_CEEMEA_S6-132.indd 70 23.11.16 15:4123.11.16 15:41
Page 71

Garancijski list
Za izdelek velja dveletna garancija, ki začne veljati z datumom izročitve blaga.
Proizvajalec jamči, da bo izdelek deloval v garancijskem roku ob pravilni uporabi v
skladu z njegovim namenom in priloženimi navodili. V garancijski dobi bomo brezplačno
odpravili vse okvare izdelka, ki so posledica napak v materialu ali izdelavi, tako da vam
bomo izdelek po naši presoji popravili ali v celoti zamenjali.
Če pooblaščeni servis vašega izdelka ne popravi v 45 dneh, imate pravico zahtevati nov
izdelek. Za sprejem v reklamacijo se šteje dan, ko je izdelek sprejet v pooblaščeni
servis, pri prodajalcu(distributerju) ali v trgovino, kjer ste izdelek kupili.
Čas zagotavljanja servisa, vzdrževanja, nadomestnih delov in priklopnih aparatov je 3
leta po preteku garancijskega roka.
Popravila na domu zaradi zahtevnosti in neprenosljivosti sodobne servisne opreme in
razpoložljivosti rezervnih delov niso mogoča.
Garancija velja na območju Republike Slovenije, pa tudi v vseh državah, kjer izdelek
dobavlja podjetje Braun ali njegov pooblaščeni distributer.
Garancija ne izključuje pravic potrošnika, ki izhajajo iz odgovornosti prodajalca za
napake na blagu.
Garancija ne velja:
– Za okvare, ki so posledica nepravilne uporabe, normalne obrabe ali rabe oziroma
napake, ki imajo zanemarljiv učinek na vrednost in delovanje izdelka.
– Ob vsakem posegu nepooblaščene osebe ali kakršnekoli druge predelave izdelka in
če pri popravilu niso uporabljeni originalni Braunovi rezervni deli.
Za popravilo v garancijski dobi celotno napravo skupaj z računom in/ali izpolnjenim
garancijskim listom odnesite ali pošljite na pooblaščeni servisni center Braun:
JEŽEK SERVIS D.O.O. , Cesta 24. Junija 2, 1231 Ljubljana
Tel. št.: +386 1 561 66 30
E-mail: jezektrg.servis@siol.net
Potrošnik lahko zahtevo za popravilo v garancijski dobi za celotno napravo, skupaj z
računom in/ali izpolnjenim garancijskim listom, prav tako uveljavlja tudi pri prodajalcu ali
pri proizvajalcu (distributerju).
Za dodatne informacije smo vam na voljo na brezplačni telefonski številki 080 2822.
Distributer: Orbico, d. o. o., Verovškova ul. 72, 1000 Ljubljana
Proizvajalec: Braun GmbH, Frankfurter Str. 145, 61476 Kronberg, Nemčija
71
91092674_Series_5-2cc_wd_CEEMEA_S6-132.indd 7191092674_Series_5-2cc_wd_CEEMEA_S6-132.indd 71 23.11.16 15:4123.11.16 15:41
Page 72

Türkçe
Ürünlerimiz en yüksek kalite standartlarını, işlevselliği ve tasarımı karşılamak için
üretilmiştir. Braun kalitesine güvendiğiniz için teşekkür ederiz. Yeni Braun Tıraş
Makinenizi severek kullanacağınızı umuyoruz.
Lütfen kullanma talimatlarını eksiksiz bir biçimde okuyun. Kullanma talimatları,
güvenlikle ilgili bilgiler içermektedir. İleride ihtiyaç duyduğunuzda okumak üzere
saklayın.
Uyarı
Cihazınızın ekstra düşük voltaj için güvenlik sağlayan adaptör
içeren özel kablo seti vardır. Lütfen değiştirmeyiniz herhangi bir
parçası ile oynamayınız, aksi takdirde elektrik çarpabilir. Sadece
cihaz ile birlikte verilen özel kablo setini kullanın.
Eğer cihazınızda 492 işareti varsa, bu cihazı 492-XXXX
kodlu Braun şarj cihazıyla kullanabilirsiniz.
Cihaz, akan su altında temizlemeye uygundur. Güvenlik
sebebiyle yalnızca kablosuz olarak çalıştırılabilir.
Tıraş makinesini suda kullanmadan önce fişini çekin.
Eleği veya kablosu hasar görmüş tıraş makinesini kullanmayınız.
Bu aygıt, 8 yaş ve üzeri çocuklar tarafından kullanılabilir. Fiziksel,
duyusal ve zihinsel kapasitesi kısıtlı veya deneyimi ve bilgisi
olmayan kişiler; gözetim altında ya da cihazın güvenli kullanımı
hakkında bilgilendirildikten ve yanlış kullanımı durumunda oluşabilecek zararları kavradıktan sonra cihazı kullanabilirler. Çocuklar
cihazla oynamamalıdır. Temizleme ve bakım işlemleri, gözetim
altında ve 8 yaşından büyük olmayan çocuklar tarafından yapılmamalıdır.
Temizleme ve Şarj İstasyonu
Temizleme sıvısının dökülmesini önlemek için, Temizleme ve Şarj
ünitesini düz bir yüzeye koyun. Kartuş yüklendiğinde eğmeyin,
aniden hareket ettirmeyin ya da temizleme sıvısı kartuştan akabileceğinden ünitenin yerini değiştirmeyin. Üniteyi aynalı dolapların
içine ya da cilalı veya vernikli alanlara koymayınız.
72
91092674_Series_5-2cc_wd_CEEMEA_S6-132.indd 7291092674_Series_5-2cc_wd_CEEMEA_S6-132.indd 72 23.11.16 15:4123.11.16 15:41
Page 73

Temizleme kartuşu yanıcı bir sıvı içermektedir. Yanıcılardan uzak
tutun. Direkt güneş ışığına ya da sigara dumanına maruz bırakmayın. Bir ısıtıcının üstüne koymayın.
Kartuşu tekrar doldurmayın ve sadece orijinal Braun yedek
kartuşlarını kullanın.
Tıraş Makinesi
1 Elek ve Bıçak kartuşu
2 Kaset çıkarma butonu
3 Çok Başlıklı Kilit Düğmesi
4 Açma/kapama düğmesi
5 Tıraş Makinesi ekranı
5a Kilit sembolü (seyahat kilidi)
5b Şarj bölmeleri
5c Temizleme göstergesi
5d Pil sembolü
6 Uzun tüy düzeltici
7 Tıraş Makinesi - Ünite bağlantısı
8 Uzun tüy düzeltici çıkarma butonu
9 İstasyon güç soketi
10 Özel kablo seti (tasarım değişkenlik gösterebilir)
11 Koruma başlığı*
12 Seyahat çantası*
*her modelde mevcut değildir
İlk kullanım ve Şarj
Özel kablo setini (10) tıraş makinesine bağlayıp kabloyu güç kaynağına (9) ya da
Temizleme ve Şarj İstasyonuna (“Temizleme ve Şarj İstasyonu” bölümüne bakın) takarak
tıraş makinesini çalıştırın.
Temel çalıştırma bilgileri
• Tam olarak şarj edilmiş cihaz – sakalınızın uzama süresine ve çevre ısısına bağlı
olarak – 50 dakikaya kadar kablosuz kullanım sağlar.
• Şarj için ortam sıcaklığının 5 °C ile 35 °C arasında olması tavsiye edilir. Aşırı derecede
düşük ya da yüksek sıcaklıklarda pil tam olarak veya hiç şarj olmayabilir. Tıraş için
ortam sıcaklığının 15 °C ile 35 °C arasında olması tavsiye edilir.
• Makineyi uzun süre 50 °C’den yüksek sıcaklıklara maruz bırakmayın.
• Tıraş makinesi bir elektrik çıkışına bağlandığında, ekran ışığının açılması birkaç dakika
alabilir.
Şarj etme / düşük şarj
Tıraş makinesi ekranı (5), pilin şarj durumunu gösterir.
• Şarj süresince şarj bölmeleri (5b) yanıp söner.
73
91092674_Series_5-2cc_wd_CEEMEA_S6-132.indd 7391092674_Series_5-2cc_wd_CEEMEA_S6-132.indd 73 23.11.16 15:4123.11.16 15:41
Page 74

• Tıraş makineniz tamamen şarj olduğunda ve bir elektrik girişine bağlandığında, 3 şarj
bölmesi de birkaç dakikalığına yanar. Sonra ekran kapanır.
• Şarj ışığı (5d) pil azaldığında kırmızı yanmaya başlar. Tıraşınızı bitirebilmeniz gerekir.
Tıraş makinesini kapattığınızda bip sesi şarj seviyesinin düşük olduğunu size
hatırlatacaktır.
Tıraş Makinesinin Kullanımı
Tıraşı başlatmak için açma/kapama düğmesine basınız (4).
Mükemmel tıraş için ipuçları:
En iyi sonucu almak için Braun size 3 basit adımı uygulamanızı öneriyor:
1. Yüzünüzü her zaman yıkamadan önce tıraş edin.
2. Tıraş makinesini her zaman, cildinize, dik açı ile tutun (90°).
3. Cildinizi gerin ve sakalınızın çıkış yönünün tersine tıraş edin.
Çok Başlıklı Kilit düğmesi (başlık kilidi)
• Ulaşılması zor bölgeleri tıraş etmek için (örn. burnun altı) tıraş makinesi başlığını
kilitleyin. Başlığı kilitlemek için Çok başlıklı kilit düğmesini (3) aşağıya doğru kaydırın.
Tıraş başlığı beş pozisyonda kilitlenebilir.
• Pozisyonu değiştirmek için baş parmağınız ve işaret parmağınız ile tıraş başlığını öne
arkaya doğru hareket ettirin. Böylelikle otomatik olarak bir sonraki pozisyona
geçecektir.
• Temizleme ve Şarj ünitesinde otomatik temizleme için başlık kilidinin çıkarılması
gerekir.
Uzun tüy düzeltici
Favori, bıyık veya sakal düzeltmek için çıkartma düğmesine (8) basın ve uzun tüy
düzelticiyi (6) yukarı doğru sürüp aktif hale getirin.
Seyahat kilidi
Kilit Sembolü (5a) motorun istenmeyen bir şekilde çalışmaya başlamasını önlemek için
tıraş makinesi kilitlendiğinde yanar. (Örn: Bavul içinde muhafaza ederken).
• Çalıştırma: Açma/kapama düğmesine (4) 3 saniye süreyle bastığınızda tıraş makinesi
kilitlenir. Bu işlem bir bip sesi ve bilgi ekranındaki kilit sembolü ile teyit edilir. Daha
sonra ekran kapanır.
• Durdurma: Açma/kapama düğmesine 3 saniye süreyle bastığınızda, tıraş makinesinin
kilidi yeniden açılır.
Tıraş makinesinin el ile temizliği
Akan su altında temizleme
• Tıraş makinesini (kablosuz olarak) çalıştırın. Tıraş başlığını temizlenene kadar
sıcak su altında tutun. Ayrıca, nazikçe aşındırıcı madde içermeyen sabunla da
temizleyebilirsiniz. Köpüğü durulayın ve tıraş makinesini çalışır durumda birkaç dakika
daha suyun altında tutun.
74
91092674_Series_5-2cc_wd_CEEMEA_S6-132.indd 7491092674_Series_5-2cc_wd_CEEMEA_S6-132.indd 74 23.11.16 15:4123.11.16 15:41
Page 75

• Daha sonra tıraş makinesini kapatın. Elek ve Bıçak kartuşunu (1) çıkartmak için
çıkarma butonuna (2) basın. Tıraş makinesi tamamen kurumalıdır.
• Eğer tıraş makinesini düzenli olarak su altında temizliyorsanız, makine yağını haftada
bir kez Elek ve Bıçak kartuşunun üzerine damlatabilirsiniz.
Her köpük kullandıktan sonra tıraş makinesi temizlenmelidir.
Fırça ile temizleme
Tıraş makinesini kapatın. Elek ve Bıçak kartuşunu (1) çıkartın ve düz bir yere yavaşca
vurun. Fırçayı kullanarak döner tıraş bıçağının iç kısmını temizleyin. Zarar meydana
gelebileceğinden, kaseti kesinlikle fırça ile temizlemeyin!
Clean&Charge (Temizleme ve Şarj)
Temizleme ve Şarj ünitesi, Braun tıraş makinenizi temizlemek, şarj etmek, yağlamak,
dezenfekte etmek, kurutmak ve saklamak üzere tasarlanmıştır.
13 İstasyon güç soketi
14 Kartuş değişimi için hazne kaldırma düğmesi
15 Makine bağlantı temas noktası ünitesi
16 Temizleme ve Şarj İstasyonu
16a Seviye göstergesi
16b Durum ışığı
16c Temizleme programı göstergeleri
17 Başlatma düğmesi
18 Temizleme kartuşu
Temizleme ve Şarj ünitesini kurmak
• Koruma filmini Temizleme ve Şarj istasyon ekranından çıkartın.
• Temizleme ve Şarj İstasyonunun arka kısmındaki kartuş değişimi için hazne
kaldırma (14) düğmesine basın.
• Temizleme kartuşunu (18) düz ve sabit bir yüzey üzerine koyun (örn. Masa).
• Kartuşun kapağını dikkatlice açın.
• Kartuşu, arka kısmından yuvasına oturana kadar sürün.
• Üniteyi kilit sesini duyana kadar yavaşca aşağıya doğru iterek hazneyi kapatın.
• Özel kablo setini (10) kullanarak istasyon güç soketini (13) bir elektrik girişine
bağlayın
Temizleme ve Şarj ünitesinin kullanılması
Önemli: Tıraş makinesi kuru, köpükten ya da her türlü sabun kalıntısından
temizlenmiş olmalıdır! Tıraş makinesini temizleme ünitesine tıraş başlığı
aşağıda, ön yüzü ve çok başlıklı kilit düğmesi (3) dönük olacak şekilde yerleştirin.
Tıraş makinesinin arka tarafındaki noktalarla (7) temizleme ünitesindeki noktalar (15)
birbirleriyle temas etmelidir. Tıraş makinesinin üniteye düzgünce oturduğu bir bip sesi
ile anlaşılır.
75
91092674_Series_5-2cc_wd_CEEMEA_S6-132.indd 7591092674_Series_5-2cc_wd_CEEMEA_S6-132.indd 75 23.11.16 15:4123.11.16 15:41
Page 76

Temizleme ve Şarj ünitesi hijyen durumunu analiz eder. Hijyen durumu, Temizleme ve
Şarj ünitesindeki (16) temizleme programı göstergelerinde (16c) gösterilir.
Temizleme ve Şarj ünitesinin şarj edilmesi
Tıraş makinesi yerleştirildiğinde şarj etme otomatik olarak başlayacaktır.
Tıraş Makinesininin Temizleme ve Şarj İstasyonunda temizlenmesi
Tıraş makinesindeki temizleme göstergesi (5c) yandığında, tıraş makinesini temizleme
ve şarj istasyonuna aşağıdaki gibi yerleştirin.
Temizleme programları
Kısa ekonomik temizlik
Normal temizlik
Yüksek yoğun temizlik
Otomatik Temizliği Başlatma
Başlatma düğmesine basarak temizleme işlemini başlatın (17). Eğer durum ışığı (16b)
yanmıyorsa (Temizleme ve Şarj istasyonu 10 dakika sonra bekleme moduna geçer),
başlama düğmesine iki kere basın. Aksi takdirde temizlik başlamayacaktır. En iyi tıraş
sonuçlarını almak için her tıraş sonrasında makinenizi temizlemenizi tavsiye
ederiz.
Temizleme programlarının her biri, temizleme sıvısının tıraş başlığından fışkırtıldığı birkaç
döngüden oluşur. Temizleme ve Şarj istasyon modelinize ve/veya seçilen programa
göre, temizlik 3 dakikaya kadar sürebilir. Bu süre boyunca durum ışığı yanıp söner. Tıraş
makinesini kuruması için ünitede bırakın. İklim koşullarına bağlı olarak kalan nemin
buharlaşması birkaç saat olabilir. Bunun ardından tıraş makinesi kullanıma hazırdır.
Temizleme ve şarj işlemi tamamlandıktan sonra bütün göstergeler kapanır.
Tıraş makinesinin Temizleme ve Şarj İstasyonundan çıkarılması
Temizleme ve Şarj istasyonunu bir elinizle tutun ve çıkarmak için tıraş makinesini hafifçe
öne doğru eğin.
Kartuşu temizleme / Değiştirme
Seviye göstergesi (16a) kalıcı olarak kırmızı yandığında, kartuş içinde kalan sıvı 3
kullanıma daha izin verecek kadar yeterlidir. Seviye göstergesi kırmızı ile yanıp
söndüğünde, kartuşun değiştirilmesi gerekir – yaklaşık her 4 haftada bir (günlük olarak
kullanıldığında).
Kaldırma düğmesine (14) basarak kartuş haznesini açtıktan sonra kartuşu çıkarmadan
önce birkaç saniye bekleyerek olası damlaların etrafa akmasını engelleyin. Çeşitli mikrop
76
91092674_Series_5-2cc_wd_CEEMEA_S6-132.indd 7691092674_Series_5-2cc_wd_CEEMEA_S6-132.indd 76 23.11.16 15:4123.11.16 15:41
Page 77

ve bakteriler içerebileceğinden, kullanılmış kartuşu çöpe atarken, yeni takacağınız
kartuşun kapağını kullanarak pislenmiş temizleme sıvısının etrafa akmasını önleyiniz.
Hijyenik temizleme kartuşu etanol ya da izopropil alkol (bkz. kartuş teknik özellikleri)
içerir. Kartuş açıldıktan sonra doğal olarak yavaşca buharlaşarak havaya karışır. Günlük
olarak kullanılmıyorsa, en uygun dezenfeksiyonun sağlanması için her bir kartuşun
yaklaşık 8 hafta sonra değiştirilmesi gerekir. Temizleme kartuşu ayrıca tıraş sistemi için
dış eleğin çerçevesinde ve Temizleme ve Şarj İstasyonunun temizleme bölmesinde artık
izleri bırakabilecek olan yağlar da içermektedir. Bu izler nemli bir bezle nazikçe silinerek
kolayca çıkarılabilir.
Aksesuarlar
Tıraş makinenizin maksimum performansını korumak için, makinenizin elek ve bıçak
kartuşunu her 18 ayda bir değiştirmenizi öneririz.
Braun yetkili servislerinde:
• Elek ve Bıçak Kartuşu: 52S/52B
• Temizleme kartuşu Temizleme ve Şarj: CCR
• Braun Tıraş Makinesi temizleyici spreyi
Çevre Bilgisi
Bu ürün, pil ve/veya geri dönüştürülebilir elektrikli atık içerir.
Çevresel koruma için, evsel atıklarla birlikte atmayın ancak geri dönüşüm için
bölgenizdeki elektrikli atık dönüştürme merkezlerine götürün.
Temizleme kartuşu normal ev atıklarıyla birlikte atılabilir.
Bu bilgiler bildirim yapılmadan değiştirilebilir.
Elektriksel teknik özellikler için özel kablo setindeki baskıya bakın.
77
91092674_Series_5-2cc_wd_CEEMEA_S6-132.indd 7791092674_Series_5-2cc_wd_CEEMEA_S6-132.indd 77 23.11.16 15:4123.11.16 15:41
Page 78

Arıza Tespiti
Problem Olası Neden Çözüm
TIRAŞ MAKİNESİ
Tıraş makinesi
tamamen şarj
olmuyor ve ışığı
yanıp sönüyor.
Elektrik girişine
bağlandığında
şarj başlamıyor.
Tıraş başlığından
gelen nahoş bir
koku.
Pil performansı
gözle görülür
derecede düştü.
Tıraş performansı gözle
görülür bir
şekilde düştü.
Tıraş başlığı
nemli.
Ortam sıcaklığı uygun
aralığın dışında.
1. Bazı durumlarda şarj
geç başlayabilir (örn.
Uzun süre kullanılmadığında)
2. Ortam sıcaklığı uygun
aralığın dışında.
3. Özel kablo seti düzgün
takılmamıştır.
1. Tıraş başlığı su ile
temizlendi.
2. Temizleme kartuşu 8
haftadan daha uzun
süredir kullanılıyor.
1. Elek ve bıçak eskimiş
bu da her bir tıraş
işlemi için daha fazla
enerji gerektiriyor.
2. Tıraş başlığı düzenli
olarak su ile temizleniyor ancak yağlanmıyor.
1. Elek ve bıçak yıpranmış.
2. Tıraş etme sistemi tıkanmış.
1. Otomatik temizlikten
sonra kuruma zamanı
çok kısaydı.
2. Temizleme ve Şarj ünitesinin boşaltım kanalı
tıkanmış.
Şarj için tavsiye edilen ortam sıcaklığı
5 °C ile 35 °C arasındadır.
1. Eğer şarj işlemi otomatik olarak
başlamazsa, birkaç dakika bekleyin.
2. Şarj için tavsiye edilen ortam sıcaklığı
5 °C ile 35 °C arasındadır.
3. Özel kablo seti yuvasına oturmamıştır.
1. Tıraş başlığını su ile temizlerken
sadece sıcak su ve bazen (aşındırıcı
madde içermeyen) sıvı sabun kullanın.
Kuruması için Elek ve Bıçak kartuşunu
çıkartın.
2. Temizleme kartuşunu en az 8 haftada
bir değiştirin.
1. Elek ve bıçak kartuşunu yenileyin.
2. Eğer tıraş makinesi düzenli olarak su
ile temizleniyorsa, yağlama için
haftada bir kez eleğin üzerine bir
damla hafif makine yağı dökün.
1. Elek ve bıçak kartuşunu yenileyin.
2. Bir damla bulaşık sıvısı ile birlikte elek
ve bıçak kartuşunu sıcak su içine
batırın. Daha sonra iyice durulayın ve
süzdürün. Kuruduktan sonra elek üzerine bir damla hafif makine yağı uygulayın.
1. Kuruması için yeterli zamanı ayırabilmek için tıraş sonrası doğrudan temizleyin.
2. Boşaltma kanalını tahta bir kürdan ile
temizleyin.
78
91092674_Series_5-2cc_wd_CEEMEA_S6-132.indd 7891092674_Series_5-2cc_wd_CEEMEA_S6-132.indd 78 23.11.16 15:4123.11.16 15:41
Page 79

TEMİZLEME VE ŞARJ İSTASYONU
Başlatma
düğmesine
basıldığında
temizlik
başlamıyor.
1. Tıraş makinesi Temizleme ve Şarj ünitesine
düzgün yerleşmemiş.
2. Temizleme kartuşunda
yeterince temizleme
sıvısı yok (ekran kırmızı
olarak yanıp sönüyor).
1. Tıraş makinasını Temizleme ve Şarj
ünitesine yerleştirin ve ünitenin arka
kısmına doğru itin (tıraş makinesinin
bağlantısının ünite bağlantısı ile
eşleşmesi gerekir).
2. Yeni temizleme sıvısı kartuşu yerleştirin. Başlama düğmesine yeniden
basın.
Temizleme sıvısı
çabuk tükenmeye başladı.
Temizleme ve Şarj ünitesinin boşaltma kanalı
tıkanmış.
– Boşaltma kanalını tahta bir kurdan ile
temizleyin.
– Tüpu düzenli olarak silerek temizleyin.
AEEE Yönetmeliğine Uygundur.
Bakanlıkça tespit ve ilan edilen kullanım ömrü 7 yıldır.
Üretici firma ve CE uygunluk değerlendirme kuruluşu:
Braun GmbH
Frankfurter Strase 145
61476 Kronberg / Germany
Procter & Gamble Satış ve Dağıtım Ltd. Şti. Nida Kule – Kuzey, Barbaros Mahallesi
Begonya Sokak No:3 34746 Ataşehir, İstanbul tarafından ithal edilmiştir. P&G Tüketici
İlişkilerine, mesai günleri saat 09.00 ile 17.00 arasında sabit hattınızdan ücretsiz 0800
261 63 65 veya GSM dahil tüm hatlardan şehir içi ücretli 0216 463 83 83 numaralı
telefonlardan ulaşabilirsiniz. www.pg.com.tr
TÜKETİCİNİN HAKLARI
Malın ayıplı olduğunun anlaşılması durumunda tüketici, 6502 sayılı Tüketicinin
Korunması Hakkında Kanunun 11 inci maddesinde yer alan; a) Sözleşmeden dönme,
b) Satış bedelinden indirim isteme, c) Ücretsiz onarılmasını isteme, ç) Satılanın ayıpsız
bir misli ile değiştirilmesini isteme, seçimlik haklarından birini kullanabilir.
Tüketici; şikâyet ve itirazları konusundaki başvurularını Tüketici Mahkemelerine ve
Tüketici Hakem Heyetlerine yapabilir.
Braun Servis İstasyonları listemize internet sitemizden veya Tüketici Hizmetleri
Merkezimizi arayarak ulaşabilirsiniz. www.braun.com/tr
79
91092674_Series_5-2cc_wd_CEEMEA_S6-132.indd 7991092674_Series_5-2cc_wd_CEEMEA_S6-132.indd 79 23.11.16 15:4123.11.16 15:41
Page 80

GARANTİ BELGESİ
Bu bölüm müşteride kalacaktır.
GARANTİ ŞARTLARI
1- Garanti süresi, malın teslim tarihinden itibaren başlar ve 2 yıldır.
2- Malın bütün parçaları dahil olmak üzere tamamı garanti kapsamındadır.
3- Malın ayıplı olduğunun anlaşılması durumunda tüketici, 6502 sayılı Tüketicinin
Korunması Hakkında Kanunun 11 inci maddesinde yer alan; a) Sözleşmeden dönme,
b) Satış bedelinden indirim isteme, c) Ücretsiz onarılmasını isteme, ç) Satılanın
ayıpsız bir misli ile değiştirilmesini isteme haklarından birini kullanabilir.
4- Tüketicinin bu haklardan ücretsiz onarım hakkını seçmesi durumunda satıcı; işçilik
masrafı, değiştirilen parça bedeli ya da başka herhangi bir ad altında hiçbir ücret talep
etmeksizin malın onarımını yapmak veya yaptırmakla yükümlüdür. Tüketici ücretsiz
onarım hakkını üretici veya ithalatçıya karşı da kullanabilir. Satıcı, üretici ve ithalatçı
tüketicinin bu hakkını kullanmasından müteselsilen sorumludur.
5- Tüketicinin, ücretsiz onarım hakkını kullanması halinde malın; garanti süresi içinde
tekrar arızalanması, tamiri için gereken azami sürenin aşılması, tamirinin mümkün
olmadığının, yetkili servis istasyonu, satıcı, üretici veya ithalatçı tarafından bir raporla
belirlenmesi durumlarında; tüketici malın bedel iadesini, ayıp oranında bedel
indirimini veya imkân varsa malın ayıpsız misli ile değiştirilmesini satıcıdan talep
edebilir. Satıcı, tüketicinin talebini reddedemez. Bu talebin yerine getirilmemesi
durumunda satıcı, üretici ve ithalatçı müteselsilen sorumludur.
6- Malın tamir süresi 20 iş gününü geçemez. Bu süre, garanti süresi içerisinde mala
ilişkin arızanın yetkili servis istasyonuna veya satıcıya bildirimi tarihinde, garanti süresi
dışında ise malın yetkili servis istasyonuna teslim tarihinden itibaren başlar. Malın
arızasının 10 iş günü içerisinde giderilememesi halinde, üretici veya ithalatçı; malın
tamiri tamamlanıncaya kadar, benzer özelliklere sahip başka bir malı tüketicinin
kullanımına tahsis etmek zorundadır. Malın garanti süresi içerisinde arızalanması
durumunda, tamirde geçen süre garanti süresine eklenir. Ulusal, resmi ve dini bayram
günleri ile yılbaşı, 1 Mayıs ve Pazar günleri dışındaki çalışma günleri iş günü olarak
sayılmaktadır.
7- Malın kullanma kılavuzunda yer alan hususlara aykırı kullanılması durumları ile
aşınmaya tabi olan ve niteliği doğrultusunda sarf malzeme olarak nitelendirilen (elek/
bıçak vb.) parçalar garanti kapsamı dışındadır.
8- Tüketici, garantiden doğan haklarının kullanılması ile ilgili olarak çıkabilecek
uyuşmazlıklarda yerleşim yerinin bulunduğu veya tüketici işleminin yapıldığı yerdeki
Tüketici Hakem Heyetine veya Tüketici Mahkemesine başvurabilir.
9- Satıcı tarafından bu Garanti Belgesinin verilmemesi durumunda, tüketici Gümrük
ve Ticaret Bakanlığı Tüketicinin Korunması ve Piyasa Gözetimi Genel
Müdürlüğüne başvurabilir.
80
91092674_Series_5-2cc_wd_CEEMEA_S6-132.indd 8091092674_Series_5-2cc_wd_CEEMEA_S6-132.indd 80 23.11.16 15:4123.11.16 15:41
Page 81

KULLANIM HATALARI
1- BRAUN ürünlerinin kullanma kılavuzunda gösterildiği şekilde kullanılması
gerekmektedir. BRAUN ürünlerine Procter & Gamble Satış ve Dağıtım Limited Şirketi’nin
yetkili kıldığı servis elemanları dışındaki şahıslar tarafından bakım onarım veya başka bir
nedenle müdahale edilmemelidir.
2- Kullanma Kılavuzunda yer alan hususlara aykırı kullanılmasından kaynaklanan arızalar
garanti kapsamı dışındadır.
3- Voltaj düşüklüğü veya fazlalığı, hatalı elektrik tesisatı ve mamulün
etiketinde yazılı voltajdan farklı voltajda kullanma nedenlerinden meydana gelecek
hasar ve arızalar garanti kapsamı dışındadır.
4- Dış etkenlerden (vurulma, çarpma, düşürülme, kırılma vs.) hasar ve arıza meydana
gelmemesine dikkat edilmelidir.
Procter & Gamble Satış ve Dağıtım Limited Şirketi
Finans Müdürü Müşteri Takımları Finans Müdürü
MALIN
Cinsi:
Markası:
SATICI FİRMA
Unvan:
Adres:
Tel, Faks:
e-posta:
Kaşe ve İmza:
Fatura Tarihi ve Sayısı: Teslim Yeri ve Tarihi:
Procter & Gamble Satış ve Dağıtım Ltd. Şti. Nida Kule – Kuzey, Barbaros Mahallesi Begonya
Sokak No:3 34746 Ataşehir, İstanbul tarafından ithal edilmiştir. P&G Tüketici İlişkilerine, mesai
günleri saat 09.00 ile 17.00 arasında sabit hattınızdan ücretsiz 0800 261 63 65 veya GSM dahil
tüm hatlardan şehir içi ücretli 0216 463 83 83 numaralı telefonlardan ulaşabilirsiniz. www.pg.com.tr
Braun Servis İstasyonları listemize internet sitemizden veya Tüketici Hizmetleri merkezimizi
arayarak ulaşabilirsiniz. www.braun.com/tr
Modeli:
Bandrol ve Seri Numarası:
81
91092674_Series_5-2cc_wd_CEEMEA_S6-132.indd 8191092674_Series_5-2cc_wd_CEEMEA_S6-132.indd 81 23.11.16 15:4123.11.16 15:41
Page 82

Română (RO/MD)
Produsele noastre sunt realizate pentru a răspunde celor mai exigente cerinţe de
calitate, funcţionalitate și design. Vă mulţumim pentru încrederea în calitatea Braun și
sperăm să vă facă plăcere să utilizaţi noul dumneavoastră produs Braun.
Citiţi aceste instrucţiuni în întregime, deoarece conţin informaţii privind
siguranţa. Păstraţi-le pentru consultări viitoare.
Avertizare
Aparatul dvs. electrocasnic este furnizat împreună cu un set special de
cabluri, care are încorporată o sursă de alimentare cu tensiune foarte
scăzută, pentru siguranţă. Nu schimbaţi şi nu modificaţi nicio componentă a acestuia; în caz contrar, există riscul de electrocutare. Folosiţi
numai setul special cablu-conector furnizat împreună cu aparatul.
Dacă aparatul prezintă simbolul 492, îl puteţi utiliza
împreună cu orice sursă de alimentare Braun având codul 492XXXX.
Acest aparat electrocasnic este adecvat pentru curăţare
sub jet de apă şi utilizare în cada de baie sau la duş.
Din motive de siguranţă, acesta poate fi utilizat numai
fără cablu.
Deconectaţi aparatul de ras de la sursa de alimentare înainte de a-l
folosi sub apă.
Nu vă bărbieriţi cu acest aparat dacă sita sau cablul sunt deteriorate.
Acest aparat poate fi utilizat de către copiii cu vârsta de peste 8 ani,
de către persoane cu capacităţi fizice, senzoriale sau mentale
reduse, precum și de către persoanele lipsite de experienţa și
cunoștinţele necesare, cu condiţia să fie supravegheate, să primească instrucţiuni privind utilizarea în siguranţă a aparatului și să
înţeleagă posibilele riscuri. Copiii nu trebuie să se joace cu acest
aparat. Operaţiunile de curăţare și întreţinere nu se vor efectua de
către copii, decât dacă aceștia au peste 8 ani și sunt supravegheaţi.
Staţie Curăţare și Încărcare
Pentru a preveni scurgerea lichidului de curăţare, asiguraţi-vă că
staţia de curăţare și încărcare este amplasată pe o suprafaţă
plană.
82
91092674_Series_5-2cc_wd_CEEMEA_S6-132.indd 8291092674_Series_5-2cc_wd_CEEMEA_S6-132.indd 82 23.11.16 15:4123.11.16 15:41
Page 83

Atunci când este instalat un cartuș de curăţare, nu loviţi, nu mişcaţi
brusc şi nu transportaţi staţia în niciun fel, întrucât lichidul de
curăţare se poate scurge din cartuș. Nu amplasaţi staţia într-un
dulăpior de baie și nici pe o suprafaţă lustruită sau lăcuită.
Cartușul de curăţare conţine un lichid extrem de inflamabil, așadar
feriţi-l de sursele de foc. Nu îl expuneţi acţiunii directe a razelor de
soare sau fumului de ţigară și nu îl depozitaţi deasupra unui radiator.
Nu reumpleţi cartușul și utilizaţi numai cartușe de rezervă
Braun originale.
Aparat de ras
1 Casetă de bărbierit
2 Buton de eliberare a casetei
3 Comutator pentru sistemul de blocare MultiHead
4 Buton pornire/oprire
5 Afișajul aparatului de ras
5a Simbolul de blocare (blocare la transport)
5b Segmente încărcare
5c Indicator de curăţare
5d Simbolul bateriei
6 Dispozitiv de tuns pentru firele lungi de păr
7 Contacte aparat de ras-staţie
8 Buton de eliberare dispozitiv de tuns pentru fire lungi de păr
9 Mufă de alimentare a aparatului de ras
10 Set special cablu-conector (modelul poate diferi)
11 Capac de protecţie*
12 Cutie de transport*
* nu este disponibil pentru toate modelele
Prima utilizare și încărcarea
Conectaţi aparatul de ras la o priză electrică introducând setul de cabluri special (10) în
mufa de alimentare (9) sau la Staţia de Curăţare şi Încărcare (vezi capitolul „Staţie
Curăţare şi Încărcare”).
Informaţii de bază despre funcţionare
• O încărcare completă asigură până la 50 de minute de bărbierit fără cablu. Această
valoare poate varia în funcţie de dimensiunea firelor de păr și de temperatura
ambientală.
83
91092674_Series_5-2cc_wd_CEEMEA_S6-132.indd 8391092674_Series_5-2cc_wd_CEEMEA_S6-132.indd 83 23.11.16 15:4123.11.16 15:41
Page 84

• Temperatura ambientală recomandată pentru încărcare este cuprinsă între 5 °C şi
35 °C. În condiţii de temperatură foarte scăzută sau foarte ridicată este posibil ca
bateria să nu se încarce corespunzător sau chiar să nu se încarce deloc. Temperatura
ambientală recomandată pentru depozitare și bărbierit este cuprinsă între
15 °C şi 35 °C.
• Nu expuneţi aparatul la temperaturi mai mari de 50 °C pentru perioade lungi de timp.
• Atunci când aparatul de ras este conectat la o priză electrică, pot trece câteva minute
până când afișajul se va aprinde.
Încărcare / încărcare scăzută
Afişajul aparatului de ras (5) indică starea de încărcare a bateriei.
• În timpul încărcării segmentul corespunzător de baterie (5b) va lumina intermitent.
• Atunci când aparatul de ras este încărcat complet și este conectat la o priză electrică,
se vor aprinde toate cele 3 segmente ale bateriei preţ de câteva secunde. Atunci
afișajul se va stinge.
• Atunci când bateria este aproape descărcată, simbolul bateriei (5d) se va aprinde
intermitent în culoarea roșie. Din acest moment, ar trebui să mai aveţi timp să finalizaţi
operaţia de bărbierit.
• Atunci când opriţi aparatul de ras un sunet scurt vă reamintește de faptul că bateria
este aproape descărcată.
Utilizarea aparatului de ras
Apăsaţi butonul pornire/oprire (4) pentru a utiliza aparatul de ras.
Sfaturi pentru un bărbierit uscat, perfect
Pentru cele mai bune rezultate, Braun vă recomandă să urmaţi 3 paşi simpli:
1. Bărbieriţi-vă întotdeauna înainte de a vă spăla pe faţă.
2. Ţineţi în permanenţă aparatul de ras în unghi drept (90°) în raport cu pielea.
3. Întindeţi-vă pielea şi bărbieriţi-vă contrar direcţiei de creştere a părului.
Comutator pentru sistemul de blocare MultiHead (blocare a capului aparatului de ras)
• Pentru a bărbieri zonele greu accesibile (de ex. de sub nas) glisaţi comutatorul pentru
sistemul de blocare MultiHeadLock (3) înapoi, pentru blocarea capului apararatului
de ras. Capul aparatului de ras poate fi blocat în cinci poziţii.
• Pentru a schimba poziţia, deplasaţi înainte și înapoi capul aparatului de ras cu degetul
mare și arătătorul. Se va fixa automat în următoarea poziţie.
• Pentru curăţare automată în Staţia Curăţare şi Încărcare blocarea capului aparatului
de ras ar trebui să fie eliberată.
Dispozitiv de tuns pentru firele lungi de păr
Pentru a tunde perciunii, mustaţa sau barba, apăsaţi butonul de eliberare (8) și glisaţi în
sus dispozitivul de tuns pentru firele de păr lungi (6).
84
91092674_Series_5-2cc_wd_CEEMEA_S6-132.indd 8491092674_Series_5-2cc_wd_CEEMEA_S6-132.indd 84 23.11.16 15:4123.11.16 15:41
Page 85

Blocare la transport
Simbolul de blocare (5a) se aprinde pe afișaj atunci când aparatul de ras a fost blocat
pentru a evita pornirea întâmplătoarea a motorului (de exemplu atunci când îl depozitaţi
într-o valiză).
• Activare: Blocaţi aparatul de ras ţinând apăsat butonul de pornire/oprire (4) timp de
3 secunde. Blocarea va fi confirmată de un sunet scurt și de simbolul de blocare de
pe afișaj. Ulterior afișajul se oprește.
• Dezactivare: Deblocaţi aparatul de ras ţinând apăsat butonul de pornire/oprire timp
de 3 secunde.
Curăţarea manuală a aparatului de ras
Curăţare sub jet de apă
• Porniţi aparatul de ras (fără cablu) şi clătiţi capul aparatului de ras sub jet de apă
fierbinte până când au fost eliminate toate reziduurile. Puteţi utiliza un săpun lichid
care nu conţine substanţe abrazive.Clătiţi toată spuma şi lăsaţi aparatul de ras să mai
funcţioneze câteva secunde în plus.
• Ulterior, opriţi aparatul de ras, apăsaţi butonul de eliberare (2) pentru a scoate caseta
cu sita și dispozitivul de tăiere (1) și lăsaţi-o să se usuce.
• Dacă curăţaţi cu regularitate aparatul de ras sub jet de apă, atunci aplicaţi săptămânal
o picătură de ulei industrial ușor pe partea de sus a casetei cu sita și dispozitivul de
tăiere.
Aparatul de ras trebuie curăţat după fiecare utilizare cu spumă.
Curăţarea cu peria
Opriţi aparatul de ras. Scoateţi caseta cu sita și dispozitivul de tăiere (1) și loviţi-o ușor
de o suprafaţă plană. Utilizând peria, curăţaţi zona interioară a capului pivotant.
Nu trebuie să curăţaţi caseta cu peria, deoarece acest lucru o poate deteriora!
Staţie Curăţare și Încărcare
Staţia Curăţare şi Încărcare a fost creată pentru curăţarea, încărcarea, lubrifierea,
sterilizarea, uscarea și depozitarea aparatului dumneavoastră de ras Braun.
13 Mufă de alimentare a staţiei
14 Buton de ridicare pentru schimbarea cartușului
15 Contacte staţie-aparat de ras
16 Afișajul Staţiei Curăţare şi Încărcare
16a Indicatorul de nivel
16b Indicator luminos de stare
16c Indicatoare pentru programul de curăţare
17 Buton de pornire
18 Cartuș de curăţare
85
91092674_Series_5-2cc_wd_CEEMEA_S6-132.indd 8591092674_Series_5-2cc_wd_CEEMEA_S6-132.indd 85 23.11.16 15:4123.11.16 15:41
Page 86

Instalarea Staţiei Curăţare și Încărcare
• Îndepărtaţi folia de protecţie de pe afișajul Staţiei Curăţare și Încărcare.
• Apăsaţi butonul de ridicare (14) din partea posterioară a staţiei Curăţare și Încărcare
pentru a ridica carcasa.
• Ţineţi cartușul de curăţare (18) pe o suprafaţă plană și stabilă (de ex. o masă).
• Scoateţi cu grijă capacul de pe cartuș.
• Glisaţi cartuşul din partea posterioară către baza staţiei până când se fixează.
• Închideţi ușor carcasa împingând-o în jos până se fixează.
• Utilizând setul special de cabluri (10), conectaţi mufa de alimentare a staţiei (13)
la o priză electrică.
Utilizarea staţiei Curăţare și Încărcare
Important: Aparatul de ras trebuie să fie uscat și să nu prezinte spumă sau
reziduuri de săpun! Introduceţi aparatul de ras în staţie cu capul în jos, astfel încât
partea frontală să fie vizibilă şi sistemul de blocare a capului aparatului (3) să fie
eliberat.
Contactele (7) din partea din spate a aparatului de ras trebuie să se alinieze cu
contactele (15) din staţia Curăţare și Încărcare. Împingeţi aparatul de ras în poziţia
corectă. Un sunet scurt vă confirmă faptul că aparatul de ras este corect poziţionat în
staţia Curăţare și Încărcare.
Staţia Curăţare și Încărcare analizează starea igienei. Starea acesteia este afișată de
indicatorii programului de curăţare (16c) pe afișajul staţiei Curăţare și Încărcare (16).
Încărcarea aparatului de ras în staţia Curăţare și Încărcare.
Încărcarea va porni în mod automat atunci când aparatul de ras este poziţionat corect.
Curăţarea aparatului de ras în staţia Curăţare și Încărcare.
Atunci când indicatorul de curăţare (5c) se aprinde pe afișajul aparatului de ras,
introduceţi aparatul de ras în staţia Curăţare și Încărcare, în modul descris mai sus.
Programe de curăţare
ciclu economic scurt de curăţare
nivel normal de curăţare
ciclu foarte intens de curăţare
Începeţi curăţarea automata
Începeţi procesul de curăţare ţinând apăsat pe butonul de pornire (17). Dacă indicatorul
luminos de stare (16b) nu se aprinde (staţia Curăţare și Încărcare intră în repaus după
aproximativ 10 minute), apăsaţi butonul de pornire de două ori. În caz contrar,
programul de curăţare nu va porni. Pentru cele mai bune rezultate, vă recomandăm
curăţarea după fiecare bărbierit.
86
91092674_Series_5-2cc_wd_CEEMEA_S6-132.indd 8691092674_Series_5-2cc_wd_CEEMEA_S6-132.indd 86 23.11.16 15:4123.11.16 15:41
Page 87

Fiecare program de curăţare constă din mai multe cicluri, în care lichidul de curăţare
este transportat prin capul aparatului de ras.În funcţie de modelul staţiei Curăţare şi
Încărcare și/sau programul selectat, timpul de curăţare durează până la 3 minute.În tot
acest timp indicatorul de stare a bateriei luminează intermitent. Lăsaţi aparatul de ras în
staţie pentru uscare. Durează până la câteva ore până când umiditatea rămasă se
evaporează, în funcţie de condiţiile climaterice.
După finalizarea procedurii de curăţare și încărcare, toate indicatoarele se opresc.
Înlăturarea aparatului de ras din staţia Curăţare și Încărcare
Ţineţi staţia cu o mână și înclinaţi ușor aparatul de ras către partea din faţă pentru a-l
elibera.
Cartuş de curăţare / Înlocuire
Atunci când indicatorul de nivel (16a) rămâne aprins în culoarea roșie, lichidul rămas în
cartuş este suficient pentru aproximativ încă 3 cicluri. Atunci când indicatorul de nivel
se aprinde intermitent în culoarea roșie, cartuşul trebuie înlocuit - la aproximativ fiecare
4 săptămâni în cazul utilizării zilnice.
După ce aţi apăsat butonul de ridicare (14) pentru a deschide carcasa, așteptaţi câteva
secunde înainte de a scoate cartușul uzat, pentru a evita scurgerile.
Înainte de eliminarea cartușului uzat, asiguraţi-vă că aţi închis orificiile utilizând capacul
cartușului nou, deoarece cartușul uzat va conţine soluţie de curăţare contaminată.
Cartușul de curăţare igienică conţine etanol sau izopropanol (pentru specificaţii,
consultaţi cartușul) care, după deschidere, se va evapora lent în mod natural.
Fiecare cartuș, dacă nu este utilizat zilnic, trebuie înlocuit după aproximativ 8 săptămâni
pentru asigurarea unei sterilizări optime. Cartuşul de curăţare conţine și lubrifianţi
pentru sistemul de bărbierit care pot lăsa urme reziduale pe rama exterioară a sitei și pe
camera de curăţare a staţiei Curăţare și Încărcare. Aceste urme pot fi îndepărtate cu
ușurinţă prin ștergerea ușoară cu o lavetă umedă.
Accesorii
Braun recomandă schimbarea casetei de bărbierit la fiecare 18 luni, pentru a păstra
performanţele maxime ale aparatului de ras.
Disponibile de la distribuitorul dumneavoastră sau de la centrele de mentenanţă Braun:
• Casetă de bărbierit: 52S/52B
• Cartuş de curăţare: CCR
• Spray de curăţare pentru aparatele de ras Braun
Notificare privind mediul înconjurător
Produsul conţine baterii și/sau deșeuri electrice reciclabile.
Pentru a proteja mediul înconjurător, nu aruncaţi produsul împreună cu gunoiul
menajer, ci duceţi componentele la punctele de colectare a deșeurilor electrice
din ţara dumneavoastră, în scopul reciclării.
87
91092674_Series_5-2cc_wd_CEEMEA_S6-132.indd 8791092674_Series_5-2cc_wd_CEEMEA_S6-132.indd 87 23.11.16 15:4123.11.16 15:41
Page 88

Conform Hotãrârii nr. 482 din 1 aprilie 2004 privind stabilirea conditiilor de introducere
pe piatã a aparatelor electrocasnice în functie de nivelul zgomotului transmis prin aer,
valoarea de zgomot dB(A) pentru acest aparat este de 63 dB(A).
Cartușul de curăţare poate fi eliminat ca deșeu menajer obișnuit.
Instrucţiunile se pot modifica fără notificare prealabilă.
Pentru specificaţiile electrice, consultaţi informaţiile imprimate pe setul special cabluconector.
Depanare
Problemă Cauză posibilă Rezolvare
SHAVER
Aparatul de ras
nu se încarcă
complet și continuă să lumineze
intermitent.
Încărcarea nu
începe în
momentul
conectării la
mufa de alimentare.
Miros neplăcut
care provine de
la capul aparatului de ras.
Temperatura ambientală
este în afara valorilor normale.
1. Uneori, încărcarea
poate începe cu întârziere (de exemplu
după o perioadă lungă
de depozitare).
2. Temperatura ambientală este în afara valorilor normale.
3. Setul de cabluri special
nu este conectat în
mod corespunzător.
1. Capul aparatului de ras
se curăţă cu apă.
2. Cartușul de curăţare
este utilizat timp de
mai mult de 8 săptămâni.
Temperatura ambientală recomandată
pentru încărcare este cuprinsă între
5 °C și 35 °C.
1. Așteptaţi câteva minute, dacă încărcarea va începe în mod automat.
2. Temperatura ambientală recomandată
pentru încărcare este cuprinsă între
5 °C și 35 °C.
3. Setul de cabluri special trebuie să fie
fixat.
1. Atunci când curăţaţi capul aparatului
de ras cu apă, utilizaţi numai apă fierbinte și, din când în când, o cantitate
mică de săpun lichid (fără substanţe
abrazive). Scoateţi caseta cu sita și
dispozitivul de tăiere pentru a permite
uscarea.
2. Schimbaţi cartușul de curăţare cel
puţin la fiecare 8 săptămâni.
88
91092674_Series_5-2cc_wd_CEEMEA_S6-132.indd 8891092674_Series_5-2cc_wd_CEEMEA_S6-132.indd 88 23.11.16 15:4123.11.16 15:41
Page 89

Performanţele
bateriei au scăzut semnificativ.
1. Sita și dispozitivul de
tăiere sunt uzate, ceea
ce necesită mai multă
putere pentru fiecare
bărbierit.
2. Capul aparatului de ras
este curăţat cu regularitate cu apă, dar nu
este lubrifiat.
Performanţele
de bărbierit au
scăzut semnificativ.
Capul aparatul
de ras este ud.
1. Sita și dispozitivul de
tăiere sunt uzate.
2. Sistemul de bărbierit
este înfundat.
1. Timpul de uscare după
curăţarea automată a
fost prea scurt.
2. Scurgerea staţiei Curăţare şi Încărcare este
înfundată.
CLEAN&CHARGE STATION
Curăţarea nu
începe atunci
când este apăsat
butonul de pornire.
1. Aparatul de ras nu este
poziţionat corespunzător în staţia Curăţare şi
Încărcare.
2. Cartușul de curăţare
nu conţine suficient
lichid de curăţare (afișajul se aprinde intermitent în culoarea
roșie).
Consum crescut
de lichid de
Scurgerea staţiei Clean&
Charge este înfundată.
curăţare.
1. Înlocuiţi caseta cu sita și dispozitivul
de tăiere cu una nouă.
2. Dacă aparatul de ras este curăţat cu
regularitate cu apă, aplicaţi săptămânal o picătură de ulei industrial ușor pe
sită , pentru lubrifiere.
1. Înlocuiţi caseta cu sita și dispozitivul
de tăiere cu una nouă.
2. Înmuiaţi caseta cu sita și dispozitivul
de tăiere în apă fierbinte, în care aţi
adăugat o picătură de detergent de
vase lichid. Ulterior, clătiţi-o bine și
uscaţi-o prin tamponare. După uscare,
aplicaţi o picătură de ulei industrial
ușor pe sită.
1. Curăţaţi imediat după bărbierit pentru
a îi permite suficient timp de uscare.
2. Curăţaţi scurgerea cu o scobitoare de
lemn.
1. Introduceţi aparatul de ras în staţia
Curăţare şi Încărcare și apăsaţi-l către
partea posterioară a staţiei (contactele
aparatului de ras trebuie să se alinieze
cu contactele de pe staţie).
2. Introduceţi un nou cartuș de curăţare.
Apăsaţi butonul de pornire din nou.
– Curăţaţi scurgerea cu o scobitoare de
lemn.
– Ștergeţi cu regularitate tubul pentru a-l
curăţa.
89
91092674_Series_5-2cc_wd_CEEMEA_S6-132.indd 8991092674_Series_5-2cc_wd_CEEMEA_S6-132.indd 89 23.11.16 15:4123.11.16 15:41
Page 90

Garanţie
Acordăm o garanţie de 2 ani pentru acest produs, de la data livrării produsului. Durata
medie de utilizare: 5 ani, cu condiţia respectării instrucţiunilor de utilizare si efectuării
intervenţiilor tehnice numai de către personalul service autorizat.
În perioada de garanţie vom remedia gratuit neconformităţile aparatului, prin repararea
sau înlocuirea produsului, după caz. Această garanţie este valabilă în orice ţara în care
acest aparat este furnizat de către compania Braun sau de către distribuitorul desemnat
al acesteia. Repararea sau înlocuirea produselor se va efectua în cadrul unei perioade
rezonabile de timp (maxim 15 zile de la data aducerii la cunoştinţă a neconformităţii).
Prezenta garanţie nu acoperă: defectele datorate utilizării necorespunzatoare, uzurii
normale, precum si defectele care au un efect neglijabil asupra valorii sau funcţionării
aparatului. Garanţia devine nulă dacă se efectuează reparaţii de către persoane
neautorizate şi dacă nu se utilizează componente originale Braun.
Pentru a beneficia de service în perioada de garanţie, prezentaţi produsul împreună cu
factura (bonul/chitanţa de cumpărare) la una dintre unităţile service agreate.
PUNCT CENTRAL DE SERVICE BRAUN
Şos. Viilor, Nr.14, Corp Clădire C2, Etaj 2,
Biroul nr. 3, Sector 5, București (acces din Str. Năsăud)
Tel: 021.224.30.35
Mobil: 0722.541.548
E-mail: service.braun@interbrands.ro
90
91092674_Series_5-2cc_wd_CEEMEA_S6-132.indd 9091092674_Series_5-2cc_wd_CEEMEA_S6-132.indd 90 23.11.16 15:4123.11.16 15:41
Page 91

Български
Нашите продукти са проектирани така, че да отговарят на най-високите стандарти
за качество, функционалност и дизайн.Благодарим Ви за доверието в качеството
на Braun и се надяваме, че се радвате на вашия нов продукт на Braun.
Прочетете изцяло тези инструкции, те съдържат информация за
безопасност. Запазете ги за справка в бъдеще.
Предупреждение
Уредът се предоставя със специален комплект кабели, в които
е интегрирано електрозахранване с безопасно свръхниско
напрежение. Не заменяйте или подправяйте която и да е от
частите му, в противен случай съществува риск от токов удар.
Използвайте уреда само с предоставения комплект специални
кабели.
Ако на уреда има маркировка 492, можете да го
използвате с всякакво захранване на Braun с код 492-XXXX.
Този уред е подходящ за почистване под течаща вода и
за използване във вана или под душ. Поради съобра-
жения за безопасност, може да бъде използван
само безжично.
Изключете уреда от захранването, преди да влезе в контакт с
вода.
Не се бръснете с повредена мрежа или кабел.
Този уред може да се използва от деца над 8 години и хора с
намалени физически, сетивни и умствени възможности или
липса на опит и знание, само ако са наблюдавани, инструктирани за безопасната употреба на уреда и разбират възможните опасности. Не се разрешава деца да играят с уреда.
Почистването и поддръжката не трябва да се извършват от
деца, освен ако те не са над 8 години и под наблюдение.
Станция за почистване и зареждане
За да предотвратите изтичане на почистваща течност, се уверете, че станцията за почистване и зареждане е поставена на
равна повърхност.
91
91092674_Series_5-2cc_wd_CEEMEA_S6-132.indd 9191092674_Series_5-2cc_wd_CEEMEA_S6-132.indd 91 23.11.16 15:4123.11.16 15:41
Page 92

Когато се инсталира почистващата касета, не накланяйте, не
местете с резки движения и не транспортирайте станцията по
никакъв начин, тъй като почистващата течност може да прелее
от касетата. Не поставяйте станцията в шкаф с огледало, нито
върху полирана или лакирана повърхност.
]Почистващата касета съдържа силно запалима течност,
затова я дръжте далеч от източници на запалване. Не излагайте на пряка слънчева светлина и цигарен дим, нито поставяйте върху радиатор.
Не пълнете касетата и използвайте само оригинална
Резервна касета, предоставена от Braun.
Самобръсначка
1 Бръснеща глава
2 Бутон за освобождаване на касетата
3 Ключ за блокиране на главата
4 Бутон за вкл./изкл.
5 Дисплей на самобръсначката
5a Символ за заключване (при пътуване)
5b Сегменти на зареждане
5c Индикатор за почистване
5d Символ на батерията
6 Тример за дълги косми
7 Контакти „самобръсначка към станция“
8 Бутон за освобождаване на тримера за дълги косми
9 Щепсел за захранване на самобръсначката
10 Комплект специални кабели (формата може да е различна)
11 Предпазна приставка*
12 Калъф за пътуване*
* не при всички модели
Първо използване и зареждане
Свържете самобръсначката към електрически контакт като пъхнете специалния
кабел (10) в гнездото за захранване (9) или чрез поставката за зареждане
(вж. Глава „Станция за почистване и зареждане“).
92
91092674_Series_5-2cc_wd_CEEMEA_S6-132.indd 9291092674_Series_5-2cc_wd_CEEMEA_S6-132.indd 92 23.11.16 15:4123.11.16 15:41
Page 93

Информация за основните функции
• Пълният заряд осигурява до 50 минути време за бръснене без кабел. Това
време може да варира в зависимост от растежа на брадата Ви и температурата
на околната среда.
• Препоръчителната температура на околната среда при зареждане е от 5 °C до
35 °C. Батерията може да не се зарежда правилно или изобщо да не се зарежда
при твърде ниски или твърде високи температури. Препоръчителната
температура на околната среда за бръснене е от 15 °C до 35 °C.
• Не излагайте уреда на температури по-високи от 50 °C за продължителни
периоди от време.
• Когато самобръсначката е свързана към електрически контакт, може да отнеме
няколко минути докато дисплеят светне.
Зареждане/нисък заряд
Индикация за състоянието на заряда на батерията (5) се показва на дисплея на
самобръсначката.
• По време на зареждане, съответният сегмент на зареждане (5b) ще мига.
• Когато самобръсначката е напълно заредена и свързана към електрически
контакт, всичките 3 зарядни сегмента ще светят за няколко секунди. След това
дисплеят ще изключи.
• Символът на батерията (5d) ще мига в червено, когато батерията е изтощена.
Ще можете да завършите вашето бръснене. С изключване на самобръсначката,
звуков сигнал ще ви напомни за ниския заряд на батерията.
Употреба на самобръсначката
Натиснете ключа за вкл./изкл. (4), за да задействате самобръсначката.
Съвети за идеално сухо бръснене
За най-добри резултати, Braun Ви препоръчва да следвате 3 лесни стъпки:
1. Винаги се бръснете, преди да измиете лицето си.
2. Винаги дръжте самобръсначката под прав ъгъл (90°) върху кожата си.
3. Изпъвайте кожата си и бръснете срещу посоката на растежа на брадата си.
Ключ за блокиране на главата (блокира главата)
• За бръснене на труднодостъпни места (напр. под носа) плъзнете ключа за
блокиране на главата (3) надолу, за да заключите главата на самобръсначката.
Главата на самобръсначката може да бъде заключена в пет позиции.
• За да промените позицията, движете главата на самобръсначката с палеца и
показалеца напред и назад. Тя автоматично ще щракне на следващата позиция.
• За автоматично почистване в станцията за почистване и зареждане, ключът на
главата трябва да бъде освободен.
Тример за дълги косми
За да подрежете бакенбарди, мустаци или брада, натиснете и пуснете бутона за
освобождаване (8) и плъзнете тримера за дълги косми (6) нагоре.
93
91092674_Series_5-2cc_wd_CEEMEA_S6-132.indd 9391092674_Series_5-2cc_wd_CEEMEA_S6-132.indd 93 23.11.16 15:4123.11.16 15:41
Page 94

Заключване при пътуване
Символът за заключване (5a) светва на дисплея, когато самобръсначката трябва
да бъде заключена, за да се избегне нежелано стартиране на мотора (напр. при
прибиране в куфар).
• Активиране: Самобръсначката се заключва с натискане на ключа за вкл./изкл.
(4) за 3 секунди. Това се потвърждава със звуков сигнал и символ за заключване
на дисплея. След това дисплеят изгасва.
• Деактивиране: Самобръсначката се отключва с натискане на ключа за вкл./изкл.
за 3 секунди.
Ръчно почистване на самобръсначката
Почистване под течаща вода
• Включете самобръсначката (безжично) и изплакнете бръснещата глава
под гореща течаща вода, докато всички остатъци бъдат отстранени.
Можете да използвате течен сапун без абразивни вещества. Изплакнете цялата
пяна и оставете самобръсначката да работи за още няколко секунди.
• След това изключете самобръсначката, натиснете бутона за освобождаване (2),
за да свалите бръснещата глава (1) и я оставете да изсъхне.
• Ако редовно почиствате самобръсначката под вода, веднъж в седмицата
слагайте една капка леко машинно масло върху бръснещата глава.
Самобръсначката трябва да се почиства след всяка употреба с пяна.
Почистване с четка
Изключете самобръсначката. Свалете бръснещата глава (1) и я поставете върху
равна повърхност. Като използвате четката, почистете вътрешната зона на
въртящата се глава. Не почиствайте главата с четката, защото това може да я
повреди!
Станция за почистване и зареждане (C&C)
Станцията за почистване и зареждане е предназначена за почистване,
зареждане, смазване, дезинфекциране, подсушаване и съхранение на Вашата
самобръсначка Braun.
13 Щепсел за захранване на станцията
14 Повдигащ бутон за смяна на касетата
15 Контакти „станция към самобръсначка“
16 Дисплей на станцията за почистване и зареждане
16a Индикатор на нивото
16b Индикатор за състояние
16с Показатели на програмата за почистване
17 Бутон старт
18 Почистваща касета
94
91092674_Series_5-2cc_wd_CEEMEA_S6-132.indd 9491092674_Series_5-2cc_wd_CEEMEA_S6-132.indd 94 23.11.16 15:4123.11.16 15:41
Page 95

Инсталиране на C&C
• Премахнете защитното фолио от дисплея на C&C.
• Натиснете бутона за повдигане (14) от задната страна на C&C, за да повдигнете
корпуса.
• Дръжте почистваща касета (18) надолу върху плоска, стабилна повърхност
(напр. маса).
• Внимателно свалете капака на касетата.
• Плъзнете касетата от задната страна в основата на станцията докато щракне.
• Бавно затворете корпуса, като го натиснете надолу, докато се заключи.
• Като използвате специалния комплект кабели (10), свържете извода за
захранване на станцията (13) към електрически контакт.
Използване на C&C
Важно: Самобръсначката трябва да бъде суха и без пяна или остатъци от
сапун! Пъхнете самобръсначката в C&C с горната страна надолу, като предната
страна се показва и главата е отключена (3).
Контактите (7) на задната страна на самобръсначката трябва да съвпаднат с
контактите (15) в C&C. Натиснете самобръсначката в правилната позиция.
Звуков сигнал потвърждава, че самобръсначката е поставена правилно в C&C.
C&C анализира състоянието на хигиената.
Състоянието се указва от индикаторите на почистващата програма (16c) на
дисплея на C&C (16).
Зареждане на самобръсначката в C&C
Зареждането стартира автоматично, когато самобръсначката бъде поставена
вътре правилно.
Почистване на самобръсначката в C&C
Когато индикаторът за почистване (5c) светне на дисплея на самобръсначката,
поставете самобръсначката в C&C, както е описано по-горе.
Програми за почистване
кратко икономично почистване
нормално ниво на почистване
високо интензивно почистване
Стартиране на автоматично почистване
Стартирайте процеса на почистване с натискане на бутона старт (17). Ако
индикаторът за състояние (16b) не свети (C&C превключва в режим на готовност
след около 10 минути), натиснете бутона старт два пъти. В противен случай
почистването няма да започне. За най-добри резултати при бръснене, ние
препоръчваме да почиствате след всяко бръснене.
95
91092674_Series_5-2cc_wd_CEEMEA_S6-132.indd 9591092674_Series_5-2cc_wd_CEEMEA_S6-132.indd 95 23.11.16 15:4123.11.16 15:41
Page 96

Всяка почистваща програма се състои от няколко цикъла, при които почистващата
течност се впръсква през главата на самобръсначката. В зависимост от модела на
Вашата станция за почистване и зареждане и/или избраната програма, времето
за почистване отнема до 3 минути. През това време индикаторът за състояние
мига. Оставете самобръсначката в станцията за подсушаване. В зависимост от
климатичните условия, пълното изсушаване на влагата може да отнеме до няколко
часа.
След приключване на процедурата на почистване и зареждане, всички
индикатори изгасват.
Изваждане на самобръсначката от C&C
Хванете C&C с ръка и наклонете леко самобръсначката напред, за да я
освободите.
Почистваща касета/Смяна
Когато индикаторът за ниво (16a) свети постоянно в червено, останалата течност в
касетата е достатъчна за около още 3 цикъла. Когато индикаторът за ниво мига в
червено, касетата трябва да бъде сменена - на около 4 седмици при ежедневна
употреба.
След като сте натиснали повдигащия бутон (14), за да отворите корпуса,
почакайте няколко секунди, преди да извадите използваната касета, за да
избегнете каквото и да било капене. Преди да изхвърлите използваната касета,
уверете се, че сте затворили отворите, като използвате капачето от новата касета,
защото използваната касета съдържа замърсен почистващ разтвор.
Хигиенизиращите почистващи касети съдържат етанол или изопропанол (вижте
касетата за спецификации), който започва бавно да се изпарява, след като
пълнителят бъде отворен. В случай че не се използва ежедневно, касетата трябва
да се сменя на всеки 8 седмици, за да се осигури оптимална дезинфекция.
Почистващата касета също така съдържа смазочни течности за бръснещата
система, които могат да оставят остатъчни петна върху външната рамка и
почистващата камера на C&C. Тези петна могат да бъдат премахнати лесно с
нежно избърсване с влажна кърпа.
Аксесоари
Braun препоръчва да сменяте бръснещата глава на всеки 18 месеца, за да
поддържате максималната производителност на Вашата самобръсначка.
Налични при Вашия търговец или в сервизните центрове на Braun:
• Бръснеща глава: 52S/52B
• Почистваща касета: CCR
• Почистващ спрей за самобръсначки Braun
96
91092674_Series_5-2cc_wd_CEEMEA_S6-132.indd 9691092674_Series_5-2cc_wd_CEEMEA_S6-132.indd 96 23.11.16 15:4123.11.16 15:41
Page 97

Информация за защита на околната среда
Този продукт съдържа батерии и/или електрически отпадъци,
които подлежат на рециклиране. С цел опазване на околната среда не
изхвърляйте уреда с битовите отпадъци, а го предавайте в пунктовете за
събиране на електрически отпадъци във Вашата държава.
Почистващата касета може да бъде изхвърлена с редовните битови отпадъци.
Подлежи на промени без предизвестие.
За електрическите характеристики вижте надписите върху комплекта кабели.
Отстраняване на проблеми
Проблем Възможна причина Решение
SHAVER
Самобръснач-
ката не се
зарежда
напълно и продължава да
мига.
Зареждането
не започва при
свързване към
контакта.
Неприятна
миризма от главата на самобръсначката.
Околната температура
е извън позволените
граници.
1. Понякога зареждането започва със
закъснение (напр.
след дълъг период на
съхранение).
2. Околната температура е извън позволените граници.
3. Специалният комплект кабели не е
включен правилно.
1. Главата на самобръсначката е почиствана
с вода.
2. Почистващата касета
е употребявана
повече от 8 седмици.
Препоръчителната околна температура за зареждане е от 5 °C до 35 °C.
1. Изчакайте няколко минути, ако
зареждането не започне автоматично.
2. Препоръчителната околна температура за зареждане е от 5 °C до 35 °C.
3. Специалният комплект кабели
трябва да щракне.
1. При почистване на главата на самобръсначката само с вода, използвайте гореща вода и от време на
време някакъв течен сапун (без
абразивни вещества). Свалете
бръснещата глава, за да я оставите
да се изсуши.
2. Сменяйте почистващата касета наймалко веднъж на 8 седмици.
97
91092674_Series_5-2cc_wd_CEEMEA_S6-132.indd 9791092674_Series_5-2cc_wd_CEEMEA_S6-132.indd 97 23.11.16 15:4123.11.16 15:41
Page 98

Работните
показатели на
батерията са
намалели значително.
1. Мрежата и бръсначите са изхабени,
което изисква повече
заряд за всяко бръснене.
2. Бръснещата глава е
редовно почиствана
с вода, но не е смазвана.
Работата при
бръснене е
намаляла значително.
Главата на
самобръсначката е влажна.
1. Мрежата и бръсначите са изхабени.
2. Системата за бръснене е задръстена.
1. Времето за подсушаване след автоматичното почистване е
било твърде кратко.
2. Отводняването на
станцията за
почистване и зареждане е задръстено.
CLEAN&CHARGE STATION
Почистването
не стартира при
натискане на
бутона „Старт“.
1. Самобръсначката не
е поставена правилно в станцията за
почистване и зареждане.
2. Почистващата касета
не съдържа достатъчно почистваща
течност (дисплеят
мига в червено).
Увеличена е
консумацията
на почистваща
Отводняването на станцията за почистване и
зареждане е запушено.
течност.
1. Сменете бръснещата глава.
2. Ако самобръсначката е почиствана
редовно с вода, нанасяйте капка
леко машинно масло върху мрежата
веднъж седмично за смазване.
1. Сменете бръснещата глава.
2. Потопете бръснещата глава в
гореща вода с капка препарат за
миене на съдове. След това я
почистете добре и я измийте. След
като изсъхне, поставете капка леко
машинно масло върху мрежата.
1. Почистете веднага след бръснене,
за да има достатъчно време за подсушаване.
2. Почистете отводняването с дървена
клечка за зъби.
1. Поставете самобръсначката в станцията за почистване и зареждане и
я натиснете към задната страна на
станцията (контактите на самобръсначката трябва да се изравнят с
контактите на станцията).
2. Поставете нова почистваща касета.
Натиснете отново бутона „Старт“.
– Почистете отводняването с дървена
клечка за зъби.
– Редовно избърсвайте контейнера,
за да почистите.
98
91092674_Series_5-2cc_wd_CEEMEA_S6-132.indd 9891092674_Series_5-2cc_wd_CEEMEA_S6-132.indd 98 23.11.16 15:4223.11.16 15:42
Page 99

Гаранция
Нашите продукти са с гаранция 2 години, считано от датата на покупката.
В рамките на гаранционния срок безплатно се отстраняват дефектите в
материалите и производството чрез поправка, смяна на части или целия уред, по
преценка на сервизния център. Тази гаранция се признава във всички страни,
където Braun и неговият изключителен дистрибутор продават този уред и няма
ограничение за внос или официална разпоредба не забранява да се извърши
предвиденото гаранционно обслужване.
Гаранцията не покрива: повреди от неправилна употреба (работа при
неподходящо напрежение, включване в неподходящ източник на електрически
ток, счупване); износване и незначителни дефекти, които не пречат на нормалната
работа на уреда. Гаранцията не се признава при поправка на уреда от
неоторизирани лица или ако не са използвани оригинални резервни части на
Braun. Гаранцията е валидна при правилно попълнени: дата на покупката, печат и
подпис в гаранционната карта.
За всички рекламации, възникнали в гаранционния срок, изпратете уреда както и
гаранционната му карта в най-близкия сервиз на Braun. За справки 0800 11 003 –
национален телефон на БГ сервиз без увеличение на телефонната услуга или
www.bgs.bg.
99
91092674_Series_5-2cc_wd_CEEMEA_S6-132.indd 9991092674_Series_5-2cc_wd_CEEMEA_S6-132.indd 99 23.11.16 15:4223.11.16 15:42
Page 100

Русский
Наши продукты созданы, чтобы удовлетворять наивысшим стандартам качества,
функциональности и дизайна. Благодарим за доверие качеству Braun и надеемся,
что вам понравится ваш новый продукт Braun.
Внимательно ознакомьтесь с приведенными инструкциями – они содержат
информацию о безопасной эксплуатации. Храните их для дальнейшего
использования.
Внимание
Прибор оборудован специальным кабелем питания со встроенным безопасным
источником питания сверхнизкого напряжения. Не меняйте и не повреждайте
какие-либо элементы во избежание риска поражения электрическим током.
Используйте только специальный кабель питания, поставляемый вместе с
прибором.
Если на прибор нанесена маркировка 492, его можно использовать
со всеми источниками питания Braun с маркировкой 492-XXXX.
Прибор можно промывать под проточной водой и использовать в
ванне и душе. Из соображений безопасности это можно делать
только тогда, когда прибор отключен от кабеля питания.
Перед использованием бритвы в воде отключите ее от сети питания.
Использовать прибор с поврежденной бреющей сеткой или кабелем
запрещено.
Этот прибор может использоваться детьми в возрасте от 8 лет, лицами с
ограниченными физическими, сенсорными или умственными возможностями и
лицами, не имеющими достаточного опыта и знаний, только если они находятся
под присмотром или получили необходимые инструкции по безопасному
использованию прибора и понимают сопряженные с применением последнего
риски. Не разрешайте детям играть с прибором. Детям до 8 лет и находящимся
без присмотра взрослых запрещается самостоятельно чистить прибор и
пользоваться им.
Блок подзарядки и очистки Clean&Charge
Для предотвращения утечки чистящей жидкости убедитесь, что блок
подзарядки и очистки Clean&Charge размещен на горизонтальной поверхности.
При установленном чистящем картридже избегайте наклонов, резких движений
или транспортировки станции, иначе возможна утечка чистящей жидкости из
картриджа. Не ставьте станцию в зеркальный шкафчик, на отполированную или
лакированную поверхность.
Чистящий картридж содержит легковоспламеняющуюся жидкость: держите его
вдали от источников возгорания. Исключите воздействие прямого солнечного
света, не курите рядом с картриджем и не храните его вблизи горячих
поверхностей.
Не заправляйте картридж; используйте только оригинальные сменные
картриджи производства Braun.
100
91092674_Series_5-2cc_wd_CEEMEA_S6-132.indd 10091092674_Series_5-2cc_wd_CEEMEA_S6-132.indd 100 23.11.16 15:4223.11.16 15:42
 Loading...