

Page 1

Series3
lock
o
390cc
i
r
e
e
s
i
r
e
S
e
s
3
S
3
n
o
f
f
full
low
clean
www.braun.com/register
l
p
e
r
1
6
m
o
390cc
a
c
e
s
h
t
n
Type 5772
Page 2
English 6
Français 10
Polski 15
âesk˘ 20
Slovensk˘ 24
Magyar 28
Hrvatski 32
Slovensko 36
Türkçe 40
кЫТТНЛИ 44
ì͇ªÌҸ͇ 50
61
Braun Infolines
GB
0800 783 70 10
IRL
1 800 509 448
F
0 800 944 802
B
0 800 14 592
PL
0 801 127 286
0 801 1 BRAUN
221 804 335
CZ
02/5710 1135
SK
(06-1) 451-1256
H
01/6690 330
HR
SLO
080 2822
0 212 473 75 85
TR
RUS
8 800 200 20 20
UA
+ 38 044 428 65 05
HK
852-25249377
(Audio Supplies Company Ltd.)
Braun GmbH
Frankfurter Straße 145
61476 Kronberg/Germany
98970016/IV-09
GB/F/PL/CZ/SK/H/HR/SLO/TR/RUS/UA/Arab
www.service.braun.com
Page 3
1
washable
lock
full
low
clean
390cc
S
e
r
i
e
s
3
S
e
r
i
e
s
3
2
3
4
5
6
7
8
9
10
lock
S
S
o
n
STOP
e
e
clean
r
1
6
390cc
i
e
r
s
i
e
r
s
3
3
o
f
f
full
low
l
a
p
c
e
e
s
m
h
t
o
n
11
s
e
n
s
i
t
i
v
r
e
1
p
6
l
a
m
c
e
o
n
t
h
3
s
e
Page 4
on
off
full
on
off
washable
on
off
oil
A
lock
lock
90°
B
full
lock
full
click!
4
lock
lock
Page 5
•••
•••
1
2
lo
ck
fu
ll
lo
w
clea
n
390
cc
on
off
full
clean
390cc
lo
c
k
full
low
clean
390cc
C
lo
c
k
full
low
c
lean
390
cc
1
2
new
3
4
5
3
9
0
c
c
h
t
s
n
o
m
6
1
e
c
a
l
r
p
e
c
le
an
lo
w
fu
ll
lock
a
•••
min
b
•••
min
c
min
old
new
m
o
6
n
1
t
h
s
r
e
p
l
a
c
e
m
o
6
n
1
t
h
s
r
e
p
l
a
c
e
5
m
o
n
8
t
1
h
s
r
e
p
l
a
e
c
m
o
6
n
1
t
h
s
r
e
p
l
a
c
e
Page 6

English
Our products are designed to meet the
highest standards of quality, functionality and
design. We hope you enjoy your new Braun
Shaver.
Warning
Your shaving system is provided with a
special cord set, which has an integrated
Safety Extra Low Voltage power supply. Do
not exchange or tamper with any part of it,
otherwise there is risk of an electric shock.
This appliance is not intended for use by
children or persons with reduced physical or
mental capabilities, unless they are given
supervision by a person responsible for their
safety. In general, we recommend that you
keep the appliance out of reach of children.
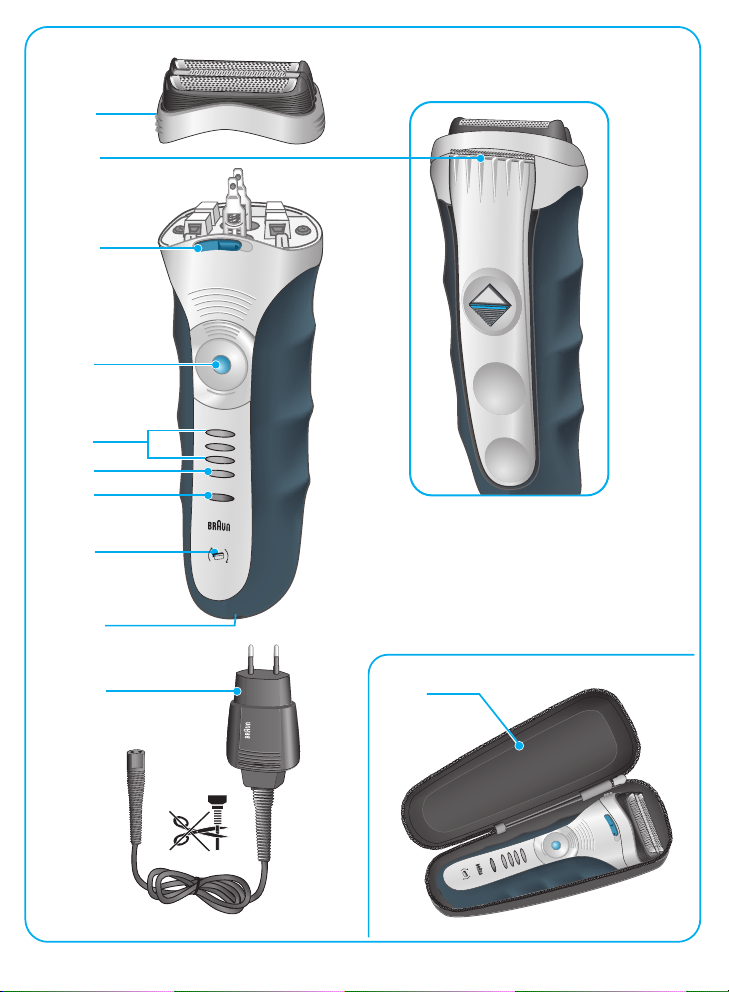
Description
1 Foil & Cutter cassette
2 Long hair trimmer
3 Precision setting switch («lock»)
4 On/off switch
5 Charging lights (green)
6 Low-charge light (red)
7 Cleaning light (yellow)
8 Replacement light for shaving parts
9 Shaver power socket
10 Special cord set
11 Travel pouch
Charging
The best environmental temperature for
charging is between 15 °C to 35 °C. Do not
expose the shaver to temperatures higher
than 50 °C for extended periods of time.
Using the special cord set (10), connect the
•
shaver to an electrical outlet with the motor
switched off.
When charging for the first time, leave the
•
shaver to charge continuously for 4 hours.
Subsequent charges will take about 1 hour.
A full charge provides up to 45 minutes of
•
cordless shaving time depending on your
beard growth.
6
Shave without the cord. With normal use
•
the shaver will be charged automatically
after every cleaning in the Clean&Renew™
(see «C Clean&Renew™»).
Maximum battery capacity will only be
•
reached after several charging/discharging
cycles.
5-minute quick charge (with the special
•
cord set (10)) is sufficient for a shave.
If the rechargeable batteries are discharged,
•
you may also shave by connecting the
shaver to an electrical outlet via the special
cord set.
Charging lights (5)
The green charging lights show the charge
status of the batteries. The green charging
light blinks when the shaver is being charged
or switched on. When the battery is fully
charged, all green charging lights shine
permanently, provided the shaver is switched
on or connected to an electrical outlet.
Low-charge light (6)
The red low-charge light flashes when the
battery is running low.
You should be able to finish your shave.
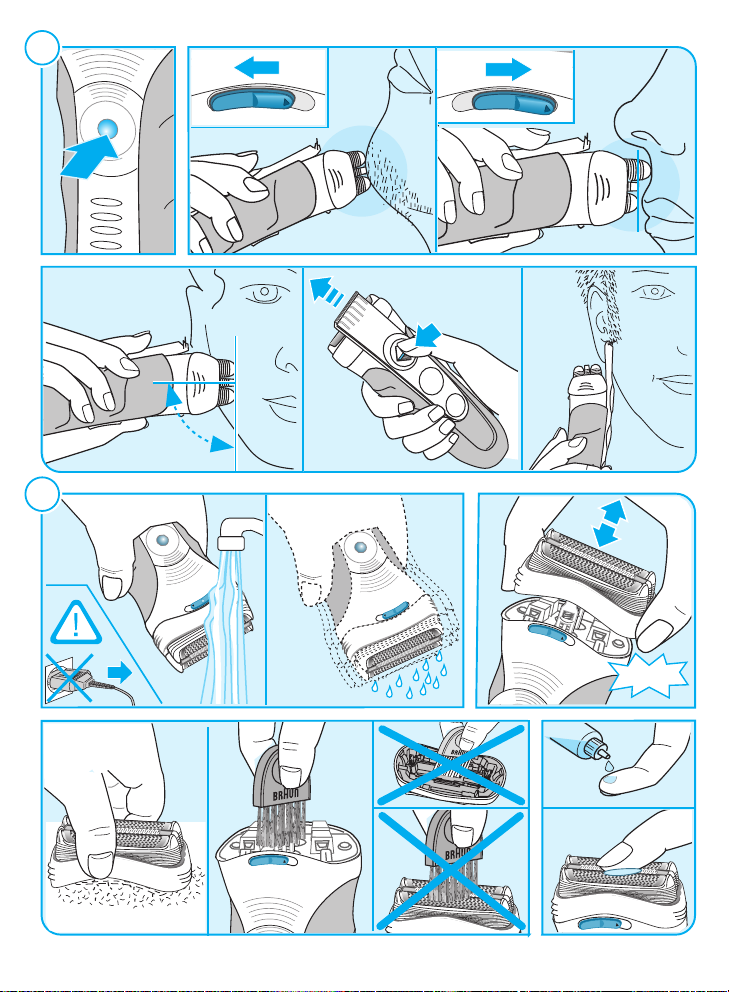
A Shaving
Press the on/off switch (4) to operate the
shaver (picture).
The flexible shaving foils automatically adjust
to every contour of your face.
Long hair trimmer (2)
To trim sideburns, moustache or beard, slide
the long hair trimmer upwards.
Precision setting switch («lock») (3)
For precise handling in hard to shave areas
(e.g. under the nose) slide the switch (3) to
the right to position «lock». The centre trimmer and one foil will be lowered.
Page 7
Tips for the perfect shave
For best results, Braun recommends you
follow 3 simple steps:
1. Always shave before washing your face.
2. At all times, hold the shaver at right
angles (90°) to your skin.
3. Stretch your skin and shave against the
direction of your beard growth.
B Keeping your shaver in top
shape
Cleaning indicator
Your shaver should be cleaned daily in the
Clean&Renew™, and certainly when the
yellow cleaning light (7) shines constantly
after shaving. If this is not done, the yellow
light will go out after some time. The shaver’s
electronics will then assume it has been
cleaned manually and a new calculation of
the time when the next cleaning is required
will be started. During the cleaning process in
the Clean&Renew™ the yellow light will flash
and will go off after approx. 4 hours when
cleaning is finished.
Automatic cleaning
Once the shaver is put into the
Clean&Renew™, it is cleaned automatically
(see «C Clean&Renew™»).
Manual cleaning is recommended only when
the Clean&Renew™ is not available, e. g.
when travelling.
Manual cleaning
The shaver head is suitable for
cleaning under running tap water.
Warning: Detach the shaver from the
power supply before cleaning the
shaver head in water.
Regular cleaning ensures better shaving
performance. Rinsing the shaver head under
running water after each shave is an easy
and fast way to keep it clean:
Switch the shaver on (cordless) and rinse
•
the shaver head under hot running water.
You may use liquid soap without abrasive
substances. Rinse off all foam and let the
shaver run for a few more seconds.
Next, switch off the shaver, remove the
•
shaver Foil & Cutter cassette (1) and let it
dry.
If you regularly clean the shaver under
•
water, then once a week apply a drop of
light machine oil onto the long hair trimmer
(2) and shaver Foil & Cutter cassette (1).
Alternatively, you may clean the shaver using
a brush:
Switch off the shaver. Remove the shaver
•
Foil & Cutter cassette and tap it out on a
flat surface.
Using a brush, clean the inner area of the
•
shaver head. However, do not clean the
shaver Foil & Cutter cassette with a brush
as this may damage it.
Replacement light for shaving parts/Reset
To maintain 100% shaving performance,
replace the shaver Foil & Cutter cassette (1),
when the replacement light for shaving parts
(8) comes on (after about 18 months) or when
worn.
The replacement light will remind you during
the next 7 shaves to replace the foil and
cutter cassette. Then the shaver will automatically reset.
After you have replaced the Foil & Cutter
cassette (1), press the on/off switch (4) for at
least 5 seconds to reset the counter.
While doing so, the replacement light blinks
and goes off when the reset is complete. The
manual reset can be done at any time.
Preserving the batteries
In order to maintain the optimum capacity
of the rechargeable batteries, the shaver
has to be fully discharged (by shaving) every
6 months approximately. Then recharge the
shaver to full capacity.
7
Page 8
Environmental notice
This product contains rechargeable
batteries. In the interest of protecting
the environment, please do not
dispose of the product in the household waste at the end of its useful life.
Disposal can take place at a Braun Service
Centre or at appropriate collection sites
provided in your country.
C Clean&Renew™
Braun Clean&Renew™ has been developed
for cleaning, charging and storing your shaver.
Clean your shaver daily in the Clean&Renew™.
During the automated cleaning process, the
shaver is switched on and off at intervals
to obtain best cleaning results. Since the
specially formulated cleaning fluid contains a
small amount of oil, the cleaning procedure
also fulfils the lubrication needs of the shaver.
Important
Only use the power supply cord set
•
supplied with the shaver.
In order to avoid any leakage of the
•
cleaning fluid, place the appliance on a flat,
stable surface. Do not tip, move suddenly
or transport in any way if a cleaning
cartridge is installed.
Do not place the appliance in a mirror
•
cabinet, nor store it over radiators, nor
place it on polished or lacquered surfaces.
Do not expose to direct sunlight.
The appliance contains highly flammable
•
liquid. Keep it away from sources of
ignition. No smoking.
Keep out of reach of children. Do not refill
•
cartridge. Use only original Braun refill
cartridge.
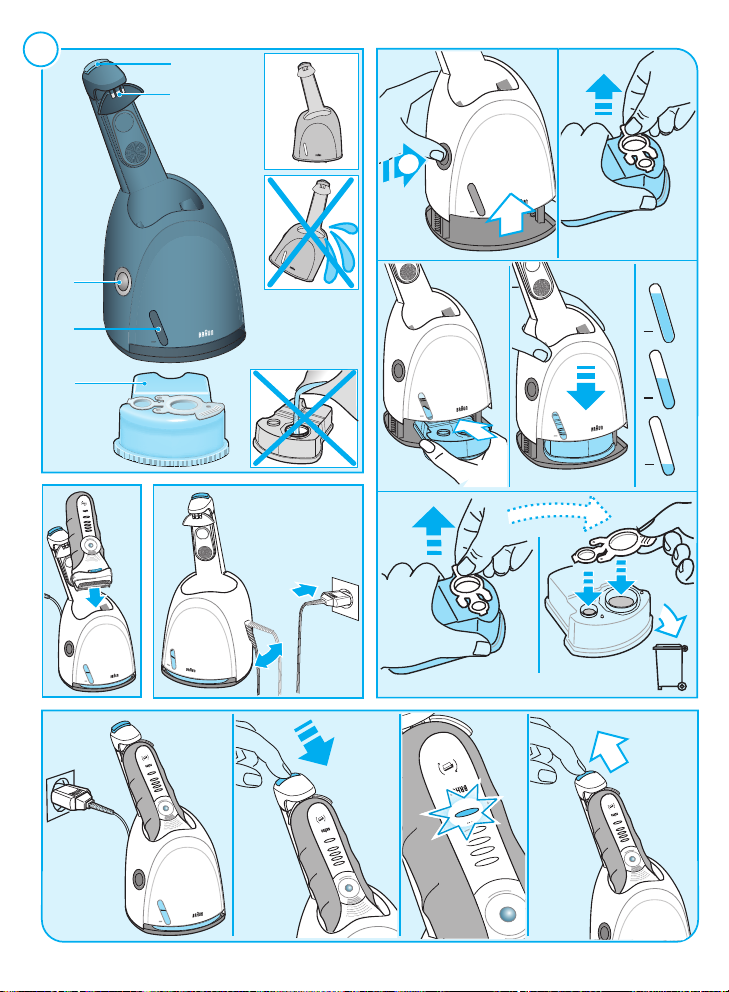
Description
1 Start/release button
2 Contact bow
3 Lift button for cartridge exchange
4 Level indicator
5 Cleaning cartridge
8
Before using Clean&Renew™
Installing the cartridge
•
Press the lift button (3) to open the housing.
•
Hold the cartridge down on a flat, stable
surface (e.g. table). Carefully remove the lid
from the cartridge. Slide the cartridge into
the base as far as it will go.
•
Slowly close the housing by pushing it
down until it locks.
Replacing the cartridge
After having pressed the lift button to open
the housing, wait for a few seconds before
removing the used cartridge.
Before discarding the used cartridge, make
sure to close the openings using the lid of the
new cartridge, since the used cartridge will
contain contaminated cleaning solution.
The used cartridge can be disposed in the
household waste.
Operating your
Clean&Renew™
Connect your Clean&Renew™ with the
•
cord set to the mains electricity supply.
The special socket at the back is adjustable to save space. After each shave,
switch the shaver off and put it into the
Clean&Renew™, upside down and with
the front showing.
Push the start/release button (1) to lock
•
and connect the shaver. The cleaning
process will start. The yellow light on the
shaver will flash during the complete
process (approx. 2 minutes cleaning, min.
4 hours drying).
Do not interrupt the cleaning process, as
•
it leaves the shaver wet and not fit for use.
If interruption is needed nonetheless, press
the start/release button (1).
When cleaning is finished, the yellow light
•
will go off and the shaver is ready for use.
To release it, push the start/release button.
A cleaning cartridge should be sufficient for
•
about 30 cleaning cycles. When the level
indicator (4) has reached the «min» mark,
the remaining fluid in the cartridge is
Page 9
sufficient for about 5 more cleaning cycles.
Then the cartridge should be replaced,
when used daily approx. every 4 weeks.
The hygienic cleaning solution cartridge
•
contains alcohol which, once opened,
will naturally evaporate slowly into the
surrounding air. Each cartridge, if not used
daily should be replaced after approx.
8 weeks.
The cleaning cartridge also contains
•
lubricates, which may leave residual marks
on the shaver head after cleaning.
However, these marks can be removed
easily by wiping gently with a cloth or soft
tissue paper.
Clean the housing from time to time with a
•
damp cloth, especially the opening where
the shaver rests.
Accessories
Available at your dealer or Braun Service
Centres:
Foil & Cutter cassette: 32S
•
Cleaning cartridge Clean&Renew™: CCR
•
Subject to change without notice.
This product conforms to the European
Directives EMC 2004/108/EC and Low
Voltage 2006/95/EC.
Guarantee
We grant 2 years guarantee on the product
commencing on the date of purchase.
Within the guarantee period we will eliminate,
free of charge, any defects in the appliance
resulting from faults in materials or workmanship, either by repairing or replacing the
complete appliance as we may choose.
This guarantee extends to every country
where this appliance is supplied by Braun or
its appointed distributor.
This guarantee does not cover: damage
due to improper use, normal wear and tear
(e.g. shaver Foil & Cutter cassette) as well
as defects that have a negligible effect on
the value or operation of the appliance.
The guarantee becomes void if repairs are
undertaken by unauthorised persons and if
original Braun parts are not used.
To obtain service within the guarantee period,
hand in or send the complete appliance with
your sales receipt to an authorised Braun
Customer Service Centre.
For UK only:
This guarantee in no way affects your rights
under statutory law.
For electric specifications, see printing on the
special cord set.
Please do not dispose of the product
in the household waste at the end
of its useful life. Disposal can take
place at a Braun Service Centre or at
appropriate collection points provided in
your country.
9
Page 10

Français
Nos produits sont conçus pour répondre
aux normes les plus élevées en matière de
qualité, fonctionnalité et design. Nous espérons que vous apprécierez votre nouveau
rasoir Braun.
Attention
Votre rasoir est livré avec un cordon d’alimentation basse tension. Vous ne devez pas
remplacer ou modifier ses composants, afin
d’éviter tout risque d’accident.
Cet appareil n’est pas destiné à des enfants
ou des personnes aux capacités physiques,
sensorielles ou mentales réduites à moins
qu’elles ne soient sous la surveillance d’un
adulte responsable de leur sécurité. Nous
recommandons de garder l’appareil hors de
portée des enfants.
Description
1 Cassette de rasage (grille et bloc-
couteaux)
2 Tondeuse rétractable pour poils longs
3 Loquet de réglage de précision (« lock »)
4 Bouton marche/arrêt (« on/off »)
5 Témoins lumineux de charge (vert)
6 Témoin lumineux de décharge (rouge)
7 Témoin lumineux de nettoyage (jaune)
8 Indicateur lumineux de remplacement de
la cassette de rasage
9 Prise d’alimentation du rasoir
10 Cordon d’alimentation
11 Etui
Mise en charge du rasoir
La température ambiante idéale pour charger
le rasoir est comprise entre 15 °C et 35°C.
N’exposez pas votre rasoir à des températures supérieures à 50 °C pendant une
période prolongée.
En utilisant le cordon d’alimentation (10),
•
branchez le rasoir moteur arrêté sur une
prise électrique.
10
Lors de la première charge, laissez le rasoir
•
se charger pendant 4 heures. Les charges
suivantes prendront environ une heure.
Une pleine charge procure jusqu’à 45
•
minutes d’autonomie en mode rasage qui
varie en fonction de l’épaisseur et de la
densité de votre barbe.
Rasez-vous sans le cordon d’alimentation.
•
Lors de l’utilisation du système de
nettoyage Clean&Renew™, le rasoir se
rechargera automatiquement (voir
« C Système de charge autonettoyant
Clean&Renew™ »).
La capacité maximale de la batterie ne
•
sera atteinte qu’après plusieurs cycles de
charge/décharge.
Une charge rapide de 5 minutes (avec le
•
cordon d’alimentation spécial (10)) est
suffisante pour un rasage.
Si les batteries sont déchargées, vous
•
pouvez aussi vous raser en branchant le
rasoir à une prise électrique via le cordon
d’alimentation.
Témoins lumineux de charge (5)
Les témoins lumineux de charge indiquent le
niveau de charge des batteries. Le témoin
lumineux vert de charge clignote lorsque le
rasoir est en cours de charge ou en marche.
Quand la batterie est complètement chargée,
tous les témoins lumineux verts de charge
sont allumés, que le rasoir soit en marche ou
branché sur une prise électrique.
Témoin lumineux de décharge (6)
Le voyant lumineux rouge de faible charge
clignote lorsque la batterie doit être
rechargée.
La charge restante est normalement
suffisante pour que vous puissiez terminer
votre rasage
A Rasage
Appuyez sur le bouton marche/arrêt
« on/off » (4) pour mettre en marche le rasoir
(cf. schéma). Les grilles de rasage souples
s’adaptent automatiquement aux contours
de votre visage.
Page 11
Tondeuse rétractable pour poils longs (2)
Pour tailler les pattes, la moustache ou la
barbe, faites glisser la tondeuse rétractable
vers le haut.
Loquet de réglage de précision (« lock ») (3)
Pour une utilisation précise dans les zones
difficiles à atteindre (par exemple, sous le
nez), poussez le loquet (3) vers la droite pour
que « lock » se retrouve en position centrale.
La midi tondeuse de la cassette de rasage et
une de ses grilles seront alors abaissées.
ment (voir «C Système de charge autonettoyant Clean&Renew™»). Le nettoyage
manuel est recommandé seulement si le
système Clean&Renew™ n’est pas disponible, par exemple pendant un voyage.
Nettoyage manuel
La tête du rasoir peut être lavée sous
l’eau chaude courante.
Attention : débranchez toujours le
rasoir de la prise électrique secteur
avant de nettoyer la tête sous l’eau.
Conseils pour un rasage parfait
Pour un résultat de rasage optimal, Braun
vous recommande de suivre 3 étapes
simples :
1. Rasez-vous toujours avant de vous
laver le visage.
2. Tenez toujours le rasoir à angle droit
(90°) par rapport à la peau.
3. Tendez votre peau et rasez-vous dans
le sens opposé à la pousse du poil.
B Conserver votre rasoir en
parfait etat
Indicateur de nettoyage
Nous vous recommandons de nettoyer votre
rasoir après chaque rasage dans le système
autonettoyant Clean&Renew™, et au plus
tard quand le témoin lumineux de nettoyage
(7) s’allume de façon continue. Si aucun
nettoyage n’est fait, le témoin lumineux
s’éteindra après un certain temps.
Le système électronique du rasoir supposera
que le rasoir a été nettoyé manuellement
et un nouveau calcul du temps jusqu’au
prochain nettoyage nécessaire sera effectué.
Pendant le cycle de nettoyage dans le
système Clean&Renew™, le témoin lumineux
jaune clignotera et s’éteindra après environ
4 heures, à la fin du cycle de nettoyage.
Nettoyage automatique
Dès que le rasoir est mis dans le système
Clean&Renew™, il est nettoyé automatique-
Un nettoyage régulier assure une meilleure
performance de rasage. Nettoyer la tête
du rasoir sous l’eau après chaque rasage
permet de garder le rasoir propre simplement
et rapidement :
Mettez en marche le rasoir (sans cordon) et
•
rincez la tête de rasage sous l’eau chaude.
Vous pouvez utiliser du savon liquide ne
contenant pas de substances abrasives.
Rincez toute la mousse et laissez le rasoir
en marche pendant quelques secondes
supplémentaires.
Ensuite, arrêtez le rasoir, retirez la cassette
•
de rasage (1) et laissez la sécher.
Si vous nettoyez régulièrement votre rasoir
•
sous l’eau, appliquez une fois par semaine
une goutte d’huile de machine à coudre sur
la tondeuse rétractable (2) et sur la cassette
de rasage (1).
Vous pouvez également nettoyer le rasoir en
utilisant une brossette :
Arrêtez le rasoir. Enlevez la cassette de
•
rasage et tapotez-la légèrement sur une
surface plane.
A l’aide de la brossette, nettoyez l’intérieur
•
de la tête du rasoir. Cependant, ne nettoyez
pas la cassette de rasage avec la brossette
car cela risquerait de l’endommager.
Témoin lumineux de remplacement de la
cassette de rasage / réinitialisation
Pour conserver 100% de la performance de
votre rasoir, remplacez la cassette de rasage
11
Page 12

(1) quand le témoin lumineux de remplacement des pièces de rasage (8) s’allume (après
environ 18 mois) ou quand elle est usée.
Le témoin lumineux de remplacement vous
rappellera lors des 7 rasages suivants qu’il
faut remplacer la cassette de rasage. Ensuite,
le rasoir réinitialisera automatiquement
l’affichage.
Après avoir remplacé la cassette de rasage
(1), appuyez sur le bouton marche/arrêt (4)
pendant au moins 5 secondes afin de
remettre manuellement le compteur à zéro.
Pendant ce temps là, le témoin lumineux
de remplacement clignote et s’éteint quand
la réinitalisation est faite. La réinitialisation
manuelle peut être faite à n’importe quel
moment.
Conservation des batteries
Pour maintenir la capacité optimale des
batteries rechargeables, tous les 6 mois
environ déchargez complètement, le rasoir
en l’utilisant sans le remettre en charge entre
chaque rasage ; ensuite recharger le rasoir au
maximum.
Respect de l’environnement
Ce produit contient des batteries
rechargeables. Dans un souci de
protection de l’environnement, veuillez
ne pas jeter le produit avec les ordures
ménagères au terme de son cycle de vie.
Vous pouvez remettre ce produit aux centres
service agréés Braun ou aux points de
collecte dans votre pays.
C Système de charge auto-
nettoyant Clean&Renew™
Le système Clean&Renew™ de Braun a été
conçu pour nettoyer, charger et ranger votre
rasoir. Nettoyez votre rasoir quotidiennement
dans le système Clean&Renew™.
Pendant le cycle de nettoyage automatique,
la rasoir se met en marche ponctuellement
12
pour obtenir de meilleurs résultats. Le liquide
de nettoyage, de composition spécifique
contient une petite quantité d’huile qui assure
la lubrification du rasoir.
Important
Utilisez uniquement le cordon d’alimenta-
•
tion livré avec le rasoir.
Afin d’éviter tout débordement du liquide
•
de nettoyage, placez le système sur une
surface plane et stable. Ne pas l’incliner, le
bouger brusquement ou le transporter de
quelque façon que ce soit quand il y a une
cartouche de liquide de nettoyage en place.
Ne pas mettre le système dans une armoire
•
de toilette, ne pas le ranger au dessus d’un
radiateur, ni le placer sur une surface polie
ou vernie. Ne l’exposez pas directement à
la lumière du soleil.
Le système contient du liquide hautement
•
inflammable. Gardez le à l’écart des
sources d’ignition. Ne fumez pas à
proximité.
Gardez le hors de portée des enfants.
•
Ne remplissez pas la cartouche. Utilisez
uniquement les cartouches de nettoyage
originales Braun.
Description
1 Bouton mise en marche / ouverture
(« start / release »)
2 Prise de connexion rasoir
3 Bouton poussoir d’ouverture boîtier
pour remplacer la cartouche
4 Indicateur du niveau de liquide de
nettoyage
5 Cartouche de liquide de nettoyage
Avant d’utiliser le système Clean&Renew™
Installation de la cartouche
Appuyez sur le bouton poussoir (3) pour
•
ouvrir le boîtier.
Posez la cartouche sur une surface plate et
•
stable (par exemple, une table). Retirez
doucement l’opercule de la cartouche puis
l’installer en la poussant jusqu’en butée
Page 13
dans la base du système autonettoyant.
•
Abaisser le boîtier supérieur du
Clean&Renew™ jusqu’à son verrouillage
pour le fermer.
Remplacement de la cartouche
Après avoir appuyé sur le bouton poussoir (3)
pour ouvrir le boîtier, attendez quelques
secondes avant de retirer la cartouche
usagée.
Avant de jeter la vieille cartouche qui contient
du liquide de nettoyage usagé, refermez-la
en utilisant l’opercule de la nouvelle cartouche. La cartouche de nettoyage usagée
peut être jetée avec les ordures ménagères.
Installation de votre système
autonettoyant Clean&Renew™
Branchez votre système Clean&Renew™
•
avec le cordon d’alimentation à une prise
électrique. Le connecteur à l’arrière du
boîtier est réglable pour gagner de la place.
Après chaque rasage, arrêtez le rasoir et
mettez le dans le système Clean&Renew™,
la tête de rasage vers le bas et la face
avant du rasoir vers vous.
Appuyez sur le bouton marche/ouverture (1)
•
pour bloquer et connecter le rasoir. Le cycle
de nettoyage commence. Le témoin lumineux jaune du rasoir clignotera pendant la
durée du nettoyage (environ 2 minutes de
nettoyage et 4 heures de séchage au
moins).
N’interrompez pas le cycle de nettoyage,
•
car le rasoir resterait mouillé et ne sera pas
prêt à être utilisé. Si vous devez cependant
interrompre le cycle, appuyez sur le bouton
marche/ouverture (1).
Lorsque le nettoyage est terminé, le témoin
•
lumineux jaune s’éteint et le rasoir est prêt
à être utilisé. Pour libérer et sortir le rasoir,
appuyez sur le bouton marche/ouverture.
Une cartouche de liquide de nettoyage
•
assure environ 30 cycles de nettoyage.
Quand l’indicateur de niveau du liquide de
nettoyage (4) atteint le niveau « min », le
liquide restant est suffisant pour encore
5 cycles de nettoyage. Ensuite, la cartouche
doit être remplacée (remplacement environ
toutes les 4 semaines pour une utilisation
quotidienne).
La cartouche de solution hygiénique et
•
nettoyante contient de l’alcool, dont une
partie s’évaporera naturellement et lentement. Toute cartouche, si elle n’est pas
utilisée quotidiennement, sera à remplacer
après environ 8 semaines.
La cartouche de liquide nettoyant contient
•
un lubrifiant qui peut éventuellement laisser
quelques traces résiduelles sur la tête du
rasoir après le nettoyage. Cependant, ces
traces peuvent être enlevées facilement, en
essuyant à l’aide d’une lingette de tissu ou
de papier.
De temps en temps, nettoyez le bac de
•
nettoyage du système autonettoyant
Clean&Renew avec un chiffon humide.
Pièces de rechange
Pièces de rechange disponibles auprès de
votre revendeur ou de votre centre service
agréé Braun:
Cassette de rasage (Foil & Cutter): 32S
•
Cartouche de liquide de nettoyage
•
Clean&Renew™: CCR
Sujet à toute modification sans préavis.
Cet appareil est conforme aux normes
Européennes fixées par les Directives
2004/108/EC et la directive Basse
Tension 2006/95/EC.
Voir les spécifications électriques
mentionnées sur l’adaptateur basse tension.
A la fin de vie de votre appareil,
veuillez ne pas le jeter avec vos
déchets ménagers. Remettez-le à
votre Centre Service agréé Braun
ou déposez-le dans des sites de récupération
appropriés conformément aux réglementations locales ou nationales en vigueur.
13
Page 14

Garantie
Nous accordons une garantie de 2 ans sur
ce produit, à partir de la date d‘achat.
Pendant la durée de la garantie, Braun
prendra gratuitement à sa charge la réparation des vices de fabrication ou de matière en
se réservant le droit de décider si certaines
pièces doivent être réparées ou si l‘appareil
lui-même doit être échangé.
Cette garantie s‘étend à tous les pays où cet
appareil est commercialisé par Braun ou son
distributeur exclusif.
Cette garantie ne couvre pas : les dommages
occasionnés par une utilisation inadéquate,
l’usure normale (par exemple, grille et bloccouteaux) ainsi que les défauts d’usures
qui ont un effet négligeable sur la valeur
ou l’utilisation de l’appareil. Cette garantie
devient caduque si des réparations ont été
effectuées par des personnes non agréées
par Braun et si des pièces de rechange ne
provenant pas de Braun ont été utilisées.
Pour toute réclamation intervenant pendant
la période de garantie, retournez ou rapportez l‘appareil ainsi que l‘attestation de
garantie à votre revendeur ou à un Centre
Service Agréé Braun.
Appelez au 08.10.30.97.80 (ou se référez à
http://www.braun.com/global/contact/
servicepartners/europe.country.html) pour
connaitre le Centre Service Agrée Braun le
plus proche de chez vous.
Clause spéciale pour la France
Outre la garantie contractuelle exposée cidessus, nos clients bénéficient de la garantie
légale des vices cachés prévue aux articles
1641 et suivants du Code civil.
14
Page 15

Polski
Nasze produkty spełniają najwyższe
standardy jakości, funkcjonalności i designu.
Mamy nadzieję, ze będziesz usatysfakcjonowany naszą nową golarką Braun.
Ostrzeżenie
Twój system golący wyposażony jest
w specjalną stację ładującą. Nie należy
samodzielnie wymieniać lub wymontowywać
jakiejkolwiek jej części, gdyż grozi to porażeniem prądem.
Urządzenie nie jest przeznaczone dla dzieci
oraz dla osób z ograniczeniami fizycznymi lub
psychicznymi, chyba że osoba będąca ich
opiekunem wyrazi na to pozwolenie.
Generalnie radzimy trzymać urządzenie
z dala od dzieci.
Opis
1 Kaseta z systemem noży i folii golących
2 Trymer
3 Włącznik precyzyjnego golenia («lock»)
4 Przycisk/włącznik/wyłącznik («on/off»)
5 Wskaźnik naładowania baterii
6 Wskaźnik rozładowania baterii
7 Wskaźnik czyszczenia golarki
8 Wskaźnik wymiany elementów golących
9 Stacja ładowania golarki
10 Przewód zasilający
11 Etui
Ładowanie
Najbardziej efektywne ładowanie odbywa się
w temperaturze powietrza między 15 °C a
35 °C. Nie należy wystawiać golarki na długie
działanie temperatury wyższej niż 50 °C.
Za pomocą dołączonego do zestawu
•
przewodu zasilającego należy podłączyć
wyłączoną golarkę do gniazda elektrycznego.
Pierwsze ładowanie powinno trwać co
•
najmniej 4 godziny bez przerwy. Na kolejne
wystarczy 1 godzina.
W pełni naładowana bateria zapewnia do
•
45 minut bezprzewodowego golenia, w
zależności od rodzaju i długości zarostu.
Istnieje możliwość golenia bezprzewodo-
•
wego. Podczas normalnego użytkowania,
golarka będzie ładowana automatycznie,
każdorazowo po zakończeniu procesu
czyszczenia w bazie czyszcząco-ładującej
(poniżej «C Baza czyszcząco-ładująca
Clean&Renew™»).
Maksymalna wydajność baterii zostanie
•
osiągnięta jedynie po kilkakrotnych cyklach
pełnego jej naładowania i rozładowania.
Szybkie, 5-minutowe ładowanie (za pomocą
•
przewodu zasilającego (10)) zapewnia czas
pracy golarki wystarczający na jedno
ogolenie.
Jeżeli bateria golarki jest rozładowana,
•
istnieje możliwość golenia z podłączeniem
za pomocą przewodu zasilającego
bezpośrednio do gniazdka elektrycznego.
Wskaźniki naładowania baterii (5)
Zielone wskaźniki pokazują stan naładowania
baterii. Wskaźniki pulsują, kiedy golarka jest
w czasie ładowania, lub kiedy jest włączona.
Jeżeli golarka jest włączona lub podłączona
do źródła prądu, a bateria jest w pełni naładowana, wszystkie zielone wskaźniki świecą
światłem ciągłym.
Wskaźnik rozładowania baterii (6)
W przypadku, gdy bateria jest na wyczerpaniu
zapala się czerwona kontrolka.
Powinno jednak wystarczyć energii na dokończenie golenia.
A Golenie
Należy włączyć golarkę za pomocą przycisku
włącznik/wyłącznik (4). Sprężyste folie golące
dopasują się do kształtu każdej twarzy.
Trymer (2)
Służy do przycinania baczków, wąsów i
dłuższej brody.
Włącznik precyzyjnego golenia (3)
Ułatwia golenie trudnodostępnych miejsc np.
pod nosem; należy przesunąć blokadę w
prawą stronę do pozycji «lock», aby środkowa
część trymera oraz folia goląca zostały dla
wygodniejszego golenia obniżone.
15
Page 16
Porady
Dla najlepszych efektów golenia Braun
poleca 3 proste zasady:
1. Należy się golić przed umyciem twarzy.
2. Golarka w czasie golenia zawsze
powinna być prowadzona pod kątem
prostym w stosunku do golonej
powierzchni.
3. Należy naciągnąć skórę i golić «pod
włos», odwrotnie do kierunku porostu
włosów.
B Jak utrzymać golarkę
w najlepszym stanie
Wskaźnik czystości
Golarka powinna być czyszczona codziennie
przy pomocy bazy czyszcząco-ładującej
(Clean&Renew), a już na pewno wtedy, kiedy
żółta dioda (7) świeci po goleniu ciągłym
światłem. To znak, że użytkownik powinien
wyczyścić golarkę. Jeżeli czynność nie
zostanie wykonana, dioda po jakimś czasie
przestanie sygnalizować konieczność mycia
a elektroniczny system golarki założy, że
sprzęt został wyczyszczony ręcznie a nie przy
pomocy bazy. Czas odliczany do ponownego
mycia będzie naliczany od nowa.
W czasie procesu samoczyszczenia w bazie
czyszcząco-ładującej dioda będzie pulsować
żółtym światłem i wyłączy się dopiero wtedy,
kiedy czyszczenie zostanie zakończone, czyli
po ok. 4 godzinach.
Automatyczne czyszczenie
Wystarczy umieścić golarkę w bazie
czyszcząco-ładującej (Clean&Renew), żeby
została ona automatycznie (poniżej «C Baza
czyszcząco-ładująca Clean&Renew™»).
Ręczne mycie jest polecane jedynie wtedy,
kiedy baza jest niedostępna np. w czasie
podróży.
Czyszczenie ręczne
Głowica golarki jest przystosowana do
mycia pod bieżącą wodą.
16
Ostrzeżenie: Należy odłączyć golarkę od
źródła prądu, zanim użytkownik zacznie
czyścić głowicę po bieżącą wodą.
Regularne czyszczenie zapewnia lepsze
golenie. Opłukanie głowicy pod bieżącą
wodą po każdym goleniu, to najszybsza i
najłatwiejsza droga do utrzymania golarki
w czystości i higienie.
Należy włączyć golarkę (bezprzewodowo) i
•
opłukać głowicę pod ciepłą, bieżącą wodą.
Można użyć mydła w płynie, jeżeli nie
posiada żadnych grudkowatych składników
np. ziarenek do peelingu. Następnie należy
dokładnie opłukać głowicę z mydła i zostawić działającą golarkę na kilka dodatkowych
sekund.
Kolejnym krokiem jest wyłączenie golarki
•
oraz wyjęcie kasety z folią golącą i
nożykami (1). Należy pozostawić wyjęte
elementy do wyschnięcia.
Jeżeli golarka jest regularnie czyszczona
•
pod bieżącą wodą, to wystarczy raz na
tydzień nanieść kroplę lekkiego oleju
maszynowego na trymer (2) oraz na kasetę
z folią i nożykami (1). W ten sposób
zostaną nasmarowane elementy golące,
które wymagają takiej ochrony.
Golarka mo˝e byç tak˝e czyszczona przy
pomocy szczoteczki:
Należy wyłączyć golarkę a następnie wyjąć
•
kasetę z folią golącą i nożykami (1).
Delikatnie stukając kasetą o płaską
powierzchnię, trzeba wysypać wszelkie
zanieczyszczenia.
Używając szczoteczki należy oczyścić
•
głowicę golarki oraz jej okolice. Absolutnie
nie należy używać szczoteczki do czyszczenia kasety z folią i nożykami, gdyż
można ją uszkodzić.
Wskaźnik wymiany elementów golących /
reset
Aby golarka zawsze działała na 100% swoich
możliwości, należy co 18 miesięcy wymieniać
kasetę z foliami i nożami (1). Przypomina o
tym specjalny wskaźnik wymiany elementów
golących (8). Jeżeli elementy golące zużyją
Page 17
się wcześniej, wskaźnik także o tym poinformuje. W ciągu następnych 7 goleń specjalna
dioda (8) będzie przypominać o konieczności
wymiany. Po tym czasie czyli po 7 goleniach,
specjalny panel zostanie automatycznie
zresetowany a czas do następnej wymiany
będzie naliczany na nowo.
Po wymianie kasety z folią golącą i blokiem
ostrzy (1), należy wcisnąć przycisk on/off (4)
i przytrzymać przynajmniej przez 5 sekund,
aby zresetować licznik.
W czasie wykonywania tej czynności wskaźnik będzie pulsować i wyłączy się, kiedy
reset golarki zostanie zakończony. Ręczne
zresetowanie może być przeprowadzone
o każdej porze i w każdym momencie.
Konserwacja baterii
Aby zachować optymalną pojemność
akumulatora golarki, należy go formatować
raz na 6 miesięcy, czyli rozładować w czasie
golenia a następnie naładować do pełna.
Ochrona środowiska
Produkt posiada akumulator. Kiedy
przestanie on już być już użyteczny,
prosimy o zwrócenie go do jednego
z punktów serwisowych Braun, gdzie
stara bateria, nie szkodząc środowisku,
zostanie zutylizowana. Zużyta bateria może
zostać oddana także do specjalnego punktu
recyklingu. Traktowanie zużytych baterii jak
zwykłych śmieci stwarza zagrożenie dla
naszego środowiska.
C Baza czyszcząco-ładująca
(Clean&Renew™)
Baza czyszcząco-ładująca została stworzona
dla łatwiejszego czyszczenia, ładowania i
przechowywania golarki. System powinien
być używany każdego dnia.
W czasie automatycznego procesu czyszczącego, golarka jest włączana i wyłączana
w interwałach. W ten sposób zapewnia się
najlepsze efekty czyszczenia. Ponieważ
specjalny płyn czyszczący zawiera niewielką
ilość oleju, proces czyszczenia zapewnia
także odpowiednie nasmarowanie poszczególnych części głowicy golarki.
Ważne
Do zasilania należy używać jedynie kabla
•
dołączonego do zestawu.
Aby uniknąć wyciekania płynu czyszc-
•
zącego, należy umieścić urządzenie na
płaskiej, stabilnej powierzchni. Nie należy
trząść, obracać lub transportować bazy
czyszcząco-ładującej, szczególnie jeżeli
jest w niej zamontowany cartridge
czyszczący.
Nie należy umieszczać urządzenia w
•
lustrzanych pokojach, w okolicy nadajników
fal, na lakierowanych lub błyszczących
powierzchniach. Nie należy także wystawiać go na bezpośrednie działanie promieni
słonecznych.
Urządzenie zawiera łatwopalny płyn, więc
•
należy je trzymać z dala od źródeł ognia.
Nie należy także palić papierosów w jego
pobliżu.
Należy trzymać z dala od dzieci.
•
Zabronione jest samodzielne napełnianie
cartridga czyszczącego. Należy używać
oryginalnych, wymiennych cartridgy marki
Braun.
Opis
1 Przycisk START
2 Stacja łącząca
3 Dźwignia do wymiany cartridga
4 Wskaźnik zużycia cartridga
5 Cartridge czyszczący
Przygotowanie do użycia Clean&Renew™
Instalacja cartridga
Należy unieść dźwignię (3) aby otworzyć
•
obudowę.
Ustawić cartridge na płaskiej, poziomej
•
powierzchni np. na stole. Należy ostrożnie
usunąć pokrywkę z cartridga a następnie
delikatnie wsunąć cartridge do samego
końca bazy. Opór jest oznaką, ze cartridge
został wsunięty do końca.
Powoli zamknąć obudowę.
•
17
Page 18
Wymiana cartridga
Po otwarciu obudowy należy poczekać kilka
sekund, zanim cartridge zostanie usunięty.
Przed wyjęciem cartridga z bazy, należy zdjąć
pokrywkę nowego. Pokrywka ta posłuży jako
zamknięcie dla starego, zużytego wkładu,
w którym znajduje się zanieczyszczony płyn.
Cartridge mogą być traktowane jak normalne,
domowe odpadki. Nie ma konieczności
przeprowadzania specjalnej utylizacji.
Użytkowanie bazy czyszczącoładującej
Należy podłączyć bazę czyszcząco-
•
ładującą do źródła prądu za pomocą
dołączonego przewodu zasilającego. Po
każdym goleniu należy golarkę wyłączyć i
umieścić do góry nogami, frontem do
przodu w bazie systemu Clean&Renew™.
Następnie należy wcisnąć przycisk
•
START (1) bazy czyszcząco-ładującej
Clean&Renew™, aby zablokować golarkę
i połączyć ją z bazą. W tym momencie
rozpoczyna się pełny proces czyszczenia.
Specjalny wskaźnik golarki będzie
pulsować żółtym światłem w czasie całego
procesu czyszczenia (ok. 2 min samego
mycia oraz najmniej 4 godziny suszenia).
Radzimy nie przerywać procesu, gdyż
•
wtedy golarka będzie mokra i nie będzie
gotowa do użycia. Jeżeli jednak ingerencja
jest nieunikniona, należy ponownie nacisnąć przycisk START (1). To zatrzymuje
proces.
Proces czyszczenia jest zakończony wtedy,
•
kiedy pulsująca żółtym kolorem dioda
golarki przestaje świecić. Aby odłączyć
golarkę od bazy, należy przycisnąć przycisk
START (1).
Cartridge czyszczący wystarcza na ok.
•
30 cykli czyszczenia. Kiedy wskaźnik
zużycia catridga pokazuje znak «min»,
oznacza to, że wkład starczy jeszcze na ok.
5 cykli. Należy jednak pamiętać o wymianie
cartridga. Przeciętnie jeden cartridge
wystarcza na 4 tygodnie codziennego
używania.
18
Dla zapewnienia idealnej higieny, wkład
•
czyszczący zawiera minimalną ilość
alkoholu. Po otwarciu alkohol paruje,
więc cartridge powinien być wymieniany
najrzadziej co 8 tygodni. Po tym czasie
traci swoje właściwości odkażające.
Płyn czyszczący zawiera również substan-
•
cje smarujące, które po czyszczeniu mogą
pozostawić ślady na ramce zewnętrznej
folii. Ślady te można jednak łatwo usunąć,
delikatnie ścierając je kawałkiem materiału
lub chusteczką higieniczną.
Obudowę bazy czyszcząco-ładującej
•
powinno się czyścić co jakiś czas wilgotną
szmatką, szczególnie w miejscu, w którym
styka się z golarką
Akcesoria:
Dostępne w centrach serwisowych Braun
Kasety z foliami golącymi oraz
•
nożykami: 32S
Cartridge bazy czyszcząco-ładującej:
•
CCR
Powy˝sze informacje mogà ulec zmianie bez
uprzedniego powiadomienia.
Produkt ten spe∏nia wymogi dyrektywy
EMC 2004/108/EC oraz dyrektywy
2006/95/EC dotyczàcej elektrycznych
urzàdzeƒ niskonapi´ciowych.
Specyfikacje elektryczne zosta∏y wydrukowane na specjalnym kablu sieciowym.
Ten symbol oznacza, że zużytego
sprzętu nie można wyrzucać łącznie z
odpadami socjalnymi. Zużyty produkt
należy zostawić w jednym z punktów
zbiórki zużytego sprzętu elektrycznego i
elektronicznego. Odpowiednie przetworzenie
zużytego sprzętu zapobiega potencjalnym
negatywnym wpływom na środowisko lub
zdrowie ludzi, wynikającym z obecności
składników niebezpiecznych w sprzęcie.
Page 19

Warunki gwarancji
1. Procter and Gamble DS Polska sp. z.o.o.
gwarantuje sprawne działanie sprzętu w
okresie 24 miesięcy od daty jego wydania
Kupującemu. Ujawnione w tym okresie
wady będą usuwane bezpłatnie, przez
wymieniony przez firmę Procter and
Gamble DS Polska sp. z.o.o.
autoryzowany punkt serwisowy, w terminie
14 dni od daty dostarczenia sprzętu do
autoryzowanego punktu serwisowego.
2. Kupujący może wysłać sprzęt do naprawy
do najbliżej znajdującego się
autoryzowanego punktu serwisowego
wymienionego przez firmę Procter and
Gamble DS Polska
sp. z.o.o. lub skorzystać z pośrednictwa
sklepu, w którym dokonał zakupu sprzętu.
W takim wypadku termin naprawy ulegnie
wydłużeniu o czas niezbędny do
dostarczenia i odbioru sprzętu.
3. Kupujący powinien dostarczyć sprzęt w
oryginalnym opakowaniu fabrycznym
dodatkowo zabezpieczonym przed
uszkodzeniem. Uszkodzenia
spowodowane niedostatecznym
zabezpieczeniem sprzętu nie podlegają
naprawom gwarancyjnym.
4. Niniejsza gwarancja jest ważna z
dokumentem zakupu i obowiązuje na
terytorium Rzeczypospolitej Polskiej.
5. Okres gwarancji przedłuża się o czas od
zgłoszenia wady lub uszkodzenia do
naprawy sprzętu.
6. Naprawa gwarancyjna nie obejmuje
czynności przewidzianych w instrukcji, do
wykonania których Kupujący zobowiązany
jest we własnym zakresie i na własny
koszt.
7. Ewentualne oczyszczenie sprzętu
dokonywane jest na koszt Kupującego
według cennika danego autoryzowanego
punktu serwisowego i nie będzie
traktowane jako naprawa gwarancyjna.
8. Gwarancją nie są objęte:
a) mechaniczne uszkodzenia sprzętu
spowodowane w czasie jego
użytkowania lub w czasie dostarczania
sprzętu do naprawy;
b) uszkodzenia i wady wynikłe na skutek:
– używania sprzętu do celów innych
niż osobisty użytek;
– niewłaściwego lub niezgodnego z
instrukcją użytkowania, konserwacji,
przechowywania lub instalacji;
– używania niewłaściwych materiałów
eksploatacyjnych;
– napraw dokonywanych przez
nieuprawnione osoby; stwierdzenie
faktu takiej naprawy lub
samowolnego otwarcia sprzętu
powoduje utratę gwarancji;
– przeróbek, zmian konstrukcyjnych
lub używania do napraw
nieoryginalnych części zamiennych
firmy Braun;
c) części szklane, żarówki oświetlenia;
d) ostrza i folie do golarek oraz materiały
eksploatacyjne.
9. Bez nazwy i modelu sprzętu, daty jego
zakupu potwierdzonej pieczątką i
podpisem sprzedawcy karta gwarancyjna
jest nieważna.
10. Niniejsza gwarancja na sprzedany towar
konsumpcyjny nie wyłącza, nie ogranicza
ani nie zawiesza uprawnień Kupującego
wynikających z niezgodności towaru z
umową.
19
Page 20

Český
Naše výrobky jsou vyrobeny tak, aby splňovaly
nejvyšší nároky na kvalitu, funkčnost a design.
Doufáme, že budete se svým novým holicím
strojkem Braun spokojeni.
Výstraha
Tento holicí strojek je vybaven speciálním
síťovým přívodem s integrovaným bezpečnostním síťovým adaptérem. Nevyměňujte
ani nerozebírejte žádnou z jeho částí, jinak by
mohlo dojít k úrazu elektrickým proudem.
Tento přístroj nesmí používat děti ani osoby
se sníženými psychickými nebo mentálními
schopnostmi bez dohledu osoby, která je
zodpovědná za jejich bezpečnost. Doporučujeme uchovávat přístroj mimo dosah dětí.
Popis
1 Kazeta s planžetou a břitovým blokem
2 Zastřihovač dlouhých vousů
3 Tlačítko pro přesné holení («lock»)
4 Spínač zapnutý/vypnutý («on/off»)
5 Kontrolky nabíjení (zelená)
6 Kontrolka nízkého nabití (červená)
7 Kontrolka čištění (žlutá)
8 Kontrolka výměny holicích dílů
9 Síťová zásuvka holicího strojku
10 Speciální síťový přívod
11 Pouzdro
Nabíjení
Nejvhodnější teplota okolí pro nabíjení je
15 °C až 35 °C. Nevystavujte holicí strojek
dlouhodobě teplotám vyšším než 50 °C.
Pomocí speciálního síťového přívodu (10)
•
připojte holicí strojek k zásuvce elektrické
sítě, přičemž holicí strojek je vypnutý.
Při prvním nabíjení nechte holicí strojek
•
trvale nabíjet nejméně po dobu 4 hodin.
Další dobíjení budou trvat zhruba 1 hodinu.
Plné nabití umožňuje až 45 minut holení
•
bez síťového přívodu, v závislosti na
vzrůstu vašich vousů.
Holte se bez připojení k síti. Při běžném
•
používání se holicí strojek dobíjí automaticky po každém čištění v čisticí stanici
Clean&Renew™ (viz «C Clean&Renew™»).
20
Maximální kapacita baterie bude dosažena
•
až po několika cyklech nabití a vybití.
Pětiminutové rychlonabíjení (pomocí
•
speciálního síťového přívodu (10)) postačí
na jedno oholení bez síťového přívodu.
Pokud je akumulátorová baterie vybita,
•
můžete se také holit holicím strojkem,
připojeným k síti pomocí speciálního
síťového přívodu.
Kontrolky nabíjení (5)
Zelené kontrolky nabíjení indikují stav baterie.
Odpovídající zelená kontrolka bliká po dobu
nabíjení nebo je-li holicí strojek zapnutý.
Když je baterie plně nabitá, všechny zelené
kontrolky začnou svítit nepřetržitě za
předpokladu, že holicí strojek je zapnutý
nebo připojený k síťovému přívodu.
Kontrolka nízkého nabití (6)
Při poklesu kapacity baterie začne blikat
červený dílek, indikující slabé nabití baterie.
Zbývající kapacita pak postačí na dokončení
holení.
A Holení
Pro zahájení provozu holicího strojku
stiskněte spínač «on/off» (4) – viz obrázek.
Výkyvný holicí systém se automaticky
přizpůsobuje všem konturám vašeho obličeje.
Zastřihovač dlouhých vousů (2)
Při zastřihování kotlet, knírku nebo bradky
vysuňte zastřihovač dlouhých vousů směrem
nahoru.
Tlačítko pro přesné holení («lock») (3)
Pro přesné oholení těžko holitelných míst
(např. pod nosem), posuňte tlačítko (3)
směrem doprava do pozice «lock». Prostřední
zastřihovač a jedna planžeta se sklopí.
Tipy pro perfektní oholení
Pro dosažení nejlepších výsledků vám
Braun doporučuje 3 jednoduché kroky:
1. Holte se vždy před mytím obličeje.
2. Holicí strojek držte vždy v pravém úhlu
(90°) k pokožce.
3. Napněte pokožku a holte se proti směru
růstu vousů.
Page 21

B Udržování holicího strojku
ve špičkové formě
Kontrolka čištění
Váš holicí strojek by měl být čištěn denně
v čisticí stanici Clean&Renew™, nejpozději
však když začne po holení nepřetržitě svítit
žlutá kontrolka čištění (7). Pokud čištění
neprovedete, kontrolka čištění po nějakém
čase zhasne. Elektronika holicího strojku
usoudí, že byl holicí strojek vyčištěn
manuálně, a zahájí počítání času nového
čisticího cyklu.
Během procesu čištění v čisticí stanici
Clean&Renew™ bude svítit žlutá kontrolka.
Kontrolka zhasne po ukončení čištění, zhruba
po 4 hodinách.
Automatické čištění
Po vložení do čisticí stanice Clean&Renew™
se holicí strojek čistí automaticky (viz
«C Clean&Renew™»). Ruční čištění
doporučujeme provádět pouze v případech,
kdy nemáte čisticí stanici Clean&Renew™
k dispozici, tedy například na cestách.
Ruční čištění
Tento přístroj je možné čistit pod
tekoucí vodou.
Upozornění: Před čištěním holicí
hlavy vodou odpojte holicí strojek
ze sítě.
Pravidelným čištěním zlepšíte holicí výkon
vašeho holicího strojku. Propláchnutí holicí
hlavy pod tekoucí vodou po každém holení
představuje rychlý a snadný způsob jak
udržovat holicí strojek čistý:
Zapněte holicí strojek (bez síťového
•
přívodu) a opláchněte holicí hlavu pod
horkou tekoucí vodou. Můžete použít tekuté
mýdlo bez abrazivních složek. Opláchněte
všechnu pěnu a nechte holicí strojek ještě
několik sekund běžet.
Poté holicí strojek vypněte a sejměte kazetu
•
s holicí planžetou a břitovým blokem (1).
Demontované holicí díly nechte oschnout.
Pokud čistíte holicí strojek pod tekoucí
•
vodou pravidelně, promažte každý týden
zastřihovač dlouhých vousů (2) a na povrch
kazety s planžetou a břitovým blokem (1)
naneste kapku jemného oleje na šicí stroje.
Holicí strojek můžete alternativně čistit
pomocí kartáčku:
•
Vypněte holicí strojek, sejměte kazetu s
planžetou a břitovým blokem a jemně ji
vyklepejte na ploché podložce.
•
Pomocí kartáčku vyčistěte vnitřní část holicí
hlavy. Kartáček však nepoužívejte na
čištění kazety holicí planžety a břitového
bloku – tyto díly byste tak mohli poškodit.
Kontrolka výměny holicích dílů/Resetování
Aby byl udržen 100% holicí výkon, vyměňte
kazetu s holicí planžetou a břitovým blokem
(1) vždy, když se rozsvítí kontrolka výměny
holicích dílů (8) (po cca 18 měsících), nebo
když jsou holicí díly opotřebovány.
Kontrolka výměny vám bude v průběhu následujících 7 holení připomínat nutnost výměny
kazety holicí planžety a břitového bloku. Pak
holicí strojek automaticky resetuje displej.
Po výměně holicí planžety a břitového bloku
(1) stiskněte na minimálně 5 sekund tlačítko
«on/off» (4), čímž resetujete čítač.
V průběhu resetování bude blikat kontrolka
výměny, která po dokončení resetování zhasne.
Manuální resetování se může provést kdykoli.
Ochrana akumulátorových baterií
Pro udržení optimální kapacity akumulátorových baterií by měl být holicí strojek
(normálním holením) plně vybit každých cca
6 měsíců. Poté holicí strojek nabijte na plnou
kapacitu.
Poznámka k životnímu
prostředí
Tento výrobek obsahuje akumulátorové
baterie. V zájmu ochrany životního
prostředí nevyhazujte výrobek po konci
jeho životnosti do běžného domovního
odpadu. Odevzdejte jej do servisního
střediska Braun nebo na příslušné sběrné
místo zřízené dle předpisů ve vaší zemi.
21
Page 22

C Clean&Renew™
Čisticí stanice Braun Clean&Renew™ byla
vyvinuta pro čištění, nabíjení a ukládání
vašeho holicího strojku. Svůj holicí strojek
čistěte ve stanici Clean&Renew™ denně.
Během automatického procesu čištění je
holicí strojek zapínán a vypínán v takových
intervalech, aby bylo dosaženo optimálního
výsledku. Jelikož speciální čisticí kapalina
obsahuje malé množství oleje, je při čištění
zároveň zajištěno správné promazání strojku.
Důležité upozornění
Používejte pouze speciální síťový přívod,
•
kterým je váš holicí strojek vybaven.
Ujistěte se, že jste umístili čisticí stanici
•
«Clean&Renew™» na rovný stabilní
povrch, zabráníte tím úniku čisticí kapaliny.
Po instalaci čisticí kazety stanici
nenahýbejte, nijak s ní nepohybujte ani ji
nepřemísťujte.
Stanici neumísťujte do zrcadlové skříňky,
•
ani ji neskladujte nad topným tělesem.
Nepokládejte ji na leštěné či lakované
povrchy a nevystavujte ji přímému slunci.
Čisticí kazeta obsahuje vysoce hořlavou
•
kapalinu, proto ji uchovávejte mimo možné
zdroje vznícení. Nekuřte.
Uchovávejte mimo dosah dětí. Kazetu
•
nedoplňujte a používejte pouze originální
náhradní kazety Braun.
Popis
1. Tlačítko «start/release»
2. Kontaktní hlavice
3. Uvolňovací tlačítku pro výměnu kazety
4. Ukazatel stavu náplně
5. Čisticí kazeta
Před použitím čisticí stanice
Clean&Renew™ Instalace kazety
Stiskněte uvolňovací tlačítko (3), aby se
•
otevřel kryt čisticí stanice.
Čisticí kazetu položte na plochou stabilní
•
podložku (např. na stůl). Z kazety opatrně
odstraňte uzávěr. Kazetu zasuňte co
nejdále do základny přístroje.
22
Pomalým stlačením dolů čisticí stanici
•
uzavřete až zacvakne.
Výměna čisticí kazety
Po stisknutí uvolňovacího tlačítka pro vysunutí a po otevření přístroje počkejte několik
sekund než použitou kazetu vyjmete.
Před odložením použité kazety se ujistěte,
že jste uzavřeli otvory pomocí víčka z nové
kazety, Použitý zásobník totiž obsahuje
kontaminovaný čisticí roztok.
Použitou kazetu můžete vyhodit do běžného
komunálního odpadu.
Provoz čisticí stanice
Clean&Renew™
Pomocí speciálního síťového přívodu
•
připojte čisticí stanici Clean&Renew™
k síťové zásuvce. Stanice má v zadní části
nastavitelný podstavec pro úsporu místa.
Po každém oholení vypněte holicí strojek
a vložte jej do základny čisticí stanice
Clean&Renew™ čelní stranou dopředu.
Stiskněte tlačítko start/release (1), aby se
•
holicí strojek připojil a zahájil se proces
čištění. Po celou dobu čištění bude na
holicím strojku svítit žlutá kontrolka (asi
2 minuty čištění, nejméně 4 hodiny sušení).
Čisticí proces nepřerušujte, holicí strojek by
•
zůstal vlhký a nebyl by připraven k použití.
Pokud je nezbytné proces i přesto přerušit,
stiskněte tlačítko start/release (1).
Po ukončení čištění zhasne žlutá kontrolka
•
a holicí strojek je připraven k dalšímu
použití. Strojek uvolníte stisknutím tlačítka
start/release.
Čisticí kazeta by měla dostačovat na
•
cca 30 čisticích cyklů. Jakmile dosáhne
ukazatel stavu náplně (4) značky «min»,
je v kazetě kapalina již jen pro dalších
asi 5 čistících cyklů. Poté je třeba kazetu
vyměnit. Při denním používání je třeba
čisticí kazetu vyměnit po každých
4 týdnech.
Hygienický čisticí roztok v kazetě obsahuje
•
líh, který po otevření přirozeně pomalu
vyprchává do okolního vzduchu. Každou
Page 23

kazetu, i když není používána denně, je
nutno vyměnit po cca 8 týdnech.
Čisticí kazeta obsahuje také lubrikanty,
•
které po čištění mohou na hlavě holicího
strojku zanechat stopy. Ty se snadno
odstraní jemným hadříkem nebo papírovým
kapesníkem.
Čas od času očistěte vlhkým hadříkem kryt.
•
Zaměřte se především na otvor čisticí
stanice, do kterého se zasouvá holicí strojek.
Příslušenství:
K dostání v prodejnách se sortimentem Braun
nebo v servisních střediscích Braun:
Kazeta s planžetou a břitovým blokem:
•
32S
Čisticí stanice Clean&Renew™: CCR
•
Deklarovaná hodnota emise hluku tohoto
spotfiebiãe je 63 dB(A), coÏ pfiedstavuje
hladinu A akustického v˘konu vzhledem na
referenãní akustick˘ v˘kon 1 pW.
MÛÏe b˘t zmûnûno bez upozornûní.
Záruka
Na tento v˘robek poskytujeme záruku po
dobu 2 let od data prodeje spotfiebiteli.
Bûhem této záruãní doby bezplatnû
odstraníme závady na v˘robku, zpÛsobené
vadami materiálu nebo chybou v˘roby.
Oprava bude provedena podle na‰eho
rozhodnutí buì opravou nebo v˘mûnou
celého v˘robku. Tato záruka platí pro
v‰echny zemû, kam je tento v˘robek dodáván
firmou Braun nebo jejím autorizovan˘m
distributorem.
Tato záruka se nevztahuje: na po‰kození,
vzniklá nesprávn˘m pouÏíváním a údrÏbou,
na bûÏné opotfiebení (napfi. bfiitového bloku a
folie), jakoÏ i na defekty, mající zanedbateln˘
vliv na hodnotu a pouÏitelnost pfiístroje.
Záruka pozb˘vá platnosti, pokud byl v˘robek
mechanicky po‰kozen nebo pokud jsou
opravy provedeny neautorizovan˘mi osobami
nebo pokud nejsou pouÏity originální díly
Braun. Pfiístroj je urãen v˘hradnû pro domácí
pouÏití. Pfii pouÏití jin˘m zpÛsobem nelze
uplatnit záruku.
Tento pfiístroj odpovídá pfiedpisÛm o
odru‰ení (smûrnice ES 2004/108/EC)
a smûrnici o nízkém napûtí
(2006/95/EC).
Elektrikáfiské specifikace najdete v návodu
na speciální sadû ‰ÀÛr.
Po skonãení Ïivotnosti neodhazujte
prosím tento v˘robek do bûÏného
domovního odpadu. MÛÏete jej
odevzdat do servisního stfiediska
Braun nebo na pfiíslu‰ném sbûrném
místû zfiízeném dle místních pfiedpisÛ.
Poskytnutím záruky nejsou dotãena práva
spotfiebitele, která se ke koupi vûci váÏí podle
zvlá‰tních právních pfiedpisÛ.
Záruka platí jen tehdy, je-li záruãní list fiádnû
vyplnûn (datum prodeje, razítko prodejny a
podpis prodavaãe) a je-li souãasnû s ním
pfiedloÏen prodejní doklad (dále jen doklady
o koupi). Chcete-li vyuÏít servisních sluÏeb
v záruãní dobû, pfiedejte nebo po‰lete
kompletní pfiístroj spolu s doklady o koupi do
autorizovaného servisního stfiediska Braun.
Aktualizovan˘ seznam servisních stfiedisek je
k dispozici v prodejnách v˘robkÛ Braun.
Volejte zákaznickou infolinku 221 804 335
pro informace o v˘robcích a nejbliωím
servisním stfiedisku Braun.
O pfiípadné v˘mûnû pfiístroje nebo zru‰ení
kupní smlouvy platí pfiíslu‰ná zákonná
ustanovení. Záruãní doba se prodluÏuje o
dobu, po kterou byl v˘robek podle záznamu
z opravny v záruãní opravû.
23
Page 24

Slovenský
Naše výrobky sú vyrobené tak, aby spĺňali tie
najvyššie nároky na kvalitu, funkčnosť a
dizajn. Dúfame, že budete so svojím novým
holiacim strojčekom Braun spokojní.
Upozornenie
Váš holiaci strojček je vybavený špeciálnym
prevodníkom na nízke napätie (špeciálnym
sieťovým káblom so sieťovým adaptérom).
Žiadnu jeho časť nesmiete meniť, ani ho
rozoberať, inak by mohlo dôjsť k úrazu
elektrickým prúdom.
Tento prístroj nie je určený deťom ani
osobám so zníženými fyzickými, zmyslovými
alebo mentálnymi schopnosťami, ak na
nich nedohliada osoba zodpovedná za ich
bezpečnosť. Prístroj odporúčame uchovávať
mimo dosahu detí.
Popis
1 Planžeta a holiaci blok
2 Zastrihávač dlhých fúzov
3 Spínač precízneho holenia («lock»)
4 Tlačidlo zapnutia/vypnutia («on/off»)
5 Indikátory nabíjania (zelené)
6 Indikátor slabého nabitia (červený)
7 Indikátor čistenia (žltý)
8 Svetelný indikátor výmeny holiacich
dielov
9 Elektrická zásuvka holiaceho strojčeka
10 Špeciálny sieťový kábel
11 Puzdro
Nabíjanie
Najvhodnejšia teplota okolia na nabíjanie je
medzi 15 °C až 35 °C. Holiaci strojček
nevystavujte dlhodobo teplotám nad 50 °C.
Pomocou špeciálneho sieťového kábla (10)
•
zapojte strojček do elektrickej zásuvky a
motorček strojčeka nechajte vypnutý.
Pri prvom nabíjaní nabíjajte strojček
•
nepretržite 4 hodiny. Každé ďalšie nabíjanie
bude trvať asi 1 hodinu.
Plne nabitá batéria zabezpečuje až
•
45 minút holenia bez použitia sieťového
kábla v závislosti od dĺžky vašich fúzov.
24
Hoľte sa bez použitia sieťového kábla. Pri
•
bežnom používaní sa strojček automaticky
nabije po každom čistení v základni
Clean&Renew™ (pozri «C Základňa
Clean&Renew™»).
Maximálnu kapacitu batérie dosiahnete až
•
po niekoľkých cykloch nabitia/vybitia.
5-minútové rýchle nabitie (pomocou špe-
•
ciálneho sieťového kábla (10)) postačí na
jedno oholenie.
Keď sa akumulátorové batérie vybijú,
•
môžete sa oholiť aj zapojením holiaceho
strojčeka to elektrickej zásuvky pomocou
špeciálneho sieťového kábla.
Indikátory nabíjania (5)
Zelené indikátory nabíjania (5) ukazujú stav
nabitia batérie. Zelený indikátor bliká, keď sa
holiaci strojček nabíja, alebo keď je zapnutý.
Keď je batéria plne nabitá, všetky zelené
indikátory nepretržite svietia, ak je strojček
zapnutý alebo pripojený do elektrickej
zásuvky.
Indikátor slabého nabitia (6)
Keď je batéria takmer vybitá, rozsvieti sa
červený dielik indikujúci slabé nabitie batérie.
Batéria by mala postačiť na dokončenie
holenia.
A Holenie
Strojček zapnite stlačením tlačidla zapnutia/
vypnutia (4) (obrázok).
Flexibilné holiace planžety sa automaticky
prispôsobia každej kontúre vašej tváre.
Zastrihávač dlhých fúzov (2)
Na zastrihnutie bokombrád, fúzov alebo brady
vysuňte zastrihávač smerom nahor.
Spínač precízneho holenia («lock») (3)
Na precíznu manipuláciu so strojčekom
v miestach, ktoré sa ťažko holia (napr. pod
nosom), posuňte spínač (3) doprava, do
pozície «lock». Stredový zastrihávač a jedna
planžeta sa stiahnu.
Page 25

Tipy na najlepšie oholenie
Pre dosiahnutie najlepších výsledkov
holenia vám Braun odporúča dodržiavať
3 jednoduché pravidlá:
1. Vždy sa hoľte predtým, ako si umyjete
tvár.
2. Holiaci strojček držte vždy v pravom
uhle (90°) k pokožke.
3. Pokožku držte napnutú a hoľte sa proti
smeru rastu fúzov.
B Udržiavanie holiaceho
strojčeka v špičkovej forme
Indikátor čistenia
Holiaci strojček by ste mali čistiť každý deň
v základni Clean&Renew™ a určite vtedy,
keď indikátor čistenia (7) po holení nepretržite
svieti. Ak tak neurobíte, žltý indikátor po
nejakom čase prestane svietiť. Elektronický
systém holiaceho strojčeka sa bude domnievať, že strojček bol umytý manuálne a začne
odznova počítať čas, kedy bude potrebné
holiaci strojček opäť vyčistiť.
Žltý indikátor počas čistenia strojčeka
v základni Clean&Renew™ svieti a vypne
sa po približne 4 hodinách, keď sa čistenie
skončí.
Automatické čistenie
Keď holiaci strojček vložíte do základne
Clean&Renew™, tá ho automaticky vyčistí
(pozri «C Základňa Clean&Renew™»).
Manuálne čistenie sa odporúča vykonať iba
vtedy, keď základňa Clean&Renew™ nie je
k dispozícii, napríklad počas cestovania.
Manuálne čistenie
Holiacu hlavu strojčeka môžete
umývať pod tečúcou vodou.
Upozornenie: predtým, ako holiacu
hlavu umyjete vodou, odpojte strojček
z elektrickej siete.
Pravidelné čistenie zaručuje lepšie výsledky
holenia. Opláchnutie holiacej hlavy pod
tečúcou vodou po každom holení je jednoduchý a rýchly spôsob, ako ju udržať čistú:
Holiaci strojček zapnite (bez použitia
•
sieťového kábla) a holiacu hlavu opláchnite
v teplej tečúcej vode. Môžete použiť aj
tekuté mydlo bez abrazívnych látok. Penu
dôkladne opláchnite a strojček nechajte
zapnutý ešte niekoľko sekúnd.
Potom strojček vypnite, zložte planžetu
•
a holiaci blok (1) a nechajte ich uschnúť.
Ak holiaci strojček pravidelne čistíte pod
•
tečúcou vodou, raz do týždňa aplikujte na
zastrihávač dlhých fúzov (2) a na planžetu
a holiaci blok (1) kvapku jemného
strojového oleja.
Alternatívne môžete holiaci strojček vyčistiť
pomocou kefky:
Holiaci strojček vypnite. Planžetu a holiaci
•
blok zložte a vyklepte ich na rovnom
povrchu.
Kefkou vyčistite vnútornú časť holiacej
•
hlavy. Planžetu a holiaci blok však kefkou
nečistite, pretože by sa mohli poškodiť.
Svetelný indikátor výmeny holiacich
dielov/Vynulovanie počítadla
Planžetu a holiaci blok (1) vymeňte, keď sa
rozsvieti svetelný indikátor výmeny holiacich
dielov (8) (po asi 18 mesiacoch používania),
alebo keď sa diely opotrebujú, aby ste
zachovali 100 % výkon holiaceho strojčeka.
Indikátor výmeny dielov vám počas ďalších
7 holení bude pripomínať, aby ste planžetu a
holiaci blok vymenili. Holiaci strojček potom
počítadlo automaticky vynuluje.
Keď planžetu a holiaci blok (1) vymeníte,
vynulujte počítadlo stlačením tlačidla
zapnutia/vypnutia (4) na aspoň 5 sekúnd.
Indikátor výmeny holiacich dielov počas tohto
úkonu bliká a vypne sa, keď sa vynulovanie
dokončí. Manuálne vynulovanie môžete
urobiť kedykoľvek.
Starostlivosť o batérie
Približne každých 6 mesiacov nechajte holiaci
strojček úplne vybiť (holením), aby sa zachovala optimálna kapacita akumulátorových
batérií. Potom holiaci strojček opäť nabite na
plnú kapacitu.
25
Page 26

Poznámka k životnému
prostrediu
Tento výrobok obsahuje akumulátorové
batérie. V záujme ochrany životného
prostredia nevyhadzujte výrobok po
skončení jeho životnosti ako súčasť
bežného odpadu domácnosti. Odovzdať ho
môžete v servisných strediskách Braun alebo
na príslušných zberných miestach vo vašej
krajine zriadených podľa miestnych predpisov
a noriem.
C Základňa Clean&Renew™
Základňa Braun Clean&Renew™ bola
vyvinutá na čistenie, nabíjanie a skladovanie
holiaceho strojčeka. Čistite svoj holiaci
strojček v základni Clean&Renew™ každý
deň.
Počas automatického čistenia sa holiaci
strojček v určitých časových intervaloch
zapína a vypína s cieľom dosiahnuť najlepšie
výsledky čistenia. Keďže špeciálne zloženie
čistiacej tekutiny obsahuje aj malé množstvo
oleja, čistiaci cyklus poskytuje holiacemu
strojčeku aj potrebnú lubrikáciu.
Dôležité upozornenia
Používajte iba sieťový kábel, ktorý sa
•
dodáva spolu s holiacim strojčekom.
Aby ste zabránili vytečeniu čistiacej
•
tekutiny, položte zariadenie na rovný
a stabilný povrch. Keď je v základni
nainštalovaná čistiaca tekutina, buďte
opatrní, aby ste základňu neprevrátili,
prudko s ňou nehýbali, ani ju neprenášali.
Zariadenie neodkladajte do kúpeľňovej
•
skrinky, ani na vyleštený alebo lakovaný
povrch, ani ho neuchovávajte v blízkosti
tepelných zdrojov. Nevystavujte ho priamemu slnečnému svetlu.
Zariadenie obsahuje vysoko horľavú
•
tekutinu. Nenechávajte ho v blízkosti
zdrojov zapálenia ani pri ňom nefajčite.
Udržujte mimo dosahu detí. Použitú náplň
•
opätovne nenapĺňajte. Používajte iba
originálne náhradne náplne Braun.
26
Popis
1 Tlačidlo zapnutia čistenia/uvoľnenia
strojčeka
2 Kontaktný bod medzi základňou
a holiacim strojčekom
3 Tlačidlo na výmenu čistiacej náplne
4 Indikátor úrovne čistiacej tekutiny
5 Čistiaca náplň
Pred použitím základne Clean&Renew™
Inštalácia čistiacej náplne
Otvorte kryt základne stlačením tlačidla (3).
•
Čistiacu náplň položte na rovný a pevný
•
povrch (napr. na stôl). Veko na náplni
opatrne zložte. Náplň zasuňte čo možno
najhlbšie do spodnej časti základne.
Kryt opatrne zatvorte tak, že ho budete
•
tlačiť smerom nadol, až kým sa nezavrie.
Výmena čistiacej náplne
Keď stlačíte tlačidlo na výmenu náplne a
otvoríte kryt, niekoľko sekúnd počkajte a až
potom použitú náplň odstráňte.
Predtým, ako použitú náplň vyhodíte, sa
uistite, že ste ju zavreli pomocou veka z
novej náplne, pretože použitá náplň bude
obsahovať znečistený čistiaci roztok.
Čistiacu náplň môžete vyhodiť spolu
s bežným odpadom domácnosti.
Manipulácia so základňou
Clean&Renew™
Základňu Clean&Renew™ zapojte do
•
elektrickej siete pomocou sieťového kábla.
Dĺžka špeciálnej zástrčky na zadnej strane
sa dá nastaviť, aby šetrila priestor. Po
každom holení holiaci strojček vypnite
a vložte ho do základne Clean&Renew™
dolu hlavou tak, aby bolo vidieť jeho prednú
stranu.
Holiaci strojček pripojte a upevnite
•
k základni stlačením tlačidla zapnutia
čistenia/uvoľnenia strojčeka (1). Vtedy sa
začne proces čistenia. Žltý indikátor na
strojčeku bude svietiť počas celého čistenia
(približne 2 minúty čistenia a najmenej
4 hodiny sušenia).
Page 27

Čistiaci program neprerušujte, pretože
•
holiaci strojček zostane vlhký a nebude
vhodný na okamžité použitie. Ak napriek
tomu musíte program prerušiť, stlačte
tlačidlo zapnutia čistenia/uvoľnenia
strojčeka (1).
Keď sa čistenie skončí, žltý indikátor
•
prestane svietiť, a vtedy je holiaci strojček
pripravený na použitie. Uvoľníte ho
stlačením tlačidla zapnutia čistenia/
uvoľnenia strojčeka (1).
Jedna čistiaca náplň postačí na asi 30
•
čistiacich cyklov. Keď indikátor úrovne
čistiacej tekutiny (4) klesne na značku
«min», zostávajúca tekutina v náplni
postačí na ďalších asi 5 cyklov. Potom
by sa čistiaca náplň mala vymeniť. Pri
každodennom používaní vydrží približne
4 týždne.
Hygienická čistiaca náplň obsahuje alkohol,
•
ktorý sa po otvorení prirodzene a pomaly
vyparí do vzduchu, preto by sa každá
náplň, hoci sa nepoužíva denne, mala
vymeniť približne každých 8 týždňov.
Čistiaca náplň obsahuje aj lubrikačné látky,
•
ktoré môžu po čistení zanechať na holiacej
hlave viditeľné stopy. Tie sa však dajú
ľahko odstrániť, keď ich jemne utriete
kusom látky alebo servítkou.
Z času na čas umyte kryt základne
•
pomocou vlhkej handričky, najmä otvor, do
ktorého sa vkladá holiaci strojček.
Príslušenstvo
Dostupné u vášho predajcu alebo v servisných strediskách Braun:
Planžeta a holiaci blok: 32S
•
Čistiaca náplň Clean&Renew™: CCR
•
Deklarovaná hodnota emisie hluku tohto
spotfiebiãa je 63 dB(A), ão predstavuje
hladinu A akustického v˘konu vzhºadom
na referenãn˘ akustick˘ v˘kon 1 pW.
Právo na zmeny vyhradené.
Toto zariadenie vyhovuje predpisom o
odru‰ení (smernica ES 2004/108/EC)
a predpisom o nízkom napätí (smernica
2006/95/EC).
Podrobné technické údaje sa nachádzajú na
‰peciálnom sieÈovom kábli.
Po skonãení Ïivotnosti neodhadzujte
zariadenie do beÏného domového
odpadu. Zariadenie odovzdajte do
servisného strediska Braun alebo na
príslu‰nom zbernom mieste zriadenom
podºa miestnych predpisov a noriem.
Záruka
Na tento v˘robok poskytujeme záruku po
dobu 2 rokov odo dÀa predaja spotrebiteºovi.
Poãas tejto záruãnej doby bezplatne
odstránime závady na v˘robku, spôsobené
vadami materiálu alebo chybou v˘roby a to
podºa ná‰ho rozhodnutia buì opravou alebo
v˘menou celého v˘robku. Táto záruka platí
pre v‰etky krajiny, kde tento v˘robok dodáva
firma Braun alebo jej autorizovan˘ distribútor.
Táto záruka sa nevzÈahuje: na po‰kodenia,
ktoré vzniknú nesprávnym pouÏívaním a
údrÏbou, na beÏné opotrebenie (napr.
britového bloku a fólie) ako aj na defekty,
ktoré majú zanedbateºn˘ vplyv na hodnotu
a pouÏitie prístroja. Záruka stráca platnosÈ
v prípade, Ïe v˘robok bol mechanicky
po‰koden˘, alebo sa uskutoãnili opravy
neautorizovan˘mi osobami, alebo sa nepouÏili
originálne diely Braun. Prístroj je v˘hradne
urãen˘ na domáce pouÏitie. Pri pouÏití in˘m
spôsobom nie je moÏné záruku uplatniÈ.
Poskytnutím záruky nie sú ovlyvnené spotrebiteºské práva, ktoré sa ku kúpe predmetu
viaÏu podºa zvlá‰tnych predpisov.
Záruka platí iba vtedy, ak je záruãn˘ list riadne
vyplnen˘ (dátum predaja, peãiatka predajne a
podpis predavaãa) a zároveÀ s ním predloÏen˘
doklad o predaji (ìalej iba doklady o zakúpení).
Ak chcete vyuÏiÈ servisné sluÏby v záruãnej
dobe, kompletn˘ prístroj spolu s dokladmi
o zakúpení odovzdajte alebo za‰lite do
autorizovaného servisného strediska Braun.
Aktualizovan˘ zoznam servisn˘ch stredísk je
k dispozícii v predajniach v˘robkov Braun.
Vzhºadom na prípadnú v˘menu prístroja alebo
na zru‰enie kúpnej zmluvy platia príslu‰né
zákonné ustanovenia. Záruãná doba sa
predlÏuje o dobu, poãas ktorej bol v˘robok
podºa záznamu z opravovne v záruãnej
oprave.
27
Page 28

Magyar
Termékeink előállítása során, messzemenően
törekszünk a legmagasabb minőségi követelményekkel, funkcionalitással és formatervezéssel szembeni igények kielégítésére.
Reméljük, örömét leli majd új Braun borotvájában!
Figyelmeztetés
Az Ön borotvarendszerét egy különleges
csatlakozókábellel láttuk el, integrált,
biztonságos kisfeszültségű rendszerrel.
Semmilyen alkatrészét ne cserélje, vagy
alakítsa át, ellenkező esetben áramütés
veszélye állhat fenn!
A készüléket gyermekek, mozgássérültek,
szellemi vagy értelmi fogyatékosságban
szenvedő személyek, - kizárólag a biztonságukért felelős személy felügyelete mellett
használják! Javasoljuk, hogy a készüléket
tartsa gyermekektől elzárva!
Leírás
1 Szitából és késből álló nyíróegység
2 Hosszúszőr-vágó
3
Precíziós nyírófejrögzítő kapcsoló («lock»)
4 Be/Ki kapcsoló gomb («on/off»)
5 Töltéskijelző fények (zöld)
6 Alacsony töltöttségi szint kijelző (piros)
7 Tisztítás-jelző fény (sárga)
8 Borotvaalkatrészek cseréjének
aktualitását jelző fény
9 Csatlakozó bemenet
10 Különleges csatlakozókábel
11 Borotva tartótok
A teljes feltöltés max. 45 perc zsinór nélküli
•
borotválkozást eredményez, mely idő a
szakállhosszúságtól függően eltérő lehet.
Borotválkozzon vezeték nélkül! Normál
•
használat mellett, a borotva feltöltése automatikusan megtörténik a Clean&Renew™
egységben (lásd: «C Clean&Renew™»).
Az akkumulátor a maximum kapacitását
•
több, egymást követő töltés-lemerülés
folyamat után éri el.
A lemerült készüléknek egyetlen
•
borotválkozáshoz 5-perces gyorsfeltöltés
(a különleges csatlakozókábel segítségével
(10)) elegendő.
Amennyiben az akkumulátor lemerült
•
állapotban van, használhatja borotvakészülékét úgy is, hogy a különleges csatlakozókábel segítségével csatlakoztatja elektromos hálózathoz!
Töltéskijelző fények (5)
A zöld töltéskijelző fények, jelzik az akkumulátor töltöttségi szintjének állapotát.
A zöld töltéskijelző fény villogása azt mutatja,
hogy a borotva feltöltött éppen töltés alatt áll,
vagy bekapcsolt állapotban van. A teljes
feltöltöttséget mindkét zöld fény folyamatos
világítása jelzi, feltéve hogy a készülék
bekapcsolt állapotban van, vagy elektromos
hálózatba csatlakoztatott.
Alacsony töltöttségi szint kijelző (6)
A piros színű kijelző villogással jelzi az
akkumulátor alacsony töltöttségi állapotát.
Ilyenkor a készülék még lehetővé teszi a
borotválkozás befejezését.
Töltés
A töltéshez legideálisabb környezeti
hőmérséklet 15 °C és 35 °C között van.
Ne tegye ki a készüléket huzamosabb ideig
50 °C-nál magasabb hőmérsékletnek!
A különleges csatlakozókábel segítségével
•
(10), csatlakoztassa a kikapcsolt állapotban
lévő borotvát az elektromos hálózathoz!
Az első töltés alkalmával folyamatosan, 4
•
órán keresztül töltse a készüléket! A további
feltöltések 1 órát vesznek majd igénybe.
28
A Borotválkozás
A borotva működtetéséhez, (az ábrának
megfelelően) nyomja meg a Be/Kikapcsoló
gombot! (4).
A billenő sziták automatikusan követik
arcának minden vonalát.
Hosszúszőr-vágó (2)
A pajesz, bajusz vagy szakáll nyírásához tolja
fel a hosszúszőr-vágót!
Page 29

Nyírófejrögzítő kapcsoló («lock») (3)
A nehezen hozzáférhető területek (pl. az orr
alatti rész) precíz nyírásához, csúsztassa el
jobbra a rögzítő kapcsolót (3) a «lock»
pozícióba! Ez a mozdulat lejjebb ereszti a
középső nyíróalkatrészt és az egyik szitát.
Tippek a tökéletes borotválkozáshoz
A legjobb borotválkozási eredmény
eléréséhez, a Braun az alábbi három
egyszerű lépést javasolja:
1. Mindig arcmosás előtt borotválkozzon!
2. Borotválkozás közben tartsa a
készüléket megfelelő szögben (90°)
az arcfelületre!
3. Feszítse meg a bőrt, és a szakáll
növekedési irányával ellentétesen
borotválkozzon!
B A borotva karbantartása
Tisztítás-jelző fény
A borotvakészüléket lehetőleg tisztítsa
naponta a Clean&Renew™ tisztítóegységben,
de legalábbis amikor a tisztítás-jelző
sárga fény (7) a borotválkozást követően
folyamatosan jelez. Amennyiben a tisztítás
nem történik meg, a sárga fénykijelzés egy
idő után megszűnik. A készülék elektronikája
ugyanis úgy érzékeli, hogy a tisztítás
manuálisan ment végbe, így a következő
tisztítás esedékességéhez igazodva, új
számolásba kezd. A Clean&Renew™
tisztítóegységben történő tisztítási folyamat
közben a sárga fénykijelző villog, majd kb.
4 óra elteltével, a tisztítás befejezésekor,
kialszik.
Automatikus tisztítás
A készülék a Clean&Renew™ egységbe
történő behelyezéssel, automatikusan tisztul
(lásd: «C Clean&Renew™»).
A kézi tisztítás olyan esetekben javasolt,
amikor a Clean&Renew™ tisztítóegység
nincs kéznél, pl. utazás során.
Kézi tisztítás
A készülék alkalmas a vízsugár alatt
történő tisztításra.
Figyelmeztetés: A borotvafej vízzel
történő tisztításának megkezdése
előtt, távolítsa el a borotvát az elektromos hálózatból!
A rendszeres tisztítás növeli a készülék
hatékonyságát. A borotvafej vízzel történő
átöblítése minden egyes használat után,
egyszerű és gyors módja a készülék tisztántartásának:
Kapcsolja be a borotvát (vezeték nélkül),
•
és öblítse le a borotvafejet meleg vízsugár
alatt! A tisztításhoz használhat szemcsés
összetevőktől mentes, folyékony szappant
is. Ezt követően mossa le a habot, és még
pár másodpercig működtesse a készüléket!
Ezt követően kapcsolja ki a készüléket, majd
•
vegye le a készülékről a nyíróegységet (1)
és hagyja azt megszáradni!
Amennyiben borotváját rendszeresen
•
tisztítja vízsugár alatt, hetente egyszer
kenje be a hosszúszőr-vágót (2) valamint a
nyíróegységet (1) egy csepp jó minőségű
műszerolajjal!
Alternatívaként, tisztíthatja borotváját egy
tisztítókefe segítségével:
Kapcsolja ki a borotvát! Vegye le a
•
nyíróegységet, és kocogtassa egy lapos
felülethez!
A kefe segítségével seperje át a borotvafej
•
belsejét! A nyíróegységet azonban ne
tisztítsa kefével, mert megsérülhet!
Alkatrészek cseréjének aktualitását jelző
fény / Alaphelyzet beállító (reset)
A borotva 100%-os teljesítményének
megtartása érdekében, a nyíróalkatrész
cseréjének aktualitását jelző fény (8)
kigyulladásakor, (körülbelül 18 hónap
elteltével), vagy, amikor az elhasználódott,
cserélje ki a nyíróegységet (1)!
A cserére figyelmeztető fény emlékezteti
Önt a következő 7 borotválkozás alkalmával,
hogy a nyíróegység cserére szorul.
Ezt követően a borotva automatikusan
visszaállítja a kijelzőt alapállapotba.
29
Page 30

A számláló újraindításához a borotvaszitából
és nyíróegységből álló kazetta (1) cseréjét
követően legalább 5 másodpercig tartsa
benyomva a ki/bekapcsoló gombot!
A művelet elvégzése közben a cserére
figyelmeztető fény villogni kezd, majd az
alapbeállítás megtörténte után kialszik. Ez a
fajta kézi beállítás bármikor elvégezhető.
Az akkumulátor karbantartása
A tölthető akkumulátor optimális kapacitásának megőrzése érdekében, a borotvát
körülbelül félévente ajánlatos egyszer teljesen
lemeríteni (normál használattal), majd
teljesen újratölteni.
után ne billentse meg, ne végezzen a
berendezéssel hirtelen mozdulatot, illetve
ne mozdítsa át más helyre azt!
Ne tárolja az állványt fürdőszobai tükrös
•
szekrényben, vagy olyan felületen, amely
fel van polírozva vagy lakkozva! Ne tegye
ki a készüléket közvetlen napsugárzásnak!
A tisztítópatron rendkívül gyúlékony
•
folyadékot tartalmaz! Tartsa távol azoktól
a helyektől, ahol szikra keletkezhet!
Ne használja égő cigaretta közelében!
Gyermekektől elzárva tartandó! Ne töltse
újra házilag a patront! Újratöltéshez
kizárólag eredeti Braun cserepatront
használjon!
Környezetvédelmi felhívás
A készülék tölthető akkumulátorral
rendelkezik. A környezet megóvása
érdekében, kérjük, hogy elhasználódott
készülékét ne dobja háztartási
hulladékok közé! Megsemmisítés helyéül a
Braun szervízközpont, illetve országonként
az arra kijelölt gyűjtőhelyek szolgálnak!
Figyelmeztetés: a készülék felnyitása
tönkreteszi a készülékházat, és megszünteti
a garancia jogosultságot!
C Clean&Renew™
A Braun Clean&Renew™ egységet borotvakészülékének tisztítása, töltése, és tárolása
céljából fejlesztették ki. Tisztítsa borotváját a
Clean&Renew™ egységben, minden nap!
A kedvező eredmény érdekében, az
automatikus-tisztítófolyamat során a borotva
időközönként ki-, illetve bekapcsol. Mivel a
kifejezetten erre tervezett tisztítófolyadék kis
mennyiségű műszerolajat is tartalmaz, ezért
tisztítás során a szükséges kenőanyag
fölvitele is megtörténik.
Fontos!
Készülékét kizárólag a hozzá tartozó
•
csatlakozókábellel használja!
A tisztítófolyadék szivárgásának elkerülése
•
érdekében, a helyezze a készüléket egy
lapos felületre! A tisztítópatron behelyezése
30
Leírás
1 Indító/kioldó gomb
2 Borotva csatlakozási bemenet
3 Kiemelő kapcsoló patroncseréhez
4 Tisztítófolyadék szintkijelző
5 Tisztítópatron
A Clean&Renew™ használatának
megkezdése előtt
A tisztítópatron behelyezése
A borítás leemeléséhez nyomja meg a
•
kiemelő gombot (3)!
Fogja le a tisztítópatront egy lapos, stabil
•
felületen! (pl. asztalon) Óvatosan távolítsa
el a patron zárófedelét! Csúsztassa be a
patront az állvány aljába, egészen addig,
amíg belepattan!
Óvatos lenyomással pattanásig, zárja
•
vissza a borítást!
A tisztítópatron cseréje
A borítást felnyitó kiemelő kapcsoló megnyomását követően, várjon pár másodpercet az
elhasznált patron kiemelése előtt!
Mielőtt kidobná az elhasznált patront,
győződjön meg arról, hogy az új patron
zárófedelével lezárja a régit, mivel az
elhasznált patron még tartalmazhat
szennyező folyadékot! Az elhasznált patron
háztartási hulladékba helyezhető.
Page 31

Clean&Renew™ egység
használata
A hozzátartozó kábel segítségével,
•
csatlakoztassa a Clean&Renew™ egységet
elektromos hálózatba! A helymegtakarítás
érdekében, a készülék hátoldalán elhelyezkedő különleges csatlakozókábel, állítható.
Minden egyes borotválkozás után kapcsolja
ki a borotvát, és helyezze szemből, fejjel
lefelé Clean&Renew™ egységbe!
A borotva csatlakozásához és rögzítéséhez
•
nyomja be az Indító/Kioldó gombot (1)!
A tisztítási folyamat megkezdődik. Tisztítás
során a sárga kijelző fény villog (körülbelül
2 perc tisztítás, legalább 4 óra szárítás).
A tisztítási folyamatot ne szakítsa félbe,
•
különben a borotva nedves, ezáltal
alkalmatlan lesz a használatra! Amennyiben
ennek ellenére a megszakítás mégis
szükséges, nyomja meg a Indító/Kioldó
gombot! (1)
A tisztítás befejeztével a sárga jelzőfény
•
kialszik, és a készülék készen áll a
használatra. A borotva kioldásához nyomja
meg ismét az Indító/Kioldó gombot!
A tisztítópatron körülbelül 30 tisztításhoz
•
elegendő. Amikor a szintjelző (4) eléri
a «min» jelzést, a patron még körülbelül
5 tisztításra lesz elegendő. Ezután a patron
cserére szorul, melyre mindennapos használat mellett, átlagosan havonta kerül sor.
A higiénikus tisztítópatron alkoholt
•
tartalmaz, mely a felnyitást követően lassú,
természetes párolgási folyamatnak indul.
Amennyiben a borotvát nem mindennap
használja, a patron cseréje körülbelül
kéthavonta esedékes.
Mivel a tisztítópatron kenőanyagot is
•
tartalmaz, ezért előfordulhat hogy a
tisztítást követően nyomot hagy a
borotvafejen. Ez azonban törlőruha, vagy
puha papírzsebkendő segítségével, egy
óvatos törlőmozdulattal könnyedén
eltávolítható.
Időnként tisztítsa át a tisztítóegység
•
borítását egy nedves törlőkendővel,
különösen a tisztító üreget, ahol a borotva
helye van!
Tartozékok
Megvásárolhatóak a kereskedőknél vagy a
Braun Márkaszervízekben:
•
Borotva szitából és késből álló
nyíróegység: 32S
•
Clean&Renew™ tisztítóegység: CCR
A változtatás jogát fenntartjuk.
A termék megfelel mind az EMC
követelményrendszerének, amint
az az Európa Tanács 2004/108/EC
direktívájában szerepel, mind pedig az
alacsonyfeszültségrŒl szóló elŒírásoknak
(2006/95/EC).
Az elektromos leírás a speciális vezetékre
nyomtatva olvasható.
A környezetszennyezés elkerülése
érdekében arra kérjük, hogy a
készülék hasznos élettartalma végén
ne dobja azt a háztartási szemétbe.
A mıködésképtelen készüléket leadhatja a
Braun szervizközpontban, vagy az országa
szabályainak megfelelŒ módon dobja a
hulladékgyıjtŒbe.
Garancia
A Braun – ismerve termékei megbízhatóságát,
készülékeire két év garanciát vállal, azzal a
megkötéssel, hogy a jótállási igényt a készülék
csomagolásában található Jótállási Nyilatkozatban feltüntetett Braun márkaszervizekben
lehet érvényesíteni.
A garancia hatálya alól kivételt képeznek
azok a meghibásodások, amelyek a készülék
szakszerűtlen, vagy nem rendeltetésszerű
használatára vezethetők vissza, valamint
azok az apróbb hibák, amelyek a készülék
értékét, vagy használhatóságát nem
befolyásolják.
A garancia nem vonatkozik a gyorsan kopó,
rendszeresen cserélendő tartozékokra (pl.
Borotvaszita, kés, stb.)
A jótállási igény érvényesítésére vonatkozó
részletes tájékoztató a készülék
csomagolásában található.
31
Page 32

Hrvatski
Naši su proizvodi oblikovani su tako da
zadovoljavaju najviše standarde kvalitete,
funkcionalnosti i dizajna. Nadamo se da ćete
uživati u brijanju novim Braunovim aparatom
za brijanje.
Upozorenje
Vaš aparat za brijanje ima ugrađeni sigurnosni niskonaponski adapter. Nemojte mijenjati
ili samostalno rukovati bilo kojim dijelom
adaptera, jer se tako izlažete opasnosti od
strujnog udara.
Nije predviđeno da ovaj uređaj koriste djeca
ili osobe smanjenih fizičkih ili mentalnih
sposobnosti, osim ako ih ne nadgleda osoba
odgovorna za njihovu sigurnost. Općenito,
preporučamo da ovaj uređaj držite van
dohvata djece.
Opis
1 Kaseta mrežice i bloka noža
2 Podrezivač dugih dlačica
3 Prekidač precizne postavke («lock»)
4 Prekidač za uključivanje/isključivanje
(«on/off»)
5 Indikator punjenja (zeleno svjetlo)
6 Indikator prazne baterije (crveno svjetlo)
7 Indikator čišćenja (žuto svjetlo)
8 Svjetlo upozorenja za zamjenu dijelova
9 Utičnica uređaja
10 Specijalni priključni kabel
11 Etui
Punjenje
Najbolja temperatura okoline za punjenje je
između 15 °C i 35 °C. Ne izlažite uređaj na
duže vrijeme temperaturama višim od 50 °C.
Specijalnim priključnim kabelom (10) spojite
•
aparat za brijanje na izvor elektične energije.
Motor uređaja pri tome mora biti isključen.
Pri prvom punjenju ostavite uređaj da se
•
neprestano puni 4 sata. Za sljedeća punjenja trebat će otprilike 1 sat.
Pun kapacitet baterija dostatan je za oko
•
45 minuta brijanja bez priključnog kabela,
što ovisi i o jačini vaše brade.
32
Brijte se bez kabela. Uz normalnu upotrebu,
•
aparat će se automatski puniti nakon
svakog čišćenja u Clean&Renew™ jedinici
(vidi «C Clean&Renew™»).
Baterije dostižu maksimum svojeg kapaci-
•
teta tek nakon nekoliko uzastopnih ciklusa
punjenja i pražnjenja.
Brzo punjenje u trajanju od 5 minuta
•
(posebnim priključnim kabelom (10))
dovoljno je za jedno brijanje.
Ako su baterije potpuno prazne, možete se
•
brijati, a da ih prethodno ne napunite. Samo
spojite uređaj s izvorom električne energije
specijalnim priključnim kabelom.
Indikator punjenja (5)
Zeleno svijetlo indikatora punjenja pokazuje
stanje baterija. Ono bljeska dok se aparat
za brijanje puni ili kad je uključen. Kada je
baterija puna sva zelena svijetla neprestano
svijetle, pod uvjetom da je aparat za brijanje
uključen ili spojen na izvor električne energije.
Indikator prazne baterije (6)
Crvena lampica prazne baterije bljeska kad je
baterija pri kraju.
Svejedno biste se mogli moći obrijati do kraja.
A Brijanje
Pritiskom na prekidač za uključivanje/
isključivanje (4) uključite aparat (ilustracija).
Prilagodljive mrežice automatski se
prilagođavaju svim obrisima vašeg lica.
Podrezivač dugih dlačica (2)
Kako biste oblikovali zalistke, brkove ili bradu
gurnite podrezivač dugih dlačica prema gore.
Prekidač precizne postavke («lock») (3)
Za precizno rukovanje na teško dostupnim
područjima (npr. ispod nosa) gurnite prekidač
(3) na desno u poziciju «lock». Središnji
podrezivač i jedna mrežica će se spustiti.
Page 33

Savjeti za savršeno brijanje
Za najbolje rezulate, Braun preporučuje da
slijedite ova 3 jednostavna koraka:
1. Uvijek se brijte prije nego operete lice.
2. Uvijek držiteaparat za brijanje pod
pravim kutem (90°) u odnosu na kožu.
3. Nategnite kožu i brijte se u smjeru
suprotnom od rasta dlačica.
B Održavanje aparata za
brijanje u vrhunskom stanju
Indikator čišćenja
Svoj aparat za brijanje morate svakodnevno
čistiti u jedinici Clean&Renew™ i uvijek kad
žuto svijetlo indikatora čišćenja (7) svijetli
nakon brijanja. Ako se to ne napravi nakon
nekog vremena žuto svijetlo će se samo
isključiti. Elektronika aparata za brijanje
pretpostavit će da se uređaj očistio ručno i
započet će ponovno računati vrijeme do
sljedećeg čišćenja. Tijekom čišćenja u jedinici
Clean&Renew™ žuto svijetlo će bljeskati i
isključit će se otprilike 4 sata nakon kraja
čišćenja.
Automatsko čišćenje
Čim uređaj stavite u jedinicu Clean&Renew™,
proces čišćenja započinje automatski (vidi
«C Clean&Renew™»).
Ručno čišćenje preporučuje se samo kad
Clean&Renew™ jedinica nije dostupna, npr.
kada ste na putu.
Ručno čišćenje
Ovaj uređaj se može čistiti i pod
mlazom tekuće vode.
Upozorenje: prije čišćenja vodom
uvijek isključite uređaj iz struje.
Redovito čišćenje omogućuje kvalitetniji i bolji
rad aparata. Ispiranje glave aparata vrućom
tekućom vodom nakon svakog brijanja,
jednostavan je i brz način održavanja aparata
čistim:
Uključite uređaj (provjerite da ste isključili
•
priključni kabel) i isperite glavu aparata
tekućom vrućom vodom. Za čišćenje
možete koristiti i sapun na prirodnoj bazi
ako ne sadrži nikakva jaka sredstva.
Isperite pjenu i pustite da aparat radi još
nekoliko sekundi.
Potom isključite uređaj i pritisnite mehani-
•
zam za otpuštanje. Skinite mrežicu i
izvucite blok noža i ostavite ih da se osuše.
Čistite li uređaj redovito tekućom vodom
•
jednom tjedno nanesite kapljicu laganog
strojnog ulja na podrezivač dugih dlačica
(2) i zaštitni poklopac mrežice i bloka
noža (1).
Isto tako aparat možete očistiti i četkicom:
Prvo isključite aparat, pa izvucite kasetu
•
mrežice i bloka noža te njime lagano
tupkajte po ravnoj površini.
Četkicom očistite blok noža i unutrašnji dio
•
glave za brijanje. U svakom slučaju, nikada
četkicom nemojte čistiti mrežicu jer biste je
tako mogli oštetiti.
Svjetlo upozorenja za zamjenu dijelova/
Reset
Kako biste osigurali najtemeljitije i
najkvalitetnije brijanje, zamijenite kasetu
mrežice i bloka noža čim to signalizira svjetlo
upozorenja za zamjenu dijelova (8) (otprilike
svakih 18 mjeseci) ili kada se dijelovi istroše.
Svjetlo upozorenja za zamjenu dijelova
podsjećat će vas tijekom sljedećih 7 brijanja
da trebate zamijeniti mrežicu i blok noža.
Potom će se uređaj automatski resetirati.
Nakon što zamijenite kazetu s mrežicom i
blokom noža (1) pritisnite prekidač za
uključivanje/isključivanje i držite ga najmanje
5 sekundi kako biste resetirali brojač.
Za to vrijeme će treperiti svjetlo upozorenja
za zamjenu dijelova, a ugasit će se kada je
resetiranje završeno. Ručno resetiranje
možete napraviti u svakom trenutku.
Održavanje baterija
Kako biste održali optimalni kapacitet baterija,
treba pustiti aparat da se do kraja sam
isprazni (upotrebom) otprilike svakih
6 mjeseci. Tada ga napunite do punog
kapaciteta.
33
Page 34

Napomena o brizi za okoliš
Ovaj uređaj sadrži punjive baterije.
Kako biste zaštitili okoliš, na kraju
radnog vijeka uređaja nemojte ga
odlagati zajedno s kućnim otpadom.
Baterije odložite u servisnim centrima Braun
ili na mjestima predviđenima za odlaganje
potrošenih baterija.
C Clean&Renew™
Braun Clean&Renew je jedinica oblikovana
za čišćenje, punjenje i spremanje vašeg
aparata. Svakodnevno čistite svoj aparat za
brijanje u jedinici Clean&Renew.
Tijekom automatiziranog procesa čišćenja,
aparat se sam uključuje i isključuje na
određeno vrijeme kako bi se postiglo najbolje
moguće čišćenje. Kako njegova posebna
tekućina za čišćenje sadrži manje količine
ulja, proces čišćenja uključuje i potrebno
podmazivanje dijelova aparata.
Važno
Koristite isključivo priključni kabel koji dolazi
•
s uređajem.
Kako biste izbjegli curenje tekućine za
•
čišćenje uređaj postavite na ravnu, stabilnu
površinu. Nemojte je naginjati, naglo
pomicati ili premještati na bilo koji način
ako je uložena patrona sa sredstvom za
čišćenje.
Nemojte spremati jedinicu u toaletni orma-
•
rić, iznad radijatora, na polirane ili lakirane
površine. Nemojte je izlagati sunčevoj
svjetlosti.
Jedinica sadrži visoko zapaljivu tekućinu.
•
Ne držite je u blizini izvora vatre. Ne pušite.
Držati izvan dohvata djece. Nemojte sami
•
puniti patrone. Koristite samo originalne
Braunove patrone.
Opis
1 Prekidač za uključivanje/otpuštanje
2 Ležište za aparata za brijanje
3 Prekidač za otvaranje kućišta
34
4 Prikaz stanja tekućine za čišćenje
5 Patrona sa sredstvom za čišćenje
Prije korištenja jedinice Clean&Renew™
Postavljanje patrone
Pritisnite prekidač za otvaranje kućišta (3).
•
Patronu sa sredstvom za čišćenje stavite
•
na ravnu stabilnu površinu (npr. na stol).
Pažljivo skinite poklopac patrone. Uložite
patronu do kraja u bazu stanice.
Polako zatvorite kućište pritiskom prema
•
dolje.
Zamjena patrone
Nakon što otvorite kućište, pričekajte par
sekundi prije nego što izvučete patronu.
Prije nego izvučete korištenu patronu nemojte
zaboraviti zatvoriti njezine otvore poklopcem
kojeg ste skinuli s nove patrone, jer korištena
patrona sadrži prljavu tekućinu za čišćenje.
Korištenu patronu možete odložiti zajedno
s kućnim otpadom.
Korištenje jedinice
Clean&Renew™
Priključite svoju jedinicu Clean&Renew™
•
u izvor električne energije putem kabela
koji dolazi s njom. Poseban priključak sa
stražnje strane osigurava uštedu prostora.
Nakon svakog brijanja, isključite aparat
i stavite ga u jedinicu Clean&Renew™,
s glavom prema dolje s time da je prednja
strana aparata okrenuta prema vama.
Pritisnite prekidač za uključivanje/otpušta-
•
nje (1) kako biste učvrstili i priključili aparat
za brijanje. Čišćenje će tada započeti, i dok
god bude trajalo, svijetlit će žuta lampica
(oko 2 minuta čišćenja, najmanje 4 sata
sušenja).
Molimo ne prekidajte proces čišćenja, jer
•
ako se aparat izvuče iz jedinice prerano, on
će ostati mokar i samim time neprikladan za
upotrebu. Ako ipak morate prekinuti proces,
pritisnite prekidač za uključivanje/otpuštanje
(1).
Kada je čišćenje završeno, svijetlit će žuto
•
svjetlo i aparat je spreman za uporabu.
Page 35

Aparat iz kućišta otpuštate pritiskom na
prekidač za uključivanje/otpuštanje.
Patrona sa sredstvom za čišćenje trebala bi
•
biti dostatna za 30-ak ciklusa čišćenja.
Kada na prikazu stanja tekućine za čišćenje
(4) uočite oznaku «min», vodite računa o
tome da vam je postojeća patrona dostatna
za otprilike 5 ciklusa čišćenja.
Potom morate zamijeniti patronu; ako je
•
koristite svaki dan, trebat ćete je mijenjati
otprilike svaka 4 tjedna.
Higijensko sredstvo za čišćenje sadrži
•
alkohol koji, nakon što se patrona otvori,
s vremenom isparava. Zato se patronu, ako
se aparat ne koristi svakodnevno, treba
zamijeniti svakih 8 tjedana.
Patrona za punjenje sadrži i lubrikante koji
•
nakon čišćenja mogu ostati u malim količinama na glavi aparata. Ipak, te je ostatke
lako ukloniti brisanjem mekom krpom ili
papirnatim ubrusima.
S vremena na vrijeme očistite kućište
•
vlažnom krpom, posebno mjesto na koje se
ulaže aparat.
Dodaci
Dostupni kod prodavača ili u Braunovim
servisnim centrima:
Kaseta mrežice i bloka noža: 32S
•
Patrone za jedinicu Clean&Renew™:
•
CCR
Jamstveni list
Jamstvo ne vrijedi za o‰teçenja nastala
neispravnom uporabom, normalnu
istro‰enost (npr. mreÏice ili bloka noÏa) i
nedostatke koji samo neznatno utjeãu na
vrijednost ili valjanost uporabe aparata.
Ovo jamstvo vrijedi u svakoj zemlji gdje su
proizvodi distribuirani od strane Brauna ili
sluÏbenog distributera.
Jamstvo ne vrijedi za o‰teçenja nastala
neispravnom uporabom, normalnu
istro‰enost i nedostatke koji samo neznatno
utjeãu na vrijednost ili valjanost uporabe
aparata. Jamstvo prestaje kod popravka
od strane neovla‰tene osobe ili uporabe
neoriginalnih dijelova umjesto Braun
rezervnih dijelova.
Jamstvo vrijedi samo uz predoãenje raãuna
i pravilno ispunjenog jamstvenog lista.
Braunov servis moÏete kontaktirati na broj
telefona 00 385 1 66 01 777.
PodloÏno promjeni bez prethodne obavijesti.
Detalji o elektriãnoj energiji otisnuti su na
specijalnom prikljuãnom kabelu.
35
Page 36

Slovensko
Naši izdelki so zasnovani tako, da ustrezajo
najvišjim standardom kakovosti, funkcionalnosti in dizajna. Želimo si, da bi vaš novi
Braunov brivnik z veseljem uporabljali.
Opozorilo
Sistem za britje je opremljen s posebno
priključno vrvico z vgrajenim varnostnim
nizkonapetostnim napajanjem. Njenih delov
ne smete zamenjati ali spreminjati, sicer
obstaja tveganje električnega udara.
Otroci in ljudje z zmanjšano fizično ali duševno sposobnostjo lahko uporabljajo aparat
le pod nadzorstvom osebe, ki je odgovorna
za njihovo varnost. Priporočamo vam, da
napravo hranite izven dosega otrok.
Opis
1 Enota z mrežico in rezili
2 Prirezovalnik daljših dlak
3 Stikalo za nastavitev natančnega britja
(»lock«)
4 Stikalo za vklop/izklop («on/off»)
5 Indikatorji polnjenja (zeleni)
6 Indikator potrebnega polnjenja (rdeč)
7 Indikator čiščenja (rumen)
8 Indikator potrebne zamenjave brivnih
delov
9 Vtič brivnika za priključno vrvico
10 Posebna priključna vrvica
11 Etui
Polnjenje
Najprimernejša temperatura okolice za
polnjenje je med 15 °C in 35 °C. Brivnika ne
smete dalj časa izpostavljati temperaturam,
višjim od 50 °C.
Brivnik priključite na električno omrežje
•
s posebno priključno vrvico (10). Motor
brivnika mora biti pri tem izključen.
Pri prvem polnjenju naj se brivnik štiri ure
•
neprekinjeno polni. Nadaljnja polnjenja
bodo trajala približno eno uro.
Povsem napolnjena baterija brivnika
•
zadošča za do 45 minut britja brez
36
priključne vrvice, odvisno od rasti vaše
brade.
Brijte se brez priključne vrvice. Pri normalni
•
uporabi se bo brivnik po vsakem čiščenju v
enoti Clean&Renew™ samodejno napolnil
(glejte «C Clean&Renew™»).
Baterija bo dosegla svojo maksimalno
•
kapaciteto šele po nekajkratnem polnjenju/
praznjenju.
5-minutno hitro polnjenje (s posebno
•
priključno vrvico (10)) zadostuje za en
postopek britja.
Če so baterije za ponovno polnjenje
•
popolnoma prazne, se lahko obrijete tudi
tako, da brivnik priključite na električno
omrežje s posebno priključno vrvico.
Indikatorji polnjenja (5)
Zeleni indikatorji polnjenja kažejo stanje
napolnjenosti baterij. Kadar se brivnik polni
ali kadar je vključen, utripa zeleni indikator
polnjenja. Ko je baterija povsem napolnjena,
vsi zeleni indikatorji polnjenja neprekinjeno
svetijo, pod pogojem, da je brivnik vklopljen
ali priključen na električno vtičnico.
Indikator potrebnega polnjenja (6)
Rdeči indikator potrebnega polnjenja utripa,
ko je napolnjenost baterije nizka. Svoje britje
boste lahko dokončali.
A Britje
Brivnik vključite s pritiskom na stikalo za vklop
(4) (glejte sliko).
Fleksibilne brivske mrežice se samodejno
prilagodijo potezam vašega obraza (glejte
sliko).
Prirezovalnik daljših dlak (2)
Če želite prirezati zalizke, brke ali brado,
potisnite prirezovalnik daljših dlak navzgor.
Stikalo za nastavitev natančnega britja
(»lock«) (3)
Za natančno uporabo brivnika na težko
dostopnih območjih (npr. pod nosom)
pomaknite stikalo (3) v desno do položaja
»lock«. Osrednji prirezovalnik in ena od
mrežic se spustita.
Page 37

Nasveti za brezhibno britje
Za kar najboljše rezultate britja vam Braun
priporoča, da upoštevate tri preproste
nasvete:
1. Vedno se obrijte, preden umijete obraz.
2. Brivnik ves čas držite pravokotno na
kožo (90°).
3. Kožo z roko rahlo napnite in se brijte
v nasprotni smeri rasti brade.
B Vzdrževanje brivnika
Indikator čiščenja
Priporočamo vam, da brivnik vsak dan očistite
v enoti Clean&Renew™, še posebej pa
takrat, ko po uporabi brivnika rumeni indikator
čiščenja (7) neprekinjeno sveti. Če tega ne
storite, bo rumeni indikator čez nekaj časa
ugasnil. Elektronika brivnika bo predvidevala,
da ste brivnik očistili ročno, in bo na novo
preračunala, kdaj je potrebno naslednje
čiščenje. Med postopkom čiščenja v enoti
Clean&Renew™ rumeni indikator utripa.
Ugasne po približno 4 urah, ko je čiščenje
končano.
Samodejno čiščenje
Ko brivnik postavite v enoto Clean&Renew™,
se prične samodejno čiščenje (glejte
«C Clean&Renew™»). Ročno čiščenje
priporočamo samo v primeru, ko čiščenje v
enoti Clean&Renew™ ni možno, na primer na
potovanju.
Ročno čiščenje
Glavo brivnika lahko čistite pod tekočo
vodo.
Opozorilo: Preden glavo brivnika
očistite z vodo, morate brivnik izključiti
iz električnega omrežja.
Redno čiščenje brivnika vam zagotavlja boljše
rezultate britja. Izpiranje glave brivnika pod
tekočo vodo po vsakem britju je preprost in
hiter način za vzdrževanje čistoče:
Vključite brivnik (brez priključne vrvice) in
•
glavo brivnika izperite pod vročo tekočo
vodo. Uporabite lahko tudi tekoče milo, ki
ne vsebuje abrazivnih snovi. Peno dobro
izperite in pustite, da brivnik deluje še nekaj
sekund.
Nato izključite brivnik, odstranite enoto z
•
mrežico in rezili (1) in pustite, da se posuši.
Če brivnik redno čistite pod tekočo vodo,
•
na prirezovalnik daljših dlak (2) in enoto
z mrežico in rezili (1) vsak teden nanesite
kapljico lahkega strojnega olja.
Brivnik lahko očistite tudi s ščetko:
Izključite brivnik. Odstranite enoto z mrežico
•
in rezili in jo iztrkajte na ravni površini.
S ščetko očistite notranjost glave brivnika.
•
Enote z mrežico in rezili ne smete čistiti s
ščetko, ker jo s tem lahko poškodujete.
Indikator potrebne zamenjave brivnih
delov / Ponastavitev prikaza
Za ohranjanje 100 % učinkovitosti britja
morate enoto z mrežico in rezili (1) zamenjati
takrat, ko zasveti indikator potrebne
zamenjave brivnih delov (8) (približno vsakih
18 mesecev), oziroma ko opazite znake
obrabe.
Indikator potrebne zamenjave vas bo med
naslednjimi sedmimi postopki britja opozarjal,
da morate zamenjati enoto z mrežico in rezili.
Nato bo brivnik samodejno ponastavil prikaz.
Potem ko zamenjate enoto z mrežico in rezili
(1), za najmanj 5 sekund pritisnite stikalo za
vklop/izklop (4), da ponastavite števec.
Indikator potrebne zamenjave pri tem utripa,
ko je ponastavitev končana, pa ugasne.
Ročno ponastavitev lahko opravite kadarkoli.
Ohranjanje kapacitete baterij
Da bodo baterije za ponovno polnjenje
ohranile optimalno kapaciteto, jih morate
približno vsakih 6 mesecev povsem izprazniti
(z britjem). Nato brivnik ponovno napolnite
do polne kapacitete.
37
Page 38

Varovanje okolja
Izdelek je opremljen z baterijami za
ponovno polnjenje. Iz okoljevarstvenih
razlogov vas prosimo, da izdelka ob
koncu njegove življenjske dobe ne
odvržete med gospodinjske odpadke.
Napravo lahko odnesete na ustrezno zbirno
mesto, določeno v skladu z veljavnimi
predpisi v Republiki Sloveniji.
Pred uporabo enote Clean&Renew™
Namestitev kartuše
Pritisnite na tipko za dvig ohišja (3) in
•
odprite enoto.
Čistilno kartušo položite na ravno in trdno
•
površino (npr. na mizo). Previdno odstranite
pokrovček kartuše. Nato kartušo do konca
potisnite v spodnji del enote.
Previdno zaprite ohišje enote, tako da ga
•
pritisnete navzdol, dokler se ne zaskoči.
C Clean&Renew™
Enota Braun Clean&Renew™ je zasnovana
za čiščenje, polnjenje in shranjevanje vašega
brivnika. Brivnik vsak dan očistite v enoti
Clean&Renew™.
Med samodejnim postopkom čiščenja se
brivnik v presledkih vklaplja in izklaplja, kar
omogoča optimalne rezultate čiščenja.
Posebna čistilna tekočina vsebuje tudi
majhno količino olja, tako da se deli brivnika
med čiščenjem tudi ponovno naoljijo.
Pomembno
Uporabite lahko samo posebno priključno
•
vrvico, ki je priložena brivniku.
Enoto postavite na ravno in trdno površino,
•
da preprečite morebitno iztekanje čistilne
tekočine. Če je v enoto nameščena čistilna
kartuša, je ne smete nagibati, naglo premakniti ali prenašati.
Enote ne postavite v omarico z ogledalom,
•
ne hranite je nad radiatorjem in ne postavite
na zloščeno ali lakirano površino. Enote ne
izpostavite neposredni sončni svetlobi.
Enota vsebuje zelo vnetljivo tekočino.
•
Ne hranite je blizu virov vžiga. Ne kadite.
Hranite izven dosega otrok. Kartuše ne
•
smete ponovno napolniti. Uporabite le originalne Braunove kartuše.
Opis
1 Tipka za vklop/sprostitev
2 Kontakt
3 Tipka za dvig ohišja enote za zamenjavo
kartuše
4 Indikator nivoja tekočine
5 Čistilna kartuša
38
Zamenjava kartuše
Ko s pritiskom na tipko odprete ohišje enote,
počakajte nekaj sekund in šele nato odstranite rabljeno kartušo.
Preden rabljeno kartušo odvržete, obvezno
zaprite njene odprtine s pokrovčkom nove
kartuše, saj rabljena kartuša vsebuje kontaminirano čistilno raztopino.
Staro kartušo lahko odvržete skupaj z gospodinjskimi odpadki.
Rokovanje z enoto
Clean&Renew™
Enoto Clean&Renew™ priključite na
•
električno omrežje. Posebna vtičnica na
zadnji strani enote je prilagodljiva, zato
zavzame le malo prostora. Po vsakem
britju izključite brivnik in ga s sprednjo
stranjo in z glavo navzdol postavite v enoto
Clean&Renew™.
Pritisnite na tipko za vklop/sprostitev (1), da
•
se brivnik blokira in se vzpostavi kontakt.
Prične se postopek čiščenja. Med celotnim
postopkom čiščenja utripa rumeni indikator
na brivniku (približno 2 minuti čiščenja,
najmanj 4 ure sušenja).
Postopka čiščenja ne smete prekiniti, ker se
•
brivnik ne bo posušil in ne bo pripravljen za
uporabo. Če morate postopek čiščenja kljub
vsemu prekiniti, pritisnite na tipko za vklop/
sprostitev (1).
Ko je čiščenje končano, rumeni indikator
•
ugasne in brivnik je pripravljen na uporabo.
Brivnik sprostite tako, da pritisnete na tipko
za vklop/sprostitev.
Page 39

Čistilna kartuša zadostuje za približno
•
30 postopkov čiščenja. Ko indikator nivoja
tekočine (4) doseže oznako «min», tekočina
v kartuši zadošča še za približno pet postopkov čiščenja. Kartušo je pri vsakodnevni
uporabi potrebno zamenjati približno vsake
4 tedne.
Higienska čistilna raztopina vsebuje alko-
•
hol, ki potem, ko kartušo odprete, postopoma izhlapeva v okolico. Če kartuše ne
uporabljate vsak dan, jo morate zamenjati
približno vsakih 8 tednov.
Čistilna raztopina vsebuje mazivne
•
sestavine, ki po čiščenju lahko pustijo sledi
na glavi brivnika. Sledi lahko enostavno
nežno obrišete s krpo ali mehko papirnato
brisačo.
Ohišje občasno očistite z vlažno krpo, še
•
posebej notranjost odprtine, v katero
postavite brivnik.
Dodatni nastavki
Na voljo pri vašem prodajalcu ali v Braunovih
servisnih centrih:
Enota z mrežico in rezili: 32S
•
Čistilna kartuša Clean&Renew™: CCR
•
PridrÏujemo si pravico do sprememb.
Ta izdelek je skladen z evropskima
smernicama o elektromagnetni
zdruÏljivosti 2004/108/EC in
nizkonapetostnih napravah 2006/95/EC.
Garancija
Za izdelek valja dvoletna garancija, ki zaãne
veljati z datumom nakupa. V ãasu trajanja
garancije bomo brezplaãno odpravili vse
napake, ki so posledica slabega materiala
ali izdelave, bodisi s popravilom bodisi z
zamenjavo celega izdelka.
Ta garancija velja v vsaki drÏavi, kjer je
izdelek dobavljen od BRAUN ali njegovega
poobla‰ãenega distributerja.
Garancija ne pokriva okvar, ki so posledica
nepravilne uporabe, normalne obrabe
(mreÏice, bloki noÏa,...) in tudi ne okvar, ki
v zanemarljivi meri vplivajo na vrednost ali
delovanje aparata.
Garancija preneha veljati, ãe popravilo izvr‰i
nepoobla‰ãena oseba, oziroma ãe pri
popravilu niso uporabljeni originalni Braunovi
nadomestni deli.
Za popravilo v garancijskem roku izroãite ali
po‰ljite kompleten izdelek z raãunom
poobla‰ãenemu Braunovemu servisu.
Za informacije pokliãite poobla‰ãeni servis
ISKRA PRINS tel. + 386 1 476 98 00.
Podatki o elektriãnem prikljuãku so odtisnjeni
na posebnem prikljuãnem kablu.
OdsluÏene naprave ne smete odvreãi
skupaj z gospodinjskimi odpadki.
Odnesite jo v Braunov servisni center
ali na ustrezno zbirno mesto v skladu
z veljavnimi predpisi.
39
Page 40

Türkçe
Ürünlerimiz kalite, kullanım ve tasarımda
en yüksek standartlara ulaşabilmek için
üretilmiştir. Yeni Braun tıraş makinenizden
memnun kalacağınızı umarız.
Uyarı
Tıraş makinenizin ekstra düşük voltaj için
güvenlik sağlayanadaptör içeren özel
kablo seti vardır. Genel olarak, çocukların
erişemeyeceği bir yerde tutmanızı öneririz.
Bu aygıt sorumlu bir kiµinin gözetiminde
olmaksızın çocukların ve fiziksel yada ruhsal
engelli kiµilerin kullanmasına uygun de©ildir.
Aygıtınızı çocukların ulaµabilece©i yerlerden
uzak tutmanızı öneririz.
Tanımlamalar
1 Elek koruyucu kapak
2 Uzun tüy düzeltici
3 Hassas ayar düğmesi («lock»)
4 Açma/kapama düğmesi («on/off»)
5 Şarj ışıkları (yeşil)
6 Şarj ikaz ışığı (kırmızı)
7 Temizleme ünitesi ışığı (sarı)
8 Tıraş başlıkları için değiştirme ışığı
9 Tıraş güç soketi
10 Özel kablo seti
11 Etui
Tıraş Makinesini Şarj Etme
Şarj etmek için ideal çevre sıcaklığı 15 °C
ile 35 °C arasındadır. Tıraş makinenizi
50 °C den daha yüksek sıcaklığı maruz
bırakmayınız.
Özel kablo setini (10) kullanarak, tıraş
•
makinenizi elektriğe bağlayınız. lk şarj
ettiğinizde, cihazınızı 4 saat kesintisiz şarj
ediniz. Daha sonraki şarj süreleri ortalama
1 saat sürecektir.
Tam olarak şarj edilmiş cihaz – sakalınızın
•
sertliğine ve uzama süresine bağlı olarak –
45 dakikaya kadar kablosuz kullanım
sağlar.
40
Cihazınızı kablosuz olarak kullanınız.
•
Normal kullanım ile tıraş makineniz her
Clean&Renew™ ünitesinde temizleme
işlemi sırasında şarj olacaktır (sayfa
«C Clean&Renew™»).
Maksimum batarya kapasitesine birkaç şarj
•
etme işleminden sonra ulaşabilirsiniz.
5 dakikalık hızlı şarj etme özelliği (özel
•
kablo seti ile (10)) tek seferlik tıraş işlemi
için yeterlidir.
Eğer sarj edilebilir bataryanız bitmiş ise,
•
özel kablo seti ile cihazınız fişe takılıyken
tıraş olabilirsiniz.
Şarj Işıkları (5)
Yeşil şarj ışığı cihazınızın şarj durumunu
göstermektedir. Yeşil şarj ışığı yanıp söndüğü
zaman cihazınızın şarj edilmekte olduğunu
gösterir. Cihazınız tamamen şarj olduğunda
yeşil şarj ışığı sürekli yanmaya başlar.
Şarj kaz Işığı (6)
Kırmızı renkli düşük şarj göstergesi, pilin şarjı
azaldığında yanar.
Bu durumda pildeki güç, tıraşınızı bitirmenize
yeterli olacaktır.
A Tıraş Olma
Tıraş makinesini çalıştırmak için açma/
kapama düğmesine (4) basınız.
Esnek kesici sistem yüz kıvrımlarınıza otomatik olarak uyum sağlar.
Uzun Tüy Düzeltici (2)
Favori, bıyık ve sakalınızı düzeltmek için uzun
tüy düzelticiyi yukarı doğru oynatınız.
Hassas Ayar Düğmesi («lock») (3)
Burun altı gibi tıraş edilmesi zor bölgelerde
rahat tıraşı sağlamak için hassas ayar
düğmesini (3) sağa doğru («lock») pozisyonuna getiriniz.
Page 41

Mükemmel tıraş için ipuçları
En iyi sonuçlar için, Braun size 3 basit you
tavsiye ediyor:
1. Cildinizi yıkamadan once tıraş olmanızı
öneririz.
2. Tıraş makinenizi cildinize 90° açı ile
tutunuz.
3. Cildinizi geriniz ve sakallarınızı çıktıktan
yönün tersine doğru tıraş ediniz.
sabunlu su kullanabilirsiniz. Bütün köpükten
arındığından emin olunuz ve tıraş makinenizi bir kaç saniye daha çalışır durumda
suyun altında tutunuz.
Daha sonra, tıraş makinenizi kapatınız,
•
tıraş eleğini ve elek koruyucu başlığını (1)
çıkartınız ve kurumaya bırakınız.
Eğer cihazınızı düzenli olarak su altında
•
temizliyorsanız, haftada bir kere uzun tüy
düzeltici (2) ve elek koruyucu başlığına (1)
bir damla hafif makine yağı uygulayınız.
B Tıraş Makinenizin ömrünü
uzatmak için
Temizleme ndikatörü
Tıraş makinenizin günlük temizliği
Clean&Renew™ içinde, temizleme ünitesi
ışığı (7) sarı yandığı zaman gerçekleşmelidir.
Eğer bu gerçekleşmez ise, sarı ışık ışık bir
süre sonra sönecektir. Tıraş makineniz
daha sonra elle temizlendiğini sanıp, yeni
temizleme süresi için zamanı belirleyecektir.
Clean&Renew™ içerisindeki temizleme
işlemi sırasında sarı ışık yanacak ve ortalama
4 saat sonra temizleme işlemi bitince
kapanacaktır.
Otomatik temizleme
Tıraş makineniz Clean&Renew™ içerisine
konulduktan sonra, otomatik olarak temizlenecektir (sayfa «C Clean&Renew™»). El ile
temizleme sadece Clean&Renew™ seyahat
gibi müsait olmadığı durumlarda önerilir.
El ile Temizleme
Tıraş makineniz musluk suyu altında
temizleme uygundur.
Uyarı: Tıraş makinenizi temizlemeden
önce cihazının fişten çekilmiş
olduğundan emin olunuz.
Düzenli temizleme tıraş makineninizden en
iyi performansı almanızı sağlayacaktır. Tıraş
başlığını akan su altında temizlemek kolay ve
hızlı bir temizleme yöntemidir:
Cihazı çalıştırınız (kablosuz olarak) ve tıraş
•
başlığını sıcak suyun altına tutunuz.
Dilerseniz aşındırıcı madde içermeyen
Alternatif olarak, bir fırça yardımı ile tıraş
makinenizi temizleyebilirsiniz:
Cihazınızı kapatınız, Elek koruyucu
•
başlığını (1) çıkartınız ve düz bir yüzeye
hafifçe vurunuz.
Fırçayı kullanarak, tıraş başlığının iç
•
bölgesini temizleyiniz. Buna rağmen, elek
ve kesiciyi zarar verebileceğinden fırça ile
temizlemeyiniz
Tıraş Başlığı Parçaları için Değiştirme
Işığı / Resetleme
%100 tıraş performansı sağlamak için tıraş
makinesi eleğini ve kesiciyi (1) tıraş başlığı
parçaları değiştirme ışığı (8) yandığında
(ortalama 18 ayda bir) ya da eskidiğinde
değiştiriniz.
kaz ışığı yanmaya başladıktan sonra 7 tıraş
süresince yanmaya devam edecektir.
Daha sonra ekran kendini resetleyecektir.
Bıçak & Elek kasetini değiştirdikten sonra,
tıraş makinesinin sayacını resetlemek için
açma/kapama düğmesine en az 5 saniye
kadar basınız.
Bunu yaparken, değiştirme ikaz ışığı yaıp
sönecektir, resetleme işlemi tamamlandığında
ışık sönecektir. Manual resetleme istenildiği
zaman yapılabilir.
Daha uzun pil ömrü için
Şarj edilebilir pilin optimum kapasitesini
korumak için, tıraş makineniz ortalama her
6 ayda bir deşarj edilmelidir. Daha sonra
cihaz tam olarak şarj edilmelidir.
41
Page 42

Çevre ile ilgili duyuru
Bu ürün şarj edilebilir piller içermektedir.
Doğal çevreyi korumak adına, lütfen
ürünü kullanım ömrü sonunda ev
atıkları ile beraber atmayınız. Ürünü
atmak istediğinizde Braun servis merkezlerine
götürebilirsiniz ya da bulunduğunuz ülkenin
katı atık kuralları çerçevesinde yok ediniz.
C Clean&Renew™ (Temizleme
ve Yenileme Ünitesi)
Braun Clean&Renew™ ünitesi tıraş makinenizi temizlemek, şarj etmek ve saklamak
üzere tasarlanmıştır.
Otomatik temizleme işlemi sırasında en iyi
temizleme sonucunu sağlamak için, cihaz
belirli aralıklarla açılıp kapanacaktır. Özel
olarak hazırlanmış olan temizleme sıvısı az
miktarda yağ içerdiğinden temizleme işlemi
sırasında cihaz için gerekli olan yağlama
işlemi de yapılmış olacaktır.
Önemli
Sadece cihazınızla birlikte sunulan elektrik
•
bağlantı kablosunu kullanınız.
Temizleme sıvısının akmasını önlemek için,
•
cihazı düz ve kaymayan bir yüzeye yerleştiriniz. Temizleme kartuşu takılı iken cihazınızı
aniden hareket ettirmemeye, yerini değiştirmemeye ve devirmemeye dikkat ediniz.
Cihazınızı cam bölmeler, radyasyona
•
maruz kalacağı yerler ve cilalı yüzeylerde
bulundurmayınız. Direk güeş ışığına maruz
bırakmayınız.
Cihazda yüksek miktarda yanıcı sıvı bulun-
•
maktadır, yakıcı maddelere yaklaştırmayınız. Çocukların ulaşabileceği yerlerden
uzak tutunuz. Kartuşu yeniden doldurmaya
çalışmayınız. Orjinal Braun yedek kartuşunu kullanınız.
Tanımlamalar
1 Başlama/Bırakma düğmesi
2 Bağlantı haznesi
3 Kartuş değişimi için çıkarma düğmesi
4 Seviye indikatörü
5 Temizleme kartuşu
42
Clean&Renew™, ünitesini kullanmaya
başlamadan once
Çıkarma düğmesine (3) basarak cihazın
•
kapağını açınız.
Kartuşu düz ve kaymaz bir yüzeyde ters
•
olarak tutunuz (örneğin masa). Kartuş
üzerindeki halkayı dikkatlice çıkartınız.
Kartuşu tabana kaydurarak yerleştiriniz.
Kapağı yavaşça yerine oturuncaya kadar
•
iterek kapatınız.
Kartuş Değiştirme
Çıkarma düğmesine basarak kapağı açtıktan
sonra, eski kartuşu çıkarmadan once bir kaç
saniye bekleyiniz.
Kullanmış kartuş kirlenmiş temizleme sıvısı
içerdiğinden, atmadan once yeni kartuşun
üzerindeki halka çıkıntıyı kullanarak eski
kartuşun çıkışlarını kapatınız.
Clean&Renew™ ünitesini
çalıştırma
Üniteyi elektriğe bağlayınız. Tıraş olduktan
•
sonra, tıraş makinenizi kapatınız ve ters
olarak Clean&Renew™ ünitesine
yerleştiriniz.
Başlama/Bırakma düğmesine (1) basarak
•
cihazı hazneye oturtunuz. Temizleme işlemi
başlayacaktır. Sarı ışık temizleme süresince
yanmaya devam edecektir. (ortalama 2 dak.
Temizleme, hiç olmazsa 4 saat kuruma)
Çalışmakta olan programı, tıraş makinesini
•
nemli ve kullanıma Uygun olmayan bir
şekilde bırakacağı için durdurmayınız.
Eğer yine de durdurmanız gerekiyor ise
başlatma/bırakma (1) düğmesine basınız.
Program bittiğinde sarı ışık sönecek
•
ve cihazınız tıraşa hazır hale gelecektir.
Çıkarmak için başlatma/bırakma (1)
düğmesine basınız.
Bir temizleme kartuşu 30 temizleme işlemi
•
için yeterlidir. Seviye gösterme indikatörü
(4) min noktasına ulaştığında, geri kalan
sıvı ortalama 5 tıraş işlemi için daha yeterlidir. Daha sonra kartuş yenisi ile değiştirilmelidir. Her gün kullanıldığında 4 haftada
bir değiştirilmelidir.
Page 43

Hijyenik temizleme solüsyonu alkol içerir
•
ve kartuş birkez açıldığında yavaşça
havaya karışmaya başlar. Günlük olarak
kullanılmı-yorsa ortalama 8 haftada bir
değiştirilmelidir.
Temizlik sıvısı anı zamanda yağlayıcı
•
maddeler de içerir ve temizlik sonrası tıraş
makinesi üzerinde belli belirsiz izler
kalabilir. Bu izler, ince bir bez ya da kağıt
mendil vasıtasıyla kolayca silinebilir.
Ürünün dışınıve özellikle tıraş makinenizin
•
yerleştiği bölümü belirli aralıklarla nemli bir
bezle silerek temizleyiniz.
Aksesuarlar
Braun Servis merkezlerinde veya Braun yetkili
satıcılarında bulunmaktadır.
Elek ve kesici bıçaklar: 32S
•
Clean&Renew™, ünitesi için temizleme
•
kartuşu: CCR
Bildirim yapılmadan deπiµtirilebilir.
Elektrikle ilgili direktifler özel kordon setinin
üzerinde yazmaktadır.
Bakanlıkça tespit ve ilan edilen kullanım ömrü
7 yıldır.
Üretici firma ve CE işareti uygunluk
değerlendirme kuruluşu:
Braun GmbH
Frankfurter Straße 145
61476 Kronberg / Germany
“ (49) 6173 30 0
Fax (49) 6173 30 28 75
P & G Sat. ve Dağ. Ltd. Şti.
Serin Sok. No: 9 34752 çerenköy/stanbul
tarafından ithal edilmiştir.
P & G Tüketici Hizmetleri
0 212 473 75 85,
trconsumers@custhelp.com
43
Page 44

кЫТТНЛИ
Наши изделия разработаны в соответствии с самыми высокими стандартам
качества, функциональности и дизайна.
Надеемся, что Вам понравится новая
бритва Braun.
Предупреждение
Бритва снабжена адаптером низкого
напряжения. Не заменяйте и не модифицируйте никакие детали адаптера. Это
может привести к поражению электрическим током.
Данное устройство не предназначено для
использования детьми или людьми с ограниченными физическими или умственными возможностями, в случае, если они
не находятся под присмотром людей,
ответственных за их безопасность. Мы
рекомендуем хранить устройство в месте,
недоступном для детей.
Описание
1 Бреющая сетка и режущий блок
2 Триммер для подравнивания длинных
волос
3 Кнопка режима точного бритья
4 Кнопка включения/выключения
5 Индикатор зарядки (зеленый)
6 Индикатор низкого уровня зарядки
(красный)
7 Индикатор чистки бритвы (желтый)
8 Индикатор замены сетки и режущего
блока
9 Разъем подключения бритвы
к электросети
10 Шнур питания
11 Футляр
При подключении бритвы к электриче-
•
ской сети используйте специальное
устройство (10).
Заряжая аккумулятор в первый раз,
•
оставьте ее подключенной к сети на
4 часа. Последующие зарядки будут
занимать у вас около часа.
Полная зарядка аккумулятора
•
обеспечивает 45 минут непрерывной
работы бритвы в зависимости от густоты
щетины.
Брейтесь бритвой, работающей от
•
аккумулятора. В нормальном режиме
бритва заряжается автоматически
после каждой чистки в устройстве
Clean&Renew™ (Чистки и Подзарядки)
(см. «C Устройство Clean&Renew™»).
Аккумулятор достигнет своей макси-
•
мальной емкости после нескольких
циклов зарядки/разрядки.
Быстрая 5-ти минутная зарядка акку-
•
мулятора (используйте специальное
устройство (10)) позволяет зарядить
аккумулятор на один сеанс бритья.
Если аккумулятор не заряжен, вы
•
можете использовать бритву, только
подключив ее к электросети посредством специального шнура.
Индикаторы зарядки (5)
Индикаторы зарядки зеленого цвета
указывают на уровень заряда аккумуляторов. Зеленый индикатор мигает, когда
бритва заряжается или включается.
Когда бритва полностью заряжена, все
индикаторы зарядки непрерывно горят
зеленым светом, при условии, что бритва
включена.
Зарядка бритвы
Оптимальный диапазон температуры
воздуха для зарядки бритвы от 15 °C
до 35 °C. Не подвергайте бритву
воздействию температуры выше, чем
50 °C в течение длительного периода
времени.
44
Индикатор низкого уровня зарядки (6)
Красный сигнал индикатора загорается
при низком уровне зарядки аккумулятора
электробритвы.
Вам должно хватить времени завершить
бритье.
Page 45

А Бритье
Нажмите кнопку включения/выключения
(4) как показано на картинке. Плавающие
бреющие сетки автоматически адаптируются ко всем контурам вашего лица.
Триммер для подравнивания длинных
волос (2)
Для подравнивания бакенбардов, усов или
бороды, выдвиньте триммер вперед.
Режим точного бритья («lock») (3)
Для более точного и эффективного бритья
на труднодоступных участках роста волос
(например, под носом), переведите кнопку
(3) в правое положение «lock» (фиксация).
Интегрированный триммер и одна из сеток
будет зафиксированы ниже своего уровня
для большего удобства при бритье.
Рекомендации для чистого бритья
Для достижения лучшего результата
Braun рекомендует следовать трем
простым правилам:
1. Мы рекомендуем бриться до
умывания.
2. Держите бритву под прямым углом
(90°) к коже.
3. Натяните кожу и перемещайте
бритву в направлении против роста
волос.
В Ухаживайте за своей
бритвой правильно
Индикаторы чистки бритвы
Рекомендуется проводить чистку с
помощью устройства Clean&Renew™
(Чистки и Подзарядки) после каждого
сеанса бритья. В этом случае желтый
индикатор чистки бритвы (7) будет
гореть непрерывно. Если чистка не была
произведена, через некоторое время
индикатор погаснет. Бритва автоматически начнет отсчет времени, которое
должно пройти до следующего сеанса
чистки, начиная с этого момента.
В течение процесса чистки в устройстве
Clean&Renew™ (Чистки и Подзарядки)
желтый индикатор будет мигать.
В среднем процесс чистки и подзарядки
бритвы занимает 4 часа, после чего
индикатор погаснет.
Автоматическая чистка
Сразу, как только вы поместите бритву
в устройство Clean&Renew™ (Чистки и
Подзарядки), процесс чистки и подзарядки начнется автоматически. Ручная
чистка бритвы рекомендуется только в
случае, если устройство Clean&Renew™
не доступно, например, если вы путешествуете.
Ручная чистка бритвы
Бреющая головка легко промывается под струей воды.
Внимание: Отключите бритву от
электрической сети перед тем, как
начать чистить бритву под струей
воды.
Регулярный уход за бритвой обеспечит
вам лучшее качество бритья на протяжении всего периода эксплуатации бритвы.
Чистка бритвы под струей воды – легкий
и быстрый способ содержать бритву
в чистоте.
Отсоедините бритву от электрической
•
сети и включите ее (бритва должна
работать от аккумулятора). Ополосните
бреющую головку под струей горячей
воды. Вы можете также использовать
жидкое мыло без абразивных частиц.
После того, как вы смоете пену, подержите работающую бритву под струей
воды еще некоторое время.
Затем выключите бритву, снимите брею-
•
щую сетку и режущий блок и позвольте
им высохнуть.
Если вы регулярно чистите бритву под
•
струей воды, наносите раз в неделю на
сетку и режущий блок (1) и триммер для
45
Page 46

длинных волос (2) каплю светлого
машинного масла.
В качестве альтернативы, Вы можете
чистить бритву с помощью щеточки:
Выключите бритву. Удалите сетку и
•
режущий блок (1) и аккуратно постучите
ими по плоской поверхности.
Используя щеточку, очистите внутрен-
•
нюю часть бреющей головки. Не чистите
щеткой сетку и режущий блок, так как
это может повредить их.
Индикатор замены сетки и режущего
блока/Сброс
Для поддержания 100% эффективности
работы бритвы необходимо регулярно
производить замену бреющей сетки и
режущего блока (1).
Замену рекомендуется производить при
включении индикатора замены сетки и
режущего блока (8) или по мере износа,
но не реже, чем каждые 18 месяцев.
Индикатор замены сетки и режущего
блока будет напоминать вам в течение
последующих 7 сеансов бритья о необходимости замены сетки и режущего блока.
После этого показания дисплея бритвы
будут автоматически сброшены.
После замены сетки и режущего блока (1),
нажмите на кнопку включения/выключения (4) и удерживайте ее не менее
5 секунд для сброса счетчика.
При этом индикатор замены сетки и
режущего блока мигает и выключается
после окончания сброса. Ручной сброс
можно произвести в любое время.
С Устройство Clean&Renew™
Устройство Clean&Renew™ разработано
для чистки, подзарядки и хранения вашей
бритвы. Рекомендуем чистить бритву с
помощью данного устройства ежедневно.
В течение автоматического процесса
чистки бритва остается включенной и
выключается при достижении наилучшего
результата чистки. Специальная формула
чистящей жидкости содержит небольшое
количество масел, поэтому в процессе
очистки детали бритвы также получают
необходимую смазку.
Важно
Для подключения бритвы к электросети
•
используйте только тот электрический
шнур, который был в комплекте.
Чтобы избежать утечки чистящей
•
жидкости, устанавливайте устройство
чистки и подзарядки на ровной, устойчивой поверхности.
Не размещайте устройство на зеркаль-
•
ной, лакированной или полированной
поверхностях, не храните устройство
рядом с отопительными и нагревательными приборами, не подвергайте
воздействию прямых солнечных лучей.
Устройство содержит воспламеняющуюся
•
жидкость. Держите устройство вдали от
источников возгорания. Не курите рядом
с устройством.
Держите в месте, недосягаемом для
•
детей. Не заполняйте картриджи повторно. Используйте только оригинальные картриджи Braun.
Уход за аккумулятором
Для поддержания максимальной емкости
аккумулятора, бритву необходимо
полностью разряжать (путем обычного
использования) примерно один раз в
6 месяцев.
После этого полностью зарядите бритву.
Внимание: Вскрытие корпуса приведет
к повреждению прибора и лишению
гарантии.
46
Описание
1 Кнопка старт/сброс
2 Контактная дуга
3 Кнопка замены картриджа
4 Индикатор уровня
5 Чистящий картридж
Page 47

Перед использованием устройства
Clean&Renew™
Установка картриджа
Нажмите кнопку замены картриджа (3)
•
для открытия корпуса.
Поместите картридж на плоскую,
•
устойчивую поверхность (например,
стол). Осторожно снимите заглушку
картриджа. Плавно поместите картридж
в основание устройства до упора.
Медленно закройте корпус устройства
•
чистки и подзарядки Clean&Renew™,
надавив на него до щелчка.
Замена картриджа
Для замены картриджа с чистящей
жидкостью нажмите на кнопку замены
картриджа, немного подождите пока
корпус устройства чистки и подзарядки
Clean&Renew™ откроется, и удалите
использованный картридж.
Прежде чем выбросить использованный
картридж, закройте его отверстие с
помощью заглушки от нового картриджа,
так как использованный картридж
содержит остатки загрязненной чистящей
жидкости.
Устройство Clean&Renew™
Устройство Clean&Renew™
•
подключается к электрической сети с
помощью специального электрического
шнура регулируемой длины, который
позволяет экономить пространство.
После каждого сеанса бритья
выключайте бритву и помещайте бритву
в устройство бреющей головкой вниз.
Нажмите на кнопку старт/сброс (1)
•
чтобы начать процесс чистки. Желтый
индикатор будет гореть в течение всего
процесса (примерно 2 минуты – чистка
и около миним. 4-х часов – сушка
бритвы).
Не прерывайте процесс чистки бритвы
•
с помощью устройства чистки и
подзарядки Clean&Renew™.
Преждевременно извлеченная из
устройства чистки и подзарядки
Clean&Renew™ непросохшая бритва не
пригодна для бритья. Тем не менее,
если необходимо прервать процесс,
нажмите на кнопку старт/сброс (1).
По окончании процесса чистки и
•
подзарядки желтый индикатор чистки
погаснет. Теперь бритва готова к
использованию. Чтобы извлечь бритву,
нажмите кнопку старт/сброс (1).
При ежедневном использовании
•
устройства чистки и подзарядки
Clean&Renew™ чистящего картриджа
хватает примерно на 30 циклов чистки.
Когда уровень индикатора чистящей
жидкости (4) достигает нижней границы
«min», жидкости хватит примерно на
5 сеансов чистки. Затем картридж
следует заменить. При ежедневном
использовании устройства чистки и
подзарядки Clean&Renew™ необходимо
заменять картридж примерно каждые
4 недели.
Гигиеническая чистящая жидкость
•
содержит алкоголь, который после
вскрытия картриджа начинает медленно
испаряться в окружающую атмосферу.
При не ежедневном использовании
картридж следует заменять примерно
каждые 8 недель.
Чистящий картридж содержит увлаж-
•
няющие компоненты, которые после
процесса чистки могут оставлять следы
на бреющей головке бритвы. Следы
легко удаляются с бреющей головки
с помощью тканевой или бумажной
салфетки.
Периодически очищайте корпус бритвы
•
и устройство чистки и подзарядки
Clean&Renew™ влажной тканью, особенно внутреннюю часть устройства,
в которую помещается бритва.
Аксессуары
Представлены в магазинах бытовой
техники или в Сервисных центрах Braun:
Бреющая сетка и режущий блок №:
•
32S
47
Page 48

Чистящий картридж Clean&Renew™:
•
CCR
Содержание может быть изменено без
предварительного уведомления.
Электрические спецификации смотрите
на корпусе прибора.
Внимание: Вскрытие корпуса приведет
к повреждению прибора и лишению
гарантии.
Изделие использовать по
назначению в соответствии
с инструкцией по эксплуатации.
Аккумуляторная и сетевая бритва Series 3
модель 390
Тип 5772
Сделано в Германии,
БРАУН Гмбх,
Braun GmbH,
Waldstr. 9, 74731 Walldürn,
Germany.
Изделие использовать по назначению
в Соответствии с инструкцией по
эксплуатации Служба потребителей:
Проктер энд Гэмбл, Россия,
123317, Москва,
Краснопресненская наб., 18.
Телефон горячей линии: 8 800 200 20 20
(звонок по России бесплатный)
Й‡‡МЪЛИМ˚В У·flБ‡ЪВО¸ТЪ‚‡ ЩЛП˚
BRAUN
СОfl ‚ТВı ЛБ‰ВОЛИ П˚ ‰‡ВП „‡‡МЪЛ˛ М‡
‰‚‡ „У‰‡, М‡˜ЛМ‡fl Т ПУПВМЪ‡
ФЛУ·ВЪВМЛfl ЛБ‰ВОЛfl.
З ЪВ˜ВМЛВ „‡‡МЪЛИМУ„У ФВЛУ‰‡ П˚
·ВТФО‡ЪМУ ЫТЪ‡МЛП ФЫЪВП ВПУМЪ‡,
Б‡ПВМ˚ ‰ВЪ‡ОВИ ЛОЛ Б‡ПВМ˚ ‚ТВ„У
48
ЛБ‰ВОЛfl О˛·˚В Б‡‚У‰ТНЛВ ‰ВЩВНЪ˚,
‚˚Б‚‡ММ˚В МВ‰УТЪ‡ЪУ˜М˚П Н‡˜ВТЪ‚УП
П‡ЪВЛ‡ОУ‚ ЛОЛ Т·УНЛ.
З ТОЫ˜‡В МВ‚УБПУКМУТЪЛ ВПУМЪ‡ ‚
„‡‡МЪЛИМ˚И ФВЛУ‰ ЛБ‰ВОЛВ ПУКВЪ ·˚Ъ¸
Б‡ПВМВМУ М‡ МУ‚УВ ЛОЛ ‡М‡ОУ„Л˜МУВ ‚
ТУУЪ‚ВЪТЪ‚ЛЛ Т б‡НУМУП У Б‡˘ЛЪВ Ф‡‚
ФУЪВ·ЛЪВОВИ.
Й‡‡МЪЛfl У·ВЪ‡ВЪ ТЛОЫ ЪУО¸НУ ВТОЛ ‰‡Ъ‡
ФУНЫФНЛ ФУ‰Ъ‚ВК‰‡ВЪТfl ФВ˜‡Ъ¸˛ Л
ФУ‰ФЛТ¸˛ ‰ЛОВ‡ (П‡„‡БЛМ‡) М‡
ФУТОВ‰МВИ ТЪ‡МЛˆВ УЛ„ЛМ‡О¸МУИ
ЛМТЪЫНˆЛЛ ФУ ˝НТФОЫ‡Ъ‡ˆЛЛ BRAUN,
НУЪУ‡fl fl‚ОflВЪТfl „‡‡МЪЛИМ˚П Ъ‡ОУМУП.
щЪ‡ „‡‡МЪЛfl ‰ВИТЪ‚ЛЪВО¸М‡ ‚ О˛·УИ
ТЪ‡МВ ‚ НУЪУЫ˛ ˝ЪУ ЛБ‰ВОЛВ
ФУТЪ‡‚ОflВЪТfl ЩЛПУИ BRAUN ЛОЛ
М‡БМ‡˜ВММ˚П ‰ЛТЪЛ·¸˛ЪУУП Л „‰В
МЛН‡НЛВ У„‡МЛ˜ВМЛfl ФУ ЛПФУЪЫ ЛОЛ
‰Ы„ЛВ Ф‡‚У‚˚В ФУОУКВМЛfl МВ
ФВФflЪТЪ‚Ы˛Ъ ФВ‰УТЪ‡‚ОВМЛ˛
„‡‡МЪЛИМУ„У У·ТОЫКЛ‚‡МЛfl.
Й‡‡МЪЛfl МВ ФУН˚‚‡ВЪ ФУ‚ВК‰ВМЛfl,
‚˚Б‚‡ММ˚В МВФ‡‚ЛО¸М˚П
ЛТФУО¸БУ‚‡МЛВП (ТП. Ъ‡НКВ ТФЛТУН МЛКВ)
МУП‡О¸М˚И ЛБМУТ ‰ВЪ‡ОВИ (М‡ФЛПВ,
ТВЪНЛ Л ВКЫ˘В„У ·ОУН‡) ‚ ФУˆВТТВ
˝НТФОЫ‡Ъ‡ˆЛЛ ЛБ‰ВОЛfl.
щЪ‡ „‡‡МЪЛfl ЪВflВЪ ТЛОЫ ВТОЛ ВПУМЪ
ФУЛБ‚У‰ЛОТfl МВ ЫФУОМУПУ˜ВММ˚П М‡ ЪУ
ОЛˆУП Л ВТОЛ ЛТФУО¸БУ‚‡М˚ МВ
УЛ„ЛМ‡О¸М˚В ‰ВЪ‡ОЛ ЩЛП˚ BRAUN.
З ТОЫ˜‡В ФВ‰˙fl‚ОВМЛfl ВНО‡П‡ˆЛЛ ФУ
ЫТОУ‚ЛflП ‰‡ММУИ „‡‡МЪЛЛ, ФВВ‰‡ИЪВ
ЛБ‰ВОЛВ ˆВОЛНУП ‚ПВТЪВ Т „‡‡МЪЛИМ˚П
Ъ‡ОУМУП ‚ О˛·УИ ЛБ ˆВМЪУ‚ ТВ‚ЛТМУ„У
У·ТОЫКЛ‚‡МЛfl ЩЛП˚ BRAUN.
ЗТВ ‰Ы„ЛВ ЪВ·У‚‡МЛfl, ‚НО˛˜‡fl
ЪВ·У‚‡МЛfl ‚УБПВ˘ВМЛfl Ы·˚ЪНУ‚,
ЛТНО˛˜‡˛ЪТfl, ВТОЛ М‡¯‡ УЪ‚ВЪТЪ‚ВММУТЪ¸
МВ ЫТЪ‡МУ‚ОВМ‡ ‚ Б‡НУММУП ФУfl‰НВ.
кВНО‡П‡ˆЛЛ, Т‚flБ‡ММ˚В Т НУППВ˜ВТНЛП
НУМЪ‡НЪУП Т ФУ‰‡‚ˆУП МВ ФУФ‡‰‡˛Ъ ФУ‰
˝ЪЫ „‡‡МЪЛ˛.
З ТУУЪ‚ВЪТЪ‚ЛЛ Т Б‡НУМУП ко ‹ 2300-1 УЪ
7.02.1992 „. «й б‡˘ЛЪВ Ф‡‚
ФУЪВ·ЛЪВОВИ» Л ФЛМflЪ˚П ‰УФУОМВМЛВП
Н Б‡НУМЫ ко УЪ 9.01.1996 „. «й ‚МВТВМЛЛ
ЛБПВМВМЛИ» Л ‰УФУОМВМЛИ ‚ Б‡НУМ «й
Page 49

б‡˘ЛЪВ Ф‡‚ ФУЪВ·ЛЪВОВИ» Л «дУ‰ВНТ
клолк У· ‡‰ПЛМЛТЪ‡ЪЛ‚М˚ı
Ф‡‚УМ‡Ы¯ВМЛflı», ЩЛП‡ BRAUN
ЫТЪ‡М‡‚ОЛ‚‡ВЪ ТУН ТОЫК·˚ М‡ Т‚УЛ
ЛБ‰ВОЛfl ‡‚М˚П ‰‚ЫП „У‰‡П Т ПУПВМЪ‡
ФЛУ·ВЪВМЛfl ЛОЛ Т ПУПВМЪ‡
ФУЛБ‚У‰ТЪ‚‡, ВТОЛ ‰‡ЪЫ ФУ‰‡КЛ
ЫТЪ‡МУ‚ЛЪ¸ МВ‚УБПУКМУ.
аБ‰ВОЛfl ЩЛП˚ BRAUN ЛБ„УЪУ‚ОВМ˚ ‚
ТУУЪ‚ВЪТЪ‚ЛЛ Т ‚˚ТУНЛПЛ ЪВ·У‚‡МЛflПЛ
В‚УФВИТНУ„У Н‡˜ВТЪ‚‡. иЛ ·ВВКМУП
ЛТФУО¸БУ‚‡МЛЛ Л ФЛ ТУ·О˛‰ВМЛЛ Ф‡‚ЛО
ФУ ˝НТФОЫ‡Ъ‡ˆЛЛ, ФЛУ·ВЪВММУВ З‡ПЛ
ЛБ‰ВОЛВ ЩЛП˚ BRAUN, ПУКВЪ ЛПВЪ¸
БМ‡˜ЛЪВО¸МУ ·УО¸¯ЛИ ТУН ТОЫК·˚, ˜ВП
ТУН ЫТЪ‡МУ‚ОВММ˚И ‚ ТУУЪ‚ВЪТЪ‚ЛЛ Т
кУТТЛИТНЛП Б‡НУМУП.
ëÎÛ˜‡Ë, ̇ ÍÓÚÓ˚ „‡‡ÌÚËfl ÌÂ
‡ÒÔÓÒÚ‡ÌflÂÚÒfl:
– ‰ВЩВНЪ˚, ‚˚Б‚‡ММ˚В ЩУТ-П‡КУМ˚ПЛ
Ó·ÒÚÓflÚÂθÒÚ‚‡ÏË;
– ЛТФУО¸БУ‚‡МЛВ ‚ ФУЩВТТЛУМ‡О¸М˚ı
ˆÂÎflı;
– ̇ۯÂÌË Ú·ӂ‡ÌËÈ ËÌÒÚÛ͈ËË ÔÓ
˝НТФОЫ‡Ъ‡ˆЛЛ;
– ÌÂÔ‡‚Ëθ̇fl ÛÒÚ‡Ìӂ͇ ̇ÔflÊÂÌËfl
ФЛЪ‡˛˘ВИ ТВЪЛ (ВТОЛ ˝ЪУ ЪВ·ЫВЪТfl);
– ‚МВТВМЛВ ЪВıМЛ˜ВТНЛı ЛБПВМВМЛИ;
– ПВı‡МЛ˜ВТНЛВ ФУ‚ВК‰ВМЛfl;
– ФУ‚ВК‰ВМЛfl ФУ ‚ЛМВ КЛ‚УЪМ˚ı,
„˚БЫМУ‚ Л М‡ТВНУП˚ı (‚ ЪУП ˜ЛТОВ
ÒÎÛ˜‡Ë ̇ıÓʉÂÌËfl „˚ÁÛÌÓ‚ Ë
М‡ТВНУП˚ı ‚МЫЪЛ ФЛ·УУ‚);
– ‰Оfl ФЛ·УУ‚, ‡·УЪ‡˛˘Лı УЪ ·‡Ъ‡ВВН,
– ‡·ÓÚ‡ Ò ÌÂÔÓ‰ıÓ‰fl˘ËÏË ËÎË
ËÒÚÓ˘ÂÌÌ˚ÏË ·‡Ú‡ÂÈ͇ÏË, β·˚Â
ÔÓ‚ÂʉÂÌËfl, ‚˚Á‚‡ÌÌ˚ ËÒÚÓ˘ÂÌÌ˚ÏË
ЛОЛ ЪВНЫ˘ЛПЛ ·‡Ъ‡ВИН‡ПЛ (ТУ‚ВЪЫВП
ÔÓθÁÓ‚‡Ú¸Òfl ÚÓθÍÓ Ô‰Óı‡ÌÂÌÌ˚ÏË
ÓÚ ‚˚ÚÂ͇ÌËfl ·‡Ú‡ÂÈ͇ÏË);
– ‰Îfl ·ËÚ‚ – ÒÏflÚ‡fl ËÎË ÔÓ‚‡Ì̇fl
ÒÂÚ͇.
Б‡ФУОМВММ˚И УЛ„ЛМ‡О гЛТЪ‡ ‚˚ФУОМВМЛfl
ВПУМЪ‡ ТУ ¯Ъ‡ПФУП ТВ‚ЛТМУ„У ˆВМЪ‡ Л
ФУ‰ФЛТ‡ММ˚И ФУЪВ·ЛЪВОВП ФУ ФУОЫ˜ВМЛЛ
ЛБ‰ВОЛfl ЛБ ВПУМЪ‡. нВ·ЫИЪВ
ФУТЪ‡‚ОВМЛfl ‰‡Ъ˚ ‚УБ‚‡Ъ‡ ЛБ ВПУМЪ‡,
ТУН „‡‡МЪЛЛ ФУ‰ОВ‚‡ВЪТfl М‡ ‚ВПfl
М‡ıУК‰ВМЛfl ЛБ‰ВОЛfl ‚ ТВ‚ЛТМУП ˆВМЪВ.
З ТОЫ˜‡В ‚УБМЛНМУ‚ВМЛfl ТОУКМУТЪВИ Т
‚˚ФУОМВМЛВП „‡‡МЪЛИМУ„У ЛОЛ
ФУТОВ„‡‡МЪЛИМУ„У У·ТОЫКЛ‚‡МЛfl ФУТ¸·‡
ТУУ·˘‡Ъ¸ У· ˝ЪУП ‚ аМЩУП‡ˆЛУММЫ˛
лОЫК·Ы лВ‚ЛТ‡ ЩЛП˚ BRAUN ФУ
ЪВОВЩУМЫ 8 800 200 20 20 (Б‚УМУН ЛБ
кУТТЛЛ ·ВТФО‡ЪМУ).
ЗМЛП‡МЛВ! йЛ„ЛМ‡О¸М˚И Й‡‡МЪЛИМ˚И
н‡ОУМ ФУ‰ОВКЛЪ ЛБ˙flЪЛ˛ ФЛ У·‡˘ВМЛЛ
‚ ТВ‚ЛТМ˚И ˆВМЪ ‰Оfl „‡‡МЪЛИМУ„У
ВПУМЪ‡. иУТОВ ФУ‚В‰ВМЛfl ВПУМЪ‡
Й‡‡МЪЛИМ˚П н‡ОУМУП ·Ы‰ВЪ fl‚ОflЪ¸Тfl
49
Page 50

ì͇ªÌҸ͇
Продукція нашої компанії відповідає
найвищим стандартам якості, функціональності та дизайну.
Сподіваємося, Вам сподобається користуватися Вашою новою бритвою від Braun.
Обережно!
До комплекту Вашої бритви входить спеціальний шнур живлення з вмонтованим
блоком запасного енергопостачання на
випадок збоїв напруги. Не можна
замінювати чи зачіпати жодну з деталей,
оскільки це може призвести до ураження
електричним струмом.
Цим пристроєм не можна користуватися
дітям або особам з фізичними, сенсорними
або розумовими вадами без нагляду
особи, яка відповідає за їх безпеку. Ми
рекомендуємо зберігати пристрій у місці,
недоступному для дітей.
Опис
1 Сіточка для гоління та ріжучий блок
2 Тример для довгого волосся
3 Перемикач режимів комфортного
гоління («lock»)
4 Вимикач («on/off»)
5 Лампочки-індикатори зарядження
(зелені)
6 Лампочка-індикатор низького
зарядження (червона)
7 Лампочка-індикатор чищення (жовта)
8 Лампочка-індикатор заміни ріжучих
частин
9 Гніздо живлення бритви
10 Спеціальний шнур
11 Футляр
За допомогою спеціального шнура (10)
•
підключіть бритву до електричної
мережі. Мотор при цьому повинен бути
вимкнений.
Коли Ви заряджаєте бритву вперше,
•
залиште її заряджатися безперервно
протягом 4 годин. Подальші зарядження
триватимуть близько 1 години.
Повна зарядка дозволяє голитися до
•
45 хвилин без застосування електричного шнура. Цей час може змінюватись,
залежно від росту Вашої бороди.
Гоління без шнура. При звичайному
•
використанні бритва буде заряджатися
автоматично на станції Clean&Renew™
після кожного чищення (див. «C Пристрій
Clean&Renew™»).
Повної зарядки можна досягти лише
•
після кількох циклів зарядження/
розрядження.
Для бритви є достатнім 5-хвилинне
•
швидке заряджання (за допомогою
спеціального шнура (10)).
У разі розрядження акумуляторних
•
батарейок, Ви можете голитися,
підключивши бритву до електричної
мережі за допомогою спеціального
шнура.
Лампочки-індикатори (5)
Лампочки-індикатори зеленого кольору
вказують на статус зарядження
батарейок. Якщо бритва заряджається
або увімкнена, зелені лампочкиіндикатори починають блимати. Коли
бритва повністю заряджена, усі зелені
лампочки-індикатори горять рівно,
зазначаючи, що бритва увімкнена або
підключена до електричної мережі.
Заряджання
Оптимальна температура середовища під
час зарядження від 15 °C до 35 °C. Не
допускайте перебування бритви тривалий
час при температурах, вищих за 50 °C.
50
Лампочка-індикатор низького
зарядження (6)
Червоний сигнал індикатору загоряється
при низькому рівні зарядки акумулятора
електробритви. Вам має вистачити часу,
щоб завершити гоління.
Page 51

А Гоління
Щоб ввімкнути бритву, натисніть на кнопку
вимикача («on/off») (4). (Див. малюнок).
Сіточка для гоління рухається максимально вільно, автоматично пристосовуючись
до кожного контору вашого обличчя.
Тример для довгого волосся (2)
Щоб підстригти бакенбарди або бороду на
потрібну довжину, слід висунути тример
для довгого волосся.
Перемикач режимів комфортного
гоління («lock») (3)
Для точних рухів у зонах, складних для
гоління (на приклад: під носом), плавно
поверніть перемикач праворуч (3) на
позицію «lock». Рух центрального тримеру
та однієї сіточки уповільниться.
Маленькі поради для ідеального
гоління
Для досягнення найкращих результатів
Braun радить дотримуватись 3-х простих правил:
1. Голитися слід завжди перед умиванням.
2. Завжди тримайте бритву під прямим
кутом (90°) до шкіри.
3. Натягуйте шкіру і голіться проти
напрямку росту бороди.
B Як підтримувати бритву у
відмінному стані
Індикатор чищення
Вашу бритву слід чистити кожного дня у
станції Clean&Renew™ принаймні тоді,
коли жовта лампочка-індикатор чищення
(7) горить рівно після гоління. Якщо цього
не зробити, жовта лампочка через деякий
час вимкнеться. Електрична апаратура
бритви допустить, що бритву почистили
вручну та лічильник часу, необхідного для
наступного чищення, перезапуститься.
Протягом процесу чищення за допомогою
пристрою Clean&Renew™ жовта лампочкаіндикатор блиматиме приблизно протягом
4 годин після закінчення гоління.
Автоматичне чищення
Знаходячись у пристрої Clean&Renew™,
бритва чиститься автоматично (див.
«C Пристрій Clean&Renew™»). Ручне
чищення рекомендується лише коли
пристрій Clean&Renew™ недоступний,
наприклад під час подорожі.
Ручне чищення
Голівку бритви можна чистити під
струменем водопровідної води.
Увага: Вимкніть бритву з
електричної мережі, перш ніж
починати її чищення водою.
Регулярне чищення забезпечує краще
гоління. Промивання голівки бритви під
струменем води після кожного гоління є
легким та простим способом залишати
бритву чистою:
Ввімкніть бритву (без шнура) та про-
•
мийте голівку під струменем гарячої
води. Можна також використовувати
рідке мило без абразивних частинок.
Змийте всю піну та залиште бритву
попрацювати ще декілька секунд.
Після цього вимкніть бритву, зніміть
•
сіточку для гоління та ріжучий блок (1),
потім дайте розібраним частинам
просохнути.
Якщо Ви регулярно чистите бритву за
•
допомогою води, один раз на тиждень
слід наносити краплю легкого машинного мастила на тример для довгого
волосся (2), сіточку для гоління та
ріжучий блок (1).
У якості альтернативи, Ви можете чистити
бритву за допомогою щіточки:
Вимкніть бритву. Зніміть сіточку для
•
гоління та ріжучий блок та вибийте на
горизонтальній поверхні.
51
Page 52

За допомогою щіточки очистіть
•
внутрішню поверхню голівки. Однак, не
можна чистити сіточку для гоління та
ріжучий блок щіткою, оскільки це може
їх пошкодити.
Лампочка-індикатор заміни ріжучих
частин / перезапуск
Щоб забезпечити оптимальну якість
гоління, слід заміняти сіточку для гоління
та ріжучий блок (1) тоді, коли вмикається
лампочка-індикатор заміни (8) (приблизно
кожні 18 місяців) або тоді, коли касета
зношується.
Лампочка-індикатор заміни буде нагадувати Вам під час наступних 7 голінь про
необхідність заміни сіточки для гоління
та ріжучого блоку. Потім бритва автоматично перезапустить дисплей.
Після заміни сітки та ріжучого блоку (1),
натисніть на кнопку увімкнення/вимкнення
(4) та утримуйте не менш ніж 5 секунд,
щоб скинути лічильник.
Під час цієї процедури лампочка-індикатор заміни буде блимати та вимкнеться,
коли перезапуск буде закінчено. Ручний
перезапуск лічильника можна здійснювати
у будь-який час.
Збереження батарейок
Для досягнення максимальної зарядки
акумуляторних батарейок, бритву
необхідно повністю розряджати (під час
гоління) приблизно кожні 6 місяців. Потім
максимально заряджайте бритву.
Екологічне попередження
Цей пристрій містить батарейки,
що перезаряджаються.
В інтересах захисту навколишнього
середовища, просимо не кидати їх
до корзини з домашніми відходами після
закінчення строку використання. Ви
можете здати їх до Сервісного центру
Braun або до відповідного центру збору,
що знаходиться у Вашій країні.
52
C Пристрій Clean&Renew™
Пристрій Clean&Renew розроблений для
чищення, заряджання та зберігання Вашої
бритви.
Чистіть Вашу бритву кожного дня за
допомогою пристрою Clean&Renew™.
Для кращого результату протягом
автоматичного процесу чищення, бритва
періодично включається та вимикається.
Оскільки спеціальний розчин для чищення
містить невелику кількість мастильної
речовини, Ваша бритва отримує необхідне
змащення під час процедури чищення.
Важливо
Використовуйте лише той шнур
•
живлення, який входить до комплекту
Вашої бритви.
Щоб запобігти протіканню рідини для
•
чищення, завжди ставте станцію на
рівну поверхню. Коли встановлено
картридж для чищення, не можна
нахиляти, різко зміщати або переміщати
блок.
Не ставте пристрій у дзеркальні шафи,
•
над батареями або на поліровані та
вкриті лаком поверхні. Не залишайте під
прямими променями сонця.
Пристрій для чищення містить легкозай-
•
мисту речовину, тому його слід тримати
подалі від джерел вогню. Не курити
поруч.
Зберігати у місцях недоступних для
•
дітей. Не перезаряджайте картридж.
Користуйтеся лише справжніми
багаторазовими картриджами фірми
Braun.
Опис
1 Кнопка запуску/вимкнення
2 Контакти, що з’єднують станцію
з бритвою
3 Кнопка для підняття при заміні
картриджа
4 Індикатор рівня
5 Картридж для чищення
Page 53

Перед використанням пристрою
Clean&Renew™
Установка картриджу
Натисніть на кнопку (3), щоб відкрити
•
корпус.
Встановіть картридж для чищення на
•
рівній горизонтальній надійній поверхні
(наприклад, на столі). Обережно зніміть
кришку з картриджа. Обережно опустіть
картридж всередину пристрою до кінця.
Повільно закрийте корпус, тиснучи вниз,
•
поки він не стане на місце.
Заміна картриджа для чищення
Натиснувши на кнопку для підняття, щоб
відкрити корпус, зачекайте кілька секунд.
Перш ніж викинути відпрацьований
картридж, пересвідчіться, що Ви закрили
його отвір кришкою нового картриджа,
оскільки відпрацьований картридж
міститиме забруднений розчин для
чищення.
Використаний картридж можна викинути у
корзину з домашніми відходами.
Робота станції Clean&Renew™
Приєднайте станцію Clean&Renew™
•
за допомогою спеціального шнура до
електричної розетки. Спеціальне гніздо,
розташоване на задній панелі, регулюється для збереження вільного місця.
Після кожного гоління, вимикайте бритву
та ставте її у станцію Clean&Renew™
головкою вниз лицевою стороною.
Натисніть кнопку запуску (1), щоб
•
заблокувати та підключити бритву.
Розпочнеться процес чищення. Жовта
лампочка-індикатор блиматиме протягом повного процесу (приблизно 2 хвилини чищення, мінім. 4 години –
сушіння).
Не переривайте процес чищення,
•
оскільки бритва залишиться вологою та
непридатною до використання. Однак,
якщо необхідно зупинити програму,
натисніть на кнопку запуску/вимкнення
(1).
Після завершення процесу чищення
•
жовта лампочка-індикатор вимкнеться,
і бритва буде готовою до використання.
Щоб дістати бритву, натисніть на кнопку
запуску/вимкнення.
Картриджа для чищення повинно виста-
•
чати приблизно на 30 циклів чищення.
Коли індикатор рівня (4) досягне відмітки «min», рідини, що залишилася у
картриджі, вистачить приблизно ще
на 5 циклів чищення. Також картридж
слід замінювати при щоденному
використанні приблизно кожні 4 тижні.
Гігієнічний розчин для чищення у
•
картриджі містить спирт, який після
відкриття картриджа повільно випаровуватиметься в повітря. Будь-який
картридж, якщо ним не користуються
щодня, необхідно замінювати приблизно
раз на 8 тижнів.
Картридж для чищення також містить
•
мастильні речовини, які після чищення
можуть залишати сліди на голівці
бритви. Однак, ці сліди легко можна
усунути, протираючи ганчіркою або
м’якою серветкою.
Періодично протирайте корпус вологою
•
серветкою, особливо отвір для бритви.
Аксесуари
Можна придбати у Вашого ділера або у
Сервісному центрі Braun:
Сіточка для гоління та ріжучий
•
блок: 32S
Картридж для чищення
•
Clean&Renew™: CCR
дУПФ‡М¥fl Б‡ОЛ¯‡π Б‡ ТУ·У˛ Ф‡‚У ‚МУТЛЪЛ
БП¥МЛ ‚ НУМТЪЫНˆ¥˛ ФЛТЪУ˛ ·ВБ
ТФВˆ¥‡О¸МУ„У У„УОУ¯ВММfl.
ЦОВНЪЛ˜М¥ ТФВˆЛЩ¥Н‡ˆ¥ª М‡‚В‰ВМУ М‡
ТФВˆ¥‡О¸МУПЫ НУПФОВНЪ¥ КЛ‚ОВММfl.
53
Page 54

Бритва Braun Series 3 390 cc, Тип 5772;
Виготовлено Браун ГмбХ у Німеччині,
Braun GmbH, Waldstrasse 9,
D-74731, Walldurn, Germany.
Виріб відповідає вимогам ДСТУ
3135.2-2000 (ГОСТ 30345.2-2-2000),
(ІЕС 60335-2-8:1992), ДСТУ CISPR
14-1:2004. Відповідає нормам санітарного
законодавства України згідно з висновком
держ. сан.-епідем. експертизи МОЗ
України.
Товар використовувати за призначенням,
відповідно до інструкції з експлуатації.
Дата виготовлення продукції Braun
вказана безпосередньо на виробі (в місці
маркування) і складається з трьох цифр:
перша цифра є останньою цифрою року
виготовлення, інші дві цифри є порядковим номером тижня у році.
Гарантія – 2 роки. У разі необхідності
гарантійного чи постгарантійного
обслуговування, звертайтеся до головного
офісу сервісного центру Braun в Україні:
ПП «І.Б.С.», вул. Глибочицька 53, м. Київ.
Тел. (044) 4286505.
íÓ‚‡ ëÂÚËÙ¥ÍÓ‚‡ÌÓ
ɇ‡ÌÚ¥ÈÌ¥ ÁÓ·Ó‚’flÁ‡ÌÌfl Ù¥ÏË Çraun
СОfl ‚Т¥ı ‚ЛУ·i‚ ПЛ ‰‡πПУ „‡‡МЪ¥˛ М‡ ‰‚‡
УНЛ, ФУ˜ЛМ‡˛˜Л Б ПУПВМЪЫ ФЛ‰·‡ММfl
‚ЛУ·Ы.
èÓÚfl„ÓÏ „‡‡ÌÚ¥ÈÌÓ„Ó ÔÂ¥Ó‰Û ÏË
·ВБФО‡ЪМУ ЫТЫ‚‡πПУ ¯ОflıУП ВПУМЪЫ,
Б‡ПiМЛ ‰ВЪ‡ОВИ ‡·У Б‡П¥МЛ ‚Т¸У„У ‚ЛУ·Ы
54
·Ы‰¸-flН¥ Б‡‚У‰Т¸Н¥ ‰ВЩВНЪЛ, ‚ЛНОЛН‡М¥
МВ‰УТЪ‡ЪМ¸У˛ flН¥ТЪ˛ П‡ЪВ¥‡О¥‚ ‡·У
ТНО‡‰‡ММfl.
м ‚ЛФ‡‰НЫ МВПУКОЛ‚УТЪ¥ ВПУМЪЫ ‚
„‡‡МЪ¥ИМЛИ ФВ¥У‰ ‚Л¥· ПУКВ ·ЫЪЛ
Б‡П¥МВМЛИ М‡ МУ‚ЛИ ‡·У ‡М‡ОУ„¥˜МЛИ
‚¥‰ФУ‚¥‰МУ ‰У б‡НУМЫ ФУ Б‡ıЛТЪ Ф‡‚
ТФУКЛ‚‡˜¥‚.
Й‡‡МЪ¥fl М‡·Ы‚‡π ТЛОЛ ОЛ¯В, flН˘У ‰‡Ъ‡
НЫФ¥‚О¥ Ф¥‰Ъ‚В‰КЫπЪ¸Тfl ФВ˜‡ЪНУ˛ Ъ‡
Фi‰ФЛТУП ‰¥ОВ‡ (П‡„‡БЛМЫ) М‡
УЛ„¥М‡О¸МУПЫ „‡‡МЪ¥ИМУПЫ Ъ‡ОУМ¥ З„aun
‡·У М‡ УТЪ‡ММ¥И ТЪУ¥Мˆ¥ УЛ„¥М‡О¸МУª
¥МТЪЫНˆ¥ª Б ВНТФОЫ‡Ъ‡ˆ¥ª Зr‡un, flН‡ Ъ‡НУК
ПУКВ ·ЫЪЛ „‡‡МЪiИМЛП Ъ‡ОУМУП.
сfl „‡‡МЪ¥fl ‰¥ИТМ‡ Ы ·Ы‰¸-flН¥И Н‡ªМ¥, ‚ flНЫ
ˆВИ ‚Л¥· ФУТЪ‡‚ОflπЪ¸Тfl Щ¥ПУ˛ Зr‡un ‡·У
ФЛБМ‡˜ВМЛП ‰ЛТЪЛ·’˛ЪВУП, Ъ‡ ‰В КУ‰М¥
У·ПВКВММfl Б ¥ПФУЪЫ ‡·У ¥М¯¥ Ф‡‚У‚¥
ФУОУКВММfl МВ ФВВ¯НУ‰К‡˛Ъ¸ М‡‰‡ММ˛
„‡‡МЪ¥ИМУ„У У·ТОЫ„У‚Ы‚‡ММfl.
б‰¥ИТМВММfl „‡‡МЪ¥ИМУ„У У·ТОЫ„У‚Ы‚‡ММfl
МВ ‚ФОЛ‚‡π М‡ ‰‡ЪЫ Б‡Н¥М˜ВММfl ЪВП¥МЫ
„‡‡МЪ¥ª. Й‡‡МЪ¥fl М‡ Б‡П¥МВМ¥ ˜‡ТЪЛМЛ
Б‡Н¥М˜ЫπЪ¸Тfl ‚ ПУПВМЪ Б‡НiМ˜ВММfl „‡‡МЪ¥ª
М‡ ‰‡МЛИ ‚Лi·.
Й‡‡МЪ¥fl МВ ФУНЛ‚‡π ФУ¯НУ‰КВММfl,
‚ЛНОЛН‡М¥ МВ‚iМЛП ‚ЛНУЛТЪ‡ММflП (‰Л‚.
Ъ‡НУК ФВВОiН МЛК˜В) МУП‡О¸МЛИ БМУТ
Т¥ЪУН Ъ‡ МУК¥‚ ‰Оfl „УОiММfl, ‰ВЩВНЪЛ, ˘У
МВБМ‡˜МЛП ˜ЛМУП ‚ФОЛ‚‡˛Ъ¸ М‡ flН¥ТЪ¸
У·УЪЛ ФЛО‡‰Ы. сfl „‡‡МЪ¥fl ‚Ъ‡˜‡π
ТЛОЫ, flН˘У ВПУМЪ Б‰iИТМ˛πЪ¸Тfl МВ
‚ФУ‚МУ‚‡КВМУ˛ ‰Оfl ˆ¸У„У УТУ·У˛ Ъ‡,
flН˘У ‚ЛНУЛТЪУ‚Ы˛Ъ¸Тfl МВ УЛ„¥М‡О¸Мi
‰ВЪ‡О¥ ЩiПЛ Зr‡un.
Й‡‡МЪ¥fl МВ ТЪУТЫπЪ¸Тfl Ъ‡НЛı ‚ЛФ‡‰Н¥‚:
Ы¯НУ‰КВММfl, ‚ЛНОЛН‡М¥ МВФ‡‚ЛО¸МЛП
‚ЛНУЛТЪ‡ММflП, МУП‡О¸МЛИ БМУТ ‰ВЪ‡ОВИ
(М‡Ф., Т¥ЪУ˜НЛ ‰Оfl „УО¥ММfl ‡·У ¥КЫ˜У„У
·ОУН‡), ‰ВЩВНЪЛ, ˘У ТФ‡‚Оfl˛Ъ¸
МВБМ‡˜МЛИ ‚ФОЛ‚ М‡ flН¥ТЪ¸ У·УЪЛ
ФЛТЪУ˛.
Page 55

м ‚ЛФ‡‰НЫ ФВ‰’fl‚ОВММfl ВНО‡П‡ˆИ¥ª Б‡
ЫПУ‚‡ПЛ ‰‡МУª „‡‡МЪ¥ª, ФВВ‰‡ИЪВ ‚Лi· Ы
НУПФОВНЪ¥ ‡БУП Б „‡‡МЪ¥ИМЛП Ъ‡ОУМУП Ы
·Û‰¸-flÍËÈ ¥Á ˆÂÌÚ¥‚ Ò‚¥ÒÌÓ„Ó Ó·ÒÎÛ„Ó‚Û‚‡ÌÌfl ÙiÏË Çr‡un.
ЗТ¥ ¥М¯¥ ‚ЛПУ„Л, ‡БУП Б ‚ЛПУ„‡ПЛ
‚¥‰¯НУ‰Ы‚‡ММfl Б·ЛЪН¥‚, МВ ‰¥ИТМ¥, flН˘У
М‡¯‡ ‚¥‰ФУ‚i‰‡О¸М¥ТЪ¸ МВ ‚ТЪ‡МУ‚ОВМ‡
Б‡НУММЛП ˜ЛМУП.
ÇËÔ‡‰ÍË, ̇ flÍ¥ Ì ÓÁÔÓ‚Ò˛‰ÊÛπÚ¸Òfl
„‡‡ÌÚ¥fl:
– ‰ВЩВНЪЛ, ‚ЛНОЛН‡М¥ ЩУТ-П‡КУМЛПЛ
Ó·ÒÚ‡‚Ë̇ÏË;
– ‚ËÍÓËÒÚ‡ÌÌfl Á ÔÓÙÂÒ¥ÈÌÓ˛ ÏÂÚÓ˛;
– ÔÓÛ¯ÂÌÌfl ‚ËÏÓ„ ¥ÌÒÚÛ͈¥ª Á
ВНТФОЫ‡Ъ‡ˆ¥ª;
– МВ‚iМВ ‚ТЪ‡МУ‚ОВММfl М‡ФЫ„Л ПВВКi
КЛ‚ОВММfl (flН˘У ˆВ ‚ЛП‡„‡πЪ¸Тfl);
– Б‰iИТМВММfl ЪВıМ¥˜МЛı БП¥М;
– ПВı‡М¥˜Мi ФУ¯НУ‰КВММfl;
– ‰Оfl ФЛО‡‰¥‚, ˘У Ф‡ˆ˛˛Ъ¸ М‡
·‡Ú‡ÂÈ͇ı – Ó·ÓÚ‡ Á Ì‚i‰ÔÓ‚¥‰ÌËÏË
‡·Ó ÒÔ‡ˆ¸Ó‚‡ÌËÏË ·‡Ú‡ÂÈ͇ÏË,
·Ы‰¸flН¥ ФУ¯НУ‰КВММfl, ‚ЛНОЛН‡М¥
ÒÔ‡ˆ¸Ó‚‡ÌËÏË ‡·Ó Ô¥‰Ú¥Í‡˛˜ËÏË
·‡Ú‡ÂÈ͇ÏË;
– ‰Îfl ·ËÚ‚ – Á¥Ï’flÚ‡ ‡·Ó ÔÓ‚‡Ì‡ Ò¥Ú͇.
м ‚ЛФ‡‰НЫ ‚ЛМЛНМВММfl ТНО‡‰МУ˘¥‚
Б ‚ЛНУМ‡ММflП „‡‡МЪ¥ИМУ„У ‡·У
Ф¥ТОfl„‡‡МЪ¥ИМУ„У У·ТОЫ„У‚Ы‚‡ММfl
ФУı‡ММfl Б‚ВЪ‡ЪЛТ¸ ‰У ТВ‚¥ТМУ„У ˆВМЪЫ
Щ¥ПЛ Зr‡un ‚ мН‡ªМ¥.
55
Page 56

5657585960
Page 57

Page 58

Page 59

Page 60

Page 61

61
 Loading...