

Page 1
Series3
r
i
e
e
s
r
i
e
e
S
s
S
3
3
+
–
Type 5415, 5413
www.braun.com
360s-4
360s-4
330s-4
320s-4
Page 2
English 6
Français 10
Polski 15
âesk˘ 20
Slovensk˘ 25
Magyar 30
Hrvatski 34
Slovenski 38
Türkçe 42
кЫТТНЛИ 46
ì͇ªÌҸ͇ 52
65
Braun GmbH
Frankfurter Straße 145
61476 Kronberg/Germany
www.braun.com
Braun Infolines
GB
0800 783 7010
IRL
1 800 509 448
F
0 800 944 802
PL
801 127 286
801 1 BRAUN
CZ
221 804 335
SK
02/5710 1135
H
(06-1) 451-1256
HR
01/6690 330
SLO
080 2822
TR
0 800 261 63 65
RUS
8 800 200 20 20
UA
+ 38 044 428 65 05
HK
852-25249377
(Audio Supplies Company Ltd.)
www.service.braun.com
99762213/XII-10
GB/F/PL/CZ/SK/H/HR/SLO/TR/RUS/
UA/Arab
Page 3
1
+
–
3
8
0
s
4
S
e
r
i
e
s
3
S
e
r
i
e
s
3
2
3
r
i
e
e
s
r
i
e
e
S
s
S
3
3
4
+
+
5
6
7
–
360
3
60s-
4
–
330
320
10
360
8
9
11
STOP
4
330 320
Page 4
oil
+
90°
f
ul
l
l
o
c
k
f
u
ll
click!
5
Page 5
English
Our products are designed to meet the highest standards of quality,
functionality and design. We hope you enjoy your new Braun Shaver.
Warning
Your shaving system is provided with a special cord set, which has an
integrated Safety Extra Low Voltage power supply. Do not exchange or
tamper with any part of it, otherwise there is risk of an electric shock.
Do not shave with a damaged foil or cord.
This appliance is not intended for use by children or persons with reduced
physical, sensory or mental capabilities, unless they are given supervision
by a person responsible for their safety. In general, we recommend that you
keep the appliance out of reach of children. Children should be supervised
to ensure that they do not play with the appliance.
Oil bottle
Keep out of reach of children. Do not swallow. Dispose of properly when
empty.
Description
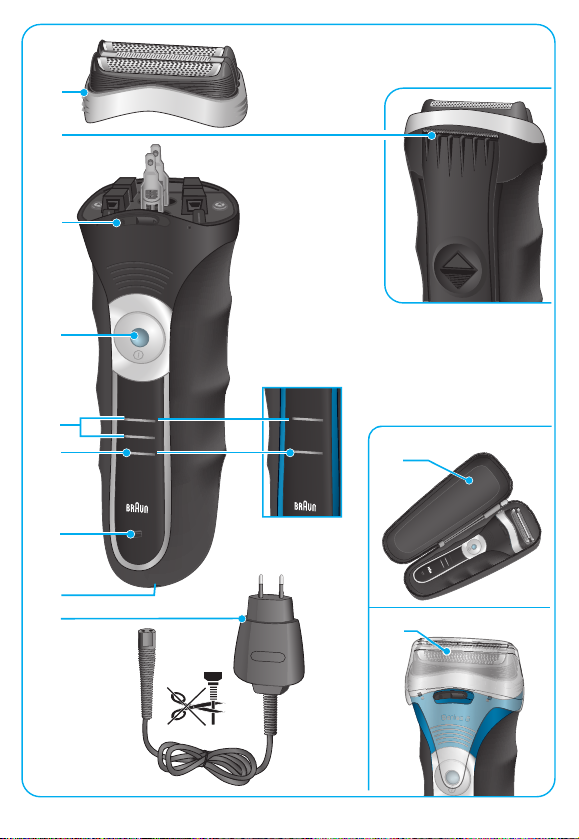
1 Foil & Cutter cassette
2 Long hair trimmer
3 Precision setting switch (« ») (360s only)
4 On/off switch
5 Charging lights (green)
6 Low-charge light (red)
7 Replacement light for shaving parts
8 Shaver power socket
9 Special cord set
10 Etui (360s only)
11 Protection cap (330s/320s only)
Charging
The best environmental temperature for charging is between 15 °C to 35 °C.
Do not expose the shaver to temperatures higher than 50 °C for extended
periods of time.
• Using the special cord set (9), connect the shaver to an electrical outlet with
the motor switched off. When charging for the first time
is not used for a few months
4 hours.
6
, leave the shaver to charge continuously for
or when the shaver
Page 6
• Once the shaver is completely charged, discharge the shaver through
normal use. Then recharge to full capacity. Subsequent charges will take
about 1 hour.
• A full charge provides up to 45 minutes of cordless shaving time depending
on your beard growth. However, the maximum battery capacity will only be
reached after several charging/discharging cycles.
• If the rechargeable batteries are discharged, you may also shave by connecting the shaver to an electrical outlet via the special cord set.
• 5-minute quick charge is sufficient for a shave.
Charging lights (5)
The green charging lights show the charge status of the batteries
(330s/320s: 1 charging light). The green charging light blinks when the
shaver is being charged or switched on. When the battery is fully charged,
all green charging lights (330s/320s: 1 charging light) shine permanently,
provided the shaver is connected to an electrical outlet.
Low-charge light (6)
The red low-charge light flashes when the battery is running low.
You should be able to finish your shave.
Shaving
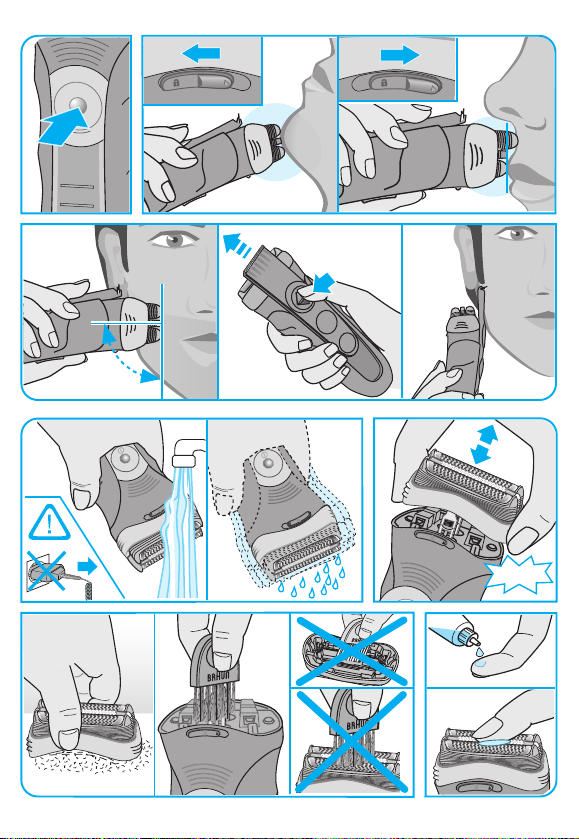
Press the on/off switch (4) to operate the shaver (picture).
The flexible shaving foils automatically adjust to every contour of your face
(picture).
Long hair trimmer (2)
To trim sideburns, moustache or beard, slide the long hair trimmer upwards.
Precision setting switch (« ») (360s only)
For precise handling in hard to shave areas (e.g. under the nose) slide the
switch (3) to the right to position « ». The centre trimmer and one foil will be
lowered.
Tips for the perfect shave
For best results, Braun recommends you follow 3 simple steps:
1. Always shave before washing your face.
2. At all times, hold the shaver at right angles (90°) to your skin.
3. Stretch your skin and shave against the direction of your beard growth.
7
Page 7

Cleaning
The shaver head is suitable for cleaning under running tap water.
Warning: Detach the shaver from the power supply before cleaning
the shaver head in water.
Regular cleaning ensures better shaving performance. Rinsing the shaver
head under running water after each shave is an easy and fast way to keep
it clean:
• Switch the shaver on (cordless) and rinse the shaver head under hot
running water. You may use liquid soap without abrasive substances.
Rinse off all foam and let the shaver run for a few more seconds.
• Next, switch off the shaver, remove the shaver Foil & Cutter cassette (1)
and let it dry.
• If you regularly clean the shaver under water, then once a week apply a
drop of light machine oil onto the long hair trimmer (2) and shaver
Foil & Cutter cassette (1) (picture).
Alternatively, you may clean the shaver using a brush:
• Switch off the shaver. Remove the shaver Foil & Cutter cassette and tap it
out on a flat surface (picture).
• Using a brush, clean the inner area of the shaver head. However, do not
clean the shaver Foil & Cutter cassette with a brush as this may damage it
(picture).
Keeping your shaver in top shape
Replacement light for shaving parts / Reset
To maintain 100% shaving performance, replace the shaver Foil & Cutter
cassette (1), when the replacement light for shaving parts (7) comes on (after
about 18 months) or when worn.
Foil & Cutter cassette: 32S/32B
The replacement light will remind you during the next 7 shaves to replace the
Foil & Cutter cassette. Then the shaver will automatically reset the display.
After you have replaced the Foil & Cutter cassette (1), press the on/off switch
(4) for at least 5 seconds to reset the counter.
While doing so, the replacement light blinks and goes off when the reset is
complete. The manual reset can be done at any time.
8
Page 8

Preserving the batteries
In order to maintain the optimum capacity of the rechargeable batteries, the
shaver has to be fully discharged (by shaving) every six months approximately. Then recharge the shaver to full capacity.
Environmental notice
This product contains rechargeable batteries. In the interest of
protecting the environment, please do not dispose of the product in
the household waste at the end of its useful life. Disposal can take
place at a Braun Service Centre or at appropriate collection sites
provided in your country.
Subject to change without notice.
For electric specifications, see printing on the special cord set.
Guarantee
We grant a 2 year guarantee on the product commencing on the date of
purchase. Within the guarantee period we will eliminate any defects in the
appliance resulting from faults in materials or workmanship, free of charge
either by repairing or replacing the complete appliance at our discretion.
This guarantee extends to every country where this appliance is supplied by
Braun or its appointed distributor.
This guarantee does not cover: damage due to improper use, normal wear or
use as well as defects that have a negligible effect on the value or operation
of the appliance.
The guarantee becomes void if repairs are undertaken by unauthorised
persons and if original Braun parts are not used.
To obtain service within the guarantee period, hand in or send the complete
appliance with your sales receipt to an authorised Braun Customer Service
Centre (address information available online at www.service.braun.com).
For UK only:
This guarantee in no way affects your rights under statutory law.
9
Page 9

Français
Nos produits sont conçus pour répondre aux normes les plus élevées en
matière de qualité, fonctionnalité et design. Nous espérons que vous
apprécierez votre nouveau rasoir Braun.
Attention
Votre rasoir est livré avec un cordon d’alimentation basse tension. Vous ne
devez pas remplacer ou modifier ses composants, afin d’éviter tout risque
d’accident.
Ne vous rasez pas avec une grille ou un cordon endommagés.
Cet appareil n’est pas destiné à des enfants ou à des personnes aux
capacités mentales, sensorielles et physiques réduites à moins qu’elles ne
soient sous la surveillance d’un adulte responsable de leur sécurité.
Il convient de surveiller les enfants pour s’assurer qu’ils ne jouent pas avec
l’appareil. Conserver hors de portée des enfants.
Bouteille d’huile
Conserver hors de la portée des enfants. Ne pas avaler. Eliminer comme il
convient après usage.
Description
1 Cassette de rasage (grille et bloc-couteaux)
2 Tondeuse rétractable pour poils longs
3 Loquet de réglage de précision («
4 Bouton marche/arrêt
5 Témoins lumineux de charge (vert)
6 Témoin lumineux de décharge (rouge)
7 Indicateur lumineux de remplacement de la cassette de rasage
8 Prise d’alimentation du rasoir
9 Cordon d’alimentation
10 Etui (360s uniquement)
11 Capot de protection (330s/320s uniquement)
») (360s uniquement)
Mise en charge du rasoir
La température ambiante idéale pour charger le rasoir est comprise entre
15 °C et 35°C. N’exposez pas votre rasoir à des températures supérieures
à 50 °C pendant une période prolongée.
• En utilisant le cordon d’alimentation (9), branchez le rasoir à une prise
électrique moteur arrêté. Lors de la première charge, ou si le rasoir n’a
10
Page 10

pas été utilisé pendant plusieurs mois, laissez le rasoir se charger pendant
4 d’heures.
• Lorsque le rasoir est complètement chargé, utilisez le normalement
jusqu’à complète décharge de la batterie. Rechargez le ensuite jusqu’à
pleine capacité. Les charges suivantes prendront environ une heure.
• Une pleine charge procure jusqu’à 45 minutes d’autonomie de rasage en
fonction de l’épaisseur et de la dureté de votre barbe. Cependant, la
capacité maximale de la batterie ne sera atteinte qu’après plusieurs cycles
de charge/décharge.
• Si les batteries sont déchargées, vous pouvez aussi vous raser en
branchant le rasoir à une prise électrique via le cordon d’alimentation.
• Une charge rapide de 5 minutes est suffisante pour un rasage.
Témoins lumineux de charge (5)
Les témoins lumineux de charge indiquent le niveau de charge des batteries
(330s/320s : 1 témoin lumineux). Le témoin lumineux vert de charge clignote
lorsque le rasoir est en cours de charge ou en marche. Quand la batterie
est complètement chargée, tous les témoins lumineux verts (330s/320s :
1 témoin lumineux) de charge sont allumés, que le rasoir soit branché sur
une prise électrique.
Témoin lumineux de décharge (6)
Le voyant lumineux rouge de faible charge clignote lorsque la batterie doit
être rechargée. La charge restante est normalement suffisante pour que vous
puissiez terminer votre rasage.
Rasage
Appuyez sur le bouton marche/arrêt (4) pour mettre en marche le rasoir
(cf. schéma). Les grilles de rasage souples s’adaptent automatiquement aux
contours de votre visage (cf. schéma).
Tondeuse rétractable pour poils longs (2)
Pour tailler les pattes, la moustache ou la barbe, faites glisser la tondeuse
rétractable vers le haut.
Loquet de réglage de précision (« »)
Pour une utilisation précise dans les zones difficiles à atteindre (par exemple,
sous le nez), poussez le loquet (3) vers la droite pour que « » se retrouve
en position centrale. La mini tondeuse de la cassette de rasage et une de
ses grilles seront alors abaissées.
(360s uniquement)
11
Page 11
Conseils pour un rasage parfait
Pour un résultat de rasage optimal, Braun vous recommande de suivre
3 étapes simples :
1. Rasez-vous toujours avant de vous laver le visage.
2. Tenez toujours le rasoir à angle droit (90°) par rapport à la peau.
3. Tendez votre peau et rasez-vous dans le sens opposé à la pousse du
poil.
Nettoyage
La tête du rasoir peut être lavée sous l’eau chaude courante.
Attention : débranchez toujours le rasoir de la prise électrique secteur
avant de nettoyer la tête sous l’eau.
Un nettoyage régulier assure une meilleure performance de rasage. Nettoyer
la tête du rasoir sous l’eau après chaque rasage permet de garder le rasoir
propre simplement et rapidement :
• Mettez en marche le rasoir (sans cordon) et rincez la tête de rasage sous
l’eau chaude. Vous pouvez utiliser du savon liquide ne contenant pas
de substances abrasives. Rincez toute la mousse et laissez le rasoir en
marche pendant quelques secondes supplémentaires.
• Ensuite, arrêtez le rasoir, retirez la cassette de rasage (1) et laissez la
sécher.
• Si vous nettoyez régulièrement votre rasoir sous l’eau, appliquez une fois
par semaine une goutte d’huile de machine à coudre sur la tondeuse
rétractable (2) et sur la cassette de rasage (1) (cf. schéma).
Vous pouvez également nettoyer le rasoir en utilisant une brossette :
• Arrêtez le rasoir. Enlevez la cassette de rasage et tapotez-la légèrement
sur une surface plane.
• A l’aide de la brossette, nettoyez l’intérieur de la tête du rasoir. Cependant,
ne nettoyez pas la cassette de rasage avec la brossette car cela risquerait
de l’endommager (cf. schéma).
Entretien du rasoir
Témoin lumineux de remplacement de la cassette de rasage /
réinitialisation
Pour conserver 100% de la performance de votre rasoir, remplacez la
cassette de rasage (1) quand le témoin lumineux de remplacement des
12
Page 12

pièces de rasage (7) s’allume (après environ 18 mois) ou quand elle est
usée.
Cassette de rasage « Foil & Cutter »: 32S/32B
Le témoin lumineux de remplacement vous rappellera lors des 7 rasages
suivants qu’il faut remplacer la cassette de rasage. Ensuite, le rasoir
réinitialisera automatiquement l’affichage.
Après avoir remplacé la cassette de rasage (1), appuyez sur le bouton
marche/arrêt (4) pendant au moins 5 secondes afin de remettre manuellement le compteur à zéro.
Pendant ce temps là, le témoin lumineux de remplacement clignote et
s’éteint quand la réinitalisation est faite. La réinitialisation manuelle peut être
faite à n’importe quel moment.
Conservation des batteries
Pour maintenir la capacité optimale des batteries rechargeables, tous les
6 mois environ déchargez complètement, le rasoir en l’utilisant sans le
remettre en charge entre chaque rasage ; ensuite recharger le rasoir au
maximum.
Respect de l’environnement
Ce produit contient des batteries rechargeables. Dans un souci de
protection de l’environnement, veuillez ne pas jeter le produit avec
les ordures ménagères au terme de son cycle de vie. Vous pouvez
remettre ce produit aux centres service agréés Braun ou aux points
de collecte dans votre pays.
Sujet à toute modification sans préavis.
Voir les spécifications électriques mentionnées sur l’adaptateur basse
tension.
13
Page 13

Garantie
Nous accordons une garantie de 2 ans sur ce produit, à partir de la date
d’achat.
Pendant la durée de la garantie, Braun prendra gratuitement à sa charge la
réparation des vices de fabrication ou de matière en se réservant le droit de
décider si certaines pièces doivent être réparées ou si l‘appareil lui-même
doit être échangé.
Cette garantie s’étend à tous les pays où cet appareil est commercialisé par
Braun ou son distributeur exclusif.
Cette garantie ne couvre pas : les dommages occasionnés par une utilisation
inadéquate, l’usure normale (par exemple, grille et bloc-couteaux) ainsi que
les défauts d’usuresqui ont un effet négligeable sur la valeur ou l’utilisation
de l’appareil. Cette garantie devient caduque si des réparations ont été
effectuées par des personnes non agréées par Braun et si des pièces de
rechange ne provenant pas de Braun ont été utilisées.
Pour toute réclamation intervenant pendant la période de garantie, retournez
ou rapportez l’appareil ainsi que l‘attestation de garantie à votre revendeur
ou à un Centre Service Agréé Braun.
Se référez à www.service.braun.com ou appelez 0 800 944 802 pour
connaitre le Centre Service Agrée Braun le plus proche de chez vous.
Clause spéciale pour la France
Outre la garantie contractuelle exposée ci-dessus, nos clients bénéficient de
la garantie légale des vices cachés prévue aux articles 1641 et suivants du
Code civil.
14
Page 14
Polski
Nasze produkty spełniają najwyższe standardy jakości, funkcjonalności i
designu. Mamy nadzieję, ze będziesz usatysfakcjonowany naszą nową
golarką Braun.
Ostrzeżenie
Twój system golący wyposażony jest w specjalną stację ładującą. Nie należy
samodzielnie wymieniać lub wymontowywać jakiejkolwiek jej części, gdyż
grozi to porażeniem prądem.
Urządzenia nie należy używać z uszkodzoną folią golącą lub kablem sieciowym.
Urzàdzenie to nie mo˝e byç u˝ywane przez dzieci lub osoby fizycznie lub
umys∏owo upoÊledzone, jeÊli nie znajdujà si´ one pod nadzorem osoby
odpowiedzialnej za ich bezpieczeƒstwo. Zalecamy przechowywaç urzàdzenie w miejscu niedost´pnym dla dzieci. Dzieci powinny być nadzorowane
podczas używania urządzenia w celu zapewnienia odpowiedniego bezpieczeństwa.
Pojemnik z olejem
Przechowywać poza zasięgiem dzieci. Nie połykać. Puste opakowanie wyrzucić.
Opis
1 Kaseta z systemem noży i folii golących
2 Trymer
3 Włącznik precyzyjnego golenia (« ») (dotyczy tylko 360s)
4 Przycisk włącznik/wyłącznik
5 Wskaźniki naładowania baterii (zielony)
6 Wskaźnik rozładowania baterii (czerwony)
7 Wskaźnik wymiany elementów golących
8 Stacja ładowania golarki
9 Przewód zasilający
10 Etui (dotyczy tylko 360s)
11 Nasadka zabezpieczająca (dotyczy tylko 330s/320s)
Ładowanie
Najbardziej efektywne ładowanie odbywa się w temperaturze powietrza
między 15 °C a 35 °C. Nie należy wystawiać golarki na długie działanie
temperatury wyższej niż 50 °C.
• Za pomocą dołączonego w zestawie przewodu zasilającego (9), należy
podłączyć wyłączoną golarkę do gniazda elektrycznego. W przypadku
pierwszego ładowania golarki lub nie używania jej przez kilka miesięcy,
należy podłączyć ją do ciągłego zasilania na 4 godziny.
15
Page 15
• Po maksymalnym naładowaniu golarki, należy ją w czasie normalnego
użytkowania rozładować, a następnie ponownie maksymalnie naładować.
Pełne naładowanie zajmuje około 1 godziny.
• Pełne naładowanie akumulatora zapewnia 45 minut bezprzewodowego
golenia. Pełna gotowość baterii zostanie osiągnięta dopiero po kilku jej
rozładowaniach i ponownych naładowaniach.
• Jeżeli bateria golarki jest rozładowana, istnieje możliwość golenia z podłą-
czeniem za pomocą przewodu zasilającego bezpośrednio do gniazdka
elektrycznego.
• Szybkie, 5-minutowe ładowanie zapewnia czas pracy golarki wystarczający
na jedno ogolenie.
Wskaźniki naładowania baterii (5)
Zielone wskaźniki pokazują stan naładowania baterii (330s/320s: 1 wskaźniki
naładowania baterii). Wskaźniki pulsują, kiedy golarka jest w czasie ładowania, lub kiedy jest włączona. Jeżeli golarka jest włączona lub podłączona do
źródła prądu, a bateria jest w pełni naładowana, wszystkie zielone wskaźniki
(330s/320s: 1 wskaźniki naładowania baterii) świecą światłem ciągłym.
Wskaźnik rozładowania baterii (6)
W przypadku, gdy bateria jest na wyczerpaniu zapala się czerwona kontrolka.
Powinno jednak wystarczyć energii na dokończenie golenia.
Golenie
Należy włączyć golarkę za pomocą przycisku włącznik/wyłącznik (4).
Sprężyste folie golące dopasują się do kształtu każdej twarzy (rysunek).
Trymer (2)
Służy do przycinania baczków, wąsów i dłuższej brody.
Włącznik precyzyjnego golenia (« ») (dotyczy tylko 360s)
Ułatwia golenie trudnodostępnych miejsc np. pod nosem; należy przesunąć
blokadę w prawą stronę do pozycji « », aby środkowa część trymera oraz
folia goląca zostały dla wygodniejszego golenia obniżone.
Porady
Dla najlepszych efektów golenia Braun poleca 3 proste zasady:
1. Należy się golić przed umyciem twarzy.
2. Golarka w czasie golenia zawsze powinna być prowadzona pod kątem
prostym w stosunku do golonej powierzchni.
3. Należy naciągnąć skórę i golić «pod włos», odwrotnie do kierunku
porostu włosów.
16
Page 16

Czyszczenie
Głowica golarki jest przystosowana do mycia pod bieżącą wodą.
Ostrzeżenie: Należy odłączyć golarkę od źródła prądu, zanim
użytkownik zacznie czyścić głowicę po bieżącą wodą.
Regularne czyszczenie zapewnia lepsze golenie. Opłukanie głowicy pod
bieżącą wodą po każdym goleniu, to najszybsza i najłatwiejsza droga do
utrzymania golarki w czystości i higienie.
• Należy włączyć golarkę (bezprzewodowo) i opłukać głowicę pod ciepłą,
bieżącą wodą. Można użyć mydła w płynie, jeżeli nie posiada żadnych
grudkowatych składników np. ziarenek do peelingu. Następnie należy
dokładnie opłukać głowicę z mydła i zostawić działającą golarkę na kilka
dodatkowych sekund.
• Kolejnym krokiem jest wyłączenie golarki oraz wyjęcie kasety z folią golącą
i nożykami (1). Należy pozostawić wyjęte elementy do wyschnięcia.
• Jeżeli golarka jest regularnie czyszczona pod bieżącą wodą, to wystarczy
raz na tydzień nanieść kroplę lekkiego oleju maszynowego na trymer (2)
oraz na kasetę z folią i nożykami (1). W ten sposób zostaną nasmarowane
elementy golące, które wymagają takiej ochrony.
Golarka mo˝e byç tak˝e czyszczona przy pomocy szczoteczki:
• Należy wyłączyć golarkę a następnie wyjąć kasetę z folią golącą i nożykami
(1). Delikatnie stukając kasetą o płaską powierzchnię, trzeba wysypać
wszelkie zanieczyszczenia.
• Używając szczoteczki należy oczyścić głowicę golarki oraz jej okolice.
Absolutnie nie należy używać szczoteczki do czyszczenia kasety z folią i
nożykami, gdyż można ją uszkodzić.
Jak utrzymać golarkę w najlepszym stanie
Wskaźnik wymiany elementów golących / reset
Aby golarka zawsze działała na 100% swoich możliwości, należy co 18 miesięcy wymieniać kasetę z foliami i nożami (1). Przypomina o tym specjalny
wskaźnik wymiany elementów golących (7). Jeżeli elementy golące zużyją
się wcześniej, wskaźnik także o tym poinformuje.
Kasety z foliami golącymi oraz nożykami: 32S/32B
W ciągu następnych 7 goleń specjalna dioda będzie przypominać o
konieczności wymiany. Po tym czasie czyli po 7 goleniach, specjalny panel
zostanie automatycznie zresetowany a czas do następnej wymiany będzie
naliczany na nowo.
17
Page 17
Po wymianie kasety z folią golącą i blokiem ostrzy (1), należy wcisnąć przycis (4) i przytrzymać przynajmniej przez 5 sekund, aby zresetować licznik.
W czasie wykonywania tej czynności wskaźnik będzie pulsować i wyłączy
się, kiedy reset golarki zostanie zakończony. Ręczne zresetowanie może być
przeprowadzone o każdej porze i w każdym momencie.
Konserwacja baterii
Aby zachować optymalną pojemność akumulatora golarki, należy go formatować raz na 6 miesięcy, czyli rozładować w czasie golenia a następnie naładować do pełna.
Ochrona środowiska
Produkt posiada akumulator. Kiedy przestanie on już być już użyteczny,
prosimy o zwrócenie go do jednego z punktów serwisowych Braun,
gdzie stara bateria, nie szkodząc środowisku, zostanie zutylizowana.
Zużyta bateria może zostać oddana także do specjalnego punktu
recyklingu. Traktowanie zużytych baterii jak zwykłych śmieci stwarza
zagrożenie dla naszego środowiska.
Powy˝sze informacje mogà ulec zmianie bez uprzedniego powiadomienia.
Specyfikacje elektryczne zosta∏y wydrukowane na specjalnym kablu
sieciowym.
Warunki gwarancji
1. Procter and Gamble DS Polska sp. z.o.o. z siedzibą w Warszawie przy
ul. Zabranieckiej 20, gwarantuje sprawne działanie sprzętu w okresie
24 miesięcy od daty jego wydania Kupującemu. Ujawnione w tym okresie
wady będą usuwane bezpłatnie, przez wymieniony przez firmę Procter
and Gamble DS Polska sp. z.o.o. autoryzowany punkt serwisowy, w
terminie 14 dni od daty dostarczenia sprzętu do autoryzowanego punktu
serwisowego.
2. Kupujący może wysłać sprzęt do naprawy do najbliżej znajdującego się
autoryzowanego punktu serwisowego wymienionego przez firmę Procter
and Gamble DS Polska sp. z.o.o. lub skorzystać z pośrednictwa sklepu,
18
Page 18

w którym dokonał zakupu sprzętu. W takim wypadku termin naprawy
ulegnie wydłużeniu o czas niezbędny do dostarczenia i odbioru sprzętu.
3. Kupujący powinien dostarczyć sprzęt w oryginalnym opakowaniu
fabrycznym dodatkowo zabezpieczonym przed uszkodzeniem.
Uszkodzenia spowodowane niedostatecznym zabezpieczeniem sprzętu
nie podlegają naprawom gwarancyjnym.
4. Niniejsza gwarancja jest ważna z dokumentem zakupu i obowiązuje na
terytorium Rzeczypospolitej Polskiej.
5. Okres gwarancji przedłuża się o czas od zgłoszenia wady lub uszkodzenia
do naprawy sprzętu.
6. Naprawa gwarancyjna nie obejmuje czynności przewidzianych w
instrukcji, do wykonania których Kupujący zobowiązany jest we własnym
zakresie i na własny koszt.
7. Ewentualne oczyszczenie sprzętu dokonywane jest na koszt Kupującego
według cennika danego autoryzowanego punktu serwisowego i nie będzie
traktowane jako naprawa gwarancyjna.
8. Gwarancją nie są objęte:
a) mechaniczne uszkodzenia sprzętu spowodowane w czasie jego
użytkowania lub w czasie dostarczania sprzętu do naprawy;
b) uszkodzenia i wady wynikłe na skutek:
– używania sprzętu do celów innych niż osobisty użytek;
– niewłaściwego lub niezgodnego z instrukcją użytkowania,
konserwacji, przechowywania lub instalacji;
– używania niewłaściwych materiałów eksploatacyjnych;
– napraw dokonywanych przez nieuprawnione osoby; stwierdzenie
faktu takiej naprawy lub samowolnego otwarcia sprzętu powoduje
utratę gwarancji;
– przeróbek, zmian konstrukcyjnych lub używania do napraw
nieoryginalnych części zamiennych firmy Braun;
c) części szklane, żarówki oświetlenia;
d) ostrza i folie do golarek oraz materiały eksploatacyjne.
9. Bez nazwy i modelu sprzętu, daty jego zakupu potwierdzonej pieczątką
i podpisem sprzedawcy karta gwarancyjna jest nieważna.
10. Niniejsza gwarancja na sprzedany towar konsumpcyjny nie wyłącza,
nie ogranicza ani nie zawiesza uprawnień Kupującego wynikających
z niezgodności towaru z umową.
19
Page 19
Český
Naše výrobky jsou vyrobeny tak, aby splňovaly nejvyšší nároky na kvalitu,
funkčnost a design. Doufáme, že budete se svým novým holicím strojkem
Braun spokojeni.
Výstraha
Tento holicí strojek je vybaven speciálním síťovým přívodem s integrovaným
bezpeč-nostním síťovým adaptérem. Nevyměňujte ani nerozebírejte žádnou
z jeho částí, jinak by mohlo dojít k úrazu elektrickým proudem.
Přístroj nepoužívejte, je-li poškozena planžeta nebo vadný síťový přívod.
Pfiístoj nesmí pouÏívat dûti ani osoby se sníÏen˘mi fyzick˘mi nebo
psychick˘mi schopnostmi bez dohledu osoby, která je zodpovûdná za jejich
bezpeãnost. Obecnû je doporuãeno uchovávat pfiístroj mimo dosah dûtí.
Děti by měly být pod dozorem, aby se zajistilo, že nebudou spotřebič používat na hraní.
Lahvička s olejem
Uchovávejte mimo dosah dětí. Nepolykejte. Po vyprázdnění zlikvidujte
v rámci tříděného odpadu.
Popis
1 Kazeta s planžetou a břitovým blokem
2 Zastřihovač dlouhých vousů
3 Tlačítko pro přesné holení (« ») (pouze 360s)
4 Spínač zapnutý/vypnutý
5 Kontrolky nabíjení (zelená)
6 Kontrolka nízkého nabití (červená)
7 Kontrolka výměny holicích dílů
8 Síťová zásuvka holicího strojku
9 Speciální síťový přívod
10 Pouzdro (pouze 360s)
11 Ochranný nástavec (pouze 330s/320s)
Nabíjení
Nejvhodnější teplota okolí pro nabíjení je 15 °C až 35 °C. Nevystavujte holicí
strojek dlouhodobě teplotám vyšším než 50 °C.
• Pomocí speciálního síťového přívodu (9) připojte holicí strojek k zásuvce
elektrické sítě, přičemž holicí strojek je vypnutý. Pokud holicí strojek
20
Page 20
nabíjíte poprvé nebo jste ho několik měsíců nepoužíval, nechte holicí
strojek nabíjet nepřetržitě 4 hodiny.
• Jakmile je holicí strojek plně nabitý, vybijte jej normálním používáním,
a pak znovu nabijte na plnou kapacitu. Další dobíjení budou trvat zhruba
1 hodinu.
• Plné nabití umožňuje až 45 minut holení bez síťového přívodu, v závislosti
na vzrůstu vašich vousů. Maximální kapacity baterie se však dosáhne až
po několika cyklech nabíjení/vybíjení.
• Pokud je akumulátorová baterie vybita, můžete se také holit holicím stroj-
kem, připojeným k síti pomocí speciálního síťového přívodu.
• Pětiminutové rychlonabíjení postačí na jedno oholení bez síťového přívodu.
Kontrolky nabíjení (5)
Zelené kontrolky nabíjení indikují stav baterie (330s/320s: 1 kontrolky
nabíjení). Odpovídající zelená kontrolka bliká po dobu nabíjení nebo je-li
holicí strojek zapnutý. Když je baterie plně nabitá, všechny zelené kontrolky
začnou (330s/320s: 1 kontrolky nabíjení) svítit nepřetržitě za předpokladu,
že holicí strojek je připojený k síťovému přívodu.
Kontrolka nízkého nabití (6)
Při poklesu kapacity baterie začne blikat červený dílek, indikující slabé nabití
baterie. Zbývající kapacita pak postačí na dokončení holení.
Holení
Pro zahájení provozu holicího strojku stiskněte spínač (4) – viz obrázek.
Výkyvný holicí systém se automaticky přizpůsobuje všem konturám vašeho
obličeje (viz obrázek).
Zastřihovač dlouhých vousů (2)
Při zastřihování kotlet, knírku nebo bradky vysuňte zastřihovač dlouhých
vousů směrem nahoru.
Tlačítko pro přesné holení (« ») (pouze 360s)
Pro přesné oholení těžko holitelných míst (např. pod nosem), posuňte tlačítko
(3) směrem doprava do pozice « ». Prostřední zastřihovač a jedna planžeta
se sklopí.
21
Page 21

Tipy pro perfektní oholení
Pro dosažení nejlepších výsledků vám Braun doporučuje 3 jednoduché
kroky:
1. Holte se vždy před mytím obličeje.
2. Holicí strojek držte vždy v pravém úhlu (90°) k pokožce.
3. Napněte pokožku a holte se proti směru růstu vousů.
Čištění
Tento přístroj je možné čistit pod tekoucí vodou. Upozornění: Před
čištěním holicí hlavy vodou odpojte holicí strojek ze sítě.
Pravidelným čištěním zlepšíte holicí výkon vašeho holicího strojku.
Propláchnutí holicí hlavy pod tekoucí vodou po každém holení představuje
rychlý a snadný způsob jak udržovat holicí strojek čistý:
• Zapněte holicí strojek (bez síťového přívodu) a opláchněte holicí hlavu pod
horkou tekoucí vodou. Můžete použít tekuté mýdlo bez abrazivních složek.
Opláchněte všechnu pěnu a nechte holicí strojek ještě několik sekund
běžet.
• Poté holicí strojek vypněte a sejměte kazetu s holicí planžetou a břitovým
blokem (1). Demontované holicí díly nechte oschnout.
• Pokud čistíte holicí strojek pod tekoucí vodou pravidelně, promažte každý
týden zastřihovač dlouhých vousů (2) a na povrch kazety s planžetou a
břitovým blokem (1) naneste kapku jemného oleje na šicí stroje.
Holicí strojek můžete alternativně čistit pomocí kartáčku:
• Vypněte holicí strojek, sejměte kazetu s planžetou a břitovým blokem a
jemně ji vyklepejte na ploché podložce.
• Pomocí kartáčku vyčistěte vnitřní část holicí hlavy. Kartáček však nepou-
žívejte na čištění kazety holicí planžety a břitového bloku – tyto díly byste
tak mohli poškodit.
Udržování holicího strojku ve špičkové formě
Kontrolka výměny holicích dílů / Resetování
Aby byl udržen 100% holicí výkon, vyměňte kazetu s holicí planžetou a
břitovým blokem (1) vždy, když se rozsvítí kontrolka výměny holicích dílů (7)
(po cca 18 měsících), nebo když jsou holicí díly opotřebovány.
22
Page 22

Kazeta s planžetou a břitovým blokem: 32S/32B
Kontrolka výměny vám bude v průběhu následujících 7 holení připomínat
nutnost výměny kazety holicí planžety a břitového bloku. Pak holicí strojek
automaticky resetuje displej.
Po výměně holicí planžety a břitového bloku (1) stiskněte na minimálně
5 sekund tlačítko «on/off» (4), čímž resetujete čítač.
V průběhu resetování bude blikat kontrolka výměny, která po dokončení
resetování zhasne. Manuální resetování se může provést kdykoli.
Ochrana akumulátorových baterií
Pro udržení optimální kapacity akumulátorových baterií by měl být holicí
strojek (normálním holením) plně vybit každých cca 6 měsíců. Poté holicí
strojek nabijte na plnou kapacitu.
Poznámka k životnímu prostředí
Tento výrobek obsahuje akumulátorové baterie. V zájmu ochrany
životního prostředí nevyhazujte výrobek po konci jeho životnosti
do běžného domovního odpadu. Odevzdejte jej do servisního
střediska Braun nebo na příslušné sběrné místo zřízené dle předpisů
ve vaší zemi.
Deklarovaná hodnota emise hluku tohoto spotfiebiãe je 63 dB(A), coÏ
pfiedstavuje hladinu A akustického v˘konu vzhledem na referenãní
akustick˘ v˘kon 1 pW.
MÛÏe b˘t zmûnûno bez upozornûní.
Elektrikáfiské specifikace najdete v návodu na speciální sadû ‰ÀÛr.
23
Page 23

Záruka
Na tento v˘robek poskytujeme záruku po dobu 2 let od data prodeje
spotfiebiteli. Bûhem této záruãní doby bezplatnû odstraníme závady na
v˘robku, zpÛsobené vadami materiálu nebo chybou v˘roby. Oprava bude
provedena podle na‰eho rozhodnutí buì opravou nebo v˘mûnou celého
v˘robku. Tato záruka platí pro v‰echny zemû, kam je tento v˘robek dodáván
firmou Braun nebo jejím autorizovan˘m distributorem.
Tato záruka se nevztahuje: na po‰kození, vzniklá nesprávn˘m pouÏíváním
a údrÏbou, na bûÏné opotfiebení (napfi. bfiitového bloku a folie), jakoÏ i na
defekty, mající zanedbateln˘ vliv na hodnotu a pouÏitelnost pfiístroje. Záruka
pozb˘vá platnosti, pokud byl v˘robek mechanicky po‰kozen nebo pokud jsou
opravy provedeny neautorizovan˘mi osobami nebo pokud nejsou pouÏity
originální díly Braun. Pfiístroj je urãen v˘hradnû pro domácí pouÏití. Pfii pouÏití
jin˘m zpÛsobem nelze uplatnit záruku.
Poskytnutím záruky nejsou dotãena práva spotfiebitele, která se ke koupi vûci
váÏí podle zvlá‰tních právních pfiedpisÛ.
Záruka platí jen tehdy, je-li záruãní list fiádnû vyplnûn (datum prodeje, razítko
prodejny a podpis prodavaãe) a je-li souãasnû s ním pfiedloÏen prodejní
doklad (dále jen doklady o koupi). Chcete-li vyuÏít servisních sluÏeb v záruãní
dobû, pfiedejte nebo po‰lete kompletní pfiístroj spolu s doklady o koupi do
autorizovaného servisního stfiediska Braun. Aktualizovan˘ seznam servisních
stfiedisek je k dispozici v prodejnách v˘robkÛ Braun.
Volejte zákaznickou infolinku 221 804 335 pro informace o v˘robcích a
nejbliωím servisním stfiedisku Braun.
O pfiípadné v˘mûnû pfiístroje nebo zru‰ení kupní smlouvy platí pfiíslu‰ná
zákonná ustanovení. Záruãní doba se prodluÏuje o dobu, po kterou byl
v˘robek podle záznamu z opravny v záruãní opravû.
24
Page 24

Slovenský
Naše výrobky sú vyrobené tak, aby spĺňali tie najvyššie nároky na kvalitu,
funkčnosť a dizajn. Dúfame, že budete so svojím novým holiacim strojčekom
Braun spokojní.
Upozornenie
Váš holiaci strojček je vybavený špeciálnym prevodníkom na nízke napätie
(špeciálnym sieťovým káblom so sieťovým adaptérom). Žiadnu jeho časť
nesmiete meniť, ani ho rozoberať, inak by mohlo dôjsť k úrazu elektrickým
prúdom.
Strojček nepoužívajte, ak je poškodená planžeta alebo sieťová šnúra.
Tento prístroj nie je urãen˘ pre deti a osoby so zníÏen˘mi fyzick˘mi a
mentálnymi schopnosÈami, ak pri jeho pouÏívaní nie sú pod dozorom
osoby, ktorá je zodpovedná za ich bezpeãnosÈ. Vo v‰eobecnosti odporúãame, aby ste prístroj uchovávali mimo dosahu detí. Dávajte pozor, aby
deti prístroj nepoužívali na hranie.
Fľaštička s olejom
Uchovávajte mimo dosahu detí. Nekonzumujte. Po vyprázdnení obsahu
fľaštičku zahoďte.
Popis
1 Planžeta a holiaci blok
2 Zastrihávač dlhých fúzov
3 Spínač precízneho holenia (« ») (iba 360s)
4 Tlačidlo zapnutia/vypnutia
5 Indikátory nabíjania (zelené)
6 Indikátor slabého nabitia (červený)
7 Svetelný indikátor výmeny holiacich dielov
8 Elektrická zásuvka holiaceho strojčeka
9 Špeciálny sieťový kábel
10 Puzdro (iba 360s)
11 Ochranný nadstavec (iba 330s/320s)
Nabíjanie
Najvhodnejšia teplota okolia na nabíjanie je medzi 15 °C až 35 °C. Holiaci
strojček nevystavujte dlhodobo teplotám nad 50 °C.
• Pomocou špeciálneho sieťového kábla (9) zapojte strojček do elektrickej
zásuvky a motorček strojčeka nechajte vypnutý. Ak holiaci strojček nabíjate
25
Page 25

po prvýkrát alebo ak ste ho niekoľko mesiacov nepoužívali, nabíjajte
honepretržite 4 hodiny.
• Keď je holiaci strojček plne nabitý, vybite ho bežným používaním. Potom ho
znova nabite na plnú kapacitu. Každé ďalšie nabíjanie bude trvať približne
1 hodinu.
• Plne nabitá batéria zabezpečuje až 45 minút holenia bez použitia sieťového
kábla v závislosti od dĺžky vašich fúzov. Maximálnu kapacitu batérie však
dosiahnete až po niekoľkých cykloch nabitia/vybitia.
• Keď sa akumulátorové batérie vybijú, môžete sa oholiť aj zapojením
holiaceho strojčeka to elektrickej zásuvky pomocou špeciálneho sieťového
kábla.
• 5-minútové rýchle nabitie postačí na jedno oholenie.
Indikátory nabíjania (5)
Zelené indikátory nabíjania ukazujú stav nabitia batérie (330s/320s): 1 Indikátory nabíjania). Zelený indikátor bliká, keď sa holiaci strojček nabíja,
alebo keď je zapnutý. Keď je batéria plne nabitá, všetky zelené indikátory
(330s/320s: 1 Indikátory nabíjania) nepretržite svietia, ak je strojček pripojený
do elektrickej zásuvky.
Indikátor slabého nabitia (6)
Keď je batéria takmer vybitá, rozsvieti sa červený dielik indikujúci slabé
nabitie batérie. Batéria by mala postačiť na dokončenie holenia.
Holenie
Strojček zapnite stlačením tlačidla zapnutia/vypnutia (4) (obrázok).
Flexibilné holiace planžety sa automaticky prispôsobia každej kontúre vašej
tváre (obrázok).
Zastrihávač dlhých fúzov (2)
Na zastrihnutie bokombrád, fúzov alebo brady vysuňte zastrihávač smerom
nahor.
Spínač precízneho holenia (« ») (iba 360s)
Na precíznu manipuláciu so strojčekom v miestach, ktoré sa ťažko holia
(napr. pod nosom), posuňte spínač (3) doprava, do pozície « ». Stredový
zastrihávač a jedna planžeta sa stiahnu.
26
Page 26

Tipy na najlepšie oholenie
Pre dosiahnutie najlepších výsledkov holenia vám Braun odporúča
dodržiavať 3 jednoduché pravidlá:
1. Vždy sa hoľte predtým, ako si umyjete tvár.
2. Holiaci strojček držte vždy v pravom uhle (90°) k pokožke.
3. Pokožku držte napnutú a hoľte sa proti smeru rastu fúzov.
Čistenie
Holiacu hlavu strojčeka môžete umývať pod tečúcou vodou.
Upozornenie: predtým, ako holiacu hlavu umyjete vodou, odpojte
strojček z elektrickej siete.
Pravidelné čistenie zaručuje lepšie výsledky holenia. Opláchnutie holiacej
hlavy pod tečúcou vodou po každom holení je jednoduchý a rýchly spôsob,
ako ju udržať čistú:
• Holiaci strojček zapnite (bez použitia sieťového kábla) a holiacu hlavu
opláchnite v teplej tečúcej vode. Môžete použiť aj tekuté mydlo bez
abrazívnych látok. Penu dôkladne opláchnite a strojček nechajte zapnutý
ešte niekoľko sekúnd.
• Potom strojček vypnite, zložte planžetu a holiaci blok (1) a nechajte ich
uschnúť.
• Ak holiaci strojček pravidelne čistíte pod tečúcou vodou, raz do týždňa
aplikujte na zastrihávač dlhých fúzov (2) a na planžetu a holiaci blok (1)
kvapku jemného strojového oleja.
Alternatívne môžete holiaci strojček vyčistiť pomocou kefky:
• Holiaci strojček vypnite. Planžetu a holiaci blok zložte a vyklepte ich na
rovnom povrchu.
• Kefkou vyčistite vnútornú časť holiacej hlavy. Planžetu a holiaci blok však
kefkou nečistite, pretože by sa mohli poškodiť.
Udržiavanie holiaceho strojčeka v špičkovej forme
Svetelný indikátor výmeny holiacich dielov / Vynulovanie počítadla
Planžetu a holiaci blok (1) vymeňte, keď sa rozsvieti svetelný indikátor
výmeny holiacich dielov (7) (po asi 18 mesiacoch používania), alebo keď sa
diely opotrebujú, aby ste zachovali 100 % výkon holiaceho strojčeka.
Planžeta a holiaci blok: 32S/32B
27
Page 27

Indikátor výmeny dielov vám počas ďalších 7 holení bude pripomínať, aby ste
planžetu a holiaci blok vymenili. Holiaci strojček potom počítadlo automaticky
vynuluje.
Keď planžetu a holiaci blok (1) vymeníte, vynulujte počítadlo stlačením
tlačidla zapnutia/vypnutia (4) na aspoň 5 sekúnd.
Indikátor výmeny holiacich dielov počas tohto úkonu bliká a vypne sa, keď sa
vynulovanie dokončí. Manuálne vynulovanie môžete urobiť kedykoľvek.
Starostlivosť o batérie
Približne každých 6 mesiacov nechajte holiaci strojček úplne vybiť (holením),
aby sa zachovala optimálna kapacita akumulátorových batérií. Potom holiaci
strojček opäť nabite na plnú kapacitu.
Poznámka k životnému prostrediu
Tento výrobok obsahuje akumulátorové batérie. V záujme ochrany
životného prostredia nevyhadzujte výrobok po skončení jeho životnosti
ako súčasť bežného odpadu domácnosti. Odovzdať ho môžete
v servisných strediskách Braun alebo na príslušných zberných
miestach vo vašej krajine zriadených podľa miestnych predpisov a noriem.
Deklarovaná hodnota emisie hluku tohto spotfiebiãa je 63 dB(A), ão
predstavuje hladinu A akustického v˘konu vzhºadom na referenãn˘
akustick˘ v˘kon 1 pW.
Právo na zmeny vyhradené.
Podrobné technické údaje sa nachádzajú na ‰peciálnom sieÈovom kábli.
28
Page 28

Záruka
Na tento v˘robok poskytujeme záruku po dobu 2 rokov odo dÀa predaja
spotrebiteºovi. Poãas tejto záruãnej doby bezplatne odstránime závady
na v˘robku, spôsobené vadami materiálu alebo chybou v˘roby a to podºa
ná‰ho rozhodnutia buì opravou alebo v˘menou celého v˘robku. Táto záruka
platí pre v‰etky krajiny, kde tento v˘robok dodáva firma Braun alebo jej
autorizovan˘ distribútor.
Táto záruka sa nevzÈahuje: na po‰kodenia, ktoré vzniknú nesprávnym
pouÏívaním a údrÏbou, na beÏné opotrebenie (napr. britového bloku a fólie)
ako aj na defekty, ktoré majú zanedbateºn˘ vplyv na hodnotu a pouÏitie
prístroja. Záruka stráca platnosÈ v prípade, Ïe v˘robok bol mechanicky
po‰koden˘, alebo sa uskutoãnili opravy neautorizovan˘mi osobami, alebo
sa nepouÏili originálne diely Braun. Prístroj je v˘hradne urãen˘ na domáce
pouÏitie. Pri pouÏití in˘m spôsobom nie je moÏné záruku uplatniÈ.
Poskytnutím záruky nie sú ovlyvnené spotrebiteºské práva, ktoré sa ku kúpe
predmetu viaÏu podºa zvlá‰tnych predpisov.
Záruka platí iba vtedy, ak je záruãn˘ list riadne vyplnen˘ (dátum predaja,
peãiatka predajne a podpis predavaãa) a zároveÀ s ním predloÏen˘ doklad
o predaji (ìalej iba doklady o zakúpení).
Ak chcete vyuÏiÈ servisné sluÏby v záruãnej dobe, kompletn˘ prístroj spolu
s dokladmi o zakúpení odovzdajte alebo za‰lite do autorizovaného servisného
strediska Braun. Aktualizovan˘ zoznam servisn˘ch stredísk je k dispozícii
v predajniach v˘robkov Braun.
Vzhºadom na prípadnú v˘menu prístroja alebo na zru‰enie kúpnej zmluvy
platia príslu‰né zákonné ustanovenia. Záruãná doba sa predlÏuje o dobu,
poãas ktorej bol v˘robok podºa záznamu z opravovne v záruãnej oprave.
29
Page 29

Magyar
Termékeink előállítása során, messzemenően törekszünk a legmagasabb
minőségi követelményekkel, funkcionalitással és formatervezéssel szembeni
igények kielégítésére. Reméljük, örömét leli majd új Braun borotvájában!
Figyelmeztetés
Az Ön borotvarendszerét egy különleges csatlakozókábellel láttuk el,
integrált, biztonságos kisfeszültségű rendszerrel. Semmilyen alkatrészét ne
cserélje, vagy alakítsa át, ellenkező esetben áramütés veszélye állhat fenn!
Ne szőrtelenítsen sérült szitával vagy vezetékkel.
A készüléket mozgássérültek, szellemi vagy értelmi fogyatékosságban
szenvedŒ gyermekek vagy személyek, – kizárólag a biztonságukért felelŒs
felügyelet mellett használják! Javasoljuk, hogy a terméket gyermekektŒl
elzárva tartsa! Általában javasoljuk, hogy a készüléket tartsa gyermekek által
nem hozzáférhető helyen!
Olajtartó flakon
Gyermekektől elzárva tartandó! Ne nyelje le! Javasoljuk, hogy a kiürült flakont
kimosás után helyezze el szelektív hulladékgyűjtőben!
Leírás
1 Szitából és késből álló nyíróegység
2 Hosszúszőr-vágó
3
Precíziós nyírófejrögzítő kapcsoló (« ») (csak a 360s modellekhez)
4 Be/Ki kapcsoló gomb
5 Töltéskijelző fények (zöld)
6 Alacsony töltöttségi szint kijelző (piros)
7 Borotvaalkatrészek cseréjének aktualitását jelző fény
8 Csatlakozó bemenet
9 Különleges csatlakozókábel
10 Borotva tartótok
11 Védősapka
(csak a 360s modellekhez)
(csak a 330s/320s modellekhez)
Töltés
A töltéshez legideálisabb környezeti hőmérséklet 15 °C és 35 °C között van.
Ne tegye ki a készüléket huzamosabb ideig 50 °C-nál magasabb
hőmérsékletnek!
• A különleges csatlakozókábel segítségével (9), csatlakoztassa a kikapcsolt
állapotban lévő borotvát az elektromos hálózathoz!
30
Az első töltés
Page 30

alkalmával, – vagy amennyiben a borotvát több hónapja nem használta, –
hagyja a készüléket 4 órán át folyamatosan töltődni!
• A teljesen feltöltött készüléket, normál használat során merítse le, majd
töltse fel újból teljesen! A későbbiekben a feltöltési idő körülbelül 1 óra.
• A teljes feltöltés max. 45 perc zsinór nélküli borotválkozást eredményez,
mely idő a szakállhosszúságtól függően eltérő lehet. Az akkumulátor
maximum kapacitását, több, egymást követő töltés-lemerülés folyamat után
éri el.
• Amennyiben az akkumulátor lemerült állapotban van, használhatja
borotvakészülékét úgy is, hogy a különleges csatlakozókábel segítségével
csatlakoztatja elektromos hálózathoz!
• A lemerült készüléknek egyetlen borotválkozáshoz 5-perces gyorsfeltöltés
elegendő.
Töltéskijelző fények (5)
A zöld töltéskijelző fények, jelzik az akkumulátor töltöttségi szintjének állapotát
(330s/320s: 1
mutatja, hogy a borotva feltöltött éppen töltés alatt áll, vagy bekapcsolt
állapotban van. A teljes feltöltöttséget mindkét zöld fény folyamatos (330s/320s:
1
töltéskijelző fények)
állapotban van, vagy elektromos hálózatba csatlakoztatott.
Alacsony töltöttségi szint kijelző (6)
A piros színű kijelző villogással jelzi az akkumulátor alacsony töltöttségi
állapotát. Ilyenkor a készülék még lehetővé teszi a borotválkozás befejezését.
töltéskijelző fények)
világítása jelzi, feltéve hogy a készülék bekapcsolt
. A zöld töltéskijelző fény villogása azt
Borotválkozás
A borotva működtetéséhez, (az ábrának megfelelően) nyomja meg a Be/
Kikapcsoló gombot! (4).
A billenő sziták automatikusan követik arcának minden vonalát.
Hosszúszőr-vágó (2)
A pajesz, bajusz vagy szakáll nyírásához tolja fel a hosszúszőr-vágót!
Nyírófejrögzítő kapcsoló (« »)
A nehezen hozzáférhető területek (pl. az orr alatti rész) precíz nyírásához,
csúsztassa el jobbra a rögzítő kapcsolót (3) a « » pozícióba! Ez a mozdulat
lejjebb ereszti a középső nyíróalkatrészt és az egyik szitát.
(csak a 360s modellekhez)
31
Page 31

Tippek a tökéletes borotválkozáshoz
A legjobb borotválkozási eredmény eléréséhez, a Braun az alábbi három
egyszerű lépést javasolja:
1. Mindig arcmosás előtt borotválkozzon!
2. Borotválkozás közben tartsa a készüléket megfelelő szögben (90°) az
arcfelületre!
3. Feszítse meg a bőrt, és a szakáll növekedési irányával ellentétesen
borotválkozzon!
A készülék tisztítása
A készülék alkalmas a vízsugár alatt történő tisztításra.
Figyelmeztetés: A borotvafej vízzel történő tisztításának megkezdése
előtt, távolítsa el a borotvát az elektromos hálózatból!
A rendszeres tisztítás növeli a készülék hatékonyságát. A borotvafej vízzel
történő átöblítése minden egyes használat után, egyszerű és gyors módja a
készülék tisztántartásának:
• Kapcsolja be a borotvát (vezeték nélkül), és öblítse le a borotvafejet meleg
vízsugár alatt! A tisztításhoz használhat szemcsés összetevőktől mentes,
folyékony szappant is. Ezt követően mossa le a habot, és még pár
másodpercig működtesse a készüléket!
• Ezt követően kapcsolja ki a készüléket, majd vegye le a készülékről a
nyíróegységet (1) és hagyja azt megszáradni!
• Amennyiben borotváját rendszeresen tisztítja vízsugár alatt, hetente
egyszer kenje be a hosszúszőr-vágót (2) valamint a nyíróegységet (1) egy
csepp jó minőségű műszerolajjal!
Alternatívaként, tisztíthatja borotváját egy tisztítókefe segítségével:
• Kapcsolja ki a borotvát! Vegye le a nyíróegységet, és kocogtassa egy lapos
felülethez!
• A kefe segítségével seperje át a borotvafej belsejét! A nyíróegységet
azonban ne tisztítsa kefével, mert megsérülhet!
A borotva karbantartása
Alkatrészek cseréjének aktualitását jelző fény / Alaphelyzet beállító
A borotva 100%-os teljesítményének megtartása érdekében, a nyíróalkatrész
cseréjének aktualitását jelző fény (7) kigyulladásakor, (körülbelül 18 hónap
elteltével), vagy, amikor az elhasználódott, cserélje ki a nyíróegységet (1)!
Borotva szitából és késből álló nyíróegység: 32S/32B
32
Page 32

A cserére figyelmeztető fény emlékezteti Önt a következő 7 borotválkozás
alkalmával, hogy a nyíróegység cserére szorul. Ezt követően a borotva
automatikusan visszaállítja a kijelzőt alapállapotba.
a borotvaszitából és nyíróegységből álló kazetta (1) cseréjét követően
legalább 5 másodpercig tartsa benyomva a ki/bekapcsoló gombot!
A művelet elvégzése közben a cserére figyelmeztető fény villogni kezd, majd
az alapbeállítás megtörténte után kialszik. Ez a fajta kézi beállítás bármikor
elvégezhető.
Az akkumulátor karbantartása
A tölthető akkumulátor optimális kapacitásának megőrzése érdekében, a
borotvát körülbelül félévente ajánlatos egyszer teljesen lemeríteni (normál
használattal), majd teljesen újratölteni.
A számláló újraindításához
Környezetvédelmi felhívás
A készülék tölthető akkumulátorral rendelkezik. A környezet megóvása
érdekében, kérjük, hogy elhasználódott készülékét ne dobja háztartási
hulladékok közé! Megsemmisítés helyéül a Braun szervízközpont,
illetve országonként az arra kijelölt gyűjtőhelyek szolgálnak!
Figyelmeztetés: a készülék felnyitása tönkreteszi a készülékházat, és
megszünteti a garancia jogosultságot!
A változtatás jogát fenntartjuk.
Az elektromos leírás a speciális vezetékre nyomtatva olvasható.
Garancia
A Braun – ismerve termékei megbízhatóságát, készülékeire két év garanciát
vállal, azzal a megkötéssel, hogy a jótállási igényt a készülék csomagolásában
található Jótállási Nyilatkozatban feltüntetett Braun márkaszervizekben lehet
érvényesíteni.
A garancia hatálya alól kivételt képeznek azok a meghibásodások, amelyek a
készülék szakszerűtlen, vagy nem rendeltetésszerű használatára vezethetők
vissza, valamint azok az apróbb hibák, amelyek a készülék értékét, vagy
használhatóságát nem befolyásolják.
A garancia nem vonatkozik a gyorsan kopó, rendszeresen cserélendő
tartozékokra (pl. Borotvaszita, kés, stb.)
A jótállási igény érvényesítésére vonatkozó részletes tájékoztató a készülék
csomagolásában található.
33
Page 33

Hrvatski
Naši su proizvodi oblikovani su tako da zadovoljavaju najviše standarde kvalitete, funkcionalnosti i dizajna. Nadamo se da ćete uživati u brijanju novim
Braunovim aparatom za brijanje.
Upozorenje
Vaš aparat za brijanje ima ugrađeni sigurnosni niskonaponski adapter.
Nemojte mijenjati ili samostalno rukovati bilo kojim dijelom adaptera, jer se
tako izlažete opasnosti od strujnog udara.
Nikada nemojte koristiti aparat kojem je oštećena mrežica ili priključni kabel.
Nije predvi∂eno da ovaj ure∂aj koriste djeca ili osobe smanjenih fiziãkih
ili mentalnih sposobnosti, osim ako ih ne nadgleda osoba odgovorna za
njihovu sigurnost. Općenito, preporučujemo da ovaj uređaj držite van dosega
djece, a kada ga koriste pripazite da se ne igraju s njime.
Boca s uljem
Držati dalje od dosega djece. Ne gutati. Odložiti u skladu s propisima kada se
isprazni.
Opis
1 Kaseta mrežice i bloka noža
2 Podrezivač dugih dlačica
3 Prekidač precizne postavke (« ») (modelima 360s)
4 Prekidač za uključivanje/isključivanje
5 Indikator punjenja (zeleno svjetlo)
6 Indikator prazne baterije (crveno svjetlo)
7 Svjetlo upozorenja za zamjenu dijelova
8 Utičnica uređaja
9 Specijalni priključni kabel
10 Etui (modelima 360s)
11 Zaštitni poklopac (modelima 330s/320s)
Punjenje
Najbolja temperatura okoline za punjenje je između 15 °C i 35 °C. Ne izlažite
uređaj na duže vrijeme temperaturama višim od 50 °C.
• Dok je aparat za brijanje isključen specijalnim priključnim kabelom (9) spojite
aparat za brijanje s izvorom električne energije.
uređaj niste koristili nekoliko mjeseci, pustite aparat da se puni 4 sata bez
prekida.
• Kad je aparat za brijanje napunjen, ispraznite ga normalnom uporabom.
34
Kod prvog punjenja ili ako
Page 34

Zatim ga napunite do punog kapaciteta. Sljedeća punjenja trajat će otprilike
1 sat.
• Pun kapacitet baterija dostatan je za oko 45 minuta brijanja bez priključnog
kabela, što ovisi i o jačini vaše brade. Baterije dostižu maksimum svojeg
kapaciteta tek nakon nekoliko uzastopnih ciklusa punjenja i pražnjenja.
• Ako su baterije potpuno prazne, možete se brijati, a da ih prethodno ne
napunite. Samo spojite uređaj s izvorom električne energije specijalnim
priključnim kabelom.
• Brzo punjenje u trajanju od 5 minuta dovoljno je za jedno brijanje.
Indikator punjenja (5)
Zeleno svijetlo indikatora punjenja pokazuje stanje baterija (330s/320s:
1 indikatora punjenja). Ono bljeska dok se aparat za brijanje puni ili kad je
uključen. Kada je baterija puna sva zelena svijetla (330s/320s: 1 indikatora
punjenja) neprestano svijetle, pod uvjetom da je aparat za brijanje spojen na
izvor električne energije.
Indikator prazne baterije (6)
Crvena lampica prazne baterije bljeska kad je baterija pri kraju.
Svejedno biste se mogli moći obrijati do kraja.
Brijanje
Pritiskom na prekidač za uključivanje/isključivanje (4) uključite aparat
(ilustracija).
Prilagodljive mrežice automatski se prilagođavaju svim obrisima vašeg lica
(ilustracija).
Podrezivač dugih dlačica (2)
Kako biste oblikovali zalistke, brkove ili bradu gurnite podrezivač dugih
dlačica prema gore.
Prekidač precizne postavke (« ») (modelima 360s)
Za precizno rukovanje na teško dostupnim područjima (npr. ispod nosa)
gurnite prekidač (3) na desno u poziciju « ». Središnji podrezivač i jedna
mrežica će se spustiti.
Savjeti za savršeno brijanje
Za najbolje rezulate, Braun preporučuje da slijedite ova 3 jednostavna
koraka:
1. Uvijek se brijte prije nego operete lice.
2.
Uvijek držiteaparat za brijanje pod pravim kutem (90°) u odnosu na kožu.
3. Nategnite kožu i brijte se u smjeru suprotnom od rasta dlačica.
35
Page 35

Čišćenje
Ovaj uređaj se može čistiti i pod mlazom tekuće vode.
Upozorenje: prije čišćenja vodom uvijek isključite uređaj iz struje.
Redovito čišćenje omogućuje kvalitetniji i bolji rad aparata. Ispiranje glave
aparata vrućom tekućom vodom nakon svakog brijanja, jednostavan je i brz
način održavanja aparata čistim:
• Uključite uređaj (provjerite da ste isključili priključni kabel) i isperite glavu
aparata tekućom vrućom vodom. Za čišćenje možete koristiti i sapun na
prirodnoj bazi ako ne sadrži nikakva jaka sredstva. Isperite pjenu i pustite
da aparat radi još nekoliko sekundi.
• Potom isključite uređaj i pritisnite mehanizam za otpuštanje. Skinite mrežicu
i izvucite blok noža (1) i ostavite ih da se osuše.
• Čistite li uređaj redovito tekućom vodom jednom tjedno nanesite kapljicu
laganog strojnog ulja na podrezivač dugih dlačica (2) i zaštitni poklopac
mrežice i bloka noža (1).
Isto tako aparat možete očistiti i četkicom:
• Prvo isključite aparat, pa izvucite kasetu mrežice i bloka noža te njime
lagano tupkajte po ravnoj površini.
• Četkicom očistite blok noža i unutrašnji dio glave za brijanje. U svakom
slučaju, nikada četkicom nemojte čistiti mrežicu jer biste je tako mogli
oštetiti.
Održavanje aparata za brijanje u vrhunskom stanju
Svjetlo upozorenja za zamjenu dijelova / resetiranje
Kako biste osigurali najtemeljitije i najkvalitetnije brijanje, zamijenite kasetu
mrežice i bloka noža čim to signalizira svjetlo upozorenja za zamjenu dijelova
(7) (otprilike svakih 18 mjeseci) ili kada se dijelovi istroše.
Kaseta mrežice i bloka noža: 32S/32B
Svjetlo upozorenja za zamjenu dijelova podsjećat će vas tijekom sljedećih
7 brijanja da trebate zamijeniti mrežicu i blok noža. Potom će se uređaj automatski resetirati.
Nakon što zamijenite kazetu s mrežicom i blokom noža (1) pritisnite prekidač
za uključivanje/isključivanje (4) i držite ga najmanje 5 sekundi kako biste
resetirali brojač.
Za to vrijeme će treperiti svjetlo upozorenja za zamjenu dijelova, a ugasit će
se kada je resetiranje završeno. Ručno resetiranje možete napraviti u svakom
trenutku.
36
Page 36

Održavanje baterija
Kako biste održali optimalni kapacitet baterija, treba pustiti aparat da se do
kraja sam isprazni (upotrebom) otprilike svakih 6 mjeseci. Tada ga napunite
do punog kapaciteta.
Napomena o brizi za okoliš
Ovaj uređaj sadrži punjive baterije. Kako biste zaštitili okoliš, na
kraju radnog vijeka uređaja nemojte ga odlagati zajedno s kućnim
otpadom. Baterije odložite u servisnim centrima Braun ili na mjestima
predviđenima za odlaganje potrošenih baterija.
PodloÏno promjeni bez prethodne obavijesti.
Detalji o elektriãnoj energiji otisnuti su na specijalnom prikljuãnom kabelu.
Jamstveni list
Jamstvo ne vrijedi za o‰teçenja nastala neispravnom uporabom, normalnu
istro‰enost (npr. mreÏice ili bloka noÏa) i nedostatke koji samo neznatno
utjeãu na vrijednost ili valjanost uporabe aparata.
Ovo jamstvo vrijedi u svakoj zemlji gdje su proizvodi distribuirani od strane
Brauna ili sluÏbenog distributera.
Jamstvo ne vrijedi za o‰teçenja nastala neispravnom uporabom, normalnu
istro‰enost i nedostatke koji samo neznatno utjeãu na vrijednost ili valjanost
uporabe aparata. Jamstvo prestaje kod popravka od strane neovla‰tene
osobe ili uporabe neoriginalnih dijelova umjesto Braun rezervnih dijelova.
Jamstvo vrijedi samo uz predoãenje raãuna i pravilno ispunjenog
jamstvenog lista.
Braunov servis moÏete kontaktirati na broj telefona 00 385 1 66 01 777.
37
Page 37

Slovenski
Naši izdelki so zasnovani tako, da ustrezajo najvišjim standardom kakovosti,
funkcionalnosti in dizajna. Želimo si, da bi vaš novi Braunov brivnik z veseljem uporabljali.
Opozorilo
Sistem za britje je opremljen s posebno priključno vrvico z vgrajenim
varnostnim nizkonapetostnim napajanjem. Njenih delov ne smete zamenjati
ali spreminjati, sicer obstaja tveganje električnega udara.
Brivnika ne smete uporabljati, če sta mrežica ali priključna vrvica poškodovani.
Ta naprava ni namenjena, da bi jo uporabljali otroci ali osebe z zmanj‰ano
fiziãno in umsko sposobnostjo, razen pod nadzorom osebe odgovorne za
njihovo varnost. Priporočamo vam, da napravo hranite izven dosega otrok
oziroma zagotovite, da se otroci ne igrajo z njo.
Steklenička z oljem
Hranite izven dosega otrok. Ne zaužijte. Prazno embalažo odvrzite na
ustrezno mesto.
Opis
1 Enota z mrežico in rezili
2 Prirezovalnik daljših dlak
3 Stikalo za nastavitev natančnega britja (« ») (iba 360s)
4 Stikalo za vklop/izklop
5 Indikatorji polnjenja (zeleni)
6 Indikator potrebnega polnjenja (rdeč)
7 Indikator potrebne zamenjave brivnih delov
8 Vtič brivnika za priključno vrvico
9 Posebna priključna vrvica
10 Etui (iba 360s)
11 Zaščitni pokrovček (iba 330s/320s)
Polnjenje
Najprimernejša temperatura okolice za polnjenje je med 15 °C in 35 °C.
Brivnika ne smete dalj časa izpostavljati temperaturam, višjim od 50 °C.
• Brivnik priključite na električno omrežje s posebno priključno vrvico (9).
Motor brivnika mora biti pri tem izključen. Pri prvem polnjenju ali kadar
brivnika nekaj mesecev ne uporabljate, pustite brivnik, da se neprekinjeno
polni 4 ure.
• Ko je brivnik povsem napolnjen, ga izpraznite z normalno uporabo. Nato ga
38
Page 38

ponovno napolnite do polne kapacitete. Nadaljnja polnjenja bodo trajala
približno eno uro.
• Povsem napolnjena baterija brivnika zadošča za do 45 minut britja brez
priključne vrvice, odvisno od rasti vaše brade. Vendar baterije dosežejo
polno kapaciteto šele po nekaj postopkih polnjenja in praznjenja.
• Če so baterije za ponovno polnjenje popolnoma prazne, se lahko obrijete
tudi tako, da brivnik priključite na električno omrežje s posebno priključno
vrvico.
• 5-minutno hitro polnjenje zadostuje za en postopek britja.
Indikatorji polnjenja (5)
Zeleni indikatorji polnjenja kažejo stanje napolnjenosti baterij (330s/320s:
1 indikatorji polnjenja). Kadar se brivnik polni ali kadar je vključen, utripa
zeleni indikator polnjenja. Ko je baterija povsem napolnjena, vsi zeleni
indikatorji polnjenja (330s/320s: 1 indikatorji polnjenja) neprekinjeno svetijo,
pod pogojem, da je brivnik priključen na električno vtičnico.
Indikator potrebnega polnjenja (6)
Rdeči indikator potrebnega polnjenja utripa, ko je napolnjenost baterije nizka.
Svoje britje boste lahko dokončali.
Britje
Brivnik vključite s pritiskom na stikalo za vklop (4) (glejte sliko).
Fleksibilne brivske mrežice se samodejno prilagodijo potezam vašega obraza.
Prirezovalnik daljših dlak (2)
Če želite prirezati zalizke, brke ali brado, potisnite prirezovalnik daljših dlak
navzgor.
Stikalo za nastavitev natančnega britja (« ») (iba 360s)
Za natančno uporabo brivnika na težko dostopnih območjih (npr. pod nosom)
pomaknite stikalo (3) v desno do položaja « ». Osrednji prirezovalnik in ena
od mrežic se spustita.
Nasveti za brezhibno britje
Za kar najboljše rezultate britja vam Braun priporoča, da upoštevate tri
preproste nasvete:
1. Vedno se obrijte, preden umijete obraz.
2. Brivnik ves čas držite pravokotno na kožo (90°).
3. Kožo z roko rahlo napnite in se brijte v nasprotni smeri rasti brade.
39
Page 39

Čiščenje
Glavo brivnika lahko čistite pod tekočo vodo.
Opozorilo: Preden glavo brivnika očistite z vodo, morate brivnik
izključiti iz električnega omrežja.
Redno čiščenje brivnika vam zagotavlja boljše rezultate britja. Izpiranje glave
brivnika pod tekočo vodo po vsakem britju je preprost in hiter način za
vzdrževanje čistoče:
• Vključite brivnik (brez priključne vrvice) in glavo brivnika izperite pod vročo
tekočo vodo. Uporabite lahko tudi tekoče milo, ki ne vsebuje abrazivnih
snovi. Peno dobro izperite in pustite, da brivnik deluje še nekaj sekund.
• Nato izključite brivnik, odstranite enoto z mrežico in rezili (1) in pustite, da
se posuši.
• Če brivnik redno čistite pod tekočo vodo, na prirezovalnik daljših dlak (2) in
enoto z mrežico in rezili (1) vsak teden nanesite kapljico lahkega strojnega
olja.
Brivnik lahko očistite tudi s ščetko:
• Izključite brivnik. Odstranite enoto z mrežico in rezili in jo iztrkajte na ravni
površini.
• S ščetko očistite notranjost glave brivnika. Enote z mrežico in rezili ne
smete čistiti s ščetko, ker jo s tem lahko poškodujete.
Vzdrževanje brivnika
Indikator potrebne zamenjave brivnih delov / Ponastavitev prikaza
Za ohranjanje 100 % učinkovitosti britja morate enoto z mrežico in rezili (1)
zamenjati takrat, ko zasveti indikator potrebne zamenjave brivnih delov (7)
(približno vsakih 18 mesecev), oziroma ko opazite znake obrabe.
Enota z mrežico in rezili: 32S/32B
Indikator potrebne zamenjave vas bo med naslednjimi sedmimi postopki britja
opozarjal, da morate zamenjati enoto z mrežico in rezili. Nato bo brivnik
samodejno ponastavil prikaz.
Potem ko zamenjate enoto z mrežico in rezili (1), za najmanj 5 sekund
pritisnite stikalo za vklop/izklop (4), da ponastavite števec.
Indikator potrebne zamenjave pri tem utripa, ko je ponastavitev končana, pa
ugasne. Ročno ponastavitev lahko opravite kadarkoli.
40
Page 40

Ohranjanje kapacitete baterij
Da bodo baterije za ponovno polnjenje ohranile optimalno kapaciteto, jih
morate približno vsakih 6 mesecev povsem izprazniti (z britjem). Nato brivnik
ponovno napolnite do polne kapacitete.
Varovanje okolja
Izdelek je opremljen z baterijami za ponovno polnjenje.
Iz okoljevarstvenih razlogov vas prosimo, da izdelka ob koncu
njegove življenjske dobe ne odvržete med gospodinjske odpadke.
Napravo lahko odnesete na ustrezno zbirno mesto, določeno
v skladu z veljavnimi predpisi v Republiki Sloveniji.
PridrÏujemo si pravico do sprememb.
Podatki o elektriãnem prikljuãku so odtisnjeni na posebnem prikljuãnem kablu.
Garancija
Za izdelek valja dvoletna garancija, ki zaãne veljati z datumom nakupa.
V ãasu trajanja garancije bomo brezplaãno odpravili vse napake, ki so
posledica slabega materiala ali izdelave, bodisi s popravilom bodisi
z zamenjavo celega izdelka.
Ta garancija velja v vsaki drÏavi, kjer je izdelek dobavljen od BRAUN ali
njegovega poobla‰ãenega distributerja.
Garancija ne pokriva okvar, ki so posledica nepravilne uporabe, normalne
obrabe (mreÏice, bloki noÏa,...) in tudi ne okvar, ki v zanemarljivi meri
vplivajo na vrednost ali delovanje aparata.
Garancija preneha veljati, ãe popravilo izvr‰i nepoobla‰ãena oseba,
oziroma ãe pri popravilu niso uporabljeni originalni Braunovi nadomestni
deli.
Za popravilo v garancijskem roku izroãite ali po‰ljite kompleten izdelek
z raãunom poobla‰ãenemu Braunovemu servisu.
Za informacije pokliãite poobla‰ãeni servis ISKRA PRINS
tel. + 386 1 476 98 00.
41
Page 41

Türkçe
Ürünlerimiz kalite, kullanım ve tasarımda en yüksek standartlara ulaşabilmek
için üretilmiştir. Yeni Braun tıraş makinenizden memnun kalacağınızı umarız.
Uyarı
Tıraş makinenizin ekstra düşük voltaj için güvenlik sağlayanadaptör içeren
özel kablo seti vardır. Genel olarak, çocukların erişemeyeceği bir yerde
tutmanızı öneririz.
Eleği veya kablosu hasar görmüş tıraş makinesini kullanmayınız.
Bu aygıt sorumlu bir kiμinin gözetiminde olmaksızın çocukların ve fiziksel
yada ruhsal engelli kiμilerin kullanmasına uygun de©ildir. Aygıtınızı çocukların
ulaμabilece©i yerlerden uzak tutmanızı öneririz. Çocukların cihazla oynama-
sını engellemek için gözetim altında tutunuz.
Yağ Şişesi
Çocukların erişemeyeceği yerde saklayınız. Yutmayınız. Boşaldığında uygun
biçimde atınız.
Tanımlamalar
1 Elek koruyucu kapak
2 Uzun tüy düzeltici
3 Hassas ayar düğmesi (« ») (sadece 360s modelleri için)
4 Açma/kapama düğmesi
5 Şarj ışıkları (yeşil)
6 Şarj ikaz ışığı (kırmızı)
7 Tıraş başlıkları için değiştirme ışığı
8 Tıraş güç soketi
9 Özel kablo seti
10 Etui (sadece 360s modelleri için)
11 Koruma Ataçmanı (sadece 330s/320s modelleri için)
Tıraş Makinesini Şarj Etme
Şarj etmek için ideal çevre sıcaklığı 15 °C ile 35 °C arasındadır.
Tıraş makinenizi 50 °C den daha yüksek sıcaklığı maruz bırakmayınız.
• Cihazınız çalışmıyor iken özel kablo setini kullanarak tıraş makinenizi ya da
şarj etme standını prize takınız. Cihaz ilk kez şarj edilirken veya birkaç ay
boyunca kullanılmadığında, cihazı 4 saat kesintisiz olarak şarjda bırakınız.
• Cihazınız tamamen şarj olduğunda, normal kullanımla cihazı deşarj ediniz.
Ve cihazı tekrar tam olarak şarj ediniz. Şarj etme süreleri ortalama 1 saat
sürecektir.
42
Page 42

• Tam olarak şarj edilmiş cihaz – sakalınızın sertliğine ve uzama süresine
bağlı olarak – 45 dakikaya kadar kablosuz kullanım sağlar.
• Eğer sarj edilebilir bataryanız bitmiş ise, özel kablo seti ile cihazınız fişe
takılıyken tıraş olabilirsiniz.
• 5 dakikalık hızlı şarj etme özelliği tek seferlik tıraş işlemi için yeterlidir.
Şarj Işıkları (5)
Yeşil şarj ışığı cihazınızın şarj durumunu göstermektedir (330s/320s: 1 şarj
ışıkları). Yeşil şarj ışığı yanıp söndüğü zaman cihazınızın şarj (330s/320s:
1 şarj ışıkları) edilmekte olduğunu gösterir. Cihazınız tamamen şarj olduğunda yeşil şarj ışığı sürekli yanmaya başlar.
Şarj kaz Işığı (6)
Kırmızı renkli düşük şarj göstergesi, pilin şarjı azaldığında yanar. Bu durumda
pildeki güç, tıraşınızı bitirmenize yeterli olacaktır.
Tıraş Olma
Tıraş makinesini çalıştırmak için açma/kapama düğmesine (4) basınız.
(resim)
Esnek kesici sistem yüz kıvrımlarınıza otomatik olarak uyum sağlar. (resim)
Uzun Tüy Düzeltici (2)
Favori, bıyık ve sakalınızı düzeltmek için uzun tüy düzelticiyi yukarı doğru
oynatınız.
Hassas Ayar Düğmesi (« ») (sadece 360s modelleri için)
Burun altı gibi tıraş edilmesi zor bölgelerde rahat tıraşı sağlamak için hassas
ayar düğmesini (3) sağa doğru (« ») pozisyonuna getiriniz.
Mükemmel tıraş için ipuçları
En iyi sonuçlar için, Braun size 3 basit you tavsiye ediyor:
1. Cildinizi yıkamadan once tıraş olmanızı öneririz.
2. Tıraş makinenizi cildinize 90° açı ile tutunuz.
3. Cildinizi geriniz ve sakallarınızı çıktıktan yönün tersine doğru tıraş
ediniz.
Temizleme
Tıraş makineniz musluk suyu altında temizleme uygundur.
Uyarı: Tıraş makinenizi temizlemeden önce cihazının fişten çekilmiş
olduğundan emin olunuz.
43
Page 43

Düzenli temizleme tıraş makineninizden en iyi performansı almanızı
sağlayacaktır. Tıraş başlığını akan su altında temizlemek kolay ve hızlı bir
temizleme yöntemidir:
• Cihazı çalıştırınız (kablosuz olarak) ve tıraş başlığını sıcak suyun altına
tutunuz. Dilerseniz aşındırıcı madde içermeyen sabunlu su kullanabilirsiniz.
Bütün köpükten arındığından emin olunuz ve tıraş makinenizi bir kaç saniye
daha çalışır durumda suyun altında tutunuz.
• Daha sonra, tıraş makinenizi kapatınız, tıraş eleğini ve elek koruyucu
başlığını (1) çıkartınız ve kurumaya bırakınız.
• Eğer cihazınızı düzenli olarak su altında temizliyorsanız, haftada bir kere
uzun tüy düzeltici (2) ve elek koruyucu başlığına (1) bir damla hafif makine
yağı uygulayınız. (resim)
Alternatif olarak, bir fırça yardımı ile tıraş makinenizi temizleyebilirsiniz:
• Cihazınızı kapatınız, Elek koruyucu başlığını (1) çıkartınız ve düz bir
yüzeye hafifçe vurunuz.
• Fırçayı kullanarak, tıraş başlığının iç bölgesini temizleyiniz. Buna rağmen,
elek ve kesiciyi zarar verebileceğinden fırça ile temizlemeyiniz. (resim)
Tıraş makineninizin ideal performansını her zaman
korumak için
Tıraş Başlığı Parçaları için Değiştirme Işığı / Resetleme
%100 tıraş performansı sağlamak için tıraş makinesi eleğini ve kesiciyi (1)
tıraş başlığı parçaları değiştirme ışığı (7) yandığında (ortalama 18 ayda bir)
ya da eskidiğinde değiştiriniz.
Elek ve kesici bıçaklar: 32S/32B
kaz ışığı yanmaya başladıktan sonra 7 tıraş süresince yanmaya devam
edecektir. Daha sonra ekran kendini resetleyecektir.
Bıçak & Elek kasetini değiştirdikten sonra, tıraş makinesinin sayacını
resetlemek için açma/kapama düğmesine (4) en az 5 saniye kadar basınız.
Bunu yaparken, değiştirme ikaz ışığı yaıp sönecektir, resetleme işlemi
tamamlandığında ışık sönecektir. Manual resetleme istenildiği zaman
yapılabilir.
Daha uzun pil ömrü için
Şarj edilebilir pilin optimum kapasitesini korumak için, tıraş makineniz
ortalama her 6 ayda bir deşarj edilmelidir. Daha sonra cihaz tam olarak şarj
edilmelidir.
44
Page 44

Bildirim yapılmadan deπiμtirilebilir.
Elektrikle ilgili direktifler özel kordon setinin üzerinde yazmaktadır.
EEE STANDARTLARINA UYGUNDUR
Bakanlıkça tespit ve ilan edilen kullanım ömrü 7 yıldır.
Üretici firma ve CE işareti uygunluk değerlendirme kuruluşu:
Braun GmbH
Frankfurter Straße 145
61476 Kronberg / Germany
“ (49) 6173 30 0
Fax (49) 6173 30 28 75
P & G Sat. ve Dağ. Ltd. Şti.
Serin Sok. No: 9 34752 çerenköy/stanbul
tarafından ithal edilmiştir.
P & G Tüketici Hizmetleri
0 800 261 63 65,
trconsumers@custhelp.com
45
Page 45

кЫТТНЛИ
Руководство по эксплуатации
Наши изделия разработаны в соответствии с самыми высокими
стандартам качества, функциональности и дизайна. Надеемся, что
Вам понравится новая бритва Braun.
Предупреждение
Бритва снабжена сетевым адаптером низкого напряжения. Не
заменяйте и не модифицируйте никакие детали адаптера. Это может
привести к поражению электрическим током.
Не используйте бритву с порванной сеткой или поврежденным шнуром
сетевого адаптера.
Прибор не предназначен для использования лицами (включая детей)
с пониженными физическими, чувственными или умственными
способностями или при отсутствии у них опыта или знаний, если они не
находятся под контролем или не проинструктированы об использовании
прибора лицом, ответственным за их безопасность. Дети должны
находиться под контролем для недопущения игры с прибором.
Маслёнка
Держать вдали от детей. Не употреблять в пищу. Утилизировать как
бытовой отход.
Описание и комплектность
1 Бреющая сетка и режущий блок
2 Триммер для подравнивания длинных волос
3 Кнопка режима точного бритья (« ») (только для моделей 360s)
4 Кнопка включения/выключения
5 Индикатор зарядки (зеленый)
6 Индикатор низкого уровня зарядки (красный)
7 Индикатор замены сетки и режущего блока
8 Разъем подключения бритвы к электросети
9 Сетевой адаптер
10 Футляр (только для моделей 360s)
11 Защитная насадка (только для моделей 330s/320s)
Зарядка бритвы
Оптимальный диапазон температуры воздуха для зарядки бритвы от
15 °C до 35 °C. Не подвергайте бритву воздействию температуры
выше, чем 50 °C в течение длительного периода времени.
46
Page 46

• Используя специальный разъем на корпусе бритвы, подключите
выключенную бритву к электрической розетке. Заряжая бритву
первый раз, или в случае, если бритва не использовалась в течение
нескольких месяцев, следует проводить зарядку непрерывно не
менее 4 часов.
• Полностью заряженную бритву используйте, пока аккумулятор не
разрядится. Затем зарядите бритву до полной емкости аккумулятора.
Последующие зарядки будут занимать около 1 часа.
• Полный заряд аккумулятора обеспечит до 45 минут непрерывной
работы бритвы, в зависимости от густоты щетины.
Однако, максимальной емкости аккумулятор достигнет только через
несколько циклов зарядки/разрядки бритвы.
• Если аккумулятор не заряжен, Вы можете использовать бритву,
только подключив ее к электросети посредством сетевого адаптера.
• Быстрая 5-ти минутная зарядка аккумулятора позволяет зарядить
аккумулятор на один сеанс бритья.
Индикаторы зарядки (5)
Индикаторы зарядки зеленого цвета указывают на уровень заряда
аккумуляторов (330s/320s: 1 индикаторы зарядки). Зеленый индикатор
мигает, когда бритва заряжается или включается. Когда бритва
полностью заряжена, все индикаторы зарядки (330s/320s: 1 индикаторы
зарядки) непрерывно горят зеленым светом, при условии, что бритва
включена.
Индикатор низкого уровня зарядки (6)
Красный сигнал индикатора загорается при низком уровне зарядки
аккумулятора электробритвы. Вам должно хватить времени завершить
бритье.
Бритье
Нажмите кнопку включения/выключения (4) как показано на картинке.
Плавающие бреющие сетки автоматически адаптируются ко всем
контурам Вашего лица (см. изображение).
Триммер для подравнивания длинных волос (2)
Для подравнивания бакенбардов, усов или бороды, выдвиньте триммер
вперед.
Режим точного бритья (« ») (только для моделей 360s)
Для более точного и эффективного бритья на труднодоступных участках
роста волос (например, под носом), переведите кнопку (3) в правое
47
Page 47

положение (фиксация). Интегрированный триммер и одна из сеток будет
зафиксированы ниже своего уровня для большего удобства при бритье.
Рекомендации для чистого бритья
Для достижения лучшего результата Braun рекомендует следовать
трем простым правилам:
1. Мы рекомендуем бриться до умывания.
2. Держите бритву под прямым углом (90°) к коже.
3. Натяните кожу и перемещайте бритву в направлении против роста
волос.
Чистка бритвы
Бреющая головка легко промывается под струей воды.
Внимание: Отключите бритву от электрической сети перед тем,
как начать чистить бритву под струей воды.
Регулярный уход за бритвой обеспечит Вам лучшее качество бритья на
протяжении всего периода эксплуатации бритвы. Чистка бритвы под
струей воды – легкий и быстрый способ содержать бритву в чистоте.
• Отсоедините бритву от электрической сети и включите ее (бритва
должна работать от аккумулятора). Ополосните бреющую головку
под струей горячей воды. Вы можете также использовать жидкое
мыло без абразивных частиц. После того, как Вы смоете пену, подержите работающую бритву под струей воды еще некоторое время.
• Затем выключите бритву, снимите бреющую сетку и режущий блок
(1) и позвольте им высохнуть.
• Если Вы регулярно чистите бритву под струей воды, наносите раз в
неделю на сетку и режущий блок (1) и триммер для длинных волос (2)
каплю светлого машинного масла.
В качестве альтернативы, Вы можете чистить бритву с помощью
щеточки:
• Выключите бритву. Удалите сетку и режущий блок (1) и аккуратно
постучите ими по плоской поверхности.
• Используя щеточку, очистите внутреннюю часть бреющей головки.
Не чистите щеткой сетку и режущий блок, так как это может
повредить их.
48
Page 48

Ухаживайте за своей бритвой правильно
Индикатор замены сетки и режущего блока / Сброс
Для поддержания 100% эффективности работы бритвы необходимо
регулярно производить замену бреющей сетки и режущего блока (1).
Замену рекомендуется производить при включении индикатора замены
сетки и режущего блока (7) или по мере износа, но не реже, чем
каждые 18 месяцев.
Бреющая сетка и режущий блок: 32S/32B
Индикатор замены сетки и режущего блока будет напоминать Вам в
течение последующих 7 сеансов бритья о необходимости замены сетки
и режущего блока. После этого показания дисплея бритвы будут автоматически сброшены.
После замены сетки и режущего блока (1), нажмите на кнопку включения/выключения (4) и удерживайте ее не менее 5 секунд для сброса
счетчика.
При этом индикатор замены сетки и режущего блока (7) мигает и
выключается после окончания сброса. Ручной сброс можно произвести
в любое время.
Уход за аккумулятором
Для поддержания максимальной емкости аккумулятора, бритву
необходимо полностью разряжать (путем обычного использования)
примерно один раз в 6 месяцев.
После этого полностью зарядите бритву.
В изделие могут быть внесены изменения без предварительного
уведомления.
Электрические спецификации смотрите на корпусе прибора.
Внимание: Вскрытие корпуса приведет к повреждению прибора и
лишению гарантии.
Изделие использовать по назначению в соответствии
с руководством по эксплуатации.
Данное изделие соответствует всем требуемым европейским и
российским стандартам безопасности и гигиены.
49
Page 49

Аккумуляторная и сетевая бритва Series 3 модели 360s/330s/320s
Тип 5415 / 5413
Изготовлено в Германии для Браун ГмбХ, Германия/Braun GmbH,
Frankfurter Strasse 145, 61476, Kronberg, Germany.
RU: Импортер/Служба потребителей: OOO «Проктер энд Гэмбл
Дистрибьюторская Компания», Россия, 125171, Москва, Ленинградское
шоссе, 16А, стр.2. Тел. 8-800-200-20-20.
BY: Импортер: ООО «Электросервис и Ко», Беларусь, 220012, г. Минск,
ул. Чернышевского, 10А, к. 412А3. Сервисный центр: ООО «Катрикс»,
Беларусь, 220012, г. Минск, ул. Чернышевского, 10А, к.409.
Й‡‡МЪЛИМ˚В У·flБ‡ЪВО¸ТЪ‚‡ BRAUN
СОfl ‚ТВı ЛБ‰ВОЛИ П˚ ‰‡ВП „‡‡МЪЛ˛ М‡ ‰‚‡ „У‰‡, М‡˜ЛМ‡fl Т ПУПВМЪ‡
ФЛУ·ВЪВМЛfl ЛБ‰ВОЛfl.
З ЪВ˜ВМЛВ „‡‡МЪЛИМУ„У ФВЛУ‰‡ П˚ ·ВТФО‡ЪМУ ЫТЪ‡МЛП ФЫЪВП
ВПУМЪ‡, Б‡ПВМ˚ ‰ВЪ‡ОВИ ЛОЛ Б‡ПВМ˚ ‚ТВ„У ЛБ‰ВОЛfl О˛·˚В Б‡‚У‰ТНЛВ
‰ВЩВНЪ˚, ‚˚Б‚‡ММ˚В МВ‰УТЪ‡ЪУ˜М˚П Н‡˜ВТЪ‚УП П‡ЪВЛ‡ОУ‚ ЛОЛ
Т·УНЛ.
З ТОЫ˜‡В МВ‚УБПУКМУТЪЛ ВПУМЪ‡ ‚ „‡‡МЪЛИМ˚И ФВЛУ‰ ЛБ‰ВОЛВ
ПУКВЪ ·˚Ъ¸ Б‡ПВМВМУ М‡ МУ‚УВ ЛОЛ ‡М‡ОУ„Л˜МУВ ‚ ТУУЪ‚ВЪТЪ‚ЛЛ Т
Б‡НУМУП «й Б‡˘ЛЪВ Ф‡‚ ФУЪВ·ЛЪВОВИ».
Й‡‡МЪЛfl У·ВЪ‡ВЪ ТЛОЫ, ЪУО¸НУ ВТОЛ ‰‡Ъ‡ ФУНЫФНЛ ФУ‰Ъ‚ВК‰‡ВЪТfl
ФВ˜‡Ъ¸˛ Л ФУ‰ФЛТ¸˛ ‰ЛОВ‡ (П‡„‡БЛМ‡) М‡ ФУТОВ‰МВИ ТЪ‡МЛˆВ
оригинального руководства ФУ ˝НТФОЫ‡Ъ‡ˆЛЛ BRAUN, НУЪУ‡fl fl‚ОflВЪТfl
„‡‡МЪЛИМ˚П Ъ‡ОУМУП.
щЪ‡ „‡‡МЪЛfl ‰ВИТЪ‚ЛЪВО¸М‡ ‚ О˛·УИ ТЪ‡МВ, ‚ НУЪУЫ˛ ˝ЪУ ЛБ‰ВОЛВ
ФУТЪ‡‚ОflВЪТfl ЩЛПУИ BRAUN ЛОЛ М‡БМ‡˜ВММ˚П ‰ЛТЪЛ·¸˛ЪУУП, Л „‰В
МЛН‡НЛВ У„‡МЛ˜ВМЛfl ФУ ЛПФУЪЫ ЛОЛ ‰Ы„ЛВ Ф‡‚У‚˚В ФУОУКВМЛfl МВ
ФВФflЪТЪ‚Ы˛Ъ ФВ‰УТЪ‡‚ОВМЛ˛ „‡‡МЪЛИМУ„У У·ТОЫКЛ‚‡МЛfl.
Й‡‡МЪЛfl МВ ФУН˚‚‡ВЪ ФУ‚ВК‰ВМЛfl, ‚˚Б‚‡ММ˚В МВФ‡‚ЛО¸М˚П
ЛТФУО¸БУ‚‡МЛВП (ТП. Ъ‡НКВ ТФЛТУН МЛКВ) Л МУП‡О¸М˚И ЛБМУТ ‰ВЪ‡ОВИ
(М‡ФЛПВ, ТВЪНЛ Л ВКЫ˘В„У ·ОУН‡) ‚ ФУˆВТТВ ˝НТФОЫ‡Ъ‡ˆЛЛ ЛБ‰ВОЛfl.
щЪ‡ „‡‡МЪЛfl ЪВflВЪ ТЛОЫ, ВТОЛ ВПУМЪ ФУЛБ‚У‰ЛОТfl МВ ЫФУОМУПУ˜ВММ˚П
М‡ ЪУ ОЛˆУП, Л ВТОЛ ЛТФУО¸БУ‚‡М˚ МВ УЛ„ЛМ‡О¸М˚В ‰ВЪ‡ОЛ BRAUN.
З ТОЫ˜‡В ФВ‰˙fl‚ОВМЛfl ВНО‡П‡ˆЛЛ ФУ ЫТОУ‚ЛflП ‰‡ММУИ „‡‡МЪЛЛ,
ФВВ‰‡ИЪВ ЛБ‰ВОЛВ ˆВОЛНУП ‚ПВТЪВ Т „‡‡МЪЛИМ˚П Ъ‡ОУМУП ‚ О˛·УИ ЛБ
ˆВМЪУ‚ ТВ‚ЛТМУ„У У·ТОЫКЛ‚‡МЛfl BRAUN.
ЗТВ ‰Ы„ЛВ ЪВ·У‚‡МЛfl, ‚НО˛˜‡fl ЪВ·У‚‡МЛfl ‚УБПВ˘ВМЛfl Ы·˚ЪНУ‚,
50
Page 50

ЛТНО˛˜‡˛ЪТfl, ВТОЛ М‡¯‡ УЪ‚ВЪТЪ‚ВММУТЪ¸ МВ ЫТЪ‡МУ‚ОВМ‡ ‚ Б‡НУММУП
ФУfl‰НВ.
кВНО‡П‡ˆЛЛ, Т‚flБ‡ММ˚В Т НУППВ˜ВТНЛП НУМЪ‡НЪУП Т ФУ‰‡‚ˆУП МВ
ФУФ‡‰‡˛Ъ ФУ‰ ˝ЪЫ „‡‡МЪЛ˛.
З ТУУЪ‚ВЪТЪ‚ЛЛ Т Б‡НУМУП ко ‹ 2300-1 УЪ 7.02.1992 „. «й б‡˘ЛЪВ Ф‡‚
ФУЪВ·ЛЪВОВИ» ЩЛП‡ BRAUN ЫТЪ‡М‡‚ОЛ‚‡ВЪ ТУН ТОЫК·˚ М‡ Т‚УЛ
ЛБ‰ВОЛfl ‡‚М˚П ‰‚ЫП „У‰‡П Т ПУПВМЪ‡ ФЛУ·ВЪВМЛfl ЛОЛ Т ПУПВМЪ‡
ФУЛБ‚У‰ТЪ‚‡, ВТОЛ ‰‡ЪЫ ФУ‰‡КЛ ЫТЪ‡МУ‚ЛЪ¸ МВ‚УБПУКМУ.
аБ‰ВОЛfl BRAUN ЛБ„УЪУ‚ОВМ˚ ‚ ТУУЪ‚ВЪТЪ‚ЛЛ Т ‚˚ТУНЛПЛ ЪВ·У‚‡МЛflПЛ
В‚УФВИТНУ„У Н‡˜ВТЪ‚‡. иЛ ·ВВКМУП ЛТФУО¸БУ‚‡МЛЛ Л ФЛ
ТУ·О˛‰ВМЛЛ Ф‡‚ЛО ФУ ˝НТФОЫ‡Ъ‡ˆЛЛ, ФЛУ·ВЪВММУВ З‡ПЛ ЛБ‰ВОЛВ
BRAUN, ПУКВЪ ЛПВЪ¸ БМ‡˜ЛЪВО¸МУ ·УО¸¯ЛИ ТУН ТОЫК·˚, ˜ВП ТУН
ЫТЪ‡МУ‚ОВММ˚И ‚ ТУУЪ‚ВЪТЪ‚ЛЛ Т кУТТЛИТНЛП Б‡НУМУП.
ëÎÛ˜‡Ë, ̇ ÍÓÚÓ˚ „‡‡ÌÚËfl Ì ‡ÒÔÓÒÚ‡ÌflÂÚÒfl:
– ‰ВЩВНЪ˚, ‚˚Б‚‡ММ˚В ЩУТ-П‡КУМ˚ПЛ У·ТЪУflЪВО¸ТЪ‚‡ПЛ;
– ЛТФУО¸БУ‚‡МЛВ ‚ ФУЩВТТЛУМ‡О¸М˚ı ˆВОflı;
– М‡Ы¯ВМЛВ ЪВ·У‚‡МЛИ руководства ФУ ˝НТФОЫ‡Ъ‡ˆЛЛ;
– ÌÂÔ‡‚Ëθ̇fl ÛÒÚ‡Ìӂ͇ ̇ÔflÊÂÌËfl ÔËÚ‡˛˘ÂÈ ÒÂÚË (ÂÒÎË ˝ÚÓ
ЪВ·ЫВЪТfl);
– ‚МВТВМЛВ ЪВıМЛ˜ВТНЛı ЛБПВМВМЛИ;
– ПВı‡МЛ˜ВТНЛВ ФУ‚ВК‰ВМЛfl;
– ФУ‚ВК‰ВМЛfl ФУ ‚ЛМВ КЛ‚УЪМ˚ı, „˚БЫМУ‚ Л М‡ТВНУП˚ı (‚ ЪУП ˜ЛТОВ
ТОЫ˜‡Л М‡ıУК‰ВМЛfl „˚БЫМУ‚ Л М‡ТВНУП˚ı ‚МЫЪЛ ФЛ·УУ‚);
– ‰Оfl ФЛ·УУ‚, ‡·УЪ‡˛˘Лı УЪ ·‡Ъ‡ВВН, – ‡·УЪ‡ Т МВФУ‰ıУ‰fl˘ЛПЛ
ËÎË ËÒÚÓ˘ÂÌÌ˚ÏË ·‡Ú‡ÂÈ͇ÏË, β·˚ ÔÓ‚ÂʉÂÌËfl, ‚˚Á‚‡ÌÌ˚Â
ЛТЪУ˘ВММ˚ПЛ ЛОЛ ЪВНЫ˘ЛПЛ ·‡Ъ‡ВИН‡ПЛ (ТУ‚ВЪЫВП ФУО¸БУ‚‡Ъ¸Тfl
ÚÓθÍÓ Ô‰Óı‡ÌÂÌÌ˚ÏË ÓÚ ‚˚ÚÂ͇ÌËfl ·‡Ú‡ÂÈ͇ÏË);
– ‰Îfl ·ËÚ‚ – ÒÏflÚ‡fl ËÎË ÔÓ‚‡Ì̇fl ÒÂÚ͇.
ЗМЛП‡МЛВ! йЛ„ЛМ‡О¸М˚И Й‡‡МЪЛИМ˚И н‡ОУМ ФУ‰ОВКЛЪ ЛБ˙flЪЛ˛ ФЛ
У·‡˘ВМЛЛ ‚ ТВ‚ЛТМ˚И ˆВМЪ ‰Оfl „‡‡МЪЛИМУ„У ВПУМЪ‡.
иУТОВ ФУ‚В‰ВМЛfl ВПУМЪ‡ Й‡‡МЪЛИМ˚П н‡ОУМУП ·Ы‰ВЪ fl‚ОflЪ¸Тfl
Б‡ФУОМВММ˚И УЛ„ЛМ‡О гЛТЪ‡ ‚˚ФУОМВМЛfl ВПУМЪ‡ ТУ ¯Ъ‡ПФУП
ТВ‚ЛТМУ„У ˆВМЪ‡ Л ФУ‰ФЛТ‡ММ˚И ФУЪВ·ЛЪВОВП ФУ ФУОЫ˜ВМЛЛ ЛБ‰ВОЛfl
ЛБ ВПУМЪ‡. нВ·ЫИЪВ ФУТЪ‡‚ОВМЛfl ‰‡Ъ˚ ‚УБ‚‡Ъ‡ ЛБ ВПУМЪ‡, ТУН
„‡‡МЪЛЛ ФУ‰ОВ‚‡ВЪТfl М‡ ‚ВПfl М‡ıУК‰ВМЛfl ЛБ‰ВОЛfl ‚ ТВ‚ЛТМУП
ˆВМЪВ.
З ТОЫ˜‡В ‚УБМЛНМУ‚ВМЛfl ТОУКМУТЪВИ Т ‚˚ФУОМВМЛВП „‡‡МЪЛИМУ„У
ЛОЛ ФУТОВ„‡‡МЪЛИМУ„У У·ТОЫКЛ‚‡МЛfl ФУТ¸·‡ ТУУ·˘‡Ъ¸ У· ˝ЪУП ‚
аМЩУП‡ˆЛУММЫ˛ лОЫК·Ы лВ‚ЛТ‡ BRAUN ФУ ЪВОВЩУМЫ 8 800 200 20 20
(Б‚УМУН ЛБ кУТТЛЛ ·ВТФО‡ЪМУ).
51
Page 51

ì͇ªÌҸ͇
Керівництво з експлуатації
Продукція нашої компанії відповідає найвищим стандартам якості,
функціональ
користуватися Вашою новою бритвою від Braun.
Обережно!
До комплекту Вашої бритви входить спеціальний шнур живлення з
вмонтованим блоком запасного енергопостачання на випадок збоїв
напруги. Не можна замінювати чи зачіпати жодну з деталей, оскільки
це може призвести до ураження електричним струмом.
Не використовуйте бритву з пошкодженими сіткою або спеціальним
шнуром живлення.
Прилад не призначений для використання особами (включаючи дітей)
зі зниженими фізичними, чуттєвими або розумовими можливостями або
за відсутності у них досвіду або знань, якщо вони не знаходяться під
контролем або не проінструктовані про використання приладу особою,
відповідальною за їх безпеку. Діти повинні знаходитися під контролем
для недопущення гри з приладом.
Баночка з олійкою
Тримати подалі від дітей. Не споживати в їжу. Утилізувати як побутовий
відхід.
Опис та комплектність
1 Сіточка для гоління та ріжучий блок
2 Тример для довгого волосся
3 Перемикач режимів комфортного гоління («
моделей 360s)
4 Вимикач увімкн./вимкн.
5 Лампочки-індикатори заряджання (зелені)
6 Лампочка-індикатор низького заряджання (червона)
7 Лампочка-індикатор заміни ріжучих частин
8 Гніздо живлення бритви
9 Спеціальний шнур
10 Футляр (тільки для моделі 360s)
11 Захисна насадка (тільки для моделі 330s/320s)
Заряджання
Оптимальна температура середовища під час заряджання від 15 °C до
35 °C. Не допускайте перебування бритви тривалий час при температурах, вищих за 50 °C.
52
ності та дизайну. Сподіваємося, Вам сподобається
») (лише для
Page 52

• За допомогою спеціального шнура (9) приєднайте бритву до елек-
тричної розетки. Мотор при цьому повинен бути вимкнений.
Заряджаючи бритву вперше, або у випадку, якщо бритва не використовувалася протягом декількох місяців, слід проводити зарядку
безперервно не менше 4 годин.
• Якщо бритва повністю заряджена, розрядіть її під час звичайного
користування. Після того повністю зарядіть. Подальші заряджання
триватимуть близько 1 години.
• Повна зарядка дозволяє голитися до 45 хвилин без застосування
електричного шнура. Цей час може змінюватись, залежно від росту
Вашої щетини. Однак, повної зарядки акумулятора можна досягти
лише після кількох циклів заряджання/розряджання.
• У разі розряджання акумуляторних батарейок, Ви можете голитися,
підключивши бритву до електричної мережі за допомогою спеціального шнура.
• Для бритви є достатнім 5-хвилинне швидке заряджання.
Лампочки-індикатори (5)
Лампочки-індикатори зеленого кольору вказують на статус заряджання
батарейок (330s/320s: 1 лампочки-індикатори). Якщо бритва
заряджається або увімкнена, зелені лампочки-індикатори починають
блимати. Коли бритва повністю заряджена, усі зелені лампочкиіндикатори (330s/320s: 1 лампочки-індикатори) горять рівно,
зазначаючи, що бритва увімкнена або підключена до електричної
мережі.
Лампочка-індикатор низького зарядження (6)
Червоний сигнал індикатору загоряється при низькому рівні зарядки
акумулятора електробритви. Вам має вистачити часу, щоб завершити
гоління.
Гоління
Щоб ввімкнути бритву, натисніть на кнопку вимикача (4). (Див.
малюнок.)
Сіточка для гоління рухається максимально вільно, автоматично
пристосовуючись до кожного контору вашого обличчя. (Див. малюнок.)
Тример для довгого волосся (2)
Щоб підстригти бакенбарди або бороду на потрібну довжину, слід
висунути тример для довгого волосся.
53
Page 53

Перемикач режимів комфортного гоління («
моделей 360s)
Для точних рухів у зонах, складних для гоління (наприклад: під носом),
плавно поверніть перемикач праворуч (3) на позицію « ». Рух центрального тримеру та однієї сіточки уповільниться.
Маленькі поради для ідеального гоління
Для досягнення найкращих результатів Braun радить дотримуватись
3-х простих правил:
1. Голитися слід завжди перед умиванням.
2. Завжди тримайте бритву під прямим кутом (90°) до шкіри.
3. Натягуйте шкіру і голіться проти напрямку росту щетини.
») (лише для
Чищення
Голівку бритви можна чистити під струменем водопровідної
води.
Увага: Вимкніть бритву з електричної мережі, перш ніж починати
її чищення водою.
Регулярне чищення забезпечує краще гоління. Промивання голівки
бритви під струменем води після кожного гоління є легким та простим
способом залишати бритву чистою:
• Ввімкніть бритву (без шнура) та промийте голівку під струменем
гарячої води. Можна також використовувати рідке мило без абразивних частинок. Змийте всю піну та залиште бритву попрацювати ще
декілька секунд.
• Після цього вимкніть бритву, зніміть сіточку для гоління та ріжучий
блок (1), потім дайте розібраним частинам просохнути.
• Якщо Ви регулярно чистите бритву за допомогою води, один раз на
тиждень слід наносити краплю легкого машинного мастила на тример
для довгого волосся (2), сіточку для гоління та ріжучий блок (1).
У якості альтернативи, Ви можете чистити бритву за допомогою щіточки:
• Вимкніть бритву. Зніміть сіточку для гоління та ріжучий блок та
вибийте на горизонтальній поверхні.
• За допомогою щіточки очистіть внутрішню поверхню голівки. Однак,
не можна чистити сіточку для гоління та ріжучий блок щіткою,
оскільки це може їх пошкодити.
54
Page 54

Як підтримувати бритву у відмінному стані
Лампочка-індикатор заміни ріжучих частин / перезапуск («reset»)
Щоб забезпечити оптимальну якість гоління, слід замінювати сіточку
для гоління та ріжучий блок (1) тоді, коли вмикається лампочкаіндикатор заміни (7) (приблизно кожні 18 місяців) або тоді, коли касета
зношується.
Сіточка для гоління та ріжучий блок: 32S/32B
Лампочка-індикатор заміни буде нагадувати Вам під час наступних
7 голінь про необхідність заміни сіточки для гоління та ріжучого блоку.
Потім бритва автоматично перезапустить дисплей. Після заміни сітки
та ріжучого блоку (1), натисніть на кнопку увімкнення/вимкнення (4) та
утримуйте не менш ніж 5 секунд, щоб скинути лічильник.
Під час цієї процедури лампочка-індикатор заміни (7) буде блимати та
вимкнеться, коли перезапуск буде закінчено. Ручний перезапуск
лічильника можна здійснювати у будь-який час.
Збереження батарейок
Для досягнення максимальної зарядки акумуляторних батарейок,
бритву необхідно повністю розряджати (під час гоління) приблизно
кожні 6 місяців. Потім максимально заряджайте бритву.
Екологічне попередження
Цей пристрій містить батарейки, що перезаряджаються.
В інтересах захисту навколишнього середовища, просимо не
кидати їх до корзини з домашніми відходами після закінчення
терміну використання. Ви можете здати їх до Сервісного центру
Braun або до відповідного центру збору, що знаходиться у Вашій країні.
дУПФ‡М¥fl Б‡ОЛ¯‡π Б‡ ТУ·У˛ Ф‡‚У ‚МУТЛЪЛ БП¥МЛ ‚ НУМТЪЫНˆ¥˛
ФЛТЪУ˛ ·ВБ ТФВˆ¥‡О¸МУ„У У„УОУ¯ВММfl.
ЦОВНЪЛ˜М¥ ТФВˆЛЩ¥Н‡ˆ¥ª М‡‚В‰ВМУ М‡ ТФВˆ¥‡О¸МУПЫ НУПФОВНЪ¥
КЛ‚ОВММfl.
55
Page 55

Бритва Braun Series 3 360s/330s/320s, Тип 5415 / 5413.
Виготовлено Браун ГмбХ у Німеччині: Braun GmbH, Waldstrasse 9,
D-74731, Walldurn, Germany.
ТОВ «Проктер енд Гембл Трейдінг Україна», Україна, 04070, м.Київ,
вул. Набережно-Хрещатицька, 5/13, корпус літ. А. Тел. (0-800) 505-000.
www.pg.com.ua
Товар використовувати за призначенням, відповідно до інструкції
з експлуатації.
Дата виготовлення продукції Braun вказана безпосередньо на виробі
(в місці маркування) і складається з трьох цифр: перша цифра є
останньою цифрою року виготовлення, інші дві цифри є порядковим
номером тижня у році.
Гарантія – 2 роки. У разі необхідності гарантійного чи постгарантійного
обслуговування, звертайтеся до головного офісу сервісного центру
Braun в Україні: ПП «І.Б.С.», вул. Глибочицька 53, м. Київ.
Тел. (044) 4286505.
íÓ‚‡ ëÂÚËÙ¥ÍÓ‚‡ÌÓ
ɇ‡ÌÚ¥ÈÌ¥ ÁÓ·Ó‚’flÁ‡ÌÌfl виробника
Для всіх виробів ми даємо гарантію на два роки, починаючи з моменту
придбання виробу або з дати його виробництва, у разі відсутності або
неналежного оформлення гарантійного талону на виріб.
èÓÚfl„ÓÏ „‡‡ÌÚ¥ÈÌÓ„Ó ÔÂ¥Ó‰Û ÏË безкоштовно ЫТЫ‚‡πПУ ¯ОflıУП
ВПУМЪЫ, Б‡ПiМЛ ‰ВЪ‡ОВИ ‡·У Б‡П¥МЛ ‚Т¸У„У ‚ЛУ·Ы ·Ы‰¸-flН¥ Б‡‚У‰Т¸Н¥
‰ВЩВНЪЛ, ‚ЛНОЛН‡М¥ МВ‰УТЪ‡ЪМ¸У˛ flН¥ТЪ˛ П‡ЪВ¥‡О¥‚ ‡·У ТНО‡‰‡ММfl.
56
Page 56

м ‚ЛФ‡‰НЫ МВПУКОЛ‚УТЪ¥ ВПУМЪЫ ‚ „‡‡МЪ¥ИМЛИ ФВ¥У‰ ‚Л¥· ПУКВ ·ЫЪЛ
Б‡П¥МВМЛИ М‡ МУ‚ЛИ ‡·У ‡М‡ОУ„¥˜МЛИ ‚¥‰ФУ‚¥‰МУ до Закону України «Про
захист прав споживачів».
Й‡‡МЪ¥fl М‡·Ы‚‡π ТЛОЛ ОЛ¯В, flН˘У ‰‡Ъ‡ НЫФ¥‚О¥ Ф¥‰Ъ‚В‰КЫπЪ¸Тfl
ФВ˜‡ЪНУ˛ Ъ‡ Фi‰ФЛТУП дилера (П‡„‡БЛМЫ) М‡ УЛ„¥М‡О¸МУПЫ
„‡‡МЪ¥ИМУПЫ Ъ‡ОУМ¥ З„aun ‡·У М‡ УТЪ‡ММ¥И ТЪУ¥Мˆ¥ УЛ„¥М‡О¸МУª
¥МТЪЫНˆ¥ª Б ВНТФОЫ‡Ъ‡ˆ¥ª Зr‡un, flН‡ Ъ‡НУК ПУКВ ·ЫЪЛ „‡‡МЪiИМЛП
Ъ‡ОУМУП.
ñfl „‡‡ÌÚ¥fl ‰¥ÈÒ̇ Û ·Û‰¸-flÍ¥È Í‡ªÌ¥, ‚ flÍÛ ˆÂÈ ‚Ë¥· ÔÓÒÚ‡‚ÎflπÚ¸Òfl
представником компанії виробника ‡·Ó ÔËÁ̇˜ÂÌËÏ дистриб‘ютором,
Ъ‡ ‰В КУ‰М¥ У·ПВКВММfl Б ¥ПФУЪЫ ‡·У ¥М¯¥ Ф‡‚У‚¥ ФУОУКВММfl МВ
ФВВ¯НУ‰К‡˛Ъ¸ М‡‰‡ММ˛ „‡‡МЪ¥ИМУ„У У·ТОЫ„У‚Ы‚‡ММfl.
Й‡‡МЪ¥fl М‡ Б‡П¥МВМ¥ ˜‡ТЪЛМЛ Б‡Н¥М˜ЫπЪ¸Тfl ‚ ПУПВМЪ Б‡НiМ˜ВММfl „‡‡МЪ¥ª
М‡ ‰‡МЛИ ‚Лi·.
Й‡‡МЪ¥fl МВ ФУНЛ‚‡π ФУ¯НУ‰КВММfl, ‚ЛНОЛН‡М¥ МВ‚iМЛП ‚ЛНУЛТЪ‡ММflП
(‰Л‚. Ъ‡НУК ФВВОiН МЛК˜В) нормальне зношування Т¥ЪУН Ъ‡ МУК¥‚ ‰Оfl
„УОiММfl, ‰ВЩВНЪЛ, ˘У МВБМ‡˜МЛП ˜ЛМУП ‚ФОЛ‚‡˛Ъ¸ М‡ flН¥ТЪ¸ У·УЪЛ
ФЛО‡‰Ы. сfl „‡‡МЪ¥fl ‚Ъ‡˜‡π ТЛОЫ, flН˘У ВПУМЪ Б‰iИТМ˛πЪ¸Тfl МВ
‚ФУ‚МУ‚‡КВМУ˛ ‰Оfl ˆ¸У„У УТУ·У˛ Ъ‡, flН˘У ‚ЛНУЛТЪУ‚Ы˛Ъ¸Тfl МВ
УЛ„¥М‡О¸Мi запасні частини виробника.
У випадку пред‘явлення рекламації за умовами даної гарантії,
передайте виріб у повному комплекті згідно опису в оригінальній
інструкції з експлуатації разом з гарантійним талоном у будь-який
сервісний центр, який офіційно вповноважений представником компанії
виробника.
ЗТ¥ ¥М¯¥ ‚ЛПУ„Л, ‡БУП Б ‚ЛПУ„‡ПЛ ‚¥‰¯НУ‰Ы‚‡ММfl Б·ЛЪН¥‚, МВ ‰¥ИТМ¥,
flН˘У М‡¯‡ ‚¥‰ФУ‚i‰‡О¸М¥ТЪ¸ МВ ‚ТЪ‡МУ‚ОВМ‡ Б‡НУММЛП ˜ЛМУП.
ЗЛФ‡‰НЛ, М‡ flН¥ МВ УБФУ‚Т˛‰КЫπЪ¸Тfl „‡‡МЪ¥fl:
– ‰ВЩВНЪЛ, ‚ЛНОЛН‡М¥ ЩУТ-П‡КУМЛПЛ У·ТЪ‡‚ЛМ‡ПЛ;
– використання з професійною метою або з метою отримання прибутку;
– ФУЫ¯ВММfl ‚ЛПУ„ ¥МТЪЫНˆ¥ª Б ВНТФОЫ‡Ъ‡ˆ¥ª;
– МВ‚iМВ ‚ТЪ‡МУ‚ОВММfl М‡ФЫ„Л ПВВКi КЛ‚ОВММfl
(flН˘У ˆВ ‚ЛП‡„‡πЪ¸Тfl);
– Б‰iИТМВММfl ЪВıМ¥˜МЛı БП¥М;
– ПВı‡М¥˜Мi ФУ¯НУ‰КВММfl;
57
Page 57

– ‰Îfl ÔË·‰¥‚, ˘Ó Ô‡ˆ˛˛Ú¸ ̇ ·‡Ú‡ÂÈ͇ı – Ó·ÓÚ‡ Á Ì‚i‰ÔÓ‚¥‰ÌËÏË
‡·Ó ÒÔ‡ˆ¸Ó‚‡ÌËÏË ·‡Ú‡ÂÈ͇ÏË, будь-які ФУ¯НУ‰КВММfl, ‚ЛНОЛН‡М¥
ÒÔ‡ˆ¸Ó‚‡ÌËÏË ‡·Ó Ô¥‰Ú¥Í‡˛˜ËÏË ·‡Ú‡ÂÈ͇ÏË;
– пошкодження з вини тварин, гризунів та комах (в тому числі у
випадках знаходження гризунів та комах усередині приладів);
– ‰Îfl ·ËÚ‚ – Á¥Ï’flÚ‡ ‡·Ó ÔÓ‚‡Ì‡ Ò¥Ú͇.
Увага! Гарантійний талон підлягає вилученню в разі звернення до
сервісного центру з проханням про виконання гарантійного ремонту.
Після проведення ремонту гарантійним талоном буде вважатися
заповнений оригінал листа виконаного ремонту зі штампом сервісного
центру та підписаний споживачем про отримання виробу з ремонту.
Гарантійний термін подовжується на період, який даний виріб
знаходився в сервісному центрі в ремонті.
В разі виникнення труднощів з виконанням гарантійного та
післягарантійного обслуговування, прохання звертатися до
інформаційної служби сервісу представника компанії виробника
в Україні.
Телефон гарячої лінії 0 800 505 000. Дзвінки по Україні зі стаціонарних
телефонних номерів є безкоштовними. Дзвінки з мобільних телефонів
оплачуються згідно тарифів відповідного оператора.
Також можна отримати додаткову інформацію на сервісному порталі
виробника в інтернеті www.service.braun.com.
58
Page 58

59606162636465
Page 59

Page 60

Page 61

Page 62

Page 63

Page 64

 Loading...