

Page 1

Specifications subject to change without notice.
Printed in the U.S.A. (October 2009) BSI, LLC
www.bsidesigns.com 5125 Race Court Denver, Colorado 80216 Office: 303.331.8777 Fax: 303.331.8444
Revision 1.0
Thank you for choosing products from BSI, LLC. We
appreciate your business and are available to assist you
with all of your needs.
This manual has been designed to help you better
understand your product and its proper usage.
If you have questions that go beyond this detailed manual
please contact our Customer Service Department at
1.800.662.9595
Thank you,
The BSI, LLC Team
Owner's Manual and Warranty
Deco 900 Series
Page 2
Specifications subject to change without notice.
Printed in the U.S.A. (October 2009) BSI, LLC
www.bsidesigns.com 5125 Race Court Denver, Colorado 80216 Office: 303.331.8777 Fax: 303.331.8444
Revision 1.0
This Owner’s Manual can be used as a guide to understanding the inner-workings of BSI, LLC's Deco 900 Series Food
Shields. The following content includes a detailed look at the basic food shield in these areas:
1. Basic Parts of a Food Shield
2. Proper Method of Adjusting the Glass
3. Recommended Limitations
4. Cleaning Instructions
5. Ordering Replacement Parts
6. BSI, LLC Warranty
INTRODUCTION
BASIC PARTS OF A FOOD SHIELD
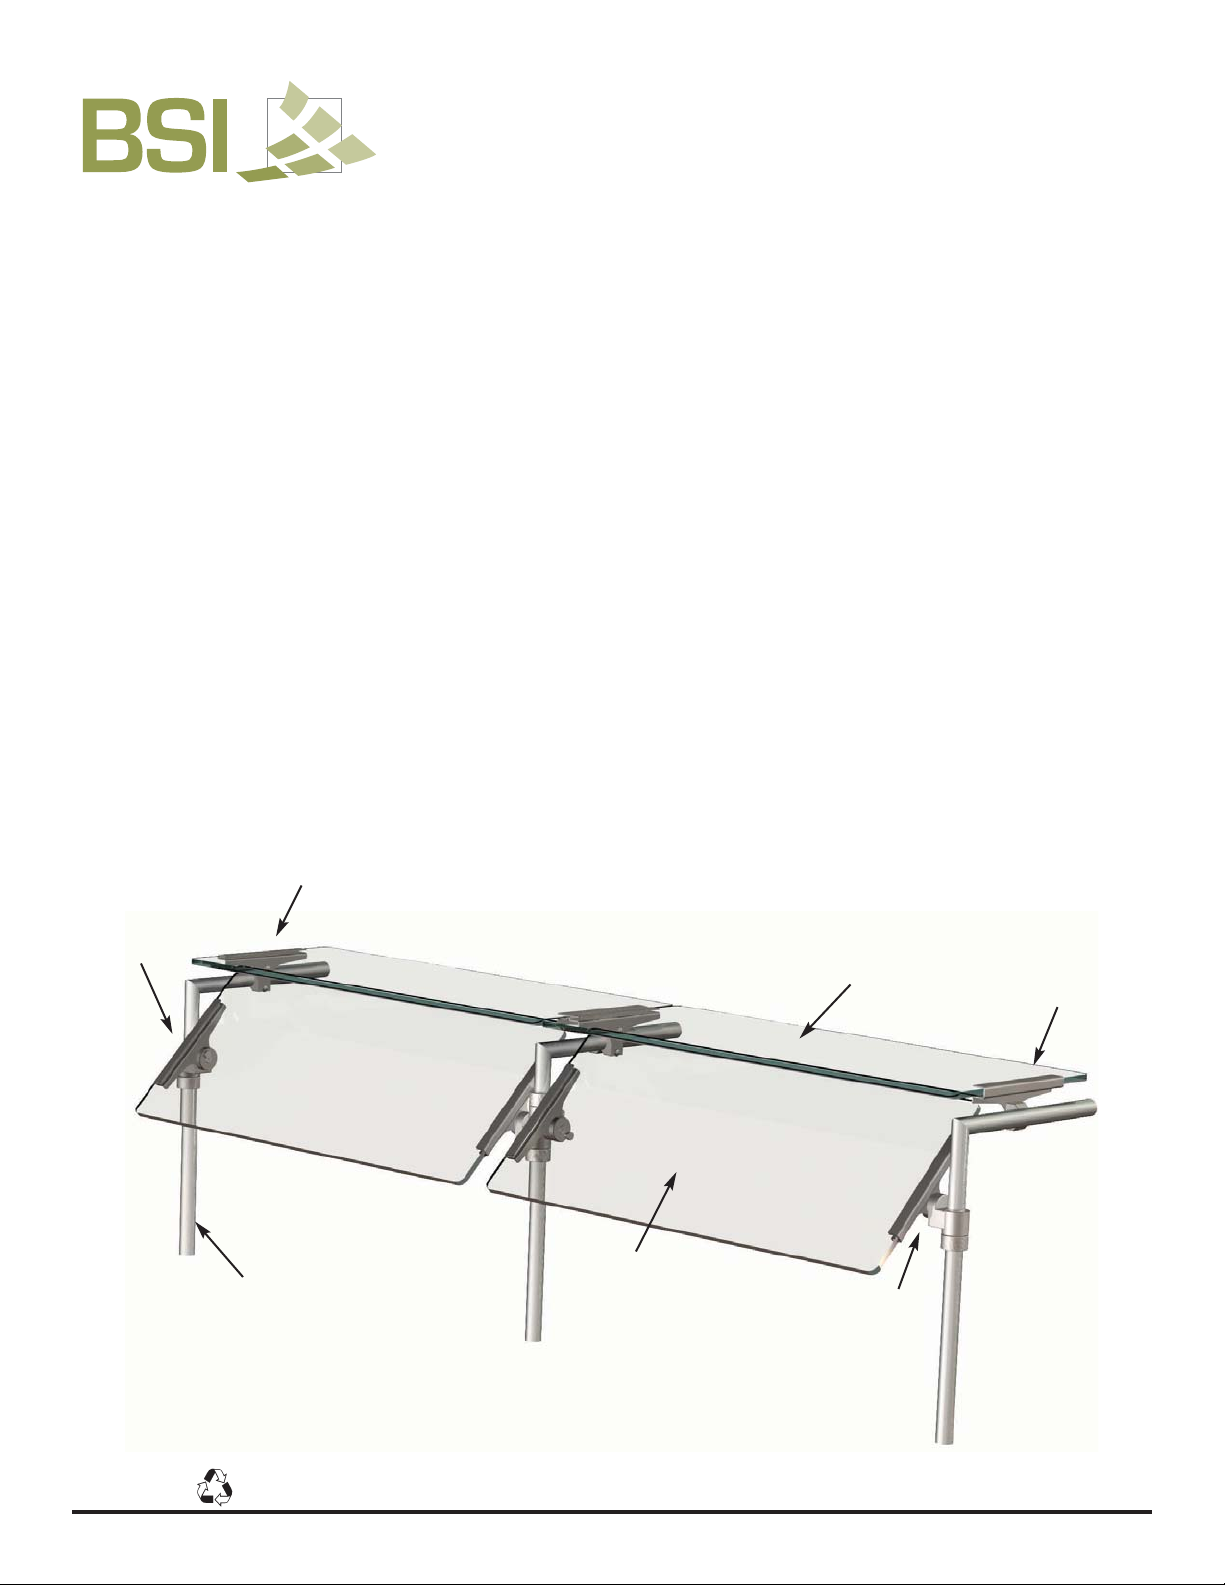
Fig. 1 shows the basic components of a Deco 900 Series Food Shield.
Fig. 1: Deco-950
Stationary Glass
Bracket
Stationary Glass
Bracket
Adjustable
Front Glass
Bracket
Adjustable
Front Glass
Bracket
Front Glass Panel
1" Stainless Steel Post
Top Glass Panel
THIS PRODUCT MUST BE INSTALLED IN ACCORDANCE WITH NSF STANDARDS, UL STANDARDS OR ANY
APPLICABLE HEALTH CODES BY A PERSON FAMILIAR WITH THE CONSTRUCTION AND OPERATION OF THE
PRODUCT.
Page 3
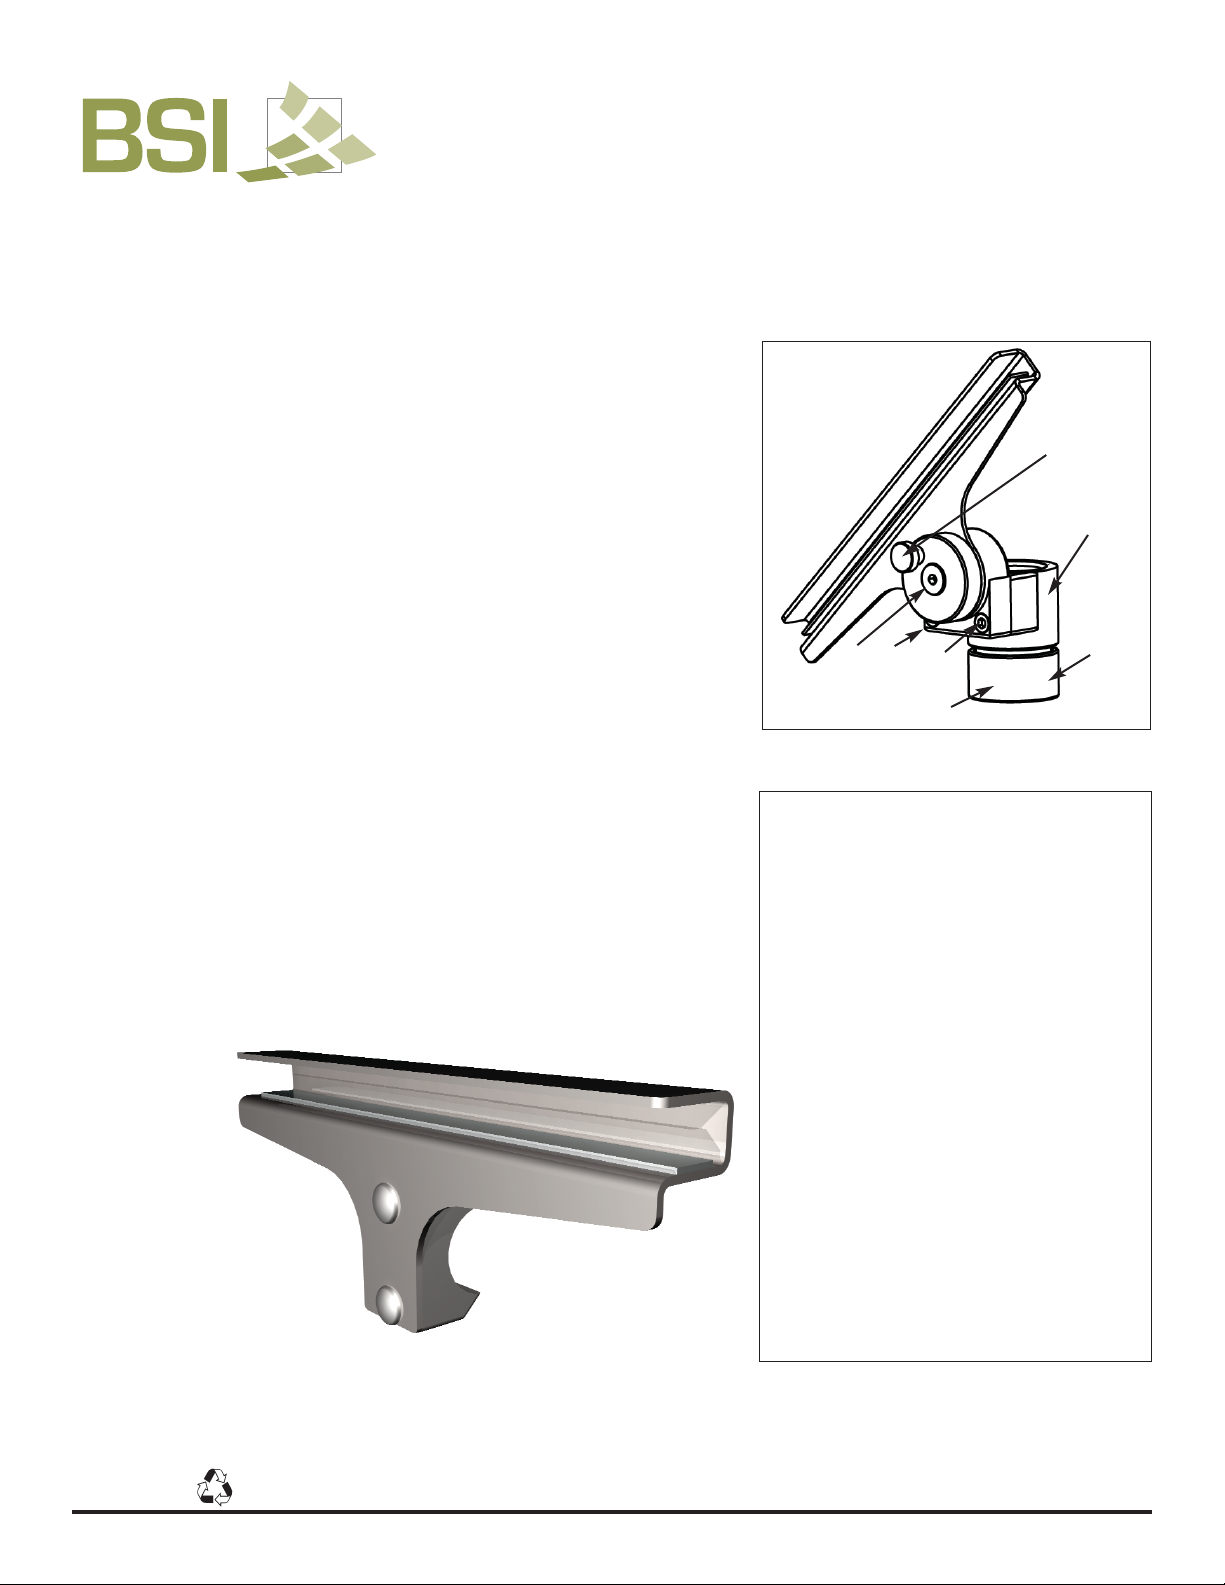
Tension Ring
Spring
Plunger
Allen Wrench
Holes
Specifications subject to change without notice.
Printed in the U.S.A. (October 2009) BSI, LLC
www.bsidesigns.com 5125 Race Court Denver, Colorado 80216 Office: 303.331.8777 Fax: 303.331.8444
Revision 1.0
BRACKET DETAILS
Fig. 3: Stationary Glass Bracket
Fig. 2: Front Glass Bracket Assembly
Posts and Brackets are made of stainless steel.
The
Front Glass Bracket Assembly (Fig. 2)
is designed to be rotated to fit
either the left, right or center post
(see Fig. 4)
.
The
Tension Ring (includes the slip joint washer and slide collar nut) (Fig. 2)
allows for vertical adjustment and is easy to grasp and tighten without tools.
To properly adjust the height of the glass it may be helpful for there to be
one person for every bracket. Full perimeter slip joint washer leads to
weight-bearing capacity of 100 lbs. per shelf. Turn and loosen the Tension
Ring on both sides. Evenly raise or lower the brackets and glass panel to
desired height.
The angle of the glass panels can be tilted forward or backwards. To
properly adjust the angle of the glass it may be helpful for there to be one
person for every bracket. Angle adjustment is done with a simple
spring
plunger (Fig. 2)
, allowing the glass to be unlocked and rotate 360ofreely.
Simple pull out the plunger while turning the bracket and glass to the desired
angle. The glass will not drop out when the glass is adjusted. The glass
rotates in 22.5
o
increments.
The front glass bracket can also be used when the glass angle must remain
stationary. The spring plunger can be replaced by a set screw making the
front glass bracket unable to pivot without tools.
Use a level to properly balance the full length of the glass.
The bracket is secured into place using Phillips head screws. If the glass
needs to be replaced, Allen Head screws are used to hold the glass panel
securely in the Glass Bracket.
Slide
Collar
Slide
Collar
Nut
DO
Clean food shields on a regular basis.
Do wipe the surface with a clean damp
cloth and mild detergent to remove
fingerprints, dust, etc.
Do clean glass with a glass cleaner. Use a
non-ammonia cleaner.
CLEANING INSTRUCTIONS
DON’T
Don't polish food shields with any brass
polish. Your food shield has a durable
finish and will maintain its finish for years
if well maintained. (Polishing the finish
with a polishing agent of any kind will
destroy the finish or powder coating).
Don't scrub the surface with any abrasive
substance such as steel wool, pot
scrubbers, Ajax cleanser, Comet or similar
products, as it will change the finish or
remove the powder coating.
The
Stationary Glass Bracket
(Fig. 3
) is used to secure a
glass shelf.
Page 4
ORDERING REPLACEMENT PARTS
In case of damaged parts please call our Customer Service Department
Monday thru Friday, 8:00am -4:00pm at
1-800-662-9595.
BRACKET PARTS
Specifications subject to change without notice.
Printed in the U.S.A. (October 2009) BSI, LLC
www.bsidesigns.com 5125 Race Court Denver, Colorado 80216 Office: 303.331.8777 Fax: 303.331.8444
Revision 1.0
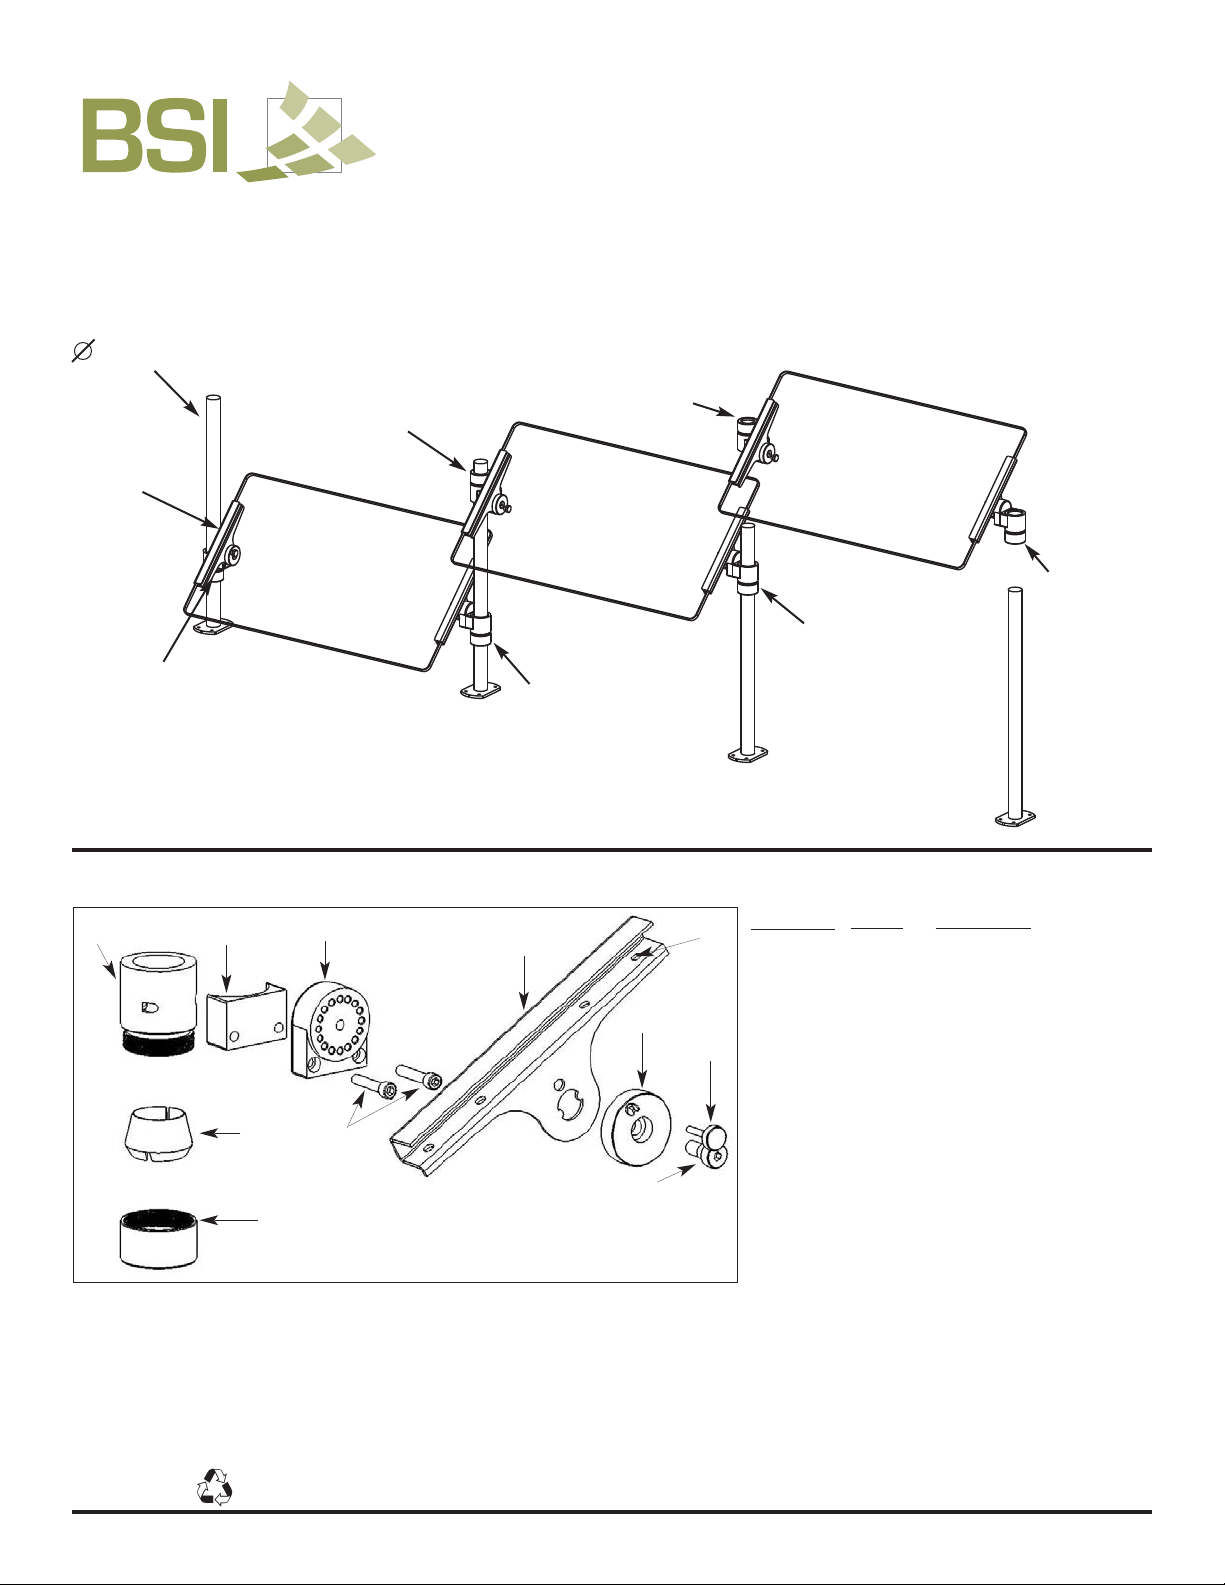
Tension
Ring Down
1" S/S Post
Front Glass
Bracket
BRACKET LAYOUT
Left Front Glass
Panel Assembly
Tension
Ring Down
Tension Ring Up
Tension
Ring Down
Tension Ring Up
Tension Ring
Down
Center Front Glass
Panel Assembly
Right Front Glass
Panel Assembly
Fig. 4: Deco-900 Multi-Panel Sample
J
I
H
G
F
E
D
C
B
A
K
Fig. 5: Front Glass Bracket - Exploded View
Location
Part # Part Name
A............... 14366..... Slide Collar
B............... 14364..... Mounting Block
C............... 14368..... Adjusting Block
D............... 14369..... 10-32 Cap Screw
E............... Custom.. Front Glass Bracket
F................ 14393..... 1/4-20 Set Screw
G............... 14367..... Pin Washer
H.............. 14361..... Spring Plunger
I................ 14326..... Shoulder Bolt
J................ 14372..... Slip Joint Washer
K............... 14365..... Slide Collar Nut
Fig. 3......... Custom.. Stationary Glass Bracket
Page 5

Specifications subject to change without notice.
Printed in the U.S.A. (October 2009) BSI, LLC
www.bsidesigns.com 5125 Race Court Denver, Colorado 80216 Office: 303.331.8777 Fax: 303.331.8444
Revision 1.0
BSI, LLC warrants that its fabricated products shall be free from any defects in material and workmanship for a period of
one year from date of shipment.
BSI, LLC guarantees parts furnished by suppliers to BSI, LLC only to the extent of the original manufacturer's express
warranty to BSI, LLC. Failure of the Original Purchaser to receive such manufacturer's warranty shall in no way create
any warranty, express or implied, or any other obligation or liability on BSI, LLC’s part in respects thereof.
If shipment of a replacement part is requested prior to the arrival in the BSI, LLC factory of the part claimed to be
defective, the Original Purchaser must accept delivery of the replacement part on a C.O.D. basis, with credit being issued
after the part has been received and inspected at BSI, LLC's plant and determined by BSI, LLC to be within this
Warranty.
No claims can be made under this Warranty for spoilage of products for any reason, including system failure.
Warranty work not performed by BSI, LLC personnel must have prior written authorization. BSI, LLC can decide to
approve on site repairs, providing at no charge new replacement parts and also paying reasonable labor charges for a
period of 90 days from date of shipment. A Return Material Authorization number must accompany returned goods.
This warranty does not apply to:
Buyouts or purchased components, as these are covered by the original manufacturer's warranties,
Freight damaged material,
Damage caused by improper installation, improper use, or abuse, or equipment modified without factory
authorization,
Damage caused by normal wear and tear,
Customer furnished materials or buyouts.
This warranty is the complete and only warranty, expressed or implied. BSI, LLC's liability is limited to the purchase
price of the equipment. The customer's sole and exclusive remedy is the repair, replacement, or refund for the defective
equipment.
LIMITED WARRANTY
STANDARD EQUIPMENT WARRANTY
 Loading...