

Bras SCIROCCO UL OPERATOR’S MANUAL
SCIROCCO UL
OPERATOR’S MANUAL
CARNET D’INSTRUCTIONS
MANUAL DE INSTRUCCIONES
SCIROCCO UL
ENGLISH
1 TECHNICAL CHARACTERISTICS
Scirocco
Transparent removable bowls n 1
Capacity of each bowl, approx. l 5
Dimensions:
width cm 24
depth cm 32
height cm 49
Net weight, approx. kg 7
Gross weight, approx. kg 8
Adjustable thermostats n 2
Noise level lower than 70 dB (A)
IMPORTANT
Electric specifications: read the information on the data plate of each single dispenser, situated on the underside. The serial
number of the units is preceded by #
The manufacturer reserves the right to make
changes without any prior notification.
2 INTRODUCTION
Read this instruction manual carefully to know the
specifications of the dispenser. As all mechanical
products, this unit requires cleaning and
maintenance. Its working order can be
compromised by possible errors made by the
operator during disassembly and cleaning. For
this reason it is important that the staff in charge
of the dispenser is qualified to carry out the day to
day operations, which are dismantling, cleaning,
sterilisation and reassembly.
3 INSTALLATION
1 Remove the dispenser from the packaging.
(This should be kept for any future requirement)
2 Check the dispenser has not been damaged
during transport. The forwarding agent must be
notified immediately of any claim.
3 Install the dispenser on a counter top that will
support its weight, even with a full load.
4 Before connecting the dispenser electrically
check that the voltage (in the network) is as
shown on the data plate. Plug the unit into a
grounded, protected single phase electrical
supply according to the applicable electrical
codes and the specifications of your machine. If
you want to make a fixed connection to the
network, connect the cord to a bipolar wall
breaker with a contact gap of at least 3mm. not
use extension cords to connect the unit
electrically.
ATTENTION
Ensure that the unit is grounded correctly;
if not it may cause electric shock to persons or damage the dispenser.
5 The dispenser does not leave the factory
presanitized and sanitized. Prior to use it must be
disassembled, cleaned and sanitized according
to the instructions in chapter 7 CLEANING AND
SANITIZING PROCEDURES.
4 TO OPERATE SAFELY
1 Read the instruction booklet before using the
dispenser.
2 Use the dispenser only if it is grounded
correctly.
3 Do not use extension cords to connect the
dispenser electrically.
4 Do not operate the dispenser if it is not
closed and blocked with screws.
5 Do not place fingers or objects in the cooling
fissures and faucet outlet panels louvers.
6 Do not remove the container when the unit is
in operation.
7 This unit is not meant to be used outside.
8 This unit is not to be installed in areas
subject to water-spouts.
9 Do not use water-jets to clean the unit.
10 This unit can work in a room temperature
2
range between +5° and +50°C.
ATTENTION
Position I : mixer and heating device in
The dispenser is equipped with a thermostat, on
the right side, to adjust the temperature of the
product.
working order
Do not remove the container until the hot
plate is cold.
ATTENTION
Do not remove the container from the
dispenser when it contains hot products.
IMPORTANT
Place the unit on an horizontal surface.
ATTENTION
In case of damages, the power cord must
be replaced by qualified personnel only in
order to prevent any shock hazard.
5 OPERATING PROCEDURES
1 Clean and sanitized the dispenser prior to
use following the instructions in chapter 7
CLEANING AND SANITIZING PROCEDURES.
2 Fill the bowl with the product, prepared
according to the instructions of the manufacturer.
3 Install the cover above the container making
sure that it is placed correctly.
4 Set the control switch (see charter 5.1.
COMMAND DESCRIPTIONS)
5 The dispenser should always operate with
the cover installed in order to prevent possible
contamination of the product.
6 The dispenser must run uninterruptedly;
heating will stop automatically when the product
is ready for dispensing. The mixing device will
continue to operate.
7 The dispenser is supplied with a container
with a closed removable bottom to facilitate
cleaning and sterilisation.
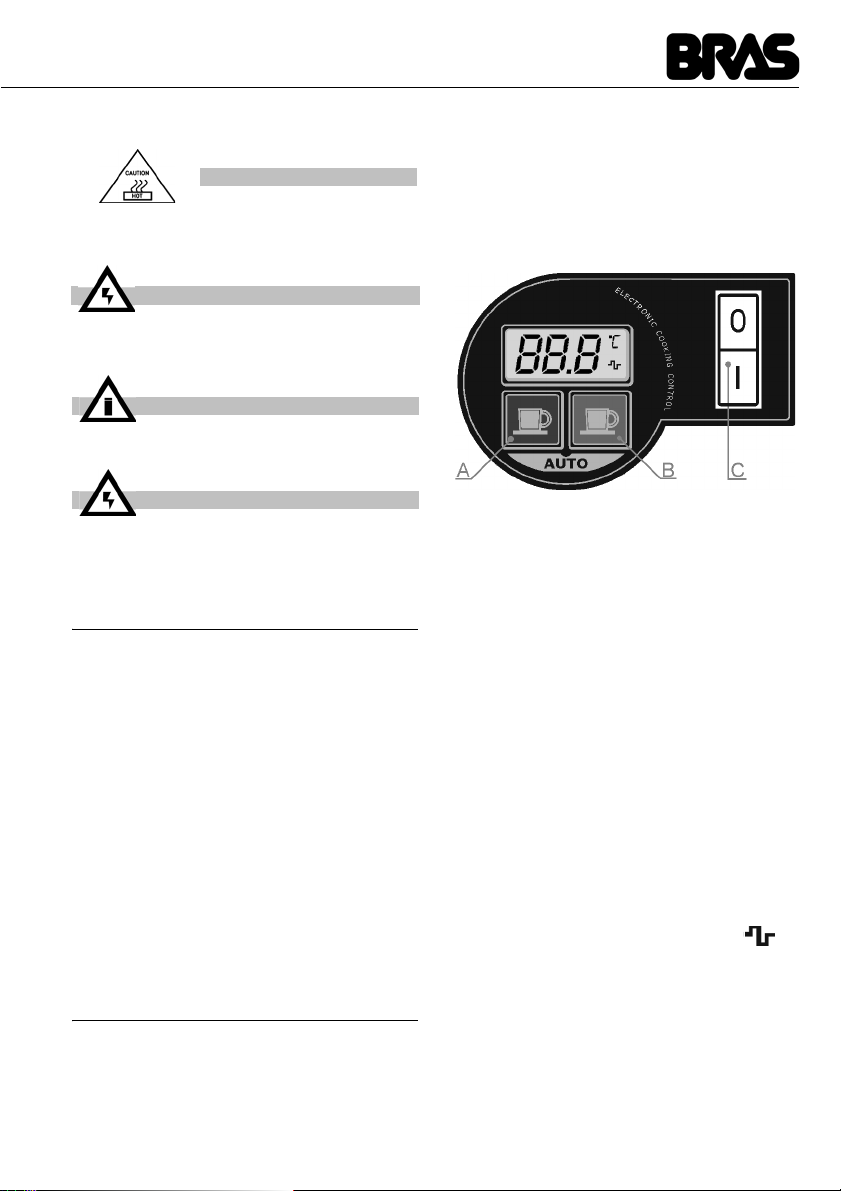
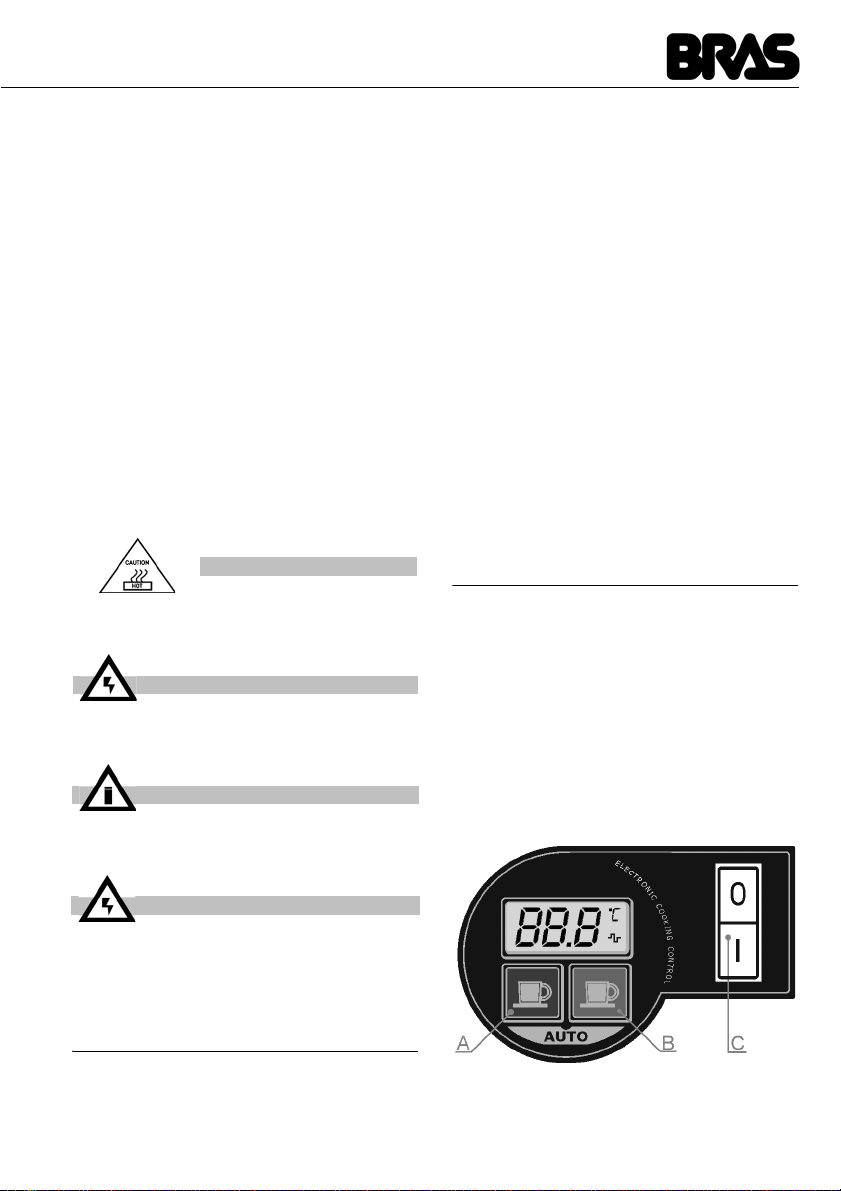
5. 1 DESCRIPTION OF CONTROLS
The dispenser is equipped with a general switch
whose functions are:
Position 0 : power is turned off
(ELECTRONIC VERSION)
The dispenser is equipped with a general switch
whose functions are:
Position 0 : power is turned off.
Position I : mixing and hating on.
The dispenser is also equipped with an electronic
device, located on the right side, to control the
temperature of the product. This device has one
display, to show the set temperature and two keys
whose functions are the following:
Key A : to decrease the desired temperature
Key B : to increase the desired temperature
On the display, the symbols °C or °F indicates the
current temperature unit and the symbol indicates the turning on of the heating element.
When the dispenser is turned on, both the mixing
and the heating are turned on and on the display
the set temperature is shown. The set temperature value blinks until when the product has reached the desired temperature.
When the dispenser is turned OFF all the current
settings are saved into memory to be effective at
one degree by one; by keeping it
pressed for more than two seconds it
is possible to quickly decrease the
temperature.
one degree by one; by keeping it
pressed for more than two seconds it
is possible to quickly increase the
temperature.
3

SCIROCCO UL
ENGLISH
the following power on.
6 OPERATION HELPFUL HINTS
hot chocolate: preparation following the
traditional artisan method, mix the cocoa with milk
or water well in a pan before pouring it into the
bowl. Follow the instructions of the manufacturer
if using packaged instantaneous products. It is
possible to mix these directly in the container.
Activate the dispenser turning the switch to
position 1. Turn the thermostat knob to 90°C to
obtain the cooking temperature of the product.
When the hot chocolate is ready lower the
temperature to the value required for dispensing
turning the thermostat knob.
IMPORTANT
Before switching off the dispenser completely (switch at position 0), bring the thermostat to the lowest temperature and wait for
the product to cool down. This stops the
product (if not agitated) from sticking to the
hot plate
AUTOMATING COOKING CYCLE
electronic version
By pressing together key A and B the dispenser
performs an Automatic Cooking Cycle. This means that the product is heated up to 95 °C and
maintained at this temperature for 15 minutes. After the expiration of the Automatic Cooking Cycle
the product is maintained at the desired temperature set before the cycle.
The temperature and the length of the Automatic
Cooking Cycle are factory preset. To reset them
turn the dispenser off and then turn it on keeping
key A pressed. On the display the Cooking
Temperature is shown and it is possible to
decease or increase it using keys A or B and to
confirm it pressing both keys together. Then the
length of the Cooking Cycle is shown and it is
possible to decease or increase it using keys A or
B and to confirm it pressing both keys together.
7 CLEANING AND SANITIZING
PROCEDURES
Cleaning and sanitizing are essential to maintain
perfect taste and maximum efficiency from your
dispenser. The procedures described below are
general and can vary due to the sanitary
regulations of the local health authorized.
The product must be taken out of the dispenser
before it is disassembled for cleaning.
7. 1 DISASSEMBLY
ATTENTION
Before proceeding to disassemble any component always disconnect the unit from the
electricity removing the plug or switching
off the 2 pole wall breaker.
1 Empty the bowl and remove the lid
2 Remove the mixer from the central shaft
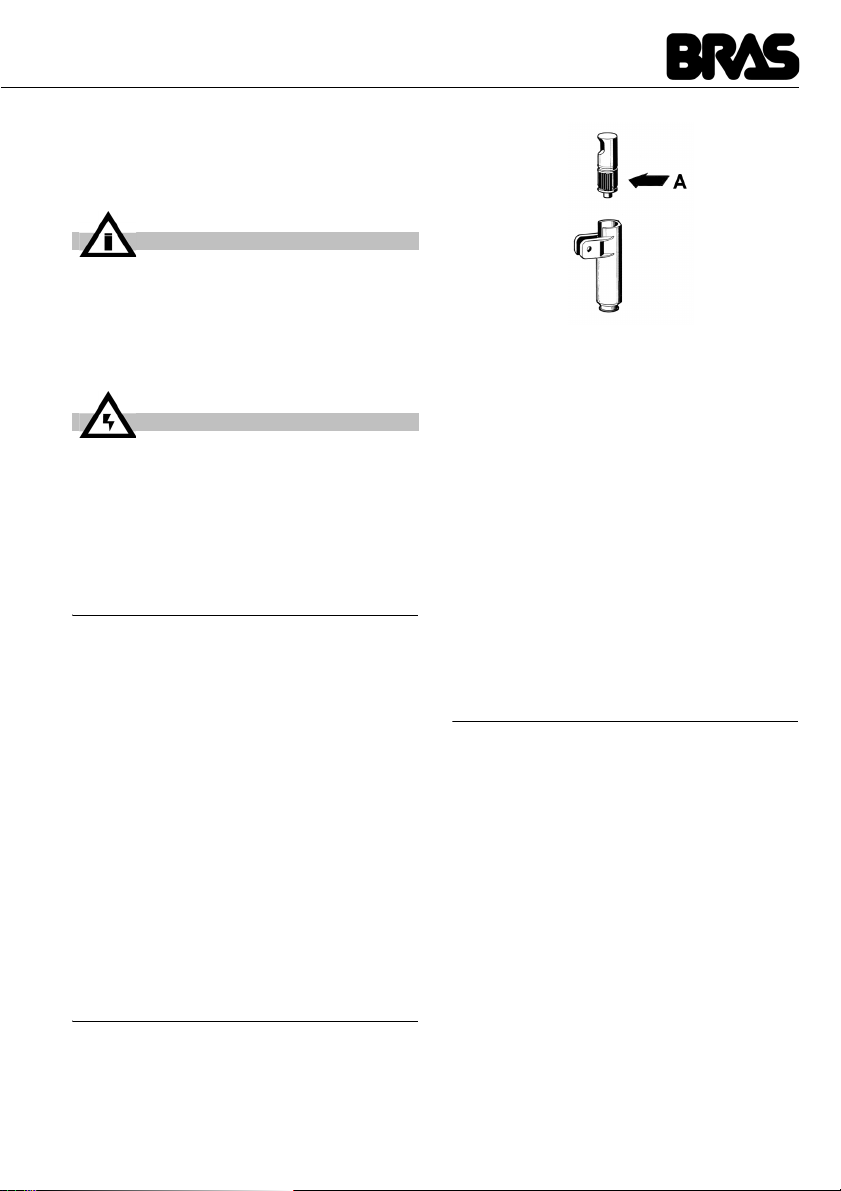
3 Dismantle the faucet following the sequence
shown (see fig. 1)
figure 1
Remove the container, lifting it upwards.
4
5 Remove the drip-tray and empty it.
7. 2 CLEANING
IMPORTANT
Before cleaning disconnect the dispenser
from the electricity taking out the plug or
turning off the outside switch on the wall.
ATTENTION
Do not wash any component of the
machine in the dishwasher.
1 Prepare approx. four litres (2 gallons) of hot
water (45-60° C) and specific detergent in a bowl
4
according to the instructions of the manufacturer;
a solution, which is too concentrated, may cause
damage to the parts to be washed, one that is
too diluted will not clean adequately. Do not use
abrasive detergents.
IMPORTANT
Use detergents compatible with the plastic
parts to avoid damaging the dispenser.
2 Use a suitable brush and carefully clean all
the parts in contact with the drink
lubricant.
figure 2
ATTENTION
Do not use excessive amounts of water
near the electric components of the dispenser when washing it as this can cause
electric shock or damage the dispenser.
3 Rinse all the washed parts in running water.
7. 2. 1 SANITIZING
The dispenser must be sanitized prior to starting
the machine. Do not allow the unit to sit for
extended periods of the time after sanitization
1 Before starting the procedure described
below wash hands with an anti-bacterial soap.
2 Prepare at least. four litres of hot water (45-
60°C) and sterilising product legally approved in
your Country, following the instructions of the
manufacturer. If there is no specific sterilising
product prepare a solution of water and bleach in
the following ratio: 1 tbsp: 2 litres of water.
3 Immerse all the parts to be sterilised in the
solution for time indicated by the manufacturer.
4 Allow the sterilised parts to air dry on a clean
surface.
5 Use non-abrasive cloths to dry the external
parts.
7. 3 ASSEMBLY
1 Put the drip-tray and grill in place
2 Lubricate the faucet piston (in the area A
shown in fig. 2) using food grade approved
3 Reassemble the faucet assembly on the
container in the opposite way to which it was
dismantled (see fig. 1).
4 Install the container putting the central shaft
in place.
5 Insert the mixer in the central shaft
6 Position the cover on the container.
8 MAINTENANCE
1 Daily: check the dispenser for any loss of
product from the gaskets. If there is, first check
the dispenser is assembled correctly making
sure that the gaskets need no lubricating and
they are not faulty or worn. In this case they must
be replaced with original parts.
2 To avoid damage to the dispenser the plastic
parts must be lubricated only with the grease
supplied by the manufacturer or other grease
compatible with polycarbonate.
5

SCIROCCO UL
ENGLISH
TROUBLESHOOTING
PROBLEM CAUSE SOLUTION
Mixer doesn't turn Drive shaft coupling not cor-
Gear motor doesn't turn Motor overheated: “Thermal
Beverage leaks from the
container
rect
Drive shaft coupling broken Replace mixer and/or drive
Gear motor not working See “Gear motor doesn't
Electrical wires disconnected
or interrupted
Product too dense Dilute the product
Protection” tripped
Stator winding burned out or
interrupted
Rotor shifted Check the alignment of the
Gears in the reducer box
damaged or worn
Container gasket seal broken
or worn
Tap piston o-ring broken or
worn
Check that it's in the correct operating position
shaft
turn”
Connect or replace
electrical wires
Check the voltage of the
outlet. Check the
ventilation (fins on the side
panels obstructed or lower
part of the distributor
obstructed). Check the
viscosity of the product
Replace the motor
rotor bearings
Replace the motor
Replace gasket seal
Replace the piston o-ring
Tap piston not in closed position
6
Check the tap lever or
spring and replace the
worn part

PROBLEM CAUSE SOLUTION
Heating element not hot Heating element burned out Replace the heating
Thermal fuse burned out Adjust it to a suitable
Thermal fuse burned out Thermal fuse defective Replace with a good one
I'm not getting a sufficiently dense product
I'm not getting a sufficiently hot product
The temperature of the
service thermostat (located on
the side of the distributor) is
set too low
Product excessively diluted Increase the concentration
The temperature of the
service thermostat (located on
the side of the distributor) is
set too low
The bottom of the tub is not
touching the heating element
element
temperature
Adjust it to a suitable
temperature
of the product
Adjust it to a suitable
temperature
Position the tub on the
heating element correctly
7
FRANCAIS
SCIROCCO UL
1 CARACTERISTIQUES
TECHNIQUES
Scirocco
Réservoirs transparents démontables n 1
Capacité chaque réservoir, environ l 5
Dimensions:
largeur cm 24
profondeur cm 32
hauteur cm 49
Poids net, environ kg 7
Poids brut, environ kg 8
Thermostats réglables n 2
Niveau de bruit inférieur à 70 dB (A)
IMPORTANT
Caractéristiques électriques : lire les données qui figurent sur la plaquette de
chaque distributeur. Cette plaquette se
trouve sous le distributeur. Les numéros
d'immatriculation des appareils sont précédés du symbole #. Les données figurant
sur la plaquette sont toujours celles
auxquelles vous devez faire référence.
Nous nous réservons le droit d'apporter des
modifications sans avertissement préalable.
3 INSTALLATION
1 Retirez le distributeur de l'emballage. Nous
vous conseillons de conserver l'emballage, vous
pourriez en avoir besoin plus tard.
2 Assurez-vous que le distributeur n'a pas subi
de dommages au cours du transport. Si c'est le
cas, présentez immédiatement une réclamation
auprès du transporteur.
3 Posez le distributeur sur un comptoir qui
supporte son poids lorsqu'il est plein.
4 Avant d'effectuer les branchements
électriques, vérifiez que la tension du réseau est
la même que celle indiquée sur la plaquette.
Branchez le distributeur à un réseau monophasé
à l'aide d'une prise comprenant la mise à la terre,
conformément aux normes en vigueur. Si vous
voulez réaliser un branchement fixe au réseau,
branchez le câble à un dispositif bipolaire de
coupure fixé au mur dont les ouvertures de
contact sont d'au moins 3 mm. N'utilisez pas de
rallonge pour brancher l'appareil au réseau
électrique.
ATTENTION
Vérifiez que l'appareil est correctement
relié à la terre. S'il ne l'est pas, les personnes pourraient subir des chocs électriques
et le distributeur pourrait être endommagé.
2 INTRODUCTION
Nous vous recommandons de lire attentivement
ce carnet d’istructions, de façon à connaître
toutes les caractéristiques du distributeur.
Comme tous les produits mécaniques, ce
distributeur nécessite hygiène et soin. Son bon
fonctionnement peut être compromis par
d'éventuelles erreurs de l'opérateur au cours des
phases de montage et de nettoyage. C'est la
raison pour laquelle il est important que les
procédures quotidiennes de démontage et
remontage soient connues par tout le personnel
responsable du distributeur sans courir le risque
de commettre des erreurs.
5 Le distributeur n'est ni lavé ni désinfecté
avant de sortir de la fabrique. Avant de l'utiliser, il
vous faut le démonter, le laver et le désinfecter
suivant les indications du chapitre 7
NETTOYAGE.
4 POUR UN FONCTIONNEMENT
SANS DANGER
1 N'utilisez pas le distributeur avant d'avoir lu
ce carnet d’istructions.
2 N'utilisez pas le distributeur s'il n'est pas
correctement relié à la terre.
3 N'utilisez pas de rallonge pour le
8
branchement électrique du distributeur.
4 Ne mettez pas le distributeur en fonction si
les panneaux ne sont pas en place et fixés par
des vis.
5 N'introduisez pas les doigts ou des objets
dans les fentes des panneaux ou dans
l'ouverture du robinet.
6 Ne retirez pas le conteneur lorsque la
machine est en route.
7 L'appareil n'est pas indiqué pour l'installation
à l'extérieur.
8 N'installez pas l'appareil en zones sujets à
jets d'eau.
9 Ne pas employer des jets d'eau pour le
nettoyage de l'appareil.
10 La température ambiante adapte pour le bon
fonctionnement de l'appareil est entre +5° et
+50°C.
7 NETTOYAGE.
2 Remplissez le conteneur du produit voulu
préparé selon les indications du producteur.
3 Montez le couvercle sur le conteneur en
veillant à le positionner correctement.
4 Agissez sur les commandes (voir chapitre
5.1 DESCRIPTION DES COMMANDES).
5 Le distributeur doit toujours fonctionner à
couvercle fermé, afin d'éviter une éventuelle
contamination du produit.
6 Le distributeur doit fonctionner sans
interruption. Le chauffage s'arrêtera
automatiquement lorsque le produit sera prêt à la
distribution. Le dispositif d'agitation continuera à
fonctionner.
7 Le distributeur est équipé d'un conteneur à
fond clos amovible afin de faciliter les opérations
de nettoyage et désinfection.
ATTENTION
Ne retirez par le conteneur tant que la
plaque chauffante est chaude.
ATTENTION
Ne retirez pas le conteneur du distributeur
lorsque celui-ci contient du produit chaud.
IMPORTANT
L’appareil doit être installé sur une surface
horizontale.
ATTENTION
Si le câble est endommagé, il doit être rem-
placé par le fabricant ou par son service
technique ou de toute façon par du person-
nel qualifié pour éviter tout risque.
5 MODE D'EMPLOI
1 Avant d'utiliser le distributeur, lavez-le et
désinfectez-le suivant les indications du chapitre
5. 1 DESCRIPTION DES COMMANDES
Le distributeur est doté d'un interrupteur général
dont les fonctions sont :
Position 0 : le distributeur est éteint.
Position I : l'agitateur et le ventilateur sont
Le distributeur est équipé d'un thermostat, placé
sur le côté droit, pour le réglage de la température
du produit.
(VERSION ELECTRONIQUE)
L'interrupteur C de l'appareil a les fonctions les
en fonction.
9
 Loading...