

Page 1

Branson 00 series
Manual transmission: 2100/2400
Operator’s Manual
Kukje Machinery Co,.LTD
Page 2

- 2
-
CONTENTS
TO ENSURE SAFE OPERATION ……………………………………………………………… 6
GENERAL PRECAUTIONS…………………………………………..……………………… 6
GENERAL PRECAUTIONS DURING OPERATION………………………………………… 14
GENERAL PRECAUTIONS AFTER OPERATION………………….…………………… 15
GENERAL PRECAUTIONS FOR STORAGE……………………………………………… 17
GENERAL PRECAUTIONS IN INCLINED AREA …………………………………………… .19
MAINTENANCE BEFORE OPERATION…………………………….……………………… 20
MISC. PRECAUTIONS………………………………………………………………………… 21
ABOUT WARRANTY …………………………………………………………………………… 26
OVERVIEW OF THE TRACTOR ……………………………………………………………… 27
LOCATION OF SAFETY DECALS ………………………………………..…………………… 26
FUNCTIONS ………………………………………………………………………………… 31
PARTS FOR ENGINE CONTROL ………………………………….…………………… 31
PARTS FOR DRIVE & PTO ……………………………………………………………… 33
PARTS FOR HYDRAULIC SYSTEM ………………………………..……………………… 36
PARTS FOR ELECTRIC SYSTEM …………………………………..…………………… 37
INSTRUMENT PANEL ………………………………………………………………………… 39
OTHER PARTS ………………………………………………………..……………………… 42
OPERATION & WORK……………………………………………………………………… 43
1. CHECKING BEFORE OPERATION …………………………………………………… 43
2. BREAKING IN YOUR TRACTOR(FIRST 50 HOURS) ………….…………………… 48
3. STARTING AND STOPPING THE ENGINE ……………………….………………… 48
4. TO RAISE OR LOWER IMPLEMENTS ………………………………..………………… 52
5. ADJUSTING THE LOWERING SPEED OF THE IMPLEMENTS …………………… 52
6. DRIVING ON THE R OAD …………………………………………………….…………… 53
7. DRIVING ON A SLOPE ………………………………………………..……………… 54
8. ENTERING AND LEAVING THE PAVEMENT ………………………………………… 55
9. TURNING ON THE PAVEMENT ………………………………….………………… 55
10. DIFFERENTIAL GEAR LOCK ………………………………………..………………… 56
11. INSTALLING 3-POINT HITCH ………………………………………………………… 57
12. AUX. HYDRAULICS ………………………………………………..…………………… 58
13. ADJUSTING WHEEL TREAD ……………………………………………………… 59
14. POWER STEERING ………………………………………………………………… 60
15. PRECAUTIONS FOR CONNECTING THE IMPLEMENT ………………………… 60
18. ROPS FOLDING METHOD ……………………………………………………………… 61
MAINTENANCE AFTER WORK ……………………………………………….……………… 62
Page 3

- 3
-
1. MAINTENANCE AFTER WORK …………………………………………..……………… 62
2. MAINTENANCE FOR PROLON GED STORAGE ……………………………………… 63
PERIODIC MAINTENANCE AND ADJUSTMENT ……………………….……………… 64
1. PERIODIC MAINTENANCE SCHEDULE ………………………..………………… 65
2. OIL, GREASE, AND ANTI-FREEZE CHART …………………………………………… 66
3. FUEL, OIL, AND COOLANT CHART …………………………………………………… 66
4. OPENGIN AND CLOSING HOOD, SIDE COVER …………..………………… 67
5. CHEKING AND CHANGING OIL ………………………………………………………… 68
6. FILTER REPLACEMENT …………………………………………………….………… 70
7. RADIATOR SCREEN & AIR CLEANER ELEMENT …………………………………… 71
8. CLEANING OF RADIATOR SCREEN ………………………………………….……… 71
9. COOLANT ……………………………………………………………………….………… 72
10. DRAINING AIR FROM FUEL TANK …………………………………………………… 74
11. BATTERY ……………………………………………………………………………… 74
12. PIPES (Fuel Hoses) …………………………………………………………… 75
13. ELECTRICAL CABLES …………………………………………………….…………… 76
14. GREASING ……………………………………………………………………… 76
15. CLUTCH ………………………………………………………….…………………… 77
16. STEERING WHEEL …………………………………………………………… 77
17. BRAKE …………………………………………………………………………………… 78
18. FAN BELT ……………………………………………………….……………………… 79
19. TIRES …………………………………………………………….………….…………… 79
20. COLOR OF EXHAUST GAS ………………………………………………………… 80
21. FUSE & FUSEABLE LINKS …………………………………………………………… 80
22. TOE-IN ………………………………………………………………………..………… 81
TROUBLESHOOTING ………………………………………………………………..………… 82
1. ENGINE …………………………………………………………………………………… 82
2. CLUTCH & BRAKE ……………………………………………………………… 84
3. HYDRAULIC SYSTEM ……………………………………………………… 84
4. ELECTRICAL SYSTEM ……………………………………………………… 85
SPECIFICATIONS ……………………………………………………………………… 86
Page 4

- 4
-
Page 5

- 5
-
THANK YOU FOR PURCHASING A BRANSON TRACTOR.
-
This Manual contains handling tips and precautions for safe operation of your
new tractor. Read it carefully before you operate your tractor, and make sure
that you have a full understanding of this Manual. This will ensure correct
operation and to keep the tractor in optimum condition.
-
After reading the Manual, keep it close to the tractor for immediate reference.
-
When you loan your tractor to someone else, loan the Manual as well.
-
In case the Manual is lost or damaged, please contact your nearest
authorized dealer for a copy.
-
Some parts of this product may have been changed for the improvement of
quality or for safety reasons, in which case the photographs or drawings of
the parts in this booklet may not be the same as the actual parts installed on
this product.
-
If you find anything in this Manual unclear or need further explanation, please
contact your authorized dealer.
The instructions given with the following marks are very important for your safety.
Failure to obs erve the instruction given with t his mark may result in death
or injury.
Failure to obser ve the instruction given with this mark may ex pose you to
the risk of death or injury.
Failure to observe the instruction given with this mark may expose you to
injury.
• The section, “ To Ensure Safe Operation,” on the following pages details safety points to
be observed to ensure safe operation of your tractor.Please make sure you read it
carefully before operating the tractor.
Read this Manual for correct and safe use of the product.Failure to use the product properly
may result in an accident. Keep this Manual close to the tractor after you have
read it.
Page 6

- 6
-
TO ENSURE SAFE OPERATION
Be sure to observe the in str uct io ns g i ven in thi s section to avoid m ach in ery
breakdown or personal injury or death.
• GENERAL PRECAUTIONS
Beware of exhaust gas
Do not start or operate the engine in an enclosed
space.
And you should only operate engine outside or in a
well ventilated area.
[Otherwise]
The exhaust gas can cause intoxication and lead
to fatal consequences.
Carry out maintenance on a flat and
safe place.
Select a flat and safe location to secure the tractor
in place and will not cause a risk to people passing
by. Before carrying out the maintenance, block the
front and rear tires to prevent moving while servicing
tracks.
[Otherwise]
An unexpected accident may occur, such as
overturning of the tractor.
Carry out maintenance in a
well-lit place.
Make sure work area is properly lighted.
Use safety work lights with protective covering.
[Otherwise]
An unexpected accident may occur, possibly fire
or explosion.
Page 7

- 7
-
Prepare for emergencies
Keep a first aid kit and fire extinguisher handy at all
times while operating equipment.
Do not drive if you are:
• Unable to concentrate because of fatigue, under
treatment of medicine.
• Under the influence on alcohol
• Pregnant
• Under the age of 18
Wear the appropriate
clothing when operating
equipment
Do not wear
loose fitting clothes.
Do wear
proper foot wear with anti-slip soles,
safety helmet and protective comfortable clothes to
allow freedom of movement.
【Otherwise】
You will be exposed to a risk of being entangled
will equipment resulting in injury
Use only recommended
implements
Be sure to use only implements which are
recommended by manufacturer.
【Otherwise】
An unexpected accident may occur or tractor
may not perform properly
Page 8

- 8 -
Fasten your seat belt at all
times
Keep your seat belt fasten at all times while
operation tractor.
【Otherwise】
There is a risk of death or serious injury if an
accident occurs.
Check the safety of the
tractor and start to move
slowly.
Only operate tractor while people or animal are at
safe distance away.
Check around the tractor, start the engine, and
move slowly.
【Otherwise】
There is a risk of injury.
Pay attention to the
shoulder of the road
When moving along the unpaved road with ditches
or slanted sides, pay attention to the shoulders.
【Otherwise】
There is a risk of falling over.
Connect the break pedals
when driving on a road.
Make sure to connect the brake pedals when driving
on a road.
【Otherwise】
There is a risk of abrupt turning or overturning
due to one-sided braking.
Page 9

- 9
-
Avoid braking, or turning at
excessive Speed
Reduce throttle speed when making a turn, apply
brake on driving on a hilly or curved road.
.
【Otherwise】
There is a risk of overturning
Observe traffic regulations
and drive safely.
When driving on the road, observe the traffic
regulations and wear a hardhat and seat belt.
【Otherwise】
There is a risk of accident or injury.
Only driver should be
aboard the tractor while in
operation
This tractor is designed to allow only one operator.
The driver must not allow anyone else to get on the
tractor.
* Especially, children
【Otherwise】
An unexpected accident may occur.
Donot allow anyone near
while operating the tractor
or implement.
When engaging or disengaging the implement by
moving the tractor, make sure that no one is around
the tractor or between the implement and the tractor.
【Otherwise】
There is a risk of accident or injury.
Page 10

- 10 -
Keep children away from
the tractor.
Fully warn the children and keep them away from
the tractor at all times.
【Otherwise】
There is a risk of injury.
Properly train anyone
operating
Explain the handling tips in detail and make sure the
driver reads the Manual before driving.
【Otherwise】
There is a risk of death, serious injury,
or damage to tractor.
Treatment of hazardous materials
z Properly discard hazardous materials.
z Hazardous materials from tractor are the
following: Coolant, brake oil, oil, filter elements,
battery and so on.
● When draining fuel, oil or other liquids, use a
container without holes. Do not dispose of
chemicals on the ground or in rivers or
waterways.
No smoking or open flame when
fueling.
Absolutely no lit cigarettes, matches, or lighters any where
near when fueling the tank.
【Otherwise】
Fire or explosion may occur.
Page 11

- 1 1 -
Remove dirt and debris
from muffler and engine
before operating
[Otherwise]
There is a risk of fire.
Frequency inspects the
electrical parts and wiring.
Inspect electrical wiring contact insulation to avoid
shorting or sparks.
[Otherwise]
There is a risk of fire due to short circuit.
Do not over inflate tires
When filling tires with air, do not inflate it beyond the
maximum pressure stated in this booklet.
[Otherwise]
The tire may blow out, causing an injury.
Use correct tools.
Use proper tools to carry out all maintenance
procedure.
【Otherwise】
There is a risk of accident due to poor
maintenance.
Page 12

- 12 -
Secure hood and side
covers before operate
tractor.
After detaching the covers for checking or
maintenance, make sure to put them back in their
place.
[Otherwise]
There is a risk that you may get entangled in the
tractor or get injured.
Observe correct procedures
when installing or removing
the battery.
Connect the (+) terminal first when installing the battery,
and disconnect the (-) terminal first when removing it.
[Otherwise]
There is a risk of burn or fire due to short circuit.
Connect dual brake pedal
before moving tractor.
Check if the brakes work properly and evenly on
both
sides or if the steering wheel is loose.
[Otherwise]
There is a risk of accident.
Lock steering tilt before
moving tractor.
Except when you adjust the steering wheel tilt,
make sure that the tilt lever is placed in the <Lock>
position.
【Otherwise】
The tractor may not turn properly cause an accident.
Page 13

- 13 -
Avoid contact with the battery
solution.
Be careful that your body or your clothes do not come in
contact with the battery solution.
【Otherwise】
You may get burnt or your clothes may be damaged.
Perform the required
maintenance.
Check the tractor before and after use and perform
the required maintenance.
【Otherwise】
There is a risk of accident, injury or machinery
breakdown.
Page 14

- 14 -
• GENERAL PRECAUTIONS DURING OPERATING
Use the loading ramps
when crossing a ditch or a
dike
Be sure to use the loading ramps when crossing a ditch
or dike, or when passing through soft land. The loading
ramps must be suitable for the tractor in width, length
and strength.
【Otherwise】
There is a risk of accident that the tractor may
slip or turn over.
Properly ventilate when
working in a green house.
Ventilate the green house to let out the exhaust gas.
【Otherwise】
The exhaust gas can cause intoxication and lead
to fatal consequences.
Pay attention and keep
hands on the steering wheel
while driving.
【Otherwise】
There is a risk of accident or injury.
Stop the engine when
removing grass, etc. from
blades of the cultivator.
【Otherwise】
There is a risk that you will get entangled in the
cultivator or sustain a serious injury.
Page 15

- 15 -
• GENERAL PRECAUTIONS AFTER OPERATING.
Cover the PTO shaft when
not in use.
When the PTO shaft is not in use, apply grease to it
and keep it covered.
【Otherwise】
There is a risk that you may get entangled or get
injured.
Carry out maintenance after
the parts have cooled down.
Carry out the maintenance work after the heated
area such as the muffler or the engine is fully cooled
down.
[Otherwise]
There is a risk of getting burnt.
Be careful of high oil pressure.
Make sure that the hydraulic coupling or the hose is not loose
or damaged. Before separating the hydraulic coupling or the
hose, eliminate the high pressure inside the hydraulic system.
[Otherwise]
The oil under high pressure may cause damage
to the skin or injury.
Make sure that you are
seated in the driver’s seat
with your seat belt fastened
before start engine.
When starting the engine, make sure that you are
seated in the driver’s seat with your seat belt
fastened and check the seat position and the safety
of the tractor.
【Otherwise】
An unexpected accident may occur.
Page 16

- 16 -
Put tractor cover on only after
tractor has cooled down.
Put tractor cover on only after parts such as the
engine and muffler have cooled down.
[Otherwise]
There is a risk of fire
Do not open the radiator
cap when the radiator is hot.
Never open the radiator cap when the radiator is
heated.
【Otherwise】
Hot water may splash, causing burns or damage.
Be careful of hot muffler.
During operation and right after the engine is turned
off, the muffler is very hot. Avoid touching it, as you
may get burnt.
Page 17

- 17 -
• GENERAL PRECAUTIONS FOR ST ORAGE
Disconnect the clutch when
storing the tractor for a long
time.
When storing the tractor for a long period of time,
make sure to put the clutch pedal in the “disconnect”
position.
【Otherwise】
The tractor may move and cause injury or an
accident.
Disconnect the Battery and
the key when storing the
tractor for a long period of
time.
When storing the tractor without use for a long
period of time, remove the battery and keep the key
in a safe place.
【Otherwise】
There is a risk of an accident.
Be sure to connect battery
cable on the right side and sequence.
When connecting battery to tractor, connect + terminal first
then – terminal but when disconnecting battery from tractor
disconnect – terminal first then + terminal
[Otherwise]
There is a risk of fire or injury
Confirm that the implement
is down on the ground
when starting the engine.
When starting the engine, confirm that the position
lever is on “Lowest” and that the auto rotary lever is
on “Release”.
【Otherwise】
Implement may come down suddenly and cause an injury.
Page 18

- 18 -
Maintenance periodically
After using tractor, visit your local dealer for
maintenance, such as oil change and filters.
[Otherwise]
There is a risk of accident due to poor
maintenance.
Page 19

- 19 -
• GENERAL PRECAUTIONS IN INCLINED AREA
Use loading ramps with
proper slope & loading
capacity.
Loading or unloading must be done on a flat and
safe place, the tractor engine switched off, and the
parking brake engaged.The loading ramps must
be non-slip and have sufficient strength, length, and
width for the tractor.
【Otherwise】
The tractor may roll backwards or fall off causing accident or injury.
Move the tractor backward
when loading, and forward
when unloading.
Move the tractor backward when loading it on the
truck, and forward when unloading from the truck.
【Otherwise】
The tractor may roll or fall off causing accident
or injury.
Be careful when driving on
the loading ramps.
【Otherwise】
The tractor may roll backwards or fall causing
accident or injury.
Do not shift gears on slopes
or on the loading ramps.
When driving on slopes or on the loading ramps, select
the proper gear and then do not shift the gear.
【Otherwise】
There is a risk of slipping, rolling, or overturning.
Page 20

- 20 -
• MAINTENANCE BEFORE OPERATING
Stop the engine before
maintenance.
Turn engine off before performing any maintenance on
tractor
[Otherwise]
There is a risk of injury.
Fill the fuel tank only after
the engine has cooled.
Never add the fuel while the engine is running or hot.
【Otherwise】
The fuel may ignite and result in fire.
Use caution when checking the
battery.
Avoid fire when checking or charging the battery.
【Otherwise】
You may get burned due to ignition or explosion of
the battery.
Page 21

- 21 -
• Misc. PRECAUTIONS
Do not modify the tractor.
Use only the genuine parts or other approved parts.
Do not modify the tractor.
【Otherwise】
machinery breakdown.
Pay attention when
turning with implement.
Depending on implements, the overall length may
become very long. Pay particular attention to people
or objects nearby when making a turn.
【Otherwise】
There is a risk of person injury or a collision of
the implement.
Move wheels to widest
setting when working slope
or when towing.
【Otherwise】
There is a risk of turning over.
Use caution when towing
a trailer
Link the brake of the trailer with the brake of the
tractor.Do not shift gears when driving on a hill.
【Otherwise】
There is a risk of accident or injury.
Page 22

- 22 -
Follow the instruction
manual when engaging an
implement
When engaging an implement to the tractor, follow
the instruction manual for the implement.
【Otherwise】
There is a risk of personal injury or damage to
the tractor.
Balance a heavy
implement with weights.
When engaging a heavy implement, load the
weights on the front to keep the balance of the
tractor.
【Otherwise】
There is a risk of accident or injury due to loss
of balance.
Pay attention to the
balance between the front
and rear side during
loader operation.
During loader operation, apply weights or implement
to avoid loosing balance between the front and the
rear side of tractor.
[Otherwise]
There is a risk of overturning accident due to
loss of balance.
Do not put hands or feet
under or near implement.
Do not get under the implement or put your feet
under it.
【Otherwise】
The implement unit may fall down and there is a
risk of injury.
Page 23

- 23 -
Do not substitute balance
weights with a person or
anything else.
Do not use a person or anything else in place of the
balance weight. Use only recommended balance
weight for traction.
【Otherwise】
There is a risk of accident or injury.
Be careful of unexpected
movement when using a the
rotary
When working with the rotary, put the rotary slowly
on soft or rocky ground.The tractor may be pushed
in an unexpected direction by the rotating force of
the rotary.
【Otherwise】
There is a risk of accident or injury
Properly secure tractor
during transports.
When transporting the tractor, apply the parking
brake with gear engaged and fasten the tractor to
the truck securely sufficient strength.
【Otherwise】
There is a risk of accident that the tractor may
fall off the truck.
Connect the brakes on both
sides when loading or
unloading the tractor
【Otherwise】
The tractor may overturn due to one-sided
braking when the brake pedal is depressed in an
emergency.
Page 24

- 24 -
Release the differential
gear lock when making a
turn.
Make sure to release the differential gear lock when
making a turn.
【Otherwise】
The tractor may not turn to the direction you
want and cause an accident.
Use the drawbar when
towing.
Make sure to use the drawbar when towing. Never
tow anything with the top link or the lower link.
【Otherwise】
The tractor may turn over.
Pay special attention when
on a
slope or loading
ramps.
Pay special attention to driving on a slope or the
loading ramps.
【Otherwise】
There is a risk of accident that the tractor may
slip, roll, or overturn.
Turn off engine in a flat
area when leaving the
tractor.
When leaving the tractor, park the tractor on a flat
and safe area, turn off the engine, and apply the
parking brake. Also, let the work unit rest on the
ground.
【Otherwise】
The tractor may move and cause an accident.
Page 25

- 25 -
Remove spilled excess fuel
before starting engine.
After filling the fuel tank, close the fuel filler cap
completely and wipe off the excess fuel thoroughly.
【Otherwise】
There is a risk of fire.
Be aware of the PTO RPM
requirements for the
implements
Do not use a low-revolution implement at high
revolution.Be sure to follow the designated PTO
requirements for the implements.
【Otherwise】
The performance of the implement may not
properly work and there is a risk of accident or
injury or damage to the tractor.
Only engage or disengage
implements on flat, level
area.
Engage or disengage implements on a flat, level,
area. Supply proper lighting at all times especially at
night.
【Otherwise】
There is a risk of accident or injury.
Engage the parking brake
during warm of engine.
【Otherwise】
The tractor may move and cause an accident or
injury.
Page 26

- 26 -
ABOUT WARRANTY
WARRANTY
You will need the “Warranty Registration” when your tractor requires warranty service. Read it and keep
in a safe place.
Trouble shooting
In case of machinery trouble, refer to “Trouble shooting” on end of this manual. If the trouble cannot be
rectified, please contact your nearest authorized dealer.
<Information you will need when contacting the dealer for service>
x Type of model and machine s/n number.
x In case of engine, the engine s/n number.
x Circumstances of breakdown.
(What kind of work, gear position, etc)
x Amount of work done.
(Square footage or number of hours)
x Other information in as much detail as possible
surrounding the circumstanced of the
breakdown.
Chassis S/N
Engine S/N
Page 27

- 27 -
OVERVIEW OF THE TRACTOR
(Manual transmission)
ROPS
Direction Lamp
Rear Tire
Steering Wheel
Hood
Head Lamp
Combination Lamp
Lower Link
Fuel Tank
Front Tire
Seat
Drawbar
Page 28
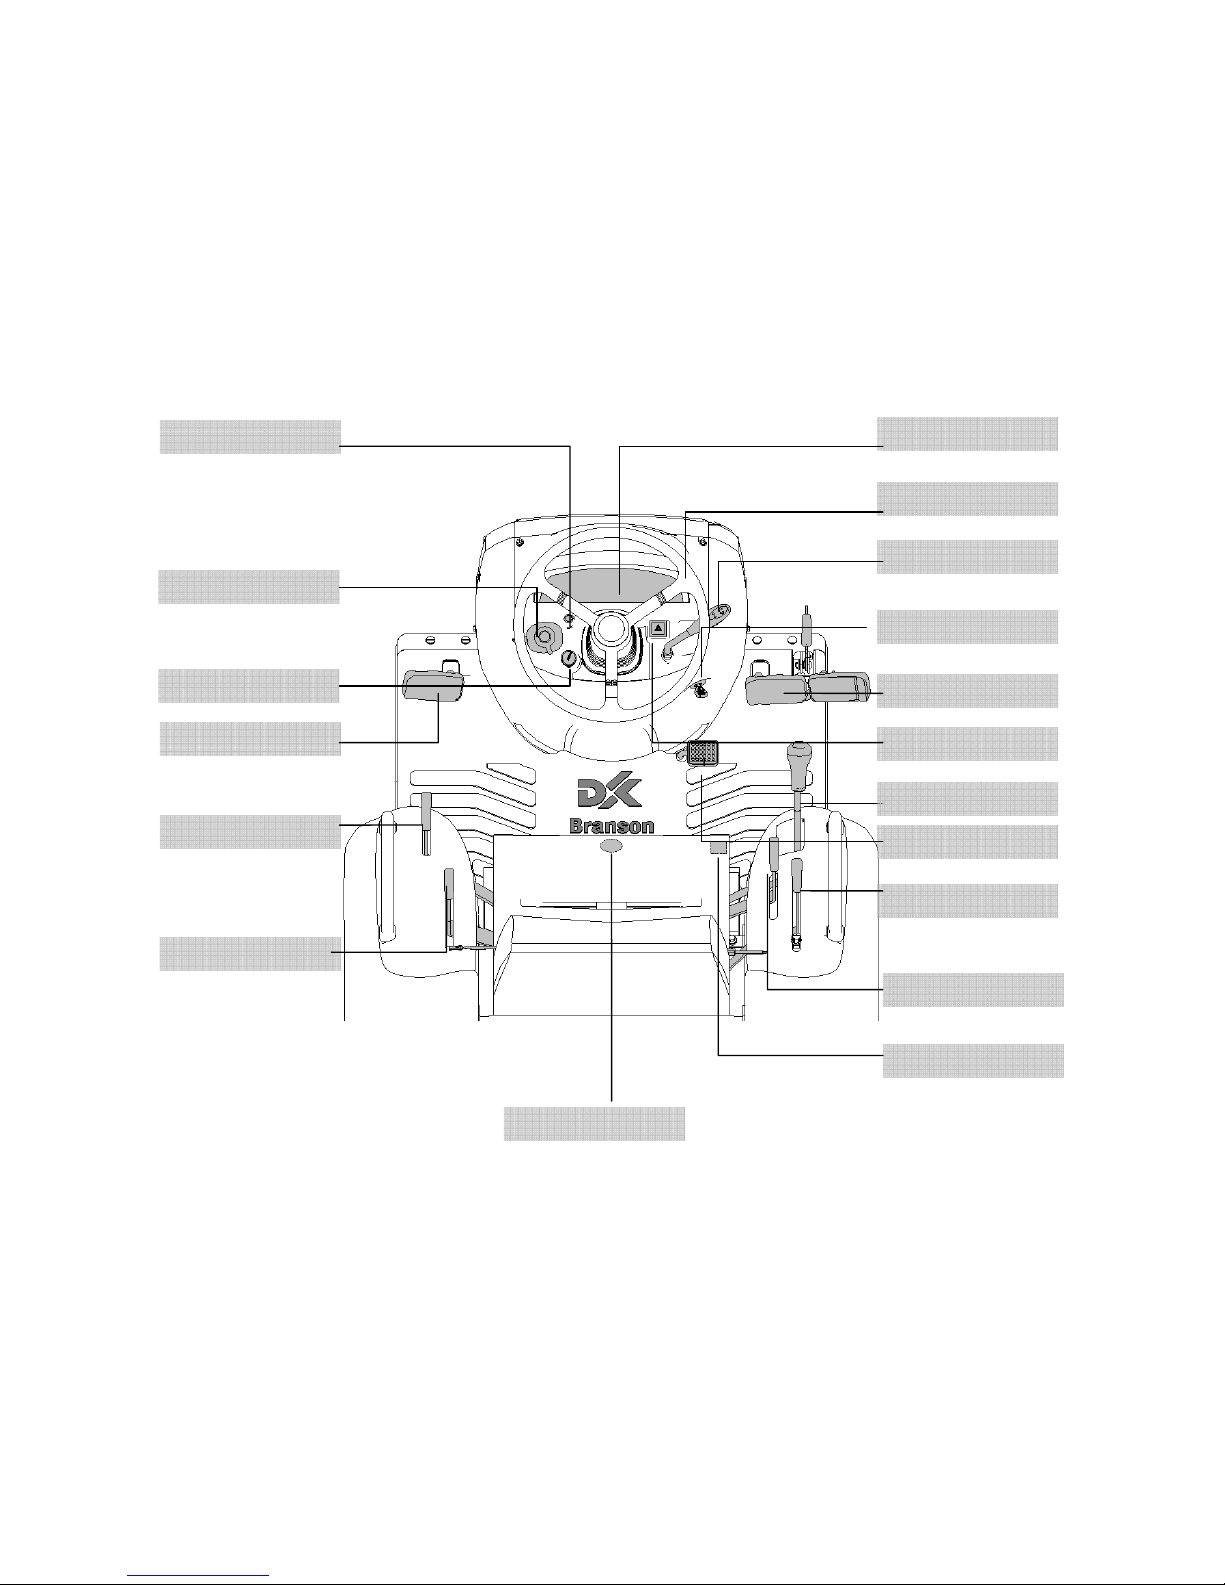
- 28 -
OVERVIEW OF THE TRACTOR
Emergency Stop S/W
Clutch Pedal
Range Shift Lever
PTO Shift Lever
MFWD Lever
Slow Return Valve
Differential Lock Pedal
Position Lever
Brake Pedal
Accelerator Pedal
Key Switch
Accelerator Lever
Steering Tilt Lever
Instrument Panel
Main Shift Lever
Emergency Lamp S/W
Combination S/W
Side Lamp S/W
Page 29
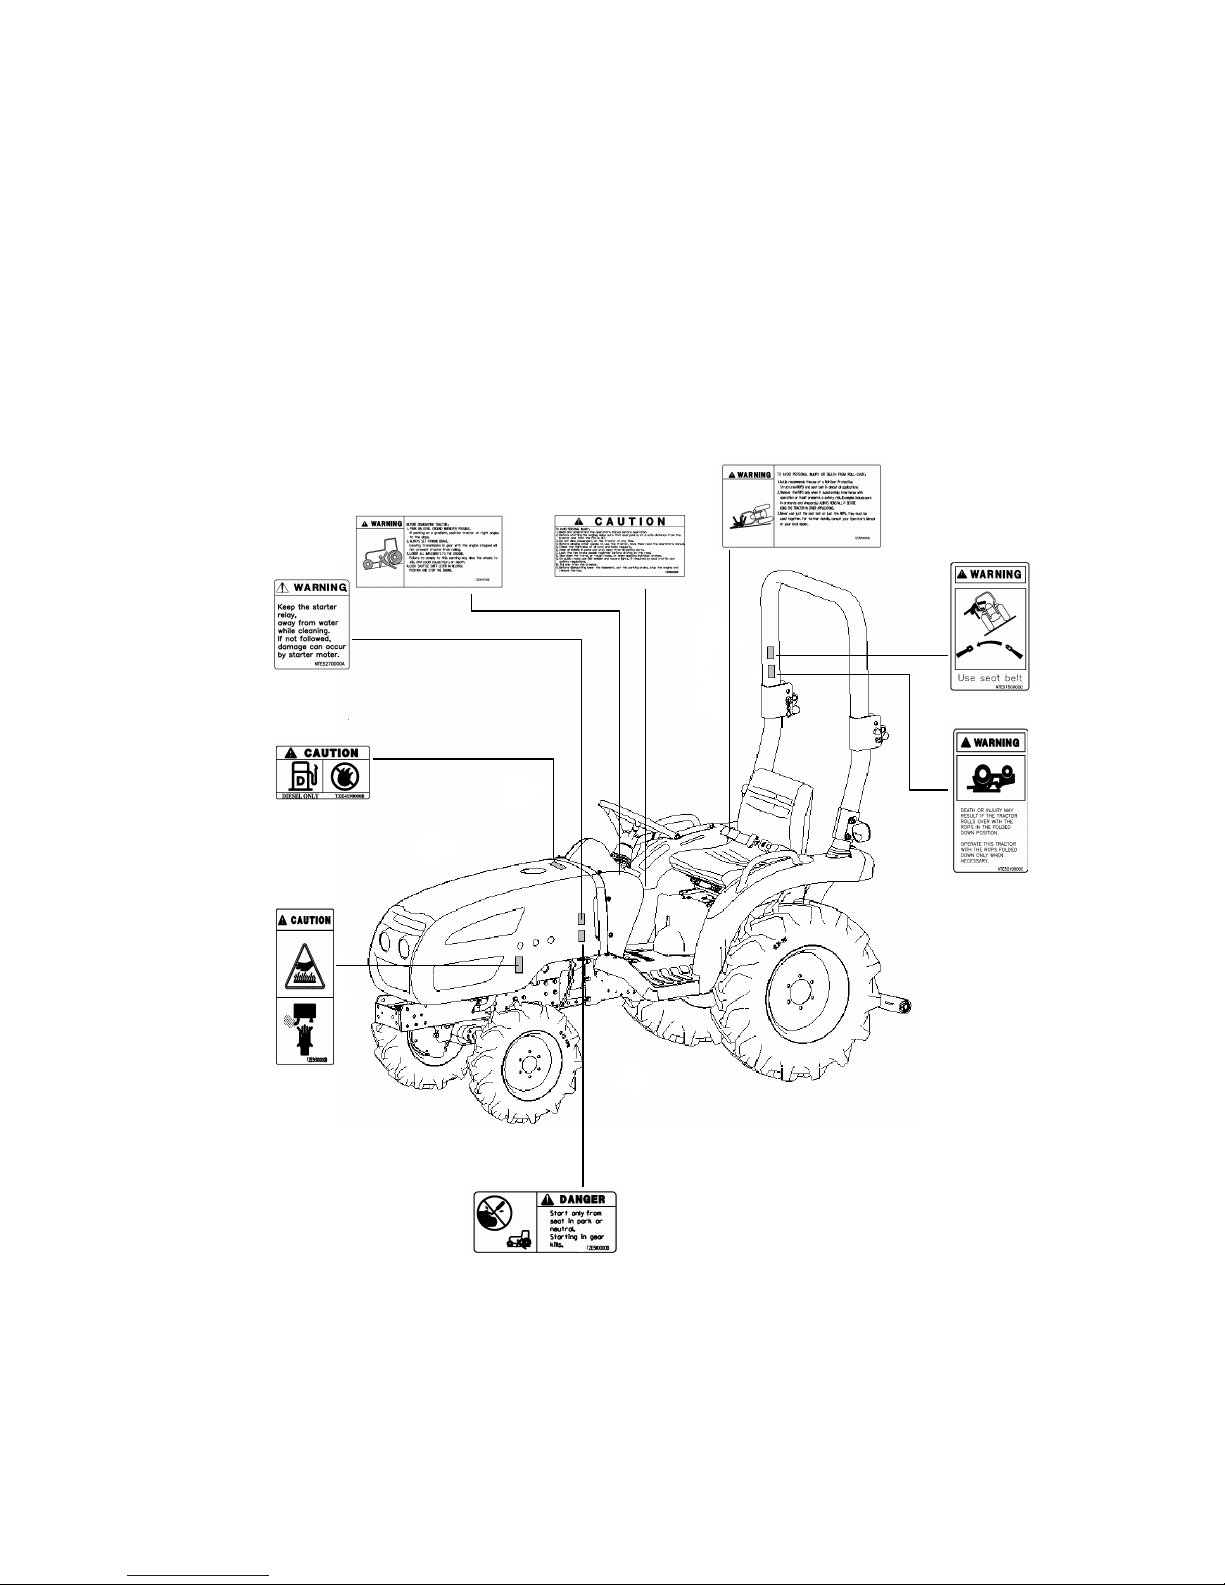
- 29 -
LOCATION OF SAFETY DECALS
Safety decals are provided to ensure safe operation.
Keep the safety decals clean at all times and protect them from damage.
In case of loss or damage, replace with a new decal.
6. NTE5270000A4
10. TA00016518A 1 1.TA00016517A
12. TZE5170000B4
9. NTE5150000C4
8. NTE5210000C4
4.TZE4190000B4
5. TZE5130000B4
7. TZE5110000B4
Page 30
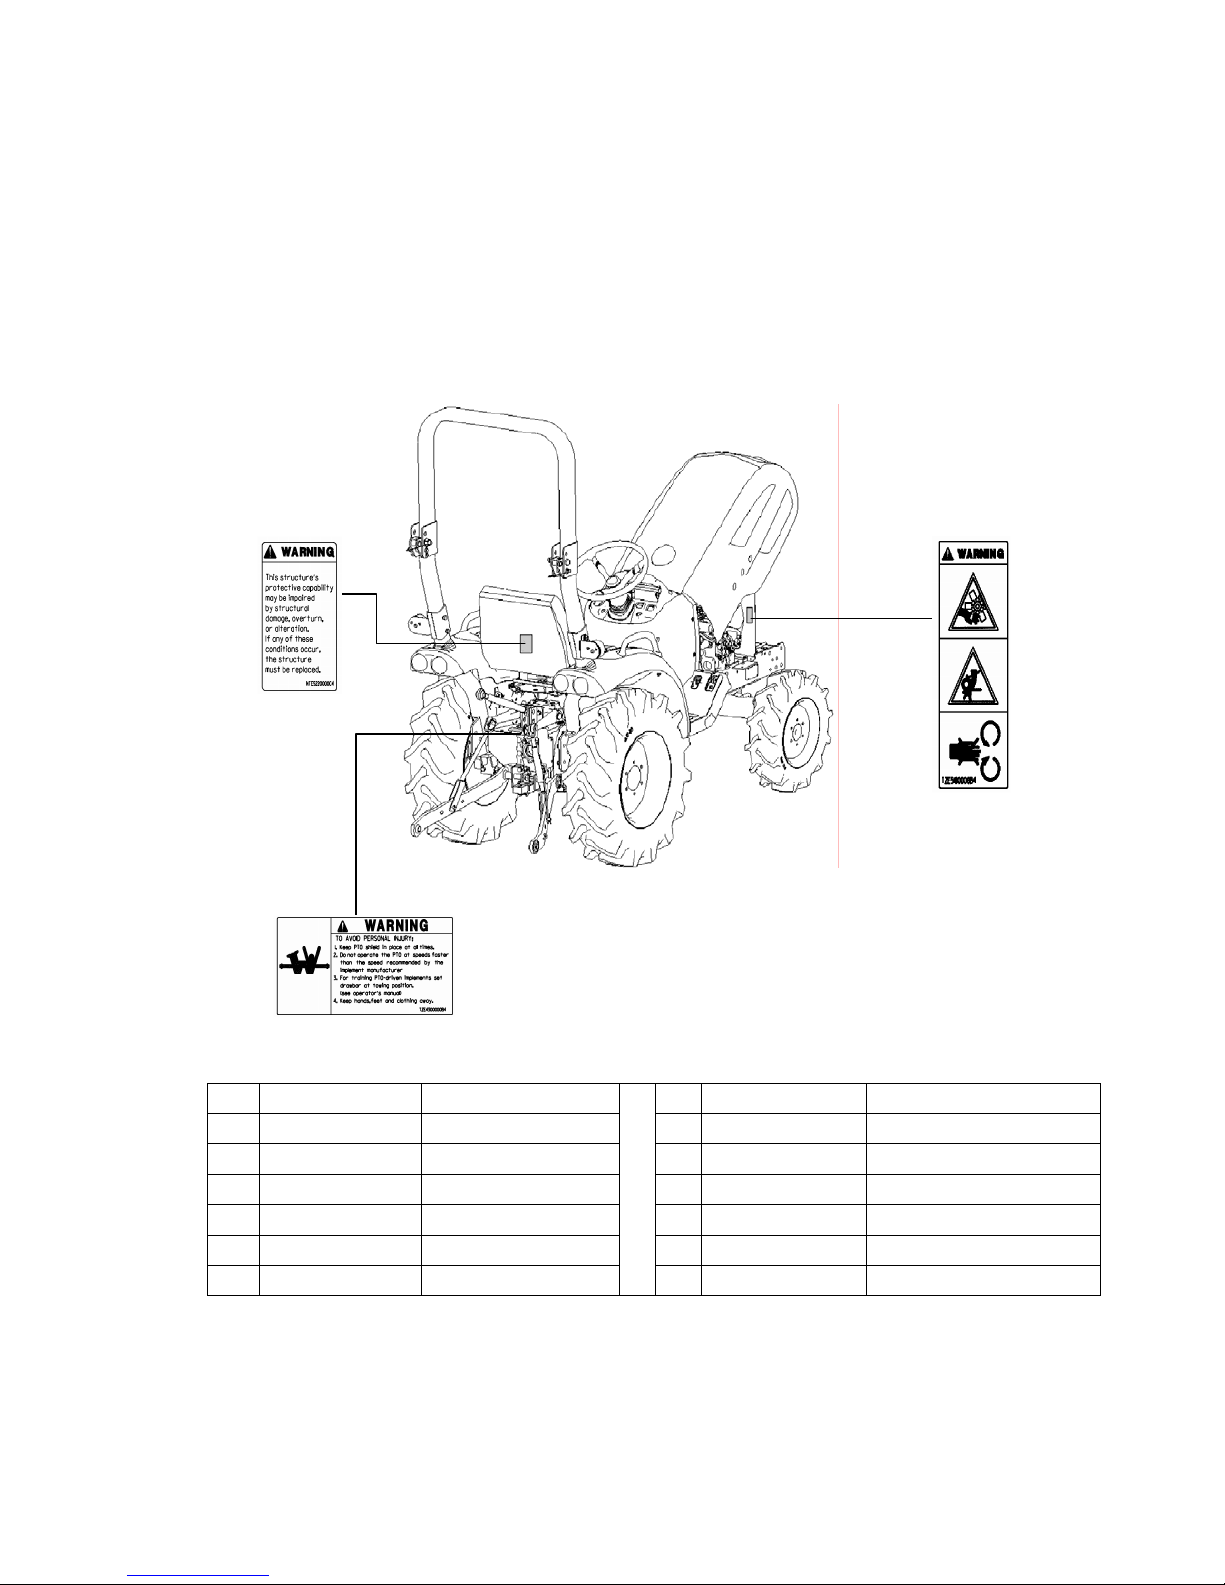
- 30 -
LOCATION OF SAFETY DECALS
Safety decals are provided to ensure safe operation.
Keep the safety decals clean at all times and protect them from damage.
In case of loss or damage, replace with a new decal.
No Part code Part description No Part code Part description
1 TZE5180000B4 LABEL, FAN WARNING 7 TZE5110000B4 LABEL, START CAUTION
2 TZE4300000B4 LABEL, PTO CAUTION 8 NTE5210000C4 LABEL, PTO
3 NTE5220000C4 LABEL, SAFETY 9 NT E51500 00C4 LABEL, DRAWBAR
4 TZE4190000B4
LABEL, FILLER CAUTION
10 TA00016518A LABEL, SAFETY
5 TZE5130000B4 LABEL, MUFFLER 11 TA0016517A LABEL, SAFETY
6 NTE5270000A4
LABEL, START CAUTION
12 TZE5170000B4 LABEL, ROPS WARNING
3. NTE6220000C4
2. TZE4300000B4
1. TZE5180000B4
Page 31
- 31 -
FUNCTIONS
A. PART FOR ENGINE COMTROL
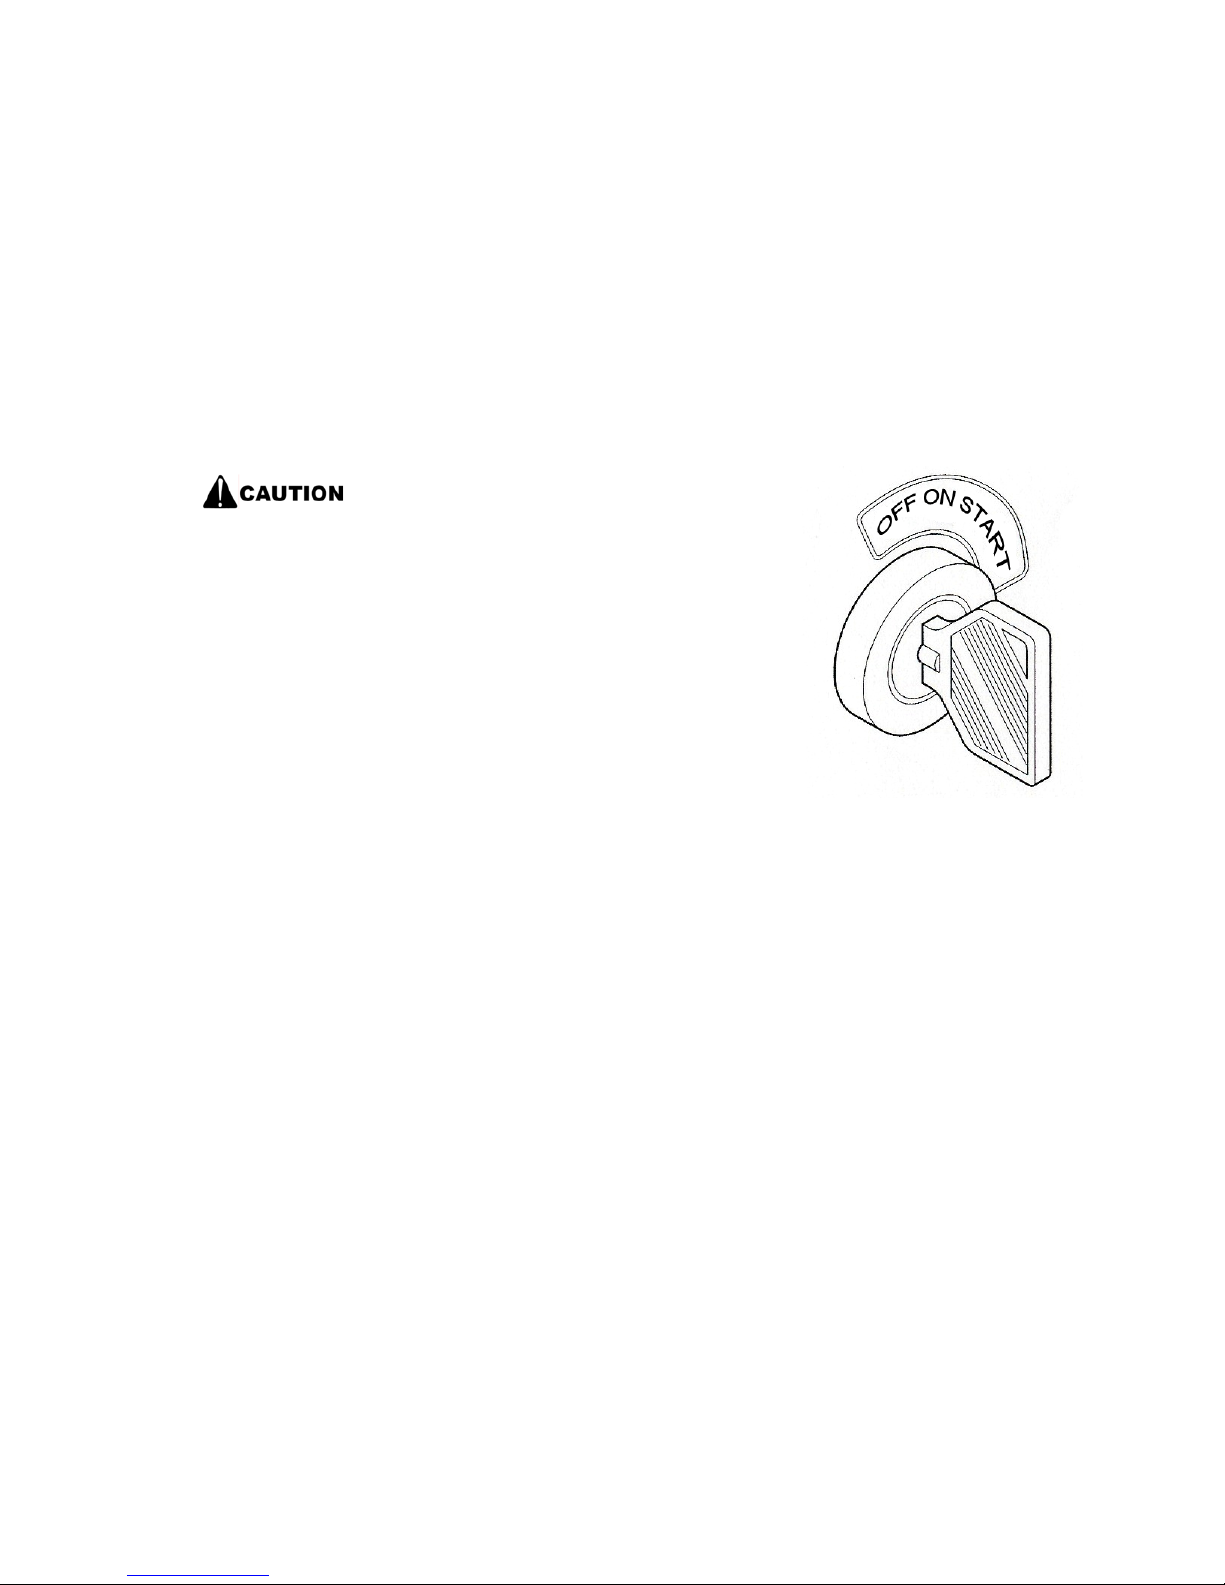
1. Main Key Switch
When the tractor is not in use,
take out the key and keep it in a
safe place. Otherwise, children
may start the tractor and cause an
accident.
It is used to start the engine.
“OFF” The engine is stopped, and current does no
flow. (The key can be taken out)
“ON” Electric current flows to the switched of all
electrical parts. If the engine is stopped, the engine
oil pressure pilot lamp and the battery charge pilot
lamp are lit. Depending on the outside temperature,
the thermostat pilot lamp may also be lit.
“START” Starting motor turns and the engine is
started. Once the engine is started, take your had
off the key. The key will return to the “ON” position
automatically and the engine will keep running.
Turn engine off before performing any maintenance
on tractor
Page 32
- 32 -
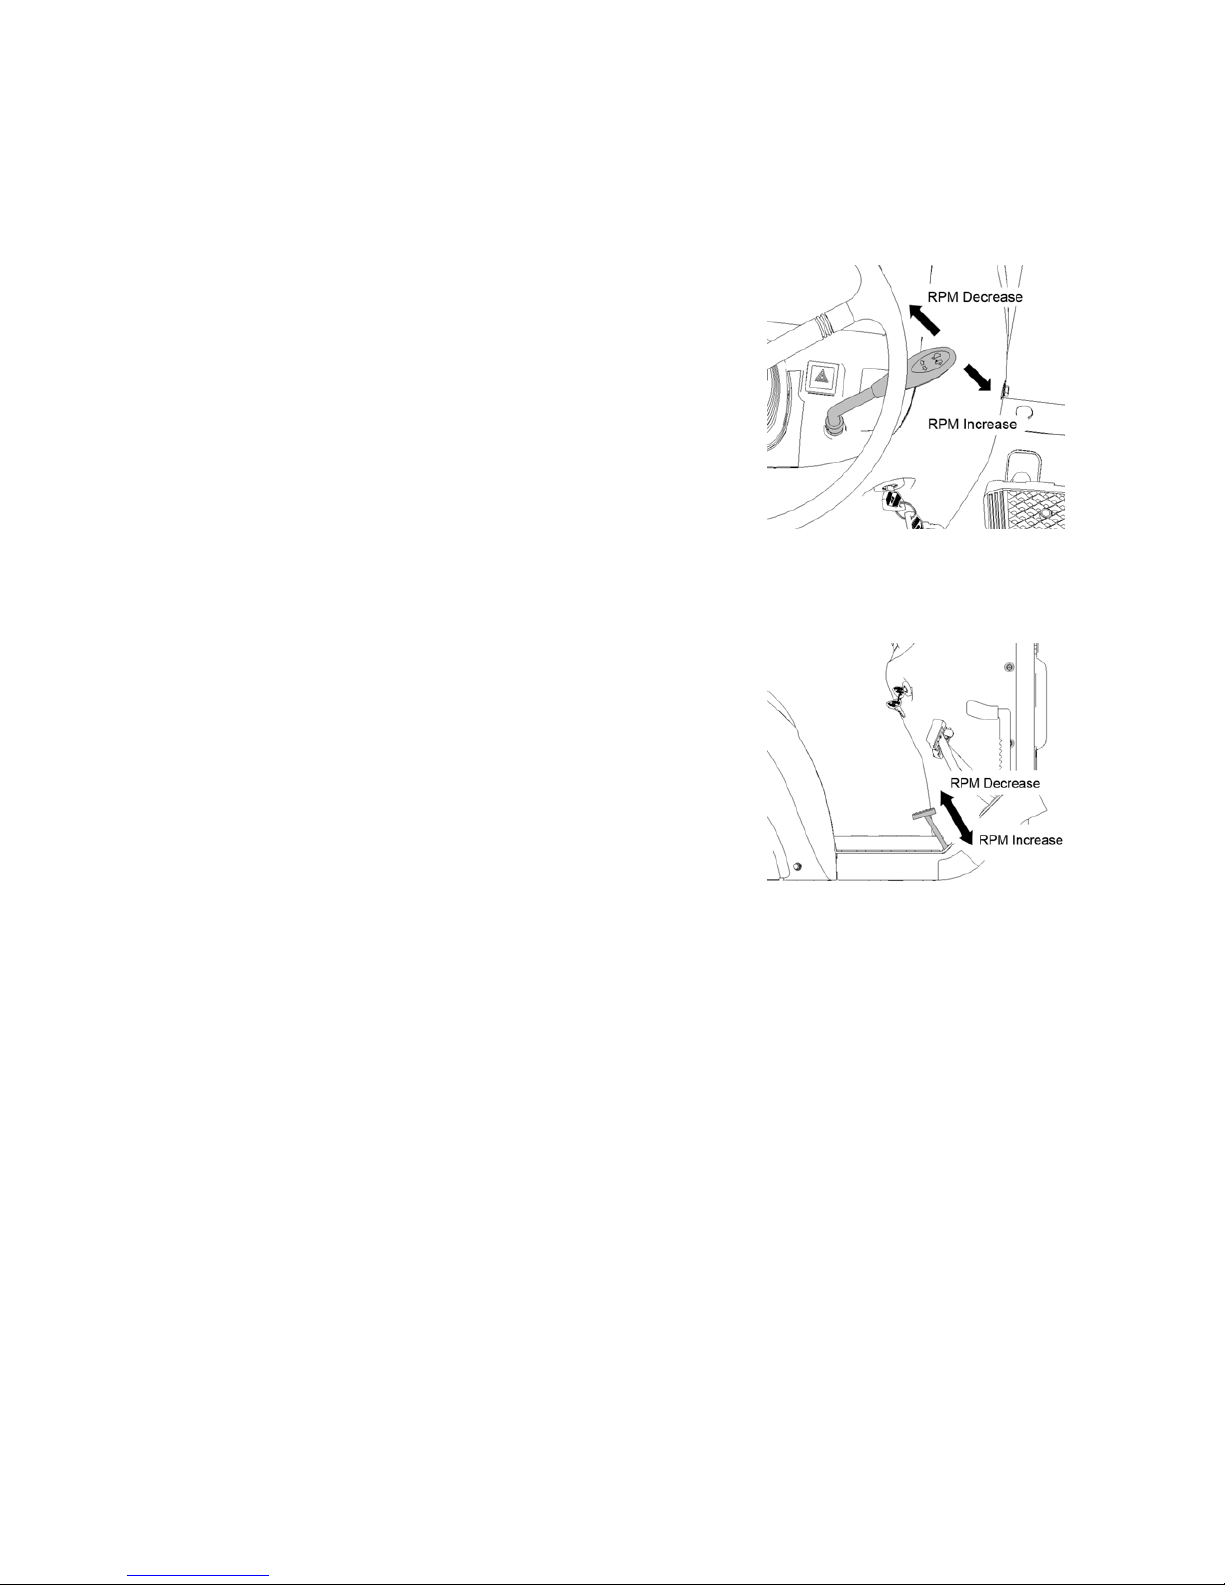
2. Accelerator Lever
It is used to make the engine run faster or slower. It
is also used when working at a constant speed.
3. Accelerator Pedal
It is used to make the engine run faster or slower. It
is usually used when driving on a road.
(Manual transmission only)
“
Page 33
- 33 -
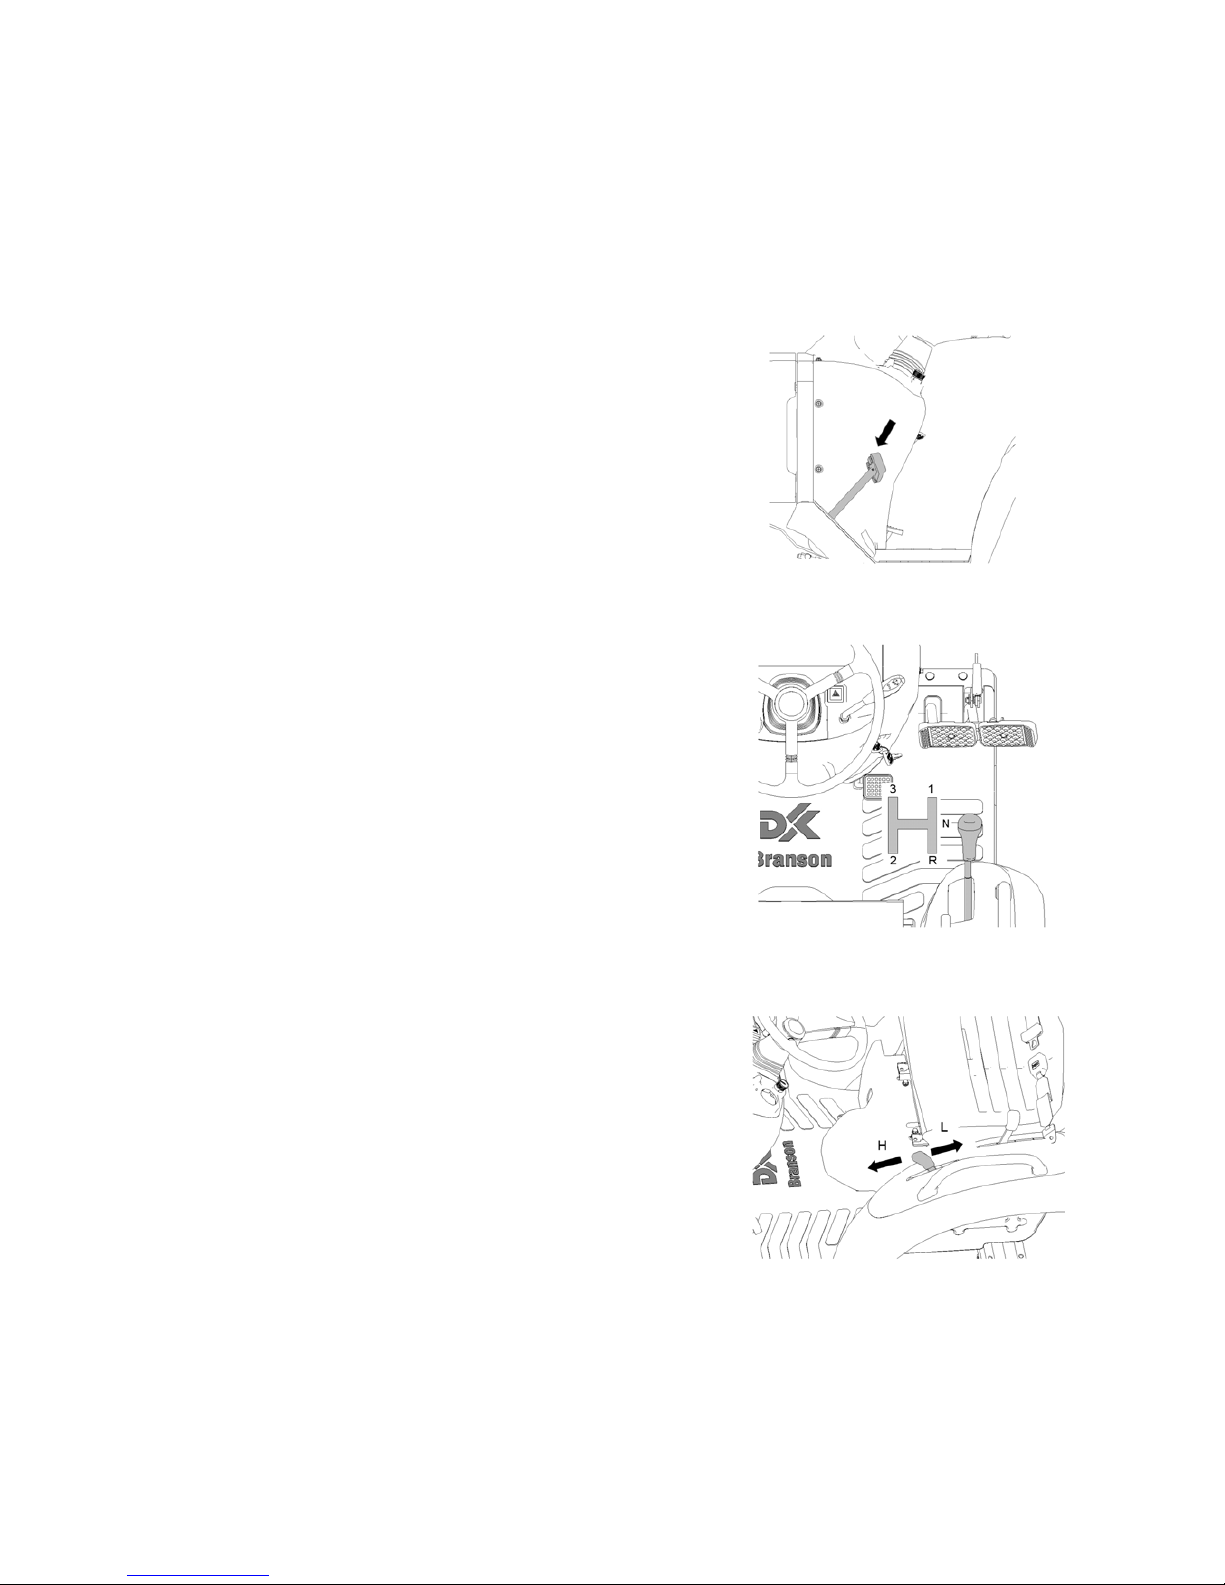
B. PART FOR DRIVING & PTO
1. Clutch Pedal
It is used to transmit the engine power.
(Manual transmission only)
2. Main Shift Lever
The gear is shifts in four levels. When shifting the
gears depress the clutch fully.
(Manual transmission only)
3. Range Shift Lever
The range gear is shifted in three levels, in
combination with the main gear shifting.
When shifting the range gear, depress clutch fully
(Manual transmission)
Page 34
- 34 -
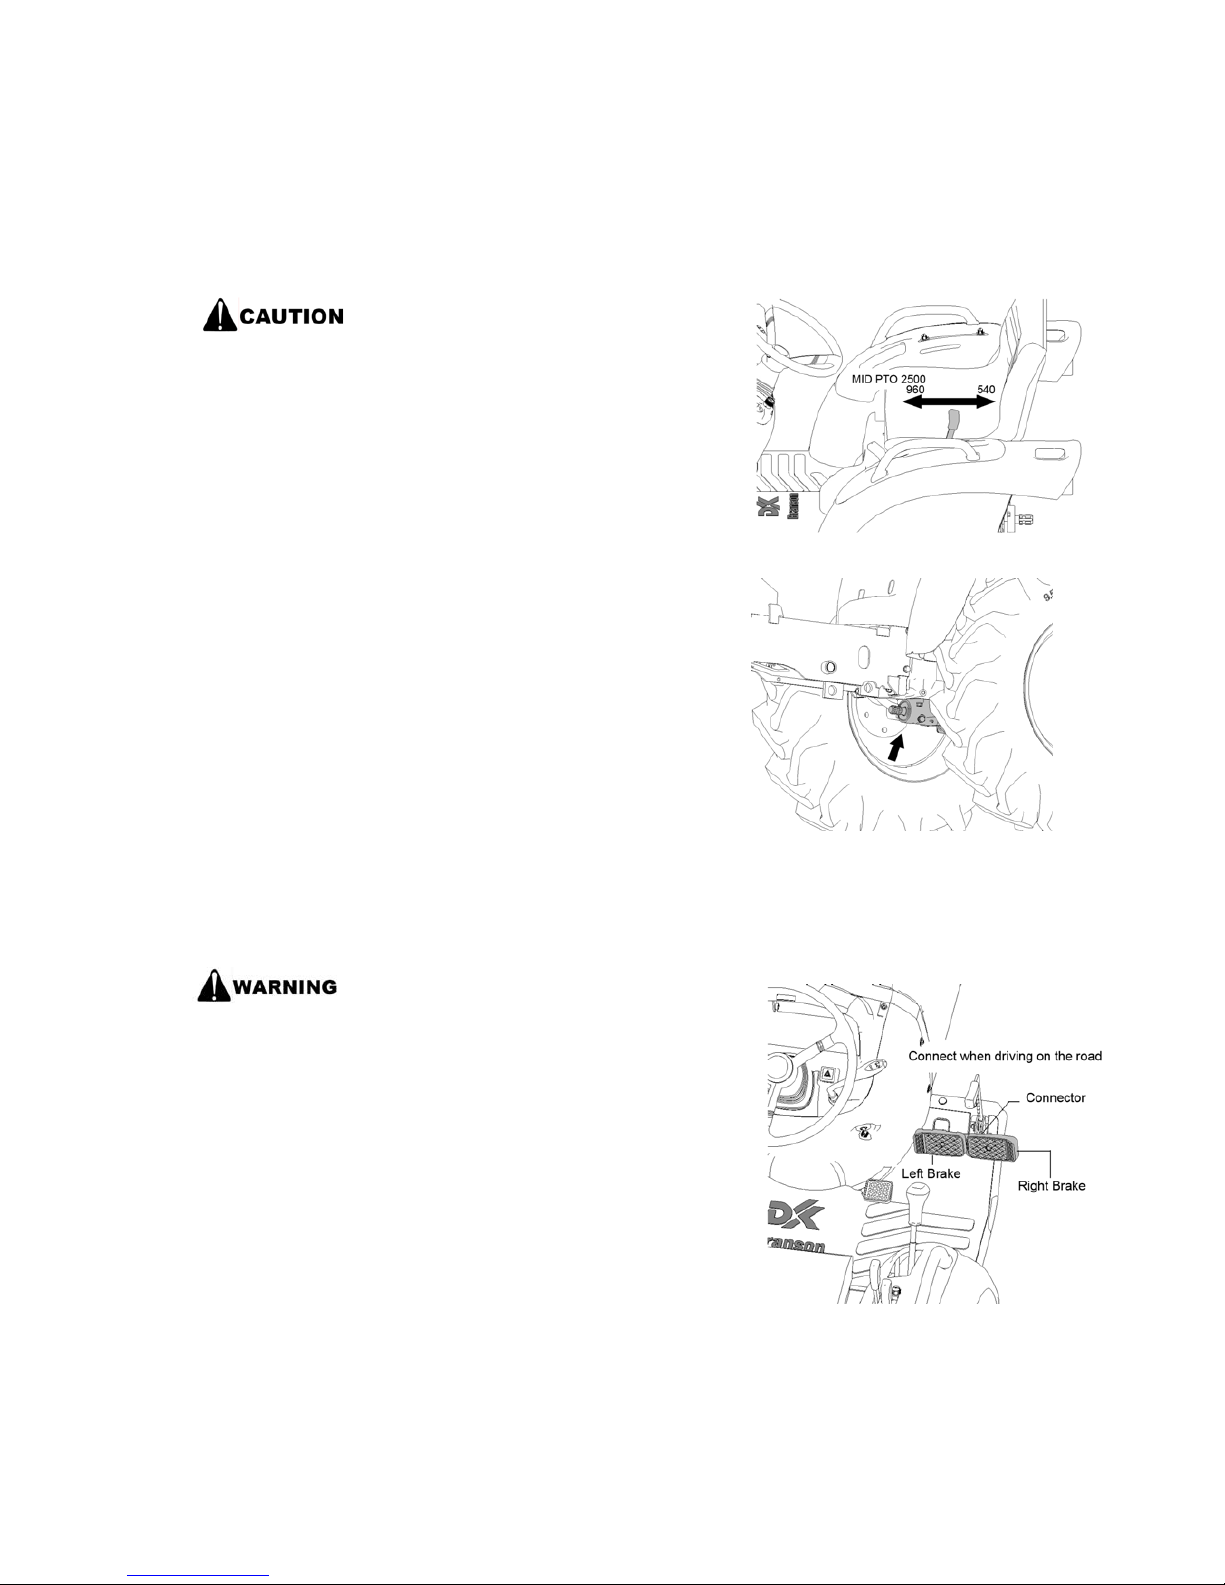
4. PTO Lever
Observe the PTO speed
designated on the work unit.
Otherwise, the work unit may be
damaged and cause an accident.
The revolution of the PTO shaft can be shifted in
two levels.(1
st
Rear 540rpm : 2nd Rear 960rpm -
Mid 2500 rpm) When shifting level, press clutch
pedal deeply.
* Mid PTO
The mid PTO is available for Branson approved
implements
5. Brake pedal
Make sure to connect the brake
pedals with the connector when
driving on a road.
[Otherwise]
There is a risk of abrupt turning or overturning due
to one-sided braking. Brake pedals are independent
of each other and can be used for making a small
turn on the pavement. Depressing the brake pedal
on the side to which to make a turn, the rear wheel
on that side is stopped and the tractor can make a
small turn.
Page 35
- 35 -
6. MFWD Lever
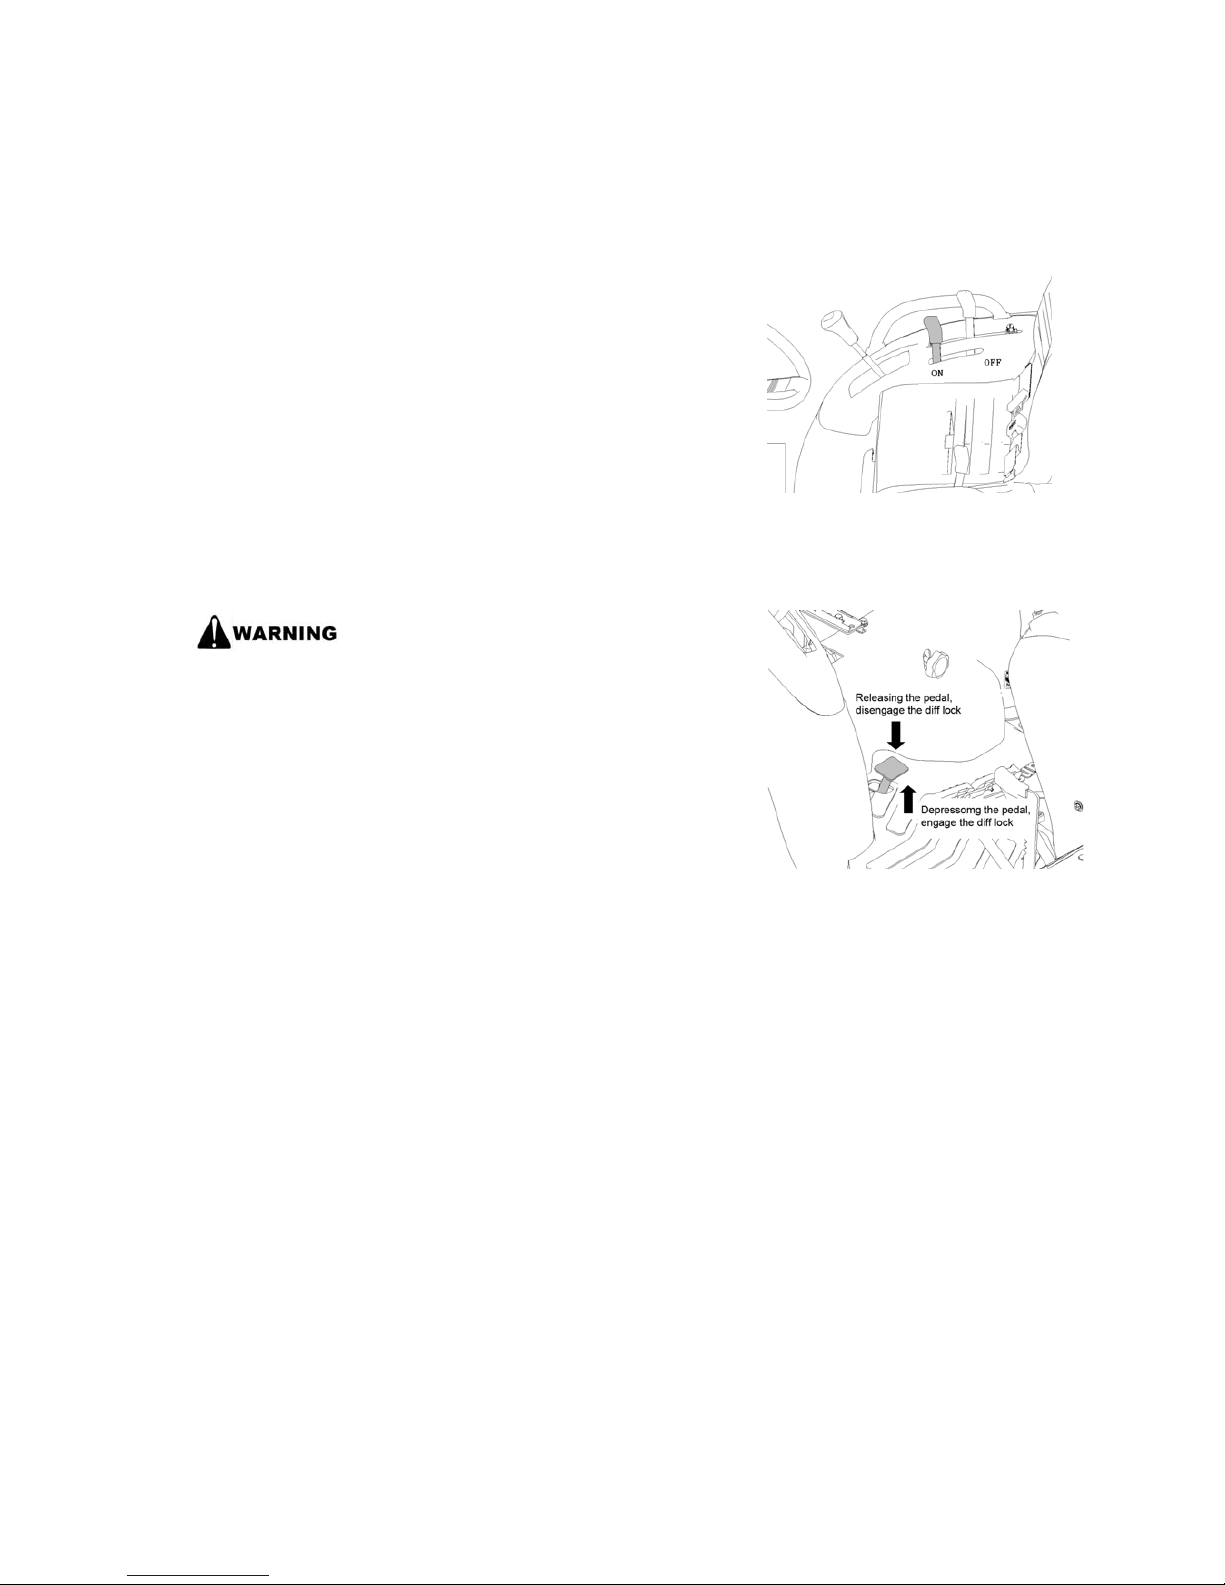
It is used to shift between 2-wheel drive and 4 wheel
drive. Depress clutch pedal or stop machine when
shifting the lever.
7. Differential Gear Lock Pedal
Release the differential gear lock
when making a turn. Otherwise,
the tractor may not turn in the
direction you want and cause an
accident.
It is used to transmit the same power to both rear
wheels and serves to prevent slipping when one of
the rear wheels is idling.
Page 36
- 36 -
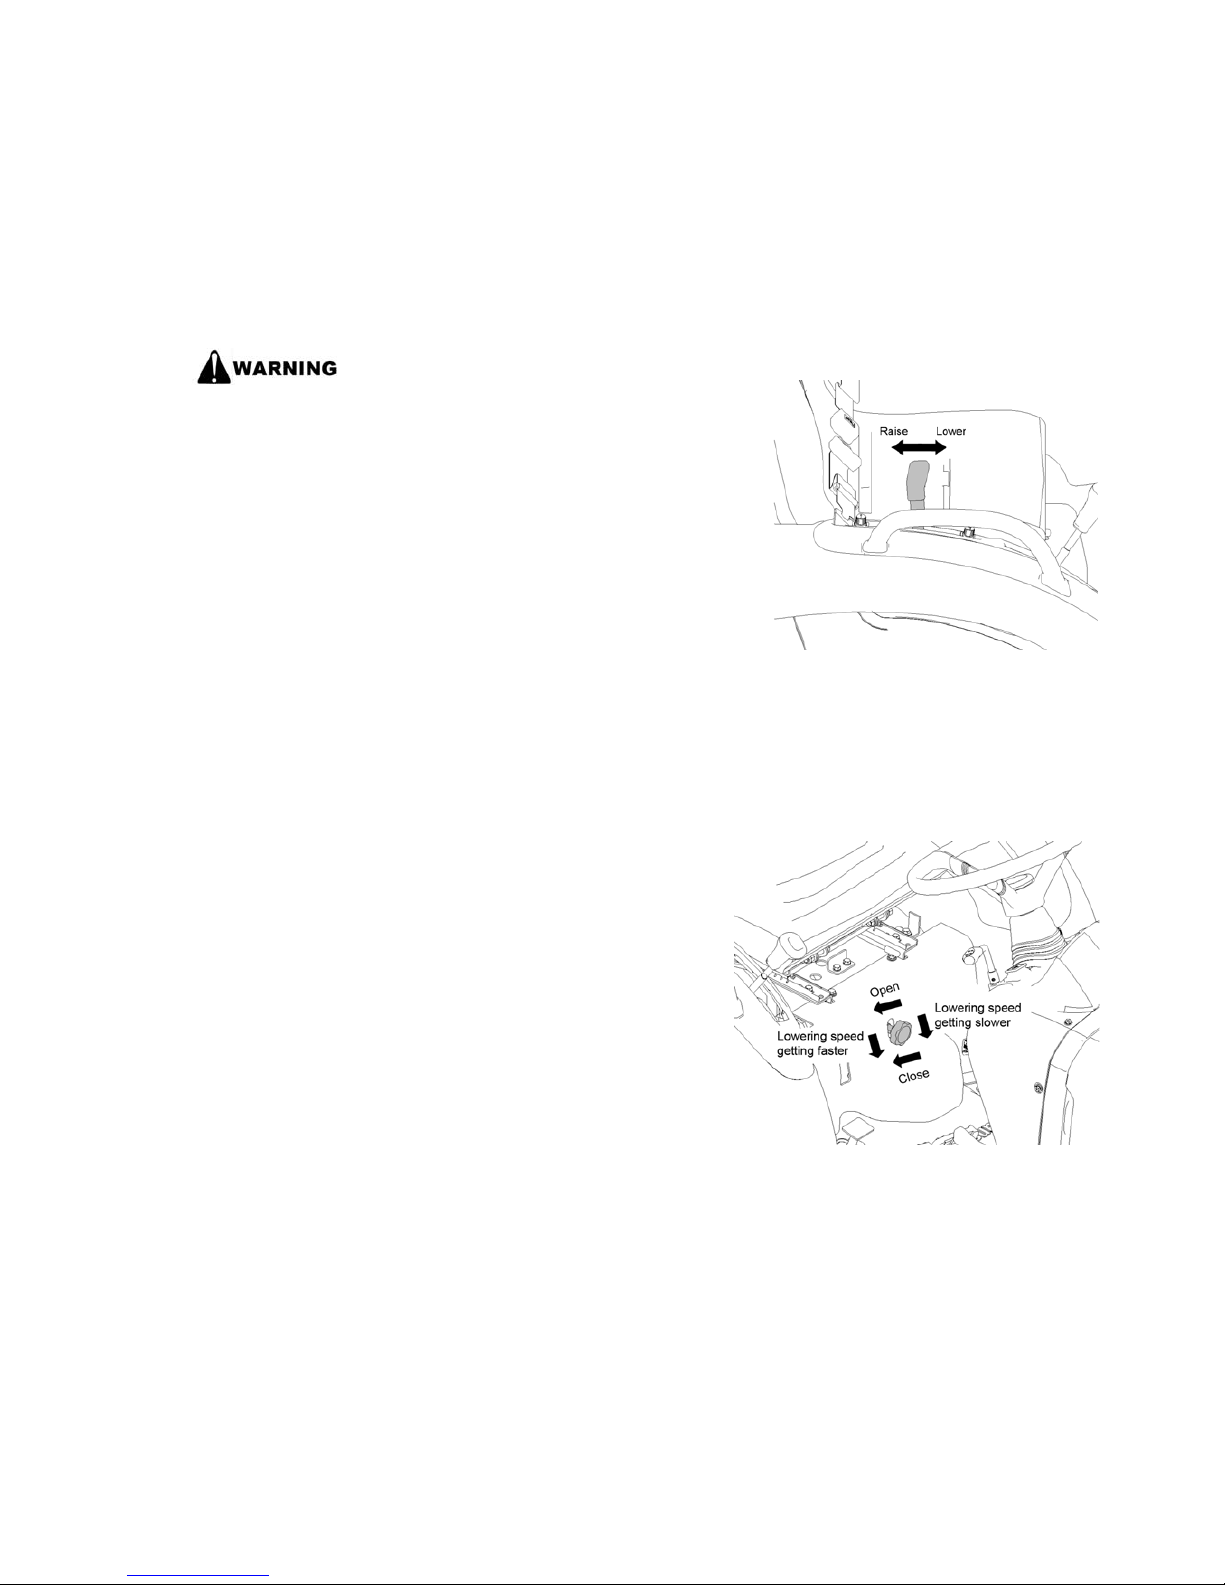
C. PART FOR HYDRAULIC SYSTEM
1. Position Control Lever
Confirm that no one or a foot is
under the implement before
operating the system. Otherwise,
there is a risk of injury.
When lowering the implement, set the position
control lever, and the implement will go down to the
set position.
It is used to keep the implement constantly at a
certain position. When the lift lamp is on, the
implement cannot be lowered with position control
lever. A stopper is used to fix the position control
lever in the “UP” position while driving on a road.
2. Hydraulic Stop/Slow Return Valve
It is used to regulate the lowering speed of the work
unit (slow return function). Also, if you wind the
valve fully to the right, the hydraulic pressure to the
device raising the work unit is stopped.
Page 37
- 37 -
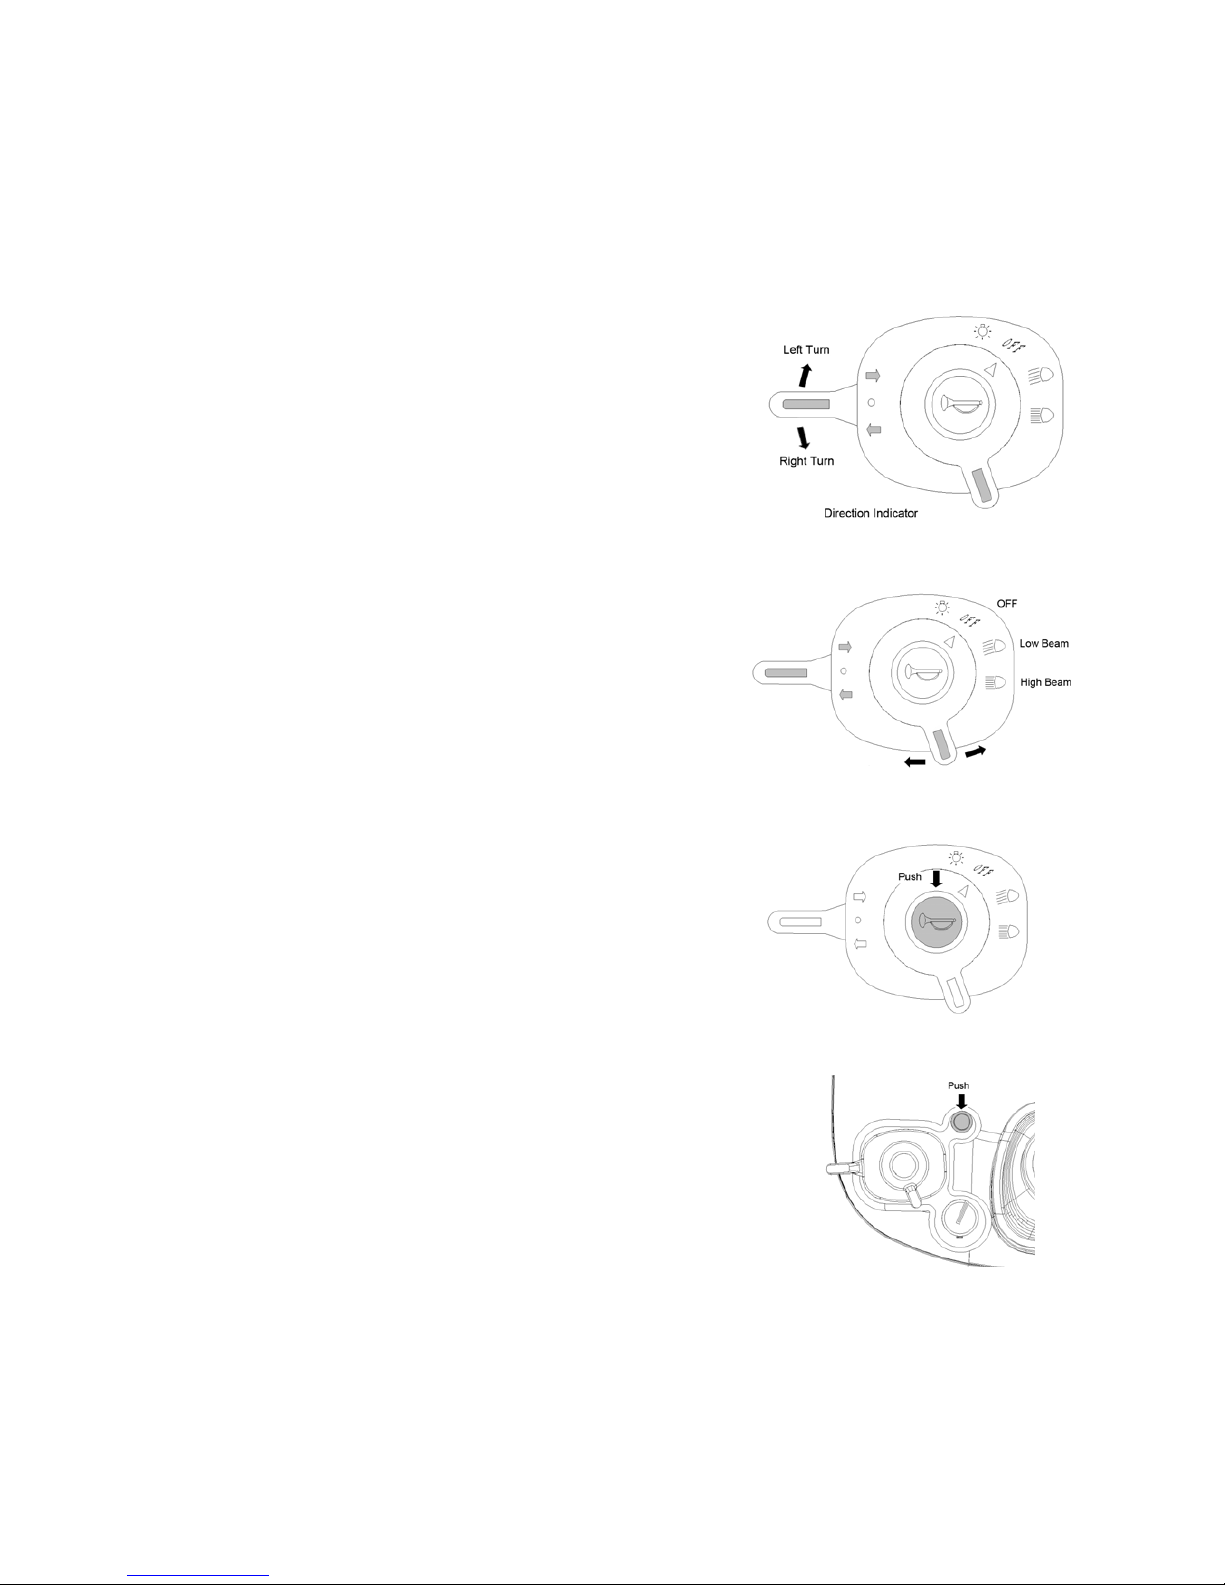
D. PART FOR ELECTRIC SYSTEM
1. Direction Indicator Switch
With the key switch in the “ON” position, turn the
direction indicator switch to the right to turn on the
direction indicator lamp in the right side, and turn
the indicator switch to the left to turn on the lamp on
the left.
2. Light Switch
With the main switch in the “ON” position, turn the
light switch one click to the right for high beam and
two clicks to the right for low beam.
3. Horn
With the main switch in the “ON” position, press the
horn button to sound the horn.
4. Emergency engine shut off button
During the engine operation, any time press the
emergency engine shut off button to stop engine
when emergency situation.
Note : If use the emergency engine shut off button,
restarting needs to return the key to “OFF” position.
Page 38
- 38 -
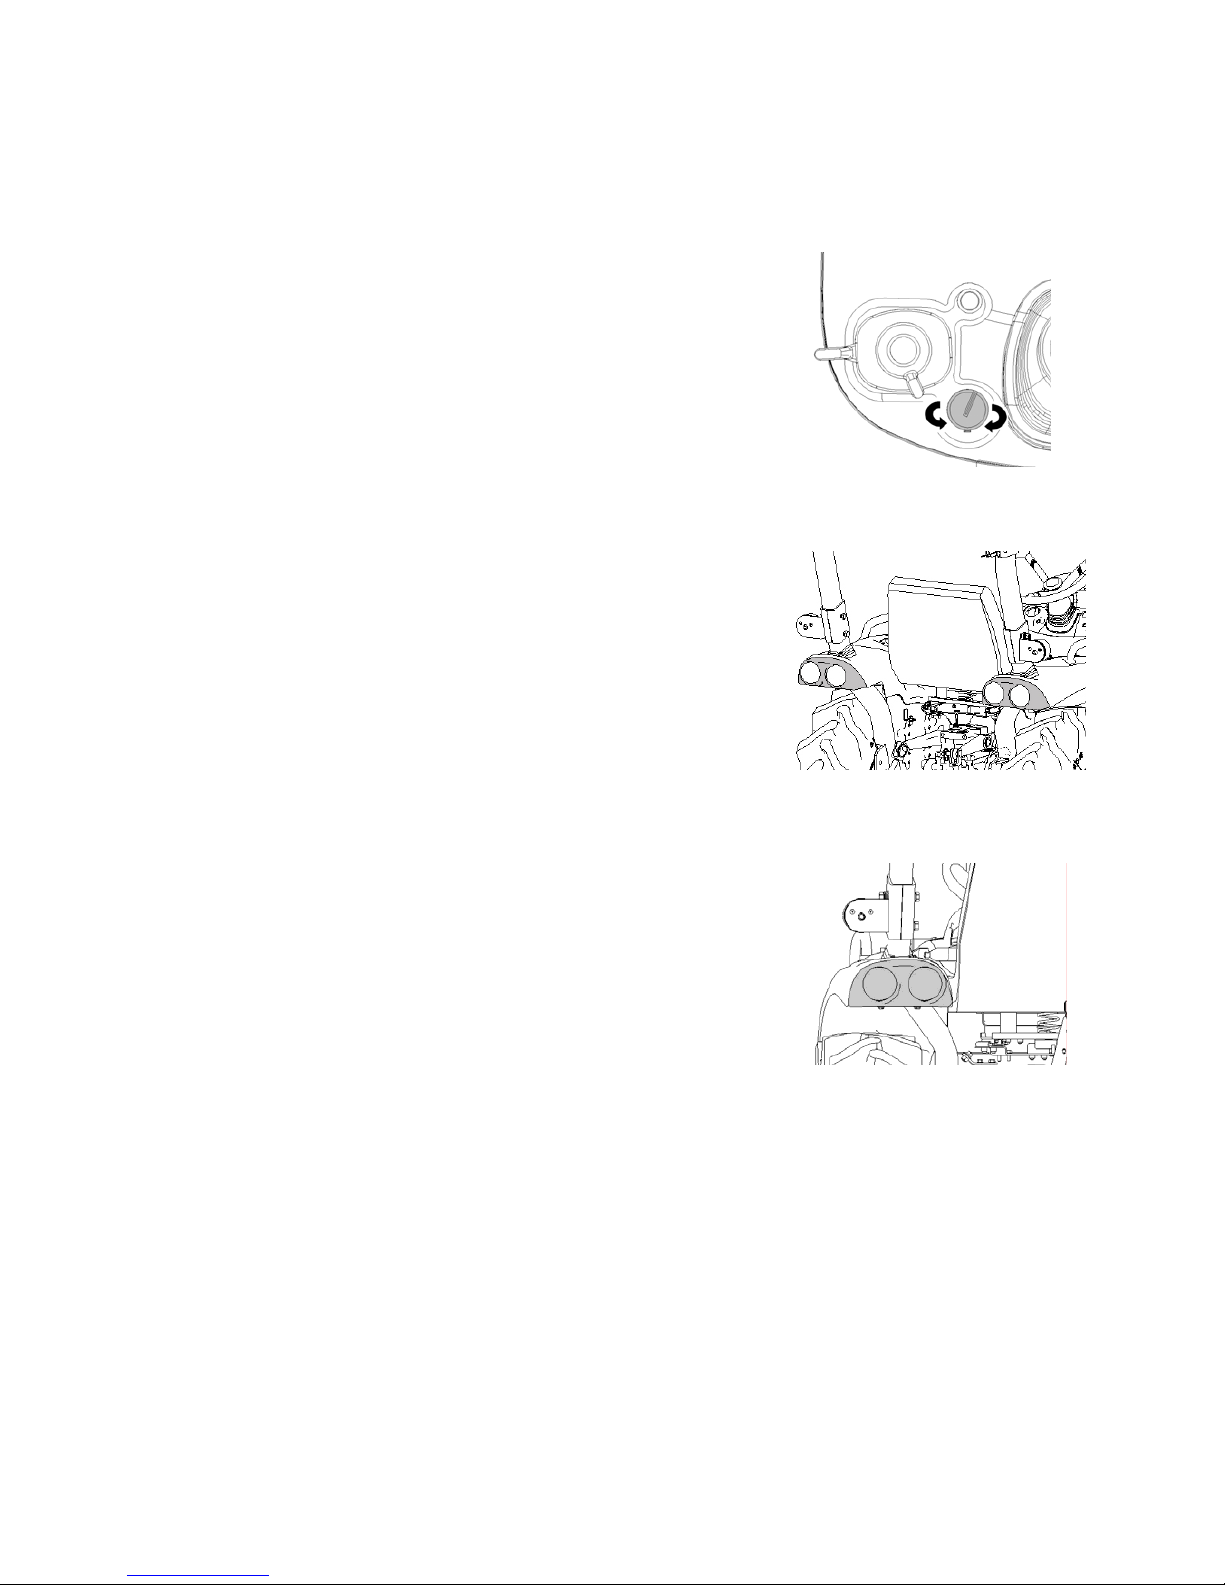
5. Side lamp On/Off switch
With the main switch in the “ON” position, turn the
side lamp switch one click to the right to on the side
lamp when you road drive.
6. Tail Lamp
It is connected with the head lamp and is turned on
when the headlamp is turned on.
7. Brake Lamp
It is turned on when the brake pedal is depressed.
Page 39
- 39 -
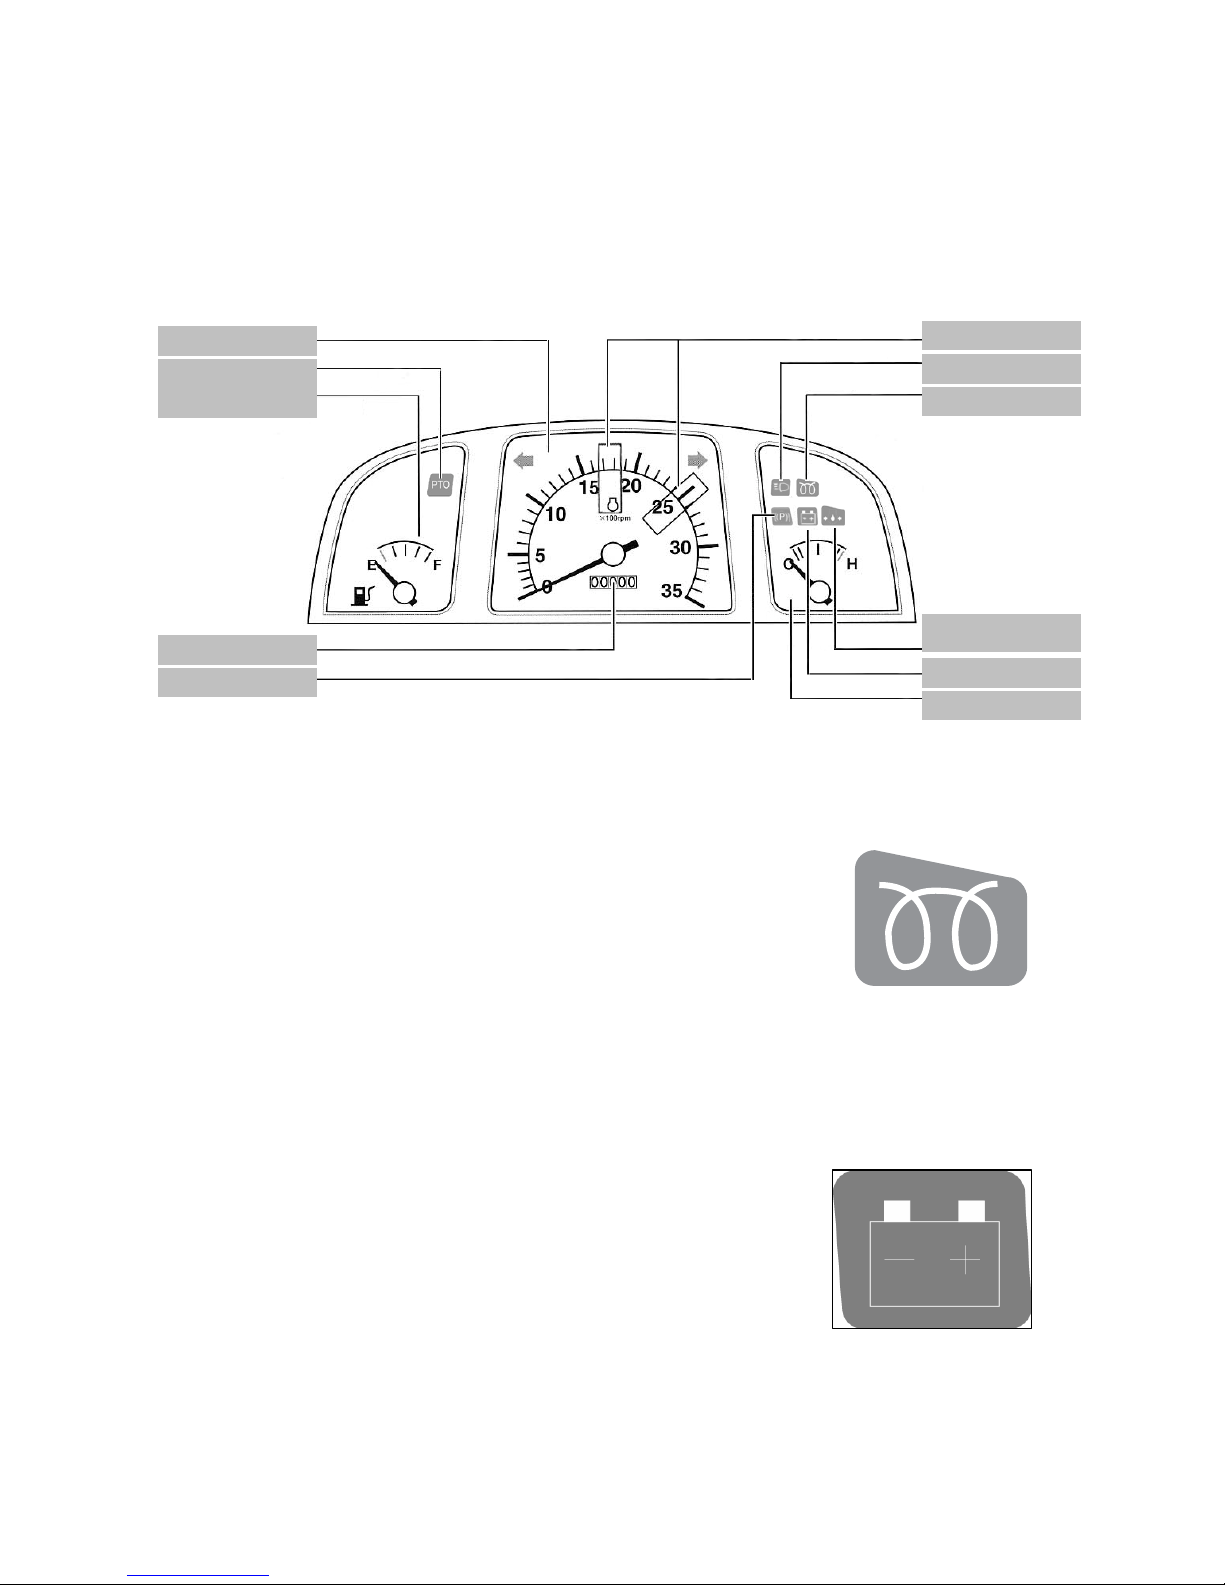
E. INSTRUMENT PANEL
1. Thermostat warning lamp
Lamp will come on when the ignition switch is put into the “ON”
position with outside temperature of around 40°F, indicating that
electricity is supplied to the heater or glow plug s. Turn the ignition
switch to “START” after the lamp has been turned off (it is turned off
automatically) then it will start the engine
. The length of time the
thermostat stays on will depend on the temperature of the
engine coolant.
Coolant temp 32°F ~ 60°F 10sec
32°F ~ 5°F 20sec
2. Charge pilot lamp
It will be turned on when the key switch is put into the “ON” position,
and will be turned off when the battery starts being charged after
engine is started and the engine revolution incr eases. The battery
will not be charged with the engine below 1,000 rpm. (The rpm
should be 1,500 rpm or higher)
PTO Position
Head lamp High beam
Pre-heat Lamp
Engine oil pressure
Pilot lamp
Battery Charge Lamp
Water Temp Gauge
Hour Meter
Park Brake Lamp
Meter Panel
PTO Lamp
Fuel Gauge
Page 40
- 40 -
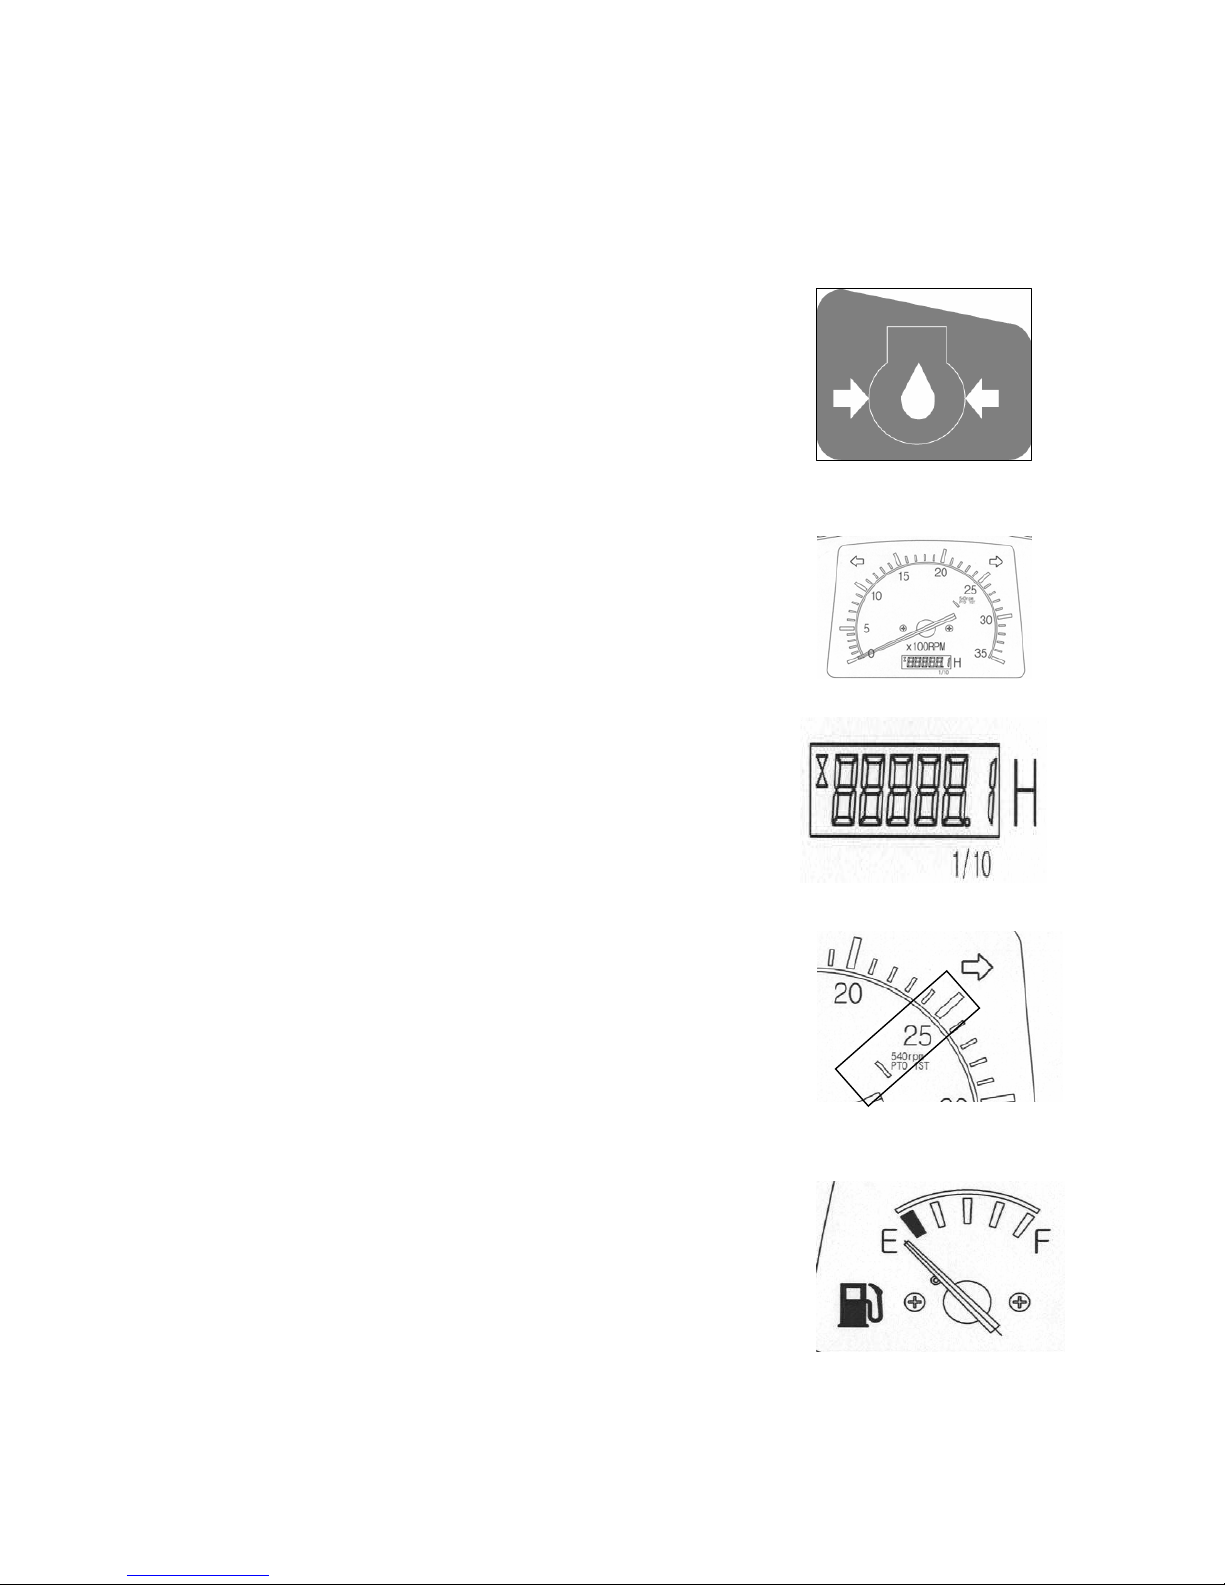
3. Engine oil pressure warning lamp
Lamp will come on when the ignition switch is put into the
“ON” position.It will turn off when the engine is started.
If this lamp comes on while the engine is running, it
indicates a problem in the engine oil system. Stop the
engine immediately and check for problems.
4. Engine RPM indicator.
The needle indicates the number of engine RPM
5. Hour meter
Indicates the tractor’s running hours.
6. PTO running indicator.
It Indicates the position 2600 rpm where PTO revolutions
achieve 540, and 1000rpm.And 1700 rpm position where
PTO revolutions achieve 540E.
7. Fuel indicator
Indicates the quantity of fuel remaining in the tank. If the
needle is in the red zone, refill immediately.
Page 41
- 41 -
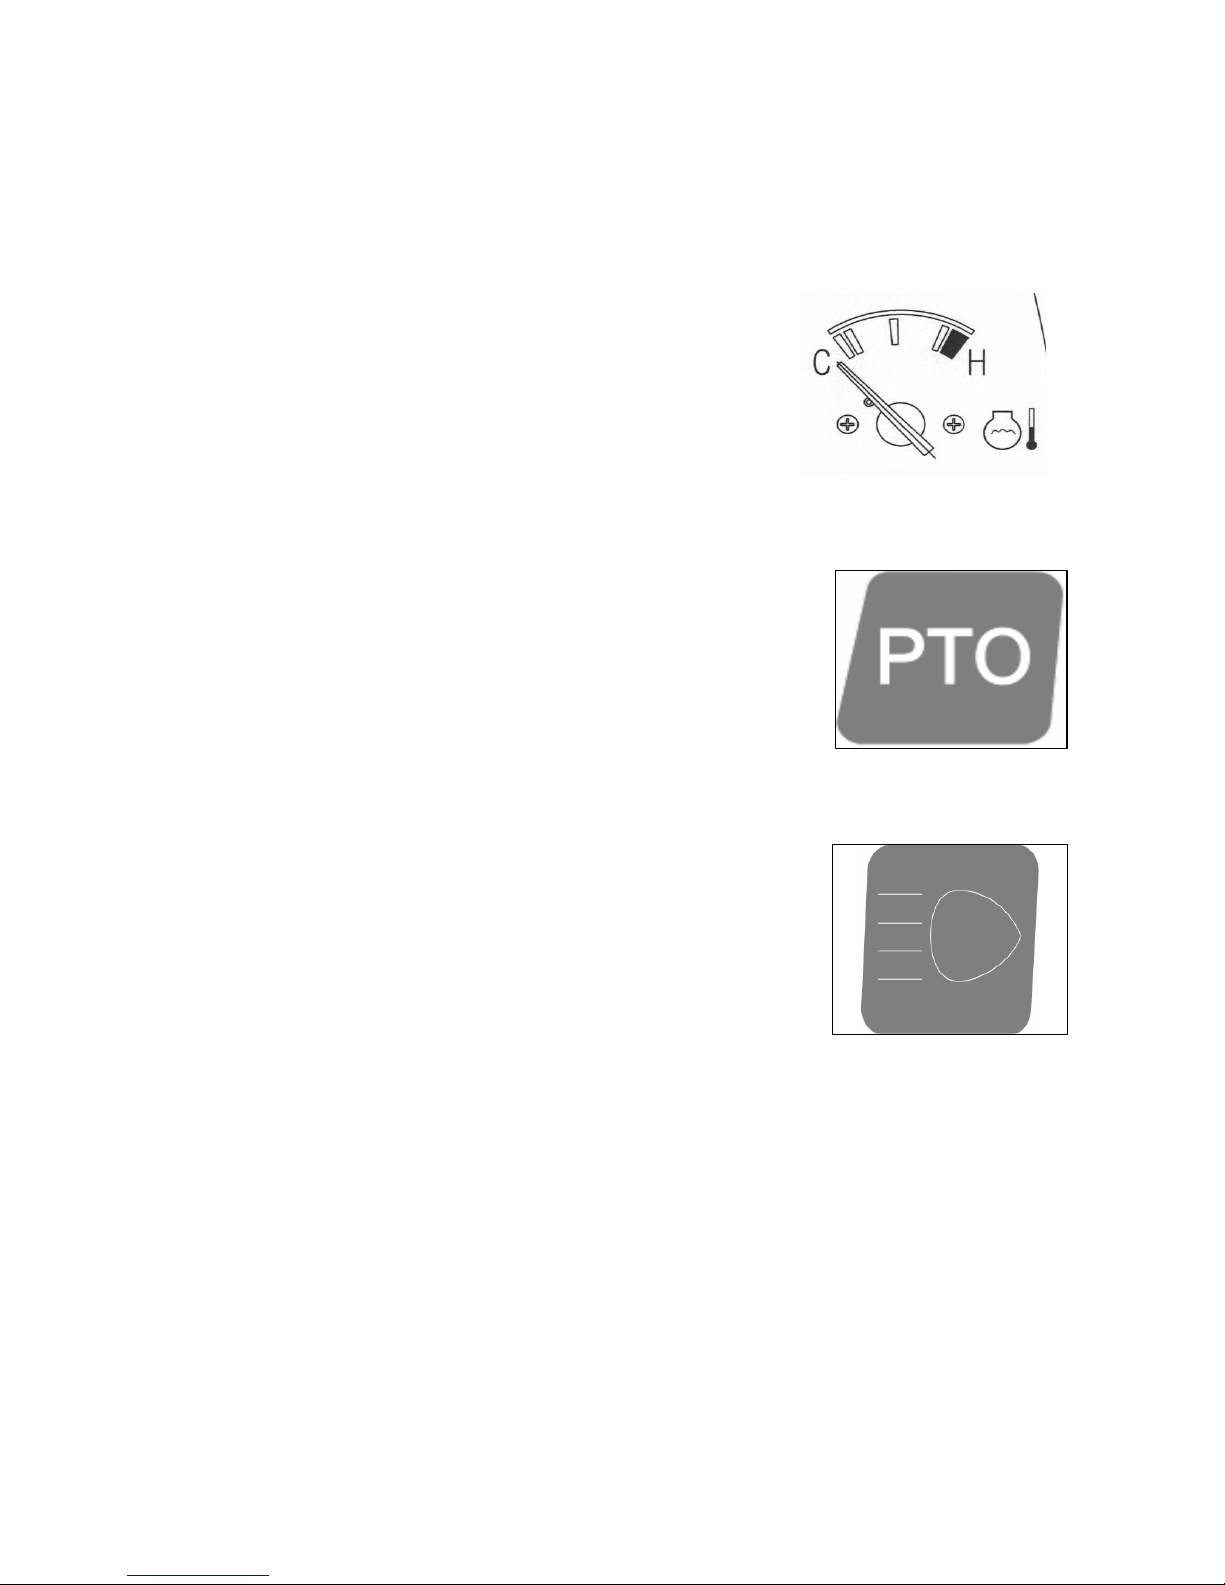
8. Water temp indicator
The needle indicates the temperature of the engine
coolant during running. If the needle is in the red zone,
stop running the engine and check for problems.
9. PTO “ON/OFF” lamp
Lamp will come on when PTO is engaged. On the contrary, if
PTO is disengaged, lamp will be turned off.
10. Head lamp (upper)
Indicates the head lamps beam’s position.
It will come on when the head lamps are on Hi beam. On the
contrary, if the head lamps are in the low beam, this indicator
will not be lit.
Page 42
- 42 -
F. PART FOR OTHER
1. Driver Seat Adjustment Lever
The levers adjust the driver seat to suit the driver.
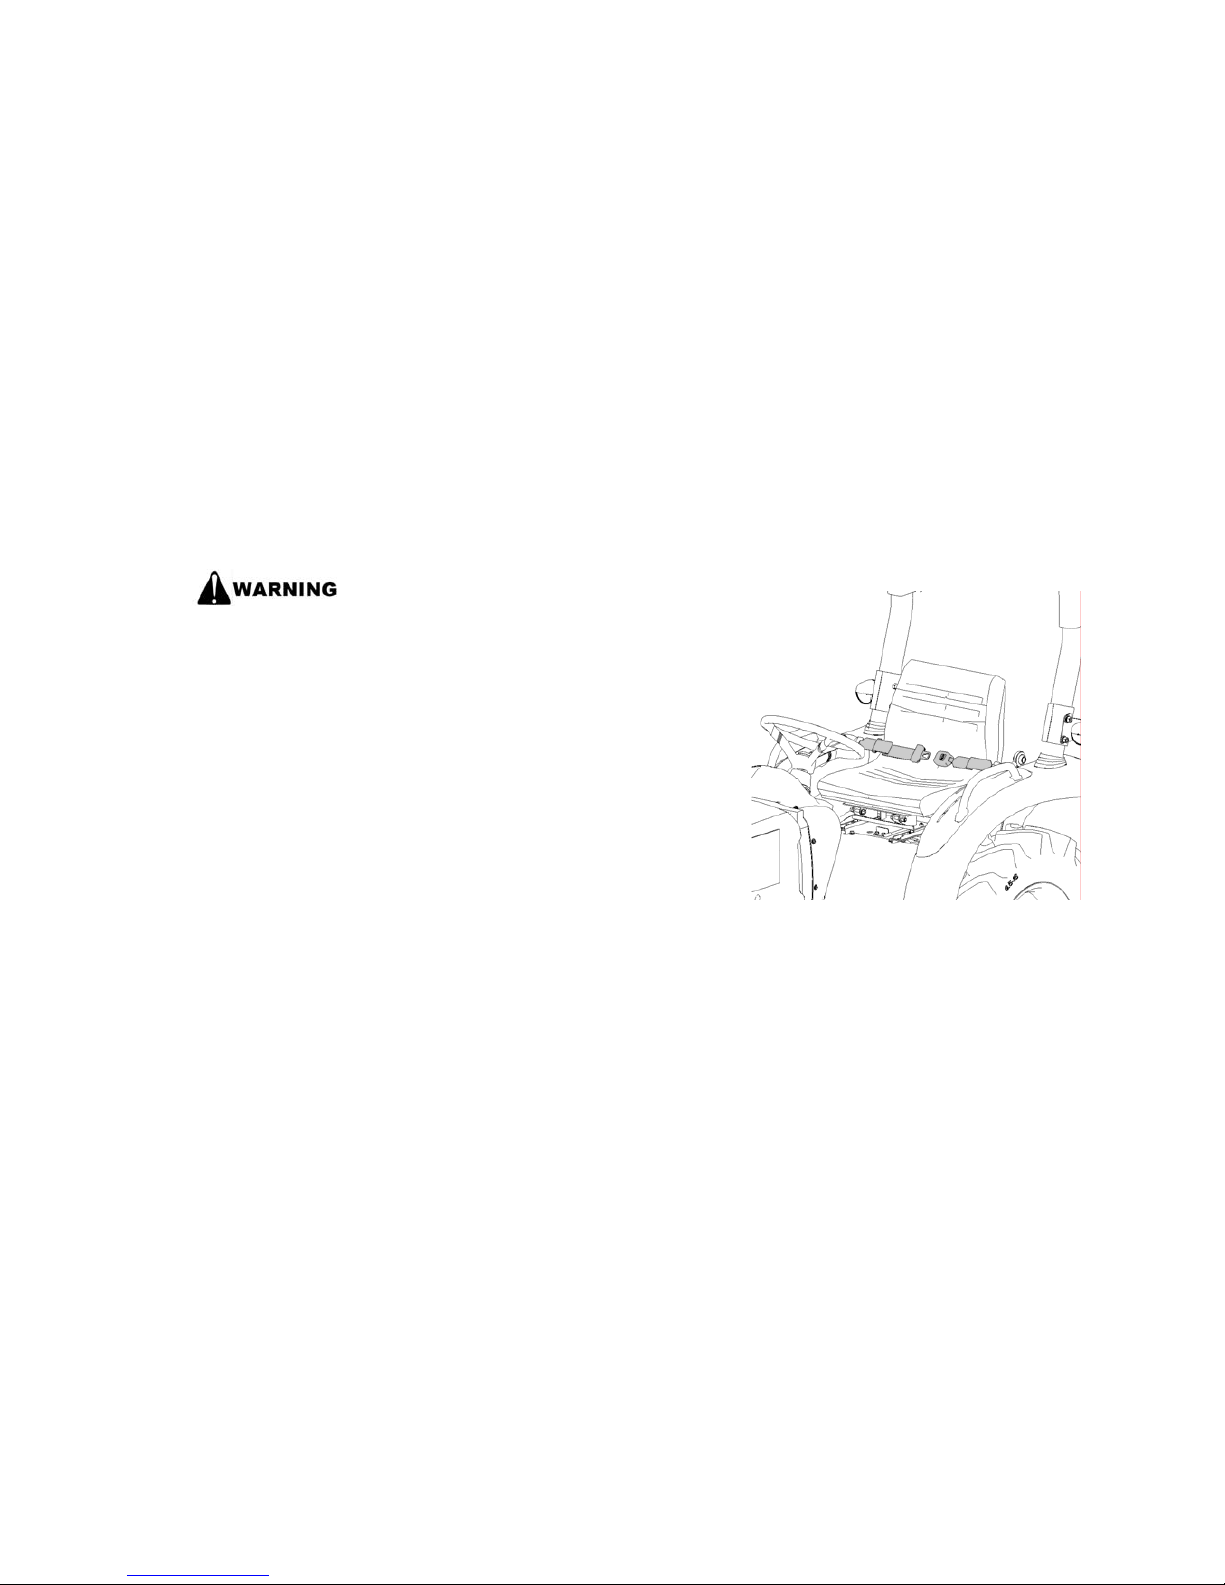
2. Seat Belt
Do not wear the seat belt when the
safety frame is folded down. With
the frame folded down, it does not
provide safety.
When operating the tractor, make
sure to keep the safety frame in
the upright position and wear the
seat belt.
[Otherwise]
There is a risk of death or injury if the tractor turns
over. Adjust the seat to the driver and keep the
upper body upright. Wrap the seat belt around the
waist and insert it into the buckle until the clicking
sound is heard. When releasing the seat belt, use
the “PRESS” button.
Page 43

- 43 -
OPERATION & WORK
1. CHECKING BEFORE OPERATION
• Do not provide illumination with a lit cigarette or a lighter when
fueling.
• Never fill the fuel tank while the engine is running or hot.
• After filling the fuel tank, close the fuel filler cap completely and
wipe off the excess fuel thoroughly.
• If the fuel hoses are damaged, fuel will leak. Make sure that you
check for any leakage.
• Perform the maintenance on a flat and safe location that will
keep the tractor in place and will not cause a risk to people
passing by. Before carrying out the maintenance, place blocks at
the front fires to prevent movement.
[Otherwise]
An unexpected accident may occur, such as overturning of
the tractor.
• When going under the implement, fully close the slow/stop valve.
[Otherwise]
There is a risk of injury due to implement falling.
• Stop the engine during checking, maintenance, or repair
• Carry out the maintenance work after heated area such as the
muffler or the engine have fully cooled down.
[Otherwise]
There is risk of burn.
• After detaching the covers for checking or maintenance, make
sure to put them back in their place.
[Otherwise]
There is a risk that you may get entangled in the tractor
or get injured.
Page 44
- 44 -
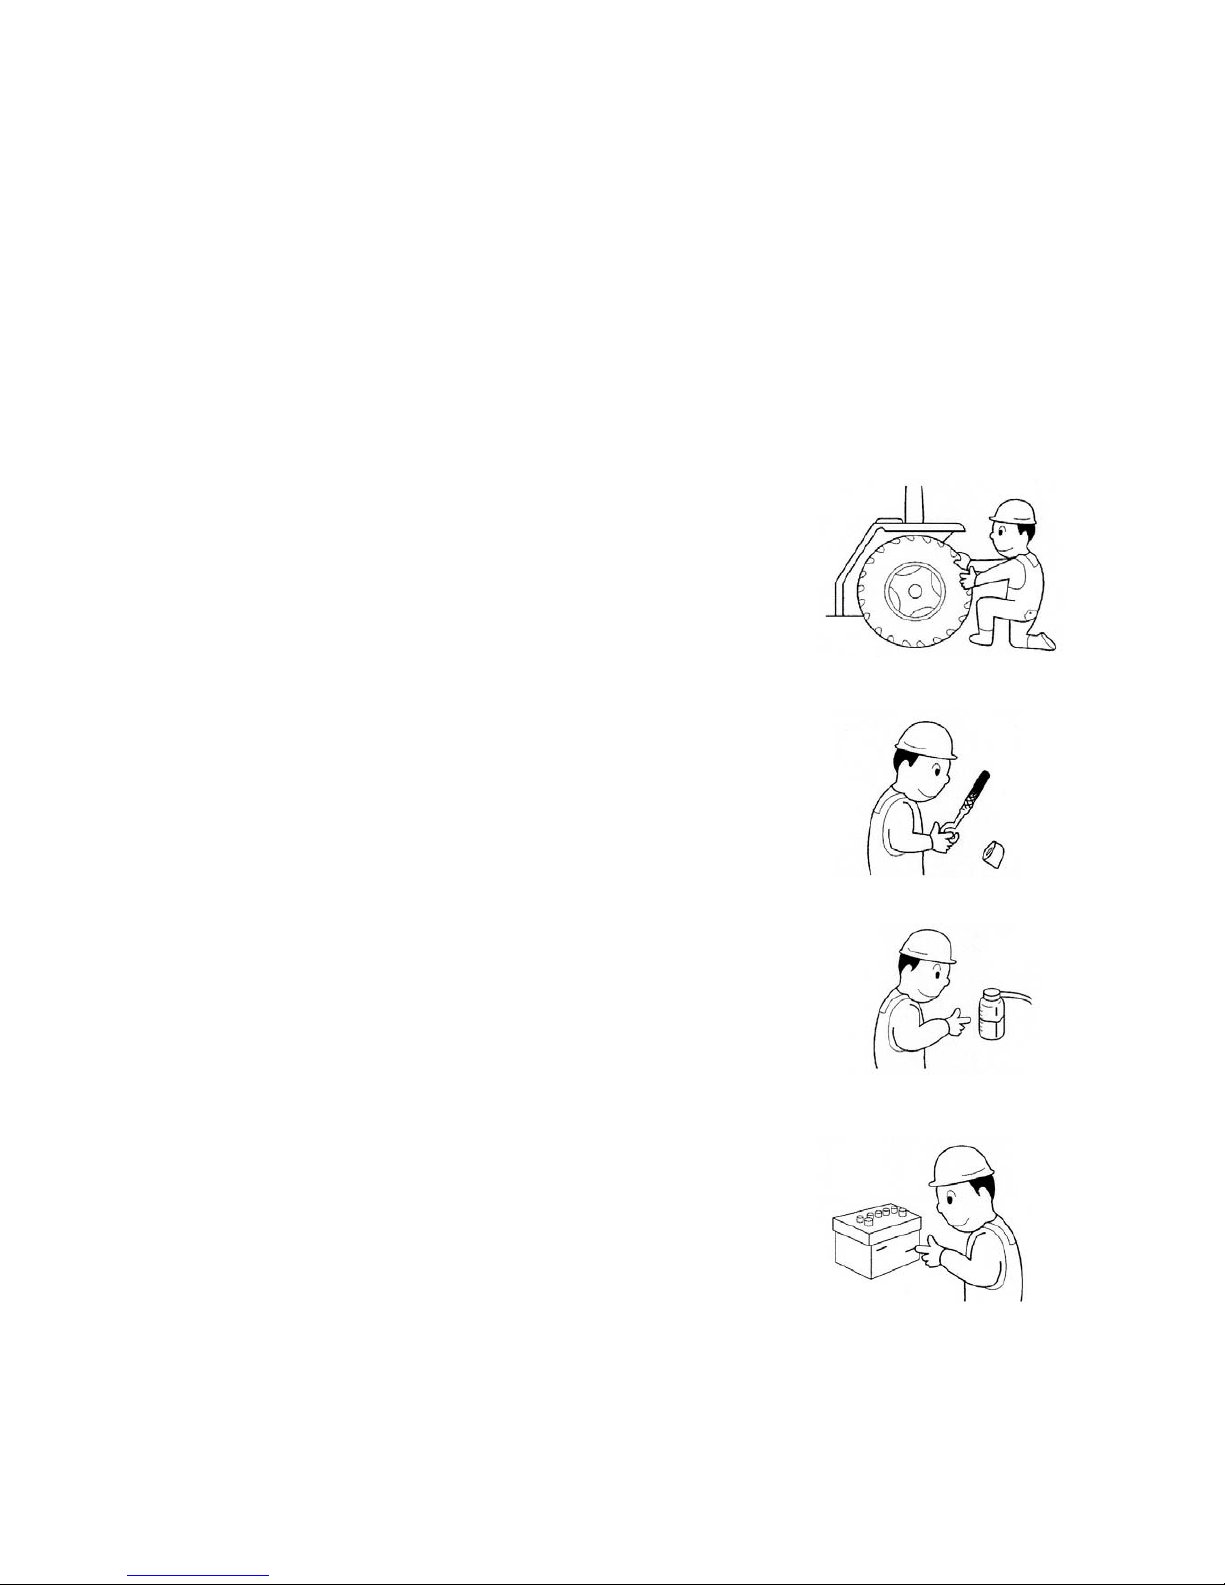
To ensure a safe and comfortable operation, please carry out the routine check-up
everyday before starting the work. Rectify any problem immediately, and also check for
problems after work. This checking should be done in the following sequence.
1. Check the suspicious parts of the previous day.
Check the parts that you thought were not normal during the work of previous day.
2. Check around the tractor.
• Parking deformation, damage or stains
• Tire pressure and abrasion
• Damage to the tractor, or loosened bolts
• Loosening of wheel bolts
• Fuel quantity, fuel leaks, or damage to the fuel hose
3. Open the engine hood.
• Engine oil level, contamination, or leakage
• Engine coolant level, leakage, or damage to the hose
• Battery solution level
Page 45
- 45 -
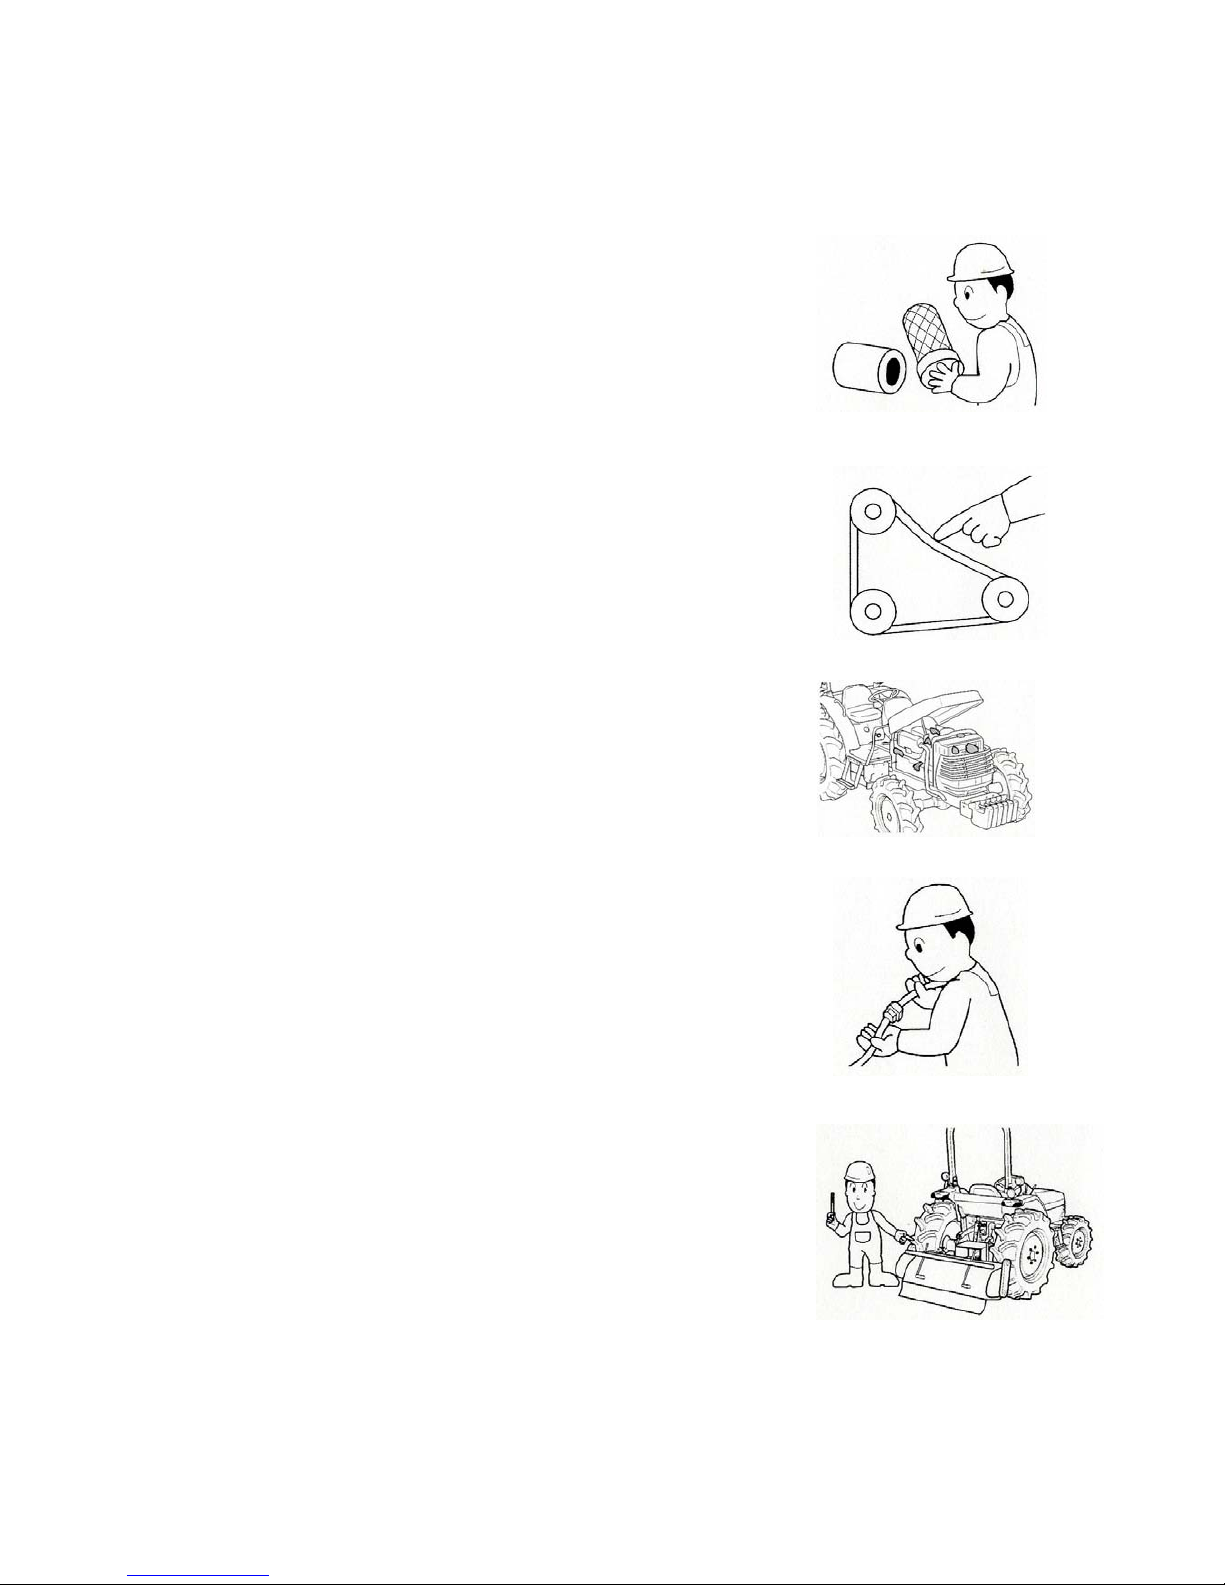
• Air cleaner
• Cooling fan belt tension, damage
• Dust or straw on the radiator grill or the engine
• Damage to the coating of the cables,
Or loosening of the contacts
4. Check around the implement
• Condition of the locking pin of the universal joint
inserted in the PTO shaft
• Condition of R pins in each part
• Loosening of the bolts holding the blade
• Quantity of oil in each part. For more details, please
refer to the implement manufacturer’s instructions.
Page 46
- 46 -
5. Check on the driver seat.
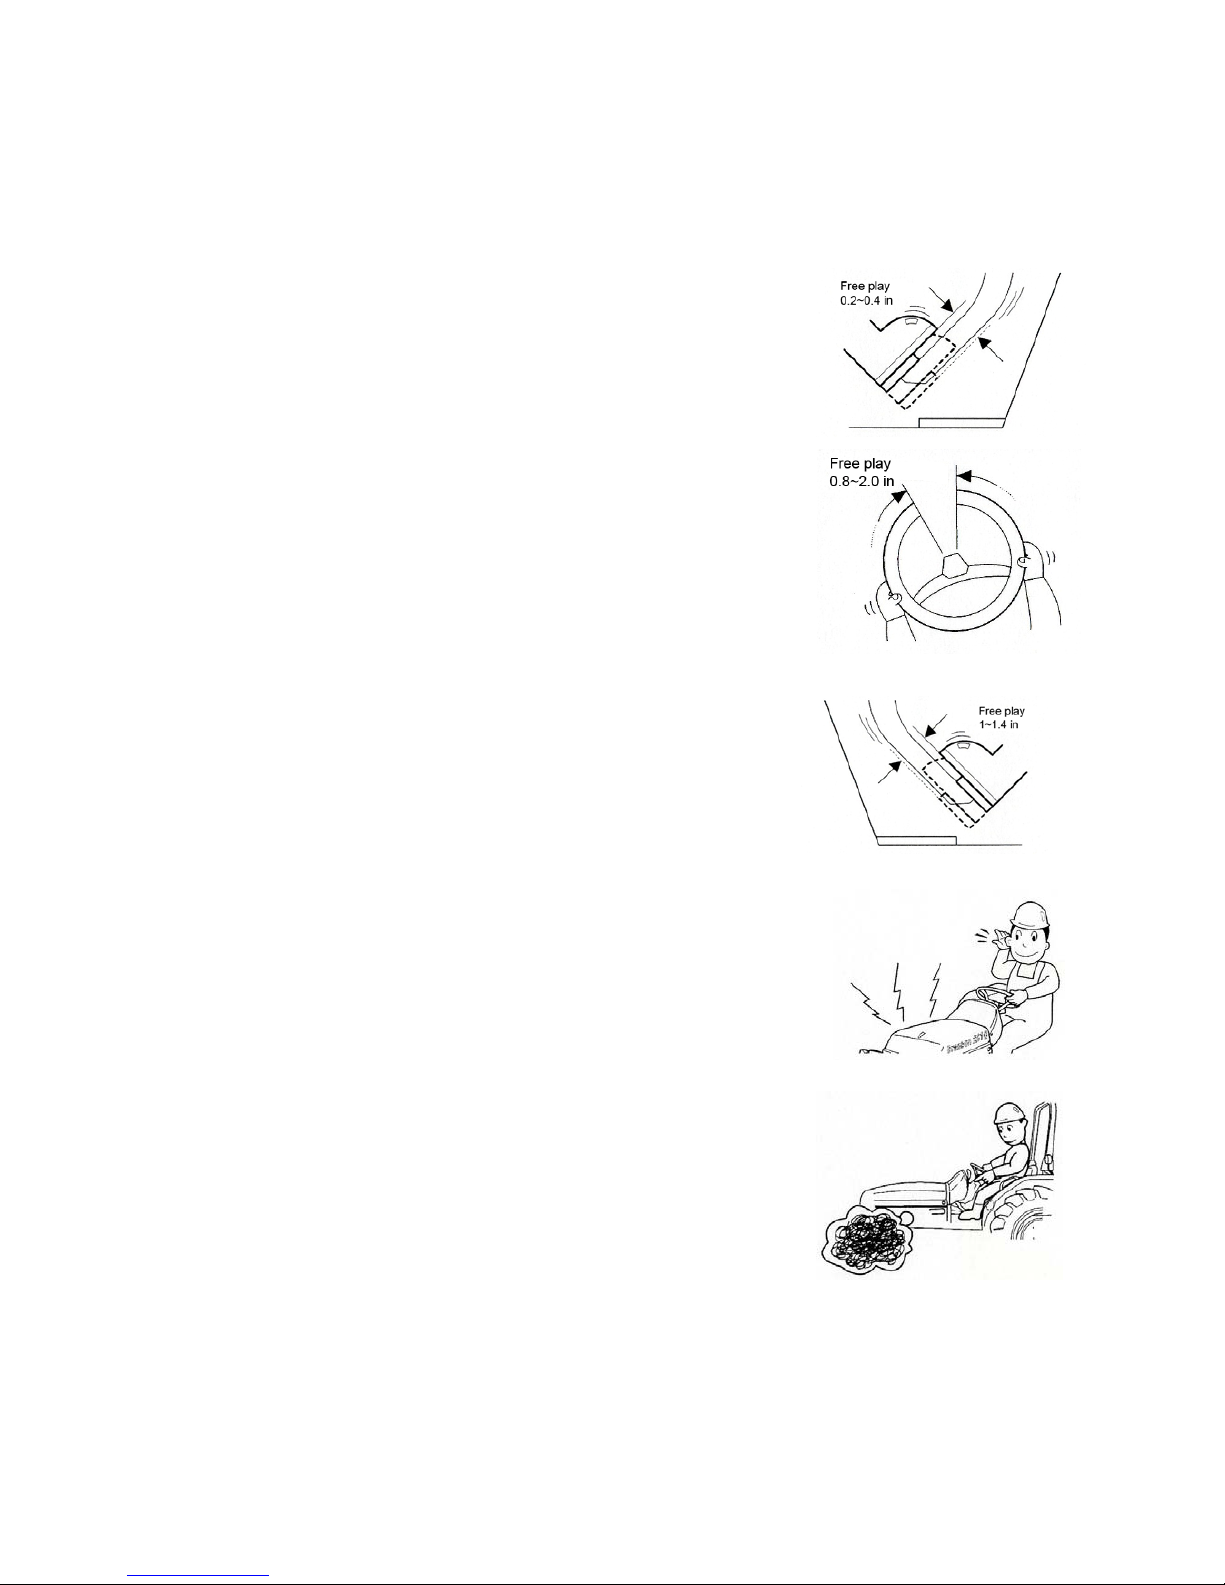
• Operational condition and free play of the brake
(0.2~0.4in)
• Free play of the steering wheel
(0.8~2.0in)
• Operational condition and free play of the clutch pedal
6. Start the engine.
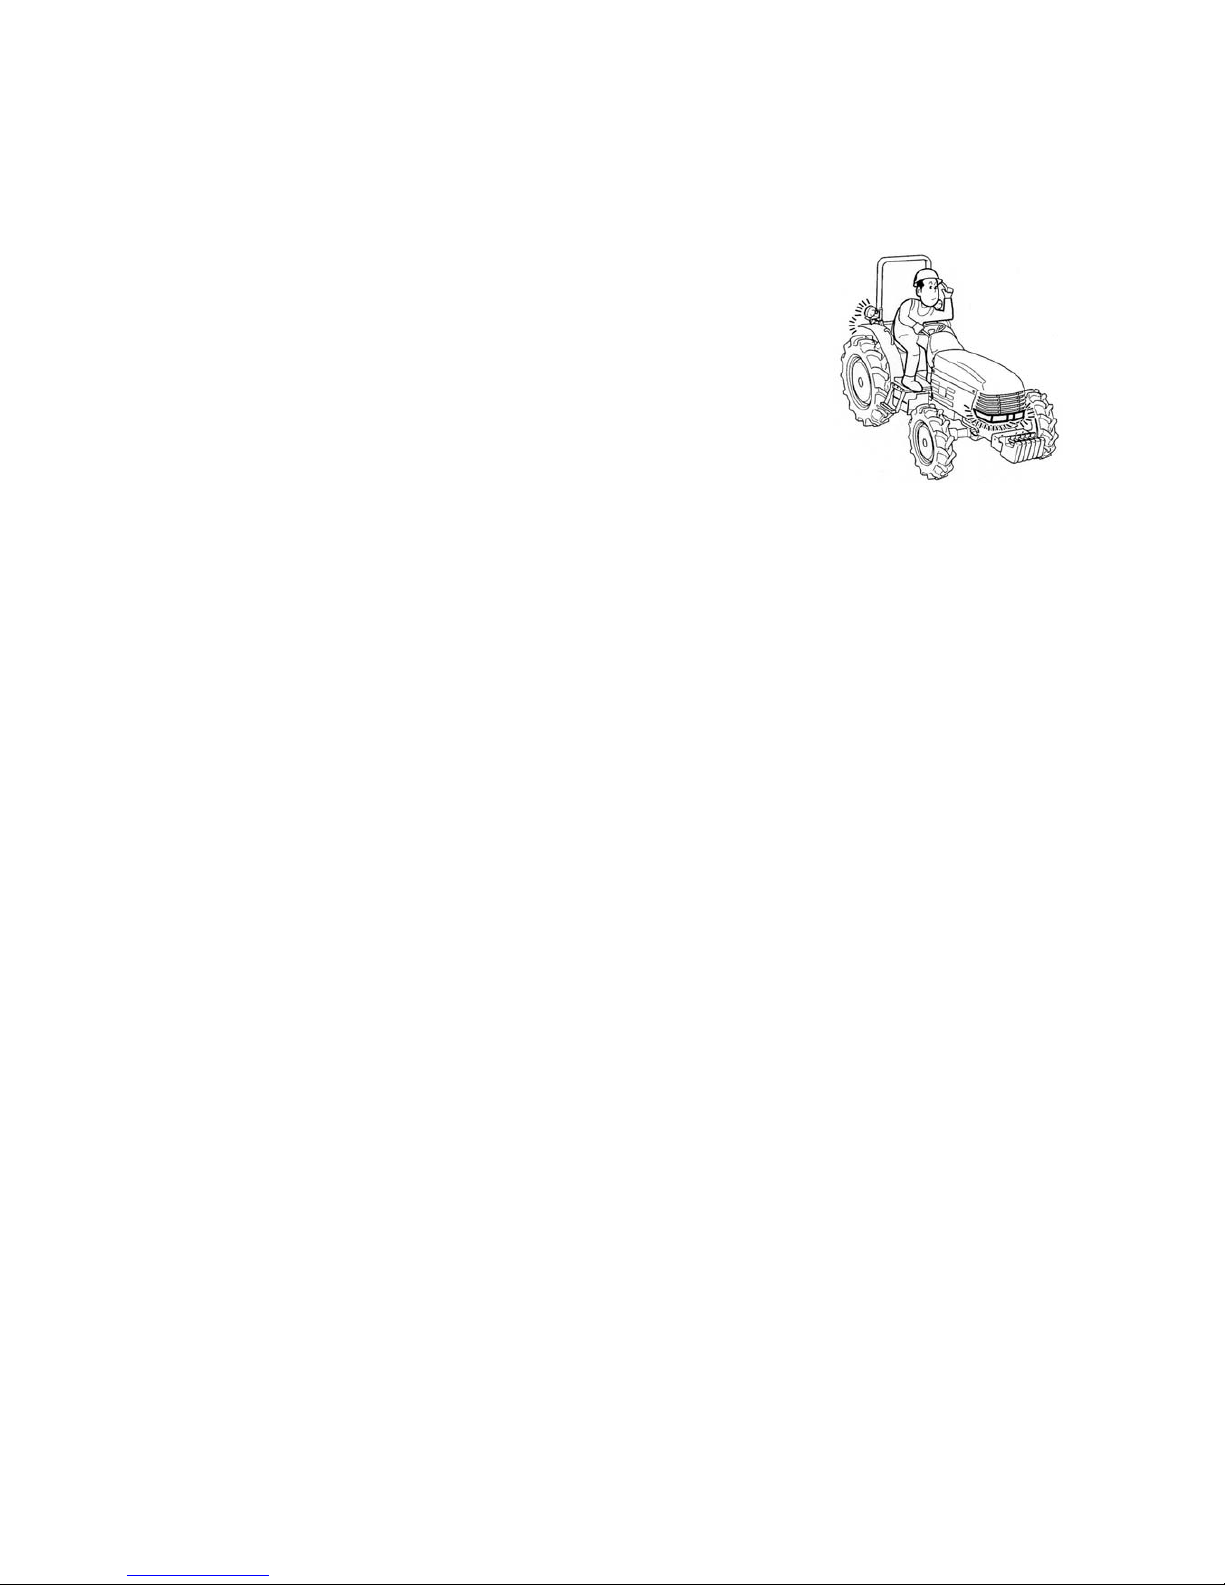
• Abnormal noise from the engine
• Color of the exhaust gas
Page 47
- 47 -
• Operation of lamps and gauges
Page 48
- 48 -
2. BREAKING IN YOUR TRACTOR (FIRST 50 HOURS)
The operation of a new tractor during the first 50 hours in very important, as it will greatly influence the
life and performance of the tractor.
Pay attention to the following precautions during the break-in period.
(1) A void rapid accelerating and abrupt s to pp in g .
(2) Avoid over-speeding and overloads.
(3) Drive the tractor after the engine has been warmed up.
(4) Reduce the speed while driving on a rough road or a slope.
(5) At the first 50
th
hour, carry out inspections of each part and replace the engine oil.
3. STARTING AND ST OPPING THE ENGINE
• When starting the engine, make sure that you are seated in the driver’s
seat and check position of the levers and the safety around the tractor.
Otherwise, there is a risk of injury.
• Do not start the engine in an enclosed space. You must start the engine
outside where there open air. If you should have to start the engine inside a
building, make sure that the space is well ventilated.
【Otherwise】
The exhaust gas can cause intoxication and can lead to fatal consequences.
• Make sure to carry out checking and maintenance before and after the use
of the tractor, particularly the operating devices such as the clutc h and the
brake lever.
【Otherwise】
There is a risk of injury or machin ery breakdown.
Engage the parking brake during warming-up. Otherwise, the tractor may move
and cause an accident.
• Don’t crank engine unless position control lever is in the lowest position.
【Otherwise】
Implement might rise quickly and there is a risk of injury or machinery breakdown.
Page 49
- 49 -
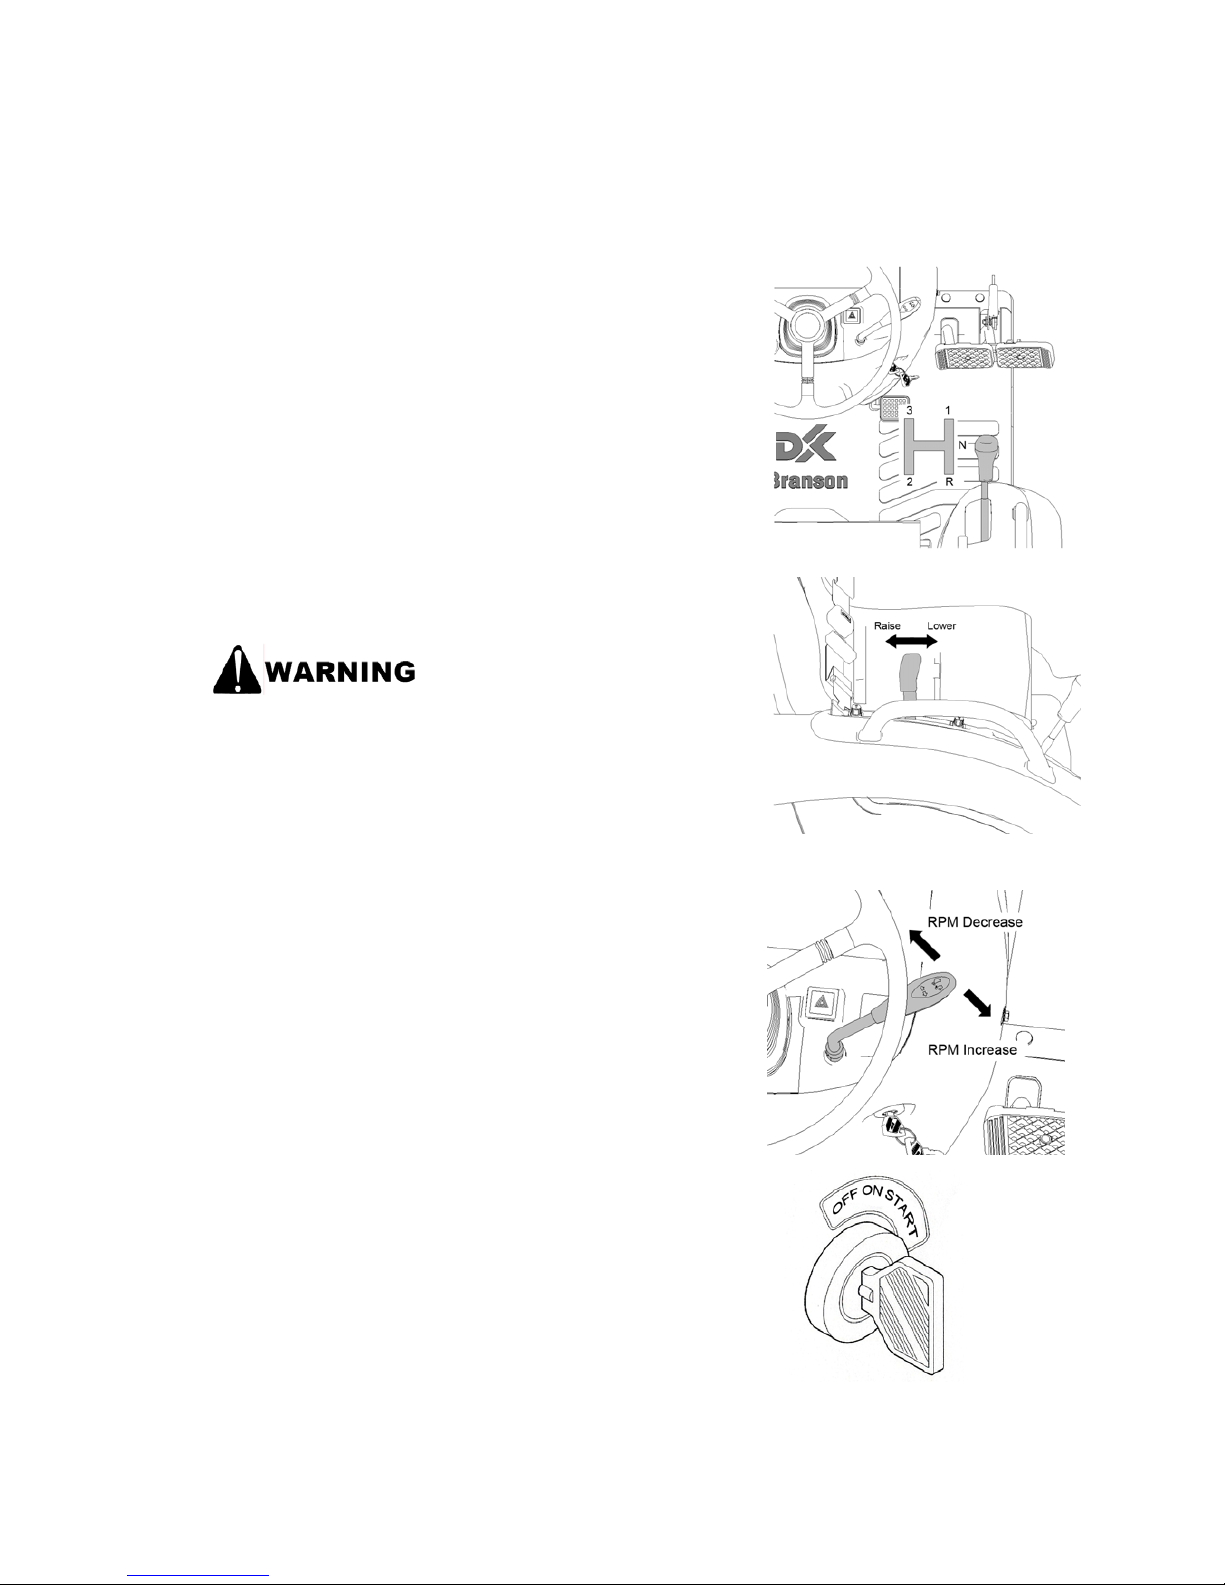
TO START THE ENGINE
(1) Put the main shift lever and PTO lever into
“NEUTRAL” position.
(2) Put the position control lever into the “lowest”
position.
Don’t crank engine unless
position control lever is in the
lowest position.
【Otherwise】
Implement might rise quickly and there is a risk of injury or
machinery breakdown
(3) Put the acceleration lever to Min a turn ignition
switch to “ON” position.
Page 50
- 50 -
(4) After the pre-heat lamp has turned off, depress
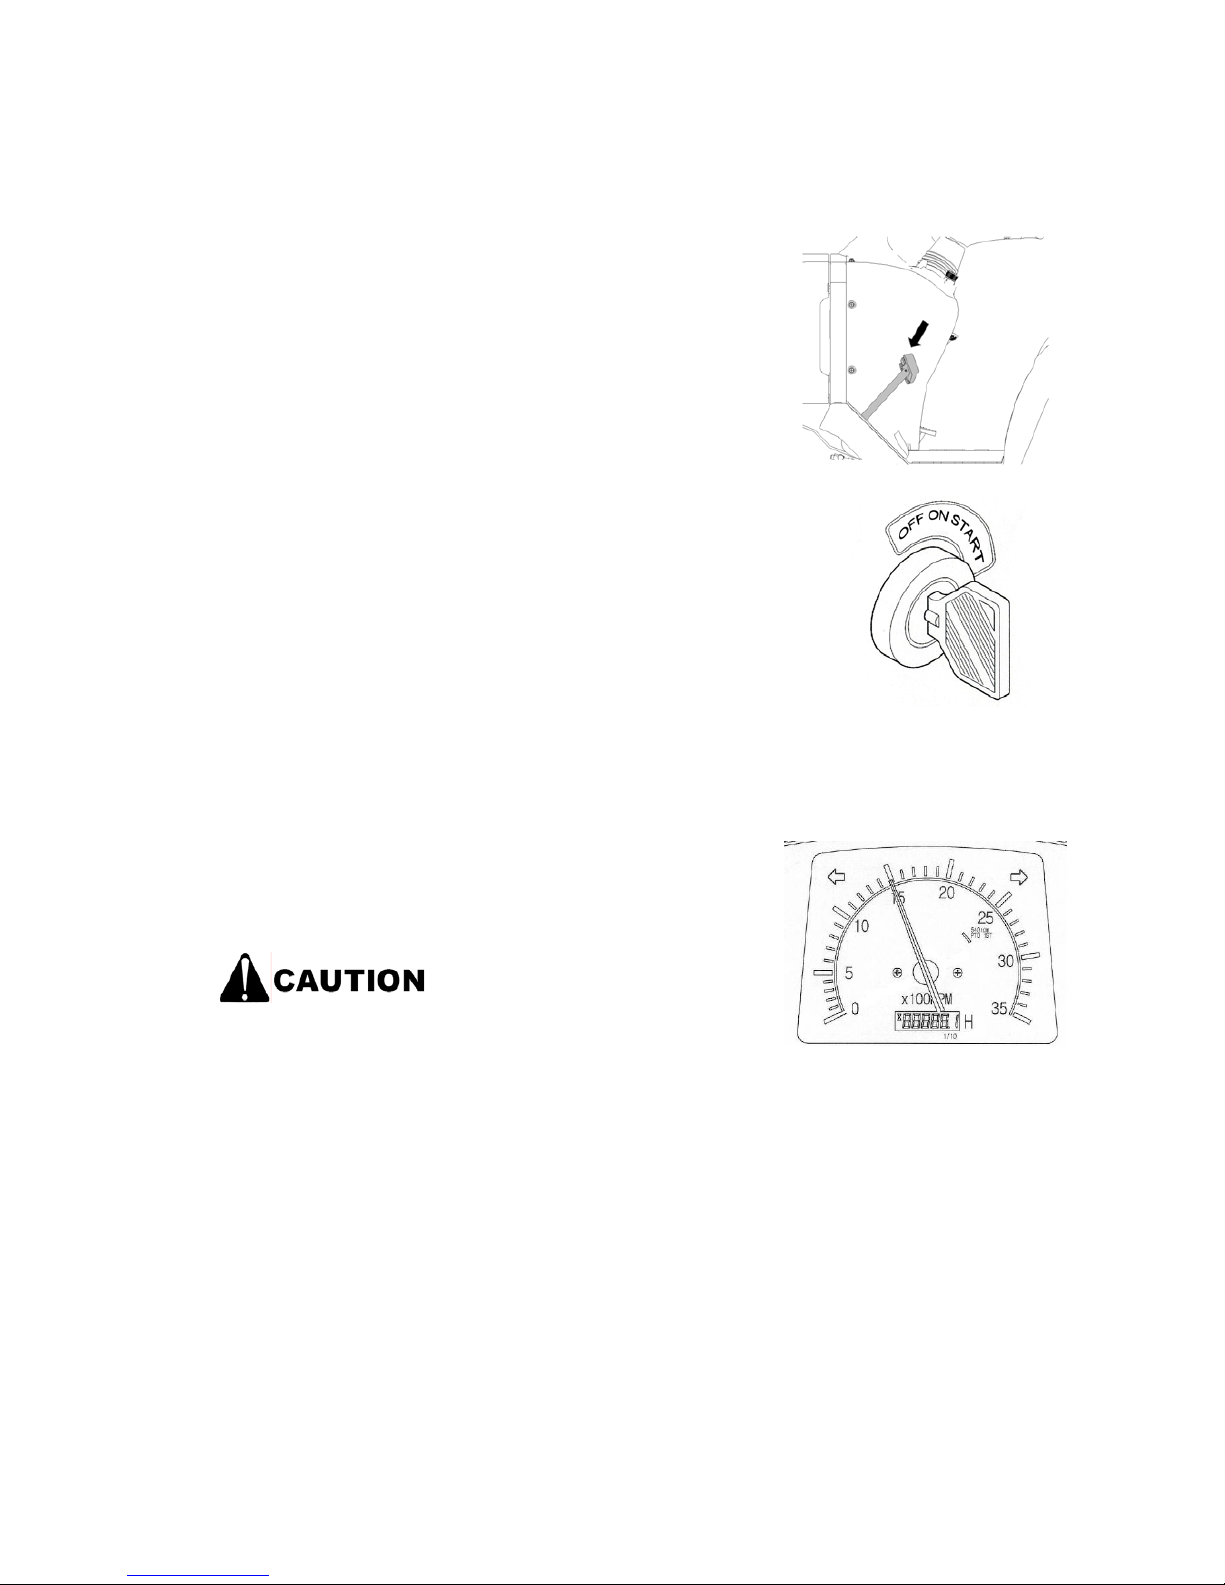
the clutch pedal fully and turn the ignition switch
to START
(5) Once the engine has started, take your hand off
the ignition switch.
(6) Increase the engine to about 1,500rpm and warm
it up for about five minutes without a load.
Never put your feet on the
clutch pedal during driving
or working. Otherwise, it
may cause an accident or
quick wear of the clutch
disks.
Page 51
- 51 -
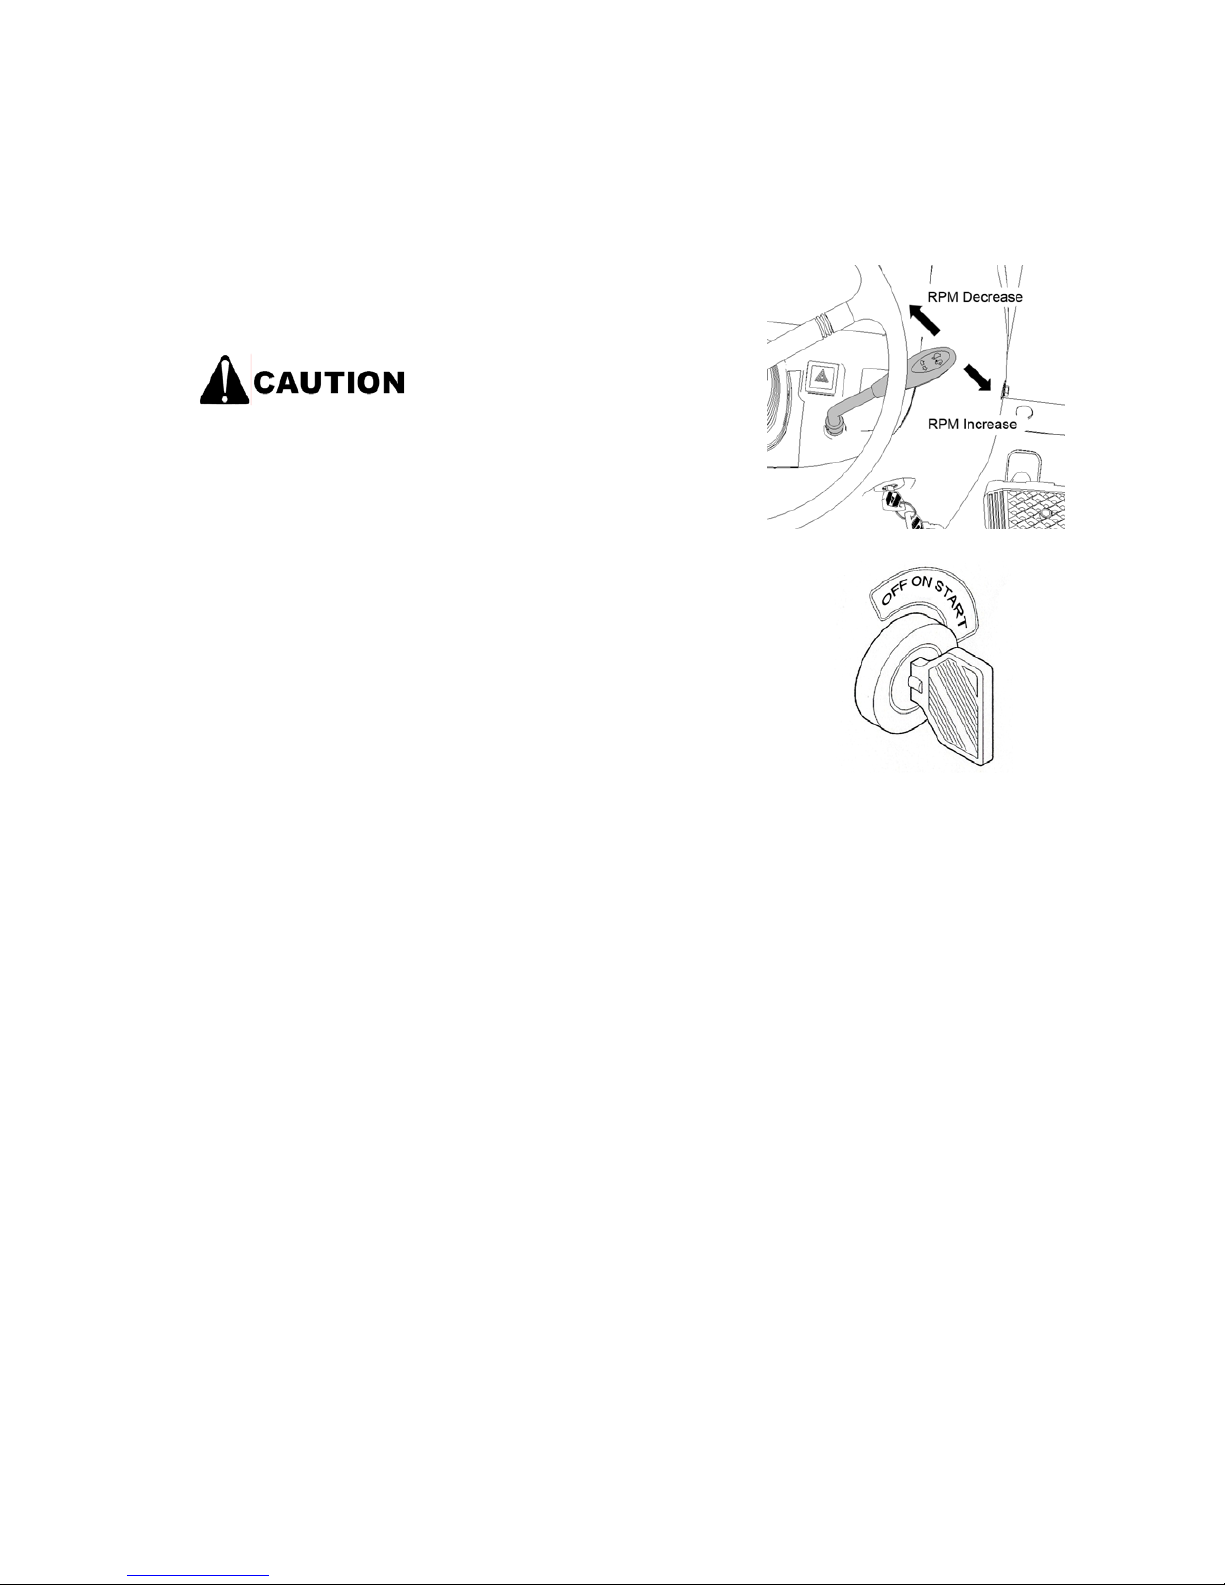
TO STOP THE ENGINE
Put the acceleration lever on LOW, and turn the
ignition switch to OFF
• When stopping the engine,
never stop it with the reducer
lever.
• After stopping the engine,
make sure to apply the parking
brake.
Page 52
- 52 -
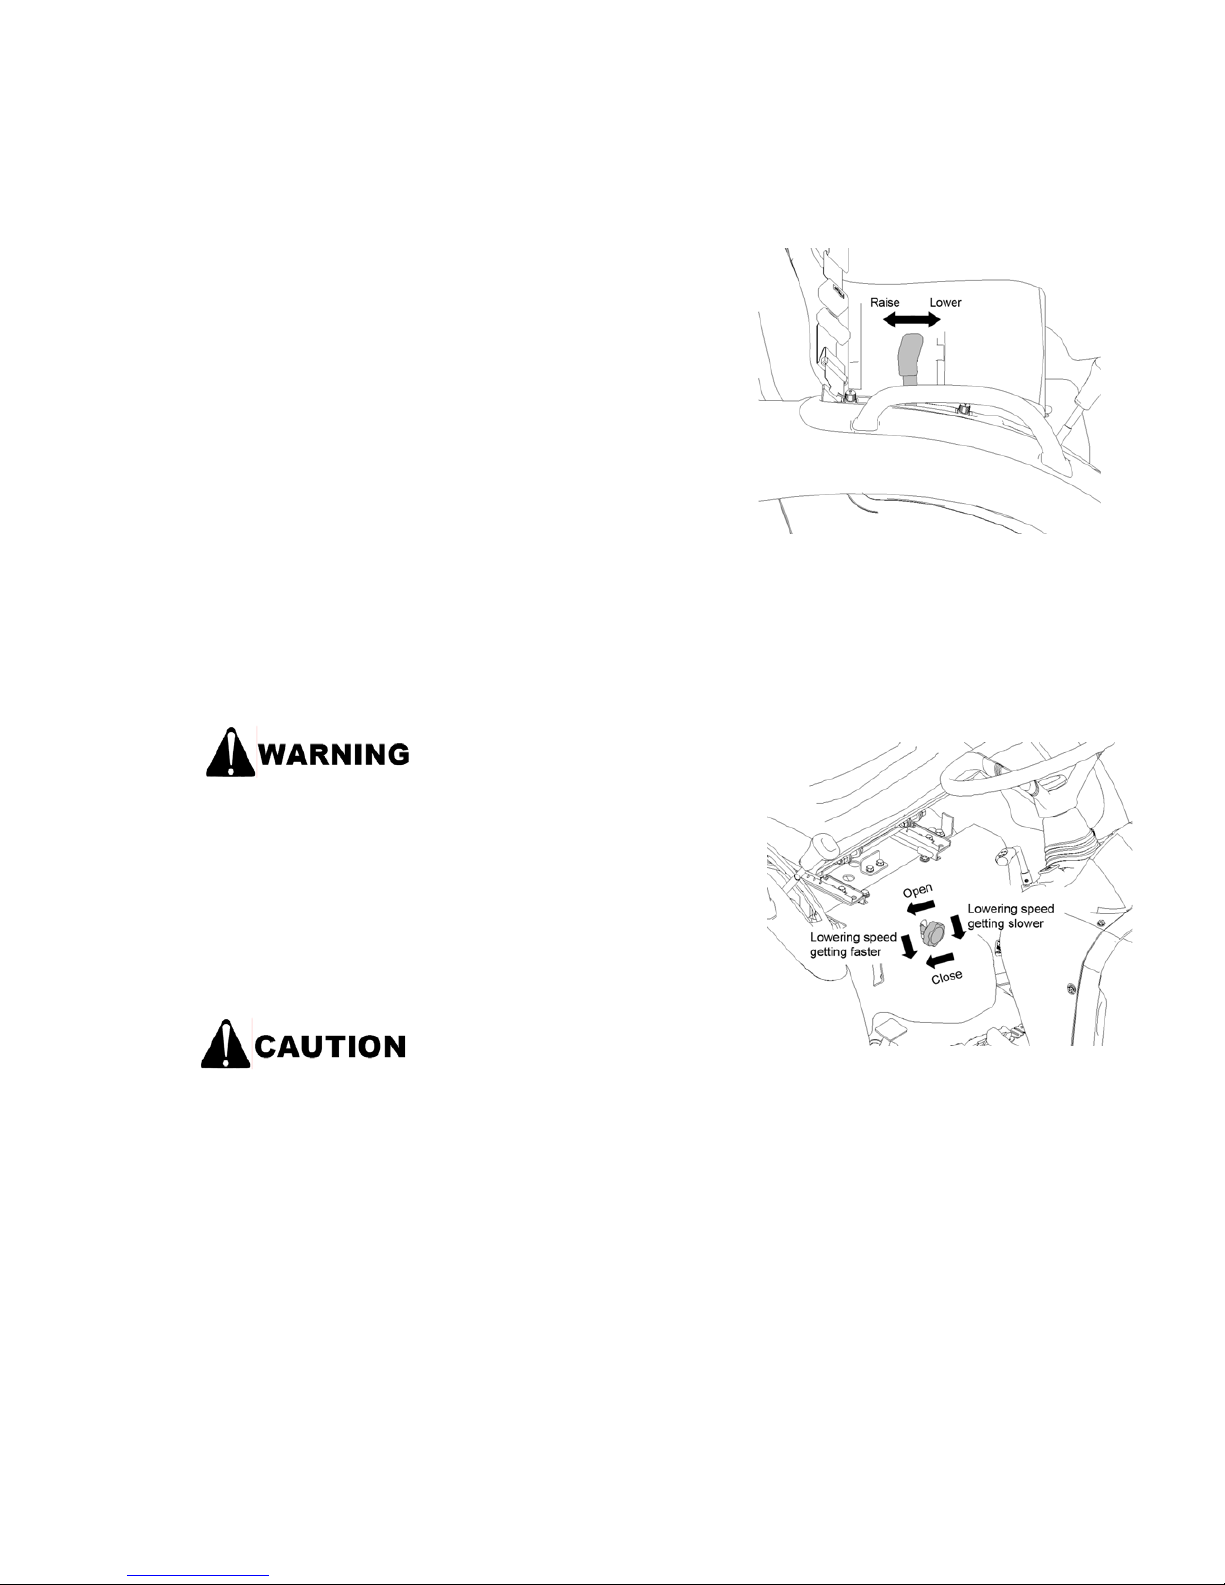
4. TO RAISE OR LOWER THE IMPLEMENT
Move the position control lever forward or backward
to lower or raise the implement.
5. ADJUSTING THE LOWERING SPEED OF THE IMPLEMENT
Do not work under or put a
foot under the implement.
【Otherwise】
The implement may fall and cause an injury.
For adjusting the lowering speed, turn the hydraulic stop/slow
return valve (A) to the left for faster movement or to the right for
slower movement. Turning the valve fully to the right will block
the hydraulic pressure and will cause the implement to stop.
When driving on a road, leave
the hydraulic stop/slow
return valve open and lock
the position control lever into
SHALLOW position
Page 53
- 53 -
6. DRIVING ON THE ROAD
• When driving on a road or crossing a dike, make sure to connect
the brake pedals. Otherwise, the tractor may turn abruptly or
turn over due to one-sided braking.
• Observe the traffic regulations when driving on the road.
Otherwise, you may be involved in an accident.
• This tractor is designed to accommodate only one person.Do
not allow anyone on the tractor other than the driver. Otherwise, you
will be exposed to a risk of accident.
• Put the PTO lever into “N” and connect the brake pedals.
• When making a turn, turn on the direction indicator lamp to inform
other vehicles of your intention.
• Monitor the vehicles coming from behind through the rear view
mirror and do not hinder other vehicles from passing you.
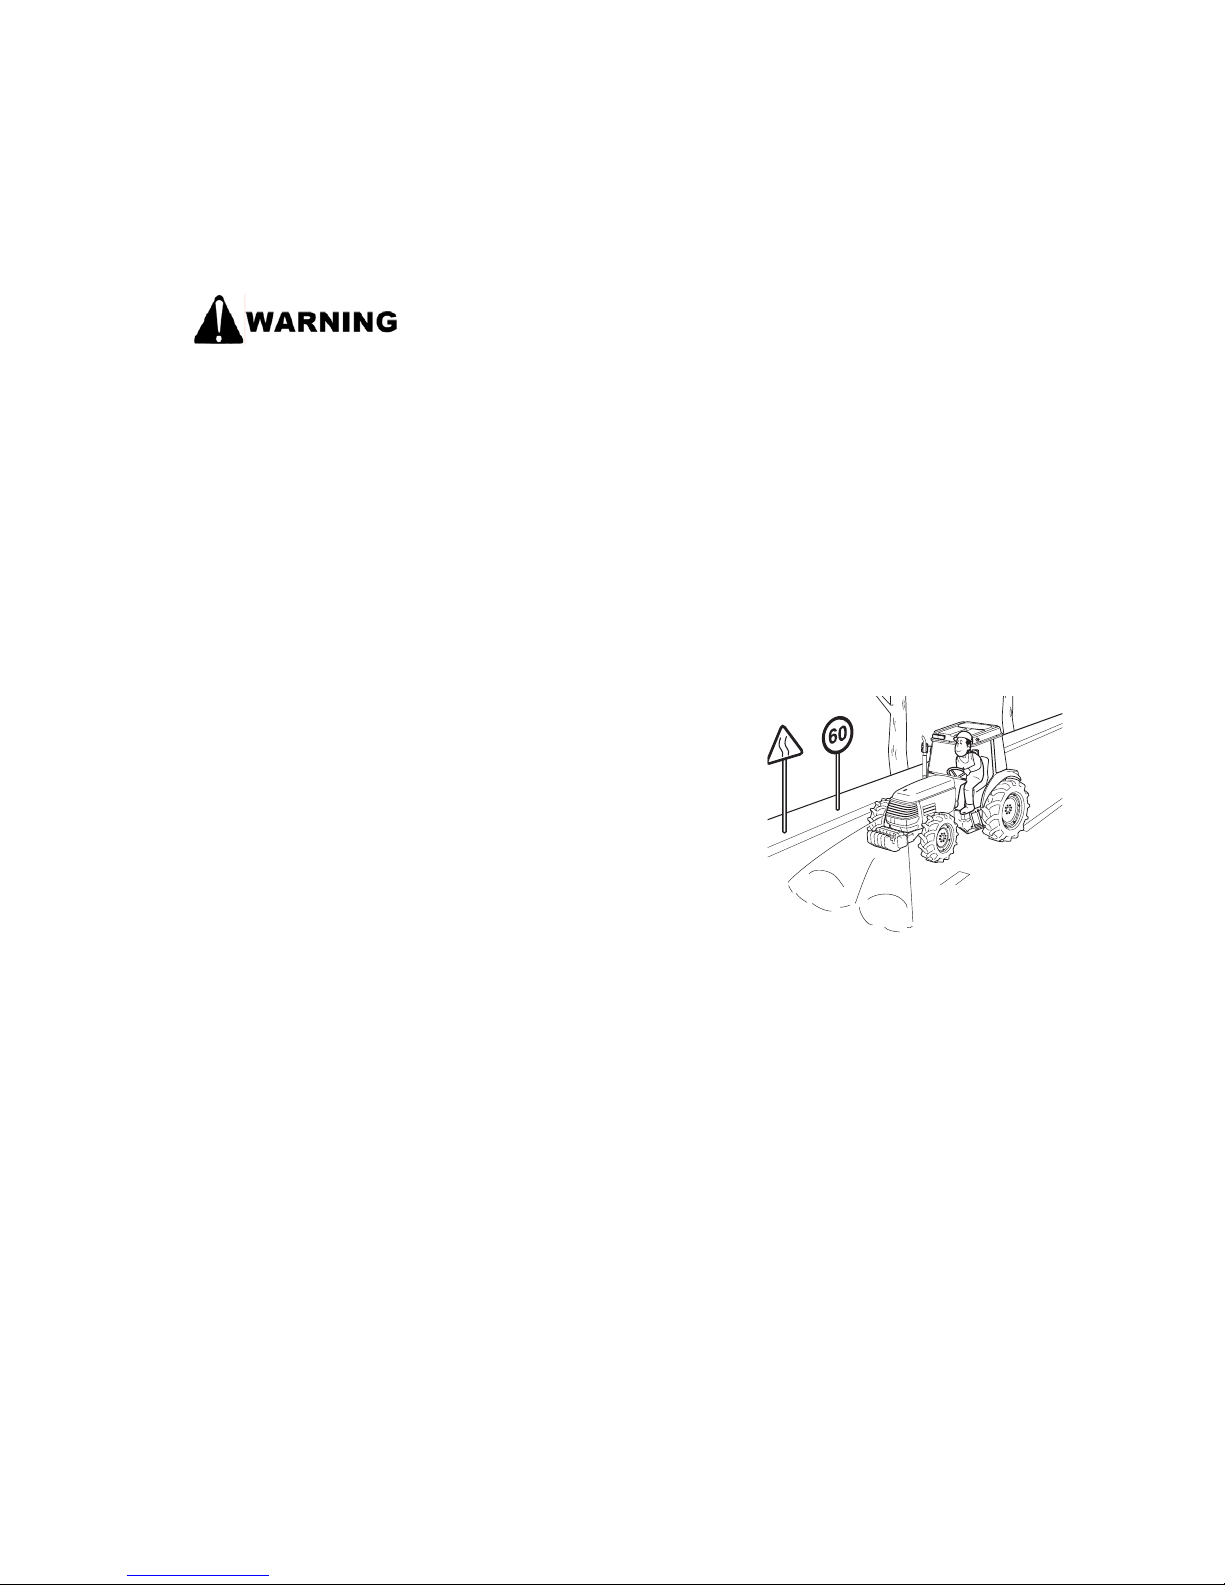
• Pay particular cautions to
narrow farm roads, slopes, and
grassy shoulders, and reduce the
speed.
• Put the position control lever to
UP and lock it with the stopper.
Otherwise, you will be exposed to
a risk of an accident.
Page 54
- 54 -
7. DRIVING ON THE SLOPE
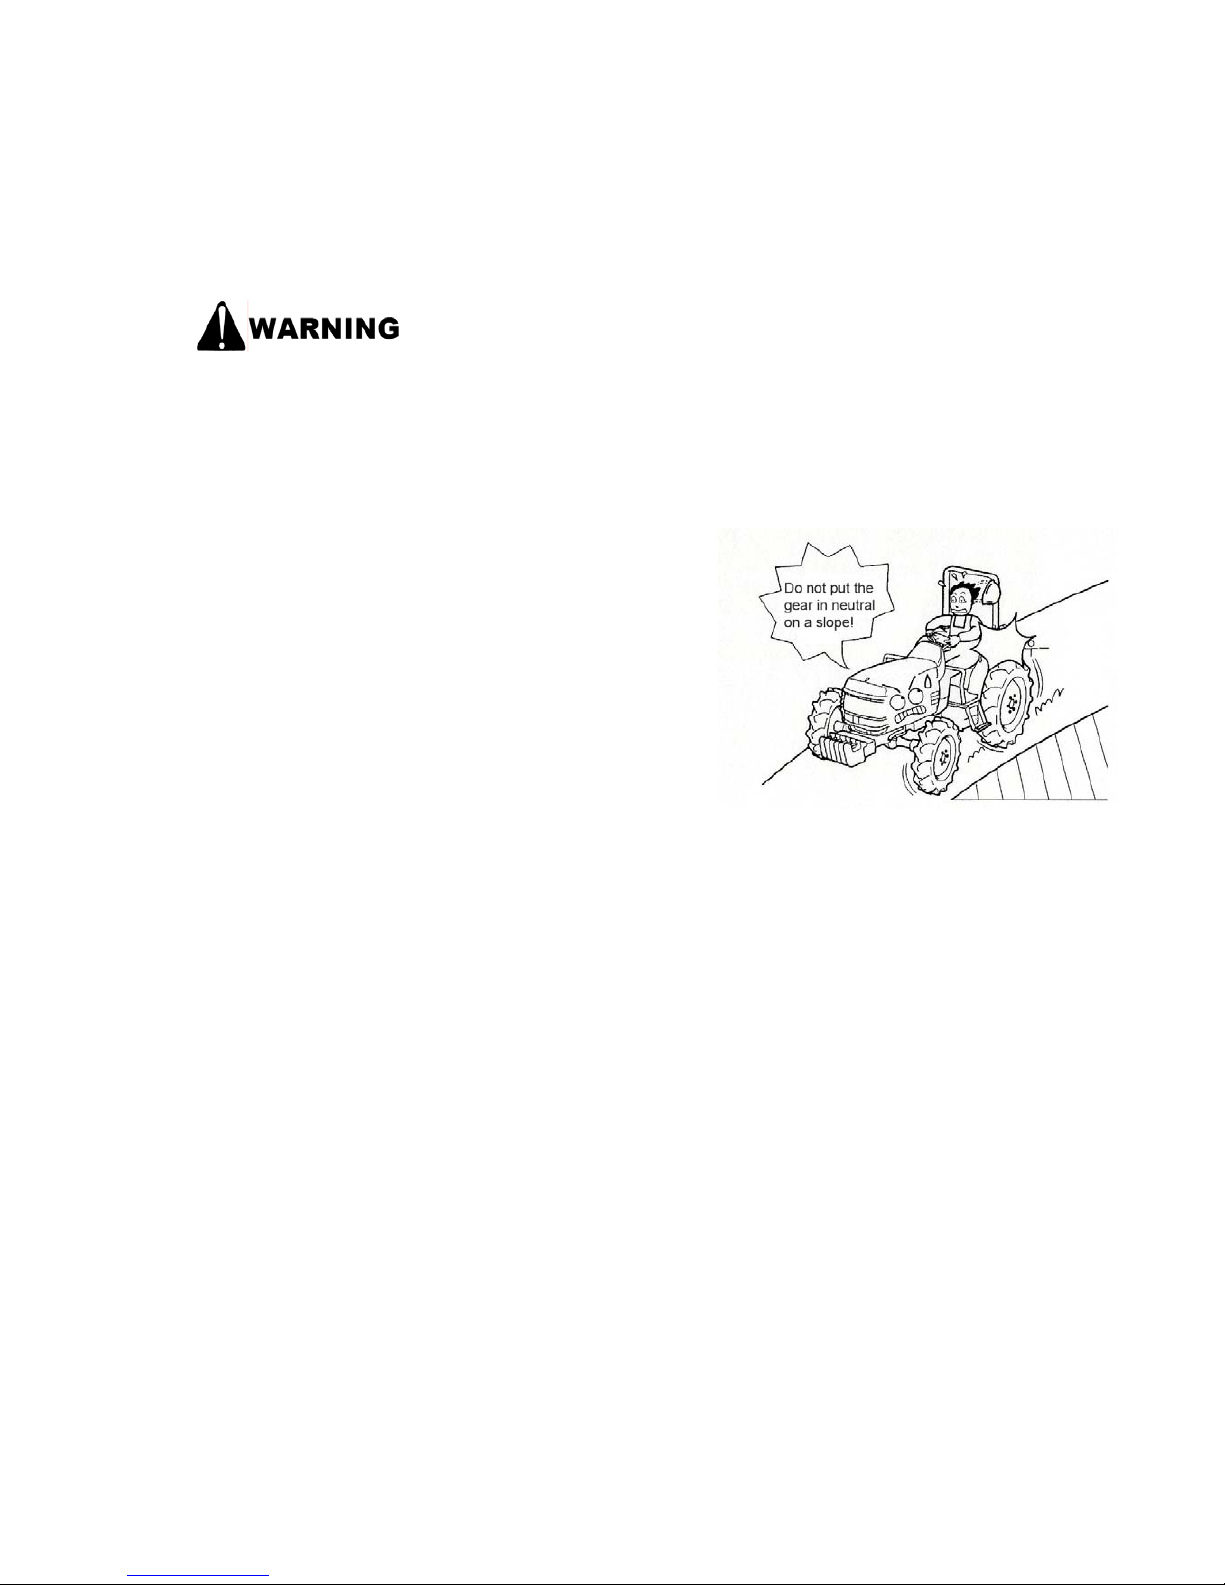
• Select a proper speed, and do not shift the gear.
• Do not park on a slope. Otherwise, the tractor may slip or overturn
and cause an accident.
• Reduce speed and pay special attention to the speed.
• Do not depress the clutch pedal when driving on a slope. The
tractor may slide down and lead to a serious situation.
• When starting the tractor upwards on a slope, start slowly in low
gear with low engine rpm. Otherwise, the front of the tractor may be
lifted and cause a very
dangerous situation.
• You may shift the gear
when you are no longer on
the slope. If you stop on a
slope, apply the parking
brake. Otherwise, you may
be exposed to a risk of
accident.
Page 55
- 55 -
8. ENTERING AND LEAVIN G THE PAVEMENT
• Make sure to connect the brake pedal. Otherwise, the tractor
may turnover due to one-sided braking.
• When you cross a dike or raised ground to enter or leave the
pavement, use loading ramps with sufficient strength, and
lower the implement to achieve a lower center of gravity.
• Drive backward when climbing up a steep slope, and drive
forward when climbing down.
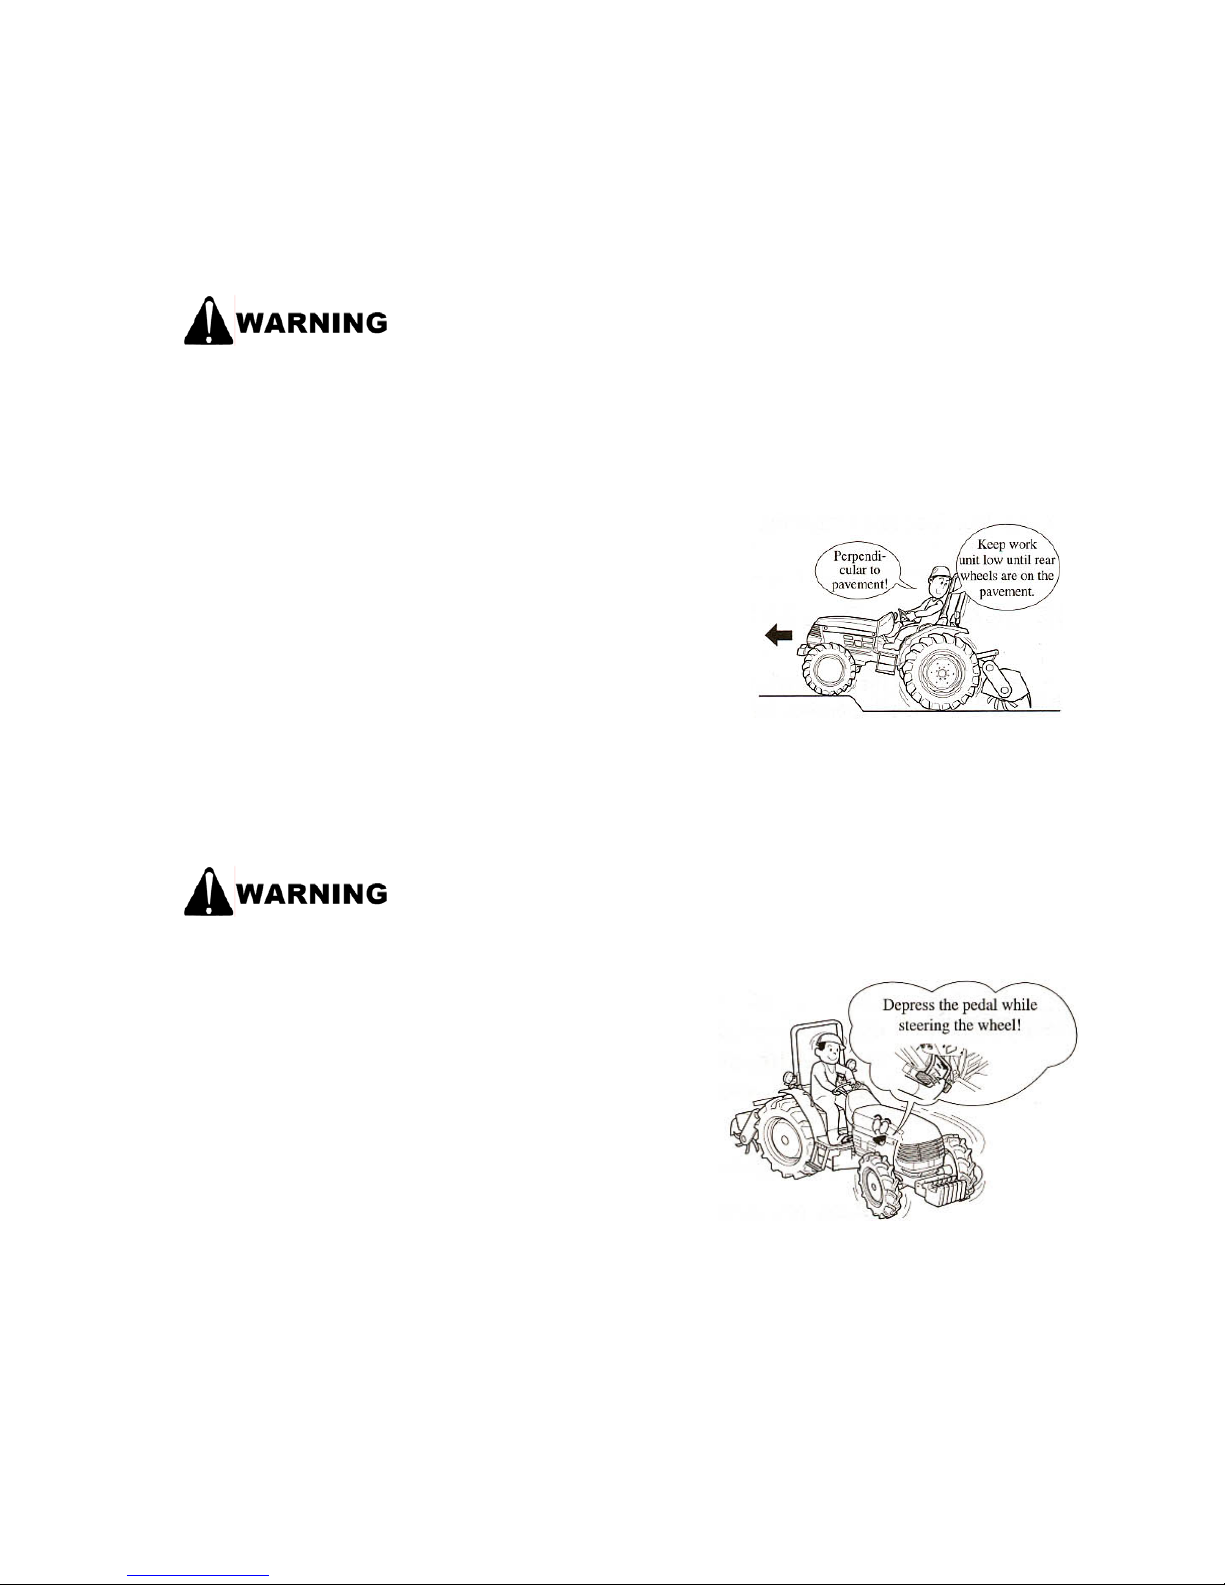
Enter or leave the pavement in a perpendicular
direction. When climbing onto the pavement, lower
the implement to achieve a lower center of gravity.
Once all wheels of the tractor are on the pavement,
raise the implement.
9. TURNING ON THE PAVEMENT
Make sure to release the differential gear lock before making a
turn. Otherwise, the tractor will not turn in the intended
direction but may cause an accident.
When making a turn, reduce the engine rpm and
make a slow turn. When making a turn on the
pavement, remove the connector of the brake
pedals. Depress the brake pedal on the side to
which to make a turn, while steering the wheel,
this will allow the tractor to make the turn without
moving ahead. Make sure to keep the work unit
in the up position when making a turn.
Page 56
- 56 -
10. DIFFERENTIAL GEAR LOCK
Make sure to release the differential gear lock w hen making a turn .
Otherwise, the tractor will not turn in the intended direction and
may cause an accident.
Never lock the differential gear when driving on a road. Otherwise,
driving will be unstable and the tractor may cause an accident.
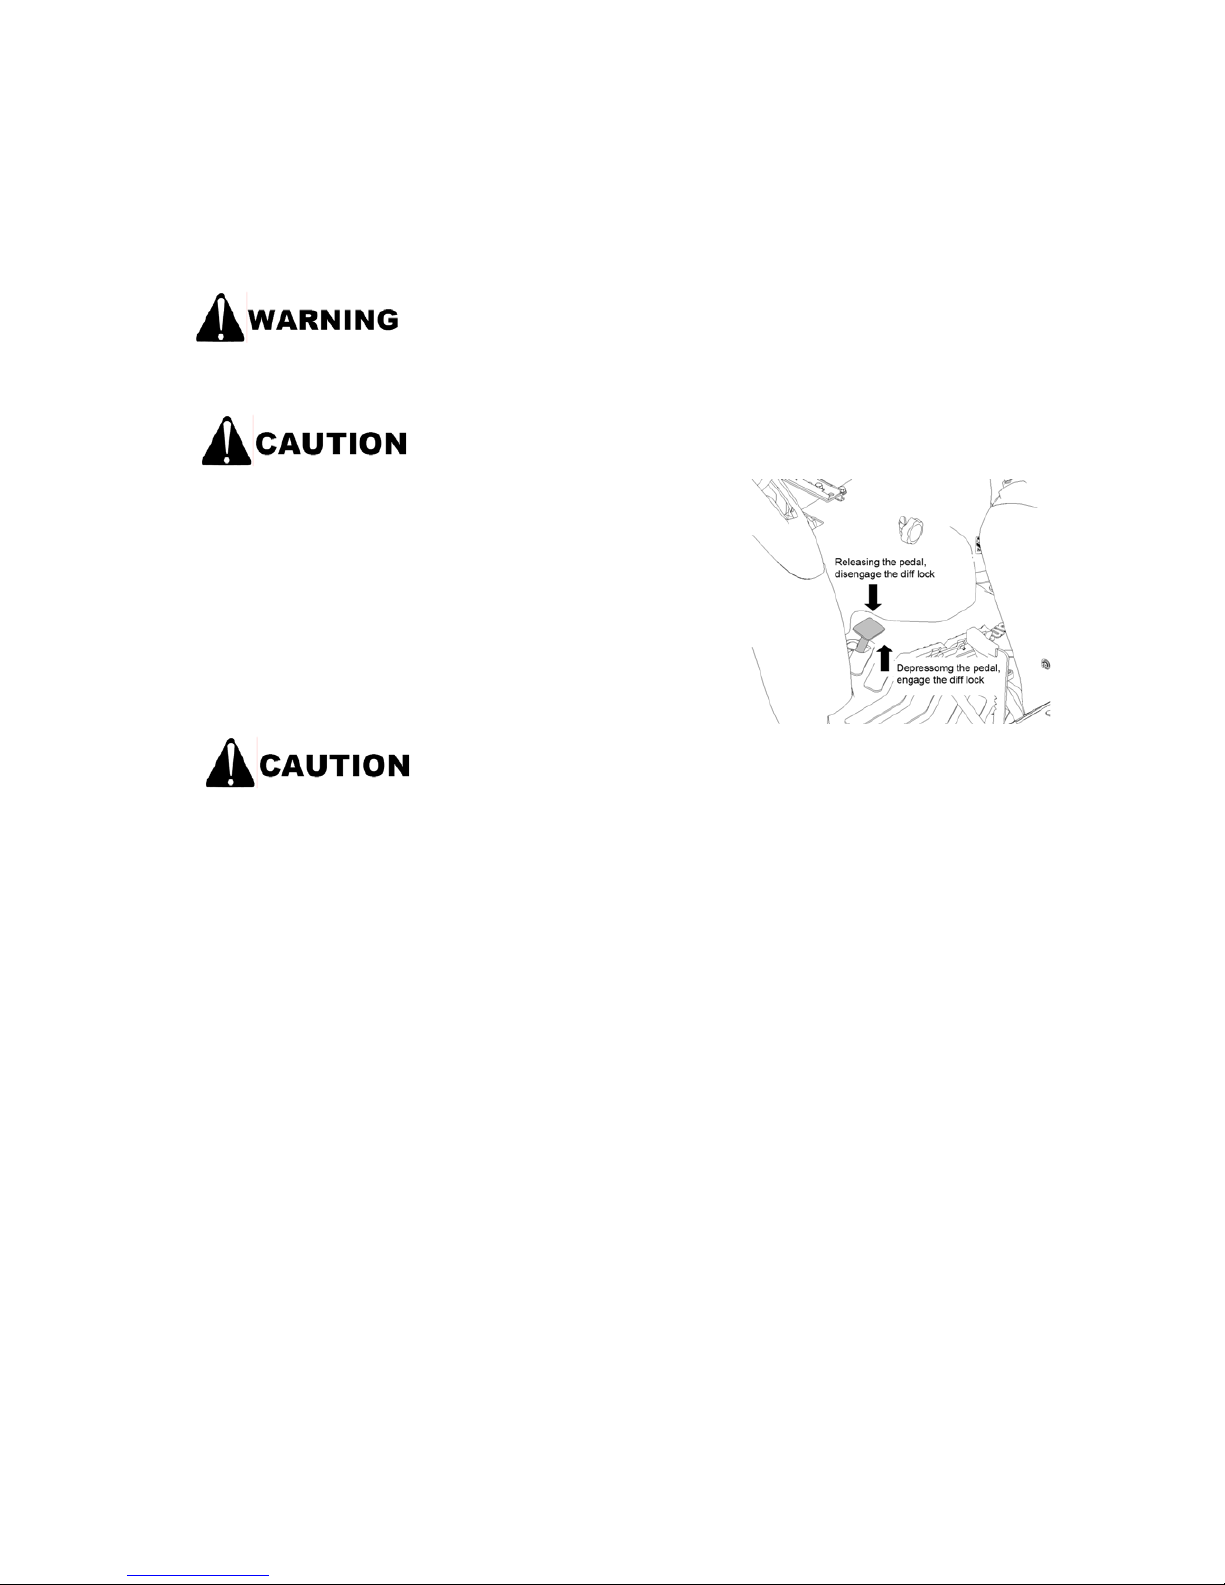
Depressing the differential gear lock pedal will make both
rear wheels roll at the same speed. Releasing the pedal
will automatically unlock the differentia l gea r.
• When locking the differential gear, reduce the e n gine rpm.
• If the differential gear cannot be unlocked, disengage the clutch
or depress the brake pedal lightly.
• Keep your feet away fro m the differential gear lock pedal except
when you have it depressed.
• Don’t use the differential gear lock with the Creep mode.
Page 57
- 57 -
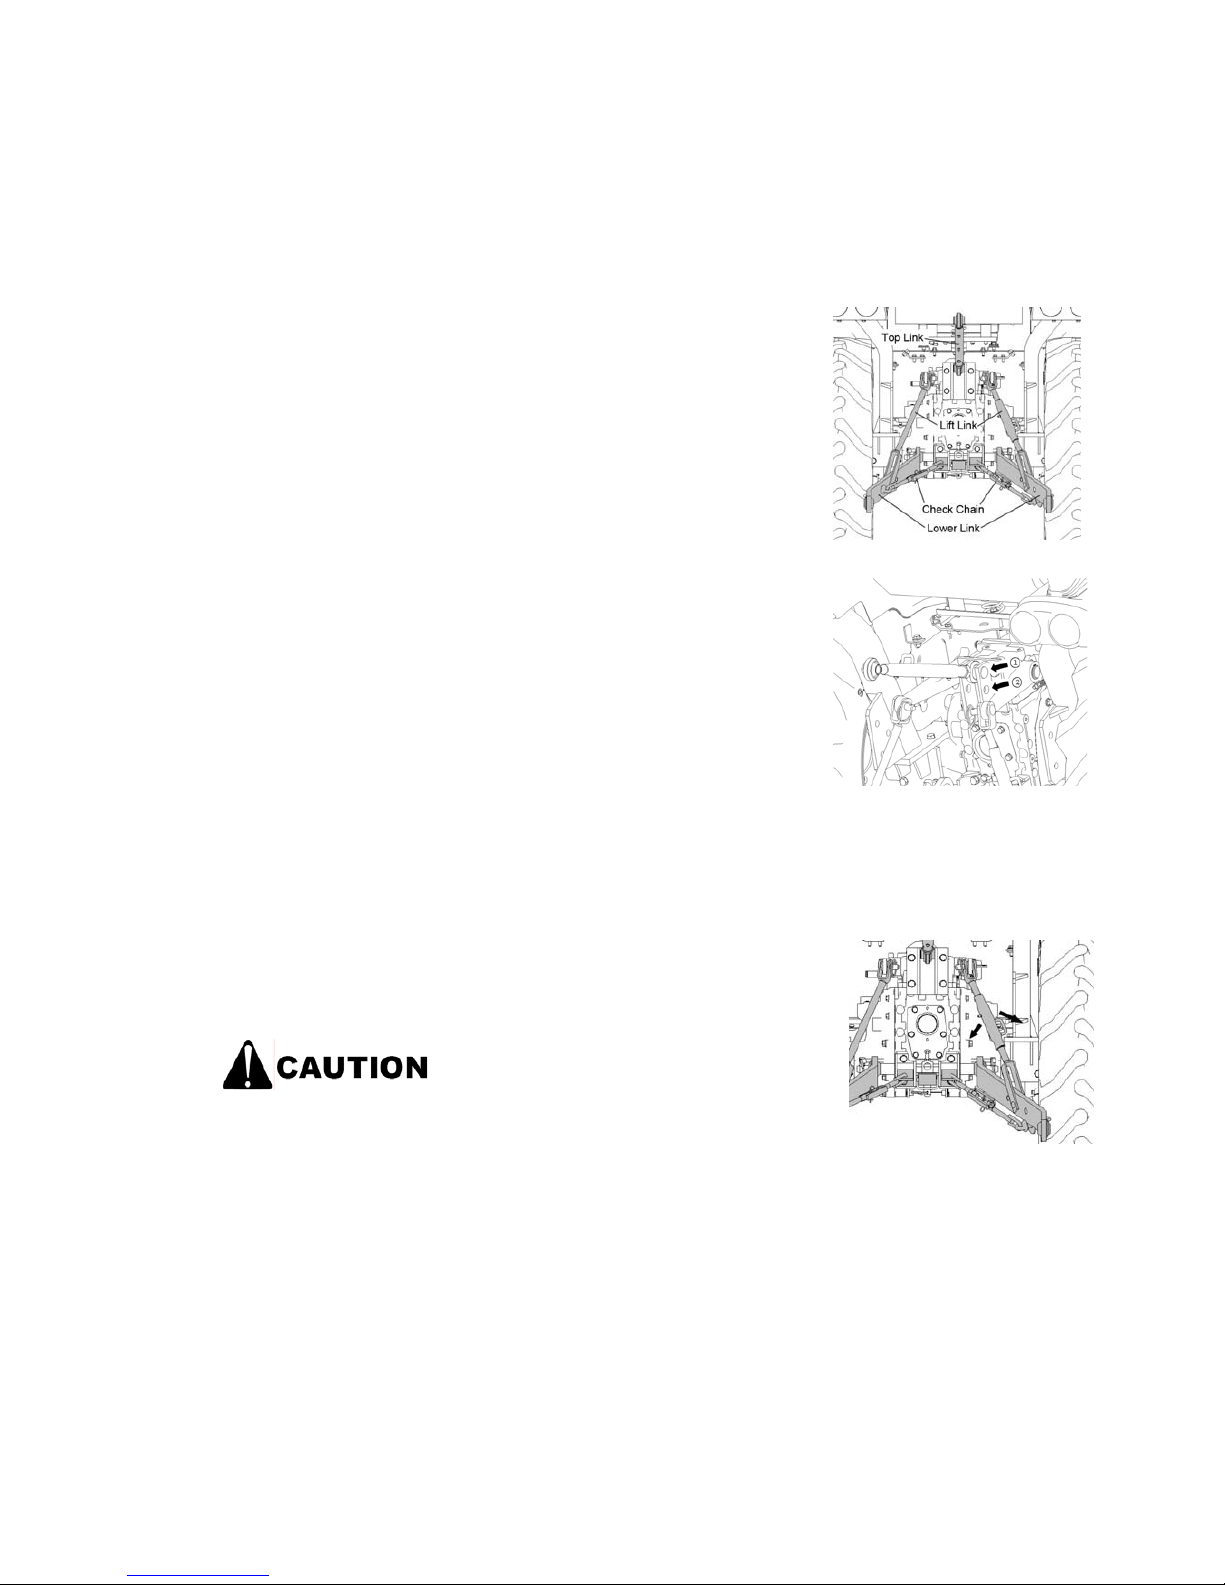
11. INSTALLING 3-POINT HITCH
(1) Attach the lower link to the link hook and insert pin into hook.
(2) Connect Check chain to bracket & Lift link mounting hole and adjust
length.
Refer to instruction of implement for adjusting swing clearance.
(3) There are 2 holes in top link mounting bracket.
※ Top link needs to be moved from (1) to (2) as
followed.
z If rear side of implement is too high.
(4) Level a 3 point mounted implement from side to side by turning the
adjusting handle to shorten or lengthen the adjustable lifting rod with the
implement on the ground.
After adjusting, turn down the
lever for locking.
Page 58
- 58 -
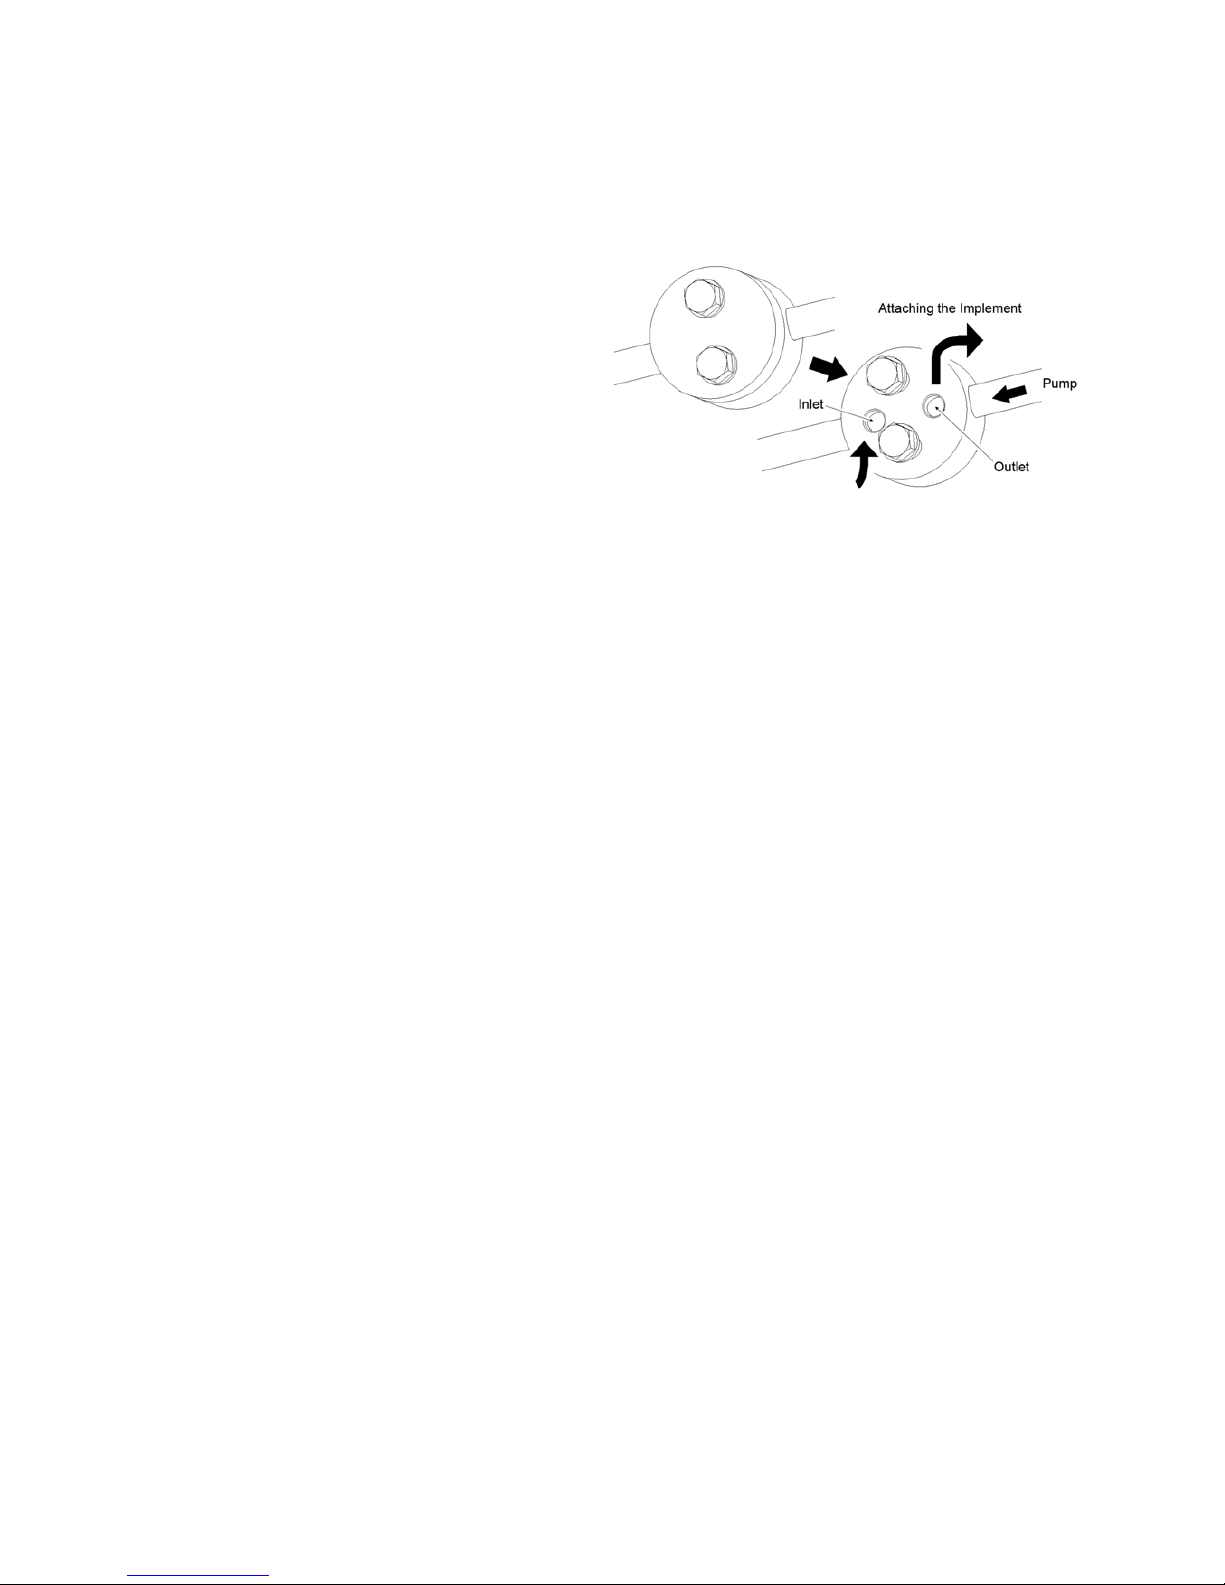
12. AUX. HYDRAULICS
Hydraulic block type outlet is useful when
adding hydraulic operated equipment such as
front loader, etc .
When implement is attached
1. Remove the block cover.
2. Attach the implement inlet and outlet.
[Note]
1. For hydraulic block type outlet, be sure to use the control valve “Power beyond type” with relief
valve that has a third line return to tank for the operation of hydraulic block.
2. The “tank” port flow from implement should be connected to the located on the right hand side of
transmission case.
3. If the implement control valve has a relief valve, th e tank port flow from implement should be
connected to the port located on the right hand side of transmission case.
Page 59
- 59 -
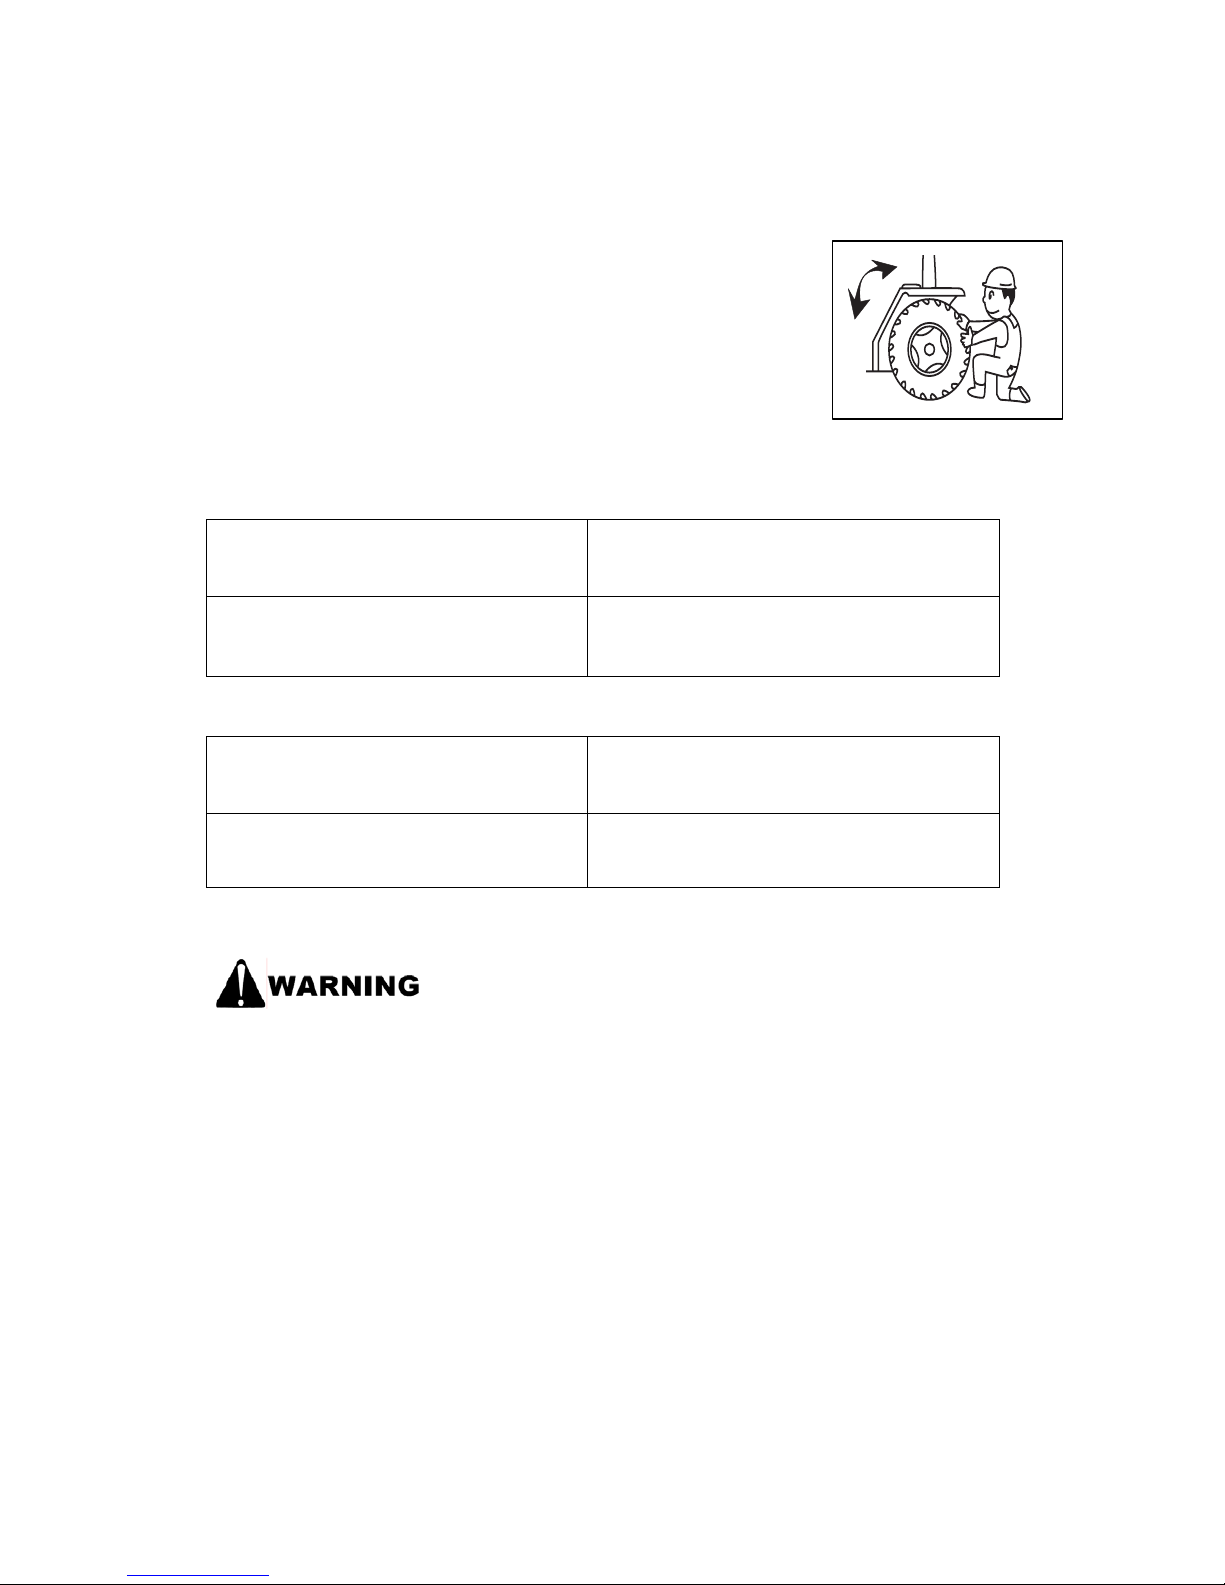
13. ADJUSTING WHEEL TREAD
Adjust the wheel tread depending on the type and condition of th e
work. Also, increase the wheel tread when work ing on a slope or
towing.
[Tightening torque]
[Front wheel]
Tightening torque
Bolts on wheels and axle
56.8 ~ 66.4 lb-ft
(77~90 N.m)
[Rear wheel]
Tightening torque
Bolts on wheels and axle
79.6 ~ 92.2 lb-ft
(108~125 N.m)
• When changing tires, please use a hoist or strong support
and make sure the tractor does not move.
[Otherwise】
There is a risk of death or injury
Page 60

- 60 -
14. POWER STEERING
• Pay attention to the steering wheel while driving, because it can be
very lightly manipulated when the engine is running.
• Power steering will run only when engine is running. When
engine is idling, power steering may feel a little heavy.
• If the wheel is steered to the maximum, the relief valve is opened
and a warning sound will be made. Do not continue to operate the
tractor with warning a sound.
• Do not steer the wheel unnecessarily, because steering the wheel
without moving will attribute to early wear of tires and rims.
15. PRECAUTIONS FOR CONNECTING THE IMPLEMENT
- When engaging or disengaging the implement by moving the tractor, make sure that no one is
allowed around the tractor or between the implement and the tractor.
- Engage or disengage the implemen t on a flat and safe place. Supply proper lighting at all
times and especially at night.
- When engaging a heavy implement, load the weight on the front to keep the balance of the
tractor.
- When adjusting the implement, apply the parking brake, switch off the engine, and confirm that
the PTO lever is on the “N” posit ion.
- When towing something, make sure to use t he drawbar.
- Increase the wheel tread on a slope or when towing.
- Depending on the implement, the overall length may become very long. Pay particular
attention to people or objects nearby when making a turn.
- Do not substitute the balance weight with a person or anything else. Always use the
recommended balance weight.
- For front loader work, mount an implement on the rear to keep the balance of the tractor.
- Read the instruction manual of the impleme nt mounted to the t ractor.
【Otherwise】
There is a risk of death or injury
When the PTO shaft is not in use, affix the safety cover on it.
[Otherwise】
There is a risk of getting entangled in the tractor or injured.
Page 61
- 61 -
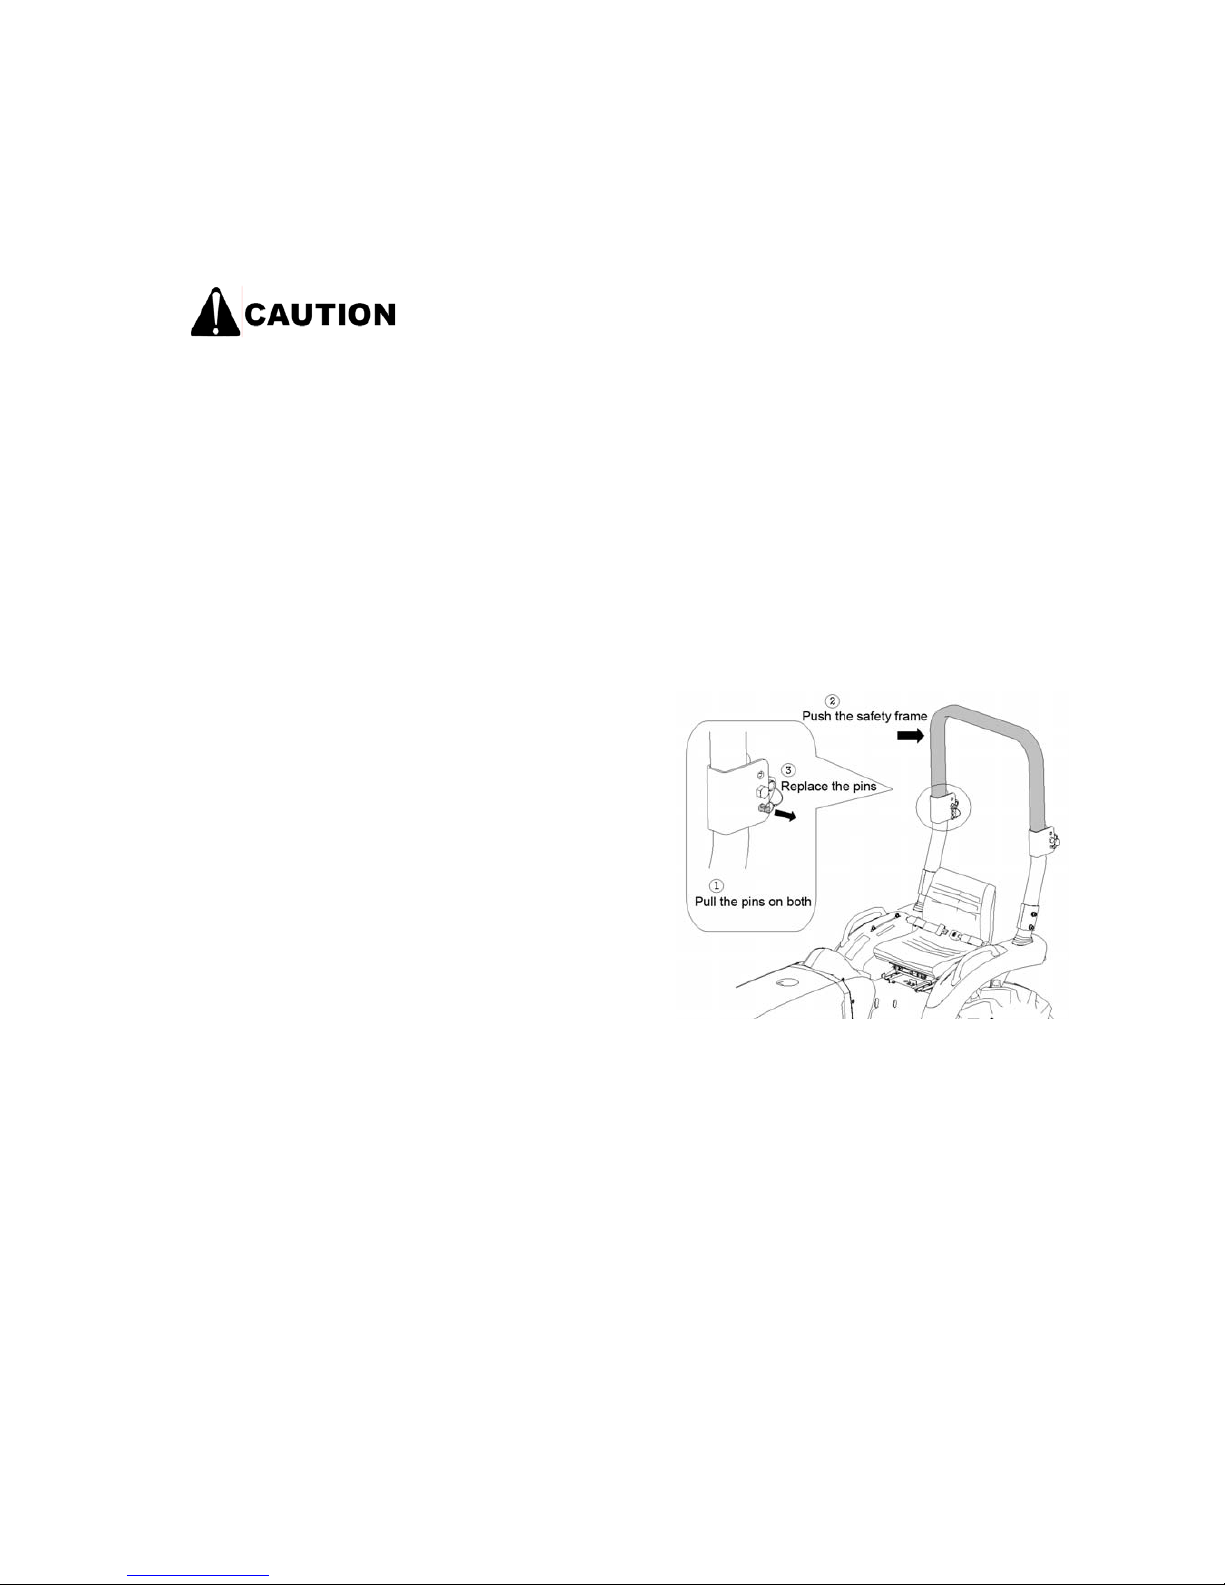
16. ROPS FOLDING METHOD
• Don’t fasten your seat belt after folding ROPS
• When you drive tractor, fold up vertically
• Fasten your seat belt after folding up ROPS
• When working with the tractor, don’t fold down ROPS
• Don’t change ROPS without authority
• Before using tractor, check your ROPS support and other parts.
• If there is damage to the ROPS, change ROPS at once
[Otherwise】
If the tractor rolls over, you could be injured or death may occur.
※ ROPS are a very important structure for protection on roll over, ALWAYS check
your ROPS
< How to fold down the ROPS >
(1) Pull the pins to separate both sides.
(2) Raise the ROPS a little.
(3) Replace the pin.
(4) Fold down the ROPS, and the pins will
lock into place.
*If it is not certain whether the pins are
fixed, shake the frame a little bit to fix
the pins for sure.
< How to fold up ROPS >
(1) Pull the pins on both sides of the tractor and turn them about 1/4 turns to release
the lock of the ROPS.
(2) Raise the ROPS a little.
(3) Replace the pins.
(4) Stand the ROPS up, and the pins will lock into place.
*If it is not certain whether the pins are fixed, shake the ROPS a little bit to fix the
pins for sure.
(5) Turn the handle to fix the push plate and the frame.
Page 62
- 62 -
MAINTEANCE AFTER WORK
1. MAINTENANCE AFTER WORK
• When covering the tractor, make sure that the engine or the
muffler has fully cooled down.
【Otherwise】
There is a risk of fire
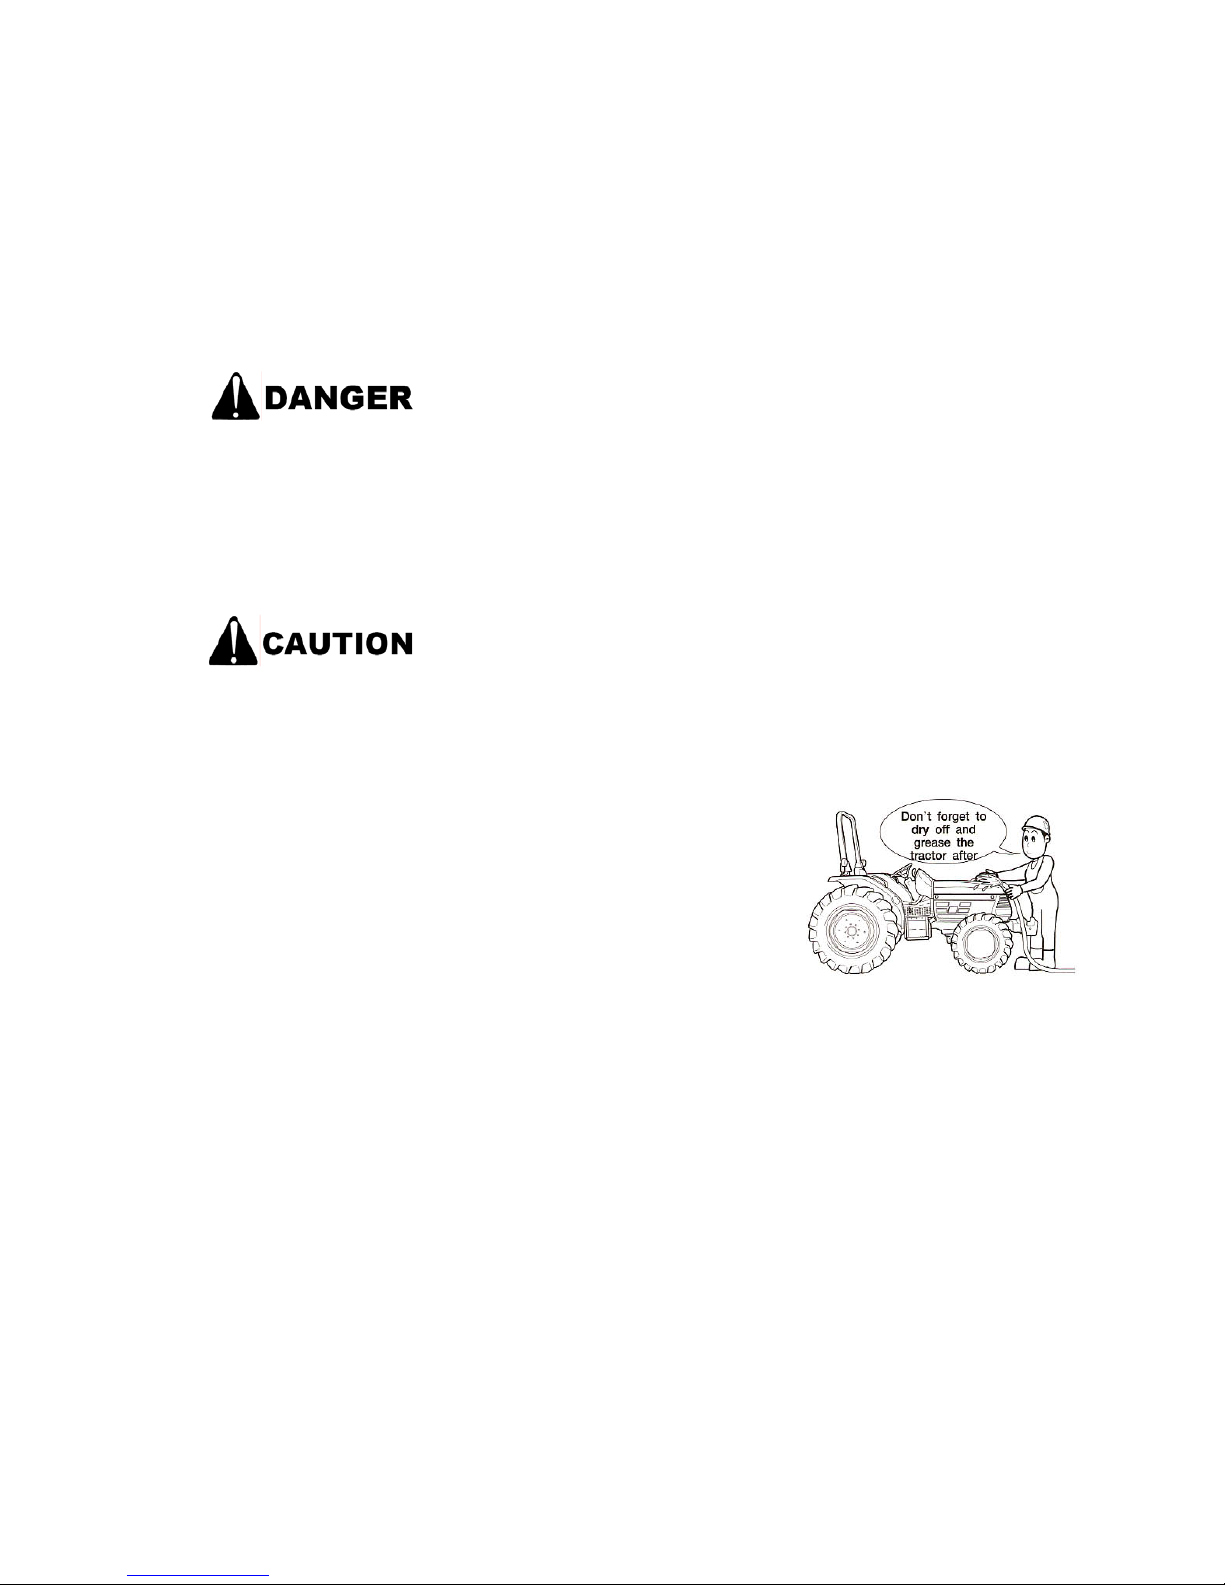
After work, clean the tractor. After cleaning, dry the moisture and supply grease into
each grease nipple.
• When carrying out checking, maintenance, or repair, make
sure to turn off the engine
.
【Otherwise】
There is a risk that you may be entangled in the tractor or get injured.
• When carrying out checking or maintenance, make
sure that the engine or the muffler has fully cooled
down.
[Otherwise]
There is a risk of getting burnt.
• Avoid water on electrical parts whenever possible, as it will cause equipment
breakdown.
Page 63
- 63 -
2. MAINTENANCE FOR PROLONGED STORAGE
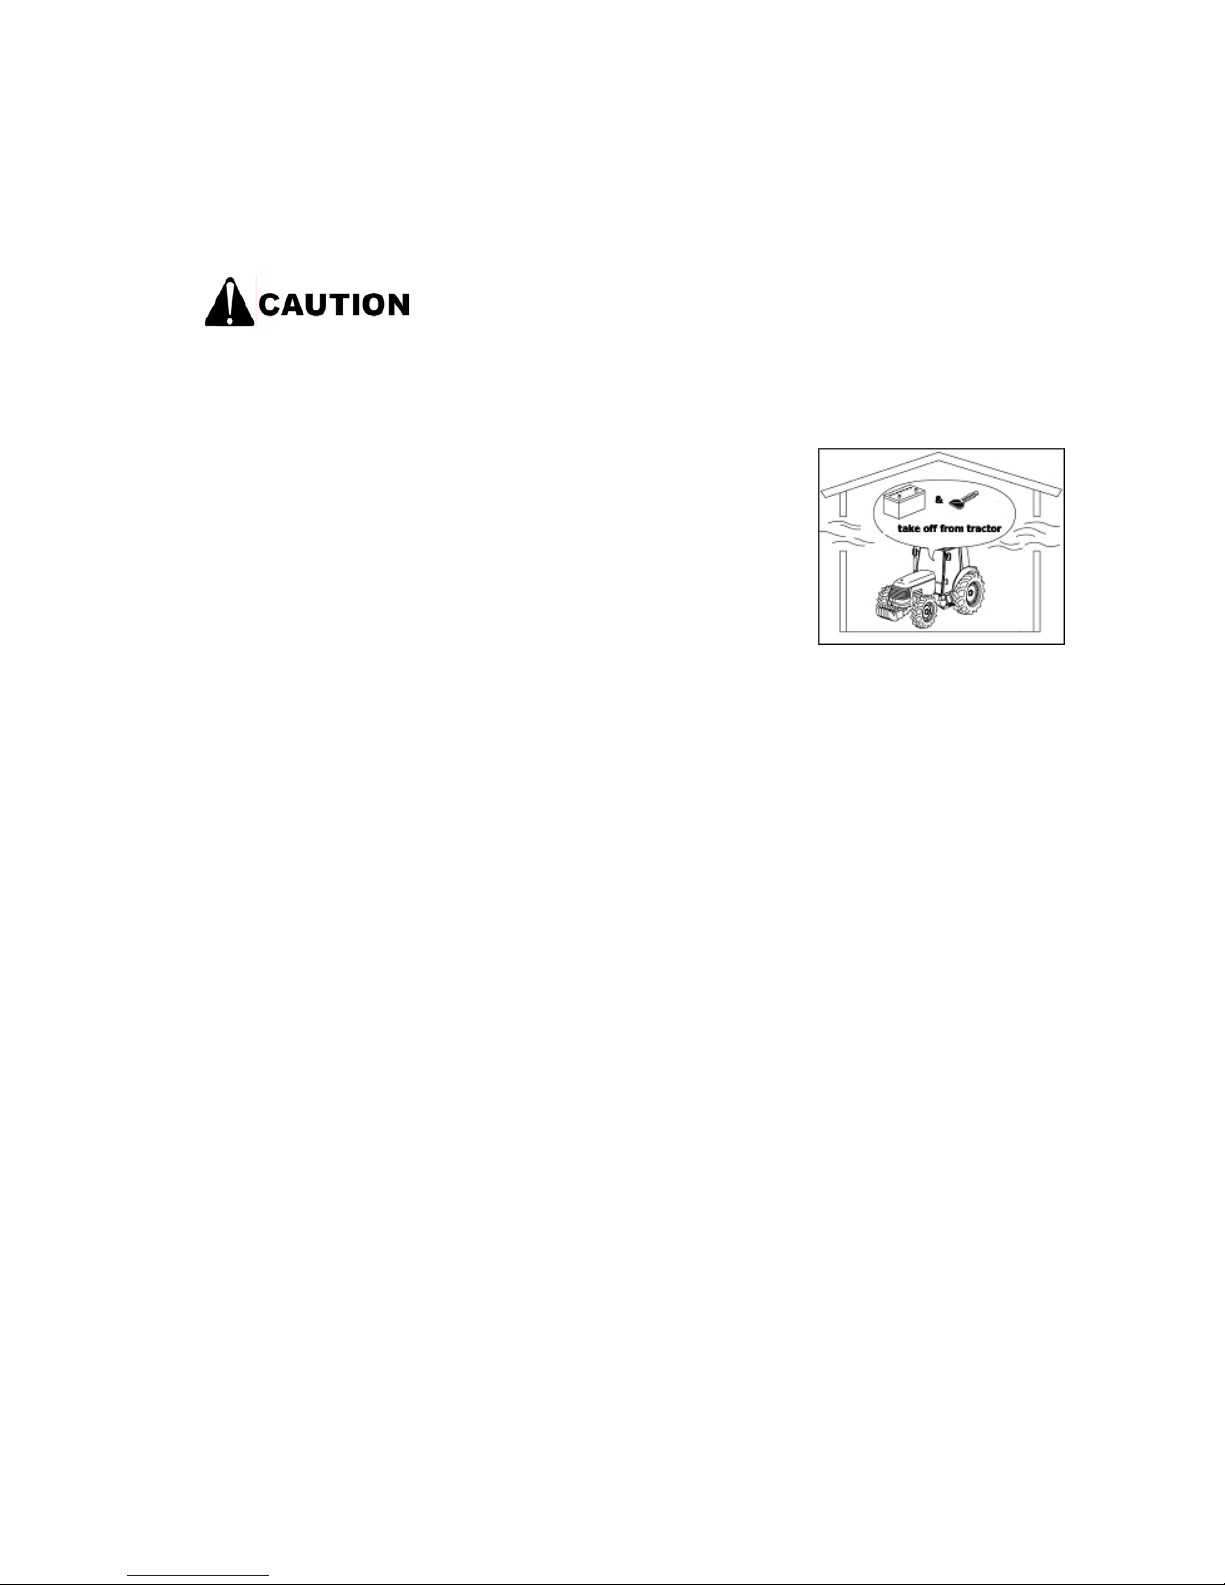
When storing the tractor for a long time, take out the key and
keep it in a safe place. Otherwise, there is a risk of accident.
• When the tractor will not be used for a long time, store it in
the following manner
.
(1) For long storage, put the ignition switch to “OFF”
(2) Select a dry and well-drained place for storage. Remove
the weights & implement or put it down onto the ground.
(3) Apply the anti-corrosion oil or engine oil and grease on
the parts that are subject to rust.
(4) Fill up the fuel tank. Empty space in the fuel tank will
produce dewdrops that will produce condensation that
will be the cause of rust formation. And lock the fuel cock
to “C” (closed).
(5) Disconnect the battery completely and store it away
from the tractor in a well-ventilated, dry, dark place if
possible. When the battery is attached to the tractor,
make sure to connect the (+) terminal first.
(6) Drain the coolant.
(7) Cover the air cleaner, muffler, and engine oil inlet with
plastic sheets to keep moisture away.
(8) Keep the clutch pedal in a depressed position to avoid
rust on the clutch.
(9) Maintain the air pressure in the tires.
[Precaution]
• The battery will be discharged even if it is not in use. Recharge it fully every 12
months
Page 64
- 64 -
PERIODIC MAINTENANCE AND ADJUSTMENT
• Carry out maintenance on a flat
and safe place where the tractor will
not fall or move and there is no
traffic danger. Also, block the front
tires to prevent moving of the tractor.
Otherwise, there is a risk of accident,
such as overturning of the tractor.
• Carry out checking and maintenance for each part every
year.
• In particular, replace the fuel pipe and the steering wheel
hose every two years. Otherwise, there is a risk of accident or
machinery breakdown due to poor maintenance.
• When carrying out checking or maintenance, make sure to
stop the engine.
• Replace the covers that have been detached for checking or
maintenance.
[Otherwise]
There is a risk of getting entangled in the tractor or injured.
• Carry out checking or maintenance after heated parts, such as muffler, engine or
transmission, have fully cooled down.
[Otherwise]
There is a risk of getting burnt.
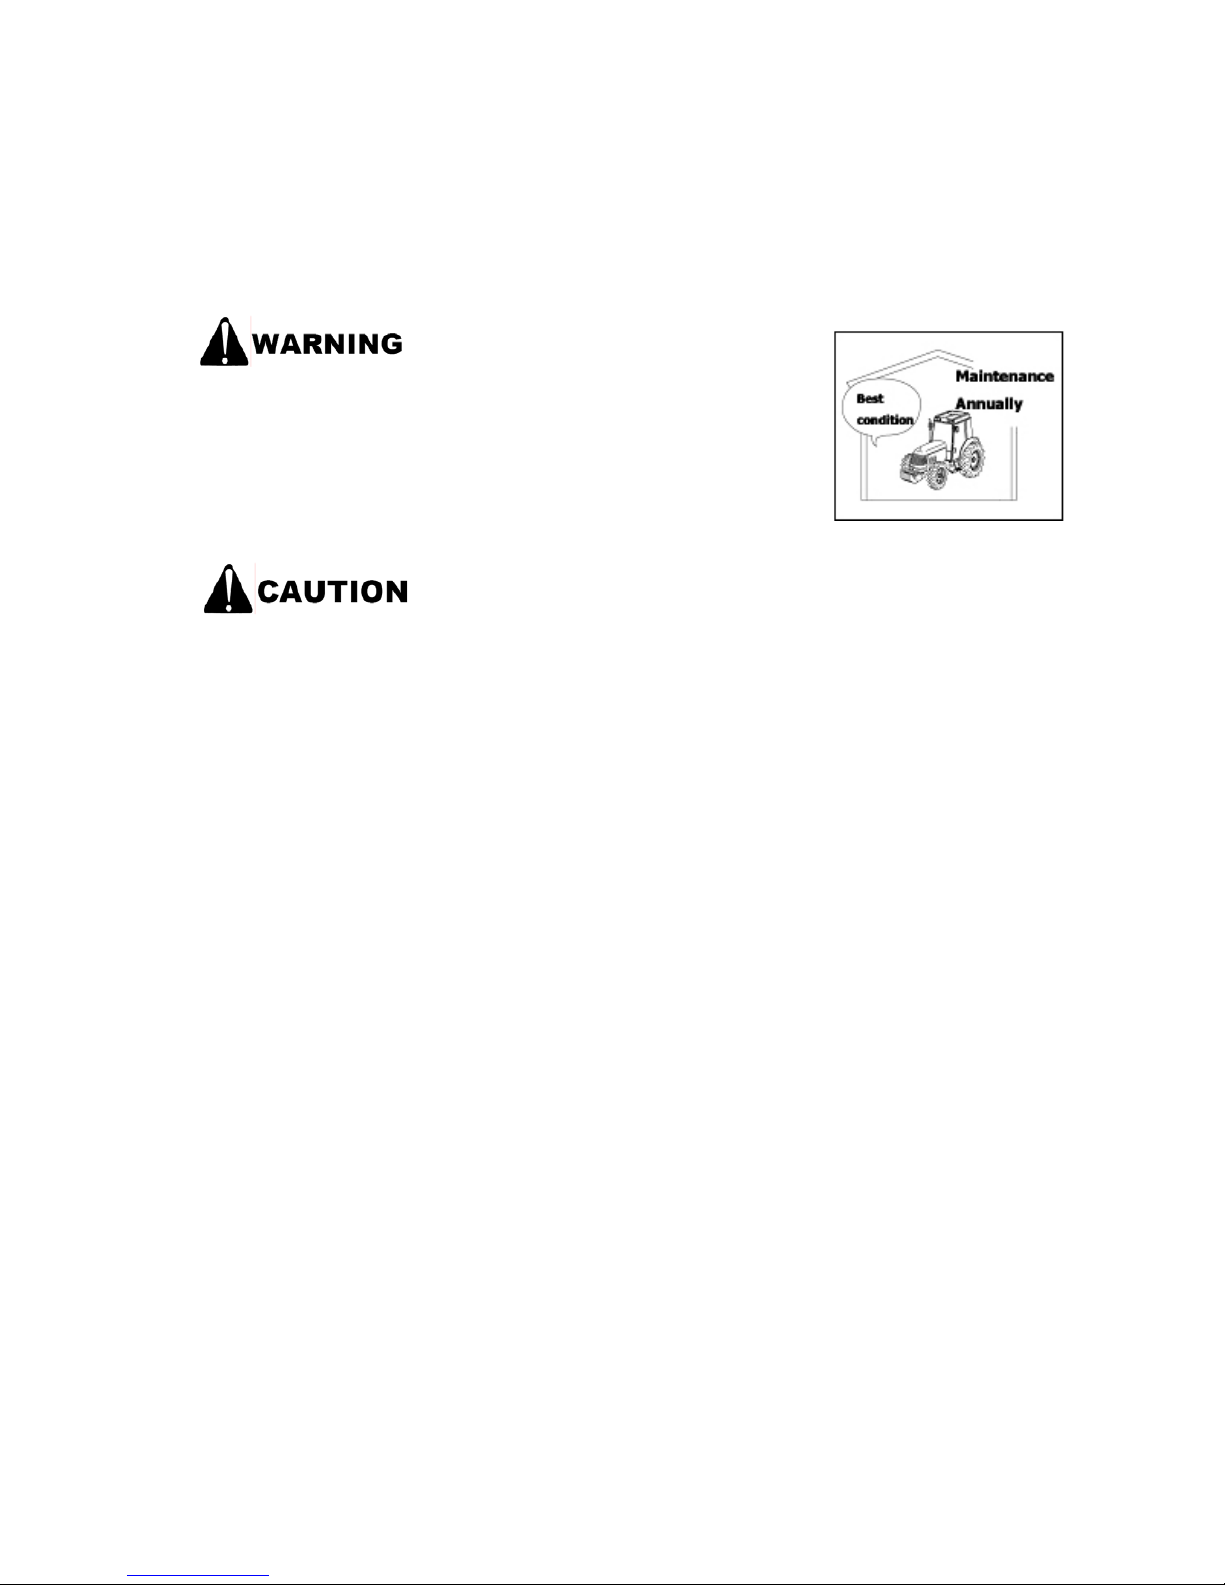
If you carry out maintenance during the off season, you can ensure optimum condition of the tractor as
well as safe and comfortable working conditions during the busy season.Also, in order to secure the
safety of each part of the tractor and to prevent a n accident that may occur due to poor maintenance,
arrange with your authorized dealer for periodic maintenance once a year.
In particular, we recommend that the electrical cables and the rubber hoses, such as fuel hose, steering
wheel hoses and radiator hoses, be replaced every two years.
Page 65

- 65 -
PERIODIC MAINTENANCE AND ADJUSTMENT
1. PERIODIC MAINTENANCE SCHEDULE
Running hours
Check items
50 100 150 200 250 300 350 400 450 500 550 600
Engine oil R R R R R R R
Transmission fluid R
○ ○ ○ ○
R
○ ○ ○ ○ ○
R
Front axle fluid R
○ ○ ○ ○
R
○ ○ ○ ○ ○
R
Engine oil filter R R R
Transmission fluid filter R R R
Radiator cleaning At the time the coolant is replaced
Fuel oil filter and element
○
○
R
○
○
R
Coolant Check before every use (Replace every year)
Air cleaner element
○ ○ ○ ○ ○ ○ ○ ○ ○ R ○ ○
Fan and radiator cleaning
○ ○ ○ ○ ○ ○ ○ ○ ○ ○ ○ ○
Battery solution Replace every two years
Battery (specific gravity)
○
○
○
○
○
○
Fuel pipe and connection
○ ○ ○ ○ ○ ○ ○ ○ ○ ○ ○ ○
Steering wheel hose
○ ○ ○ ○ ○ ○ ○ ○ ○ ○ ○ ○
Radiator hose
Hydraulic fluid hose
Fuel hose, electric cables
Electric cables
○ ○ ○ ○ ○ ○ ○ ○ ○ ○ ○ ○
Greasing
○ ○ ○ ○ ○ ○ ○ ○ ○ ○ ○ ○
Tightening handles
○
○
○
○
○
○
Tightening bolts
○ ○
○
○
○
○
○
Cooling fan belt
○ ○
○
○
○
○
○
Engine breed pipe
○ ○
○
○
○
○
○
Engine crankcase cleaning
○
○
Intake/exhaust gas valves
○
Fuel injection valve
○
Generator motor
○ ○
○
○
Hydraulic system
○ ○
○
○
※ Inspection should be done every 50 hours. If the tractor is not used much, inspect every year.
※ Replace parts every two years regardless of running hours.
※ Replace the steering wheel hose every two years.
Page 66
- 66 -
2. OIL, GREASE, AND ANTI-FREEZE CHART
Type
Item
Type Remarks
Fuel Diesel(KS # 2) Summer: S,Winter:W
Engine oil SAE 10W-40 CG Above
Grease NO.2 of KSM2130 Multi purpose
Anti - Freeze
International genuine
product
No.2 of KSM 2142,permanent
type
Transmission,
Steering, Front
axle fluid
Branson origin oil
-Texaco TDH oil, 1893
-Chevron Tractor HYD Fluid
Note) Use winter diesel when temperature is below 50’F.
3. FUEL, OIL, AND COOLANT CHART
Manual Transmission
MODEL
Type
2100 2400
Fuel 6.08 gal (23L) 6.08 gal (23L)
Radiator 1.00 gal (3.8L) 1.00 gal (3.8L)
Coolant
Sub tank 0.21 gal (0.8L) 0.21 gal (0.8L)
Engine oil 0.79 gal (3L) 0.79 gal (3L)
Transmission oil 3.43 gal (13L) 3.43 gal (13L)
Front axle oil 0.85 gal (3.2L) 0.85 gal (3.2L)
Page 67

- 67 -
4. OPENING AND CLOSING OF ENGINE HOOD AND SIDE COVERS
Opening and Closing of the hood
(1) Press the hood open lever to release the lock of hood
(2) Raise the hood with both hands
(3) When closing the hood, press the front part of hood
until a clicking sound is heard.
(4) After closing the hood, try to pull up the hood to see if
the hood is securely locked in place.
Page 68
- 68 -
5. CHECKING AND CHANGING OILS
Do not dispose of waste oil in water or in sewage system but take
appropriate measures, such as contacting a waste oil disposal
specialist.
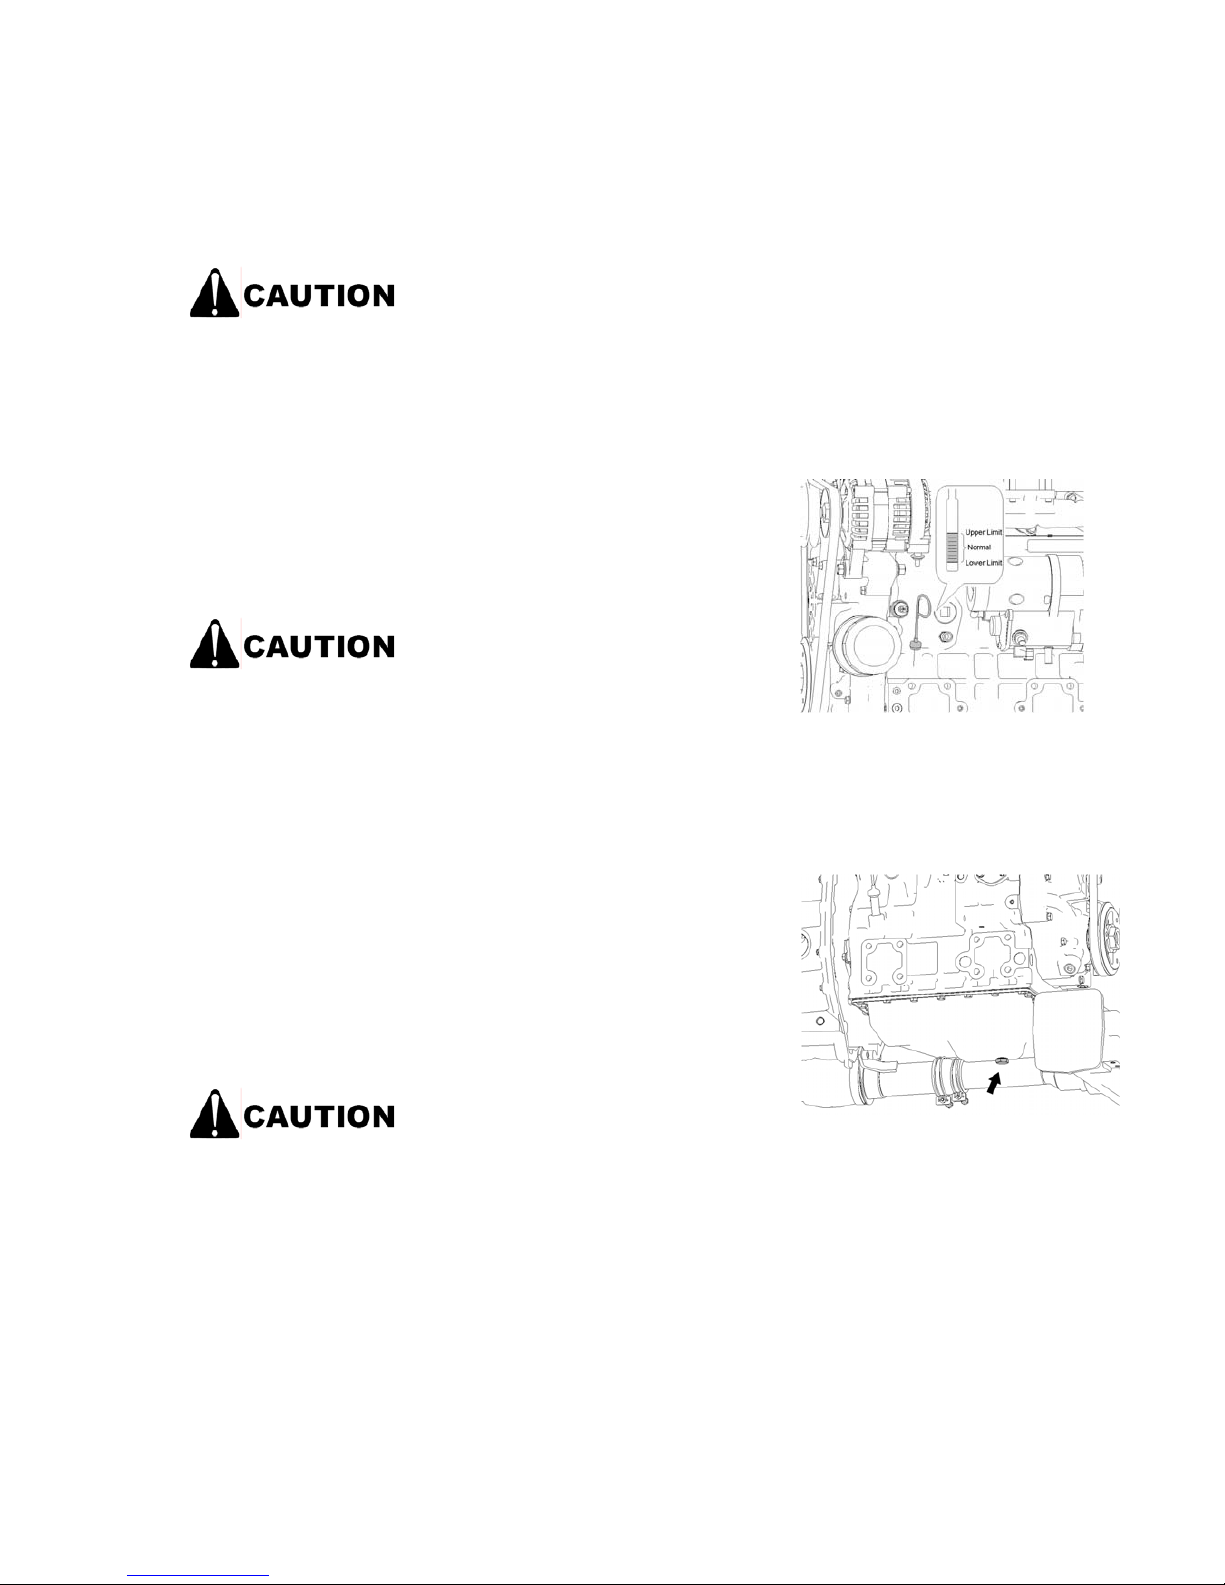
Engine oil
Checking
Pull out the dipstick, clean the tip of dipstick, put it back into
the engine, and pull it out again to see if the oil level is
between the upper and lower limit. If the oil level is below the
lower limit, add oil.
Check the oil lever before the
engine is started or after the engine
is cooled down.
Change Oil
Drain the oil by removing the plug under the engine. Put new
oil through the engine oil filler hole. Change the oil
periodically, and select the right type of oil depending on the
temperature and usage.
Drain the oil when oil is warm but
be careful! If oil is hot, there is a
risk of getting burnt.
6530
Page 69
- 69 -
Transmission oil
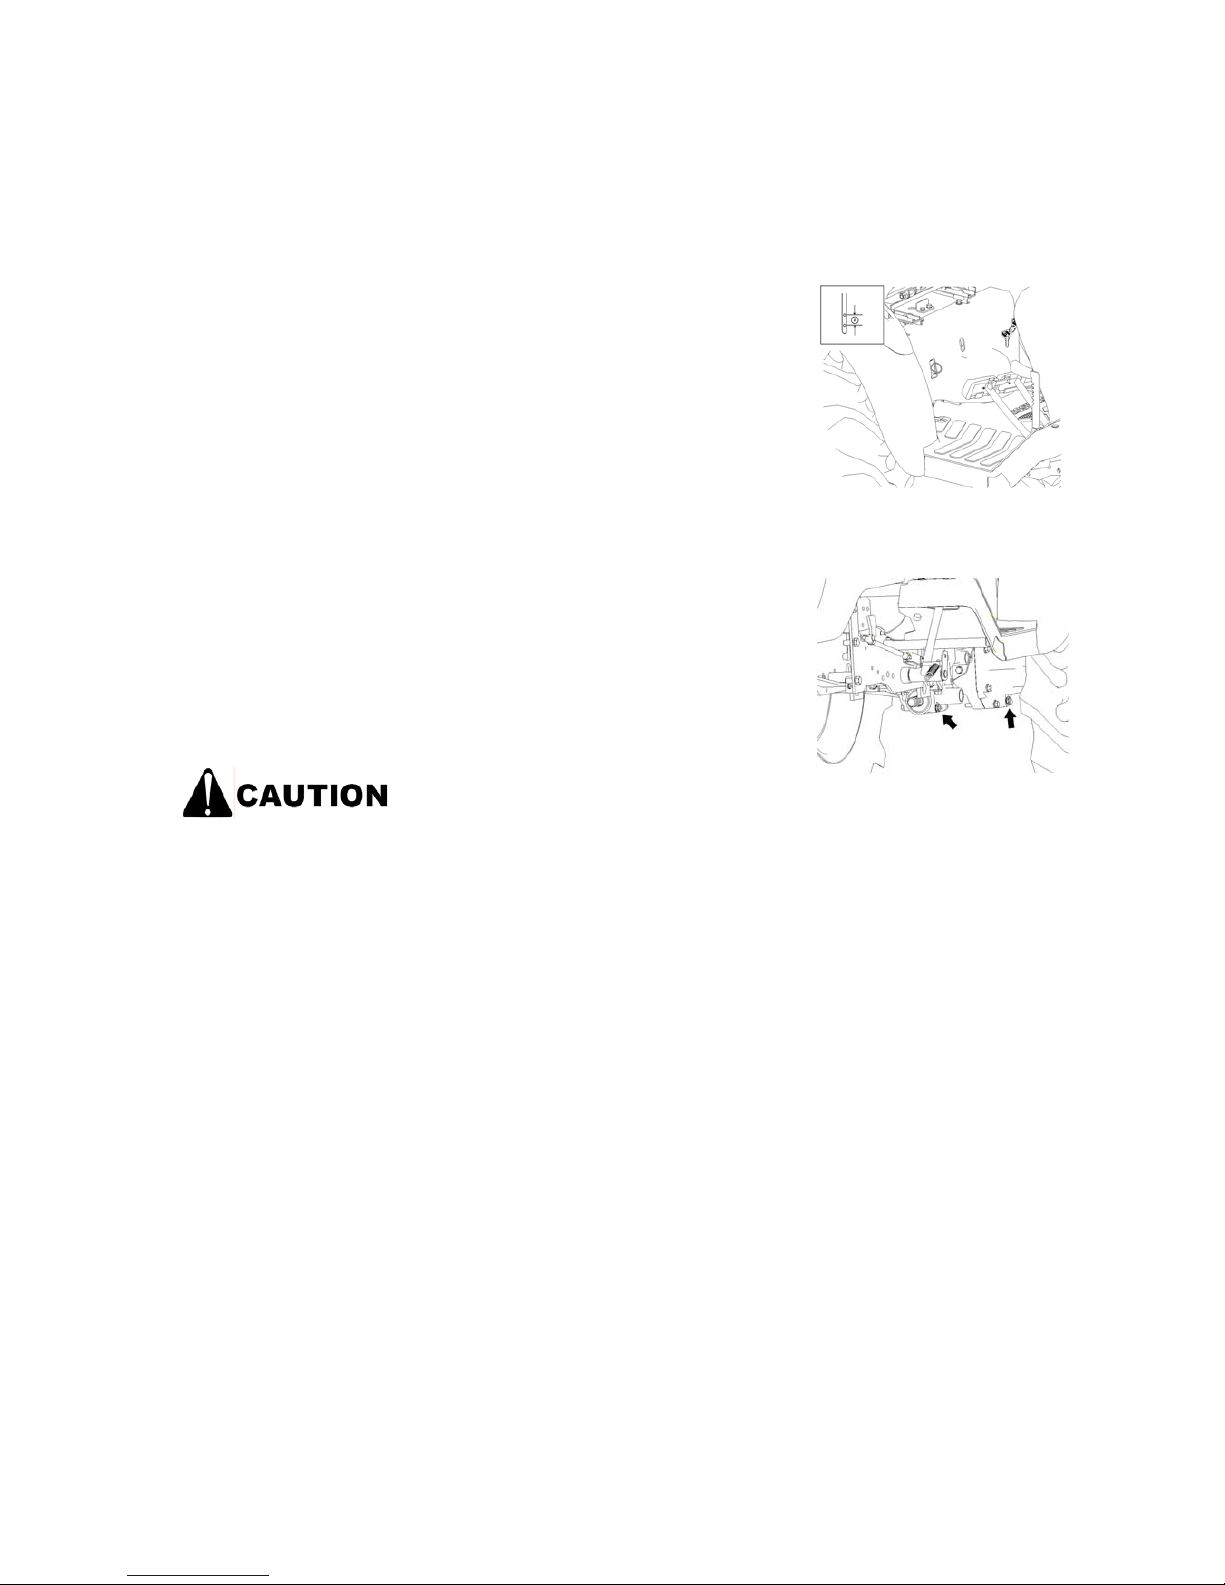
Checking
Check the fluid level through the inspection window at the rear
side of the transmission compartment. The level should be
within sight through the inspection gauge. If the fluid level is
below the inspection holes(A), add fluid.
Change of fluid
Drain the fluid through the drain holes under the rear axle case
and rear axle housing. Supply the fluid through the filler hole
behind the hydraulic case.
*Transmission oil can be used for the hydraulic system and for
the power steering unit.
* Make sure to the genuine Branson transmission fluid.
Drain the oil when oil is warm but be
careful if oil is hot, there is a risk of
getting burnt.
Page 70
- 70 -
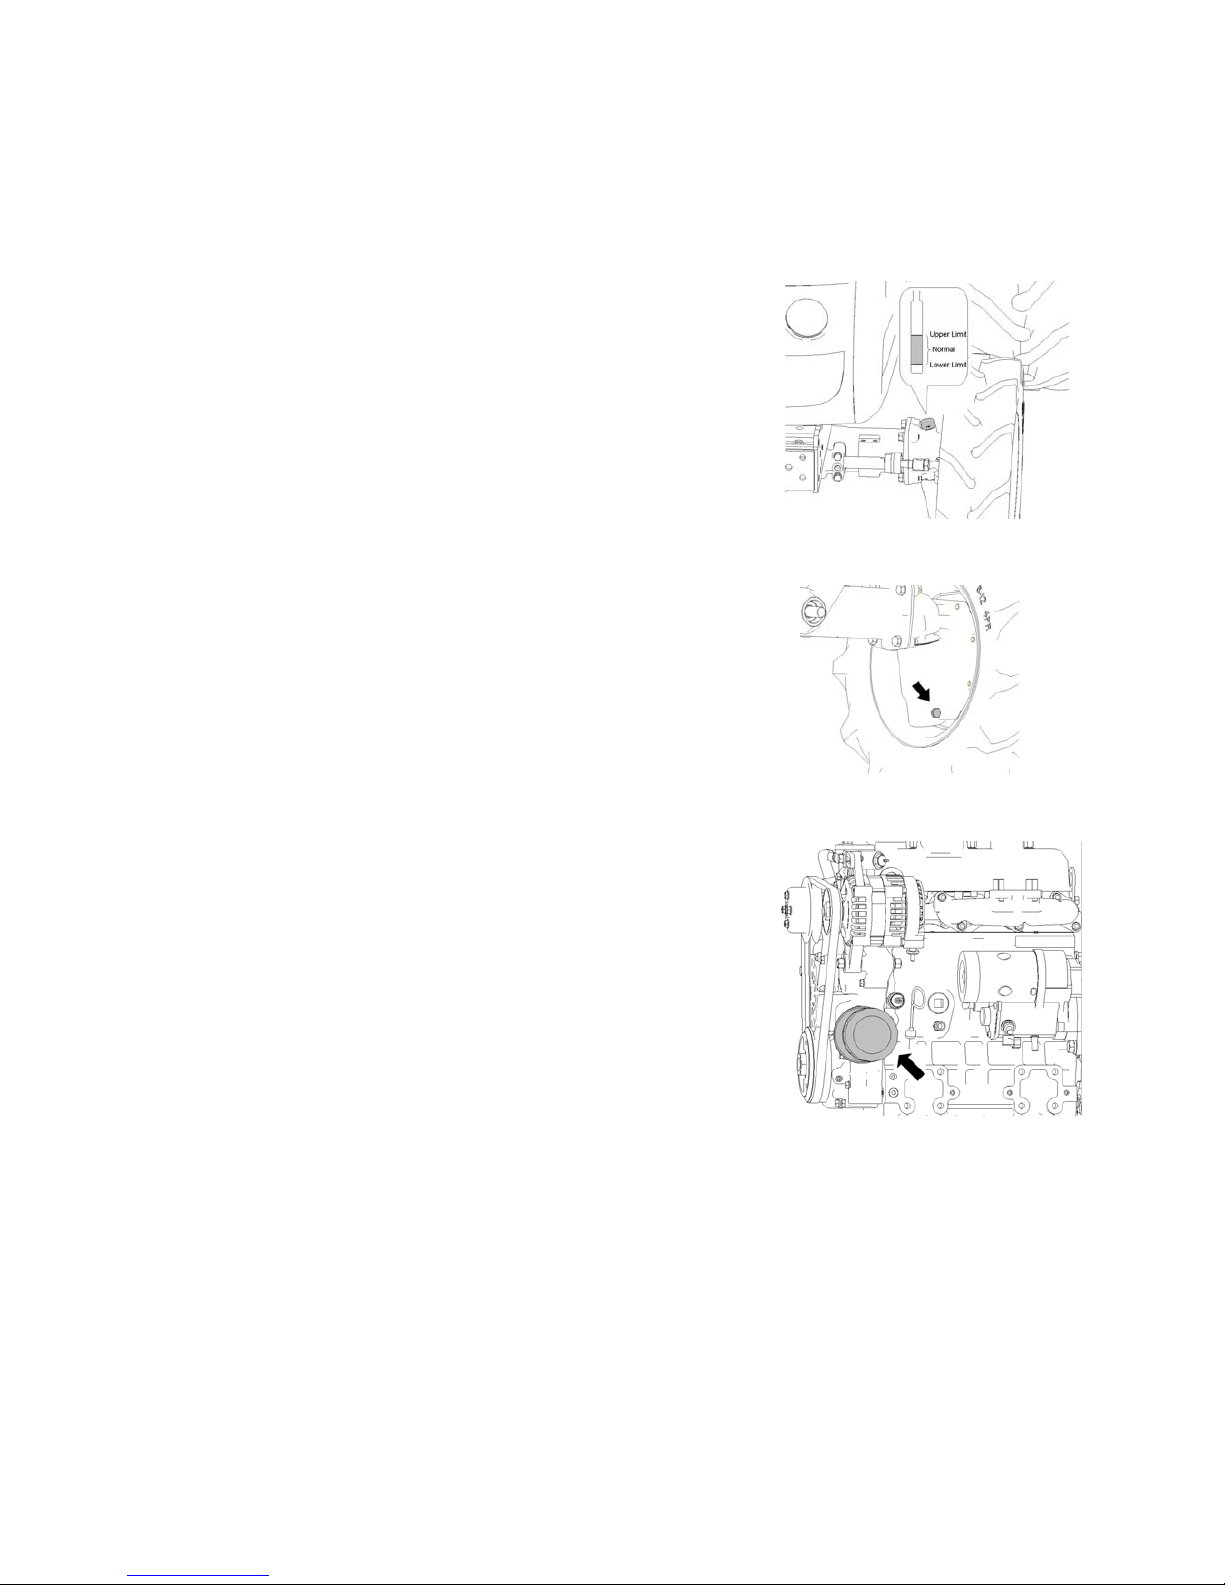
Front Axle Fluid
Checking
Open the fluid filler cap at the upper right side of the front axle,
clean the tip of the gauge, dip the cap without screwing in , and
take it out again to read the fluid level. Refill the fluid as
necessary, a nd also check for leaks.
Change of Fluid
Drain the fluid through three drain holes under the front axle.
Refill the fluid from the upper right side of the front axle.
6. FILTER REPLACEMENT
Engine Oil Filter.
Replace it every 300 hours or when engine oil is changed.
Note : First 50hr filter has to be changed.
Replacement
(1) After draining the engine oil, turn the cartridge to the left
with the filter wrench.
(2) Apply a thin film of oil over the rubber ring on the bottom of
the new cartridge and attach the new filter securely.
(3) After changing the engine oil, start the engine and run it
until the engine oil pressure warning lamp is turned off
(4) After the oil pressure warning lamp is turned off, check the
oil level again. Add oil as necessary.
Page 71
- 71 -
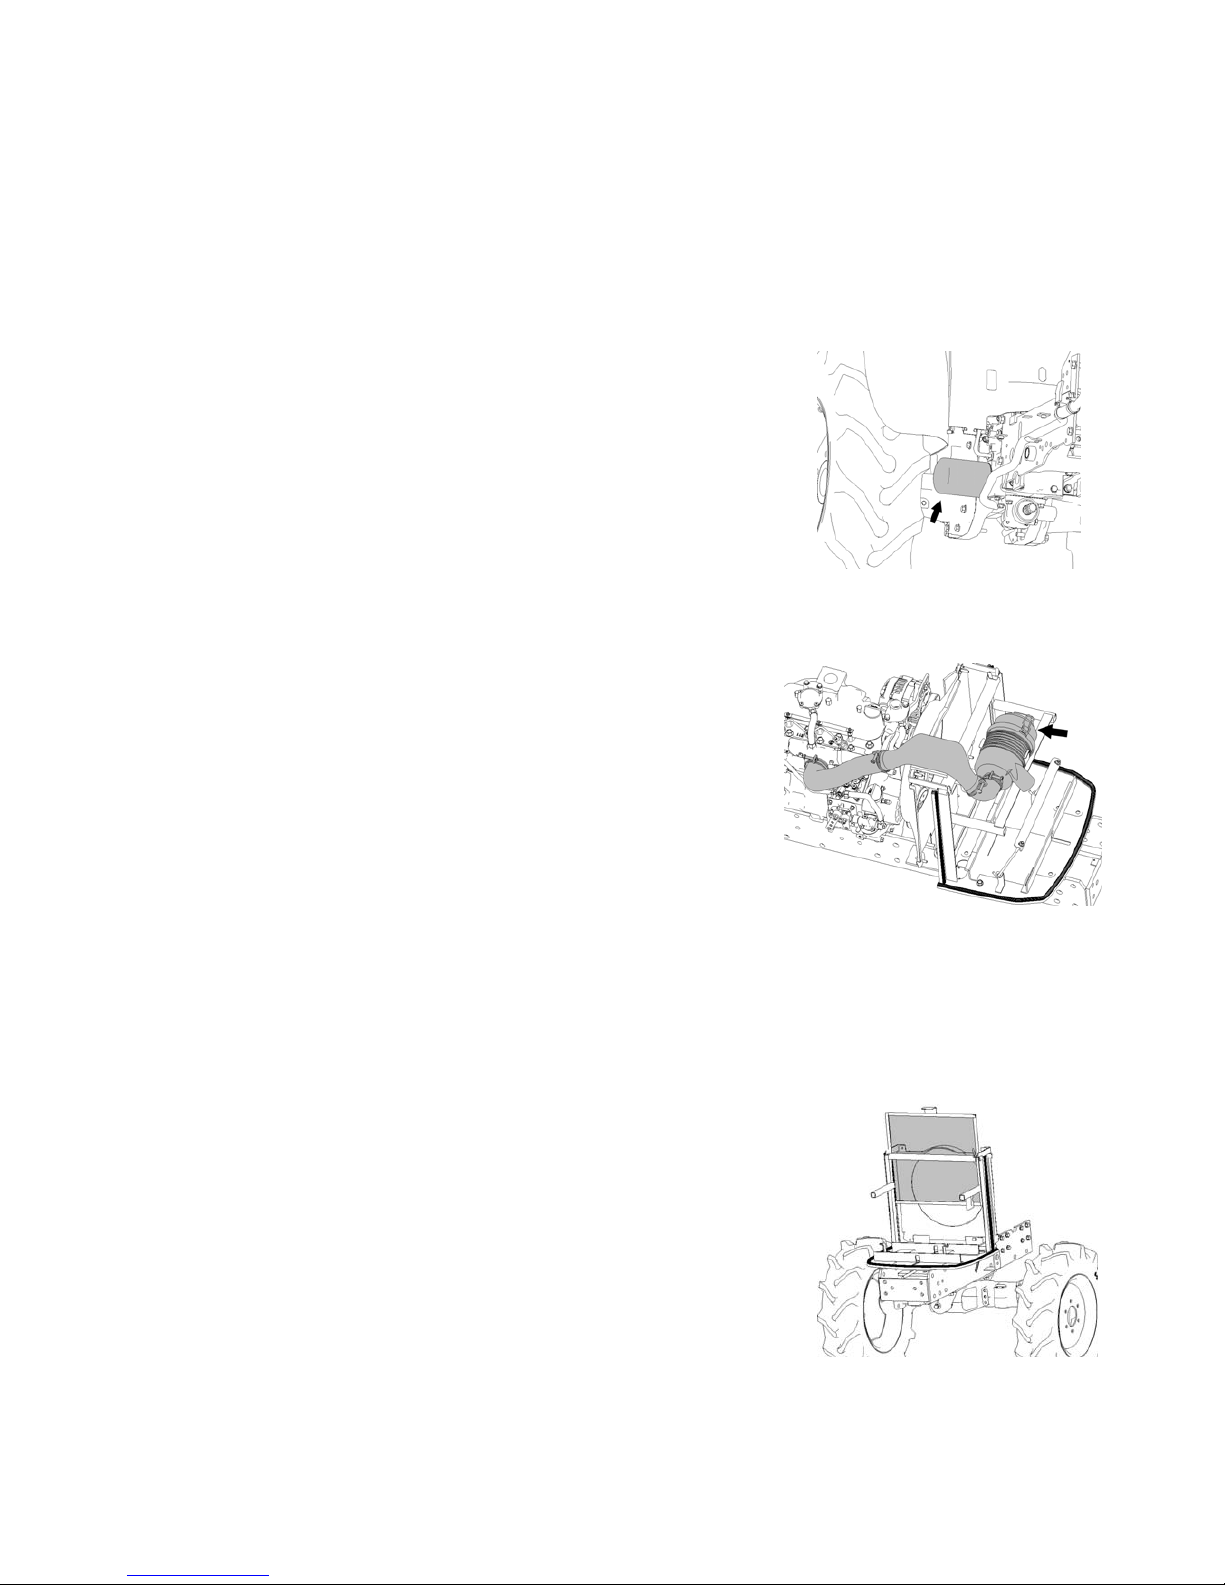
Transmission Fluid Filter
The filter is a cartridge type,
Note: First 50hr, filter has to be changed.
Replacement
(1) After draining the transmission fluid, turn the cartridge to the left
to take it out.
(2) Apply a thin film of fluid over the rubber ring on the bottom of the
new cartridge and attach the new filter sec urely.
(3) After changing the transmission fluid, start the engine to circulate
the fluid and then stop the engine. Check the fluid level at dipstick
on left axle housing and add fluid as necessary.
7. RADIATOR SCREEN & AIR CLEANER ELEMENT
The Air cleaner removes the dust mixed in the intake air, thereby
preventing abrasion of cylinder liners and piston rings to keep the
engine in good condition. When working in dusty environments,
clean the air filter every 50 hours and replace it every 400 hours.
In normal working environments, clean the air filter every 100 hours
and replace it every 1,000 hours. If the running hours are shorter,
replace the element after one year.
<Cleaning of Air Cleaner>
Open the cover and take out the element.Blow air inside the
element or shake it to take the dust off the element. Be careful to
avoid damage to the pins.
8. CLEANING OF RADIATOR SCREEN
Unscrew the butterfly bolt, pull up the radiator screen to take it
out. Remove straw and dust. Clean it before and after working.
Page 72
- 72 -
9. COOLANT
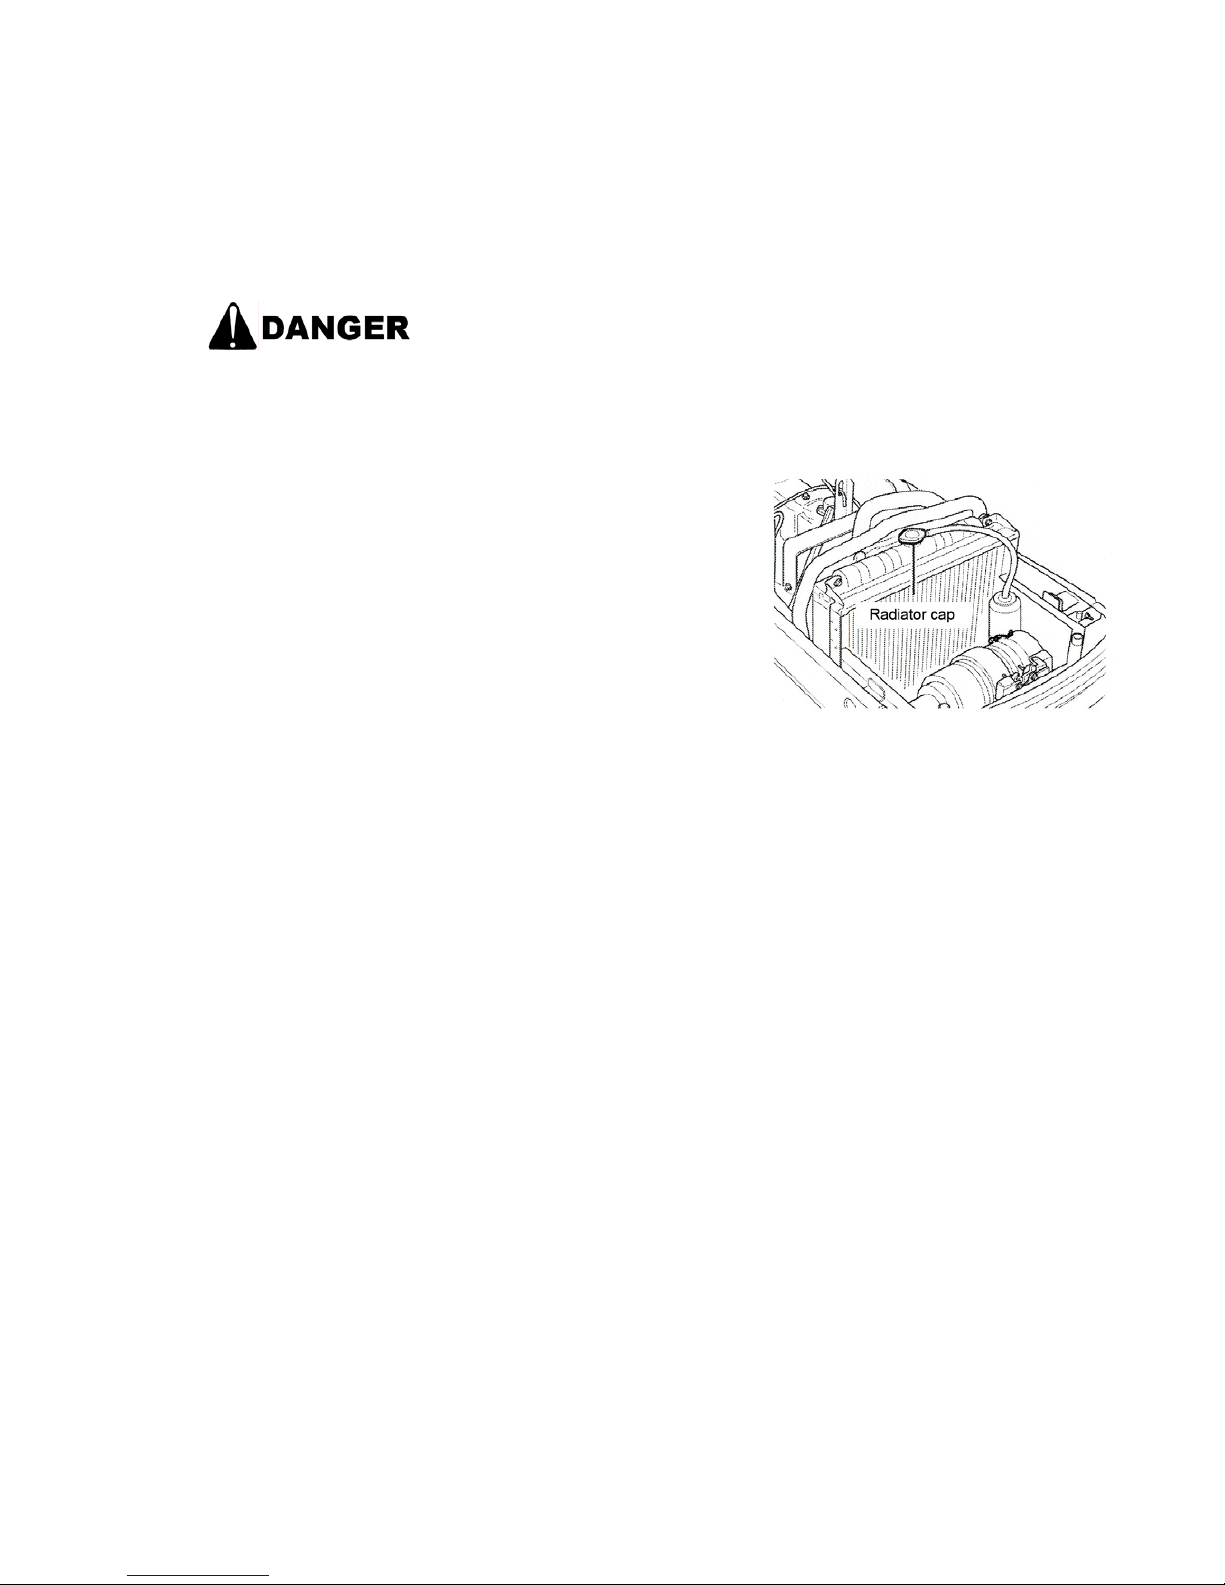
Do not open the radiator cap while the engine is running or
right after the engine is stopped. Open the radiator cap only
after the engine is stopped and fully cooled down.
【Otherwise】
Hot water will splash and may cause burn injury.
Checking
Open the engine hood and the side cover and see if the water
lever in the reservoir is between the upper and lower limit. Add
clean water as necessary.
Page 73

7
3
Replacement
(1) Open the radiator cap and the drain plug to completely drain the water from the radiator.
(2) Rinse the radiator with tap water until no dirt or rust comes out.
※ For better results, fill the radiator with water mixed with radiator flu sh, r un the engine for over 15
minutes, and drain the water solution.
(3) Replace the drain plug, add anti-freeze and fill the radiator with tap water.
(4) Replace the radiator cap and run the engine to mix the anti-freeze and water
.
[Handing of Anti-Freeze]
Anti-freeze has an effect of lowering the freezing point of water. This tractor is filled with
international genuine anti-freeze when delivered from the factory. As the freezing point may differ
depending on the mixture ratio, refer to the following table in very cold weather to ensure safety.
Anti-Freeze Mixture Ratio
Outdoor Temp (‘F) 23 14 5 -4 -13 -22
Ratio (%) 82 73 66 61 55 49
Anti-Freeze (%) 18 27 34 39 45 51
【Precaution】
• When replacing the coolant, add anti-corrosive solution and run the engine for
about five minutes to mix it with the water.
• For correct mixture ratio, refer to the manufacturer’s instructions.
• When refilling the coolant, add only tap water.
• As anti-freeze expires in one year, replace the coolant every year.
Page 74
74
10. DRAINING AIR FROM FUEL TANK
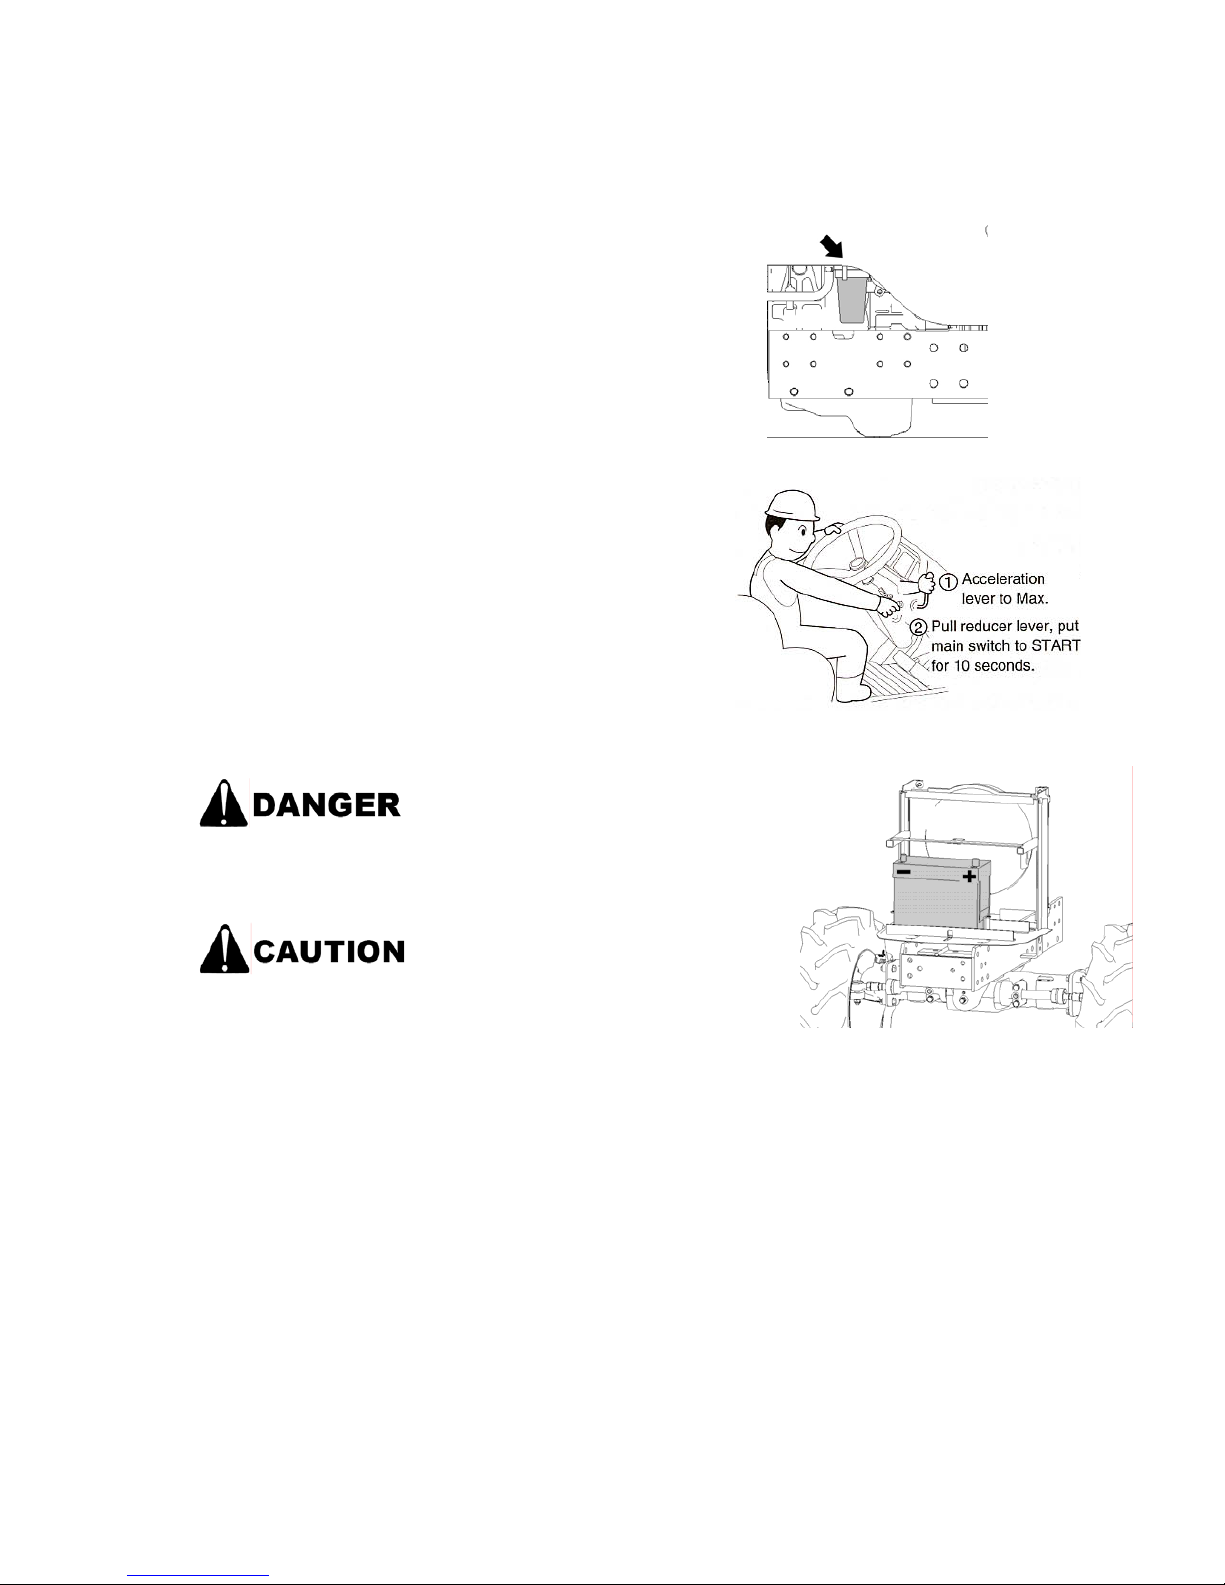
Drain the air from the fuel tank, fuel filte r, and fuel filter
element when the engine stops as the fuel runs ou t or
during maintenance.
(1) Refill fuel to fuel tank.
(2) Put the fuel filter valve to “OPEN.”
(3) Put the acceleration lever to MAX and the key switch
to START to run the starting motor for about 10
seconds. That completes the procedure.
[Note】
If air is not removed, then there will be air in
the fuel lines.
Please check fuel lines for leakage or
breakage.
11. Battery
• Avoid heat when checking or
charging the battery.
Otherwise, the battery may
explode and cause burns or
other injury.
When connecting the battery
cable, connect the (+) terminal
first. When disconnecting the
cable, disconnect the (-)
terminal first.
【Otherwise】
There is a risk of getting burnt due to shorting of the battery.
【Precaution】
• When replacing the battery, make sure to install the battery of the same capacity
as designated in the instruction manual.
• To preserve the environment and to recycle resources, do not discard the old
battery and hand it over to the battery dialer for proper disposal.
Page 75
7
5
12. PIPES
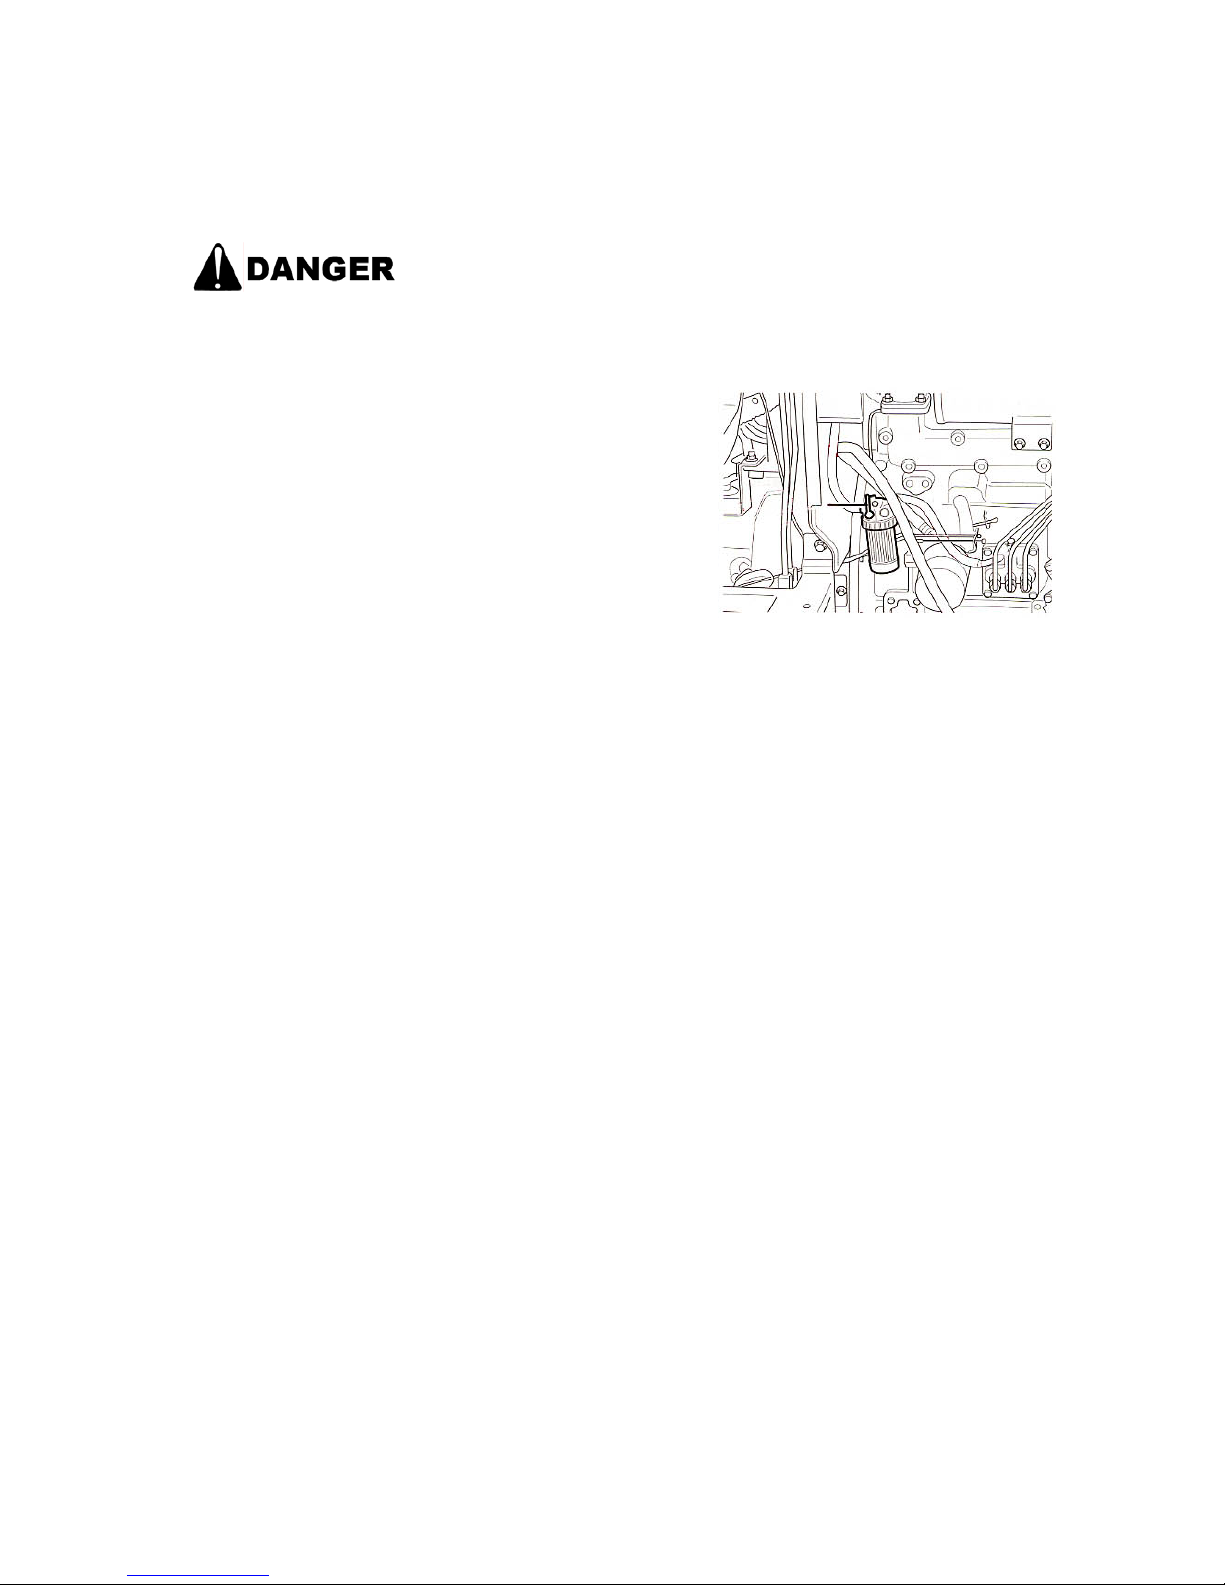
Inspect the condition of the fuel hoses and check for fuel
leakage from any damaged parts of the hoses
.
【Otherwise】
There is a risk of fire.
Check for damage to fuel hoses, steering wheel hoses
(pipe), and radiator hoses, and see if ther e is any leakage
or loosening of bolts.
Replace the pipes and hoses every two years even though
they are not damaged.
[Precaution]
When replacing the fuel hose, drain air.
Page 76
- 76 -
13. ELECTRICAL CABLES
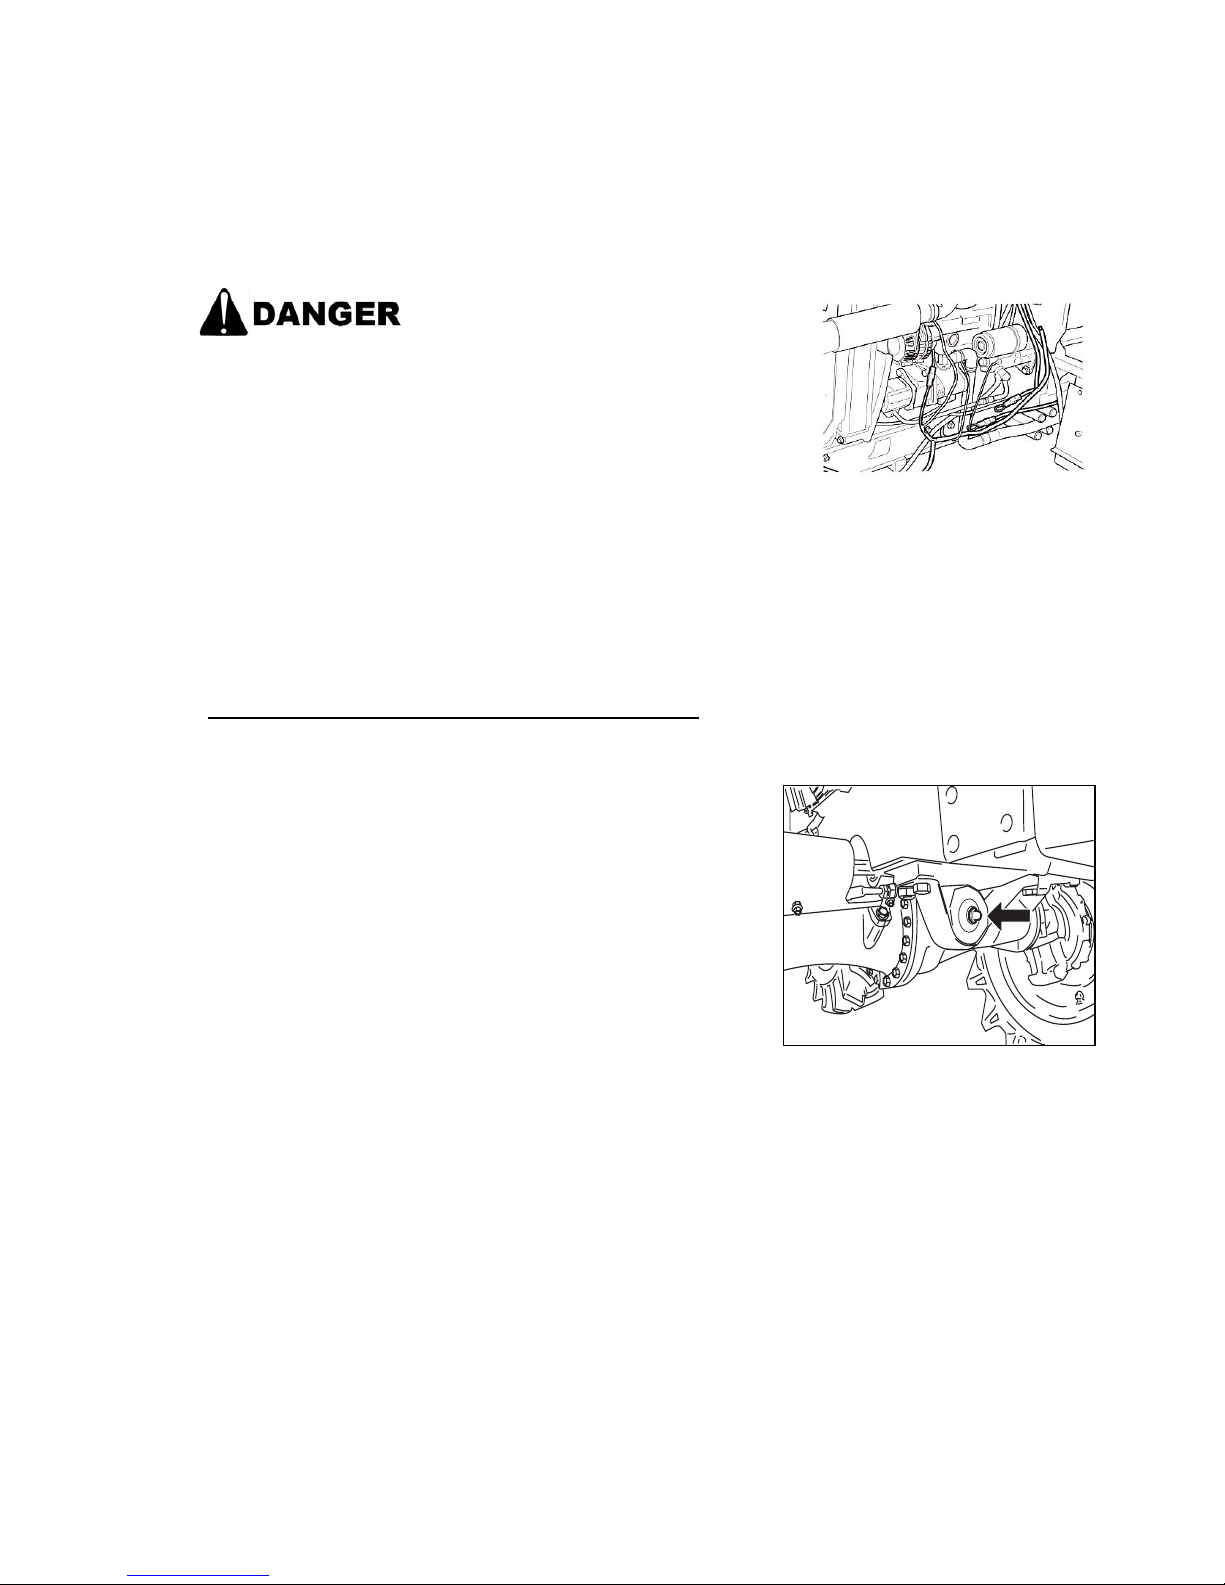
• Before starting to work everyday,
check if any cable is in contact with
other parts, or if any insulation is
peeled off or damaged, or any
contact is loosened.
• Before and after work, remove any
straw or dust on the battery or
cables.
Inspect cables and wire connectors for any loose of damage
【Otherwise】
There is a risk of fire due to short circuit.
Open the side covers of the engine and check if any cable is in contact with other parts, or if any insulation
is peeled off or damaged, or any contact is loosened.
Damaged cables must be repaired by an authorized dealer.
Arrange for periodic maintenance for cables
every 50 hours or once a year even thought the cables are not damaged.
14. GREASING
Apply grease every 50 hours.Check the relevant parts before
starting work everyday and add grease as necessary. After working
on a watered farm, make sure to apply grease to the tractor.
Page 77
- 77 -
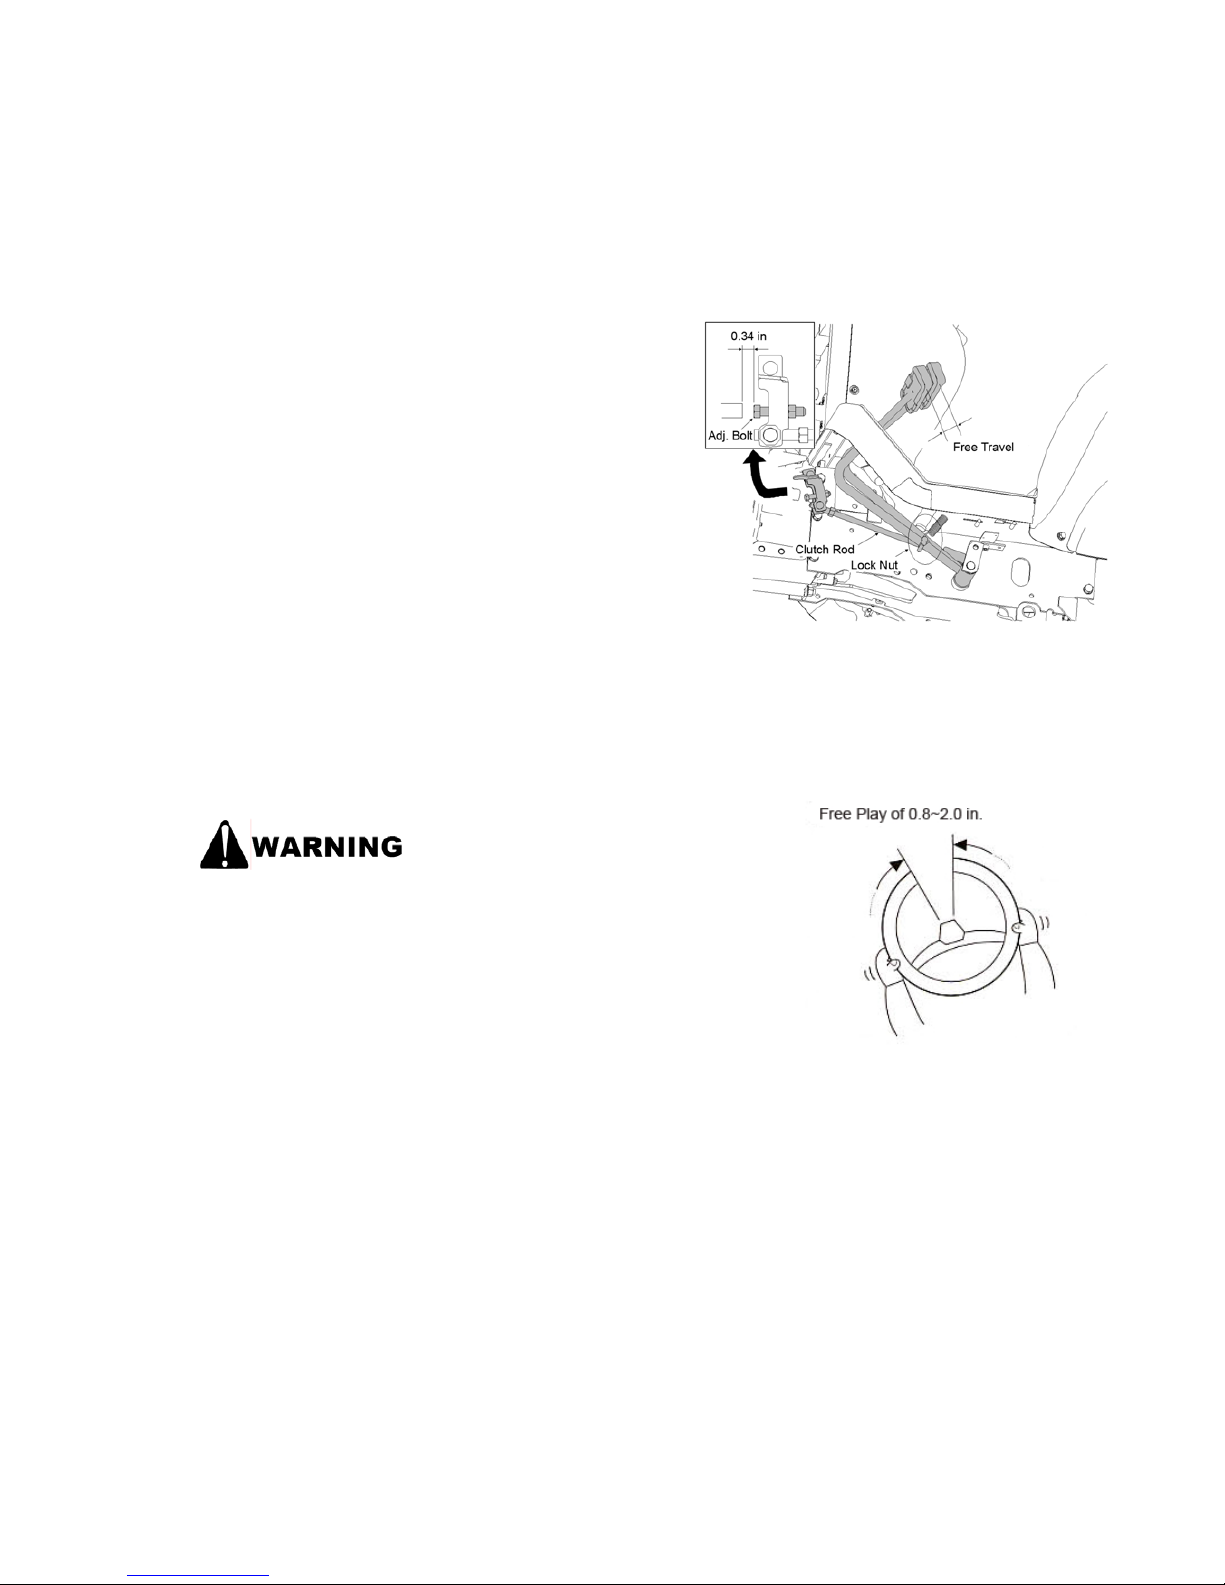
15. CLUTCH
Adjust clutch pedal as follow.
1. Stop the engine and remove the key
2. Slightly depress the clutch pedal and measure free
play at top of pedal stroke.
3. If adjustment is needed, loosen the lock nut and
turn the clutch rod to adjust the rod length
within acceptable limits.
4. Retighten the lock nut.
5. After adjusting, release the clutch pedal and
check the clearance with bolts if adjustment is
needed. (0.34in)
(Clutch pedal free play : 0.8~1.19 in.)
16. STEERING WHEEL
Check if the steering wheel vibrates
severely or has no free play.
Otherwise, there is a risk of accident.
When the steering wheel is turned lightly, there should be free play 0.8
~ 2.0 in. If the extent of the free play e xceeds this range, the steering
wheel may feel heavy or the tractor may no t move straight. If the free
play is not normal, have it fixed at your nearest au thoriz ed de aler.
Page 78
- 78 -
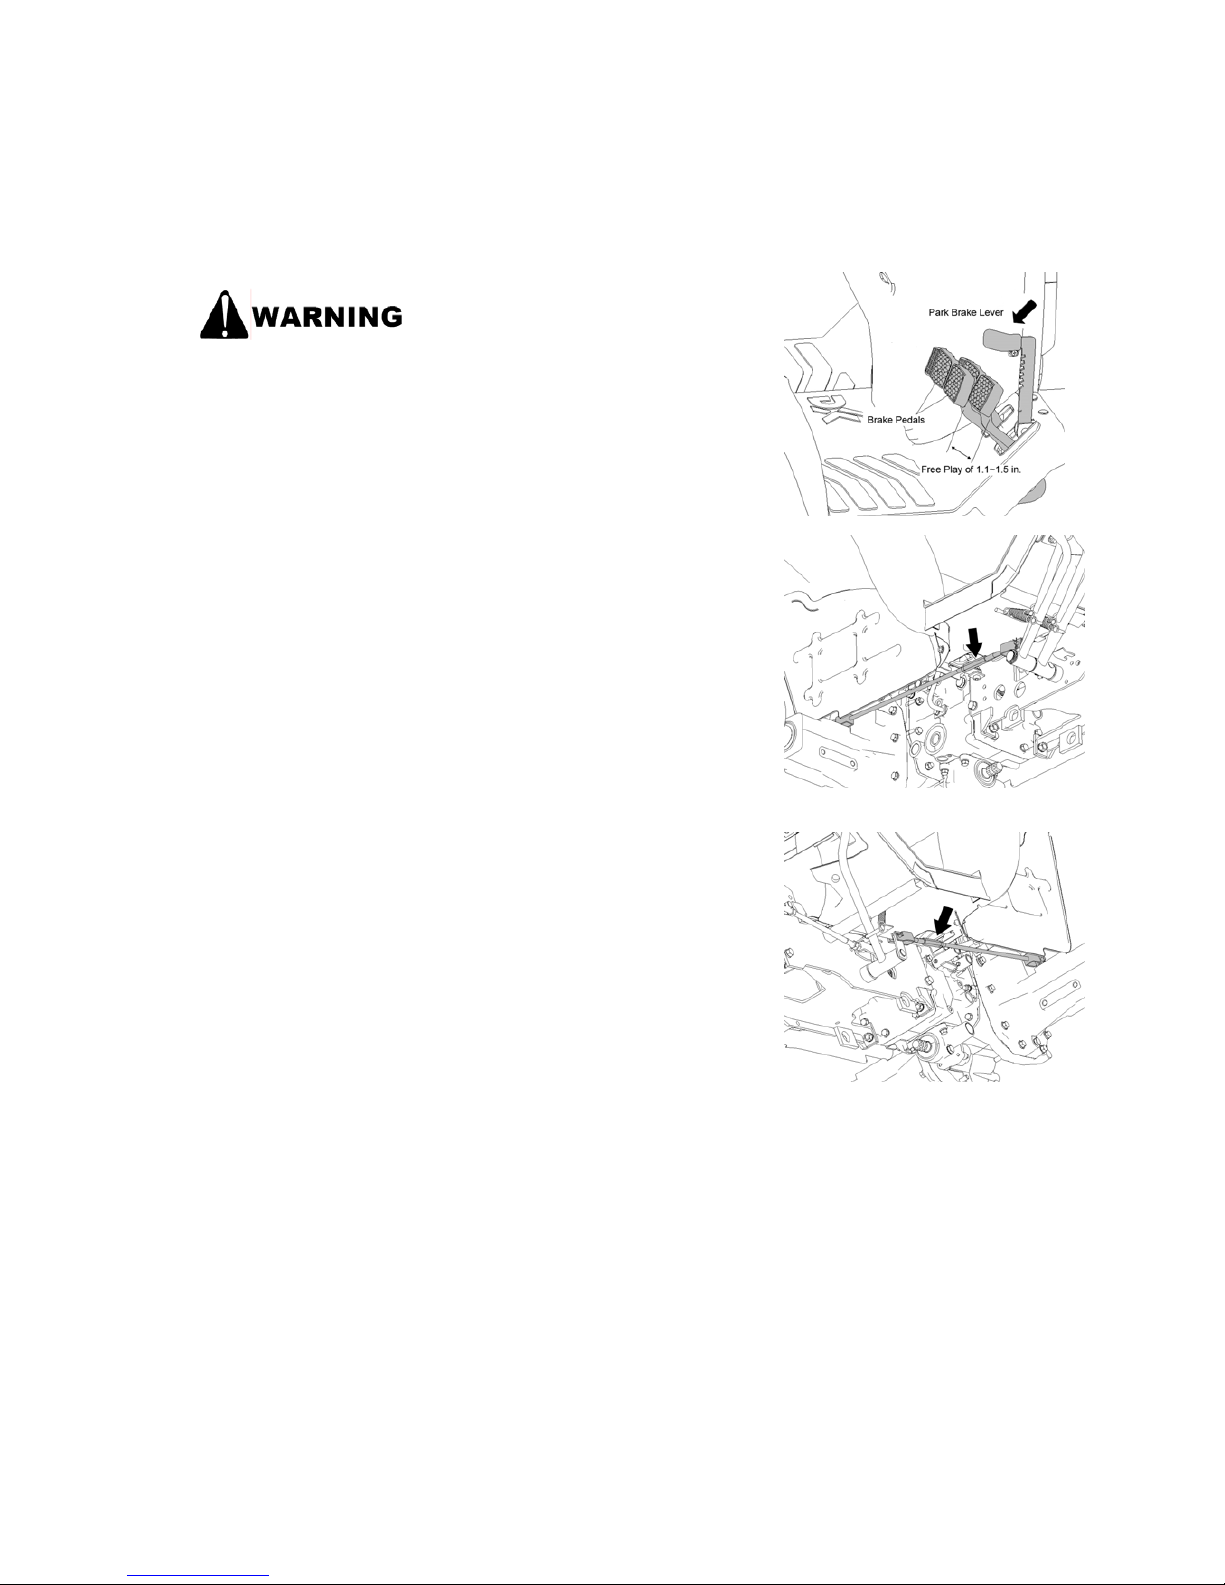
17. BRAKE
Check the brakes to avoid one-sided
braking. Otherwise, there is a risk of
accident.
If the extent of free play different
between the two brake pedals, onesided braking will occur. Make sure
that the free play of both brake
pedals is the same.
※ In this case, the free play of the brake pedal is
1.1~1.5 in [30~40mm].
※ Adjust both of the brake pedals
(Brake Rod (R) )
(Brake Rod (L) )
Page 79
- 79 -
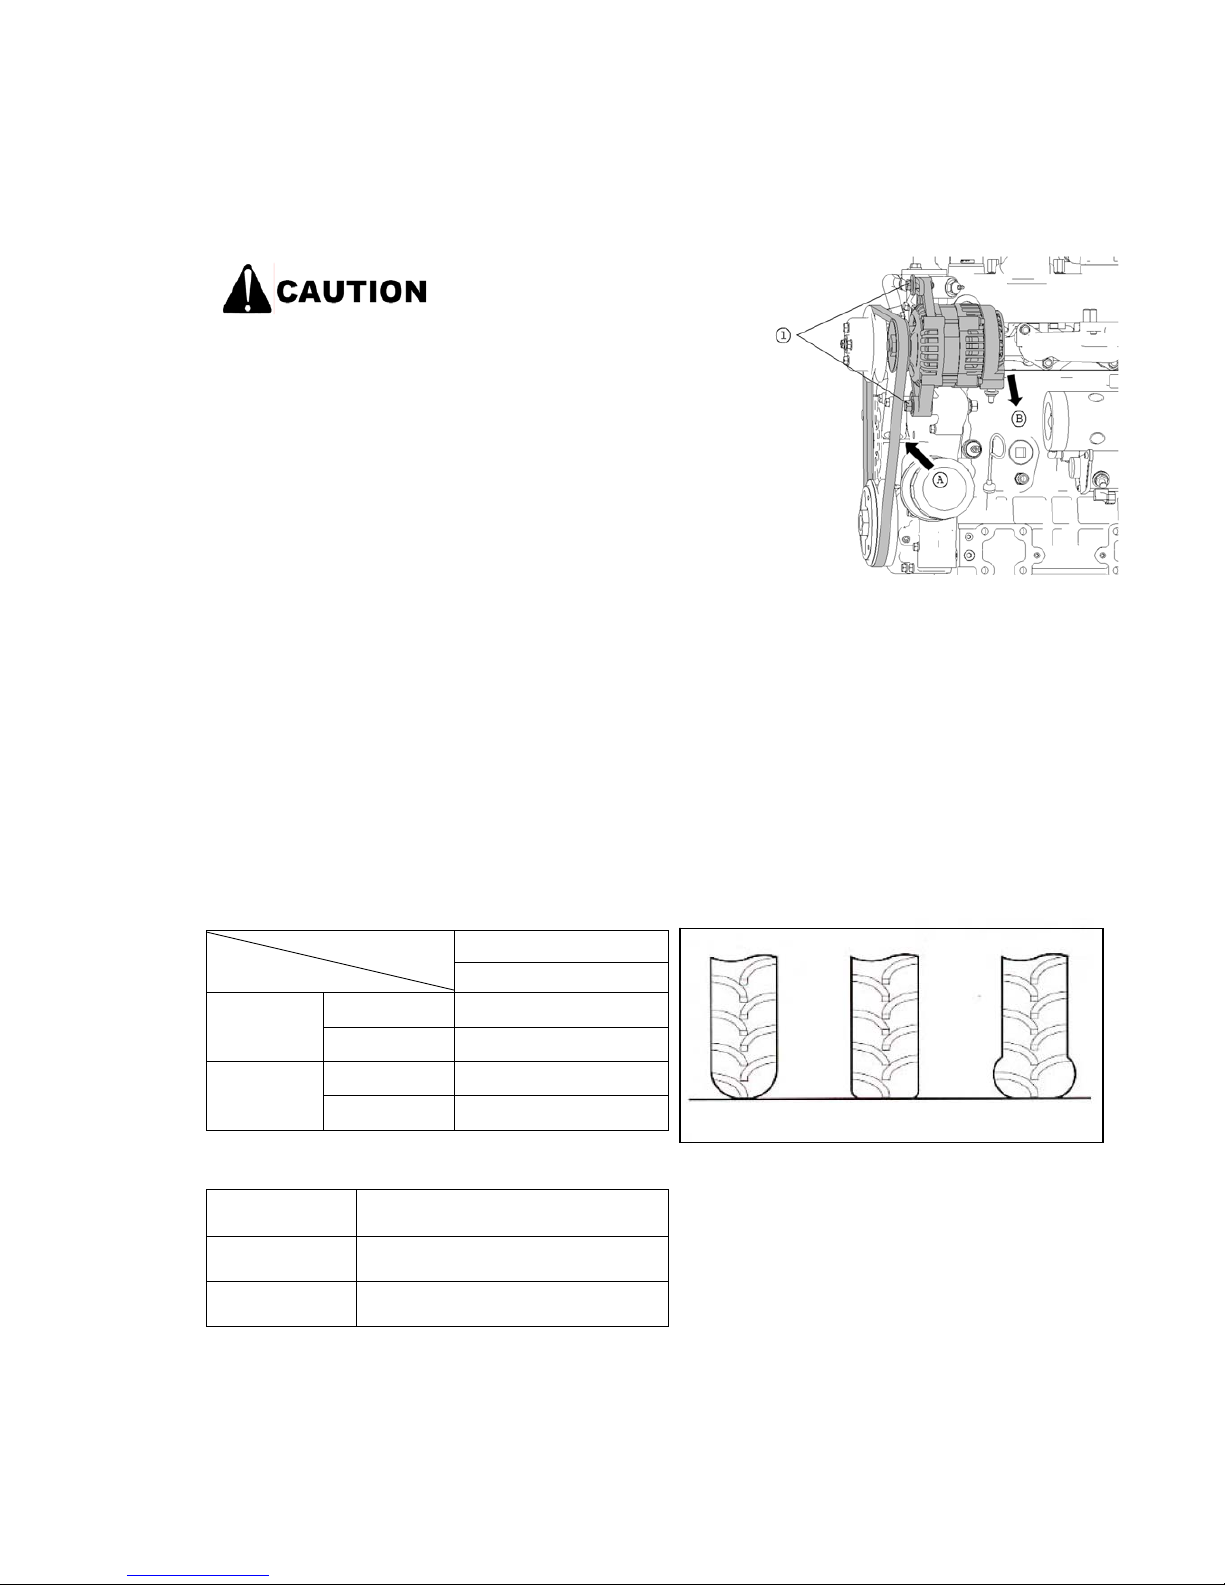
18. FAN BELT
Carry out inspection or
maintenance after the engine
is fully cooled down.
【Otherwise】
There is a risk of getting burnt.
Open the engine hood and side covers and press the middle of fan
belt with finger to see if the belt sags about 0.4 ~ 0.6in(A) or if
there is any damage to the belt. If the sagging is not correct,
loosen the generator bolts(1) and move the ge nerator(B) to adjust
the tension of the fan belt. If the fan belt still slips after the
generator is moved to the maximum, replace the belt with a new
one. New belts must be inspected after 50 hours of running.
19. TIRES
Adjust air pressure in front and rear tires to standard pressure.
Also, check if there are any cracks on the tires.
When front wheels are put under a load of the front weights or a front loade r, air pressure in the front
wheels must be adjusted to the maximu m in the chart as followed.
Air pressure in tires
Torque of wheel bolts
Type Torque (lb-ft)
Front wheel 130 ~ 145
Rear wheel 130 ~ 145
Air pressure(psi)
10/20 series
Front 29
With
Implement
Rear 19
Front 44
With
loader
Rear 29
High Standard Low
Page 80
- 80 -
20. COLOR OF EXHAUST GAS
The exhaust gas may be a little black at the time of starting the engine, but normally its color is clear.
Black – incomplete combustion due to too much fuel intake.
White – misfiring or cold temperature.
Blue – burning of engine oil
If the color of the exhaust gas remains black or white during operation, have the tractor inspected at your
nearest authorized dealer.
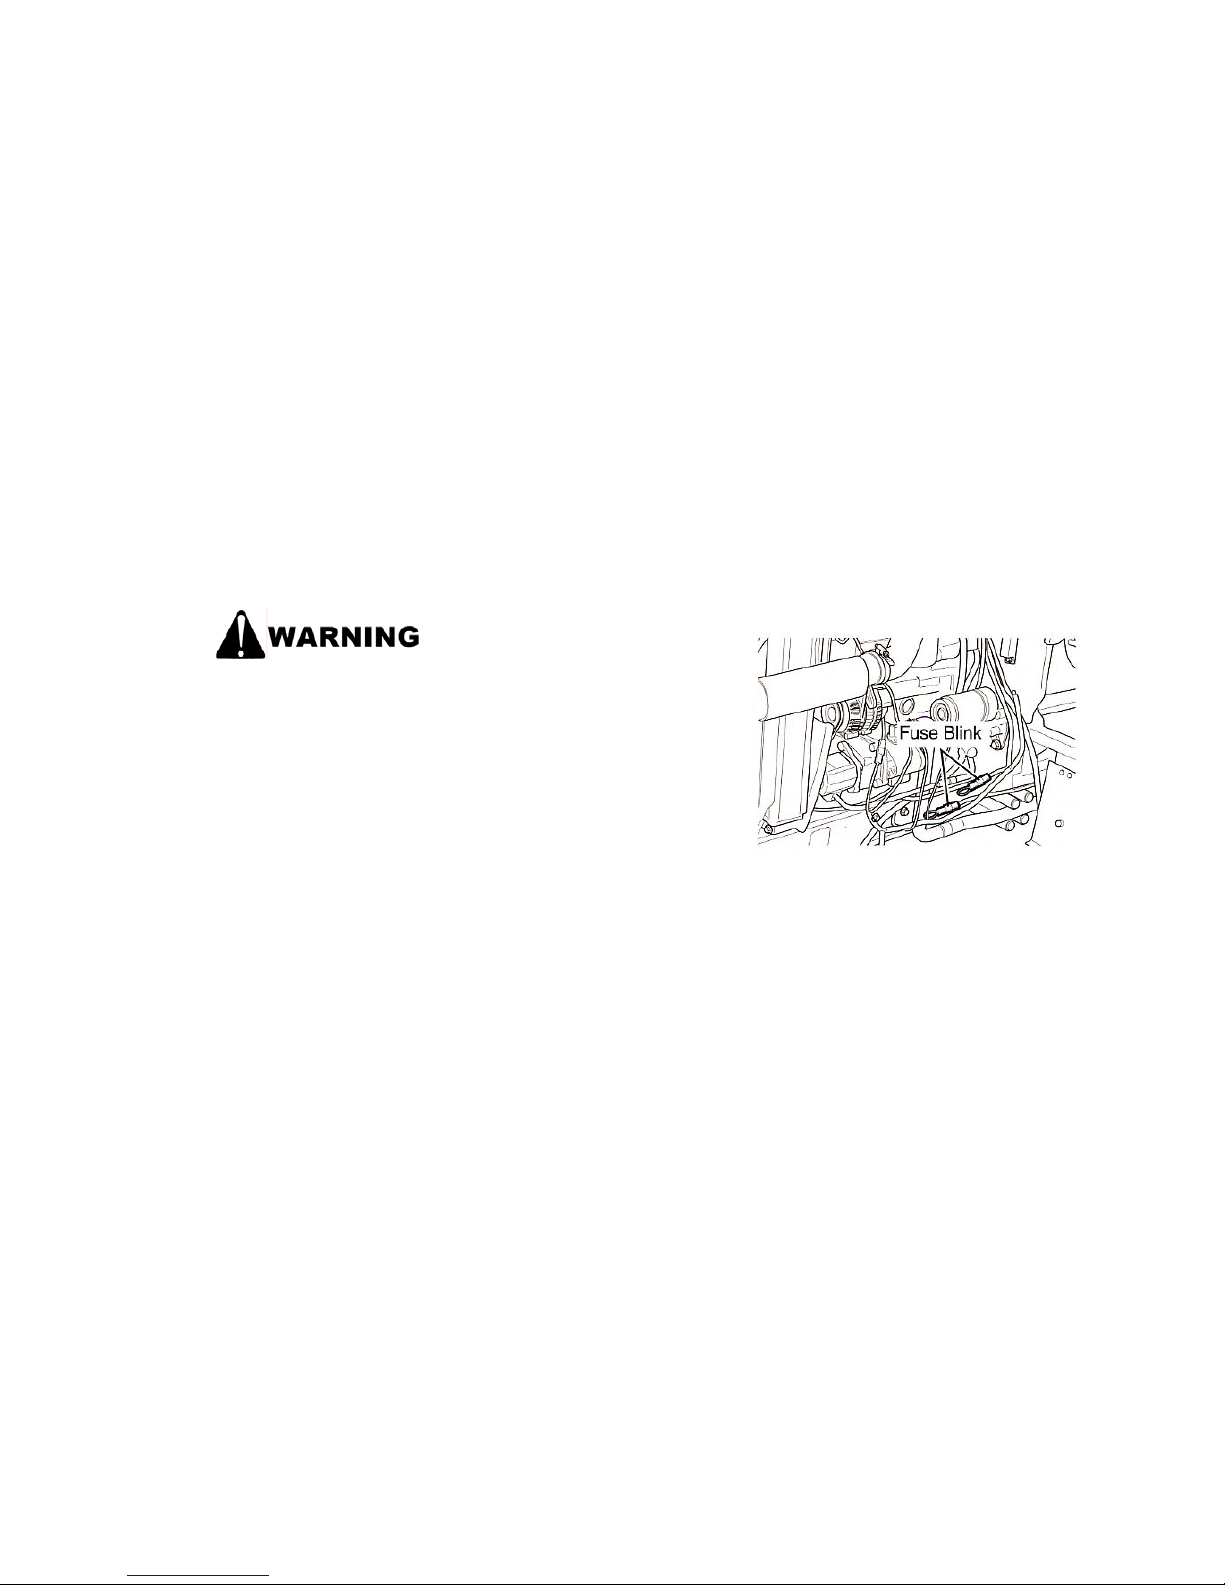
21. FUSE & FUSEABLE LINKS
When replacing the fuse,
use only the one of the
same capacity.
Open the fuse box cover and check the fuses. Replace any
burnt-out fuses with new ones of required capacity. Stop the
engine and check the main fuses (Fusible link).
A fuse link is a type of fuse, which burns and disconnects the
current in the event of excessive current flowing in the circuit.
Its plastic coating is discolored when it is cut off, in which case
it should be inspected at the authorized dealer.
Page 81
- 81 -
22. TOE-IN
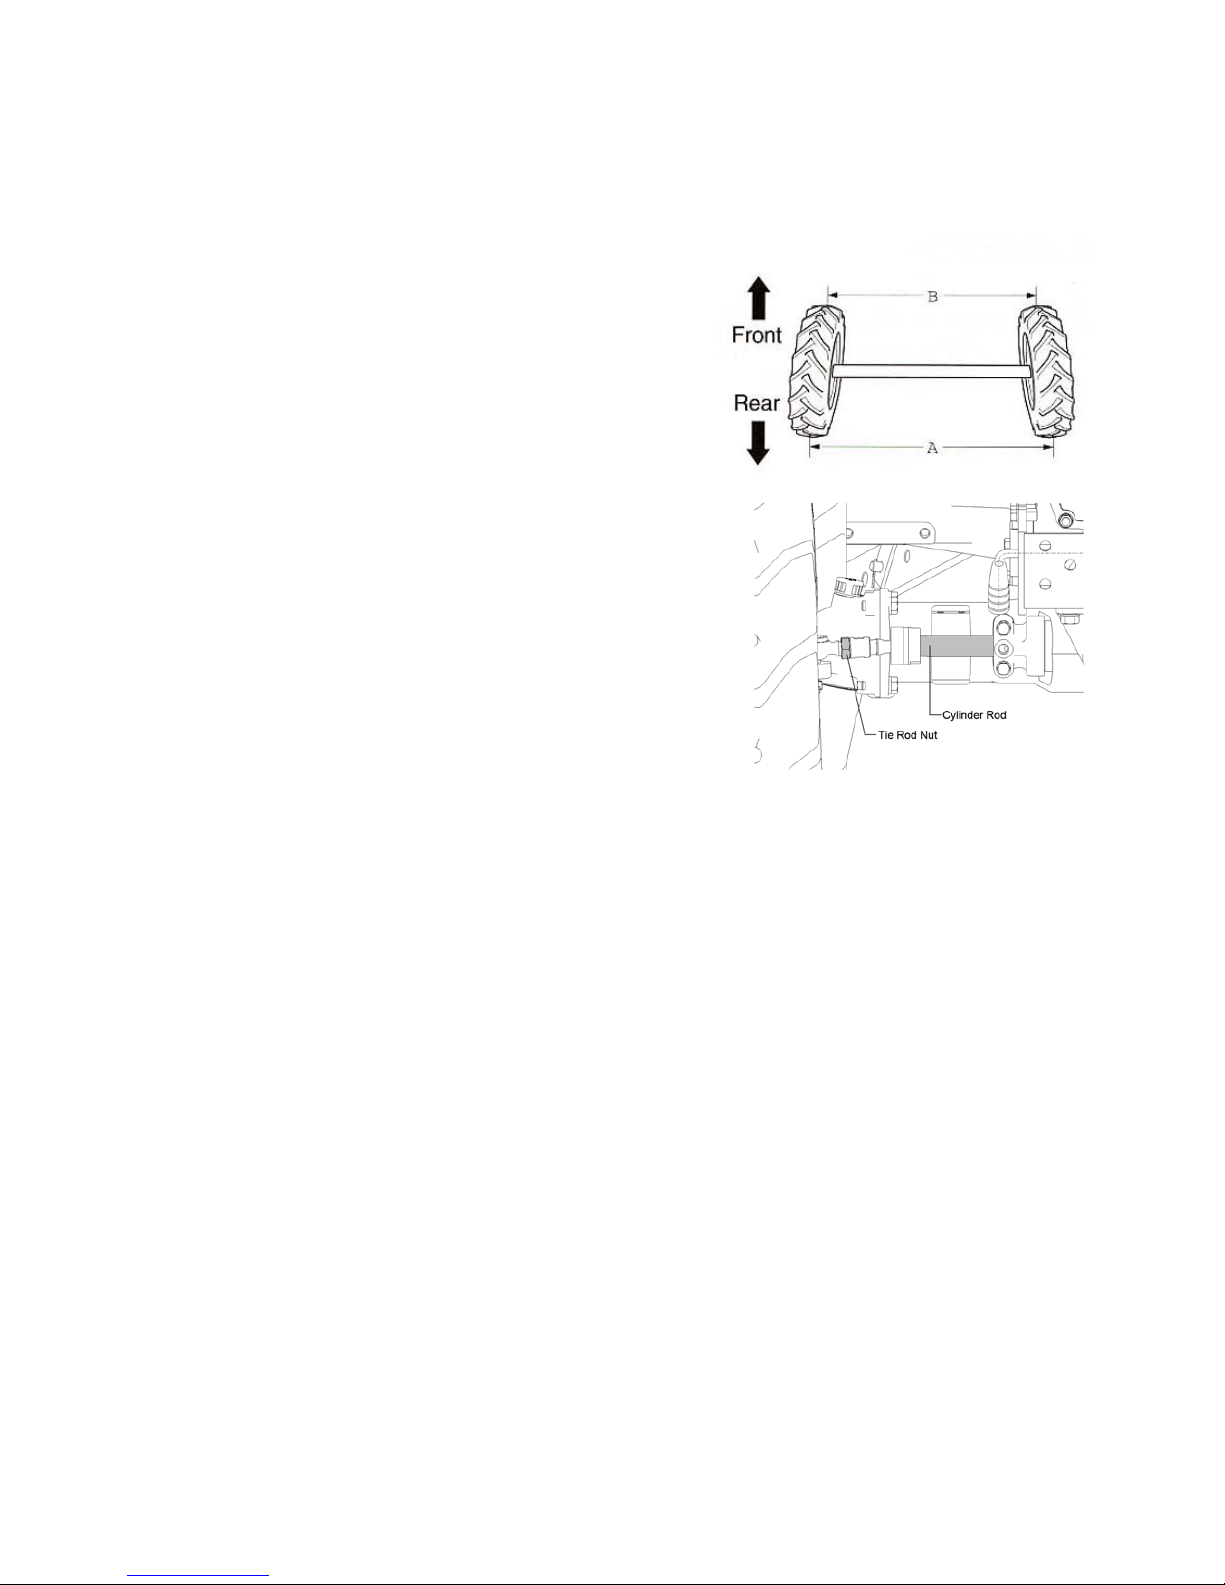
If the toe-in is not properly aligned, the steering
wheel may be uncontrollable or the tractor may
produce an abnormal vibration. Measure the
distance A and B of the front wheels and see if the
different between the two measurements is 0.15 ~
0.3 in.(4~8mm) If not, loosen nuts at the end of the
cylinder rod on both sides and adjust the length of
the screws. Tighten the nuts when the toe-in is
0.15 ~ 0.3 in.(4~8mm)
Page 82

- 82 -
TROUBLESHOOTING
※If the condition of the tractor is not good, stop the engine and carry out an inspection base d on the
following table.
1. ENGINE
Situation Inspection item Solution
Are you depressing the clutch?
Depress the clutch fully and turn the
main switch to START
Is the battery solution enough?
Is the battery discharged?
Fill the battery solution and fully
charge the battery.
Is the battery terminal loosened or
corroded?
Clean and tighten the terminals.
Apply grease to avoid rust
Is the main fuse burnt out? Replace the fuse
Is the key switch broken?
Contact the dealer for repair or
replacement.
The motor does
not start when the
main switch is
turned to START.
Is the starting motor out of order?
Contact the dealer for repair or
replacement.
Is the fuel tank empty?
Fill up the fuel tank and drain the
air.
Is the fuel mixed with air? Drain the air from the fuel.
Does the engine run only when
the reducer lever is pulled?
Charge the battery.
The motor starts,
nut the engine
does not start.
Is the fuel cock on “C”? Put the fuel cock on “O”
Is the air mixed in the fuel
system?
Drain the water and replace the
fuel.
Is the injection nozzle clogged?
Have the injection nozzle repaired
or replaced
The engine
revolution is
irregular.
Is the fuel filter clogged?
Have the fuel filter washed or
replaced.
Page 83

- 83 -
Situation Inspection item Solution
Is the coolant lever low? Refill the coolant.
Is the fan belt slack or damaged? Adjust or replace the fan belt.
Is the radiator fin clogged? Clean the radiator fin.
Is the engine oil lever low? Refill the engine oil.
The engine is
overheated.
Is the engine running under too
much load?
Reduce the load.
Is the air cleaner clogged? Inspect the air cleaner
Is the nozzle stained with carbon?
Is the compression force weak?
Is the valve clearance adjusted
properly?
The engine power
is too weak.
Is the injection timing bad?
Contact the dealer for repair
Coolant warning
lamp is in during
operation.
Is the coolant level in the reservoir
low?
Refill the coolant
Is the engine oil level low? Refill the engine oil
Is the viscosity of the engine oil
low?
Replace the engine oil with the one
with proper viscosity.
Is the pressure switch out of
order?
Replace the switch
Engine oil warning
lamp is on during
operation.
Is the oil pump out of order? Contact dealer for repair
Thermostat lamp is
not turned on.
Is the fuse burnt our? Replace the fuse
Is the regulator (current limit) out
of order?
Contact dealer for repair
Battery warning
lamp is on during
operation.
Is the fan belt slack or damaged? Adjust or replace the fan belt
Page 84
- 84 -
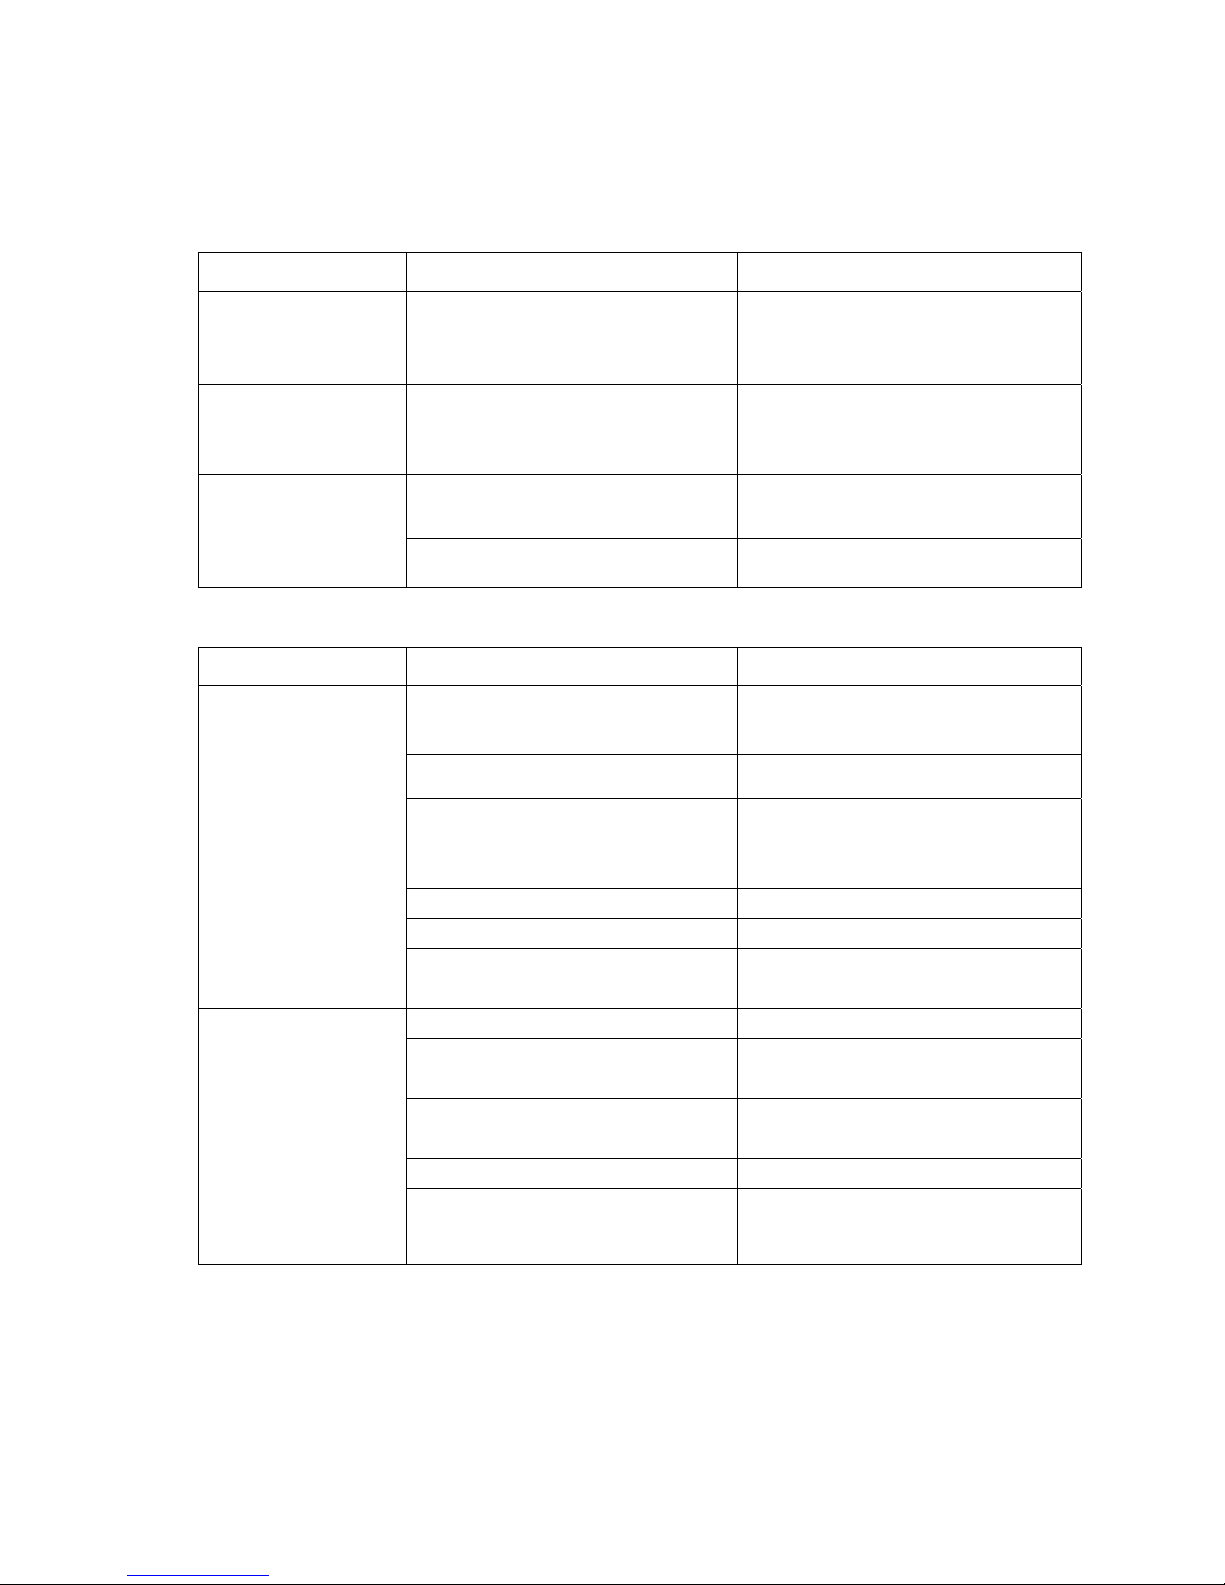
2. CLUTCH & BRAKE
Situation Inspection item Solution
The clutch slips or
cannot be
disconnected
Is the extent of free play of the
clutch pedal proper?
Adjust the free play of the pedal
The brake does not
work or works on
one side.
Is the extent of free play of the
brake pedal proper?
Adjust the free play of the pedal
Is the brake pedal return spring
damaged?
Replace the spring
The brake pedal
squeaks and does
not return well
Is each part well greased? Remove the rust and apply grease.
3. HYDRAULI C SY STEM
Situation Inspection item Solution
Is the hydraulic stop/slow return
valve put to “Close”?
Put the hydraulic stop/slow return
valve to “Open.”
Is the transmission fluid level low? Refill the transmission fluid.
Is the air taken in the intake pipe
system?
Tighten the filter case or connection
parts. Replace the pipe or O-ring if
damaged.
Is the oil filter clogged? Clean or replace it.
Is the hydraulic pump out of order? Contact the dealer for repair.
The work unit
cannot be lifted
Is the control valve dusty or is the
O-ring damaged?
Contact the dealer for repair.
Is the cylinder damaged? Contact the dealer for repair.
Is the hydraulic stop/slow return
valve put to “Close”?
Put the hydraulic stop/slow return
valve to “Open.”
Is the control valve dusty or stuck
with foreign substance?
Consult the dealer for repair.
Is the cylinder damaged? Consult the dealer for repair.
The work unit
cannot be lowed.
Is the position control lever on the
shallowest position?
Move the position control lever to
the releasing direction.
Page 85

- 85 -
4. ELECTRICAL SYSTEM
Situation Inspection item Solution
Is the bulb burnt out? Replace the bulb.
Is the fuse burnt out? Replace the fuse.
The headlamp will
not turn on.
Is the cable separated from the
socket?
Inspect cable.
Is the bulb burnt out? Replace the bulb.
Is the fuse burnt out? Replace the fuse.
Is the flasher unit out of order? Replace the flasher unit.
The direction
indicator lamp will
not operate.
Is the contact in bad condition?
Inspect and clean the grounding
and terminals.
Is the bulb burnt out? Replace the bulb.
Is the fuse burnt out? Replace the fuse.
Is the contact of the cable in bad
condition?
Inspect the cable and secure the
contact.
In the switch out of order? Replace the switch.
Is the grounding in bad condition?
Connect the grounding cable
securely to the body.
The lamps will not
turn on.
Is the battery discharged? Charge the battery.
Is the fuse burnt out? Replace the fuse.
The horn does not
sound.
Is the horn switch contact in bad
condition?
Inspect the horn switch.
Page 86

- 86 -
SPECIFICATIONS
Manual transmission
Items Unit
2100 2400
Drive system
4 Wheel Drive
Main Dimensions
Overall Length
in
119.3 (3031mm) 119.3 (3031mm)
Overall Width
in
44.3 (1124mm) 44.3 (1124mm)
Overall Height
in
87.2 (2216mm) 87.2 (2216mm)
Wheel Base
in
59.1 (1502mm) 59.1 (1502mm)
Front Tread
in
33.6 (853mm) 33.6 (853mm)
Rear Tread
in
34.6 (880mm) 34.6 (880mm)
Ground Clearance
in
13.7 (349mm) 13.7 (349mm)
Weight
lbs.
1720 (780kg) 1742 (790kg)
Engine
Vertical 4 cycle. Water cooled, Diesel
Model
Combustion System
Swirl Chamber
Aspiration
N/A
Engine Horsepower
HP
20.5 @ 2600 24 @2600
No. of Cylinders
3 3
Bore x Stroke
mm
74 x 82 78 x 82
Displacement
cc
1000 1100
Compression Ratio
21:1
Fuel Consumption
gal/hp.hr
0.067 (210 g/hp.hr)
Type of Air Cleaner
Dry, element
Page 87

- 87 -
SPECIFICATIONS
Manual transmission
Items Unit
2100 2400
Fuel Tank Capacity
gal
6.08 (23L) 6.08 (23L)
Battery
Volt
12
Steering
Hydrostatic
Clutch
Dry, single stage
Brake
Wet disc
Transmission
Main Shifting
Sychro mesh
Range shifting
Synchro shuttle
Gear Shifting (F x R)
6F x 2R
Tires (Agricultural)
Turf and Industrial tires Available
Front
6 - 12 6 - 12
Rear
9.5 - 16 9.5 – 16
Rear PTO
6 spline shaft
Type
Live
Speed
540 rpm,960 rpm (540E) @2600 engine rpm
MID PTO
14 spline shaft
Type
Live
Speed
2500 rpm @ 2600 engine rpm
Hydraulic System
Position
3 point hitch
Category I
Lift capacity at lift point
lbs
1653 (750kg)
Pump capacity(main)
gal/min
7 (4.1) 7 (4.1)
Page 88

- 88 -
SPECIFICATIONS (Traveling speed)
SHIFTING MODEL
Manual transmission
LEVEL
MAIN RANGE
00 series
1 1 L 0.7
2 2 L 1.2
3 3 L 2.2
4 1 H 3.0
5 2 H 5.2
Forward
6 3 H 9.5
1 1 L 0.9
Reverse
2 2 H 3.7
◎ Rated Engine rpm: 2600 rpm
※ This specification will be changed without prior notice for improvement of quality
※ Theory speeds figured by rate d engine rpm (mile/hr)
 Loading...