

Brandt VH1542J Instructions For Use Manual
分 区
0
技术要求:
1.文档的印刷颜色为PANTONE BLACK C
2.文档规格为A4,要求按A5规格输出菲林及印刷
3.如供应商的排版需要加空白页,请加在最后
英文用户手册
VH1542J(U7313B)
80g双胶
法国(BRANDT)
0
VH1542J

Dish wa sh er Features... .. .. ............. .. ............. . .. .. .. 6
4) Pri or u si ng for the first ti me. .. ............. .. ............. 7
A、Wat er Softener..... .. .. ............. .. ............... .. .. ...7
5) Loa di ng t he Dishwasher B as ke t............ .. ........12
Atte nt io n before or after l oa di ng the Dishwash er
Bask et s. ............. .. ............. .. .. ............. .. ...........12
7) Mai nt en ance and cleani ng. .. ............. .. ............1 6
Filt er in g System........ .. ............. .. .. ............. .. ......16
Cari ng f or t he Dishwasher. .. .. ............. .. ..............17
B、Load in g th e Salt into the Sof te ne r............. .. .....8
C、Fill t he R in se Aid Dispenser. .. .. ............. .. ........ .8
D、Func ti on o f Detergent ... .. .. ............. .. ..............9
Load in g th e upper Basket. .. .. ............. .. ...............13
Load in g th e Lower Basket. .. .. ............. .. ..............13
6) Sta rt in g a washing progr am me. ............. .. ........14
Was h Cycle Tabl e............. .. ............. .. .. ..............14
Tur ning on the Applianc e. ............. .. ............. .. ...... 14
Chan ge t he P rogramme... .. .. ............. .. ............... 15
At the e nd o f th e Wash Cycle .. ............. .. .. ...........15
8) Ins ta ll ation instruc ti on. ............. .. ............. .. .. ..18
9) Trou bl es hooting Tips... .. .. ............. .. ............. .2 5
Befo re c al ling for servic e.. .. ............. .. ............... 25
Erro r co de s............. .. ............. .. .. ............. .. .....26
Techni ca l in formation.. .. .. ............. .. ............. ..27
1) Saf et y In formation... .. .. ............. .. ............. .. .. ..1
3) Ope ra ti on Instructio ns .. ............. .. ............. .. .. ..6
Cont ro l Pa nel......... .. .. ............. .. ............. .. .. .........6
Inst al la tion preparat io n............ .. .. ............. .. ..... 18
Aest he ti c panel's dimen si on s and installat io n.....19
Tensio n ad ju stment of the doo r sp ri ng......... .. .. .. .2 1
Conn ec ti on of drain hoses .. ............. .. .. ............. 21
Dish wa sh er installati on s te ps......... .. .. .............. 22
Abou t El ec tricity Conne ct in g............ .. ............... 23
Cold Water Connectio n. ............. .. .. ............. .. .. . 24
Loading the b askets accordi ng to En5 0242
To revie w th e se ction on troubl es hooting Tips
will h el p yo u to solve some com mo n problems
by you rs el f .
NOTE:
Dear C us to mer,
Plea se c ar efully read thi s ma nu al before using t he
dish wa sh er, it will help you t o us e an d maintain the
dish wa sh er properly.
Pass i t on t o an y subsequent owne r of t he a ppliance.
This m an ua l contains sect io ns o n safety Instru ct io ns,
Oper at in g Instruction s, I ns tallation Ins tr uc tions and
Tro ubleshooting Tip s, e tc.
The ma nu fa cturer, follow in g a po licy of constan t
deve lo pm ent and updatin g of t he p roduct, may
make m od if ications with ou t gi ving prior noti ce .
This u se r ma nual shall also b e go t fr om the
manu fa ct urer or respons ib le v endor.
Read this Manual
Before Calling for Service
Keep i t to r ef er to it at a later date.
If you c an n ot s olve the proble ms b y yo urself ,
plea se a sk f or the help of prof es sional technici an s.
2) Qui ck o pe ration guide. .. .. ............. .. ............. .. .. 5
.
..

This appliance is intended to be used in household
and similar applications such as:
-staff kitchen areas in shops, offices and other
working environments;
-farm houses;
-by clients in hotels, motels and other residential type
environments;
-bed and breakfast type environments.
This appliance can be used by children aged from 8
years and above and persons with reduced physical,
sensory or mental capabilities or lack of experience
and knowledge if they have been given supervision
or instruction concerning use of the appliance in a
safe way and understand the hazards involved.
Children shall not play with the appliance. Cleaning
and user maintenance shall not be made by children
without supervision.(For EN60335-1)
This appliance is not intended for use by persons
(including children )with reduced physical, sensory
or mental capabilities, or lack of experience and
knowledge ,unless they have been given supervision
or instruction concerning use of the appliance by a
person responsible for their safety.(For IEC60335-1)
This appliance is for indoor use only, for household
use only.
To protect against the risk of electrical shock, do not
immerse the unit, cord or plug in water or other liquid.
Please unplug before cleaning and maintenance the
appliance .
Use a soft cloth moisten with mild soap, and then use
a dry cloth to wipe it again.
1.IMPORTANT SAFETY INFORMATION
When using your dishwasher,
follow the precautions listed below:
WARNING!
1

This appliance must be earthed. In the event of a
malfunction or breakdown, earthing will reduce the risk
of an electric shock by providing a path of least
resistance of electric current. This appliance is equipped
with a cord having an equipment-earthing conductor
and a grounding plug.
The plug must be plugged into an appropriate outlet that
i s i nstalled a nd earthed in a ccordance with all local
codes and ordinances.
Improper connection of the equipment-earthing
conductor can result in the risk of an electric shock.
Check with a qualified electrician or service
representative if you are in doubt whether the appliance
is properly grounded.
Do not modify the plug provided with the appliance;
If it does not fit the outlet.
Have a proper outlet installed by a qualified electrician.
Do not abuse, sit on, or stand on the door or dish rack of
the dishwasher.
Do not operate your dishwasher unless all enclosure
panels are properly in place.
Open the door very carefully if the dishwasher is
operating, there is a risk of water squirting out.
Do not place any heavy objects on or stand on the door
when it is open. The appliance could tip forward.
When loading items to be washed:
1) Locate sharp items so that they are not likely to
damage the door seal;
EARTHING INSTRUCTIONS
2

3
2) Warning: Knives and other utensils with sharp points
must be loaded in the basket with their points down or
placed in a horizontal position.
Check that the detergent powder is empty after
completion of the wash cycle.
Do not wash plastic items unless they are marked
dishwasher safe or the equivalent.
For plastic it ems n check th e m anufacturer's
ot so marked,
recommendations.
Use only det ergent and rins e add itives des igned for
an aut omatic dish washer.
Never use soap, laundry detergent, or hand washing
detergent in your dishwasher.
Children should be supervised to ensure that they do not
play with the appliance.
The door should not be left open, since this could increase
the risk of tripping.
If the supply cord is damaged, it must be replaced by the
manufacturer or its service agent or a similarly qualified
person in order to avoid a hazard.
During installation, the power supply must not be
excessively or dangerously bent or flattened.
Do not tamper with controls.
The appliance is to be connected to the water mains using
new hose sets and that old hose-sets should not be reused.
The maximum number of place settings to be washed
is 1 .
The maximum permissible inlet water pressure is 1MPa.
The minimum permissible inlet water pressure is 0.04MPa.
3

Dispose of the dishwasher packaging material
correctly.
All packaging materials can be recycled.
Plastic parts are marked with the standard
international abbreviations:
PE for polyethylene, e.g. sheet wrapping material
PS for polystyrene, e.g. padding material
POM polyoxymethylene, e.g. plastic clips
PP polypropylene, e.g. Salt filler
ABS Acrylonitrile Butadiene Styrene, e.g. Control
Panel .
Packaging material could be dangerous for children!
For disposing of package and the appliance please
go to a recycling centre. Therefore cut off the power
supply cable and make the door closing device
unusable.
Cardboard packaging is manufactured from recycled
paper and should be disposed in the waste paper
collection for recycling.
By ensuring this product is disposed of correctly, you
will help prevent potential negative consequences
for the environment and human health, which could
otherwise be caused by inappropriate waste handling
of this product.
For more detailed information about recycling of this
product, please contact your local city office and your
household waste disposal service.
DISPOSAL: Do not dispose this product as unsorted
municipal waste. Collection of such waste separately
for special treatment is necessary.
WARNING!
Disposal
4
Compartment A:
With each wash cycle.
Compartment B:
For programmes with pre-wash only.
(Follow the user instructions!)
Mechanical indicator C.
Electric indicator on control panel (if provided).
Check the rinse aid level
(On models with water softener system only.)
Electric indicator on control panel (if provided).
If there is no salt warning light in the control panel
(for some models), you can estimate when to fill the salt into
the softener by the number of cycles the dishwasher has run.
Check the regeneration
salt level
Load the baskets
Select a programme
T urn on the water tap ,close the door . The machine will start working after about 10 seconds.
Running the dishwasher
Switch off the appliance
Turn off the water tap,
unload the baskets
Fill the detergent dispenser
Warning: wait a few minutes (about 15 minutes) before unloading the dishwasher to avoid handling
the dishes and utensils while they are still hot and more susceptible to break.
They will also dry better.Unload the appliance, starting from the lower basket.
Changing the programme
Add forgotten dishes in the
dishwasher.
Scrape off any large amount of leftover food. Soften remnants of burnt food in pans,
then load the baskets. Refer to the dishwasher loading instructions.
Press the Programme Button until the selected programme lights up.
( See the section entitled“Operation instruction”)
When the working cycle has finished, then stop.
Turn off the appliance using the On/Off Button.
If the appliance is switched
off during a wash cycle.
Open the door car ef ul ly.
Hot steam may esc ap e
when the door is op en ed !
WARNING!
If the appliance is switched off during a wash cycle, when switched
on again, please re-select the washing cycle and operate the dishwasher
according to the original Power-on state ).
Switch on the appliance
Open the door,press the On/Off button to switch on the appliance .
1.Open the door a little to stop the dishwasher.
2.After the spray arms stop working, you can open the door completely.
3.Add the forgotten dishes.
4.Close the door, the dishwasher will start running again after 10 seconds.
2.Quick operation guide
For detaile d opera ting me thod read the corresponding co ntent o n the ins truction manual.
1. A running cycle can only be modified if it has been running for a short time. Otherwise the detergent
may have already been released and the water already drained. If this is the case, the detergent
dispenser must be refilled.
2. Press the Programme Button for more than 3 seconds to cancel the running programme.
3. Select a new programme.
4. Restart the dishwasher.
5
3.Operation Instruction
Dishwasher Features
Control Panel
before usin g it for th e fir st time.
To get the best perfor mance f rom your dishwasher, read all ope ratin g instr uctions
IMPORTANT
Dishwasher Features
6
9
Dispenser
CupShelf
Spra y arms
Filter assembly
Inletpipe connector
Drain pi pe
Lower Basket
Inner pipe
Upper Basket
1
Salt Con tainer
5
6
7
8
9
10
3
2
4
10
1
2
3
4
5
6
7
8
Back View
Fron t vi ew
9.On/Off Button: To turn on/off the power supply.
1.Delay Button : To Press the button to delay.
7. Program Button : To Press the button to select a
wash Program.
5.Salt and rinse aid wa
rning lights: To show
when the salt con
tainer or dispenser need to be
refilled
6.Program indicators: to show which program
you have chosen.
8.Power indicator: To show when the power on.
2.Display Window: To show the delay time,
etc.
3.Half load functions Button: To select Half load
functions.
4.Halfload indicator: To be on when selected the
Halfload function.
fault codes
.
(Only to be used when you haveonly about
or less than 6 place setting dish load. You will get lower
water and energy consumption. It can only be used
with intensive, Normal, ECO, Glass and Opti A60min
programs. )
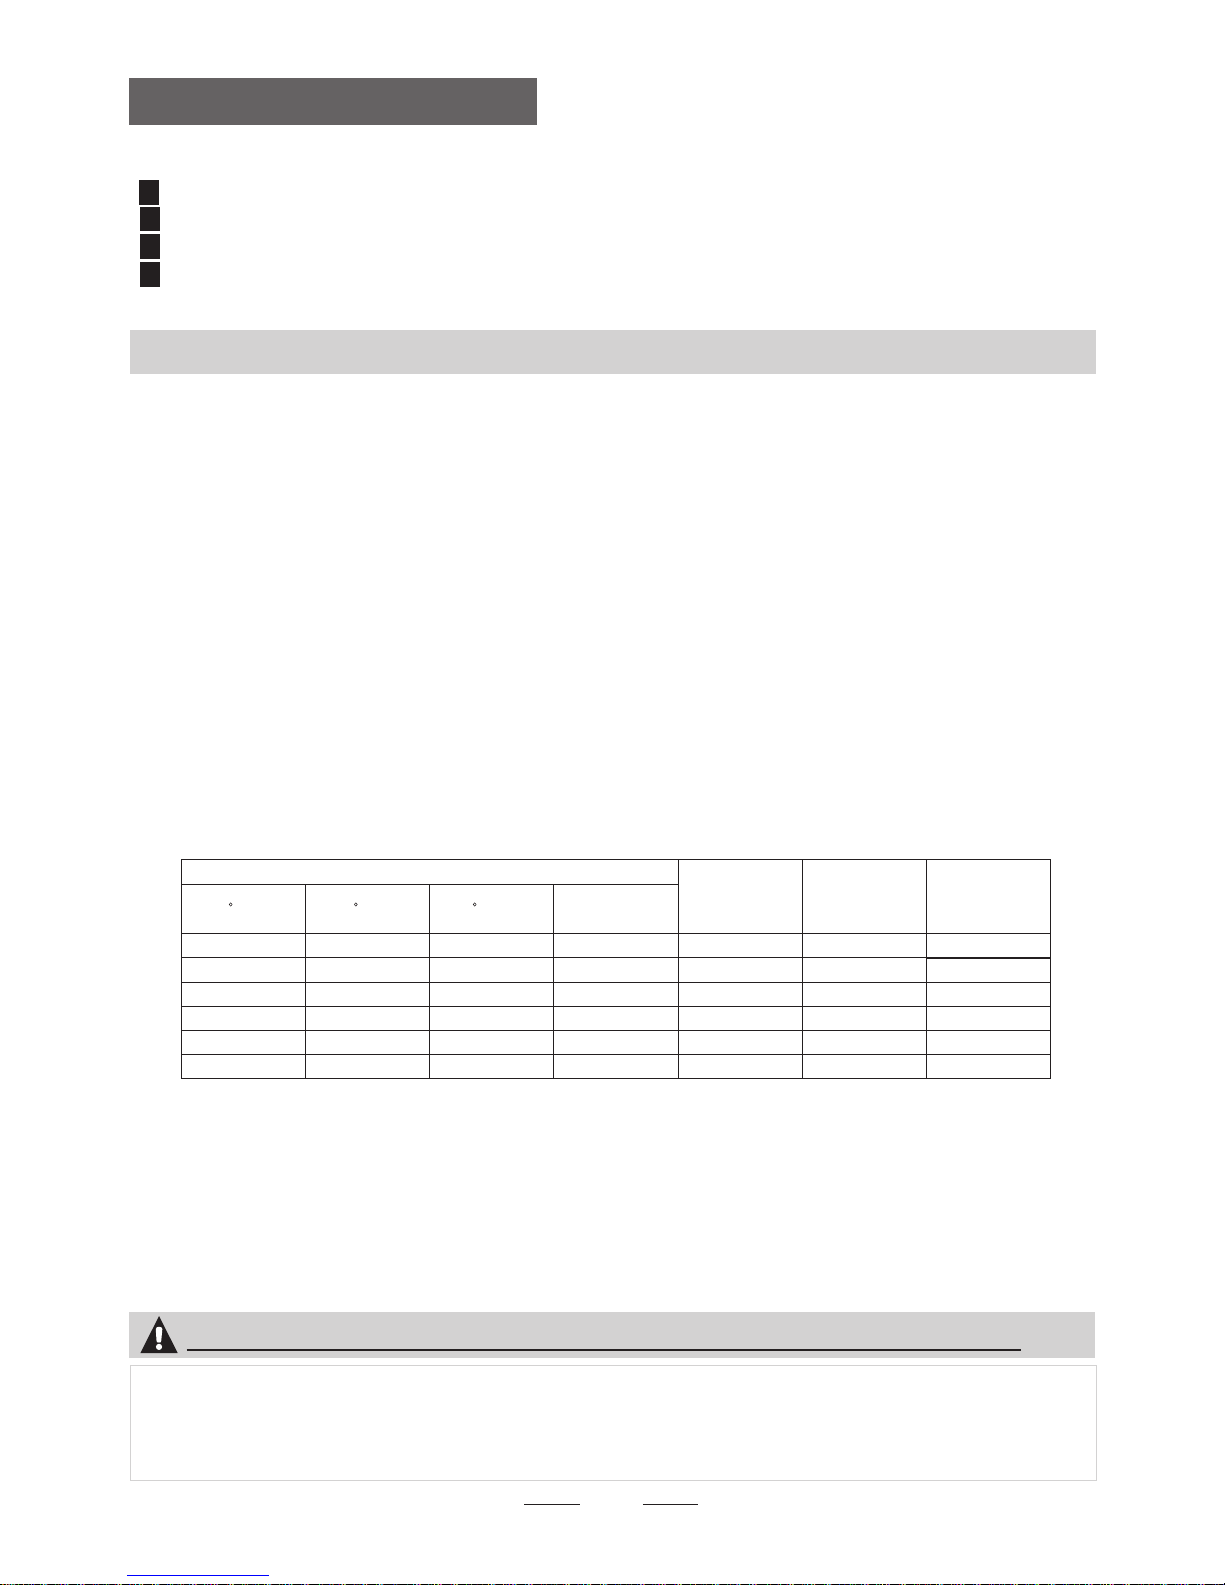
The wa te r so ftener must be se t ma nu ally, using the water hard ne ss dial.
The wa te r so ftener is desig ne d to r emove mineral s an d sa lts from the wate r, wh ic h would have
a detr im en tal or adverse effect on th e op eration of the appl ia nce.
The hi gh er t he content of the se m in erals and salts , th e ha rder your water i s.
The so ft en er should be adju st ed a ccording to the h ar dn ess of the water in y ou r ar ea. Your local Wat er Authority
can ad vi se y ou on the hardnes s of t he w ater in your area .
Adjusting Salt Consumption
The di sh wa sher is designe d to a ll ow for adjustme nt i n th e amount of salt co ns um ed based on the har dn ess of
the wa te r us ed. Th is is intended to opt im ise and customise t he l evel o f salt consump ti on.
1. Ope n th e do or ,Switch on the a pp li ance;
2. Pre ss t he P rogram button f or m or e than 5 seconds to s ta rt t he water softener
set mode l wi thin 60second s af te r the appliance w as s wi tched on( The Salt and
Rins e ai d wa rninglights w il l be o n periodicall y wh en it get in the set mode l );
3. Pre ss t he P rogram button t o se le ct the proper set a cc or ding to your loca l en vi ronment,
the se ts w il l change in the fol lo wi ng sequence: H1 -> H2 ->H3->H4->H 5- >H 6;
4. Pre ss t he P ower button to en d th e se t up model.
WATER SOFT EN ER
The ha rd ne ss of the water var ie s fr om place to place . If h ar d water is used in th e di sh washer, deposi ts w il l
form o n th e di shes and utensi ls .
The ap pl ia nce is equipped w it h a sp ecial softene r th at u ses a salt contai ne r sp ecifically de si gned to eliminate
lime a nd m in erals from the wa te r.
4.Prior using for the first time
Cont ac t yo ur local water bo ar d fo r information o n th e ha rdness of your wa te r su pply.
dH
mmol/l
0~90~5 0~0.94
H1( Rapid )
0
/
10-20
6-11
1.0-2.0
H2(1Hou r)
20 60
21-30
12-17 2.1-3.0
H3(1Hou r、Ra pi d)
30 50
H4(Glas s)
40
40
fH
0~6
7-14
15-21
Clarke
WATER HARDN ES S
Selecto r Po si tion
Salt c on sumptio n
(gram/c yc le )
Auto no my
(cycles /1 kg s)
Plea se f ol low the steps bel ow f or a djustment in sa lt c on sumption.
18-22 31-40 22-28 3.1- 4. 0
A. Water Softener
NOTE:
If your model does not have any w ater softener, you may skip this section.
°
Clar k: B ri tish degree
°
fH: Fren ch d egree
°
DH: Ge rm an d egree
Note:1
dH=1 .2 5 Clarke =1 .7 8 fH=0.178mmol /l
°
°
°
1
41-60
23-34 4.1-6.0
H5(Glas s Rapid)、
50 30
H6(Glas s、1H ou r)
60
20
29-42
35-55 61-98 43-69 6.1- 9. 8
Note:2
The ma nu fa ctory setting : H (EN 5024 2)
Befo re u si ng your dishwas he r fo r the first time:
A. Set the w at er softener
. Add 1.5 Kg d is hwasher salt an d th en f ull fill the salt c on ta iner with water
C. Fil l th e ri nse aid dispens er
D. Fil l in d et ergent
7
3
B
 Loading...