

Page 1

Backofen
Oven
Four
Oven
Forno
DE BETRIEBSANLEITUNG
EN GUIDE TO INSTALLATION
FR GUIDE D’UTILISATION
NL GEBRUIKSAANWIJZING
PT GUIA DE UTILIZAÇÃO
99641131 ML BIO.qxp 05/01/2007 14:03 Page 1
Page 2

Da wir unsere Produkte ständig verbessern möchten, behalten wir uns das Recht vor, ihre technischen, funktionellen und ästhetischen Merkmale zu verändern, damit sie mit der technischen
Weiterentwicklung Schritt halten.
Wichtig:
Bitte lesen Sie vor der Inbetriebnahme des Gerätes diese Einbau- und
Gebrauchsanleitung aufmerksam durch, damit Sie sich sehr rasch mit seinem Betrieb vertraut
machen können.
Liebe Kundin, lieber Kunde,
Sie haben soeben einen
BBRRAANNDDTT
Backofen erworben, und wir dan-
ken Ihnen dafür.
Wir haben in dieses Gerät unsere ganze Leidenschaft und unser
Know-how einfließen lassen, damit es Ihre Bedürfnisse bestmöglich
erfüllt. Es ist innovativ, leistungsfähig, und wir haben es so konzipiert, daß auch seine Benutzung immer einfach bleibt.
In der
BBRRAANNDDTT
Produktpalette finden Sie auch eine breite Auswahl
an Dunstabzugshauben, Mikrowellenherden, Kochfeldern,
Küchenherden, Geschirrspülern, Waschmaschinen,
Wäschetrocknern, Kühlschränken, Gefrierschränken und
Tiefkühltruhen), die Sie mit four Ihrem neuen
BBRRAANNDDTT
Backofen abs-
timmen können.
Sie können uns auch im Internet unter
wwwwww..bbrraannddtt..ccoomm
besuchen,
wo Sie unsere jüngsten Innovationen sowie nützliche und ergänzende Informationen finden.
BBRRAANNDDTT
2
DE
02
EN
36
NL
70
104
FR
PT
136
99641131 ML BIO.qxp 05/01/2007 14:03 Page 2
Page 3

INHALT
1/FÜR DEN BENUTZER
• Sicherheitshinweise ________________________________________ 04
• Umwelt
___________________________________________________
05
2 /EINBAU DES GERÄTS
• Wahl des Aufstellungsortes
_________________________________
06
• Einbau ___________________________________________________ 06
• Elektrischer Anschluss
______________________________________
07
• Austausch des Stromkabels
_________________________________
08
3 / BESCHREIBUNG DES GERÄTS
• Übersicht über den Ofen
____________________________________
09
• Beschreibung des Zubehörs
_________________________________
10
• Beschreibung der Programmiervorrichtung_____________________ 11
4 / BENUTZUNG DES GERÄTS
• Nutzung der Programmiervorrichtung
_________________________
12
º
Einstellung der Uhr _____________________________________ 12
º
Änderung der Uhrzeit ___________________________________ 12
º
Sofortiger Garvorgang __________________________________ 13
º
Programmierter Garvorgang _____________________________ 14
º
Spargaren ____________________________________________ 16
º
Grill+ _________________________________________________ 17
º
Nutzung der function kurzzeitwecker ______________________ 18
º
Einstellung der anzeigehelligkeit __________________________ 18
5 / ZUBEREITUNGSARTEN IM BACKOFEN __________________________ 19
6 / PFLEGE UND REINIGUNG DES GERÄTS
• Reinigung der Außenfläche
__________________________________
21
• Reinigung der Ofentür
______________________________________
21
• Reinigung des Pyrolyseofens ________________________________ 23
• Hinweise und Sicherheit_____________________________________ 23
• Reinigungsbeginn
__________________________________________
24
• Ende der Reinigung
________________________________________
25
7 / FUNKTIONSSTÖRUNGEN ______________________________________ 26
• Wechsel der Glühbirne
______________________________________
27
8 / VORTEILE UND PRINCIP DES “3EASY COOK” VORGANGS _________ 28
• EASY COOK ZUBEREITUNGSARTEN
_________________________
30
• Tipps und Tricks
___________________________________________
31
• Rezeptvorschäge __________________________________________ 32
8 / KUNDENDIENST ______________________________________________ 35
3
99641131 ML BIO.qxp 05/01/2007 14:03 Page 3
Page 4

4
SICHERHEITSHINWEISE
— Dieses Gerät ist für die Benutzung durch
Privatpersonen in ihrem Haushalt konzipiert
worden. Es ist ausschließlich für das Garen
von Lebensmitteln bestimmt. Dieser Backofen
enthält keinerlei asbesthaltige Bestandteile.
— Dieses Gerät muss von Erwachsenen
benutzt werden. Bitte darauf achten, dass
Kinder es nicht berühren und als Spielzeug
benutzen. Stellen Sie sicher, dass sie die
Bedienelemente des Geräts nicht berühren.
— Das Gerät bei Lieferung sofort auspacken
oder auspacken lassen. Sein allgemeines
Aussehen prüfen. Eventuelle Vorbehalte
schriftlich auf dem Lieferschein vermerken,
und ein Exemplar davon behalten.
— Das Gerät ist für den normalen
Haushaltsgebrauch bestimmt. Es nicht für
kaufmännische oder industrielle oder andere
Zwecke als diejenigen benutzen, für die es
konzipiert worden ist.
— Die Merkmale dieses Geräts nicht verändern
oder versuchen, sie zu verändern. Dies würde
eine Gefahr für Sie darstellen.
— Während des Gerätebetriebs Kleinkinder
fern halten. Dadurch wird vermieden, dass sie
sich durch Umkippen eines Kochgefäßes verbrennen. Außerdem ist die Gerätevorderseite
bei Ofenbetrieb und -reinigung (Pyrolyse) heiß.
— Das Gerät nie am Türgriff ziehen.
— Vor der ersten Nutzung des Ofens, diesen
leer 15 Minuten lang heizen. Für hinreichende
Raumbelüftung sorgen. U. U. stellen Sie einen
besonderen Geruch oder leichte
Rauchentwicklung fest. Das ist normal.
— Beim Backen darauf achten, dass die
Backofentür richtig geschlossen ist, damit die
Dichtung ihre Aufgabe richtig erfüllt.
— Das Gerät wird bei Benutzung heiß. Die
Heizelemente im Backofen nicht berühren. Sie
könnten sich schwer verbrennen.
— Wenn die Zubereitungen in den Backofen eingeführt oder aus dem Backofen herausgeholt
werden, die oberen Heizelemente nicht mit den
Händen berühren. Die Hände mit
Topfhandschuhen schützen.
— Kochgeräte (Rost, Spieß ...) nach dem
Zubereiten nicht mit bloßen Händen berühren.
— Nie Alu-Folie direkt auf den Backofenboden
legen (s. Kapitel Beschreibung des Ofens). Die
sich dort sammelnde Hitze könnte die
Emaillierung beschädigen.
— Keine schweren Lasten auf die offene
Backofentür stellen und sicher stellen, dass
kein Kind auf die Tür klettert oder sich darauf
setzt.
— Um Beschädigungen der Bedienknöpfe des
Geräts zu vermeiden, die Ofentür bei laufendem
oder noch heißem Ofen nicht geöffnet lassen.
— Den Ofenraum nur bei abgeschaltetem Ofen
reinigen.
— Bei intensivem und längeren Betrieb des
Geräts kann eine Zusatzbelüftung erforderlich
sein. Fenster öffnen oder Dunstabzug stärker
aktivieren.
— Abgesehen von dem mit dem Ofen gelieferten
Zubehör nur hitzebeständiges Geschirr verwenden (Herstellerhinweise befolgen).
— Nach der Ofenbenutzung sicher stellen, dass
alle Schalter ausgeschaltet sind.
— Niemals Dampf- oder Hochdruckgeräte zur
Reinigung des Ofens benutzen (Anforderungen
an die elektrische Sicherheit).
— Zur erhöhten Sicherheit ist der Ofen mit
einer AUTOMATISCHEN AUSSCHALTUNG
ausgestattet, sollten Sie aus Versehen
vergessen, den Ofen auszuschalten. Nach 10
Stunden Betriebszeit wird die AS-Funktion
(Automatikstopp) aktiviert und der Ofen heizt
nicht mehr. Anstelle der Uhrzeit wird AS
angezeigt und es ertönt eine Zeit lang eine
Serie 2 aufeinanderfolgender Signaltöne.
•
Wichtig
Diese Betriebsanleitung mit dem Gerät
aufbewahren. Sollte das Gerät an eine andere Person verkauft oder veräußert werden,
sichergehen, dass sie auch die
Betriebsanleitung bekommt. Vor der
Installation und Benutzung des Geräts sollten diese Hinweise zur Kenntnis genommen
werden. Sie sind für die Sicherheit des
Benutzers und anderer Personen verfasst
worden.
1 / FÜR DEN BENUTZERDE
99641131 ML BIO.qxp 05/01/2007 14:03 Page 4
Page 5

UMWELT
•
—Die Verpackung des Gerätes kann wieder verwertet werden. Führen Sie sie der
Wiederverwertung zu und tragen Sie zum Umweltschutz bei, indem sie die Verpackung in den
dazu bestimmten Containern Ihrer Gemeinde entsorgen.
—In das Gerät wurden viele wiederverwertbare Materialien eingebaut. Dieses Logo zeigt an, dass
alte Geräte nicht mit anderen Abfällen zu mischen sind. Die von dem Hersteller organisierte Wiederverwertung erfolgt unter optimalen Bedingungen unter Einhaltung der
europäischen Richtlinie 2002/96/EG zu Abfällen aus elektrischen und elektronischen
Geräten. Fragen Sie in der Gemeindeverwaltung oder bei Ihrem Händler nach den
Ihnen am nächsten gelegenen Sammelpunkten für Altgeräte.
—Wir danken für Ihren Beitrag zum Umweltschutz.
Achtung
Die Installation darf nur von qualifizierten Installateuren und Technikern vorgenommen
werden.
Dieses Gerät entspricht folgenden europäischen Richtlinien:
- Niederspannungsrichtlinie 73/23/EWG, novelliert durch die CE-Kennzeichnungsrichtlinie
93/68/EWG.
- Richtlinie zur elektromagnetischen Verträglichkeit 89/336/EWG, novelliert durch die CEKennzeichnungsrichtlinie 93/68/EWG.
- Verordnung EG Nr. 1935/2004 zu Materialien und Gegenständen, die dazu bestimmt sind, mit
Lebensmitteln in Kontakt zu kommen.
1 / FÜR DEN BENUTZER
DE
5
99641131 ML BIO.qxp 05/01/2007 14:03 Page 5
Page 6
6
EINBAU
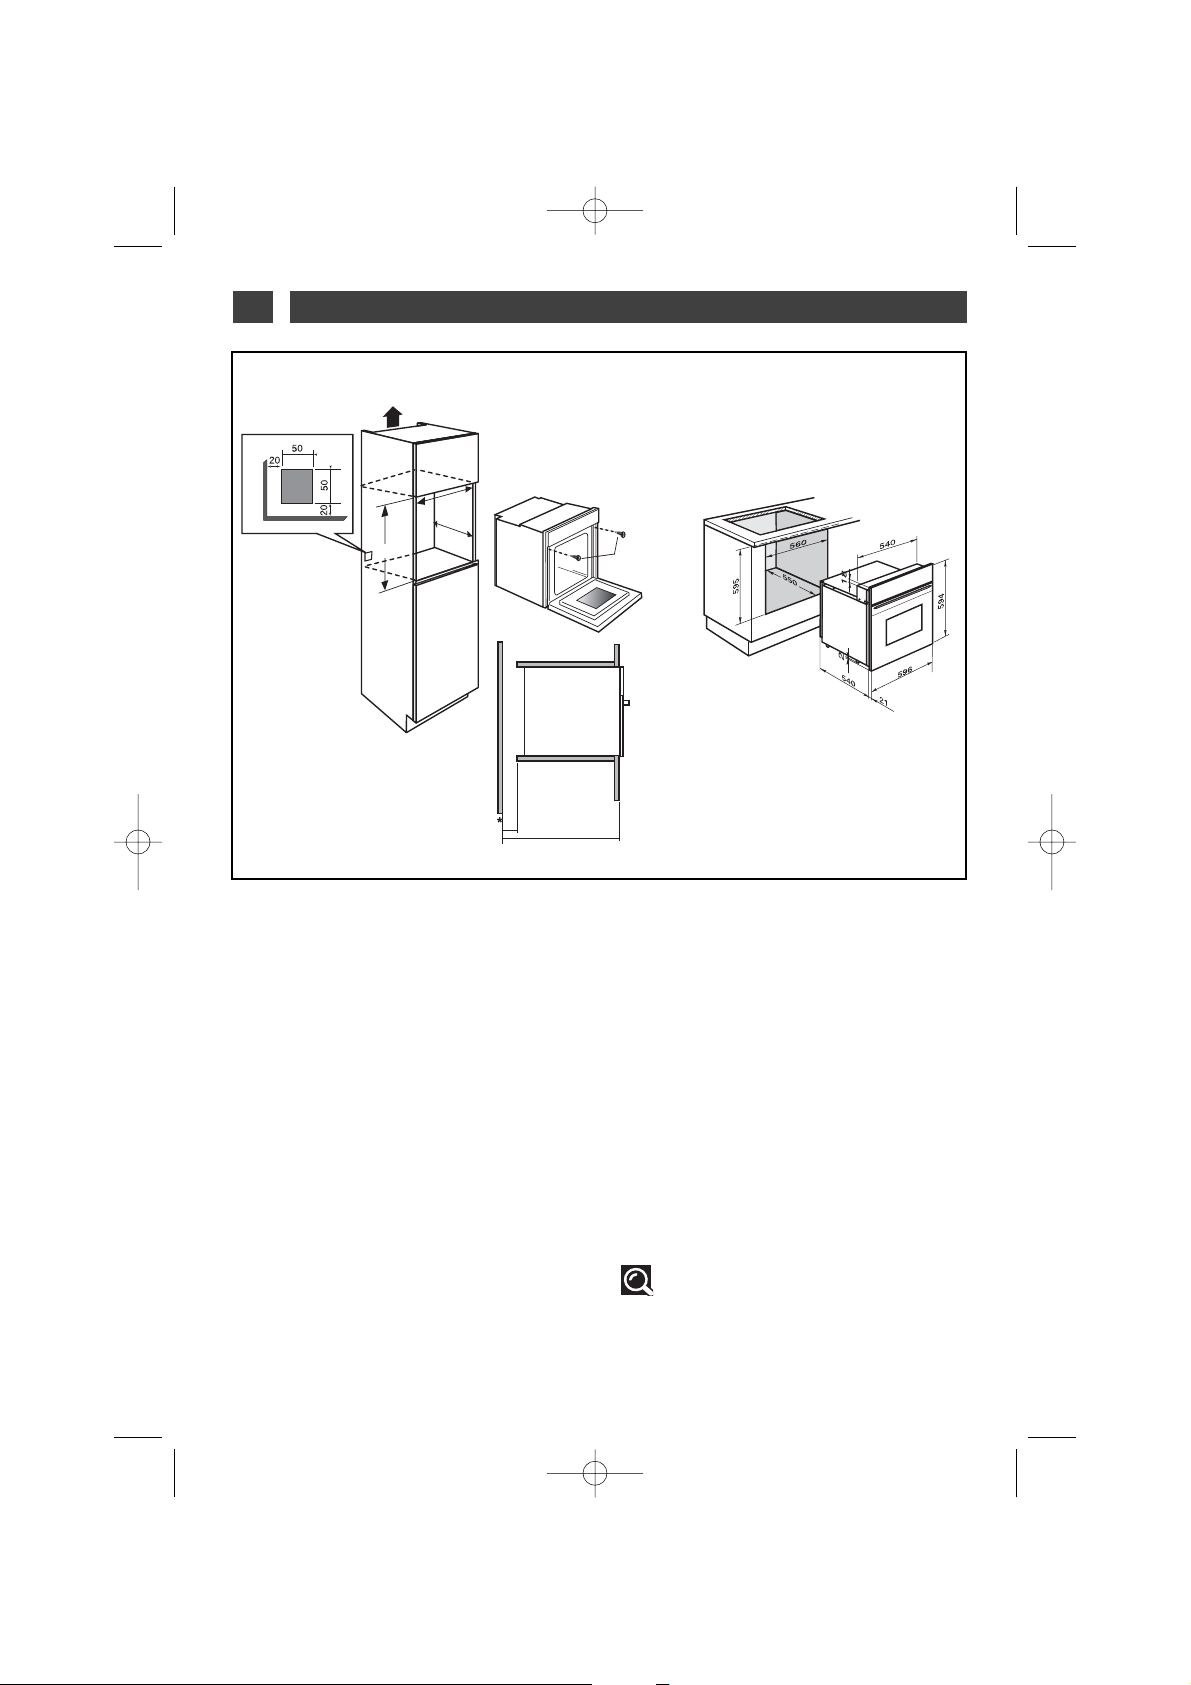
Hierfür:
1) Die Gummi-Schraubenabdeckungen ent-fernen, um die Befestigungsbohrungen frei-zulegen.
2) In die Möbelwand ein Loch von 2 mm
Durchmesser bohren, um das Bersten des
Holzes zu verhindern.
3) Den Backofen anhand der 2 Schrauben befestigen.
4) Die Gummi-Schraubenabdeckungen wieder
aufsetzen (sie dienen auch zur Dämpfung beim
Schließen der Backofentür).
(*) Bei einem offenen Möbel muss die Öffnung
(maximal) 70 mm groß sein.
Empfehlung
Sich von einem Fachmann für
Haushaltsgeräte die Konformität der
Installation bestätigen lassen.
•
WAHL DES AUFSTELLUNGSORTES
Aus obenstehenden Abbildungen gehen die
Maße eines Schrankes hervor, in den der Ofen
eingesetzt werden kann.
Der Backofen kann beliebig unter einer
Arbeitsfläche oder in einem Säulenmöbel
(offen* oder geschlossen) mit den passenden
Abmessungen für den Einbau installiert werden (siehe nebenstehendes Schema).
Der Backofen hat eine optimierte Lüftung, und
somit werden beim Backen und Säubern
bemerkenswerte Ergebnisse erzielt, wenn folgende Punkte berücksichtigt werden:
• Den Backofen mittig in das Möbel einbauen,
damit ein Mindestabstand von 5 mm zum
benachbarten Möbel eingehalten wird.
• Das Material des Einbaumöbels oder die
Beschichtung dieses Möbels muss hit-zebeständig sein.
• Um die Stabilität zu erhöhen, den Ofen mit 2
Schrauben in den entsprechenden Bohrungen
in den Seitenwänden des Möbels befestigen
(Abb.1).
•
Abb. 01
2 / EINBAU DES GERÄTSDE
99641131 ML BIO.qxp 05/01/2007 14:03 Page 6
560
550
585
70
550
Page 7
7
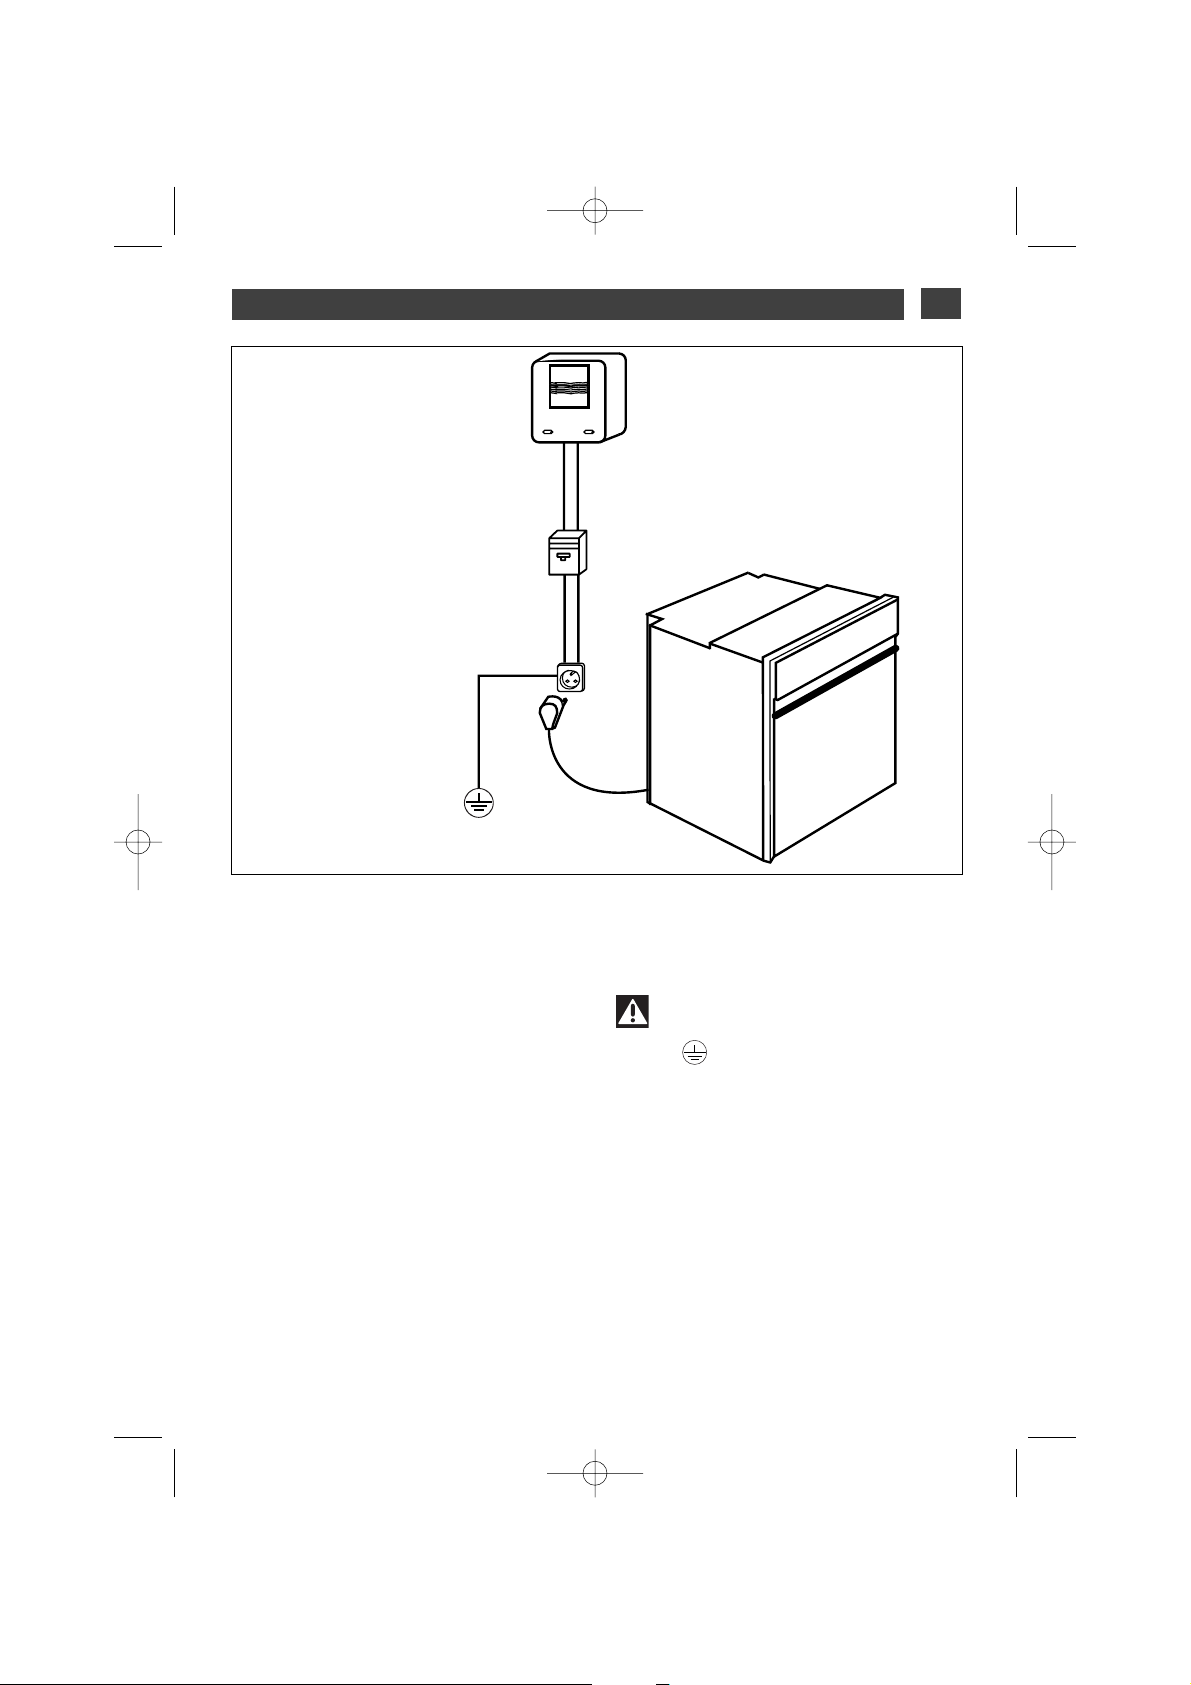
•
Zähler 20 A Einphasenstrom
220-240V~50Hz
Steckdose
2 Pole + Erdung
IEC Norm 60083
Einphasige Leitung 220 - 240 V
~
Versorgungskabel
Länge 1,50 m
etwa
Differenzialabschalter oder
Schmelzsicherung 16 A
ELEKTRISCHER ANSCHLUSS
Die elektrische Sicherheit ist über korrekten
Einbau sicher zu stellen. Bei Einbau und
Wartungsvorgängen muss das Gerät vom
Stromnetz getrennt, die Schmelzsicherungen
müssen abgeschaltet oder herausgenommen
werden.
Der Stromanschluss wird hergestellt, bevor
das Gerät in das Möbel eingeschoben wird.
Prüfen, ob:
- die Leistung der Installation ausreicht,
- die Versorgungsleitungen in gutem Zustand
sind,
- der Drähtequerschnitt mit den Installationsregeln übereinstimmt.
Der Backofen muss mit einem (genormten)
Stromkabel mit 3 Leitern mit 1,5 mm
2
(1 Ph +
1N + Erde) angeschlossen werden, die an das
einphasige 220 - 240 V~Netz über eine
Steckdose 1 ph + 1 N + Erdung nach ICE-
Norm 60083 oder über eine omnipolare
Abschaltevorrichtung oder gemäß
Installationsregeln angeschlossen sein müssen.
Achtung
Der Schutzdraht (grün-gelb) ist an die
Klemme des Geräts angeschlossen und
muss mit der Erdung der Anlage verbunden
sein.
Im Falle eines Anschlusses mit Steckdose
muss diese auch nach der Installation des
Gerätes zugänglich sein.
Die Schmelzsicherung der vorhandenen
Anlage muss 16 Ampere aufweisen.
Wenn das Stromkabel beschädigt ist, muss
es durch ein Spezialkabel oder einen
besonderen Satz ersetzt werden, der bei
Hersteller oder Kundendienst erhältlich ist.
2 / EINBAU DES GERÄTS
DE
99641131 ML BIO.qxp 05/01/2007 14:03 Page 7
Page 8

•
Achtung
Wir übernehmen keine Haftung für Unfälle oder Zwischenfälle aufgrund nicht vorhande-
ner oder nicht ordnungsgemäßer Erdung.
Wenn die Stromanlage der Wohnung für den Anschluss des Geräts geändert werden muss,
sich an einen qualifizierten Elektriker wenden.
Wenn der Ofen irgendeine Störung aufweist, das Gerät vom Netz trennen oder diejenige
Sicherung herausnehmen, die der Anschlussleitung des Geräts entspricht.
AUSTAUSCH DES STROMKABELS
— Das Stromkabel (H05 RR-F, H05 RN-F oder H05 VV-F) muss ausreichend lang sein, damit es
an den einzubauenden und auf dem Boden vor dem Möbel stehenden Backofen angeschlossen
werden kann.
Hierfür muss das Gerät vom Netz getrennt werden:
— Das Fach unten rechts von der rückwärtigen Haube durch Losschrauben von 2 Schrauben öffnen und die Klappe wegschwenken.
— Jeden Draht des neuen Stromkabels über 12 mm freilegen.
— Die Adern sorgfältig verdrehen.
— Die Schrauben des Klemmenhalters lockern und das auszutauschende Stromkabel entfernen.
•
Das Stromkabel von der Seite der Haube in die Kabelklemme rechts vom Klemmenhalter ein-
führen.
— Alle Adern der Stromkabel müssen von den Schrauben erfasst werden.
— Der Draht der Phase an die Klemme L.
— Der grün-gelbe Erdungsdraht muss an die Klemme angeschlossen werden.
— Der Draht des Nulleiters (blau) an die Klemme N.
— Die Schrauben des Klemmenhalters festschrauben und den Anschluss durch Ziehen an jedem
Draht überprüfen.
— Das Kabel mit der Kabelklemme rechts des Klemmenhalters fixieren.
— Das Fach wieder mit den 2 Schrauben schließen.
2 / EINBAU DES GERÄTSDE
8
99641131 ML BIO.qxp 05/01/2007 14:03 Page 8
Page 9
9
9
3
2
6
0
2
1
9
9
3
2
4
8
4
8
9
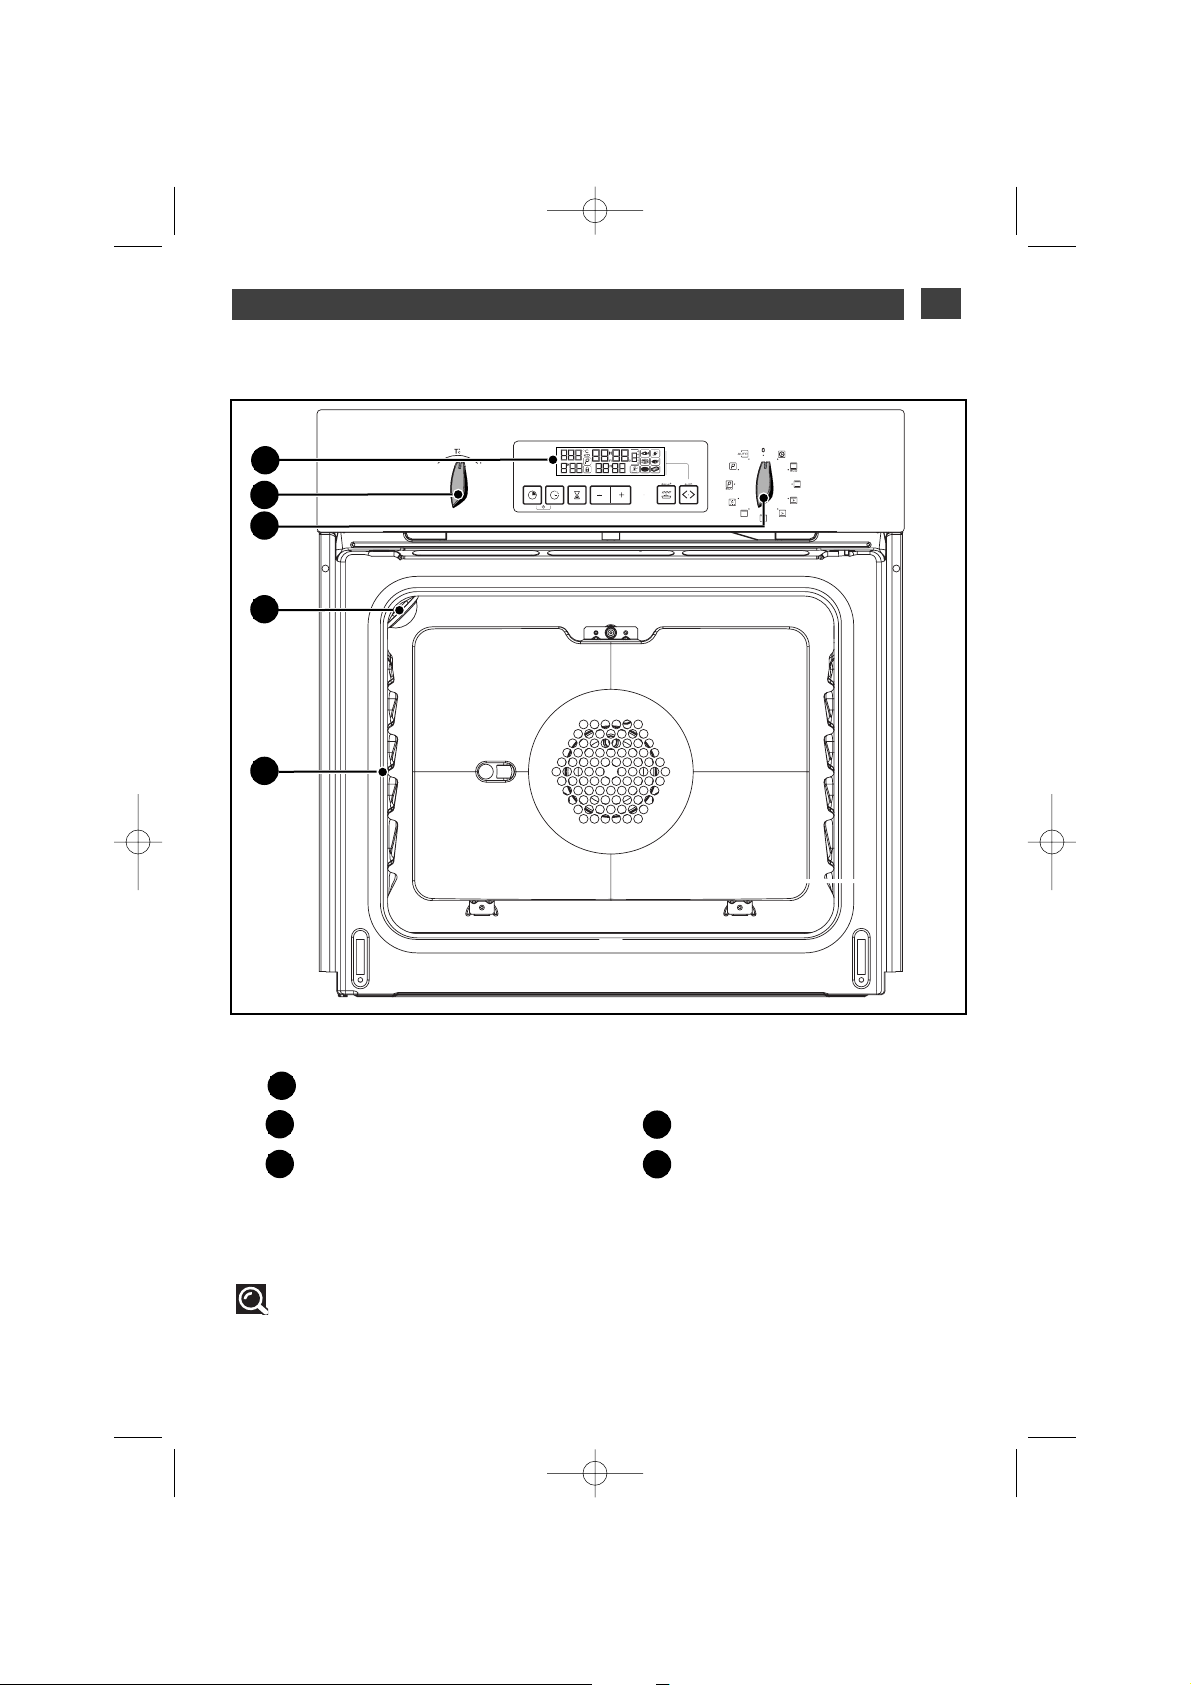
•
ÜBERSICHT ÜBER DEN OFEN
B
C
Programmierer
Temperaturwahlschalter
Funktionswahlschalter
D
E
Lampe
Anzeiger der Einschubleiste
Empfehlung
Diese Einbau- und Betriebsanleitung gilt für mehrere Modelle. Ihr Gerät kann leicht von
den gegebenen Beschreibungen und der Ausstattung abweichen.
E
D
B
C
3 / BESCHREIBUNG DES GERÄTS
DE
A
A
99641131 ML BIO.qxp 05/01/2007 14:03 Page 9
Page 10
10
3 / BESCHREIBUNG DES GERÄTSDE
fig.3
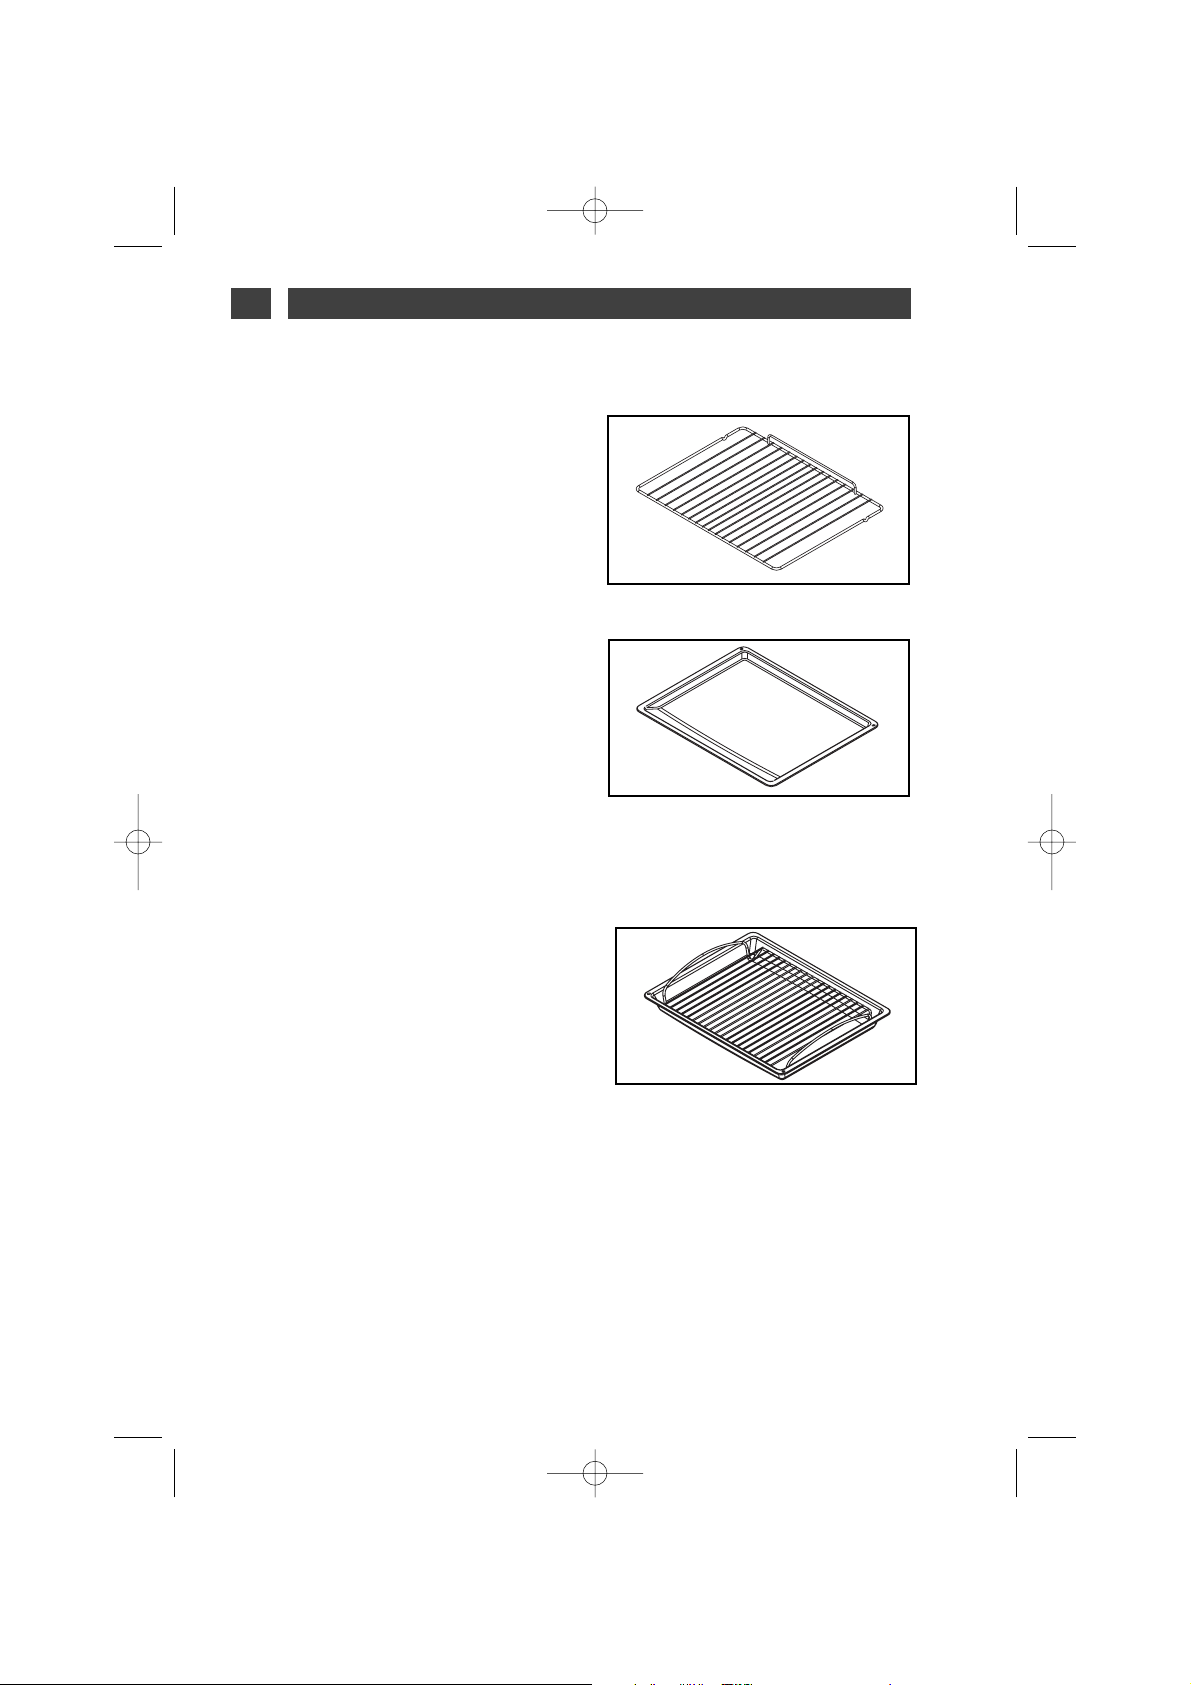
•
TTiieeffeess BBlleecchh
mit
GGrriillllrroosstt ((bbeessoonnddeerrss
ffüürr GGrriillllgguutt))
(Abb. 3)
Es dient zum Auffangen von Bratsaft und Fett
bei starkem Grillen oder Umluft-Grill.
Bei Größenanpassung des Bratens kann es als
Bratpfanne genutzt werden. (Z. B.: Geflügel mit
Gemüse umgeben, bei mäßiger Temperatur).
Dieses Blech sollte, außer in Position GRILL,
nie direkt auf den Backofenboden gestellt
werden.
Hinten
Vorne
•
Kippsicheres Rost (Abb. 1)
Das Rost ist für alle Kochgeschirre und Kuchenformen geeignet, die zu garende oder
überbackende Lebensmittel enthalten.
Es wird für Grillgerichte benutzt (sie werden
direkt daraufgelegt).
BESCHREIBUNG DES
ZUBEHÖRS
•
Abb.1
Abb.2
•
Mehrzweckblech (Abb. 2)
Es dient als Kuchenblech und hat eine schräg
abgewinkelte Kante. Es wird für das Backen
von Backwaren wie Windbeutel, Baisers,
Madeleines, Blätterteig ... benutzt.
Wenn es unter dem Rost eingeschoben wird,
fängt es Bratensaft und Fett auf. Es kann auch
zur Hälfte mit Wasser gefüllt werden und für
Kochvorgänge im Wasserbad genutzt werden.
Braten oder andere Fleischstücke sollten
nicht direkt auf das Mehrzweckblech gegeben
werden, denn dies würde automatisch zu starken Spritzern an den Ofenwänden führen.
99641131 ML BIO.qxp 05/01/2007 14:03 Page 10
Page 11

11
3 / BESCHREIBUNG DES GERÄTS
DE
BESCHREIBUNG DES PROGRAMMIERERS
••
C
O
N
I
A
B
Temperaturanzeige
ECO-Anzeige (Garen und Pyrolyse)
Anzeige von Uhrzeit und Dauer
Anzeige der Einschubhöhe
EASY COOK Funktionstaste
GRILL+ Taste
Anzeige der EASY COOK Gerichte
EASY COOK Anzeige
C
D
E
Tasten zur Einstellung der Zeit
Taste des Kurzzeitweckers
Taste Ende der Garzeit
Taste Gardauer
Anzeige des Endes der Garzeit
Anzeiger der Türverriegelung
Anzeiger der Gardauer
Pyrolyseanzeige
F
G
H
F
A
D
B
JK
L
H
P
G
E
I
J
K
L
M
N
O
M
P
99641131 ML BIO.qxp 05/01/2007 14:03 Page 11
Page 12
12
4 / NUTZUNG DES GERÄTESDE
•
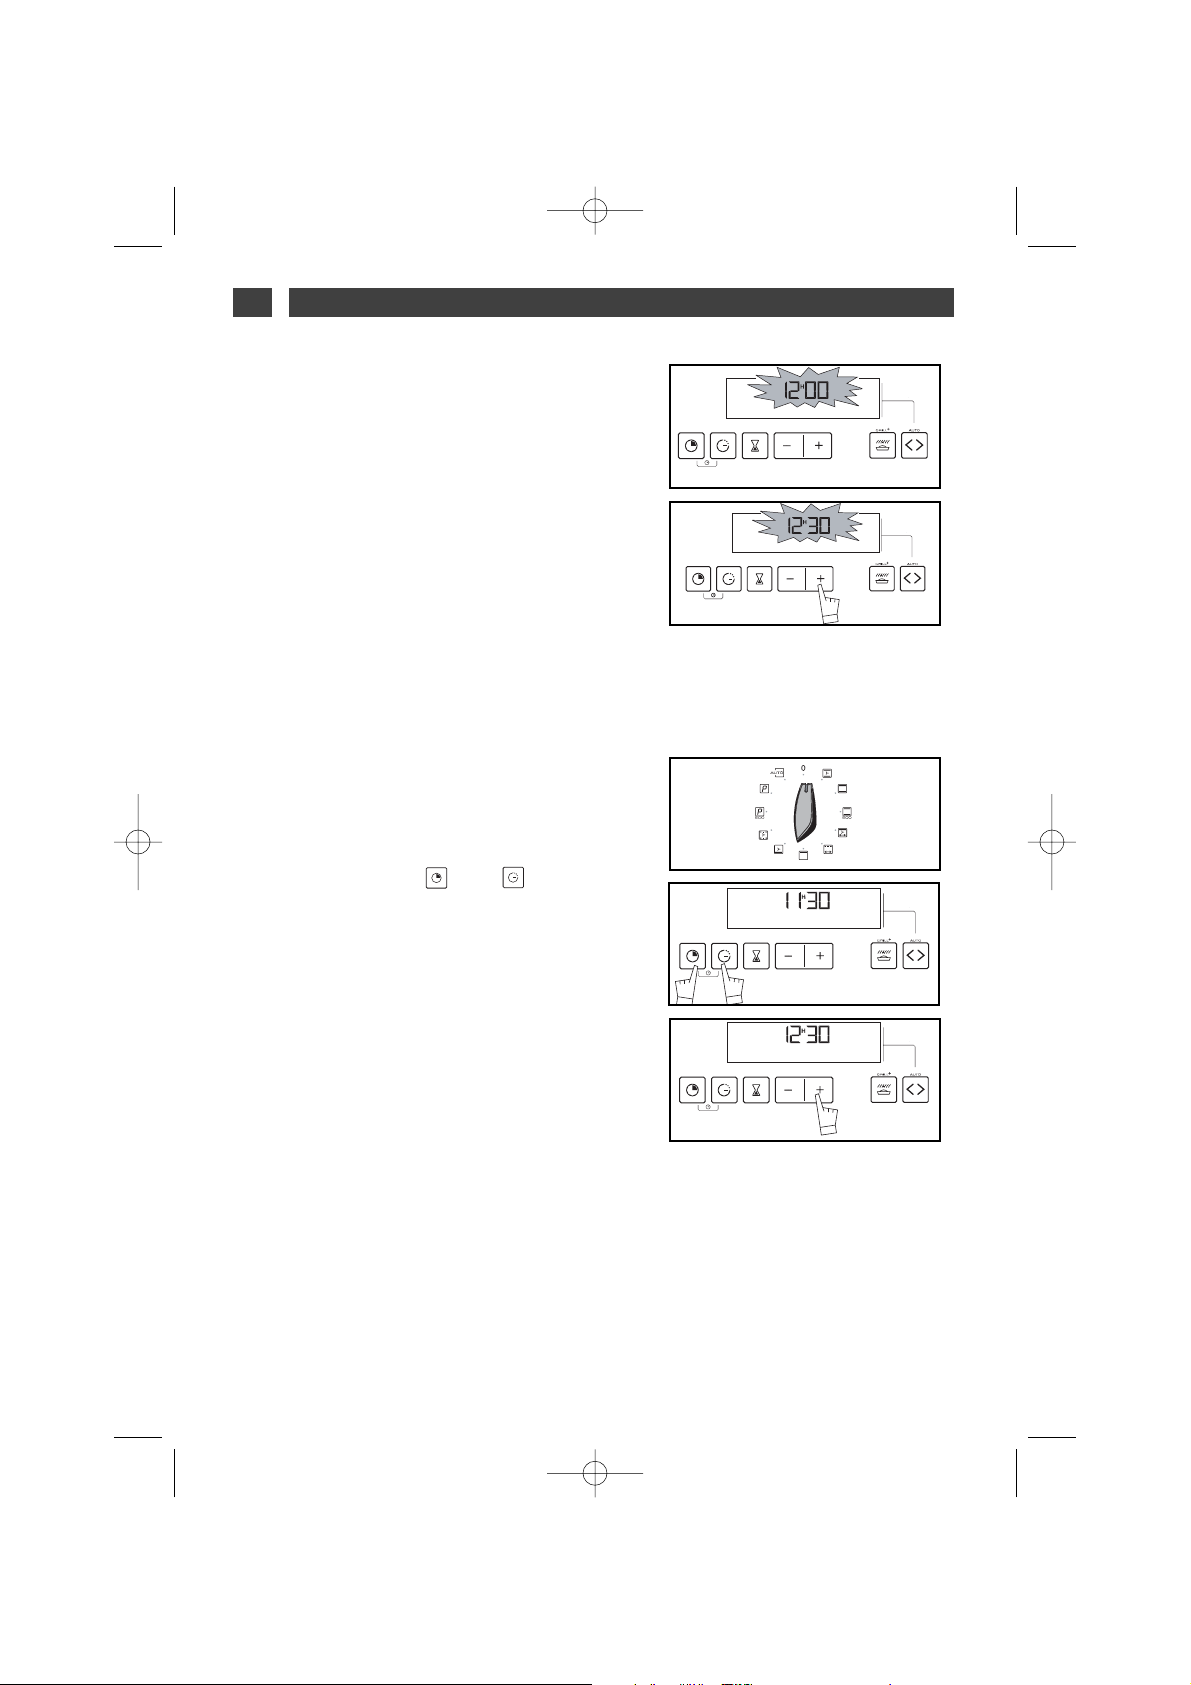
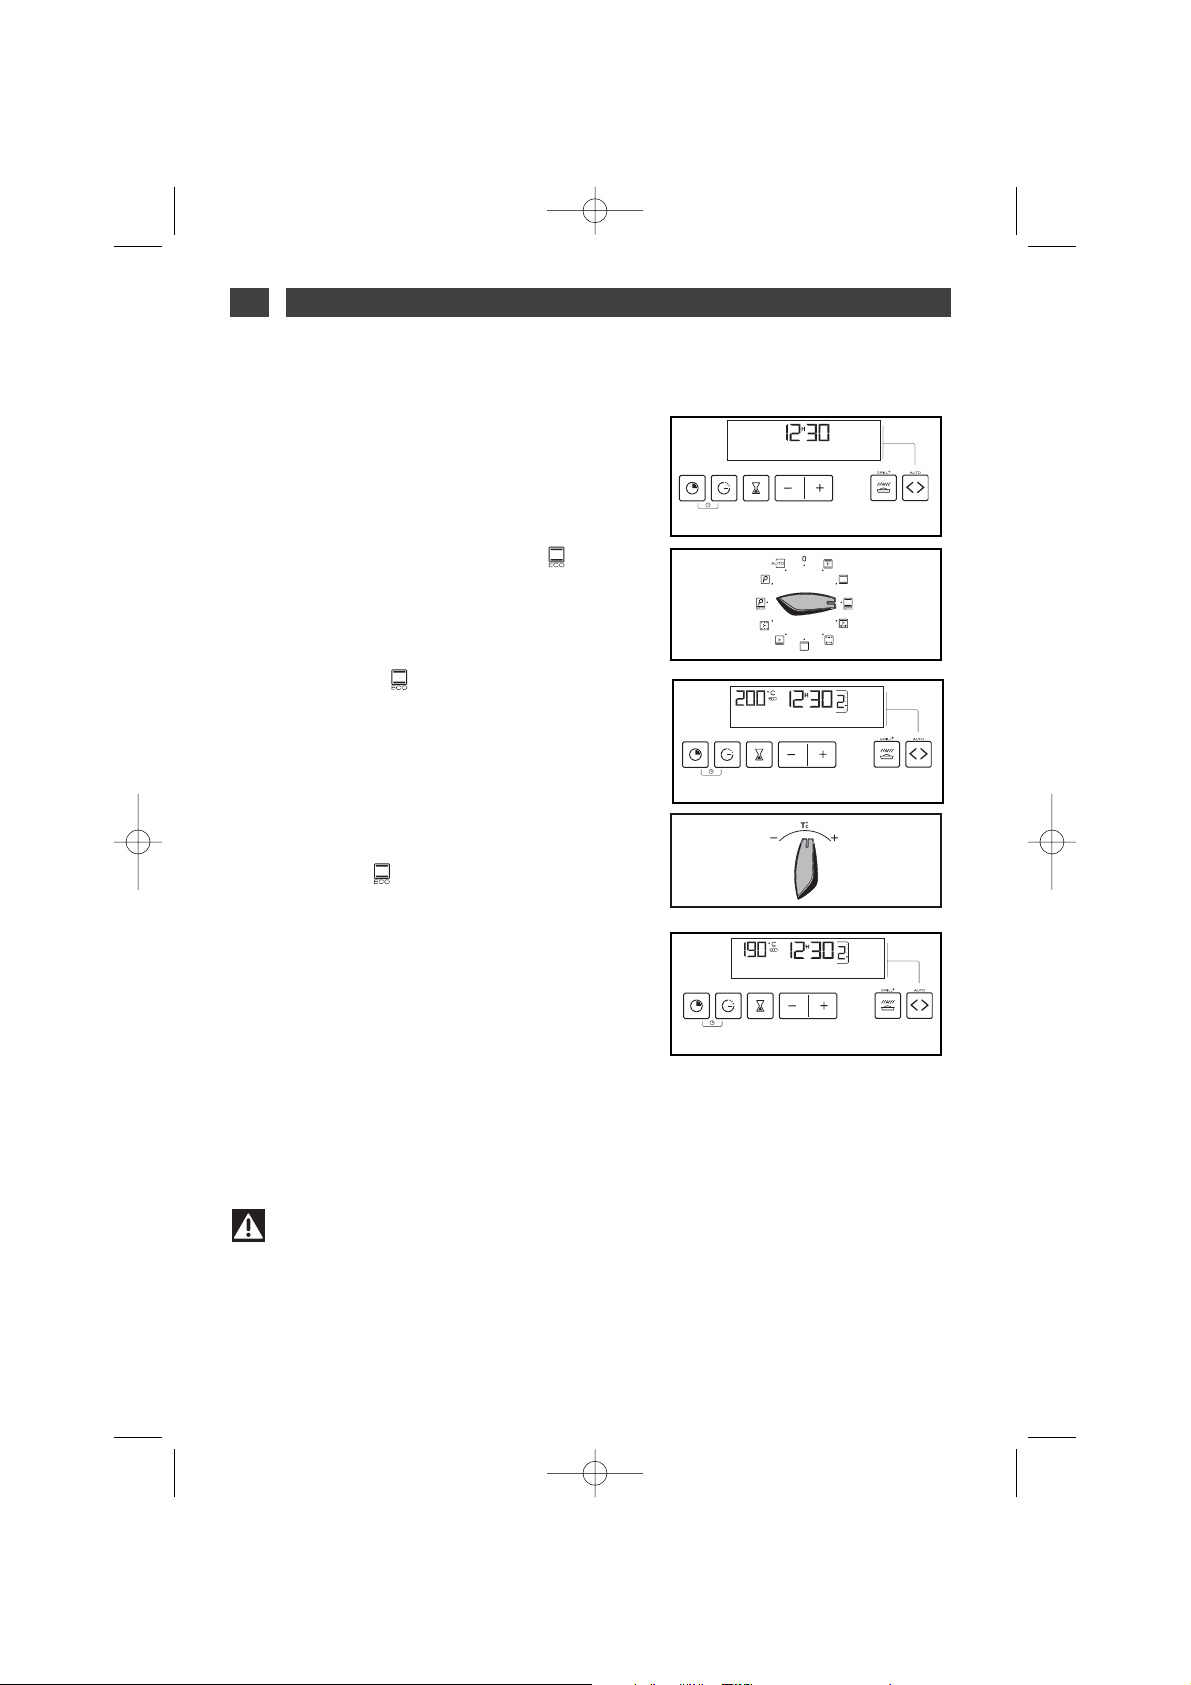
Einstellung der Uhrzeit
--
Bei Anschluss an den Strom
In der Anzeige blinkt 12:00 (Abb.1)
Die Uhrzeit über die Tasten + und - einstellen
(bei Festhalten der Taste erfolgt ein
Schnelldurchlauf) (Abb. 2).
Beispiel: 12.30 Uhr
Die eingestellte Uhrzeit wird nach nach einigen Sekunden automatisch abgespeichert.
Die Anzeige blinkt nicht mehr.
- Einstellung der korrekten Uhrzeit
Der Funktionswahlschalter muss sich in
Position 0 (Abb. 1) befinden.
Gleichzeitig die Tasten “ ” und einige
Sekunden lang drücken (Ab. 2), wenn die
Tageszeit blinkt, loslassen. Signaltöne geben
an, dass eine Einstellung vorgenommen werden kann.
Die Uhrzeit mit den Tasten + oder - einstellen
(Abb. 3).
Die eingestellte Uhrzeit wird nach nach einigen Sekunden automatisch abgespeichert.
Abb.1
Abb.2
Abb.2
Abb.3
Abb.1
99641131 ML BIO.qxp 05/01/2007 14:03 Page 12
Page 13
13
4 / NUTZUNG DES GERÄTES
DE
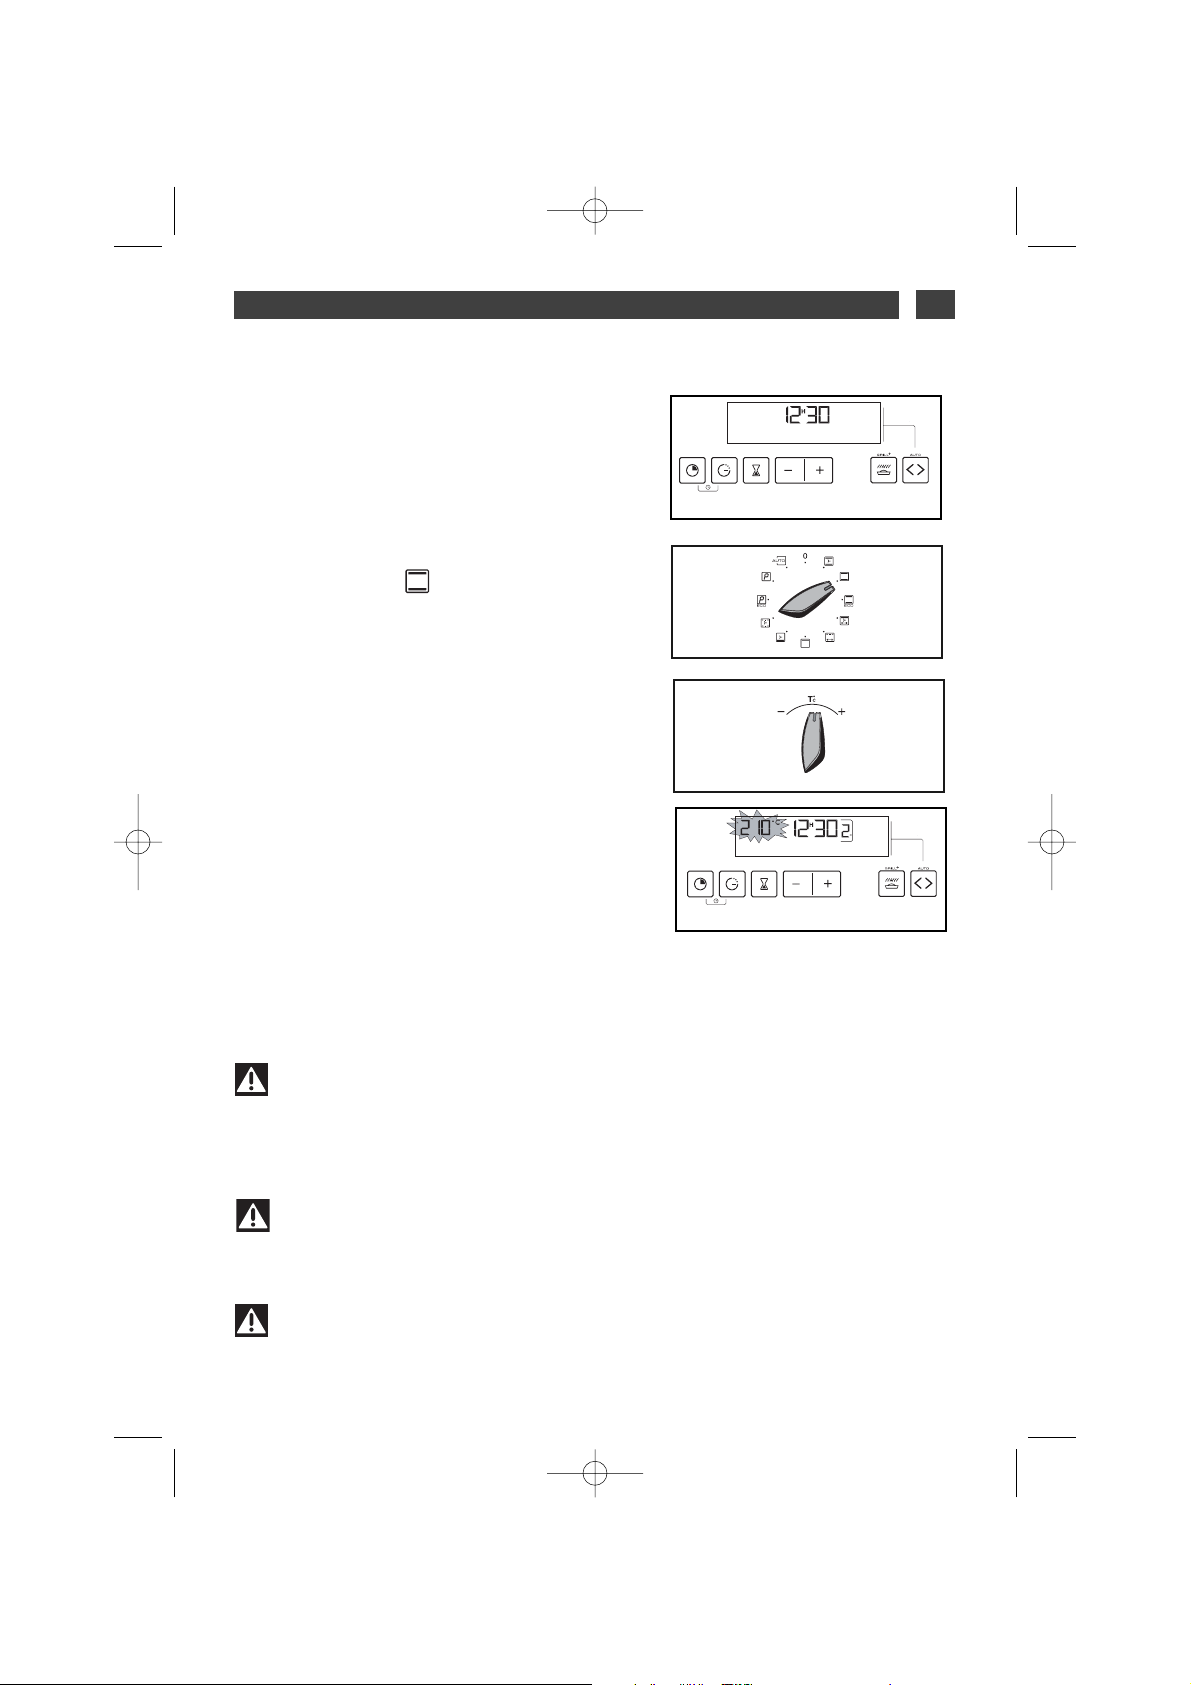
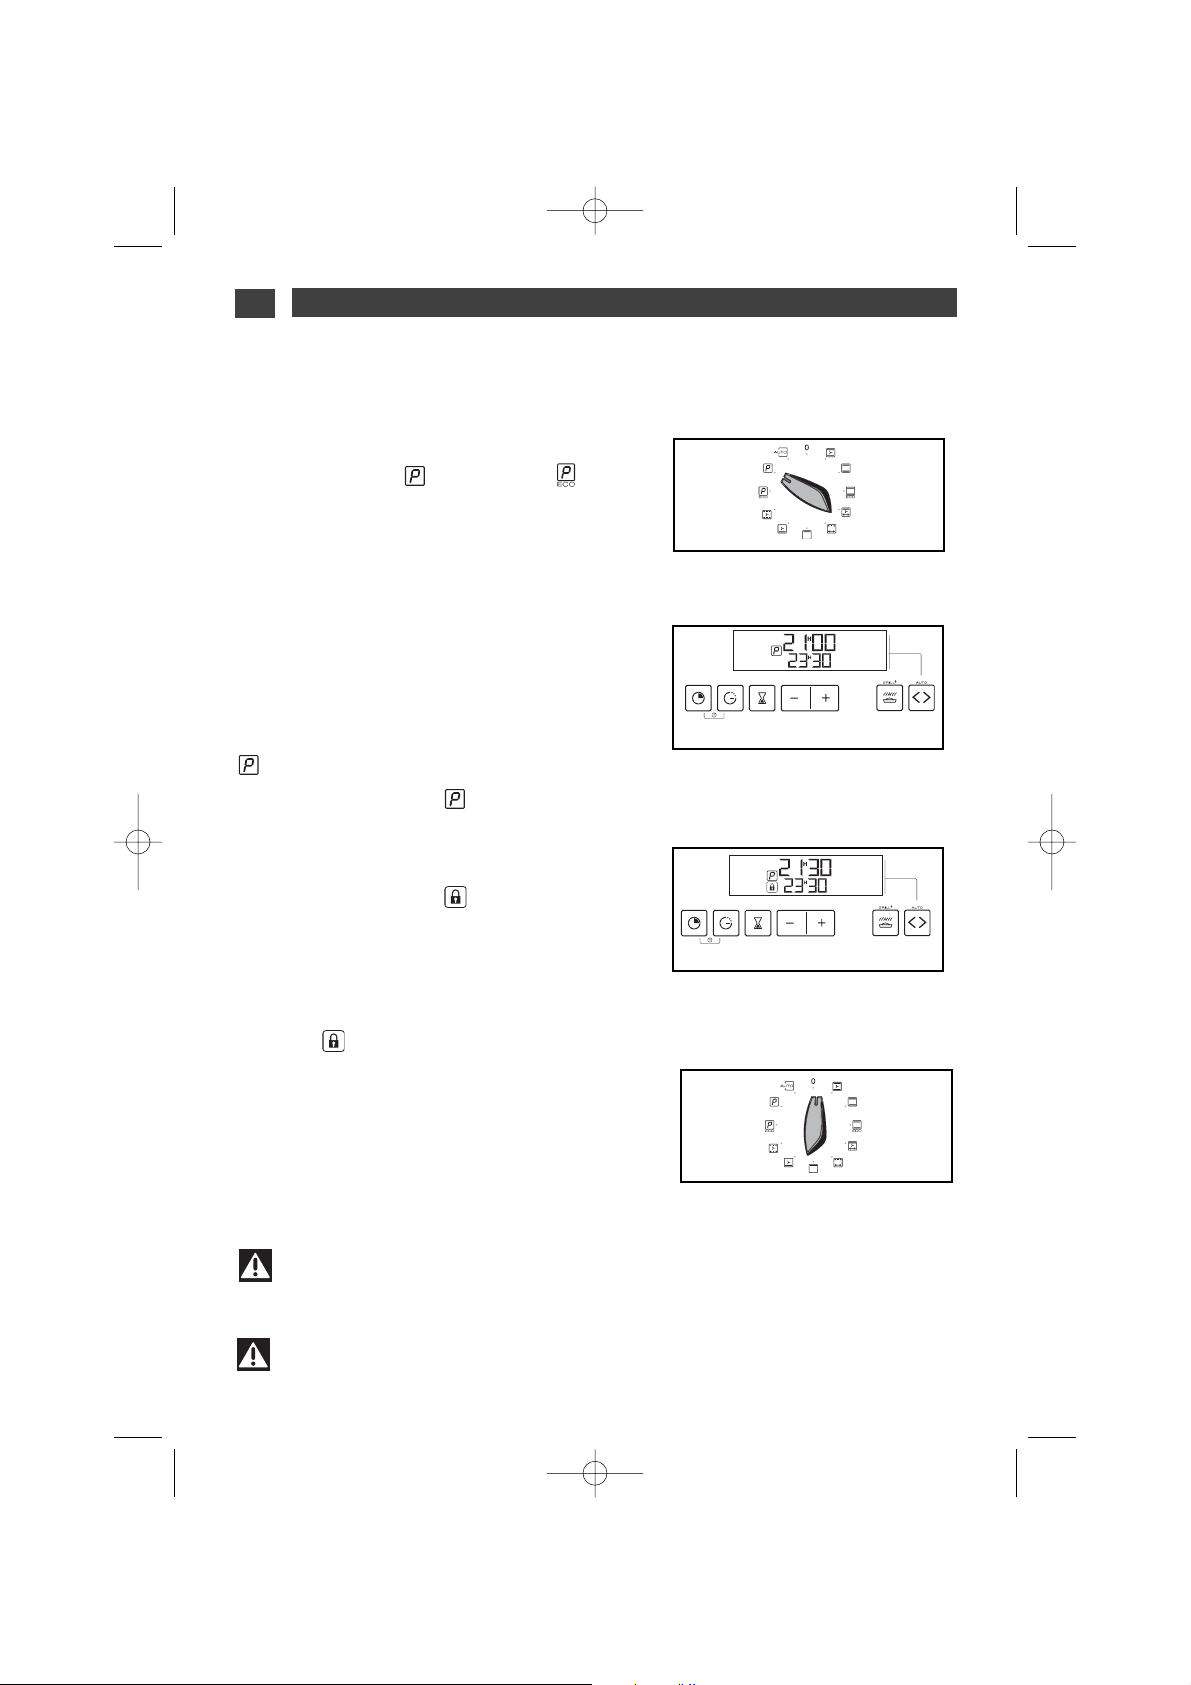
•Sofortiger Garvorgang
— Der Programmierer darf nur die Uhrzeit
anzeigen;
Diese darf nicht blinken (Abb. 1).
Den Funktionswahlschalter auf die gewünschte Position drehen.
Beispiel: Position (Abb.2).
Der Backofen schlägt die für die gewählte Garart optimale Temperatur vor.
Die Temperatur kann jedoch noch reguliert
werden. Dazu den Temperaturwahlschalter in
Richtung ++oder --(Abb. 3) drehen.
Beispiel: Temperaturmarkierung 210°C. (Abb.
4).
DDaass GGeerriicchhtt wwiiee eemmppffoohhlleenn iinn
den Ofen ein-
führen.
Danach heizt der Ofen und die Temperaturan-
zeige blinkt.
Wenn die gewählte Temperatur erreicht wird,
ertönen Signaltöne.
Die Anzeige hört auf zu blinken.
Abb.2
Abb.4
Achtung
Garvorgänge erfolgen immer bei geschlossener Ofentür.
Achtung
Nach einem Garzyklus funktioniert die Gebläseturbine noch einige Zeit, um zuverlässi-
gen Ofenbetrieb sicher zu stellen.
Abb.1
Abb.3
Achtung
Keine Wäsche oder Geschirrtücher an den Ofengriff hängen.
99641131 ML BIO.qxp 05/01/2007 14:03 Page 13
Page 14
14
4 / NUTZUNG DES GERÄTESDE
--
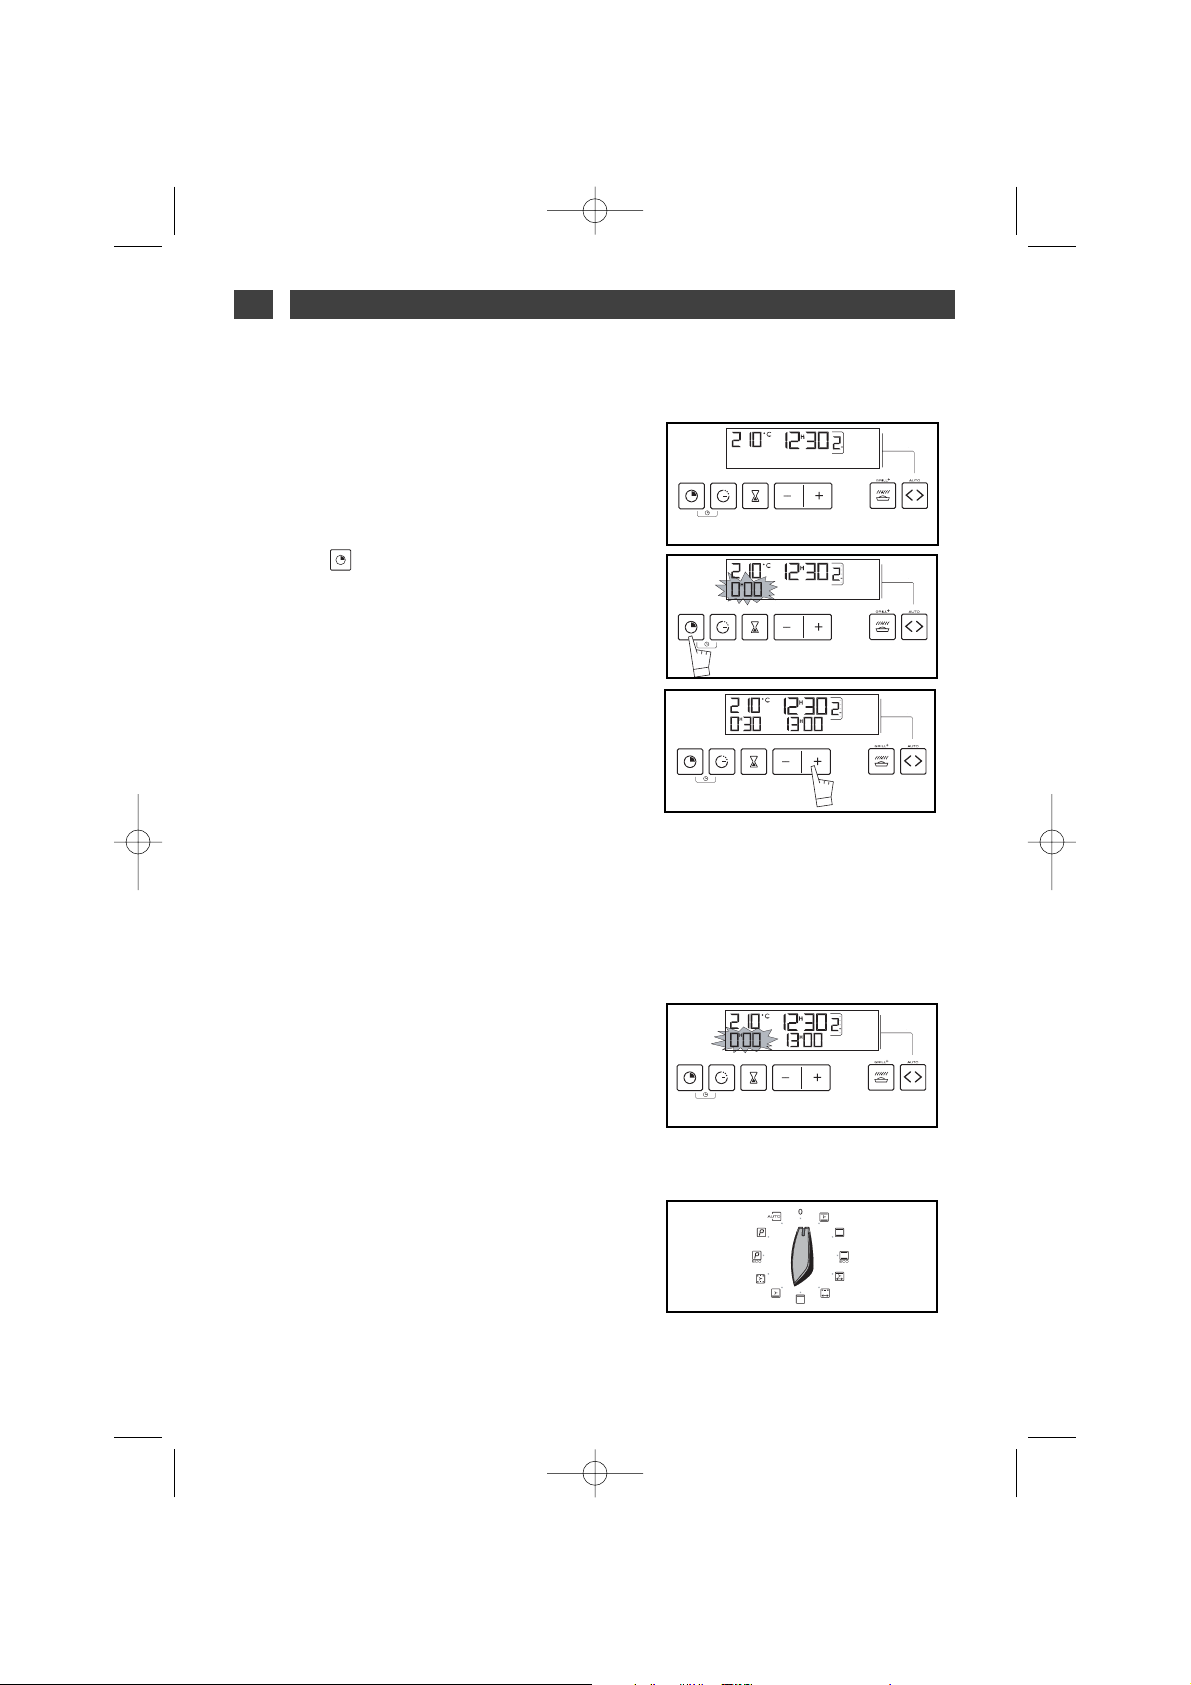
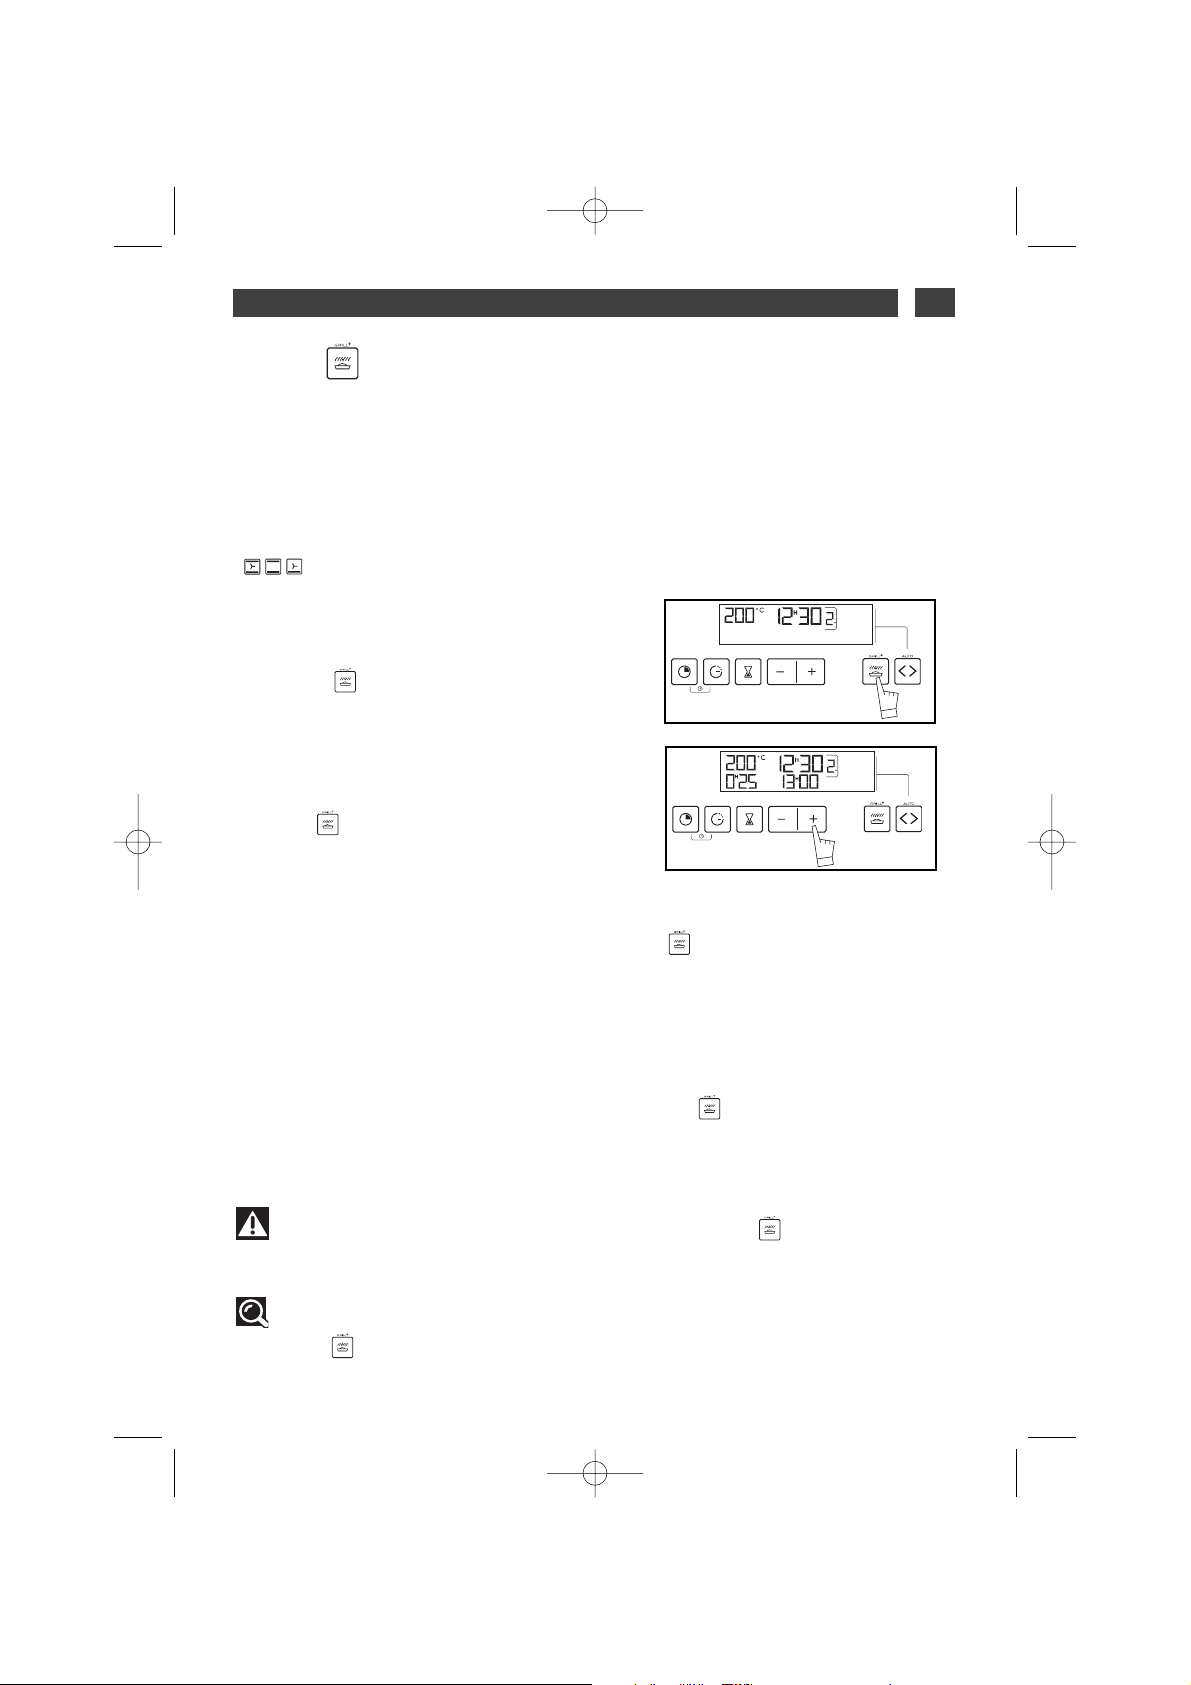
Unmittelbar anlaufender Garvorgang
über vorprogrammierte Zeit
- Garmodus wählen und Temperatur anpassen (Abb. 1).
- Die Taste “ ” drücken, bis die Anzeige für
die Dauer der Garzeit blinkt.
”
Die Anzeige 0:00 blinkt und zeigt an, dass die
Garzeit jetzt eingestellt werden kann (Abb..
2).
- Über Taste ++oder --die gewünschte Zeit einstellen.
Beispiel: 30 Minuten Garzeit (Abb.
3).
Nach einigen Sekunden wird die Garzeit automatisch abgespeichert.
Die Anzeige blinkt nicht mehr.
Die eingestellte Zeit läuft sofort ab Einstellung.
NNaacchh ddiieesseenn 33 SScchhrriitttteenn bbeeggiinnnntt ddeerr OOffeenn zzuu
hheeiizzeenn::
Wenn die gewählte Temperatur erreicht wird,
ertönen Signaltöne.
Am Ende der Garzeit (Ende der programmierten Garzeit)
- schaltet sich der Backofen aus,
- 0:00 blinkt (Abb.
4).
- ertönt einige Minuten lang eine Reihe von
Signaltönen. Die Signaltöne können durch
Druck auf eine beliebige Taste abgestellt werden.
Wird der Funktionswahlschalter auf 0 gestellt
(Abb.5
), erscheint die Tageszeit wieder in
der Anzeige.
Abb.2
Abb.3
PROGRAMMIERTER GARVORGANG
••
Abb.1
Abb.4
Abb.5
99641131 ML BIO.qxp 05/01/2007 14:03 Page 14
Page 15
15
4 / NUTZUNG DES GERÄTES
DE
--
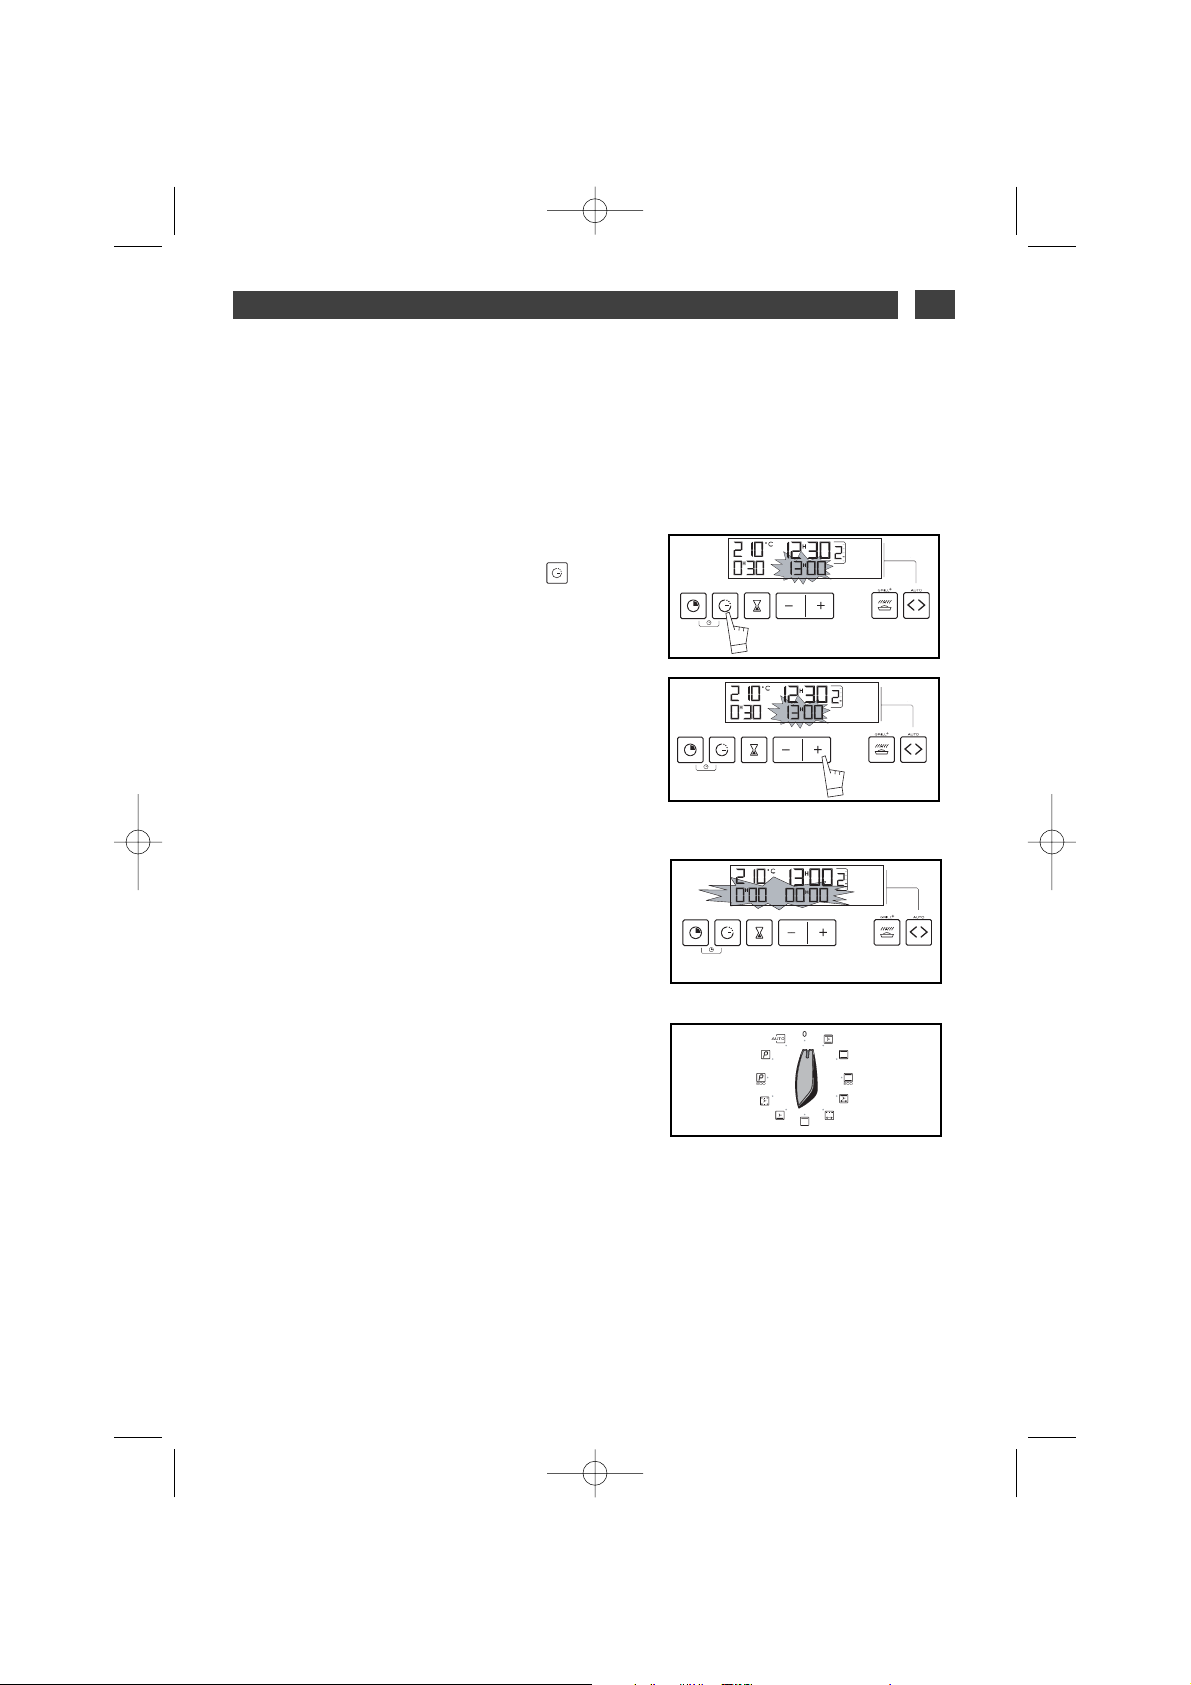
Zeitlich versetzt anlaufende Garzeit
und Wahl des Endzeitpunkts des Garvorgangs
WWiiee bbeeii eeiinneemm pprrooggrraammmmiieerrtteenn GGaarrvvoorrggaanngg
vvoorrggeehheenn..
- Nach Einstellung der Garzeit Taste “ ”
drücken, bis der Anzeiger für das Ende der
Garzeit blinkt.
Die Anzeige für das Ende der Garzeit zeigt an,
dass jetzt eine Einstellung vorgenommen werden kann (Abb..
1).
- Den gewünschten Endzeitpunkt mit dem
Wahlschalter ++oder --einstellen.
Beispiel: Ende der Garzeit um 13 Uhr (Abb.
2).
Das gewünschte Garzeitende wird nach einigen Sekunden automatisch abgespeichert.
Die Anzeige blinkt nicht mehr.
NNaacchh ddiieesseenn 33 SScchhrriitttteenn wwiirrdd ddaass AAuuffhheeiizzeenn
zzeeiittlliicchh ssoo vveerrsseettzztt,, ddaassss ddeerr GGaarrvvoorrggaanngg uumm
1133..0000 UUhhrr
aabbggeesscchhlloosssseenn iisstt..
Am Ende der Garzeit (Ende der programmierten Garzeit)
- schaltet sich der Backofen aus,
- 0:00 und die Dauer blinken (Abb.
3).
- ertönt einige Minuten lang eine Reihe von
Signaltönen. Die Signaltöne können durch
Druck auf eine beliebige Taste abgestellt werden.
Wird der Funktionswahlschalter auf 0 gestellt
(Abb.4
), erscheint die Tageszeit wieder in
der Anzeige.
Abb.1
Abb.2
Abb.3
Abb.4
PROGRAMMIERTER GARVORGANG
••
99641131 ML BIO.qxp 05/01/2007 14:03 Page 15
Page 16
16
4 / NUTZUNG DES GERÄTESDE
SPARGAREN*
••
— Der Programmierer darf nur die Uhrzeit
anzeigen (Abb.
1
);
— Den Funktionswähler auf die Position “ “
STELLEN. DIE ANZEIGE “ECO” LEUCHTET AUF (ABB.
2).
— Das Gericht nach den Empfehlungen in der
Anzeige in den Backofen stellen.
BBeeiissppiieell:: PPoossiittiioonn ““ ““-->> EEiinnsscchhuubblleeiissttee 11
ooddeerr 22 ((AAbbbb..
3
))..
— Der Backofen schlägt die optimale
Temperatur für den gewählten Backvorgang
vor: 200°C.
Über den Temperaturschalter können Sie die
Temperatur jedoch nach oben (+) und unten () einstellen(Abb.
4).
Beispiel: Position” “ angepasst auf 190 °C
(Abb.
5).
Die Temperaturanzeige blinkt. 3
Signaltöne weisen darauf hin, dass die
eingestellte Temperatur erreicht ist.
*Mit dieser Position kann bei gleich
guten Backergebnissen bis zu 20%
Energie eingespart werden.
Die Position ECO wird für die
Etikettierung mit Energieangaben
benutzt.
Achtung
Nach einem Garzyklus funktioniert die Gebläseturbine noch einige Zeit, um zuverlässi-
gen Ofenbetrieb sicher zu stellen.
Abb.2
Abb.5
Abb.1
Abb.4
Abb.3
99641131 ML BIO.qxp 05/01/2007 14:03 Page 16
Page 17
17
4 / NUTZUNG DES GERÄTES
DE
GRILL
+
••
— Mit dieser Funktion kann zum Abschluss des
gewählten Backvorgangs eine Funktion
“Bräunung” des Gerichts hinzugefügt werden.
Dann wird während der letzten 5 Minuten des
Backvogangs der Grill hinzugeschaltet.
Sie ist nur bei folgenden Backfunktionen aktiv:
“”
Diese Funktion kann zu Beginn des
Backvorgangs programmiert werden, indem 5
Minuten zur Backzeit hinzugefügt werden,
oder indem der Funktionswähler am Ende der
Garzeit auf “ ” gestellt wird.
— Den gewählten Garmodus einstellen und
eventuell die Temperatur anpassen.
— Taste “GRILL
+” drücken, die Gardauer
blinkt auf 0h05 (dieser Wert entspricht der notwendigen Mindestzeit für die Aktivierung der
Funktion “ ” in der gewählten Garabfolge).
— Die Gesamtgarzeit über die Tasten + oder einstellen. Die Dauer wird nach einigen
Sekunden automatisch abgespeichert, die
Anzeige blinkt nicht mehr.
— Nach diesen 3 Schritten heizt der Ofen, das Symbol “ ” leuchtet auf und zeigt an, dass die
Funktion aktiv ist.
Die Gerichte nicht zu nahe unter den Grill stellen, um zu schnelles Bräunen zu vermeiden.
Einschubleiste 1 oder 2 (von unten) wählen.
Beispiele für Gerichte:
—Nudel-, Blumenkohl-, Chicoree-, Fischauflauf in Muscheln, Crumble ...
Programmierungsbeispiele: Gratinierte Zwiebelsuppe:
—Garzeit und Temperatur auswählen: 180 °C, Programm: “
”
und Zeit: 25 Minuten
Die Bouillon heizt 20 Minuten lang und das Überbacken erfolgt während der verbleibenden 5
Minuten.
Empfehlung
Diese Funktion kann während des Garvorgangs zu jeder Zeit über einen Druck auf die
Taste
“ ” ein- oder ausgeschaltet werden.
Diese Funktion kann auch bei zeitversetztem Garen aktiviert werden.
Achtung
Durch Drehen des Funktionswahlschalters wird die Funktion
“ ” deaktiviert.
99641131 ML BIO.qxp 05/01/2007 14:04 Page 17
Page 18
18
4 / NUTZUNG DES GERÄTESDE
-- DDeerr PPrrooggrraammmmiieerr eerr ddeess OOffeennss kkaa nnnn aallss
uunnaabbhhäännggiiggeerr KKuurrzzzzeeiittwweecckkeerr eeiinnggeesseettzztt wweerr--
ddeenn,, oohhnnee ddaassss ddeer
r OOffeenn eeiinnggeesscchhaalltteett iisstt..
In diesem Fall hat die Anzeige des Kurzzeitweckers Vorrang vor der Anzeige der Tageszeit.
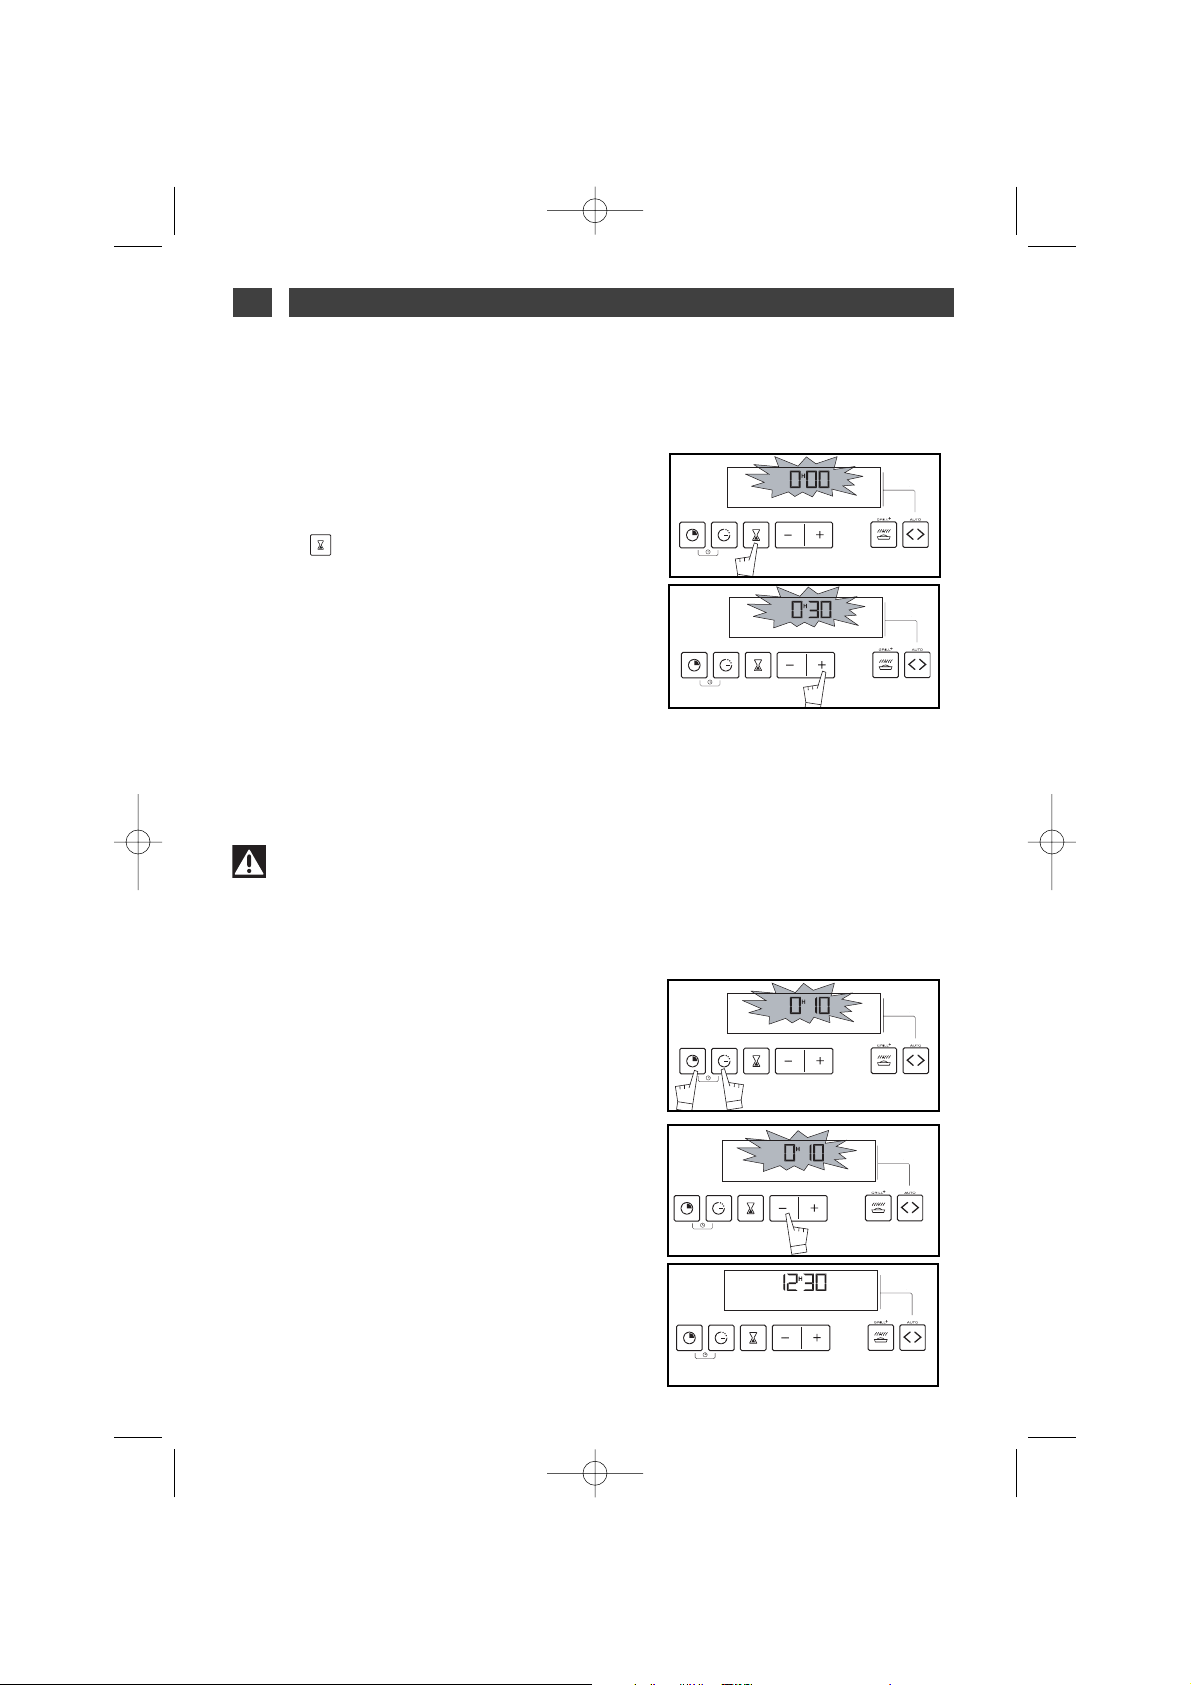
- Taste “ “ (Abb. 1) drücken, bis 0.00 erscheint.
- Die Zeit über die Tasten ++oder --(Abb. 2) auf
die gewünschte Dauer
eeiinnsstteelllleenn ((mmaaxx.. 6600 MMii--
nnuutteenn))..
Achtung
Die Programmierung des Kurzzeitweckers kann jederzeit geändert oder aufgehoben
werden.
Abb.1
Abb.2
NUTZUNG DER FUNKTION
KURZZEITWECKER
••
EINSTELLUNG DER
ANZEIGEHELLIGKEIT
••
Die Helligkeit der Anzeige kann eingestellt werden, hierfür:
- Die Zeit des Programmierers auf 0Uhr10 einstellen und bestätigen (Abb. 1).
- Etwa zehn Sekunden lang die Tasten ++und
--
gleichzeitig drücken, bis “CO” angezeigt wird
und man in den Einstellungsmodus gelangt
(Abb.
2)
.
- Tasten ++und
--
drücken, bis die gewünschte
Helligkeit erreicht ist.
Nach der Einstellung der gewünschten Helligkeit einige Sekunden warten und den Programmierer wieder auf die Tageszeit einstellen.
Abb.1
Abb.2
Der Anzeiger blinkt nicht mehr, der Zeitschalter startet und zählt die Zeit sekundenweise rückwärts.
Wenn die eingestellte Zeit abgelaufen ist, ertönt ein akustisches Signal.
Dieses kann durch Druck auf eine beliebige Taste abgestellt werden.
99641131 ML BIO.qxp 05/01/2007 14:04 Page 18
Page 19

19
5 /ZUBEREITUNGSARTEN IM BACKOFEN
DE
UUMMLLAAUUFFHHIITTZZEE
(température préconisée
118800°°CC
mini 35°C maxi 235°C)
•
Das Garen erfolgt durch das Heizelement an der Rückwand des Backofens und die
Luftschraube.
•
Schneller Temperaturanstieg. Gewisse Gerichte können in den kalten Backofen gestellt
werden.
•
Wird zur Erhaltung der vollen Qualität von
wweeiisssseemm FFlleeiisscchh,, FFiisscchh,, GGeemmüüssee eemmppffoohhlleenn
Für
Koch- und Backvorgänge auf bis zu 3 Ebenen.
TERKÖMMLICH (ECO)
(empfohlene Temperatur 200°C mindestens 35°C, maximal 275°C)
•
Das Backen erfolgt durch Heizelemente unten und oben ohne Luftumwälzung
•
Mit dieser Position kann unter Beibehaltung gleicher Backergebnisse Energie einge-
spart werden.
•
Die Position ECO wird für die Etikettierung mit Energieangaben benutzt.
Hinweis: alle Garvorgänge
oohhnnee VVoorrhheeiizzeenn..
HERKÖMMLICH
(empfohlene Temperatur 200°C mindestens 35°C, maximal 275°C)
•
Das Backen erfolgt durch Heizelemente unten und oben ohne Umluft.
•
Erfordert ein Vorheizen, bevor das Gericht in den Backofen gestellt wird.
•
Für langsame und empfindliche Garvorgänge empfohlen: saftiges Wild ... Zum Anbra-
ten von Rinderbraten Zum Schmoren im geschlossenen Kochtopf nach der Vorbereitung
auf dem Kochfeld (Hähnchen in Rotweinsauce, Hasenpfeffer).
HERKÖMMLICHE UMLUFT
(empfohlene Temperatur 200°C mindestens 35°C, maximal 275°C)
•
Das Garen erfolgt durch die Heizelemente unten, oben und die Umluft.
•
Schneller Temperaturanstieg: Gewisse Gerichte können in den kalten Backofen gestellt werden.
•
Empfohlen für Fleisch, Fisch, Gemüse, am besten in einem Tontopf.
UNTERWÄRME UMLUFT
(empfohlene Temperatur 205°C mindestens 35°C, maximal 275°C)
•
Das Garen erfolgt anhand des unteren Heizelements verbunden mit leichtem Grillen
bei Umluft.
•
Garen mit Unterhitze und leichter Oberhitze. Das Rost in die untere Einschubleiste
einschieben.
•
Empfohlen für feuchte Speisen (Speckkuchen, saftige Obsttorten...) Der Teig wird
von unten gut gebacken. Empfohlen für aufgehende Zubereitungen (Sandkuchen, Brio-
che, Guglhupf ...) und Soufflees, die somit nicht durch die Ausbildung einer Kruste am
Aufgehen gehindert werden.
GRILL UMLUFT
(empfohlene Temperatur
220000°°CC
mindestens180°C maximal 230°C)
•
Das Garen erfolgt abwechselnd durch das obere Heizelement und die Luftumwäl
zung.
•
Hinweis: alle Garvorgänge
oohhnnee VVoorrhheeiizzeenn..
•
Für das Anbraten und Durchbraten von
rrootteemm uunndd wweeiisssseemm FFlleeiisscchh..
*
ECO
99641131 ML BIO.qxp 05/01/2007 14:04 Page 19
Page 20

20
5 /ZUBEREITUNGSARTEN IM BACKOFEN
DE
STARKER GRILL
(empfohlene Temperatur 275°C mindestens 180°C, maximal 275°C)
•
Das Garen erfolgt anhand des oberen Heizelements ohne Umluft.
• 5 Minuten vorheizen. Die Fettpfanne in die untere Einschubleiste einführen, um ablaufendes Fett aufzufangen.
• Wird für das Grillen von Koteletts,Würstchen, Brotscheiben und Gambas auf dem
Grillrost empfohlen.
WARM HALTEN / BROTTEIG
(empfohlene Temperatur 80°C mindestens 35°C, maximal 100°C)
•
Dosierung des oberen und unteren Heizelements verbunden mit Umluft.
•
Empfohlen, um Brot-, Brioche- und Napfkuchenteig gehen zu lassen ... überschrei-
tet 40 °C nicht (Teller wärmen, Auftauen).
99641131 ML BIO.qxp 05/01/2007 14:04 Page 20
Page 21

21
6 / PFLEGE UND REINIGUNG DES GERÄTS
DE
REINIGUNG DER AUßENFLÄCHE
•
Das Fenster des elektronischen Programmierers und die Ofentür mit einem weichen Tuch und
Glasreiniger reinigen.
Keine Scheuermittel oder harten Metallschaber zur Reinigung der Ofenglastür verwenden, da
dies zu Kratzern auf der Oberfläche und u. U. zum Platzen des Glases führen kann.
Zur Pflege des Geräts empfehlen wir Clearit Pflegeprodukte.
Clearit bietet professionelle Produkte und geeignete Lösungen für die tägliche Pflege von
Haushaltsgeräten und Küchen an.
Sie werden von Ihrem Händler angeboten, ebenso wie eine ganze Palette von Produkten,
Zubehör und Verbrauchsartikeln.
Die Erfahrung der Profis
im Dienst der Verbraucher
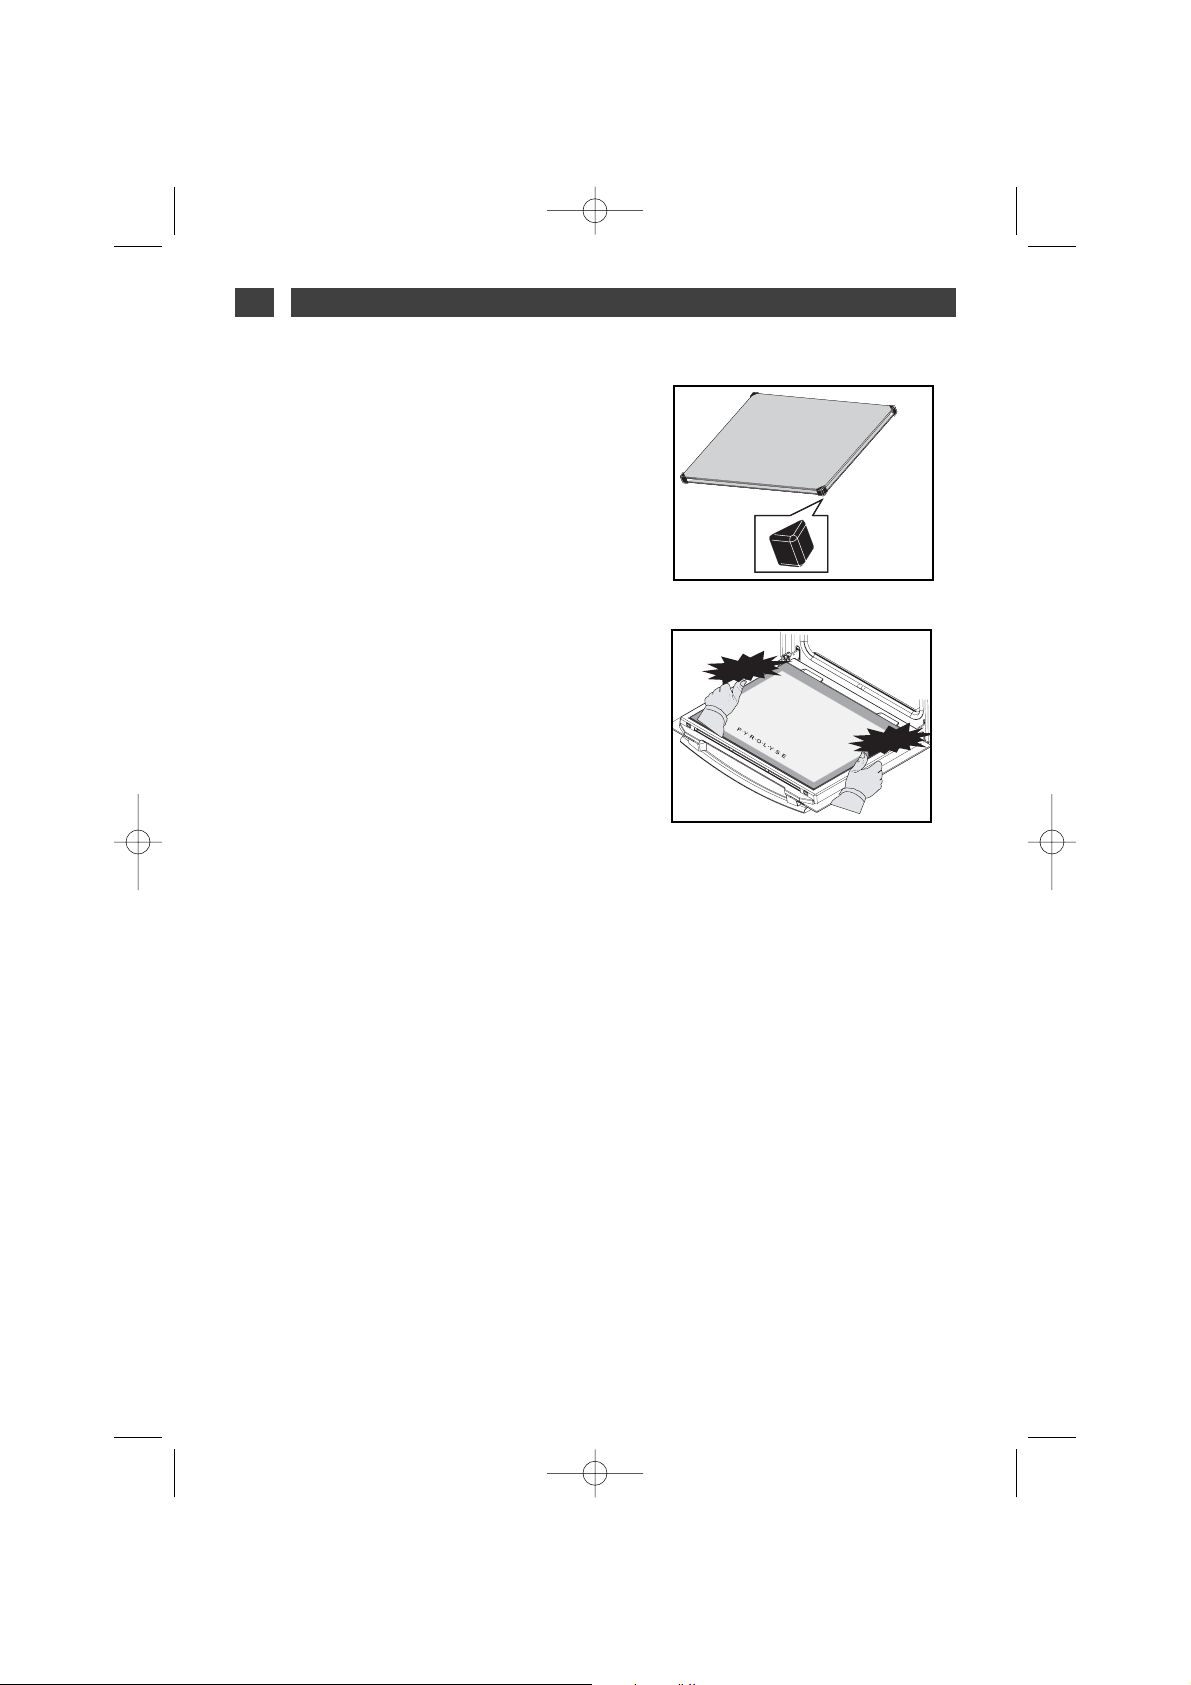
- Tür vollständig öffnen und mit den beiden
roten Distanzstücken arretieren (Abb. 1).
Sie liegen in der mit dem Gerät gelieferten
Plastiktüte.
REINIGUNG DER TÜR
••
Die erste mit Clip befestigte Scheibe folgendermaßen entfernen:
Die beiden anderen roten Distanzstücke in die
dazu vorgesehenen Stellen AAeinführen (Abb.
2).
Auf diese Teile eine Hebelwirkung ausüben,
um die Clips von der Scheibe zu entfernen
(Abb. 3)
- Die Scheibe mit einem weichen Schwamm
und Geschirrspülmittel reinigen.
Scheibe nicht in Wasser tauchen.
Weder Scheuercreme noch
Scheuerschwamm verwenden. Mit klarem
Wasser spülen und einem nicht fusselden
Tuch trocknen.
Achtung
Bevor die Clips von der Scheibe
entfernt werden, das Gerät abkühlen lassen.
fig.2
AA
AA
fig.1
fig.3
99641131 ML BIO.qxp 05/01/2007 14:04 Page 21
CLIC
CLIC
Page 22
22
6 / PFLEGE UND REINIGUNG DES GERÄTSDE
- Falls erforderlich, alle Innenscheiben der Tür
entfernen. Modellabhängig besteht dieser
Satz aus einer oder zwei Scheiben, die an
jeder Ecke schwarze Gummimuffen aufweisen (Abb. 4).
- Nach der Reinigung die vier Gummiecken
wieder anbringen und auf folgende
Markierungen auf der Scheibe achten:
* oben links: L
* oben rechts: R
Alle Innenscheiben in der Tür so anbringen,
dass sich L und R auf der Scharnierseite
befinden.
- Wenn der Ofen über nur eine Innenscheibe
verfügt, muss diese so nah wie möglich an
der mit Clips befestigten Scheibe sein.
- Die letzte Scheibe mit Clips so befestigen,
dass die Anzeige “P.Y.R.O.L.Y.S.E” auf Sie
zeigt(Abb. 5).
- Die roten Distanzstücke entfernen.
Das Gerät ist nun wieder betriebsbereit.
fig.4
fig.5
LL
RR
99641131 ML BIO.qxp 05/01/2007 14:04 Page 22
CLAC
CLAC
Page 23

23
6 / PFLEGE UND REINIGUNG DES GERÄTS
DE
Achtung
- Vor Beginn der Pyrolyse
aalllleess ZZuubbeehhöörr aauuss ddeemm OOffeennrraauumm eennttffeerrnneenn,, aauucchh KKoocchhggeeffääßßee..
Vor Anlaufen der Pyrolyse ev. erhebliche Verkrustungen entfernen, damit einer Entzündungsgefahr oder übermäßiger Rauchentwicklung entgegengewirkt wird.
- Währen der Pyrolyse werden die Flächen heißer als bei normalem Ofenbetrieb. Kinder fernhalten.
- Den Innenraum nicht mit Alufolie auskleiden, um weniger reinigen zu müssen: eine Überhitzung würde die Emaillierung des Ofenraums beschädigen.
SICHERHEITSHINWEISE
••
WWeenniigg vveerrsscchhmmuuttzzeennddee
GGaarrvvoorrggäännggee
SSttaarrkk vveerrsscchhmmuuttzzeennddee
GGaarrvvoorrggäännggee
SSeehhrr ssttaarrkk vveerrsscchhmmuuttzzeennddee
GGaarrvvoor
rggäännggee
Gebäck, Gemüse, Backwaren,
Speckkuchen, Soufflés
Fleisch, Fisch, (in einem
Kochgefäß), gefülltes Gemüse
Große Fleischstücke am Spieß.
Garvorgänge ohne Spritzer: Eine
Pyrolyse ist nicht gerechtfertigt.
Die Pyrolyse kann alle 3
Bratvorgänge gerechtfertigt sein.
Die Pyrolyse kann nach einem
derartigen Bratvorgang durchge-
führt werden, wenn es zu erhe-
blichen Spritzern kam.
Der Backofen reinigt sich selbst bei hoher Temperatur und entfernt Verschmutzungen durch
Spritzer und übergelaufene Flüssigkeiten.
- Freigesetzter Rauch wird beim Durchgang durch den Katalysator vernichtet.
Nicht mit der Reinigung warten, bis der Backofen stark verfettet ist.
WWaannnn ssoollllttee eeiinnee PPyyrroollyyssee dduurrcchhggeeffüühhrrtt wweerrddeenn??
- Wenn der Backofen beim Vorheizen raucht oder beim Braten stark raucht.
- Wenn der Ofen nach verschiedenen Garvorgängen (Lamm, Fisch, Grillgerichte, ...) im
Kaltzustand Geruch abgibt.
Die Pyrolyse ist nicht nach jedem Braten erforderlich, sondern erst dann, wenn der
Verschmutzungsgrad es rechtfertigt,
- Um jeder Situation gewachsen zu sein, bietet Ihr Ofen zwei verschiedene Pyrolyse-Durchläufe.
- Ein wirtschaftlicher Zyklus mit 1 1/2 Stunde Dauer (unter Berücksichtigung der
Abkühlungszeit des Backofens wird dieser 2 Stunden lang gesperrt). Der Verbrauch liegt bei
diesem Zyklus fast 25% unter dem eines Standard-Pyrolysezyklus. Wenn dieser Zyklus regelmässig genutzt wird, (nach jeweils 2 oder 3 Fleischgarvorgängen), kann der Backofen immer
sauber gehalten werden.
- Ein 2-stündiger Standardzyklus (unter Berücksichtigung der Abkühlungszeit des
Backofens wird dieser 2 1/2 Stunden lang gesperrt) gewährleistet die effiziente Reinigung eines
stark verschmutzten Backofens.
- Als Sicherheitsmaßnahme wird die Tür gesperrt, sobald die Innentemperatur des
Backofens die Backtemperaturen überschrietet. Das Öffnen der Tür ist auch dann unmöglich,
wenn der Funktionswahlschalter auf 0 gestellt wird.
PYROLYSEOFEN
••
99641131 ML BIO.qxp 05/01/2007 14:04 Page 23
Page 24
24
6 / PFLEGE UND REINIGUNG DES GERÄTS
DE
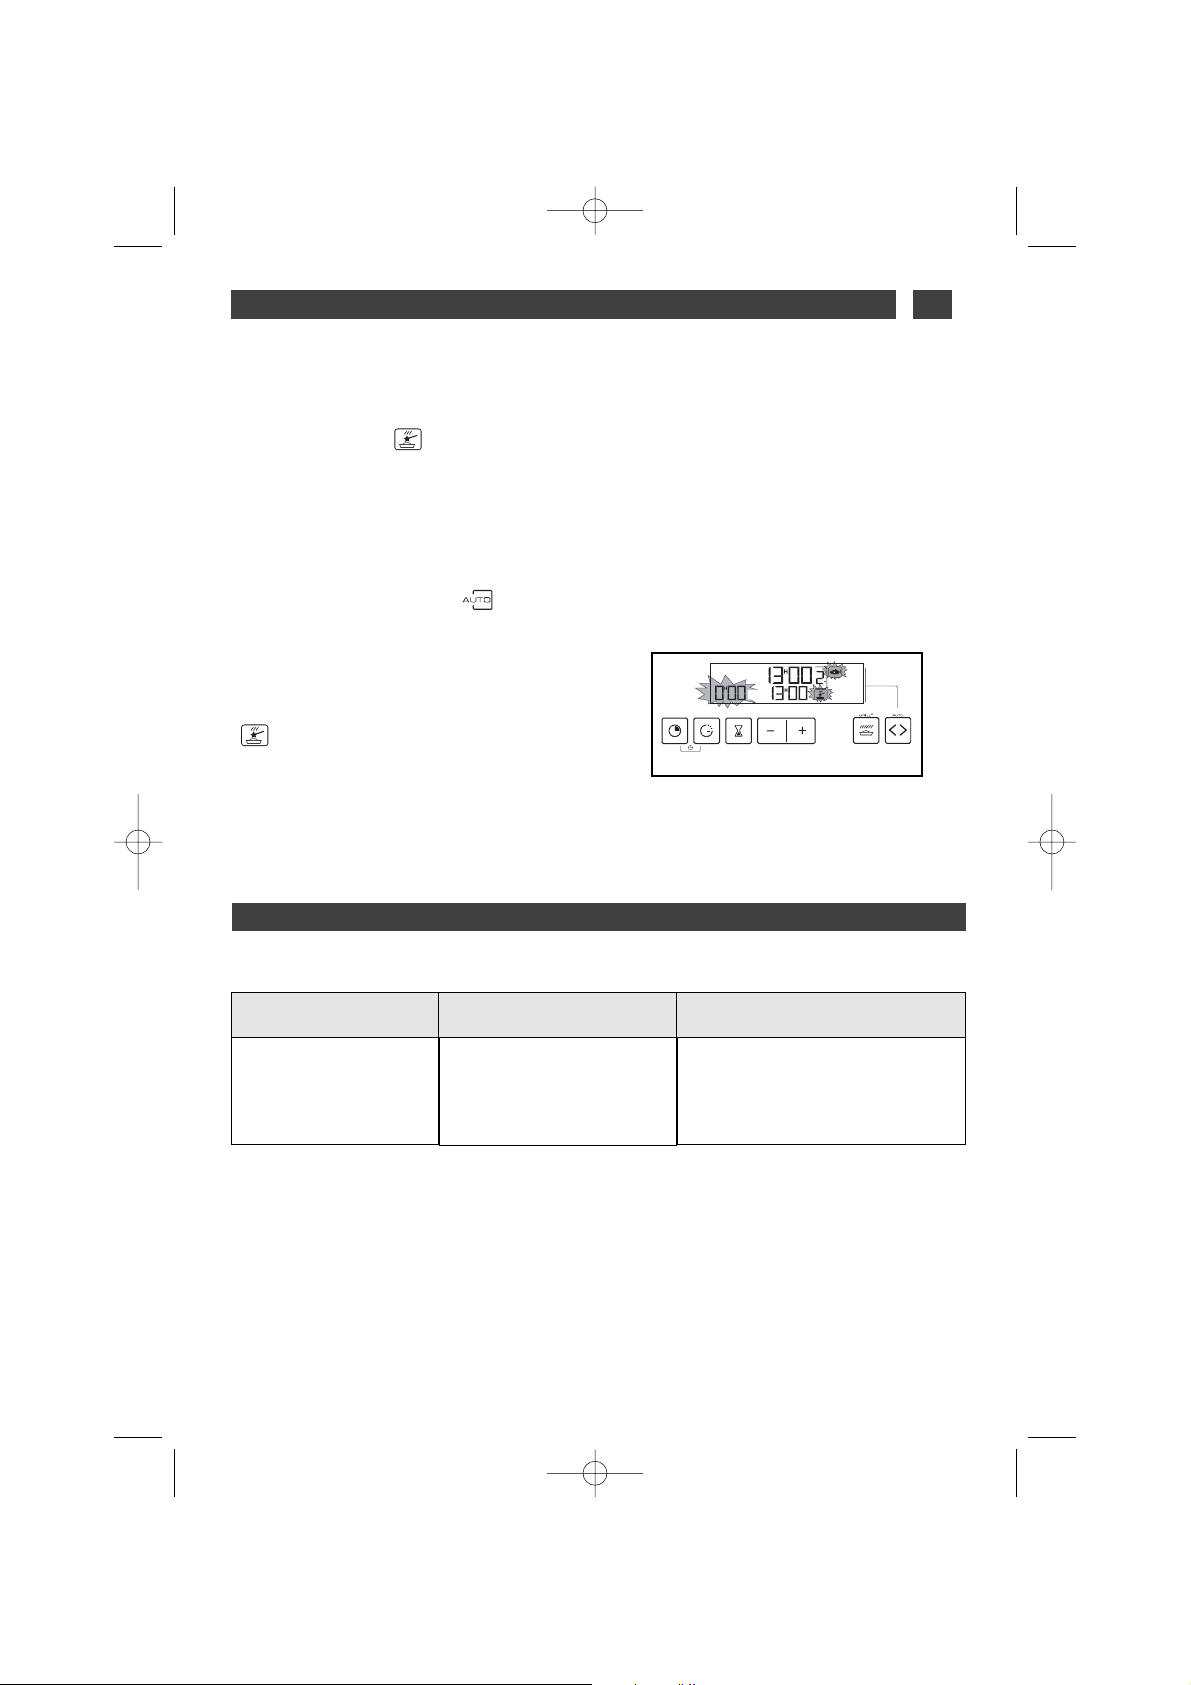
Prüfen, dass der Programmierer die Tageszeit
anzeigt und diese nicht blinkt.
Den Wahlschalter auf ”Pyrolyse” oder
“Pyrolyse ECO” stellen (Abb. 1).
Bei “Pyrolyse” steht der Ofen 2 1/2 Stunden lang
(2 Stunden Pyrolyse + 30 Minuten Abkühlen), bei
“Pyrolyse ECO” 2 Stunden (1 1/2 Stunden Pyrolyse + 30 Minuten Abkühlen) nicht zur Verfügung
(die Dauer kann nicht geändert werden). Bei dieser Zeitangabe ist die Abkühldauer bis zur Freigabe der Tür berücksichtigt.
Der Anzeiger gibt die Uhrzeit an, zu der der
Backofen erneut verfügbar ist (Abb. 2).
in der Anzeige zeigt an, dass sich der Ofen
im Pyrolysezyklus befindet, ECO zeigt an,
dass er sich im Pyrolyse ECO-Zyklus befindet.
Während des Pyrolysezyklus zeigt ein Vorhängeschloss in der Anzeige an, dass die Tür gesperrt ist (Abb. 3).
Am Ende des Pyrolysezyklus zeigt der Anzeiger
(s- (Abb. 2) an.
Wenn das Vorhängeschloss nicht mehr angezeigt wird, kann die Tür geöffnet werden.
Den Funktionswähler wieder auf Position 0 stellen (Abb.4).
Nach Erkalten des Backofens die weiße Asche
mit einem feuchten Tuch entfernen. Der Backofen ist sauber und wieder für einen beliebigen
Garvorgang bereit.
Abb.1
Achtung
Vor Beginn einer Pyrolyse das Kochgeschirr aus dem Backofen nehmen und eventuell
vorhandene starke Überlaufreste entfernen.
SOFORTIGE PYROLYSEREINIGUNG
••
Abb.2
Abb.4
Abb.3
Achtung
Keine Wäsche oder Geschirrtücher an den Ofengriff hängen.
99641131 ML BIO.qxp 05/01/2007 14:04 Page 24
Page 25

25
6 / PFLEGE UND REINIGUNG DES GERÄTS
DE
VERZÖGERTE PYROLYSEREINIGUNG
••
Die Anweisungen aus dem Absatz “Sofortige
Pyrolyse” befolgen, dann:
Taste “ ” drücken, die Anzeige für das
Ende der Garzeit blinkt und zeigt an, dass
Einstellungen vorgenommen werden können.
Den gewünschten Endzeitpunkt über den
Wahlschalter + oder - einstellen.
Beispiel: Ende der Pyrolyse um 4.00 Uhr.
Anschließend wird der Beginn der Pyrolyse
so verschoben, dass sie um 4.00 Uhr abgeschlossen ist.
Am Ende der Pyrolyse den
Funktionswahlschalter auf 0 stellen.
Achtung
Keine Wäsche oder Geschirrtücher an den Ofengriff hängen.
99641131 ML BIO.qxp 05/01/2007 14:04 Page 25
Page 26

26
7/ FUNKTIONSSTÖRUNGEN
DE
Empfehlung
Wenn Ihr Eingriff nicht ausreicht, auf jeden Fall sofort den Kundendienst rufen.
WWAASS IISSTT ZZUU TTUUNN??
MMÖÖGGLLIICCHHEE
UURRSSAACCHHEENN
SSIIEE SSTTEELLLLEENN FFEESSTT,,
DDAASSSS......
DD aass SScchhlloo ssss--SSyymmbbooll
bblliinnkktt
-Backofentür nicht richtig
verriegelt.
á Den Kundendienst rufen.
-Der Backofen ist nicht angeschlossen.
- Die Schmelzsicherung der Anlage ist außer Betrieb.
- Die gewählte Temperatur ist
zu niedrig.
DD eerr BBaa cckk ooffee nn hheeiizztt
nniicchhtt..
- Ofen anschließen.
- Die Schmelzsicherung der Stroman-
lage austauschen und ihren Wert prüfen (16 A).
- Höhere Temperatur einstellen.
WWeennnn SSiiee ZZwweeiiffeell hhaabbeenn,, oobb ddeerr BBaacckkooffeenn rriicchhttiigg ffuunnkkttiioonniieerrtt,,
bedeutet das nicht unbe-
dingt, dass eine Störung vorliegt.
ÜÜbbeerrpprrüüffeenn SSiiee zzuunnääcchhsstt ddiiee ffoollggeennddeenn PPuunnkkttee::
- Die Lampe ist außer Betrieb.
- Der Backofen ist nicht angeschlossen oder die
Schmelzsi-
cherung ist außer Betrieb.
DDiiee LLaammppee ddeess BBaacckkoo--
ffeennss ffuunnkkttiioonniieerrtt nniicchhtt
mmeehhrr..
- Glühbirne austauschen.
- Ofen anschließen oder Sicherung
austauschen.
-Die Tür ist nicht richtig geschlossen.
- Das Verriegelungssystem
ist defekt.
DDiiee PPyyrroollyysseerreeiinniigguunngg
ffuunnkkttiioonniieerrtt nniicchhtt..
- Schließen der Backofentür überprüfen.
- Den Kundendienst rufen.
- Garvorgang läuft.
- Nach dem Garvorgang.
DDeerr BBaacckkooffeenn ggiibbtt SSii --
ggnnaallttöönnee aabb..
- Die gewünschte Temperatur ist erreicht.
- Der programmierte Garvorgang ist
beendet.
Achtung
- Das Gerät ist nur von geschultem Fachpersonal zu reparieren. Unsachgemäße Repara-
turen können eine Gefahr für den Benutzer bedeuten.
- Das Gebläse funktioniert
maximal 1 Stunde nach dem
Garvorgang oder wenn die
Temperatur im Backofen über
125°C liegt.
- Schaltet sich der Ventilator
nach 1 Stunde nicht aus,
DDaass KKüühhllggeebblläässee llääuufftt
nnaacc hh AAbbss cchhaalltteenn ddee ss
BBaacckkooffeennss wweeiitteerr..
die Backofentür öffnen, um das Abkühlen des Backofens zu beschleunigen.
- Den Kundendienst rufen.
- Der Ofen ist für eine Demonstration programmiert.
DD eerr OOff ee nn hhee ii zztt ssiicchh
nniicchhtt aauuff uu nn dd dd ii ee AAnn--
zzeeiiggee zzeeiiggtt aallllee 88 SSeekkuunn--
ddeenn ““DDEEMMOO”” aann..
- Uhrzeit auf 0.00 Uhr einstellen. 10
Sekunden lang auf + und - drücken,
bis ein Signalton ertönt.
99641131 ML BIO.qxp 05/01/2007 14:04 Page 26
Page 27
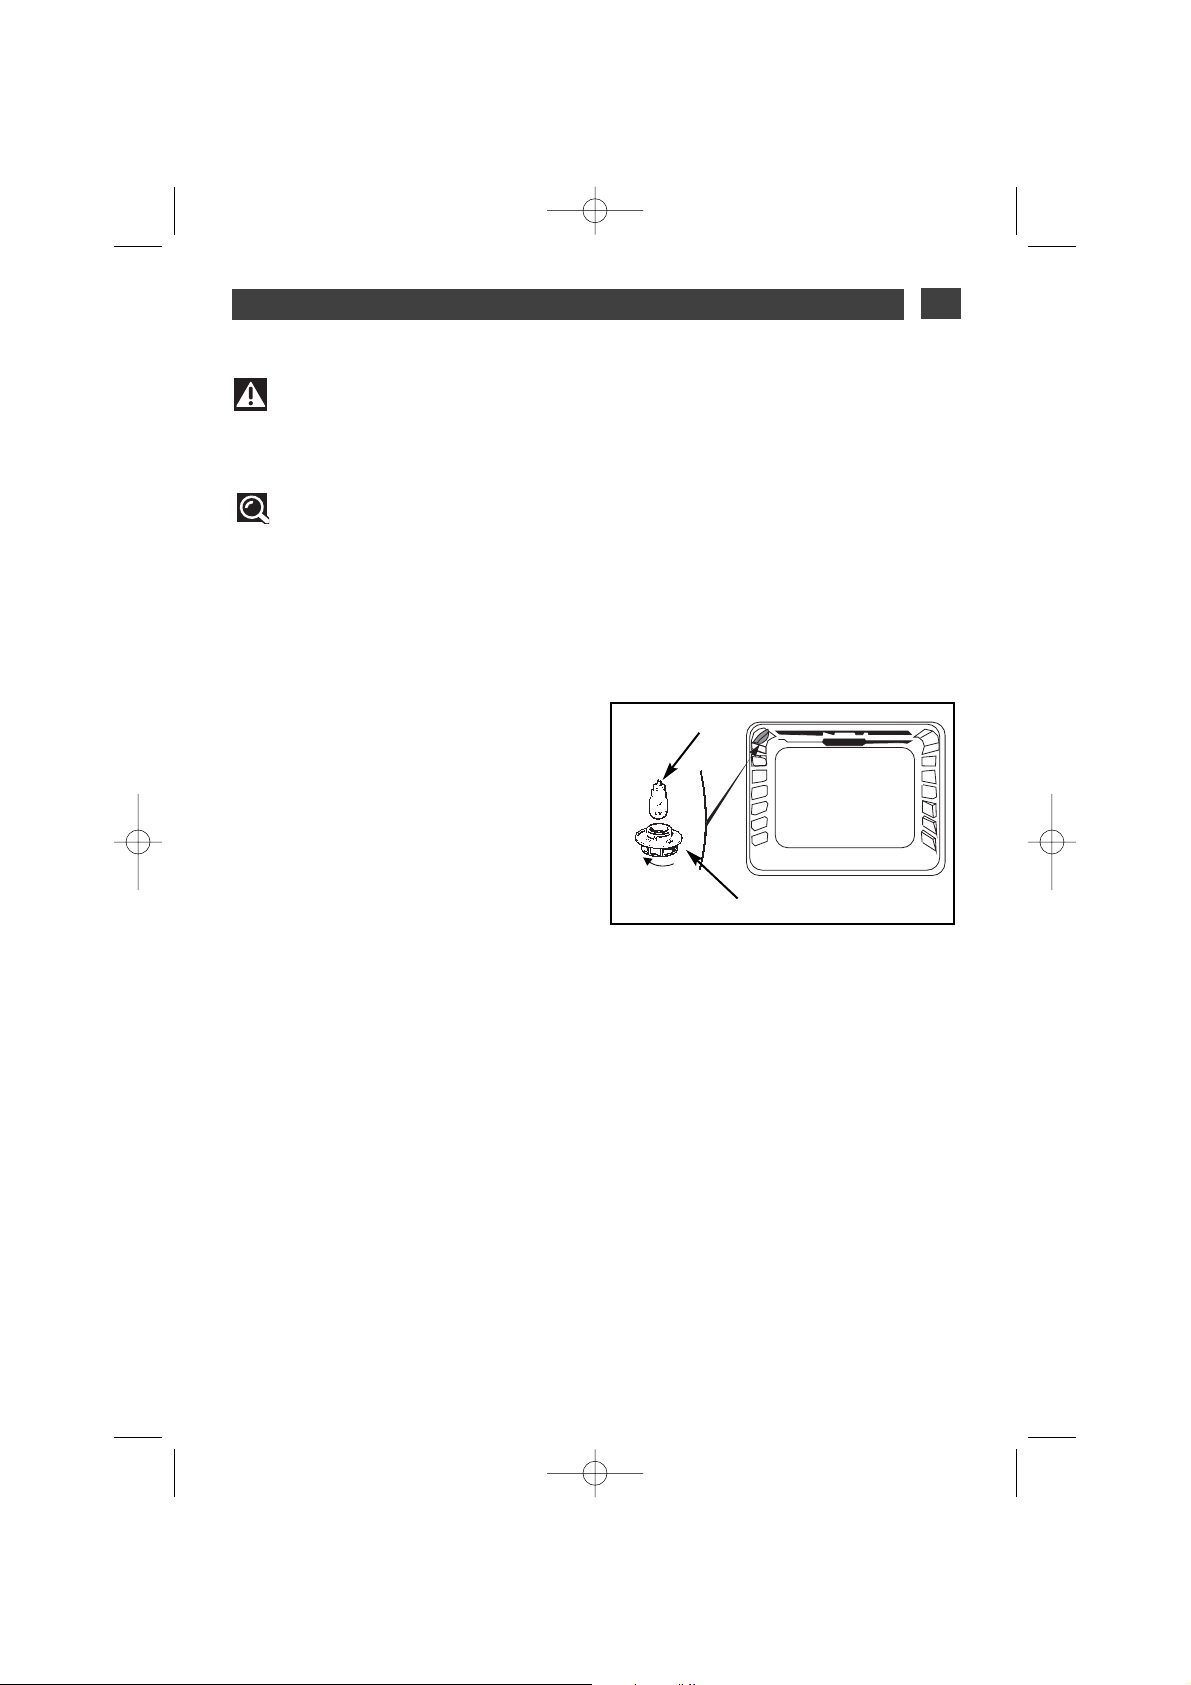
Glühbirne
Losschrauben
Glasabdeckung
Die Glühbirne befindet sich an der Decke des
Ofenraums.
a) Ofen vom Strom trennen.
b) Die Glasabdeckung entfernen (Abb. 1).
c) Die Glühbirne in die gleiche Richtung herausschrauben.
Merkmale der Glühbirne:
- 15 W
- 220-240 V
~
- 300°C
- Sockel E 14
d) Die Glühbirne austauschen, die Abdeckung
festschrauben und den Backofen wieder
anschließen.
WECHSEL DER GLÜHBIRNE
•
Empfehlung
Beim Herausdrehen der Glasabdeckung und der Lampe erleichtert das Tragen eines
Gummihandschuhs die Arbeit.
Achtung
-Vor jedem Eingriff an der Glühlampe den Ofen vom Netz trennen, um Stromschläge zu
vermeiden. Ggf. den Ofen abkühlen lassen.
Abb.1
7 / FUNKTIONSSTÖRUNGEN
DE
27
99641131 ML BIO.qxp 05/01/2007 14:04 Page 27
Page 28

28
8 / VORTEILE UND PRINZIP DES “EASY COOK” VORGANGS
DE
Mit der Funktion “ ” brauchen Temperatur und Gardauer nicht mehr gewählt zu werden.
Diese beiden Parameter werden automatisch vom Backofen berechnet, um ein optimales
Ergebnis zu erreichen.
Der Garmodus “ ” läuft in 2 Phasen ab:
1) Eine erste Phase (Erfassung), in der der Backofen durch seine elektronischen Sonden die
Daten zum spezifischen Garen des Gerichts aufzeichnet.
Diese Phase wird mit einem in der rechten Zone des Anzeigers blinkenden symbolisiert:
Sie kann je nach gewählter Garart 5 bis 40 Minuten dauern.
WÄHREND DIESER PHASE DIE BACKOFENTÜR NICHT ÖFFNEN, damit die Aufzeichnung der
Daten nicht gestört wird.
2) Eine zweite Phase (Berechnung), in der der Backofen die notwendige Garzeit bestimmt wird.
Das Symbol der Animation “ ” leuchtet dauernd. Der Ofen gibt die restliche Garzeit
wie auch die Uhrzeit am Ende des Garvorgangs an. Die Backofentür kann geöffnet werden,
wenn das Gericht beispielsweise begossen oder umgedreht werden soll.
3) Am Ende der Garzeit ertönt eine Reihe von Signaltönen.
VORTEIL UND PRINZIP
••
GEBRAUCHSANLEITUNG
••
a) SSofortiges Garen:
Den Wahlschalter auf die Funktion “ ” stellen.
Über Knopf “ ” das gewünschte Gericht wählen.
Es auf die in der Anzeige empfohlene Einschubleiste einschieben. Die Backofentür schliessen.
Der Backofen beginnt mit dem Garvorgang.
Die Suchphase beginnt und wird durch die Animation in der Anzeige symbolisiert: Es wird eine
Garzeit vorgeschlagen. Am Ende des Garvorgangs ertönt eine Reihe von Signaltönen.
b) VVerzögerter Garvorgang:
Den Wahlschalter auf die Funktion “ ” stellen.
Gericht über Druck auf den Knopf “ ” auswählen.
Das Gericht in den Backofen schieben und die Tür schliessen
Den Wahlschalter auf
“”
stellen.
Den gewünschten Endzeitpunkt durch Druck auf + oder - einstellen.
Beispiel: Ende der Garzeit 13.00 Uhr.
Nach diesem Schritten ist der Start des Garens verschoben.
Das Garende wird auf der Grundlage der durchschnittlichen Basiszeit geschätzt. Ebenso wie
bei einem sofortigen Garvorgang wird diese Zeit während des Garvorgangs optimiert. Daher
kann die Uhrzeit sich gegenüber der ursprünglichen Einstellung um einige Minuten (+ oder -)
verändern.
99641131 ML BIO.qxp 05/01/2007 14:04 Page 28
Page 29
8 / VORTEILE UND PRINZIP DES “EASY COOK” VORGANGS
DE
HINWEISE
••
Sobald das Symbol “ ” nicht mehr blinkt,
kann die Backofentür geöffnet werden.
Wenn die Tür geöffnet wird, während
das Symbol sich bewegt, ertönt eine Reihe von
Signaltönen und die Symbole für die Gerichte
blinken.
Beim Garvorgang im Modus “ ” MUSS BEI
KALTEM BACKOFEN BEGINNEN
muss abgewartet werden, bis der Ofen ganz
abgekühlt ist, bevor ein zweiter Garvorgang im
gleichen Modus erfolgen kann (ist das nicht
der Fall, blinken die Anzeigen für die Gardauer
“ ” und die Symbole der Gerichte in der
Anzeige und eine Reihe von Signaltönen verhindert den Garvorgang).
9/ FUNKTIONSSTÖRUNGEN
WWAASS IISSTT ZZUU TTUUNN??MMÖÖGGLLIICCHHEE
UURRSSAACCHHEENN
SSIIEE SSTTEELLLLEENN FFEESSTT,,
DDAASSSS......
- Sie haben während der Suchphase die Tür geöffnet: Das
Programm ist storniert.
- Der Ofen ist warm
SSiiggnnaallttöönnee ++ bblliinnkkeennddeess
PPiikkttoogg rraammmm EEAASSYY
CCOOOOKK
áDen Backofen abkühlen lassen, bevor wieder mit dem Garen begonnen
wird.
29
99641131 ML BIO.qxp 05/01/2007 14:04 Page 29
Page 30

30
10 / EASY COOK ZUBEREITUNGSARTENDE
FFIISSCCHHGGEERRIICCHHTTEE
••
Ganze Fische (Dorade, junger Seehecht ...) oder einzelne -duaxgw (Forel-
len, Makrelen) mit Gewürzen und Weißwein, Fischbraten
HINWEISE:
- Diese Funktion ganzen Fische vorbehalten, die in einem Gefäß gegart werden (bei gegrilltem oder in Papier gebackenem Fisch muss der Backofen vorgeheizt werden).
RRIINNDDEERRBBRRAATTEENN
••
Rinderbraten (in der Mitte nicht durchgebraten)
HINWEISE:
- Wenn gut durchgebratenes Fleisch gewünscht wird, mit herkömmlicher Bratfunktion arbeiten.
- Den Braten mindestens 1 Stunde vor dem Bratbeginn aus dem Kühlschrank nehmen
(siehe Ratschläge auf der nächsten Seite). Möglichst viel Speck entfernen, den Braten mit
wenig Wasser und einem Teelöffel Öl in ein Tongefäß legen. Erst am Ende der Bratzeit salzen.
PPIIZZZZAA
••
FFrriisscchhee PPiizzzzaa aauuss ddeemm FFeeiinnkkoossttggeesscchhääfftt
•
PPiizzzzaa aauuss FFeerrttiiggtteeiigg
•
PPiizzzzaa aauuss sseellbbsstt zzuubbeerreeiitteetteemm TTeeiigg
•
TTKK--PPiizzzzaa ((KKäässeerroolllleenn,, BBrrööttcchheenn ((DDoossee))
HINWEISE:
•
Wenn ein knuspriger Teig gewünscht wird, die Pizza auf das Rost legen.
•
Wenn ein weicher Teig gewünscht wird, die Pizza in die emaillierte Form geben.
HHÄÄHHNNCCHHEENN
••
HHäähhnncchheennggeewwiicchhtt 11 kkgg bbiiss 11,,88 kkgg
•
kklleeiinnee EEnnttee,, PPeerrllhhuuhhnn......
HINWEISE:
- Braten am Drehspiess: Nicht vergessen, die Fettpfanne auf der 1. Einschubleiste einzuschieben, um das Fett aufzufangen.
- In einem Gefäß garen: vorzugsweise aus Ton, um Fettspritzer zu vermeiden.
- Um Spritzer zu vermeiden, die Geflügelhaut einstechen.
TTAARRTTEE
••
FFrriisscchhee TTaarrttee
•
TTKK--TTaarrttee
•
SSppeecckkkkuucchheenn
•
RRoohheerr BBlläätttteerrtteeiigg mmiitt ttiieeffggeekküühhlltteemm FFlleeiisscchh
RATSCHLÄGE:
- eine anti-haftbeschichtete Alu-Form verwenden: dadurch wird der Boden von unten knuspriger
- Handelsübliche TK-Tarte und Speckkuchen: Die Alu-Schale entfernen, bevor sie auf das
Gitter gestellt werden
GGEEMMÜÜSSEE
•
ggeeffüüllllttee TToommaatteenn,, PPaapprriikkaasscchhootteenn ......
•
LLaassaaggnnee ((ffrriisscchh ooddeerr ttiieeffggeekküühhlltt))
•Hackfleisch mit Kartoffelbrei, Stockfischmus, Nudelauflauf, etc. ...
RRAATTSSCCHHLLÄÄGGEE::
--GGrröößßee ddeerr GGeeffääßßee eennttsspprreecchheenndd ddeerr zzuu ggaarreennddeenn MMeennggee
aauusswwäähhlleenn,, uumm eeiinn ÜÜbbeerrllaauuffeenn
vvoonn SSaafftt zzuu vveerrmmeeiiddeenn..
99641131 ML BIO.qxp 05/01/2007 14:04 Page 30
Page 31

11 /TIPPS UND TRICKS
DE
31
FFIISSCCHHGGEERRIICCHHTTEE
Beim Einkauf muss Fisch angenehm und etwas nach Meer riechen.
Der Körper muss fest und starr sein, die Schuppen fest an der Haut kleben, das Auge
lebhaft und gewölbt und die Kiemen glänzend und feucht sein.
RRIINNDDFFLLEEIISSCCHH
(FLEISCH ALLGEMEIN)
Fleisch unbedingt lange vor dem Braten aus dem Kühlschrank nehmen: Das Fleisch wird
durch den Schock zwischen Kälte und Hitze hart, bei richtiger Behandlung wird der
Rinderbaten außen goldbraun, innen rot und warm in der Mitte. Nicht vor dem Braten
salzen: Das Salz absorbiert das Blut und trocknet das Fleisch aus. Das Fleisch mit flachen
Rührlöffeln umdrehen: Wenn es eingestochen wird, läuft das Blut aus. Das Fleisch nach
dem Braten immer 5 bis 10 Minuten ruhen lassen: in Aluminiumfolie eingewickelt vorne in
den heißen Backofen legen: Das während des Bratens nach außen gezogene Blut fließt
somit wieder nach innen und zieht durch den Braten.
Kochgefäße aus Ton verwenden: Glas fördert Fettspritzer.
Auch nicht in der emaillierten Fettpfanne braten.
PPIIZZZZAA::
Backpapier zwischen Gitter und Pizza legen, um zu vermeiden, dass schmelzender Käse
oder Tomatensoße den Ofenboden verschmutzen.
HHÄÄHHNNCCHHEENN::
Das Gefäß entsprechend der Größe des Hähnchens wählen, damit das Fett nicht ver-
brennt.
TTAARRTTEE//SSPPEECCKKKKUUCCHHEENN
Backformen aus Glas, Porzellen vermeiden: Sie sind zu dick, sie verlängern die Backdauer
und der Teigboden wird nicht knusprig.
Bei Obst kann der Tarteboden aufweichen: Es reicht, einige Löffel feinen Grieß, zu
Paniermehl zerbröckelte Kekse, Mandelpulver oder Tapioca aufzustreuen, die den Saft beim
Backen aufsaugen.
Bei feuchtem oder tiefgekühltem Gemüse (Lauch, Spinat, Brokkoli oder Tomaten) kann ein
wenig Maismehl verstreut werden.
GGEEMMÜÜSSEE
Ein sämiges Kartoffelgratin wird erzielt, wenn die Kartoffeln vorgekocht,
in Scheiben geschnitten und etwa 20 Minuten in Milch oder einer Milch-Sahne-Mischung gekocht
werden.
Gefüllte Tomaten: einen Deckel von den Tomaten abschneiden, Kerne ausnehmen und die
Tomaten von innen salzen und zum Abtropfen vor dem Füllen auf ein Rost stürzen.
99641131 ML BIO.qxp 05/01/2007 14:04 Page 31
Page 32

32
12 / REZEPTVORSCHLÄGEDE
FFIISSCCHH
Graue Goldbrasse mit trockenem Cidre: 1 Goldbrasse, 1,5 kg.
500 g Champignons.
2 säuerliche Äpfel.
2 Schalotten.
2 Suppenlöffel Crème fraîche.
100 g Butter.
1/2 Liter Cidre. Salz, Pfeffer.
Den Fisch ausnehmen und schuppen. Ihn in ein gebuttertes Gefäß auf die feingehackten
Schalotten und die in Scheiben geschnittenen Pilze legen. Cidre, Salz, Pfeffer und einige
Butterflöckchen hinzufügen. In den Ofen schieben. Die ungeschälten geviertelten Äpfel in der Butter
garen. Nach dem Kochen den Fisch auf eine heiße Platte geben, den Saft filtern und mit Sahne löschen.
Die Crème fraîche zum Saft hinzufügen, mit Äpfeln und Pilzen servieren.
RRIINNDDEERRBBRRAATTEENN
Saucen
SAUTERNES Saucee mit PETERSILIE und ROQUEFORT:
2 Suppenlöffel feingeschnittene Schalotten in Butter anschwitzen.
10 cl Sauternes hinzufügen, verdampfen lassen.
100 g Roquefort hinzufügen, langsam zergehen lassen.
20 cl Sahne, Salz, Pfeffer hinzufügen. Aufkochen.
C
OGNACSAUCE mit ROSA PFEFFER:
2 Suppenlöffel fein gehackte Schalotten anschwitzen.
15 cl Rotwein hinzufügen, verdampfen lassen.
1 Eigelb, 1 Löffel Ketchup, 200 g Butter hinzufügen. Salz, Pfeffer.
Unter Schlagen 3 Löffel Cognac und 1 Teelöffel zerstoßene rosa Pfefferkörner hinzugeben.
FR
UCHTIGE SAUCE mit BIRNE und KRESSE:
1 Birne mit Weißwein bedeckt kochen. Abtropfen lassen und mixen.
1/2 Sträußchen Kresse aufkochen, abtropfen lassen, klein hacken.
1 Suppenlöffel gehackte Schalotten in Butter dämpfen.
Mit dem Weinsud löschen. Verdampfen lassen.
Die Birne, die Kresse und 20 cl Sahne hinzufügen.
Salzen, pfeffern, leicht aufkochen lassen.
In den Backofen einschieben. Die ungeschälten Apfelviertel in der Butter garen. Nach dem Kochen den
Fisch auf eine heiße Platte geben, den Saft filtern und mit Sahne ablöschen.
Die Crème fraîche zum Saft hinzufügen, mit Äpfeln und Pilzen servieren.
PPIIZZZZAA
Grundlage: 1 Pizzateig
*mit Gemüse:
6 Suppenlöffel Tomatensauce + 100 g gewürfelte Zucchini + 50 g gewürfelte Paprikaschote + 50 g Aubergine in Scheiben + 2 kleine Tomaten in Scheiben + 50 g geriebener Greyerzer Käse + Oregano + Salz + Pfeffer.
*mit R
oquefort, geräuchertes Bauchfleisch:6 Suppenlöffel Tomatensauce + 100 g geräu-
chertes Bauchfleisch + 100 g Roquefortwürfel + 50 g Walnüsse + 60 g geriebener Greyerzer.
*mit Wür
stchen, Quark:200 g abgetropften Quark auf den Teig verteilen + 4 Würstchen
in Scheiben + 150 g Schinken in Streifen + 5 Oliven + 50 g geriebener Greyerzer + Oregano + Salz
+ Pfeffer.
99641131 ML BIO.qxp 05/01/2007 14:04 Page 32
Page 33

33
12 / REZEPTVORSCHLÄGE
DE
HHÄÄHHNNCCHHEENN
Das Hähnchen mit einem schönen Strauß frischem Estragon füllen oder mit einer Mischung aus 6
zerstoßenen Knoblauchzehen, einer Prise Grobsalz und einigen Pfefferkörnern bestreichen.
TTAARRTTEESS // SSPPEECCKKKKUUCCHHEENN
Aluminiumform mit Anti-Haft-Beschichtung, 30 cm Durchmesser.
BBlläätttteerrtteeiiggttaarrttee mmiitt NNuuggaatt uunndd ÄÄppffeellnn::
1 Portion Blätterteig mit dem Blatt ausbreiten und mit der Gabel einstechen.
200 ml Sahne mit einer Vanilleschote aufkochen.
2 Eier mit 30 g Zucker verschlagen und die abgekühlte Sahne hinzufügen.
2 Äpfel würfeln und in 70 g Nugat wälzen.
Sahne + Äpfel auf dem Teig verteilen. In den Backofen einschieben.
SSPPEECCKKKKUUCCHHEENN::
Grundlage: 1 Alu-Form, 27 bis 30 cm Durchmesser
1 Portion gebrauchsfertigen Mürbeteig
3 verschlagene Eier + 50 cl Crème fraîche
Salz, Pfeffer, Muskat.
V
er
schiedener Belag: 200 g vorgebratene Speckwürfel,
oder 1 kg gekochte Chicoree + 200 g geriebener Gouda
oder - 200 g Brokkoli + 100 g Speckwürfel + 50 g Blauschimmelkäse
oder - 200 g Lachs + 100 g gekochten und abgetropften Spinat
GGEEMMÜÜSSEE
MMiitt wwaarrmmeemm ZZiieeggeennkkäässee ggeeffüüllllttee TToommaatteenn
8 Tomaten
300 g frischer Ziegenkäse
4 EL Olivenöl
1 kleines Bund Kräuter (Schnittlauch oder Basilikum)
Salz, Pfeffer.
Tomaten waschen, Deckel abschneiden und das Fruchtfleisch vorsichtig aus-
höhlen.
Stürzen und gut abtropfen lassen.
Mit einer Gabel Käse und Olivenöl mischen, mit fein geschnittenen Kräutern,
Salz und Pfeffer würzen.
Den Deckel wieder auflegen und die Tomaten in ein Gefäß stellen. In den Ofen
schieben.
Warm auf einem Bett aus grünem Salat servieren.
99641131 ML BIO.qxp 05/01/2007 14:04 Page 33
Page 34

34
99641131 ML BIO.qxp 05/01/2007 14:04 Page 34
Page 35

35
66 //
KUNDENDIENST
DE
Any maintenance on your equipment should be undertaken by:
- either your dealer,
- or another qualified mechanic who is an authorized agent for the brand appliances.
When making an appointment, state the full reference of your equipment (model, type and serial
number). This information appears on the manufacturer's nameplate attached to your equipment.
Eingriffe an Ihrem Gerät dürfen nur:
- von Ihrem Händler oder
- von einem sonstigen Fachmann und Vertragshändler der Marke durchgeführt werden.
Geben Sie bei der Meldung einer Störung die vollständige Typenbezeichnung Ihres Gerätes an
(Modell, Typ, Seriennummer). Diese Angaben finden Sie auf einem an Ihrem Gerät angebrachten Schild.
66 //
AFTER-SALES SERVICE
EN
66 //
SERVICIO TÉCNICO
ES
Qualquer intervenção no seu aparelho deve ser realizada:
- quer pelo seu revendedor,
- quer por outro profissional qualificado autorizado pela marca.
Ao chamá-los, indique a referência completa do seu aparelho (modelo, tipo e número de série).
Estas informações figuram na placa de identificação fixada no aparelho.
Las intervenciones que requiera la máquina deberán ser efectuadas:
- por el revendedor,
- o por cualquier profesional cualificado depositario de la marca.
Al llamar, mencione la referencia completa de la máquina (modelo, tipo y número de serie).
Estos datos figuran en la placa de identificación situada en la máquina.
66 //
SERVIZIO POST-VENDITA E RELAZIONI CON I CONSUMATORI
IT
66 //
SERVICEDIENST
NL
Qualquer intervenção no seu aparelho deve ser realizada:
- quer pelo seu revendedor,
- quer por outro profissional qualificado autorizado pela marca.
Ao chamá-los, indique a referência completa do seu aparelho (modelo, tipo e número de série).
Estas informações figuram na placa de identificação fixada no aparelho.
De eventuele ingrepen in de machine moeten worden uitgevoerd :
- of door uw vakhandelaar,
- of door een andere gekwalificeerd technicus van dit merk.
Tijdens het telefoneren, dient u de complete referentie op te geven van uw machine (model,
type, serienummer). Deze informatie staat op het typeplaatje op de machine.
66 //
SERVIÇO PÓS-VENDA
PT
99641131 ML BIO.qxp 05/01/2007 14:04 Page 35
Page 36

As part of our commitment to constantly improving our products, we reserve the right to make
changes to them based on technical advances to their technical and functional features and
appearance.
Warning:
Before installing and using your appliance, please carefully read this Guide to
Installation and Use, which will allow you to quickly familiarise yourself with its operation.
Dear Customer,
You have just acquired a
BBRRAANNDDTT
oven and we would like to thank
you.
We have invested all our dedication and know-how in this appliance
so that it would best meet your needs. With innovation and performance, we designed it to be always easy to use.
In the
BBRRAANNDDTT
product range, you will also find a wide choice of
microwaves, cooking hobs, ventilation hoods, cookers, dishwashers,
washing machines, driers, fridges and freezers, that you can coordinate with your new
BBRRAANNDDTT
oven.
Visit our website
wwwwww..bbrraannddtt..ccoomm
where you will find all of our pro-
ducts, as well as useful and complementary information.
BBRRAANNDDTT
36
DE
02
EN
36
NL
70
104
FR
PT
136
99641131 ML BIO.qxp 05/01/2007 14:04 Page 36
Page 37

1 / NOTICES TO THE USER
••
Safety Recommendations
___________________________________
38
••
Environment
______________________________________________
39
••
Child safety
________________________________________________
39
2 / INSTALLING YOUR APPLIANCE
••
Choice of location
__________________________________________
40
••
Building in
________________________________________________
40
••
Electrical connection
_______________________________________
41
••
Changing the power cable
___________________________________
42
3 / DESCRIPTION OF YOUR APPLIANCE
••
Introduction to your oven
____________________________________
43
••
Description of the accessories
_______________________________
44
••
Description of your programmer______________________________ 45
4/USING YOUR APPLIANCE
••
Using the programmer
______________________________________
46
º
How to set the time_____________________________________ 46
º
How to change the time _________________________________ 46
º
Immediate cooking _____________________________________ 47
º
Programmed cooking ___________________________________ 48
º
Economic cooking _____________________________________ 50
º
Grill+ _________________________________________________ 51
º
Use of the timer function ________________________________ 52
º
Display brightness______________________________________ 52
5 / OVEN COOKING MODES_______________________________________ 53
6 / CARING FOR AND CLEANING YOUR APPLIANCE
••
Cleaning the outer surfaces
__________________________________
55
••
Cleaning the door
__________________________________________
55
••
Pyrolytic oven cleaning______________________________________ 57
••
Instructions and security ____________________________________ 57
••
Begin cleaning
_____________________________________________
58
••
End of cleaning
____________________________________________
59
7 / TROUBLESHOOTING __________________________________________ 60
••
Changing the bulb
_________________________________________
61
8 / EASY COOK ADVANTAGES AND PRINCIPLES_____________________ 62
••
EASY COOK cooking modes
________________________________
64
9 / AFTER-SALES SERVICE________________________________________ 69
TABLE OF CONTENTS
EN
37
99641131 ML BIO.qxp 05/01/2007 14:04 Page 37
Page 38

38
SAFETY RECOMMENDATIONS
— This oven was designed for use by private
persons in their homes. It is intended solely
for cooking foodstuffs. This oven does not
contain any asbestos-based components.
— This appliance is to be used by adults. Make
sure that children do not touch it and that
they do not treat it as a toy. Make sure that
they do not touch the appliance’s control
panel.
— When you receive the appliance, unpack or
have it unpacked immediately. Give it an overall inspection. Make note of any concerns or
reservations on the delivery slip and make
sure to keep a copy of this form.
— Your appliance is intended for standard
household use. Do not use it for commercial
or industrial purposes or for any other purpose than that for which it was designed.
— Do not modify or attempt to modify any of
the characteristics of this appliance. This
would be dangerous to your safety.
— Keep small children away from the appliance while it is in use. Thus you will prevent
them from burning themselves by tipping over
cookware. Moreover, the front of your appliance is hot during use and during cleaning
(pyrolysis).
— Never pull your appliance by the door handle.
— Before using your oven for the first time,
heat it up while empty for approximately
15 minutes. Ensure that the room is sufficiently ventilated. You may notice a particular
odour or a small amount of smoke. All of this
is normal.
— During cooking, ensure that the door of your
oven is firmly closed so that the seal can properly fulfil its function.
— When in use, the appliance becomes hot. Do
not touch the heating elements located inside
the oven. You are at risk of incurring serious
burns.
— When inserting or removing your dishes
from the oven, do not bring your hands near to
the upper heating elements; use insulated
cooking mitts.
— After cooking, do not touch the cookware
(grid, turnspit, etc.) with bare hands
— Never place aluminium paper directly in contact with the bottom element (See the
“Description of your oven” chapter), the accumulated heat could cause deterioration of the
enamel.
— Do not place heavy items on the open oven
door; ensure that children cannot climb or sit
on it.
— To avoid damaging the control panel of your
appliance, do not leave the door open when
the oven is functioning or still hot.
— The oven must be turned off for all attempts
to clean the cavity.
— Intensive and prolonged use of the appliance
may require additional ventilation achieved by
opening the window or increasing the power
of the mechanical fan.
— In addition to the accessories provided with
your oven, only use dishes that are resistant to
high temperatures (follow manufacturer’s
instructions).
— After using your oven, ensure that all the
controls are in the off position.
— Never use steam or high-pressure devices to
clean the oven (requirement imposed by electrical safety).
— For your safety, your oven is equipped with
an AUTOMATIC STOP, if you forget to turn off
your oven by mistake. After 10 hours of operation, the AS (Automatic Stop) feature is activated and your oven stops running. AS
appears instead of the time and a series of 2
successive beeps is emitted for a short time.
••
Warning
Keep this user guide with your appliance. If the appliance is ever sold or transferred to another person, ensure that the
new owner receives the user guide. Please
become familiar with these recommendations before installing and using your oven.
They were written for your safety and the
safety of others.
11 //
NOTICES TO THE USEREN
99641131 ML BIO.qxp 05/01/2007 14:04 Page 38
Page 39

39
CARE FOR THE ENVIRONMENT
••
— This appliance’s packing materials are recyclable. Recycle them and play a role in protecting the
environment by depositing them in municipal containers provided for this purpose.
— Your appliance also contains many recyclable materials. It is therefore marked with this logo to
indicate that used appliances must not be mixed with other waste. Recycling of the appliances organised by your manufacturer will thus be undertaken in optimum conditions,in accordance with European directive 2002/96/CE relative to electrical and electronic equipment waste. Consult your city hall or your retailer to find the drop-off points
for used appliances that is nearest to your home.
— We thank you for your help in protecting the environment.
Warning
IInnssttaallllaattiioonn sshhoouulldd oonnllyy bbee ppeerrffoorrmmeedd bbyy qquuaalliiffiieedd iinnssttaalllleerrss aanndd tteecchhnniicciiaannss..
TThhiiss aapppplliiaannccee ccoommpplli
ieess wwiitthh tthhee ffoolllloowwiinngg EEuurrooppeeaann ddiirreeccttiivveess::
-- LLooww VVoollttaaggee DDiirreeccttiivvee 7733//2233//CCEEEE mmooddiiffiieedd bbyy ddiirreeccttiivvee 993
3//6688//CCEEEE ffoorr aattttrriibbuuttiioonn ooff CCEE
aapppprroovvaall..
-- EElleeccttrroommaaggnneettiicc CCoommppaattiibbiilliittyy DDiirreeccttiivvee 8899//333366//CCEEEE mmooddiiffiieed
d bbyy ddiirreeccttiivvee 9933//6688//CCEEEE ffoorr aattttrrii--
bbuuttiioonn ooff CCEE aapppprroovvaall..
-- CCEE RReegguullaattiioonn 11993355//22000044 ccoonncceerrnniinngg mmaatteerri
iaallss aanndd oobbjjeeccttss ddeessiiggnneedd ttoo ccoommee iinnttoo ccoonnttaacctt wwiitthh
ffooooddssttuuffffss..
1 / NOTICES TO THE USER
EN
99641131 ML BIO.qxp 05/01/2007 14:04 Page 39
Page 40

40
provided for this purpose on either side of the
front side panels (fig.1).
BUILD-IN
To do this:
1) Remove the rubber screw covers to access
the mounting holes.
2) Drill a Ø 2 mm hole in the cabinet panel to
avoid splitting the wood.
3) Attach the oven with the two screws.
4) Replace the rubber screw covers (they also
serve to absorb the shock caused by closing
the oven door).
(*) If the cabinet is open, its opening must be
70 mm (maximum).
Tip
To be certain that you have properly
installed your appliance, do not hesitate to
call on a household appliance specialist.
••
CHOICE OF LOCATION
The diagrams above indicate the dimensions
of a cabinet that would be acceptable for your
oven.
The oven can be installed under a work top or
in a column of cabinetry (open* or closed)
having the appropriate dimensions for built-in
installation (see adjacent diagram).
Your oven has optimised air circulation that
allows it to achieve remarkable cooking and
cleaning results if the following guidelines are
respected:
• Centre the oven in the cabinet so as to
guarantee a minimum distance of 5 mm between the appliance and the neighbouring
cabinet.
• The destination cabinet must be made of or
coated with a material that is heat resistant.
• For greater stability, attach the oven in the
cabinet with two screws through the holes
••
Fig. 01
2 / INSTALLING YOUR APPLIANCEEN
99641131 ML BIO.qxp 05/01/2007 14:04 Page 40
560
550
585
70
550
Page 41

41
••
ELECTRICAL CONNECTION
Monophase 20A Meter
220-240V~ 50Hz
Electrical outlet
2 prong receptacle
+ ground lead
CEI Standard 60083
Monophase line 220-240 V ~
Power cable
length 1.50 m
approximately
A fuse or differential cir-
cuit breaker
Electrical safety must be provided by a correct build-in. During build-in and maintenance
operations, the appliance must be unplugged
from the electrical grid; fuses must be cut off
or removed.
The electrical connections are made before
the appliance is installed in its housing.
Ensure that:
- the electrical installation has sufficient voltage,
-the electrical wires are in good condition
- the diameter of the wires complies with the
installation requirements.
Your oven must be connected with a power
cord (standardised) with three 1.5 mm
2
conductors (1 ph +1 N + ground) that must be
connected to a monophase 220-240 V
~ net-
work via a CEI 60083 standardised receptacle (1 ph +1 N + ground lead) or an all-pole
cut-off device, in compliance with installation regulations.
Warning
The safety wire (green-yellow) is con
nected to the appliance’s terminal and
must be connected to the ground lead of the
electrical set-up.
In the case of a hook-up with electrical outlet,
it must be accessible after installation.
The fuse in your set-up must be 16 amperes.
If the power cable is damaged, it must be replaced by a cable or a special kit available
from the manufacturer or its After-Sales Service Department.
2 / INSTALLING YOUR APPLIANCE
EN
99641131 ML BIO.qxp 05/01/2007 14:04 Page 41
Page 42

42
••
——
The power cable (H05 RR-F, H05 RN-F ou H05 VV-F) must be of sufficient length to be connect-
ed to the build-in oven while it sits on the floor in front of the cabinet.
To do this the appliance must be disconnected from the electrical network:
——
Open the inspection flap located at the lower right of the back cover by unscrewing the two
screws, then pivot the inspection flap.
——
Strip 12 mm along each wire of the new power cable.
——
Carefully twist together the strands.
——
Loosen the screws from the terminal board and remove the power cord to be replaced.
•
Introduce the power cable through the side of the cover in the cable clip located to the right of
the terminal board.
——
All the strands of the electricity wires must be captured under the screws.
——
The phase wire on the L terminal.
——
The green-yellow coloured ground wire should be connected to the terminal .
——
The neutral conductor (blue) on the N terminal.
——
Screw down tightly the screws on the terminal board and check the connection by pulling on each
wire.
——
Attach the cable with the cable clip located to the right of the terminal board.
——
Close the inspection flap using the two screws.
Warning
WWee ccaannnnoott bbee hheelldd rreessppoonnssiibbllee ffoorr aannyy aacccciiddeenntt rreessuullttiinngg ffrroomm aann iinneexxiisstteenntt,, ddeeffeeccttiivvee
oorr iinnccoorrrreecctt
ggrroouunndd lleeaadd..
IIff tthhee eelleeccttrriiccaall iinnssttaallllaattiioonn aatt yyoouurr rreessiiddeennccee rreeqquuiirreess aannyy cchhaannggeess iinn oorrddeerr ttoo hhooookk uupp yyoouurr
AApppplliiaannccee,, ccaallll uuppoonn aa pprrooffeessssiioonnaall eelleeccttrriicciiaann..
IIff tthhee oovveenn mmaallffuunnccttiioonnss iinn aannyy wwaayy,, uunnpplluug
g tthhee aapppplliiaannccee oorr rreemmoovvee tthhee ffuussee ccoorrrreessppoonnddiinngg
ttoo tthhee sseeccttoorr tthheerree tthhee oovveenn iiss hhooookkeedd uupp..
CHANGING THE POWER CORD
2 / INSTALLING YOUR APPLIANCEEN
99641131 ML BIO.qxp 05/01/2007 14:04 Page 42
Page 43

9
9
3
2
6
0
2
1
9
9
3
2
4
8
4
8
43
••
INTRODUCTION TO YOUR OVEN
A
B
Programmer
Temperature selector
Function selector
C
D
E
Lamp
Shelf support indicator
Tip
This Guide to Installation and Use is valid for several models. Minor differences in
details and fittings may emerge between your appliance and the descriptions provided.
E
D
B
A
C
3 / DESCRIPTION OF YOUR APPLIANCE
EN
99641131 ML BIO.qxp 05/01/2007 14:04 Page 43
Page 44

44
REAR
FRONT
••
Anti-tipping safety grid (fig.1)
The grid can be used to hold all dishes and
moulds containing foodstuffs to be cooked or
browned.
It can be used for barbecues (to be placed directly on the grid).
ACCESSORIES
••
fig.1
fig.2
••
Multi-purpose dish (fig.2)
Inserted under the grid, it catches barbecue
juices and grease. It can also be used half-full
of water for double-boiler cooking methods.
Avoid placing roasts or meats directly in the
dish because you are certain to have major
spattering on the oven walls.
3 / DESCRIPTION OF YOUR APPLIANCEEN
fig.3
••
Hollow dish fitted with a special bar-
becue support grid (fig.3)
It is used to collect juices and grease from
cooking with the high grill or the pulsed grill.
It can be used as a cooking dish when suitable
for the size of the item to be cooked (e.g. whole
poultry surrounded with vegetables, at moderate temperature).
Never place this dish directly on the base,
except in GRILL position.
Tip
To clean dishes coated with anti-adhesive enamel, let them col before cleaning
them manually with a dish soap. Avoid scouring sponges. Do not cut on it with a
knife or a metallic pizza cutter; use plastic or silicone utensils instead.
99641131 ML BIO.qxp 05/01/2007 14:04 Page 44
Page 45

45
3 / DESCRIPTION OF YOUR APPLIANCE
EN
PRESENTATION OF THE PROGRAMME SELECTOR
••
C
O
N
I
A
B
Temperature display
ECO indicator (cooking and self-cleaning)
Time and duration display
Shelf number indicator
EASY COOK function button
GRILL+ button
EASY COOK plates indicator
EASY COOK indicator
C
D
E
Touch controls for setting time
Timer touch control
Cooking end time touch control
Cooking time touch control
Cooking end time indicator
Door locked indicator
Cooking time indicator
Self-cleaning indicator
F
G
H
F
A
D
B
JK
L
H
P
G
E
I
J
K
L
M
N
O
M
P
99641131 ML BIO.qxp 05/01/2007 14:04 Page 45
Page 46

46
4 / USING YOUR APPLIANCEEN
•
How to set the time.
--
When the power is on
The display flashes 12:00. (fig.1)
Set the time by pressing the + or - buttons
(continued pressure on the button runs
through the numbers quickly) (fig.2).
Example: 12:30
The adjusted time is automatically recorded
after a few seconds.
The display stops flashing.
- To reset the time on the clock
The function selector must be in position 0
(fig. 1).
Press buttons “ ” and at the same
time for a few seconds (fig.2), then release
them when the time of day begins to flash.
The sound of beeping shows that you can set
it now.
Adjust the time setting using the + or - buttons (fig.3).
The adjusted time is automatically recorded
after a few seconds.
fig.1
fig.2
fig.2
fig.3
fig.1
99641131 ML BIO.qxp 05/01/2007 14:04 Page 46
Page 47

47
4 / USING YOUR APPLIANCE
EN
•Immediate cooking
— The analog programmer should display only
the time;
It should not be flashing (fig 1).
Turn the function selector to the position of
your choice.
Example: position (fig.2).
Your oven will offer you the best temperature
for this type of cooking.
You can also adjust the temperature by moving the temperature selection knob to ++or
--
(fig.3)
Example: temperature reference 210°C (fig.4).
PPuutt yyoouurr ppllaattee iinn tthhee oovveenn
following the rec-
ommendations provided.
After doing this, the oven heats up, and the
temperature indicator flashes.
A series of beeps will be emitted when the
oven reaches the selected temperature.
The temperature stops flashing.
fig.2
fig.4
Warning
All cooking is done with the door closed.
Warning
After a cooking cycle, the cooling fan continues to operate for a period of time to guar-
antee good oven reliability.
fig.1
fig.3
Warning
Do not hang a towel or cloth on the oven handle.
99641131 ML BIO.qxp 05/01/2007 14:05 Page 47
Page 48

48
4 / USING YOUR APPLIANCEEN
--
Cooking with immediate start and pro-
grammed cooking time
- Select the cooking mode desired and adjust
the temperature (fig.
1).
- Press the “ ” button until the cooking
time indicator starts to flash.
“
The display flashes 0:00 to tell you that you
can now set it (fig.2).
- Press the ++or --button to set the time you require.
Example: 30 min cooking (fig.
3).
The cooking time is automatically recorded after a few seconds.
The display stops flashing.
Time counting takes place immediately after
setting.
AAfftteerr tthheessee tthhrreeee sstteeppss,, tthhee oovveenn hheeaattss uupp::
A series of beeps will be emitted when the
oven reaches the selected temperature.
At the end of cooking (end of programmed
time),
- the oven switches off,
- 0:00 flashes (fig.
4).
- A series of beeps is emitted for a few minutes. Press any button to stop the beeping.
The display goes back to showing the time of
day by moving the function selector back to 0
(fig.5
).
fig.2
fig.3
PROGRAMMED COOKING
••
fig.1
fig.4
fig.5
99641131 ML BIO.qxp 05/01/2007 14:05 Page 48
Page 49

49
4 / USING YOUR APPLIANCE
EN
--
Cooking with delayed start and select-
ed end time
PPrroocceeeedd aass wwiitthh pprrooggrraammmmeedd ccooookkiinngg..
- After setting the cooking time, press the “ ”
button until the end cooking time indicator flashes.
The end cooking time display to indicate that
setting is now possible (fig.
1).
- Press the ++or --button to set the cooking
time you require.
Example: end cooking at 1:00 pm (fig.
2).
The end of cooking is automatically recorded
after a few seconds,
The display stops flashing.
AAfftteerr tthheessee 33 aaccttiioonnss,, tthhee ssttaarrtt ooff ccooookkiinngg iiss
ddeellaayyeedd ssoo tthhaatt ccooookkiinngg wwiillll eenndd aatt 11::0000 ppmm..
At the end of cooking (end of programmed
time),
- the oven switches off,
- 0:00 and the cooking time flash (fig.
3).
- A series of beeps is emitted for a few minutes. Press any button to stop the beeping.
The display goes back to showing the time of
day by moving the function selector back to 0
(fig.4
).
fig.1
fig.2
fig.3
fig.4
PROGRAMMED COOKING
••
99641131 ML BIO.qxp 05/01/2007 14:05 Page 49
Page 50

50
4 / USING YOUR APPLIANCEEN
ECONOMIC * COOKING
••
— The analog programmer should display only
the time (fig.
1).
— Rotate the function selector to the “ ”
POSITION. L’The “ECO” indicator comes on on
the display (fig.
2
).
— Place your plate in the oven as recommended on the display.
Example: position “ ”-> shelf 1 or 2 recommended (fig.3).
— Your oven recommends the optimal temperature for the chosen cooking mode at 200°C.
But you can adjust it by moving the temperature selector to + or -(fig.
4).
Example: position “ ” adjusted to 190°C
(fig.
5).
The temperature indicator flashes. Three
beeps will indicate to you that the set temperature has been reached.
*This position makes it possible to save
up to 20% energy while still offering identical cooking results.
The ECO position is used for energy
labelling.
Warning
After a cooking cycle, the cooling fan continues to operate for a period of time to guar-
antee good oven reliability.
fig.2
fig.5
fig.1
fig.4
fig.3
99641131 ML BIO.qxp 05/01/2007 14:05 Page 50
Page 51

51
EN
GRILL
+
••
— This function allows you to combine the chosen cooking method with a function that
“browns” your dish at the end of cooking; this
can be accomplished by turning on the grill for
the last five minutes of the programme.
It is only active for the following cooking functions:” ”
This function can be programmed at the start
of cooking by adding 5 minutes to the cooking
time or simply at the end of cooking by pressing the “ ”.button.
— Set the cooking mode chosen and if necessary adjust the temperature.
— Press the “GRILL
+” button, cooking time
flashes at 0:05 (this cooking time is the minimum required to activate the “ ” function in
the cooking sequence chosen).
— Press the + or - buttons to adjust the total
cooking time. The cooking time is recorded
automatically after a few seconds; the display
stops flashing.
— After these 3 actions, the oven heats up and the icon “ ” lights up, shwoing you that the function is in operation.
Do not put plates too close to the grill so they don’t brown too fast. Follow 1stor 2 ndsteps (starting from the bottom).
Sample dishes:
— Gratins on pasta, cauliflower, endives, shellfish, crumbles, etc.
Programming examples: Onion soup au gratin:
— Select the cooking sequence and temperature: 180°C, the programme: “ ”
and the time: 25 minutes.
The stock will be heated for 20 minutes and browning will carry on for the remaining 5 minutes.
Tip
It is possible to activate or deactivate this option at any point during cooking by
adjusting the “ ” knob.
You can also activate this function with delayed cooking.
Warning
Every time the function selector is rotated, the function is deactivated
“”.
4 / USING YOUR APPLIANCE
99641131 ML BIO.qxp 05/01/2007 14:05 Page 51
Page 52

52
EN 4 / USING YOUR APPLIANCE
-- TThhee pprrooggrraammmmee sseelleeccttoorr oonn yyoouurr oovveenn ccaann
bbee uusseedd aass aa sseeppaarraattee ttiimmeerr wwhhiicchh ccaann bbee
uusseedd wwhheenn tthhee oovveen
n iiss ooffff..
In this case, the timing display takes priority
over the time of day display.
- Press the “ ” button (fig.1) until it reads 0.00.
- Adjust the time chosen by pressing ++or
--
(fig.2) buttons until you reach the time required (maximum 60 minutes).
Warning
It is possible to change or cancel the timer programme at any time.
fig.1
fig.2
USE OF THE TIMER FUNCTION
••
ADJUSTING THE BRIGHTNESS
OF THE DISPLAY
••
You can adjust the brightness of your display. To
do this:
- Set and validate the time on your programme
selector at 0:10 (fig.1).
- Press buttons ++and
--
at the same time for ten
seconds or so until “CO” is displayed in order to
go back to setting mode
(fig.2)
.
- Press buttons ++or
--
to obtain the brightness
you require.
Once you have set the brightness to the level
you require, wait a few seconds and reset the
programme selector to the time of day.
fig.1
fig.2
The display stops flashing and the timer starts, counting the time in seconds.
Once the time has elapsed, the timer sounds a series of beeps to let you know.
Press any button to stop the beeping.
99641131 ML BIO.qxp 05/01/2007 14:05 Page 52
Page 53

53
CCIIRRCCUULLAATTIINNGG HHEEAATT
(recommended temperature
118800°°CC
- Min. 35°C - Max. 235°C)
•
Cooking is controlled by the heating element located at the back of the oven and by the
fan.
•
Preheating unnecessary except for cooking programmes requiring very short times
(biscuits on several levels).
•
Recommended for preserving tenderness in meats, vegetables and fish and for multi-
ple cooking on up to three levels.
TTRRAADDIITTIIOONNAALL EECCOO
(recommended temperature
220000°°CC
- Min 35°C Max - 275. C)
•
Cooking controlled by the upper and lower heating elements with no fan.
•
This position makes it possible to save approximately 25% while maintaining cooking
properties. The ECO position is used for the energy label performance.
•
You will save energy throughout the cooking cycle, but the time may be slower.
TTRRAADDIITTIIOONNAALL
(recommended temperature
222255°°CC
- Min 35°C Max - 275°C)
•
Cooking controlled by the upper and lower heating elements with no fan.
•
Requires preheating before the dish is placed in the oven.
•
Recommended for
ssllooww,, ggeennttllee ccooookkiinngg::
tender game meat, etc. To seal
rrooaassttss
of red
meat. To simmer in a
ccoovveerreedd sstteeww ppaann
dishes that were begun on the hob (coq au vin,
stew, etc.).
TRADITIONAL PULSED
(recommended temperature 200°C min 35°C max 275°C)
•
Cooking is controlled by the upper and lower heating elements and by the fan.
•
Rapid temperature increase: Some dishes can be placed in the oven while it is still
cold.
•
Recomended for meat, fish, vegetables, preferably placed in a terracotta dish.
PPUULLSSEEDD BBOOTTTTOOMM EELLEEMMEENNTT
(recommended temperature
220055°°CC
- Min 35°C Max - 275. C)
•
Cooking is controlled by the bottom element combined with a slight dose of the grill
and with the fan.
•
Cooking heat from the bottom with a small amount of heat from the top. Place the grid
on the lowest shelf support.
•
Recommended for
mmooiisstt ddiisshheess
(quiches, juicy fruit tarts, etc.). The crust will be thor-
oughly cooked on the bottom. Recommended for
ddiisshheess tthhaatt rriissee(ccaakkee,, bbrriioocchhee, kkoouuggllooff,,
eettcc..
) and
ffoorr ssoouuffffllééss
that will not be stuck by a crust formed on the top.
Cooking multiple items on up to three levels.
PPUULLSSEEDD GGRRIILLLL
(recommended temperature
220000°°CC
- Min. 180°C - Max. 230°C)
•
Cooking is controlled alternately by the upper element and the fan.
•
Preheating unnecessary. Roasts and poultry that are juicy crispy and all over.
•
Recommended for all
ppoouullttrryy
or
rrooaassttss
to seal and cook through
lleegg rrooaasstt, bbeeeeff rriibbss
For preserving tenderness in filets of
ffiisshh
.
*
5 / OVEN COOKING MODES
EN
ECO
*
99641131 ML BIO.qxp 05/01/2007 14:05 Page 53
Page 54

54
HHIIGGHH GGRRIILLLL
(recommended temperature
227755°°CC
- Min 180°C Max - 275°C)
•
Cooking controlled by the upper element without the fan.
• Preheat the oven for five minutes. Slide the drip tray onto the lower shelf support to collect greases.
• Recommended for grilling
cchhooppss,ssaauussaaggeess, sslliicceess ooff bbrreeaadd, pprraawwnnss ppllaacceedd oonn tthhee ggrriidd
.
LLOOWW TTEEMMPPEERRAATTUURREE SSTTAABBIILLIISSAATTIIOONN//BBRREEAAD
D DDOOUUGGHH
(recommended temperature
8800°°CC
- Min 35°C Max - 100°C)
•
Heat regulated by the upper and lower elements with use of fan.
•
Recommended for
rriissiinngg ddoouugghh ffoorr bbrreeaadd,, bbrriioocchhee,, kkoouuggllooff
, etc. while not exceeding
40° (plate heating, defrosting).
* Programme(s) used to obtain the results indicated on the energy label in compliance with
European standard EN 50304 and in accordance with European Directive 2002/40/CE.
5 / OVEN COOKING MODESEN
99641131 ML BIO.qxp 05/01/2007 14:05 Page 54
Page 55

55
CLEANING THE OUTER SURFACES
••
To clean the window of the electronic timer, as well as the oven door, use a soft cloth moistened
with a glass cleaner.
Do not use abrasive cleaning products or hard, metallic scrubbers to clean the oven’s glass
door, which could scratch the surface and cause the glass to shatter.
To preserve your appliance, we recommend that you use Clearit cleaning products.
Clearit offers you professional products and solutions designed for the daily care of your household appliances and kitchens.
They are on sale at your regular retailer, along with a complete line of accessories and consumable products.
PPrrooffeessssiioonnaall eexxppeerrttiissee
sseerrvviinngg iinnddiivviidduuaallss
- Open the door all the way and fix it in place
using the two red stops (fig.1).
They are supplied in your appliance’s plastic
pouch.
CLEANING THE DOOR
••
- Remove the first clipped in glass as follows:
Insert the other two red stops in the AAlocations provided for this purpose (fig.2).
Create a lever effect on these parts to unclip
the glass (fig.3).
- Clean the glass using a soft sponge and dish
soap.
Do not immerse the glass in water.
Do not use abrasive creams or scrubbing
sponges. Rinse with clean water and dry with
a lint-free cloth.
Warning
Before unclipping the glass, let the
appliance cool down.
6 / CARING FOR AND CLEANING YOUR APPLIANCE
EN
fig.2
AA
AA
fig.1
fig.3
99641131 ML BIO.qxp 05/01/2007 14:05 Page 55
CLIC
CLIC
Page 56

56
- If necessary, remove the door’s inner glass
assembly. This assembly is composed of one
or two sheets of glass (depending on model),
each of which has a black rubber corner pad
(fig.4).
- After cleaning, reposition the four rubber
pads, taking care to follow the indications on
the glass:
* top left: L
* top right: R
Place your inner glass assembly in the door
so that L and R are located on the hinge side.
- If your oven is equipped with a single inner
sheet of glass, it must be located as close as
possible to the clipped glass.
- Clip in your last glass sheet by placing the
indication “PYROLYSIS” so that it faces you
(fig.5).
- Remove the red plastic stops.
Your appliance is again operational.
fig.4
fig.5
LL
RR
6 / CARING FOR AND CLEANING YOUR APPLIANCEEN
99641131 ML BIO.qxp 05/01/2007 14:05 Page 56
CLAC
CLAC
Page 57

57
6 / CARING FOR AND CLEANING YOUR APPLIANCE
EN
Warning
- Before starting self-cleaning,
rreemmoovvee aallll yyoouurr uutteennssiillss ffrroomm iinnssiiddee tthhee oovveenn,, iinncclluuddiinngg
ppoottss aanndd ppaannss..
Before starting self-cleaning, remove the large splashes which may have occurred in order to
prevent them from burning or producing too much smoke.
- During self-cleaning the surfaces become hotter than in normal use, so keep the children
away.
- Never line the inside of the oven to save on cleaning: by causing overheating you will damage
the enamel with which the inside of the oven is lined.
SAFETY RECOMMENDATIONS
••
CCooookkiinngg pprroocceedduurreess
wwhhiicchh hhaarrddllyy ssooiill tthhee oovveenn
SS
CCooookkiinngg pprroocceedduurreess
wwhhiicchh ddoo ssooiill tthhee oovveenn
CCooookkiinngg pprroocceedduurreess
wwhhiicchh sseerriioouussllyy ssooiill tthhee oovveenn
Biscuits, vegetables, cakes and
pastries, quiches, soufflés, etc.
Meats, fish, (in a dish) stuffed
vegetables.
Large spit-roasts.
Cooking without spatters: self-
cleaning isn’t called for.
Pyrolysis is warranted after three
cooking cycles.
Pyrolysis can be performed after
one cooking application of this
kind if there is a lot of splattering.
- Your oven cleans itself by destroying the grime caused by splashes and spills at high temperatures.
- Fumes caused by the process are destroyed by being passed through a catalyser.
You should not wait until the oven is coated in grease to initiate a cleaning cycle.
IInn wwhhaatt ssiittuuaattiioonnss sshhoouulldd sseellff--cclleeaanniinngg bbee uusseedd??
- When the oven gives off smoke during preheating or smokes excessively during cooking.
- When you can still smell you oven when it has cooled down after various cooking procedures
(lamb, fish, grills, etc.)
Pyrolysis is not necessary after each cooking cycle, but simply when the level of grime warrants
it,
-.In order to adapt to any situation, this oven has 2 types of self-cleaning procedures.
- A savings cycle lasting 1 hour 30 mins (including the cooling time for the oven, the door
will be locked for 2 hours); this cycle consumes nearly 25% less than the standard self-cleaning
cycle. Used regularly (every two or three meat cooking sessions) this cycle lets you keep your
oven clean under any circumstances.
- A standard self-cleaning cycle lasts 2 hours (including the cooling time of the oven, the
door will be locked for 2 1/2 hours) and ensures effective cleaning of a very grimy oven.
- As a safety measure, the door is locked as soon as the internal oven temperature
exceeds cooking temperatures. It is then impossible to open the door, even if the function selector knob is set at 0.
SELF-CLEANING OVEN
••
99641131 ML BIO.qxp 05/01/2007 14:05 Page 57
Page 58

58
6 / CARING FOR AND CLEANING YOUR APPLIANCEEN
Ensure that the analog programmer displays the
time of day and that it is not flashing.
All you have to do is position your cooking selectorswitch on the “Self-cleaning” position or the
“ECO self-cleaning” position (fig.1).
The period of time during which the oven cannot
be used is 2hrs 30 mins (2 hours for cleaning + 30
minutes cooling time) in “Self-cleaning” mode or
2hrs (1hr 30 mins cleaning + 30 minutes cooling
time) en “ECO self-cleaning” mode (this period of
time cannot be changed). This period of time includes cooling up to the time the door unlocks.
The display will tell you at what time you can use
your oven again (fig.2).
The on the display will tell you that you are in a
self-cleaning cylcle or ECO in an ECO self-
cleaning cycle.
During the self-cleaning cycle, a padlock appears on the display, to tell you that the door is
locked (fig.3).
At the end of the self-cleaning cycle, the display
will tell you (see (fig.2).
When the padlock has disappeared from the
display, the door can now be opened.
Rotate the function selector to the 0 position
(fig.4).
When the oven is cool, use a damp cloth to remove the white ashes. The oven is clean and once
again ready for the cooking application of your
choice.
fig.1
Warning
Before beginning a self-cleaning cycle, remove the pots and pans from the oven and
clean any major spill residue.
IMMEDIATE SELF-CLEANING
••
fig.2
fig.4
fig.3
Warning
Do not hang a towel or cloth on the oven handle.
99641131 ML BIO.qxp 05/01/2007 14:05 Page 58
Page 59

59
DELAYED SELF-CLEANING
••
Follow the instructions described in the
“immediate self-cleaning” paragraph, then
Press button “ ”, the indicator at the end
of the cooking cycle flashes to show that setting can now be carried out.
Press the + or - buttons to set the time
desired.
Example: Self-cleaning ends at 4:00 pm.
After these actions, self-cleaning is delayed to
that it finishes at 4:00.
When the pyrolysis cycle is over, return the
function selector to 0.
6 / CARING FOR AND CLEANING YOUR APPLIANCE
EN
99641131 ML BIO.qxp 05/01/2007 14:05 Page 59
Page 60

60
7 / TROUBLESHOOTINGEN
Tip
In all cases, if your efforts have been unsuccessful, contact the After-Sales Service
Department immediately.
IIff yyoouu hhaavvee aannyy ddoouubbttss aabboouutt tthhee ssaattiissffaaccttoorryy wwoorrkkiinngg ooff yyoouurr oovveenn
this does not nec-
essarily mean there has been a malfunction.
IInn aannyy eevveenntt,, cchheecckk tthhee ffoolllloowwiinngg iitteemmss::
Warning
- The appliance may only be repaired by professionals. Repairs not carried out according
to the rules may be a source of danger to the user.
YYOOUU OOBBSSEERRVVEE
TTHHAATT……
PPOOSSSSIIBBLLEE CCAAUUSSEESS WWHHAATT SSHHOOUULLDD YYOOUU DDOO??
TThhee oovveenn iiss nnoott
hheeaattiinngg
- The oven is not connected.
- Your fuse is out of order.
- The selected temperature is
too low.
➡ Plug in your oven.
➡ Replace the fuse in your electrical
set-up and check its capacity (16A).
➡ Increase the selected temperature.
TThhee ppaaddlloocckk iiss
ffllaasshhiinngg
- Problem with the door’s locking mechanism.
➡ Call the After-Sales Service Department.
TThhee lliigghhtt iinn yyoouurr
oovveenn iiss nnoo lloonnggeerr
wwoorrkkiinngg..
- The light is out of order.
- The oven is not connected or
the fuse is not working.
➡ Replace the bulb.
➡ Plug in your oven or replace the
fuse.
TThhee ppyyrroollyyssiiss
cclleeaanniinngg ccyyccllee ddooeess
nnoott bbeeggiinn..
- The door is not properly
closed.
- The locking system is defective.
➡ Make sure the door is closed.
➡ Call the After-Sales Service Depart-
ment.
YYoouurr oovveenn ssttaarrttss
bbeeeeppiinngg..
- During cooking.
- At the end of cooking.
➡ The recommended temperature of
your choice has been reached.
➡ Your programmed cooking cycle is
finished.
TThhee ccoooo ll ii nn gg ffaann
kkeeeeppss wwoorrkkiinngg wwhheenn
tthhee oovveenn hhaass bb eeeenn
sswwiittcchheedd ooffff..
- The fan should work for a
maximum of one hour after
cooking, or when the oven
temperature is greater than
125°C
- If it does not stop after 1 hour.
➡ Open the door to speed up oven
cooling
➡ Call the After-Sales Service Depart-
ment.
TThhee oo vveenn ddooeess nnoott
hheeaatt uupp aanndd ““DDEEMMOO””
ffllaasshheess uupp oonn tthhee ddiiss--
pp ll aayy aa bboouutt ee vveerryy
88 sseeccoonnddss..
- Your oven has been programmed for a demonstration.
➡ Set the time at 0:00. Press + and -
for 10 seconds until you hear a beep.
99641131 ML BIO.qxp 05/01/2007 14:05 Page 60
Page 61

61
EN
7 / TROUBLESHOOTING
Bulb
Unscrew
View port
The bulb is located on the ceiling of your oven’s
cavity.
a) Disconnect the oven.
b) Unscrew the view port (fig.1).
c) Unscrew the bulb in the same direction.
Bulb specifications:
- 15 W
- 220-240 V ~
- 300°C
- E 14 cap
d) Replace the bulb then reposition the view
port and reconnect your oven.
CHANGING THE BULB
••
Tip
To unscrew the view port and the light, use a rubber glove, which will make disas-
sembly easier.
Warning
- Disconnect your oven before performing any task on the bulb to avoid the risk of elec-
tric shock and, if necessary, let the appliance cool down.
fig.1
99641131 ML BIO.qxp 05/01/2007 14:05 Page 61
Page 62

62
EN
8 / “EASY COOK” ADVANTAGES AND PRINCIPLES
Using the “ ” function means you no longer have to select the temperature and cooking
time
These two parameters are automatically calculated by your oven in order to give you optimal
cooking.
This “ ”cooking mode takes place in 2 steps:
1) The first step (acquisition) during which the oven will use its electronic sensors to record the
specific cooking data for your dish.
This step is represented by flashing in the right-hand area of the display: this may take
between 5 and 40 minutes depending on cooking mode chosen.
DO NOT OPEN THE DOOR DURING THIS PHASE or you may disturb the recording of data.
2) In the second step (calculation, the oven sets the cooking time necessary. The icon for the
“ ” animation appears. The oven shows the cooking time remaining as well as the actual
time at the end of cooking. If you wish to interrupt the dish (basting, turning the piece of food,
etc) you may open.
3) At the end of cooking you will hear a series of beeps.
ADVANTAGES AND PRINCIPLES
••
HOW TO USE THE APPLIANCE
••
a) IInstant cooking:
Position the cooking selector on the “ ” function.
Using the “ ” button, choose the dish.
Place it on the shelf recommended on the display. Close the door. The oven begins cooking.
The seeking procedure begins, shown by the animation on the display: a time is suggested.
When cooking is complete, the oven emits several beeps.
b) DDelayed cooking:
Position the cooking selector on “ ”.
Choose your dish by pressing the “ ” button.
Place your dish in the oven and close the door
Position the mode selector on
“”
.
Press the + or - buttons to set the end cooking time desired.
Example.: End of cooking 1:00 pm.
After these actions, the start of cooking is delayed.
The cooking end time is estimated based on the average basic time. Just as for immediate
cooking, this time will be optimised during the cooking programme; therefore, the time may vary
by a few minutes (over or under) compared to the initial time selected.
99641131 ML BIO.qxp 05/01/2007 14:05 Page 62
Page 63

63
EN
8 / “EASY COOK” ADVANTAGES AND PRINCIPLES
TIPS
••
As soon as the icon “ ” stops flashing, you
may open the oven door
If, however, you open the door while the icon is
lit, your oven sounds a warning beep and the
dish icons flash.
Cooking in “ ” mode MUST START WITH
THE OVEN COLD, you should wait until the
oven has completely cooled down before
beginning a second cooking cycle in this mode
(if you do not, the cooking time indicators,
“ ” and the dishes flash on the display,
while a series of beeps will prevent you from
starting
to cook).
9 / IF AN OPERATING FAULT OCCURS
WWHHAATT SSHHOOUULLDD YYOOUU DDOO??
TTHHEE CCAAUUSSEESS
PPOOSSSSIIBBLLEE
YYOOUU SSHHOOUULLDD
CCHHEECCKK TTHHAATT……
- You have opened the door
during the seek stage: the programme is cancelled.
- The oven is hot
BBeeeeppiinngg ++ tthhee EEAASSYY
CCOOOOKK iiccoonn ffllaasshheess
➡ Allow the oven to cool down before re-starting cooking.
99641131 ML BIO.qxp 05/01/2007 14:05 Page 63
Page 64

64
FFIISSHH
••
Whole fish (sea bream, hake, trout, mackerel, etc.) with herbs and spices
and white wine, roast fish
TIPS:
- use this function for whole fish, cooked in the dish (for grilled fish or fish cooked in foil,
the oven must be preheated).
RROOAASSTT BBEEEEFF
••
Roast beef (rare to medium rare)
TIPS:
- If you prefer meat well-done, opt for a traditional cooking function.
- take the roast from the refrigerator at least 1 hour before beginning cooking (see tips on
the next page). Remove most of the bacon strips, place the roast on an earthenware
dish with a little water and a teaspoonful of oil. Add salt only when cooking is finished.
PPIIZZZZAA
••
ffrreesshh rreeaaddyy--mmaaddee ppiizzzzaa
•
rreeaaddyy ttoo uussee ppiizzzzaa bbaasseess
•
ssppeecciiaall ppiizzzzaa bbaasseess
•
ffrroozzeenn ppiizzzzaa ((rroolllleedd iinn cchheeeessee,, ssmmaallll llooaavveess ((ppaacckkeedd))
TIPS:
•
put it on the grill for a crispy crust
•
put it on the enamel plate to get a soft crust.
CCHHIICCKKEENN
••
cchhiicckkeennss ffrroomm 11 kkgg ttoo11..88 kkgg
•
dduucckklliinngg,, gguuiinneeaa ffoowwll,, eettcc..
TIPS:
- spit cooking: don’t forget to put a drip tray on the first shelf to catch the fat.
- cooking in a dish: preferably made of earthenware to avoid grease spattering
- prick the poultry skin to avoid spattering.
TTAARRTTSS
••
FFrreesshh ttaarrttss
•
FFrroozzeenn ttaarrttss
•
QQuuiicchheess
•
RRaaww ffrroozzeenn mmeeaatt ppaassttrriieess
TIPS:
- use a non-stick aluminium mould: the pastry will be crisper underneath l
- ready-made frozen tarts and quiches: remove the aluminium tray before putting them on
the grill
VVEEGGEETTAABBLLEESS
•
ttoommaattooeess,, ssttuuffffeedd ppeeppppeerrss
•
llaassaaggnnaa ((ffrreesshh oorr ffrroozzeenn))
•
ccoottttaaggee ppiiee,, bbrraannddaaddee,, ppaassttrryy ggrraattiinnss,, eettcc..
TIPS:
- carefully match the size of your plate to the amount you have to cook to prevent the juice
boiling over.
8 / EASY COOK COOKING MODESEN
99641131 ML BIO.qxp 05/01/2007 14:05 Page 64
Page 65

65
EN
11 / TIPS AND HINTS
FFIISSHH
When you buy fish, the smell should be pleasant and not too fishy.
The body should be firm and rigid and the scales should be firmly stuck to the skin;
the eye should be bright and rounded and gills will appear shiny and moist.
BBEEEEFF
(MEAT IN GENERAL)
It is essential to take all meat out of the refrigerator well before cooking: cold-hot
temperature shocks toughen meat; this way you will produce a roast beef that is golden
outside, red inside and warm in the middle. Do not salt before cooking: salt absorbs the
blood and dries out the meat. Use a spatula to turn the meat: if you prick it the blood will
drain away. Always let meat sit after cooking for 5 to 15 minutes: wrap it in a sheet of
aluminium and place it just inside a warm oven: this way the blood, drawn to the outside,
will flow back and moisten the roast.
Use earthenware roasting dishes: glass promotes grease spattering.
Do not cook in the enamelled drip tray.
PPIIZZZZAA::
To prevent cheese or tomato sauce from dripping in the oven, you can place a piece of
greaseproof paper between the grill and the pizza.
CCHHIICCKKEENN::
Carefully match the plate to the size of the chicken so that the grease doesn’t burn.
TTAARRTTSS//QQUUIICCHHEESS::
Do not use glass and porcelain dishes, they are too thick and make cooking time longer,
preventing the base from turning crisp and golden.
With fruit, the bottom of the tart is in danger of becoming soggy: just add a few spoonfuls
of fine semolina, crushed biscuit crumbs, almond powder or tapioca, which will absorb the
juice during cooking.
With high-water content or frozen vegetables (leeks, spinach, broccoli or tomatoes) you can
sprinkle on a tablespoon of cornmeal.
VVEEGGEETTAABBLLEESS
To make a smoother potato gratin, the potatoes should be precooked cut into medallions in
milk or milk and cream for about twenty minutes.
To make stuffed tomatoes: after having cut open a head, remove the seeds, salt the inside
and put them back on the grill so that they drain before you stuff them.
99641131 ML BIO.qxp 05/01/2007 14:05 Page 65
Page 66

66
FFIISSHH
Black sea bream with dry cider: 1 black sea bream weighing 1.5 kg.
500 g button mushrooms.
2 tart apples.
2 shallots
2 tablespoons of heavy cream
100 g butter.
1/2 litre cider. Salt, pepper.
Clean and scale the fish. Place it in a buttered dish on the finely minced shallots and sliced
mushrooms. Add the cider, salt and pepper and a few knobs of butter. Place it in the oven. Cook the
apples in unpeeled quarters in the butter. When cooking is complete, transfer the fish to a warm dish,
strain the juice and deglaze the dish with the cream.
Add the cream to the juice, serve with apples and mushrooms.
RROOAASSTT BBEEEEFF
Accompanying sauces.
PARSLEY S
AUTERNES or ROQUEFOR
T SAUCE
Sauté 2 tablespoons of minced shallots in the butter.
Add 10 cl Sauternes, let it evaporate.
Add 100 g Roquefort, let it melt slowly.
Add 20 cl liquid cream, salt, pepper. Bring to a boil.
C
OGNAC sauce with PINK PEPPER:
Sauté 2 tablespoons of minced shallots in the butter.
Add 15 cl Sauternes, let it evaporate.
Add the yolk of an egg, 1 spoonful of ketchup, 200 g of butter Salt, pepper.
While beating, add 3 spoonfuls of Cognac and 1 teaspoonful of crushed red berries.
FR
UITY PEAR sauce with CRESS:
Cook 1 pear, covered in white wine. Drain, mix.
Blanch 1/2 bunch of cress, drain, chop.
Sauté 1 tablespoon of chopped shallots in the butter.
Moisten with the cooking juices. Evaporate off.
Add the pear, the cress and 20 cl of liquid cream.
Salt, pepper, lightly boil.
Place in the oven. Cut the unpeeled apples into quarters and simmer them in the butter. When cooking
is complete, transfer the fish to a warm dish, strain the juice and deglaze the dish with the cream.
Add the cream to the juice, serve with apples and mushrooms.
PPIIZZZZAA
Base: 1 pizza crust
*v
egetable: 6 tablespoons tomato sauce + 100 g diced zucchini + 50 g diced bell peppers + 50 g sliced eggplant + 2 small sliced tomatoes + 50 g shredded gruyere + oregano + salt +
pepper.
*r
oquefort and smoked ham: 6 tablespoons tomato sauce + 100 g smoked ham + 100 g
roquefort in small chunks + 50 g walnuts + 60 g shredded gruyere.
*sausag
e and fromag
e blanc: 200 g drained fromage blanc spread on the crust + 4
sausages, sliced + 150 g ham, slivered + 5 olives + 50 g shredded gruyere + oregano + salt + pepper.
12 / A FEW RECIPESEN
99641131 ML BIO.qxp 05/01/2007 14:05 Page 66
Page 67

67
CCHHIICCKKEENN
Stuff with a good bunch of fresh tarragon or coat it with a mixture made of 6 cloves of
crushed garlic and a big pinch of salt and a few peppercorns.
TTAARRTTSS // QQUUIICCHHEESS
Non-stick aluminium mould 30 cm in diameter.
GGllaazzeedd ppuuffff--ppaassttrryy aappppllee ttaarrtt::
1 puff pastry base spread out with its sheet, pricked with a fork.
200 ml cream brought to a boil with a vanilla bean.
2 beaten eggs with 30 g sugar, add the cooled cream.
2 apples cut into cubes rolled in 70 g crushed pralines.
Remove the cream and the apples. Place in the oven.
QQUUIICCHHEESS ::
Base: 1 aluminium mould, diameter 27 to 30 cm
1 pressed base, ready to use
3 beaten eggs + 50 cl heavy cream
salt, pepper, nutmeg.
Assor
ted garnishes: 200 g of precooked bacon pieces,
or - 1 kg cooked endives + 200 g shredded gouda
or - 200 g broccoli + 100 g larding bacon + 50 g blue cheese
or- 200 g of salmon + 100 g of drained cooked spinach
VVEEGGEETTAABBLLEESS
TToommaattooeess ssttuuffffeedd wwiitthh hhoott ggooaatt’’ss cchheeeessee..
8 tomatoes
300g of fresh goat’s cheese
4 soupspoons of oilve oil
1 small bunch of fine herbs (chives or basil)
Salt, pepper.
Wash the tomatoes, remove the core and carefully remove the pulp.
Turn them around to drain them well.
Using a fork, mix the cheese and olive oil, add the fine herbs chopped mint, salt
and pepper
Replace the stalk and arrange them on a plate. Place in the oven.
Serve warm on a bed of green salad.
EN
12 / A FEW RECIPES
99641131 ML BIO.qxp 05/01/2007 14:05 Page 67
Page 68

68
99641131 ML BIO.qxp 05/01/2007 14:05 Page 68
Page 69

66 //
KUNDENDIENST
DE
Any maintenance on your equipment should be undertaken by:
- either your dealer,
- or another qualified mechanic who is an authorized agent for the brand appliances.
When making an appointment, state the full reference of your equipment (model, type and serial
number). This information appears on the manufacturer's nameplate attached to your equipment.
Eingriffe an Ihrem Gerät dürfen nur:
- von Ihrem Händler oder
- von einem sonstigen Fachmann und Vertragshändler der Marke durchgeführt werden.
Geben Sie bei der Meldung einer Störung die vollständige Typenbezeichnung Ihres Gerätes an
(Modell, Typ, Seriennummer). Diese Angaben finden Sie auf einem an Ihrem Gerät angebrachten Schild.
66 //
AFTER-SALES SERVICE
EN
66 //
SERVICIO TÉCNICO
ES
Qualquer intervenção no seu aparelho deve ser realizada:
- quer pelo seu revendedor,
- quer por outro profissional qualificado autorizado pela marca.
Ao chamá-los, indique a referência completa do seu aparelho (modelo, tipo e número de série).
Estas informações figuram na placa de identificação fixada no aparelho.
Las intervenciones que requiera la máquina deberán ser efectuadas:
- por el revendedor,
- o por cualquier profesional cualificado depositario de la marca.
Al llamar, mencione la referencia completa de la máquina (modelo, tipo y número de serie).
Estos datos figuran en la placa de identificación situada en la máquina.
66 //
SERVIZIO POST-VENDITA E RELAZIONI CON I CONSUMATORI
IT
66 //
SERVICEDIENST
NL
Qualquer intervenção no seu aparelho deve ser realizada:
- quer pelo seu revendedor,
- quer por outro profissional qualificado autorizado pela marca.
Ao chamá-los, indique a referência completa do seu aparelho (modelo, tipo e número de série).
Estas informações figuram na placa de identificação fixada no aparelho.
De eventuele ingrepen in de machine moeten worden uitgevoerd :
- of door uw vakhandelaar,
- of door een andere gekwalificeerd technicus van dit merk.
Tijdens het telefoneren, dient u de complete referentie op te geven van uw machine (model,
type, serienummer). Deze informatie staat op het typeplaatje op de machine.
66 //
SERVIÇO PÓS-VENDA
PT
69
99641131 ML BIO.qxp 05/01/2007 14:05 Page 69
Page 70

Dans le souci d'une amélioration constante de nos produits, nous nous réservons le droit d'apporter à leurs caractéristiques techniques, fonctionnelles ou esthétiques toutes modifications
liées à leur évolution.
Important :
Avant de mettre votre appareil en marche, veuillez lire attentivement ce guide d'instal-
lation et d'utilisation afin de vous familiariser plus rapidement avec son fonctionnement.
70
DE
02
EN
36
NL
70
104
FR
PT
136
Chère Cliente, Cher Client,
Vous venez d'acquérir un four
BBRRAANNDDTT
et nous vous en remercions.
Nous avons mis dans cet appareil toute notre passion, notre savoirfaire pour qu'il réponde au mieux à vos besoins. Innovant, performant,
nous l'avons conçu pour qu'il soit aussi toujours facile à utiliser.
Vous trouverez également dans la gamme des produits
BBRRAANNDDTT
, un
vaste choix de fours, de fours à micro-ondes, tables de cuisson, de
cuisinières, de lave-vaisselle, de lave-linge, de sèche-linge, de réfrigérateurs et congélateurs que vous pourrez coordonner à votre nouvelle hotte
BBRRAANNDDTT
.
Bien entendu, dans un souci permanent de satisfaire le mieux possible vos exigences vis à vis de nos produits, notre service consommateurs est à votre disposition et à votre écoute pour répondre à
toutes vos questions ou suggestions (coordonnées à la fin de ce
livret).
Et connectez-vous aussi sur notre site
wwwwww..bbrraannddtt..ccoomm
où vous
trouverez tous nos produits, ainsi que des informations utiles et
complémentaires.
BBRRAANNDDTT
99641131 ML BIO.qxp 05/01/2007 14:05 Page 70
Page 71

71
SOMMAIRE
FR
1 / A L’ATTENTION DE L’UTILISATEUR
••
Consignes de sécurité
______________________________________
72
••
Environnement
____________________________________________
73
2 / INSTALLATION DE VOTRE APPAREIL
••
Choix de l’emplacement
_____________________________________
74
••
Encastrement
_____________________________________________
74
••
Raccordement électrique
____________________________________
75
••
Changement de câble d’alimentation
__________________________
76
3 / DESCRIPTION DE VOTRE APPAREIL
••
Présentation de votre four
___________________________________
77
••
Description des accessoires
_________________________________
78
••
Description de votre programmateur __________________________ 79
4 / UTILISATION DE VOTRE APPAREIL
º
Comment régler l’heure _________________________________ 80
º
Comment modifier l’heure _______________________________ 80
º
Cuisson immédiate _____________________________________ 81
º
Cuisson programmée ___________________________________ 82
º
Cuisson économique ___________________________________ 84
º
Utilisation de la fonction Gril+ ____________________________ 85
º
Utilisation de la fonction minuterie ________________________ 86
º
Luminosité de l’afficheur ________________________________ 86
5 / LES MODES DE CUISSON DU FOUR_____________________________ 87
6 / ENTRETIEN ET NETTOYAGE DE VOTRE APPAREIL
••
Nettoyage de la surface extérieure
____________________________
89
••
Nettoyage de la porte
_______________________________________
89
••
Nettoyage du four pyrolytique ________________________________ 91
••
Consignes de sécurité ______________________________________ 91
••
Démarrage du Nettoyage
____________________________________
92
7 / ANOMALIES DE FONCTIONNEMENT ____________________________ 94
••
Changement de l’ampoule
___________________________________
95
8 / AVANTAGES ET PRINCIPE “AUTO COOK” ________________________ 96
••
Modes de cuisson
_________________________________________
98
••
Recettes
__________________________________________________
100
8 / SERVICE APRES-VENTE
••
Interventions
______________________________________________
103
••
Relations consommateurs
___________________________________
103
99641131 ML BIO.qxp 05/01/2007 14:06 Page 71
Page 72

72
CONSIGNES DE SÉCURITÉ
— Cet appareil a été conçu pour être utilisé
par des particuliers dans leur lieu d'habitation.
Il est destiné exclusivement à la cuisson des
denrées alimentaires. Ce four ne contient
aucun composant à base d'amiante.
— Cet appareil doit être utilisé par des adultes.
Veillez à ce que les enfants n'y touchent pas
et ne l'utilisent pas comme un jouet. Assurezvous qu'ils ne manipulent pas les commandes
de l'appareil.
— A la réception de l'appareil, déballez-le ou
faites le déballer immédiatement. Vérifiez son
aspect général. Faites les éventuelles réserves par écrit sur le bon de livraison dont vous
gardez un exemplaire.
— Votre appareil est destiné à un usage
domestique normal. Ne l'utilisez pas à des
fins commerciales ou industrielles ou pour
d'autres buts que celui pour lequel il a été
conçu.
— Ne modifiez pas ou n'essayer pas de modifier les caractéristiques de cet appareil. Cela
représenterait un danger pour vous.
— Eloignez les jeunes enfants de l'appareil
pendant son fonctionnement. Vous éviterez
ainsi qu'ils se brûlent en renversant un récipient de cuisson. De plus la façade de votre
appareil est chaude pendant l'utilisation et le
nettoyage (pyrolyse).
— Ne tirez jamais votre appareil par la poignée
de la porte.
— Avant d'utiliser votre four pour la première
fois, chauffez le à vide pendant 15 minutes
environ. Assurez-vous que la pièce est suffisamment aérée. Vous constaterez peut être
une odeur particulière ou un petit dégagement de fumée. Tout ceci est normal.
— Lors de la cuisson, assurez-vous que la
porte de votre four est bien fermée afin que le
joint d'étanchéité remplisse correctement sa
fonction.
— Lors de son utilisation, l'appareil devient
chaud. Ne touchez pas les éléments chauffants situés à l'intérieur du four. Vous risqueriez de graves brûlures.
— En enfournant ou en sortant vos plats du
four, n'approchez pas vos mains des éléments
chauffants supérieurs, utilisez des gants thermiques de cuisine.
— Après une cuisson, ne prenez pas à main
nue la casserolerie (grille, tournebroche,..),
— Ne placez jamais de papier d'aluminium
directement en contact avec la sole (voir chapitre description de votre four), la chaleur
accumulée pourrait entraîner une détérioration
de l'émail.
— Sur la porte ouverte du four, ne posez pas de
charges lourdes, et assurez vous qu'un enfant
ne puisse ni monter ni s'asseoir.
— Pour éviter d'endommager les commandes
de votre appareil, ne laissez pas la porte
ouverte lorsqu'il est en fonctionnement ou
encore chaud.
— Pour toute intervention de nettoyage dans la
cavité du four, le four doit être arrêté.
— Une utilisation intensive et prolongée de l'appareil peut nécessiter une aération supplémentaire en ouvrant la fenêtre ou en augmentant la puissance de la ventilation mécanique.
— En plus des accessoires fournis avec votre
four, n'utilisez que des plats résistants à de
hautes températures (suivez les instructions
des fabricants).
— Après utilisation de votre four, assurez-vous
que toutes les commandes se trouvent sur la
position arrêt.
— N'utilisez jamais d'appareils à vapeur ou à
haute pression pour nettoyer le four (exigences relatives à la sécurité électrique).
— Pour votre sécurité, votre four est équipé
d’un ARRET AUTOMATIQUE, si par mégarde
vous oubliez d’éteindre votre four. Après 10
heures de fonctionnement, la fonction AS
(Automatique Stop) s’active et votre four s’arrête de chauffer. AS s’affiche à la place de
l’heure et une série de 2 bips successifs est
émise pendant un certain temps.
••
Important
Conservez cette notice d'utilisation
avec votre appareil. Si l'appareil devait être
vendu ou cédé à une autre personne, assurez-vous que la notice d'utilisation l'accompagne. Merci de prendre connaissance de
ces conseils avant d'installer et d'utiliser
votre appareil. Ils ont été rédigés pour votre
sécurité et celle d'autrui.
11 //
A L’ATTENTION DE L’UTILISATEUR
FR
99641131 ML BIO.qxp 05/01/2007 14:06 Page 72
Page 73

73
RESPECT DE L’ENVIRONNEMENT
••
— Les matériaux d'emballage de cet appareil sont recyclables. Participez à leur recyclage et contribuez ainsi à la protection de l'environnement en les déposant dans les conteneurs municipaux
prévus à cet effet.
— Votre appareil contient également de nombreux matériaux recyclables. Il est donc marqué de ce
logo afin de vous indiquer que les appareils usagés ne doivent pas être mélangés avec d'autres
déchets. Le recyclage des appareils qu'organise votre fabricant sera ainsi réalisé dans
les meilleures conditions, conformément à la directive européenne 2002/96/CE sur les
déchets d'équipements électriques et électroniques. Adressez vous à votre mairie ou
à votre revendeur pour connaître les points de collecte des appareils usagés les plus
proches de votre domicile.
— Nous vous remercions pour votre collaboration à la protection de l'environnement.
Attention
LL''iinnssttaallllaattiioonn eesstt rréésseerrvvééee aauuxx iinnssttaallllaatteeuurrss eett tteecchhnniicciieennss qquuaalliiffiiééss..
CCeett aappppaarreeiill eesstt ccoonnffoorrmmee aau
uxx ddiirreeccttiivveess eeuurrooppééeennnneess ssuuiivvaanntteess ::
-- DDiirreeccttiivvee BBaassssee TTeennssiioonn 7733//2233//CCEEEE mmooddiiffiiééee ppaarr llaa ddiirreeccttiivvee 9933//6688//CCEEEE ppoouurr ll’’aappppoossiittiioonn dduu
mmaarrqquuaaggee CCEE..
-- DDiirreeccttiivvee CCoommppaattiibbiilliittéé EElleeccttrroommaaggnnééttiiqquuee 8899//333366//CCEEEE mmo
oddiiffiiééee ppaarr llaa ddiirreeccttiivvee 9933//6688//CCEEEE
ppoouurr ll’’aappppoossiittiioonn dduu mmaarrqquuaaggee CCEE..
-- RRèègglleemmeenntt CCEE nn°° 11993355//22000044 ccoonncceerrnnaanntt lleess mmaattéérriiaauuxx eett oobbjjeett ddeessttiinnééss àà eennttrreerr eenn ccoonnttaacctt
aavveecc ddeess ddeennrrééeess aalliimmeennttaaiirreess..
1 / A L’ATTENTION DE L’UTILISATEUR
FR
99641131 ML BIO.qxp 05/01/2007 14:06 Page 73
Page 74

74
meuble par 2 vis au travers des trous prévus à
cet effet sur les montants latéraux (fig.1).
ENCASTREMENT
Pour ce faire :
1) Retirez les cache vis en caoutchouc pour accéder aux trous de fixation.
2) Effectuez un trou de Ø 2 mm dans la paroi
du meuble pour éviter l’éclatement du bois.
3) Fixez le four avec les 2 vis.
4) Remettez les cache vis en caoutchouc
(ceux-ci servent également à amortir la fermeture de la porte du four).
(*) si le meuble est ouvert, son ouverture doit
être de 70 mm (maxi).
Conseil
Pour être assuré d’avoir une installation conforme, n’hésitez pas à faire appel à
un spécialiste électroménager.
••
CHOIX DE L’EMPLACEMENT
Les schémas ci-dessus déterminent les cotes
d'un meuble qui permettra de recevoir votre
four.
Le four peut indifféremment être installé sous
un plan de travail ou dans un meuble en colonne (ouvert* ou fermé) ayant les dimensions
d’encastrement adaptées (voir schéma cicontre).
Votre four possède une circulation d’air optimisée qui permet d’obtenir des résultats de cuisson et de nettoyage remarquables en respectant les éléments suivants :
• Centrez le four dans le meuble de façon à
garantir une distance mini de 5 mm avec le
meuble voisin.
• La matière du meuble d’encastrement ou le
revêtement de celui-ci doit résister à la chaleur.
• Pour plus de stabilité, fixez le four dans le
••
Fig. 01
2 / INSTALLATION DE VOTRE APPAREILFR
99641131 ML BIO.qxp 05/01/2007 14:06 Page 74
560
550
585
70
550
Page 75

75
••
RACCORDEMENT ELECTRIQUE
Compteur 20A Mono
220-240V~ 50Hz
Prise de courant
2 pôles + terre
norme CEI 60083
Ligne Mono 220-240 V ~
Câble
d'alimentation
longueur 1,50 m
environ
Disjoncteur différentiel ou
fusible 16A
La sécurité électrique doit être assurée par un
encastrement correct. Lors de l'encastrement
et des opérations d'entretien, l'appareil doit
être débranché du réseau électrique, les fusibles doivent être coupés ou retirés.
Le raccordement électrique est à réaliser
avant la mise en place de l'appareil dans le
meuble.
Vérifiez que:
- la puissance de l'installation est suffisante,
- les lignes d'alimentation sont en bon état
- le diamètre des fils est conforme aux règles
d'installation.
Votre four doit être branché avec un cordon
d'alimentation (normalisé) à 3 conducteurs de
1,5mm
2
(1ph + 1N + terre) qui doivent être rac-
cordés sur réseau 220-240V
~monophasé
par l'intermédiaire d'une prise de courant 1ph
+1 neutre + terre normalisée CEI 60083 ou
d'un dispositif à coupure omnipolaire ou
conformément aux règles d'installation.
Attention
Le fil de protection (vert-jaune)
est relié
à la borne de l'appareil et doit être relié
à la terre de l'installation.
Dans le cas d'un branchement avec prise de
courant, celle-ci doit être accessible après
installation.
Le fusible de l'installation doit être de 16 ampères.
Si le câble d'alimentation est endommagé, il
doit être remplacé par un câble ou un ensemble spécial disponible auprès du fabricant ou de son Service Après Vente.
2 / INSTALLATION DE VOTRE APPAREIL
FR
99641131 ML BIO.qxp 05/01/2007 14:06 Page 75
Page 76

••
——
Le câble d’alimentation (H05 RR-F, H05 RN-F ou H05 VV-F) doit avoir une longueur suffisante
pour être raccordé au four à encastrer posé au sol devant le meuble.
Pour cela l’appareil doit être déconnecté du réseau :
——
Ouvrez la trappe située en bas à droite du capot arrière en dévissant les 2 vis, puis faîtes pivo-
ter la trappe.
——
Dénudez chaque fil du nouveau câble d’alimentation sur 12mm.
——
Torsadez soigneusement les brins.
——
Desserrez les vis du bornier et retirez le cordon d’alimentation à changer.
•
Introduire le câble d’alimentation par le côté du capot dans le serre-câble situé à droite du
bornier.
——
Tous les brins des fils d’alimentation doivent être emprisonnés sous les vis.
— Le fil de la phase sur la borne L.
— Le fil de terre couleur vert-jaune doit être relié à la borne .
——
Le fil du neutre (bleu) sur la borne N.
——
Vissez à fond les vis du bornier et vérifiez le branchement en tirant sur chaque fil.
——
Fixez le câble au moyen du serre-câble situé à droite du bornier.
——
Refermez la trappe à l’aide des 2 vis.
Attention
NNoottrree rreessppoonnssaabbiilliittéé nnee ssaauurraaiitt êêttrree eennggaaggééee eenn ccaass dd''aacccciiddeenntt oouu dd''iinncciiddeenntt ccoonnssééccuuttiiff
àà uunnee mmiissee à
à llaa tteerrrree iinneexxiissttaannttee,, ddééffeeccttuueeuussee oouu iinnccoorrrreeccttee..
SSii ll''iinnssttaallllaattiioonn éélleeccttrriiqquuee ddee vvoottrree hhaabbiittaattiioonn n
néécceessssiittee uunnee mmooddiiffiiccaattiioonn ppoouurr llee bbrraanncchheemmeenntt
ddee vvoottrree aappppaarreeiill,, ffaaiitteess aappppeell àà uunn éélleeccttrriicciieenn qquuaalli
iffiiéé..
SSii llee ffoouurr pprréésseennttee uunnee qquueellccoonnqquuee aannoommaalliiee,, ddéébbrraanncchheezz ll''aappppaarreeiill oouu eennlleevveezz llee ffuussiibbllee ccoorr--
rr
eessppoonnddaanntt àà llaa lliiggnnee ddee bbrraanncchheemmeenntt dduu ffoouurr..
CHANGEMENT DE CABLE D’ALIMENTATION
2 / INSTALLATION DE VOTRE APPAREILFR
76
99641131 ML BIO.qxp 05/01/2007 14:06 Page 76
Page 77

77
••
PRESENTATION DE VOTRE FOUR
A
B
Programmateur
Sélecteur de température
Sélecteur de fonctions
C
D
E
Lampe
Indicateur de gradins
Conseil
Ce guide d’installation et d’utilisation est valable pour plusieurs modèles. De légères
différences de détails et d’équipements peuvent apparaître entre votre appareil et les descriptions présentées.
E
D
B
A
C
3 / DESCRIPTION DE VOTRE APPAREIL
99641131 ML BIO.qxp 05/01/2007 14:06 Page 77
9
9
8
9
9
4
1
3
8
2
4
3
2
2
0
6
Page 78

78
3 / DESCRIPTION OF YOUR APPLIANCEEN
fig.3
••
Plat creux équipé d'une grille sup-
port spéciale grillades (fig.3)
Il sert à recueillir le jus et les graisses de cuisson réalisées en gril fort ou gril pulsé.
Il peut être utilisé comme plat de cuisson en
appropriant la taille du morceau à cuire (ex: une
volaille avec les légumes autour, à température
modérée).
Ne jamais poser ce plat directement sur la sole,
sauf en position GRIL.
Conseil
Pour l’entretien des plats recouverts d’un émail anti-adhérant, laissez les refroidir avant de les nettoyer manuellement avec un produit vaisselle. Evitez les éponges
grattantes. Ne coupez pas dessus avec un couteau ou une roulette à pizza métallique, utilisez plûtot des ustensiles en plastique ou en silicone.
AR
AV
••
Grille sécurité anti-basculement
(fig.1)
La grille peut être utilisée pour supporter tous
les plats et moules contenant des aliments à
cuire ou à gratiner.
Elle sera utilisée pour les grillades (à poser directement dessus).
ACCESSOIRES
••
fig.1
fig.2
••
Plat multi usages (fig.2)
Inséré dans les gradins sous la grille, il receuille les jus et les graisses des grillades. Il
peut aussi être utilisé à demi rempli d’eau pour
des cuissons au bain -marie. Evitez de poser
directement dans ce plat des rôtis ou des viandes car vous aurez automatiquement d’importantes projections sur les parois du four.
99641131 ML BIO.qxp 05/01/2007 14:06 Page 78
Page 79

79
3 / DESCRIPTION DE VOTRE APPAREIL
FR
PRESENTATION DU PROGRAMMATEUR
••
C
O
N
I
A
B
Affichage de température
Indicateur ECO (cuisson et pyrolyse)
Affichage de l’heure et durées
Indicateur du numéro de gradin
Touche de fonction EASY COOK
Touche du GRILL+
Indicateur des plats EASY COOK
Indicateur EASY COOK
C
D
E
Touches de réglage du temps
Touche du minuteur
Touche de fin de cuisson
Touche de durée de cuisson
Indicateur de fin de cuisson
Indicateur de porte verrouillée
Indicateur de durée de cuisson
Indicateur de pyrolyse
F
G
H
F
A
D
B
JK
L
H
P
G
E
I
J
K
L
M
N
O
M
P
99641131 ML BIO.qxp 05/01/2007 14:06 Page 79
Page 80

80
4 / UTILISATION DE VOTRE APPAREILFR
•
Comment régler l’heure ?
--
A la mise sous tension
L’afficheur clignote à 12:00. (fig.1)
Réglez l’heure en appuyant sur les touches +
ou - (le maintien de la touche permet d’obtenir
un défilement rapide) (fig.2).
Exemple : 12H30
L’enregistrement de l’heure ajustée est automatique au bout de quelques secondes.
L’affichage ne clignote plus.
- Pour remettre à l’heure l’horloge
Le sélecteur de fonction doit obligatoirement
être sur la position 0 (fig.1).
Appuyez simultanément sur les touches
“ ” et pendant quelques secondes
(fig.2), puis relâchez quand l’heure du jour clignote. Des bips sonores indiquent que le
réglage est alors possible.
Ajustez le réglage de l’heure avec les touches + ou - (fig.3).
L’enregistrement de l’heure ajustée est automatique au bout de quelques secondes.
fig.1
fig.2
fig.2
fig.3
fig.1
99641131 ML BIO.qxp 05/01/2007 14:06 Page 80
Page 81

81
4 / UTILISATION DE VOTRE APPAREIL
FR
•Cuisson immédiate
— Le programmateur ne doit afficher que
l’heure.
Celle-ci ne doit pas clignoter (fig.1).
Tournez le sélecteur de fonctions sur la position de votre choix.
Exemple : position (fig.2).
Votre four vous propose la température optimale pour ce type de cuisson.
Il vous est cependant possible d’ajuster la
température en actionnant la manette de sélection de température vers ++ou
--
(fig.3)
Exemple : repère de température 210°C (fig.4).
PPllaacceezz vvoottrree ppllaatt ddaannss llee ffoouurr
selon les recom-
mandations fournies.
Après ces actions, le four chauffe, et l’indica-
teur de température clignote.
Une série de bips sonores retentit lorsque le
four atteint la température choisie.
Celle-ci cesse de clignoter.
fig.2
fig.4
fig.1
fig.3
Attention
Toutes les cuissons se font porte fermée.
Attention
Après un cycle de cuisson, la turbine de refroidissement continue de fonctionner pen-
dant un certain temps, afin de garantir une bonne fiabilité du four.
Attention
Ne pas accrocher de linge ou de torchon à la poignée du four.
99641131 ML BIO.qxp 05/01/2007 14:06 Page 81
Page 82

82
4 / UTILISATION DE VOTRE APPAREILFR
--
Cuisson avec départ immédiat et durée
programmée
- Choisissez le mode de cuisson souhaité et
ajustez la température (fig.
1).
- Appuyez sur la touche “ ” jusqu’à faire clignoter l’indicateur de durée de cuisson.
“
L’affichage clignote à 0h00 pour indiquer que
le réglage est alors possible (fig.
2).
- Appuyez sur la touche ++ou --pour régler le
temps souhaité.
Exemple : 30 min de cuisson (fig.
3
).
L’enregistrement du temps de cuisson est
automatique au bout de quelques secondes
L’afficheur ne clignote plus.
Le décompte de la durée se fait immédiatement après le réglage.
AApprrèèss cceess 33 aaccttiioonnss,, llee ffoouurr cchhaauuffffee ::
Une série de bips sonores retentit lorsque le
four atteint la température choisie.
En fin de cuisson (fin du temps programmé),
- le four s’arrête,
- 0:00 clignote (fig.
4).
- une série de bips sonores est émise durant
quelques minutes. L’arrêt définitif de ces bips
se fait en appuyant sur n’importe quelle touche.
L’affichage repasse à l’heure du jour en ramenant le sélecteur de fonctions sur 0 (fig.5
),
fig.2
fig.3
CUISSON PROGRAMMEE
••
fig.1
fig.4
fig.5
99641131 ML BIO.qxp 05/01/2007 14:06 Page 82
Page 83

83
4 / UTILISATION DE VOTRE APPAREIL
FR
--
Cuisson avec départ différé et heure
de fin choisie
PPrrooccééddeezz ccoommmmee uunnee ccuuiissssoonn pprrooggrraammmmééee..
- Après le réglage de la durée de cuisson, appuyez sur la touche “ ” jusqu’à faire cligno-
ter l’indicateur de fin de cuisson.
L’affichage de la fin de cuisson pour indiquer
que le réglage est alors possible (fig.
1).
- Appuyez sur la touche ++ou --pour régler
l’heure de fin de cuisson souhaitée.
Exemple : fin de cuisson à 13h (fig.
2
).
L’enregistrement de la fin de cuisson est automatique au bout de quelques secondes
L’afficheur ne clignote plus.
AApprrèèss cceess 33 aaccttiioonnss,, llee ddééppaarrtt ddee llaa cchhaauuffffee
eesstt ddiifffféérréé ppoouurr qquuee llaa ccuuiissssoonn ssooiitt ffiinniiee àà 1133hh..
En fin de cuisson (fin du temps programmé),
- le four s’arrête,
- 0:00 et la durée clignotent (fig.
3).
- une série de bips sonores est émise durant
quelques minutes. L’arrêt définitif de ces bips
se fait en appuyant sur n’importe quelle touche.
L’affichage repasse à l’heure du jour en ramenant le sélecteur de fonctions sur 0 (fig.4
),
fig.1
fig.2
fig.3
fig.4
CUISSON PROGRAMMEE
••
99641131 ML BIO.qxp 05/01/2007 14:06 Page 83
Page 84

84
4 / UTILISATION DE VOTRE APPAREILFR
CUISSON ECONOMIQUE *
••
— Le programmateur ne doit afficher que
l’heure (fig.
1).
— Tournez le sélecteur de fonctions sur la position “ ”. L’indicateur “ECO” s’allume dans
l’afficheur (fig.
2).
— Placez votre plat dans le four selon la préconisation indiquée dans l’afficheur.
Exemple : position “ ”-> gradins 1 ou 2
conseillés (fig.
3).
— Votre four vous propose la température optimale pour le mode de cuisson choisi 200°C.
Il vous est cependant possible d’ajuster celleci en utilisant le sélecteur de température vers
+ ou -(fig.
4).
Exemple : position “ ” ajustée à 190°C
(fig.
5).
L’indicateur de température clignote. 3 bips
vous indiqueront que la température de
réglage est atteinte.
*Cette position permet de faire un gain
d’énergie jusqu’à 20% tout en conservant les
résultats de cuisson identiques.
La position ECO est utilisé pour l’étiquettage énergétique.
Attention
Après un cycle de cuisson, la turbine de refroidissement continue de fonctionner pen-
dant un certain temps, afin de garantir une bonne fiabilité du four.
fig.2
fig.5
fig.1
fig.4
fig.3
99641131 ML BIO.qxp 05/01/2007 14:06 Page 84
Page 85

85
4 / UTILISATION DE VOTRE APPAREIL
FR
GRIL
+
••
— Cette fonction vous permet d’associer à la
séquence de cuisson choisie une fonction
“Dorage” du plat en fin de cuisson, celle-ci
s’effectuant par la mise en service du gril pendant les 5 dernières minutes de la séqence.
Elle est active que sur les fonctions de cuisson
suivantes :” ”
Cette fonction peut être programmée en début
de cuisson en ajoutant 5 minutes au temps de
cuisson ou simplement en fin de cuisson en
appuyant sur la touches “ ”
.
— Réglez le mode de cuisson choisi et éventuellement ajustez la température.
— Appuyez sur la touche“GRILL
+”, la durée de
cuisson clignote à 0h05 (cette valeur de durée
correspond au temps minimum nécessaire
pour activer la fonction“ ”dans la séquence
de cuisson choisie).
— Appuyez sur les touches + ou - pour ajuster
la durée de cuisson totale. L’enregistrement de
la durée est automatique au bout de quelques
secondes, l’afficheur ne clignote plus.
— Après ces 3 actions, le four chauffe et le symbole “ ”s’illumine, vous indiquant que la fonction
est en service.
Ne posez pas les plats trop prêts du grilloir pour éviter un dorage trop rapide. Respectez 1
er
ou
2
em
gradin (en partant du bas).
Exemples de plats :
— Gratins de pâtes, de chou-fleurs, d’endives, de coquilles de poissons, de crumbles...
Exemples de programmation : Gratinée à l’oignon :
— Sélectionnez la séquence de cuisson, la température : 180°C, le programme : “
et le temps : 25 minutes.
Le bouillon va chauffer pendant 20 minutes et le gratinage se fera pendant les 5 minutes restantes
Conseil
Il est possible de mettre en service ou de supprimer cette fonction à tout moment de
la cuisson en appuyant sur la touche
“”.
Il est également possible d’activer cette fonction dans une cuisson différée.
Attention
Toutes rotation du sélecteur de fonctions entraîne la désactivation de la fonction
“”.
99641131 ML BIO.qxp 05/01/2007 14:06 Page 85
Page 86

86
4 / UTILISATION DE VOTRE APPAREILFR
-- LLee pprrooggrraammmmaatteeuurr ddee vvoottrree ffoouurr ppeeuutt êêttrree
uuttiilliisséé ccoommmmee mmiinnuutteerriiee iinnddééppeennddaannttee ppeerr--
mmeettttaanntt ddee ddééccoom
mpptteerr uunn tteemmppss ssaannss ffoonncc--
ttiioonnnneemmeenntt dduu ffoouurr..
Dans ce cas, l’affichage de la minuterie est
prioritaire sur l’afficheur de l’heure du jour.
- Appuyez sur la touche “ ” (fig.1) jusqu’à
faire 0.00.
- Ajustez le temps choisi en appuyant sur les
touches ++ou
--
(fig.2) jusqu’à obtenir la durée
voulue (maxi 60 minutes).
Attention
Il est possible de modifier ou d’annuler à n’importe quel moment la programmation de
la minuterie.
fig.1
fig.2
UTILISATION DE LA FONCTION
MINUTERIE
••
REGLAGE DE LA LUMINOSITE
DE L’AFFICHEUR
••
Vous pouvez faire varier la luminosité de votre afficheur, pour cela :
- Réglez et validez l’heure de votre programmateur à 0h10 (fig.1).
- Appuyez simultanément sur les touches ++et
--
pendant une dizaine de secondes jusqu’à l’affichage de “CO” afin de rentrer dans le mode de
réglage
(fig.2)
.
- Appuyez sur les touches ++ou
--
afin d’obtenir la
luminosité souhaitée.
Après avoir réglé la luminosité de votre choix, attendez quelques secondes et remettez votre
programmateur à l’heure du jour.
fig.1
fig.2
L’afficheur s’arrête de clignoter et la minuterie se met en marche et décompte le temps de secondes en secondes.
Une fois la durée écoulée, la minuterie émet une série de bips sonores pour vous avertir.
L’arrêt de ces bips se fait en appuyant sur n’importe quelle touche.
99641131 ML BIO.qxp 05/01/2007 14:06 Page 86
Page 87

5 / LES MODES DE CUISSON DU FOUR
FR
CCHHAALLEEUURR TTOOUURRNNAANNTTEE
(température préconisée
118800°°CC
mini 35°C maxi 235°C)
•
La cuisson s'effectue par la résistance placée au fond du four et par l’hélice de
brassage d’air.
•
Préchauffage inutile.sauf pour des cuissons exigeant des temps très courts (sablés sur
plusieurs niveaux)
•
Recommandé pour garder le moelleux des viandes, pour les légumes, poissons et pour
les cuissons multiples jusqu’à 3 niveaux.
TTRRAADDIITTIIOONNNNEELL EECCOO
(température préconisée
220000°°CC
mini 35°C maxi 275°C)
•
La cuisson s'effectue par les éléments inférieur et supérieur sans brassage d’air.
•
Cette position permet de faire un gain d’énergie d’environ 25% en conservant les quali
tés de cuisson. La position ECO est utilisée pour l’étiquetage énergétique.
•
Vous réaliserez une économie d’énergie tout au long de la cuisson mais le temps peut
être plus long.
TTRRAADDIITTIIOONNNNEELL
(température préconisée
224400°°CC
mini 35°C maxi 275°C)
•
La cuisson s'effectue par les éléments inférieur et supérieur sans brassage d’air.
•
Nécessite un préchauffage avant d’enfourner le plat.
•
Recommandé pour les cuissons lentes et délicates :
ggiibbiieerrss mmooeelllleeuuxx
...Pour saisir
rrôôttiiss
ddee vviiaannddeess rroouuggee
. Pour mijoter en cocotte fermée plats préalablement démarrés sur table
de cuisson (
ccooqq aauu vviinn,, cciivveett
).
TTRRAADDIITTIIOONNNNEELL PPUULLSSEE
(température préconisée
220000°°CC
mini 35°C maxi 275°C)
•
La cuisson s'effectue par les éléments inférieur et supérieur et par l’hélice de
brassage d’air.
•
Montée rapide en température : Certains plats peuvent être enfournés four froid.
•
Recommandé pour les
vviiaannddeess, ppooiissssoonnss, lléégguummeess
, posés dans un plat en terre de préfé-
rence.
SSOOLLEE PPUULLSSEEEE
(température préconisée
220055°°CC
mini 35°C maxi 275°C)
•
La cuisson s'effectue par l’élément inférieur associé à un léger dosage du gril et à
l’hélice de brassage d’air.
•
Cuisson par le dessous avec léger dosage dessus. Placez la grille sur le gradin bas.
•
Recommandé pour les
ppllaattss hhuummiiddeess
(quiches, tartes aux fruits juteux...). La pâte sera
bien cuite dessous. Recommandé pour
lleess pprrééppaarraattiioonnss qquuii llèèvveenntt(ccaakkee,, bbrriioocchhee
,
kkoouuggllooff......
) et pour les
ssoouuffffllééss
qui ne seront pas bloqués par une croûte dessus.
les cuissons multiples jusqu’à 3 niveaux.
GGRRIILL PPUULLSSEE
(température préconisée
22000
0°°CC
mini 180°C maxi 230°C)
•
La cuisson s'effectue , alternativement, par l’élément supérieur et par l’hélice de
brassage d’air.
•
Préchauffage inutile. Volailles et rôtis juteux et croustillants sur toutes les faces.
•
Recommandé pour toutes les
vvoollaaiilllleess
ou
rrôôttiiss
, pour saisir et cuire à coeur
ggiiggoott, ccôôtteess
ddee bbooeeuuff
. Pour garder leur fondant aux pavés de
ppooiissssoonnss
.
*
ECO
87
99641131 ML BIO.qxp 05/01/2007 14:06 Page 87
Page 88

5 / LES MODES DE CUISSON DU FOUR
FR
GGRRIILL FFOORRTT
(température préconisée
227755°°CC
mini 180°C maxi 275°C)
•
La cuisson s’effectue par l’élément supérieur sans brassage d’air.
• Effectuez un préchauffage de 5 min. Glissez la léchefrite sur le gradin du bas pour rceuillir le graisses.
• Recommandé pour griller les
ccôôtteelleetttteess, ssaauucciisssseess, ttrraanncchheess ddee ppaaiinn, ggaammbbaass ppoossééeess
ssuurr llaa ggrriillllee
.
MMAAIINNTTIIEENN AAUU CCHHAAUUDD // PPAATTEE A
A PPAAIINN
(température préconisée
8800°°CC
mini 35°C maxi 100°C)
•
Dosage de l’élément supérieur et inférieur associés au brassage d’air.
•
Recommandé pour
ffaaiirree lleevveerr lleess ppââtteess àà ppaaiinn,, àà bbrriioocchhee,, kkoouuggllooff
...en ne dépassant
pas 40° (chauffe-assiette, décongélation).
88
99641131 ML BIO.qxp 05/01/2007 14:06 Page 88
Page 89

89
NETTOYAGE DE LA SURFACE EXTERIEURE
••
Pour nettoyer la fenêtre du programmateur électronique, ainsi que la porte du four, utilisez un
chiffon doux, imbibé de produit à vitre.
Ne pas utiliser de produits d’entretien abrasifs ou de grattoirs métalliques durs pour nettoyer
la porte en verre du four, ce qui pourrait érafler la surface et entraîner l’éclatement du verre.
6 / ENTRETIEN ET NETTOYAGE DE VOTRE APPAREIL
Pour préserver votre appareil, nous vous recommandons d'utiliser les produits d'entretien
Clearit.
Clearit vous propose des produits professionnels et des solutions adaptées pour l'entretien quotidien de vos appareils électroménagers et de vos cuisines.
Vous les trouverez en vente chez votre revendeur habituel, ainsi que toute une ligne de produits
accessoires et consommables.
LL''eexxppeerrttiissee ddeess pprrooffeessssiioonnnneellss
aauu sseerrvviiccee ddeess ppaarrttiiccuulliieerrss
- Ouvrez complétement la porte et la bloquer
à l’aide des deux butées rouges (fig.1).
Elles sont fournies dans la pochette plastique
de votre appareil.
NETTOYAGE DE LA PORTE
••
- Retirez la première glace clipée de la
manière suivante:
Insérez les deux autres butées rouges dans
les emplacements AAprévus à cet effet (fig.2).
Faire levier sur ces pièces afin de déclipper la
glace (fig.3).
- Nettoyez votre glace à l’aide d’une éponge
douce et de produit vaisselle.
Ne pas immerger la glace dans l’eau.
Ne pas utiliser de crèmes à récurer, ni d’éponges grattantes. Rincez à l’eau claire et
essuyez avec un chiffon non pelucheux.
Attention
Avant de procéder au déclippage de
la glace, laissez refroidir l’appareil.
FR
fig.2
AA
AA
fig.1
fig.3
99641131 ML BIO.qxp 05/01/2007 14:06 Page 89
CLIC
CLIC
Page 90

6 / ENTRETIEN ET NETTOYAGE DE VOTRE APPAREILFR
- Si nécessaire, retirez l’ensemble des glaces
intérieures de la porte. Cet ensemble est
composé d’une ou deux glaces selon modèle
avec à chaque coin une butée caoutchouc
noire (fig.4).
- Après nettoyage, repositionnez vos quatre
coins caoutchouc en prenant soin que sur la
glace soit indiqué :
* en haut à gauche : L
* en haut à droite : R
Placez votre ensemble de glaces intérieures
dans la porte afin que L et R se situent côté
charnières.
- Si votre four est équipé d’une seule glace
intérieure, celle-ci doit se trouver au plus proche de la glace clipée.
- Clippez votre dernière glace en plaçant l’indication ”P.Y.R.O.L.Y.S.E” vers vous (fig.5).
- Retirez les butées plastique rouge.
Votre appareil est de nouveau opérationnel.
fig.4
fig.5
LL
RR
90
99641131 ML BIO.qxp 05/01/2007 14:06 Page 90
CLAC
CLAC
Page 91

91
Attention
- Avant de débuter la pyrolyse,
rreettiirreezz ttoouuss lleess aacccceessssooiirreess àà ll’’iinnttéérriieeuurr dduu ffoouurr,, yy ccoommpprriiss
llaa ccaasssseerroolleerriiee..
Avant le démarrage de la pyrolyse, enlevez les débordements importants qui auraient pu se
produire, afin d’éviter le risque d’inflammation ou une production excessive de fumée.
- Pendant la pyrolyse, les surfaces deviennent plus chaudes qu’en usage normal, les enfants
doivent être éloignés.
- Ne recouvrez pas l’intérieur du four de papier aluminium pour économiser un nettoyage : en
provoquant une surchauffe, vous endommageriez l’émail qui recouvre la cavité.
CONSIGNE DE SECURITE
••
CCuuiissssoonnss
ppeeuu ssaalliissssaannttee
SS
CCuuiissssoonnss
ssaalliissssaanntteess
CCuuiissssoonnss
ttrrèèss ssaalliissssaanntteess
Biscuits, légumes, pâtisseries,
quiches, soufflés...
Viandes, poissons (dans un plat),
légumes farcis.
Grosses pièces de viandes à la
broche.
Cuissons sans éclaboussures :
une pyrolyse n’est pas justifiée.
La pyrolyse peut se justifier toutes les 3 cuissons.
La pyrolyse peut se faire après
une cuisson de ce type, si les
projections ont été importantes.
- Votre four se nettoie par destruction à haute température les salissures qui proviennent des
éclaboussures ou des débordements.
- Les fumées dégagées sont détruites par leur passage dans un catalyseur.
Il ne faut pas attendre que le four soit trop chargé de graisses pour effectuer ce nettoyage.
DDaannss qquueell ccaass ddeevveezz--vvoouuss eeffffeeccttuueerr uunnee ppyyrroollyyssee ??
- Lorsque votre four fume lors d’un préchauffage ou fume énormément lors de cuissons.
- Lorsque votre four dégage une odeur à froid suite à différentes cuissons (moutons, poissons,
grillades...).
La pyrolyse n’est pas nécessaire après chaque cuisson, mais seulement si le degré de salissure
le justifie.
- Afin de s’adapter à chaque situation, ce four dispose de 2 cycles de nettoyage pyrolyse.
- Un cycle économique d’une durée d’1h30min (compte tenu du temps de refroidissement du four, celui-ci sera verrouillé pendant 2 heures) ce cycle consomme près de 25% de
moins que le cycle pyro standard. Actionné régulièrement (toutes les 2 ou 3 cuissons de viandes), ce cyclepermet de garder un four propre en toutes circonstances.
- Un cycle standard d’une durée de 2h (compte tenu du temps de refroidissement
du four, celui-ci sera verrouillé pendant 2h30), assurera un nettoyage efficace d’un four très sale.
- Par mesure de sécurité, la porte se bloque dès que la température à l’intérieur du four
dépasse les températures de cuisson. Il est impossible alors d’ouvrir la porte même en positionnant la manette de sélecteur de fonction sur 0.
FOUR PYROLYTIQUE
••
6 / ENTRETIEN ET NETTOYAGE DE VOTRE APPAREIL
FR
99641131 ML BIO.qxp 05/01/2007 14:06 Page 91
Page 92

92
6 / ENTRETIEN ET NETTOYAGE DE VOTRE APPAREIL
FR
Vérifiez que le programmateur affiche l’heure du
jour et que celle-ci ne clignote pas.
Il suffit de positionner votre sélecteur de cuisson
sur la position “Pyrolyse”ou sur la position
“Pyrolyse ECO”(fig.1).
La durée d’indisponibilité du four est de 2h30 (2
heures de pyro + 30 minutes de refroidissement)
en “Pyrolyse” ou 2h (1h30 de pyro + 30 minutes
de refroidissement) en “Pyrolyse ECO”(cette durée n’est pas modifiable). Ce temps prend en
compte la durée de refroidissement jusqu’au déverrouillage de la porte.
L’afficheur vous indique l’heure à laquelle votre
four sera à nouveau disponible (fig.2).
Le
dans l’afficheur vous indique que vous
êtes en cycle de pyrolyse ou ECO en cycle de
pyrolyse ECO.
Au cours du cycle de pyrolyse, un cadenas
apparait dans l’afficheur, et vous indique
que la porte est verrouillée (fig.3)..
En fin de cycle de pyrolyse, l’afficheur indique
(voir (fig.2).
Quand la cadenas n’apparaît plus dans l’afficheur, il est possible d’ouvrir la porte.
Ramenez le sélecteur de fonctions sur la position 0(fig.4).
Lorsque le four est froid, utilisez un chiffon humide pour enlever la cendre blanche. Le four est
propre et à nouveau utilisable pour effectuer une
cuisson de votre choix.
fig.1
NETTOYAGE PYROLYSE IMMEDIAT
••
fig.2
fig.4
fig.3
Attention
Avant de débuter une pyrolyse, retirez la casserolerie du four et enlevez les déborde-
ments importants qui auraient pu se produire.
Attention
Ne pas accrocher de linge ou de torchon à la poignée du four.
99641131 ML BIO.qxp 05/01/2007 14:06 Page 92
Page 93

6 / ENTRETIEN ET NETTOYAGE DE VOTRE APPAREIL
FR
NETTOYAGE PYROLYSE DIFFÉRÉ
••
Suivre les instructions décrites dans le paragraphe “pyrolyse immédiate” puis
Appuyez sur la touche “ ”, l’indicateur de
fin de cuisson clignote pour indiquer que le
réglage est alors possible.
Appuyez sur les touches + ou - pour régler
l’heure de fin souhaitée.
Exemple : fin de pyrolyse à 4h.
Après ces actions, le départ de la pyrolyse
est différé pour quelle se termine à 4h.
Quand votre pyrolyse est terminée, remettez
le selecteur de fonction sur 0.
93
99641131 ML BIO.qxp 05/01/2007 14:06 Page 93
Page 94

94
7 / EN CAS D’ANOMALIES DE FONCTIONNEMENT
FR
Conseil
Dans tous les cas, si votre intervention n’est pas suffisante, contactez sans attendre
le Service après-vente.
QQUUEE FFAAUUTT--IILL FFAAIIRREE ??
LLEESS CCAAUUSSEESS
PPOOSSSSIIBBLLEESS
VVOOUUSS CCOONNSSTTAATTEEZZ
QQUUEE……
LLee ccaaddeennaass cclliiggnnoottee
- Défaut de verrouillage de la
porte.
➡ Faire appel au Service Après vente.
- Le four n’est pas branché.
- Le fusible de votre installation est hors service.
- La température sélectionnée est trop basse.
VVoott rree ffoouurr nnee cchhaauuffffee
ppaass
➡ Branchez votre four.
➡ Changez le fusible de votre installa-
tion et vérifiez sa valeur (16A).
➡ Augmentez la température sélec-
tionnée.
VVoouuss aavveezz uunn ddoouuttee ssuurr llee bboonn ffoonnccttiioonnnneemmeenntt ddee vvoottrree ffoouurr,,
ceci ne signifie pas for-
cément qu'il y a une panne.
DDaannss ttoouuss lleess ccaass,, vvéérriiffiieezz lleess ppooiinnttss ssuuiivvaannttss ::
- La lampe est hors service.
- Votre four n’est pas branché ou le fusible est hors
service.
LLaa llaammppee ddee vvoottrree ffoouurr
nnee ffoonnccttiioonnnnee pplluuss..
➡ Changez la lampe.
➡ Branchez votre four ou changez le
fusible.
- La porte est mal fermée.
- Le système de verrouillage
est défectueux.
LLee nneettttooyyaaggee ppaarr ppyyrroo--
llyyssee nnee ssee ffaaiitt ppaass..
➡ Vérifiez la fermeture de la porte.
➡ Faire appel au Service Après Vente.
- En cours de cuisson.
- En fin de cuisson.
VVoottrree ff oouurr éémmee tt ddeess
bbiippss..
➡ La température de consigne de votre choix est atteinte.
➡ Votre cuisson programmée est terminée.
Attention
- Les réparations sur l'appareil doivent être effectuées uniquement par des professionnels. Les réparations non effectuées dans les règles peuvent être source de dangers pour l'utilisateur.
- La ventilation fonctionne
pendant 1 heure maximum
après la cuisson, ou lorsque
la température de votre four
est supérieure à 125°C
- Si pas d’arrêt après 1 heure.
LLee vveennttiillaatteeuurr ddee rreeffrrooii--
ddiisssseemmeenntt ccoonnttiinnuuee ddee
ttoouurrnneerr àà ll’’aarrrrêêtt dduu ffoouurr
➡ Ouvrir la porte pour accélérer le refroidissement du four
➡ Faire appel au Service Après Vente.
- Votre four est programmé
pour une démonstration.
LLee ffoouurr nnee cchhaauuffffee ppaass
eett ““DD EE MM OO ”” aapp ppaa rraaiitt
ddaannss ll’’aaffffiicchheeuurr ppaarr iinn--
tteerrmmiitteennccee eennvviirroonn ttoouu--
tteess lleess 8
8 sseeccoonnddeess..
➡ Réglez l’heure à 0h00. Appuyez
pendant 10 secondes sur + et jusqu’à l’émission d’un bip.
99641131 ML BIO.qxp 05/01/2007 14:07 Page 94
Page 95

Ampoule
Dévissez
Hublot
L'ampoule se situe au plafond de la cavité de
votre four.
a) Débranchez le four.
b) Dévissez le hublot (fig.1).
c) Dévissez l'ampoule dans le même sens.
Caractéristiques de l'ampoule :
- 15 W
- 220-240 V
~
- 300°C
- culot E 14
d) Changez l'ampoule puis remontez le hublot
et rebranchez votre four.
Conseil
Pour dévisser le hublot et l’ampoule, utilisez un gant de caoutchouc qui facilitera le
démontage.
Attention
- Débranchez votre four avant toute intervention sur l'ampoule pour éviter tout risque de
choc électrique et laissez refroidir si besoin l’appareil.
fig.1
7 / EN CAS D’ANOMALIES DE FONCTIONNEMENT FR
CHANGEMENT DE L’AMPOULE
••
95
99641131 ML BIO.qxp 05/01/2007 14:07 Page 95
Page 96

96
Avec la fonction “ ” vous n’avez plus besoin de sélectionner la température et le temps de
cuisson.
Ces deux paramètres sont calculés automatiquement par votre four, afin d’obtenir une cuisson
optimale.
Le mode de cuisson “ ” s’effectue en 2 phases:
1) Une première phase (acquisition) durant laquelle le four va enregistrer, grâce à ses capteurs
électroniques les données de cuisson spécifiques à votre plat.
Cette phase se symbolise par clignotant dans la zone droite de l’afficheur:
Elle peut durer entre 5 et 40 minutes selon la cuisson choisie.
NE PAS OUVRIR LA PORTE PENDANT CETTE PHASE afin de ne pas perturber l’enregistrement des données.
2) Une deuxième phase (calcul), le four détermine le temps de cuisson nécessaire. Le symbole de
l’animation “ ” se fixe. Le four indique le temps de cuisson
restant ainsi que l’heure réelle de fin de cuisson. Vous pouvez ouvrir, si vous souhaitez intervenir sur le plat (arrosage, retournement de l’aliment...).
3) En fin de cuisson, une série de bips sonores retentit.
AVANTAGE ET PRINCIPE
••
MODE D’UTILISATION
••
a) CCuisson immédiate :
Positionnez le sélecteur de cuisson sur la fonction “ ”.
A l’aide du bouton“ ”, choisissez le plat.
Insérez-le sur le gradin préconisé dans l’afficheur. Fermez la porte. Le four débute sa cuisson.
La phase de recherche commence symbolisée par l’animation dans l’afficheur: un temps est
proposé. La cuisson terminée, le four émet plusieurs bips.
b) CCuisson différée :
Positionnez le sélecteur de cuisson sur “ ”.
Choisissez votre plat en appuyant sur le bouton “ ”.
Enfournez votre plat et fermez la porte
Positionnez le sélecteur de mode sur
“”
.
Appuyez sur les touches + ou - pour régler l’heure de fin de cuisson souhaitée.
Exemple.: Fin de cuisson 13h00.
Après ces actions, le départ de cuisson est différé.
La fin de cuisson est estimée à partir du temps moyen de base. De la même façon qu’une cuisson immédiate, ce temps sera optimisé en cours de cuisson et donc l’heure peut varier de quelques minutes (en +ou en -) par rapport à la sélection initiale.
8 / AVANTAGES ET PRINCIPE “EASY COOK”
FR
99641131 ML BIO.qxp 05/01/2007 14:07 Page 96
Page 97

8 / AVANTAGES ET PRINCIPE “EASY COOK”
FR
CONSEILS
••
Dès que le symbole “ ” ne clignote plus,
vous avez libre accès pour ouvrir la porte du
four.
Si toutefois vous ouvrez la porte alors que le
symbole est animé, votre four émet un “bip”
d’avertissement et les symboles des plats clignotent.
La cuisson en mode “ ” DOIT DEBUTER
AVEC LE FOUR FROID, il convient d’attendre le
refroidissement complet avant d’effectuer une
deuxième cuisson sur ce même mode (dans le
cas contraire les indicateurs de durée de cuisson, “ ”et les plats clignotent dans l’afficheur ainsi qu’une série de bips sonores vous
empêchant de débuter une cuisson).
9 / EN CAS D’ANOMALIES DE FONCTIONNEMENT
QQUUEE FFAAUUTT--IILL FFAAIIRREE ??LLEESS CCAAUUSSEESS
PPOOSSSSIIBBLLEESS
VVOOUUSS CCOONNSSTTAATTEEZZ
QQUUEE……
- Vous avez ouvert la porte
pendant la phase de recherche : le programme est annulé.
- Le four est chaud
BBii ppss++ pp ii ccttoo EEAASS YY
CCOOOOKK cclliiggnnootteenntt
➡ Laissez refroidir le four pour redémarrer la cuisson.
97
99641131 ML BIO.qxp 05/01/2007 14:07 Page 97
Page 98

98
10 / LES MODES DE CUISSON EASY COOKFR
PPOOIISSSSOONNSS
••
Poissons entiers (dorade, colinot...) ou entiers individuels (truites, maque-
reaux) avec aromates et vin blanc, rôti de poisson
CONSEILS :
- réservez cette fonction pour les poissons entiers, cuisinés au plat (les poissons grillés ou
cuits en papilotte nécessitent un préchauffage du four).
RROOTTII DDEE BBOOEEUUFF
••
Rôtis de boeuf (cuisson saignante à coeur)
CONSEILS :
- si vous préférez une viande bien cuite, optez pour une fonction de cuisson traditionnelle.
- sortez le rôti du réfrigérateur, 1 heure minimum avant de débuter la cuisson (voir conseils
page suivante). Otez le maximum de barde, posez le rôti dans un plat en terre avec un peu
d’eau et une cuillerée à café d’huile. Ne salez qu’en fin de cuisson.
PPIIZZZZAA
••
ppiizzzzaa ttrraaiitteeuurr ffrraaîîcchheess
••
ppiizzzzaa ppââtteess pprrêêtteess àà ll’’eemmppllooii
••
ppiizzzzaa ppââtteess ““mmaaiissoonn””
••
ppiizzzzaa ssuurrggeellééeess ((rroouullééss aauu ffrroommaaggee,, ppeettiittss ppaaiinnss ((eenn bbooîîttee))
CONSEILS :
•
posez-la sur la grille pour obtenir une pâte croustillante
•
posez-la dans le plat émaillé pour obtenir une pâte moëlleuse.
PPOOUULLEETT
••
ppoouulleettss ddee 11 kkgg àà 11,,880000 kkgg
••
ccaanneettttee,, ppiinnttaaddee......
CONSEILS :
- cuisson au tourne-broche : n’oubliez pas de poser la lèche-frite au 1er gradin pour récupérer la graisse.
- cuisson dans un plat : en terre de préférence pour éviter les projections de gras
- piquez la peau des volailles pour éviter les éclaboussures.
TTAARRTTEESS
••
TTaarrtteess ffrraaîîcchheess
••
TTaarrtteess ssuurrggeellééeess
••
QQuuiicchheess
••
FFeeuuiilllleettééss ccrruuss àà llaa vviiaannddee ssuurrggeellééss
CONSEILS :
- utilisez un moule en aluminium non adhésif :la pâte sera plus croustillante dessous
- tartes et quiches surgelées du commerce : retirez la barquette aluminium avant de les poser sur la grille
LLEEGGUUMMEESS
••
ttoommaatteess,, ppooiivvrroonnss ffaarrcciiss
••
llaassaaggnneess ((ffrraaiiss oouu ssuurrggeellééss))
••
hhaacchhiiss ppaarrmmeennttiieerr,, bbrraannddaaddee,, ggrraattiinnss ddee ppââtteess eettcc......
CONSEILS :
- adapter correctement les dimensions de votre plat à la quantité à cuire pour éviter les dé-
bordements de jus.
99641131 ML BIO.qxp 05/01/2007 14:07 Page 98
Page 99

11 / CONSEILS ET ASTUCES
FR
PPOOIISSSSOONNSS
A l’achat, l’odeur doit être agréable et faible de marée.
Le corps ferme et rigide, les écailles fortement adhérentes à la peau, l’oeil vif et
bombé et les branchies brillantes et humides.
BBOOEEUUFF
(VIANDES EN GENERAL)
Sortez impérativement toute viande du réfrigérateur bien avant la cuisson: le choc froidchaud durcit la viande, ainsi vous obtiendrez un rôti de boeuf doré autour, rouge dedans et
chaud à coeur. Ne salez pas avant de cuire: le sel absorbe le sang et dessèche la chair.
Retournez la viande à l’aide de spatules: si vous la piquez le sang s’échappe. Laissez
toujours reposer la viande après cuisson pendant 5 à 10 minutes: emballez-la dans un
papier d’aluminium et posez-la à l’entrée du four chaud: ainsi le sang attiré vers l’extérieur
pendant la cuisson va refluer et irriguer le rôti.
Utilisez des plats à rôtir en terre: le verre favorise les projections de gras.
Ne cuisez pas non plus dans la lèche-frite émaillée.
PPIIZZZZAA ::
Pour éviter au fromage ou à la sauce tomate de couler dans le four, vous pouvez poser
une feuille de papier sulfurisé entre la grille et la pizza.
PPOOUULLEETT ::
Adaptez le plat à la taille du poulet pour que les graisses ne brûlent pas.
TTAARRTTEESS//QQUUIICCHHEESS ::
Evitez les plats en verre, en porcelaine: trop épais ils prolongent le temps de cuisson et le
fond de la pâte n’est pas croustillant.
Avec les fruits, le fond de tarte risque de se détremper: il suffit alors d’y déposer quelques
cuillerées de semoule fine, de biscuits écrasés en chapelure, de poudre d’amandes ou de
tapioca, qui en cuisant absorberont le jus.
Avec les légumes humides ou surgelés (poireaux, épinards, brocolis ou tomates) vous pouvez saupoudrer une cuiller à soupe de fleur de maïs.
LLEEGGUUMMEESS
Pour un gratin de pommes de terre plus onctueux, il est conseillé de précuire celles-ci
coupées en rondelles dans du lait ou lait + crème pendant une vingtaine de minutes.
Pour faire des tomates farcies : après avoir découpé un chapeau, retirez les graines, salez
l’intérieur et retournez-les sur une grille pour qu’elles s’égouttent avant de les farcir.
99
99641131 ML BIO.qxp 05/01/2007 14:07 Page 99
Page 100

100
PPOOIISSSSOONNSS
Dorade grise au cidre brut: 1 dorade de 1,5 kg.
500 g de champignons de Paris.
2 pommes acides.
2 échalotes.
2 cuillerées à soupe de crème épaisse.
100 g de beurre.
1/2 litre de cidre. Sel, poivre.
Videz, écaillez le poisson. Posez-le dans un plat beurré sur les échalotes hachées fines et les
champignons en lamelles. Ajoutez le cidre, sel et poivre et quelques noisettes de beurre. Enfournez.
Cuire dans le beurre les pommes en quartiers non épluchées. A la fin de la cuisson déposez le poisson
dans un plat chaud, filtrez le jus et déglacez à la crème.
Rajoutez la crème au jus, servez avec pommes et champignons.
RROOTTII DDEE BBOOEEUUFF
Sauces d’accompagnement.
Sauce SAUTERNES PERSILLEE au ROQUEFORT:
Faites suer 2 cuillers à soupe d’échalotes ciselées au beurre.
Ajoutez 10 cl de Sauternes, laissez évaporer.
Ajoutez 100 g de Roquefort, faites fondre doucement.
Ajoutez 20 cl de crème liquide, sel, poivre. Faites bouillir.
Sauce C
OGNA
C au POIVRE R
OSE :
Faites suer 2 cuillers à soupe d’échalotes ciselées.
Ajoutez 15 cl de vin rouge, laissez évaporer.
Ajoutez 1 jaune d’oeuf, 1 cuiller de Ketchup, 200 g de beurre. Sel, poivre.
En fouettant, versez 3 cuillers de Cognac et 1 cuiller à café de baies roses concassées.
Sauce FR
UITEE à la POIRE et au CRESSON :
Faites cuire 1 poire, recouverte de vin blanc. Egouttez, mixez.
Ebouillantez 1/2 botte de cresson, égouttez, hachez.
Faites étuver 1 cuiller à soupe d’échalotes hachées au beurre.
Mouillez avec le vin de la cuisson. Faites évaporer.
Ajoutez la poire, le cresson et 20 cl de crème liquide.
Salez, poivrez, faites bouillir légèrement.
Enfournez. Cuire dans le beurre les pommes en quartiers non épluchées. A la fin de la cuisson déposez
le poisson dans un plat chaud, filtrez le jus et déglacez à la crème.
Rajoutez-la crème au jus, servez avec pommes et champignons.
PPIIZZZZAA
Base: 1 pâte pour pizza
*aux légumes:
6 cuillerées à soupe de sauce tomate + 100 g de courgettes coupées en
dès + 50 g de poivrons coupés en dés + 50 g d’aubergines en rondelles + 2 petites tomates en
rondelles + 50 g de gruyère râpé + origan + sel + poivre.
*au r
oquefort, poitrine fumée: 6 cuillerées à soupe de sauce tomate + 100 g de poitrine
+ 100 g de roquefort en dés + 50 g de noix + 60 g de gruyère râpé.
*aux saucisses, fr
omage blanc : 200 g de fromage blanc égoutté étalé sur la pâte + 4
saucisses en rondelles + 150 g de jambon en lanières + 5 olives + 50 g de gruyère râpé + origan +
sel + poivre.
12 / QUELQUES RECETTESFR
99641131 ML BIO.qxp 05/01/2007 14:07 Page 100
 Loading...