

Page 1

FR GUIDE D'INSTRUCTION & D'UTILISATION
EN INSTRUCTIONS FOR USE
Cave à vin
Wine cellar
Page 2

Chère Cliente, Cher Client,
Vous venez d’acquérir un produit BRANDT et nous vous en remercions.
Nous avons mis dans cet appareil toute notre passion, notre savoir-faire pour
qu’il réponde au mieux à vos besoins. Innovant, performant, nous l’avons conçu
pour qu’il soit aussi toujours facile à utiliser.
Vous trouverez également dans la gamme des produits BRANDT, un vaste
choix de fours, de fours à micro-ondes, de tables de cuisson, de hottes,
de cuisinières, de lave-vaisselle, de lave-linge, de sèche-linge, de réfrigérateurs et
congélateurs que vous pourrez coordonner à votre nouveau produit BRANDT.
Bien entendu, dans un souci permanent de satisfaire le mieux possible vos
exigences vis à vis de nos produits, notre service consommateurs est à votre
disposition et à votre écoute pour répondre à toutes vos questions ou
suggestions (coordonnées à la fin de ce livret).
Et retrouvez-nous aussi sur notre site www.Brandt.fr sur lequel vous trouverez tous
nos produits, ainsi que des informations utiles et complémentaires.
BRANDT
Un jour j’ai dit Brandt
Dans le souci d’une amélioration constante de nos produits, nous nous réservons le droit
d’apporter à leurs caractéristiques techniques, fonctionnelles ou esthétiques toutes
modifications liées à leur évolution.
Important : Avant de mettre votre appareil en route, veuillez lire
attentivement ce guide d’installation et d’utilisation afin de vous familiariser
plus rapidement avec son fonctionnement.
02
Page 3

SOMMAIRE
• Consignes de sécurité _____________________________________04
1/INSTALLATION DE VOTRE APPAREIL ___________________________05
• Branchement électrique ____________________________________05
• Avant de brancher votre appareil _____________________________05
• Protection de l'environnement _______________________________ 05
• Description de l'appareil ____________________________________06
• Inversion du sens d'ouverture des portes ______________________06
2/UTILISATION DE VOTRE APPAREIL _____________________________07
• Conseils _______________________________________________07
• Utilisation du bandeau de commandes ________________________07
3/ENTRETIEN COURANT DE VOTRE APPAREIL _____________________08
• Nettoyage et entretien _____________________________________08
• Remplacement des ampoules _______________________________08
• Coupure de courant et arrêt provisoire ________________________ 08
• Déplacement de l'appareil ____________________________________ 08
4/MESSAGES PARTICULIERS, INCIDENTS ________________________09
• Problèmes de fonctionnement _______________________________09
• Normes CE _____________________________________________09
5/COORDONNEES DU SERVICE APRES-VENTE ___________________10
03
Page 4

CONSIGNES DE SECURITE
CONSIGNES DE SECURITE
Cet appareil a été conçu pour la
conservation des vins. Tout autre usage,
notamment la conservation de denrées
alimentaires, pourrait se révéler
dangereuse car la température n'est pas
assez basse.
L'installation doit être effectuée selon les
instructions de ce manuel ; une mauvaise
installation pourrait détériorer l'appareil.
Pour les problèmes éventuels de
fonctionnement de l'appareil, adressezvous toujours et exclusivement aux
centres autorisés de Service Après-Vente
ou bien à du personnel qualifié.
Pour toute opération d'entretien,
débranchez préalablement l'appareil en
évitant de tirer sur le câble d'alimentation.
Si cet appareil en remplace un autre, qui
ait un dispositif de fermeture à loquet, à
ressort, à serrure ou autre, n'oubliez pas
de détruire le dispositif de fermeture ou,
mieux encore, de démonter la porte de
votre ancien appareil afin d'éviter que
quelqu'un puisse être bloqué à l'intérieur
(des enfants qui jouent, des animaux,
etc…).
Après avoir déballé l'appareil, assurezvous qu'il n'a pas été endommagé. Dans
cette éventualité, les détériorations
devront être signalées au revendeur dans
les 24h qui suivent la livraison. Les
matériaux employés pour l'emballage sont
entièrement recyclables (carton, plastique
à bulles de PE, EPS…). Tenir ces
matériaux hors de portée des enfants.
Le circuit de réfrigération de l'appareil
renferme de l'isobutane réfrigérant, un gaz
naturel peu polluant mais néanmoins
inflammable. Pendant le transport et
l'installation de l'appareil, assurez vous
qu'aucun des composants du circuit de
réfrigération n'est endommagé. En cas de
dommage, le laisser à l'écart des flammes
et des sources d'inflammation et bien
aérer la pièce où il se trouve.
Pour un fonctionnement optimal de
l'appareil, installez-le loin des sources de
chaleur et assurez-vous que l'air puisse
bien circuler autour (voir Installation de
l'appareil).
04
Page 5
INSTALLATION
Avant de procéder à l'installation, lisez
attentivement les consignes de sécurité,
afin d'éviter certains inconvénients.
Installez l'appareil dans une pièce sans
humidité et bien aérée, loin de toute
source de chaleur. Laissez une distance
minimum de 2,5 cm entre le haut de
l'appareil et un meuble au dessus.
Si votre appareil doit être installé à côté
d'un réfrigérateur ou d'un congélateur, un
intervalle de 5 cm doit être maintenu sur
les côtés pour empêcher la formation de
condensation sur l'extérieur de l'appareil.
La classe climatique de votre appareil est
indiquée sur la plaque signalétique. Elle
détermine le rang des températures
ambiantes pour lequel l'unité frigorifique
est conçue, en garantissant le bon
fonctionnement de l'appareil.
Classe Températures ambiantes
N 16° à 32°
ST 18° à 38°
T 18° à 43°
BRANCHEMENT
ELECTRIQUE
Caractéristiques de la prise : 220-240V
avec prise de terre.
• Evitez d'utiliser des adaptateurs ou des
rallonges.
• Evitez que le câble soit en contact avec
le compresseur.
• Evitez que le câble soit pris sous
l'appareil.
L'installation électrique de l'appareil est
dotée d'une mise à la terre. Pour votre
sécurité, connectez l'appareil à une prise
de courant dotée d'une mise à la terre
efficace (conformément aux normes en
vigueur sur la sécurité de l'installation
électrique).
Le constructeur décline toute
responsabilité pour les dommages qui
auraient été causés par le manque de
mise à la terre.
AVANT DE BRANCHER
• Nettoyez l'intérieur de la cave à l'eau
tiède additionnée de bicarbonate. Rincez
et séchez soigneusement.
• Attendez 2 heures avant la mise en
fonctionnement pour assurer la
stabilisation des lubrifiants du motocompresseur.
PROTECTION DE
L'ENVIRONNEMENT
Cet appareil ne contient pas, dans son
circuit réfrigérant et ses matières
isolantes, de gaz réfrigérants nocifs à la
couche d'ozone. Il ne doit pas être mis au
rebut avec les ordures urbaines et la
ferraille afin d'éviter d'endommager le
circuit réfrigérant, plus particulièrement à
l'arrière de l'appareil. Contactez votre
mairie afin de vous renseigner sur la
collecte de ce type d'appareils.
Les matériaux utilisés dans cet
appareil et identifiés par ce symbole sont
recyclables.
05
Page 6
INSTALLATION
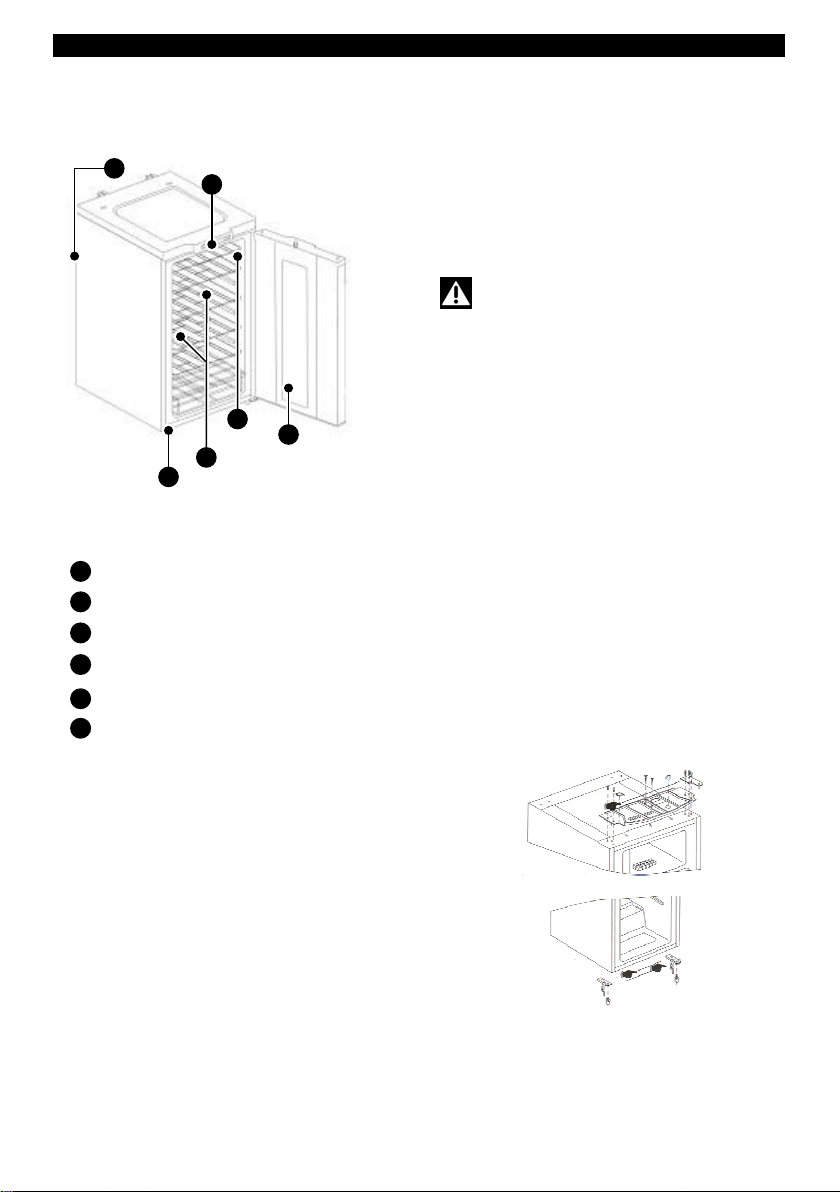
DESCRIPTION DE VOTRE
APPAREIL
B
Afficheur digital
A
Condenseur
B
C
Pieds réglables
D
Lumière
Clayettes réglables et coulissantes
E
F
Panneau vitré
ACCESSOIRES
Votre appareil est livré avec 8 clayettes
réglables et amovibles, vous permettant
de stocker des bouteilles de différentes
capacités ou tailles.
Il est également muni d'une serrure à clé.
A
D
F
E
C
INVERSION DU SENS
D'OUVERTURE DE LA
PORTE
Il est possible de changer le sens
d'ouverture de la porte (gauche au lieu de
droite) :
L'appareil doit toujours être
débranché lorsque vous procédez au
changement du sens d'ouverture.
1. Retirez le top du réfrigérateur : enlevez
les 2 cache-vis situés sur le top, retirez
les 2 vis et faites glisser ce dernier vers
l'avant.
2. Penchez l'appareil légèrement en
arrière et calez le dans cette position.
3. Dévissez les vis de la charnière
supérieure de porte et retirez le support
et l'axe de cette dernière.
4. Ouvrez légèrement la porte et faites la
sortir de sa charnière basse.
5. Dévissez l'axe inférieur et revissez le du
côté opposé. Emboîtez la porte dans
l'axe et fermez la.
6. Revissez solidement la charnière
supérieure sur le côté opposé et l'axe
de porte. Remettez le top (reprendre le
point 1 à l'envers).
06
Page 7

UTILISATION DE VOTRE APPAREIL
La température ambiante jouant un grand
rôle sur l'efficacité de l'appareil, nous vous
conseillons de placer votre cave à vin
dans une pièce dont la température est
comprise entre 22 et 25°C.
La température intérieure change selon
l'emplacement des clayettes. De même, la
lumière peut faire varier la température ;
veillez donc à ne pas allumer trop souvent
la lampe intérieure.
Conseils :
•
La température intérieure recommandée
pour votre cave à vin est comprise entre 7
et 18°C.
• Les températures recommandées pour
les vins selon leur type sont :
Vin rouge : 15-18°C
Vin blanc, sec : 10-15°C
Vin mousseux : 7-9°C
Vin rosé : 9-10°C
UTILISATION DU BANDEAU
DE COMMANDE
Lorsque vous réglez la température pour
la première fois, ou après une longue
période pendant laquelle l'appareil a été
débranché, une température apparaît
automatiquement sur l'afficheur : 10°C est
la température par défaut.
Pour ajuster la température, utilisez les 2
bouton qui vous permettent de
régler la température au degré près.
Réglez votre température en fonction des
vins que vous stockez. Par exemple si
vous avez deux types de vins, rouge et
blanc, réglez votre cave en fonction du
plus grand nombre de bouteilles.
Cependant, une différence de 3°C existe
entre le haut et le bas de la cave à vin :
07
vous pouvez en profiter pour stocker du
vin blanc sur les clayettes du haut et du
vin rouge sur celles du bas, tout en
gardant un réglage "vin rouge".
Si vous choisissez la température pour du
vin rouge, un voyant s'allumera à côté de
l'inscription Red (rouge). Il en sera de
même pour les 2 autres types de vins
présents sur le bandeau: White (blanc) et
Sparkling (mousseux). Il n'y a pas de
voyant spécifique pour le vin rosé.
Vous pouvez également choisir l'unité de
mesure de la température : Fahrenheit ou
Celsius en appuyant sur la touche .
Enfin, vous pouvez allumer ou éteindre la
lumière grâce à la touche . Cependant,
la lumière s'éteint automatiquement après
2 heures.
Pour votre sécurité, l'appareil est muni
d'une serrure à clé. La porte se ferme dès
que la clé est retirée, et ce afin d'éviter
tout risque d'enfermement.
PLAN DE CHARGEMENT
8 bouteilles* par clayette
3 bouteilles* par demi-clayette
*bouteilles taille maxi : hauteur 300.5mm diam 76.4mm
Page 8

ENTRETIEN
A
NETTOYAGE ET ENTRETIEN
Débranchez votre appareil avant de
procéder au nettoyage.
• Nettoyez l'intérieur à l'eau et au
bicarbonate à l'aide d'une éponge ou
d'une lavette, vous éviterez ainsi la
formation de mauvaises odeurs.
• Nettoyez les clayettes avec une solution
de détergent doux. Vous pouvez
également utiliser cette solution pour
nettoyer l'extérieur de l'appareil.
• Veillez à sécher consciencieusement la
partie basse de l'appareil afin d'éviter la
formation de condensation.
• N'utilisez en aucun cas du dissolvant ou
du détergent abrasif, car ils pourraient
endommager l'intérieur de votre appareil.
Ne mettez pas non plus les accessoires
intérieurs au lave-vaisselle.
• Il est recommandé de passer un chiffon
une fois par an sur le dos de l'appareil,
car s'il est sale, le rendement diminue et
la consommation augmente.
REMPLACEMENT DE
L'AMPOULE
B
Débranchez votre réfrigérateur avant
de procéder au changement de l'ampoule.
• Retirez les vis de fixation.
• Enlevez la grille par le bas.
• Retirez l'ampoule en la dévissant.
A
B
• Placez une nouvelle ampoule de même
modèle (10W), remettez la grille et fixez le
tout à l'aide des vis de fixation.
COUPURE DE COURANT ET
ARRET PROVISOIRE
En cas de coupure de courant de longue
durée ou d'arrêt de l'appareil
(vacances…), vous devez :
• Sortir toutes les bouteilles,
• Débranchez l'appareil et nettoyez-en
l'intérieur,
• Laissez la porte ouverte pour éviter la
condensation et les mauvaises odeurs.
DEPLACEMENT DE
L'APPAREIL
Si vous devez déplacer votre cave à vin,
veillez à suivre les instructions suivantes
afin de réaliser cette opération dans les
meilleures conditions :
• Videz l'appareil de toutes les bouteilles,
• Fixez les accessoires intérieurs afin
d'éviter toute casse,
• Vissez les pieds réglables en position basse
et bloquez la porte en position fermée.
• Durant le transport, veillez à ce que
l'appareil reste toujours en position
verticale.
08
Page 9

MESSAGES PARTICULIERS, INCIDENTS
PROBLEMES DE FONCTIONNEMENT
Avant de faire intervenir le Service Après-Vente, vérifiez avec le tableau suivant que
vous ne pouvez régler le problème vous-même :
PROBLEME SOLUTION
Vérifiez que la fiche est bien connectée,
L'appareil ne fonctionne pas
La température est trop haute
Le joint d'étanchéité ne tient pas en
place.
Le compresseur est souvent en
fonctionnement
que le fusible n'a pas fondu ou que le
disjoncteur n'a pas sauté.
Contrôlez la température et réajustez-la le
cas échéant.
Assurez-vous que la température
ambiante corresponde bien à celle
recommandée pour un fonctionnement
optimal.
Enfin, veillez à ne pas ouvrir la porte plus
souvent qu'il ne le faut.
Il se peut qu'il soit sale : lavez-le ainsi que
son emplacement avec de l'eau tiède
savonneuse. Séchez-le soigneusement et
réinsérez-le dans la rainure. Si cela ne
suffit pas à le maintenir en place,
procédez à son changement.
La charge de bouteilles est peut-être trop
importante : veillez à ne pas dépasser la
capacité maximum de votre cave.
Assurez-vous que l'air peut circuler
librement autour de l'appareil et que le
joint d'étanchéité est en place.
Vérifiez également les points cités en cas
de température trop haute.
SERVICE D'ASSISTANCE TECHNIQUE
Si vous avez déjà réalisé les vérifications indiquées et que votre problème persiste, NE
REALISEZ AUCUNE REPARATION VOUS-MEME. Mettez-vous en contact avec le
Service d'Assistance Technique le plus proche.
CET APPAREIL RESPECTE LES DIRECTIVES CEE
2006/95, 2004/108, 96/57, 92/31, 94/62
09
Page 10

Service après vente
FAGORBRANDT SAS- Locataire Gérant- société par actions simplifiée au capital de 20.000.000 Euros - RCS Nanterre 440 303 196
Les éventuelles interventions sur votre appareil doivent être effectuées par un
professionnel qualifié dépositaire de la marque.
Lors de votre appel, mentionnez la référence complète de votre appareil (modèle, type,
numéro de série) : ces renseignements figurent sur votre certificat de garantie et sur la
plaque signalétique.
PIECES D'ORIGINE : lors d'une intervention d'entretien, demandez
exclusive de pièces détachées certifiées d'origine
.
l'utilisation
Relation consommateurs
… pour en savoir plus sur tous les produits de la marque :
informations, conseils, les points de vente, les spécialistes après vente.
… pour communiquer :
nous sommes à l'écoute de toutes vos remarques, suggestions, propositions auxquelles
nous répondrons personnellement.
Vous pouvez aussi nous écrire :
Service Consommateurs BRANDT
BP 9526
95068 Cergy Pontoise
Tel :
Page 11

CONTENTS
• Safety advice ___________________________________________04
1/INSTALLATION OF YOUR APPLIANCE __________________________05
• Electrical connection _____________________________________05
• Before connecting your appliance _____________________________05
• Protecting the environment ________________________________05
• Description of the appliance ________________________________ 06
• Reversing the direction the door opens _______________________06
2/USING YOUR APPLIANCE ____________________________________07
• Advice ________________________________________________07
• Using the control panel ____________________________________ 07
3/MAINTENANCE OF YOUR APPLIANCE __________________________08
• Cleaning and maintenance _________________________________ 08
• Replacing the bulb ________________________________________ 08
• Power cuts and temporary stoppages ________________________08
• Moving the appliance _____________________________________08
4/PARTICULAR MESSAGES AND INCIDENTS ______________________ 09
• Operating problems ______________________________________09
• CE norms ______________________________________________09
11
Page 12

SAFETY ADVICE
This appliance has been designed for
storing wine. Any other use, in particular
for keeping food, may prove dangerous
because the temperature is not low
enough.
The appliance must be installed in
accordance with the instructions in this
manual; poor installation can damage the
appliance.
In the event of any operating problems
with the appliance, always only contact the
authorised After-Sales Service centres or
a suitably qualified person.
In the event of any maintenance operation,
first disconnect the appliance. Do not pull
the power cable.
If this appliance replaces another that has
a latch, spring, bolt or some other type of
lock, remember to destroy the locking
mechanism, or even better, remove your
old appliance’s door, to prevent anyone
from becoming locked inside it (children
playing, animals, etc.).
Once you have unpacked your appliance,
ensure that it has not been damaged. If
this is the case, any damage must be
reported to the retailer within 24 hours of
delivery. The materials used for the
packaging are completely recyclable
(cardboard, PE bubble wrap, EPS, etc.).
Keep these materials out of children’s
reach.
The appliance’s refrigeration circuit
contains isobutane refrigerant, a lowpollution natural gas that nevertheless is
inflammable. When transporting and
installing the appliance, ensure that none
of the components in the refrigeration
circuit is damaged. In the event of any
damage, keep it away from naked flames
and sources of inflammation and ventilate
well the room in which it is situated.
For the appliance to operate optimally,
install it away from any heat sources and
ensure that air can circulate around it
correctly (see Installing the appliance).
12
Page 13

INSTALLATION OF YOUR APPLIANCE
In order to avoid certain problems,
carefully read the safety instructions
before proceeding to install the appliance
Install the appliance in a well-ventilated,
damp-free room, away from any heat
source. Leave a minimum distance of
2.5cm between the top of the appliance
and any unit above it.
If your appliance must be installed next to
a refrigerator or freezer, you must maintain
a gap of 5cm at the sides to prevent
condensation from forming on the outside
of the appliance.
Your appliance’s climatic classification is
shown on the information plate. This
determines the ambient temperature range
for which the refrigeration unit is designed,
ensuring that the appliance will operate
correctly.
Class Ambient temperatures
N 16° to 32°
ST 18° to 38°
T 18° to 43°
ELECTRICAL CONNECTION
Socket characteristics: 220-240V with
Earth.
• Do not use adapters or extensions
• Prevent the cable from being in contact
with the compressor.
• Prevent the cable from becoming caught
underneath the appliance.
The appliance’s electrical connection is
fitted with an Earth. For your safety,
connect the appliance to an effective
earthed socket (in accordance with the
standards in force regarding safe electrical
installation).
The manufacture refuses to accept any
liability for any damage that may be
caused through failure to earth the
appliance correctly.
BEFORE CONNECTION
• Clean the inside of the wine cellar with
bicarbonate diluted in warm water. Rinse
and dry carefully.
• Wait 2 hours before starting the appliance
to ensure that the lubricants in the
compressor unit have stabilised.
PROTECTION OF THE
ENVIRONMENT
This appliance does not contain any
refrigerant gases harmful to the ozone
layer in its refrigeration circuit and its
insulating materials. It must not be
scrapped with the urban rubbish and scrap
iron in order to avoid damaging the
refrigeration circuit and in particular the
back of the appliance. Contact your town
council for information on the collection of
these types of appliances.
The materials used in this appliance
which are identified by this symbol can be
recycled.
13
Page 14

INSTALLATION OF YOUR APPLIANCE
DESCRIPTION OF YOUR
APPLIANCE
B
Digital display
A
Condenser
B
C
Adjustable feet
D
Light
Adjustable sliding shelves
E
F
Glazed panel
ACCESSORIES
Your appliance is supplied with 8
adjustable, removable shelves enabling
you to store bottles of different sizes or
capacities.
It also has a key-operated lock.
REVERSING THE DIRECTION
THE DOOR OPENS
You can change the direction in which the
door opens (left instead of right):
A
D
F
E
C
The appliance must always be
disconnected while you change the
direction of opening.
1. Raise the top of the refrigerator:
Remove the 2 screw covers on the top,
Remove the 2 screws and slide the top
forward.
2. Tip the appliance slightly backwards
and wedge it in this position.
3. Unscrew the screws from the door’s
upper hinge and remove its pin and
support.
4. Open the door slightly and remove the
lower hinge.
5. Unscrew the lower pin and rescrew it on
the opposite side. Fit the door on the pin
and close it.
6. Rescrew the upper hinge and the door
pin tightly on the opposite side. Refit the
top (reverse the procedure in Point 1).
14
Page 15

USING YOUR APPLIANCE
The ambient temperature plays a major
role in the efficiency of your appliance’s
operation. We would advise you to place
your wine cellar in a room with a
temperature of 22 to 25°C.
How the shelves are arranged changes
the appliance’s internal temperature. Light
can also cause the temperature to change.
Take care therefore not to switch on the
interior light too often.
Advice:
•
Your wine cellar’s recommended internal
temperature is 7 to 18°C.
• The recommended temperatures for
wines according to their type are:
Red wine: 15-18°C
Dry white wine: 10-15°C
Sparkling wine: 7-9°C
Rosé wine: 9-10°C
USING THE CONTROL
PANEL
lower shelves, while keeping the “Red
wine” setting.
If you select the temperature for red wine,
an indicator light lights up next to the Red
marking. The same applies to the other 2
types of wines marked on the panel: White
and Sparkling. There is no specific
indicator light for rosé wine.
You can also select the temperature’s
measurement: Fahrenheit or Celsius, by
pressing the button.
You can also switch the interior light on or
off by pressing the button. However,
the light will switch off automatically after 2
hours.
For your safety, the appliance is fitted
with a key-operated lock. The door locks
as soon the key is removed to avoid any
risk of anyone being shut inside.
LOADING PLAN
When you set the temperature for the first
time or after a long period when the
appliance was disconnected, a
temperature appears automatically on the
display: 10°C is the default temperature.
To adjust the temperature, use the 2
buttons, which enable you to set the
temperature to the degree.
Set the temperature according to the
wines you are storing. For example, if you
have two types of wine, red and white, set
your cellar according to the type with the
larger number of bottles. However, there is
a difference of 3°C between the top and
the bottom of the cellar: you can take
advantage of this to store white wine on
the upper shelves and red wine on the
8 bottles* per shelf
3 bottles* per half-shelf
*bottle maximum size : height 300.5mm diam 76.4mm
15
Page 16

MAINTENANCE OF YOUR APPLIANCE
A
CLEANING & MAINTENANCE
Disconnect your appliance before
proceeding to clean it.
• Clean the inside with bicarbonate diluted
in water and a sponge or a washcloth.
This prevents any unpleasant smells from
forming.
• Clean the shelves with a gentle detergent
solution. You can also use the same
solution to clean the outside of the
appliance.
• Ensure that you dry the lower part of the
appliance carefully to prevent
condensation forming.
• Never use solvents or abrasive
detergents because these could damage
the inside of your appliance. Do not wash
the accessories inside the appliance in a
dishwasher.
• We recommend that you wipe down the
back of the appliance with a soft cloth
once a year because performance is
reduced and consumption increases if this
is dirty.
REPLACING THE BULB
B
Disconnect your cellar before
proceeding to change the bulb.
• Remove the fixing screws.
• Remove the grill from underneath.
• Unscrew the bulb .
A
B
16
• Insert a new bulb of the same model
(10W), replace the grill and use the fixing
screws to fasten it down.
POWER CUTS AND
TEMPORARY STOPPAGES
If the power is cut off for a long time or the
appliance is being switched off for a period
(holidays, etc.), you must:
• Remove all the bottles,
• Disconnect the appliance and clean the
inside,
• Leave the door open to prevent
condensation and unpleasant smells
MOVING THE APPLIANCE
If you must move your wine cellar, ensure
that you observe the following instructions
carefully so that you can do this under the
best conditions:
• Remove all the bottles from the appliance,
• Fasten down the internal accessories to
prevent them from breaking,
• Screw the adjustable feet in the low
position and lock the door in the closed
position.
• During transport, ensure the appliance
always remains in a vertical position.
Page 17

PARTICULAR MESSAGES AND INCIDENTS
OPERATING PROBLEMS
Before calling for the After-Sales service, check whether you can fix the problem
yourself on the following table:
PROBLEM SOLUTION
Check that the appliance is correctly
The appliance does not work
The temperature is too high
The sealing joint is not securely in
place
The compressor is working a lot
plugged in and whether the fuse has
blown or the circuit breaker tripped.
Check the temperature and adjust it if
necessary.
Ensure that the ambient temperature
closely matches the recommended
optimum operating temperature.
Ensure that you do not open the door
more often than required.
It may be dirty: wash it and its housing
with warm soapy water. Dry it carefully
and refit it in the groove. If this is still not
enough to hold it in place, replace it.
The bottle load may be too high: ensure
that you do not exceed your cellar’s
maximum capacity.
Ensure that air can circulate freely around
the appliance and that the sealing joint is
in place.
Also check the points mentioned above for
if the temperature is too high.
TECHNICAL ASSISTANCE SERVICE
If you have already made the above checks and you problem still persists, DO NOT
ATTEMPT ANY REPAIRS YOURSELF. Contact your nearest Technical Assistance
Service.
THIS APPLIANCE COMPLIES WITH EEC DIRECTIVES
2006/95, 2004/108 , 96/57, 92/31, 94/62
17
Page 18

FAGORBRANDT SAS- Locataire Gérant- société par actions simplifiée au capital de 20.000.000 Euros - RCS Nanterre 440 303 196
 Loading...