

Page 1

EN GUIDE TO INSTALLATION DK
FR GUIDE D'UTILISATION FI
INSTALLATIONSVEJLEDNING
ASENNUSOHJEET
PT MANUAL DE UTILIZAÇÃO NO MANUAL FOR INSTALLASJON
DE BEDIENUNGSANLEITUNG SE GUIDE FÖR INSTALLATION
CZ NÁVOD K POUŽITÍ GR ΟΔΗΓΟΣ ΕΓΚΑΤΑΣΤΑΣΗΣ
Decorative Hood
Hotte decorative
Exaustor decorativo
Dekorative Dunstabzugshaube
Extrakční dekorativní zvon
Dekorativ emhætte
Koristekupu
Dekorativ hette
Dekorativ spiskåpa
Διακοσμητικός απορροφητήρας
Page 2
2
EN 18
EN 2
FR 18
PT 34
DE 50
CZ 66
DK 82
FI 98
NO 116
SE 135
GR 151
As part of our commitment to constantly improving our products, we reserve the right
to make changes to them based on technical advances to their technical and functional
features and appearance.
Warning :
Before installing and using your appliance, please carefully read this Guide
to Installation and Use, which will allow you to quickly familiarise yourself with its
operation.
Page 3
ENTABLE OF CONTENTS
3
1 / NOTICES TO THE USER
• Safety recommendations _____________________________________ 4
• Environmental protection _____________________________________ 5
• Description of your appliance _________________________________ 6
2 / INSTALLING YOUR APPLIANCE
• Using the evacuation mode ___________________________________ 7
• Using the recycling mode _____________________________________ 7
• Electrical connections ________________________________________ 8
• Assembling the hood ________________________________________ 9
• Assembling the ventilation shaft
º Outdoor evacuation ______________________________________ 10
º Recycling _______________________________________________ 11
3 / USING YOUR APPLIANCE
• Description of control panel ___________________________________ 12
4 / CARING FOR AND CLEANING YOUR APPLIANCE
lter ____________________________________ 13
13
• Cleaning the outer surfaces ___________________________________ 14
• Changing the light bulb _______________________________________ 14
• Maintaining your appliance ___________________________________ 15
5 / TROUBLESHOOTING ___________________________________________ 16
6 / AFTER-SALES SERVICE __________________________________________ 17
1 / NOTICES TO THE USER
• Safety recommendations _____________________________________ 20
• Environmental protection _____________________________________ 21
• Description of your appliance _________________________________ 22
2 / INSTALLING YOUR APPLIANCE
• Using the evacuation mode ___________________________________ 23
• Using the recycling mode _____________________________________ 23
• Electrical connections ________________________________________ 24
• Assembling the hood ________________________________________ 25
• Assembling the ventilation shaft
º Outdoor evacuation ______________________________________ 26
º Recycling _______________________________________________ 27
3 / USING YOUR APPLIANCE
• Description of control panel ___________________________________ 28
4 / CARING FOR AND CLEANING YOUR APPLIANCE
• Cleaning the lter cartridges __________________________________ 29
• Changing the carbon lter ____________________________________ 29
• Cleaning the outer surfaces ___________________________________ 30
• Changing the light bulb _______________________________________ 30
• Maintaining your appliance ___________________________________ 31
5 / TROUBLESHOOTING ___________________________________________ 32
6 / AFTER-SALES SERVICE __________________________________________ 33
Page 4

1 / NOTICES TO THE USEREN
with these recommendations before installing and using your appliance . They were written
for your safety and the safety of others.
— This appliance was designed for use by
private persons in their homes.
4
Attention
Keep this user guide with your appliance. If the appliance is ever sold or transferred to
another person, ensure that the new owner receives the user guide. Please become familiar
with these recommendations before installing and using your oven. They were written for
your safety and the safety of others.
• SAFETY RECOMMENDATIONS
— This oven was designed for use by private persons in their homes.
— This appliance is to be used by adults.
Make sure that children do not touch and
that they do not treat it as a toy. Make sure
that they do not touch the appliance’s control panel.
— When you receive the appliance, unpack
or have it unpacked immediately. Give it an
overall general inspection. Make note of any
concerns or reservations on the delivery slip
and make sure to keep a copy of this form.
— Your appliance is intended for standard
household use. Do not use it for commercial
or industrial purposes or for any other purpose than that for which it was designed.
— Do not modify or attempt to modify any
of the characteristics of this appliance. This
would be dangerous to your safety.
— Repairs must only be carried out by an
approved specialist.
— Always unplug the hood before cleaning
it or performing other maintenance acts.
— Provide adequate ventilation for the room
in the case of simultaneous use of the hood
and other appliances powered by an energy
source other than electricity. This will prevent the hood from aspirating the combustion gases.
— You should never “ ambé” dishes under
the hood or operate gas rings under the
hood without placing cookware on them
(the ames sucked up into the hood can
damage the appliance).
— When frying food under the appliance,
you must carefully monitor the preparation
at all times.
Oils and grease brought to very high temperatures can catch re.
— Respect the recommended frequency of
cleanings and lter replacements. The accumulation of grease deposits may cause
a re.
— The hood should never be used over a
combustible fuel burning stove (wood, coal,
etc.).
— Never use steam or high-pressure devices to clean your appliance (requirement
imposed by electrical safety).
— With a view to constantly improving our
products, we reserve the right to modify
their technical, functional or aesthetic characteristics, making any changes to their
features considered necessary or desirable
in view of technical progress.
— In order to easily locate the reference
information for your appliance, we recommend that you note these data on the “After-Sales Service Department and Customer
Relations” page.
(This page also explains to you where to nd
this information on your appliance.)
- This appliance is not intended to be used
by persons (including children) with reduced
physical, sensory or mental abilities, or persons lacking experience or awareness, unless using it with the help of a person reponsible for their safety, or under supervision
and with prior instruction in its use.
Warning
In the case of a kitchen heated by a device connected to a chimney (a stove, for example) the “recycling” version of the hood should be installed. Do not use the hood without
metal fi lters.
Suitable ventilation should be provided in the room when the hood is used at the same time
as appliances operated by gas or another combustible fuel.
Page 5
1 / NOTICES TO THE USER EN
5
• ENVIRONMENTAL PROTECTION
— This appliance’s packaging material is recyclable. Help recycle it and protect the environment by dropping it off in the municipal receptacles provided for this purpose.
— Your appliance also contains a great amount of recyclable material. It is marked with this
label to indicate the used appliances that should not be mixed with other waste. This way,
the appliance recycling organised by your manufacturer will be done under
the best possible conditions, in compliance with European Directive 2002/96/
EC on Waste Electrical and Electronic Equipment. Contact your town hall or
your retailer for the used appliance collection points closest to your home.
— We thank you doing your part to protect the environment.
Warning
Installation should only be performed by installers and qualifi ed technicians.
Warning
Remove the protective fi lm from the cartridge fi lter before use.
Page 6
1 / NOTICES TO THE USEREN
6
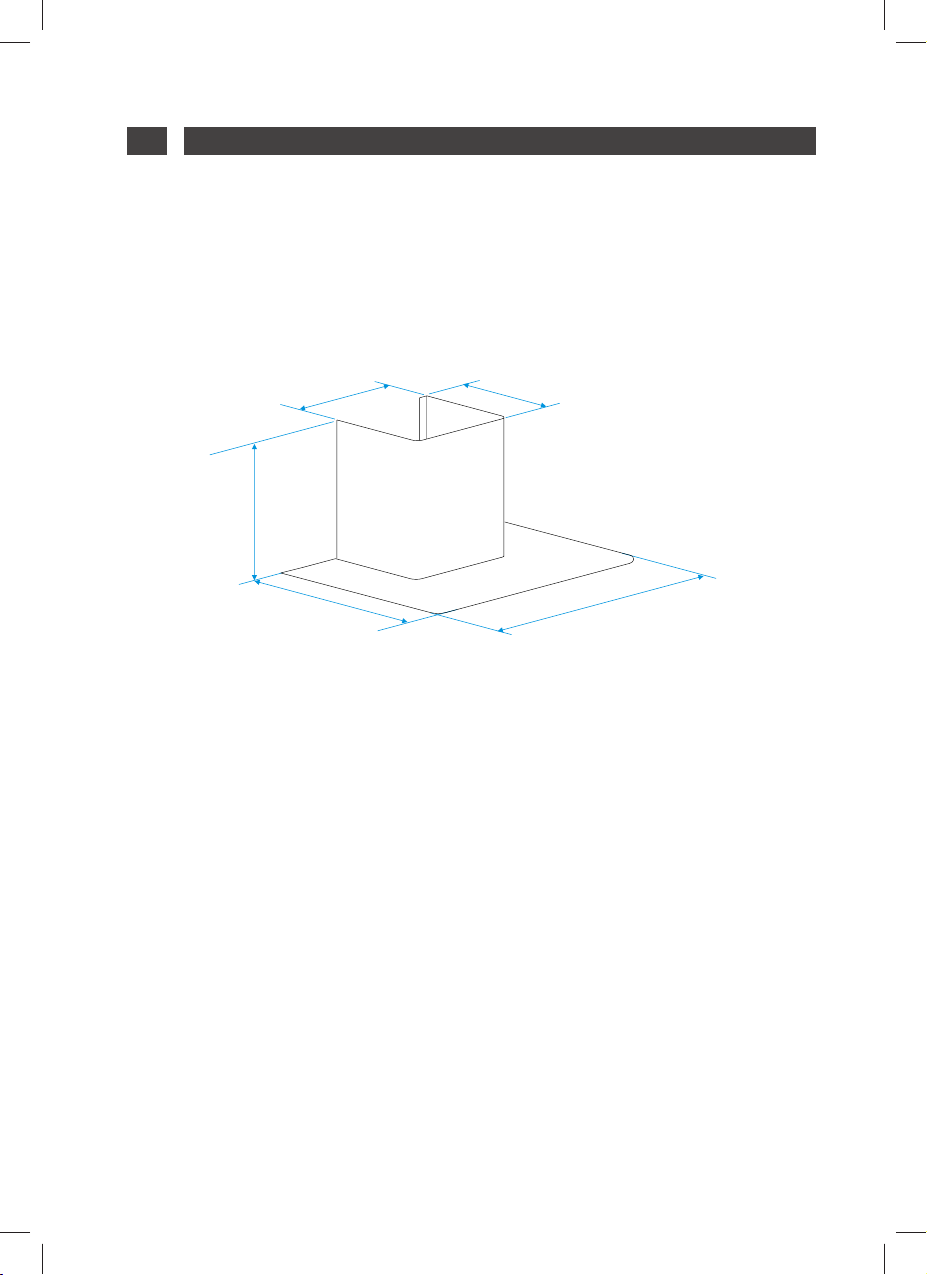
• DESCRIPTION OF YOUR APPLIANCE
3 0 5
2 7 0
5 0 0 - 9 8 0
5 0
0
0 96 0 / 0 0
Page 7
2 / INSTALLING YOUR APPLIANCE EN
— The appliance must be unplugged during installation or when any repairs or maintenance
work is being performed.
— Ensure that the network voltage corresponds to the voltage noted on the identi cation
plate located inside the hood.
— If the electrical installation at your residence requires any changes in order to hook up
your Appliance, call upon a professional electrician.
— If the hood is being used in evacuation mode, do not connect the appliance to a
combustion gas exhaust duct (boiler, chimney, etc.) or to a CMV (controlled mechanical
ventilation) system.
— Under no circumstances should the exhaust duct empty into the attic.
— Install the hood at a safe distance of at least 70 cm from an electric, gas or combined
cooking hob.
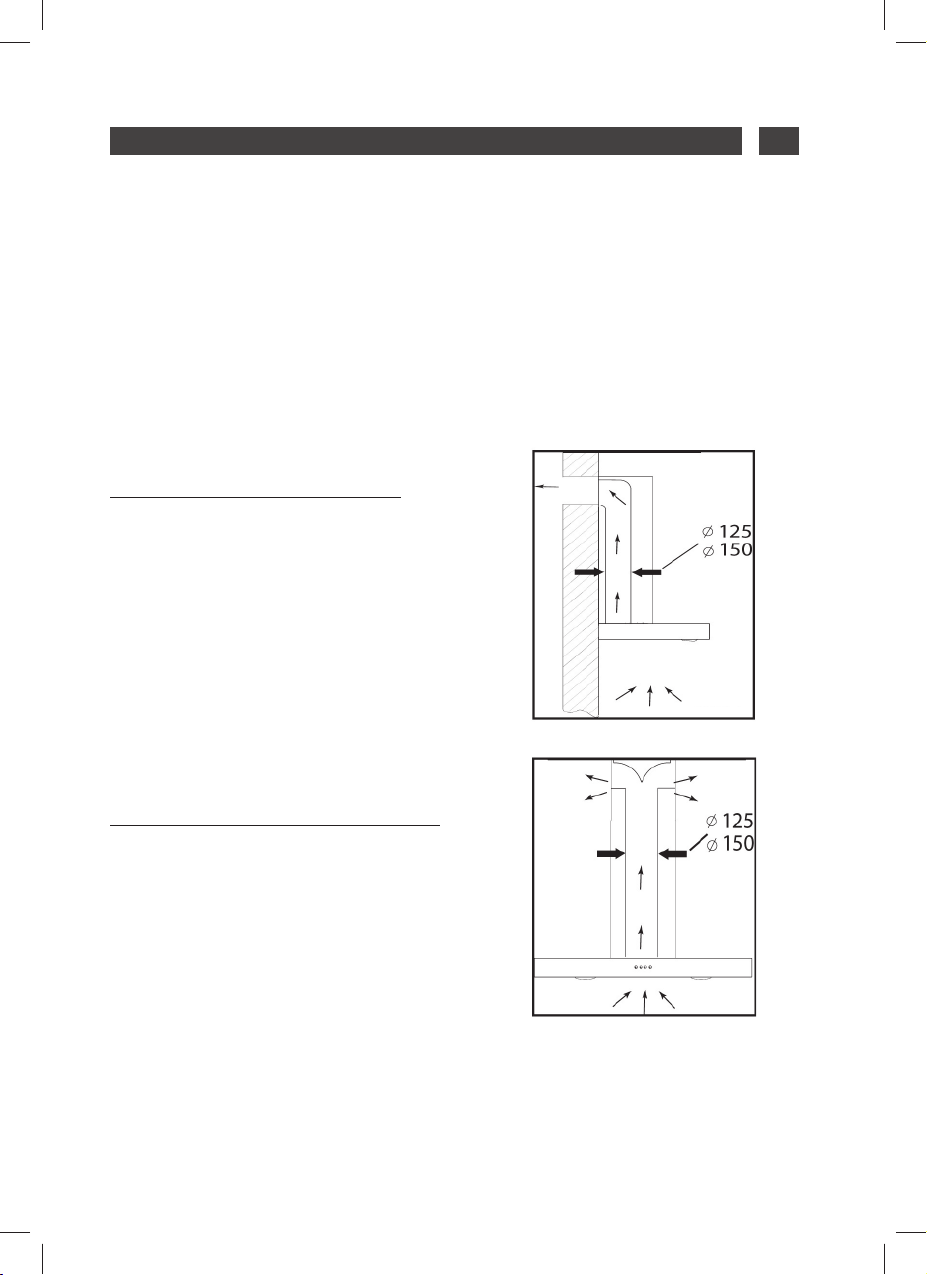
• USING THE EVACUATION MODE
If you possess an outlet to the exterior
(pic. 1)
Your hood can be connected to this outlet
using a ue (minimum diameter Ø mm that
is enamelled, in aluminium, exible or made
of in ammable material). If your ue is less
than 125 mm in diameter, you must use the
recycling mode.
pic.1
• USING THE RECYCLING MODE
If you do not possess an outlet to the exterior
(pic. 2)
All of our appliances can be used in recycling
mode.
In this case, you should add an active
carbon lter which will keep in odours. (See
Chapter 4: Changing the carbon lter.)
pic.2
7
Page 8

2 / INSTALLING YOUR APPLIANCEEN
• ELECTRICAL CONNECTIONS
During installation and maintenance
operations, the appliance must be
unplugged from the electrical grid; fuses
must be cut off or removed.
The electrical connections are made before
the appliance is installed in its housing.
Ensure that:
— the electrical installation has suf cient
voltage,
— the electrical wires are in good
condition,
— the diameter of the wires complies with
the installation requirements.
Warning
This appliance is delivered with a H 05
VVF power cord that has three- 0.75 mm2
conductors (neutral, phase and ground).
It must be connected to the main power
supply (which should be a 220-240 V single
phase current) via a CEI 60083 standardised
socket that should remain accessible after
installation, in keeping with installation
guidelines.
We cannot be held responsible for any
accident resulting from an inexistent,
defective or incorrect ground lead. The fuse
for your installation must be 10 or 16A. If
the power cable is damaged, call the aftersales service department in order to avoid
danger.
Warning
If the electrical installation at your
residence requires any changes in order
to hook up your appliance, call upon a
professional electrician.
Warning
If the hood displays any malfunctions,
unplug the appliance or remove the fuse
corresponding to the electrical socket
where your appliance is plugged in.
8
Page 9

2 / INSTALLING YOUR APPLIANCE EN
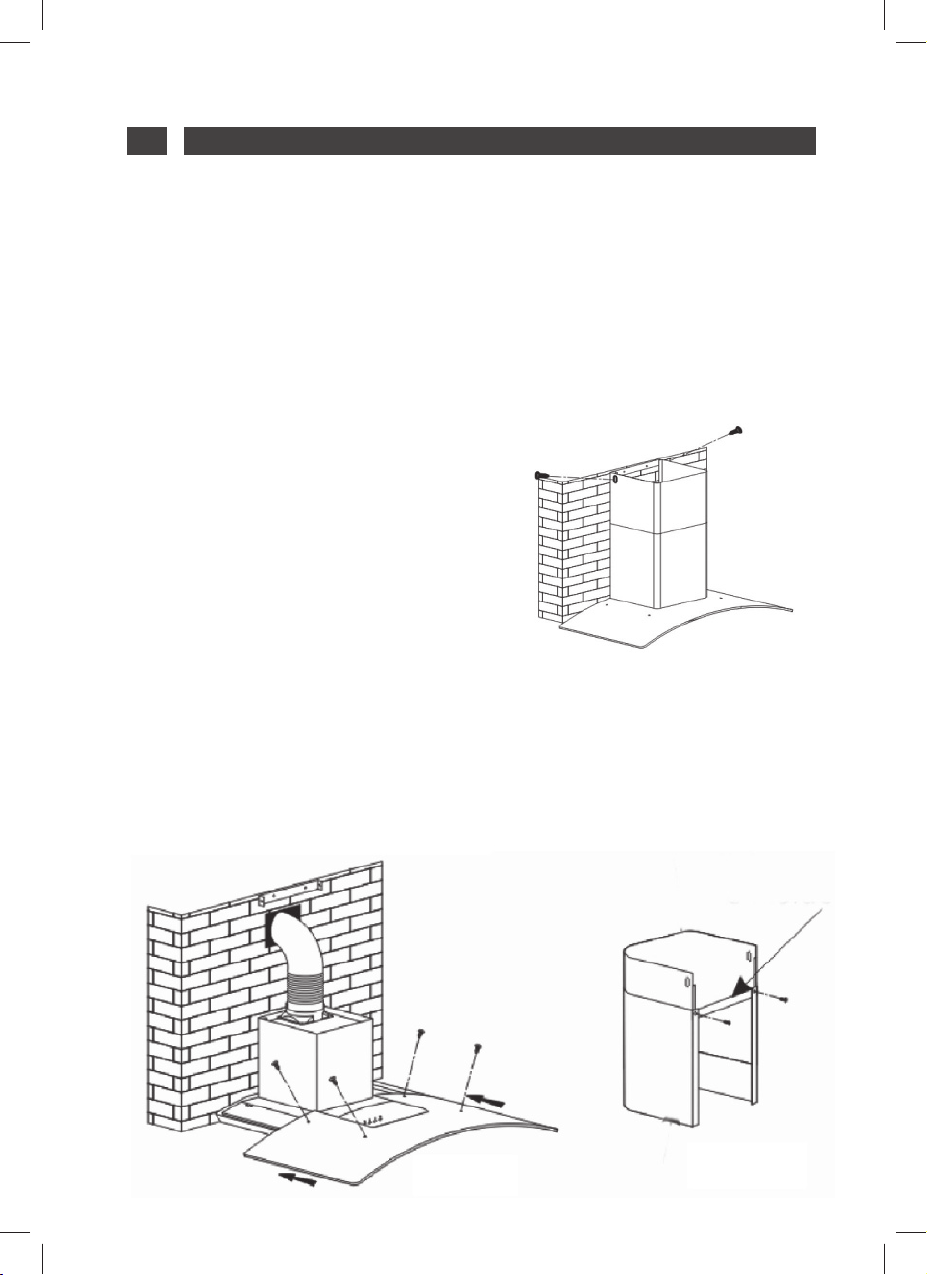
• ASSEMBLING THE HOOD
Warning
The hood must be installed
in compliance with all applicable
regulations concerning the ventilation of
premises. In France these regulations are
described in DTU 61.1 from the CSTB. In
particular, the evacuated air should never
be conveyed to a duct used to evacuate
smoke from appliances that use gas or
other combustible fuels. Unused ducts
may only be used after approval from a
competent specialist.
The minimum distance between the cooking
surface and the lowest part of the hood
must be 70 cm at least. If the instructions
for the hob installed under the hood
specify a distance of more than 70 cm, this
requirement must be respected.
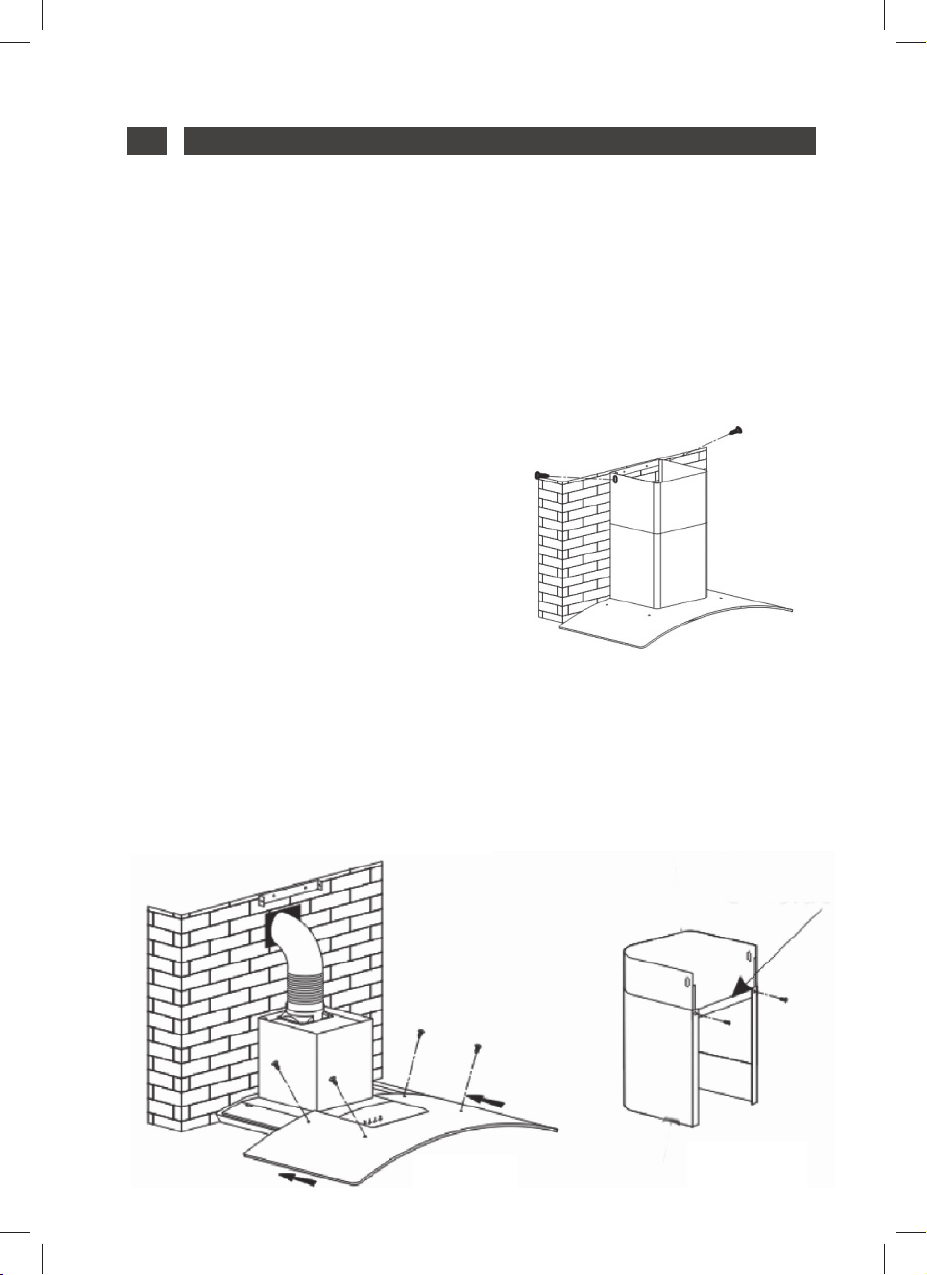
Fixing to the wall :
— Mark a vertical line on the wall centred
on the cooktop.
— Mark on the wall the three holes that
have to be drilled, using the supplied
hood suspension hook and observing the
recommended distance.
— Drill the three 8 mm diameter holes in a
suitable position and insert the plugs (part A
Pic. 1).
— Before xing the hood, mount the nonreturn valve on the motor outlet -Secure
the hood’s xing support, ensuring that it is
perfectly level. (part A Pic. 1)
— Fix the extendable evacuation sleeve
(not included) to the motor outlet without
impeding the movement of the non-return
valve.
— Fit and secure the body of the hood on
this support with the screws provided for
this purpose.
Pict 2
Pict 1
Page 10
2 / INSTALLING YOUR APPLIANCEEN
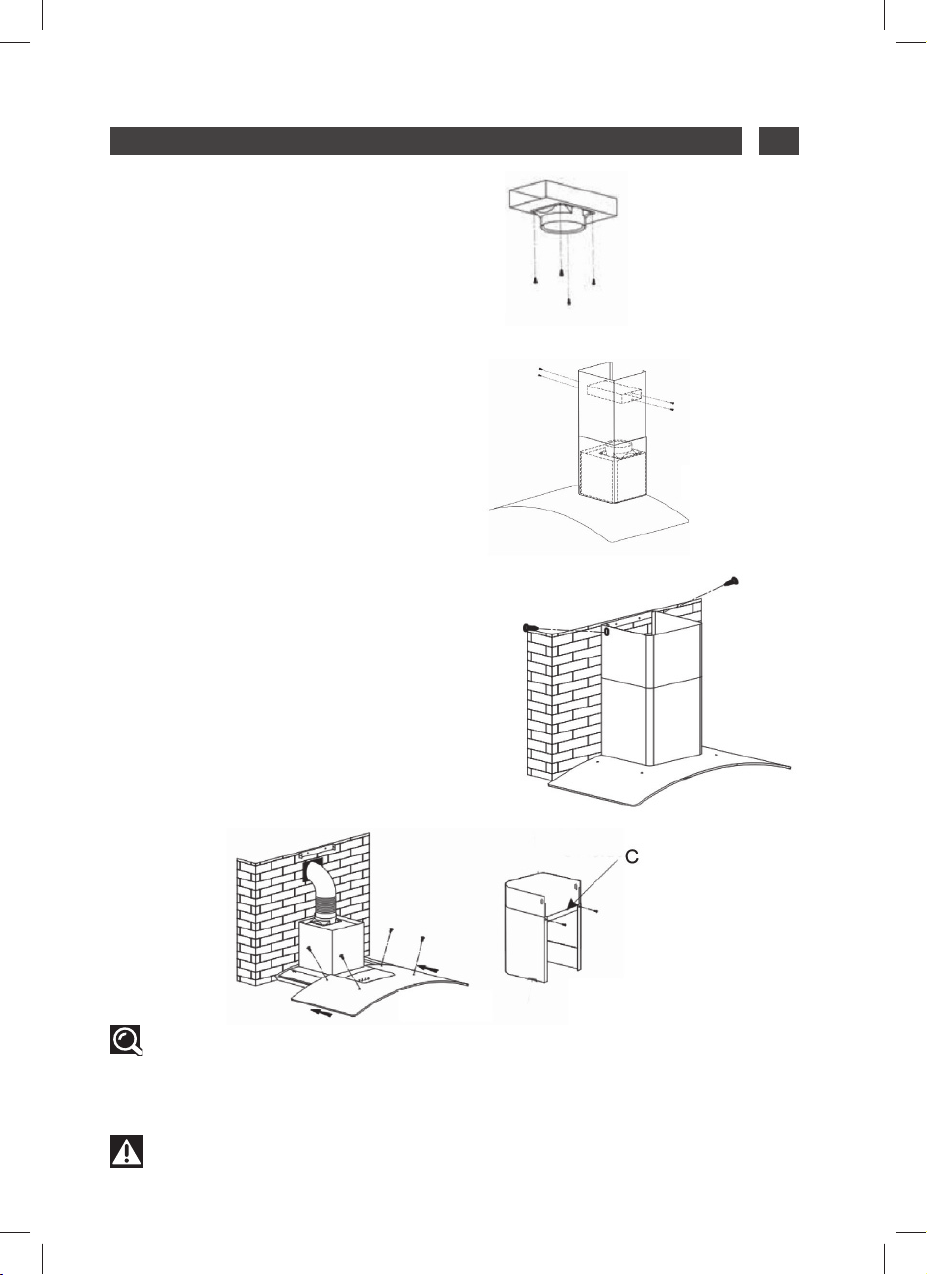
• ASSEMBLING THE VENTILATION
SHAFT
• Outdoor evacuation
— Calculate the nal height for xing the
duct support U-bracket (part B Pic. 1)
— Mark the two holes accordingly
— Drill 8 mm diameter holes and secure
the duct support bracket, ensuring that it is
xed on the same axis as the hood (part B
Pic. 1)
— Fix the at bracket behind the lower duct.
(part C Pic. 4).
— Place the glass on the guides. Slide the
glass in and secure it with the 4 screws
with rubber seal (glass safety). Tighten the
screws slightly.
— Fix the two ducts to the hood.
— Connect the sleeve to the air outlet to the
outside.
— Make the electrical connection to the
hood using the mains supply cable.
— Lift the upper duct up to the ceiling and
x it to the bracket using the screws.
Pict 3
10
Pict 4
Page 11

2 / INSTALLING YOUR APPLIANCE EN
11
• Recycling
— Calculate the nal height for xing the
duct support U-bracket (part B Pic. 1).
— Mark the two holes.
— Drill 8 mm diameter holes and secure
the duct support bracket, ensuring that it is
xed in the same axis as the hood (part B
Pic. 1).
— Fix the at bracket behind the lower duct
part C Pic. 4).
— Place the glass on the guides. Slide the
glass in and secure it with the 4 screws.
— Fit the sleeve adapter on the de ector
(Pic. 8).
— Connect the extendable sleeve (not
included) to the de ector (Pic. 8).
— Fit the two parts of the duct on to the
hood.
— Fit the de ector (Pic. 8) into the upper
duct by the ventilation inlets (Pic. 6)
— Make the electrical connection to the
hood using the mains supply cable.
— Lift the upper duct up to the ceiling and
x it to the bracket using the two screws
(Pic. 7).
Pict 8
Pict 6
Pict 7
Tip
For optimal use of your appliance, we recommend that you connect the hood to a 150
mm-diameter fl ue (not delivered with the appliance). Minimise the number of angles and
bends and the lengths of the fl ue. In the event that the hood will be operated using outdoor
evacuation, you should ensure a suffi cient infl ow of fresh air to avoid a pressure defi ciency
in the room.
Pict 3
Pict 4
Warning
Do not use tools to remove the safety fi lm of hood.
Page 12

3 / USING YOUR APPLIANCEEN
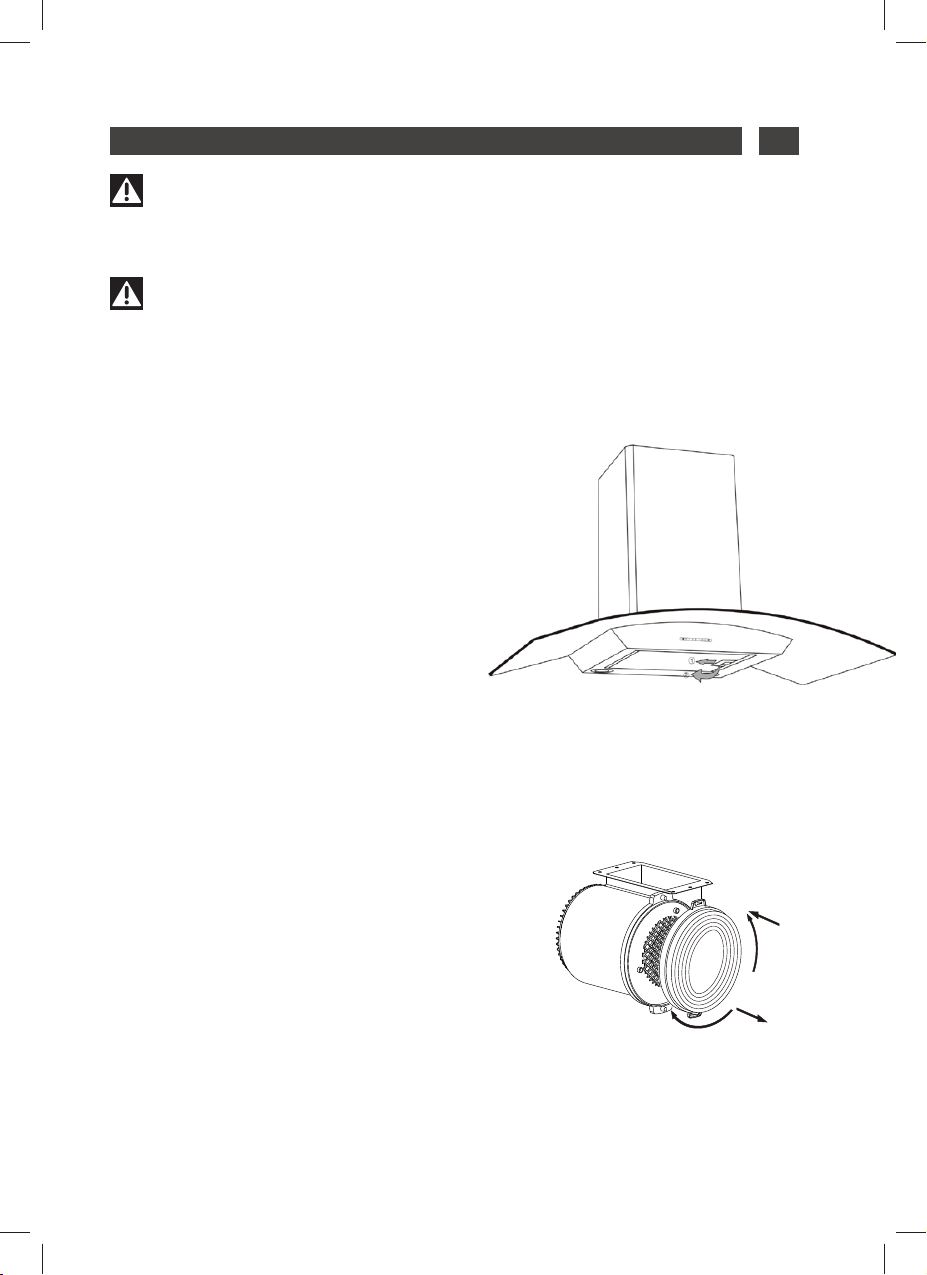
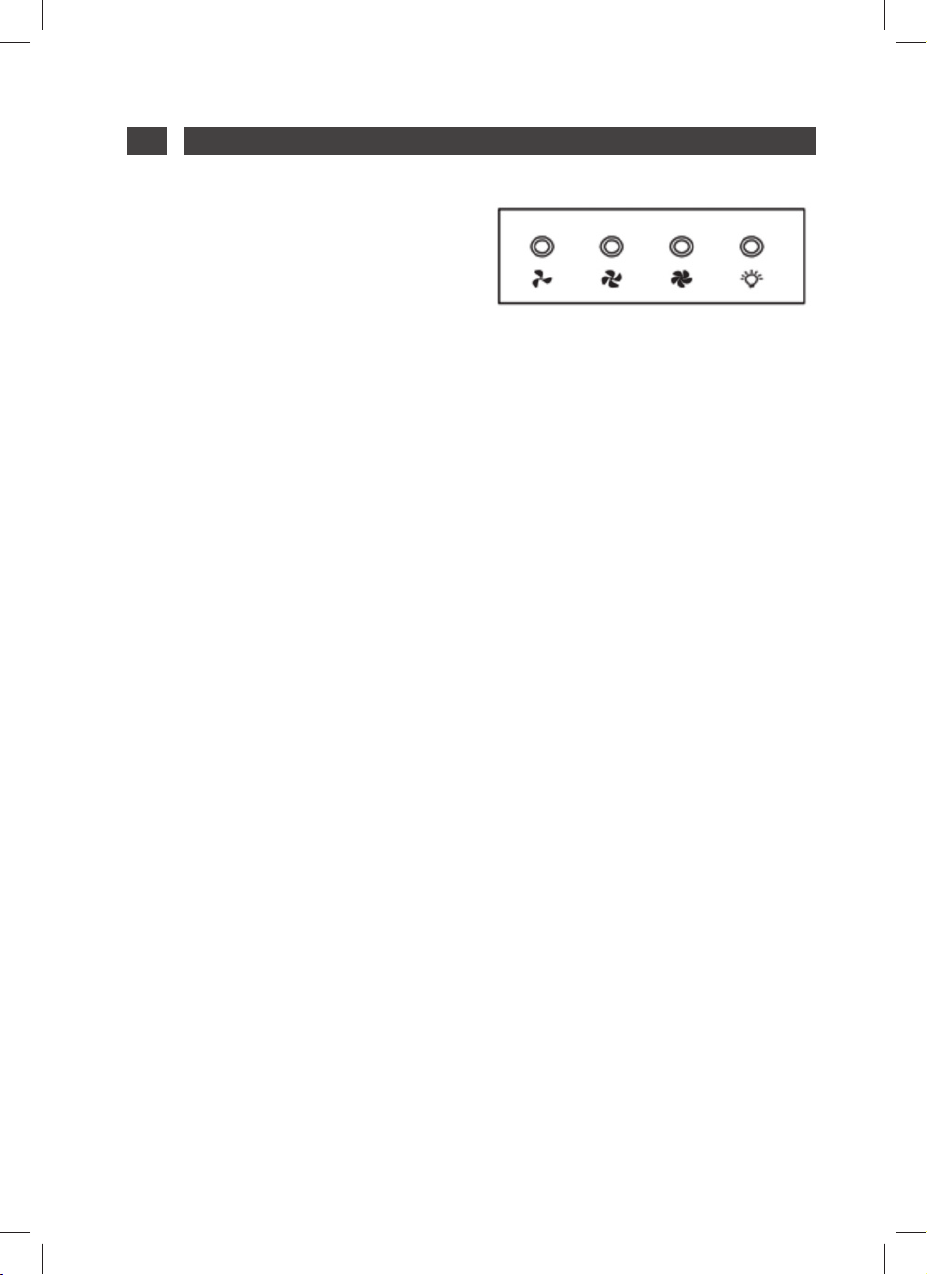
• TO USE YOUR COOKER HOOD
How to use the control panel .
a. Press the button “Low”, the inner indicator
light of switch starts shining, the motor is
running at low speed. Press the button
again,the motor stop.
b. Press the button “Mid”, the inner indicator
light of switch starts shining, the motor
is running at medium speed. Press the
button again, the motor stop.
c. Press the button “High”, the inner
indicator light of switch starts shining,the
motor is running at high speed. Press the
button again, the motor stop.
d. Press the button “Light”, both lights start
shining. Press the button again, the lights
are switched off then.
Low
Mid
High Light
12
Page 13
4 / CARING FOR AND CLEANING YOUR APPLIANCE EN
Warning
Always unplug the hood before cleaning it or performing other maintenance acts.
Regular maintenance of your appliance is a guarantee of proper functioning, good
performance and durability.
Warning
Failure to respect the guidelines for cleaning the appliance and fi lters may cause
fi res. Please carefully adhere to the maintenance recommendations.
• CLEANING THE FILTER
CARTRIDGES
They must be cleaned after approximately
30 hours of use or at least once a month.
These lters can be cleaned in a vertical
position in your dishwasher.
Use a brush, hot water and mild detergent.
Rinse and dry them thoroughly before
returning them to the hood.
• Dismantling the fi lter cartridge
— Turn the built-in lter cartridge handle.
— Tilt the lter cartridge downward.
• CHANGING THE CARBON
FILTER (optional)
Replace it after approximately 120 hours of
use.
— Remove the lter cartridge.
— Turn the carbon lter to remove it.
— Do the operation in the reverse order to
put a new lter back.
— Put the lter cartridges back.
Clo s e
Ope n
13
Page 14

4 / CARING FOR AND CLEANING YOUR APPLIANCEEN
• CLEANING THE OUTER SURFACES
To clean the outside of your hood, use soapy water, but never use abrasive creams, corrosive
detergents, scrubbing sponges or brushes. Wipe down with a soft, damp cloth.
• CHANGING THE LIGHT BULB
Warning
Before carrying out any work, the power supply to the hood must be turned off, either
by unplugging it or by using the circuit breaker switch.
Model with halogen bulb
— Remove the lighting port
— Change the halogen bulb.
— Replace the bulb by repeating these
steps in reverse order.
14
Page 15

4 / CARING FOR AND CLEANING YOUR APPLIANCE EN
Warning
Before carrying out any work, the power supply to the hood must be turned off, either
by unplugging it or by using the circuit breaker switch.
• MAINTAINING YOUR APPLIANCE
MAINTENANCE WHAT TO DO
Never use metal scouring
pads, abrasive products or
excessively stiff brushes.
Top surface and
accessories
This fi lter traps fatty vapours
and dust. This component
plays an important role in
ensuring the effectiveness
Filter cartridge
Activated carbon fi lter
of your hood.
In the event of tough stains,
use a non-abrasive cream,
then rinse with clean water.
This fi lter traps odours and
must be changed at least
once a year depending on
your level of use.
You should order these
fi lters from your dealer
(quoting the reference
shown on the identifi cation
plate located inside the
hood) and note the date the
fi lter was changed.
PRODUCTS/ACCESSORIES
TO USE
To clean the body and the
lighting port, you should
use only commercial
household cleaning
products diluted in water
and then rinse using clean
water, drying with a soft
cloth.
Use a commercial
household cleaning
product then rinse
abundantly and dry. These
fi lters can be cleaned in
a vertical position in your
dishwasher.
(Do not allow them to
touch dirty dishes or
silverware.)
To preserve your appliance, we recommend that you use Clearit cleaning products.
Professional expertise
serving individuals
Clearit offers you professional products and solutions designed for the daily care of your
household appliances and kitchens.
They are on sale at your regular retailer, along with a complete line of accessories and
consumable products.
15
Page 16

5 / TROUBLESHOOTINGEN
SYMPTOMS SOLUTIONS
The hood is not working...
The hood is not operating effectively...
The hood stopped working.
Ensure that:
• The power is not cut off.
• A speed has been selected.
Ensure that:
• The selected motor speed is suffi cient
for the quantity of smoke and vapours to
be cleared.
• The kitchen is suffi ciently ventilated to
allow for fresh air intake.
• The carbon fi lter is not worn (hood
operating in recycling mode).
Ensure that:
• The power is not cut off.
• The single-pole cut-off device was not
activated.
16
Page 17

6 / AFTER-SALES SERVICE EN
Any maintenance on your equipment should be undertaken by :
— either your dealer,
— or another quali ed mechanic who is an authorized agent for the brand appliances.
When making an appointment, state the full reference of your equipment (model, type and
serial number). This information appears on the manufacturer’s nameplate attached to your
equipment.
17
Page 18
FR 34
18
Dans le souci d’une amélioration constante de nos produits, nous nous réservons le
droit d’apporter à leurs caractéristiques techniques, fonctionnelles ou esthétiques
toutes modifi cations liées à leur évolution.
Important :
Avant de mettre votre appareil en marche, veuillez lire attentivement ce guide
d’installation et d’utilisation afi n de vous familiariser plus rapidement avec son
fonctionnement.
18
Page 19
FRSOMMAIRE
1 / A L’ATTENTION DE L’UTILISATEUR
• Consignes de sécurité _______________________________________ 20
• Respect de l’environnement __________________________________ 21
• Description de votre appareil __________________________________ 22
2 / INSTALLATION DE VOTRE APPAREIL
• Utilisation en version évacuation ______________________________ 23
• Utilisation en version recyclage ________________________________ 23
• Raccordement électrique _____________________________________ 24
• Montage de la hotte _________________________________________ 25
• Montage de la cheminée
º Evacuation extérieure _____________________________________ 26
º Recyclage _______________________________________________ 27
3 / UTILISATION DE VOTRE APPAREIL
• Description des commandes __________________________________ 28
29
29
4 / ENTRETIEN ET NETTOYAGE DE VOTRE APPAREIL
• Nettoyage de la surface extérieure _____________________________ 30
• Changement de la lampe _____________________________________ 30
• Entretenir votre appareil ______________________________________ 31
5 / ANOMALIES DE FONCTIONNEMENT _____________________________ 32
6 / SERVICE APRES-VENTE
• Interventions ________________________________________________ 33
• Relations consommateurs ____________________________________ 33
1 / A L’ATTENTION DE L’UTILISATEUR
• Consignes de sécurité _______________________________________ 36
• Respect de l’environnement __________________________________ 37
• Description de votre appareil __________________________________ 38
2 / INSTALLATION DE VOTRE APPAREIL
• Utilisation en version évacuation ______________________________ 39
• Utilisation en version recyclage ________________________________ 39
• Raccordement électrique _____________________________________ 40
• Montage de la hotte _________________________________________ 41
• Montage de la cheminée
º Evacuation extérieure _____________________________________ 42
º Recyclage _______________________________________________ 43
3 / UTILISATION DE VOTRE APPAREIL
• Description des commandes __________________________________ 44
4 / ENTRETIEN ET NETTOYAGE DE VOTRE APPAREIL
• Nettoyage des ltres cassettes ________________________________ 45
• Changement du ltre charbon _________________________________ 45
• Nettoyage de la surface extérieure _____________________________ 46
• Changement de la lampe _____________________________________ 46
• Entretenir votre appareil ______________________________________ 47
5 / ANOMALIES DE FONCTIONNEMENT _____________________________ 48
6 / SERVICE APRES-VENTE
• Interventions ________________________________________________ 49
• Relations consommateurs ____________________________________ 49
19
Page 20
1 / A L’ATTENTION DE L’UTILISATEURFR
Important
Conservez cette notice d’utilisation avec votre appareil. Si l’appareil devait être vendu ou cédé à une autre personne, assurez- vous que la notice d’utilisation l’accompagne.
Merci de prendre connaissance de ces conseils avant d’installer et d’utiliser votre appareil.
Ils ont été rédigés pour votre sécurité et celle d’autrui.
• CONSIGNES DE SÉCURITÉ
— Cet appareil a été conçu pour être utilisé par des particuliers dans leur lieu
d’habitation.
— Cet appareil doit être utilisé par des adultes. Veillez à ce que les enfants n’y touchent
pas et ne l’utilisent pas comme un jouet.
Assurezvous qu’ils ne manipulent pas les
commandes de l’appareil.
— A la réception de l’appareil, déballez-le
ou faites le déballer immédiatement. Véri ez son aspect général. Faites les éventuelles réserves par écrit sur le bon de livraison
dont vous gardez un exemplaire.
— Votre appareil est destiné à un usage
domestique normal. Ne l’utilisez pas à des
ns commerciales ou industrielles ou pour
d’autres buts que celui pour lequel il a été
conçu.
— Ne modi ez pas ou n’essayer pas de
modi er les caractéristiques de cet appareil.
Cela représenterait un danger pour vous.
— Les réparations doivent être exclusivement effectuées par un spécialiste agréé.
— Débranchez toujours la hotte avant de
procéder à son nettoyage ou à son entretien.
— Aérez convenablement la pièce en cas
de fonctionnement simultané de la hotte et
d’autres appareils alimentés par une source
d’énergie différente de l’énergie électrique.
Ceci a n que la hotte n’aspire pas les gaz
de combustion.
— Il est interdit de amber des mets ou de
faire fonctionner des foyers gaz sans récipients de cuisson, au dessous de la hotte
(les ammes aspirées risqueraient de détériorer l’appareil).
— Les fritures effectuées sous l’appareil
doivent faire l’objet d’une surveillance constante. Les huiles et graisses portées à très
haute température peuvent prendre feu.
— Respectez la fréquence de nettoyage et
de remplacement des ltres. L’accumulation
de dépôts de graisse risque d’occasionner
un incendie.
— Le fonctionnement au dessus d’un foyer
à combustible (bois, charbon…) n’est pas
autorisé.
— N’utilisez jamais d’appareils à vapeur ou
à haute pression pour nettoyer votre appareil (exigences relatives à la sécurité électrique).
— Dans le souci d’une amélioration constante de nos produits, nous nous réservons
le droit d’apporter à leurs caractéristiques
techniques, fonctionnelles ou esthétiques
toutes modi cations de leurs caractéristiques liées à l’évolution technique.
— A n de retrouver aisément à l’avenir les
références de votre appareil, nous vous
conseillons de les noter en page “Service
Après-Vente et Relations Consommateurs”.
(Cette page vous explique également où les
trouver sur votre appareil).
Attention
Dans le cas d’une cuisine chauffée avec un appareil raccordé à une cheminée (ex :
poêle), il faut installer la hotte en version recyclage. Ne pas utilisez la hotte sans les fi ltres
cassettes. Une ventilation convenable de la pièce doit être prévue lorsqu’une hotte de cuisine est utilisée simultanément avec des appareils utilisants du gaz ou un autre combustible.
20
Page 21

1 / A L’ATTENTION DE L’UTILISATEUR FR
• RESPECT DE L’ENVIRONNEMENT
— Les matériaux d’emballage de cet appareil sont recyclables. Participez à leur recyclage
et contribuez ainsi à la protection de l’environnement en les déposant dans les conteneurs
municipaux prévus à cet effet.
— Votre appareil contient également de nombreux matériaux recyclables. Il est donc mar-
qué de ce logo a n de vous indiquer que les appareils usagés ne doivent pas
être mélangés avec d’autres déchets. Le recyclage des appareils qu’organise
votre fabricant sera ainsi réalisé dans les meilleures conditions, conformément à la directive européenne 2002/96/CE sur les déchets d’équipements
électriques et électroniques.
Adressez vous à votre mairie ou à votre revendeur pour connaître les points
de collecte des appareils usagés les plus proches de votre domicile.
— Nous vous remercions pour votre collaboration à la protection de
l’environnement.
Attention
L’installation est réservée aux installateurs et techniciens qualifi és.
Attention
Avant la première utilisation du fi ltre cassette, retirez le fi lm de protection.
21
Page 22

1 / A L’ATTENTION DE L’UTILISATEURFR
• DESCRIPTION DE VOTRE APPAREIL
3 0 5
2 7 0
5 0 0 - 9 8 0
5 0
0
0 96 0 / 0 0
22
Page 23

2 / INSTALLATION DE VOTRE APPAREIL FR
— L’appareil doit être débranché pendant l’installation ou dans l’éventualité d’une
intervention.
— Véri ez que la tension du réseau correspond à la tension mentionnée sur la plaque
signalétique située à l’intérieur de la hotte.
— Si l’installation électrique de votre habitation nécessite une modi cation pour le
branchement de votre appareil, faites appel à un électricien quali é.
— Si la hotte est utilisée en version évacuation, ne raccordez pas l’appareil à un conduit
d’évacuation de fumées de combustion (chaudière, cheminée, etc…) ou à une VMC
(ventilation mécanique contrôlée.
— Le conduit d’évacuation, quel qu’il soit ne doit pas déboucher dans les combles.
— Installez la hotte à une distance de sécurité d’au moins 70cm d’un plan de cuisson
électrique, gaz ou mixte.
• UTILISATION EN VERSION
EVACUATION
Vous possédez une sortie vers l’extérieur
(fi g. 1)
Votre hotte peut être raccordée sur celle-ci
par l’intermédaire d’une gaine d’évacuation
(minimum Ø 125 mm, émaillée, en alu,
exible ou en matière inin ammable). Si
votre gaine est inférieure à 125 mm de
diamètre, passez obligatoirement en
mode recyclage.
fi g. 1
• UTILISATION EN VERSION
RECYCLAGE
Vous ne possédez pas de sortie vers l’extérieur
(fi g. 2)
Tous nos appareils ont la possibilité de
fonctionner en mode recyclage.
Dans ce cas, ajoutez un ltre à charbon actif
qui retiendra les odeurs.
(voir Chapitre 4: Changement du ltre
charbon)
fi g. 2
23
Page 24
2 / INSTALLATION DE VOTRE APPAREILFR
• RACCORDEMENT ELECTRIQUE
Lors de l’installation et des opérations
d’entretien, l’appareil doit être débranché
du réseau électrique, les fusibles doivent
être coupés ou retirés.
Le raccordement électrique est à réaliser
avant la mise en place de l’appareil dans le
meuble.
Véri ez que:
— la puissance de l’installation est
suf sante,
— les lignes d’alimentation sont en bon
état
— le diamètre des ls est conforme aux
règles d’installation.
Attention
Este aparato se suministra con un
cable Cet appareil est livré avec un câble
d’alimentation H 05 VVF à 3 conducteurs de
0,75 mm2 (neutre, phase et terre). Il doit être
branché sur réseau 220-240 V monophasé
par l’intermédiaire d’une prise de courant
normalisée CEI 60083 qui doit rester
accessible après installation, conformément
aux règles d’installation.
Notre responsabilité ne saurait être engagée
en cas d’accident consécutif à une mise à
la terre inexistante ou incorrecte. Le fusible
de votre installation doit être de 10 ou 16 A.
Si le câble d’alimentation est endommagé,
faites appel au service aprèsvente afi n
d’éviter un danger.
Attention
Si l’installation électrique de votre
habitation nécessite une modifi cation pour
le branchement de votre appareil, faites
appel à un électricien qualifi é.
Attention
Si la hotte présente une quelconque
anomalie, débranchez l’appareil ou enlevez
le fusible correspondant à la ligne de
branchement de l’appareil.
24
Page 25
2 / INSTALLATION DE VOTRE APPAREIL FR
• MONTAGE DE LA HOTTE
Attention
L’installation doit être conforme aux
règlements en vigueur pour la ventilation
des locaux. En France, ces règlements
sont indiqués dans le DTU 61.1 du CSTB.
En particulier, l’air évacué ne doit pas
être envoyé dans un conduit utilisé pour
évacuer les fumées d’appareils utilisant
du gaz ou autre combustible. L’utilisation
de conduits désaffectés ne peut se
faire qu’après accord d’un spécialiste
compétent.
La distance minimale entre le plan de
cuisson et la partie la plus basse de la hotte
doit être de 70 cm. au minimum. Si les
instructions de la table de cuisson installée
sous la hotte spéci ent une distance plus
grande que 70 cm, celle-ci doit être prise
en compte.
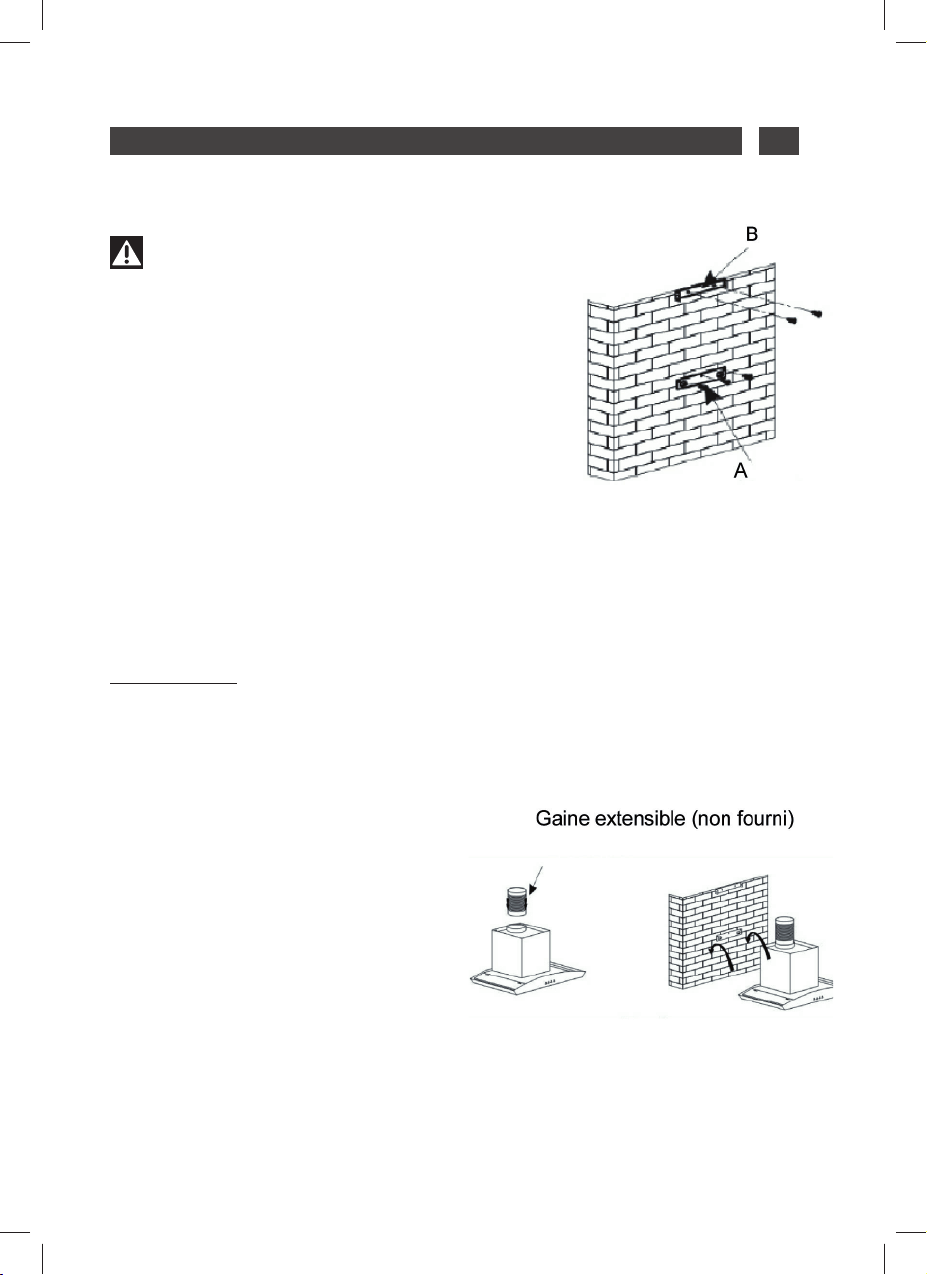
Fixation au mur :
— Tracez une ligne sur le mur, centré et à la
verticale de votre plan de cuisson.
— Tracez sur le mur les 3 trous que
vous devez percer en utilisant le crochet
de suspension de la hotte fourni et en
respectant la distance conseillée.
— Percez les 3 trous de 8mm à
l’emplacement adéquat et insérez les
chevilles (pièce A g. 1).
— Avant de raccorder la hotte, monter le
clapet anti-retour sur la sortie moteur.
— Fixez le support de xation de la hotte
en veillant à ce qu’il soit parfaitement de
niveau (pièce A g. 1).
— Fixez la gaine extensible d’évacuation
(non fournie) sur la sortie moteur sans gêner
le mouvement du clapet anti-retour.
— Posez et xez le corps de la hotte sur ce
support avec les vis prévues en dotation.
Fig. 1
Fig. 2
25
Page 26
2 / INSTALLATION DE VOTRE APPAREILFR
• MONTAGE DE LA CHEMINEE
• Evacuation extérieure
— Calculez la hauteur nale pour xer
l’étrier en U de support de la cheminée
(pièce B g. 1).
— Tracez les 2 trous à l’endroit adapté.
— Percez les 2 trous de 8mm et xez
l’étrier de support de la cheminée en
faisant attention qu’il soit bien dans l’axe
de la hotte (pièce B g. 1).
— Fixez l’étrier plat à l’arrière de la
cheminée inférieure (pièce C g. 4).
— Placer le verre sur les guides. Glisser et
xer le verre avec les 4 vis muni du joint
caoutchouc (protection au verre). Serrez
les vis modérément ( g. 3).
— Posez les 2 cheminées sur la hotte.
— Raccordez la gaine à la sortie de l’air
vers l’extérieur.
— Effectuez le raccordement électrique de
la hotte au moyen du câble d’alimentation.
— Soulever la cheminée supérieure
jusqu’au plafond et la xer à l’étrier à l’aide
des vis.
Fig. 3
26
Fig. 4
Page 27
2 / INSTALLATION DE VOTRE APPAREIL FR
• Recyclage
— Calculez la hauteur nale pour xer
l’étrier de support de la cheminée (pièce B
g. 1).
— Tracez les 2 trous à l’endroit adapté.
— Percez les 2 trous de 8mm et xez l’étrier
de support de la cheminée en faisant attention
qu’il soit bien dans l’axe de la hotte (pièce B
g. 1).
— Fixez l’étrier plat à l’arrière de la cheminée
inférieure (pièce C g. 4).
— Placer le verre sur les guides. Glisser et
xer le verre sur les 4 vis.
— Installer l’adaptateur de gaine sur le
dé ecteur ( g. 8).
— Raccordez la gaine extensible au
dé ecteur.
— Posez la cheminée composée de 2
parties sur la hotte.
— Installer le dé ecteur ( g. 8) dans la
cheminée supérieure au niveau des ouïes
d’aération ( g. 6).
— Effectuez le raccordement électrique de
la hotte au moyen du câble d’alimentation.
— Soulevez la cheminée supérieure
jusqu’au plafond et la xer à l’étrier à l’aide
des 2 vis ( g. 7).
Fig. 8
Fig. 6
Fig. 7
Fig. 3
Fig. 4
Conseil
Pour une utilisation optimale de votre appareil, nous vous conseillons le raccordement
à une gaine diamètre 150 mm (non livrée). Limiter au maximum le nombre de coude et la
longueur de la gaine. Dans le cas où la hotte fonctionne en évacuation extérieure, il convient
d’assurer une arrivée d’air frais suffi sante pour éviter de mettre la pièce en dépression.
Attention
Ne pas utiliser d’outils pour enlever le fi lm de protection transperant sur les parois.
27
Page 28
3 / UTILISATION DE VOTRE APPAREILFR
• DESCRIPTION DES COMMANDES
Bouton-poussoir
1. Appuyez sur le bouton basse vitesse,
l’avertisseur sonore retentit une fois et le
moteur tourne à basse vitesse. Appuyez
sur la touche nouveau sur le bouton,
l’arrêt du moteur.
2. Appuyez sur le bouton moyenne vitesse,
l’avertisseur sonore retentit une fois et
le moteur tourne à moyenne vitesse.
Appuyez sur la touche nouveau sur le
bouton, l’arrêt du moteur.
3. Appuyez sur le bouton vitesse rapide,
l’avertisseur sonore retentit une fois et le
moteur tourne à vitesse rapide. Appuyez
sur la touche nouveau sur le bouton,
l’arrêt du moteur.
4. Appuyez sur le bouton éclairage et les
deux lampes s’allument. Appuyez à
nouveau et elles s’éteignent.
Low
Mid
High Light
28
Page 29

4 / ENTRETIEN ET NETTOYAGE DE VOTRE APPAREIL FR
Attention
Débranchez l’appareil avant de procéder à l’entretien et au nettoyage de l’appareil.
Un entretien régulier de votre appareil est une garantie de bon fonctionnement, de bon
rendement et de durabilité.
Attention
Le non-respect des instructions de nettoyage de l’appareil et des fi ltres peut
occasionner des incendies. Veuillez respecter strictement les consignes d’entretien.
• NETTOYAGE DES FILTRES
CASSETTES
Ils doivent être nettoyés toutes les 30
heures d’utilisation environ ou une fois
par mois minimum. Ce nettoyage peut
être effectué dans votre lave-vaisselle en
position verticale.
Utilisez une brosse, de l’eau chaude et un
détergent doux. Rincez-les et séchez-les
soigneusement avant de les remettre en
place.
• Démontage du fi ltre cassette
— Pivotez la poignée intégrée du ltre
cassette.
— Basculez le ltre cassette vers le bas.
• CHANGEMENT DU FILTRE
CHARBON
Remplacez-le toutes les 120 heures
d’utilisation environ.
— Retirez les ltres cassettes.
— Tourner le ltre charbon pour le retirer.
— Faire l’opération inverse pour remettre un
nouveau ltre.
— Remettre les ltres cassettes.
Fermé
Ouvert
29
Page 30

4 / ENTRETIEN ET NETTOYAGE DE VOTRE APPAREILFR
• NETTOYAGE DE LA SURFACE EXTERIEURE
Pour nettoyer l’extérieure de votre hotte utilisez de l’eau savonneuse, mais n’utilisez jamais
de crèmes à récurer, de détergents corrosif, ni d’éponge grattoir ou brosse. Essuyez avec
un chiffon humide et doux.
• CHANGEMENT DE LAMPE
Attention
Avant toute intervention, la hotte doit être mise hors tension, soit en retirant la prise,
soit en actionnant le disjoncteur.
Modèle avec lampe halogène
— Retirez le hublot
— Changez la lampe halogène
— Replacez l’ensemble en effectuant les
opérations en sens inverse.
30
Page 31

4 / ENTRETIEN ET NETTOYAGE DE VOTRE APPAREIL FR
Attention
Avant toute intervention, la hotte doit être mise hors tension, soit en retirant la prise,
soit en actionnant le disjoncteur.
• ENTRETENIR VOTRE APPAREIL
ENTRETIEN... COMMENT PROCEDER ?
N’utilisez jamais de
tampons métalliques, de
produits abrasifs ou de
Enveloppe et
accessoires
Filtre cassette
Filtre charbon actif
Pour préserver votre appareil, nous vous recommandons d’utiliser les produits d’entretien
Clearit.
L’expertise des professionnels
au service des particuliers
Clearit vous propose des produits professionnels et des solutions adaptées pour l’entretien
quotidien de vos appareils électroménagers et de vos cuisines.
Vous les trouverez en vente chez votre revendeur habituel, ainsi que toute une ligne de
produits accessoires et consommables.
brosses trop dures.
Ce fi ltre retient les vapeurs
grasses et les poussières.
Il est l’élément assurant
une part importante de
l’effi cacité de votre hotte.
Dans le cas de taches
persistantes, utilisez une
crème non abrasive, puis
rincez à l’eau claire.
Ce fi ltre retient les odeurs et
doit être changé au moins
tous les ans en fonction de
votre utilisation.
Commandez ces fi ltres
chez votre revendeur (sous
la référence indiquée sur
la plaque signalétique
située à l’intérieur de la
hotte) et notez la date de
changement.
PRODUITS/ACCESSOIRES
A UTILISER
Pour nettoyer la
carrosserie et le hublot
d’éclairage, utilisez
exclusivement des
nettoyants ménagers du
commerce dilués dans de
l’eau, puis rincez à l’eau
claire et essuyez avec un
chiffon doux.
Avec un nettoyant
ménager du commerce,
puis rincez abondamment
et séchez. Ce nettoyage
peut être effectué dans
votre lave-vaisselle en
position verticale (ne pas
mettre en contact avec
de la vaisselle sale ou des
couverts en argent).
31
Page 32

5 / ANOMALIES DE FONCTIONNEMENTFR
SYMPTOMES SOLUTIONS
La hotte ne fonctionne pas...
La hotte a un rendement insuffi sant...
La hotte s’est arrêtée au cours du
fonctionnement
Vérifi ez que:
• il n’y a pas de coupure de courant.
• une vitesse a été effectivement
sélectionnée.
Vérifi ez que:
• la vitesse moteur sélectionnée est
suffi sante pour la quantité de fumée et
de vapeur dégagée.
• la cuisine est suffi samment aérée pour
permettre une prise d’air.
• le fi ltre à charbon n’est pas usagé
(hotte en version recyclage).
Vérifi ez que:
• il n’y a pas de coupure de courant.
• le dispositif à coupure omnipolaire ne
s’est pas enclenché.
32
Page 33

6 / SERVICE APRES-VENTE ET RELATIONS CONSOMMATEURS FR
• INTERVENTIONS
Les éventuelles interventions sur votre
appareil doivent être effectuées par un
professionnel qualité dépositaire de la
marque. Lors de votre appel, mentionnez
la référence complète de votre appareil
(modèle, type, numéro de série). Ces
renseignements gurent sur la plaque
signalétique (Fig. 1).
220-240 V - 50Hz - 260W
SERVICE :
Nr.
REF CARBON FILTER :
TYPE :
220W 40W
MADE IN E.U
419
g. 1
• RELATIONS CONSOMMATEURS
• Pour en savoir plus sur tous les
produits de la marque :
informations, conseils, les points de vente,
les spécialistes après-vente.
• Pour communiquer :
nous sommes à l’écoute de toutes vos
remarques, suggestions, propositions
auxquelles nous vous répondrons
personnellement.
> Vous pouvez nous écrire :
Service Consommateurs FAGOR
BP 9526
95069 CERGY PONTOISE CEDEX
> ou nous téléphoner au :
PIÈCES D’ORIGINE
Lors d’une intervention d’entretien,
demandez l’utilisation exclusive de pièces
détachées certifi ées d’origine.
33
Page 34

PT 50
34
Com o objectivo de melhorar constantemente os nossos produtos, reservamo-nos o
direito de modifi car as respectivas características técnicas, funcionais ou estéticas por
motivos ligados a avanços técnicos.
Importante:
Antes de colocar o seu aparelho em funcionamento, leia atentamente este
manual de instalação e utilização para se familiarizar mais rapidamente possível
com o seu funcionamento.
34
Page 35

PTÍNDICE
1 / INFORMAÇÕES DESTINADAS AO UTILIZADOR
• Instruções de segurança _____________________________________ 36
• Protecção do ambiente ______________________________________ 37
• Descrição do aparelho _______________________________________ 38
2 / INSTALAÇÃO DO APARELHO
• Utilização na versão de evacuação ____________________________ 39
• Utilização na versão de reciclagem ____________________________ 39
• Ligação eléctrica ____________________________________________ 40
• Montagem do exaustor ______________________________________ 41
• Montagem da chaminé
º Evacuação exterior _______________________________________ 42
º Reciclagem _____________________________________________ 43
3 / UTILIZAÇÃO DO APARELHO
• Descrição dos comandos ____________________________________ 44
45
45
4 / MANUTENÇÃO E LIMPEZA DO APARELHO
• Limpeza da superfície exterior ________________________________ 46
• Substituição da lâmpada _____________________________________ 46
• Manutenção do exaustor _____________________________________ 47
5 / ANOMALIAS DE FUNCIONAMENTO _____________________________ 48
6 / SERVIÇO TÉCNICO _____________________________________________ 49
1 / INFORMAÇÕES DESTINADAS AO UTILIZADOR
• Instruções de segurança _____________________________________ 52
• Protecção do ambiente ______________________________________ 53
• Descrição do aparelho _______________________________________ 54
2 / INSTALAÇÃO DO APARELHO
• Utilização na versão de evacuação ____________________________ 55
• Utilização na versão de reciclagem ____________________________ 55
• Ligação eléctrica ____________________________________________ 56
• Montagem do exaustor ______________________________________ 57
• Montagem da chaminé
º Evacuação exterior _______________________________________ 58
º Reciclagem _____________________________________________ 59
3 / UTILIZAÇÃO DO APARELHO
• Descrição dos comandos ____________________________________ 60
4 / MANUTENÇÃO E LIMPEZA DO APARELHO
• Limpeza dos ltros cassete ___________________________________ 61
• Substituição do ltro de carvão _______________________________ 61
• Limpeza da superfície exterior ________________________________ 62
• Substituição da lâmpada _____________________________________ 62
• Manutenção do exaustor _____________________________________ 63
5 / ANOMALIAS DE FUNCIONAMENTO _____________________________ 64
6 / SERVIÇO TÉCNICO _____________________________________________ 65
35
Page 36

1 / INFORMAÇÕES DESTINADAS AO UTILIZADORPT
Importante
Guarde este guia de utilização junto do aparelho. Se o aparelho for vendido ou cedido
a outra pessoa, tenha o cuidado de remeter igualmente o manual de utilização. Leia estas
recomendações antes de instalar e utilizar o aparelho. Estas recomendações foram redigidas para a sua segurança e a segurança dos outros.
• INSTRUÇÕES DE SEGURANÇA
— Este aparelho foi concebido para ser utilizado por particulares em suas casas.
— Este aparelho deve ser utilizado apenas por adultos. Certi que-se de que as
crianças não lhe tocam e que não o utilizam
como um brinquedo. Certi que-se de que
não tocam no painel de controlo do aparelho.
— Quando receber o aparelho, retire-o da
embalagem imediatamente. Faça uma veri cação geral. Aponte as eventuais reservas
por escrito na guia de remessa e guarde um
exemplar da mesma.
— Este aparelho destina-se a ter uma utilização doméstica normal. Não o utilize para
ns comerciais ou industriais ou com outros
ns para além dos objectivos para os quais
foi concebido.
— Não modi que nem tente modi car as
características deste aparelho. Isso poderá
representar um perigo para si.
— As reparações devem ser efectuadas exclusivamente por um técnico autorizado.
— Desligue sempre o exaustor antes de
proceder à manutenção ou à limpeza do
mesmo.
— Ventile convenientemente a cozinha
em caso de funcionamento simultâneo do
exaustor com outros aparelhos funcionando
com fontes de energia diferentes da electricidade, para que o exaustor não aspire os
gases de combustão.
— É interdita a realização, por baixo do
exaustor, de receitas “ ambé” ou fazer funcionar os bicos de gás sem recipientes, (as
chamas aspiradas são susceptíveis de deteriorar o aparelho).
— As frituras efectuadas sob o aparelho devem ser alvo de uma vigilância constante. O
óleo e as gorduras aquecidas a temperaturas bastante elevadas podem incendiar-se.
— Respeite a frequência de limpeza e de
substituição dos ltros. A acumulação de
gordura pode ocasionar a de agração de
incêndios.
— Não é autorizado o funcionamento por
cima de um foco de combustível (lenha,
carvão, etc.)
— Nunca utilize aparelhos a vapor ou de
alta pressão para limpar o aparelho (requisitos relativos à segurança eléctrica).
— Com a preocupação de melhorar constantemente os nossos produtos, reservamo-nos o direito de modi car as respectivas características técnicas, funcionais
ou estéticas por motivos ligados avanços
técnicos.
— Para no futuro encontrar facilmente as
referências do aparelho, aconselhamos a
que as aponte na página “Serviço Pós-Venda e Relações com o Consumidor”. (Esta
página também explica onde se encontram
no aparelho).
— Este aparelho não está previsto para ser
utilizado por pessoas (incluindo crianças)
com capacidades físicas, sensoriais ou
mentais reduzidas, ou por pessoas sem
experiência ou conhecimentos, excepto
se forem vigiadas ou se tiverem instruções
prévias sobre a utilização do aparelho.
Atenção
No caso de a cozinha ser aquecida com um aparelho ligado a uma chaminé (ex.: fogão
de sala), é necessário instalar o exaustor na sua versão de reciclagem. Não utilize o exaustor sem os fi ltros cassete.
Dever-se-á prever uma ventilação adequada da cozinha sempre que o exaustor seja utiliza-
do simultaneamente com aparelhos que utilizam gás ou outro combustível qualquer.
36
Page 37

1 / INFORMAÇÕES DESTINADAS AO UTILIZADOR PT
• PROTECÇÃO DO AMBIENTE
— Os materiais e embalagem deste aparelho são recicláveis. Por isso, participe na reciclagem dos mesmos e contribua, assim, para a protecção do ambiente, depositando-os nos
contentores municipais previstos para este efeito.
— Este aparelho também contém muitos materiais recicláveis. Por esta razão, está mar-
cado com este símbolo a m de lhe indicar que os aparelhos usados não
devem ser misturados com os restantes resíduos. A reciclagem dos aparelhos organizada pelo fabricante será, pois, efectuada nas melhores condições
possíveis, de acordo com a directiva europeia 2002/96/CE sobre os resíduos
de equipamentos eléctricos e electrónicos. Consulte a sua câmara municipal
ou o revendedor de forma a encontrar os pontos de recolha para aparelhos
utilizados mais próximos de sua casa.
— Agradecemos, desde já, a sua colaboração na protecção do ambiente.
Atenção
A instalação do exaustor é reservada aos instaladores e técnicos qualifi cados.
Atenção
Antes da primeira utilização do fi ltro cassete, retire a película de protecção.
37
Page 38

1 / INFORMAÇÕES DESTINADAS AO UTILIZADORPT
• DESCRIÇÃO DO APARELHO
3 0 5
2 7 0
5 0 0 - 9 8 0
5 0
0
0 96 0 / 0 0
38
Page 39

2 / INSTALAÇÃO DO APARELHO PT
— O exaustor deve estar desligado durante a sua instalação ou em caso de intervenção.
— Veri que se a tensão da rede eléctrica corresponde à tensão mencionada na placa de
características situada no interior do exaustor.
— Se a instalação eléctrica da sua residência necessitar de uma alteração para a ligação do
exaustor, contacte um electricista quali cado.
— Se o exaustor for utilizado na sua versão de evacuação, não o ligue a uma conduta de
evacuação de fumos de combustão (caldeira, chaminé, etc.) ou a um sistema de ventilação
mecânica controlada.
— A conduta de evacuação, seja de que tipo for, não deve desembocar em águas
furtadas.
— Instale o exaustor a uma distância mínima de segurança de 70 cm em relação à placa de
cozinha eléctrica, a gás ou mista.
• UTILIZAÇÃO NA VERSÃO
DE EVACUAÇÃO
A sua instalação possui uma saída para o exterior
(fi g. 1)
O exaustor pode ser ligado a esta saída
através de um tubo de evacuação (Ø
mínimo 125 mm, esmaltado, em alumínio,
ou em material não in amável). Se o tubo
tiver um diâmetro inferior a 125 mm,
passe obrigatoriamente para o modo
reciclagem.
fi g. 1
• UTILIZAÇÃO NA VERSÃO DE
RECICLAGEM
A sua instalação não possui saída para o exterior
(fi g. 2)
Todos os nossos aparelhos têm a
possibilidade de funcionar em modo
reciclagem.
Neste caso, acrescente um ltro de carvão
activo que captará os cheiros.
(Ver Capítulo 4: Substituição do ltro de
carvão).
fi g. 2
39
Page 40

2 / INSTALAÇÃO DO APARELHOPT
• LIGAÇÃO ELÉCTRICA
Durante a instalação e as operações de
manutenção, o exaustor deve ser desligado
da corrente eléctrica e os fusíveis devem
ser cortados ou retirados.
A ligação eléctrica deve ser realizada antes
de o aparelho ser instalado no armário.
Veri car se:
— a instalação tem potência su ciente,
— os os eléctricos estão em boas
condições.
— o diâmetro dos os está em conformidade
com os requisitos de instalação.
Atenção
Este aparelho é vendido com um
cabo eléctrico H 05 VVF de 3 condutores
de 0,75 mm
este ser ligado a uma rede monofásica de
220-240 V através de uma tomada eléctrica
normalizada CEI 60083, que, de acordo com
as regras de instalação, deve fi car acessível
após a instalação.
Declinamos qualquer responsabilidade
em caso de acidente ocasionado por uma
ligação à terra inexistente ou incorrecta. O
fusível da sua instalação deve ser de 10 ou
16 A. Se o cabo eléctrico estiver danifi cado,
contacte o serviço pós-venda a fi m de evitar
qualquer perigo.
2
(neutro, fase e terra), devendo
Atenção
Se a instalação eléctrica da sua
residência necessitar de uma alteração
para a ligação do exaustor, contacte um
electricista qualifi cado.
Atenção
Se o exaustor apresentar qualquer
anomalia, desligue o aparelho ou retire o
fusível correspondente à linha de ligação
do mesmo.
40
Page 41

2 / INSTALAÇÃO DO APARELHO PT
• MONTAGEM DO EXAUSTOR
DECORATIVO
Atenção
A instalação deve cumprir os
requisitos dos regulamentos em vigor
para a ventilação dos locais. Em França,
estes regulamentos são indicados no
DTU 61.1 do CSTB. Designadamente,
o ar evacuado não deve ser enviado
para uma conduta utilizada para a
evacuação de fumos de aparelhos a gás
ou utilizando outros combustíveis. A
utilização de tubos desafectados só pode
ser feita após acordo de um especialista
competente.
A distância mínima entre a placa de
cozinha e a parte mais baixa do exaustor
deverá ser de 70 cm, no mínimo. Se as
instruções da placa de cozinha instalada
sob o exaustor especi carem uma distância
superior a 70 cm, esta deverá ser levada em
consideração.
Fig. 1
Fixação na parede:
— Trace uma linha na parede, centrada e
verticalmente à placa de cozinha.
— Trace na parede os 3 orifícios que tem
de fazer utilizando o gancho de suspensão
do exaustor fornecido e respeitando a
distância aconselhada (peça A da g. 1).
— Faça os 3 orifícios de 8 mm no local
adequado e insira as buchas.
— Fixe o suporte de xação do exaustor,
certi cando-se de que ca totalmente
nivelado (peça A g. 1).
— Antes de ligar o exaustor, monte a válvula
de retenção na saída do motor.
— Fixe o tubo extensível de evacuação (não
fornecido) na saída do motor sem obstruir o
movimento da válvula de retenção ( g. 3).
— Coloque e xe o corpo do exaustor
neste suporte com os parafusos previstos
para esse m ( g. 2).
Fig. 2
41
Page 42

2 / INSTALAÇÃO DO APARELHOPT
• MONTAGEM DA CHAMINÉ
• Evacuação exterior
— Calcule a altura nal para xar o apoio em
U do suporte da chaminé (peça B da g. 1).
— Marque os 2 orifícios no local
adequado.
— Faça os 2 orifícios de 8 mm e xe o apoio
do suporte da chaminé certi cando-se de
que ca exactamente no eixo do exaustor
(peça B da g. 1).
— Fixe o apoio plano na parte de trás da
chaminé inferior.
— Coloque as 2 chaminés sobre o exaustor
( g. 5).
— Ligue o tubo à saída de ar para o
exterior.
— Efectue a ligação eléctrica do exaustor
com o cabo de alimentação.
— Levante a chaminé superior até ao tecto
e xe-a no apoio com parafusos.
Fig. 3
Fig. 4
42
Page 43

2 / INSTALAÇÃO DO APARELHO PT
• Reciclagem
— Calcule a altura nal para xar o apoio
de suporte à chaminé.
— Marque os 2 orifícios no local
adequado.
— Faça os 2 orifícios de 8 mm e xe o apoio
do suporte da chaminé certi cando-se de
que ca exactamente no eixo do exaustor.
— Fixe o apoio plano na parte de trás da
chaminé inferior.
— Coloque as 2 chaminés sobre o exaustor
( g. 5).
— Ligue a capa da saída de ar para o
exterior.
— Efectue a ligação eléctrica do exaustor
através do cabo de alimentação.
— Levante a chaminé superior até ao tecto
e xe-a no apoio com os 2 parafusos.
Fig. 8
Fig. 6
Fig. 7
Fig. 3
Fig. 4
Conselho
Para uma utilização ideal do exaustor, aconselhamos que a ligação seja efectuada a
um tubo com 150 mm de diâmetro (vendido separadamente). Limite ao máximo o número de
cotovelos e o comprimento do tubo. Se o exaustor funcionar com uma evacuação exterior,
convém assegurar-se da existência de uma entrada de ar exterior sufi cientemente grande
para evitar colocar a cozinha em depressão.
Atenção
Não utilize ferramentas para retirar a película de protecção transparente dos
painéis.
43
Page 44

3 / UTILIZAÇÃO DO APARELHOPT
• PARA USAR O SEU EXTRACTOR DE COZINHA
Como usar o painel de controlo.
a. Pressione o botão “Baixa” e o indicador
luminoso interior do interruptor acendese. O motor está a funcionar a baixa
velocidade. Pressione novamente o
botão e o motor pára de imediato.
b. Pressione o botão “Média” e o indicador
luminoso interior do interruptor acendese. O motor está a funcionar a média
velocidade. Pressione novamente o
botão e o motor pára de imediato.
c. Pressione o botão “Alta” e o indicador
luminoso interior do interruptor acendese. O motor está a funcionar a alta
velocidade. Pressione novamente o
botão e o motor pára de imediato.
d. Pressione o botão “Luz” e ambas as luzes
vão acender-se. Pressione novamente o
botão e as luzes irão apagar-se.
Baixa
Média
LuzAlta
44
Page 45

4 / MANUTENÇÃO E LIMPEZA DO APARELHO PT
Atenção
Desligue o aparelho antes de proceder à sua limpeza e manutenção. Uma manutenção
periódica do aparelho é uma garantia para o seu devido funcionamento, bom rendimento
e durabilidade.
Atenção
O não cumprimento das instruções de limpeza do aparelho e dos fi ltros pode provocar
incêndios. Respeite absolutamente as instruções de manutenção.
• LIMPEZA DOS FILTROS CASSETE
Devem ser limpos após 30 horas de
utilização ou no mínimo uma vez por mês. A
sua limpeza pode ser efectuada na máquina
de lavar louça na vertical.
Lave-os com uma escova, água quente e
um detergente suave. Passe-os por água
e seque-os cuidadosamente antes de os
voltar a instalar.
• Desmontagem dos fi ltros cassete
— Rode a pega integrada do ltro cassete.
— Incline o ltro cassete para baixo.
• SUBSTITUIÇÃO DO FILTRO DE
CARVÃO (opcional)
Substitua o ltro de carvão após 120 horas
de utilização aproximadamente.
— Retire os ltros cassete.
— Rode o ltro de carvão para o retirar.
— Faça a operação inversa para instalar um
novo ltro.
— Volte a instalar os ltros cassete.
Fechado
Aberto
45
Page 46

4 / MANUTENÇÃO E LIMPEZA DO APARELHOPT
• LIMPEZA DA SUPERFÍCIE EXTERIOR
Para limpar a parte exterior do exaustor, utilize água com um detergente; não utilize cremes
abrasivos, detergentes corrosivos, nem o esfregão das esponjas, nem escovas. Seque com
um pano macio e húmido.
• SUBSTITUIÇÃO DA LÂMPADA
Atenção
Antes de efectuar qualquer intervenção, desligue o exaustor da corrente eléctrica,
quer retirando a fi cha da tomada, ou accionando o disjuntor.
Modelo com lâmpada de halogéneo
— Retire o visor
— Substitua a lâmpada de halogéneo.
— Volte a instalar todos os elementos,
efectuando as operações no sentido
inverso.
46
Page 47

4 / MANUTENÇÃO E LIMPEZA DO APARELHO PT
Atenção
Antes de efectuar qualquer intervenção, desligue o exaustor da corrente eléctrica,
quer retirando a fi cha da tomada, ou accionando o disjuntor.
• MANUTENÇÃO DO EXAUSTOR
MANUTENÇÃO COMO PROCEDER?
Nunca utilize esfregões
metálicos, produtos
abrasivos ou escovas
Campânula e acessórios
Filtro cassete
Filtro de carvão activo
Para preservar o seu aparelho, recomendamos a utilização de produtos de limpeza Clearit.
Os conhecimentos e a experiência dos profi ssionais ao
serviço dos particulares
A Clearit propõe-lhe produtos pro ssionais e soluções adequadas para a manutenção diária
dos seus electrodomésticos e da sua cozinha.
Poderá encontrá-los à venda no seu revendedor habitual, bem como toda uma linha de
acessórios e consumíveis.
demasiado duras.
Este fi ltro absorve os
vapores gordurosos
e as poeiras. Este
elemento desempenha
uma importante função
na efi cácia do exaustor.
Se houver manchas
persistentes, utilize um
detergente creme não
abrasivo e passe por água
limpa.
Este fi ltro absorve os
cheiros e deve ser
substituído pelo menos
todos os anos em função da
sua utilização.
Encomende fi ltros no seu
revendedor (através da
referência indicada na placa
de características situada
dentro do exaustor) e anote
a data de substituição.
PRODUTOS/ACESSÓRIOS
A UTILIZAR
Para limpar a parte exterior
e a vigia de iluminação,
utilize exclusivamente
produtos de limpeza
domésticos vendidos no
comércio diluídos em
água, em seguida enxagúe
com água limpa e seque
com um pano macio.
Com um produto de
limpeza doméstico
vendido no comércio, em
seguida enxagúe e seque.
A sua limpeza pode ser
efectuada na máquina
de lavar louça colocados
na vertical. (Não pôr em
contacto com louça suja
ou talheres de prata).
47
Page 48

5 / ANOMALIAS DE FUNCIONAMENTOPT
SINTOMAS SOLUÇÕES
O exaustor não funciona...
O rendimento do exaustor é
insufi ciente...
O exaustor parou durante o seu
funcionamento
Verifi car se:
• não há um corte de electricidade.
• foi realmente seleccionada uma
velocidade.
Verifi car se:
• a velocidade do motor seleccionada é
sufi ciente para a quantidade de fumo e
vapor libertada.
• a ventilação da cozinha é sufi ciente
para permitir a entrada de ar.
• o fi ltro de carvão não está gasto
(exaustor na versão de reciclagem).
Verifi car se:
• não há um corte de electricidade.
• o dispositivo de corte ominoplar não
se activou.
48
Page 49

6 / SERVIÇO TÉCNICO PT
As intervenções de que o aparelho necessite devem ser realizadas
— pelo revendedor;
— por outro pro ssional quali cado autorizado pela marca.
Ao chamá-los, indique a referência completa do seu aparelho (modelo, tipo e número de
série). Estas informações guram na placa de identi cação xada no aparelho.
49
Page 50

DE 66
Mit dem Ziel die konstante Verbesserung unserer Produkte zu gewährleisten, behalten
wir uns das Recht vor, an ihnen Änderungen der technischen Eigenschaften oder am
Design vorzunehmen, die einen technischen Fortschritt bedeuten.
Wichtig:
Lesen Sie die Anleitung für die Installation und Benutzung bitte aufmerksam
durch, bevor Sie dieses Produkt in Betrieb nehmen, um sich so schnell wie möglich
mit seiner Funktionsweise vertraut zu machen.
50
Page 51

DEINHALTSVERZEICHNIS
1 / WAS DER BENUTZER BEACHTEN SOLLTE
• Hinweise für die Sicherheit ____________________________________ 52
• Hinweise zum Schutz der Umwelt _____________________________ 53
• Beschreibung des Geräts _____________________________________ 54
2 / INSTALLATION DES GERÄTS
• Benutzung in der Absaugfunktion ______________________________ 55
• Benutzung in der Umluftfunktion _______________________________ 55
• Elektrischer Anschluss _______________________________________ 56
• Montage der Dunstabzugshaube ______________________________ 57
• Montage der Rohrabdeckung
º Absaugung nach außen ___________________________________ 58
º Umluft __________________________________________________ 59
3 / BENUTZUNG DES GERÄTS
• Beschreibung der Steuerung __________________________________ 60
4 / REINIGUNG UND INSTANDHALTUNG DES GERÄTS
lter _____________________________________ 61
lters _____________________________________ 61
• Lampe austauschen _________________________________________ 62
62
• Instandhaltung des Geräts ____________________________________ 63
5 / ANOMALIEN IM BETRIEB ________________________________________ 64
6 / TECHNISCHER KUNDENDIENST _________________________________ 65
1 / WAS DER BENUTZER BEACHTEN SOLLTE
• Hinweise für die Sicherheit ____________________________________ 68
• Hinweise zum Schutz der Umwelt _____________________________ 69
• Beschreibung des Geräts _____________________________________ 70
2 / INSTALLATION DES GERÄTS
• Benutzung in der Absaugfunktion ______________________________ 71
• Benutzung in der Umluftfunktion _______________________________ 71
• Elektrischer Anschluss _______________________________________ 72
• Montage der Dunstabzugshaube ______________________________ 73
• Montage der Rohrabdeckung
º Absaugung nach außen ___________________________________ 74
º Umluft __________________________________________________ 75
3 / BENUTZUNG DES GERÄTS
• Beschreibung der Steuerung __________________________________ 76
4 / REINIGUNG UND INSTANDHALTUNG DES GERÄTS
• Reinigung der Modul lter _____________________________________ 77
• Wechsel des Kohle lters _____________________________________ 77
• Reinigung der Ober ächen außen _____________________________ 78
• Lampe austauschen _________________________________________ 78
• Instandhaltung des Geräts ____________________________________ 79
5 / ANOMALIEN IM BETRIEB ________________________________________ 80
6 / TECHNISCHER KUNDENDIENST _________________________________ 81
51
Page 52

1 / WAS DER BENUTZER BEACHTEN SOLLTEDE
Wichtig
Bewahren Sie diese Bedienungsanleitung mit dem Gerät auf. Wenn Sie es verkaufen oder an eine andere Person weiter geben, versichern Sie sich darüber, dass auch das
Handbuch zur Bedienung beiliegt. Lesen Sie bitte diese Hinweise aufmerksam durch, bevor
Sie das Gerät anschließen oder benutzen. Sie wurden für Ihre Sicherheit und für die der
Allgemeinheit verfasst.
• Hinweise für die Sicherheit
— Dieses Gerät wurde dafür konstruiert, um von
Privatpersonen in ihren Wohnungen benutzt zu
werden.
— Dieser Gerät darf nur von Erwachsenen benutzt werden. Achten Sie darauf, dass Kinder es
nicht anfassen oder es als Spielzeug benutzen.
Versichern Sie sich darüber, dass Kinder nicht die
Steuerungen des Geräts bedienen.
— Wenn Sie das Gerät erhalten, packen Sie es
sofort aus oder lassen Sie es auspacken. Überprüfen Sie visuell den allgemeinen Zustand. Wenn
Sie Reklamationen haben, legen Sie diese schriftlich auf dem Lieferschein nieder und behalten Sie
eine Kopie zurück.
— Ihr Gerät ist für den normalen häuslichen Gebrauch bestimmt. Sie dürfen es weder für kommerzielle oder industrielle Zwecke noch für Zwecke benutzen, für die es nicht konstruiert wurde.
— Modi zieren Sie nicht die Eigenschaften des
Geräts oder versuchen Sie nicht, diese zu verändern. Das kann für Sie gefährlich sein.
— Die Reparaturen dürfen nur von autorisierten
Fachleuten durchgeführt werden.
— Schalten Sie die Dunstabzugshaube stets ab,
bevor Sie sie reinigen oder mit der Instandhaltung
beginnen.
— Lüften Sie den Raum stets ausreichend, wenn
die Dunstabzugshaube zur gleichen Zeit mit anderen Geräten betrieben werden, die nicht über
Strom gespeist werden. Das dient dazu, dass die
Dunstabzugshaube nicht die Verbrennungsgase
ansaugt.
— Es dürfen unter ihr keine Nahrungsmittel ambiert werden oder es dürfen zum Beispiel keine
Gasherde betrieben werden, ohne dass ein Koch-
Achtung
Wenn in der Küche ein Heizgerät betrieben wird, dass ebenfalls an das Abzugsrohr
angeschlossen wird (zum Beispiel eine Etagenheizung), muss die Dunstabzugshaube in
der Umluftfunktion betrieben werden. Benutzen Sie die Dunstabzugshaube nicht ohne die
Modulfi lter. Sorgen Sie stets für eine ausreichende Lüftung des Raums, wenn die Dunstabzugshaube zur gleichen Zeit mit anderen Geräten betrieben wird, die mit Gas oder anderen
Heizstoffen arbeiten.
gefäß die Flamme abdeckt (die Flammen können
das Gerät beschädigen).
— Wenn Sie unter dem Gerät frittieren, müssen
Sie es konstant überwachen. Auf sehr hohe Temperaturen erhitzte Öle und Fette könnten sich ent ammen.
— Halten Sie die Frequenzen zur Reinigung und
zum Wechsel des Filters ein. Die Ansammlung
von Fetten kann zu einem Brand führen.
— Das Gerät darf nicht über offenen Flammen
(Holzfeuer, Kohlenfeuer…) betrieben werden.
— Benutzen Sie keine Dampf- oder Druckreiniger
zur Reinigung des Geräts (es handelt sich um eine
Vorschrift im Rahmen der elektrischen Sicherheit).
— Mit dem Ziel die konstante Verbesserung unserer Produkte zu gewährleisten, behalten wir uns
das Recht vor, an ihnen Änderungen der technischen Eigenschaften oder am Design vorzunehmen, die einen technischen Fortschritt bedeuten.
— Um die Spezi kationen Ihres Geräts stets leicht
zur Hand zu haben, raten wird Ihnen, sie auf der
Seite “Technischer Kundendienst und Kundenservice” zu notieren
(Diese Seite zeigt Ihnen auch, wo Sie diese Angaben auf dem Gerät nden).
— Dieses Gerät ist nicht für die Benutzung durch
Personen konzipiert (Kinder eingeschlossen), die
über eingeschränkte physische, sensorische oder
mentale Kapazitäten verfügen, die keine Erfahrung oder keine Kenntnis des Geräts haben, außer
wenn diese unter Aufsicht einer Person stehen,
die für ihre Sicherheit während der Benutzung des
Geräts verantwortlich ist und entsprechend angewiesen wurden.
52
Page 53

1 / WAS DER BENUTZER BEACHTEN SOLLTE DE
• SCHUTZ DER UMWELT
— Die Materialien zur Verpackung dieses Geräts können recycelt werden. Nehmen Sie am
Recycling teil und helfen Sie uns, die Umwelt zu schützen, indem Sie sie in die Behälter ihrer
Gemeinde werfen, die extra dafür vorgesehen sind.
— Auch das Gerät wurde mit recycelbaren Materialien hergestellt, weshalb es mit diesem
Logo versehen ist. Das zeigt an, dass derlei Geräte nicht mit anderem Müll
zusammen entsorgt werden sollten. Wenn Sie so handeln, wird das Recycling
der Geräte durch den Hersteller unter den best möglichen Bedingungen realisiert, gemäß der europäischen Richtlinie: 2002/96/CE über die Entsorgung
von elektrischen und elektronischen Geräten. Setzen Sie sich bitte mit Ihrer
Gemeinde oder dem Geschäft in Verbindung, in dem Sie das Gerät erworben
haben, um zu erfahren, wo die nächstgelegenen Punkte zur Entsorgung zu
nden sind.
— Wir bedanken uns bei Ihnen für die Unterstützung für den Schutz der
Umwelt.
Achtung
Der Anschluss darf nur von qualifi zierten Installateuren und Technikern durchgeführt
werden.
Achtung
Bevor Sie den Modulfi lter zum ersten Mal benutzen, ziehen Sie die Schutzfolie ab.
53
Page 54

1 / WAS DER BENUTZER BEACHTEN SOLLTEDE
• BESCHREIBUNG DES GERÄTS
3 0 5
2 7 0
5 0 0 - 9 8 0
5 0
0
0 96 0 / 0 0
54
Page 55

2 / ANSCHLIESSEN DES GERÄTS DE
— Das Gerät muss vom Stromnetz getrennt sein, bevor es angeschlossen wird oder Arbeiten
an ihm ausgeführt werden.
— Prüfen Sie bitte zunächst, ob die Netzspannung mit der übereinstimmt, die auf dem
Typenschild angegeben ist, das sich Inneren der Dunstabzugshaube be ndet.
— Wenn der elektrische Anschluss im Raum, in dem die Dunstabzugshaube betrieben
wird, Änderungen zum Anschluss des Gerät bedarf, lassen Sie dies von einem quali zierten
Elektriker.
— Wenn die Dunstabzugshaube mit der Absaugfunktion betrieben wird, schließen Sie es
nicht an einen Kamin an, der für die Ausleitung von Verbrennungsrückständen benutzt wird
(Heizung, offener Kamin, etc.) oder an eine mechanisch gesteuerte Ventilation.
— Die Ableitung, egal welcher Art, darf nicht unterhalb des Dachs oder im Speicher enden.
— Bringen Sie die Dunstabzugshaube in einem Sicherheitsabstand von wenigstens 70cm
über dem Elektro-, Gas- oder Mischherd an.
• BENUTZUNG MIT DER
ABSAUGFUNKTION
Wenn Sie über eine Ableitungsmöglichkeit
nach außen verfügen
(Abb. 1)
Ihre Dunstabzugshaube kann über ein
Abluftrohr (Ø mindestens 125 mm, emailliert,
aus Aluminium oder nicht brennbaren
Materialen) an den Abzug angeschlossen
werden. Ist der Durchmesser kleiner als
125 mm müssen Sie die Umluftfunktion
benutzen.
Abb. 1
• BENUTZUNG IN DER
UMLUFTFUNKTION
Wenn Sie über keine Ableitungsmöglichkeit
nach außen verfügen
(Abb. 2)
Bei allen unseren Geräten besteht die
Möglichkeit, sie in der Umluftfunktion zu
betreiben.
In diesem Fall setzen Sie einen Aktivkohle lter
ein, welcher die Gerüche heraus ltert.
(siehe Abschnitt 4: Wechsel des
Kohle lters).
Abb. 2
55
Page 56

2 / ANSCHLIESSEN DES GERÄTSDE
• ELEKTRISCHER ANSCHLUSS
Beim Anschließen und bei Arbeiten zur
Instandhaltung, muss das Gerät vom
Netzstrom getrennt werden und die
Sicherungen müssen getrennt oder
herausgedreht sein.
Der elektrische Anschluss muss vorbereitet
sein, bevor das Gerät in das Möbelstück
eingesetzt wird.
Überprüfen Sie, dass:
— die Leistung der Stromzufuhr ausreichend
ist,
— die Leitungen zur Stromzufuhr in gutem
Zustand sind,
— der Durchmesser der Kabel entsprechend
der Normen für die Installation ist.
Achtung
Dieses Gerät wird mit einem Stromkabel
geliefert (H 05 VVF) mit drei 3 Leitungen von
0,75 mm
das an ein einphasiges Stromnetz mit 220 240 V über einen gewöhnlichen Stecker (CEI
60083 ) angeschlossen wird, der nach dem
Abschluss der Arbeiten, in Übereinstimmung
mit den Installationsnormen, zugänglich
sein muss.
2
(Schutzleiter, Phase und Erdung),
Wir übernehmen keine Verantwortung im
Fall eines Unfalls, der sich wegen einer
fehlenden oder falschen Erdung ereignet.
Die Installation muss mit einer Sicherung
von 10 oder 16 A. abgesichert sein. Wenn das
Kabel zur Stromversorgung beschädigt ist,
wenden Sie sich sofort an den technischen
Kundendienst, um Gefahren zu vermeiden.
Achtung
Wenn der elektrische Anschluss im
Raum geändert werden muss, in dem die
Dunstabzugshaube betrieben werden soll,
wenden Sie sich an einen qualifi zierten
Elektriker.
Achtung
Wenn Sie eine Anomalie beim
Betrieb der Dunstabzugshaube feststellen,
schalten Sie das Gerät ab oder trennen Sie
die zugehörige Sicherung.
56
Page 57

2 / ANSCHLIESSEN DES GERÄTS DE
• MONTAGE DER
DUNSTABZUGSHAUBE
Achtung
Der Anschluss muss gemäß den
gesetzlichen Vorschriften für die Belüftung
von Räumen vorgenommen werden. In
Frankreich sind diese Vorschriften im DTU
61.1 des CSTB dargelegt. Im Besonderen
darf die abgesaugte Luft nicht in einen
Abzug führen, der zur Ableitung von Rauch
oder Verbrennungsgase anderer Gas- oder
Verbrennungsgeräte benutzt wird. Nicht
genutzte Abzüge dürfen nur nach Angaben
eines kompetenten Spezialisten genutzt
werden.
Der minimale Abstand zwischen der Kochzone
und des untersten Teils der Dunstabzugshaube
muss mindestens 70 cm betragen. Wenn
die Anleitung des jeweiligen Herds unter der
Dunstabzugshaube einen höheren Abstand als
70 cm vorschreibt, muss dieser eingehalten
werden.
Befestigung an der Wand:
—
Zeichnen Sie eine zentrierte Linie auf
die Mauer und von der Vertikalen ihres
Kochgeräts.
—
Zeichnen Sie auf die Mauer die 3 Bohrlöcher
auf, die Sie benötigen und benutzen Sie dafür
die mitgelieferten Halter der Dunstabzugshaube
und beachten Sie dabei den empfohlenen
Abstand (Teil A der Abb. 1).
—
Bohren Sie die 3 Löcher von 8 mm an den
entsprechenden Stellen und setzen Sie die
Dübel ein.
—
Schrauben Sie den Halter für die
Befestigung der Dunstabzugshaube fest und
garantieren Sie, dass er vollständig im Wasser
ist (Teil A der Abb. 1).
—
Bevor Sie die Dunstabzugshaube
aufhängen, montieren das Rückschlagventil
auf den Ausgang des Motors.
—
Schrauben Sie die dehnbare Hülle (nicht
inbegriffen) für die Abluft auf den Ausgang
des Motors ohne dabei die Bewegungen des
Rückschlagventils zu beeinträchtigen. (Abb. 3).
—
Setzen Sie den Körper der
Dunstabzugshaube auf den Halter mit den
dafür vorgesehenen mitgelieferten Schrauben
auf (Abb . 2).
57
Abb. 2
Abb. 1
Page 58

2 / ANSCHLIESSEN DES GERÄTSDE
• MONTAGE DER ROHRABDECKUNG
• Absaugung nach außen
—
Berechnen Sie die Endhöhe für den U-Halter
der Rohrabdeckung (Teil B Abb. 1)
—
Markieren Sie die 2 Löcher am richtigen Ort.
—
Bohren Sie die beiden Löcher mit 8 mm
und schrauben Sie den Halte ansch der
Rohrabdeckung an und achten Sie dabei, dass
die Achse zur Dunstabzugshaube korrekt ist
(Teil B Abb.1)
—
Schrauben Sie die ache Gabel an die
hintere untere Seite der Rohrabdeckung.
—
Setzen Sie die beiden Teile der
Rohrabdeckung auf die Dunstabzugshaube
(Abb. 5).
—
Schließen Sie die Hülle des Luftausgangs
außen an.
—
Führen Sie den elektrischen Anschluss
der Dunstabzugshaube mit dem Stromkabel
durch.
—
Führen Sie das obere Teil der Rohrabdeckung
bis zum höchsten Punkt und befestigen Sie sie
an der Gabel über die Schrauben.
Abb. 3
74
58
Abb. 4
Page 59

2 / ANSCHLIESSEN DES GERÄTS DE
• Umluft
—
Berechnen Sie die Endhöhe für den Halter
der Rohrabdeckung.
—
Markieren Sie die 2 Löcher am richtigen
Ort.
—
Bohren Sie die beiden Löcher mit 8 mm
und schrauben Sie den Halte ansch des
Rohrhalters an und achten Sie dabei, dass
die Achse zur Dunstabzugshaube korrekt ist.
—
Schrauben Sie die ache Gabel an die
hintere unteres Seite der Rohrabdeckung.
—
Setzen Sie die beiden Teile der
Rohrabdeckung auf die Dunstabzugshaube.
(Abb. 5)
—
Schließen Sie die Hülle des Luftausgangs
außen an.
—
Führen Sie den elektrischen Anschluss
der Dunstabzugshaube mit dem Stromkabel
durch.
—
Führen Sie das obere Teil der
Rohrabdeckung bis zum höchsten Punkt
und befestigen Sie sie an der Gabel über die
Schrauben.
Abb. 8
Abb. 6
Abb. 7
Hinweis
Um die optimale Leistung des Geräts zu gewährleisten, raten wird Ihnen, es an
einen Anschluss mit einem Durchmesser von 150 mm anzuschließen (nicht mitgeliefert).
Beschränken Sie so weit wie möglich den Einsatz von Winkeln und die Gesamtlänge. Wenn
die Dunstabzugshaube im Abluftbetrieb benutzt wird, müssen Sie sich darüber versichern,
dass genug Luft zugeführt wird, damit kein Unterdruck im Raum entsteht.
Abb. 3
Abb. 4
Achtung
Benutzen Sie kein Werkzeug, um den Schutzfi lm abzuziehen.
59
Page 60

3 / BENUTZUNG DES GERÄTSDE
• FÜR DIE BENUTZUNG IHRER DUNSTABZUGSHAUBE
Wie man die Steuerung benutzt:
a. Drücken Sie den Knopf “Niedrig” und die
Leuchte im Schalter wird au euchten.
Den Motor wird mit einer niedrigen
Geschwindigkeit betrieben. Wenn Sie
den Knopf erneut drücken, wird der
Motor wieder angehalten.
b. Drücken Sie den Knopf “Mittel” und die
Leuchte im Schalter wird au euchten.
Den Motor wird mit einer mittleren
Geschwindigkeit betrieben. Wenn Sie
den Knopf erneut drücken, wird der
Motor wieder angehalten.
c. Drücken Sie den Knopf “Hoch” und die
Leuchte im Schalter wird au euchten.
Den Motor wird mit einer hohen
Geschwindigkeit betrieben. Wenn Sie
den Knopf erneut drücken, wird der
Motor wieder angehalten.
d. Drücken Sie den Knopf “Licht” und beide
Lampen werden au euchten. Wenn Sie
den Knopf erneut drücken, werden die
Leuchten wieder abgeschaltet.
Niedrig
Mittel
LichtHoch
60
Page 61

4 / REINIGUNG UND INSTANDHALTUNG DES GERÄTS DE
Achtung
Trennen Sie das Gerät stets von der Stromversorgung, bevor Sie eine Arbeit zur
Wartung oder Reinigung vornehmen. Eine periodische Instandhaltung ist eine Garantie für
einen guten Betrieb, eine gute Leistung und eine lange Laufzeit.
Achtung
Wenn Sie den Anweisungen zur Reinigung des Geräts und der Filter nicht nachkommen,
kann das zu Bränden führen. Halten Sie strikt die Anweisungen zur Instandhaltung ein.
• REINIGUNG DER MODULFILTER
Sie müssen nach jeweils 30 Betriebstunden
oder nach etwa einem Monat (minimal)
gereinigt werden. Die Reinigung kann
aufrecht stehend in der Spüle vorgenommen
werden.
Benutzen Sie eine Bürste, heißes Wasser
und ein weiches Spülmittel. Spülen Sie gut
nach und trocknen Sie sie gut, bevor Sie sie
wieder einsetzen.
• Demontage des Modulfi lters
— Drehen Sie den Griff am Modul lter.
— Kippen Sie den Modul lter nach unten
weg.
• WECHSEL DES KOHLEFILTERS
(optional)
Sie müssen ihn jeweils nach 120
Betriebstunden wechseln.
— Entnehmen Sie die übrigen Modul lter
— Drehen Sie den Kohle lter, um ihn
herausnehmen zu können.
— Führen Sie den Vorgang in umgekehrter
Reihenfolge durch, um einen neuen Filter
einzusetzen.
— Setzen Sie danach die übrigen Modul lter
wieder ein.
Schließen
Öffnen
61
Page 62

4 / REINIGUNG UND INSTANDHALTUNG DES GERÄTSDE
• REINIGUNG DER OBERFLÄCHEN AUßEN
Zur äußerlichen Reinigung der Dunstabzugshaube benutzen Sie Wasser und Seife. Benutzen
Sie keine Cremes zum Spülen, noch kratzende Reiniger, Schwämme oder Bürsten. Trocknen
Sie mit einem feuchten und weichen Lappen nach.
• LAMPE AUSTAUSCHEN
Achtung
Bevor Sie irgendeine Arbeit an der Dunstabzugshaube verrichten, schalten Sie den
Strom ab, ziehen den Netzstecker oder trennen die Sicherung.
Modell mit Halogenlampe
— Nehmen Sie die Fassung heraus
— Ersetzen Sie die Halogenlampe.
— Setzen Sie die Gruppe wieder ein, indem
Sie in umgekehrter Reihenfolge vorgehen.
62
Page 63

4 / REINIGUNG UND INSTANDHALTUNG DES GERÄTS DE
Achtung
Bevor Sie irgendeine Arbeit an der Dunstabzugshaube verrichten, schalten Sie den
Strom ab, ziehen den Netzstecker oder trennen die Sicherung.
• INSTANDHALTUNG DES GERÄTS
WARTUNG WAS ZU TUN IST
Benutzen Sie niemals
metallische Schwämme,
kratzende Reiniger oder zu
Gehäuse
und Zubehör
Modulfi lter
Aktivkohlefi lter
Um das Gerät in einem guten allgemeinen Zustand zu erhalten, empfehlen wir die Nutzung
der Produkte Clearit.
Die Kenntnisse und die Erfahrung von
Fachleuten im Dienst von Privatpersonen.
Clearit bietet Ihnen Pro -Produkte und adäquate Lösungen für die täglichen Arbeiten an
Ihren Haushaltsgeräten und in Ihrer Küche.
Sie werde von Ihrem üblichen Händler zusammen mit den Zubehörprodukten und
Verbrauchsmaterialien verkauft.
harte Bürsten.
Dieser Filter hält den
fetten Dampf und den
Staub zurück. Es ist
das Element, das ganz
wesentlich die Wirksamkeit
der Dunstabzugshaube
garantiert.
Wenn es schwer lösliche
Flecken gibt, benutzen
Sie einen nicht kratzenden
Reiniger und spülen Sie mit
klarem Wasser nach.
Dieser Filter fi ltert die
Gerüche und er muss
wenigstens ein Mal im
Jahr, je nach Nutzung,
gewechselt werden.
Bestellen Sie diese Filter
bei ihrem Händler (mit
den Referenzen, die auf
der Typenplakette fi nden,
die sich im Inneren der
Dunstabzugshaube
befi ndet) und notieren Sie
das Datum des Tauschs.
PRODUKTE / ZUBEHÖR
ZUM GEBRAUCH
Um das Gehäuse und das
Auge zur Beleuchtung zu
reinigen, benutzen Sie nur
kommerzielle Reiniger, die
in Wasser verdünnt werde
und spülen Sie danach mit
Wasser nach und trocknen
Sie mit einem weichen
Lappen nach.
Reinigen Sie ihn mit einem
kommerziellen Reiniger,
spülen Sie mit reichlich
Wasser nach und trocknen
Sie ihn ab. Die Reinigung
kann aufrecht stehend in
der Spüle vorgenommen
werden.
(Bringen Sie ihn nicht mit
schmutzigem Geschirr
oder mit Silberbesteck in
Kontakt).
63
Page 64

5 / ANOMALIEN IM BETRIEBDE
SYMPTOME
Die Dunstabzugshaube funktioniert
nicht ...
Die Leistung der Dunstabzugshaube ist
unzureichend.
Die Dunstabzugshaube hat sich im
Betrieb abgeschaltet.
LÖSUNGEN
Überprüfen Sie, dass:
• der Strom nicht abgestellt wurde.
• eine Geschwindigkeit zum Betrieb
gewählt wurde.
Stellen Sie sicher, dass:
• Die gewählte Motordrehzahl ist für die
ausreichende Menge von Rauch und
Dämpfen gelöscht werden.
• Die Küche ist ausreichend belüftet,
damit für Frischluftzufuhr.
• Die Kohlenstoff-Filter nicht getragen
wird (Haube Betriebssystem im
Recycling-Modus).
Überprüfen Sie, dass:
• der Strom nicht abgestellt wurde.
• der automatische Schutztrennschalter
nicht ausgelöst wurde.
64
Page 65

6 / TECHNISCHER KUNDENDIENST DE
Die Arbeiten, die an dem Gerät ausgeführt werden, müssen durchgeführt werden von:
— dem Händler
— oder von einem von der Marke autorisiertem und quali zierten Fachmann.
Bei Anrufen geben Sie bitte stets die gesamten Referenzdaten an (Modell, Typ und
Serienummer). Diese Daten nden sich auf dem Typenschild des Geräts.
65
Page 66

CZ 130
Za účelem neustálého zlepšování našich výrobků si vyhrazujeme právo provádět
úpravy jejich technických, funkčních a estetických vlastností, spojených s technickým
pokrokem.
Důležité:
Než uvedete váš přístroj do provozu, přečtěte si pozorně tento návod k
instalaci a použití, aby jste se co nejrychleji obeznámili s jeho fungováním.
66
Page 67

OBSAH
1 / PRO UŽIVATELE
• Bezpečnostní údaje ______________________________________ 68
• Ochrana životního prostředí _______________________________ 69
• Popis přístroje __________________________________________ 70
2 / INSTALACE PŘÍSTROJE
• Použití v evakuačním způsobu _____________________________ 71
• Použití v recyklačním způsobu _____________________________ 71
• Elektrické zapojení ______________________________________ 72
• Montáž extrakčního zvonu ________________________________ 73
• Montáž komína
º Evakuace ven _______________________________________ 74
º Recyklace __________________________________________ 75
3 / POUŽITÍ PŘÍSTROJE
• Popis ovládačů _________________________________________ 76
4 / ÚDRŽBA A ČIŠTĚNÍ PŘÍSTROJE
• Čištění modulárních fi ltrů _________________________________ 77
• Výměna uhlíkového fi ltru __________________________________ 77
• Čištění vnějšího povrchu __________________________________ 78
• Výměna žárovky ________________________________________ 78
• Údržba přístroje _________________________________________ 79
5 / ZÁVADY VE FUNGOVÁNÍ ___________________________________ 80
6 / TECHNICKÝ SERVIS _______________________________________ 81
1 / PRO UŽIVATELE
• Bezpečnostní údaje ______________________________________ 132
• Ochrana životního prostředí _______________________________ 133
• Popis přístroje __________________________________________ 134
2 / INSTALACE PŘÍSTROJE
• Použití v evakuačním způsobu _____________________________ 135
• Použití v recyklačním způsobu _____________________________ 135
• Elektrické zapojení ______________________________________ 136
• Montáž extrakčního zvonu ________________________________ 137
• Montáž komína
º Evakuace ven _______________________________________ 138
º Recyklace __________________________________________ 139
3 / POUŽITÍ PŘÍSTROJE
• Popis ovládačů _________________________________________ 140
4 / ÚDRŽBA A ČIŠTĚNÍ PŘÍSTROJE
• Čištění modulárních fi ltrů _________________________________ 141
• Výměna uhlíkového fi ltru __________________________________ 141
• Čištění vnějšího povrchu __________________________________ 142
• Výměna žárovky ________________________________________ 142
• Údržba přístroje _________________________________________ 143
CZ
5 / ZÁVADY VE FUNGOVÁNÍ ___________________________________ 144
6 / TECHNICKÝ SERVIS _______________________________________ 145
67
Page 68

CZ
1 / PRO UŽIVATELE
Důležité
Uschovejte tuto příručku spolu s přístrojem. Pokud prodáte nebo přenecháte tento přístroj jiné osobě, ujistěte se, že jste k němu přiložili tento návod k použití. Prosíme,
přečtěte si tyto rady dříve, než nainstalujete a začnete používat tento přístroj. Byly sepsané
za účelem zajištění bezpečnosti vaší i vašeho okolí.
•
BEZPEČNOSTNÍ ÚDAJE
— Tento přístroj je určený pro používání
soukromými osobami ve svých domovech.
— Tento přístroj musí být používaný
dospělými osobami. Dávejte pozor, aby
se ho nedotýkaly děti a nepoužívaly jej
jako hračku. Ujistěte se, že nemanipulují
ovládačemi přístroje.
— Po obdržení přístroj ihned vybalte nebo
jej nechejte vybalit. Zkontrolujte jeho celkový
vzhled. Pokud máte nějaké výhrady, napište
je do dodacího listu a ponechejte si jednu
kopii.
— Váš přístroj je určený pro normální domácí
použití. Nepoužívejte jej k obchodním nebo
průmyslovým účelům, nebo k jakýmkoliv
jiným účelům, než k těm, pro které byl
vyrobený.
— Neupravujte, ani se nesnažte upravovat
charakteristiky
přístroje. Mohlo by to být pro vás
nebezpečné.
— Opravy musí být prováděné výhradně
autorizovaným odborníkem.
— Odpojte vždy extrační zvon, než začnete
s čištěním nebo údržbou.
— Ventilujte dostatečně pokoj, pokud
extrakční zvon funguje zároveň s jinými
přístroji, napájenými jiným zdrojem energie,
než je elektřina. To proto, aby
zvon nenasával spalované plyny.
— Nelze fl ambovat potraviny nebo mít
zapálený plynový hořák bez nádoby pod
zvonem (nasáté plameny by mohly poškodit
přístroj).
— Když budete smažit pod přístrojem,
musíte jej neustále hlídat. Oleje a tuk ohřátý
na vysokou teplotu by se mohly vznítit.
— Respektujte frekvenci čištění a výměn
fi ltrů. Nahromadění nánosů tuku by mohlo
vyvolat požár.
— Nesmí fungovat nad ohněm, který je na
bázi spalování (dřevo, uhlí,…).
— Na čištění přístroje nepoužívejte přístroje
na páru nebo vysoký tlak (požadavky
vzhledem k elektrické bezpečnosti).
— Za účelem neustálého zlepšování
našich výrobků si vyhrazujeme právo
aplikovat úpravy co se týče technických,
funkčních nebo estetických charakteristik,
způsobených technickým pokrokem.
—
Aby jste mohli snadněji nalézt reference
vašeho přístroje, radíme Vám, aby jste je
zaznamenali na stránce “Technická podpora
a zákaznické centrum”. (Na této stránce je
také popis, kde je na přístroji najdete).
— Tento přístroj není určený k používání
osobami (včetně d ětí) se sníženými fyzickými,
smyslovými nebo mentálními schopnostmi
nebo osobami, které nedisponují potřebnými
zkušenostmi nebo znalostmi, s výjimkou,
pokud by osoba zodpovědná za jejich
bezpečnost na ně dohlížela nebo je předem
náležitě poučila, jak přístroj používat.
Pozor
Pokud se sporák ohřívá pomocí přístroje napojeného na komín (například kamna), je
třeba nainstalovat zvon v recyklačním způsobu. Nepoužívejte zvon bez modulárních fi ltrů.
Je třeba zajistit adekvátní ventilaci, pokud se extrakční kuchyňský zvon používá zároveň s
dalšími přístroji, které fungují na plyn nebo jiný spalovací pohon.
68
Page 69

1 / PRO UŽIVATELE
•
OCHRANA ŽIVOTNÍHO PROSTŘEDÍ
— Materiály použité při balení tohoto přístroje jsou recyklovatelné. Podílejte se na jejich
recyklování
a pomáhejte zachovávat životní prostředí jejich vyhozením do obecních kontejnerů, určených
k těmto účelům.
— Váš přístroj také obsahuje recyklovatelné materiály, proto je označený
tímto logem, které oznamuje, že použité přístroje se nesmí míchat mezi
ostatní odpad. Tímto způsobem se recyklace přístrojů, kterou organizuje váš
výrobce, uskuteční v nejlepších možných podmínkách, v souladu s evropskou
směrnicí
2002/96/CE o odpadech elektrických a elektronických vybavení. Informujte se
na vašem obecním úřadě nebo u vašeho prodejce, aby jste se dozvěděli, kde
se nacházejí zběrná místa pro použité přístroje, která jsou nejblíže vašemu
bydlišti.
— Děkujeme Vám za vaši spolupráci při ochraně životního prostředí.
Pozor
Instalace musí být provedená kvalifi kovanými instalačními techniky.
Pozor
Dříve, než poprvé použijete modulární fi ltr, odstraňte z něj ochranný fi lm.
CZ
69
Page 70

CZ
•
POPIS PŘÍSTROJE
1 / PRO UŽIVATELE
3 0 5
2 7 0
5 0 0 - 9 8 0
5 0
0
0 96 0 / 0 0
70
Page 71

2 / INSTALACE PŘÍSTROJE
— Přístroj je třeba odpojit před instalací a před provedením jakéhokoliv zákroku na něm.
— Zkontrolujte, zda napětí sítě odpovídá napětí, uvedenému na štítku s charakteristikami,
který se nachází uvnitř zvonu.
— Pokud je pro nainstalování vašeho zvonu třeba provést nějaké změny, aby jste mohli
připojit přístroj, pověřte tím kvalifi kovaného elektrikáře.
— Pokud používáte zvon v evakuačním způsobu, nezapojujte přístroj na vývod pro evakuaci
dýmu ze spalování (kotel, komín, atd.) nebo na VMC ( mechanická kontrolovaná ventilace).
— Evakuační vývod, ať je jakýkoliv, nesmí vyústit pod střechou.
— Nainstalujte zvon do bezpečnostní vzdálenosti alespoň 70 cm od desky elektrického,
plynového nebo smíšeného vařiče.
•
POUŽITÍ V EVAKUAČNÍM
ZPŮSOBU
Pokud disponujete vývodem ven
(Obr. 1)
Můžete k němu připojit váš zvon pomocí
evakuačního vývodu (minimální Ø 125
mm, smaltovaný, hliníkový nebo nehořlavý
materiál). Pokud má vývod průměr menší,
než 125 mm, přejděte povinně do
recyklačního způsobu.
Obr. 1
CZ
•
POUŽITÍ V RECYKLAČNÍM
ZPŮSOBU
Pokud nedisponujete vývodem ven
(Obr. 2)
Všechny naše přístroje jsou uzpůsobené pro
možnost fungování v recyklačním způsobu.
V tomto případě přidejte fi ltr s aktivním
uhlím, který zachycuje pachy.
(viz. kapitola 4: Výměna uhlíkového fi ltru).
Obr. 2
71
Page 72

CZ
•
ELEKTRICKÉ ZAPOJENÍ
Při provádění instalace a údržbářských
operací musí být přístroj odpojený z
elektrické sítě a pojistky musí být vypnuté a
odstraněné.
Elektrické zapojení je třeba provést před
umístěním přístroje do nábytku.
Zkontrolujte, zda:
— je dostatečný výkon instalace,
— jsou napájecí linky v dobrém stavu,
— je průměr káblu v souladu s normami
instalace.
2 / INSTALACE PŘÍSTROJE
Pozor
Tento přístroj je dodávaný spolu s
napájecím káblem H 05 VVF s 3 vodiči
o 0,75 mm
2
(nulák, fáze a zem), který je
třeba napojit na jednofázovou síť s 220
- 240 V prostřednictvím normalizované
zásuvky CEI 60083, ta musí být přístupná
i po provedení instalace, v souladu s
instalačními normami.
Nebudeme na sebe přebírat zodpovědnost
za nehody způsobené neexistující nebo
nesprávnou zásuvkou.
Pojistka ve vaší instalaci musí mít 10
nebo 16 A. Pokud by byl napájecí kábel
poškozený, kontaktujte zákaznické
centrum, aby jste předešli jakémukoliv
nebezpečí.
Pozor
Pokud potřebujete upravit
elektrickou instalaci vašeho pokoje, aby
bylo možné zapojit přístroj, přivolejte
kvalifi kovaného elektrikáře.
Pozor
Pokud se na zvonu objeví jakákoliv
anomálie, odpojte přístroj nebo vyndejte
pojistku odpovídající lince zapojení
přístroje.
72
Page 73

2 / INSTALACE PŘÍSTROJE
•
MONTÁŽ EXTRAKČNÍHO ZVONU
Pozor
Instalace musí být v souladu s
platnými normami pro ventilaci místností.
Ve Francii jsou tyto normy popsané v DTU
61.1, CSTB. Především by vypouštěný
vzduch neměl proudit stejnými průduchy
jako dým z přístrojů, které používají plyn
nebo jiné spalování.
Neužívané vývody se mohou znovu použít
pouze se souhlasem kompetentního
odborníka.
CZ
Minimální vzdálenost mezi varnou zónou a
nejnižší částí zvonu musí být alespoň 70 cm.
Pokud by instrukce na štítku, instalovaném
pod zvonem, uváděly vzdálenost vyšší než
70 cm, je třeba ji brát v úvahu.
Upevnění na zeď:
— Nakreslete na zeď vystředěnou čáru, ve
vertikální pozici k vařící desce.
— Označte na zdi všechny 3 otvory, které
potřebujete vyvrtat a použijte hák pro
zavěšení zvonu, ponechejte a respektujte
doporučenou vzdálenost (kus A, obr. 1).
— Vyvrtejte všechny 3 otvory o 8 mm v
adekvátním rozmístění a vložte hmoždinky.
— Našroubujte držák pro upevnění zvonu
a zajistěte, aby byl zcela nivelovaný (kus A,
obr. 1).
— Před zavěšením zvonu namontujte zpětný
ventil na vývod motoru.
— Našroubujte (nepřiložené) výsuvné
odvodové pouzdro na vývod motoru tak,
aby nepřekáželo v pohybu zpětného ventilu.
(obr. 3).
— Umístěte a zapojte těleso zvonu na tento
držák pomocí připravených přiložených
šroubů. (obr. 2).
Obr. 1
Obr. 2
Obr. 2
73
Page 74

CZ
MONTÁŽ KOMÍNA
•
•
— Vypočítejte konečnou výšku pro
našroubování výběžku ve tvaru U na držáku
komína (kus B, obr. 1).
— Vyznačte 2 otvory na adekvátním místě.
— Vyvrtejte oba 2 otvory o 8 mm, našroubujte
přírubu držáku komína a věnujte pozornost
tomu, aby byla dobře uložená v hřídeli zvonu
(kus B, obr.1).
— Našroubujte plochou vidlici dozadu, na
spodní část komína.
— Umístěte oba 2 komíny na zvon (obr. 5).
— Napojte pouzdro na vývod vzduchu ven.
— Proveďte elektrické zapojení zvonu
prostřednictvím napájecího kabele.
— Zvedněte horní komín až do maximální
výšky a upevněte ho na vidlici pomocí dvou
šroubů.
2 / INSTALACE PŘÍSTROJE
Vypouštění ven
Obr. 4
Obr. 3
138
Page 75

2 / INSTALACE PŘÍSTROJE
•
Recyklování
— Vypočítejte konečnou výšku pro vložení
příruby držáku komína.
— Vyznačte 2 otvory na adekvátním místě.
— Vyvrtejte oba 2 otvory o 8 mm a
našroubujte přírubu na držák komína, dbejte
na to, aby byla dobře uložená v hřídeli
zvonu.
— Našroubujte plochou vidlici dozadu na
spodní část komína.
— Umístěte oba 2 komíny na zvon (obr. 5).
— Napojte pouzdro na vývod vzduchu ven.
— Proveďte elektrické zapojení zvonu
postřednictvím napájecího kábele.-Zvedněte
horní komín až na maximum a upevněte jej
na vidlici pomocí šroubů.
CZ
Obr. 8
Obr. 6
Obr. 7
Obr. 3
Obr. 4
Rada
Pro dosažení optimálního používání přístroje vám doporučujeme jej napojit na vedení
s průměrem 150 mm (nepřiložené). Omezit na maximum počet kolen a délku vedení. Pokud
zvon funguje pro evakuaci ven, je třeba se ujistit, zda vchází dostatek vzduchu, aby se
nevytvořil v místnosti podtlak.
Pozor
Na odstranění ochranného fi lu nepoužívejte žádné nástroje.
Page 76

CZ
•
POUŽITÍ VAŠEHO KUCHYŇSKÉHO ZVONU
Jak používat kontrolní panel.
a. Stiskněte tlačítko “Nízká” a vnitřní světelný
b. Stiskněte tlačítko “Střední” a vnitřní
c. Stiskněte tlačítko “Vysoká” a vnitřní
d. Stiskněte tlačítko “Světlo” a obě světla se
3 / POUŽITÍ PŘÍSTROJE
indikátor tlačítka se rozsvítí. Motor bude
fungovat při nízké rychlosti. Stiskněte
znovu tlačítko a motor se zastaví.
světelný indikátor tlačítka se rozsvítí.
Motor bude fungovat při střední rychlosti.
Stiskněte znovu tlačítko a motor se
zastaví.
světelný indikátor tlačítka se rozsvítí.
Motor bude fungovat při vysoké rychlosti.
Stiskněte znovu tlačítko a motor se
zastaví.
rozsvítí. Stiskněte znovu tlačítko a světla
zhasnou.
Nízká
Střední
SvětloVysoká
76
Page 77

4 / ÚDRŽBA A ČIŠTĚNÍ PŘÍSTROJE
Pozor
Odpojte přístroj dříve, než přistoupíte k jeho údržbě a čištění. Pravidelná údržba
zaručí dobré fungování, výkon a životnost.
Pozor
Nerespektování instrukcí pro čištění přístroje a fi ltrů může vyvolat požar. Dodržujte
přesně instrukce pro údržbu.
•
ČIŠTĚNÍ MODULÁRNÍCH
FILTRŮ
Musí se čistit po každých 30 hodinách
používání nebo minimálně jednou za měsíc.
Čištění lze provádět v myčce, ve vertikální
poloze.
Použijte kartáč, teplou vodu a jemný čistící
prostředek. Opatrně je opláchněte a usušte,
než je opět nasadíte.
•
Demontáž modulárního fi ltru
— Otočte integrovaným držadlem
modulárního fi ltru.
— Nakloňte modulární fi ltr směrem dolů.
CZ
•
VÝMĚNA UHLÍKOVÉHO FILTRU
(možnost)
Vyměňte jej přibližně po každých 120
hodinách použití.
— Odstraňte modulární fi ltry.
— Otočte uhlíkovým fi ltrem, aby jste jej
mohli odstranit.
— Postupute opačně pro nasazení nového
fi ltru.
— Opět nasaďte modulární fi ltry.
Zavřený
Otevřený
77
Page 78

CZ
•
ČIŠTĚNÍ VNĚJŠÍHO POVRCHU
Na vyčištění vnějšku extrakčního zvonu použijte vodu s mýdlem; nepoužívejte čistící krémy,
žíravé čistící prostředky, ani drátěnky nebo kartáče. Vysušte jemnou a vlhkou hadřičkou.
•
VÝMĚNA ŽÁROVKY
4 / ÚDRŽBA A ČIŠTĚNÍ PŘÍSTROJE
Pozor
Před provedením jakéhokoliv zásahu musíte nechat zvon bez napětí jeho odpojením
ze zásuvky nebo stisknutím jističe.
Model s halogenní žárovkou.
— Odstraňte stínítko.
— Vyměňte halogenní žárovku.
— Opět sadu nasaďte provedením stejných
operací v opačném pořadí.
78
Page 79

4 / ÚDRŽBA A ČIŠTĚNÍ PŘÍSTROJE
Pozor
Před provedením jakéhokoliv zásahu musíte nechat zvon bez napětí jeho odpojením
ze zásuvky nebo stisknutím jističe.
•
ÚDRŽBA PŘÍSTROJE
CZ
ÚDRŽBA CO DĚLAT
Kostra a příslušenství
Modulární fi ltr
Filtr s aktivním uhlím
Nikdy nepoužívejte kovové
drátěnky, abrazívní výrobky
nebo příliš tvrdé kartáče.
Tento fi ltr zachycuje mastné
výpary a prach. Jedná se o
část, která zaručuje účinnost
zvonu.
Pokud se vyskytnou odolné
skvrny, použijte neabrazivní
krém a opláchněte čistou
vodou.
Tento fi ltr zachycuje pachy a
musí se vyměnit alespoň
jednou ročně, v závislosti na
používání.
Objednejte tyto fi ltry u
vašeho prodejce (s referencí,
která je uvedená na štítku s
charakteristikami, umístěném
uvnitř zvonu) a poznamenejte
si datum výměny.
PRODUKTY/PŘÍSLUŠENSTVÍ
Na vyčištění rámu a okénka
pro osvětlení používejte
výhradně čistící komerční
výrobky rozpuštěné ve
vodě, následně opláchněte
vodou a vysušte suchým
hadříkem.
Vyčistěte pomocí
komerčního čistícího
výrobku, pořádně
opláchněte a vysušte.
Čištění lze provádět v
myčce, ve vertikální poloze.
(Nedávejte do styku se
špinavým nádobím nebo
stříbrnými příbory).
Pro udržení přístroje v dobrém statu vám doporučujeme používat údržbářské výrobky
Clearit.
Znalosti a zkušenosti profesionálů ve
službách soukromých osob.
Clearit vám nabízí profesionální výrobky a adekvátní řešení pro každodenní údržbu vašich
elektrospotřebičů a vaší kuchyně.
Můžete je zakoupit u vašeho obvyklého dodavatele, spolu s celou linií výrobků, příslušenství
a spotřebního zboží.
79
Page 80

CZ
5 / ZÁVADY PŘI FUNGOVÁNÍ
PŘÍZNAKY ŘEŠENÍ
Zvon nefunguje ...
Výkon zvonu je nedostatečný...
Zvon se během fungování zastavil
Zkontrolujte, zda :
• se nepřerušila dodávka proudu.
• byla zvolená rychlost.
Zkontrolujte, zda :
• vámi zvolená rychlost motoru je
dostatečná pro množství vzniklého kouře
a vodní páry.
• je kuchyně dostatečně ventilovaná, aby
mohl vcházet vzduch.
• není opotřebovaný uhlíkový fi ltr (zvon v
recyklačním způsobu).
Zkontrolujte, zda :
• nebyla přerušená dodávka proudu.
• nebyl aktivovaný mnohopólový vypínač.
80
Page 81

6 / TECHNNICKÝ SERVIS
Nezbytné zásahy na stroji musí provést:
— prodejce,
— nebo jakýkoliv kvalifi kovaný odborník, který je držitelem značky.
Při telefonním kontaktu uveďte kompletní referenci stroje (model, typ a sériové číslo).
Tyto údaje se nacházejí na identifi kačním štítku, umístěném na stroji.
CZ
81
Page 82

DK 162
Som en del af vores forpligtelse til løbende at forbedre vores produkter, forbeholder vi
os retten til at foretage ændringer på dem på baggrund af tekniske fremskridt i forhold
til deres tekniske og funktionelle egenskaber og udseende.
Vigtigt:
Inden du installerer og bruger dette apparat, skal denne Installations- og
brugsvejledning læses grundigt, hvilket tillader dig hurtigt at blive bekendt med
apparatets virkemåde.
82
Page 83

DKINDHOLDSFORTEGNELSE
1 / BEMÆRKNINGER TIL BRUGEREN
• Sikkerhedsanbefalinger ______________________________________ 84
• Miljøbeskyttelse _____________________________________________ 85
• Beskrivelse af apparatet ______________________________________ 86
2 / INSTALLATION AF APPARATET
• Brug med udsugningsversionen _______________________________ 87
• Brug med recirkuleringsversionen _____________________________ 87
• Elektriske tilslutninger ________________________________________ 88
• Samling af emhætten ________________________________________ 89
• Samling af ventilationsskakten
º Udsugning til det fri ______________________________________ 90
º Recirkulering ____________________________________________ 91
3 / BRUG AF APPARATET
• Beskrivelse af knapper _______________________________________ 92
4 / PLEJE OG RENGØRING AF APPARATET
lterelementerne _______________________________ 93
ltret _______________________________________ 93
ader __________________________ 94
• Udskiftning af pæren _________________________________________ 94
• Vedligeholdelse af apparatet __________________________________ 95
5 / FEJLFINDING ___________________________________________________ 96
6 / EFTERSALGSSERVICE __________________________________________ 97
1 / BEMÆRKNINGER TIL BRUGEREN
• Sikkerhedsanbefalinger ______________________________________ 164
• Miljøbeskyttelse _____________________________________________ 165
• Beskrivelse af apparatet ______________________________________ 166
2 / INSTALLATION AF APPARATET
• Brug med udsugningsversionen _______________________________ 167
• Brug med recirkuleringsversionen _____________________________ 167
• Elektriske tilslutninger ________________________________________ 168
• Samling af emhætten ________________________________________ 169
• Samling af ventilationsskakten
º Udsugning til det fri ______________________________________ 170
º Recirkulering ____________________________________________ 171
3 / BRUG AF APPARATET
• Beskrivelse af knapper _______________________________________ 172
4 / PLEJE OG RENGØRING AF APPARATET
• Udskiftning af lterelementerne _______________________________ 173
• Udskiftning af kul ltret _______________________________________ 173
• Rengøring af de udvendige over ader __________________________ 174
• Udskiftning af pæren _________________________________________ 174
• Vedligeholdelse af apparatet __________________________________ 175
5 / FEJLFINDING ___________________________________________________ 176
6 / EFTERSALGSSERVICE __________________________________________ 177
83
Page 84

1 / MÆRKNINGER TIL BRUGERDK
Vigtigt
Gem denne brugsanvisning sammen med apparatet. Hvis apparatet på noget tidspunkt sælges eller videregives til andre, skal du sørge for, at den nye ejer får denne brugsanvisning. Gør dig venligst bekendt med disse anbefalinger inden du installerer og bruger
emhætten. Anbefalingerne er udarbejdet for at værne om din og andres sikkerhed.
• SIKKERHEDSANBEFALINGER
— Denne emhætte er fremstillet til at blive bugt
af private i hjemmet.
— Dette apparat skal bruges af voksne.
Søg for at børn ikke rører det og at de ikke
behandler det som legetøj. Sørg for at de ikke
rører apparatets knapper.
— Når du modtager apparatet, skal du pakke
det ud eller få det pakket ud med det samme.
Giv det en overordnet generel inspektion. Læg
mærke til eventuelle problemer eller forbehold
på leveringssedlen og sørg for at gemme en
kopi af denne seddel.
— Apparatet er beregnet til almindeligt
husholdningsbrug. Brug det ikke til erhvervseller industrielle formål eller til noget andet
formål end til det apparatet er fremstillet til.
— Ændr ikke på nogen af apparatets dele eller
udseende og forsøg heller ikke herpå. Dette vil
udgøre en fare for din sikkerhed.
— Reparationer må kun foretages af en
autoriseret specialist.
— Stikket skal altid tages ud inden emhætten
rengøres eller inden der foretages andre
vedligeholdelseshandlinger.
— Sørg for hensigtsmæssig ventilering i
lokalet hvis emhætten bruges samtidigt med
andre apparater, som drives af en anden
energikilde end el. Dette vil forhindre emhætten
i at indsuge forbrændingsgasserne. Du bør
aldrig “ ambere” retter under emhætten eller
anvende gaskogeplader under emhætten
uden at placere kogegrejer på dem ( ammerne
kan suges op i emhætten og beskadige
apparatet).
— Ved stegning og friturestegning under
apparatet, skal emhætten og tilberedningen
overvåges omhyggeligt hele tiden.
Olier og fedtstoffer som bringes op på meget
høje temperaturer kan antændes.
— Respekter den anbefalede hyppighed for
rengøring og udskiftning af ltre. Ophobning af
fedtrester kan forårsage brand.
— Emhætten må aldrig bruges over et komfur
som bruger antændeligt materiale (træ, kul,
osv.)
— Brug aldrig damp- eller højtryksapparater
til rengøring af apparatet (krav pålagt af regler
vedr. el-sikkerhed).
— Med løbende forbedring af vores produkter
for øje, forbeholder vi os retten til at ændre
på deres tekniske, funktionelle og æstetiske
egenskaber, idet eventuelle ændringer på deres
funktioner opfattes som værende nødvendige
eller ønskværdige med den tekniske udvikling
for øje.
— For nemt at kunne nde
referenceinformationerne til apparatet,
anbefaler vi, at du noterer disse data på siden
“Eftersalgsservice og kundeservice”. (Denne
side forklarer desuden, hvor du kan nde disse
informationer på dit apparat.)
— Dette apparat er ikke beregnet til at
blive brugt af personer (herunder børn)
med med nedsatte fysiske funktioner eller
sansefunktioner, eller af personer, som mangler
erfaring eller bevidsthed, medmindre apparatet
bruges med hjælp fra den person, som er
ansvarlig for deres sikkerhed, eller under opsyn
og med forudgående instruktion i brugen af
apparatet.
Advarsel
Hvis dit køkken er opvarmet af en anordning, som er tilsluttet en skorsten (for
eksempel en brændeovn skal “recirkulerings-” versionen af emhætten installeres. Brug
ikke emhætten uden metalfi ltrene.
Der bør sørges for hensigtsmæssig ventilering i lokaler, hvor emhætten bruges samtidigt
med apparater, som bruger gas eller et andet brændbart drivmiddel.
84
Page 85

1 / MÆRKNINGER TIL BRUGER DK
• MILJØBESKYTTELSE
— Dette apparats emballagemateriale er genbrugeligt. Hjælp med at genbruge det og beskyt
miljøet ved at a evere det på et kommunalt genbrugscenter til dette formål.
— En stor del af apparatets materiale er også genbrugeligt. Det er mærket med denne
etiket for at indikere de brugte dele af apparatet, som ikke bør blandes med andet affald.
Således vil genanvendelsen af apparatet, der organiseres af fabrikanten, blive
udført under de bedst mulige forhold, i henhold til EU-direktivet 2002/96/EF
om Affald af elektrisk og elektronisk udstyr. Kontakt din kommune eller din
forhandler for at blive oplyst om genbrugscentraler i nærheden af, hvor du
bor.
— Vi takker dig for, at du gør dit til at beskytte miljøet.
Advarsel
Installationen bør kun udføres af installatører og kvalifi cerede teknikere.
Advarsel
Fjern beskyttelsesfolien fra fi ltret inden brug.
85
Page 86

1 / MÆRKNINGER TIL BRUGERDK
• BESKRIVELSE AF APPARATET
3 0 5
2 7 0
5 0 0 - 9 8 0
5 0
0
0 96 0 / 0 0
86
Page 87

2 / INSTALLATION AF APPARATET DK
— Dette apparats stik skal være taget ud af stikkontakten under installation, samt når der
udføres reparationer og vedligeholdelse.
— Du skal sikre dig at nettets spænding svarer til spændingen på indenti kationsskilt, som
ndes på indersiden af emhætten.
— Hvis el-installationerne i din bolig kræver nogen form for ændringer for at kunne tilslutte
apparatet, skal du tilkalde en professionel elektriker.
— Hvis emhættens bruges med udsugningsversionen, må apparatet ikke tilsluttes en
afktrækskanal til brændbare gasser (fyrkedel, storsten, osv) eller til et kontrolleret mekanisk
ventileringssystem.
— Aftrækskanalen må under ingen omstændigheder udledes til et loftsrum.
— Installer emhætten med en forsvarlig afstand på mindst 70 cm fra et elektrisk kogeblus,
et gaskogeblus eller et kombineret kogeblus.
• BRUG MED UDSUGNINGSVERSIONEN
Hvis du har et udtag til det fri
(Ill. 1)
Kan emhætten tilsluttes dette udtag med et
aftræksrør (diameter på mindst Ø mm, som er
emaljeret, af aluminium, eksibelt eller lavet af
ubrændbart materiale). Hvis aftrækskanalen
er mindre end 125 mm i diameter, skal du
bruge recirkuleringsversionen.
ill. 1
• BRUG MED RECIRKULERINGSVERSIONEN
Hvis du ikke har et udtag til det fri
(ill. 2)
Kan alle apparaterne bruges med
recirkuleringsversionen.
I så fald skal du påsætte et aktivt kul lter,
som vil holde på lugte.
(Se kapitel 4: Udskiftning af kul ltret.)
87
ill. 2
Page 88

2 / INSTALLATION AF APPARATET DK
• ELEKTRISKE TILSLUTNINGER
Under installation og vedligeholdelse
skal apparatets stik være taget ud af elforsyningsnettet; sikringer skal slås fra eller
fjernes.
De elektriske tilslutninger foretages inden
apparatet installeres i sin kasse.
Kontroller at:
— den elektriske installation har tilstrækkelig
spænding,
— elkablerne er i god stand,
— kablernes diameter overholder
installationskravene.
Advarsel
Apparatet leveres med en elledning til
H 05 VVF, som har tre 0,75 mm
fase og jord). Det skal tilsluttes el-nettet
(som skal have en spænding på 220-240 V)
via et godkendt strømudtag, som skal være
tilgængeligt efter installationen i henhold til
retningslinjerne for installation.
Fabrikanten kan ikke stilles til ansvar
for eventuelle ulykker forårsaget af en
ikke-eksisterende, defekt eller forkert
jordledning. Sikringen til installationen skal
være på 10 eller 16A. Hvis elledningen er
beskadiget, skal du kontakte afdelingen for
eftersalgsservice for at undgå farer.
2
ledere (nul,
Advarsel
Hvis den elektriske installation i din
bolig kræver ændringer for at dit apparat
kan tilsluttes, skal en professionel elektriker
tilkaldes.
Advarsel
Hvis emhætten udviser nogen form for
defekter, skal du tage stikket ud eller fjerne
den sikring, som hører til det elektriske
udtag, hvor apparatet er isat.
88
Page 89

2 / INSTALLATION AF APPARATET DK
• SAMLING AF EMHÆTTEN
Advarsel
Emhætten skal installeres i
overensstemmelse med alle gældende
regler for ventilering og aftrækskanaler.
I Frankrig er disse regler beskrevet i DTU
61.1 fra CSTB. I særdeleshed må den
udsugede luft aldrig ledes ud igennem
en kanal, som bruges til at udsuge røg
fra apparater, som bruger gas eller andre
brændbare drivmidler. Kanaler som ikke
er i brug må kun bruges efter godkendelse
fra en kompetent specialist.
Minimumsafstanden mellem komfurets
overkant og emhættens nederste del skal
være mindst 70 cm. Hvis anvisningerne til
det blus som er installeret under emhætten
foreskriver en afstand på over 70 cm, skal
dette krav respekteres.
Montering på væggen:
— Afmærk en vandret linje på væggen,
centreret i forhold til komfurets over ade.
— Afmærk på væggen de tre huller som
skal bores ved hjælp af den medfølgende
holder til emhætten samtidig med, at du
observerer den anbefalede afstand. (del A
Ill. 1).
— Bor de tre huller med en diameter på
8 mm i en passende position og isæt
rawlplugs.
— Inden emhætten fastgøres, skal du
montere kontraventilen på motorens udgang.
— Fastgør emhættens fastgørelsesbeslag,
sørg for at det er nøjagtigt nivelleret. (del A
Ill. 1).
— Fastgør ex-udsugningsslangen
(medfølger ikke) til motorens udgang uden
af forhindre kontraventilens bevægelse. (Ill.
3).
— Monter og fastgør emhættens hoveddel
på det tilhørende støttebeslag med de
medfølgende skruer til dette formål. (Ill. 2).
Illu. 2
Illu. 1
89
Page 90

2 / INSTALLATION AF APPARATET DK
• SAMLING AF VENTILATIONSSKAKTEN
• Udsugning til det fri
— Beregn den endelige højde, hvor
aftrækskanalens u-beslag skal fastgøres
(del B Ill. 1).
— Afmærk de to huller herefter.
— Bor hullerne med en diameter på 8 mm
og fastgør kanalens støttebeslag, sørg for
at det er fastgjort på samme akse som
emhætten (del B Ill. 1).
— Fastgør det ade beslag bag på kanalens
nedre del. Illu. 6
— Fastgør de to kanaler til emhætten. (Ill. 5).
— Tilslut exslangen til luftudtaget til det
fri.
— Foretag den elektriske tilslutning til
emhætten med kablet fra el-nettet.
— Løft den øvre kanal op til loftet og fastgør
den til beslaget med skruerne.
Illu. 4
Illu. 3
170
90
Page 91

2 / INSTALLATION AF APPARATET DK
• Recirkulering
— Beregn den endelige højde, hvor
aftrækskanalens U-beslag skal fastgøres.
— Afmærk de to huller.
— Bor hullerne med en diameter på 8 mm
og fastgør kanalens støttebeslag, sørg for
at det er fastgjort på samme akse som
emhætten.
— Fastgør det ade beslag bagpå kanalens
nedre del.
— Monter slange-tilpasningsstykket på
de ektoren (Ill. 8).
— Tilslut exslangen til de ektoren.
— Monter kanalens to dele på emhætten
(Ill. 5).
— Monter de ektoren (Illu. 8) på kanalens
øvre del ved ventilationsindtagene (Ill. 6)
— Foretag den elektriske tilslutning til
emhætten med kablet fra el-nettet.
— Løft den øvre kanal op til loftet og fastgør
den til beslaget med de to skruer.
Illu. 8
Illu. 6
Illu. 7
Råd
For at udnytte apparatet optimalt, anbefaler vi, at du tilslutter emhætten til et
aftræksrør med en diameter på 150 mm(medfølger ikke). Reducer antallet af vinkler og
knæk samt aftræksrørets længde. Hvis emhætten skal bruges med udsugning til det fri, bør
du sørge for tilstrækkelig tilførsel af frisk luft for at undgå undertryk i lokalet.
Illu. 3
Illu. 4
Vigtigt
Fjern ikke sikkerhedsfolien med nogen form for værktøj.
91
Page 92

3 / BRUG AF APPARATET DK
• BRUG AF EMHÆTTEN
Sådan bruger du knapperne.
a. Tryk på knappen “Lav” og lysindikatoren
i midten af knappen begynder at lyse.
Motoren arbejder nu ved lav hastighed.
Tryk igen på knappen og motoren
stopper.
b. Tryk på knappen “Middel” og
lysindikatoren i midten af knappen
begynder at lyse. Motoren er nu i gang
ved middel hastighed. Tryk igen på
knappen og motoren stopper.
c. Tryk på knappen “Høj” og lysindikatoren
i midten af knappen begynder at lyse.
Motoren arbejder nu ved høj hastighed.
Tryk igen på knappen og motoren
stopper.
d. Tryk på knappen “Lys” og begge lys
tændes. Tryk igen på knappen og lysene
slukkes.
LysHøjMiddelLav
92
Page 93

4 / PLEJE OG RENGØRING AF APPARATET DK
Advarsel
Stikket skal altid tages ud inden emhætten rengøres, og inden der foretages andre
former for vedligeholdelse. Regelmæssig vedligeholdelse af apparatet er en garanti for
korrekt funktion, god ydeevne og levetid.
Advarsel
Respekteres retningslinjerne for rengøring af apparat og fi ltre ikke, kan de forårsage
brand. Følg omhyggeligt anbefalingerne vedrørende vedligeholdelse.
• RENGØRING AF
FILTERELEMENTERNE
Filtrene skal rengøres efter cirka 30 timers
brug eller mindst en gang om måneden.
Disse ltre kan vaskes i opretstående stilling
i opvaskemaskinen.
Brug en børste, varmt vand og
opvaskemiddel. Skyl og tør ltrene grundigt
inden de sættes tilbage i emhætten.
• Aftagning af fi lterelement
— Drej det indbyggede greb til
lterelementet.
— Vip lterelementet nedad.
• UDSKIFNING AF
KULFILTRET (kulfi lter valgfrit)
Udskift kul ltret efter cirka 120 timers
brug.
— Fjern lterelementet.
— Drej kul ltret for at kunne fjerne det.
— Udfør forløbet i omvendt rækkefølge, når
det nye lter skal sættes på igen.
— Sæt lterelementerne tilbage.
Luk
Åbn
93
Page 94

4 / PLEJE OG RENGØRING AF APPARATETDK
• RENGØRING AF DE YDRE OVERFLADER
Brug sæbevand til rengøring af emhættens ydre ader, men brug aldrig slibemidler, ætsende
rengøringsmidler, skrubbesvampe eller børster. Tørres af med en blød fugtig klud.
• UDSKIFNING AF PÆREN
Advarsel
Inden der udføres nogen form for opgaver, skal strømforsyningen til emhætten slås
fra, enten ved at tage emhættens stik ud eller ved hjælp af kredsafbryderen.
Model med halogenpære
— Fjern skærmen
— Udskift halogenpæren.
— Sæt delene på plads ved at gentage
disse trin i omvendt rækkefølge.
94
Page 95

4 / PLEJE OG RENGØRING AF APPARATET DK
Advarsel
Inden der udføres nogen form for opgaver, skal strømforsyningen til emhætten slås
fra, enten ved at tage emhættens stik ud eller ved hjælp af hovedafbryderen.
• VEDLIGEHOLDELSE AF APPARATET
VEDLIGEHOLDELSE DET SKAL DU GØRE
Brug aldrig metalskrubbesvampe,
slibe-produkter eller meget
Øvre overfl ader og
tilbehør
Filterelementer
Aktiveret kulfi lter
hårde børster.
Dette fi lter opfanger
fedtdampe og støv. Denne
komponent spiller en
vigtig rolle i emhættens
effektivitet.
Hvis der opstår genstridige
pletter, kan du bruge en
ikke-slibende creme og
skylle efter med rent vand.
Dette fi lter opfanger lugte
og skal udskiftes mindst en
gang om året afhængig af
brugsintensiteten.
Disse fi ltre bør bestilles
hos forhandleren
(opgiv referencen på
indentitetsskiltet,
som sidder på emhættens
inderside) og noter datoen,
hvor fi lteret blev skiftet.
PRODUKTER/TILBEHØR
SOM SKAL BRUGES
Til rengøring af hoveddelen
og lysdelen, bør der kun
bruges produkter fortyndet
med vand og som fjernes
med rent vand og tørres
med en blød fugtig klud.
Brug et rengøringsprodukt
som kan købes i en
almindelig han- del, skyl
med rigeligt vand og tør.
Disse fi ltre kan vaskes i
opretstå- ende stilling i
opvaskemaskinen.
(De må ikke komme til at
røre beskidt service eller
sølvtøj.)
For at bevare apparatet, anbefaler vi, at du bruger Clearit rengøringsprodukter.
Ekspertise fra fagfolk til tjeneste for private
Clearit tilbyder professionelle produkter og løsninger udarbejdet til den daglige pleje af dine
husholdningsapparater og dit køkken.
De kan købes hos din sædvanlige forhandler, sammen med et komplet udvalg af tilbehør
og forbrugsvarer.
95
Page 96

5 / FEJLFINDINGDK
SYMPTOMER LØSNINGER
Emhætten virker ikke…
Emhættens præstation er
utilstrækkelig…
Emhætten er gået i stå
Kontroller at:
• Strømmen ikke er slået fra.
• En hastighed er valgt.
Kontroller at:
• Den valgte motorhastighed et
tilstrækkelig for den mængde af mados
og damp som skal suges ud.
• Køkkenet er tilstrækkeligt ventileret for
at tillade indtag af frisk luft.
• Kulfi ltret ikke er opbrugt (emhætte som
fungerer med recirkuleringsversionen.
Kontroller at:
• Strømmen ikke er slået fra.
• De enpolede automatsikringer ikke er
blevet aktiveret.
96
Page 97

6 / EFTERSALGSSERVICE DK
Al vedligeholdelse på dit udstyr bør foretages af:
— enten din forhandler,
— eller en anden kvali ceret mekaniker, som er autoriseret til reparation af apparater af
dette mærke.
Når du laver aftale med ovenstående, skal du opgive hele dit udstyrs reference (model, type
og serienummer). Disse oplysninger ndes på fabrikantens navneskilt påsat dit udstyr.
97
Page 98

4 / LAITTEEN HUOLTO JA PUHDISTUS
FI 98
Koska parannamme jatkuvasti tuotteitamme, pidätämme oikeuden tehdä niihin
muutoksia, jotka perustuvat tuotteiden teknisten ja toiminnallisten ominaisuuksien
kehittelyyn.
Varoitus:
Lue huolellisesti nämä asennus- ja käyttöohjeet ennen kuvun asennusta ja
käyttöä. Näin voit nopeasti tutustua sen toimintaan.
98
Page 99

4 / LAITTEEN HUOLTO JA PUHDISTUS
SISÄLTÖ FI
1 / OHJEITA KÄYTTÄJÄLLE .................................................................... 100
TURVALLISUUSOHJEET ............................................................. 100
YMPÄRISTÖNSUOJELU ............................................................. 102
LAITTEEN KUVAUS ..................................................................... 103
2 / LAITTEEN ASENNUS ......................................................................... 104
KÄYTTÖ HORMIIN POISTAVANA ............................................... 104
KIERRÄTYSMUOTO .................................................................... 104
SÄHKÖLIITÄNNÄT ....................................................................... 104
LIESITUULETTIMEN ASENNUS ................................................. 106
TUULETUSRUNGON ASENNUS ...................................................... 107
• Poistoilma ................................................................................ 107
• Kiertoilma ................................................................................. 108
3 / LAITTEEN KÄYTTÖ ............................................................................ 109
LIESITUULETTIMEN KÄYTTÖ .................................................... 109
4 / LAITTEEN HUOLTO JA PUHDISTUS ................................................. 110
SUODATTIMIEN PUHDISTUS ...................................................... 110
Suodatinpatruunan avaaminen ...................................................... 110
HIILISUODATTIMEN VAIHTAMINEN (lisävaruste) ....................... 110
ULKOPINTOJEN PUHDISTUS ..................................................... 111
LAMPUN VAIHTO .......................................................................... 111
LAITTEEN HUOLTO ...................................................................... 112
5 / VIANETSINTÄ ...................................................................................... 114
6 / ASIAKASPALVELU............................................................................... 115
99
Page 100

4 / LAITTEEN HUOLTO JA PUHDISTUS
FI 1 / OHJEITA KÄYTTÄJÄLLE
Huom.:
Nämä käyttöohjeet on säilytettävä laitteen mukana. Jos laite myydään tai
luovutetaan toiselle henkilölle, on varmistettava että uusi omistaja saa myös
käyttöohjeet. Tutustu näihin ohjeisiin ennen laitteen asennusta ja käyttöä. Ohjeet
on laadittu sinun ja muiden turvallisuutta ajatellen.
TURVALLISUUSOHJEET
- Tämä laite on tarkoitettu vain
yksityiseen kotitalouskäyttöön.
- Laitetta saavat käyttää vain aikuiset. On
varmistettava, etteivät lapset koske
tuuletinta eivätkä le iki sillä. On myös
varmistettava, etteivät lapset koske
laitteen ohjauspaneelia.
- Laite tulee poistaa pakkauksesta heti
kun se vastaanotetaan ja tarkastaa se.
Mahdolliset huomautukset tai valitukset
on merkittävä toimituslistaan, josta
säilytetään kopio.
- Laite on tarkoitettu tavalliseen
kotitalouskäyttöön. Sitä ei saa käyttää
kaupallisiin tai teoilisuustarkoituksiin, eikä
muihin sellaisiin tarkoituksiin, johin sitä ei
ole suunniteltu.
- Mitään l aitteen ominaisuuksia ei saa
muuttaa tai yrittää muuttaa, sillä se saatt-
aisi vaarantaa turvallisuuttasi.
- Ainoastaan valtuutetut ammattihenkilöt
saavat suorittaa korjauksia.
- Irrota kupu aina sähköverkosta ennen
sen puhdistamista tai muita huoltotoimen-
piteitä.
- On huolehdittava huoneen riittävästä
ilmanvaihdosta, jos kuvun kanssa
käytetään samanaikaisesti muulla kuin
sähköllä toimivien laitteiden kanssa.
Tällöin kupu ei ime niiden palokaasuja.
- Älä koskaan liekitä ruokia kuvun alla.
Jos liesituuletinta käytetään kaasulieden
yläpuolella, on huolehdittava siitä, että
liekin päälla on aina keittoastia
(liesituuletin voi vahingoittua liekkien
aiheuttamasta kuumuudesta).
- Älä jätä paistumassa olevaa ruokaa
ilman valvontaa.
Ylikuumentunueet öljyt ja rasvat voivat
syttyä palamaan.
- Noudata suositeltuja puhdistusaikavälejä
ja vaihda suodatin ohjeiden mukaisesti.
Rasvojen kerääntyminen voi aiheuttaa
palovaaran.
- Kupua ei saa koskaan käyttää
polttoaineineilla (puu, hiili, ym.) toimivan
laitteen yläpuolella.
- Älä koskaan käytä liesituulettimen
puhdistukseen höyry- tai paineilmatoimisia
laitteita (sähköturvallisuusmääräykset).
- Koska parannamme jatkuvasti
tuotteitamme, pidätämme oikeuden
muuttaa niiden teknisiä, toiminnallisia tai
esteettisiä ominaisuuksia, tekemällä
muutoksia, jotka perustuvat tuotteiden
teknisten ominaisuuksien kehittelyyn.
- Laitteen viitetietojen löytämiseksi, lue
ohjeet asiakaspalvelua käsittelevältä
sivulta.
(Sivulla on myös selitetty, mistä nämä
tiedot löytyvät laitteessa).
- Tämä laite ei sovi henkilöiden käyttöön
(lapset mukaan lukien), jotka ovat
fyysisesti tai psyykkisesti siihen
kykenemättömiä, tai joilla ei ole käyttöön
tarvittavaa kokemusta tai taitoa, ellei
mukana ole heidän turvallisuudestaan
vastaava henkilö, tai heille on etukäteen
opetettu laitteen käyttöä koskevat tiedot.
100
 Loading...